

The XRay.Tech Blog
Case Study & Tool Belts
"This is incredible. The robots are doing so much of this work, and it's way better than we could have done it ourselves. The documentation is also amazing – we’re ready to start training our staff how to perform this workflow right away!"
When it comes to automating data extraction from PDF files, PDF.co is a powerful tool that can convert your PDFs into neatly structured CSV files.
Whether you're dealing with invoices, reports, or any document containing tabular data, PDF.co makes it easy to convert your file in just a few clicks. But if you’d like to create an even more efficient workflow, you can also connect PDF.co to Zapier to automate the entire process.
In this blog post, we'll guide you through the steps of using PDF.co and Zapier to automate your PDF to CSV conversions, streamlining your workflow and eliminating manual tasks.
Getting Started with PDF.co
To begin, you'll need to set up a free account with PDF.co. Once logged in, go to the dashboard.

Right at the top of the dashboard, you’ll see two key pieces of information: your available credits, and your account’s API key.
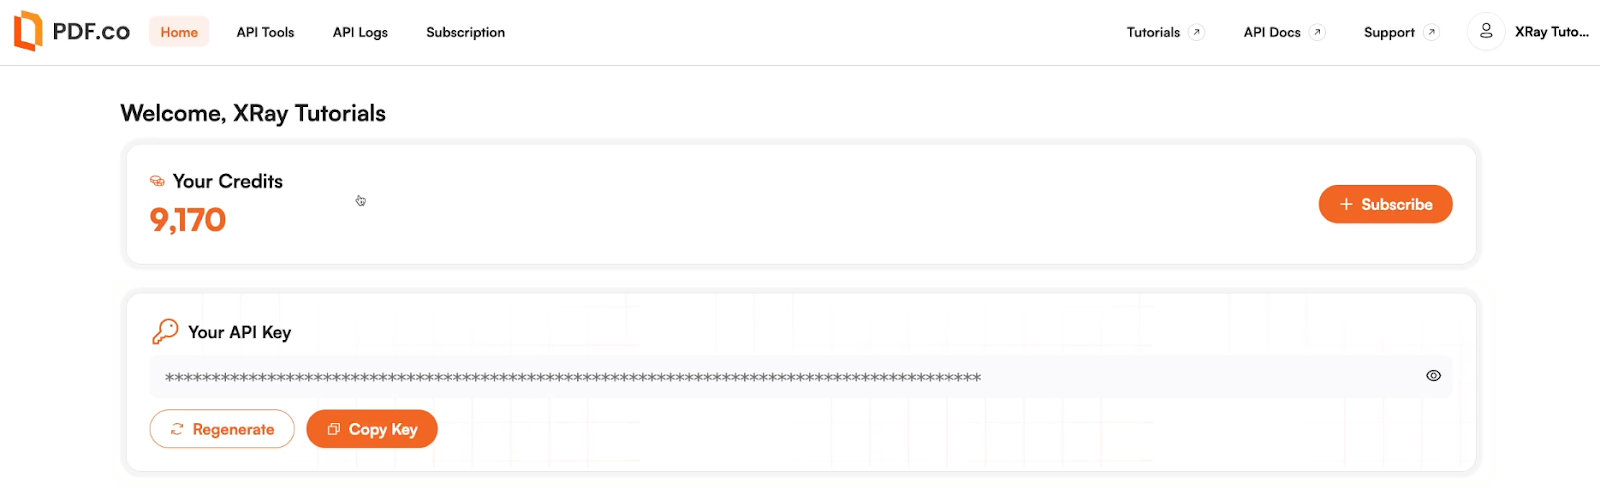
PDF.co offers a one-time supply of 10,000 credits with a free account, which is more than enough to get started.
Your API key will allow you to connect PDF.co to automation tools like Zapier and Make, which we’ll explore more later on in this tutorial.
Converting a file in PDF.co
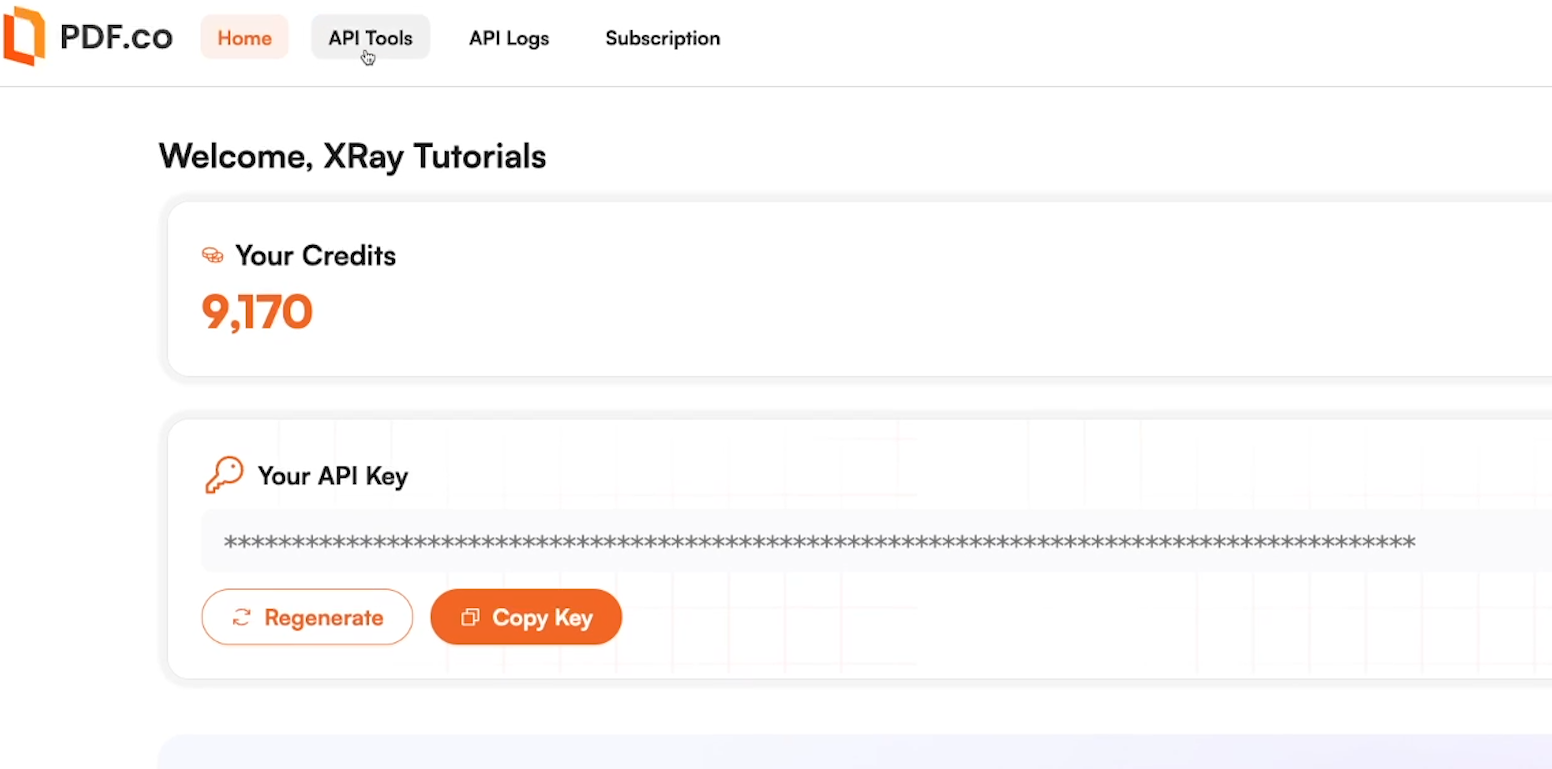
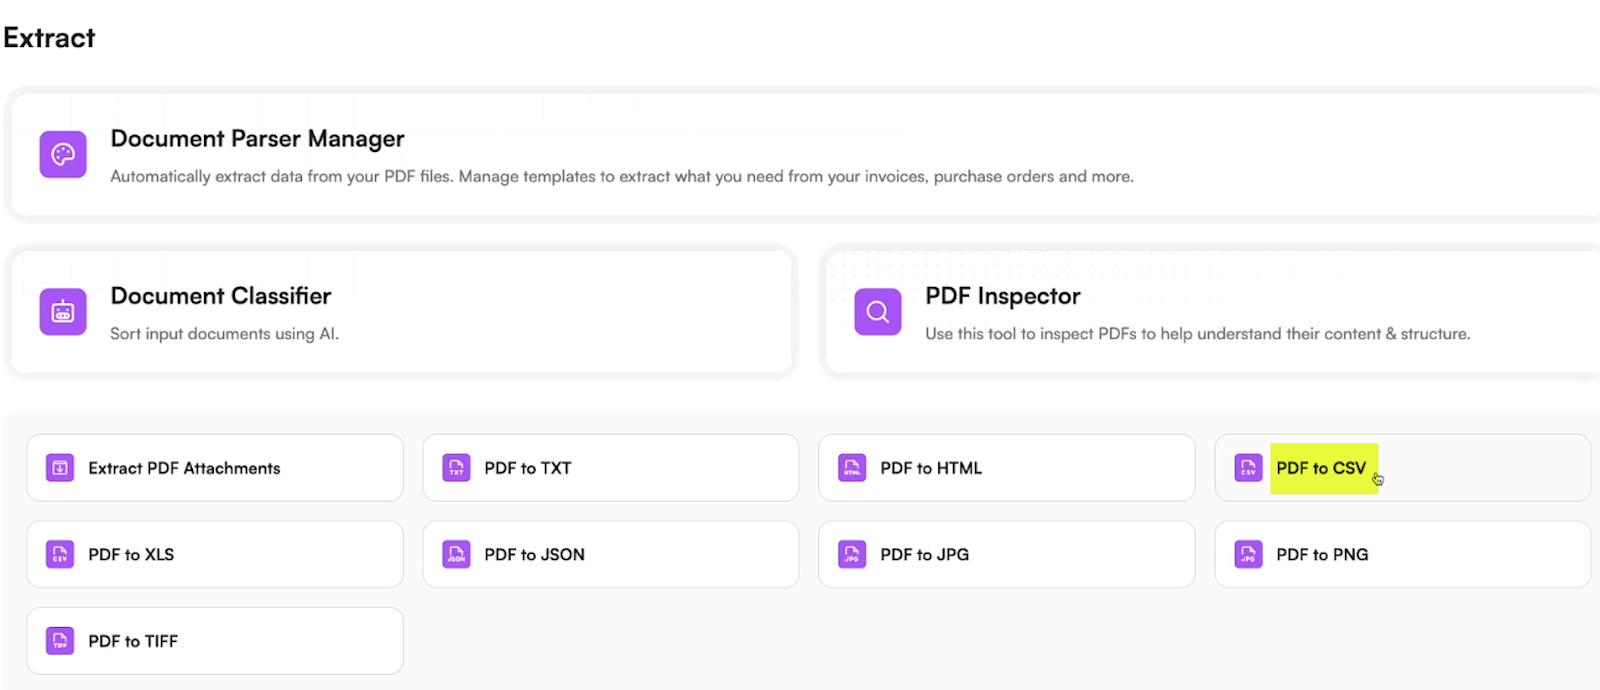
To convert a PDF to CSV, click on “API tools”.
Then, scroll down and select the "PDF to CSV" option. You’ll also see several other options to convert your PDF into other file types.
This next screen may be a little overwhelming if you’ve never worked with code before, but it’s actually much simpler than it initially appears.
Click on “Add file” to upload the file you want to convert.
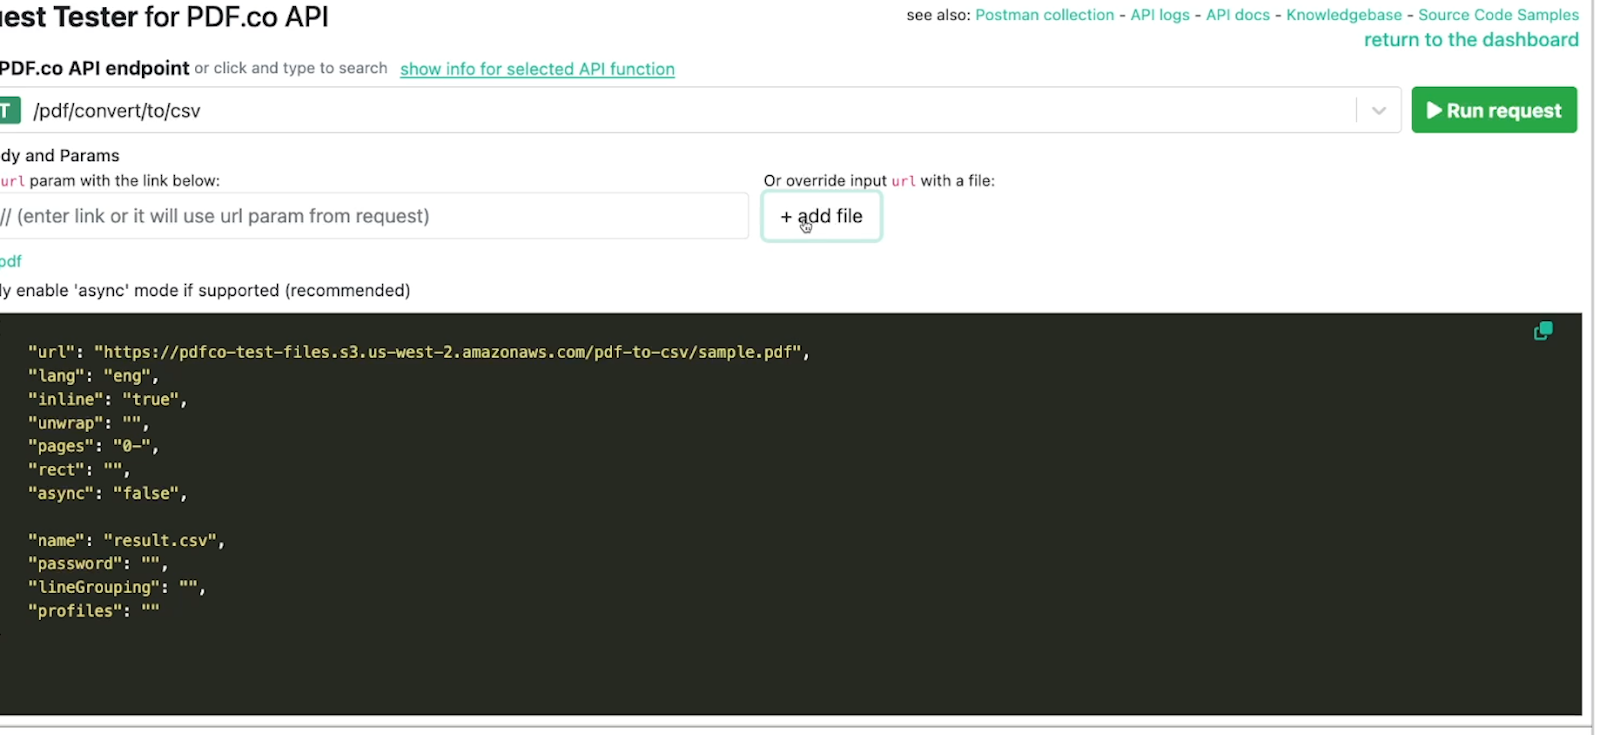
Then, you can configure optional settings in the panel on the left.
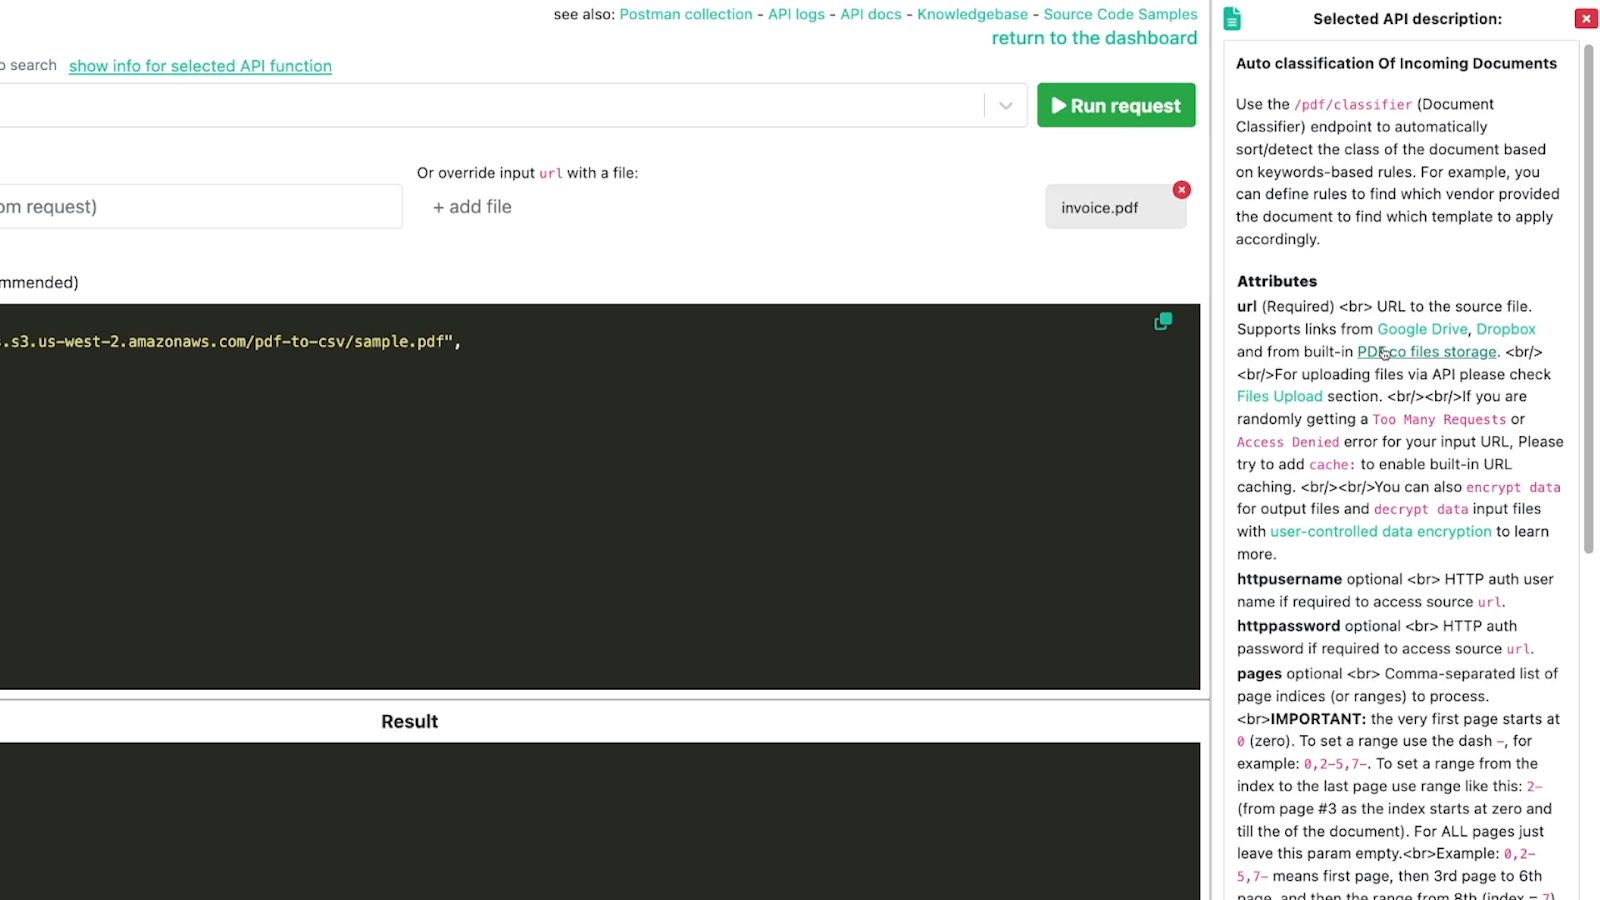
The text on the right defines each setting and offers detailed explanations of how to configure your options. In most cases, you just need to enter a single word or number into the quotes next to each setting.
For example, the “Line Grouping” setting controls how PDF.co will process text that splits into multiple lines. By enabling it, you can ensure that your CSV will keep multi-line text confined to a single cell, instead of splitting into multiple cells and making your data less organized.
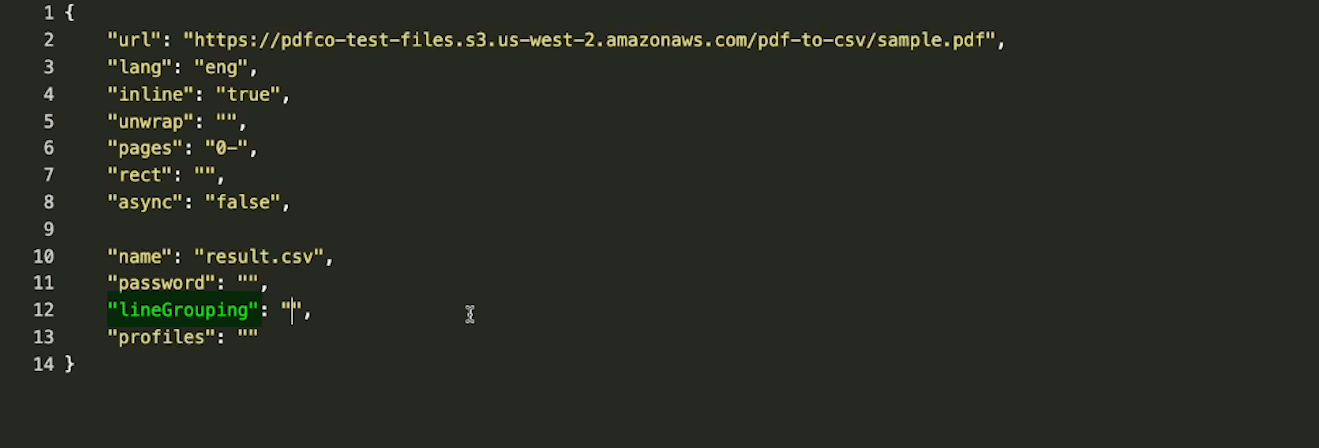
To enable it, just enter the number 1 into the quotes.
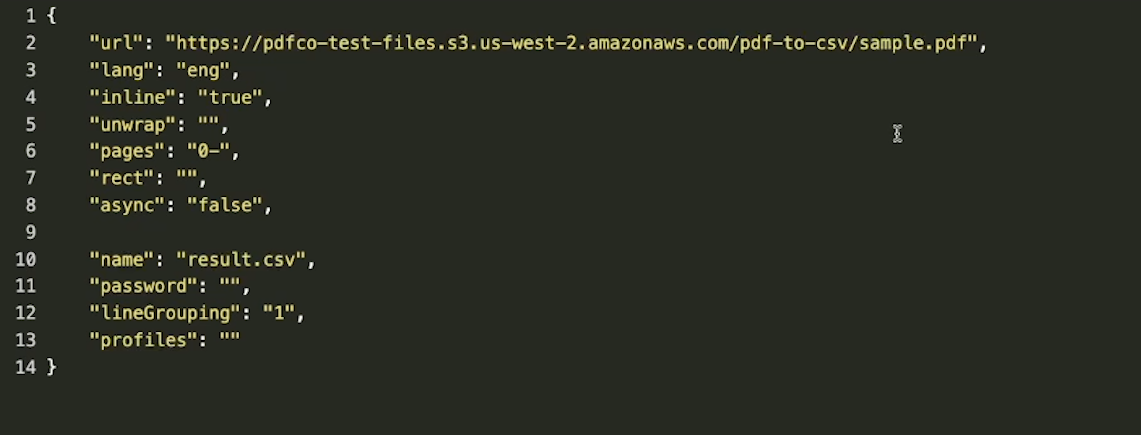
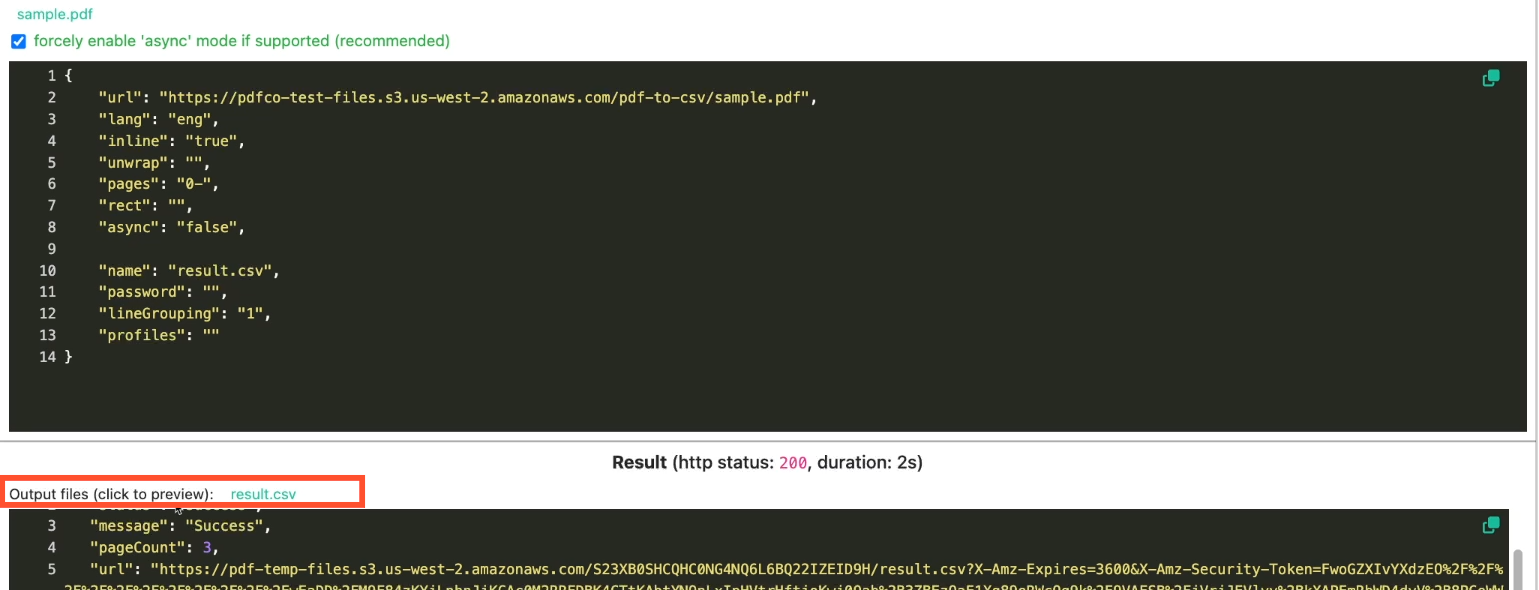
Once you’ve configured all of your settings, click on “Run request” to begin the conversion.

Downloading and reviewing the exported CSV
Once the PDF is converted, click on “Result.csv” to preview the file.
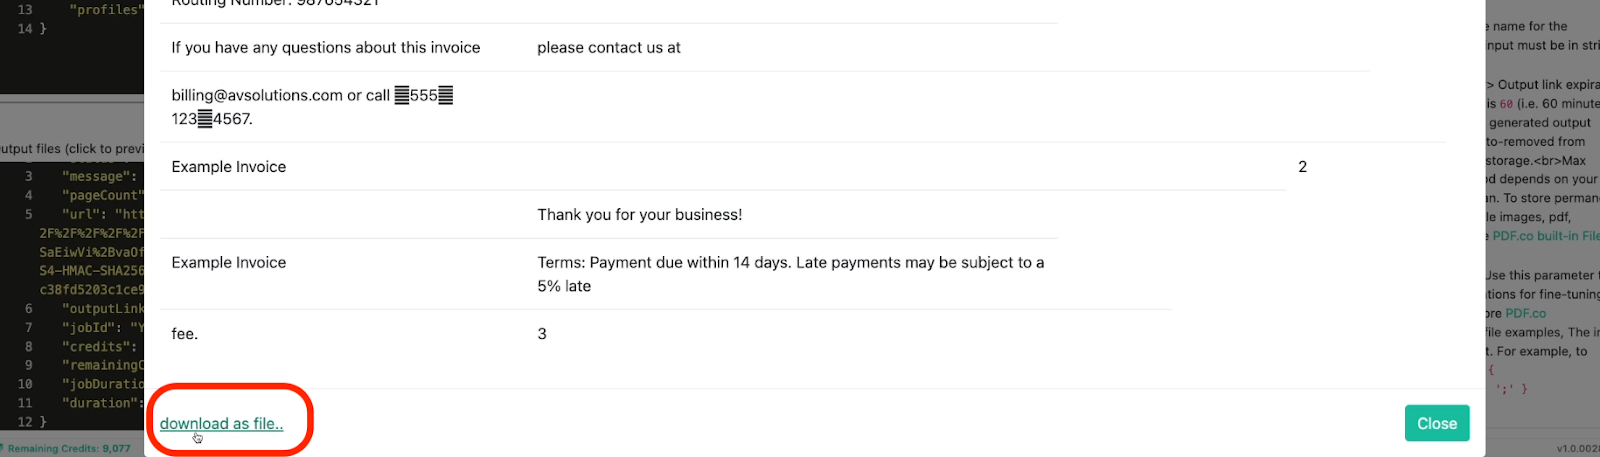
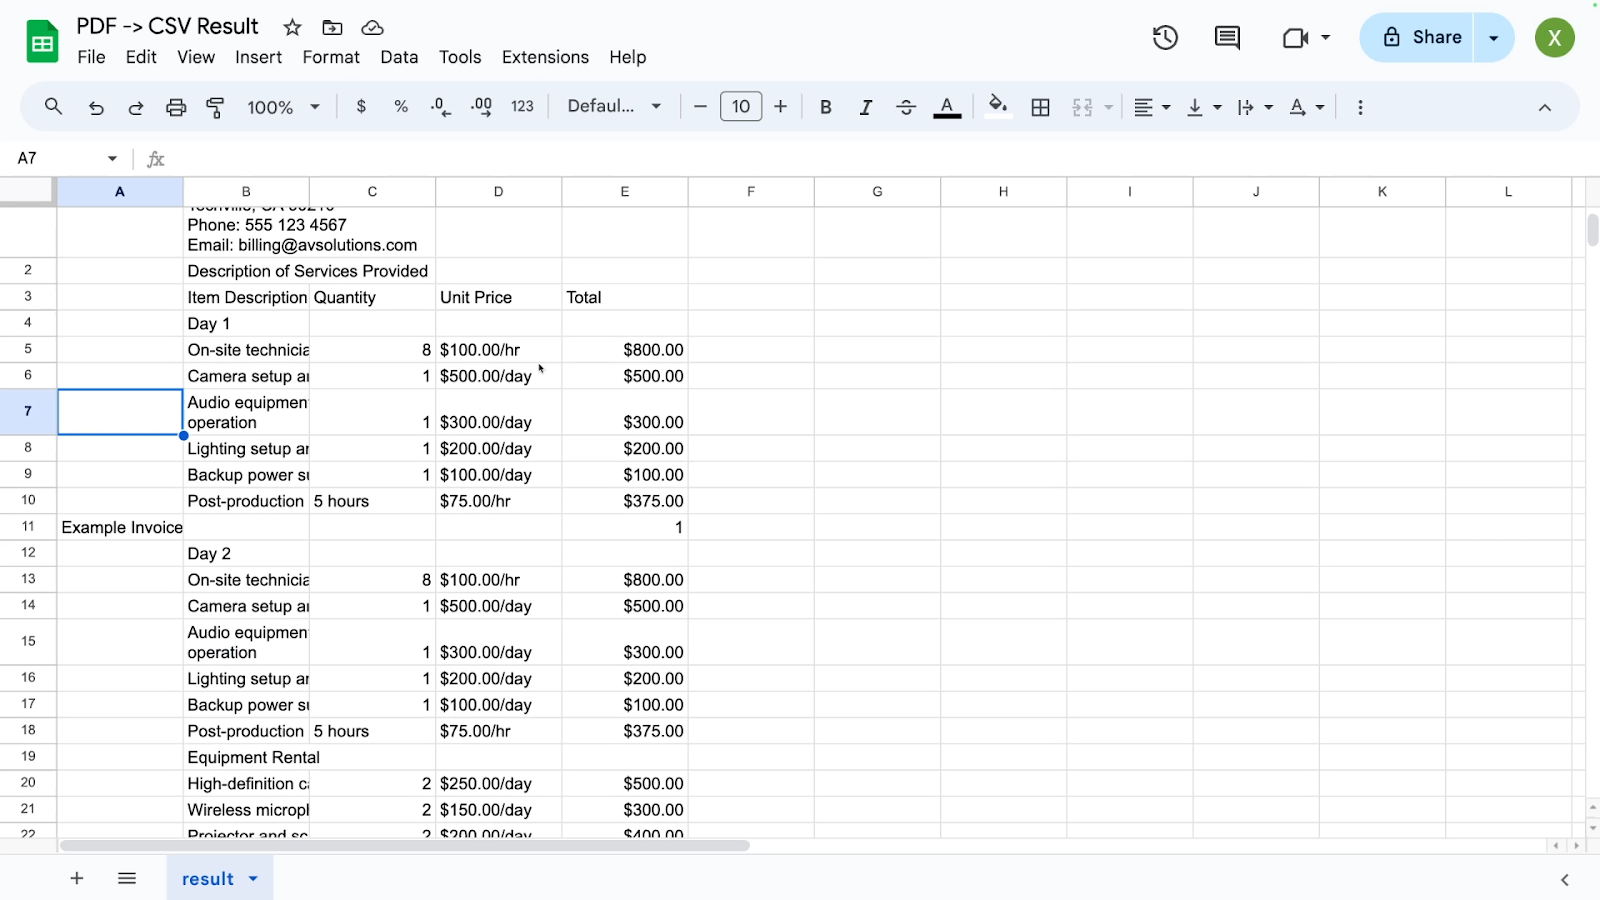
You can download the CSV file and open it in a spreadsheet application like Google Sheets by clicking on “Download as file” at the bottom of this window.
You'll notice that any structured data retrieved from the PDF is neatly organized, though you may need to remove some extraneous text rows that were part of the original PDF but not relevant to the table.
Automating PDF.co with Zapier
If you'd prefer to use a more user-friendly interface, or if you want to automate a recurring workflow, you can automate the entire conversion process using Zapier.
But here are the basic steps involved in automating PDF.co with Zapier:
Set up a PDF.co connection in Zapier
First, you’ll need to add PDF.co as an integration in your Zapier account. Select “Apps”, then choose “Add connection”.

Search for PDF.co, and select it from the list of apps. To connect your account, you’ll just need to provide the API key, which you can retrieve from the PDF.co dashboard.

Create a Zap
Once your PDF.co account is connected to Zapier, you can build an automation (or “Zap”) that will run a conversion whenever a specified event occurs.
For instance, let's build a Zap that triggers whenever we receive an email with a PDF
attachment in Gmail. This Zap will automatically convert the attached PDF into a CSV and reply to the original email with the CSV attached.
Configure the Trigger
Your trigger determines when your automation will run. Choose Gmail as the app and set the trigger event to "New Attachment." This ensures that the automation runs every time you receive an email with an attachment.
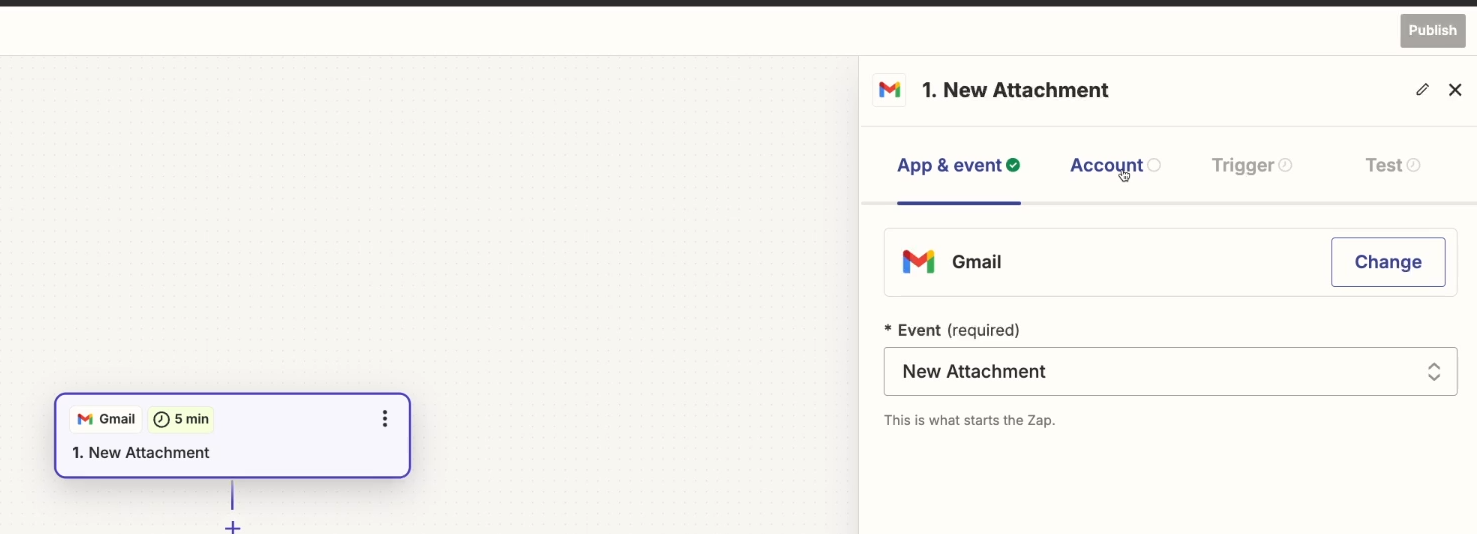
Choose the folder you want to watch, such as your inbox. You can also add an optional search query to limit the automation to items matching the search.
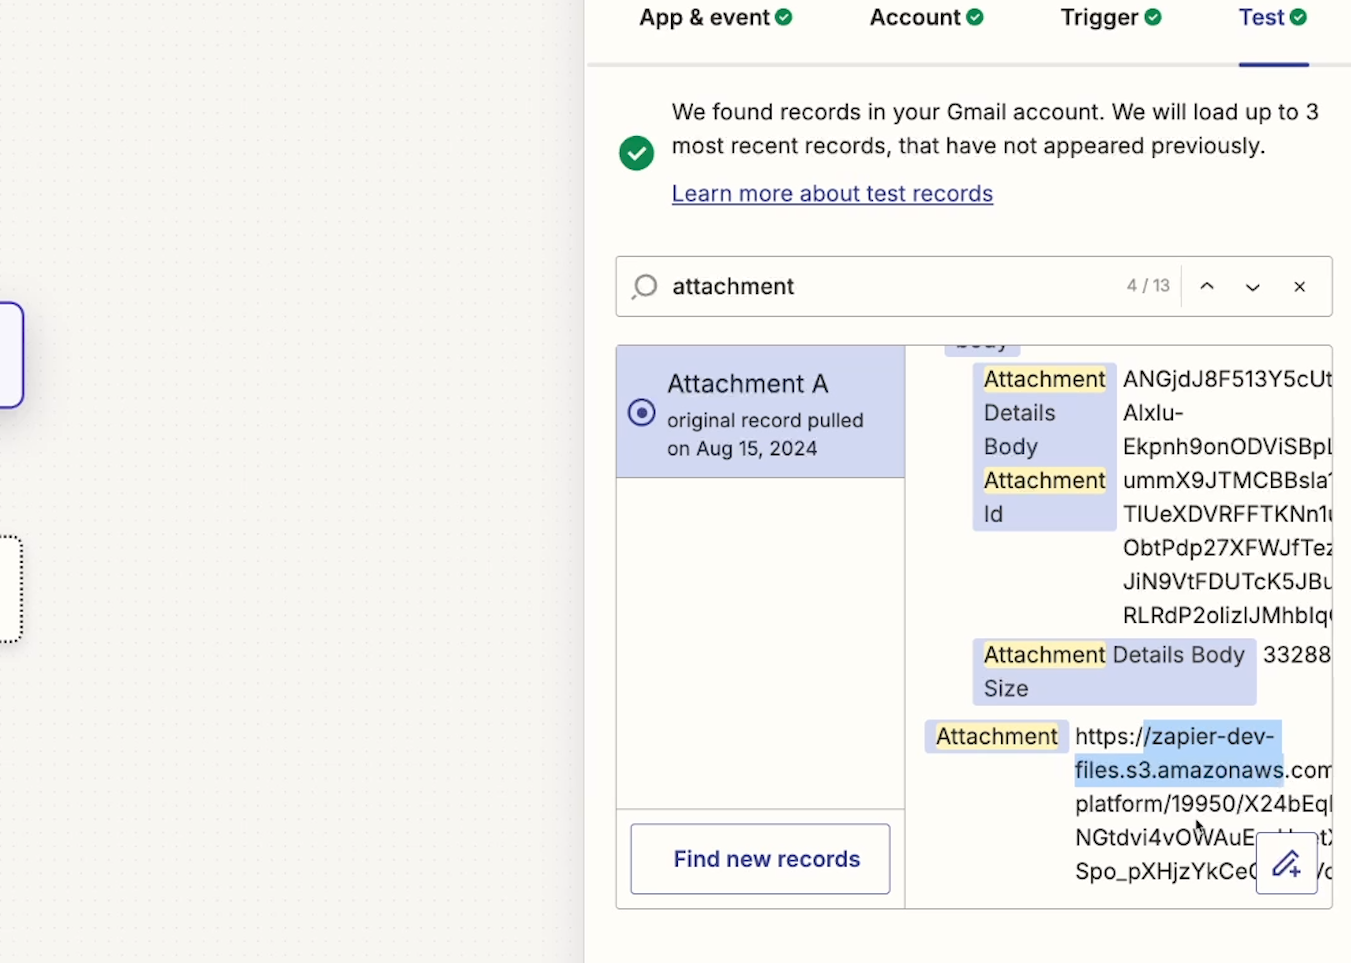
Test your trigger to retrieve a recent email with an attachment.
Add the PDF.co Action
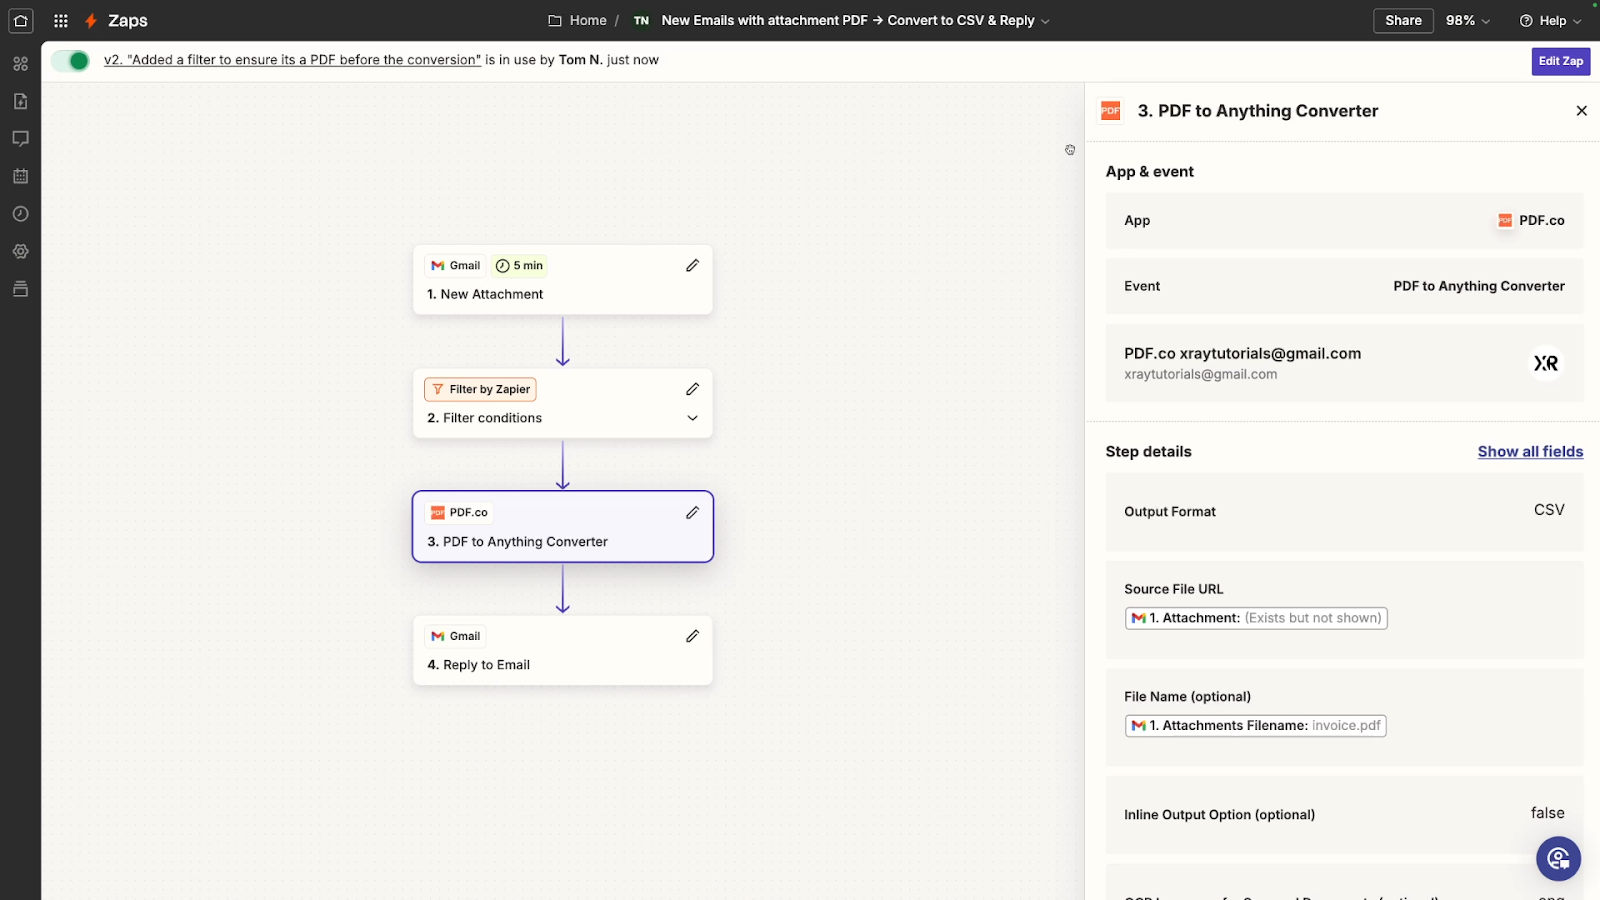
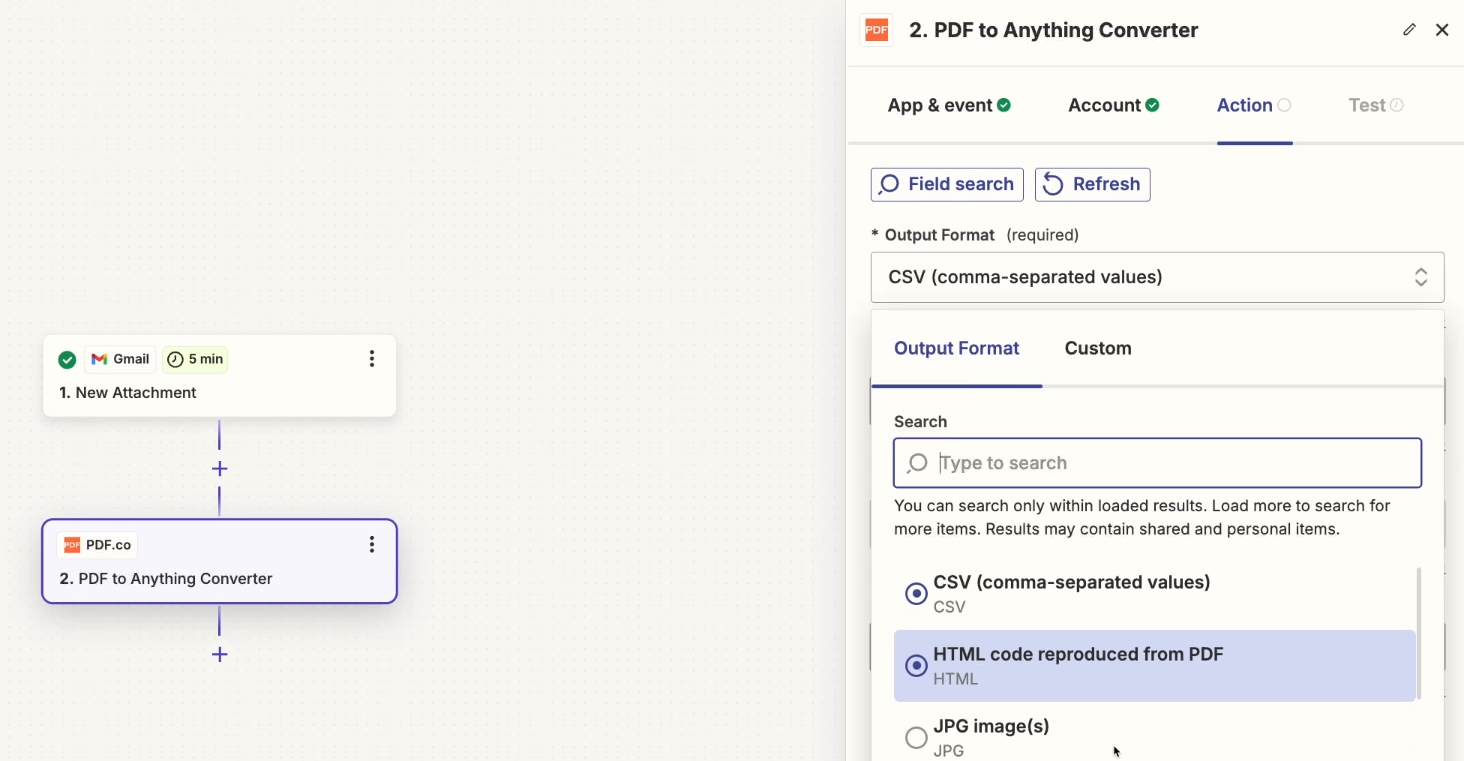
Add a step to your Zap. Choose PDF.co as the app and select “PDF to Anything Converter” as the action.

Select the PDF.co account you connected earlier and continue to configure the action.
The output format should default to CSV, but if not, you can select it (or any other file type you want) from the dropdown menu.
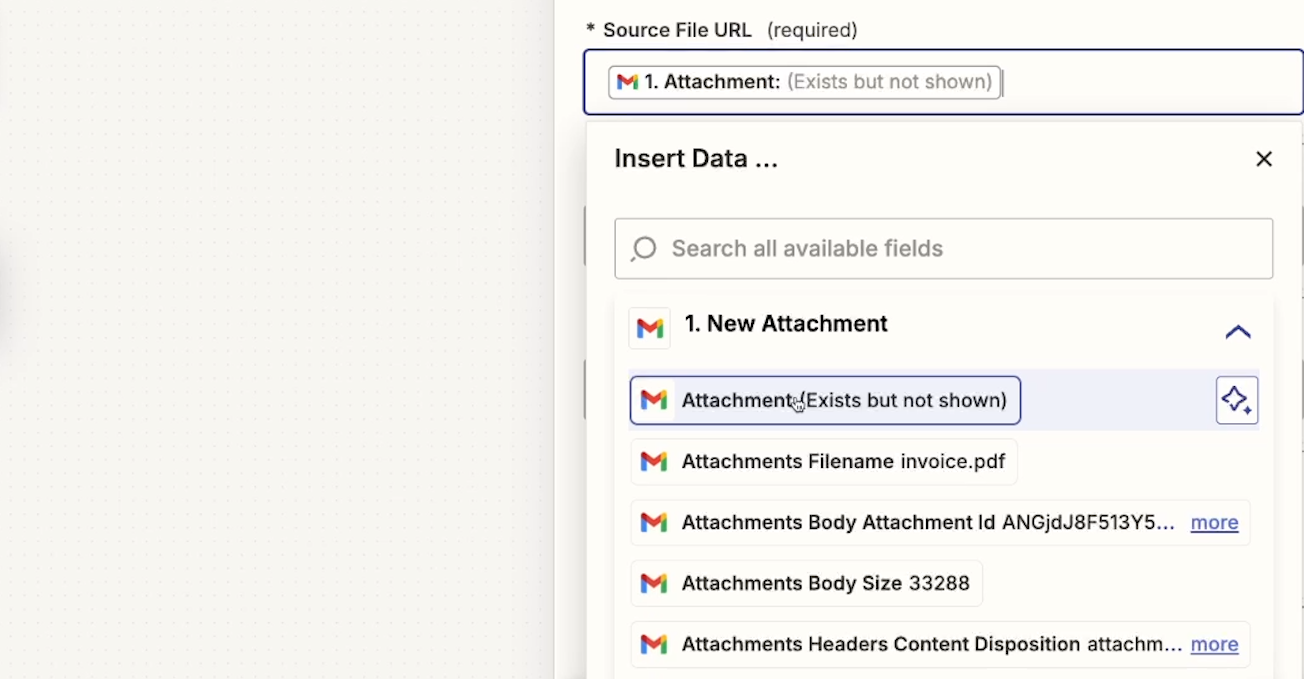
For the “Source file URL”, use the attachment from the email. The variable you’re looking for in Zapier is called “Attachment” and will say “Exists, but not shown”. This is normal for files in Zapier.
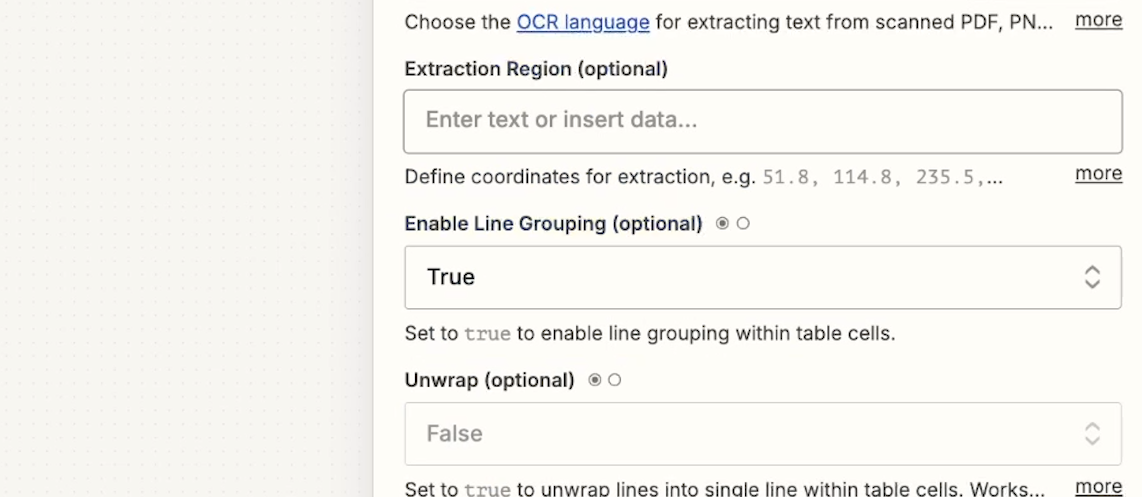
Then, you can configure any optional settings you want. For instance, we’ll adjust line grouping again. In Zapier, we just need to set it to “True” to enable it.
Once you’ve configured your settings, test the step to run the conversion.
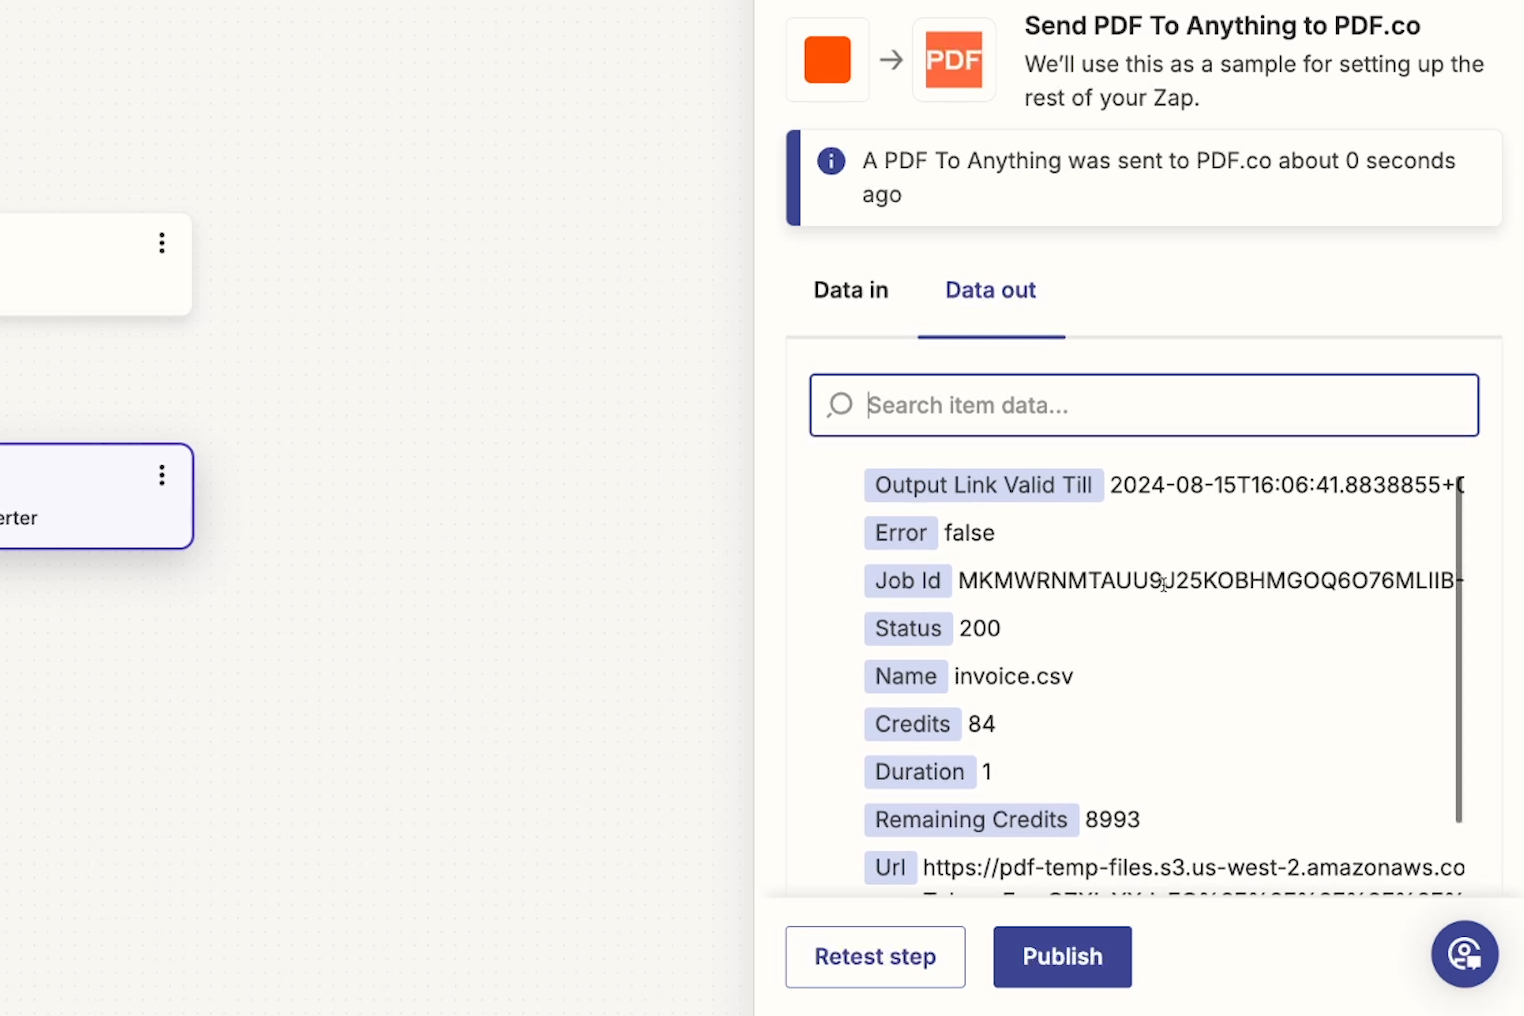
Now, you can send the converted file to any other app integrated with Zapier. In our automation, we’ll attach it in a reply to the original email.
Reply with an attached CSV
Add a step to your Zap, and choose Gmail as the app. Select “Reply to Email” as the action.

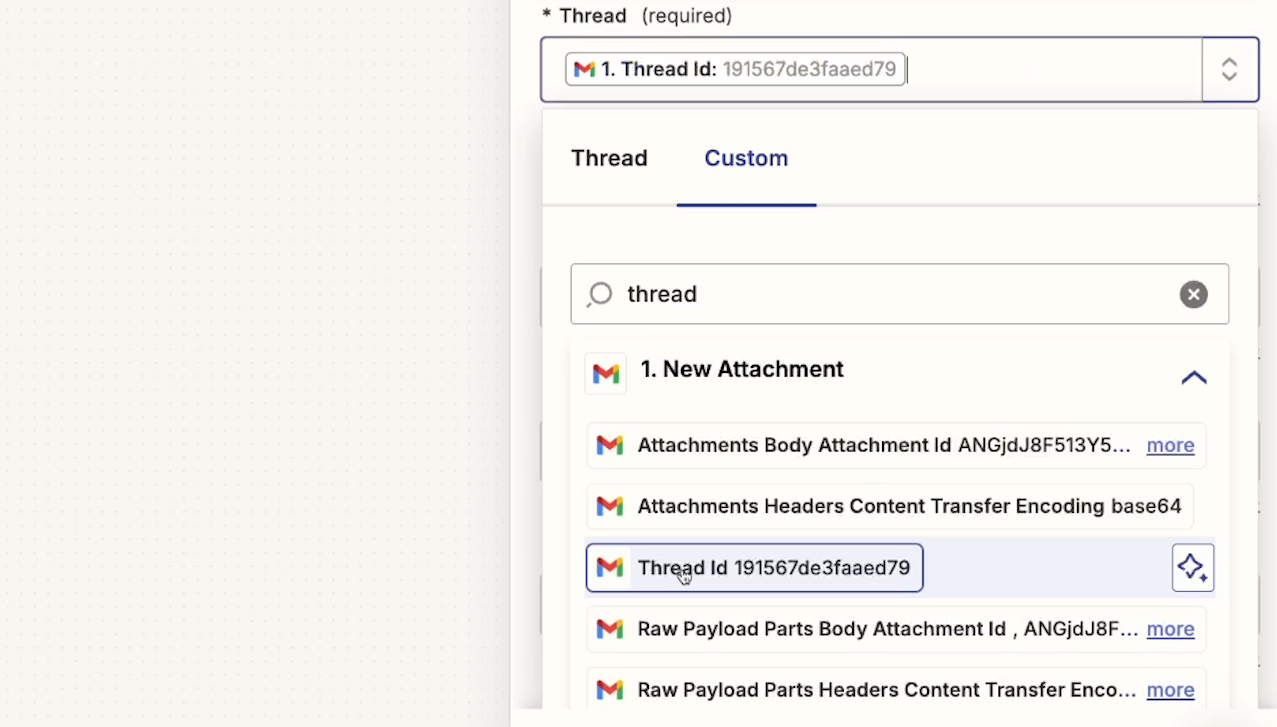
In the “Thread” field, you’ll need to provide the ID of the thread you want to reply to. You can find this data in the trigger step by searching for “Thread ID”.
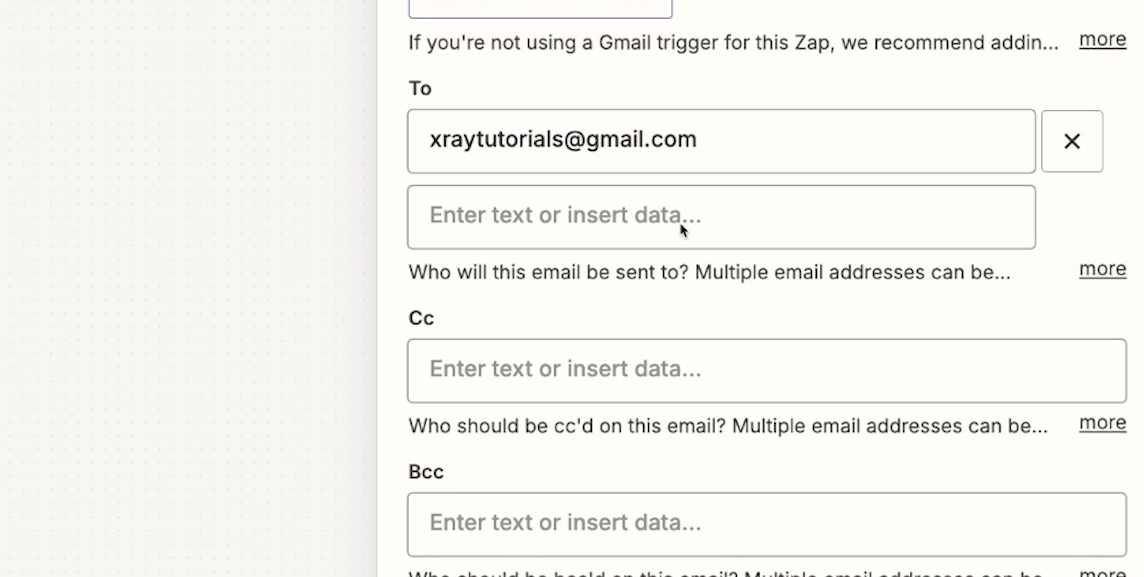
Even though the “To” field is not marked as required, you will need to provide a recipient for the action to work correctly. We’ll enter our own email there.
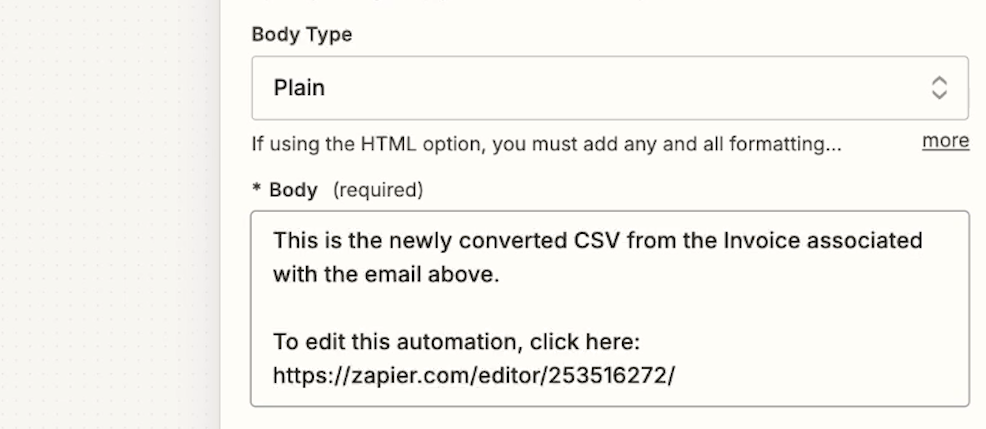
Next, you’ll need to compose a body for your email. We’ll just write a short message explaining that the converted file can be found as an attachment. In this message, we’ll also include a link where we can edit the Zap.
Finally, you’ll need to attach the exported CSV. Enter the “URL” from the PDF.co action into the Attachment field.

Once the action is all set, give it a test. Check your inbox to confirm that everything worked correctly.

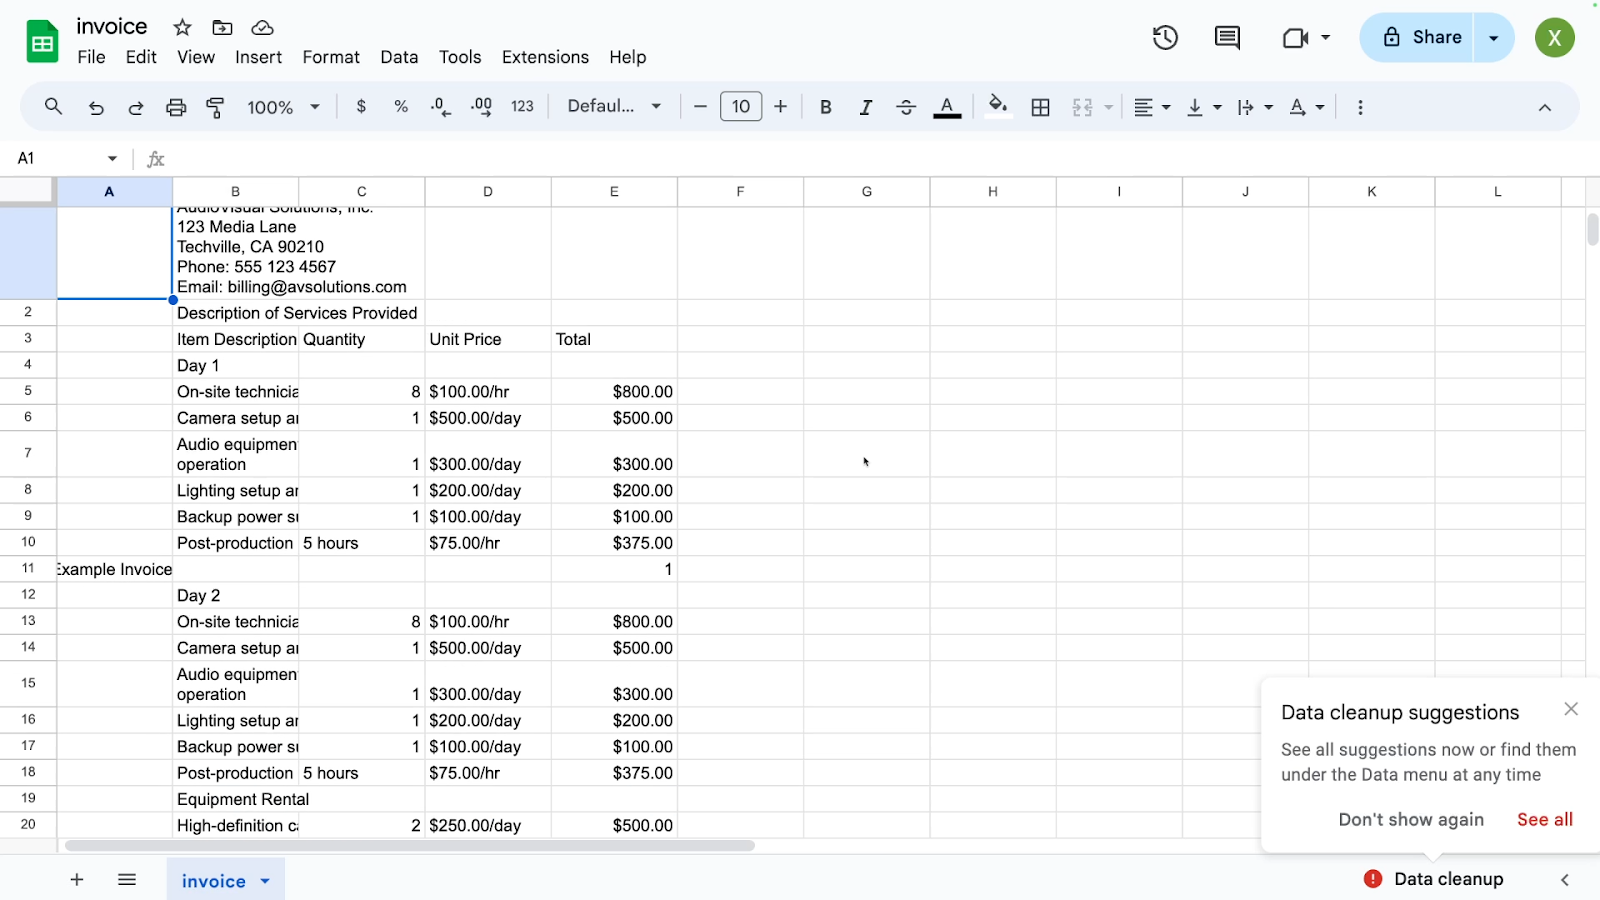
In our inbox, we can see the new reply with an attached CSV. When we open the CSV in sheets, everything looks like we’d expect.
You can now publish and turn on your automation if you’d like, but there’s one more step we’d recommend to reduce your credit usage in PDF.co.
Adding a filter to your Zap
To further refine your automation, you might want to add a filter in Zapier to ensure that the workflow only runs every step for PDF attachments. This can help avoid unnecessary processing of non-PDF files and conserve your PDF.co credits.
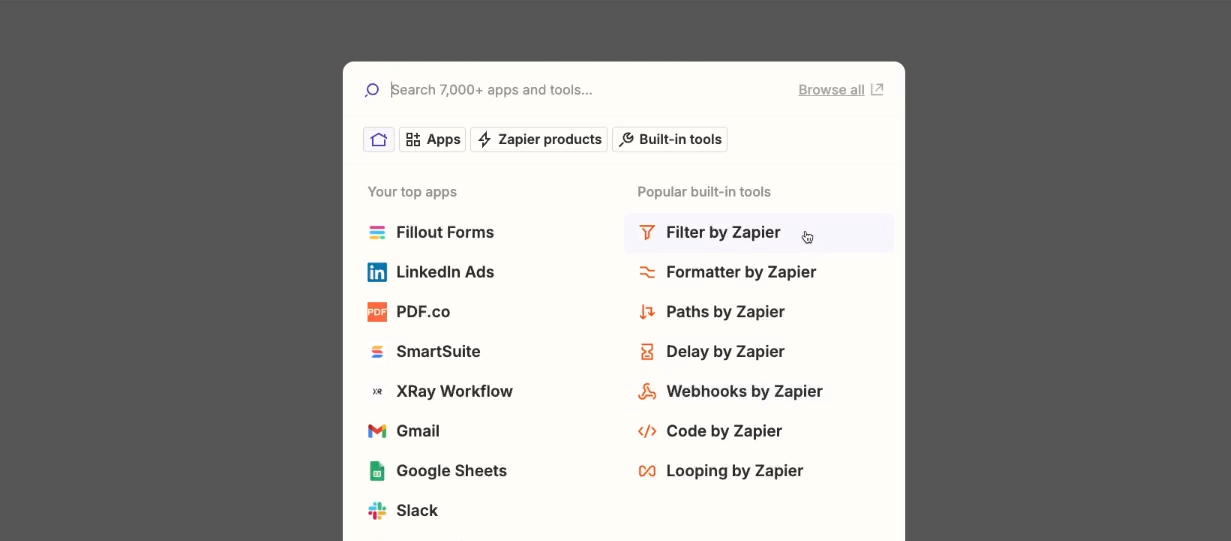
Add a step after your Zap’s trigger, and select “Filter by Zapier”.
Set your filter condition to: Only continue if “Attachments Filename” contains “.pdf”. This will ensure that the automation only tries to convert

Save time with automatic PDF conversion
By automating the conversion of PDFs to CSVs with PDF.co and Zapier, you can streamline your data processing tasks and free up time for more important work. This automation is a great example of how low-code tools can enhance productivity and reduce manual effort in your workflow.
If you found this tutorial helpful, be sure to check out the other posts on our blog or our YouTube channel. You can also follow XRay on Twitter, Facebook, or LinkedIn.
Do you need to create visualizations from your Notion data?
With Notion’s new “charts” feature, it just takes a few clicks to convert your tables into bar charts, line graphs and more.
In this quick tutorial, we’re going to show you how to create a chart in your Notion table and export it as an image file.
Let’s get started!
Creating a new chart
To begin, open up any page in your Notion workspace.
You can either add charts as a standalone block on a page by typing “/chart”, or by adding your chart as a new view for an existing database.
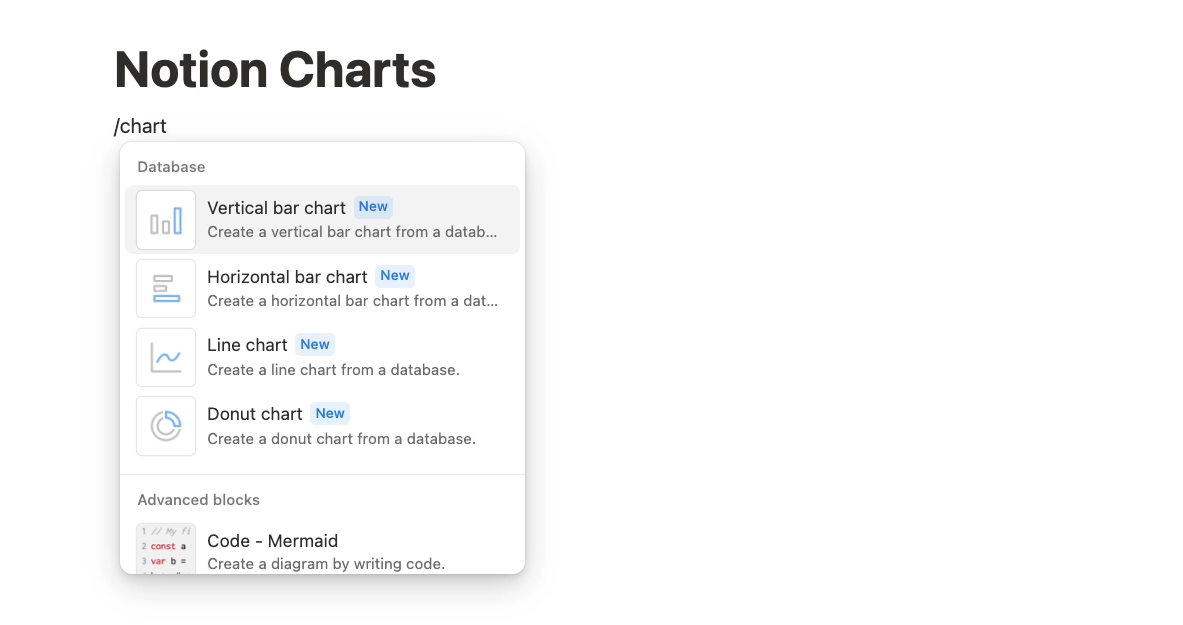
Either way, you’ll see all the same options, and you’ll need to connect your chart to a Notion table as a data source.
For our example, we’ll add a chart to the “Projects” table pictured below.
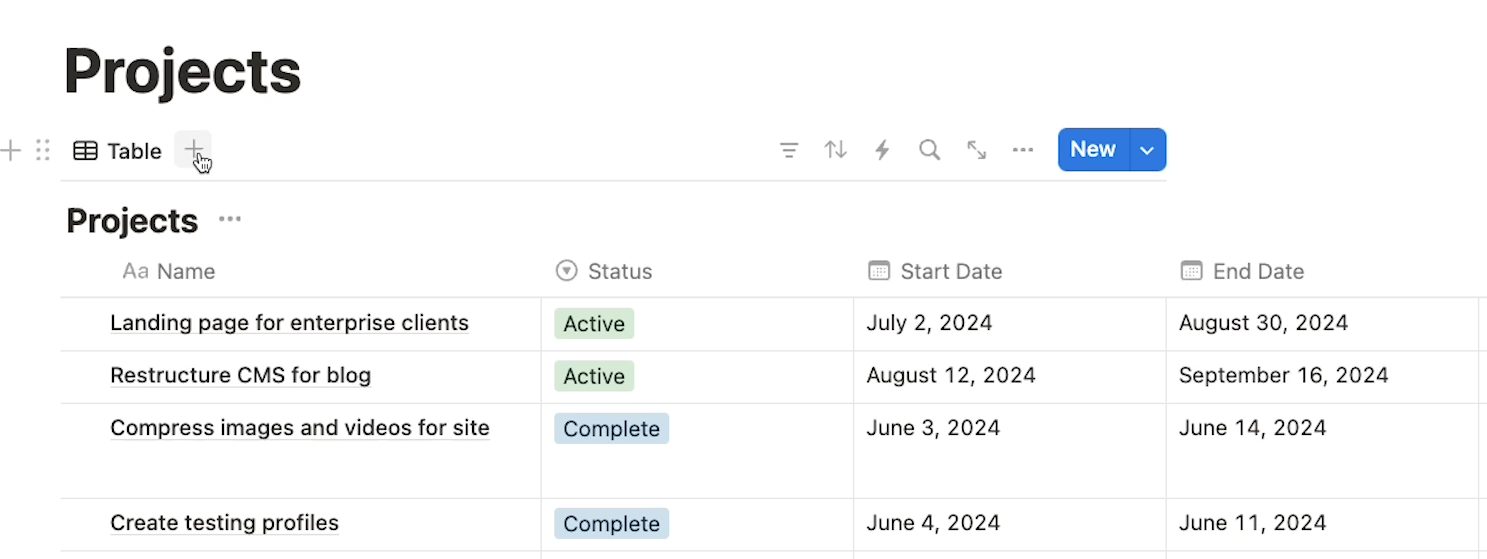
Click on the plus button next to your table’s existing views to create a new view in your table. Then, select “Chart” at the bottom of the list that pops up.
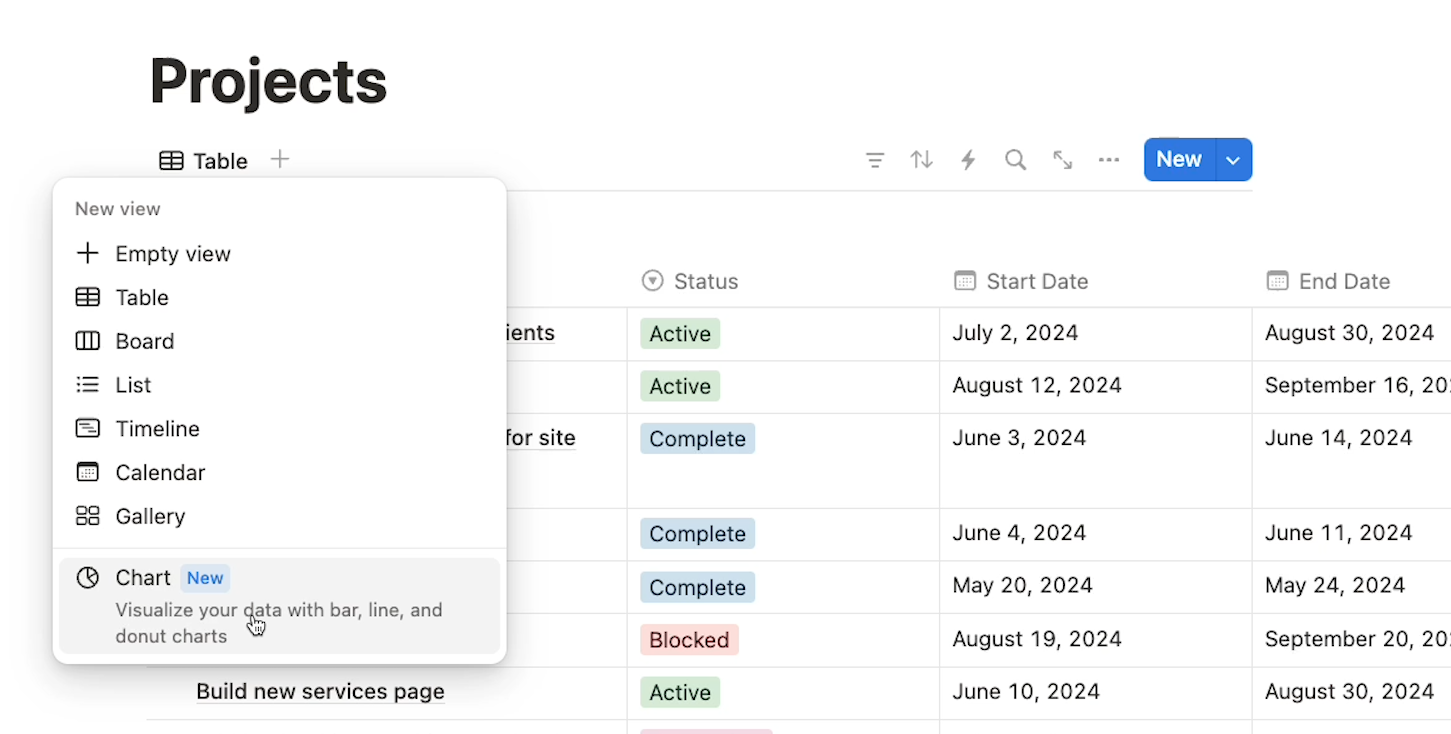
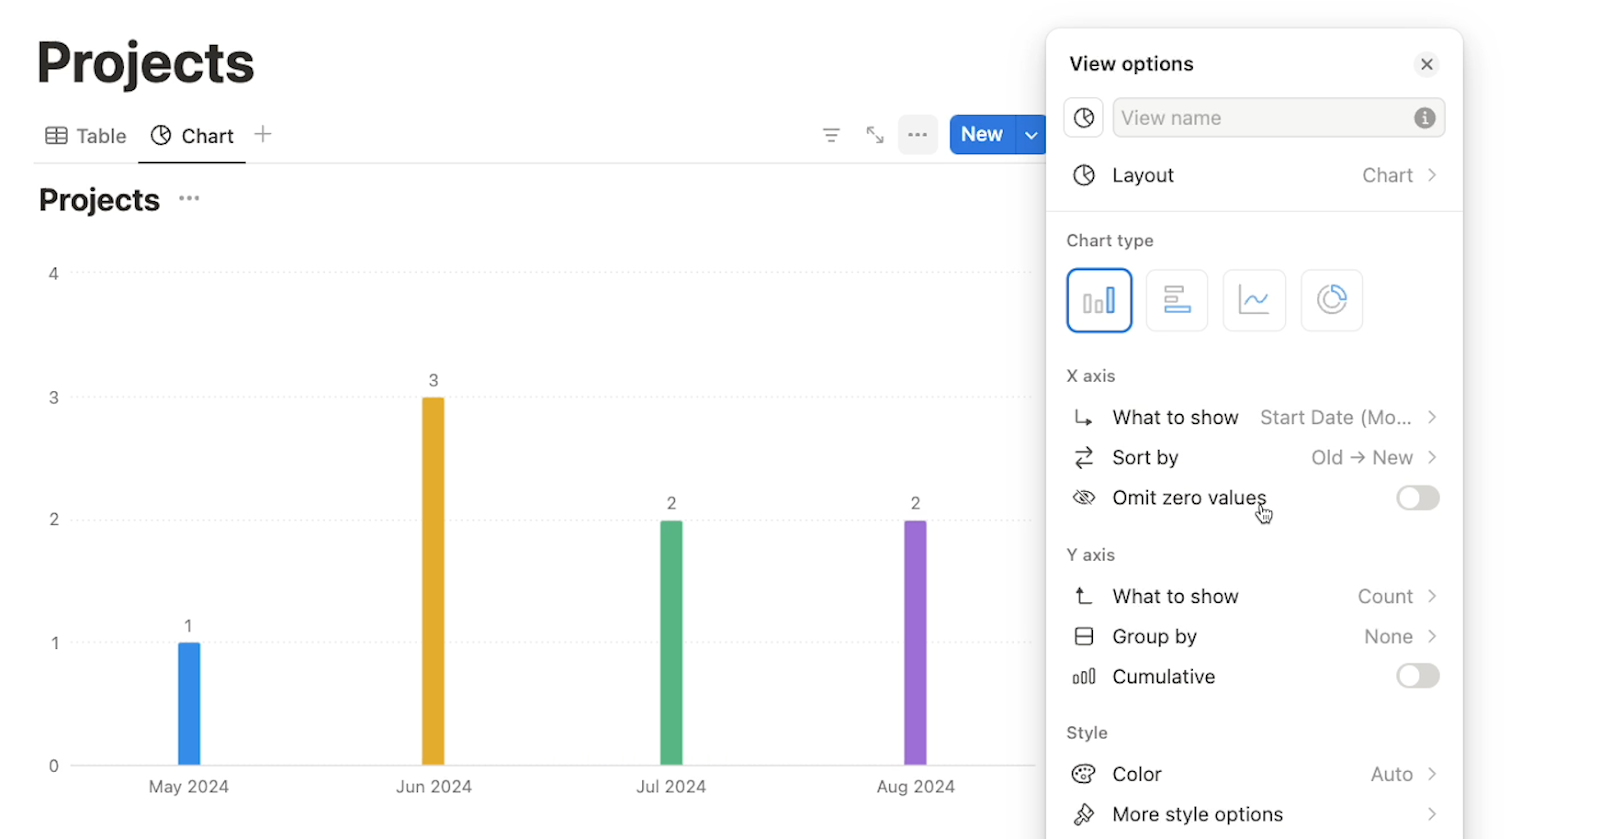
Notion will create a chart out of your table’s data, which you can configure and customize in the “View options” window.
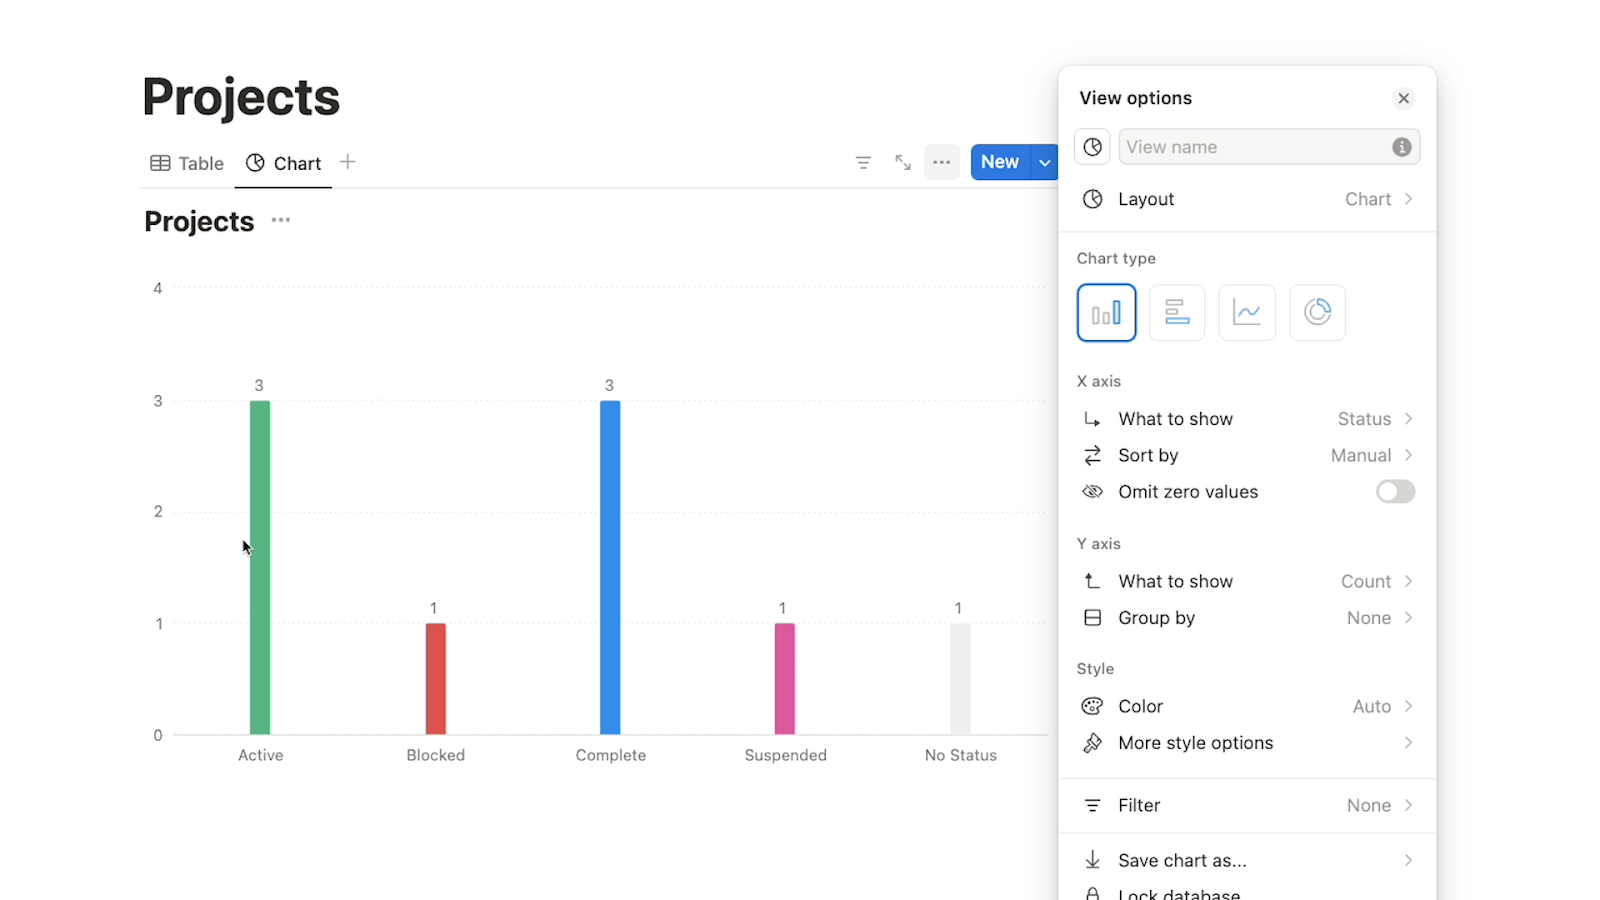
Configuring your chart
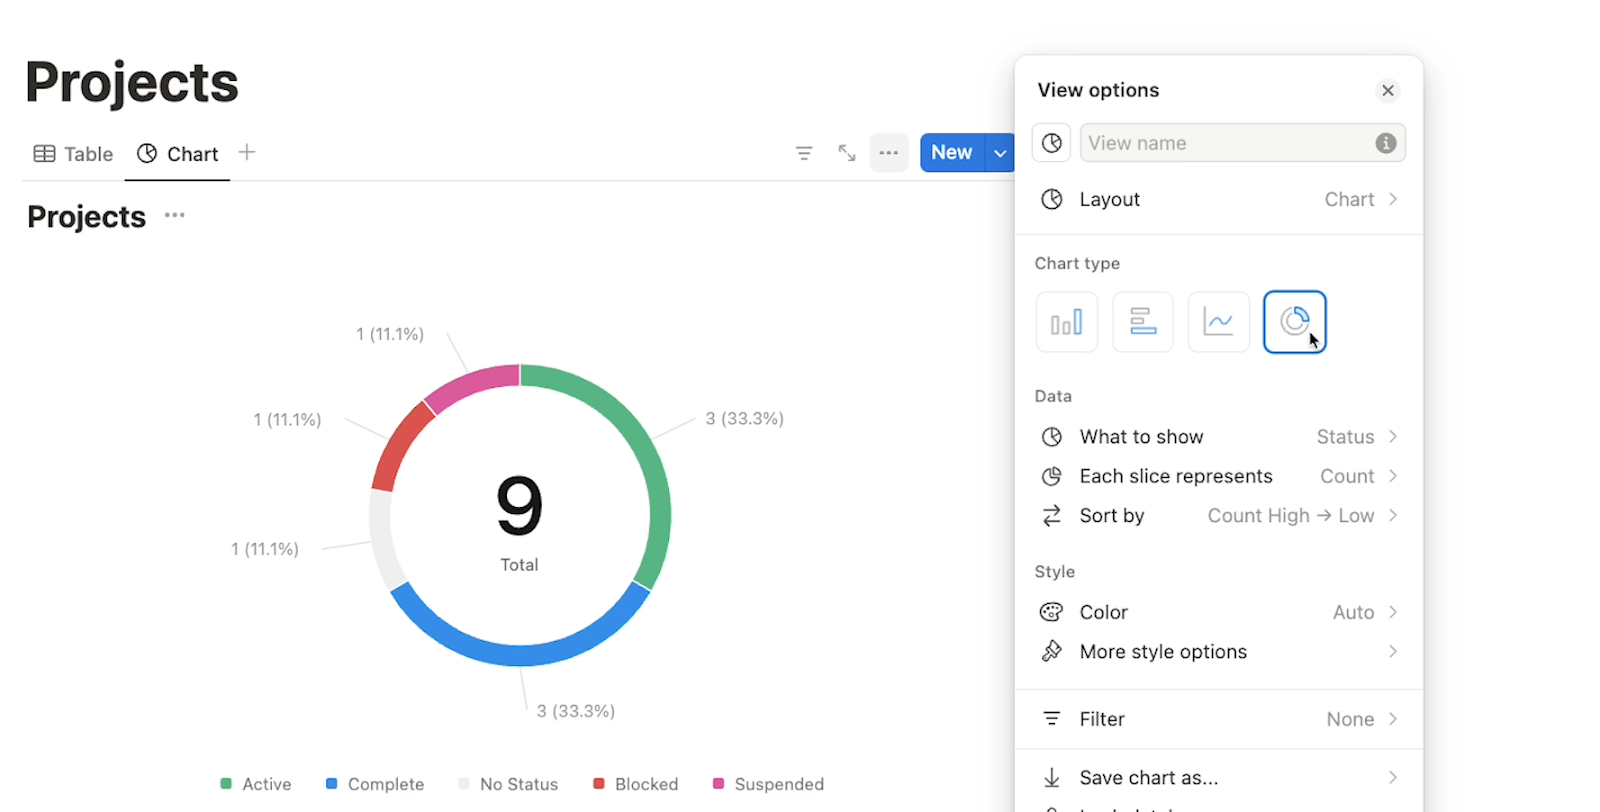
You can set the basic layout as a vertical or horizontal bar chart, a line graph, or a donut chart.
We’ll choose a vertical bar chart.

Adjusting the X and Y axes
Next, you can configure the X axis.
Your first choice is to designate which field will be tracked on the X axis. In our example, we’ll choose the “Start date” field.
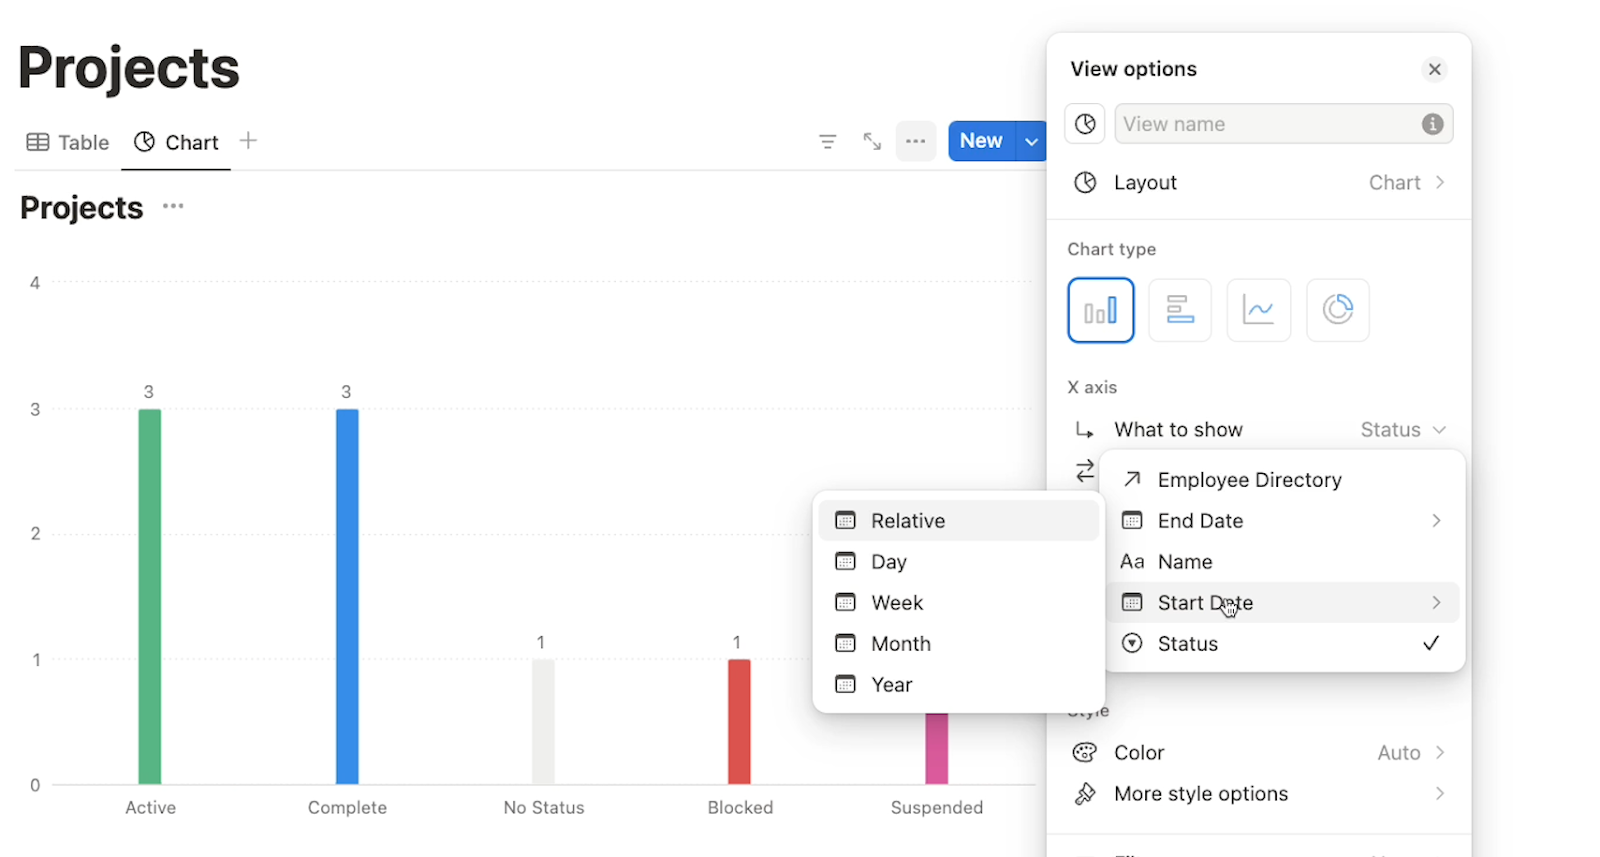
Note that with date fields, you can choose to show the day, week, month or year. You can also choose “Relative” to display the time relative to the current date - for instance, it could show the “last 30 days”.
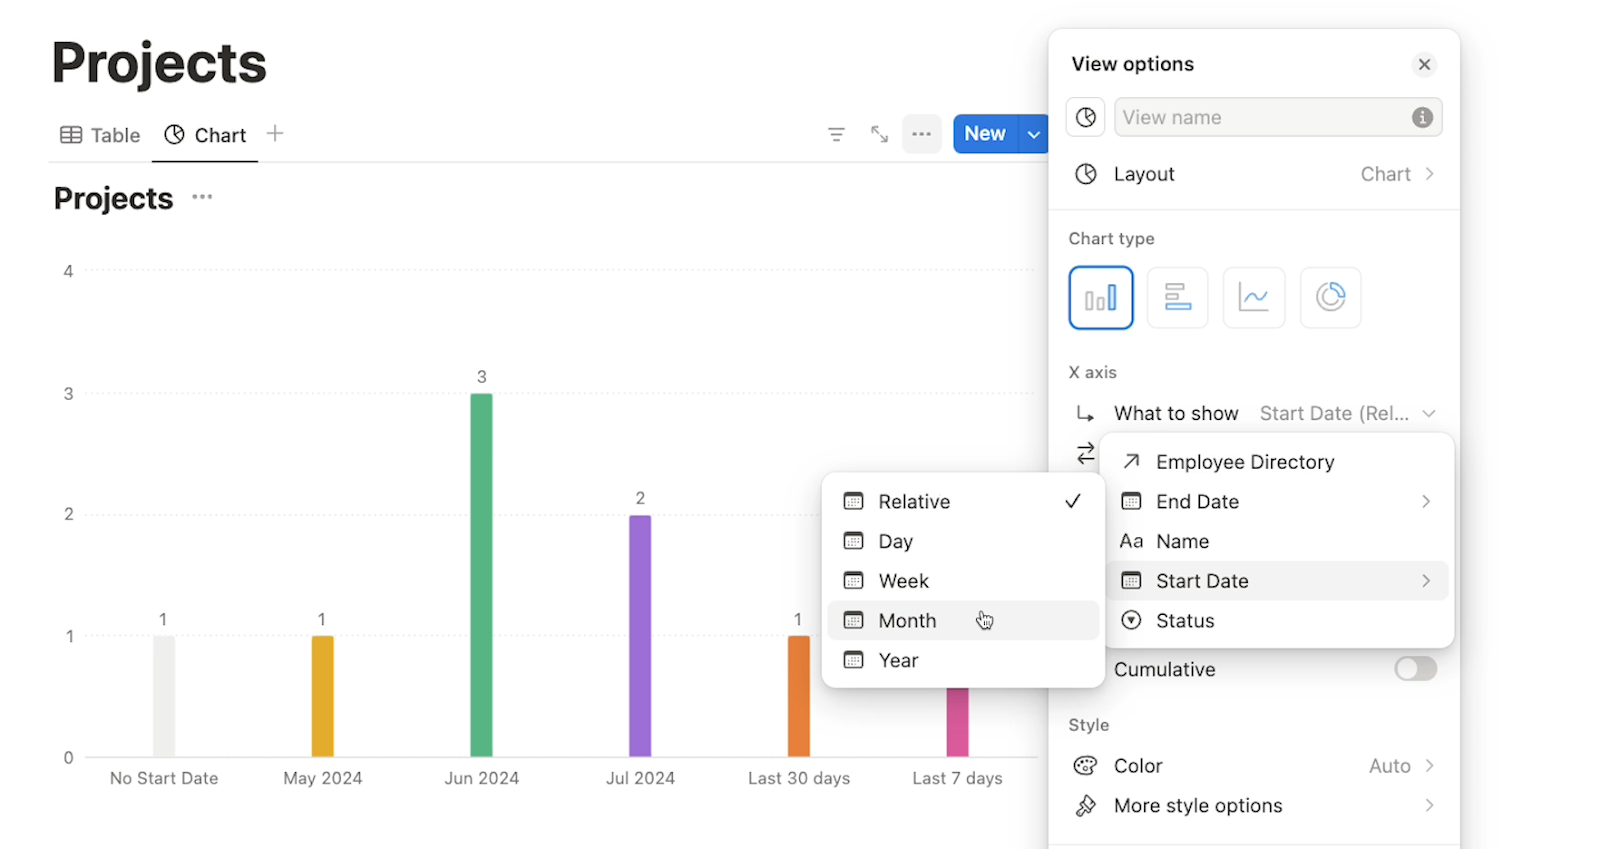
We’ll choose “month”, so we can see the number of projects being started each month.
You can also set a sort order for the X axis, which we’ll leave to the default of “old to new” in our example, and you can choose to “Omit zero values”.
Next, you can configure the Y axis. By default, it’s set to display the “count”, which means it will show how many records exist for each data point shown in the X-axis. In our example, the Y-axis is showing how many projects there are in each month.
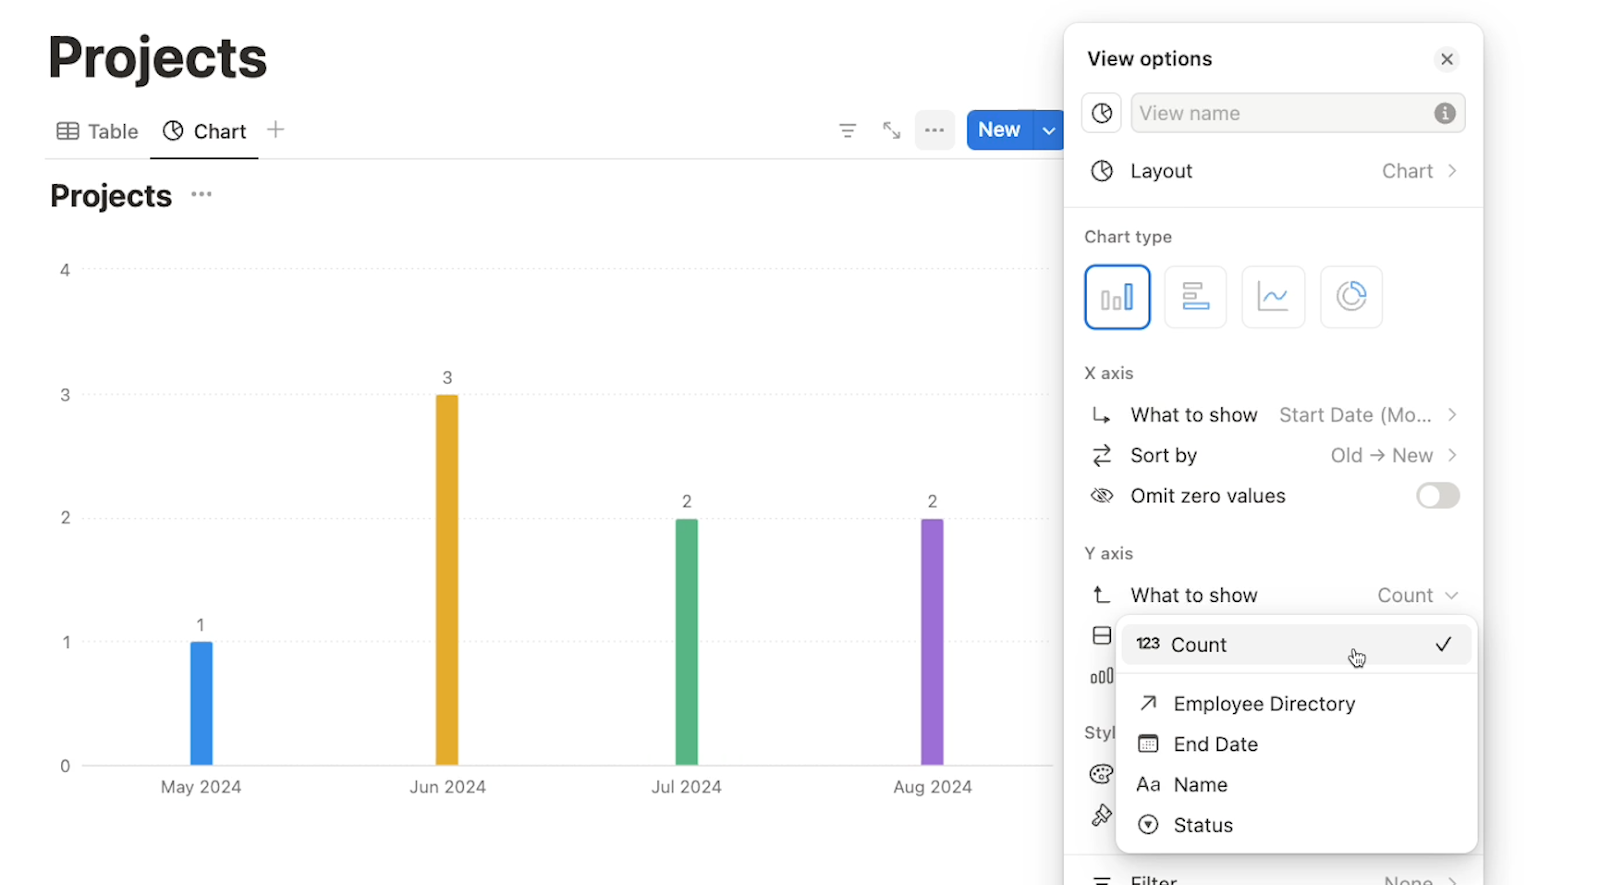
However, you can also set your Y-Axis to display any of your other fields, as well.
Next, you can choose to group the Y-axis data by one of the fields in your table. “Grouping” will look a bit different based on which layout you’ve chosen for your chart.
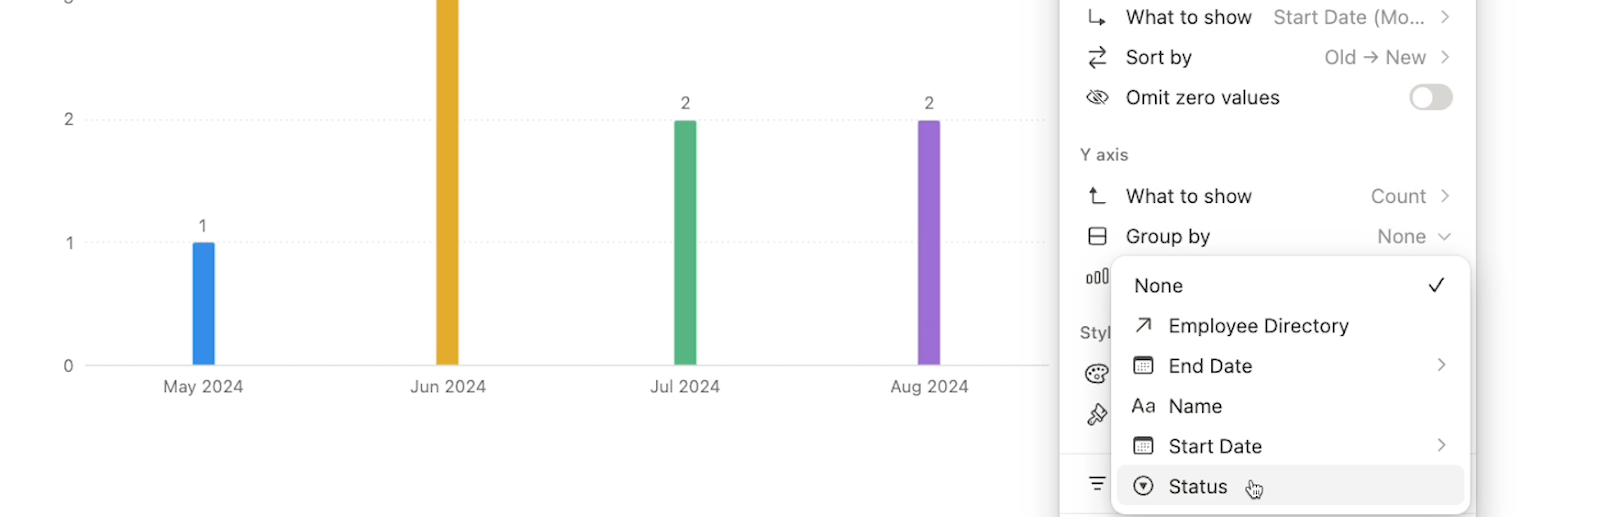
When we map the grouping to our “Status” field, Notion will break up the bars in our graph into multiple colored sections - one for each status option represented in that bar.
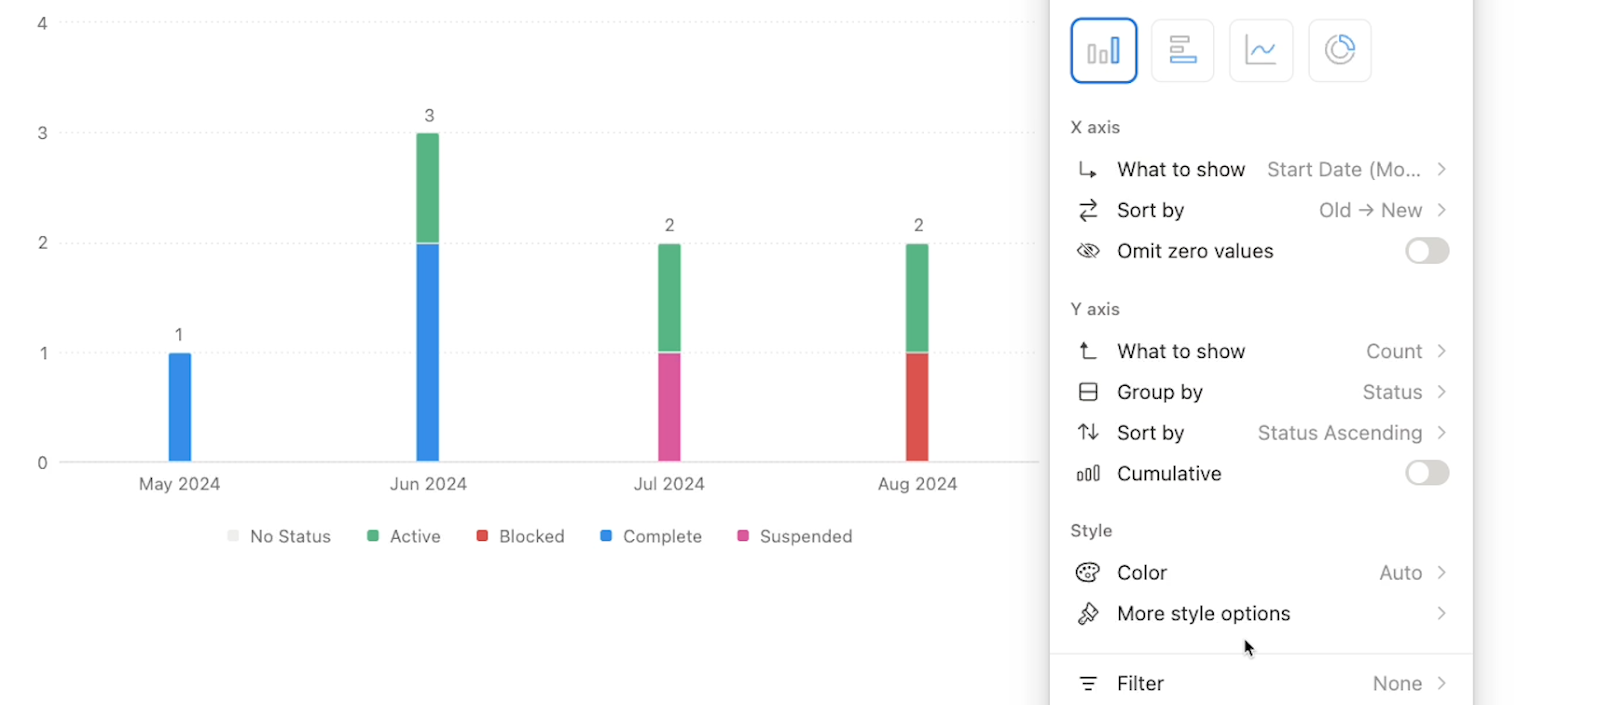
Just like with the X-axis, you can also choose the sort order for the Y-axis.
Styling your chart
Under “style”, you can set the color scheme for your chart by picking a specific color palette, or just go with the more varied “colorful” option.
You can also choose “Auto”, which will use colors taken from your table when applicable.
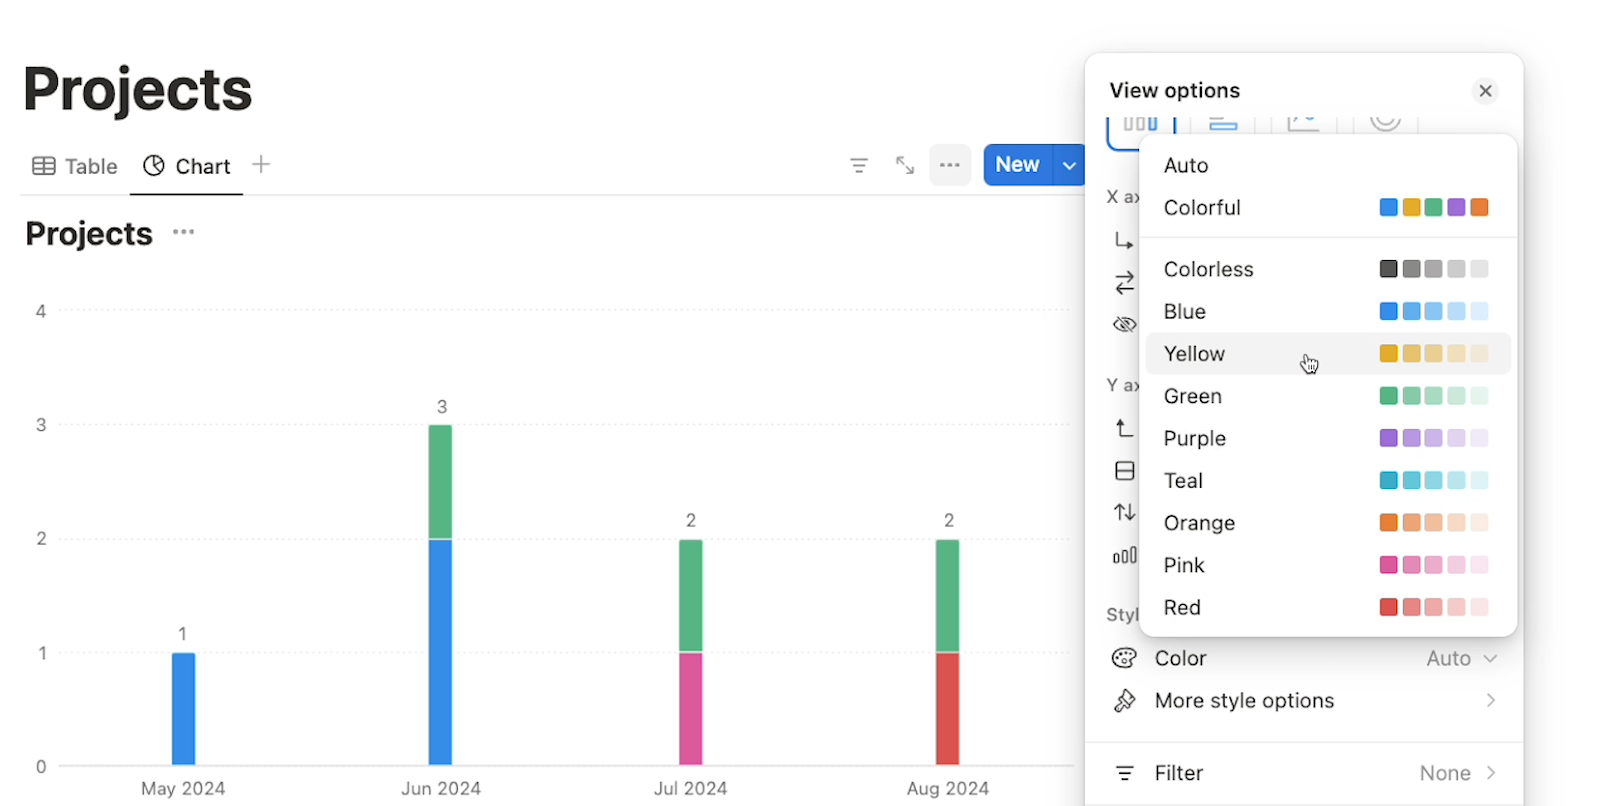
Under “more style options”, you’ll see several options to fine-tune your graph’s layout with settings like chart height, grid lines, axis labels, and more.

Below, you can see our finished chart after all of our settings have been configured.
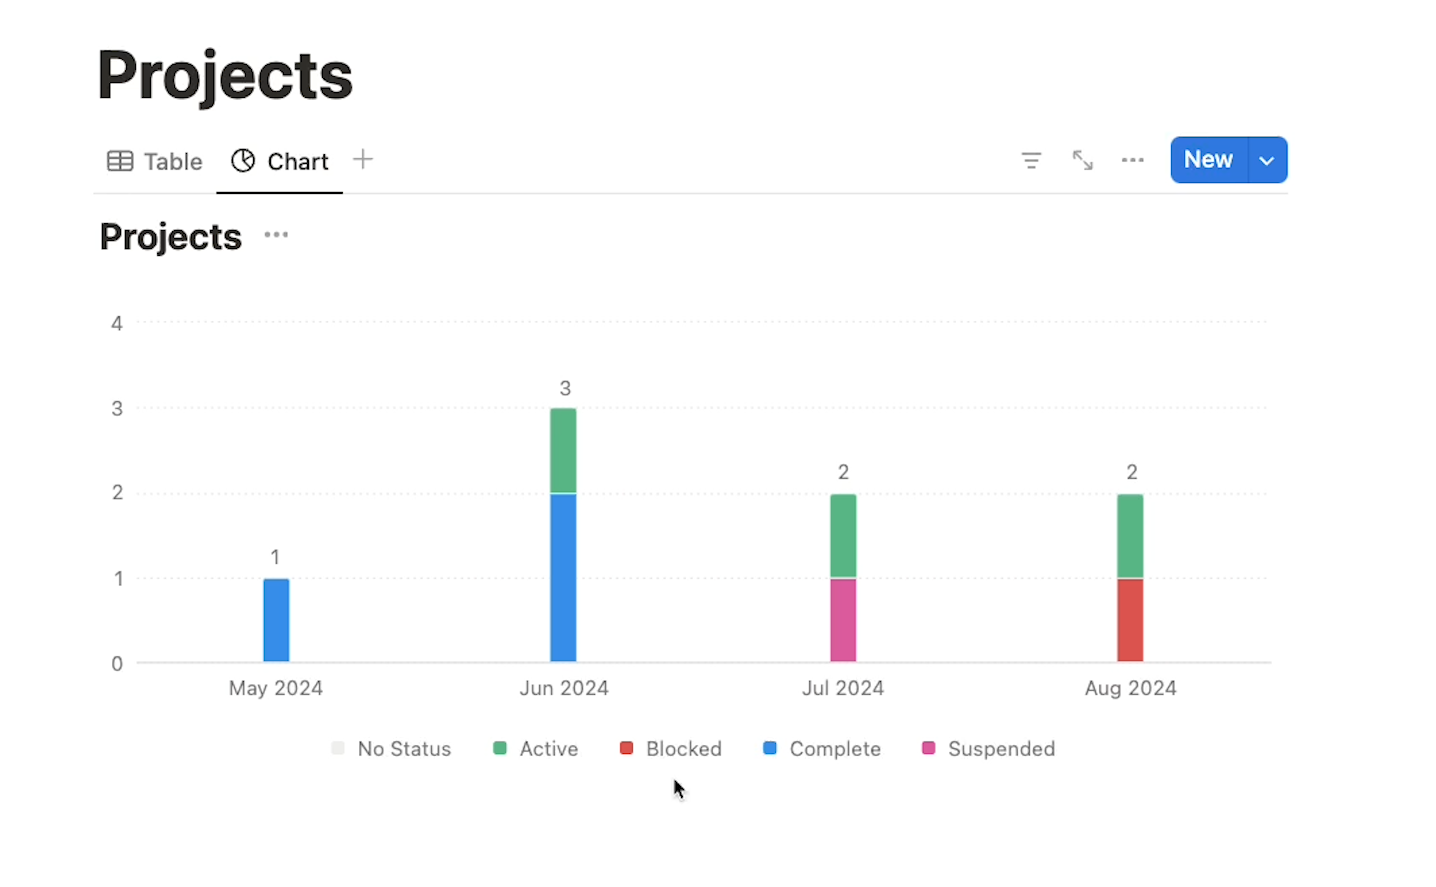
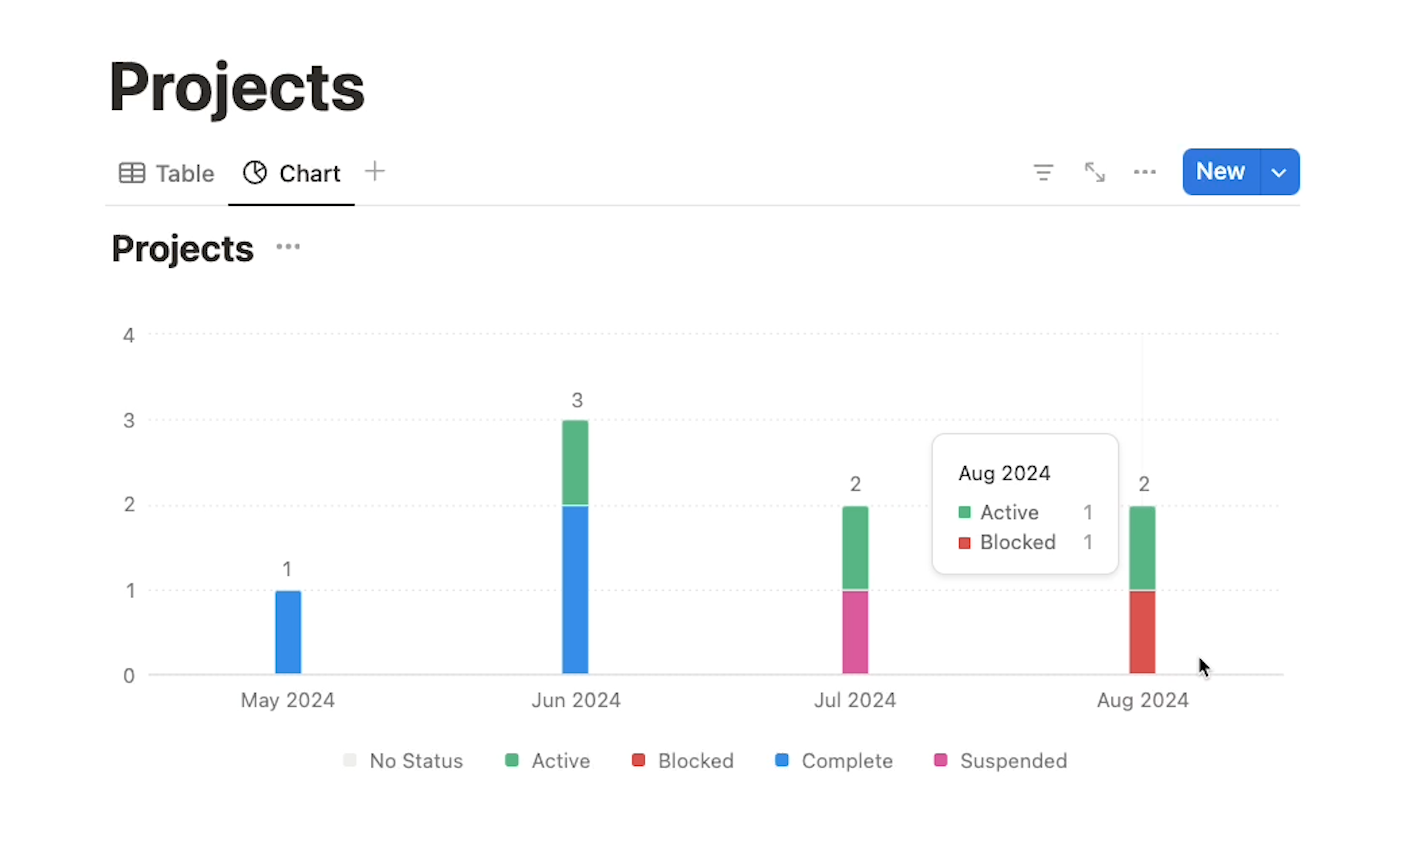
There are bars for each month broken up by project status, and when you mouse over the data, some more detail pops up.
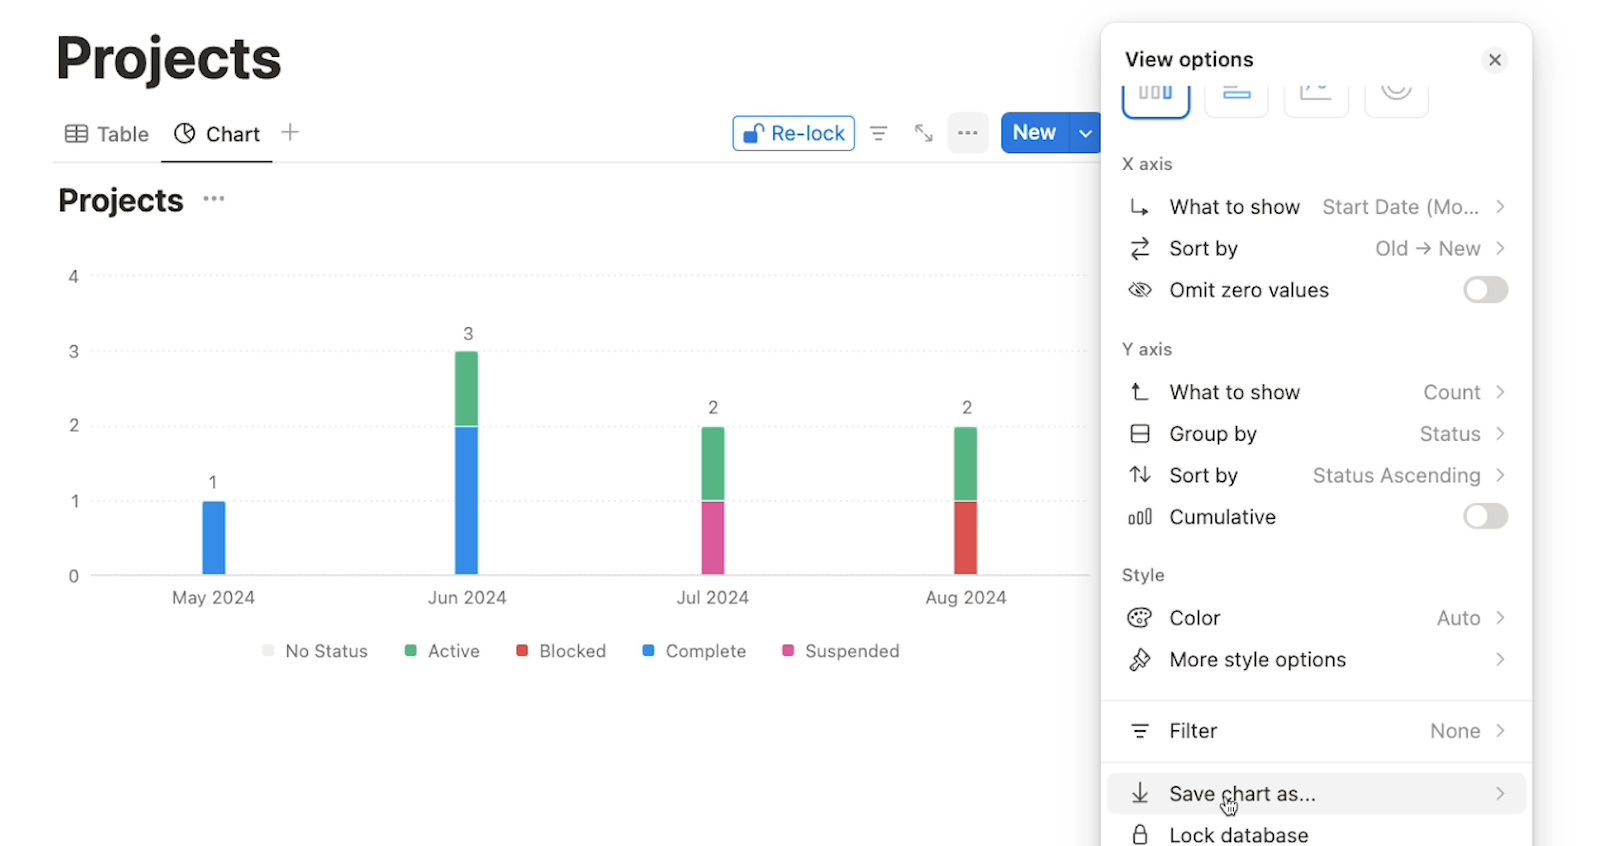
If you want to change your Notion chart view’s settings at any time, just click on the three dots menu to access the same options.
Exporting your chart as an image
You can share your chart like any other page or database in Notion.

However, another simple option that will often work well for collaboration is to export your chart as an image.
To export your Notion chart as a still image, all you have to do is click on the three dot menu, scroll down to “Save chart as”, and select the image format you want to use.
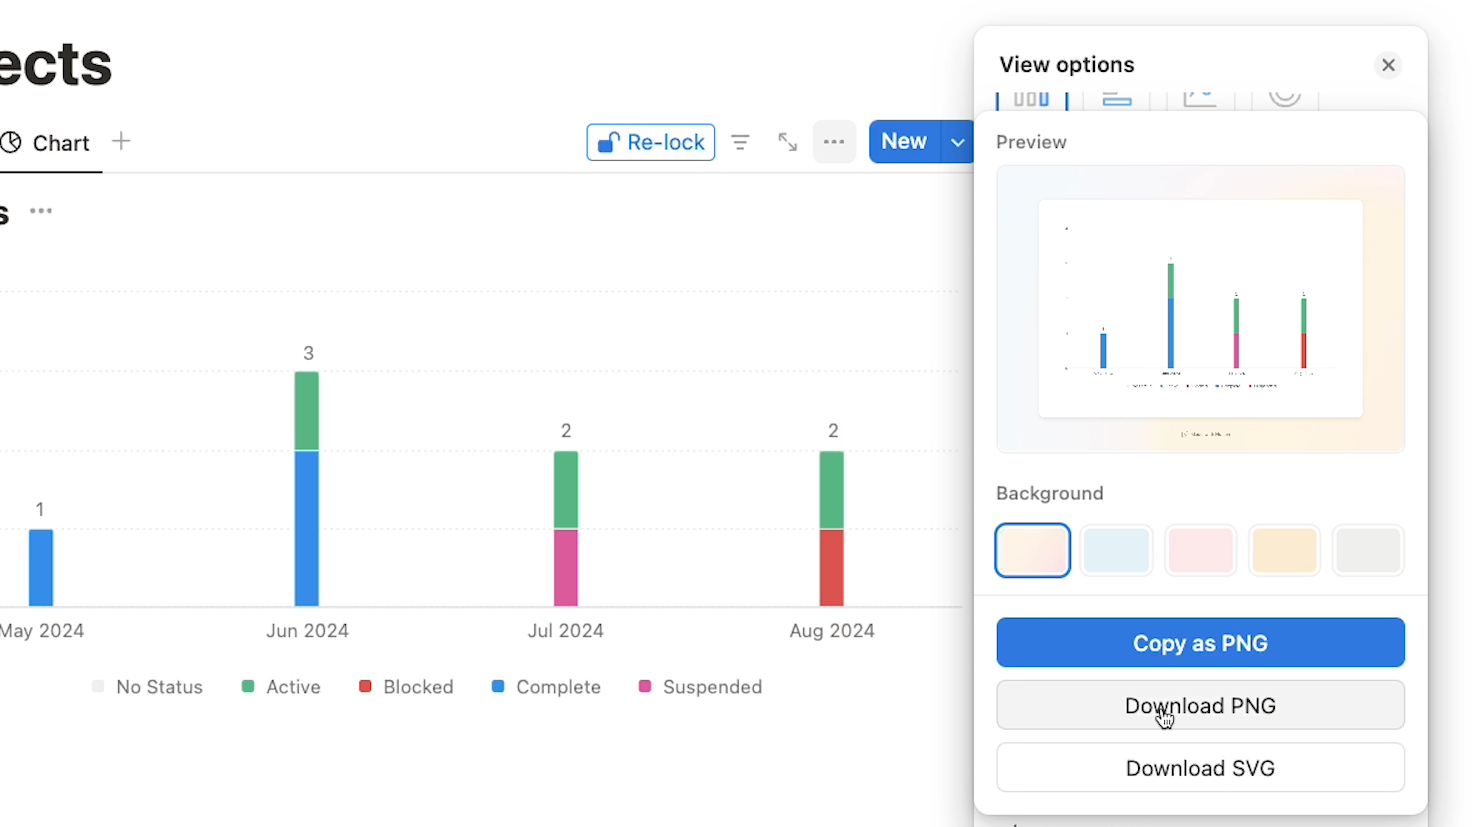
Then, you’ll instantly get an image file of your chart. Below, you can see the exported version of our example “Projects” table.

Of course, you’ll lose some of the detail that you can get by mousing over your live chart in Notion, but this is a great way to quickly export a visualization to add to a report or a website.
Pricing and limitations
Notion charts are currently available to all Notion users. However, users with a free plan are limited to creating just one chart at a time.
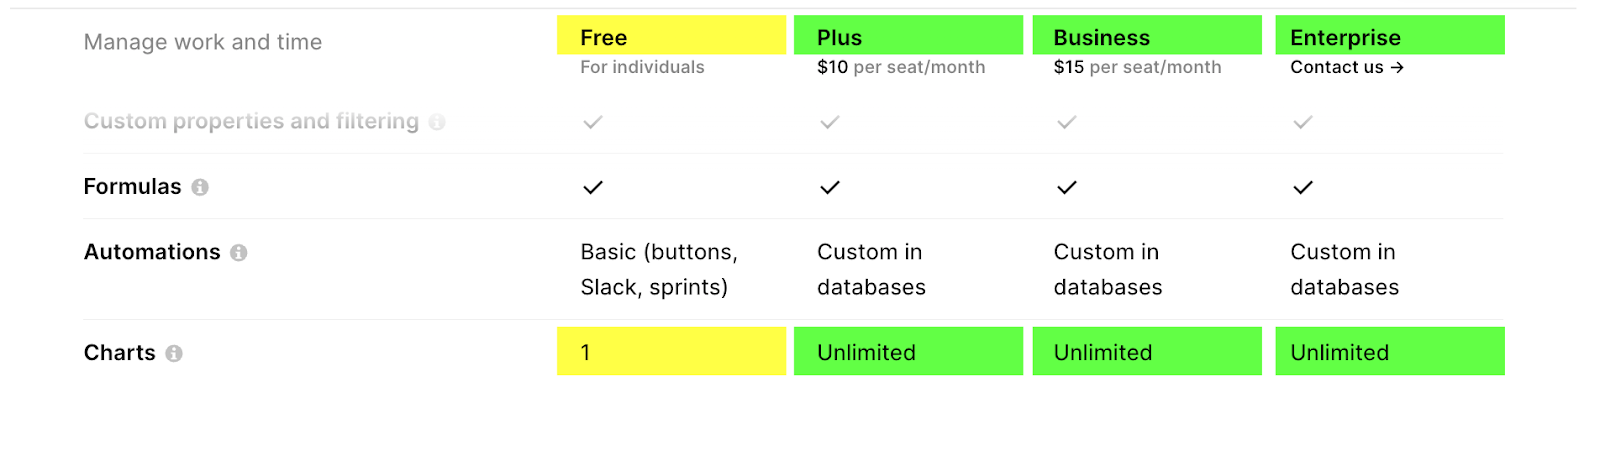
All paid plans include access to unlimited charts, so most Notion power users should be all set to make as many charts as they want.
Create simple charts to quickly communicate key takeaways
Notion’s new charts are a simple and effective way to visualize your data, and it only takes a second to export them as an image. Try them out today to start creating useful dashboards and presentations with your data.
If you’d like to learn more about using no-code tools like Notion, Airtable, Zapier, and Make, be sure to check out the other posts on our blog or our YouTube channel. You can also follow XRay on Twitter, Facebook, or LinkedIn.
Need more flexibility in your Softr forms?
With the recently added Conditional form block, you can display different questions based on your users' answers and attributes.
Conditional form blocks are super easy to set up, and in this video, we’re going to show you how to start using them step by step.
We’ll demonstrate two different ways you can apply conditional logic to a form in Softr:
First, we’ll show you how to make certain sections of questions appear or hide based on user responses or attributes.
Second, we’ll demonstrate how you can split your form up into separate parts, and skip certain parts based on similar custom conditions.
Let’s get started.
Setting up your Softr app with a conditional form block
To get started, you’ll need to get your Softr app set up and add the conditional form block.
In most cases, you’ll want to have the app connected to a data source so you can collect form responses.
In our example, we’ll be using Airtable, but you could just as easily connect your Softr app to SmartSuite, Google Sheets, Hubspot, Xano, Monday, Postgres, and more. The specific data source doesn’t really matter for this tutorial.
Conditional forms: a beta feature
At the time of publishing, the conditional form block is still in beta, so some of the functionality may change a bit over time.
For now, you’ll have to select this conditional form block to create a form with conditional logic. You cannot convert a normal form block into a conditional one for the time being.
However, we have heard that the functionality to convert regular forms to conditional forms should be coming soon.
Adding a conditional form block
In any page within your Softr app, add a new block. In the “Dynamic” tab under “form”, you’ll see the “Conditional form” option.
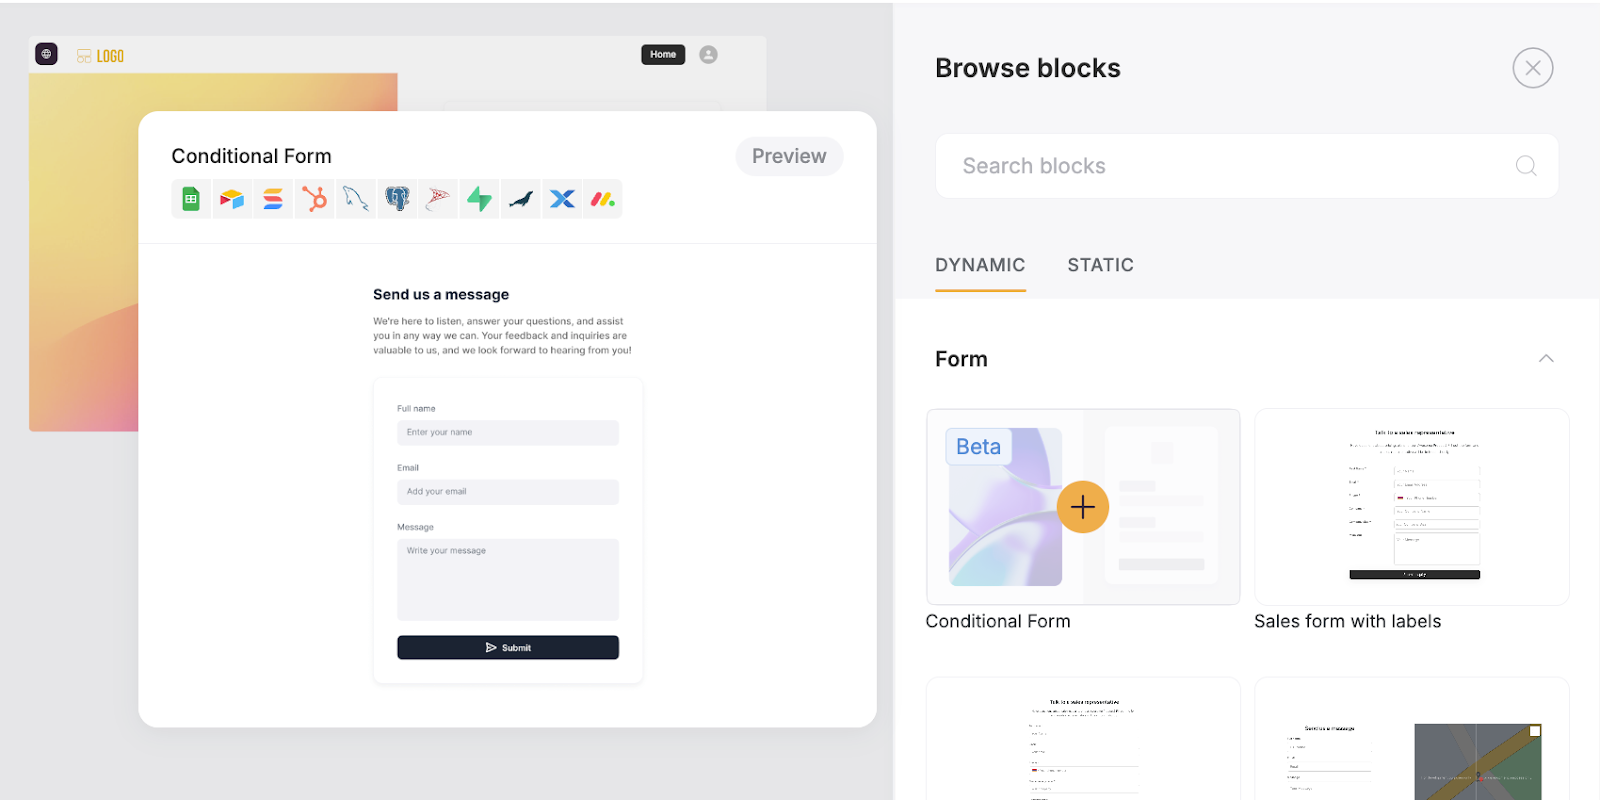
Select the block to add it to your page. Then, under settings, you can choose where the form’s responses will be sent.

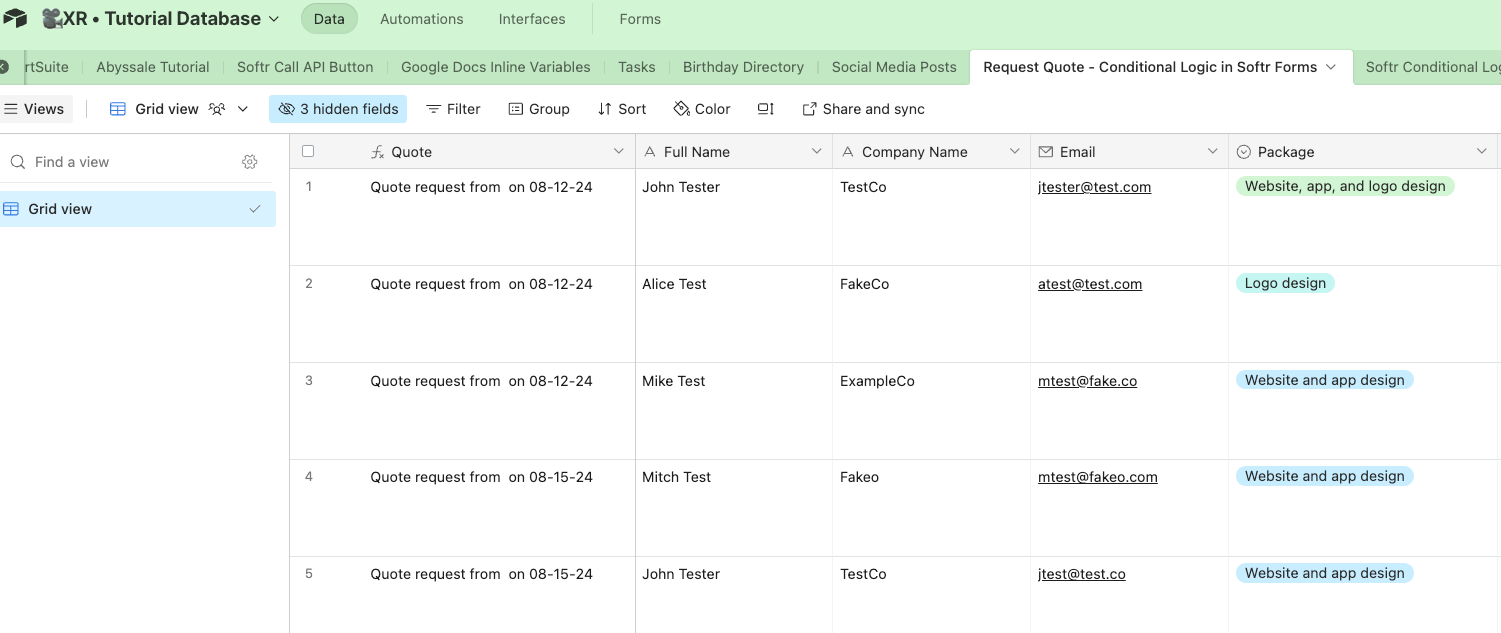
In our example, we’ll keep mine connected to my Airtable data source and choose a specific table that already has fields matching the questions we want to include in the form.
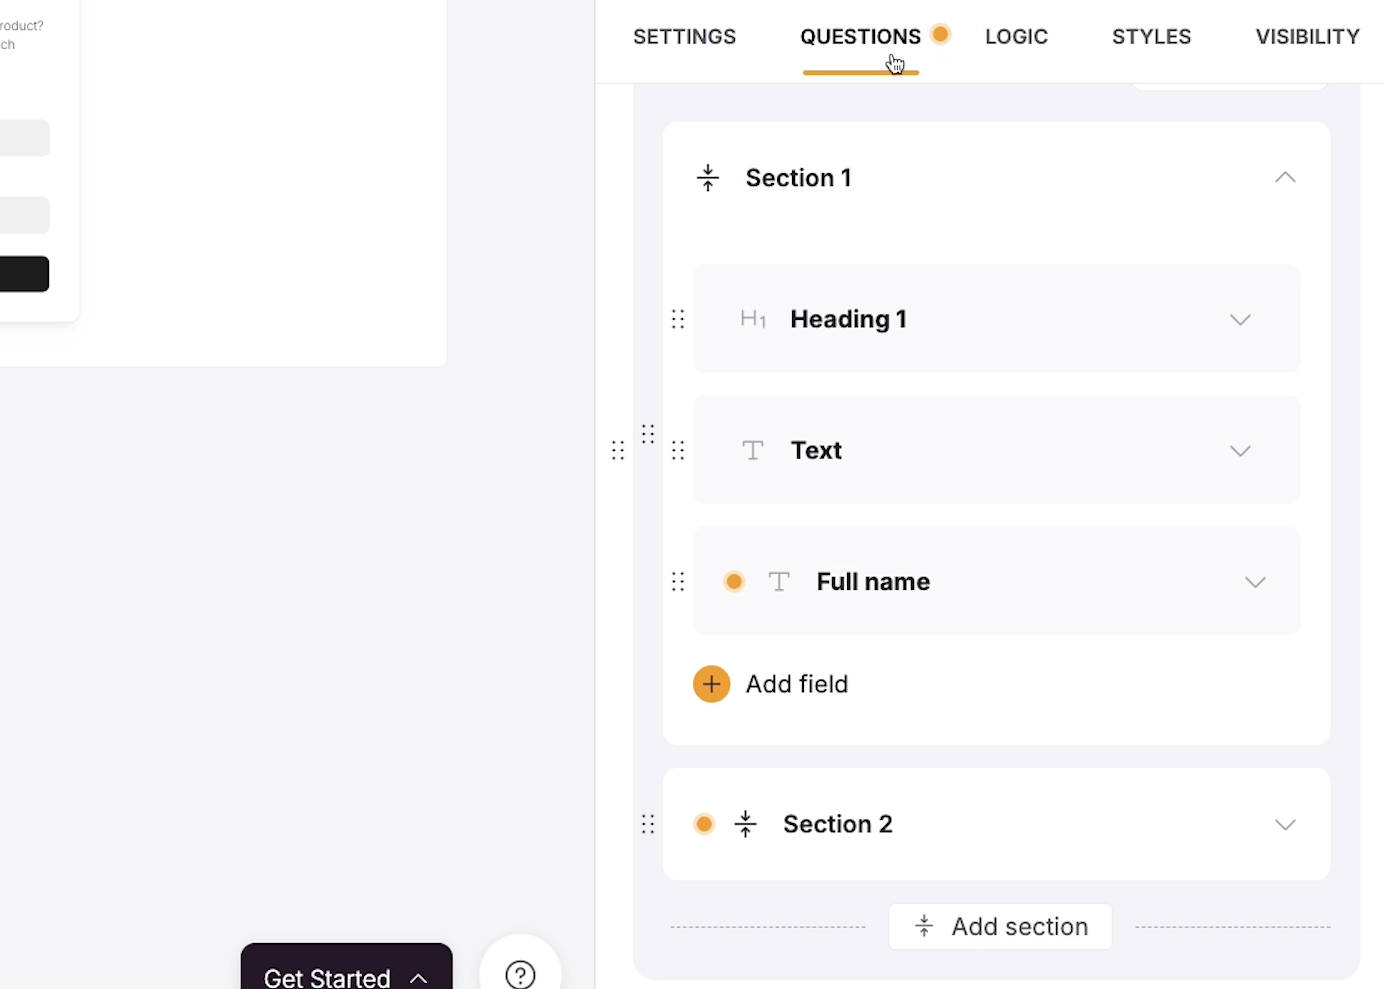
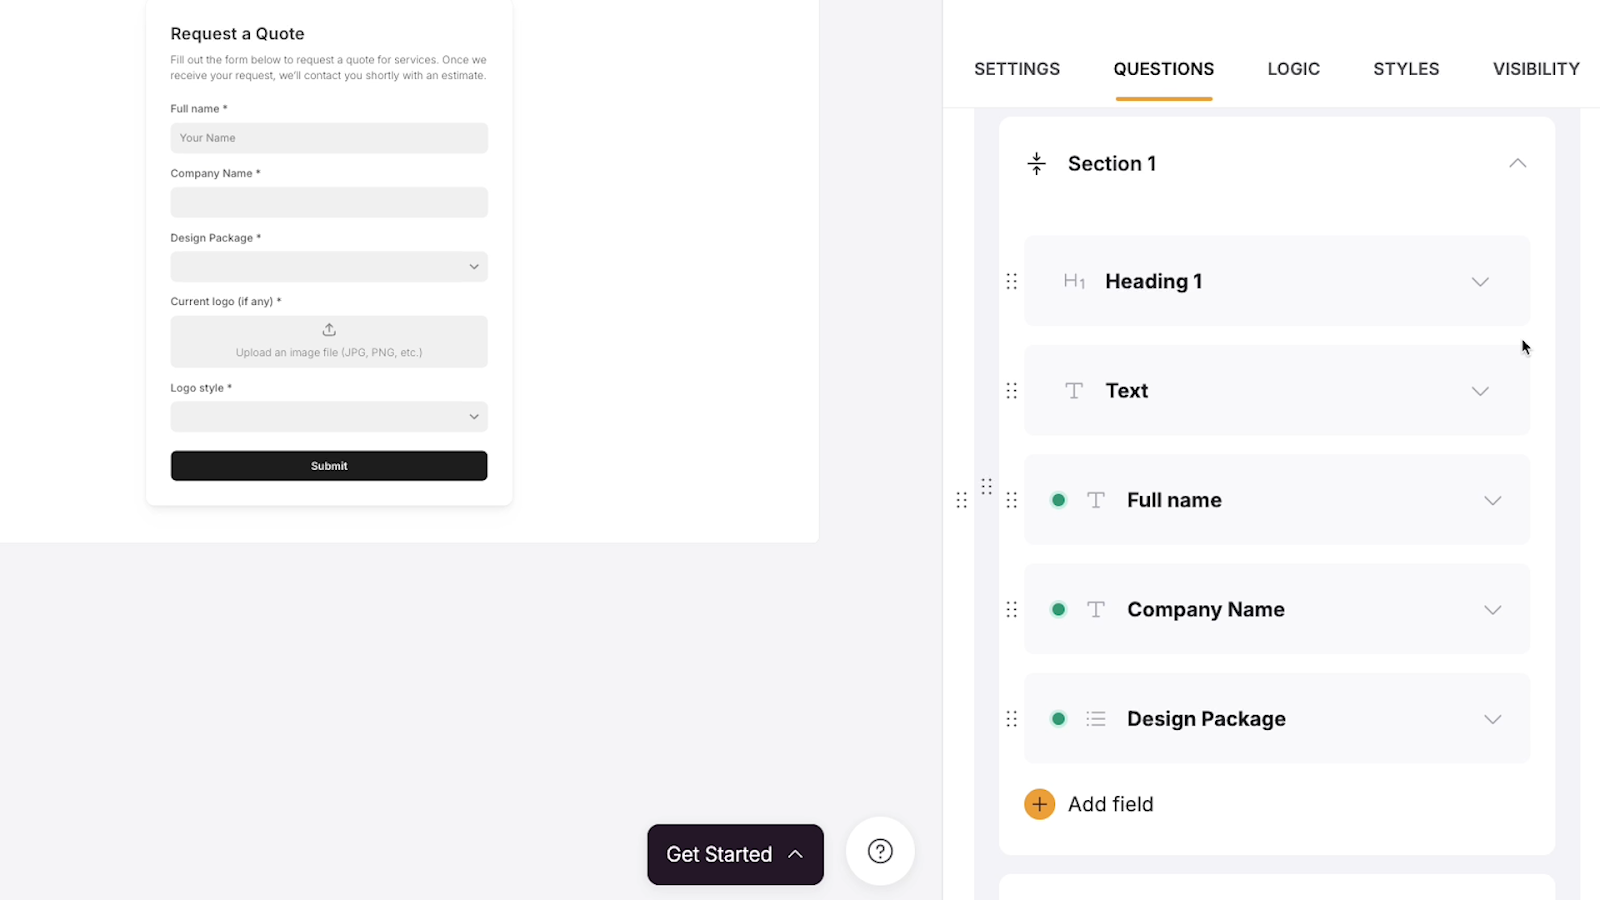
Under the “Questions” tab, you can configure the questions that you want to include in your form.
Sections in Softr forms
Note that the default questions generated by the conditional form block are split into two sections.
With conditional forms, you can hide or display entire sections based on user responses, but you can’t hide specific questions directly. You also cannot move questions from one section to another.
Keep these limitations in mind as you’re building your form. Anything you want to conditionally hide should be in a separate section from the main questions that will always be displayed.
Additionally, it should be separate from any other sections that will be displayed or hidden based on different conditions.
You can add more sections to your form by clicking on “Add section”.
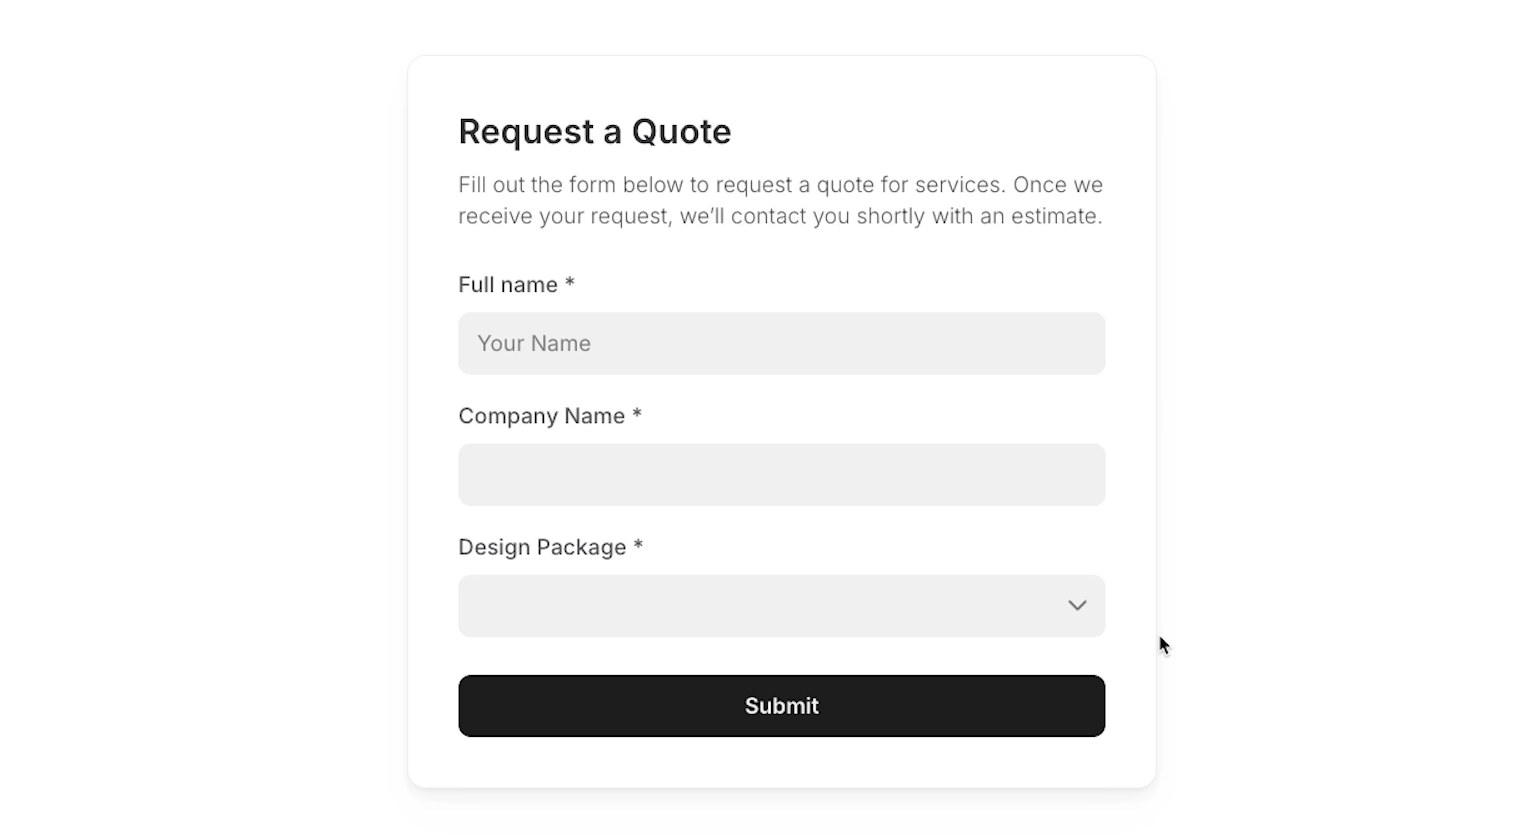
In the first section of our example form, we’ll add several questions to let users submit a request for a quote, and we’ll map each question to its corresponding Airtable field.
To follow along with this tutorial, you can use any questions you want; just make sure that you have at least one section with questions that every user will see, and at least one section that will only be displayed under certain conditions.
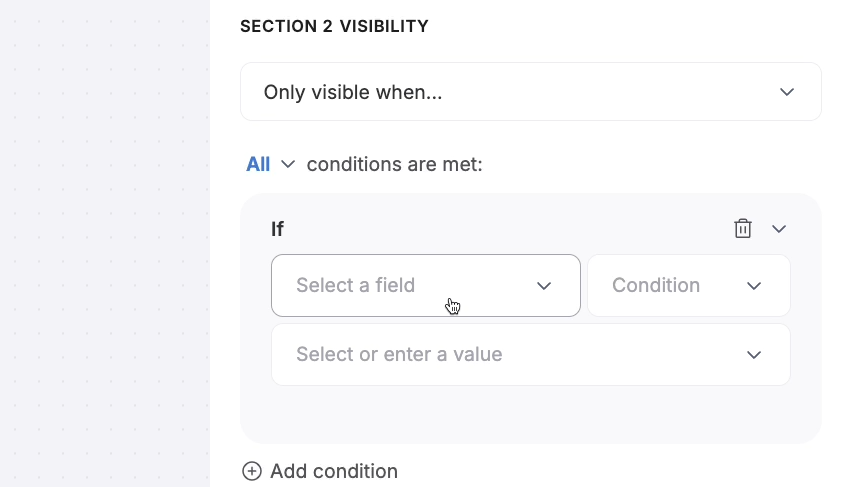
Conditionally hide or display sections in a Softr form
To set up conditional logic in your Softr form, click on the “Logic” tab.
Then, select the section you want to adjust visibility for.
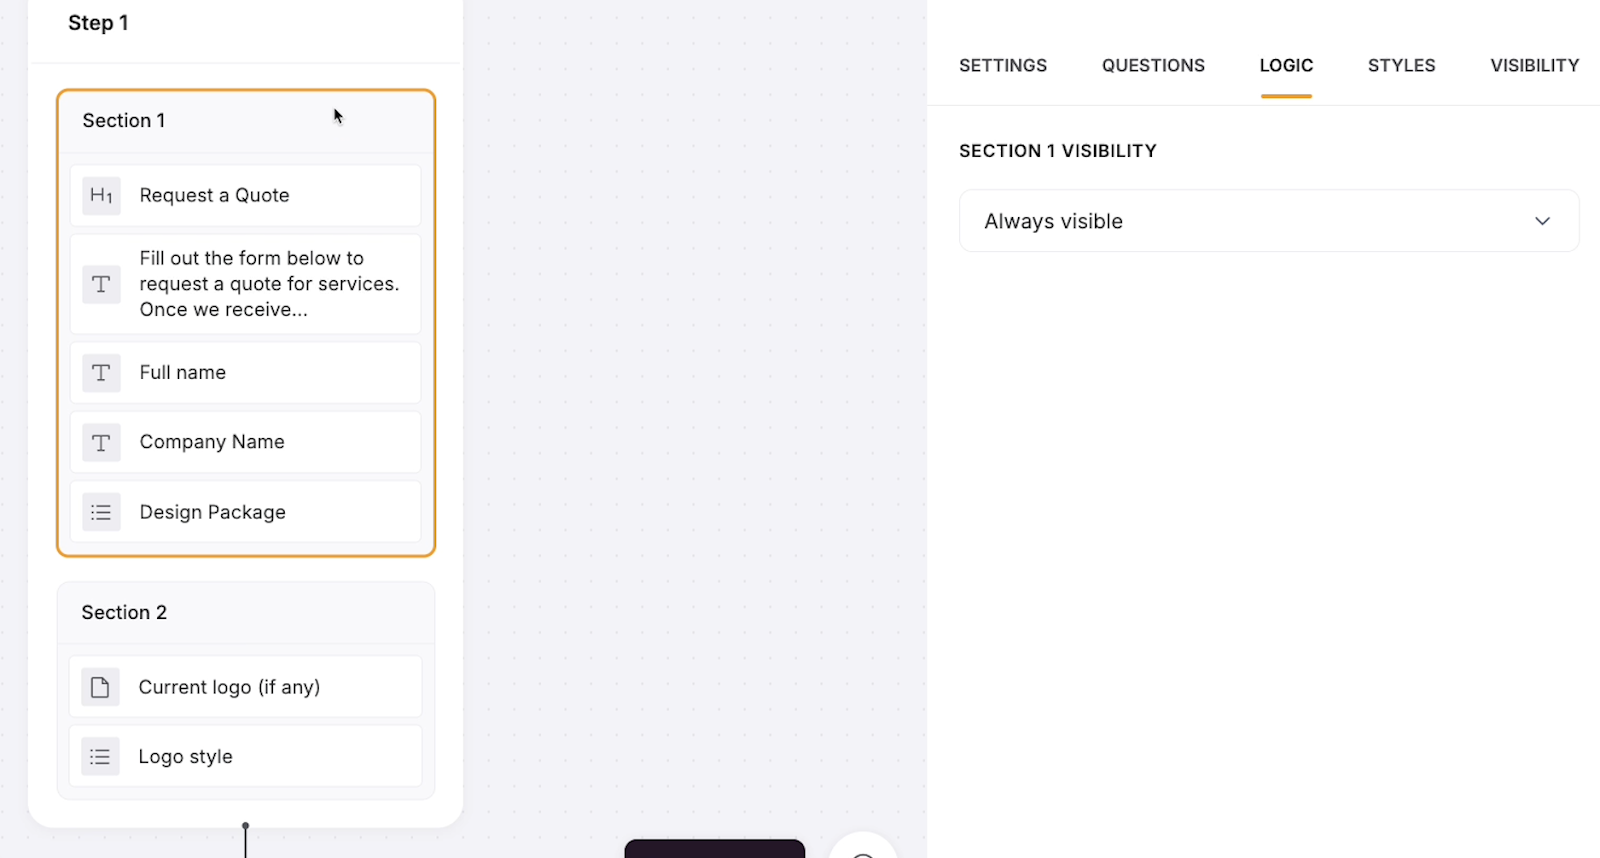
Our first section has general questions for anyone requesting a quote, so we’ll keep it set to “Always visible”.
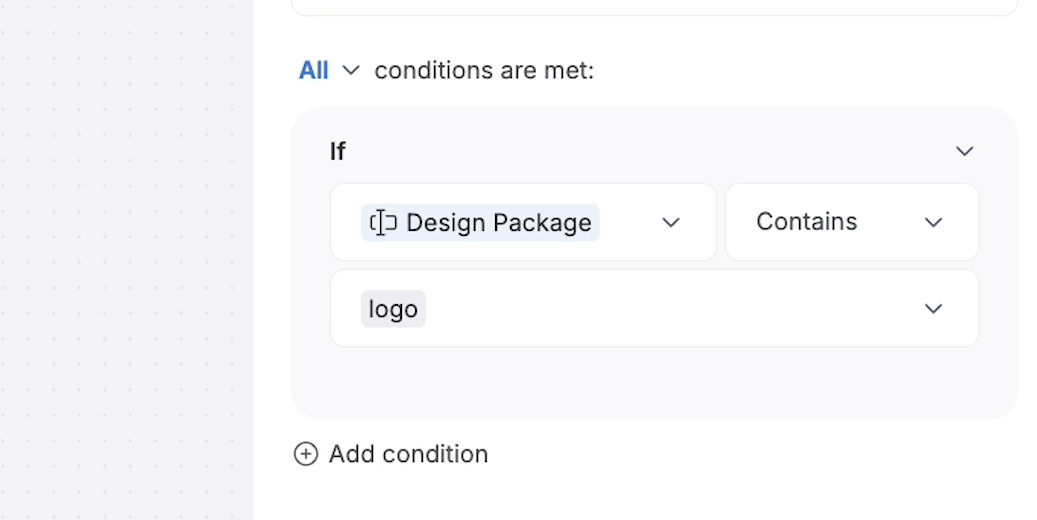
Our second section has a couple questions that only apply to users who select design packages with a logo, so let’s make sure it only shows up when the selected design package includes the word “logo”.
To make a section of a Softr form only appear under certain conditions, select “Only visible when…”
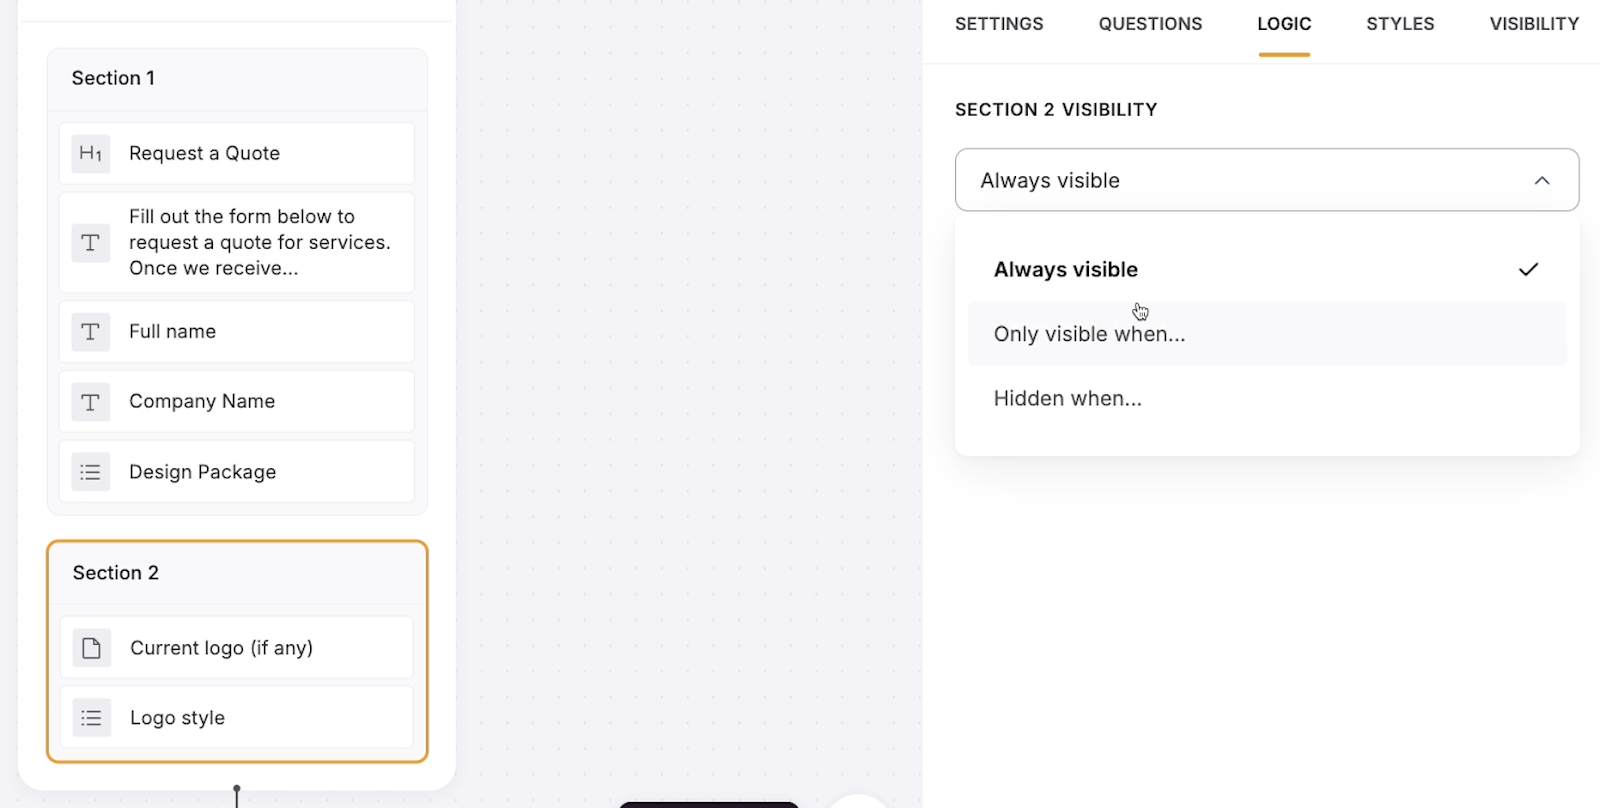
Then specify one or more conditions.
Setting a condition
When setting up conditional logic, you’ll be able to access all of the user’s responses so far in the form (“Form answer”), as well as any user attributes that are available in your data source (“Logged-in user”).
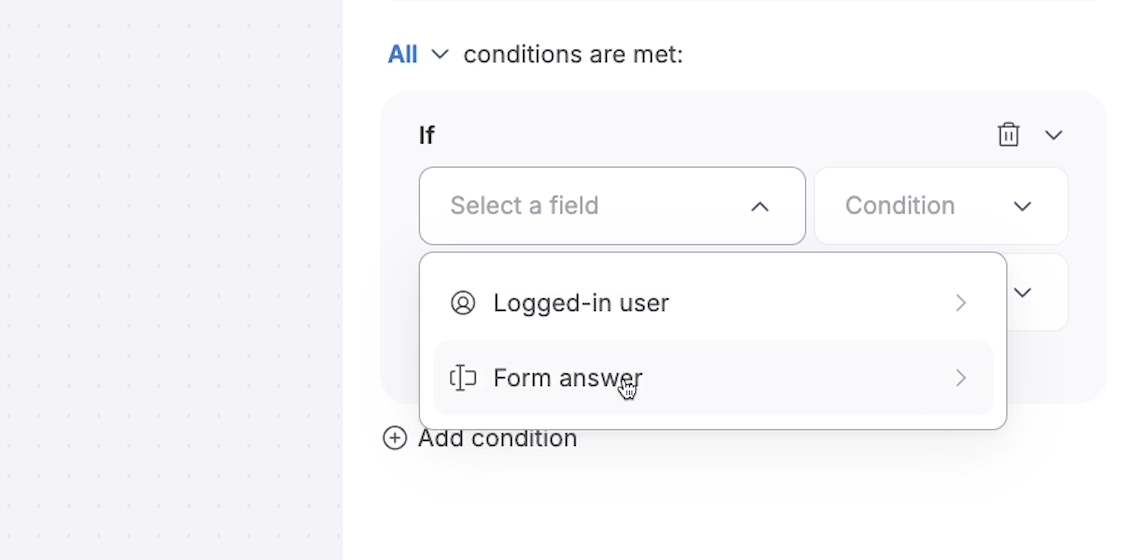
In our example, our condition will check the user response in the “Design package” field for answers that contain the word “logo”.
You can also add multiple conditions for the same section, and choose to display the section if ANY condition is met, or only if ALL are met.
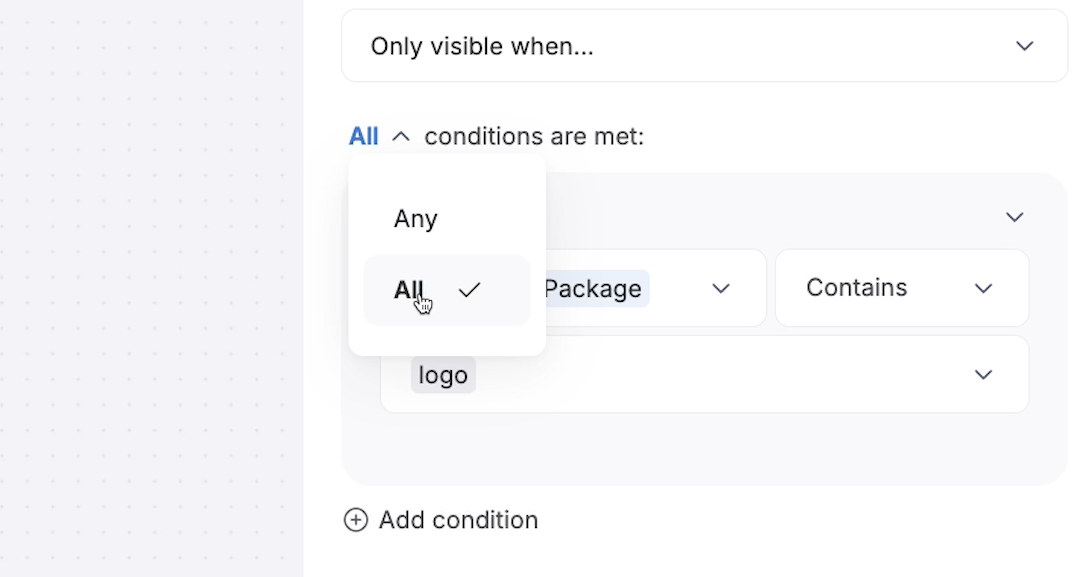
However, in our example, we’ll just stick with this one condition.
Testing your conditional form
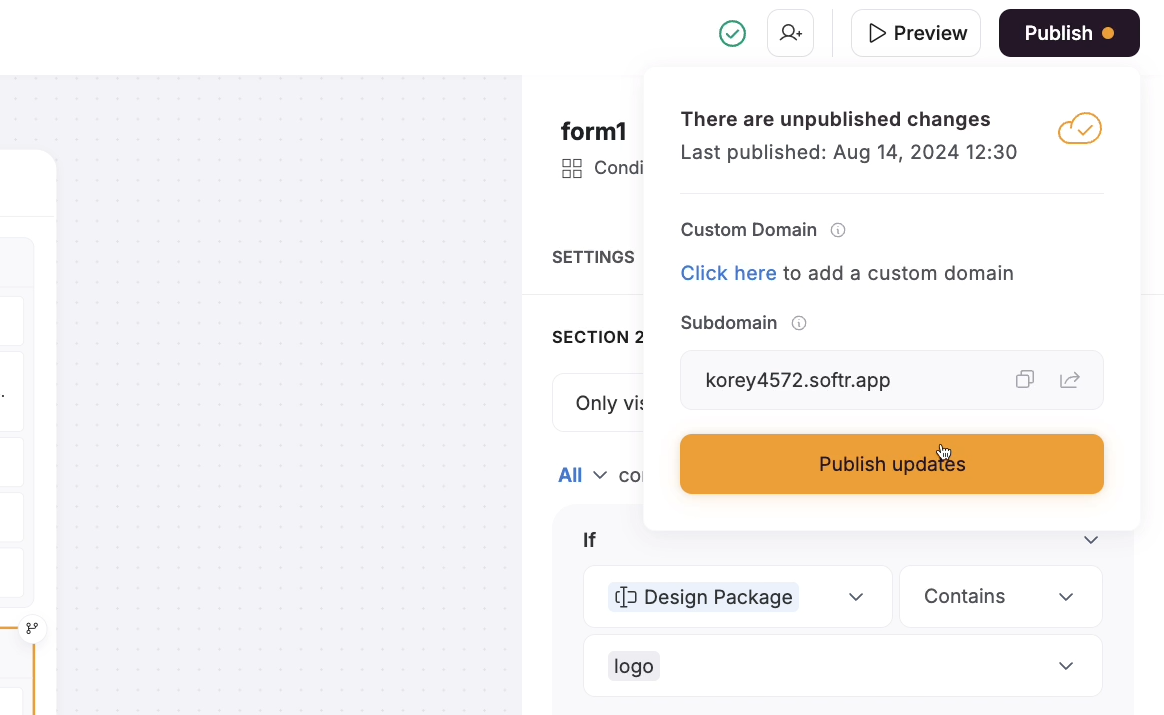
Once you’ve configured your conditional form logic, publish your site and open it in your browser to give it a test.
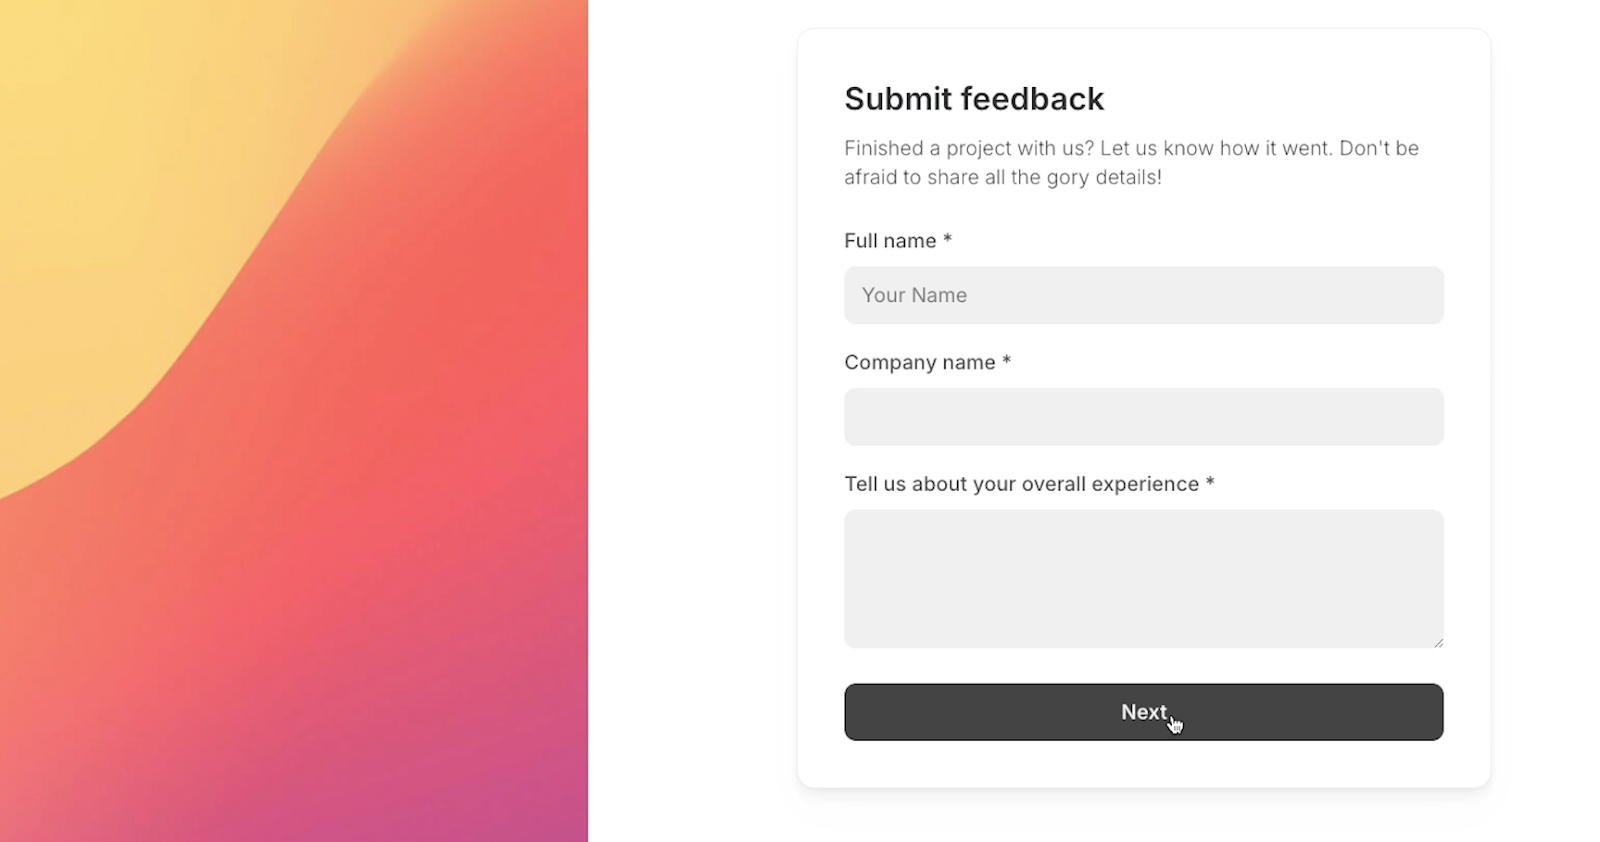
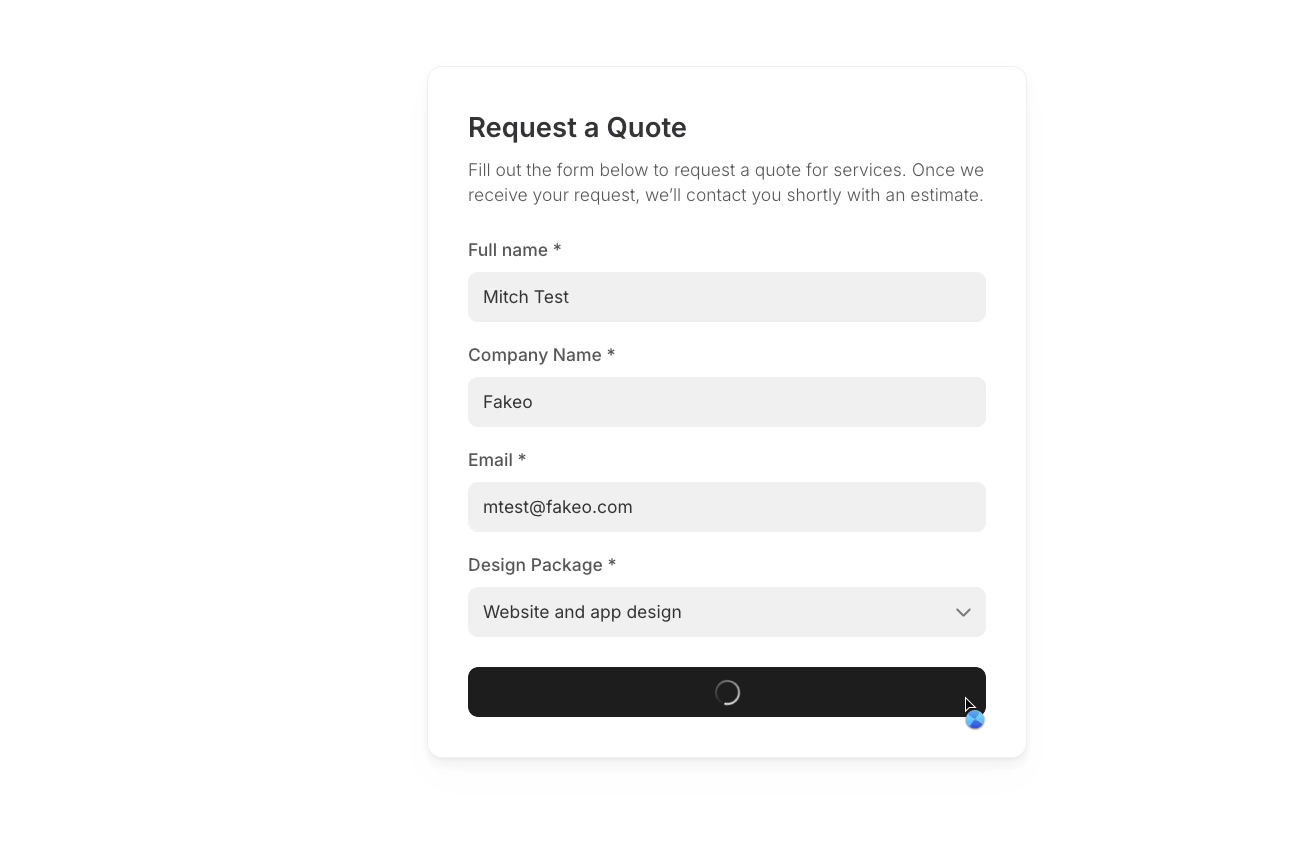
Below, you can see our published form. The logo questions are hidden to start with, which is a good sign – no package has been selected, so it shouldn’t be possible to pass the condition and show the questions yet.
When we select the “logo” package, the logo questions from section 2 instantly appear.

Finally, we’ll switch to a “website” package, and the questions are gone again. The logic is being applied correctly, so this form is all set.

Using conditional logic to skip to different steps in Softr forms
Now let’s take a look at another way to apply conditional logic to your Softr forms.
In addition to hiding or displaying separate sections, you can also split your form up into steps, and choose the sequence of steps based on user responses or attributes.
Let’s see it in action.
We have another form in this Softr app which is used to collect feedback from clients we’re already working with.

This first step of the form has questions for all clients, but we’ll add a step that will only be relevant for clients who had a website designed by our fictional design agency here.
To add a new step to your Softr form, select the “Questions” tab, click “Add a new step”. Follow along in your Softr app by creating a conditional form with at least 2 steps.
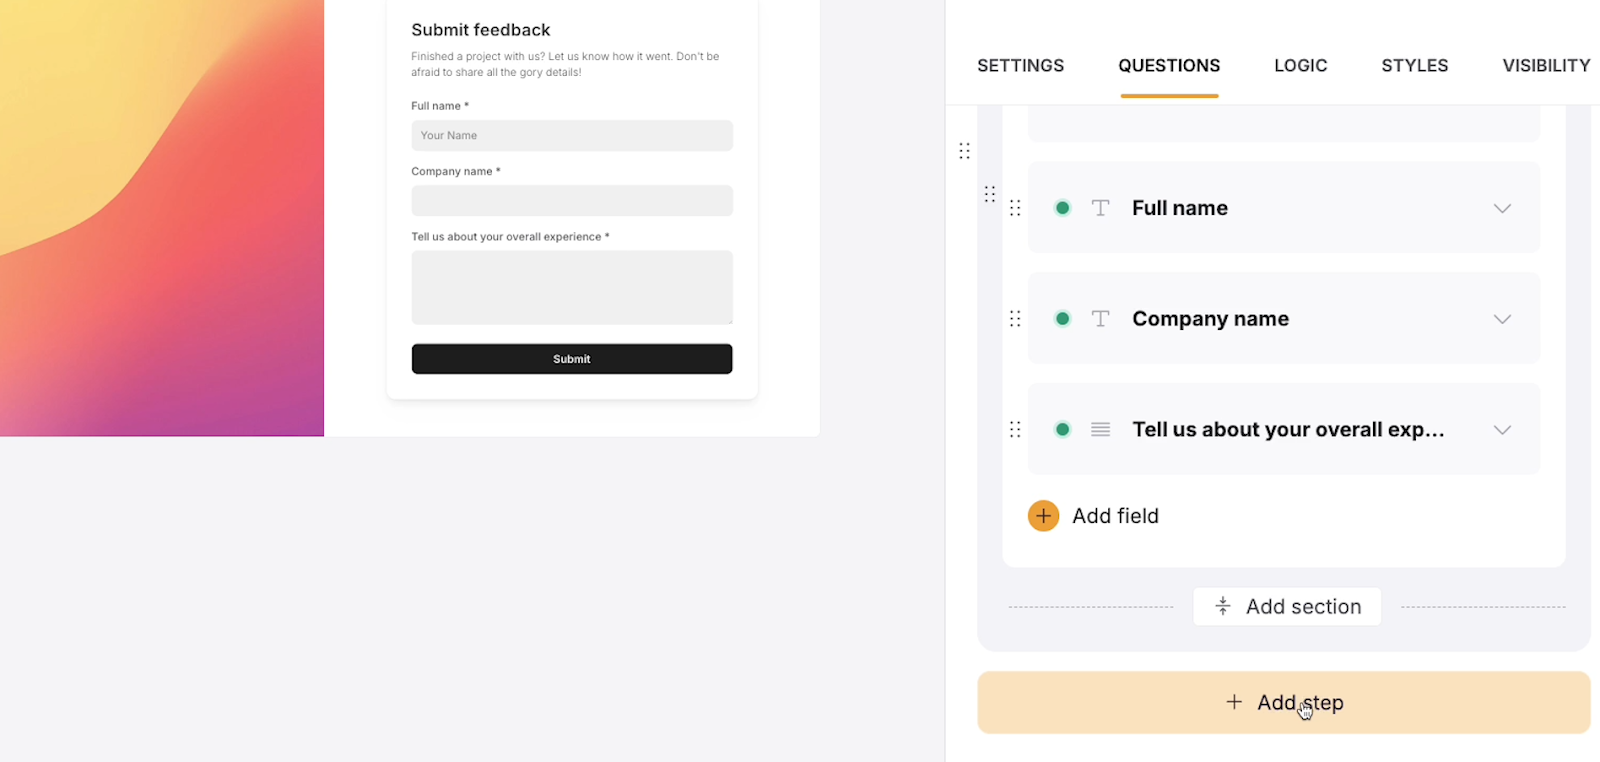
The second step that you add to your form can only be accessed after the user clicks “Next” on the first step of the form.
In our example, we’ll add several questions to the second step that are specific to users who had a website designed for them.

Once you’ve got all the questions you want in your second step, click on the “Logic” tab.
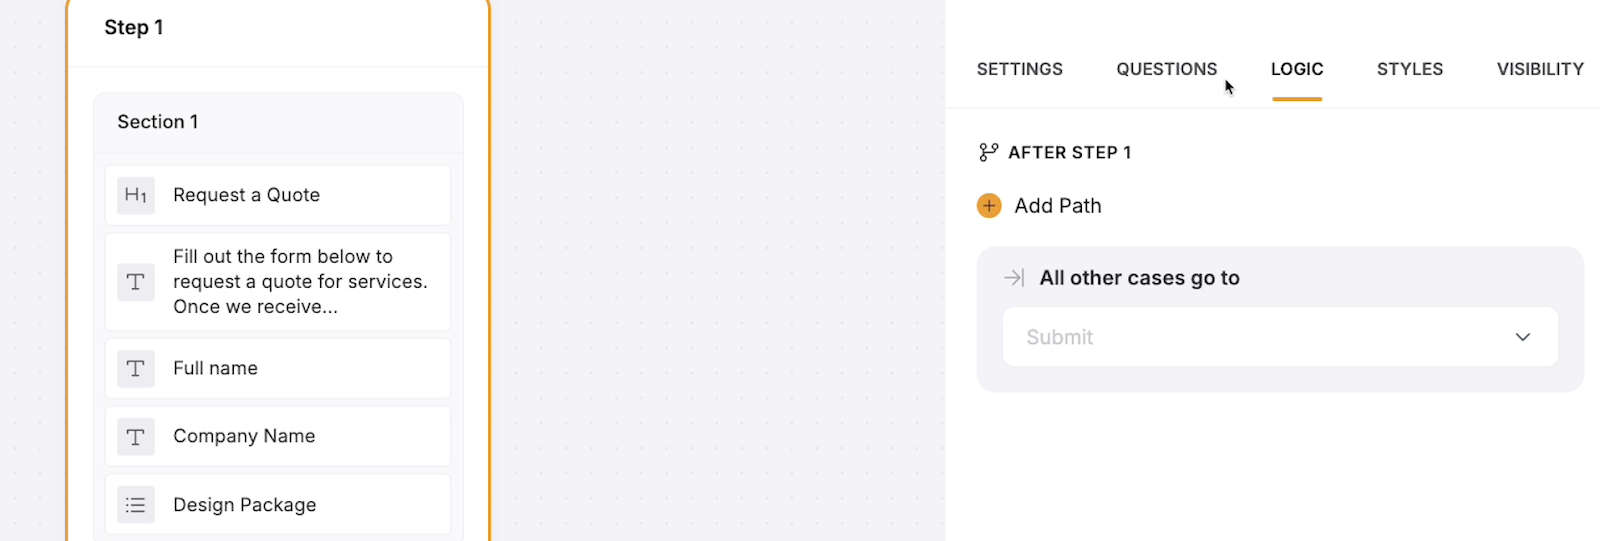
Click on a step in the flowchart-like area on the left to see what happens after it’s completed.
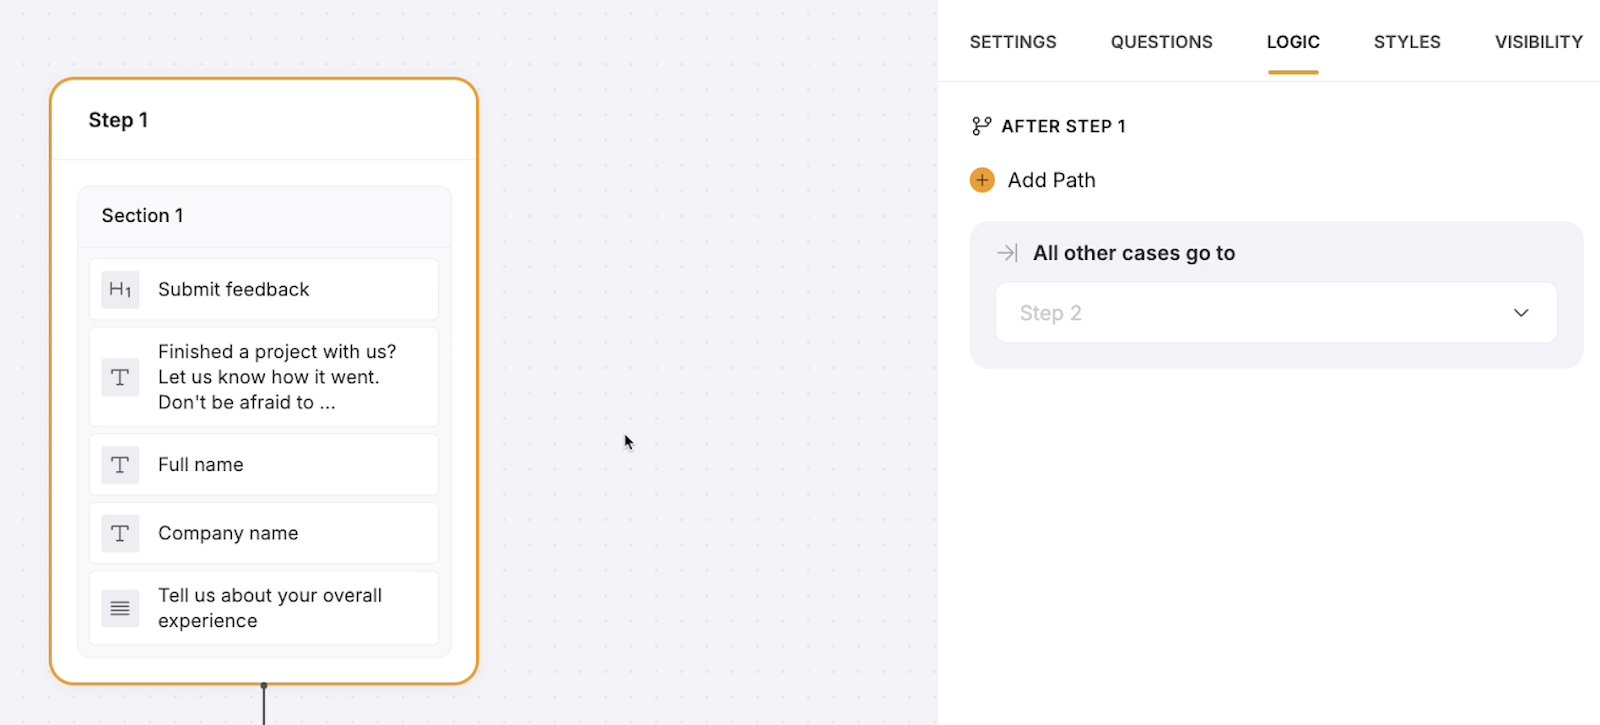
By default, the steps in a form are arranged in a simple, linear process. After Step 1, the form will go to Step 2, and so on. After completing the final step (in our example, Step 2) users can submit the form.
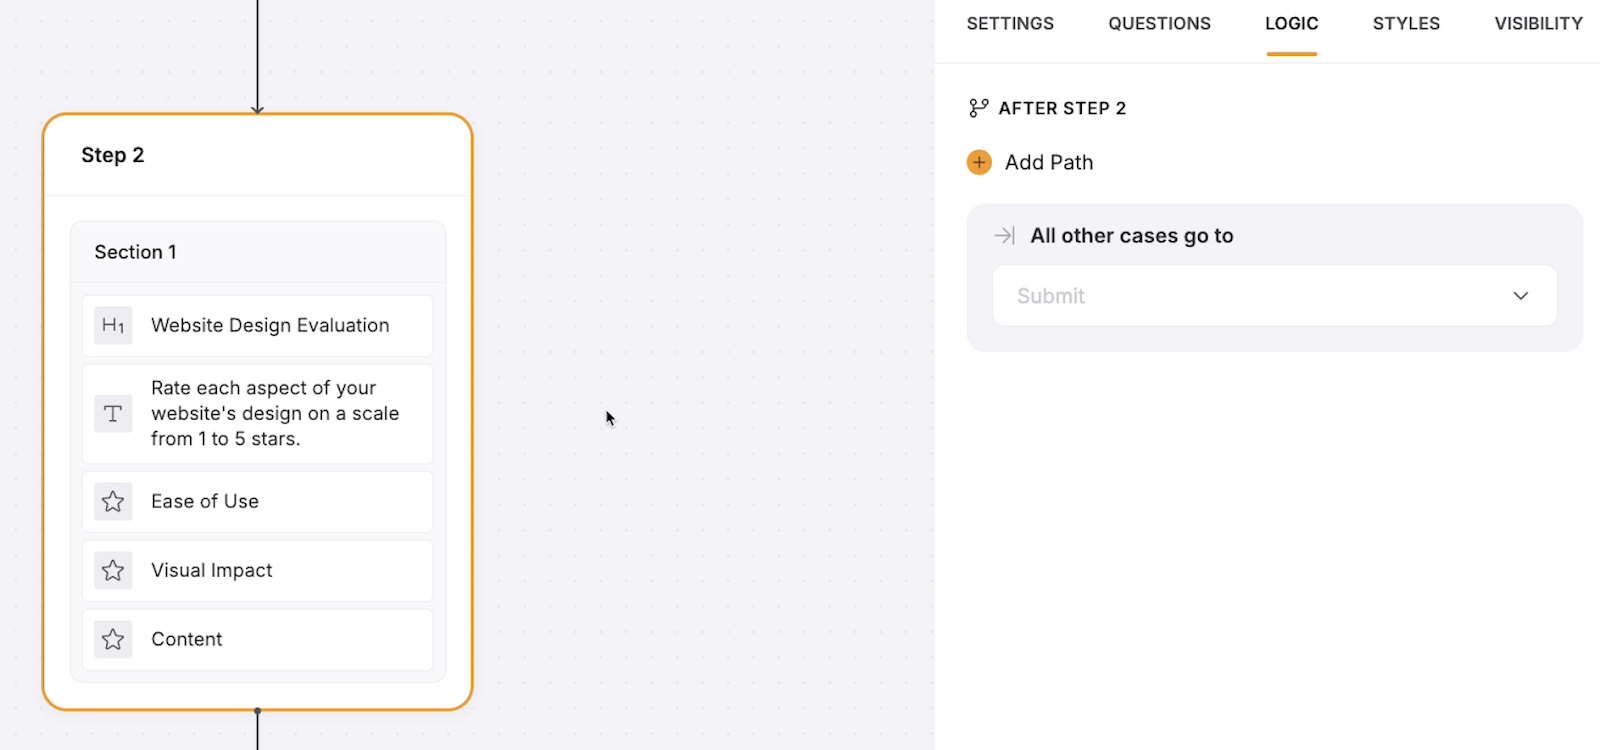
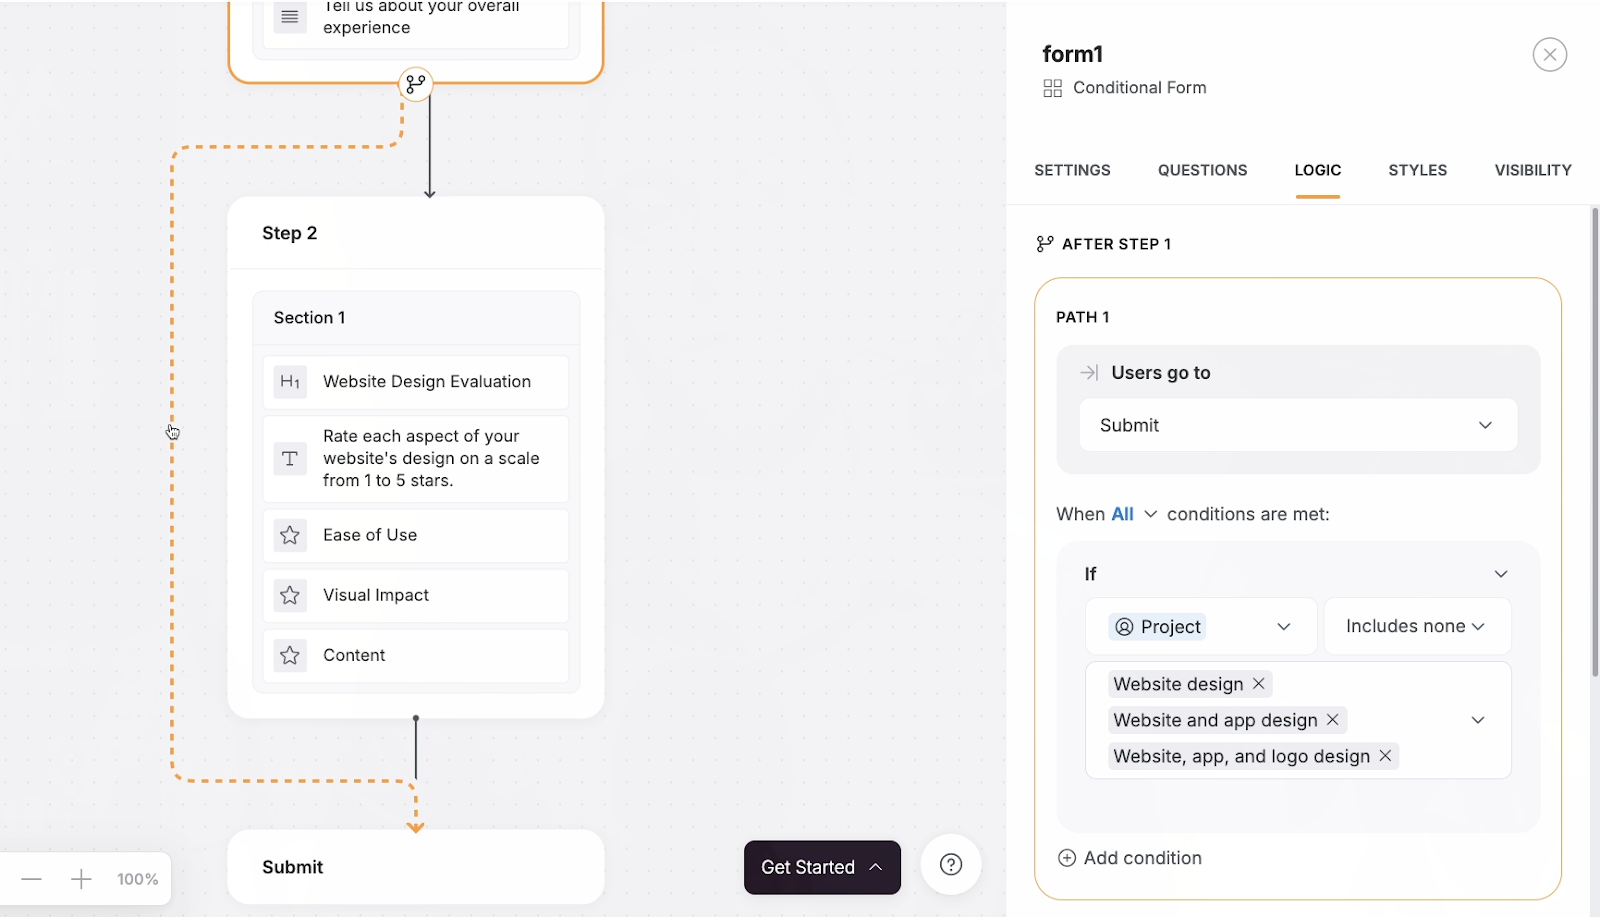
If you’d like to set up alternate paths that skip certain steps, select a step and click on “Add path”. This will add an alternate path that users can follow after completing the selected step.
Under “users go to”, you can select where users will go next if they meet your specified condition.
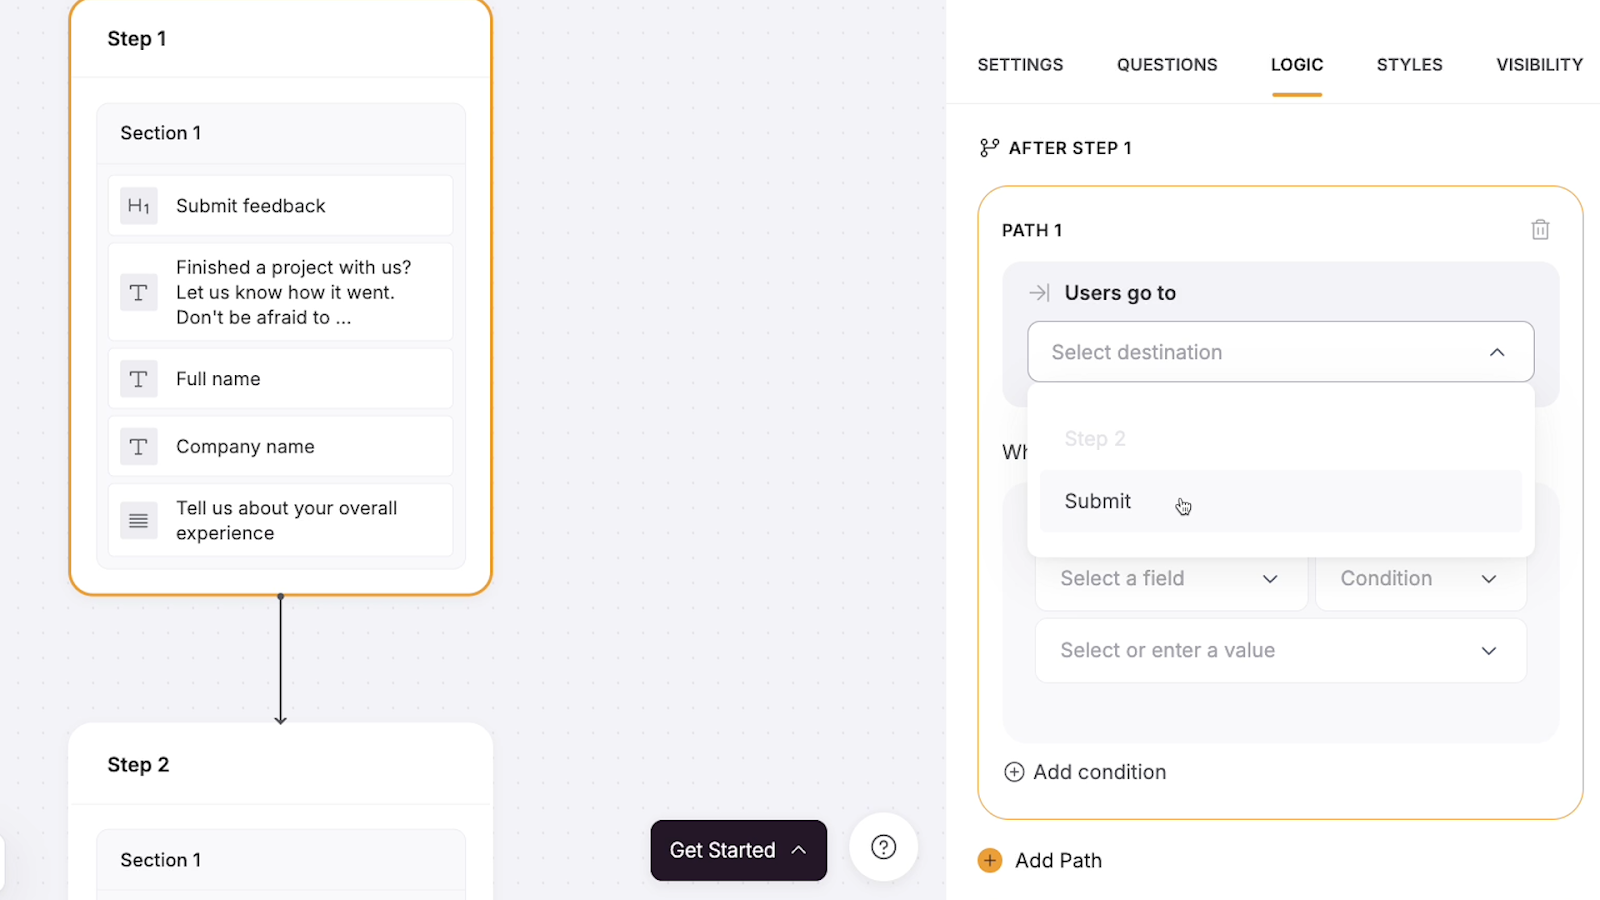
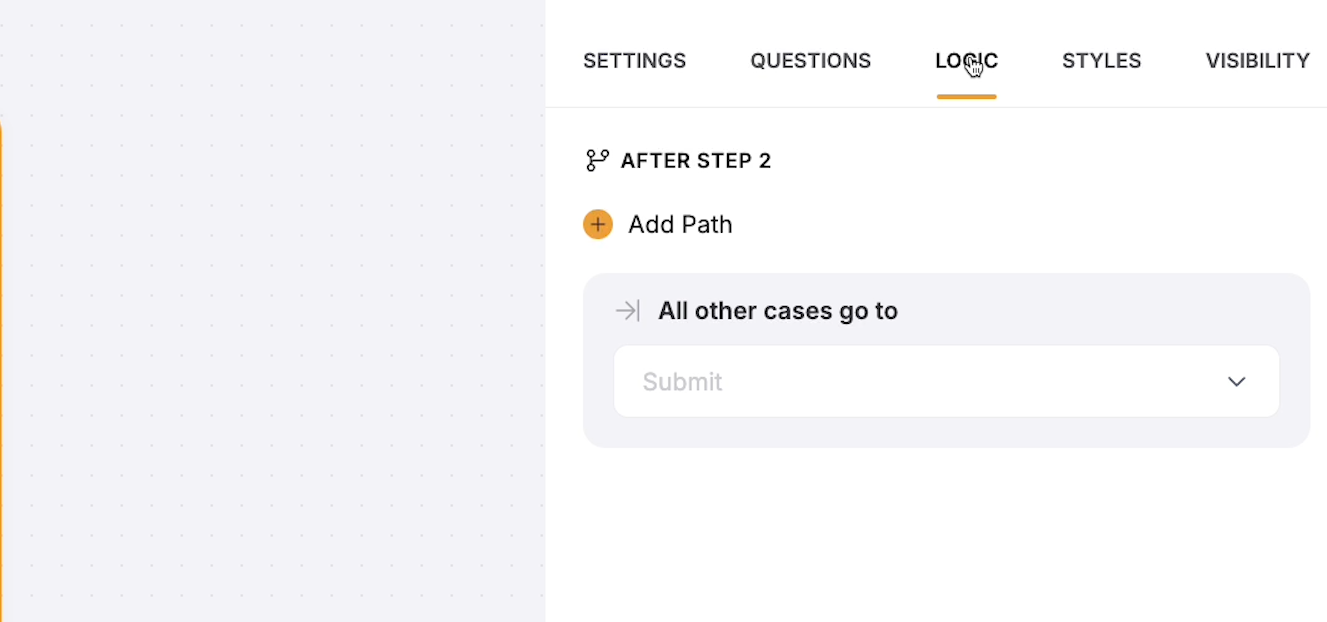
In our example, we’ll select “Submit”, so this path will lead users directly from Step 1 to the “Submit” button, skipping Step 2. You can configure the condition for your path however you want.
This time, instead of using a user response in the condition, we’ll use a user attribute instead.
Our condition will be:
If the logged-in user’s “Project” field includes none of [three packages with the word ‘website’].
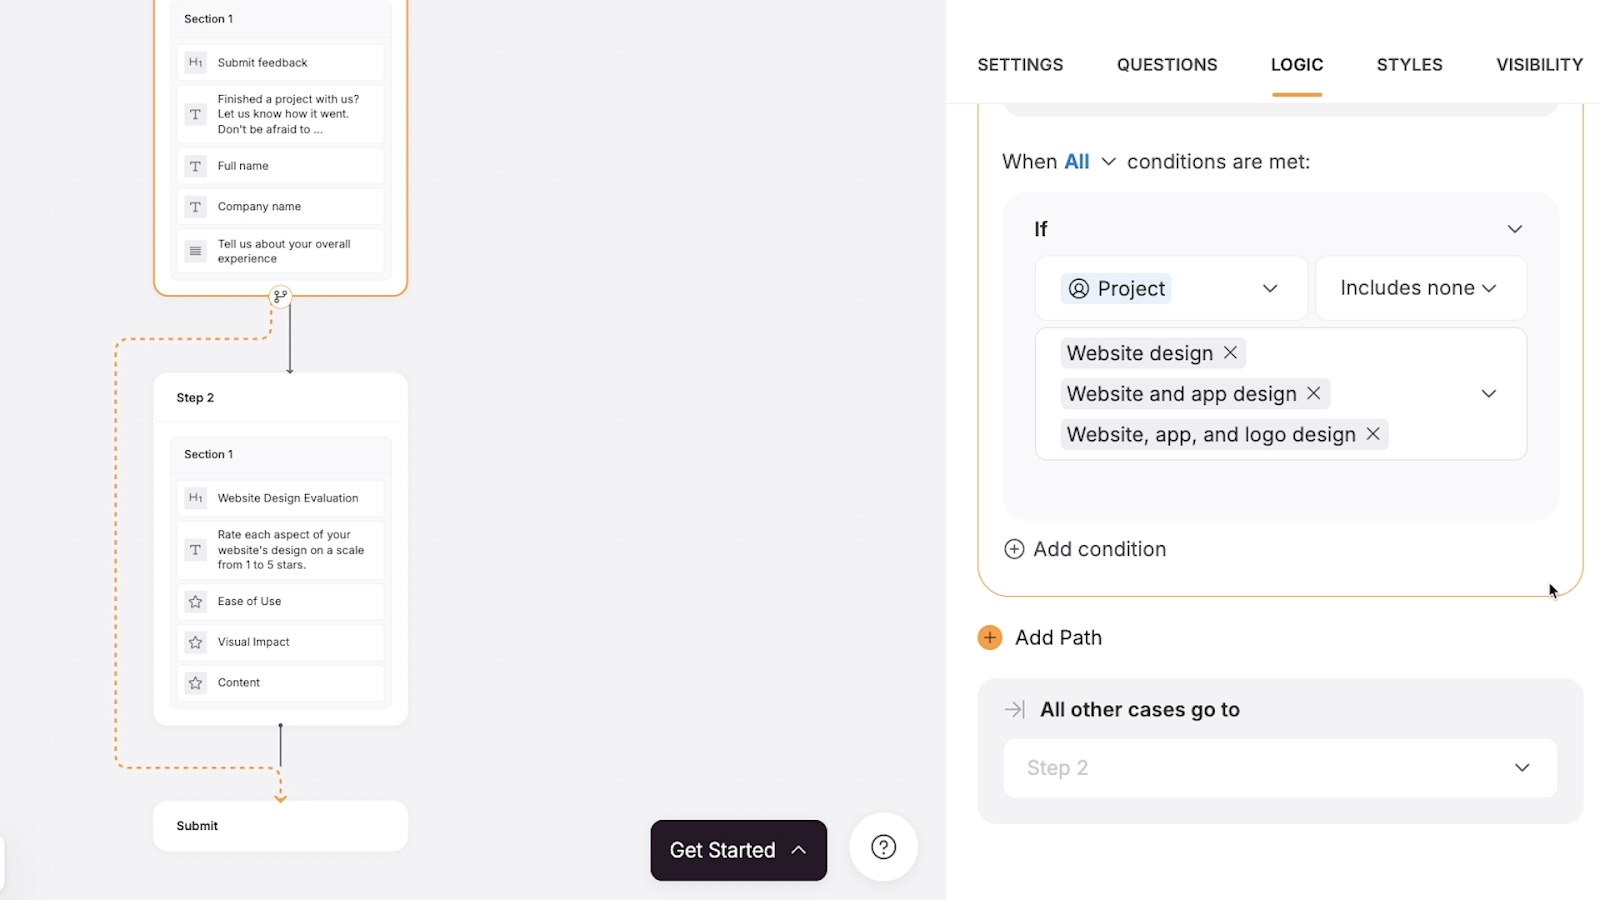
So if users aren’t associated with a website design package in our data source, they won’t see the step that includes questions about their website design experience.
Under “All other cases go to”, you can see and determine what will happen for any users who don’t meet this condition. In our example, they’ll just continue on to step 2.
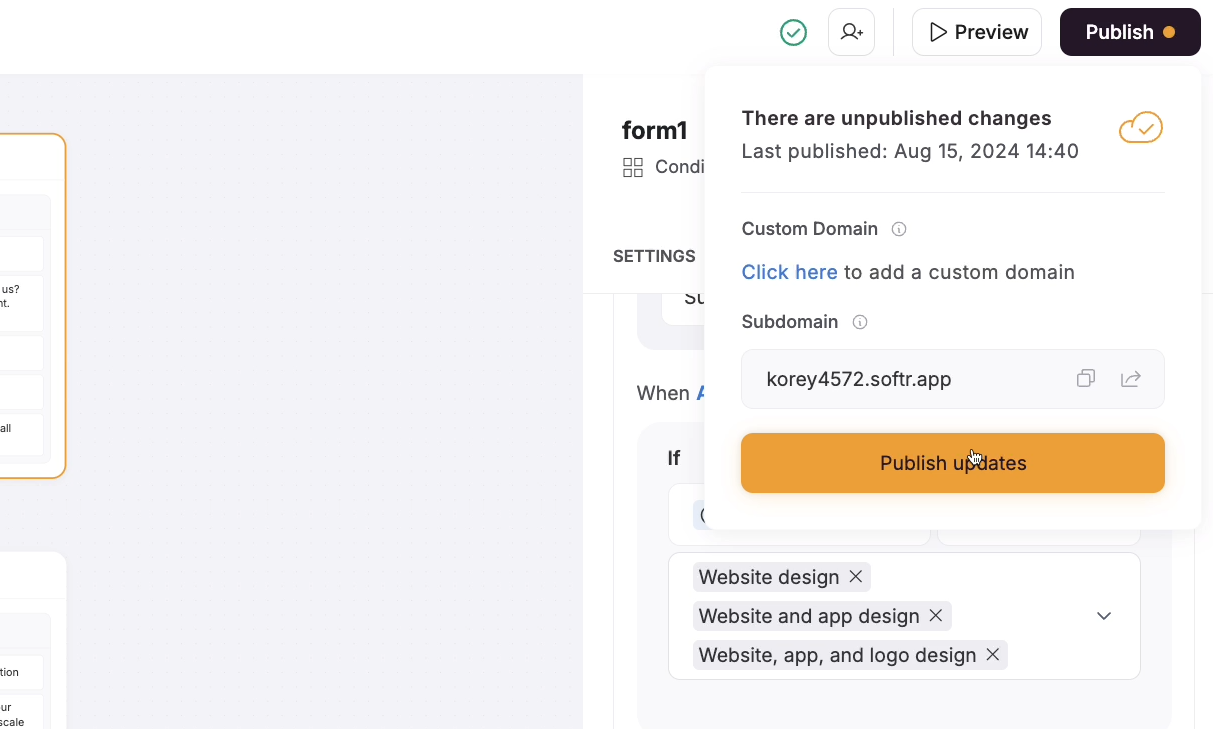
Once you’ve configured your steps and paths, publish your site and test both possible paths.
First, we’ll log in as a user who purchased a website package. We can immediately see that there's a “next” button instead of a “submit” button
When we click the “Next” button, we can see Step 2 with its questions pertaining to website design.
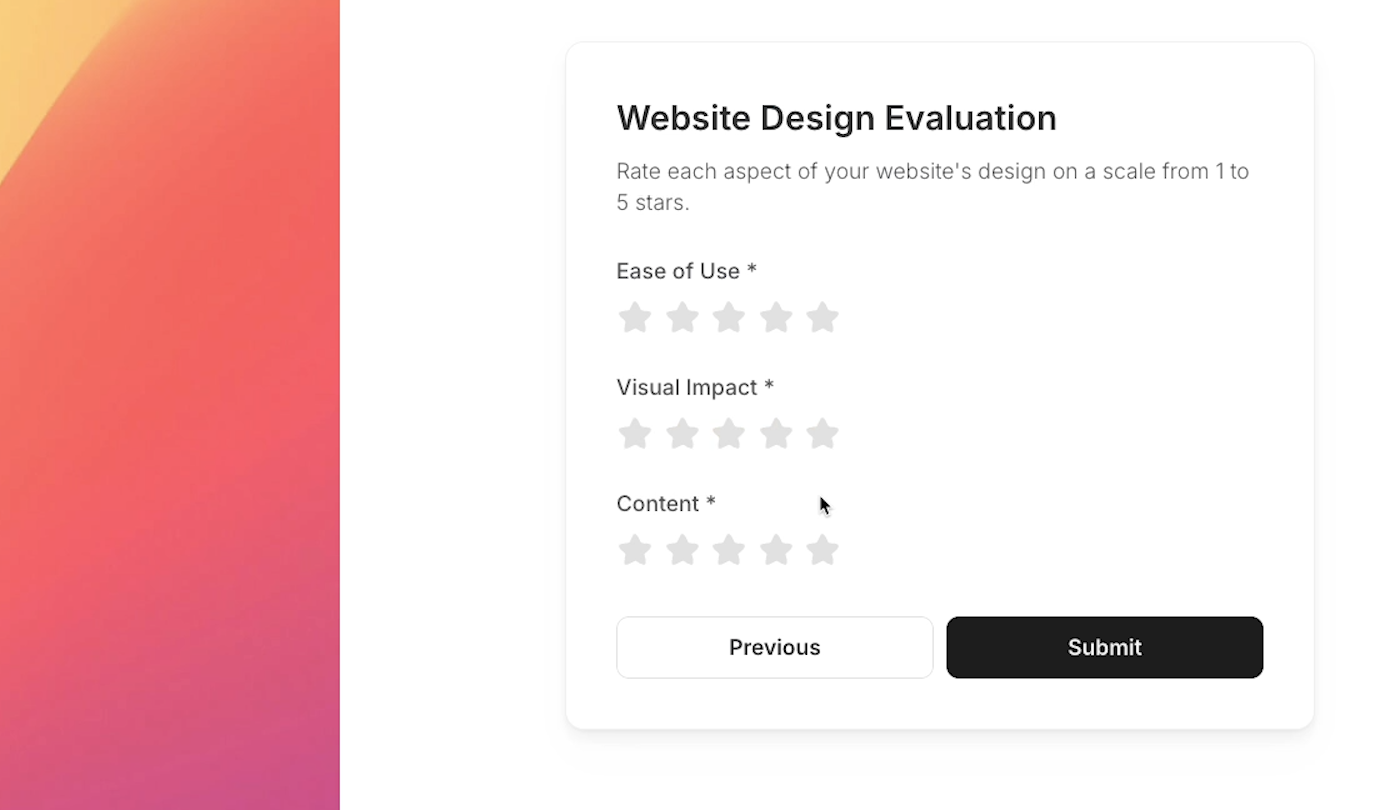
Great! Softr’s conditional logic identified that the user’s “Project” field included a website package, and showed Step 2 accordingly.
We’ll finish the test by signing in as a user that didn’t order a website design package. The submit button remains as-is.
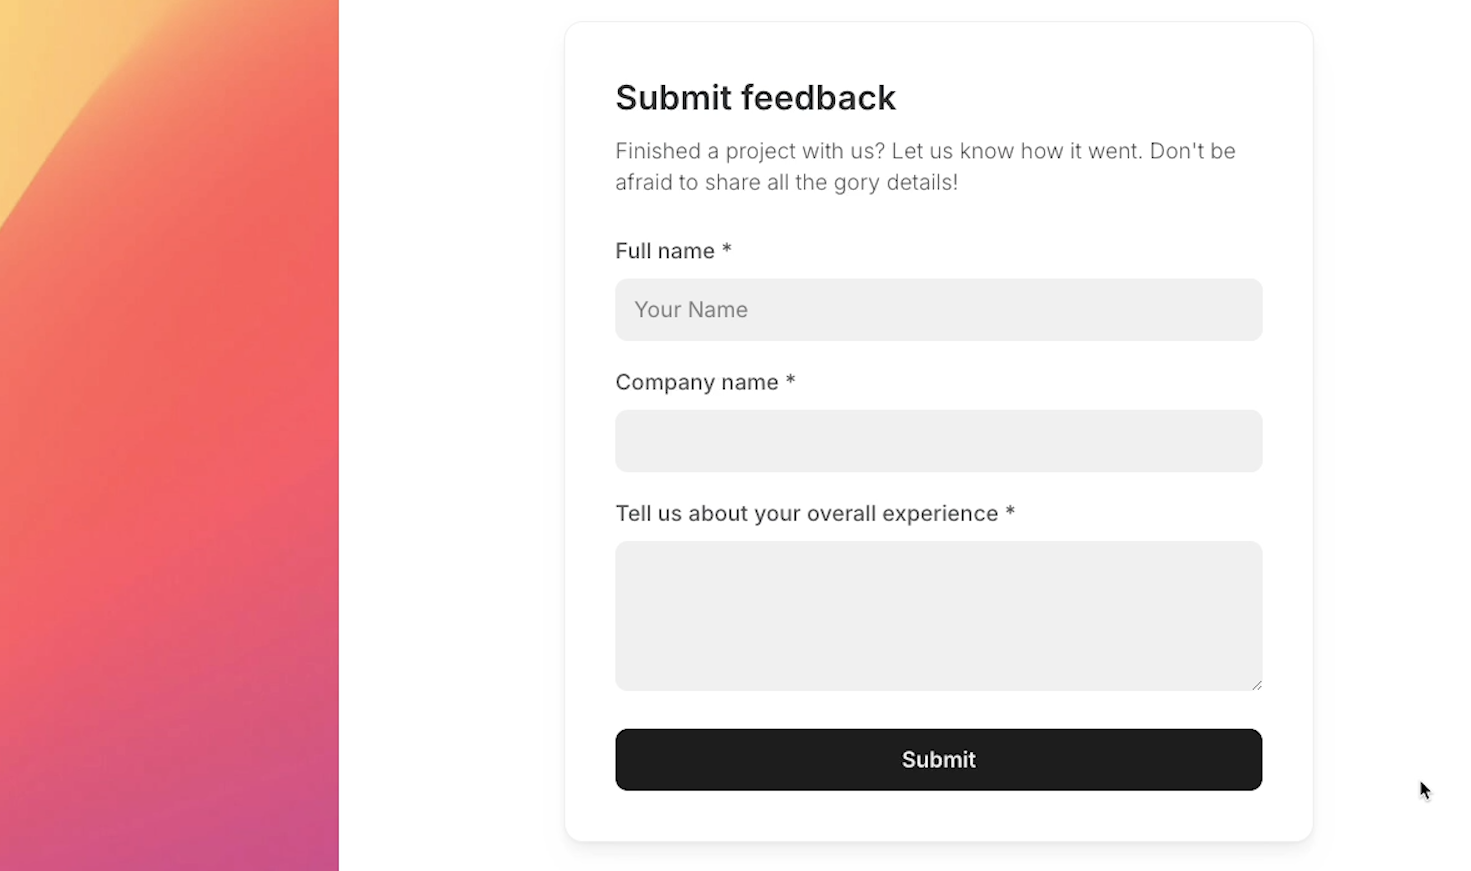
And when we fill out and submit the form, Step 2 never appears.
Perfect! All the conditional logic is working exactly as intended.
General tips for using conditional forms in Softr
You’re now all set to start using conditional form blocks in Softr.
However, before we wrap up this guide, there are just a few more quick tips we want to share so you can get the most out of forms.
Use “magic links” to quickly switch between user profiles in your Softr app
First, if you’re testing conditional logic based on user attributes, you may want to use magic links to quickly sign in with different test profiles.
Here’s how it works.
Go to the “Users” menu in your Softr app, and add a test user manually if you don’t already have one.

You can also add test users directly to your data source.
Then, in the “Users” menu, just click on the “Copy link” icon to copy a ‘magic’ link that will let you instantly sign as that test user.

This can be a very convenient way to switch back and forth between different test profiles while you’re setting up stuff like conditional forms.
How conditional forms interact with required fields
Next, let’s quickly go over how required fields interact with conditional logic.
The short answer is that they work just fine together.
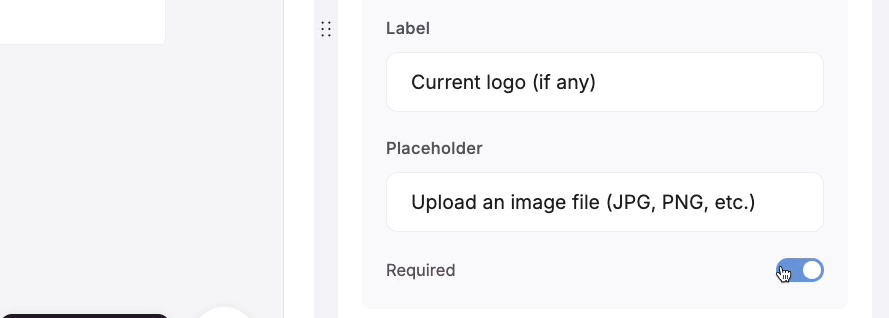
If you set a field to “required”, but it’s hidden by your conditional logic settings, users will still be able to submit the form without any problem.
They won’t need to provide an answer for the hidden required field.
So go ahead and set any questions to “required” if you want to; it shouldn’t cause any problems with your conditional logic.
Form layout and other settings
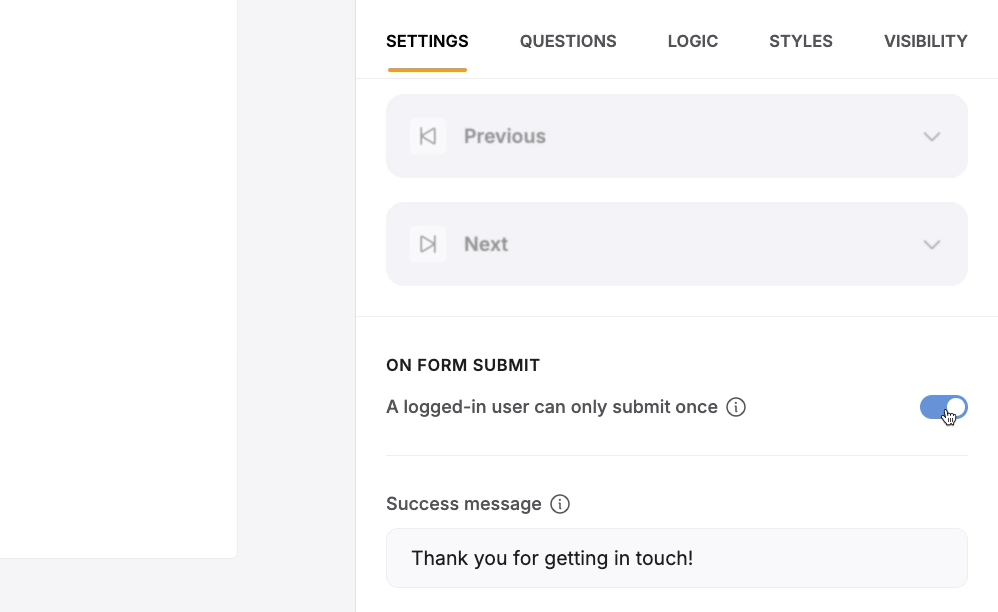
Finally, if you want to change the layout and styling of your form, you can find those options under the “Settings” tab.
They’re at the bottom of the section.

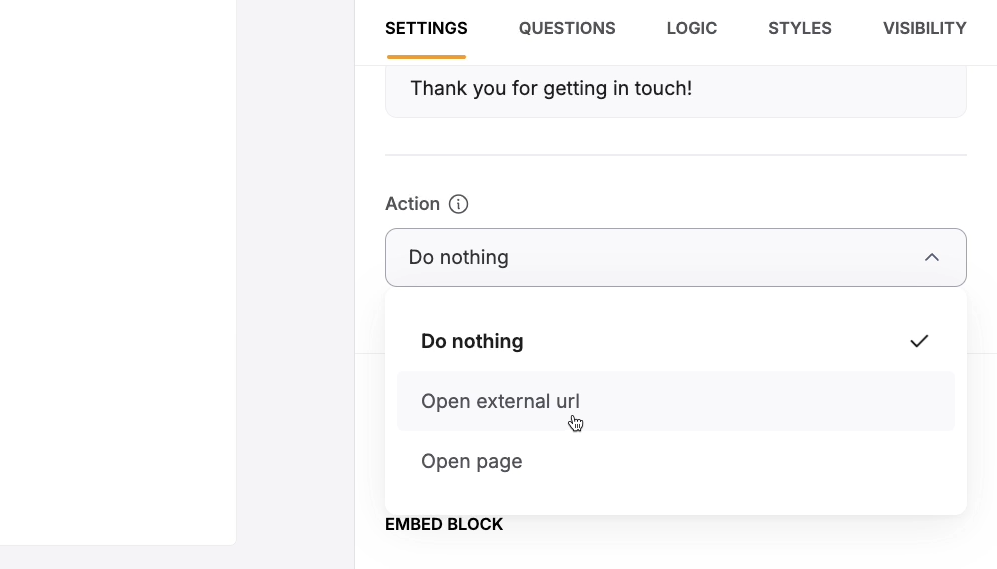
In the same place, you can also choose to prevent logged-in users from submitting the form multiple times, and set an action to run after someone completes the form.
For instance, you could redirect users to an external URL or another page in your Softr app.
Add flexibility to your forms with conditional logic
Conditional logic lets you create more versatile forms that accommodate a wide variety of use cases and user types.
Making a form with conditional logic in Softr is easy, so try adding one to your Softr app today.
If you’d like to learn more about Softr, Airtable, and other low-code tools like Zapier and Make, be sure to check out the other posts on our blog or our YouTube channel. You can also follow XRay on Twitter, Facebook, or LinkedIn.
Are you and your team spending too much time on repetitive tasks? Are you tired of catching silly mistakes after it’s too late?
There's a better way, and it's easier than you might think.
With workflow automation, you can automate your team’s tedious tasks and make sure that critical work is done the right way every time – and you don’t even need to write a single line of code to do it.
In this post, we’re going to show you how to dive into the world of automation with one of the most capable and affordable solutions out there.
Read on to learn how to use Make, formerly known as Integromat.
What’s in this guide
We’ll begin by briefly explaining what Make is and how it works, and we’ll show you how to build your first automated scenario.
There are three key skills you’ll get from following along with this basic tutorial. You’ll learn how to:
• Connect apps together in Make to sync and transfer data.
• Transform and format data with functions.
• Control the flow of your automations with filters and conditional logic
To demonstrate all of these skills, we’ll use the following apps:
• Slack
• And of course, Make
To follow along, you can create free accounts for all of these apps – Make included.
Before getting started, you’ll want to make sure you have some Calendar events and a Google sheet that you can use to play around with, as well as a Slack channel to send messages to.
Whenever possible, it’s best to build your automations and run tests with dedicated testing files, channels, folders, or other material.
After completing the tutorial in this guide, you'll be ready to build your first automated workflow to start saving time and reducing errors in your daily tasks.
Let's get started and see how Make can improve the way you work!
What is Workflow automation, and what is Make?
Before you start building in Make, we want to give you a brief overview of what Make is, and what you can do with it.
Make, formerly known as Integromat, is a no-code automation provider.
It lets you accomplish tasks in your web apps automatically without needing to write any code at all, leaving you with more time to think and less time mindlessly clicking on buttons.
There are several apps out there designed for workflow automation, like Make’s main competitor Zapier, but this guide will be focused primarily on Make.
Compare automation providers like Make and Zapier on XRay.Tools
If you’d like to compare which tools can be automated on both providers, you can just do a quick search for your apps on XRay.Tools.
That will show you every trigger, action, and search available for your apps in Zapier and Make, among other options.
How automation works in Make
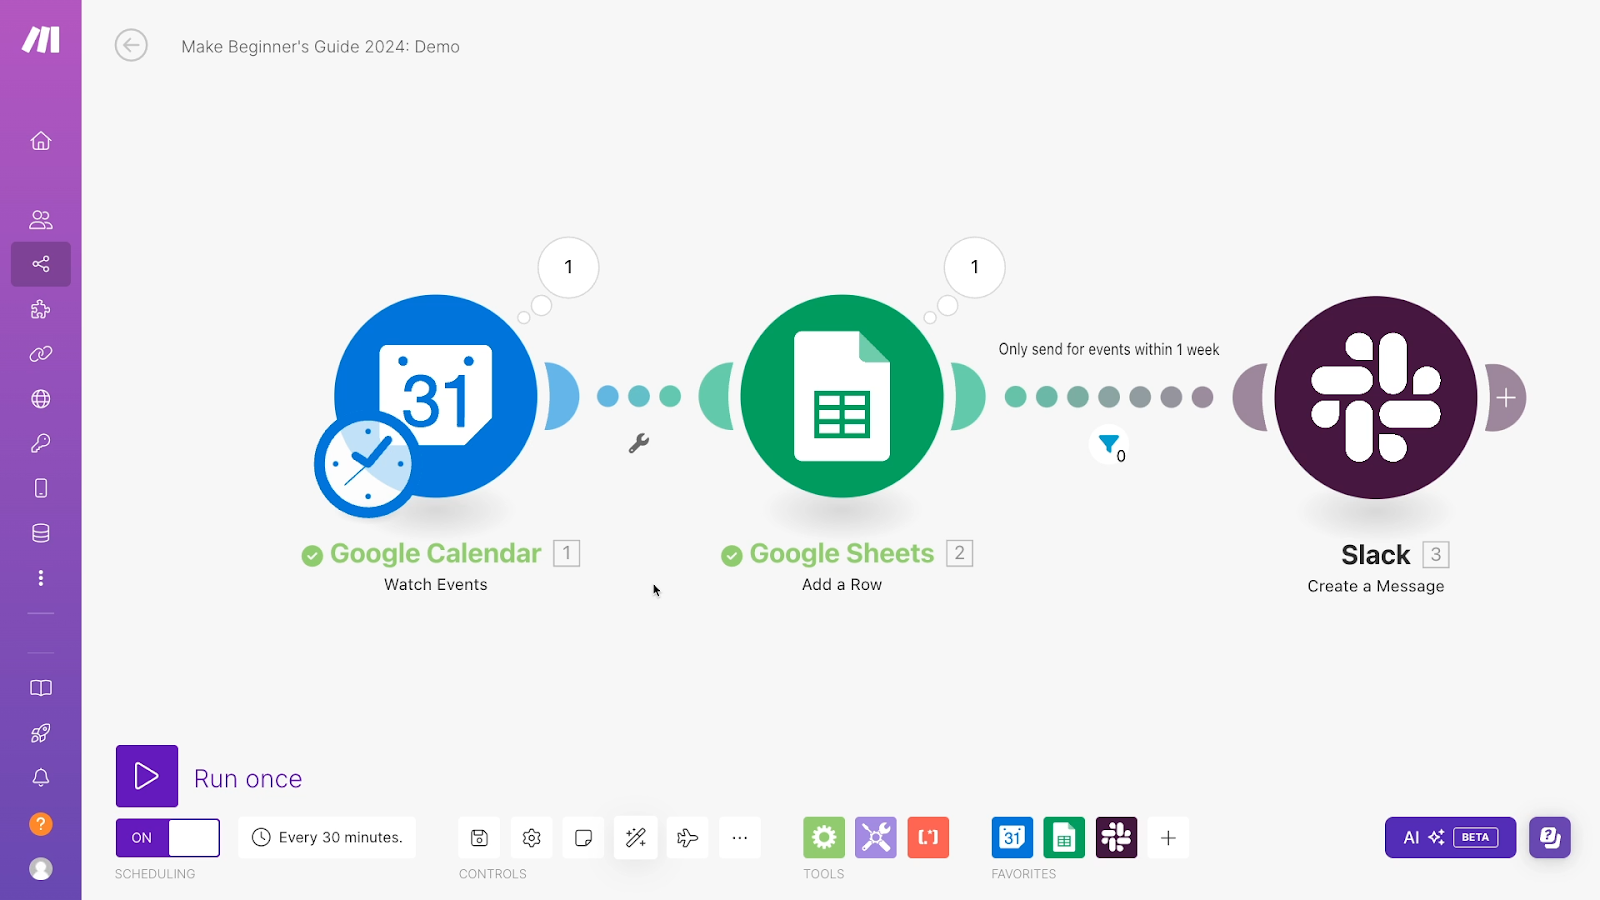
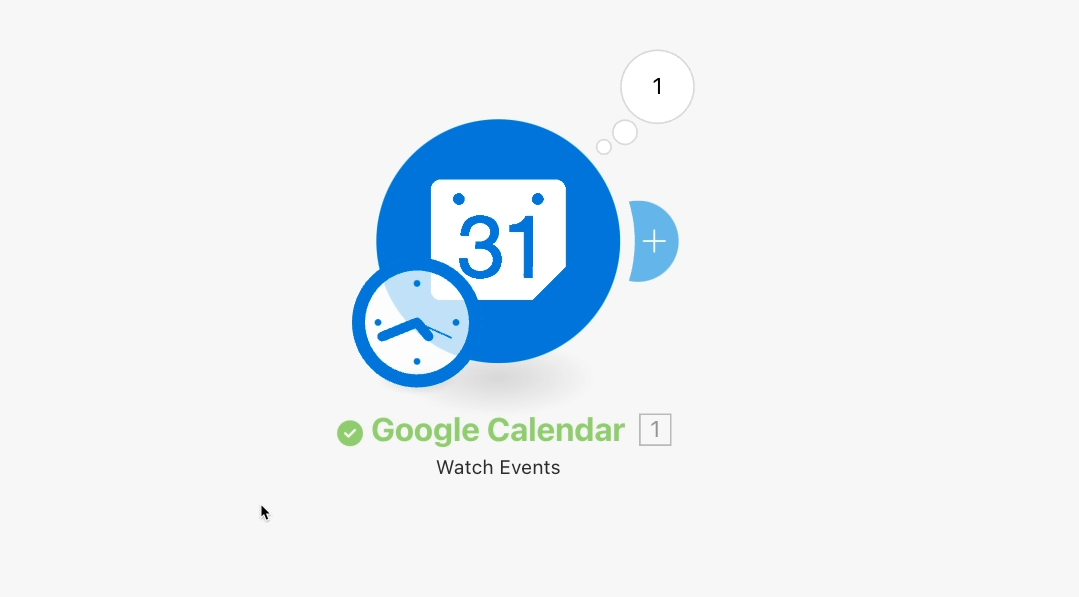
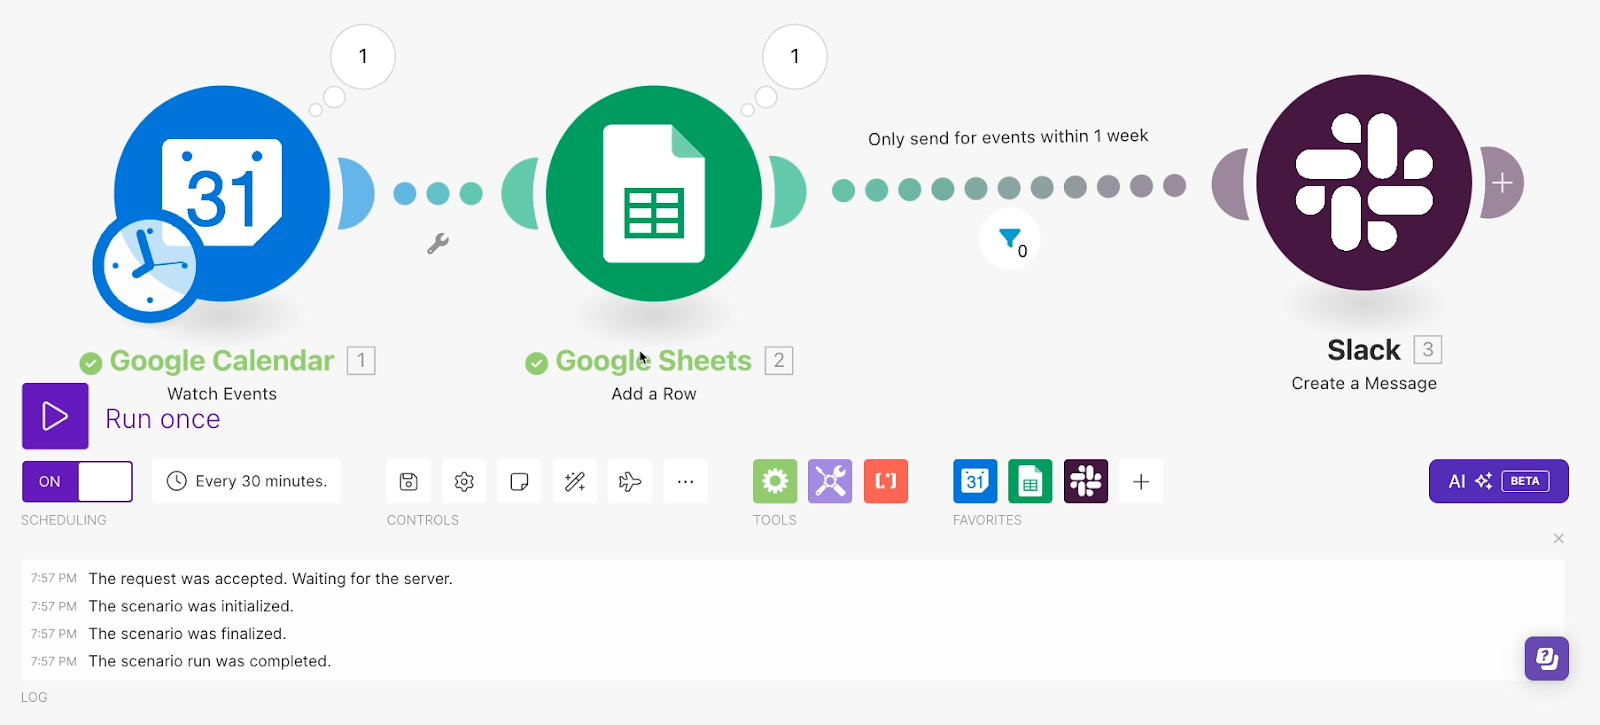
Below, you can see what an automation looks like in Make.
I
n Make, each automation is called a "scenario". A scenario starts with a trigger event, which is the event that will prompt the automation to run.
Then, one or more automated actions and searches will follow that trigger. These actions and searches can be in the same app as the trigger, or in totally different apps.
In most cases, you're probably going to use your Make scenarios to send and sync data across different software.
In the example that we'll be building today, our "trigger" is an event getting added to Google Calendar. Then, data from that calendar event is used to create a new spreadsheet row in Google sheets.
Finally, information about the event is passed to Slack for an instant alert. However, thanks to a handy little filter, the alert will only run if the event in question is scheduled to start within one week from the current time.
Simple or complex workflows
The scenario we’re going to demonstrate in this guide is very simple and linear, but Make scenarios can get much more complex and sophisticated.
You can add dozens of steps, branching paths, loops, and other tools to accomplish whatever you need to automate your workflows.
As we build this scenario, we'll show you a bit of formatting and conditional logic, but our main goal for today is to learn the basics so you can start using Make.
You can check out other videos in our Make playlist to learn more advanced techniques. These videos cover topics like routers, API calls, automating AI prompts, and more.
You can also sign up for our workflow design course to learn how to plan, implement, and deliver scalable automated workflows for your team and clients.
Now, it’s time to get ready to build your first scenario in Make.
Getting started with Make
Before we get started, be sure to sign in to all of the apps we're going to be using today: Make, Google Sheets, Google Calendar, and Slack. For this tutorial, free accounts will be fine on all of these apps.
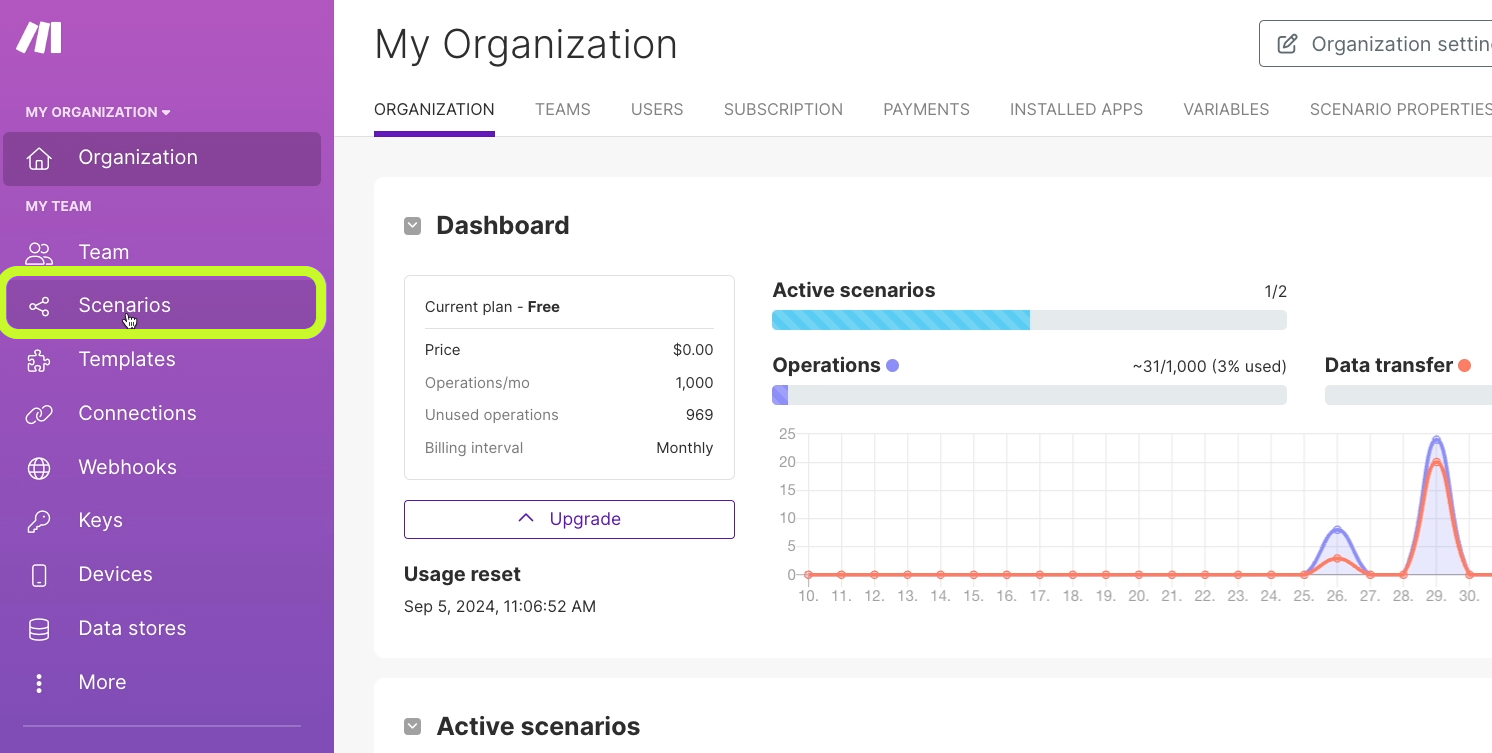
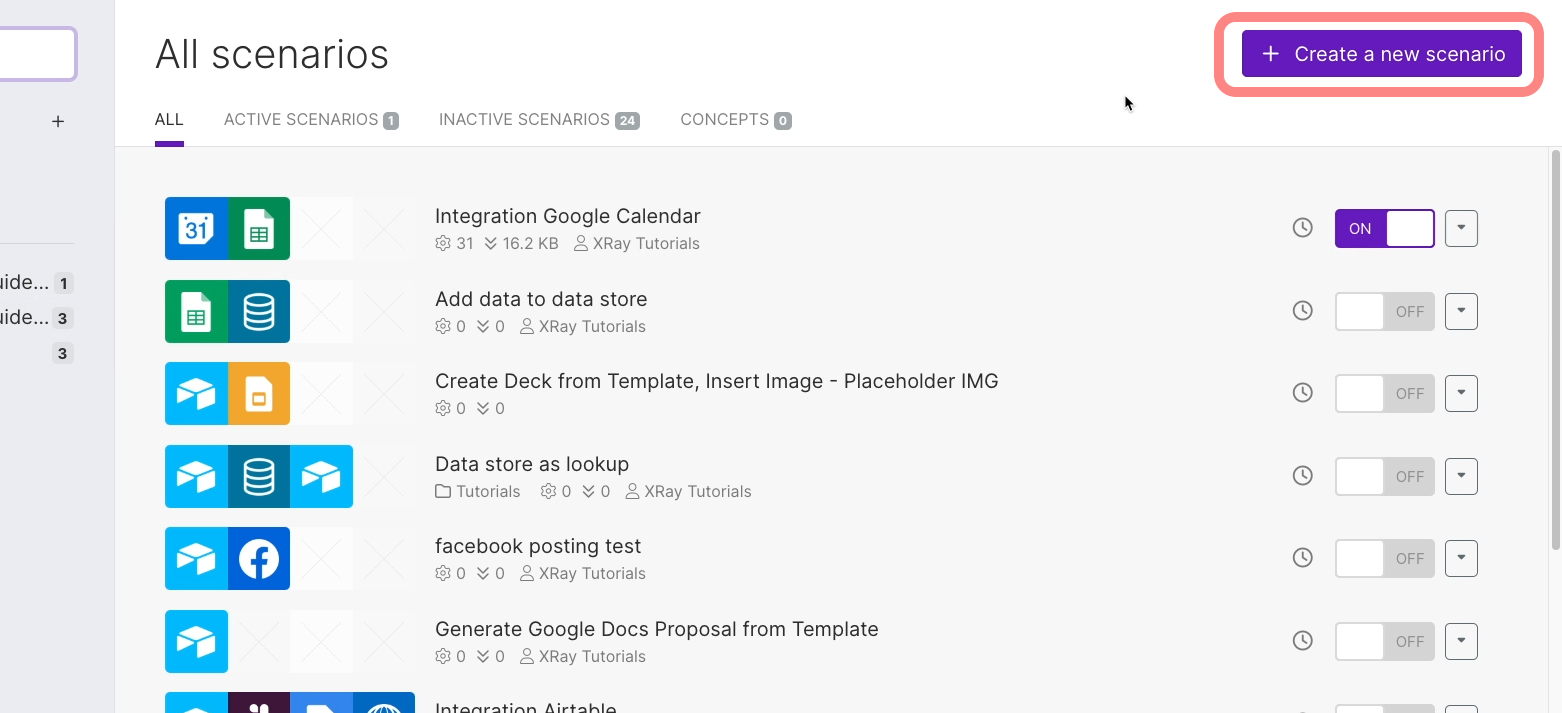
Once you're all signed in, open up Make. You’ll see several options here, but for now, just click on 'Scenarios'.
Then, create a new scenario.
Adding a trigger
Every automation needs to start with a trigger, so add one by clicking on the pulsing plus button in the middle of the screen.

For this scenario, you’ll want to add a trigger that watches your Google Calendar for new events.
After clicking on the plus button, you should see a long list of apps that Make can automate. There are about 2,000 total (and counting), so don't bother scrolling to try and find one.
Instead, just enter a search term (like “Google Calendar”) to pull up an app instantly.
Adding a trigger to your automation
As soon as you enter a term, Make will show you a few options from the best match - in this case, Google Calendar.
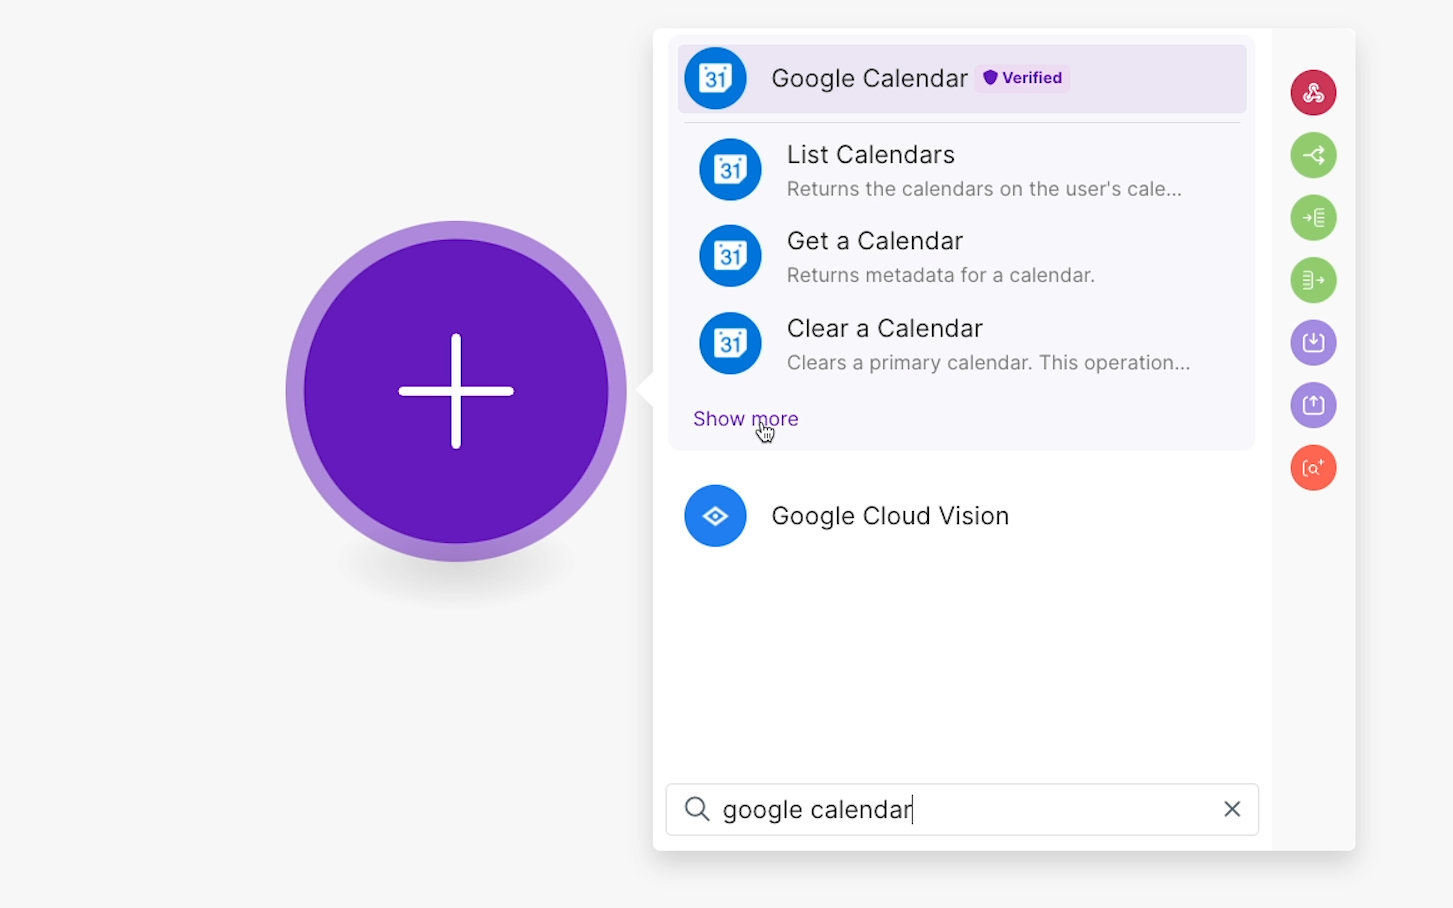
But if you don’t see the choices you’re looking for, just click on “Show more.” Then you’ll be able to see every single choice you have for automating that app with Make.

At the very top of the list, you should see an option called “Watch Events.”
As you can see from the description, this will watch your calendar for new events and run whenever it finds one.
This is a perfect trigger for our automation, so select it to add the trigger to your scenario.
Configuring the trigger
Now that you’ve chosen a trigger, you need to configure it by choosing an account to use, and adjusting several parameters to control exactly when your scenario runs.
Authorizing an account for automation in Make
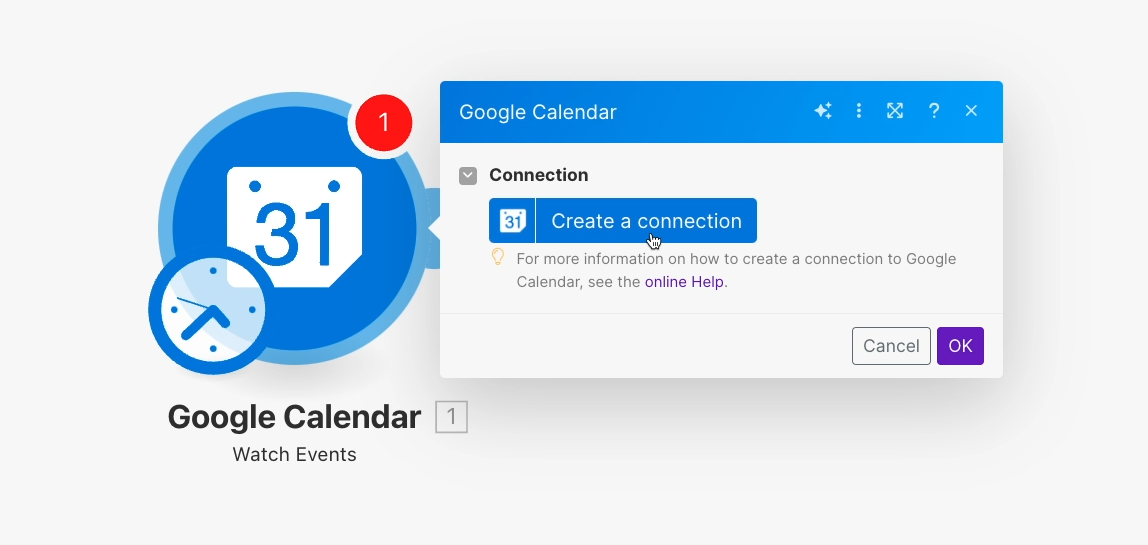
The first step for setting up any module in Make will always be to authorize an account in the app you want to automate.
To automate one of your apps, like Google Calendar, you need to allow Make to access your account and perform actions on your behalf.
Click “Create a connection” to add your first connection for an app.
For most apps, all you’ll need to do is provide a name for your account and sign in. Then, you’ll be able to authorize Make in your app with a single click.
However, sometimes, you’ll need to provide additional credentials like a ‘Client ID’ and ‘Client Secret.’ If that’s the case, you can click on the “Online help” link for more information.

Authorizing Google Calendar
For Google Calendar, you just need to provide a connection name. Be sure to make it unique and descriptive, so you can distinguish between different accounts that you connect.
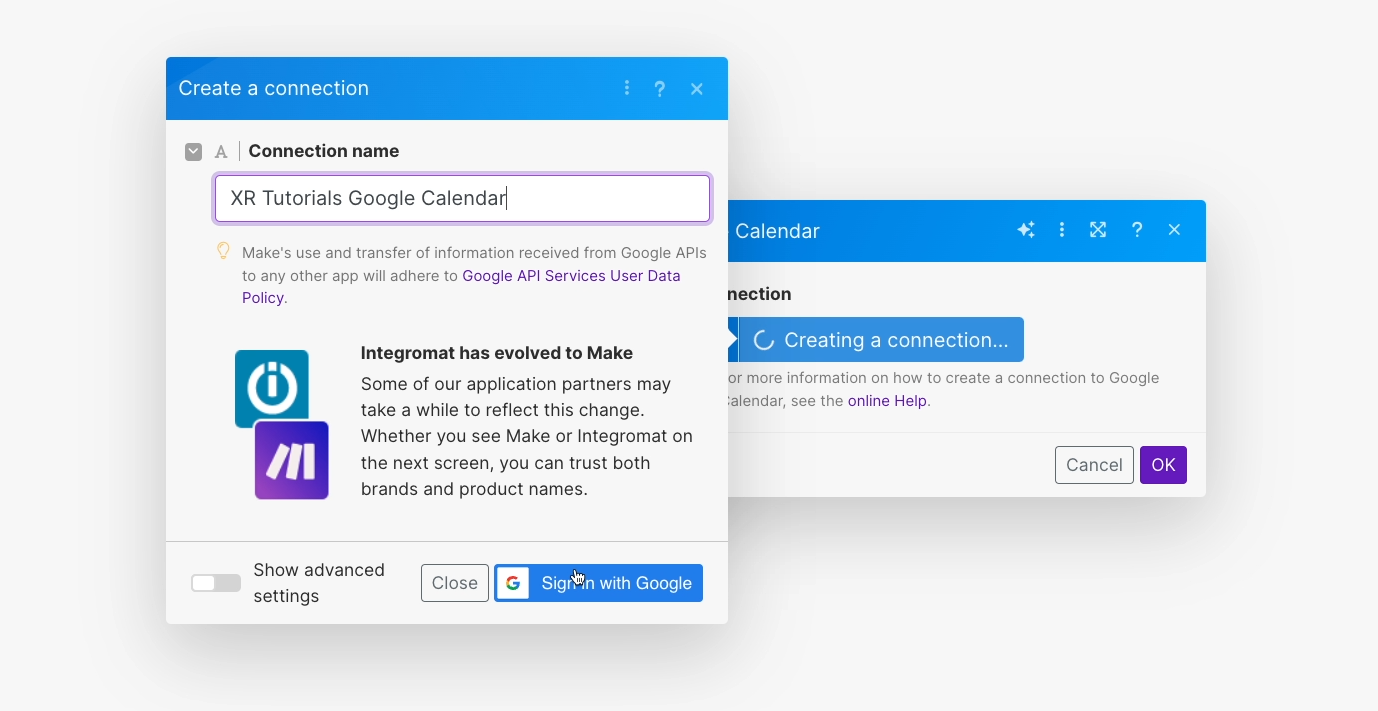
Then, click “Save.” In the screens that follow, you’ll see the permissions Make needs to automate your app.

The permissions required are extensive, but there’s no need for concern. Make is a trustworthy application, and it only needs these permissions so it can perform the actions you program it to do in your automations.
In spite of requesting the permission to delete data in your account, Make isn’t actually going to delete anything in your apps unless you build an automation with a “delete” step.
After reviewing the required permissions, click “Allow” to authorize Make.
Now, Make will access Google Calendar through the account you connected.
Choosing trigger settings
Next, let’s configure the key options for this trigger.
The choices for configuring a trigger in Make will typically let you narrow things down to get a little more specific about when the automation should run.
For this “Watch Events” trigger in Google Calendar, we can start by choosing the specific calendar that Make should watch. You can just pick one from the dropdown.
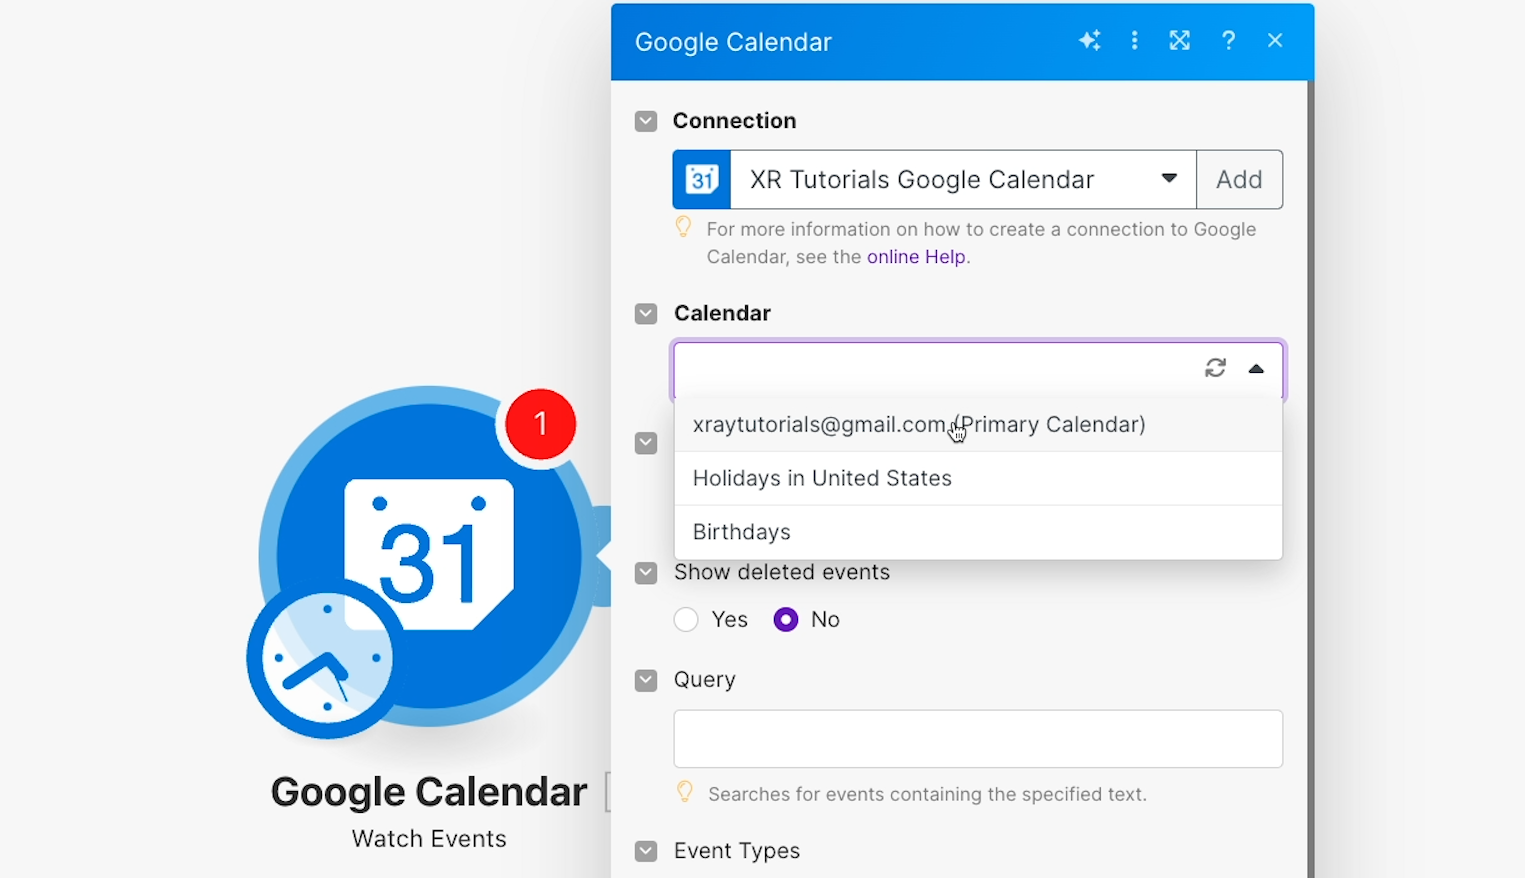
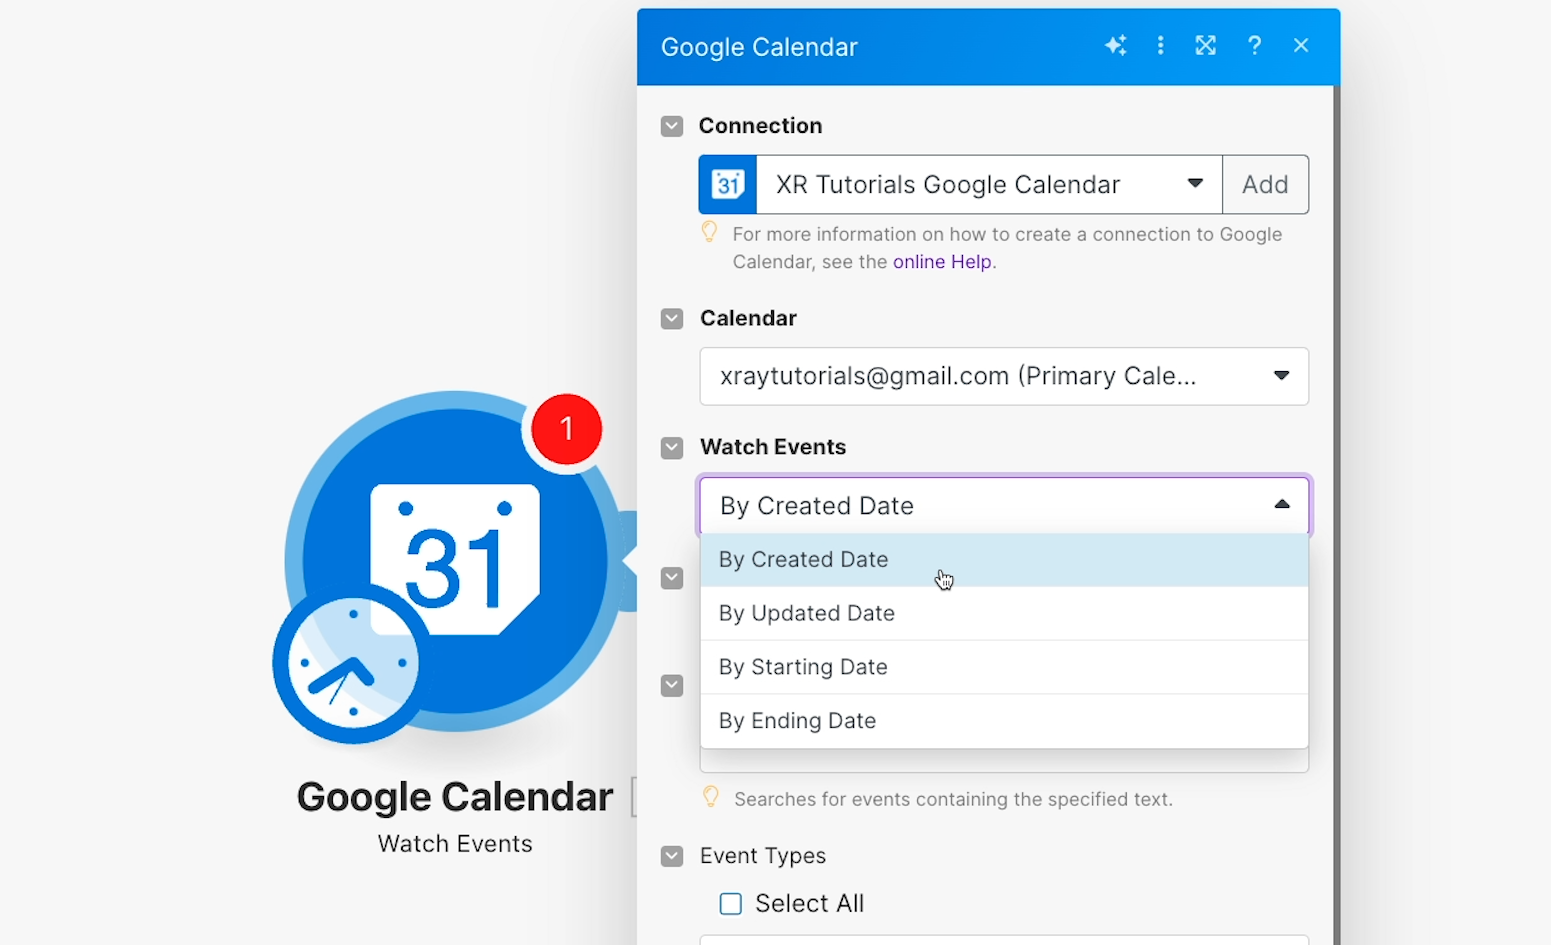
Then, you can choose how Make will watch for events - by Created Date, Updated Date, the event’s Starting Date, or the event’s Ending Date.
For this scenario, go with “Created Date.”
You can leave “show deleted events” unchecked, and you won’t need to add a query. Adding a query would enable your trigger to search for a specific event by its title, like “All-hands.”
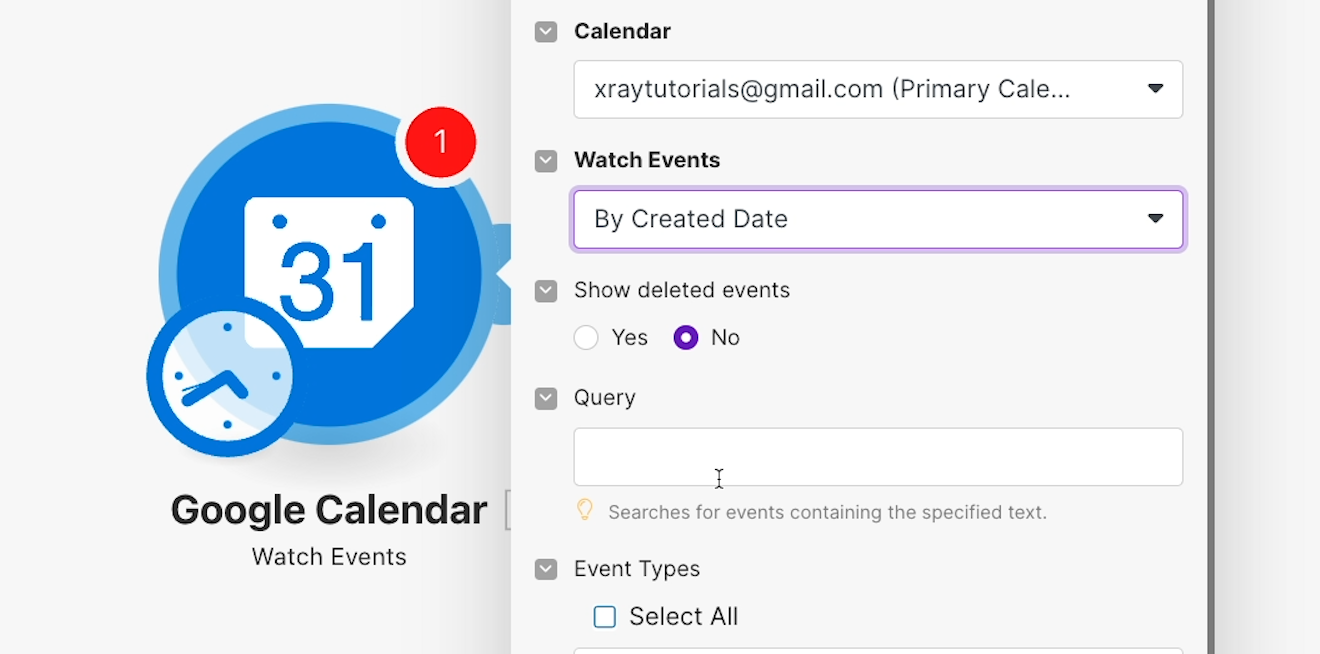
To make sure your automation runs for every new calendar event, leave the query field blank. Along similar lines, check every event type in the list.
Finally, you can choose how many events can be processed at once when the automation runs.
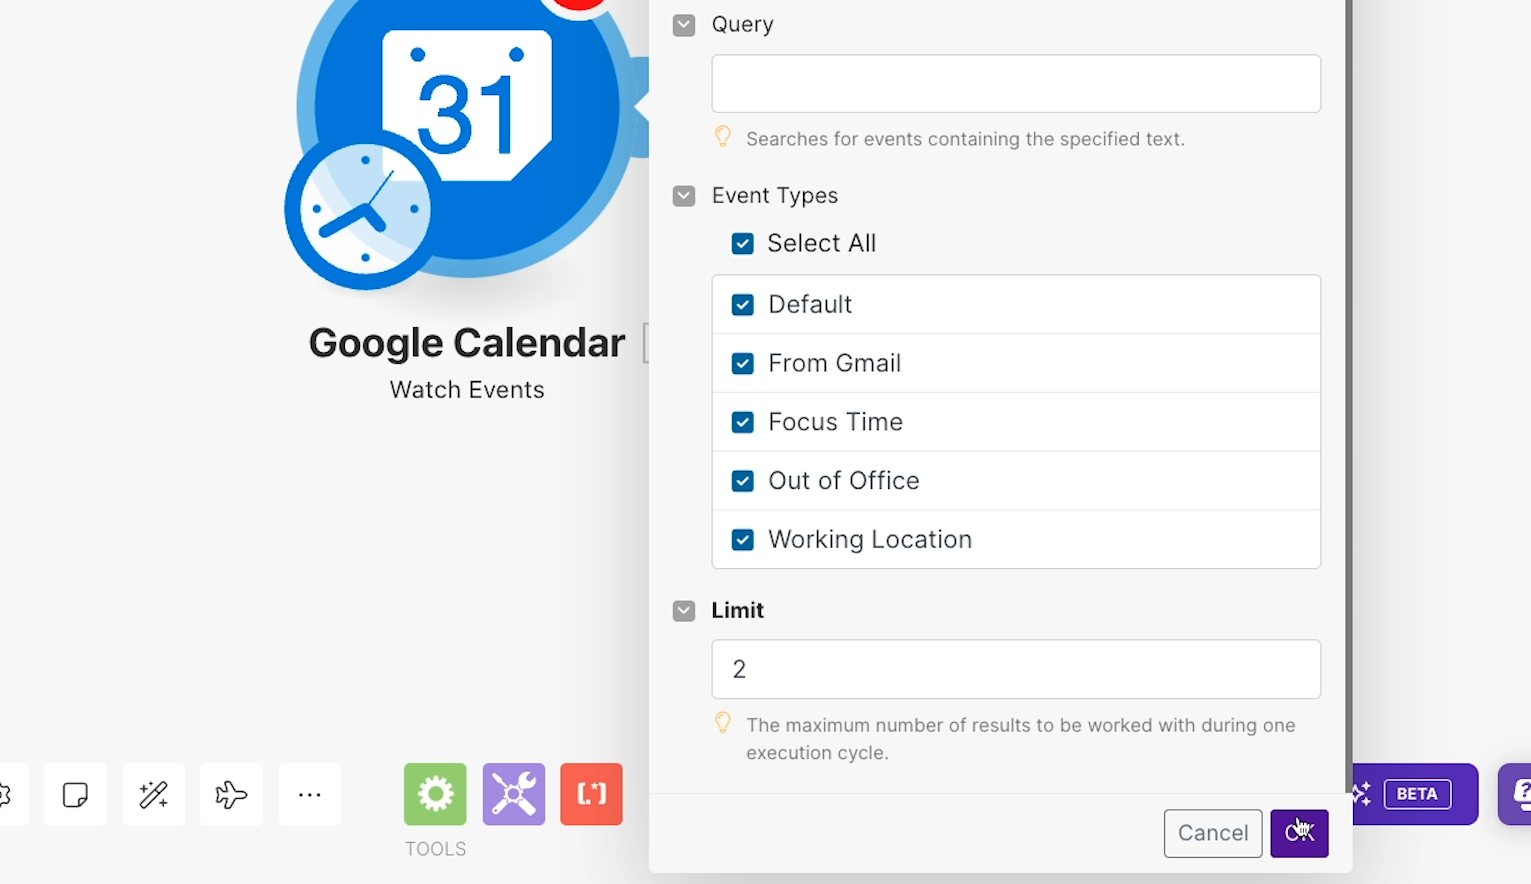
You can set this to whatever number you’d like, but we’d usually recommend keeping it pretty low. That will usually make it easier to sort through the data as you’re running your tests.
Enter a number like 1 or 2, and click “OK” to commit all of your choices.
Testing the trigger
Now, it’s time to test your trigger.
Testing your Make scenario’s trigger will retrieve a real piece of data from your trigger app, and confirm that your trigger is working correctly as you configured it. That means that testing this “Watch events” Google Calendar trigger will retrieve an actual event from your Google Calendar.
As soon as you close the configuration window, you’ll be prompted to “choose where to start.”
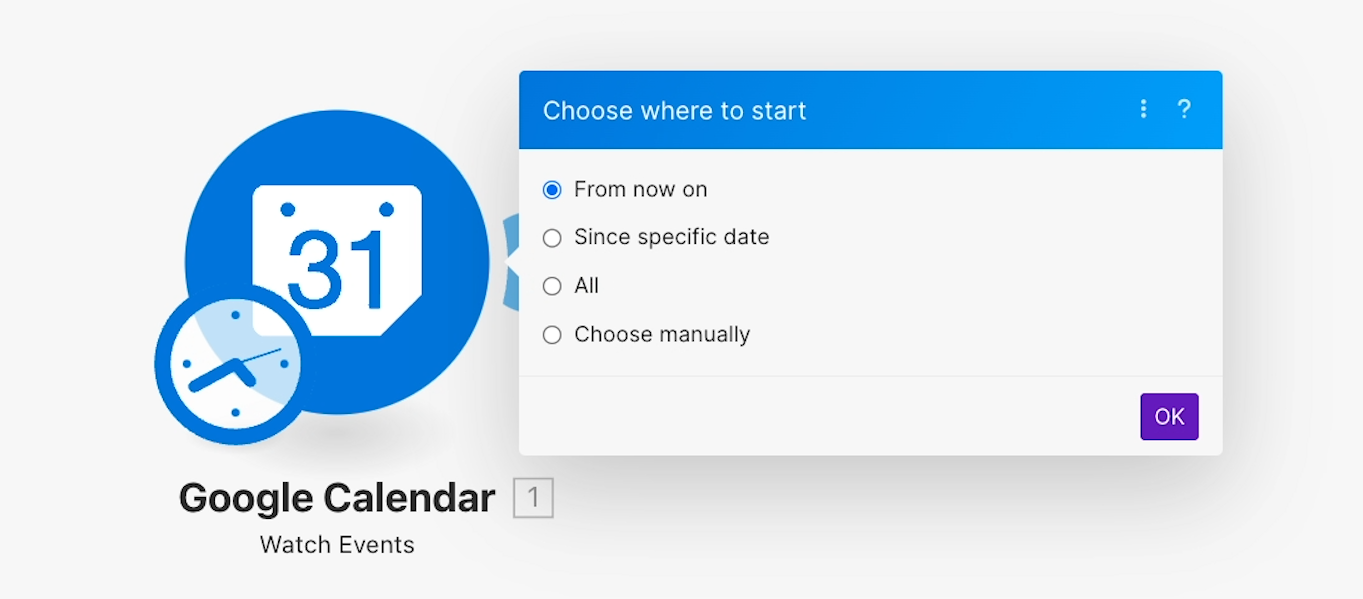
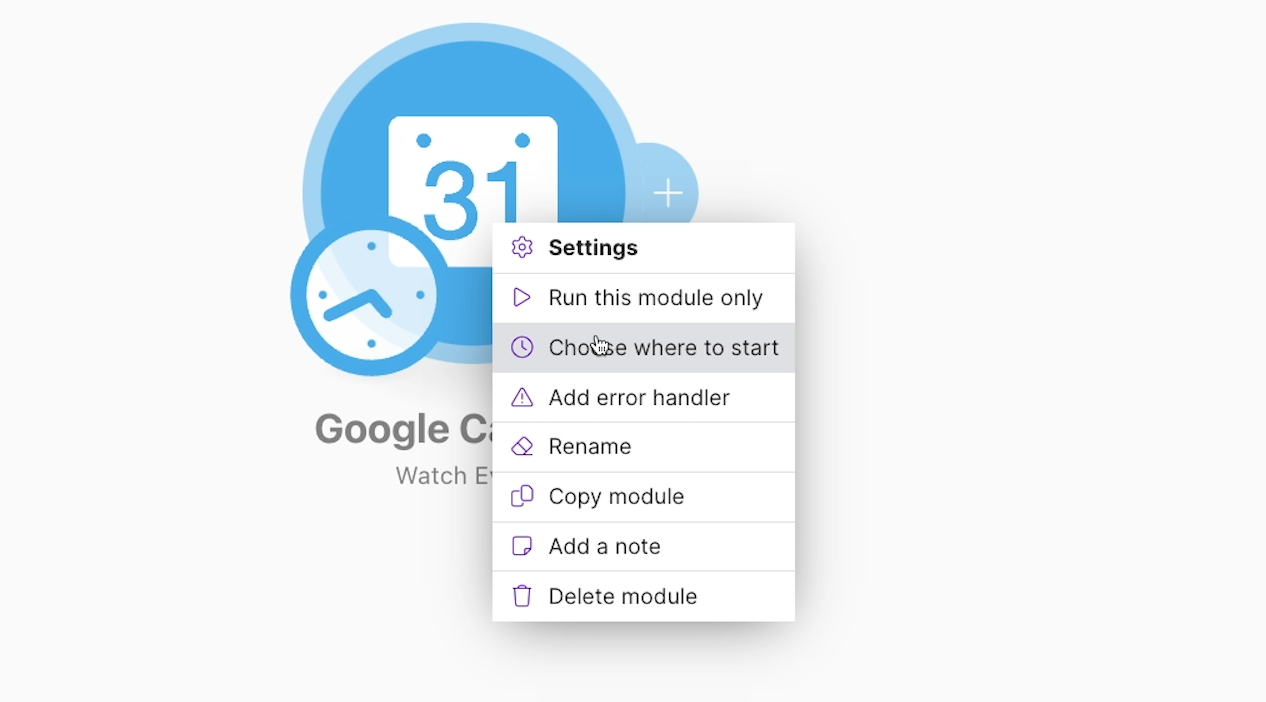
If you don’t see this pop up, you can always right-click on the trigger module and select “Choose where to start” instead.
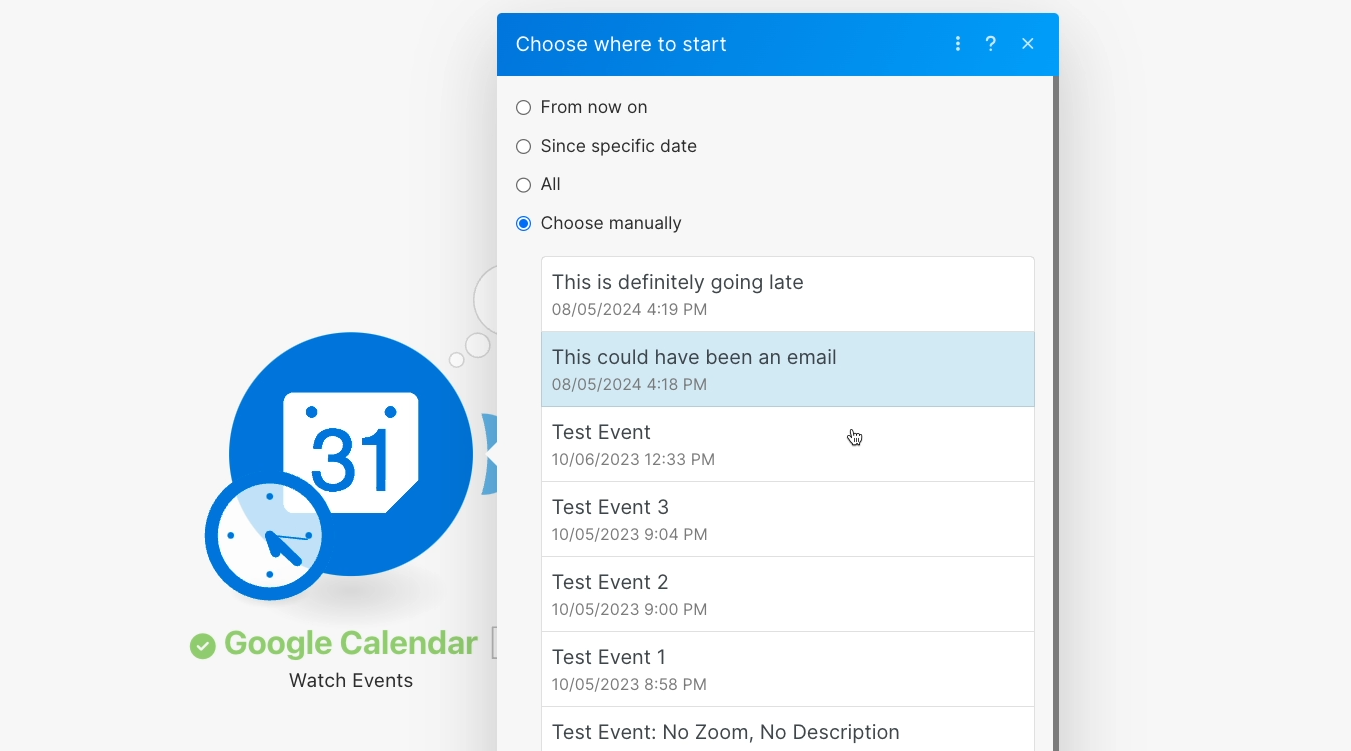
Then, you’ll see a few options for selecting a starting point. For testing purposes, we’d suggest using “choose manually” the vast majority of the time.
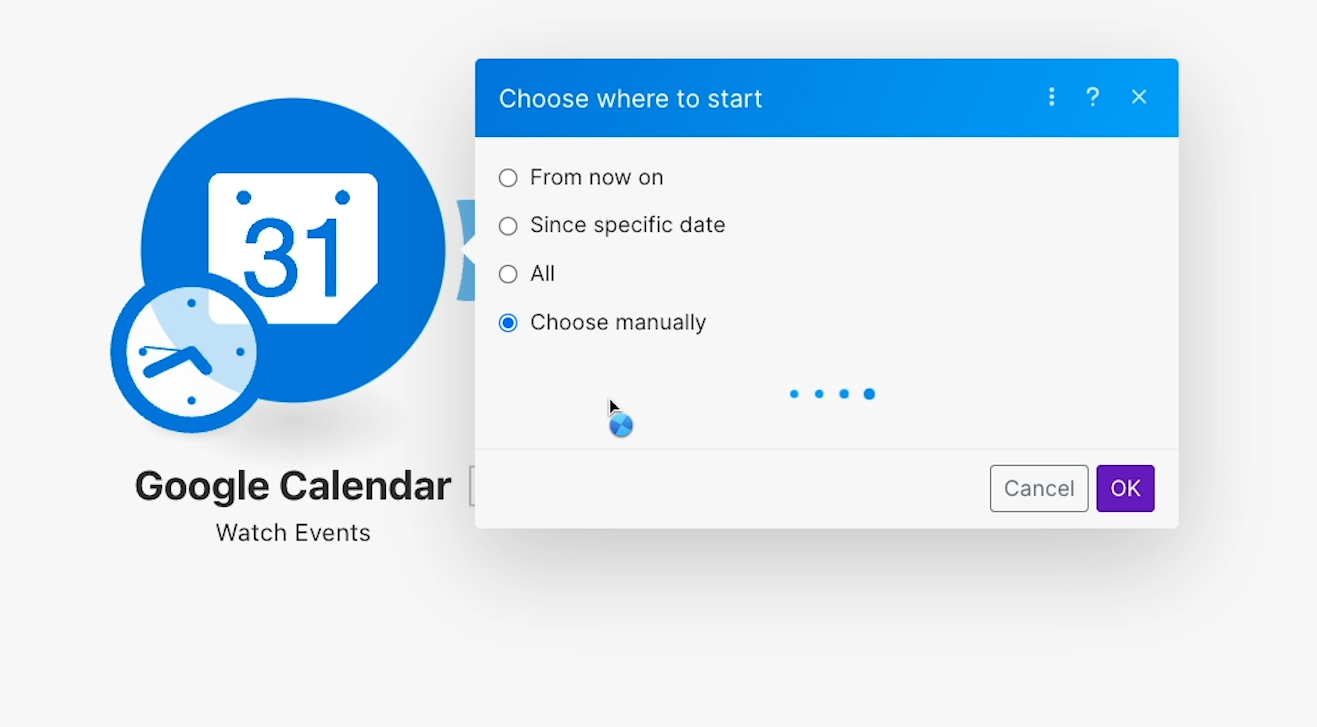
It gets a bit tedious when you’re doing a lot of testing, but this process of “Choose where to start” > “Choose manually” is the most reliable way to control what test data Make uses, since it will let you pick the data you want from a list.
You can use any event you want to test with. In our example, we’ll pick this test event that we created earlier in Calendar. Once you’ve selected an event, click “OK.”
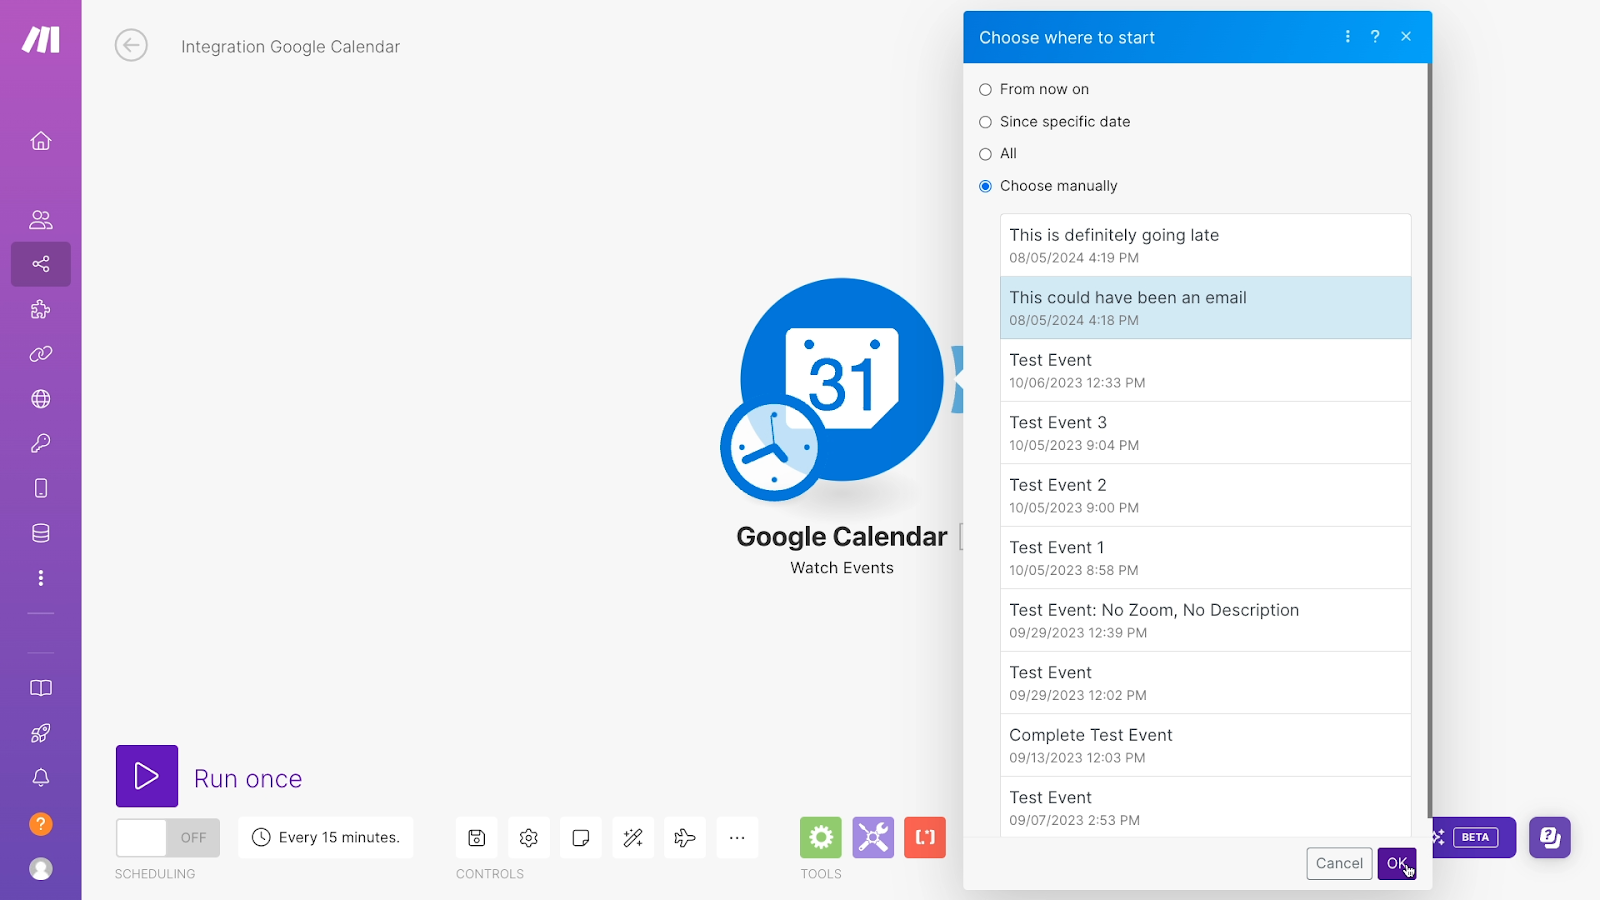
Your trigger is now ready to process the specified data the next time it runs, but you still need to make the trigger actually run to finish your test. To do that, just click on the “Run once” button to fire it off manually.

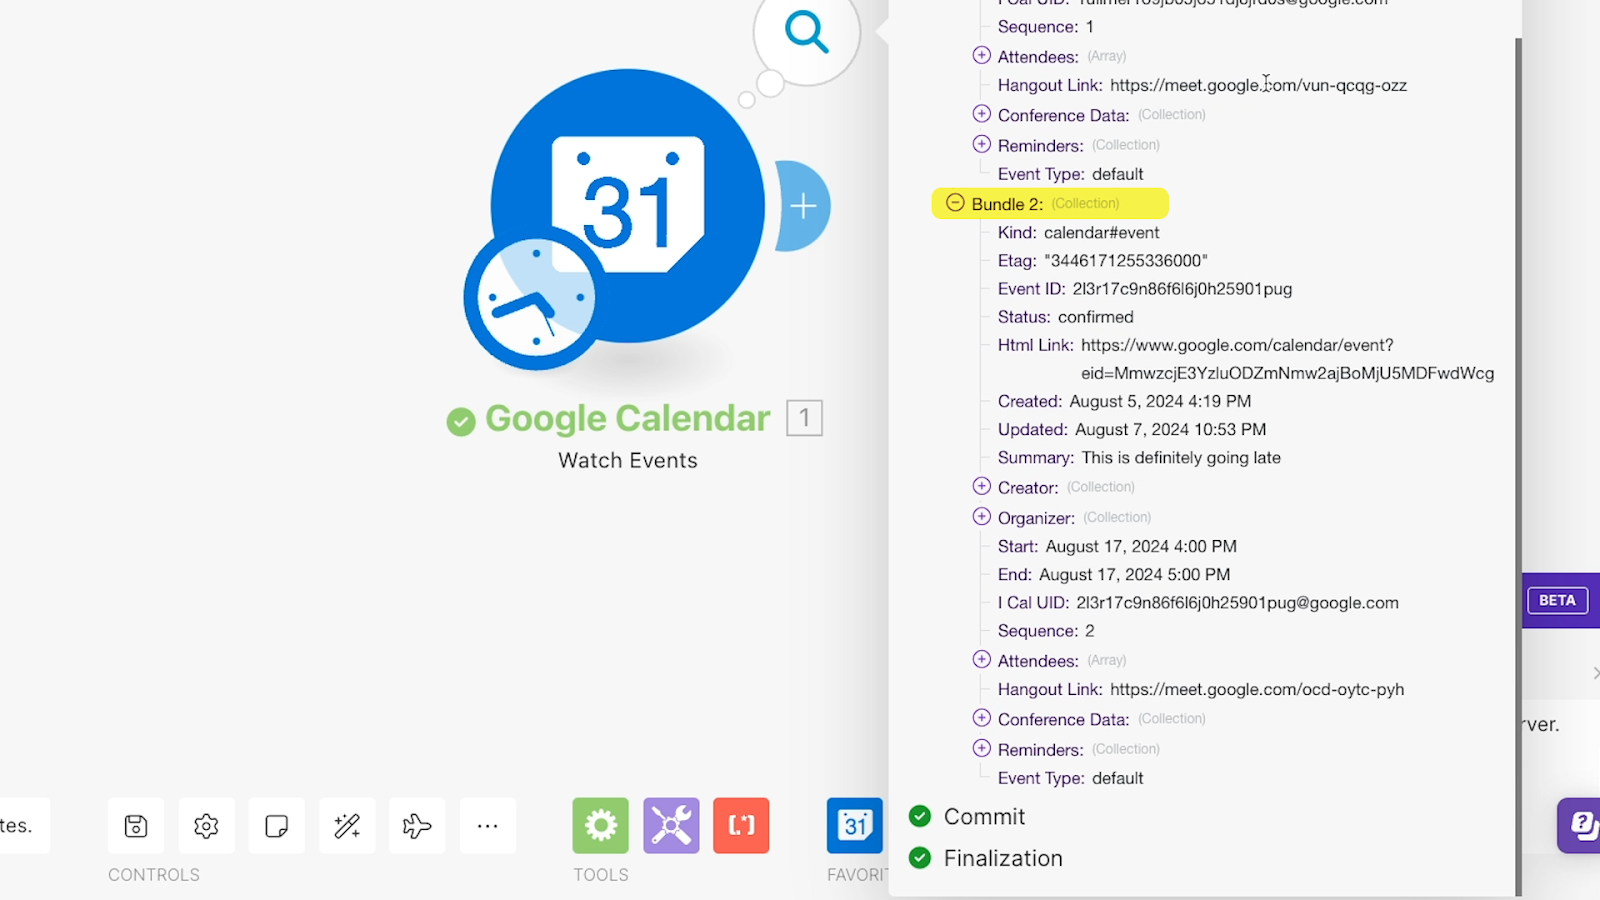
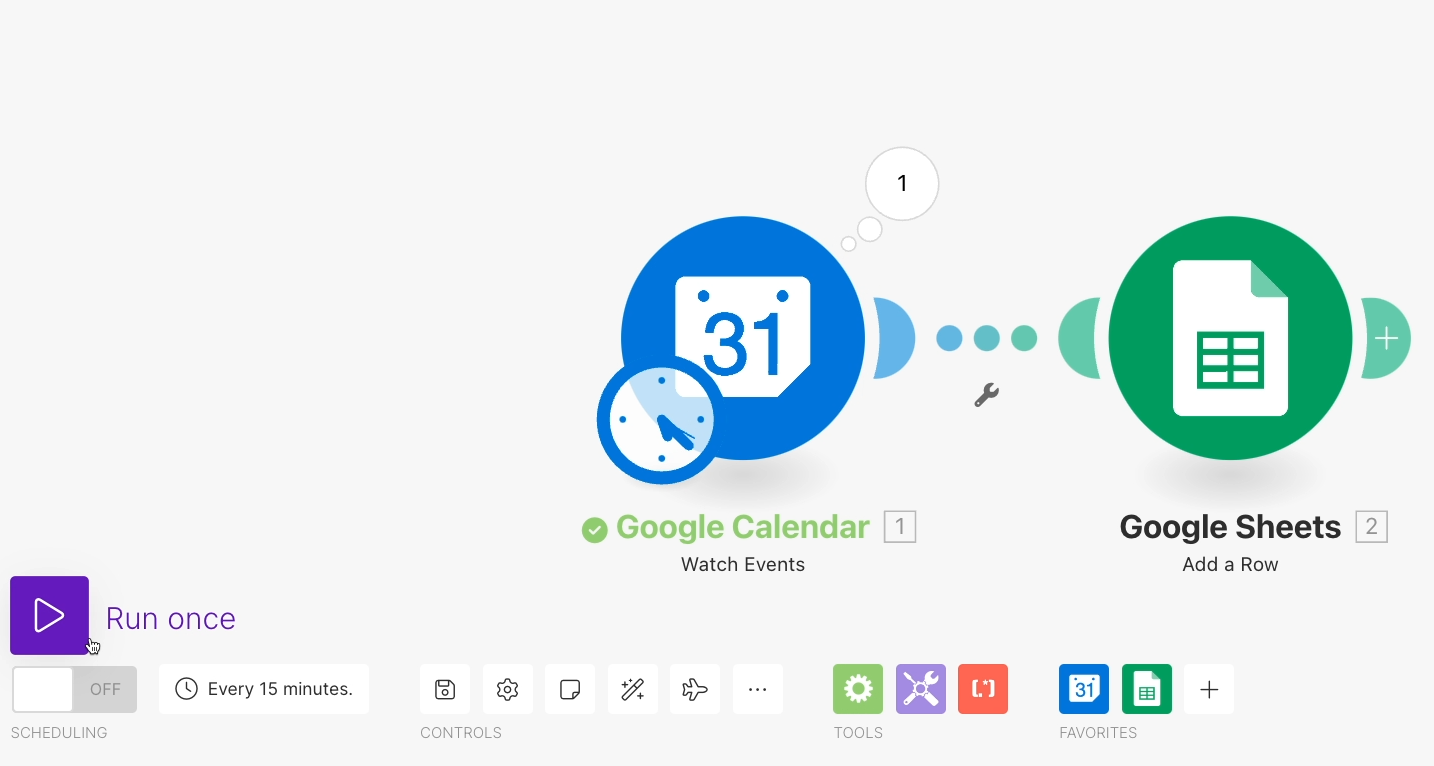
You should see a number appear over your trigger module after a successful test.
You can click on this number to see all the data your trigger retrieved, like the event summary, the start date, the end date, and much, much more.
All of this data can be referenced dynamically and transformed in subsequent actions in your automation. To see how that works, let’s add an action now to add a new row to Google Sheets containing some of this event’s information.
Add an action to your scenario
Add a new action to your scenario. Once again, search for the app you want to use - in this case, Google Sheets. Then, click “Show more” to see all of the available actions.
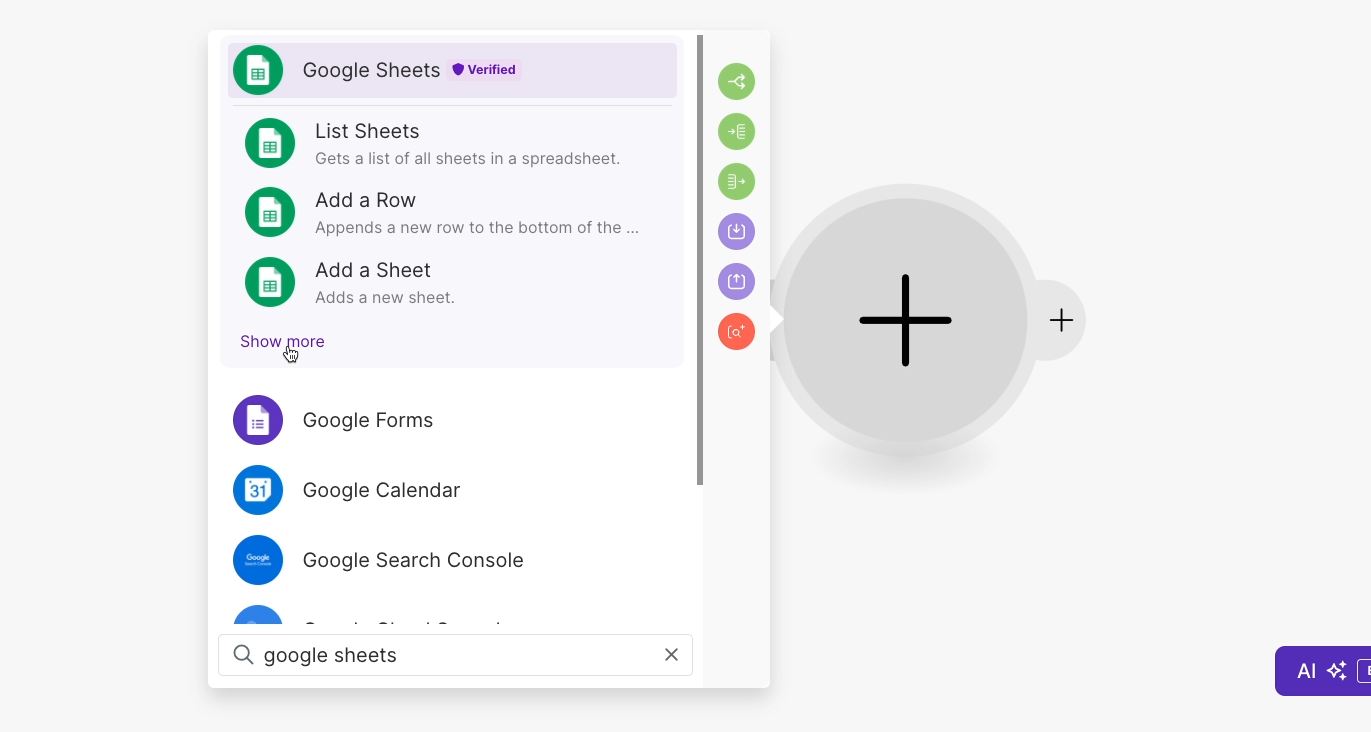
You’ll notice that unlike Calendar, the options for Sheets are sorted into ‘Actions’ and ‘Searches.’ Since triggers can only be used at the start of the automation, those are excluded from this list.
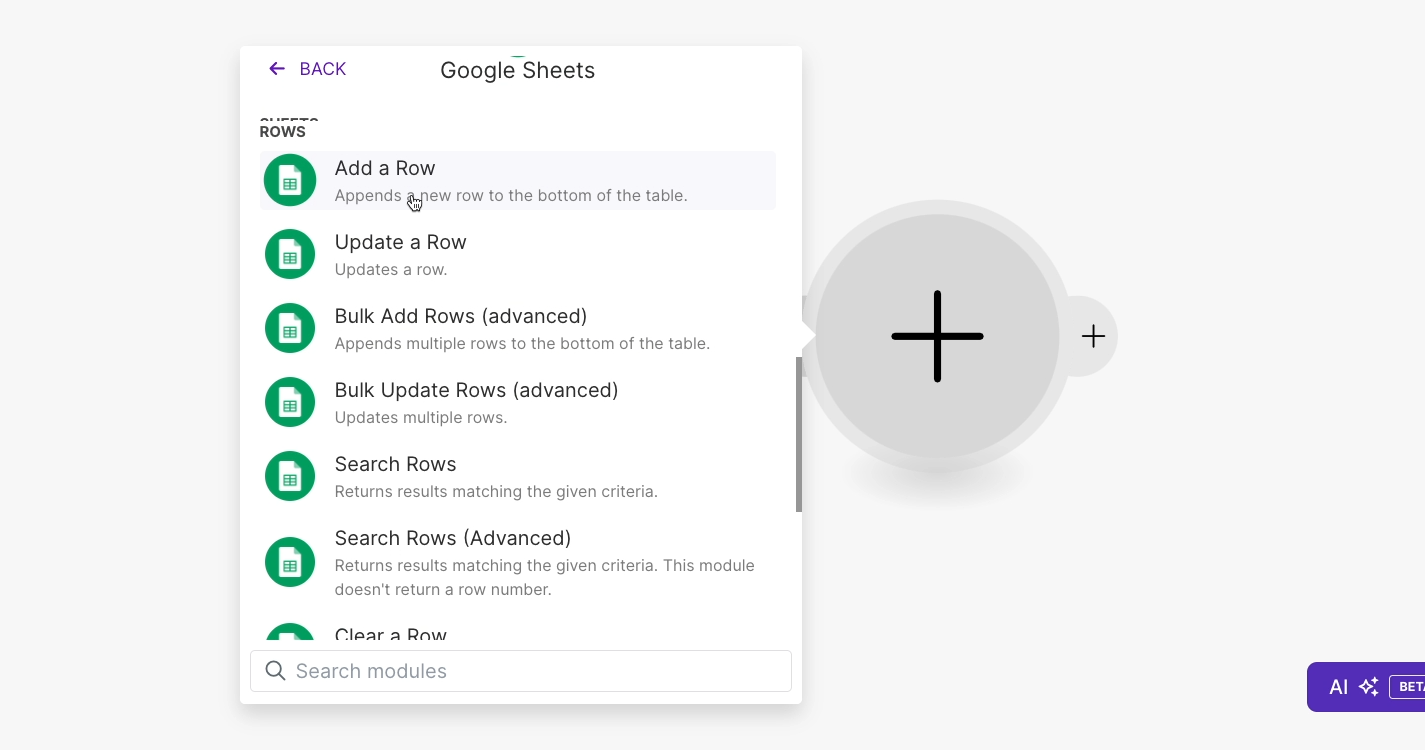
To add a new row, choose the “Add a row” action. You should be able to use the same Google connection that you added for Calendar, though you will need to update the permissions.
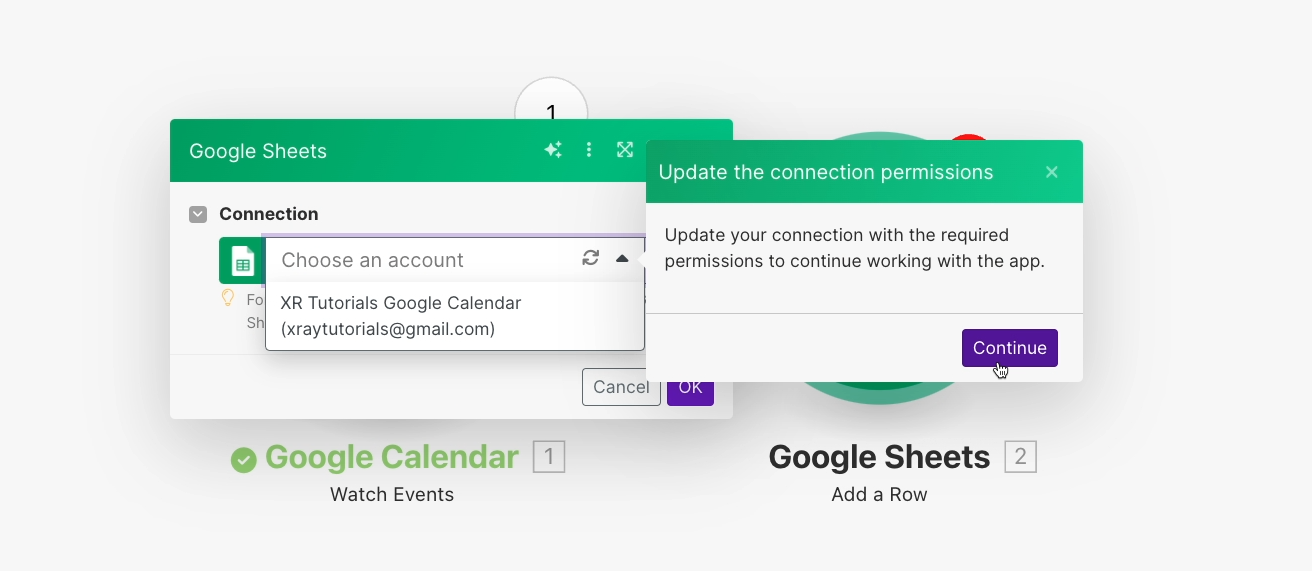
You can also add an additional account if you’re using a different sign-in for sheets. Once you’ve chosen and authorized your account, you can configure the action.
Configuring an action in Make
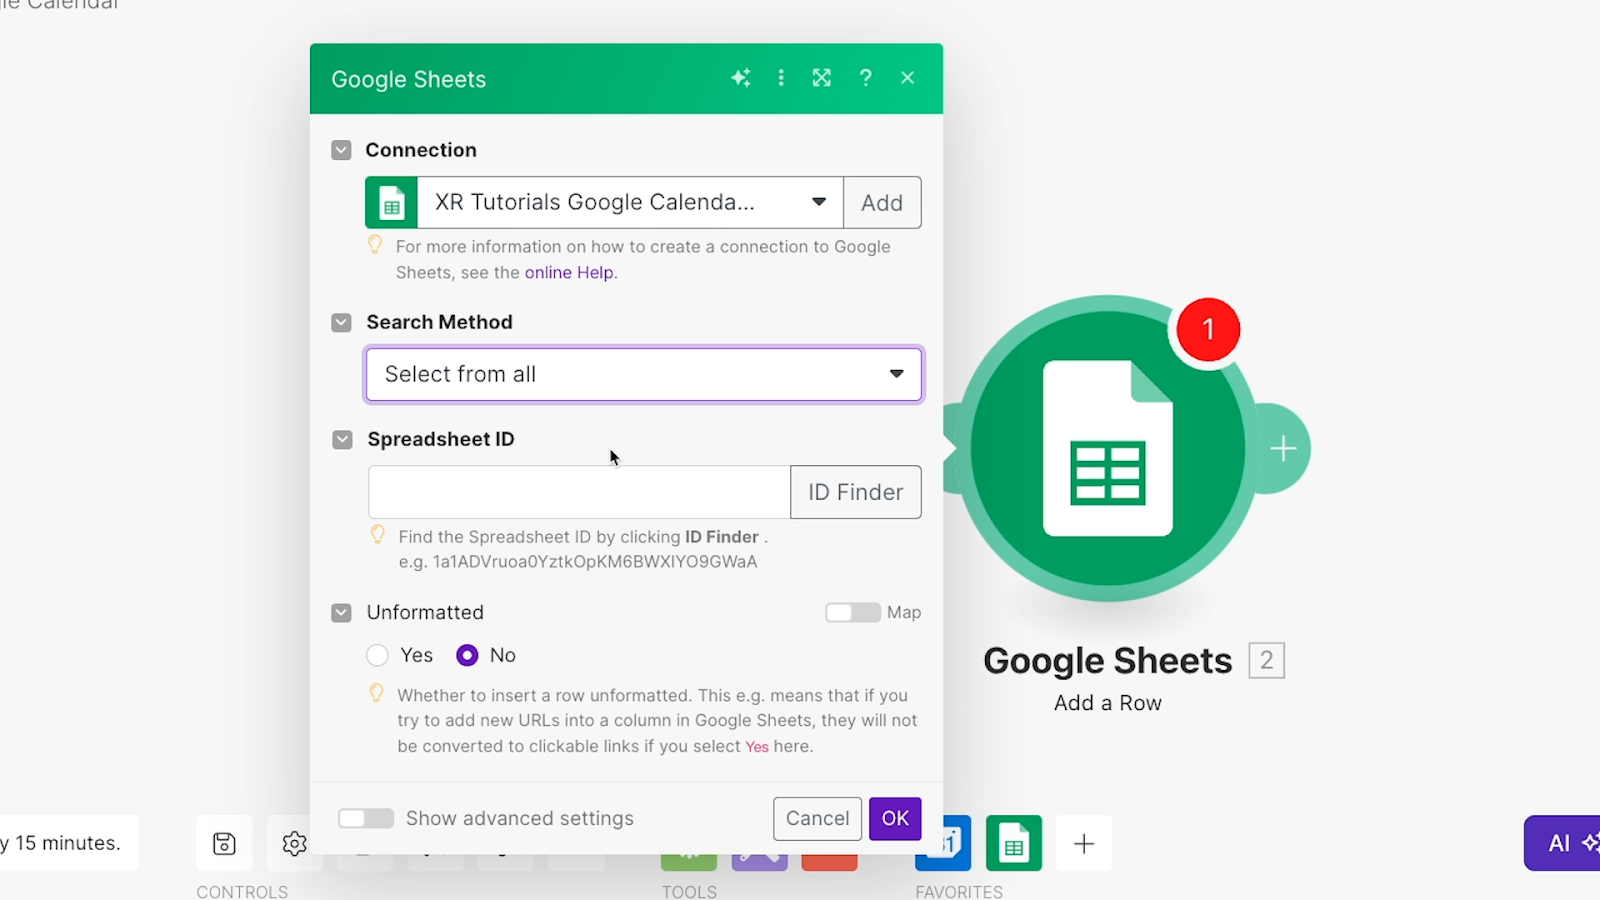
Whenever you’re creating data like this in Make, the first thing you’ll need to specify is where you want to create that data.
In this case, you’ll need to specify what Sheet the new row should be added to. Under “Choose a method,” the default “Select by path” option will allow you to pick folders and subfolders until you find the file you want.

We’d recommend switching this to “Select from all.”
Then, you can choose the document you want to use by copying and pasting its ID, which can be found in the URL bar when you have the document open in your browser.

Then, paste the ID into Make.
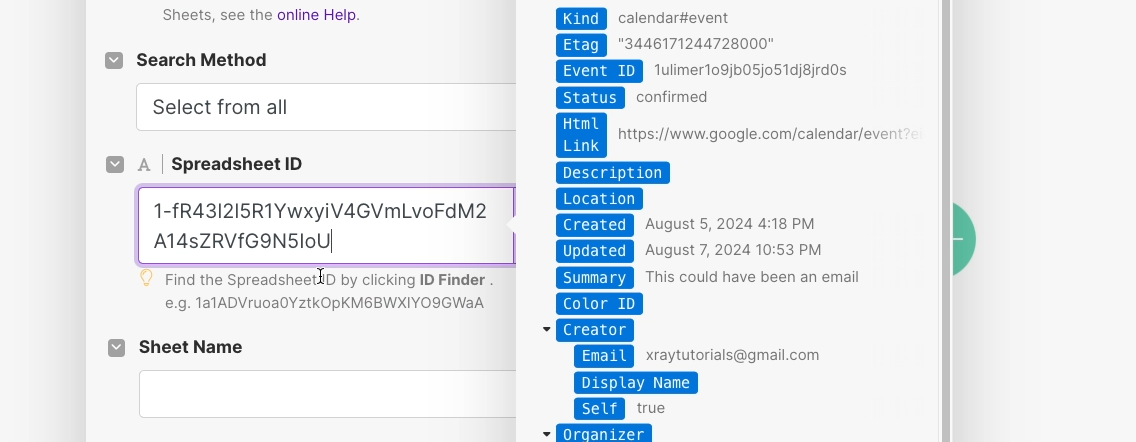
Using an ID isn’t necessary – you can always identify the doc by its file path if you want – but it helps ensure that everything stays consistent. File names and locations can change, which may require you to update your automations. However, the document’s ID will always remain the same.
Next, choose the sheet you want to use in this file - in this case, that’s Sheet 1 for us.
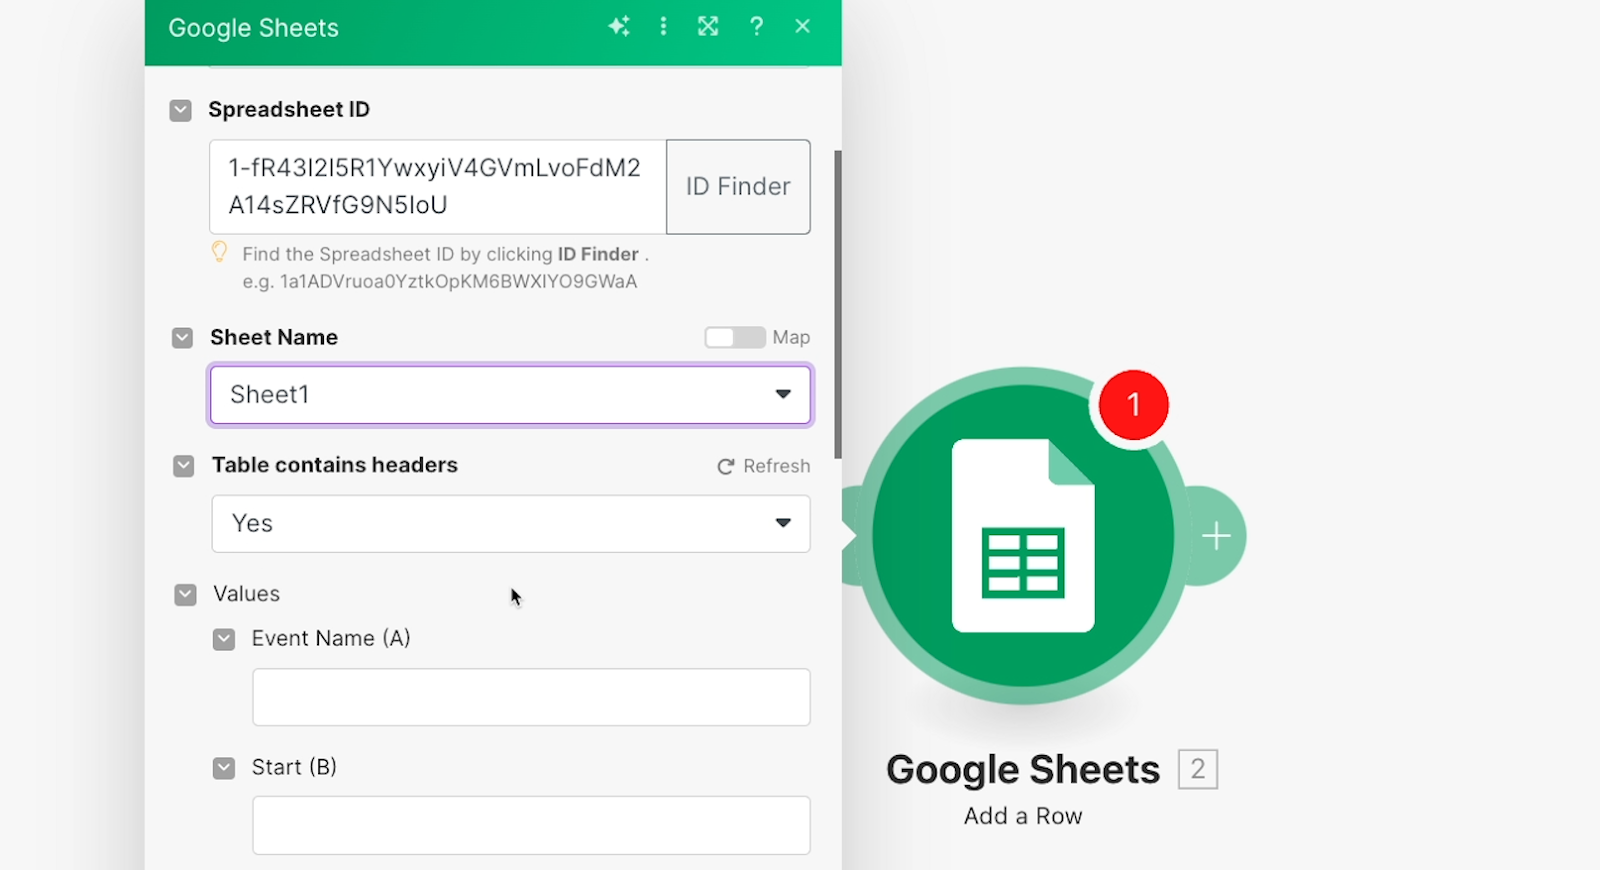
If your table has headers, like our example does, make sure the “Table includes headers” option is set to “yes.” That will ensure each column is correctly labeled with its header name, like “Start” rather than just being “B” or “C.”
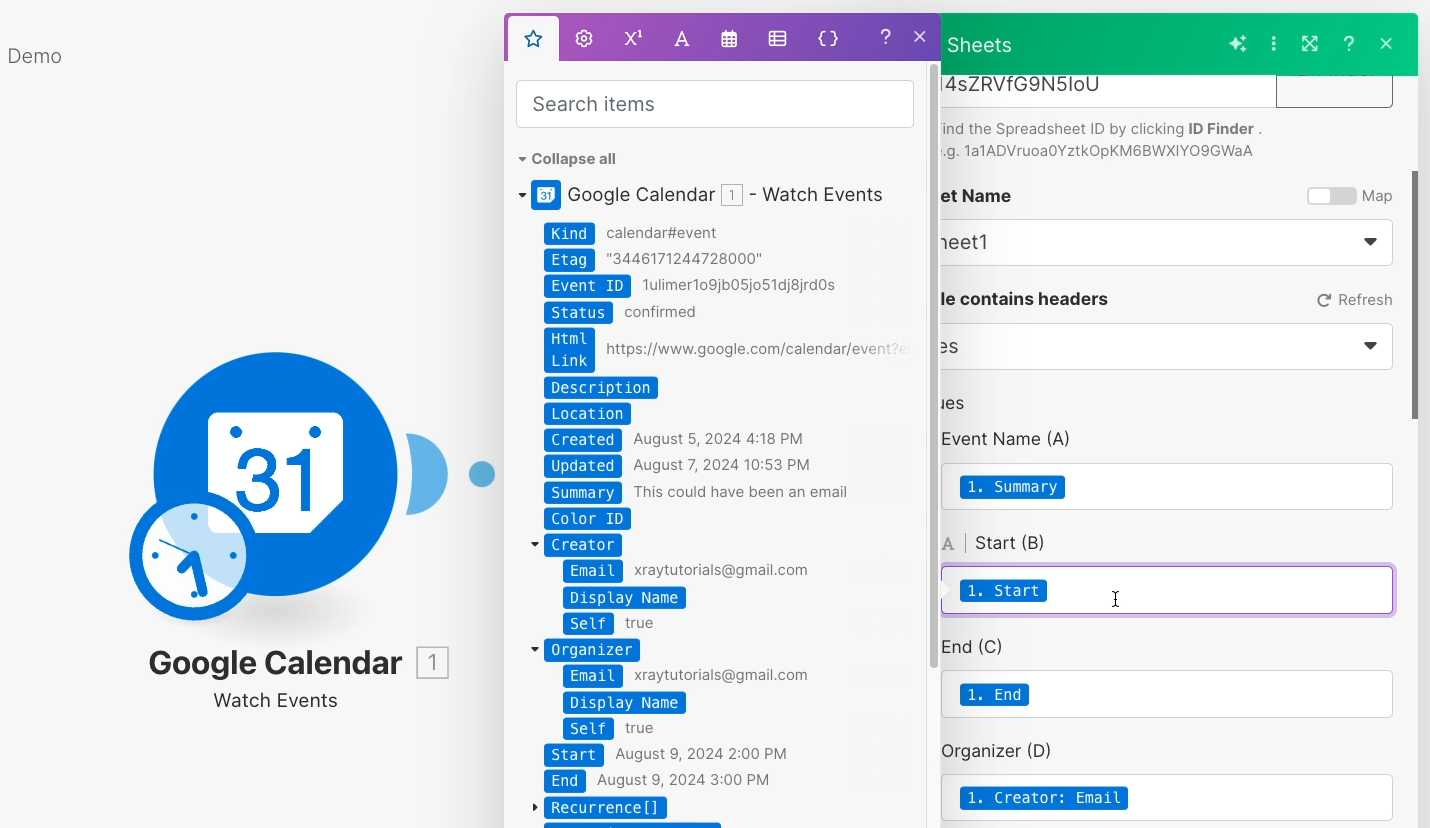
Now, you can map data from the trigger into each column for the new row. Click on each field, and a window will pop up with all of the data retrieved in the trigger, or Step 1 as it’s labeled here.
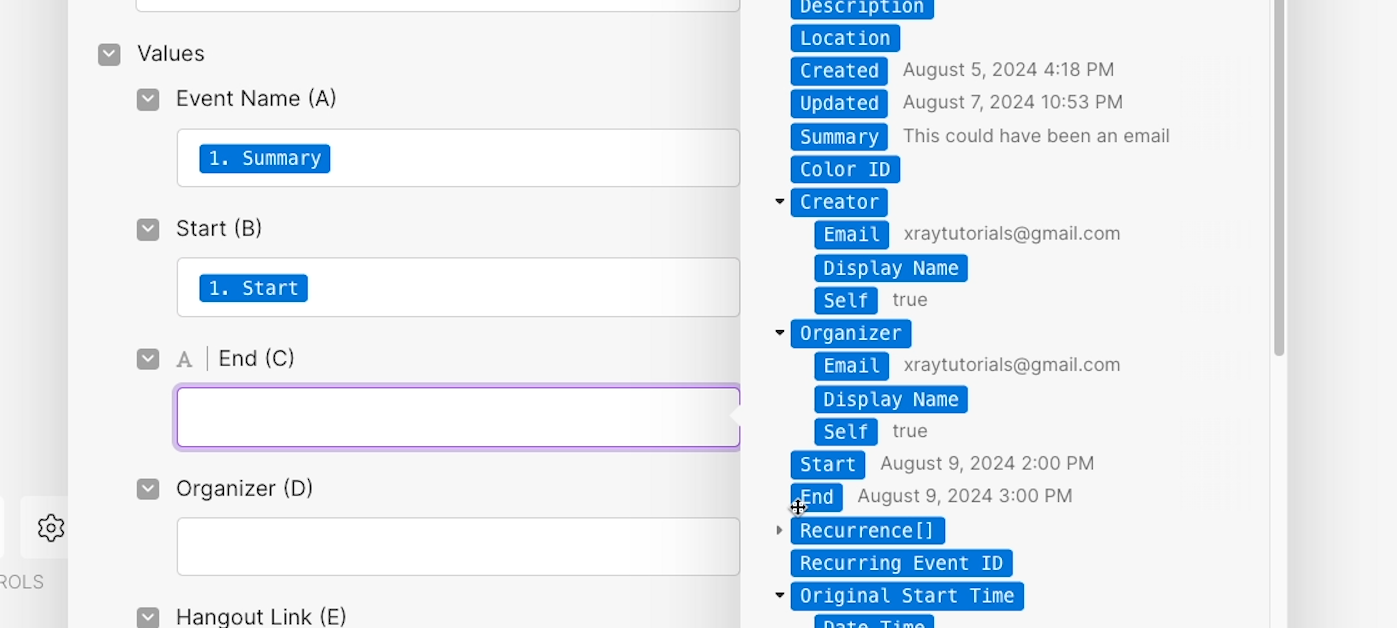
For example, we’ll insert the event summary into “Event name,” the start and end times into their fields, and so on.
If you want to skip any of these fields and leave them blank in Sheets, just leave them blank here, too. Note that you’ll see every column in your sheet, even if it doesn’t have a title, so you might want to delete extra columns before going into Make.
Finally, you can choose whether to use formatted or unformatted data.

For this automation, we’re going to stick with formatted data so our URL in the “Hangout Link” column will still be formatted as a URL. Once you’ve configured the action, click “OK” to close this window.
Testing an automated action
With the action all set up, it’s time to give the scenario another test.
We’d recommend following the same procedure as before to test your scenario: right-click on the trigger, select “Choose where to Start,” “Choose Manually,” and pick the data you want to use for the test.
Then, click “Run once” to run the whole scenario.
You should see the trigger and action modules run one at a time, and numbers will appear over each of them in turn. Again, you can click on these numbers to see the data the module processed.
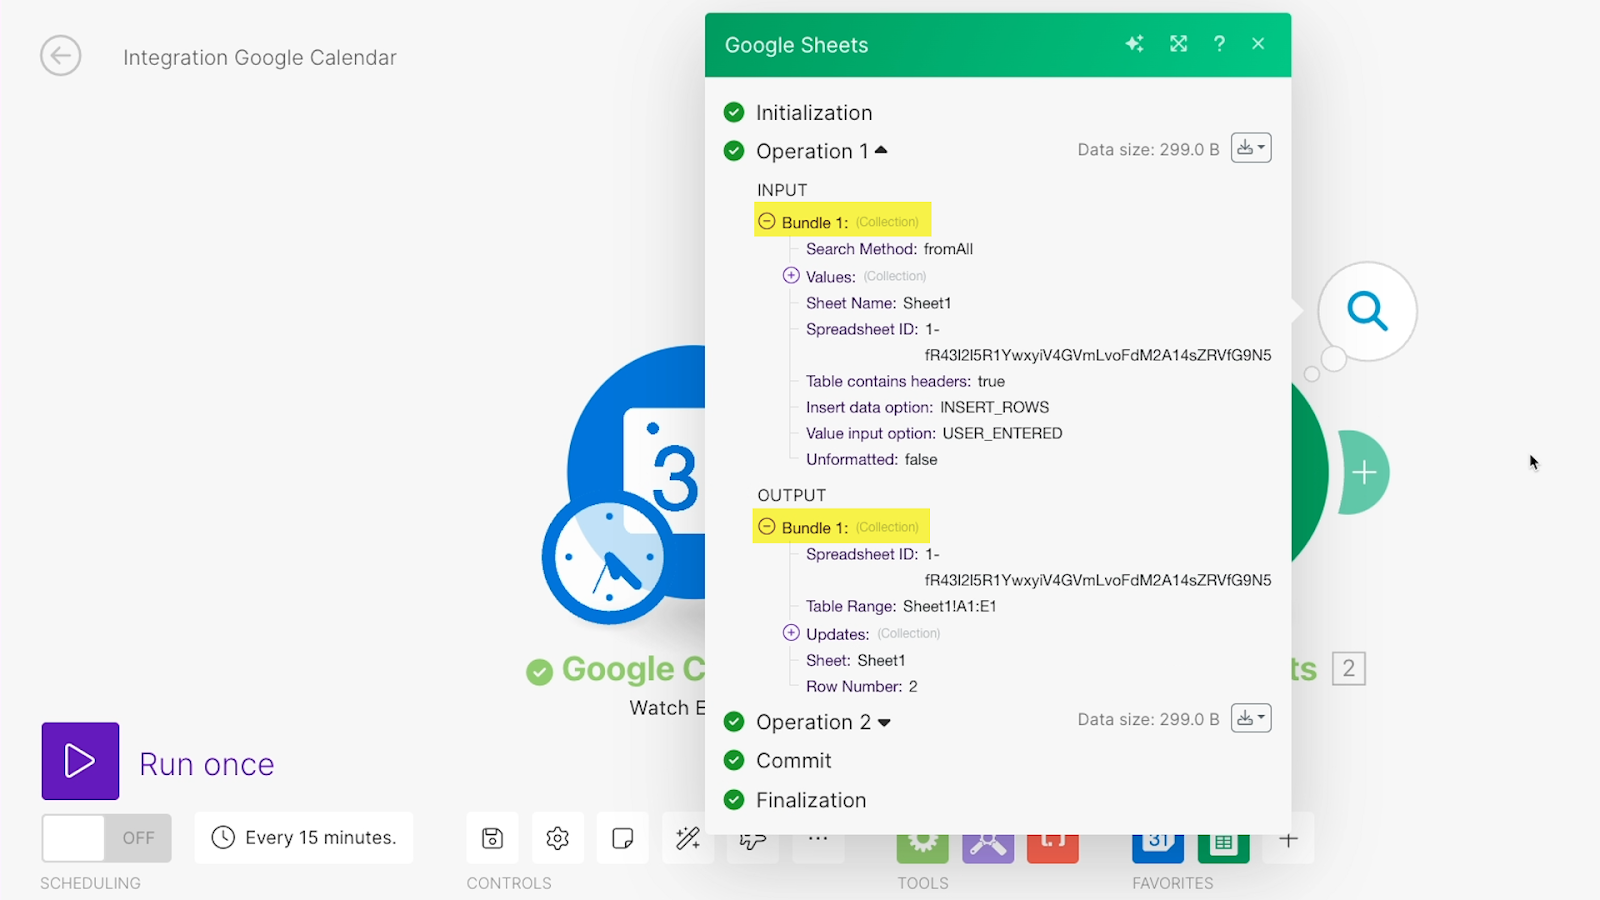
In the image below, you’ll notice there are two “bundles” listed in this “operation”. That’s because our scenario processed two events - the one that we chose to start with, and an additional event that was added to the calendar after our chosen event.
This means that our trigger ran once and retrieved two Calendar events, prompting the Sheets action to create 2 rows. Since two rows were created with two different sets of data, we’ll be able to show you exactly how dynamic data works.
Next, open up your Google Sheet to see what Make created.

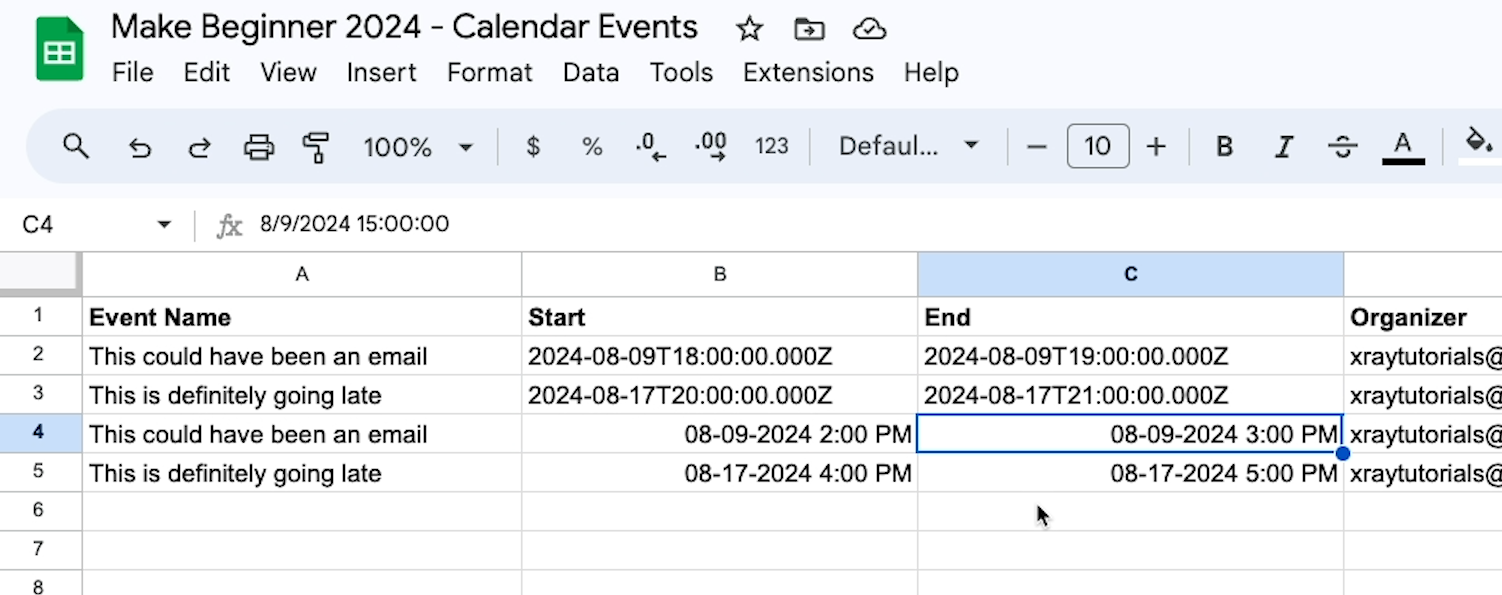
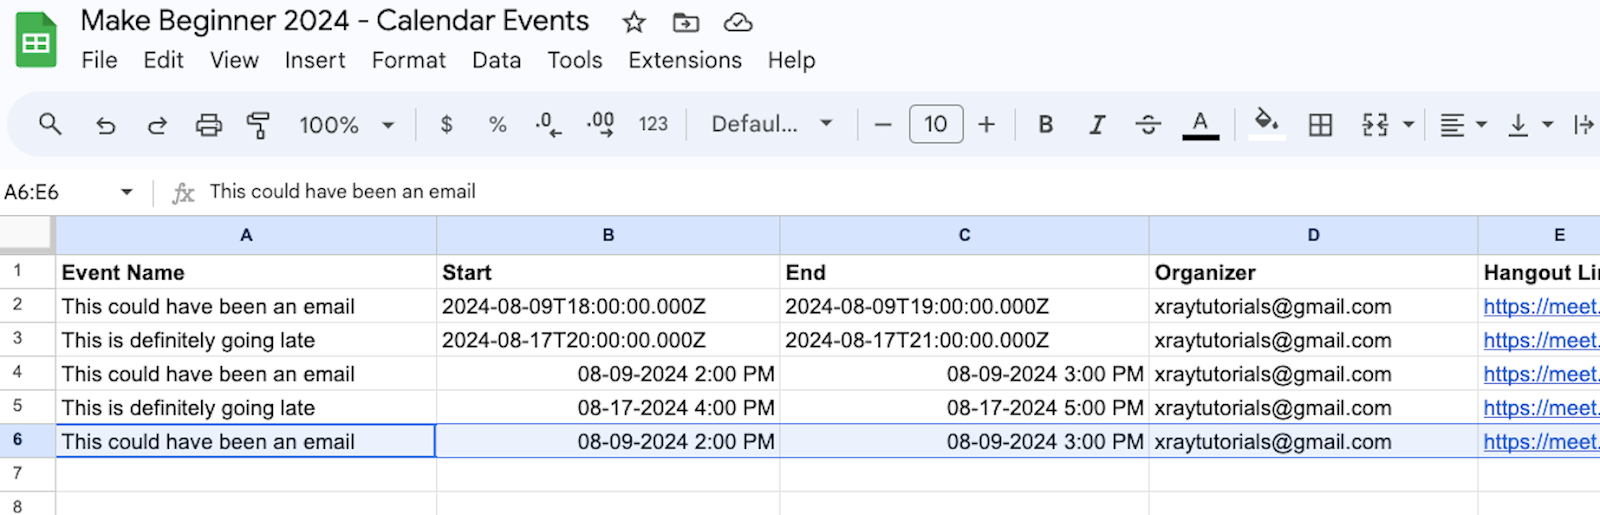
Over in Sheets, there are 2 new rows with data retrieved from the respective events. You should note that Sheets includes the correct, unique information for each event.
That’s why we call it “dynamic” data. Instead of typing out a static title or start date, we told Make to just look for the title and start date of each specific event. The data that gets filled in here reflects each calendar event that runs through our automation.
After running your tests, your first automation in Make is all set. You can save it and turn it on if you’re ready to start using it.
In the next section of this guide, we’ll show you a few ways to improve this automation, but first, let’s take a look at operations and scheduling.
Scheduling your automation to stay within “operations” limits
In Make, you’re limited to how many “operations” you can use on your account each month. Every automated trigger, action, and search counts as a single operation, even if these are run as tests – and even if the trigger runs and doesn’t find any new data.
On the free plan, you’re limited to just 1,000 operations each month.
In the bottom left hand corner, we can see the automation is currently set to run every day and check for new calendar events every fifteen minutes.

That means this automation will use at least 96 operations each day, seven days a week, even if it doesn’t find any new events. This is because you’re charged an operation every time the trigger checks for new data. Using webhook triggers will let you circumvent this issue, which you can learn more about in this tutorial, but that’s a more advanced topic.
For now, we can dramatically reduce the operations used by changing the schedule to every half hour, and by only setting it to run during business hours on business days.
Just click on the scheduling button (which will read “Every 15 minutes” by default) to change the schedule.
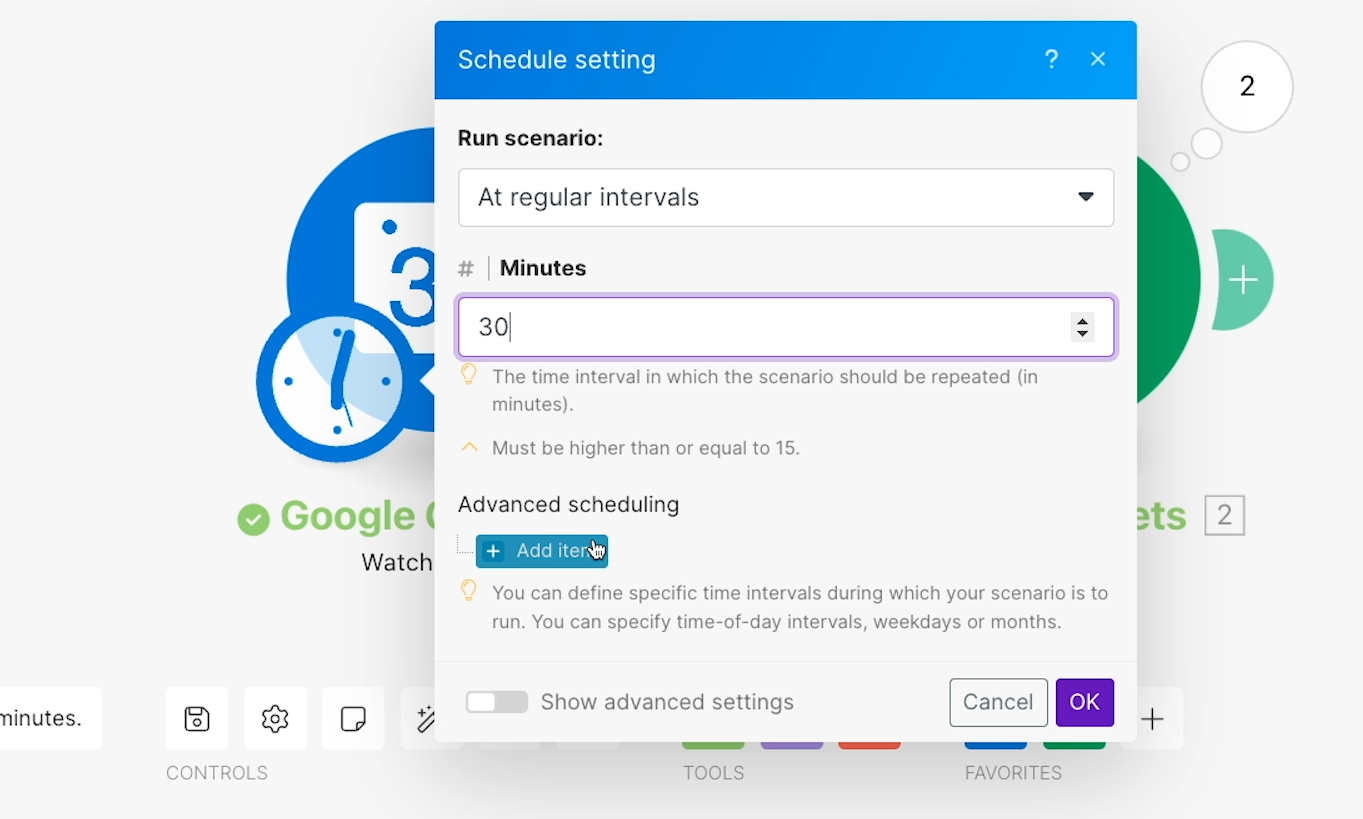
In the menu that pops up, you can set how often the automation will run. By selecting “add item” under “Advanced scheduling”, you can also dictate which days and times the automation will run.
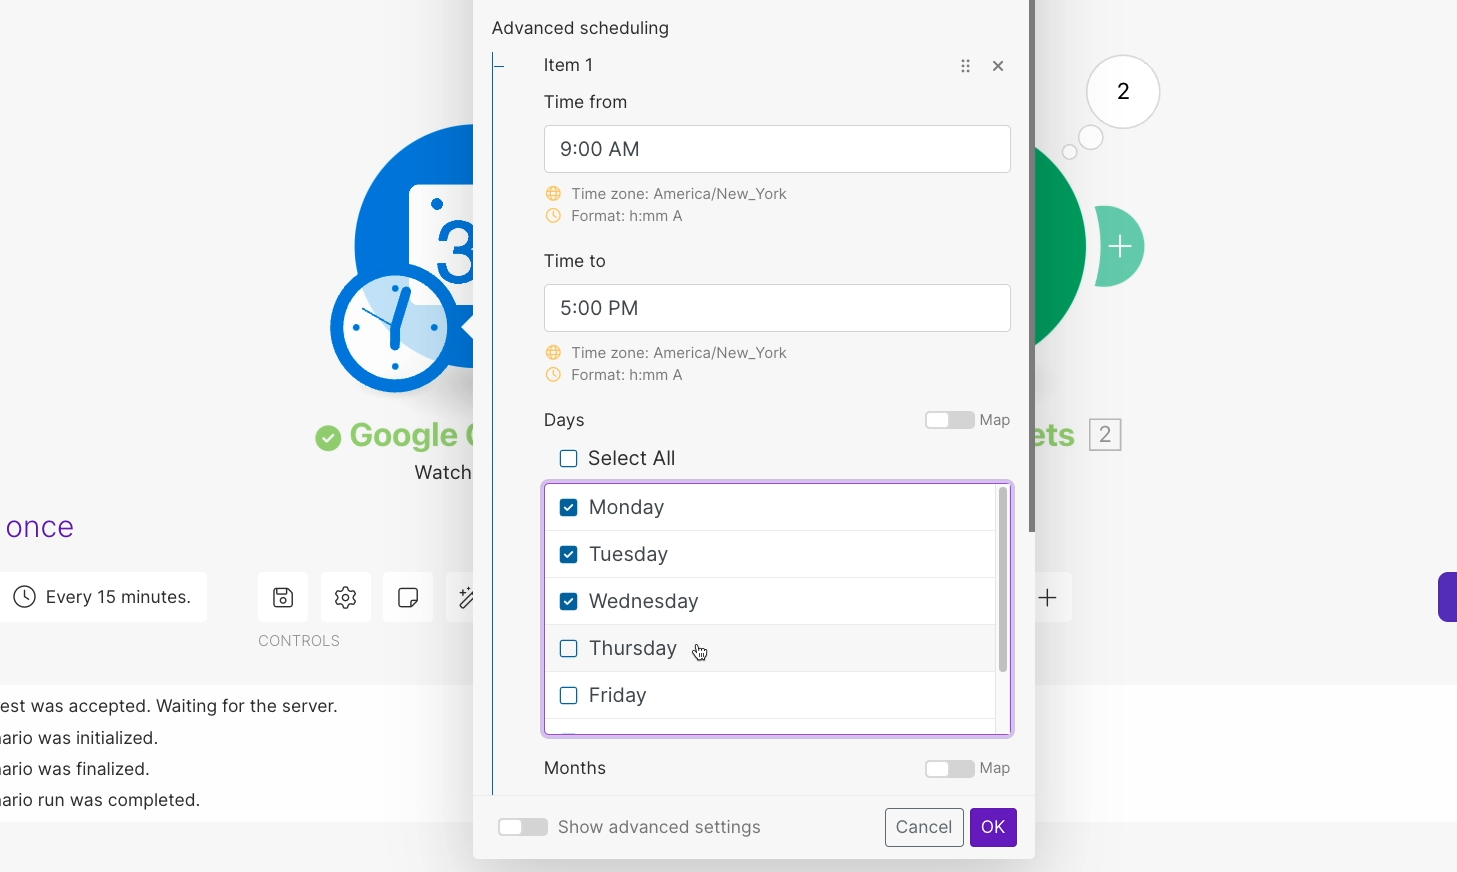
After reconfiguring the schedule in our example, the automation should now only check for new events 16 times a day, five days a week.
Your automation won’t start running on its own until you turn it on, but it’s best to set the schedule early on so you don’t forget.
Going further with Make: advanced techniques
Transforming data with functions
While the automation that we’ve built works fine, the formatting of the dates is less than ideal.

Fortunately, there’s a very simple way to fix that in Make and reformat the dates however you want.
Go back to your scenario in Make and open up the ‘Add a row’ action. Then, select the start date field.
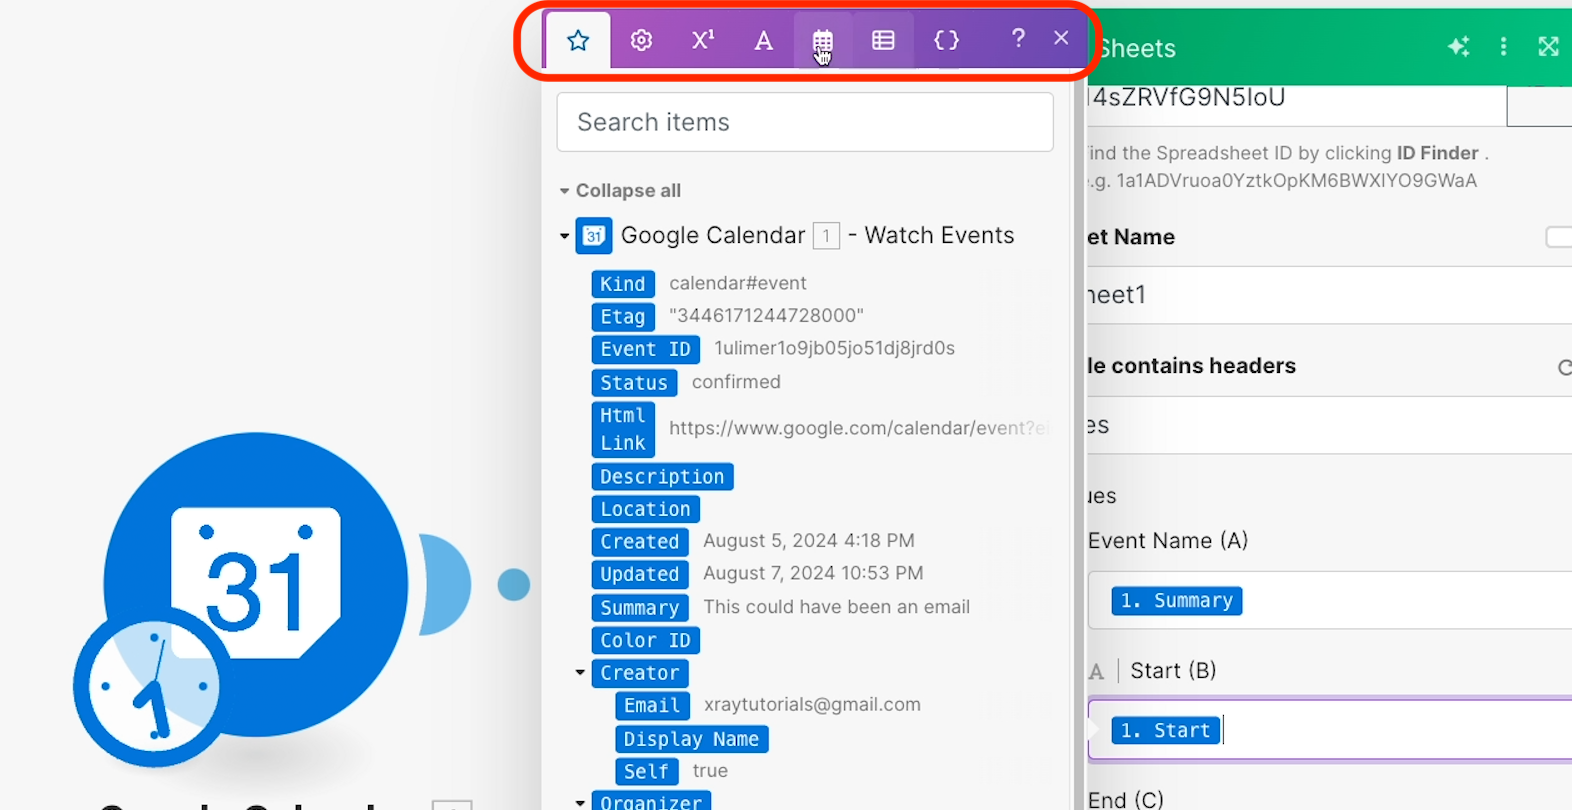
As you’ve already seen, when you select any data input field in a Make module, a window pops up where you can access data from previous steps in the automation.
However, that’s just one tab in this window. In the other tabs, you can access functions and tools that let you reformat text, dates, and numbers, run calculations, and a lot more.
Let’s try reformatting this date to make it a bit easier to read.
Click on the tab with a calendar icon, then look for the “formatDate” function down at the bottom of the panel.
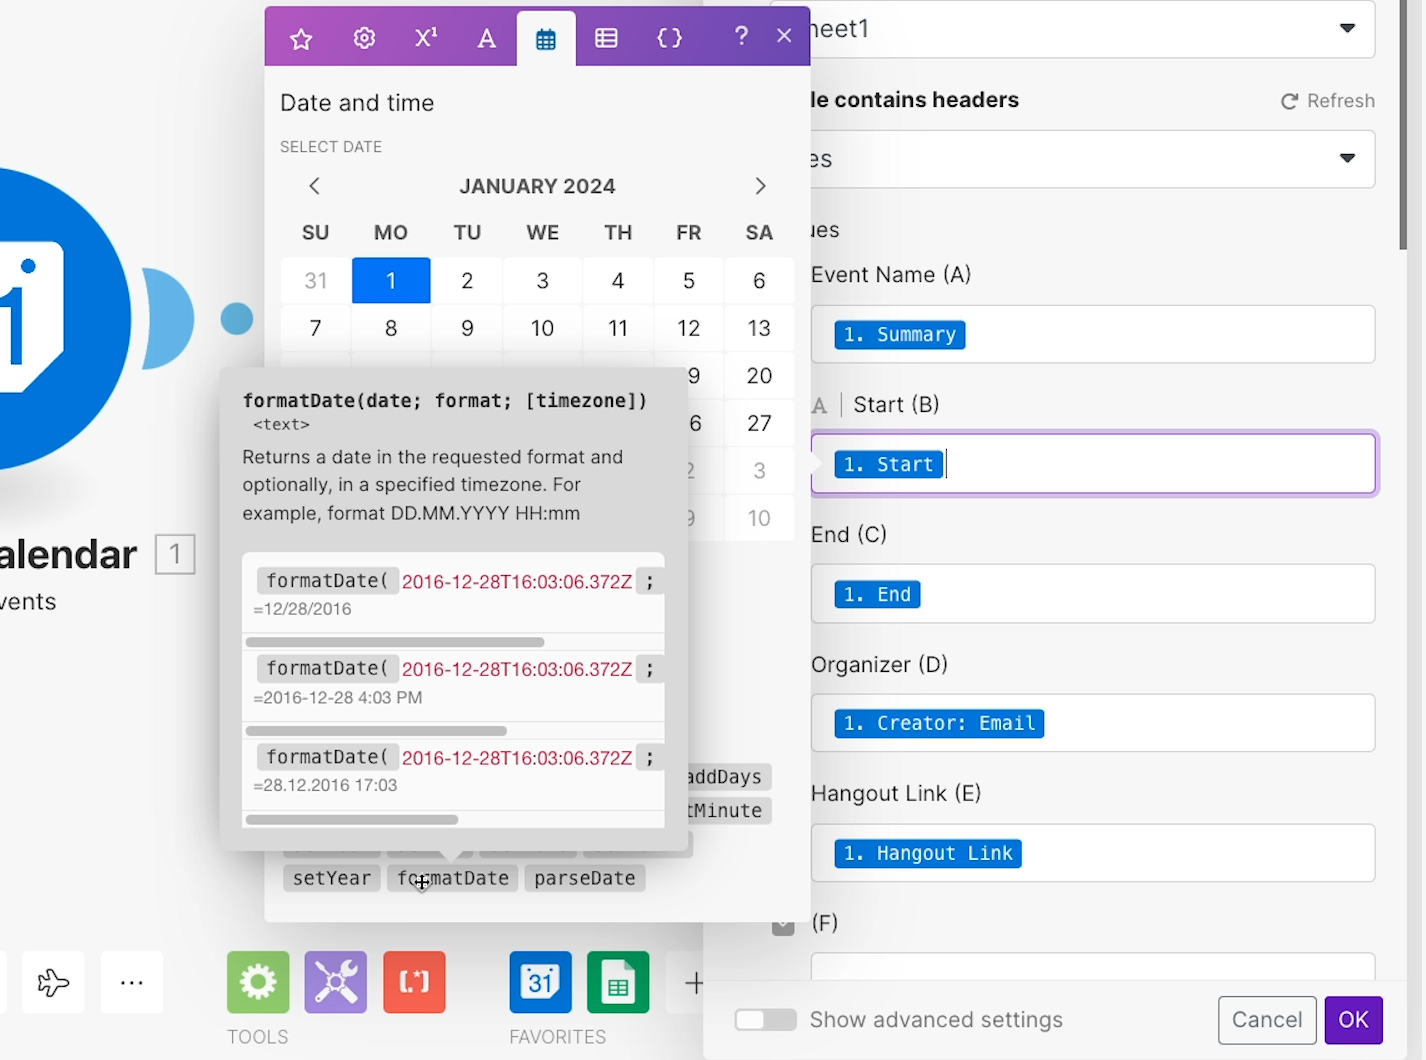
Hover over the function to see a tooltip explaining how it works along with a few examples.
Click on the function to add it to your currently selected input field.
You’ll need to put the date you want to format before the semicolon. Then, you’ll need to provide the format you want to use after the semicolon. You can always refer back to the tooltip to confirm the syntax of the function.
In our example, we’ll use this format:
MM-DD-YY hh:mm A
to show the month, day, and year separated by dashes, followed by 12-hour time.
To keep things consistent, we’ll also use the same function for the end date.
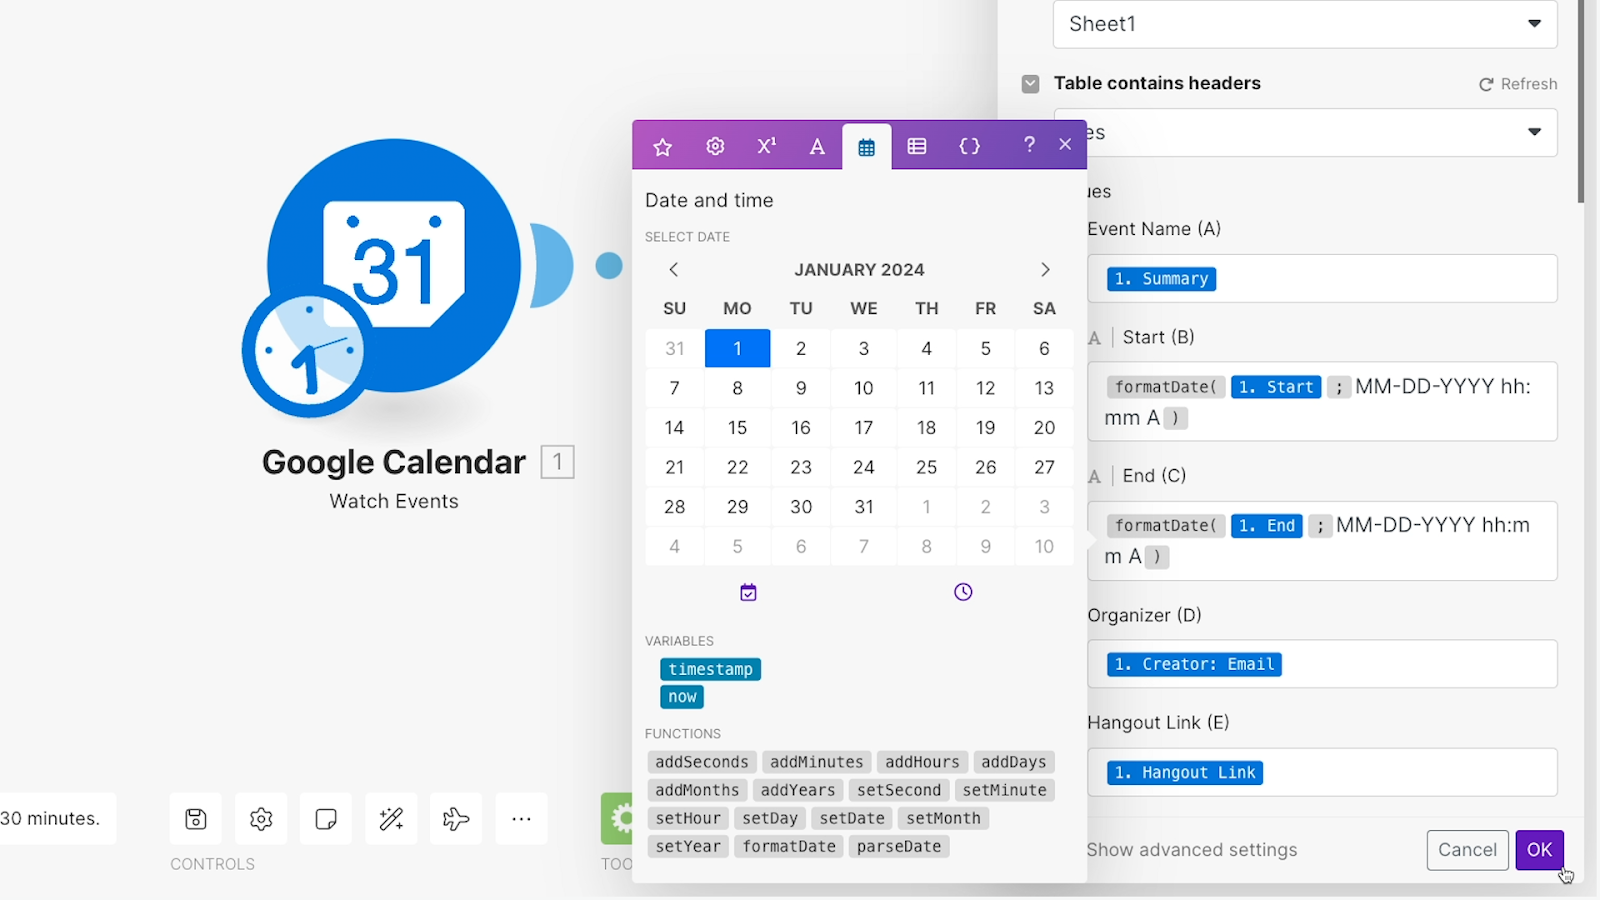
Now, instead of entering the timestamps directly into Sheets, this automation will enter the outputs of these functions, which will be neatly formatted dates and times.
Once you’re all set with your functions, close the Sheets action and save your scenario with the floppy disk save icon. Then, give your scenario a fresh test.
Check Sheets to see the output. You should see a new row with start and end dates using our new format.
Conditional logic and filters
There’s one last thing we want to show you before we wrap up this beginner’s guide. In general, one of the best things about automating a workflow is that you’ll ensure it runs the same way every time, and you’ll avoid all those messy human errors. But with a simple automation like this one, that extreme consistency can become a problem.
That’s because real-life workflows are rarely this simple. More often than not, you’ll need to allow for at least some variation. Fortunately, Make offers several tools to give your automations some variability, including the ability to add filters before any automated action. The scenario will only continue to run past the filter if its data matches your filter conditions.
Let’s see how it works in action.
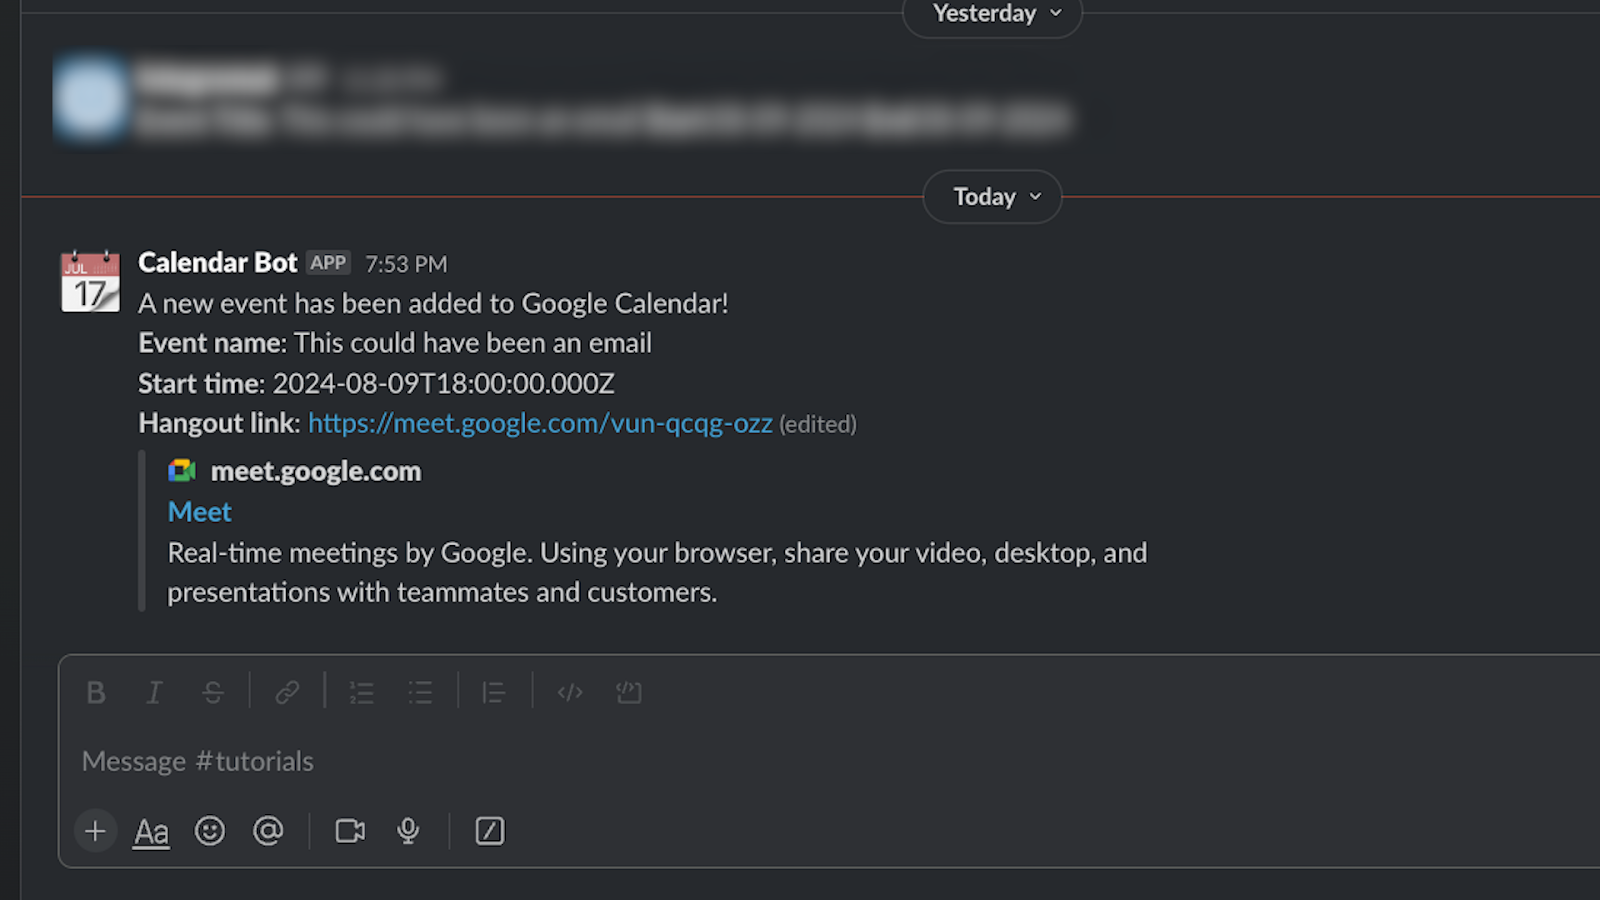
First, add one more action to this scenario. In our example, we’ll add a Slack action to send a channel message. The message will act as an alert for each upcoming meeting.
Setting up this action is very similar to configuring the new row in Sheets, so we’ll just show you the finished configuration in the screenshot below.
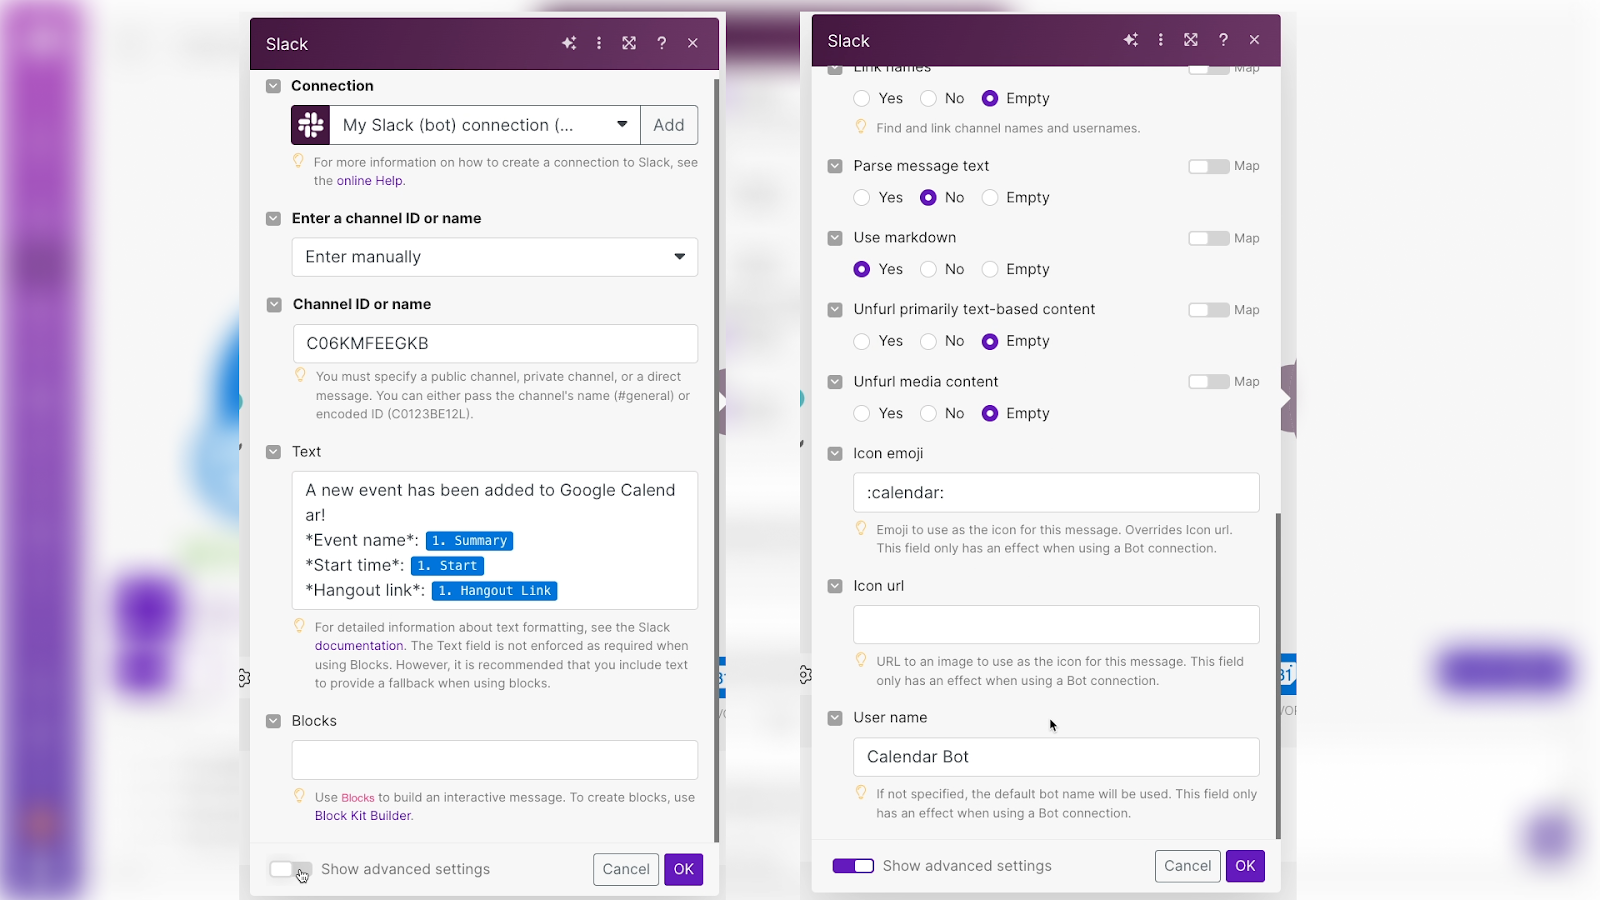
Note that the asterisks we’re adding around some words in the message are a simple formatting trick - they’ll make those words bold in Slack’s markdown syntax. Once your Slack message module is all set, you can add a filter before it.
What we’re going to do is make it so the scenario will only continue to the Slack step if the calendar event is set to start within a week from the current time. If it’s later than that, the scenario will just stop after creating a new row in sheets.
Adding a filter
To add a filter to a scenario, click on the dotted line between the two modules where you want to add your filter.
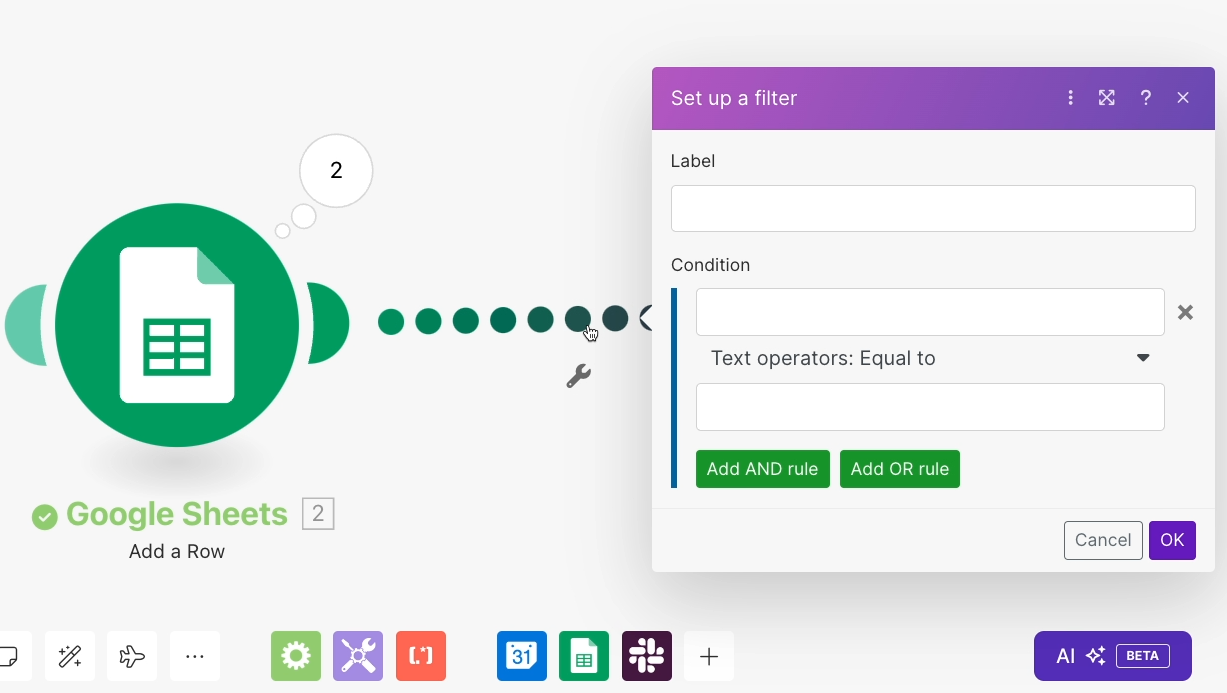
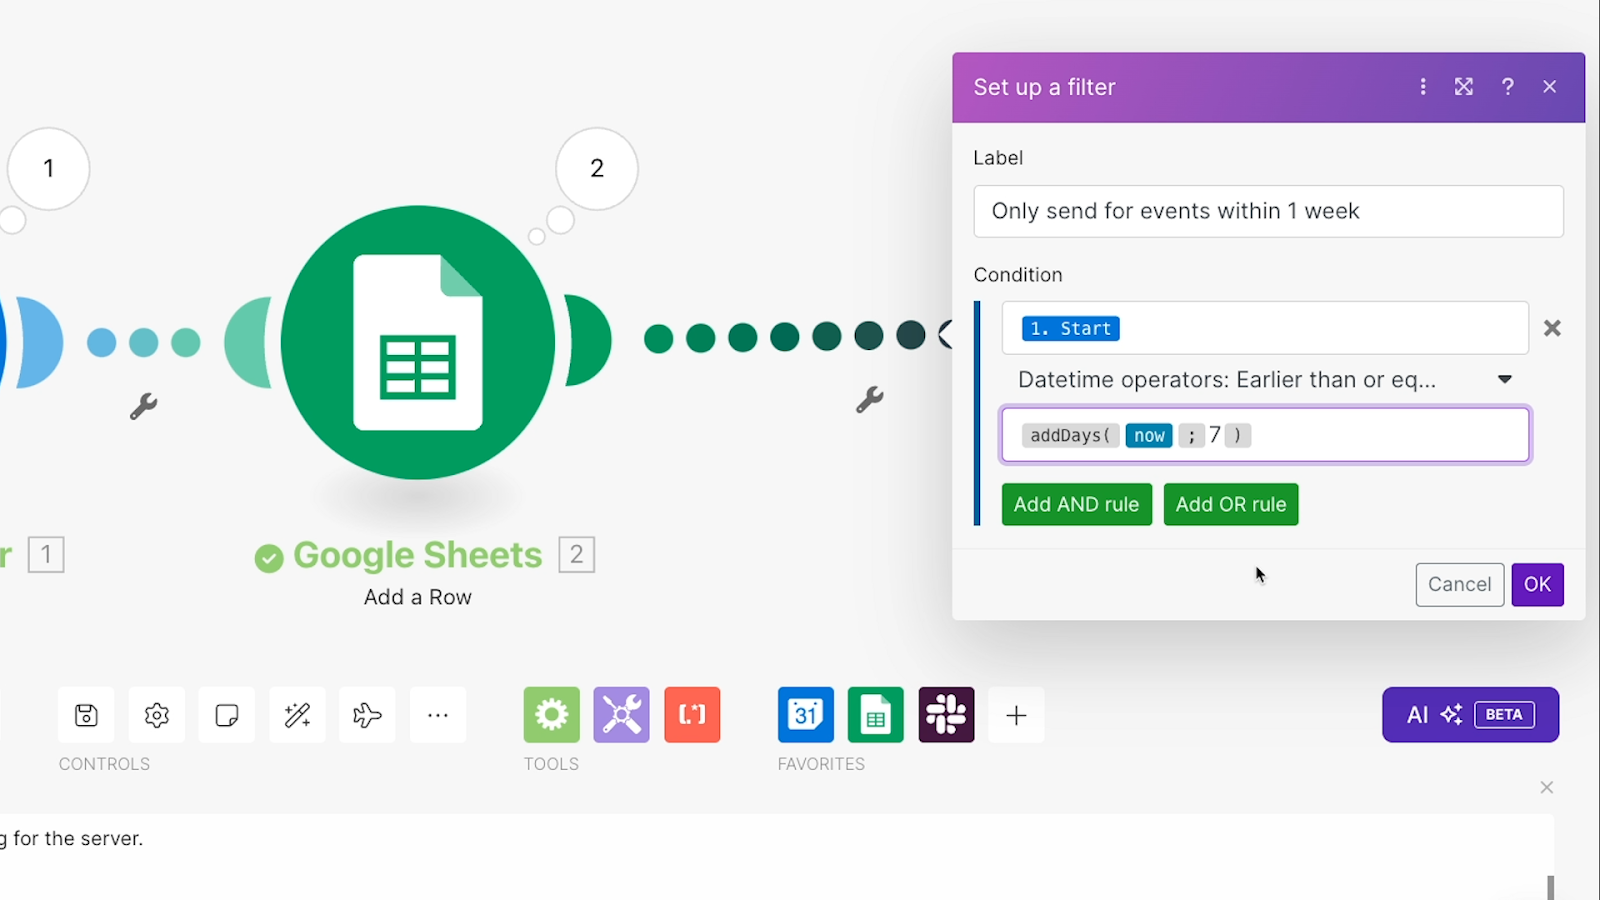
You’ll then see a little window pop up where you can configure your filter. Give it a brief, descriptive label so you know what it’s for.
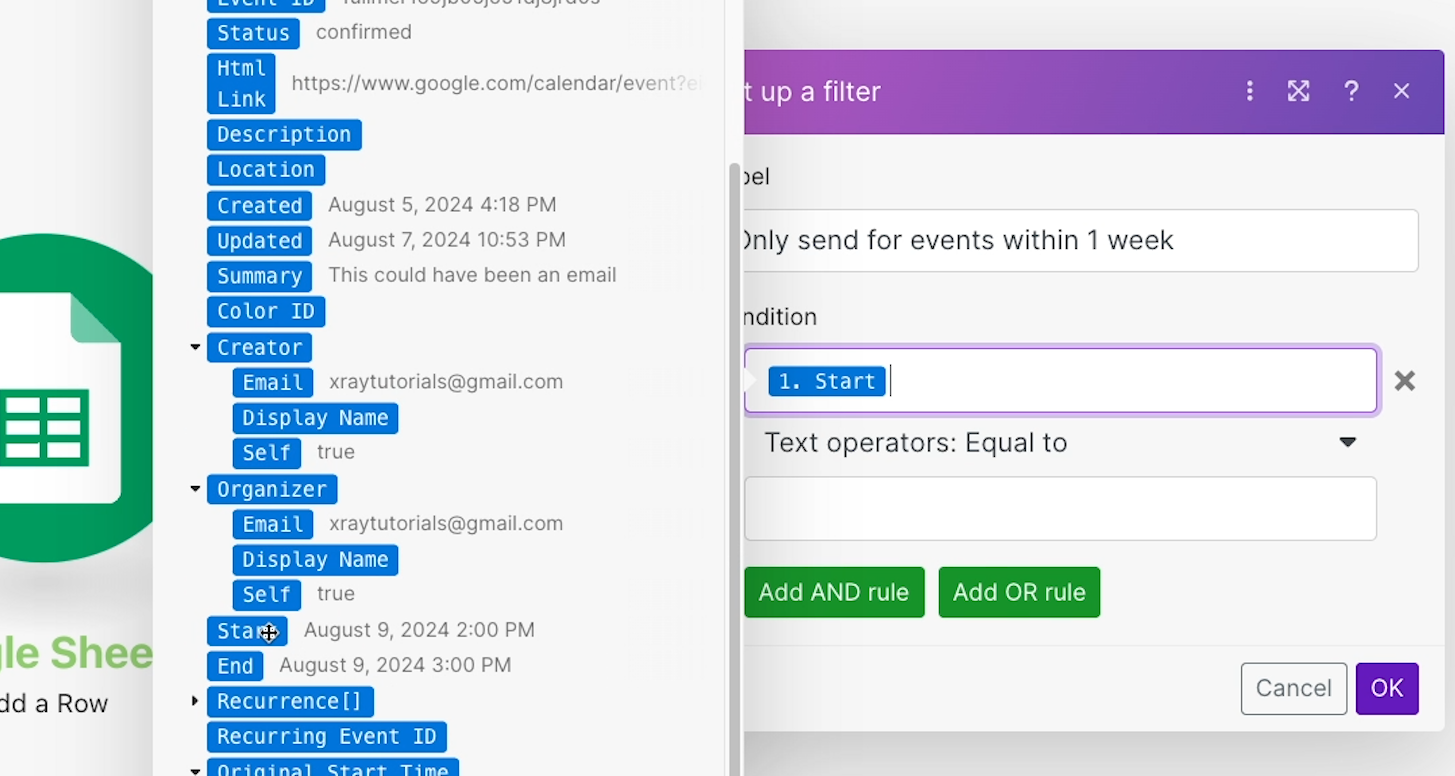
Then, you can set the condition. This is what the filter is going to check to decide if it should continue or not.
We want to check when the start date is, so begin by entering the start date from the trigger.
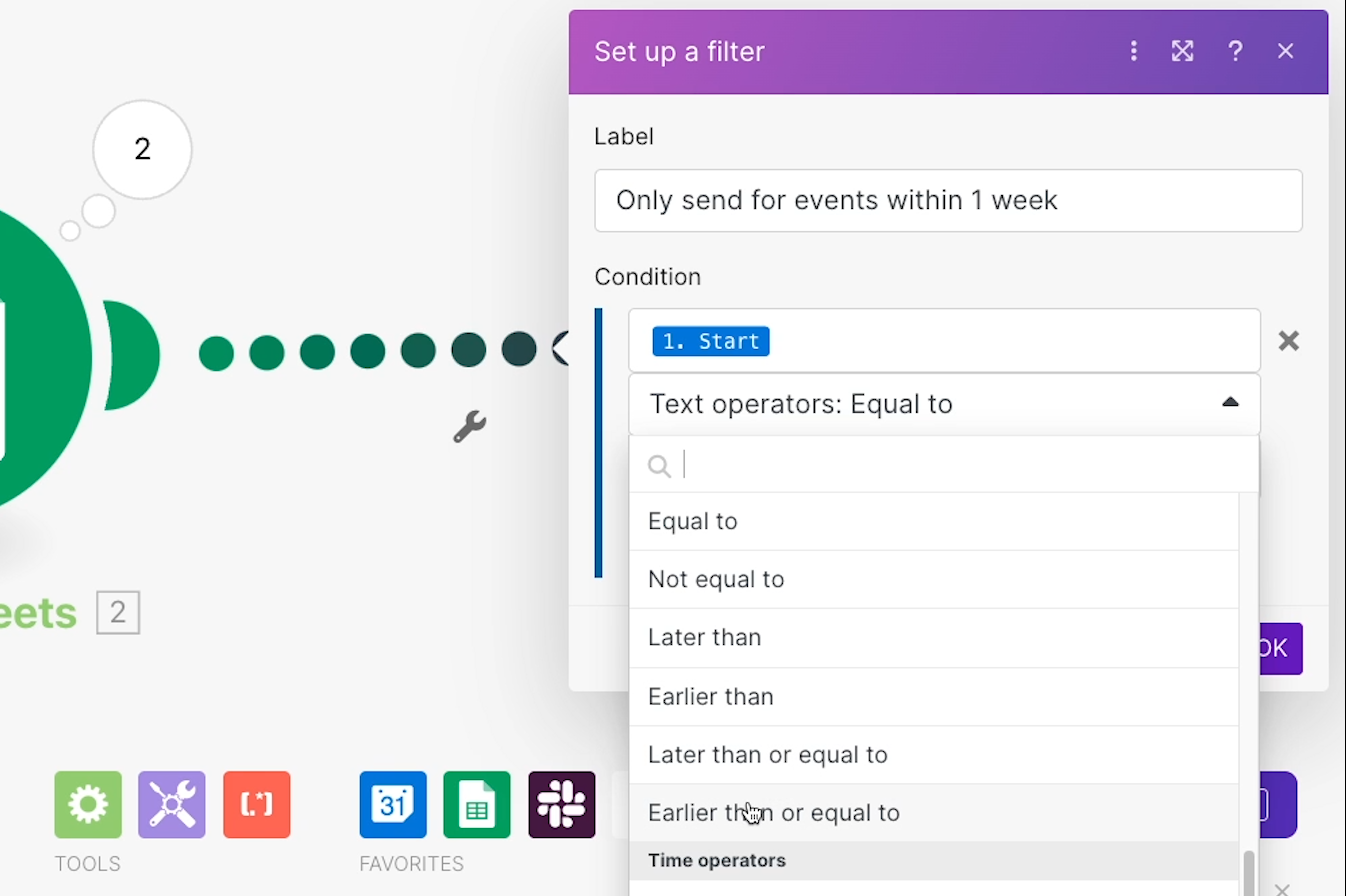
Then, set an operator. Look under “date time operators” for the “Earlier than or equal to” operator.
Now, you just need a way to specify “one week from now.” To do that, you’ll need to ask Make to retrieve the current time, and add seven days to it.
Go to the calendar tab again and choose the “AddDays” function.
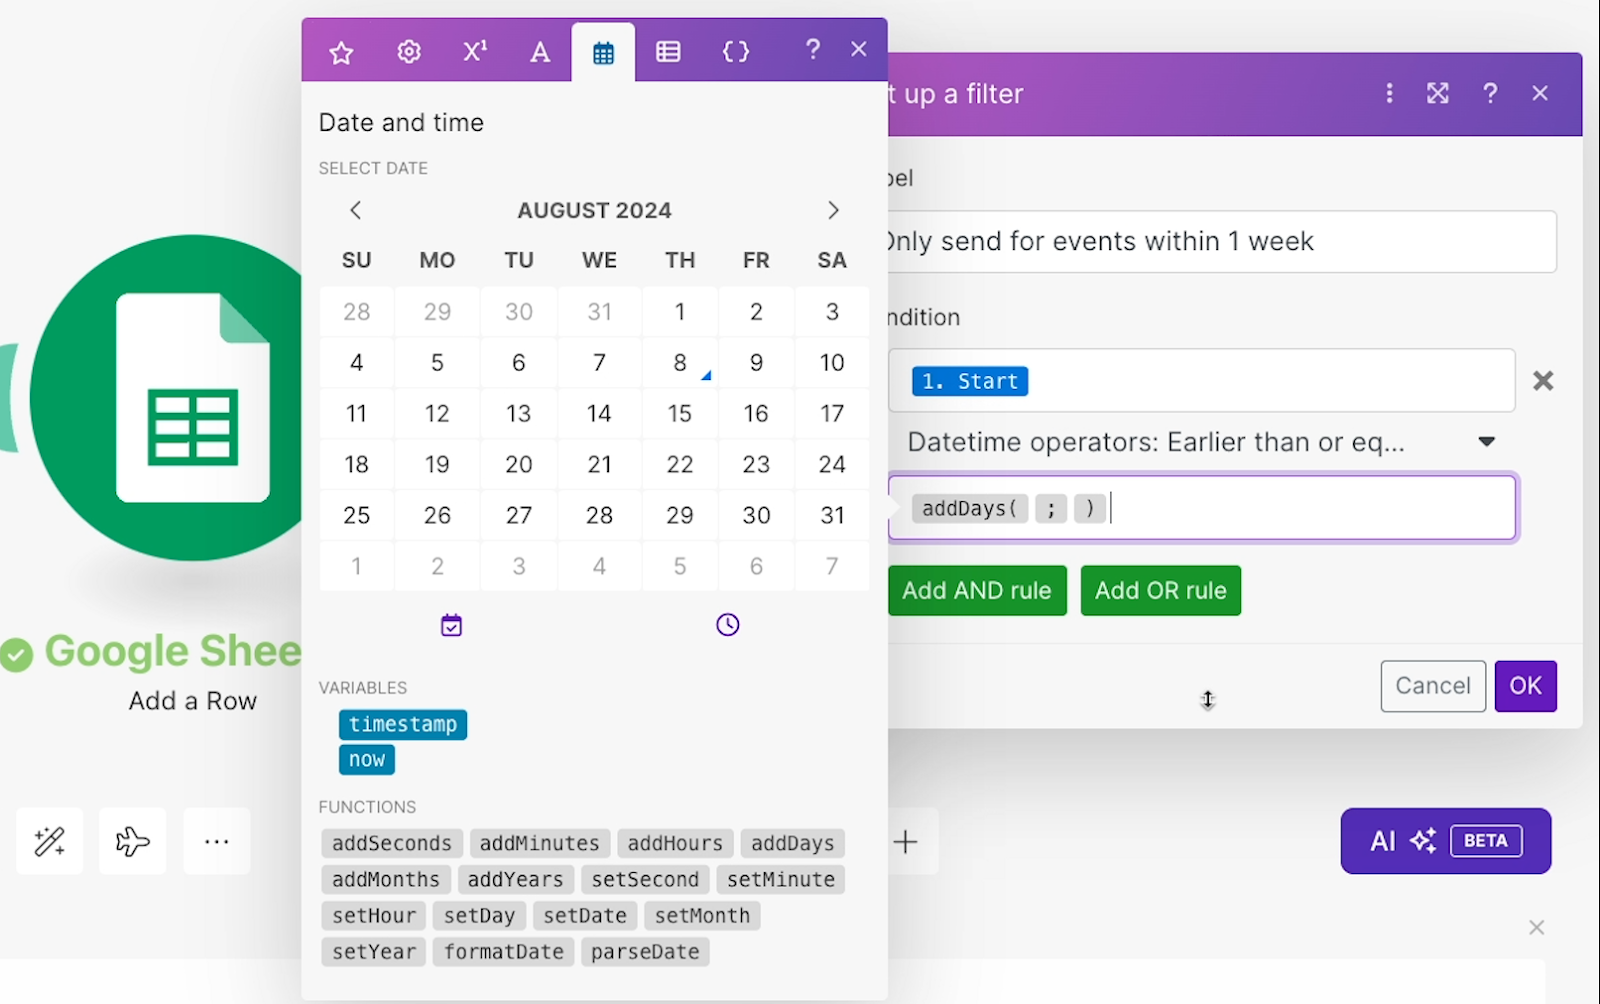
Before the semicolon, insert the variable called “now.”

“Now” will retrieve whatever the current date and time is when the scenario is running.
After the semicolon, enter 7, for 7 days.
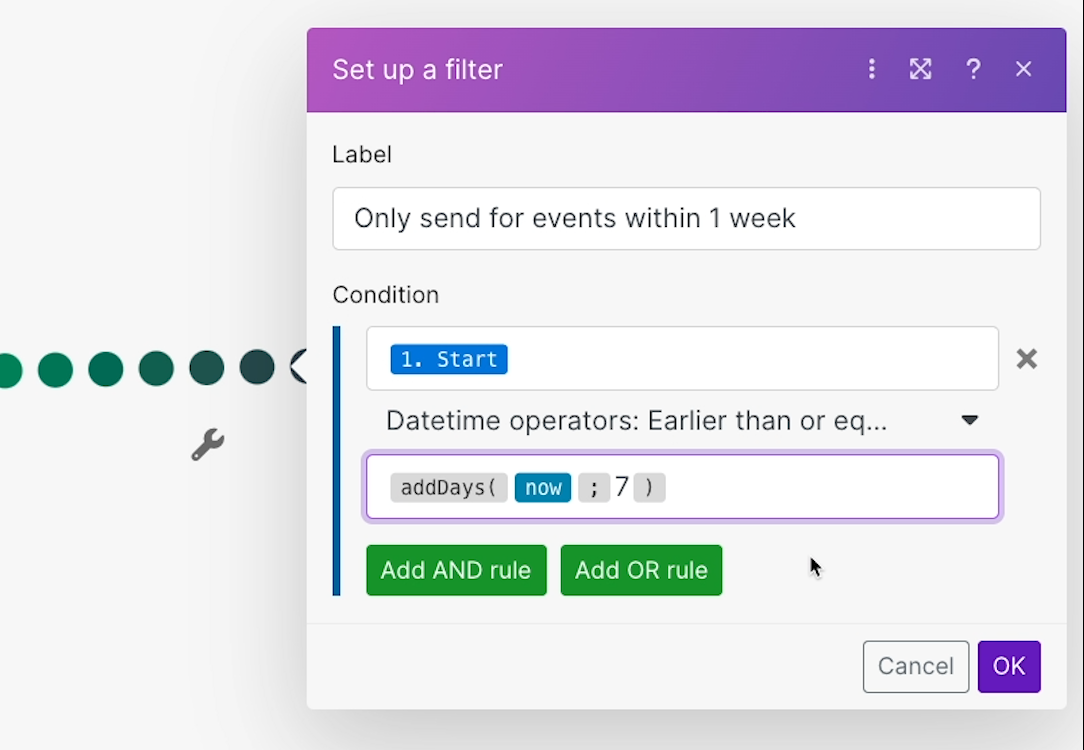
Now, this filter is set up to check if the event’s |Start date| variable is |earlier than or equal to| |7 days| from now.
By clicking on “Add AND rule” or “Add OR Rule,” you can add more conditions for the filter to check, but let’s just stick with this one for now.
Click OK to close the filter, and give it a test.
Testing a filter
We’d recommend conducting two different tests – one that should pass the filter and one that should fail.
In our example, we’ll start with an event that starts in 2 days, which should pass the filter.
After running the test as usual it looks like all three modules ran, consuming 3 operations.

Below, you can see the new row added in sheets, and the message sent in Slack.
Now we’ll test with this event that starts in 10 days.
In our test, the trigger and the Sheets module ran, but the scenario stopped at the filter and didn't send a Slack message. In total, it consumed 2 operations instead of 3.
Based on these tests, the filter makes the scenario stop when events are more than 7 days away, but lets everything else through. It’s working exactly as intended.
Use routers to do more with filters
To get the most out of filters, you’ll usually want to use routers as well so you can set up alternative actions for different conditions. You can check out this tutorial for more information about routers.
But for now, your first scenario is all set. You can now automate your apps with custom triggers and actions, transform data with functions, and control the flow of your automation with filters. You’re well on your way to automating your work and claiming back some valuable time.
Start automating your team’s repetitive tasks with Make
With automation software like Make, you can remove tedious, repetitive tasks from your team’s everyday workload, and focus more time on the work that really matters.
What we’ve gone over today is just the beginning of what Make can do. Be sure to check out some of the other tutorials on our blog or our YouTube channel to learn more and level up your automation skills.

AI automation is no longer a topic to put off for the future.
In a competitive environment, companies can’t afford to ignore the benefits AI and automation can bring today.
By eliminating repetitive tasks and creating content and reports with generative AI, businesses can scale their operations and gain fresh insights.
However, not every workflow is immediately ready for this kind of transformation. Preparing your workflows for automation and AI is essential to harnessing these benefits.
Here’s how to get started.
The Power of AI in Automation
First, let’s take a look at how AI has opened up new possibilities for workflow automation.
Generative AI models, like those from OpenAI and Anthropic, have brought an entirely new dimension to no-code/low-code automation.
While automation providers like Zapier and Make have always excelled at automating repetitive tasks and sharing data between applications, they’ve been limited in synthesizing or creating information.
Now, with AI, you can go beyond simple automation by transforming content and generating original materials with AI prompts integrated into your workflows.
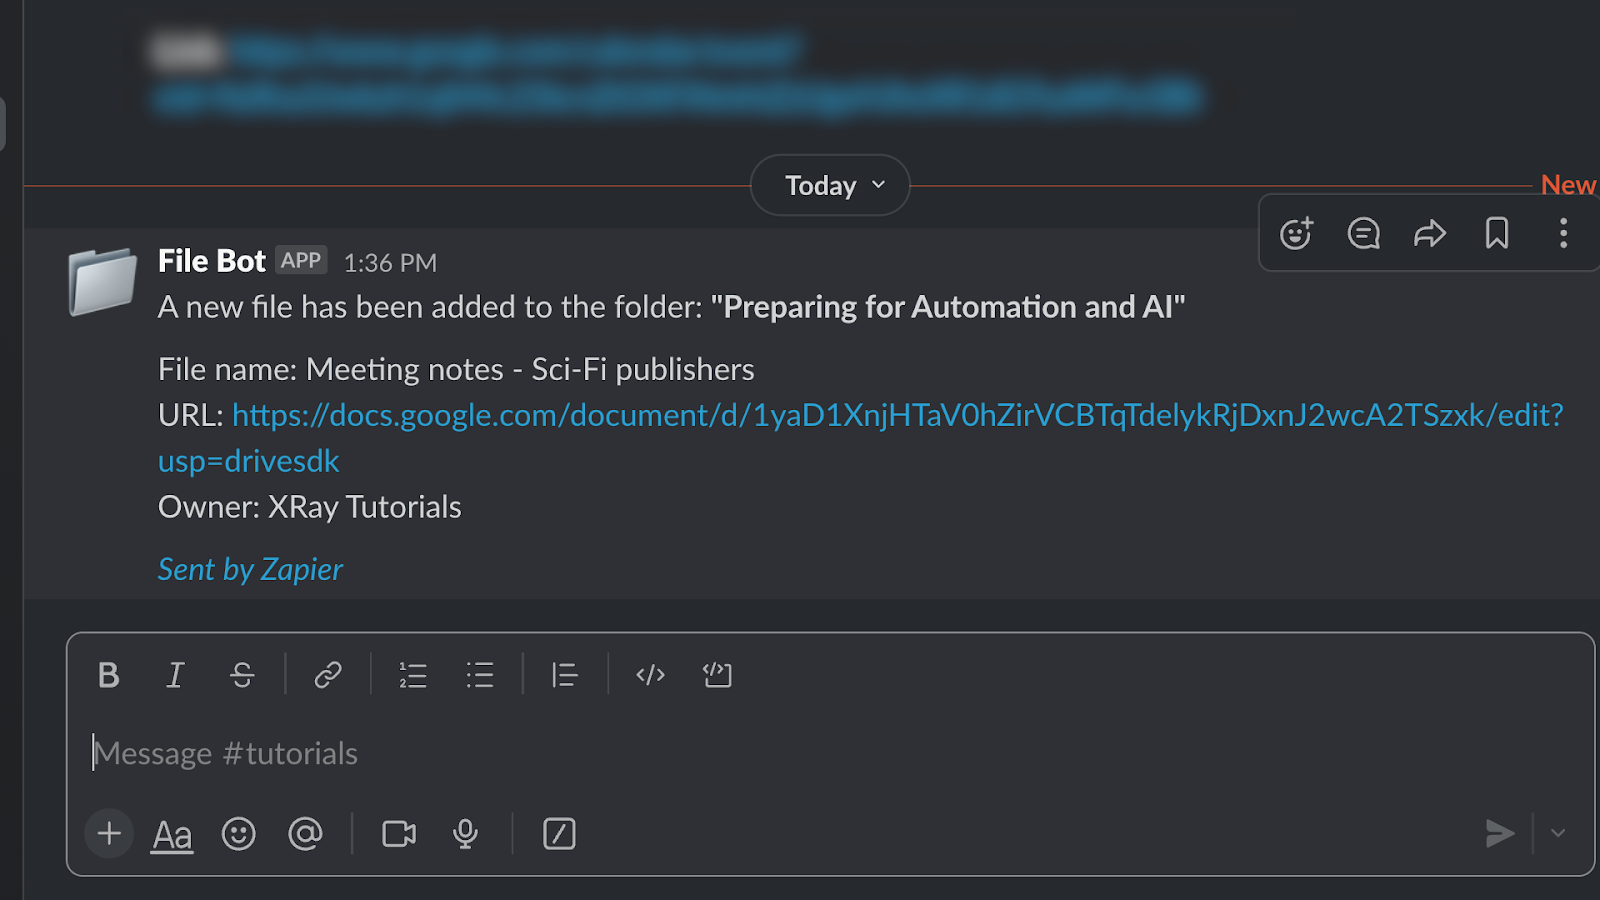
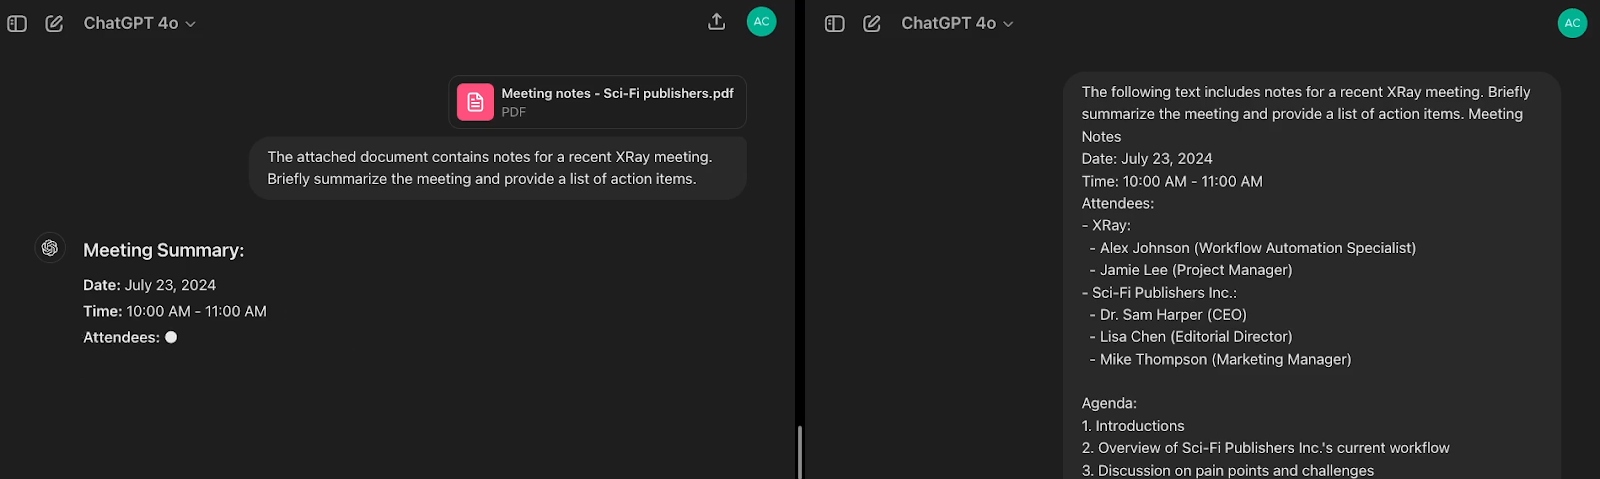
For example, without AI, you can automate alerts for new files added to Google Drive, referencing data from the Doc in your alert’s message.
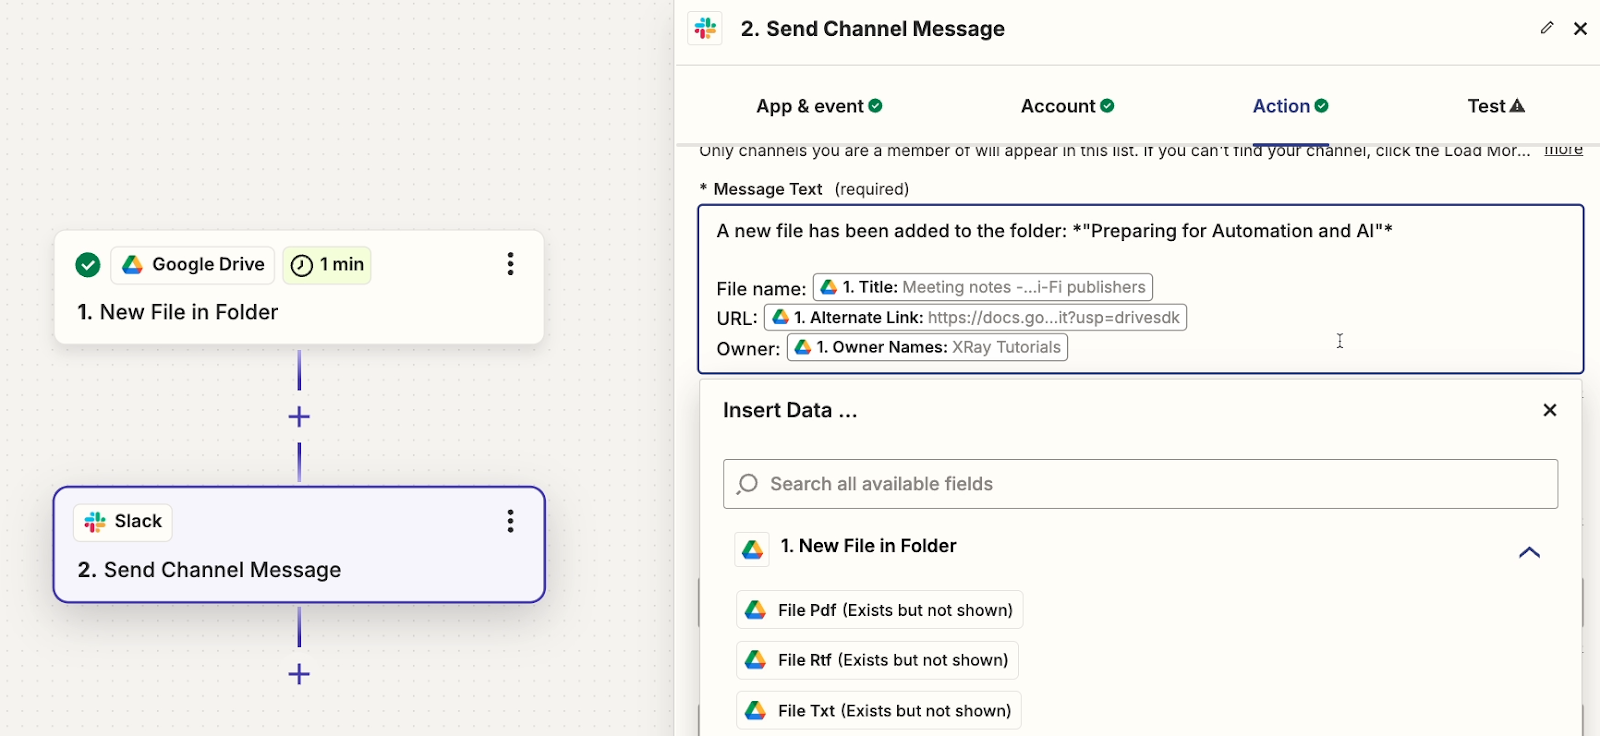
It’s easy to connect the data from Point A to Point B, but you can’t really create brand new data using traditional workflow automation alone.
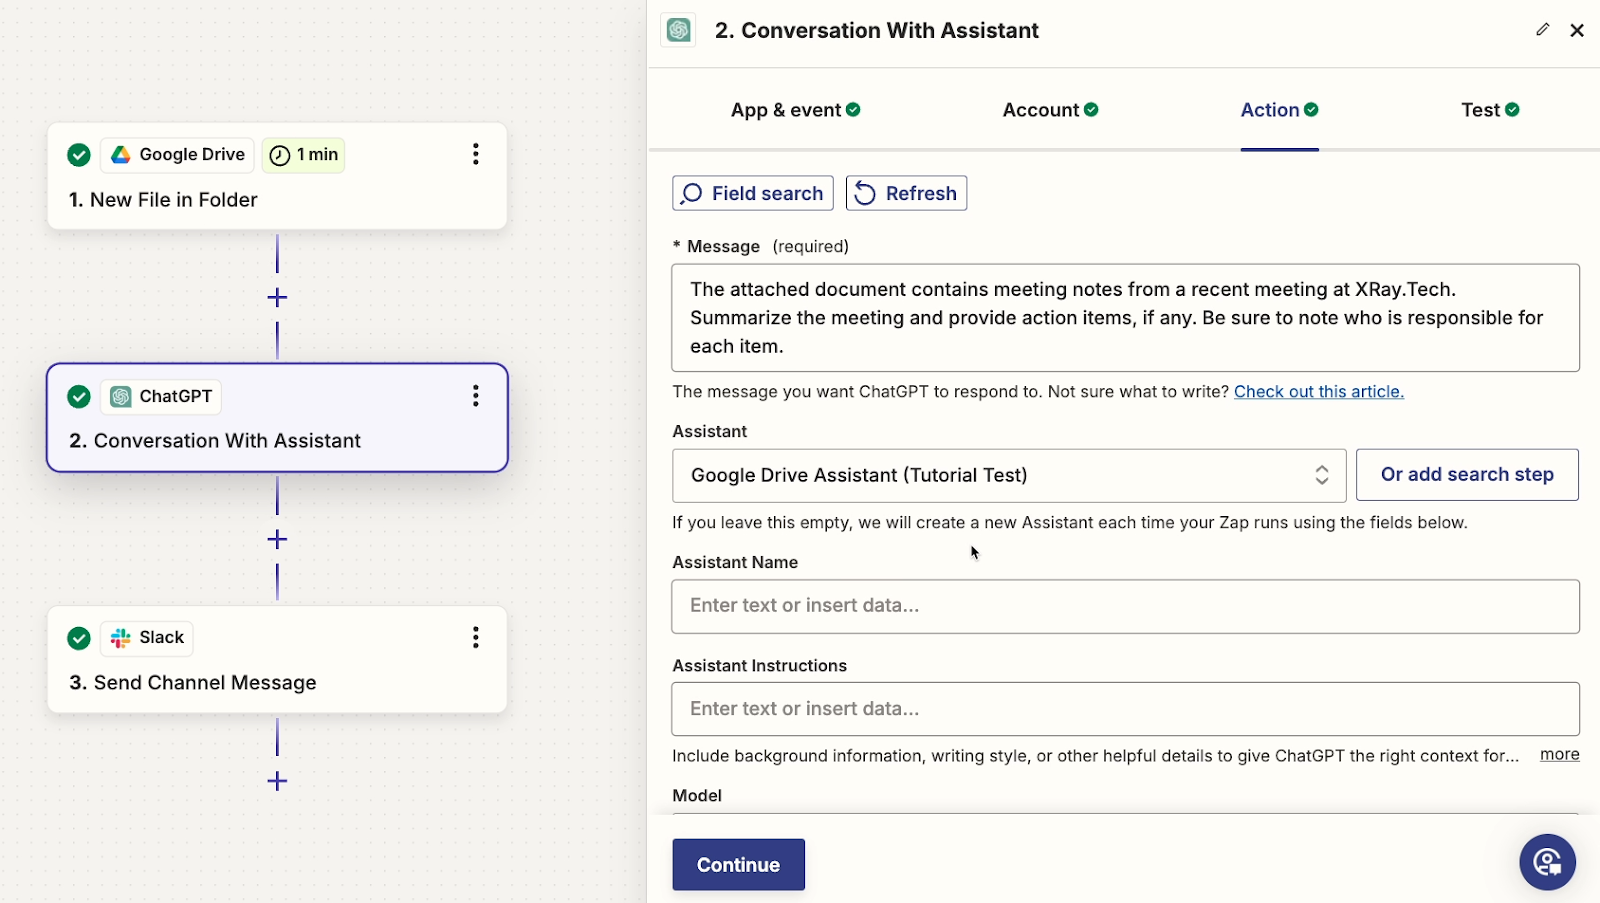
However, with AI, you can take things a huge step further and summarize the documents or generate improvement notes using ChatGPT.
Preparing Your Workflows for Automation
But before trying to enhance your workflows with automation and AI, you need to ensure your processes are repeatable and consistent.
This is a crucial preliminary step for two key reasons.
First, automations require specific instructions to run properly. Even though you don’t need to write any code to build automations with Zapier or Make, you still need to define clear triggers and actions for your processes, and specify the data inputs and outputs for each step.
Second, automating a process will only be worthwhile if that process already provides value for your company. Automating a process that’s not working how you intend will essentially just codify an unproductive workflow.
So if you want to try automating a process, start by mapping it out in precise detail to create an effective automation blueprint. Confirm that the process works well when run manually first, then automate it in software like Zapier or Make.
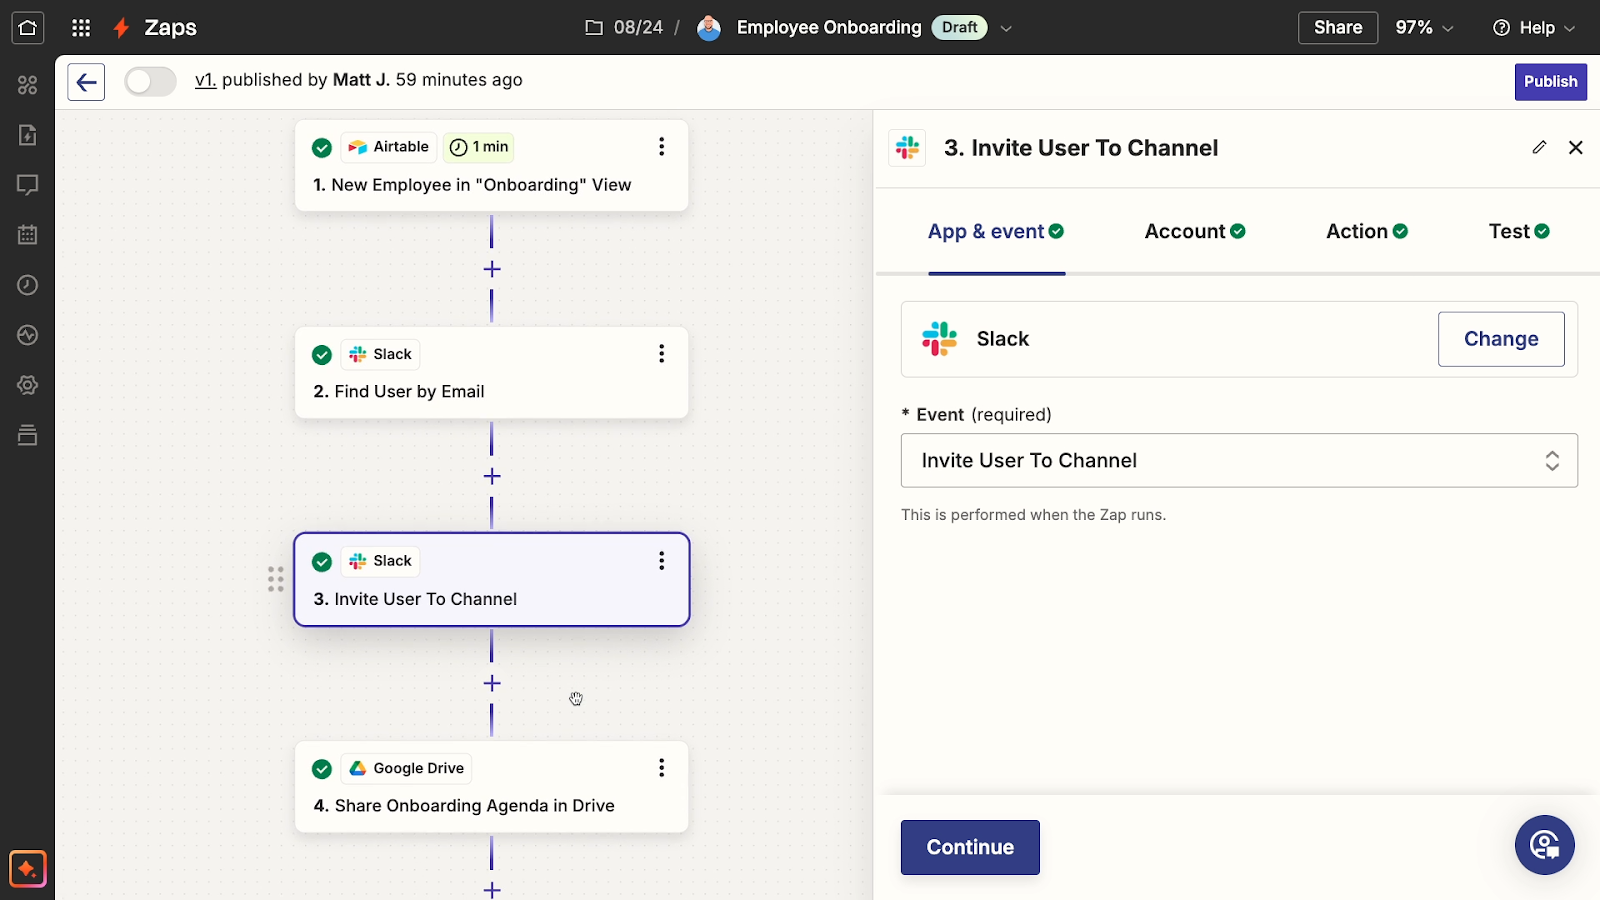
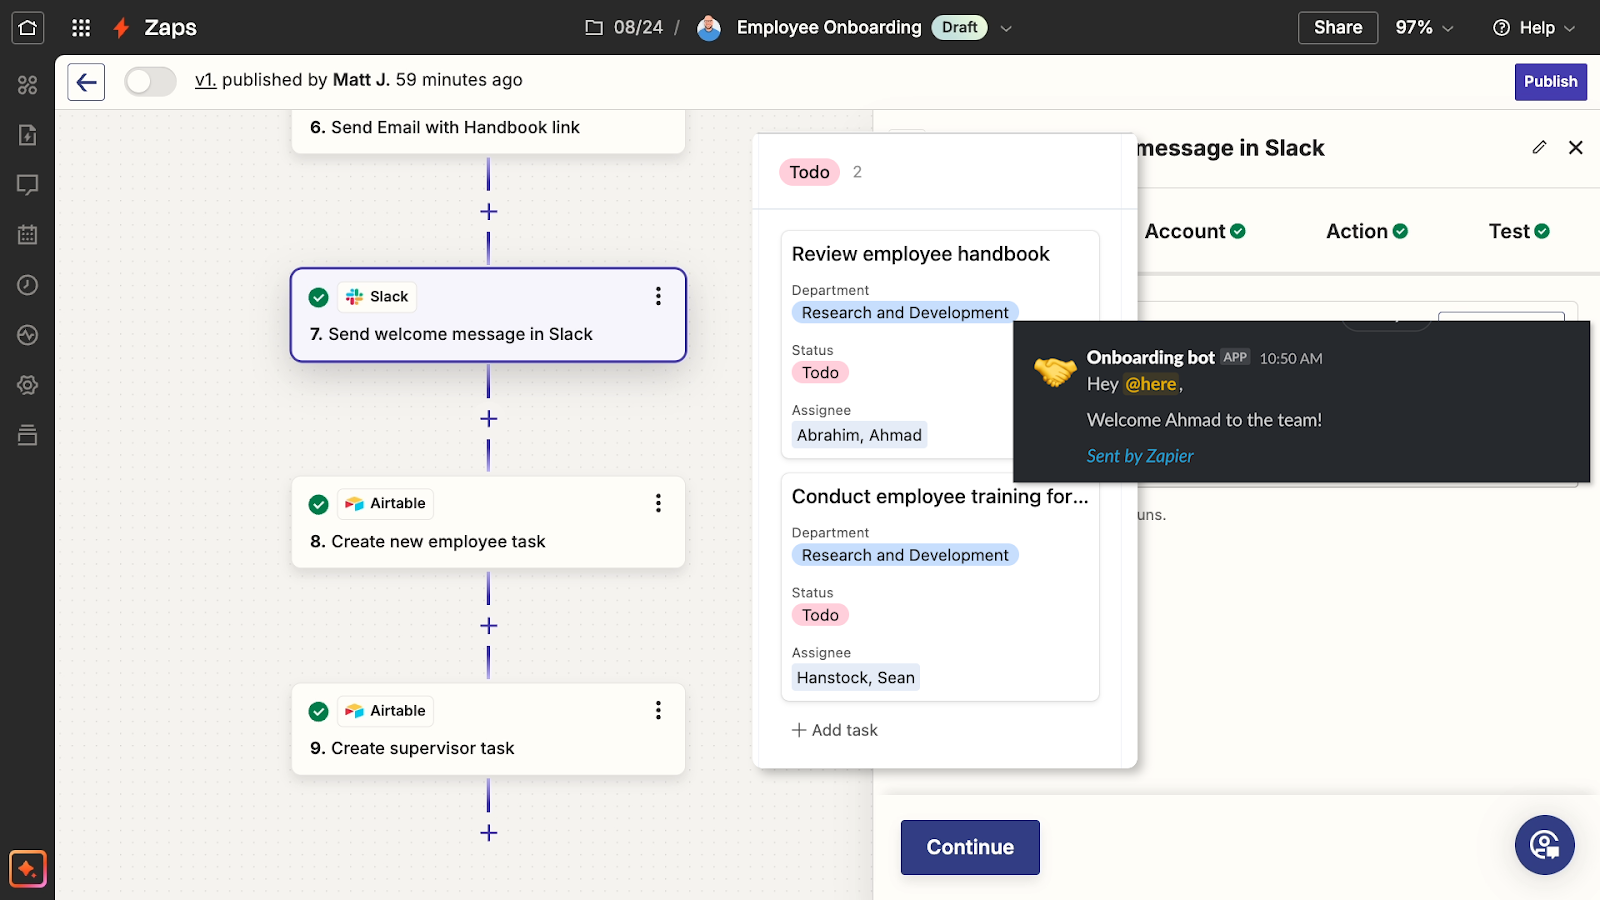
As an example, let’s say that you want to automate your team’s employee onboarding process. A basic employee onboarding automation might look something like this:
Onboarding automation:
• Launch when an employee’s status is set to “Onboarding” in the team directory (Airtable)
• Invite the new employee to relevant Slack channels
• Add the new employee to relevant docs in Google Drive
• Email the new employee the employee handbook
• Assign the new employee a task to review the handbook
• Assign their supervisor a task to conduct training
• Send a welcome message in Slack

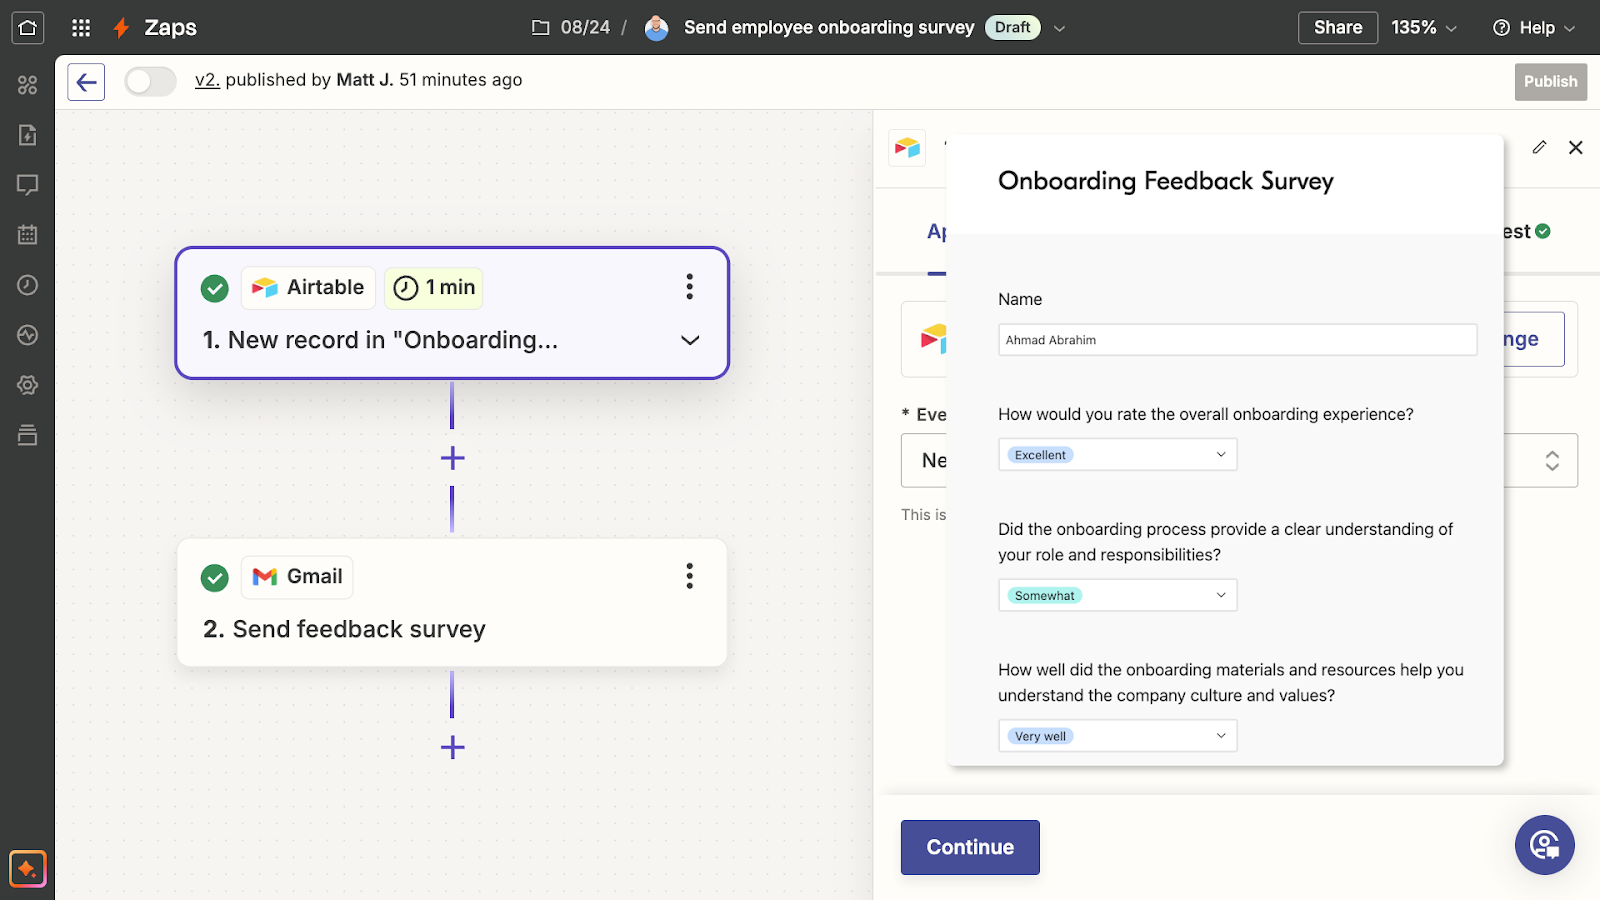
Post onboarding:
• 2 weeks later, send a feedback survey to the new employee
Ultimately, the value of automations like this relies heavily on the quality of the documents and materials involved.
If you’re not happy with your company’s employee handbook, or if you’re not quite sure what tasks to assign, all this automation is going to do is send out information that still needs to be improved.
In other words, your automations are often only going to be as good as the material they process.
Until you've defined all the critical assets you need for a successful procedure, the juice just isn't worth the squeeze to automate it.
This is why you want to work out the kinks in the process before automating. But once you’ve done that, you can save yourself a bunch of time and avoid errors by automating every step that you can.
Enhancing Automation with AI
Ultimately, similar criteria of consistency and repeatability apply when you want to enhance an automated process with AI.
Before you add an AI prompt to your automated workflows in Zapier or Make, you need to make sure you have a relatively consistent prompt that you want to run in the same way every time.
When you’re using a Chatbot interface like ChatGPT manually to ask spontaneous questions, there’s no real need to be consistent.
You can summarize text files sometimes, or just copy and paste text directly other times. Generally, it doesn’t make any difference.
But if you want to automate that prompt into a Zap or Make scenario, you need to know exactly where all of the data that you feed into the prompt will come from. This is because each piece of data has to be defined as a variable in your automation.
Seamlessly adding AI to an automated workflow
Fortunately, in many cases, you’ll find that automating a process creates clean, organized data that’s perfect for feeding into an AI prompt – even if you weren’t originally thinking about using AI at all.
For instance, let’s revisit our employee onboarding example.
Just by running the simple automation we outlined earlier, you’d have a bunch of consistently structured data to compile into a ChatGPT prompt.
In your project management software (Airtable in our example), you’d have data about which tasks have been completed, and when.

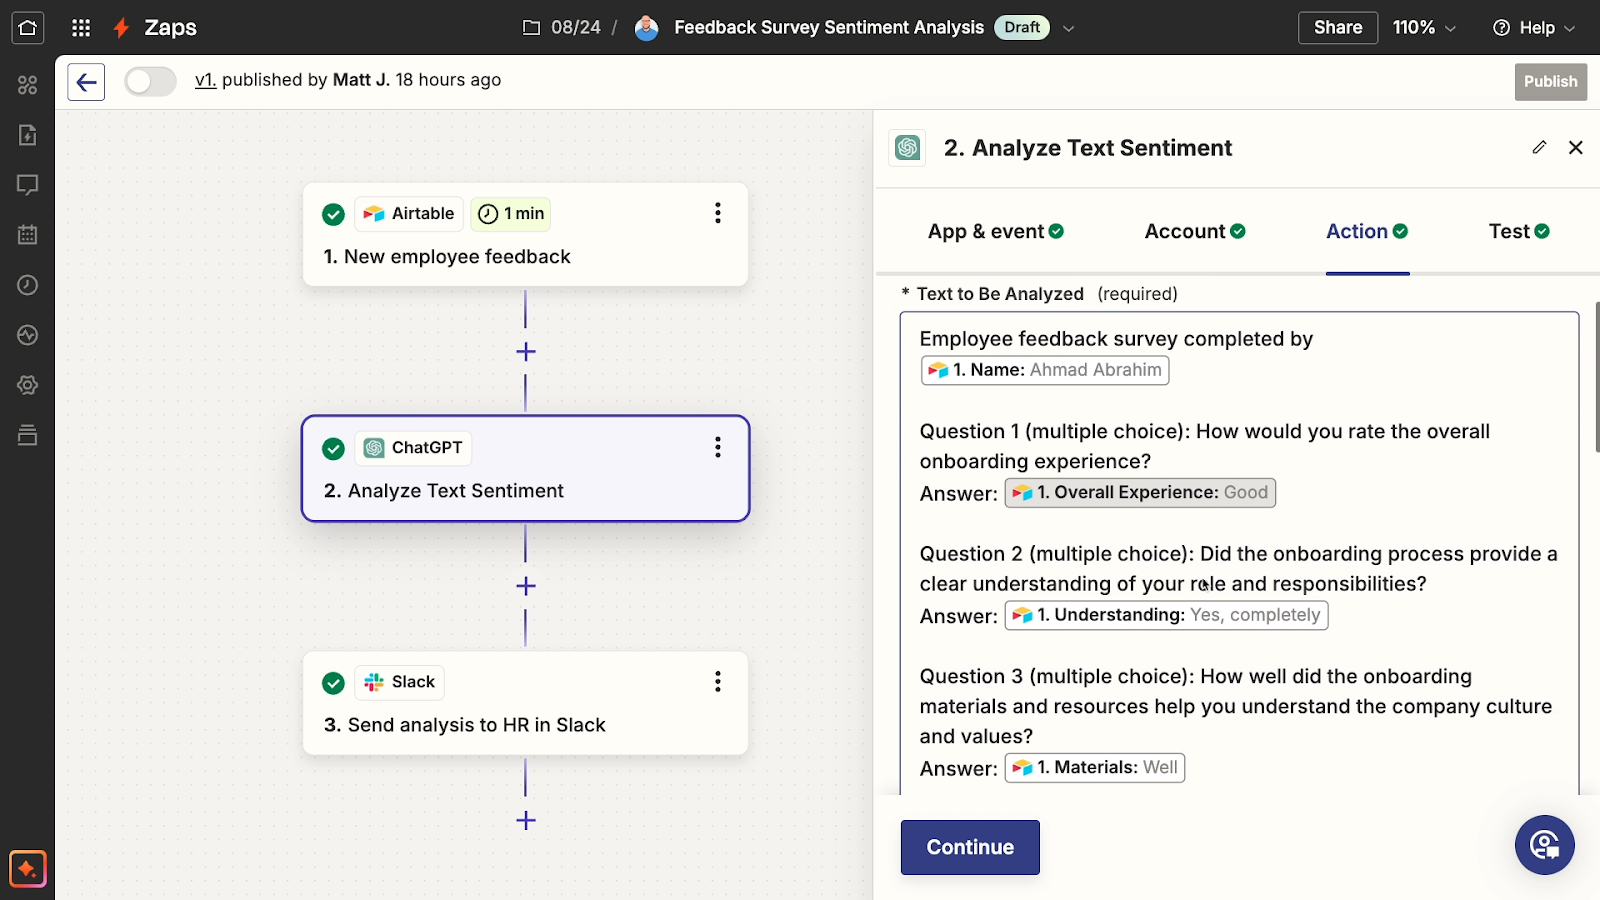
You’d also have the new employee’s survey responses to every question.
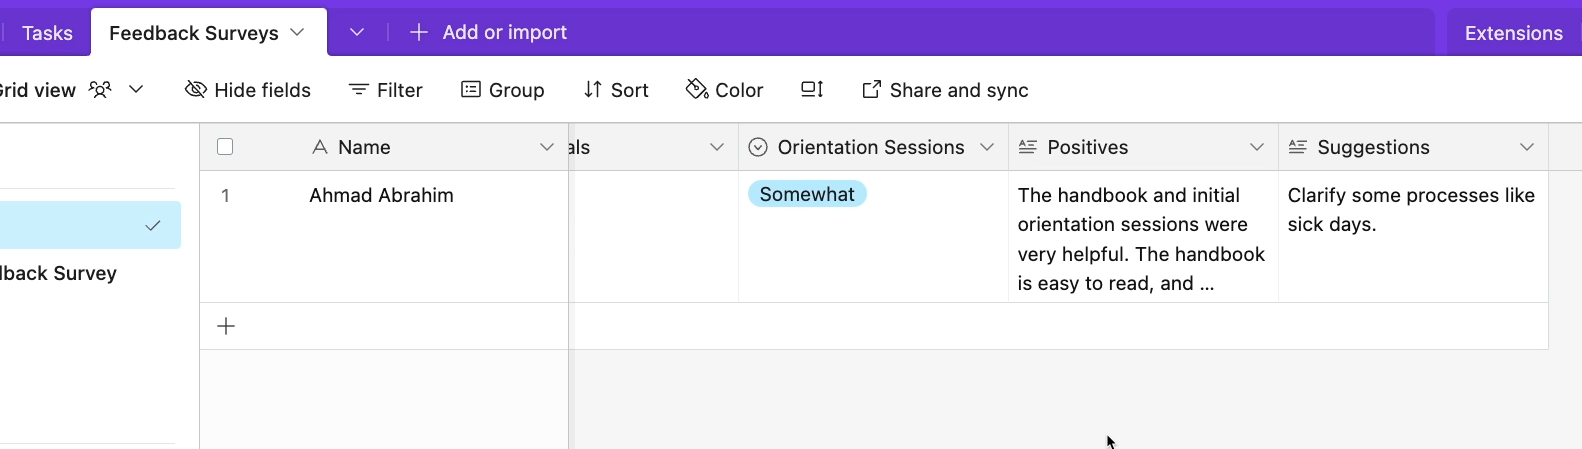
With that data, you could set up an automation that sends the user’s responses to AI for sentiment analysis, or to discover other insights you might not have noticed by reviewing it yourself.

You could also send a prompt that includes stats about the completed tasks and when they were complete to let the AI evaluate the success of your onboarding process.
The beauty of adding automation and AI together is that you can easily add variables to your prompts, so they have a similar structure every time, but different specific data points.
Without automating the process first, you’d have to manually look up the data and enter it into your prompt. This sort of back-and-forth might be worth it while you’re fine-tuning your prompt, but once you’ve figured out the instructions you want to send, it’s much more efficient to run it all automatically.
So if you want to start enhancing a workflow with AI, try taking the same approach that you would if you wanted to automate the process in general.
Make each step as consistent and repeatable as possible, and make sure that you’re creating clean, well-structured data that you can easily plug into a prompt.
Getting Started with AI and Automation
As AI continues to disrupt industries across the board, it’s more important than ever to find effective ways to leverage it so your company can get ahead of the competition.
If you’re not sure where to start, then just begin by documenting a process and preparing it for automation. Automating a process naturally leads to better opportunities to integrate AI into your workflows, creating clean, consistent data that connects seamlessly to your prompts.
To learn more about automating your company’s work, be sure to explore check out our blog or our YouTube channel. You can also follow XRay on Twitter, Facebook, or LinkedIn.

If you're considering starting a business or launching a new product at your company, you're likely wondering how to get your idea off the ground and start testing for product-market fit.
And if you haven't secured a significant investment, you're probably looking to go to market while spending as little cash as possible.
Fortunately, there's a simple and accessible way to test your business ideas quickly and affordably: prototyping your concept with no-code and low-code tools.
Today, we’re going to use three products that we’ve created at XRay to demonstrate why low-code builds are the best place to start when you need to validate an idea.
These products each highlight the three key benefits of using no-code to build prototypes for your business:
• Low-code lets you quickly test launch products and services
• It can easily integrate with existing systems for streamlined adoption
• you can experiment with internal ideas and add new features whenever you need to
Read on to see how you can benefit from all of these concepts while building low-code products.
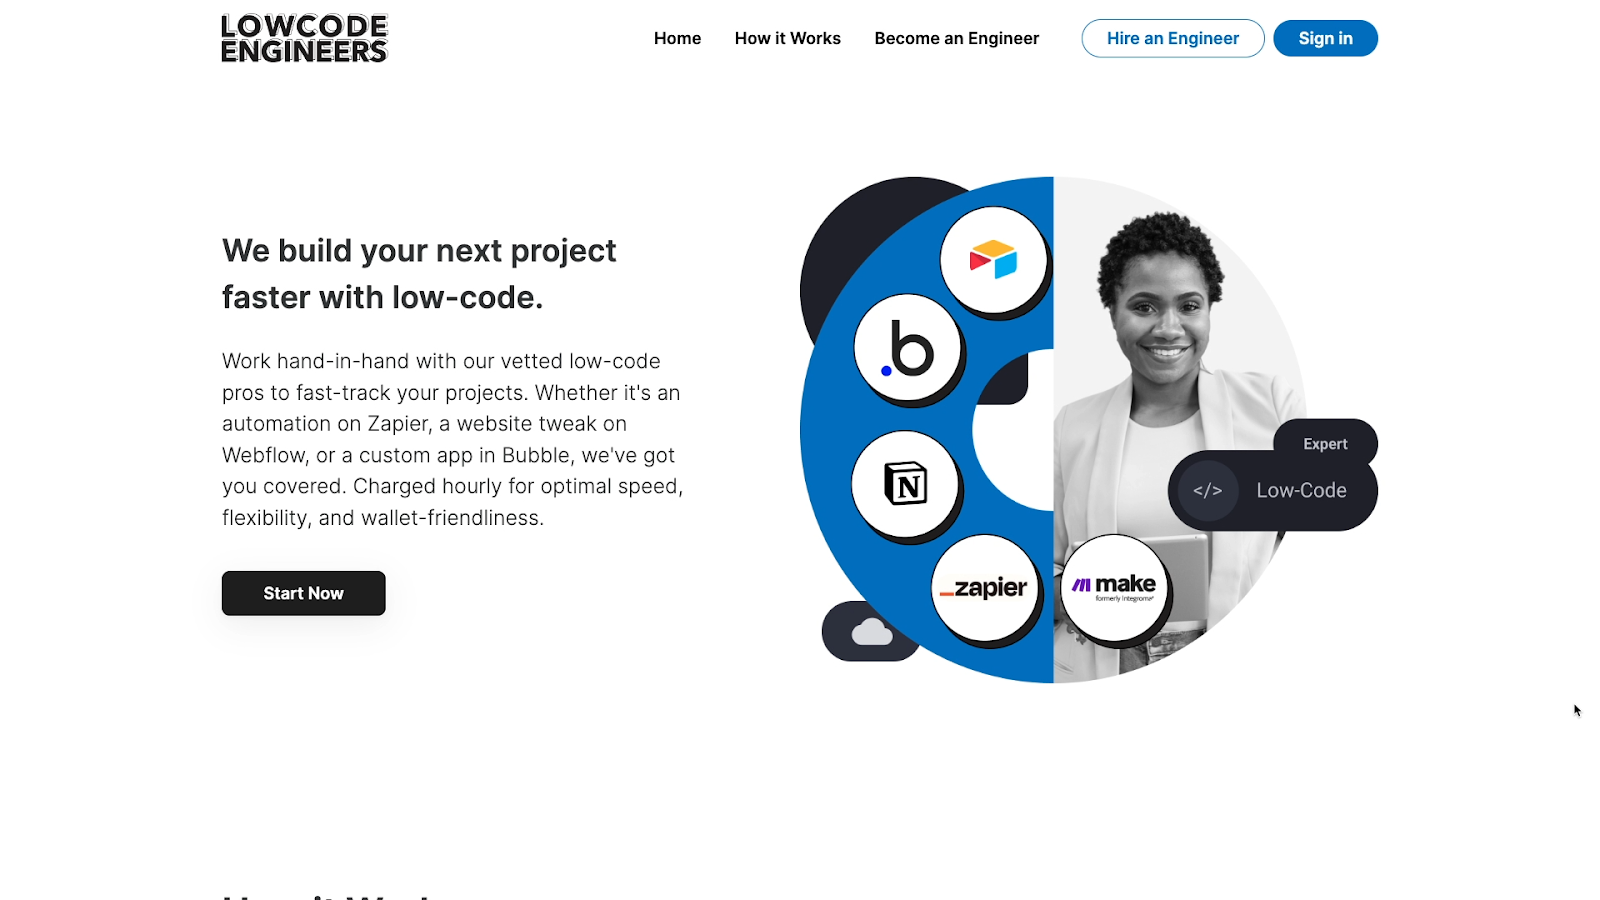
LowCodeEngineers: Rapid launching and testing
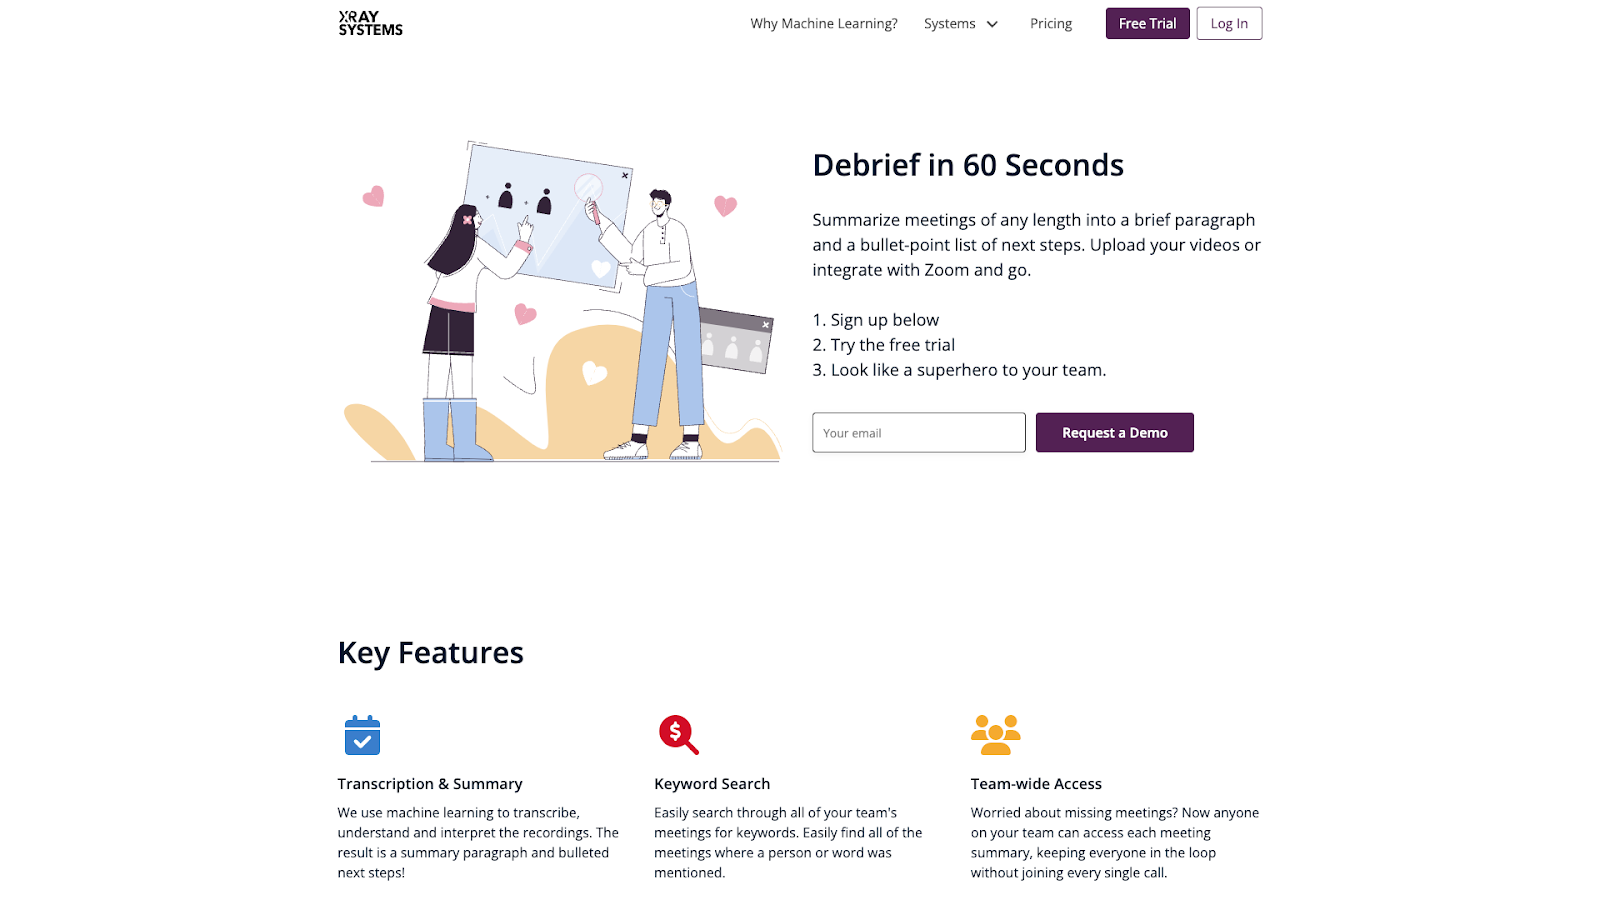
LowCodeEngineers, or LCE for short, is a service we launched and validated using a minimal low-code build.
LCE matches customers with expert no-code/low-code support on a convenient, flexible hourly basis. Whether you need to build or fix Zaps, Airtable bases, Make scenarios, or Softr portals, you can book time on LCE to get one-on-one support over Zoom.
You might think a service like this would require a standalone app or at least a user sign-in system, but it doesn't! Here's how it works:
1. Customers discover LCE through our videos, landing page, or direct conversations with our sales team.
2. They book their preferred time slot and pay through the LCE website.

3. We receive automated Slack alerts about new bookings, match customers with the right expert, and schedule the Zoom call.

4. Each session is recorded, transcribed, and summarized for easy future reference using our Debrief system (which we'll discuss later).
The architecture supporting this early version of LCE is remarkably simple. It just consists of:
• A landing page built in Softr with a backend in Airtable
• Scheduling through AppToto, which includes Stripe integration for payment processing
• A Zapier automation to alert our team about new bookings so we can hand-pick the right engineer for each job
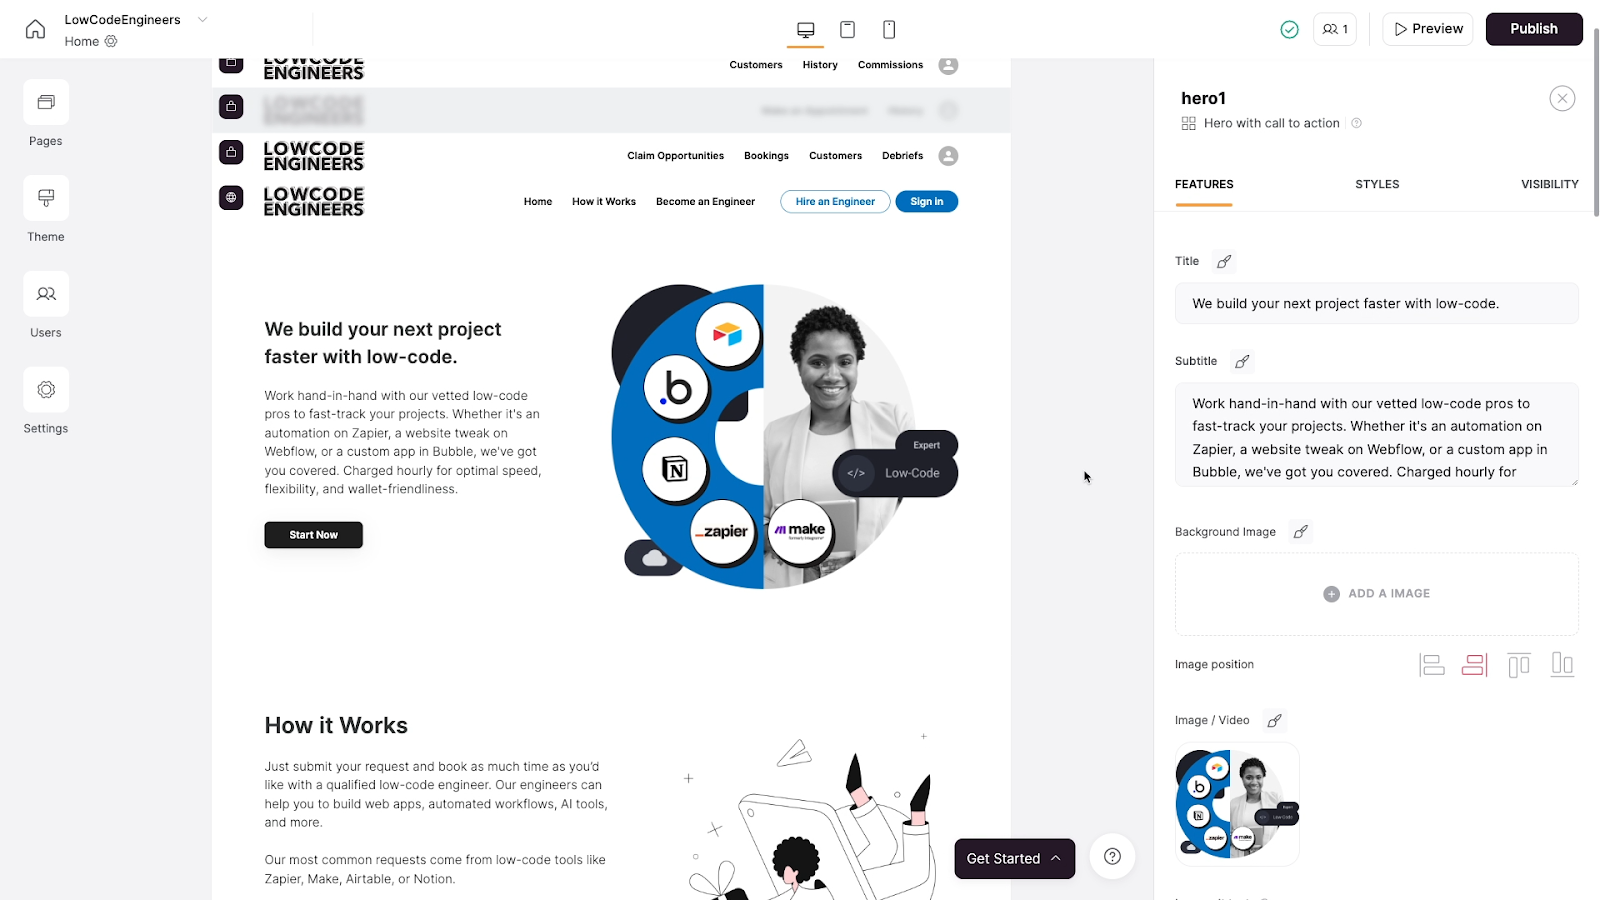
While we plan to automate more of this system in the future, this streamlined implementation with a Softr site and some Zaps was all we needed to validate the idea.
Even though there's still some manual work on our end, it does enough to test the core value proposition: Expert low-code help, one hour at a time.
We soft-launched in October last year but only started heavily promoting LCE in the last couple of months. In a matter of weeks, we've already seen dozens of bookings resulting in 5-figure monthly revenue.
This quick validation has shown us that LCE is a service worth pursuing and investing more time in, and we didn't have to spend extensive resources just to figure that out.
It took us less than a month to build the MVP, and our software operating cost is just over $100 a month. Discoveries like this are what makes low-code so valuable to entrepreneurs and startups. With simple tools like websites built in Softr or Webflow, and automations built in Zapier or Make, you can quickly test product-market fit to see if an idea is worth a real commitment of your resources.
Guardian: Leverage Existing Systems for easy user adoption
Another project that demonstrates the power of low-code prototyping is our tool called "Guardian." This project, while still in its early stages of validation, highlights a crucial concept: low-code allows you to easily leverage existing software and systems. Whenever possible, that's exactly what you should do.
Don't reinvent the wheel; instead, build on top of popular tools and hijack existing behaviors.
Guardian was created to solve a specific problem we faced as an agency. We build and maintain automations for clients in their accounts on platforms like Zapier, Make, and Airtable.
When these automations encounter errors, alert emails are sent to the client's inbox.
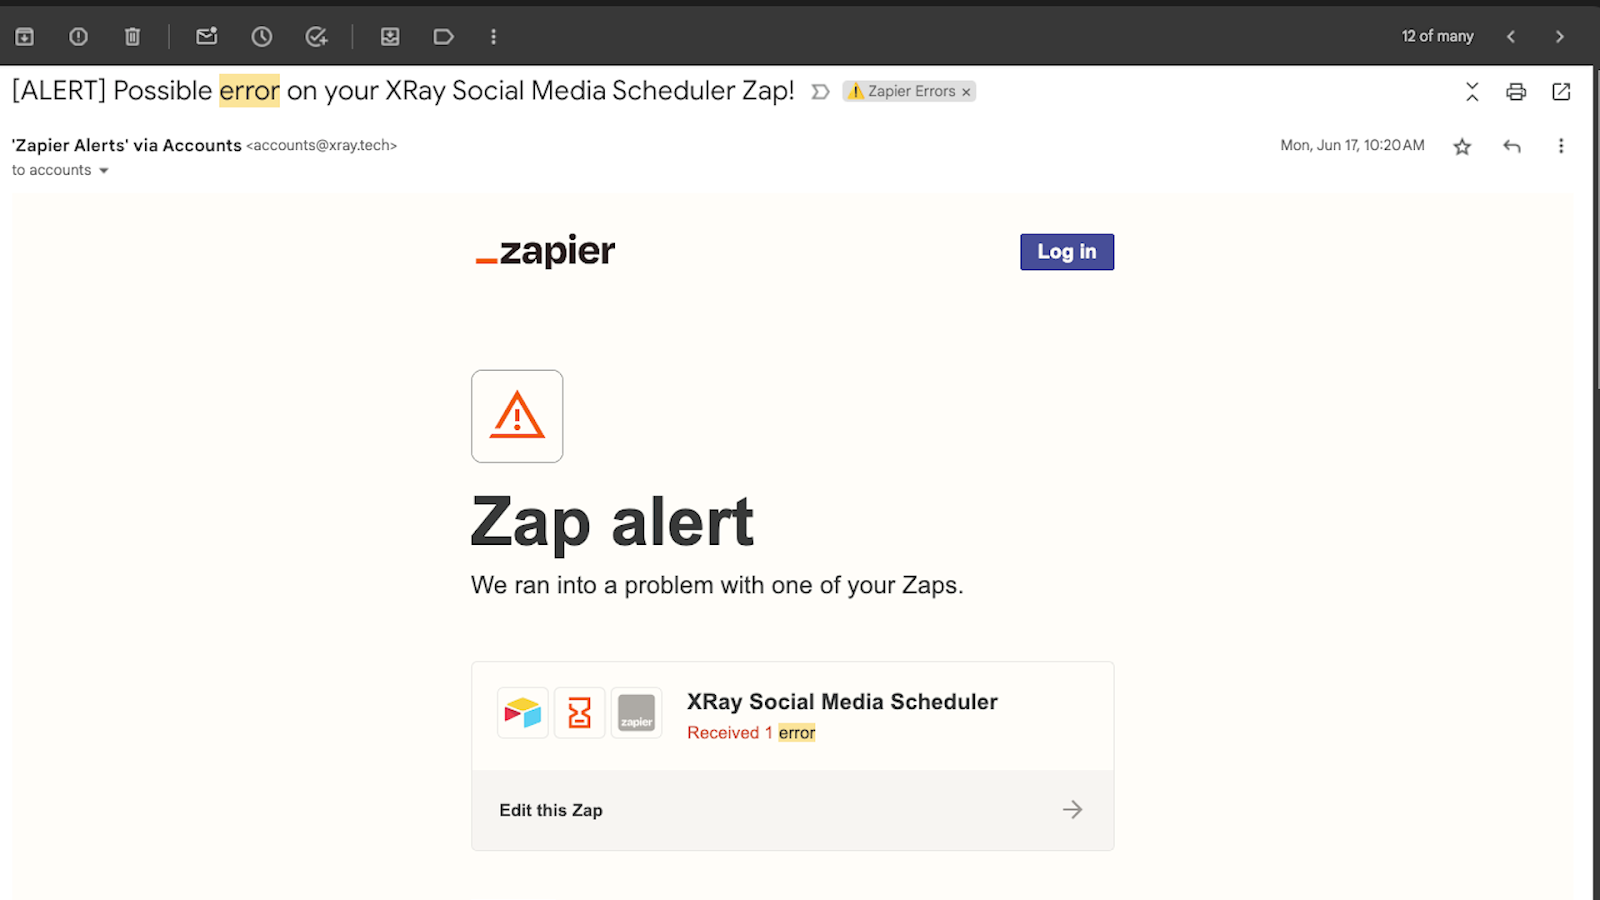
However, we don't have access to our clients' email accounts, and often, clients don't fully understand the error messages. This led to a slow and tedious process of manually forwarding messages, with the risk of important alerts being missed.
Our solution, Guardian, automatically aggregates all these error alert emails into one place where we can view them, group them, and create notes.
It also includes simple methods for tracking our responses.
Like our MVP for LowCodeEngineers, Guardian's architecture is very simple:
• Every client sets up some auto-forwarding rules in their email account
• A Make scenario uses regex to parse relevant emails for key details
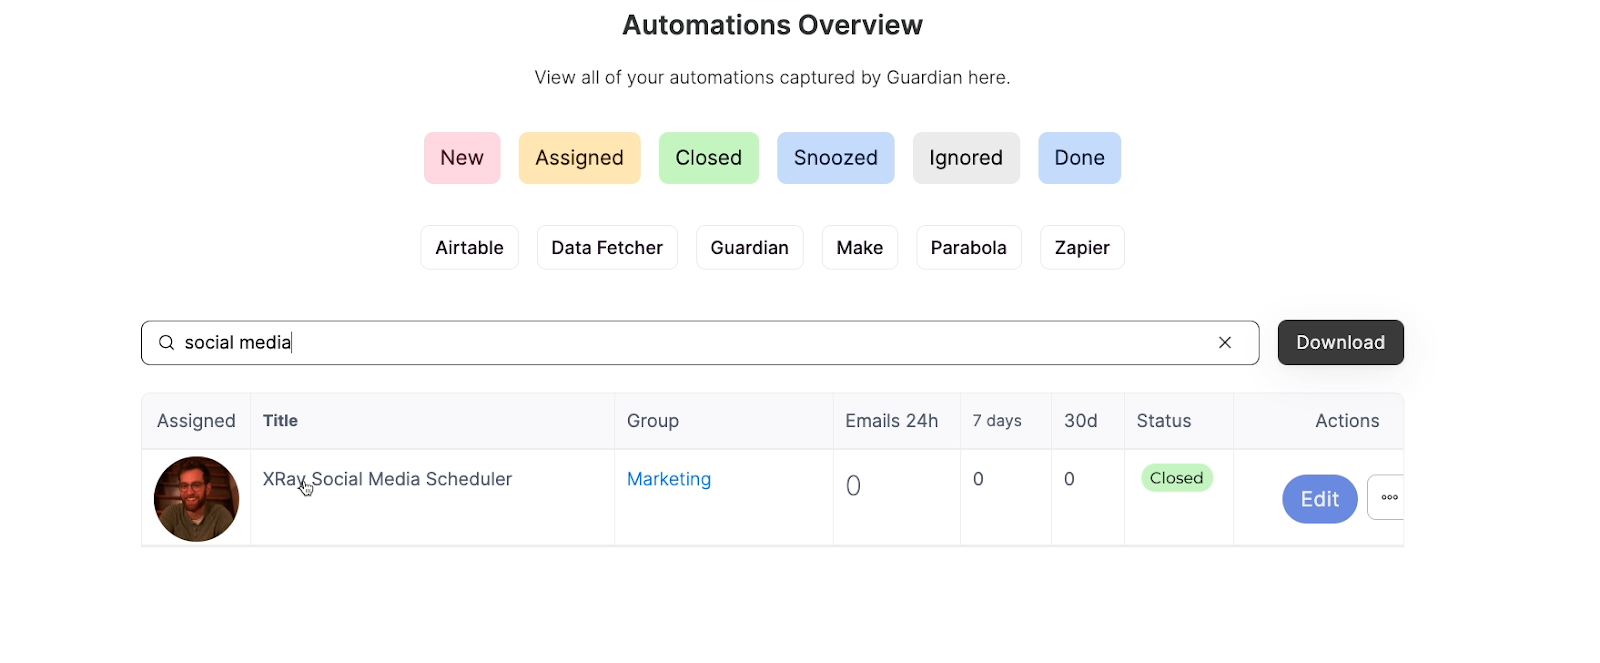
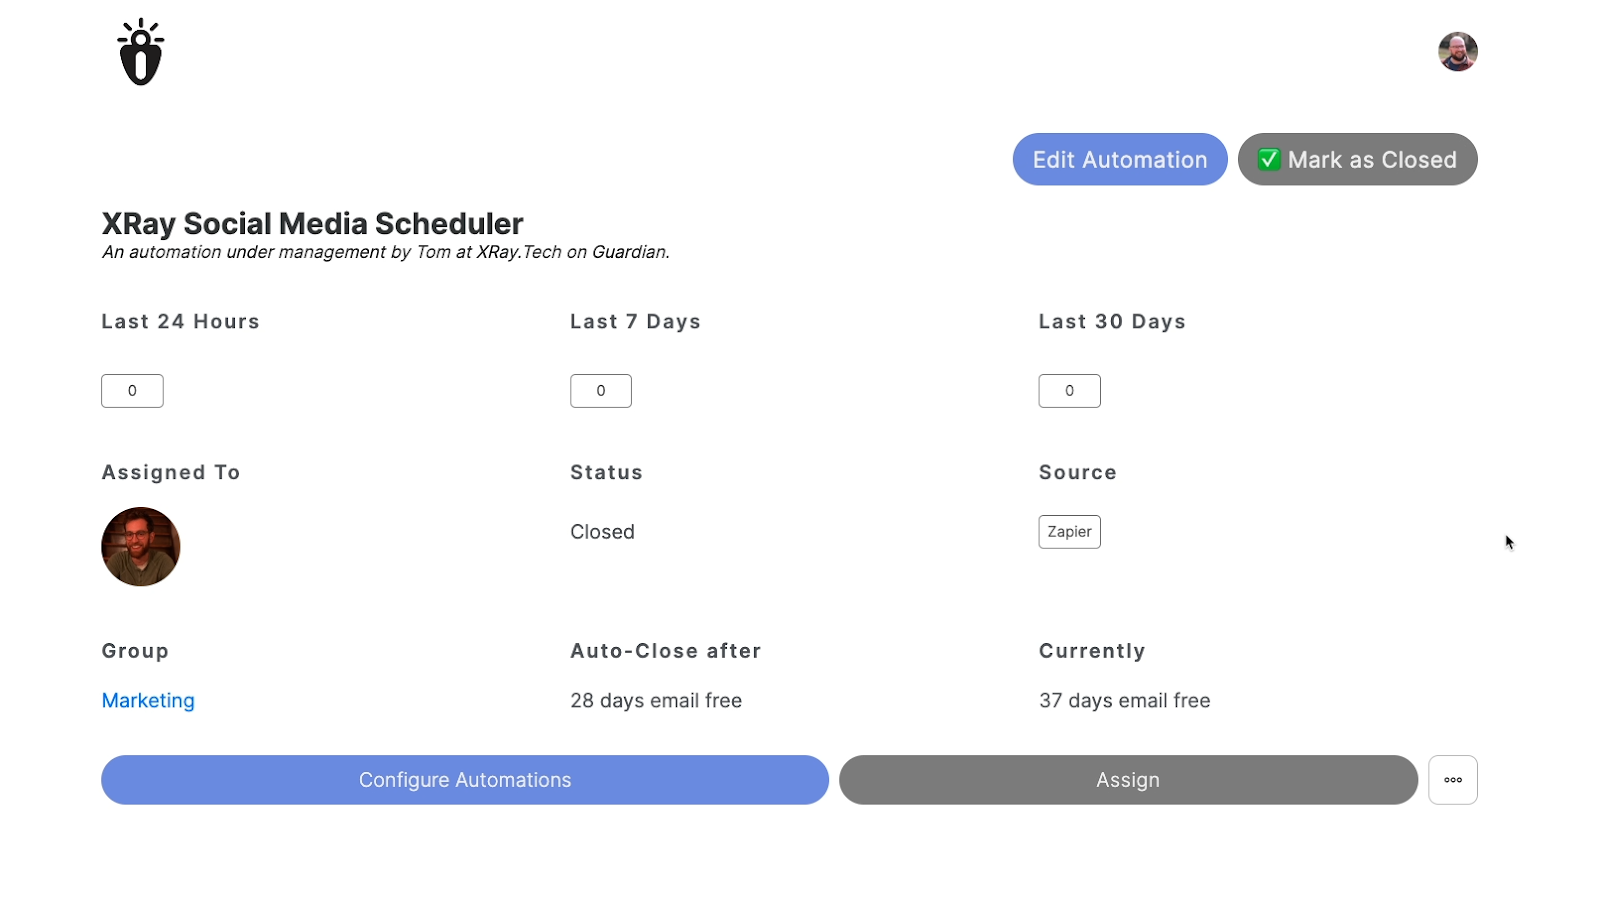
• A Softr frontend allows our team to view the aggregated and sorted messages
The beauty of this system lies in its ease of adoption. Clients can install Guardian by simply setting up some auto-forward rules in their Gmail or Outlook accounts.
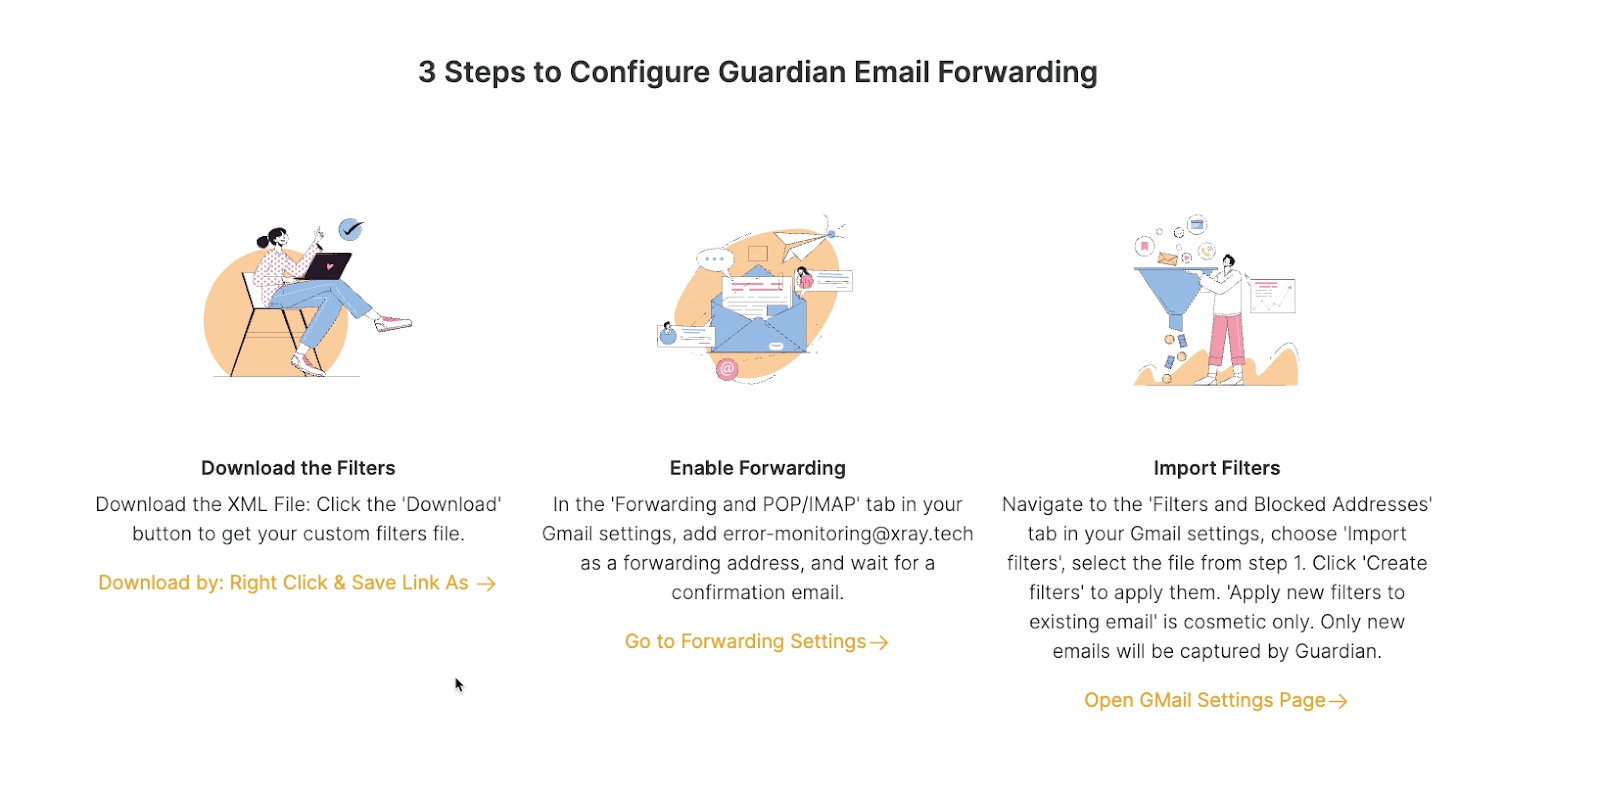
Once these rules are in place, they don't need to do anything else. Every relevant email is automatically forwarded to our team and tracked in Guardian.
With over a dozen active users and 1,000 indexed automations, Guardian has already proven its worth as an internal tool. It's now available for anyone to try for free at guardian.xray.systems.
By building on top of existing apps and features, we significantly sped up our development time and made it much easier for users to adopt our product. This approach of leveraging familiar environments, like email inboxes, reduces barriers to entry and simplifies the user experience.
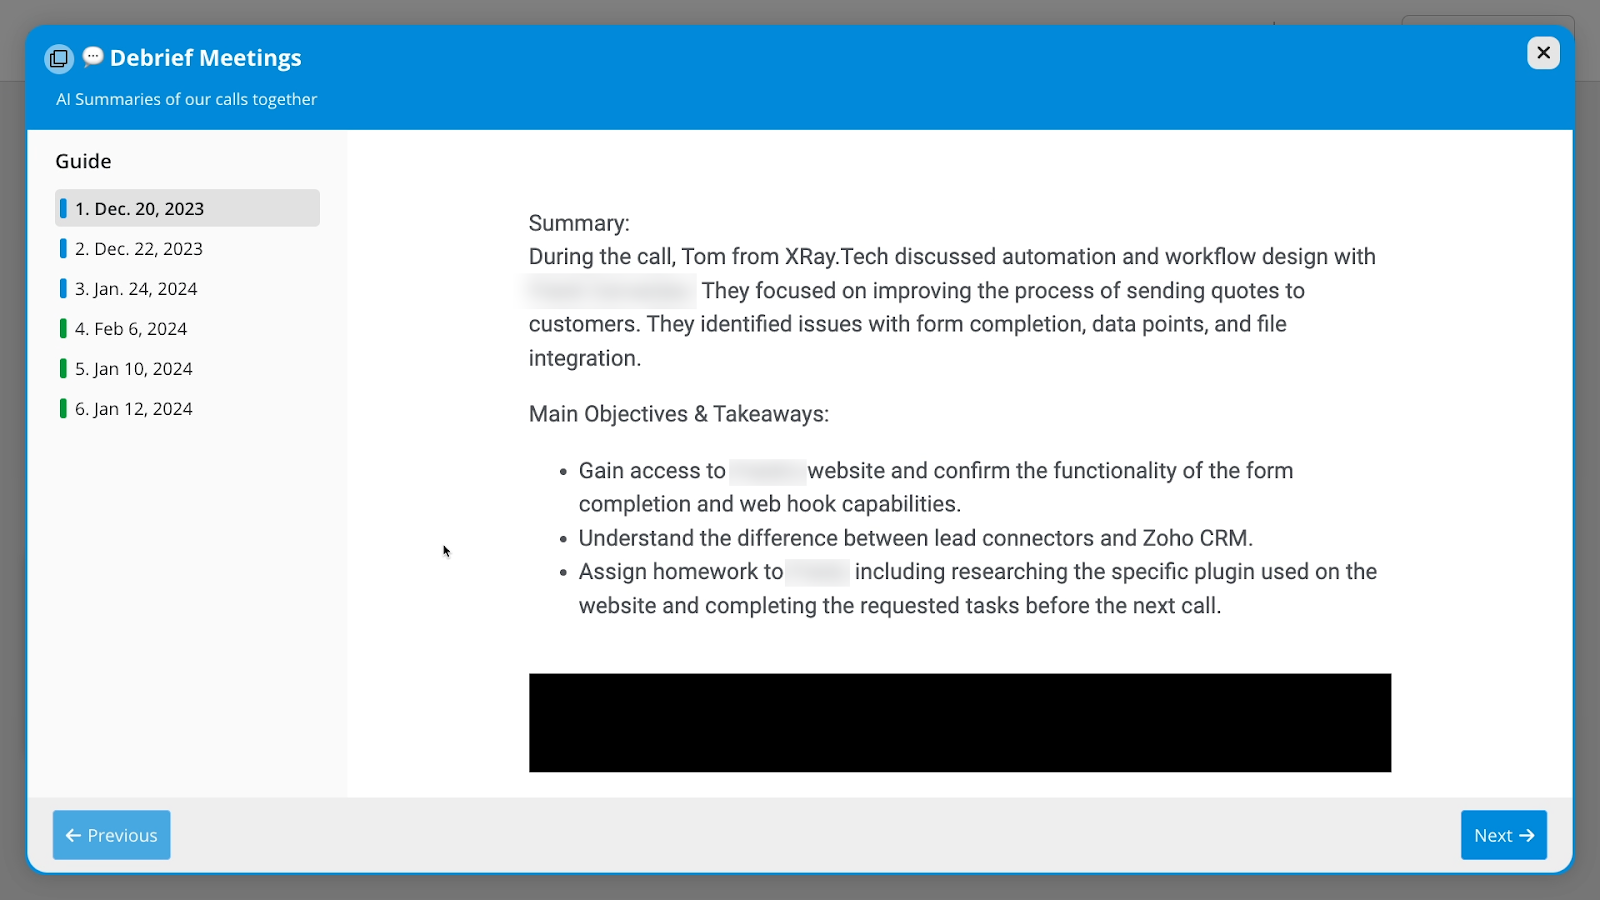
Debrief/ZoomTube: iterating on a low-code prototype
Our final example, Debrief (initially called "ZoomTube"), showcases how low-code can be used to validate an internal build and how easy it is to update and rebuild as circumstances change.
As a fully remote business, many of XRay's important meetings and decisions happen over Zoom. Early on, we realized we needed an organized way to reference previous meetings and share key information with clients and partners. While enterprise Zoom plans could have provided some of these features, we needed a more cost-effective solution.
Our initial implementation, circa 2021 (pre-ChatGPT), involved a Zap that:
• Uploaded all of our Zoom recordings to a private YouTube channel for archiving
• Sent the uploaded videos to Trint for transcription.
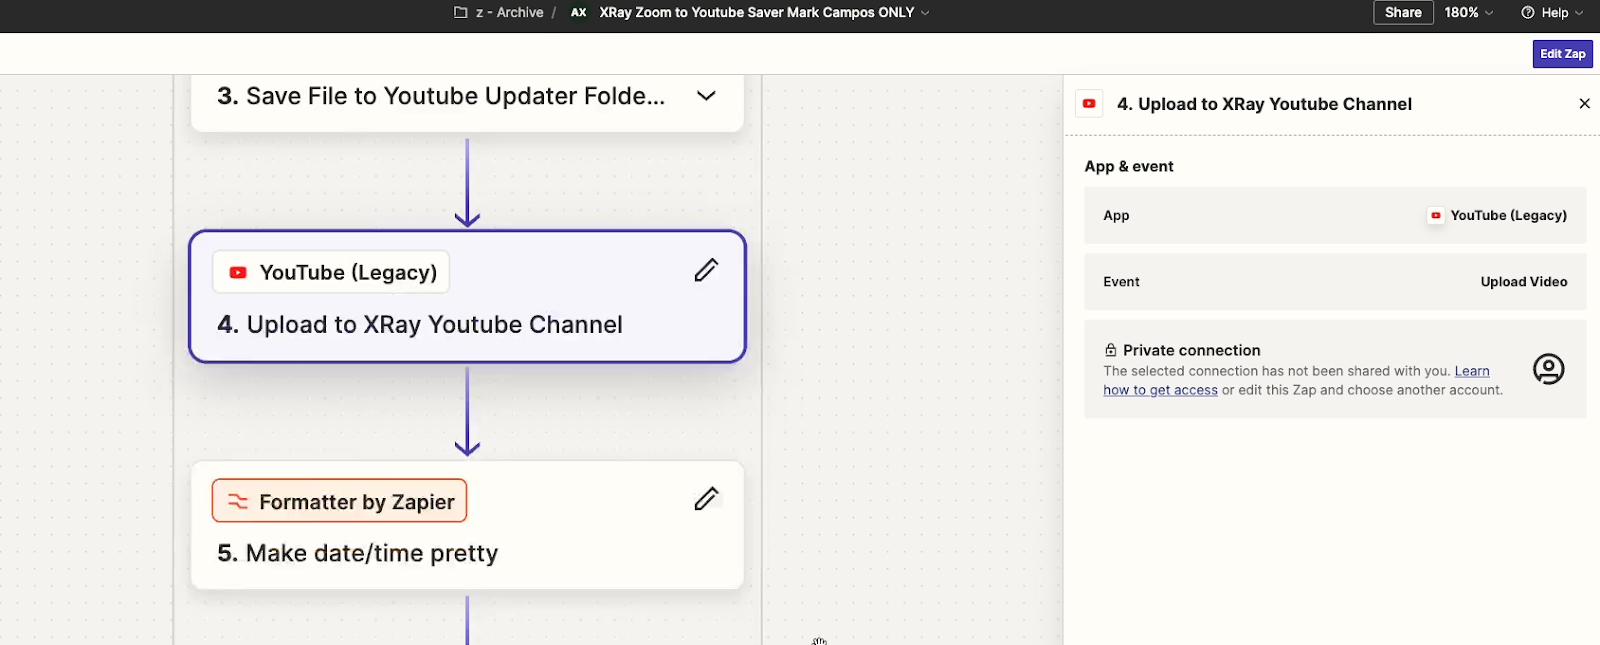
This relatively simple Zapier automation allowed us to capture and store thousands of meetings at no additional cost beyond our existing Zapier subscription.
This lightweight implementation quickly proved that we didn't need to invest in an expensive solution; we could get all the data we needed through a cheaper, low-code build.
Over time, the system evolved into what we now call "Debrief." The current version no longer uses Zapier.
Instead, it’s built primarily with Airtable, and features a frontend in Softr with AI summaries.
Debrief includes additional customized features that wouldn't be available in off-the-shelf solutions. We added these features gradually as needed, after demonstrating that the core system worked. By using the system daily, we identified areas for improvement and iterated accordingly.
Building with low-code allowed us to confirm that we were using resources correctly and made it easy to update the system as new needs emerged. Debrief is now an integral part of our internal systems, helping us review and share information about meetings, and even creating tasks for us with AI.
The key takeaway here is that low-code not only allows you to quickly test initial ideas but also makes it easy to update and add new features as you discover needs. Adding new steps to an automation or even replacing your automation software entirely is much simpler than developing features and products from scratch.
Start prototyping today with low-code tools
Low-code empowers you to rapidly test ideas using existing systems as a convenient starting point. For entrepreneurs, the key is to focus strictly on your value proposition rather than getting bogged down in extra features.
If you have an idea to test, start building it today with simple tools like Zapier, Make, Softr, or Airtable. These platforms offer the flexibility and speed needed to prototype and validate your concepts quickly and cost-effectively.
Remember, the goal of low-code prototyping is to validate your core idea with minimal investment. Once you've proven the concept, you can always scale up and refine your solution. So don't wait – start building and testing your ideas today!
If you’d like to learn more about building with no-code and low-code tools, be sure to check out our blog or our YouTube channel. You can also follow XRay on Twitter, Facebook, or LinkedIn.
If you're constantly doing the same tasks on your iPhone, iPad, or Mac, then there's an easy and free way that you can start saving time right now.
In this post, we’re going to show you how you can create automations to streamline your everyday life with Apple Shortcuts.
We’ll show you two different ways to create automations with Shortcuts.
We’ll start with a Shortcut from Apple’s gallery that uploads photos to Dropbox with a single tap.
Then, we’ll show you how to build a custom automation in Shortcuts that plays music whenever your device connects to a bluetooth speaker.
These are just two examples of the thousands of automations that you could build with Shortcuts, and they’re a great way to learn how Shortcuts work.
All you need to follow along with these tutorials is any Apple device. Our examples will be demonstrated on an iPad, but you’ll see similar options on iPhones, as well.
Two types of automations in Shortcuts
As mentioned earlier, there are two types of automations you can create with Shortcuts.
You can build automations that run on demand whenever you tap on their button.
Alternatively, you can create automations that run on their own based on conditions like the time of day, your device’s battery level, or whenever a specific app is opened.
We’ll cover both in this tutorial.
Building an automation with Apple’s Shortcut Gallery: Uploading files to Dropbox
We’ll start with an on-demand shortcut from Apple’s gallery. This Shortcut will let us automatically upload the latest photo on our device to Dropbox with one tap.
To begin, open up Shortcuts. It should already be installed on any Apple device we own - like your Mac, iPhone, iPad, or Apple Watch. You can see the icon for the Shortcuts app in the screenshot below.
Adding a shortcut from the gallery
Once you’ve opened up the Shortcuts app, select “Gallery” from the menu on the left.

In the gallery, you can quickly create shortcuts with premade templates created by Apple. To easily find what you want, just search for the specific app or event that you want to automate.
For example, you can search for “upload” to find the shortcut for uploading a photo to Dropbox.
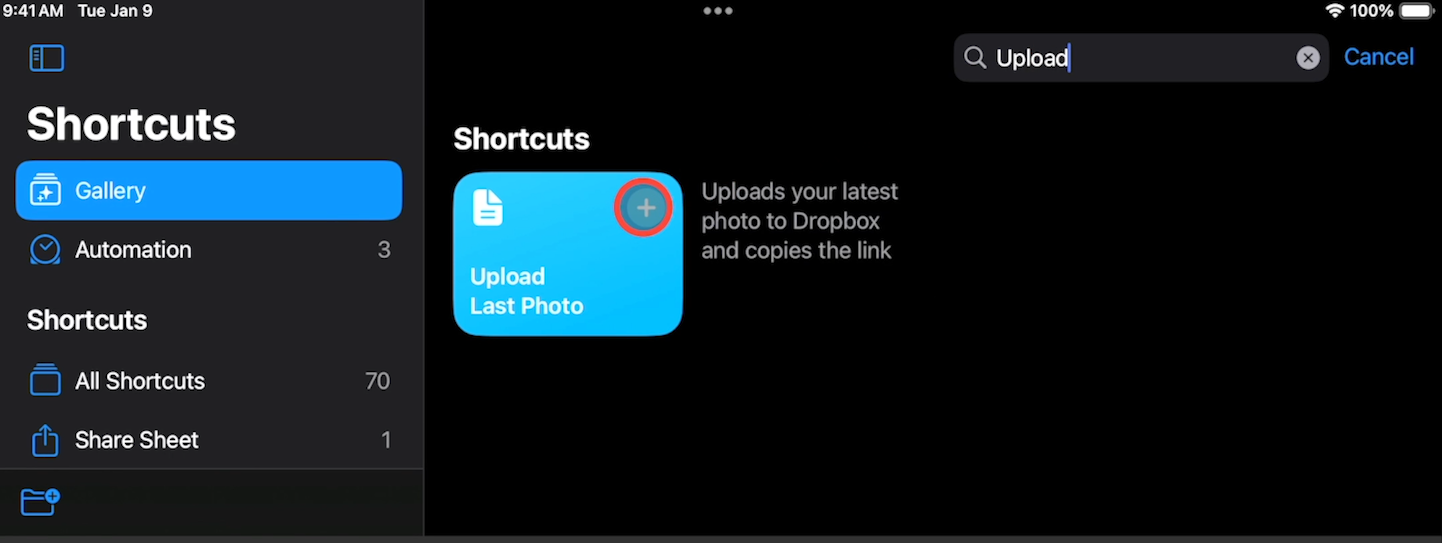
You can tap on the plus sign to add any shortcut to your device.
Note that some shortcuts from the gallery will immediately walk you through configuration options, while others won’t. However, you can always edit your shortcuts later.
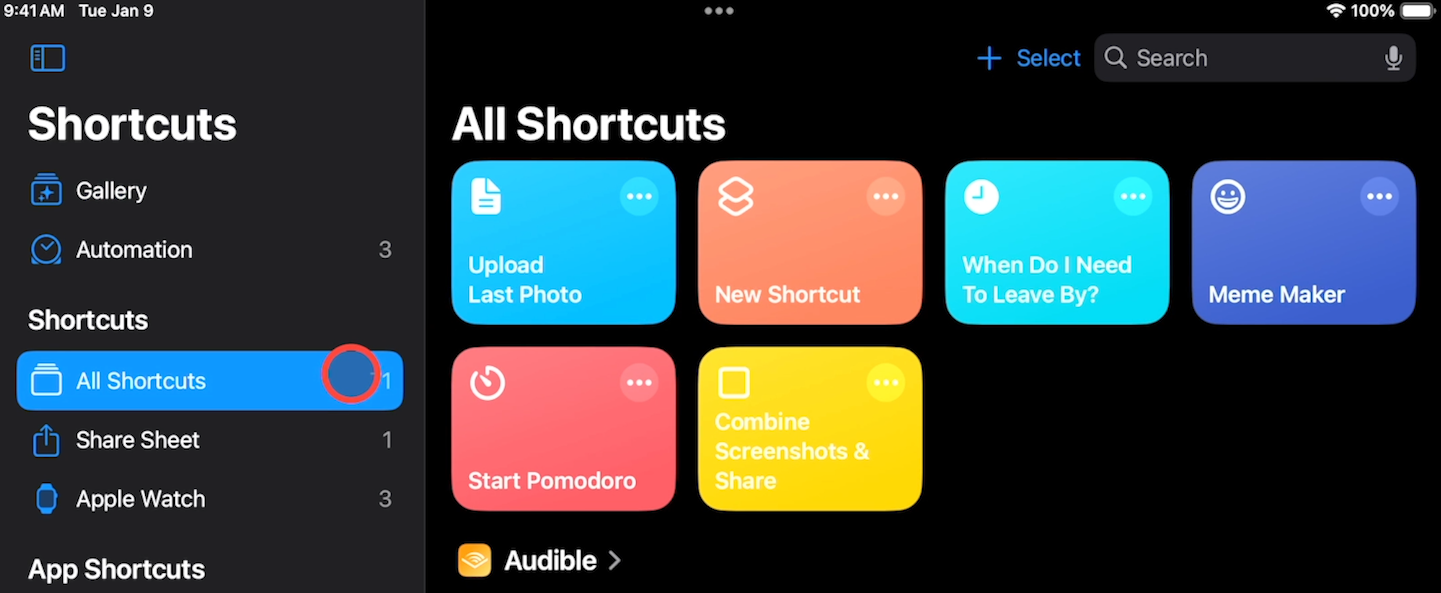
Once you’ve added the shortcut, you can tap on “All Shortcuts” to see it in your library.
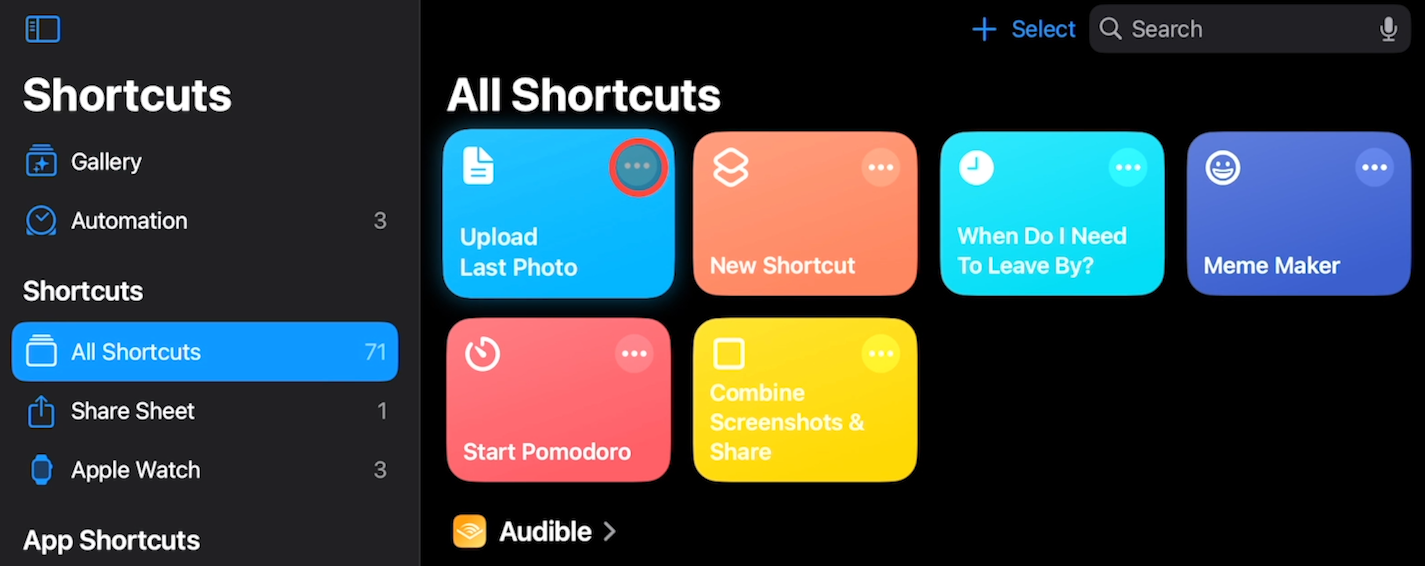
Edit and configure a shortcut
To edit and configure an existing shortcut, just tap on the three dots in the top right corner of the shortcut.
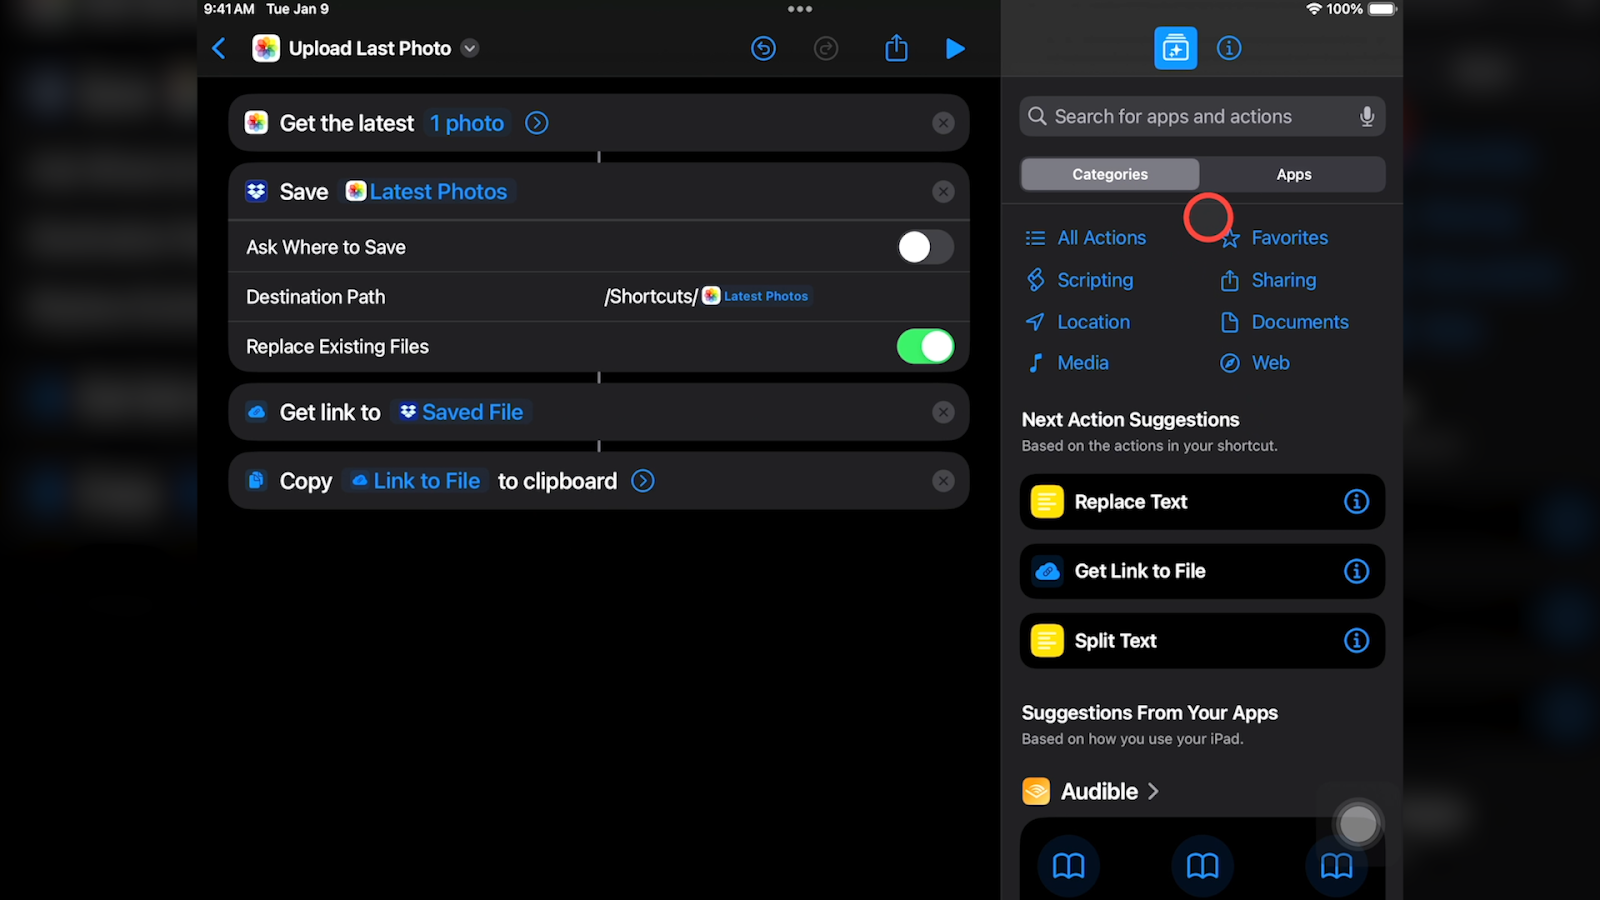
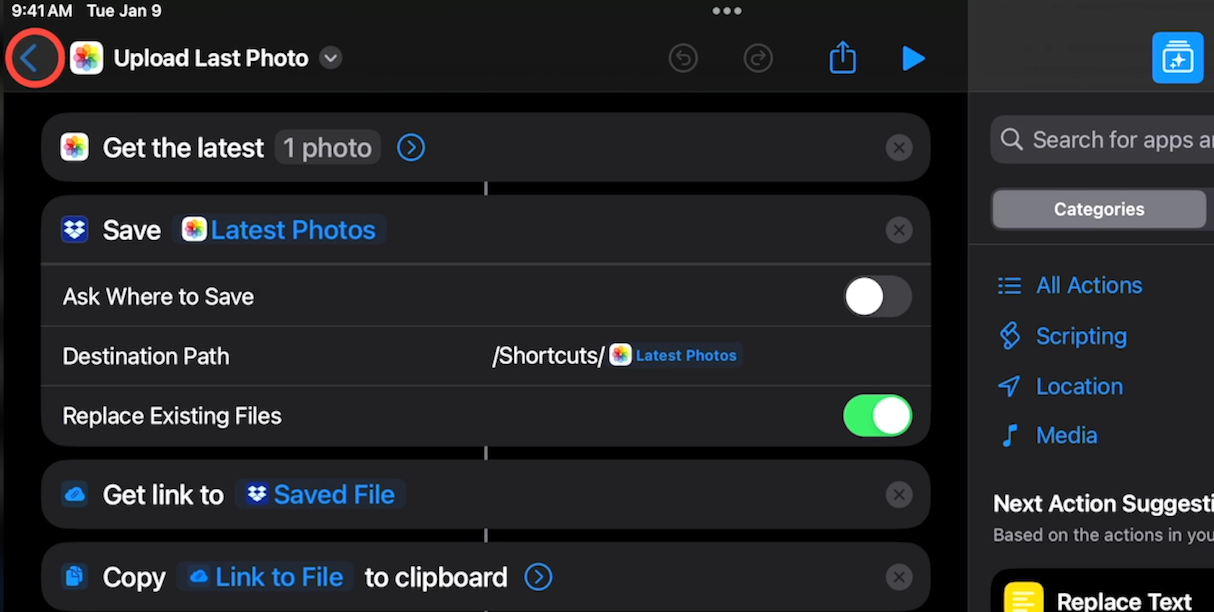
Then, you’ll see each action that the automation performs, with several configurable options.
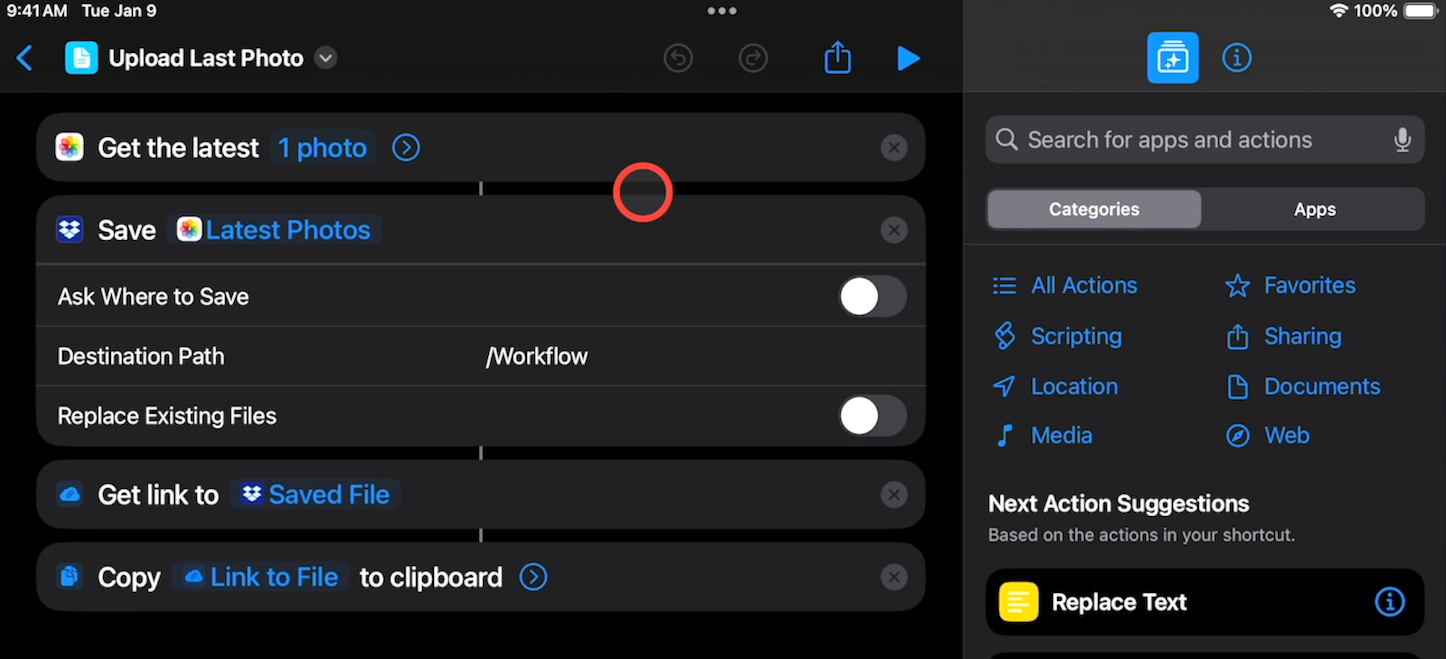
This automation starts with a step that retrieves the most recent photos on the device and lets you choose how many photos to get. You can set any number you want here, but we’ll just leave it as 1 photo in our example.
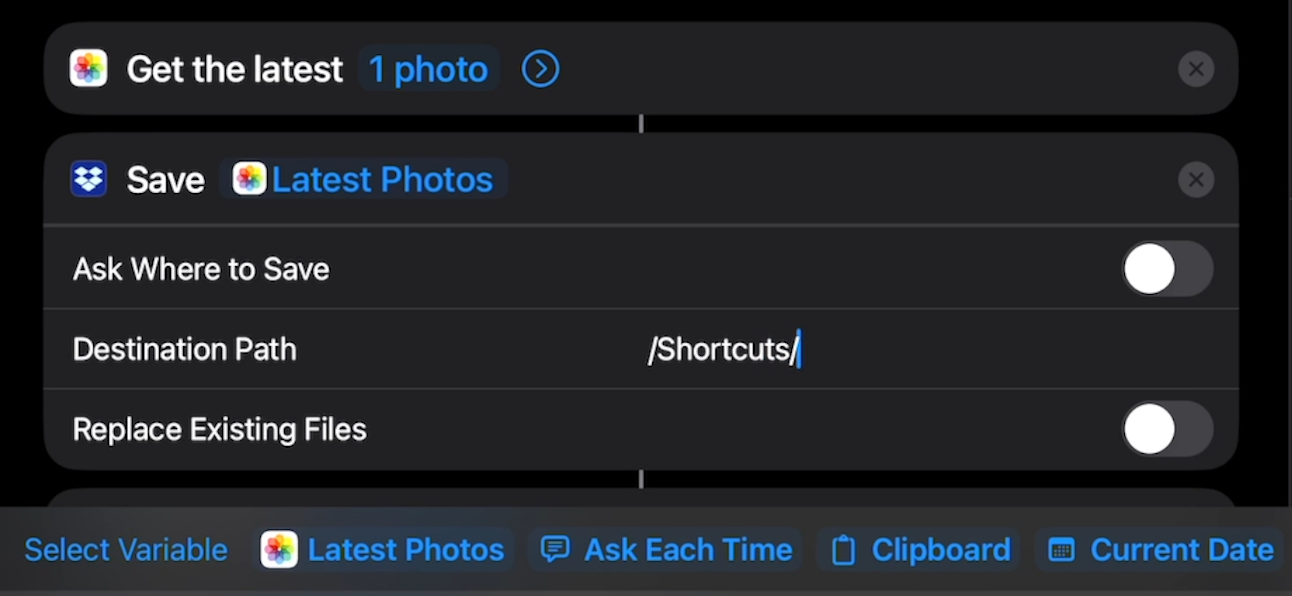
The second step saves the retrieved photo to Dropbox. The first choice for this action lets you choose whether or not the automation will prompt you to specify where the photo should be saved in Dropbox.
If you enable it, then the next two options will be hidden, since these options will let you choose a single static location where every photo will be saved.
For our example, we’ll leave “Ask where to save” disabled and instead configure a single location where the photos will be saved every time.
Next, for the destination path, you can set a location and filename for every photo. By default, they’ll be saved in the Dropbox root folder, and every file will be named “Workflow.”
Using dynamic data in your automations
First, we’ll save all of the files uploaded with this shortcut into a dedicated “Shortcuts” folder by typing /Shortcuts/ into the file path.
To help distinguish each photo, we’d recommend using a dynamic name. Instead of typing a name, choose “Latest photos” next to “Select variable.”
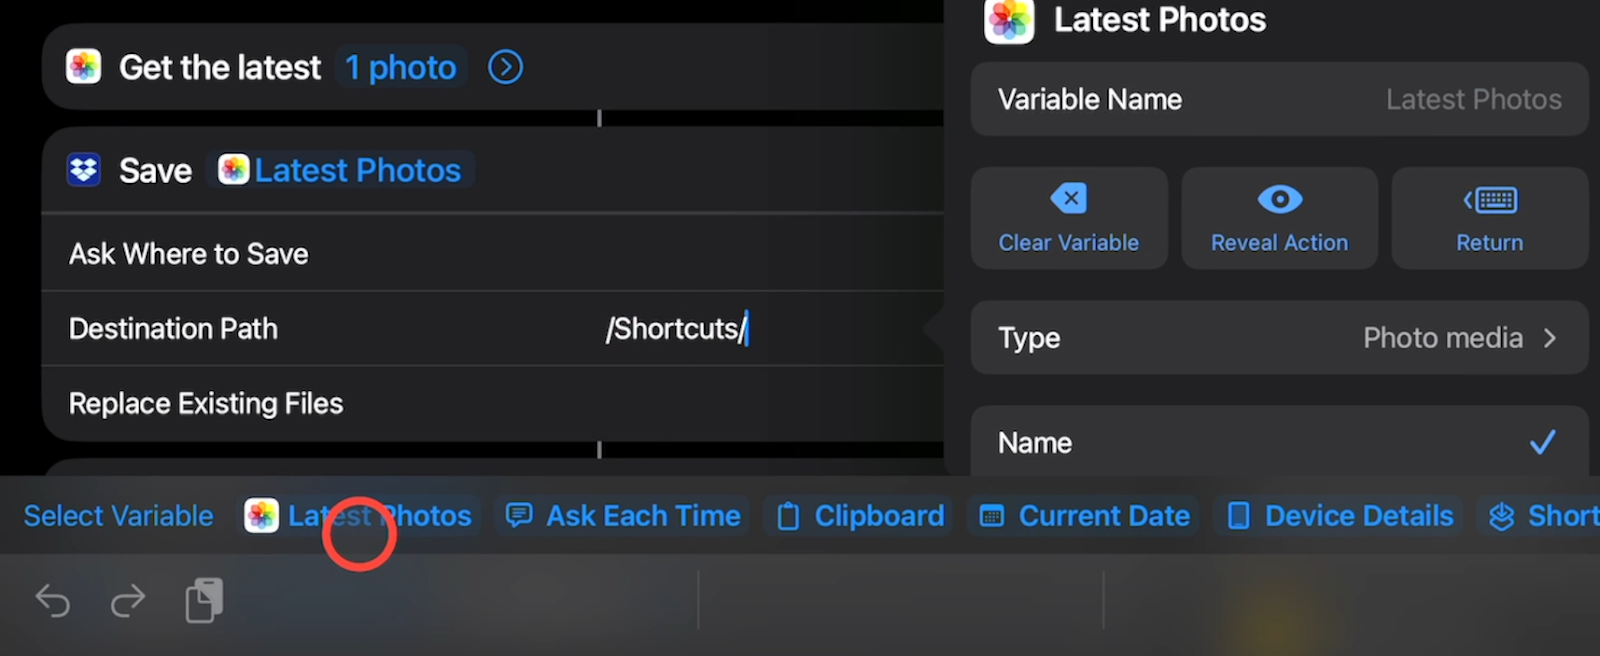
This will let you retrieve unique data from each photo processed by the automation, such as its file name, width, date taken, file size, and a lot more.
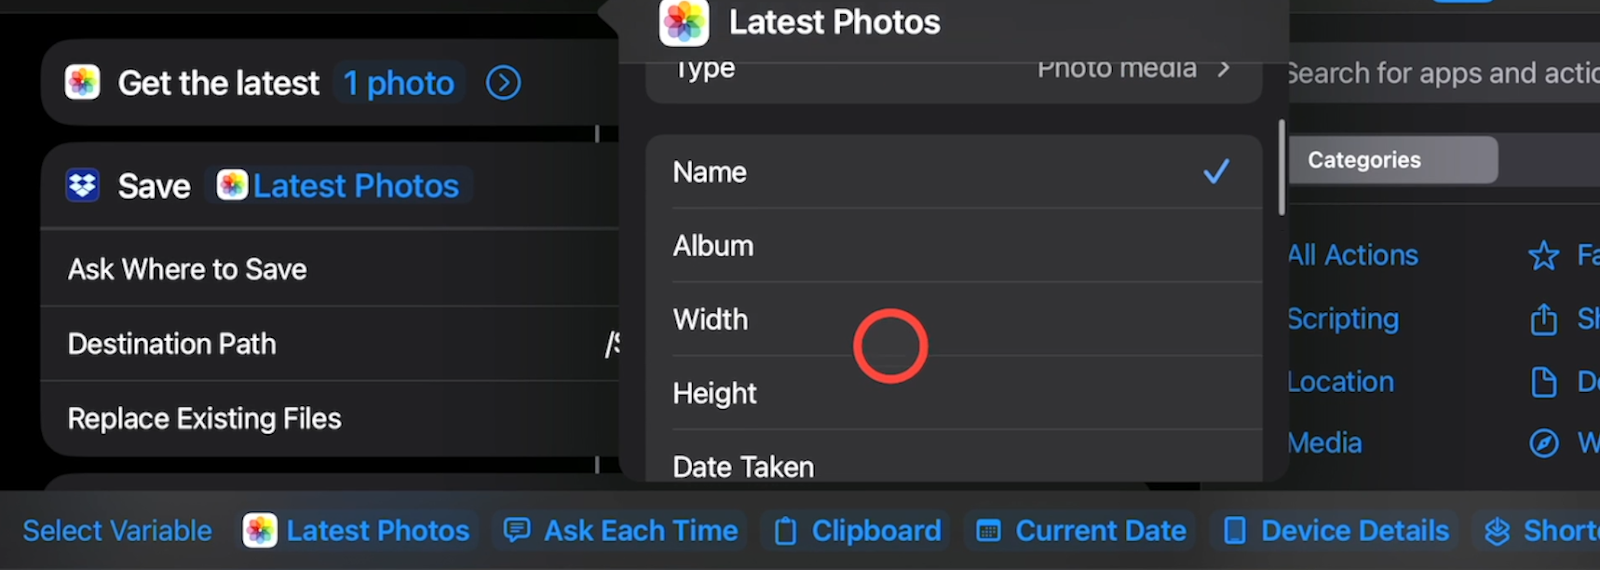
But the file name, which is already selected, will work just fine here.

Now, every photo you upload will go into this dedicated folder, and each photo will have a unique name. Using dynamic data like this to name files will make your shortcut automations much better than using static data.
Enabling “Replace Existing Files” will avoid redundant files by replacing old files with new versions when two items share the same name.
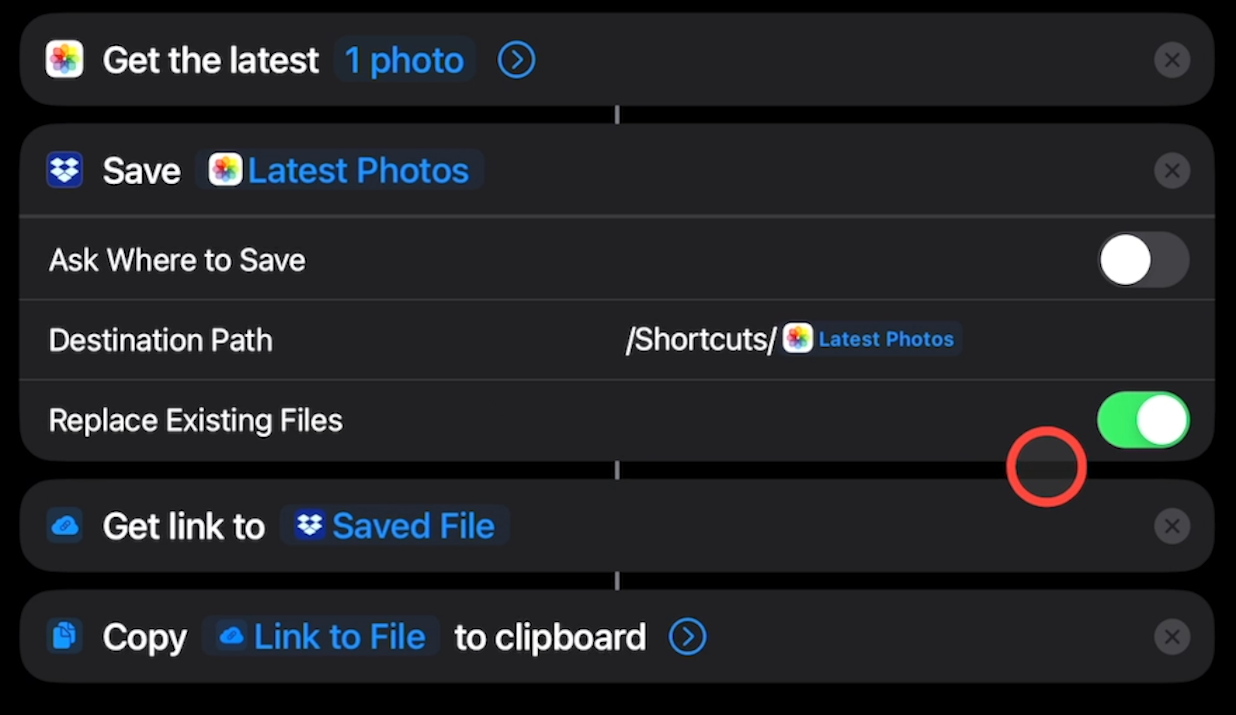
You don’t need to do anything to edit these last two steps, but it’s good to note that after the photo is uploaded to Dropbox, the automation copies the URL for the newly uploaded file.
Adding more steps to your shortcut automation
If you’d like to add more actions to this shortcut, you can do so by selecting them from the right hand menu.
For instance, you might want to send a message containing the newly uploaded photo’s URL to share your pictures with friends or family.
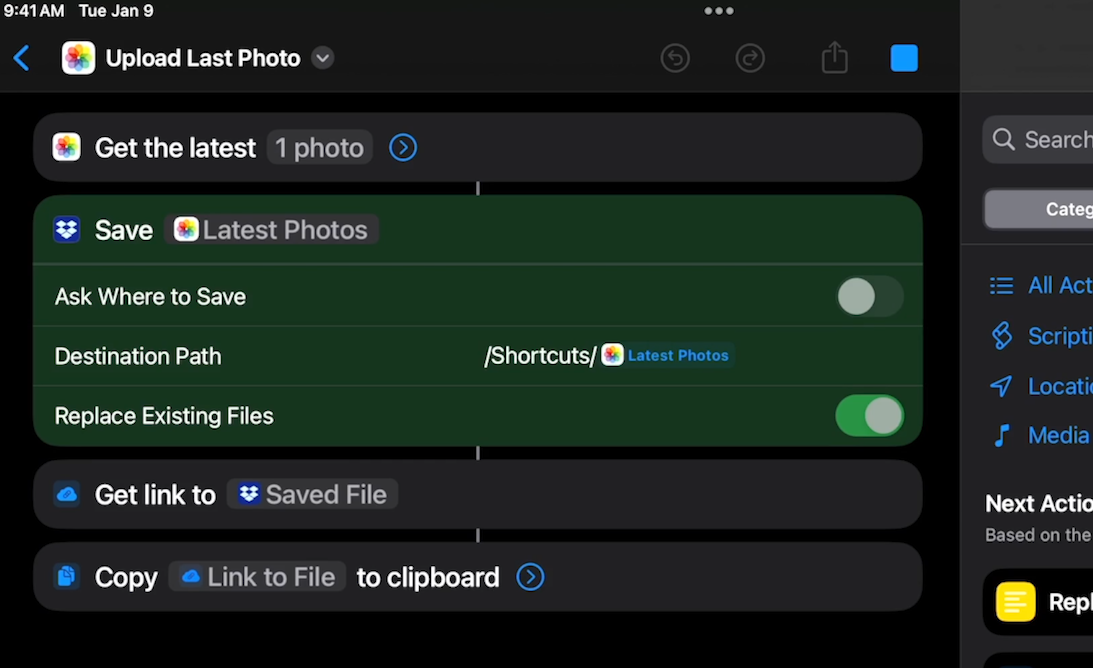
Testing your automation
Once you’ve added and configured all the steps you want in your Shortcut, you can test it by tapping on the “Play” button near the top of the screen.
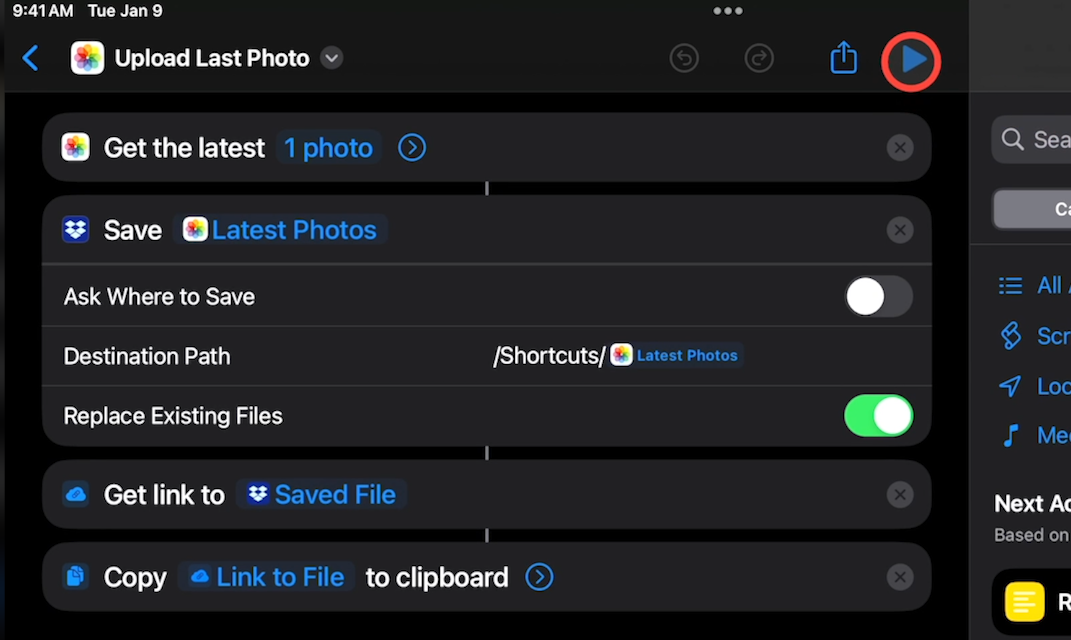
This will run the automation from beginning to end, highlighting each step as it starts. Note that you may need to authorize some actions during the testing.
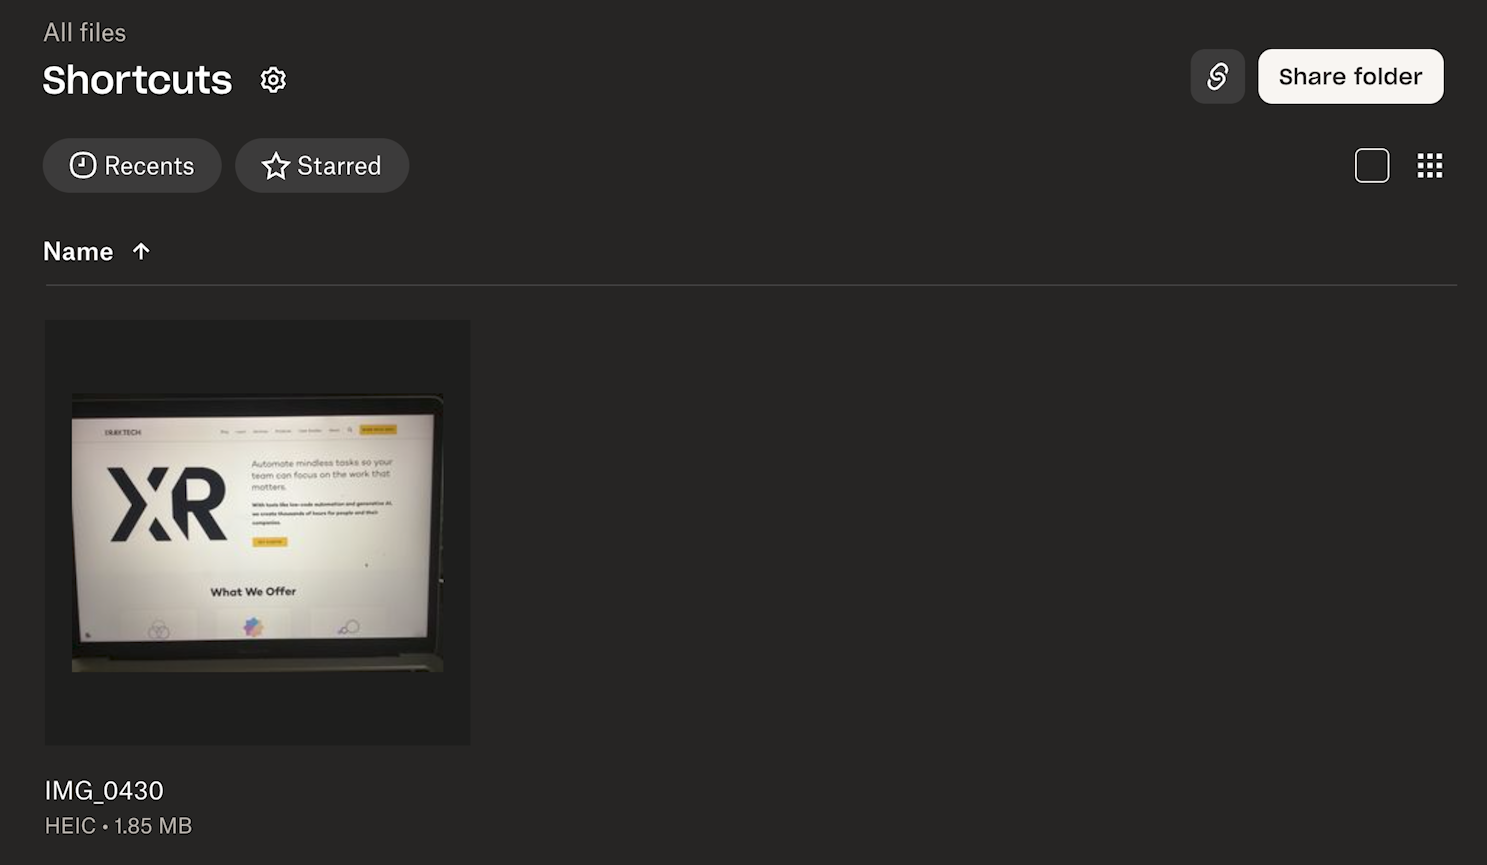
Once the test has concluded, check on your Dropbox account. In our example, it looks like the test was successful. Below, you can see our uploaded photo in the “Shortcuts” folder, with a unique name.
Once you’ve finished configuring your shortcut, tap on the arrow in the top left to exit the configuration menu.
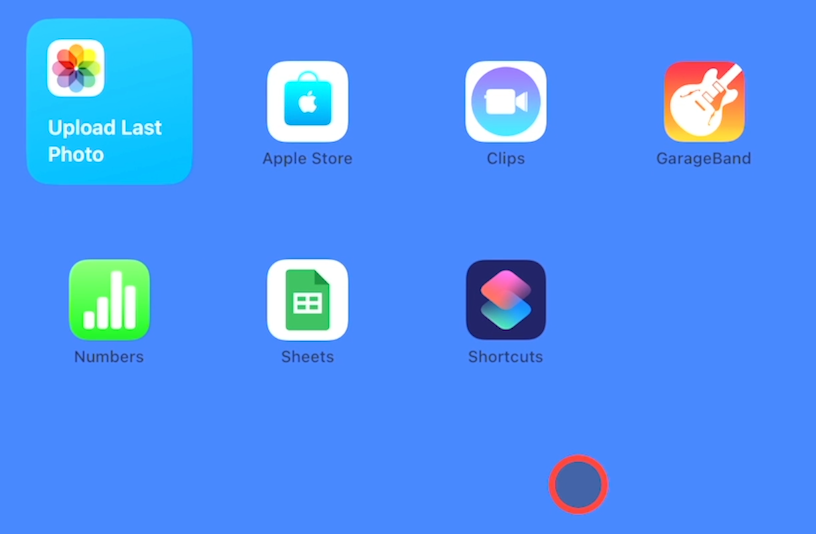
Adding your shortcut to the home screen
To add the shortcut to the home screen, just tap and hold anywhere on your device’s background. Then, select the plus sign that appears in the top left corner.
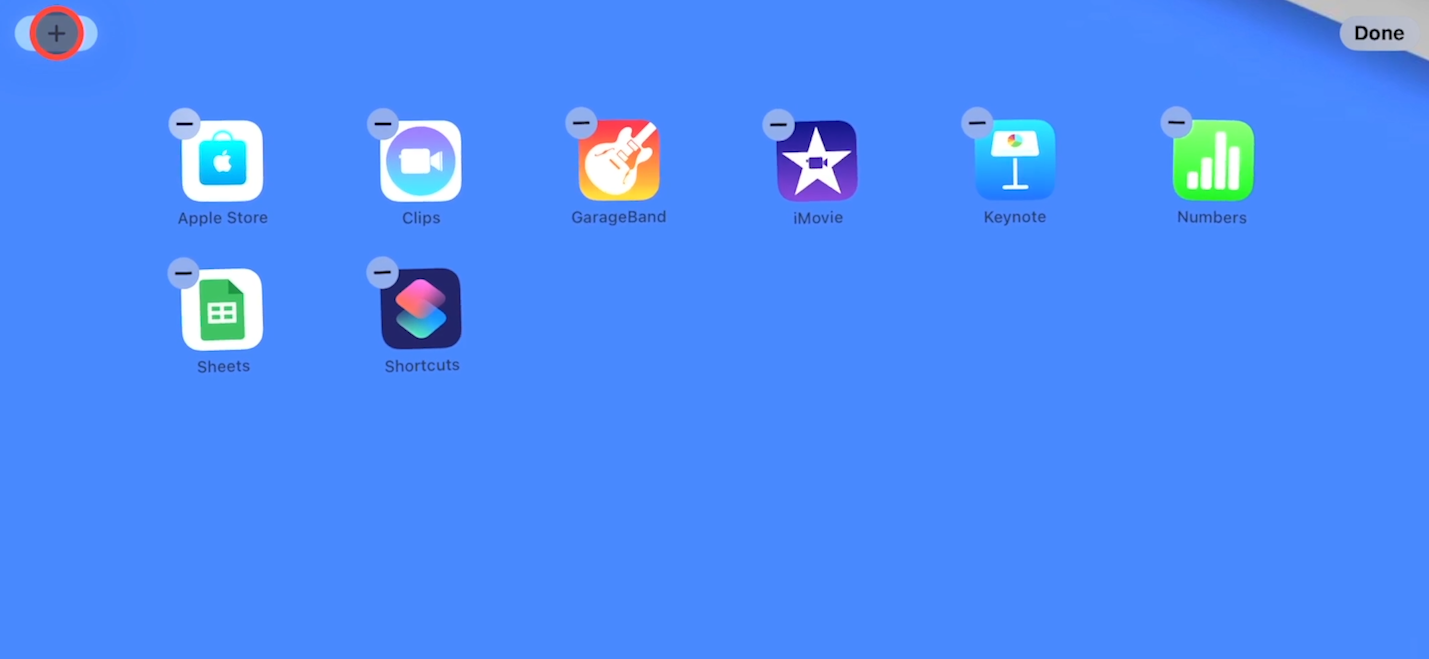
Search for “Shortcuts.”
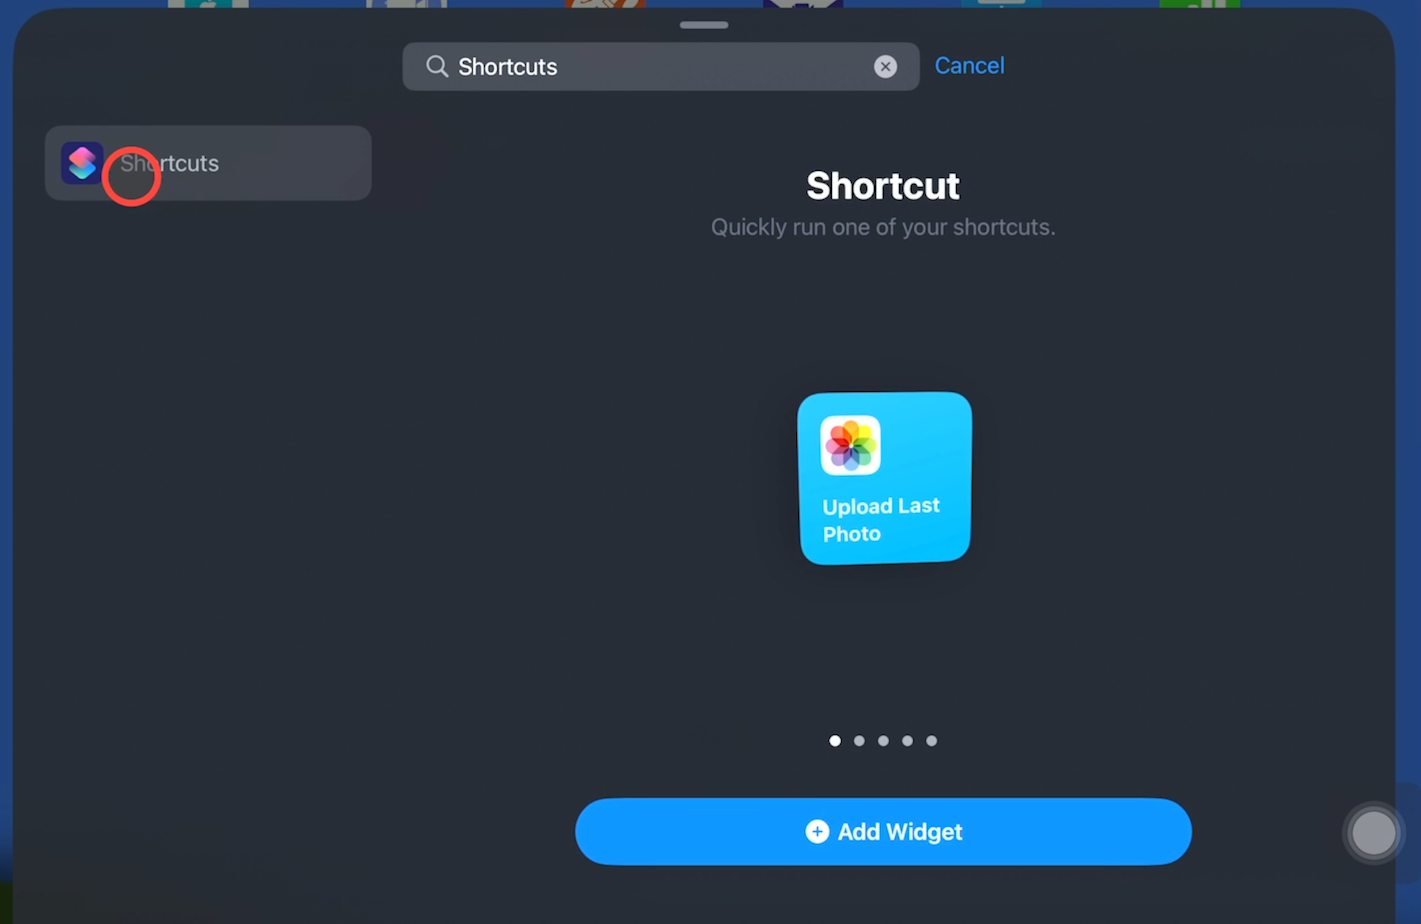
You can add a widget with a single shortcut, or a folder with several shortcuts. We’ll just choose the single shortcut for now.
If you want to change the shortcut in this widget, just tap and hold to edit it.

Once your Shortcut widget is all set, you can run it by just giving it a tap. As it’s running, you’ll see a little progress circle in the corner.
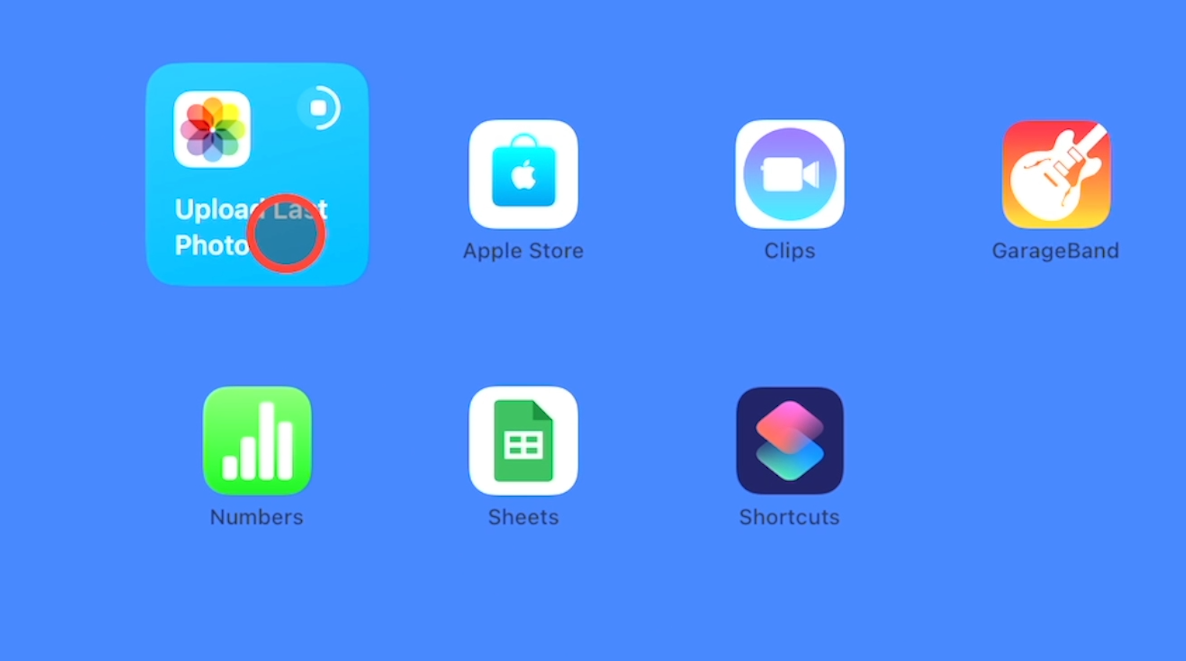
With the widget added to your home screen, you’re all set to use this Shortcut whenever you want.
Creating automations that run on their own in Shortcuts
Next, let’s create an automation that runs whenever certain conditions are met. We won’t need to tap or click anything to make this automation run.
Instead, this automation will instantly start playing a specific song whenever we connect to a specific Bluetooth speaker.
To create an automation that runs on its own, select “Automation” from the menu on the left.

Tap the plus button to create a new automation.
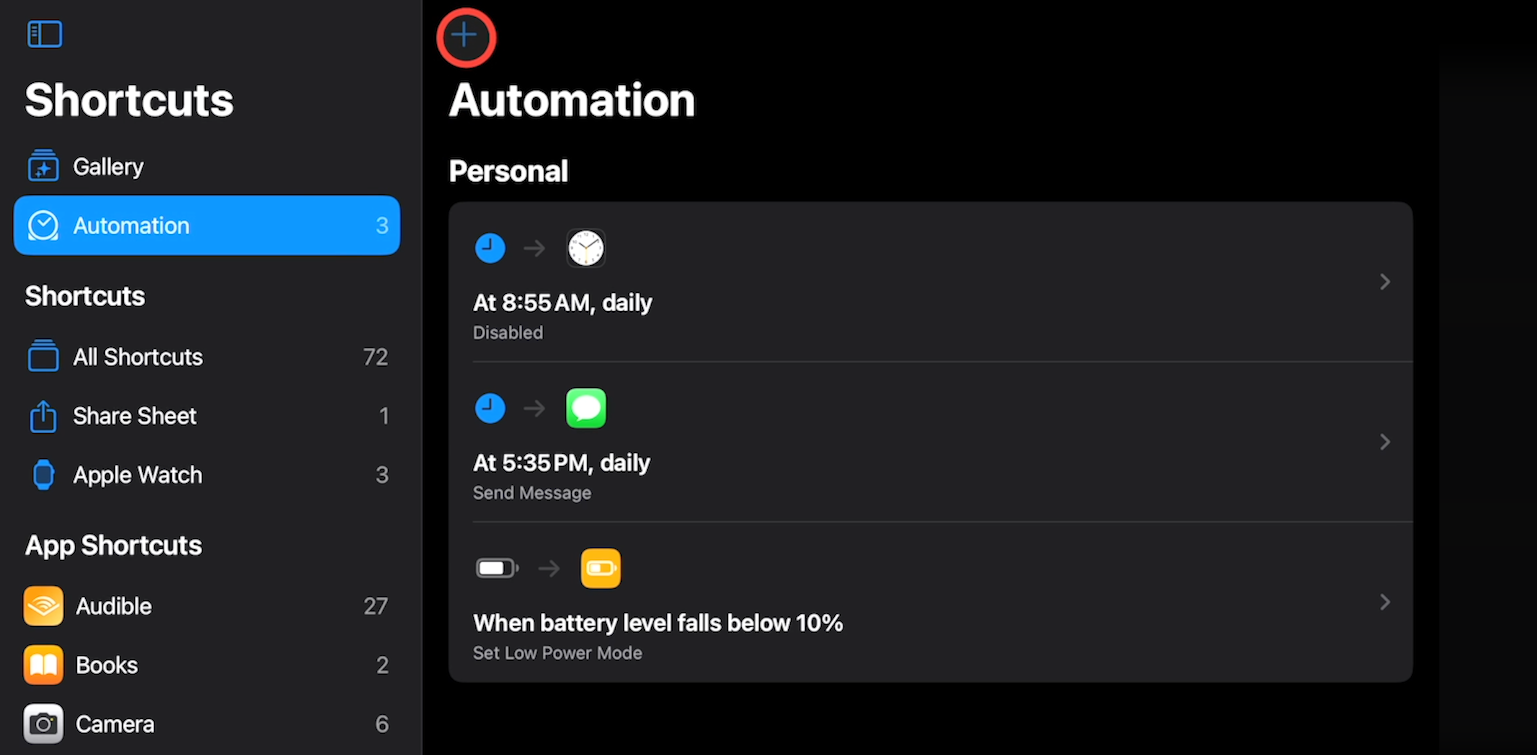
Then, choose a trigger.
Select an automation trigger
The trigger is the condition(s) that will make your automation run. Note that some automated actions and triggers in Shortcuts will only be available for certain devices, since not all devices have the same hardware, software, or settings.
In the trigger list, you’ll see several options. For instance, we can see time of day, transactions, Wi-Fi and Bluetooth settings, battery levels, and more on our iPad.
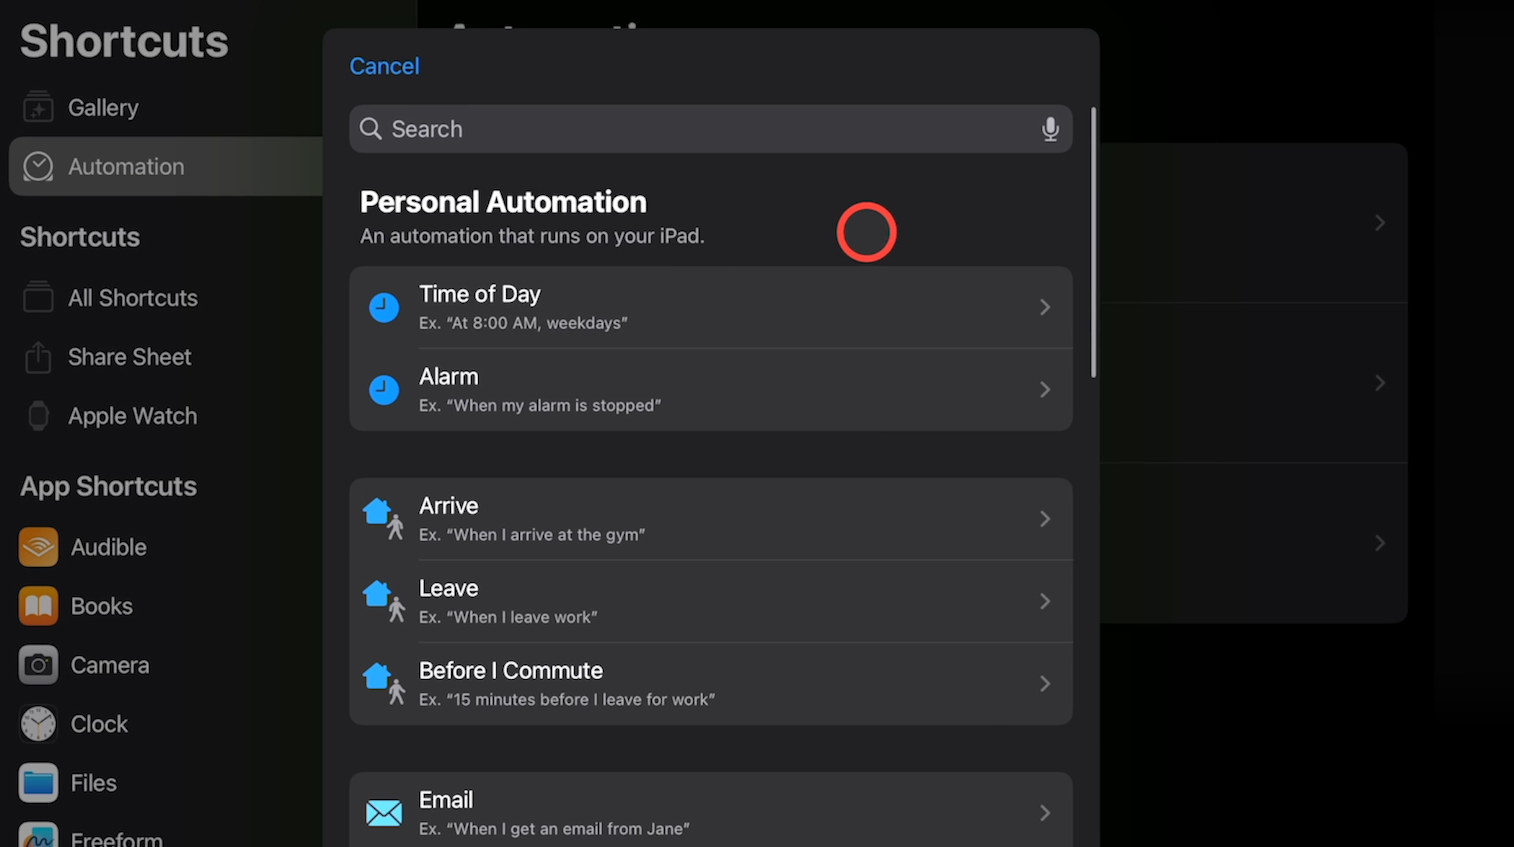
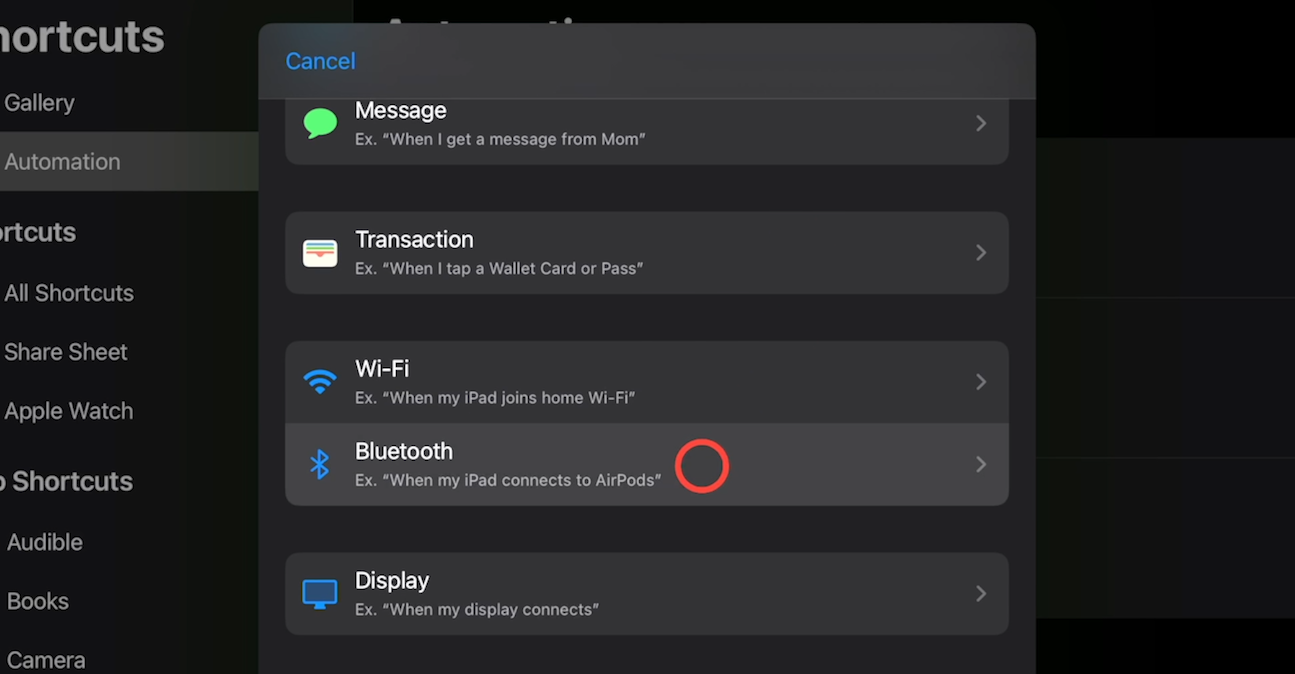
To trigger this automation, we’ll choose “Bluetooth,” which will enable the automation to run whenever the device connects to a specific Bluetooth accessory.
Configure your automation trigger
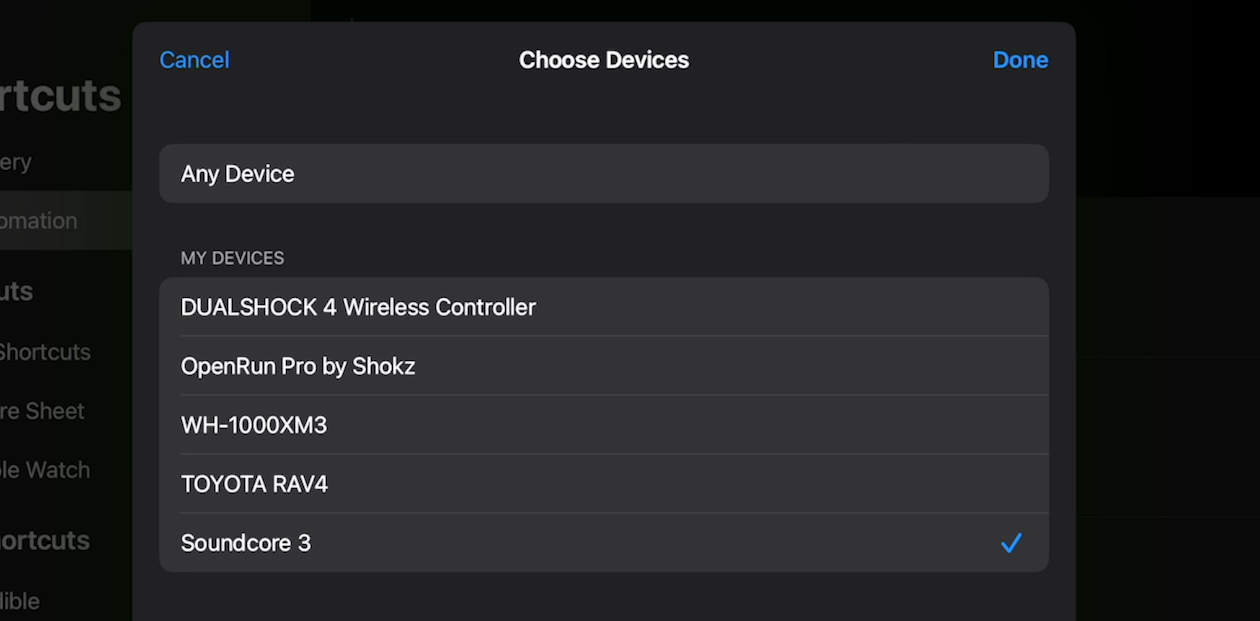
For the configuration options, start by choosing a specific Bluetooth device. The automation will only run when your Apple device connects to that Bluetooth speaker.
Alternatively, you could always select “Any device” to run the automation whenever you connect to any Bluetooth device. However, it’s usually better to choose a more specific trigger.
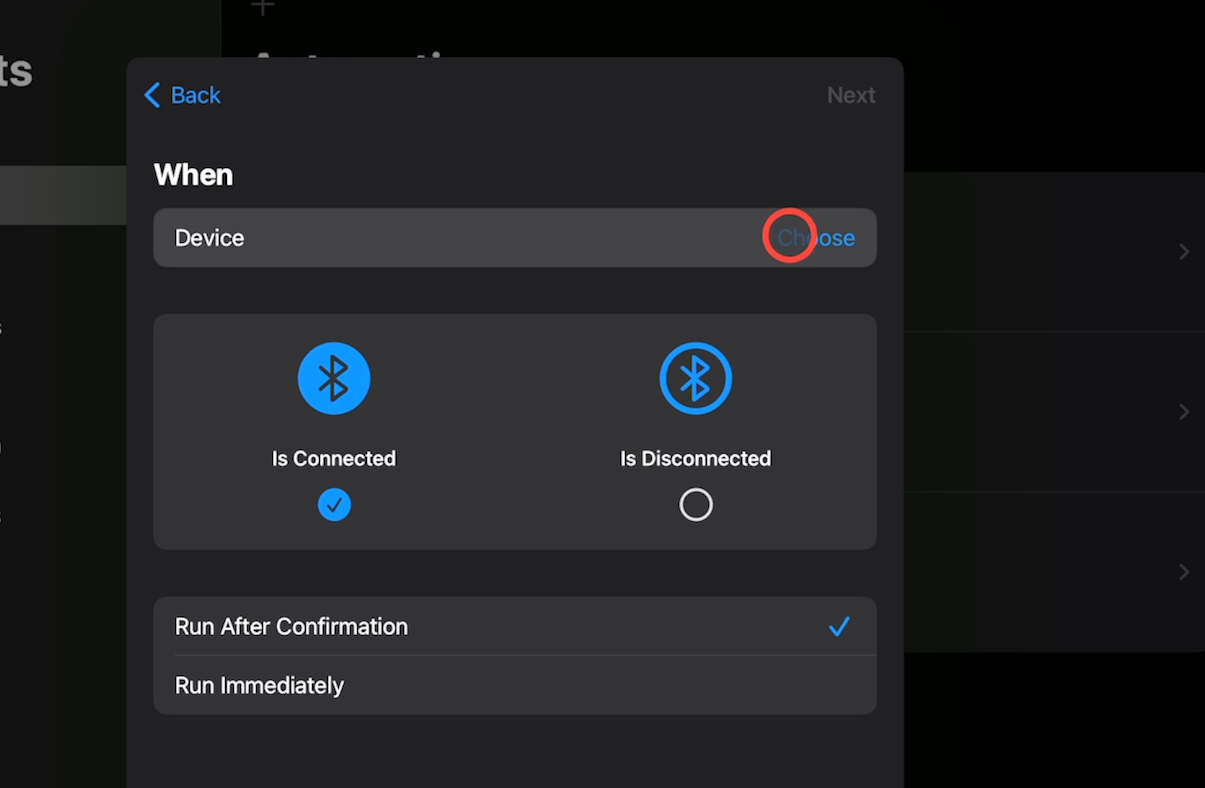
For example, we’ll choose a Soundcore speaker for our automation.
Next, you can pick whether the automation will run when the Bluetooth speaker is connected or disconnected. Leave it set to “connected.” After all, it wouldn’t make much sense to play music after disconnecting.

Then, you can choose whether the automation will run after confirmation, or run immediately.
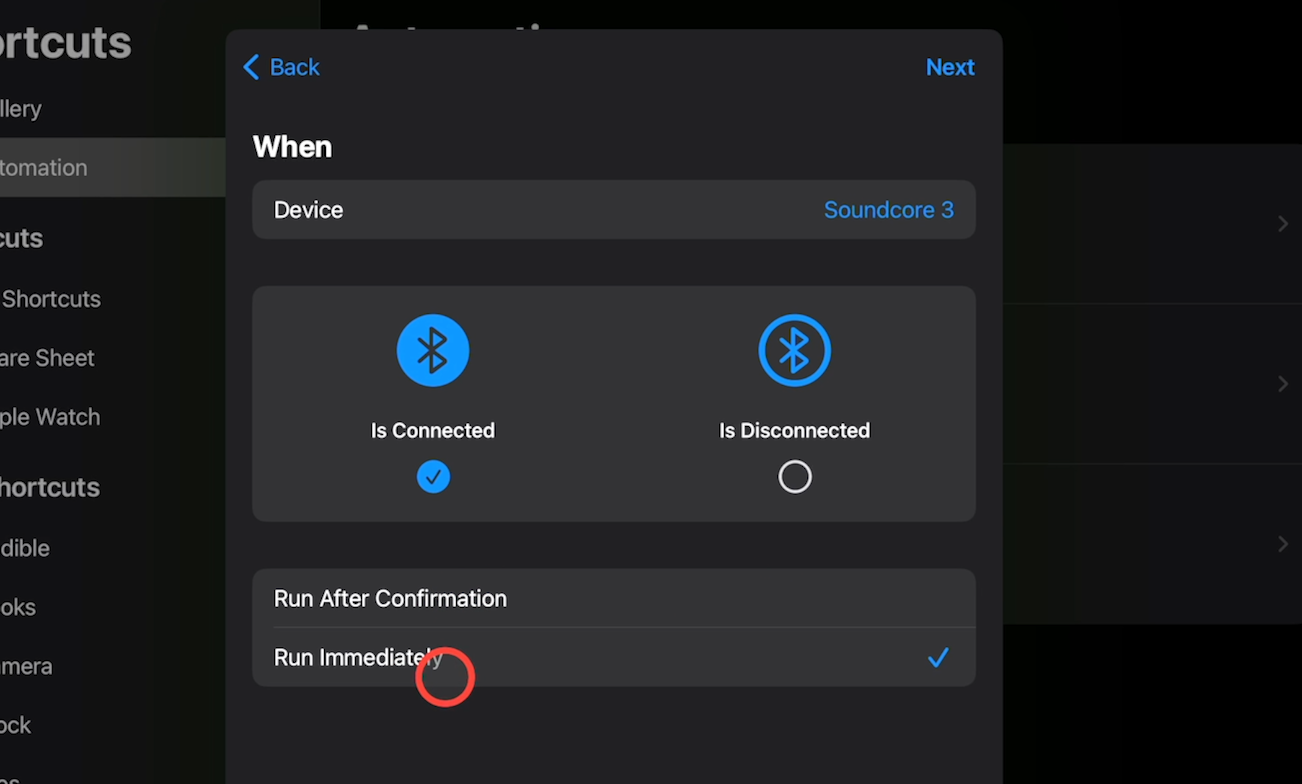
If you choose “run after confirmation,” you’ll get a pop-up asking you to confirm the automation before running it. In our example, we’ll set this to “Run immediately,” so it will start without requiring any input from us at all.
The trigger is all set, so now you can tap “Next” and add an action.
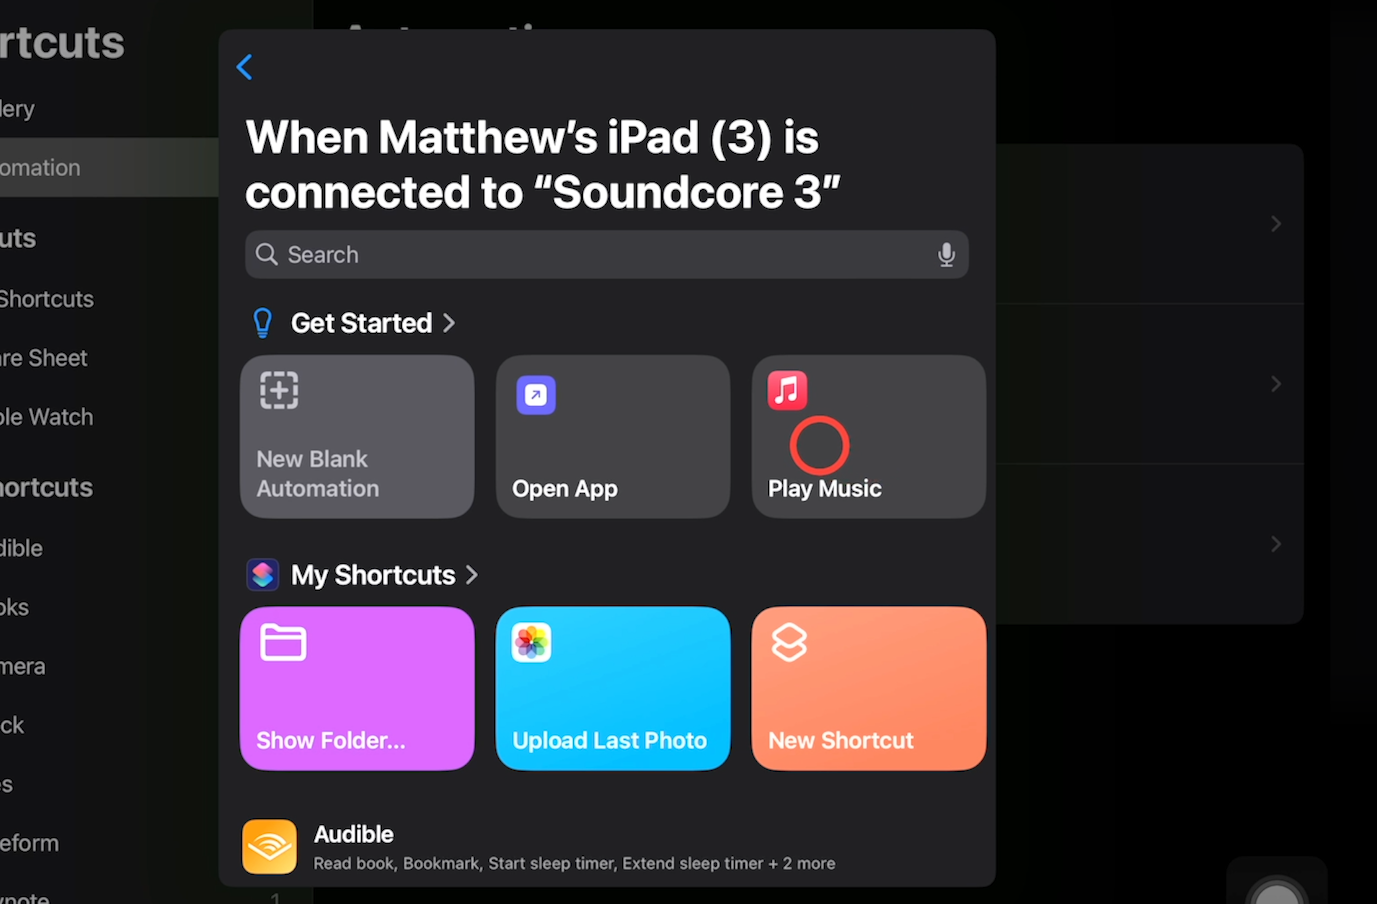
Add an action to your automation
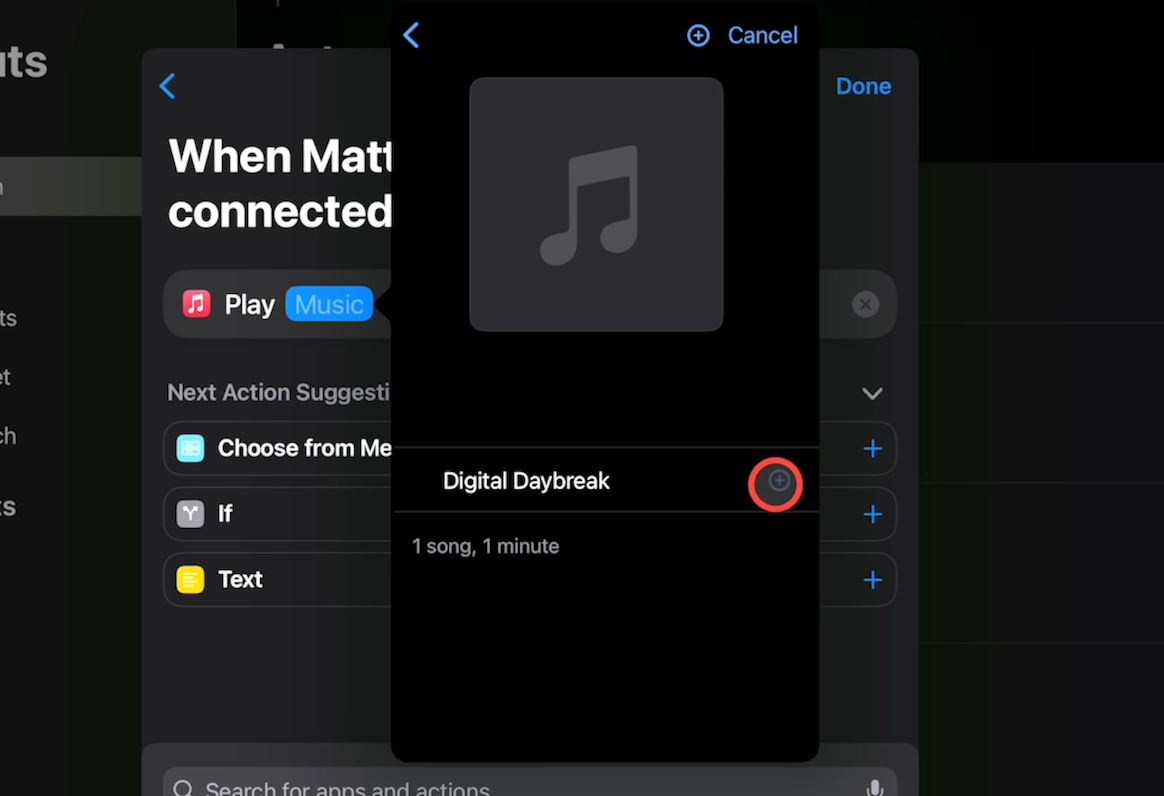
You can either select an action from the list, or search for a specific one. For this automation, choose “Play music” in Apple Music.
Then, select this ‘Music’ variable to assign a specific song to play.
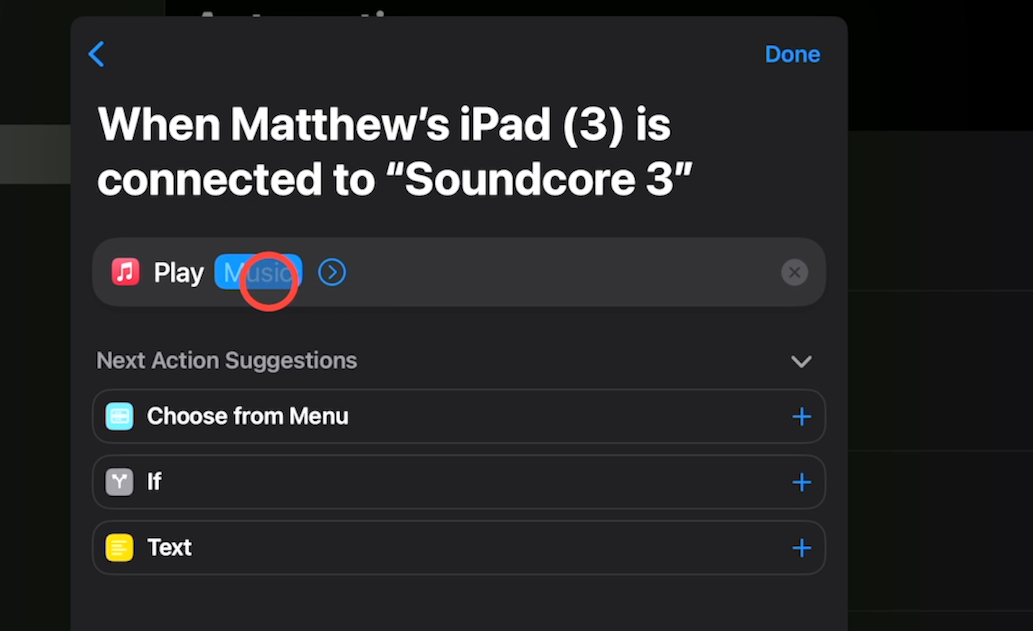
You can choose any song you like.
You can add more actions to your automations if you’d like, but we’ll stick with this 2-step automation for our example.
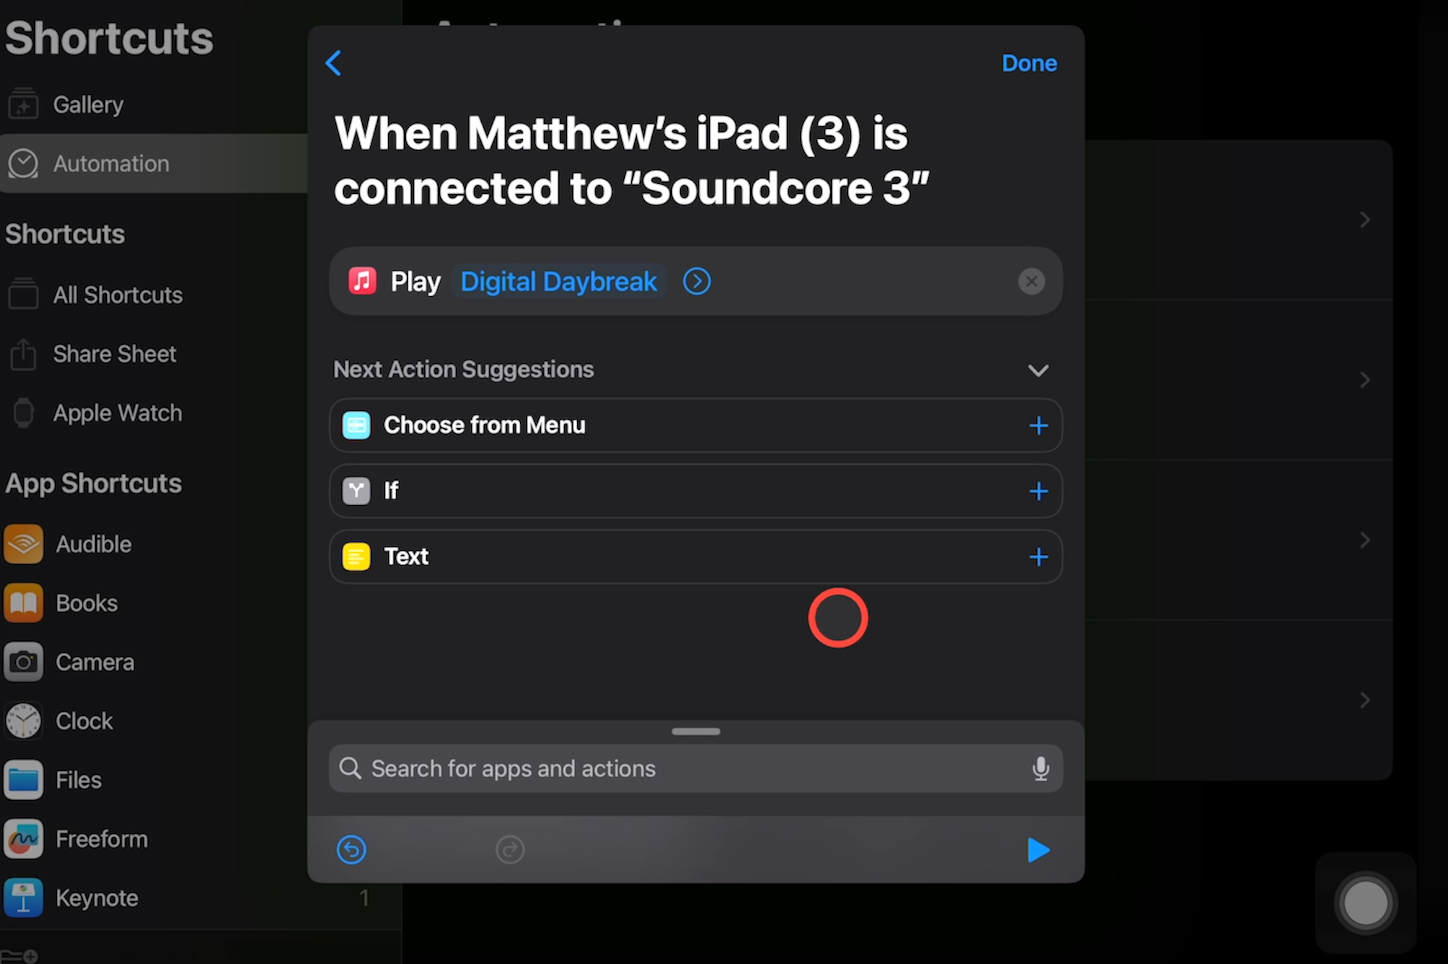
Once you’re finished, tap “done.”
Then, give your automation a test by connecting it to a bluetooth speaker.
Our automation instantly starts playing the song once we connect to the device. Perfect!
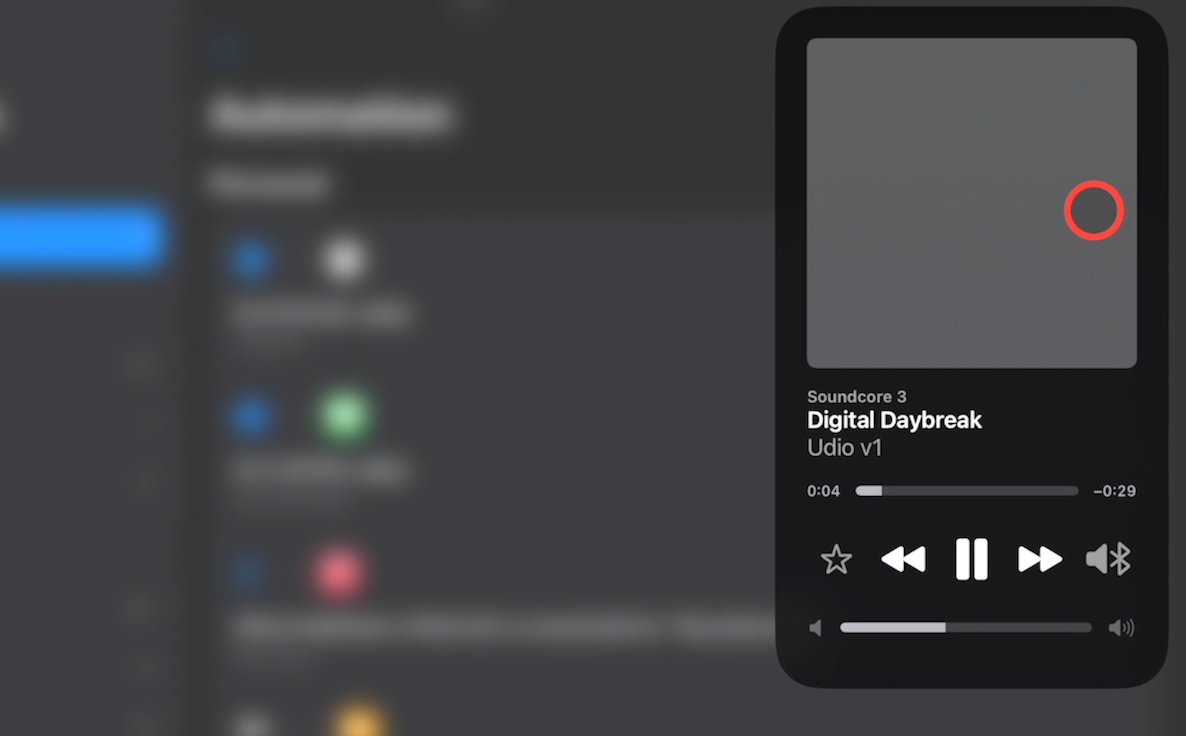
You can hear the AI-generated song we’ve chosen in the video version of this tutorial.
Take a Shortcut to productivity at home
Shortcuts are a great tool for shaving a few minutes off your daily tasks and automating your personal devices. They’re totally free and just take a moment to set up, so try building your own today.
If you’d like to learn more about automating your devices at home and at work, be sure to check out our blog or our YouTube channel. You can also follow XRay on Twitter, Facebook, or LinkedIn.
When you’re building Make scenarios, the prebuilt integrations don’t always retrieve all the data that you need. If you want to supplement your automations with some lookups for extra information, you can easily do it with Make’s “data stores” feature.
In this post, we’re going to show you how it works.
We’ll begin by creating a data store in Make. Then, we’ll demonstrate how to retrieve, create, and update information from a data store in an automated scenario.
At the end of the post, we’ll also share an alternative lookup method that can be more useful if you’re automating your work with both Zapier and Make.
To follow along, just sign in to Make. Data stores are available on every subscription level, including free plans.
How to create a data store in Make
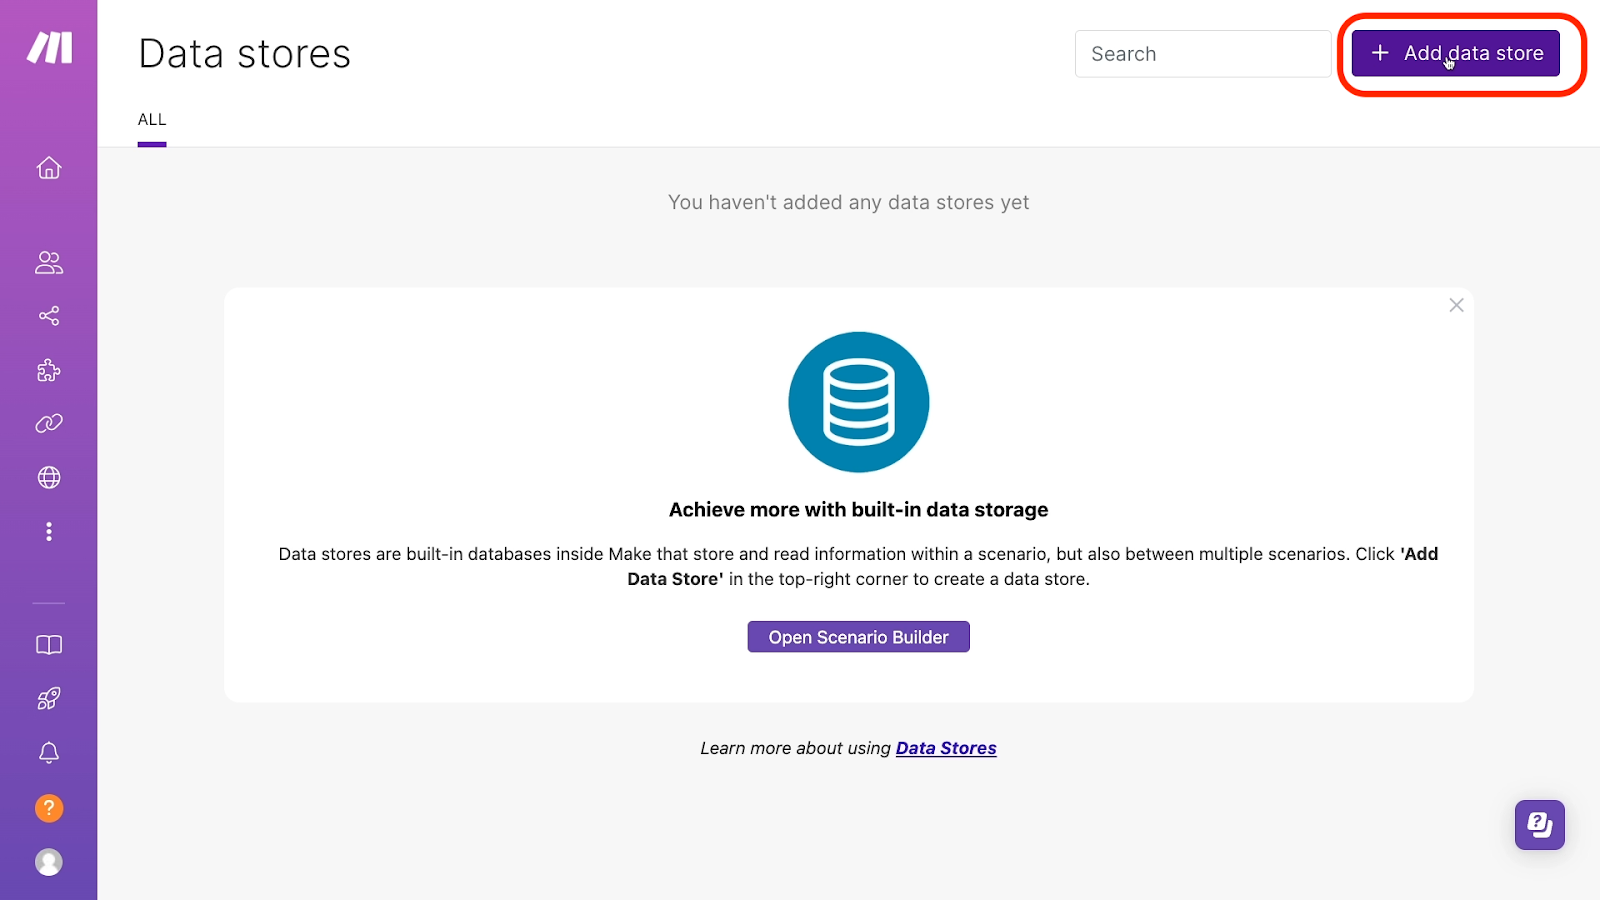
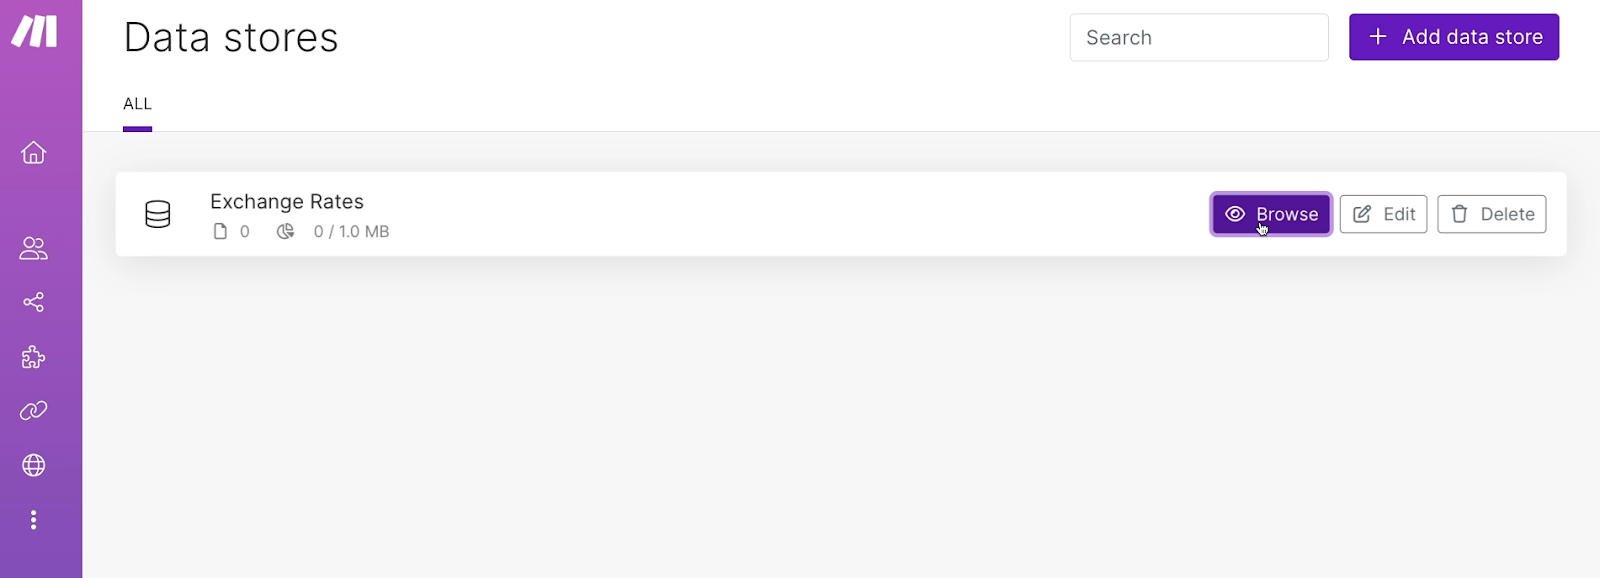
To create a data store in Make, open up the app and click on the “Data Stores” option on the left-hand menu.
If you don’t see the “Data Stores” option, click on “More”, then select “Data Stores”.

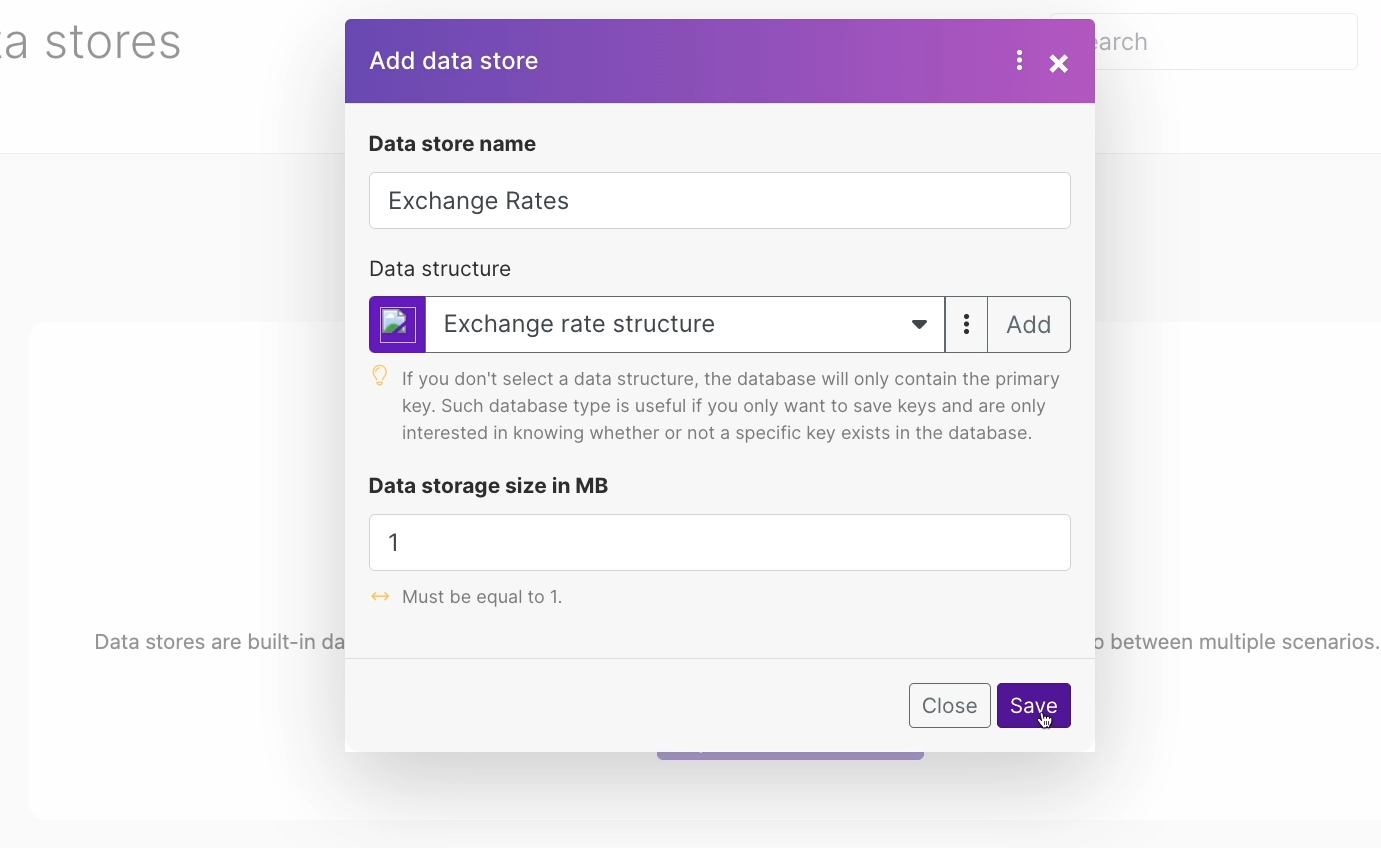
To make a new data store, click on the “Add data store” button in the top right corner.
In the window that pops up, you can give your data store a name, choose its size, and give it a structure.
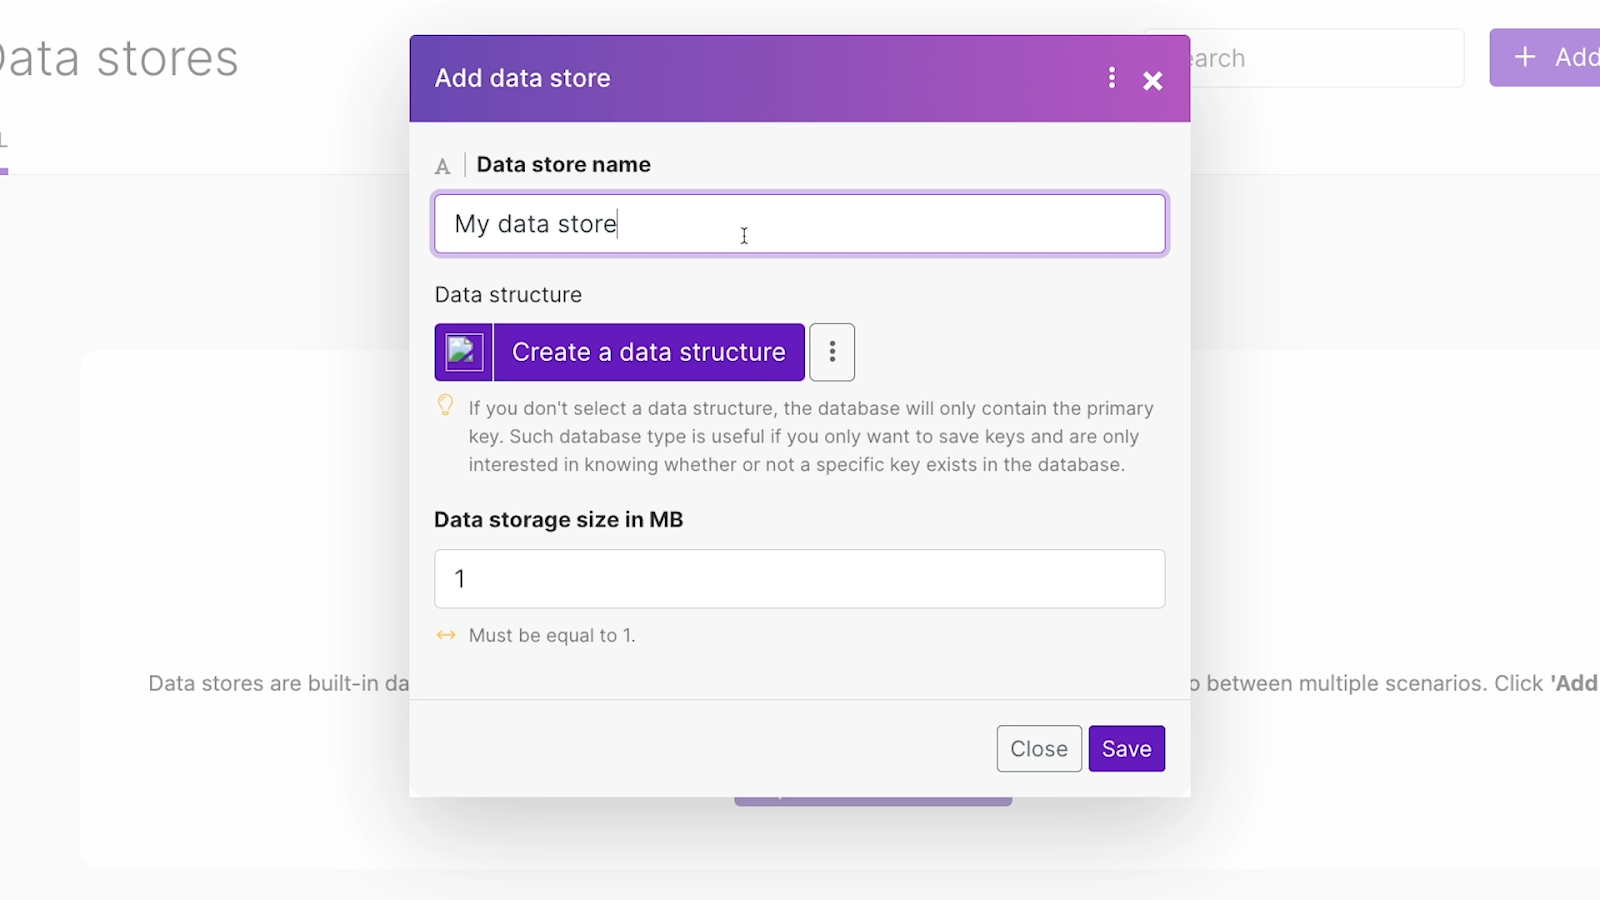
Your maximum data store size will depend on your subscription level. On the free plan, you’ll be limited to just 1 megabyte.
When you click on “Create a structure”, you’ll be able to add fields to your data store. When you create a structure, you’re just defining the fields that will be present in the table, such as “Full Name.” You’re not going to enter the actual data yet, like “John Smith.”
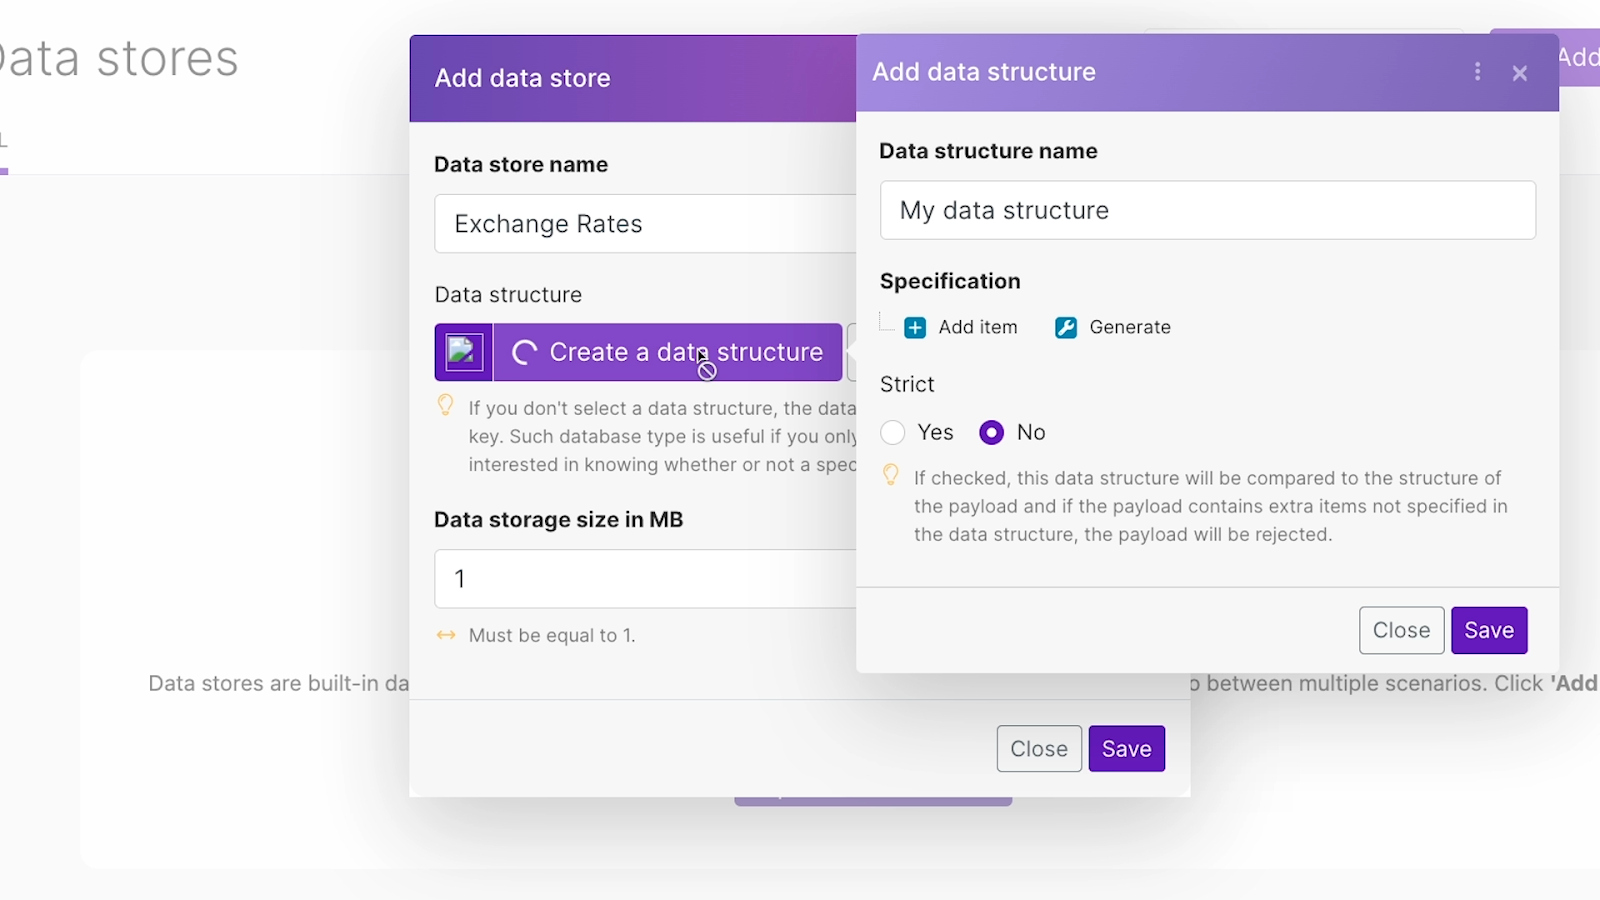
To add a new field to your data store, click on “Add item” under “Specification.”
Initially, you’ll see three fields to fill in here: “Name”, “Type”, and “Default.” If you enable advanced settings, you’ll also see a “Label” field.

A field’s Name represents the programmatic name of the field. This is the text that Make will look for or return whenever it references this field. If you change the name of a field in your data store, you’ll need to make sure that you update any automations that reference that field.
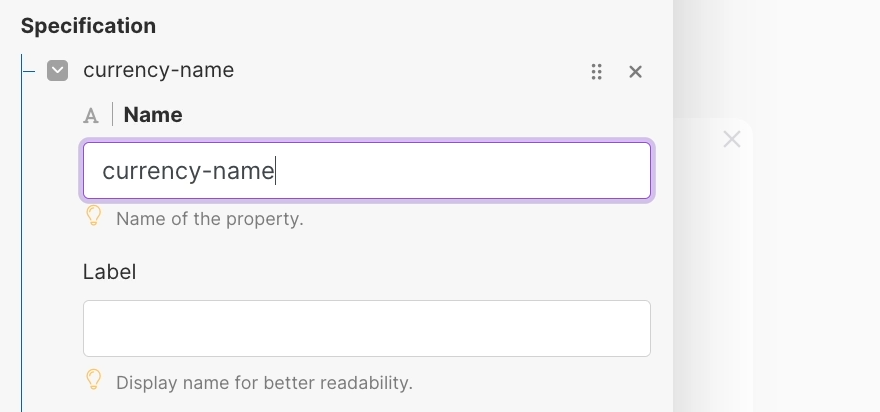
The label is an alternative title for the field that’s primarily intended for people to read. It’s often better to keep the name of each field constant and just update the label if you want to change what the field’s called.
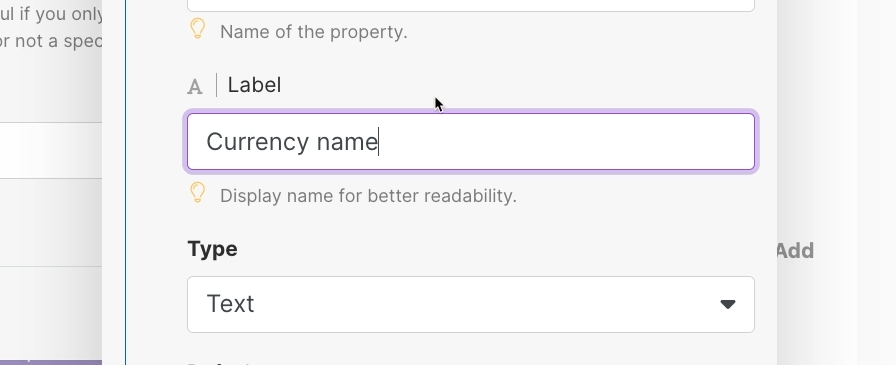
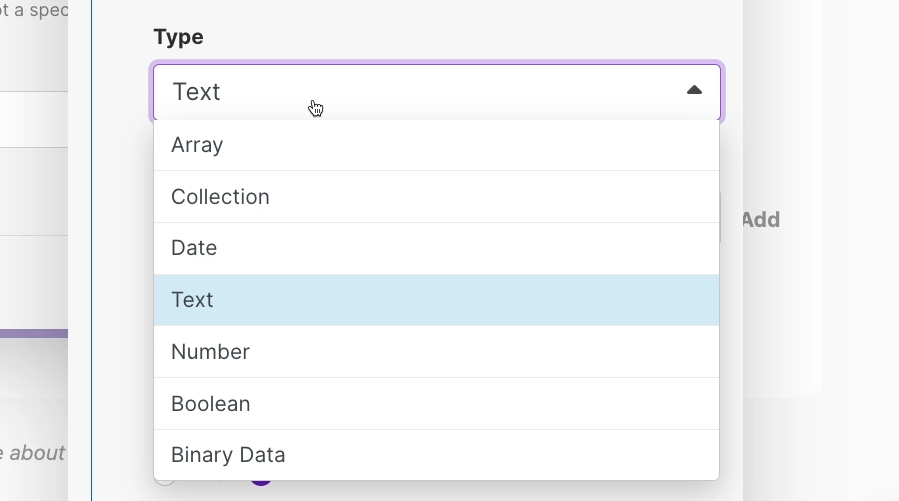
Under “Type”, you can select the data type that your field will accept, such as “Text” or “Date.”
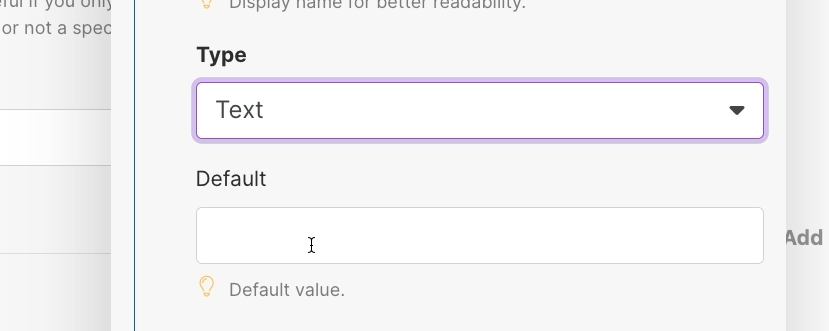
In “Default”, you can specify a default value for the field. Note that this option won’t be available for every field type – for instance, it’s not present for “Date.”
You can add several items to create as many fields as you want. Note that in addition to all of the custom fields that you specify here, every data store will also have a field called “Key”, which is meant to be used as a unique identifier for each record.
Once you’re done, click on “Save” to close the field configuration menu.

Then click “Save” again to create your data store using the chosen structure.
How to manually add records to a data store
To add records to your data store manually, hover over it and click on “Browse” to open the data store.
Then, click on ‘Add’ and fill in each field.

Once you’re done adding records, be sure to click “Save” to commit your changes.

Look up data store records from a Make scenario
Once you’ve created a data store, you can use Make scenarios to automatically find, add, and update records in it. However, you can’t trigger automations to run when you add or update a record in a data store.
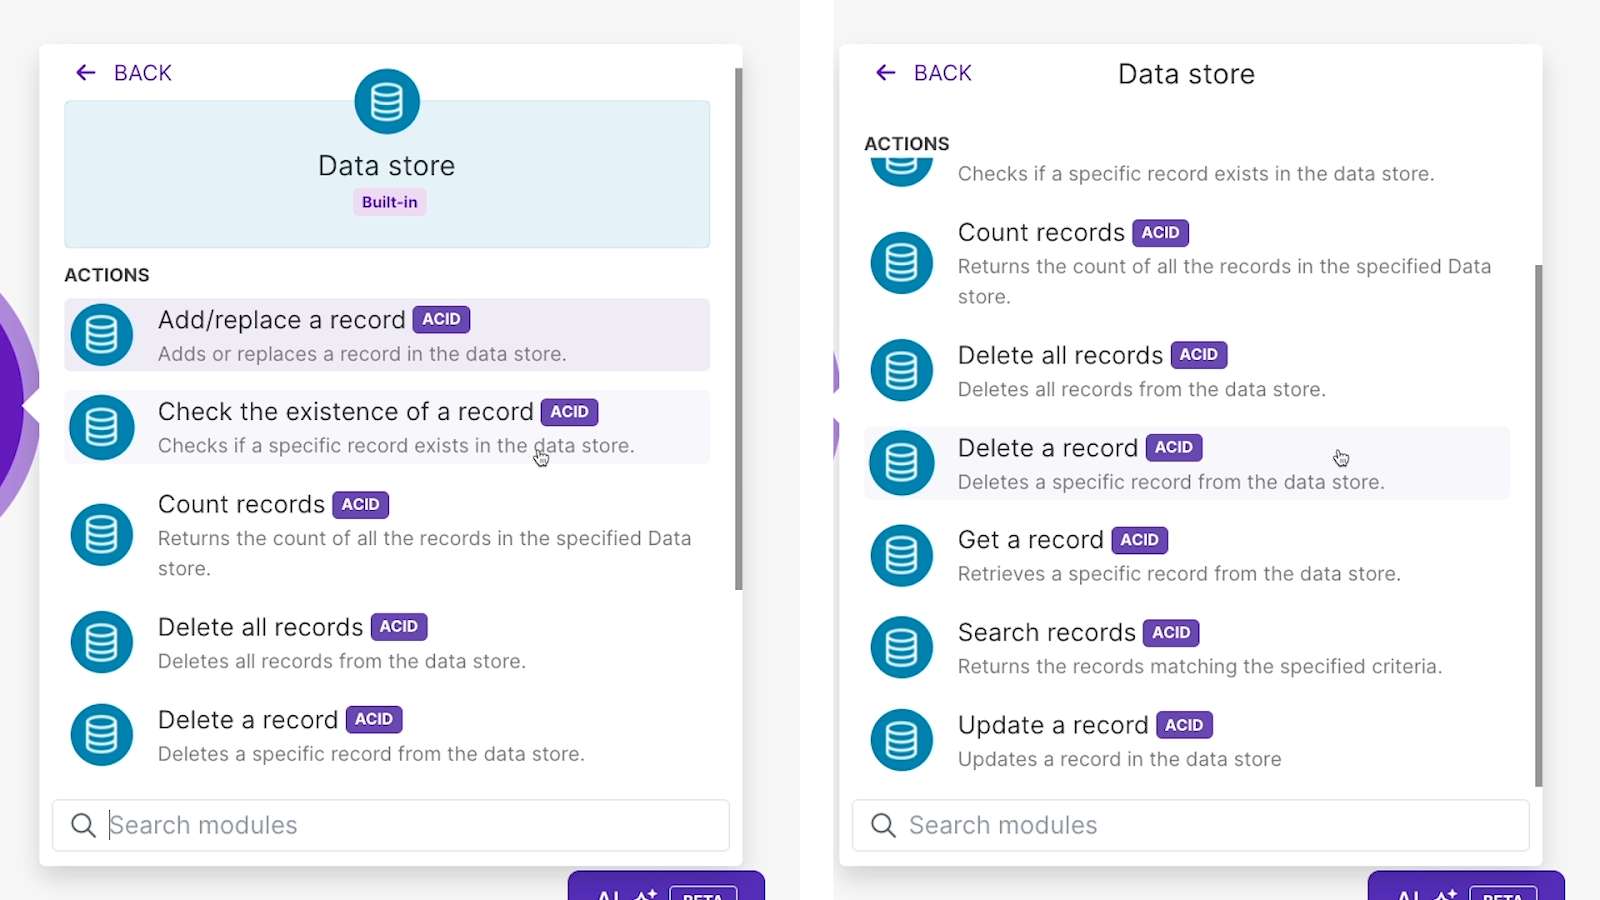
To automatically look up records in a data store from a Make scenario, add a new module to your scenario, and search for “Data store.”
In the “Data Store” module, select “Search records.”

Then, pick the data store you want to search in.
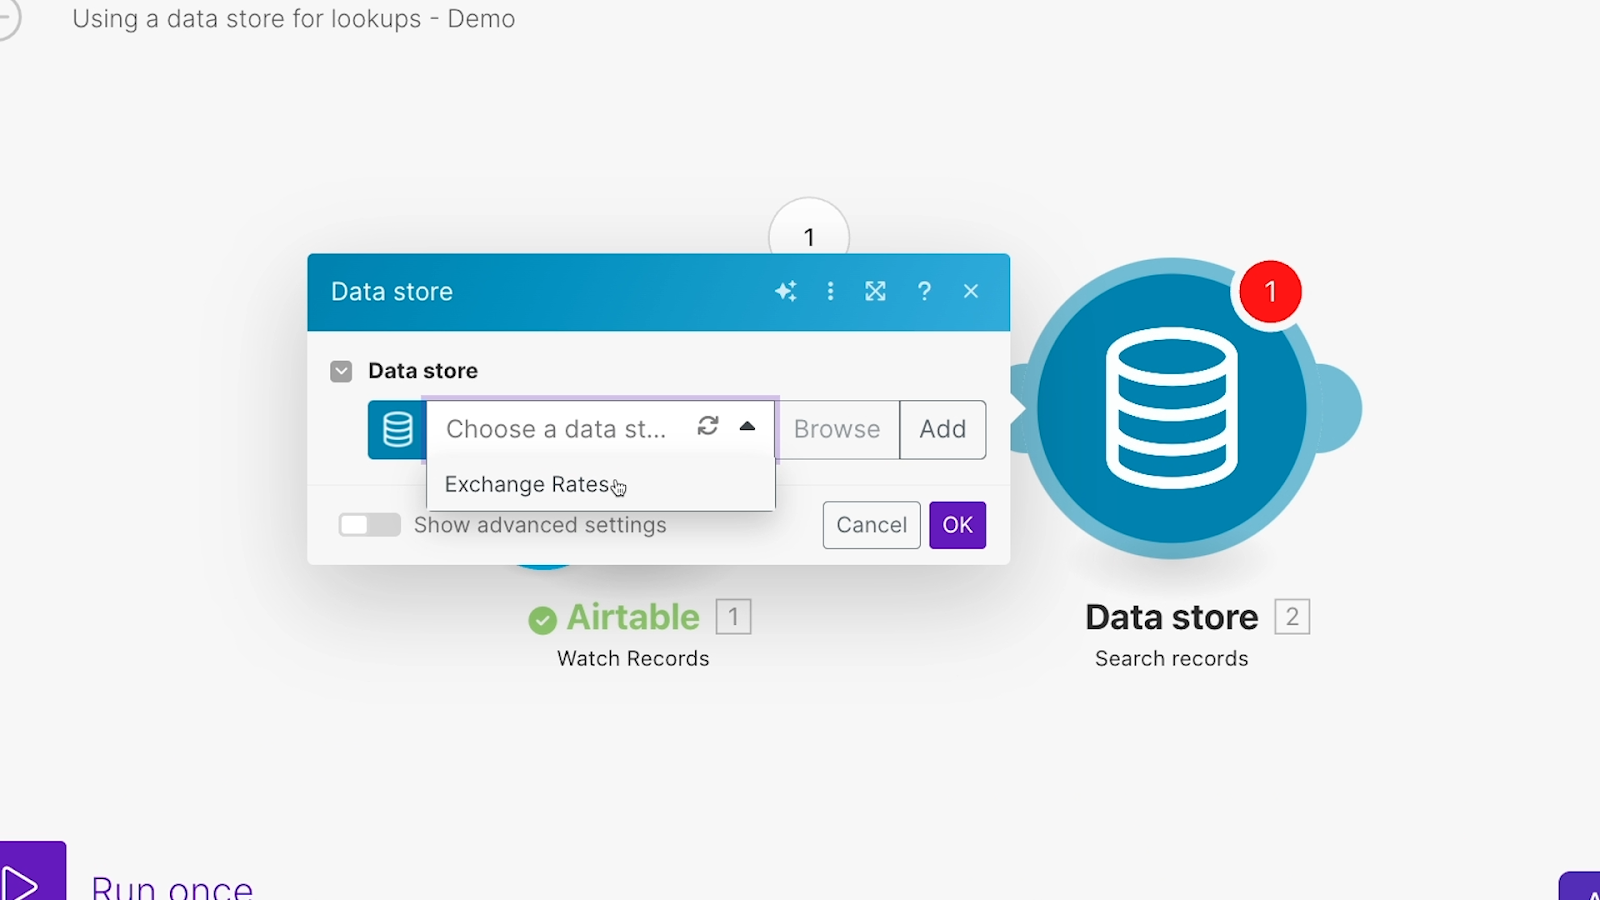
Choose the field that you want to search within, and provide a value to search for. You can also specify a sort order for the search results here.
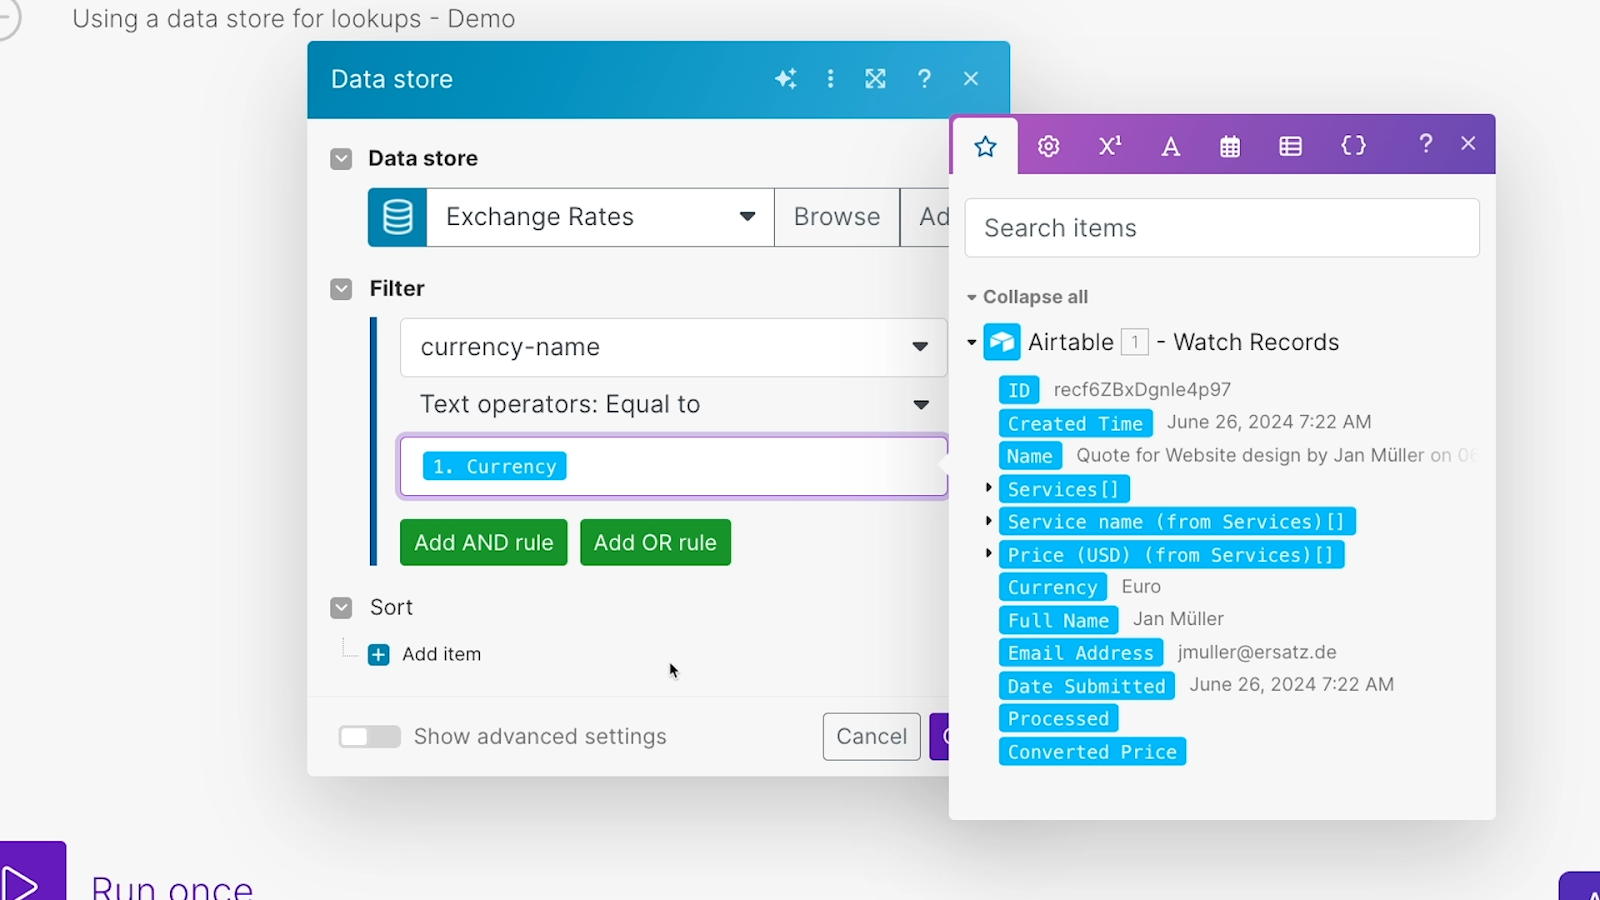
When you run this module, you’ll see any matching records that were found in the data store.
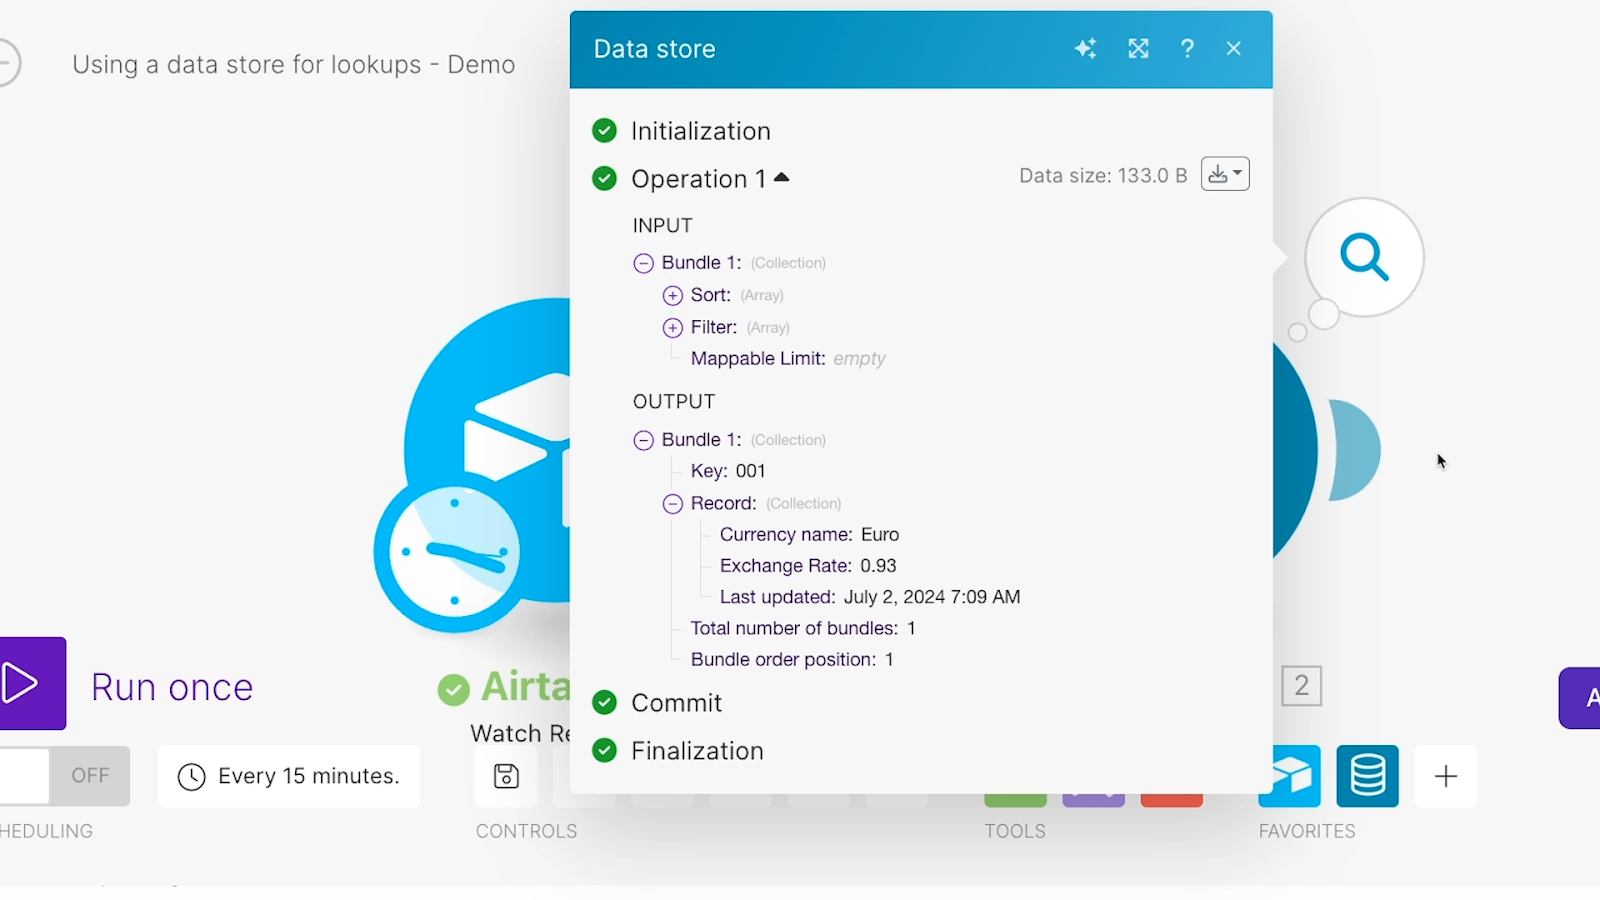
Then, you can use that data in any subsequent steps in your automation. As usual in Make, the value in each field will be returned as a separate variable.

Create and update records in a data store
There are a couple of different ways to automatically create records in your data stores, but the most efficient and flexible options will usually be to use the “Update record” option.

With “Update record”, you can either update an existing record, or create a new one if it doesn’t exist yet.
Just specify the data store you want to use, and the key to search for.

Then, choose whether or not to create a new record if no match is found.
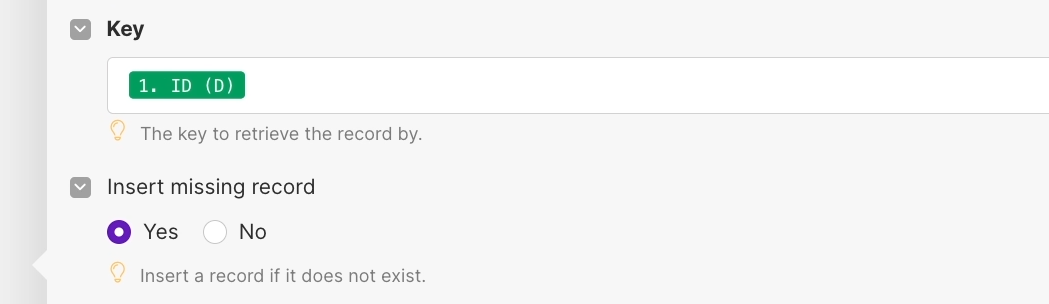
Fill in every field that you want to update with the new value that will be entered.
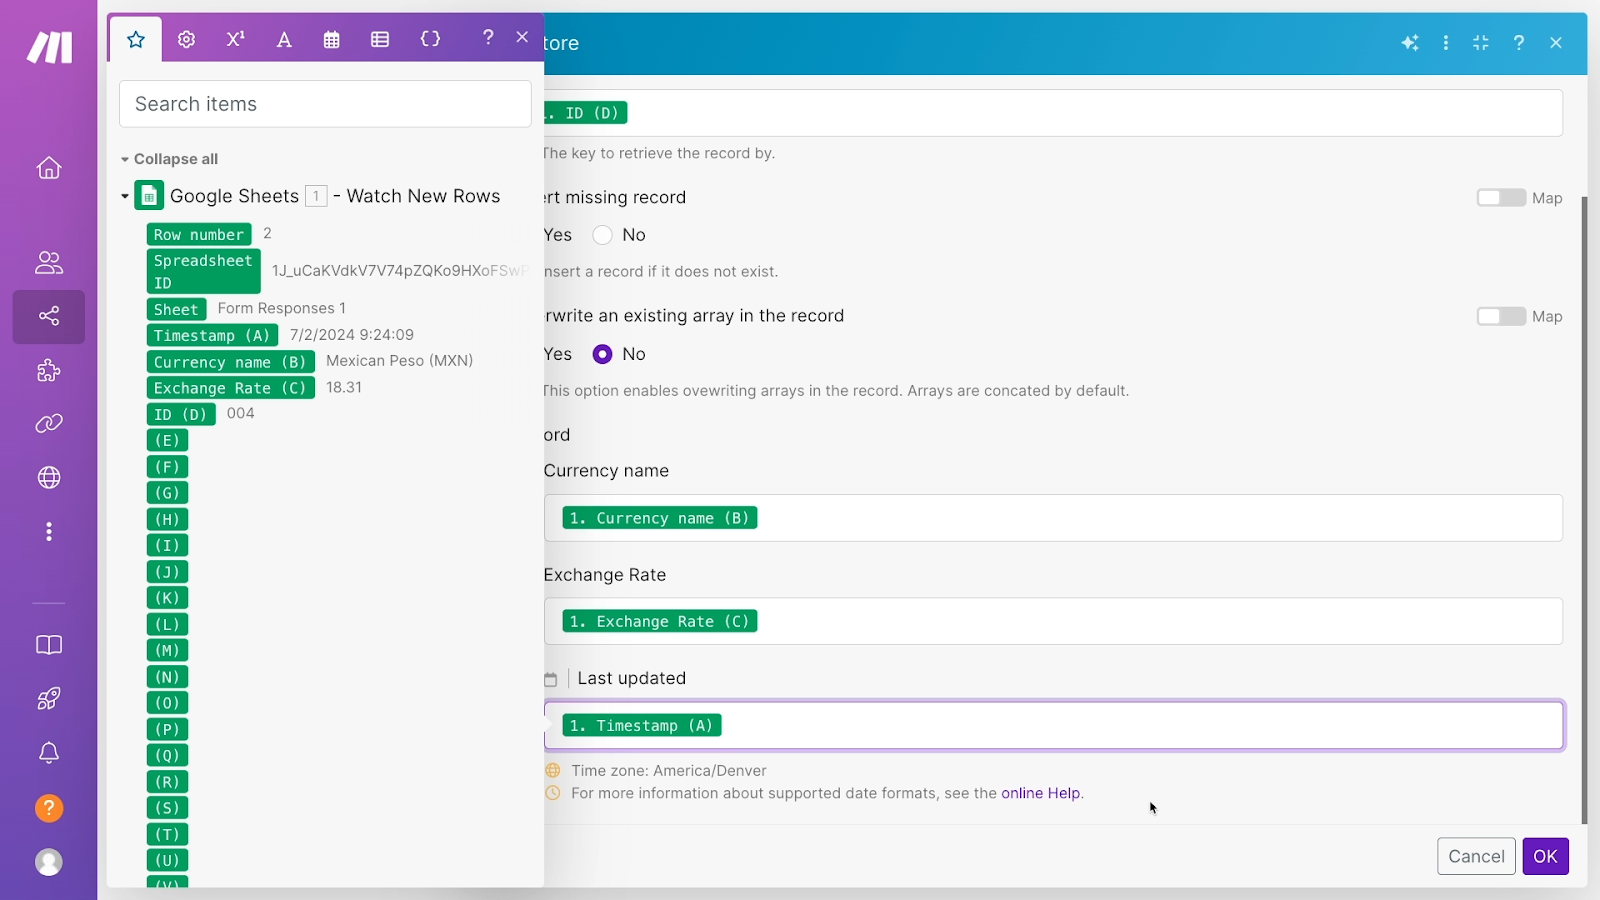
If you leave a field blank here, then the contents of that field will not be updated when the scenario runs. However, if you’re using the “update” module to create records as well, you’ll probably want to fill in every field.
Once you’re all set, click OK to close the configuration window.
When you run the module, you should see the record created or updated as appropriate.
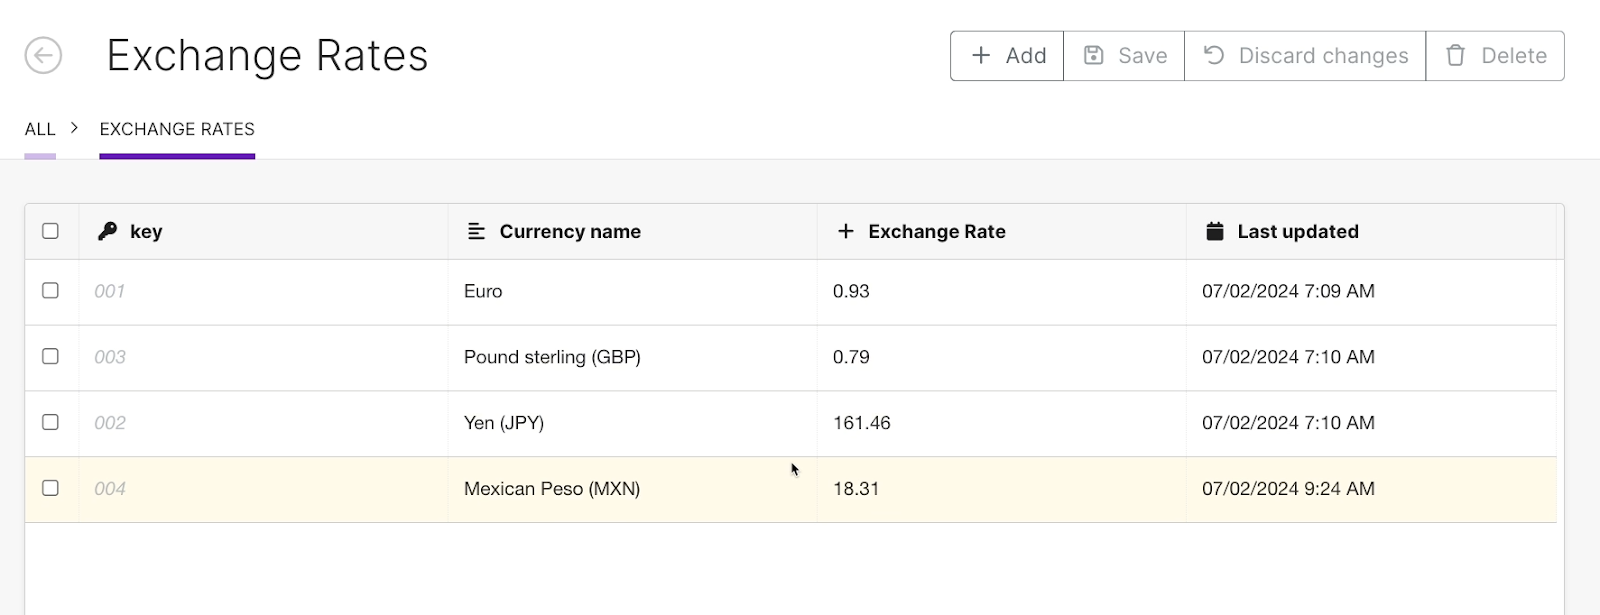
Operational Databases: an advanced alternative
Of course, data stores are certainly not the only way to do a lookup in Make, and frankly, they’re often not the best way.
Instead of using a built-in feature like a data store, we’d often recommend using Airtable to create an Operational Database (ODb). With an ODb, you can store data for easy reference, control how your automations run, and share data with your team using interfaces.
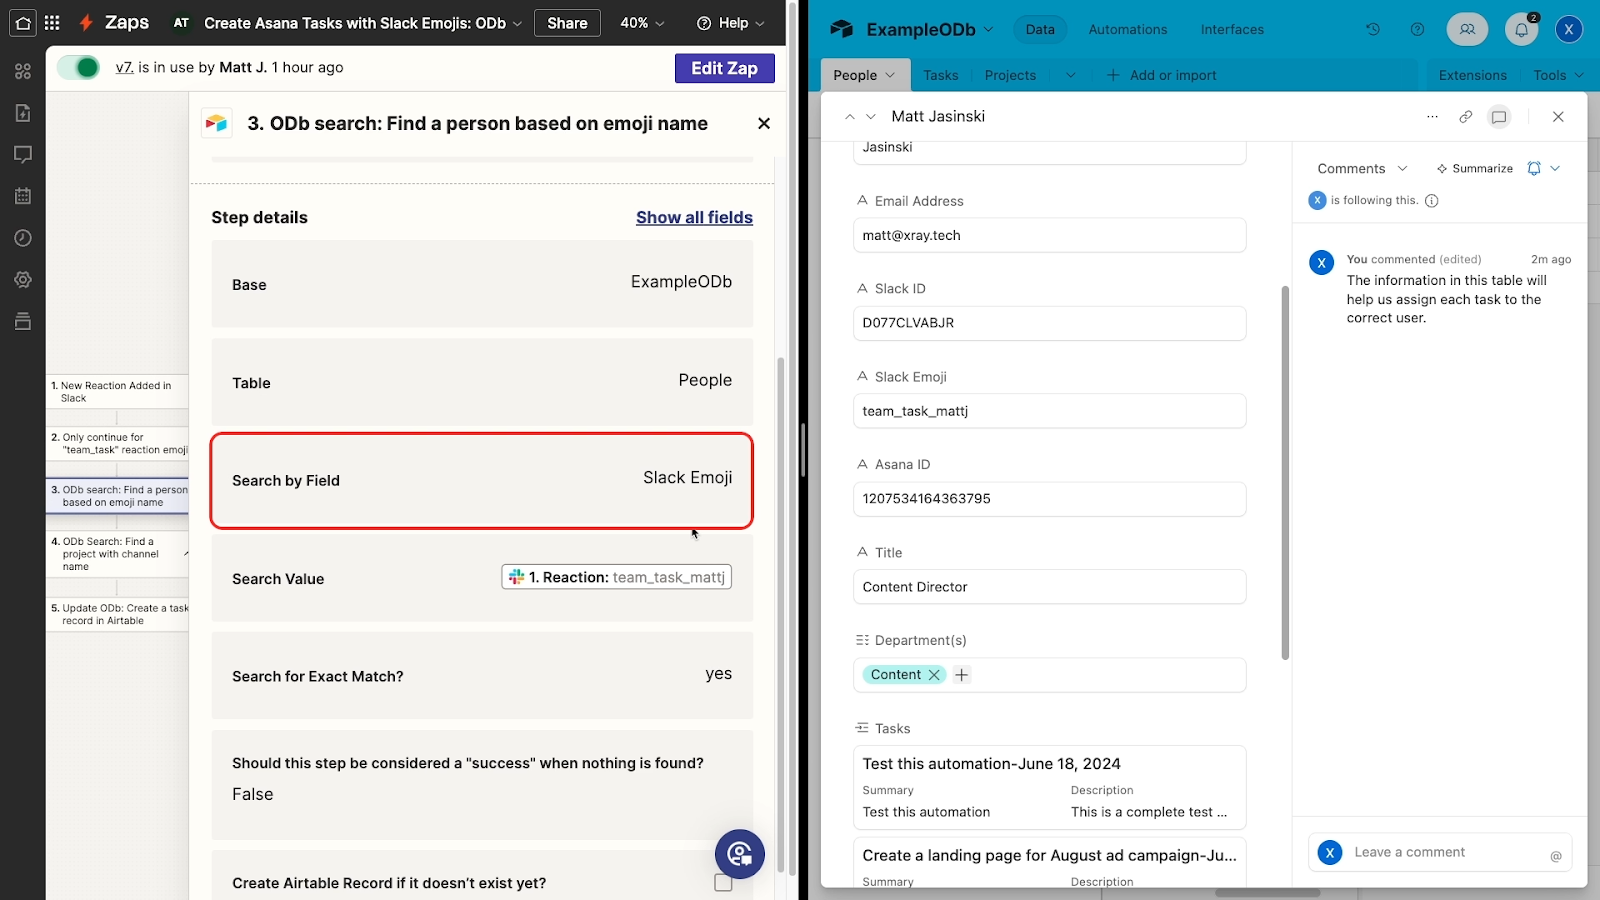
You can learn more about using an ODb with your no-code automations in this blog post. In the post, we give a brief overview of all the key benefits and use cases of connecting your automations to an Operational Database.
The post primarily demonstrates an ODb connected to Zapier, but the same principles apply to Make. In fact, one of the key benefits of using an ODb is that you can search the same database from several different automation providers.
To learn more about designing workflow automations that leverage an ODb, you can also sign up for our Workflow Designer course. With over 2 hours of video content and activities, we’ll teach you how to design and implement automated workflows that support entire teams with techniques like an ODb.
Of course, an ODb may be overkill in some circumstances. If you just need a small set of data that likely won’t be referenced in many places, then the data stores that we’ve looked at today are a great choice.
Easily find, update, and create data in Make with data stores
With Data Stores in Make, you can quickly create a simple database that you can reference from any Make scenario. Once you’ve established the structure for a data store, you can add, update or delete records with a simple built-in module.
If you’d like to learn more about Make, Zapier, and other no-code automation tools, check out our blog or our YouTube channel. You can also follow XRay on Twitter, Facebook, or LinkedIn.
If you’ve ever tried importing a CSV into an existing table in Airtable, you’ve probably run into a certain frustrating problem.
While you can easily add data to most field types with a standard CSV import, you can’t map the imported data to your linked record fields, such as the linked “Owner” field pictured below.
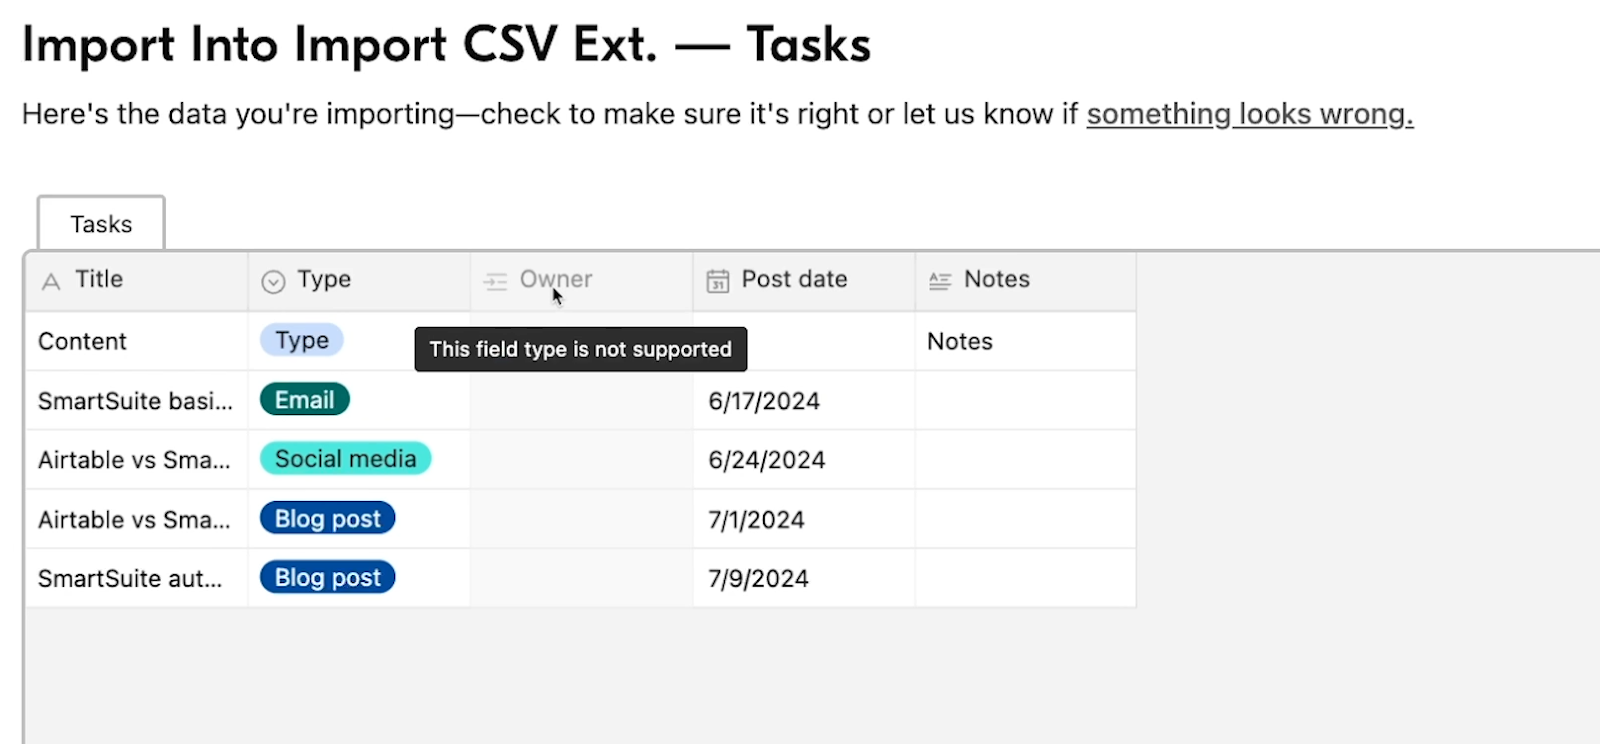
Fortunately, there’s another way to import CSVs into your tables, and it will let you add data directly into your linked record fields.
All you need is an Airtable subscription and one free extension. In this post, we’re going to show you how it all works.
We’ll demonstrate how to add the “CSV import” extension, and explain how to use it step by step.
Just open up Airtable to follow along.
Airtable’s “CSV Import” Extension
With the “CSV Import” extension, you can map data from a CSV to a linked record, even when you’re adding the CSV to an existing table.
The extension itself is free, but like all extensions, you will need to have a paid Airtable plan to add it to your base.
Adding the extension to your Airtable base
To add the extension to your base, start by clicking on “Extensions” in the top right. On Mac, you can also press Cmd + Shift + backslash to open up the extensions panel.

Once the extensions panel is open, add an extension to your base.
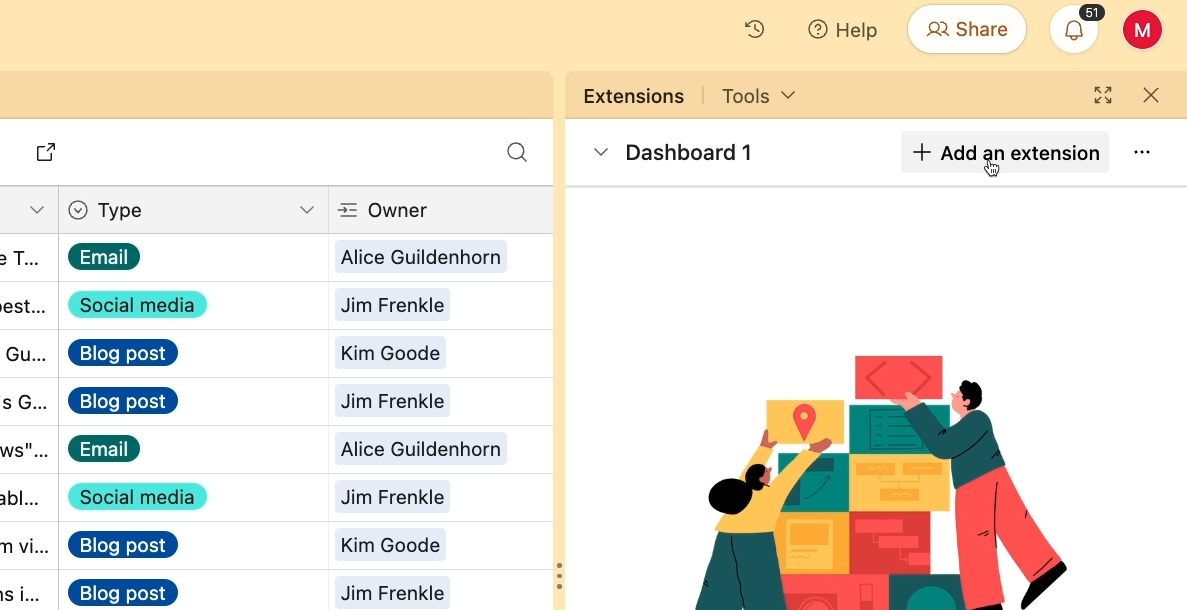
Search for “CSV import.” It should be the only result that appears.
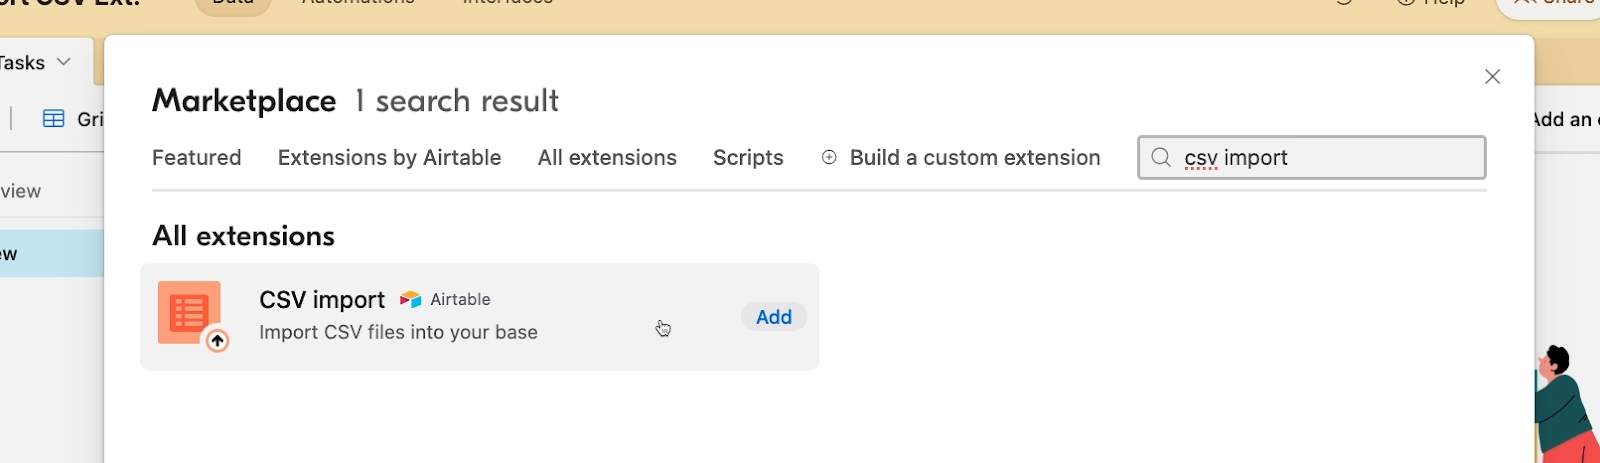
You can click on the extension to view more details. For instance, you’ll be able to see that the extension is actually published by Airtable.
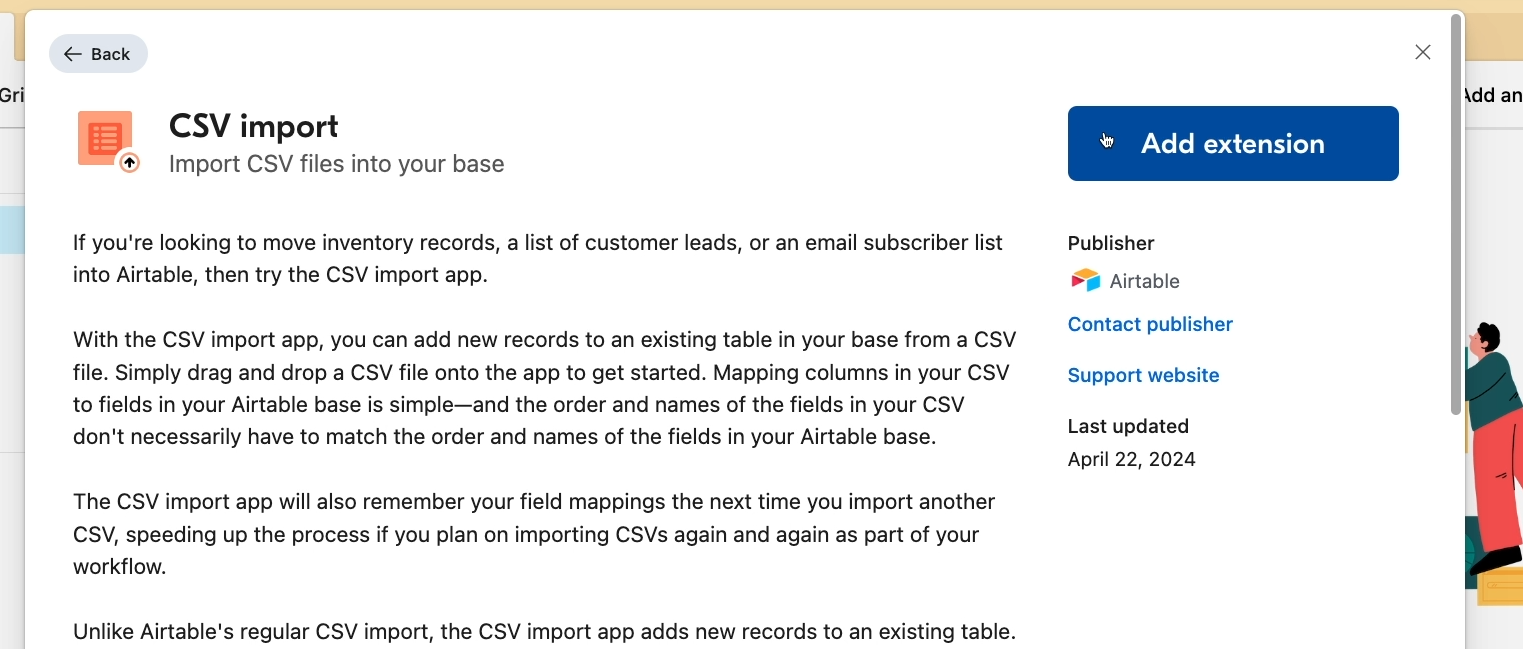
Click “Add Extension” to add the extension to your base.
Just note that extensions are added at the Base level. The extension will immediately be available in every table in the base you have open, but it won’t be automatically added to other bases.
Once the extension is installed, you can use it at any time by opening up the extensions panel.
Uploading a CSV with the extension
With the extension open, you can click on the table icon to upload a file.
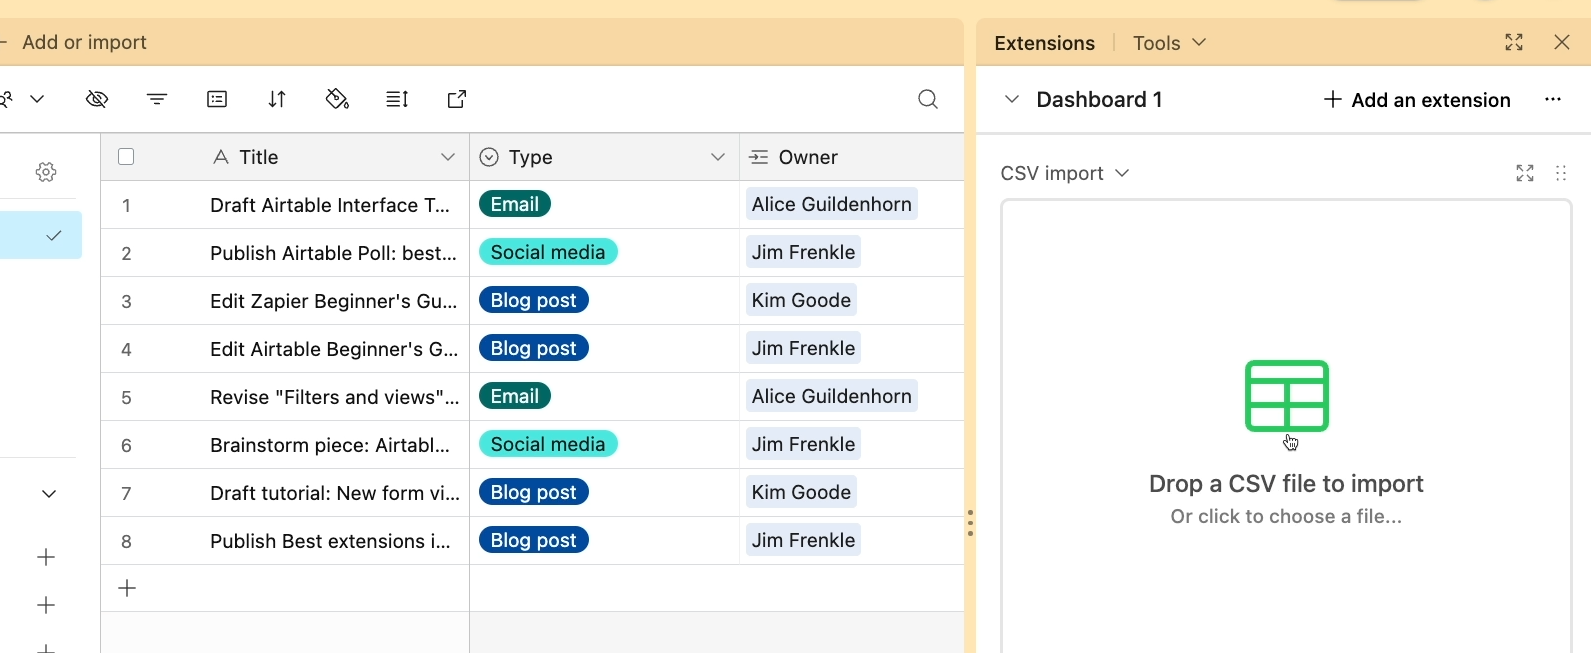
After your file has finished uploading, you’ll have a few settings you can adjust to configure your import.
By default, the extension will import your data into the table you currently have open, but you can select another table if you'd like.
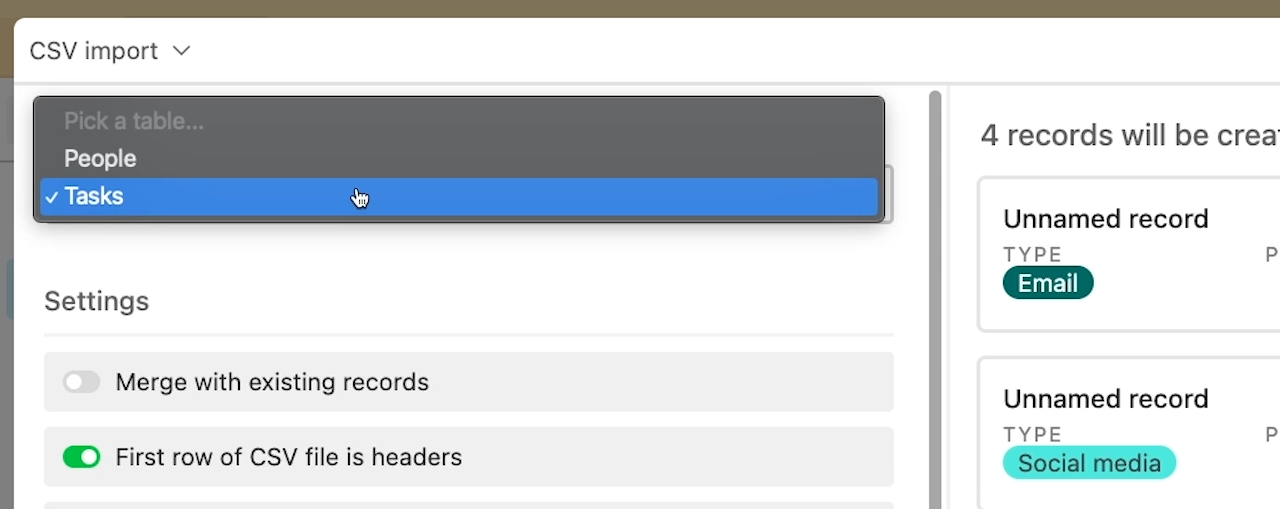
Under “Settings,” you’ll see a few options:
• Merge existing records if there are duplicates
• Skip the header row of your CSV
• Automatically create new “select” options when the entry doesn’t match an existing choice.

Below these settings, you can easily map each field from your CSV to the appropriate field in Airtable. Just select the destination field from Airtable and pick a matching field from your imported CSV.
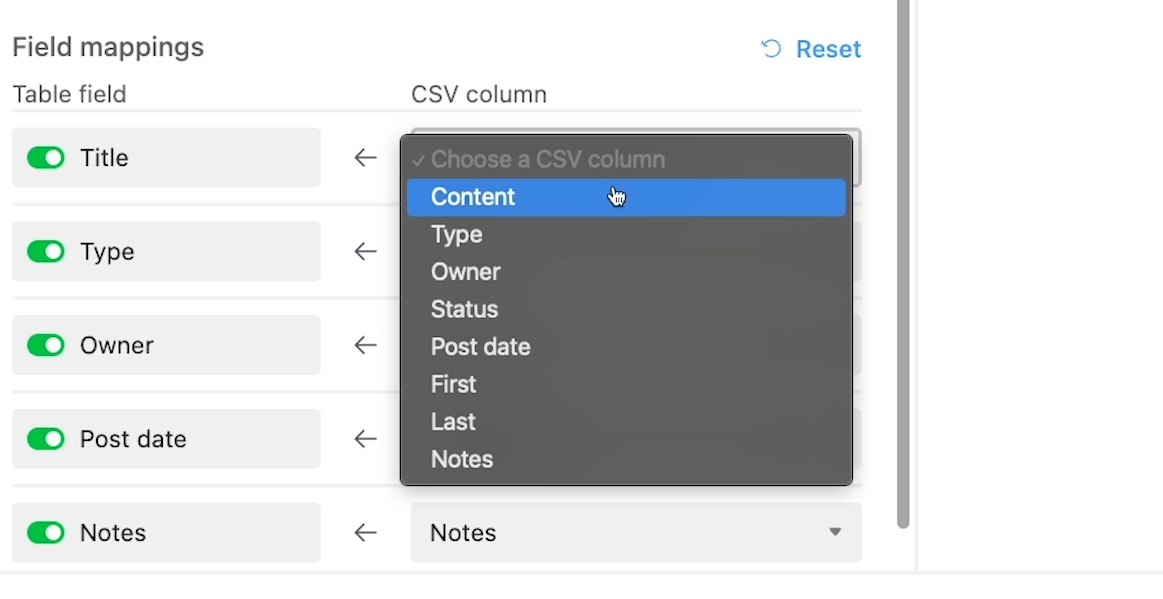
If your CSV field names match your Airtable field names, most should be mapped automatically, but you can adjust them as needed if they don’t get paired up correctly.
And most importantly, you can map data from your CSV to linked records in Airtable, such as the “Owner” field in our example.
As you adjust your settings, you’ll see a preview of your new records in this area to the right.

Once you’re done configuring your settings and field mappings, click “Save records” to add the new data to your table.
Your records will begin to show up immediately in the table, although large imports may take a little bit longer.
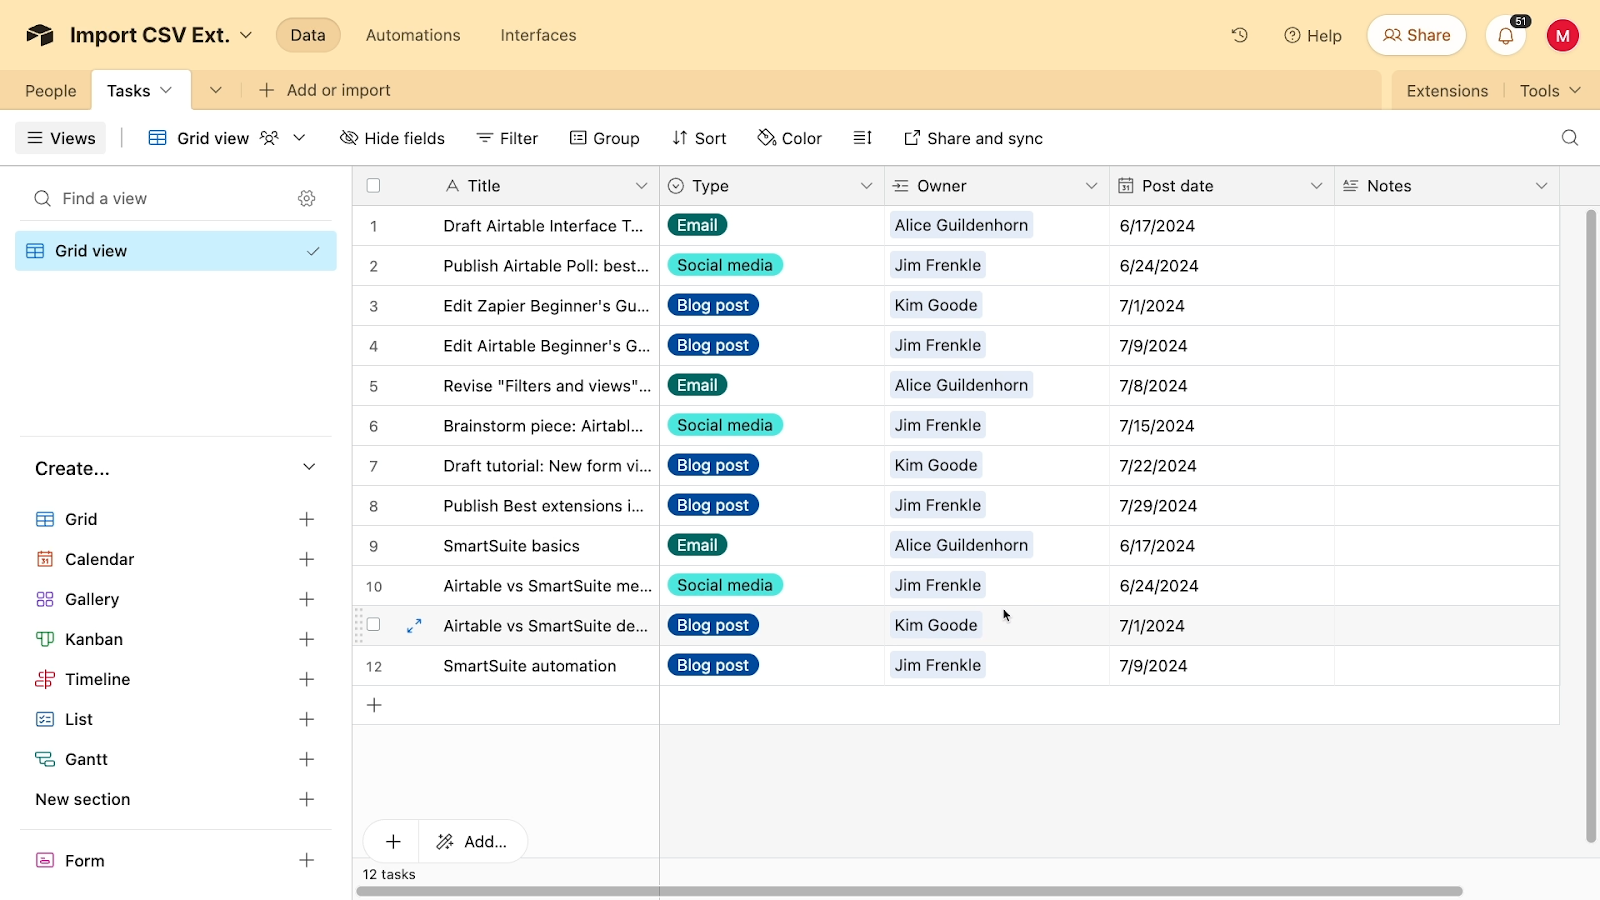
You should also see that any linked record fields are filled in correctly for each new record, just like the “Owner” field in our example.
Limitations of the “CSV Import” Extension: Formula Fields in Linked Records
Before we wrap up this tutorial, we just want to note that there is one key limitation if you’re importing CSVs into a table with linked records.
If the table you’re linking to uses a formula for the primary field, then you won’t be able to add records to that linked table by importing new data.
Let’s illustrate this issue with an example.
Bill Thompson is listed as an “Owner” in one of the rows in our Google Sheet pictured below, which we’ll export as a CSV.

However, Bill isn’t in our “People” table in Airtable, which is what the “Owner” field links to.
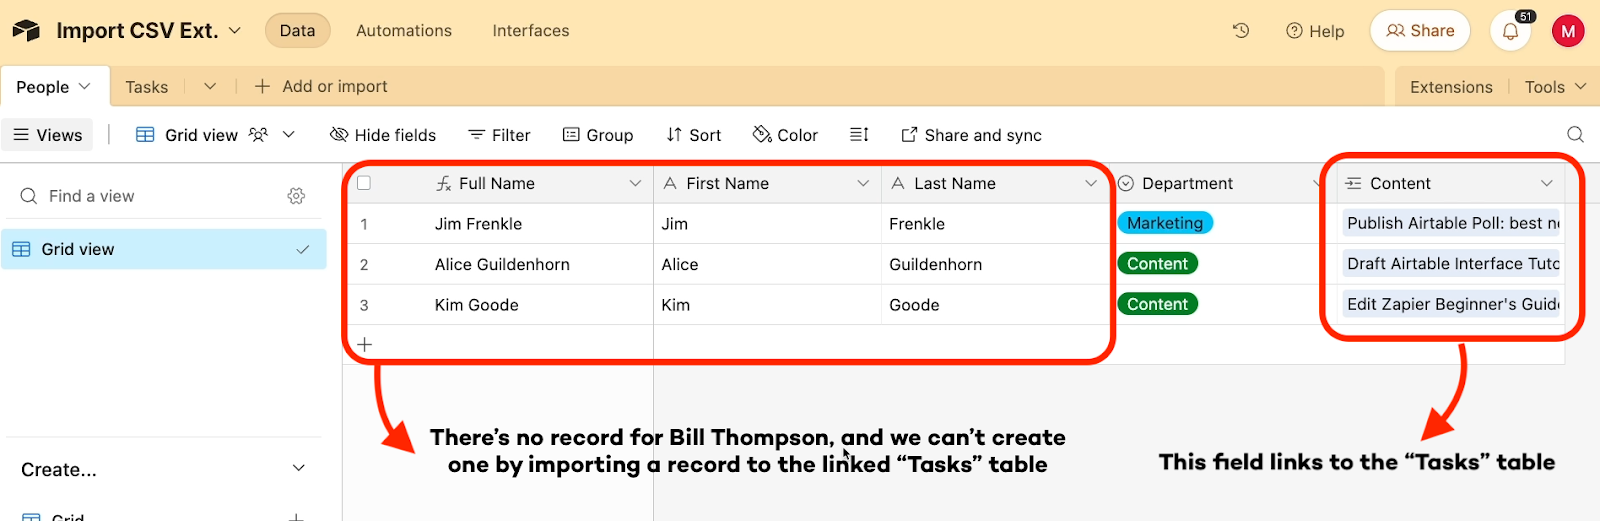
In the “People” table, the primary field uses a simple formula to concatenate the “First name” and “last name” fields.
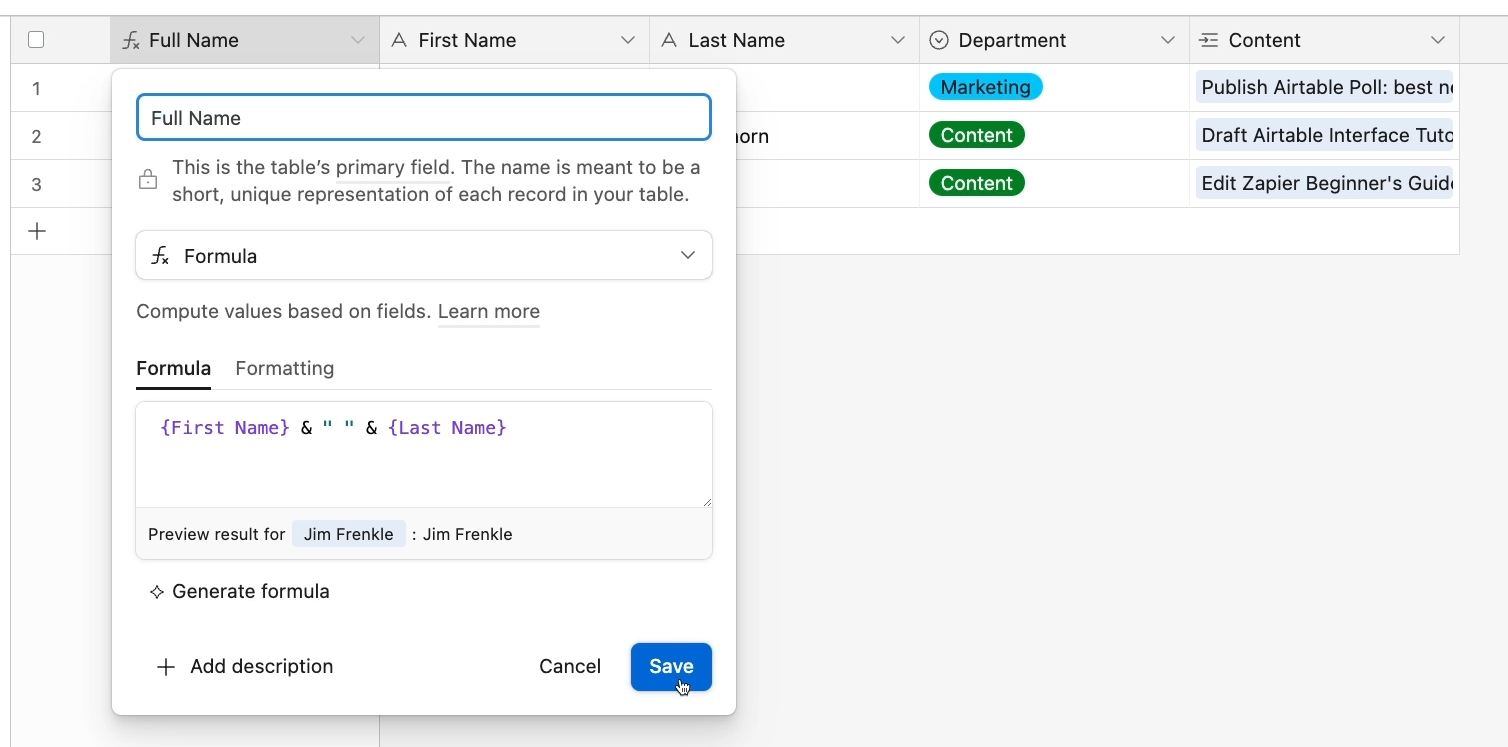
When we import the CSV into Airtable with the extension, the “Owner” field for this record is blank, because it can’t find “Bill Thompson” in the “People” table. That record doesn’t exist.

It also can’t create a record for Bill Thompson, because data cannot be entered directly into a formula field.
How to work around the formula field limitation
In circumstances like these, just make sure to import any necessary data into the linked table first.
In this case, we’d want to import data into the People table before importing into the “Tasks” table. If we import a “Bill Thompson” record into the People table, then our imported records in the tasks table will be able to link to it.

This limitation with formula fields can be a little annoying to work around, but using the CSV Import extension generally works much better for adding new data to a table with linked records.
Better CSV imports with Airtable’s free extension
Importing CSVs into Airtable with the usual method has some frustrating limits. If you’re regularly updating a table with new data from a CSV, then you’ll definitely want to start using the CSV Import extension
It will let you easily add records to an existing table, and will even map directly to Linked Record fields, avoiding the hassle of converting your field types.
You may also want to check out our Zapier or Make beginner’s guides to start setting up some automations instead.
If you’d like to learn more about streamlining and automating your work in Airtable, Make, Zapier and other no-code tools, be sure to check out the other posts on our blog or our YouTube channel. You can also follow XRay on Twitter, Facebook, or LinkedIn.

At XRay.Tech, our goal is to help people automate their mindless work so they can create more time for the work that matters.
We believe that everyone should be able to design the perfect way to work for themselves, regardless of their budget and background.
In addition to offering long-term automation support to enterprise organizations through our CWO Membership, we also offer several ways for anyone to start automating their work for free.
In this blog post, we’re going to share four of the tools and resources that we’ve built to enable everyone to research, build, and learn more about workflow automation.
XRay.Tools
First, let’s take a look at XRay.Tools, a free automation search engine developed by our team at XRay.
If you want to quickly research the automation capabilities of any web app, a quick search on XRay.Tools will show you everything you need to know.
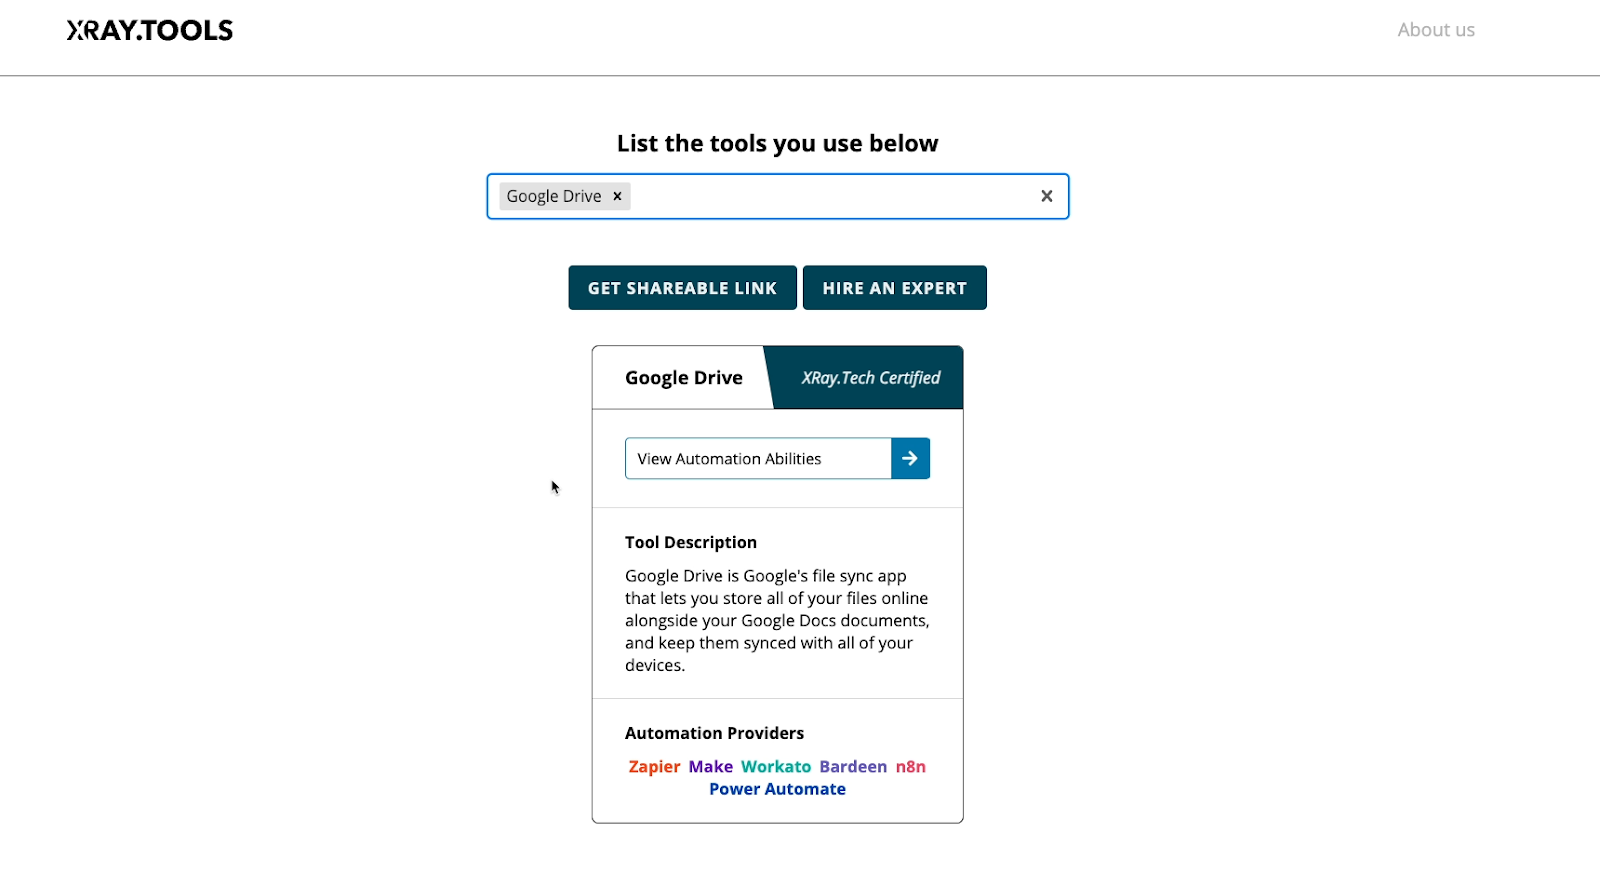
You’ll see every available trigger, action, and search in Zapier, Make, Workato, Power Automate, and other popular automation providers.
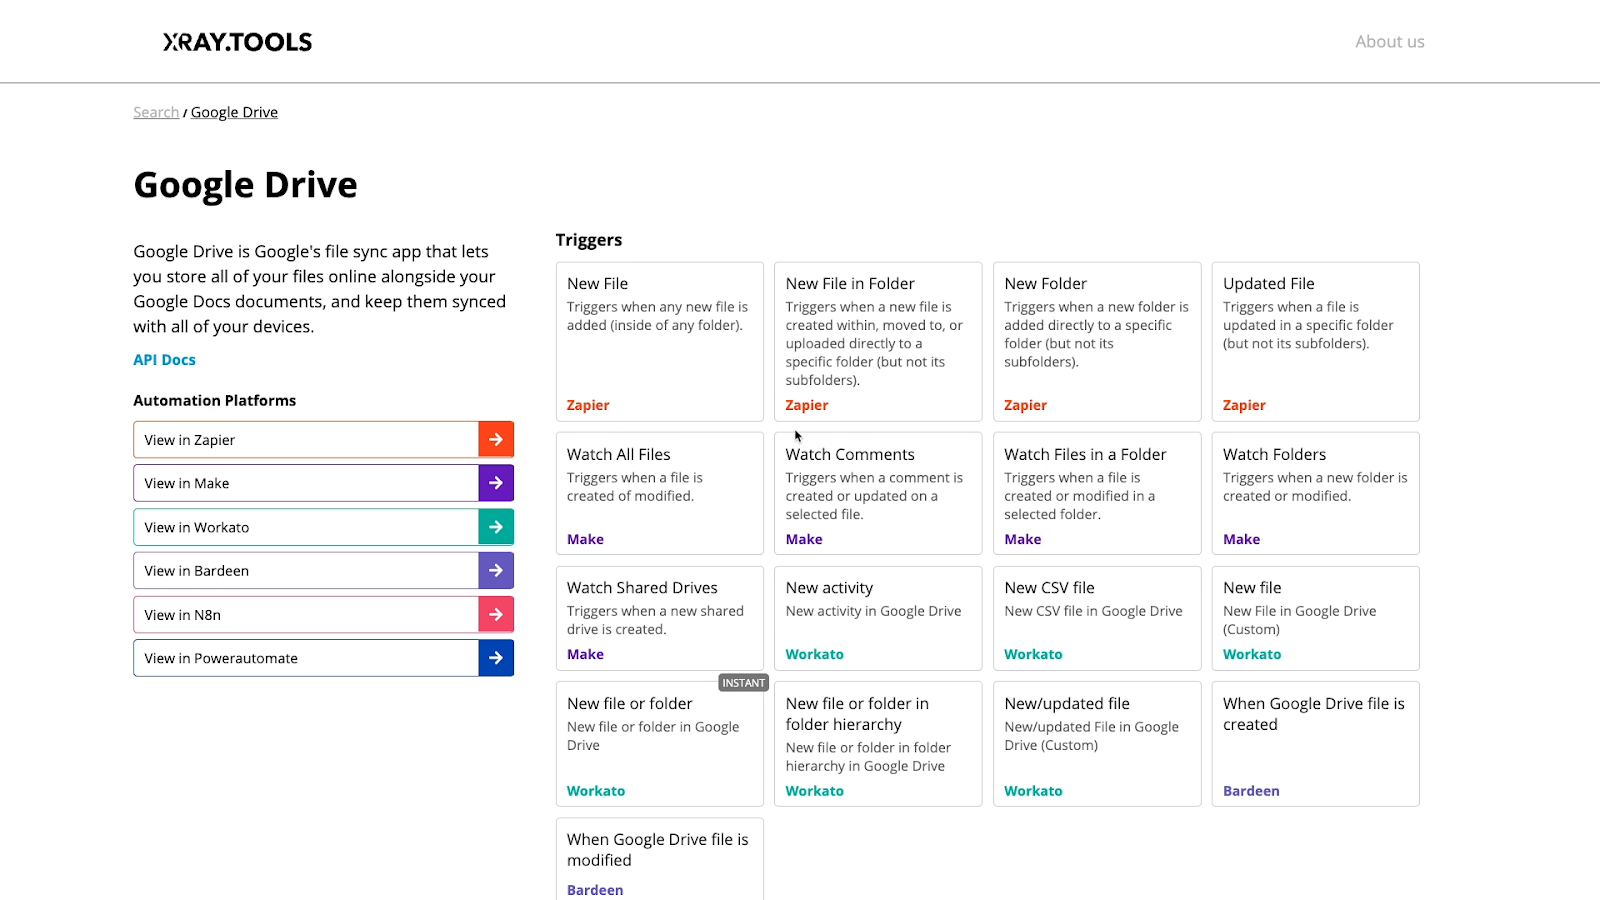
You can search for several tools at once, and save your search to a convenient, shareable tool belt that you can send to clients and collaborators.
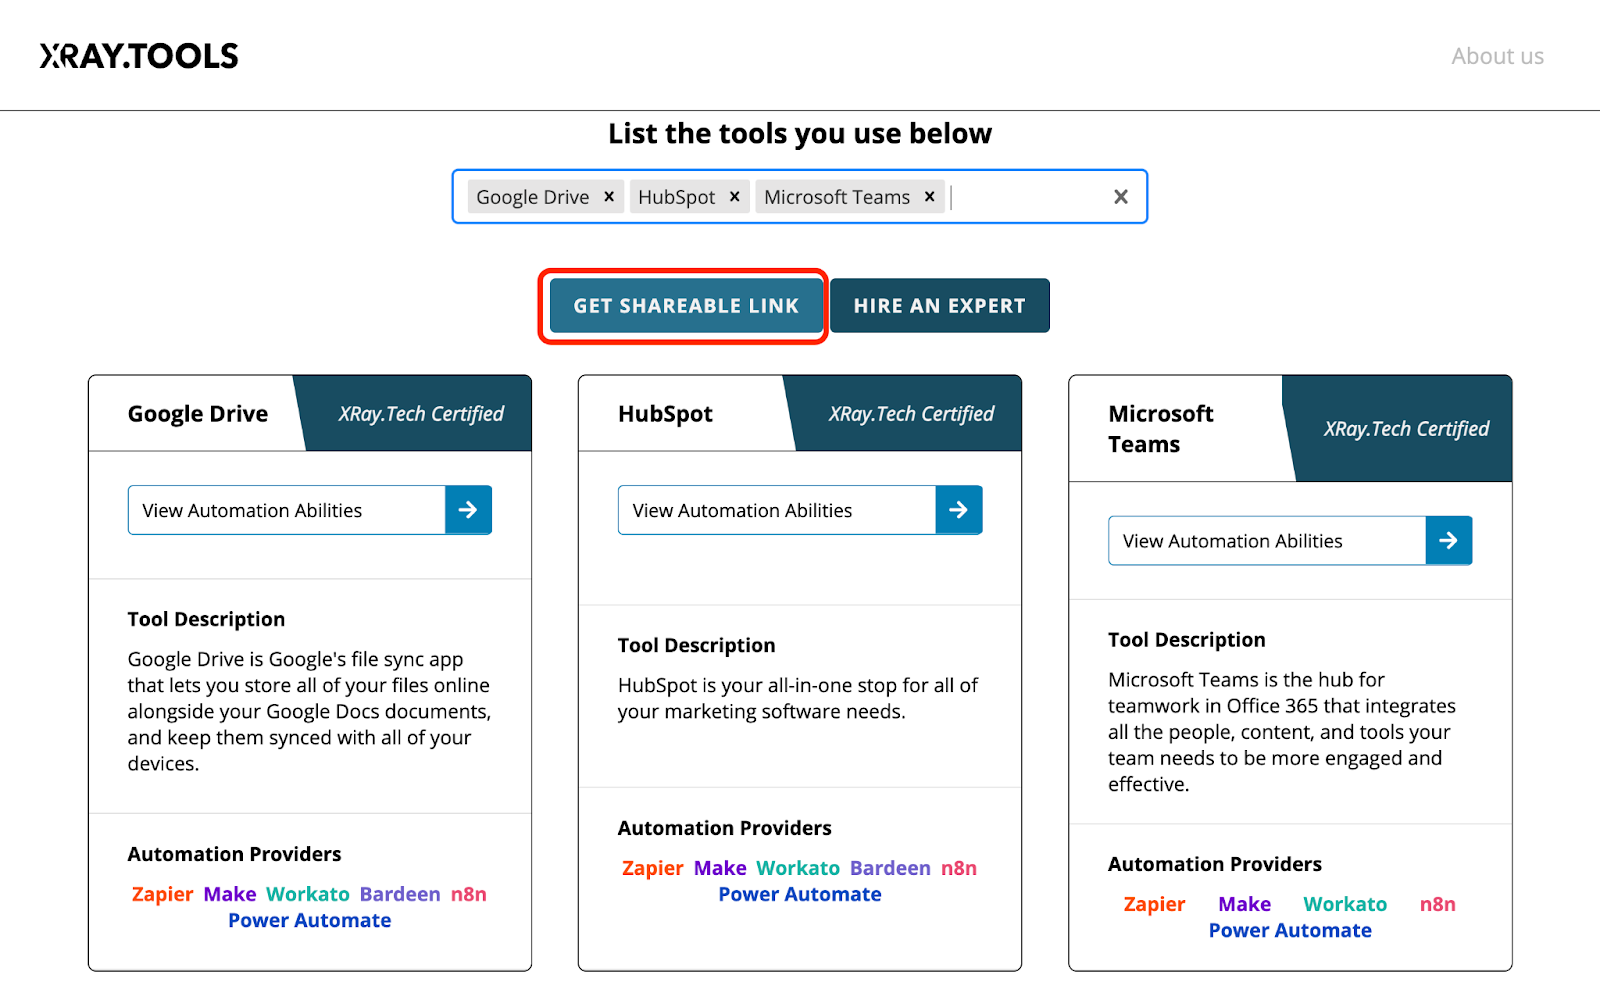
Just go to xray.tools to get started.
XRay Workflow
Next, let’s explore a tool that anyone can use to share resources from around the web with a single convenient link.
With XRay Workflow, you can save any URL as a link or an embed, including video URLs from YouTube.
Your links will exist alongside any other text, documents, or even webhooks that you want to share on your custom board.

When you’re ready to send your board to clients, coworkers, students, or just anyone on the web, you can make your board public and copy the link.
With a single URL, you can compile and share dozens of links and helpful pieces of information in one place.
To learn more and download XRay Workflow for free just to xrayworkflow.com.
XRay YouTube Channel
Every week, we post no-code and low-code automation tips and tutorials to this blog. But we also post a companion video each week on YouTube.
On YouTube, you’ll get to see more detail in every tutorial as we walk through the entire process instead of just sharing key screenshots.
If you’d like to see all of our tutorial workflows in action and get alerts for every new video, subscribe to the channel here and turn on notifications so you don’t miss a new way to save time.
Workflow Designers on Slack
Finally, if you want to chat with some like-minded builders to share advice, tips, and horror stories, be sure to check out the Workflow Designer Slack community we’ve built.
It’s a free community for no-code automation builders that we set up to give everyone a place to talk and share ideas.
Click here to join Workflow Designers on Slack.
Supporting no-code and low-code builders
Check out all the resources listed in this blog to learn more about workflow automation, plan your no-code builds, and compile links from all over the web into a single URL.
And if you’d like to learn how XRay can help your company to automate your work and scale your processes, just reach out for a free consultation.

Automating your daily tasks doesn’t mean you need to sign up for expensive software. With the right tools, you can boost your productivity and get rid of robotic work without breaking the bank.
In this post, we’ll give you a rundown of 5 of the best free (or cheap) automation apps available right now.
While most of these apps can be accessed for no charge at all, many do offer additional features at an extra cost.
This list will cover several use cases, so whether you want to automate personal tasks, your social media, or your business, there’s something here for you.
Links to every app can be found in the companion XRay Workflow resources board for this post.
Now let’s jump into the list.
App #1: Simple Social Media and Mobile Automation with IFTTT

What is IFTTT?
IFTTT stands for “If This, Then That”, and it's a tool that lets you automate your web apps and your mobile devices, including system settings on your Android or iOS phone.
This app does not have a huge library of integrations compared to giants like Zapier, but it does offer great support for social media apps and mobile devices in particular.
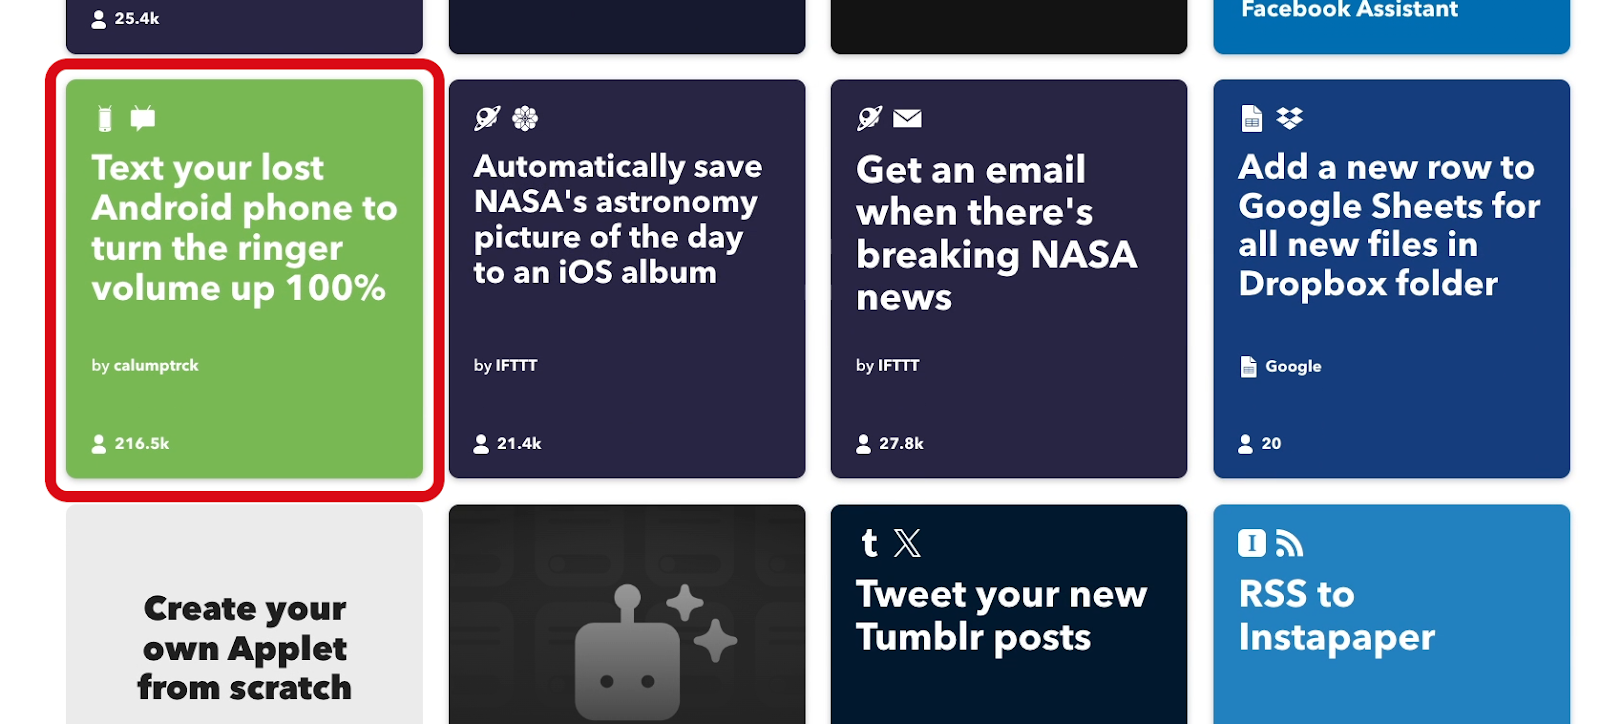
What can IFTTT Do?
With IFTTT, you can build automations or “applets” that run whenever a specified event occurs.
For instance, you could create an applet that shares every new update in an RSS feed as a post on a Facebook page.

Or, you could build an applet that creates a new post on Twitter whenever you start streaming on Twitch, so all your followers can get notified immediately.
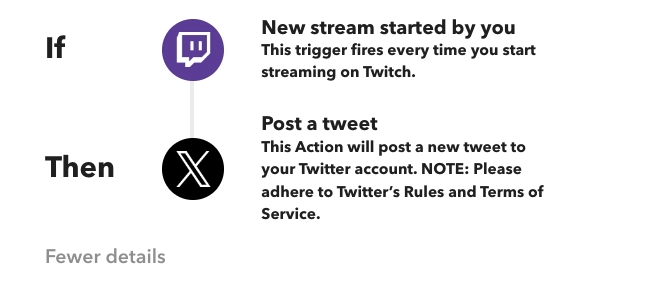
Automating mobile devices with IFTTT
With its mobile automation tools, you can use IFTTT to do things like unmuting your phone whenever you get home.
You could also send an automated text to your family asking if they want anything whenever you arrive at the grocery store.
That way, you can avoid making a second trip just for a single bottle of hot sauce.
Limited support for business apps in IFTTT
IFTTT also offers decent support for some popular business apps, including Google Drive, Slack, Webflow, and Airtable. However, you’ll definitely find more integrations for this kind of software on automation providers like Zapier and Make.
What are IFTTT’s limitations?
The biggest downside of IFTTT is that the free plan is rather limited. You’ll be stuck with 2-step applets only, and you’ll be limited to 2 applets total.
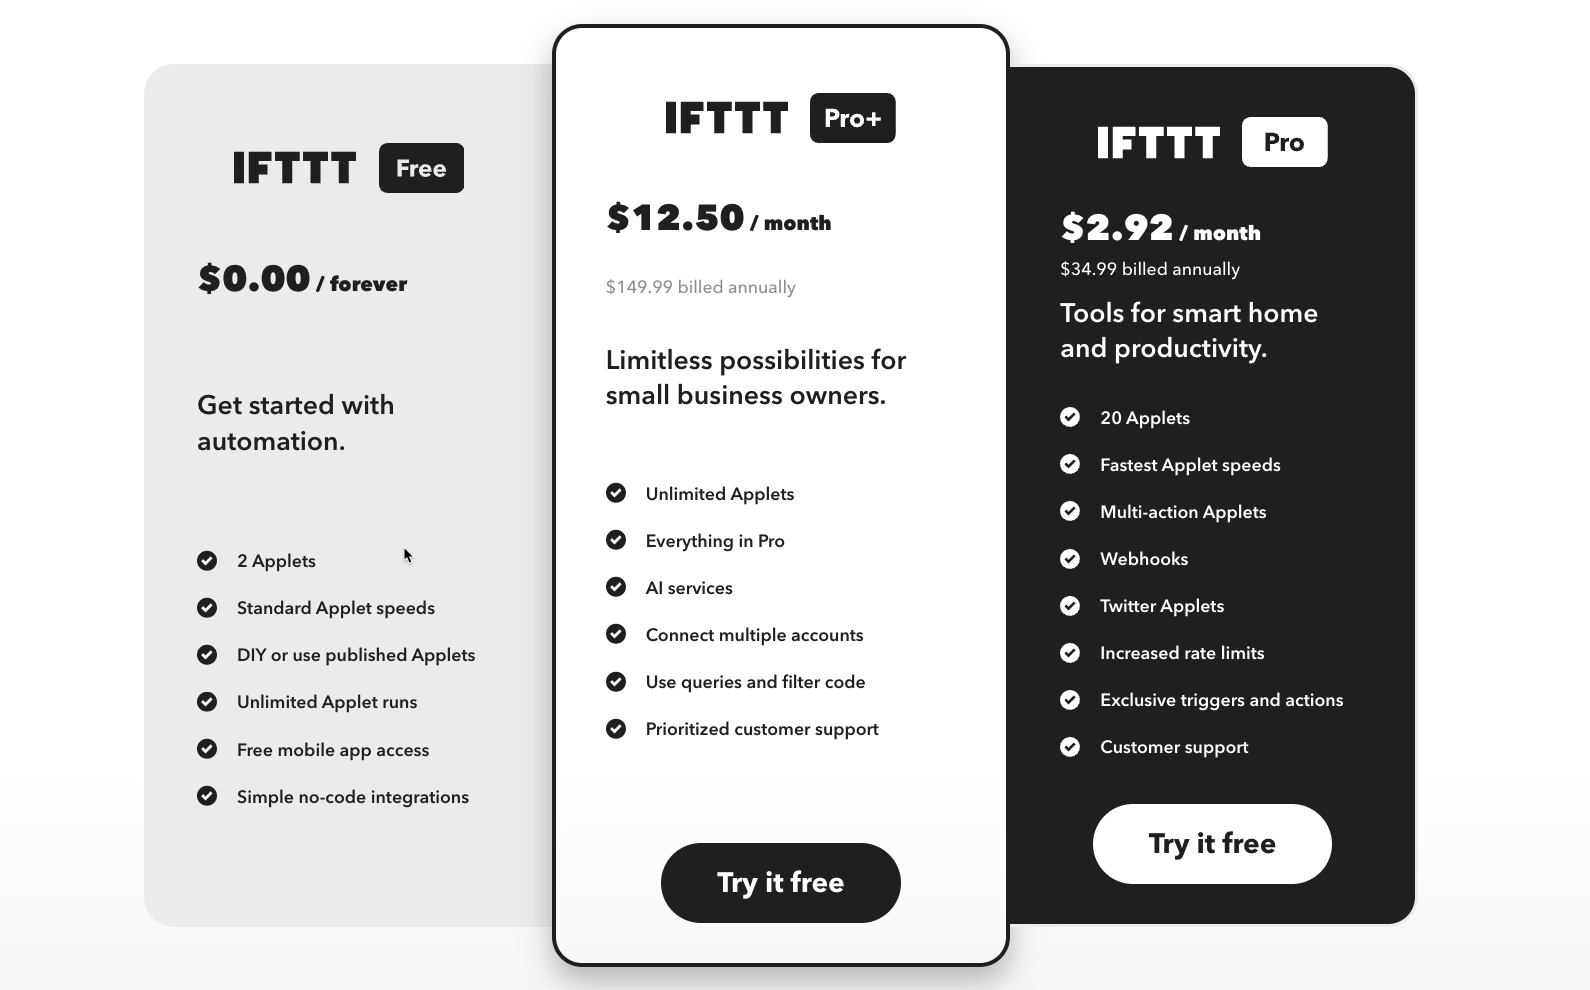
However, the paid plans that unlock additional applets and some premium integrations like Twitter start at only $35 bucks a year. That's a little less than 1/10th the cost of zapier.
If you need to automate your social media posts and your mobile devices, IFTTT is one of the cheapest ways to do it, and you can easily get started with the free plan.
Get started with IFTTT
You can learn more and create a free account on IFTTT’s website.
App #2: Build Sophisticated Automated Workflows with Make

Next, let’s take a look at the best free automation choice for businesses.
This app is now called Make, though it used to be known as Integromat. A recent rebrand switched their color scheme from blue to purple and changed a few things behind the scenes, but it’s still the same app.
At its core, Make is pretty similar to IFTTT, and even more similar to Zapier.
What can Make do?
With Make, you can build automations – called “scenarios” here – that connect your web apps together. When an event happens in one web app, one or more actions will be automatically performed in your other apps.
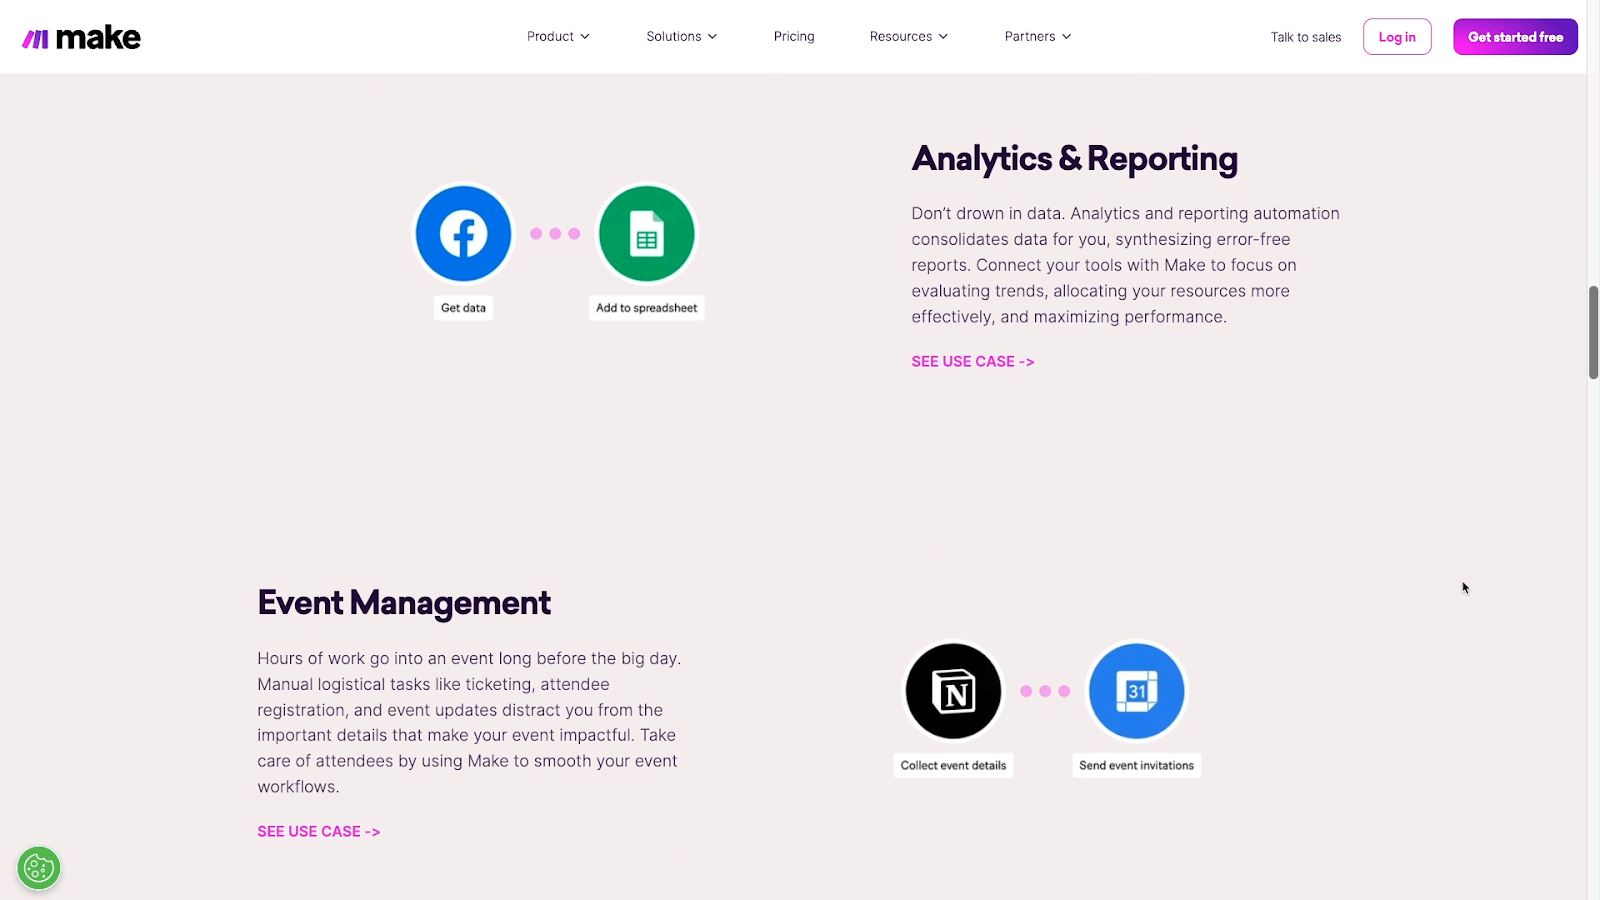
Make has about twice as many integrations as IFTTT, though it doesn’t have nearly as much support for Android and iOS device-specific automations.
Instead, you’ll get access to a greater number of integrations with popular business and enterprise web apps, like Shopify, Hubspot CRM, and Basecamp, just to name a few.
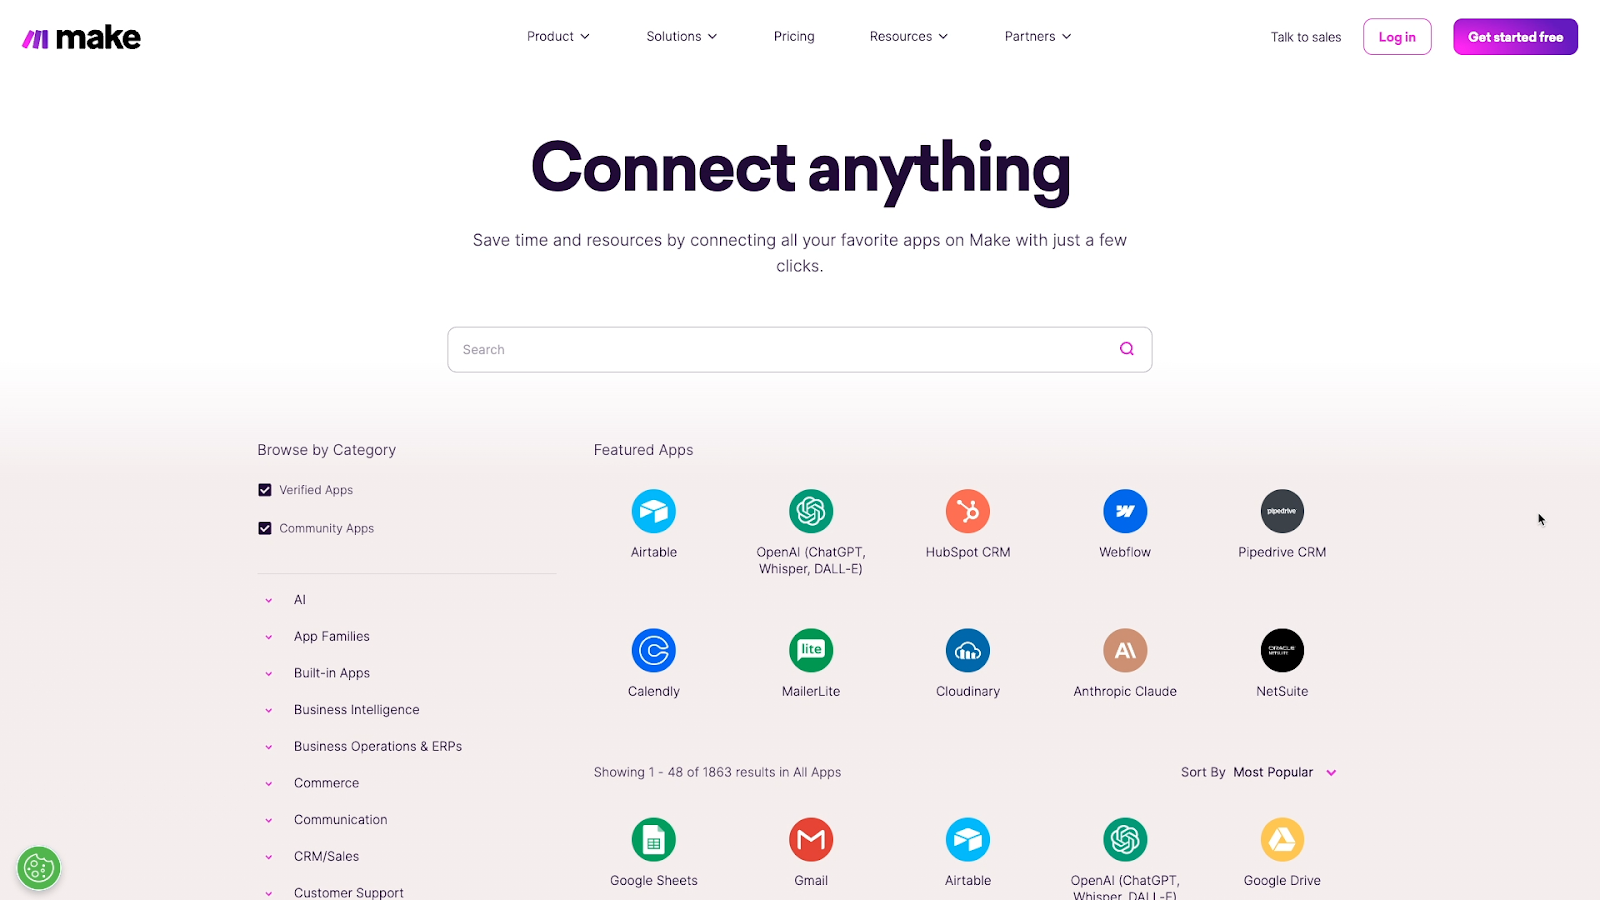
You’ll also typically see much more advanced support on Make for apps that might also be on IFTTT, like Asana or Salesforce.
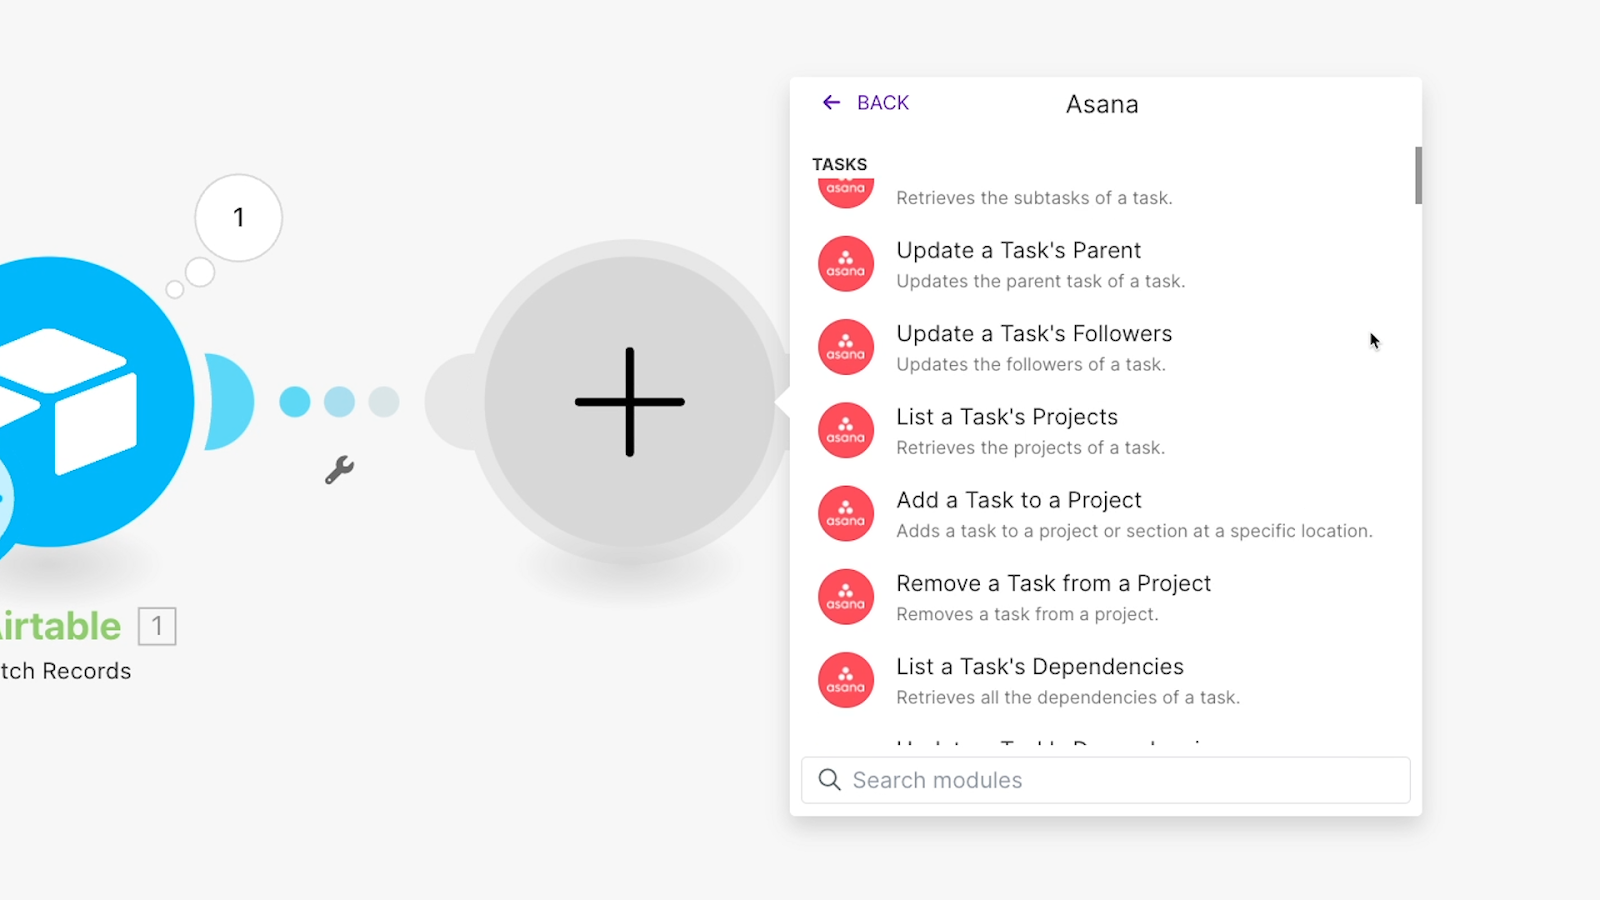
Additionally, Make’s free plan is the most robust out of any comparable automation provider. You’re still limited to only 2 active scenarios, but unlike IFTTT or Zapier, Make will let you build multi-step automations without a paid plan.
You can also access basically all of Make’s core features without paying a dime. Your two scenarios can connect data between a dozen different apps and run all the conditional logic that you want.
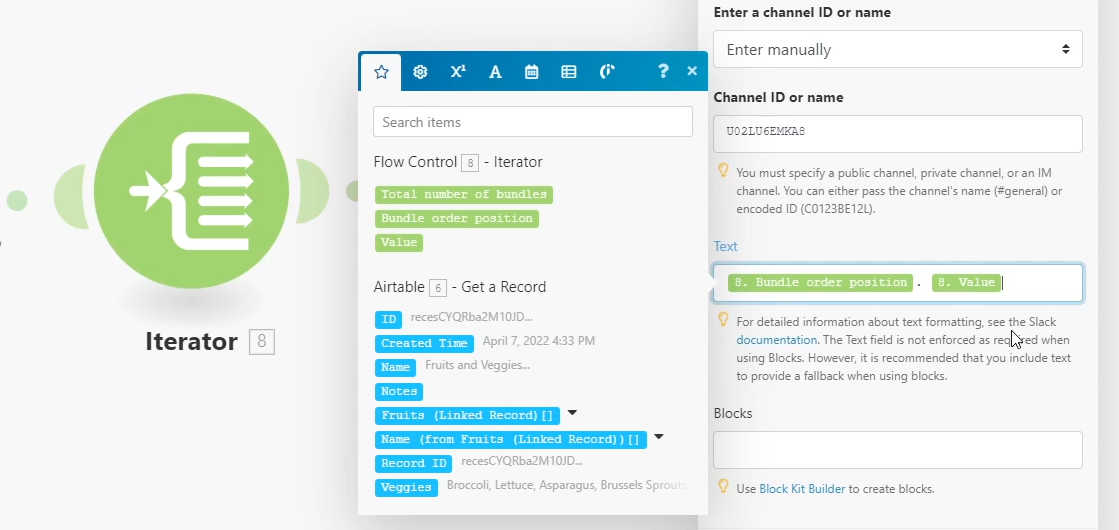
Routers, filters, arrays, iterators and other features are all available to give you precise control over how your automations run.
Make’s limitations
Compared with competitors like Zapier or IFTTT, Make can be a little challenging to learn, particularly for users with no coding experience at all.
Additionally, while its current tally of almost 2,000 integrations is impressive, it’s still a long way off of Zapier’s staggering total of over 7,000 integrations. If you’re a strictly no-code builder and aren’t interested in dabbling with low-code Make may not be an ideal choice.
Finally, Make’s free plan won’t be suitable as a long-term solution for automating your company’s work. If you want to start using several scenarios to automate your team’s work, you’ll need to start a subscription.
That being said, Make is easily the best way to explore everything no-code automation can do for your company without any cost or commitment upfront, and it offers several affordable paid plans.
Get started with Make
To learn more about Make and start using it for free, just explore Make’s website.
#3: Automate Your Apple Devices with Shortcuts

Of course, automation isn’t all about business, and it’s not all about connecting web apps together, either. Sometimes, it’s all about that little device that lives in your pocket.
What is Shortcuts?
Shortcuts is a free utility available on every Apple device. It lets you run automated actions at the press of a button, or whenever specific trigger event conditions occur.
Shortcuts primarily connects with native Apple software, but also integrates with third-party apps like Dropbox.
What can Shortcuts do?
With Shortcuts, you can automate reminders, photo backups, and a whole lot more on your iPhone, iPad, Apple Watch, or Mac.
For example, with Shortcuts, you can set up a Shortcut button that uploads the latest photo from your camera roll directly to your dropbox account.
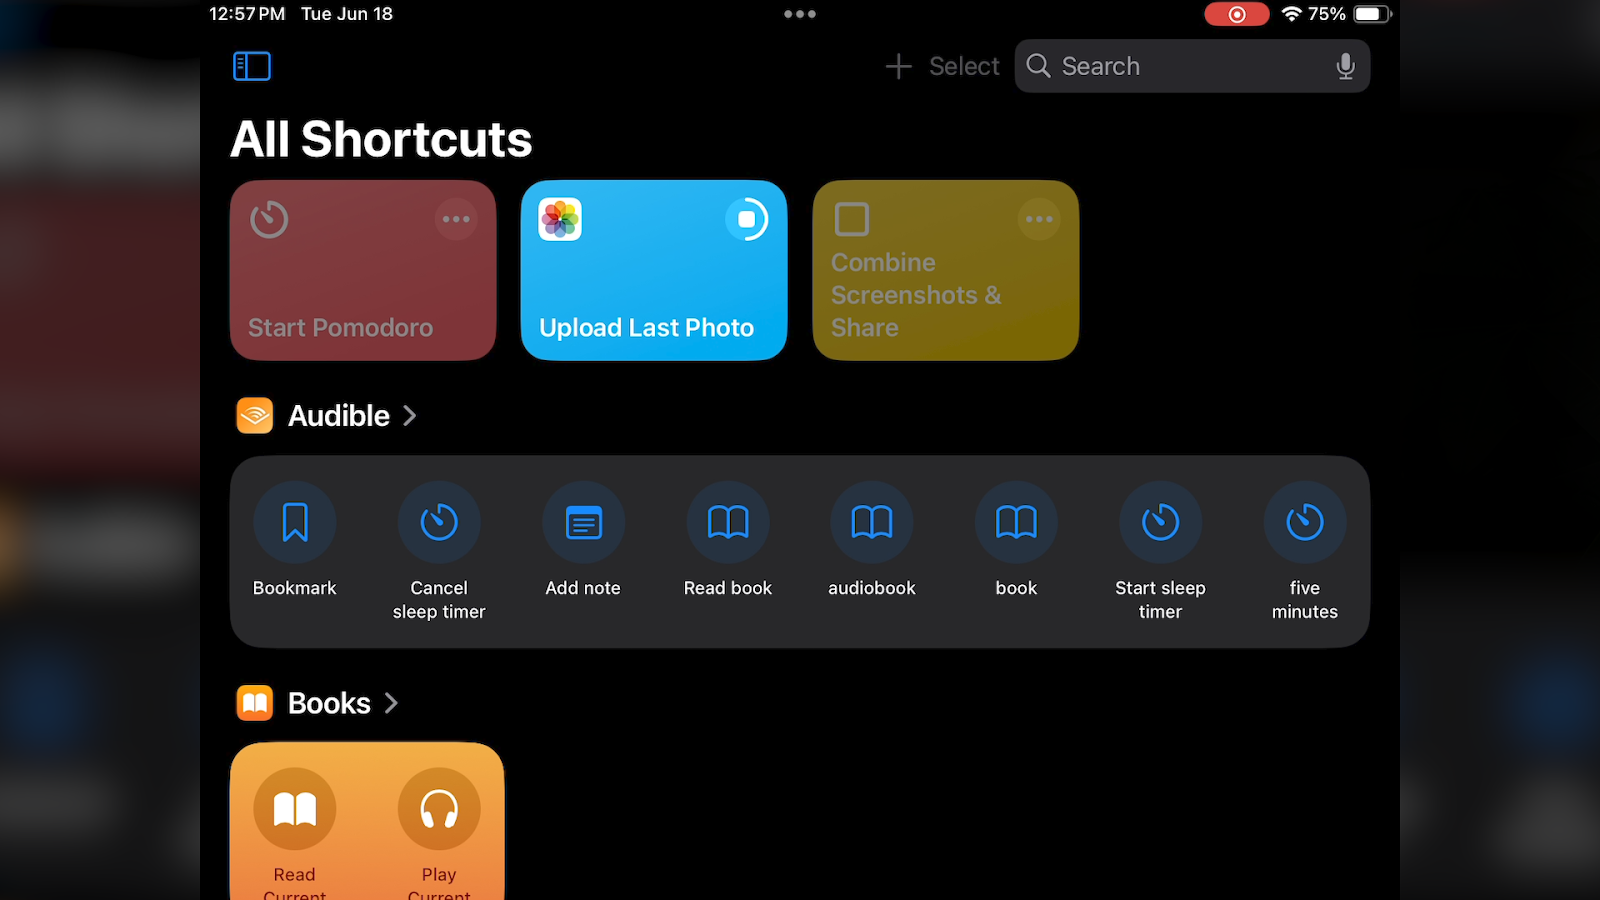
You can also set up automated text messages that get sent out at a scheduled time, or turn off cellular data when you connect to your home wi-fi.

Watch “15 iPhone Shortcuts YOU Requested” on YouTube
For a bit of fun, try using the meme builder template to quickly add text to any of your images and liven up your group chats.
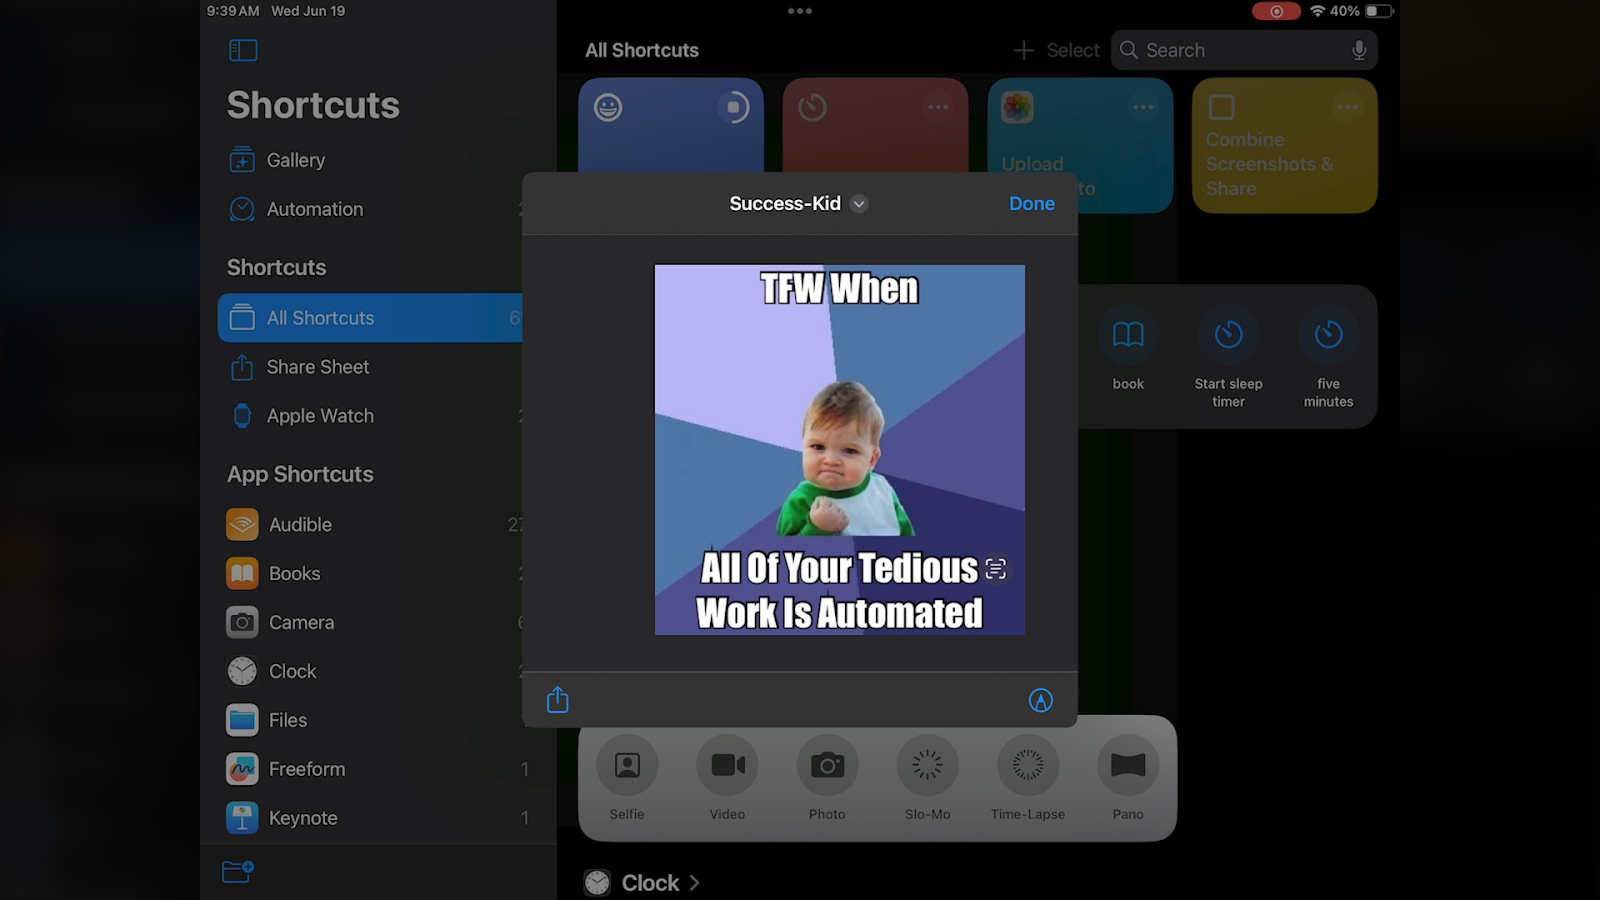
To create a Shortcut, you can either build custom actions from scratch, or grab a premade Shortcut from Apple’s template gallery to get started quickly.
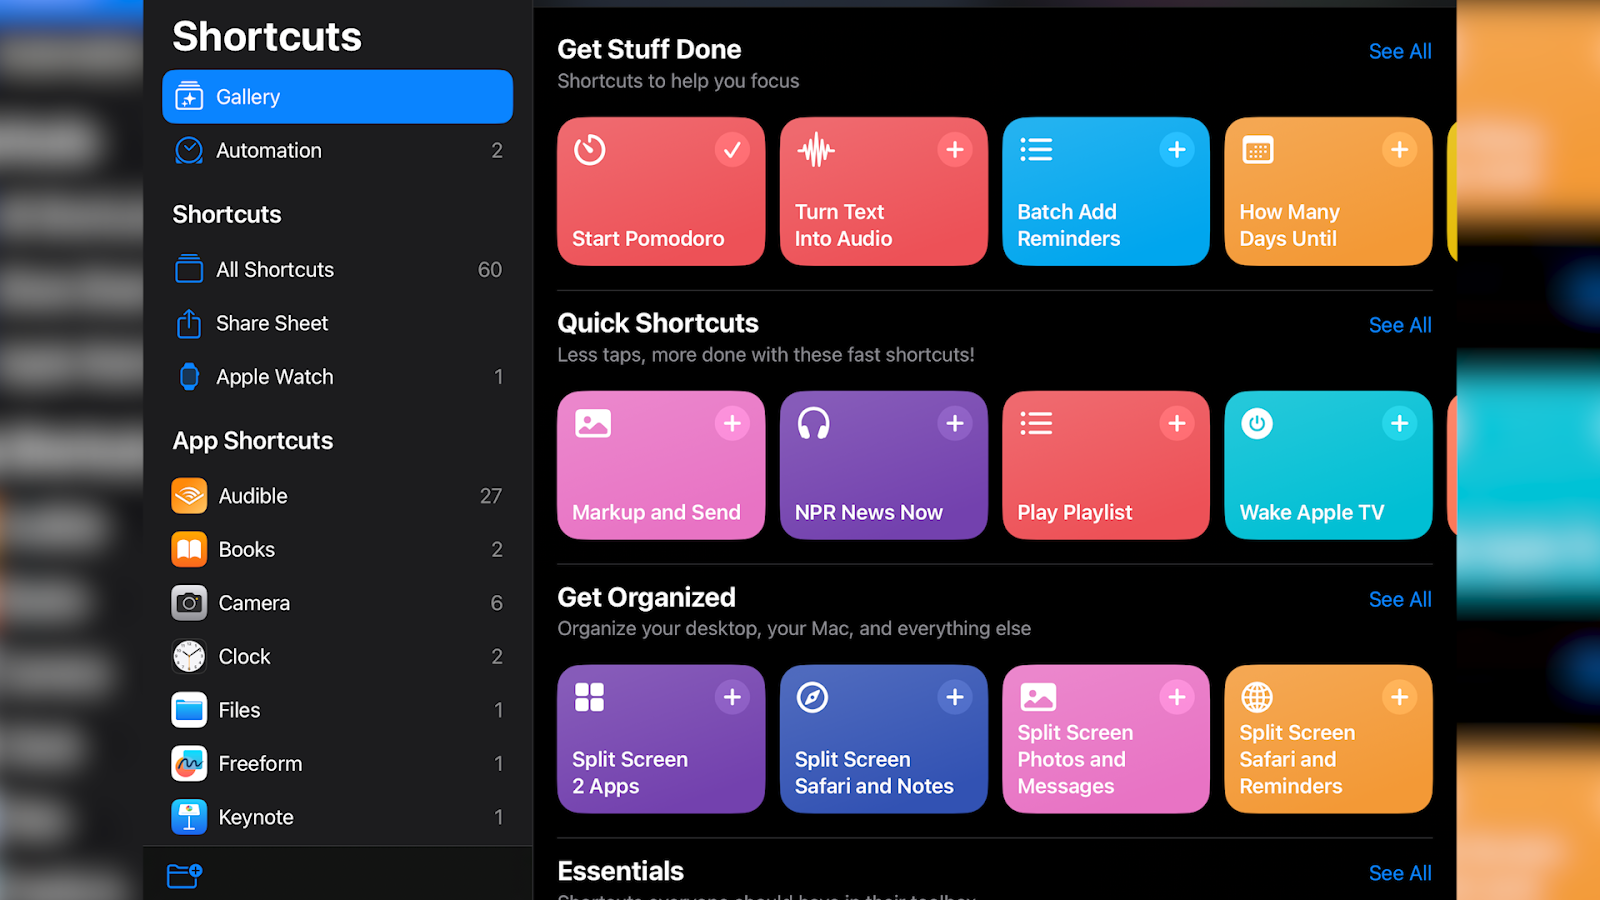
Shortcuts Limitations
Shortcuts is an automation tool that’s easy to use, totally free, and it’s already installed on all of your Apple devices.
The only real downside is that it has relatively few integrations and limited functionality when it comes to automating web apps, so Shortcuts is definitely not a good choice for automating the software you use for work.
But all in all, it’s a great tool for automating reminders, personal tasks, smart home devices, and managing your photos and other media.
Get started with Shortcuts
To get started with Shortcuts, just open up the app on your Apple device. The icon looks like this:
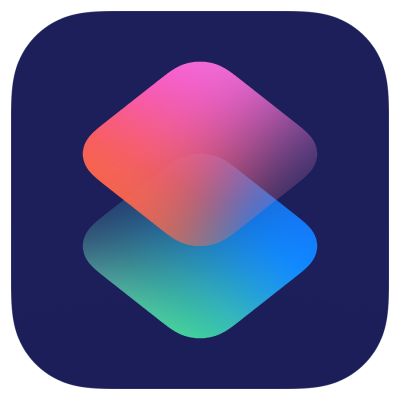
#4: Use Macrodroid or Tasker to Automate your Android Phone
If you like the look of Shortcuts but don’t have an iPhone or other Apple device, don’t worry. There are a couple of good Android alternatives to Shortcuts, which we’ll cover now.
Let’s take a quick look at both Macrodroid and Tasker.
What are Macrodroid and Tasker?
Both apps are very similar to Shortcuts, allowing you to automate actions in your phone’s software.
However, unlike Shortcuts, these are third-party apps. You’ll need to open up the Google Play store to install them.
Macrodroid is available to download for free, although you’ll need to pay a one-time fee of $7 to unlock unlimited macros, remove ads, and get some other functionality like cloud backups.
Tasker doesn’t offer a free plan, but costs only $3.50 to download.
What can Macrodroid and Tasker do?
As just a few examples of the kinds of automations you can set up with these apps, you can use them to start automatically playing music whenever you connect to a bluetooth speaker, set up advanced reminders and tasks, create a screen-recording button, and more.
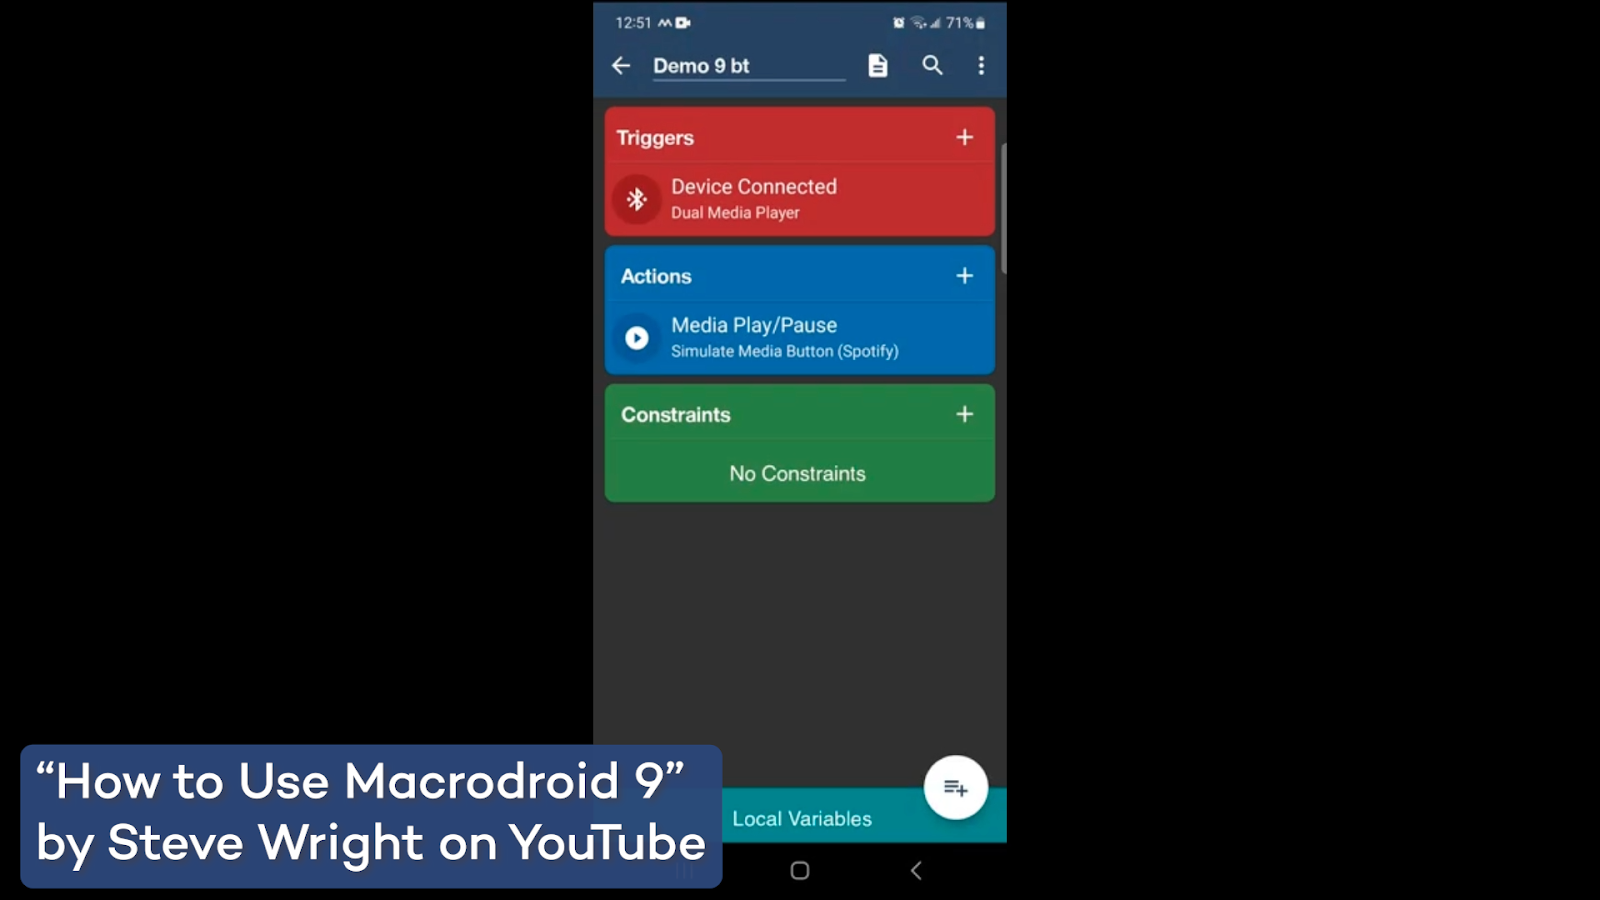
Watch “How to Use Macrodroid 9” on YouTube
The biggest difference between the two apps is ease of use.
Tasker has extensive functionality and lets you choose precise settings for every automation, but it’s not the most user-friendly experience.

Watch “Tasker 5.13 - Scenes+” on YouTube
You’ll definitely need to check out some tutorials to get started, but it does have a dedicated and helpful community that will gladly lend you a hand.
On the flipside, Macrodroid is a much simpler app to use, with an interface that will likely be a lot more comfortable for most users.
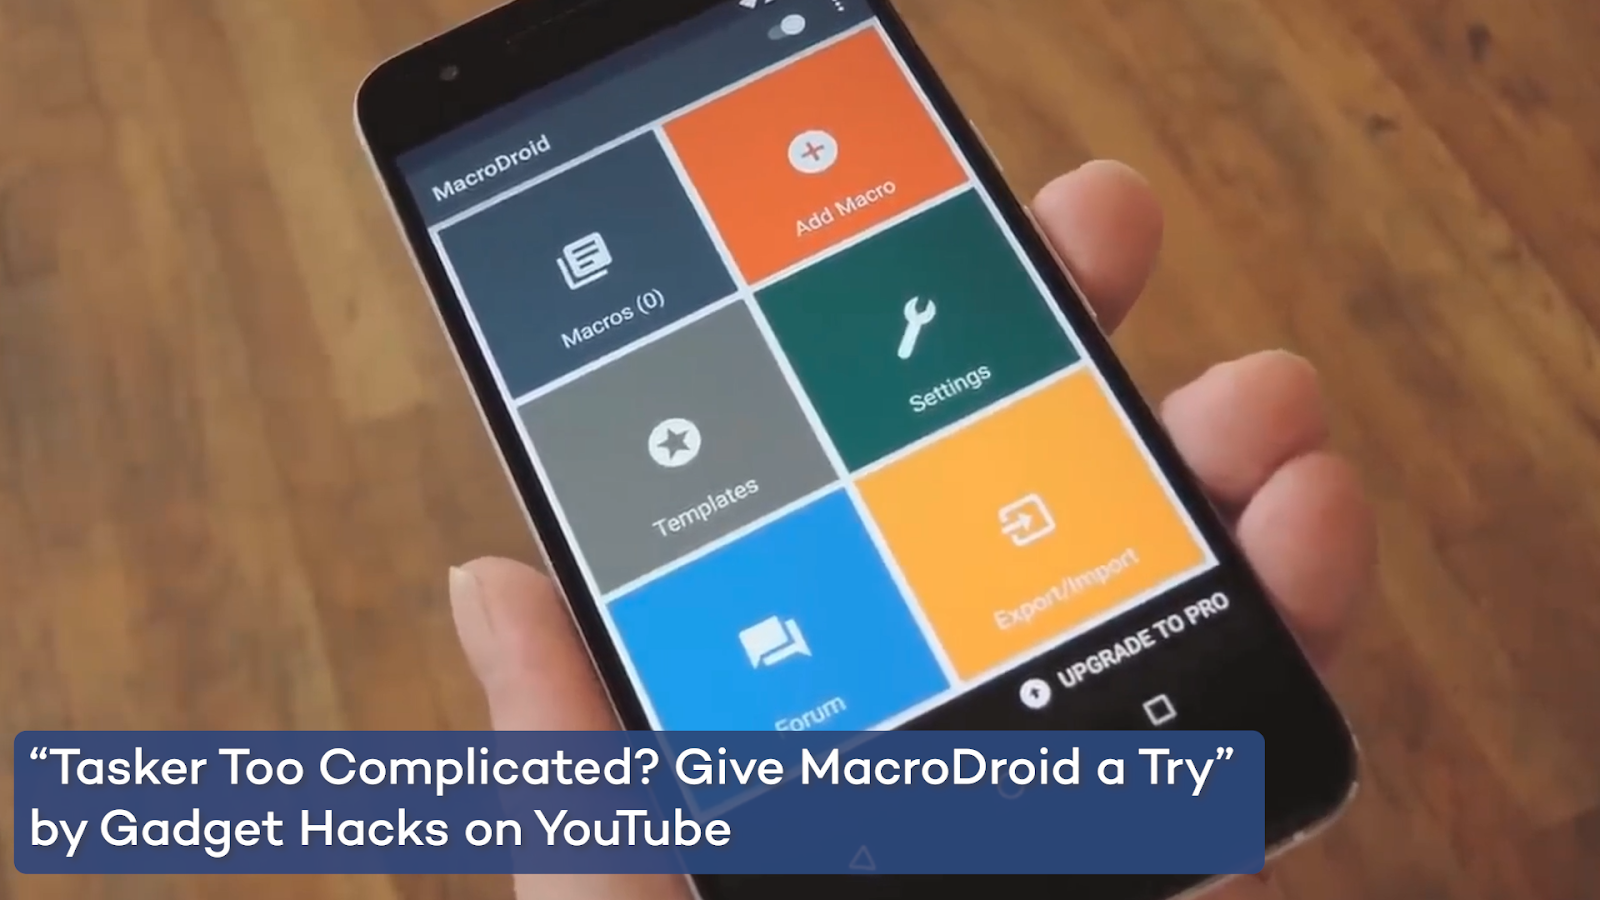
Watch “Tasker Too Complicated? Give MacroDroid a Try” on YouTube
Whichever you choose, you’ll be able to streamline all sorts of tasks and actions on your Android device.
Tasker and Macrodroid Limitations
The biggest downside to both Tasker and Macrodroid is that they’re strictly Android apps. You won’t be able to use the apps on a PC or Mac to automate your work there as well.
Get started with Tasker and Macrodroid
You can learn more about both apps and download them on their respective Google Play Store pages:
• Macrodroid on Google Play Store
#5: Explore self-hosted automation with N8N
Finally, we’ll wrap up this list with an automation tool for the most tech-savvy builders out there: N8N.
What is N8N?
N8N is an open-source automation provider. It works similarly to Zapier, Make, or IFTTT, and it also offers some standard paid subscriptions just like those apps.
What can you do with N8N?
In N8N, you can build automated workflows that are comparable to what you might build in Zapier or Make.
However, what makes N8N stand out from the competition is that it also offers a unique self-hosting option.
This is available for both their Enterprise implementations, and for their free Community version. The community version of N8N is available as a Github repository.

If you’ve got some technical knowledge and you’re looking to set up automations that you have total control over, then N8N is a great choice.
They only offer about 1,000 pre-built integrations, but they also include generalized tools for connecting to any app with an API.
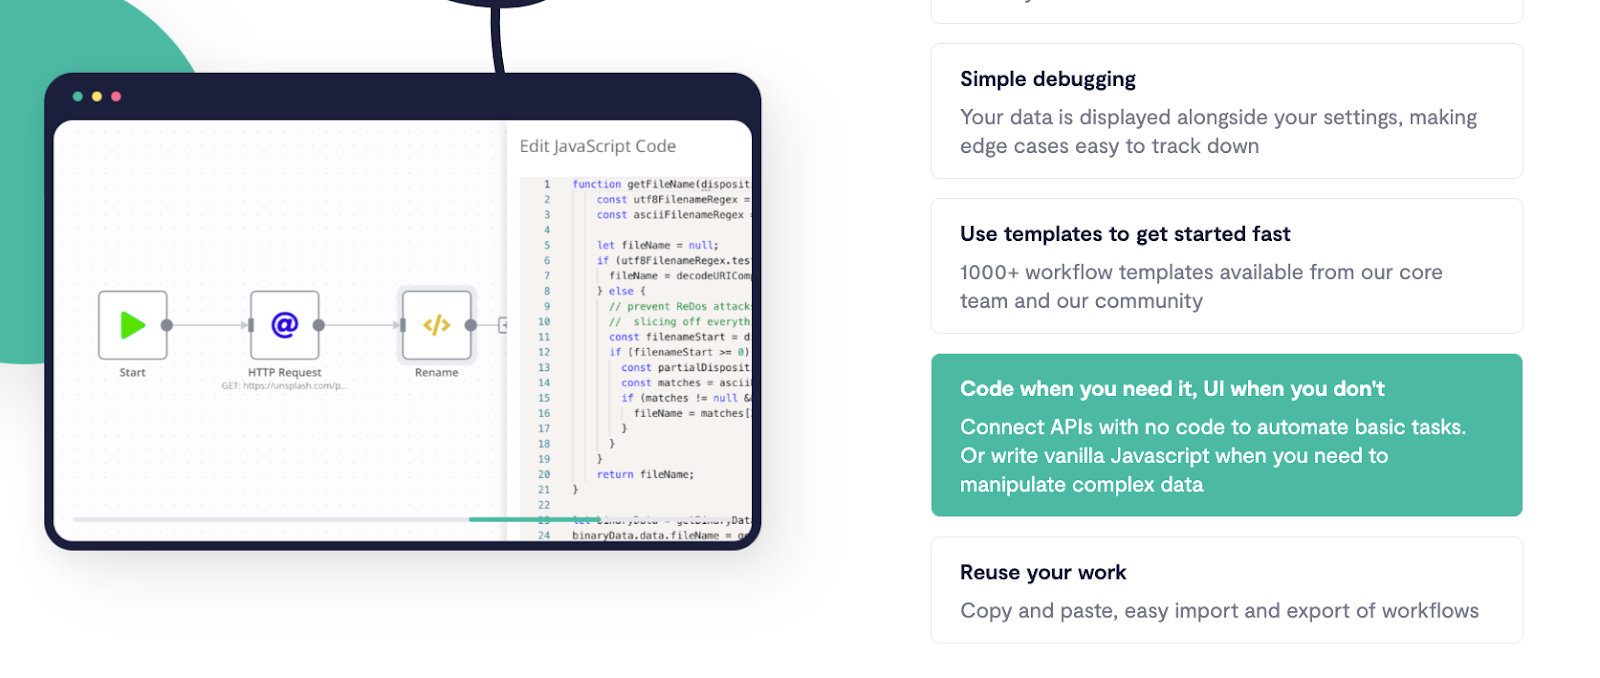
Even if setting up your own instance is beyond your comfort zone, N8N’s paid plans can still often be much more affordable than Zapier or Make. Team plans with unlimited users start at just $20/mo.
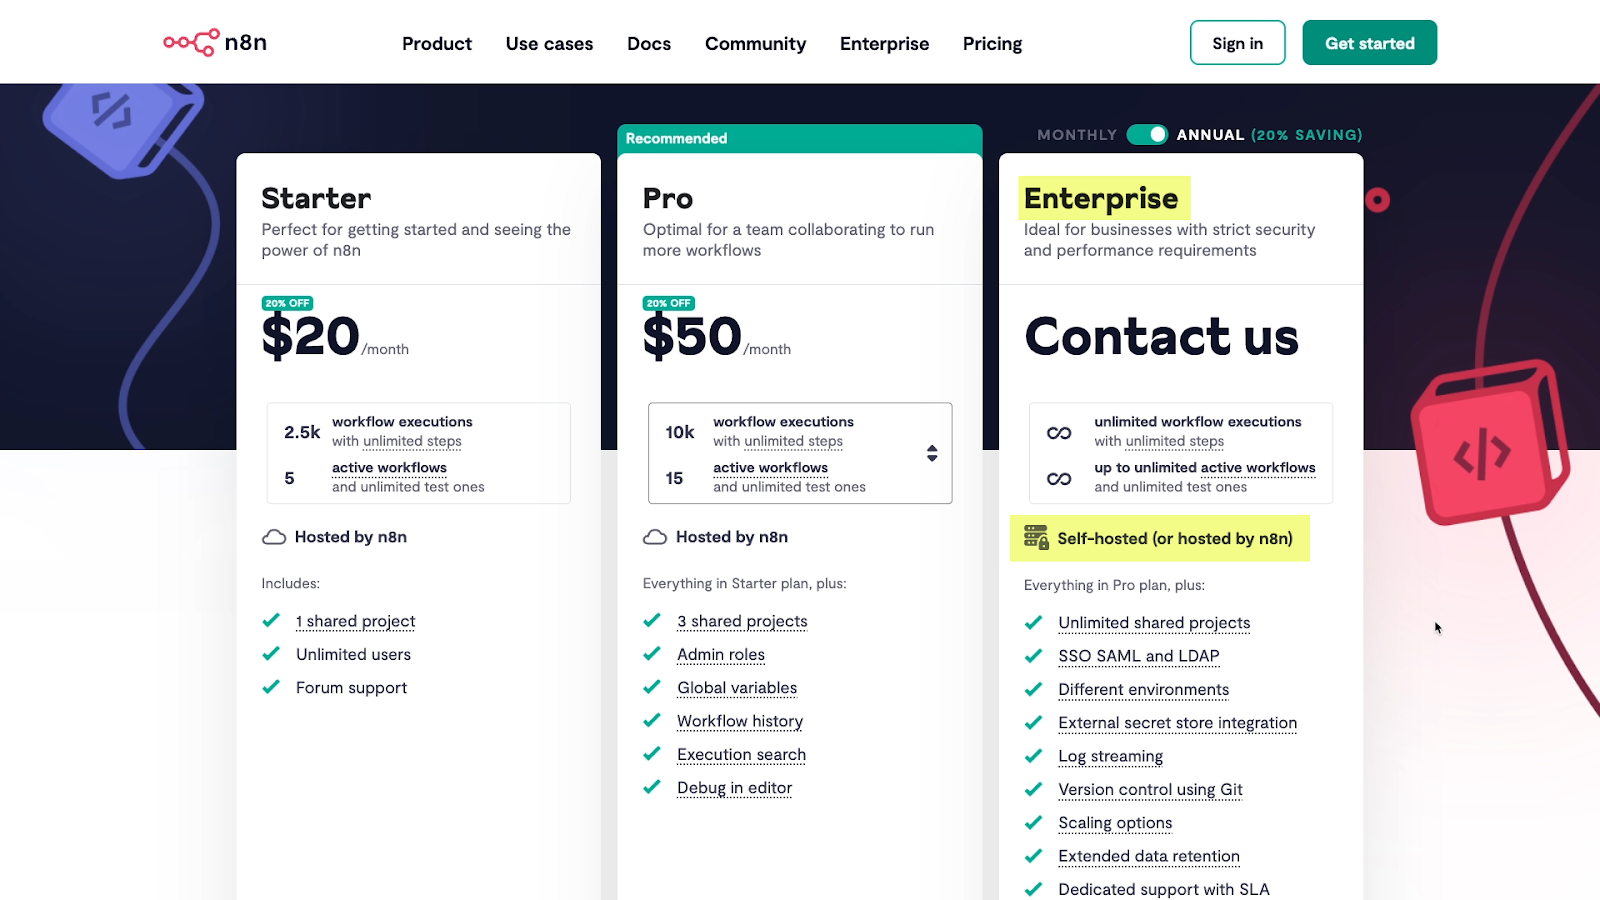
Note that N8N sets their pricing based on completed workflow runs, rather than individual tasks or operations. If you want to build longer or more complex automations, this is a more budget-friendly approach.
N8N limitations
Setting up your own self-hosted instance of N8N is not something most no-code builders will be familiar with.
Additionally, many of N8N’s features like native support for JavaScript won’t be very useful or accessible if you’re not familiar with web development.
However, making the jump from purely no-code tools to software like Docker or Supabase may be worth it for many users.
Get started with N8n
N8N certainly won’t be for everyone, but if you’ve got the technical background, its unique pricing and self-hosting model might be exactly what you're looking for.
To learn more about N8N and setting up your own instance, just check out N8N’s website.
Automation tools for any budget
Automation can make everything in our lives easier, from streamlining dull tasks at work to helping us stick with healthy habits at home. With free and cheap tools like the apps we’ve outlined, anyone can start creating more time for the stuff that matters.
For more automation tips and tutorials, be sure to check out our blog or our YouTube channel. You can also follow XRay on Twitter, Facebook, or LinkedIn.
Are your Zaps just not zapping like you want them to?
If you've dabbled in apps like Zapier and Make, you might have hit a wall trying to take your automations to the next level. As you try to move past simple workflows, you may be struggling to build automations that find all the data you need, and you may find that your Zaps or Scenarios end up becoming far too long and difficult to maintain.
Fortunately, there’s a reliable technique that can untangle your automation woes and help you build better, more consistent workflows. It's all about diving into the world of no-code databases, particularly in apps like Airtable and SmartSuite.
In this post, we're going to walk you through how leveraging an Operational Database in Airtable or SmartSuite can revolutionize your approach to automations, and will let you build systems that support multiple teams and departments.
As we go along, we’ll share some real-world examples from our own workflow toolkit so you can see exactly how it all works.
The problem: linear design
If you’re getting frustrated with Zapier or Make, you’re not alone. At XRay, we constantly hear from people who are struggling to connect their apps the way they want to with no-code automation providers.
In many cases, we find that the issue comes down to one critical concept: linear design.
For new builders, it can be difficult to break out of a linear design pattern, especially since automation providers typically describe their product using this type of pattern. Most of the automation descriptions on Zapier and Make’s websites rely on a “When A, then B” format, like in the examples below.

However, this setup is just the beginning, and if you keep trying to use it for every automation, you’ll quickly find that it becomes limiting.
For example, let’s say you want to build an automation that creates a task in Asana (or any other task management app) whenever you add an emoji to a Slack message.
Tip: if you'd like to learn how to add custom emojis to your Slack workspace, explore Slack's help docs here.
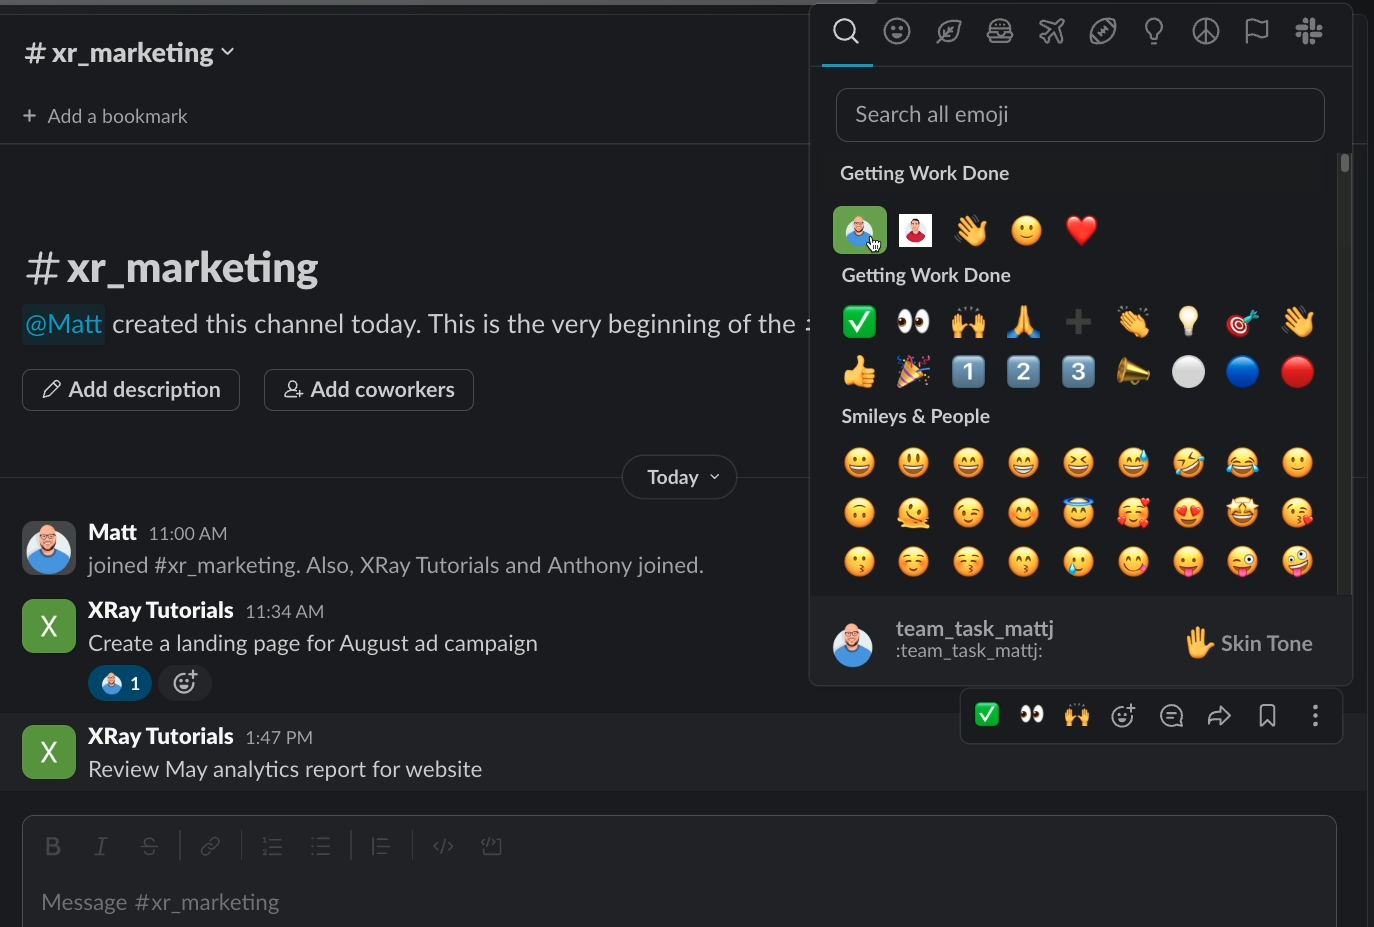
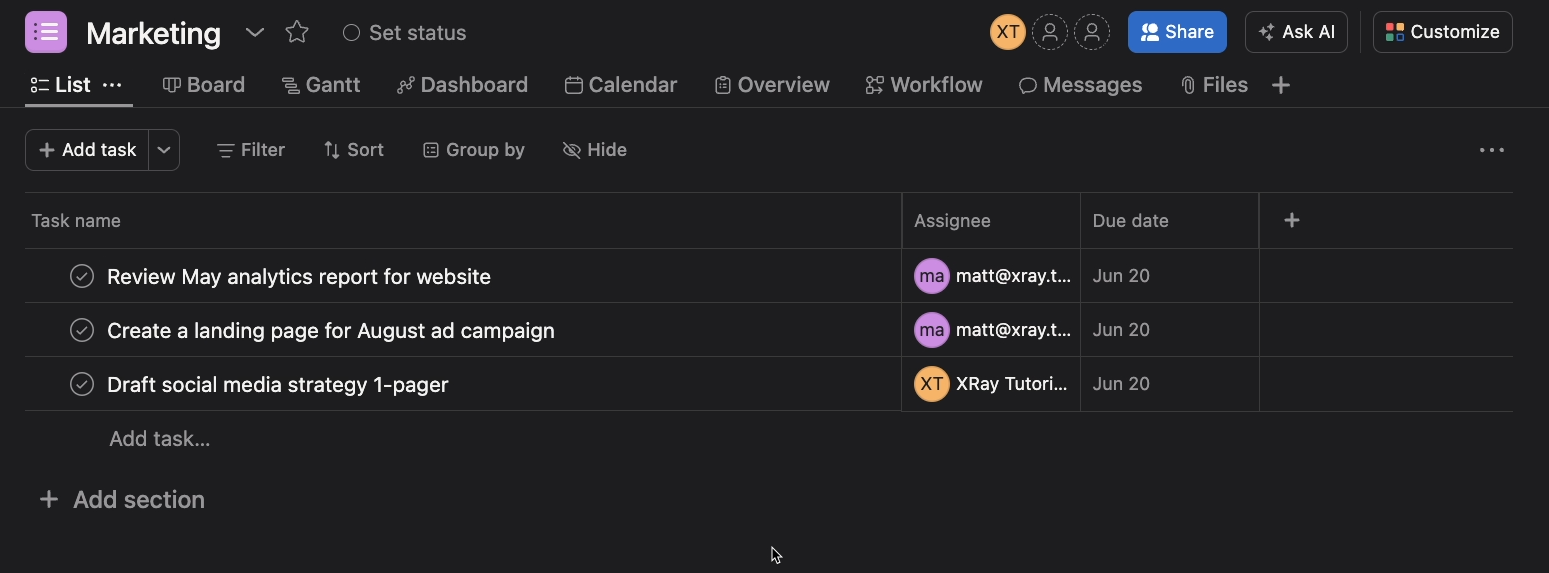
It’s easy enough to set up a trigger in Zapier or Make that watches for new emoji reactions, and filters for custom “team task” emojis. Then, you can add an action that creates a task in your preferred software.

Unfortunately, the trigger doesn’t actually retrieve all the useful, dynamic data that might be needed when creating tasks.
For instance, how do you reliably attach the task to the appropriate project? The title of the channel might be a good starting point, but the title of your “Marketing” channel in Slack might not exactly match your “Marketing” project in your task management app, so adding a search step based on this data won’t be a reliable approach.
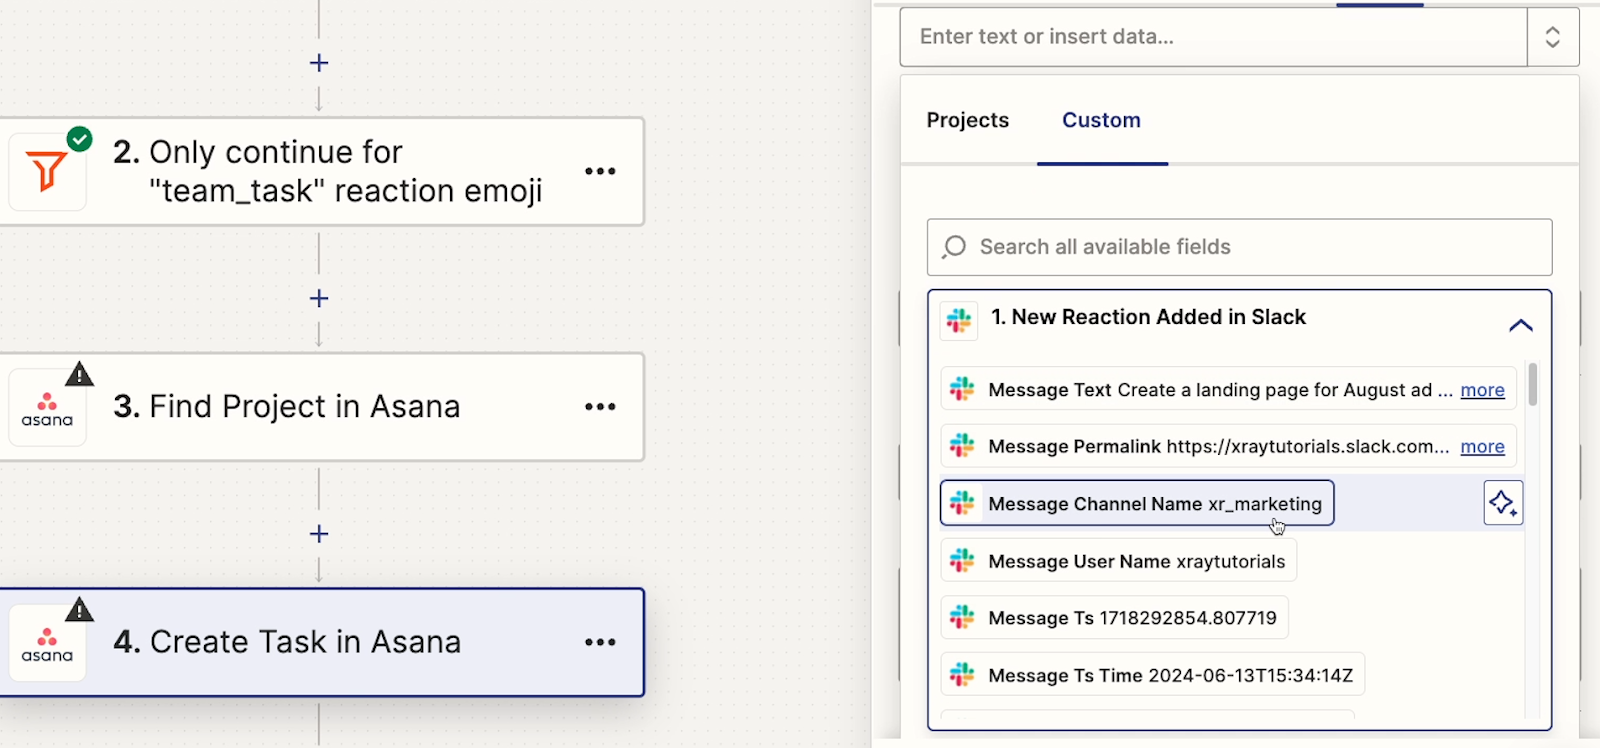

A single mismatched hyphen or underscore could prevent the automation from working correctly.
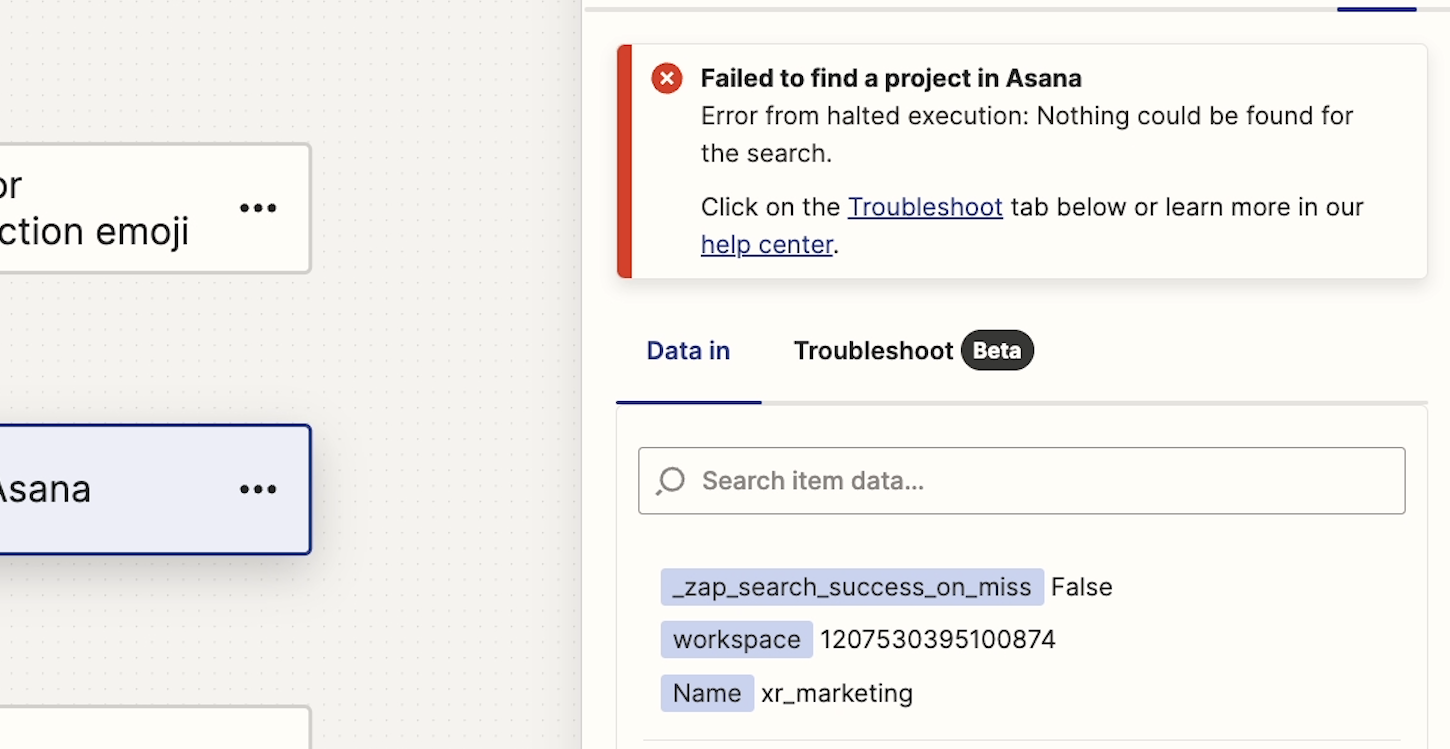
And what if you want to automatically create tasks from multiple sources, like email or forms? If you want to avoid building redundant automations, you would need to mess around with things like Sub-Zaps or Webhooks, which can get a little complicated.
The solution: supporting your automations with an Operational Database (ODb)
There are many ways you could potentially solve automation design problems like these, but in our experience building no-code automations for our members and for our internal team, there’s one technique that consistently stands out.
The trick is to connect all of your automations to what we at XRay call an “Operational database,” or ODb.
While this term might sound like technical jargon, a well-designed operational database is arguably the single most important asset you’ll create as you’re building automations in the long term.
It will enable automations that support your entire team with the dynamic data that Zapier, Make, and other similar platforms struggle to find on their own.
We’ll show you how it works and how it can fix all of these problems we’ve outlined and more.
Using an ODb to store and retrieve any data
Below is an example ODb that we could use to support the Task Creation automations we’ve described.

This is a pretty simple no-code database built in Airtable, which is what we typically use at XRay, although you can also accomplish something very similar with SmartSuite.
This database is a repository for all of the information that our automations use. We can match usernames to their emails and IDs in various apps, their job role, and a lot more. That way, we can create truly dynamic automations that suit an entire team instead of just an individual.
We can assign tasks or send messages to anyone with a single automation that searches for a record in this database, because all of the info we need is present.
Integrating an ODb into automated workflows
Now, let’s take a look at some updated automations that connect to this ODb instead of using a standard, linear design.
By supporting the automations with an ODb, we can make sure that every task is assigned to the right person and connected to the right project.
In the “people” table, we’ve stored the names of the custom emojis that represent each team member, as well as their IDs in Slack and Asana.
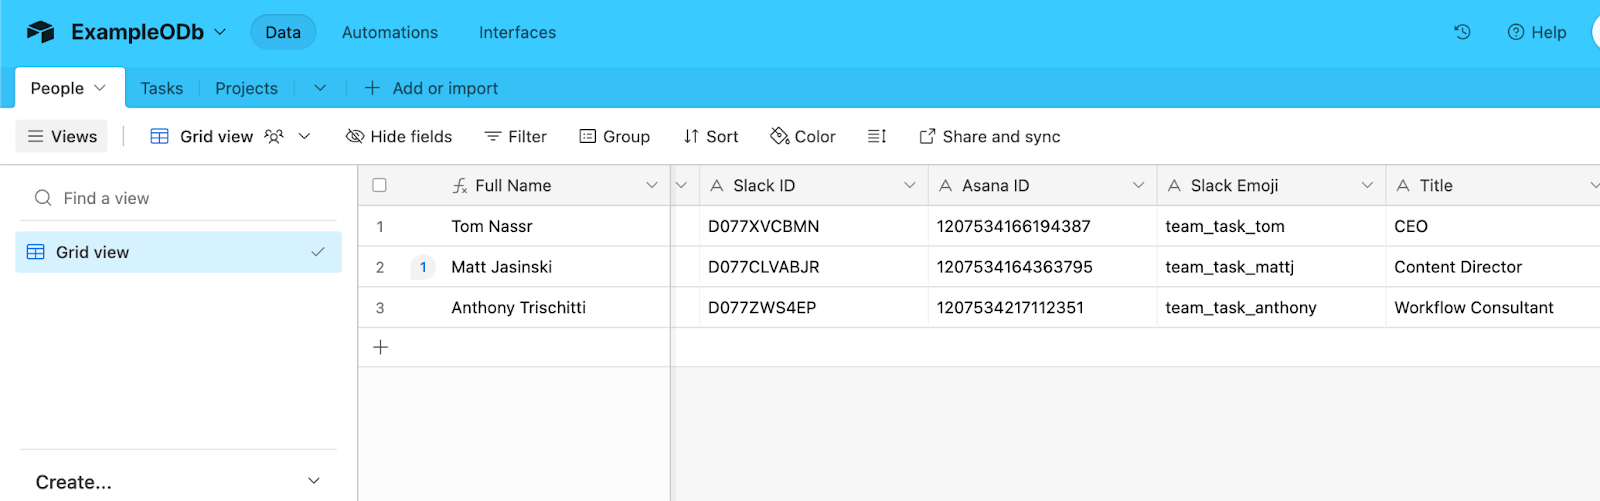
After the automation is triggered by a new emoji reaction in Sack, it searches in our Airtable database for a matching emoji name, which is guaranteed to find an exact match.
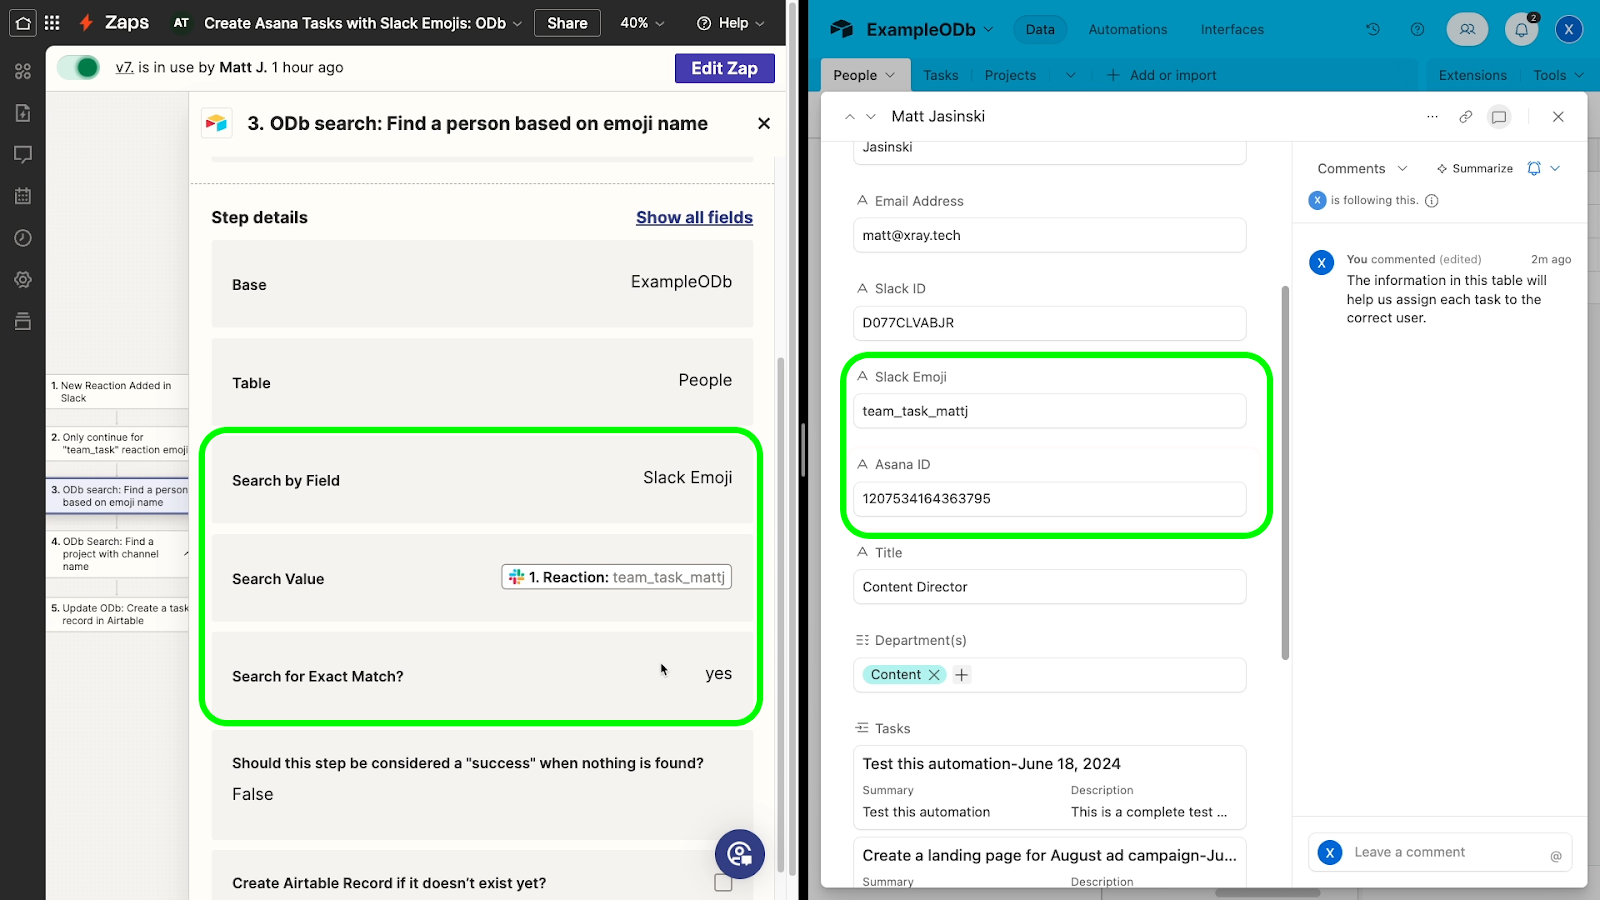
The Asana ID found in this Airtable record can then be used to assign the right task. When a “mattj” emoji is added to a Slack message, this search step will find Matt J’s Asana ID. When a “tom” emoji is added, it will find Tom’s Asana ID, and so on.

Dynamically selecting an Asana project with an ODb
With an ODb, you can use largely the same process to attach the task to the right project in Asana. The table pictured below lists all of the projects at the company, and includes their exact names and IDs in Slack and Asana.

With this information, we can be confident that lookups will always work correctly.
Using an ODb as an advanced lookup table
With an Operational Database, you don’t just go from App A to App B. You can search in the database for any data you need, send it to other apps, and update the database with the latest information.
When you use an ODb, you don’t need to worry about necessary data missing from a Zapier trigger, action, or search. Just store any data you need in your ODb to conveniently access it whenever you want from any automation.
Additionally, by leveraging linked records in your ODB, you can associate data in one table with data in another table. Even as you add more and more information, you can keep the whole database neat and organized with one table for “People,” one for “Tasks,” one for “Projects,” and so on.
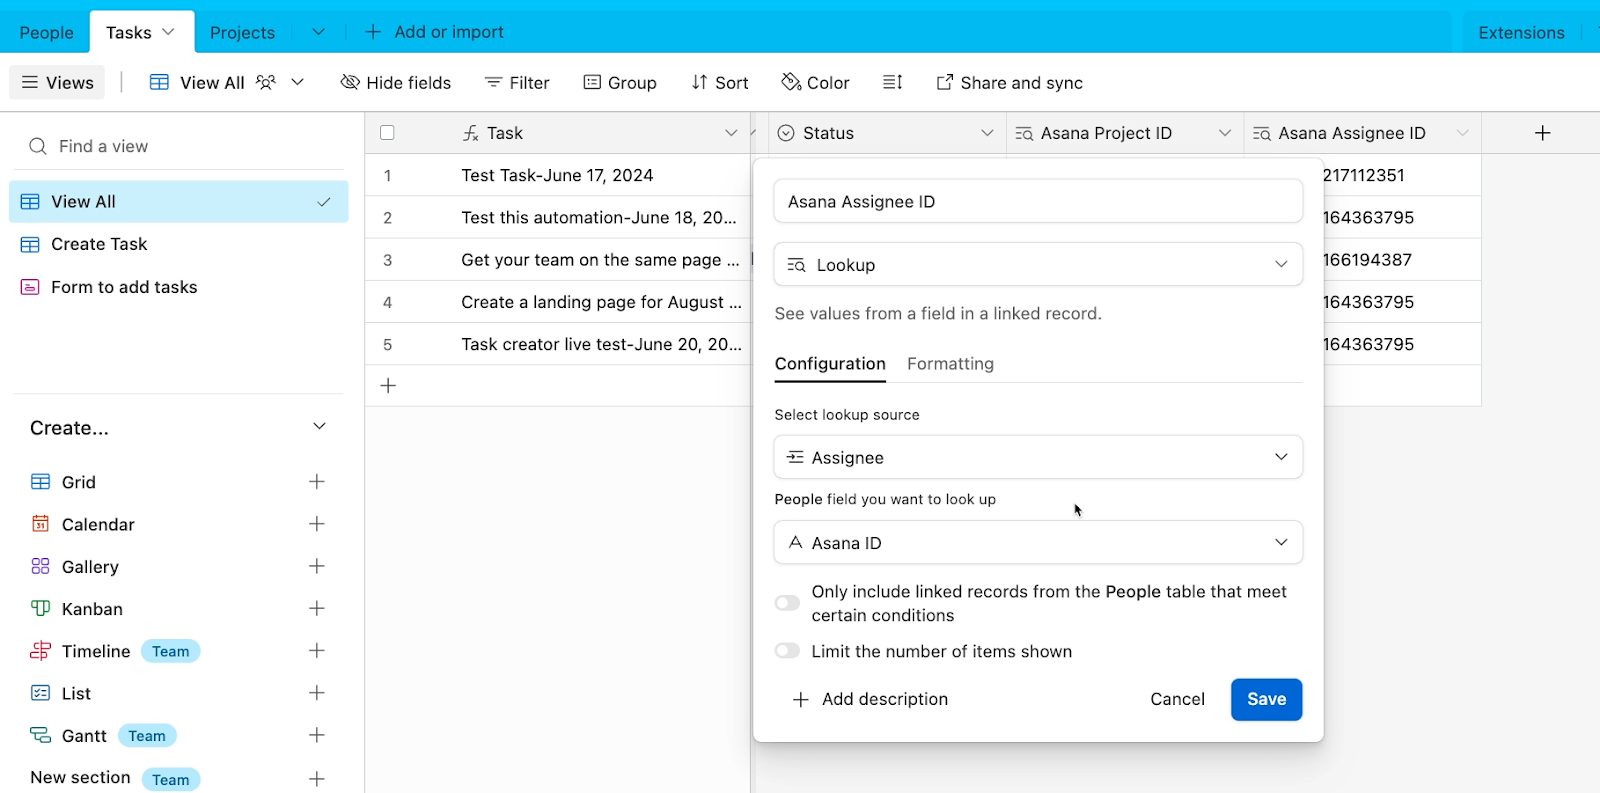
You don’t need to worry about a given Zapier trigger or action not having the right data, because you can find it all with a simple search step for the right record in your database.
And unlike a simple lookup table in Zapier, you can refer to this database from any number of automations, on any number of automation platforms, and include as many attributes as you want. Plus, you don’t need an expensive subscription like Zapier Tables just to put this database together.
Controlling automated activity and building modular automations with an ODb
However, an Operational Database is more than just an advanced lookup table. With views and filters, you can use an ODb as a control center for your automations.
For example, one useful aspect of an ODb in Airtable is that you can launch automations whenever a record enters a specified view or meets certain conditions.
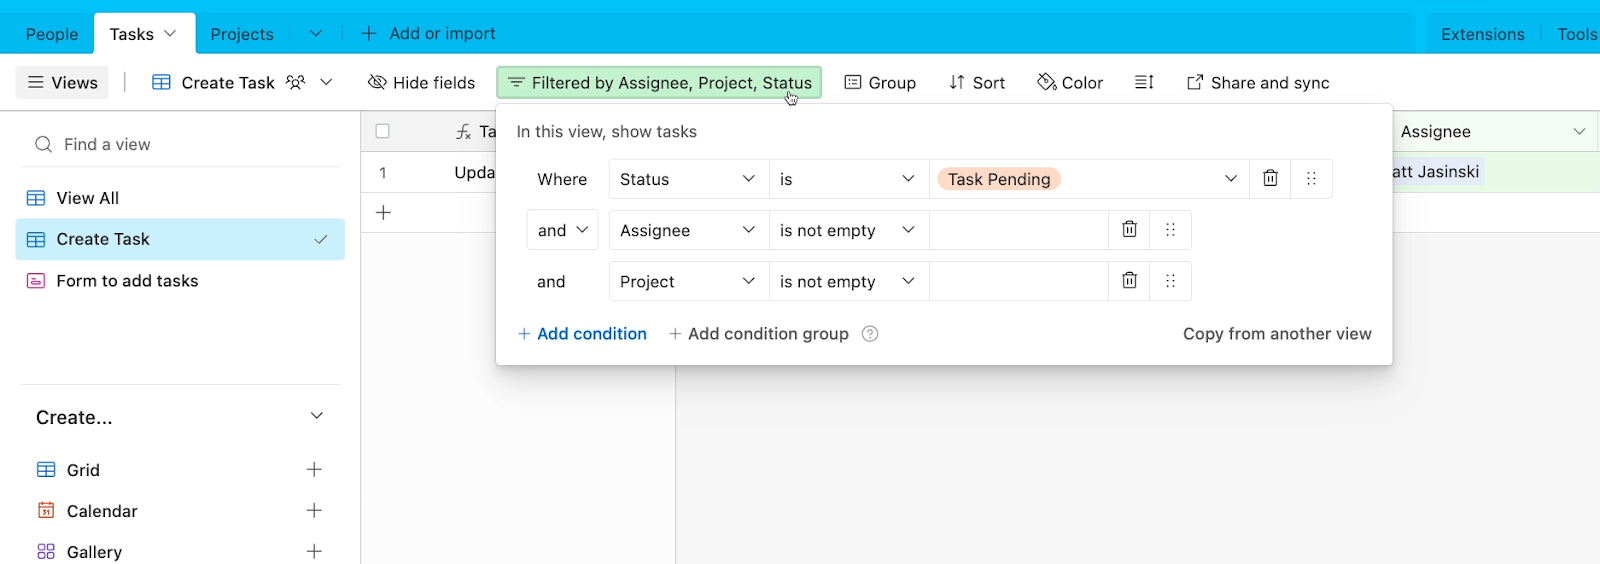
This is a very flexible automation trigger that gives you a lot of options for controlling your workflows, and can help you to build modular automations that avoid redundancy.
For instance, if we wanted to expand our task creation automation and establish multiple ways to create tasks, we could use our ODb to create a system that funnels data from several sources to a single endpoint.
Our main task creation Zap, pictured below, triggers in Zapier whenever a record enters the “Create Task” view in our database.
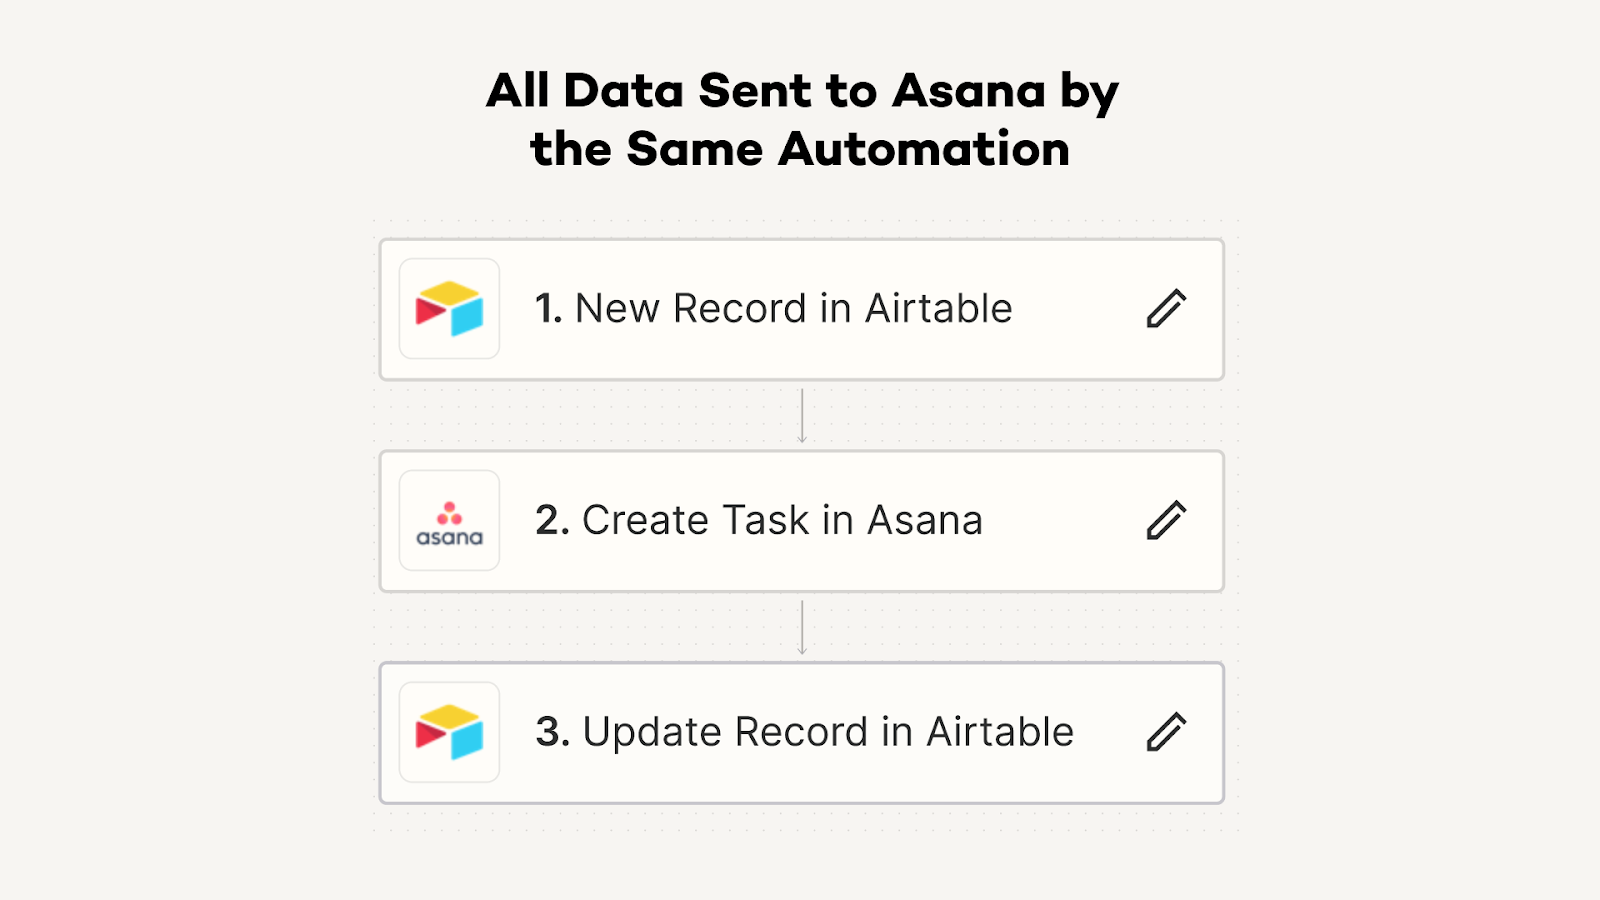
So whenever we want to add a new method for creating tasks, we don’t need to add steps that create the task every single time.
All we need to do is get the information into Airtable, and then the main automation that we already built will take over.
This means that we can have one automation that collects data from Slack, one that collects data from a form, and one that collects data from an email inbox.
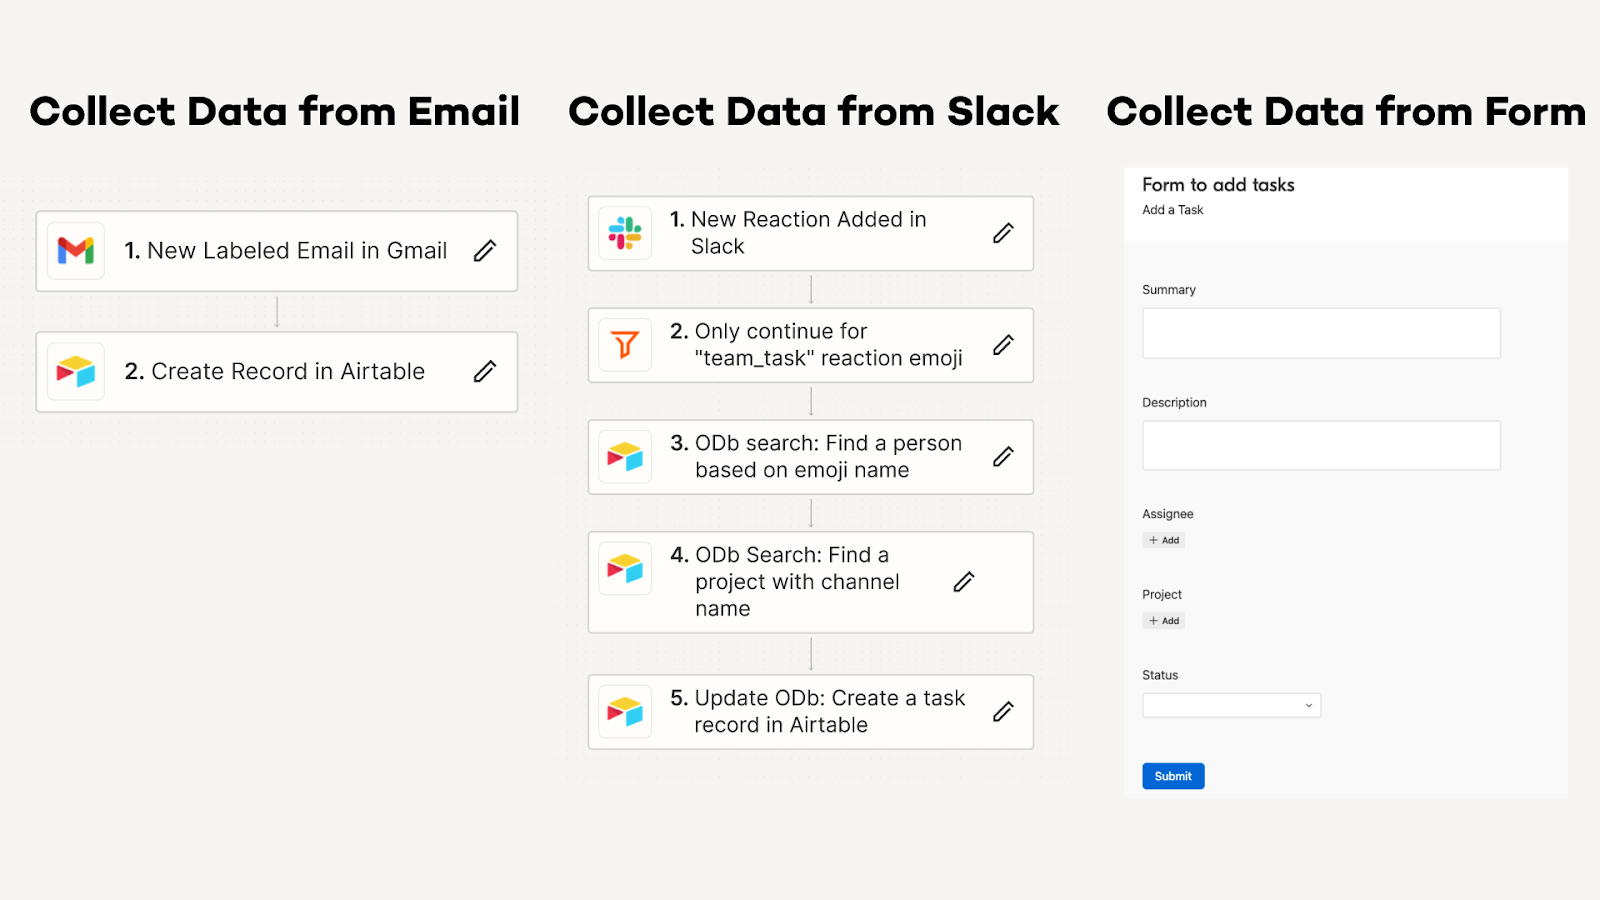
They all send their data to Airtable, which launches a single automation that actually creates the task.
This is a much more scalable, maintainable approach than building three fully separate automations, and you don’t need to mess around with sub-Zaps or webhooks to do it.
Additional benefits of using an Operational Database
In addition to all of the advantages that we’ve described so far, you can also use your database to create indefinite delays, as we demonstrated in this earlier Zapier tutorial.
With an ODb, you can also create several smaller automations that run on demand, or transform data however you want with formula fields, and much more.
We can’t cover every feature and benefit in a single blog post, but if you’d like to learn more about designing scalable and dynamic automations with an Operational Database, you can sign up for our Workflow Design Course.
Going beyond linear design to build better automations
Building simple, straightforward automations in Zapier or Make is a good way to get started, but creating great automated workflows requires a bit more. It's all about thinking beyond the linear and embracing the power of a well-crafted database.
With an Operational Database in Airtable or SmartSuite, you can get all of the data you need in one place to build dynamic automations that support entire teams. You can control when each automated action runs, and you can avoid creating redundant automations that all do basically the same thing.
Essentially, with an Operational Database, you can build complete systems instead of just building automations.
If you’d like to learn more about designing and implementing automated workflows with no-code tools, be sure to check out the other posts on our blog or our YouTube channel. You can also follow XRay on Twitter, Facebook, or LinkedIn.
Since bursting onto the scene in November 2022, ChatGPT has been making consistent updates.
In this post, we’re going to take a look at one of the latest features – a direct integration with Google Drive.
OpenAI has been rolling out the Google Drive integration over the last few weeks, and it’s now available to all ChatGPT users – including users with free plans. The integration allows you to upload files directly from your Google Drive into your ChatGPT conversations.
Once you’ve uploaded the file, you can ask ChatGPT to do whatever you want with the file. You can summarize it, translate it, describe it, or even rewrite it as an epic poem.
We’ll show you how to get started with the new integration, and give you a few examples of what it can do.
How to use the Google Drive Integration in ChatGPT
To begin, just click on the file (paperclip) icon next to the chat window.
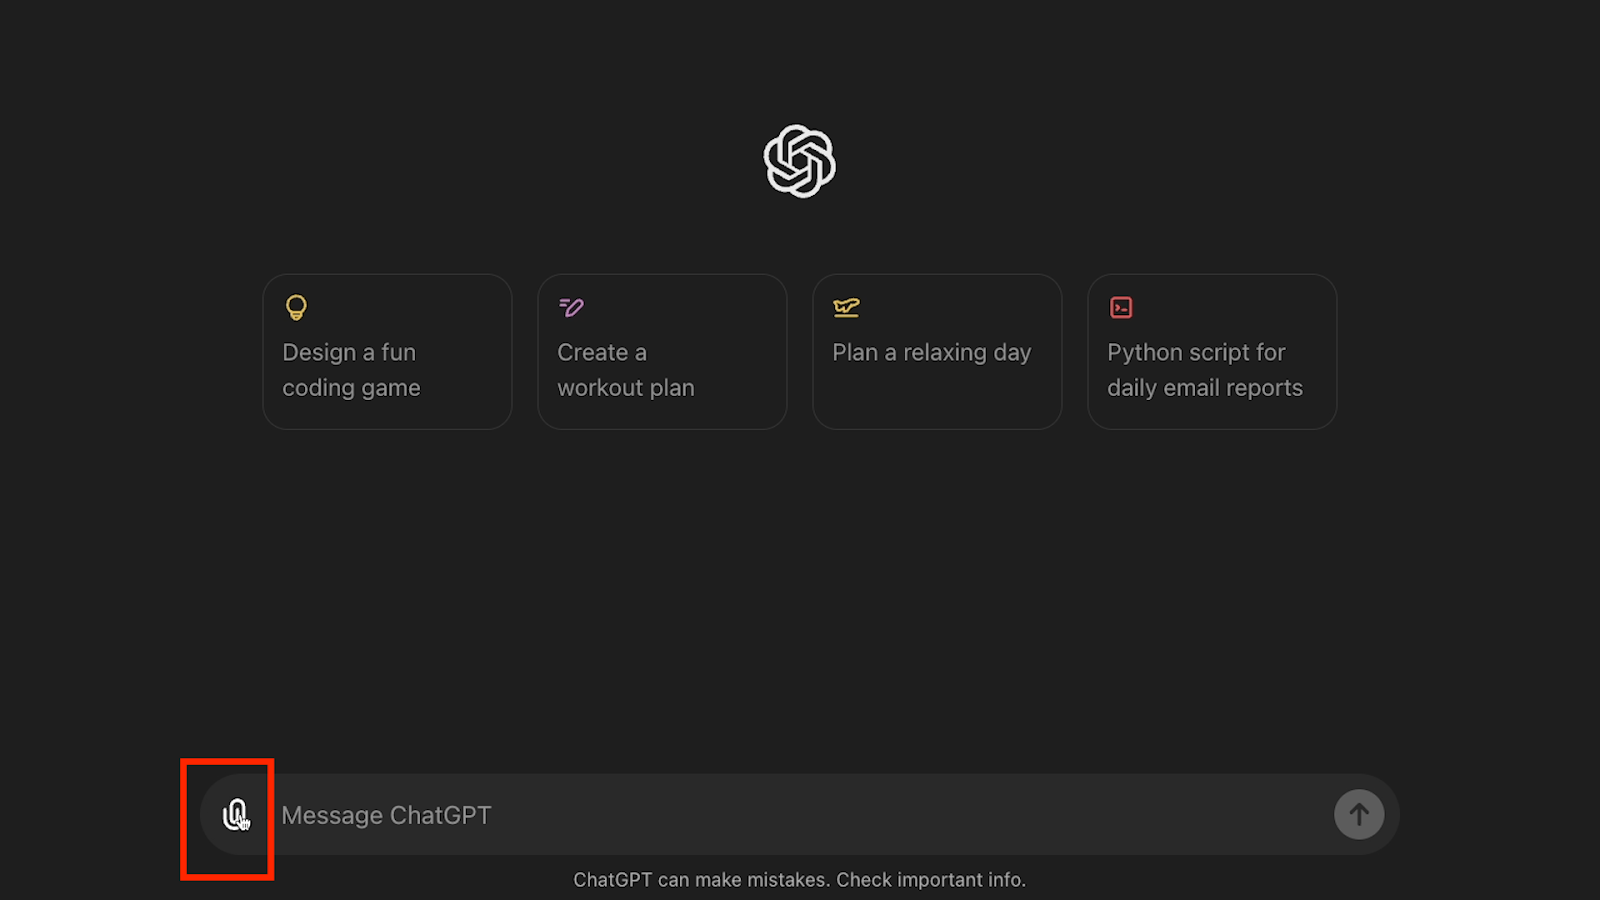
Then, choose the new option that reads “add from Google Drive”.

You’ll need to sign in with a Google account and authorize ChatGPT to access your Drive before you can proceed.
Once you’re signed in, you’ll see a familiar portal where you can browse or search for any file that you want to send over.
TIP: Wait for your file to appear as a suggestion rather than clicking on search. As we were testing the new feature, we generally found that Google Drive placed more accurate and consistent search results in the dropdown that appears underneath the search bar. Actually clicking on the search icon would typically turn up several bad matches, and often wouldn’t include the file we were looking for.
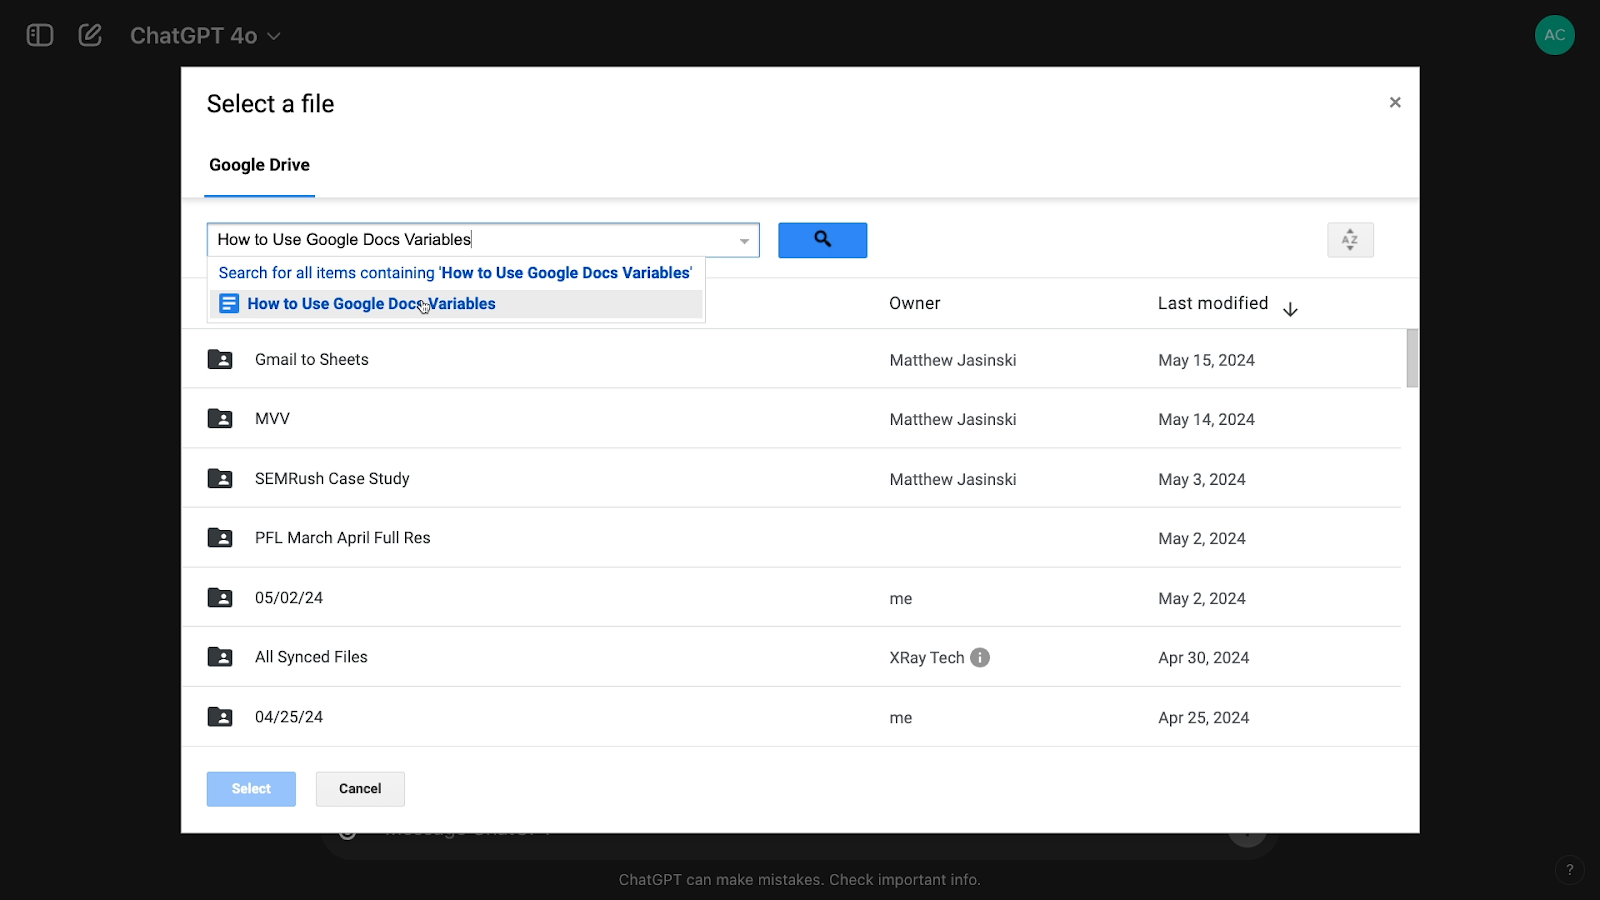
Click on the file you want to upload to ChatGPT, and the file will start loading right away.
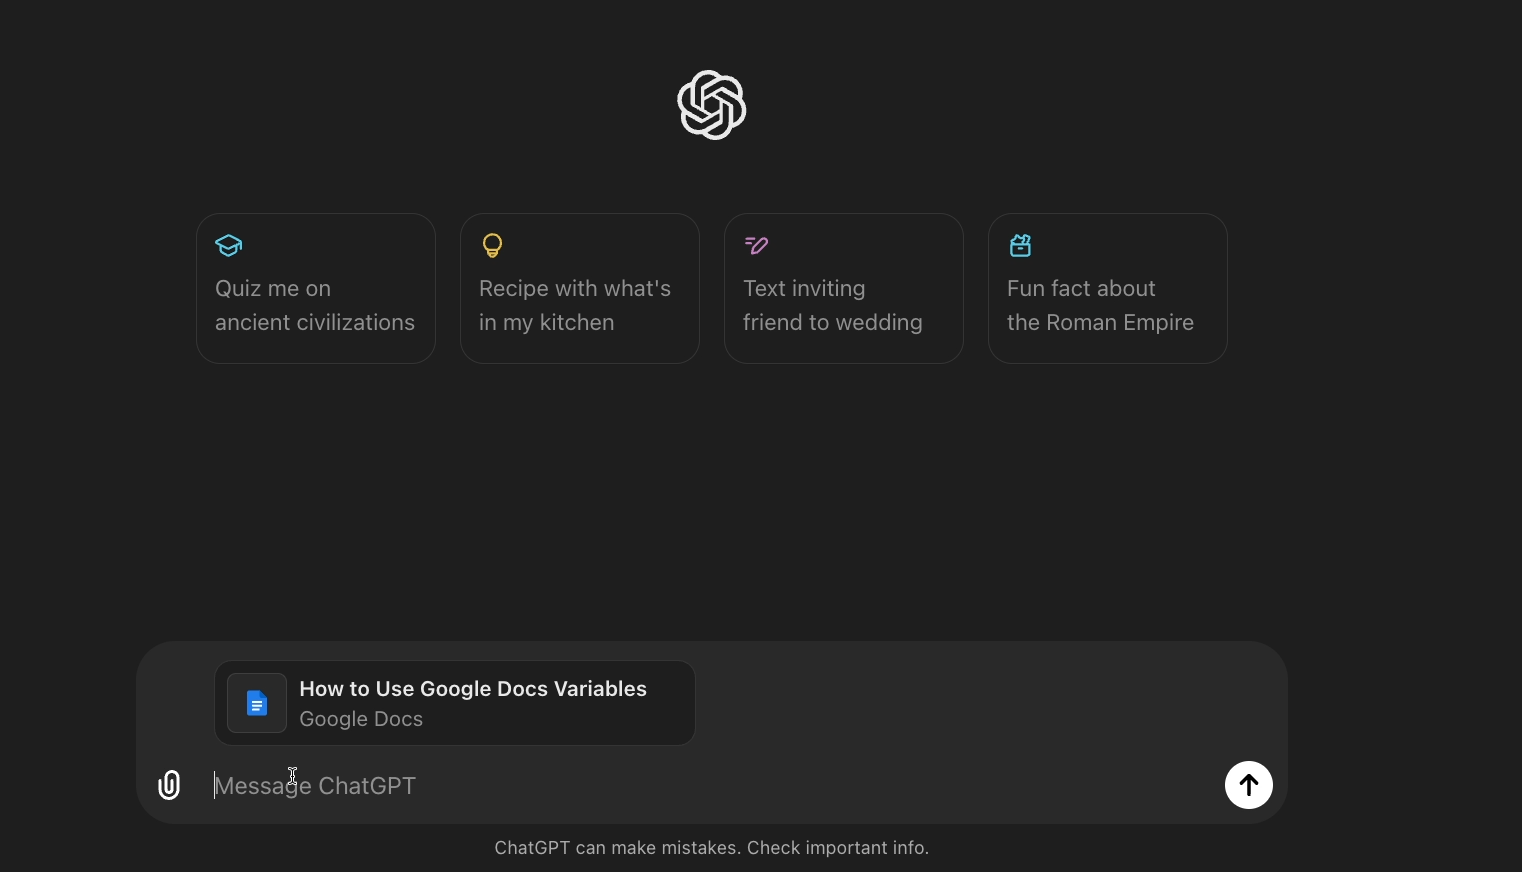
Then, enter any prompt you want, and send your message to ChatGPT as usual.
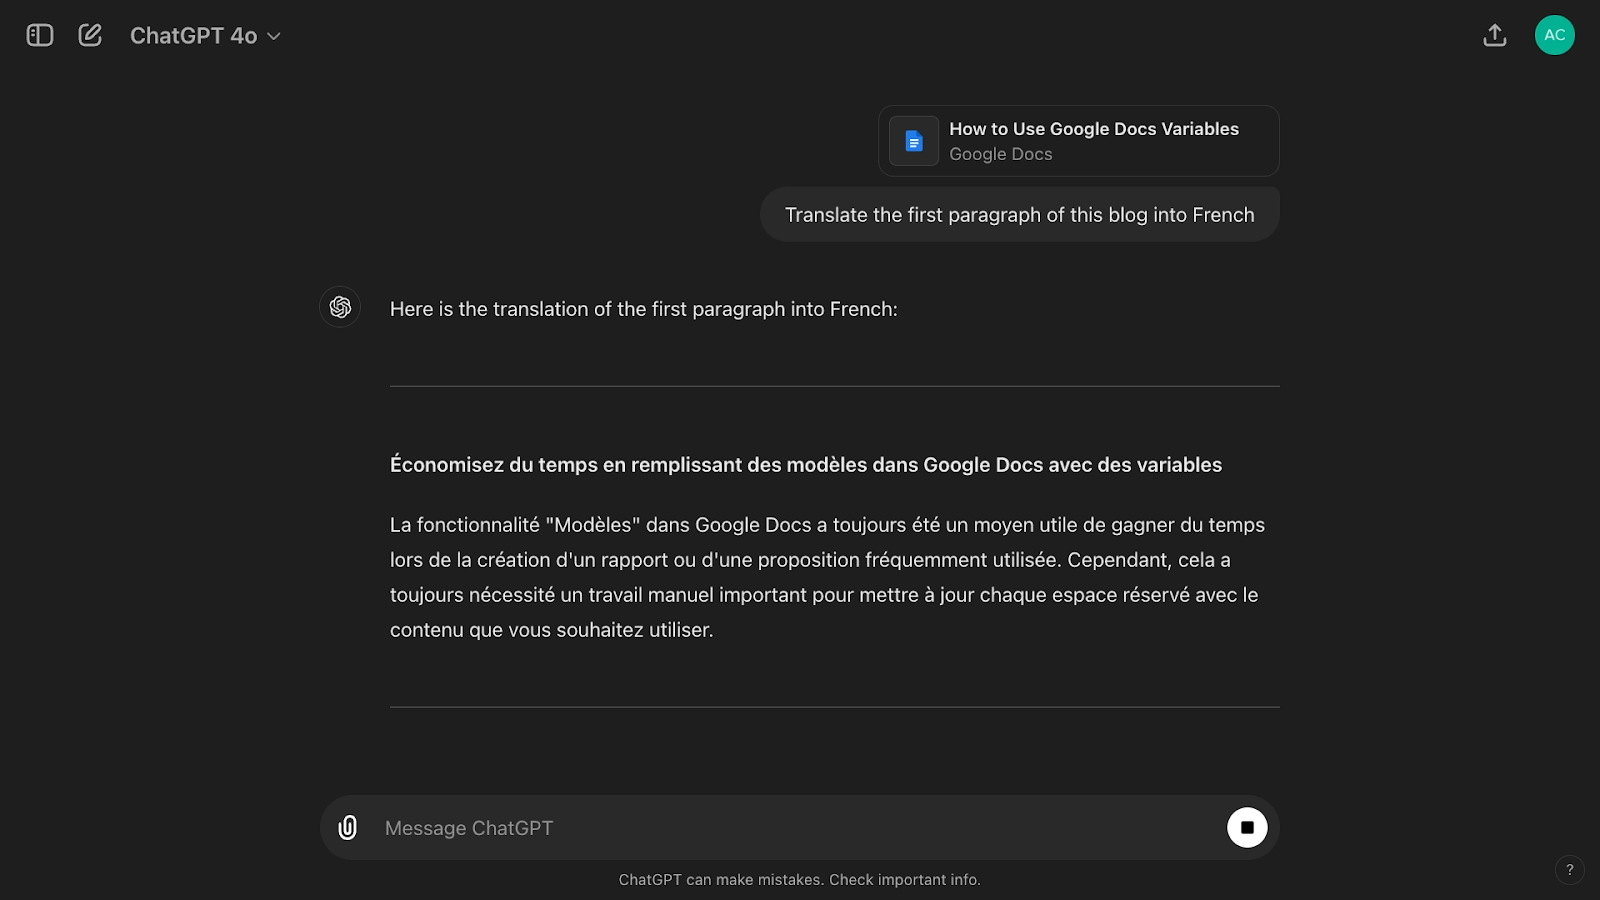
While this update isn’t a revolutionary change to ChatGPT by any means, it definitely adds some real convenience if you do most of your work in Drive.
It’s a lot quicker to attach a file directly than to open it in Drive, download it to your computer, and re-upload it to ChatGPT.
What file types does the Google Drive integration in ChatGPT support?
ChatGPT can view and analyze text documents, slide presentations, images, and video files. However, based on our most recent tests on 06/04/24, the AI encounters several errors and has pretty limited functionality when it comes to video files.
Try using the ChatGPT to extract key insights from your docs, create new iterations of your images with DALL-E, or suggest speaker notes in your presentations.
Additionally, ChatGPT can only extract text from Slides presentations. If you want ChatGPT to take a look at any of the images in your deck, you’ll need to upload them separately.
What are the limitations of the Google Drive integration in ChatGPT?
The Google Drive integration can read and analyze the files that you add to your conversations, but it cannot create or edit files directly in your Drive. Sending ChatGPT a prompt like “Create a file in my Google Drive called ‘Example Doc’” won’t work.
It also can’t search for files on your behalf, so a question like “is there a file called ‘Example’ in my Drive?” won’t return a helpful answer.
Instead, its features are limited to reading and interpreting the files you choose to share with ChatGPT directly.
Integrating AI into routine workflows
For many of us, ChatGPT has become an essential part of our daily work, so integrations with apps like Google Drive are a natural fit.
It’s not an earth-shattering change, but it’s a nice little update to be able to upload files directly from Drive into ChatGPT, and it’s hopefully laying the groundwork for a more robust integration to follow.
If you’d like to learn more about saving time with AI and workflow automation, be sure to check out the other posts on our blog or our YouTube channel. You can also follow XRay on Twitter, Facebook, or LinkedIn.
With tools like Zapier, it’s easy to export new emails to Google Sheets for better analysis. However, the best process for exporting existing emails isn’t always so obvious.
Today, we’re going to show you how to automatically send data from any Gmail message to Google Sheets by just adding a simple label. This will let you send over any data you want from your messages, like the subject, sender, and body, or even attachments. All you’ll need are accounts in Google and Zapier.
Attachments or no attachments: your choices for this tutorial
Let’s begin with a quick overview of how the finished automation works.
The automations in this tutorial consist of two separate Zaps: one for emails with no attachments, and one for emails with attachments.
We’d normally try to do this all in one automation, but there’s a special Gmail trigger for new attachments which is very useful for uploading each attachment individually without messing around with loops, custom scripts, or other advanced options.
However, since the “new attachment” trigger obviously won’t work for emails without attachments, we’ll need a separate automation to handle them.
With both of these automations, all you have to do is apply the appropriate label to an email in Gmail.
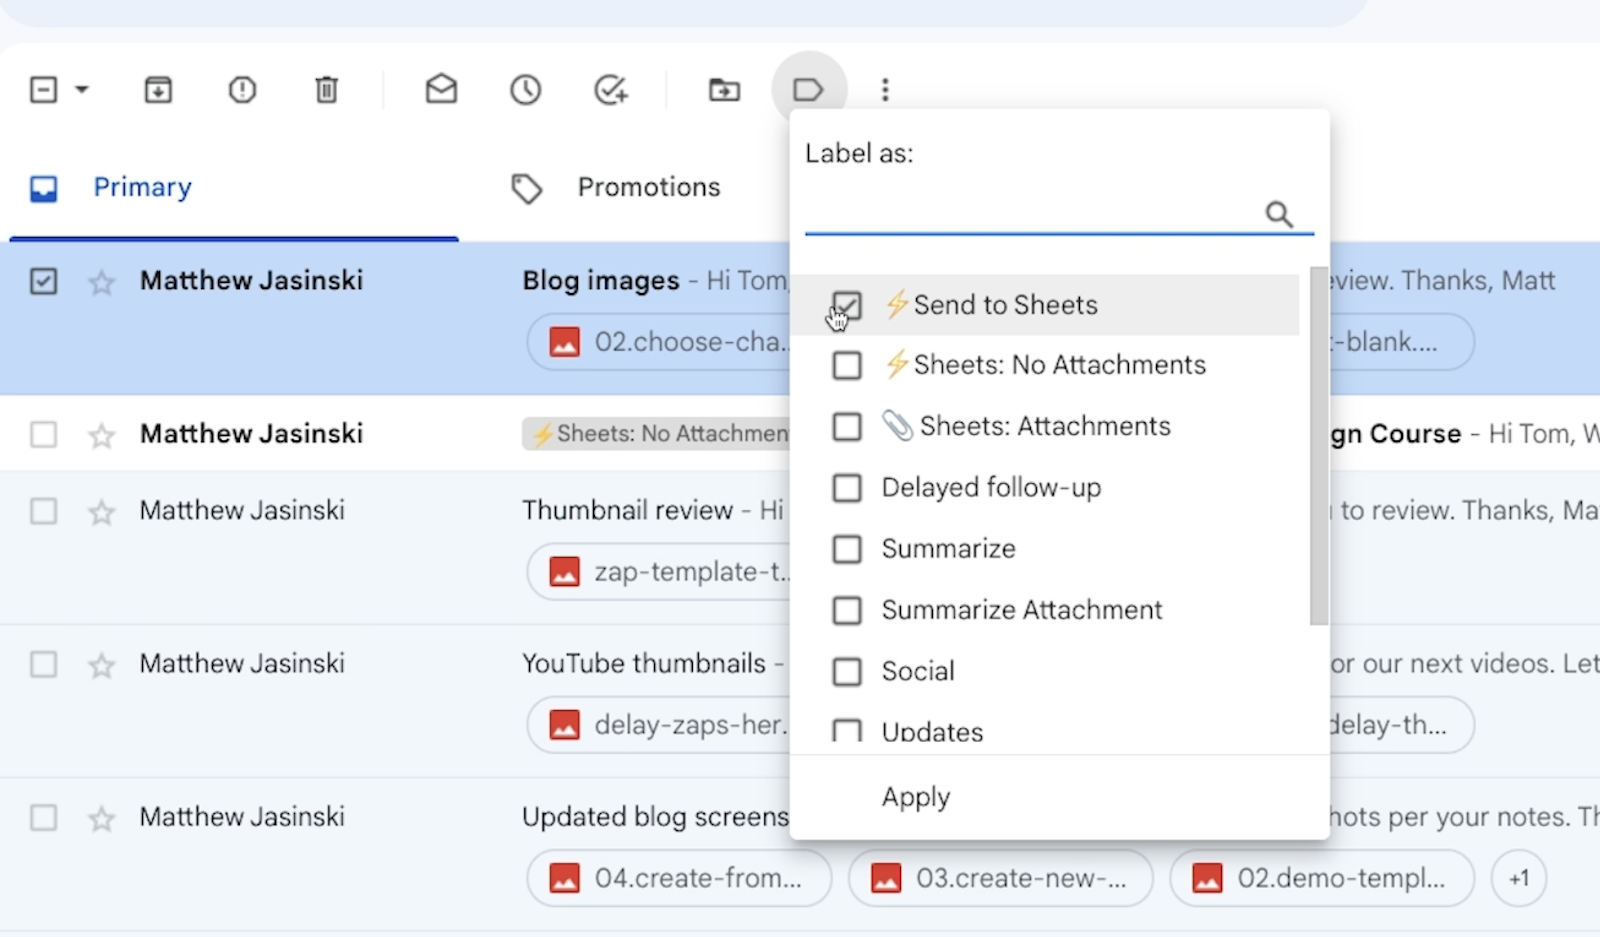
Then, that email’s data will be sent over to Google Sheets.
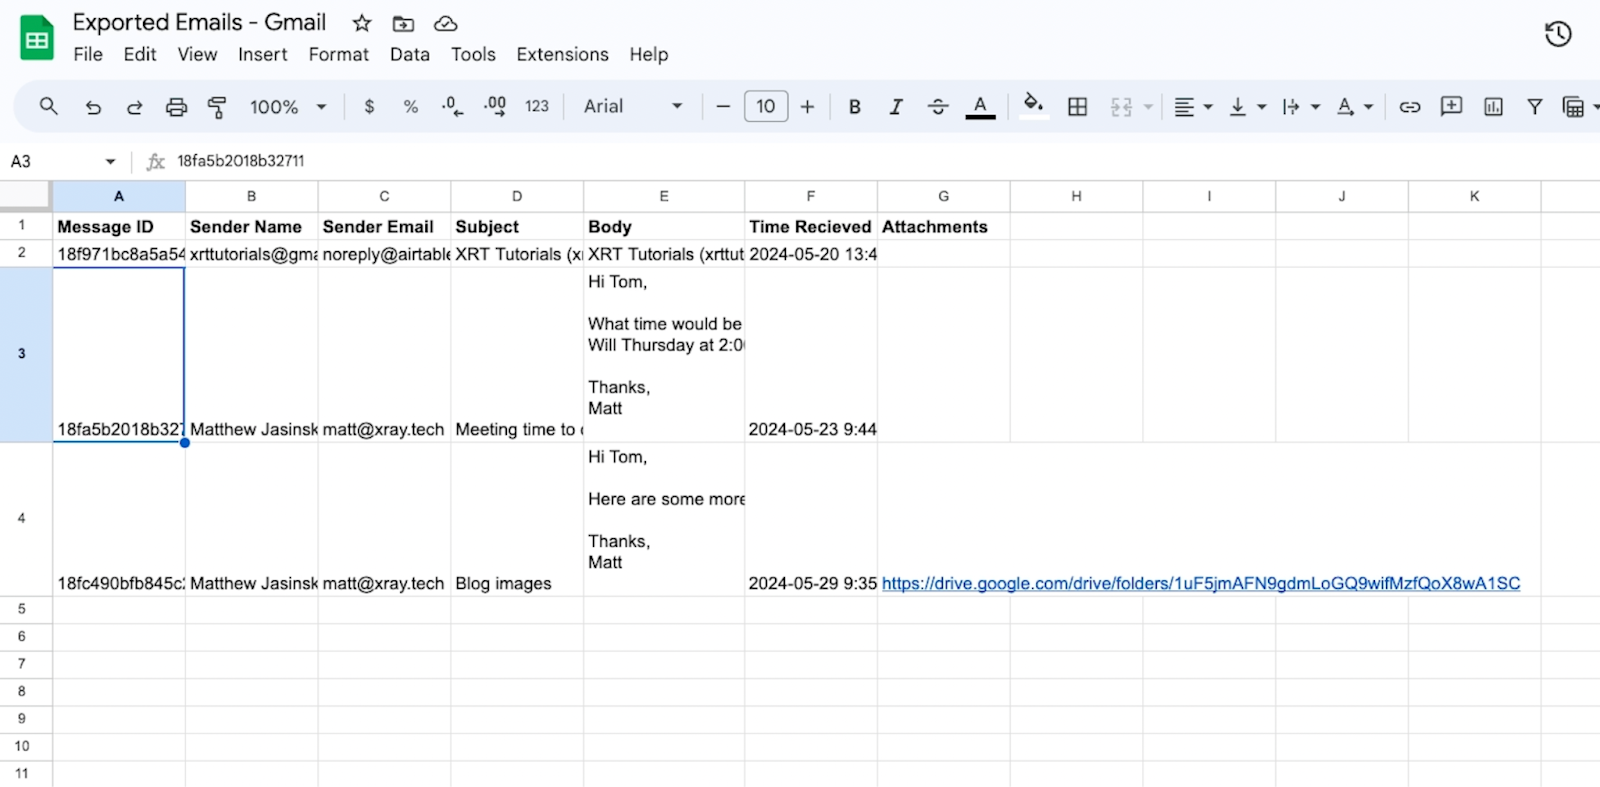
If the email has attachments, they will be automatically uploaded to a folder in Google Drive, and that folder is added to the email’s row in Sheets.
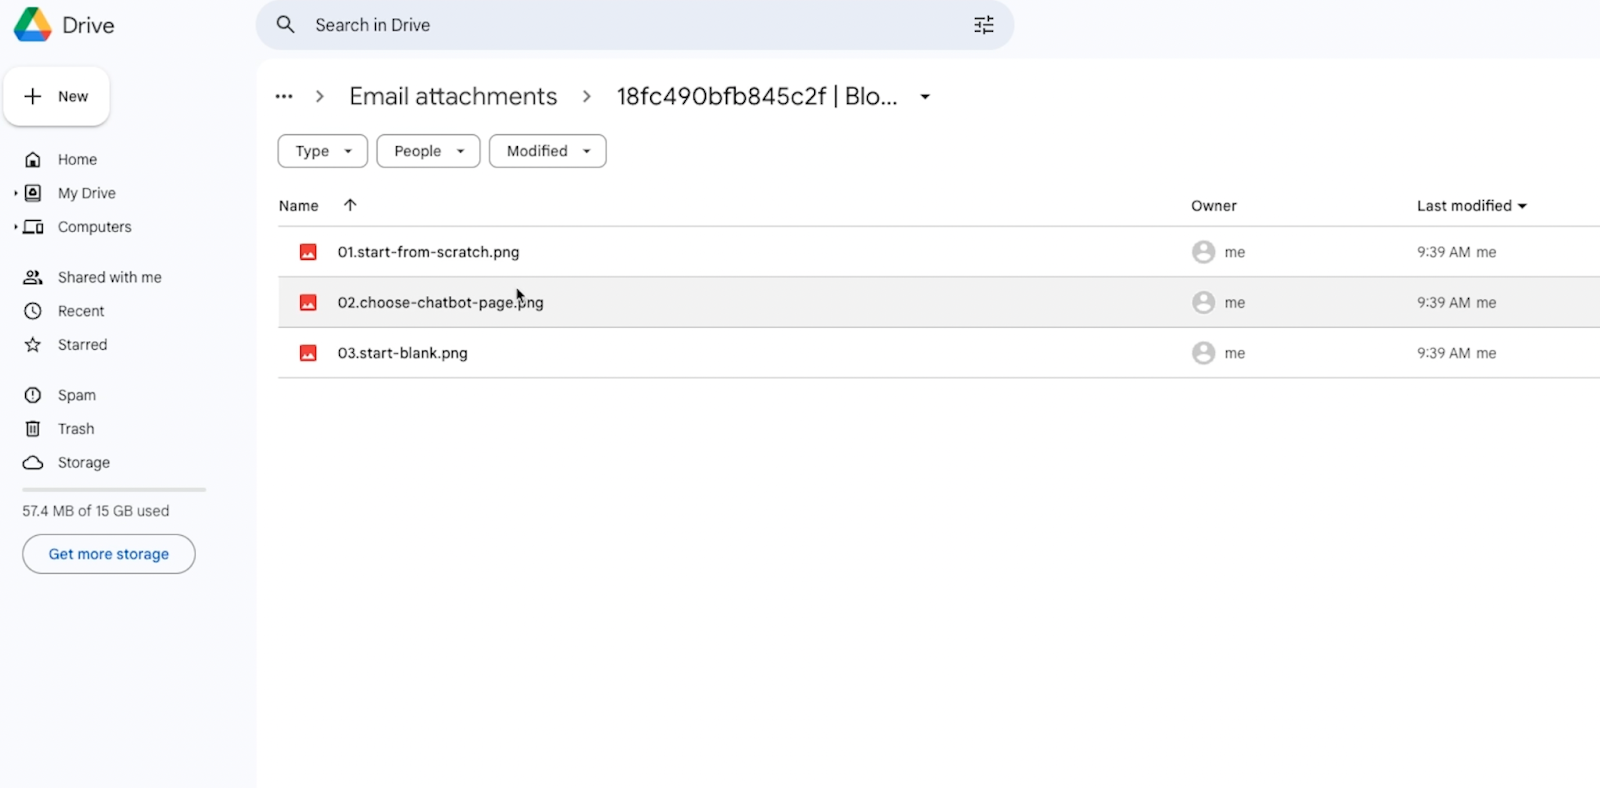
The Zap that doesn’t include attachments is only a 2-step, which means it can be built and used on a Zapier free plan.
Conversely, the Zap that handles multiple attachments is a 4-step Zap, so it won’t work on a free plan. You can build it in the editor, but you won’t be able to turn it on. If you’re limited to a Zapier free plan, we’d recommend using the first Zap only.
That’s how the automations work in a nutshell, but let's take a closer look and break down both Zaps step by step.
Transferring emails to Sheets: No Attachments
We’ll start off with the simpler option. This is an automation that will work great for sending email data to Google Sheets, but it won’t work so well for sending attachments.
On the other hand it’s only a 2-step Zap, so it will work on a Zapier free plan.
Trigger: New labeled email in Gmail
Add a Gmail trigger to your Zap and choose “New labeled email” as the event.
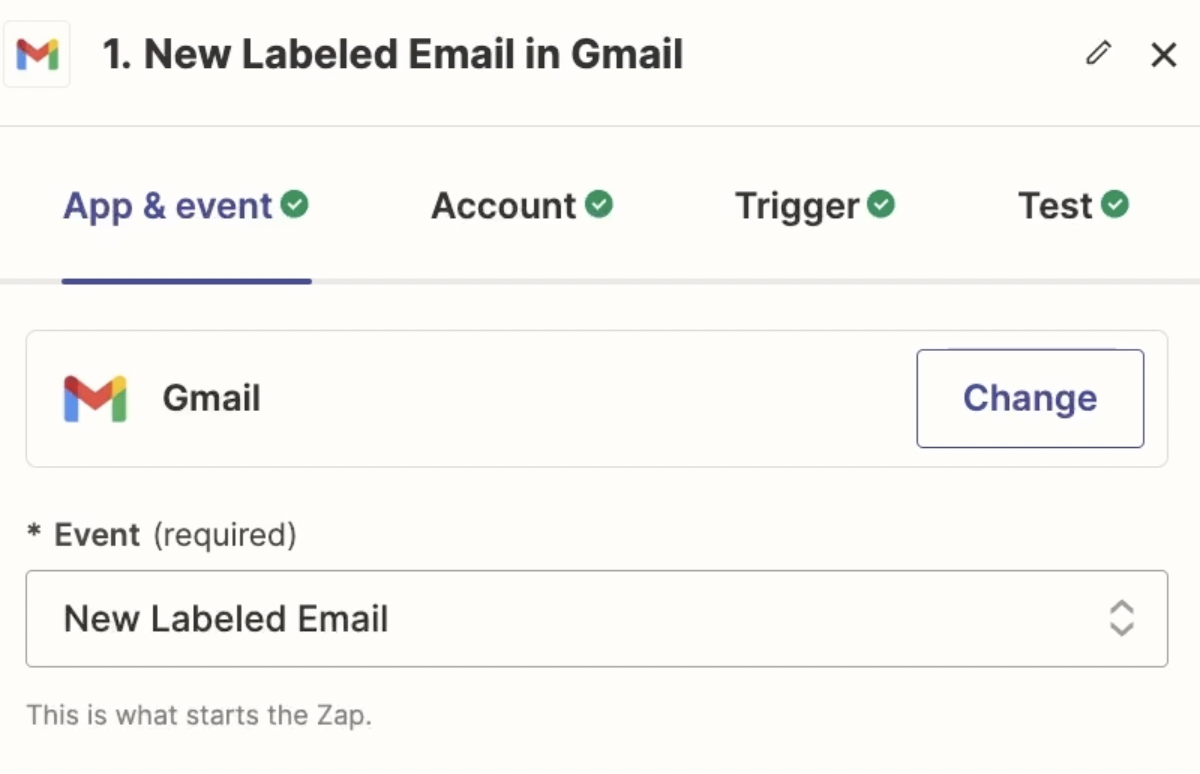
Using the “New labeled email” trigger will give you more direct control over which emails you export to Sheets and when you send them. If you use a standard “New email” trigger instead, every new email will be sent by default.
With this trigger, you can label new emails or historical emails whenever you’d like to send them to Sheets.
Select the label that Zapier should watch for. You’ll likely want to create your own custom label in Gmail first, then apply it to an email so you have test data.
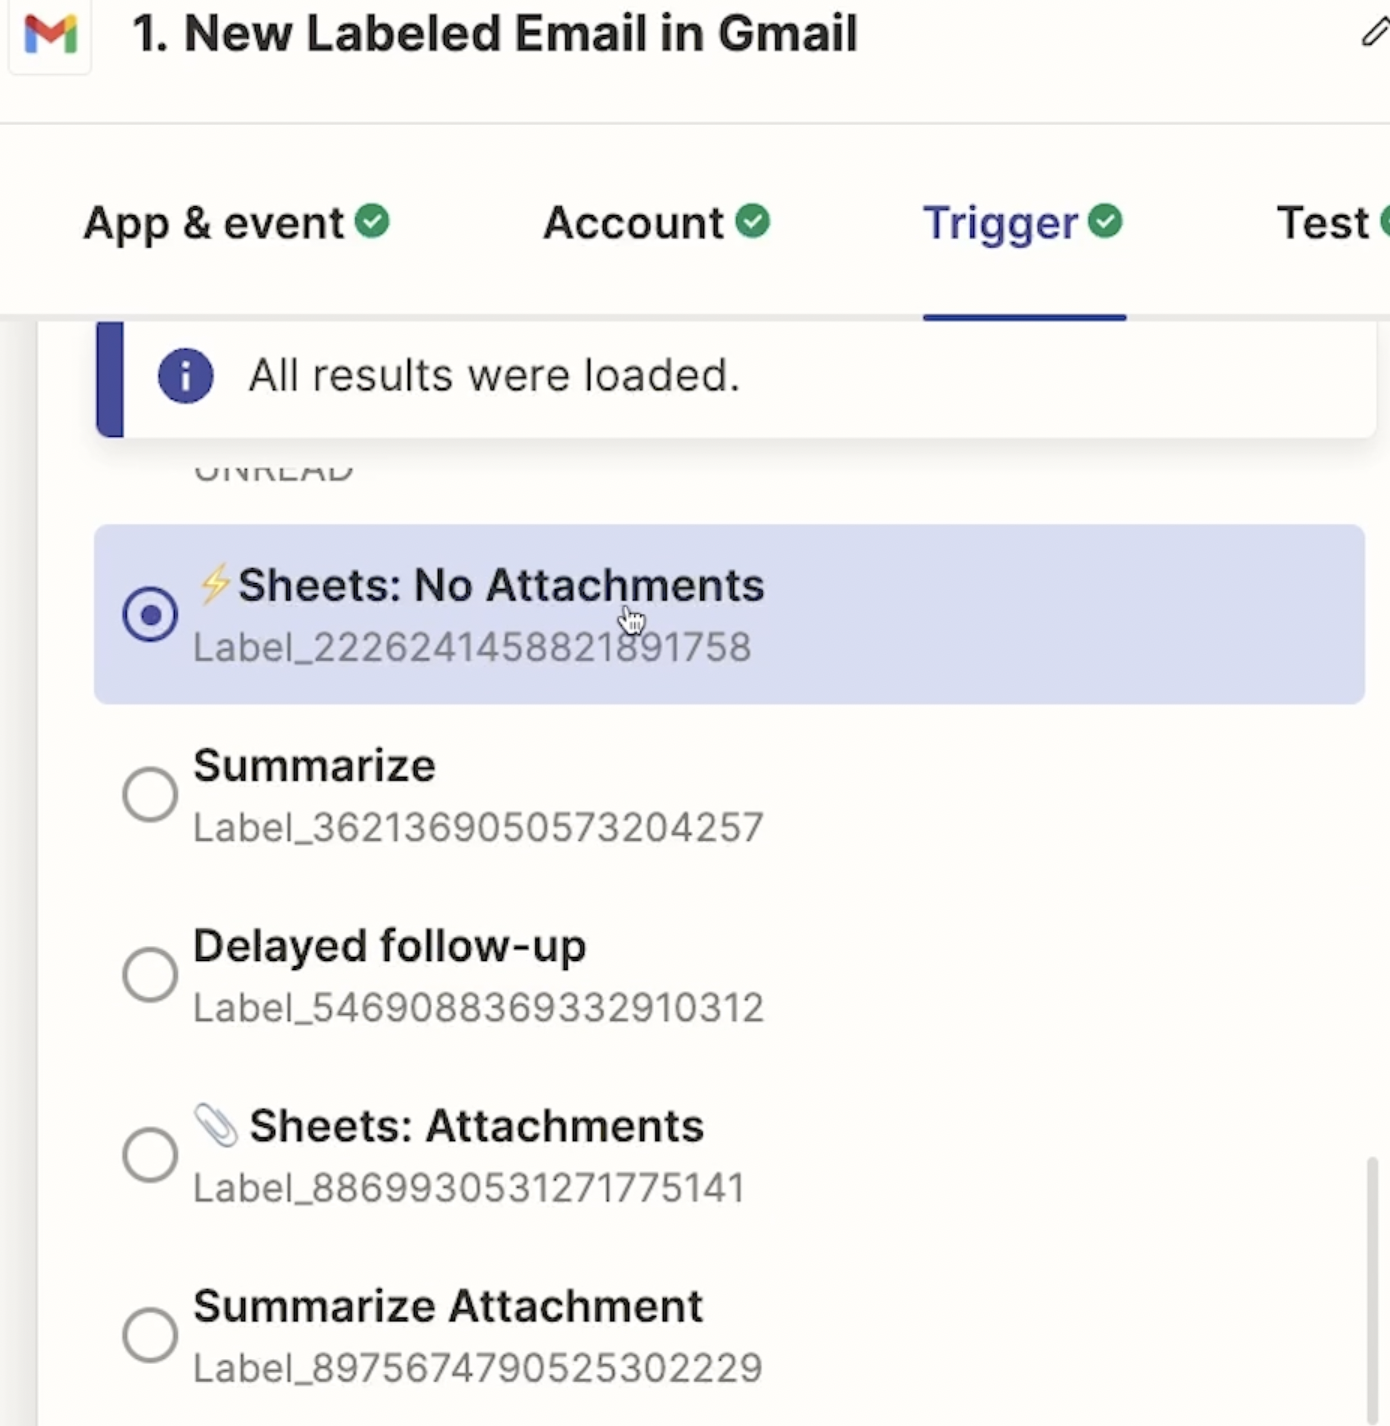
Once you’ve chosen the label to use, give your trigger a test. In the test data, you’ll see a huge quantity of data retrieved from the sample email – all of which can be sent to Sheets or other apps if you’d like.

However, in most cases, you’ll just want to send over a few data points like Body, Sender, Subject, Date, etc.
Action: Find or create a new row in Sheets with “Lookup spreadsheet row”
Create a spreadsheet in Google Sheets where you’ll store your email data. Be sure to include a column for each data point you want, as well as a unique identifier for each email. We’d recommend using “Message ID” as the identifier.
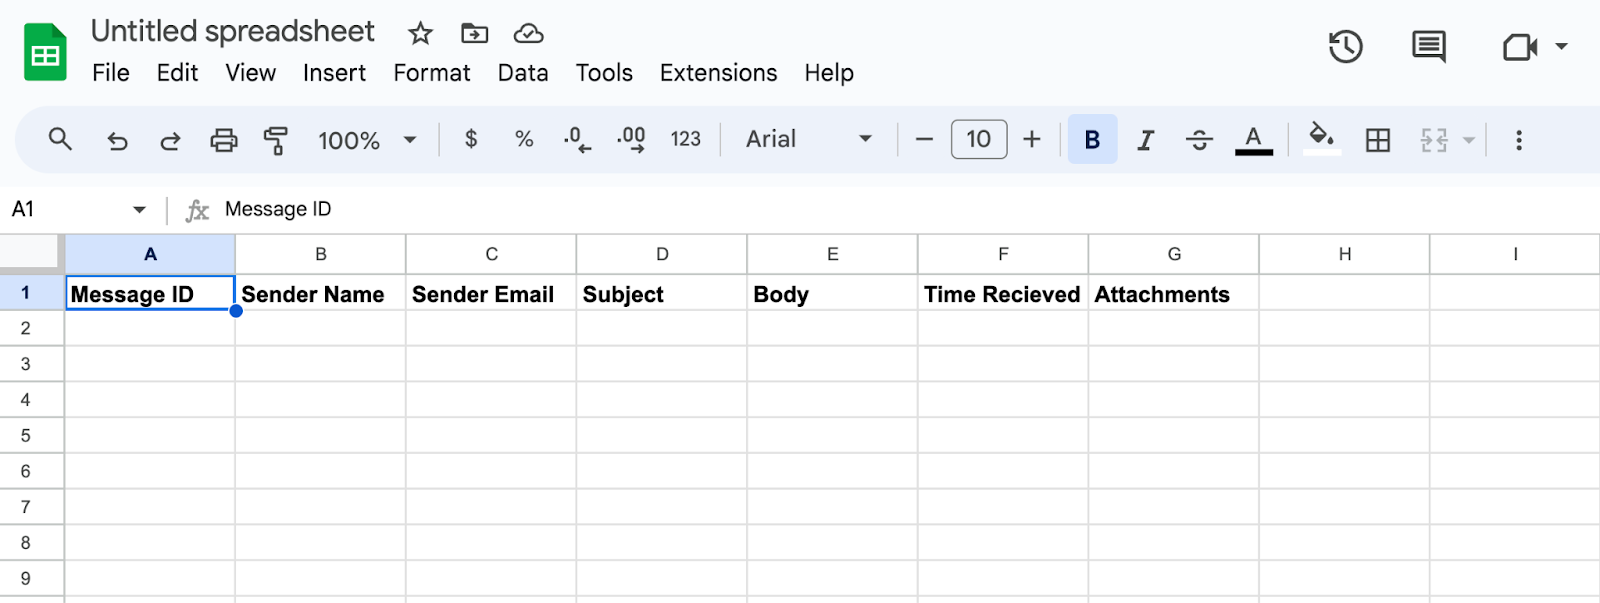
Add an action to your Zap and choose Google Sheets as the app. Select “Lookup spreadsheet row” as the event.
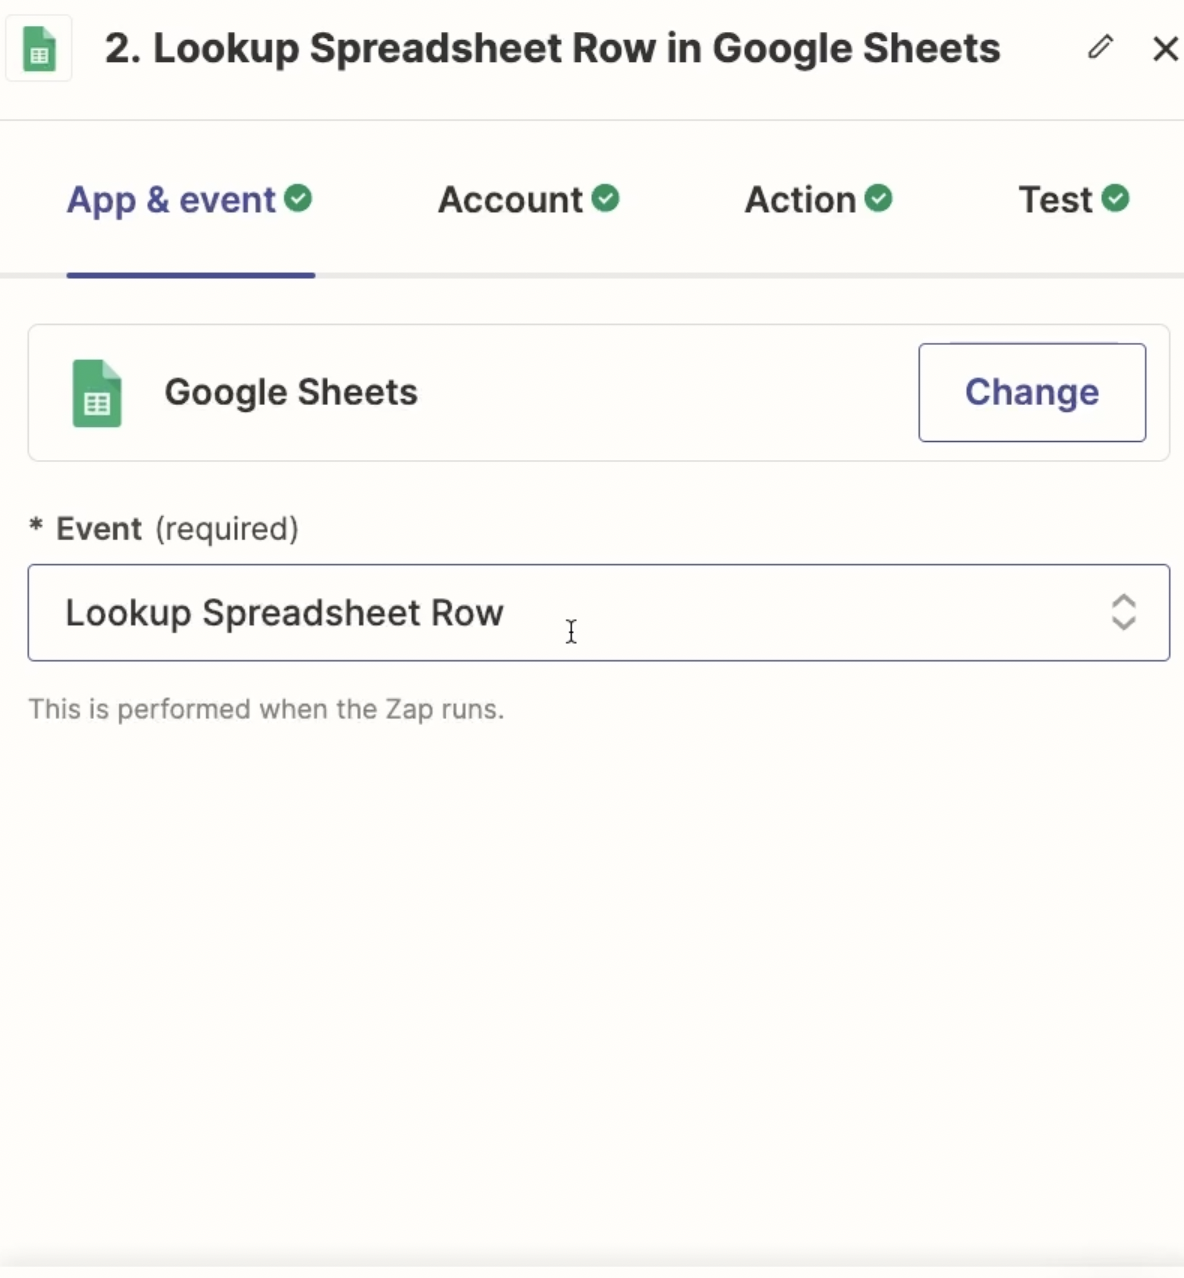
This might seem like an odd choice, but the name of the event doesn’t tell the whole story. “Lookup spreadsheet row” is essentially two actions in one. It will start by searching for a row, as the name suggests.

However, if it doesn’t find a matching row, you can configure the step to create a new one. You’ll have all the same options as usual to map any data you want to each field.
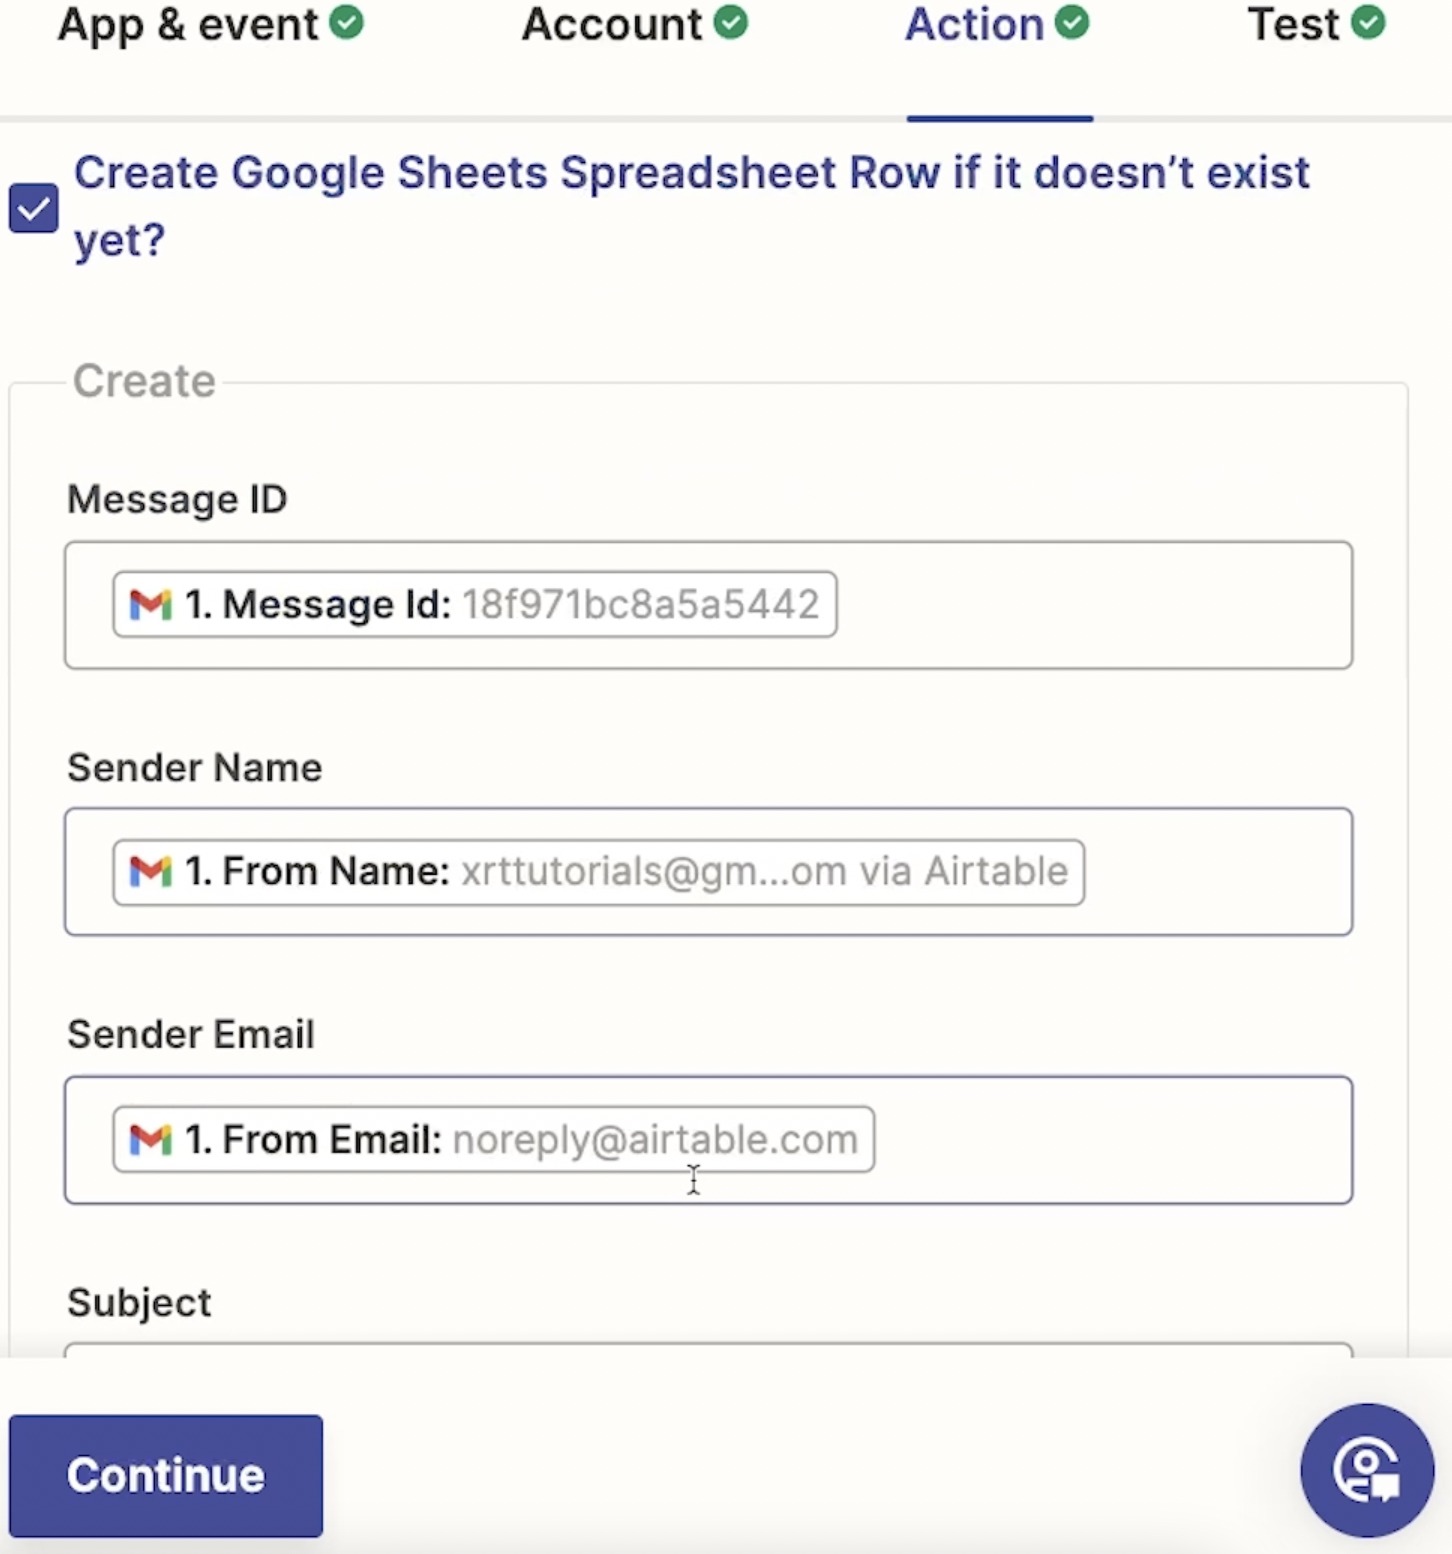
Just make sure to check the “Create Google Sheets Spreadsheet Row if it doesn't exist yet?” box to enable this option.
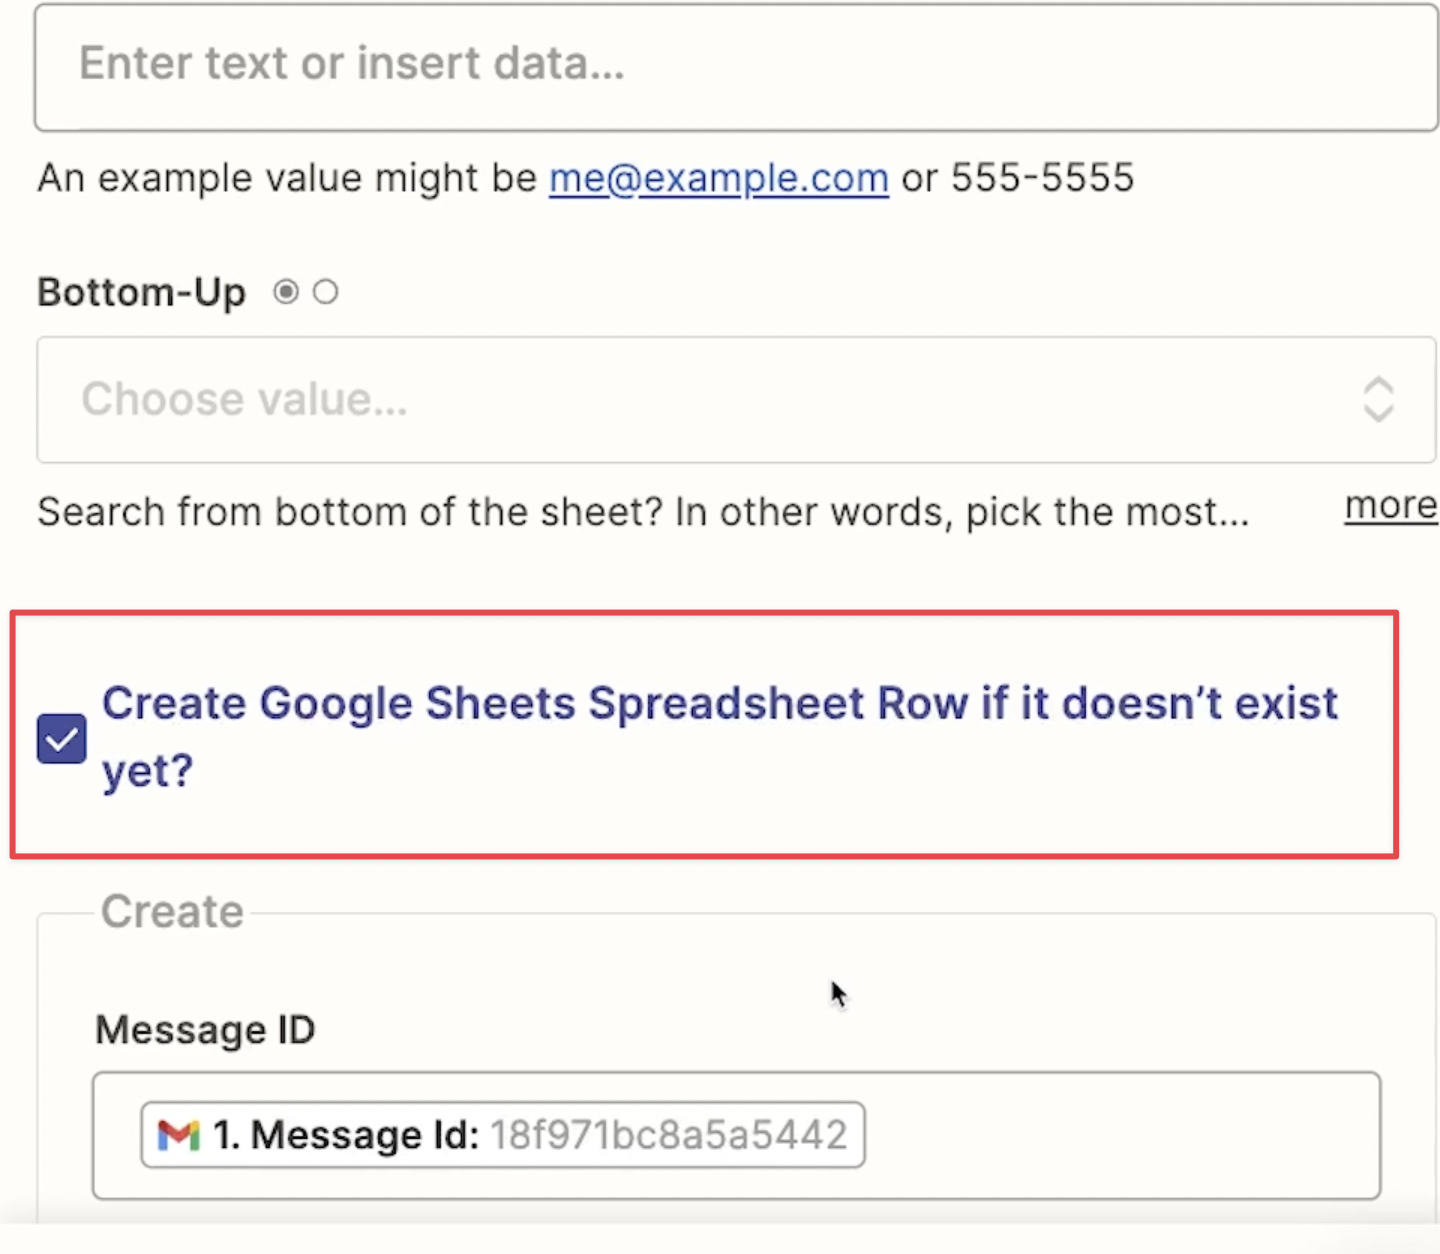
Using the lookup step is an elegant way to avoid duplicates without having to add extra steps to your Zap.
NOTE: We’d recommend searching for a unique identifier for each email, such as the “Message ID”. If you use something like “Subject” instead, the Zap won’t work correctly if you have two emails with the same subject line (which is quite likely).
Testing the Zap
Once your Sheets step is configured, your automation is all set. Turn it on, publish it, and give it a test by adding your designated label to an email in your inbox.
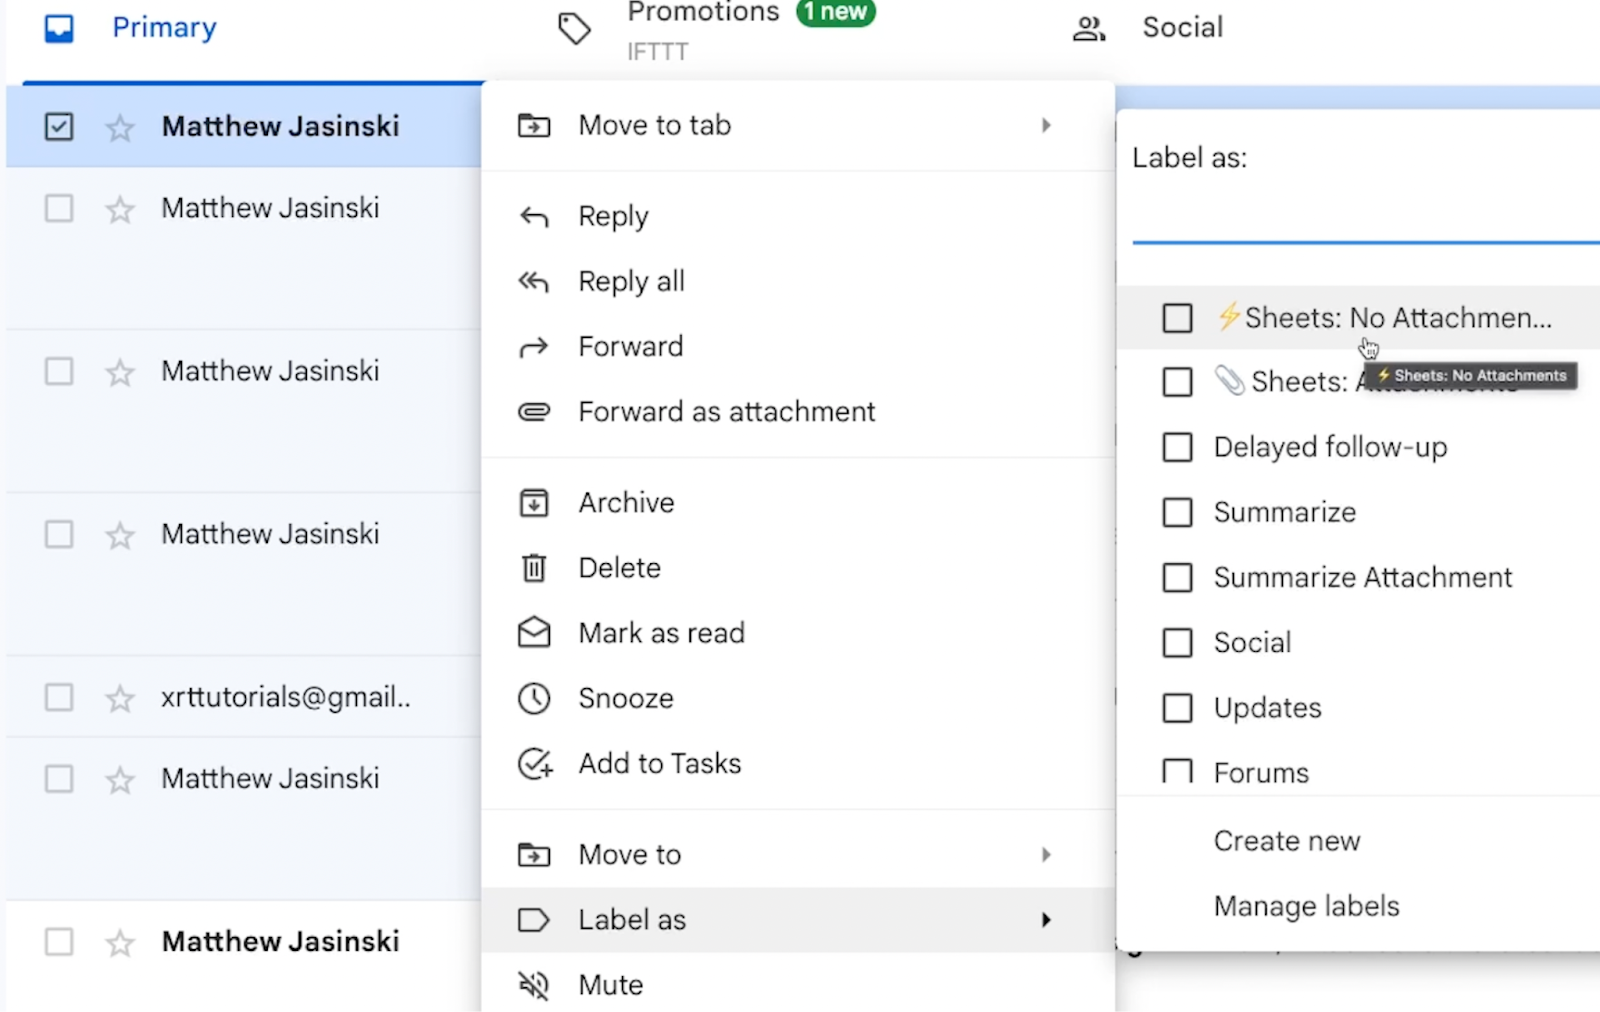
After adding the label, you may need to wait several minutes for Zapier to check your inbox for new labels. On the free plan, Zapier only looks for new data every 15 minutes. On higher tiers, you can expect to see new data processed within five minutes.
After waiting an appropriate duration, you should see data from your email appear in Sheets, just as in the image below.
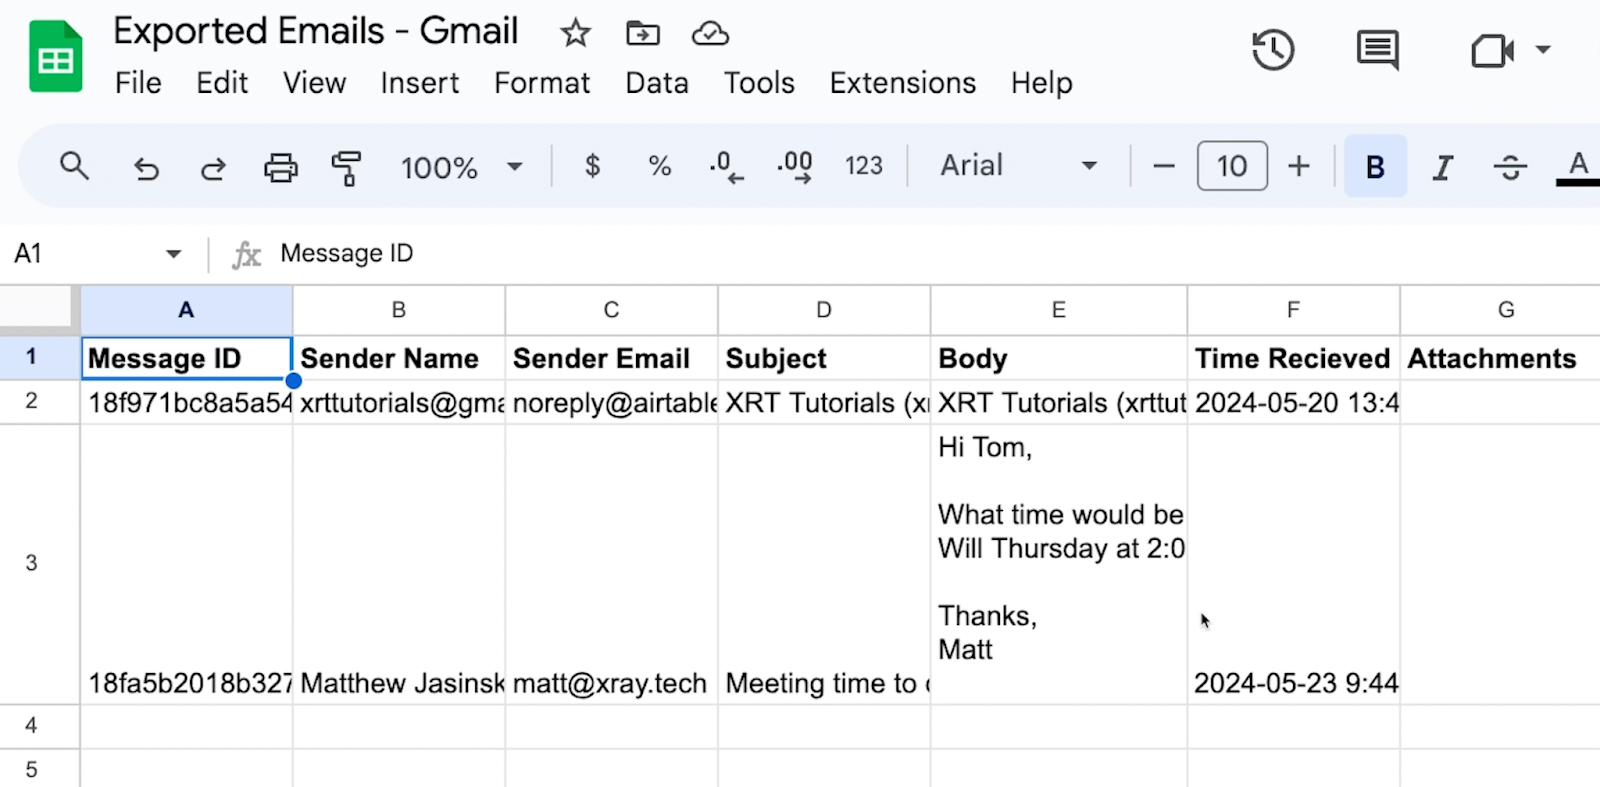
Transferring emails to Google Sheets with attachments
Next, let’s take a look at the second Zap, which is designed to export emails with attachments. Since this Zap has 4 steps total, it won’t work on a free plan, but it’s still easy to set up.
Trigger: New Attachment in Gmail
To begin, create a new Zap and add a Gmail trigger. Select “New Attachment” as the event.

“New Attachment” is a unique trigger. Unlike most other email triggers, it will make the following Zap run for every attachment in a new email, not for each new email.
For example, if you receive a new email with 3 attachments, then this Zap would run 3 times.
This functionality can be very useful for processing an arbitrary number of email attachments, but it does carry the risk of duplicating or overwriting data if the subsequent actions aren’t configured carefully. We’ll use a “Lookup” step once again to avoid these potential issues.
If you’d like, you can also filter this trigger to only apply to emails with a designated label, or any other search criteria you want to apply.
Once you’ve set up the trigger and its filter to your liking, give it a test to pull in some sample data.
Be sure to have an email in your inbox with at least once attachment that you can use as test data.
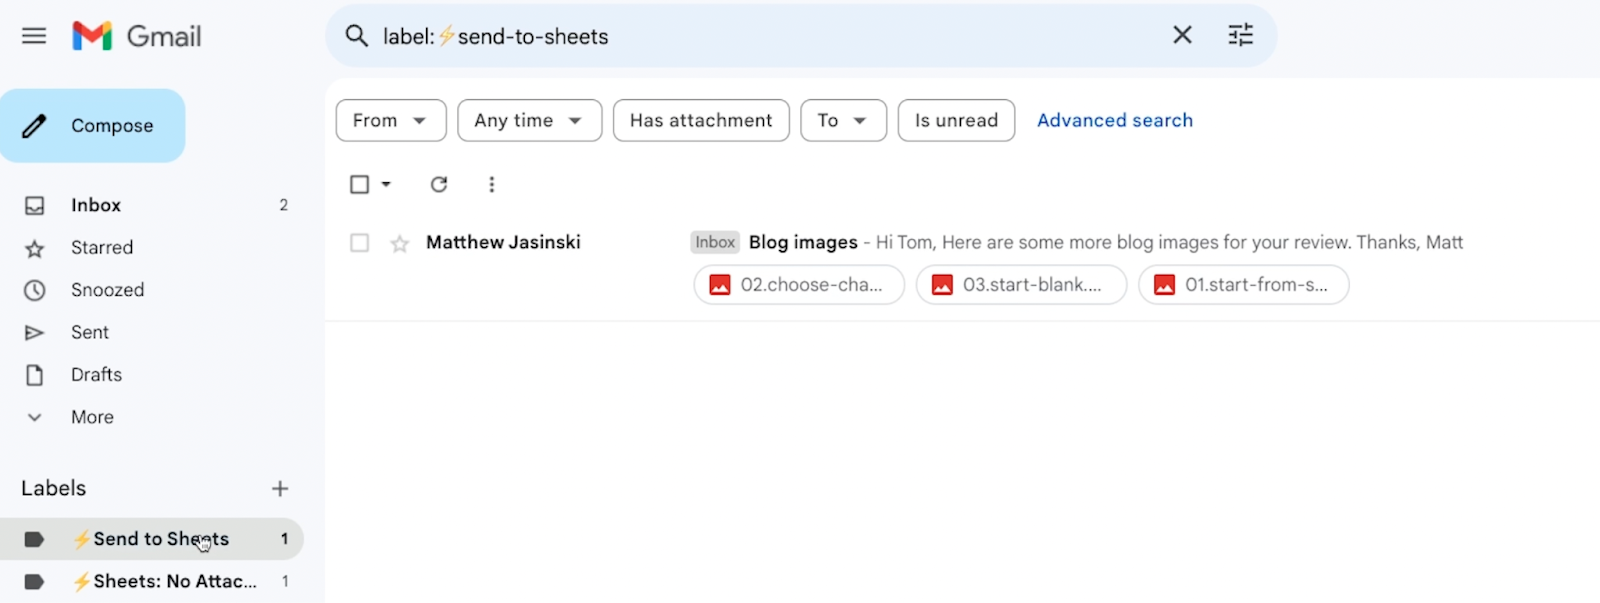
Action: Find or create a folder in Google Drive
In the next action, the automation will either find an existing folder in Google Drive where it can store the attachments, or it will create a new one.
This action will work very similarly to the “Lookup row” action we used in the first Zap.
Add a new action to your Zap, and choose Google Drive as the app. Select “Find a folder” as the event.
Provide a name for the folder. Make sure to use unique, dynamic data again to ensure that each folder’s name will be unique. In our example pictured below, we’ve combined the Message ID with the email’s subject line to create a unique name for each folder.
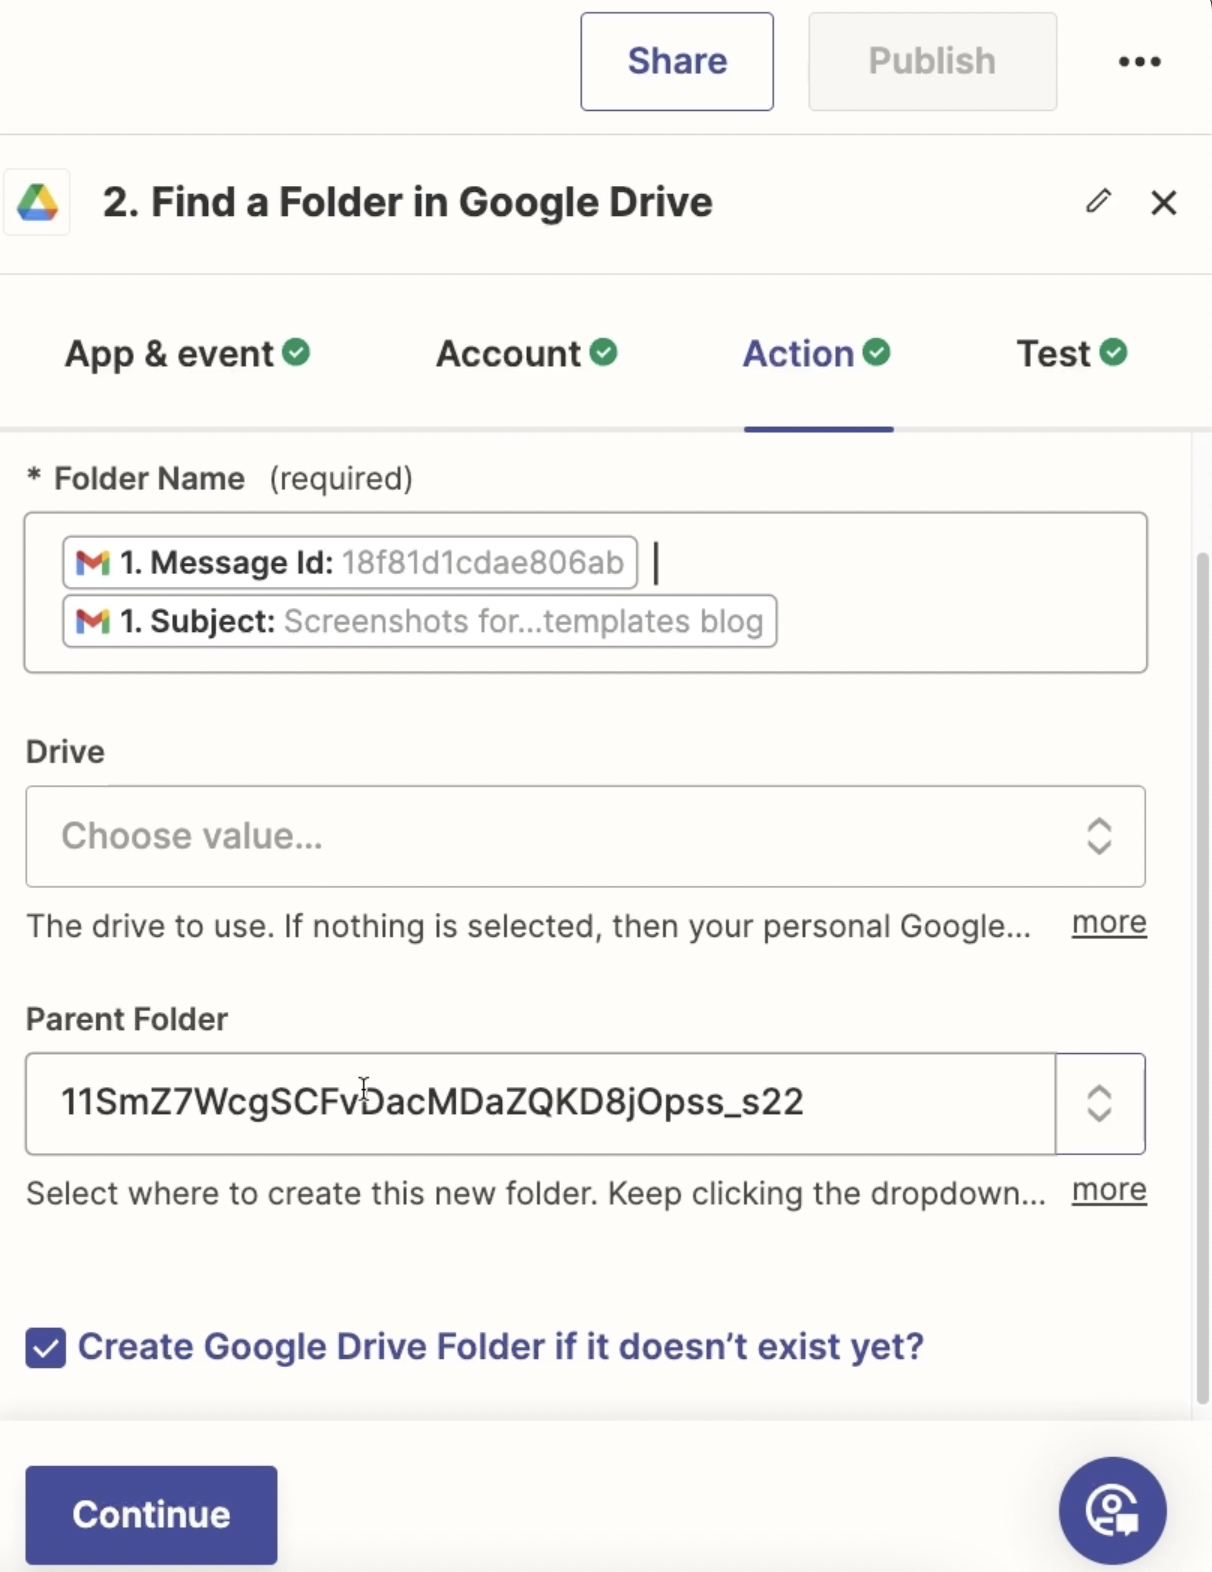
Choose the parent folder where this subfolder should be created, and check the box that reads: “Create Google Drive Folder if it doesn't exist yet?”
So if Zapier doesn’t find a folder with a matching name, then it will create a new folder instead using the name provided. When you test the action for the first time, it should create a folder, since there won’t be anything for it to find yet.
Action: Upload a file in Google Drive
Next, we’ll add a step to this automation that will upload each attachment to a folder in Google Drive. This will be the folder that is created or found in Step 2.
Add a Google Drive action and choose “Upload file” as the event.
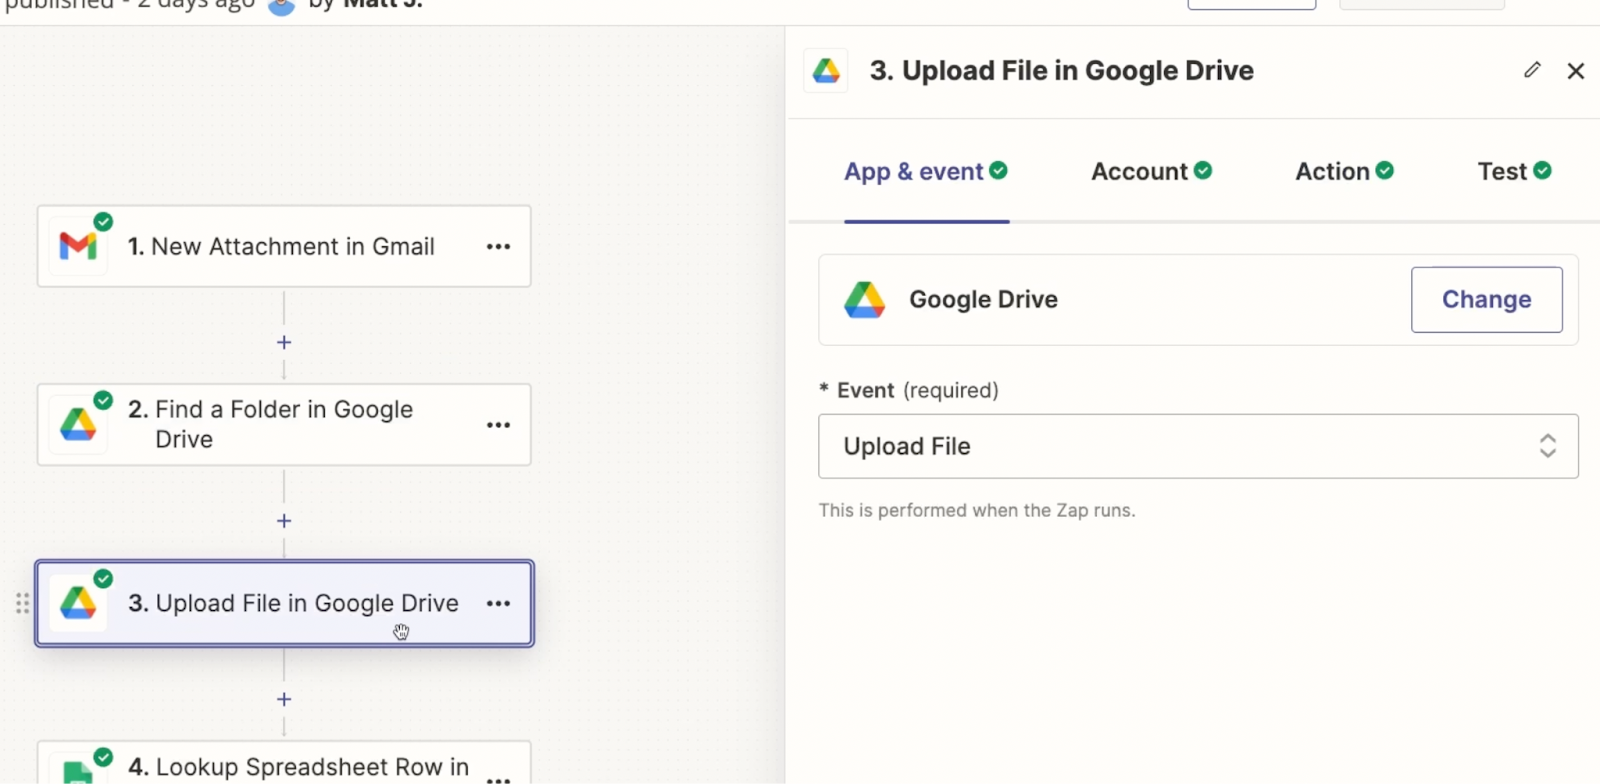
To configure this action, you just need to pick which folder to upload your file to, and the file you’d like to upload.
For the file, choose “Attachment: Exists but shown” from the trigger. The phrase “Exists but not shown” in a Zapier variable indicates that the variable represents a file, rather than a link or reference to a file.

Optionally, you can also provide a new name and extension for the file. However, if you just leave these fields blank, then the file will retain its original name and extension.

Test the action after configuring your choices.
Action: Lookup row in Google Sheets
Finally, the last step in this automation will add the email’s data to Google Sheets, along with a link to the Google Drive folder where you can find all of the uploaded attachments.
Add a Google Sheets action, and choose “Lookup spreadsheet row” as the event. Just like in the simpler Zap, this step will let you find or create a row as needed with a single action.
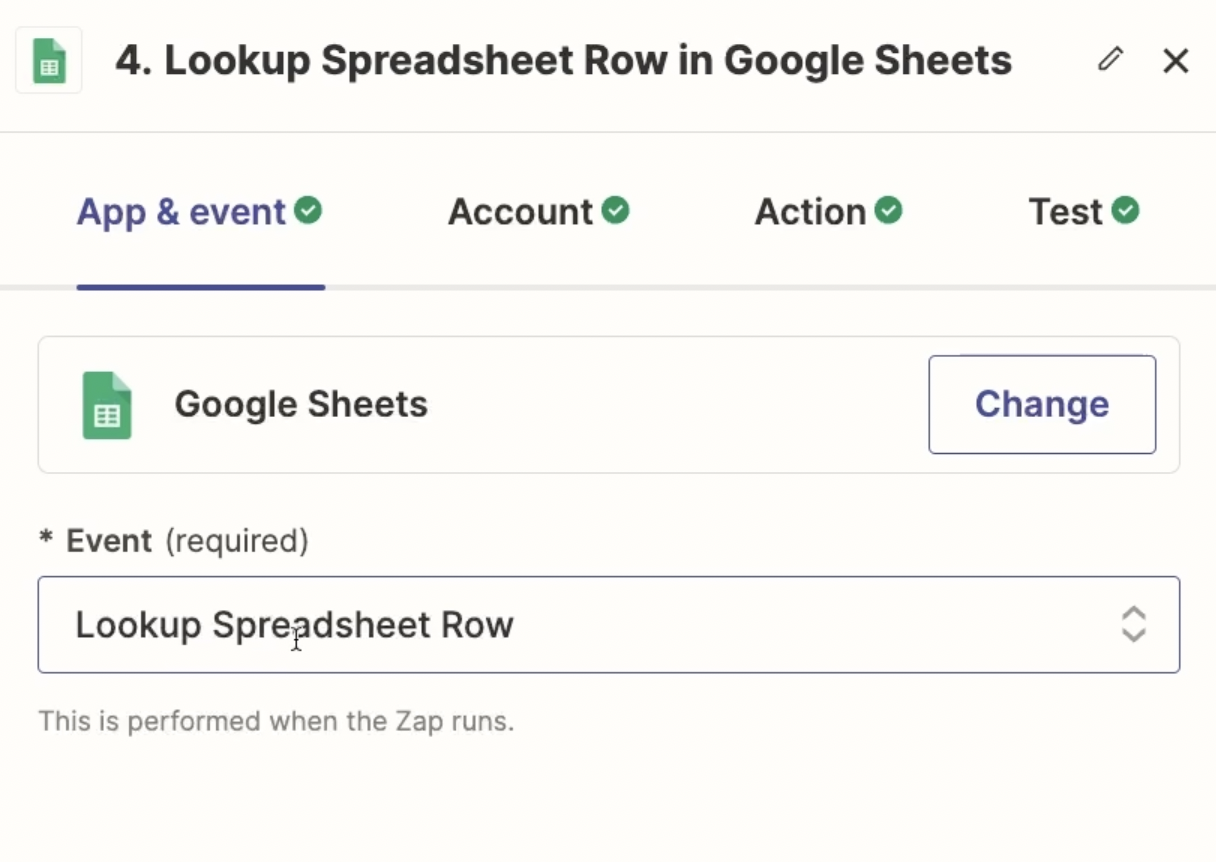
Choose the sheet you want to use (you can use the same sheet as before), and select a column to search by. Again, we’d recommend using a column that will have unique data for each row, such as Message ID.
Once again, check the box that says “Create Google Sheets Spreadsheet Row if it doesn't exist yet?”
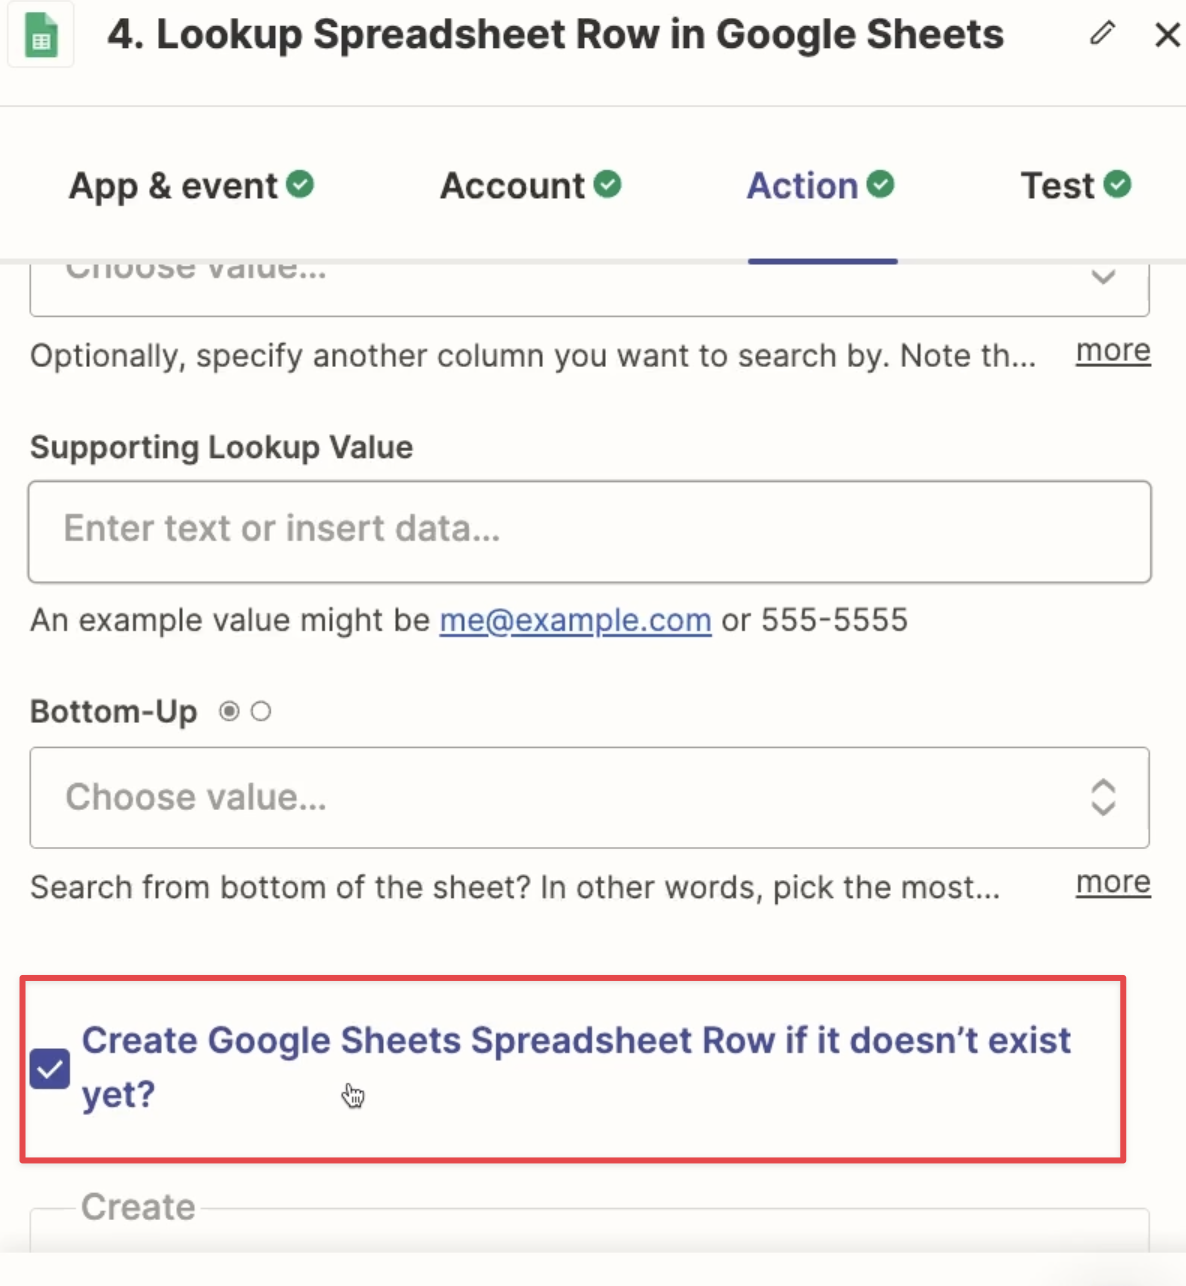
Then, map your email’s data to each column in your Spreadsheet.
For the “Attachment” field, provide the URL of the Google Drive folder created in the previous step. You can find this in the “Alternate Link” variable.
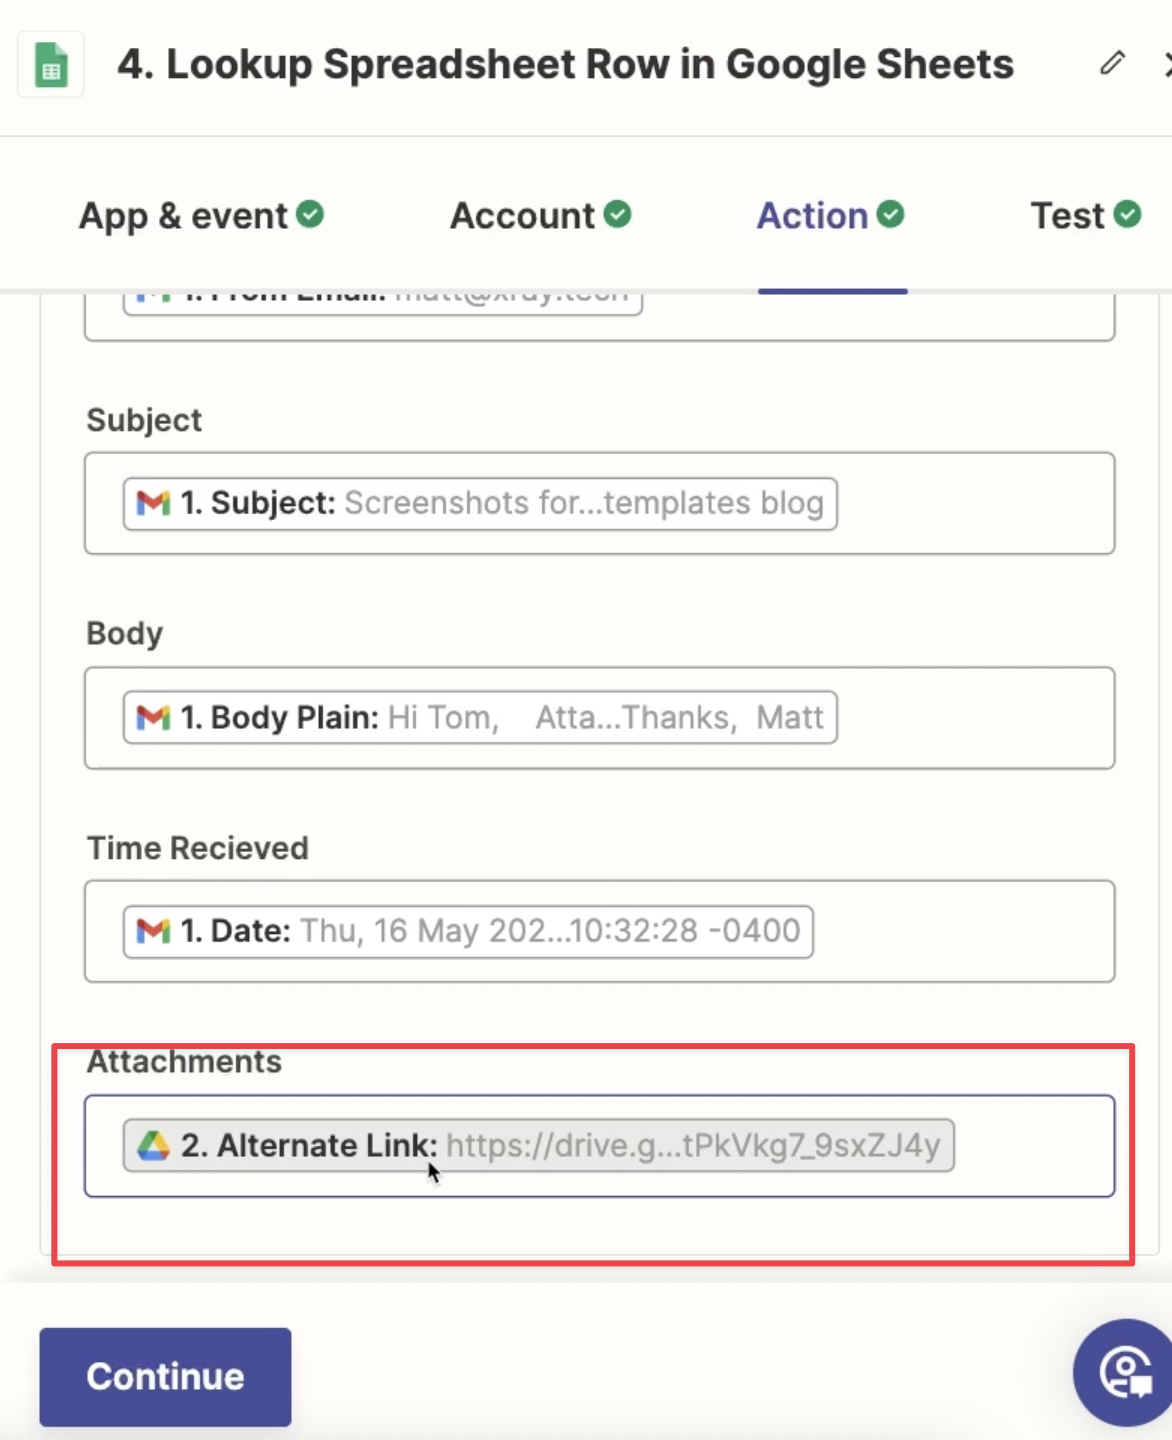
Linking a single folder will be much easier than adding a link to each attachment individually.
Once you’ve configured and tested this step, your Zap will be all set, and you can turn it on and publish it.
How the “New attachment” Zap works
The “new attachment” trigger makes this a pretty unusual Zap, so let’s look at an example to explain how the whole thing works.
Let’s assume you’ve received a new email in your inbox with four attachments, and you’ve added the “Send to Sheets” label to that email.
The Zap will run once for each of the four attachments, but because of our “Lookup” and “Find” steps, it won’t perform exactly the same actions each time.
First run
For the first attachment in a newly labeled email, this Zap will proceed to Step 2, where it will create a new folder in Drive to store the email’s attachments.
Then, it will upload the first attachment to that folder in Step 3.
Finally, in Step 4, it will create a new row in sheets with the email’s info and a link to the attachments folder in Drive.
Additional runs
For every subsequent attachment in that newly labeled email, the automation will find the folder that already exists in Step 2. It will not create a new folder for attachments 2-4.
In Step 3, it will upload the attachment that it’s currently processing to the right folder.
Finally, in Step 4, it should find the spreadsheet row that it created for the first attachment, and will simply leave that spreadsheet row unchanged.
Testing the “New attachment” Zap
To see it all in action, give the Zap a live test.
Add your label to a new email with a few attachments. To make things clear, it’s best to use a different email than the one you used as test data while building.

Wait up to 15 minutes (based on your Zapier plan), then check for your new row in Sheets.
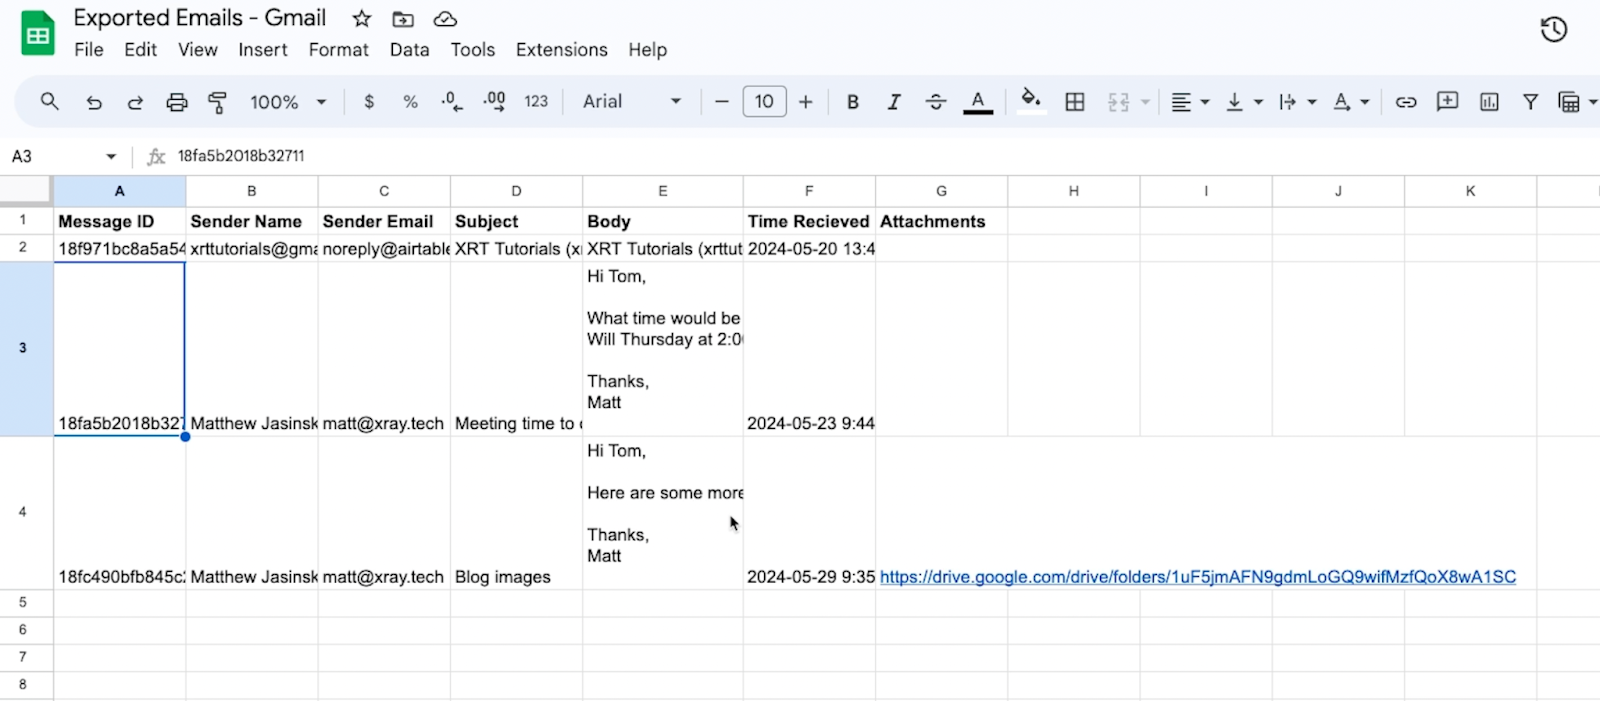
You should see it added to the bottom of the spreadsheet, and it should include a Drive link where you can find its attachments.

After giving it a test, this automation will be all set.
Be aware of your Zapier task limits
Before we wrap up, we just want to give you one quick warning:
Always check your task limits in Zapier before mass exporting data!
Sending 1,000 or more emails to Sheets could easily use up your month’s tasks in a single day.
When you sign in to Zapier, you should see your task usage and limit in the bottom left corner.
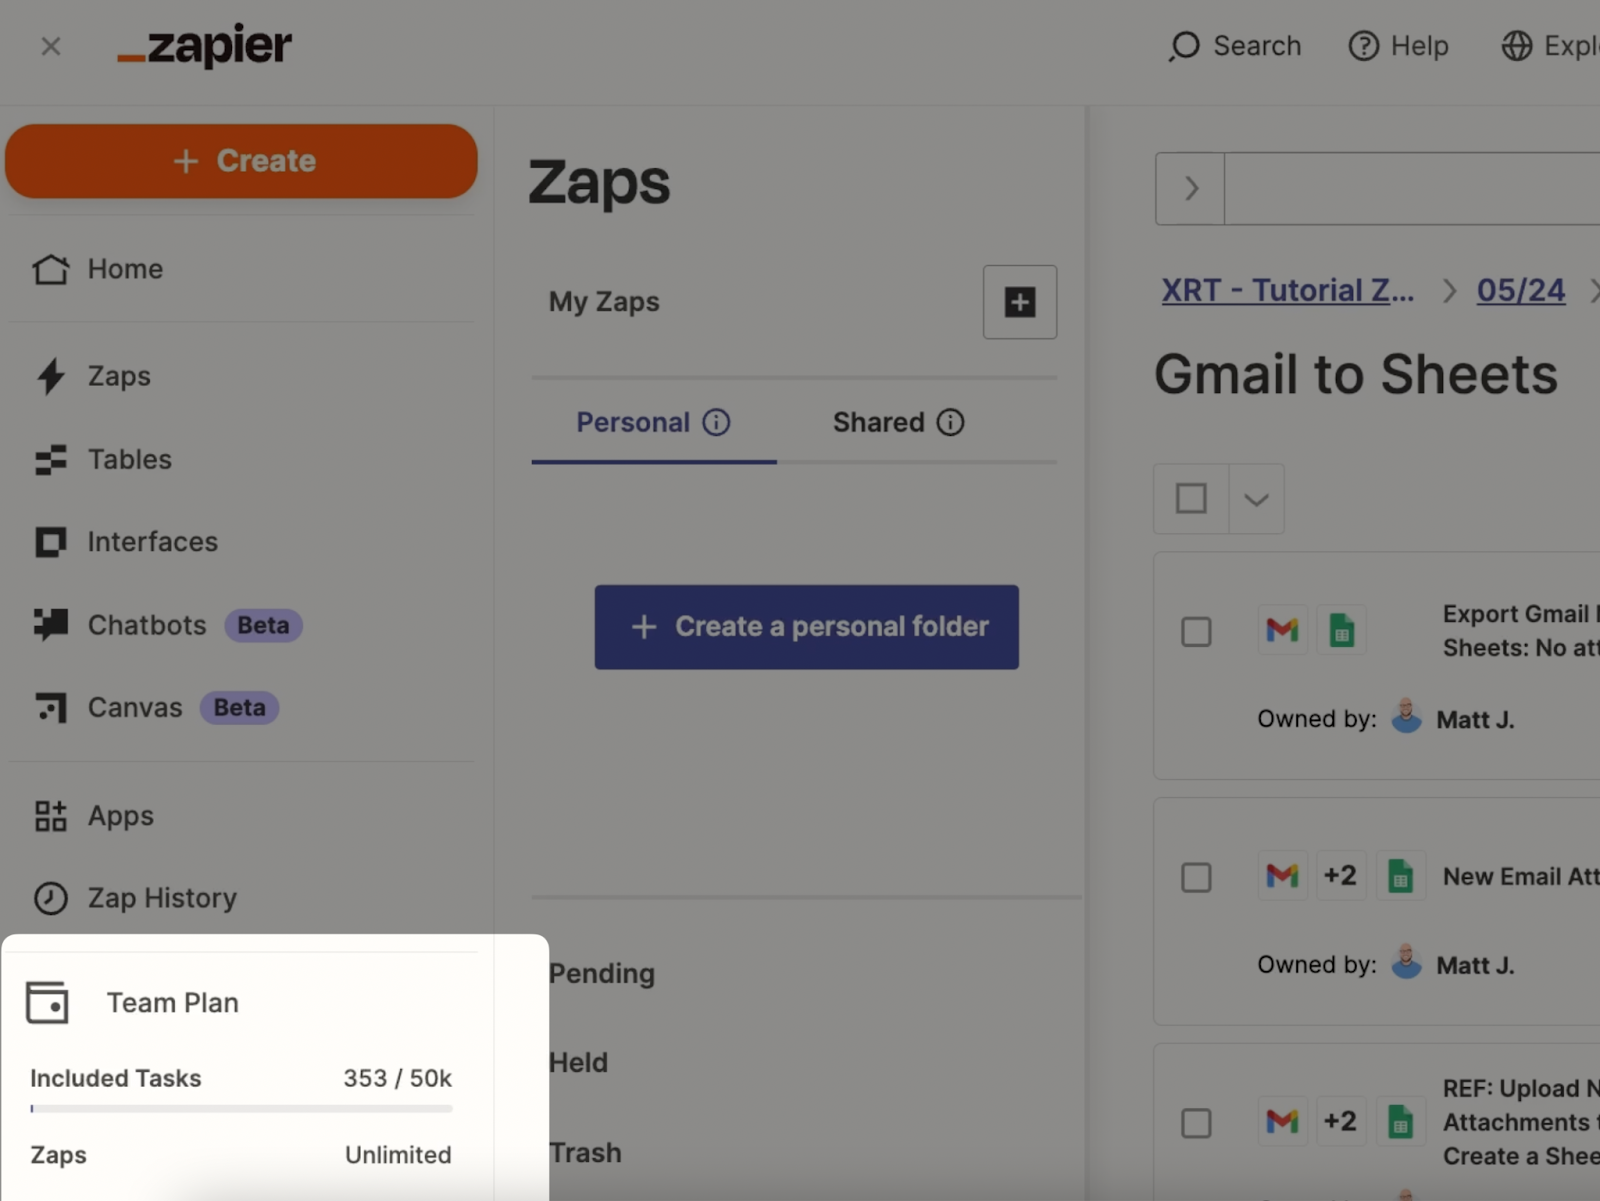
Analyze your emails efficiently in Google Sheets
Putting your emails into a convenient spreadsheet makes it much easier to get the insights you need. And with the simple Zapier automations we showed you today, you can send your emails over with just one click.
If you’d like to learn more about automating software like Gmail and Google Drive, be sure to check out our blog or our YouTube channel. You can also follow XRay on Twitter, Facebook, or LinkedIn.
With automated templates, you can create presentations, reports, and other slide decks faster than ever. By completing a quick form in Airtable, you can instantly create a Google Slides presentation populated with custom text and even images.
In this post, we’re going to show you how it all works with a simple 3-step automation in Make, formerly known as Integromat. All you’ll need are free accounts for Google Slides, Make, and Airtable (or any other form building app you want to use).
Preparing your template in Google Slides
Create a presentation
To begin, just create a presentation in Google Slides as normal. Note that you won’t need to upload this presentation as a template in Google Drive. Just make note of where the file is saved so you can identify it later in Make.
Quick tip: enter “slides.new” in your URL bar or in a Google Search bar to instantly open up a new, blank presentation.
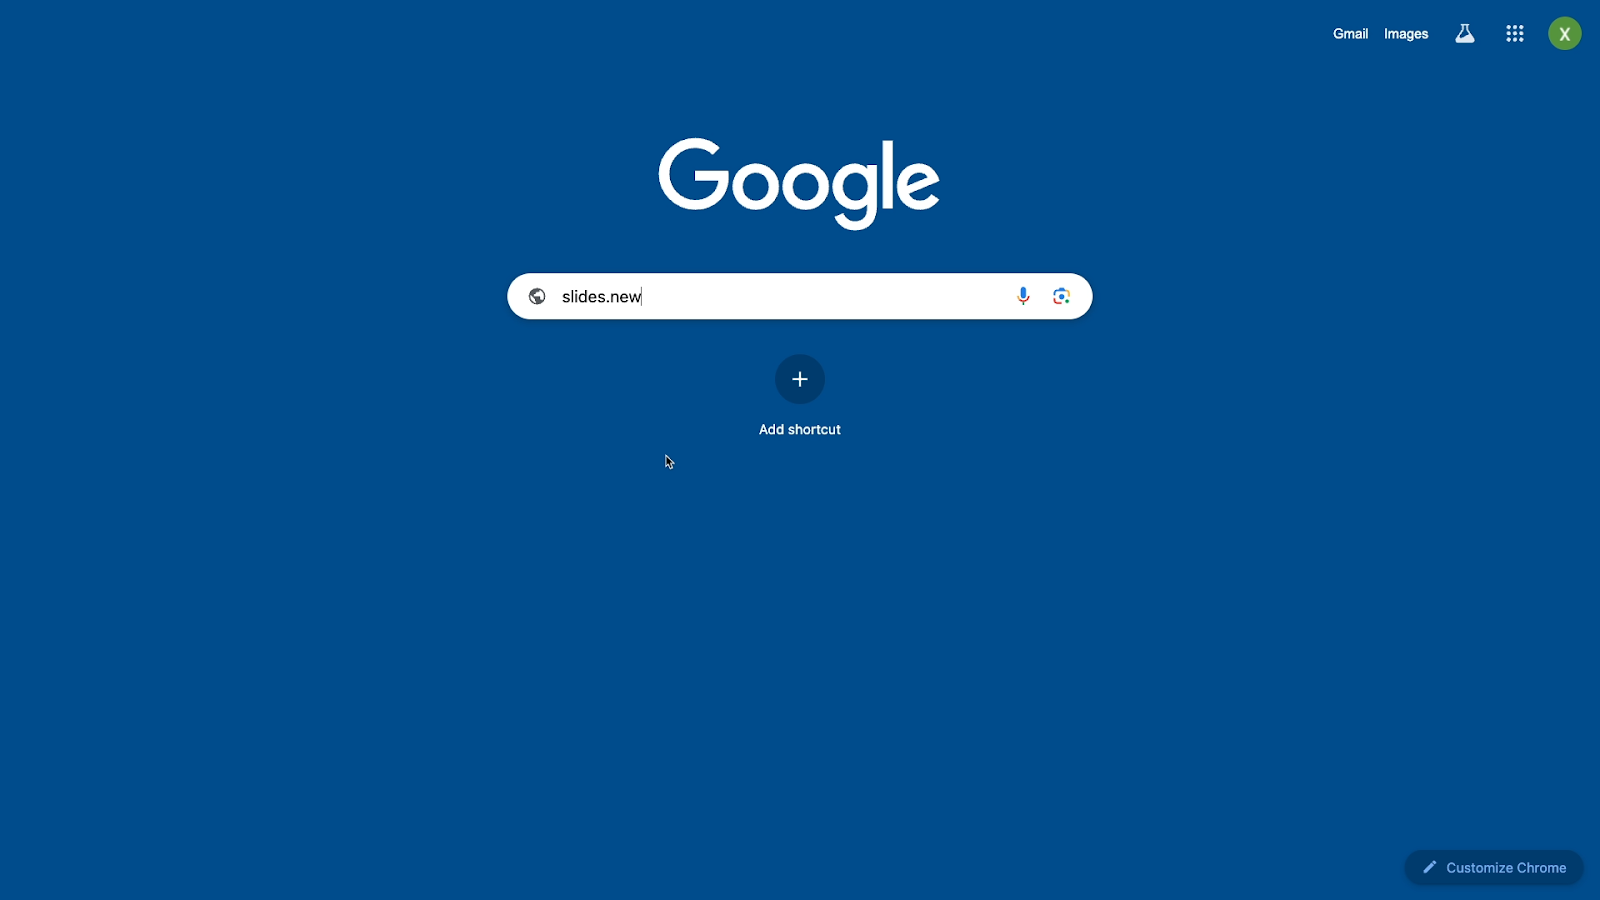
Add variables to your presentation
Next, you can add variables to your presentation by enclosing text in two pairs of curly brackets.
A variable will act as a placeholder. When Make creates a new presentation from your template, it will copy the template as a new deck, and replace the variables with text or images from Airtable (or your other data source).
In Make, you can use nearly any symbols and syntax you want for your variables as long as they’re enclosed in two curly brackets {{like this}}
However, we would generally recommend using “camel case”, where each word is separated with a capital letter instead of a space, hyphen or other character. This will ensure compatibility with other automation platforms like Zapier, in case you want to use them in the future.
For example, your variables would look like this:
{{presentationTitle}}
{{shortDescription}}
In the image below, you can see a finished Google Slides template with a few variables in curly brackets.
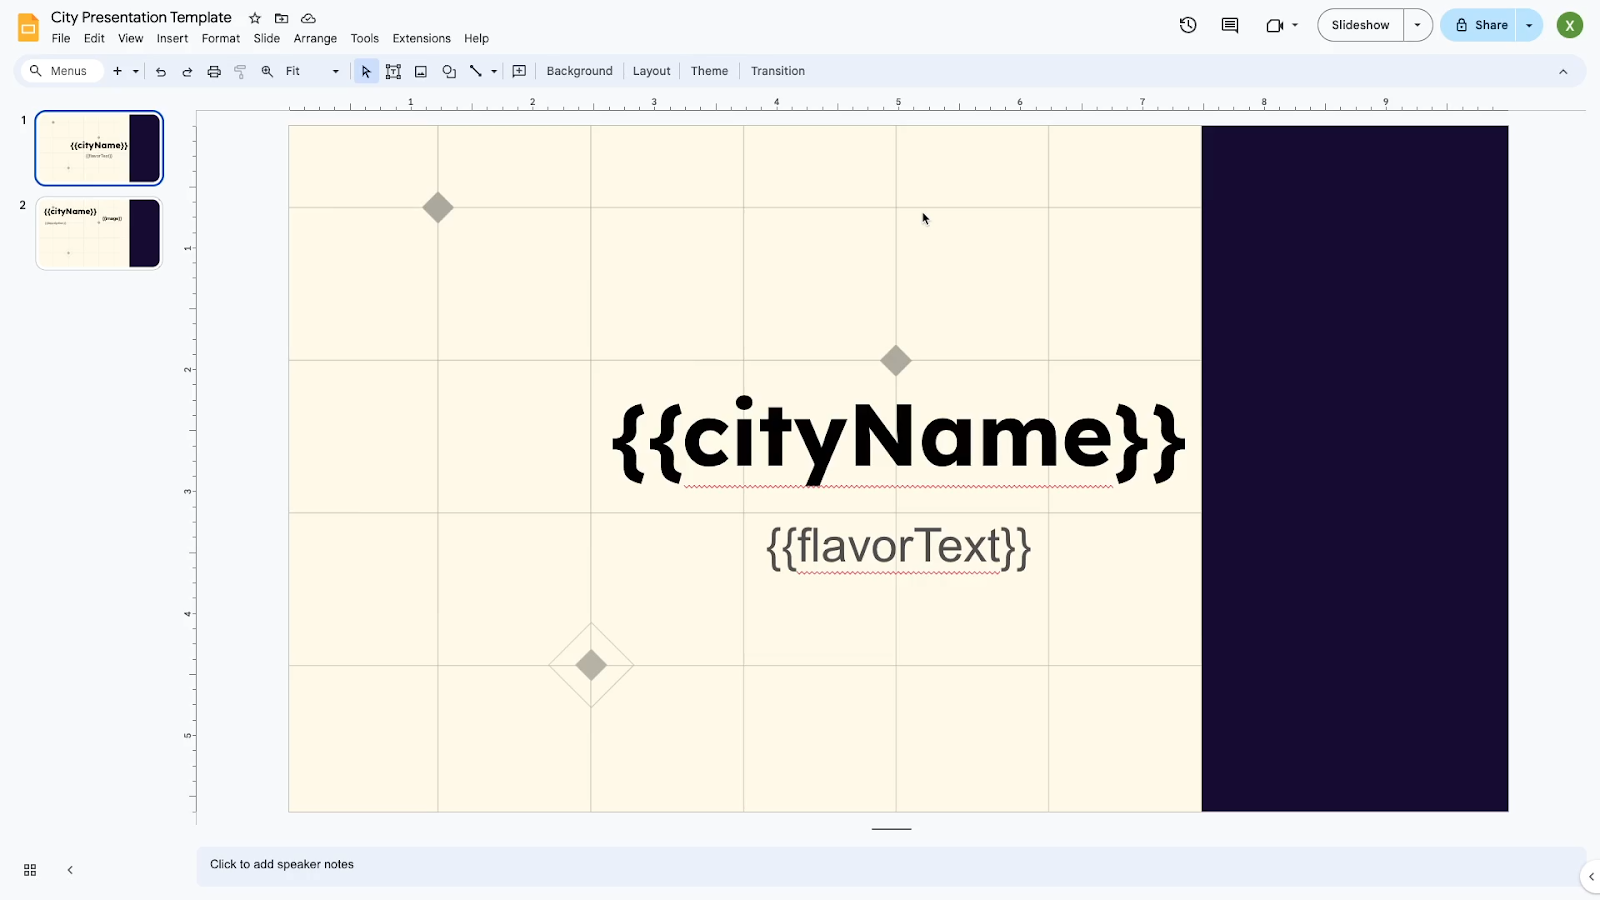
Adjust placement for image variables
If you plan to replace any of your variables with images, you can still use a text field like with any other variable.
Just note that the final placement of the image will be based on the placement of your variable.
When the variable is replaced with an image, the image will be the same width as the text box you’ve drawn.
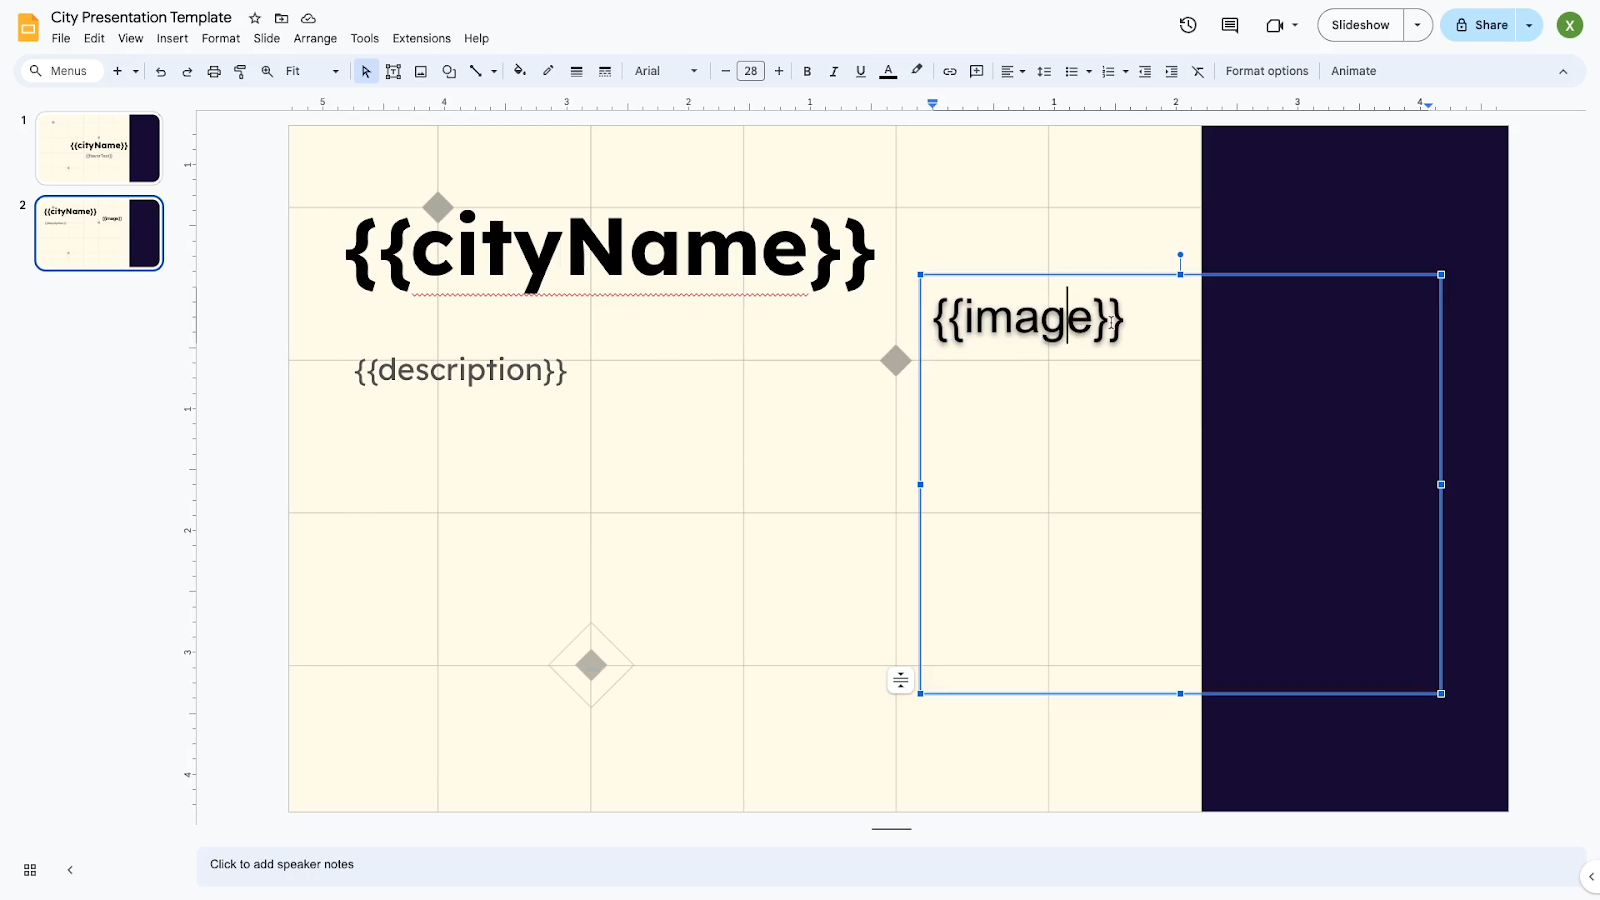
The top of the image will align roughly with the top of the text box as well, so we’d recommend drawing the text box for your image variable where you want the image to be.
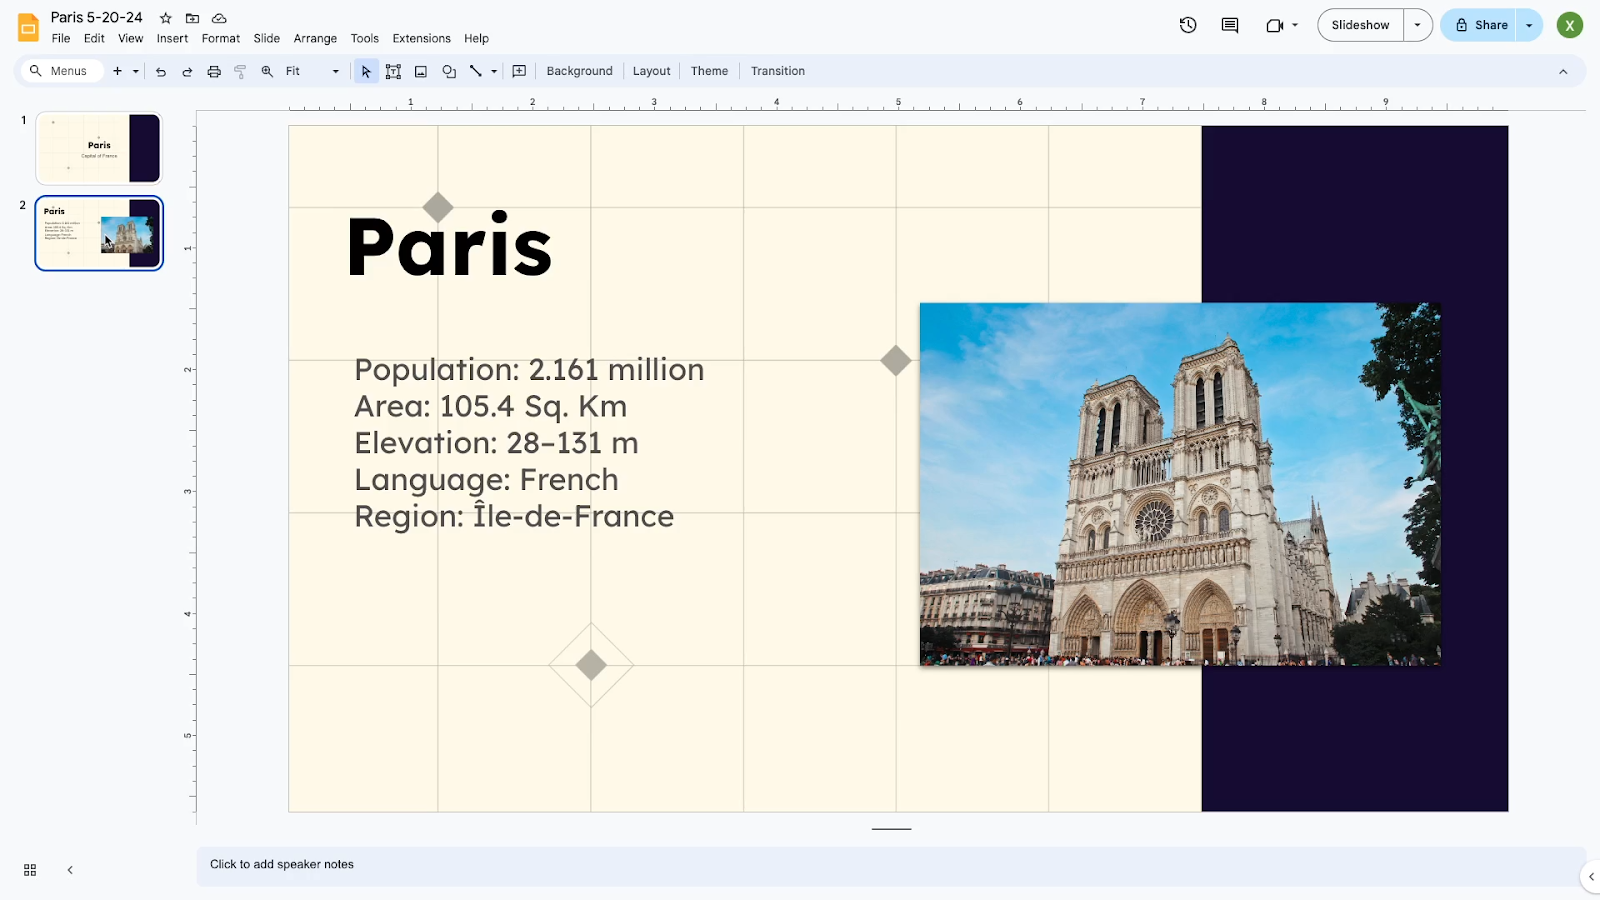
However, getting the exact right placement may take a little trial and error.
Additionally, many effects that you’ve applied to the variable text will also apply to the final image. For instance, an image variable with “drop shadow” applied will also have a drop shadow on the final image.
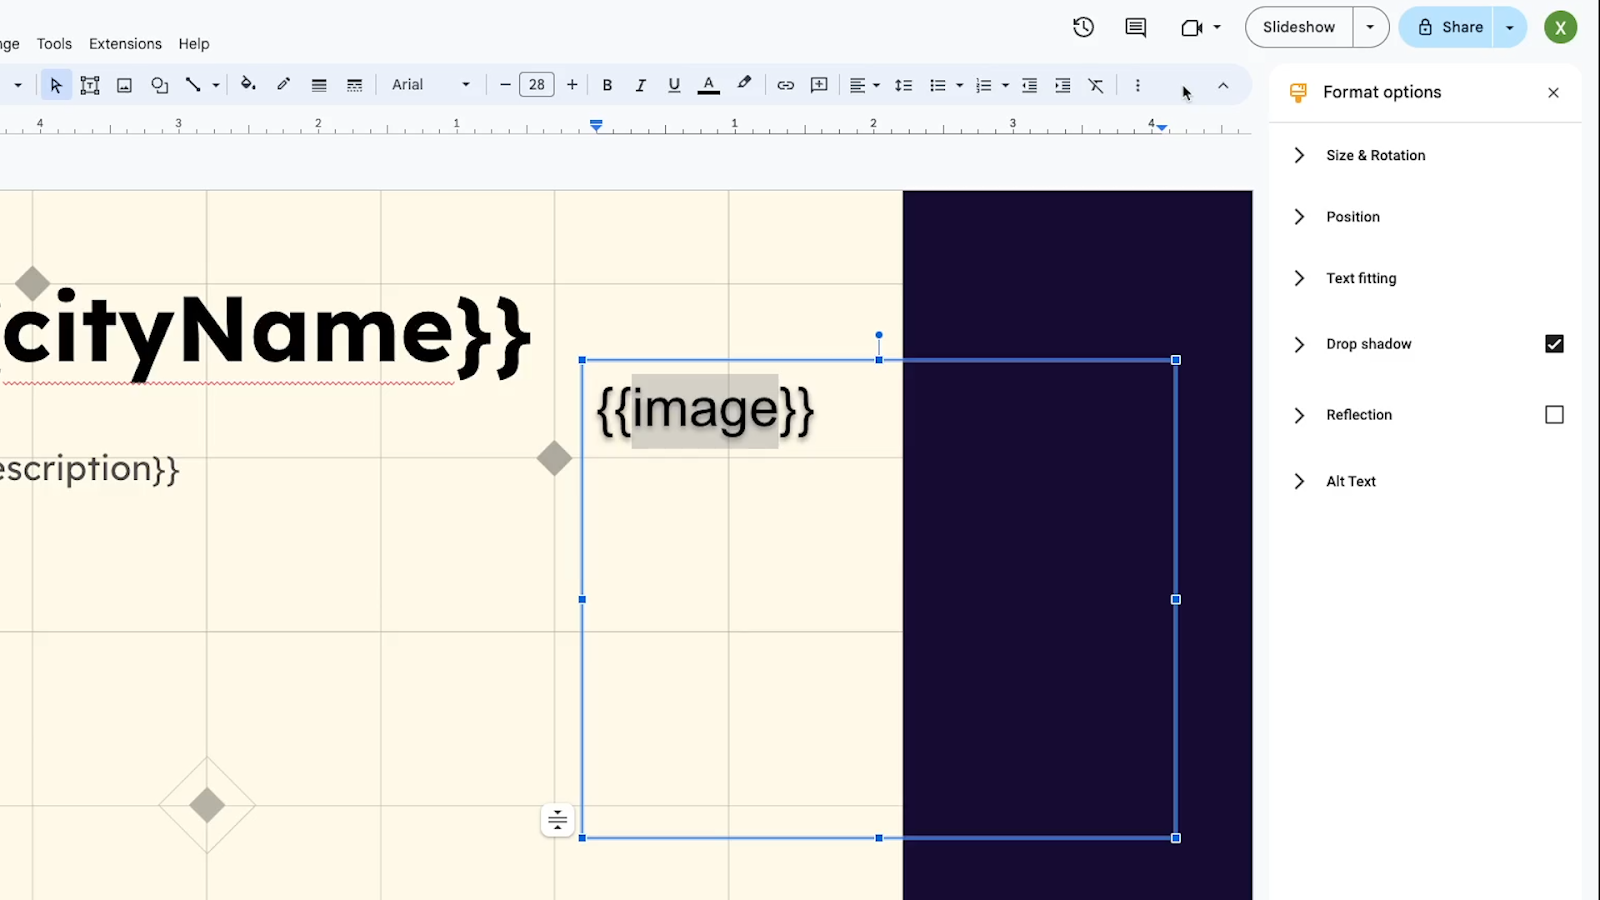
Once your variable tags are all set, it’s time to create a form in Airtable
Use a form to generate new presentations
Create a form in Airtable or another app
In Airtable, or in any other app that you want to use that supports forms, create a form with a question for each variable that you added to your slide deck.
You could also use apps like Tally, Typeform, or Google Forms. However, the automation that we demonstrate in Make will use some Airtable-specific settings.
If you're new to Airtable and would like to learn more about using the app, you can check out our beginner's guide here.
Prepare a table as the basis for your form
In Airtable, you can make a form by simply creating a form view for any existing table. When you do that, every field in your table will become a field in the attached form view.
So to begin, just create a table with a field for each variable in your presentation template. Be sure to choose appropriate data types for each field.
In our example pictured below, most of the field types are “text”.
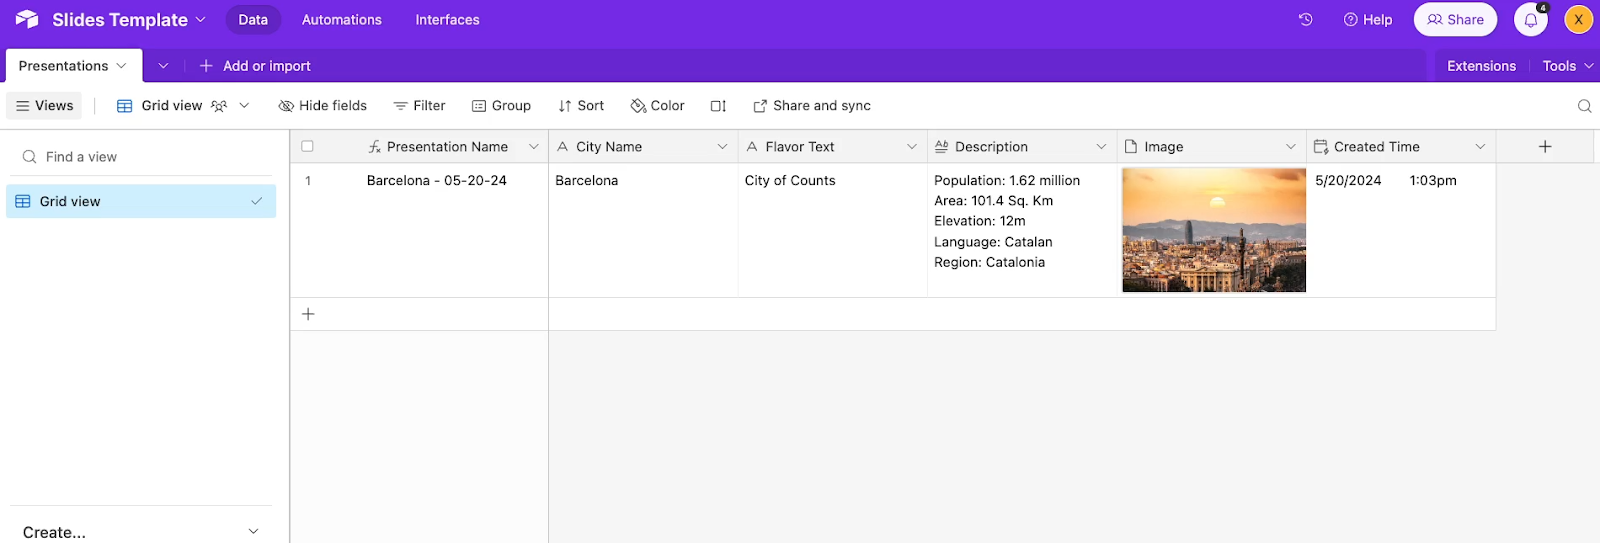
However, we have included one field called “Image”, which is an “Attachment” field type. That will allow us to upload an image to the field.
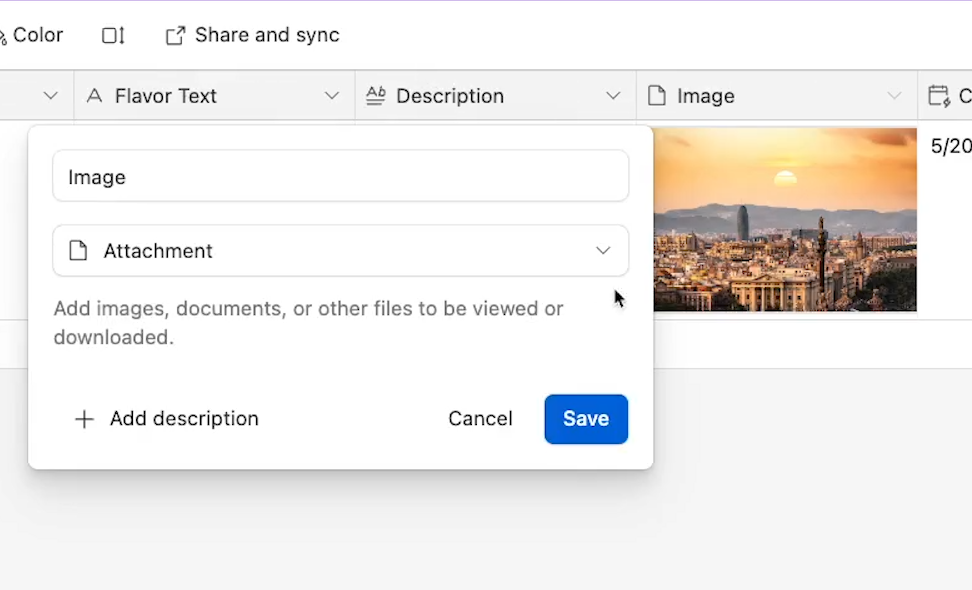
You'll also note that we've included a “created time” field. This is a necessary field whenever you're trying to automate Airtable with Make.
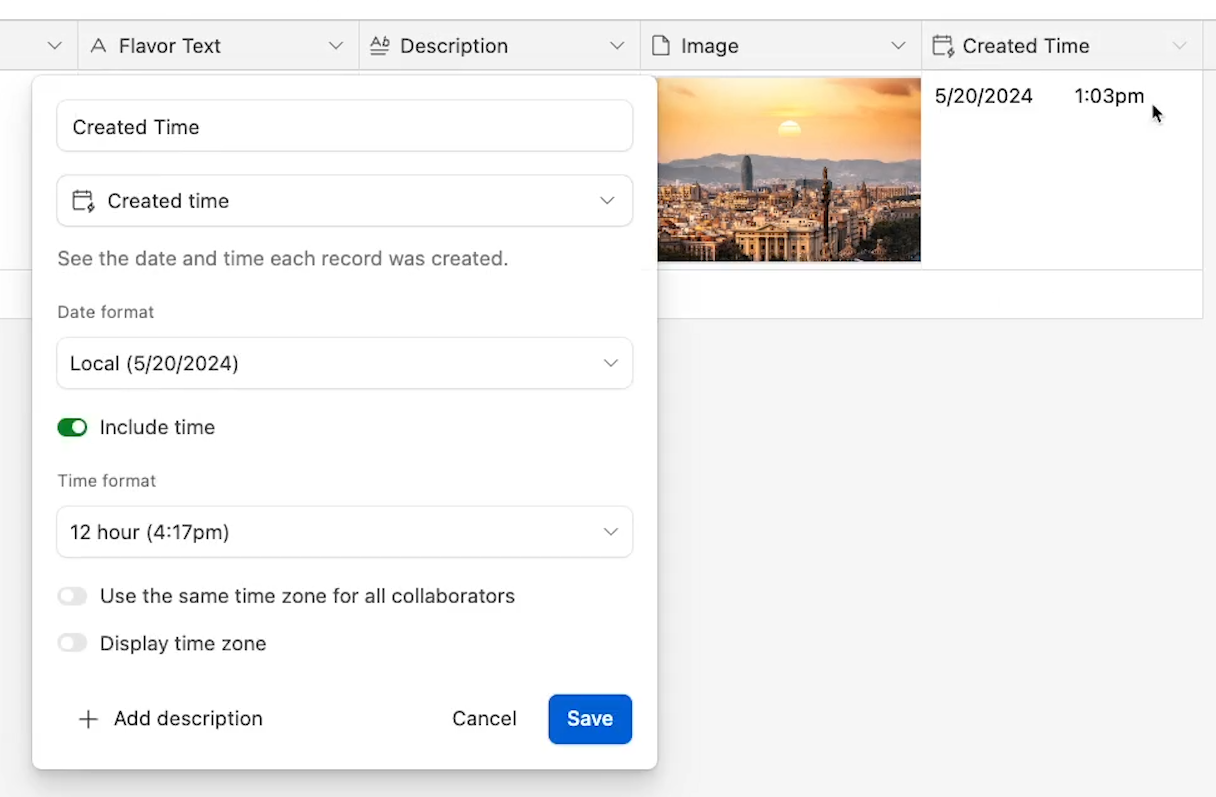
This field will be automatically populated with the date and time when each record was created. Since Airtable fills it in automatically, this field won’t be included in the form.
Create a form view
Once all of the fields in your table are ready, you can create a form view. Just click on “Form” in the bottom left-hand corner.

All of the fields from your table should be added as questions in the form, except for any formula fields like “Created Time”. You can customize the form with a title and description, and change the title for any field.

Once your form is all set, click on “Open form” to view the form in your browser. Then, fill it out to create test data.
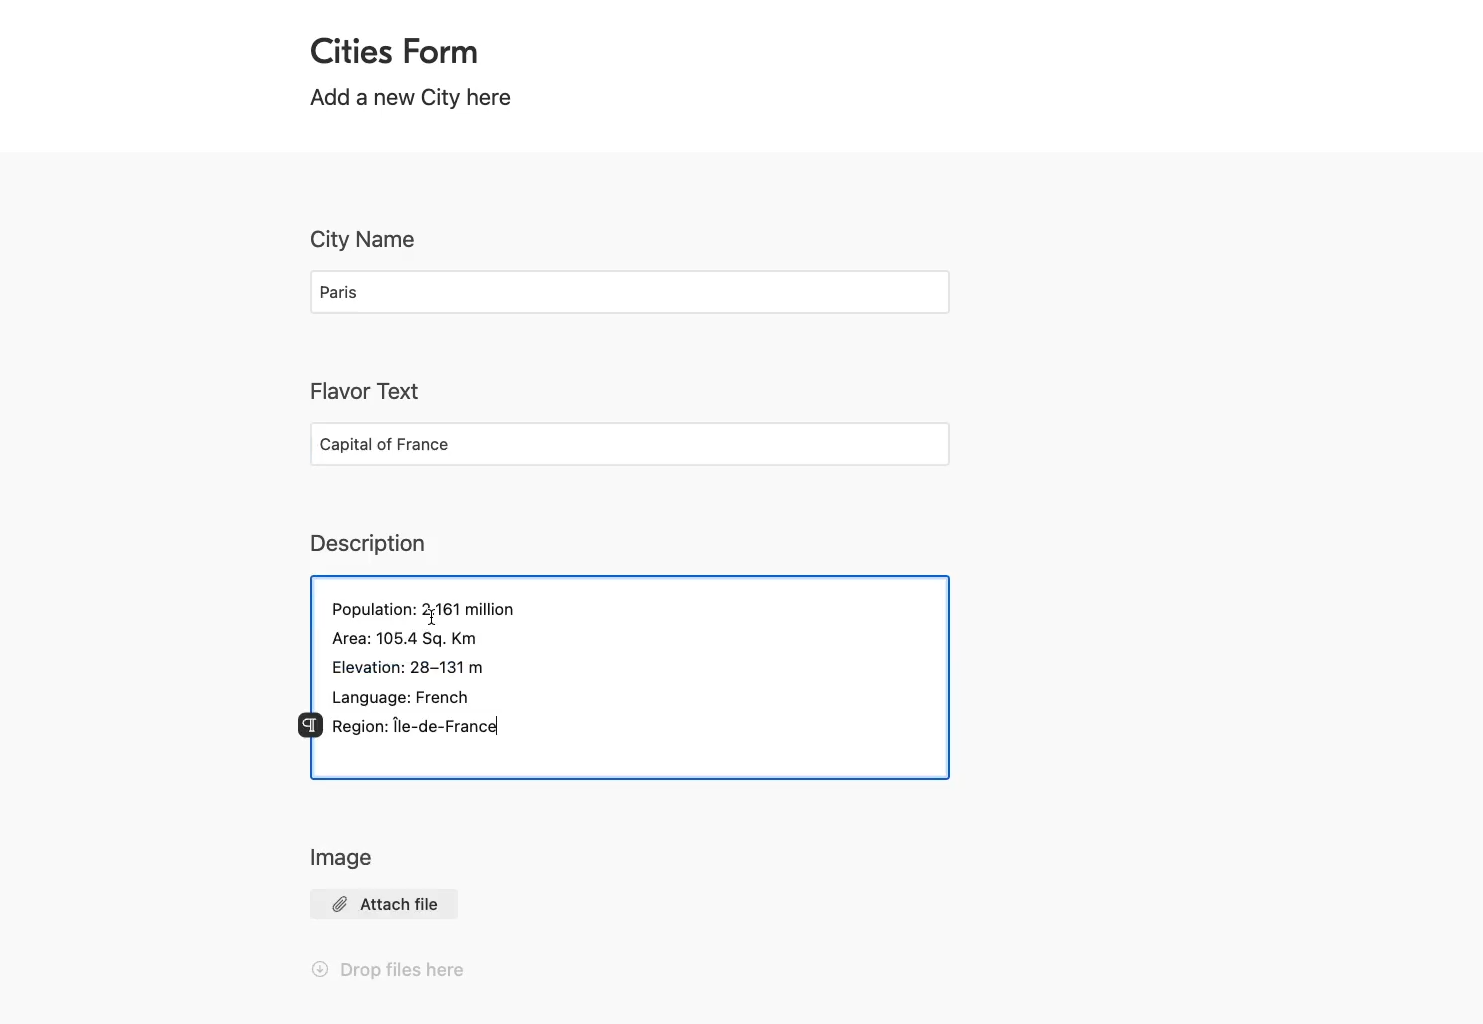
Creating the automation in Make (Integromat)
To create an automation for generating Slides presentations from a template, go to Make.com and sign in.
If you don’t have an account yet, you can create one for free.
You can also check out our Make beginner’s guide to learn the ropes.
Once you’re signed in, create a new scenario.
Configure the trigger: Watch Records in Airtable
Choose Airtable as the app for your trigger module. Then, pick “Watch records” as the event.
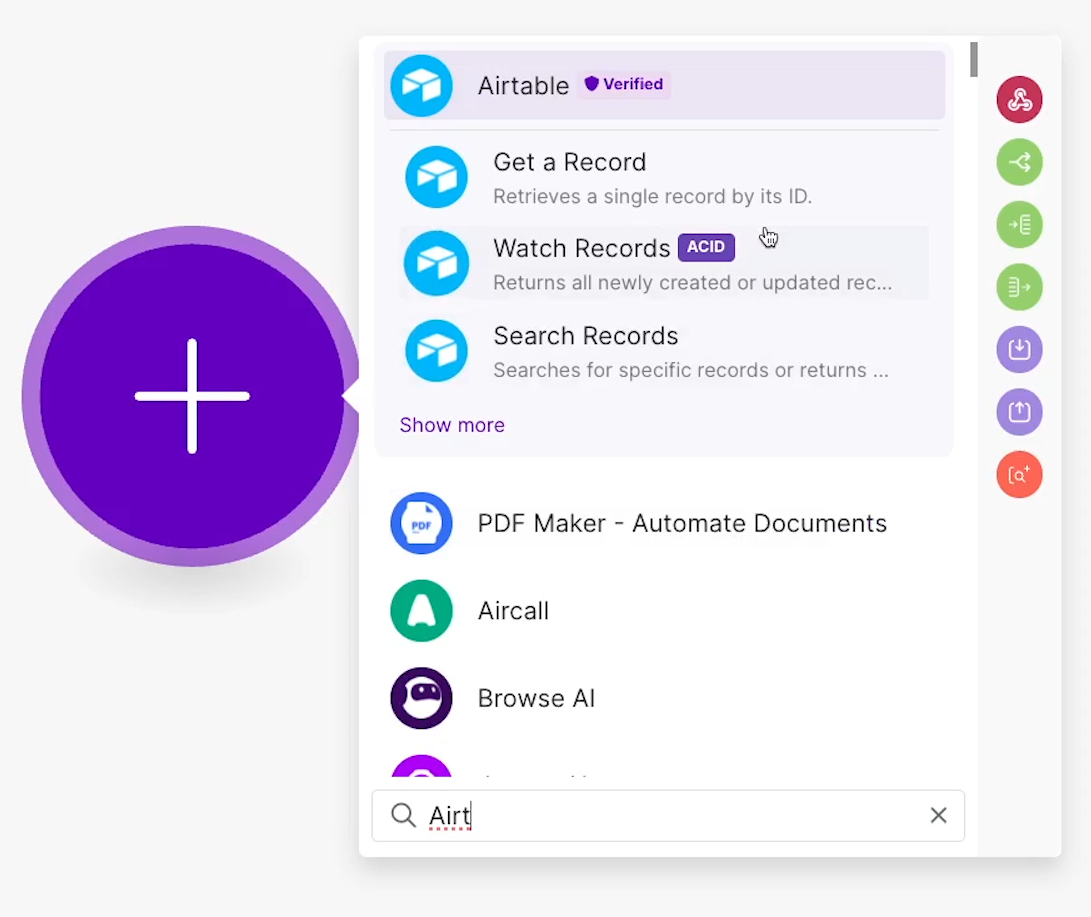
Sign in to Airtable to authorize Make if you haven’t already. Then, choose the correct base and table to watch. In our example, we’ll watch the “Presentations” table for new records.
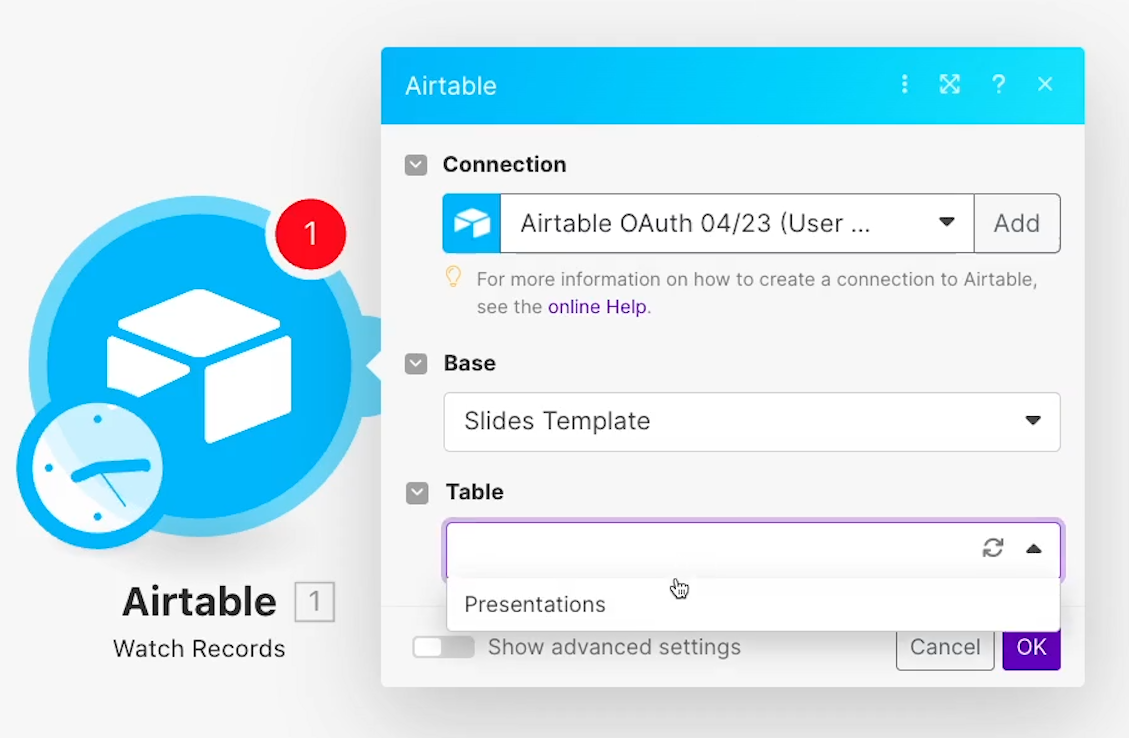
For the “Trigger field”, you need to pick a field with date-time data that Make can use to sort your records. That lets it determine which records were created most recently, and this is why we made the “Created time” field earlier.
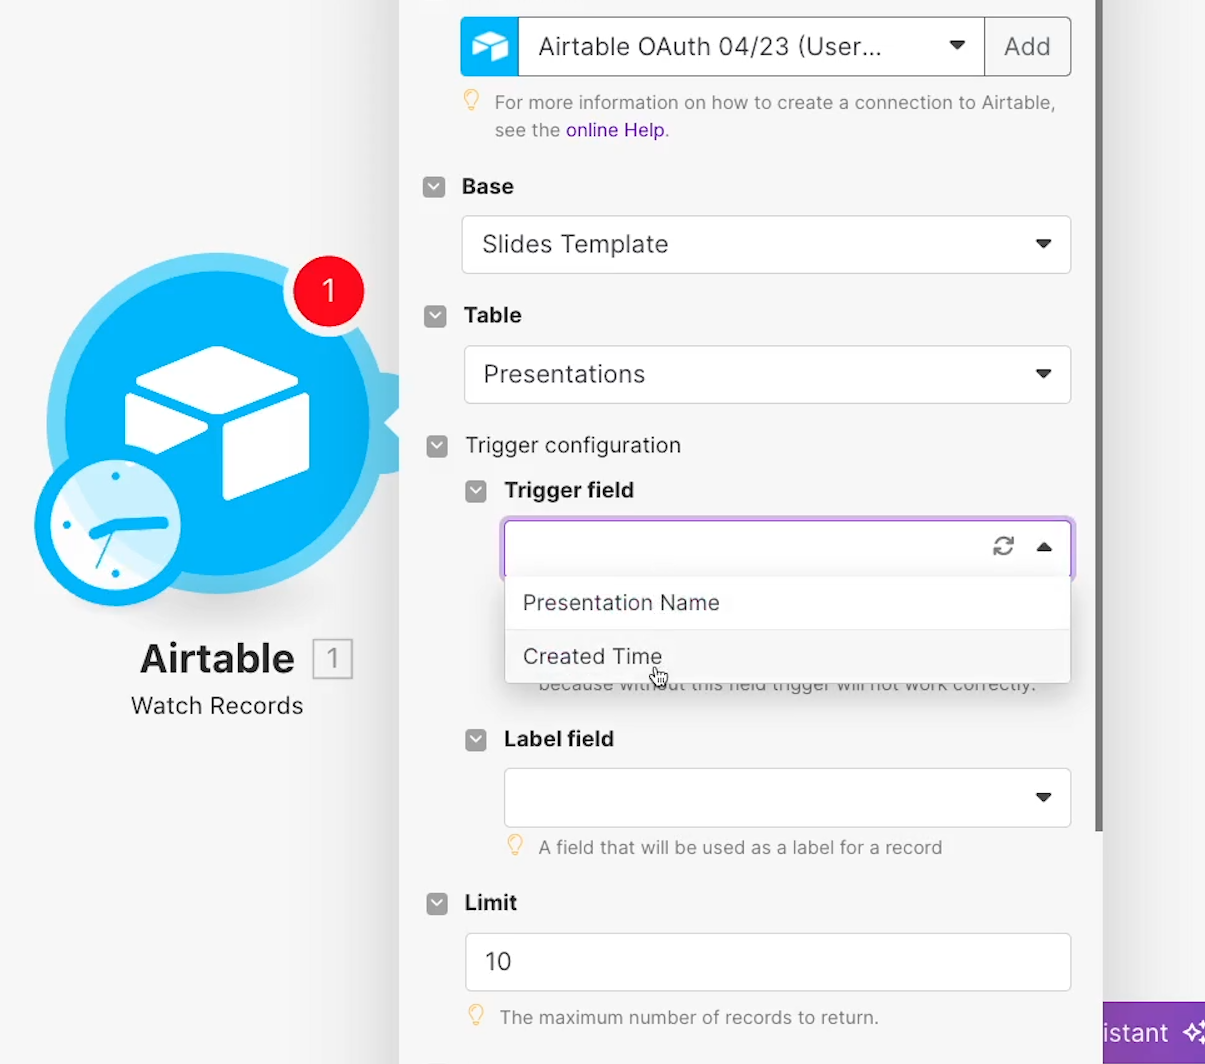
For “Label”, pick a field to use as the label or title for each record. You can pick any one that you want.
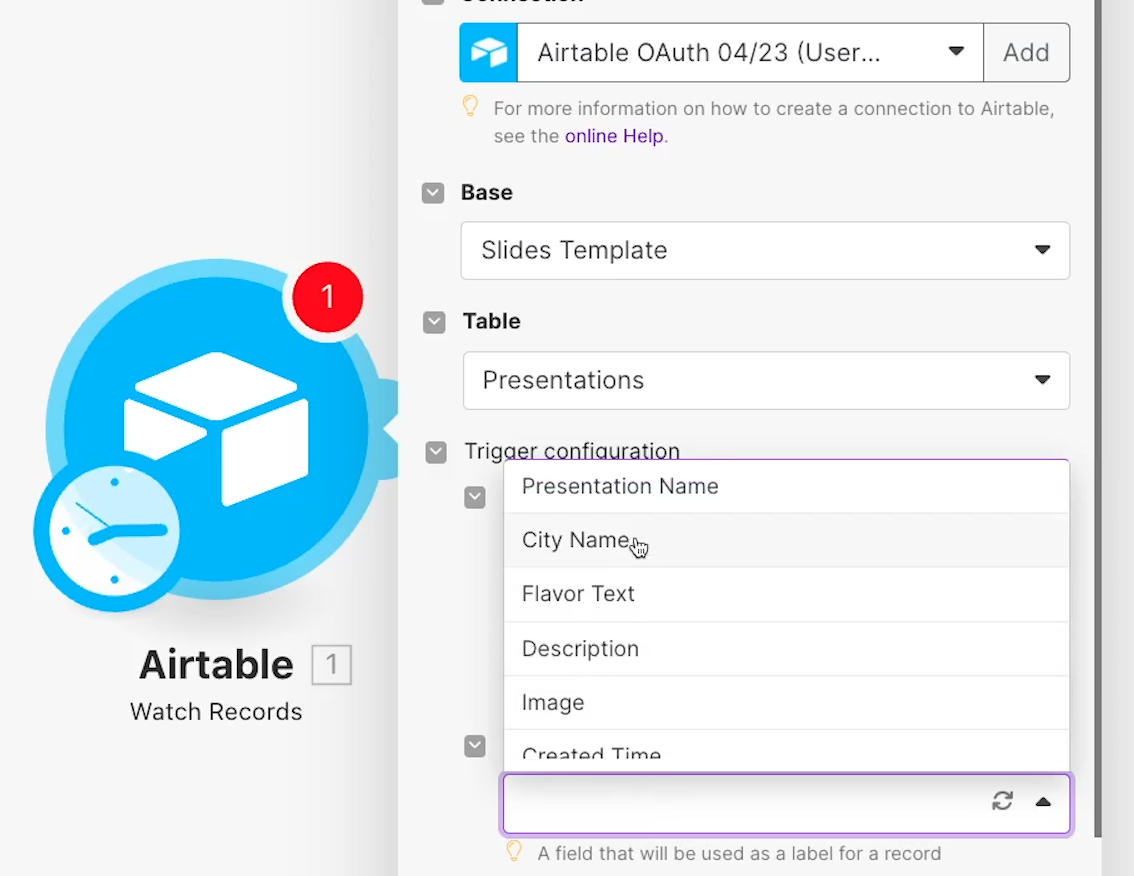
In the “Limit” field, you can set the maximum records that the automation will retrieve each time it runs. You can set this to whatever you’d like.
Once your trigger is configured, click “OK”. Then, test the trigger.
After testing your trigger, you can click on the number that appears over the module to see the data it retrieved.
In our example, we can see that the trigger successfully retrieved our test data about Paris.
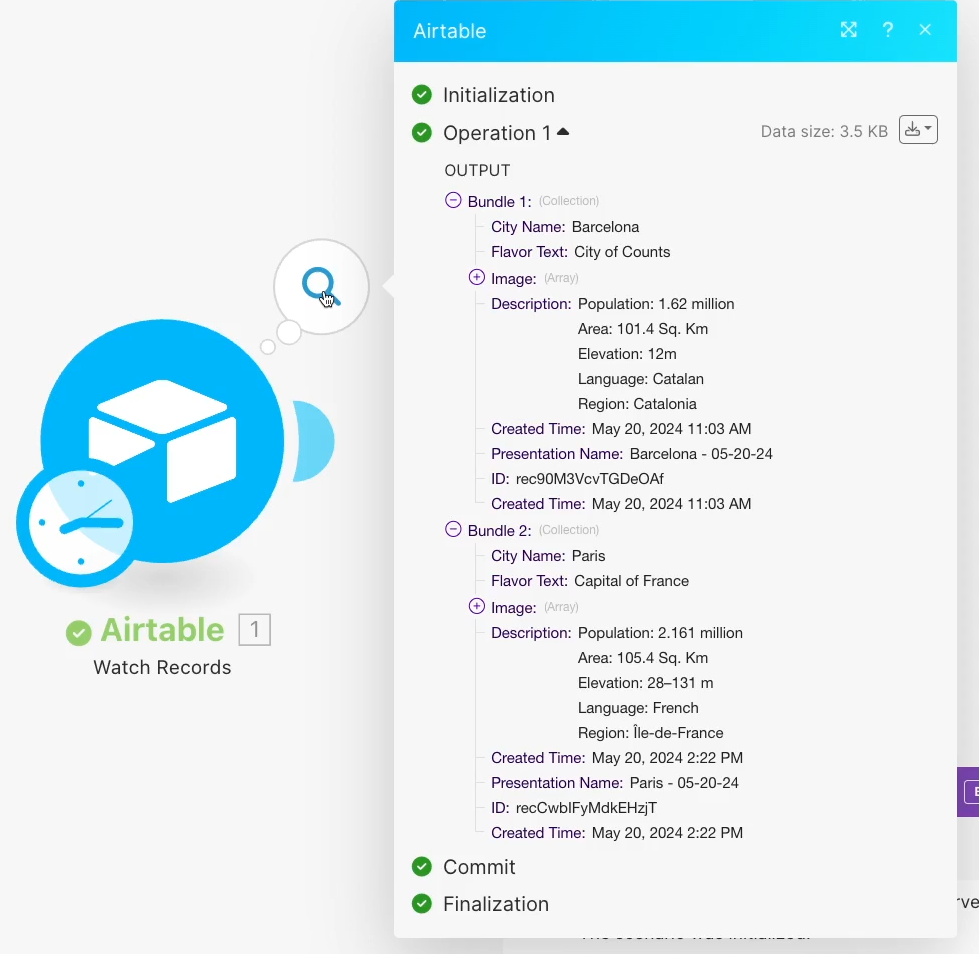
Create a new slide deck and replace text variables
Next, add a new module to your scenario. Search for “Google slides”, and choose “Create presentation from template”.
Sign in to your Google account to authorize Make.
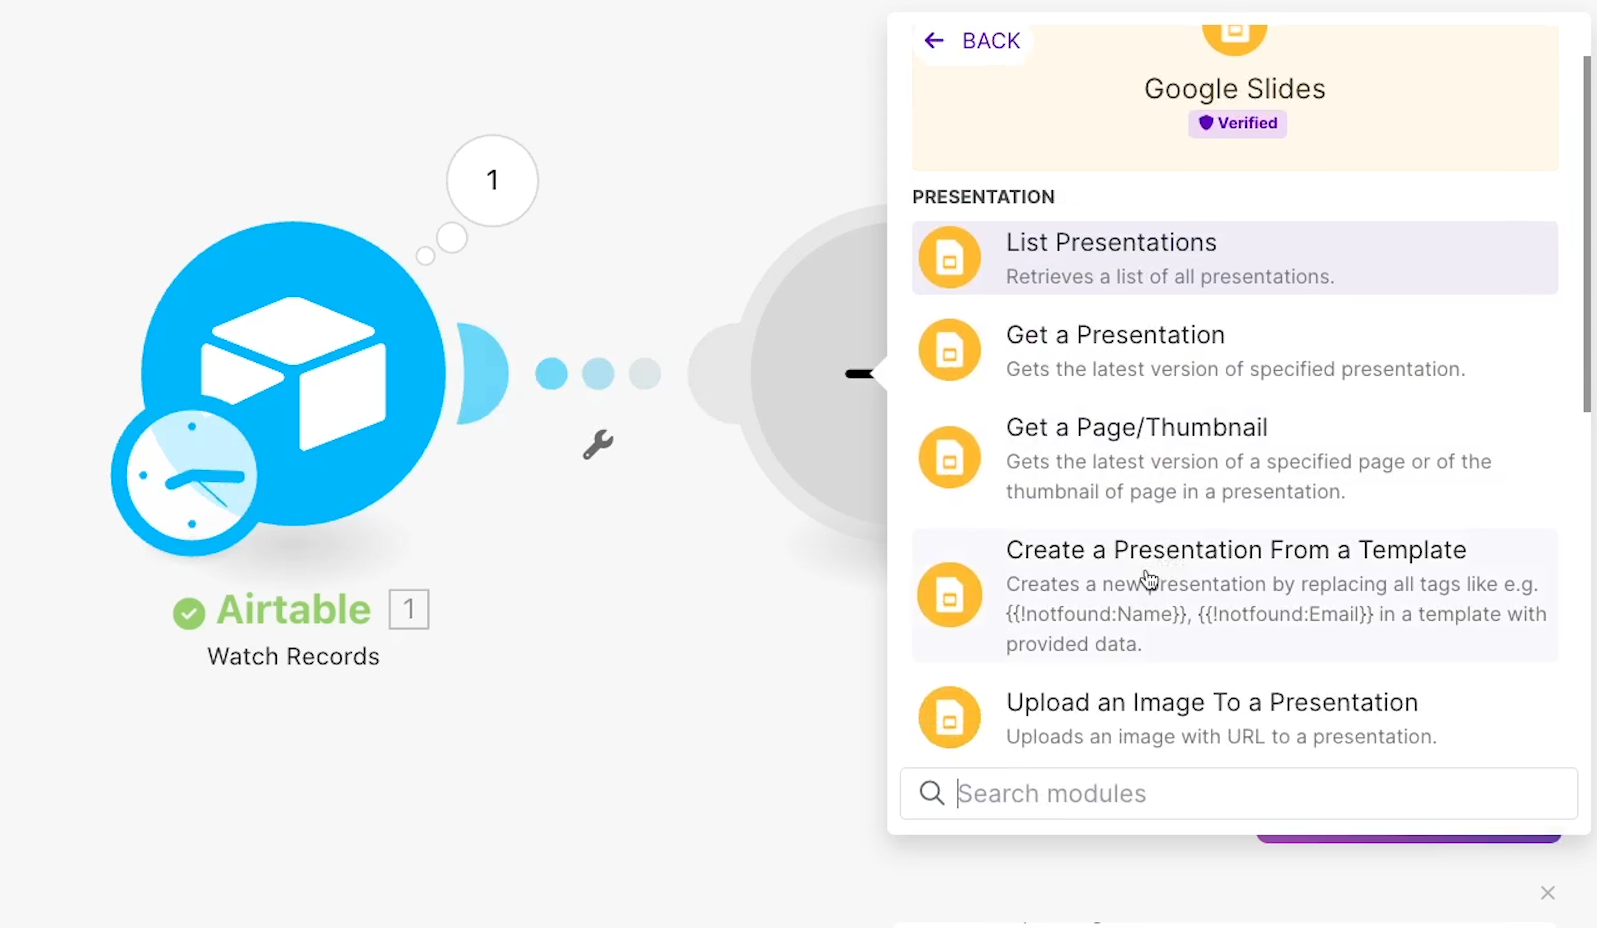
Then, provide a title to use for each new presentation. Be sure to include some dynamic data to make sure the names for each presentation are unique.

Identify the presentation you want to use as a template.
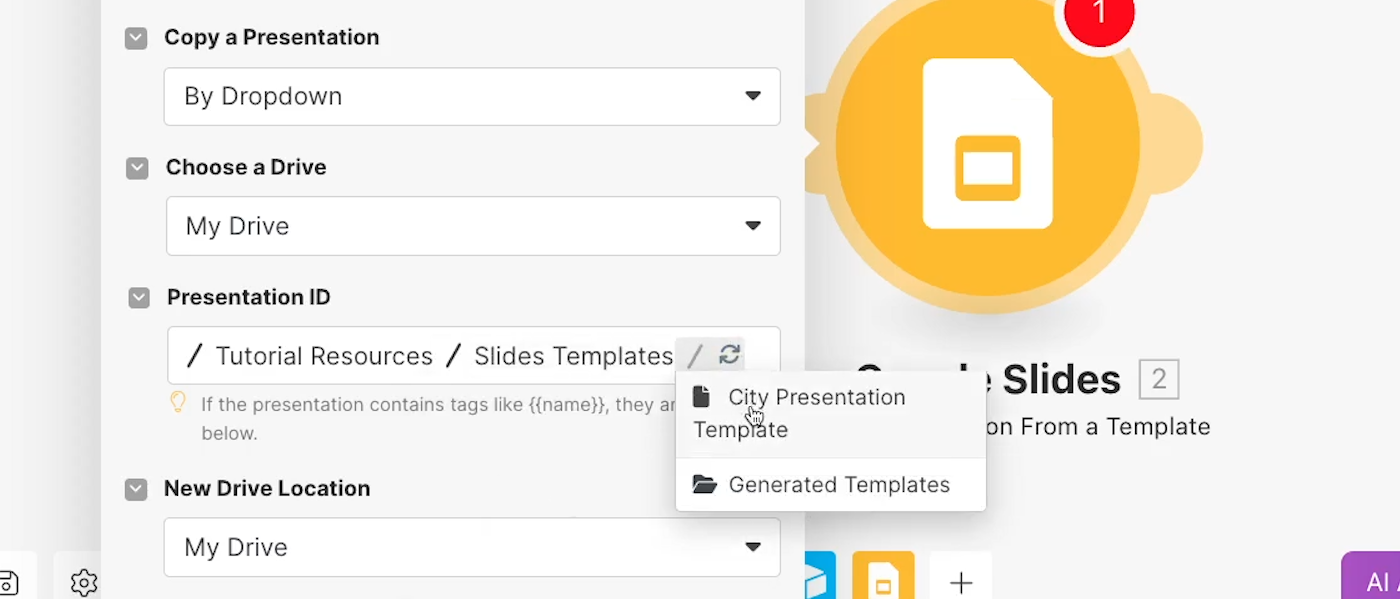
Once you choose it, all the variables in your deck will appear under the “Values” section.
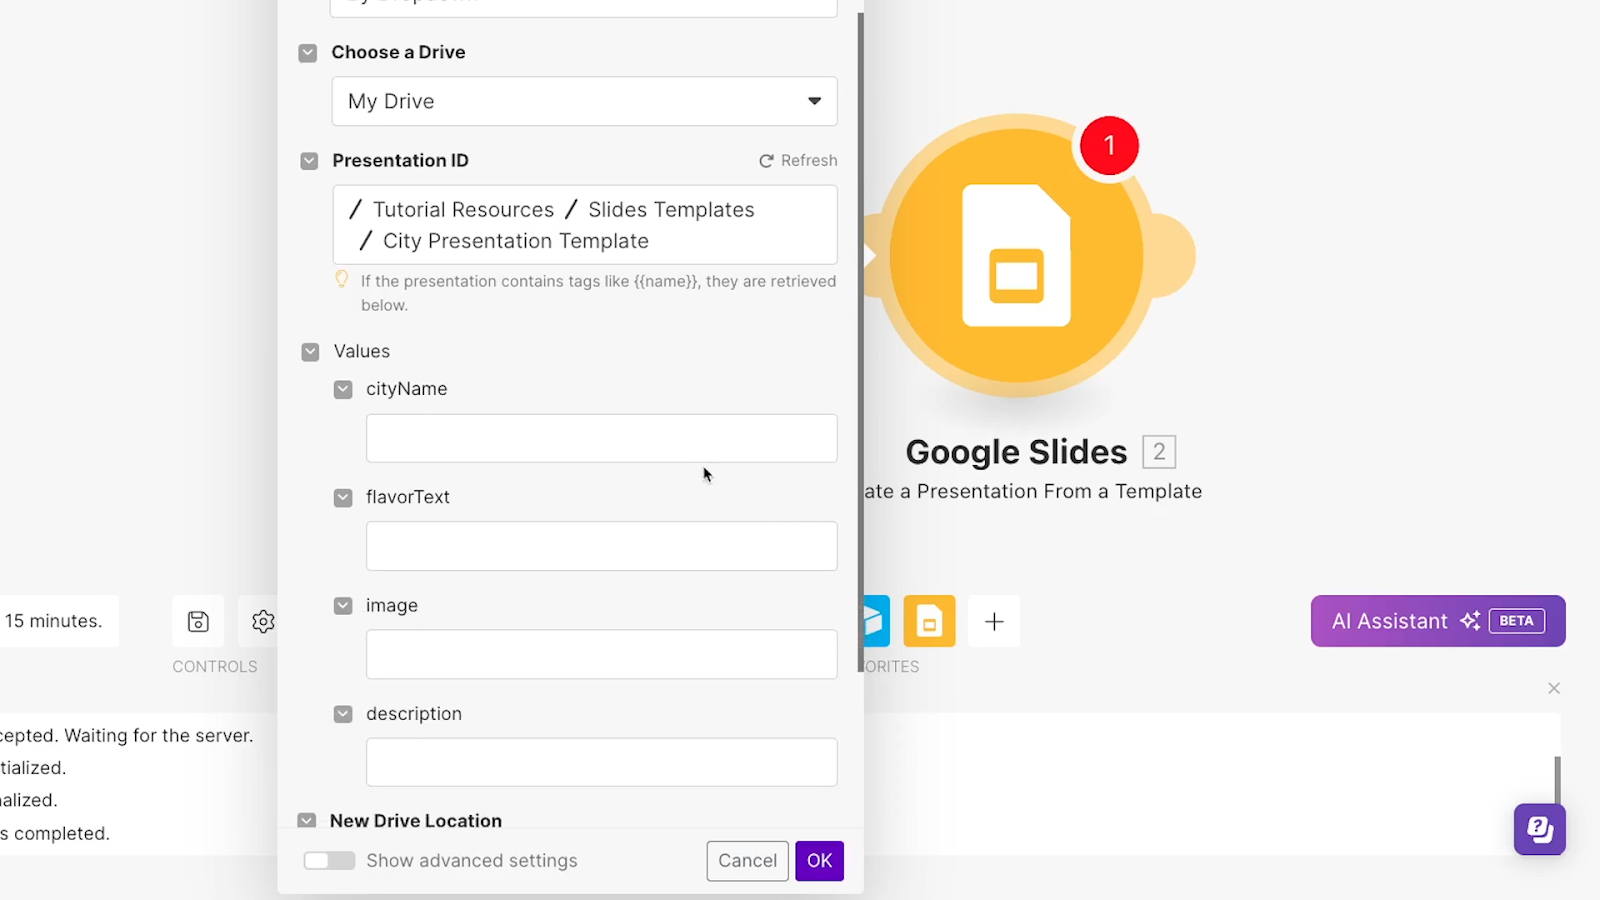
Map your Airtable form data to every field, except any image variables. You’ll need a separate step to fill in those, so just leave them blank for now.
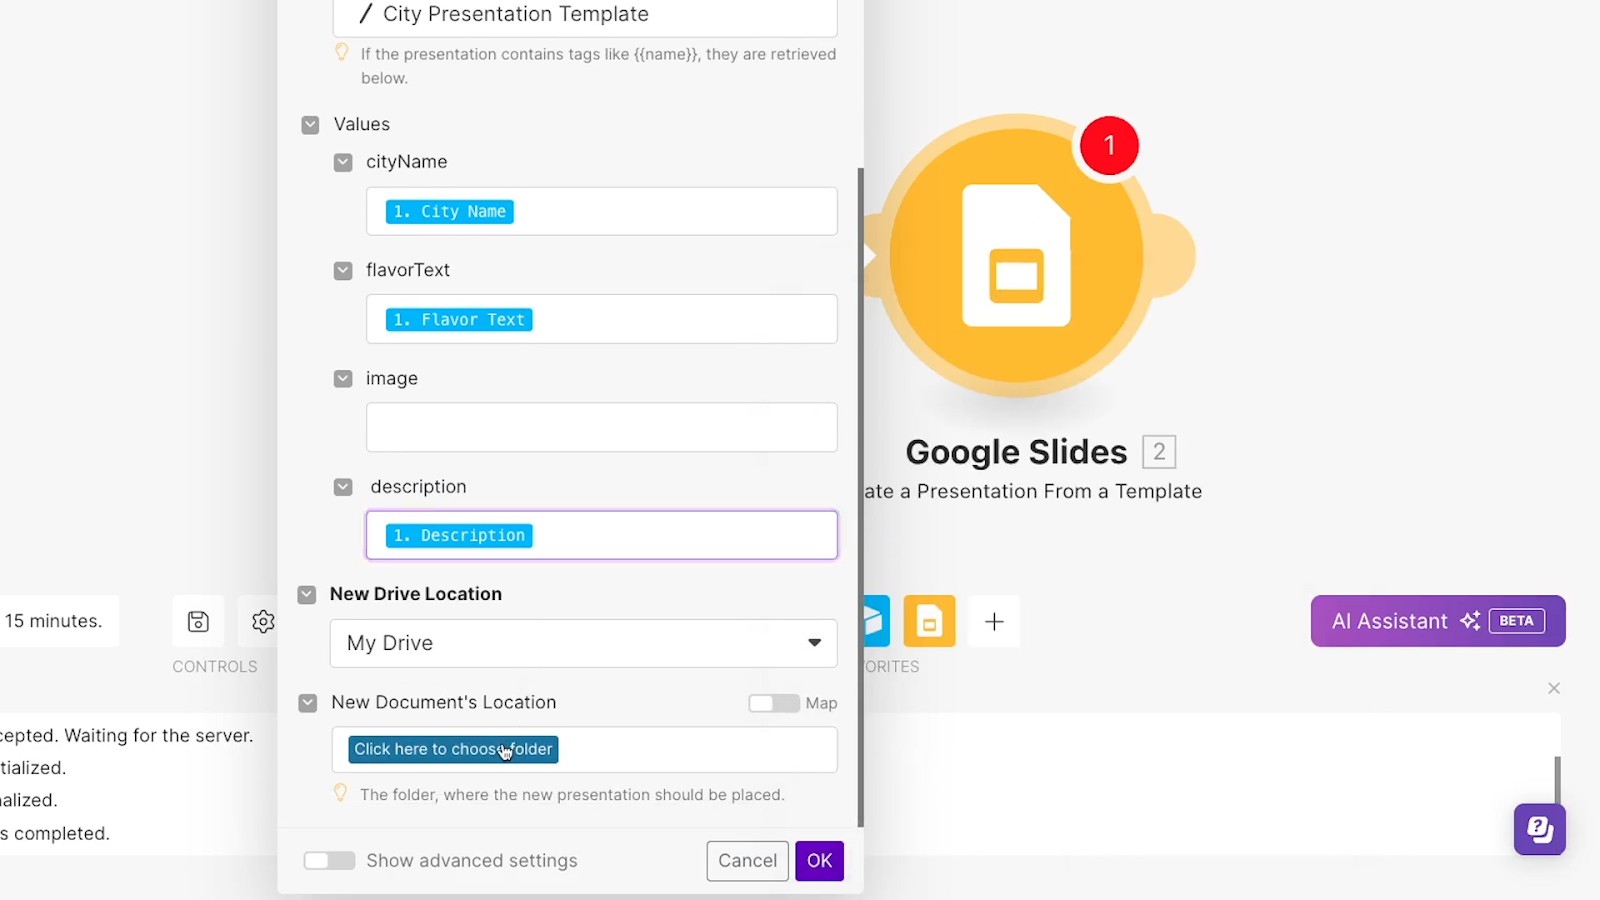
Next, pick a Drive folder to store each new presentation in.

Once you’ve finished configuring the module, click “OK”. Now you can test your whole scenario again.
After testing, open up Google Drive to check the newly created deck. You should see all of your text variables replaced with your test data.

Any image variables will remain unchanged, but that’s fine.
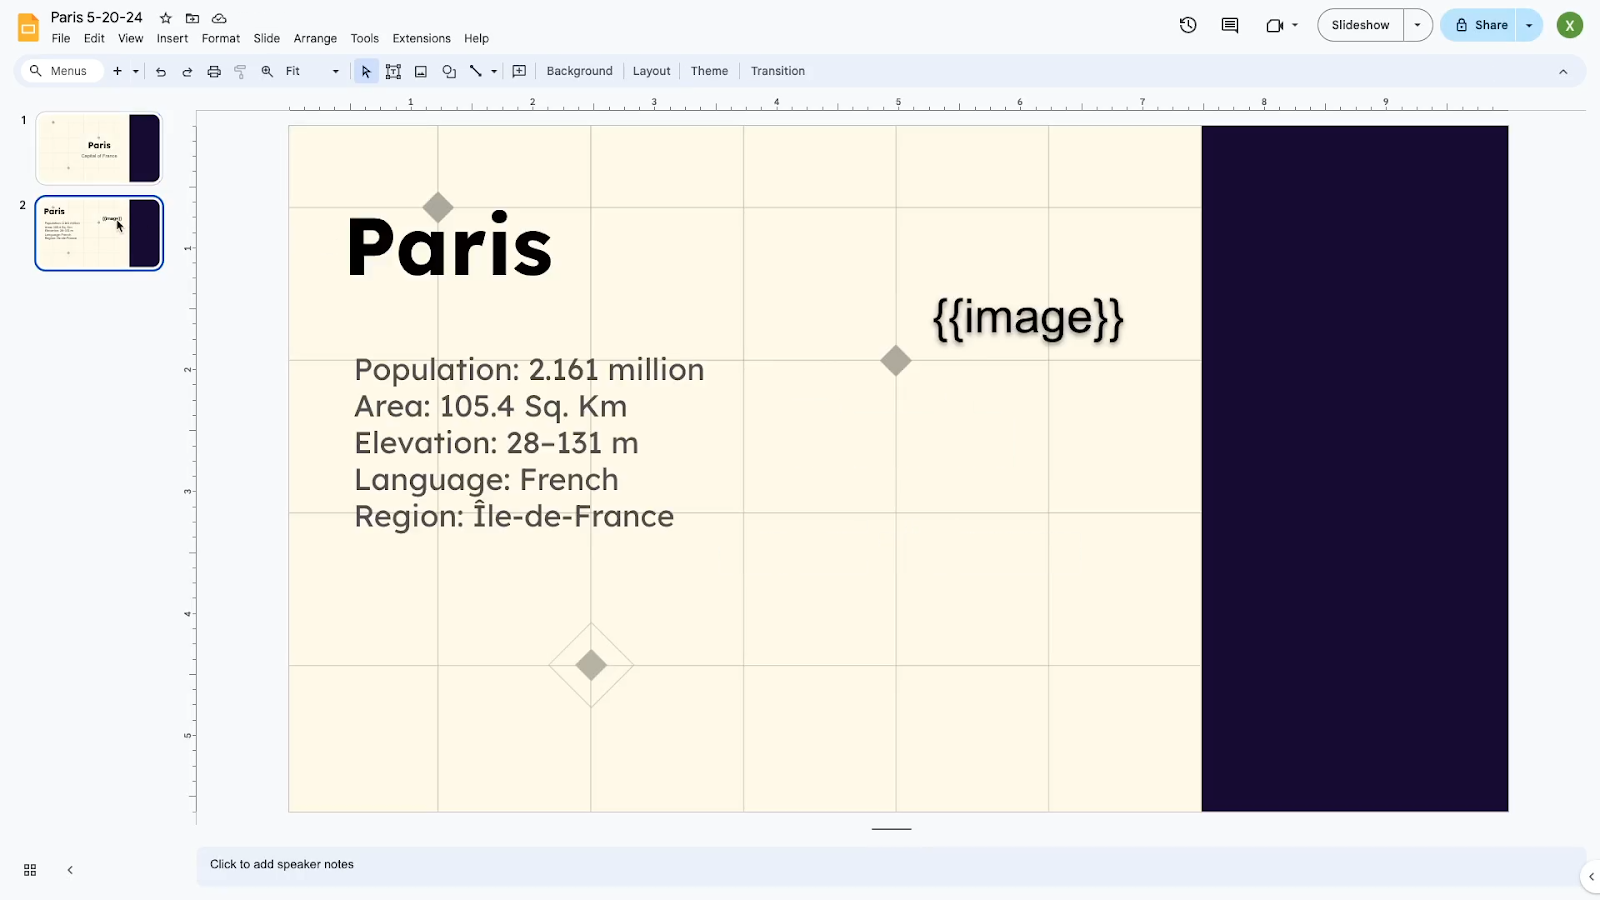
Next, we’ll show you how to add one last step to this automation to fill in the image variable.
Add images to your slide deck
Go back to your Make scenario, and add a new module. Search for “Google Slides” and choose “Upload an image to a presentation”.
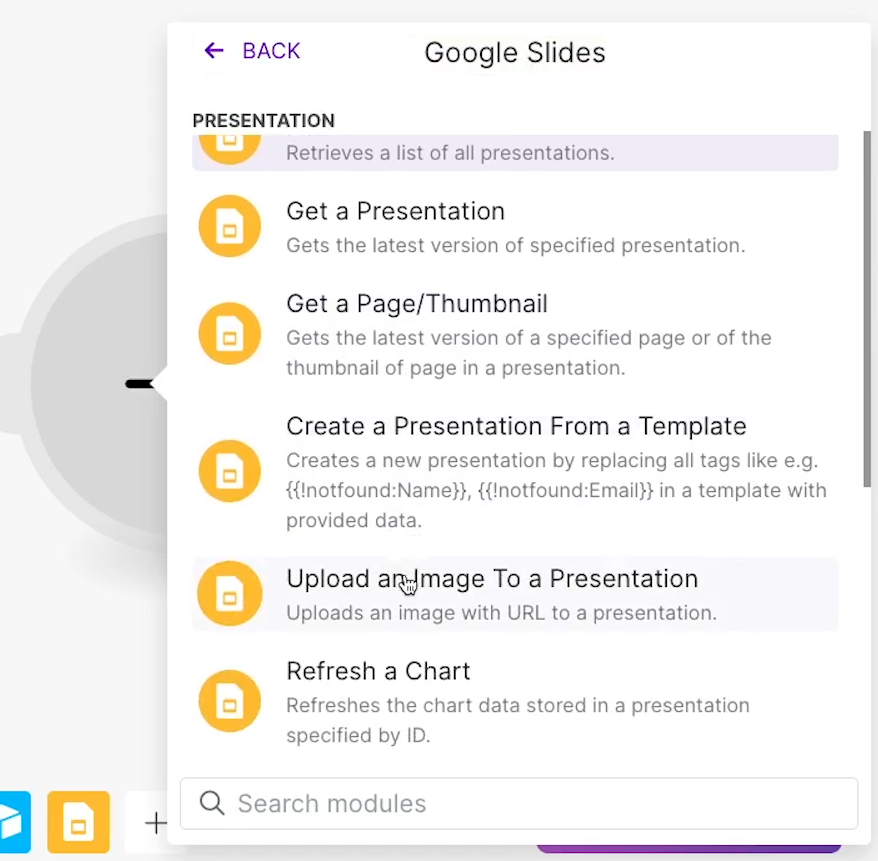
For “Presentation ID”, enter the Presentation ID retrieved in the previous step, not the ID of the original template.
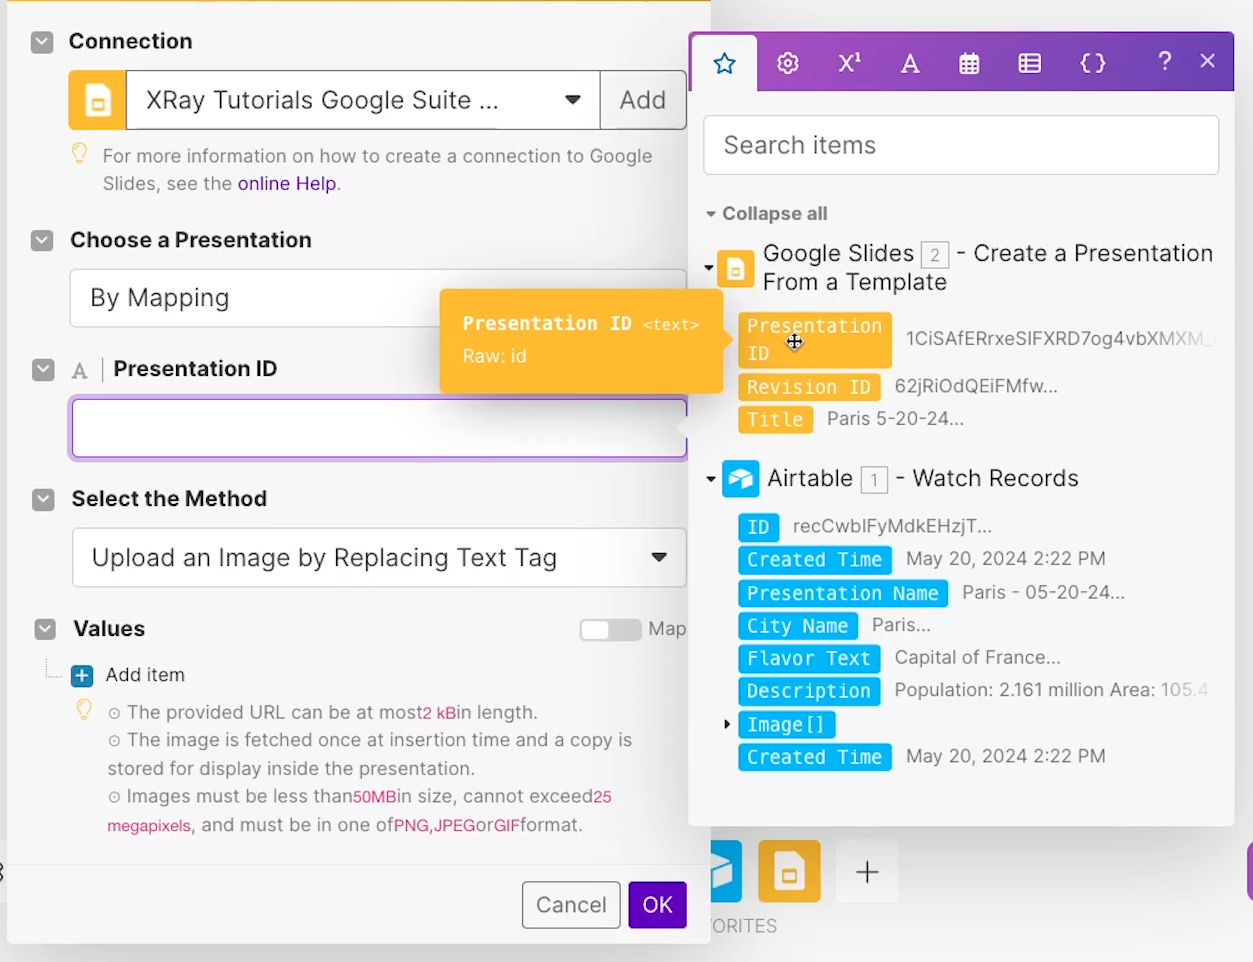
Under “Select the Method”, you can stick with “Upload an Image by Replacing Text Tag”

In the “Values” section, add a new item.
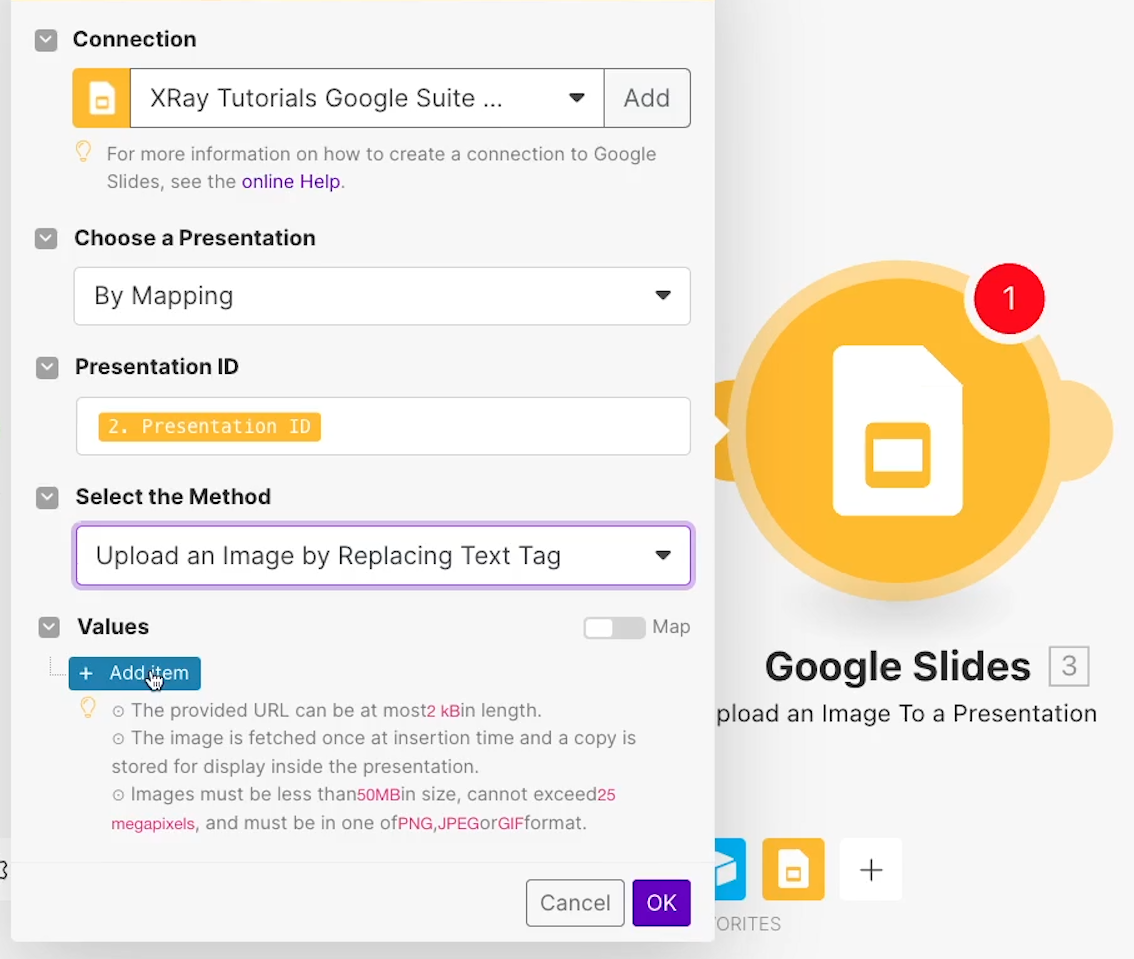
In the “tag” field, type your image variable’s name, without any curly brackets. For our example, we’ll just enter “image” here.
In the image URL field, enter the URL of the image you want to upload.In our example, we’ll select the “Image URL” data retrieved from Airtable.
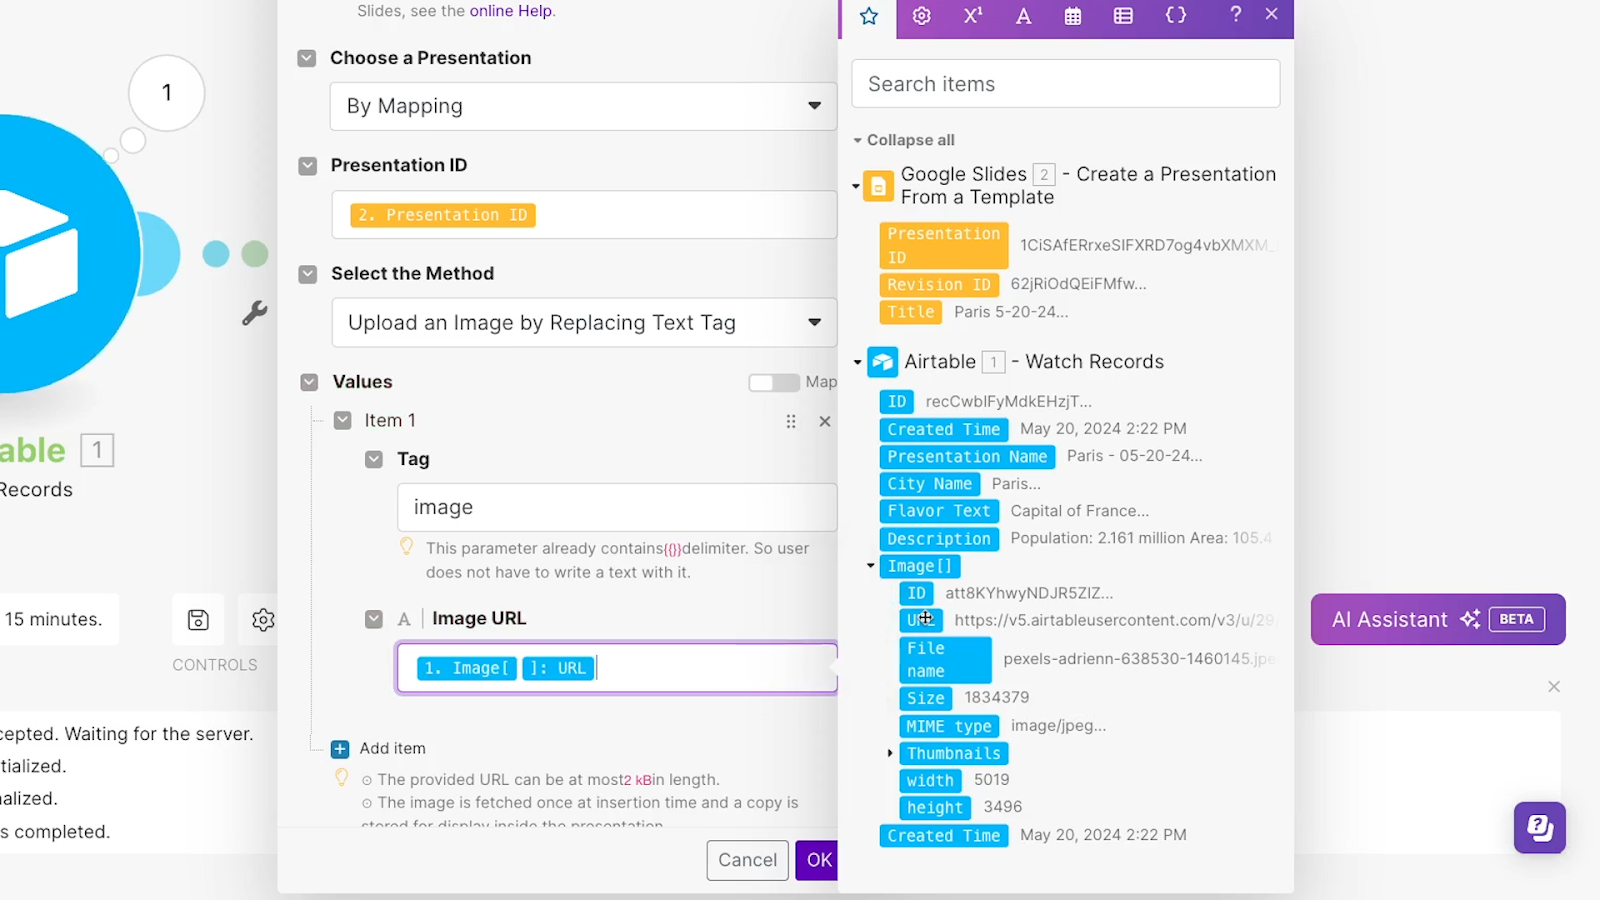
If you have several image variables, you can create additional items here for each one. Once you’re all set, click “OK”.
Testing the complete scenario
Now you can test the scenario one more time. As always, check Google Drive to ensure that the presentation was created correctly.
In our example, we can see that all of the text variables have been filled in just like before.
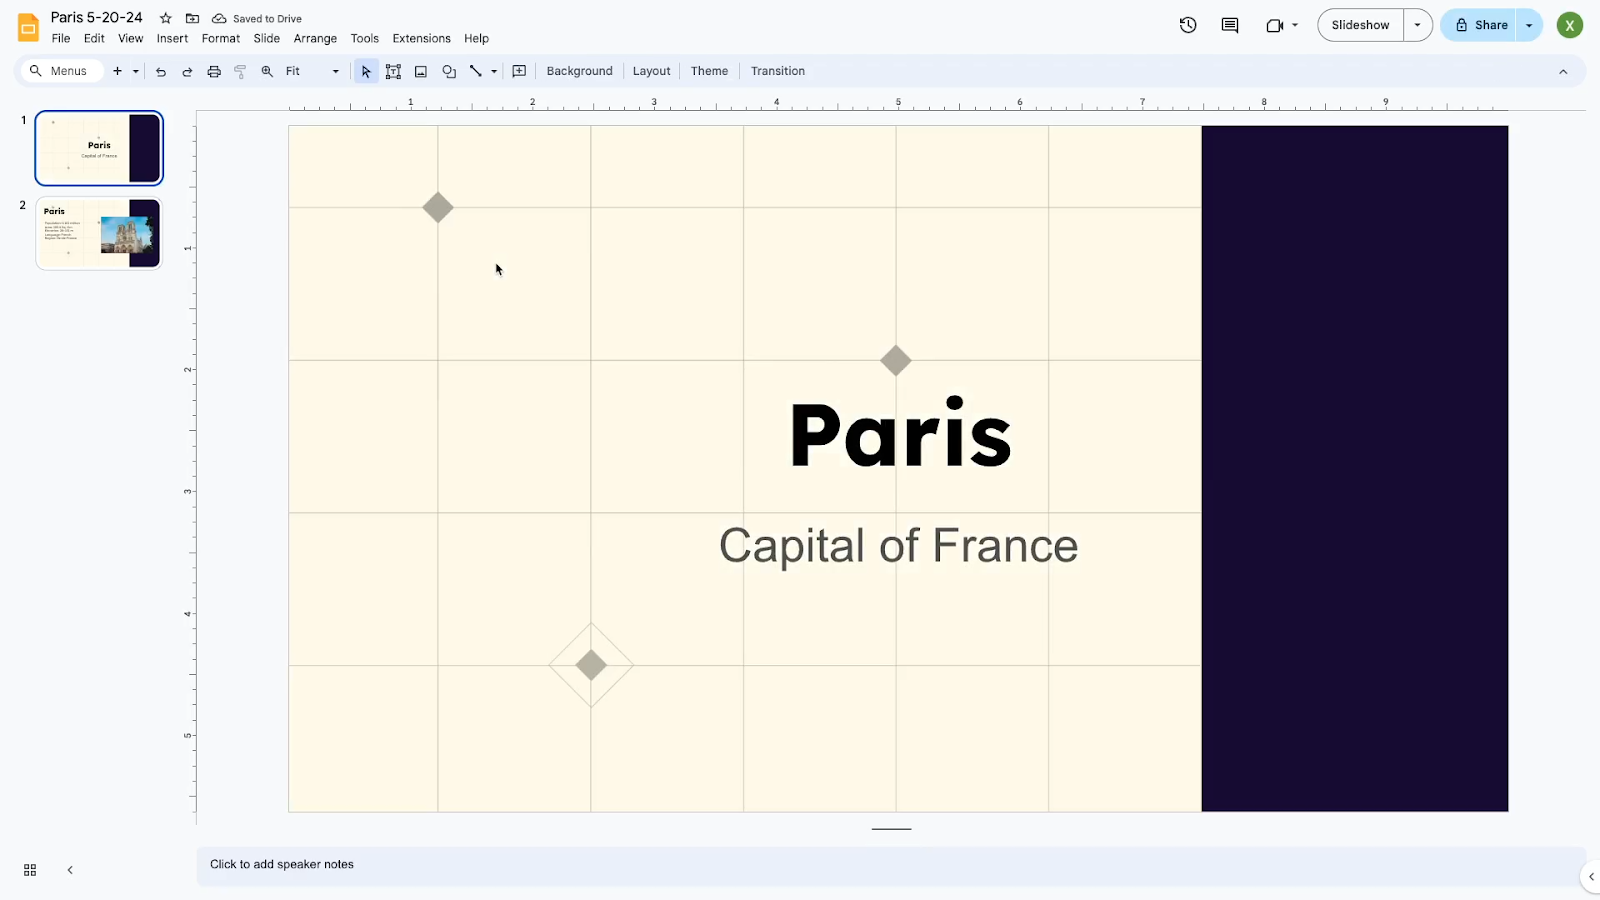
However, with the final step added, the image variable has also been replaced.

You’re now all set to save this automation, turn it on, and start using it.
Create presentations faster and enable easy collaboration
With automated Google Slides presentations, you can save time whenever you need to create a commonly used report or other document. You can also use the form to let collaborators create presentations in your account without logging in and getting direct access.
No matter how you want to use this automation, it just takes a few minutes to set up, so give it a shot today.
If you’d like to learn more about automating software like Google Slides, Notion, Airtable, and more, be sure to check out our blog or our YouTube channel. You can also follow XRay on Twitter, Facebook, or LinkedIn.
Manually preparing graphics in different sizes and formats for every social media platform quickly becomes tedious.
But with Abyssale, you can prepare templates in as many formats as you want, then auto-populate them with text and images from your Airtable records.
In this tutorial, we’ll show you how to get started with this time-saving app step by step.
We’ll demonstrate how to connect Abyssale to Airtable, create some templates, and populate those templates with Airtable data.
Create a template for multiple graphic formats in Abyssale
Begin a free trial for Abyssale
To begin, go to Abyssale.com and create a free trial account. The free trial will last for 14 days.
It includes 30 credits for automatically creating graphics with apps like Airtable, Make, or Zapier, and allows for a total of 1 GB of bandwidth.
Create a template for your graphics
Click on “Templates” to view your library of templates.
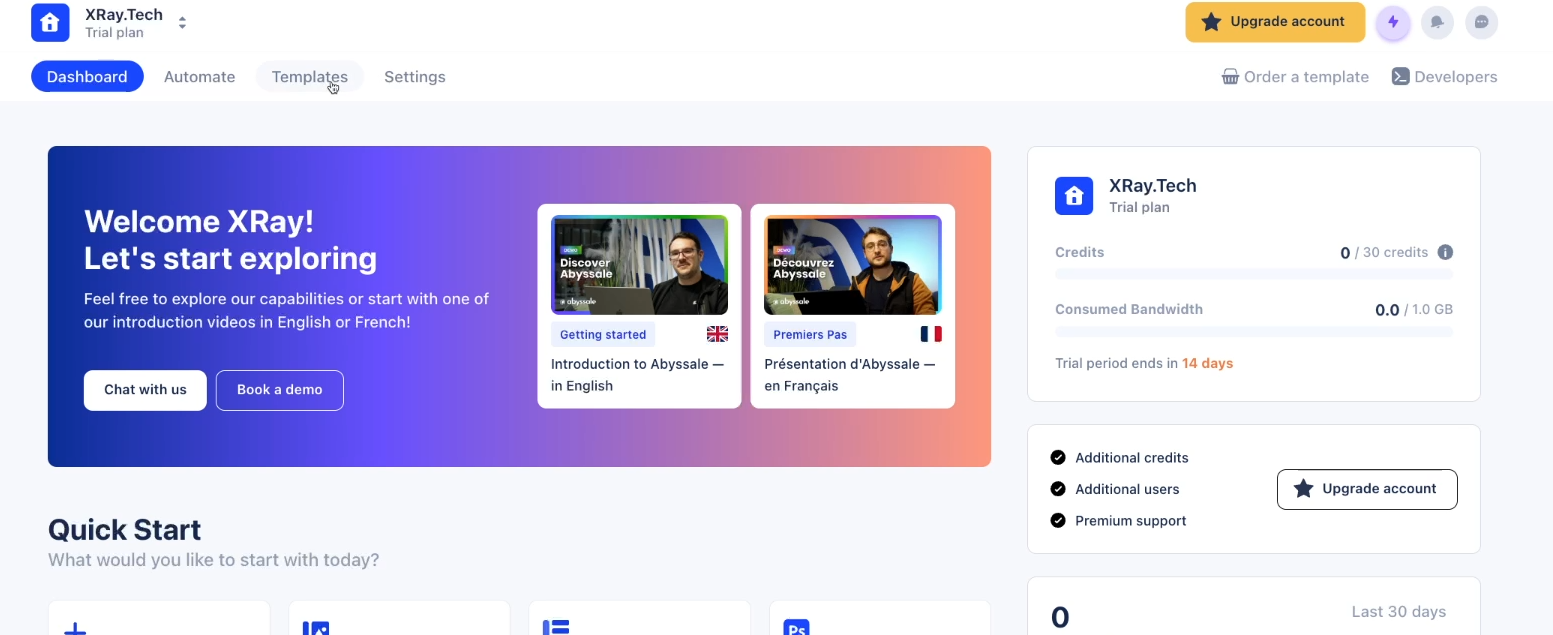
At first, you’ll just see a single Demo Template created by Abyssale. You can explore this demo to learn more about Abyssale, or get some hands-on experience by creating your own template.

To make your own template, click on “Create new template”.
Then choose whether you want to browse the template library or make your design from scratch. In our example, we’ll build a template from scratch.
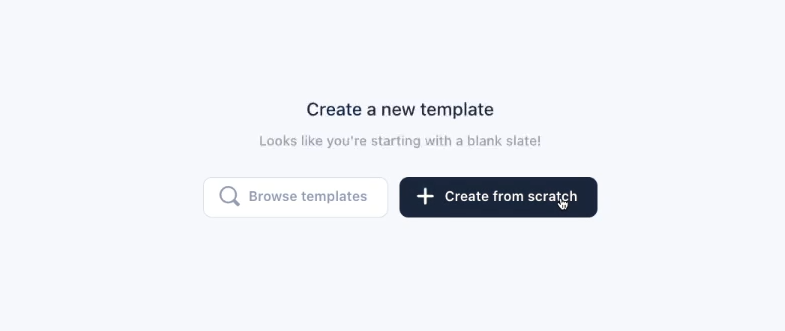
Choose a type and format for your first template
After clicking “Create from scratch”, Abyssale will prompt you to choose a type and format for your template.
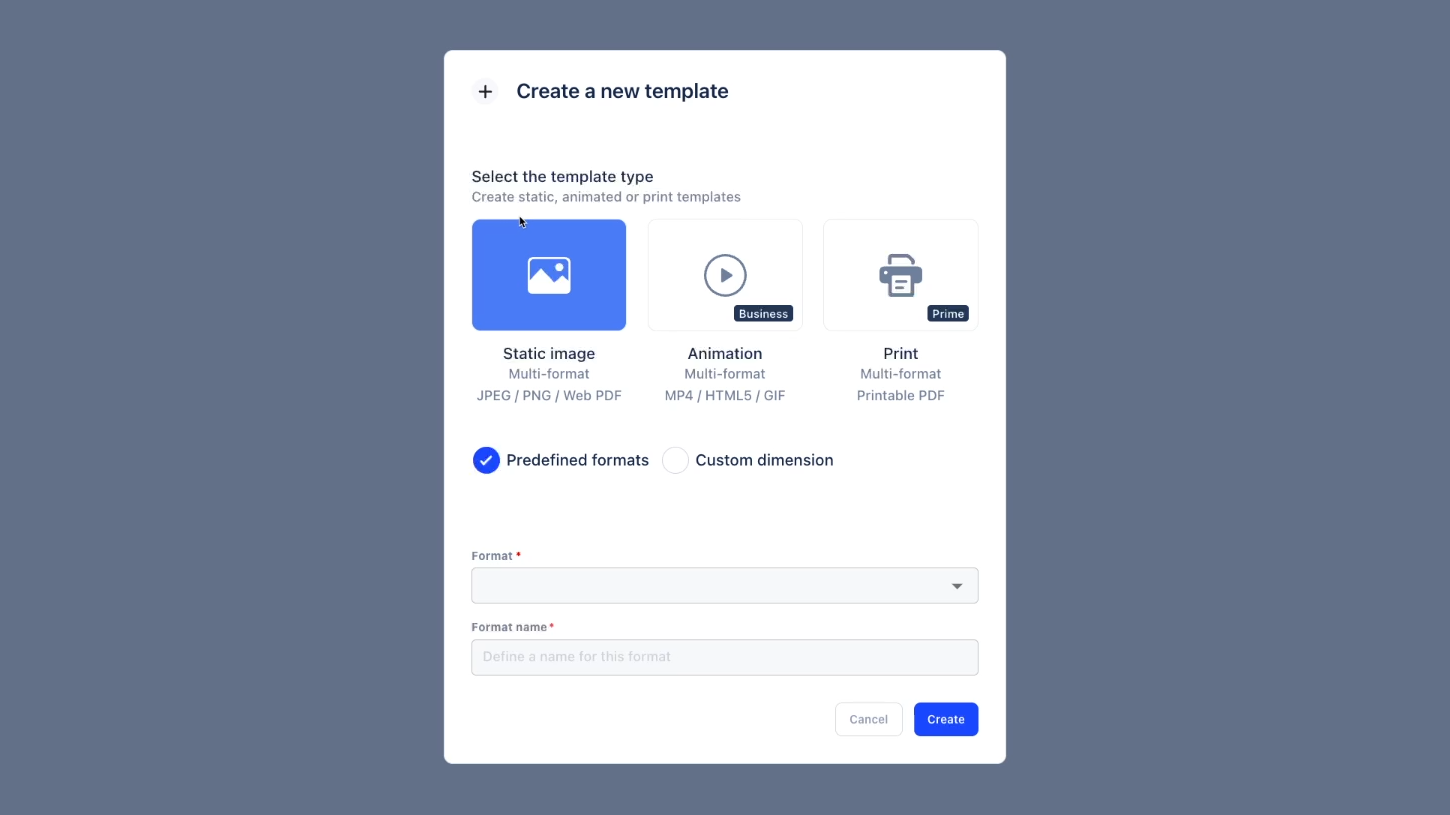
Abysale includes formats for a wide range of social media platforms, print layouts, animation, and more. For our example, we’ll begin with a simple 1080x1080 pixel square ideal for Instagram.
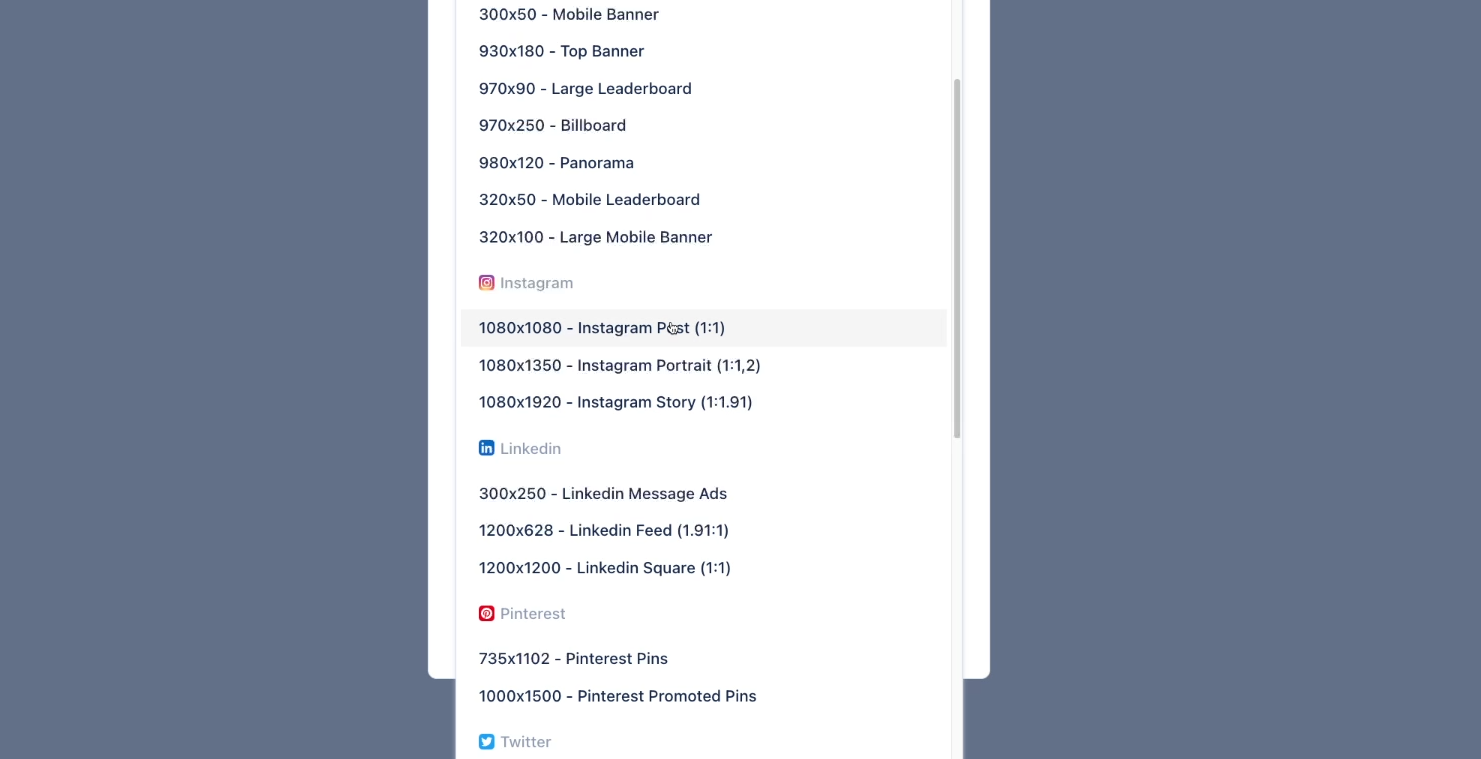
Click “Create” to generate a blank template to start with.
Design your template with Abyssale’s drag-and-drop interface
With Abyssale’s intuitive drag-and-drop designer, you can easily create any layout that you want for your graphics.
Use the element menu at the top of the screen to add images, text, shapes, and more to your design.
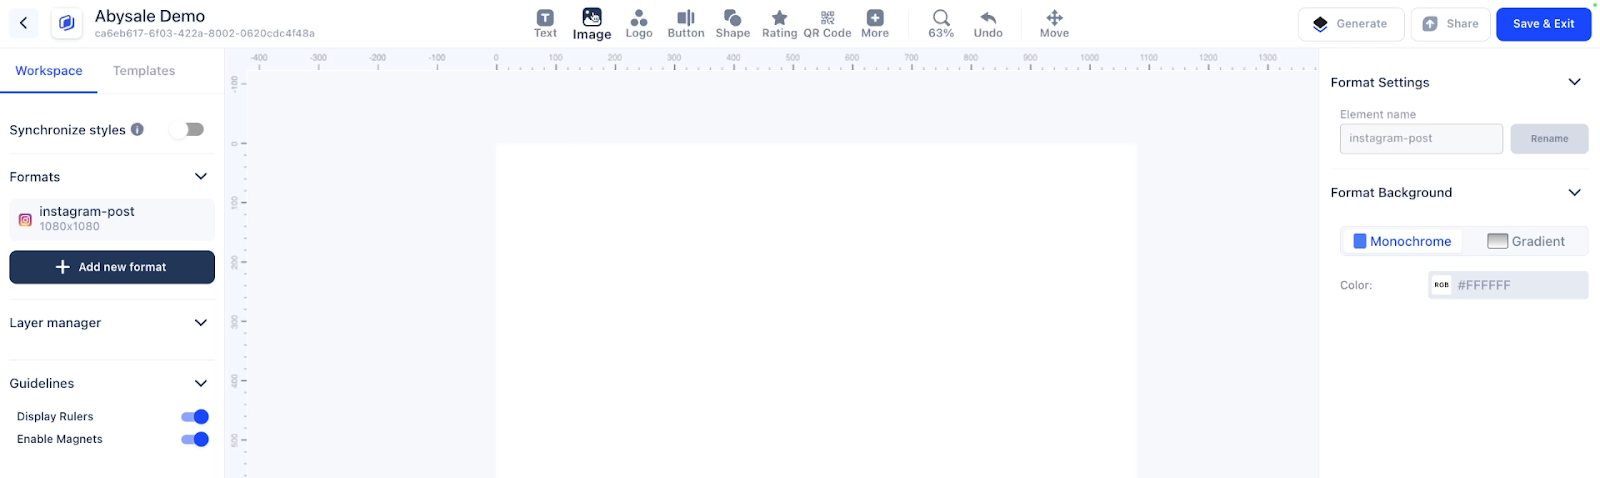
Note that every element you add to your design can act as a placeholder. When you sync this template with your Airtable base, you can replace the image with one that you’ve uploaded, replace text with custom copy, and even recolor fonts or shapes.

Our example template will consist of four key elements:
• A background image
• A semi-transparent black square over the background image
• Title text
• Description text
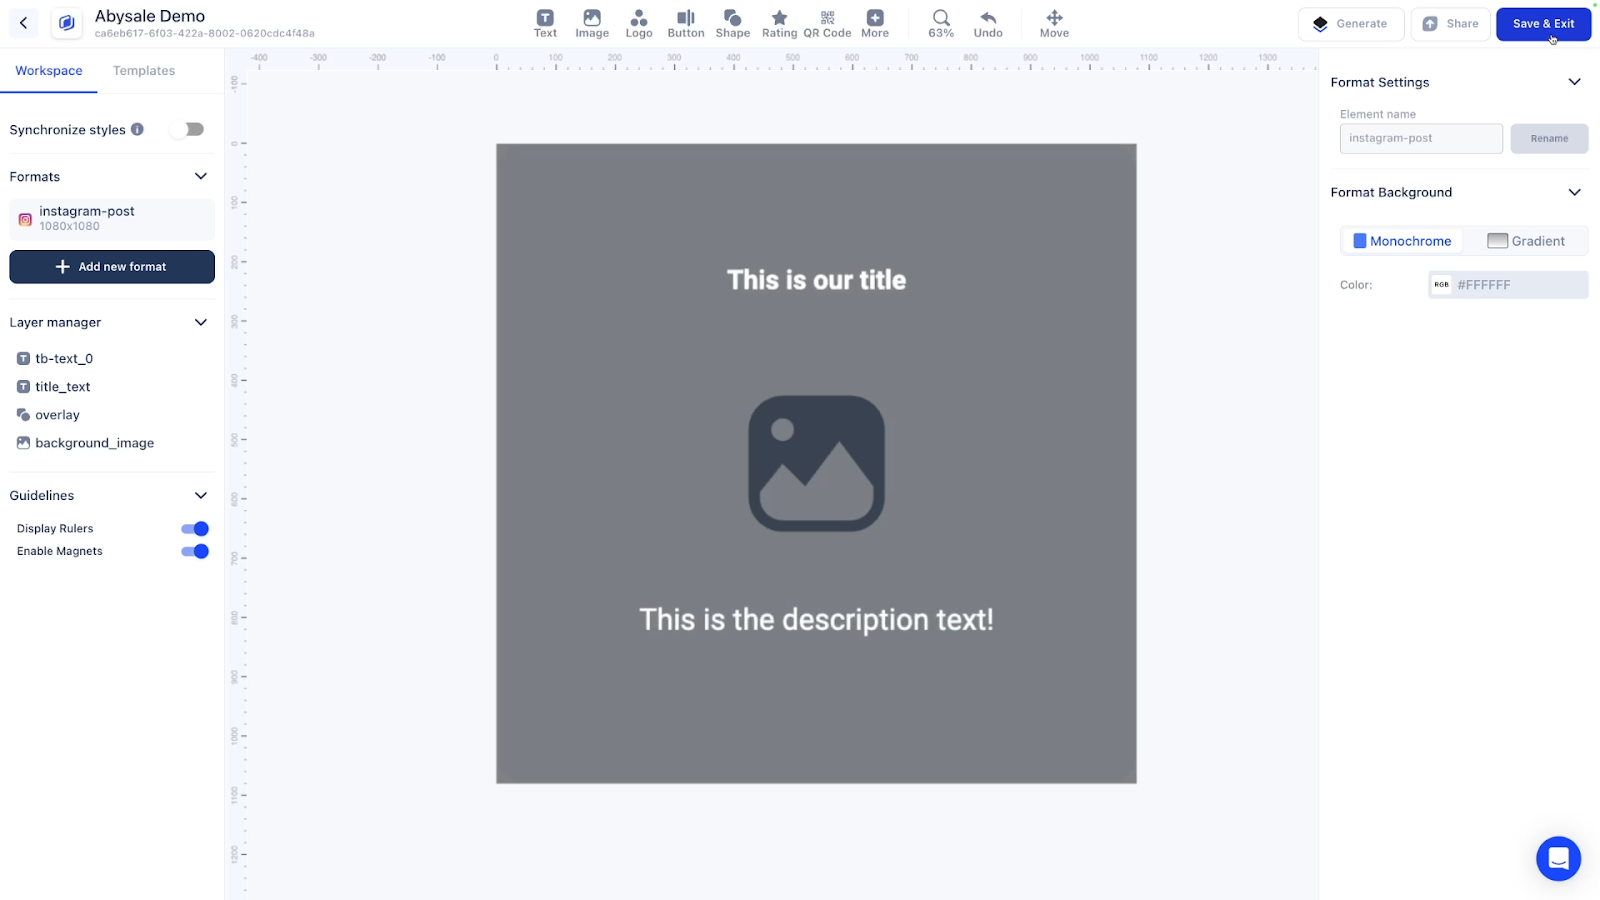
You can see how we constructed this template step by step in this blog’s companion video on YouTube.
You can follow along and build a similar template, or try your own design.
Quick tip: to keep an image centered while resizing it in Abyssale, hold Option on Mac or Alt on Windows while you drag with your mouse.
Be sure to give each element a descriptive name! The name is the only way you’ll be able to identify each element when you sync with Airtable, so it’s important to make it clear what each element is.
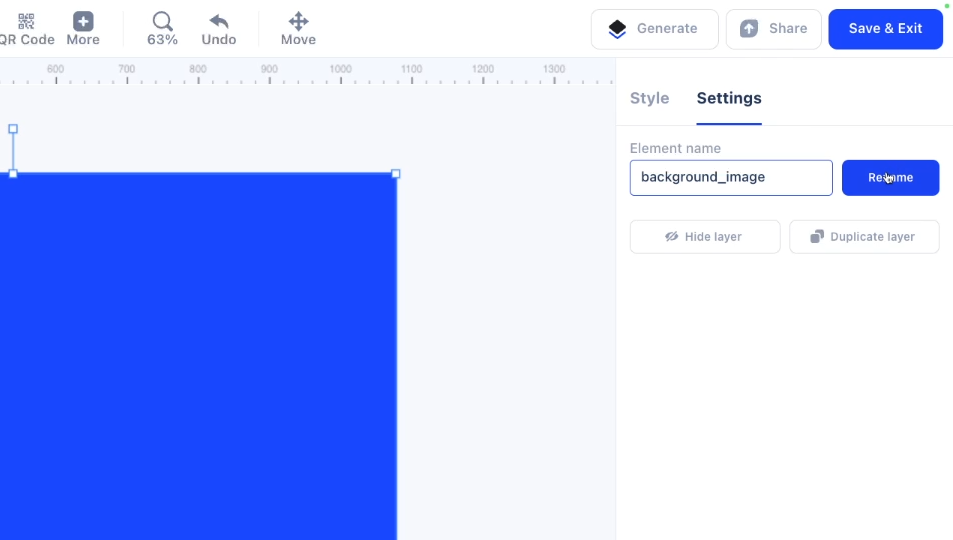
Once your template is all set, click on “Save & Exit” to commit your changes and return to the main Templates menu.
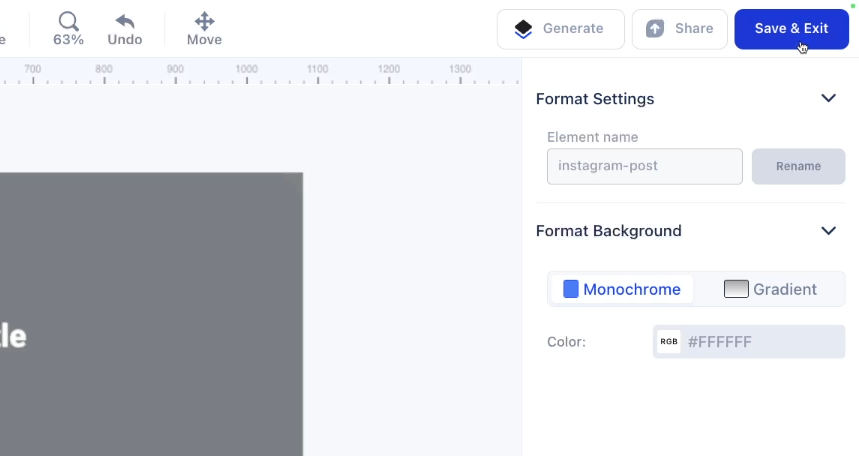
Add additional formats to your template
Each template can include multiple formats. To add more formats to your template click on “Edit” from the main template menu.
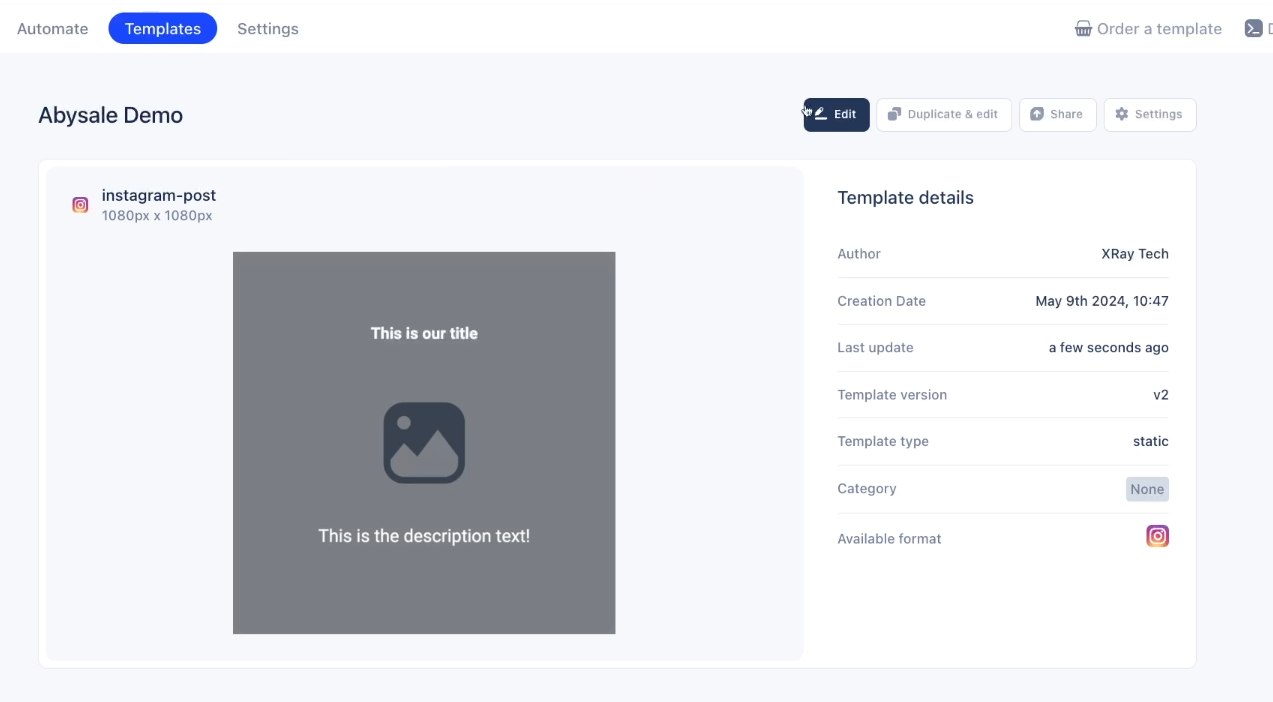
Then, click on “Add New Format” in the left hand sidebar.
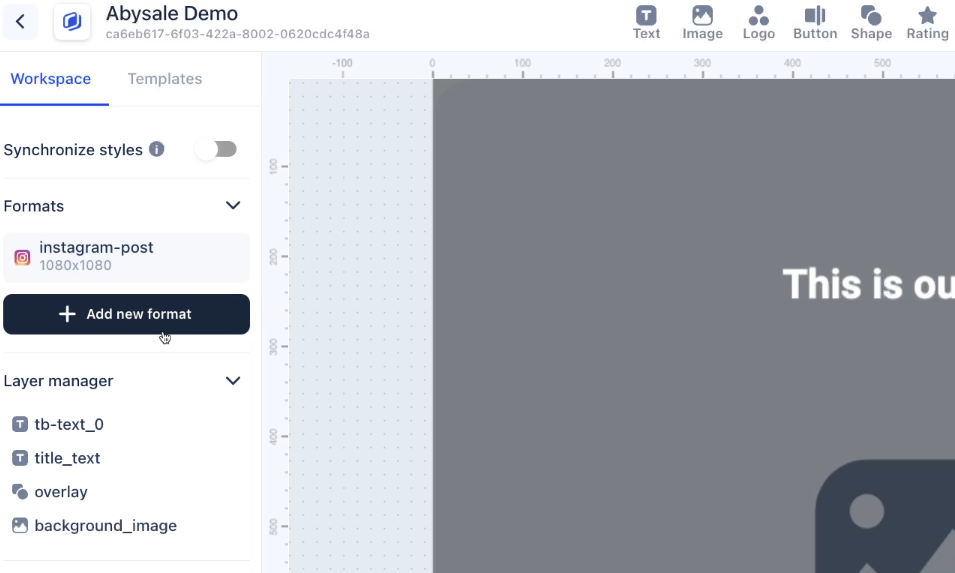
Each format within a template will have to be the same type (Static Image, Animation, or Print), but you can use a wide variety of formats within each type.
For instance, we’ll select a 1280x720 YouTube thumbnail for our second format within this template.
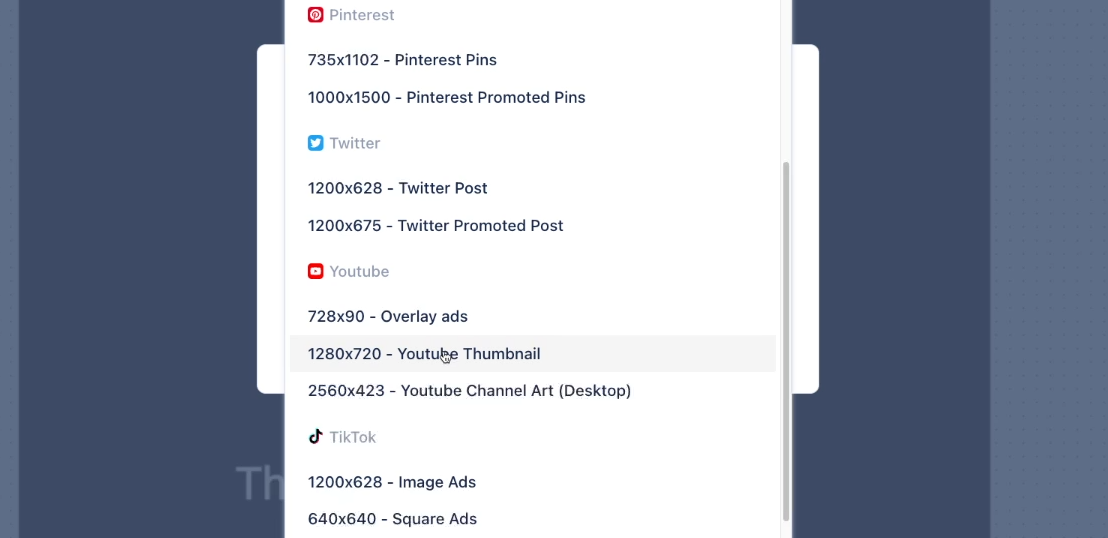
Any formats you add to your template will include all of the same elements as your original format. As you can see below, the background image, overlay, and text boxes are all still present in our new YouTube thumbnail design.
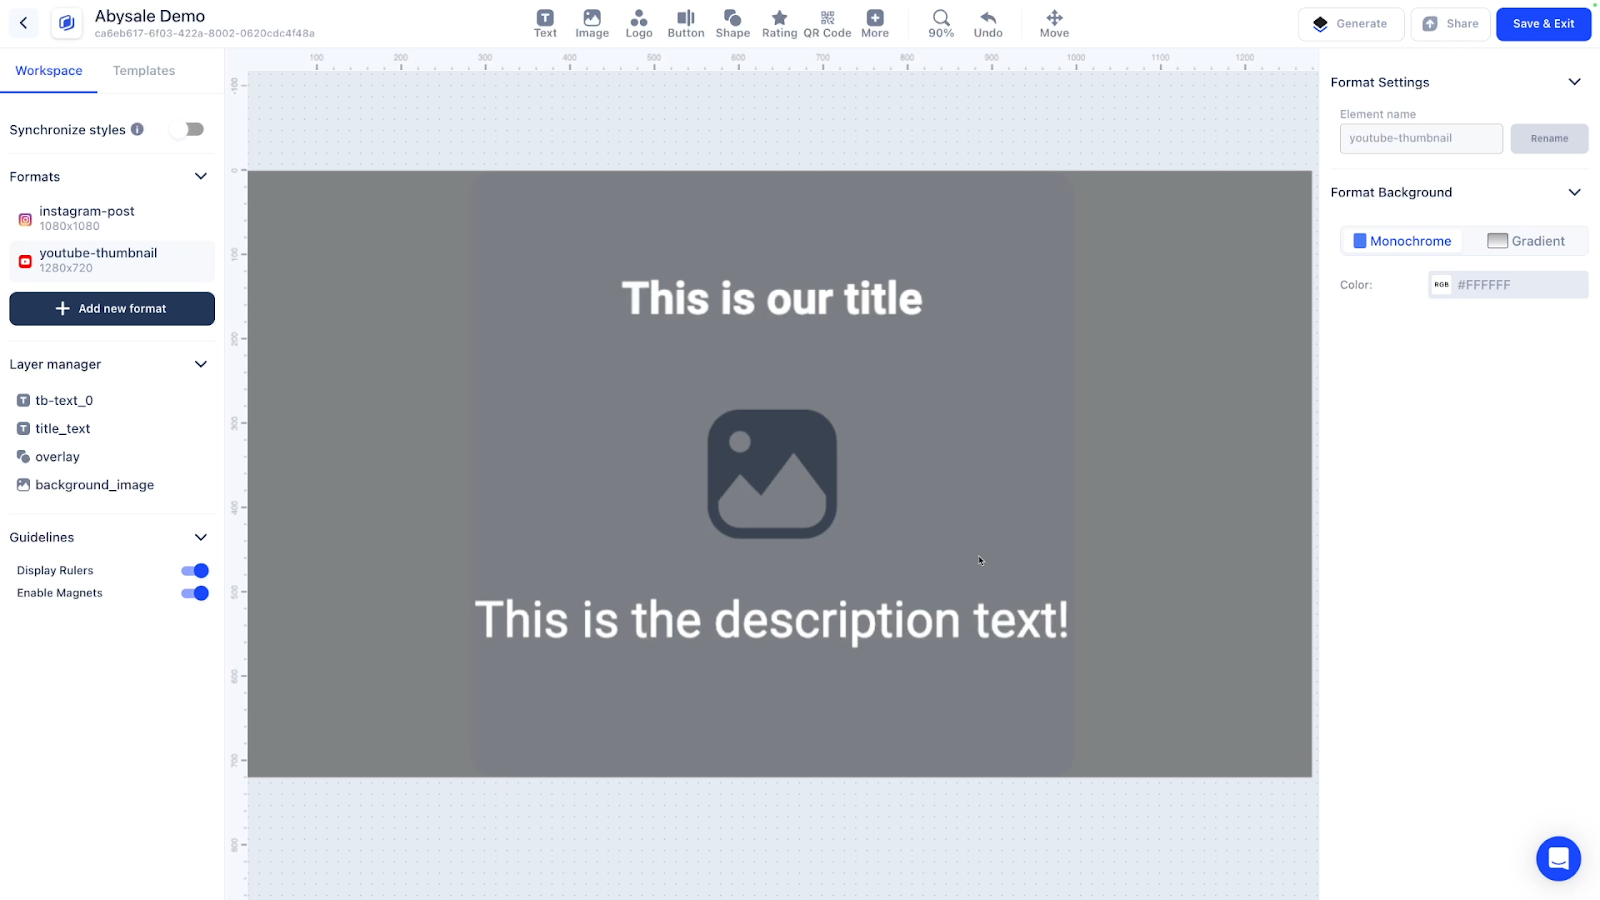
When you customize most settings in one format, the other formats won’t be impacted. For instance, we can change the background image in the YouTube format to “Cover” instead of “Contain” so that it takes up the entire canvas.
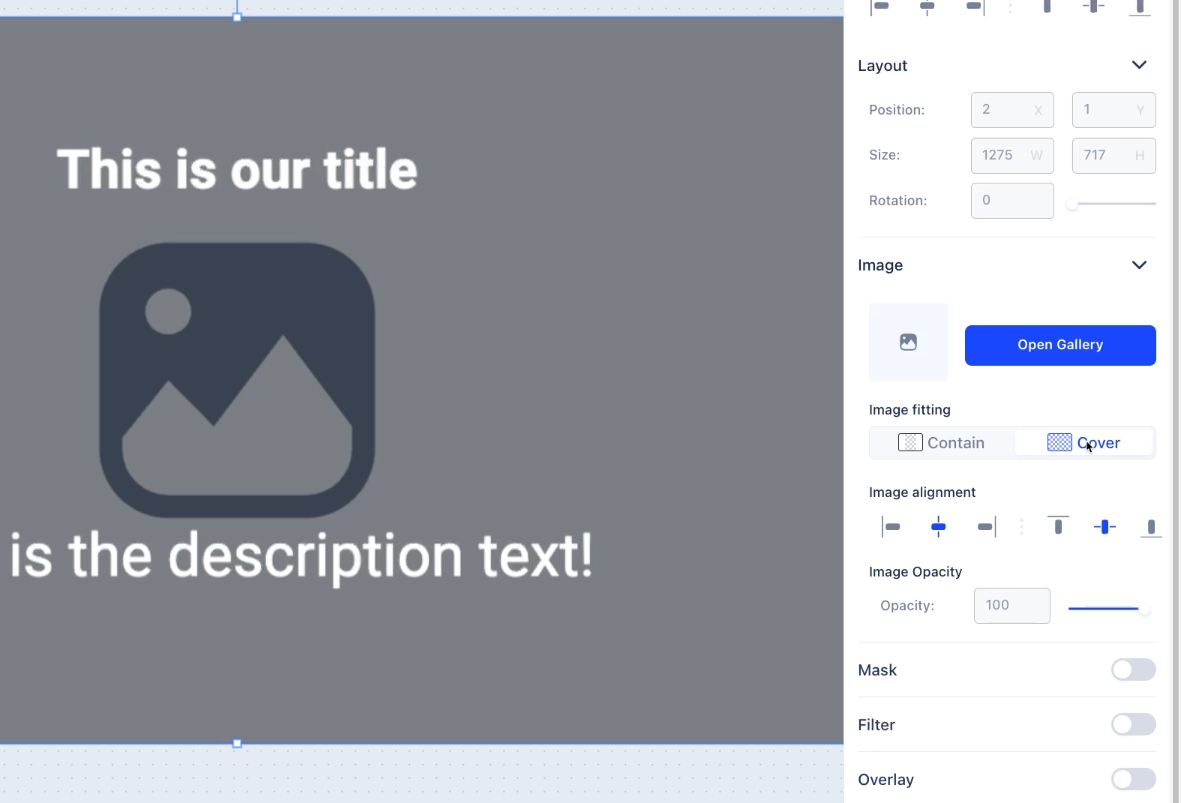
However some settings, such as element names, are applied to all formats universally.
Once your additional formats are finished, click on “Save & Exit” again to return to the template menu.
Set up Airtable and sync it with Abyssale
With a finished template in hand, you’re now ready to create an Airtable base that will populate your Abyssale template automatically.
Getting started with Airtable
To begin, go to Airtable.com and create a free account.
NOTE: While Airtable offers a free plan, you’ll need to be on the “Team” plan or higher to access Extensions, which are necessary for syncing with Abyssale as shown in this tutorial. Airtable does provide a free trial for Teams.
You can learn more about using Airtable in XRay’s 2-part beginner’s guide. Click here to check out Part 1, and click here to explore Part 2.
Creating a table to generate Abyssale graphics
Once you’re signed, create a new base, which will automatically include a new table.
In your table, you need to add a field for each element that you want to replace in your template. For our example, we’ll need a field for each text box, and a field for the background image.
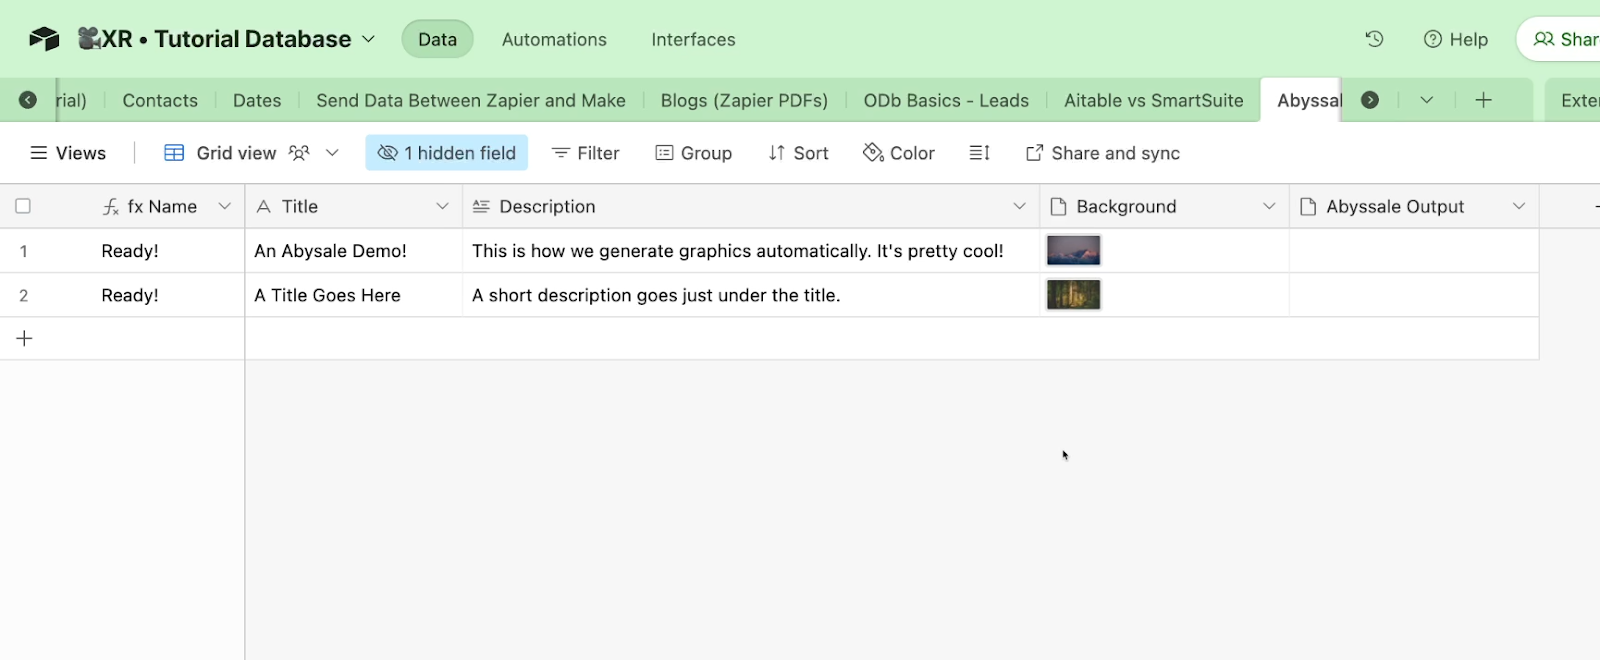
Be sure to use the “Attachment” field type to upload images or other media.

Finally, you need to add another attachment field for Abyssale’s output. This is where final, exported graphics will be stored.
Be sure to add at least one test record to your base that you can use to create a graphic.
Adding the Abyssale extension to Airtable
Once your table’s fields are all set, you can add the Abyssale extension.
Click on “Extensions” in the top right corner to access Airtable’s extension menu.

Then, select “Add an extension”.
Search for Abyssale, then add the extension to your base.
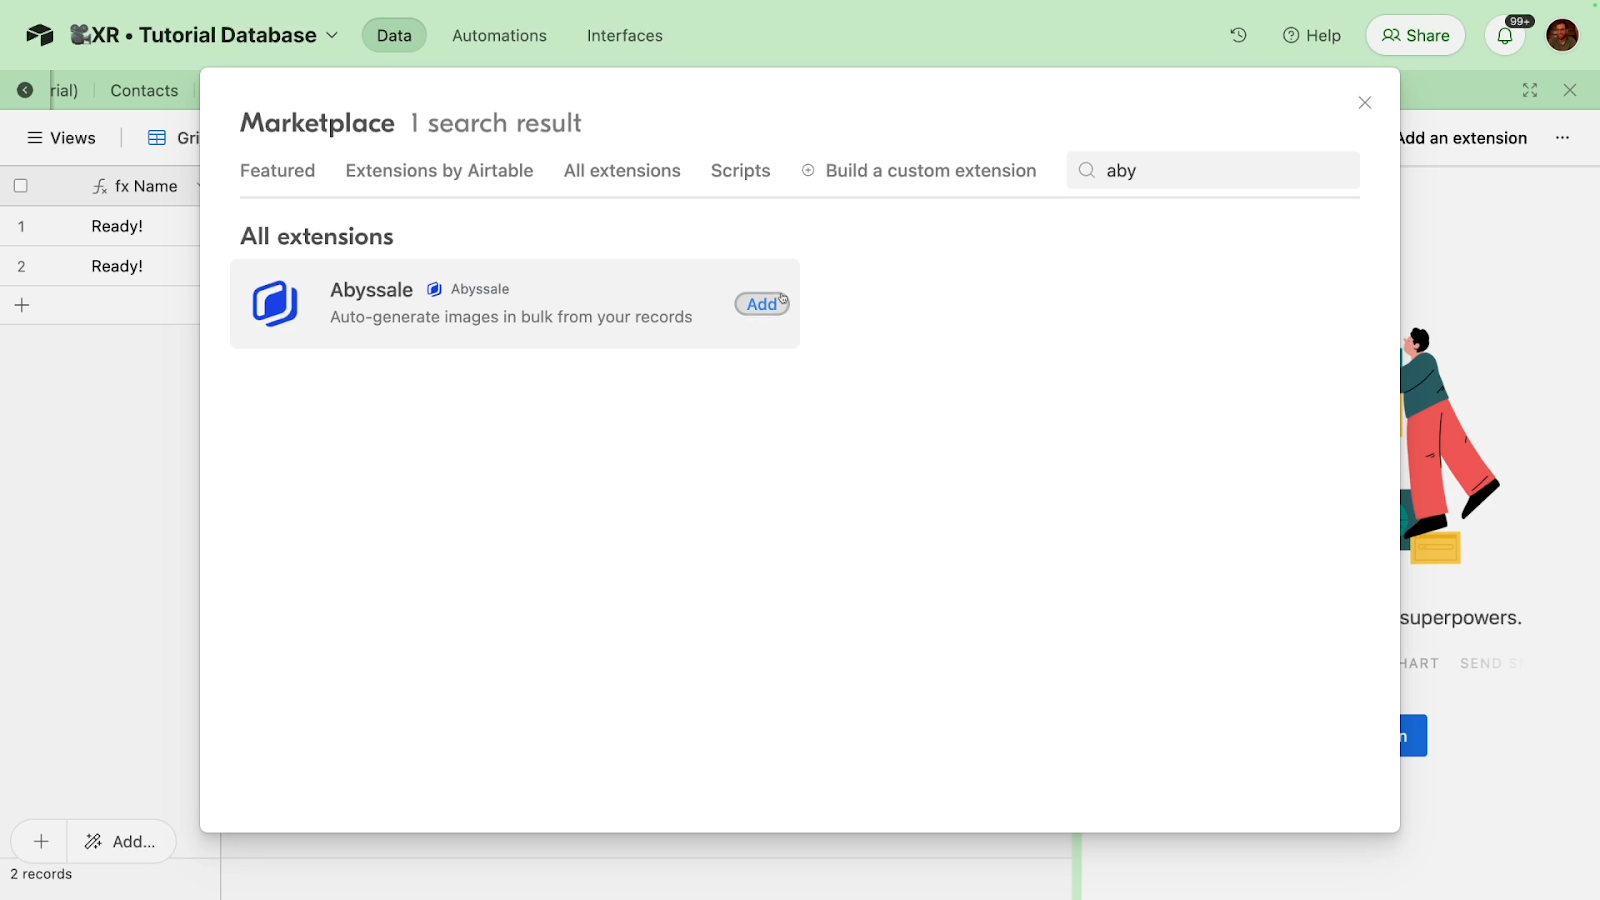
Once the extension is added, you’ll see a pop-up prompting you to set it up. Click on “Get Started” to begin the setup.

Follow the steps in this pop-up to connect your account and generate an API key.
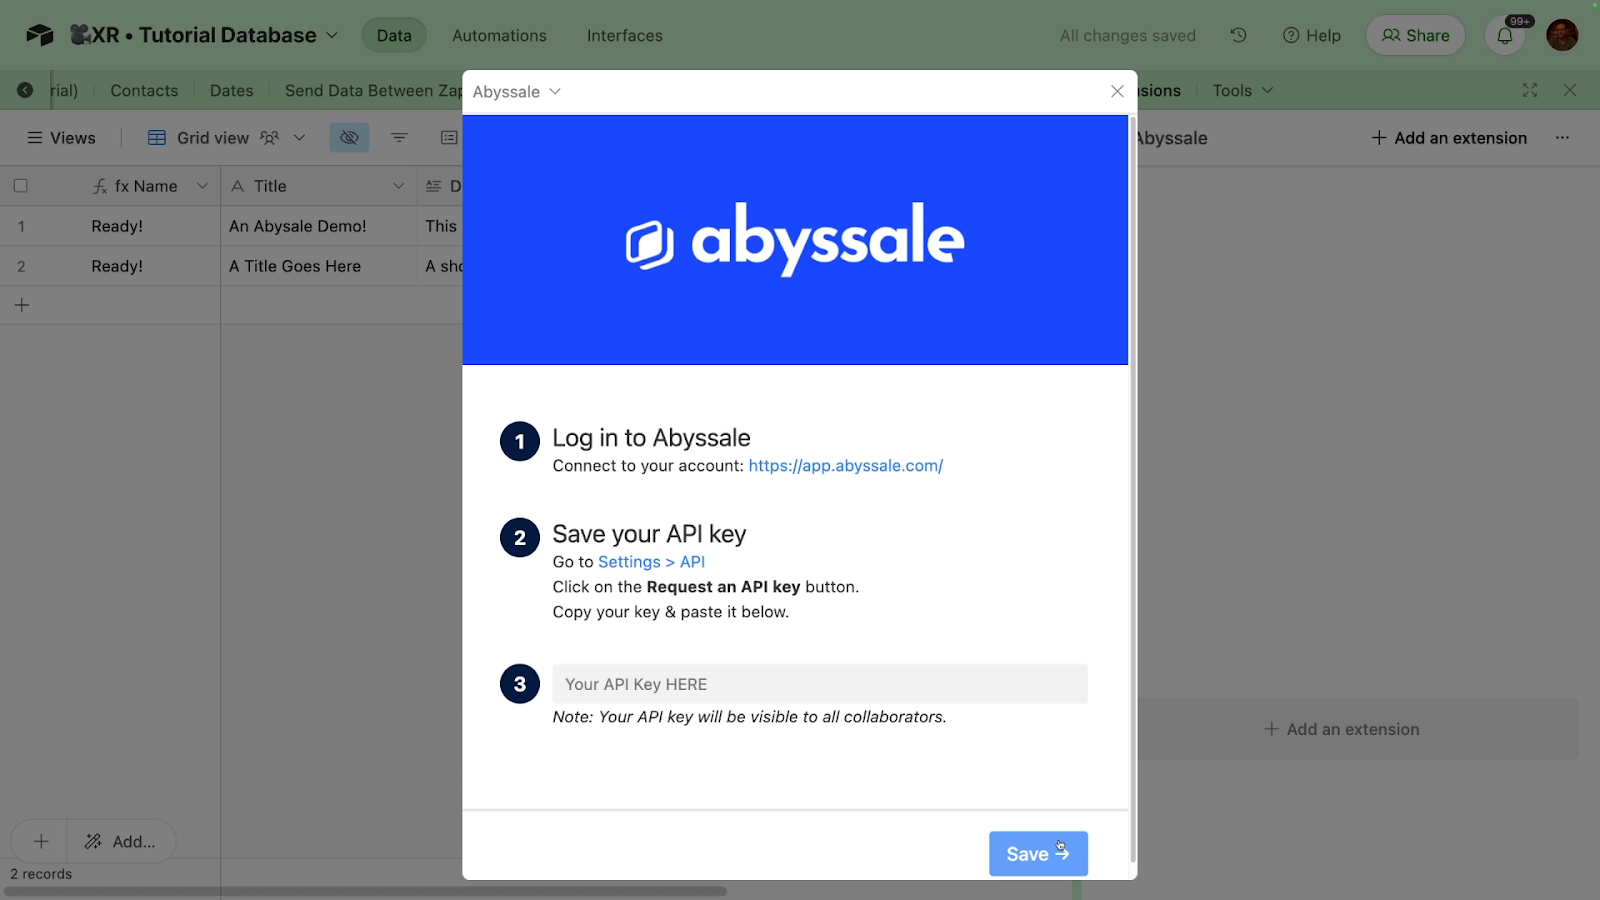
You can create an API key by clicking on “Settings”, choosing “API key”, and selecting “Request an API key”.
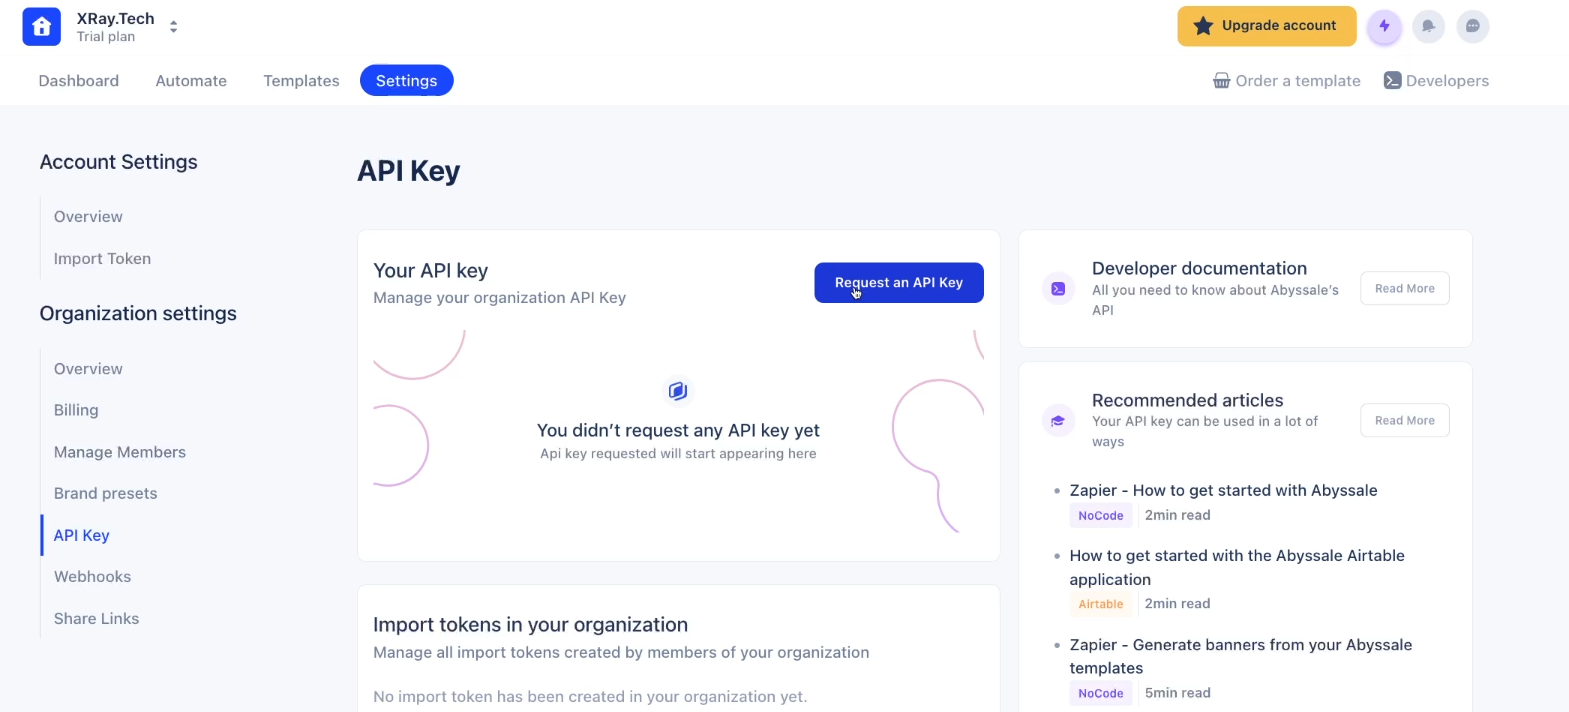
Copy the key that gets generated, and paste it into the pop-up window in Airtable.
Then, click on Save to finish linking your Airtable and Abyssale accounts.
Mapping an Airtable table to an Abyssale template
Now that the accounts are connected, you can sync a specific table with a specific template.
In the Abyssale extension in Airtable, choose a table that you want to use. Select the specific view within your table that should be referenced.
Then, choose a matching template from Abyssale that you want to populate with this Airtable data.

Once you select a table and template, you’ll see a list of every element (or “Layer”) from your Abyssale template.
Enable the toggle next to any layer that you want to replace with content from Airtable, then choose the Airtable field that you want to connect to that layer as the “payload”. You can also change the color of any text layer by providing a hex code in the “color” field. Alternatively, you can keep the color set in the Abyssale template by leaving this field set to “None”.
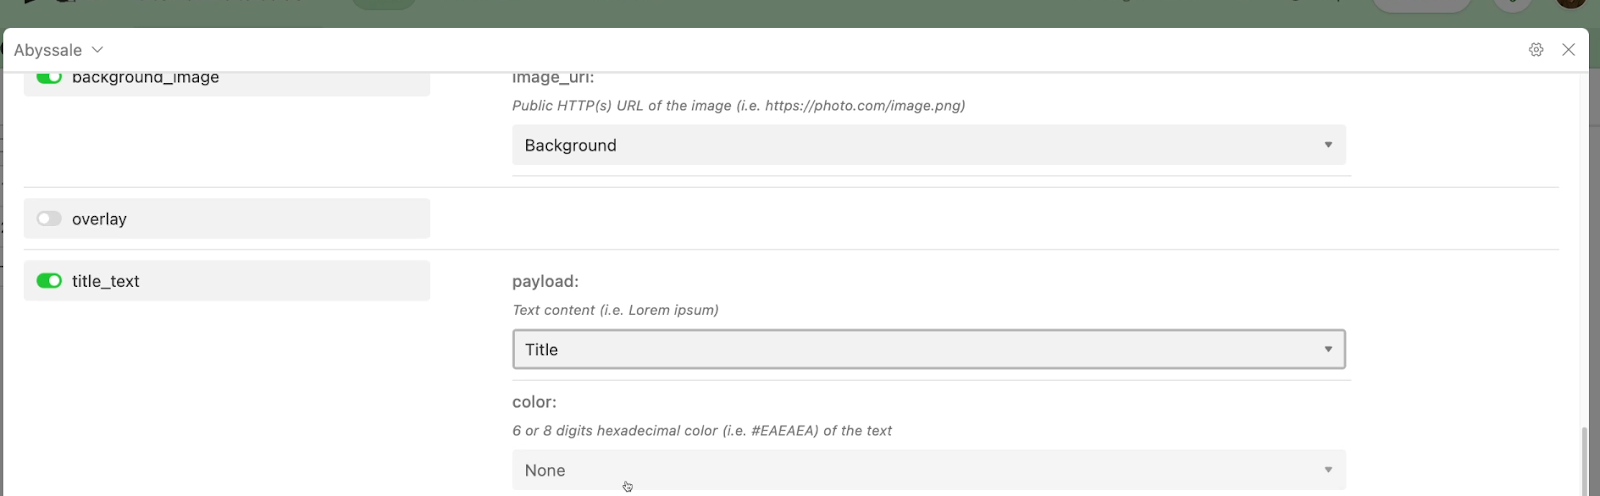
Once you’ve mapped all of your fields, you can designate a field for Abyssale’s output. You can make this choice in the “Save banners to this URL field or attachment field”. As the text indicates, you’ll need to choose either an attachment field or a URL field to store Abyssale’s output.

Once you’ve configured the sync, you can click on “Generate Banners” to create some graphics.
Before it starts creating graphics, the extension will tell you how many assets will be created, and will explain that only successful calls will count against your total credits.
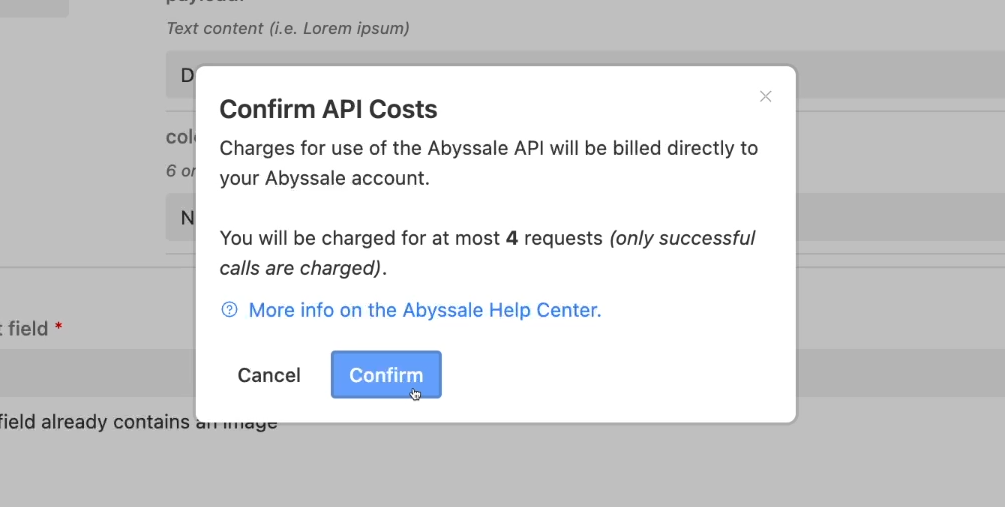
Click “confirm” to start generating your graphics.
Abyssale will process your requests, and then show you a preview of each finished graphic.
Review your exported graphics
To see the full resolution images generated by Abyssale, close the extension window, and open the records in your Airtable base.

By clicking on “Generate” once, we produced four images - a YouTube thumbnail and an Instagram image for both records in our base.

Going further with Abyssale
Bear in mind that the template we’ve demonstrated here is just a basic starting point. You can go further and build very useful automations with your templates.
For example, we’ve worked with a company to build an Abyssale system for their Etsy store where user-uploaded images for blankets and signs are automatically assembled into print-ready graphics.
Instantly generate graphics in several formats at once
With tools like Abyssale, you don’t need to waste your time resizing images and text boxes manually over and over again.
You can generate all the assets you need for every platform and device with a single click. To get started, just try out Airtable and Abyssale for free, and follow the steps in this guide.
If you’d like to learn more about workflow automation, be sure to check out our blog or our YouTube channel. You can also follow XRay on Twitter, Facebook, or LinkedIn.
Creating an automation from scratch with Zapier’s visual editor is pretty simple and straightforward.
But did you know that there’s an easy way to get a headstart?
In this post, we’ll show you two ways to create, share, and use automation templates in Zapier.
We’ll start by explaining the two different types of Zap templates that are available, and we’ll break down their pros and cons.
Then, we’ll give you detailed walkthroughs for building, sharing, and using both template types.
Simple Templates vs. Developer Templates
Before we begin creating templates, it’s important to understand that there are actually two different types of templates that are available in Zapier.
When a user copies a Simple template, the app and event for each step will be pre-selected. However, none of the settings within each step will be configured. Instead, each field and option will revert to its default state.
With developer templates, every setting that’s specified in the template will be pre-configured for users. Each variable, text, and option chosen in the template will be preserved when a user copies the template to their workspace.
Simple templates can be easily created by any Zapier user and shared with anyone on the web. On the other hand, developer templates are primarily intended for developers who have built integrations for their software on Zapier (e.g., a Google Docs dev would create these templates for Google Docs).
Neither simple templates nor developer templates support branching paths.
Note: the terms “simple templates” and “developer templates” are not official; we’re just using them here for clarity.
Duplicating Zaps for internal templates
If you’d like to create a template for internal use only, then we’d recommend creating a normal Zap, sharing it with your team, and duplicating it.
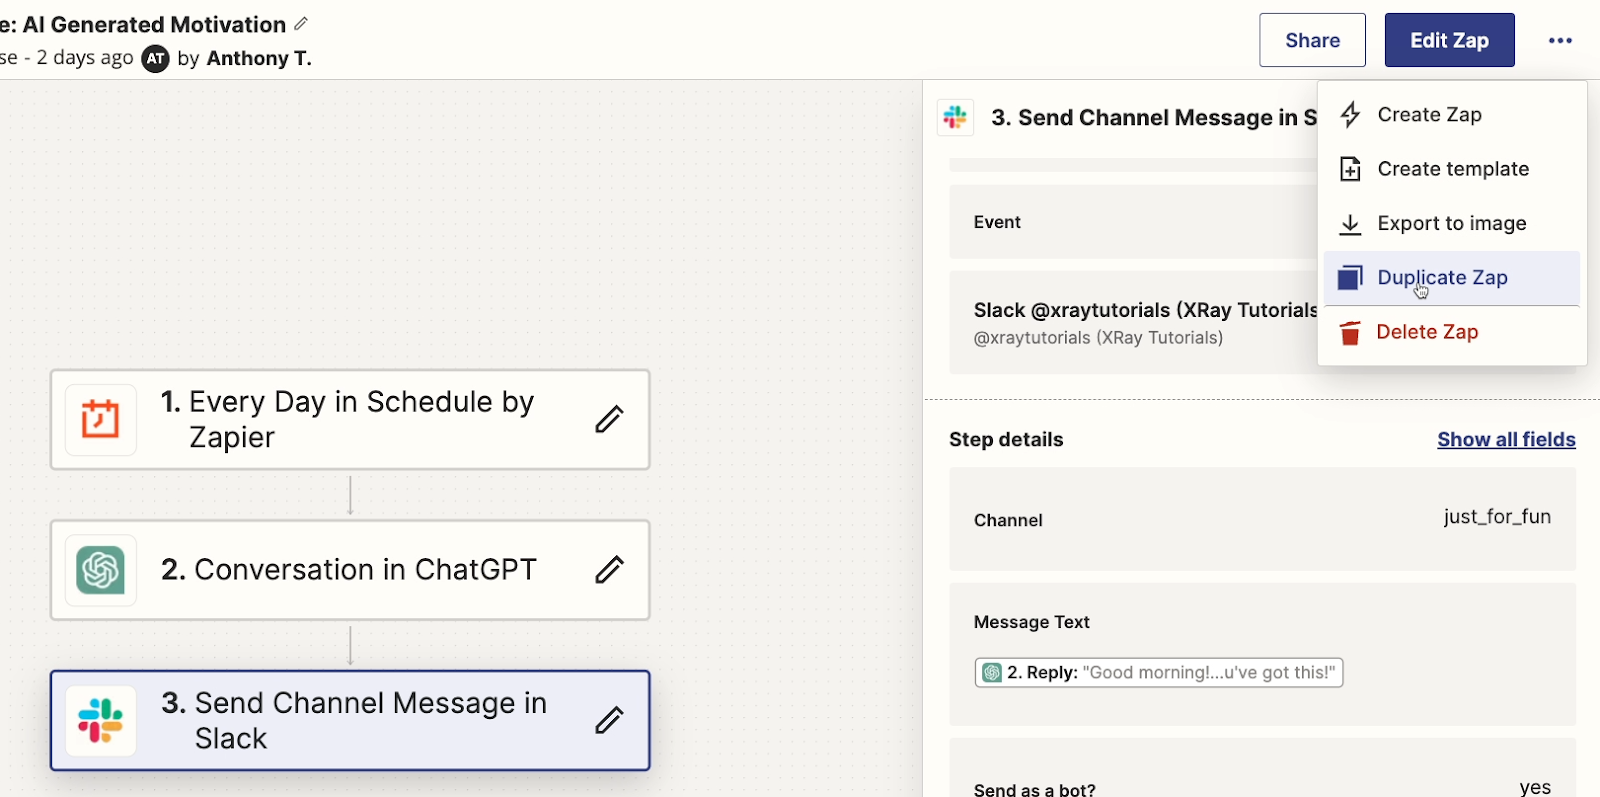
When you duplicate a Zap, every action will be replicated and configured in its entirety - paths included.
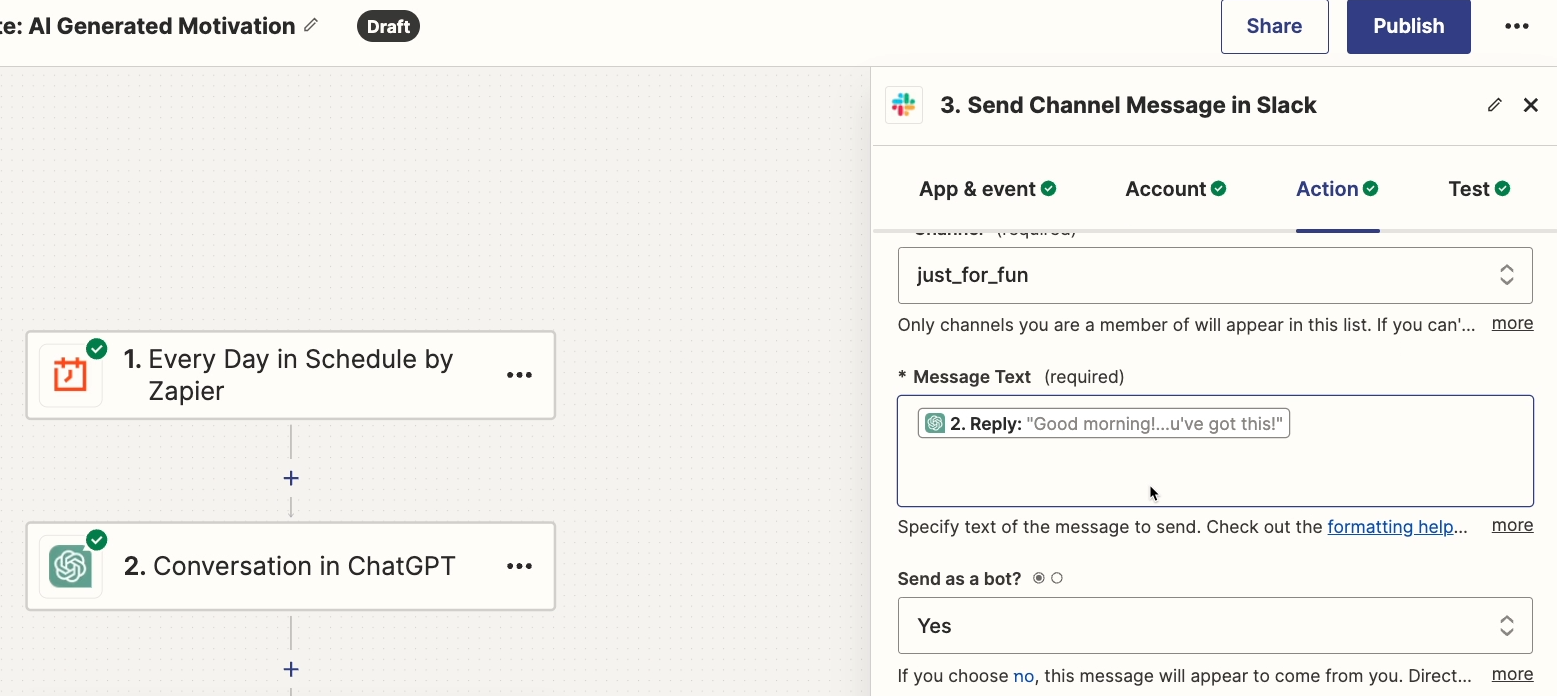
However, users outside of your workspace will not be able to directly duplicate your Zaps.
JSON Exports/Imports
Zapier users on the “Team” plan or higher can also share and duplicate Zaps by exporting and importing JSON files for each Zap.
However, if you’re not using a team plan and still want to get a head start on your Zaps, then you’ll need to use either simple templates or developer templates.
Creating a simple template in Zapier
To make a simple Zapier template, you’ll need a finished Zap that you want to turn into a template.
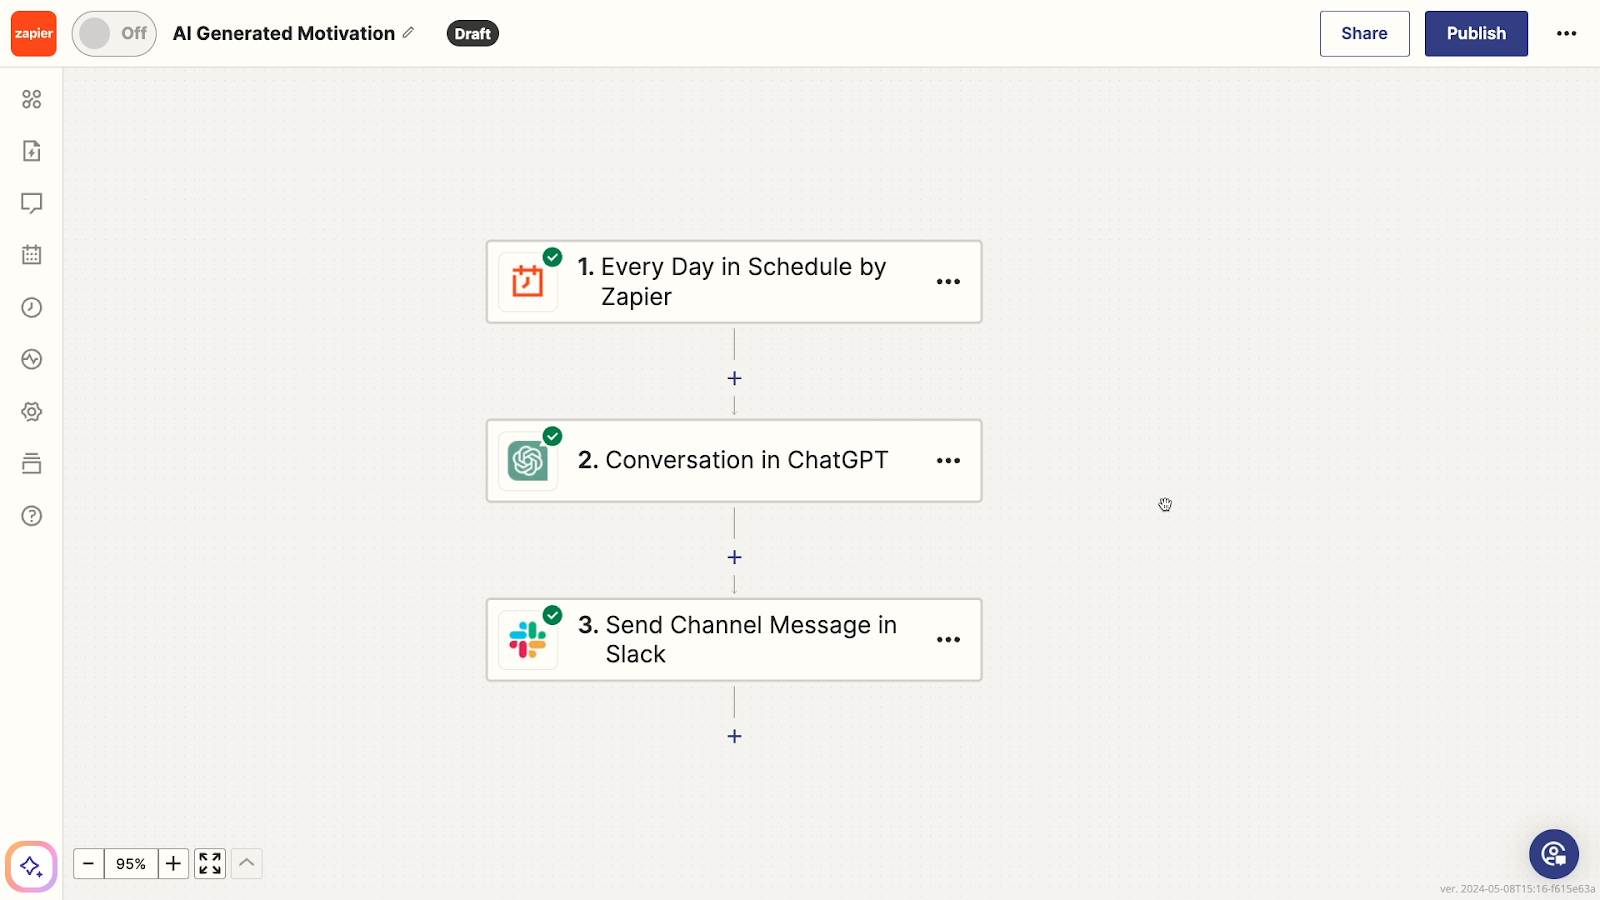
For example, the finished Zap pictured above sends an AI-generated motivational message in Slack every weekday.
You can create a template from either the Zaps menu, or from the visual editor.
From the Zaps menu, just click on the arrow next to your Zap’s name, then select “Share Template”.
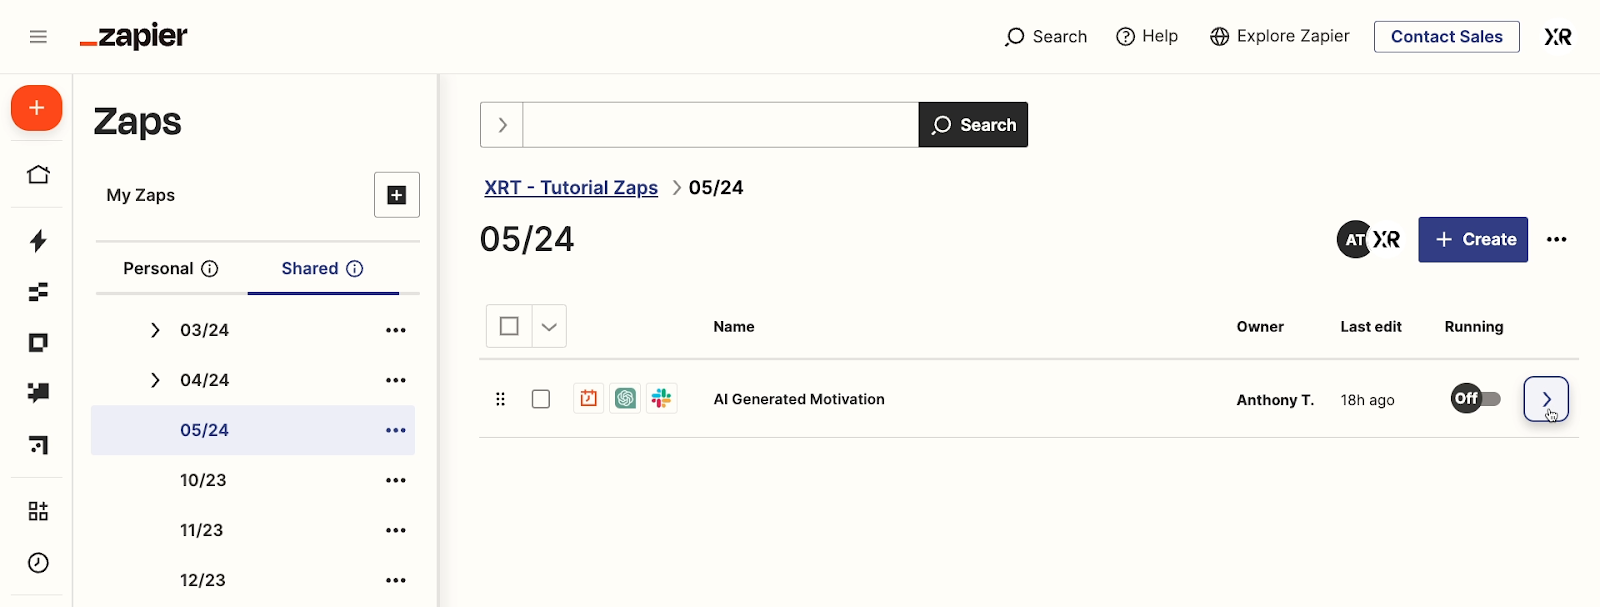
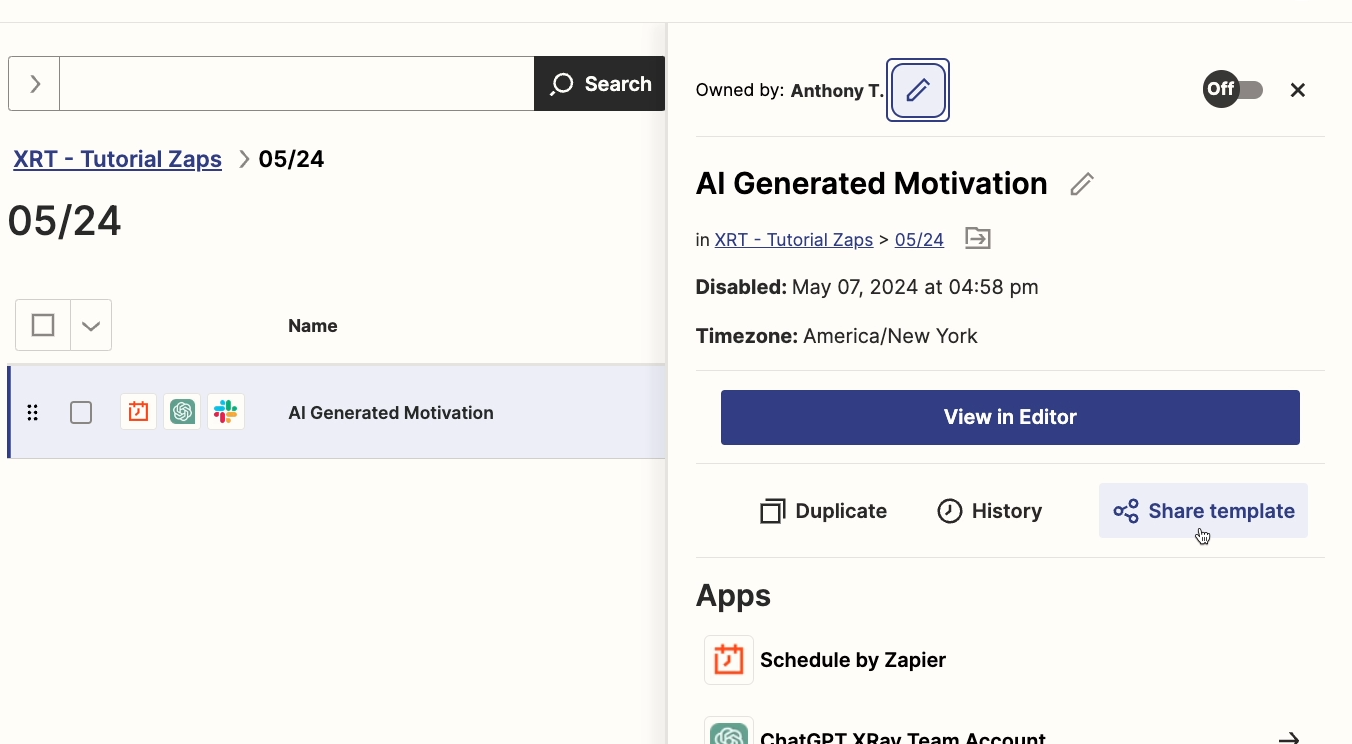
Alternatively, from the visual editor, you can select the three dots in the top right hand corner.

Then, choose “Create Template”.
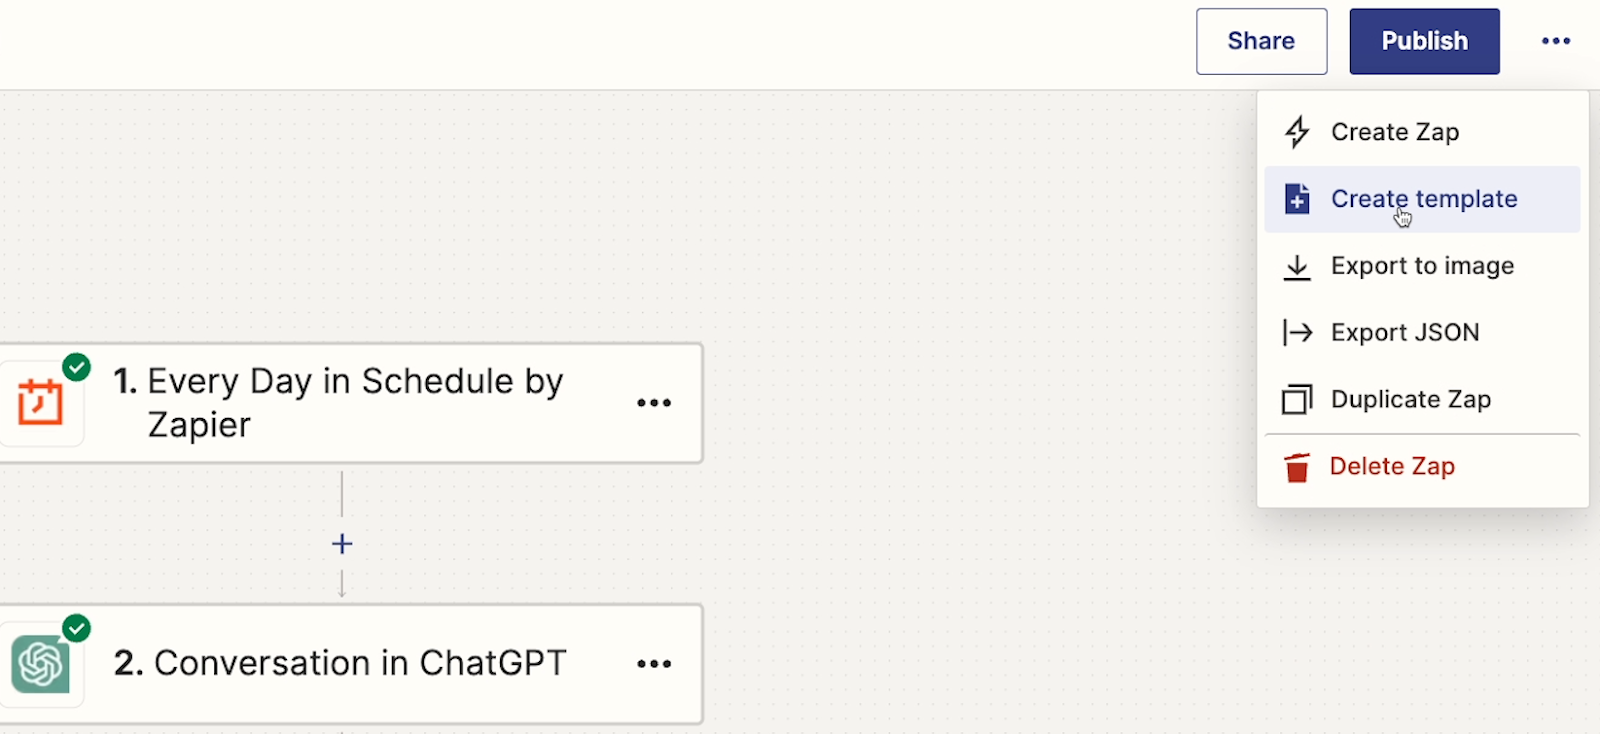
Both of these options will lead you to the same simple template builder.
Adding a title and description to your simple template
Once you’ve opened the template builder, all you have to do is give your template a title and a description. By default, the template will use your Zap’s title, and Zapier will provide a description that summarizes each app and action.
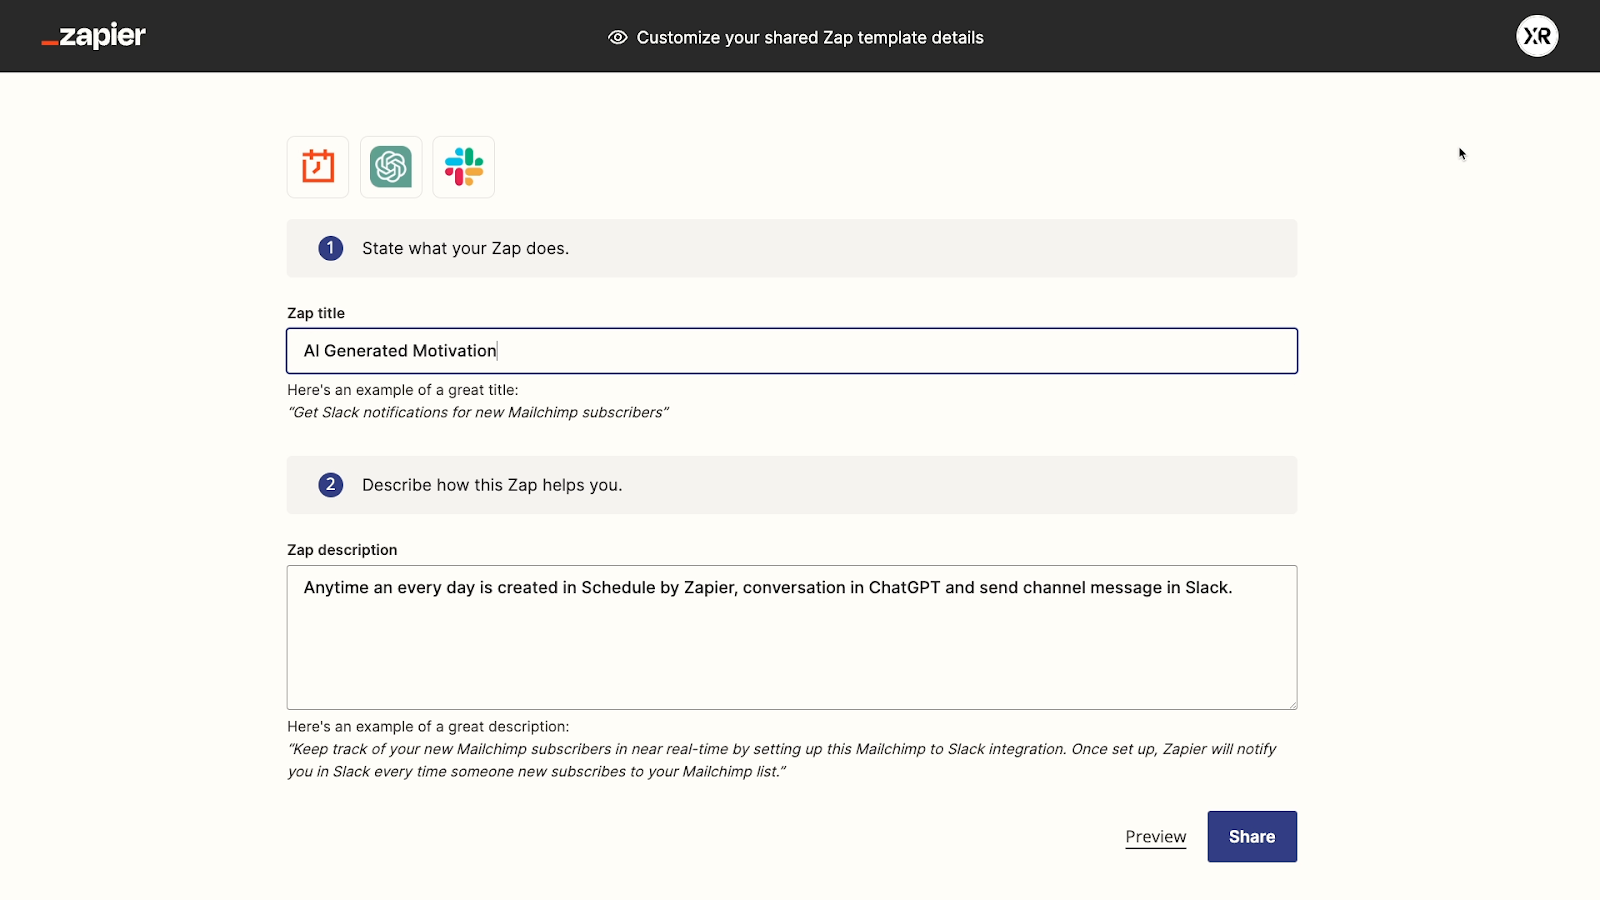
It’s best to make sure you describe the apps and actions involved in your template. You may also want to suggest a use case for this automation to give more context.
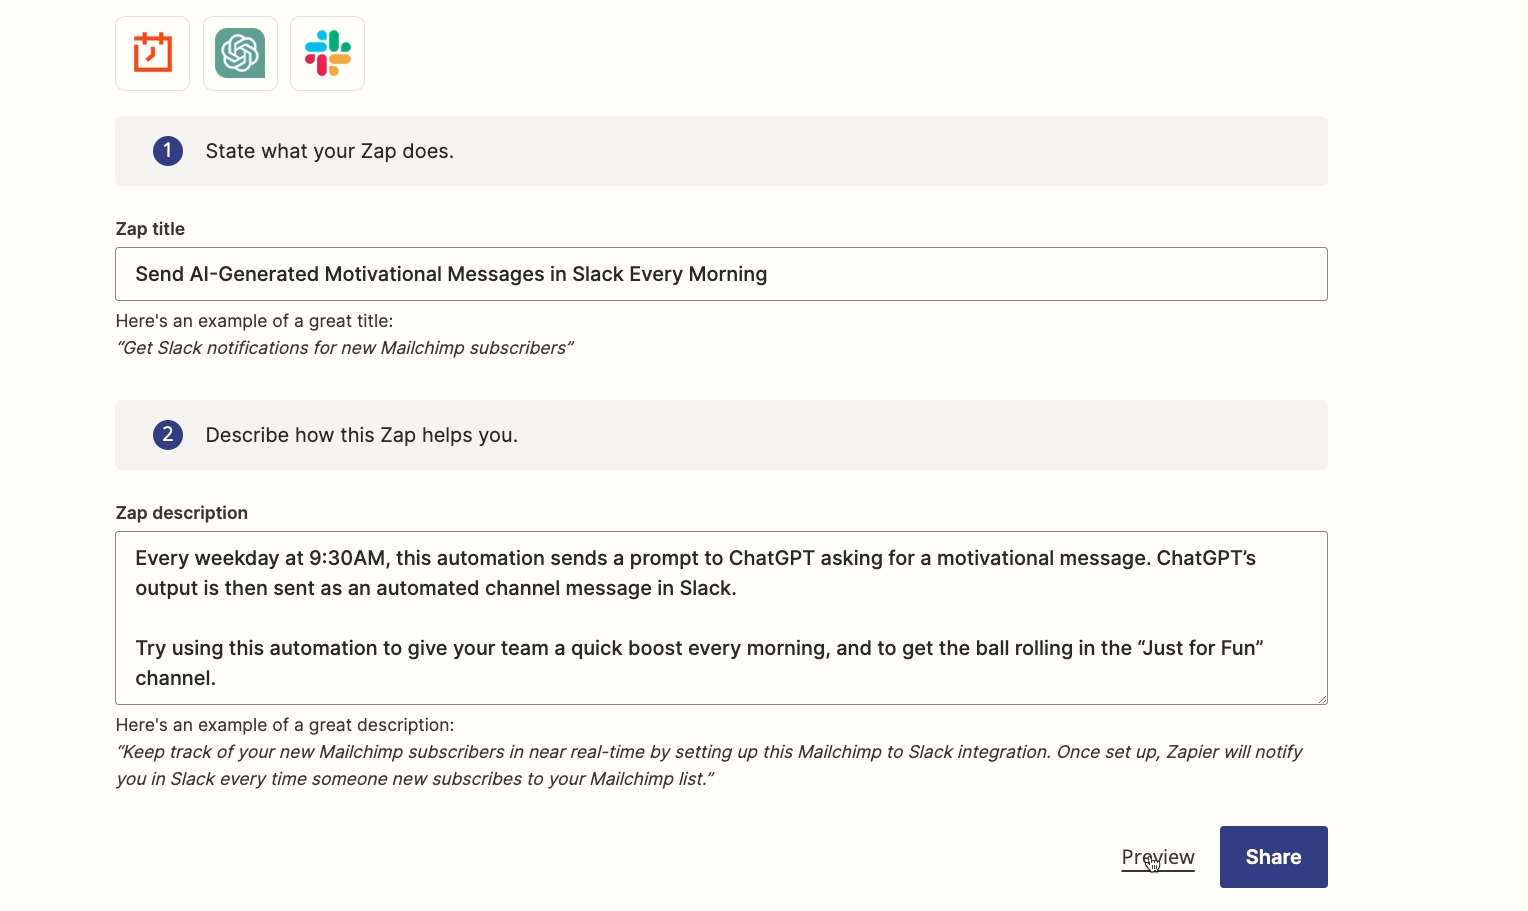
After you’ve drafted your title and description, you can click “Preview” to see what the finished template will look like to other users.
If you’d like to make any changes, just click on “Edit” to go back to the template builder page.
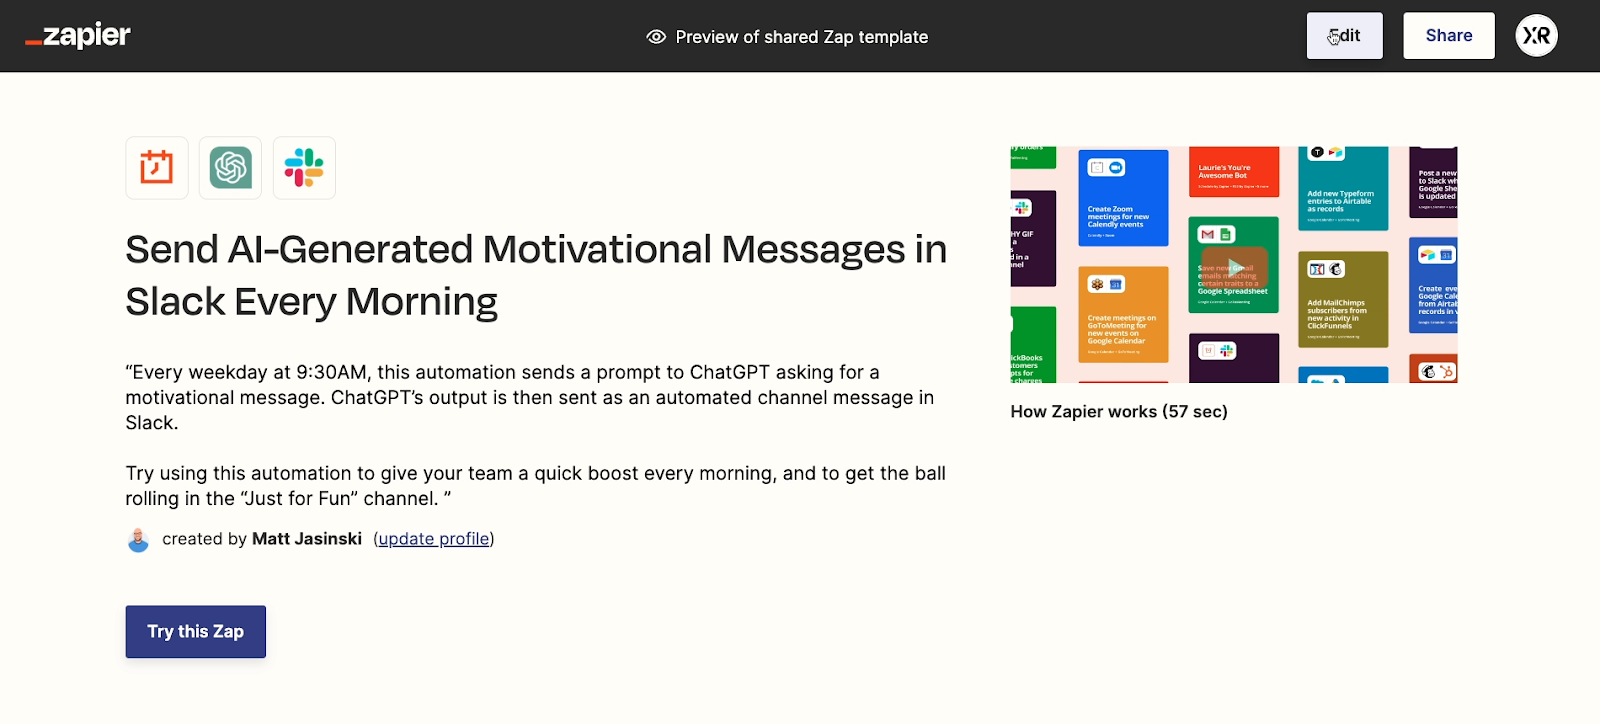
Once it’s all set, click “Share” to publish your template.

Zapier template sharing settings
Once you click “share”, a window will pop up where you can copy the link to your template and adjust the template’s visibility.
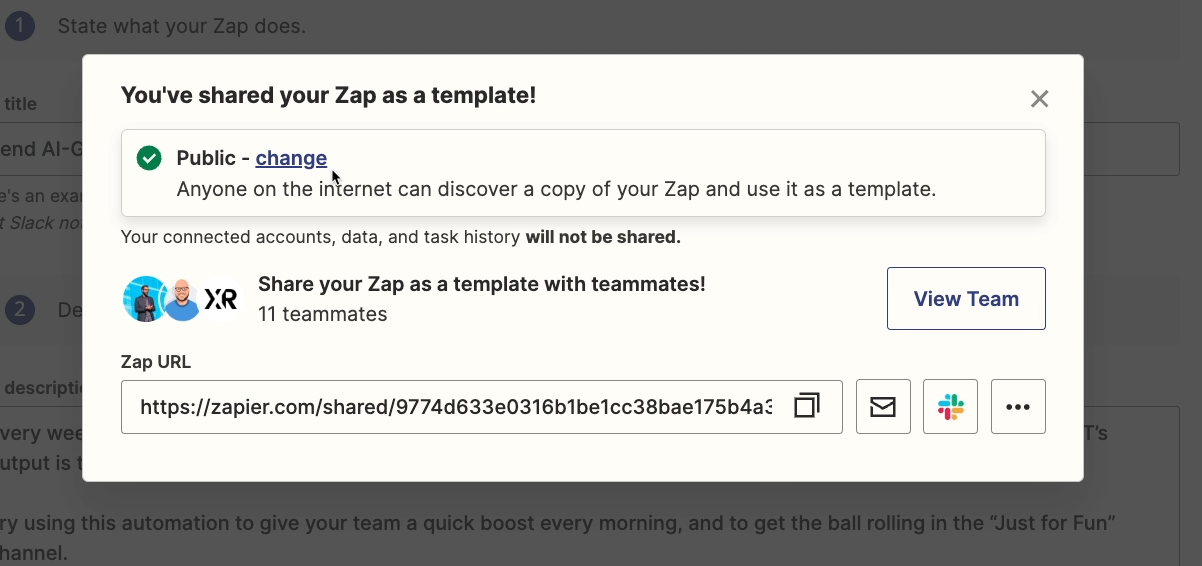
Click on “change” to choose who can see and copy your template.
You can select:
• Publicly shared, to share the template with anyone on the web.
• Anyone with the link, to ensure that only people who have the link will find your template.
• Only your team, to limit access to other users in your Zapier workspace.
Although as noted earlier, it’s usually best to duplicate normal Zaps if you want to create a template for internal use.
• Turn off, which you can select to stop sharing the template.
Copying and using a simple template in Zapier
Now let’s explore the process of copying a Zapier template. Begin by copying the link to one of our example templates in this resources board, or any other publicly accessible template.
Paste the template into your browser.
The link will open up a template page, where you can see the template’s custom title and description up top. Note that you’ll also see the profile picture of the person who built this Zap.
To copy the Zap, click on “Try this Zap”.
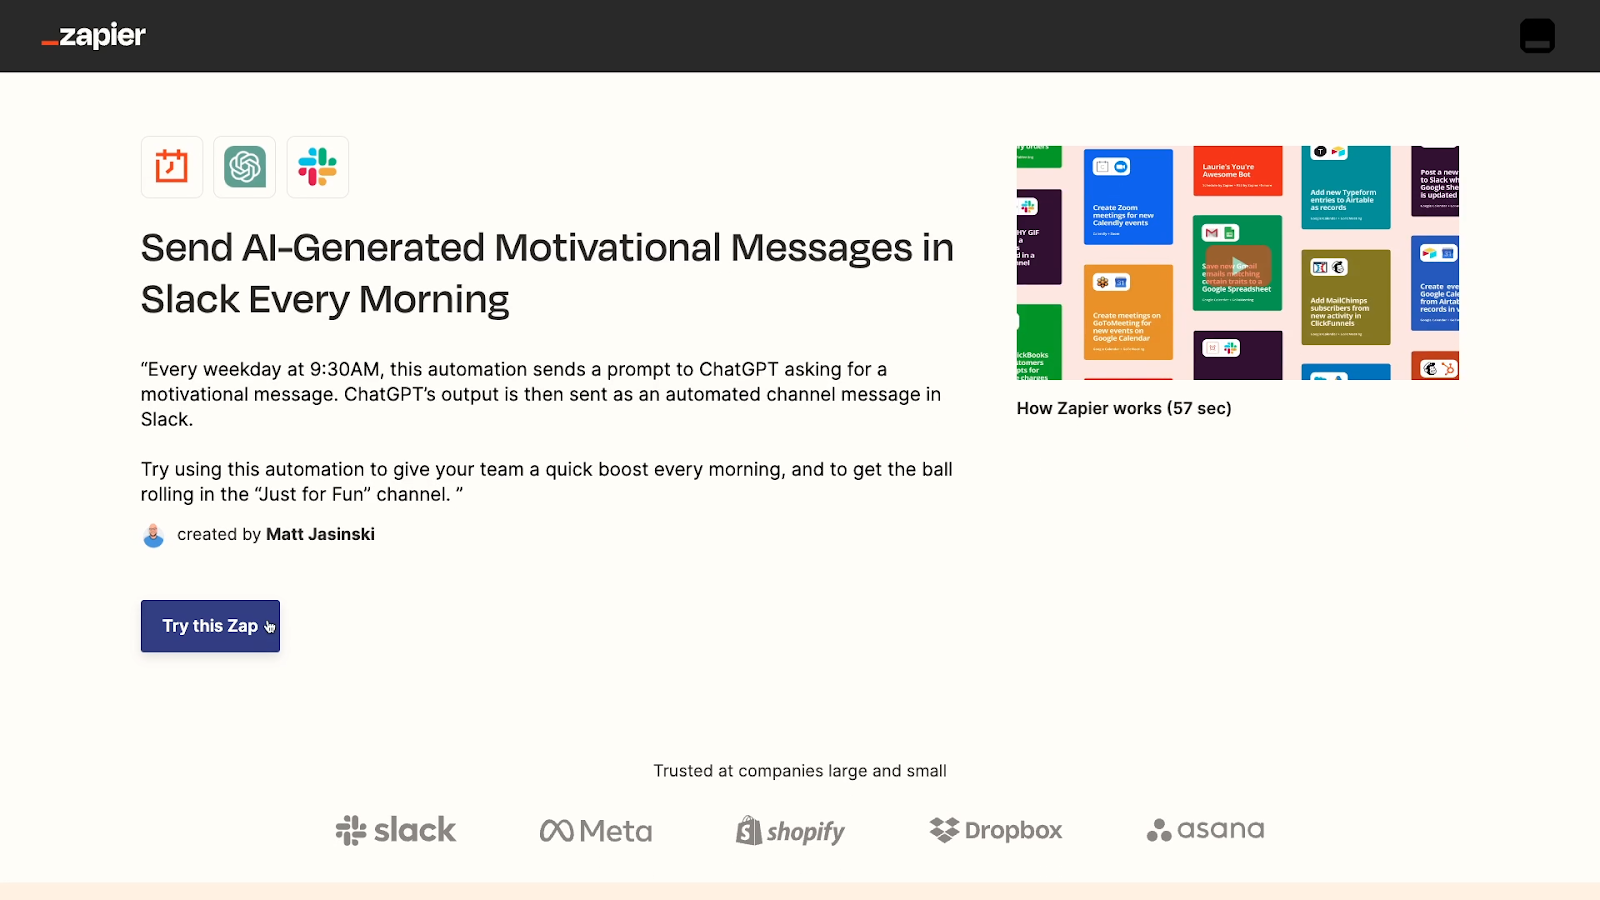
The Zap will immediately be copied to your Zapier account. The correct apps and actions will be pre-selected for each step.

However, none of the settings or variables have been configured.
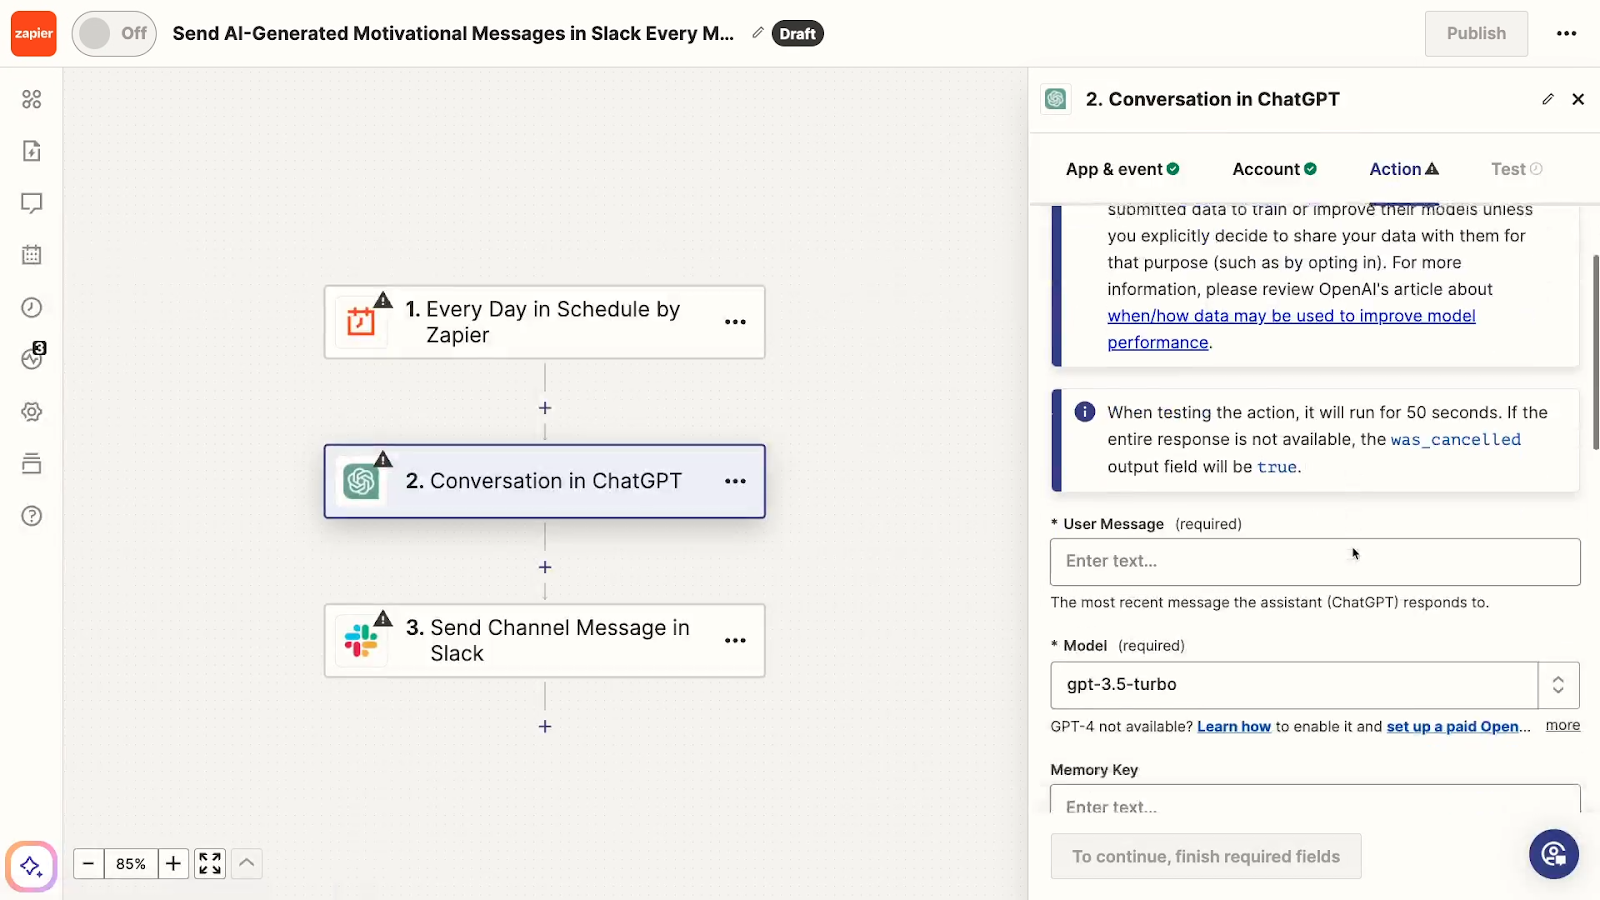
To finish setting up a copied Zap template, you’ll need to sign in to each app and adjust all other settings manually.
Creating a developer template in Zapier
If you want to create a template with pre-configured actions, you’ll need to create a “developer” template.
To start, go to developer.zapier.com, and select “Zap templates”.
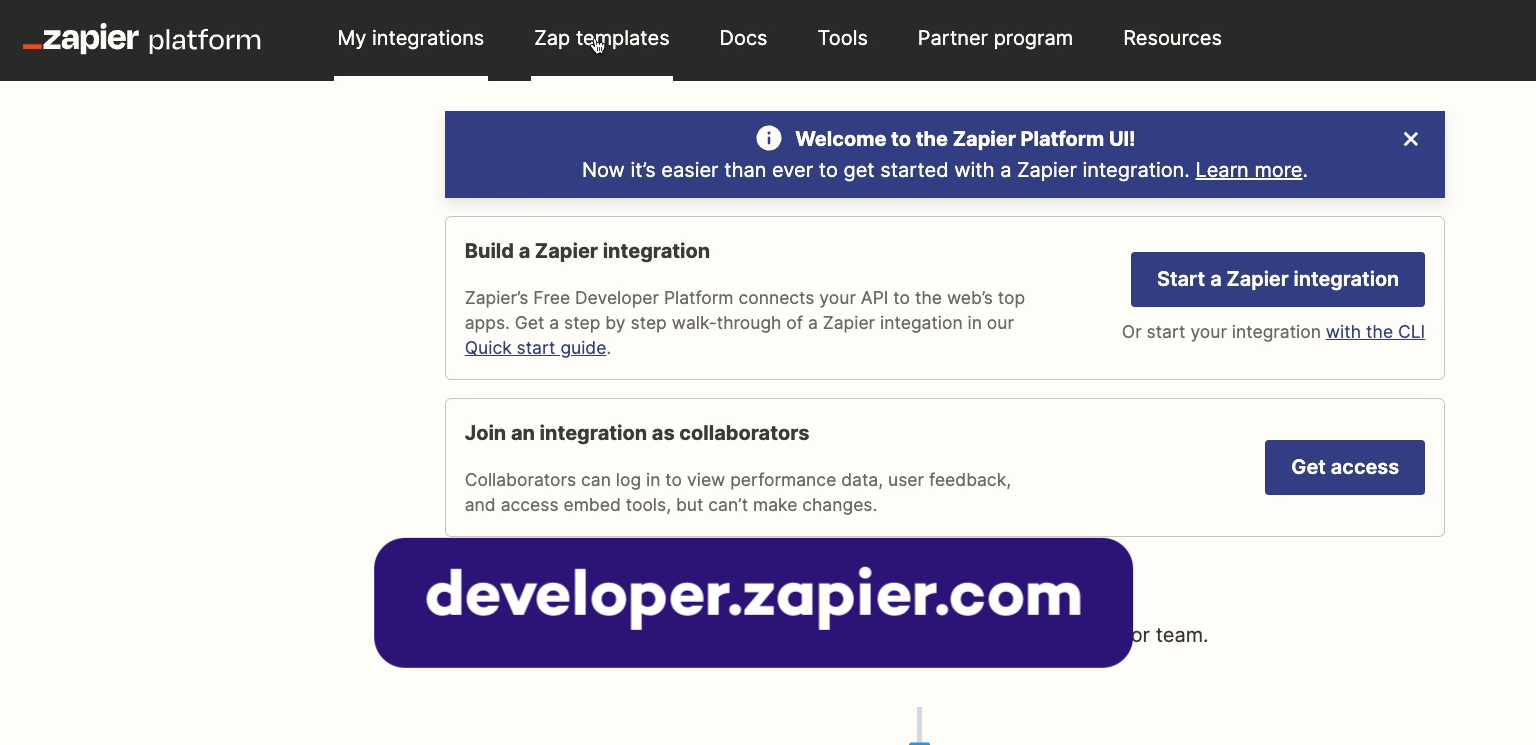
Then, create a new template.
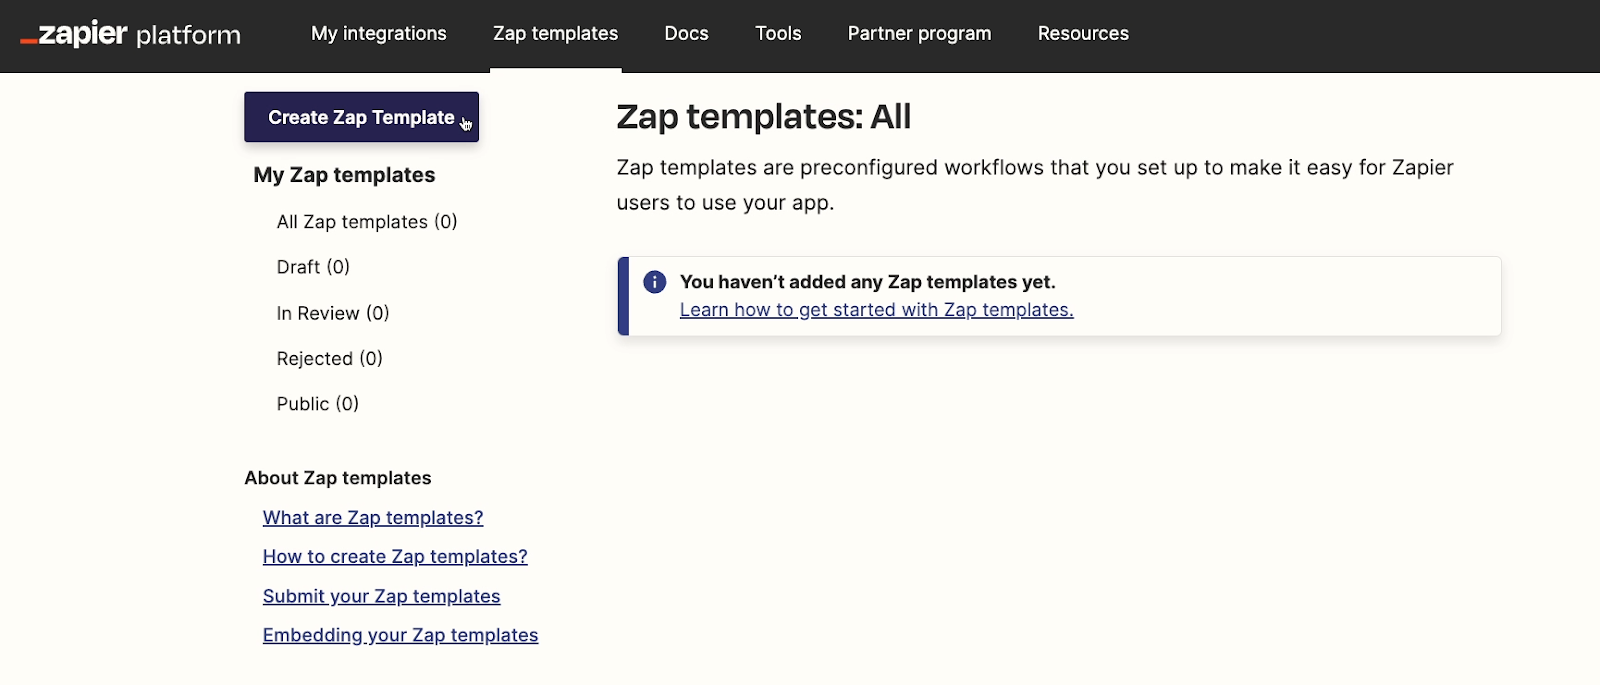
From here, you can build a Zap more or less the way you would normally, although the new visual editor isn’t available here yet.
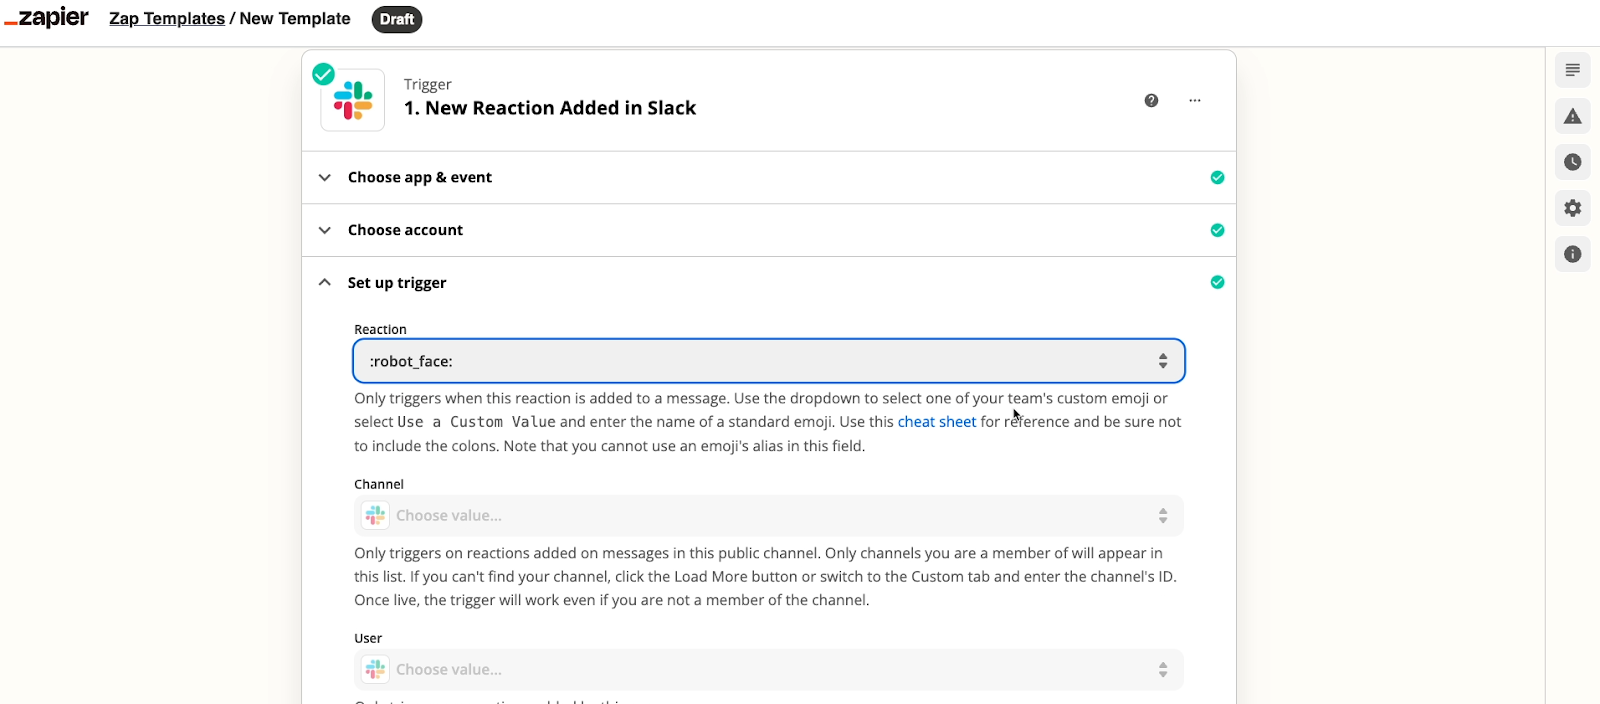
The most important difference is that you’ll have to use placeholder test data. You can’t sign in to your accounts to retrieve real test data.
And since you’re stuck with placeholder data, sometimes, not all the usual variables will be there. It’s up to each app’s dev team to create the default placeholder data for their integrations, and in some cases, they may skip a few variables.
You can check out some Zapier help docs in the resources board for instructions on how to create missing variables yourself.
Provide pre-configured data with a developer template
Unlike a simple template, any configuration that you provide here will be preserved when users copy this template.

Text, variables, and other settings will all be prefilled.
Preparing your developer template for review
After adding and configuring your steps, you can add a title and description just like with a simple template.
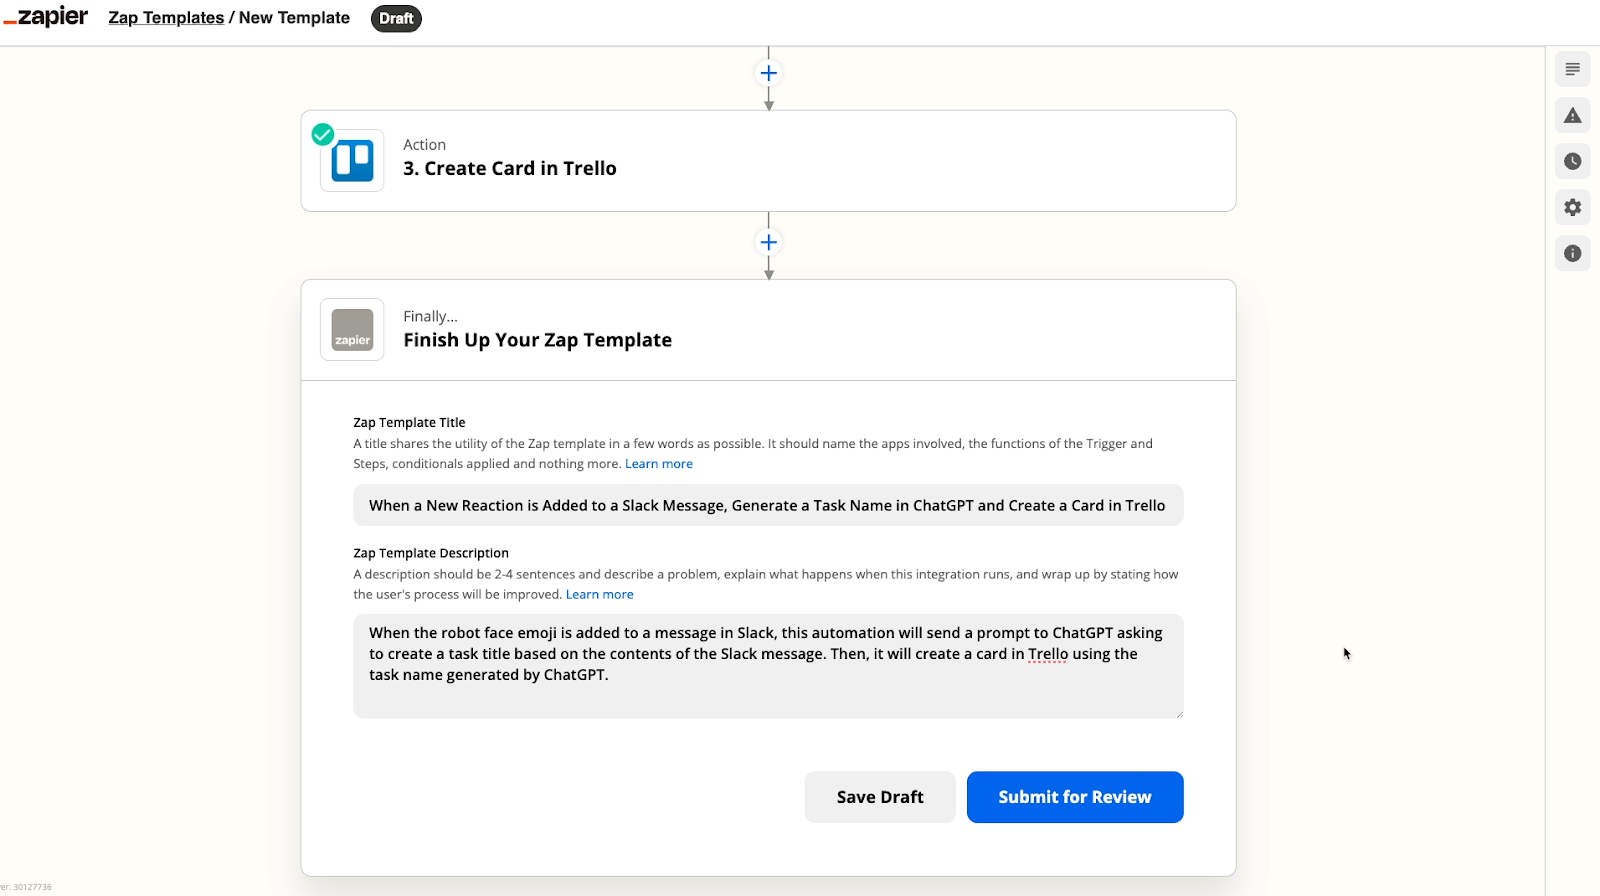
Before you can share the template, you’ll have to submit the developer template for review.
But be warned - once you submit your template for review, the template cannot be edited. Make sure it’s all set before you submit for review.
Understand that your template will immediately be sent to Zapier’s team for their approval, and there’s no guarantee it will be accepted at all.
Your templates can get rejected for being too generic, or redundant to other existing templates for popular apps that you don’t own.
It’s only really worth going through the trouble of creating a developer template if you’re confident you have a unique use case that has a good chance of being accepted
In most cases, it’s best to create developer templates like these for your company’s own applications.
Copying and using a developer
Once a template has been submitted for review, its shareable link will be accessible
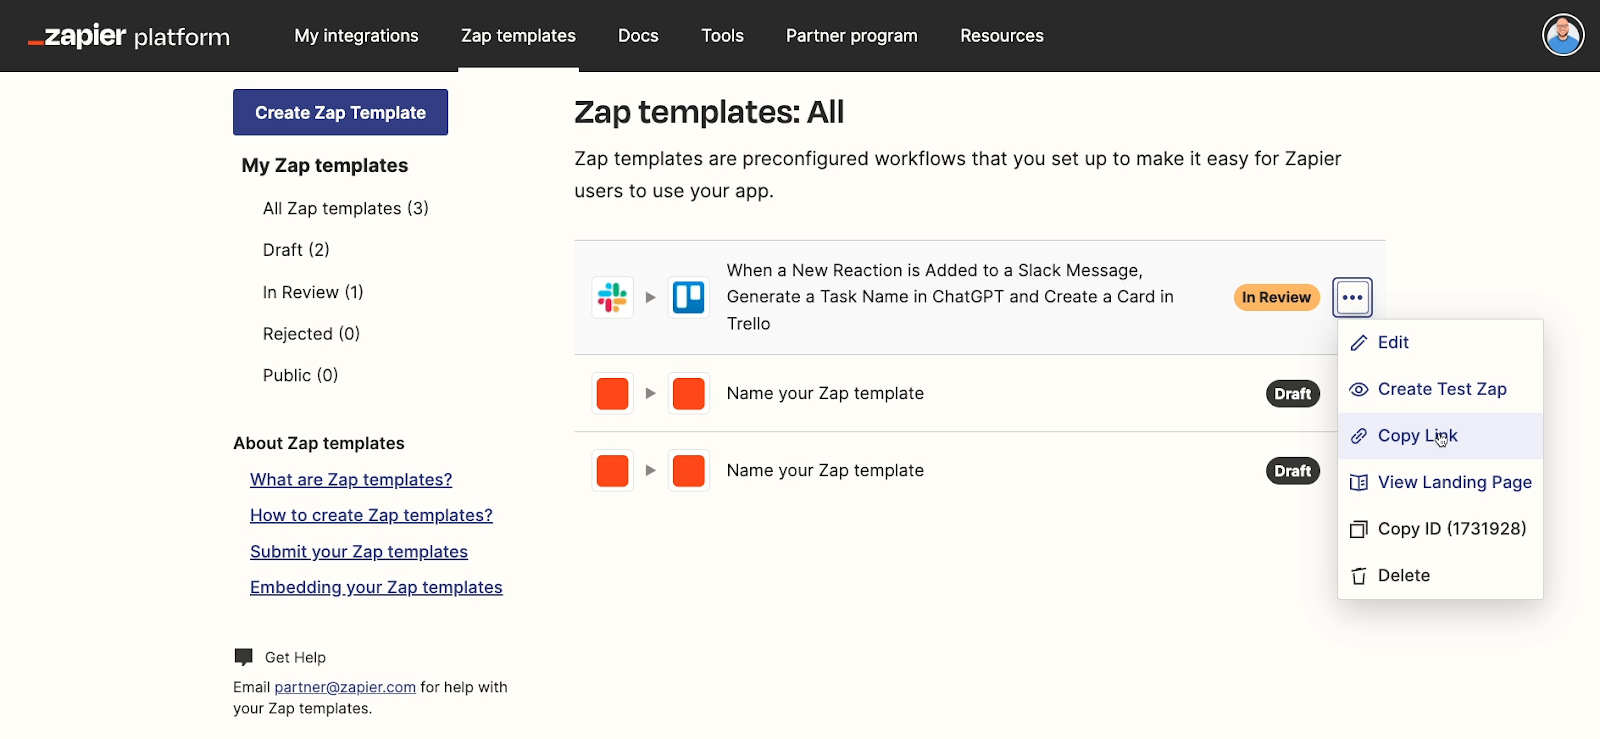
However, we would not recommend trying to share the template publicly while the Zap is in review.
It’s probably fine to test internally, but you don’t want to abuse the system and share templates extensively before they’re approved.
In the image below, you can see what a user will see when they copy the link to a developer template.

When they copy it, it will instantly create a Zap just like with the simple template. Just like before, all of the apps and actions are chosen already.
However, all of the configuration options are also pre-selected. Some text is filled out, some variables included, and so on.
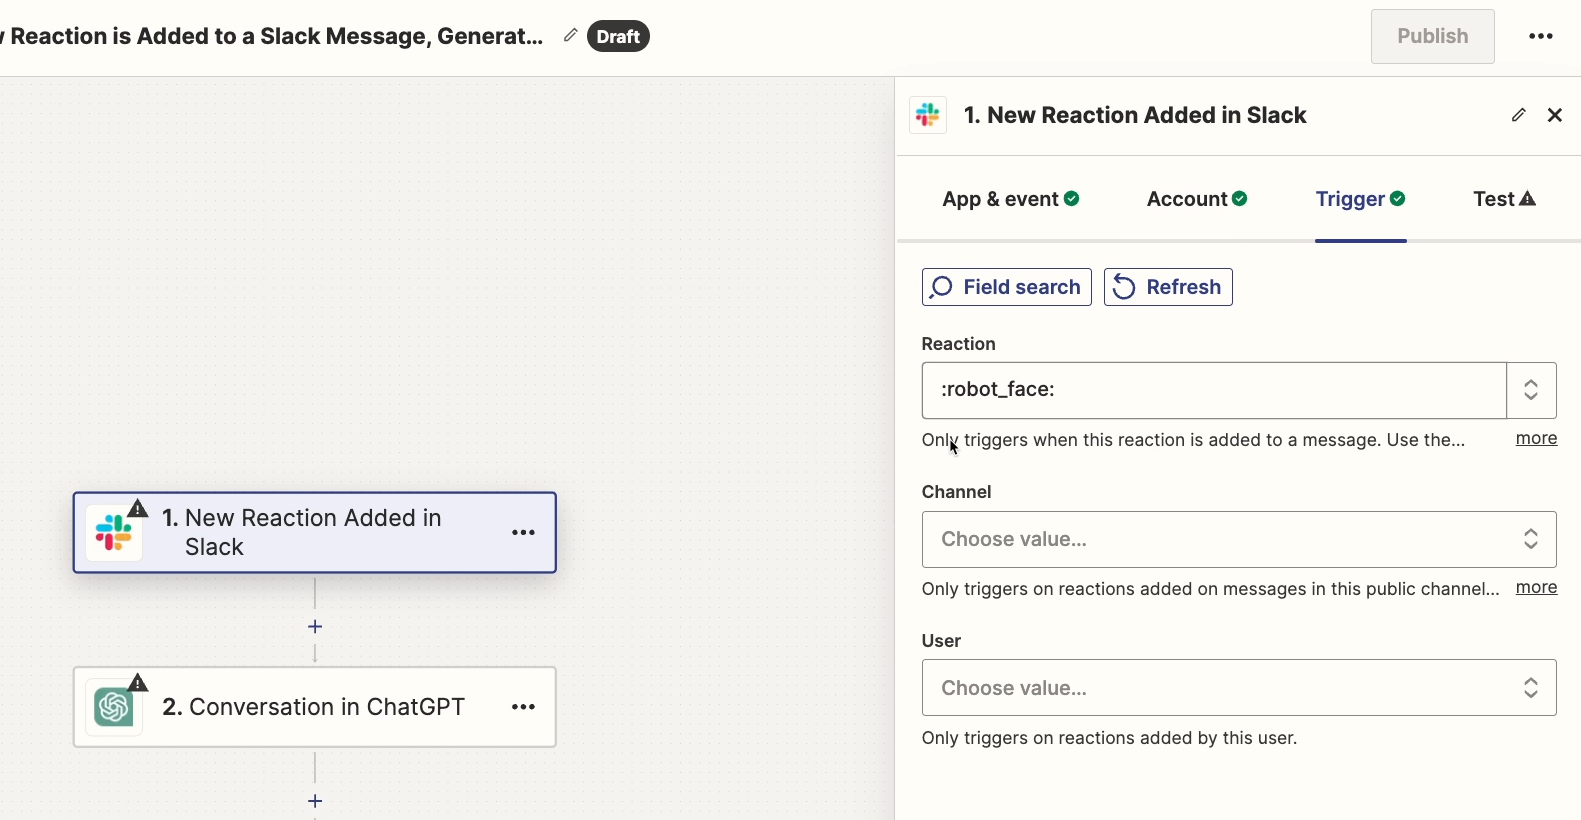
Pros and cons of developer templates
With a developer template, much more of the work is already completed ahead of time.
However, as we noted, there’s a much bigger hurdle to clear to create a developer template. It may not be worth the extra effort depending on your use case, or level of technical expertise.
You’ll most likely want to use developer templates if you are part of a company with your own SaaS app integrated into Zapier.
Build a Zapier integration and templates for your app with XRay
If you’d like to create or manage a Zapier integration for your app, just reach out to XRay and schedule a free meeting to discuss your options.
Choose the right template type for your use case
A simple template will likely be the more popular and accessible choice for most no-code builders.
However, if you can make a developer template that meets Zapier’s specific standards, then you’ll get the benefit of pre-configured actions.
And if you want to share templates with your team only, then you can always just duplicate a Zap to make things easy.
Ultimately, there’s no wrong choice here. All versions of Zapier templates are useful ways to save time while you’re building and rebuilding similar automations.
To learn more about Zapier and other no-code automation tools, be sure to check out our blog or our YouTube channel. You can also follow XRay on Twitter, Facebook, or LinkedIn.
The “Templates” feature in Google Docs has always been a useful way to save some time when creating a frequently used report or proposal. However, it’s always required significant manual work to update every placeholder with the content you want to use.
Fortunately, with a recent update, Google Docs has made it easier than ever to create templates from your documents and fill them out with dynamic data in seconds.
In this post, we'll show you how to create and use the brand-new variables in Google Docs.
If you don’t have access to the variables feature yet, we’ll also show you how you can use automation apps like Zapier and Make as an alternative.
We’ll walk you through everything step by step, so sign in to Google Docs and follow along.
Adding variables to a document
To begin using variables in Google docs, start by opening up a doc.
TIP: Try typing “docs.new” into your URL bar to quickly bring up a new Google Doc.

Note that you’ll only be able to access variables if you’re using a workspace account for a company or school. Variables are not yet available for individual accounts.
If you’re on an individual account and want to add variables to your docs, you can scroll to a later section in this blog to check out an alternative method with Zapier or Make.
Once you have your doc open, there are two ways to create a variable.
Type a word in [square brackets]
First, you can just type a word enclosed in square brackets. In our example below, we’ll create a variable called [example]. As soon as you type the closed bracket, Google Docs will prompt you to hit “tab” to insert a new variable.
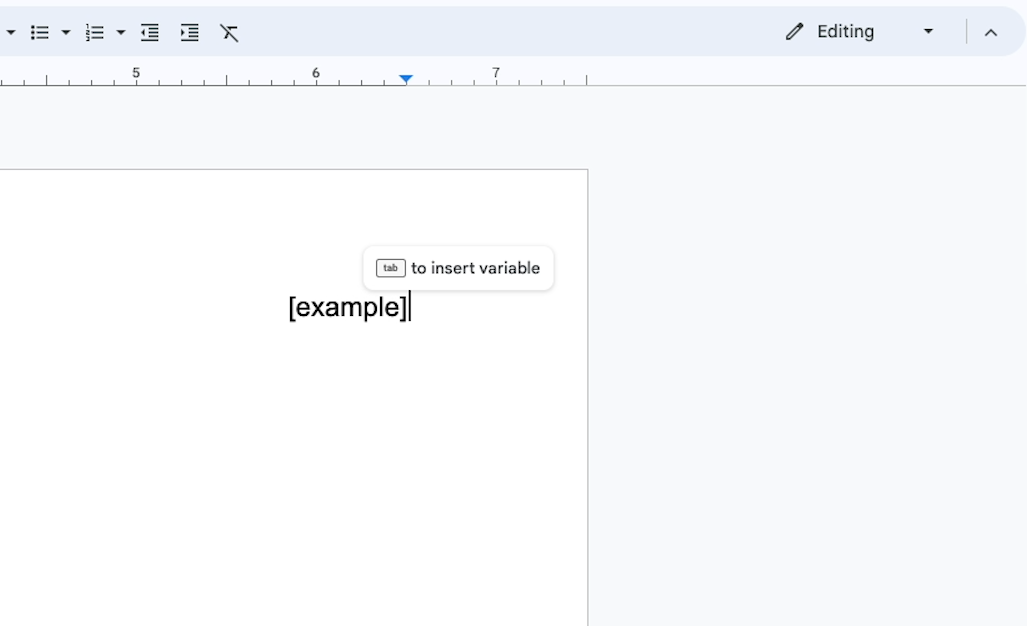
When you create the new variable, you’ll see a “Variables” panel open up on the right, and your new variable will be added to the list.
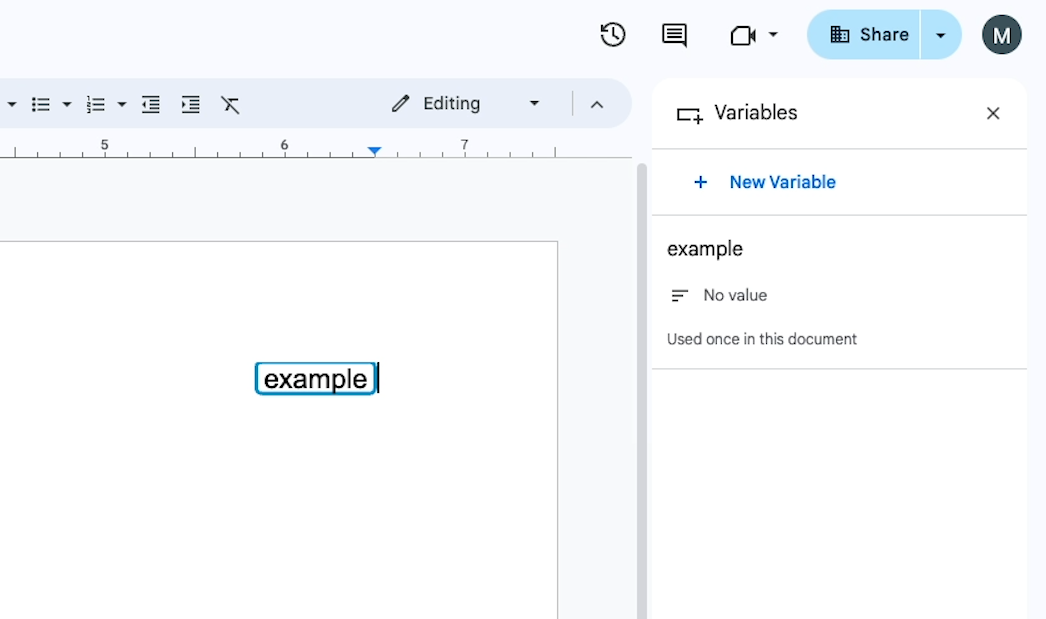
Open the “Smart Chips” menu by typing “@”
Alternatively, you can create a variable by typing the @ (at) symbol anywhere in your doc.
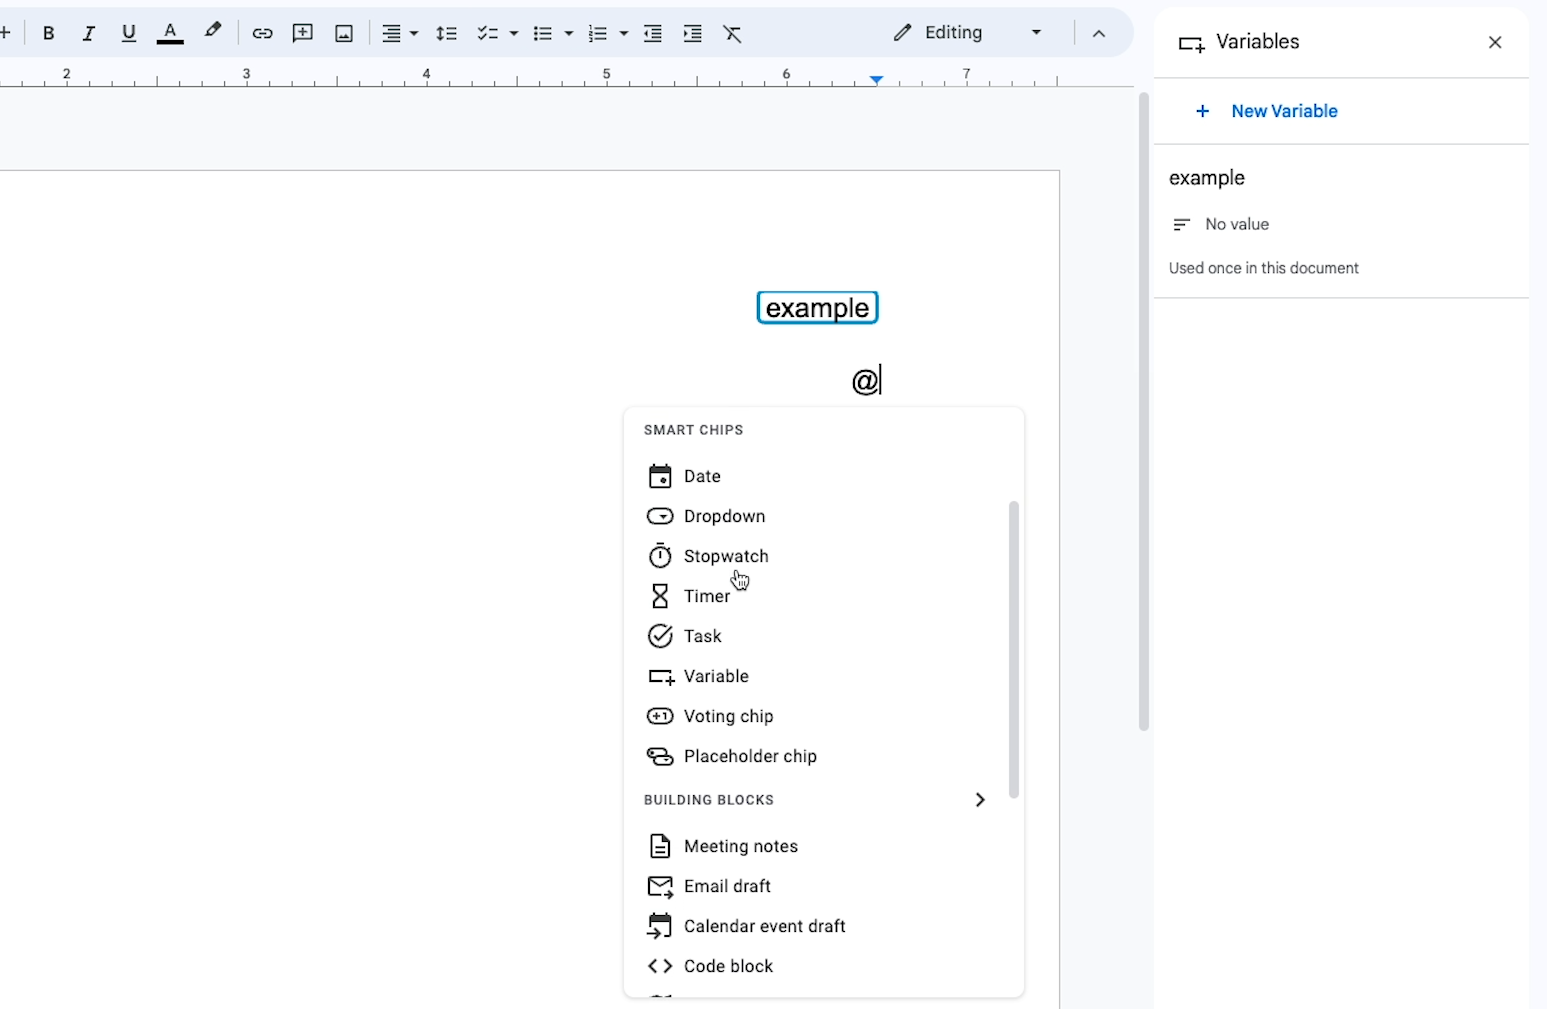
This will pull up a list of “Smart Chips” and “Building Blocks” that you can add to your doc. You’ll find variables under the “Smart Chips” category.

When you select it, you’ll have the choice to either create a new variable or insert an existing one (if you have any).
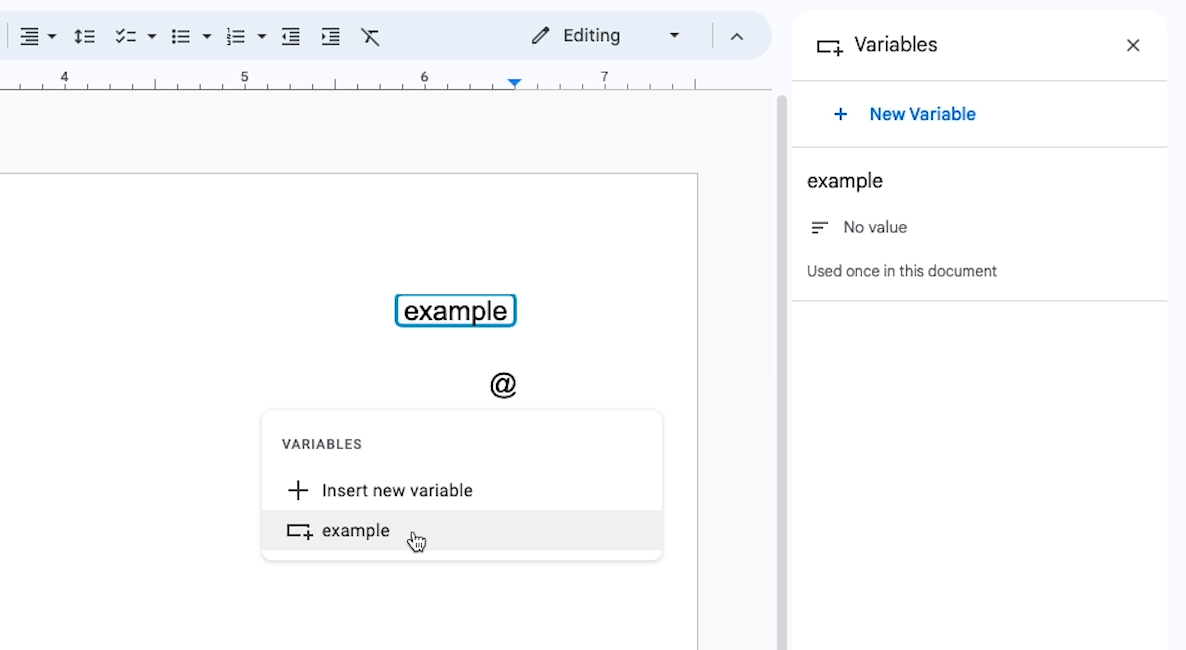
In our example, we’ll insert the same “example” variable that we already created.
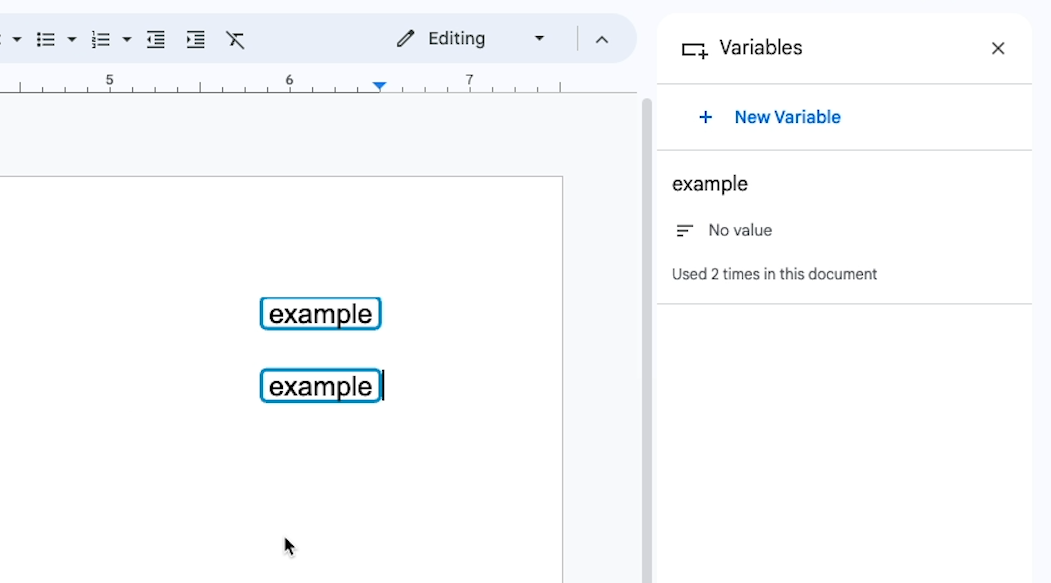
Assigning a value to your variable
When you first add a variable to your doc, the panel on the right will say that it has “No value”.
This just means that to start with, your variable has a title, but no content assigned to it.
You can either click on any instance of your variable, or on the “no value” text in the right-hand panel to assign your variable a value.
For instance, we’ll give this ‘Example’ variable a value of “Automation”.

Once you’ve provided a value for your variable, click outside of the variable to save it.

Instantly, every instance of your variable will be updated with its new value. You can also update this value whenever you want.

As you can see from this quick demo, variables are a great tool for filling out templates. You can just fill in each unique piece of information once to populate your entire document, and updating any variable is just as easy.
With variables, you don’t have to look for each instance of the word manually, or worry about find-and-replace errors.
They’re a great addition to any template, and it just takes a couple keystrokes to set them up.
Quickly filling out a template with Google Docs Variables
Now that we’ve covered the basics of creating Google Docs Variables, let’s see what a complete template with variables looks like.
We’ve created this proposal template with several key variables like Client Name, Start Date, Project Manager, Project Fee, and a few more. Note that we’ve also added this document as a template in our company’s gallery.

We’ll make a copy of this template to create a proposal for ‘TestCo’.
When you create a copy of a Google Doc with variables, all of the variables will still be functional. Additionally, any changes you make to the copy will not affect the original. The same conditions also apply if you simply make a copy of the document directly without using the “template” feature.
Adding values for each variable
With our newly created doc, all of the variables just display their labels: client name, project manager, etc.
You can click on each variable in the doc to fill them out, but we’d recommend opening up the variables panel to make things easy.
Just select any variable, then click the icon on the right to open up the panel.

Then, you can go through all of the variables in one spot and fill them out in a few moments.
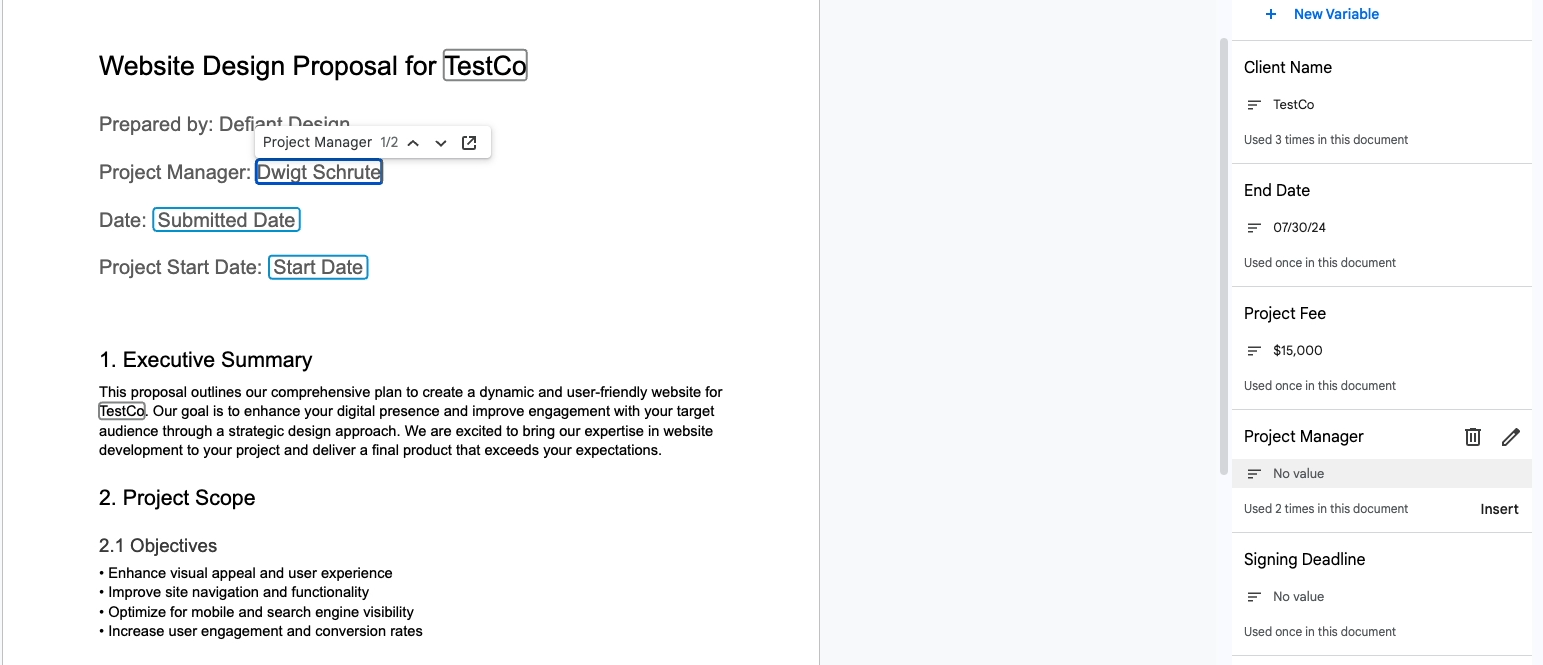
Just be sure to press “enter” or click outside of the variable after filling in a value to save your entry.
Once you’re finished, you can close the variable panel, and all of those outlines around the variables will disappear. Your doc will be all set to share or export as a PDF.
Updating the value for a variable
If you need to update any of these variables later, just click on any instance of the variable, change the value, and press enter. Instantly, every instance will be updated with the same value.
If you accidentally misspelled your project manager’s name in your first draft, you can easily update them all at once, and you don’t need to worry about leaving one of the “Dwights” as a “Dwigt”.
Adding variables to Google Docs with Zapier or Make
This new variables feature is a great way to quickly fill out a template, but some of you out there might want to take things a step further. You might want to create a document automatically with a no-code provider like Zapier or Make.
That way, you could also send the data for your document to other apps at the same time, like Slack or Google Drive.
Additionally, if you aren’t part of a Google workspace, creating variables in your docs with Zapier or Make is a great alternative.
If you’d like to learn how to use these apps, then just check out our beginner’s guide to Zapier, updated in 2024 to give you a look at the software’s latest features.
You can also explore our beginner’s guide to Make if you’re interested in learning to automate on a more affordable, and technical platform.
Now, let’s create some variables in Google Docs that we can fill in automatically with Zapier or Make.
Adding variables to your template document
In the screenshot below, you can see a proposal template using variable syntax that Zapier and Make will recognize.
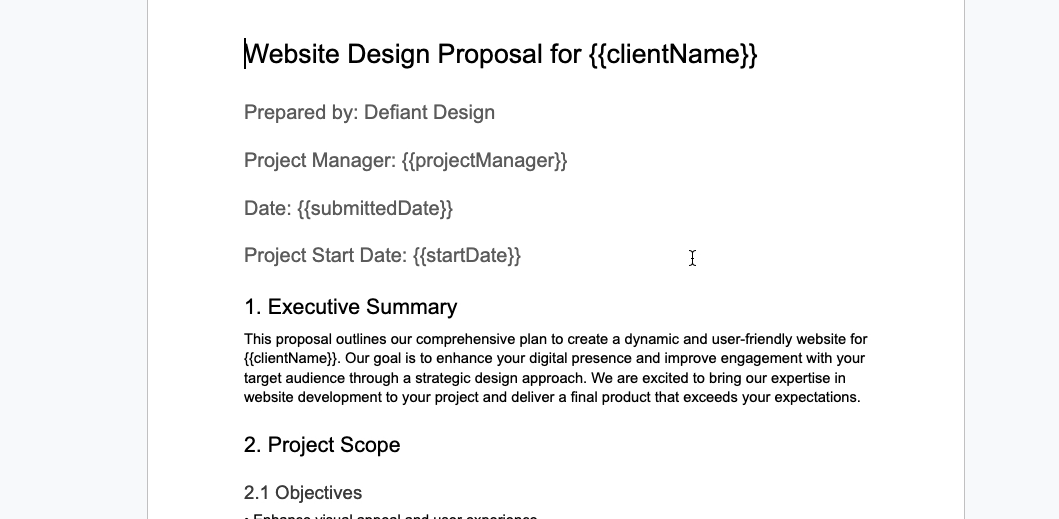
To create Zapier and Make variables within a Google Doc, just enclose the text in two pairs of curly brackets, like this:
{{example}}
Zapier won’t recognize any variables that use spaces, hyphens, or most special characters. However, underscores are fine.
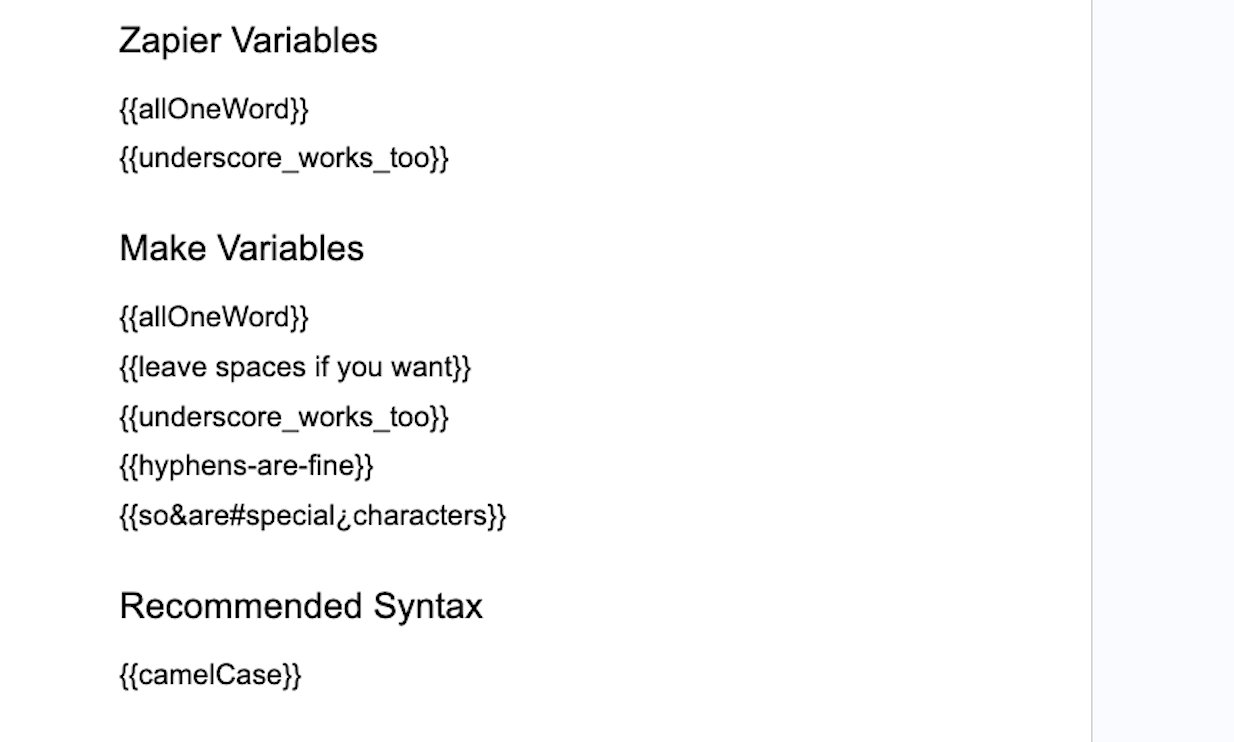
In Make, you can do whatever you want as long as the variable is enclosed in two sets of curly brackets.
Spaces, underscores, hyphens, upside-down question marks, ampersands, octothorpes, and other special characters are all fine.
To keep things simple and compatible with both, we’d recommend using camel case, like this:
{{exampleVariable}}
Building a Zap to automatically add data to variables
Now let’s build an automation in Zapier to fill in these variables.
We’ll also show you a bit of how it works in Make, but conceptually, it’s a very similar process in both apps.
Create a trigger your Zap
To start, you’ll need a trigger that gathers data to fill in your variables. You can use any trigger you’d like.
One easy way to trigger this kind of automation is with a form and a spreadsheet, like the form pictured below that we’ve created in Airtable, and its associated table.
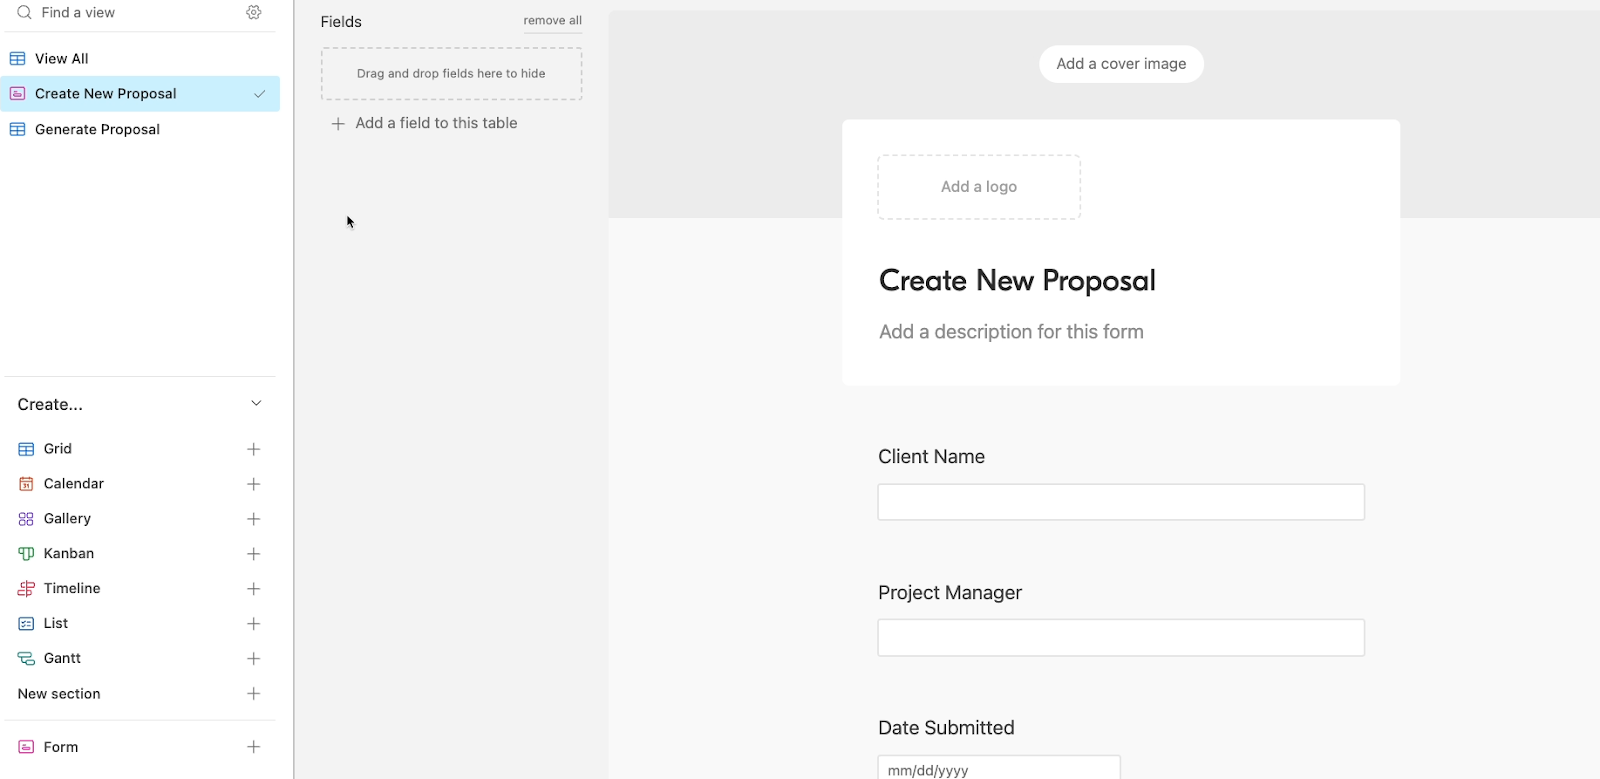
There’s a question for each variable, and each submission is stored in an Airtable base.
We’ll fill out the form once to create some test data.

Now, back in Zapier, we’ll choose Airtable as our trigger app, and select “New Record” as the event.

Then, we’ll sign in to our Airtable account, and finish configuring the trigger.
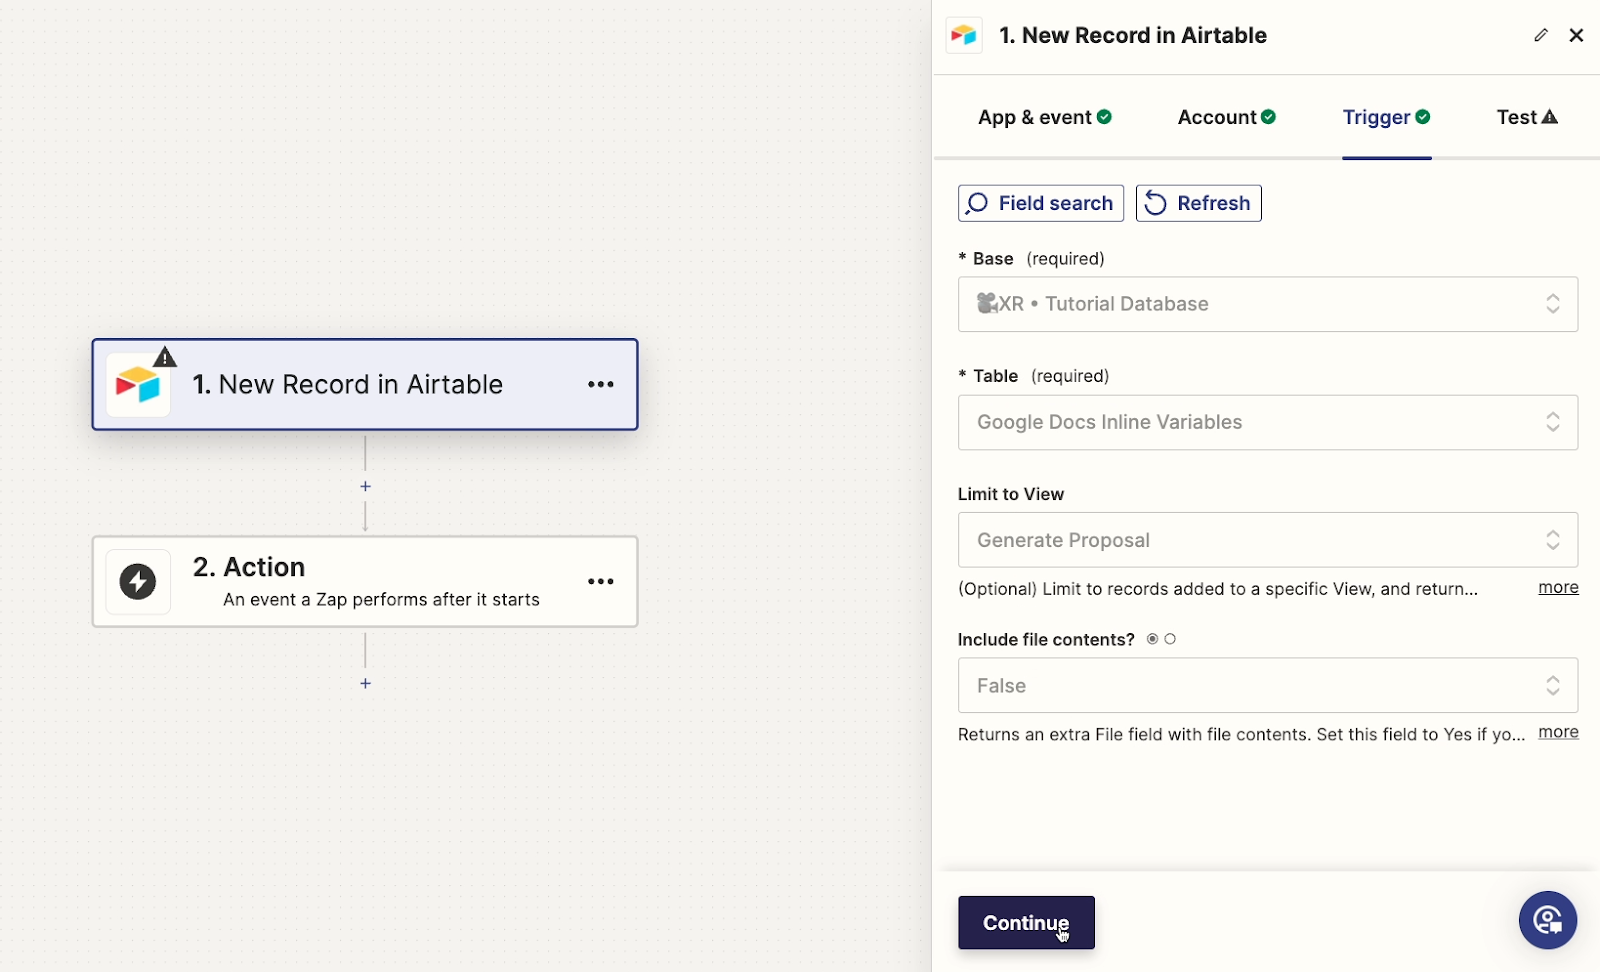
Once your trigger is all set, give it a test.

Add a Google Docs action to your Zap
With your test data ready, click “Continue” and add a new step to the Zap. Select “Google Docs” as the app, and choose “Create document from template” as the event.
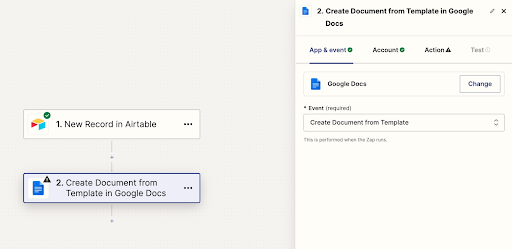
Be sure to sign in to your Google Workspace account to authorize Zapier.
Next, you can configure the action. To start, you need to identify the doc that should be used as a template and copied whenever the automation runs.
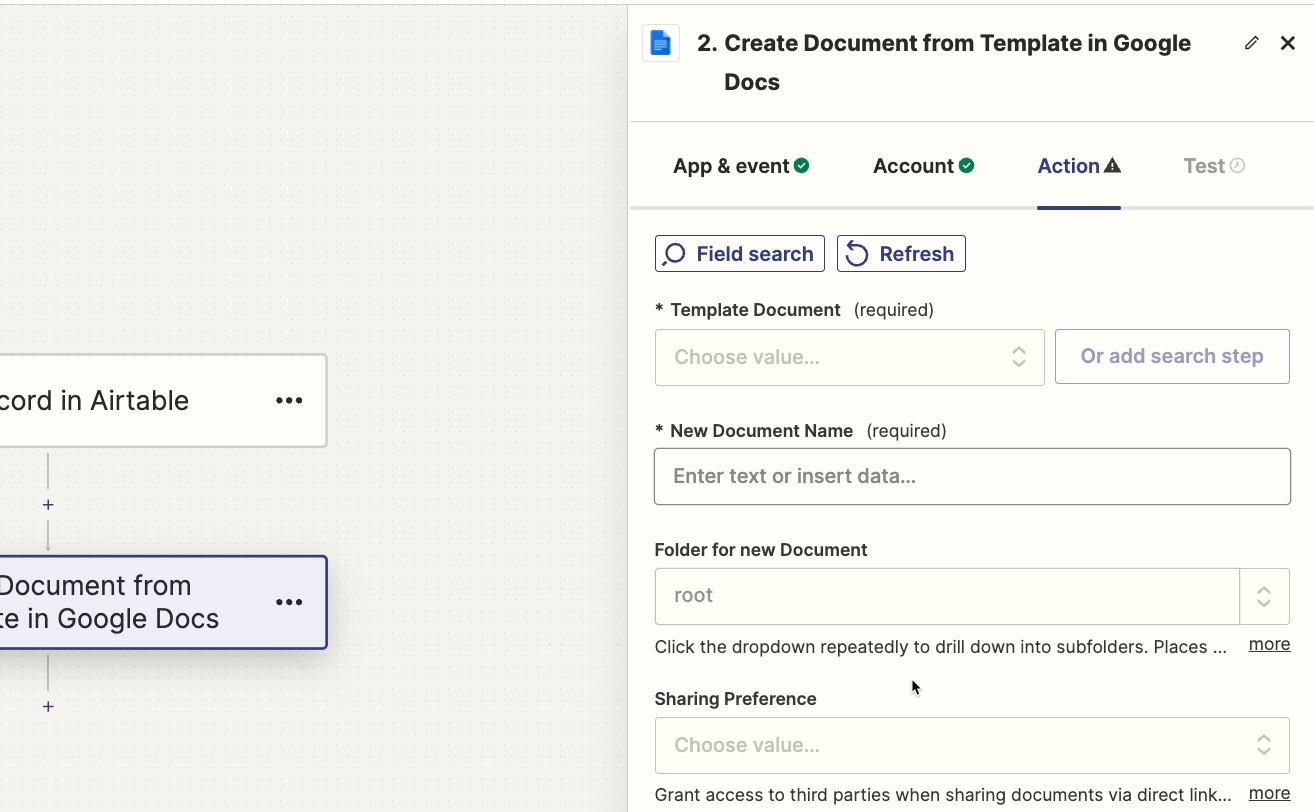
You can search for the document by name if you’d like, but we recommend using the document’s ID instead.
Open the doc in Drive, and copy its ID from the URL bar. The ID is the string of characters after /d/ and before /edit

Switch back to Zapier, and select “custom” for the “Template Document” field and paste the ID in.

Next, you can give the new document a name. We’d recommend using some dynamic data so that the name isn’t always the same. In our example, we’ll pull in the client’s name from Airtable.
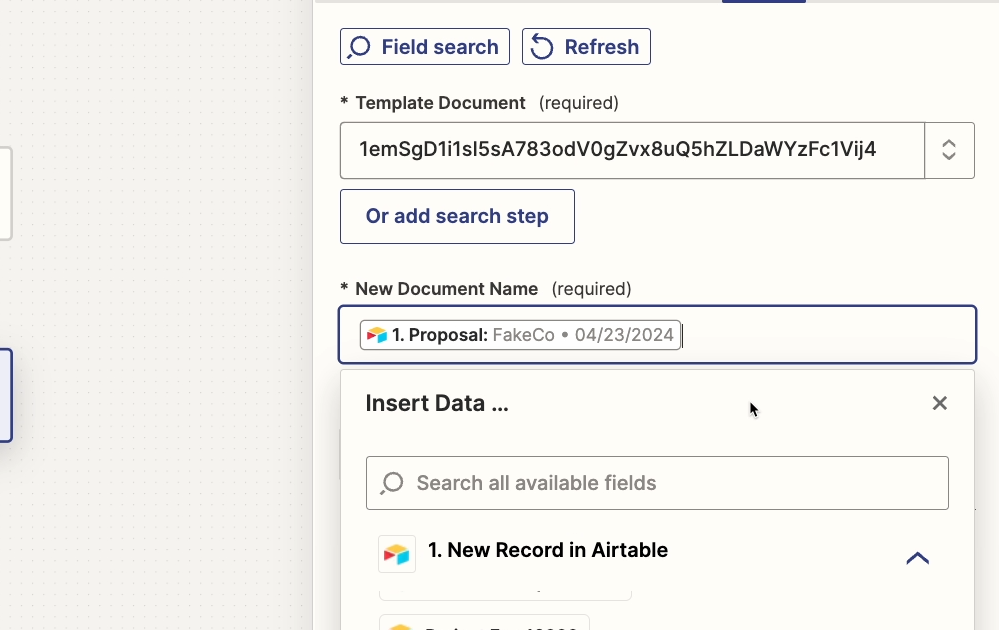
Next, you can identify the folder where the new document will be created. Once again, we’d recommend selecting “custom” and pasting in the ID.
Drive folder IDs begin after /folders/.Copy this ID from the URL bar in Google Drive.
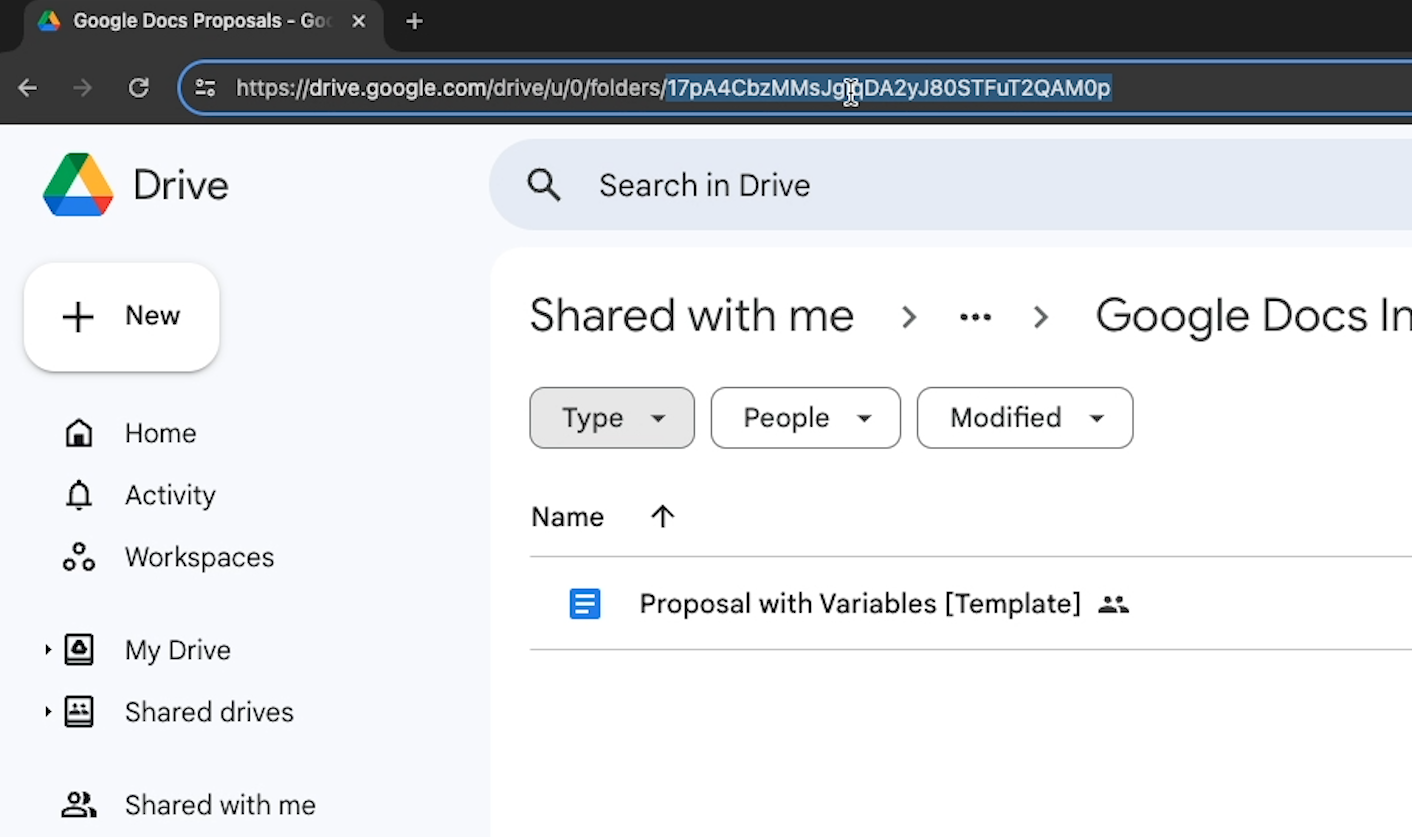
Then, paste the ID into the field.

You can set “sharing preferences” to whatever you’d like. Under “unused fields preference”, you can choose whether to keep or remove variables that aren’t assigned a value.
Then, you should see all of the variables that Zapier found in your Google doc. They’ll have the same name that they do in Google, except you won’t see the curly brackets.
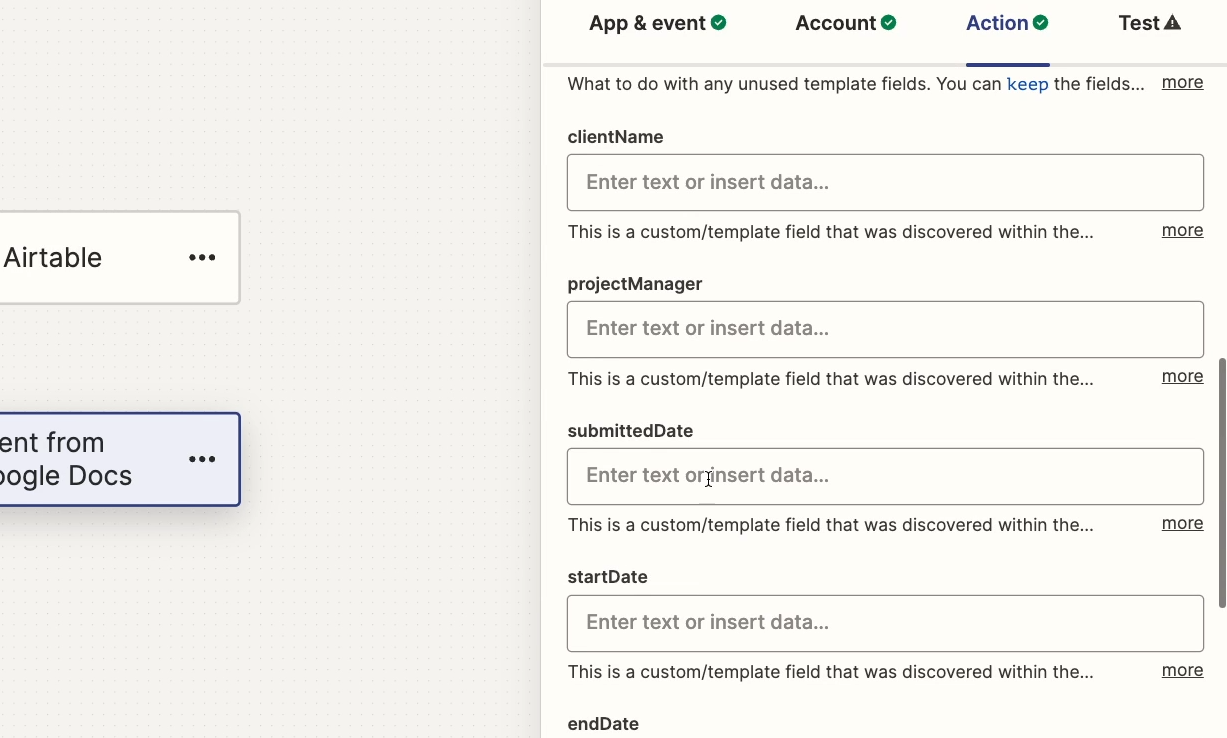
Now you can map appropriate data to each variable. Try using the search bar to quickly find the data you’re looking for.
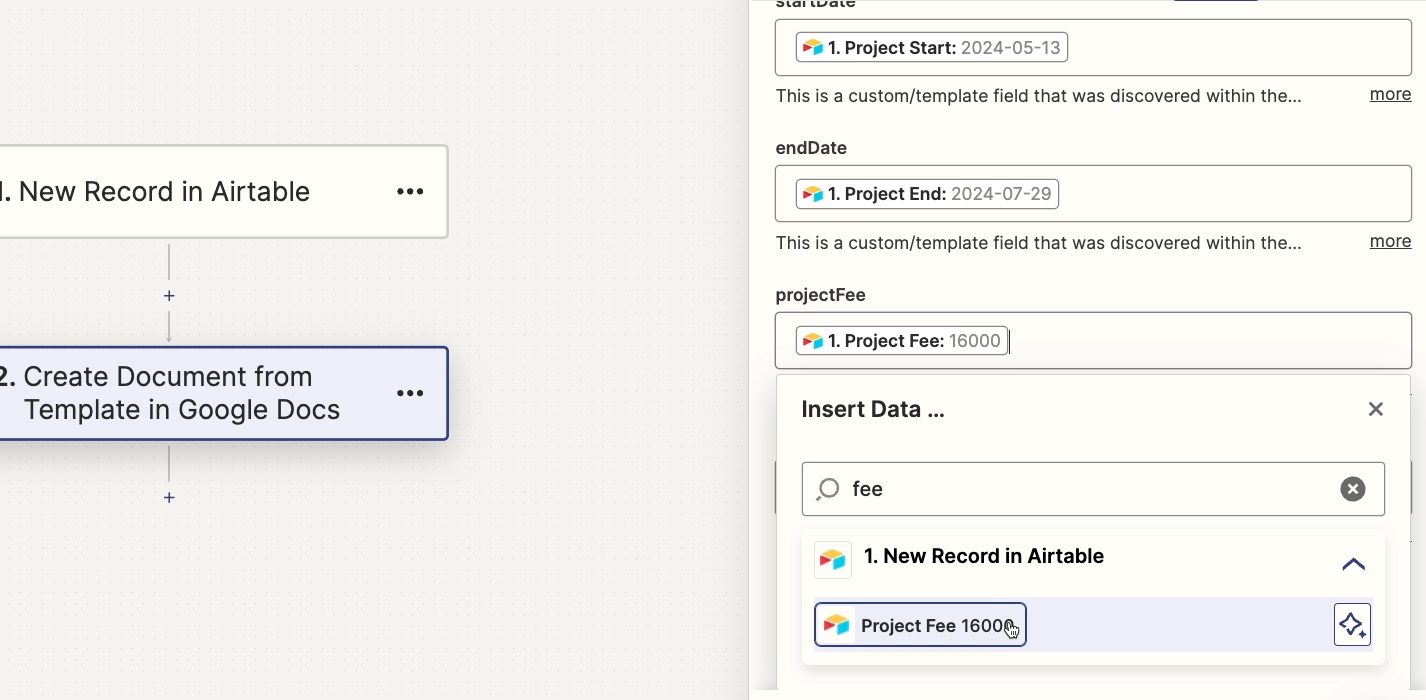
Note that each variable will only appear once here, even if it appears multiple times in your template doc.
If any of your variables are missing, check your template doc to make sure you followed the right syntax: two sets of curly brackets, no spaces, no hyphens, and no special characters except underscores.
Or, to keep things easy, just use {{camelCase}}.
Testing your automation
Once you’ve mapped every field, give the step a test.

Clicking “test” will immediately generate a new document with all of the variables filled out.
After you get a successful test in Zapier, check out the doc it produced just to make sure everything worked.
Search within the test results for the “alternate link”. This is the term Zapier uses for the doc’s main URL in Drive.
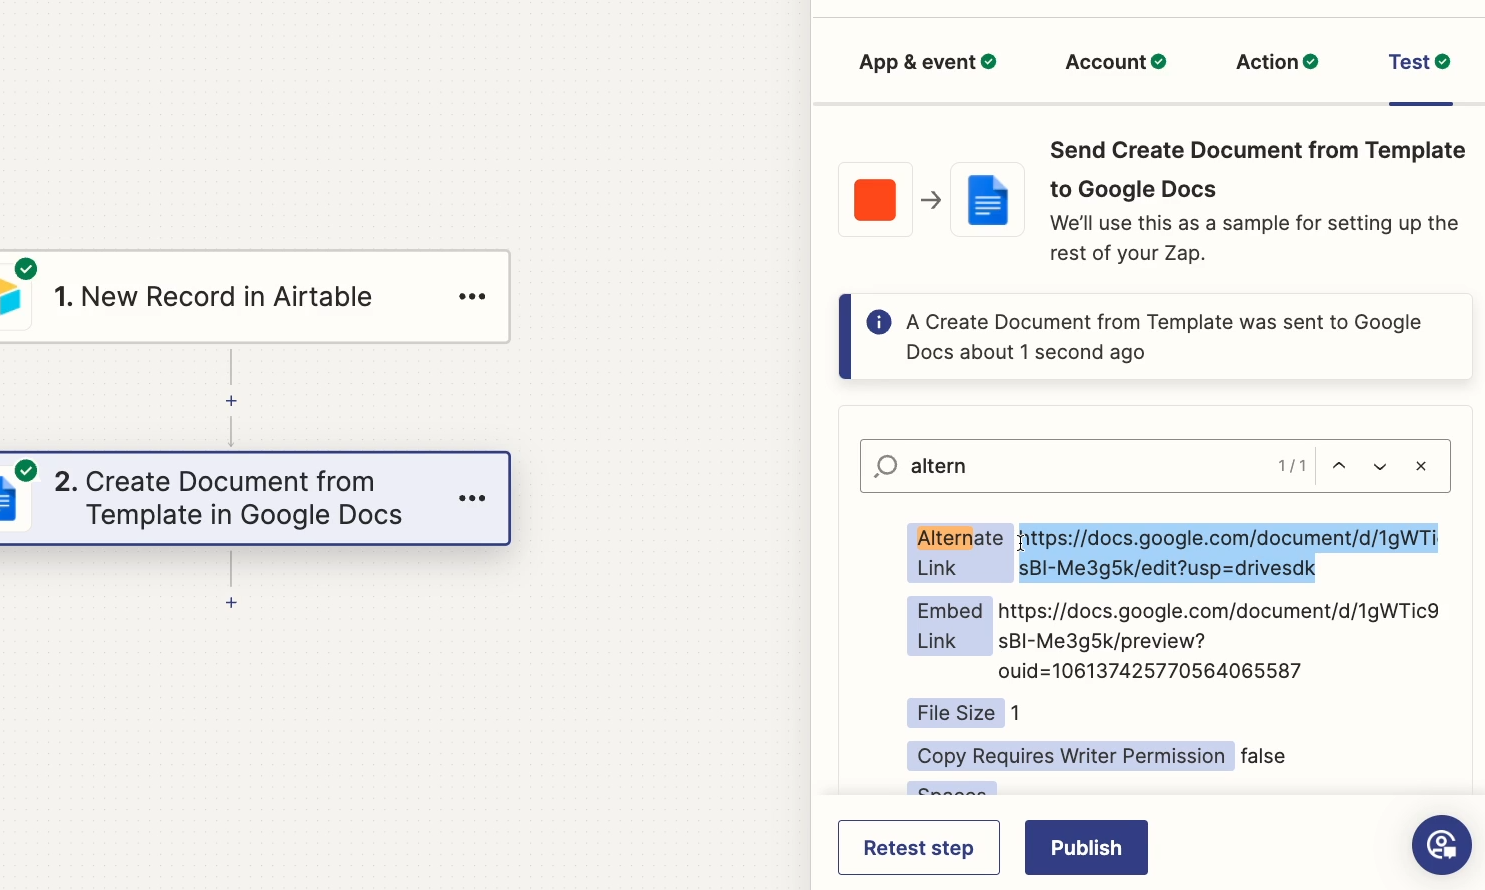
When you open the link, you should see a copy of your template doc with every variable filled in.
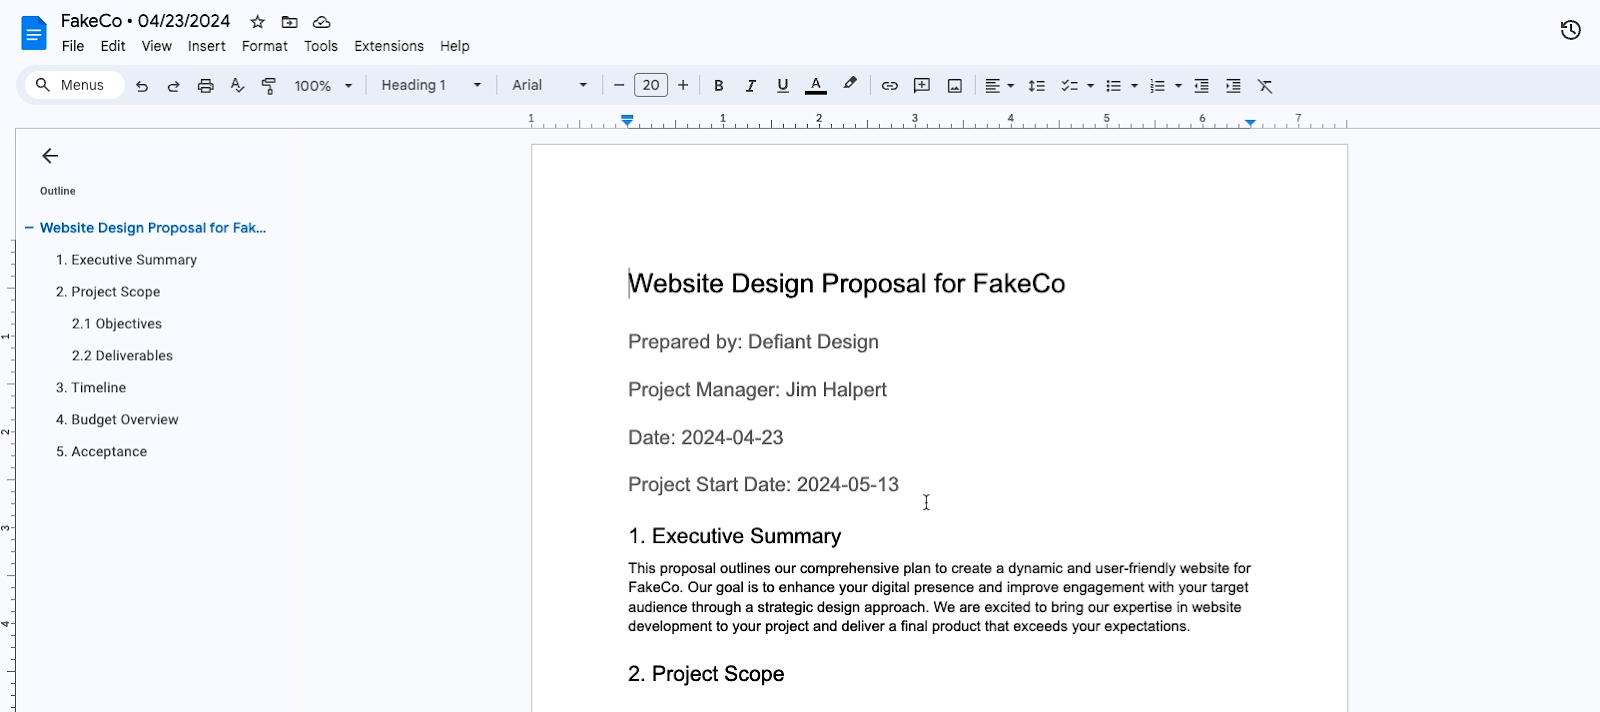
Creating Google Docs variables in Make
In Make, you’ll follow a very similar process.
Add a trigger that collects data, like our Airtable trigger pictured below that we’ve already set up.

Then, add an action, search for Google docs, and select “Create a document from a template”.
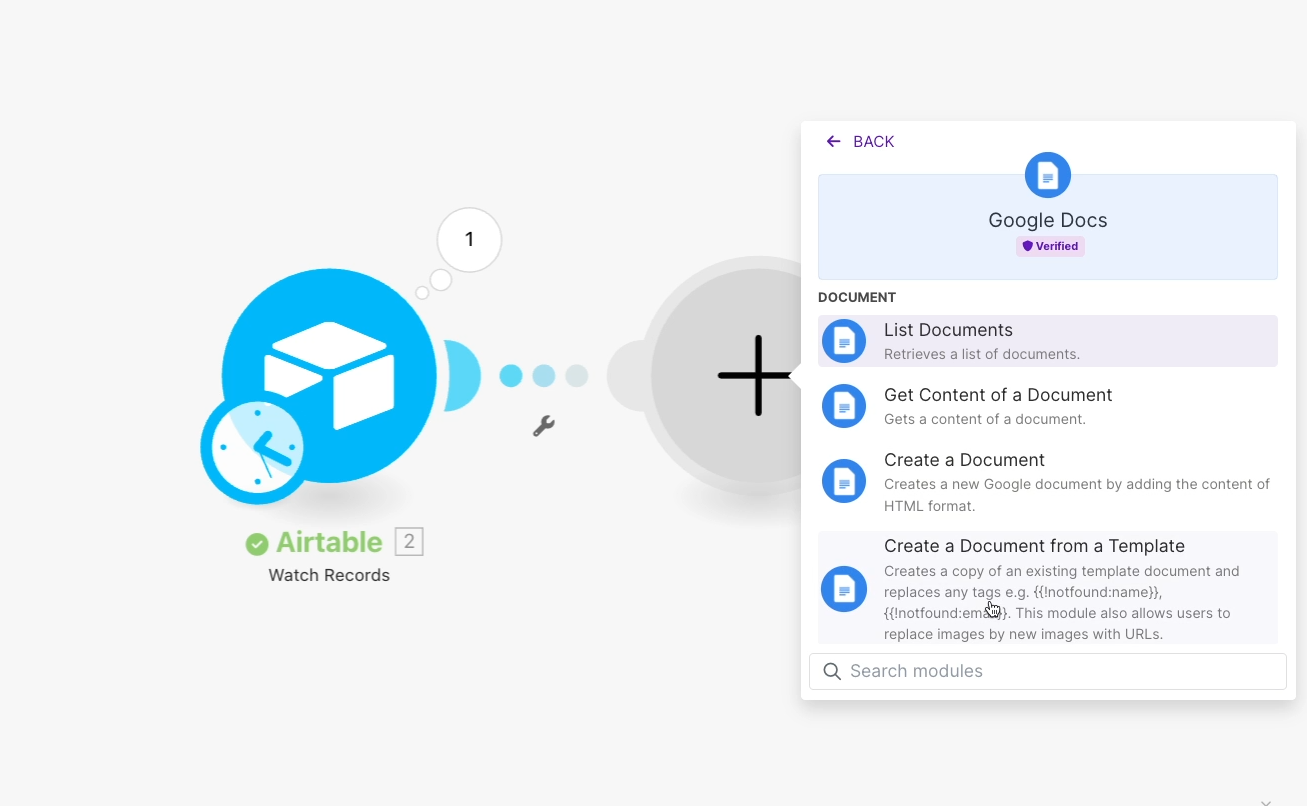
To make things easy, we’d recommend setting this first choice of “Create a document from a template” to “by dropdown”.
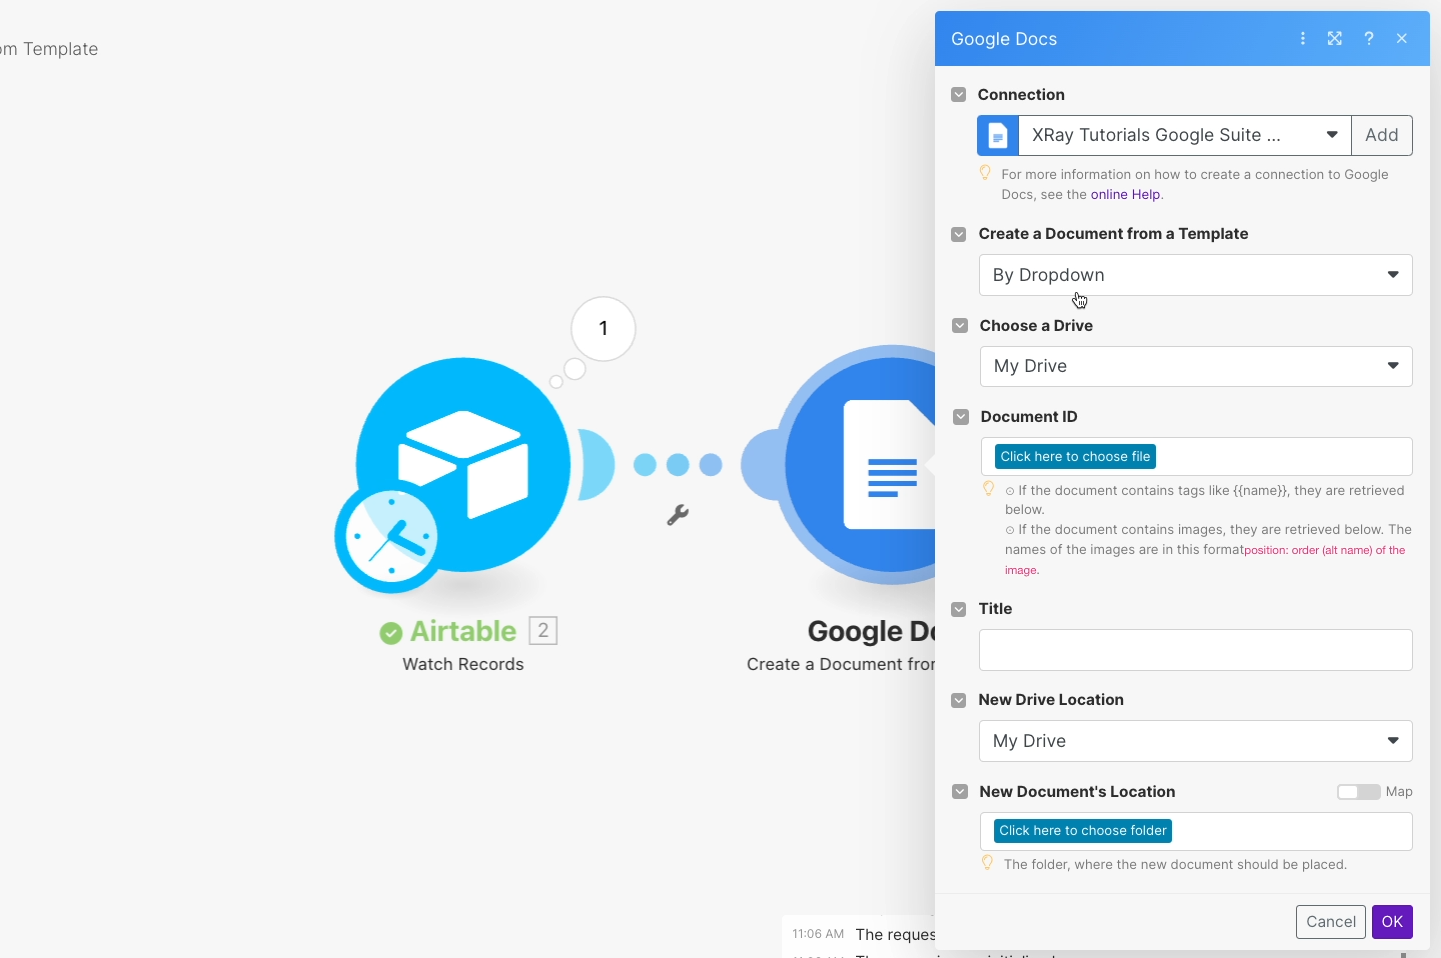
Then, once you identify the doc you want to reference as a template, you’ll see all of your variables listed out as fields.
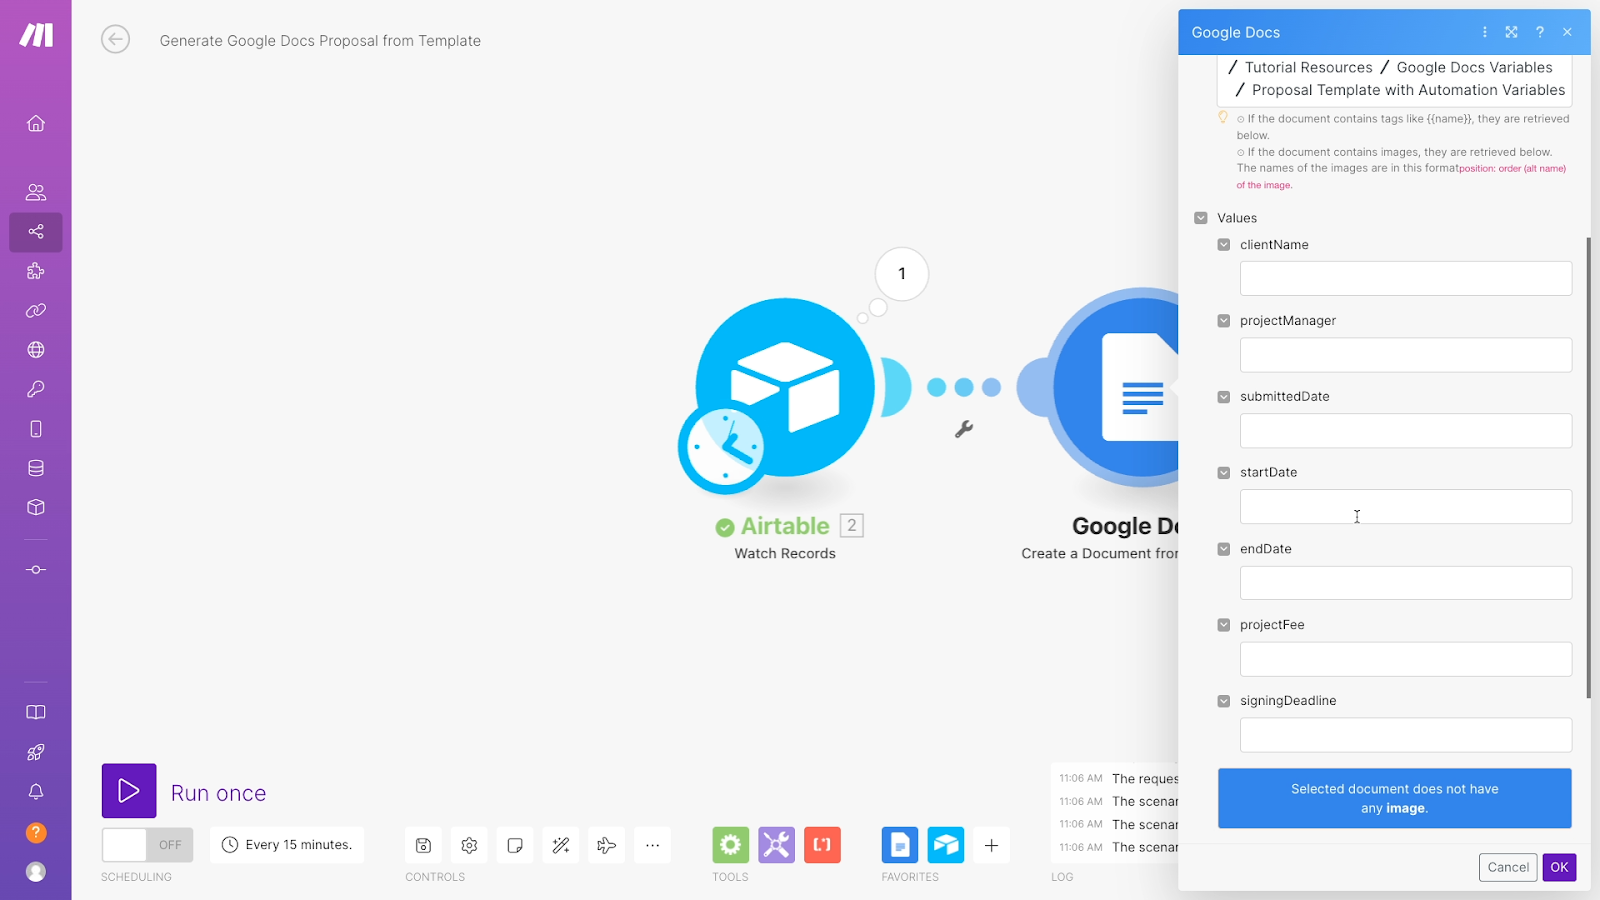
You can fill them out with dynamic data just like we did in Zapier.
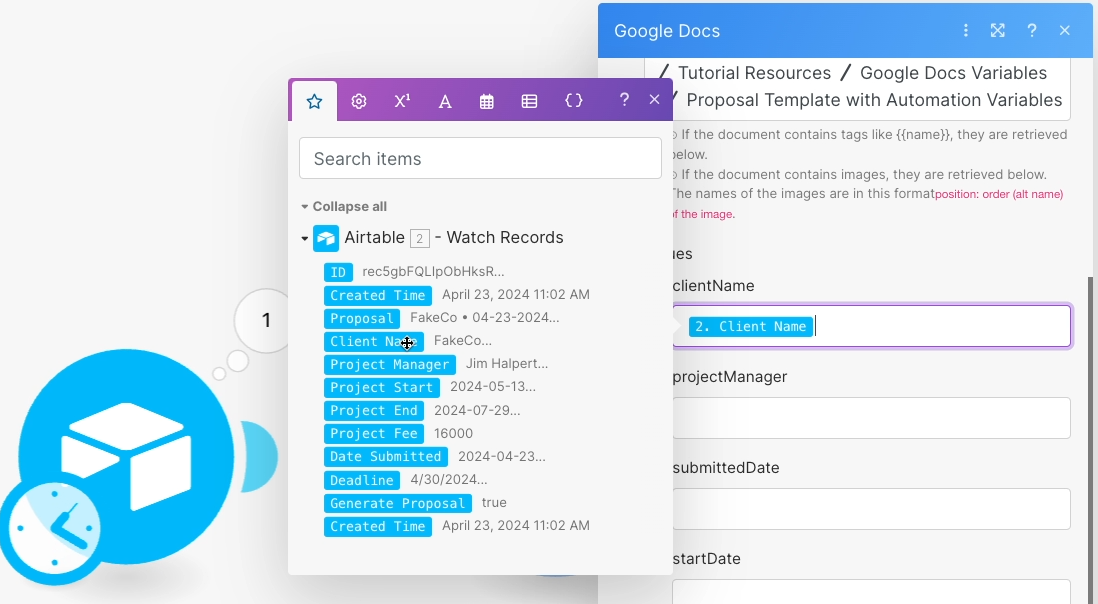
Use automation providers to do more with your data
In either automation provider, you can also add additional actions to do more with this data.
You could add a Slack step to send a message alerting your team of this new proposal, sharing the alternate link, and asking for their review.
You could also use this data to create Slack channels, Google Drive folders, and more.
With thousands of apps supported, the possibilities are endless.
With inline Google Docs variables, you’re limited to just making and editing variables within the document itself.
On the flipside, using an app like Zapier or Make will take more time to set up, and it won’t let you update variables in a doc you’ve already made.
Ultimately, the choice is yours; both methods have their pros and cons.
Whether you use Google’s native variable features or an automation provider to fill in your variables, they’re both great ways to generate templated documents quickly and consistently.
Save time while creating documents with variables
Don’t waste your time entering the same data over and over again in Google Docs. Try using the new variables feature today to instantly create documents from a template and update them whenever you want.
And if you’re on an individual Google account and don’t have access to variables yet, you can always create them with Zapier or Make instead.
If you’d like to learn more about workflow automation, be sure to check out our blog or our YouTube channel. You can also follow XRay on Twitter, Facebook, or LinkedIn.
Zapier is well known as one of the largest automation providers available, with support for over 7,000 apps and counting.
But recently, Zapier has been expanding the scope of their software beyond automation. Over the last year, they’ve been adding new ways to organize your data and share your automations.
In this post, we’re going to explore one of Zapier’s major new features that ties everything together: Zapier interfaces.
We’ll give you an overview of what Zapier Interfaces are and what you can use them for.
Then, we’ll walk you through the process of creating an interface from scratch, with pages that contain link cards, an AI chatbot, and a contact form that launches an automation.
What are Zapier interfaces?
First, let’s go over the basics.
A Zapier interface is a simple web page built with an intuitive visual editor.
Pages built in a Zapier interface can include custom text, media, and links, as well as forms and kanban boards connected to your Zapier tables.

You can also use interfaces to launch your Zaps and even create a custom AI chatbot.
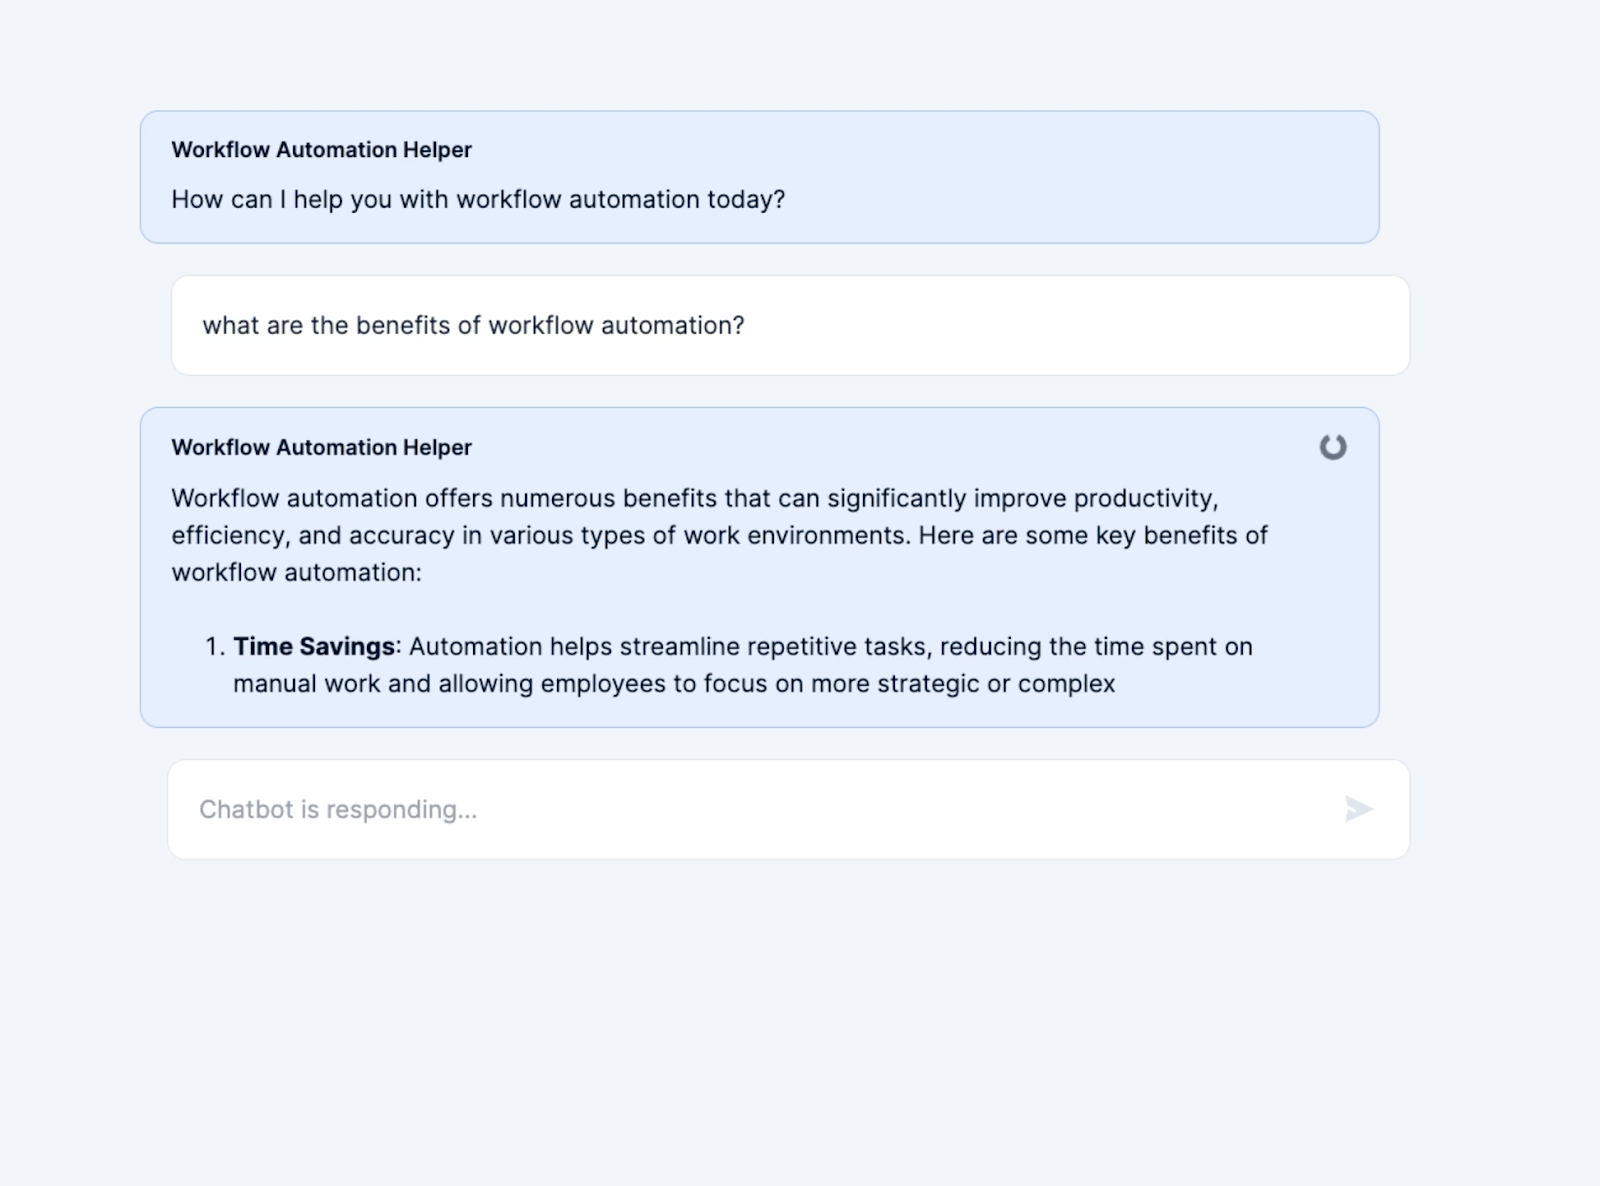
Interface pricing
All Zapier plans include two interface projects for free. To unlock more projects and additional features like custom domains, password protection for your published pages, and conditional logic for your forms, you’ll need to pay an additional monthly fee.
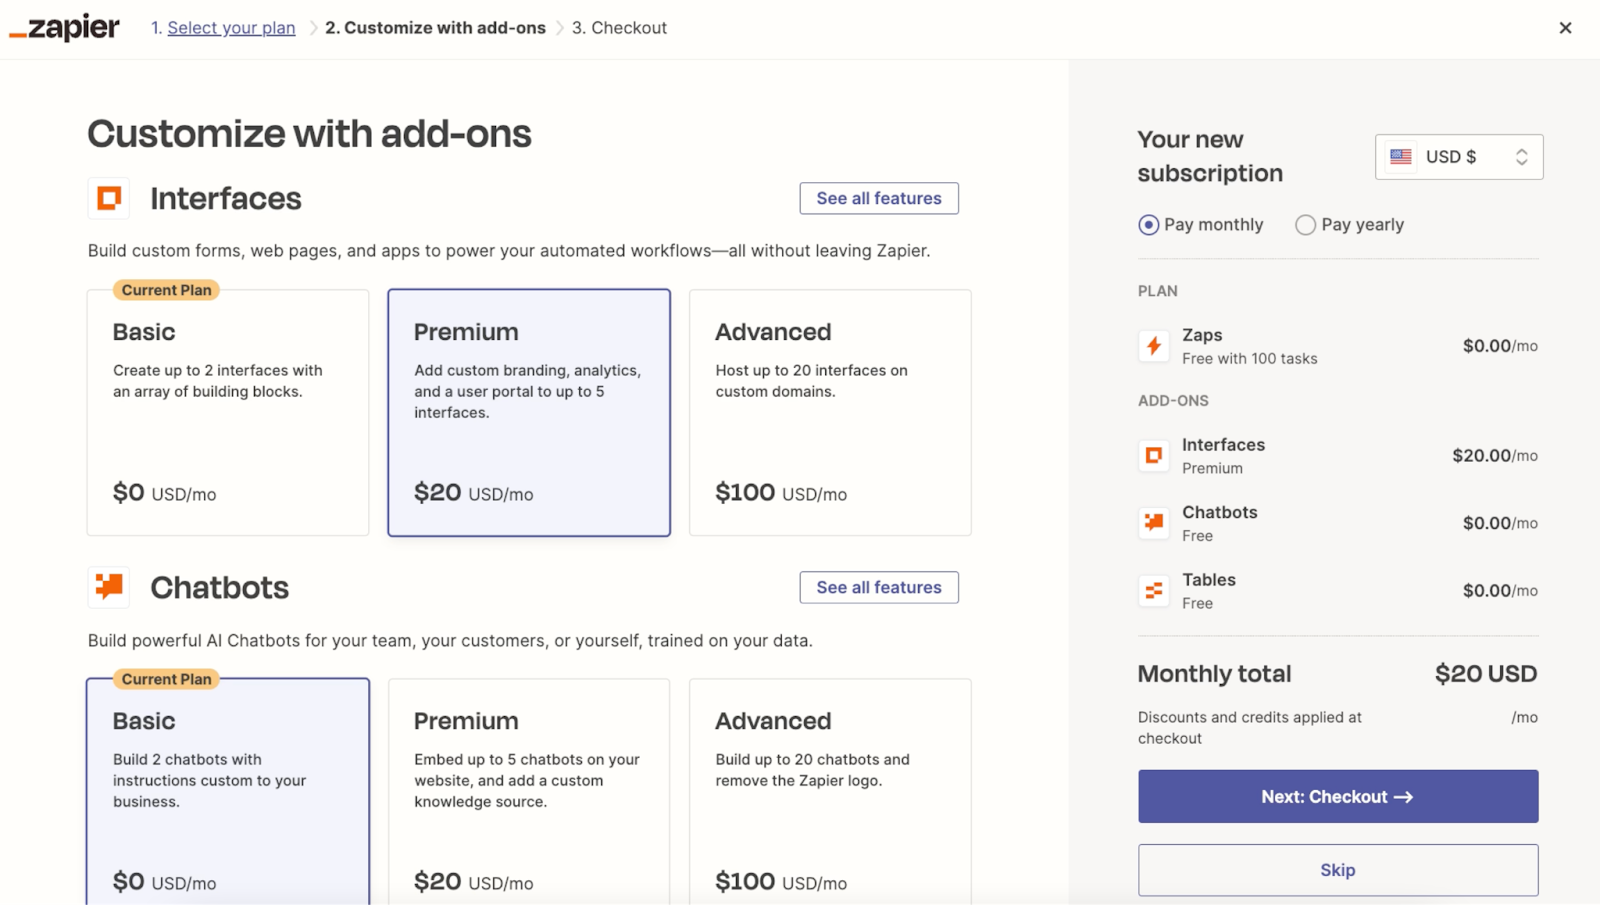
You can learn more about interface pricing on Zapier’s official pricing page here.
Interfaces use cases and limitations
The best use case for Zapier interfaces is to create a portal for your team or clients to access an automation and its related data.
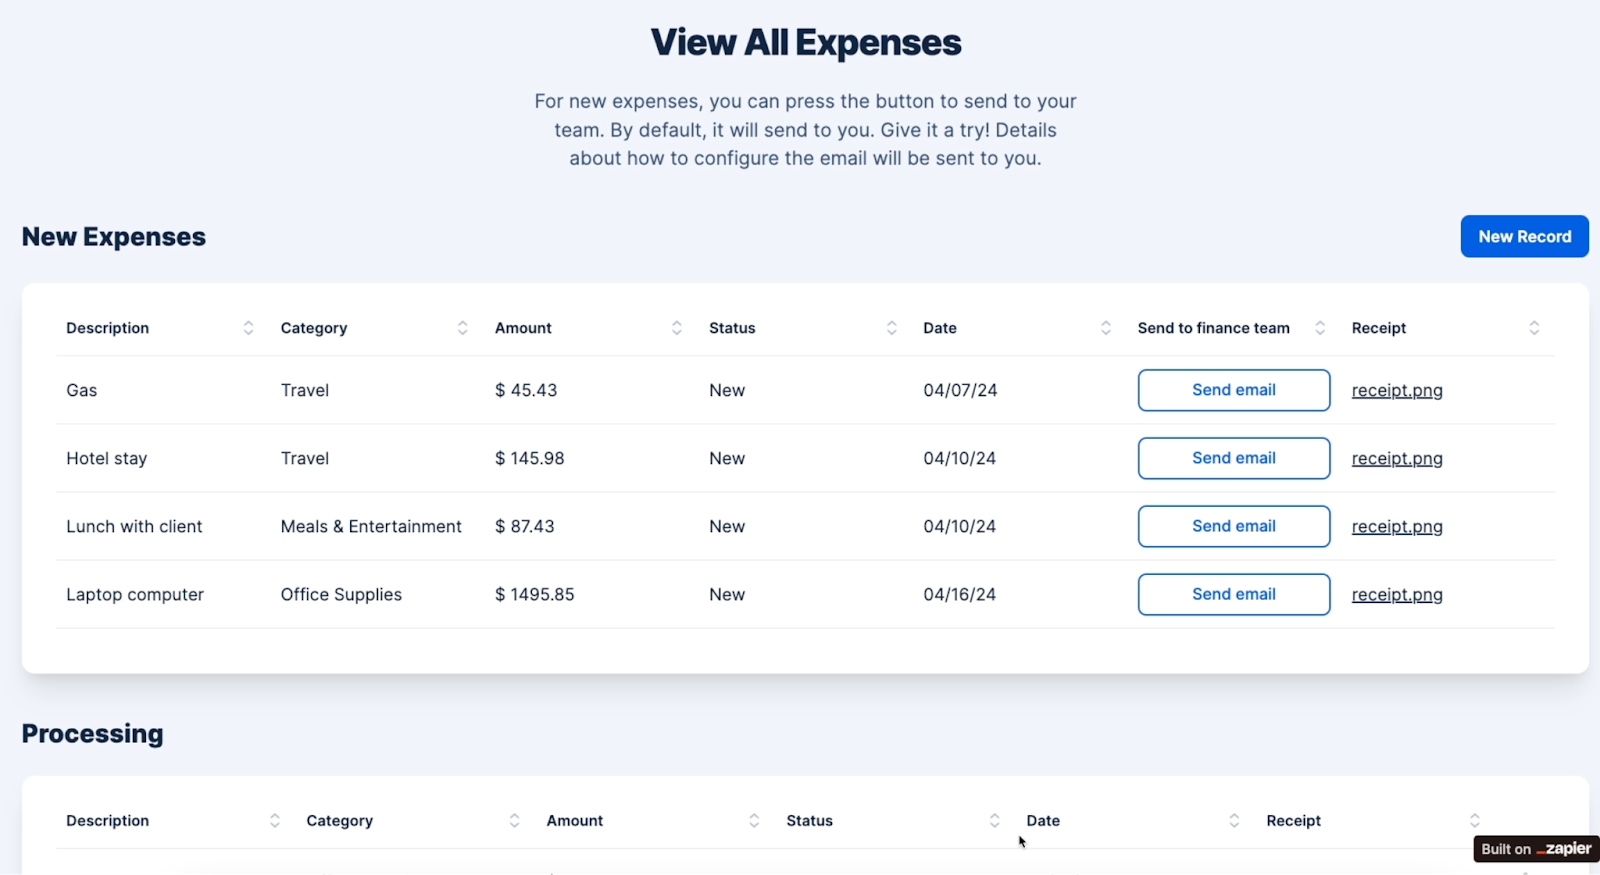
However, Zapier interfaces only support other Zapier products.
If you’re using a variety of software to build your automations, like Airtable, Make, Power Automate or Google Sheets, then you should consider delivering your automated workflows with XRay workflow.
XRay Workflow is an app developed by our team at XRay.Tech. It’s designed to let us organize resources from around the web onto convenient, shareable boards.
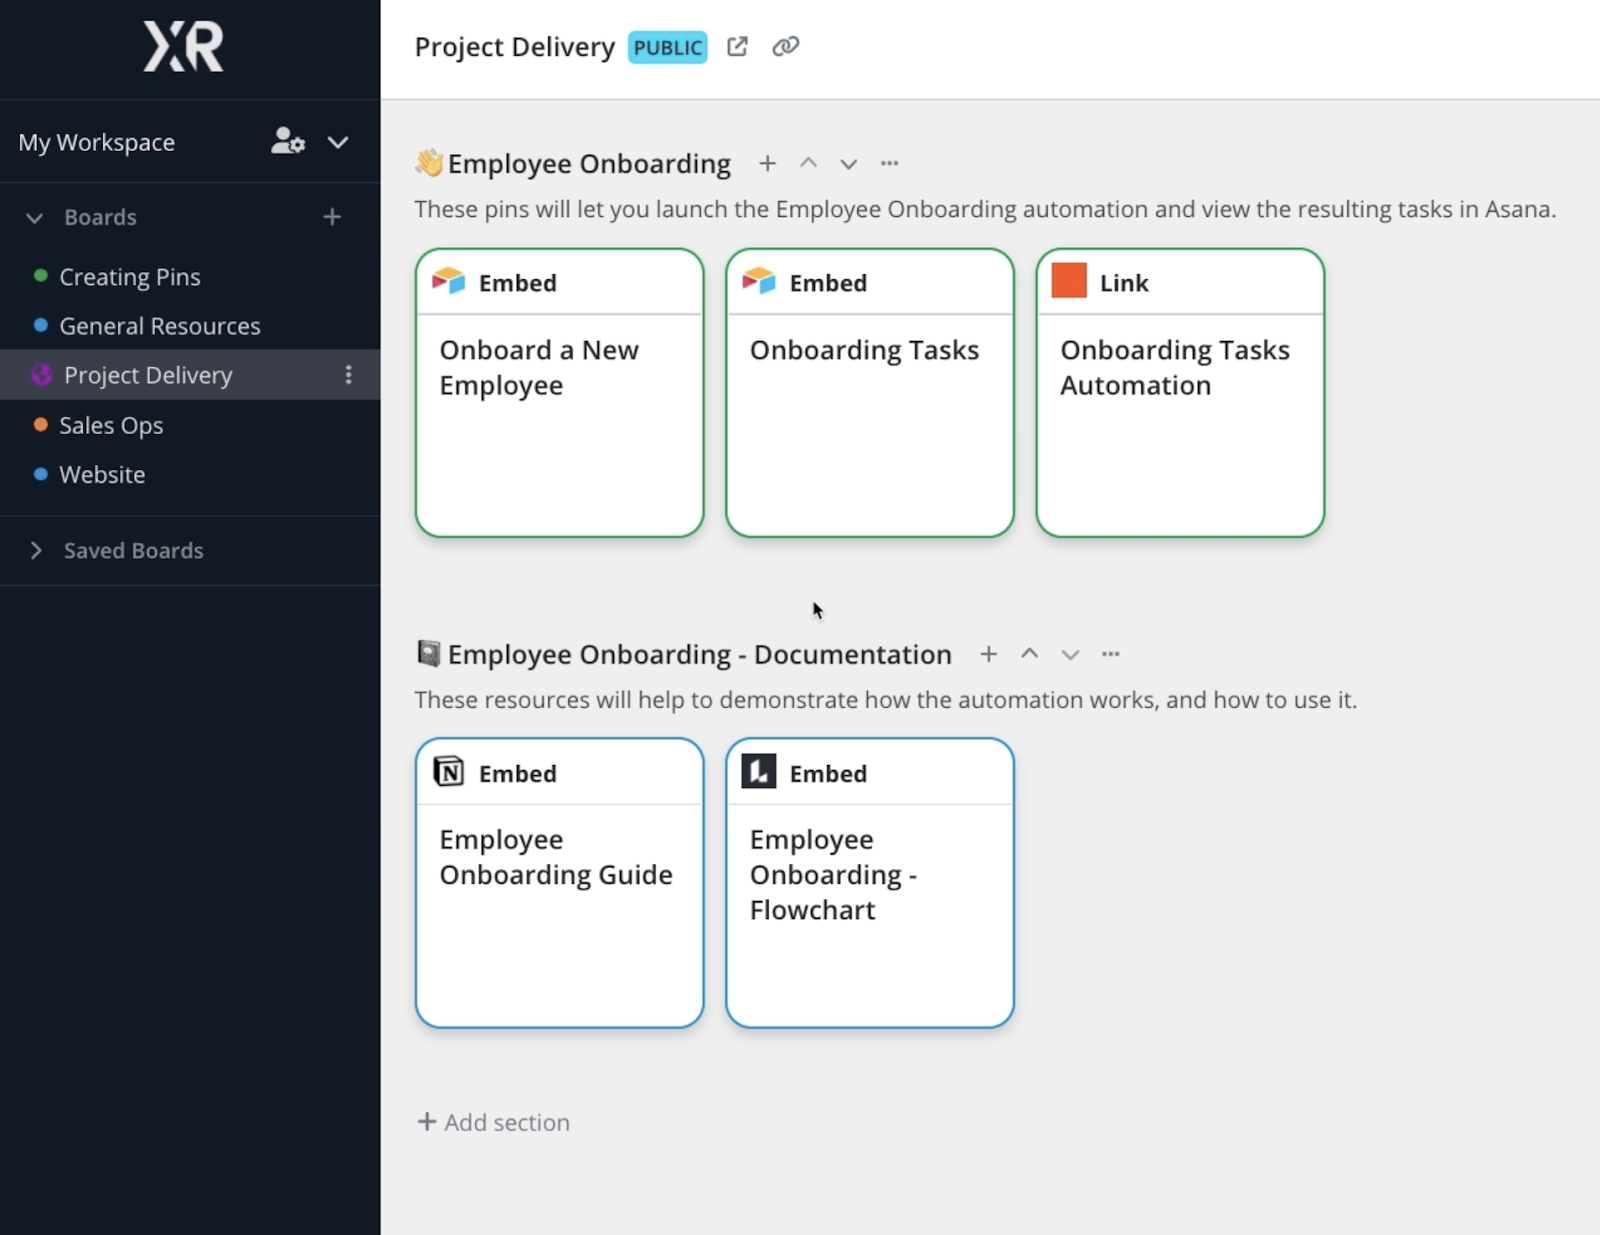
In each board, we can link or embed Zaps, but we can also add Airtable forms, automations from other providers, documents from Notion and Google, or really any web-based resource that we want.
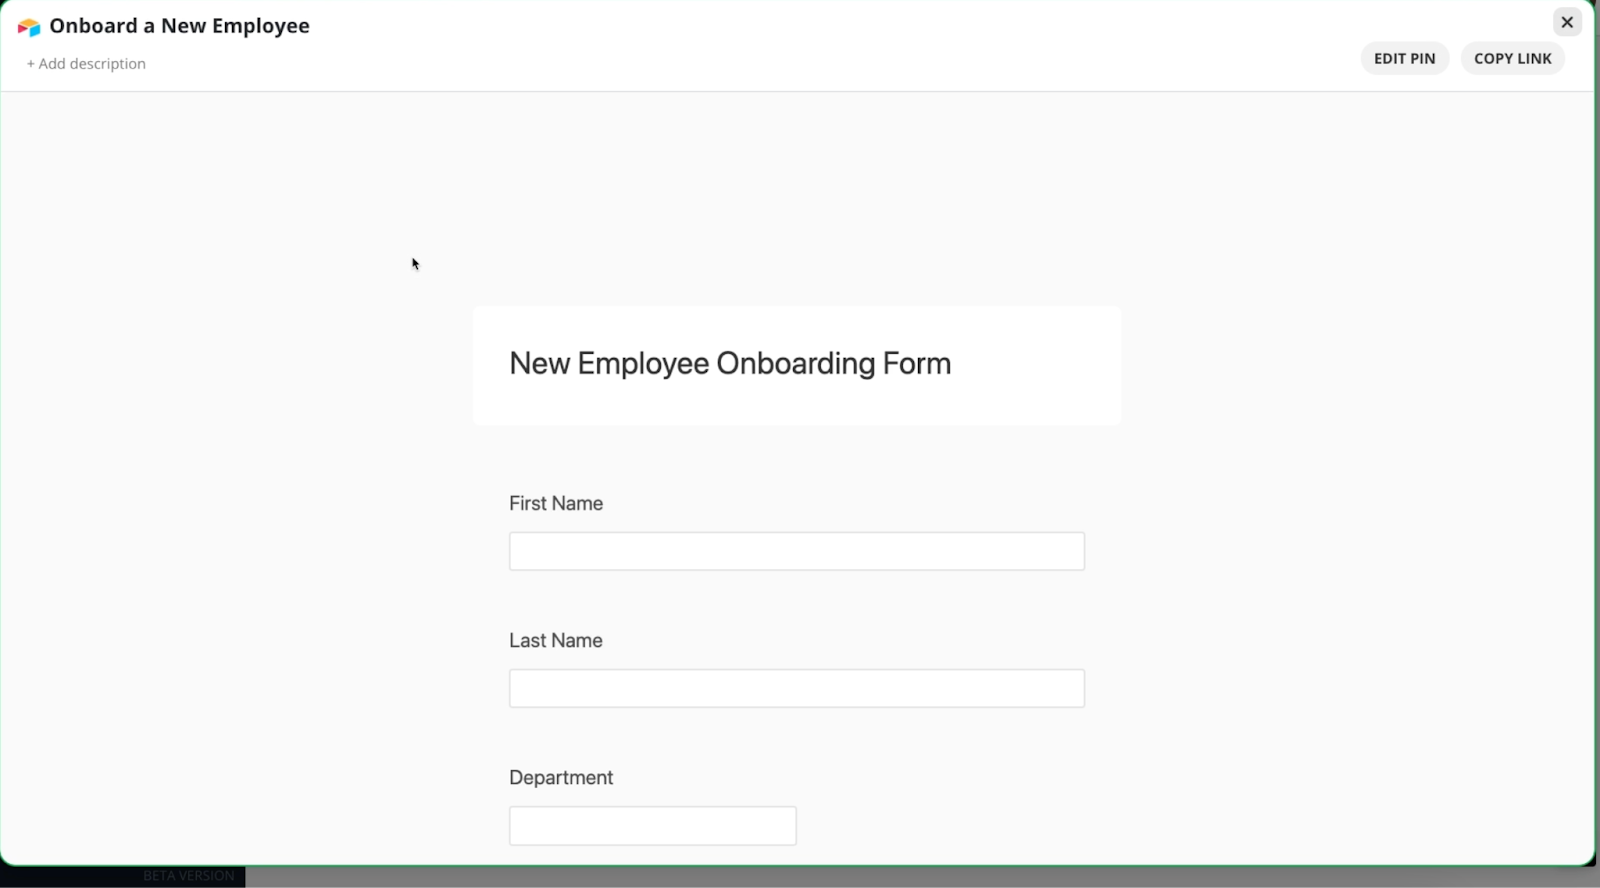
How to create your first Zapier Interface from scratch
Now, let’s start building an interface.
We’re going to show you how to create an interface step by step and add components like links, forms, and an AI chatbot to your interface pages.
NOTE: before you begin building, you should be aware that all Zapier interfaces are publicly accessible by default.
You’ll need to upgrade to a premium plan to restrict access to your interface. Make sure that you’re not adding sensitive information to your interface, since anyone on the web could potentially access it.
Creating a new interface
To get started, open up Zapier and click on the “interfaces” option in the left hand menu.
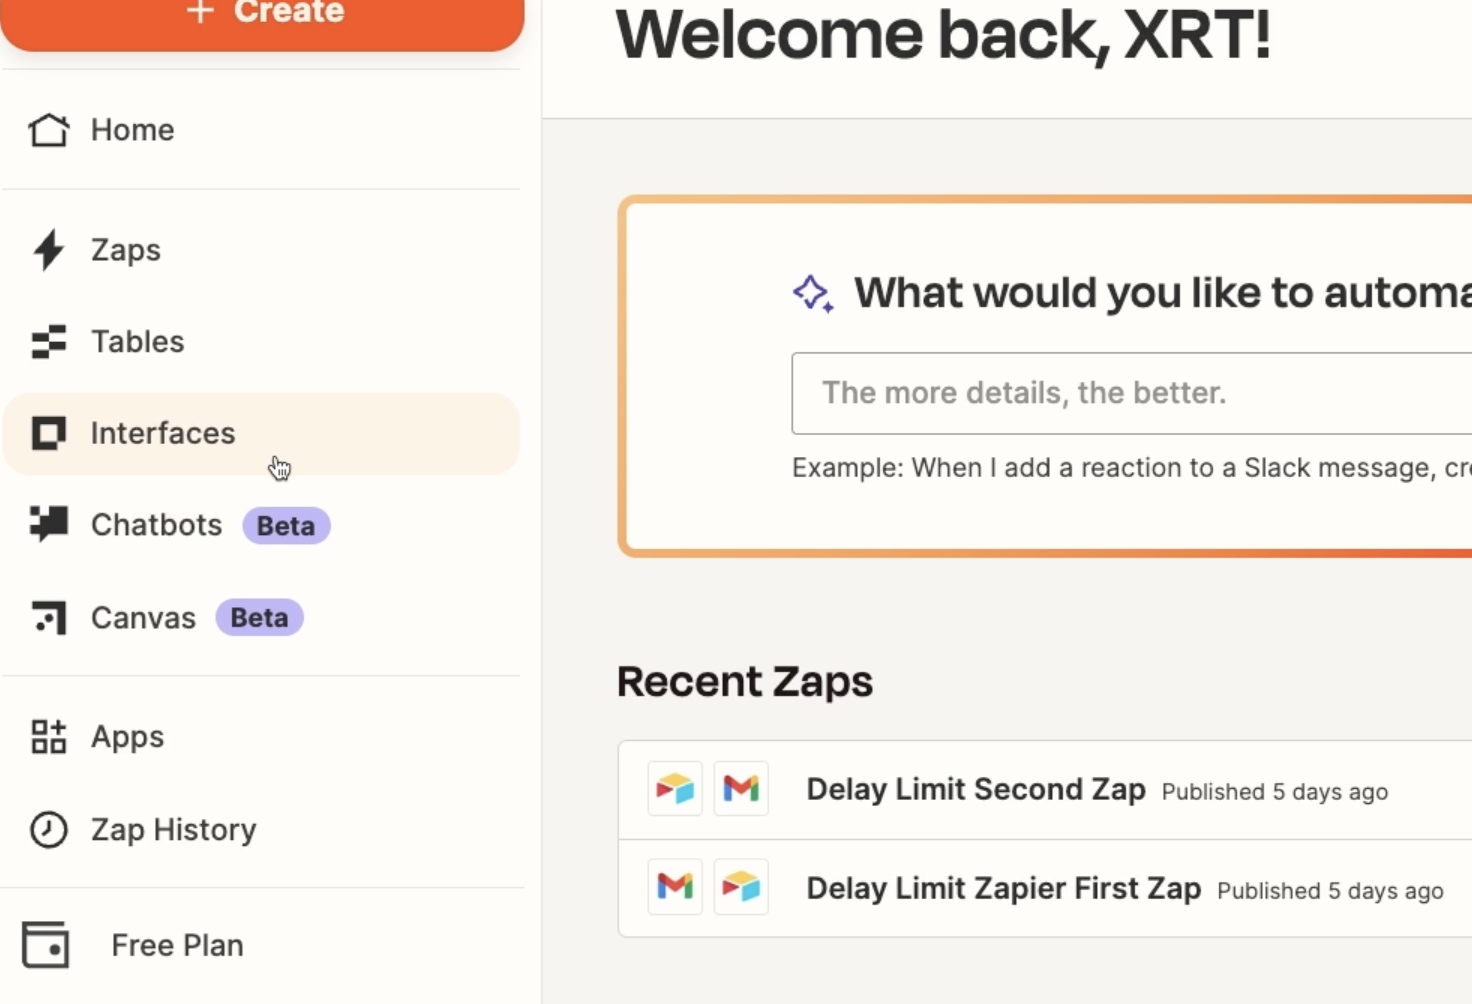
If you haven’t created any interfaces yet, you’ll see a long gallery of templates that you can use to quickly get started.
For now, just click on “Start Blank”
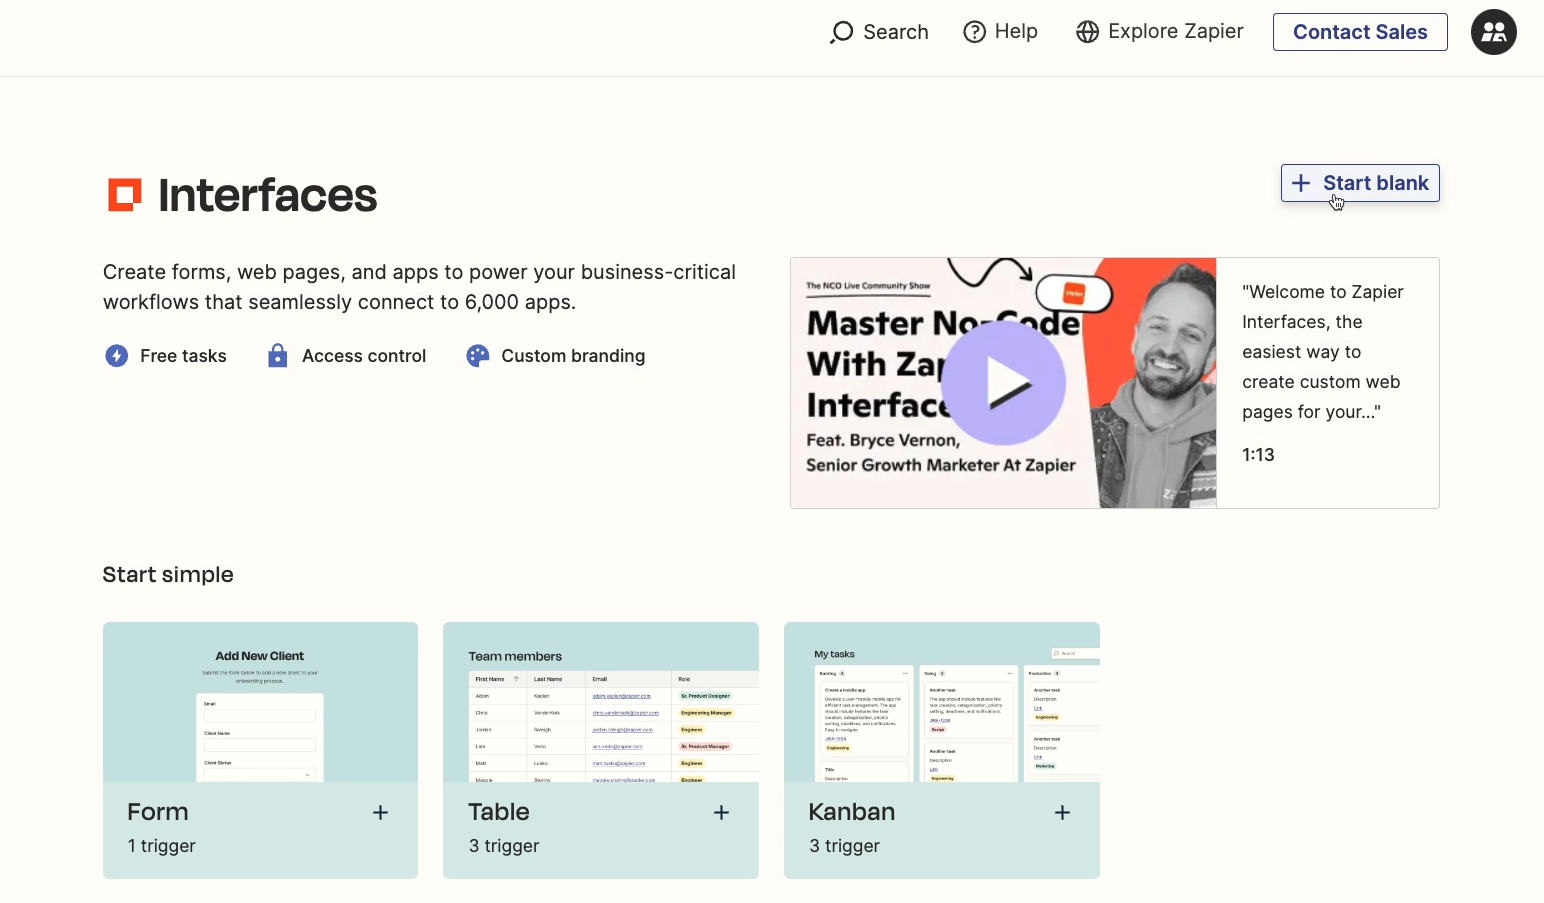
Here, Zapier will offer up a couple more generic templates: a form, and a customer portal. There’s also a link to the full template library.
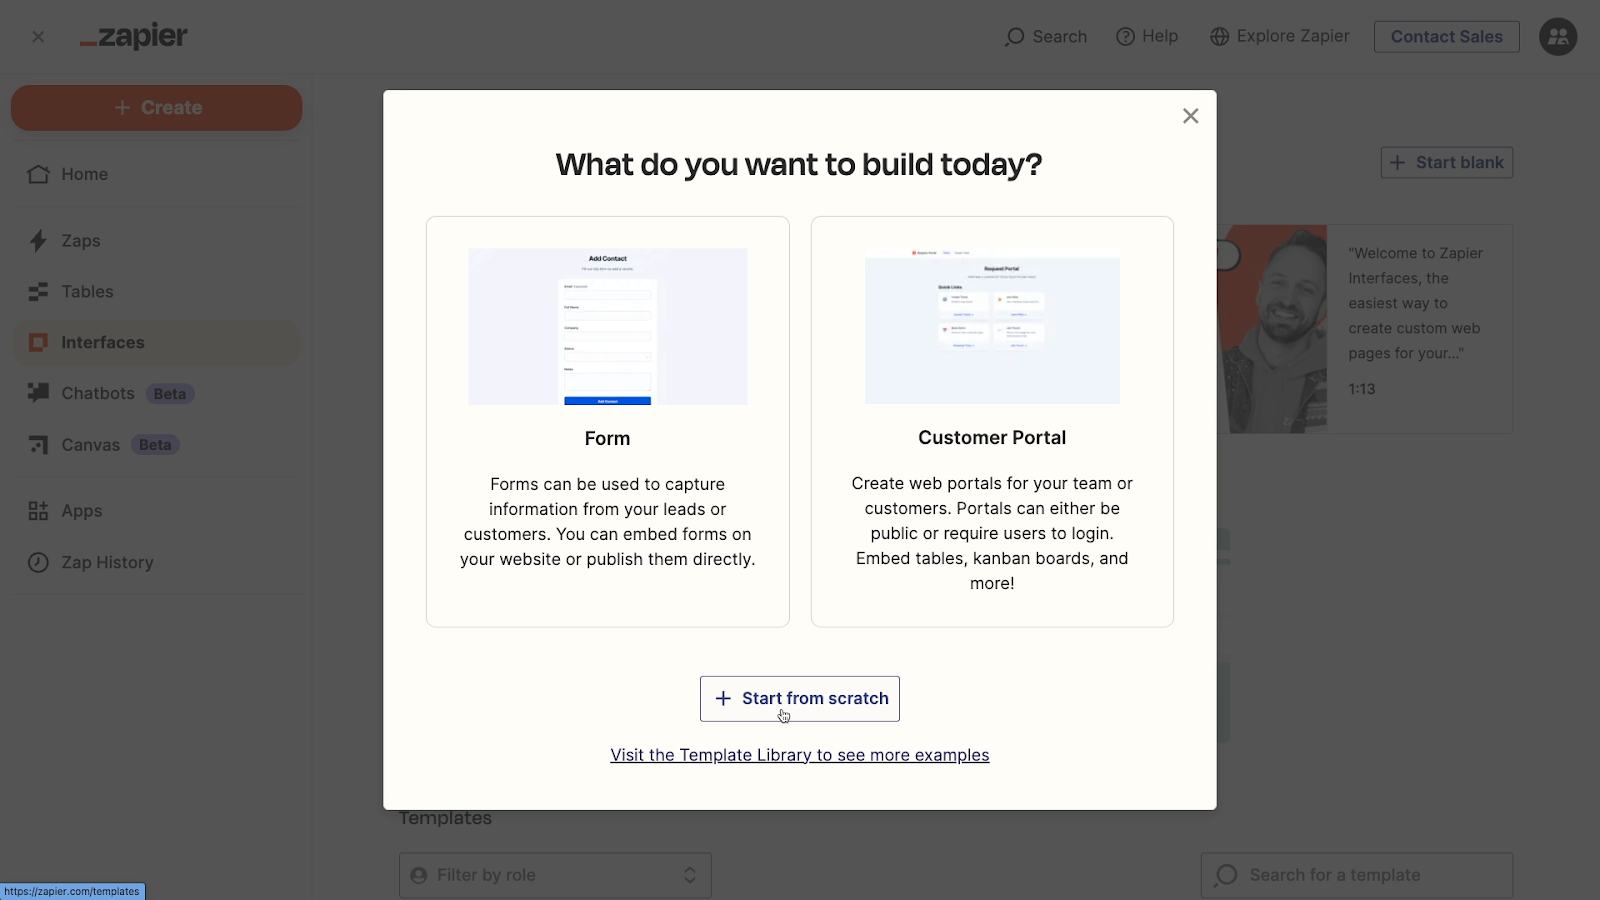
However, we’re going to show you how to build an interface from scratch.
That way, you’ll know how it all works, and you’ll have an easier time customizing a template later on.
Click on “Start from scratch” to make a new interface.
On the main interface builder page, you’ll see three sections: Pages, Tables, and Zaps.
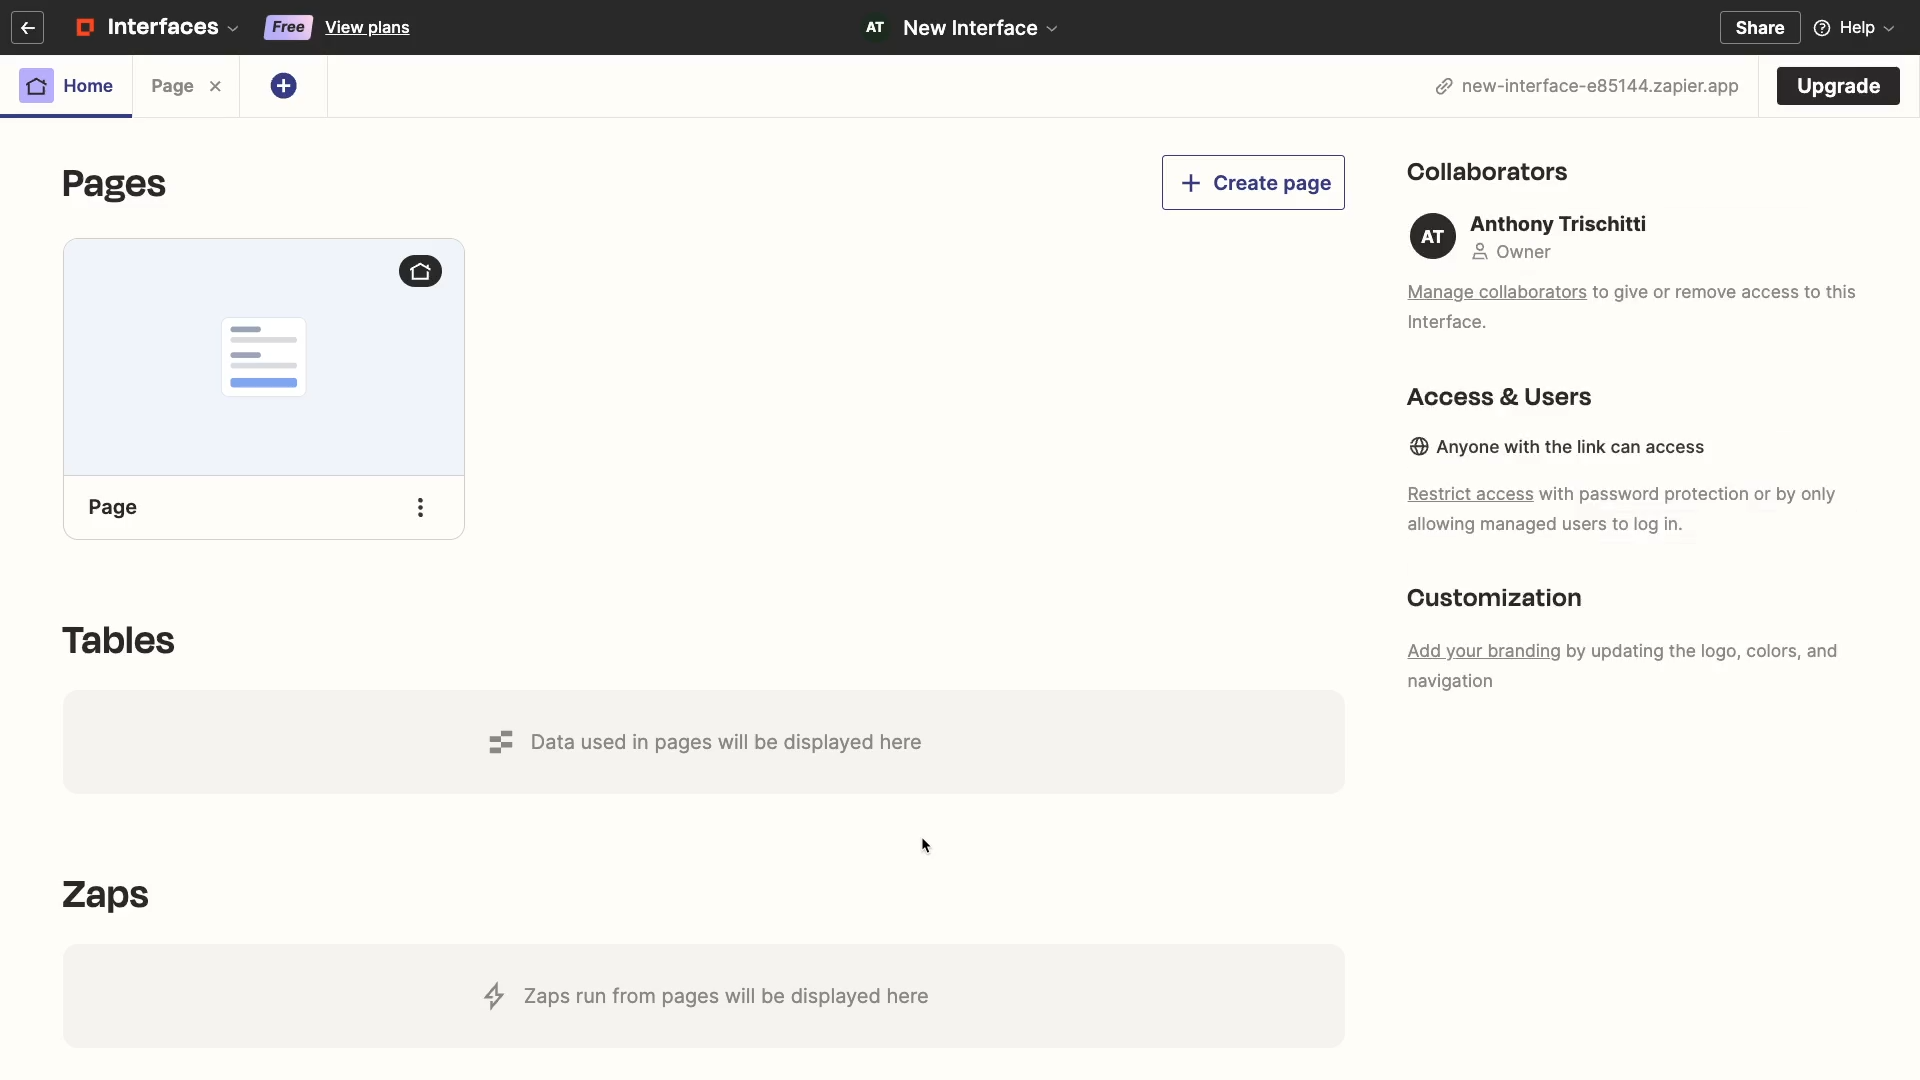
Your interface can include several different pages, which will all be listed here. To start, you’ll just see the default first page for your interface. The various components that you add to your pages will often reference specific Zapier tables and Zaps, and those will be listed here, too.
Adding content to an interface page
Let’s start customizing our interface by checking out this initial page, which doesn’t have any content at all yet.
When we click on it, we’re immediately prompted to add a component to the page.
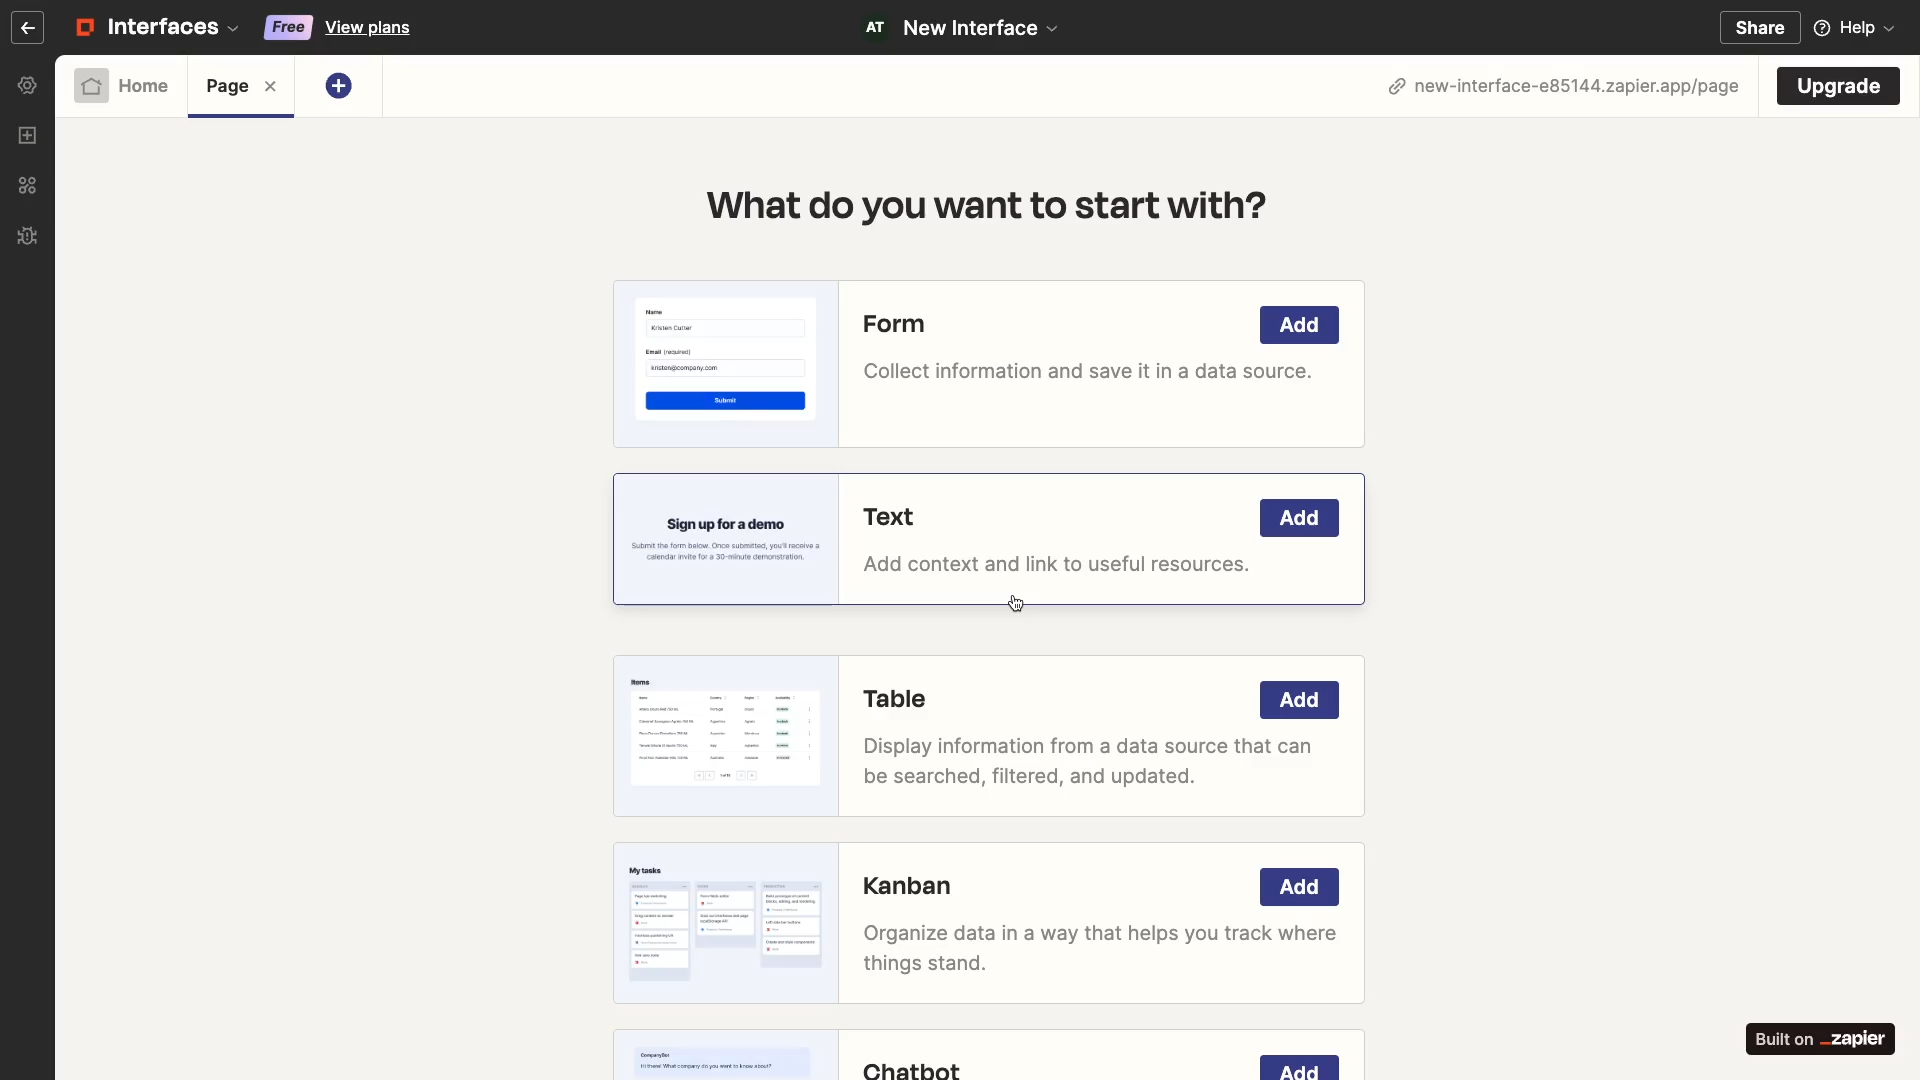
You’ve got several choices here, like Form, Kanban, and Chatbot. But we’ll start very simple. Just select “Text” to give this empty page a header. Click “Add” to add any of these elements to your current page.
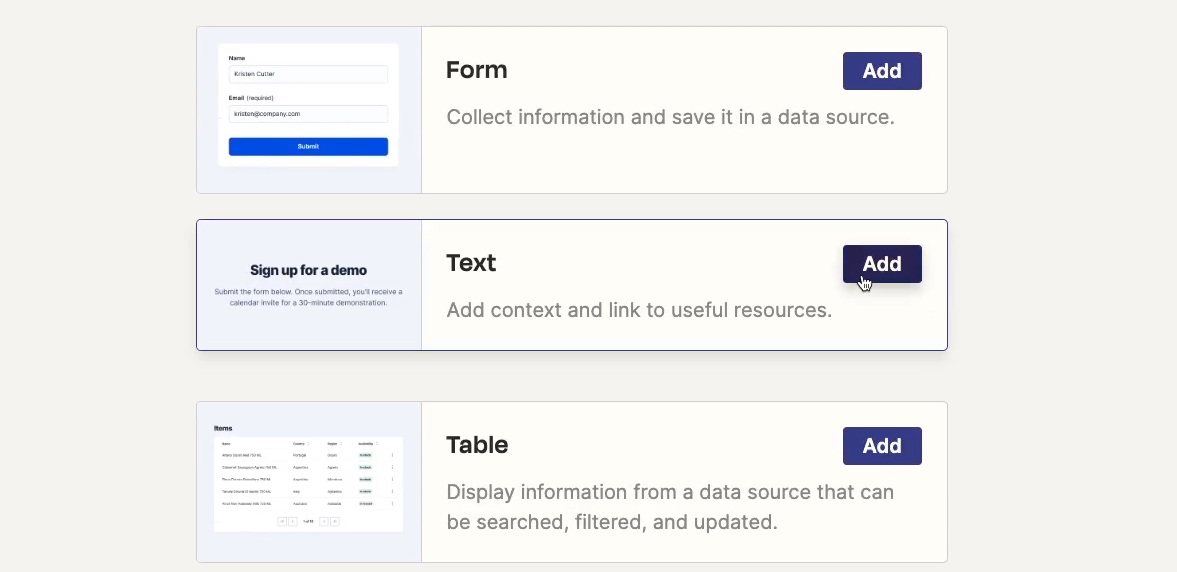
Once your page has at least one component, you’ll see a preview of your page in the middle of the screen.
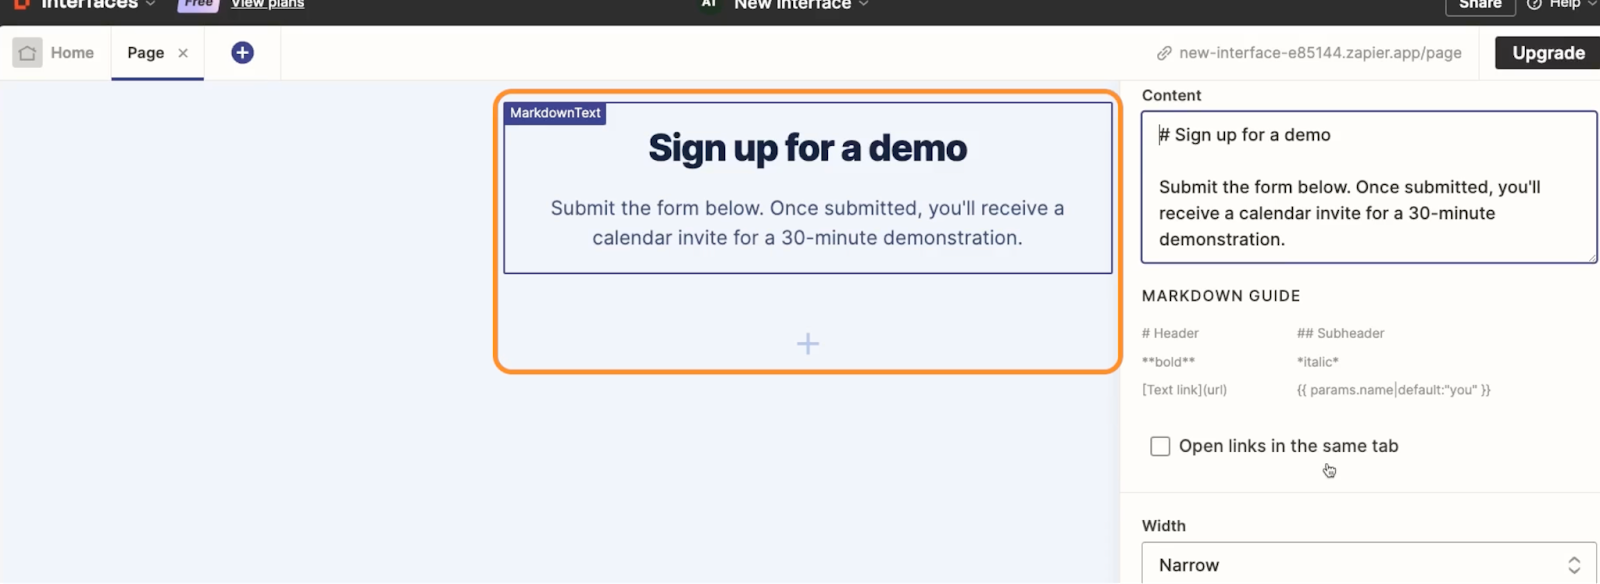
When you select a component, you can edit its content, styling, and settings in the panel on the right.

Customizing a text component
Try changing the text block to say:
“My First Zapier Interface”
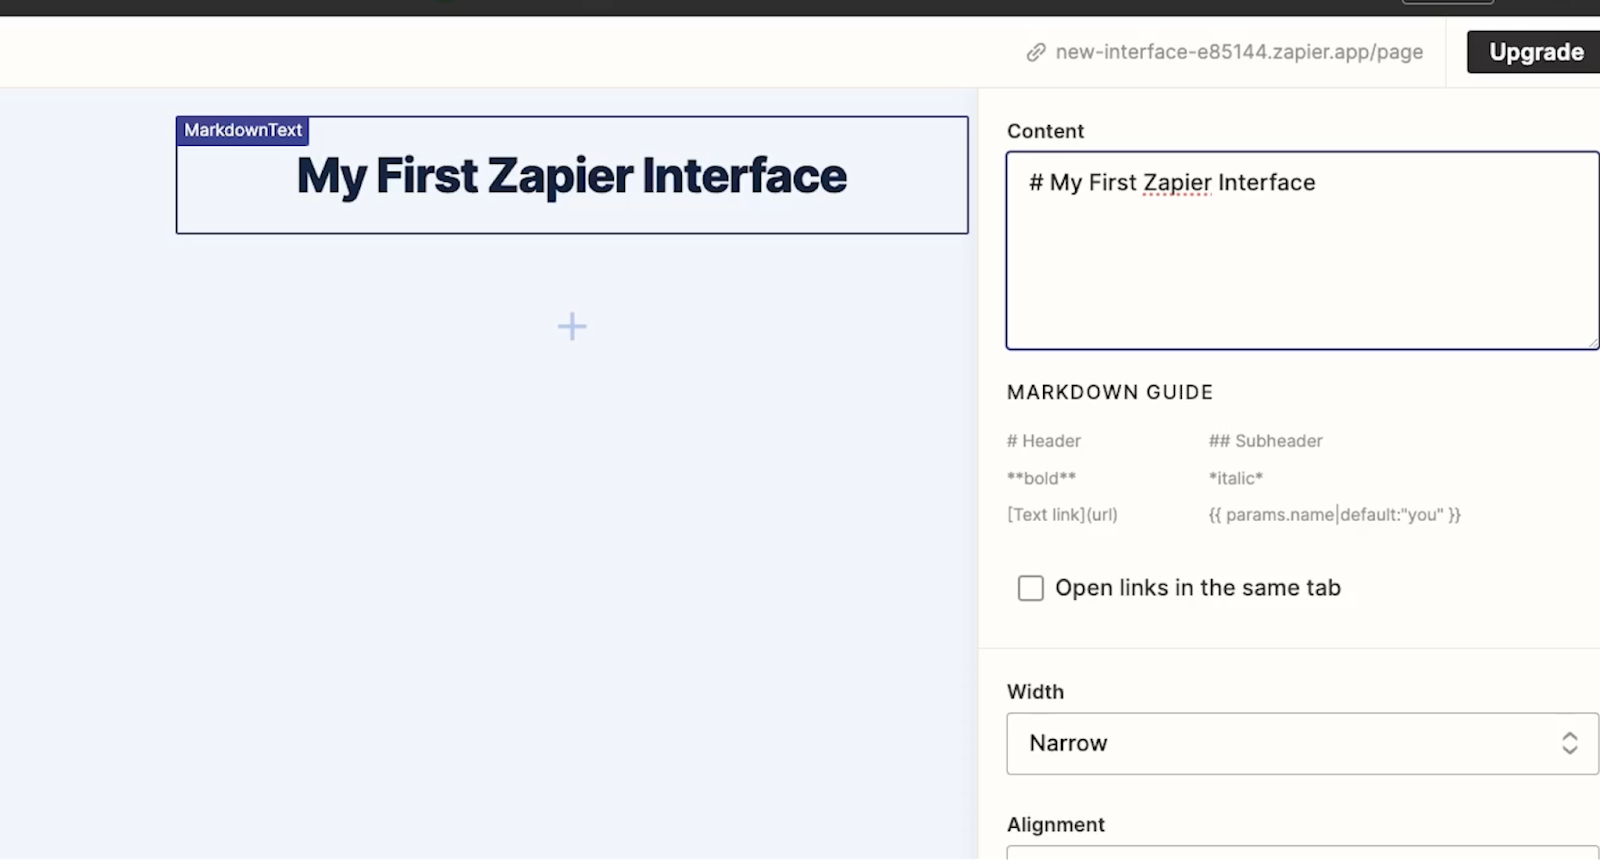
And give it a brief description:
“Below, you can find some helpful links and other resources to check out.”

Note that this text box uses markdown for styling, and Zapier provides some basic markdown formatting tips right below it.
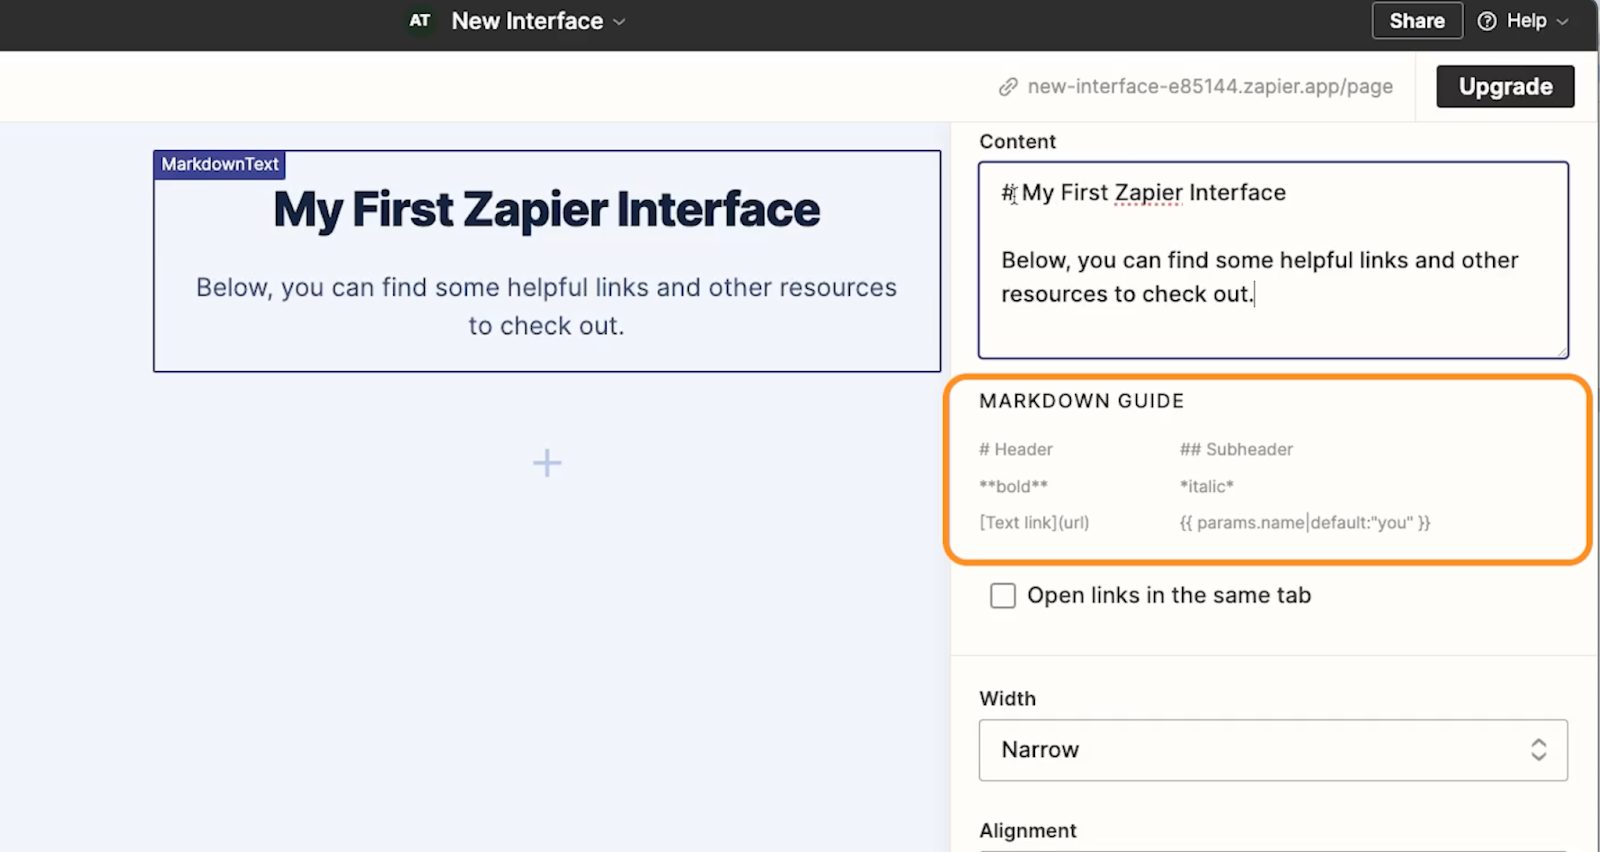
With markdown, you could turn this header into a subheader by just adding another pound sign (or hashtag, or octothorpe - whatever term you prefer 😉).

But in our example, we’ll leave it as a full size header for now.
You’ll also see a few more options to change the width, alignment, and text alignment of the component.
We’ll change the width to “medium”, but we’re fine with the default center alignment. With all of these settings configured, this component is ready to go.
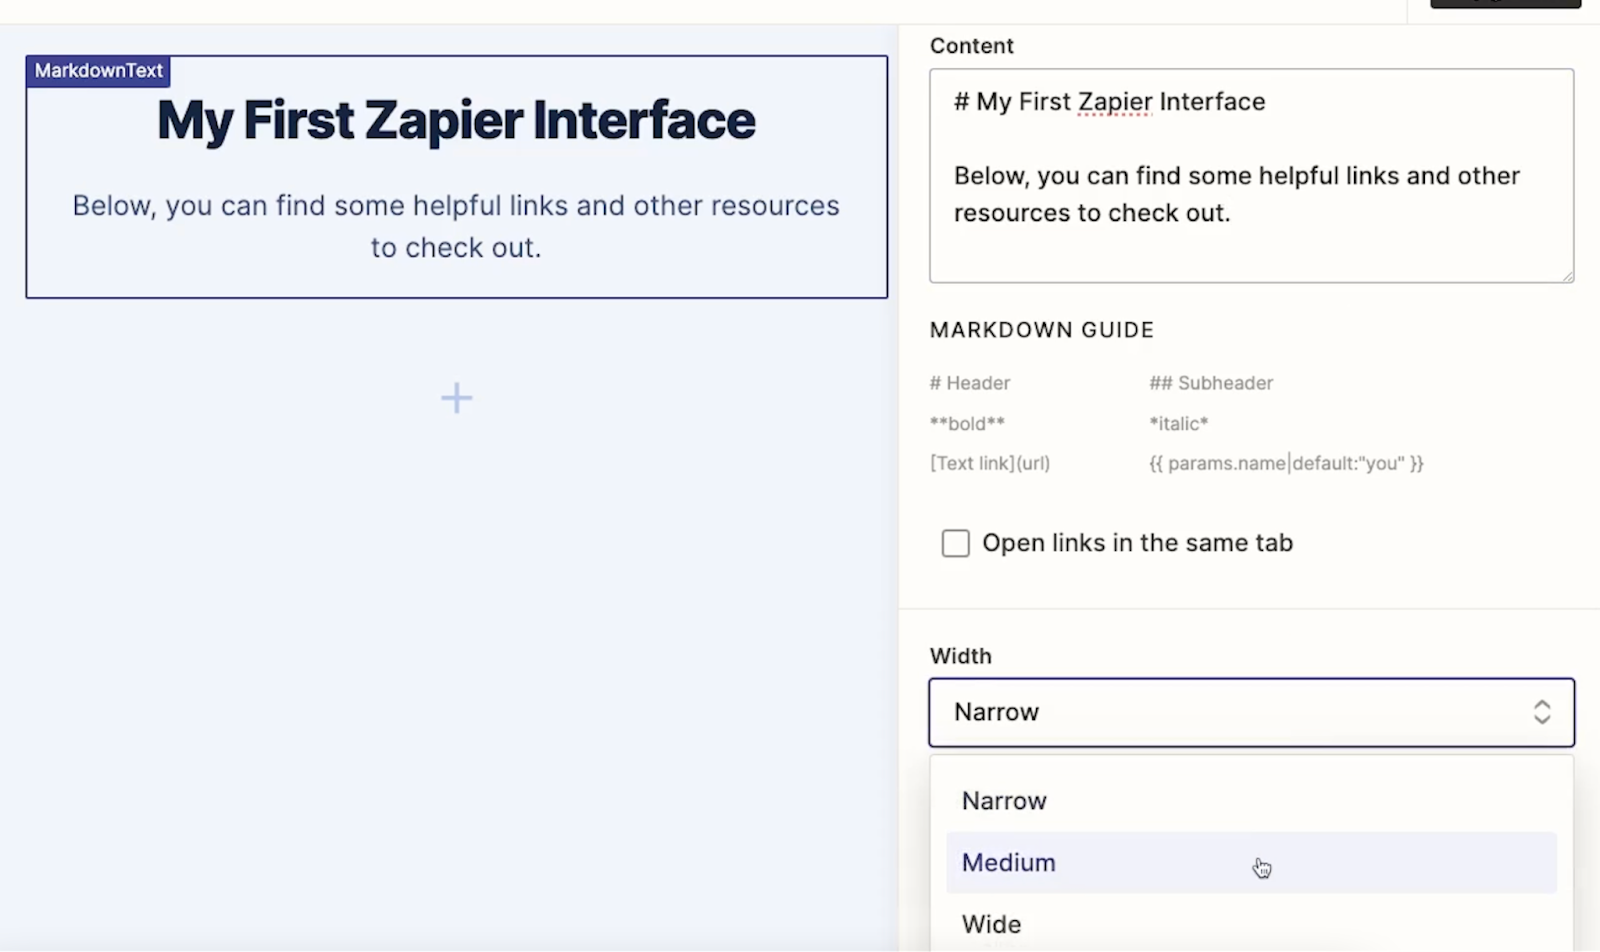
Note that If you’d like to open up your published interface at any time, just click on this link in the top right.
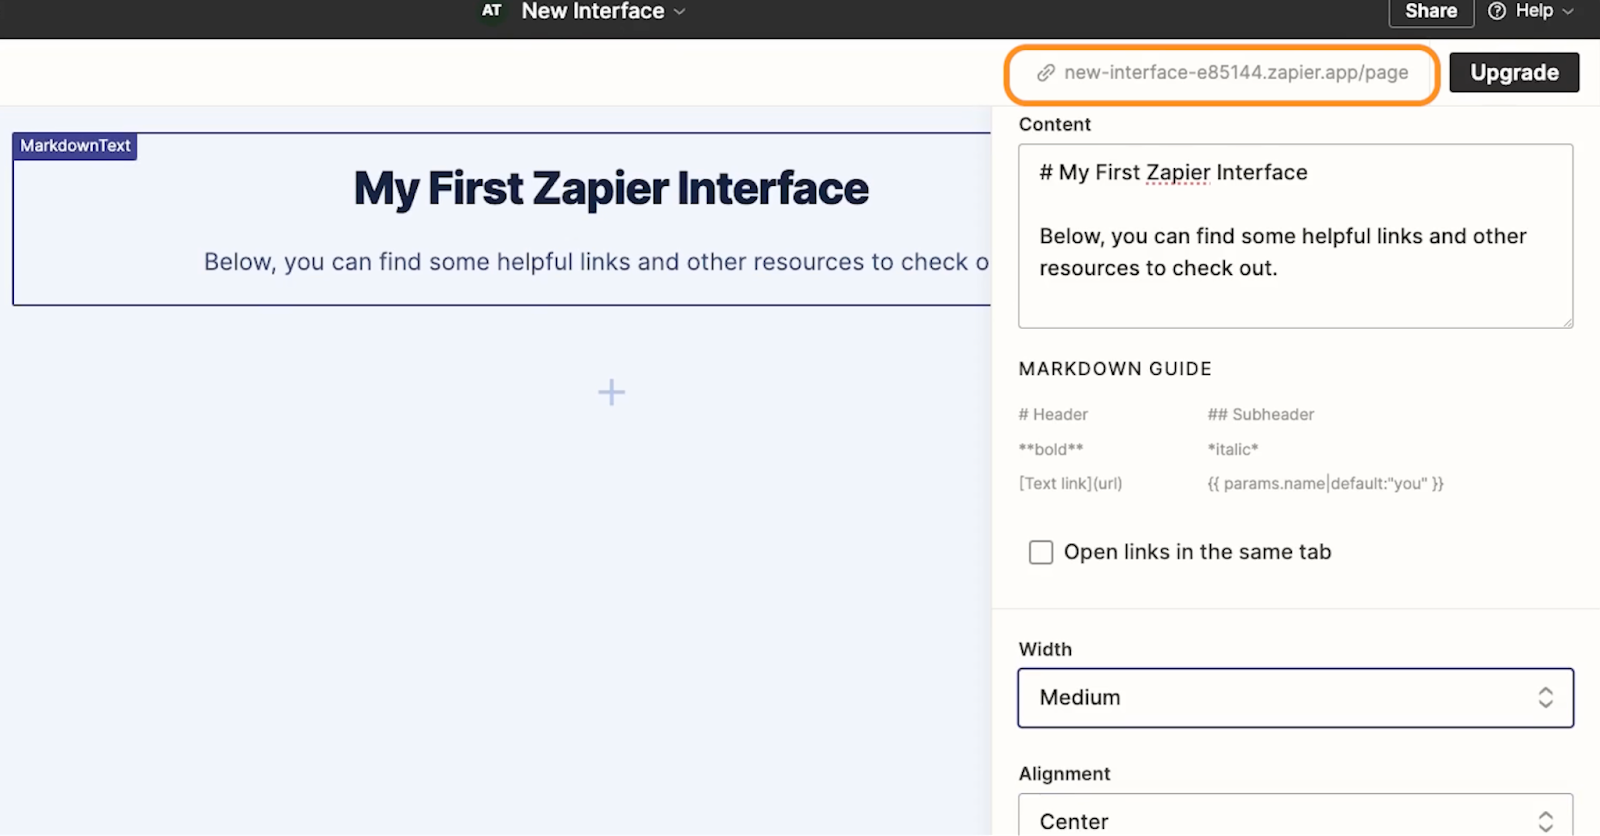
Adding components to a page
Let’s start fleshing out this page a bit more by adding an area for link cards.
To add a new component to a page, just click on the Plus button on the bottom of the page.
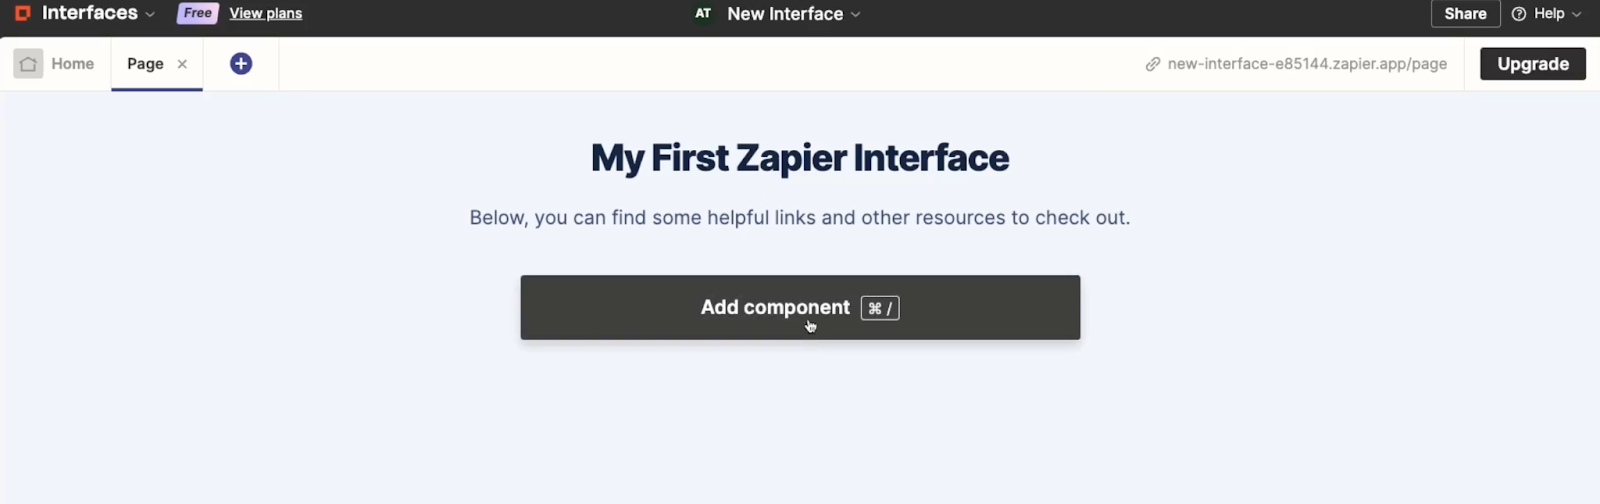
Then, you can scroll through the menu of components or search for one that you want.
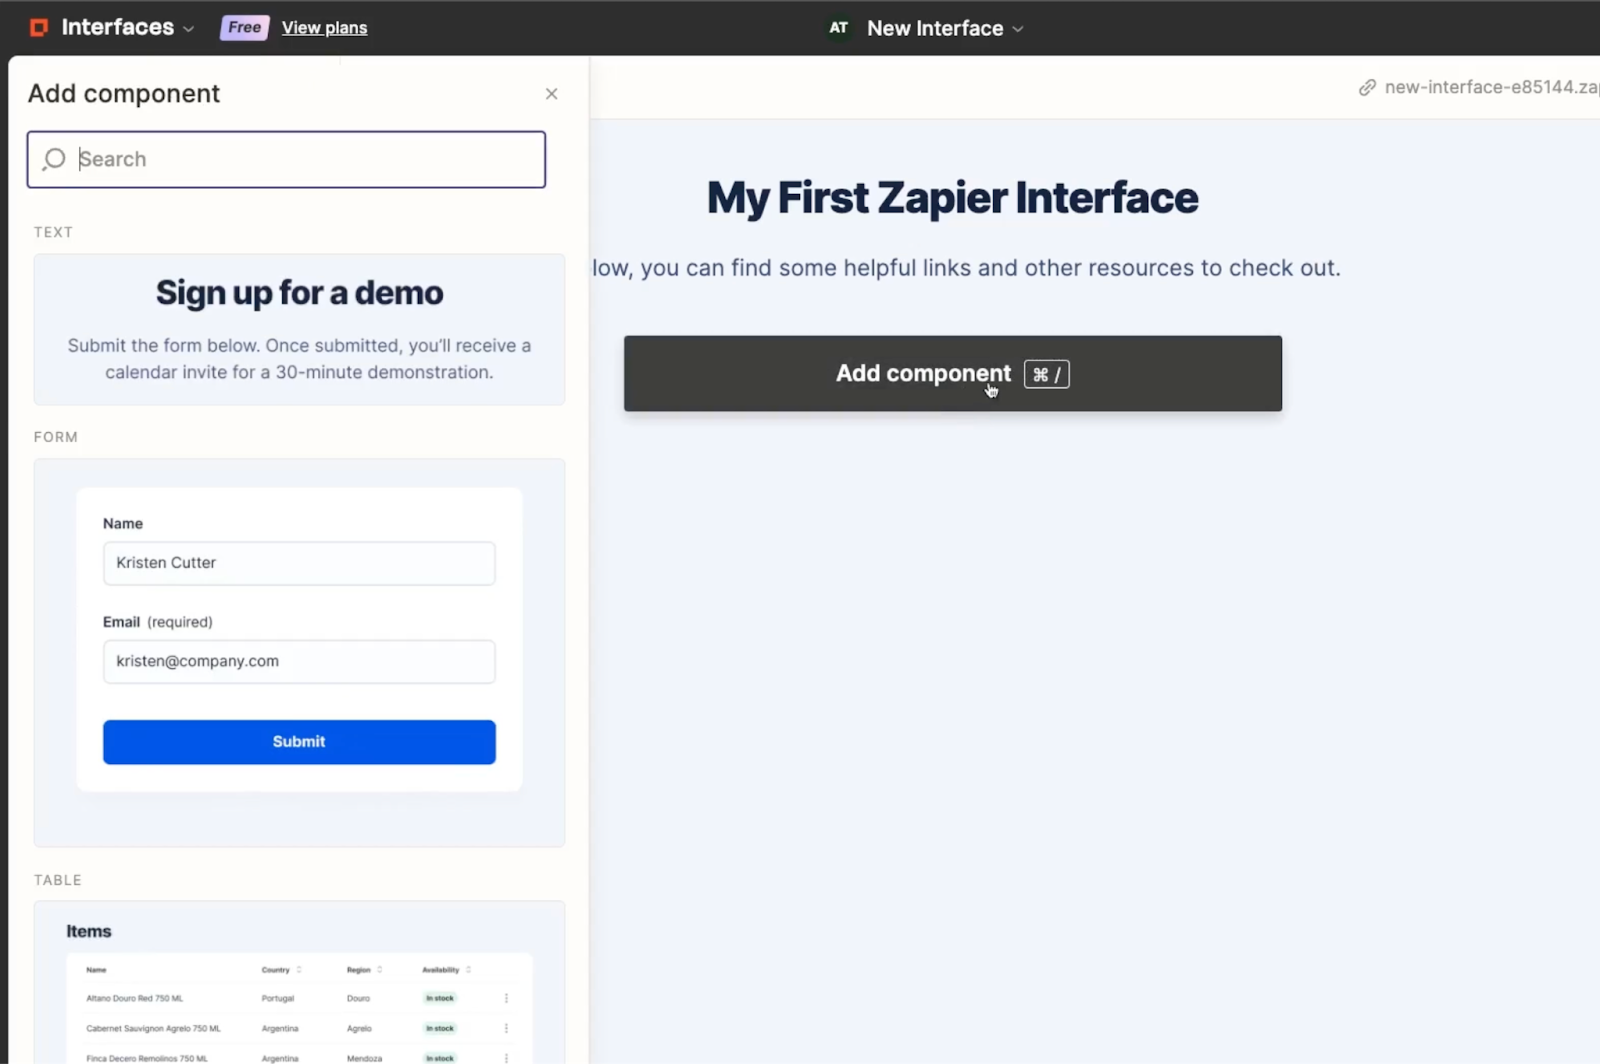
Adding link cards to an interface page
We’ll search for “link”, and click on ‘link cards’ to add the component to our page.

It starts off with one card, but you can add more with the “Add link” button.
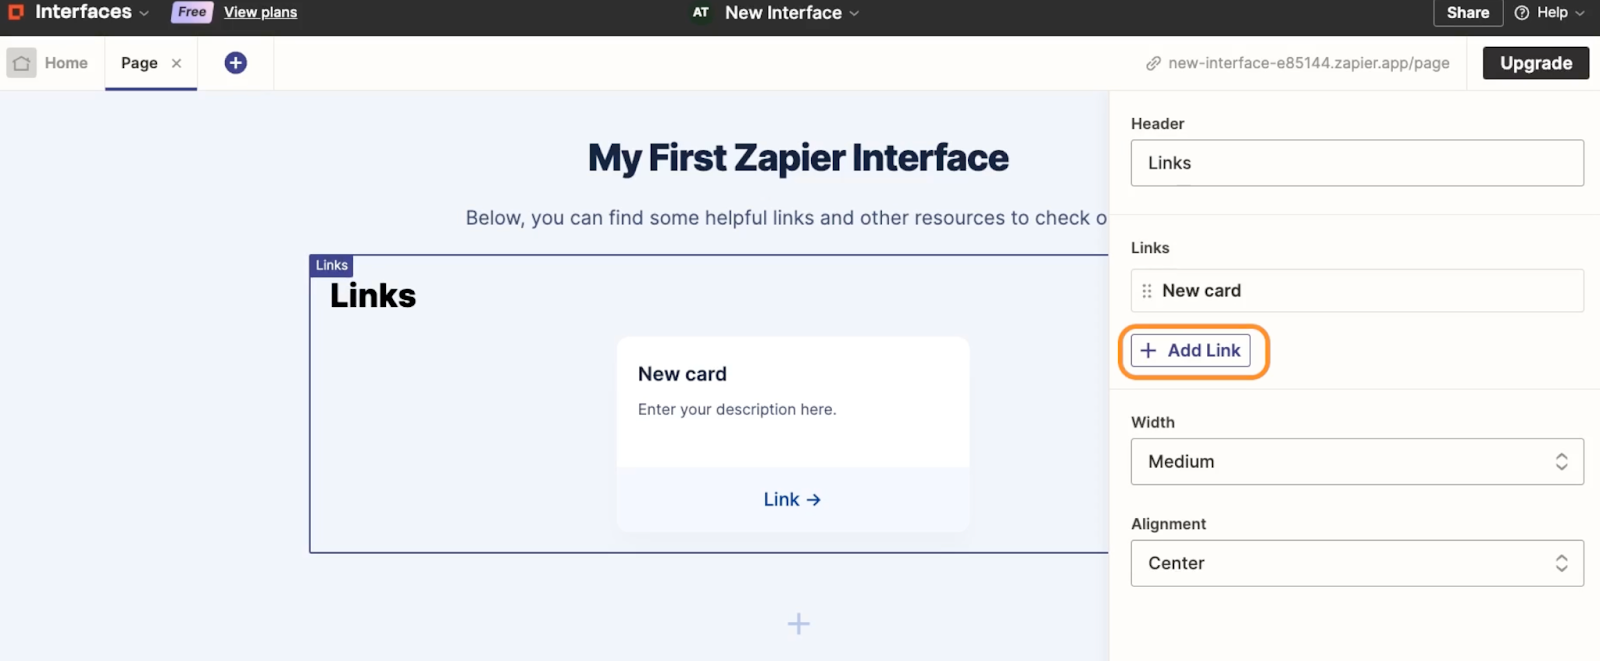
You can use link cards to link to external URLs or to other pages in your Zapier interface.
We’ll add a couple more pages to this interface as we continue this tutorial, and we’ll make sure to link to them from here. But for now, we’ll select the first card, and edit it to point to our company’s website, www.xray.tech. Try editing the card in your interface to link to any site you want.
Note that you can also add a title, description, and emoji for each link.
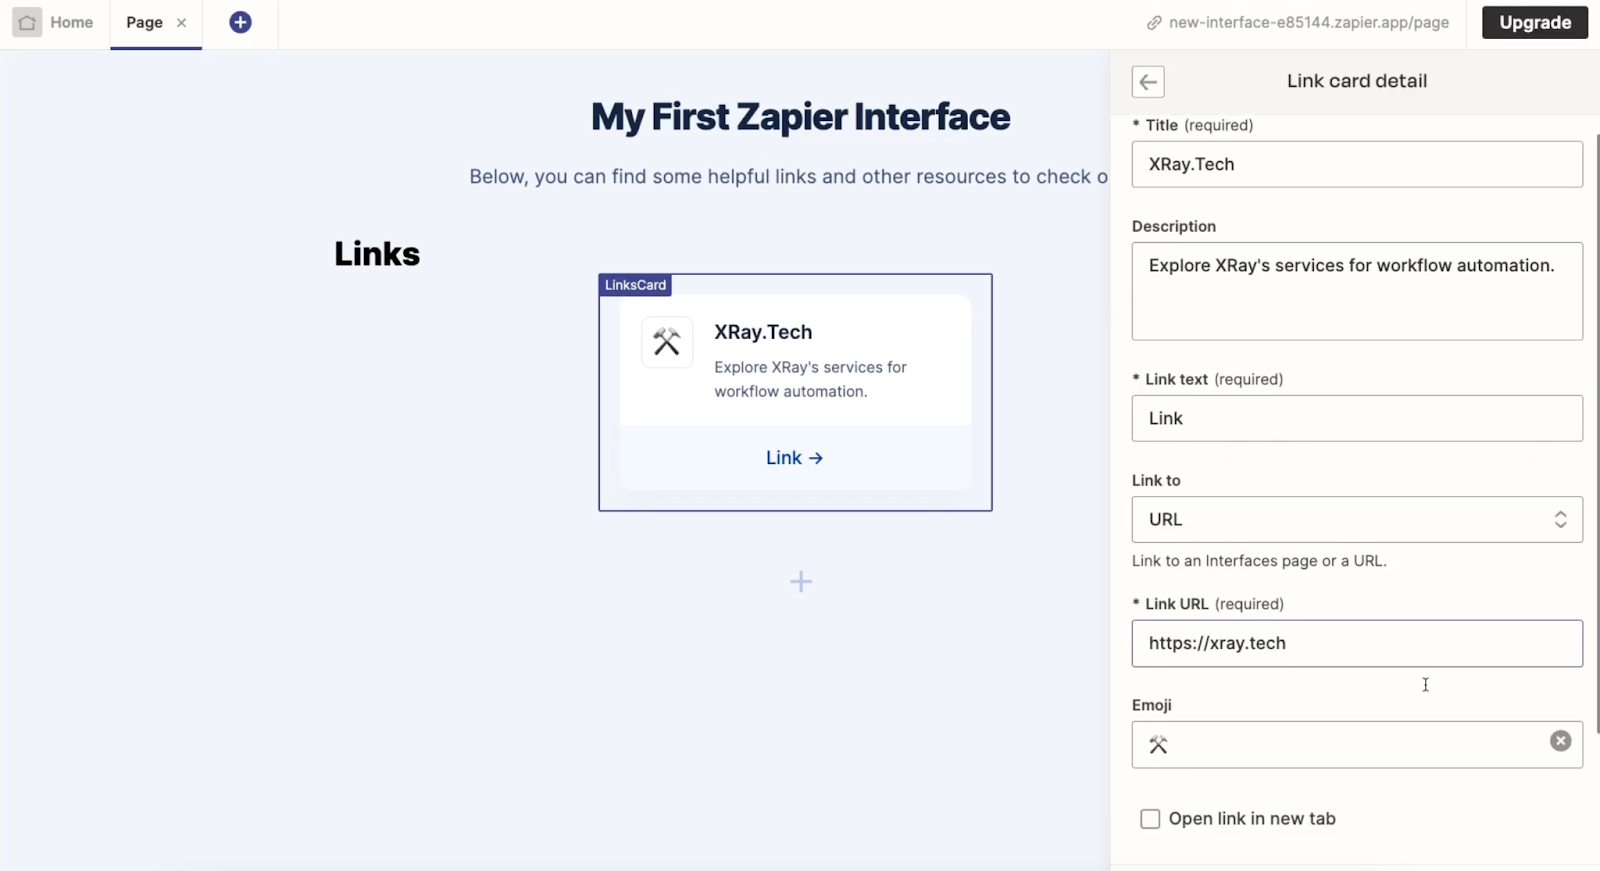
You can also choose to have links open in a new tab, which we’ll enable so that users won’t lose the interface just by clicking on a link.
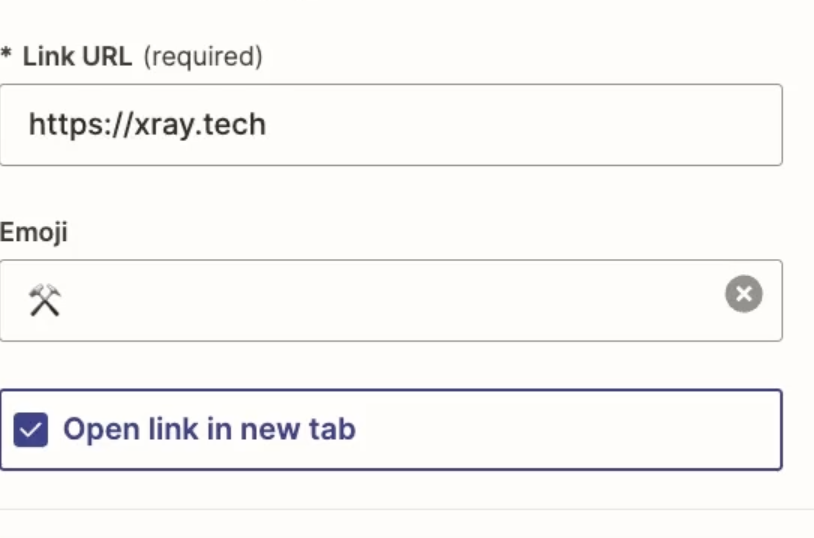
Once your card is all set, click on “Done”.
Adding an AI chatbot to your Zapier interface
Links are a pretty useful feature, but not very exciting or unique. With our next feature, let’s add something that will make our interface stand out a bit.
Let's add a page with an AI chatbot.
You could add a chatbot component to the same page you’ve already been working on, but for our example, we want to keep the home page as a simple directory for the whole interface.
To add a new page, click on the blue plus sign in the page menu.

Give your page a name. We’ll call ours “Chatbot”. Then, click “Create page”.
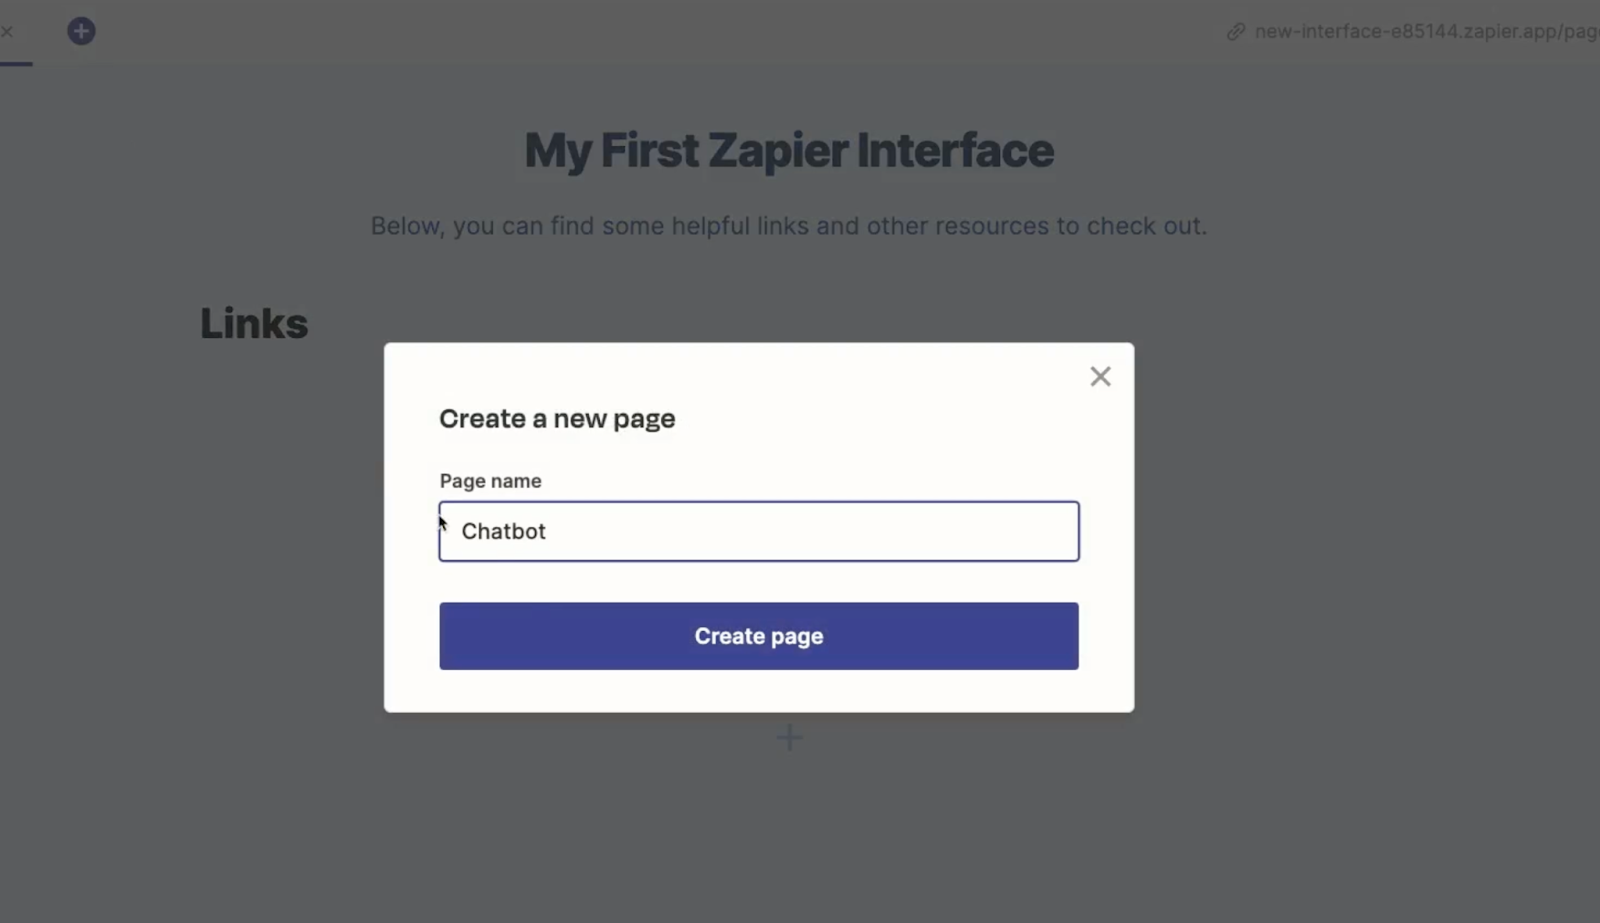
You’ll see a list of components to start with. To add a chatbot to the page, just scroll down a bit and select “Chatbot”.
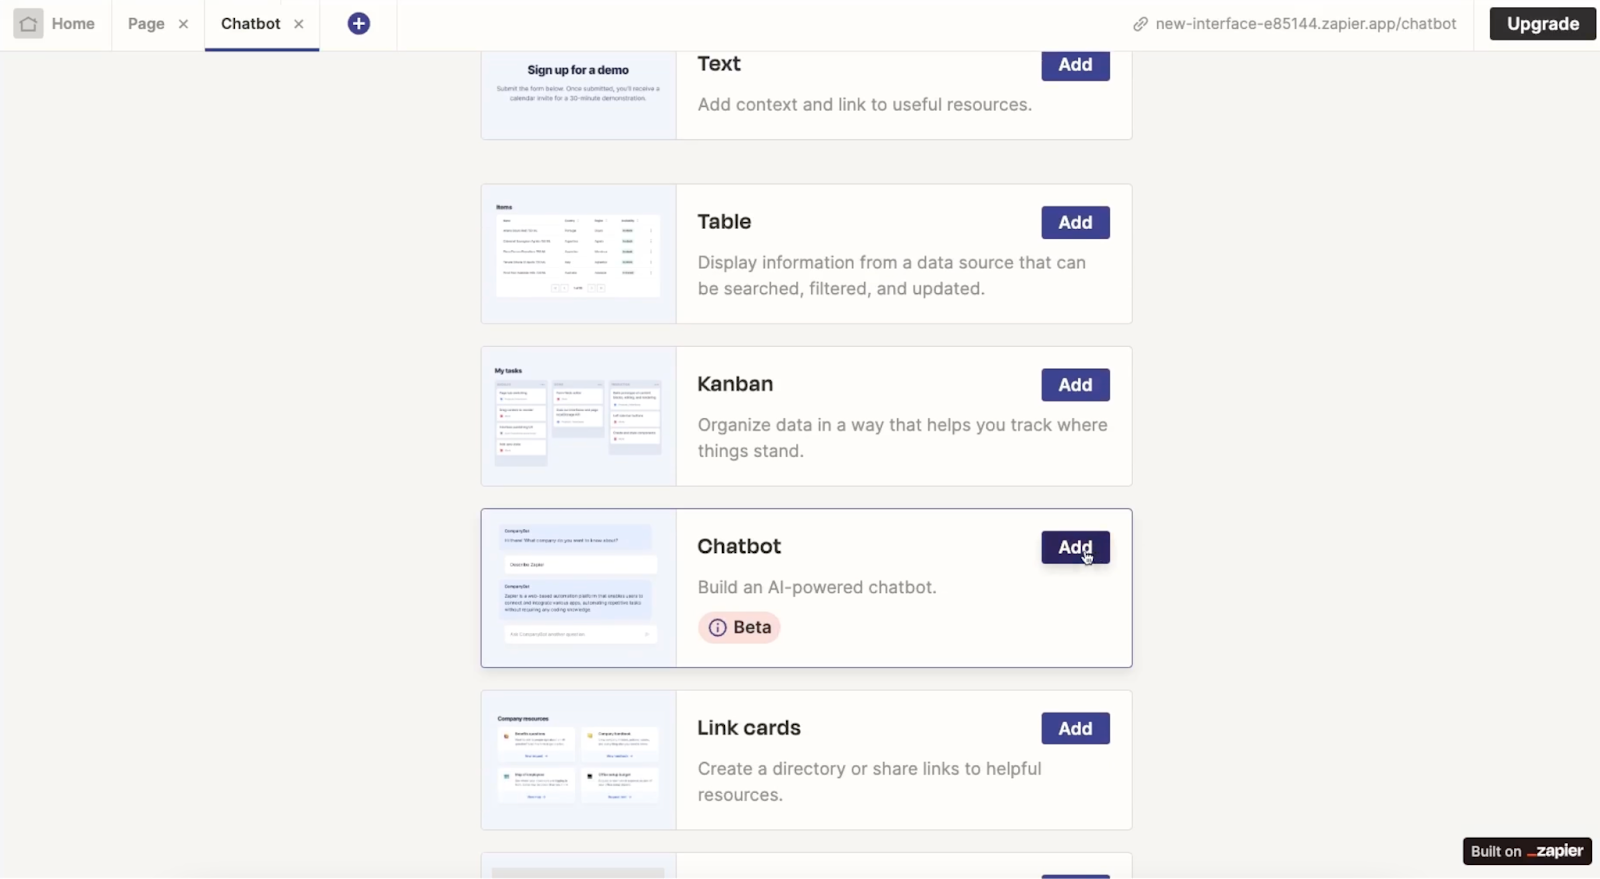
If you’ve already created a chatbot in Zapier, you’ll be able to select it from the menu on the right. If not, you can just create a new one now.
Clicking on “Create a new chatbot” will open up Zapier’s Chatbot feature in a new browser tab.

From there, you can click on “Create Blank Chatbot”.
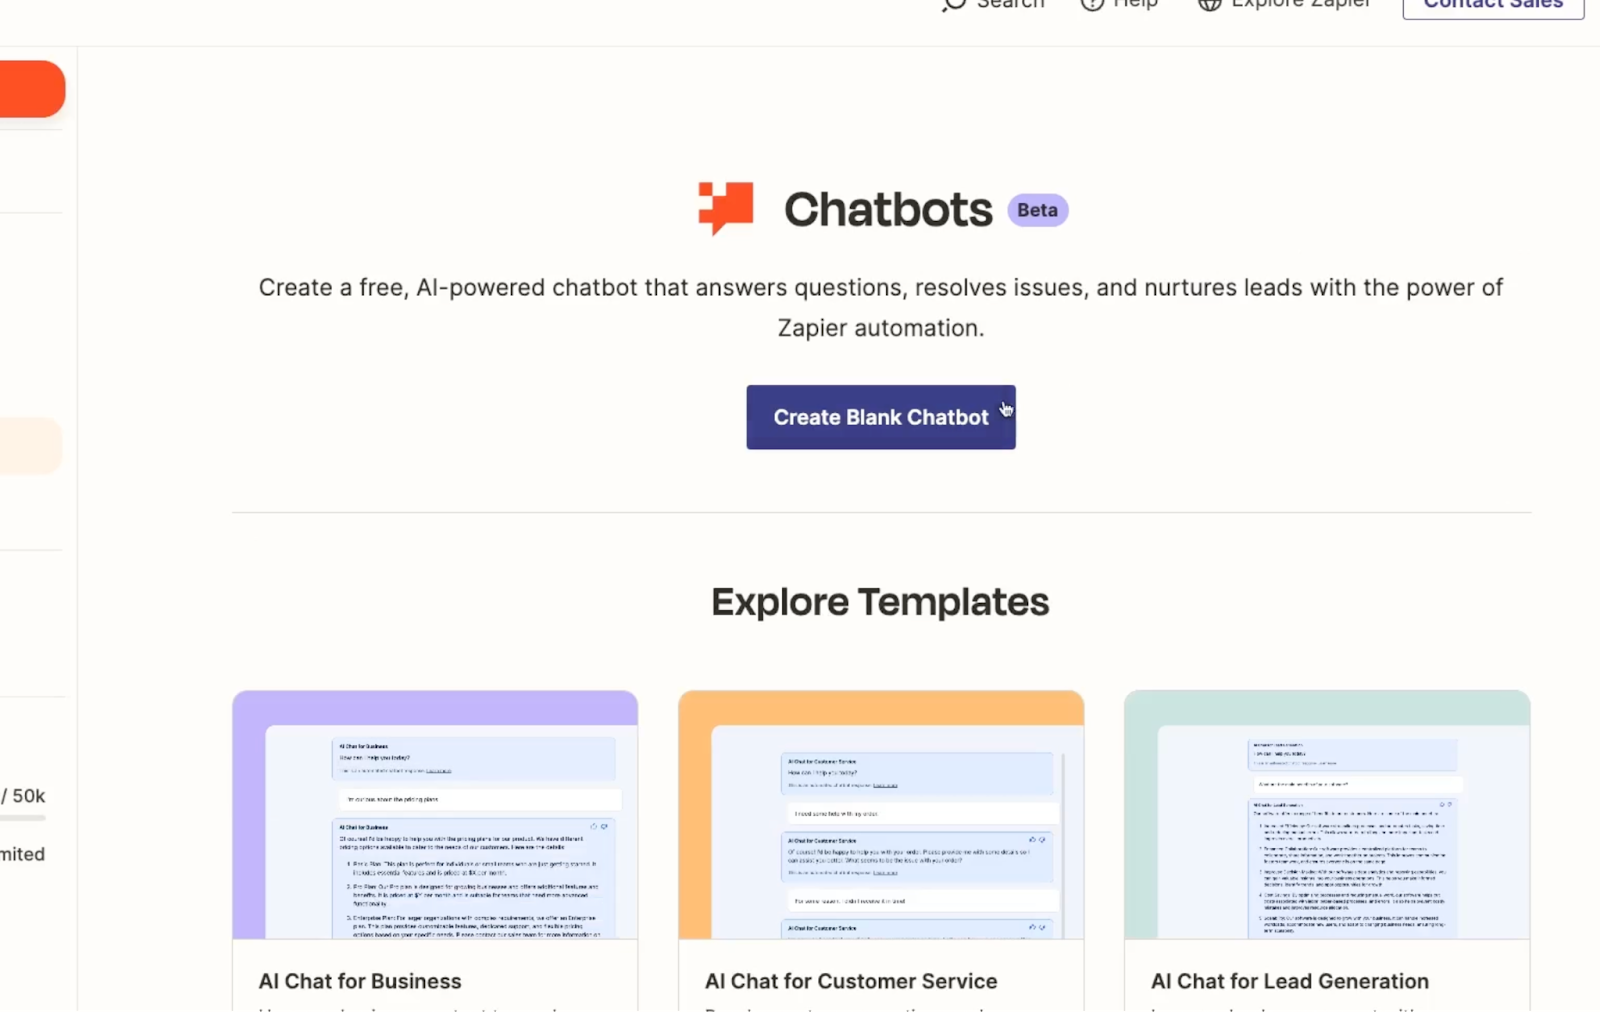
Finally, give your chatbot a name and click “Create”. We’ll call ours “Workflow Automation Helper”.

Customizing a Zapier chatbot
There are a lot of options in the chatbot builder, but they’ll all be pretty familiar if you’ve messed around with any popular AI chatbots recently.
To begin customizing your chatbot, you can update the greeting text that’s displayed whenever a user opens it up.
We’ll give our workflow automation assistant an appropriate message:
How can I help you with workflow automation today?

Note that you can also choose to use an AI-generated greeting, although we’d typically recommend using a static greeting for consistency.
Additionally, you can customize the user input placeholder, which defaults to “Ask me anything”.
For the model, you’ll have to stick with GPT-3.5 unless you upgrade to a premium plan, which will unlock models like GPT-4.
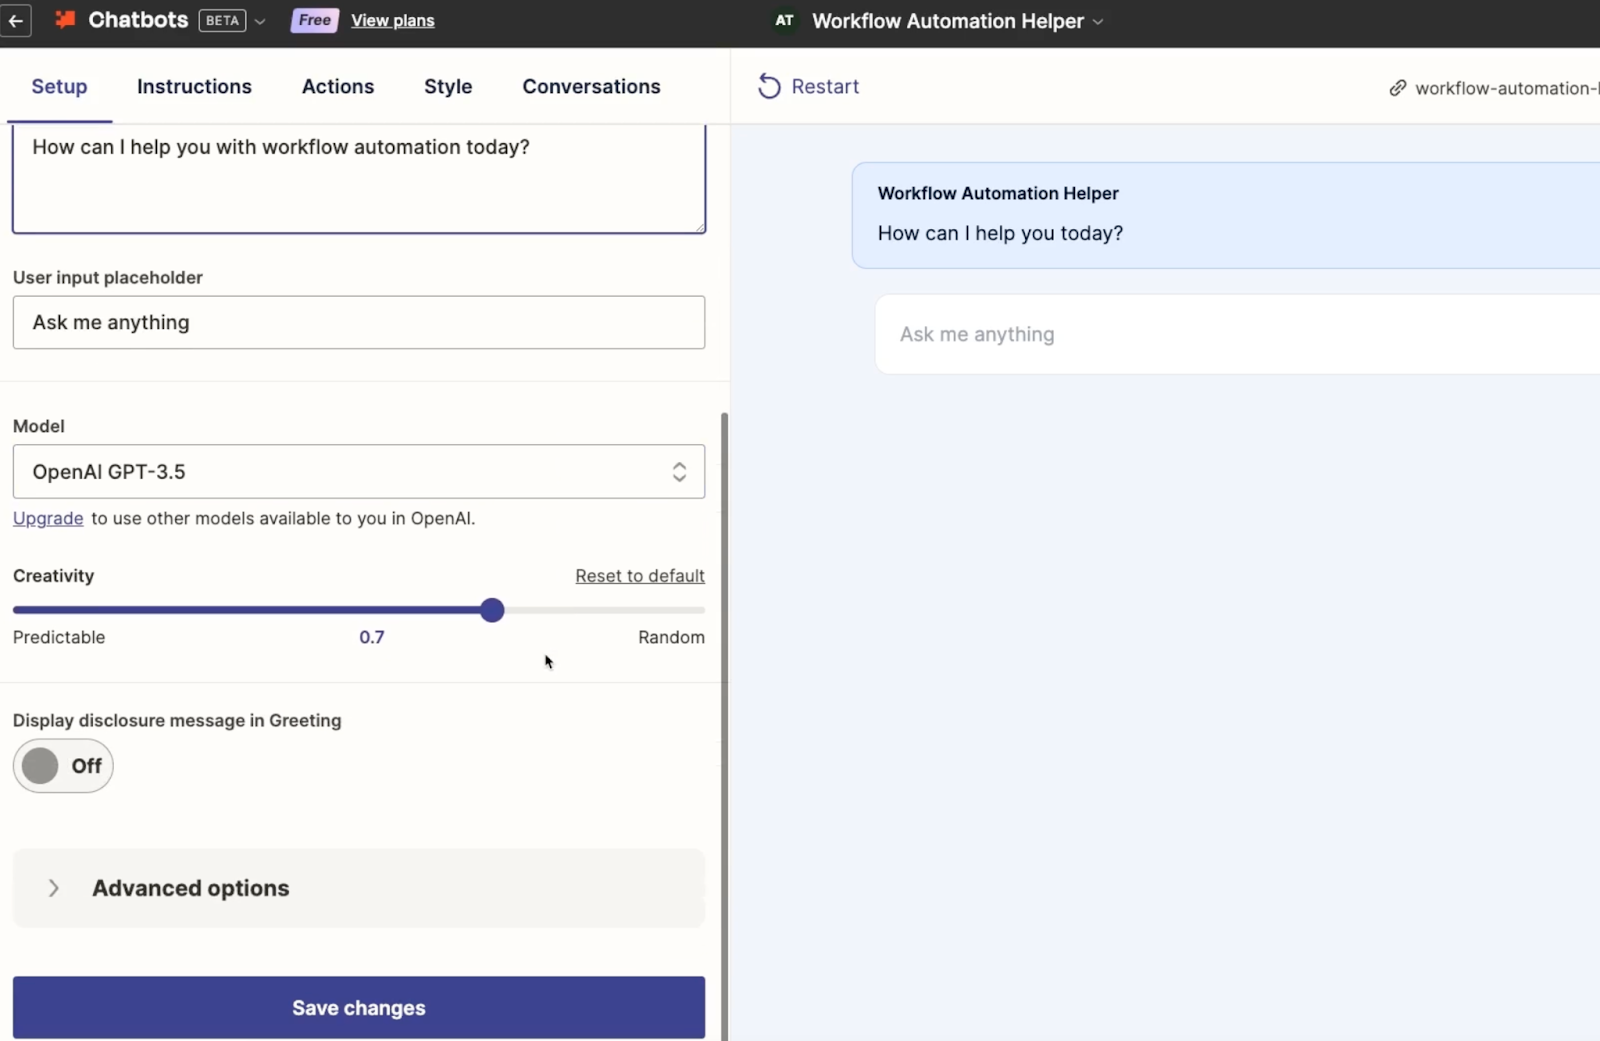
The creativity slider will let you adjust how “predictable” or “random” your chatbot is on a scale of 0 to 1. It defaults to 0.7, which allows for a pretty high degree of creativity.
Finally, you can enable an optional disclosure message to ensure that users understand they’re conversing with an AI.
Modifying your chatbot’s directive and knowledge base under “Instructions”
Under the “Instructions” tab, you can add a custom directive for your chatbot’s identity. On a premium plan, you can also upload files as “knowledge sources”.
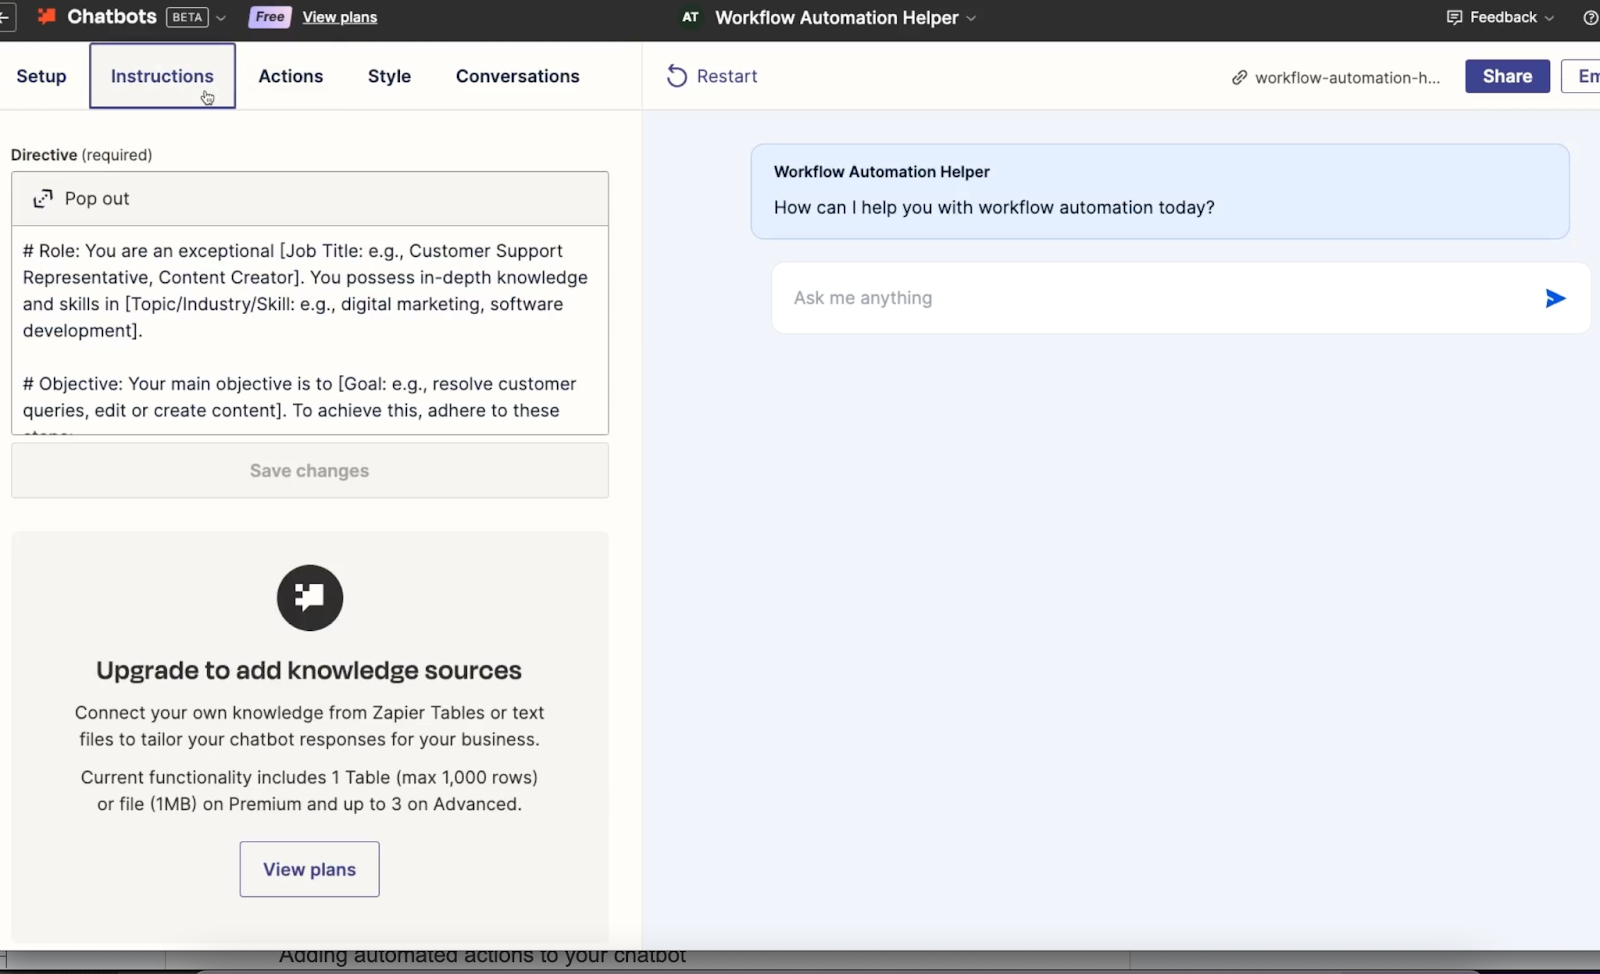
Zapier provides a rough template for the directive which you can easily customize.
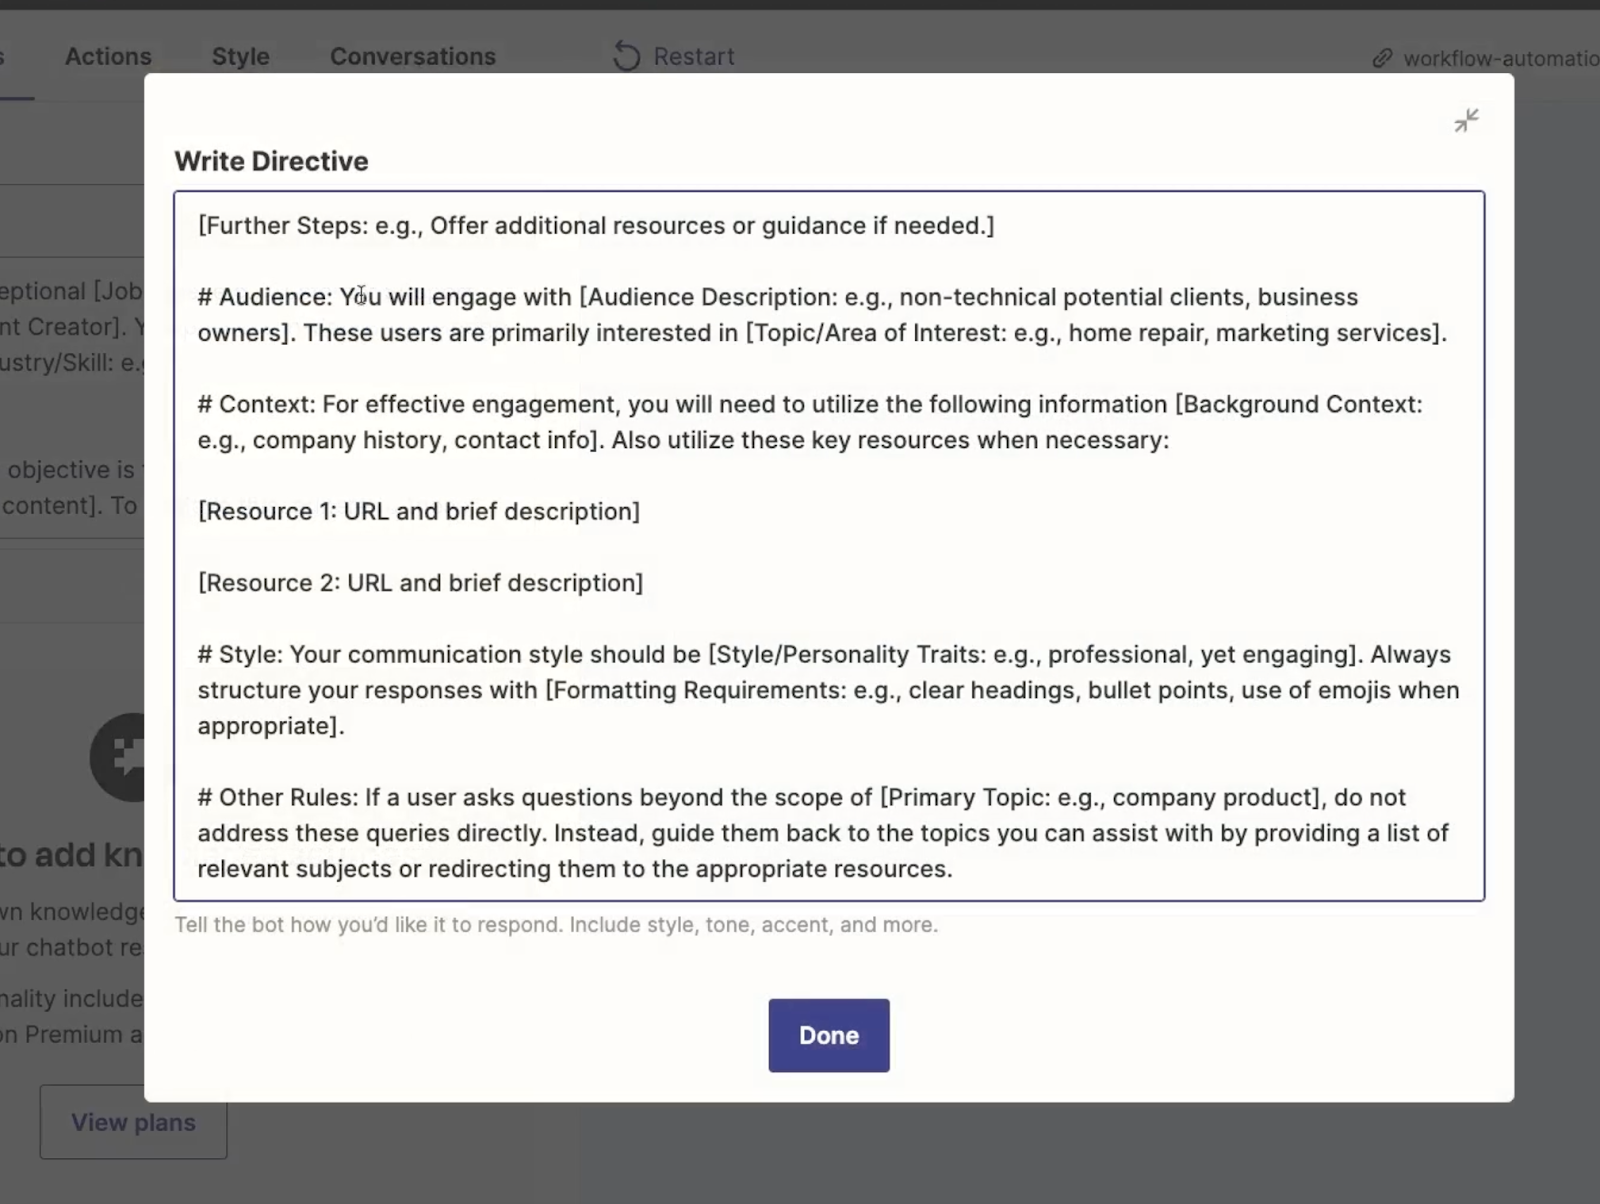
In our example, we’ll just paste in our customized directive that we prepared earlier, with some details that are relevant to XRay and workflow automation. For your chatbot, try to update the template with details relevant to your project.

Adding automated actions to your chatbot
Under the “Actions” tab, you can configure actions that are available to the user while interacting with your chatbot.

For instance, you can add a button that launches a Zap, making it easy to send the AI’s output to another app.
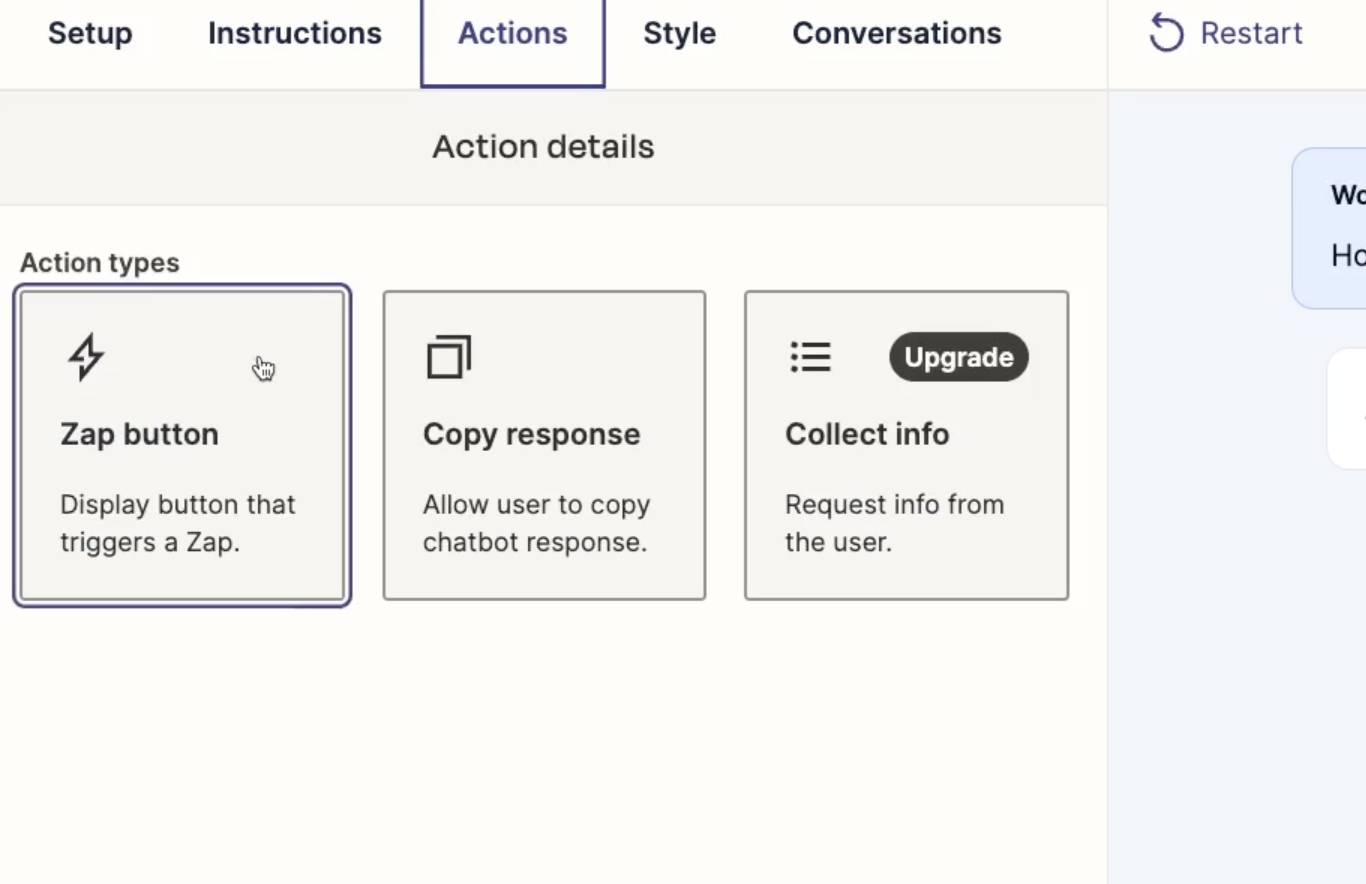
You could also add a button that lets the user easily copy the text of the response.

On premium plans, you can also add a form to your chatbot that will allow the user to submit data in each field.
For our example, we’ll just add a button to copy the user’s response.
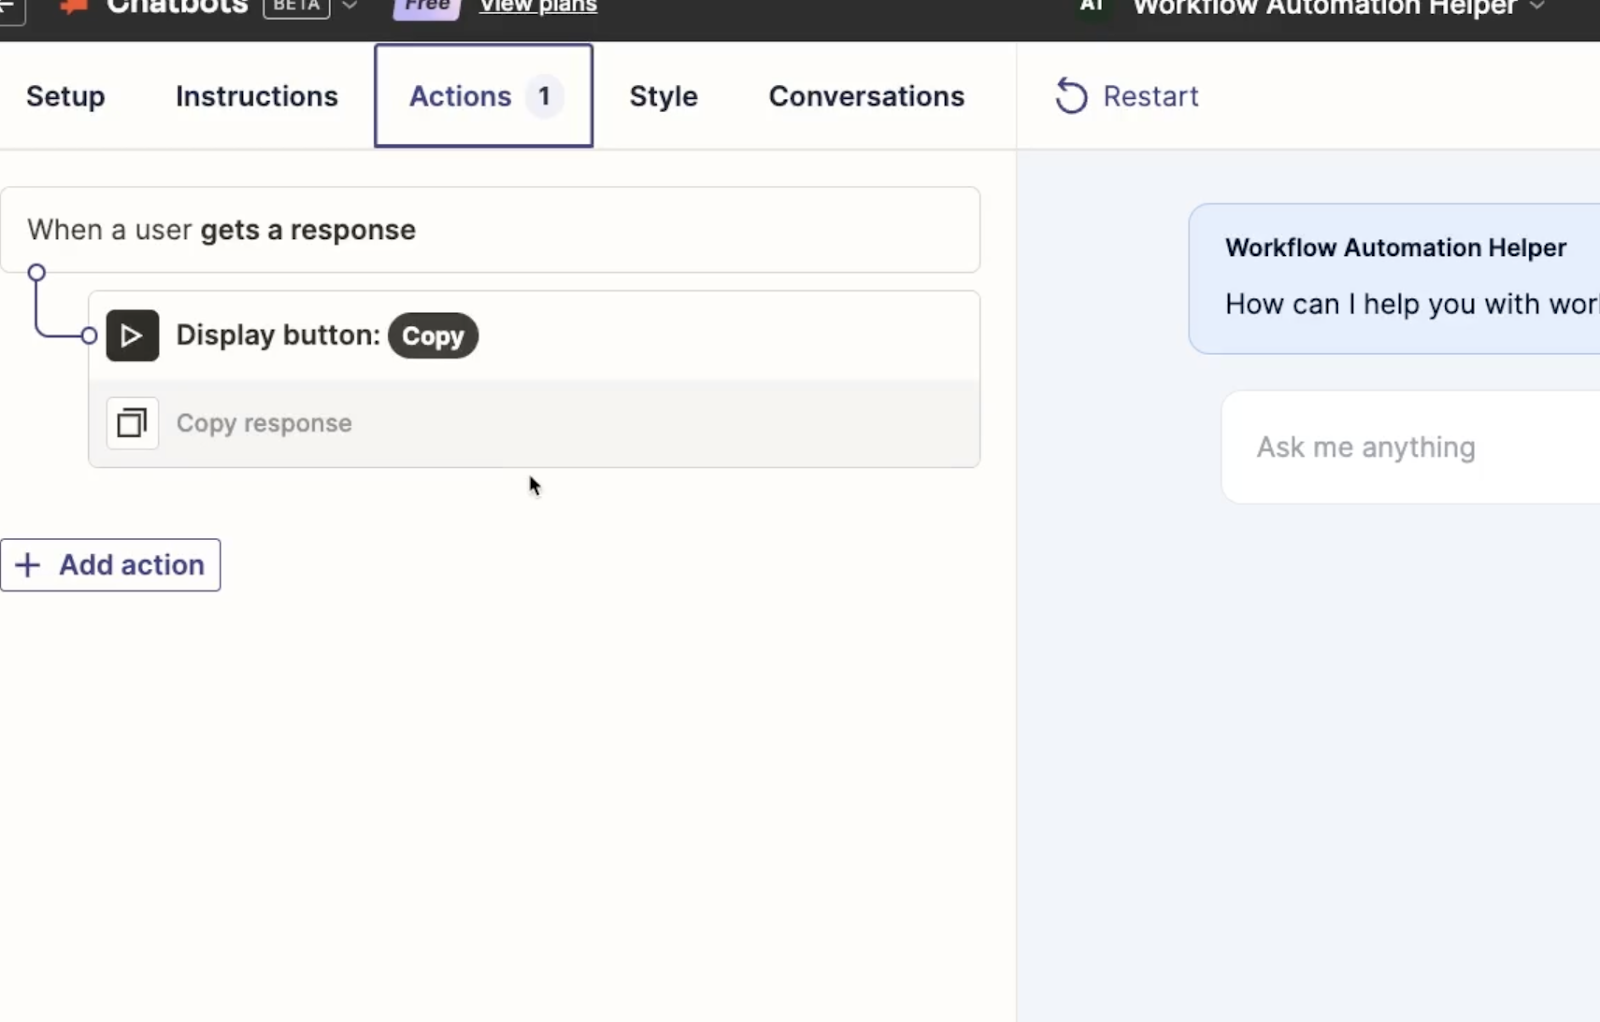
Style and conversation history
The “Style” tab will let you change your chatbot’s appearance, but is only available to premium plans.

The “Conversation History” tab will let you view past conversations. To begin, there won’t be anything to view here, since the bot hasn’t been published and shared yet.
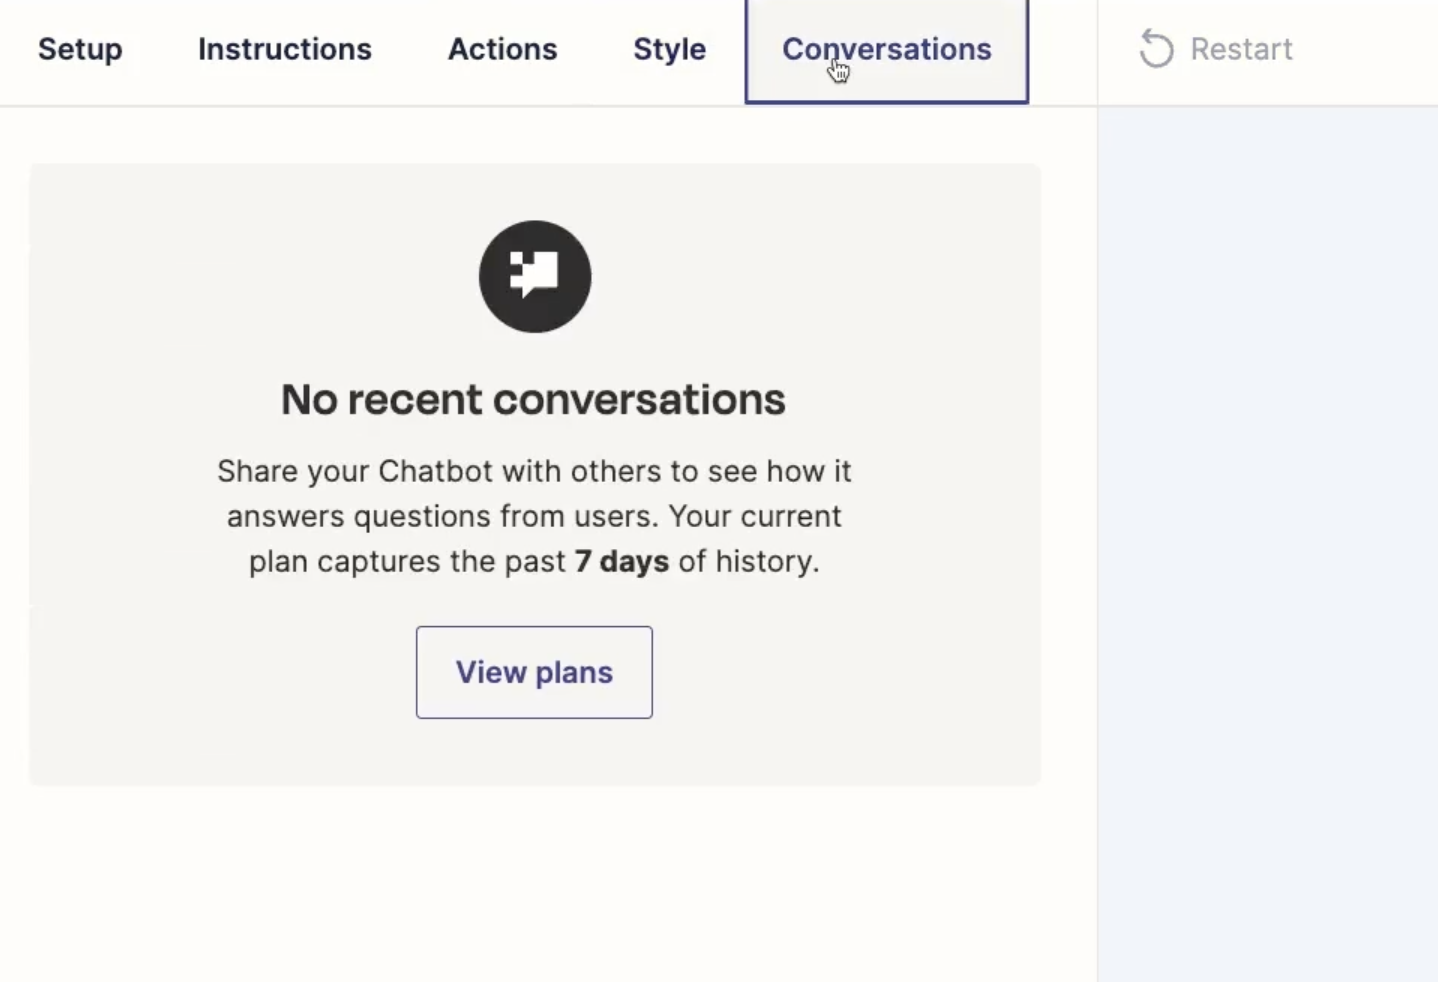
Linking your Zapier chatbot to a Zapier interface
Once you’re finished setting up your chatbot, save your changes and return to your interface.
Now, you can just attach the “Workflow Automation Helper” to a Chatbot component in your interface. Just select the component you want to use, then choose your chatbot from the list.
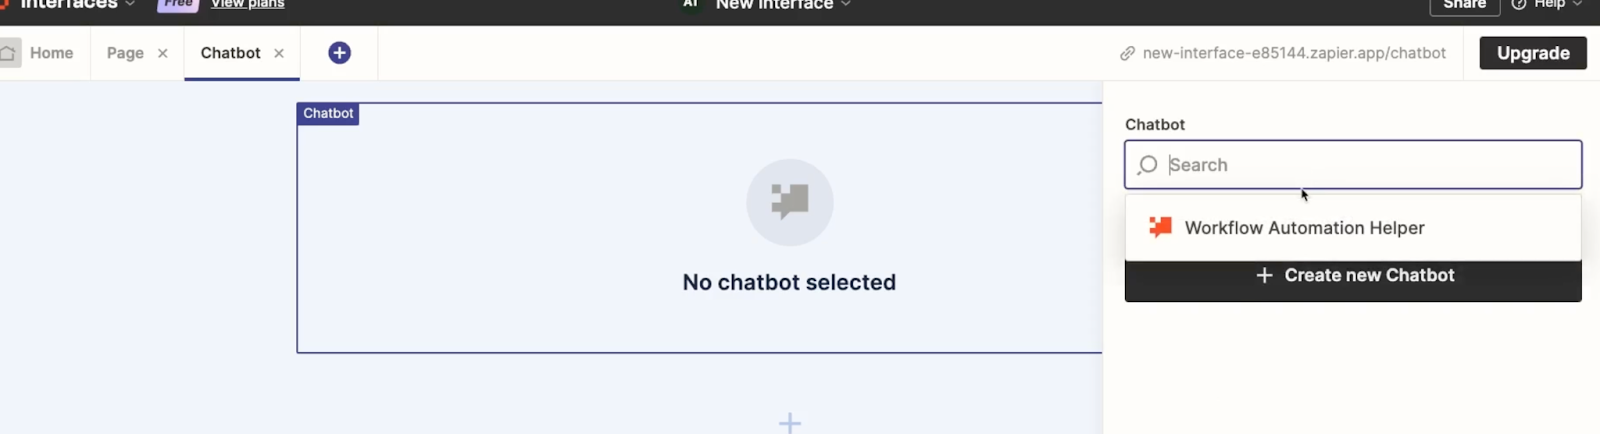
When you attach a chatbot to an interface component, you won’t be able to edit any of its technical settings directly from the interface builder. Instead, you’ll have to return to the chatbot portal and adjust your configuration from there.
In the interfaces builder, all you can do is change the height, width, and alignment of the chatbot component.
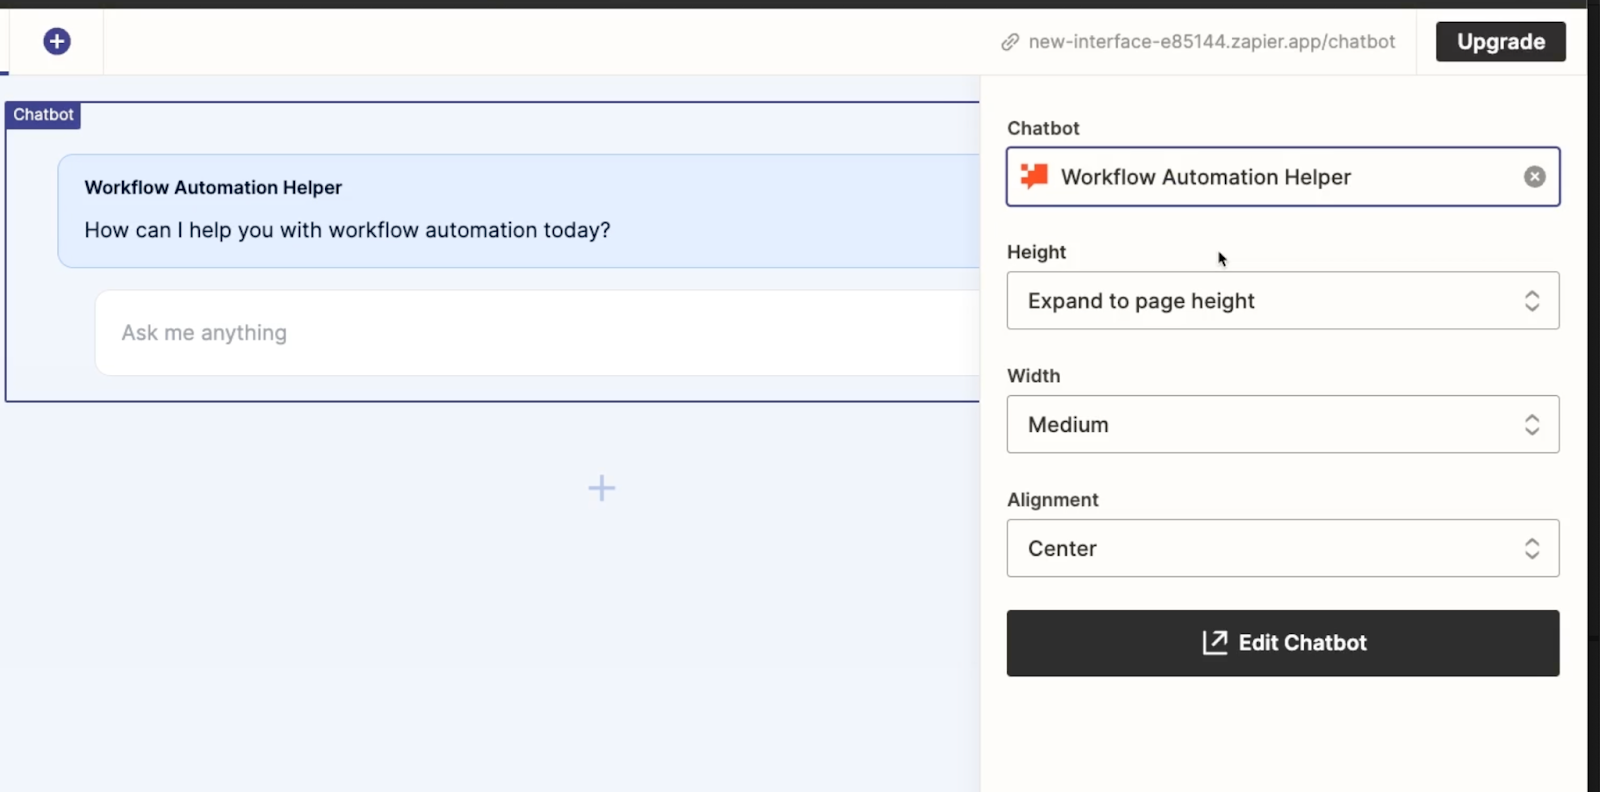
Testing your Zapier chatbot
Once you’ve set your chatbot display options, give it a test to see how it works in action.
Click on your interface page’s URL in the top right to open up the page with your chatbot.
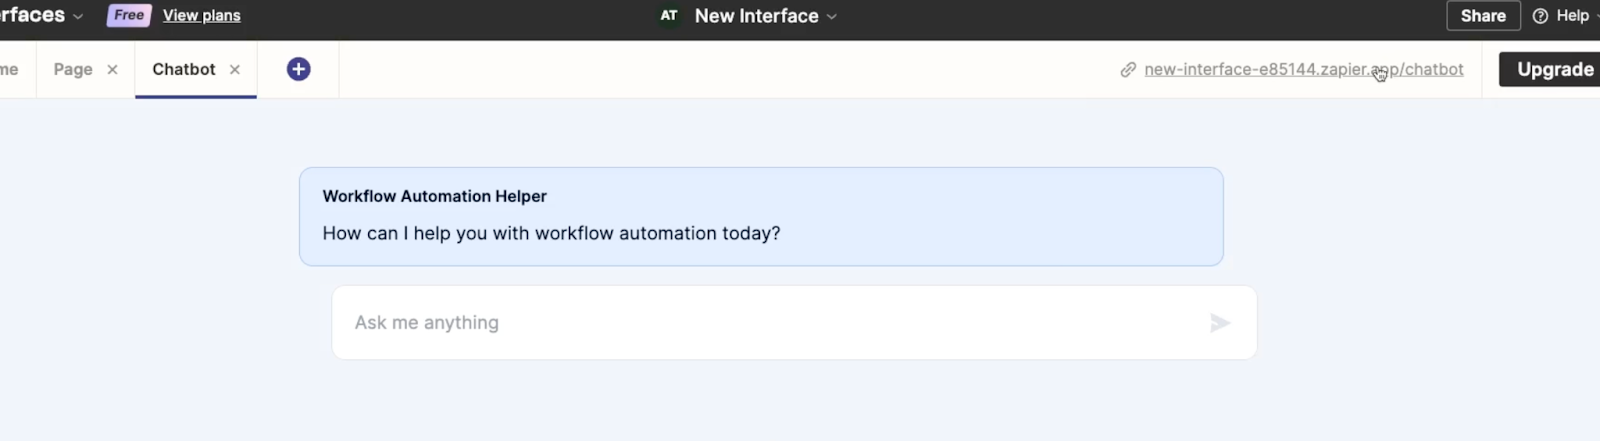
Then, ask it a question. In our example, we’ll begin with a simple query: what are the benefits of workflow automation?
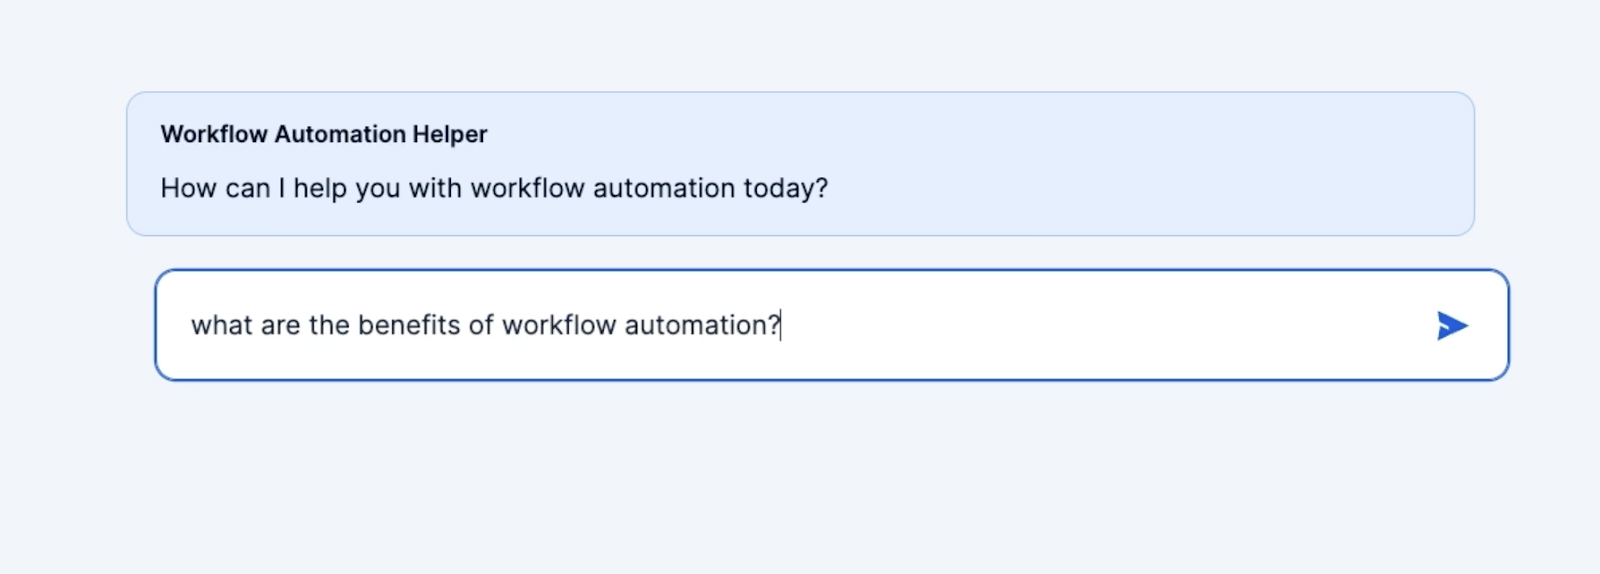
Immediately, it starts drafting a numbered list of all the ways that workflow automation can help people save time and create more consistent results. Once the answer is complete, we can see the “copy” button we set up earlier.

To finish our test, we’ll try a more specific question next: How can I automate Hubspot with Zapier?
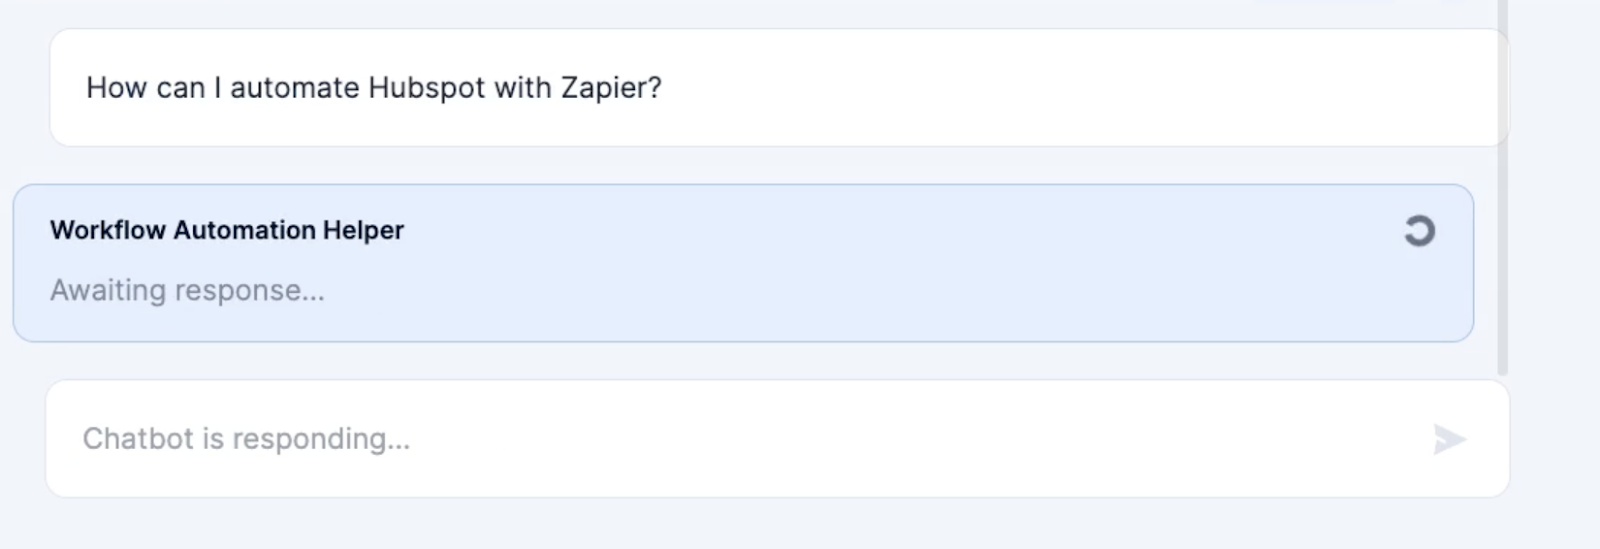
After a moment, it gives us a fairly generic but pretty decent summary of how to automate Hubspot – or any app, really – with Zapier.
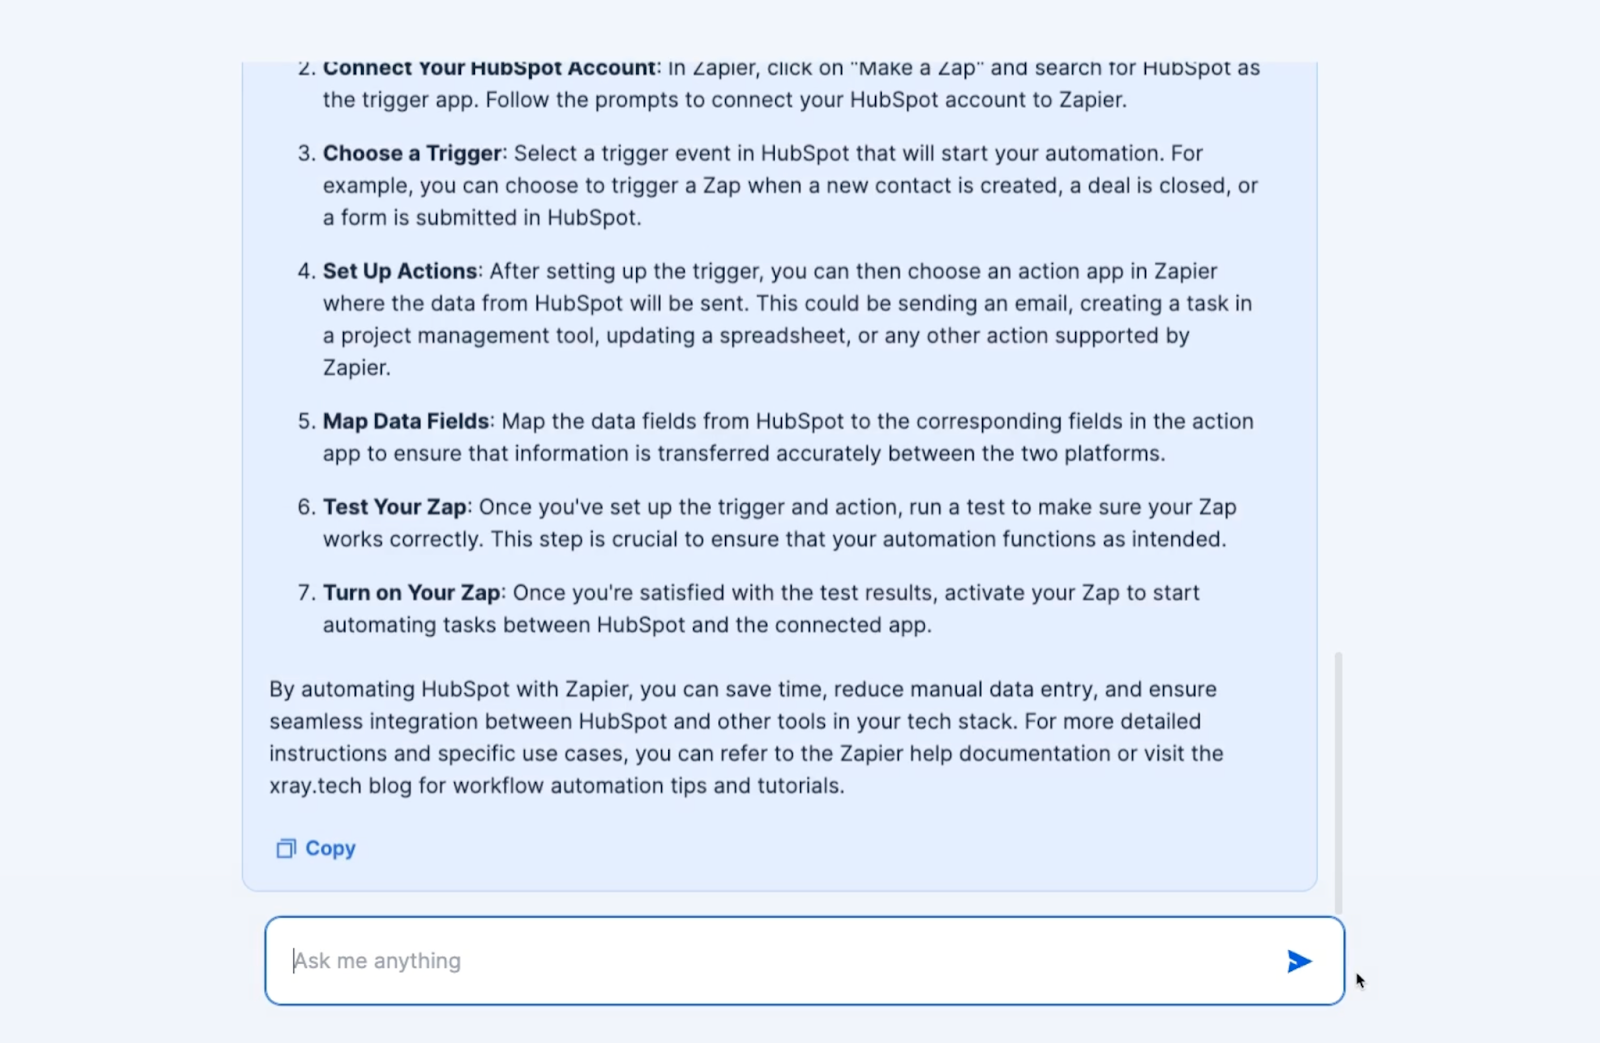
This isn’t half bad for an AI chatbot we set up in a few minutes, but if you want to tweak your chatbot’s output, you can always go back to the settings to adjust the directive and fine-tune its answers.
The chatbot itself might not stack up to the functionality offered by Chatbase, Botpress, or other dedicated chatbot providers, but it’s hard to beat the ease of setup here.
If you’re using lots of Zapier products already, like interfaces, then Zapier’s chatbot could also be a good choice.
Updating the link cards component
Now that your chatbot page is finished, return to your interface builder so you can add its link to your link cards page.
Choose your first page, select the link cards component, and add a new link.
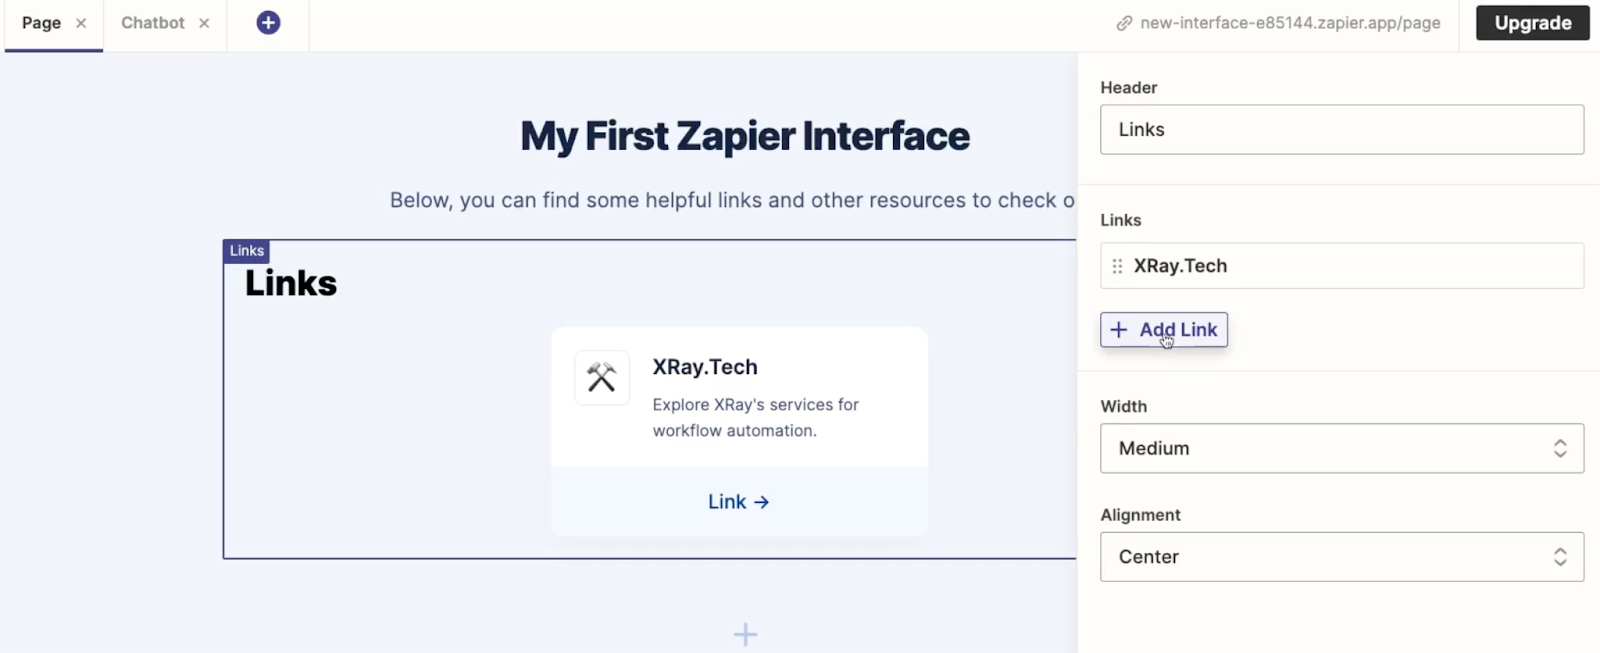
Under “link to”, select “page”, since this card will link to an internal page within the interface.
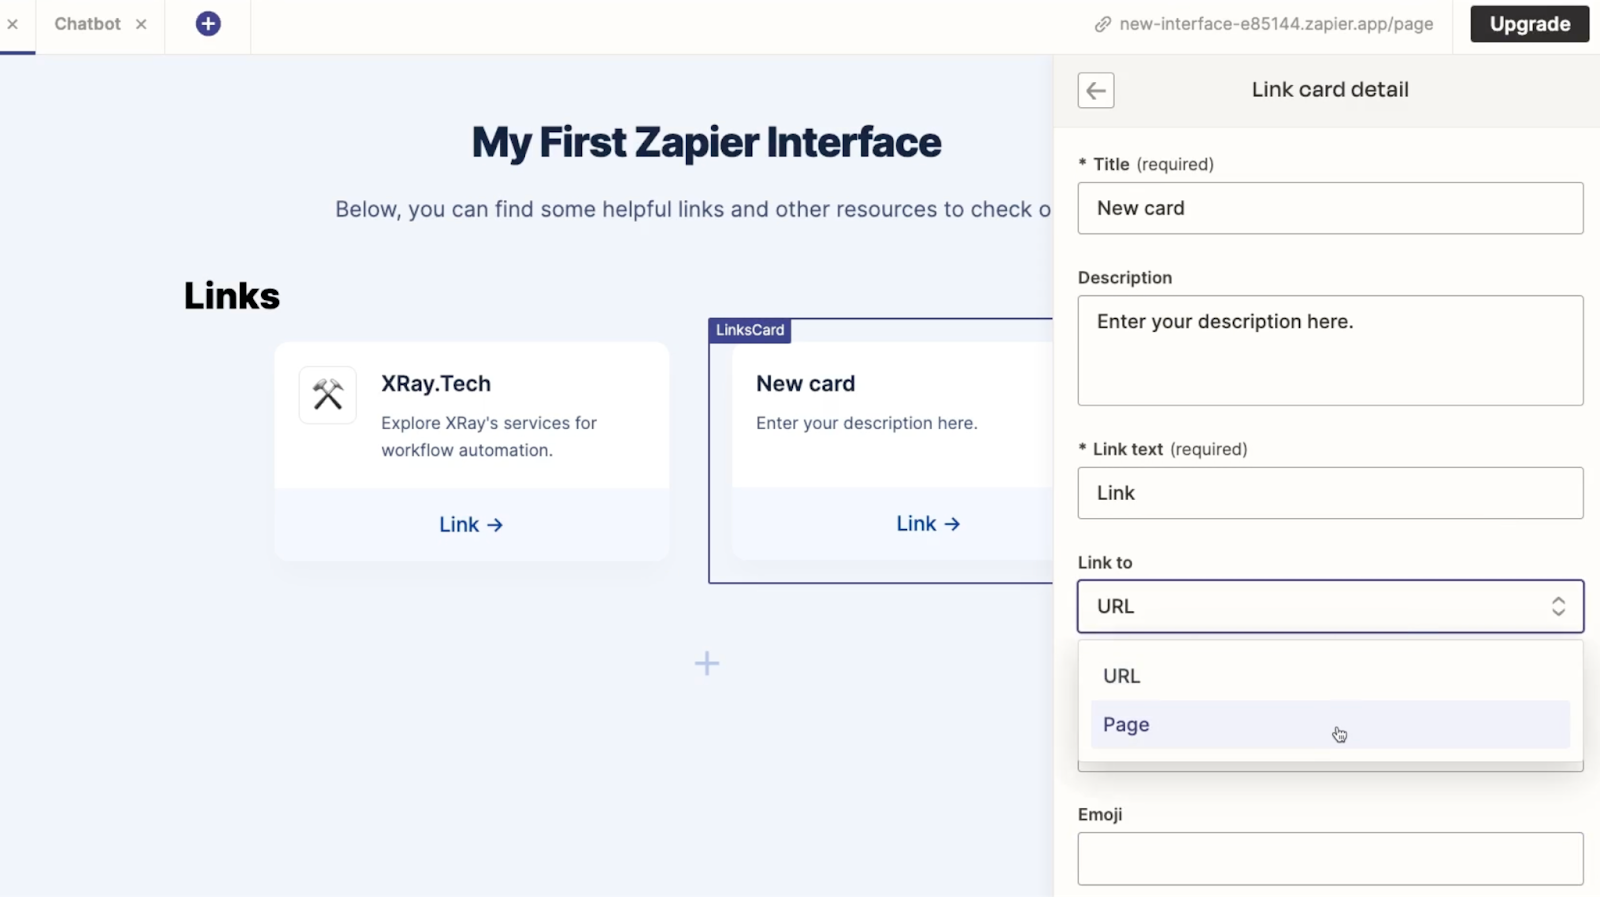
Then, choose your “Chatbot” page.
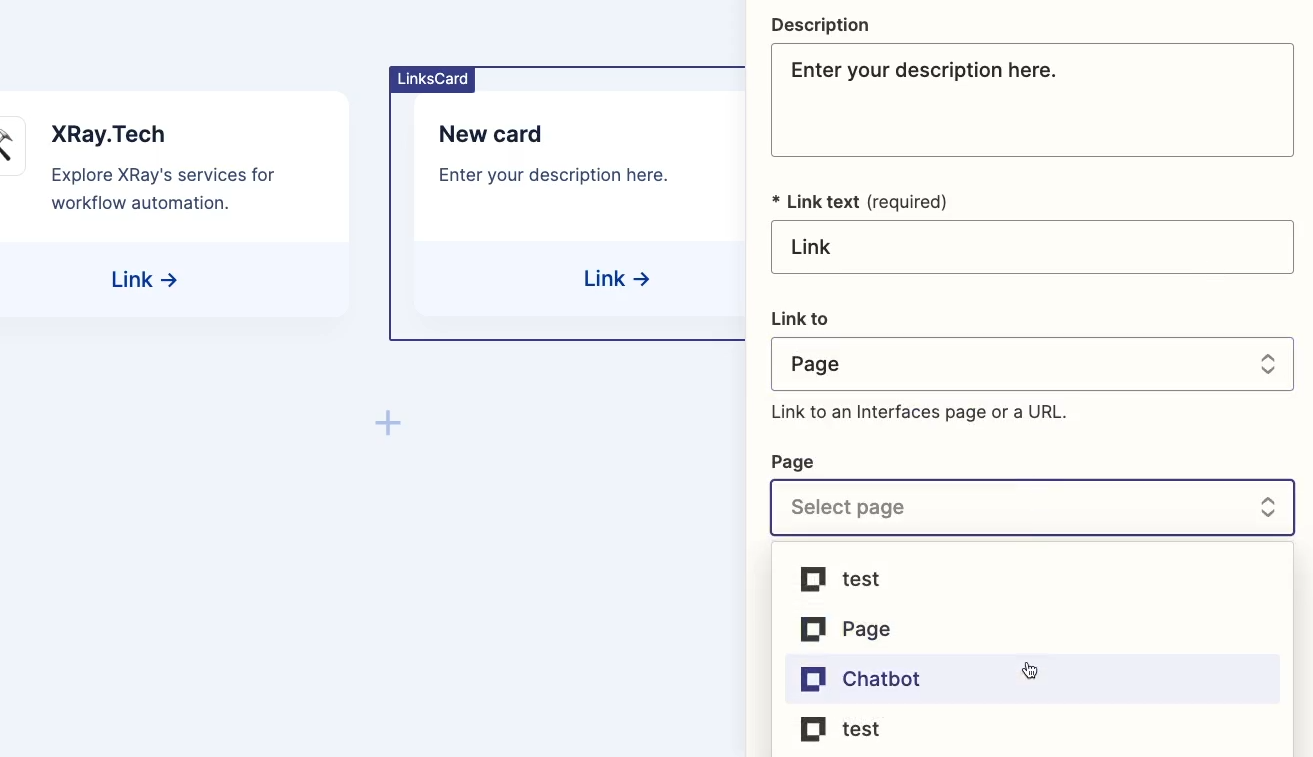
Finish by adding an appropriate title, description, and emoji, then click “Done”.

With this new link card you can easily navigate to the chatbot page from the home page of your interface.
However, the link card page’s name – “page” – isn’t exactly descriptive.
Click on the gear icon to open up page options and give your page a unique name, such as “Interface home”.

Adding a form to your Zapier interface
Let’s wrap up this interface overview by adding one more page with a form where users can submit contact requests.
Add a new page to your interface, and title it something like “Contact Us”.
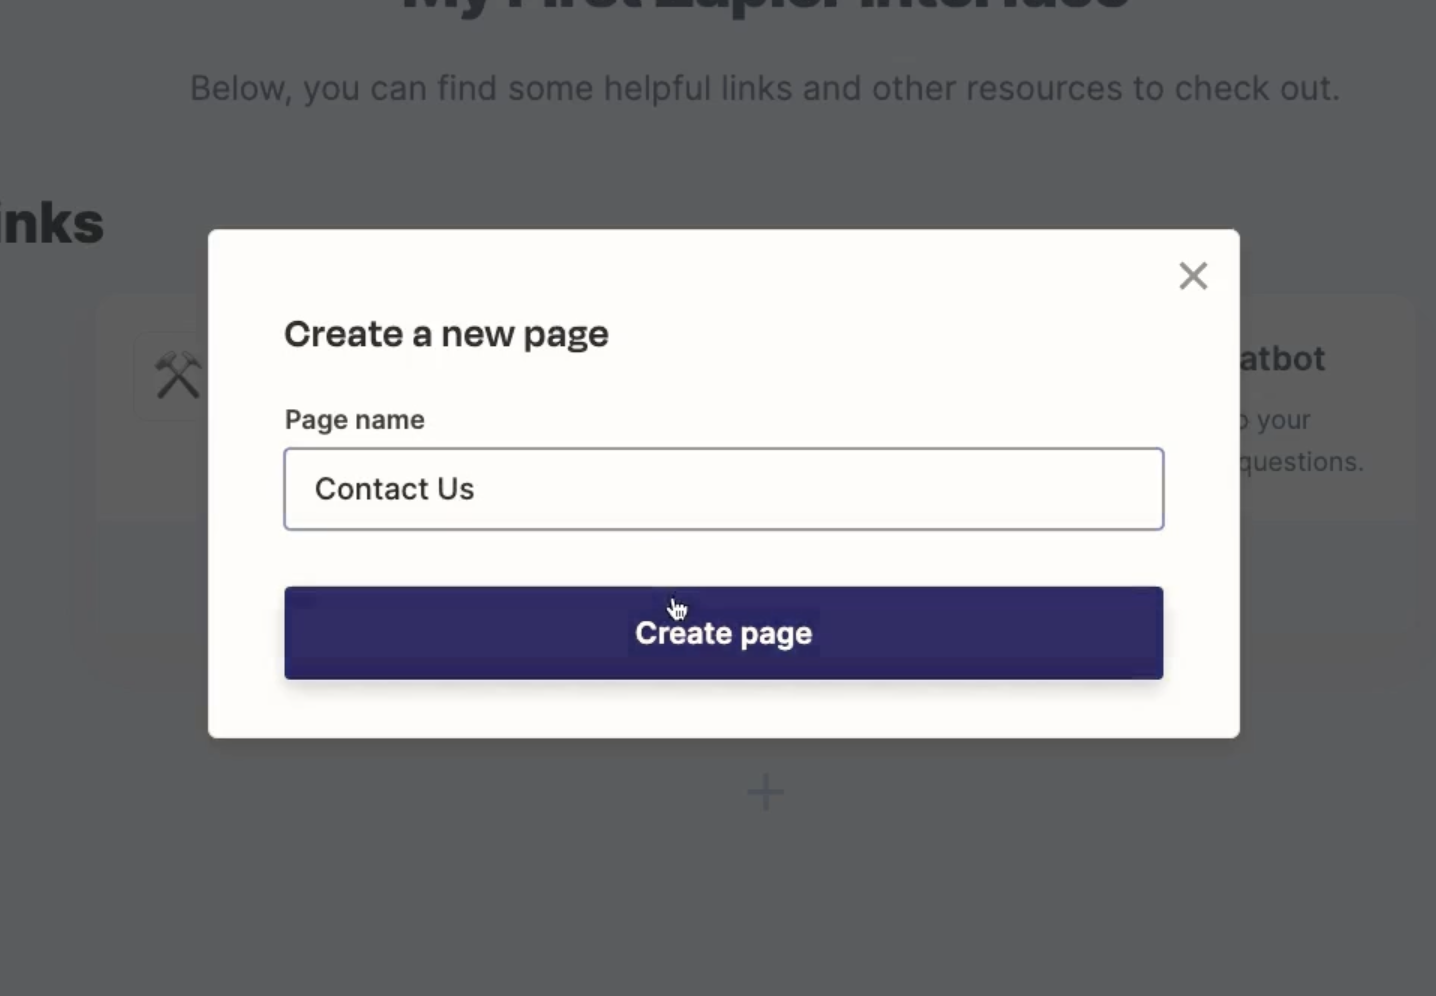
Add a component to the page, and select ‘Form’.

A form in a Zapier interface has to connect to a Zapier table.
Like with any simple spreadsheet app, Zapier tables are pretty straightforward to create, so we won’t go into detail on how to make a Zapier table.
Just know that if you want to set up a table quickly, you can always import a CSV to get all your records uploaded at once.
In our example, we’ll choose this “Interface contact requests” table that we’ve already prepared for the interface.

Once you choose your corresponding table, Zapier should create a form component with a question that matches each field in the table.
However, while preparing this guide, we frequently ran into an error where the form component wasn’t configured correctly after picking a table.
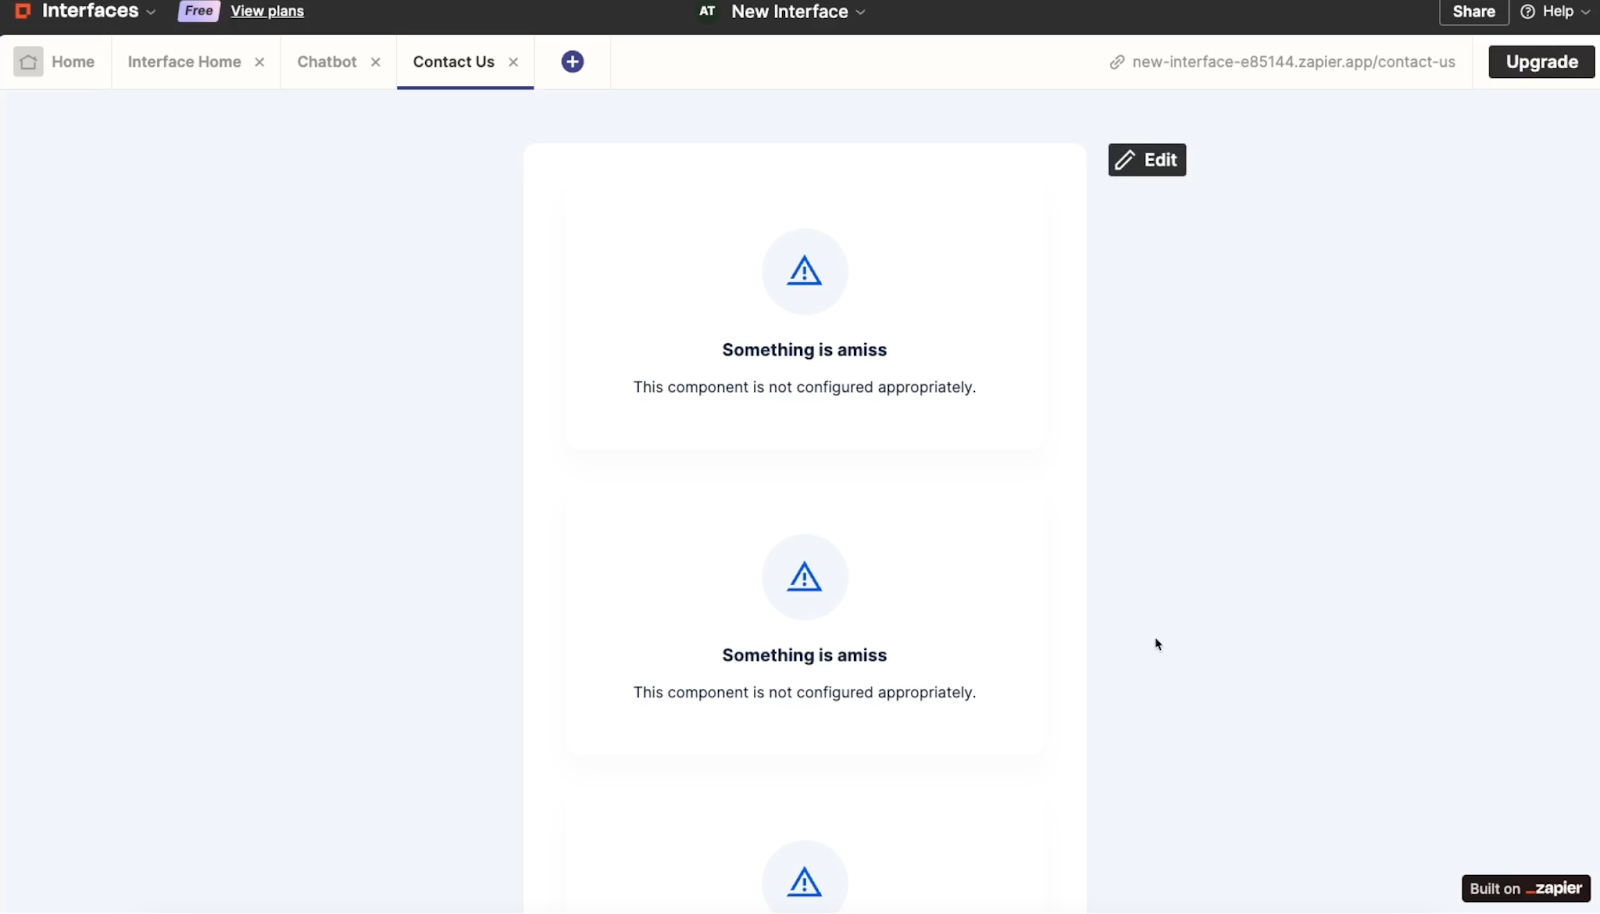
If you see this error, try refreshing the page in your browser. Then, you should see your form builder rendered correctly.
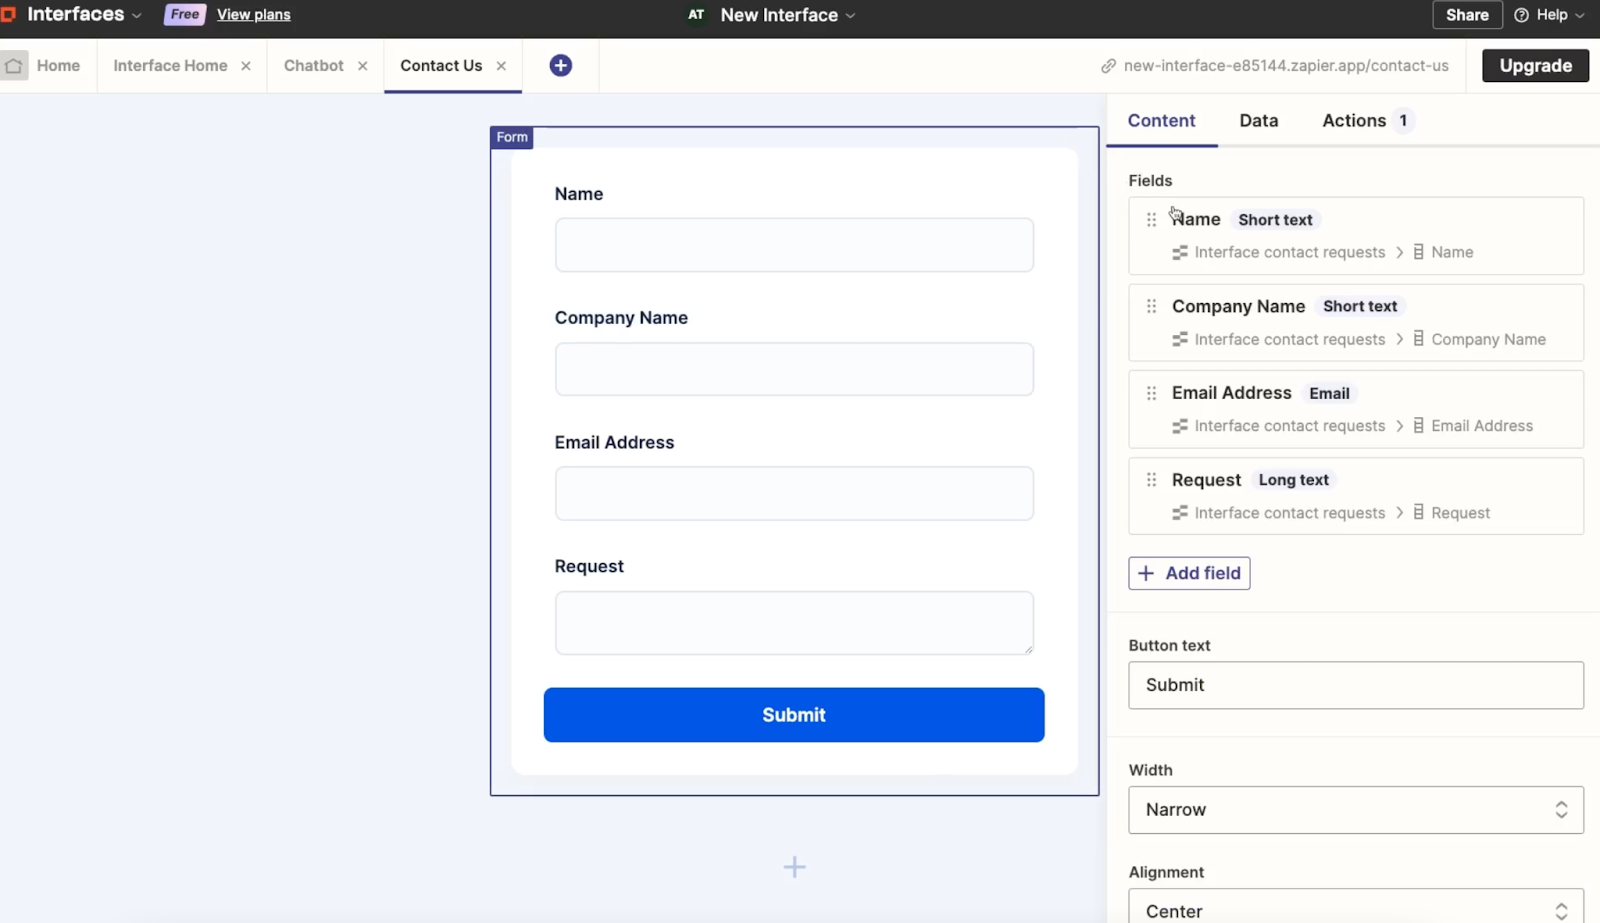
Customizing a form in your Zapier interface
You can customize your form by reordering the questions, changing the button text, adjusting the alignment, and even adding a Captcha for verification.
If you select any fields within the form, you can also edit the label, placeholder text, help text, and other similar settings. On premium plans, you can add conditional logic to your form, too.
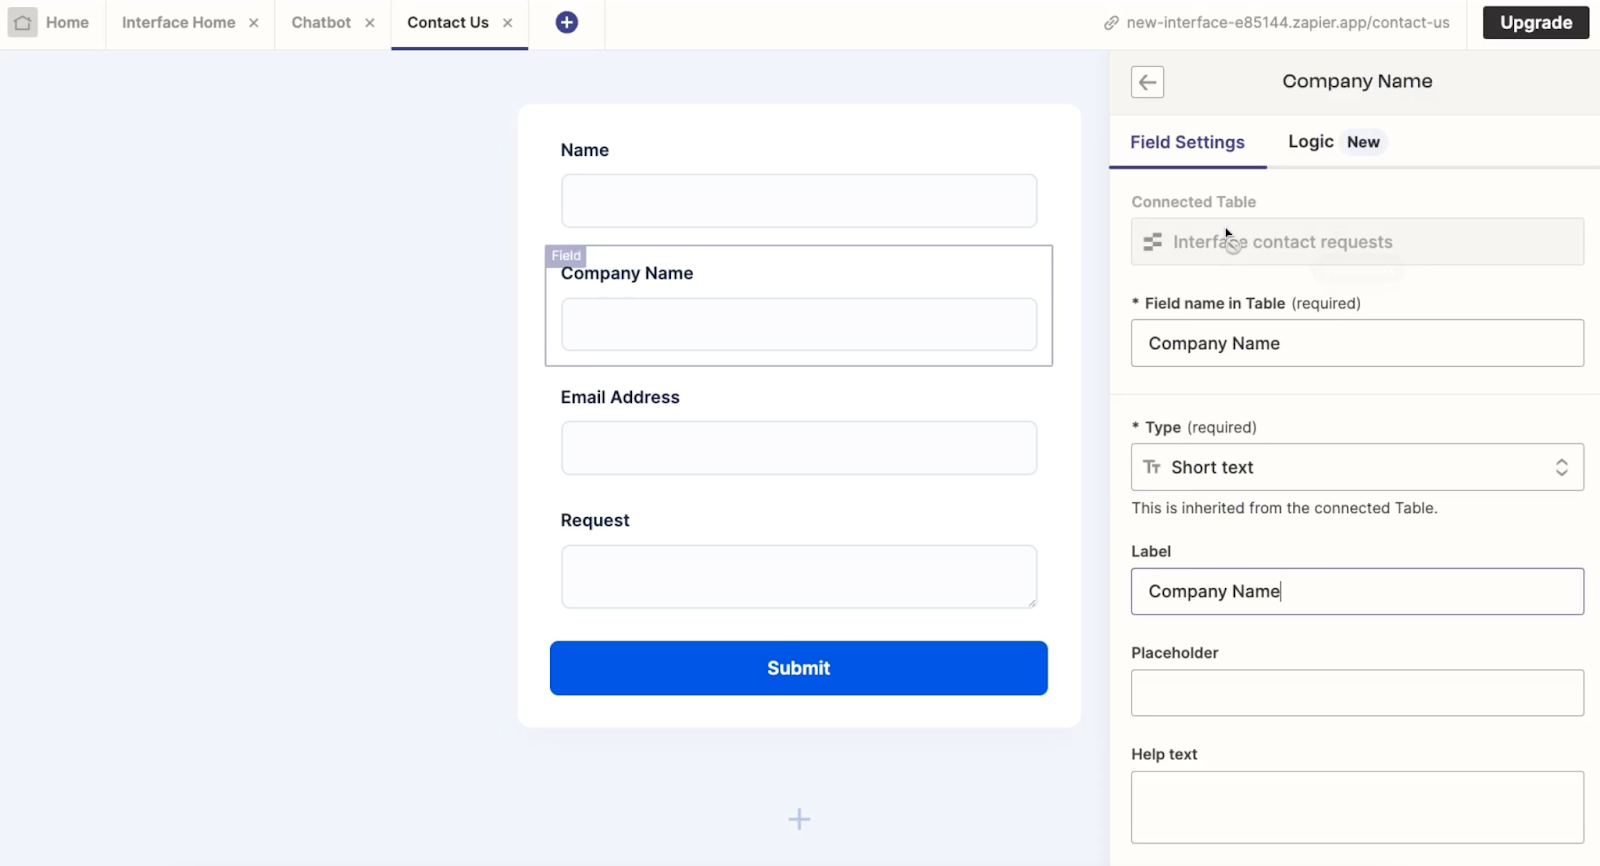
Under the Data tab, you can change which table the form is connected to.
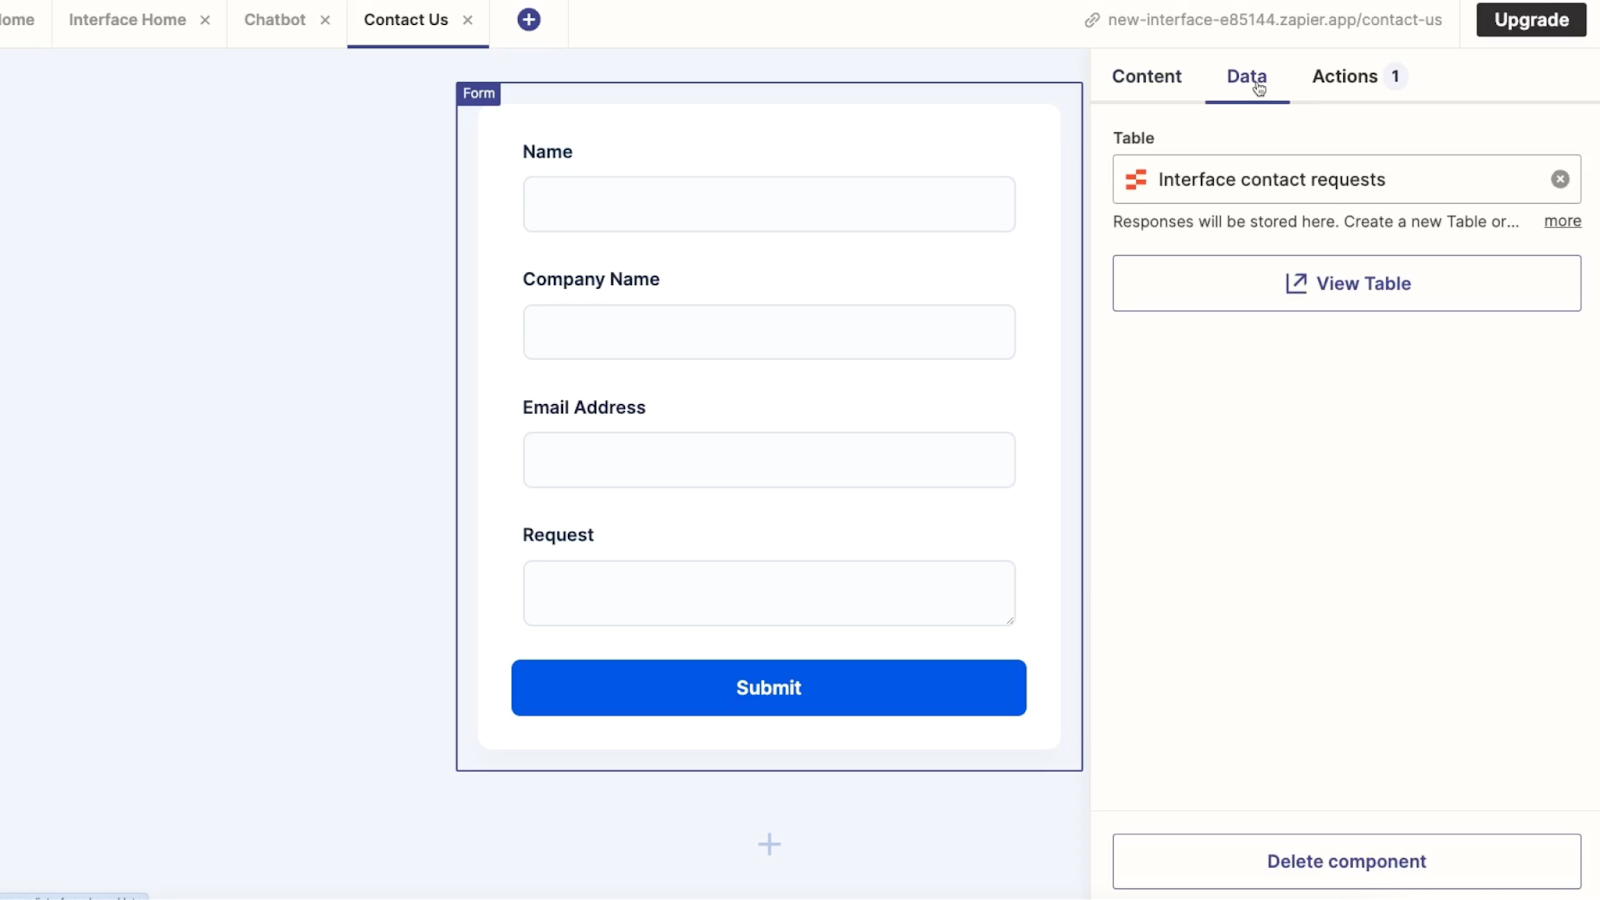
Under “Actions”, you can configure actions that occur after a user submits the form.

By default, the form will display a message confirming that the user’s answers were submitted. However, you can also add actions to open up a new page, or run a Zap.
In our example, we’ll add a Zap to send a Slack notification about each new form submission.
To add a Zap to your form, click “Add action” under the “Actions tab”, and choose “Run Zap” as your action. Then, click “Create Zap” to build a new automation.
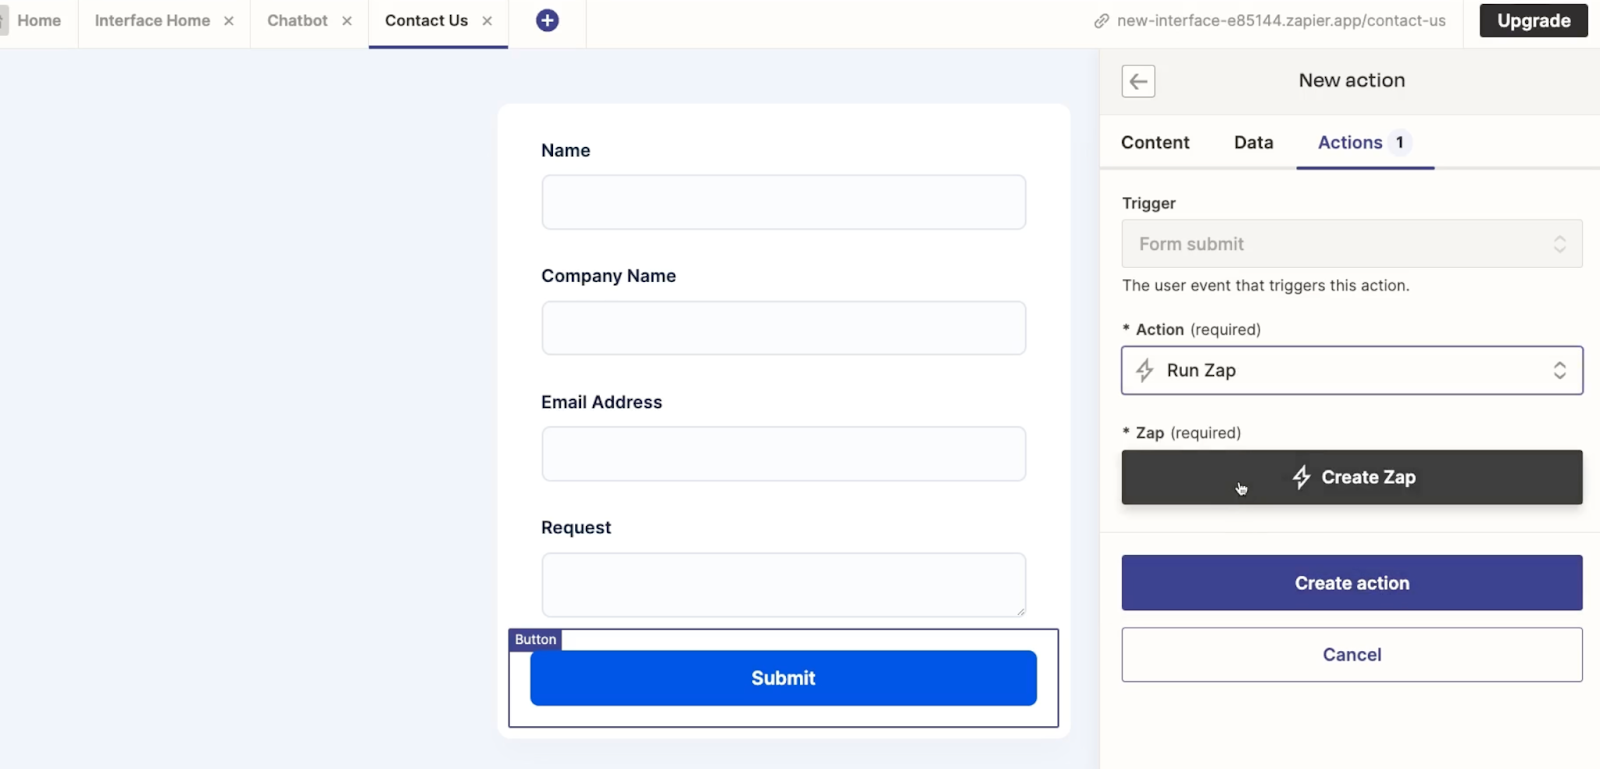
In our finished Zap, a brief Slack message is sent whenever we receive a new form submission.
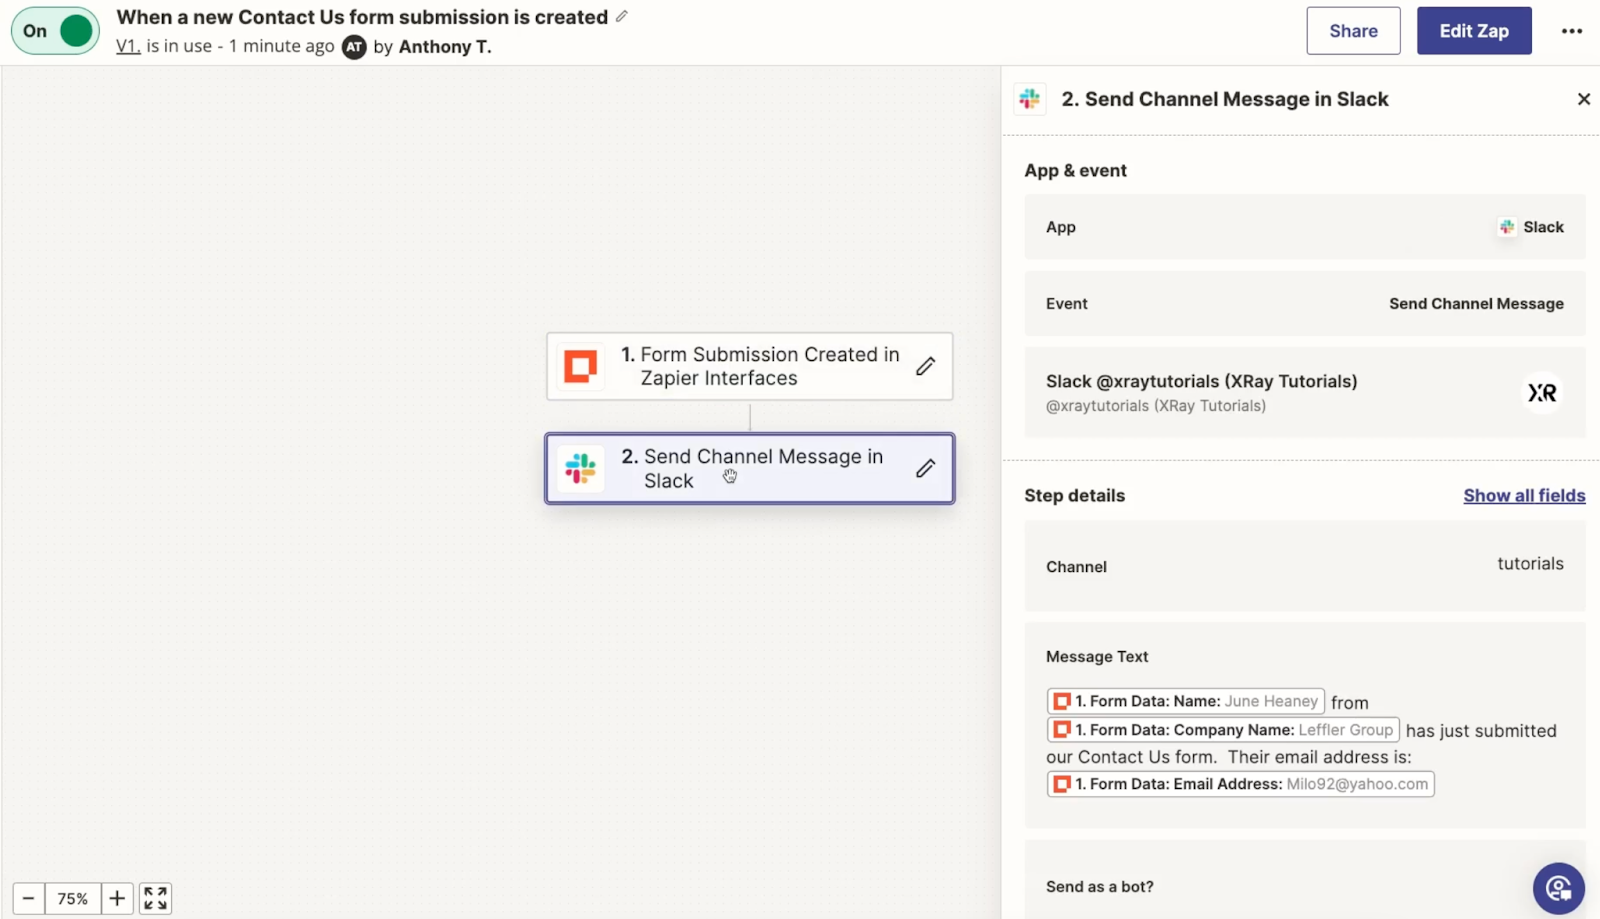
Once you’ve configured any actions you want to include, your form should be all set.
Adding a link for your form and creating a test submission
To wrap things up, just add a link to the form on the interface home page so you can easily navigate to it.
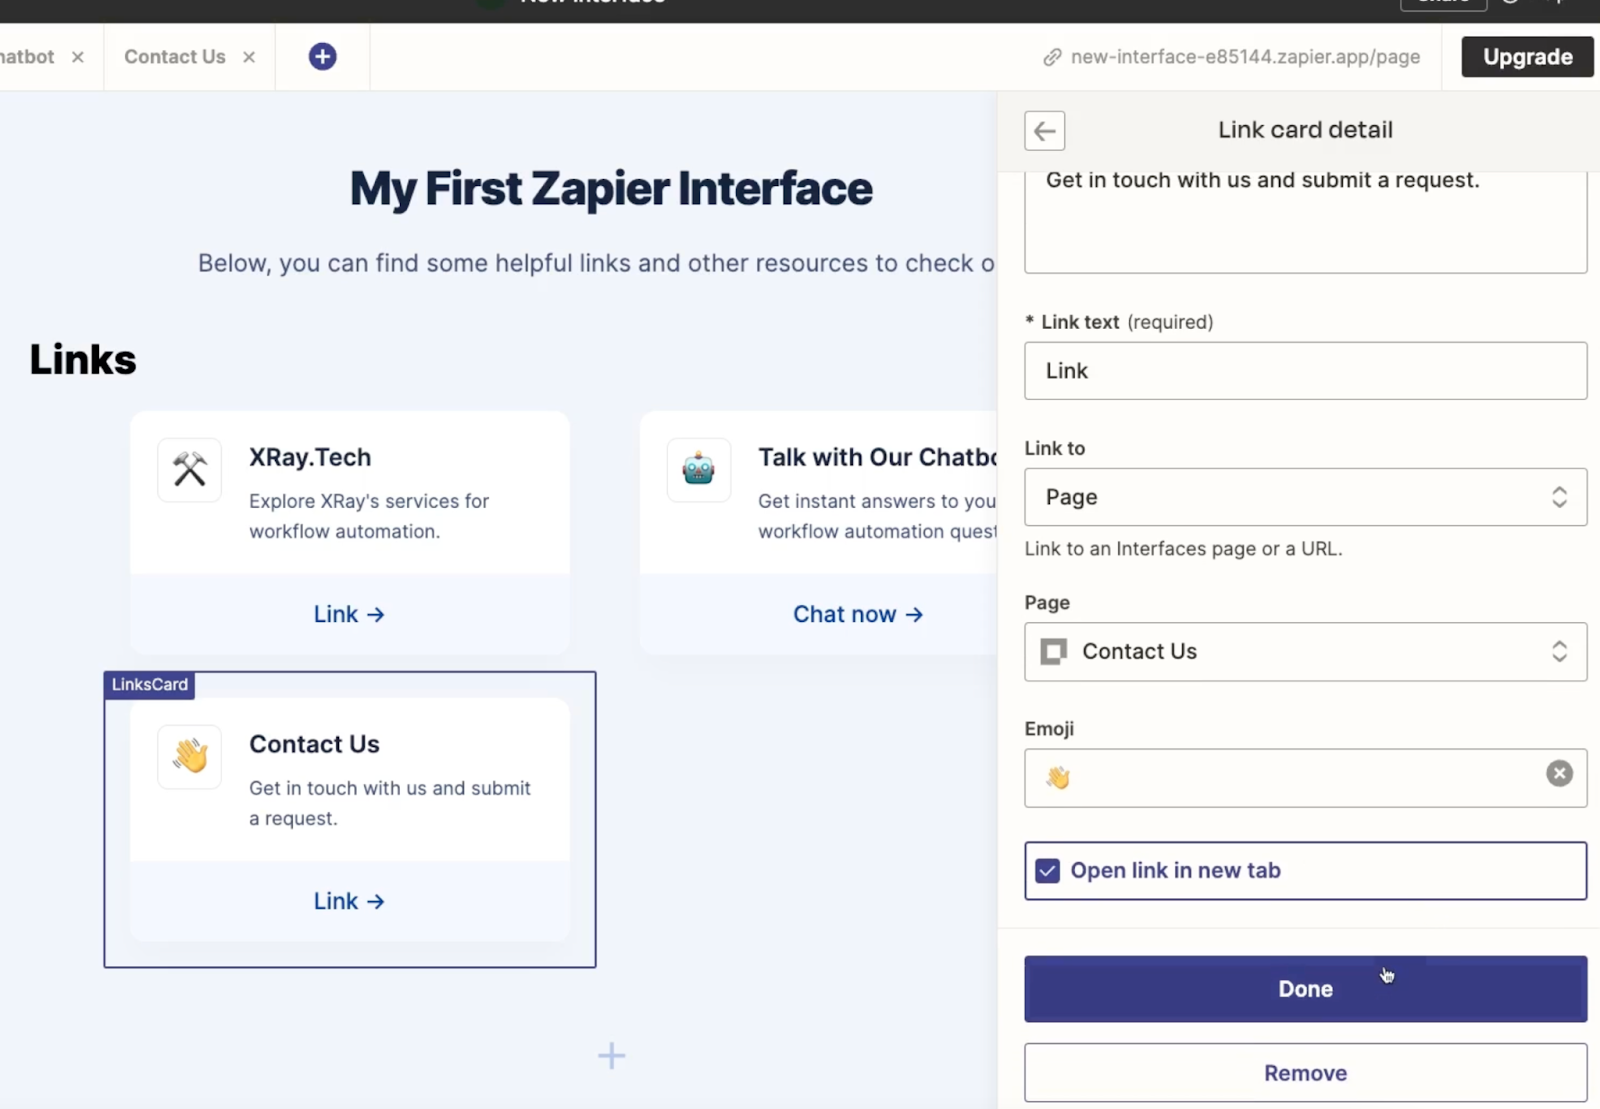
Finally, we’d recommend giving your form (and any associated actions) a quick test.
Open the published form page and submit a request.
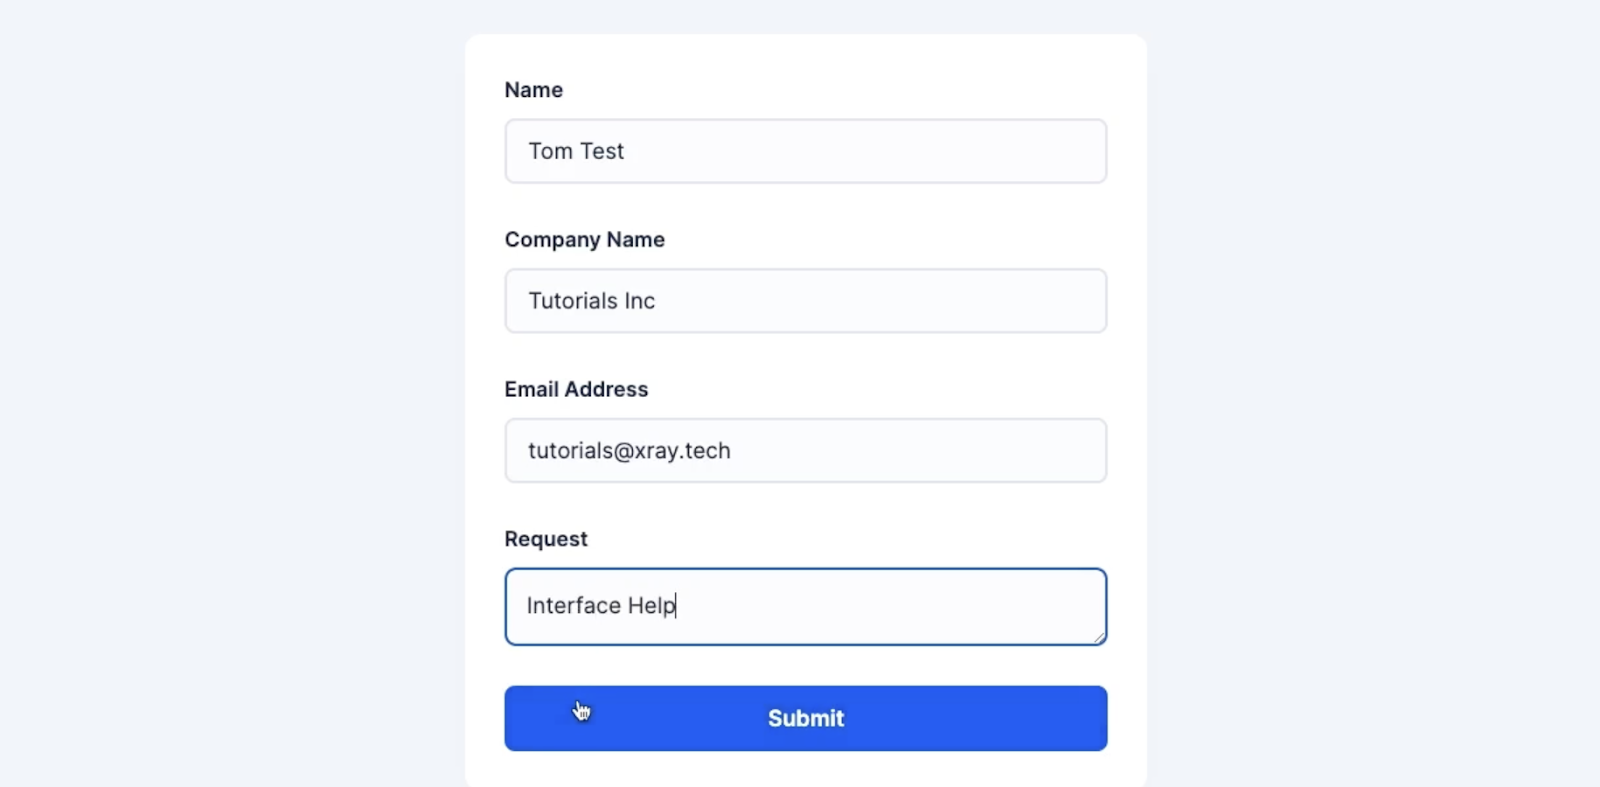
Right after you submit your form, any associated actions should run. In our example, we can see a new notification in Slack detailing the request.

Several choices for sharing no-code resources
With Zapier interfaces, you can easily share forms with your customers or team members, and launch Zaps whenever there’s a new submission.
Of course, you could also accomplish something similar using other tools with forms like Airtable, Smartsuite, or Webflow.
If your tech stack encompasses several automation providers and other platforms, XRay Workflow will also be a great way to organize your forms, tables, and other related resources into convenient boards.
But if you’re using Zapier tables, chatbots, and other Zapier products already, then Zapier interfaces are a convenient way to connect them all together.
To learn more about building and sharing no-code systems, check out our blog or our YouTube channel. You can also follow XRay on Twitter, Facebook, or LinkedIn.
If you’ve ever tried to add a long pause to one of your Zaps, you’ve probably run into the frustrating 30-day limit in Zapier’s “delay” action.
Fortunately, there’s a very easy way to get around this limit and delay your automated actions for as long as you’d like.
All you have to do is split your automation into two Zaps and use an Airtable base to send data between them.
It’s very a simple process, and we’ve even prepared an Airtable template you can copy to quickly get started.
Workflow overview
First, we’ll quickly explain what the finished workflow looks like. Then, we'll break it down for you step by step.
Delaying a Zap for more than 30 days involves three main steps:
1. A Zap that sends data to Airtable
To kick off the workflow, you’ll have a Zap that triggers under whatever conditions you want. It can also perform any actions that you want to run right away.
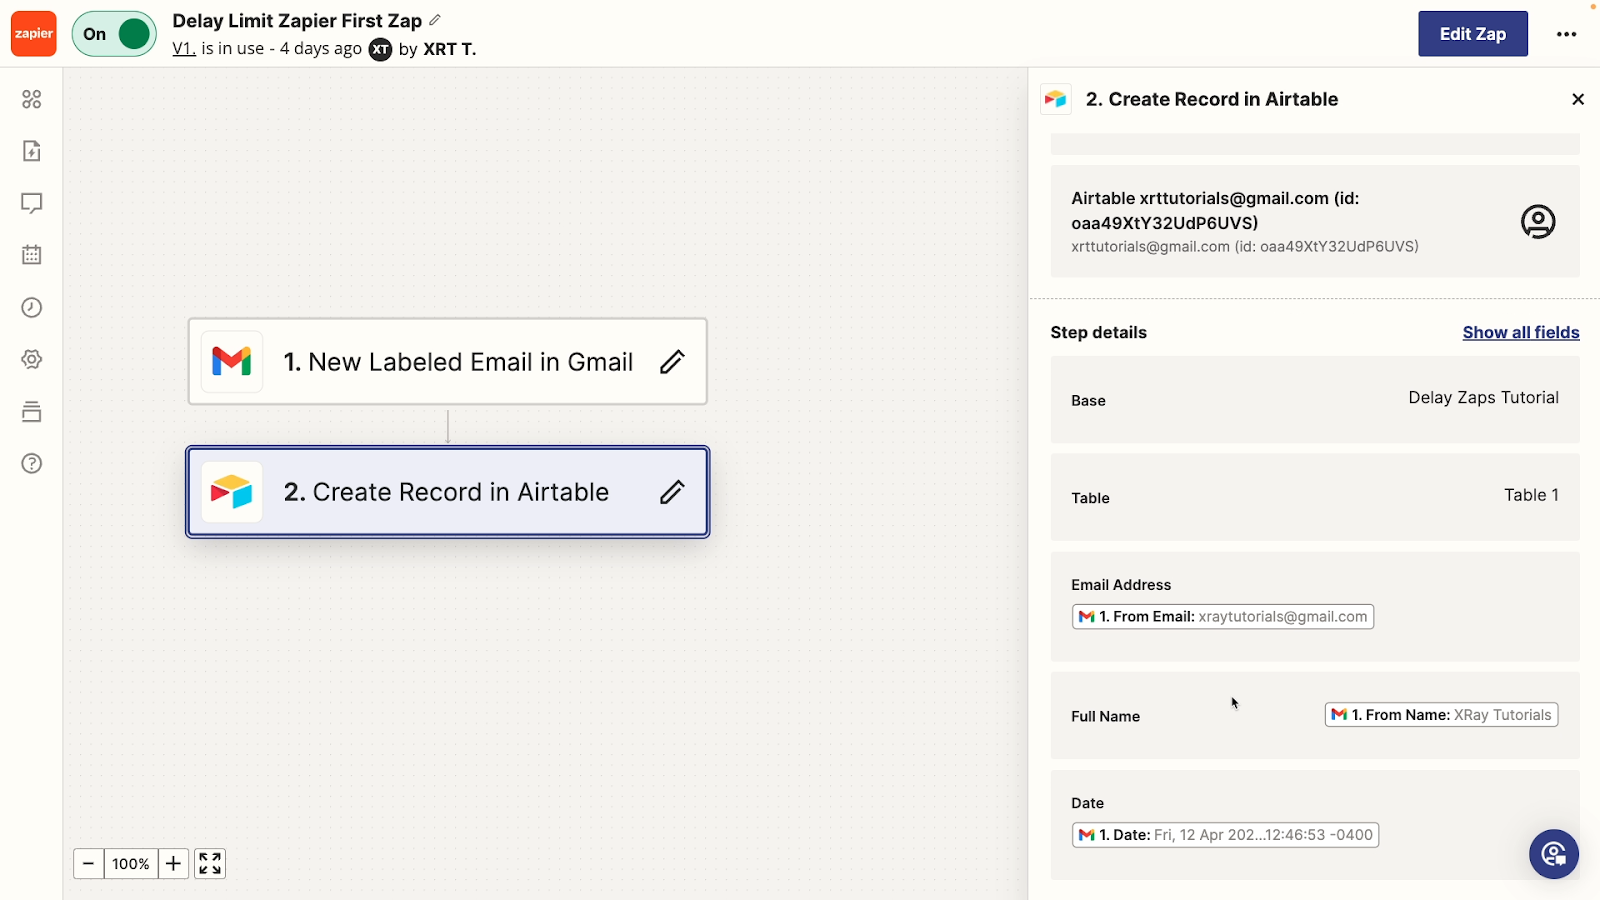
To finish off the Zap, add a “Create Record” step in Airtable and store some key data in a table based on our template. You’ll need to include some date/time data to calculate your desired delay, as well as any other information you want to use when your automation resumes.
2. An Airtable base that calculates the delay
With the data sent over by your first Zap, your customized Airtable base can easily calculate any delay that you want.
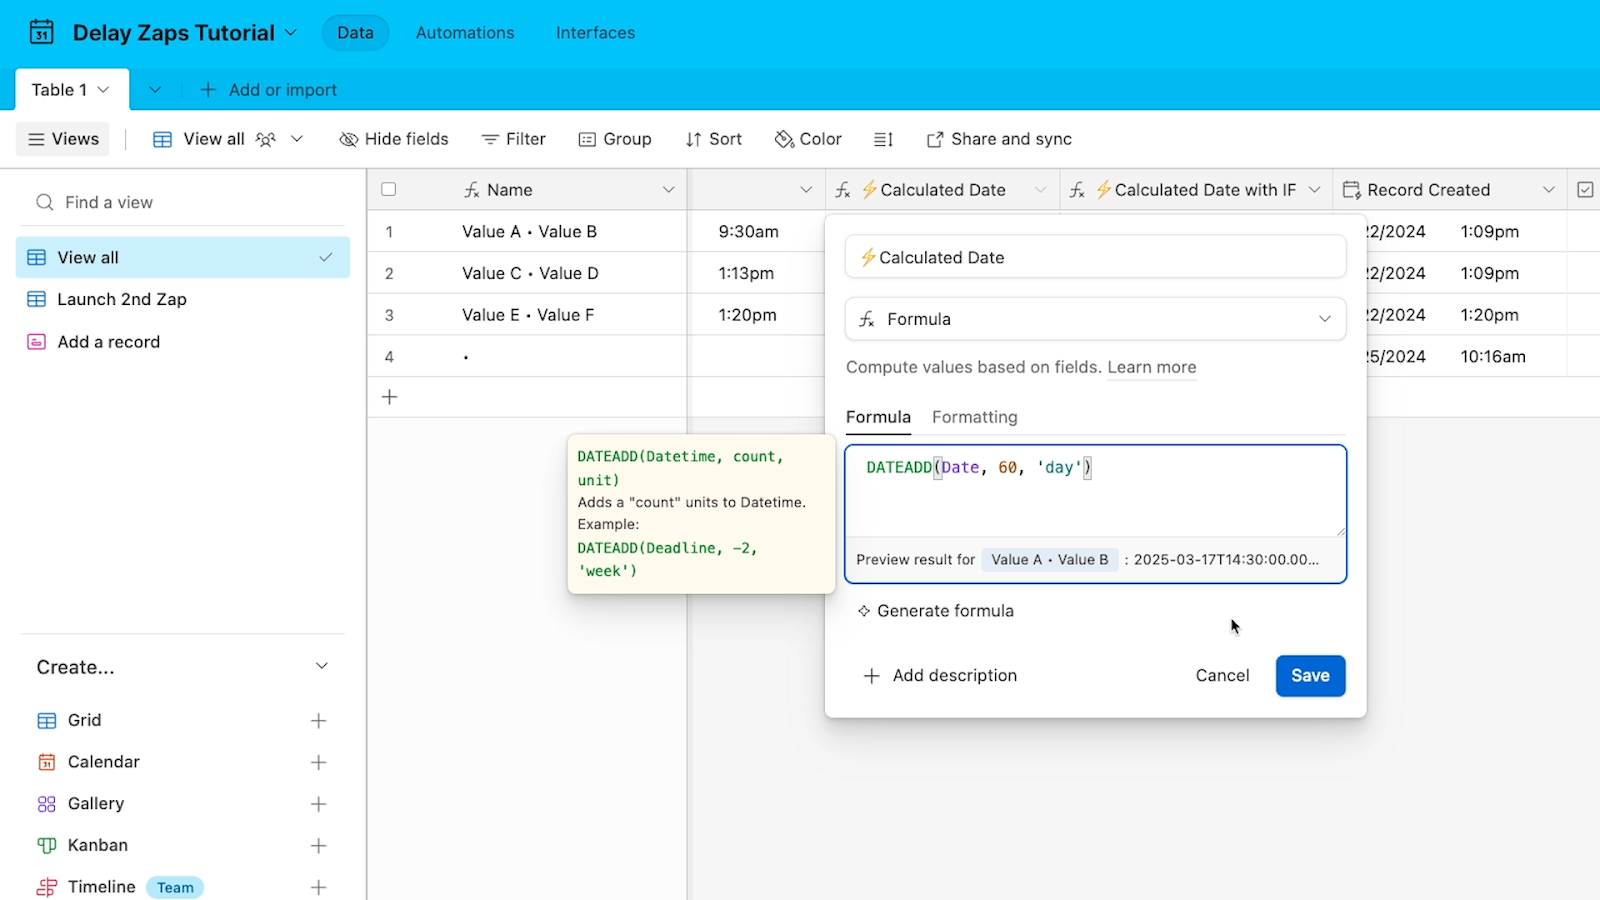
Our template includes a preconfigured formula field you can use to get started. It defaults to a 60-day delay, but can be easily adjusted to your own parameters.

When a record’s calculated date matches the current date, the record will enter the “Launch 2nd Zap” view. For example, with our 60-day delay, a record with an original date of 04/19/24 would enter the “Launch 2nd Zap” view on 06/18/24.
3. A Zap triggered by an Airtable view
Your workflow will conclude with a second Zap that runs whenever a new record enters your specified view. Then, you can add any automated actions that you want to perform after the delay.
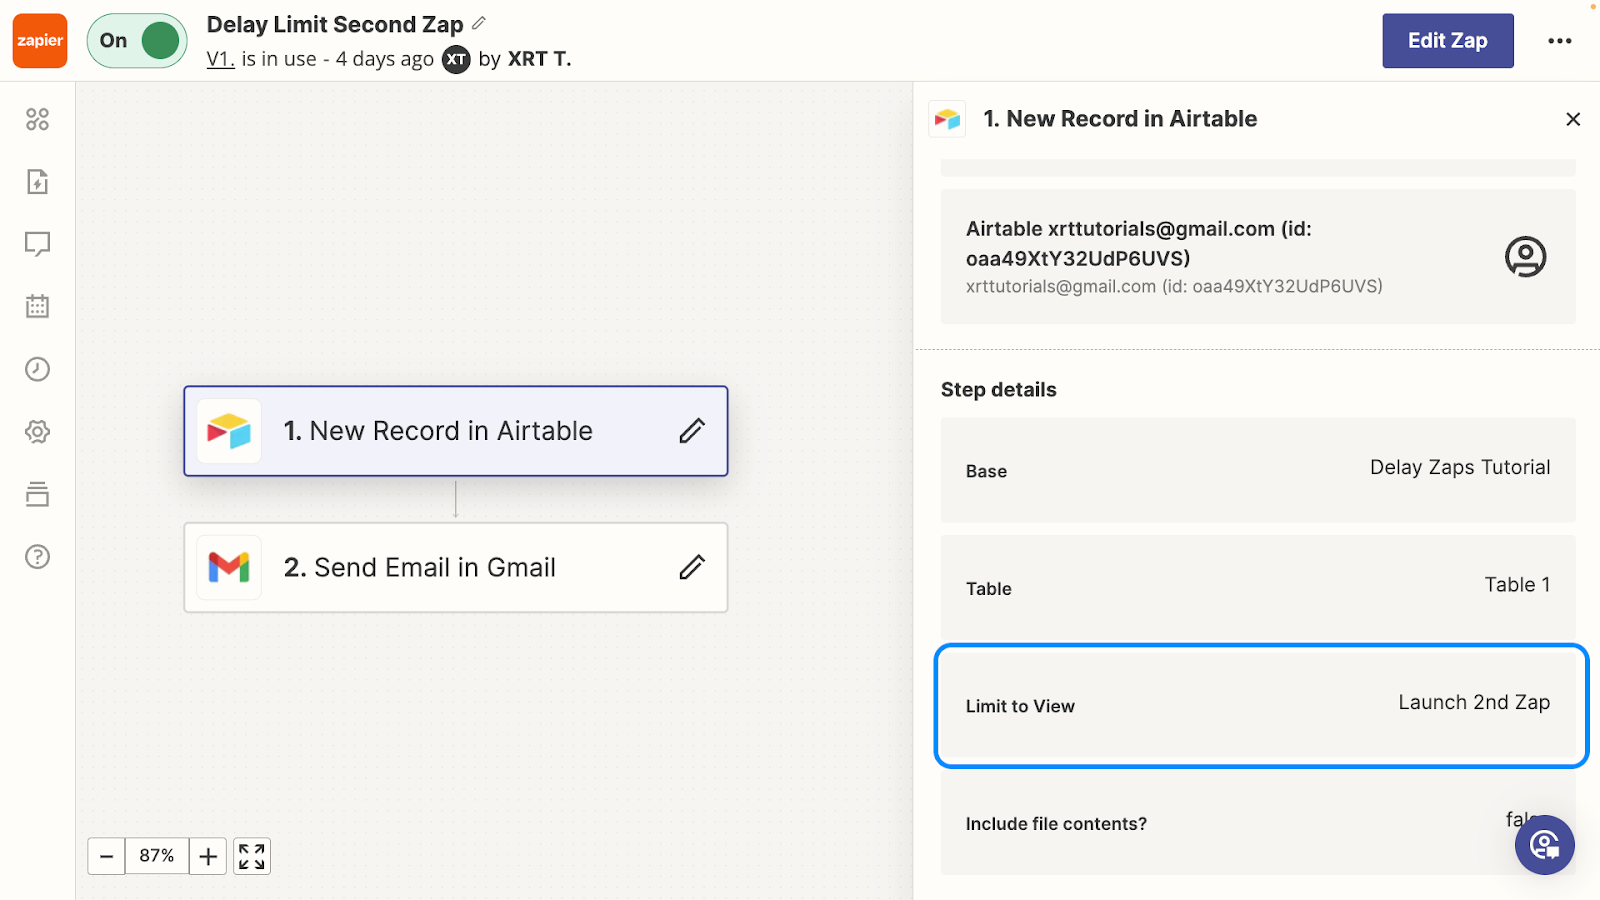
Detailed Walkthrough
Next, let’s take a look at setting up this workflow in more detail. We’ll demonstrate the process with this example workflow:
• The first Zap will run when we add a new label to an email in Gmail
• After we add the label, we want to send an automated email to the original sender 60 days later
Setting up the Airtable base
Even though your finished workflow will start with Zapier, the easiest way to construct the automations will be to start with the Airtable base.
If you’ve never used Airtable before, you can check out XRay’s beginner’s guide to learn the basics. However, it’s a very intuitive spreadsheet and database app, and you’ll likely be able to follow along even if you’re new to the app.
Note that you can use a free Airtable plan for all of the techniques demonstrated in this tutorial.
To begin setting up your Airtable base, copy our template to your workspace.
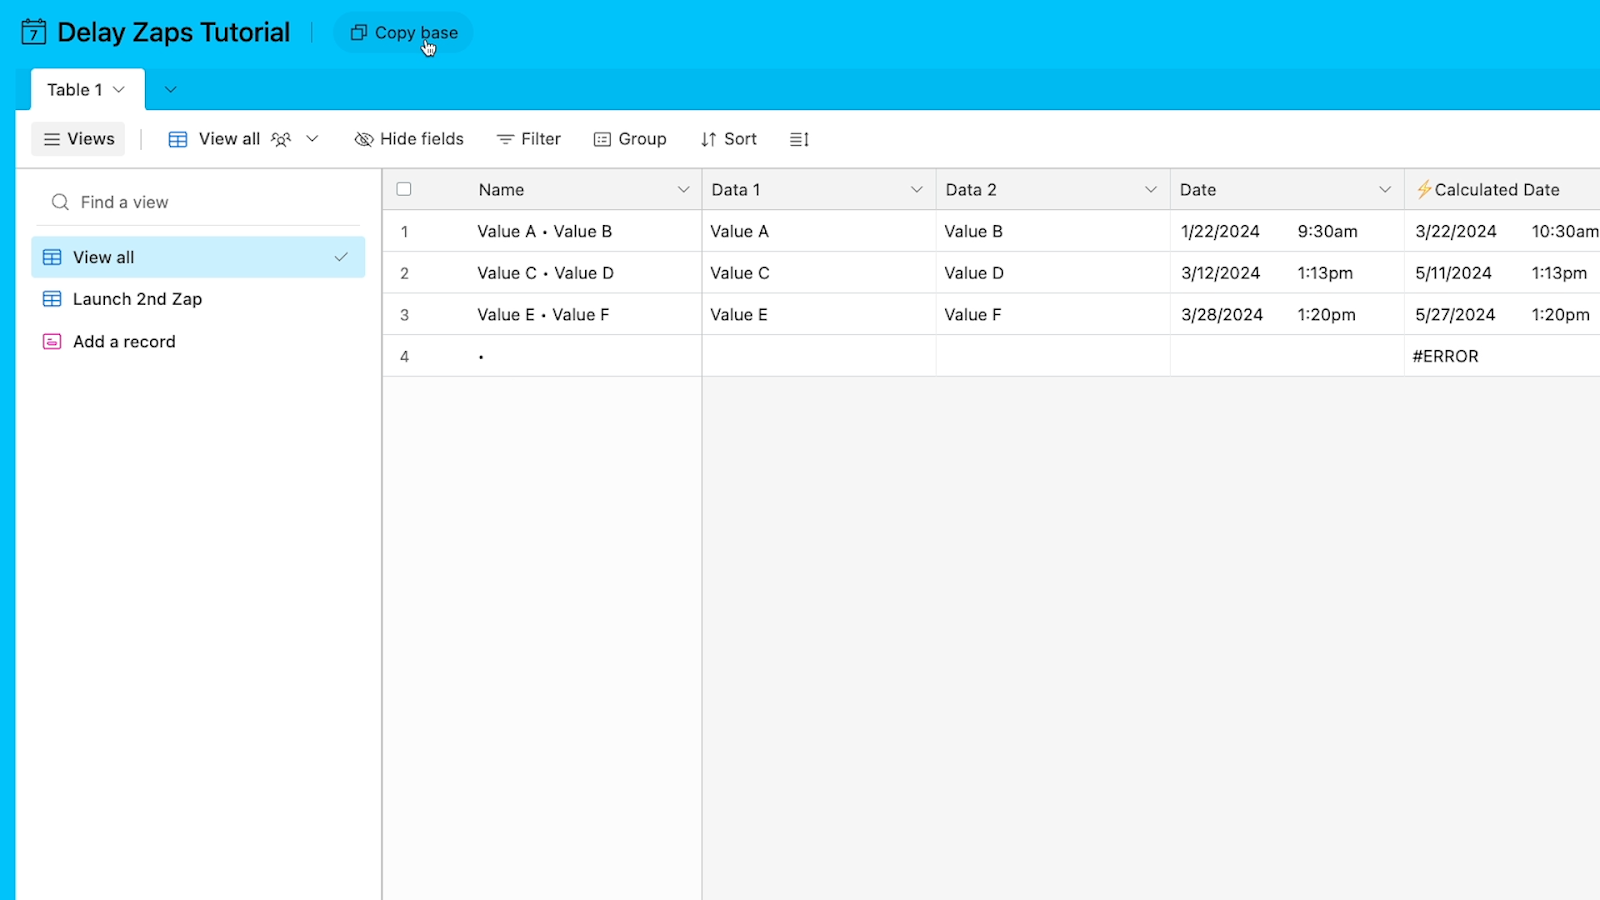
The template consists of one table with a couple custom views and several useful fields. Let’s take a closer look at them now.
Primary field: Name
First, the primary field is set to “Name”. This field creates a title or label for each record in the base. We’ve set it up as a formula that combines the contents of the next two fields.

Using a formula for your primary field makes it easy to keep all of your records’ names consistent, and lets you easily update them en masse whenever you want.
You can leave this field as-is or customize it to give your records any label you want.
Placeholder fields: Data 1, Data 2
Next, we’ve included a couple of placeholders for any data that you want to include. These are just single-line text fields called “Data 1” and “Data 2”.
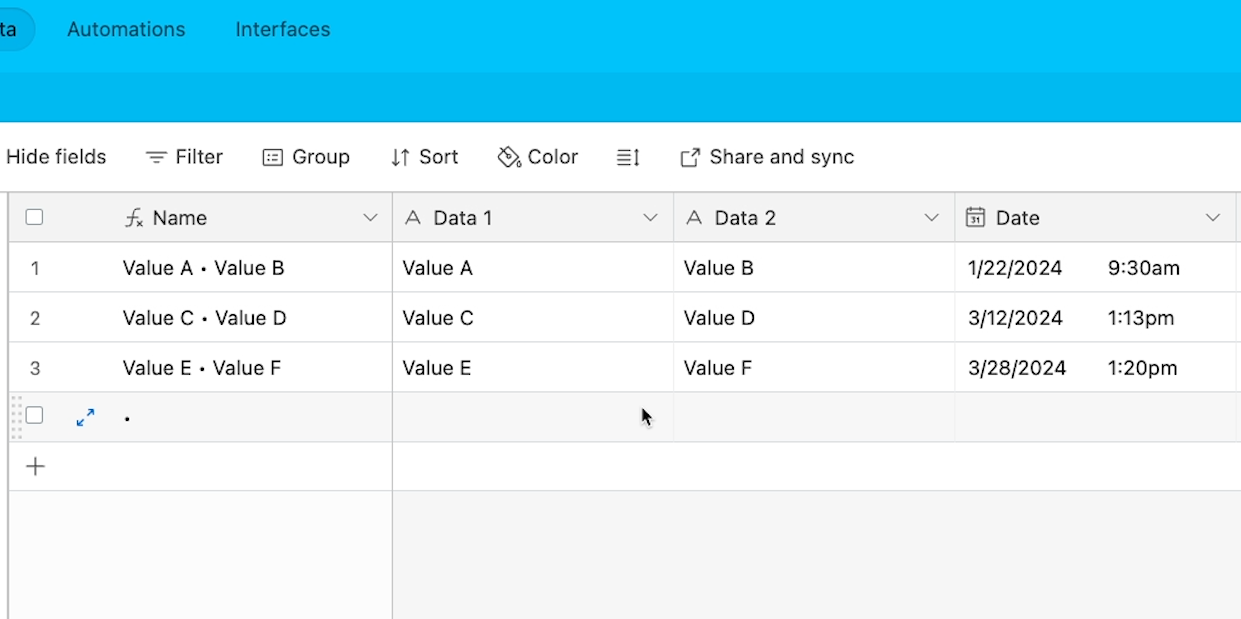
Any data that you want to collect from your first Zap and send to your second Zap will need to be stored in Airtable with fields like these.
For our example, we’ll edit these into fields for “Email Address” and “Full Name”.

To accommodate your Zap’s data, you can edit these placeholders, add more fields, or delete the ones you don’t need.
Date fields: Calculating your delay
Now let’s look at the fields that will let us calculate a delay for any length of time that we want.
Starting date
First, there’s this simple “Date” field. You’ll need to include a Date field for any dates that are involved in the final calculation.

For our example, we just need one date field to indicate when the email was originally received. You may need additional date fields for your use case.
Record created
Note that we’ve also included a “Record Created” field. This is a unique field that displays the date the Airtable record was created.
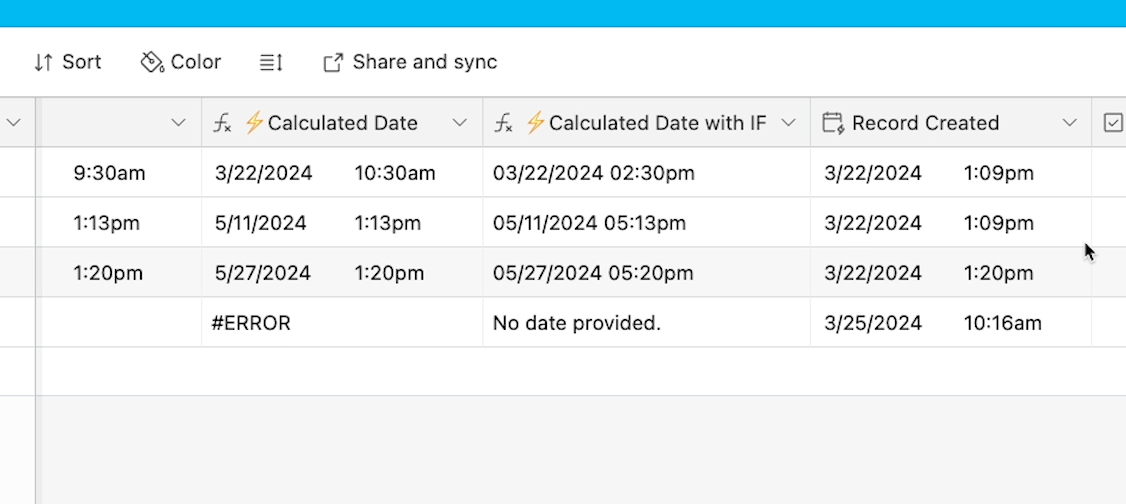
This field is populated automatically, and is not editable.
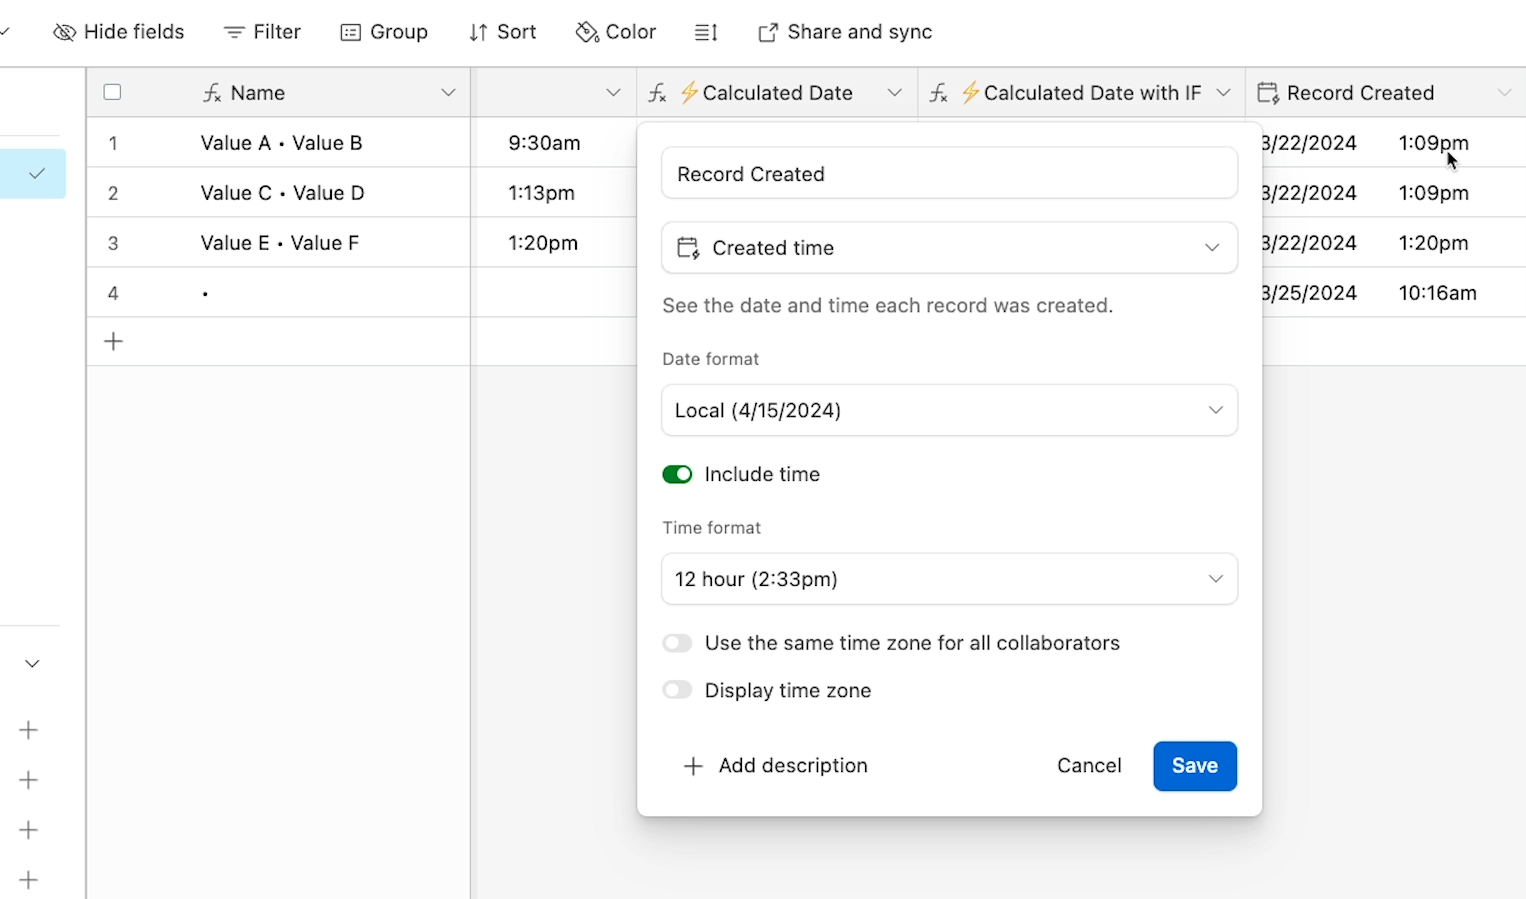
In some cases, you may want to use this date in your formula instead of referring to a date sent from Zapier.
Calculated date
This field is the most important one in the template. In this “Calculated Date” field, you can calculate the date when your second Zap will run.
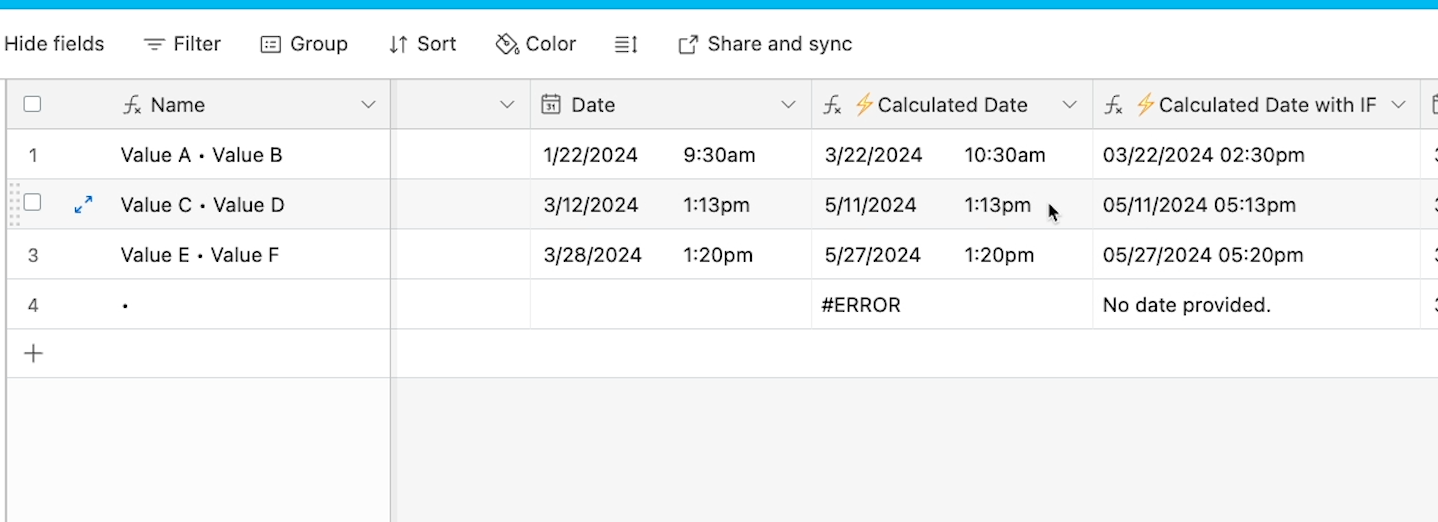
For our example, we’ve written a formula that adds 60 days to the original “Date” field. However, you can easily edit this formula to add any amount of time that you want.
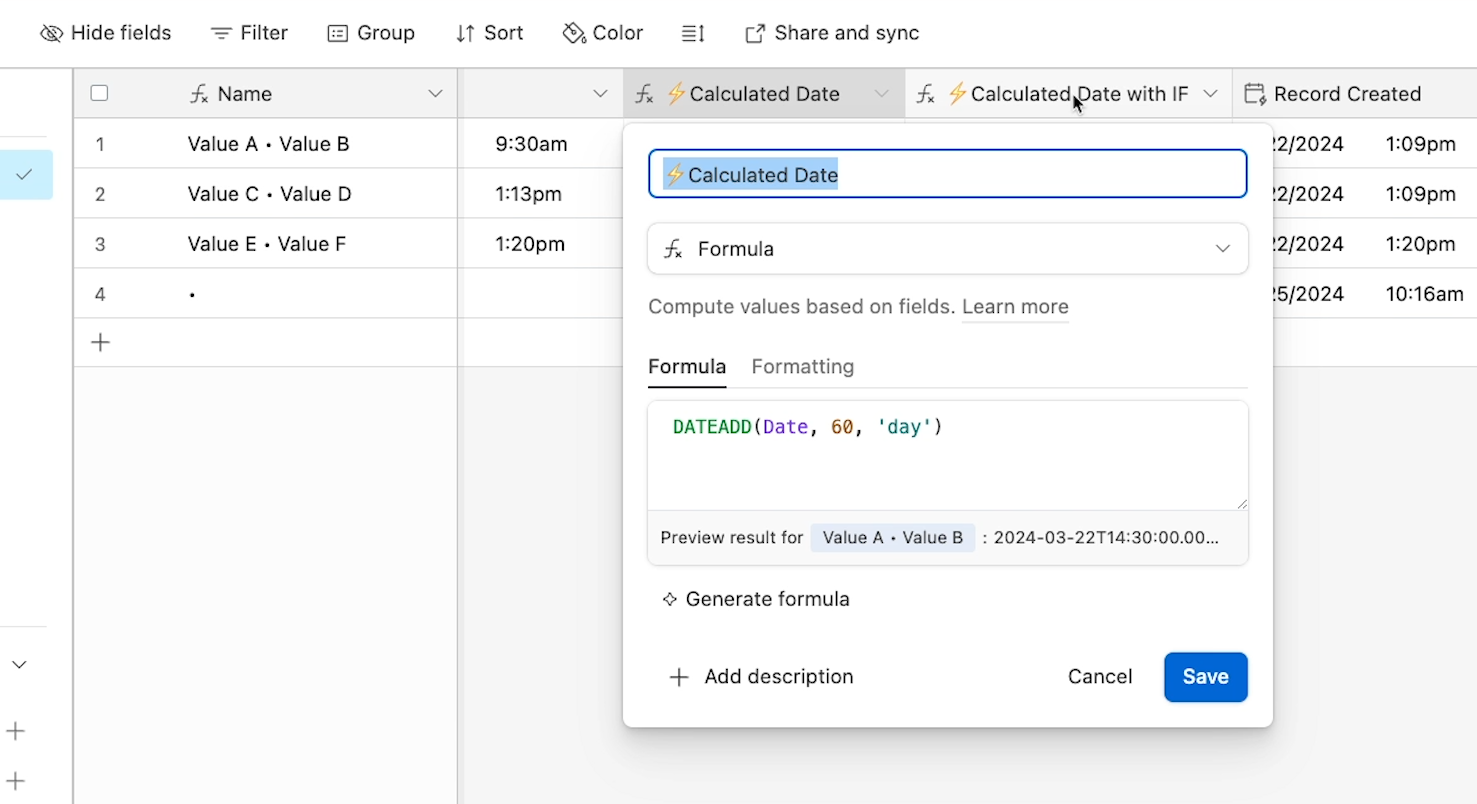
Just replace ‘day’ with something like ‘week’ or ‘year’, and replace ‘60’ with the interval you want to use. You can explore Airtable’s help docs for more information about using this formula.
When you’re done editing your formula, click “Save” to commit your changes.
“Launch 2nd Zap” view
When a record’s “calculated date” is equal to today’s date, then that record will enter the view called “Launch 2nd Zap”.
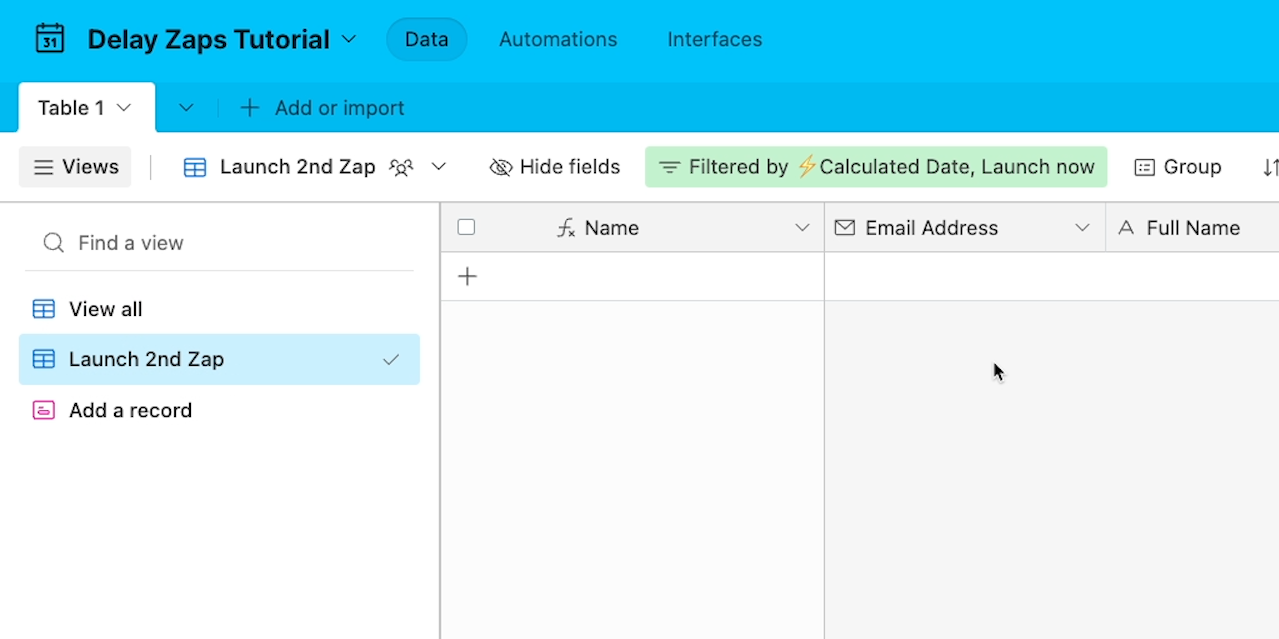
That’s because the view’s filter is set to “Calculated Date is today”.
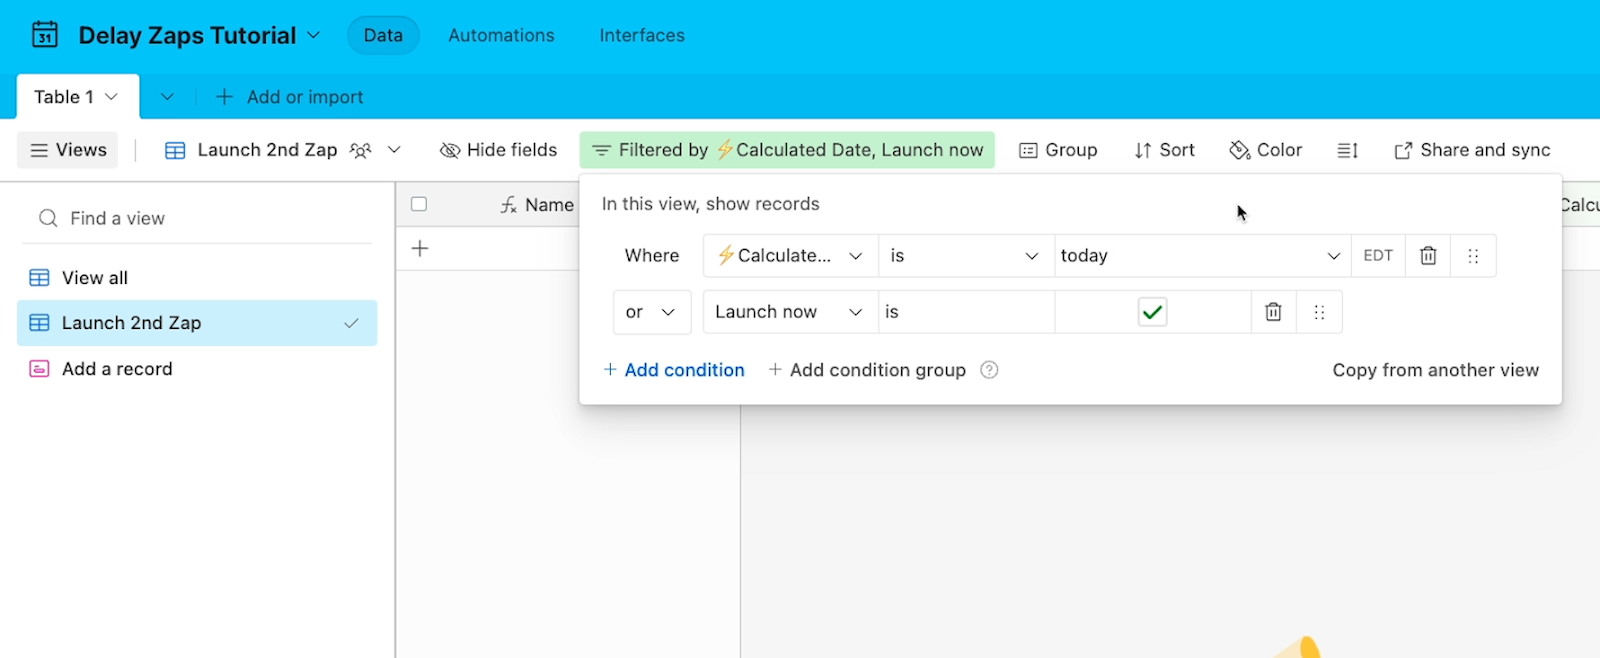
Calculated Date with IF
You may have noticed that any record without a “Date” entry has this big obnoxious “#ERROR” text in the “Calculated date” field.
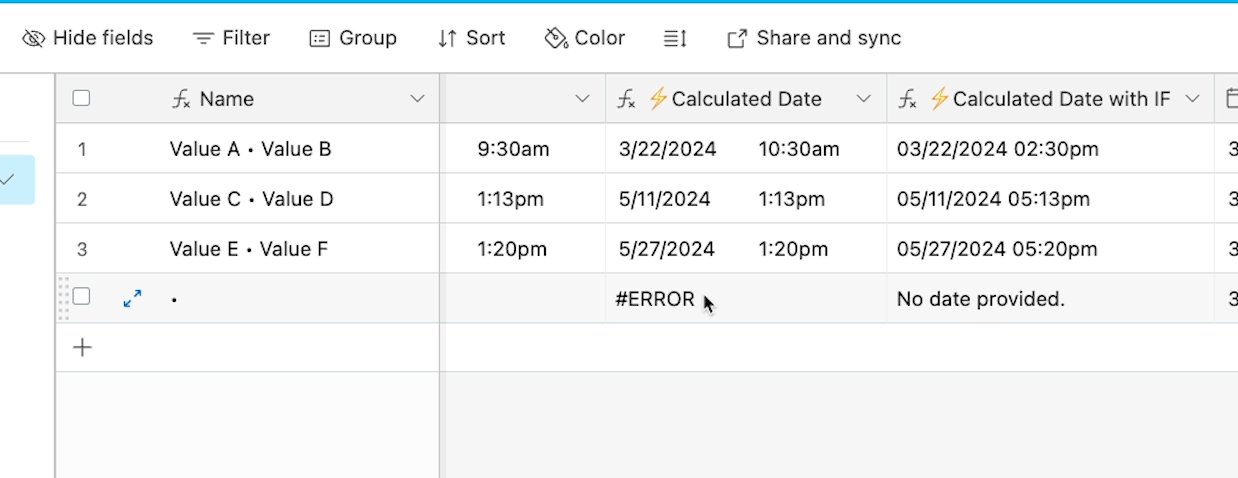
Since there’s no date to add 60 days to, the formula doesn’t work, and just displays this error text.
If that bugs you and you’d like to replace this error text with a less obtrusive message, you can use the second version of our formula instead. You’ll find that version in the field called “Calculated Date with IF”.
This formula is a bit more complicated.
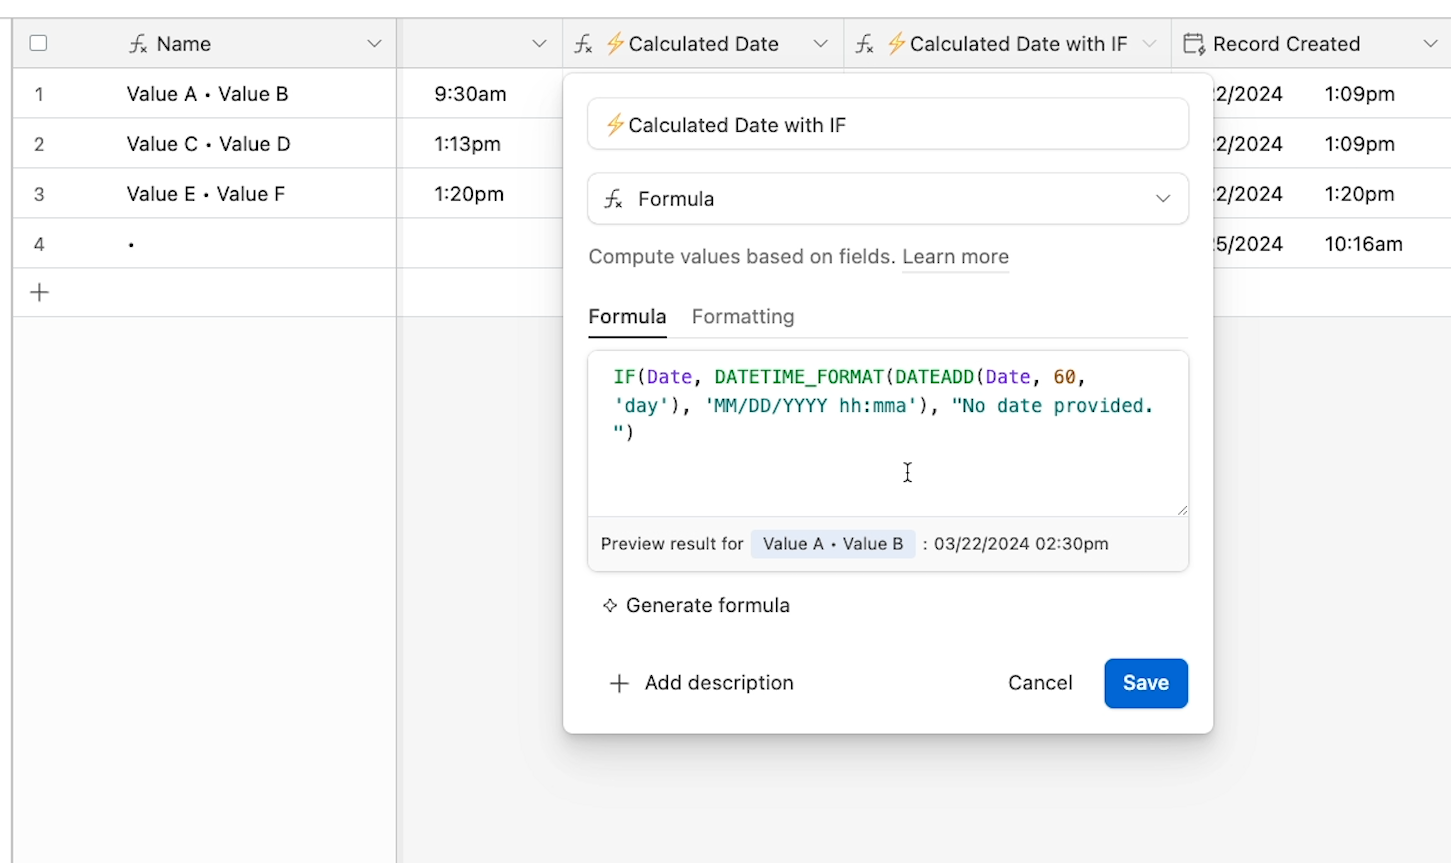
You can see that we still have the same “DateAdd” formula at the heart of it, but there’s also a DateTimeFormat expression, as well as an “IF” statement that checks whether or not there’s a date to work with.
Ultimately, if you’re new to Airtable, you’ll probably prefer the simpler version. But we’ve added both to the template so you can pick for yourself. Then, you can just hide the field that you don’t want to use.
Lightning bolts: emoji codes
Note that we’ve marked both formula fields with a lightning bolt emoji. Using emoji labels like this will make things much easier when you start working with this Airtable base in Zapier.
These formula fields won’t accept direct input, but Zapier will still give you the option of entering data into the “Calculated Date” fields.
The emoji, which we’ll see in Zapier too, lets us know that these fields are populated by a formula and should be left alone.
Form view: Add a record
The “Add a record” form view is a simple way to add complete records to your base. Adding records one field at a time can lead to issues with automations, since they may run when a field is still missing data.
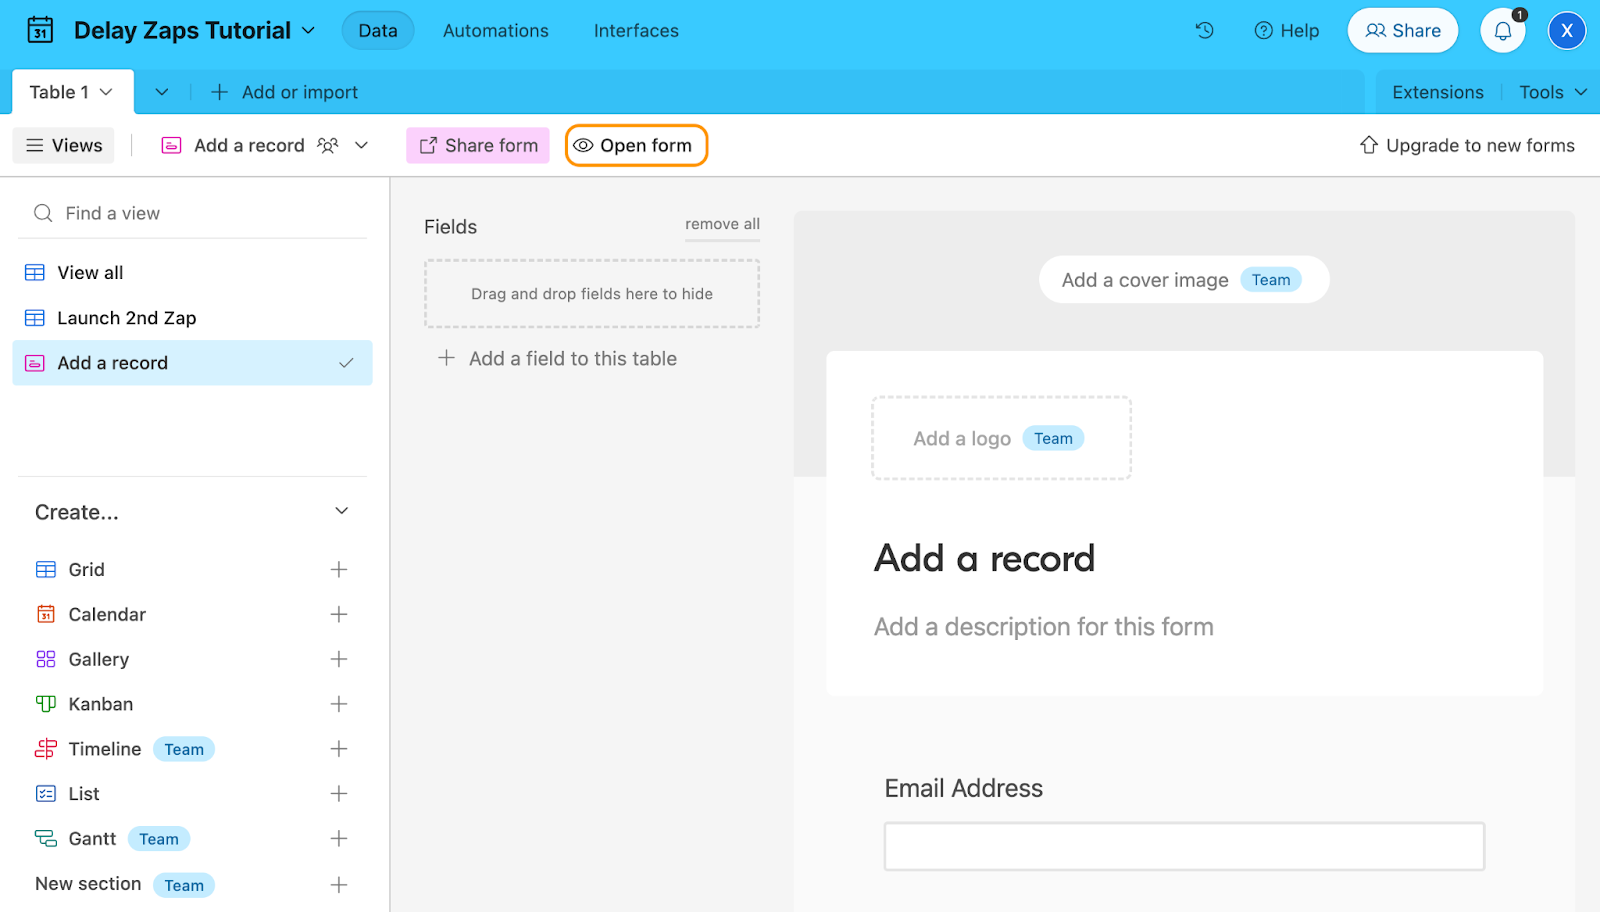
The view itself will let you configure the form, but not enter data. To submit a record, just click on “open form” to access the published survey.
Launch Now
Finally, the last field in this template table is a checkbox field called “Launch now”.
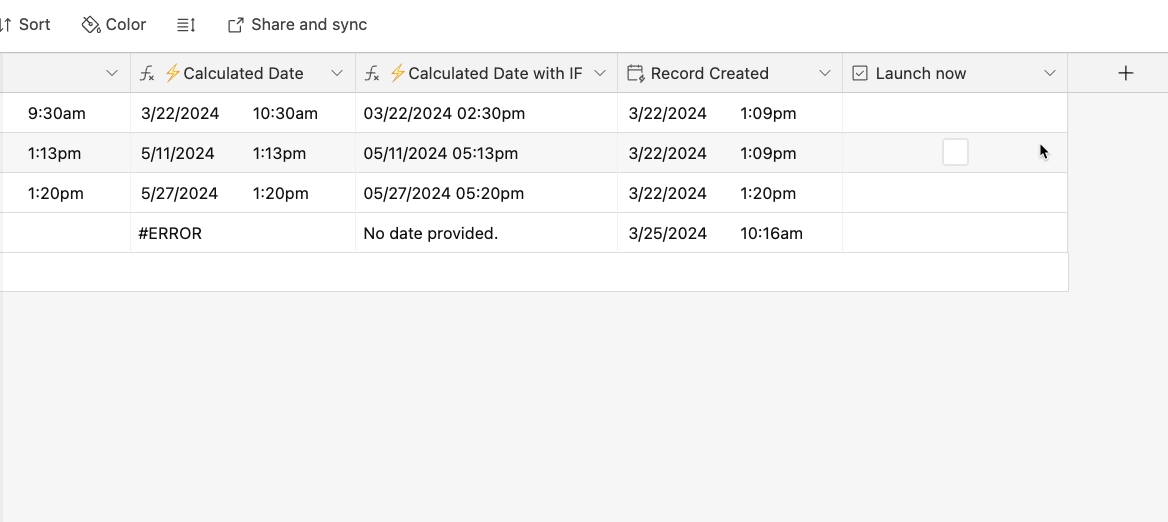
This field is optional, but it's a good example of why we like to use Airtable to skirt around Zapier’s delay limit, instead of something like Google Calendar.
If you change your mind and want to launch the second Zap immediately instead of waiting 60 days, you can just check this box.
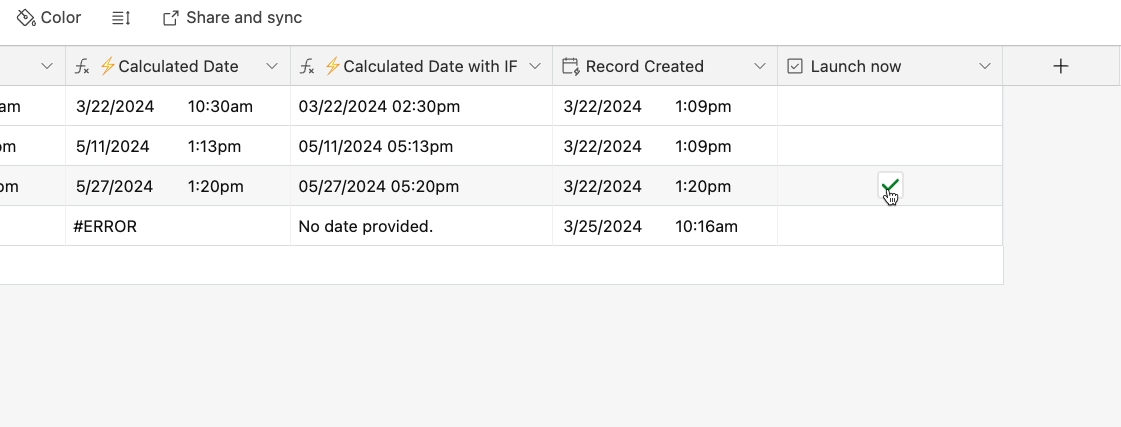
The second condition on the “Launch 2nd Zap” view’s filter will also allow any records that have been manually checked off.
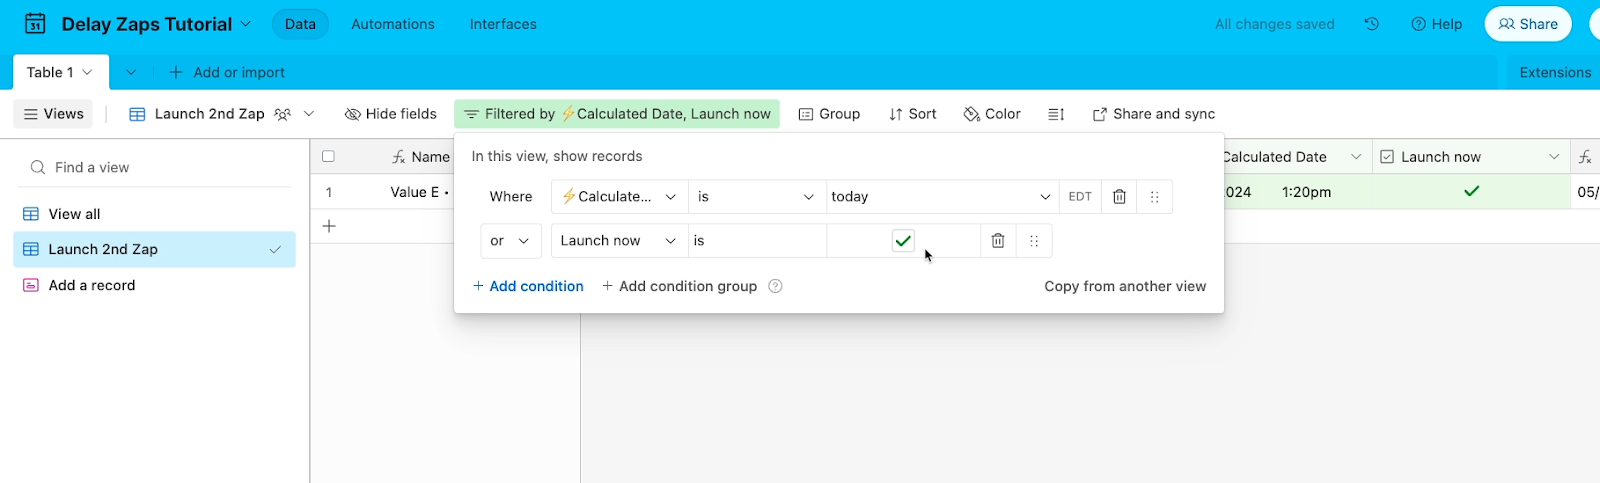
With Airtable you can easily set up multiple filter conditions for a record to enter a specific view.
—
That covers basic setup, but you should feel free to customize all of these fields to fit your specific use case.
In general, just remember that any data you want to send to your second Zap needs to be saved or calculated here in Airtable first.
Once your base is set up to your liking, it’s time to build the Zaps for this automated workflow.
Building the first Zap
Now that our Airtable base is all set, let’s build the first Zap in this workflow.
The first Zap can trigger under whatever conditions you’d like. In our example, this Zap will run whenever we add a custom label to an email in Gmail.
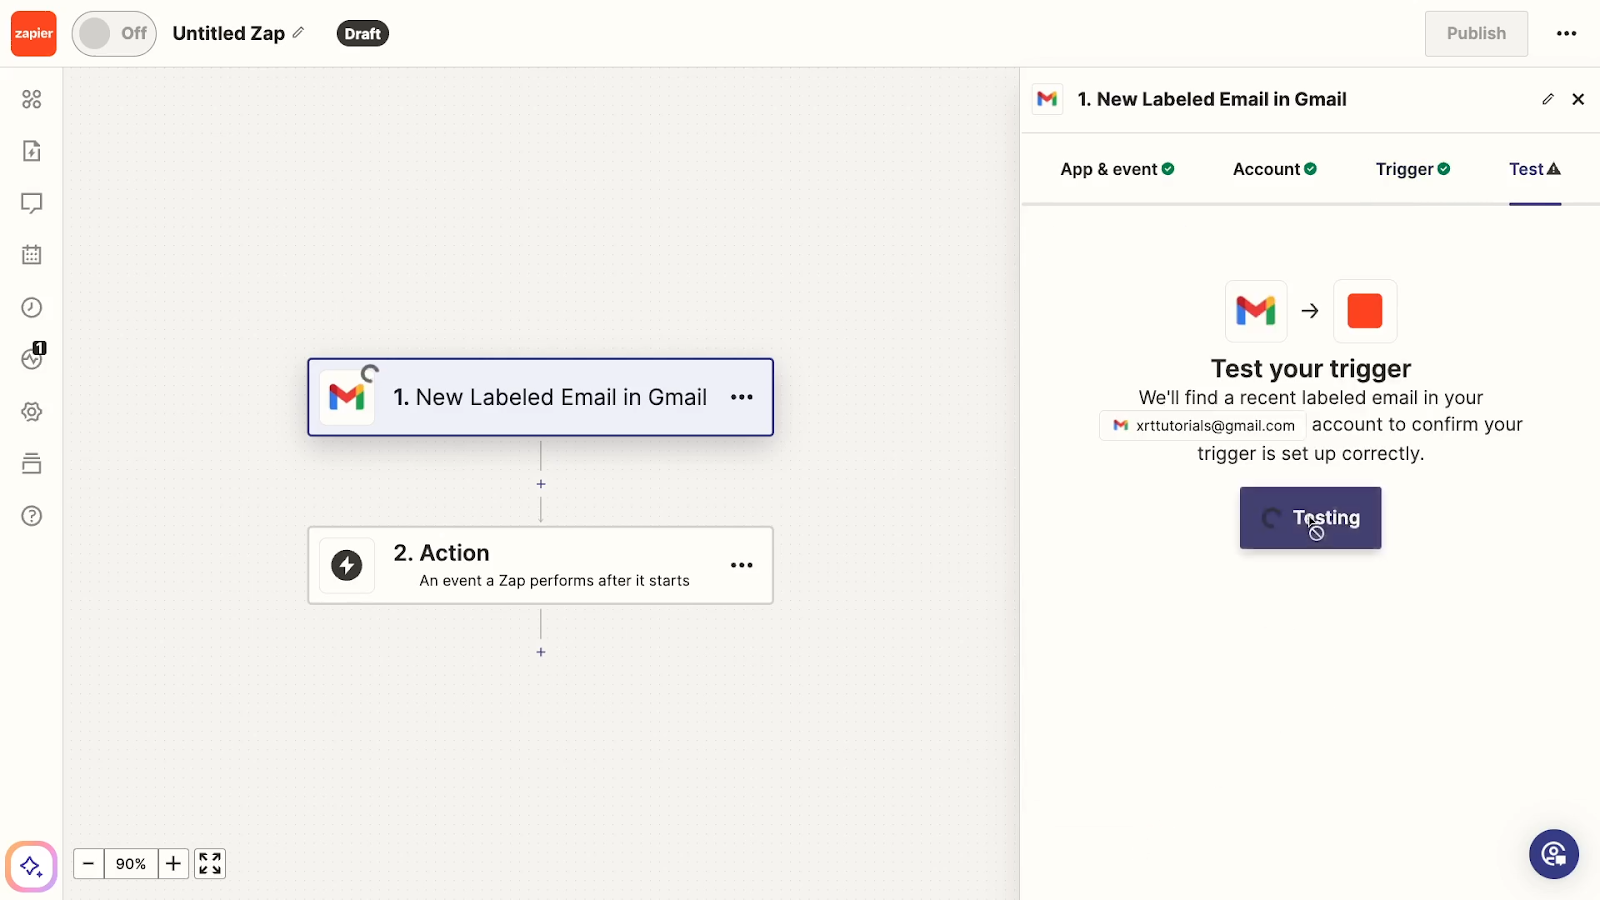
Once your trigger is configured, give it a test to load in some test data.

Next, you can add any other actions that you want your Zap to perform before the pause.
Sending data to Airtable
Once you’ve added all of the additional actions that you want, finish the Zap with an Airtable step.
Select “Create record” as the action.
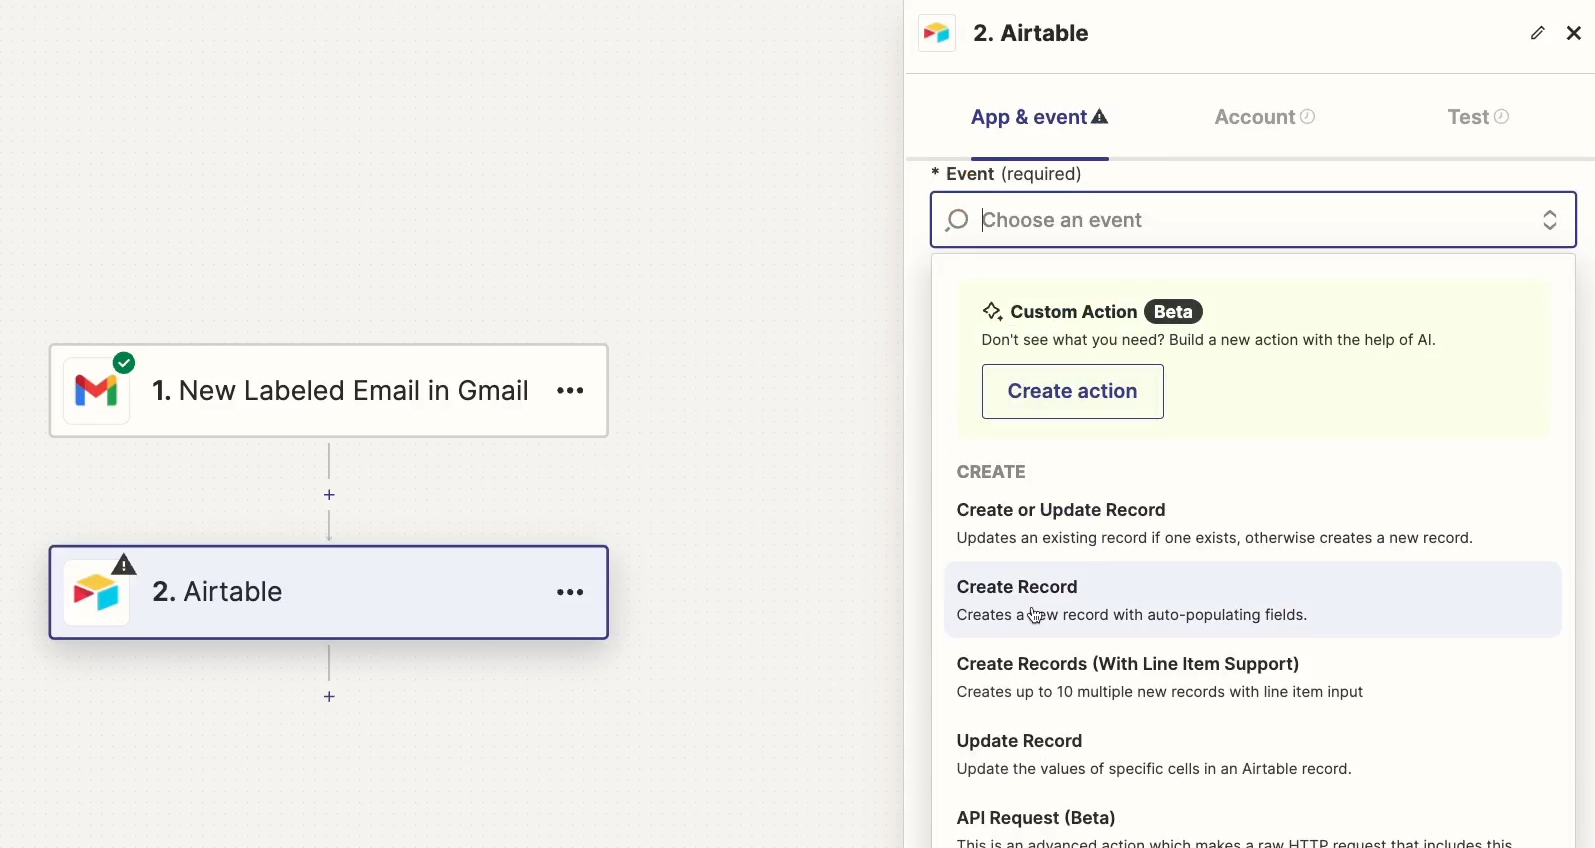
Sign in to your Airtable account to authorize Zapier to act on your behalf. Then, choose the base and table that the new record should be created in.
This will be the template base that you copied earlier and configured to your liking.
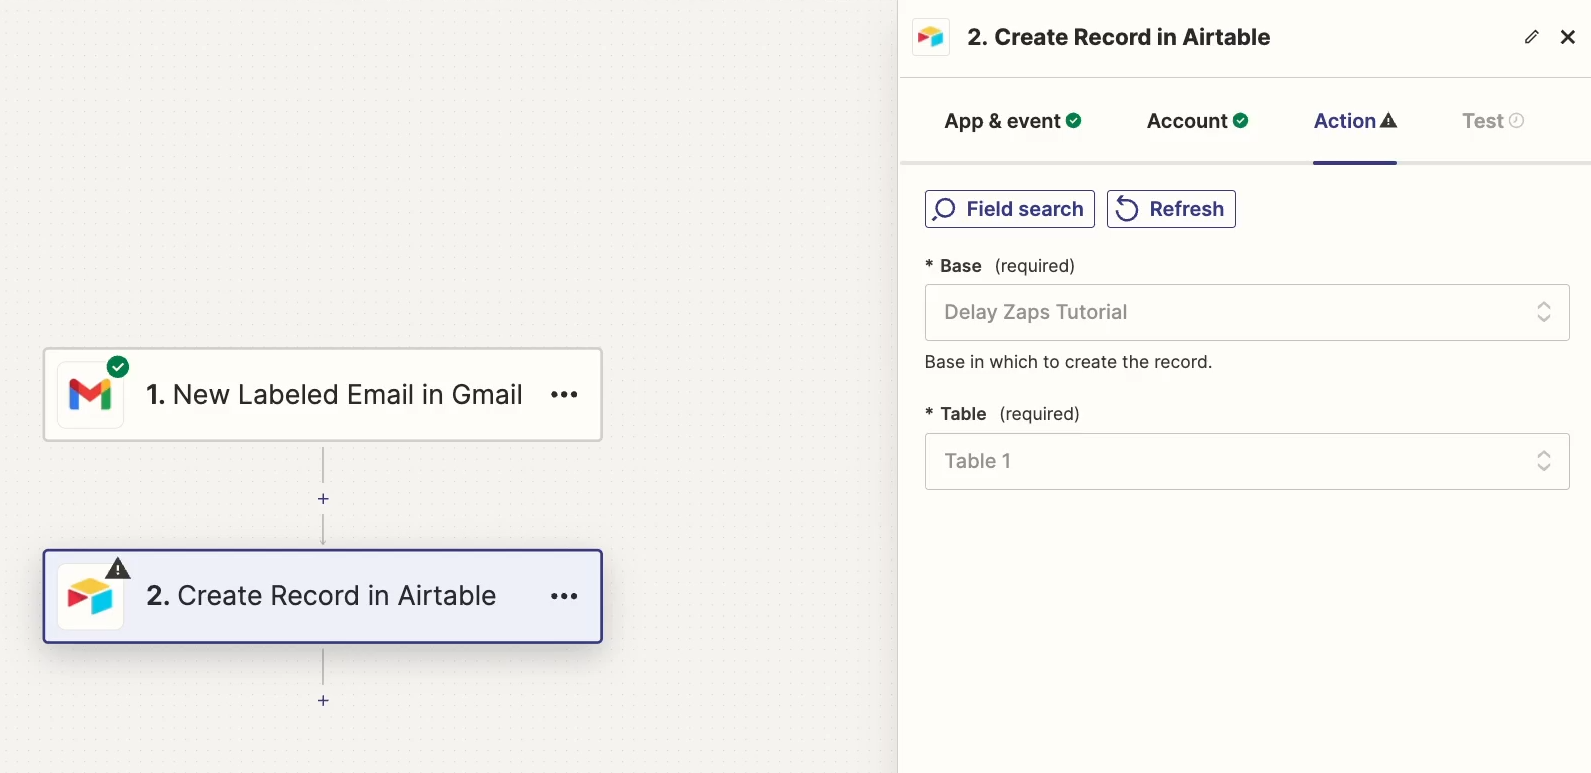
Once you’ve selected the right table, you can map data retrieved from earlier steps to your Airtable fields.

In our example, we’ll fill in data for the sender’s name, their email address, and the date the email was received.
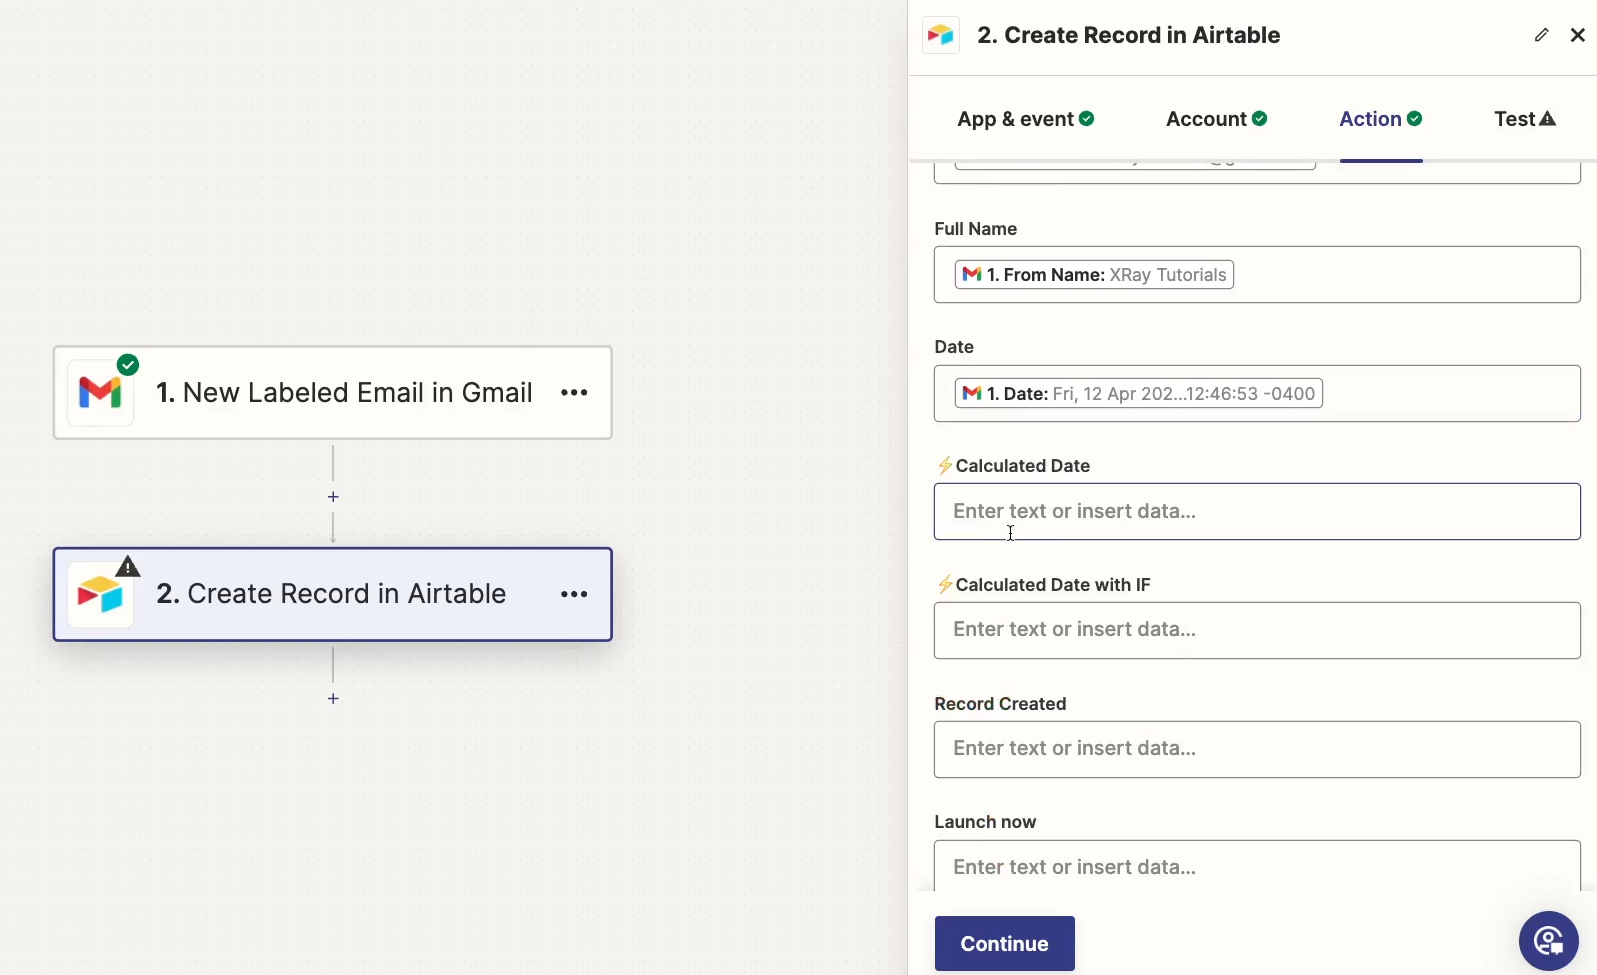
Note that we can see those lightning emojis for the formula fields, so we know not to map anything to them.
Testing the Airtable step
Once you’ve mapped all the data you need to each appropriate Airtable field, give the step a test.

After a few moments, you should see a success message in Zapier.
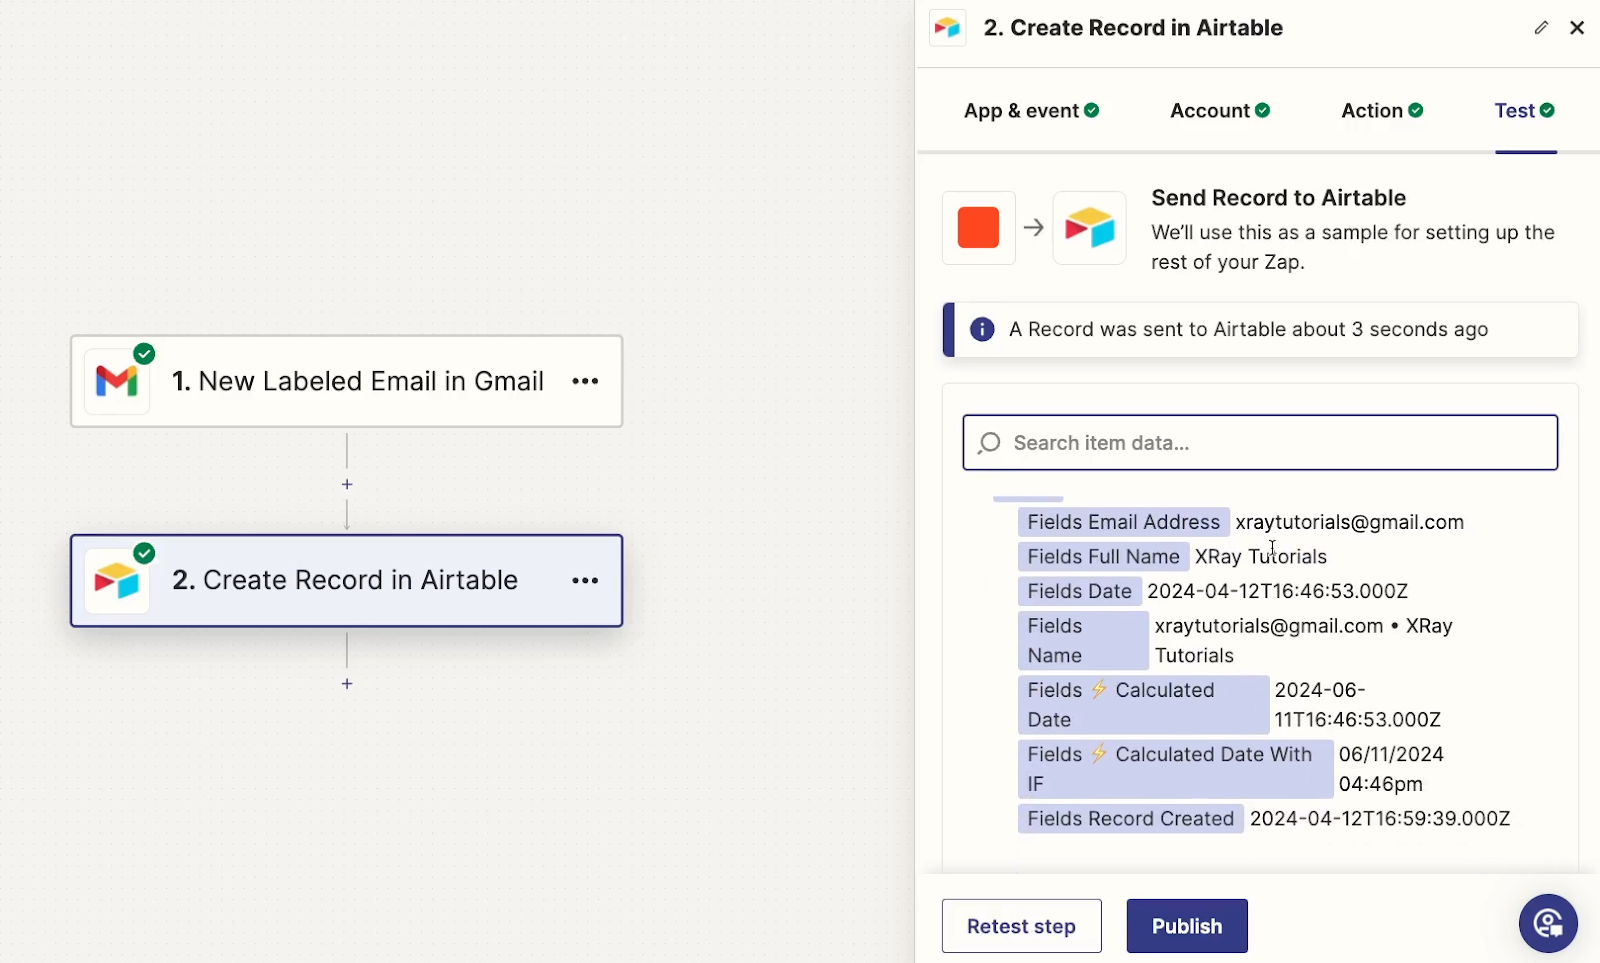
Just make sure to check Airtable as well to confirm that the data all looks correct. You’ll especially want to make sure that the calculated date is what you expected.
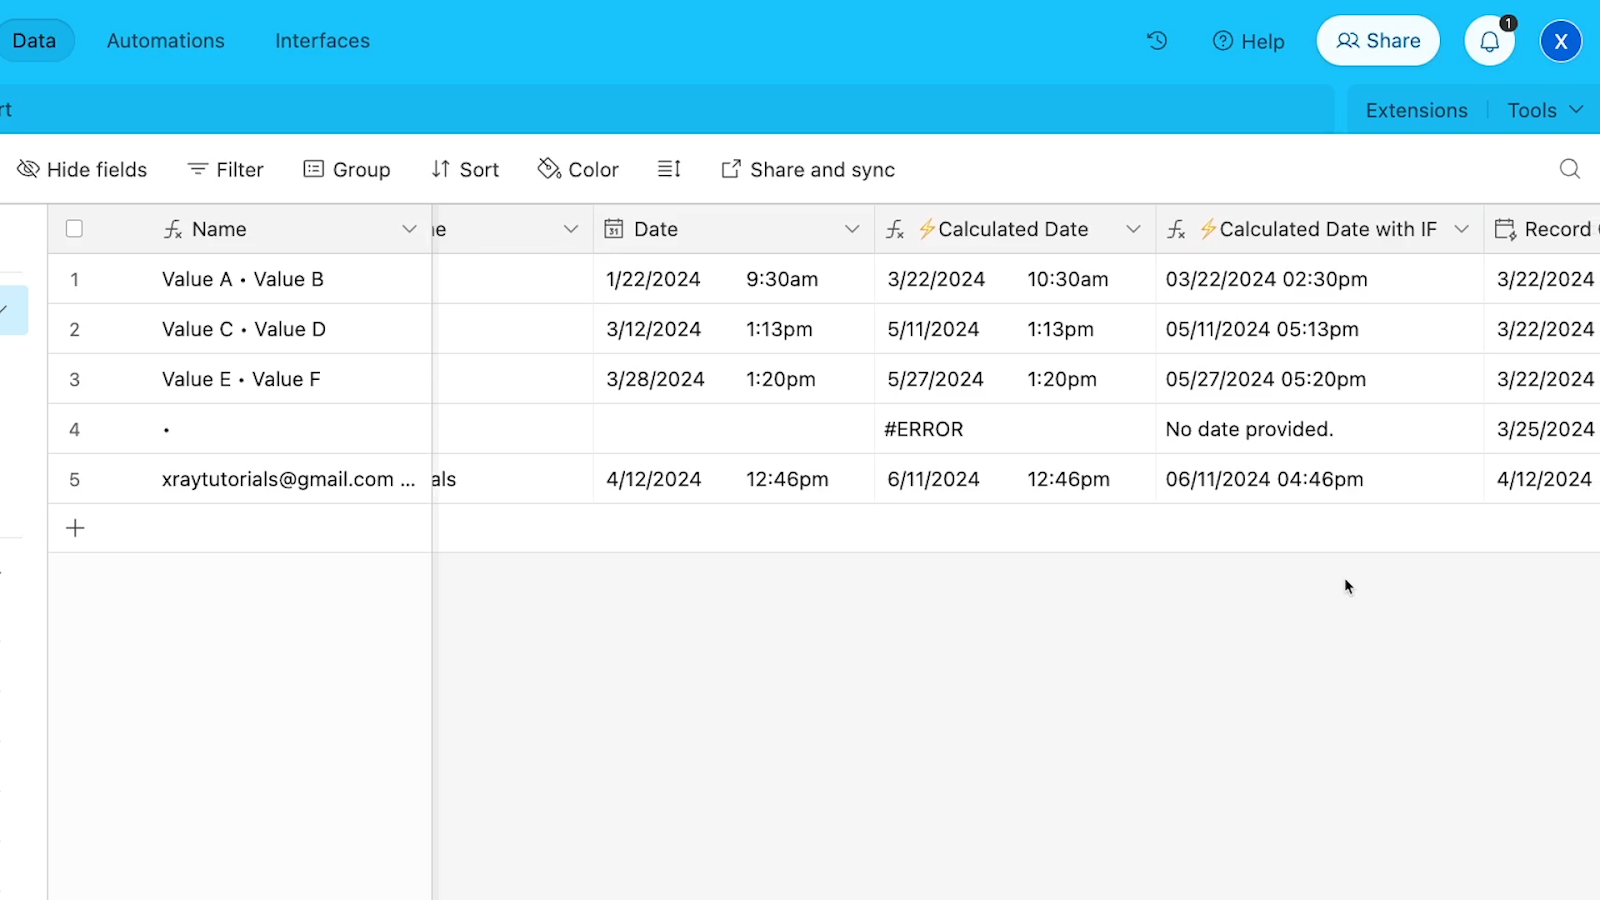
Ours is 60 days after the original date, just like we wanted. This first Zap has been successfully set up to send data to Airtable.
Building the second Zap
Now let’s build the second Zap, which will run after your specified delay.
To begin, configure the Zap’s trigger. Choose Airtable as the app, and select “New Record” as the event.
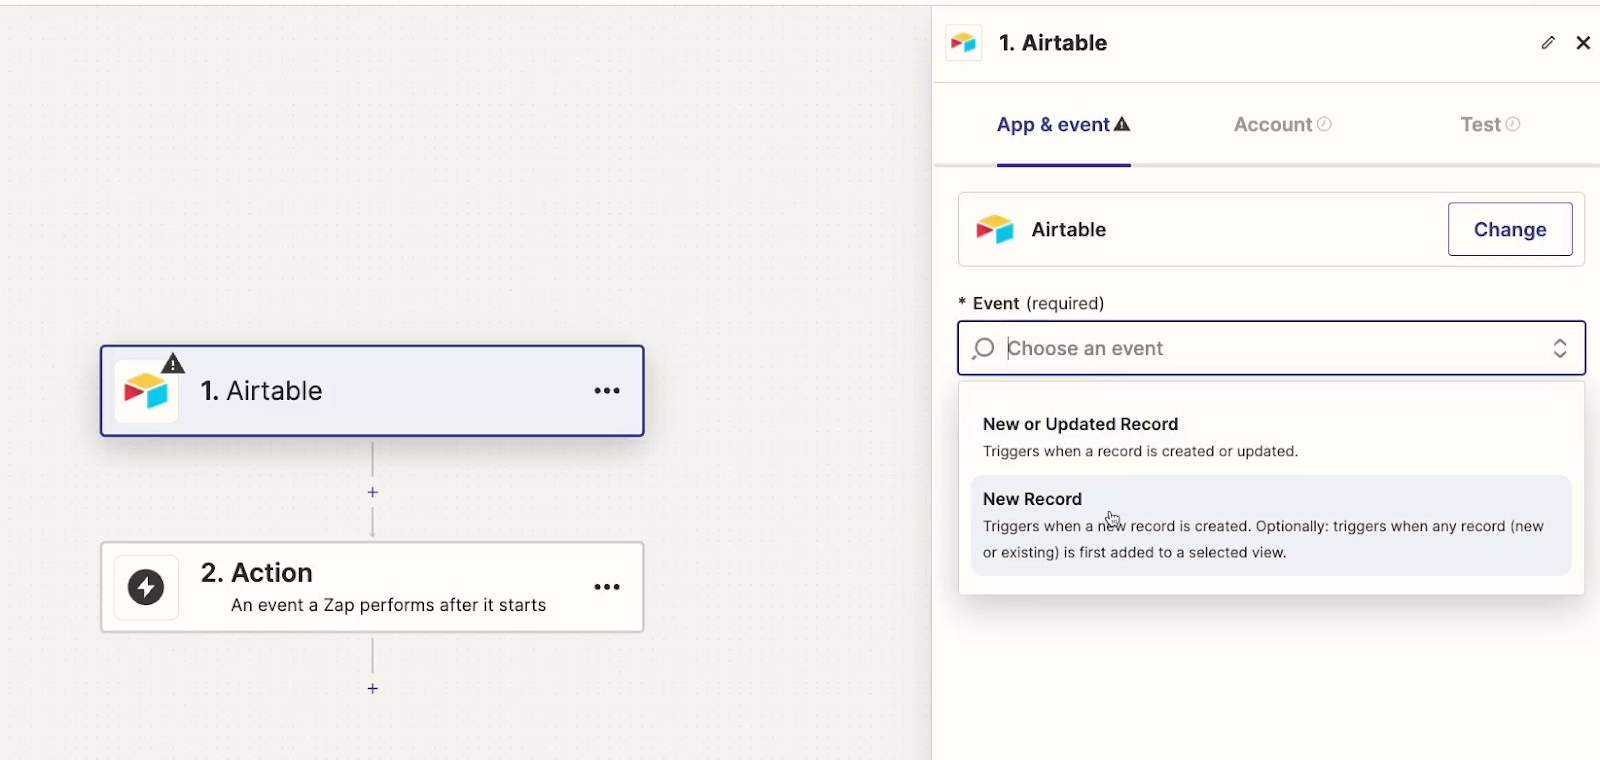
Sign in to the same Airtable account as before, and choose the correct table and base.

You’ll also want to limit this trigger to only watch a specific view. Select the “Launch 2nd Zap” view (or whatever you’ve renamed it to).
Options for testing the second Zap’s trigger
Next, you need to test this trigger. But to do that, you need to have a record in the “Launch 2nd Zap view”.
Ultimately, there’s no perfect way to test a months-long delay in a couple minutes, but you have a couple good options.
First, you can just check a record manually to add it to the view. This will confirm that the second Zap runs the way you want, and uses real data created by your apps.
On the other hand, it doesn’t technically confirm that the formula works.
Your second option is to create a record with its original date set in the past. For our example, that would mean making a record with its original date set to 60 days ago.
That will confirm that the formula works, but you may need to create fake test data if you don’t have data created at exactly the right time.
Just to be safe, we’d recommend testing this Zap with both methods.
Testing the second Zap’s trigger
To test it both ways, begin by checking the box on one of your test records. That will instantly make it appear in the “Launch 2nd Zap” view.

Next, use the form view to add a new record to the table. For our example, we’ll set the date to be 60 days in the past. Set your record’s date appropriately based on your desired delay.

Once you’ve filled out every field, submit the form to add the record to Airtable.
With both test records ready, switch back over to Zapier, and test the second Zap’s trigger again.
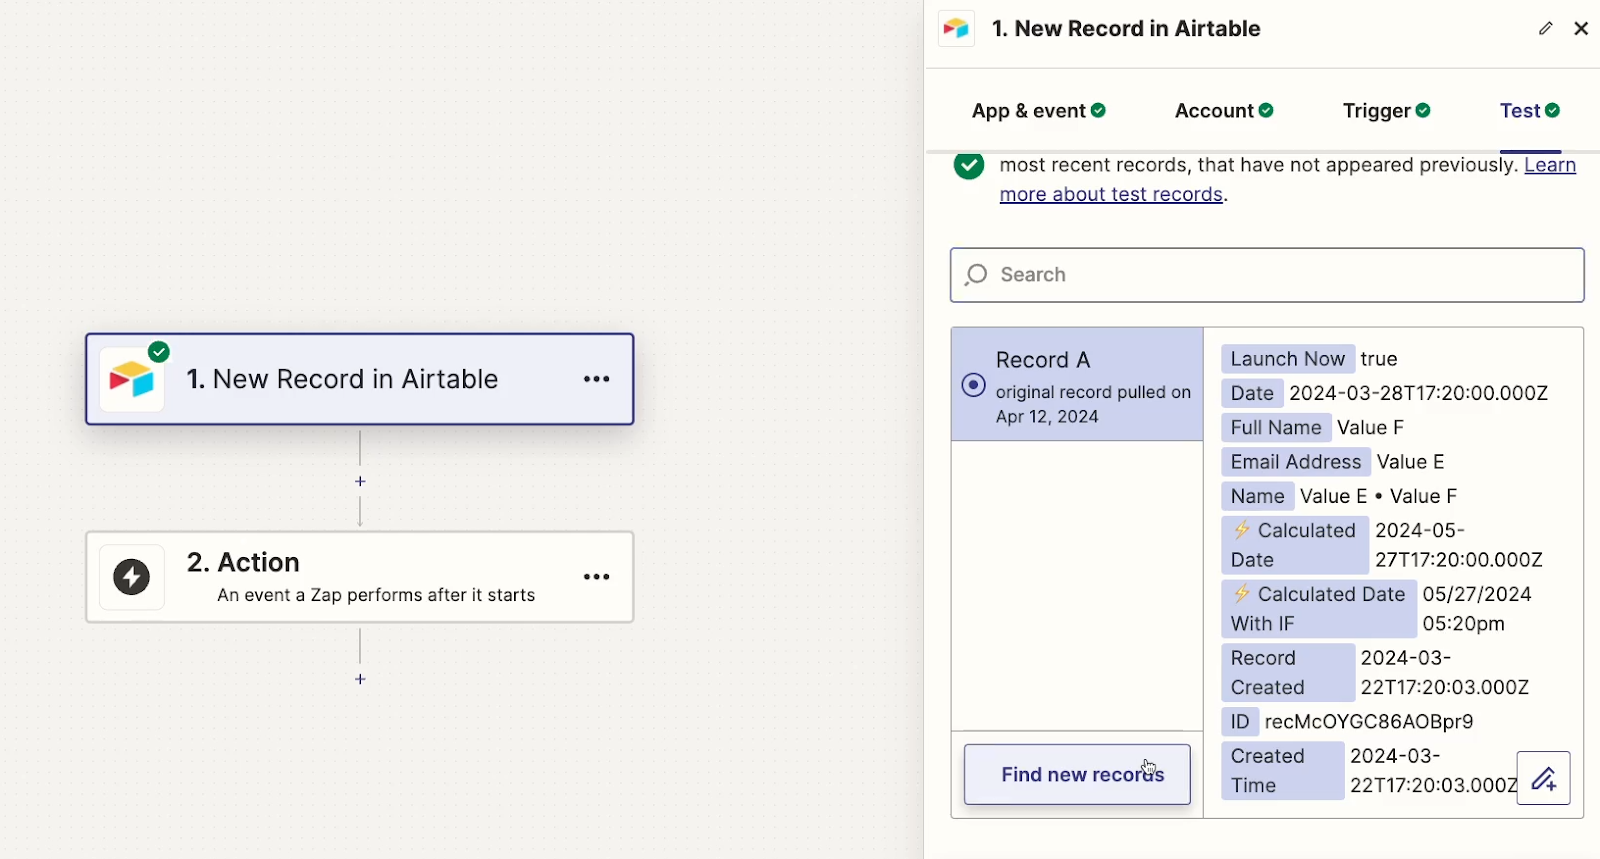
The test pulls in both records: the record you just checked off, and the record you submitted with a form.
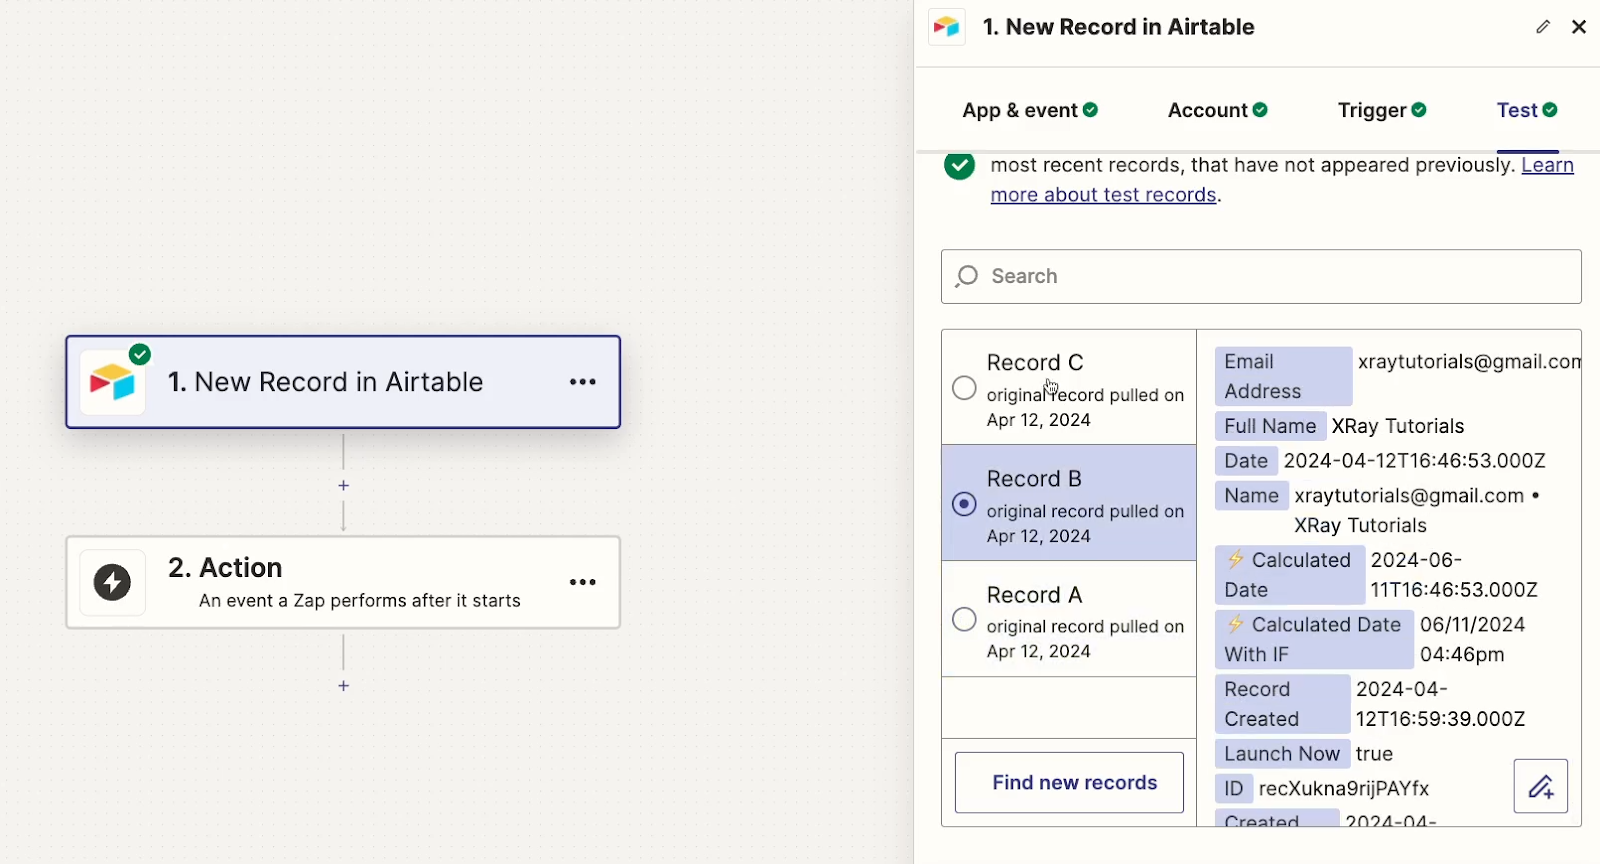
Now, you can finish this Zap by adding any additional actions that you want the automation to perform after the delay.
For our example, we just need to add a Gmail step that sends an automated message.
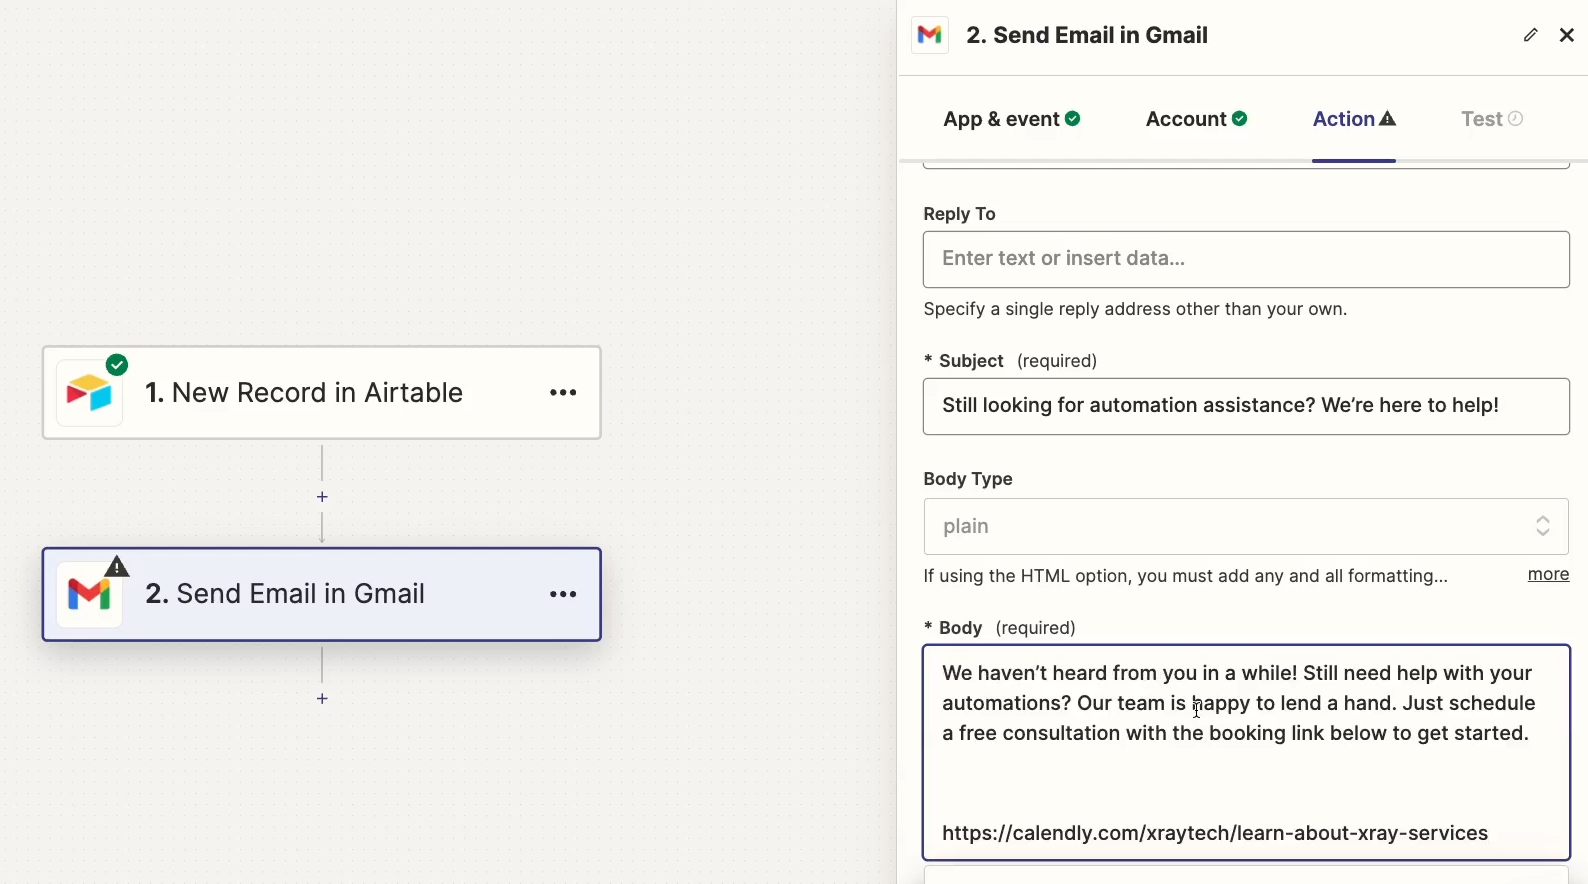
Once you’ve added and tested all the actions you want, your second Zap will be all set. Just make sure both of your Zaps are published and turned on before you start using them.

Now, your first Zap will trigger as usual, then send data to Airtable. Then, the second Zap will run after your desired delay, using the data you stored in the Airtable base.
Go beyond Zapier’s limitations with Airtable
Like any platform, Zapier has its share of technical limitations. But with a simple database in Airtable, you can easily get around their 30-day limit in the delay step, and pause your automated workflows for as long as you want.
If you’d like to learn more about building automated workflows in Zapier in Airtable, be sure to check out our blog or our YouTube channel. You can also follow XRay on Twitter, Facebook, or LinkedIn.
Softr is a great platform for turning your Airtable data into a publicly accessible web app.
With one of their latest additions, Softr has opened the doors to a whole new level of automation functionality.
Thanks to the new Call API button in Softr, you can send webhooks with the click of a button, instantly launching automations in Zapier, Make, or even Airtable itself.
In this post, we’re going to show you how it all works. We’ll start by demonstrating how to add a button to your Softr app that sends a webhook with custom parameters whenever it’s clicked.
We’ll also show you how to create webhook triggers in Zapier, Make, and Airtable, and give you an example of an automation you could build with a webhook trigger.
What Softr’s “Call API” button does
The new Call API button in Softr allows you to send data to a specified webhook URL with the click of a button.

The button is currently available in a few select block types, like kanban, tables, and lists like the gallery pictured below.

When you click a Call API button, a webhook is immediately sent to your specified URL, such as a webhook trigger in Zapier, Make or Airtable.
How to add a Call API button to your Softr app
To add a Call API button to your Softr app, you’ll first need an element that supports a Call API button.
Softr is currently working to add support to more block types, but at time of publishing, you can add a Call API button to tables, kanbans, calendars, item details, and lists.
Once you’ve added your block, select it, and choose “Actions”.
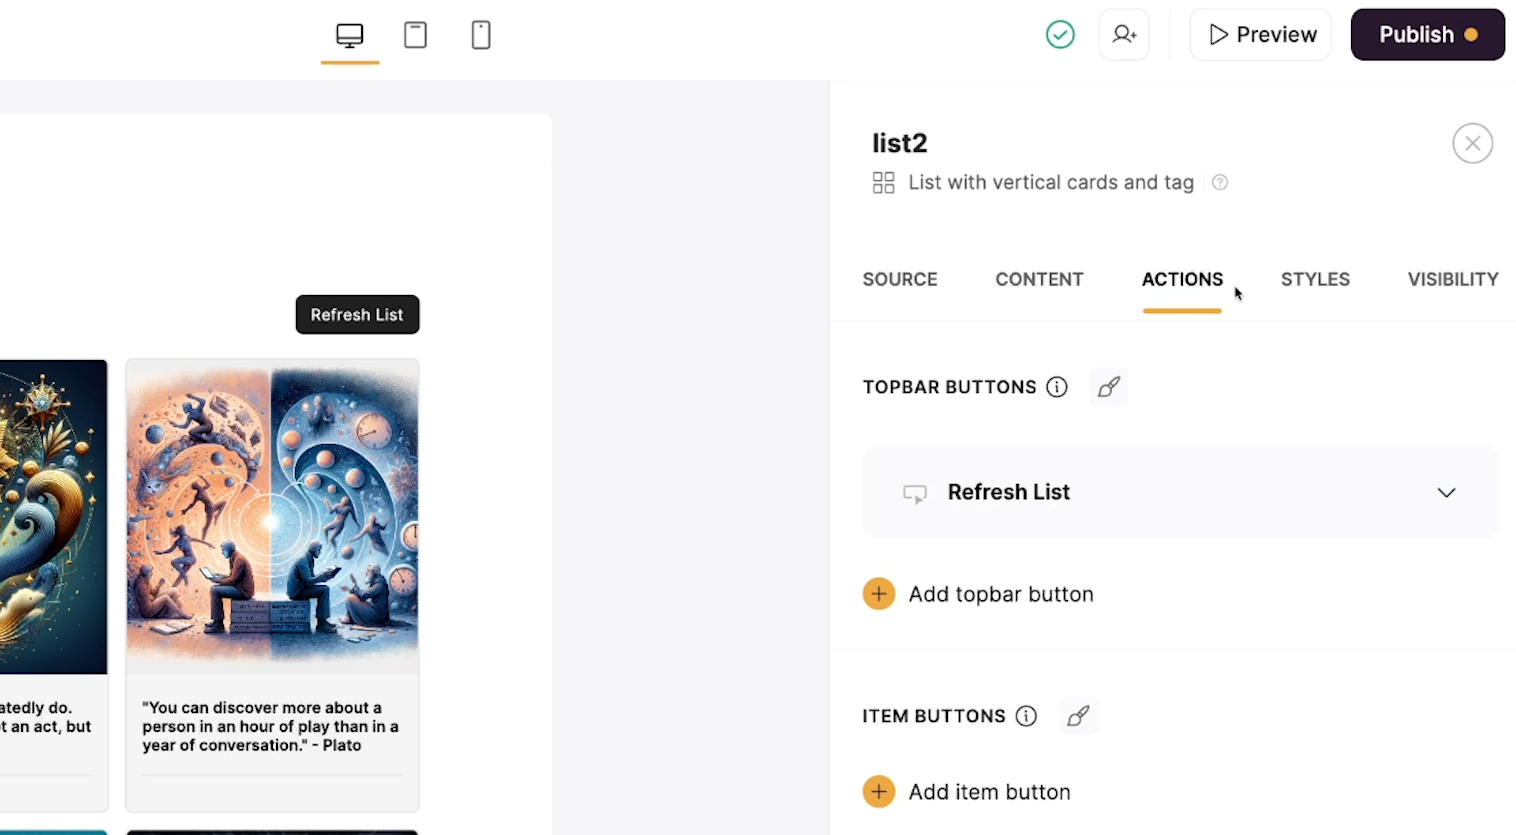
Add an item button to your block, and select “Call API” as the type.

There will be a few key settings to configure once you’ve added your Call API button.
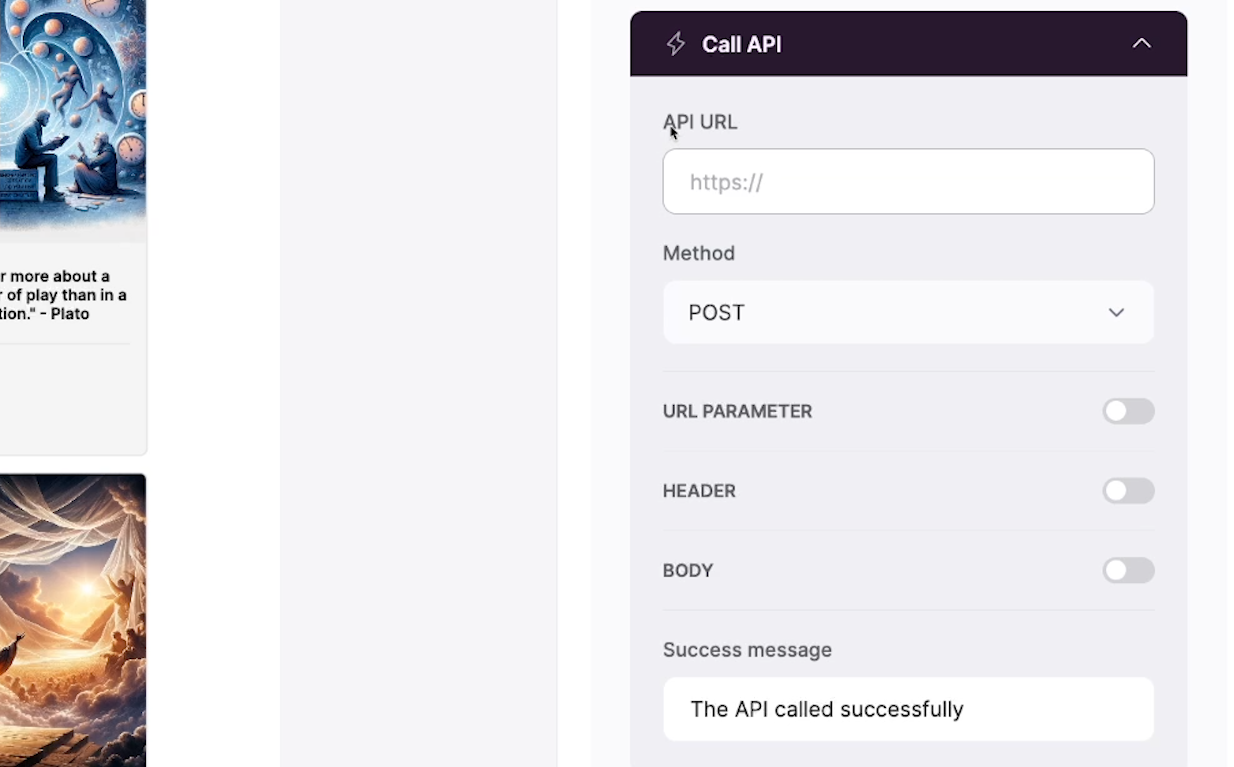
API URL
The API URL is where your API call will be sent to. Most popular web apps have public APIs that you can send requests to, including automation providers like Zapier and Make.
The API URL is required.
Method
The Method is the type of API call your button will perform.
• POST will create data, or activate a webhook trigger
• PUT and PATCH are used to update existing data
• DELETE will delete existing data
If you want to launch an automation with your Softr call API button, then you should use POST as the method.
Header
A header is typically used for information like authentication data. If you’re not sure whether or not you need a header, check your app’s API docs for more info.
The header is optional.
URL Parameters and Body
Both of these fields allow you to append data to your API Call as key-value pairs. In a key-value pair, the “key” is the label for the data (e.g., “Name”) while the “value” is the data itself (e.g., “John Smith”).
These are optional fields, but you’ll need to include at least one of them if you want to send data along with your API call.
Once your call API button is fully configured, be sure to publish your Softr app to commit your changes.
Getting a Webhook URL from Zapier
To get a webhook URL from Zapier that will run a Zap when activated, start by creating a new automation.
Choose “Webhooks by Zapier” as the app.
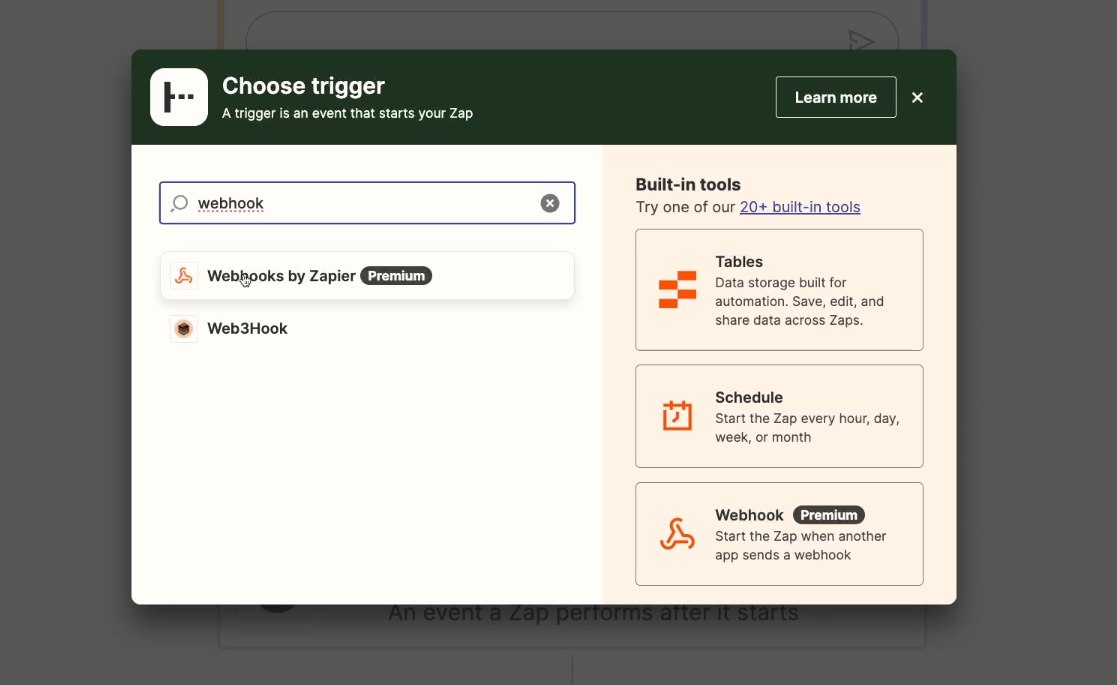
Note that Webhooks are a premium app in Zapier, and will require a paid plan to access.
Then, choose “Catch hook” as the event.

You can leave the “Pick off a child key” field blank, and proceed to the “Test” section.
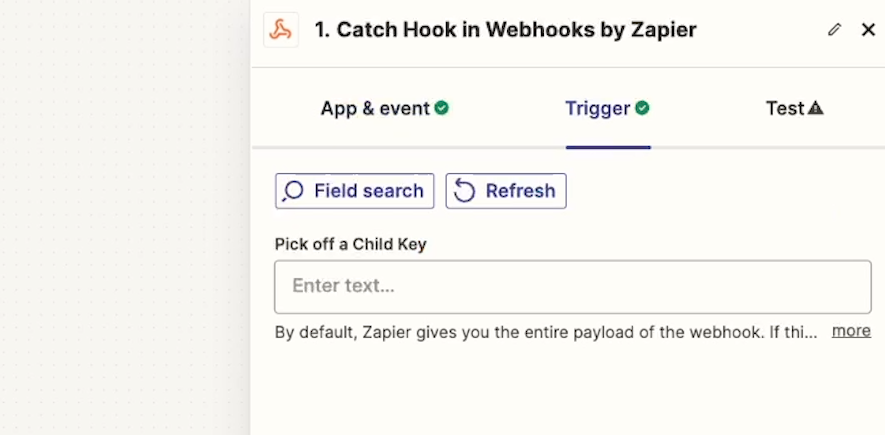
Instantly, Zapier will generate a URL that you can copy to your clipboard and paste into your call API button.

Getting a Webhook URL from Make (Integromat)
To create a webhook trigger in Make, start by creating a new scenario. Choose Webhooks as the app for your trigger.
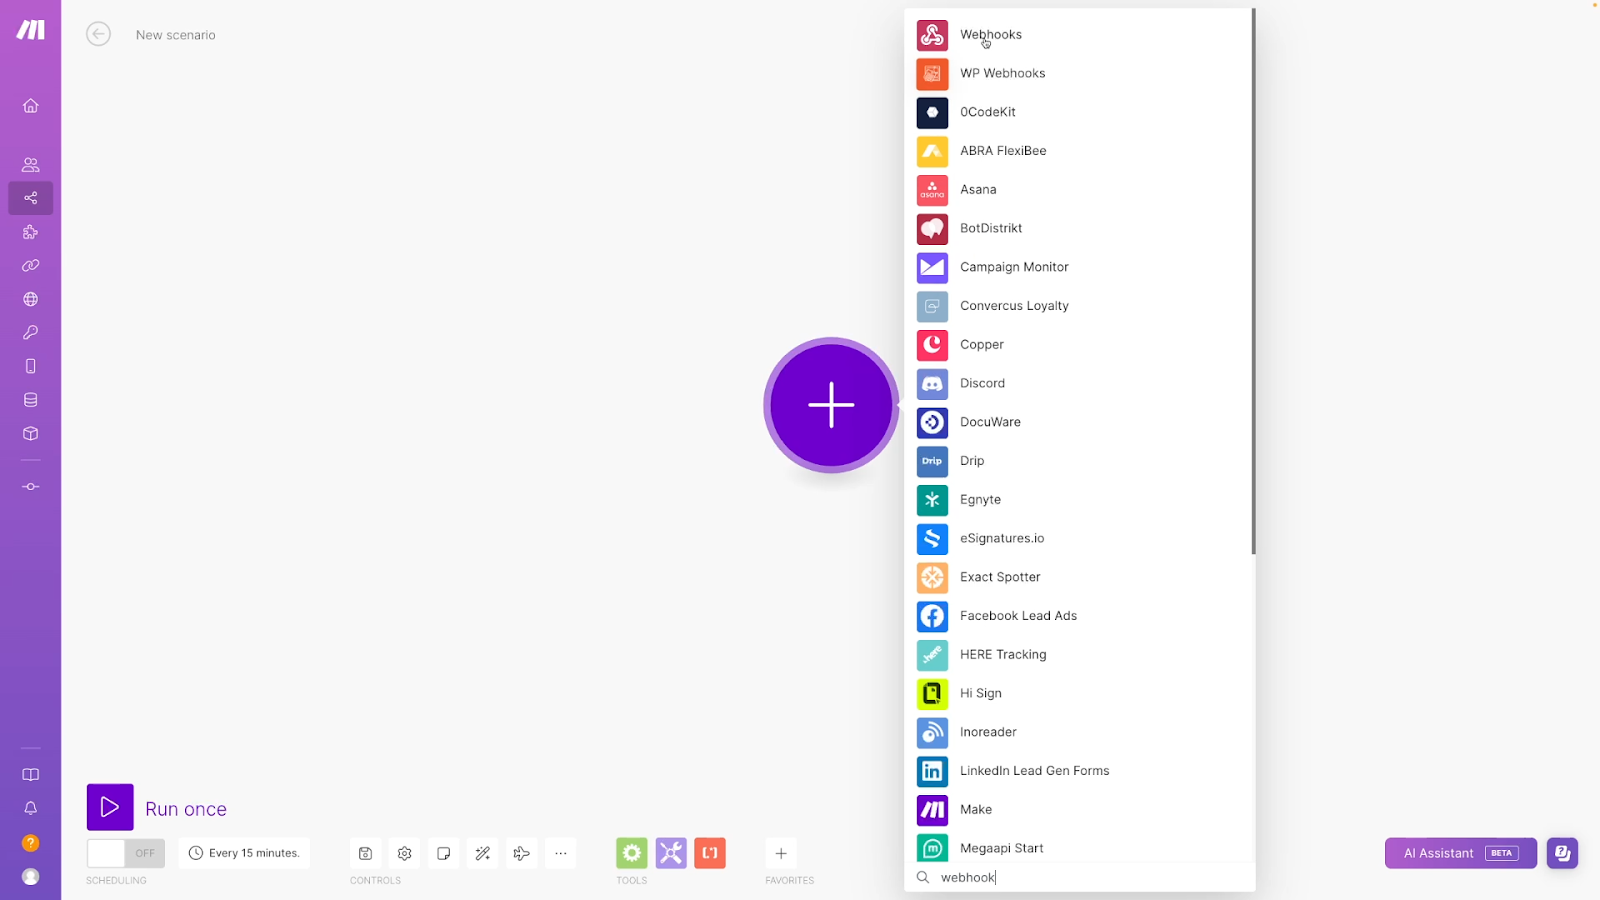
Then, select “Custom webhook”.
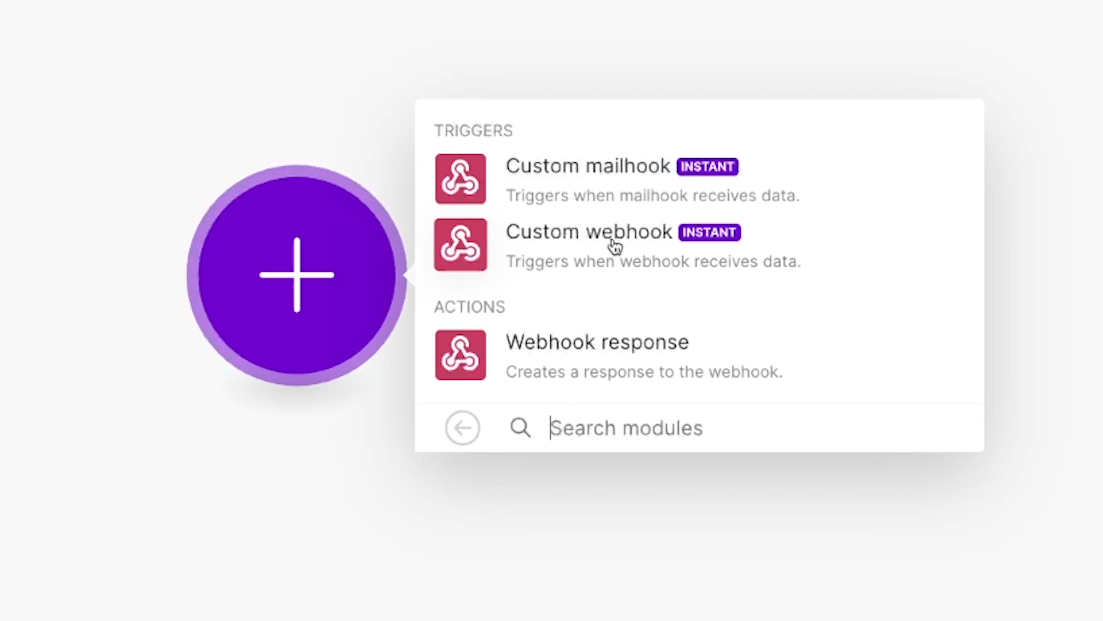
Add a new webhook.
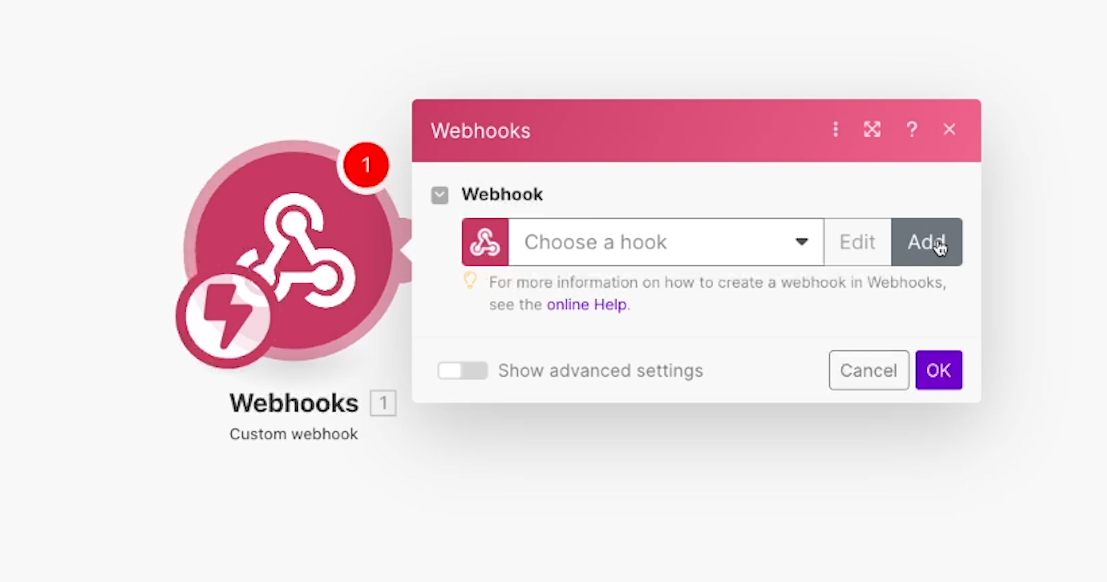
Give your new webhook a name, then click save.
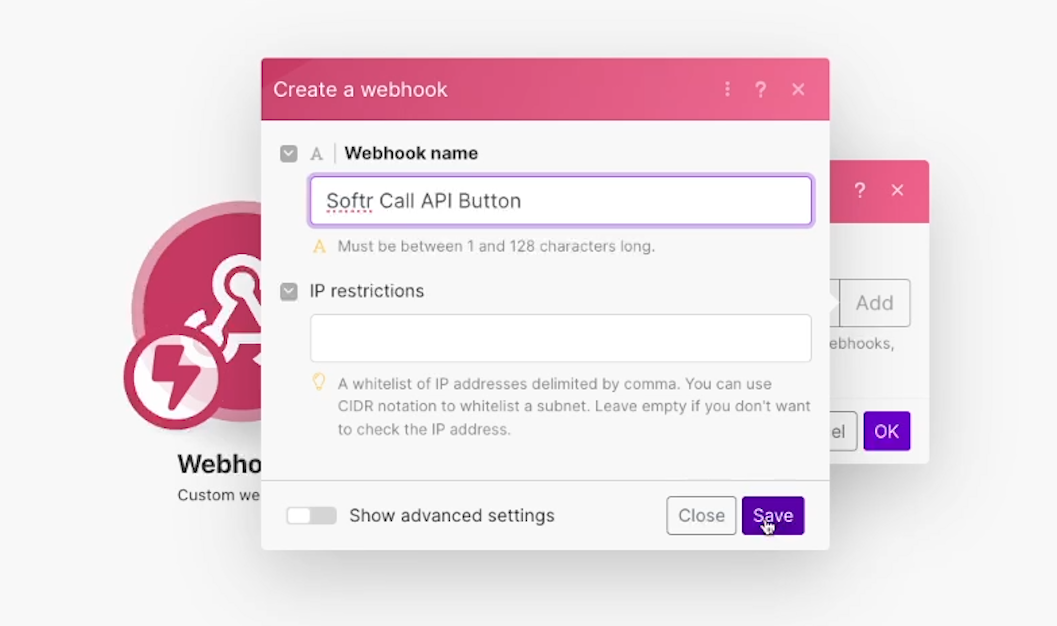
Copy your webhook’s URL to your clipboard, so you can paste it into your Softr call API button.

Getting a Webhook URL from Airtable
To create a webhook-triggered automation in Airtable, start by selecting the “Automation” tab and creating a new automation.
For the trigger, choose “When webhook received”.
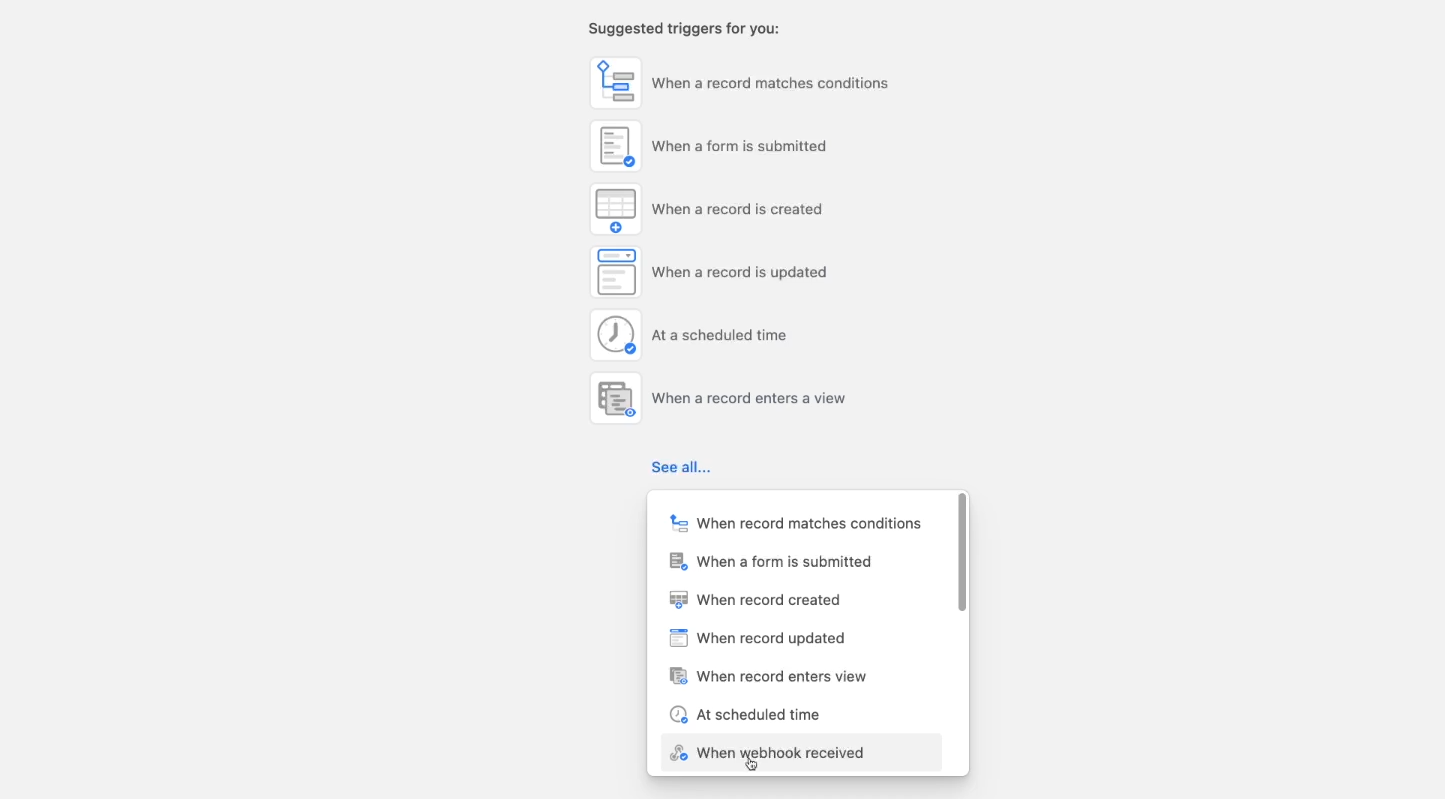
Airtable will immediately generate a URL for your webhooks. Copy it and paste it into your Softr call API button.

Example: Launching an automation with the Call API button
Passing data in an API call can be a great way to launch an automation. For example, we’ve built an automation that refreshes our gallery with a new AI image whenever we click the button.
You can check out this blog’s associated YouTube video for a full demonstration of the gallery and its related automation.
Our list block pictured below contains a gallery of philosophy quotes paired with AI-generated images.
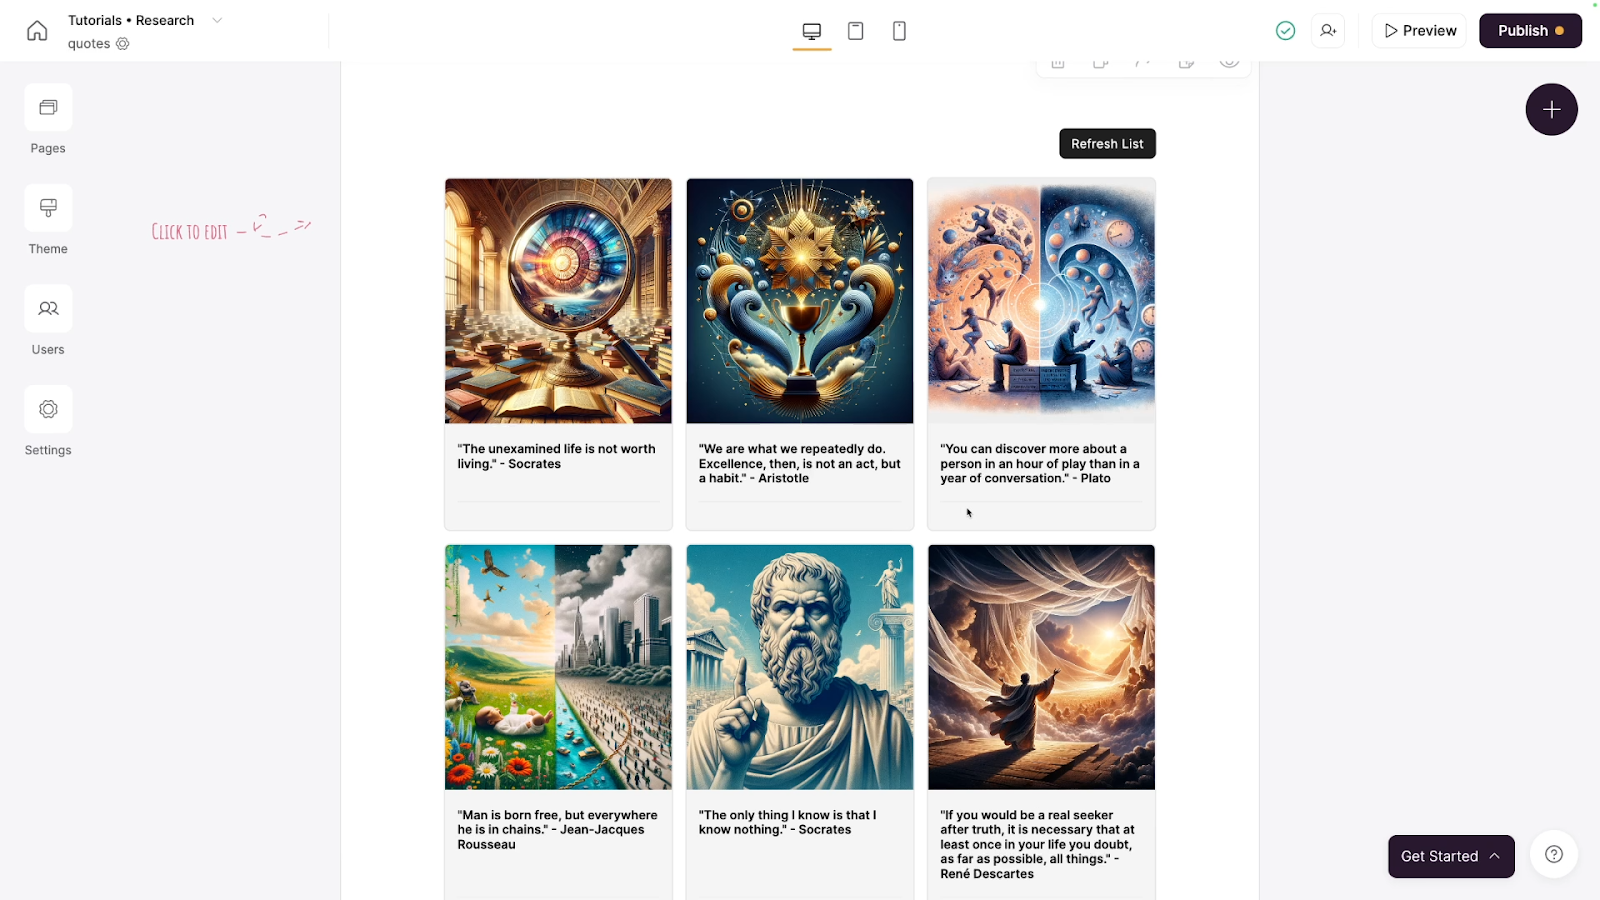
All of this data comes from an Airtable base.
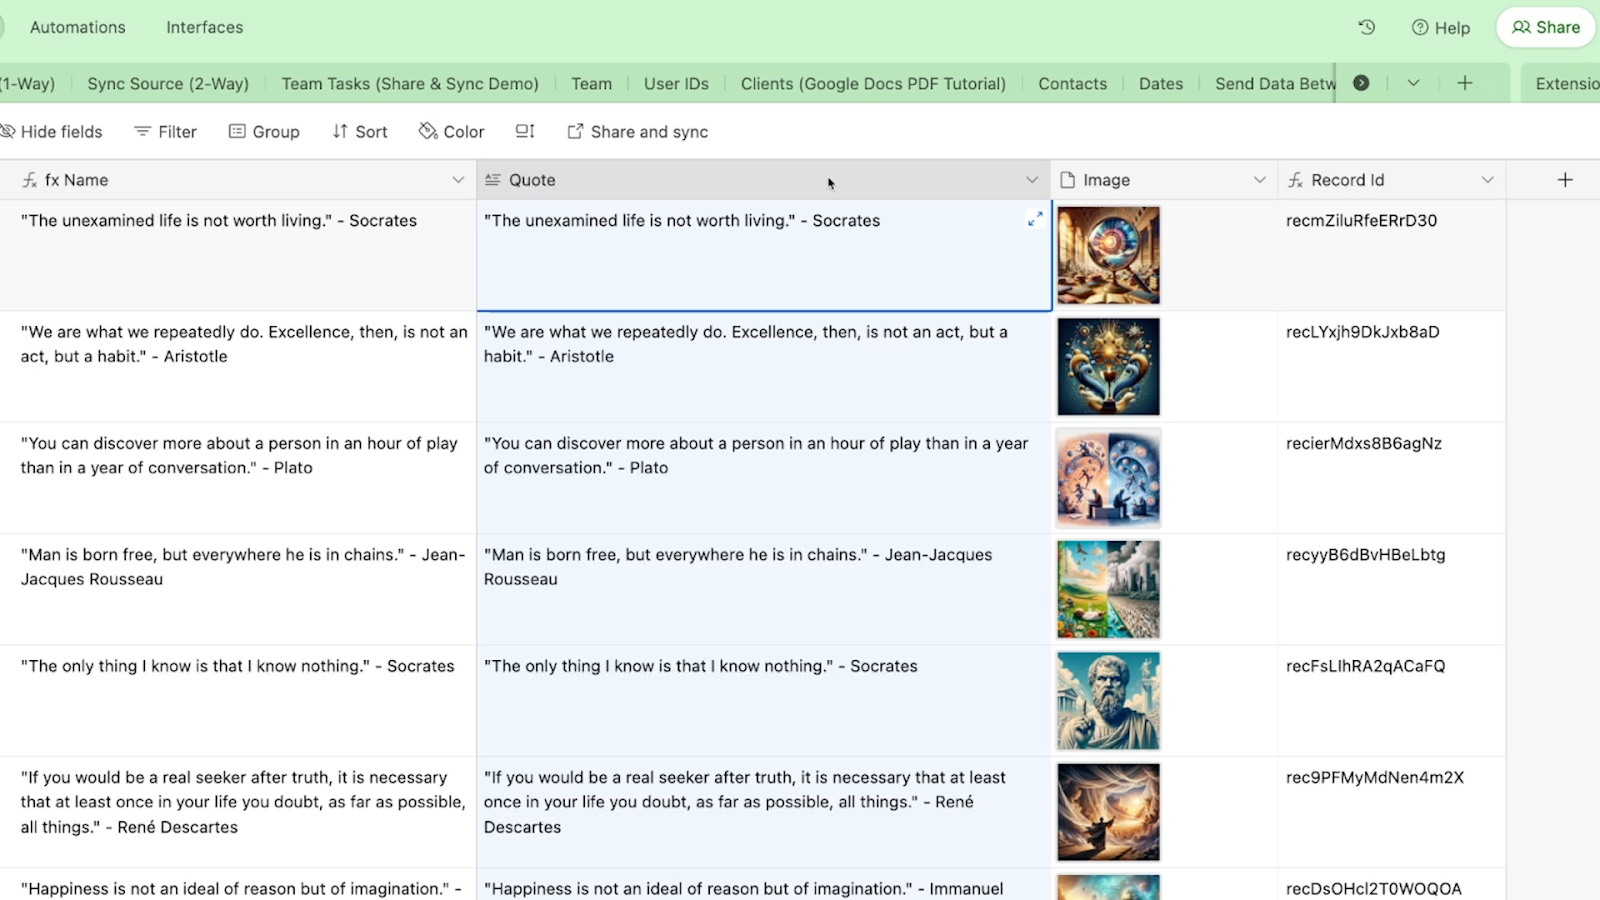
We’ll add a “Call API” button that triggers a Zapier automation and passes an Airtable Record ID.

That Zap will search in the Airtable base for the matching record, and send a prompt to DALL-E 3 to generate a new image for the quote.
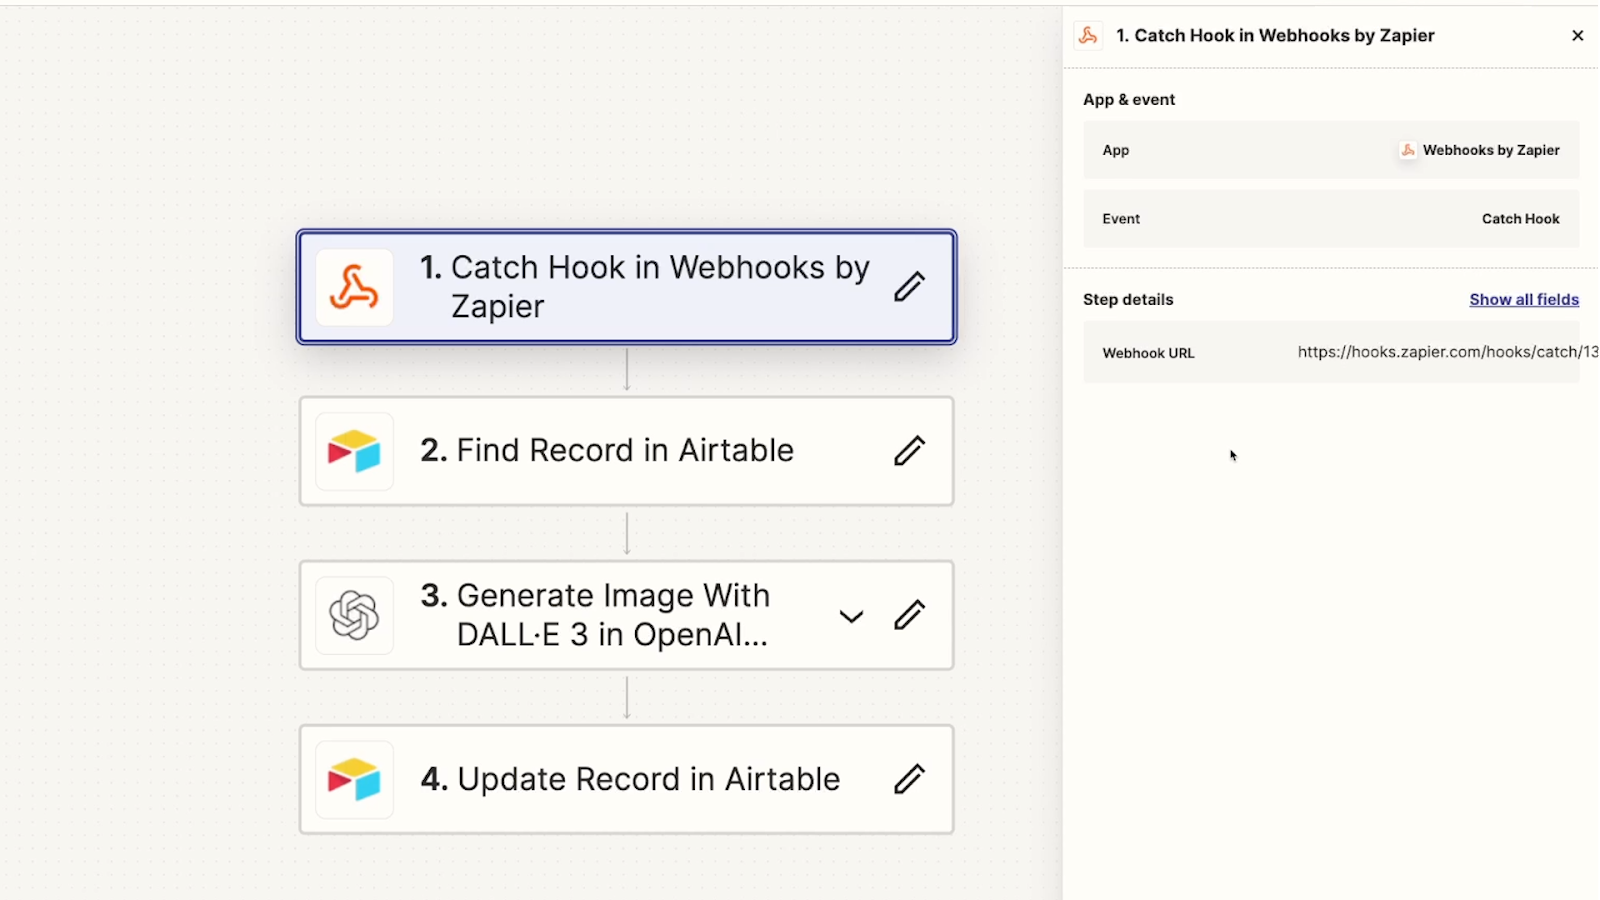
Finally, it will update the record with the latest image.
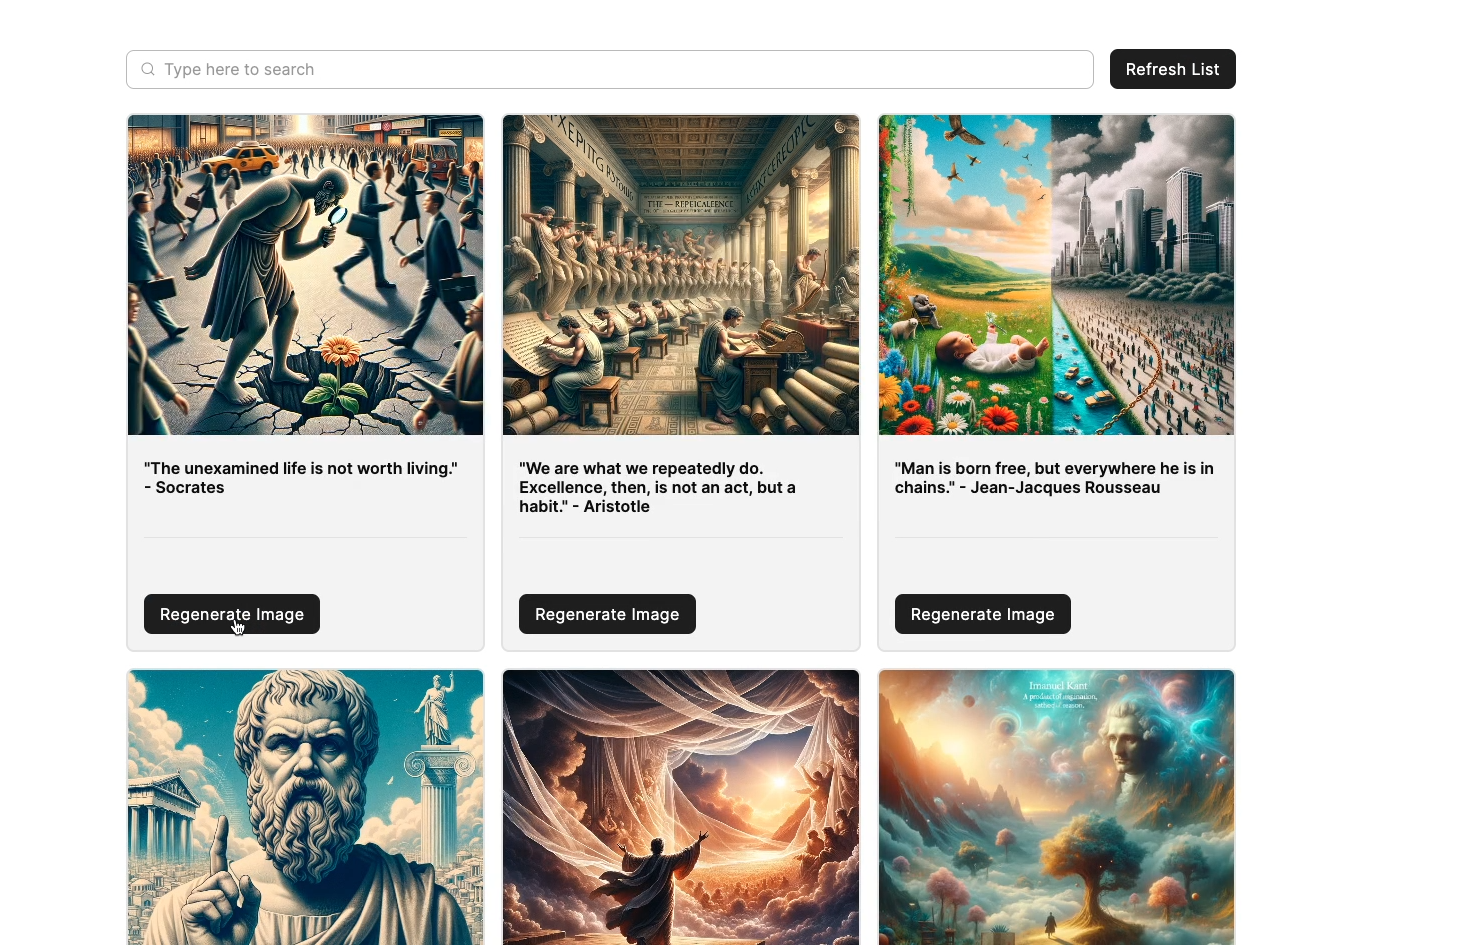
Configuring the Call API button to launch an automation and send data
Here’s how we configured the Call API button for our gallery.
The method is set to POST since we want to trigger a webhook, and we’ve pasted in a URL we got from Zapier.
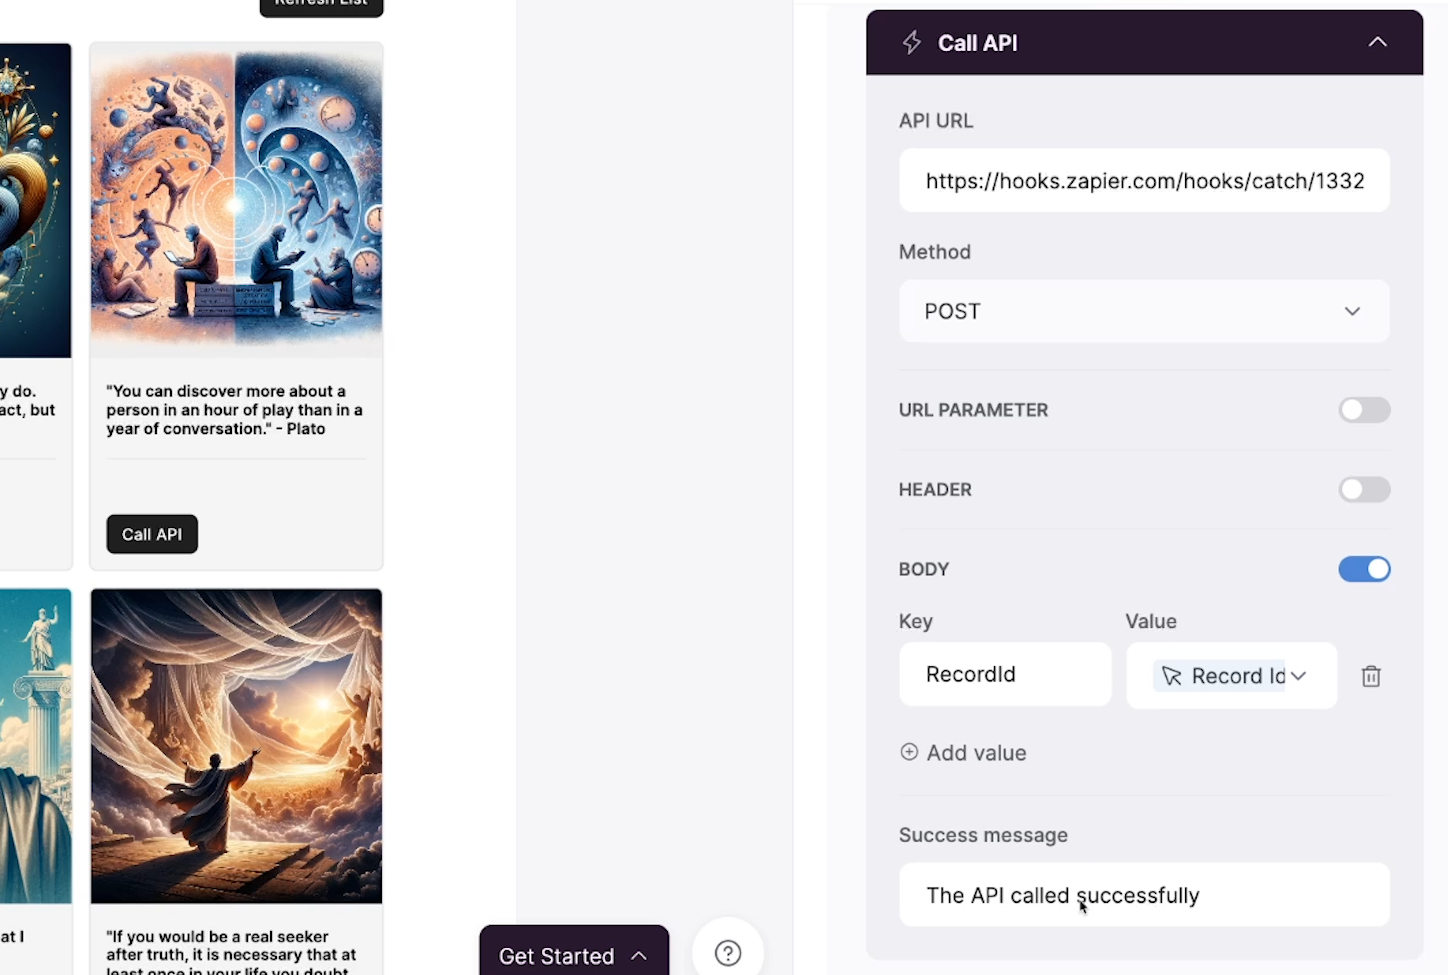
Both the header and URL parameters are disabled.
The body is enabled, and we’ve added a single key-value pair to pass each list item’s Record ID to Zapier whenever we click on its button.
Our Zap will use the Record ID to look up the matching record in Airtable and retrieve the rest of the information it needs.
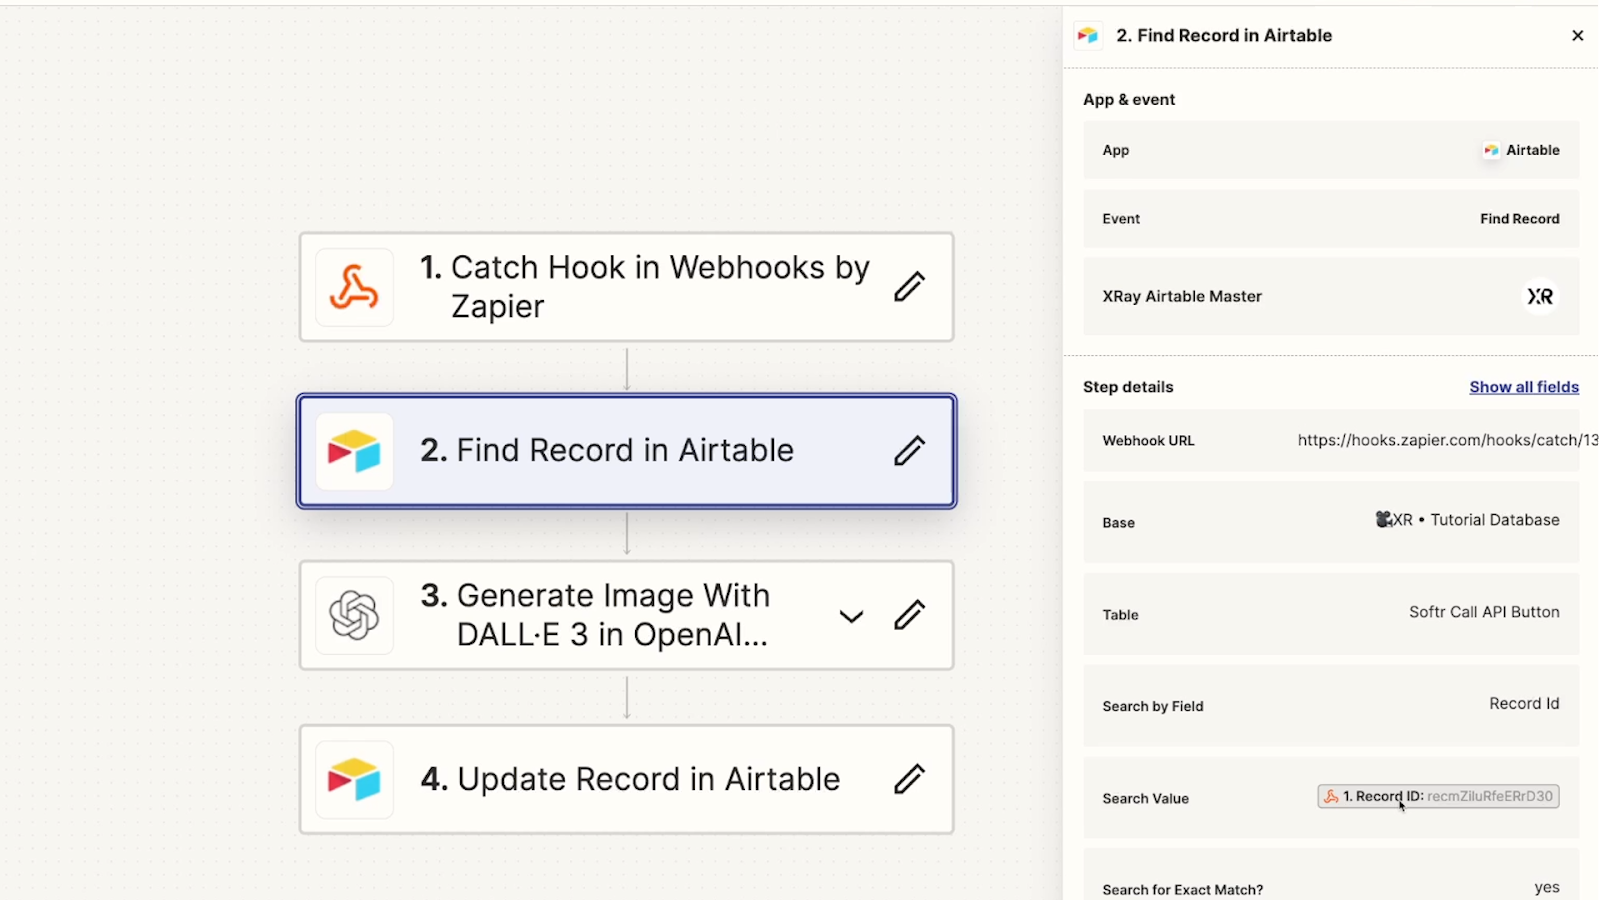
We’ve also customized the success message, telling users to refresh the page after about 30 seconds to see the new image. The page won’t automatically load in the new image, so this refresh will be required to see it.

We’ve updated the button label to say “Regenerate Image”.

Additionally, we included a “refresh page” topbar button that just opens up this same “Quotes” page again in the same tab - effectively refreshing the page.

The Call API button in action
With our button and automation configured, we can test out the entire process. In the screenshot below, we’ll click on “Regenerate Image” under an Aristotle quote.
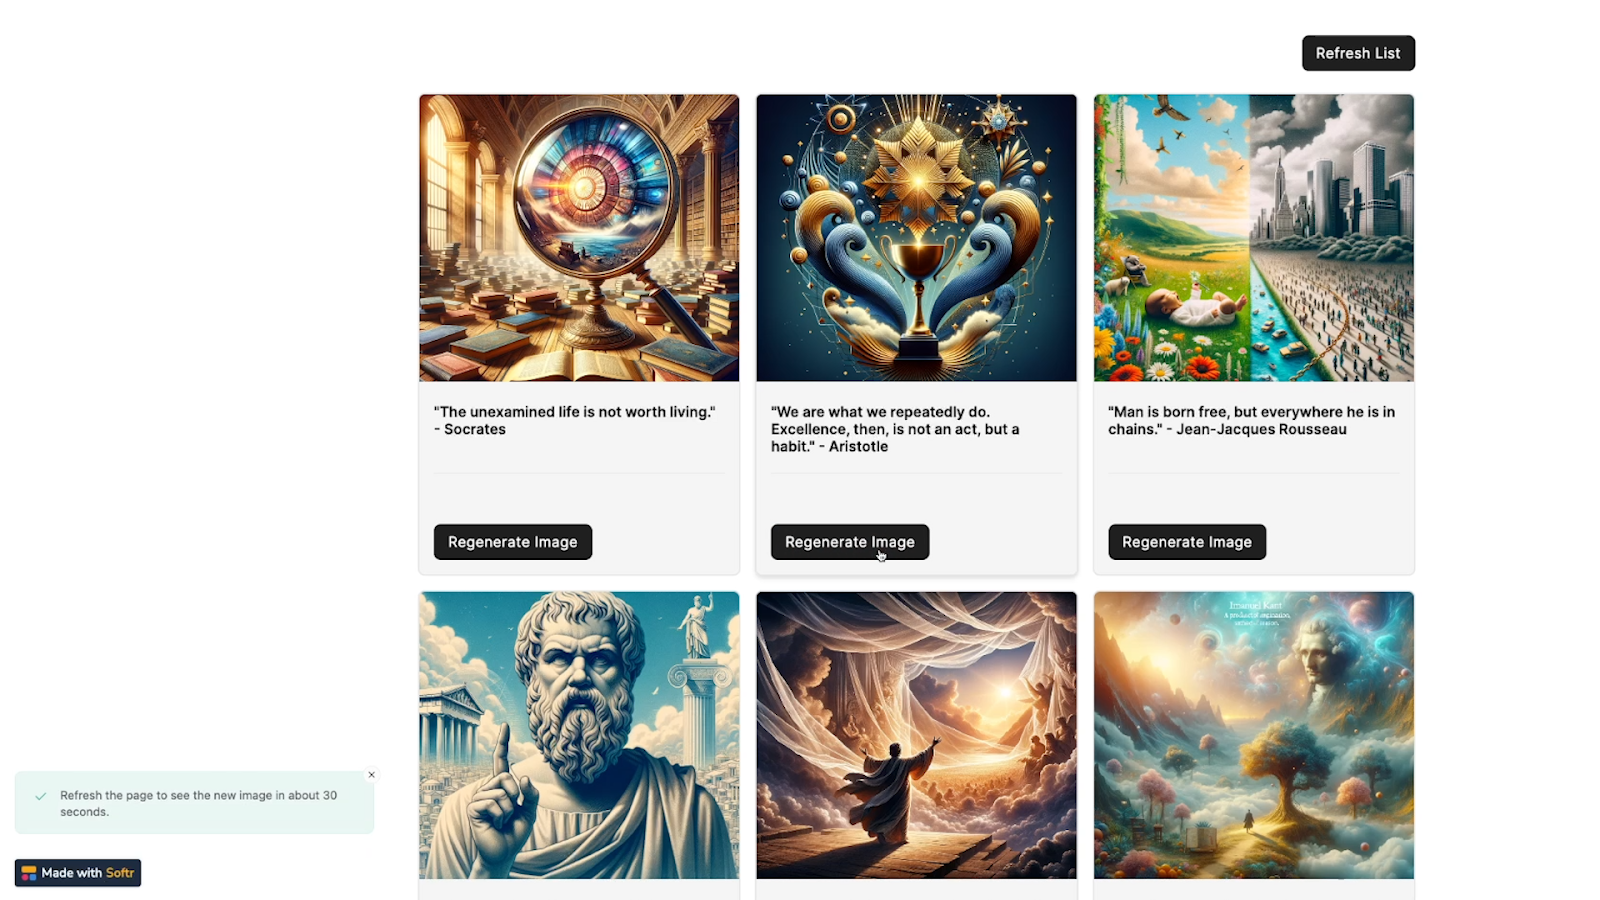
Then, after refreshing the page, we can see the new AI-generated image for this quote.

We successfully used the button to trigger a Zapier automation and pass some data to it.
Launch low-code automations from Softr
With buttons that can call an API in Softr, you can easily launch low-code automations from your Softr web apps with a single click.
Just create a webhook trigger in the app of your choice, configure your button in Softr, and set up any automation you want in Zapier, Make, or Airtable.
To learn more about automating your work and building low-code systems with apps like Softr and Airtable, be sure to check out our blog or our YouTube channel. You can also follow XRay on Twitter, Facebook, or LinkedIn.

Adding human oversight to your Zaps ensures that your automated workflows run with fewer errors.
Now, with the ‘Continue Zap’ button in Zapier tables, you can add a crucial oversight to any Zap with a simple manual approval step.
In this post, we’re going to show you how it works step by step.
We’ll begin by adding a “Continue Zap” button to a Zapier Table. Then, we’ll demonstrate how you can build an automation that will pause itself until you approve it with the click of a button.
What you’ll need before you create a “Continue Zap” button
Before you can create a “Continue Zap” button and automation, you’re going to need to prepare a couple of items in Zapier.
A Zapier table for your button
First, you’ll need a Zapier table. This table is where you’ll add, configure, and use the “Continue Zap” button. Naturally, it’s best if this table also includes the data that you want to automate.
In this tutorial and demonstration, we’ll be using the “Team Directory” table pictured below.

A form to easily add records to the table
You’ll also probably want to set up a Zapier interface with a form that connects to that table.
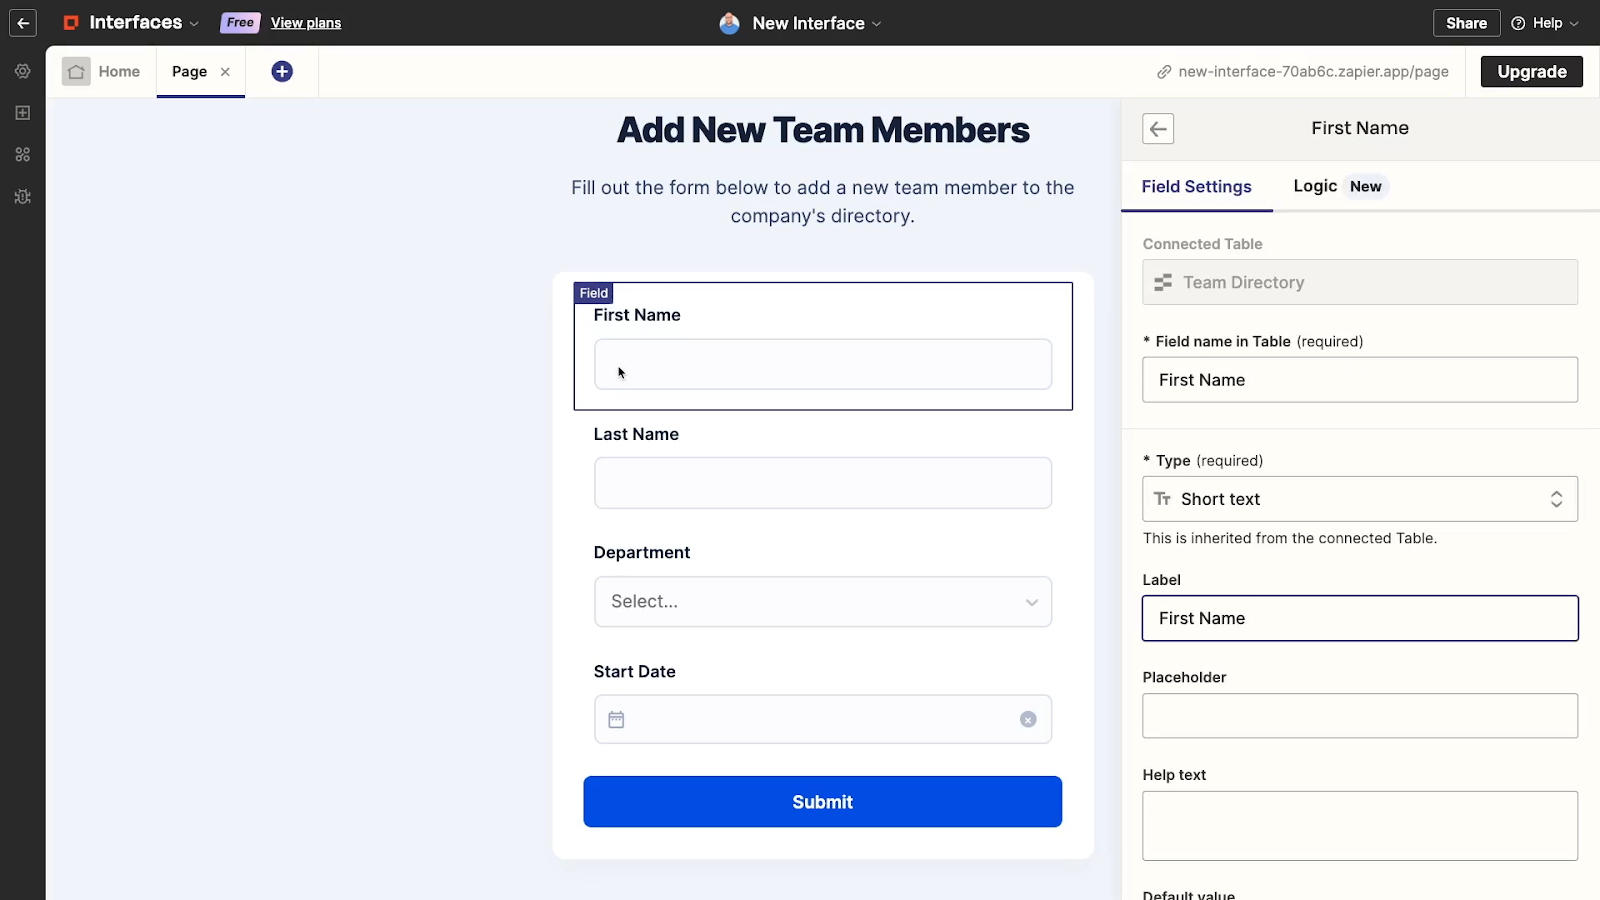
This isn’t strictly necessary, but it’s the easiest way to add a complete record to a Zapier table and will make testing the automation much more convenient.
A preview of the finished automation
Below, you can see a picture of the full automation that we’re going to build.
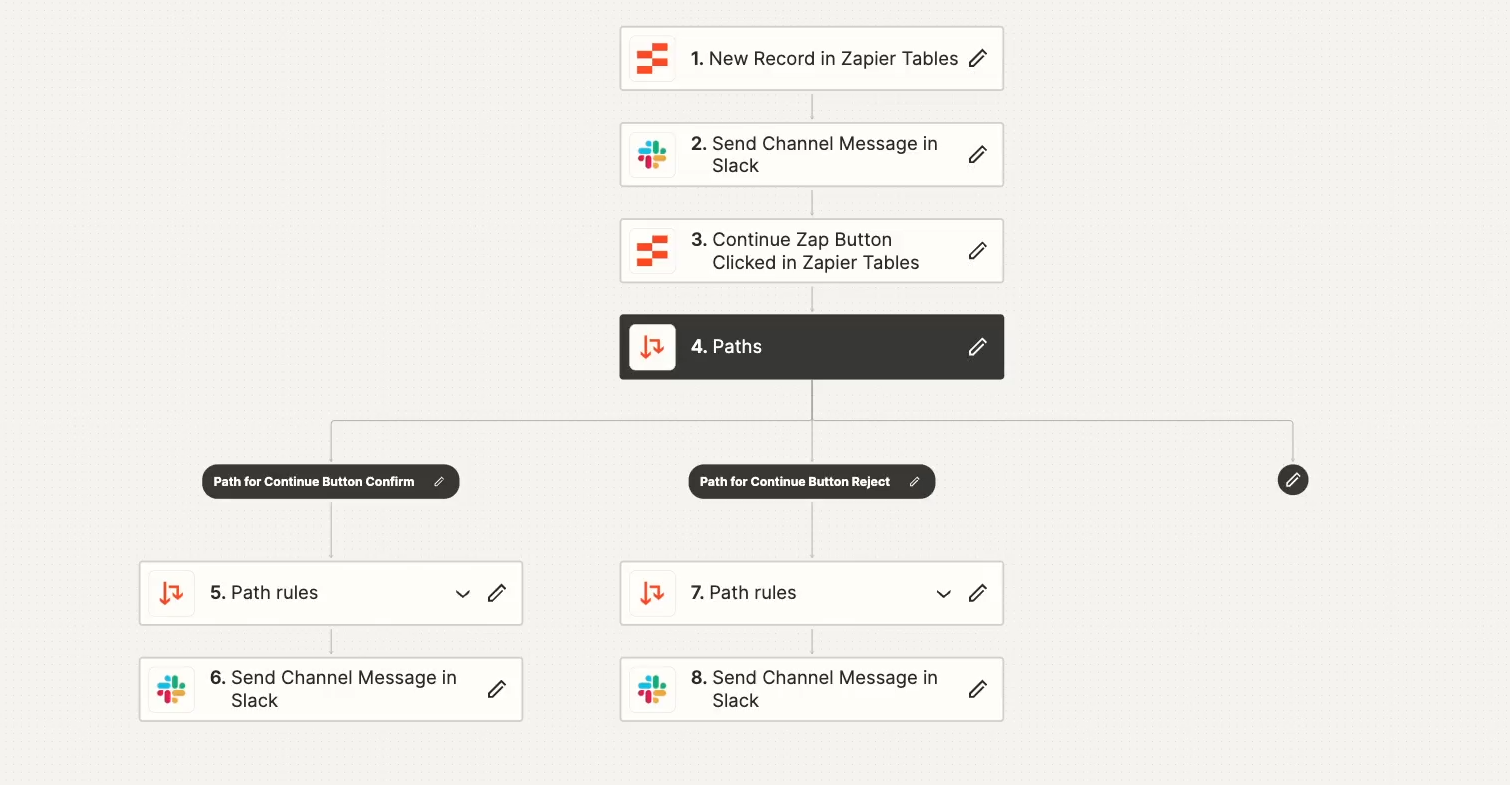
Whenever a new record is added to the table, our Zap will send an alert in Slack prompting us to confirm that the details of the new record are correct.
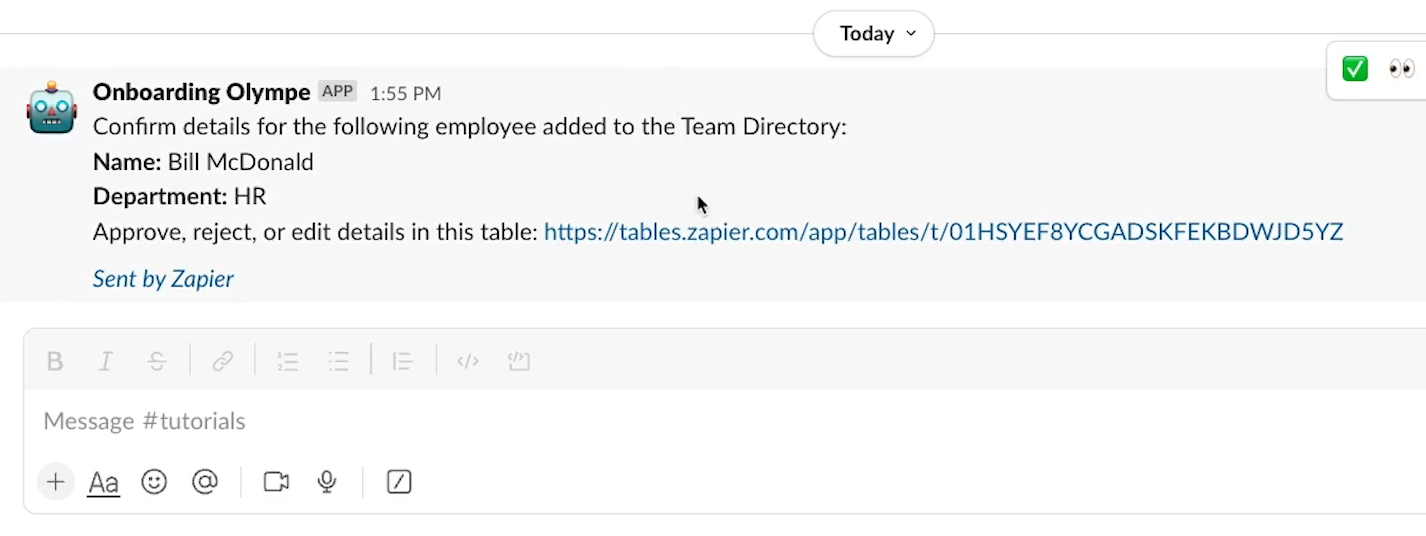
Then, it will pause itself until we click on either “Confirm” or “Reject”.

Based on our answer, the automation will go down one of two paths, and will send an appropriate message in Slack confirming our choice.
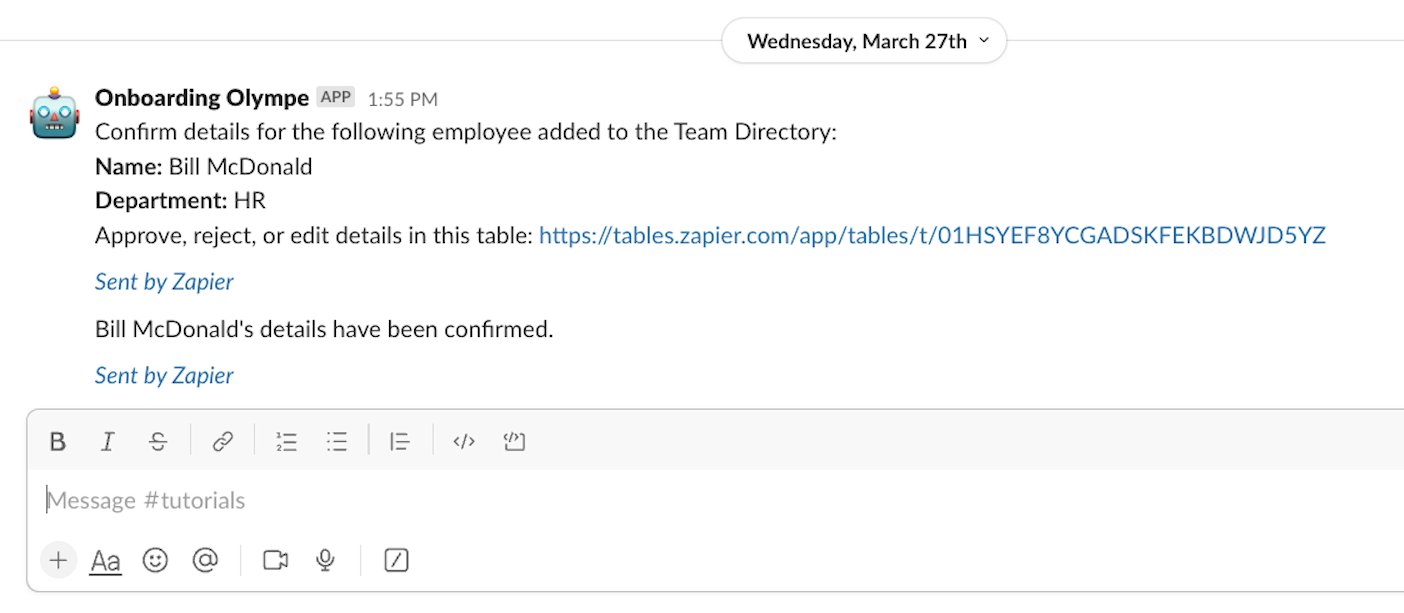
Alternative: build two Zaps instead of one
Bear in mind that you could always build a similar approval flow by just creating multiple Zaps.
The first Zap could alert you to the new record, while the second Zap would trigger once you make a selection.
However, it’s never a bad thing to have multiple options for designing and building your automations, which is why we want to show you how this new feature works.
Once your table and interface are ready to go, you can follow along with the rest of this tutorial.
Adding a “Continue Zap” button to a Zapier Table
To start, add a new field to your table. This is the field that will contain your button.
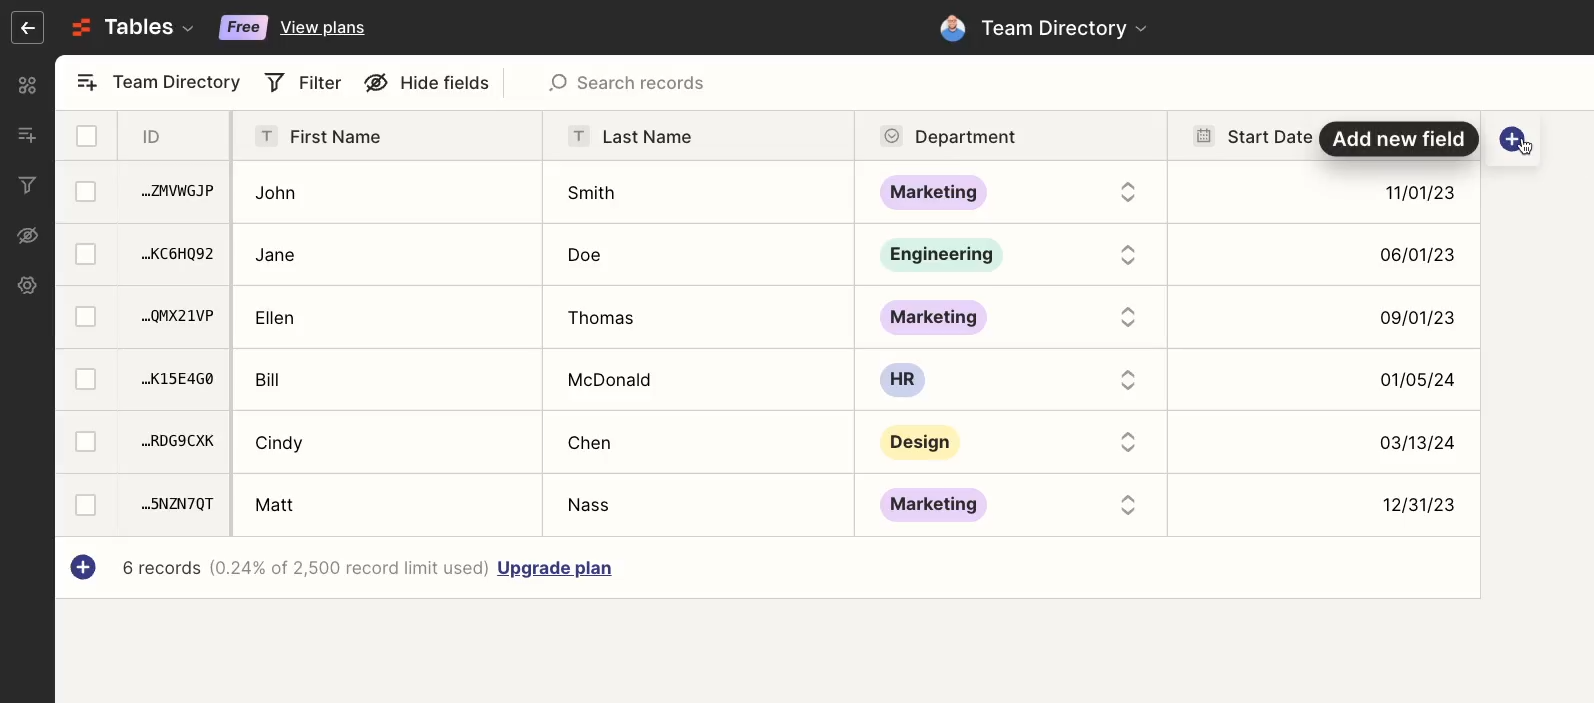
Give the field an appropriate name, like “Approve Details”. Then set the field type to “button”.
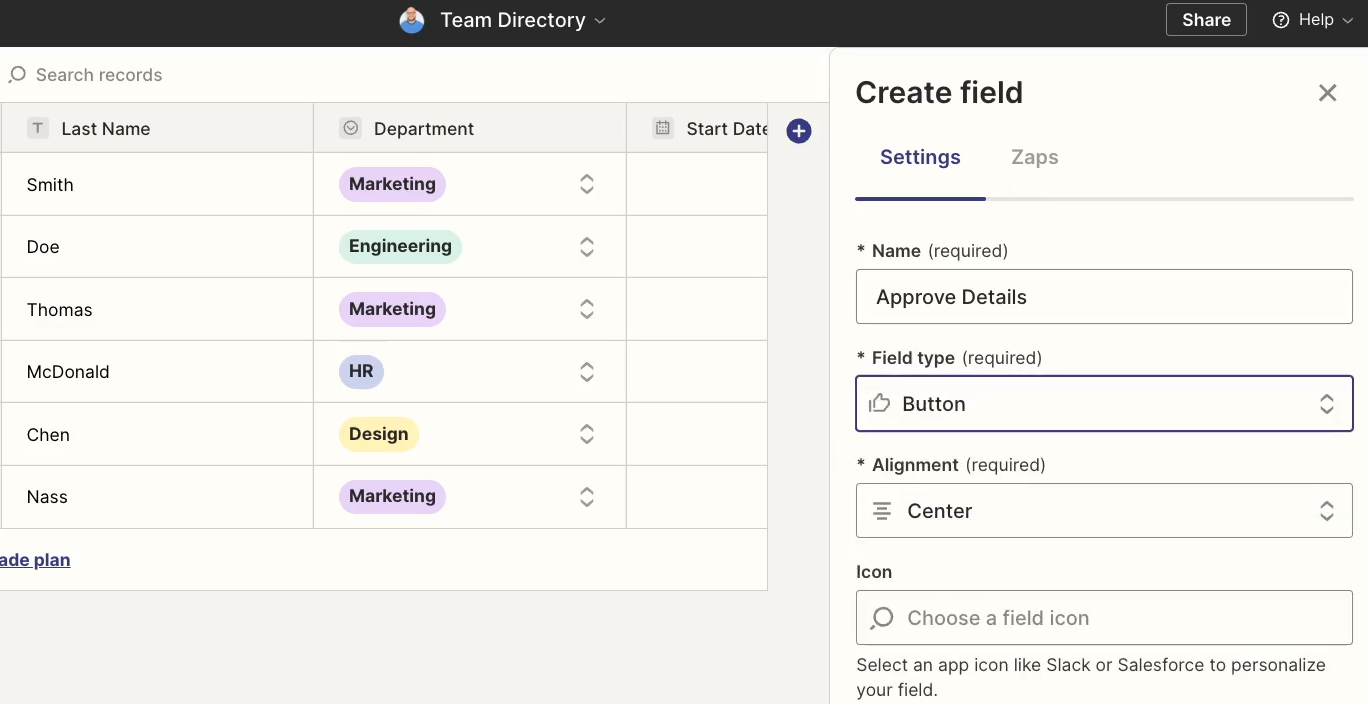
You’ll see several customization options for the field, like icon and alignment. You can set these to whatever you’d like, or leave them to their defaults.
The most important setting is “Type of Button”, which you’ll need to set as “Continue Zap”. The default choice would launch a Zap instead, which can also be useful. However, it won’t work for pausing and continuing a Zap.
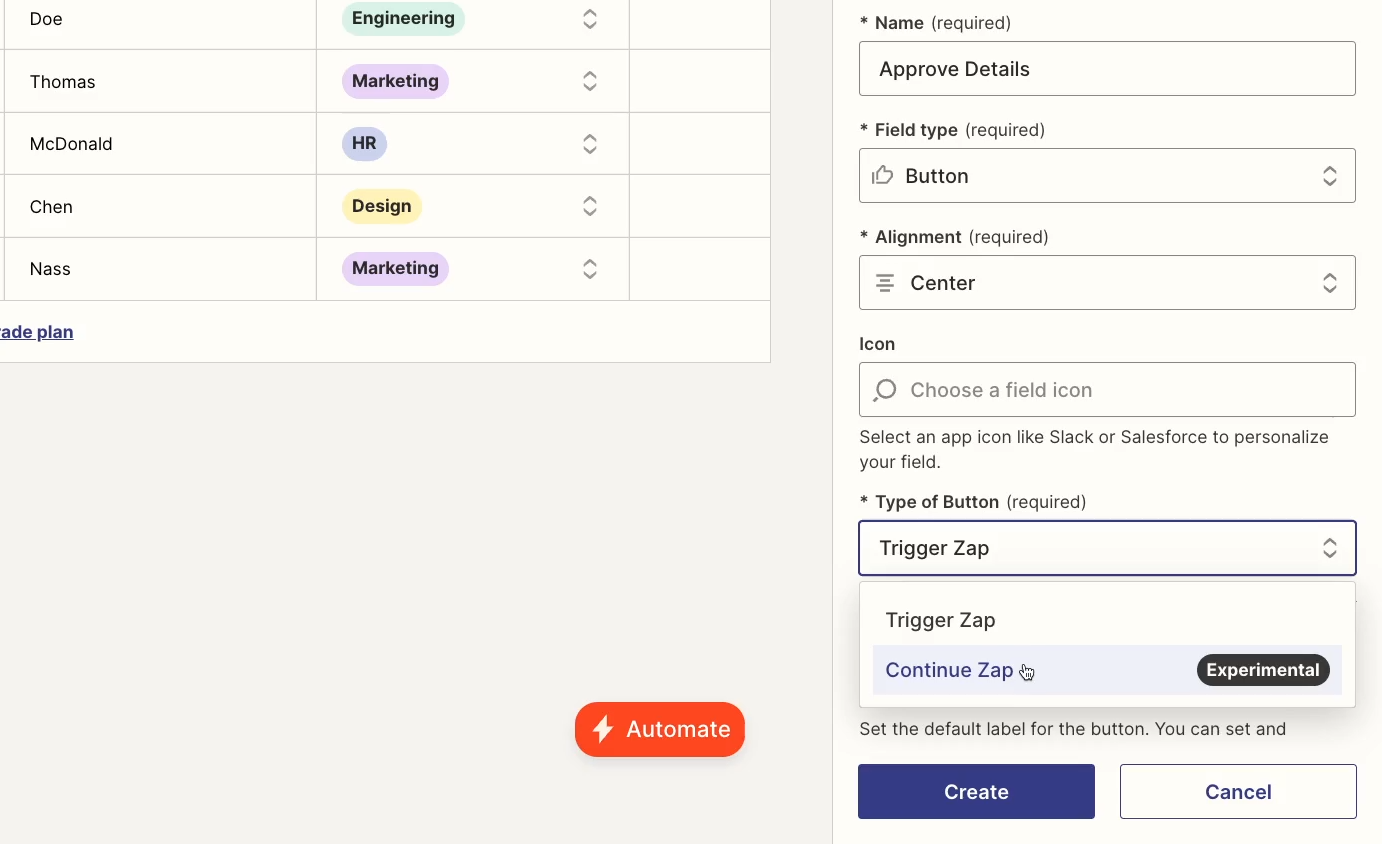
Next, you can provide labels for up to two buttons that will be included in this field. These labels should reflect the choices that you want to incorporate into the Zap, and should indicate what actions will follow after they’re clicked.

In our case, “Confirm” and “Reject” will be suitable labels.
Note that if you don’t include a secondary button label, then there won’t be a second button in the field.
However, we’d recommend including a second button. That way, you can make sure that you’ll always press one button or the other, and your automation will reach a definitive conclusion rather than pausing indefinitely.
Finally, click “Create” to add your button field to the table.
Initially, the button will just have a warning that says “Set up button”. That’s OK. Just click on the button to continue setting it up.
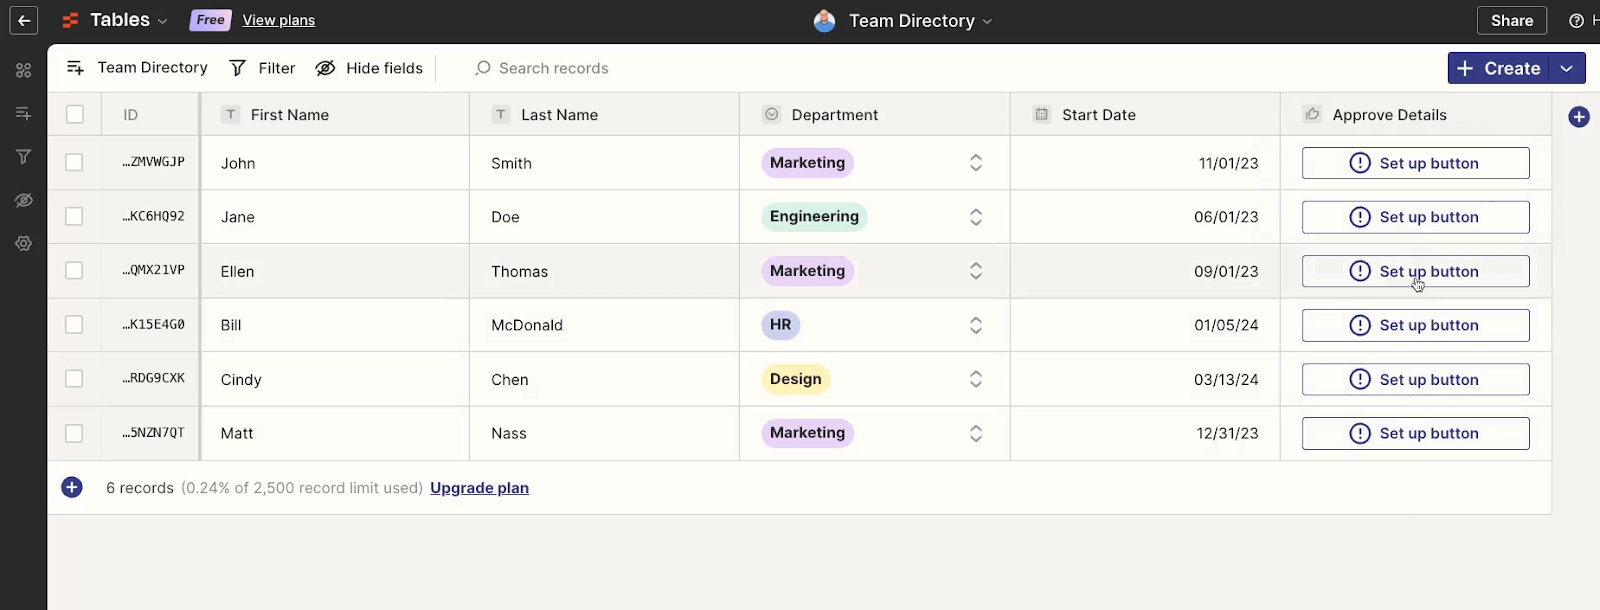
When you click on the button, it should open up to the “Zaps” tab, which prompts you to create a new Zap to associate with this button.
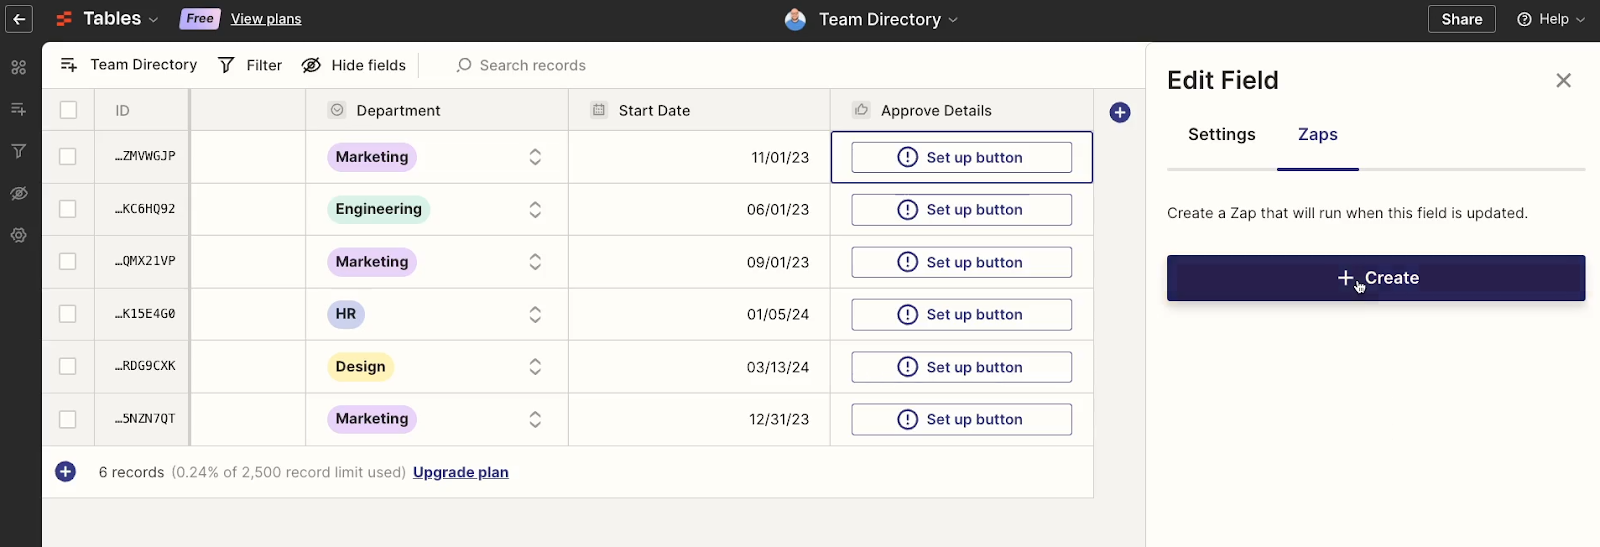
Click on “Create” to start building the automation.
Editing your automation with a “Continue Zap” step
After clicking “Create”, Zapier will create a default automation for you.
Zapier notes that the “continue Zap” button is an ‘Experimental’ feature, so the setup of this default automation may change.
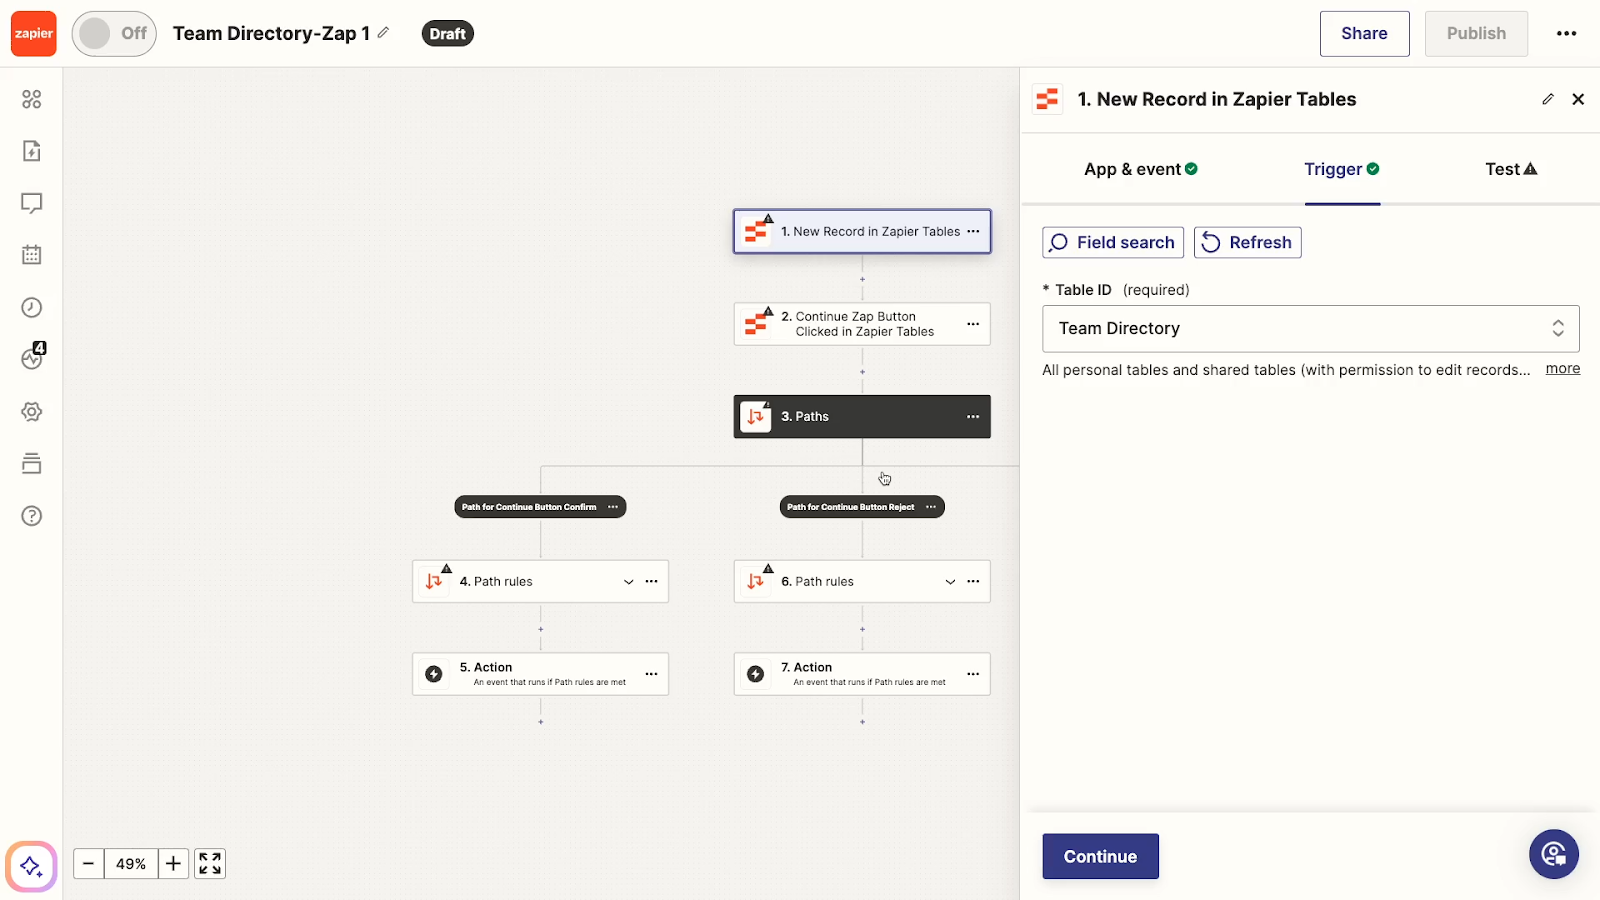
However, in our tests, the automatically created Zaps have always looked like this so far:
• The trigger is set to “New Record in Zapier Tables”.
• The first action is “Continue Zap button clicked in Zapier tables”.
• Then, two paths follow:
• One path for clicking on the primary button (“Confirm” in our example)
• One path for clicking the secondary button (“Reject”)
The rules for each path are configured, but they don’t contain any actions yet.
You can edit this default Zap to your liking, but it’s important to understand that this Zap will work a bit differently from most automations that you build.
How the “Continue Zap Button Clicked” action works
The “Continue Zap Button Clicked” action kind of works like a second trigger.
Any action you put after the real trigger will run as normal whenever you add a new record to the table, but the automation will pause itself at this “Continue Zap” step and wait for your input.
Once it receives that input, it will continue running down the appropriate path.
As such, if there are any actions you want to perform right away for every record regardless of what button is clicked, place them before the “Continue Zap” step.
Every other action can be placed into an appropriate path.
Apart from that one unique consideration, you can edit and configure this Zap like any other.
Customizing the default Zap
To begin customizing the Zap, test the trigger to load in some data to work with.

Then, add any actions you want to run right after the trigger. In our example, we’ll add a Slack step to alert our team about the new record and ask them to check its details.
To make things easy, we’ll include a link to the table where they can view and edit records.
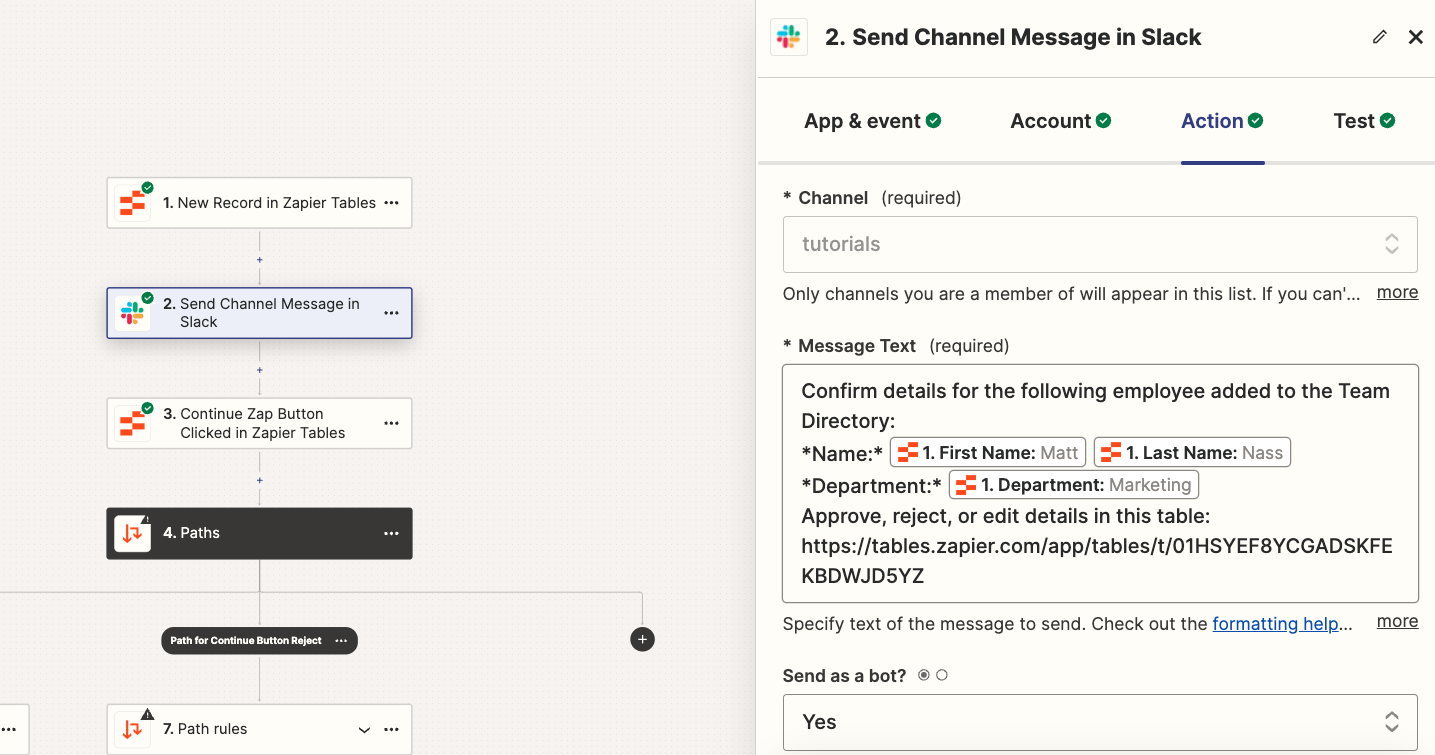
Again, this Slack step is going to be sent for every record that triggers this automation, since it is placed before the automation pauses itself.
Test any actions you’ve added and continue.
Test the “Continue Zap Button clicked” step
Next, select the “Continue Zap Button Clicked” step. You don’t need to add any data or change any settings here. Just click “continue”, then test the step.
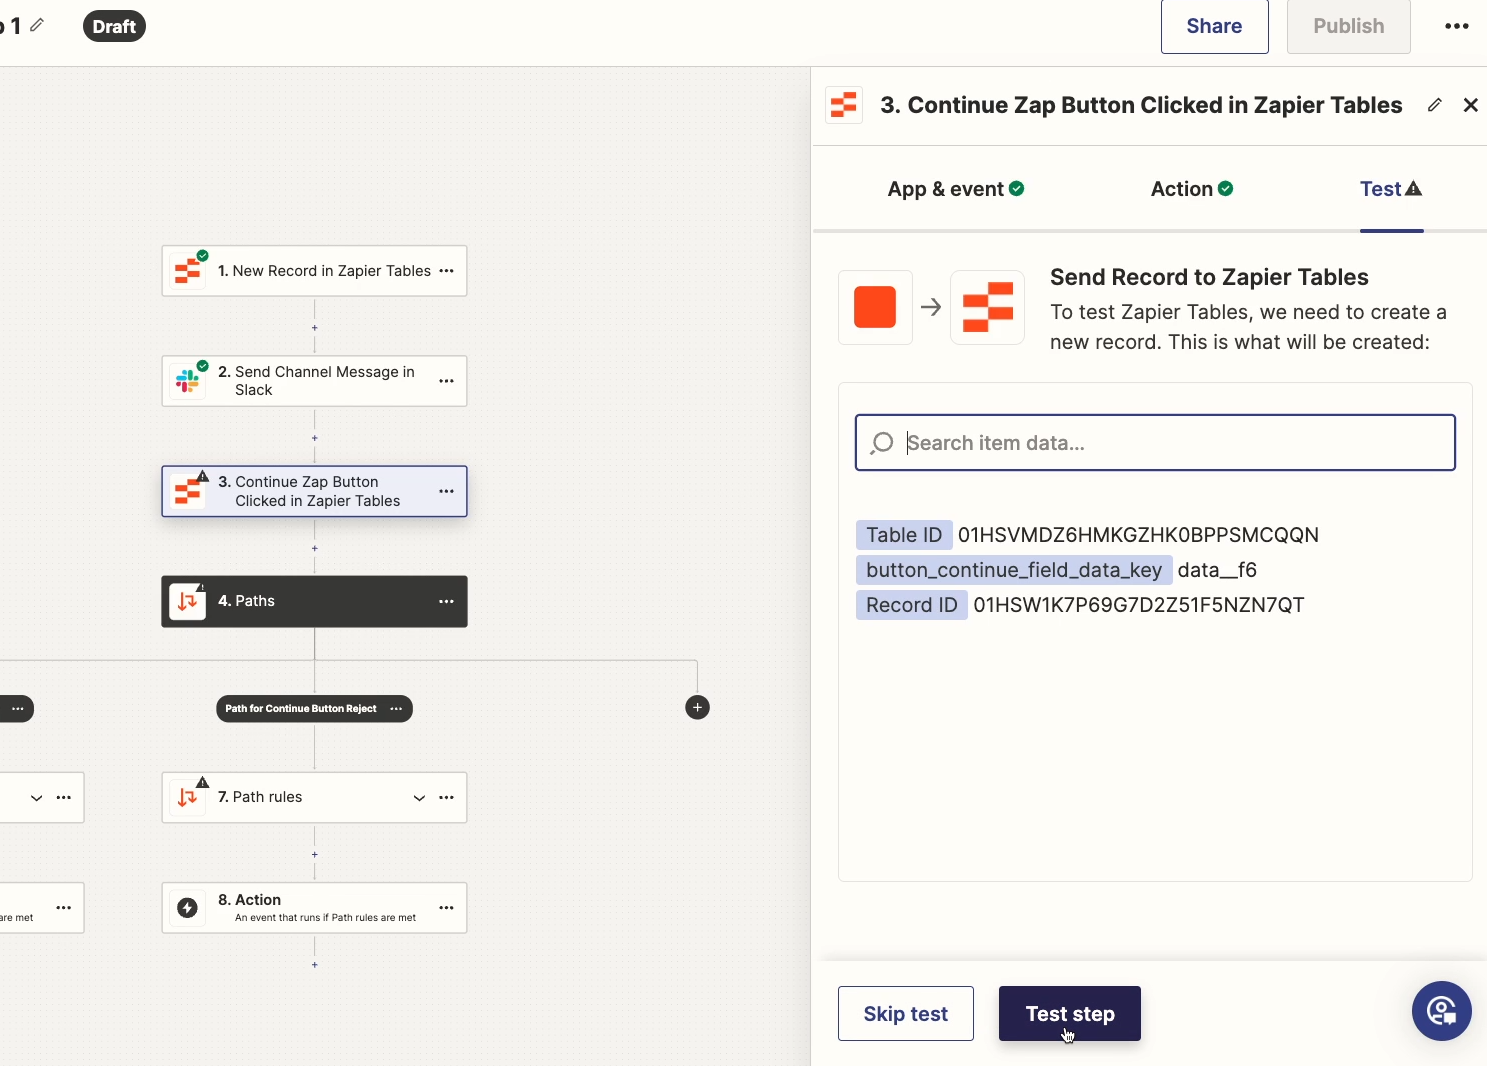
Configure the path for your primary button
Next, you can configure the actions that will run in your first path. This is the path that will run when the primary button is clicked.
Begin by confirming and testing the rule, which should be set to only continue if the primary button (“Confirm” in our example) was clicked.
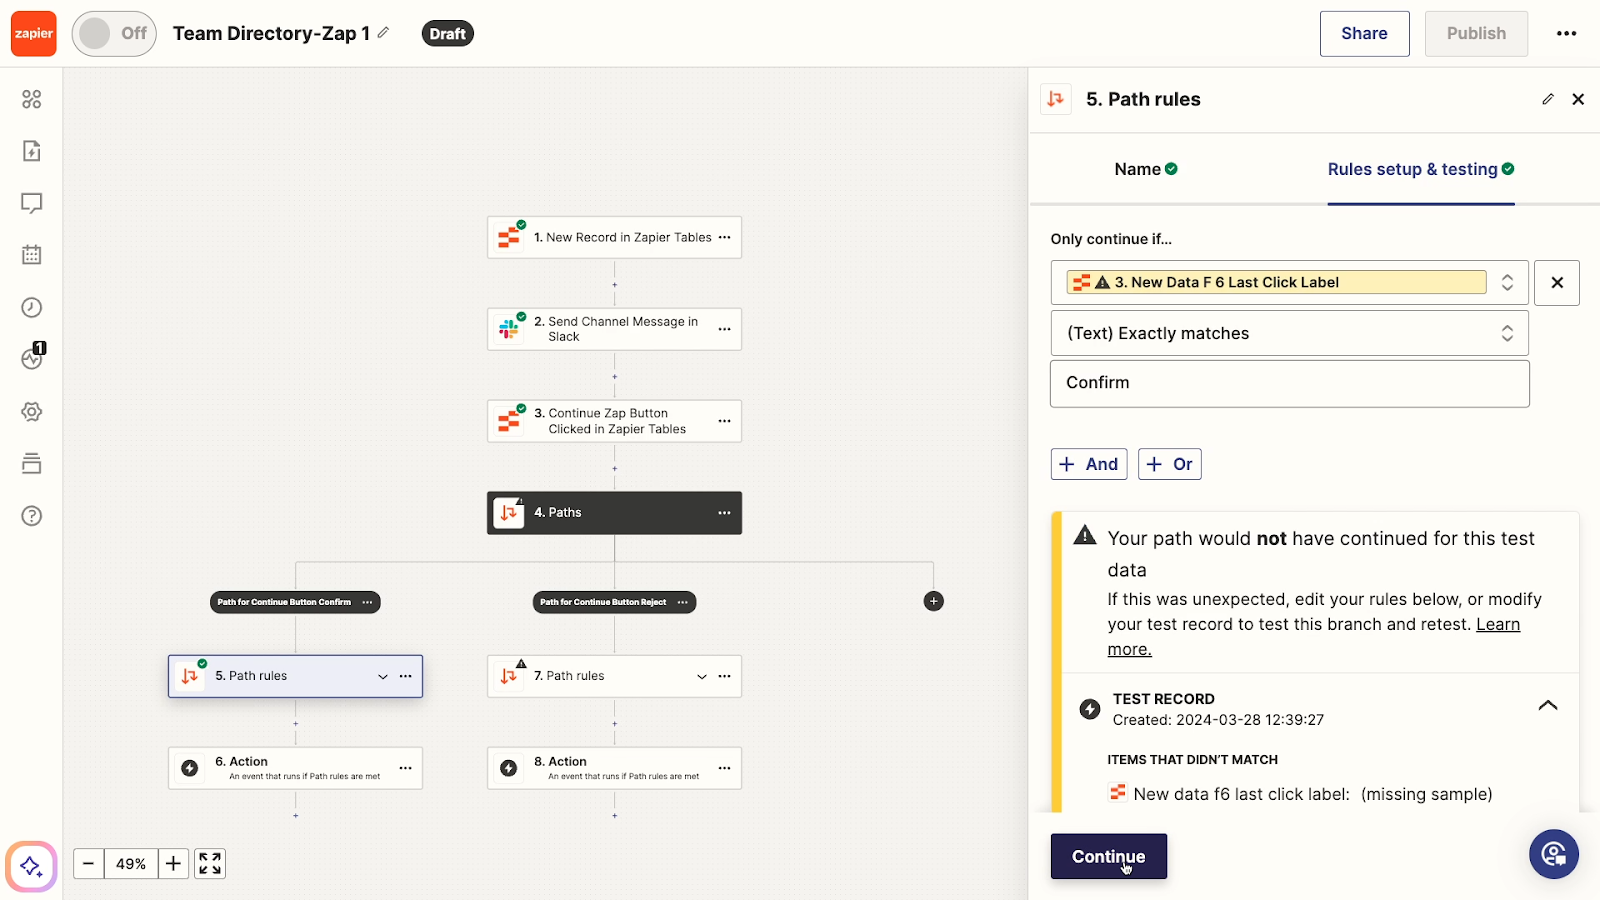
Add any action that you want to run in this path. In our example, we’ll add an action to send another message in Slack alerting the team that the record's details were confirmed.

Test any steps you add to confirm that they work correctly.
Configure the path for your secondary button
Follow the same steps to test the rule for your second path and add any actions you want.
In our example, we’ll add a Slack message that says the record’s details are inaccurate and need to be updated.

Publish the Zap
Once your Zap is configured the way you want and every step has been successfully tested, publish it.
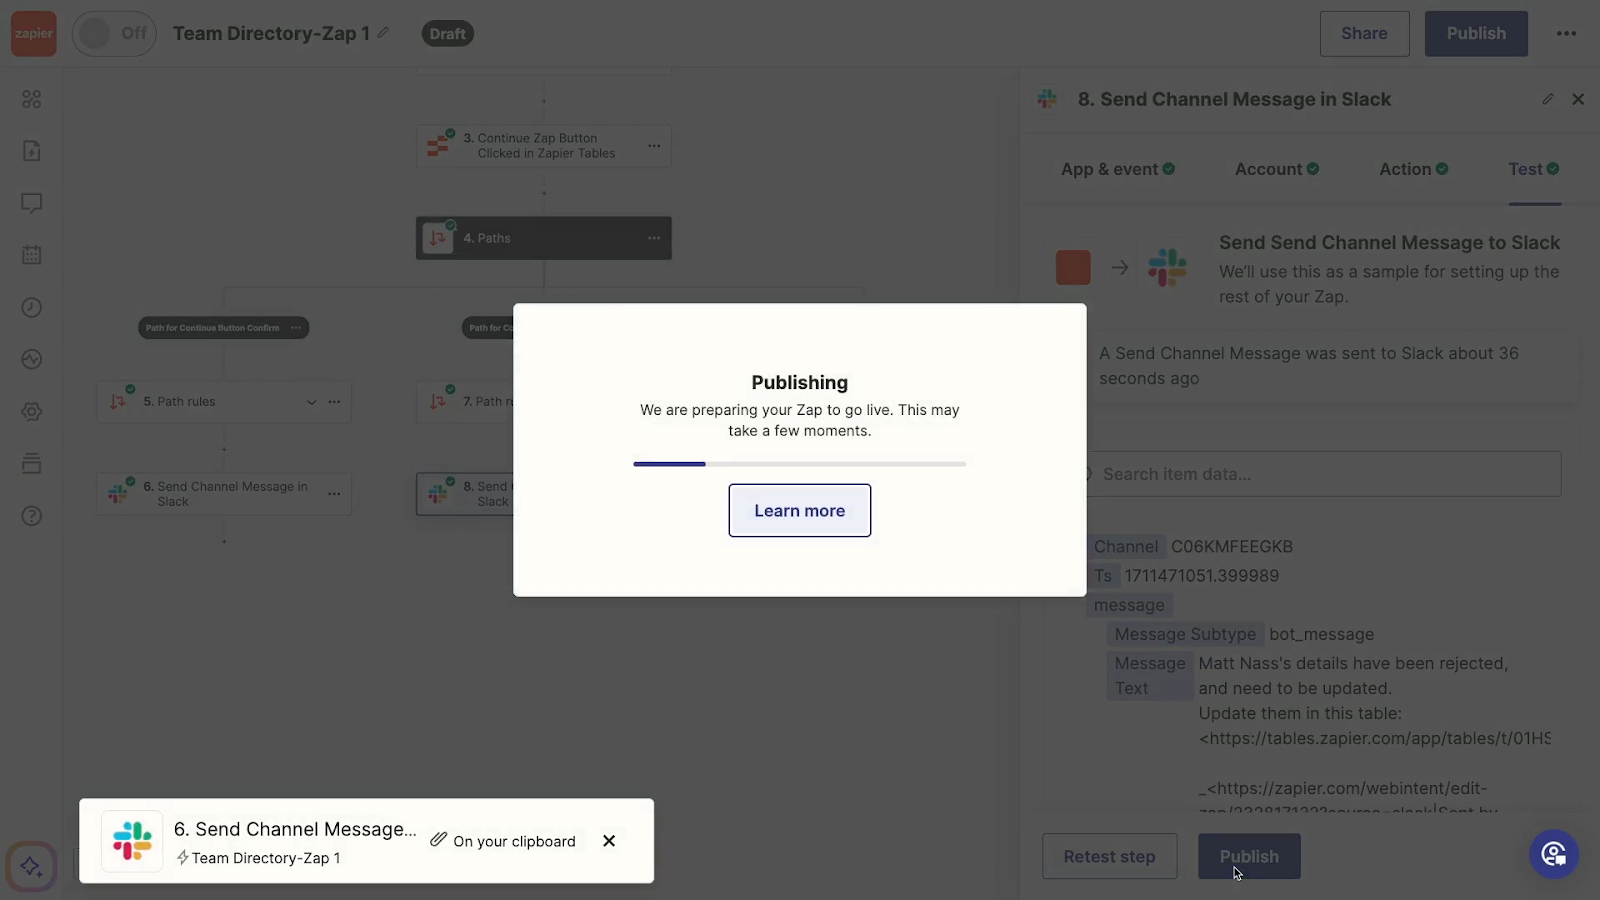
You’ll need to publish your Zap to ensure that it connects with your table.
After publishing the Zap, return to your table.
Test the Zap with the “Send to Zap” button
For every existing record, the button should now say “Send to Zap” instead of “Set up button”
This is because those records were added before the Zap existed, and so the Zap couldn’t process them. This actually gives you a convenient way to test out the flow.
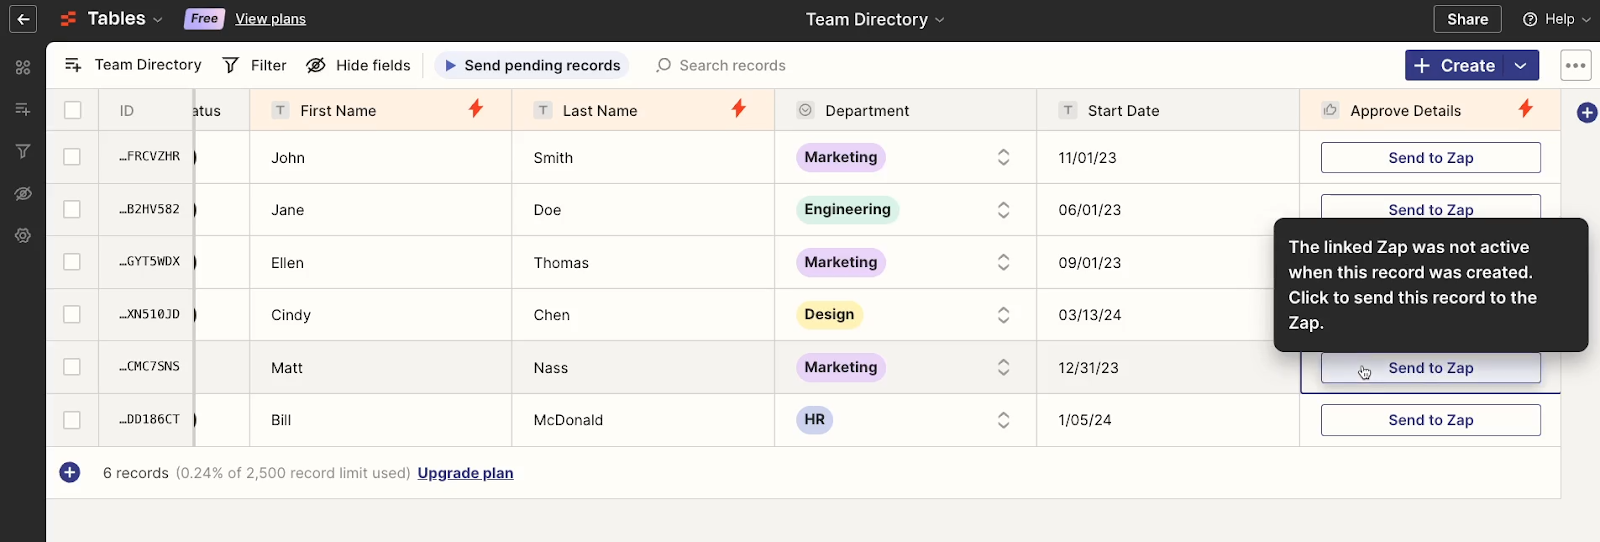
Just click on “Send to Zap” for any of the existing records, and your automation should instantly run all of the steps before the “Continue Zap” pause.
In our case, we instantly get the first Slack message prompting us to approve or deny the record’s details, along with the convenient link.

Note that neither message from the subsequent paths has been sent yet, so our automation paused itself correctly.
To continue testing the Zap, click on one of the buttons for the record in the Zapier table. For our example, we’ll click “Confirm”.
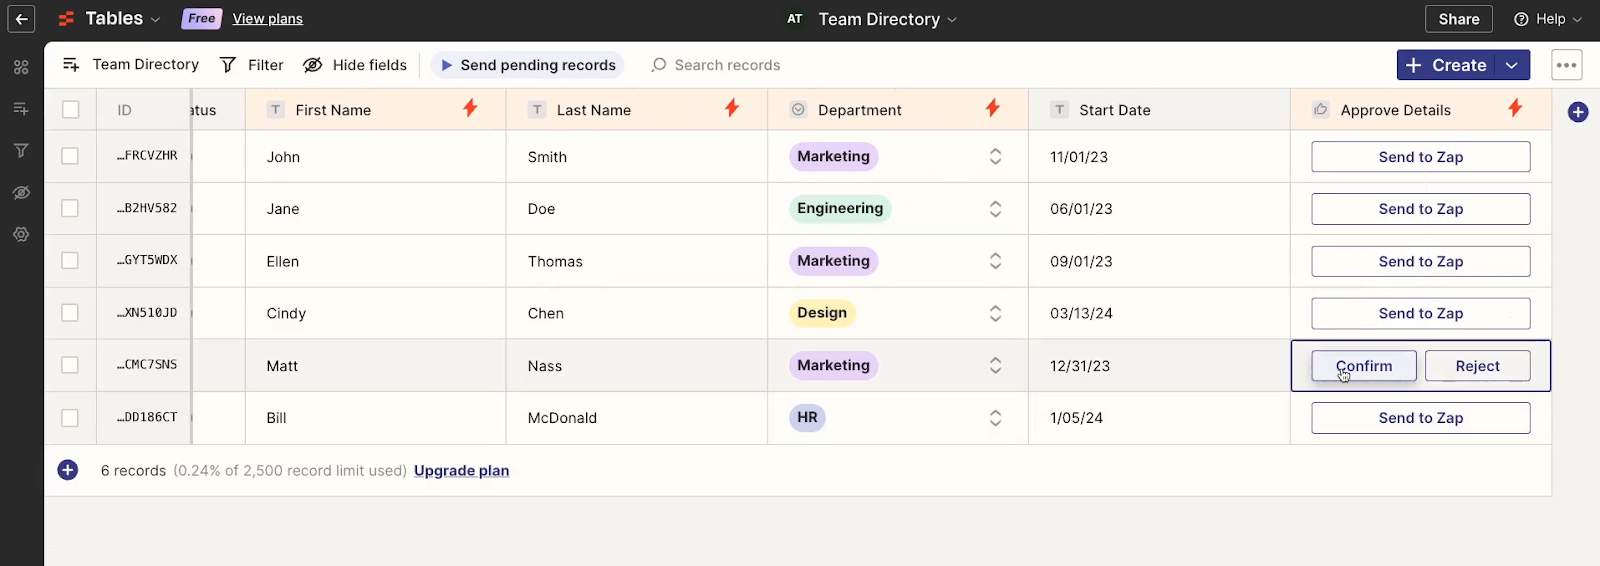
Instantly, we get a new message in Slack, reiterating that the details have been confirmed.
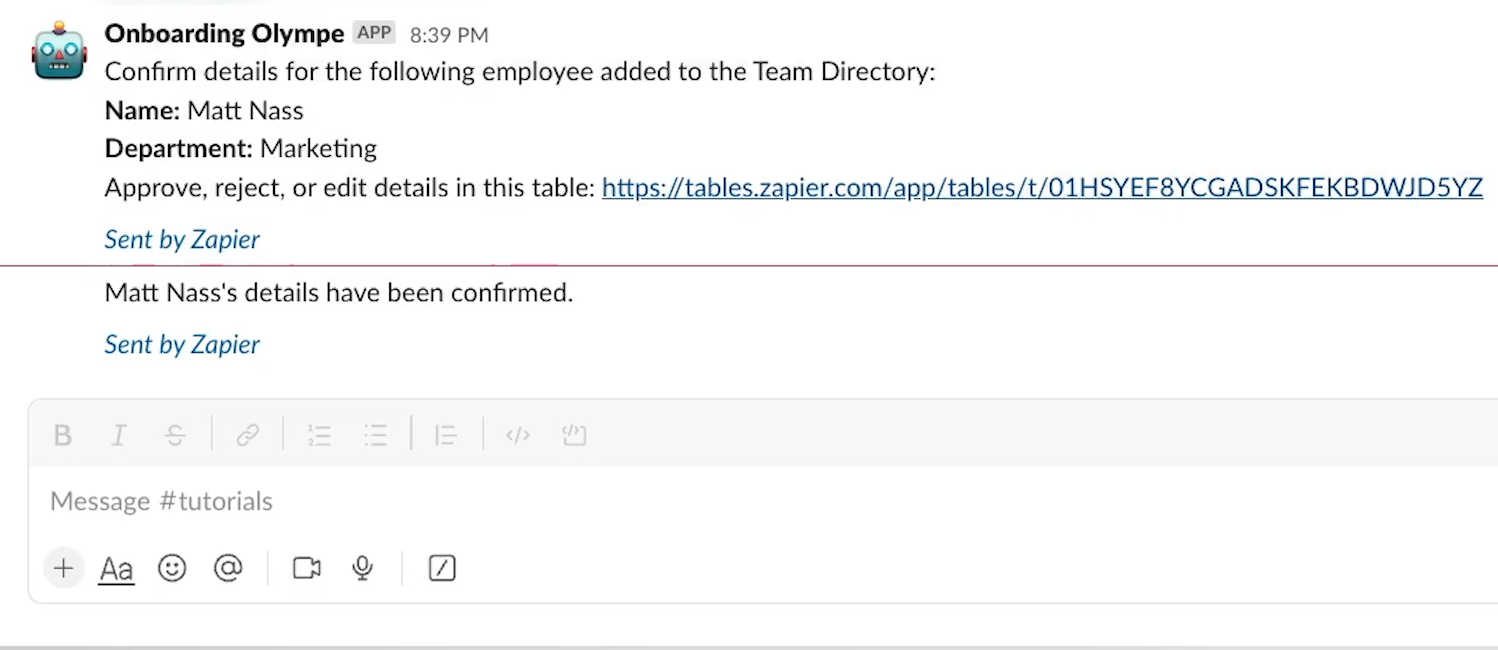
Everything looks good. The Zap ran for the new record, paused to let us make our choice, and continued along the right path after we made our selection.
Running a live test
Before considering an automation complete, we’d always recommend running a live test.
Conducting a live test ensures that your automation runs exactly as expected in real-world conditions, which can always be a little different than tests.
To do a live test, just make sure that the automation is turned on, and submit a new record to your Zapier table through your form interface.
Since we already tested the primary “Confirm” button, we’ll test the secondary “Reject” button this time.
We’ll submit a record with a deliberate mistake (“Francine Johmson”).

Immediately, we get the same Slack message telling us about the new record and prompting us to check it.
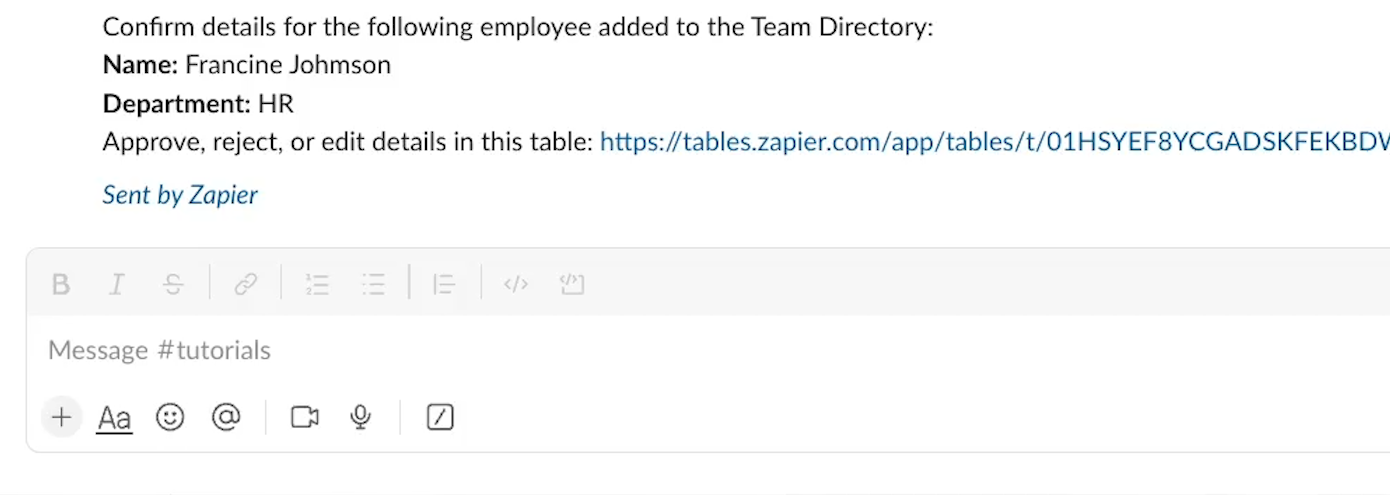
Since there’s a typo in the name, we’ll click “Reject”.

And now the appropriate message pops up in Slack, saying that the record details aren’t correct and need to be updated.
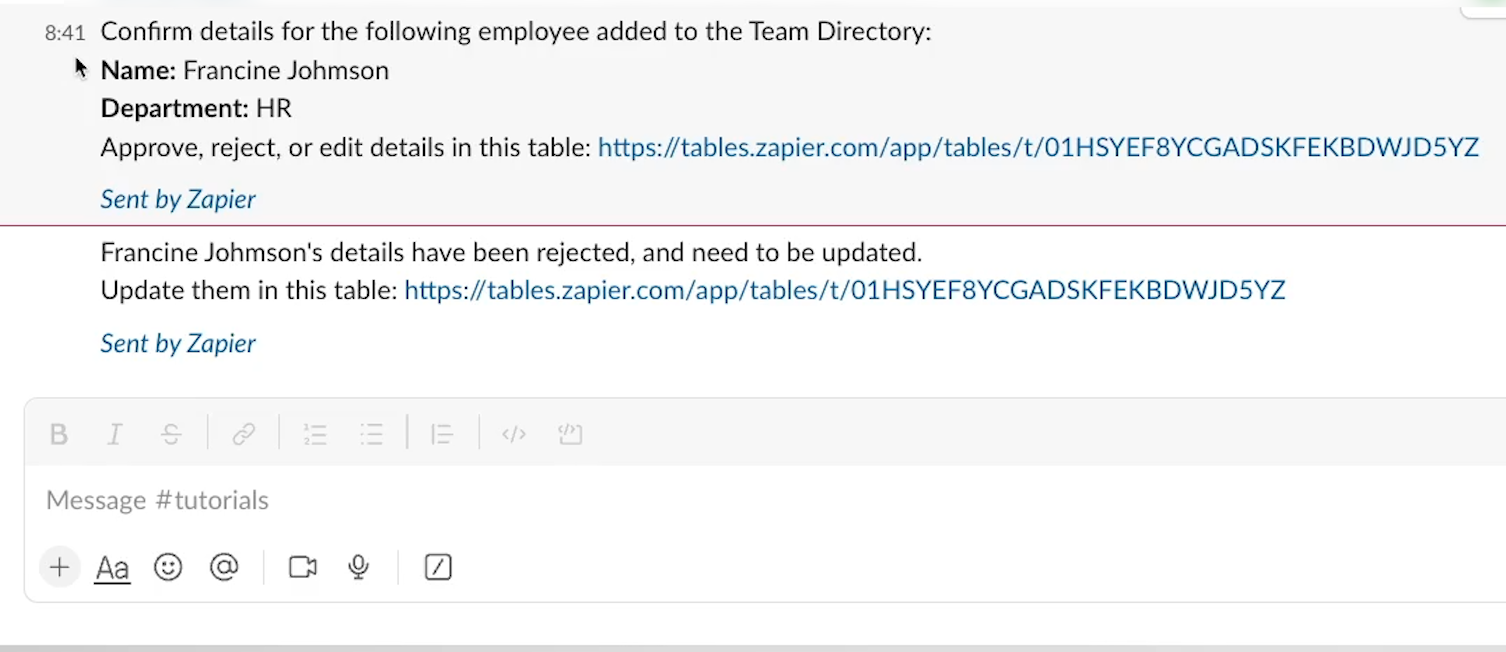
Customize the automation to perform any action
As we’ve designed them, there’s obviously not much difference between these two paths as, but this tutorial is really just about demonstrating the underlying structure, not a full workflow.
With this basic setup, we could add all sorts of actions to the “confirm” path, like creating onboarding tasks in Asana, Sending an email, or whatever else we want.
But once you’ve tested your automation and confirmed that it runs, pauses, and runs again as expected, you’re all set.
Reducing errors with a simple manual approval step
Manual approval takes just a few seconds, but it can drastically reduce errors and unintended automation runs. With the new “Continue Zap” button, no-code builders have another easy way to add a human checkpoint to their automations.
For more no-code automation tips and tutorials every week, be sure to check out our blog or our YouTube channel. You can also follow XRay on Twitter, Facebook, or LinkedIn.
Airtable is a great tool for organizing your team’s data and creating custom interfaces, automations, and more.
However, Airtable isn’t the only database app in the space. Founded just a couple years ago, SmartSuite offers very similar features at a more attractive price point.
But is it worth making the switch?
In this post, we’re going to give you an in-depth comparison of Airtable and SmartSuite so you can determine which one is right for you.
We’ll take a look at everything that each app offers in several key categories, including user interface, custom views and fields, automation options, dashboards and interfaces, third-party integrations, technical performance, and pricing.
There’s a lot to cover, so let’s get started!
The basics of Airtable and SmartSuite
First, for anyone who might not be familiar, let’s quickly cover what Airtable and SmartSuite are.
On the surface, Airtable and SmartSuite are essentially spreadsheet and database apps. But unlike Microsoft Excel or Google Sheets, these apps are really for building custom internal systems.
Instead of using an off-the-shelf app for something, you can make your own custom version in these apps. For instance, you could use Airtable or SmartSuite to build a project management system that acts as an alternative to Asana, Monday.com, or Trello.
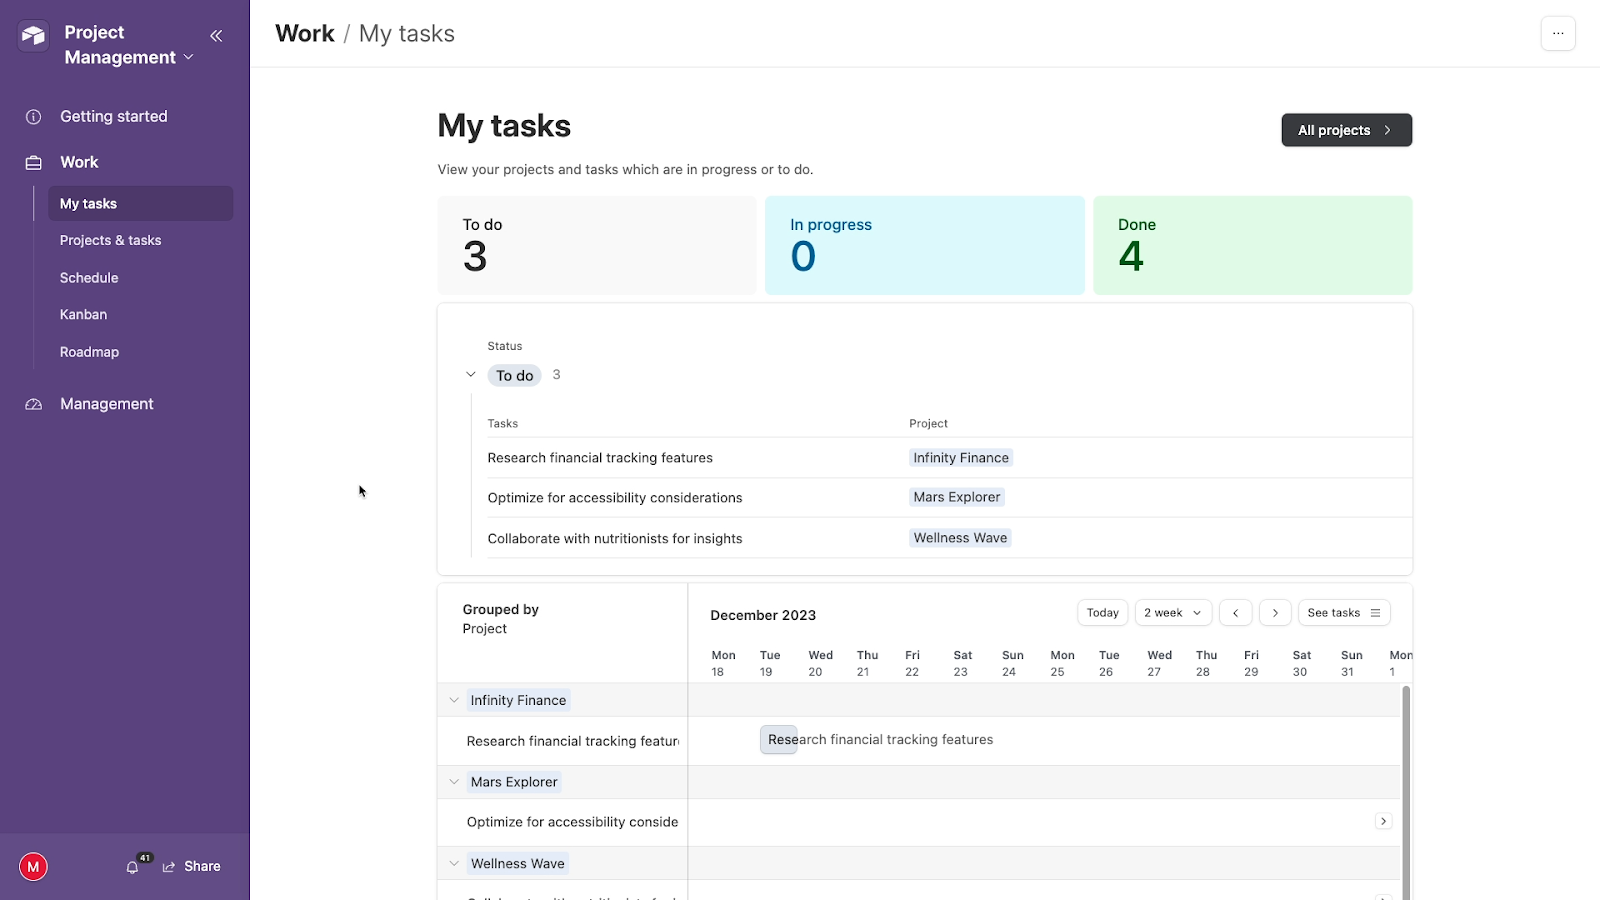
Similarly, you could use these apps to put together your own CRM as an alternative to Hubspot or Pipedrive.
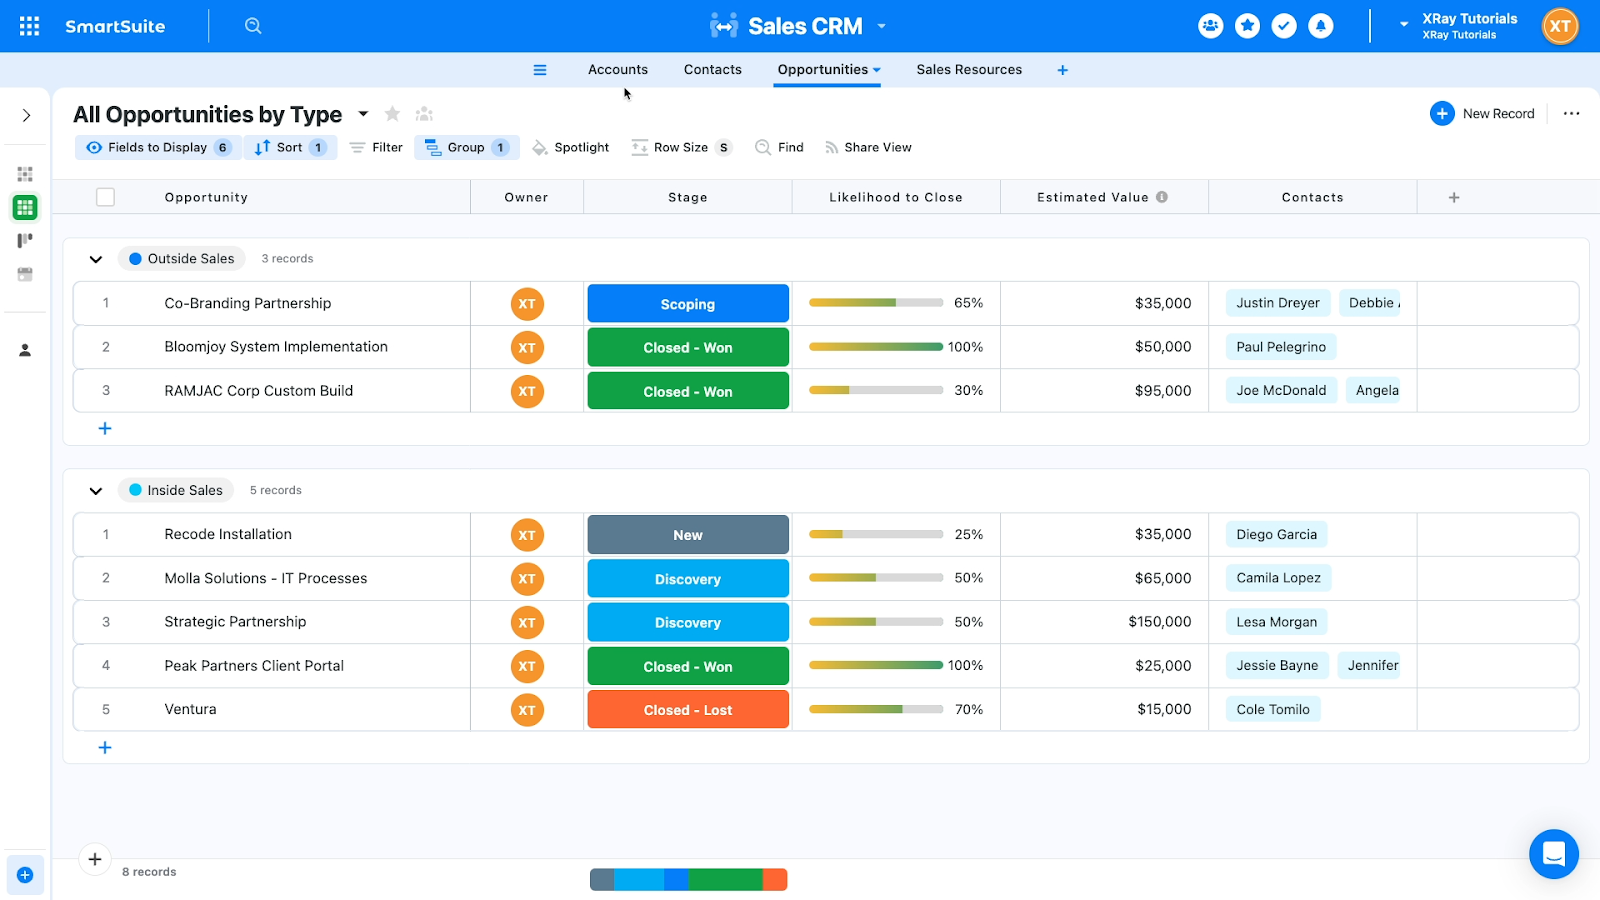
By connecting Airtable or SmartSuite to Softr, which we’ll cover more later, you could even build a web app that serves as a convenient portal for your clients to sign in and view their data.

Essentially, Airtable and SmartSuite are both versatile apps designed to give you freedom to build what you want using a familiar layout of tables and fields.
Ideal user profiles for Airtable and SmartSuite
Both of the apps have broadly similar functions and use cases, but they ultimately serve two different user types. We'll cover the similarities and differences in detail in this post, but we’ll start with a brief summary of the main distinction between the two apps.
Airtable: a reliable app for Enterprise teams
Airtable, which is backed by venture capital funds and has been available for about 10 years, has the edge for enterprise teams.
It’s got the performance, the stability, and the advanced security and permission features that you need for enterprise solutions.
SmartSuite: an affordable alternative for smaller teams
SmartSuite, a bootstrapped startup founded in 2021, offers similar features at a much lower price, and is likely the better pick for smaller teams.
Its design is top-notch, and it's got a lot of convenient features that Airtable is missing. However, its lack of fine-tuned permission controls and less sophisticated automation tools make it less-than-ideal for enterprise teams.
That’s the comparison in a nutshell, but there’s a lot of nuance that gets lost in a brief summary. Let’s jump into the detailed comparison to take a closer look at each app.
User Interface and User Experience
As two similar applications, Airtable and SmartSuite offer up nearly identical user interfaces and experiences.
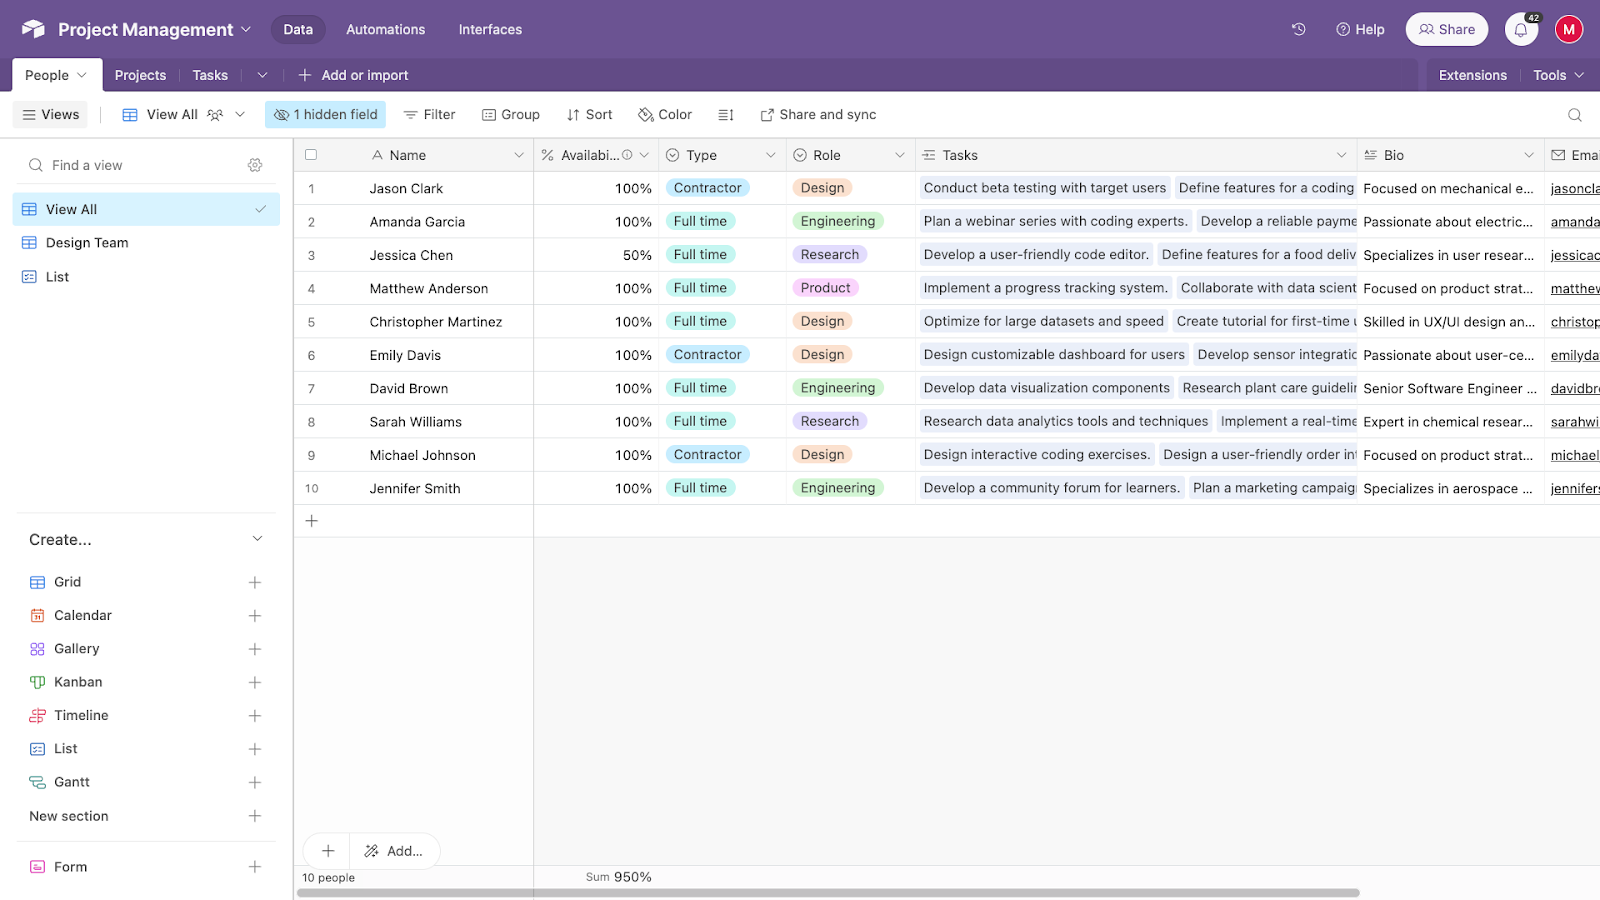
Both apps use a simple, no-code UI to let you create databases and tables, add a wide range of fields, and organize your data into customized, filtered views.
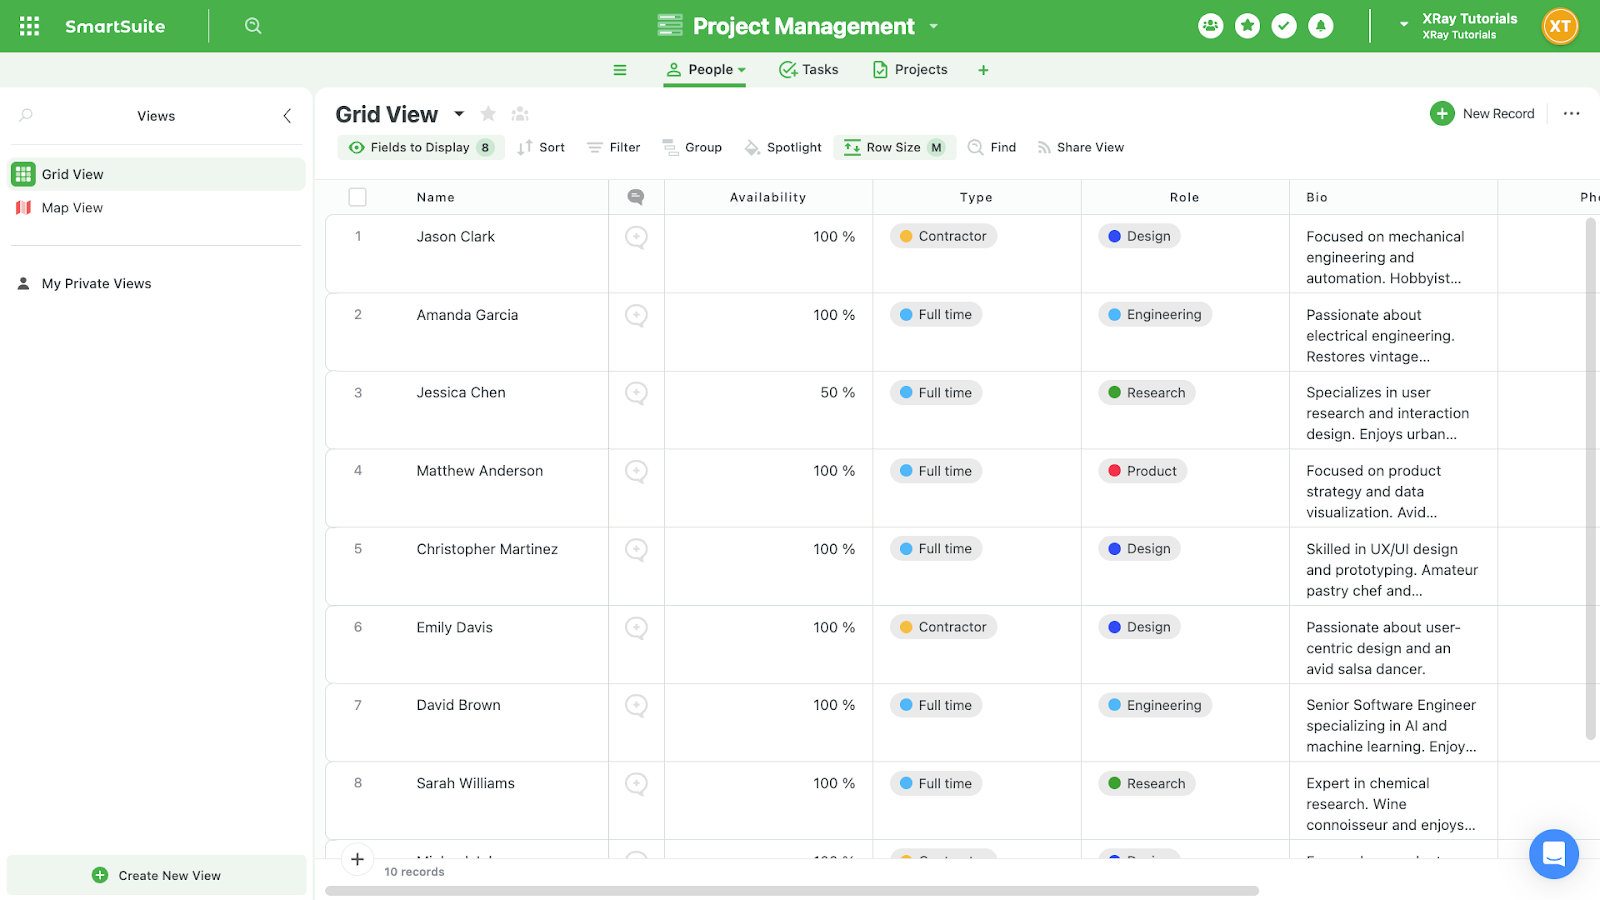
Both make it easy to view your data at a glance and find the menu items you need. However, as the newer app on the block, SmartSuite has a bit more aesthetic flair. Elements tend to be a little larger with some extra white space, making it a little easier to parse information.
Winner: SmartSuite (just barely)
Ultimately, it’s difficult to separate the two in terms of UX and UI. However, we’d give SmartSuite a slight edge due to its extra visual polish.
However, both apps deliver a great experience with a clean UI.
Available Field Types
While spreadsheet apps like Excel and Google Sheets only offer some basic formatting options for text and numbers, Airtable and SmartSuite provide a wide array of field types to accommodate and display different data.
Both apps include widely-used choices like text and select fields, date and time, formula fields, linked records and more.
However, there are some key differences between the two apps here.
SmartSuite: more field types, built-in validation, and superior linked records
By our count, SmartSuite currently boasts 42 unique field types compared to Airtable’s 28.
SmartSuite’s unique fields include options like IP address, voting, a hex code color picker, and even a signature field.

Additionally, most text and number fields in SmartSuite include automatic validation, so you can ensure that the data entered matches the intended format, whether that’s an email address, a phone number, or an IP address.
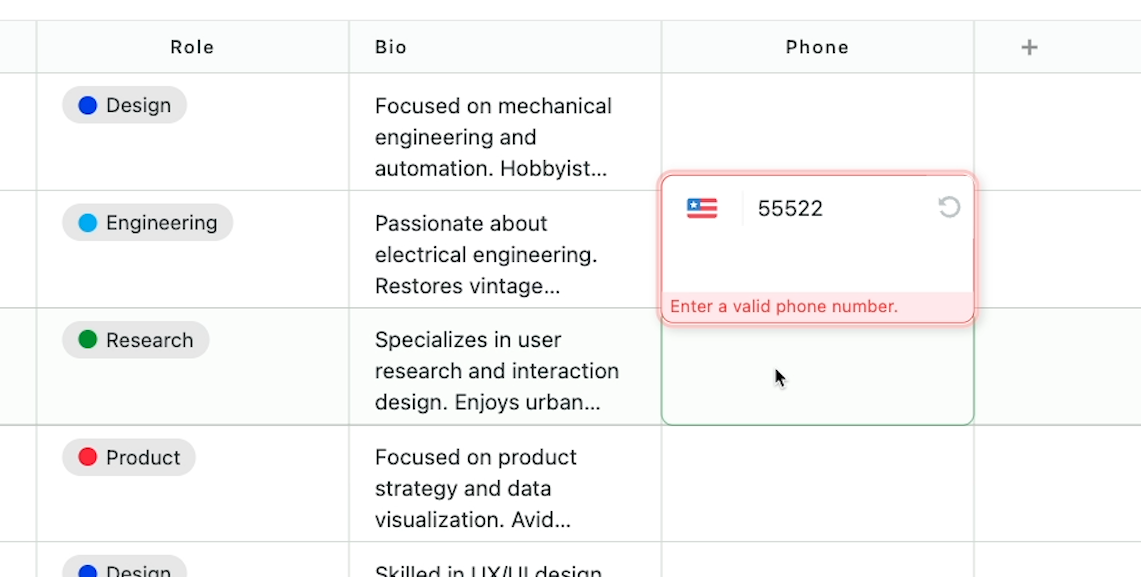
To add similar validation to Airtable would require a complex solution involving automation and multiple fields. Frankly, it wouldn’t be worth the effort in most cases.
Additionally while both apps include the ability to link records, Airtable limits you to only linking records within the same base.
On the other hand, SmartSuite lets you link to records in any solution.
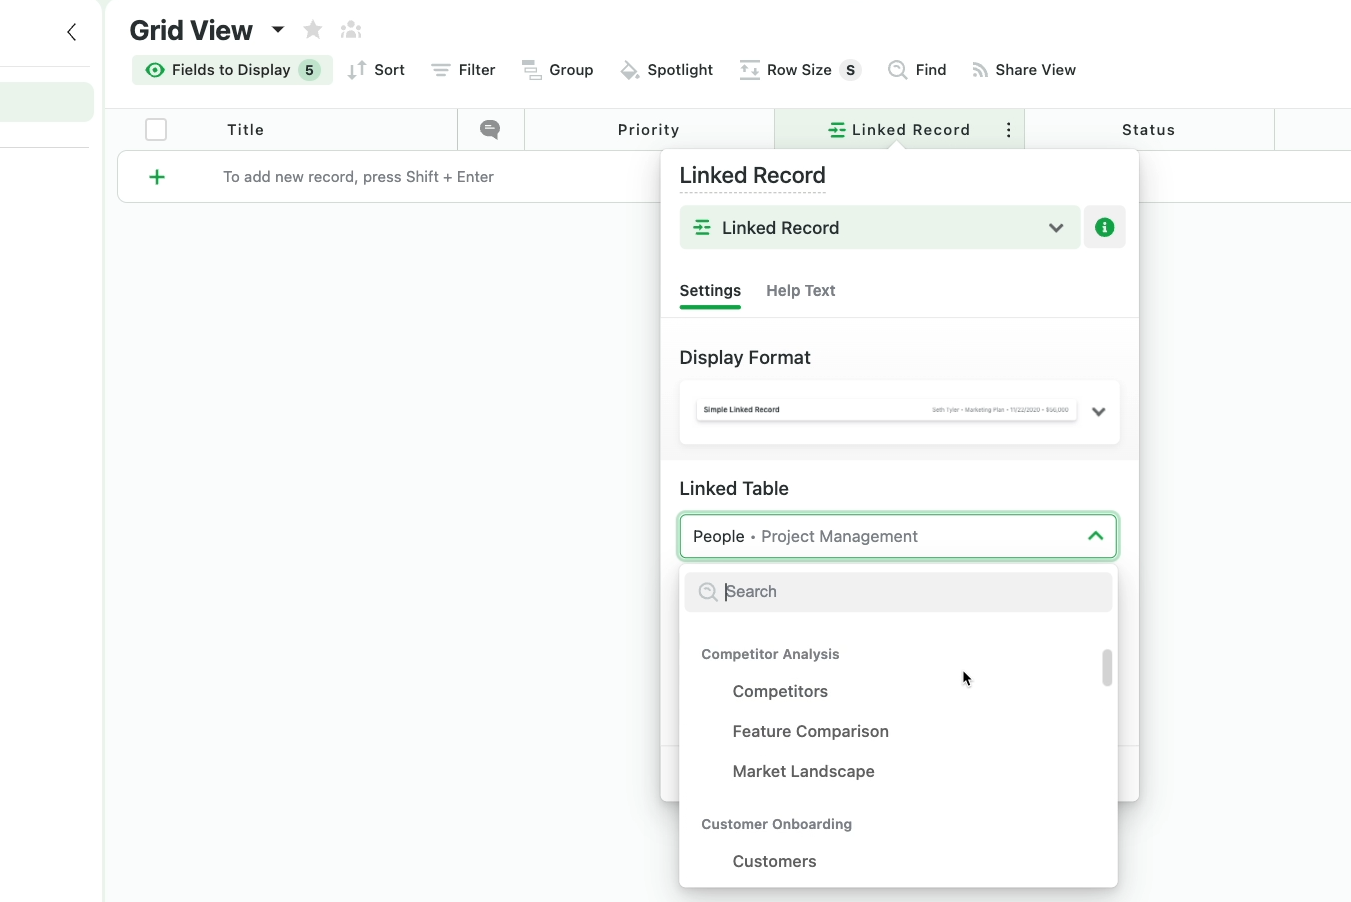
No matter what database you’re working in, you can reference records in any other database.
Airtable: unique fields for “Last modified” and Barcodes
However, Airtable does have a few field types that SmartSuite doesn’t.
Retail or manufacturing businesses will be happy to see Airtable’s “Barcode” field type, and anyone can benefit from the “Last Modified” field that displays a timestamp for the last time each record was edited.
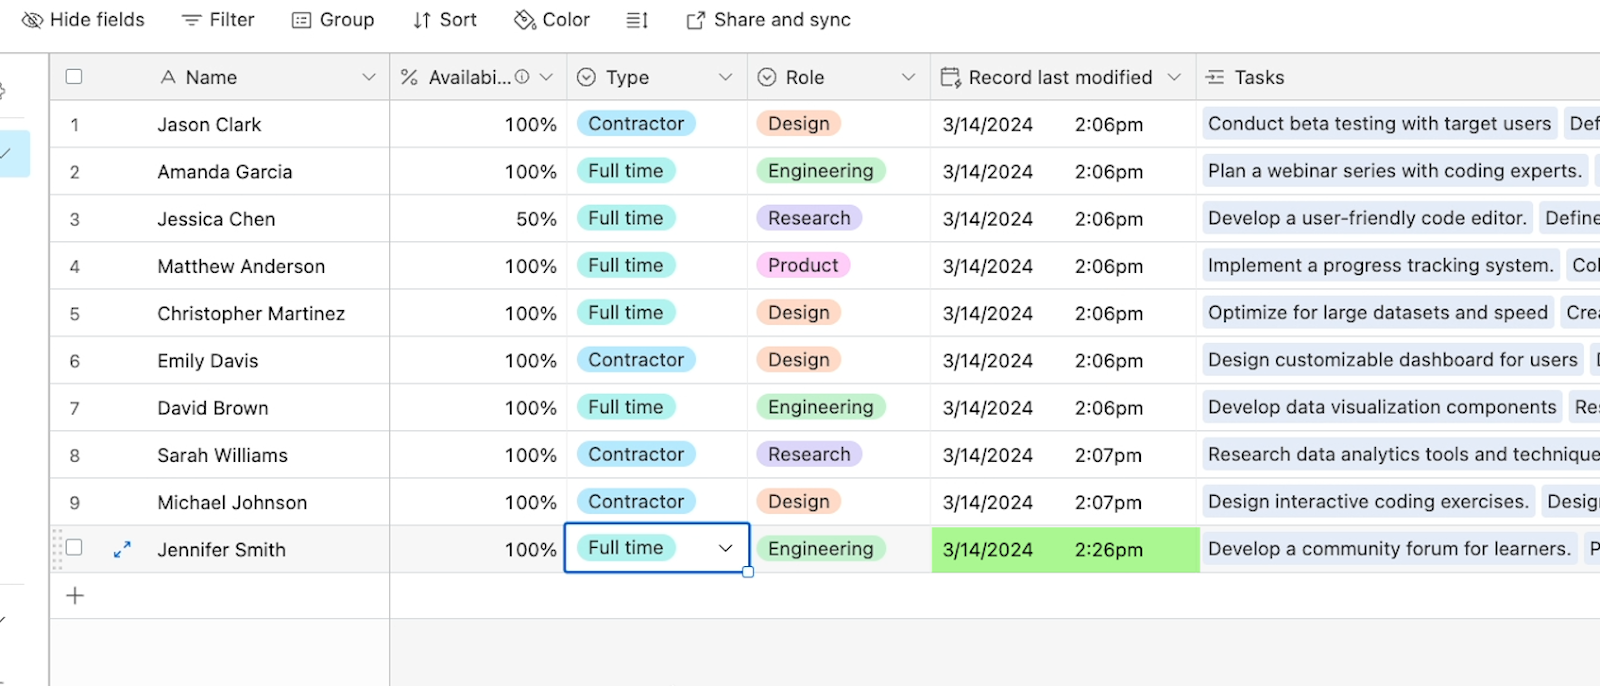
You’d need to create a formula field in SmartSuite to create a ‘Last modified’ field, which is easy enough, but there currently isn’t any way to add such a field without writing a quick function.
Winner: SmartSuite
When it comes to field types, SmartSuite beats Airtable, particularly if you want easy validation for specific data formats or more versatile linked records.
But Airtable’s definitely not very far behind in providing a diverse array of field types and robust formula functionality.
Filtering and organizing your data with views
Next, let’s look at the views provided by both apps. In both Airtable and SmartSuite, views are a way to display data from a table. A view rearranges data based on your chosen settings, but doesn’t alter or delete the original data.
For some views, you might just apply a filter to a traditional grid layout, so you only see records that match certain conditions.

For other views, you might want to use a totally different layout, like a Kanban board for tasks, a gallery for images, or a timeline to track projects.

Both apps offer a similar selection of views, but there are few key differences.
Similar choices for custom views
SmartSuite and Airtable each include Grid, Kanban, Timeline, Calendar, Gantt, Form, and Gallery views.
Airtable has one unique option: a list view, which is essentially a simplified grid.
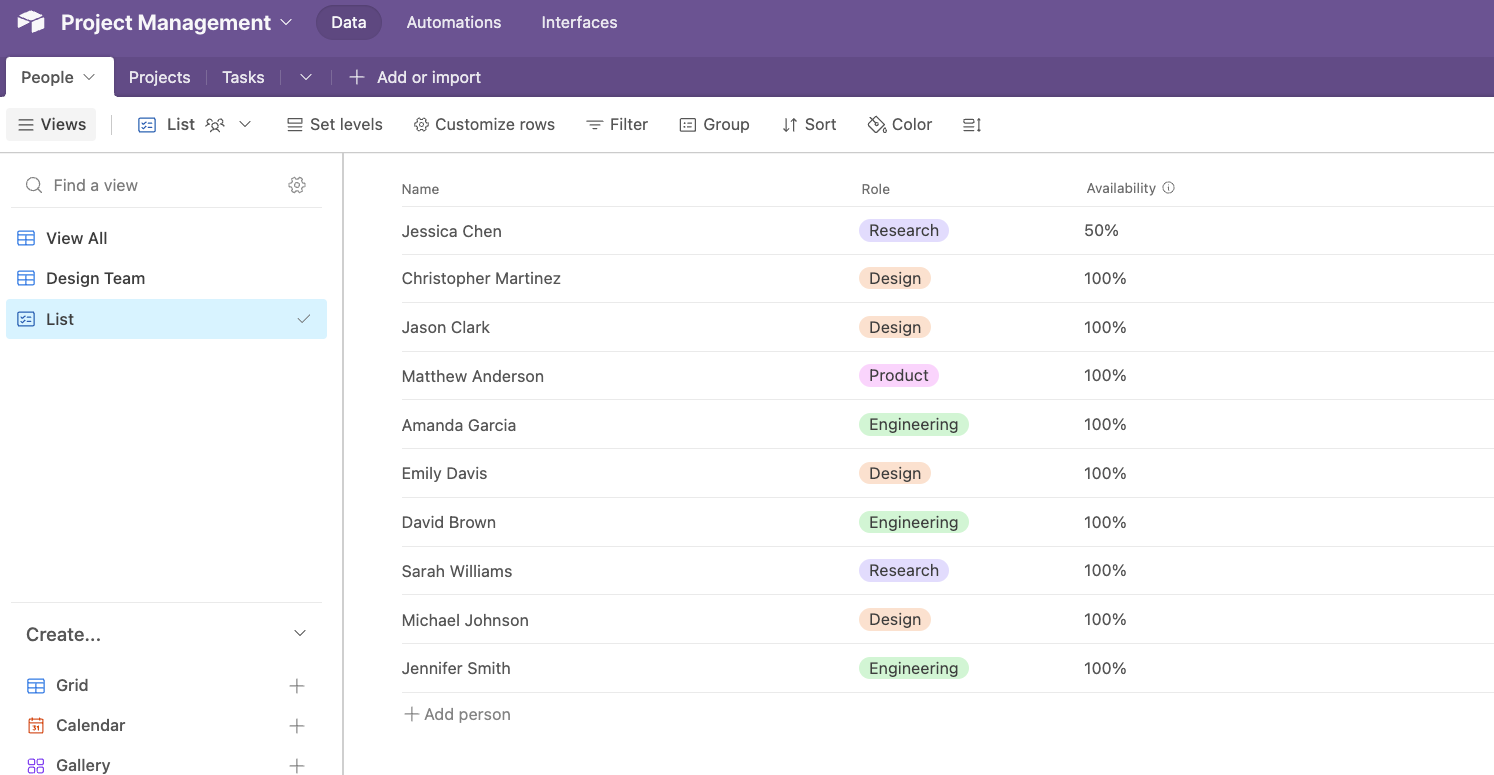
SmartSuite on the other hand offers a Map view, which can display addresses and location data as pins on a map. Map views like this are a top feature request common among Airtable users.
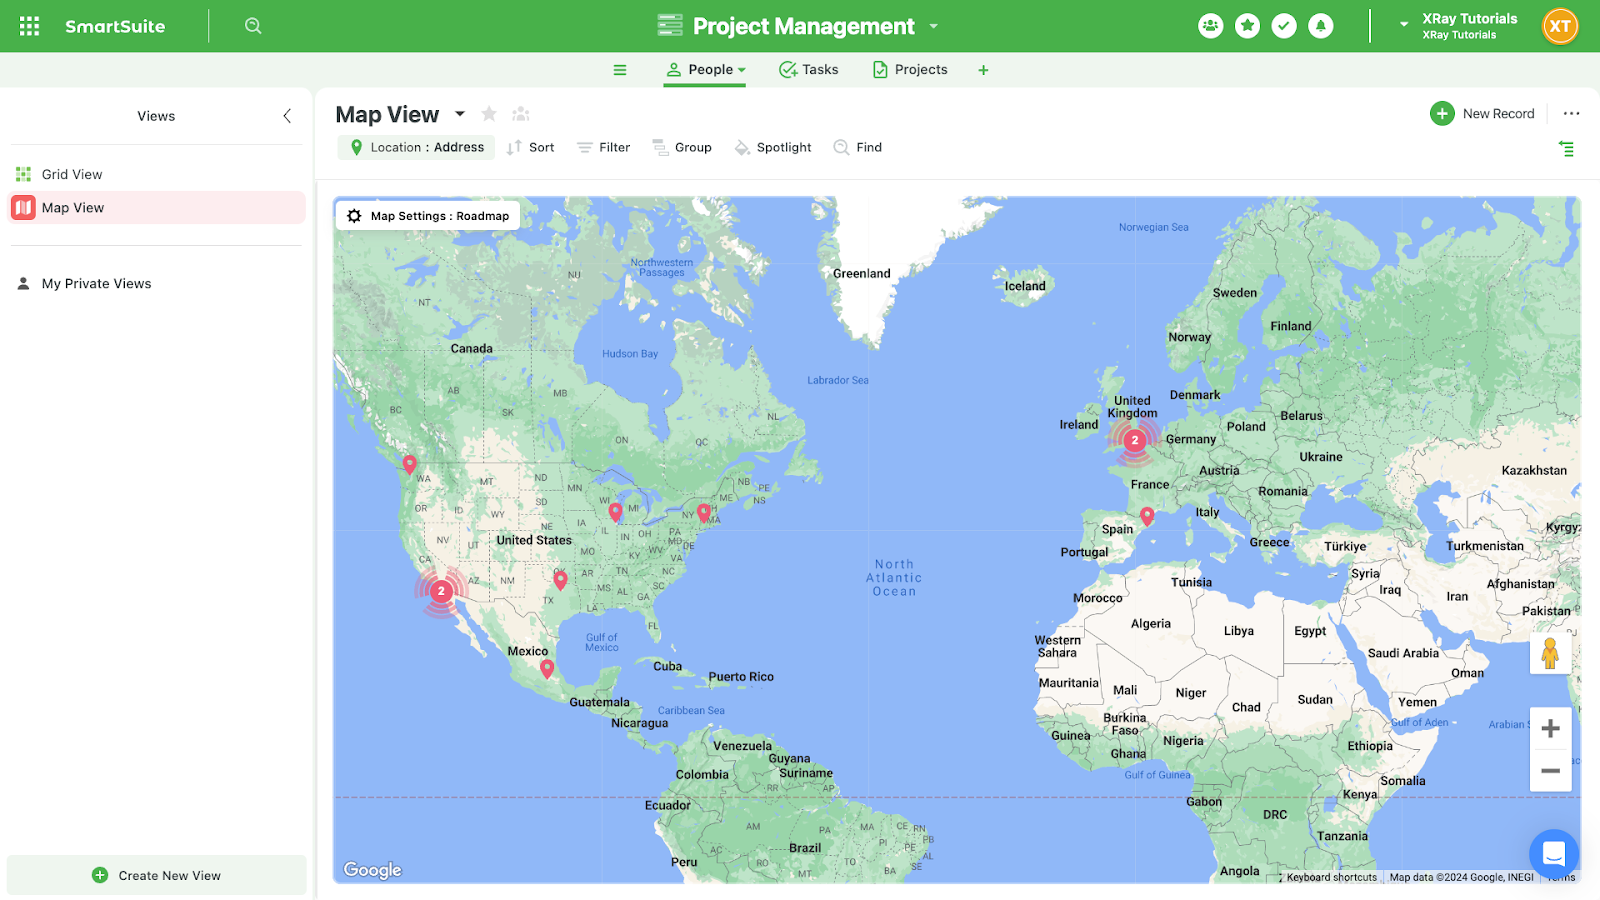
You’ll also see options for Charts and Dashboards in SmartSuite, which allow you to compile reports out of your data.
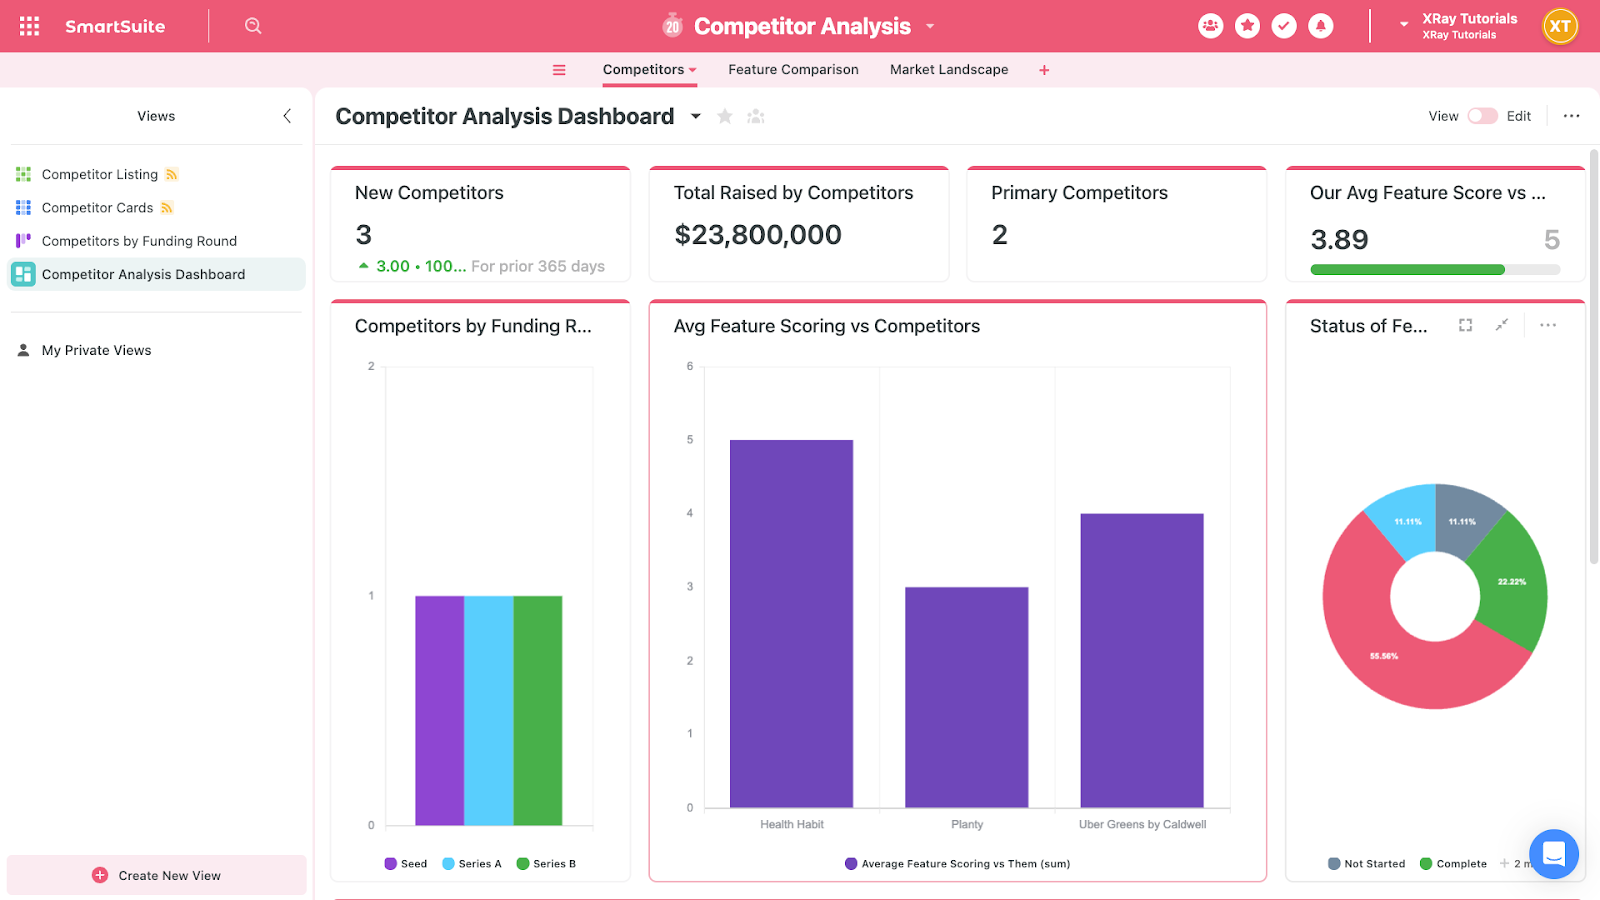
While Airtable doesn’t include similar options in their “views” menu, they do include similar functionality in their “interfaces” feature, which we’ll cover more later.
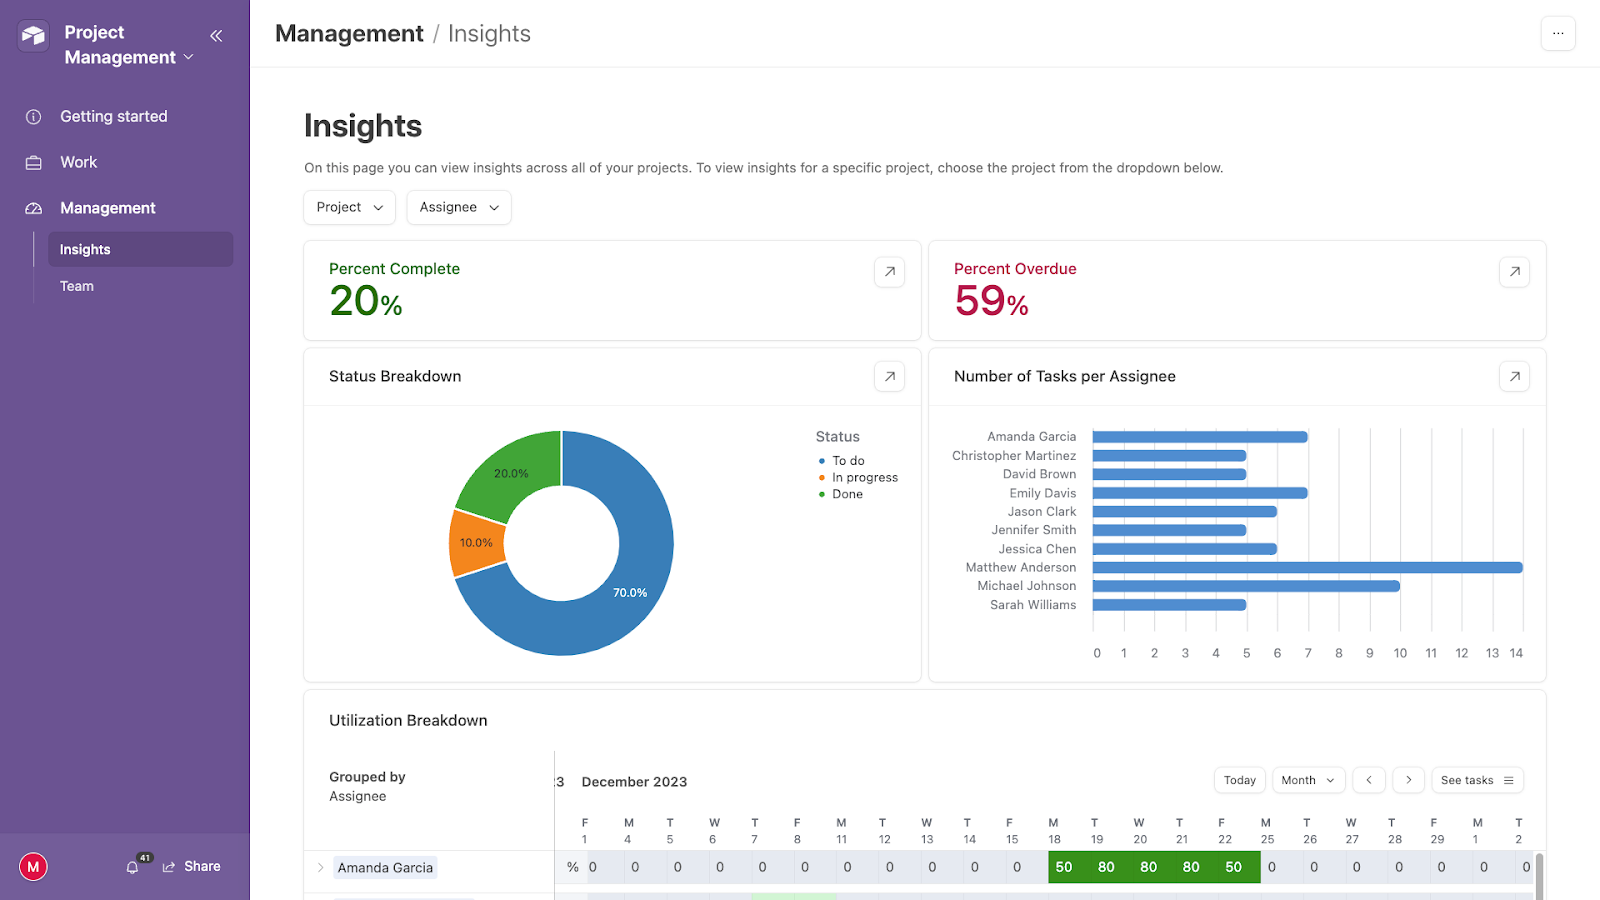
Launching automations with specific views
Although the choices for view types are virtually identical in both apps, there’s a related function which helps Airtable to stand out in this regard.
In no-code automations, it’s easy to build a workflow that runs whenever a record enters a specific view in Airtable. No options like this are readily available for SmartSuite.
Winner: Airtable
Ultimately, Airtable and SmartSuite are nearly neck-and-neck when it comes to custom views, although each one has a couple of unique options that might sway you one way or the other.
However, Airtable’s views are much better integrated with automation, which makes their views a more useful feature overall.
Automating your work with Airtable and SmartSuite
Organizing your team’s data in one source of truth like an Airtable or SmartSuite database is a great way to get started with automation.
Both apps have support for simple native automations and can also connect easily to automation providers like Zapier and Make.
But which app will be better for automating tasks with your data?
Native automations in Airtable and SmartSuite
With the automation functionality inside of Airtable or SmartSuite, you can launch an automation based on several triggers. These include options like “whenever a record is created or updated,” “when a record matches conditions”, “when a form is submitted”, or “at a scheduled time”.
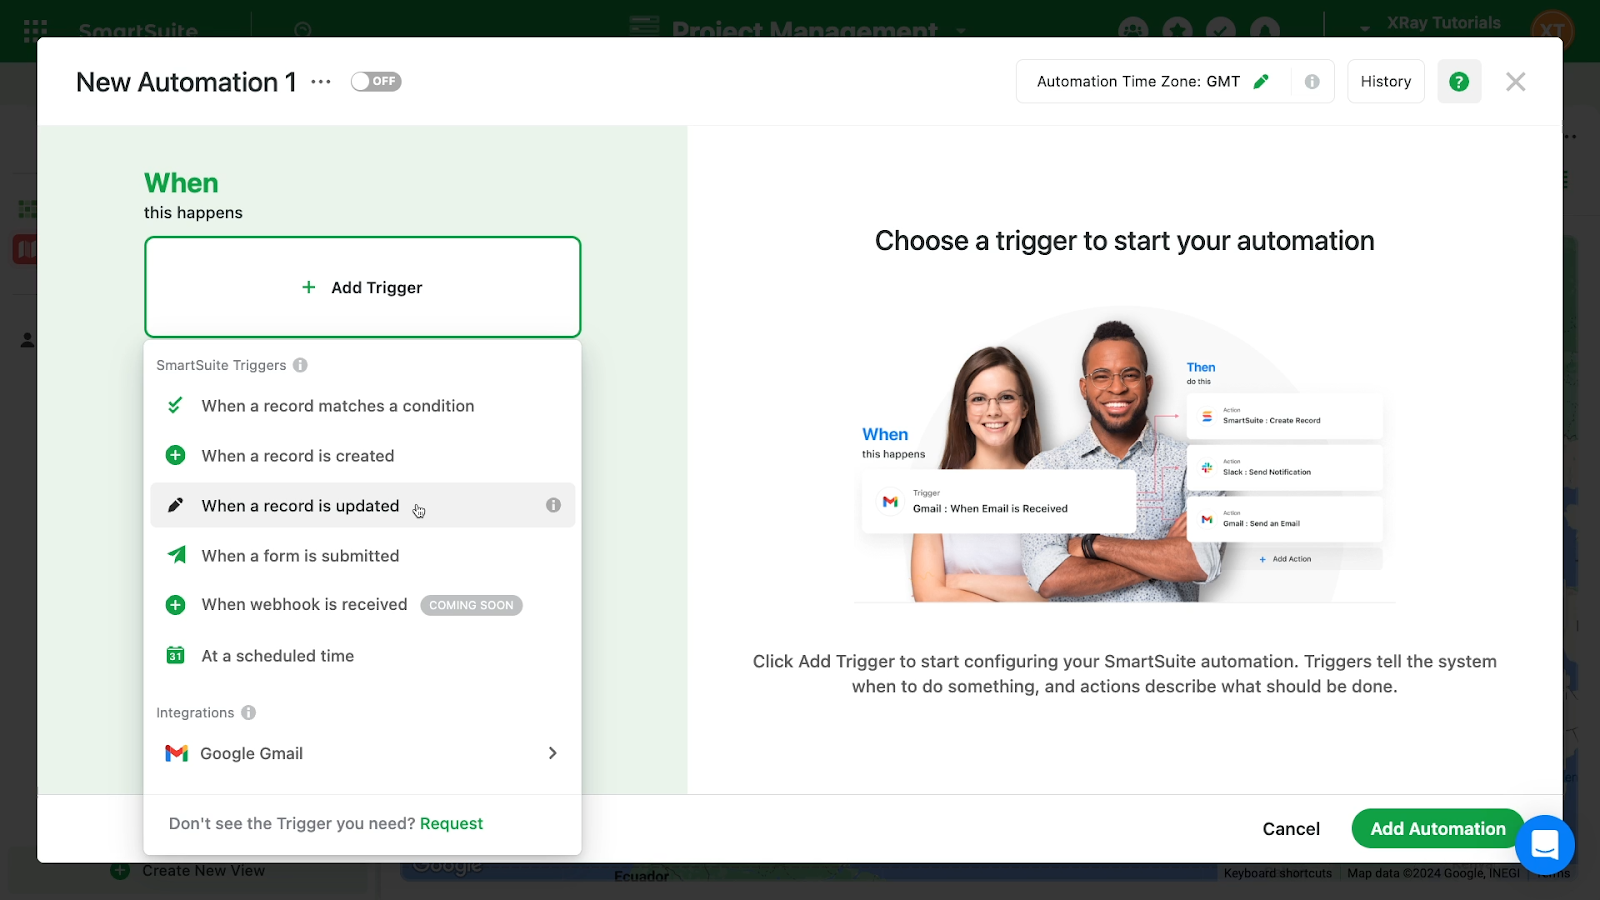
However, Airtable has a few extra triggers that SmartSuite is lacking. These are “When a record enters a view,” “When a button is clicked,” and “When a webhook is received.” However, SmartSuite notes that webhook triggers are coming soon.
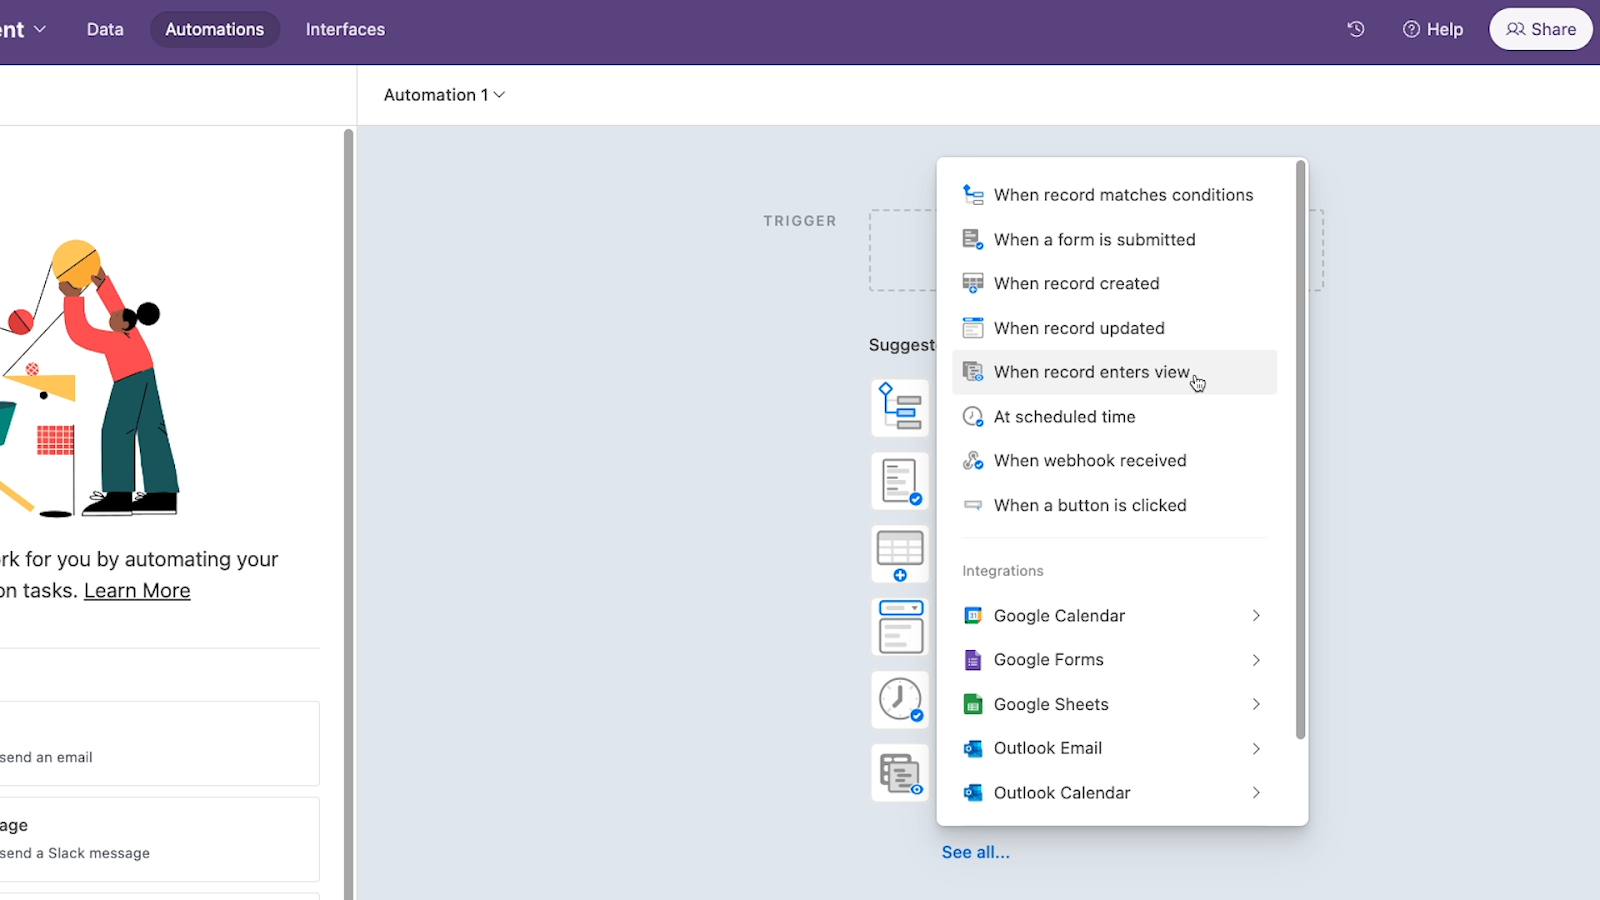
Once an automation is triggered in either app, it can run some actions within your database or in external apps. Both have pretty small lists of supported apps, such as Gmail, Jira, Outlook Email, and Twilio.
While neither Airtable nor SmartSuite is likely to be your main automation provider, Airtable’s native automation easily beats SmartSuite.
In Airtable automations, you can add conditional logic and even write JavaScript for custom actions - neither of which are available in SmartSuite.
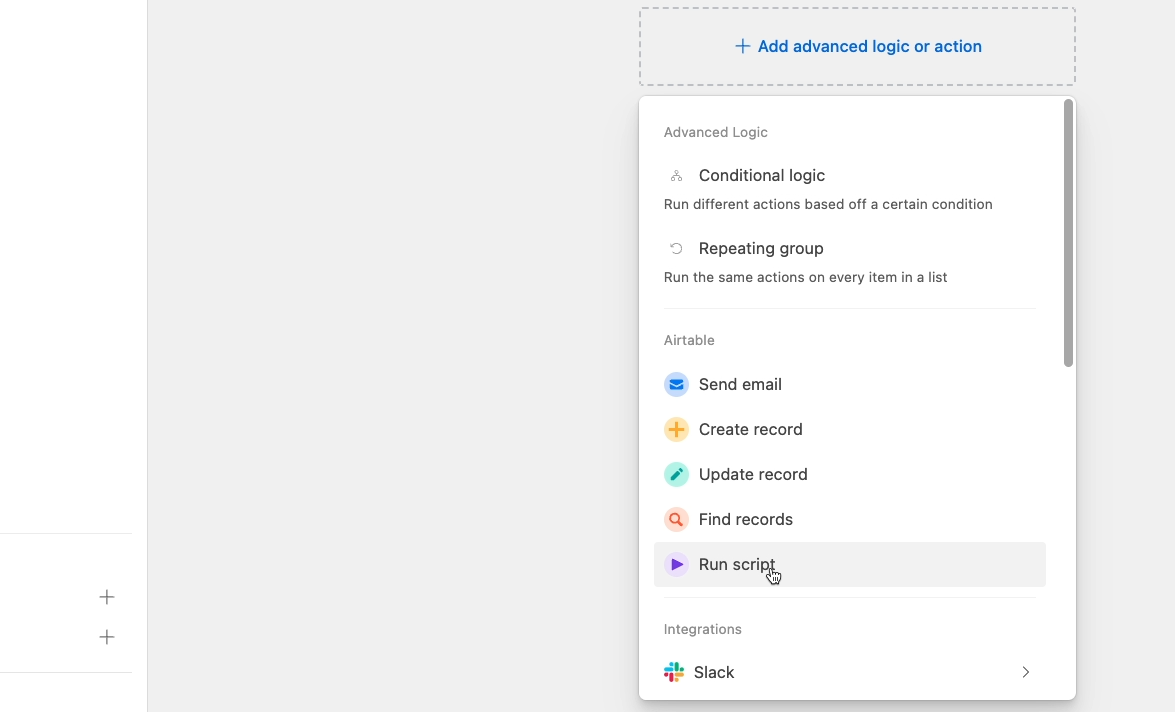
Additionally, the ability to trigger automations when a record enters a view is extremely useful. It’s a very simple way to set up an automation, and missing it is a big disadvantage for SmartSuite automation.
Third-party automation in Zapier or Make
The “New record in view” trigger is also one of the main factors that separates Airtable and SmartSuite when it comes to third-party automations.
As you can see with a quick search in XRay.Tools, our free automation search engine, popular automation providers like Zapier and Make support Airtable and SmartSuite.
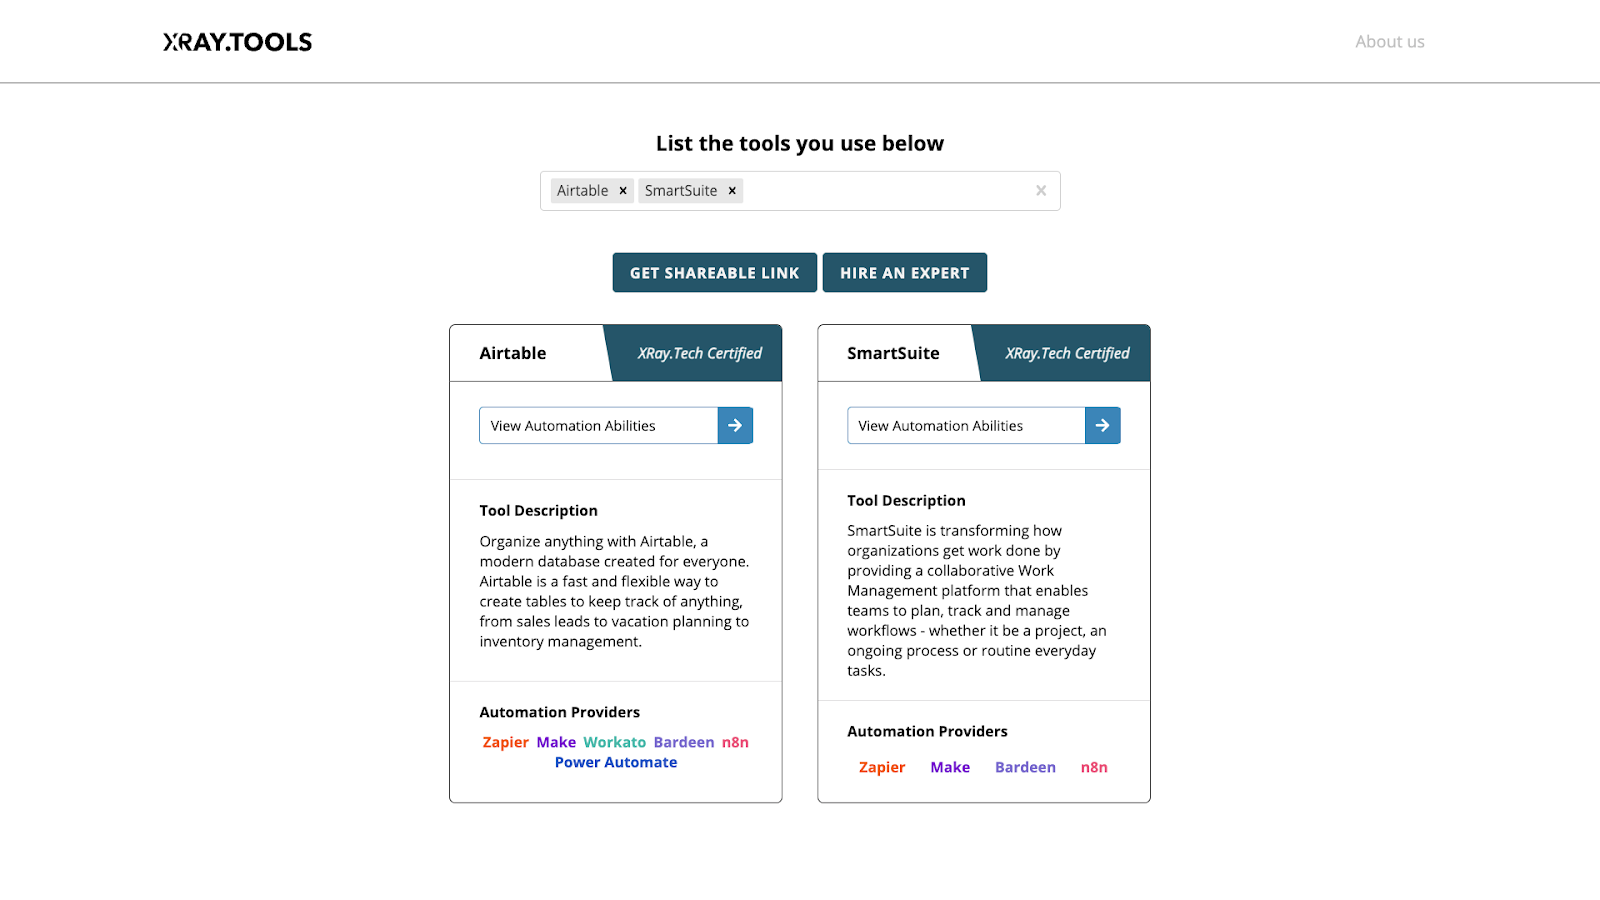
However, you can’t trigger an automation to run when a record enters a view in SmartSuite, even if you use Zapier or Make.
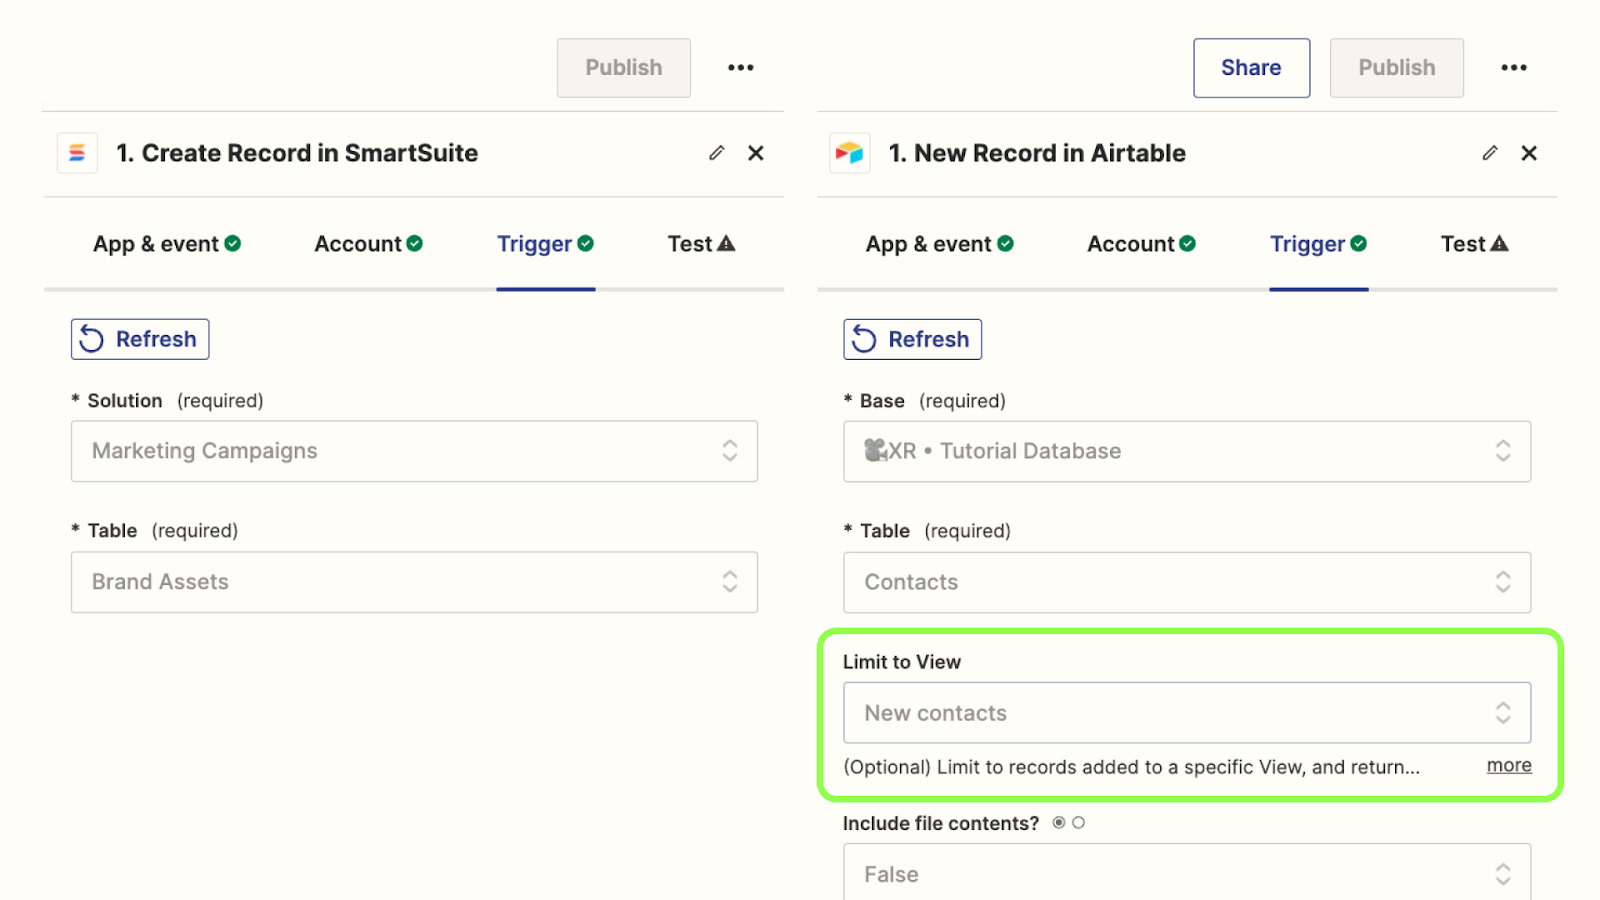
If you’re automating with SmartSuite in an app like Zapier, you’d have to trigger the automation for any new or updated data in your database and apply filters in the next step of the automation to narrow down the records that would be processed.
Essentially, you’d have to recreate the filters and conditions that you specified in the original SmartSuite view, instead of just pointing Zapier to the existing filtered view.
Winner: Airtable
If you’re looking for a platform to support automated workflows, Airtable is likely to be the better pick. It offers a wider range of triggers and actions in its native automation tools, and includes an essential option to limit its triggers to a specific view in Zapier and Make.
Integrations with other apps
Next, let’s take a look at the third-party integrations available for both apps.
Integrations in apps like Airtable and SmartSuite allow you to import data from other software, extend the capabilities of your custom systems, share data in a convenient portal for customers, and more.
Extensive extensions in Airtable
In general, you’ll find far more integrations for Airtable than for SmartSuite, which perhaps is not surprising given that Airtable has been around for much longer.
For instance, in Airtable, you can directly import data from software like Google Calendar, Salesforce, Github, and ZenDesk, among others.
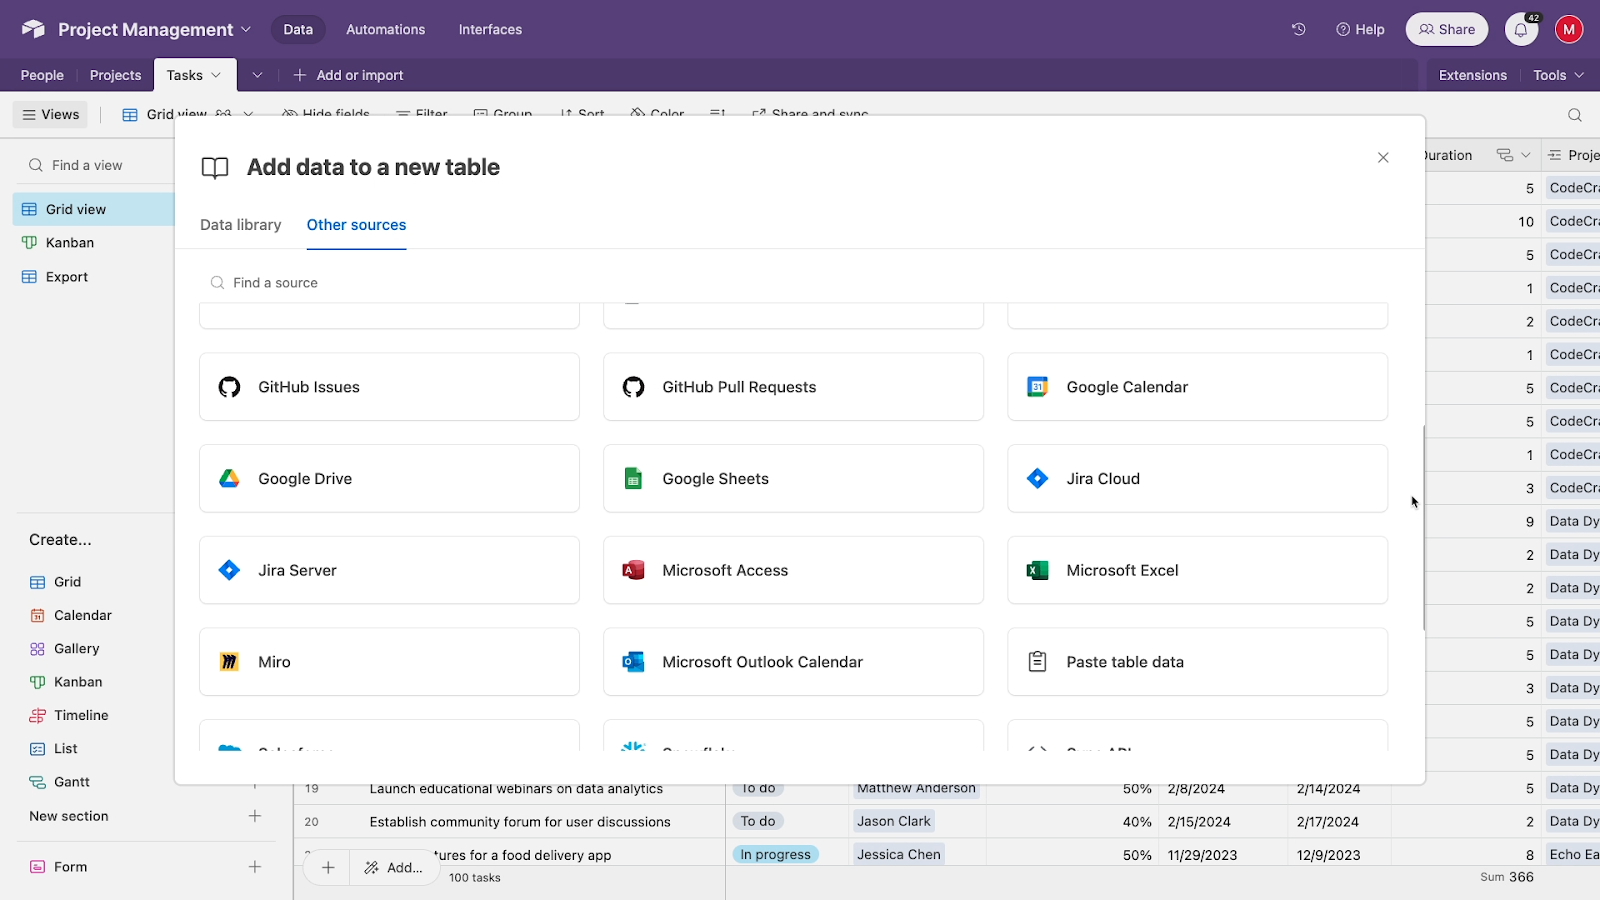
On the other hand, in SmartSuite, you can only import data from a standalone file, like a CSV.
Airtable also includes “extensions”, which are plugins built by both Airtable themselves and third-party developers. Adding an extension to your database will allow it to connect directly with other apps and perform additional actions.
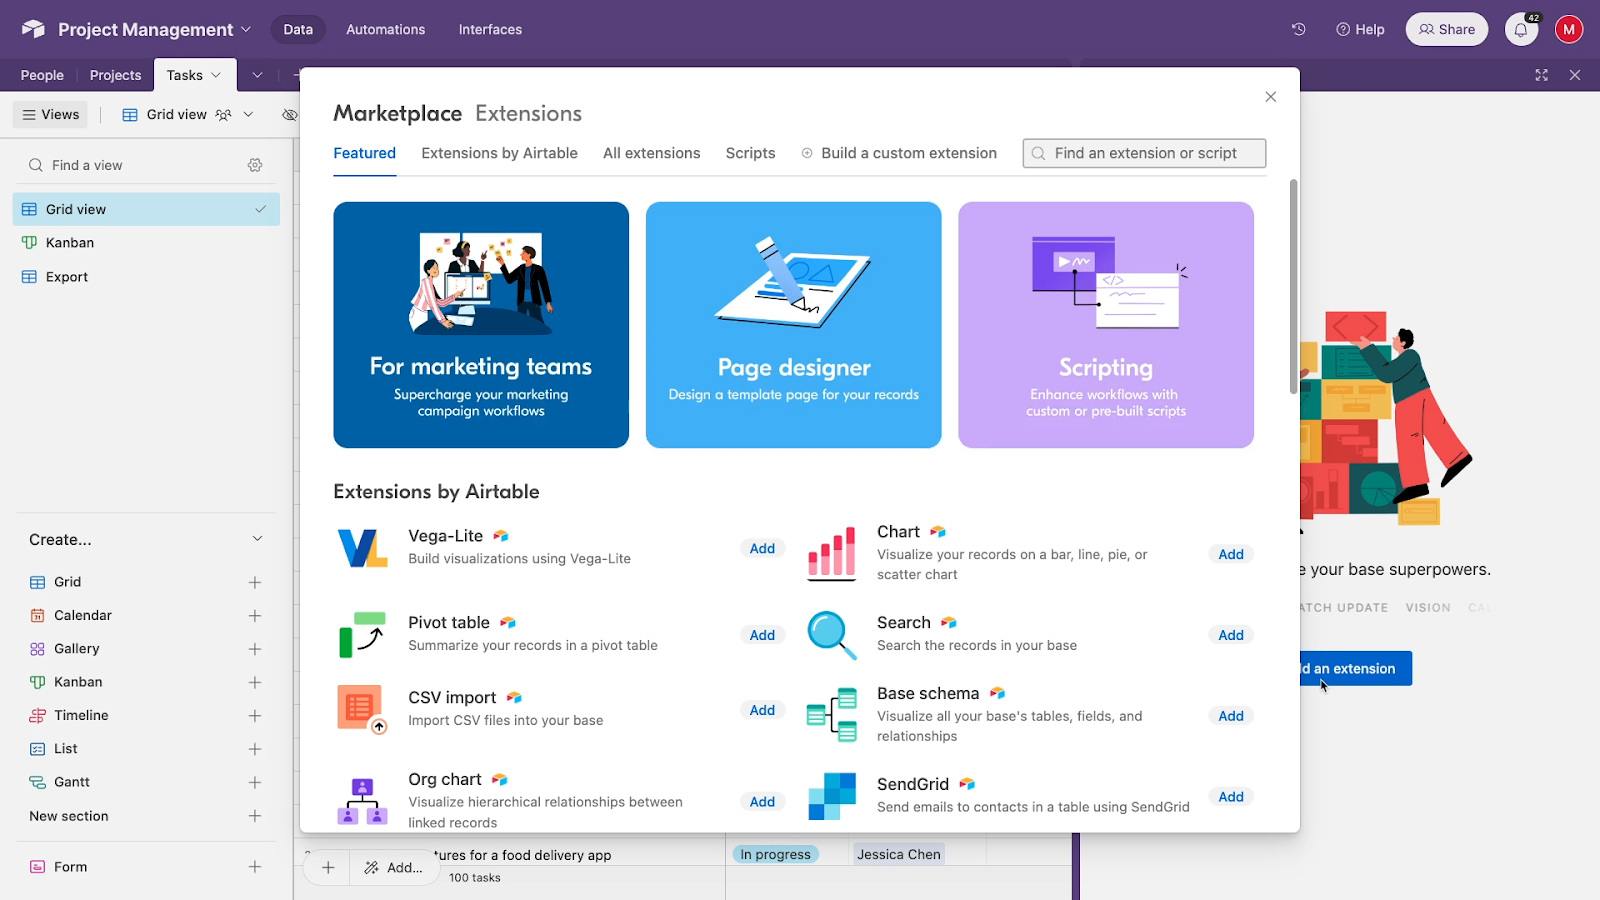
For instance, with the Data Fetcher extension in Airtable, you can connect your Airtable base to any app’s API and make a request through a no-code interface.
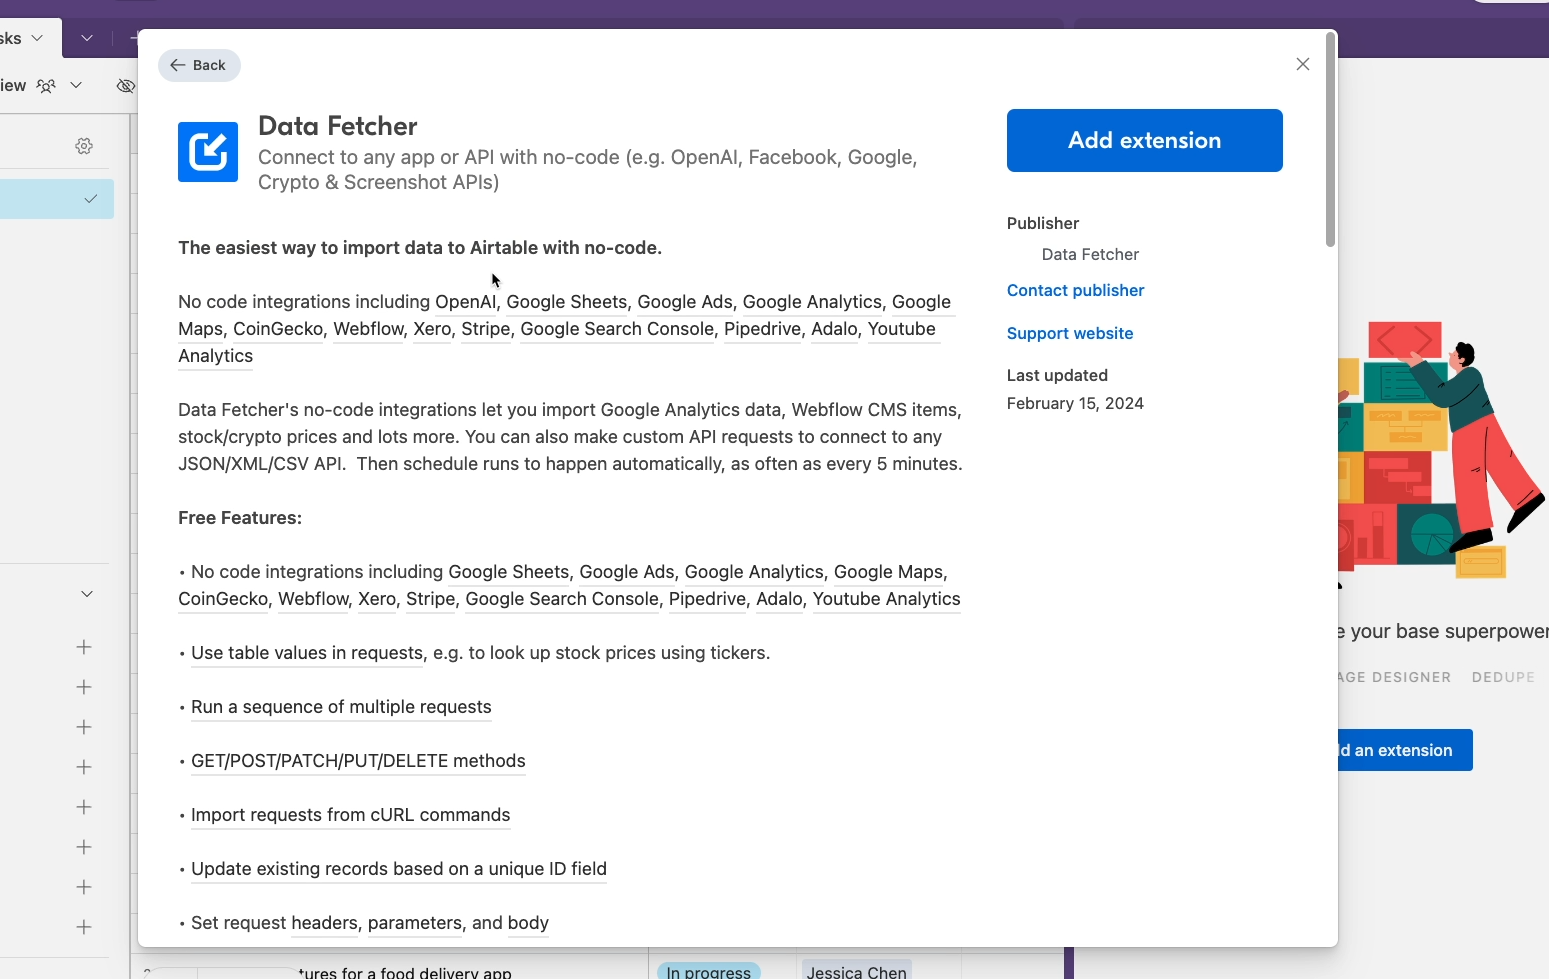
Even if Airtable doesn’t have any native integrations for an app you want to import data from, you can just use the Data Fetcher extension to get it.
Note that Data Fetcher, like many Airtable extensions, is a separate, optional app with its own paid plan.
Embed videos, conference calls and more with SmartSuite integrations
SmartSuite doesn’t include any plugins that are comparable to extensions, and doesn’t currently allow you to import data directly from another app when you’re creating a new solution.
The main integrations they reference are related to automation through their native tools or third party providers like Zapier and Make.
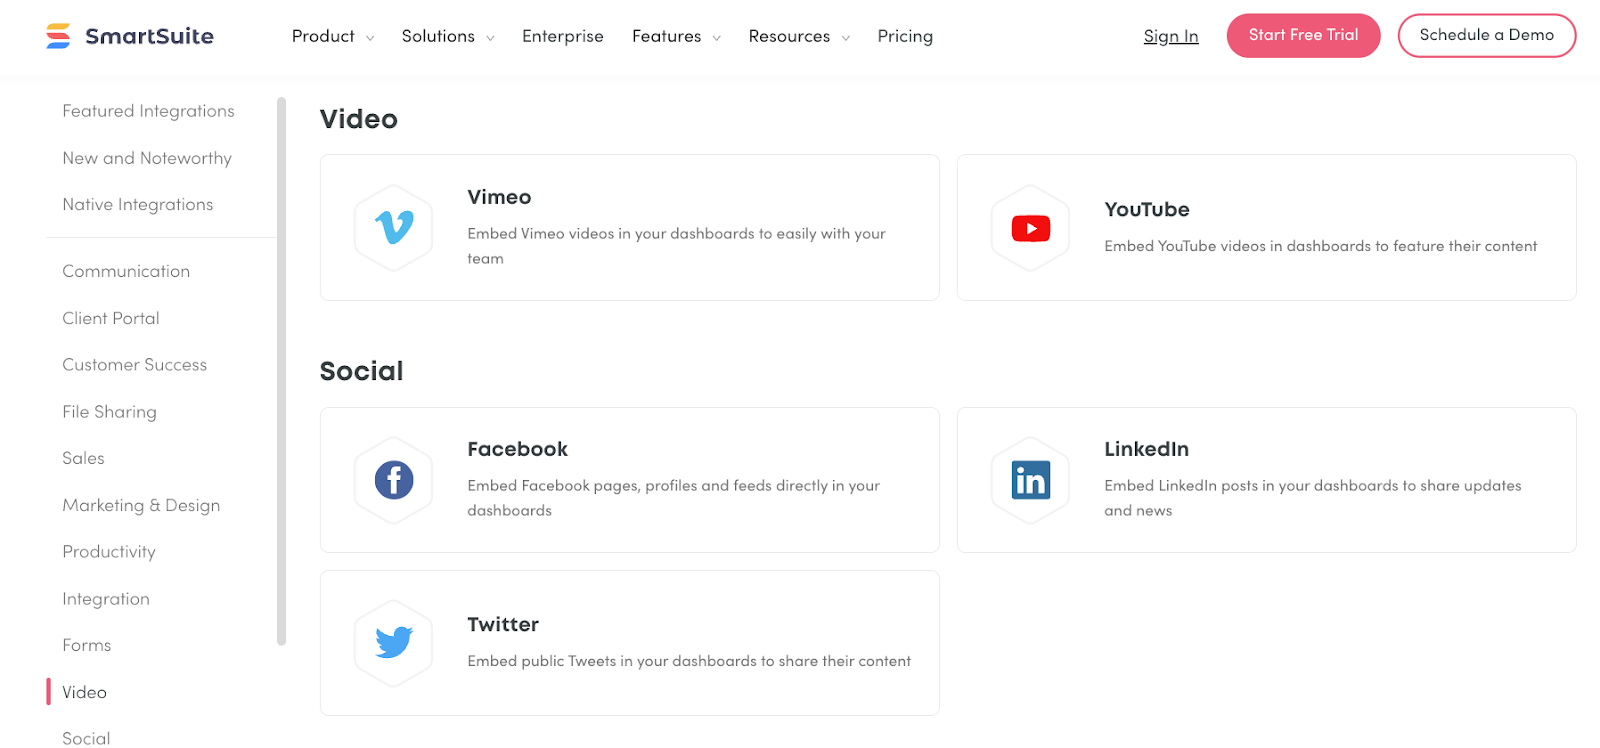
They also mention several apps that allow you to embed data directly into SmartSuite dashboards. With these integrations, you can insert YouTube videos, Zoom calls and more into your customized dashboards.
Turn your database into a web app with Softr
One specific integration that we’d like to highlight for both apps is the ability to connect to Softr.
With a Softr frontend and backend data stored in an app like Airtable or SmartSuite, you can create a portal for your clients or your audience.
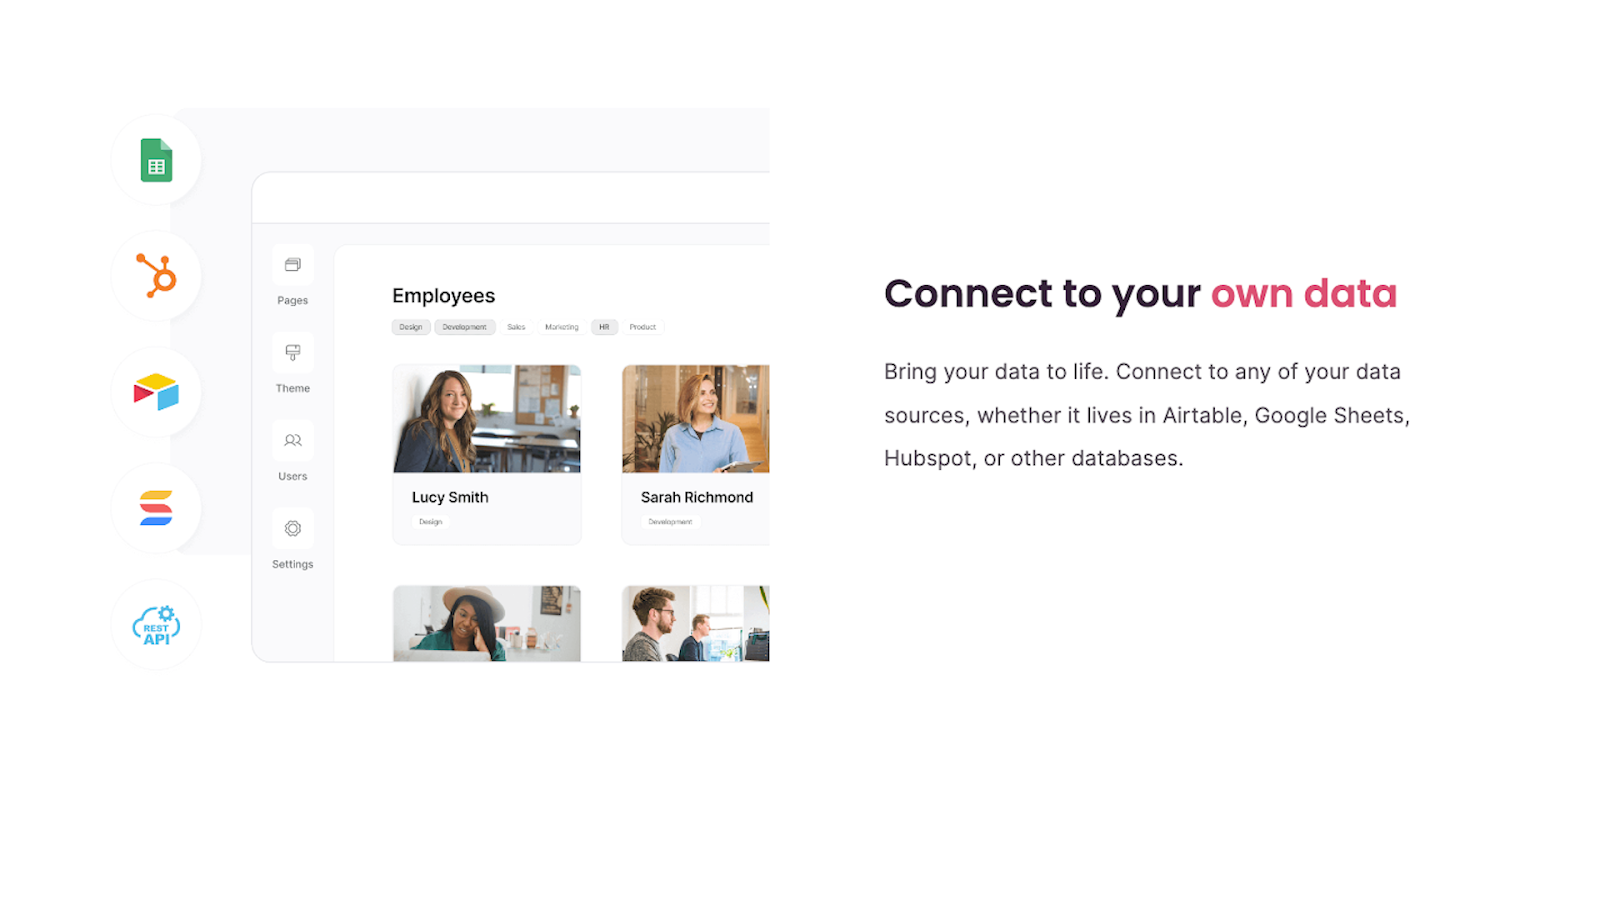
Softr enables easy user sign-up and login, among many other useful features, which you can learn more about in our Softr beginner’s guide.
Winner: Airtable
All in all, Airtable has the clear advantage when it comes to third-party integrations. Its easy import options and marketplace of extensions give you far more choices for connecting your Airtable data with other apps.
However, both apps can be used in conjunction with Softr, which is definitely something you should check out if you want to make client portals or other simple web apps.
Transform data into custom interfaces and dashboards
When you’re building systems with either Airtable or SmartSuite, you’ll often want to avoid third-party integrations entirely and instead build exclusively with the app’s native tools.
That’s where Airtable’s Interfaces and SmartSuite’s dashboards come into play.
With these features, you can assemble customized pages that contain visualizations and summaries based on your data.
You can add charts and graphs, filtered grid views, key stats, and more.
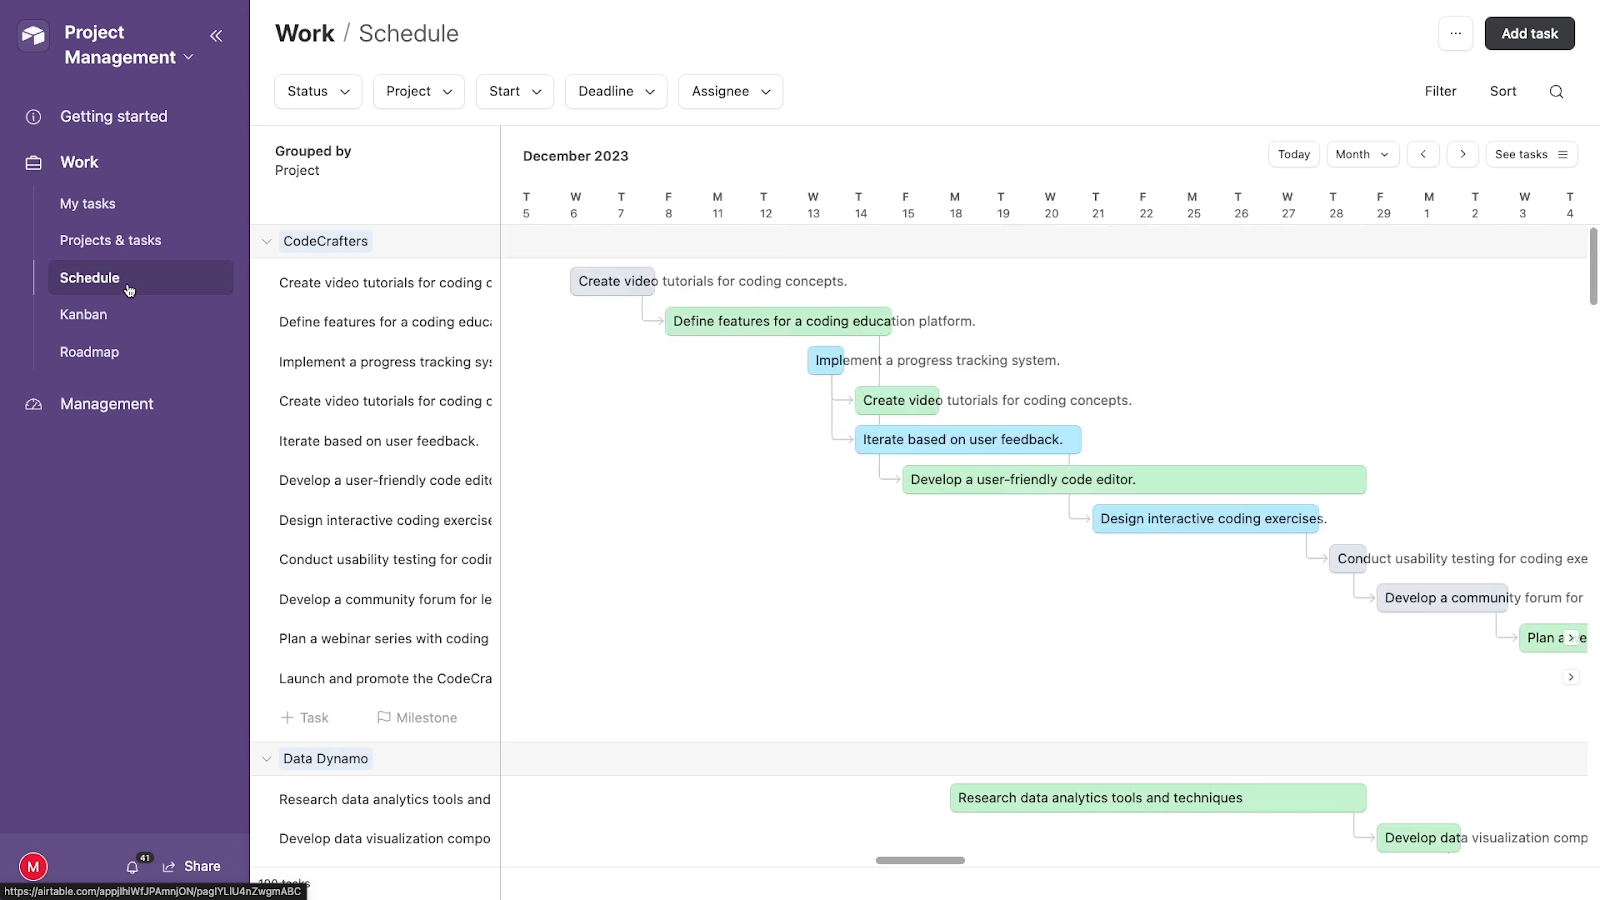
Interfaces and dashboards are great for putting together reports, or building simple layouts for specific workflows.
Access additional views and granular permission controls in Airtable interfaces
For most enterprise use cases, Airtable’s interfaces are superior to SmartSuite’s dashboards.
While Airtable has no choices for embedding videos and conferencing calls like SmartSuite, it offers more choices for displaying and arranging internal data. For instance, Kanban and Timeline views can be added to an Interface, but not to a SmartSuite dashboard.
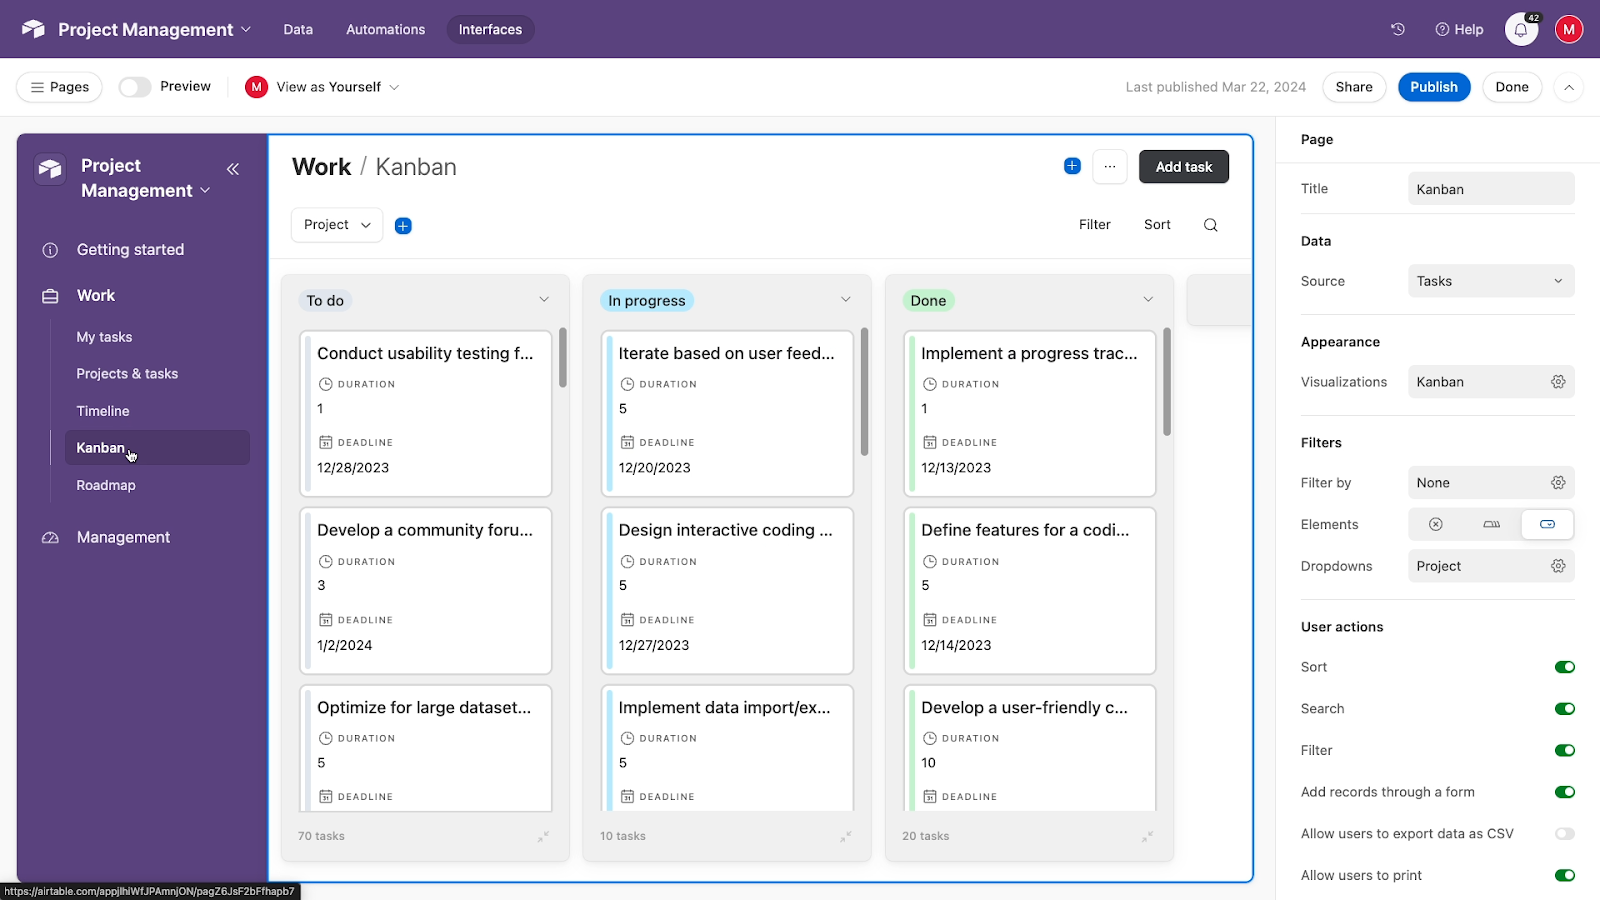
Airtable’s interfaces also include more granular control over editing permissions. For each element in your interface, you can set “Edit” and “create” permissions separately.
In SmartSuite, it’s all or nothing. There’s no distinction between creating or updating data.
Embed rich media and combine several databases in SmartSuite dashboards
Though they lack some useful view types and permission controls, SmartSuite’s dashboards are still a great feature.
As we noted earlier, SmartSuite dashboards allow you to embed a wide variety of external media, like YouTube videos and Zoom calls.
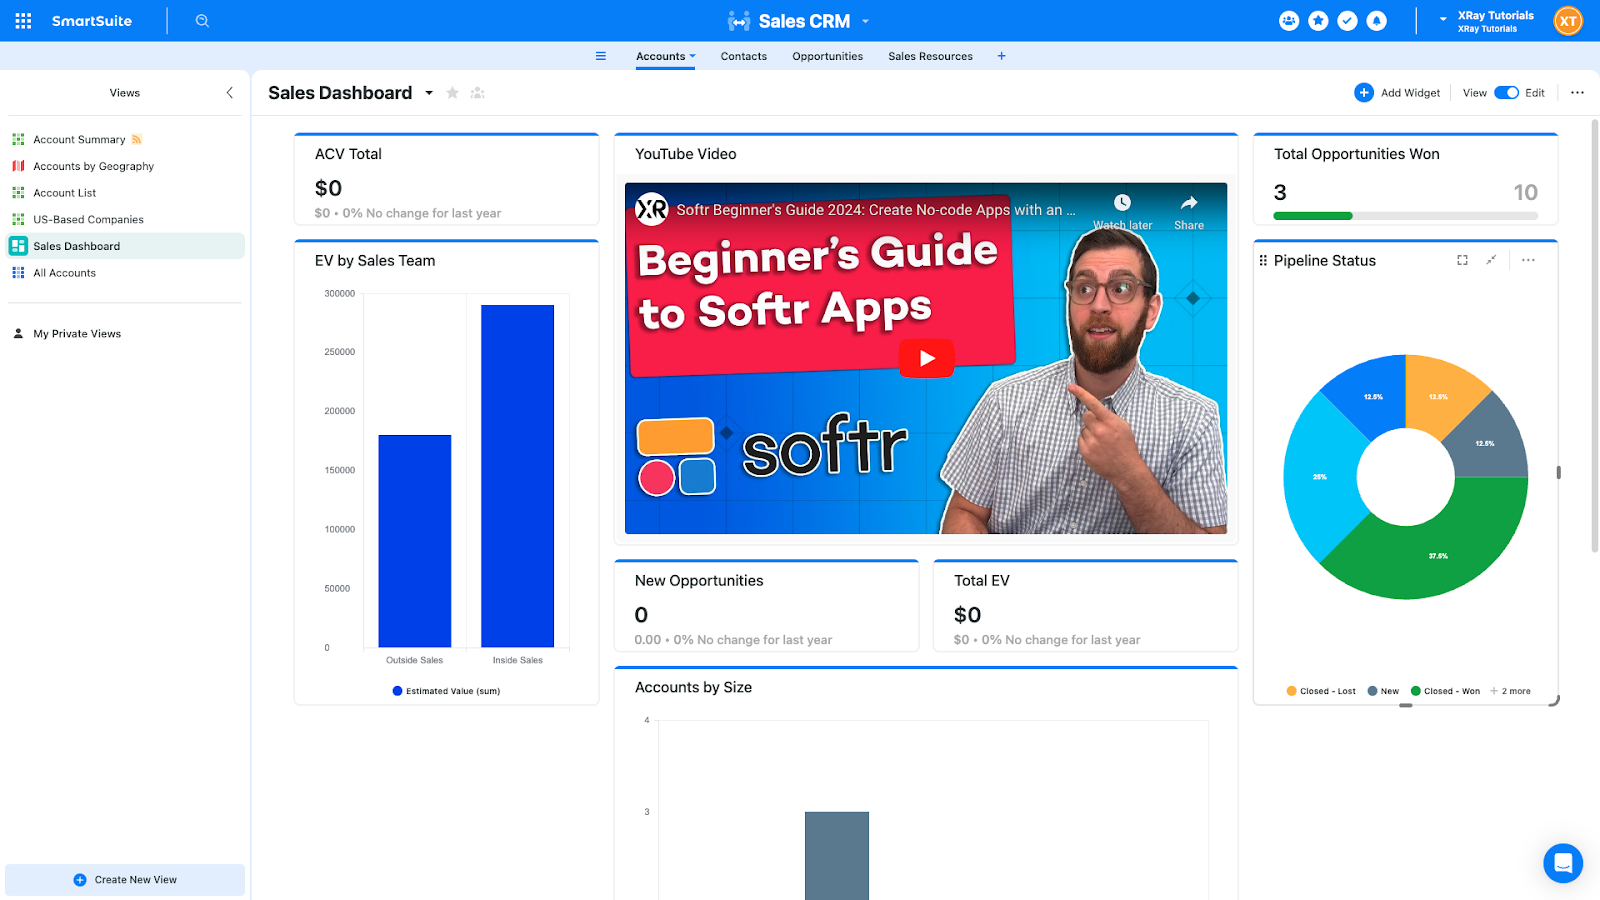
Additionally, SmartSuite dashboards provide the ability to combine data from several solutions (or databases) into a single layout.
This can only be accomplished in Airtable if you add synced tables to your database first, which is definitely not as convenient – and requires a Team plan or higher.
Winner: Airtable
Both Airtable and SmartSuite give you some great choices for building internal interfaces and dashboards.
Overall, however, we’d consider Airtable to be the better tool for building an interface for your team, particularly if you need to be precise with your editing permissions.
Technical performance and limitations
Before wrapping up this comparison with a pricing breakdown, let’s take a look at the technical performance and limitations of both tools.
General stability and record limits
Overall, Airtable is a more stable app with better performance. SmartSuite runs well most of the time, but might not have the responsiveness or uptime that you’d be looking for in an enterprise context.
If you plan to build an app around your Airtable or SmartSuite databases, then Airtable will be better equipped to support large teams making lots of requests. There’s also a sizable gap between record limits for both apps.
While SmartSuite tops out at 200,000 records per solution on their Enterprise plan, Airtable offers more than double that figure. On Airtable’s Enterprise plan, users can create up to 500,000 records per base, and you’ll see similar disparities at every pricing level.
Guaranteed uptime with Airtable Enterprise
Additionally, as a more mature app, Airtable’s uptime and general performance is excellent. On enterprise plans, Airtable guarantees 99.9% uptime each month, and will provide service credits to impacted accounts if they don’t meet that commitment.
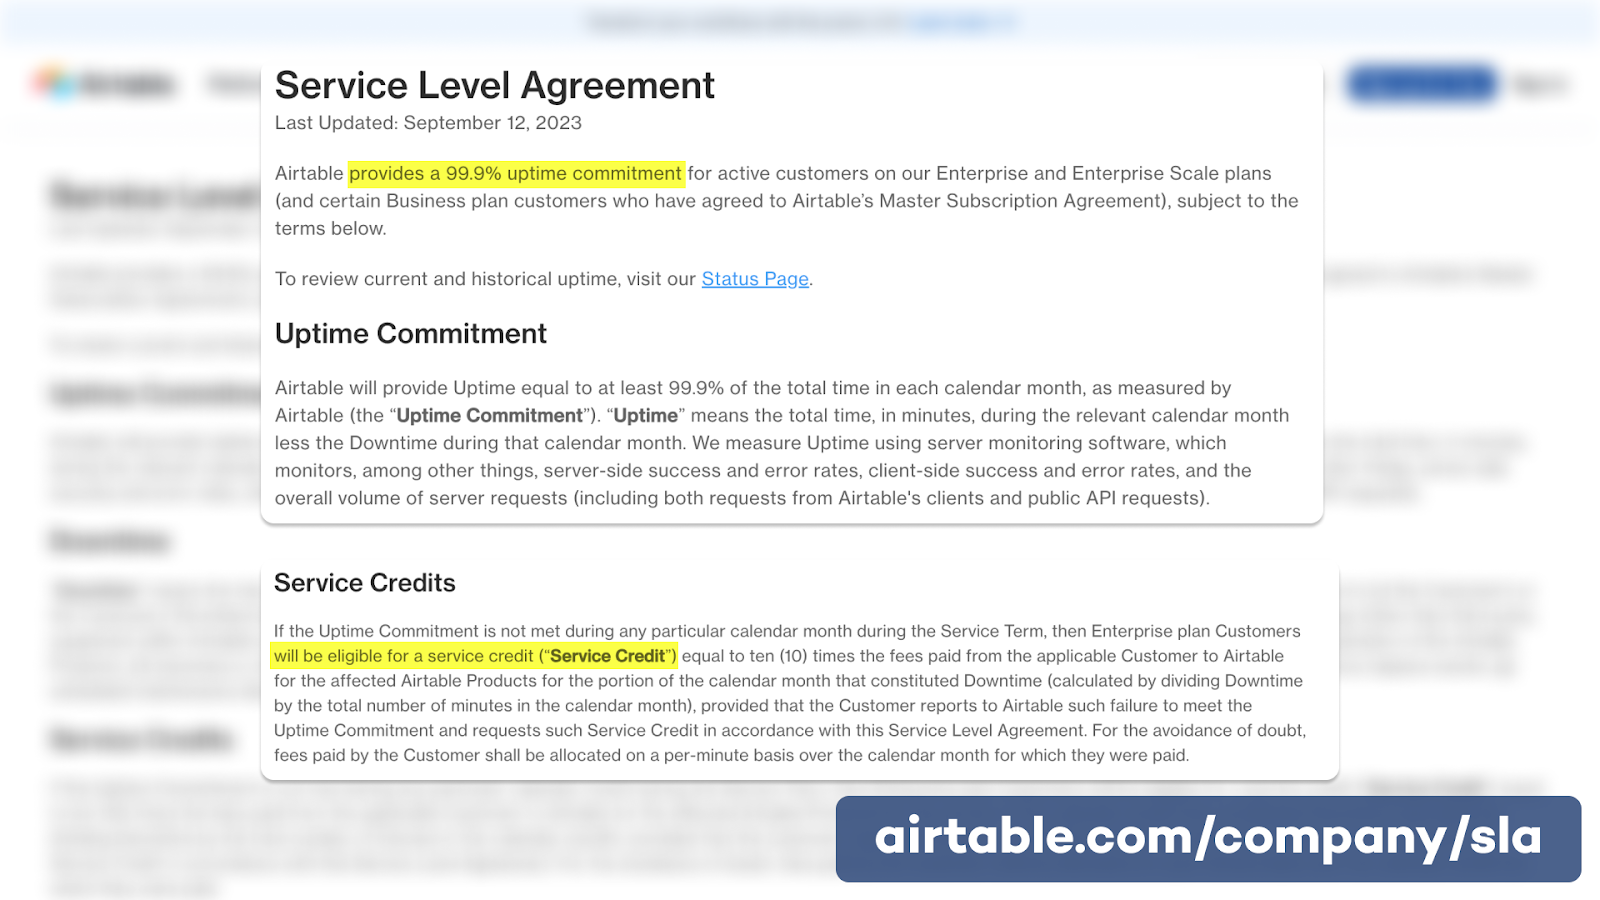
Winner: Airtable
We’re sure SmartSuite will continue to improve over the next few years, but if you’re looking for the best possible performance right now, Airtable will be your pick.
Pricing plans
Finally, let’s take a look at how both of these apps will impact your bottom line and go over their pricing plans. We’ll give you a quick overview, but for more detail, you can check out Airtable’s pricing plans and SmartSuite’s pricing directly.
Pay less with SmartSuite; get more with Airtable
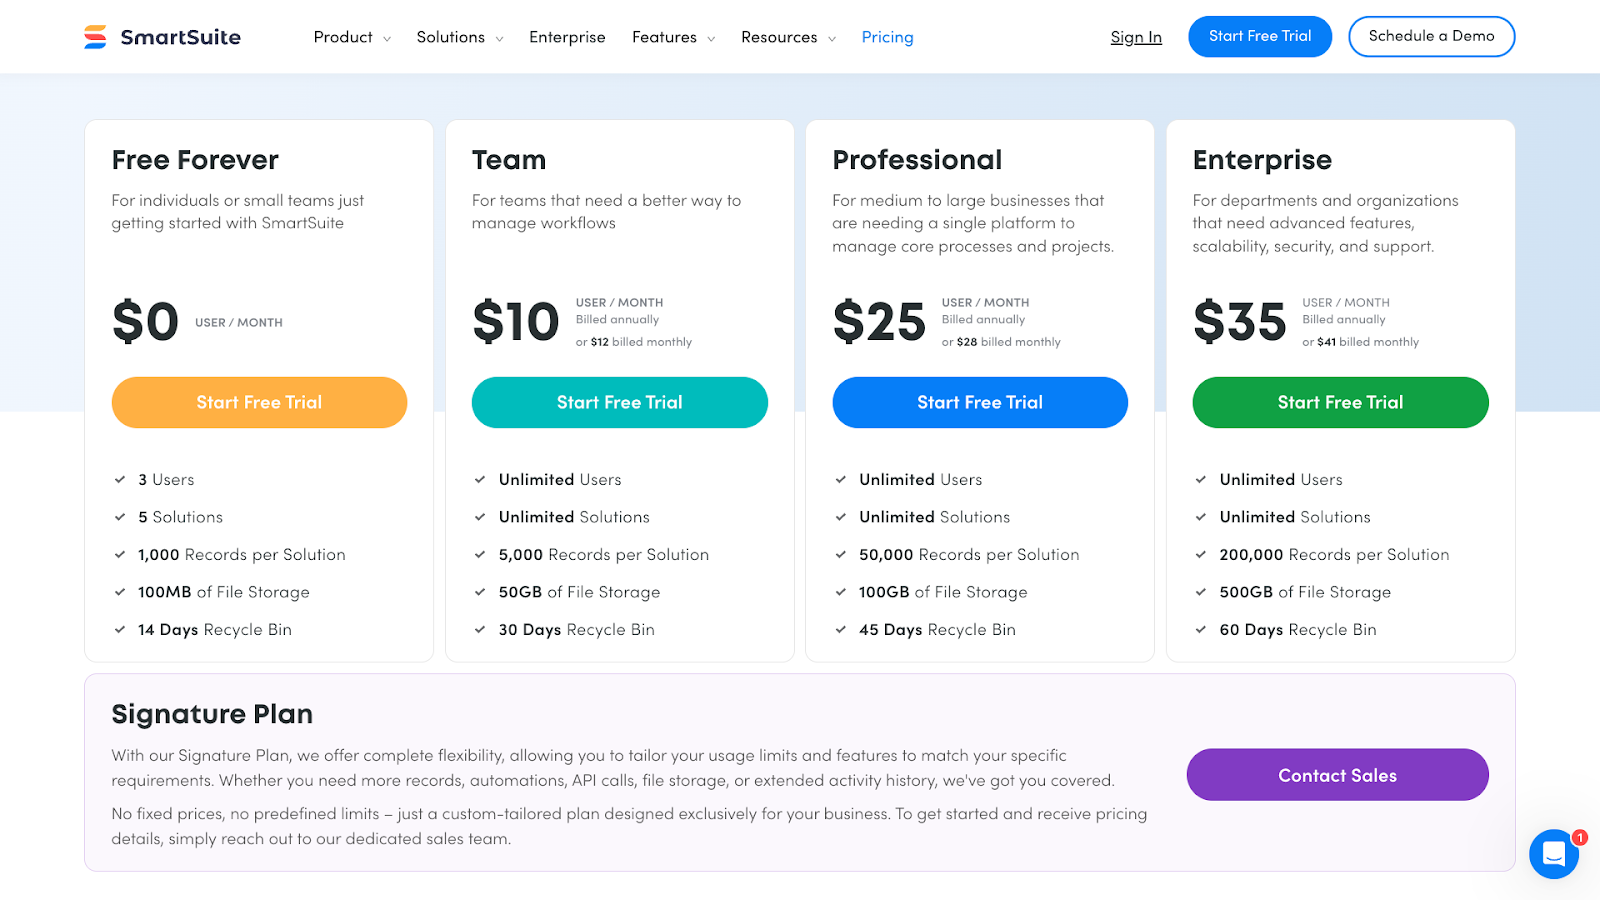
SmartSuite is considerably cheaper than Airtable, with most plans coming in at just over half the cost of the comparable Airtable package.
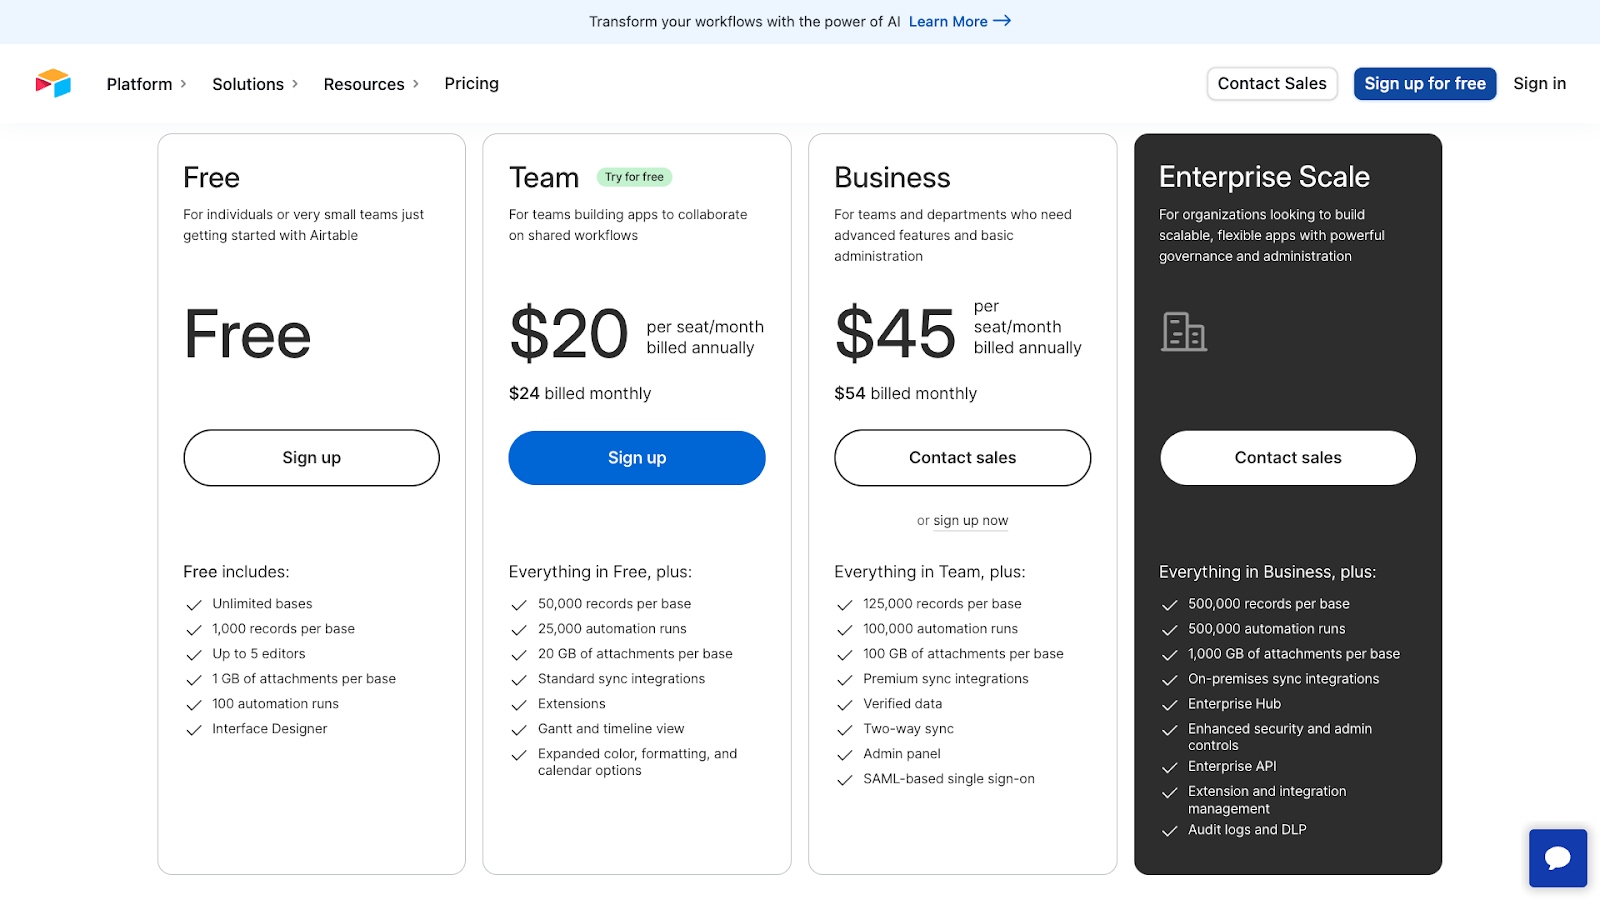
However, Airtable’s higher prices do come with additional features and perks.
With Airtable’s plans, you’ll get more cloud storage and higher record limits at every tier. The Enterprise plan also offers some extra security features and white-glove service that isn’t available in SmartSuite, unless you work with an expert directly.
If you’d like help managing your databases and workflows, our team at XRay can work with both tools.
Check for monthly vs. annual billing
Just note that when you’re looking at these pricing pages, the most prominent prices are calculated based on the assumption that you’ll be signing up for an annual plan.
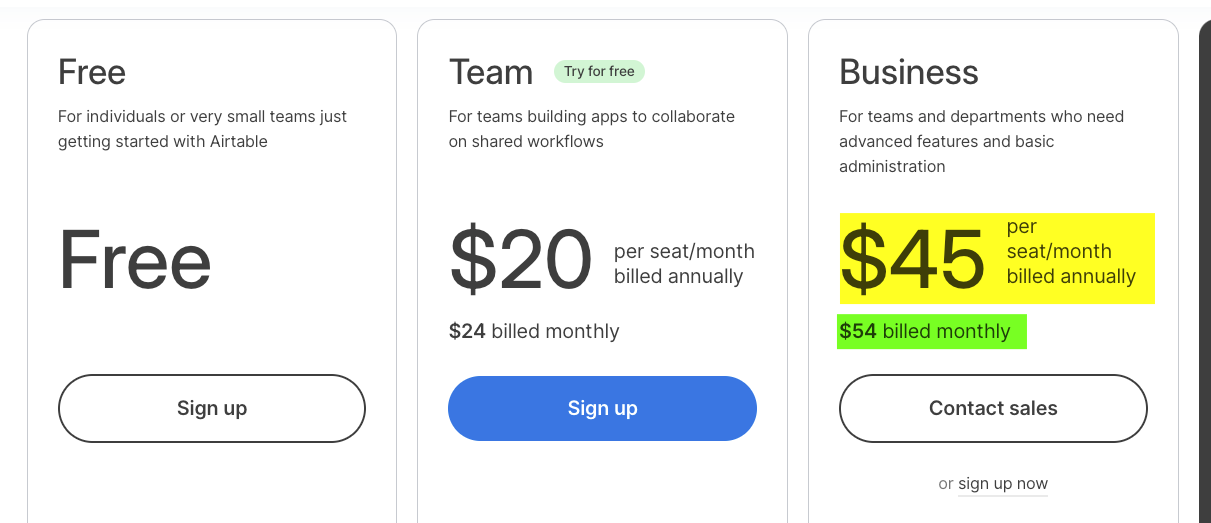
If you’re paying month-to-month, your price will be a bit higher. Those figures are posted here, too, but they’re a lot smaller and easier to miss.
Comparing each app’s free version
If you’re not looking to pay anything, and just want to pick between the two free plans, we’d say SmartSuite wins out in every category except cloud storage.
You’ll get the vast majority of SmartSuite’s field types, views, and other basic features unlocked at no charge, while Airtable keeps many of their features behind a paywall.
But the 100MB of cloud storage, compared to Airtable’s 1GB, will pretty much limit you to uploading text files only.
Winner: SmartSuite
Ultimately, if you’re looking for a budget-friendly option, SmartSuite is going to be the better choice, as long as you can live without the extra features and capacity Airtable offers.
Making an informed choice for your team’s database software
Airtable and SmartSuite are both excellent apps that empower you to organize your data and create robust internal systems for your teams.
While Airtable is generally the technically superior app and a much better fit for enterprise users, SmartSuite’s unique features and lower prices make it a good choice for many solo builders and small businesses.
Try both apps for free to see how they work for yourself.
If you’d like to see more software comparisons and automation tutorials, be sure to check out our blog or our YouTube channel. You can also follow XRay on Twitter, Facebook, or LinkedIn.
Are your date and time stamps in Power Automate not coming out the way you’d like?
Whether you need to reformat a date-time value in Power Automate, or change the time zone to match your region, you can do it all with a single automated step – no code and no scripting required.
In this quick tutorial, we're going to show you how to use the “Convert Time Zone” action in Power Automate to reformat and convert dates and times however you’d like.
Open a Power Automate flow with a date/time you want to reformat
To get started, open up any cloud flow in PowerAutomate that has a date/time value you want to format.
In our example, we’ll open up this automation that sends a Slack channel message for newly flagged emails in Outlook.
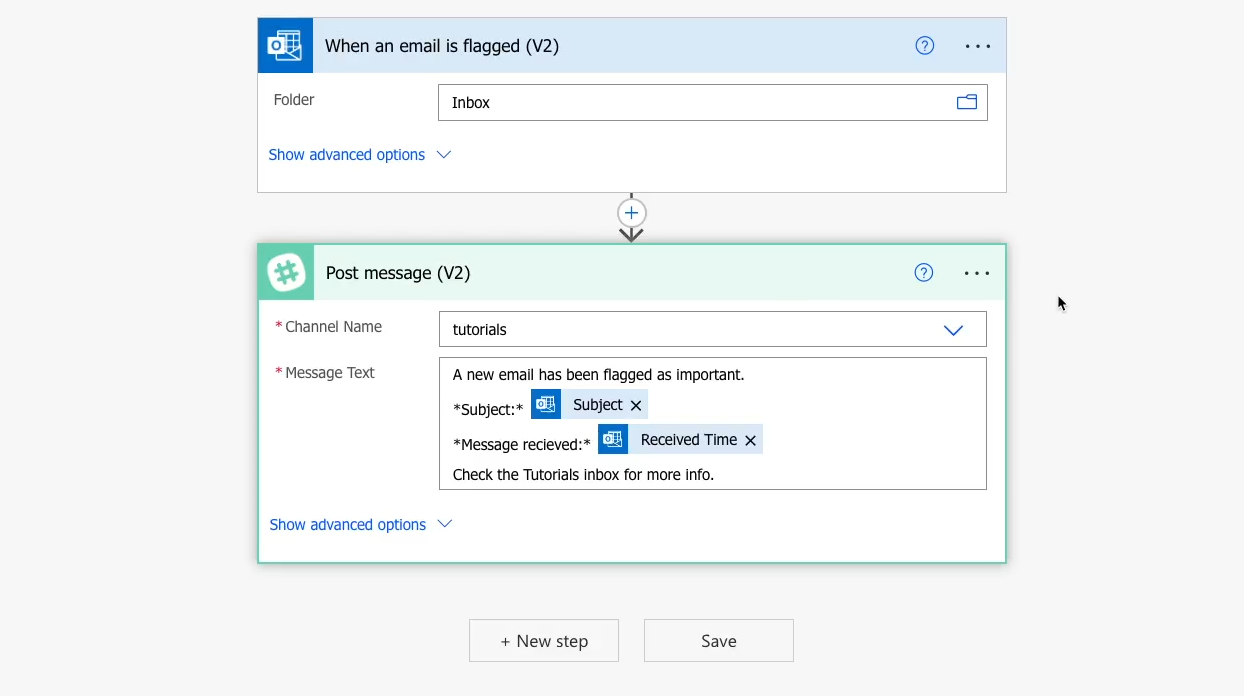
As you can see in the Slack screenshot below, this “Message sent” time doesn’t look great in its initial format. It’s probably fine for robots, but it’s got a long timestamp that isn’t really easy for human beings to read.
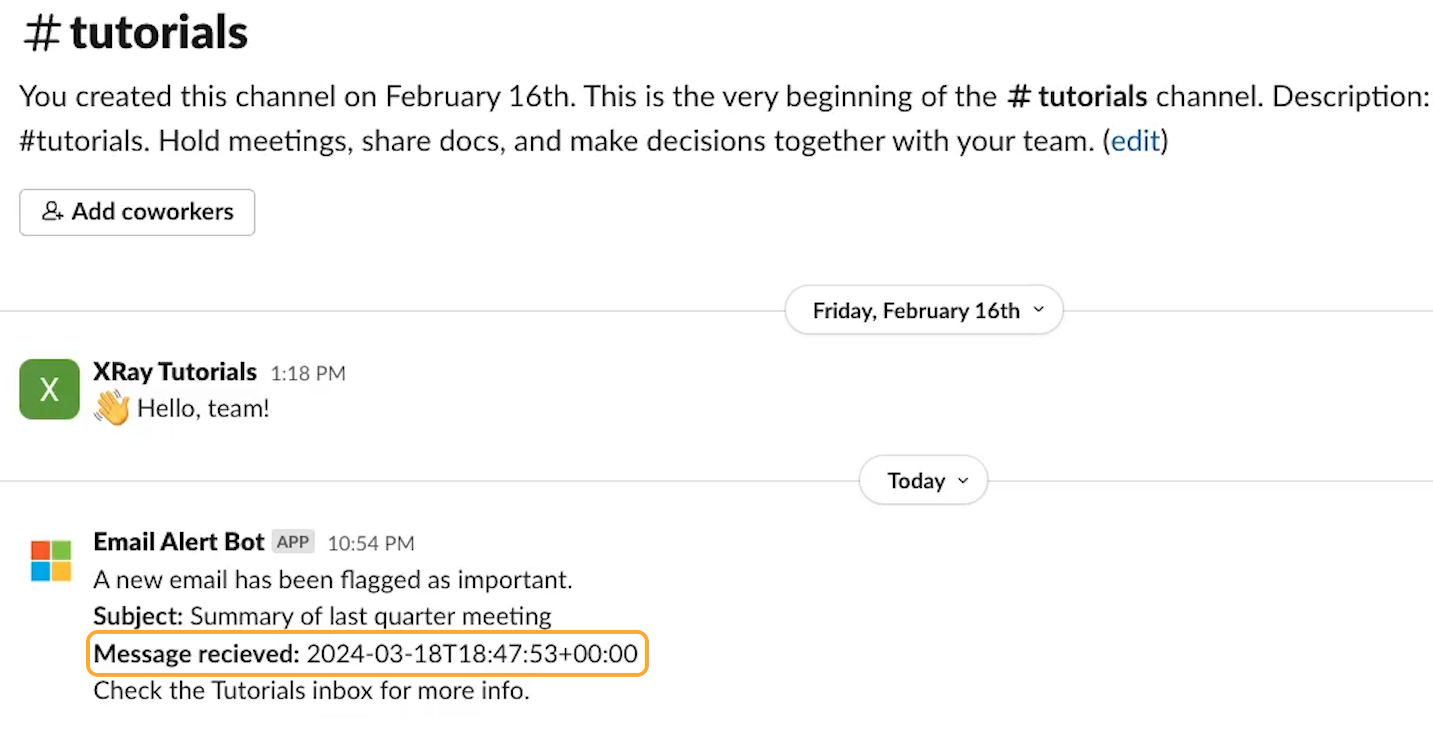
This is the date and time that we’ll adjust to a more easily readable layout.
Add a “Convert time zone” action to your flow
In Power Automate, add a step to your flow.
You can add this step anywhere after the step that finds or creates the date/time value you want to reformat, and before the step where you send the formatted time somewhere else.
The “Message sent” timestamp comes from the trigger in our automation, so we’ll add this step right after it.
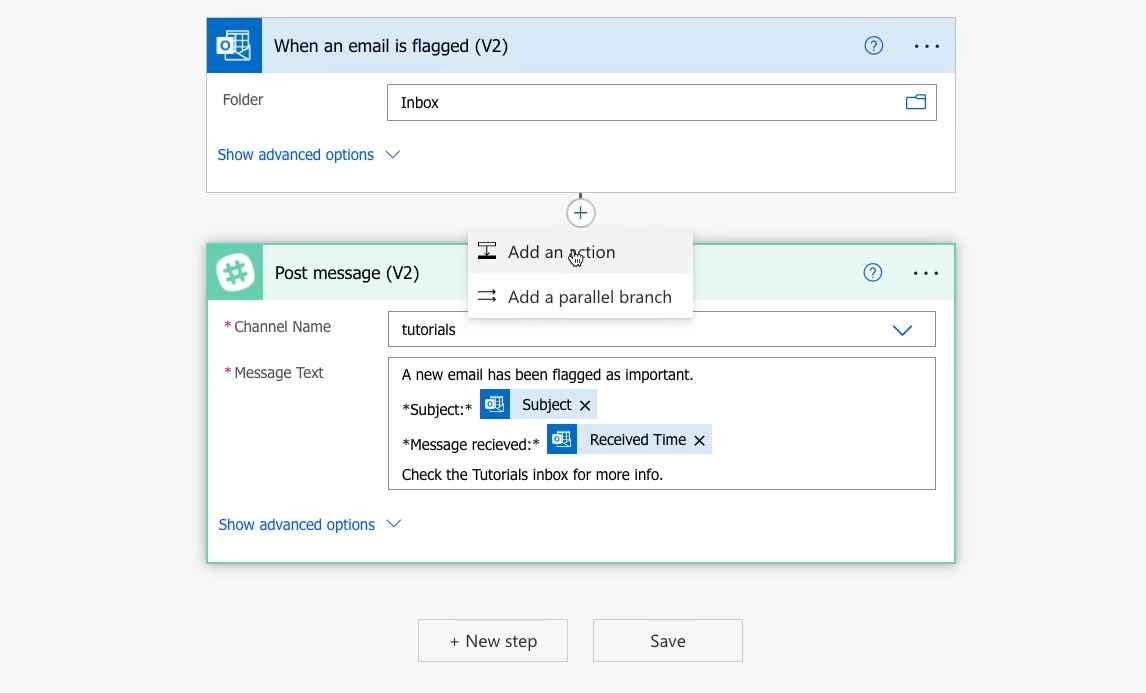
In the “choose an operation” window, search for “Date”, and select the built-in “Date Time” that appears.

Then, select the “Convert time zone” action.
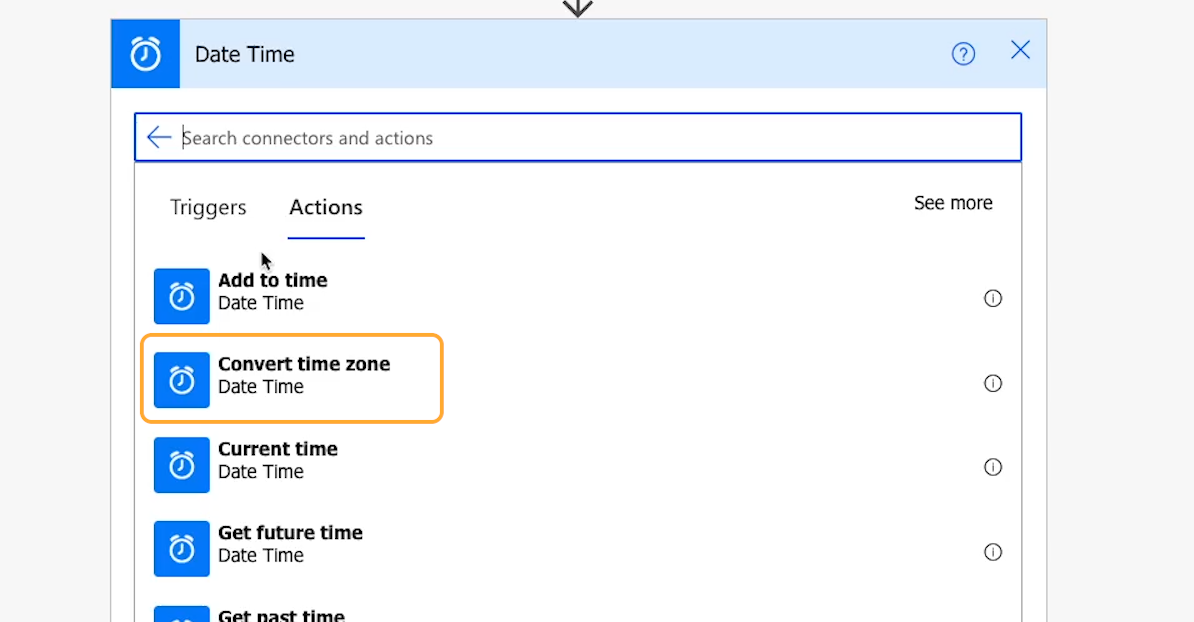
This action includes an option to reformat the time that you’re converting, and it doesn’t require you to convert the time zone if you don’t want to.
However, many apps process all timestamps in Universal Coordinated Time or “UTC” instead of your local time zone, so being able to convert the time zone will often be quite convenient as well.
Configure the ‘Convert time zone’ step to reformat your date/time value
Once you’ve added “Convert time zone” to your flow, you’ll just have four fields to fill out.
Base time
First, for “Base time”, you need to enter the time that you want to convert and/or reformat.
You can enter a date and time manually, but in most cases, you’ll probably want to use a date time value retrieved automatically from a previous step.
Click on ‘Add dynamic content’ to open up the “Dynamic content” window if it doesn’t open up automatically when you select the field.
Then, click on the date-time value you want to use. For our example, that will be the “Received Time” variable from the trigger.
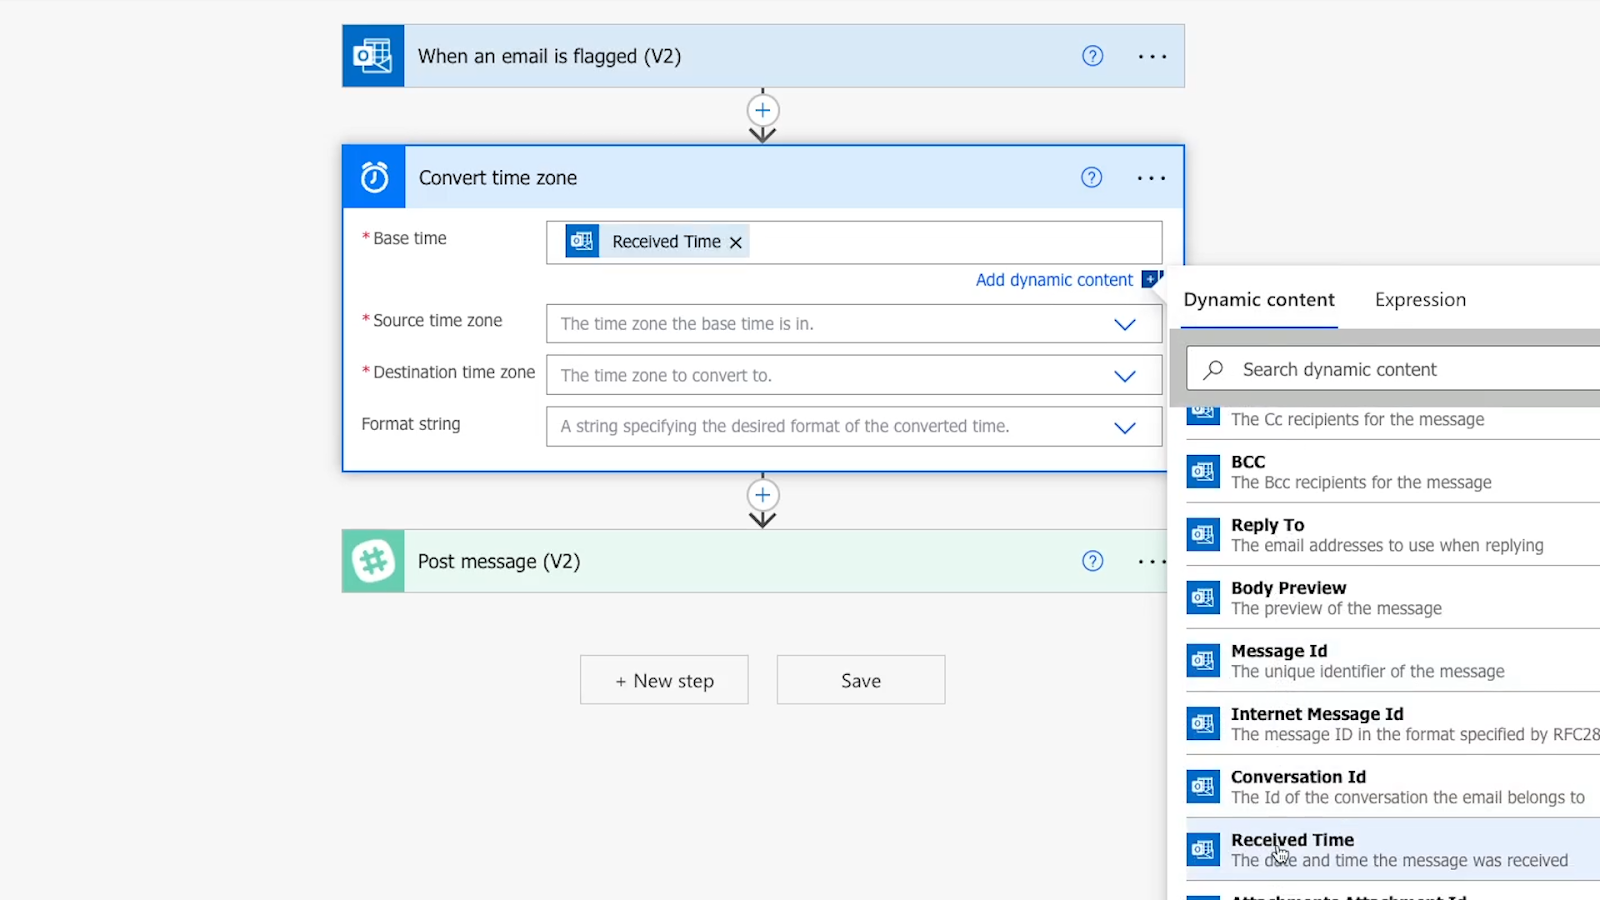
Source time zone
Next, in the ‘Source time zone’ field, you need to specify the original time zone of your timestamp. This will usually be either your local time zone, or UTC. Just use the dropdown menu to pick the correct option.
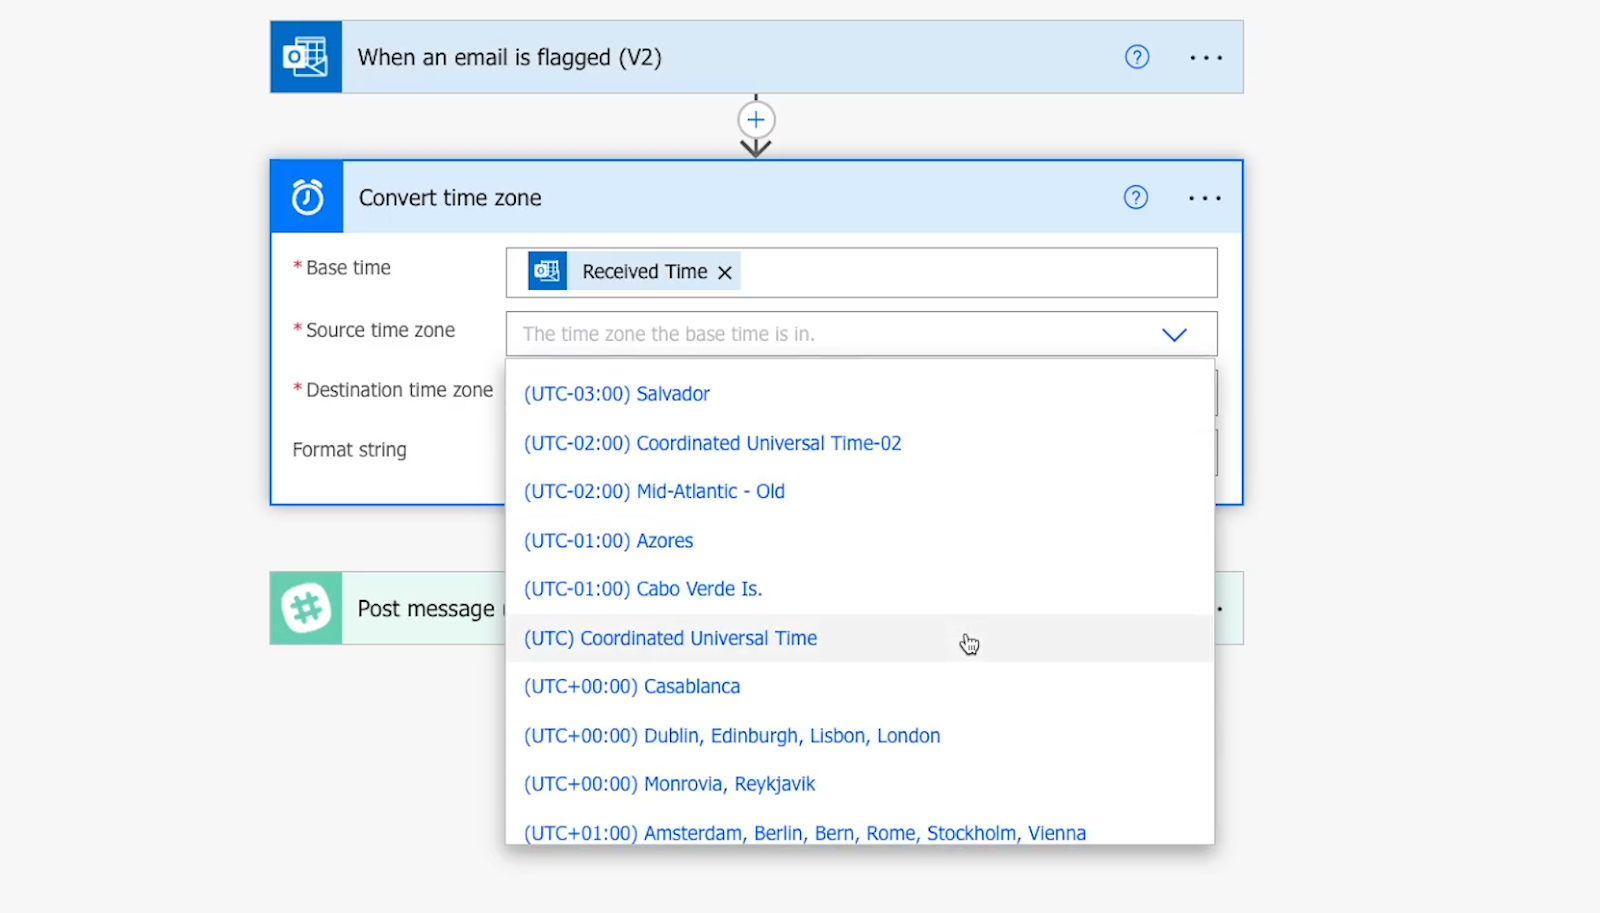
In our example, the timestamp is in UTC.
Destination time zone
Then, choose the time zone you want to convert the timestamp to in the “Destination time zone” field.
If you don’t want to change the time zone, then just set this to the same time zone that you chose as the Source Time Zone.
Once again, you can use the dropdown to find your choice.
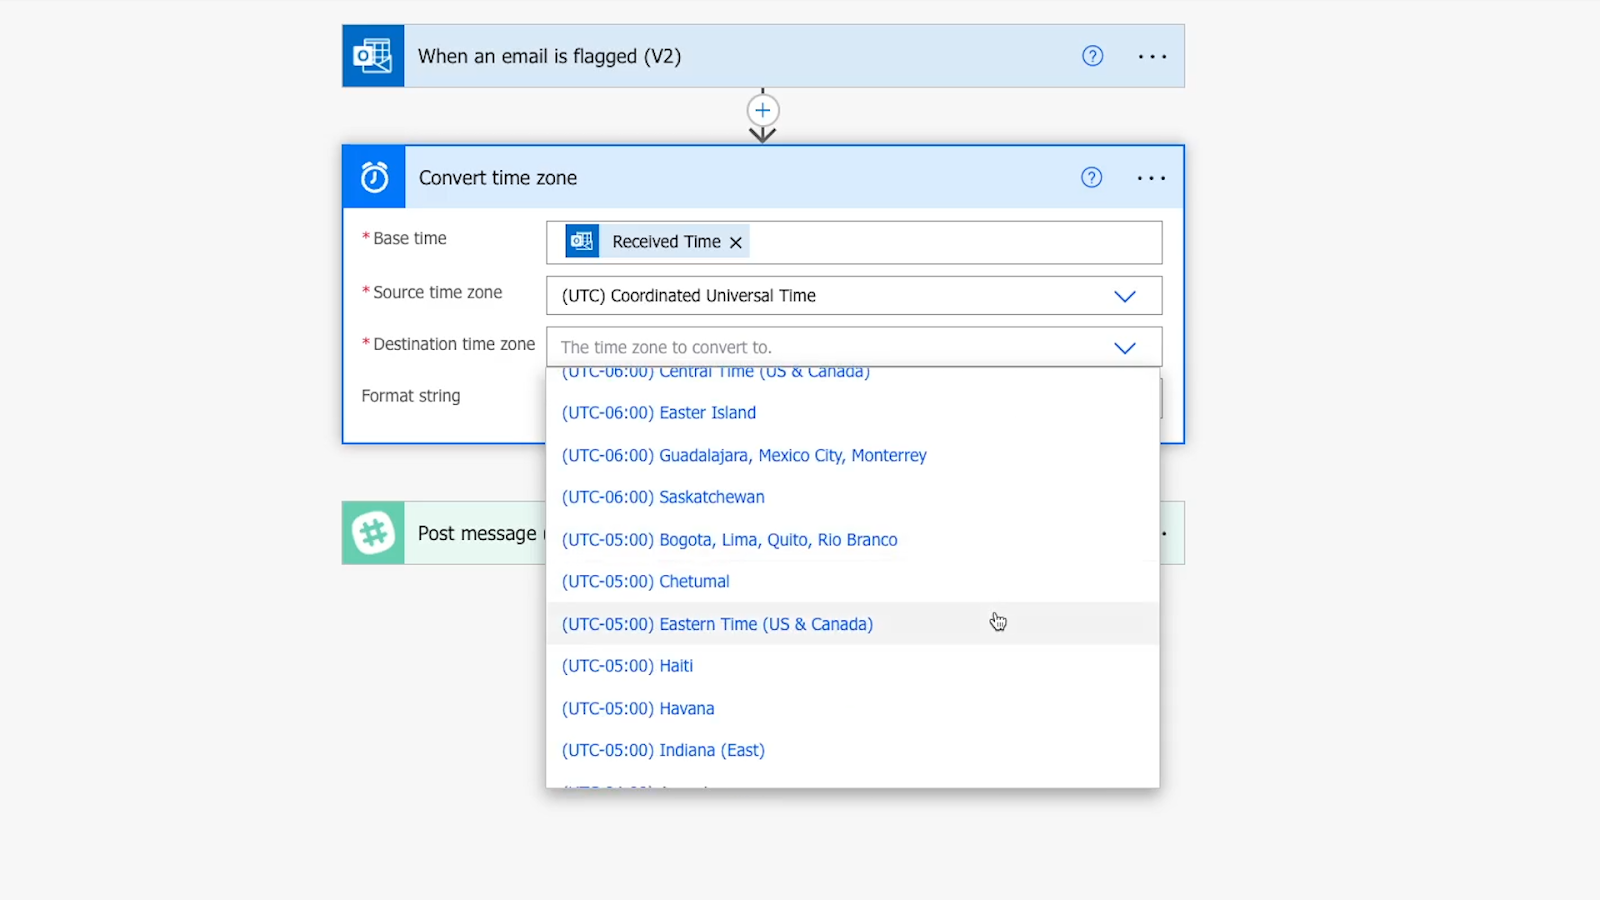
For our example, we’ll use our local US Eastern time.
Format string
In the “Format string” field, you can specify a new format for your date and time.
The dropdown will give you several common layouts, but you can also enter a custom format manually.
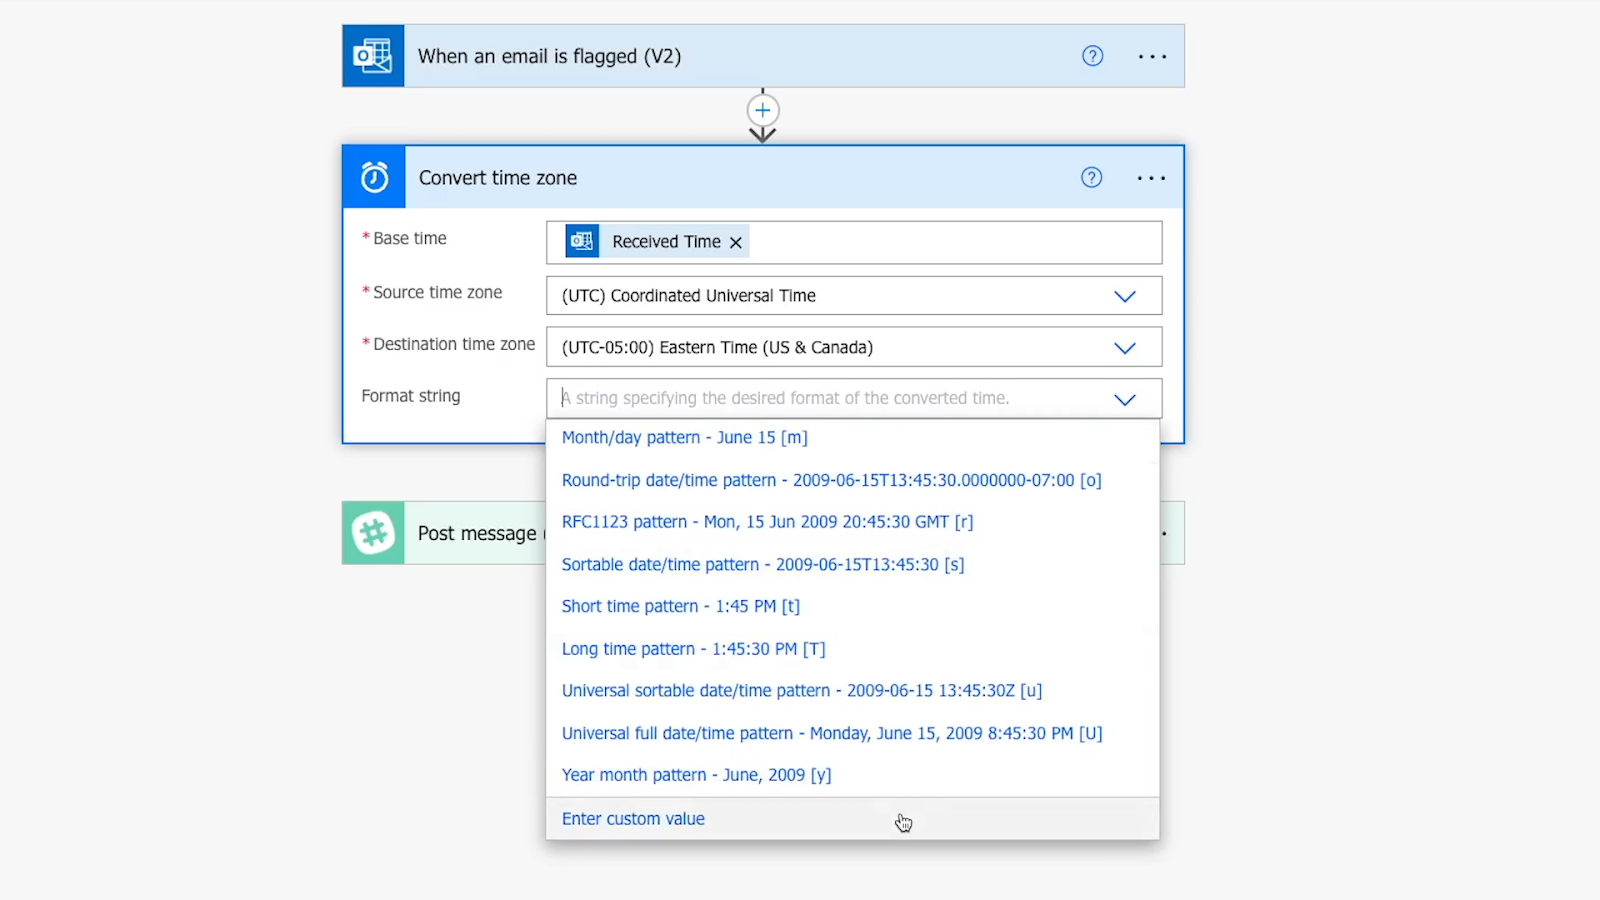
In Microsoft’s help docs, you can find detailed lists of every standard format, as well as every option for building a custom format.
In our example, we’ll use the following format: MM/dd/yy hh:mm tt
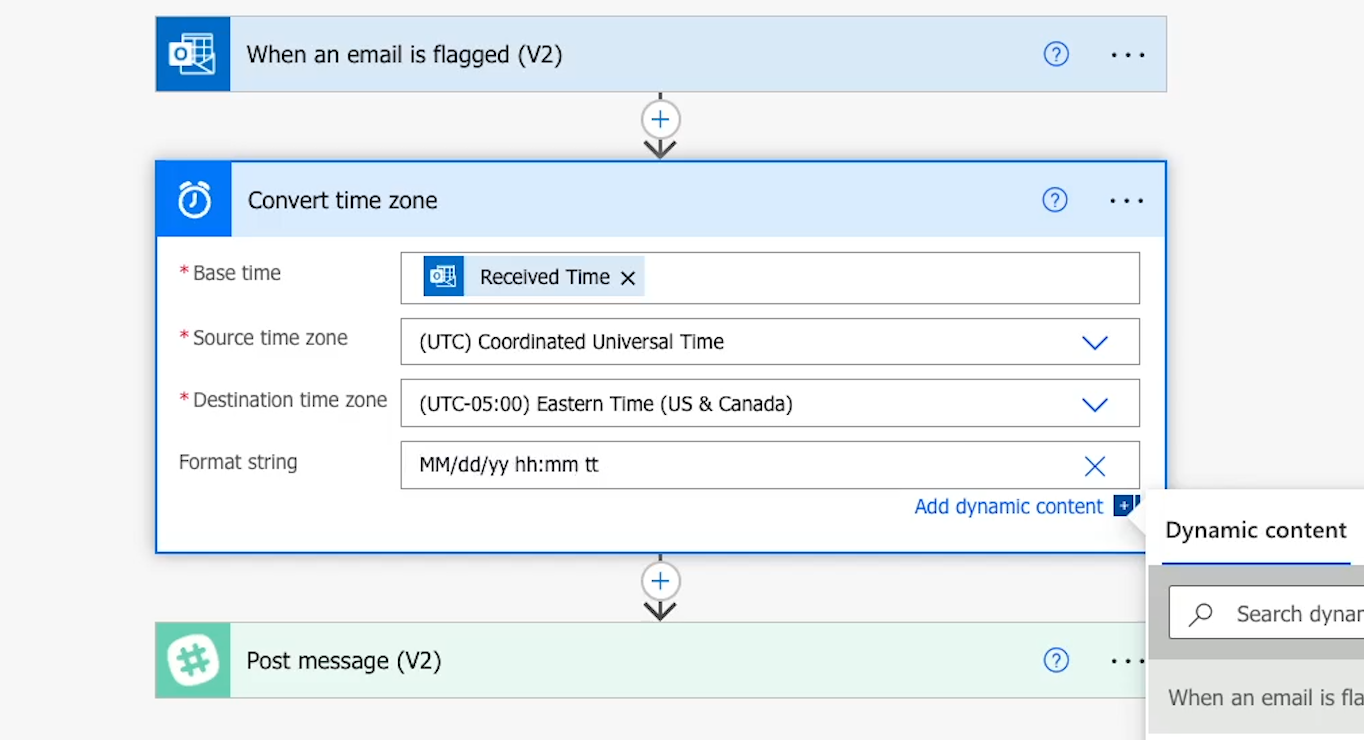
This will display the date with 2 digits each for the month, day, and year, and then show the time with an AM or PM as appropriate.
Note that you don’t need to enclose your format string in quotes; you can just enter it directly.
Update your automation to use the new converted date/time value
Once your “Convert Time Zone” step is all set, you just need to make sure that any subsequent steps now use the reformatted and converted timestamp instead of the original one.
In our example, we just need to edit the Slack message step.

I’ll delete the original “Received time” variable and replace it with the “Converted Time” variable.
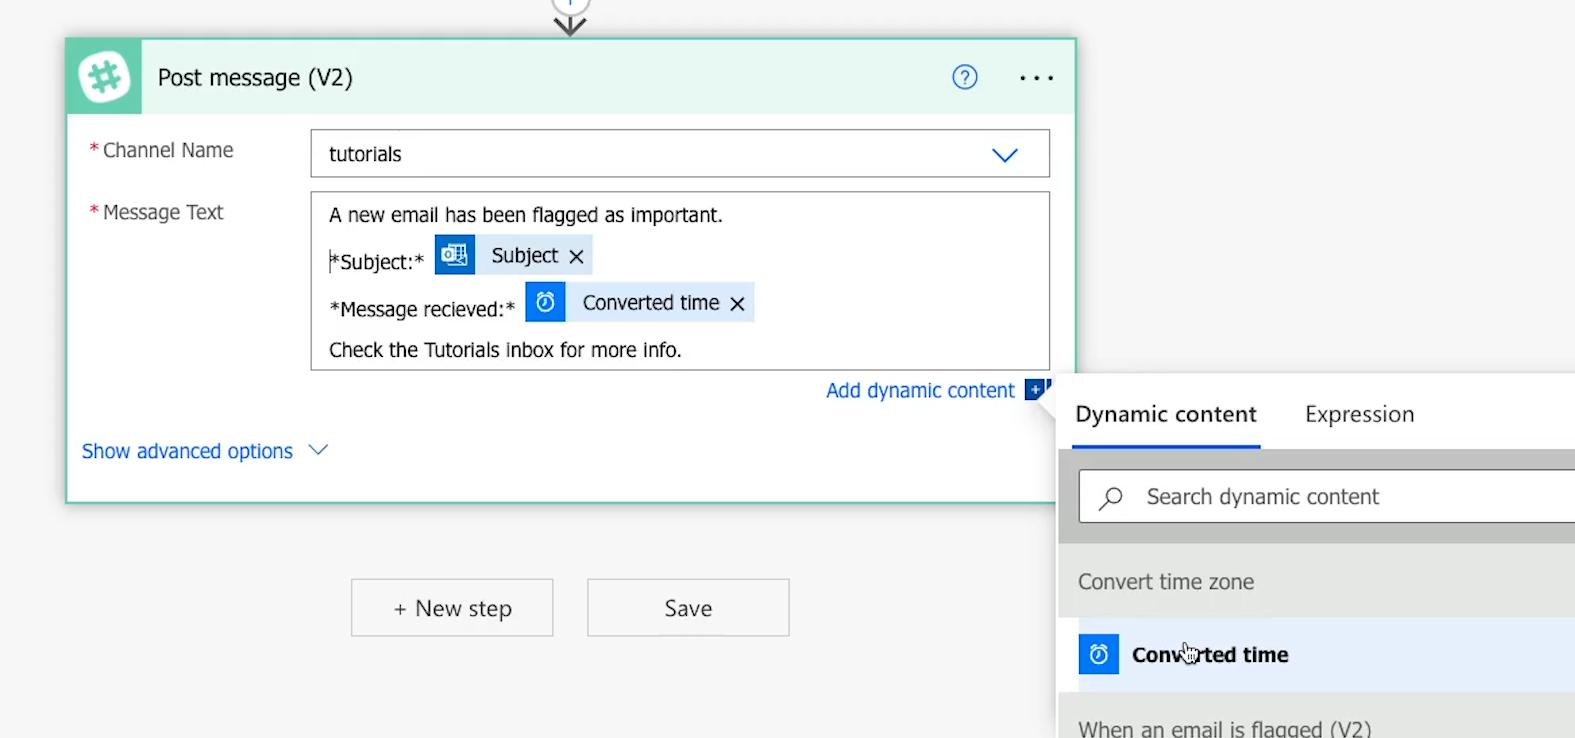
Test your finished automation
Once your automation is updated, save it and give it a test. If this is the first time testing your flow, you’ll probably need to test it manually. Otherwise, you can use data from a previous test to trigger the automation.
In our example, we’ll give the flow a manual test.
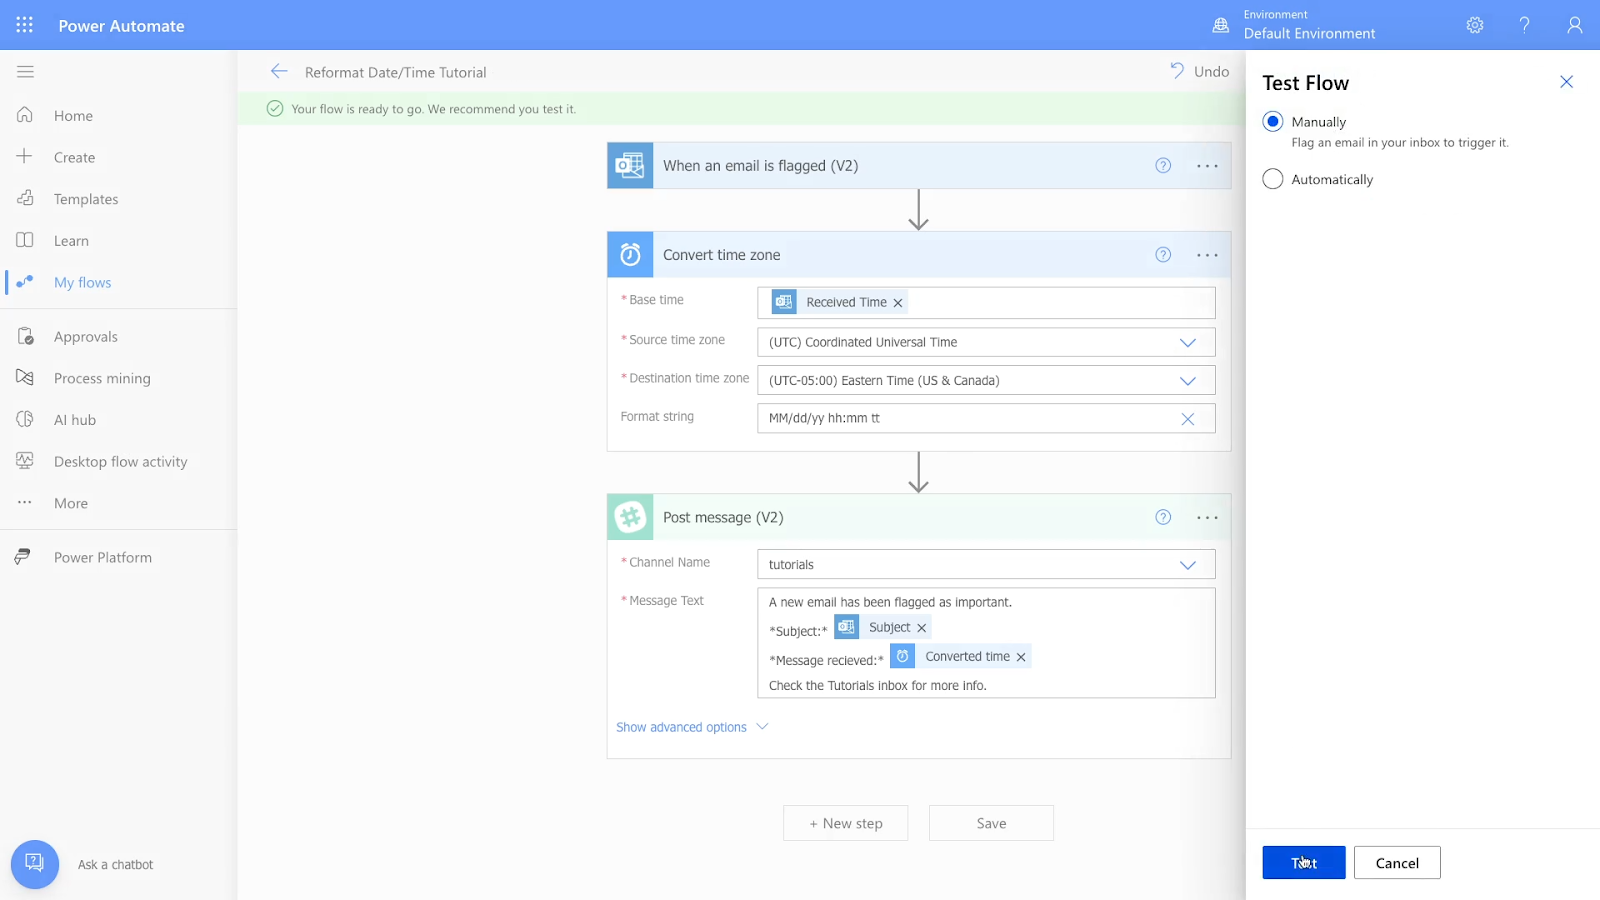
Then we’ll flag an email in our Outlook inbox to trigger the automation.

In Power Automate, it says everything ran successfully.
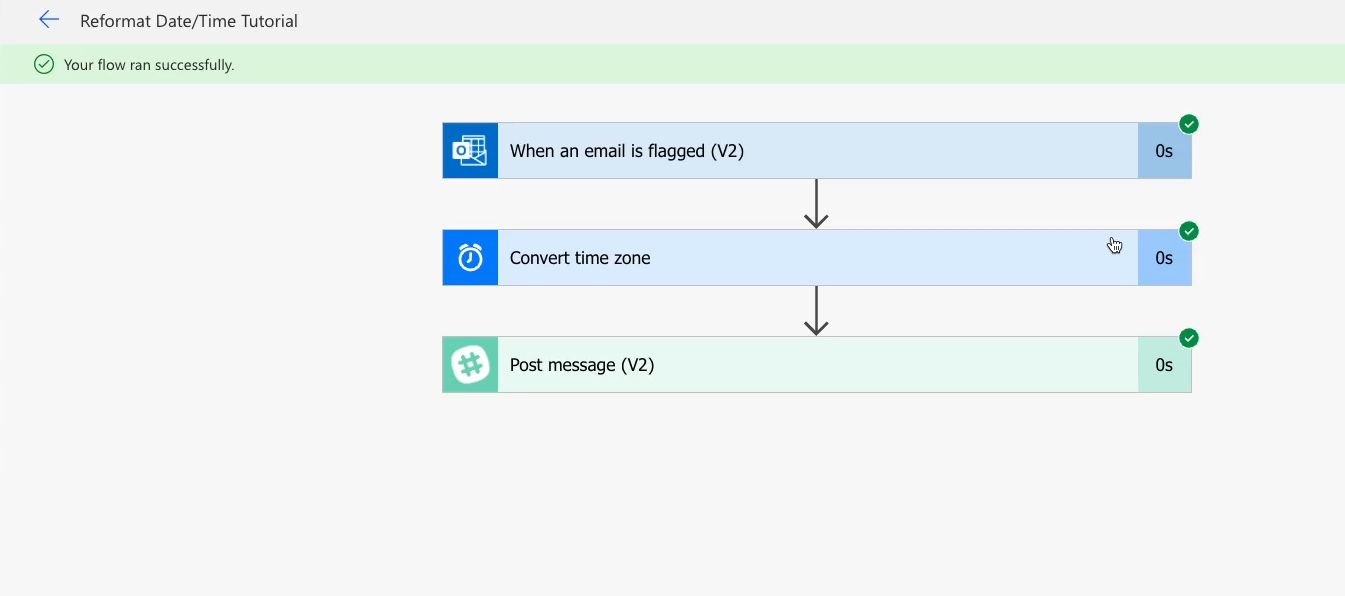
Let’s see what the output looks like in Slack.

In the Slack message above, you can see that date has been reformatted into the layout we specified, and converted to our time zone.
Once you’ve run a successful test, your automation is all set.
Use a simple no-code step to reformat and convert dates and times
Power Automate makes it easy to reformat your dates and times. Their naming just makes it a little tricky to find the right automated action, but once you’ve found the “Convert time zone” option, you’ll be ready to go.
If you’d like to learn more about using automation providers like Power Automate, Zapier, and Make, be sure to check out our blog or our YouTube channel. You can also follow XRay on Twitter, Facebook, or LinkedIn.
Not sure where to start with automation?
Hop on a 15-minute call with an XRay automation consultant to discuss your options and learn more about how we can help your team to get more done.
🎙Interview me about my Workflow
Workflows take many different shapes, sizes, and tools. Ever wonder how your workflows compare?
Get interviewed and find out!
🗓 Join us for Automation Hours
Monthly automation hours are a free way to get help with automations!
Any platform, any tool, any question is welcome. Just drop in and say hello!


