Learn how to get started with Make (formerly Integromat)
In this post, we'll show you everything you need to know to get started with Make, one of the most versatile and affordable automation providers available.
August 12, 2024
Are you and your team spending too much time on repetitive tasks? Are you tired of catching silly mistakes after it’s too late?
There's a better way, and it's easier than you might think.
With workflow automation, you can automate your team’s tedious tasks and make sure that critical work is done the right way every time – and you don’t even need to write a single line of code to do it.
In this post, we’re going to show you how to dive into the world of automation with one of the most capable and affordable solutions out there.
Read on to learn how to use Make, formerly known as Integromat.
What’s in this guide
We’ll begin by briefly explaining what Make is and how it works, and we’ll show you how to build your first automated scenario.
There are three key skills you’ll get from following along with this basic tutorial. You’ll learn how to:
• Connect apps together in Make to sync and transfer data.
• Transform and format data with functions.
• Control the flow of your automations with filters and conditional logic
To demonstrate all of these skills, we’ll use the following apps:
• Slack
• And of course, Make
To follow along, you can create free accounts for all of these apps – Make included.
Before getting started, you’ll want to make sure you have some Calendar events and a Google sheet that you can use to play around with, as well as a Slack channel to send messages to.
Whenever possible, it’s best to build your automations and run tests with dedicated testing files, channels, folders, or other material.
After completing the tutorial in this guide, you'll be ready to build your first automated workflow to start saving time and reducing errors in your daily tasks.
Let's get started and see how Make can improve the way you work!
What is Workflow automation, and what is Make?
Before you start building in Make, we want to give you a brief overview of what Make is, and what you can do with it.
Make, formerly known as Integromat, is a no-code automation provider.
It lets you accomplish tasks in your web apps automatically without needing to write any code at all, leaving you with more time to think and less time mindlessly clicking on buttons.
There are several apps out there designed for workflow automation, like Make’s main competitor Zapier, but this guide will be focused primarily on Make.
Compare automation providers like Make and Zapier on XRay.Tools
If you’d like to compare which tools can be automated on both providers, you can just do a quick search for your apps on XRay.Tools.
That will show you every trigger, action, and search available for your apps in Zapier and Make, among other options.
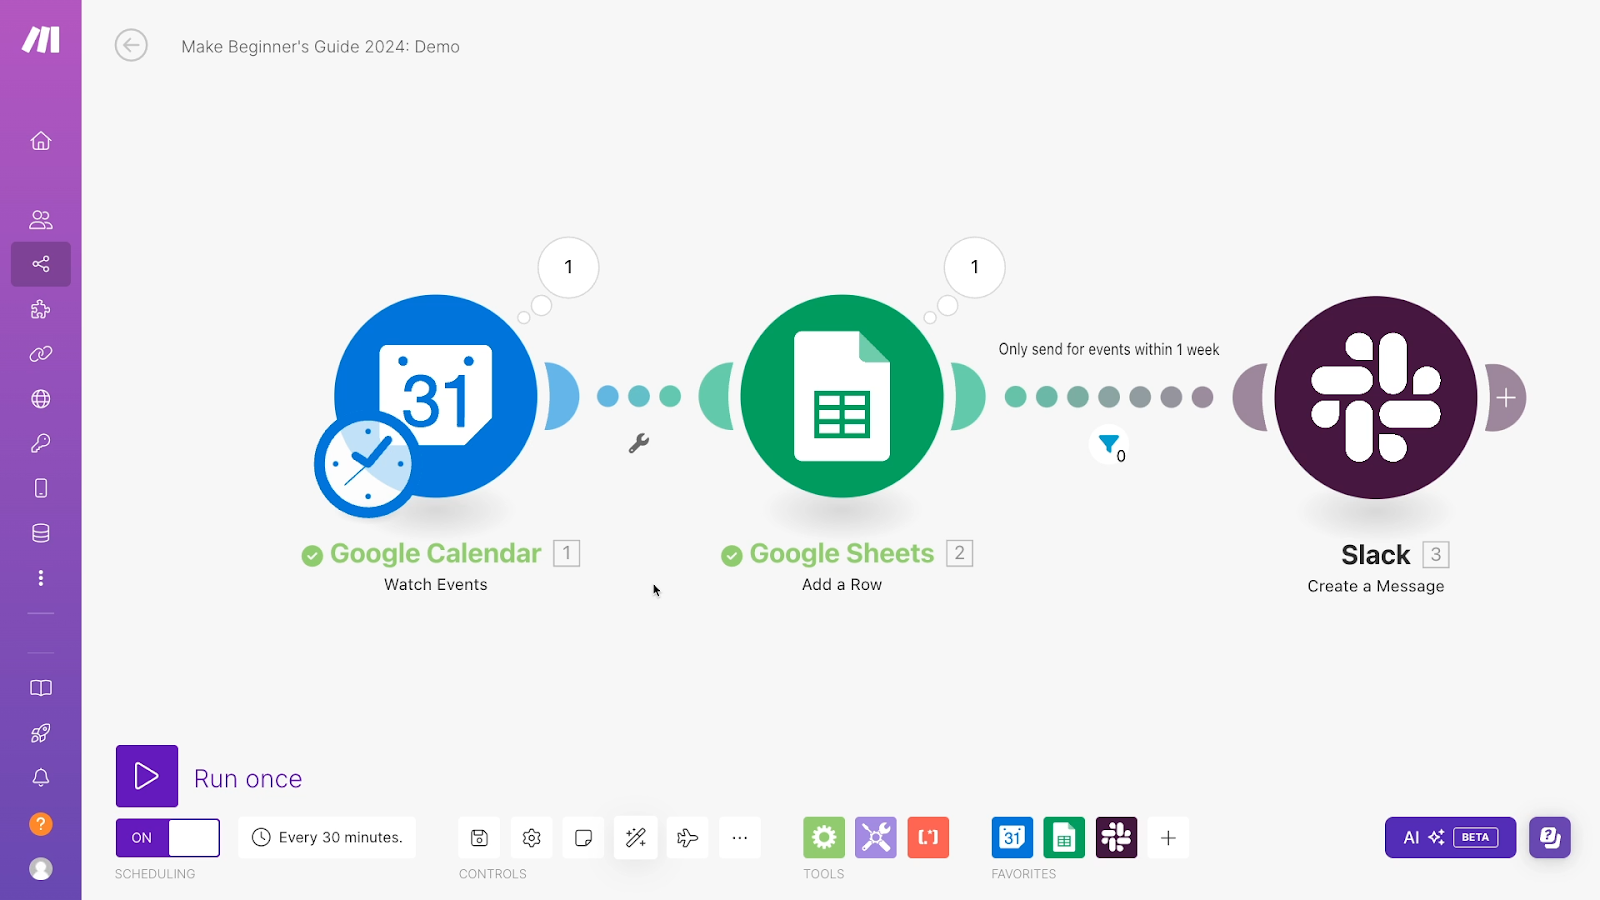
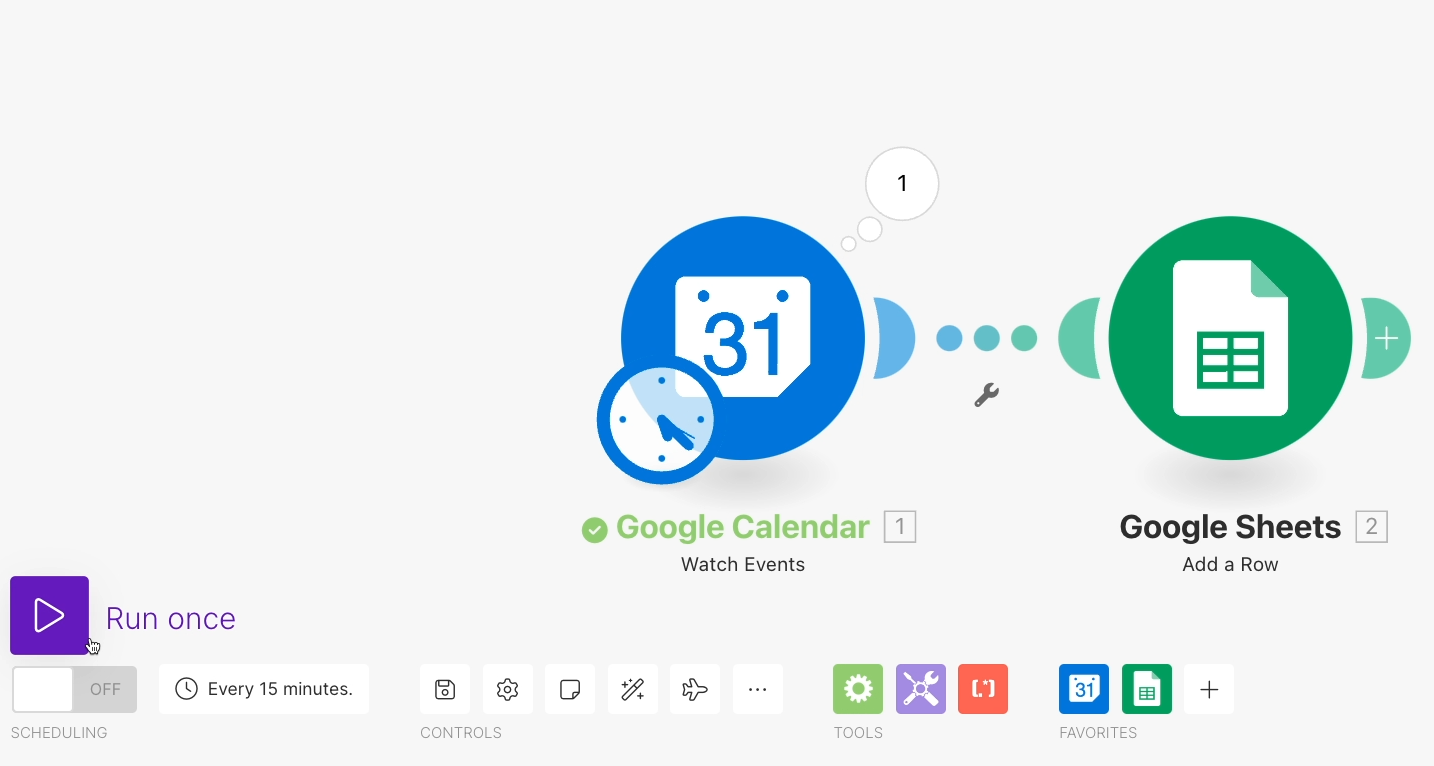
How automation works in Make
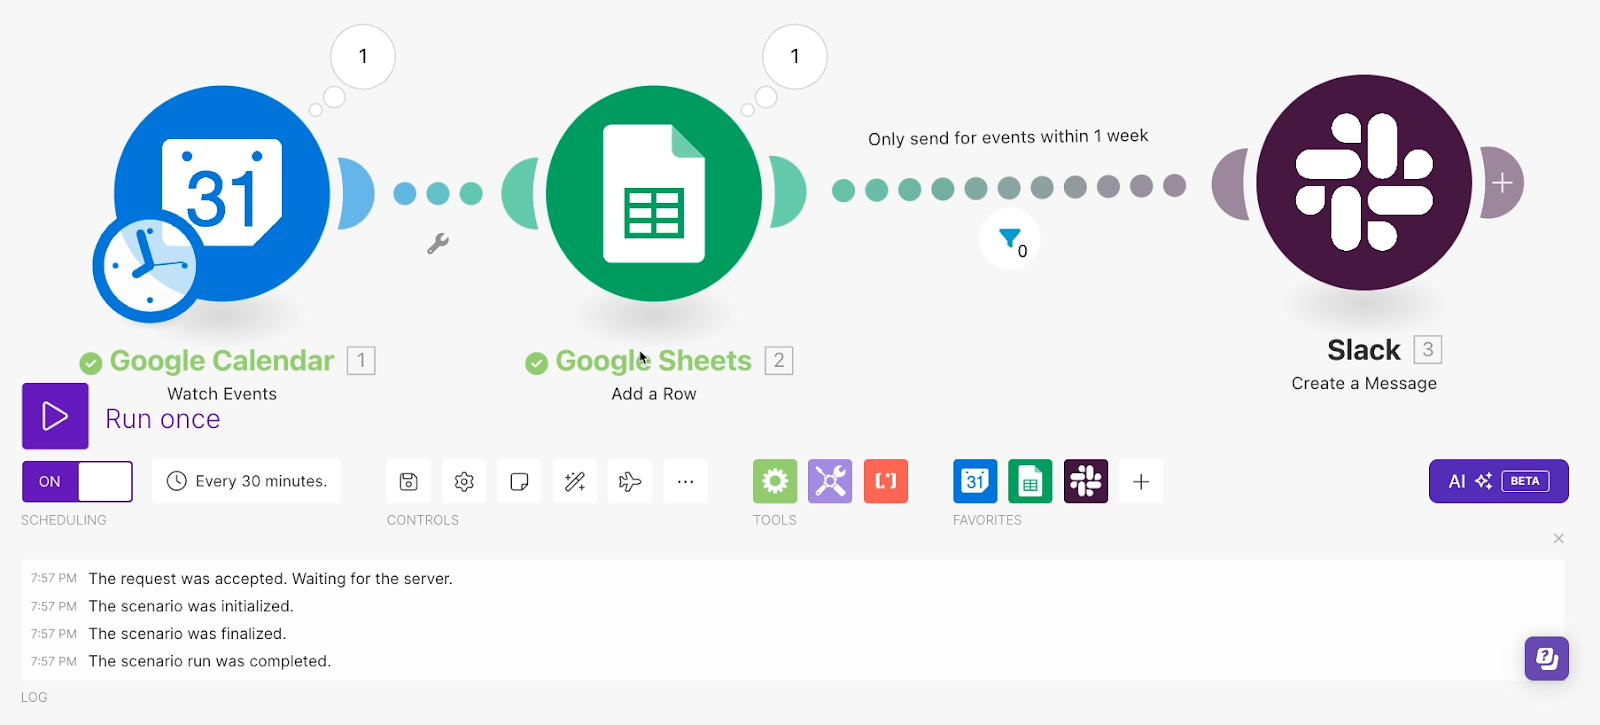
Below, you can see what an automation looks like in Make.
I
n Make, each automation is called a "scenario". A scenario starts with a trigger event, which is the event that will prompt the automation to run.
Then, one or more automated actions and searches will follow that trigger. These actions and searches can be in the same app as the trigger, or in totally different apps.
In most cases, you're probably going to use your Make scenarios to send and sync data across different software.
In the example that we'll be building today, our "trigger" is an event getting added to Google Calendar. Then, data from that calendar event is used to create a new spreadsheet row in Google sheets.
Finally, information about the event is passed to Slack for an instant alert. However, thanks to a handy little filter, the alert will only run if the event in question is scheduled to start within one week from the current time.
Simple or complex workflows
The scenario we’re going to demonstrate in this guide is very simple and linear, but Make scenarios can get much more complex and sophisticated.
You can add dozens of steps, branching paths, loops, and other tools to accomplish whatever you need to automate your workflows.
As we build this scenario, we'll show you a bit of formatting and conditional logic, but our main goal for today is to learn the basics so you can start using Make.
You can check out other videos in our Make playlist to learn more advanced techniques. These videos cover topics like routers, API calls, automating AI prompts, and more.
You can also sign up for our workflow design course to learn how to plan, implement, and deliver scalable automated workflows for your team and clients.
Now, it’s time to get ready to build your first scenario in Make.
Getting started with Make
Before we get started, be sure to sign in to all of the apps we're going to be using today: Make, Google Sheets, Google Calendar, and Slack. For this tutorial, free accounts will be fine on all of these apps.
Once you're all signed in, open up Make. You’ll see several options here, but for now, just click on 'Scenarios'.
Then, create a new scenario.
Adding a trigger
Every automation needs to start with a trigger, so add one by clicking on the pulsing plus button in the middle of the screen.

For this scenario, you’ll want to add a trigger that watches your Google Calendar for new events.
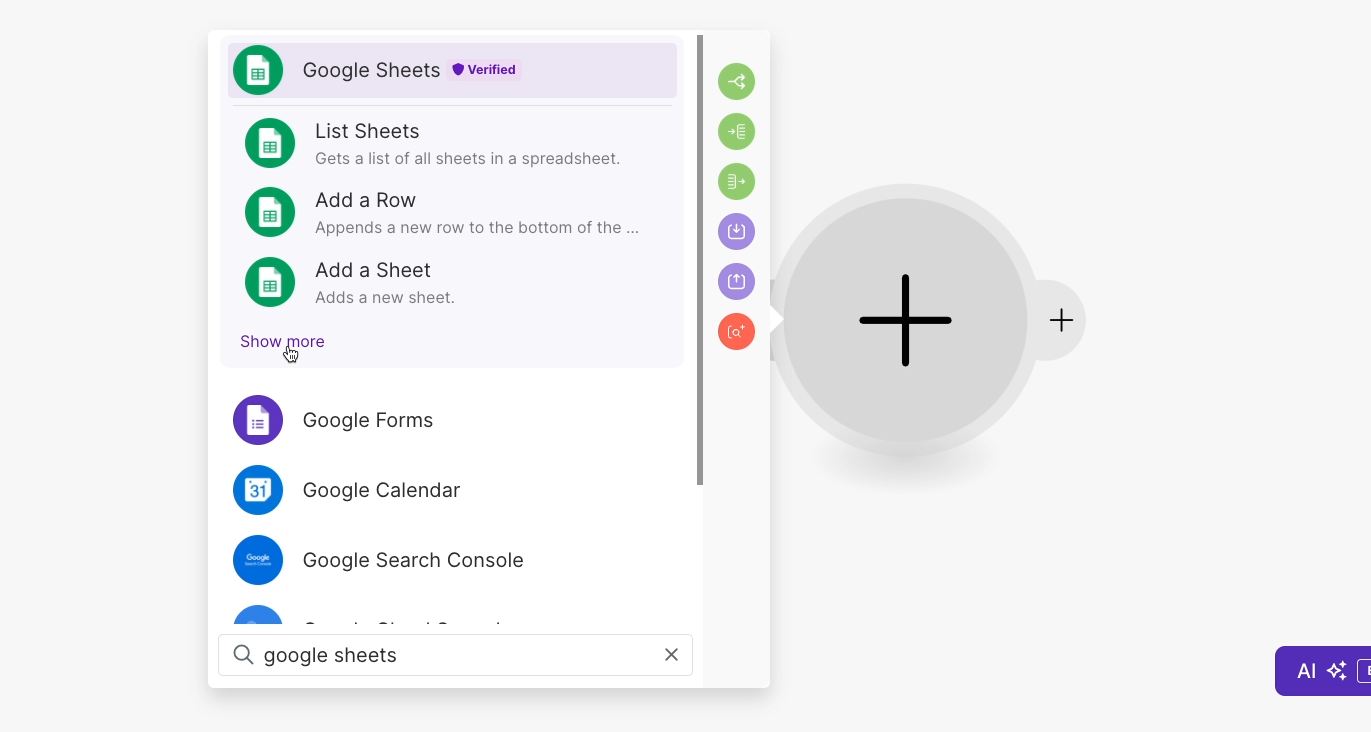
After clicking on the plus button, you should see a long list of apps that Make can automate. There are about 2,000 total (and counting), so don't bother scrolling to try and find one.
Instead, just enter a search term (like “Google Calendar”) to pull up an app instantly.
Adding a trigger to your automation
As soon as you enter a term, Make will show you a few options from the best match - in this case, Google Calendar.
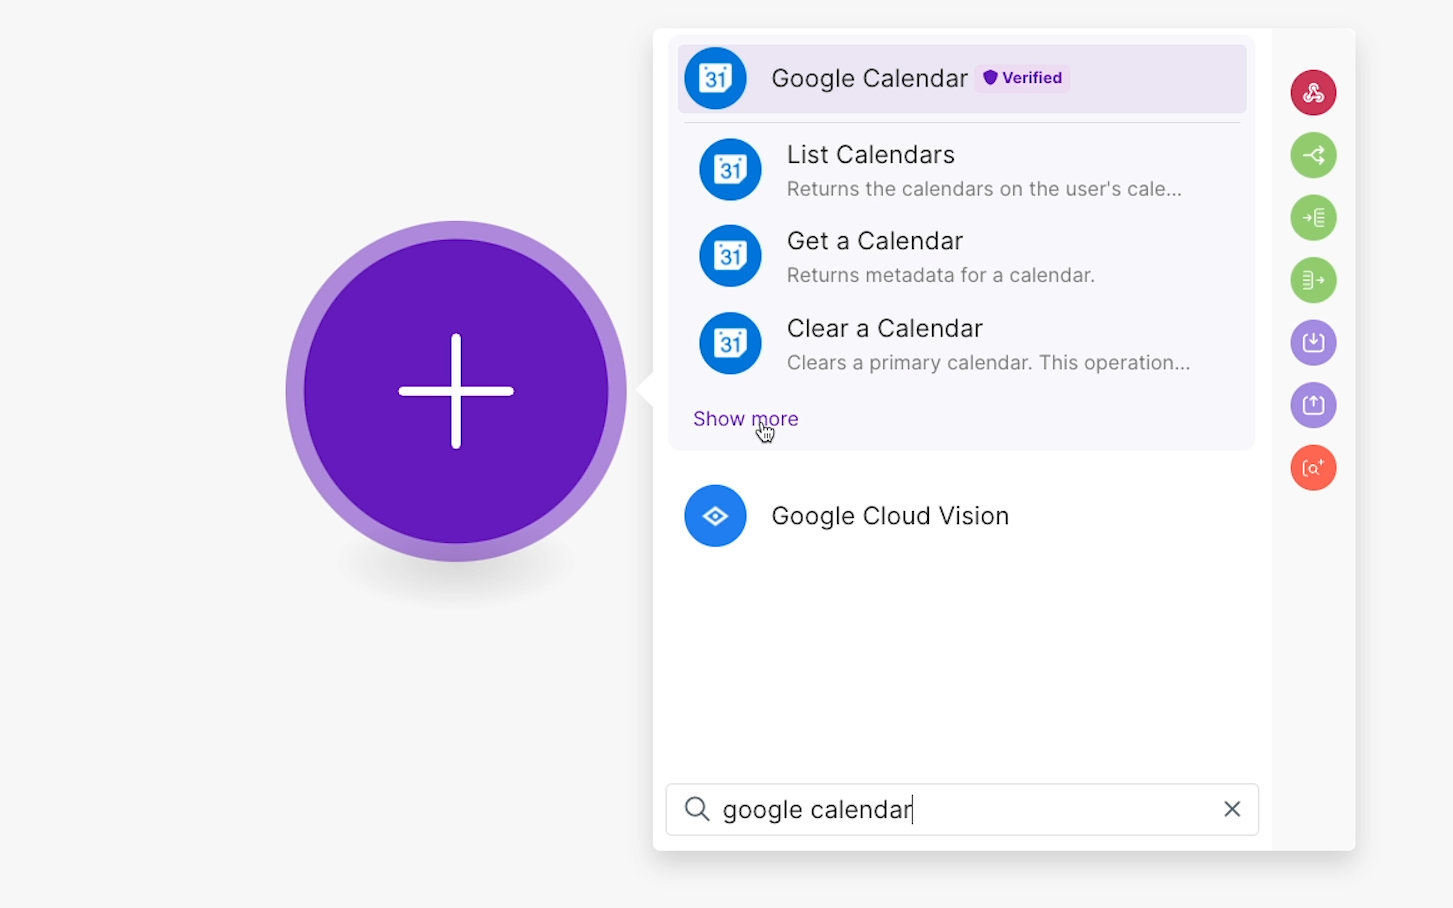
But if you don’t see the choices you’re looking for, just click on “Show more.” Then you’ll be able to see every single choice you have for automating that app with Make.

At the very top of the list, you should see an option called “Watch Events.”
As you can see from the description, this will watch your calendar for new events and run whenever it finds one.
This is a perfect trigger for our automation, so select it to add the trigger to your scenario.
Configuring the trigger
Now that you’ve chosen a trigger, you need to configure it by choosing an account to use, and adjusting several parameters to control exactly when your scenario runs.
Authorizing an account for automation in Make
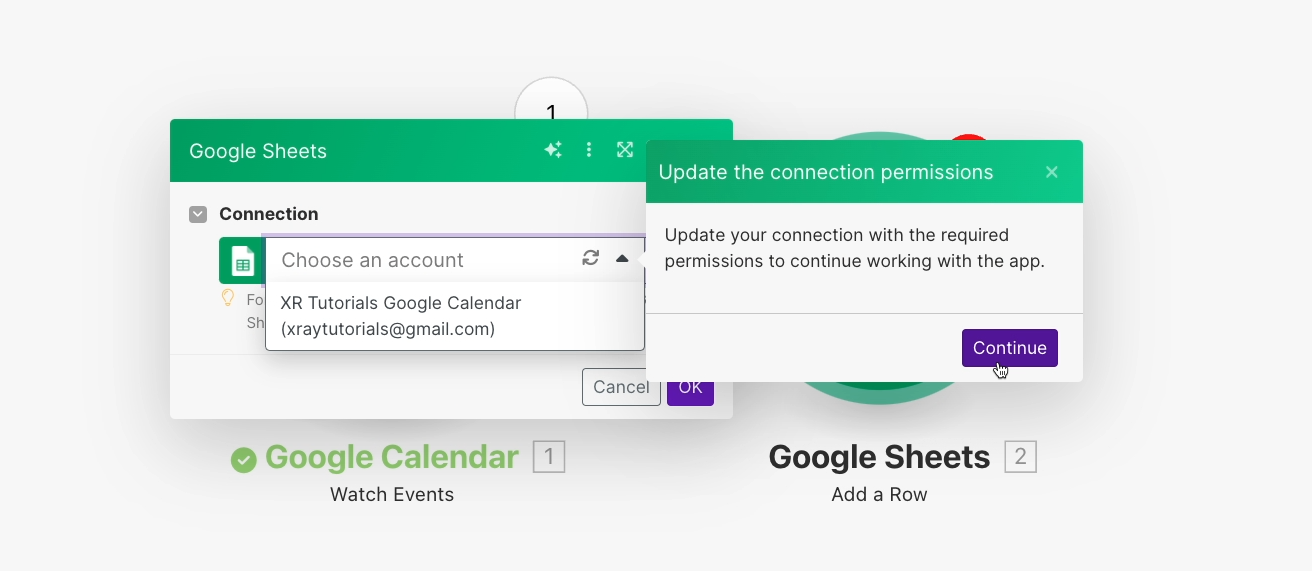
The first step for setting up any module in Make will always be to authorize an account in the app you want to automate.
To automate one of your apps, like Google Calendar, you need to allow Make to access your account and perform actions on your behalf.
Click “Create a connection” to add your first connection for an app.
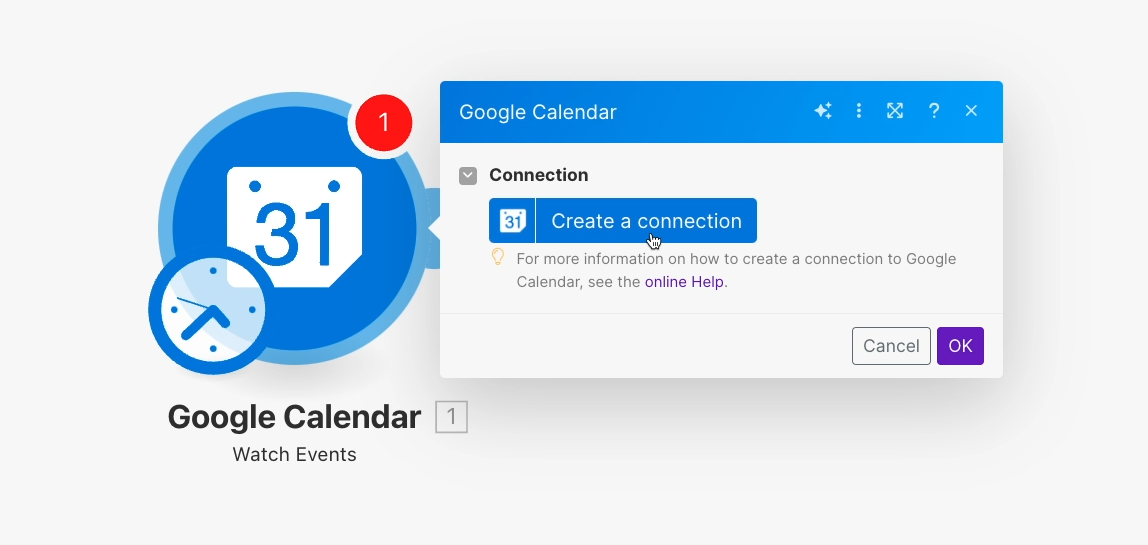
For most apps, all you’ll need to do is provide a name for your account and sign in. Then, you’ll be able to authorize Make in your app with a single click.
However, sometimes, you’ll need to provide additional credentials like a ‘Client ID’ and ‘Client Secret.’ If that’s the case, you can click on the “Online help” link for more information.

Authorizing Google Calendar
For Google Calendar, you just need to provide a connection name. Be sure to make it unique and descriptive, so you can distinguish between different accounts that you connect.
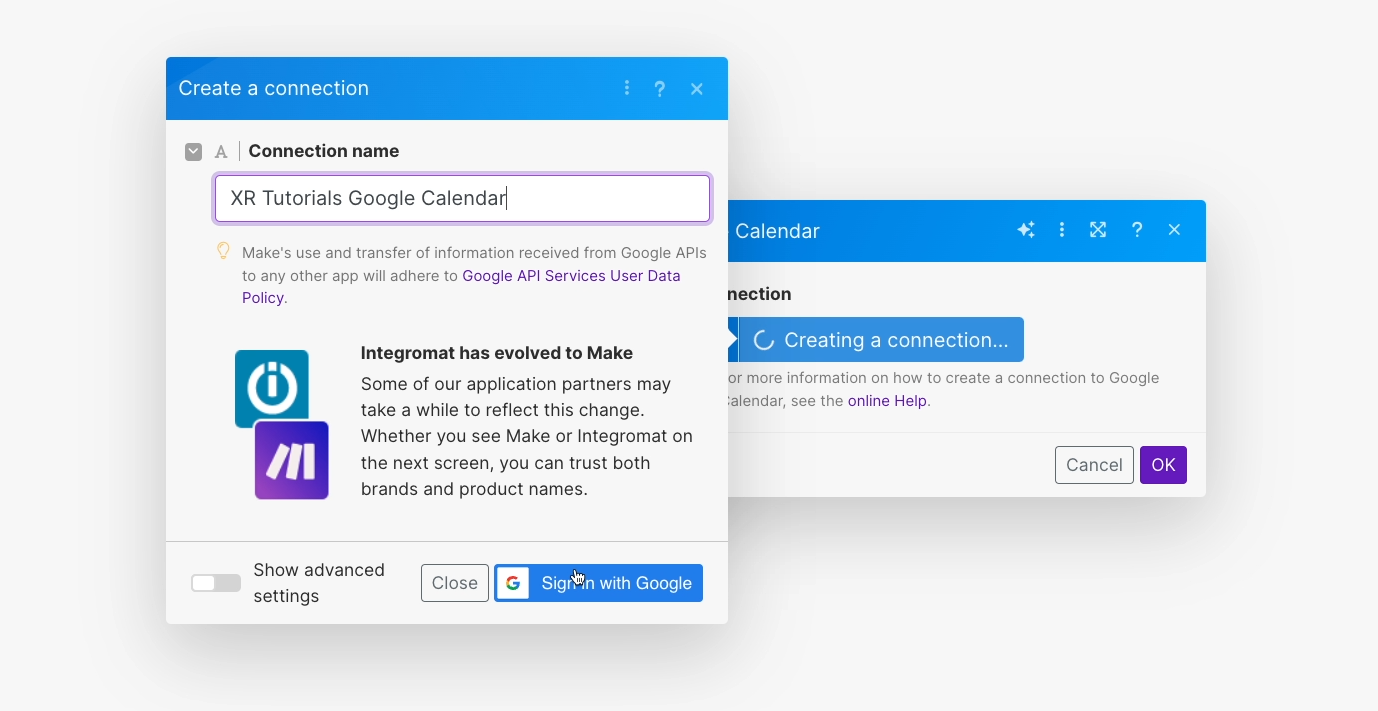
Then, click “Save.” In the screens that follow, you’ll see the permissions Make needs to automate your app.

The permissions required are extensive, but there’s no need for concern. Make is a trustworthy application, and it only needs these permissions so it can perform the actions you program it to do in your automations.
In spite of requesting the permission to delete data in your account, Make isn’t actually going to delete anything in your apps unless you build an automation with a “delete” step.
After reviewing the required permissions, click “Allow” to authorize Make.
Now, Make will access Google Calendar through the account you connected.
Choosing trigger settings
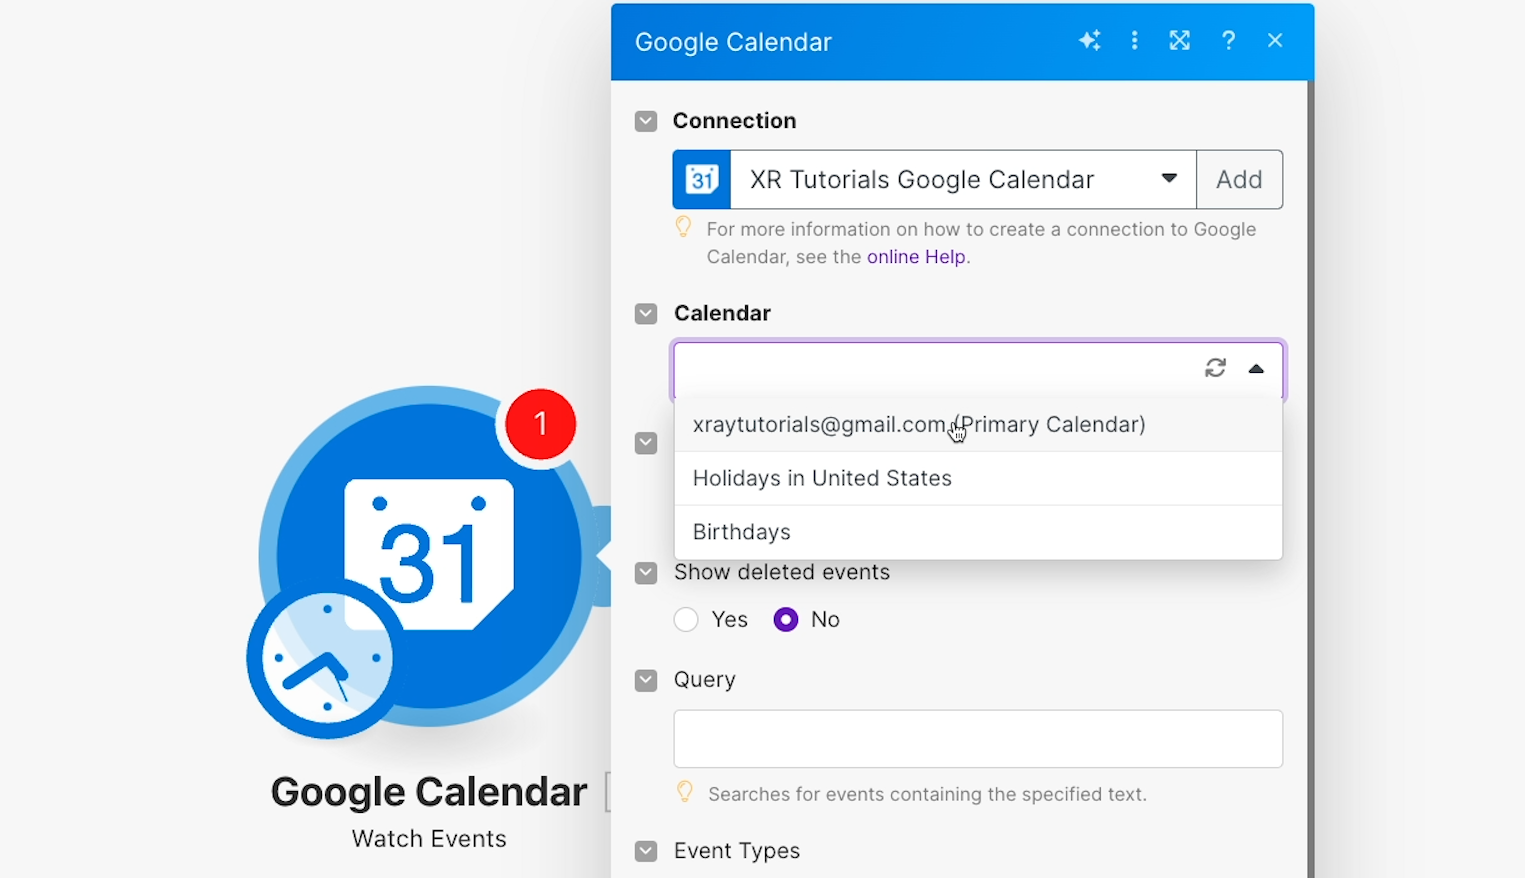
Next, let’s configure the key options for this trigger.
The choices for configuring a trigger in Make will typically let you narrow things down to get a little more specific about when the automation should run.
For this “Watch Events” trigger in Google Calendar, we can start by choosing the specific calendar that Make should watch. You can just pick one from the dropdown.
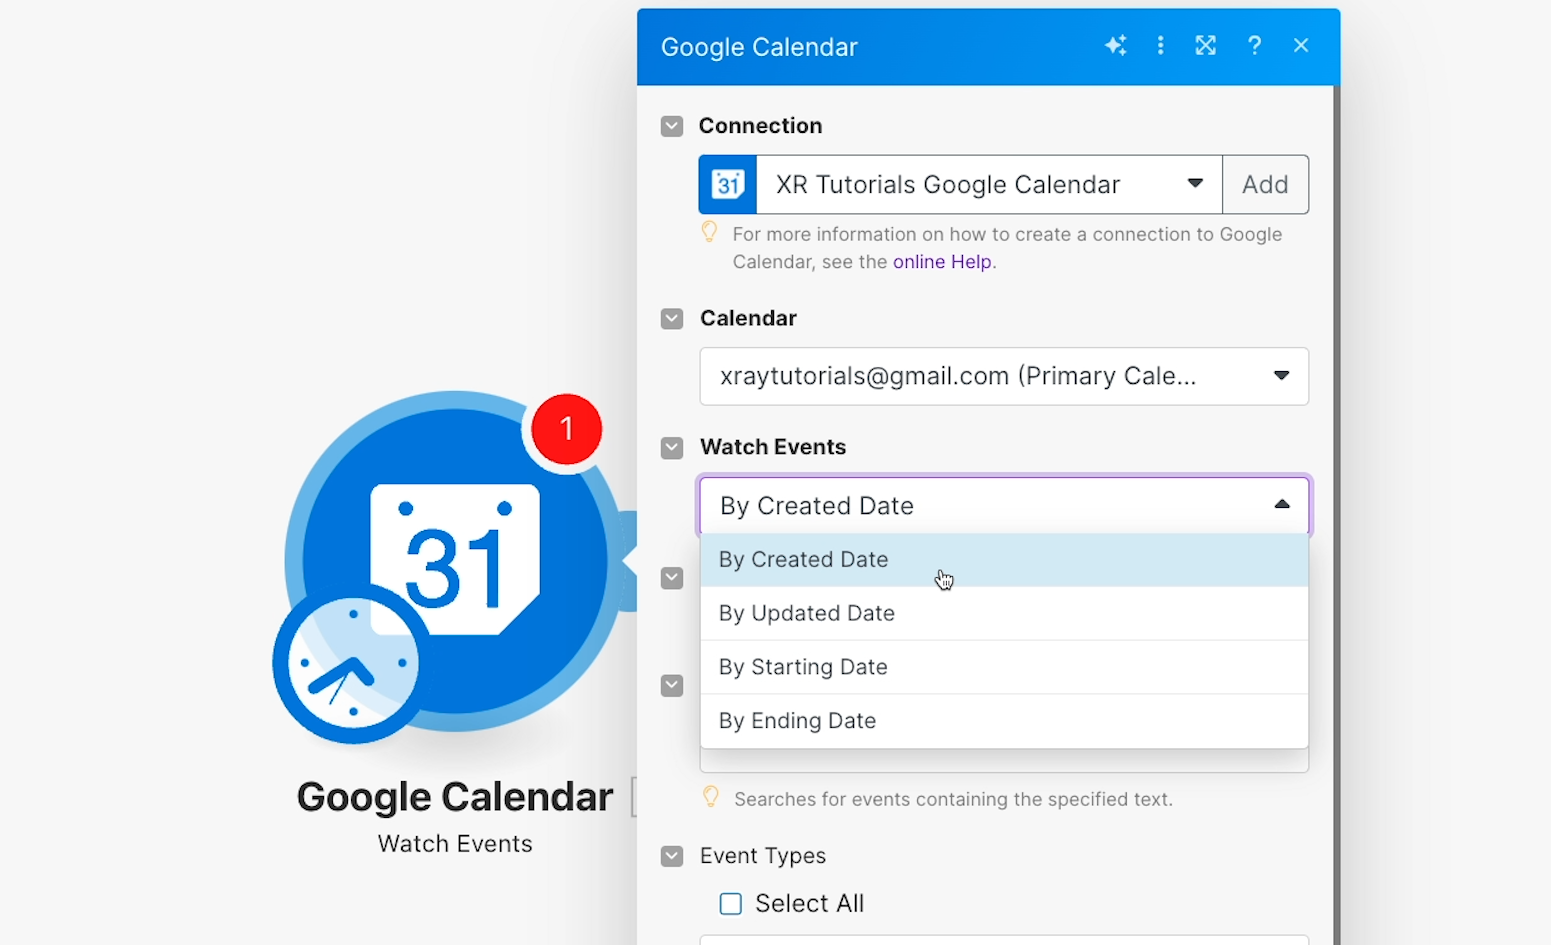
Then, you can choose how Make will watch for events - by Created Date, Updated Date, the event’s Starting Date, or the event’s Ending Date.
For this scenario, go with “Created Date.”
You can leave “show deleted events” unchecked, and you won’t need to add a query. Adding a query would enable your trigger to search for a specific event by its title, like “All-hands.”
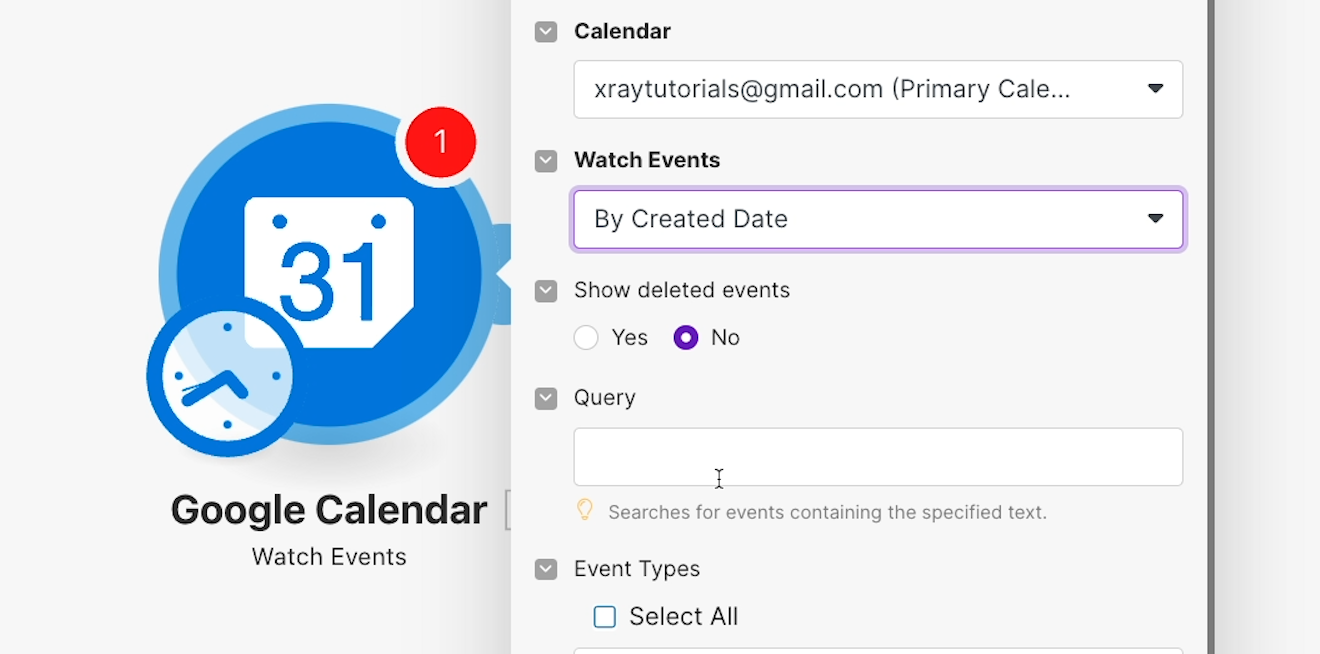
To make sure your automation runs for every new calendar event, leave the query field blank. Along similar lines, check every event type in the list.
Finally, you can choose how many events can be processed at once when the automation runs.
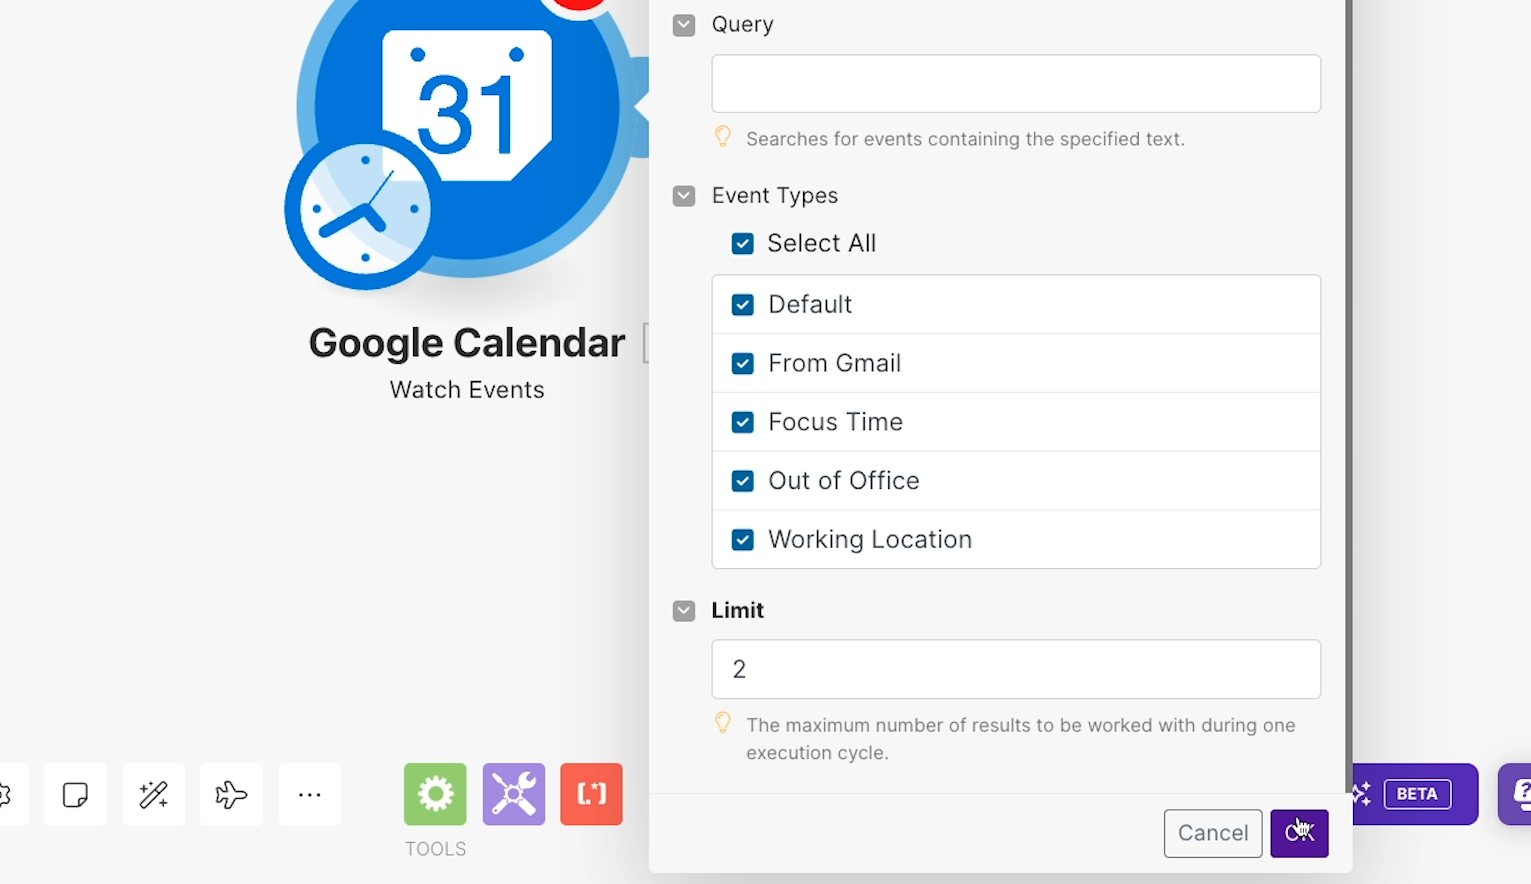
You can set this to whatever number you’d like, but we’d usually recommend keeping it pretty low. That will usually make it easier to sort through the data as you’re running your tests.
Enter a number like 1 or 2, and click “OK” to commit all of your choices.
Testing the trigger
Now, it’s time to test your trigger.
Testing your Make scenario’s trigger will retrieve a real piece of data from your trigger app, and confirm that your trigger is working correctly as you configured it. That means that testing this “Watch events” Google Calendar trigger will retrieve an actual event from your Google Calendar.
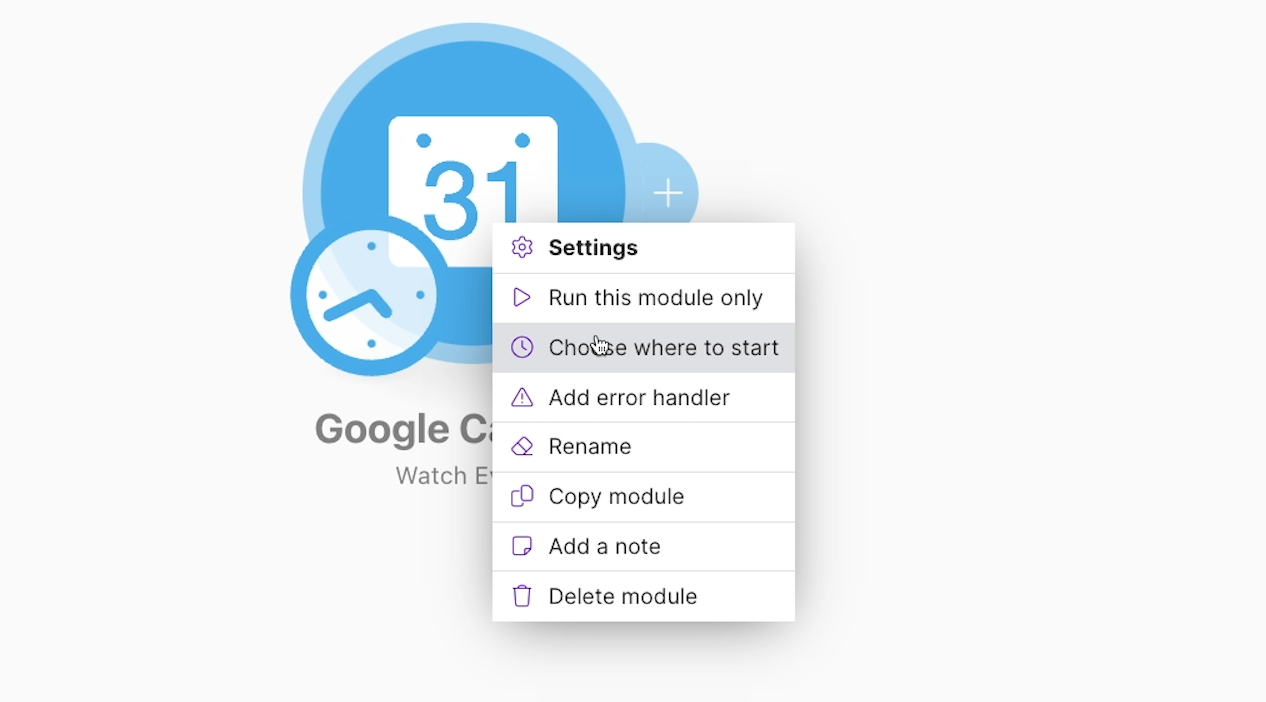
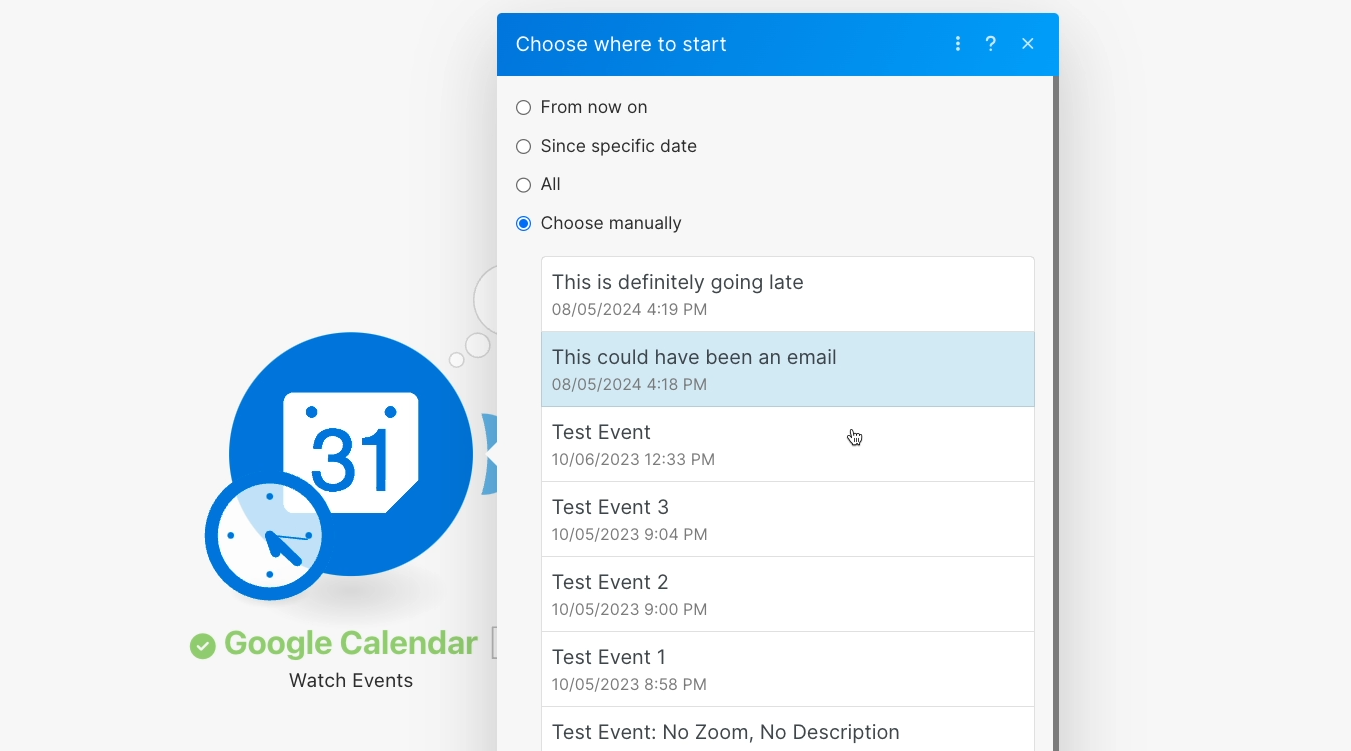
As soon as you close the configuration window, you’ll be prompted to “choose where to start.”
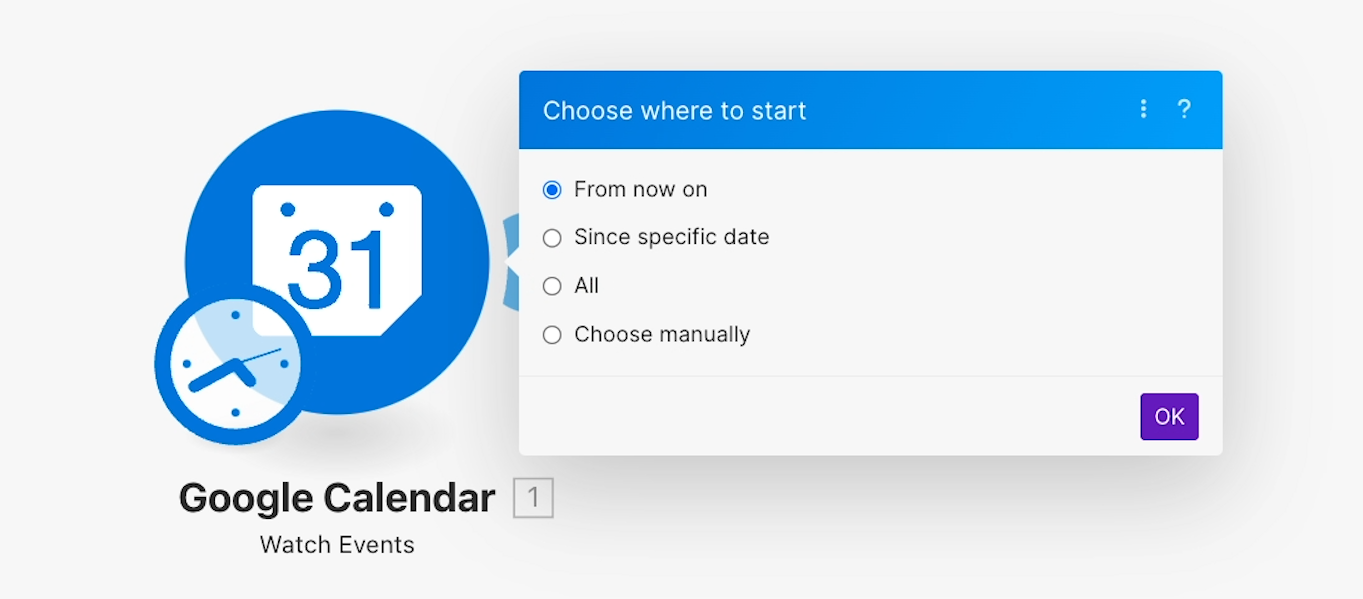
If you don’t see this pop up, you can always right-click on the trigger module and select “Choose where to start” instead.
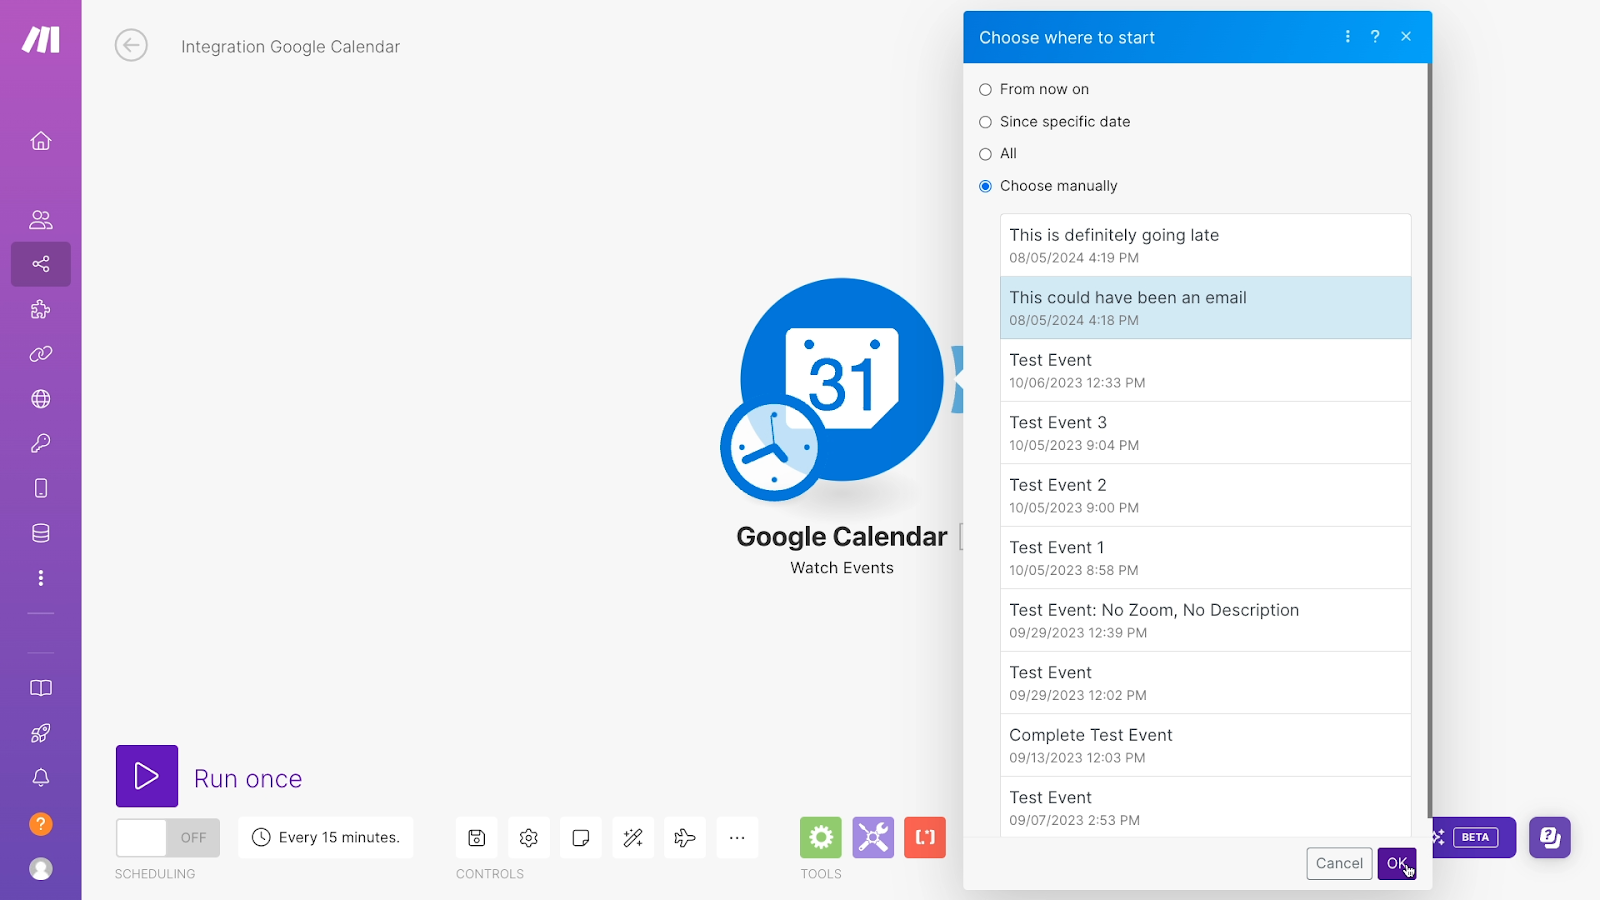
Then, you’ll see a few options for selecting a starting point. For testing purposes, we’d suggest using “choose manually” the vast majority of the time.
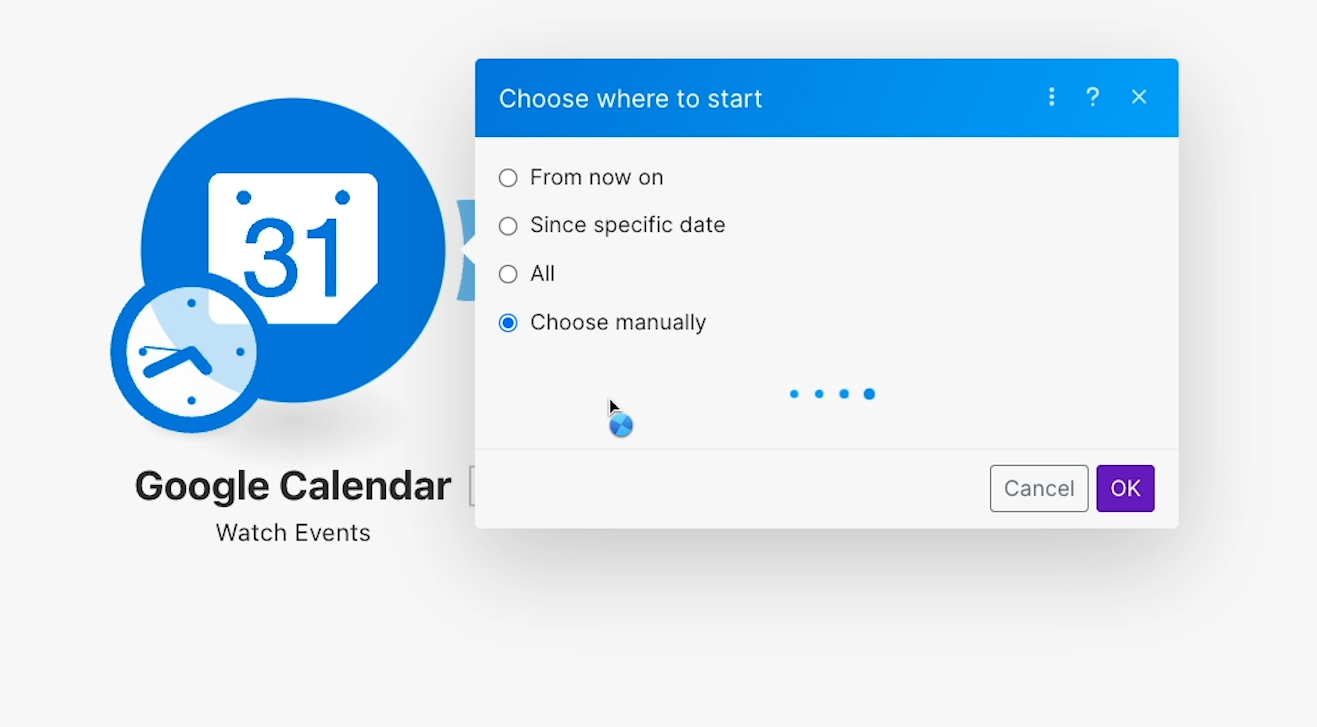
It gets a bit tedious when you’re doing a lot of testing, but this process of “Choose where to start” > “Choose manually” is the most reliable way to control what test data Make uses, since it will let you pick the data you want from a list.
You can use any event you want to test with. In our example, we’ll pick this test event that we created earlier in Calendar. Once you’ve selected an event, click “OK.”
Your trigger is now ready to process the specified data the next time it runs, but you still need to make the trigger actually run to finish your test. To do that, just click on the “Run once” button to fire it off manually.

You should see a number appear over your trigger module after a successful test.
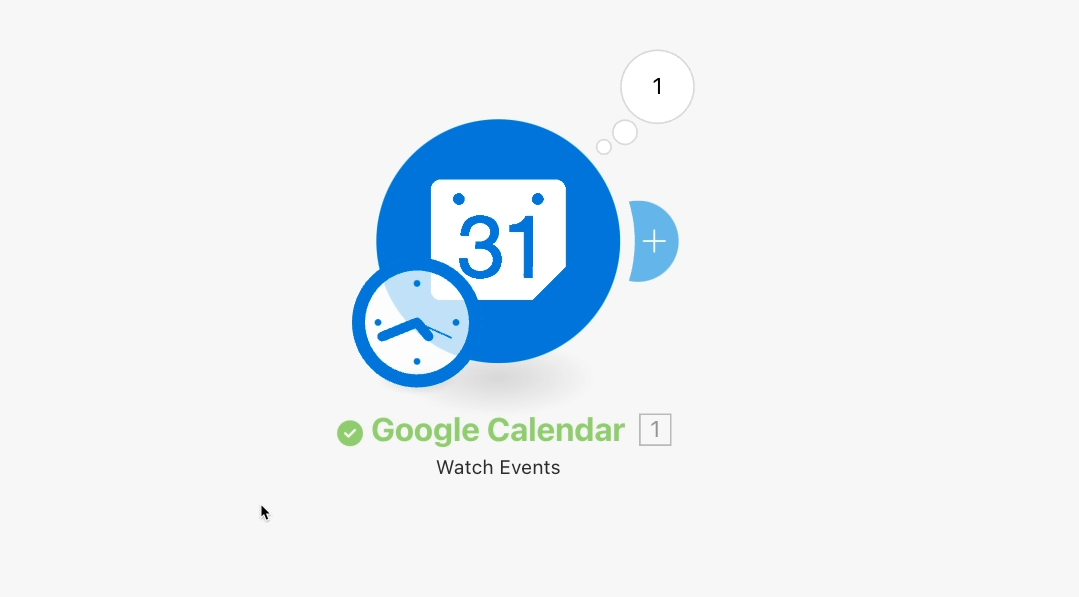
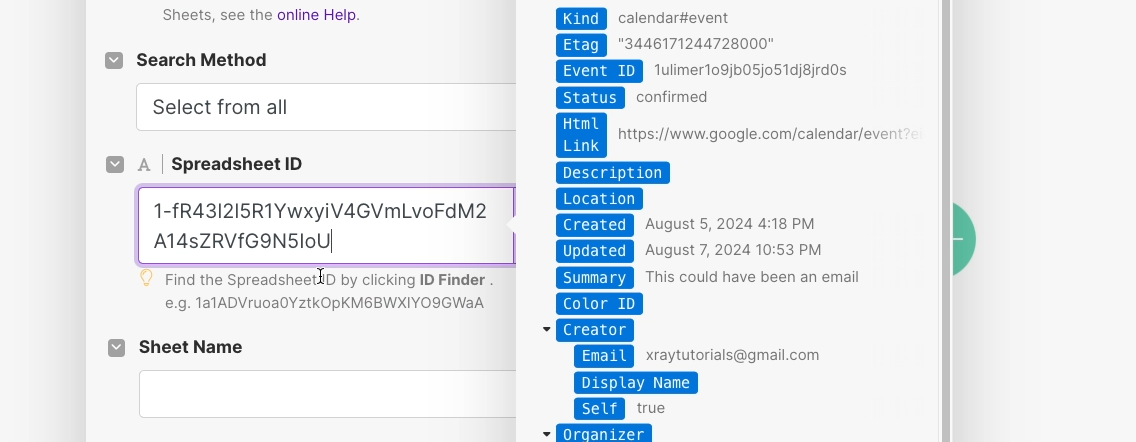
You can click on this number to see all the data your trigger retrieved, like the event summary, the start date, the end date, and much, much more.
All of this data can be referenced dynamically and transformed in subsequent actions in your automation. To see how that works, let’s add an action now to add a new row to Google Sheets containing some of this event’s information.
Add an action to your scenario
Add a new action to your scenario. Once again, search for the app you want to use - in this case, Google Sheets. Then, click “Show more” to see all of the available actions.
You’ll notice that unlike Calendar, the options for Sheets are sorted into ‘Actions’ and ‘Searches.’ Since triggers can only be used at the start of the automation, those are excluded from this list.
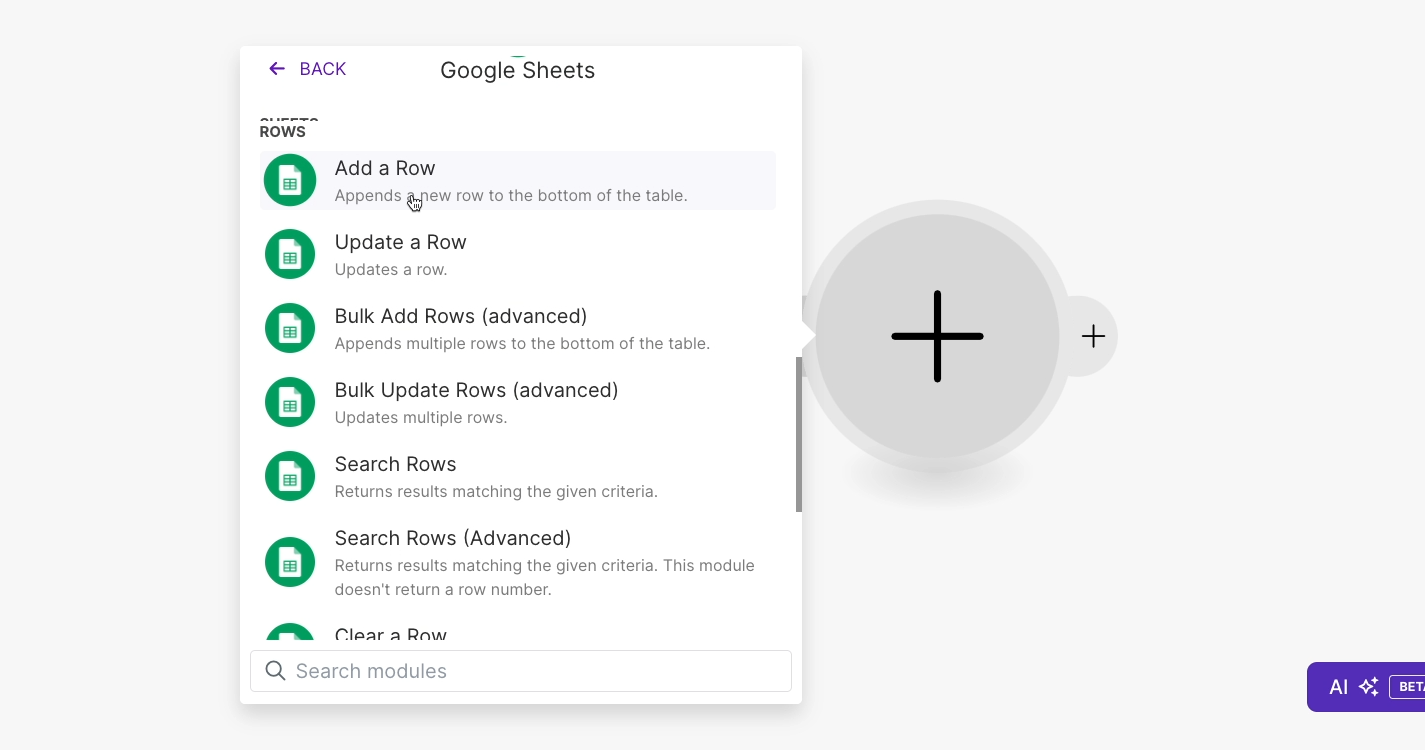
To add a new row, choose the “Add a row” action. You should be able to use the same Google connection that you added for Calendar, though you will need to update the permissions.
You can also add an additional account if you’re using a different sign-in for sheets. Once you’ve chosen and authorized your account, you can configure the action.
Configuring an action in Make
Whenever you’re creating data like this in Make, the first thing you’ll need to specify is where you want to create that data.
In this case, you’ll need to specify what Sheet the new row should be added to. Under “Choose a method,” the default “Select by path” option will allow you to pick folders and subfolders until you find the file you want.

We’d recommend switching this to “Select from all.”
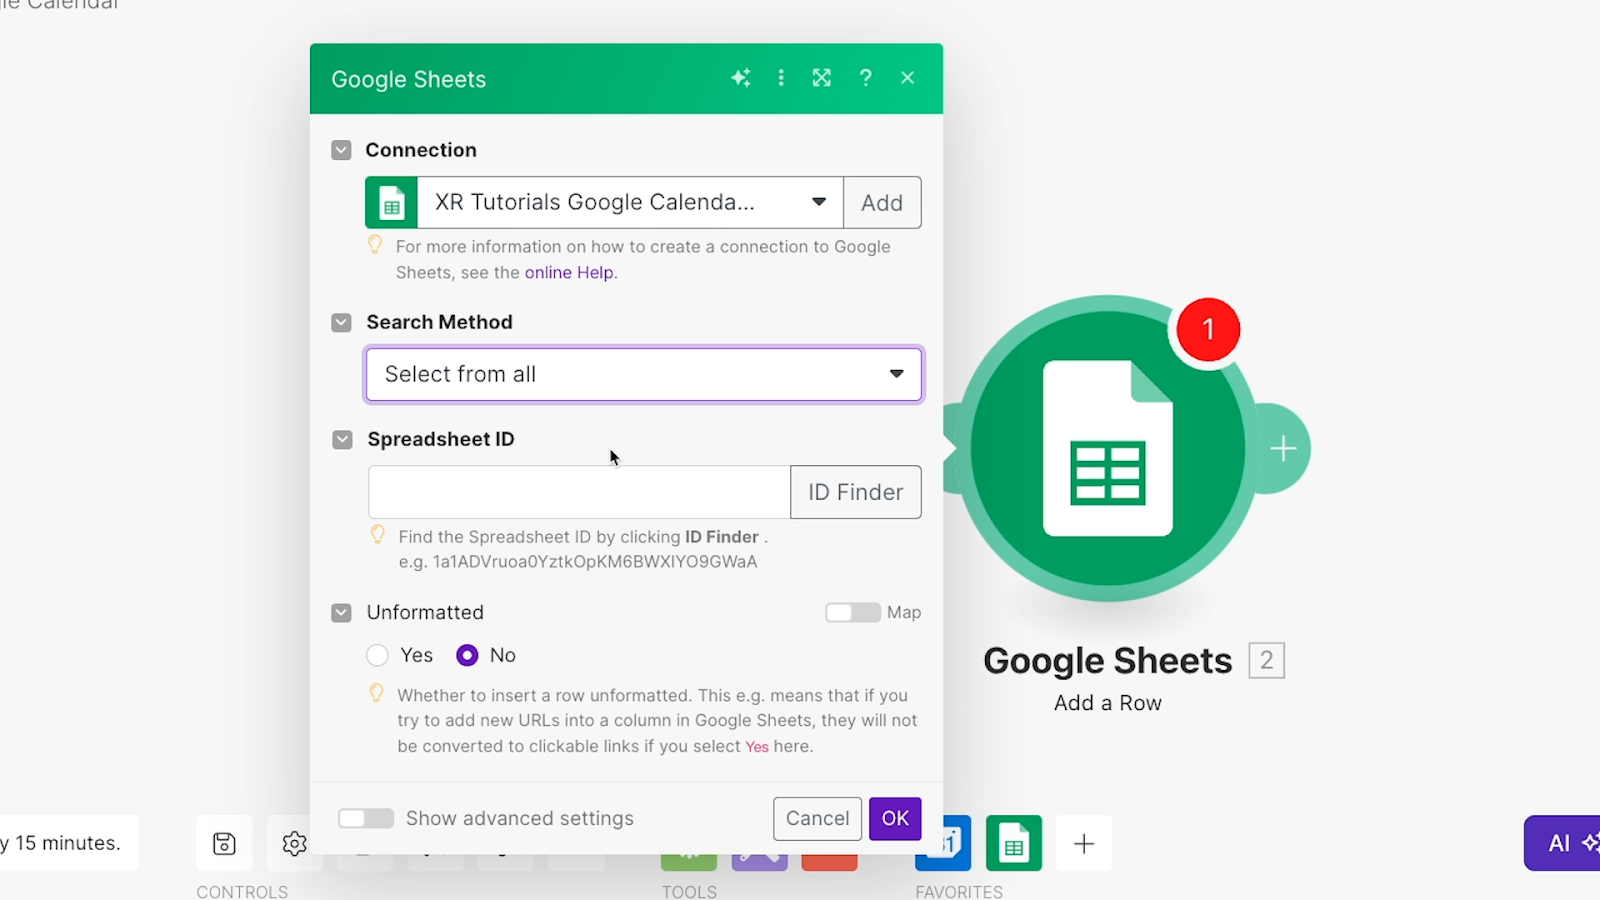
Then, you can choose the document you want to use by copying and pasting its ID, which can be found in the URL bar when you have the document open in your browser.

Then, paste the ID into Make.
Using an ID isn’t necessary – you can always identify the doc by its file path if you want – but it helps ensure that everything stays consistent. File names and locations can change, which may require you to update your automations. However, the document’s ID will always remain the same.
Next, choose the sheet you want to use in this file - in this case, that’s Sheet 1 for us.
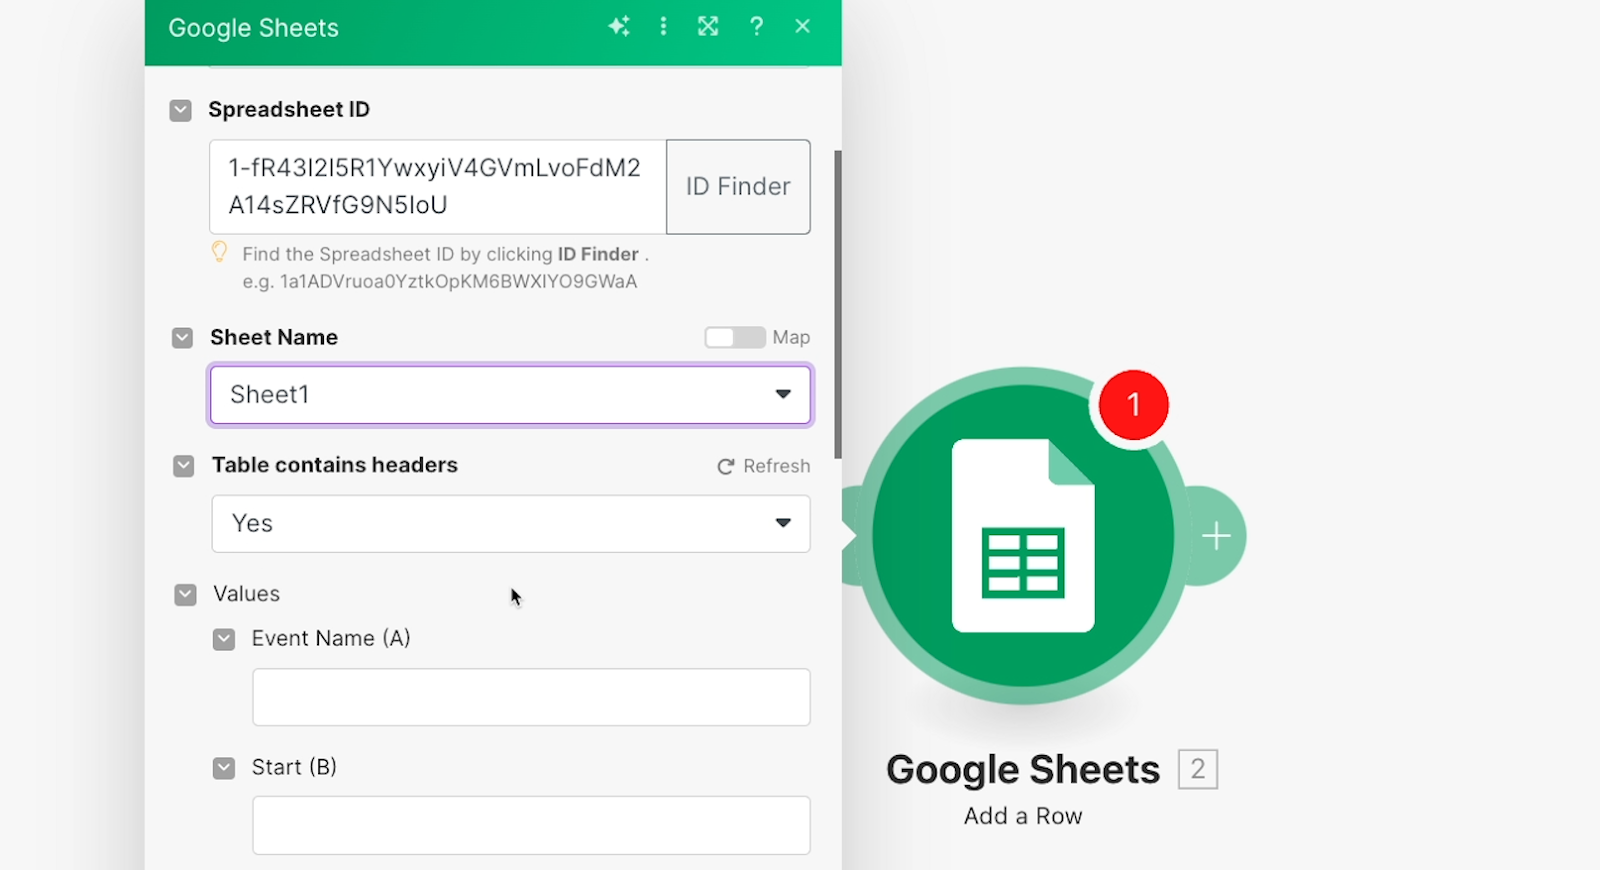
If your table has headers, like our example does, make sure the “Table includes headers” option is set to “yes.” That will ensure each column is correctly labeled with its header name, like “Start” rather than just being “B” or “C.”
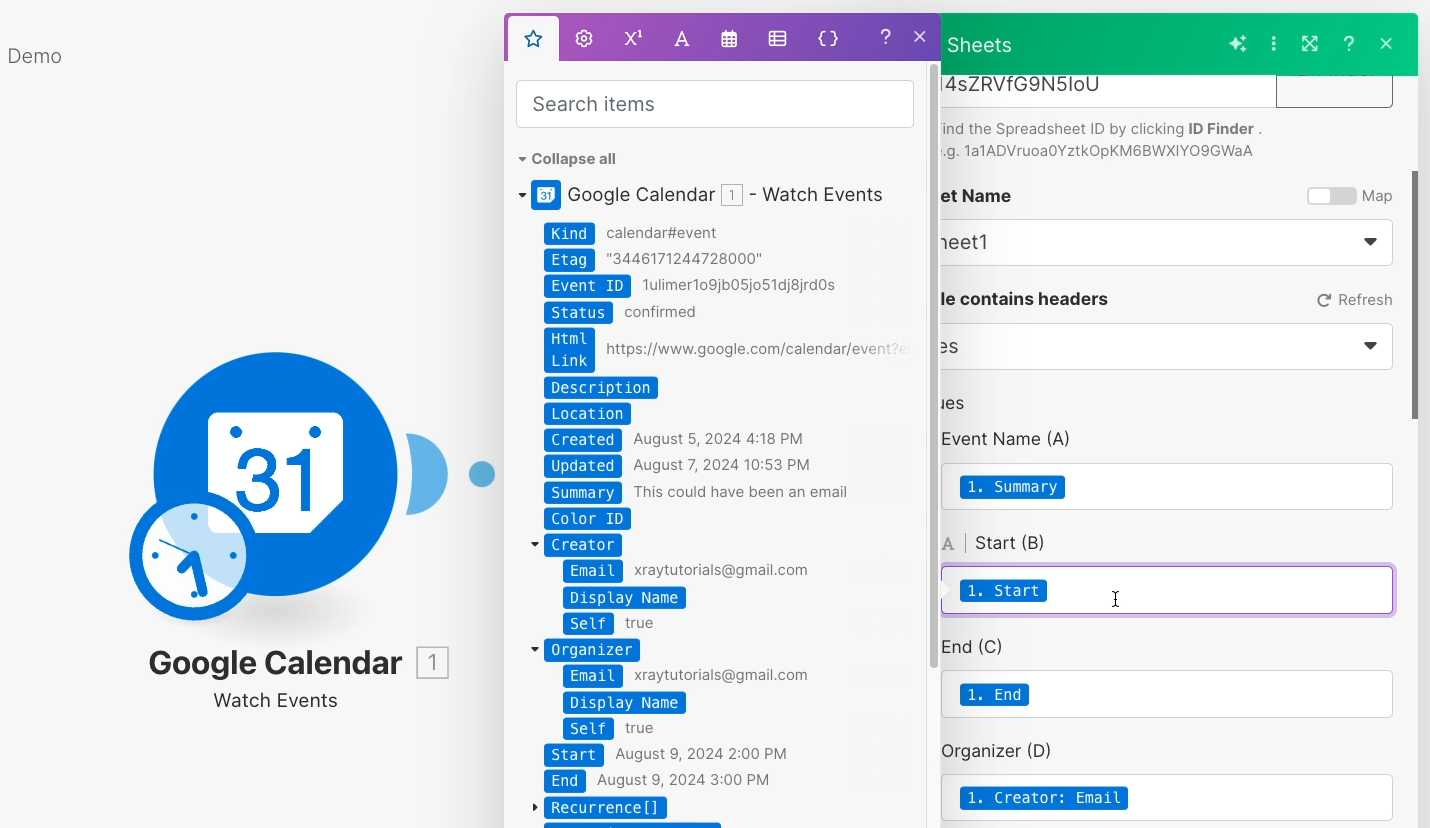
Now, you can map data from the trigger into each column for the new row. Click on each field, and a window will pop up with all of the data retrieved in the trigger, or Step 1 as it’s labeled here.
For example, we’ll insert the event summary into “Event name,” the start and end times into their fields, and so on.
If you want to skip any of these fields and leave them blank in Sheets, just leave them blank here, too. Note that you’ll see every column in your sheet, even if it doesn’t have a title, so you might want to delete extra columns before going into Make.
Finally, you can choose whether to use formatted or unformatted data.

For this automation, we’re going to stick with formatted data so our URL in the “Hangout Link” column will still be formatted as a URL. Once you’ve configured the action, click “OK” to close this window.
Testing an automated action
With the action all set up, it’s time to give the scenario another test.
We’d recommend following the same procedure as before to test your scenario: right-click on the trigger, select “Choose where to Start,” “Choose Manually,” and pick the data you want to use for the test.
Then, click “Run once” to run the whole scenario.
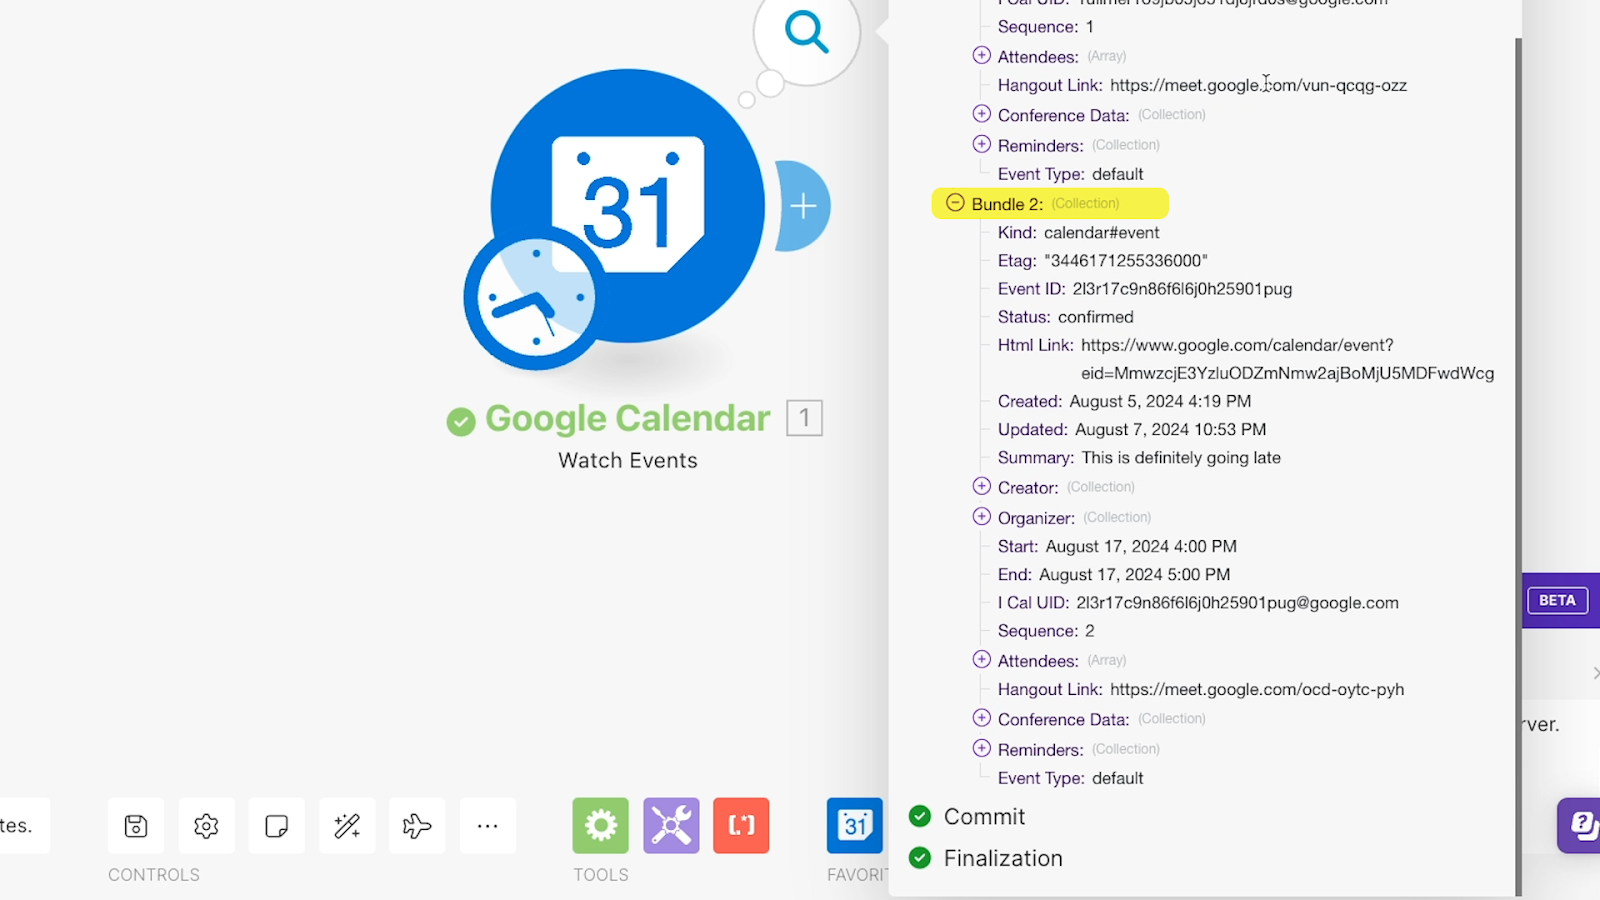
You should see the trigger and action modules run one at a time, and numbers will appear over each of them in turn. Again, you can click on these numbers to see the data the module processed.
In the image below, you’ll notice there are two “bundles” listed in this “operation”. That’s because our scenario processed two events - the one that we chose to start with, and an additional event that was added to the calendar after our chosen event.
This means that our trigger ran once and retrieved two Calendar events, prompting the Sheets action to create 2 rows. Since two rows were created with two different sets of data, we’ll be able to show you exactly how dynamic data works.
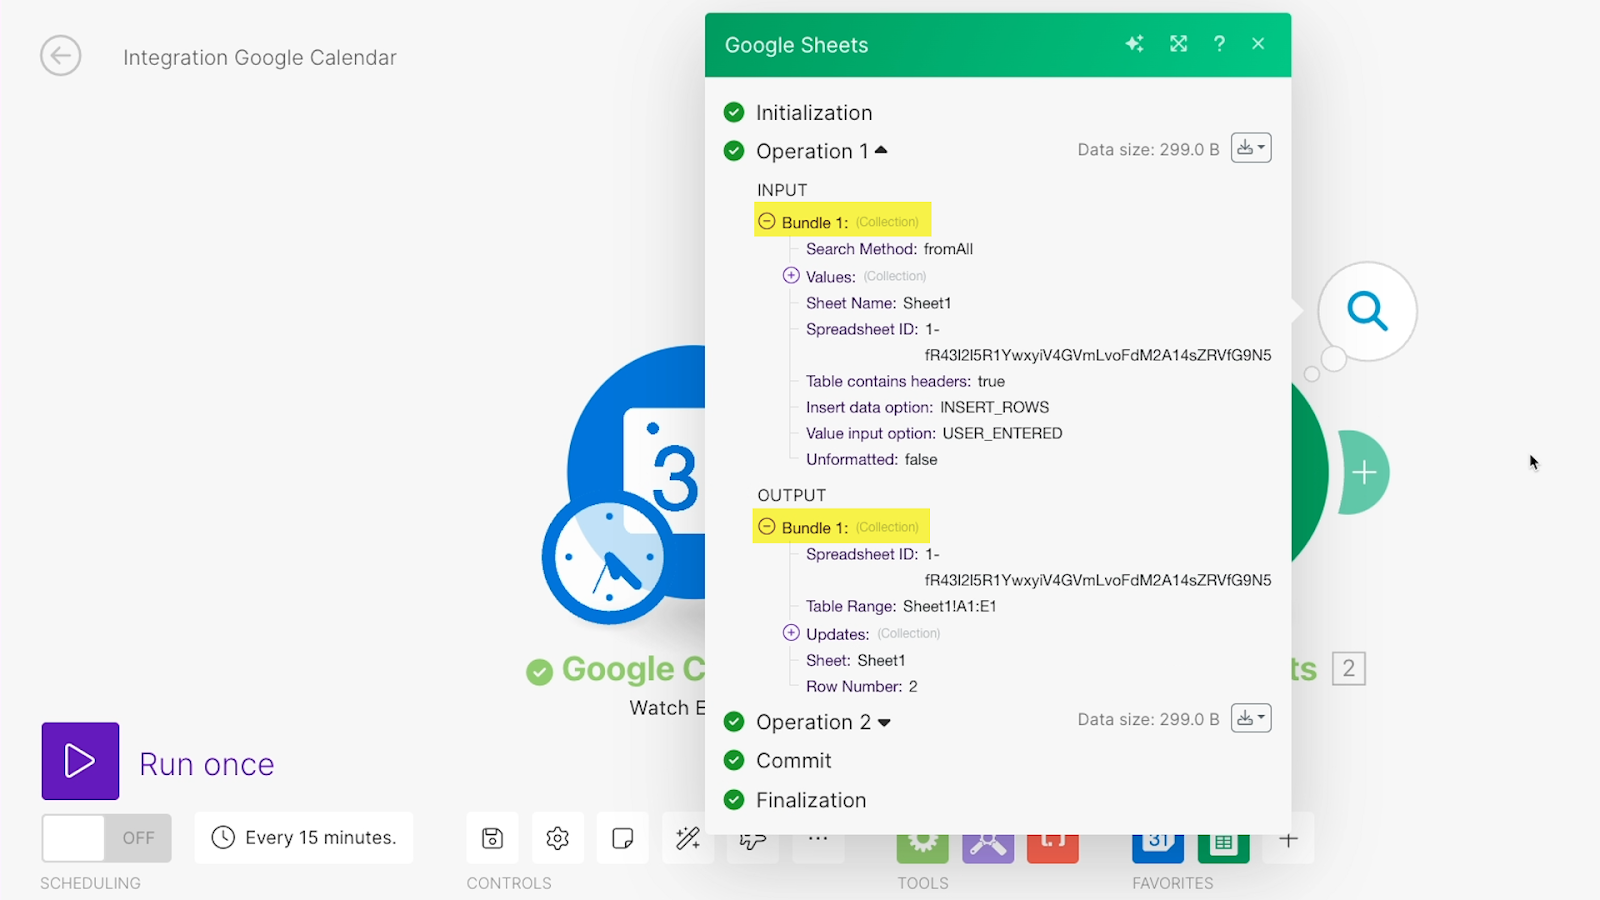
Next, open up your Google Sheet to see what Make created.

Over in Sheets, there are 2 new rows with data retrieved from the respective events. You should note that Sheets includes the correct, unique information for each event.
That’s why we call it “dynamic” data. Instead of typing out a static title or start date, we told Make to just look for the title and start date of each specific event. The data that gets filled in here reflects each calendar event that runs through our automation.
After running your tests, your first automation in Make is all set. You can save it and turn it on if you’re ready to start using it.
In the next section of this guide, we’ll show you a few ways to improve this automation, but first, let’s take a look at operations and scheduling.
Scheduling your automation to stay within “operations” limits
In Make, you’re limited to how many “operations” you can use on your account each month. Every automated trigger, action, and search counts as a single operation, even if these are run as tests – and even if the trigger runs and doesn’t find any new data.
On the free plan, you’re limited to just 1,000 operations each month.
In the bottom left hand corner, we can see the automation is currently set to run every day and check for new calendar events every fifteen minutes.

That means this automation will use at least 96 operations each day, seven days a week, even if it doesn’t find any new events. This is because you’re charged an operation every time the trigger checks for new data. Using webhook triggers will let you circumvent this issue, which you can learn more about in this tutorial, but that’s a more advanced topic.
For now, we can dramatically reduce the operations used by changing the schedule to every half hour, and by only setting it to run during business hours on business days.
Just click on the scheduling button (which will read “Every 15 minutes” by default) to change the schedule.
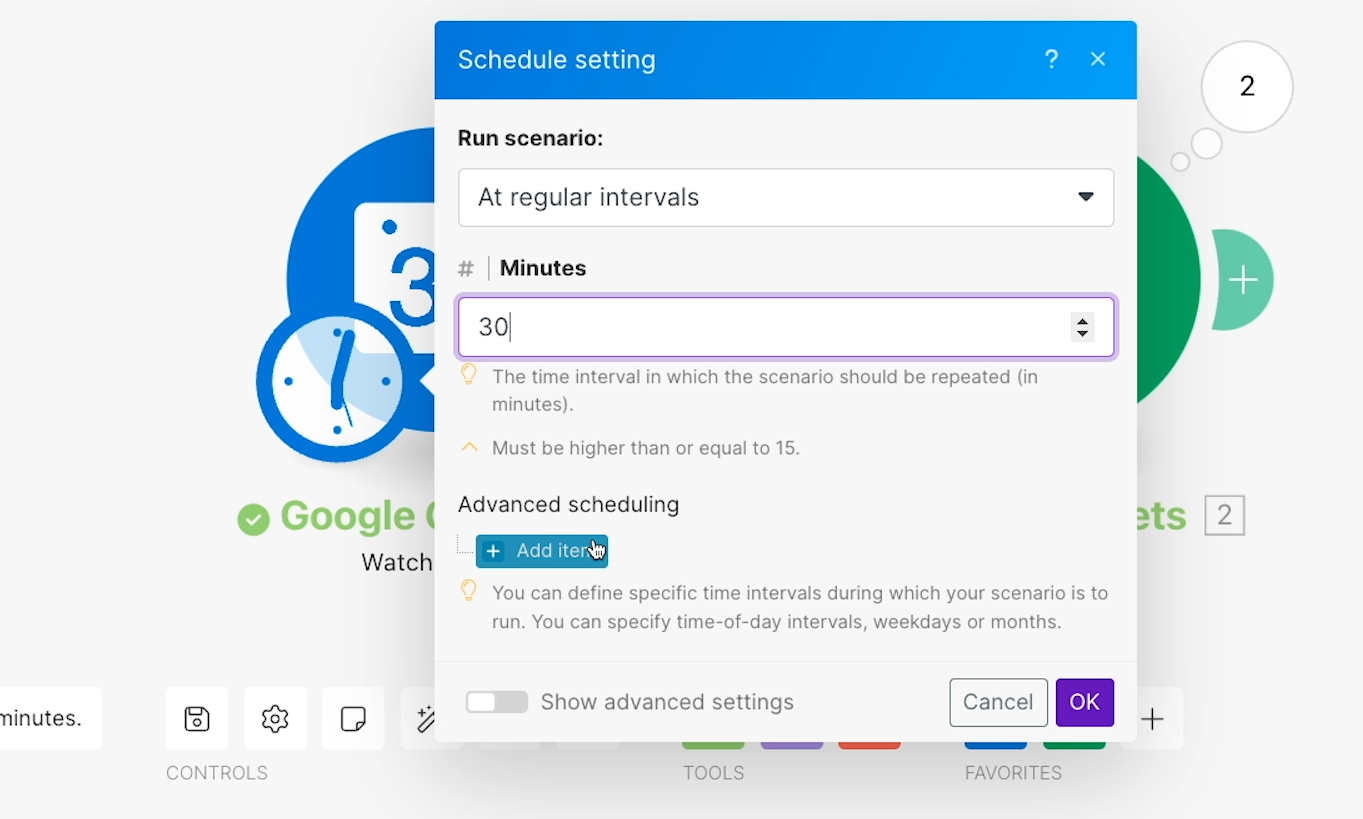
In the menu that pops up, you can set how often the automation will run. By selecting “add item” under “Advanced scheduling”, you can also dictate which days and times the automation will run.
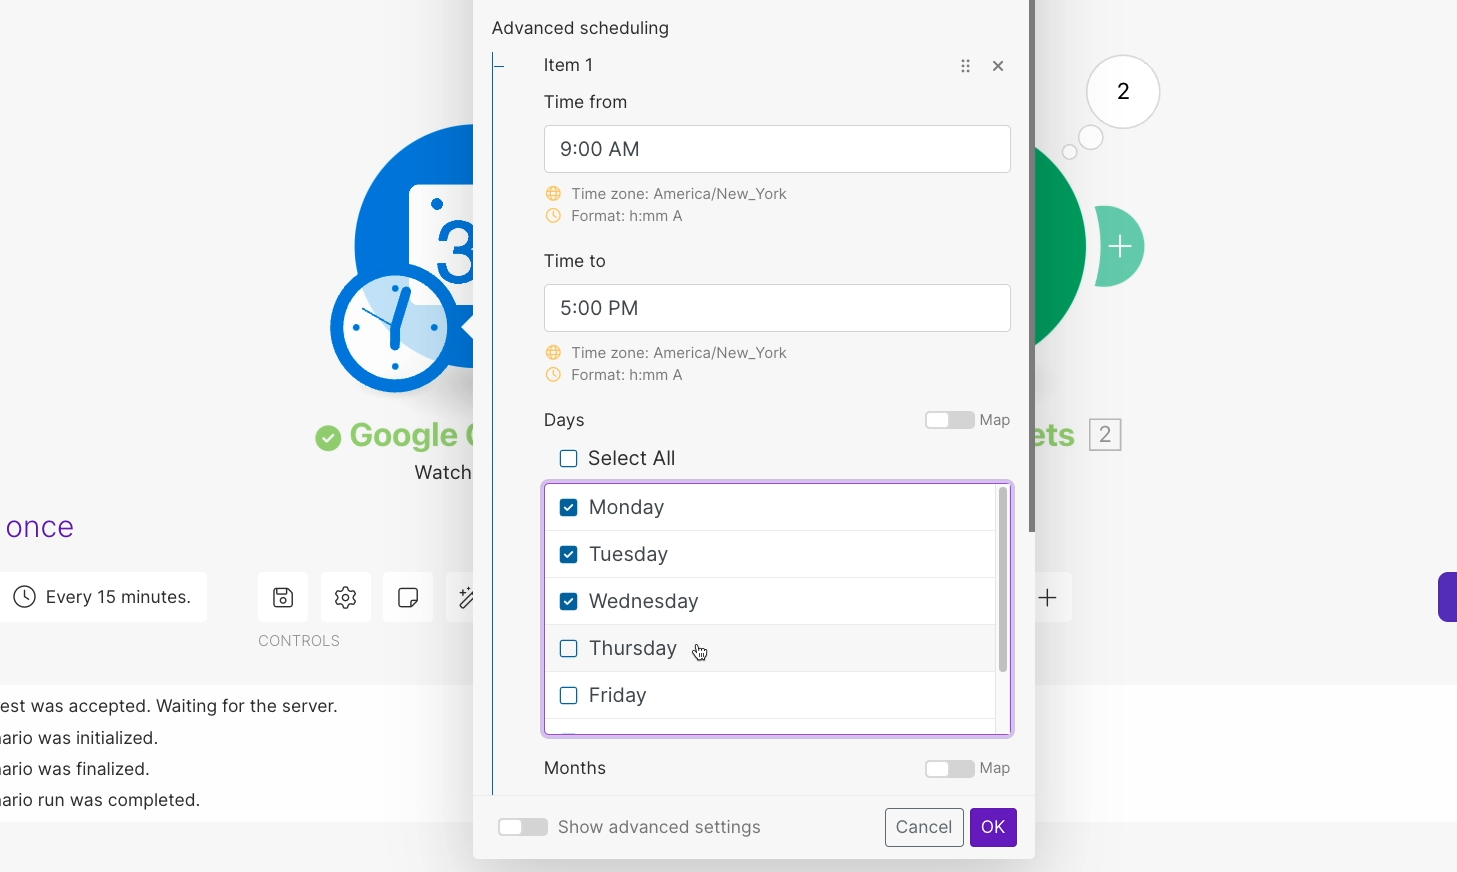
After reconfiguring the schedule in our example, the automation should now only check for new events 16 times a day, five days a week.
Your automation won’t start running on its own until you turn it on, but it’s best to set the schedule early on so you don’t forget.
Going further with Make: advanced techniques
Transforming data with functions
While the automation that we’ve built works fine, the formatting of the dates is less than ideal.

Fortunately, there’s a very simple way to fix that in Make and reformat the dates however you want.
Go back to your scenario in Make and open up the ‘Add a row’ action. Then, select the start date field.
As you’ve already seen, when you select any data input field in a Make module, a window pops up where you can access data from previous steps in the automation.
However, that’s just one tab in this window. In the other tabs, you can access functions and tools that let you reformat text, dates, and numbers, run calculations, and a lot more.
Let’s try reformatting this date to make it a bit easier to read.
Click on the tab with a calendar icon, then look for the “formatDate” function down at the bottom of the panel.
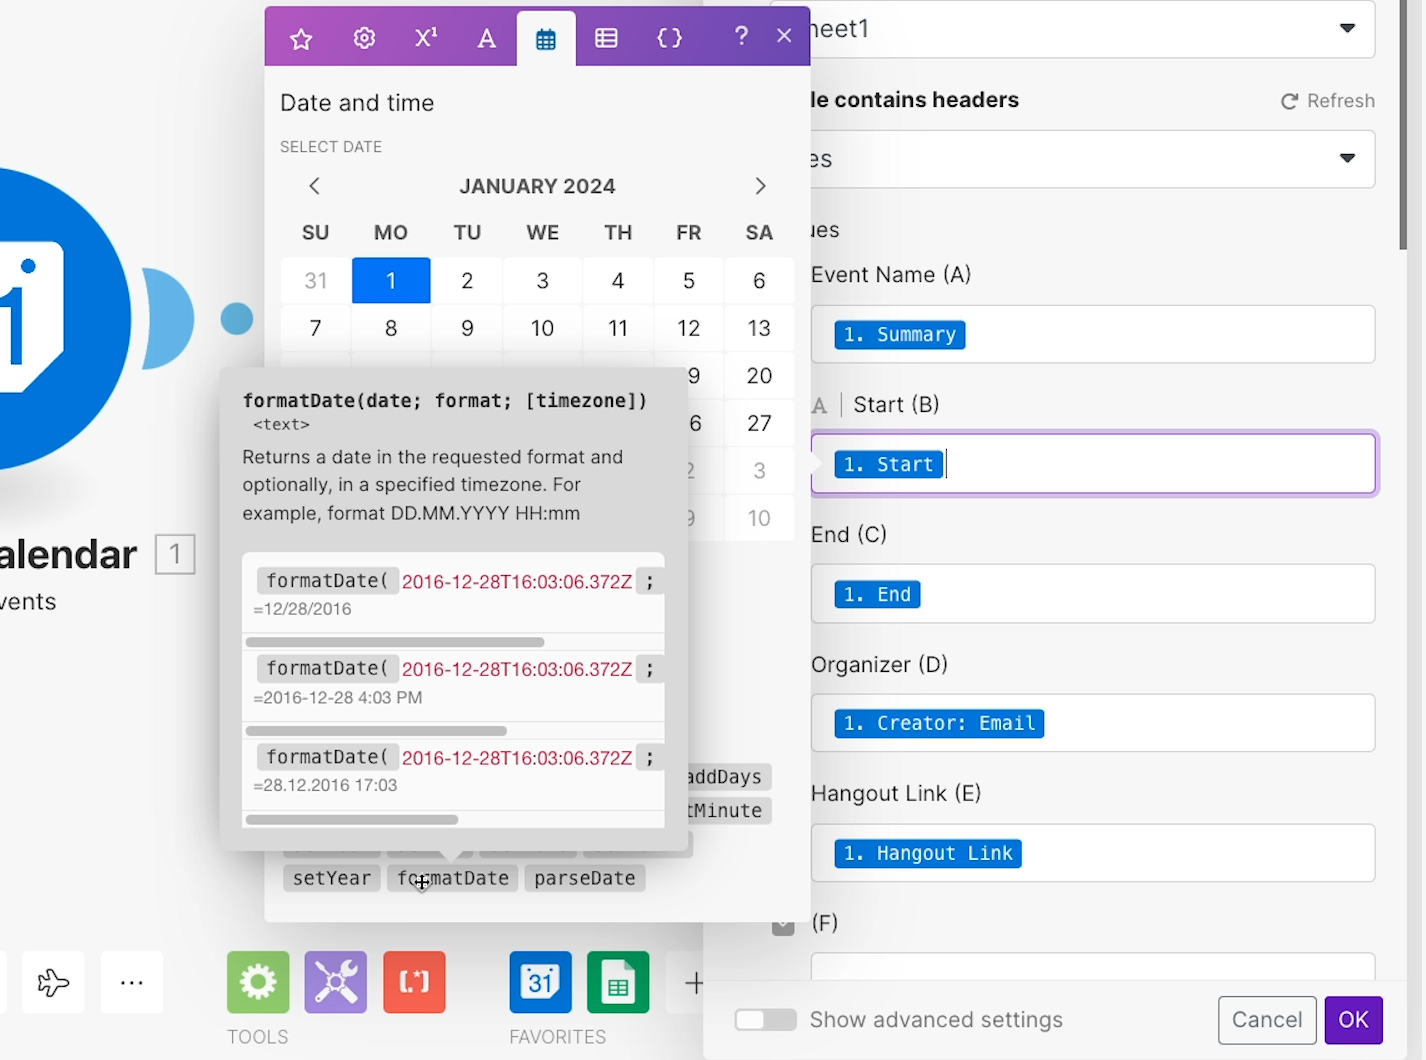
Hover over the function to see a tooltip explaining how it works along with a few examples.
Click on the function to add it to your currently selected input field.
You’ll need to put the date you want to format before the semicolon. Then, you’ll need to provide the format you want to use after the semicolon. You can always refer back to the tooltip to confirm the syntax of the function.
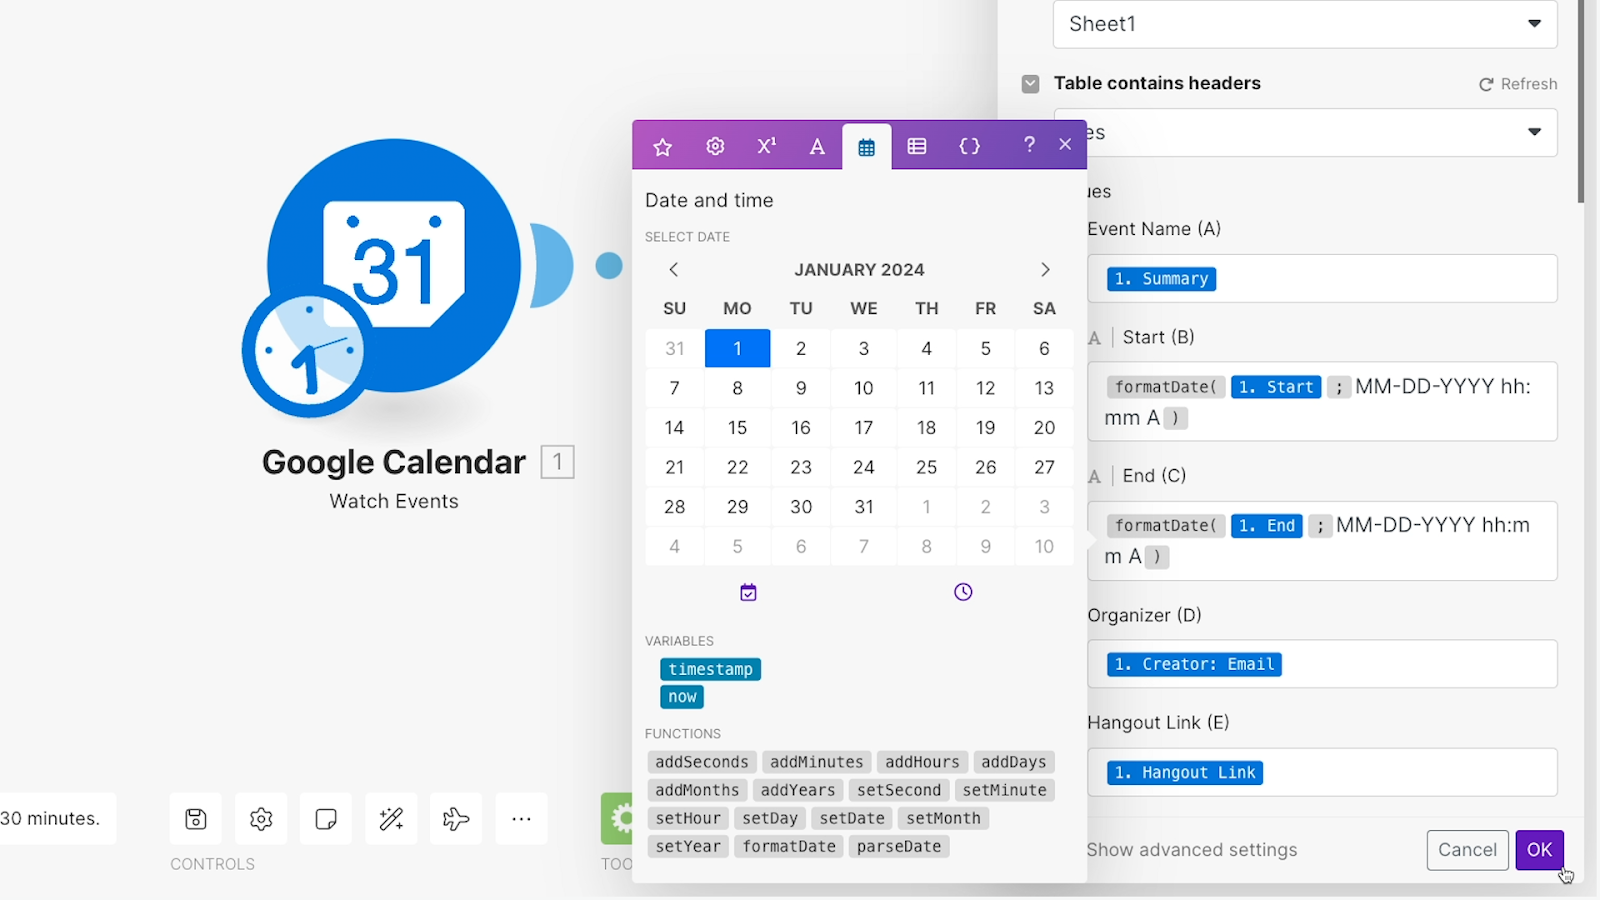
In our example, we’ll use this format:
MM-DD-YY hh:mm A
to show the month, day, and year separated by dashes, followed by 12-hour time.
To keep things consistent, we’ll also use the same function for the end date.
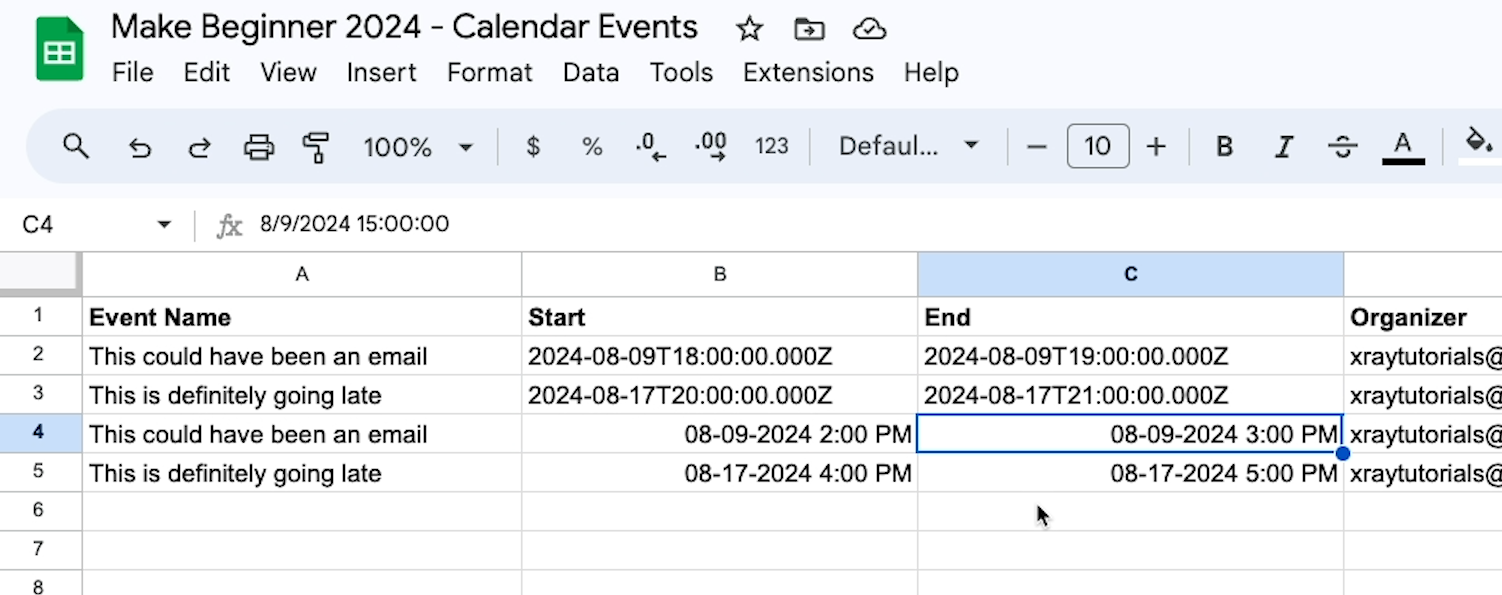
Now, instead of entering the timestamps directly into Sheets, this automation will enter the outputs of these functions, which will be neatly formatted dates and times.
Once you’re all set with your functions, close the Sheets action and save your scenario with the floppy disk save icon. Then, give your scenario a fresh test.
Check Sheets to see the output. You should see a new row with start and end dates using our new format.
Conditional logic and filters
There’s one last thing we want to show you before we wrap up this beginner’s guide. In general, one of the best things about automating a workflow is that you’ll ensure it runs the same way every time, and you’ll avoid all those messy human errors. But with a simple automation like this one, that extreme consistency can become a problem.
That’s because real-life workflows are rarely this simple. More often than not, you’ll need to allow for at least some variation. Fortunately, Make offers several tools to give your automations some variability, including the ability to add filters before any automated action. The scenario will only continue to run past the filter if its data matches your filter conditions.
Let’s see how it works in action.
First, add one more action to this scenario. In our example, we’ll add a Slack action to send a channel message. The message will act as an alert for each upcoming meeting.
Setting up this action is very similar to configuring the new row in Sheets, so we’ll just show you the finished configuration in the screenshot below.
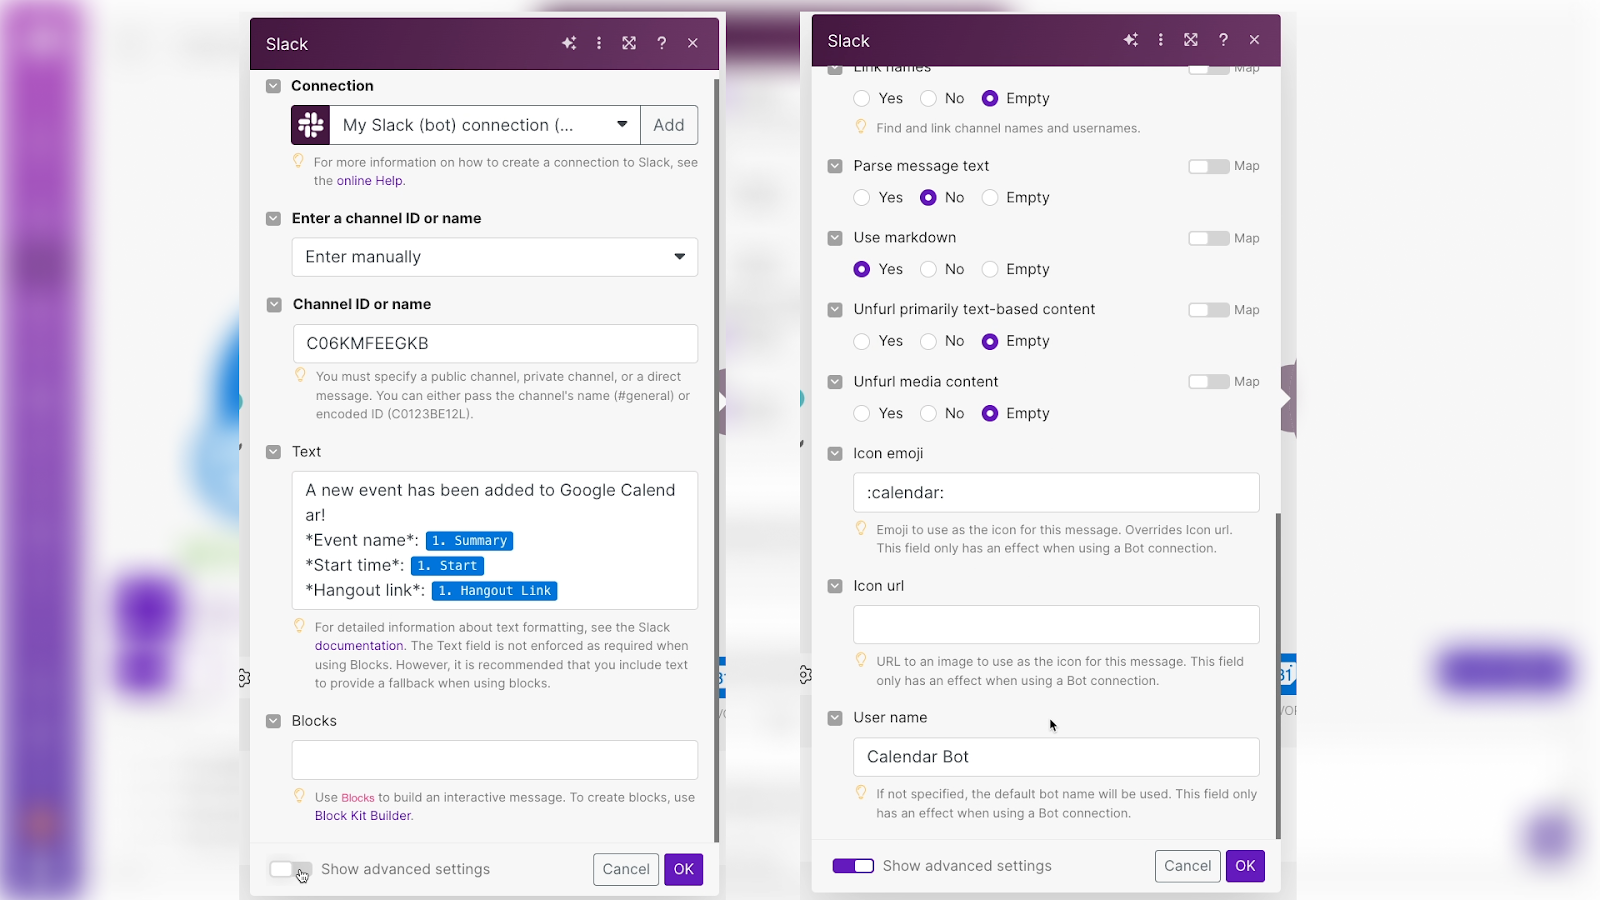
Note that the asterisks we’re adding around some words in the message are a simple formatting trick - they’ll make those words bold in Slack’s markdown syntax. Once your Slack message module is all set, you can add a filter before it.
What we’re going to do is make it so the scenario will only continue to the Slack step if the calendar event is set to start within a week from the current time. If it’s later than that, the scenario will just stop after creating a new row in sheets.
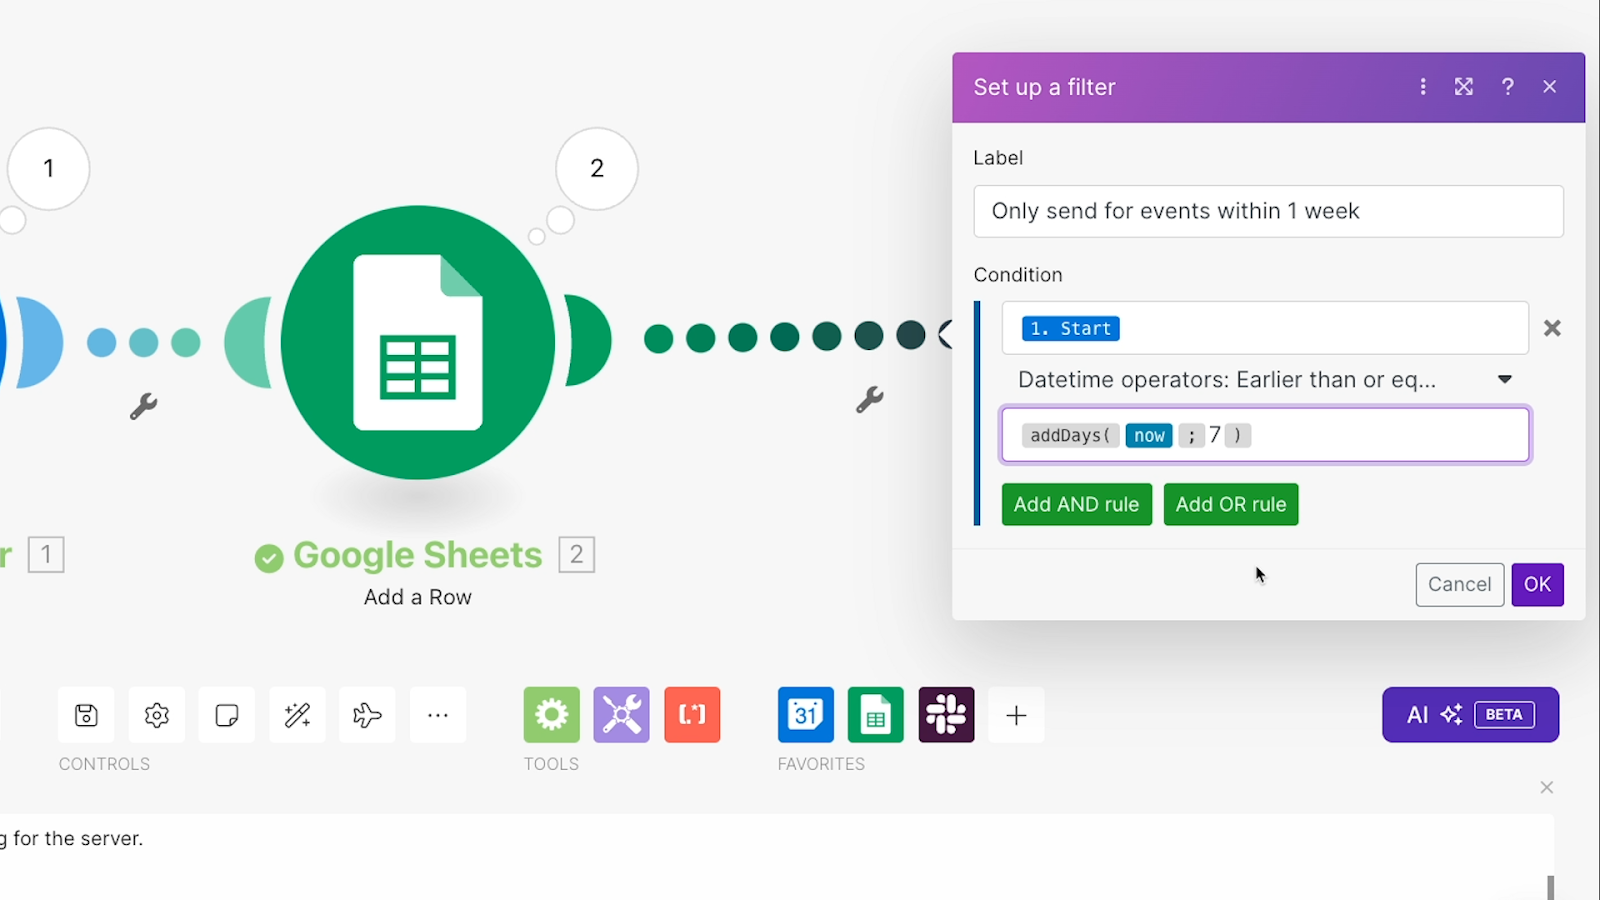
Adding a filter
To add a filter to a scenario, click on the dotted line between the two modules where you want to add your filter.
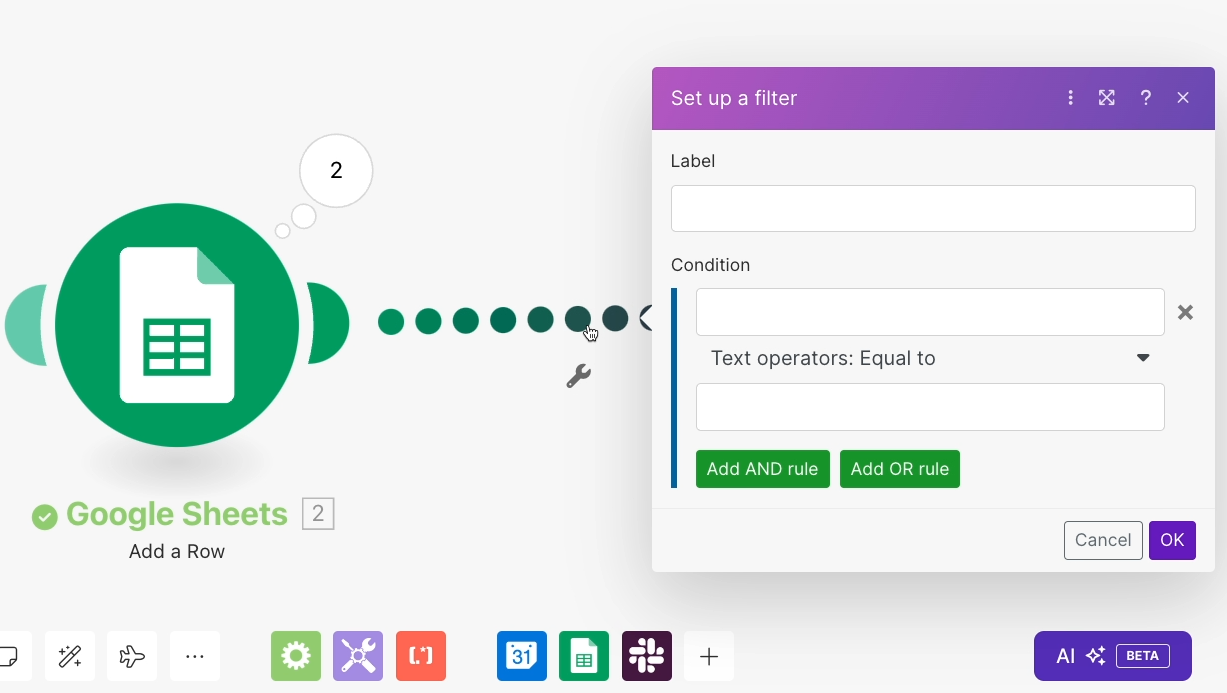
You’ll then see a little window pop up where you can configure your filter. Give it a brief, descriptive label so you know what it’s for.
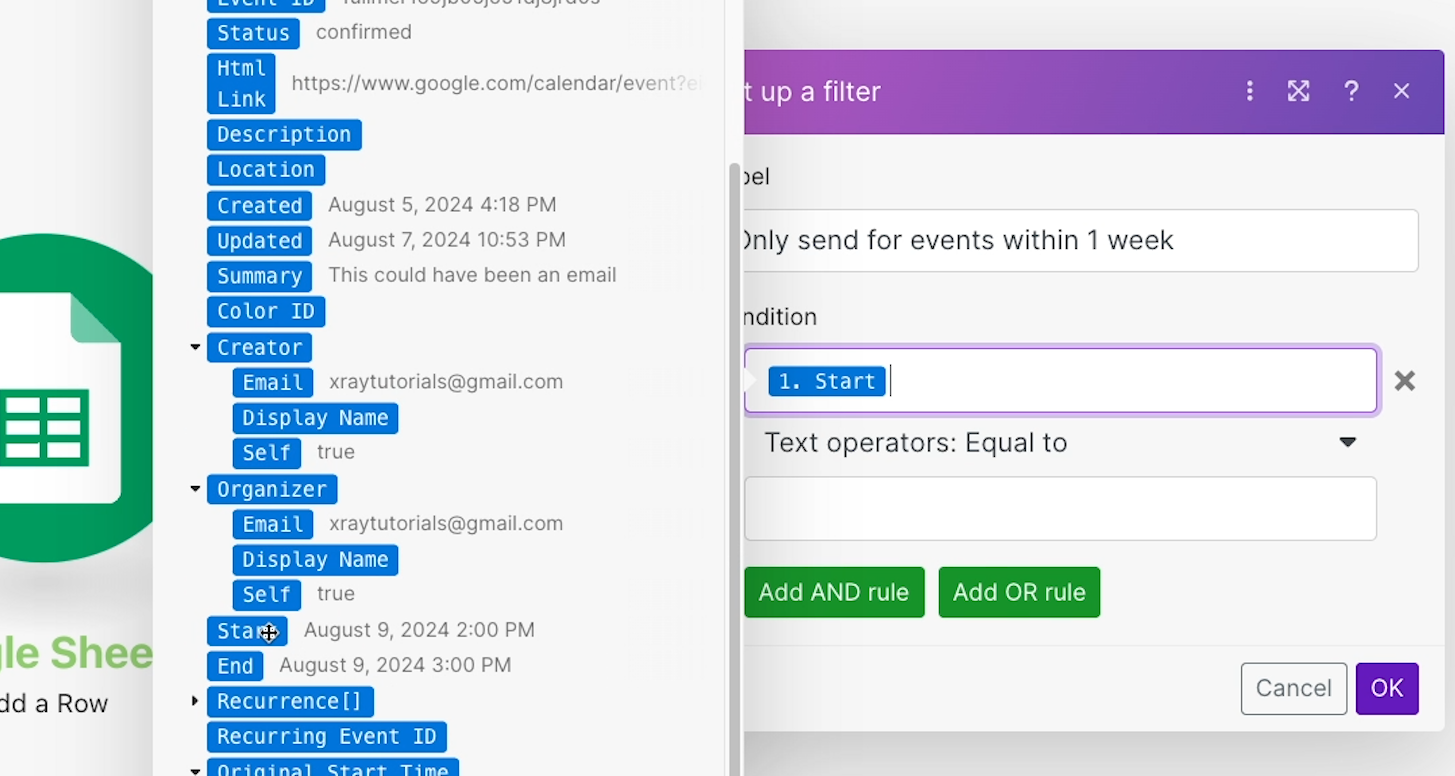
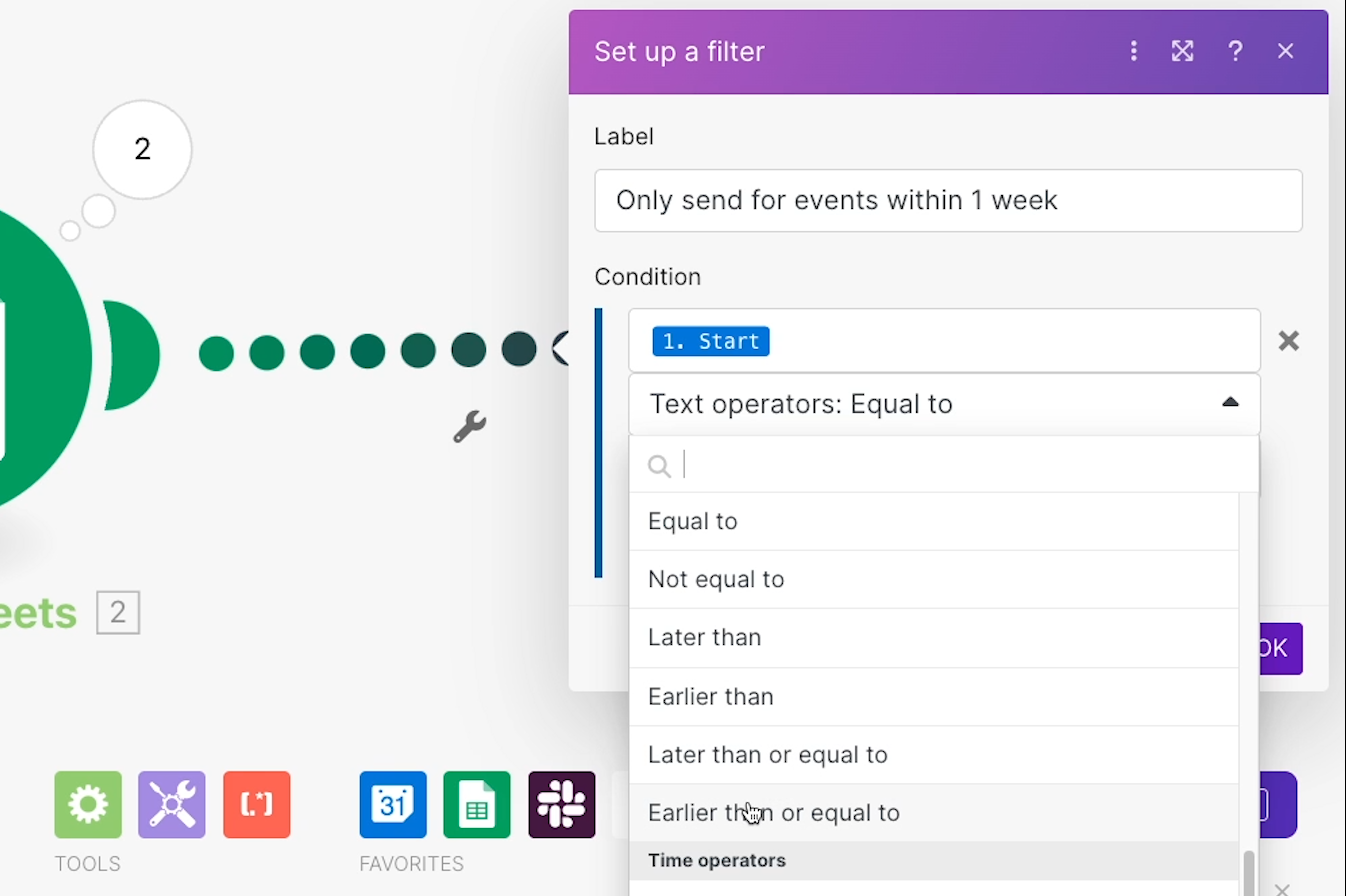
Then, you can set the condition. This is what the filter is going to check to decide if it should continue or not.
We want to check when the start date is, so begin by entering the start date from the trigger.
Then, set an operator. Look under “date time operators” for the “Earlier than or equal to” operator.
Now, you just need a way to specify “one week from now.” To do that, you’ll need to ask Make to retrieve the current time, and add seven days to it.
Go to the calendar tab again and choose the “AddDays” function.
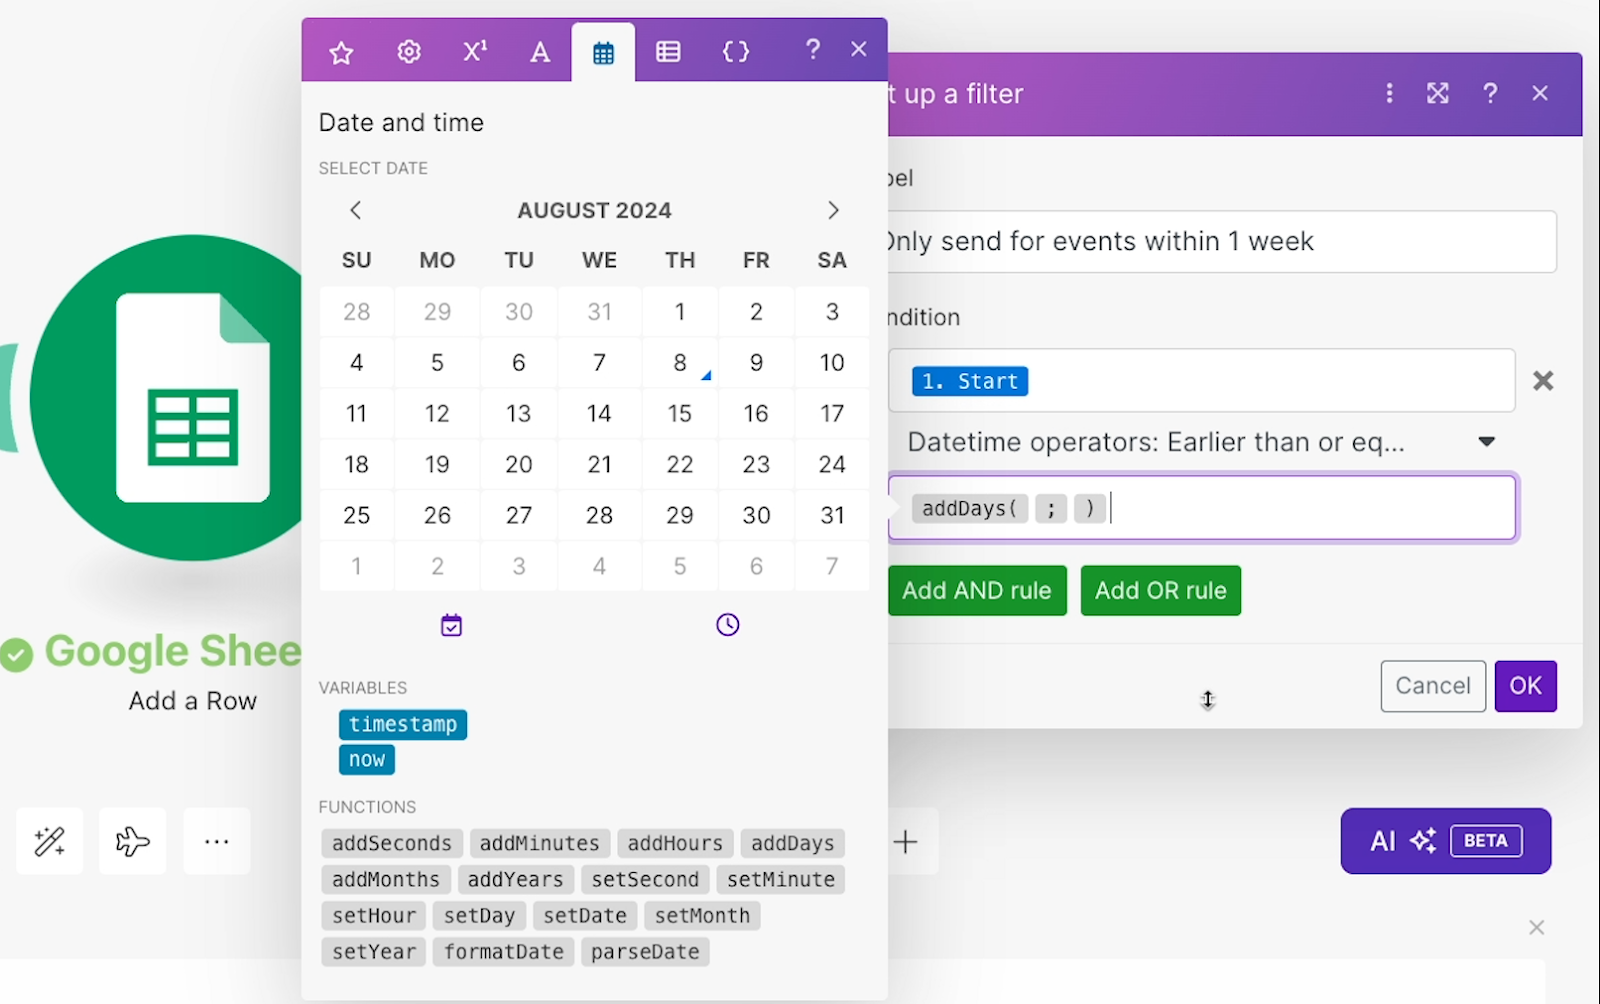
Before the semicolon, insert the variable called “now.”

“Now” will retrieve whatever the current date and time is when the scenario is running.
After the semicolon, enter 7, for 7 days.
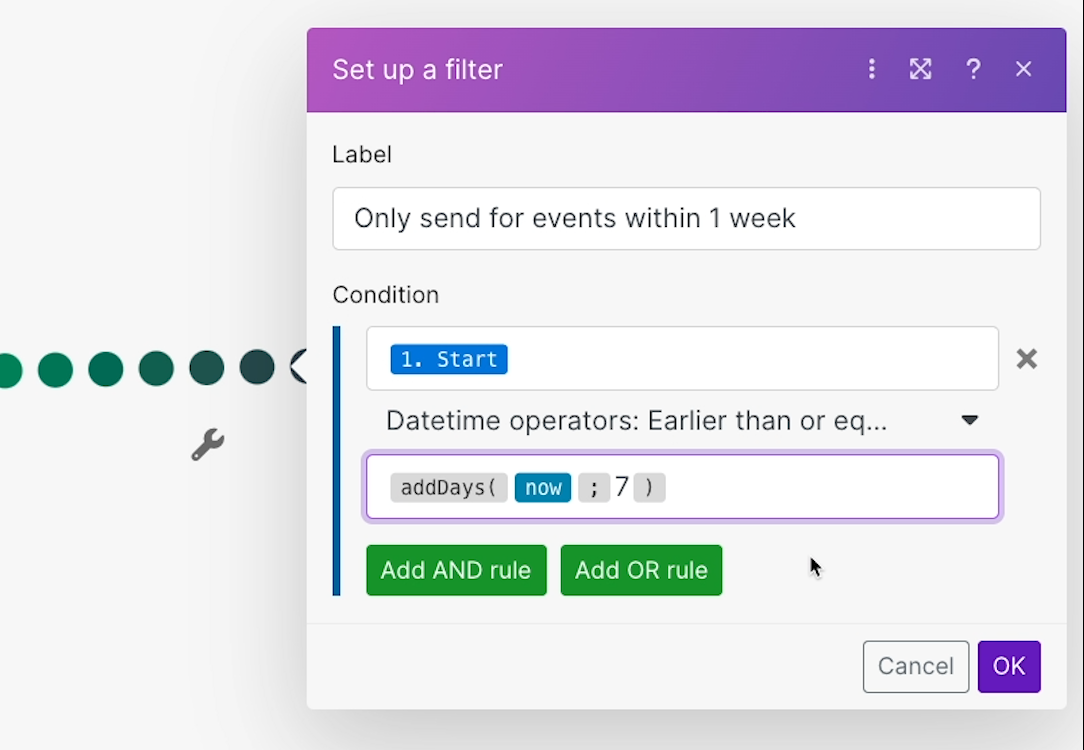
Now, this filter is set up to check if the event’s |Start date| variable is |earlier than or equal to| |7 days| from now.
By clicking on “Add AND rule” or “Add OR Rule,” you can add more conditions for the filter to check, but let’s just stick with this one for now.
Click OK to close the filter, and give it a test.
Testing a filter
We’d recommend conducting two different tests – one that should pass the filter and one that should fail.
In our example, we’ll start with an event that starts in 2 days, which should pass the filter.
After running the test as usual it looks like all three modules ran, consuming 3 operations.

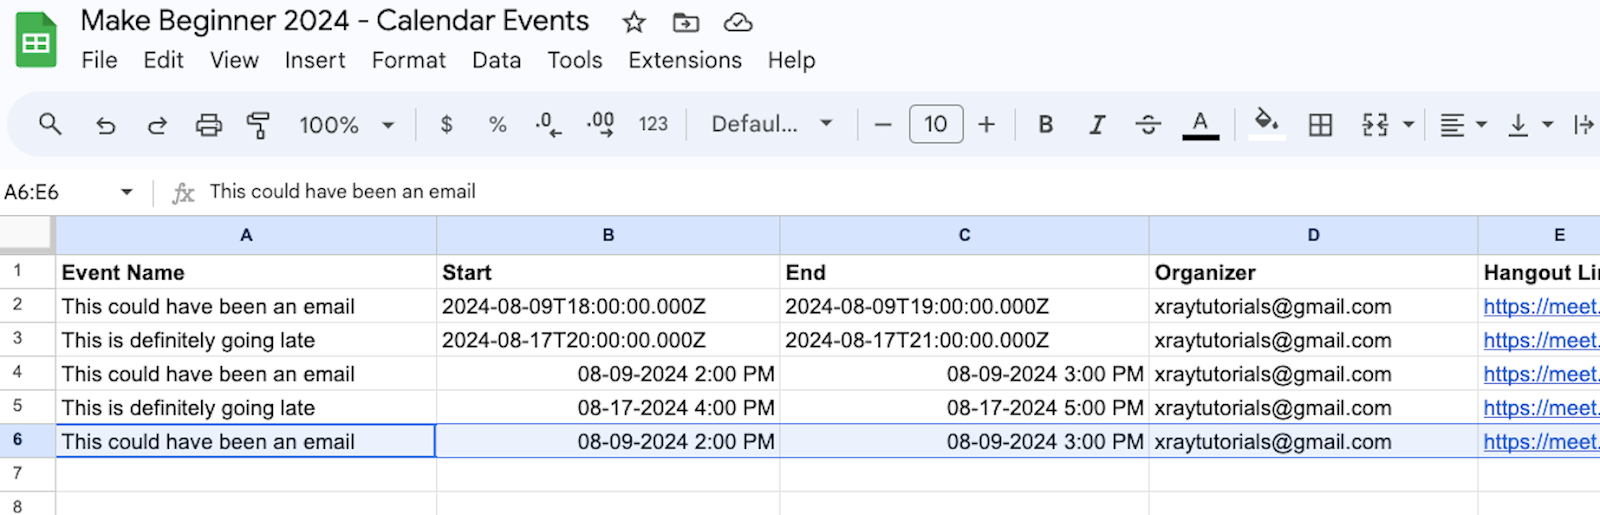
Below, you can see the new row added in sheets, and the message sent in Slack.
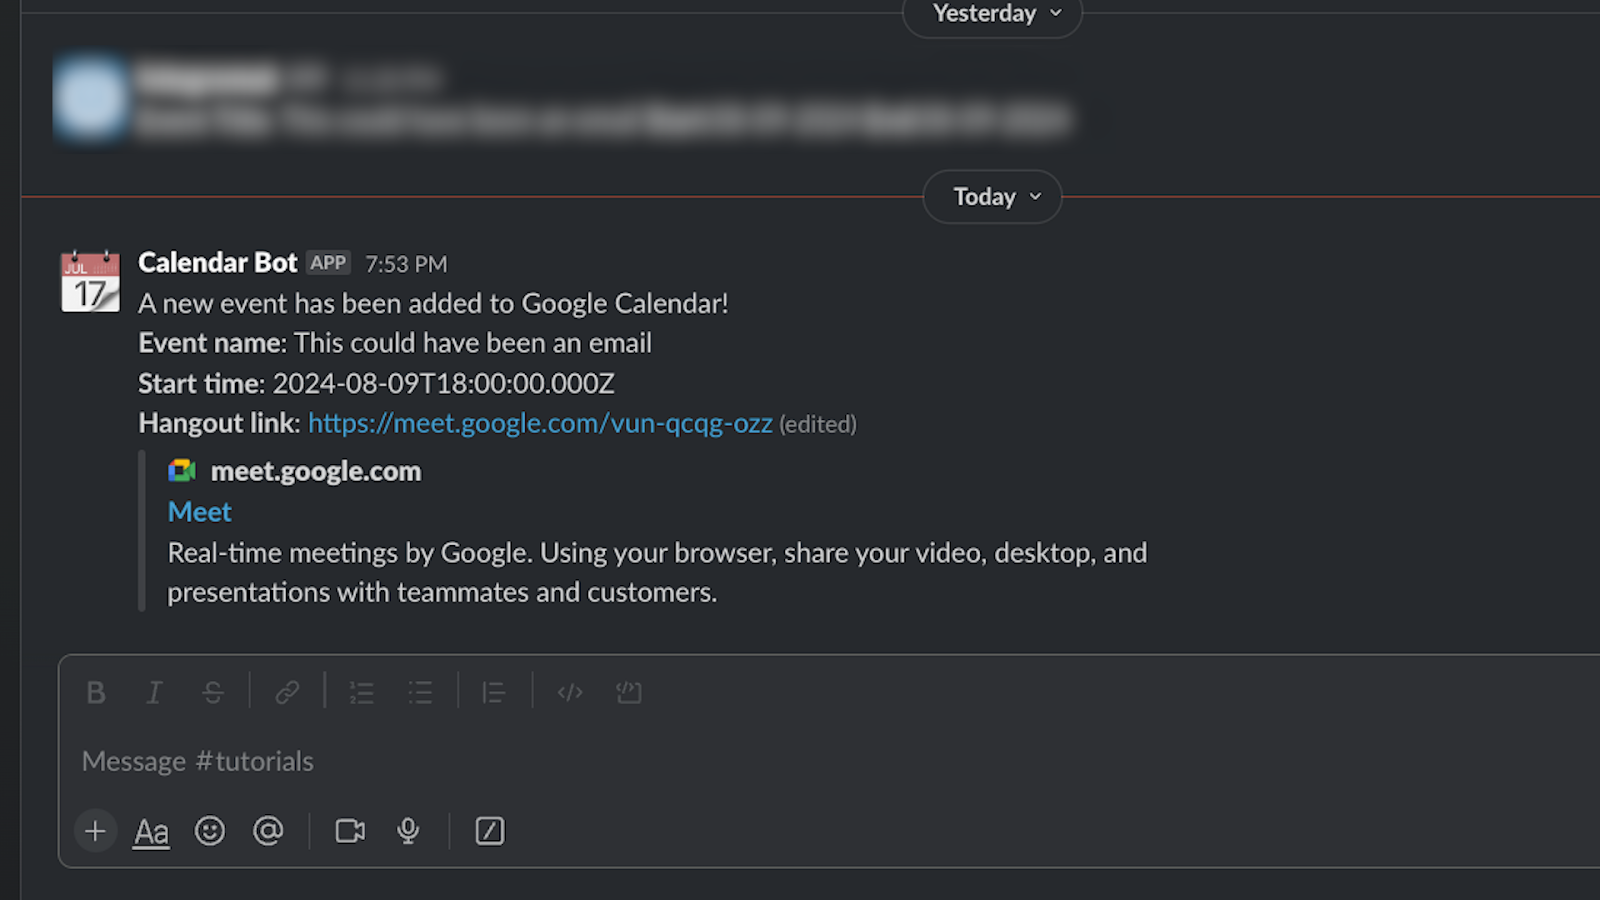
Now we’ll test with this event that starts in 10 days.
In our test, the trigger and the Sheets module ran, but the scenario stopped at the filter and didn't send a Slack message. In total, it consumed 2 operations instead of 3.
Based on these tests, the filter makes the scenario stop when events are more than 7 days away, but lets everything else through. It’s working exactly as intended.
Use routers to do more with filters
To get the most out of filters, you’ll usually want to use routers as well so you can set up alternative actions for different conditions. You can check out this tutorial for more information about routers.
But for now, your first scenario is all set. You can now automate your apps with custom triggers and actions, transform data with functions, and control the flow of your automation with filters. You’re well on your way to automating your work and claiming back some valuable time.
Start automating your team’s repetitive tasks with Make
With automation software like Make, you can remove tedious, repetitive tasks from your team’s everyday workload, and focus more time on the work that really matters.
What we’ve gone over today is just the beginning of what Make can do. Be sure to check out some of the other tutorials on our blog or our YouTube channel to learn more and level up your automation skills.