Need more flexibility in your Softr forms?
With the recently added Conditional form block, you can display different questions based on your users' answers and attributes.
Conditional form blocks are super easy to set up, and in this video, we’re going to show you how to start using them step by step.
We’ll demonstrate two different ways you can apply conditional logic to a form in Softr:
First, we’ll show you how to make certain sections of questions appear or hide based on user responses or attributes.
Second, we’ll demonstrate how you can split your form up into separate parts, and skip certain parts based on similar custom conditions.
Let’s get started.
To get started, you’ll need to get your Softr app set up and add the conditional form block.
In most cases, you’ll want to have the app connected to a data source so you can collect form responses.
In our example, we’ll be using Airtable, but you could just as easily connect your Softr app to SmartSuite, Google Sheets, Hubspot, Xano, Monday, Postgres, and more. The specific data source doesn’t really matter for this tutorial.
At the time of publishing, the conditional form block is still in beta, so some of the functionality may change a bit over time.
For now, you’ll have to select this conditional form block to create a form with conditional logic. You cannot convert a normal form block into a conditional one for the time being.
However, we have heard that the functionality to convert regular forms to conditional forms should be coming soon.
In any page within your Softr app, add a new block. In the “Dynamic” tab under “form”, you’ll see the “Conditional form” option.
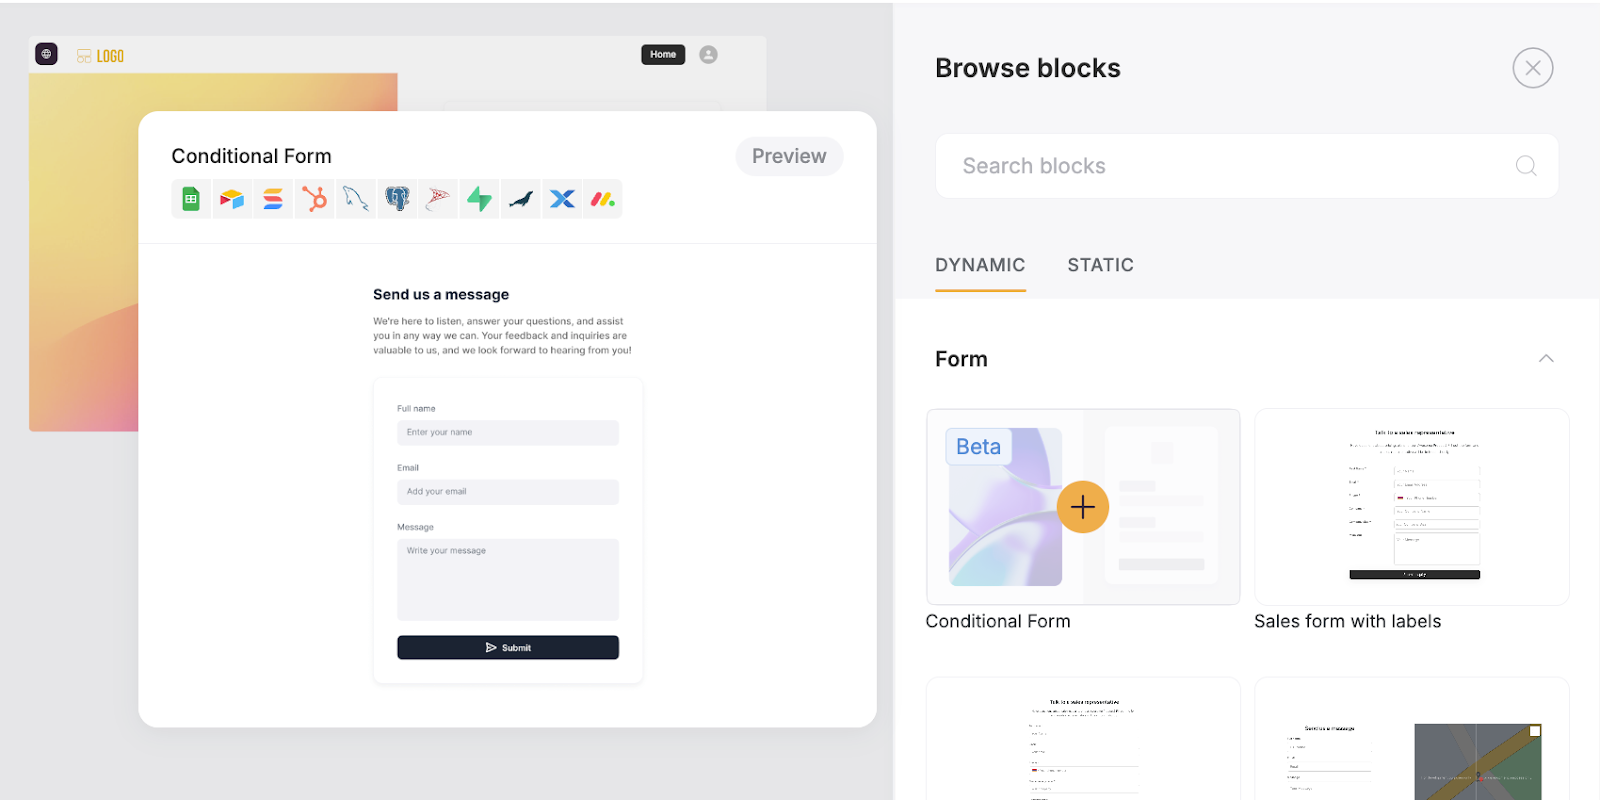
Select the block to add it to your page. Then, under settings, you can choose where the form’s responses will be sent.

In our example, we’ll keep mine connected to my Airtable data source and choose a specific table that already has fields matching the questions we want to include in the form.
Under the “Questions” tab, you can configure the questions that you want to include in your form.
Note that the default questions generated by the conditional form block are split into two sections.
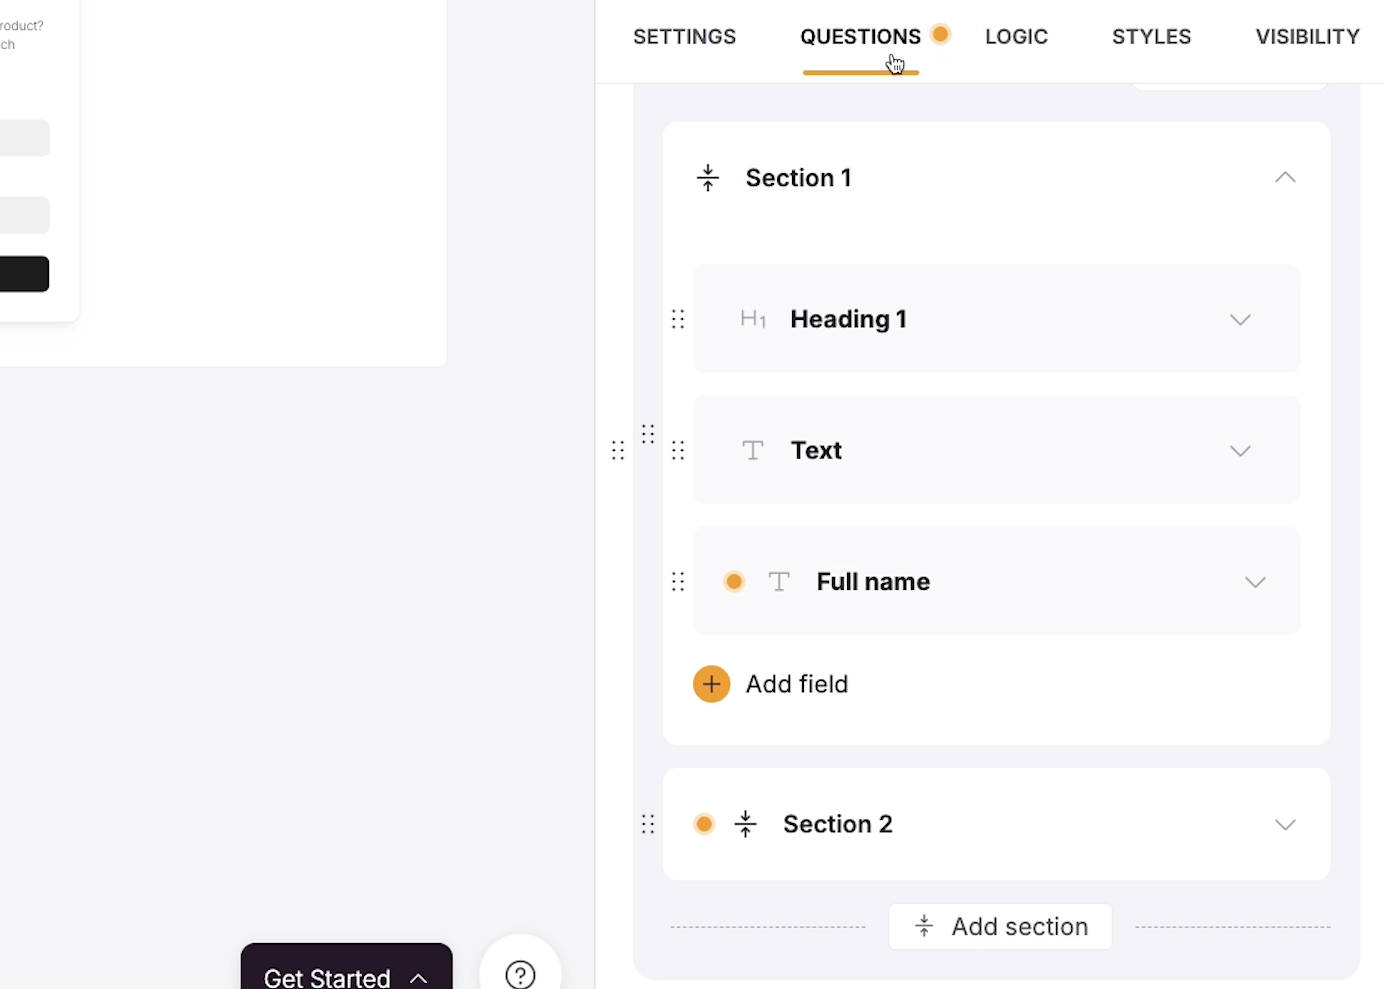
With conditional forms, you can hide or display entire sections based on user responses, but you can’t hide specific questions directly. You also cannot move questions from one section to another.
Keep these limitations in mind as you’re building your form. Anything you want to conditionally hide should be in a separate section from the main questions that will always be displayed.
Additionally, it should be separate from any other sections that will be displayed or hidden based on different conditions.
You can add more sections to your form by clicking on “Add section”.
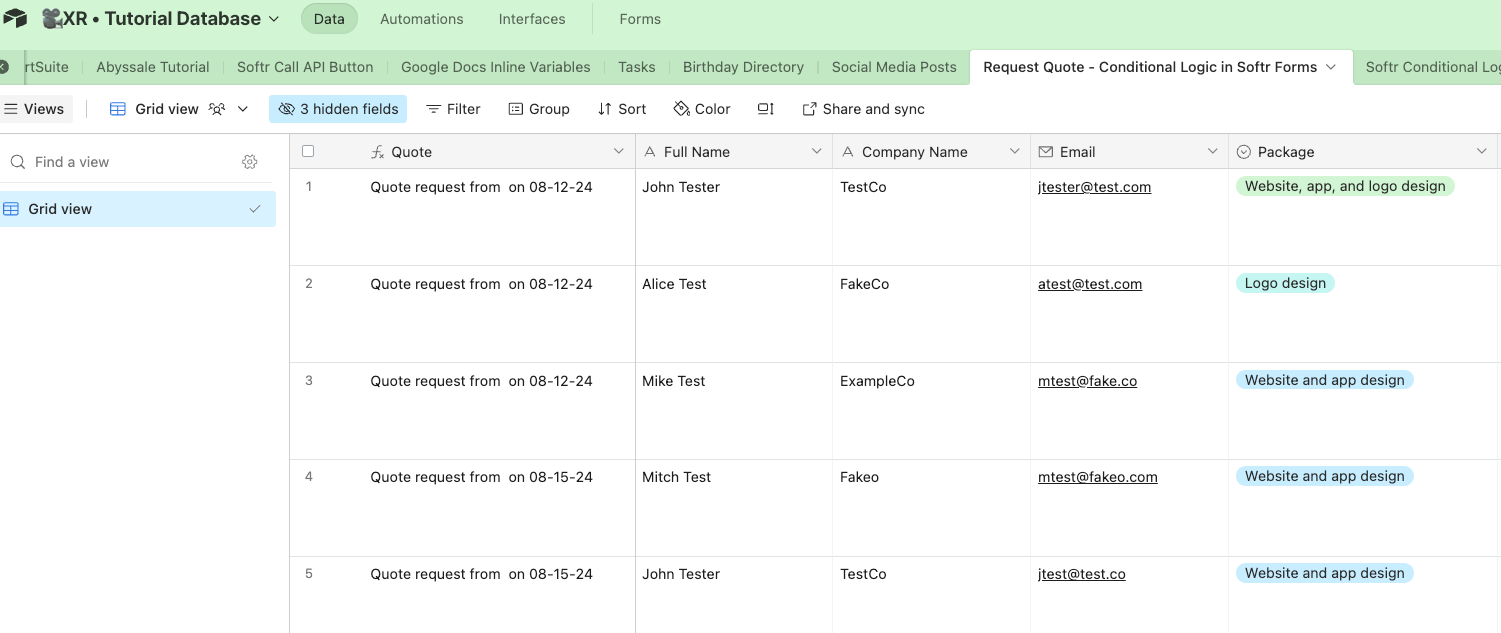
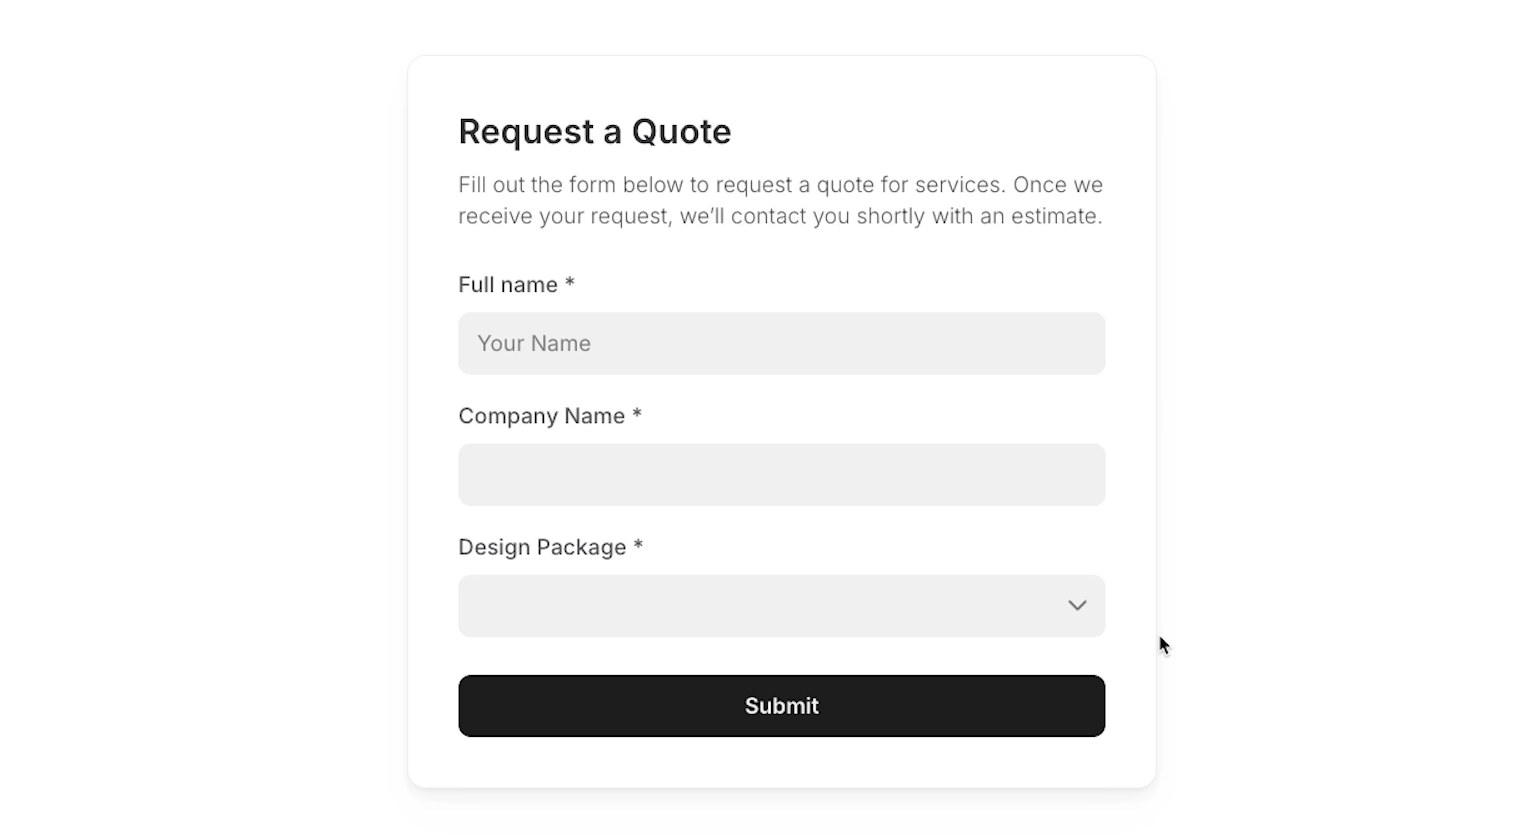
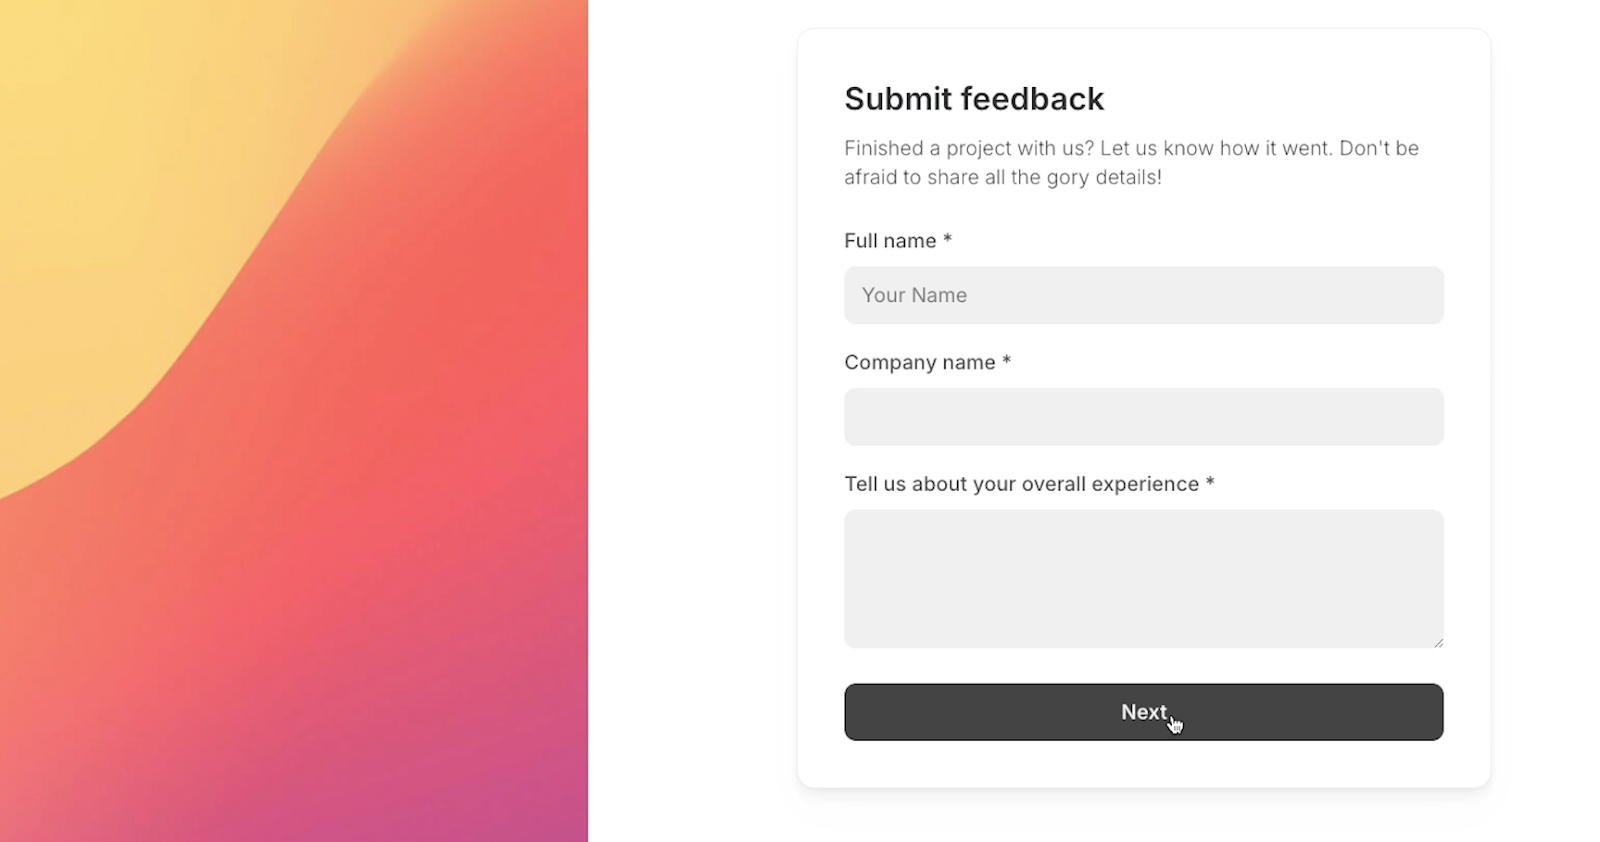
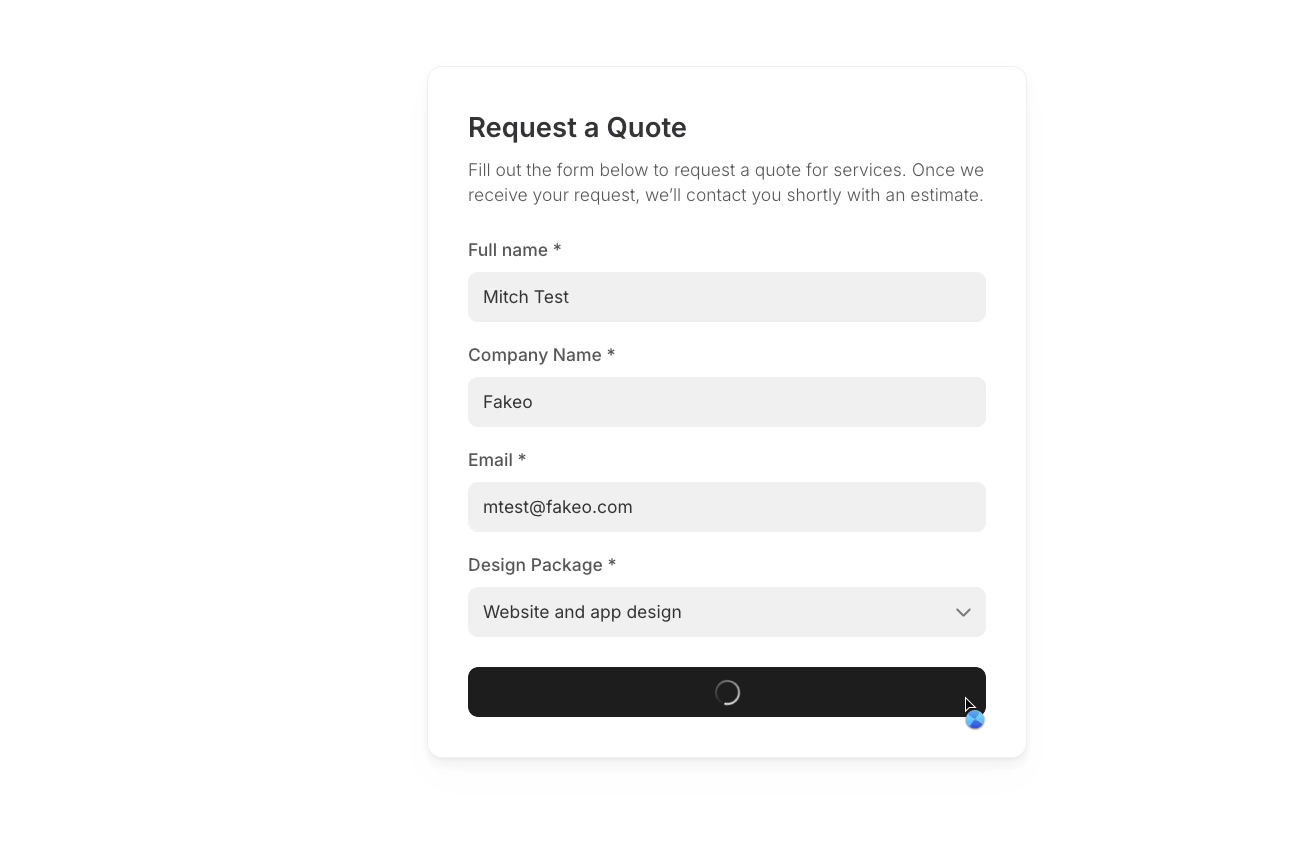
In the first section of our example form, we’ll add several questions to let users submit a request for a quote, and we’ll map each question to its corresponding Airtable field.
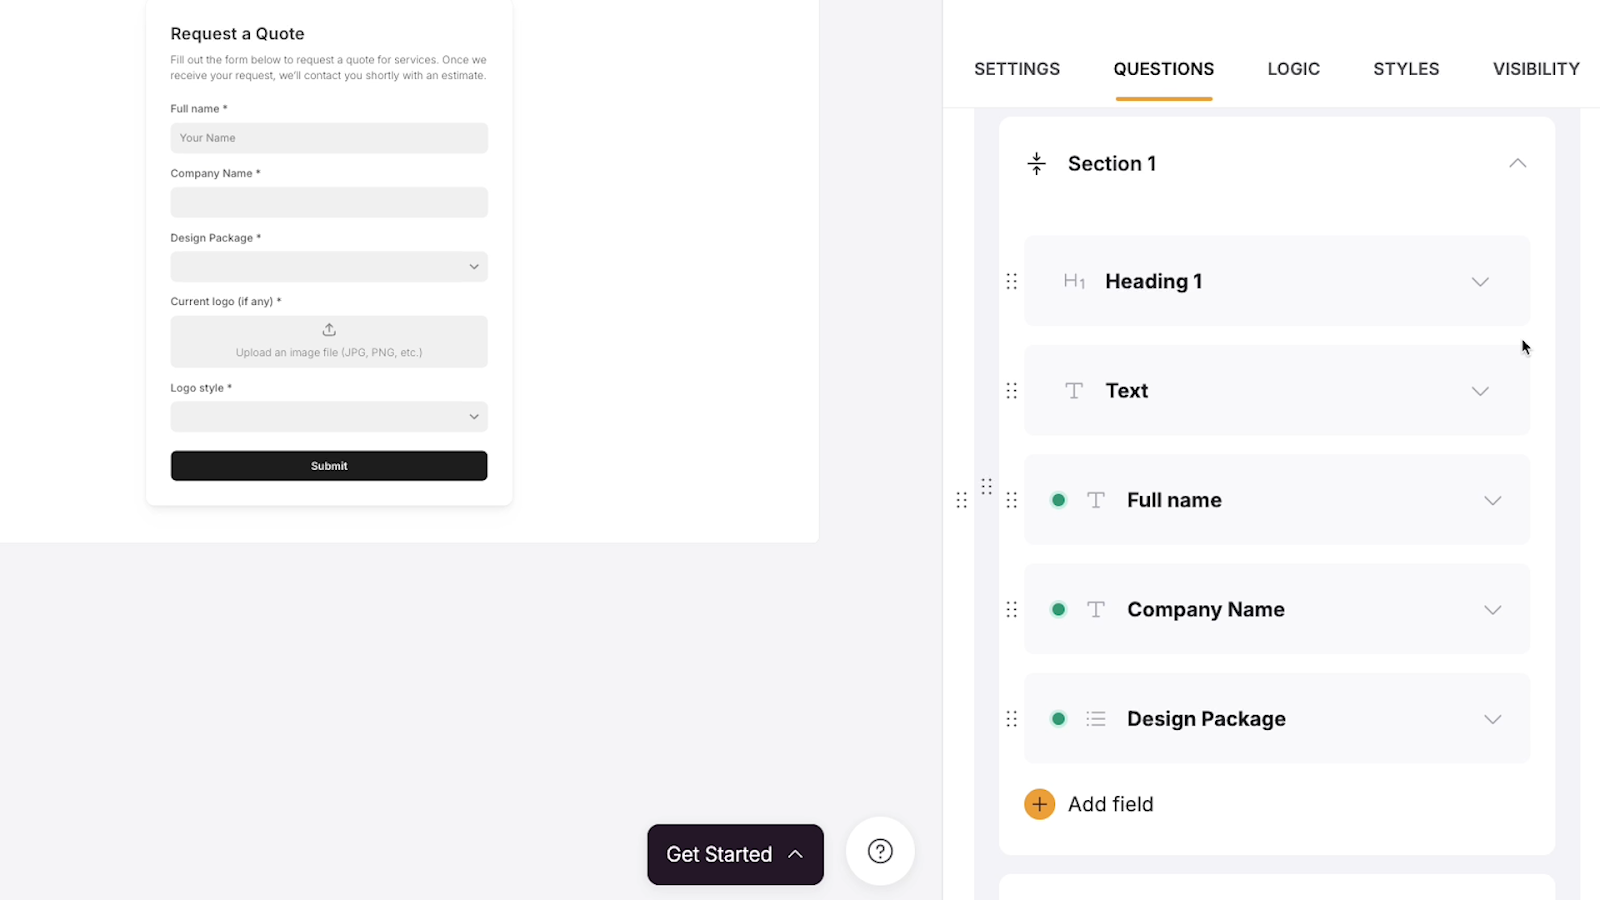
To follow along with this tutorial, you can use any questions you want; just make sure that you have at least one section with questions that every user will see, and at least one section that will only be displayed under certain conditions.
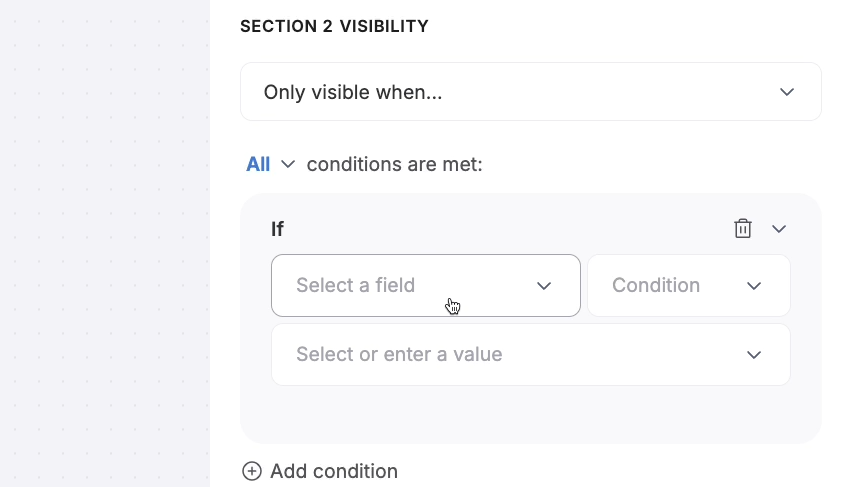
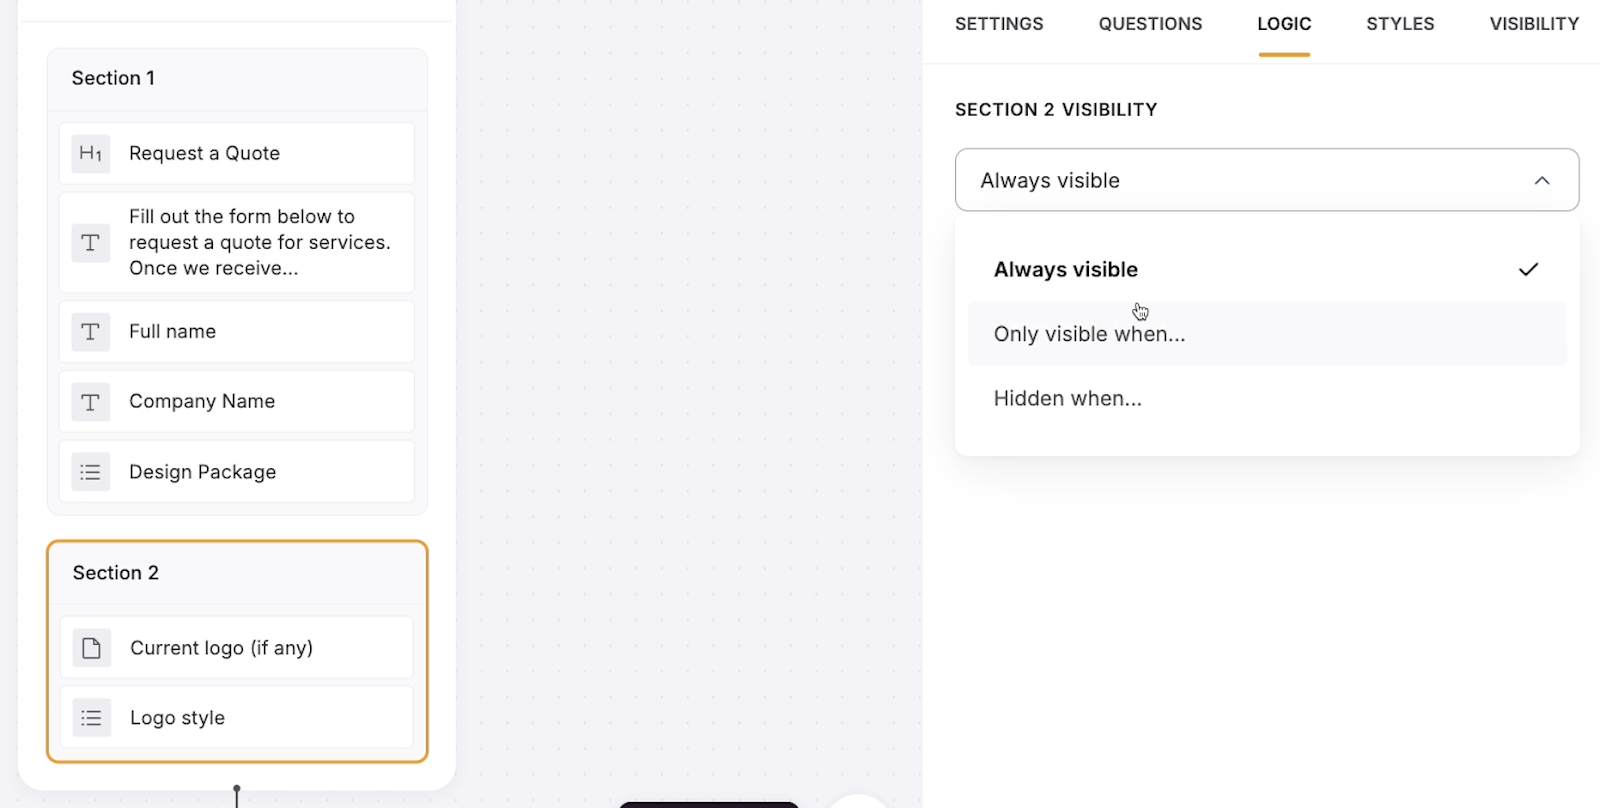
To set up conditional logic in your Softr form, click on the “Logic” tab.
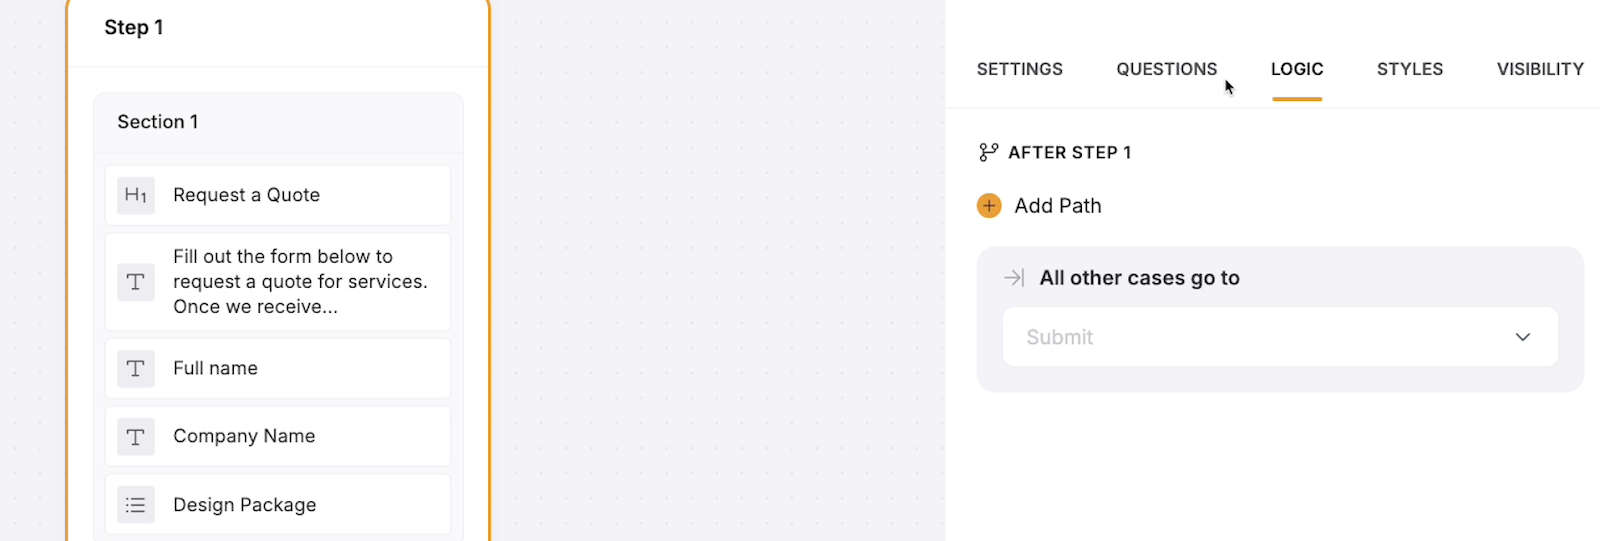
Then, select the section you want to adjust visibility for.
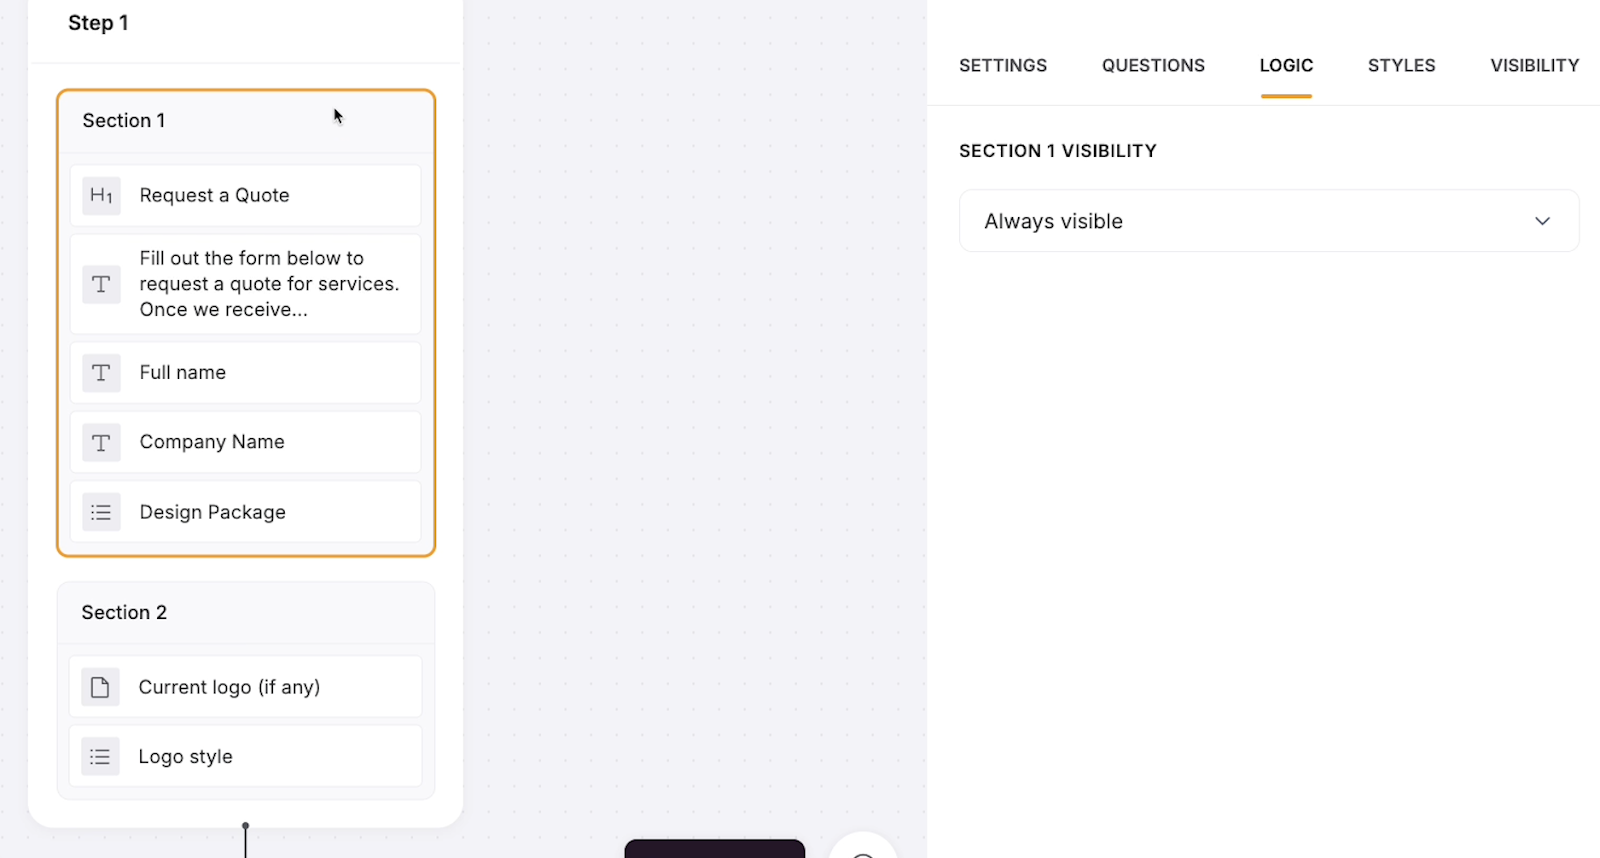
Our first section has general questions for anyone requesting a quote, so we’ll keep it set to “Always visible”.
Our second section has a couple questions that only apply to users who select design packages with a logo, so let’s make sure it only shows up when the selected design package includes the word “logo”.
To make a section of a Softr form only appear under certain conditions, select “Only visible when…”
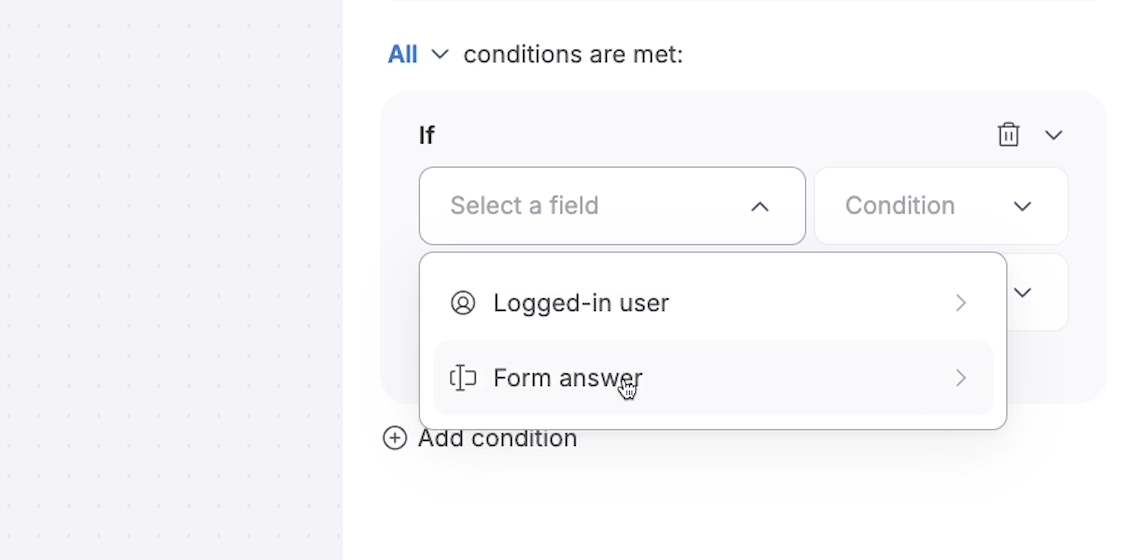
Then specify one or more conditions.
When setting up conditional logic, you’ll be able to access all of the user’s responses so far in the form (“Form answer”), as well as any user attributes that are available in your data source (“Logged-in user”).
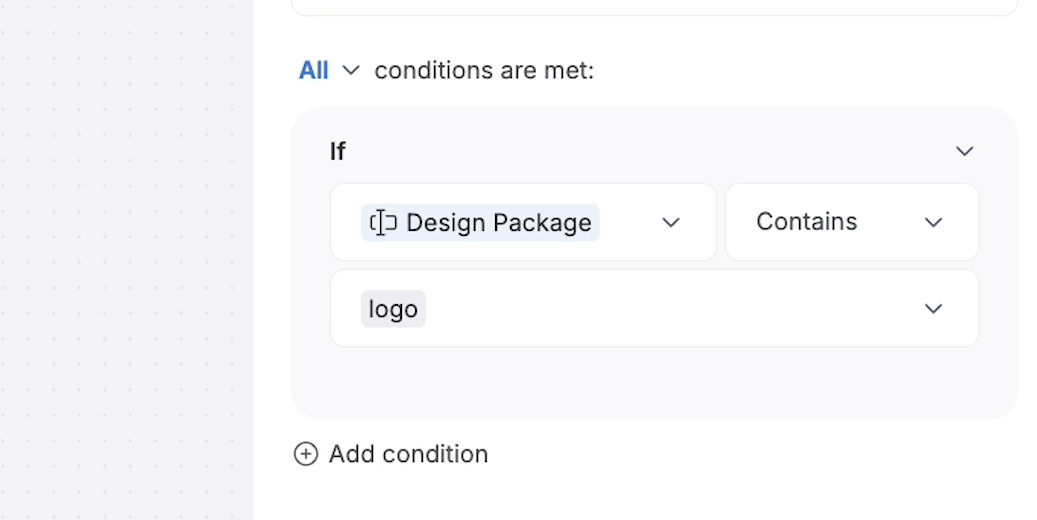
In our example, our condition will check the user response in the “Design package” field for answers that contain the word “logo”.
You can also add multiple conditions for the same section, and choose to display the section if ANY condition is met, or only if ALL are met.
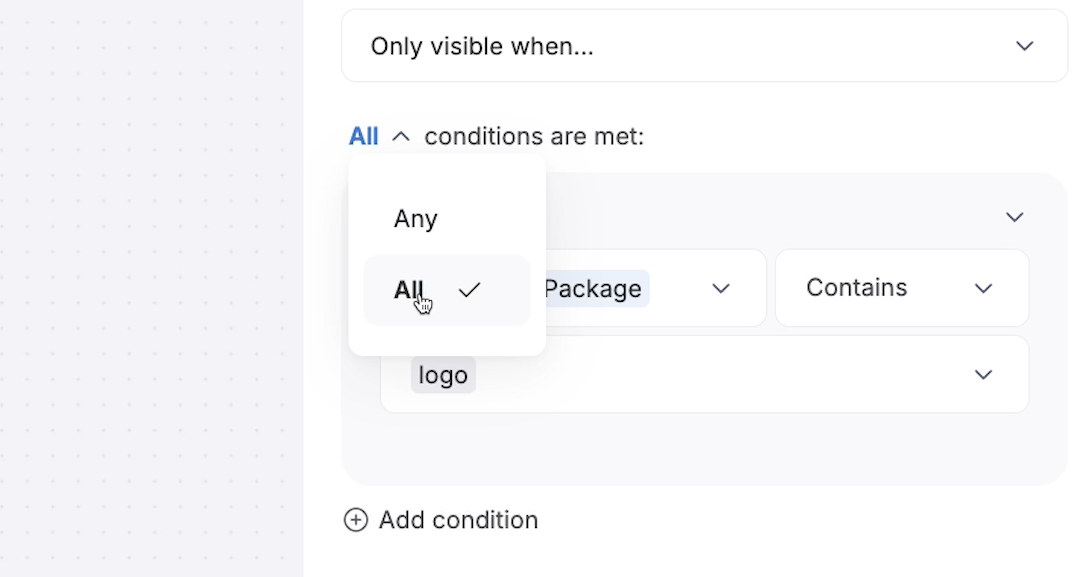
However, in our example, we’ll just stick with this one condition.
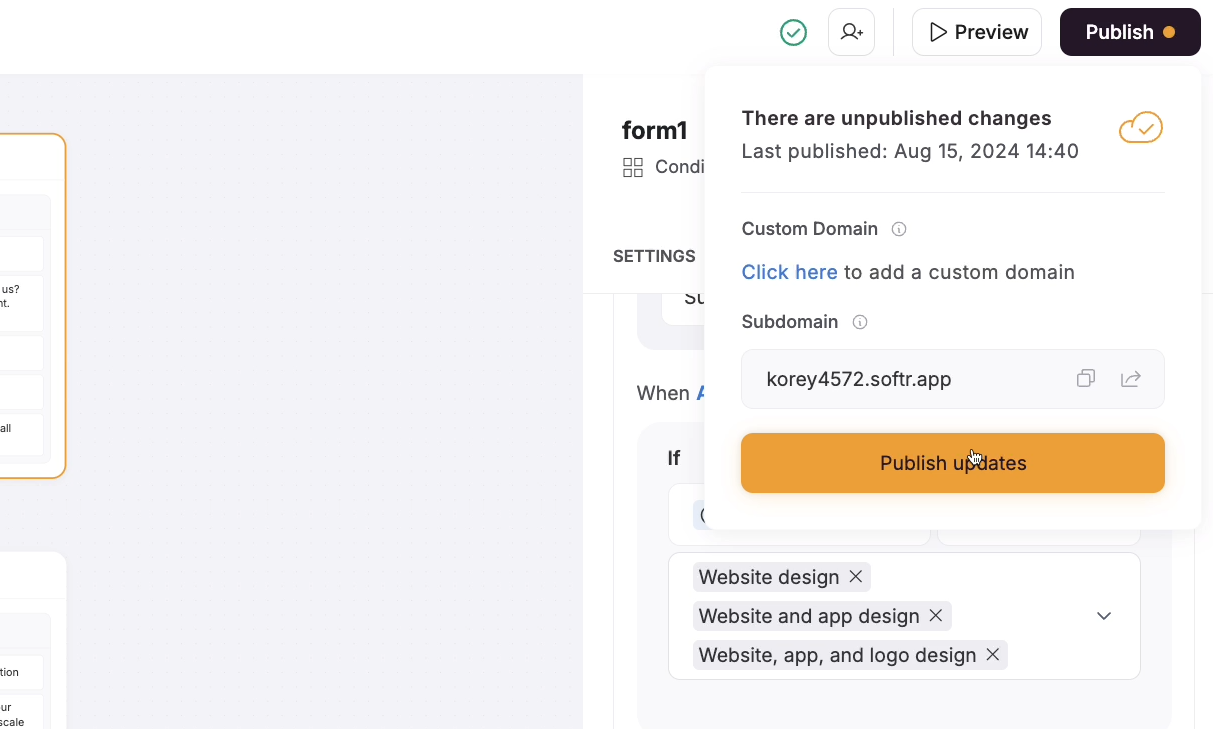
Once you’ve configured your conditional form logic, publish your site and open it in your browser to give it a test.
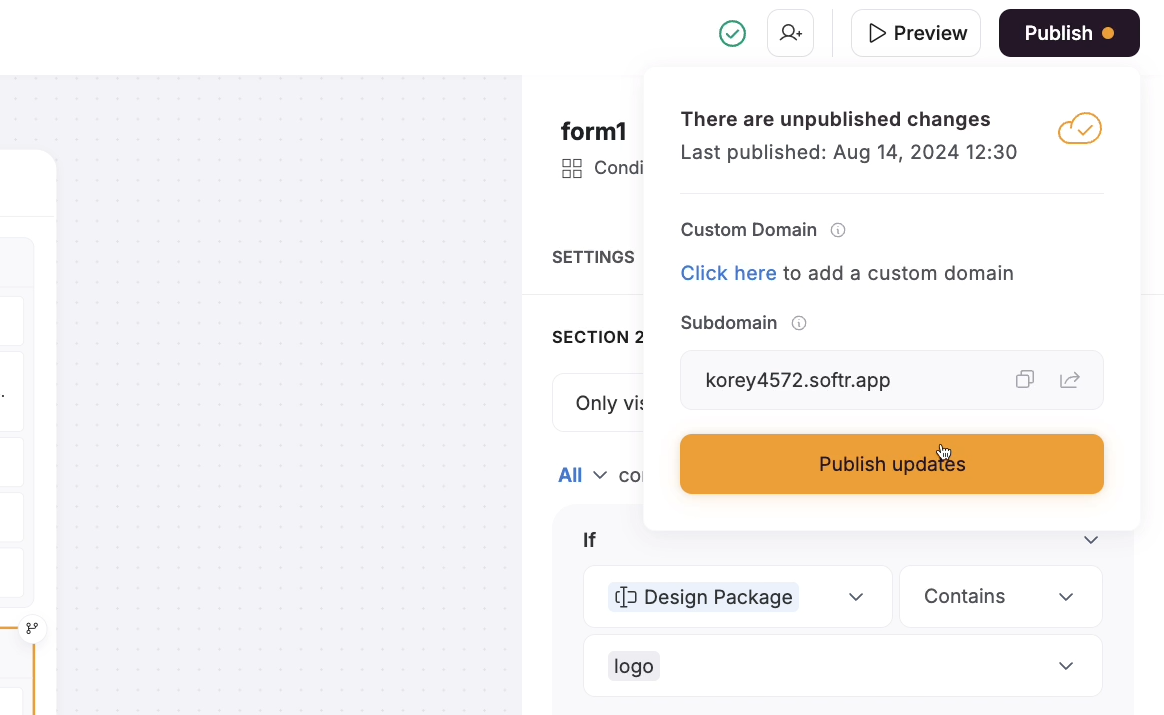
Below, you can see our published form. The logo questions are hidden to start with, which is a good sign – no package has been selected, so it shouldn’t be possible to pass the condition and show the questions yet.
When we select the “logo” package, the logo questions from section 2 instantly appear.

Finally, we’ll switch to a “website” package, and the questions are gone again. The logic is being applied correctly, so this form is all set.

Now let’s take a look at another way to apply conditional logic to your Softr forms.
In addition to hiding or displaying separate sections, you can also split your form up into steps, and choose the sequence of steps based on user responses or attributes.
Let’s see it in action.
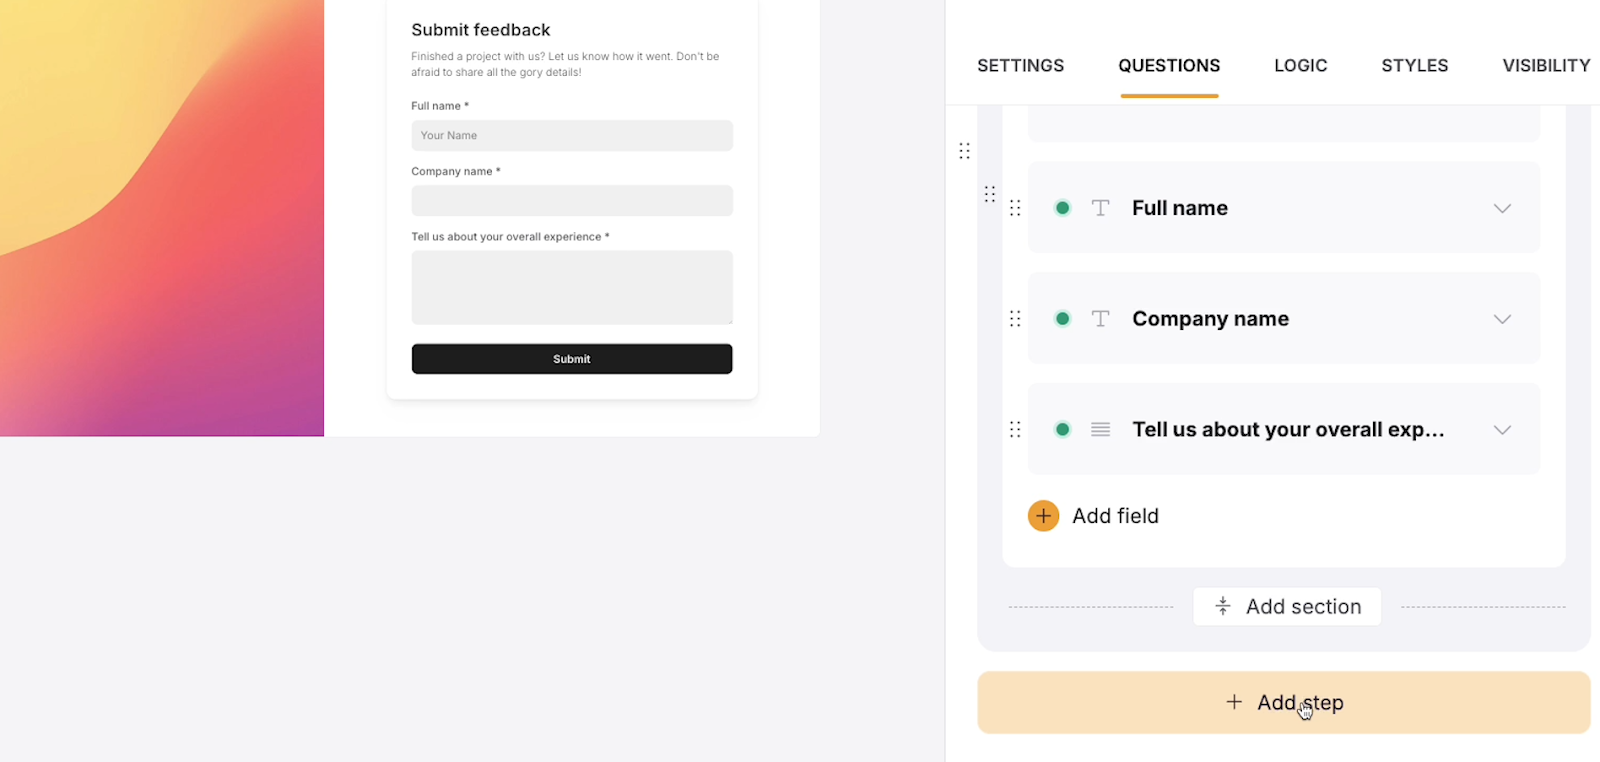
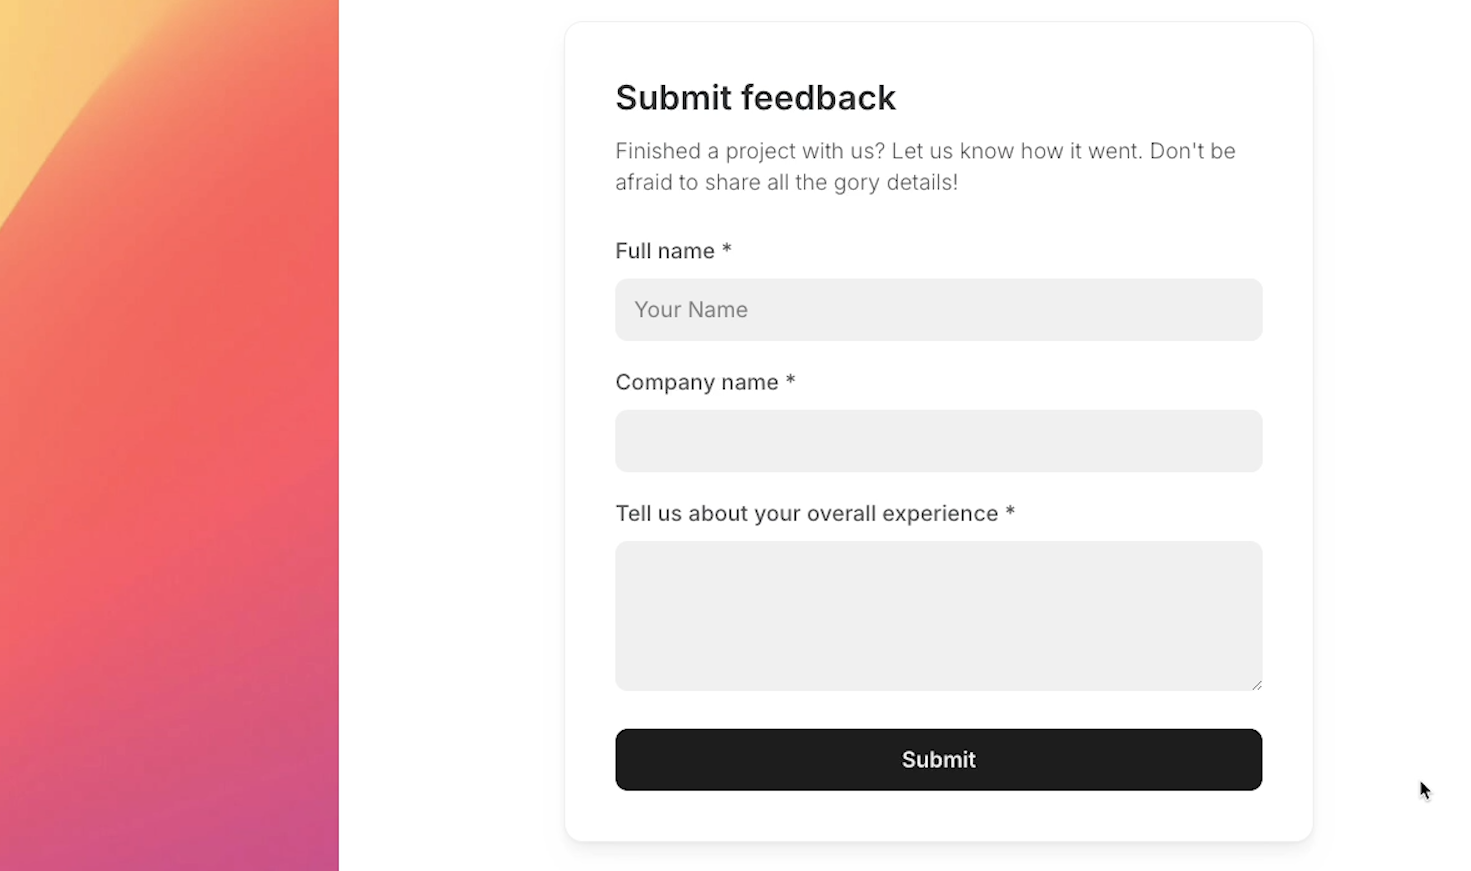
We have another form in this Softr app which is used to collect feedback from clients we’re already working with.

This first step of the form has questions for all clients, but we’ll add a step that will only be relevant for clients who had a website designed by our fictional design agency here.
To add a new step to your Softr form, select the “Questions” tab, click “Add a new step”. Follow along in your Softr app by creating a conditional form with at least 2 steps.
The second step that you add to your form can only be accessed after the user clicks “Next” on the first step of the form.
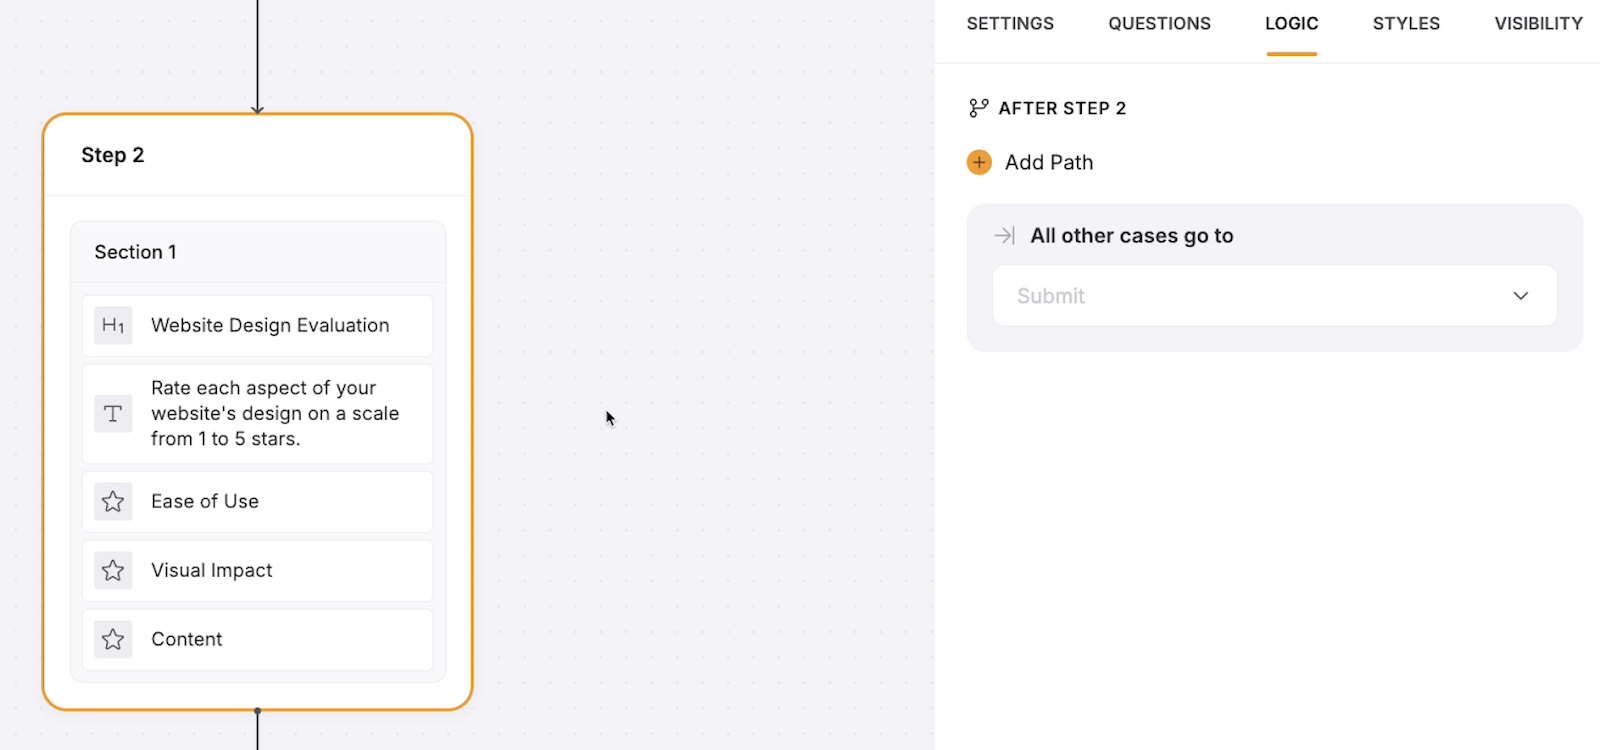
In our example, we’ll add several questions to the second step that are specific to users who had a website designed for them.

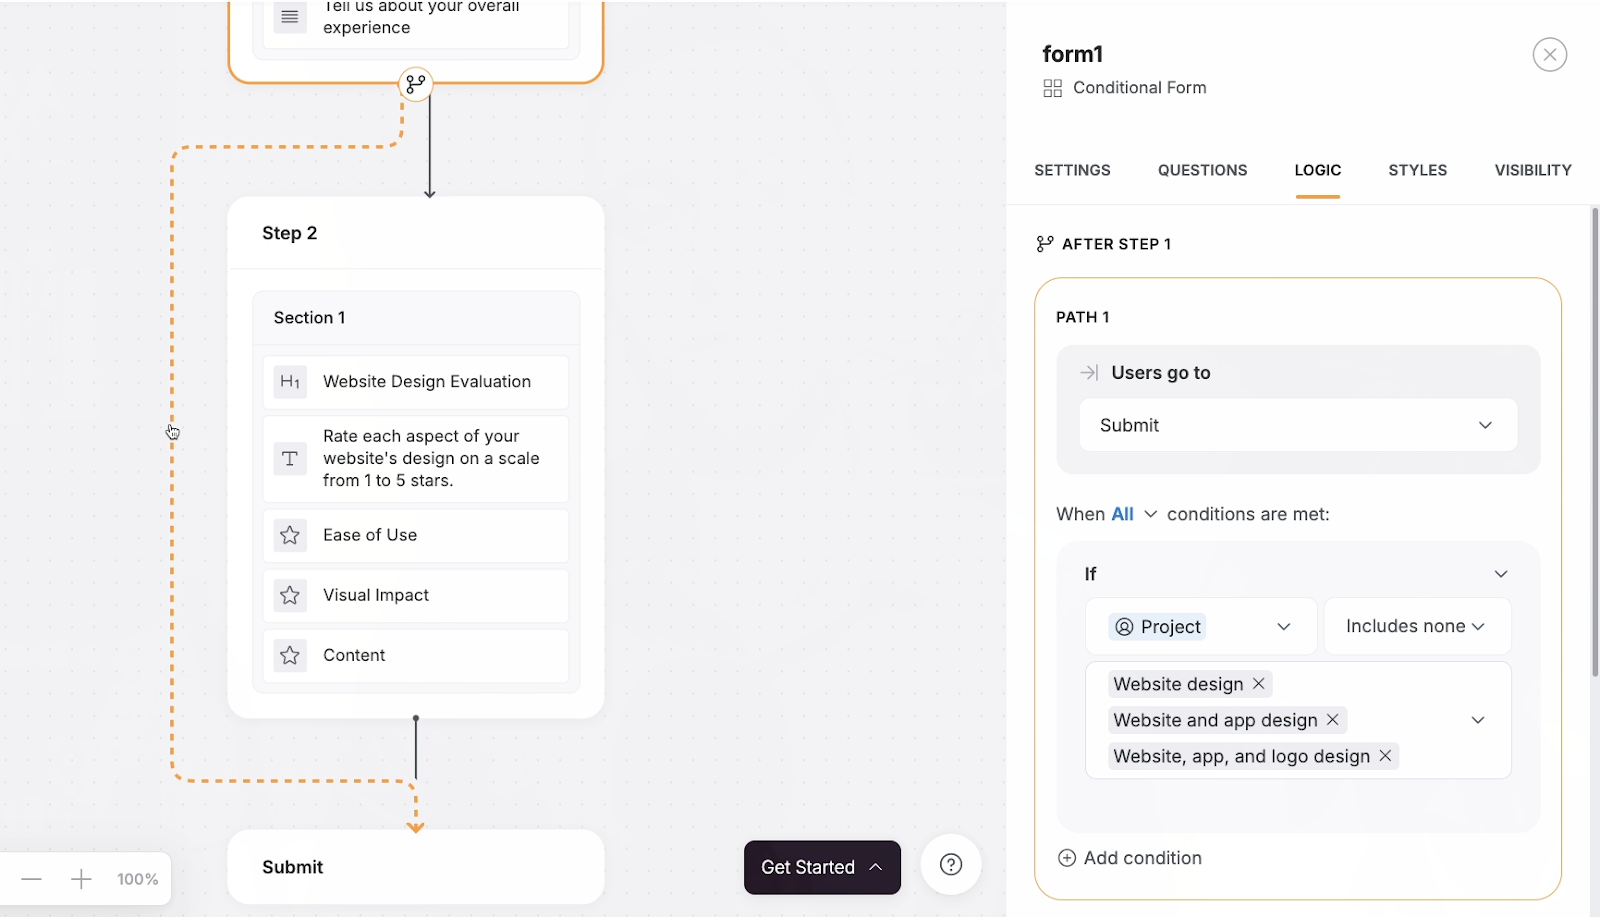
Once you’ve got all the questions you want in your second step, click on the “Logic” tab.
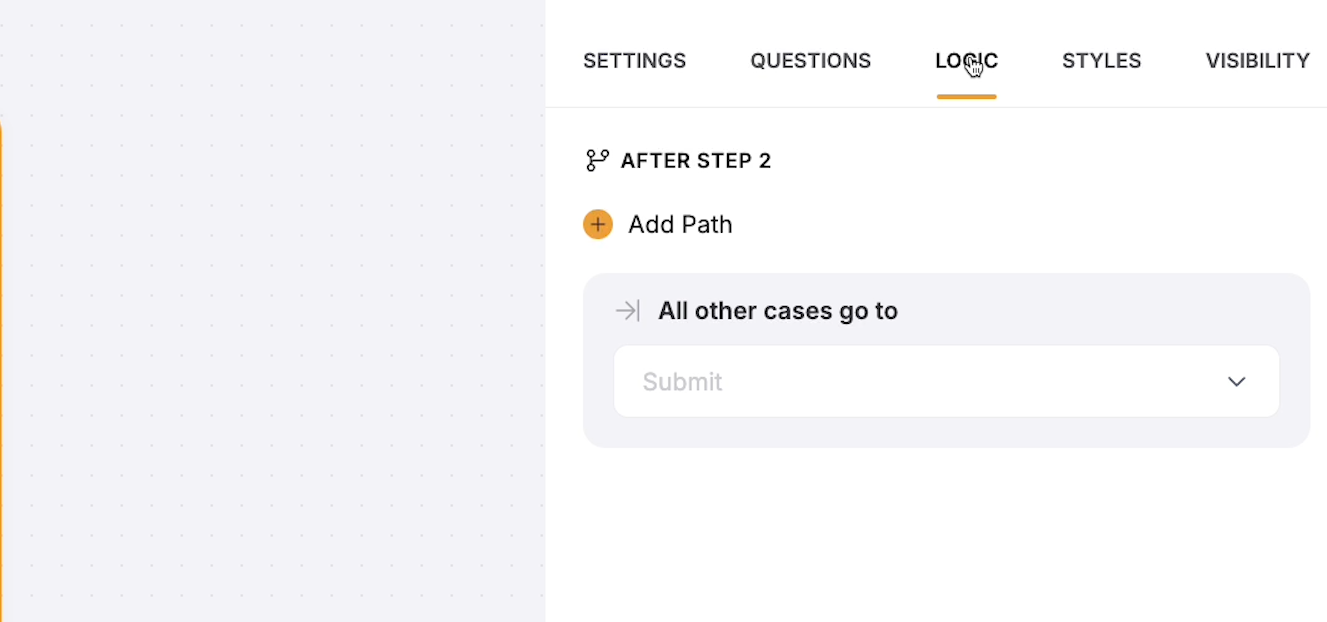
Click on a step in the flowchart-like area on the left to see what happens after it’s completed.
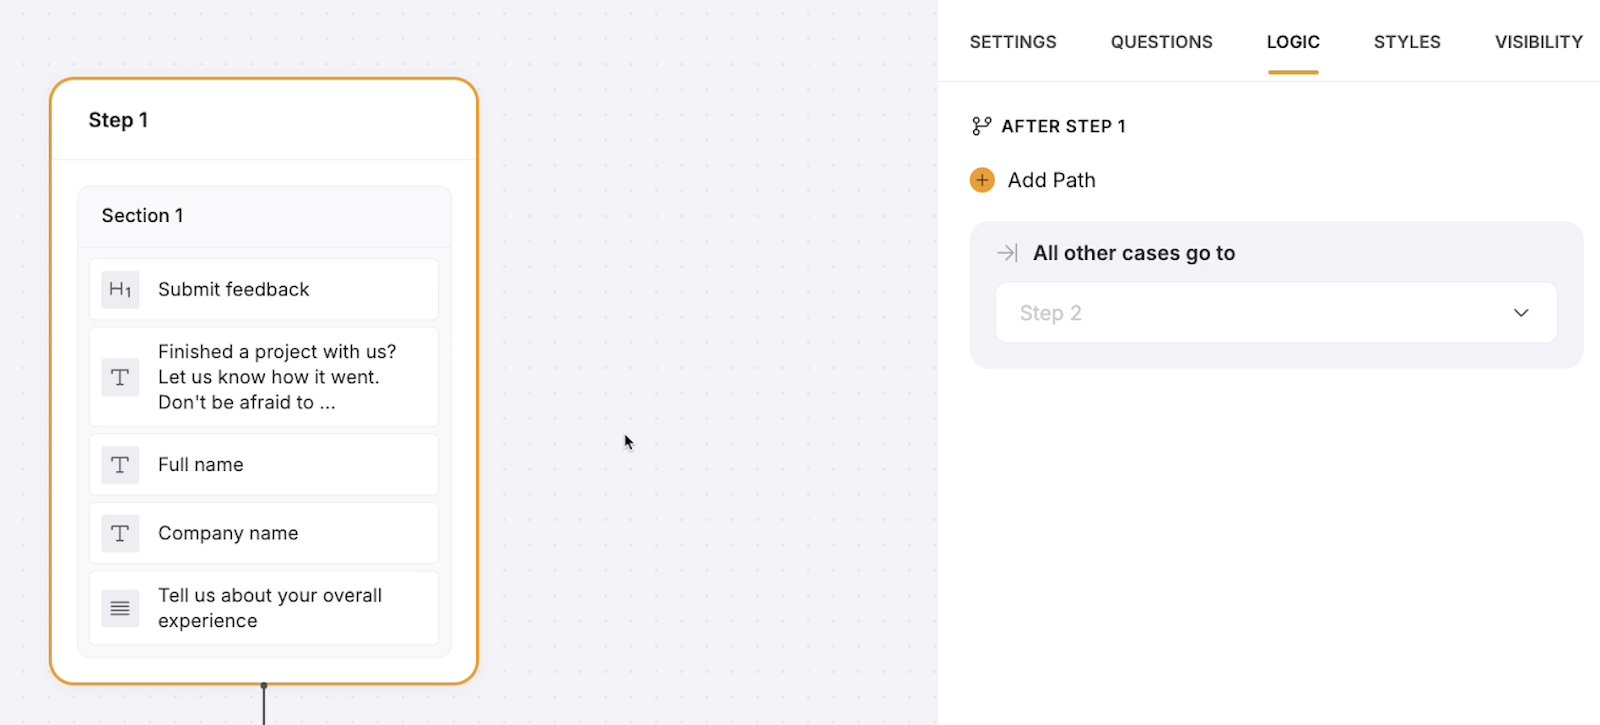
By default, the steps in a form are arranged in a simple, linear process. After Step 1, the form will go to Step 2, and so on. After completing the final step (in our example, Step 2) users can submit the form.
If you’d like to set up alternate paths that skip certain steps, select a step and click on “Add path”. This will add an alternate path that users can follow after completing the selected step.
Under “users go to”, you can select where users will go next if they meet your specified condition.
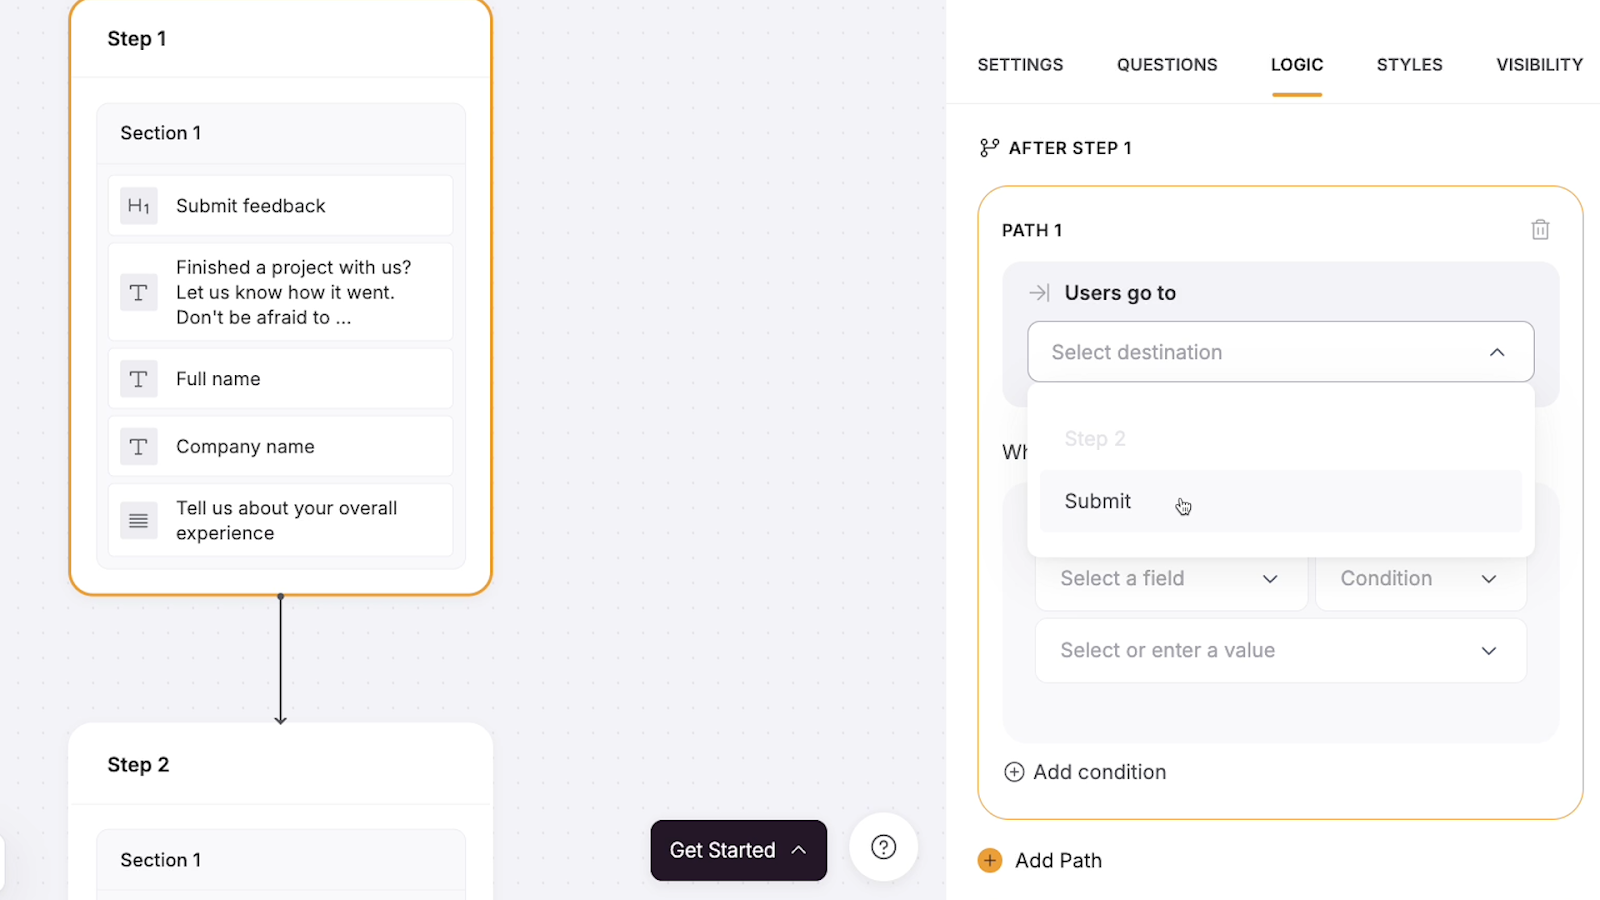
In our example, we’ll select “Submit”, so this path will lead users directly from Step 1 to the “Submit” button, skipping Step 2. You can configure the condition for your path however you want.
This time, instead of using a user response in the condition, we’ll use a user attribute instead.
Our condition will be:
If the logged-in user’s “Project” field includes none of [three packages with the word ‘website’].
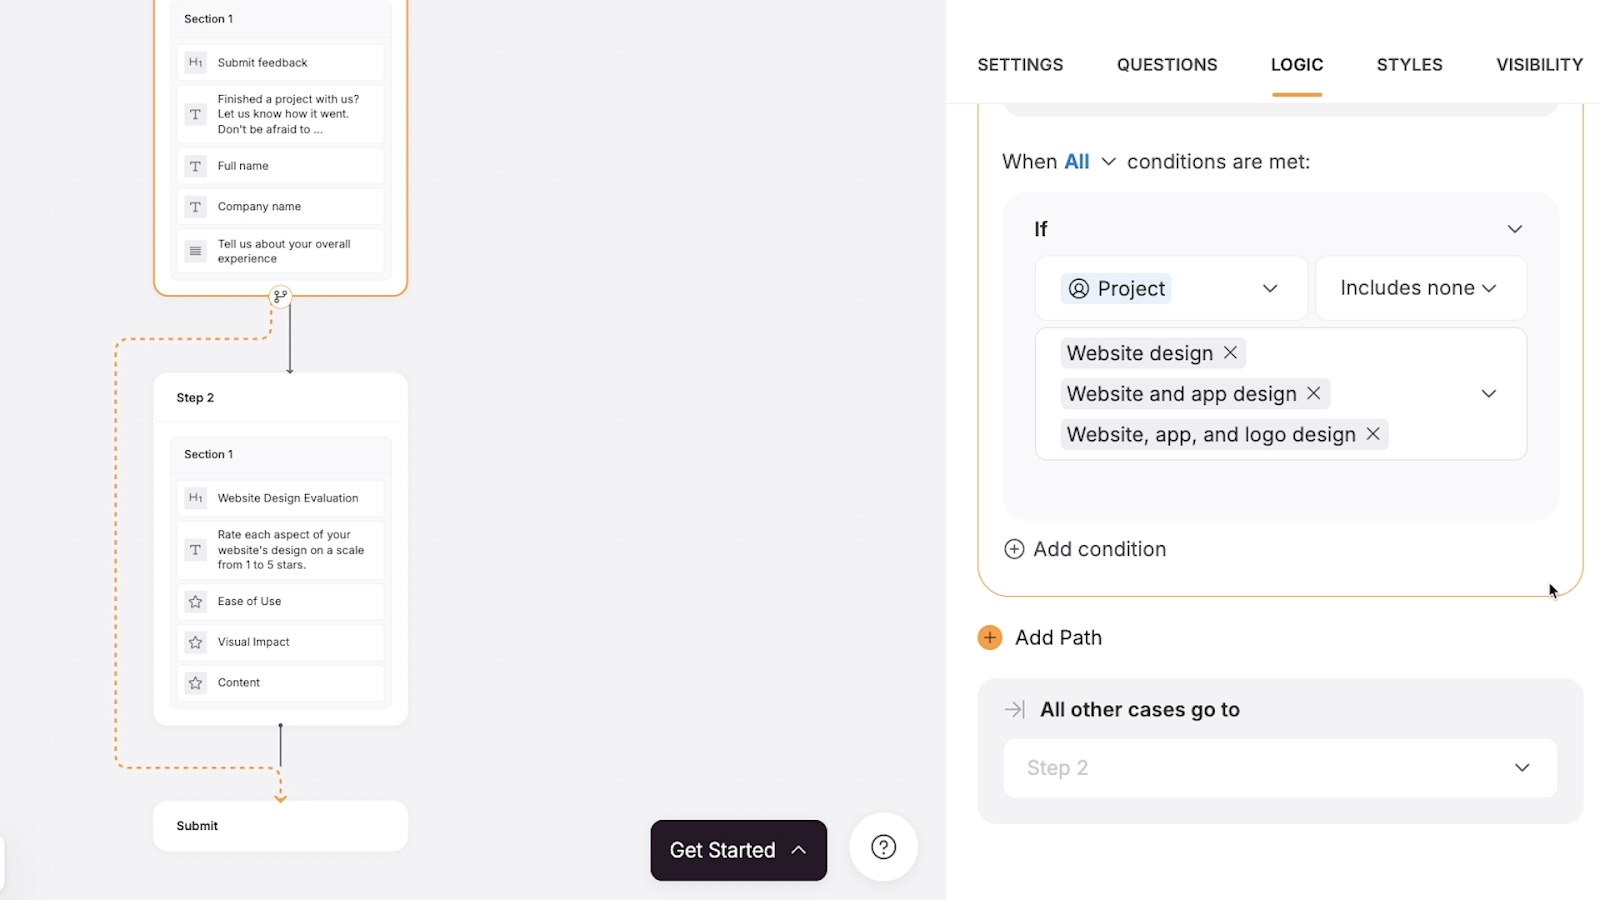
So if users aren’t associated with a website design package in our data source, they won’t see the step that includes questions about their website design experience.
Under “All other cases go to”, you can see and determine what will happen for any users who don’t meet this condition. In our example, they’ll just continue on to step 2.
Once you’ve configured your steps and paths, publish your site and test both possible paths.
First, we’ll log in as a user who purchased a website package. We can immediately see that there's a “next” button instead of a “submit” button
When we click the “Next” button, we can see Step 2 with its questions pertaining to website design.
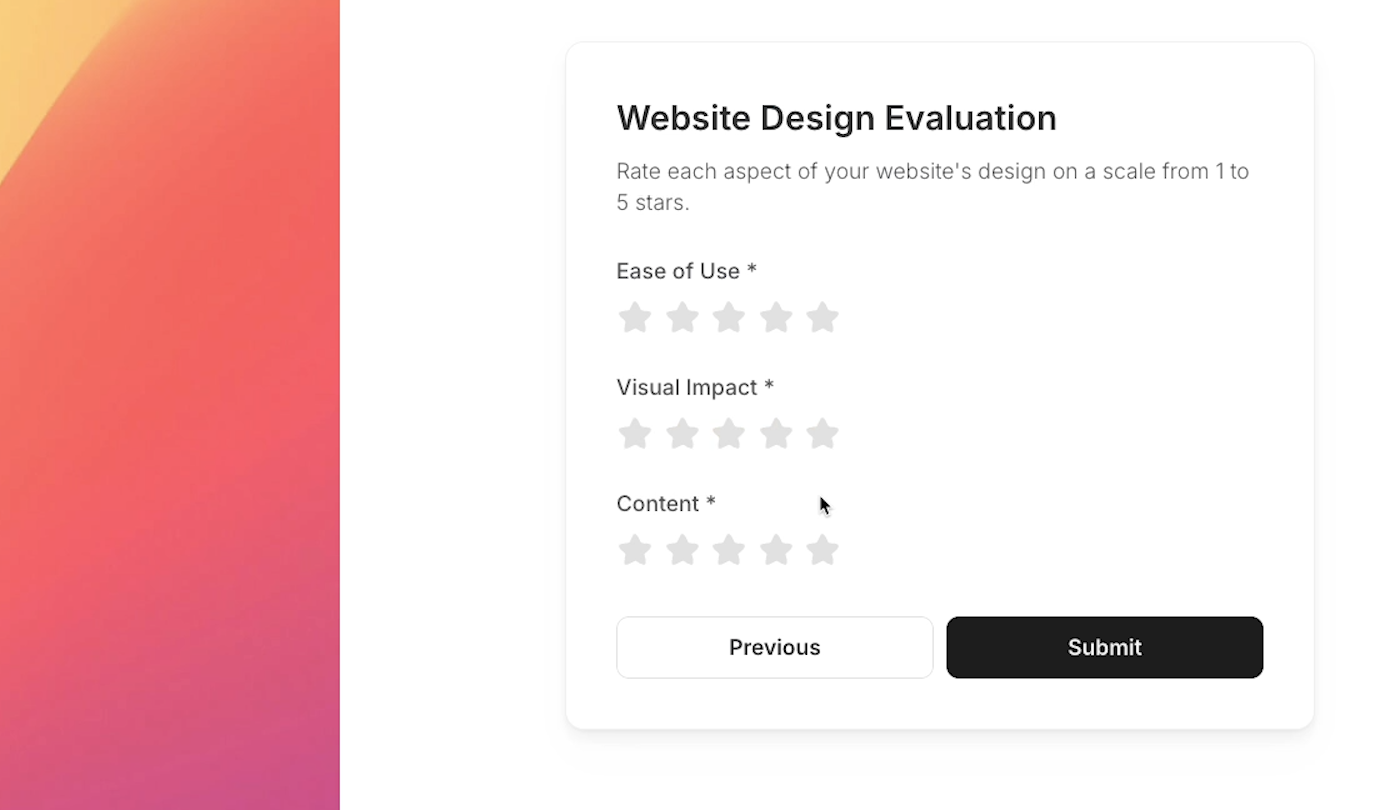
Great! Softr’s conditional logic identified that the user’s “Project” field included a website package, and showed Step 2 accordingly.
We’ll finish the test by signing in as a user that didn’t order a website design package. The submit button remains as-is.
And when we fill out and submit the form, Step 2 never appears.
Perfect! All the conditional logic is working exactly as intended.
You’re now all set to start using conditional form blocks in Softr.
However, before we wrap up this guide, there are just a few more quick tips we want to share so you can get the most out of forms.
First, if you’re testing conditional logic based on user attributes, you may want to use magic links to quickly sign in with different test profiles.
Here’s how it works.
Go to the “Users” menu in your Softr app, and add a test user manually if you don’t already have one.

You can also add test users directly to your data source.
Then, in the “Users” menu, just click on the “Copy link” icon to copy a ‘magic’ link that will let you instantly sign as that test user.

This can be a very convenient way to switch back and forth between different test profiles while you’re setting up stuff like conditional forms.
Next, let’s quickly go over how required fields interact with conditional logic.
The short answer is that they work just fine together.
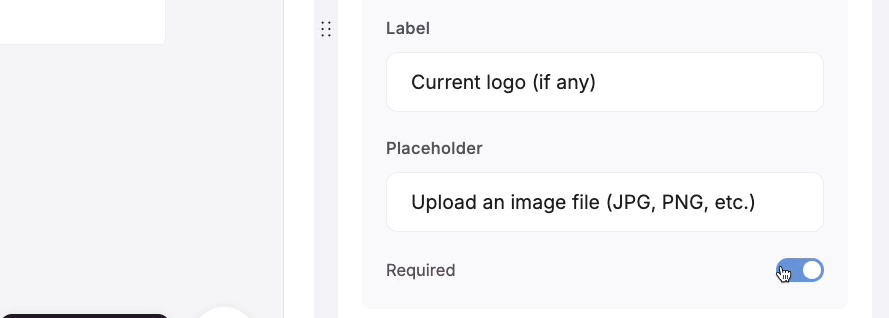
If you set a field to “required”, but it’s hidden by your conditional logic settings, users will still be able to submit the form without any problem.
They won’t need to provide an answer for the hidden required field.
So go ahead and set any questions to “required” if you want to; it shouldn’t cause any problems with your conditional logic.
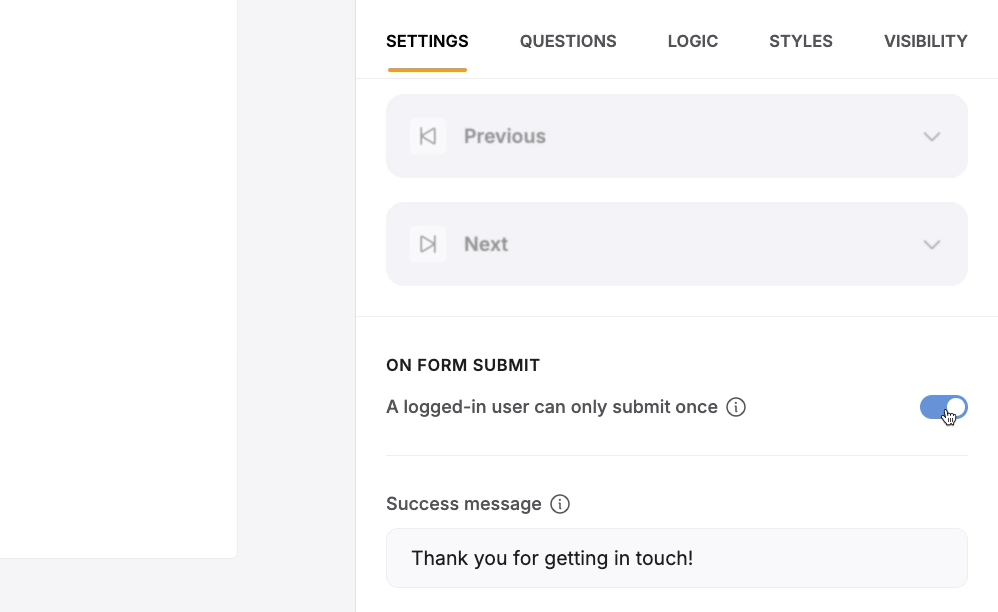
Finally, if you want to change the layout and styling of your form, you can find those options under the “Settings” tab.
They’re at the bottom of the section.

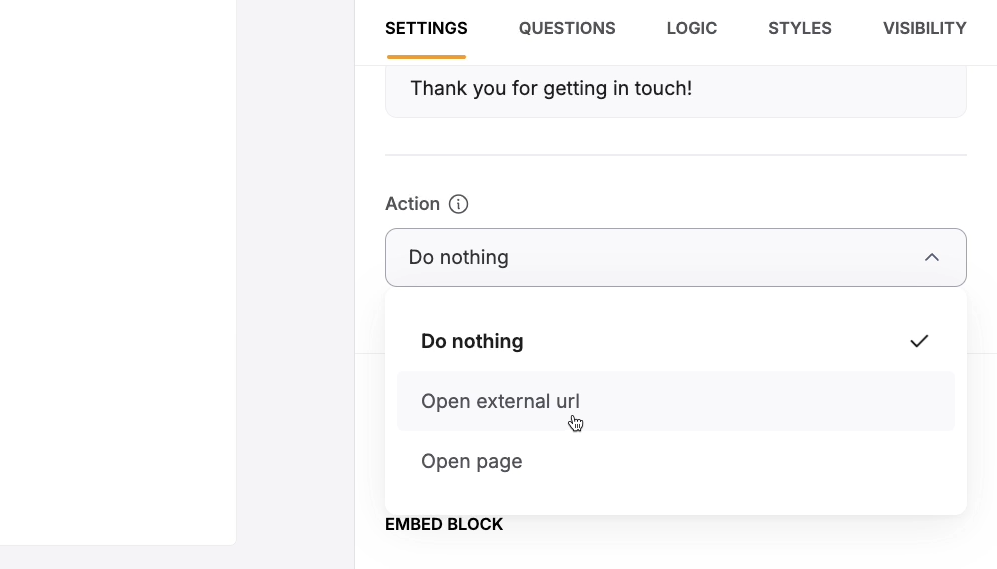
In the same place, you can also choose to prevent logged-in users from submitting the form multiple times, and set an action to run after someone completes the form.
For instance, you could redirect users to an external URL or another page in your Softr app.
Conditional logic lets you create more versatile forms that accommodate a wide variety of use cases and user types.
Making a form with conditional logic in Softr is easy, so try adding one to your Softr app today.
If you’d like to learn more about Softr, Airtable, and other low-code tools like Zapier and Make, be sure to check out the other posts on our blog or our YouTube channel. You can also follow XRAY on Twitter, Facebook, or LinkedIn.