The XRay.Tech Blog
Case Study & Tool Belts
"This is incredible. The robots are doing so much of this work, and it's way better than we could have done it ourselves. The documentation is also amazing – we’re ready to start training our staff how to perform this workflow right away!"
One of the most important parts of creating an automation starts before you even need to open up Zapier or Integromat.
Every project needs a plan that’s up to the task, and before you start connecting apps together in the platform of your choice, you should start by documenting your ideas through some business process mapping.
If you’ve never heard the term before, it might sound a little intimidating, but don’t worry. For all intents and purposes here, it simply refers to building a flowchart of a business process - in this case, the business process that you want to automate.
Creating a flowchart will help you to organize your ideas, keep track of your progress as you’re building the automation, and easily explain how the automation works to colleagues or clients.
Let’s jump right in.
Step 1: Set Up Your Workspace with the Right Tools
There are many programs available for creating flowcharts, but our preferred software at XRay is Lucidchart.
Lucidchart is a powerful app that allows you to connect data to your diagrams and offers an extensive library of sophisticated templates and shapes. If you’d prefer, you can also use a free alternative like Google Draw for business process mapping, but this tutorial will focus on Lucidchart controls and features.
In Lucidchart, you can simply drag shapes from the panel on the left onto your canvas. Once they’re on the canvas you can edit their content and connect your shapes to show a flow and a hierarchy.
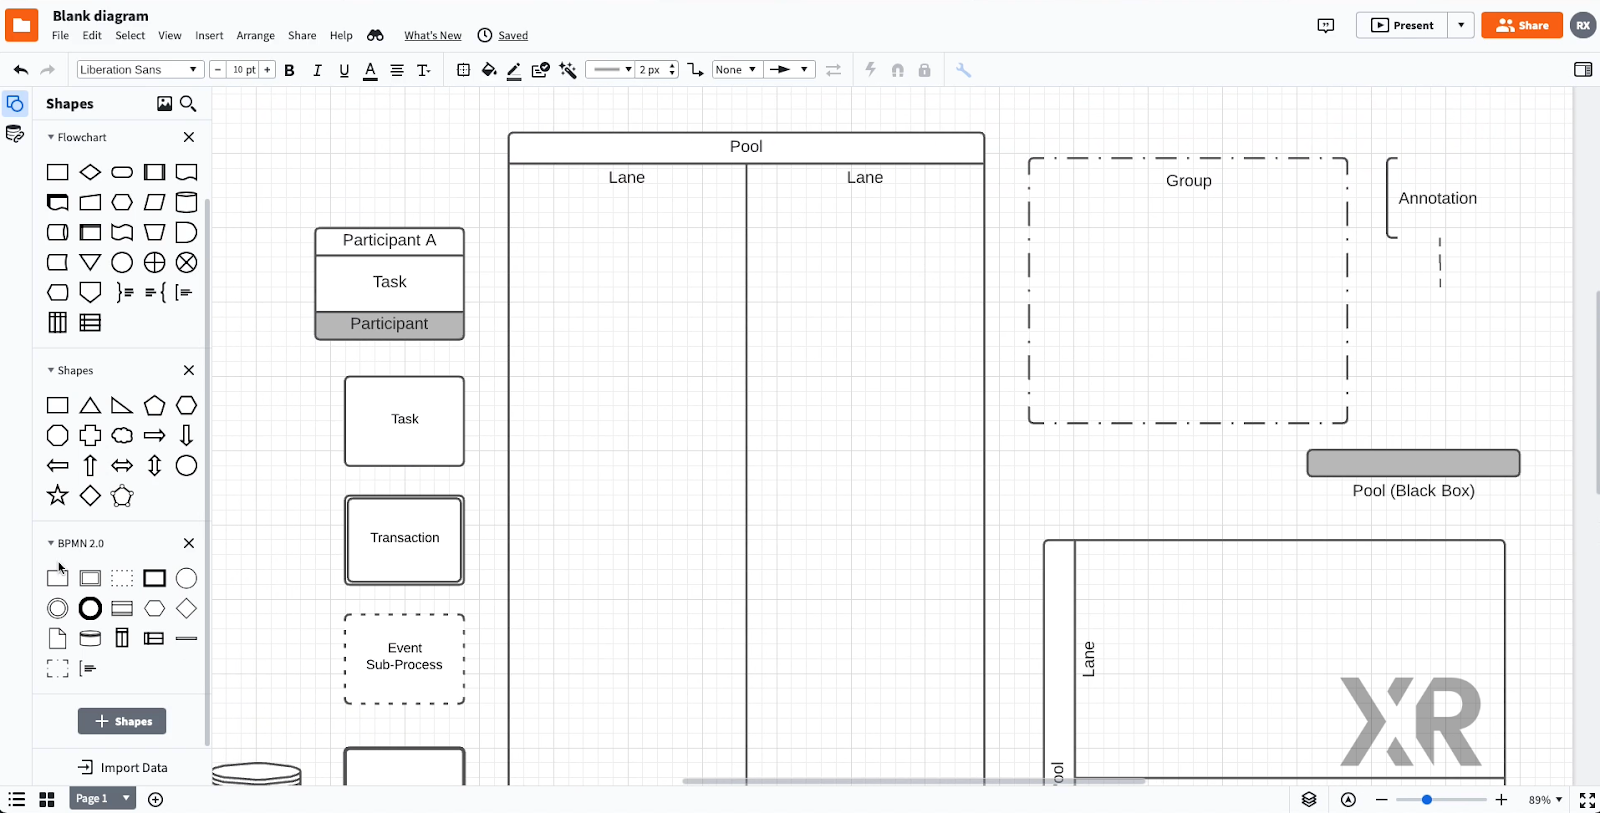
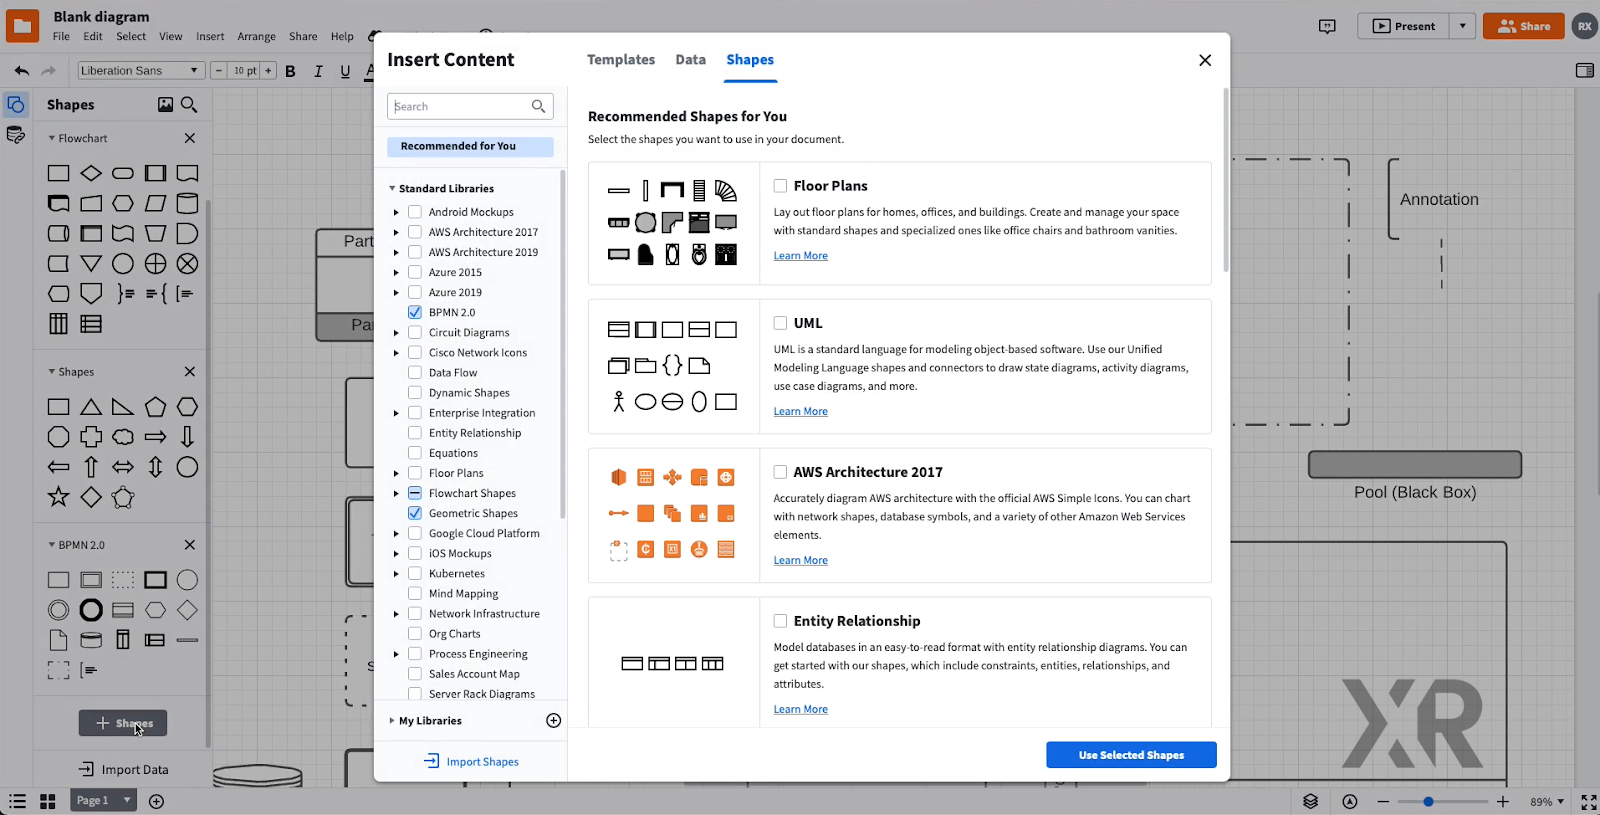
In this post and our tutorial video, we use the BPMN 2.0 Library of shapes, a common standard for business process mapping which you can add to your flowchart by clicking on the “+ Shapes” button underneath the shapes panel.
If you haven’t used Lucidchart before, play around with it a bit to get familiar with the UI. It’s generally an intuitive and straightforward app, but you can always check their support docs for help.
Once you’re all set up in Lucidchart, it’s time to start documenting the process itself.
Note: If you’re unsure of what to automate at your business, check out our post about robotic tasks to get started.
Step 2: Document Each Step of the Process
Create a shape for each action, event, or other element that’s part of this process. To make it easy to follow your flowchart chronologically, put the events that occur first at the top of your chart, and go down from there. Events that happen simultaneously can be on the same level.
As a general rule, each shape should document one specific event or action. For instance, creating a Kickoff Meeting agenda and putting that agenda into a calendar invite would be two separate tasks, even though they’re closely related.
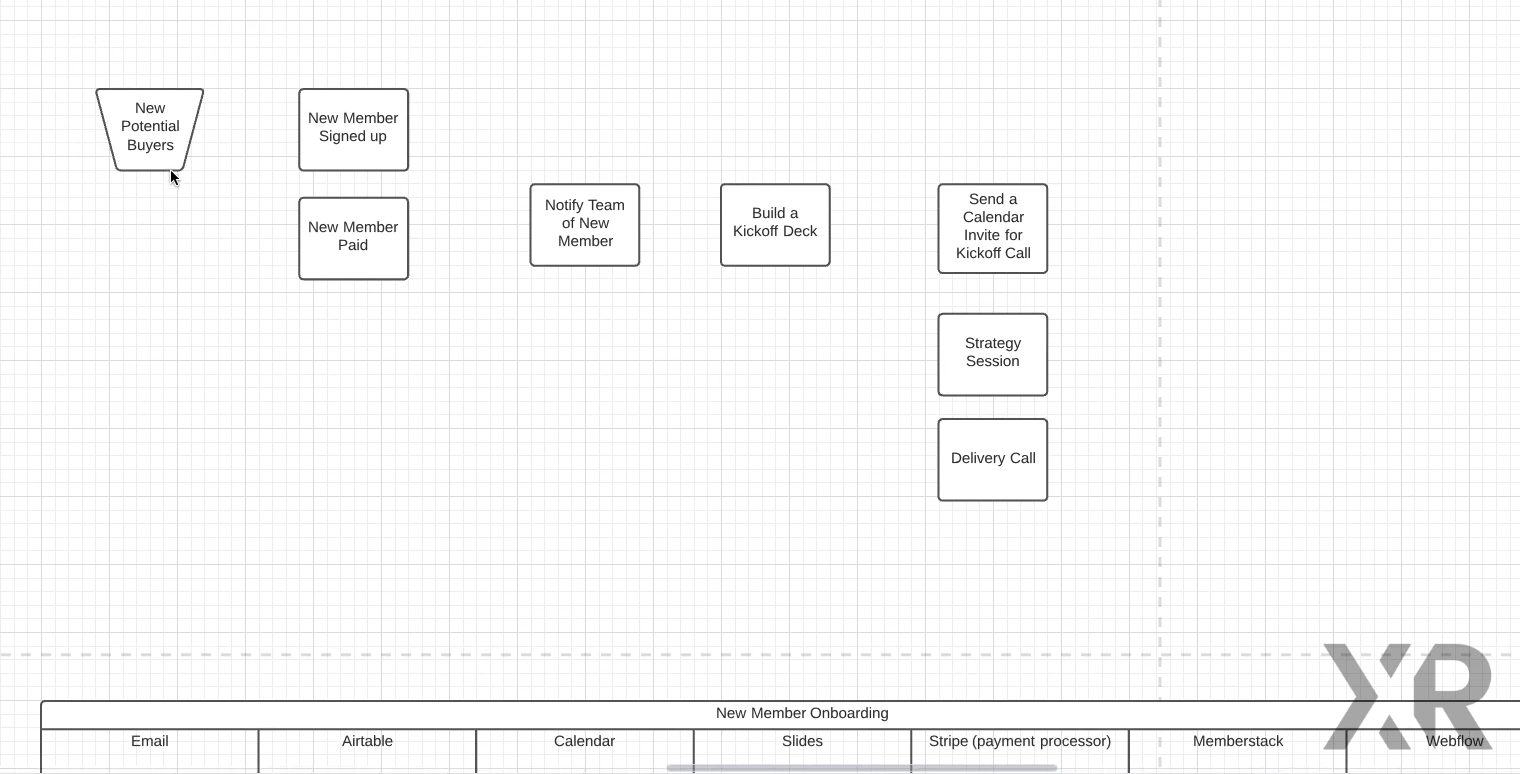
Additionally, you should put any automated action that requires a new step in the automation software into its own shape. This will make it easier to translate your flowchart into an automation when it's time to start building.
Once you’re confident that you have every step of the process documented, use arrows to connect each shape and indicate how each action or event relates to another. For instance, if a certain event prompts two actions, make sure to draw arrows from the event to both actions.
Understanding which events trigger which actions will be vital when constructing your automation, especially if you’re dealing with a process that has multiple branching paths.
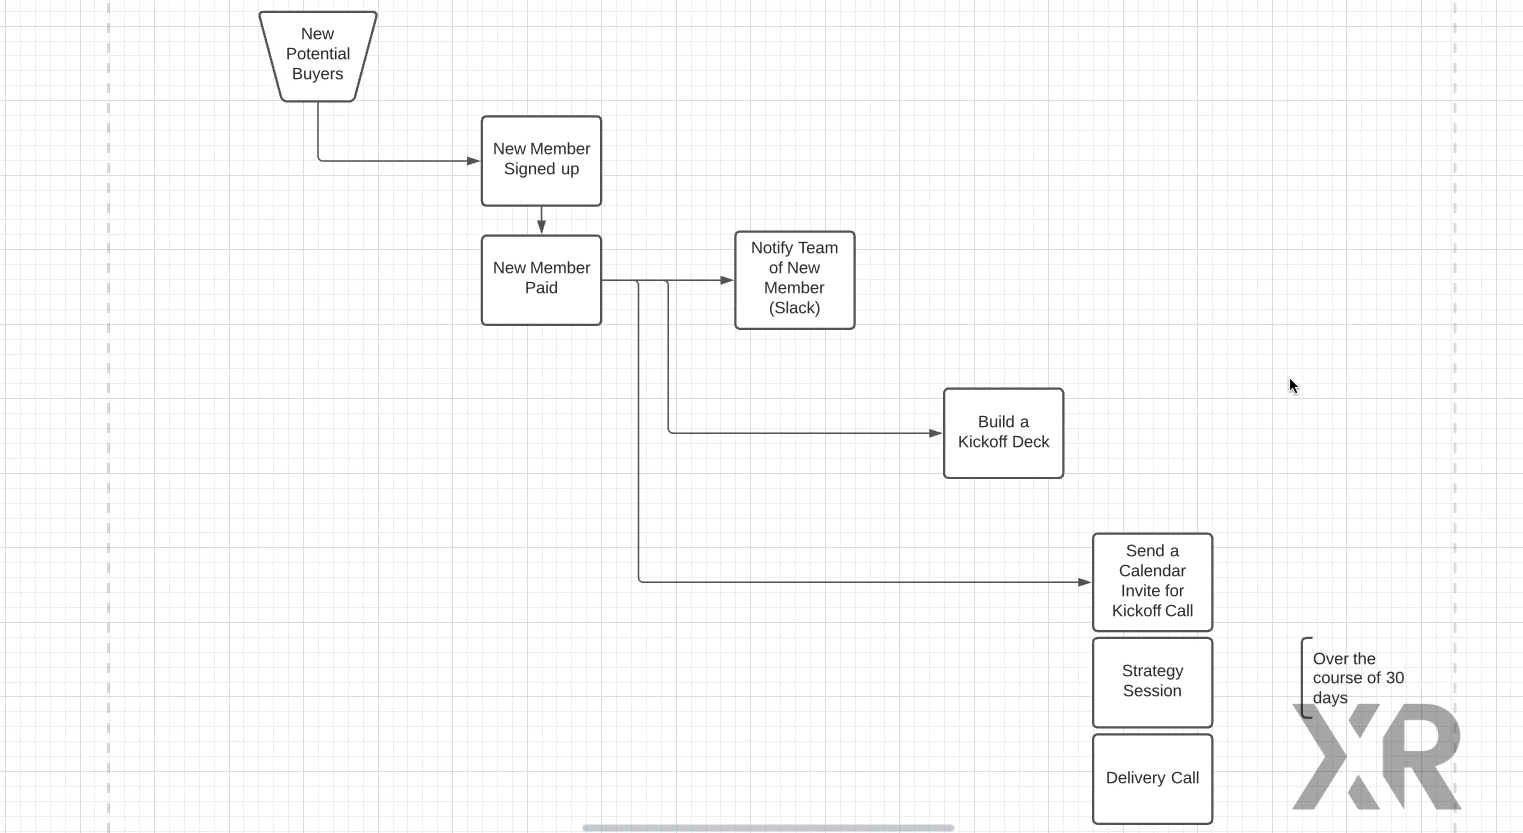
You can draw arrows in Lucidchart by just hovering over a shape, clicking on one of the circles that appears, and dragging to draw a line. Once your shapes are connected to form a clear flowchart, you can get ready to add more context with swimlanes.
Step 3: Add Each Step to a Swimlane
Finally, it’s time for a quick trip to the pool. The “pool” shape allows you to add swimlanes to your flowchart, which is a convenient way to add lots of helpful context to your flowchart.
For an automated process, you’ll want to create a swimlane in the pool diagram to represent each piece of software used in the process. You’ll likely need to create more lanes to accommodate all of the apps involved.
Drag your flowchart on top of the pool diagram, and start moving each shape into the appropriate lane. You might want to make a copy of the shapes you’ve created to preserve your work so far.
If a task involves multiple apps at once, you can stretch the shape to overlap all of the relevant lanes. Most of the time, however, each shape should only be in one lane.
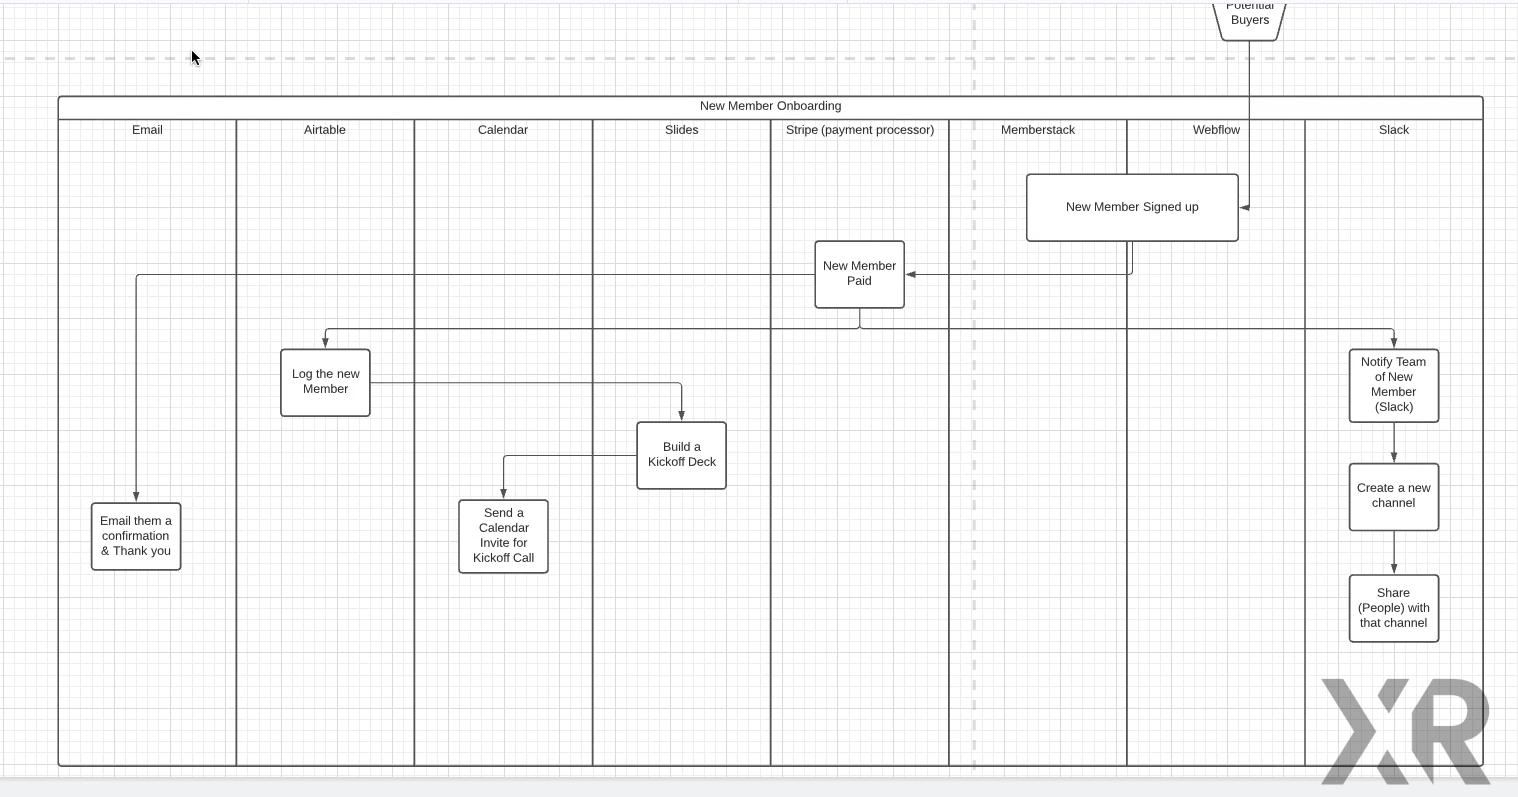
Mapping your process into swimlanes will often make you realize that you left out some important steps, so make sure to add anything that comes to mind. You can also use annotations to provide any additional information about the process.
That’s all there is to it. Now you can use your flowchart to start building your automation.
Use Documentation for Planning, Maintenance, and Collaboration
Business process mapping is an extremely useful method of documenting an automation that will give clarity and context to anyone who needs to understand the process. Whether you need a roadmap to follow while you’re creating the automation, or you just need a way to explain your idea to a colleague or client, business process mapping can help you get it done.
If you’d like to see a live demo of business process mapping, check out the video on our YouTube channel.
If you'd like to learn more about planning and building no-code automations, check out our blog or our YouTube channel. You can also follow XRay on Twitter, Facebook, or LinkedIn.

What are Robotic Tasks?
What if you could spend all day at work on the things you liked the most? What if you could take all of the tedious, mind-numbing labor and hand it off to a robot?
It’s more realistic than you might think.
At XRay, we believe that everything you do at work each day can be broken into three categories: preparing to do work, actually doing work, and reporting on the work you just did. When you’re actually doing work, you’re probably (hopefully) engaged with a lot of Mindful Tasks. However, the “preparing” and “reporting” stages of your work are likely loaded with Robotic Tasks.
Robotic Tasks are the opposite of Mindful Tasks. While Mindful Tasks tend to be challenging, unique, and rewarding, Robotic Tasks tend to be simple, repetitive, and frankly dull. Robotic Tasks are usually binary; they’re either completed correctly or they’re not. There’s no opportunity for creative flair or strategic insight to improve or diminish the quality of a Robotic Task’s outcome.
One of XRay’s primary goals is to help entrepreneurs identify and eliminate Robotic Tasks from their own workloads. In this post, we’ll dive into the details of what defines a Robotic Task, and why you shouldn’t be spending your time on them. We’ll also show you how you can start removing them from your workflow today, for free, with the tools you’re already using.
Robotic Tasks eat up your valuable time
A Robotic Task is any task that doesn’t require you to use creativity, analytical skills, strategic planning, or thoughtfulness. Some common Robotic Tasks include:
- Copying and pasting information
- Updating and opening software
- Configuring software to predetermined settings
- Running payroll
- Creating Google Drive folders and Slack channels for a new customer
- Filling in the blanks in a document template
Robotic Tasks Consume your time and your attention, and get in the way of creating value directly. Every minute that you spend searching for an email is a minute you could have been responding. There is a direct but opposing relationship between robotic and Mindful Tasks: each Robotic Task you have to complete takes away time for Mindful Tasks, even when you’ve finished the task itself. According to researchers at UC Irvine, it takes about 25 minutes to regain your focus after an interruption. If Robotic Tasks are intruding on your workflow, you’re losing more than just the time it takes to complete the tasks, and you’re hampering your ability to create value.
Now, what do we mean when we say that these tasks don’t create value? You might look at some of the items on the list above and think, for instance, “Hey, payroll is actually extremely important!”
And you’d be right. Making sure your employees and vendors get paid in full and on time is obviously a crucial task. But it’s simply a bare-minimum requirement for your company to keep existing; it’s not something that differentiates your company from any other. This is the nature of Robotic Tasks: they may or may not be important, but they’re never the activities that define your company’s value propositions.
Robotic Tasks don't make you better at anything. They don't make your customers happier, and they don't make your employees want to work harder. Your customers and employees will only notice if the Robotic Tasks aren’t getting done; even perfectly-performed Robotic Tasks just maintain the status quo and keep things moving exactly the same way as they have been. Even though many Robotic Tasks can be completed fairly quickly, breaking away from your more valuable can interrupt flow states and make it harder to effectively pick up where you left off.
So what should we do about these tasks that interrupt our focus and take up our time?
Robotic Tasks can be transferred to someone or something else
The great thing about Robotic Tasks is that you don’t actually have to do them. Every Robotic Task that’s currently dragging on your productivity can either be automated or handed off to someone else (for now).
Of course, it’s not always something that can happen immediately. The key is to identify your Robotic Tasks, and then to make sure that you have a repeatable, documented procedure for them. There’s a good chance you’ve heard of the “peanut butter sandwich exercise.” You can see a great example of the exercise here, but the gist of it is this: when you’re giving instructions to a computer via code, you have to be completely precise and unambiguous. Computers can’t think, so they can only do exactly what you tell them. For us humans, this can be difficult to adjust to, because we constantly make assumptions - often without realizing it. The peanut butter sandwich exercise asks one person to list all of the steps to making a sandwich, while another person follows those steps exactly. The results are usually chaotic, and make for some great videos. But there’s a valuable lesson there in how to approach software, and it applies to no-code solutions as well.
No-code automation platforms like Zapier are quite simple to use, but they still are going to require you to clear up any ambiguity in your processes before you can start automating them in a meaningful and coordinated way. Once you’ve found a Robotic Task that you don’t want to be burdened with anymore, document each step using the “peanut butter sandwich” mentality: no ambiguity, no room for interpretation or error. Each action will have a corresponding data point, and you need to make sure that each necessary datapoint will be captured by your automation system.
Make a note of all of the applications involved in the task, and then check Zapier and Integromat to find out which platform supports the apps you want to use, and the actions you want to take. You’ll find that Zapier has support for a greater number of applications, but Integromat can perform more actions with the apps that it does support. Once you find a platform that supports the apps, you can start creating the automation right away while referring to your documentation.
Integromat (recently acquired 🎉) and Zapier, two of the most commonly-used automation platforms, both offer free accounts that you can get started with. The free accounts set a limit on how many automations you can create and how many tasks you can perform, but will be just fine for creating your first automations. If you have any questions about using these platforms, you can always reach out to their support, or to us at humans@xray.tech 🙌.
If the app you use isn’t supported by any platform, or you can’t automate the task for some other reason, the documentation you created will allow you to re-assign the task to a more junior employee or even to a Virtual Assistant (VA). Of course, ideally, nobody would have to do Robotic Tasks. But in the meantime, it’s especially important to make sure that the people who lead your company aren’t getting bogged down with responsibilities that don’t really utilize their talents.
Automating your Robotic Tasks will make you and your team more productive
Among electric companies, devices that draw excessive power while not actually doing anything are called “energy vampires”. Robotic Tasks are the energy vampires of the workplace. Just like that old TV that’s plugged in 24/7, you might not take notice of them very often, but they’re constantly draining your time and focus, one drip at a time. Automating these tasks whenever possible will create substantial productivity gains in the long run by allowing you to devote a greater portion of your day to your value-generating activities. Don’t waste your time with Robotic Tasks; you have a choice to work more mindfully.
Action Steps
- Consider your typical workday and identify three Robotic Tasks that you frequently have to complete. Remember, a Robotic Task is one that doesn’t involve any of the CAST attributes. They’re not creative, analytic, strategic, or thoughtful.
- Pick one of the Robotic Tasks and document it thoroughly.
- Find out which no-code platform(s) you can use to automate the task
- Automate the task


One of the first questions that entrepreneurs often have when they consider automation is:
What exactly can I automate?
Trying to find out what’s possible with automation will often lead to getting overwhelmed by information and possibilities. On their website, the no-code automation platform Zapier boasts that they can connect to over 3,000 applications, while competitor Integromat lists a slightly more conservative figure of “hundreds” of integrations.
It’s true that the potential of automation is nearly limitless; in fact, if you can think of a system you’d like to automate, there’s probably a way to do it.
However, if you’re just getting started, you might be looking for some more specific advice that can help you figure out where to get your first foothold in automation.
At XRay, we’d recommend a few strategies for those just beginning their automation journey:
1. Automate the tools you’re already using
2. Use CAST to find which processes you should (and shouldn’t automate)
3. Start with some of the most commonly automated processes
In this article, we’ll explain each of these strategies and tell you about the most popular automations among our members.
Automate the tools and processes you’re already using
Whenever possible, we believe it’s best to build your automations around the tools you already use and the processes you’re comfortable with.
When your workflows are already getting the results you want, there’s no need to throw them away and start from scratch. Instead, you can support those workflows with automated steps to achieve the same outcomes faster and more consistently.
For instance, let’s consider a simple invoicing workflow. When a salesperson closes a deal, they update the lead’s information in your CRM, and then send an email to accounting to send an appropriate invoice. Someone in accounting then draws up the invoice and sends it.
With automation, you could preserve all of the steps and results, but sending the invoice would be entirely automatic. The salesperson would just have to update the lead’s status in the CRM, and this action would trigger an automated process creating and sending invoice, with notifications sent to the accounting department to keep them apprised of the deal.
Ultimately, the familiarity of the tools and processes involved will make it easier for your team to adapt to the new automated workflow without having to learn entirely new systems (of course, we still provide documentation and training to make sure that the transition goes smoothly).
Fortunately, in most cases, you can start automating with just about any apps that you’re likely to be using. As long as the app has an API, low-code automators like XRay’s techs can connect it to automation platforms like Zapier and Integromat.
So if you’re not sure where to start with automation, you might want to start with what’s already familiar. Take a look at your own business processes and find the robotic tasks that are interrupting your team’s focus, then use XRay.tools to see if there are pre-built integrations available for the apps you’re using.
Use CAST to determine which processes you should (and shouldn’t) automate
When you’re trying to figure out what to automate, it can often be helpful to look at things from another perspective: what shouldn’t be automated? What work do you and your employees want to keep doing yourselves?
At XRay, one of our goals is to create more time for people to do mindful work that requires uniquely human skills, rather than wasting their time on robotic tasks. To determine if a given task is mindful or not, we have a simple set of criteria called CAST.
You can read more about CAST here, but to sum it up quickly, CAST stands for Creative, Analytical, Strategic, and Thoughtful. It’s a simple litmus test to help determine if a given task is worthy of human attention, or if it might be better suited to automation.
Is the task in question creative, analytical, strategic or thoughtful? If so, it’s probably something that requires human attention. Drafting a new pitch deck is a creative endeavor; reviewing a quarterly report is analytical; setting goals and a plan for the next quarter is strategic; giving critical and effective feedback to your team members requires thoughtfulness.
The goal of automation should be to support tasks that require CAST attributes. Once you’ve identified the work that your people should be doing, you can start to consider what they need to have ready beforehand to do that work; in many cases, preparation tasks are prime candidates for automation.
Go with a universal automated workflow
If you’re still not sure what to automate after combing through your business processes to find robotic tasks, you could also consider our automated workflow packages that target some common and widely applicable processes.
Automated Client Onboarding
For B2B companies, agencies, and studios, client onboarding is an essential task, but can often be tedious and error-prone. By filling out a single short survey for each new client, the Client Onboarding Workflow will automatically create folders, messaging channels in Slack or Microsoft Teams, calendar invites, templated meeting agendas, and any other documents or resources you need for your projects.
By automating all of this, you can create a consistent onboarding process for your clients that leaves a great first impression and lets you capture analytics along the way. You can track each new client through all of the stages of onboarding and pinpoint any delays or problems.
Automated Team/Internal Onboarding
Much like onboarding your clients, bringing your new hires into the team often requires a great deal of administrative work. You need to create accounts for each new employee, add them to the appropriate workspaces in various apps, generate contracts and forms for them to sign, and share documentation or training material.
Each of these steps can be triggered through an automated survey that you fill out each time a new recruit joins your company, making it easy to create a consistent onboarding process, gather feedback from your new team members, and track their progress throughout their orientation and training.
Automated Data Visibility
One of the most useful benefits of automating a workflow is that it creates and captures dozens (if not hundreds) of data points for you to track and analyze. Our Data Visibility automated workflow focuses entirely on the data-driven aspect of automation.
We use automated systems to collect, clean and store vital data, identify and track KPIs, and provide your team leaders with critical business intelligence. Each time your employees and colleagues complete an essential business process, the DataViz workflow will automatically log several datapoints about what happened. You can then work with our team to study your accumulated data and uncover key insights.
Finding a Starting Point
While the staggering array of possibilities with automation can be overwhelming, there are several simple ways you can get started. You can start automating your existing processes, identify the work you want to make more time for, or consider some of our most popular automated workflows.
If you have any questions about how automation can improve your workflows, feel free to reach out to us at any time through our contact page.
If you'd like to learn more about no-code automation, check out our blog or our YouTube channel. You can also follow XRay on Twitter, Facebook, or LinkedIn.
No-code automation giant Zapier is a great platform for people who are just getting started with automation. But while no-code automation is a skill that anyone can develop with time and practice, there are still some hurdles to avoid and strategies to follow for success.
If you’re new to the field and starting to experiment with building automations in Zapier, we have a few tips and best practices in this post that will help you as you’re building Zaps to start speeding up your workflows.
Tip 1: Make a Flowchart First
Before you start diving into a somewhat longer or more complex automation, we recommend making a flowchart first that maps out your ideas. Go into Lucidchart, or whichever flowcharting software you prefer, and make a diagram that includes each step that has to go into your automation.
Using some simple color-coding can help you to keep track of the steps you’ve accomplished and the steps that you still need to add into the automation. When we’re creating flowcharts for our automations at XRay.Tech, we’ll often mark finished steps as green, incomplete steps as yellow, and steps that we haven’t started on as red. That makes it easy for any of our techs to check on the team’s progress at a glance.
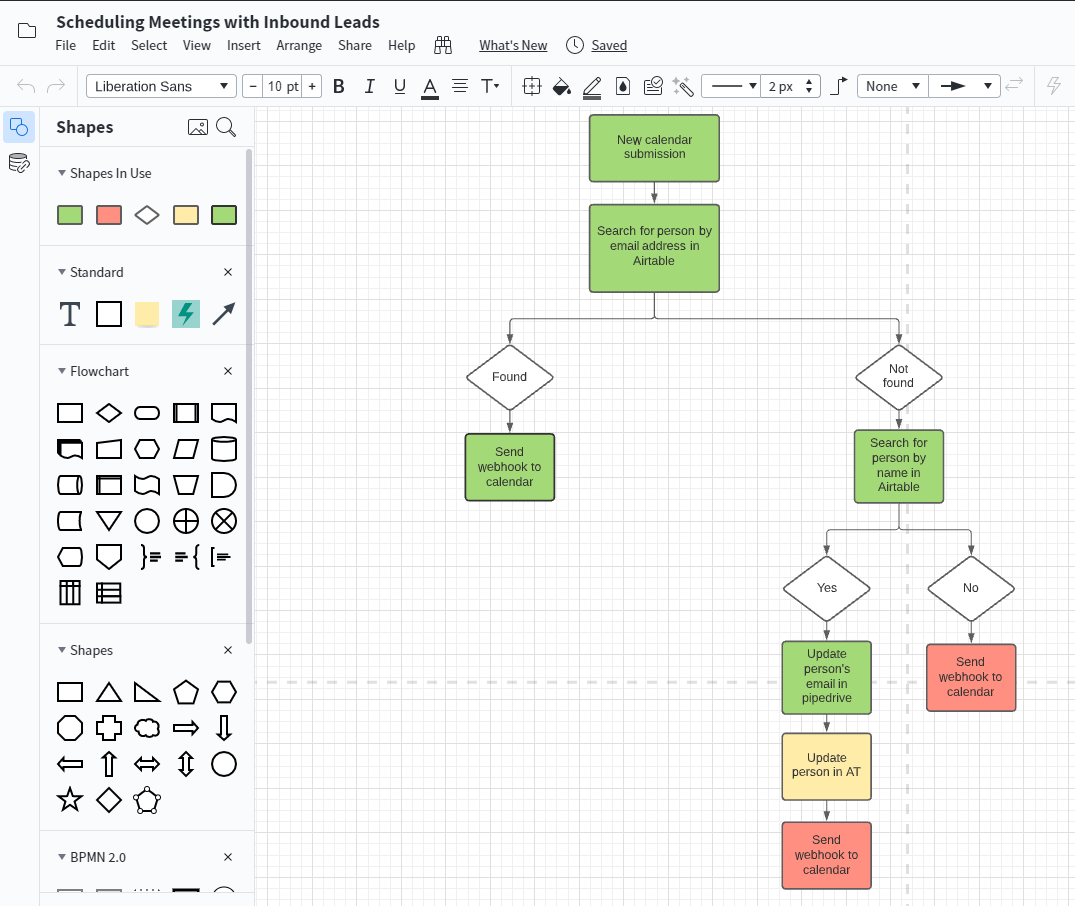
Making a flowchart is also a great way to share your automations with your team. For those who aren’t familiar with Zapier and its UI, a flowchart is a much more intuitive way to understand what an automation does and the purpose it serves.
If you’re hoping to get more of your team to start adopting automations into their workflows, simple flowcharts can be an invaluable asset for explaining how they can use what you’ve already made.
Tip 2: Give Detailed Names to Your Zaps
As your Zaps start to pile up, it will become crucial to give them descriptive, informative names. A helpful name will make it easier to find the Zap you’re looking for manually or with Zapier’s search function, which only looks at a Zap’s title.
Since Zapier doesn’t put a limit on the character lengths for Zap titles, feel free to add as much detail as you want. A short sentence is often going to provide more practical context than a brief, punchy title.
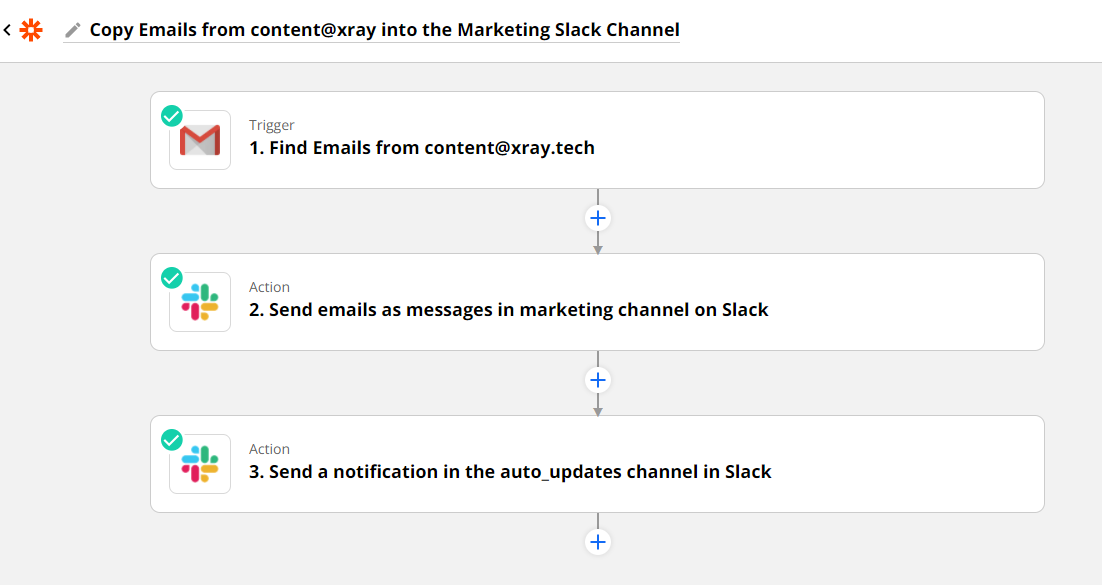
“Find emails from a specified client and copy them into that client’s Airtable directory” might be a bit of a mouthful, but it tells you exactly what the automation does, and will help to differentiate it from other Zaps you may make that connect GMail and Airtable.
Along the same lines, it’s often a good idea to rename each individual step within your Zaps to something that provides more information than the default titles. If you’re adding a search step, make a note of what the search criteria are; if you’re creating a document, explain what the document contains.
Fastidious naming conventions might seem a little tedious, but they’ll be a lifesaver when you have to revisit Zaps you made months (or years) prior. You won’t have to worry about forgetting what a particular automation does or how it works when the names of each step tell you clearly.
Tip 3: Duplicate Your Zaps Before Making Changes
While Zapier is an excellent and versatile platform overall, it does lack in certain areas that make work a bit more difficult. As of right now, Zapier doesn’t have any sort of built-in version control, which means that you can’t revert back to older versions of your Zaps after making changes.
That’s why we recommend always duplicating your Zaps before you start making any major changes. That way, you have a copy of a working version of your automation that you can fall back on in case your changes start to break the Zap.

Even if you’re trying to fix a Zap that’s already having issues, it’s often a good idea to work in a copy of the Zap so that you can preserve any steps that were working - or confirm which steps were causing the problem.
To copy a Zap, just click on the arrow next to its name, and choose “Copy” to immediately create an exact copy.
Tip 4: Chat Notifications
As your automations work quietly in the background with little or no input from you and your team, it’s important to have a way to keep track of what they’re doing. Knowing when a document was generated or when a report was filed can help you to work more efficiently and prevent you from accidentally doing redundant work.

A simple way to stay in the loop is to add a chat notification at the end of all of your automations. Just add a step to send a message in Slack, Microsoft Teams, etc., and include a brief message with what the Zap just did and a link to the Zap itself. You may also want to include links to any documents or resources that the automation created for easy reference.
At XRay, we put all of our automation notifications into a dedicated “auto_updates” channel, so we can check on our automated activity all in one spot.
Tip 5: Explore the Possibilities with XRay.Tools
Before you start building your automations, it’s a good idea to get a sense of what’s possible with the tools at your disposal.
We’ve made a web app designed specifically to show you the integrations Zapier has for any app that you search for. Just go to xray.tools, enter the software’s name to build your toolbelt, then click on View to see the triggers, actions, and searches that Zapier supports for each app.
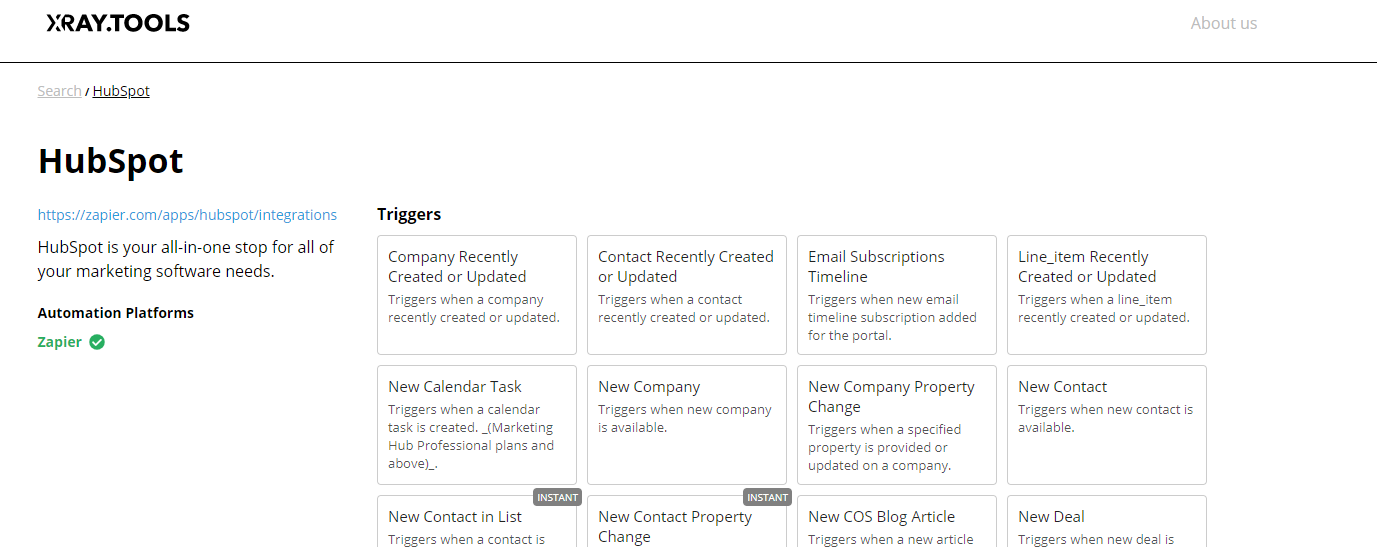
While our search only checks Zapier for now, we’ll soon add support for other platforms like Integromat. You can also click on “Get Shareable Link” to generate a link with your toolbelt prefilled into the search, so you can easily share the results with your team or refer back to it later.
Keep Automating and Saving Time
These tips should help you to kickstart your early Zaps and stay organized as you start creating more automations and experiments to support your workflows.
If you’d like to learn more about integrating automation into your daily work, check out our blog or our YouTube channel. You can also follow XRay on Twitter, Facebook, or LinkedIn.
Every app in your toolbelt serves a different function. You might be using Airtable as a database for all of your vital metrics, while Notion serves as a wiki for your team, acting as a centralized knowledge base.
But what if you want to sync some data between both? You can always migrate from one app to the other with a simple .csv export of the table in question, but that won’t help you if you want to keep the tables in both apps synced up going forward.
That’s where Unito comes in. Unito lets you build flows that automatically sync two databases, so changes in one will be reflected in the other. Unito supports several popular apps, including Airtable, Notion, Google Sheets, and more.
In this post, we’ll show you how to set up a Unito flow to sync tables in Airtable and Notion.
Set up your Airtable and Notion tables
Start with similar tables
Before you do anything in Unito itself, you’ll need to make sure your tables in Airtable and Notion are ready for the sync.
It’s best to start with identical tables, but it’s fine if one table has additional columns that won’t be synced, or different names for the same data.
As long as you know which columns will be matched together for the sync, you should be all set.
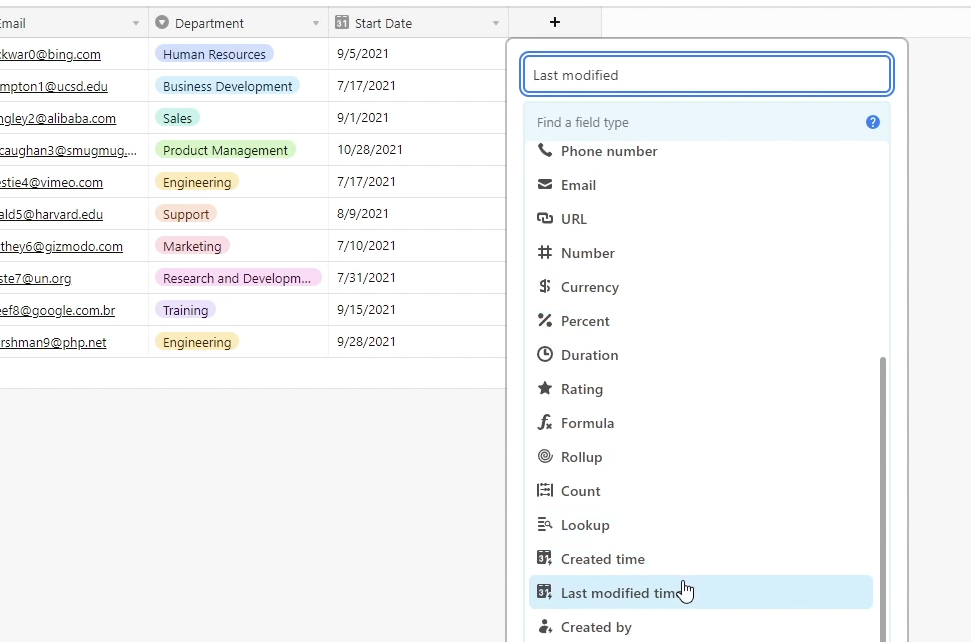
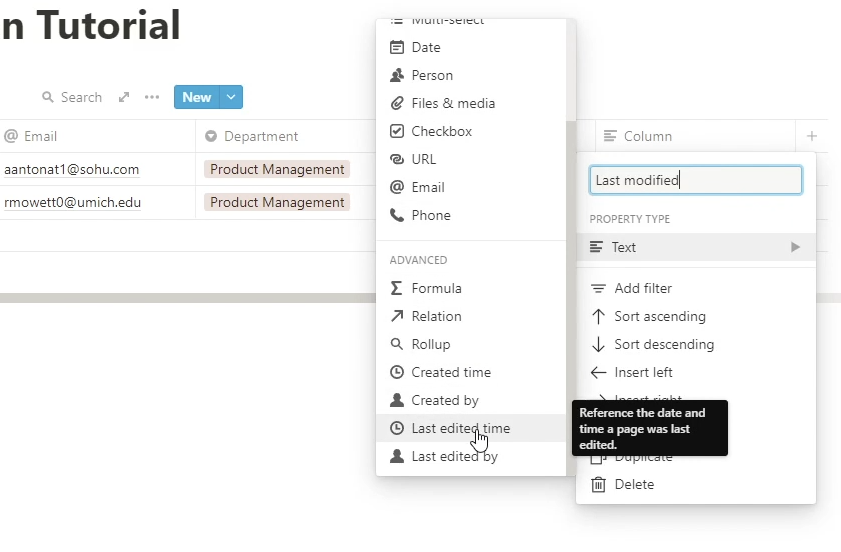
Add “Last modified” columns
Next, you’ll need to add a “Last modified” column to each table so that Unito can see when the record was last updated. That will be its cue to sync the record to the other database.
In Airtable, add a new column, and select “Last modified time” as the field type.
In Notion, create a new column with “last edited time” as the type.
Build your flow in Unito
Create a new flow
With your tables all set up, head over to Unito and create a new flow. Choose your apps, and select the tables that you want to sync.
Set the flow direction
Choose whether you want your flow to be a two-way or one-way sync. With a two-way sync, changes made to either table will prompt an update in the other table. In a one-way sync, changes to Airtable will prompt an update in Notion, but changes in Notion won’t be updated in Airtable (or vice versa).
We’ll be using a two-way sync for this flow.
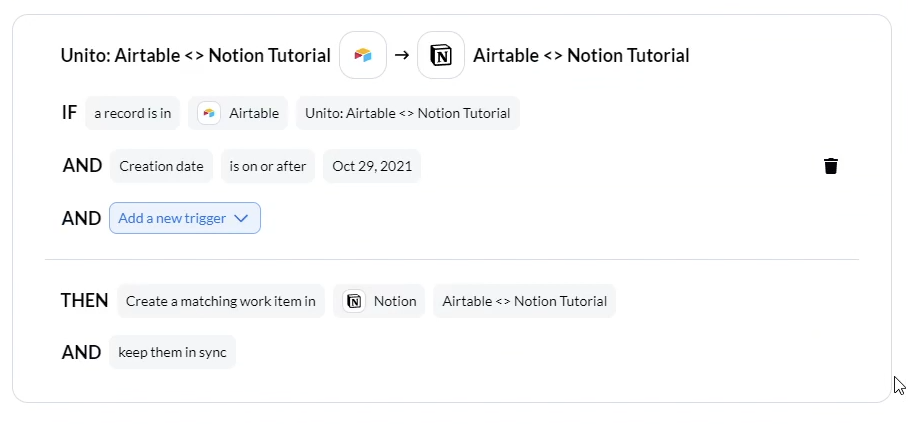
Review the syncing rules
Unito will automatically populate a set of rules that will determine which records get synced. It might look a little confusing at first, but it’s just saying that any record created on or after the current date will be synchronized.
You can modify these rules if you’d like, but it’s usually fine to leave them as they are. We’ll deal with syncing old records later.
Match fields and launch your flow
Now you’ll need to match each field in Airtable to its counterpart in Notion. If you have extra fields in either table that you don’t want to include in the sync, you can just leave them out in this step.
Once all your fields are matched up, you can launch your flow.
Sync old and new records
Old records
If you’d like to sync all of the records added to your table before the Unito flow was made, just scroll to the bottom of the flow page and select “include older records or work items”. Confirm your choice, then click on “Sync now” at the top of the page.
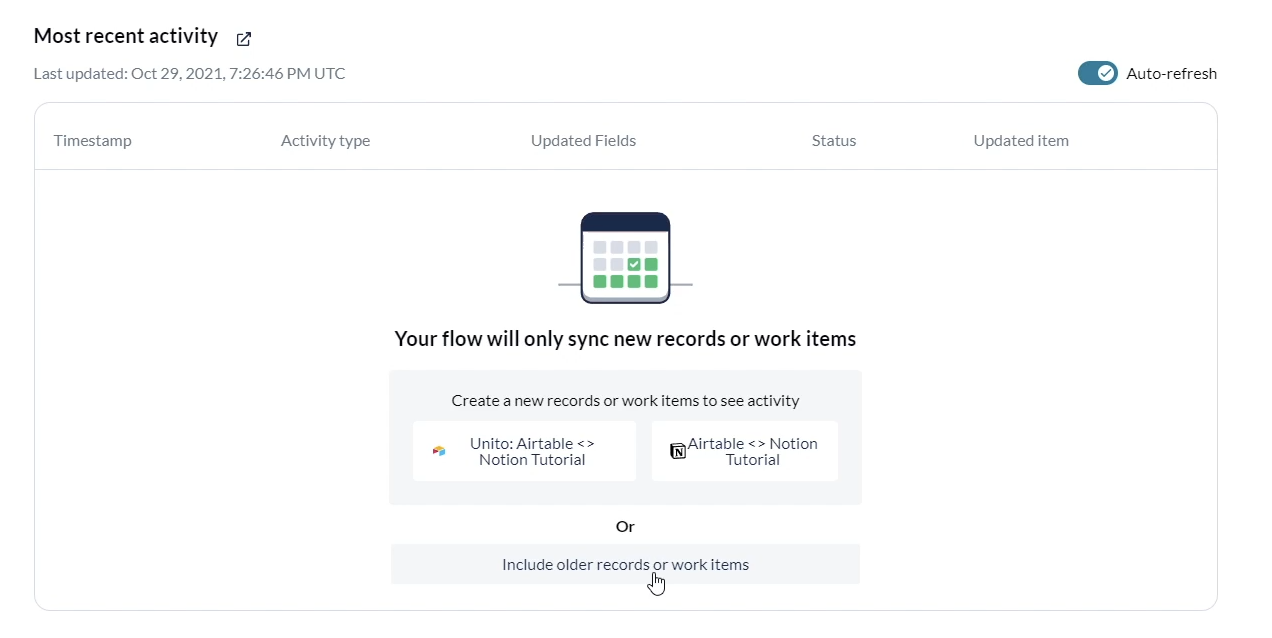
This will sync all of your existing records one at time, which can take quite a while if you’re working with large databases.
New records
To sync new records, just add them to Airtable or Notion as you normally would. Within about 10 minutes, Unito will sync the new record to the other database.
Keep your data consistent without any extra effort
Now your Airtable and Notion sync is all set, and your tables will show consistent data to everyone on your team without any added work on your part.
For more automation tutorials covering platforms like Unito, Zapier, and Integromat, check out our blog or our YouTube channel. You can also follow XRay on Twitter, Facebook, or LinkedIn.
Keep Track of Your Automations with Documentation
Every day, knowledge workers waste time on robotic tasks that could be automated. In our previous articles, we’ve shown you how the XRay method can be used to identify robotic tasks and begin automating them away. By now, you’ve probably set up an automation or two to clear some of those robotic tasks off of your plate. But what happens next? What if you want to show your team how the automation works? What if you want to train someone else to manage the automations? How can you turn a handful of zaps into a robust automation infrastructure? The answer to all of these questions is documentation.
Proper documentation makes your automations easy to maintain, keeps you and your team informed of what’s happening, and lets you record and discover valuable data about your business processes. Here’s how you can document your automations to get the most out of them, and start creating a knowledge base that goes beyond automation to encompass all of your business processes.
Creating an Operational Database
As you start integrating more automations into your business processes, you’ll need a system to keep track of them and educate your team members on how they work (or at least make them aware of what the robots are doing). Organized, systematic documentation will make it a lot easier for you to maintain your automations, and will create a source for your team to learn from. Thorough documentation will let anyone understand how a no-code automation works, much like how a software engineer’s documentation will inform any developers who pick up the project after them. Documentation takes the work and planning of one or more team members and turns it into maintainable, scalable institutional knowledge. Let’s say you’ve created an automation for onboarding clients, and part of this automation includes entering your new client’s financial info into Quickbooks. What if your financial team decides to switch to Xero? Documentation will make it easy to find the exact steps that relate to Quickbooks so that you can update them to work with Xero instead.
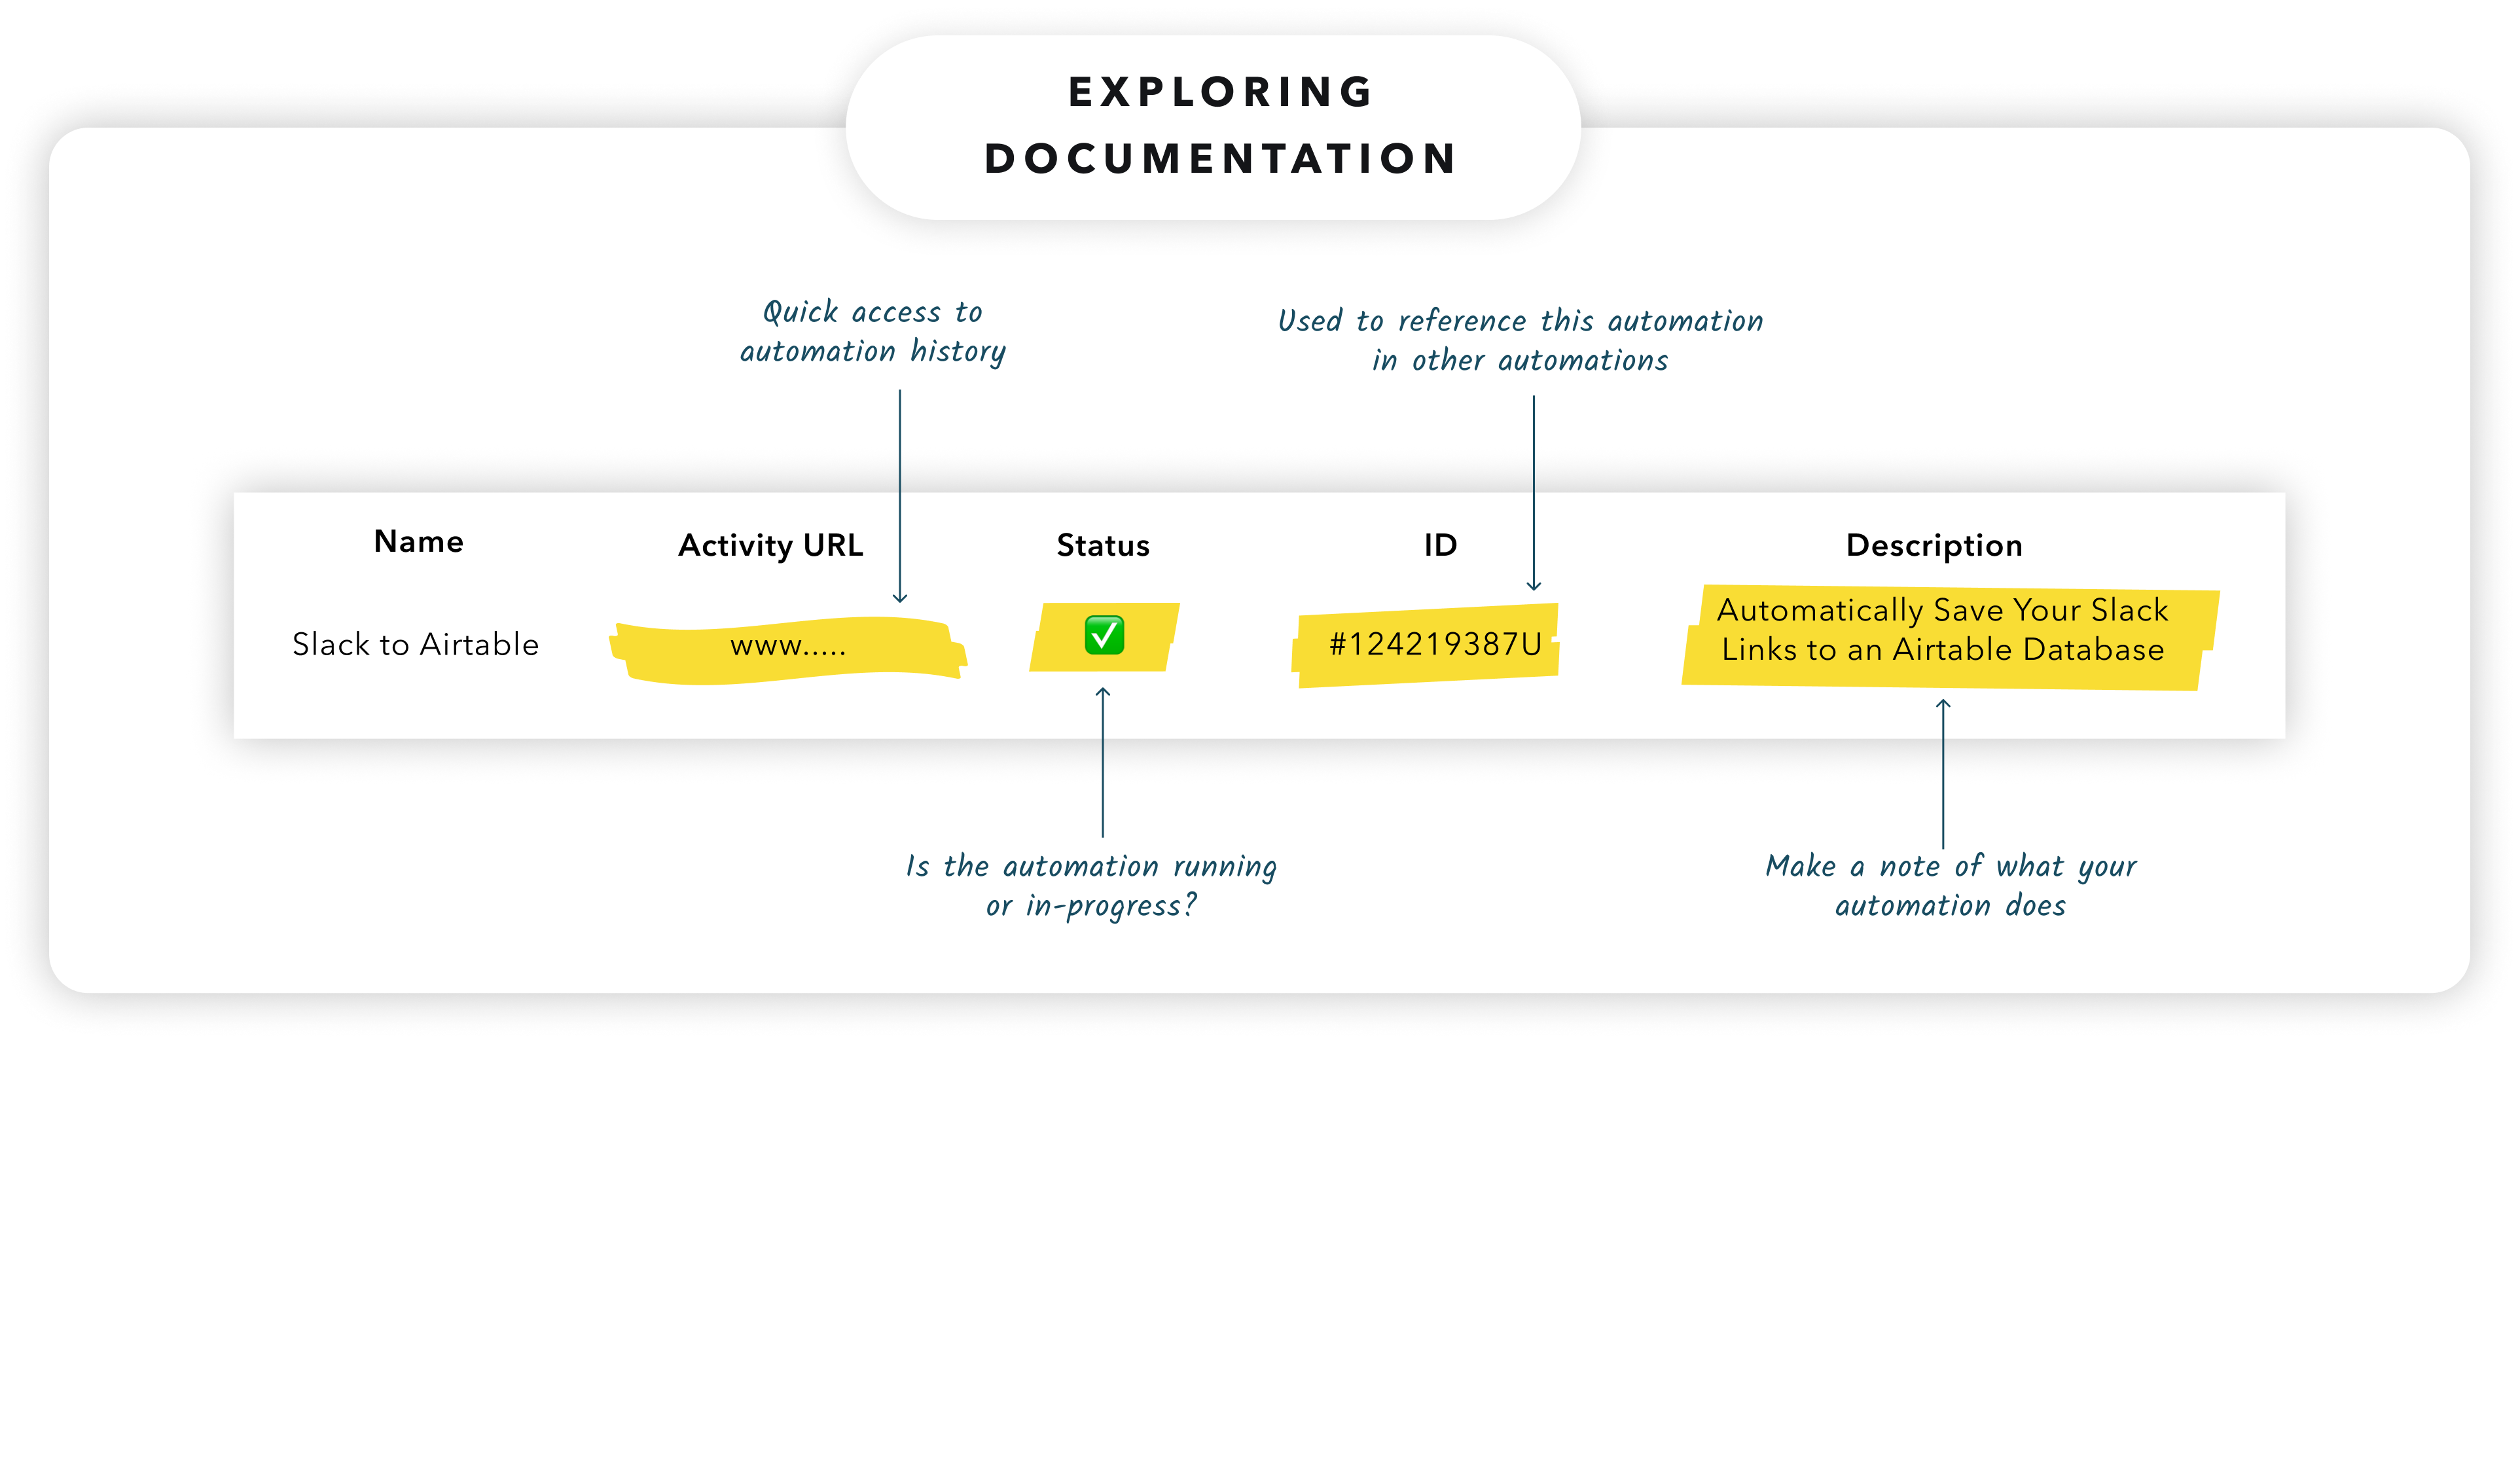
Your documentation will consist primarily of a database that describes all of your automations. You can create your database in any modern spreadsheet tool, but our preferred tool at XRay is Airtable. The purpose of the database is to define all of your automations, and to clearly organize them into triggers and processes. In our documentation system, Processes, Triggers, and Automations form a simple hierarchy. In this hierarchy, an 🤖 Automation is a single automated task; for instance, a Zap in Zapier that sends out an email every week to your team asking for general suggestions, aggregating their anonymized responses in a spreadsheet. Each automation is associated with a 🔢 Trigger and a 🙌Process. A trigger is an action or event that prompts the automation to start. In our team survey example, the automation is triggered based on the time; it runs every day at 4:00PM. A process groups together multiple automations based on their operational purpose. This feedback-gathering Zap would be just one automation in a process focused on building workplace culture.
To take a closer look at how these terms work in practice, let’s examine the documentation for Verb, one of XRay’s clients. As a fitness and wellness app, Verb needs to create a profile for each of their coaches. XRay created a series of automations that allows Verb to create fully-functional, published webpages for their coaches by filling out a simple form. In our documentation, the entire action of creating a webpage is a process called “Coach Webpage Creator” that consists of several different automations. One of the automations includes an API call to Stripe to create new objects and prices for sale, so users can book sessions with the coaches through the webpage. Another automation grabs all of that newly created information, merges it with the survey information, and pushes it all to Webflow to get published. Each of these automations is prompted to run by a trigger. Many of the automations in the “Coach Webpage Creator” process share the same trigger: “Get a New Form Response”. In other words, whenever a coach is onboarded at Verb, they fill out the Typeform survey with all of the information needed to create a new page, then several automations fire off in a specific sequence. A copy of the survey response is stored in airtable, the Head of Coaching is notified, and much more. When documenting triggers, we always use the exact same term that Zapier (or Integromat etc.) uses to describe it. This makes it easier to match up the data in our documentation to the actual systems we’ve created.
Ultimately, the goal of our documentation system is to create a hierarchy that makes it easy to find any aspect of your automation that you want to know more about, update, or reference. Maintaining the hierarchical documentation allows anyone on your team to study and understand your automated systems from any perspective. If they want to know everything that happens when a certain event occurs, they can refer to the “Triggers” tab. If they want a detailed breakdown of each step in an automation, they can check the “Automations” tab. Providing all of this additional context makes the database an extremely useful resource to turn to when someone wants to know more about an automation or learn what's possible with your existing tools. For instance, if someone on your team wants to know exactly where certain data is being stored and fetched in an automated process, they can refer to the database and check the relevant automations. Maintaining visibility into your automations becomes especially important when you need to start making changes, like replacing one of your software tools or changing who’s notified after certain steps in a process.
Like automation, documentation can seem like a tedious and daunting task at first. The key is to start small and focus on the most important information first, such as the basic hierarchy we’ve outlined in this post. If you take a look at our example in Airtable, you’ll notice we have more tabs and data than what we’ve discussed here. To get started, you don’t need to worry about that level of detail just yet - we’ll come back to it in a later post. For now, just concentrate on creating a useful, living document that organizes your automated systems in a way that your team can understand.
Self-Documenting Automations
One of the greatest benefits of automating many of your business processes is that it gives you the opportunity to empirically track each process that’s been automated and see patterns in new data. If you’ve automated your contract and payment processes, you can see how long it takes to get a proposal signed or how long it takes to receive your first payment. If things are running slower than anticipated, you can find the exact capacity breakdown points. All you need to do is set up an Operational Activity Log.
An Operational Activity Log is a document that updates whenever your automation runs, storing the key data that the automation interacted with as well as metadata about the automation. To create an Activity Log, you’ll need to have a spreadsheet to store the data, and you’ll need to add steps to each of your automations to record their data in your activity log. This can get very complex. If you’re feeling sharp, checkout this Activity Log we made for you. Creating an entry in the Airtable activity log is typically the last step in all of our Zaps. You can see an example in the screenshot below. The result is a chronological list of automations that ran, and the data processed each time they ran, all inside of one spreadsheet. The activity log is a simple creation, but it has massive implications for your overall automation strategy. It provides a reliable path for debugging when errors pop up, and it scales better than people can on their own. Questions about when a document was sent or when a proposal was completed can be answered by checking the log instead of distracting people who are focusing.
The data you store in the activity log and how you break it down is entirely up to you and your company’s needs. In general, you should try to track the key metrics that will quantify the success of both the task being automated and the automation itself. The value here is in the meta-analysis. An automated activity log gives you the ability to see trends, create timeline-based insights, and understand how well an entire workflow is working, rather than just giving you a single metric at the end. If it’s a time-sensitive task, you’ll want to make sure to log the time and date of each critical action to make sure that everything is happening on schedule. If you’re hoping to boost engagement on social media, you’ll want to log the likes, retweets, etc. that each post gets. Apps like Zapier and Integromat allow you to take nearly every piece of data that’s used in an automation and send it to spreadsheet software like Airtable and Google Sheets, so virtually any data that you want to log can be logged. Just make sure not to log so many metrics that the activity log becomes unwieldy and difficult to navigate. As the saying goes: garbage in, garbage out. You have to be intentional and strategic with what you want to keep track of, or you may end up with a pile of useless data.
In addition to activity logs, announcements are another form of documentation that you’ll set up from within an automation. While an automation is running, it should be configured to conclude the automation by sending a message into relevant communication channels to announce what it did. For example, the account management team might see a message pop up in their Slack channel that says:
“Mike just updated ABC Company’s Information!
The following information has been updated: created and assigned a new Jira Ticket, updated Hubspot CRM, drafted an email to the client"
This message shows the team how Mike’s one manual action triggered three automatic actions, and would typically include a link to the Zap or Integromat scenario, as well. As these automations get more complicated, prevalent, and important, the simple announcement will help everyone to stay in the loop and leave a clear breadcrumb trail to follow if any issues arise. You’ll need to strike the right balance of announcements. Too many, and your team will get distracted and annoyed; too few, and you start to create the dreaded “black box” effect, where everyone starts to take the automations for granted and forgets how they work.
Automation without proper documentation risks becoming a mysterious process running in the background and creates easily avoidable risks as your automation infrastructure grows, understood only by the person or people who set it up. Creating documentation and an activity log early on will provide context for your entire team, especially as your company grows and new faces enter the ranks. Over time, your automated activity logs will deliver critical insights into the operations of your company and the success of your automations. In our next post, we’ll discuss how a similar concept can even be applied to your team and their mindful tasks as you create a broader knowledge base that encompasses standard procedures and a dictionary of terms, removing unnecessary ambiguity from everyone’s daily work.
No-code and low-code automations are a convenient way to save time at work, letting you refocus your attention on the things that matter the most.
But in some cases, automations can almost become too convenient. If your automations are running completely in the background, it’s easy to lose track of what they’re doing, which can result in redundant work, unnoticed errors, or other mistakes.
The last thing you want is to spend an hour making a document that your automation already put together yesterday.
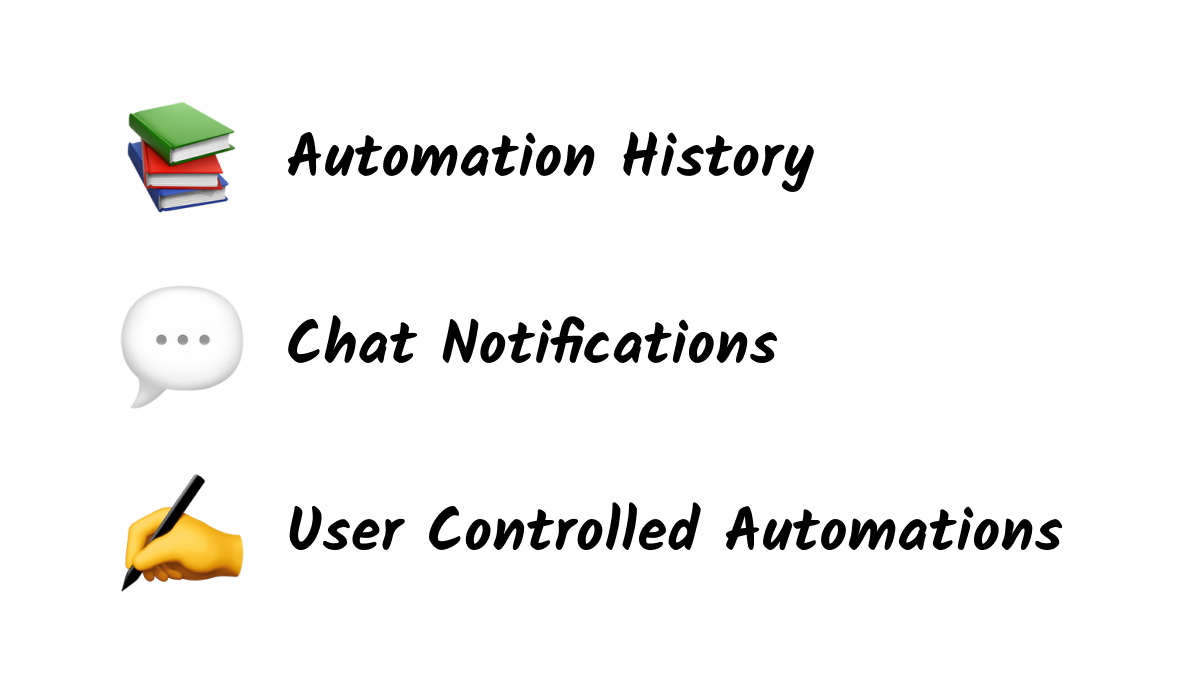
In this post, we’ll show you three ways to keep track of all your automated activity, so you’ll always know what the robots are doing.
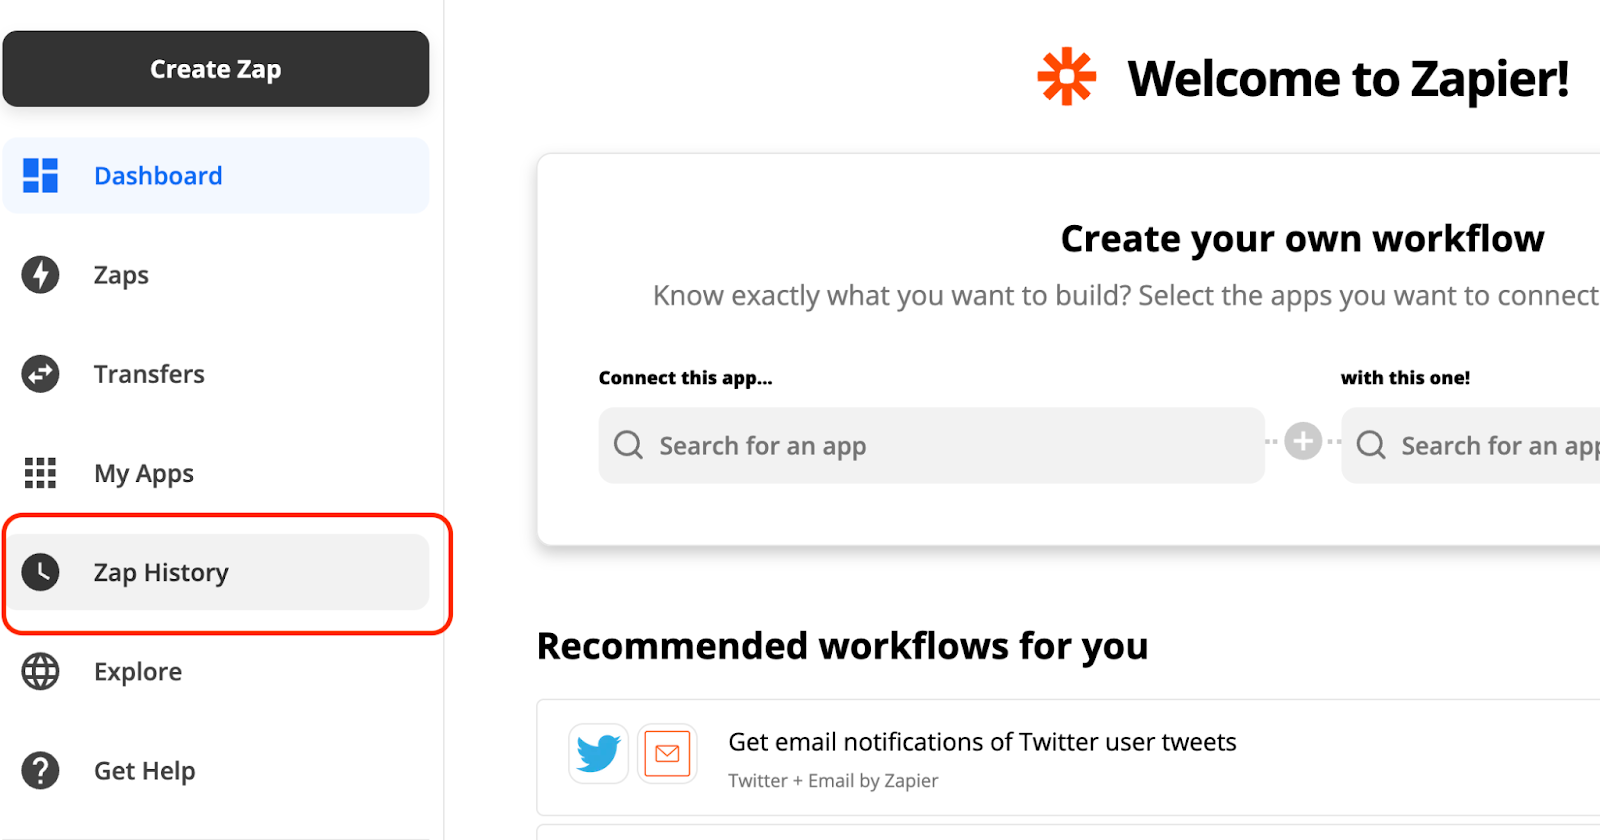
Check the automation history
One of the simplest ways to see what your automations have done is to check the history tab of your automation platform. Apps like Zapier, Integromat, Unito, etc., all have an easily accessible history tab for you to reference whenever you want.
When you check the history on any of these apps, you’ll see a list of every automated action that your account has performed over a certain window of time. This will usually include errors or failed runs in addition to the successful actions, which can be helpful when you’re trying to fix bugs.
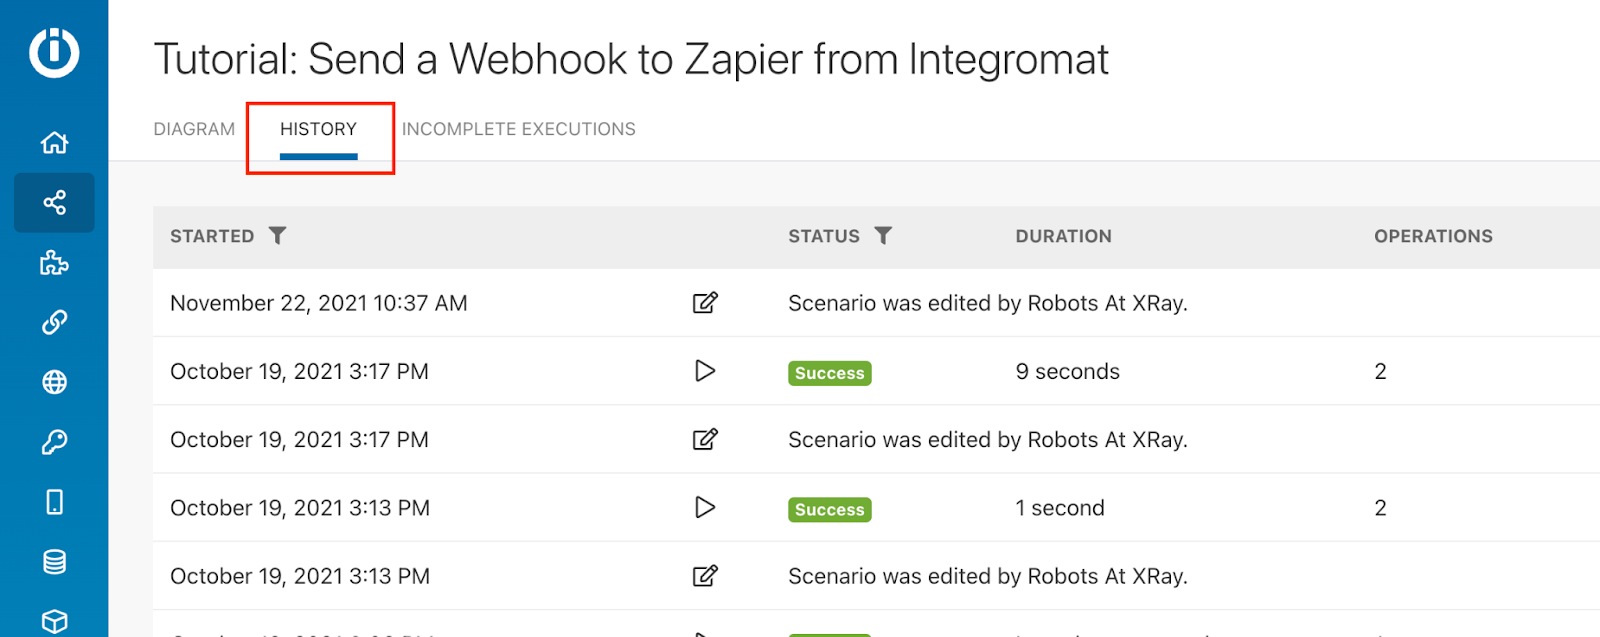
These history tabs provide comprehensive records, but regularly checking them isn’t the most convenient way to keep an eye on your automations.
At XRay, we’re all about automating repetitive tasks to save time, and refreshing an automated activity log every day definitely qualifies as a repetitive task.
So while checking the history can be useful, we’ll also show you a couple of more proactive ways to track your automations.
Configure real-time chat notifications
One of the first “best practices” that we established for building automations at XRay was to have every automation send a Slack message every time it runs. To keep things organized, we send all of the messages for our internal automations into a dedicated #auto_updates channel.
With automated messages, everyone on your team can stay in the loop without having to take any extra actions on their own. Each message includes a brief description of what the automation did, a link to edit the automation in Zapier, Integromat, etc., and links to any resources the automation might have created.
The messages are sent in real-time, so if a new document is created at 3:00pm, you’ll know about it before 3:05. Messages can also be sent in any app your team uses: Microsoft teams, Discord, etc.
Having an automation updates channel helps your team to work more efficiently with automations. It prevents them from having to ask each other if and when automations ran, or go searching for files.
It also works as a simple reminder that your automations are working - or a tacit warning that something might not be right. As long as you see regular updates when you expect them, you know everything’s working fine. If you’re not seeing any activity, it’s a strong signal that your automations might need a quick fix.
Build User-Controlled Automations
App history and chat messages will let you know about your automations after they run, but there’s also a way to stay ahead of the curve and be aware of every automated action before it happens.
There are several different ways to trigger automations, as we’ve discussed in a previous post. Many triggers are passive, like scheduled automations that run every day at a specific time, or software-based automations that run whenever a task is updated in Trello. These automations run without human input, which can be useful but doesn’t always offer the control and visibility that you might be looking for.
With a user-controlled trigger, an automation only runs when a user launches it with a survey, a form, or even a simple button. Because a human has to be involved at the start of the automation, you (or someone on your team) will always be aware of when and why a user-controlled automation runs its actions.
Opting for a user-controlled trigger isn’t always necessary, but it can be a helpful way to integrate human checkpoints into critical workflows. Even if you’re automating the bulk of the work, you may still want to have someone on your team manually approve each invoice or proposal being sent out, or every job offer going to new recruits.
Even with user-controlled triggers, you should still make sure to add a chat message to the end of the automation. That way, you’ll have confirmation that it ran successfully after you launched it.
Streamline your work without losing visibility
Automations eliminate lots of tedious work from our overburdened to-do lists, but it’s still important for us to know about all the work they’re doing. If your automations just run silently in the background, it’s easy for you and your team to get confused and start producing redundant or unnecessary work - which defeats the purpose of automating in the first place!
With the tips that we’ve outlined here, you can easily stay on top of your automated activity. If you’d like to learn more best practices for building automations, check out our blog or our YouTube channel. You can also follow XRay on Twitter, Facebook, or LinkedIn.

As certified Zapier Experts, we at XRay.Tech often hear the question: if Zapier is so easy to use, then why do I need an expert?
While Zapier is certainly an intuitive no-code platform, building automations at scale for your entire organization is often something that requires assistance from experienced automators like XRay. You’ll also find Zapier Experts to be an extremely useful resource whenever you run into a problem with your automations that you just can’t figure out on your own.
In this article we’ll explain when and why Zapier Experts can help you with your automations.
Building Automations for Your Team
It’s easy to get started building automations in Zapier. With just a little tinkering (and a few visits to Zapier’s community forum), any moderately technical user should have no difficulty in setting up some simple Zaps that make their workflows easier.
However, building automations that support your whole team, multiple departments, or even your entire organization is a much more complicated project.
Each additional user role adds its own requirements, and a previously simple automation that worked well for you may now need branching paths, precise logic, and a robust database to accommodate everyone’s needs.
Zapier Experts like XRay can help you scale your automations so you can focus on your job, not on building and managing Zaps. We’ll be able to handle all of the data that needs to go in and out of your automations, write documentation to make it easy to train your team, and provide maintenance to keep your Zaps running.
Experts Can Handle Data, Documentation, and Maintenance
Data
Experts like XRay’s automation techs are highly experienced with all the various types and formats of data that Zapier pulls in from different apps. They know how to curate the data you need most and how to store it in an efficient operational database so the information can be easily referenced in future automations.
Additionally, our techs are familiar with the unusual quirks often associated with data from certain apps, such as knowing which apps need to use a file download link and which need to save the file itself. Fine distinctions like that can make or break an automation, and can be very frustrating to try to discover on your own.
Accurate, accessible data is essential for building a team- or company-wide automated infrastructure, and Zapier experts can make sure you gather that data the right way.
Documentation
Documentation isn’t provided by every Zapier Expert, but it’s one of the key pillars of XRay’s approach to building automations.
With each automated workflow that we create for members, we create another page in their Process Playbook. The Process Playbook includes helpful, detailed guides about what each automation does and how to use it.
With proper documentation, you and your team can learn how to use each new automation and keep track of your entire automated infrastructure. While it’s pretty easy to remember one or two automations that you’ve built yourself, it’s important to have a system in place if you want to stay organized and informed when you’re relying on dozens of automations at your company.
Beyond its use as a training and informational resource, your Process Playbook also transforms your processes into a tangible asset. Presenting a few pages is a simple way to show potential investors or buyers how your company operates.
Maintenance
No-code automation relies on your other software to operate. If your automations connect Hubspot and Google Drive, then any updates to those apps might interfere with how your automations work.
Most of the time, software updates won’t be an issue, but some will cause errors in your Zaps every now and again. That’s when it’s useful to have a Zapier Expert to turn to.
A Zapier Expert will be able to find, diagnose, and fix errors in your automations much faster than you’ll be able to do on your own, maximizing the uptime and productivity of your automated workflows.
Reach Out to an Expert Whenever You’re Stuck
Whether you’re trying to scale up your Zaps or not, Zapier experts can help you to solve your automation issues when you’re hitting a wall. If you’re not sure how to get your apps connected and Zapier’s forums aren’t able to resolve the issue either, then reaching out to a Zapier Expert is your best bet.
XRay.Tech offers 30 minutes of free support, and many other experts are also happy to offer some pro bono assistance to start.
So reach out to XRay if you’d like to scale your automation, or if you just need help figuring out a tricky problem. You can also check out our blog or our YouTube channel. You can also follow XRay on Twitter, Facebook, or LinkedIn.
Any automation can be built in a number of different ways, with varying levels of complexity and flexibility.
You can build an automation in the simplest, most direct way possible to quickly handle one or two scenarios, or you can build automations with branching paths, conditional logic, and database lookups to accommodate just about any scenario you might encounter.
At XRay.Tech, we build automations that go beyond simply connecting one app to another. We build automations for our members that support workflows across their entire organization, and to do that, we need to add some steps that go further than what might be strictly necessary to just get an automation up and running.
In this post, we’re going to use an invoicing process as an example to show you three different ways to build the same kind of automation: the simplest way, a better method, and XRay’s preferred approach.
The Easy (but Error-Prone) Way
For our invoicing example, let’s assume that we want to send a Quickbooks invoice to a customer whenever we mark that client as “Closed/Won” in Hubspot.
The simplest way to build this automation would consist of only three steps.
First, the automation would trigger whenever a deal in Hubspot is marked as “Closed/Won” (this will be the same in all three examples). Then, the automation will create an invoice in Quickbooks using data pulled in from the Hubspot trigger. Finally, the automation will send the invoice to the client’s email address provided by Hubspot.
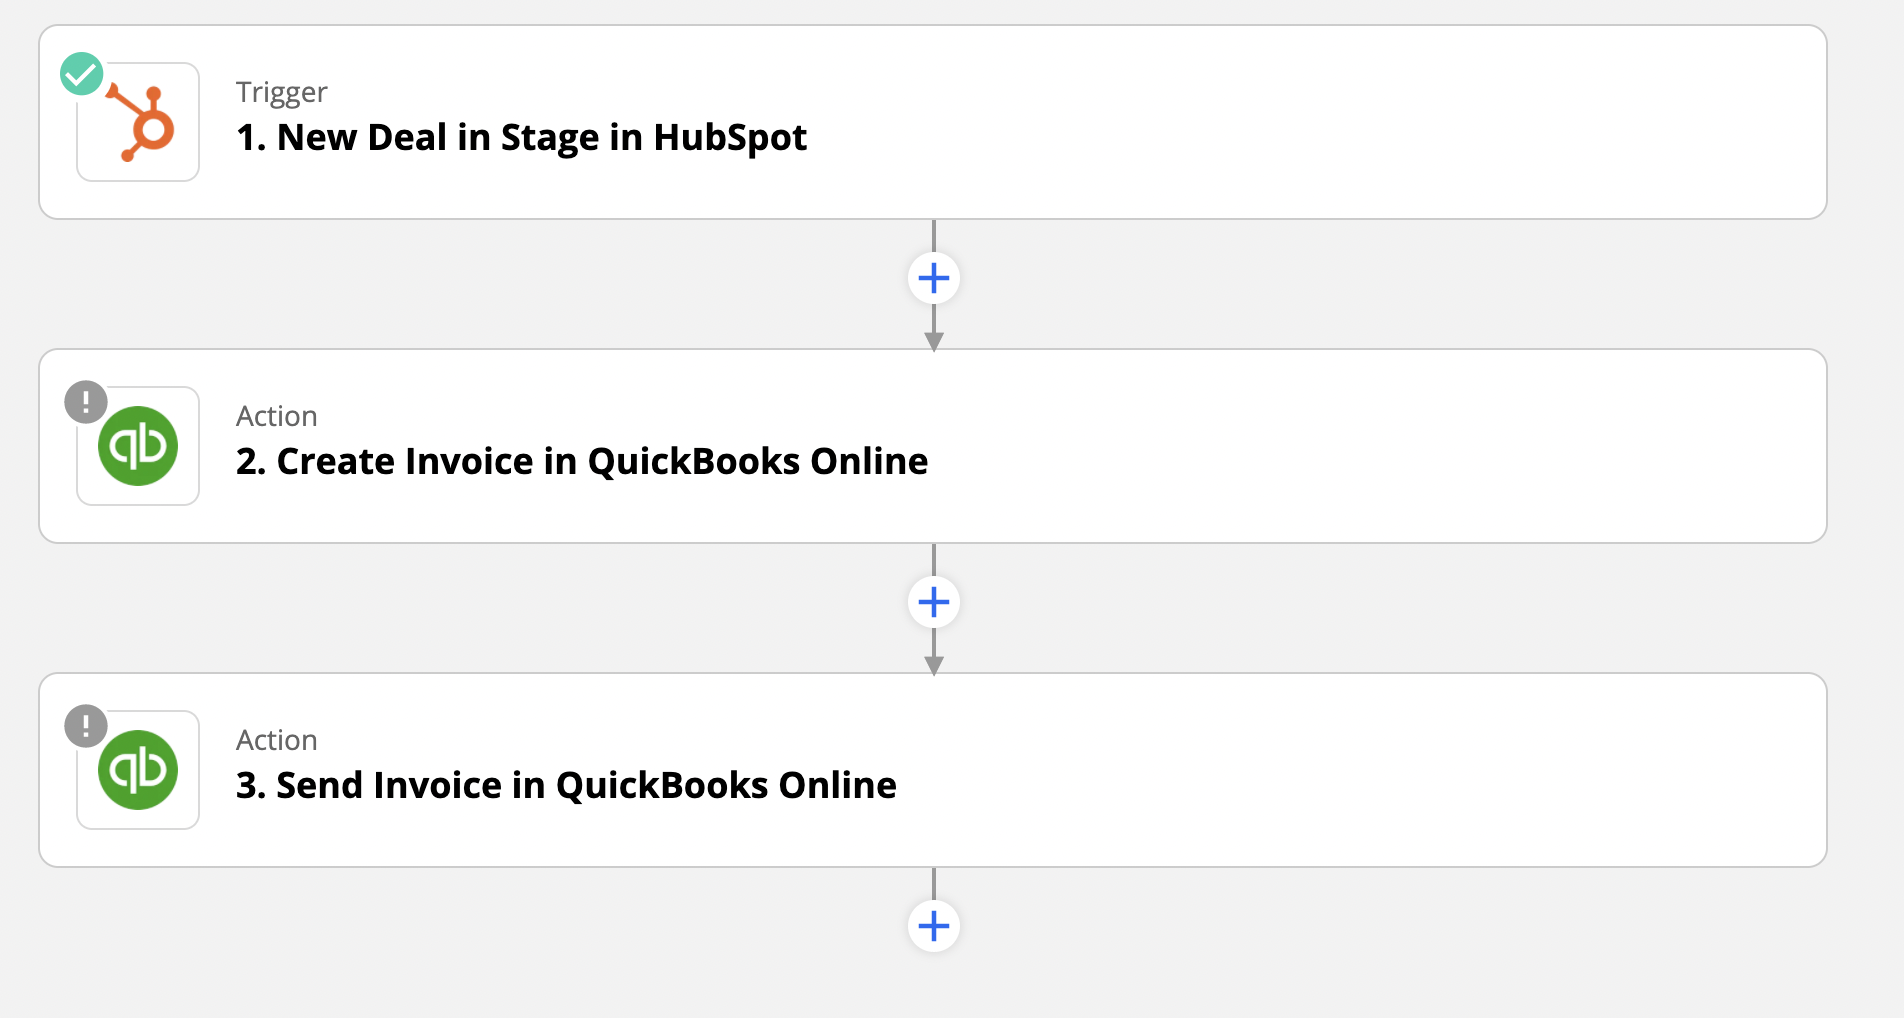
This automation is quick and easy to put together, but only offers limited functionality and will encounter errors in many common situations. For instance, if the customer in Hubspot isn’t already added into your Quickbooks database, the automation simply won’t work at all.
An automation like this is a good way to start learning what a platform like Zapier is capable of, but it wouldn’t be very useful for your company as it would still require you to add each customer manually to Quickbooks.
A Better Method: Find Customers and Build a Simple Activity Log
To make this automation actually meet minimum requirements, we’ll add a lookup step and start building a rudimentary activity log.
This version starts out the same way, but the next step is an important difference. Instead of jumping straight to creating and sending an invoice, we’re going to perform a search for an existing customer using the email address provided by the Hubspot trigger. If there’s no record of that customer in Quickbooks, then the automation will create one for us.
With this Find/Create step, we make sure that the customer is in Quickbooks without requiring any manual work to add them.

After that, the automation proceeds in much the same way as the first: it creates an invoice, and sends it out to the customer.
Finally, we’ve added a step to log some information in Google Sheets. This will create a simple activity log which will compile information whenever the automation runs.
With an activity log, we’ll be able to quickly reference a variety of data about each automated action: a payment link for the invoice, the client’s email address, the time the invoice was sent, and more.
An activity log is a great way to keep track of your automations and make sure the data that they create doesn’t get lost along the way. However, Google Sheets isn’t the best tool for working with automations. It’s a tool that nearly everyone is familiar and comfortable with, but it lacks some key features that it would need to be an ideal automation database.
To finally bring this automation up to XRay’s standards, let’s swap out Sheets for Airtable and add a Slack notification to keep everyone in the loop.
XRay’s Approach: Flexible Databases and Convenient Notifications
We’ll bring the automation up to 7 total steps with the addition of an Airtable database and a Slack notification.
Creating a database in Airtable rather than Google Sheets is more than just a simple software switch. Airtable is an ideal spreadsheet app to use as an automation database. Its system of filters and views let us sort our data in custom, precise ways to control our automations and easily collect data each time they run.
This version of the automation looks pretty similar to the previous one, but you’ll note that there are two Airtable steps instead of a single Google Sheets step. Now, instead of just making a simple activity log, we’re using Airtable to make a full customer record. We’ll be able to associate each invoice with a linked record of clients, as well as with a linked record of automations.
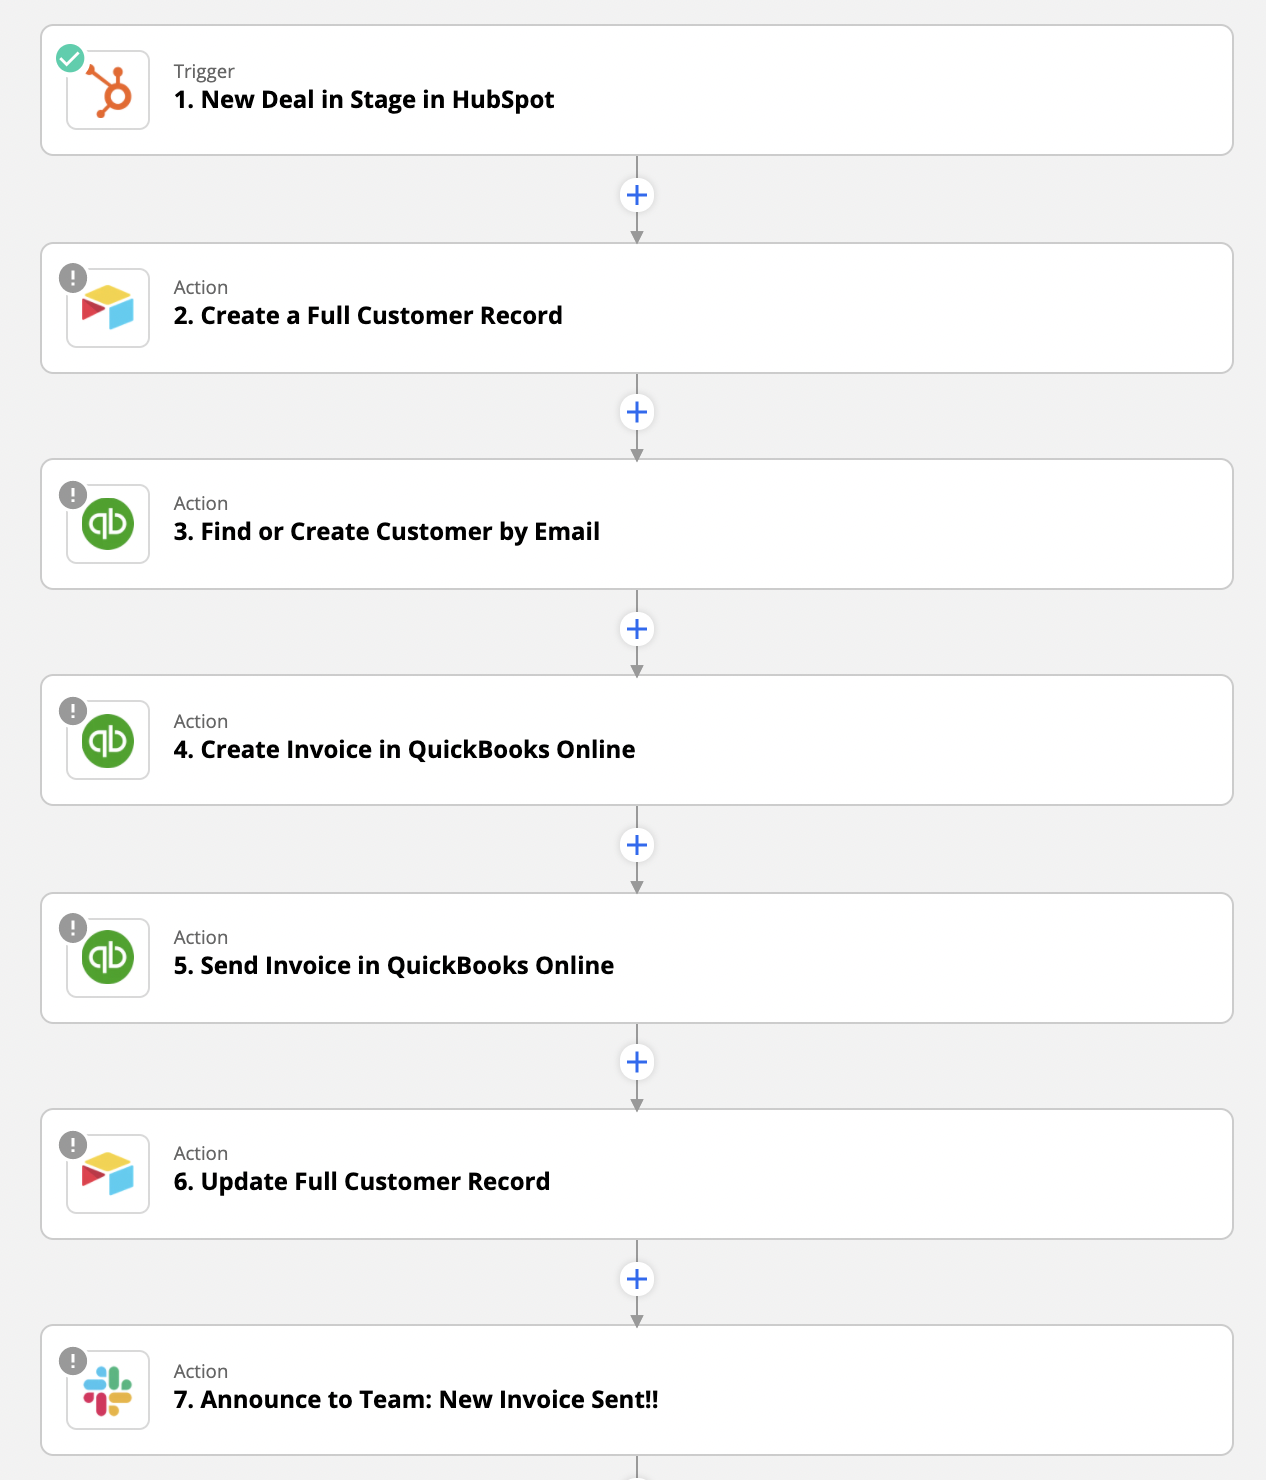
We’ll also be able to use all of this robust and interconnected data to support other automations in the future, like sending automated email reminders to clients with unpaid invoices. Making updates like these will be much easier with Airtable, because adding new columns and rearranging their order won’t break the automations as it would with Google Sheets.
Finally, we’ve added a step to send a Slack message to the team after an invoice is sent. Notifications like these are a simple but vitally important way to keep everyone in the loop about what the automations are doing.
We’ve found that automations have a tendency to become invisible unless you announce their activity, and invisible automations will often lead to confusion and redundancy as people repeat the same work that was already performed automatically.
Building Adaptable Automations for our Members
When we’re working with our members, we want to provide them with efficient, adaptable automations that can respond to all of their current needs and adjust to fit what their future needs.
While it would often be quicker to simply connect one app directly to another, using an operational database in Airtable to manage the flow of data ultimately makes the apps more useful in the short term and more resilient to change in the long term.
One of the reasons why we prefer memberships over project-based engagements is that they let us get to know the companies and the people we work with better, which in turn allows us to better build automations that match their goals and requirements.
If you’d like to learn more about how we build automations, or if you’d like to start learning to build automations yourself, check out our blog or our YouTube channel. You can also follow XRay on Twitter, Facebook, or LinkedIn.

Much of the work we do every day is defined by the people we work with. As you’re considering XRay.Tech as an option for building automated workflows, you’re likely curious about what your team will actually be like, and how you’ll work together.
In this post, we’ll explain who you’ll work with if you decide to start an XRay membership, and how everyone on your team will contribute to the success of your membership.
Your XRay Project Manager Coordinates our Efforts
Every XRay member is assigned a project manager. Your project manager will be your main point of contact at XRay, and they’ll coordinate efforts between our two teams to ensure that we’re making constant, consistent progress.
Over the course of your membership, you’ll get to know your PM well as you talk daily on Slack and once a week during regular Zoom meetings. In turn, it’s your PM’s responsibility to understand your goals and use cases, and to see how automation can fit into the long-term plans of your business.
An automation is only useful if it performs a task that serves your business and your employees. While technical skill is required to set up an automated infrastructure, it’s equally important to understand the operational context of each automation.
Each automated workflow needs to be easy to operate, and the data or assets it produces need to be suitable for your team to work with.
With a birds-eye view of your organization, your PM will help to give our technicians the context they need to build automations that fit your business.
Your XRay Technician Team Builds Your Automations
At XRay, our technicians are the skilled low-code specialists who build automations for our members and for our internal use.
In addition to a project manager, each XRay member will work with several technicians as they design, build, and maintain automated workflows.
While your project manager will stick with you for the long-term, the team of technicians who build your automations will be a bit more fluid in order to match the right person to the right task.
Collectively, our techs have a wide array of specialized skills and experience. Some are experts in particular automation platforms, and will be brought into the fold if your latest project requires knowing the intricacies of Integromat or Parabola. Others have the programming experience needed to create complex low-code automations with custom API queries. They’ll step in when your automation needs to go beyond the capabilities of prebuilt integrations.
Throughout your membership, you’ll likely see many different techs pop in and out as we tackle different workflows that require different expertise. Your project manager will make sure that any new tech brought onboard will be up to speed on Day 1, so the changes in personnel won’t slow down our progress.
Our Leadership Team Keeps an Eye on the Long Term
While most of your day-to-day conversations will be with your project manager and technicians, XRay’s leadership will stay in touch with you throughout your membership.
XRay Co-Founders Tom Nassr and Mark Campos will meet with you on a regular basis to discuss the long-term strategy of your membership. They’ll also help you to form proactive partnerships with our other XRay members whenever they see an opportunity that could be beneficial for everyone involved.
One of the reasons we prefer a membership model to working on a per-project basis is because we often find that many of our different members are working on similar problems or share similar goals. Memberships enable us to make better connections between the companies we work with.
A Collaborative Effort
Under the direction of our leadership team, your XRay project manager and technicians will form a versatile, talented team that offers long-term stability and technical flexibility throughout the duration of your membership. Together, they’ll build automated workflows that perform to specifications and make your team’s workday easier.
If you’d like to learn more about how XRay builds automations, check out our blog or our YouTube channel, or follow XRay on Twitter, Facebook, and LinkedIn. You can also contact us if you have any questions or want to talk to us about your automation goals.
Making the switch from manual processes to automated workflows is a big change for any organization. If you’re considering automation for your business, you might be worried about a messy transition as you overhaul your systems.
At XRay, we have a simple method that makes the conversion from manual to automated quick and frictionless. In this post, we’ll explain how we handle that crossover with parallel systems and extensive documentation.
Building in parallel
Whenever we build a new automation for one of our members, we start by creating a basic version of the automation that handles only the most common use cases for its business process.
We quickly refine this prototype through a series of tests of conversations with your team, until we have an automated system that approximates the results of your manual process. That’s when we begin to run the two systems together in parallel.
If, for instance, you’re automating your inbound sales process, you can continue to have your sales team monitor your CRM and email the way they always have, while also seeing how the automation processes leads and sends automatic notifications (note: until you’ve made the decision to switch, any messages or forms that would go to your customers will instead go to one of your internal accounts for testing purposes).
By running both systems at the same time, we can evaluate the performance of the automated workflow and adjust it as needed to accommodate for a wider range of scenarios or to perform additional actions.
Make the Switch When You’re Ready
Once the automation meets your expectations, you can switch over and start relying on the automated steps to complete your workflow. Any remaining test data will be replaced with live data coming in from your company or your clients.
For your first automation, we’re confident that you’ll be ready to make the transition well before your initial 45-day trial period ends (unless we previously agreed to a longer time frame for a particularly complex workflow), but the exact timing will be entirely up to you. We won’t push you to make the change until you’re happy with the automation’s performance during the parallel testing period.
To help ensure an easy transition for your team, we provide all of our members with thorough documentation that explains what each automation does, how it works, and what they need to do to use it (if anything).
All of the documentation, along with other helpful links and resources, will be delivered through our own app called the Workflow Dash. The Workflow Dash organizes web pages and links into easily accessible, context-rich Pins, and is free for our members.
Between the practice they get using the automation during testing and the extensive documentation available in the Workflow Dash, your team will have no problem making the switch.
Refine Your Automations Throughout Your Membership
With an XRay membership, our work doesn’t stop once your automation is live. For as long as your membership is active, we’ll keep improving your existing automations in addition to building new ones.
Every automation we create will be connected to an Activity Log, which will track every automated action performed. This data, along with you and your team’s experience in using the automation, will help guide us as we refine the automation to add new paths, remove outdated functionality, or integrate new software if you decide to switch tools.
Most of our updates will be done as quickly as possible, and will incur minimum downtime. Much like our process for building a full automation, we’ll run tests on any new feature before we incorporate it into the live automation.
If you maintain your XRay membership, your automations will only get better over time as we continue to fix any bugs that crop up and make incremental improvements to your entire automated infrastructure.
A Seamless Transition
XRay.Tech’s process for building and implementing automations makes it easy to switch when you’re ready and puts you in charge of the transition. Our documentation delivered through the Workflow Dash makes it easy for your team to adopt each new automated workflow, and our membership model ensures that your automations keep up with your business as your needs change.
If you’d like to learn more about XRay’s method for building automated workflows to create more time for mindful work, you can check out our blog or our YouTube channel. You can also follow XRay on Twitter, Facebook, or LinkedIn, and reach out to us directly if you have any questions.

If you’ve seen XRay’s website, then you know our mission: creating 1 billion hours of focused, mindful work for the people we work with.
It’s a lofty goal, but what does it really mean in practical terms? How are we actually creating time for people to work in a better way?
In this post, we’ll explain how XRay’s method makes our mission into a reality, we’ll give you a look at how we track the time we save for our members, and we’ll explain how the time saved by automations can be repurposed into more worthwhile pursuits.
Compounding time savings
We can’t promise that a single automated workflow or a month’s worth of optimizations will cut your workday in half, but we can guarantee incremental time savings that grow rapidly over the course of your membership.
While the exact time savings that we can accomplish will vary based on your process (and many of our automations have saved hours each week), we always start by targeting a modest 1% of your time each month at a minimum. That translates to about 25 minutes out of each 40-hour work week.
Less than half an hour each week might not sound like much, but it’s only a starting point. Once we start optimizing and supporting one of your processes with automation, that will reveal opportunities for additional automations that we can build as your membership continues.
We may start by automating your inbound lead handling flow and saving you 20-40 minutes each week that you spent sending out templated emails. That lead handling automation might then reveal the need for an onboarding automation as well, saving another 40+ minutes per client as the new automation creates folders, messaging channels, and task management projects for you.
At XRay, we don’t view automation as a one-time project, but as a continual process of discovery, opportunity, and enhancement. We use a membership model because it lets us create compounding time savings for our members as we get to know their companies and their processes as well as we know our own.
Your XRay membership may begin with about a half hour saved each week, but you’ll quickly see that figure grow as your membership continues.
Tracking your time on your terms
While we’re on the topic of saving time, you might be wondering how we keep track of the hours and minutes our automations shave off of your workload.
At XRay, every automation we build for members or for ourselves feeds data into a centralized Activity Log every time that it runs. The Activity Log collects some key information about the automation, such as the exact time that it ran, links to any resources it created, and the amount of time it saves on each run.
As we build each automation, we’ll ask you to estimate the duration of your current manual process, and compare that against the total duration of the automated process as soon as it’s ready for you to use.
In other words, we’ll rely on your experience to create an estimate of the time our automations save for you. That way, our performance metrics will be completely transparent and based on your actual results, not just our theoretical projections.
Since the Activity Log tracks the automations whenever they run and includes your estimated time savings, it automatically builds a cumulative record of the total time saved by each automation we’ve built.
So far, we’ve saved nearly 1,500 hours for our members over the 10 months that we’ve been working with them.
Reallocating your time to mindful tasks
As we’re talking about how automations save time, it’s important to consider what the benefits of streamlining a task with automation are.
Time can’t be banked and “saved” for later use, but it can be immediately reallocated to better tasks or more worthwhile pursuits.
As we’ve covered before, our goal at XRay is to automate robotic tasks. These are tasks that don’t require any creativity, analysis, strategy, or thoughtfulness (CAST). They’re repetitive grinds that consist entirely of moving and rearranging data.
Since robotic tasks are more suited to a piece of software than to a person, we think it’s a natural and logical conclusion that they should indeed be performed by software.
Once these tasks are automated, and your new Zapier, Integromat or Unito automations free up some precious time each week, what are you going to do with those extra hours and minutes?
It’s up to you of course, but we’d bet that you’ll spend most of that newfound time on mindful work; assignments and projects that define your role and help make you better at your job. With robotic, repetitive tasks being taken care of automatically, you’ll have more time to handle unique situations that actually need your input and benefit from your skillset.
All of this is to highlight the fact that the value of automation is twofold; it not only removes the distraction and tedium of robotic tasks, but also enables you to do more important, challenging, and useful work at the same time.
XRay’s plan for success
When we say that we hope to eliminate a billion hours of robotic work, we know we’re aiming high. But we believe we have a process to make it happen, and our first few months are already showing some great results.
By using our members’ first automations as a starting point, we’re able to build automated infrastructures that save more time each month, creating more opportunities for mindful work along the way.
If you’d like to learn more about how XRay is achieving its mission of saving a billion hours of mindless work, be sure to check out our blog or our YouTube channel. You can also follow XRay on Twitter, Facebook, or LinkedIn.

At XRay.Tech, one of our first goals when working with members is to get their [projects] moving quickly. It’s best for everyone if we can hit the ground running and start building their automations as soon as their membership begins.
To start your XRay membership as efficiently as possible, or to set up a smooth kickoff with just about any automator, you should prepare an outline of the process that you want to automate before your project begins.
In this post, we’ll explain how you can create a process outline that will enable XRay or any automation specialist to start building an automation from Day One of your engagement.
Repeatability: a Vital Prerequisite
Before you start on an outline, you need to make sure that the process you want to automate fit one key criterion:
Is your process repeatable?
A repeatable process is one that can be performed largely the same way every time to achieve the same results without sacrificing quality. Of course, with any manual process, there will naturally be some variation each time your team conducts the process, but the overall procedure should mostly be consistent.
Let’s imagine that you want to automate a process for generating weekly sales reports. If your team uses different apps to generate the document, or different formats for the document itself, or saves and shares the document in different places each time, then the process isn’t well-defined enough to be repeatable yet.
But if your team uses the same apps to generate the same work in the same place every time, then you have a process that’s ready for automation - and ready for an outline.
Explain the Background of Your Process
Business processes don’t exist in a vacuum. Understanding the context of your process will help automators like XRay to build an automated workflow that integrates seamlessly into your team’s day-to-day work.
To share background information about your process, briefly describe any details about your company, industry, or team that will help us to understand how the process works and the outcomes it needs to achieve.
The relevant details can vary a lot from company to company, but providing the following information (as applicable) should give an automator most of what they need to know:
• Who owns the process? i.e., who needs to approve any changes or additions to the process?
• Who would be the point(s) of the contact? Ideally, this should include the owner of the process or other decision makers
• What software is involved in this process?
• What teams or departments at your company are involved in this process?
• Are there any industry standards or regulations that automators should be aware of? Does data need to be handled a certain way?
• Are there any other particular requirements or circumstances automators should know about?
The last question is pretty broad, but just try and think of any unique circumstances that might change how an automation needs to work. For instance, you might have a remote team with employees spread across the country or the world, and any automation will need to keep them in the loop. Or perhaps your entire process rests on the shoulders of a superstar employee who needs automation to free up time.
In any case, providing detailed and relevant background information will help us to not only build a good automation, but an automation that really works for your team.
Outline Your Current Process
Next, it’s time to outline your process as it currently is. The better we understand your current process, the better we’ll be able to find opportunities for additional automation and optimization down the road.
Your process outline will also act as a useful snapshot for future comparisons. You’ll be able to see how a ten-step procedure transforms into a two-step procedure with several automated steps running in the background, giving you a clear basis to evaluate the automation’s performance and improvements.
To make your outline, we recommend using flowchart software like Lucidchart, but you can use any app you’re comfortable with. You could also just sketch it out on a piece of paper or on a whiteboard if you'd prefer.
In your chart, add a shape for each step that makes up the process, and be sure to map it all in chronological order. Each step should include:
• The software involved
• The team members and/or department involved
• Notes for paint points, if any
A simple and elegant way to build your flowchart is to use a “swimlane” diagram. Each lane can represent an app or a department at your company so you can easily demonstrate the flow of data without having to add lots of notes.

Once your chart is complete, finish documenting your process by making a quick Loom recording. In it, go through each step of the process you’ve charted out and explain what you’re doing. This visual, practical guide will be extremely helpful to the automators looking to optimize your workflow.
Identify Your Goals
Now that you’ve clearly defined the present state of your process, it’s time to look forward and identify the outcomes that you’re hoping to achieve by automating the workflow.
Naturally, one of the first things that will come to mind will likely be saving time. Automation is a great way to shave minutes off of a tedious task, and you should certainly make a note of the time savings you’re hoping to create - and who you’re hoping to save time for. It’s important to note whether you’re trying to get a task off of your sales manager’s workload, or if you’re trying to free up time for your sales reps.
However, your goals can also extend beyond simply making a process faster. Automation can create more reliable and more consistent output. It can help you to gather data that’s otherwise been invisible. It can help you to handle situations that have been beyond your capacity with your current capacity.
Think big, and let us know whatever you hope to achieve with the automation. We’ll give you our candid opinion on if it can be accomplished, and if it’s feasible, our automation techs will figure out the details of implementation. All you need to focus on is the outcome that you want to see.
Build Custom Automations with an XRay Membership
At XRay, we prefer to work with our clients through memberships because we believe the best automations result from close collaboration. Getting to know our members, their processes, and their goals lets us build automated workflows that fit seamlessly into your daily patterns and procedures.
Whether you pursue a membership or not, providing our team with a detailed outline of your process will help us to get your XRay engagement started quickly, efficiently, and correctly.
If you’d like to learn more about XRay’s method for building automated workflows, or if you’d like to learn a bit about building automations yourself, be sure to check out our blog or our YouTube channel. You can also follow XRay on Twitter, Facebook, or LinkedIn.
No matter what line of work you’re in, you probably deal with lots of automated emails every week.
Between web app notifications, purchase receipts, or - if you’re an automator- Zapier error messages, automated emails can quickly fill up your inbox.
But the automated, templated nature of these emails is actually a useful feature. Because these emails are automated, we can reverse engineer them and pull out pieces of data from their standardized template.
All we need is the Parser tool by Zapier, a web app that lets you parse templated emails for relevant data.
In this tutorial, we’ll show you how you can take Zapier error messages (or any automated email), parse its contents, and send the pertinent data in Slack where it’s more readily accessible by our whole technician team.
We’ll also show you the fundamentals of how Parser works, so you can get started building your own automations with it.
Tutorial Steps:
1. Create a mailbox in Parser by Zapier
2. Create an automation to send emails to your new Mailbox
2.1. Trigger: New email matching search
2.2. Action: Send email
3. Create a template in Parser
4. Create an automation to send parsed email data to Slack
4.1. Trigger: New email in Mailbox
4.2. Action: New channel message
5. Refine your mailbox with extra templates
Copy these Zaps:
Click on these links and copy the Zaps to follow along with this tutorial:
• Zap 1 | Send Emails to Parser Mailbox
• Zap 2 | Send Parsed Email Data to Slack
1. Create a mailbox in Parser by Zapier
First, we’re going to create a mailbox in Parser where our emails will be sent for parsing.
Go to parser.zapier.com, sign in with your Zapier account, and connect your Zapier account to Parser when you’re prompted.
Then, click on Create Mailbox. Parser will create a mailbox and an associated email address, which will be a string of random characters ending in @robot.zapier.com. Copy this email address to use later.
2. Create an automation to send emails to your new Mailbox
To start using parser, you need to send an email to the mailbox you just created. You could do so manually, but we’d recommend setting up an automation to send emails instead. That way, any similar emails you get in the future will be sent over to the Mailbox automatically.
2.1. Trigger: New email matching search
Make a new Zap in Zapier, and choose GMail as the trigger app. Select “New Email Matching Search” as the action.
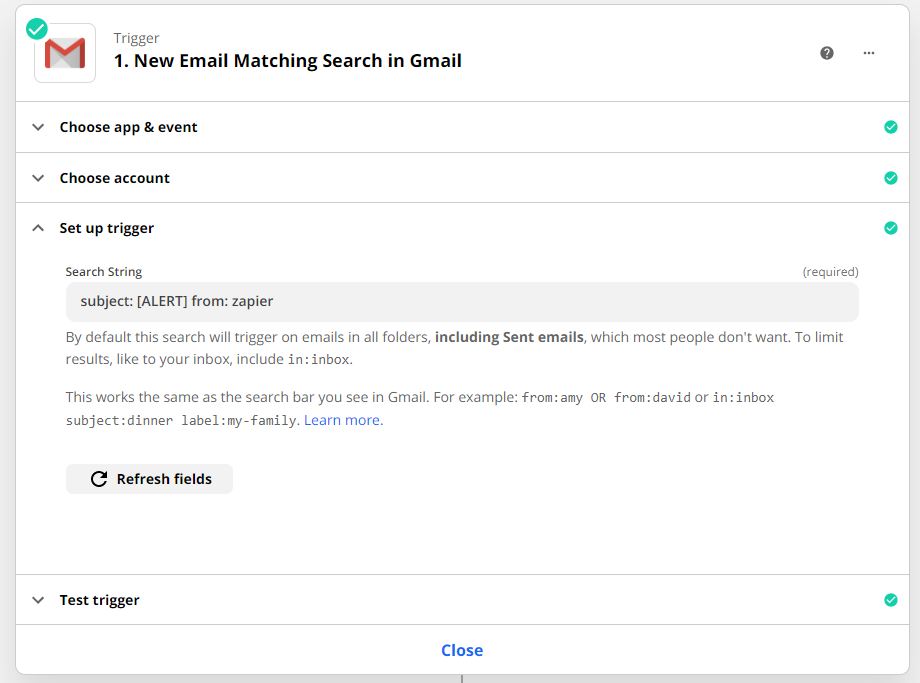
In the “Search String” field, use search times to find the recurring emails you’re looking for. Make sure they’re precise enough to exclude everything else.
To find Zapier’s error messages, we’re looking for the text “[ALERT]” in the subject line, and checking for “Zapier” in the sender name.
Test your trigger, and make sure the automation is finding the right emails. Adjust your search parameters if needed, and then continue once everything’s ready.
2.2. Action: Send email
Add a new step to the Zap, with GMail as the app again, and “Send Email” as the action. You’re now going to configure the automation to send an email to the Parser mailbox address you copied earlier.
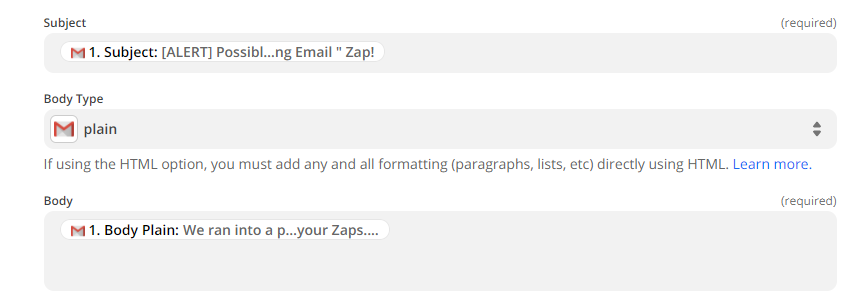
Fill in the email with the content Zapier pulled from the trigger email: plain body, subject, etc.
Test the step and continue.
3. Create a template in Parser
Now that you’ve sent an email to your Parser mailbox, it’s time to create a template to start pulling relevant data.
Navigate to your Parser mailbox to see and review the email. Highlight any portions that you want to turn into variables, and give each variable a simple descriptive name.
We’re highlighting the Zap’s title and the link where we can edit it, and calling them “zaptitle” and “zaplink” respectively.
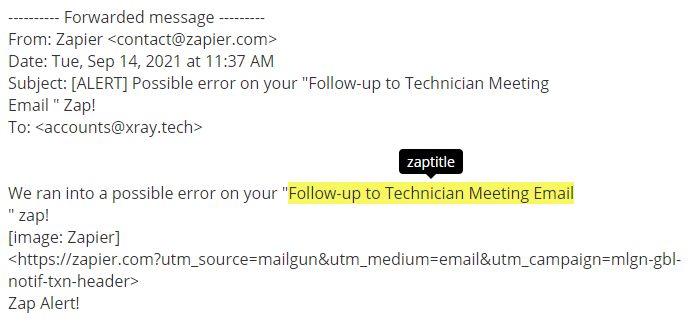
Once you’ve identified all the variables you want, click “Save Template”. Now, when new emails arrive in that mailbox, Parser will look for text that matches those patterns.
Optionally, you can change the address of the Parser mailbox now to something a bit easier to remember. If you do, just be sure to update the Zap you made in the previous steps to reflect the change.
4. Create an automation to send parsed email data to Slack
Now we’re going to build a second Zap that will send the parsed data as a Slack message.
4.1. Trigger: New email in Mailbox
Create a new Zap, and choose “Email Parser by Zapier” as the app, and select “New email”. Pick the mailbox you created previously, and use the email sent over earlier as test data.
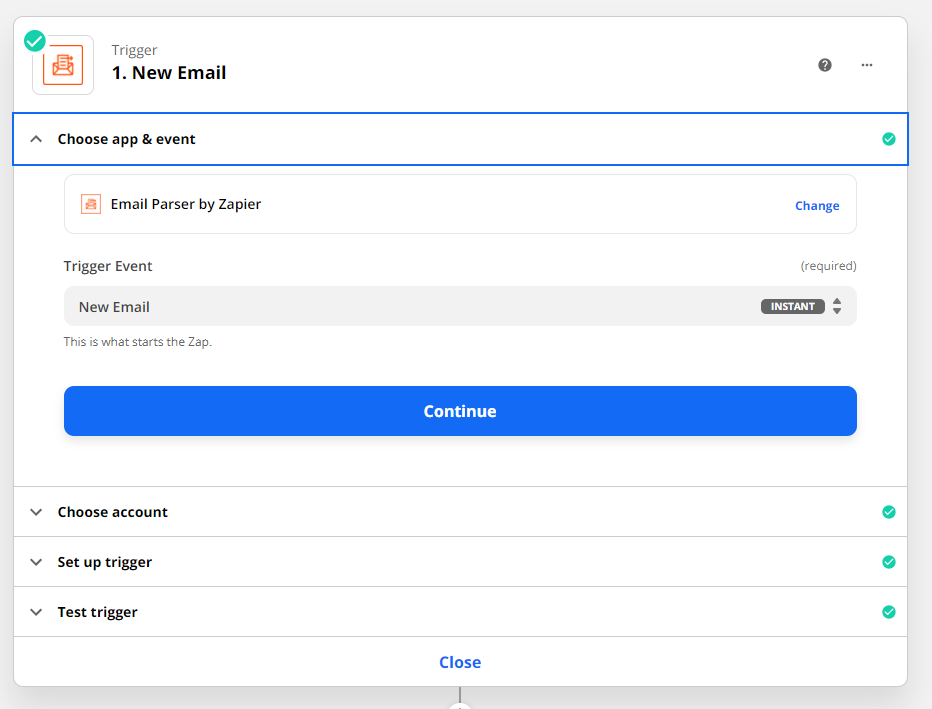
4.2. Action: New channel message
Add a step with Slack as the app and “New channel message” as the action. Pick an appropriate channel to send the message in (such as a dedicated automation-updates channel), and write the message template.
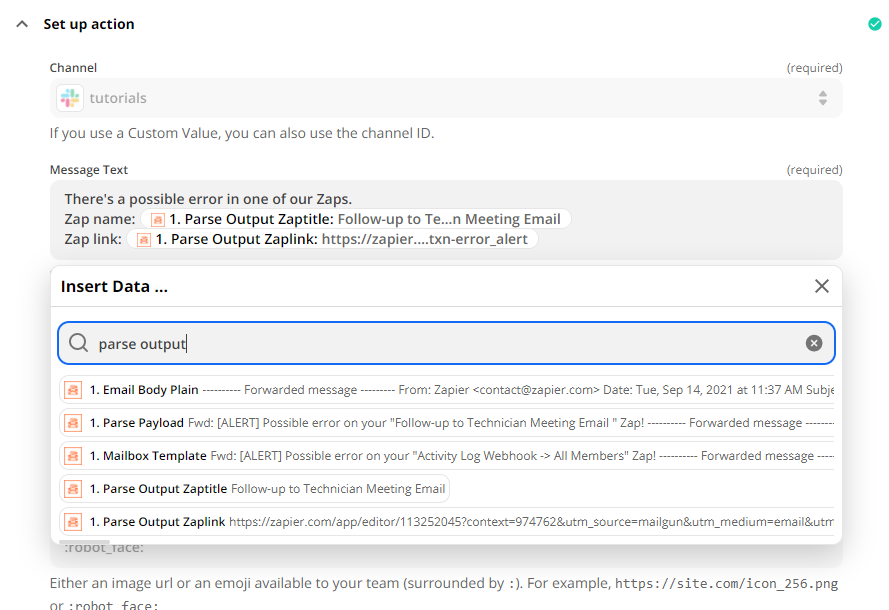
To include the variables found by Parser, just search for data starting with “Parse Output”.
Test the step, and check Slack for a message.

Now you’re (probably) all set to start redirecting your automated emails into Slack messages with Email Parser. However, if some of the data in your messages doesn’t look quite right, you’ll probably want to continue to our final step.
5. Refine your mailbox with extra templates
At first, Email Parser won’t always find your variables correctly. It might add a few extra characters in some cases, or leave a few out in others.
To fix this, you just need to make “Extra Templates”. Go back to Parser, select your Mailbox, and find an email that wasn’t parsed correctly. Scroll to the bottom of the message, and click on “Edit extra templates” (underneath the “extracted/original/template/output” options).
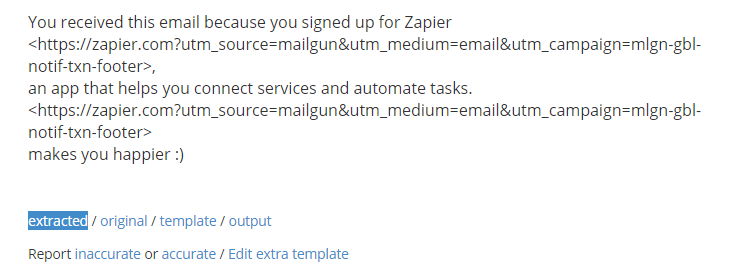
Highlight the text again, and give it the same variable name. Click on “Save Extra template”, and you’re done. Parser should now be more accurate when finding variables in your emails.
Break Free of Your Inbox
Now you can start building automations with email parser, and spend less time sorting through your inbox. Parser is useful whenever you want to work with pre-formatted emails, and it’s a great tool to have at your disposal as you build low-code automations.
If you’d like more tutorials and automation tips, be sure to check out our blog or our YouTube channel. You can also follow XRay on Twitter, Facebook, or LinkedIn.
Everyone knows that emojis are an easy way to add a bit of fun to any piece of text, but you may be surprised to learn that they can actually serve a useful purpose in automation.
As an easily-accessible set of icons, emojis are a great way to add symbols and indicators into your automated infrastructure, particularly when the apps you’re using fail to communicate important information on their own.
In this post, we’ll show you how you can use emojis in your Airtable databases to make sure you fill in the right fields in Zapier and avoid making a mistake that could ruin your automation without ever even logging an error.
How Formula Fields Work in Airtable
Formula fields are a vital part of many automations, as it’s often much easier to use your Airtable database to perform a calculation rather than setting up an entire step for it in Zapier.
For instance, if you’re working with a form that collects users’ first and last names separately, you may want to have a column in your database that concatenates each first and last name to create a full name.
(Note: you could just concatenate the names in Zapier while setting up the action; we’re just using this as an example of a simple formula to illustrate how Zapier handles formula fields)
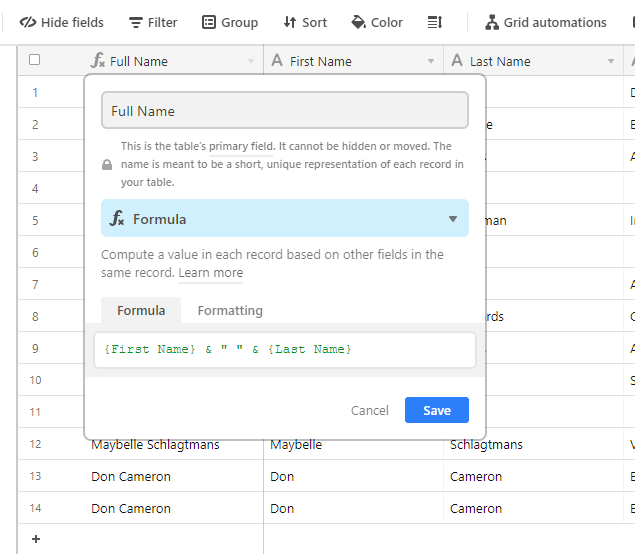
As you can see in the screenshot above, Airtable clearly indicates that “Full Name” is a formula field with the 𝑓𝑥 symbol. As long as we’re working with the table in Airtable, we’ll know not to try to add data directly to this column.
But what happens when we try to add a record to this table in Zapier?
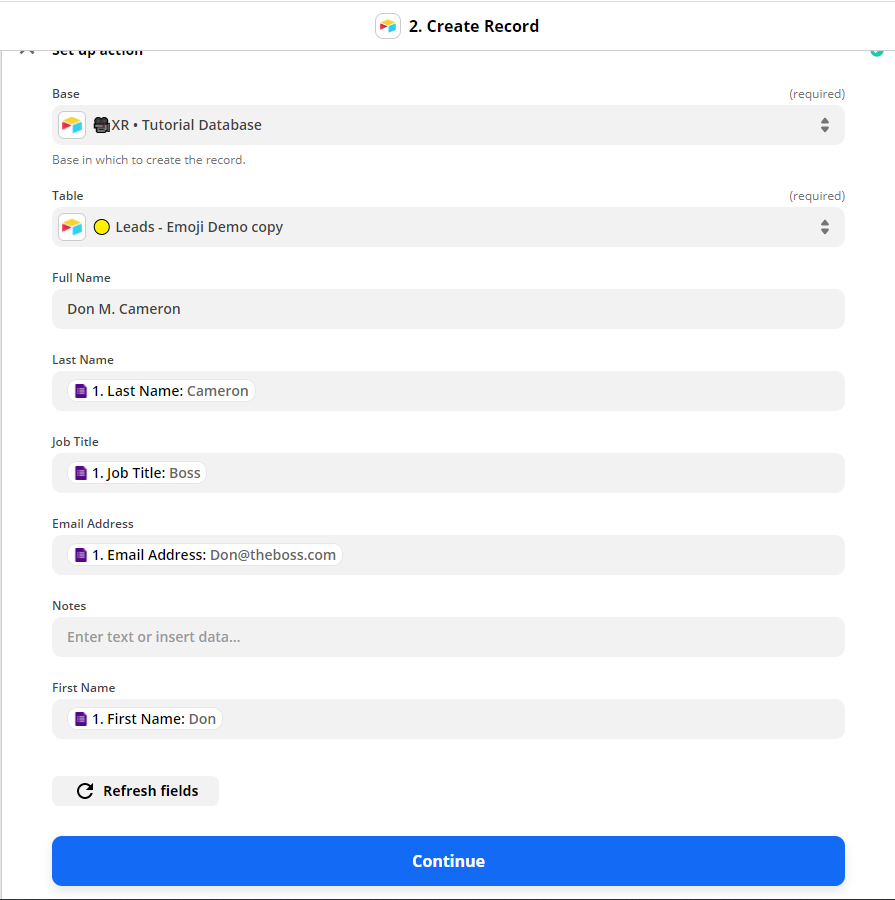
In this image, we’re creating an Airtable record from a Google Forms response. As you’ve probably noticed, Zapier doesn’t distinguish our formula field (Full Name) from our other fields in any way, and lets us enter text into the Full Name field.
When we run this Zap, Zapier won’t detect any errors, but Airtable won’t accept any text directly into the formula field, and will instead populate the field itself with the designated formula.
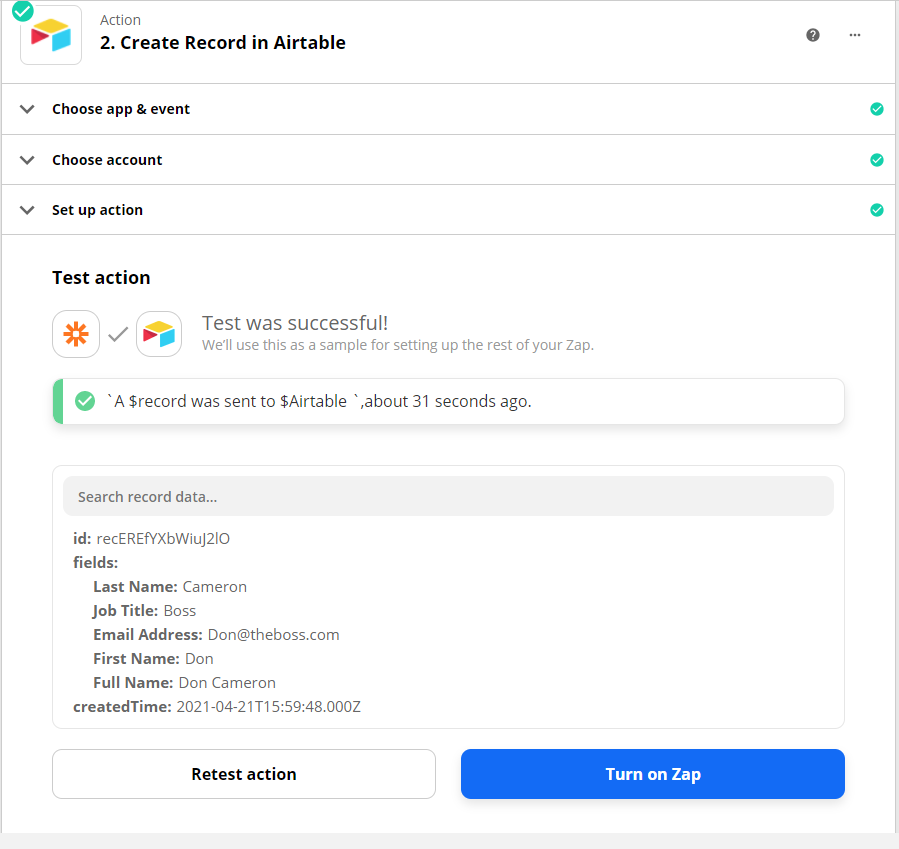
As the screenshot above shows, the record used the formula-calculated name “Don Cameron” rather than the entry we put into Zapier, “Don M. Cameron”.
While you might be able to remember the purpose and function of each field while you’re building an automation, it might not be so easy when you return to the automation a year later for updates, or hand the automation over to someone else who didn’t design it themselves.
Without clearly indicating where you can enter data and where you can’t, you could end up running your automation with bad data, and Zapier won’t even throw an error to alert you to the problem. But you can avoid this with just a few simple emojis.
Use Emojis to Create Context
At XRay, we have a dictionary of dozens of emojis that we use for automations, documentation, and time tracking, but for the sake of marking your database fields, we only need to look at three emojis for now.
To pull up an emoji keyboard on Mac, just press Ctrl + Cmd + Space. On Windows, press the Windows Key + . (period)
🤖 Robot: Data should be filled by an automation
The 🤖 robot emoji before a field name indicates that it should be filled in with automated data. When you see this emoji in a field in Zapier, it’s OK (and expected) to enter data here.
🚫 Prohibited: Data should not be entered here
The 🚫 prohibited emoji indicates that data shouldn’t be entered here at all while you’re building an automation. Use this emoji for things like formula fields, which will populate themselves.
🙌 Hands: Data should be entered manually
The 🙌 raised hands emoji indicates that you expect someone to fill in the data manually later. Like the 🚫 prohibited emoji, this tells anyone working on your automation that they shouldn’t enter data in this field as part of the automation, but it also signals that you expect the field to be filled in later. For instance, you might use this to mark a “Notes” field, which may be updated as needed by someone on your team.
Here’s what our Airtable database looks like with these three emojis correctly assigned:
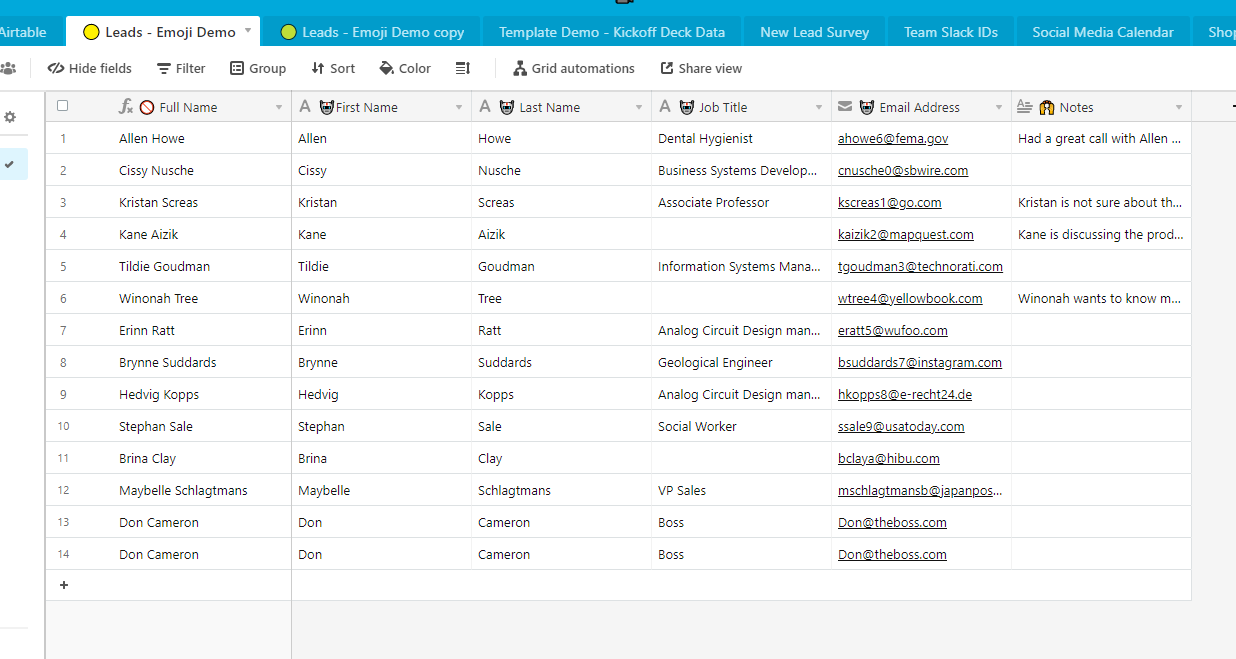
And here’s how it will show up in Zapier:
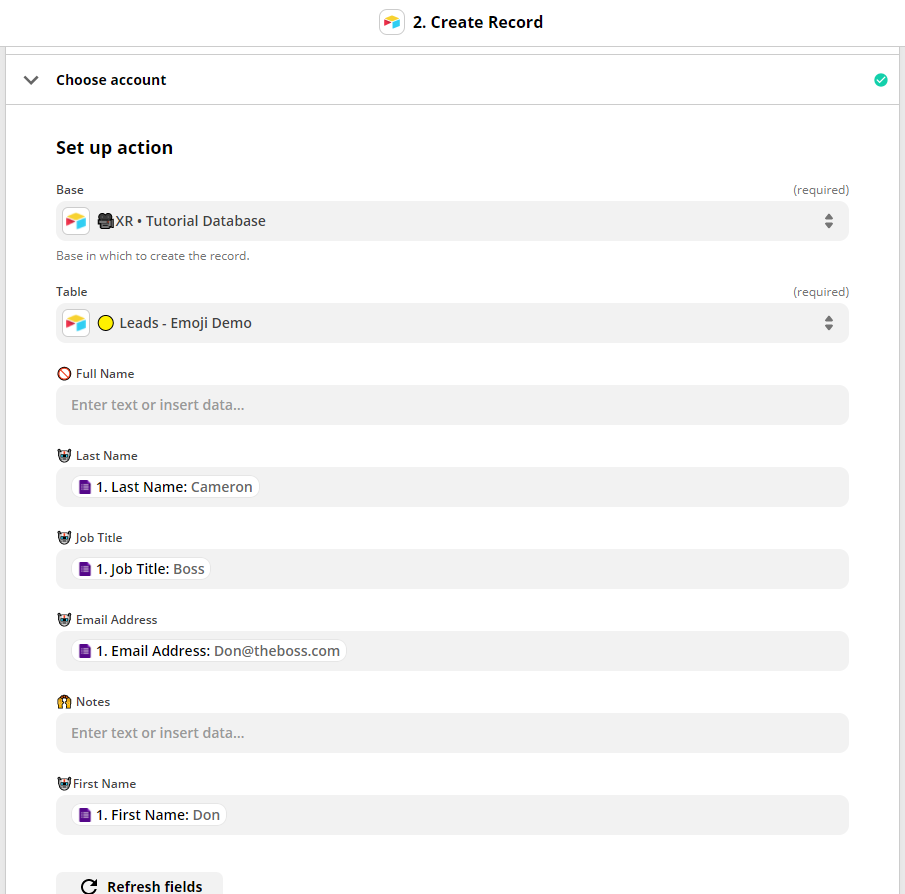
Adding emojis to your database columns takes just a few seconds, but it makes it much easier to build and maintain your automations while avoiding unseen errors.
There are many other ways to use emojis to enhance your automations, like using them as triggers or tags, but we’ll cover those topics in future blogs and tutorials.
For now, you can check out our blog or our YouTube channel for more automation tips and tutorials. You can also follow XRay on Twitter, Facebook, or LinkedIn.

Not all automations are the same. A term like “no-code/low-code” actually covers an extremely wide range of solutions with varying levels of technical complexity. As you might expect, more complex automations will often take longer to build, test, and implement, so it’s important to understand what contributes to an automation’s complexity when you’re working with a company like XRay to automate your workflows.
In this post, we’ll take a look at a few different approaches to automation and explain how they affect build time, test time, and refinement time.
While we certainly don’t want to push you away from choosing a more complicated solution if that’s what your circumstances truly call for, we do want our members (or anyone considering working with XRay) to understand that choosing a more technologically complex option will cause a longer build time.
100% No-code: Low Complexity
100% no-code solutions sit at the lowest end of the complexity scale.
When we say that a solution is “100% no-code”, that means that every automated action is natively supported by an automation platform like Zapier, Integromat, or Unito. Every trigger, action, or sync can be selected and configured from the platform’s UI.
To find out if your planned automation would be fully no-code or not, just head over to XRay.Tools and search for the apps that you want to automate. For instance, let’s say you want to make an automation that sends a Slack message to your sales team whenever a new email is sent to sales@yourcompany.com. We can search GMail and Slack to see that they’re both supported by Zapier, so we’re off to a good start.

If we click on each app for more detail, we can see that the GMail trigger we want is there (“New email”), as well as the Slack action (“Send channel message”), so we know that this can be built as 100% no-code solution.


A fully no-code solution will be quick to build, test, and refine, as we can set up actions and reconfigure settings without having to rewrite code. No-code projects will typically be delivered within a span of 2-3 weeks, although more elaborate projects that support larger teams with several different user paths could take longer.
No-code solutions are a great way to launch and test an idea. You can quickly prove a concept you’ve been considering, and determine where you need to tweak things to make it work better. If you’re new to using automated workflows, no-code is often the best place to start.
API Calls: Moderate Complexity
Starting from a no-code base, adding in API calls dials up the complexity a bit.
An API call (API = Application programming interface) is a method of sending a request to an application to get some specific data, or issuing a command to make the application perform a certain action.
Basically, API calls let programmers interact with one application to use some of its data in another application or automation.
In some cases, you’ll find that the application you want to use is supported on Zapier or Integromat, but that it doesn’t have all the right data and actions for the workflow you wanted to build. This is when we would need to use an API call to enhance the native functionality of the automation platform and get you the data you need.
An API call generally just consists of a few lines of code, but it still requires some coding experience to set it up correctly and efficiently. If your project involves API calls, it will generally take a bit longer to build and refine, as our techs will need to consult the API documentation for your specific application and study its requirements. However, testing time will remain fast, as we’d still be running the automation through a convenient platform like Integromat or Zapier.
Custom Integrations: High Complexity
If the apps you want to automate aren’t supported by Zapier or Integromat at all, or if the available integrations don’t support the actions you wanted to include, we’ll need to build a custom integration for you.
A custom integration will look and behave like a native integration, but our team of technicians will have to configure all of the triggers, actions, and fields from scratch before we can start using it. Once it’s built, it will only be available to you on your Integromat or Zapier account.
We’ll often need to build custom integrations if your workflow involves a niche application with a relatively small user base, or if the action you want to take isn’t supported by the platform.
For example, we’ve built a custom Zoom integration in the past, because even though the app is supported on Zapier, it doesn’t include an option to delete videos from cloud storage. To enable our clients to do that, we had to build a new Zoom integration.
Due to its higher complexity, this kind of custom work typically takes significantly longer to build and refine than a no-code automation or a low-code automation with API calls. Since we’d still mostly be working within automation platforms, testing would still remain relatively quick.
Low-Code Applications: Very High Complexity
In some cases, you may want to go beyond individual process automations and build a full low-code application.
A low-code application will look and function much like any other application you use every day, but it’s built with specialized low-code tools like Shinyapp or Bubble.
Compared with automated workflows, low-code applications give you more precise control over what users can (and can’t) do, and gather a wide range of features together into a single place through the app’s UI.
Even though platforms like Bubble and Shinyapp would let us build an application without needing a software engineer, we’d still need to go through an extensive design process before we would start assembling your app. We’d need to understand the user stories you want to accomplish, the experience you want to create, and the user interface that would support it all.
A low-code application will take longer to build, test, and refine than all the other project types we’ve discussed in this post, with projects lasting months rather than weeks. With the longer timeframe in mind, we recommend only pursuing a low-code application if you’ve already validated your ideas with a no-code/low-code solution first.
Building the solution that fits your needs
When you work with XRay, we’ll typically recommend the least complex solution that’s feasible for your circumstances. We can always iterate and add more elaborate features as we go, but getting an initial automation built quickly is usually the best way to start testing your ideas and finding opportunities for improvement.
Ultimately, your needs could fall into any of these categories, and our team can handle them all. We just want you to be aware that more complex features like custom integrations and applications will take longer to build so that you can plan accordingly.
If you’d like to learn more about XRay and how we help people to reclaim their time with automated workflows, check out our blog or our YouTube channel. You can also follow XRay on Twitter, Facebook, or LinkedIn.

At XRay.Tech, our low-code technicians can automate just about any app that you’re likely to use.
We know it sounds like a bold claim, but it’s actually just a simple result of how modern app development works. Narly every app built or maintained today includes an Application Programming Interface (API), and low-coders like XRay can use those APIs to create automations.
In this article, we’ll give you a quick introduction to how APIs work, and how they enable automation. While we won’t get too deep into the weeds, this article will cover some technical information.
If you just want the high-level takeaways, the most important things you need to know are:
- Low-coders like XRay.Tech can automate any app with API
- The vast majority of apps you use have an API
- API documentation lets our techs work with any app, even if they’ve never used it before
If you’re interested in learning more about how APIs work behind the scenes to make automation possible, read on!
APIs Connect an App’s Frontend to its Backend
The apps that you use every day consist of a frontend and a backend. The frontend includes the interface of the application that you interact with, while the backend stores most of the app’s data and does the heavy lifting for calculations and operations.
The frontend of an application is typically designed to be easy to use, and lets you control things by clicking on buttons, selecting options from a menu, and entering text. The backend is normally not visible to you as a user, and instead is accessed through the API.
An API is a software intermediary that lets different pieces of software communicate with one another. Each time you use the frontend interface to try to perform an action with an app - like posting a picture on social media, or creating an invoice in your accounting software - the app sends that command via the API, which prompts the backend to run the code necessary to complete the action. Then, the results are sent back to the frontend so you can see the new post, the updated invoice, etc.
Ultimately, an API lets the frontend send commands to the backend of an app in a systematic, documented way that helps to keep the app stable and secure.
Automation Platforms can Also Access APIs
APIs don’t just enable communication between one app’s frontend and backend; they also enable similar communication between totally different apps, which is what makes automation through platforms like Zapier and Integromat possible.
When you make a Zap or an Integromat Scenario, you’re using the API to send commands to the app's backend. The app performs the same actions, like posting to social media or updating an invoice. The only difference is that a low-code platform initiates the commands rather than the app’s own frontend.
Platforms like Zapier and Integromat have packaged common queries into prebuilt integrations, making it easy to build simple automations for popular applications. For instance, we can use prebuilt integrations to build a quick automation that records every Slack message sent in a certain channel into an Airtable database. As you can see in the screenshot, it’s all built using Zapier’s interface - no code is needed at all for a quick automation like this.

However, low-code platforms can’t include pre-built integrations for everything you might want to automate, and this is where our low-coders can use their technical skills and create custom API queries.
For example, one of our members needed an automation for time-tracking app Harvest, and Integromat only offered pre-built integrations for “Time and Materials” projects . Since our client needed the automation to work with “Fixed Fee” projects, our techs had to write API queries themselves.
Building this automation didn’t require our techs to be Harvest experts, because Harvest’s API documentation gave them the information they needed to start writing queries.
Documentation Helps Low-Coders Get up to Speed
In most cases, a low-code tech doesn’t need to have ever used an app before to start automating it, because they can use the API documentation to learn what they need.
API documentation lists all possible queries and commands, and includes information on proper syntax and formatting. Whenever our techs need to build a custom integration for an automation, one of their first steps is to consult the app’s API documentation to get a handle on how everything works.
So even if someone comes to us with a relatively obscure piece of software that our team hasn’t encountered before, we’ll still be able to automate it by referring to the documentation and meeting with the client to understand their business objectives.

Start Automating with Your Current Software
If an app has an API, then low-coders like our techs can automate it. If you’re looking at your app stack and wondering about automation possibilities, here’s what you can do:
1. Use our web app XRay.Tools to find pre-built integrations for your apps
Just enter the name of your application into the search field, and the app will find any pre-built integrations that already exist for your software.
Remember, even if there aren’t any prebuilt integrations, our techs can still build custom ones. Pre-built integrations just make it quicker to get started.
2. Search for your app’s API docs on their site or through Google
Searching “[app name] api” will typically bring up the app’s publicly available API documentation. If you’re looking to build automations yourself, the documentation will be an invaluable resource. If you plan to hire an automator like XRay, just knowing that the documentation exists is enough to move forward.
3. Contact XRay if you’re stuck or have any questions about workflow automation
If your software doesn’t have pre-built integrations and you can’t find any information about an API, or if you have any other questions about automation, just reach out to XRay. We’ll be happy to help you figure out what your automation options are.
If you'd like to learn more about no-code and low-code automation, check out our blog or our YouTube channel. You can also follow XRay on Twitter, Facebook, or LinkedIn.

No-code and low-code platforms like Zapier and Integromat let anyone get started with automation, even if they have no coding skills at all.
With such user-friendly software available to start connecting your apps together, you might be wondering why you need a consultancy like XRay.Tech to help design, build, and maintain your automations.
An automation expert will help you to:
- Navigate the gap between no-code and low-code
- Document your automations and monitor their activity
- Detect and fix bugs as soon as they occur
The Gap Between No-Code and Low-Code
Despite their similar names and frequent grouping, the terms “no-code” and “low-code” actually describe two very different kinds of automation with distinct levels of technical skill required.
By and large, no-code automation in a platform like Zapier truly requires no coding knowledge or experience whatsoever. As long as you have some general technical skills, you’ll have no problem exploring their intuitive UI to start building simple automations.
However, without any coding knowledge, you’ll be limited to the integrations that Zapier has already built. If they don’t list it in their selection of actions and triggers, you won’t be able to do it with your Zap.


Moving up from no-code to low-code lets you go beyond the pre-built integrations, but it’s not necessarily an easy jump to make. A low-coder can make API calls to build custom integrations, use regular expressions (regex) to select and format precise strings of text, and use JSON to export the automation.
Skilled low-coders like our XRay techs can work with these tools and systems to build fully custom automations that perform exactly the way you want, so you don’t need to spend your time digging through coding tutorials just to set up an automation.
Keep Track of All Your Automations
As you first build one or two automations to perform some simple tasks at work, it’s easy enough to keep track of them on your own.
But if you want to build an automated infrastructure that supports your whole team’s workflows, you’ll need a system to keep tabs on the dozens of automations that intersect with your day-to-day work, and a way to give your team the information they need to use each automation.
One of our top priorities when building automations at XRay is to make sure that each automation operates with total transparency and accessibility.
Whenever we set up an automated infrastructure for one of our clients, we include customized alerts, an activity log, and helpful documentation that makes it easy to stay on top of all of your automations.
Alerts
We set up messaging alerts in software like Slack or Microsoft Teams to announce each action that an automation performs, so your team can then follow up as needed. This prevents redundant work and lets you stay apprised of your automated activity in real time.
Activity Log
To get a big-picture view of how your automations perform in the long run, we set up an activity log that stores records of each automated action to measure time saved and other KPIs.
Documentation
An automation is only useful if your team knows how to use and trigger it. While good automations should change your workflows as little as possible, there will often be a few changes that your team will need to learn, and you’ll need a way to quickly onboard any new hires.
That’s why we include thorough documentation with each automation that describes how it works and how to use it. That way, your team will know how to take full advantage of the automated tools at their disposal.
Squash Bugs as Soon as They Emerge
No-code and low-code automation are still rooted in the principles of code, and they rely on other software platforms to run correctly. No matter how well-designed an automation is, it will eventually run into some bugs and errors.
A software update in one of your apps might change how data is formatted, preventing one of your automations from running correctly. You might encounter a new situation that requires a new path in your automation.
When something goes wrong, getting to the root of the problem and fixing it can be a frustrating waste of time. After all, you turned to automation to save time, not to spend time fiddling with settings to figure out an error.
Working with an automation expert like XRay gives you the benefit of our experience managing hundreds of automations. We set up automations to immediately find and report errors, so our techs can diagnose and fix them as quickly as possible.
Build Better, More Reliable Automations with Expert Help
No-code and low-code automation platforms offer a much more accessible approach to enhancing your workflows when compared to software development, and we’d encourage anyone who’s interested to dive into apps like Zapier or Integromat and just try things out.
However, building automations at scale to support your business is a skill unto itself, and one that takes considerable time to develop. Since the whole point of automation is to create more time for the work that you want to be doing, you need to ask yourself: how much of your own day do you want to spend building and maintaining your automations?
Working with automation consultancy like XRay will let you get the most out of your automations without investing all of your time into setting them up yourself.
If you’d like to learn more about XRay's approach to automation, check out our blog or our YouTube channel, or follow us on Twitter, Facebook, or LinkedIn. You can also reach out to us at any time to schedule a call.
If you use Google Calendar for your meetings and events, your calendar holds a wealth of information about how you spend your day.
At XRay.Tech, we get a lot of questions about building automations to copy Google Calendar event information into Google Sheets so people can start working with their calendar data.
In this post, we’ll quickly show you how you could copy each new calendar event into Sheets with Zapier, but we’ll also show you a better way to get the job done.
Airtable may not be as well-known as Google and Microsoft’s suite of office apps, but it’s an extremely versatile and powerful tool for storing and processing data. It also has built-in integrations for Google Calendar that make it a breeze to compile information from all your calendar events.
Connecting Calendar to Sheets with Zapier
Low-code automation platform Zapier makes it easy to connect Calendar to Sheets in just a couple steps.
First, configure the spreadsheet you want to use with an appropriate column for each piece of data that you’ll be pulling from Google Sheets. You can see that we’ve just made a few columns for event name, start and end time, etc., but you can add as many as you want.
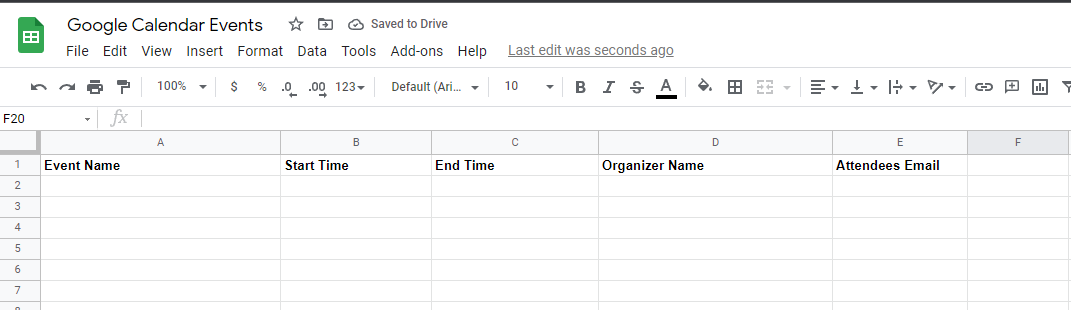
Then, go into Zapier and make a new Zap. Choose Google Calendar as the app, and “New Event in Calendar” as the trigger. Sign in to your calendar account and pick the exact calendar you want to use.
Test the trigger, and you should see a recent event from your calendar. Click on “continue” if everything looks right.
Add a Google Sheets action to your automation, and choose “Create a row”. To easily identify your sheet without having to go through several folders in Zapier, you can just copy the file’s ID - the string of characters between /d/ and /edit/ in the sheet’s URL.

Then fill each column with the appropriate data from the Calendar event, test the step, and you’re all set. Your Google sheet will now have an entry for your calendar event.
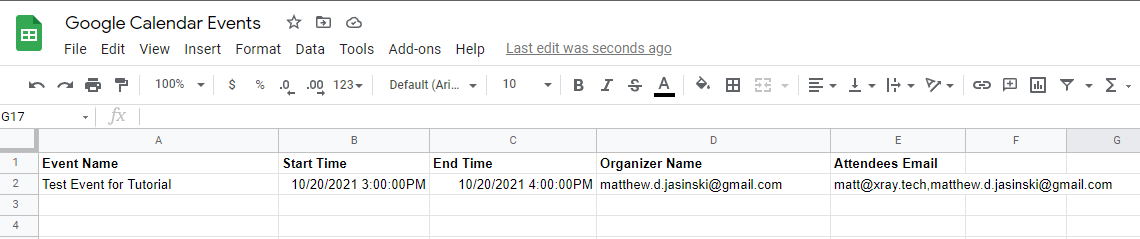
This isn’t bad, but it’s not great either. There’s no easy way to add historical data about past events, and you’d need to build additional automations to update records in Sheets.
So let’s take a look at an alternative approach.
Airtable: a Better Way to Sync Your Google Sheets Data
Airtable is a spreadsheet app with a robust suite of features for filtering, sorting, and syncing your data. It even includes a native integration for Google Calendar.
To start collecting data from your calendar, just make a new table in any base. Click on the “+” button, and scroll down to “More..”. Select Google Calendar, sign in to your account, and choose which calendar you want to sync.
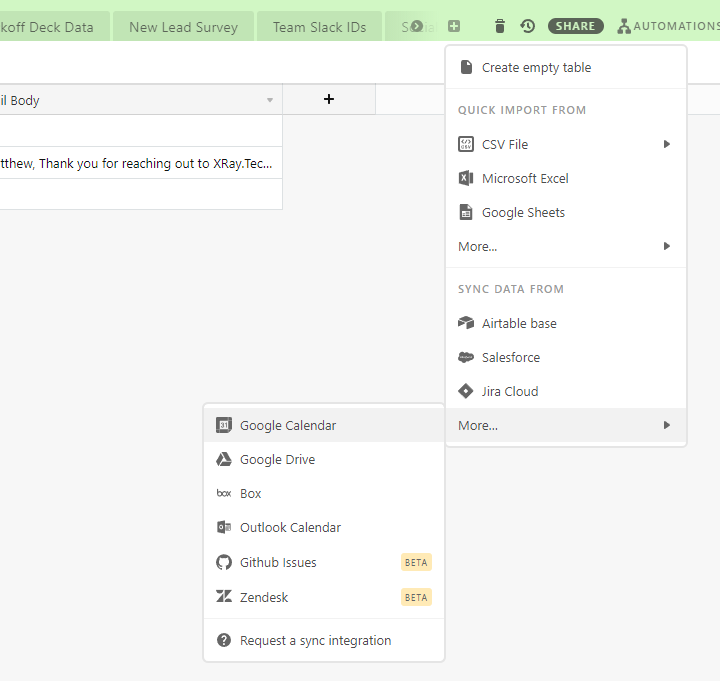
Then pick the date range that you want to sync, the fields that you want to include, and create the table.
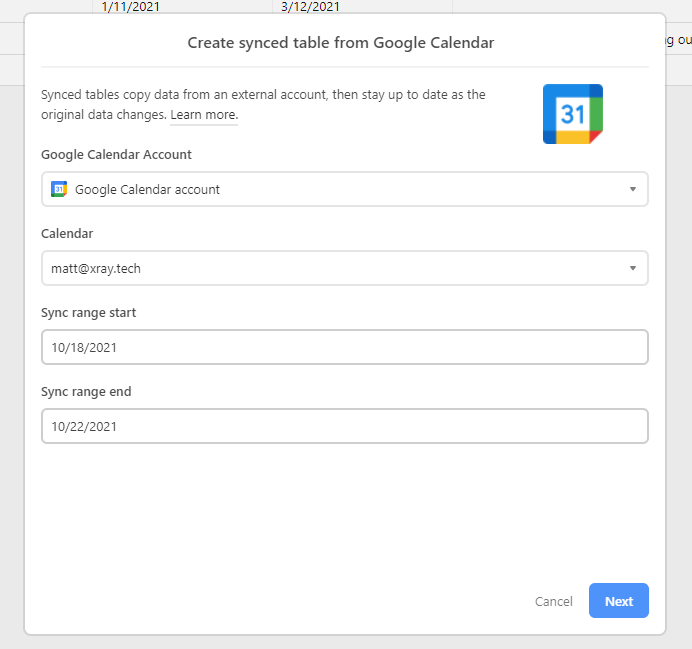
Airtable will instantly fill in your table with all of the events in the specified range. If you make any changes to the events on your calendar, those updates will be reflected in Airtable within about 10 minutes.
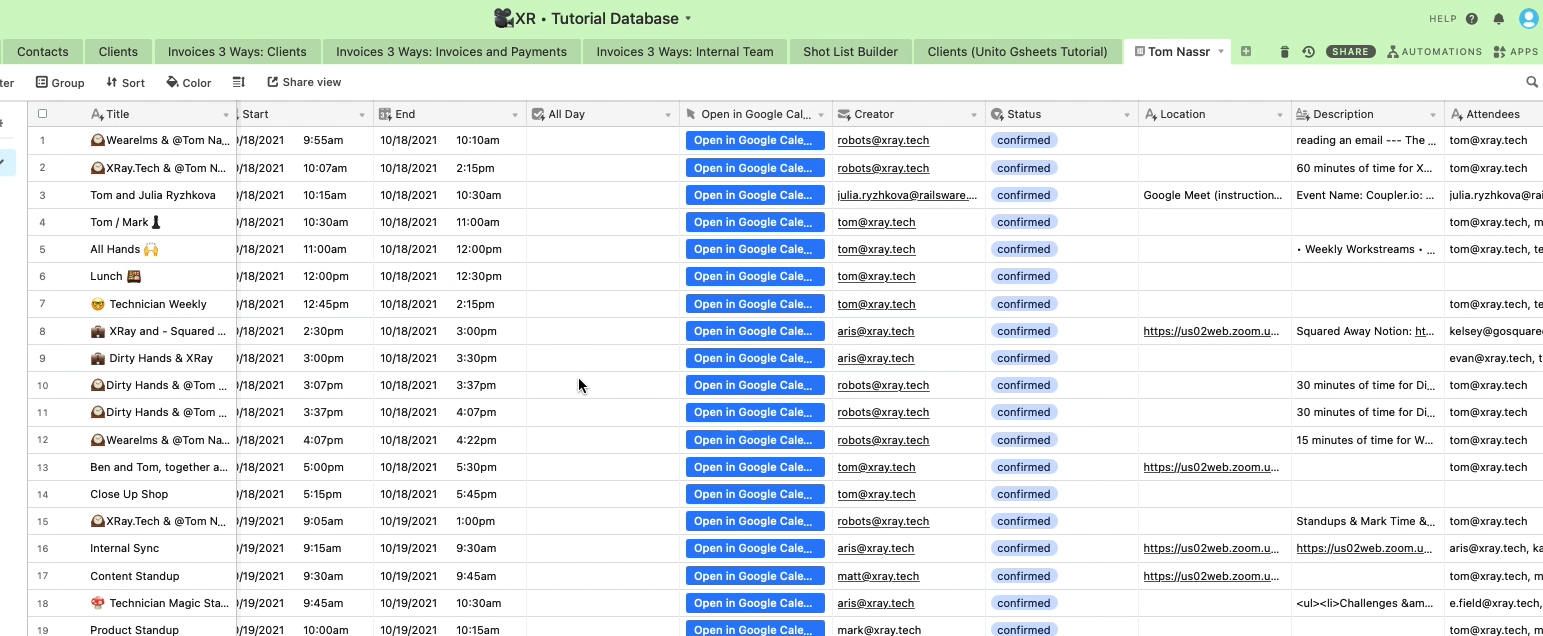
You can also click on “sync now” to see recent changes appear immediately, which can be useful while you’re testing things out.
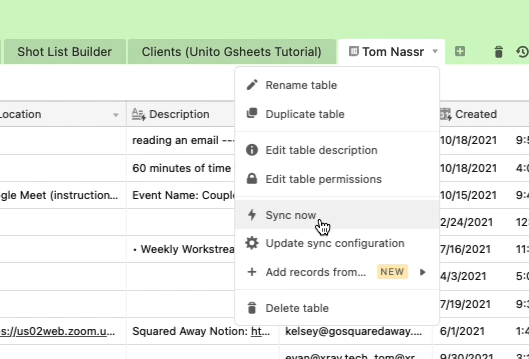
Now that all of your calendar data is in Airtable, you can easily add filters and new views to sort your information however you’d like, or add some functions to automatically calculate where you’re spending your time.
You could create a view to see all of your meetings with a certain client, or filter out your daily standup meetings, or only display meetings with certain coworkers. All of these choices would change how Airtable displays your data without altering the data itself, so you can always make additional views that include the data you’ve filtered out elsewhere.
You can even add multiple calendars to the same table if you’d like to see your coworkers’ entries alongside your own. Just click on the arrow next to your table’s name and select ‘update sync configuration’.

Click on “add new records”, select Google Calendar, and follow the same steps that you went through before to add other calendars from your account or organization.

The Right Tool for the Job
Google Sheets has many excellent uses in professional workflows, particularly for power users who know its formulas inside and out. Zapier is also a great tool for building no-code automations to speed up your processes and remove robotic tasks from your day-to-day work.
But if you’re looking to scrape key data from your Google Calendar meetings and events, Airtable is a much faster and more versatile solution. In just a few seconds, you’ll have a complete record of all your events ready to go.
With all the tools out there, adopting a new one can sometimes feel like a chore, but it can also unlock new possibilities and make your workflows much more efficient. If you’re looking to build some calendar-based automations, we strongly encourage you to check out Airtable to see what it can do.
If you’d like more tutorials and software recommendations, take a look at our blog or our YouTube channel. You can also follow XRay on Twitter, Facebook, or LinkedIn.
With its versatile layout tools, embedded tables and customizable page attributes, Notion is a great program for building a knowledge base for your company.
However, adopting an app like Notion into your company’s workflows can be difficult if much of your data is stored in more traditional spreadsheets like Google Sheets - particularly if some of your team members or departments need to keep using GSheets for its robust formulas.
If you’d like to sync data between Notion and Google Sheets so you can work with both apps, you can set up a Unito flow to do it in just a few minutes.
Unito is an automation app focused entirely on syncing data sets between different apps. Once you set up a flow, it will automatically keep your records up to date based on the rules you set.
In this post, we’ll show you how you can start syncing your Google Sheets and Notion records with Unito.
Required Software
To set up this flow in Unito, you’ll need accounts for:
• Unito
• Google Sheets
• Notion
1. Create identical columns for your tables
Before you do anything with Unito, you’ll want to make sure the Sheet and the Notion table that you want to sync both have the same columns. Later on, you’ll have to match each column to its counterpart in the other app, and this will be much quicker if you’re just matching “Name” to “Name” and “Email” to “Email.”
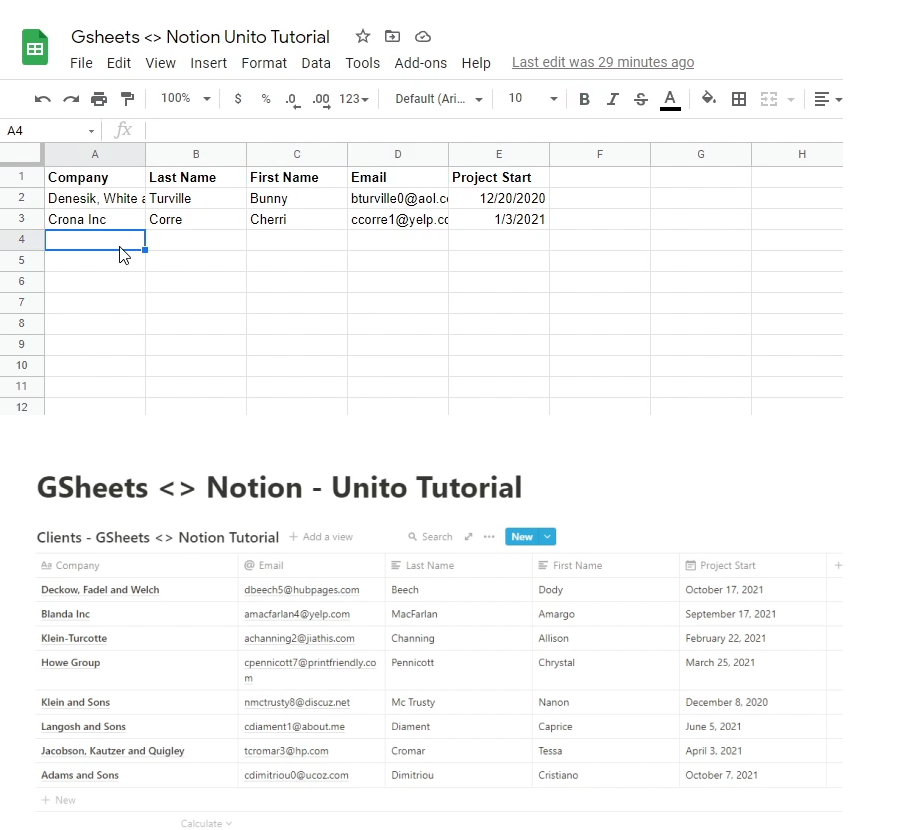
However, the columns don’t have to be in the same order in both apps.
2. Insert additional columns for Unito
Install the Unito Add-on in Google Sheets
To finish preparing your Google Sheet for a Unito sync, click on “Add-ons” in the Sheets toolbar and select “Get Add-ons”. Search for Unito and install their add-on.
To use the add-on, go back to the add-on menu, scroll down to “Unito for Google Sheets”, and select “Get Started with Unito” from its sub-menu.
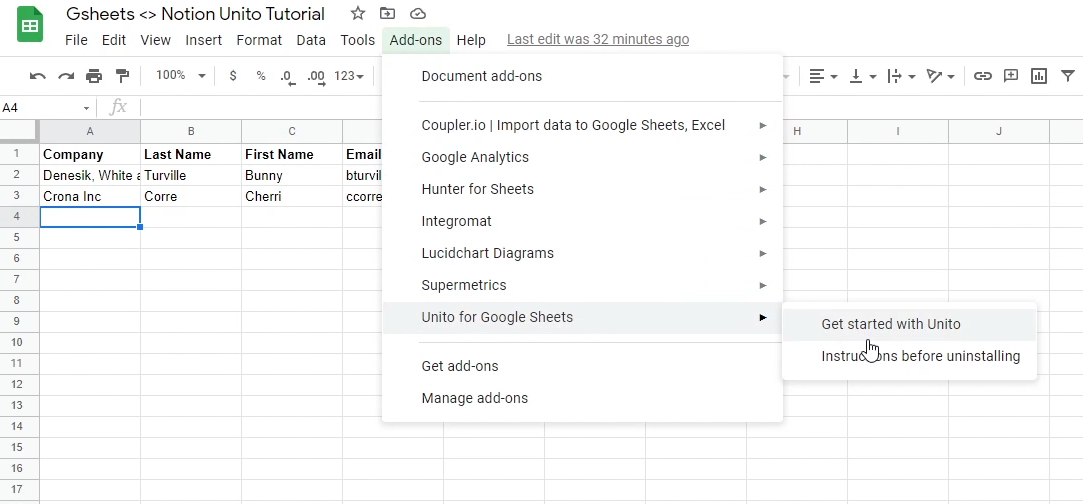
In the window that pops up, just click the button that says “Insert the two columns in this sheet”. This will automatically create two columns that Unito needs to create a flow with Google Sheets: an ID column, and a Last Modified column.
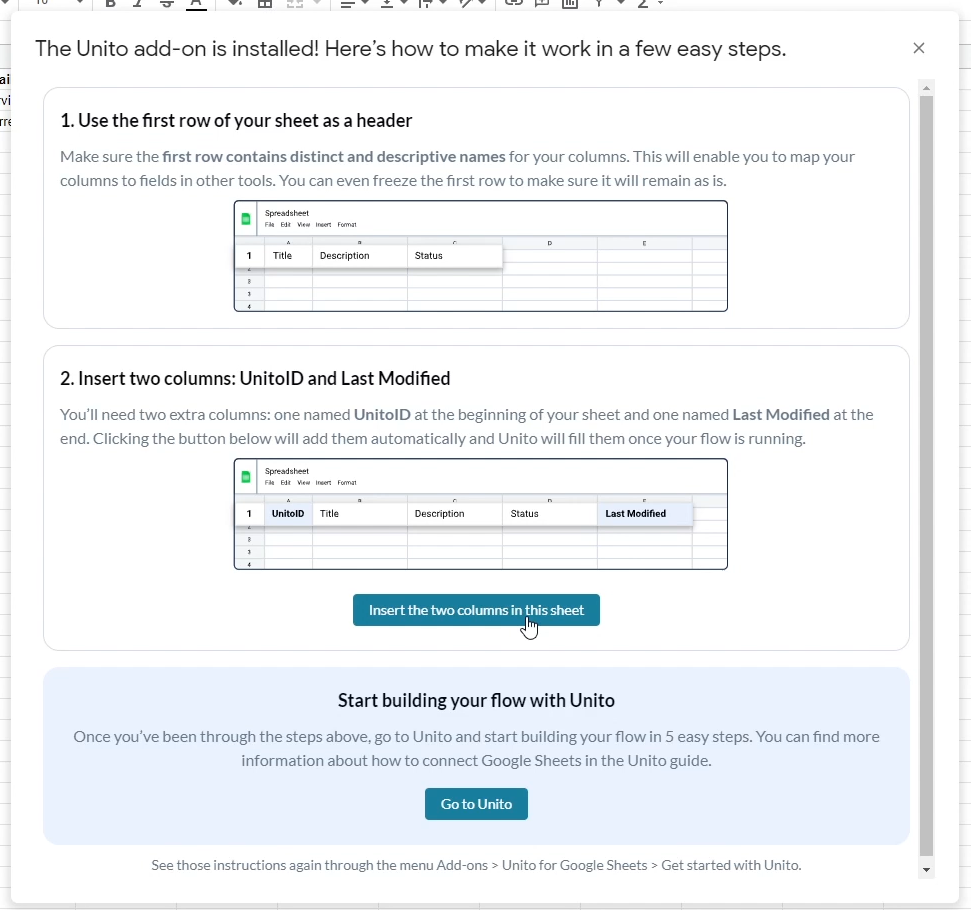
These columns let Unito keep track of unique records, and let it know when they were last edited.
Add a “Last edited time” column in Notion
Now we just need to add one column to the Notion table. Click on the “+” to add a new column, and select “last edited time” from the list of column types. Give it an appropriate name, and your Notion table will be all set.
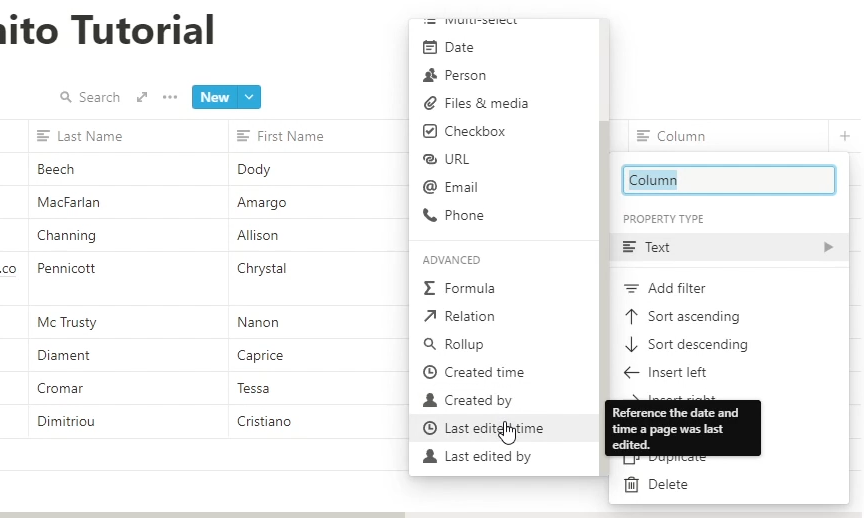
3. Build Your Flow in Unito
3.1 Create a new Flow and choose your apps
Your two apps will be Google Sheets and Notion. Sign in to your accounts and pick the two tables that you want to sync.
If you’re using a team account for Notion, note that you can only add one Notion account to Unito per team, so make sure to pick an account with access to all the tables you want to sync.
3.2 Pick your Flow direction
Flow direction will let you decide how tables get updated when a record is added or changed. With one-directional flows, you can make it so a change in Google Sheets will be reflected in Notion, but changes in Notion won’t be reflected in Google Sheets (or vice versa).
One-way flows (represented by the single arrows) can be useful if you intend to only make edits to one table, and want the other to exist strictly to display the data.
In our example, we’ll be using a two-way flow, so changes in either table will be reflected in the other, keeping the two sets of data identical.
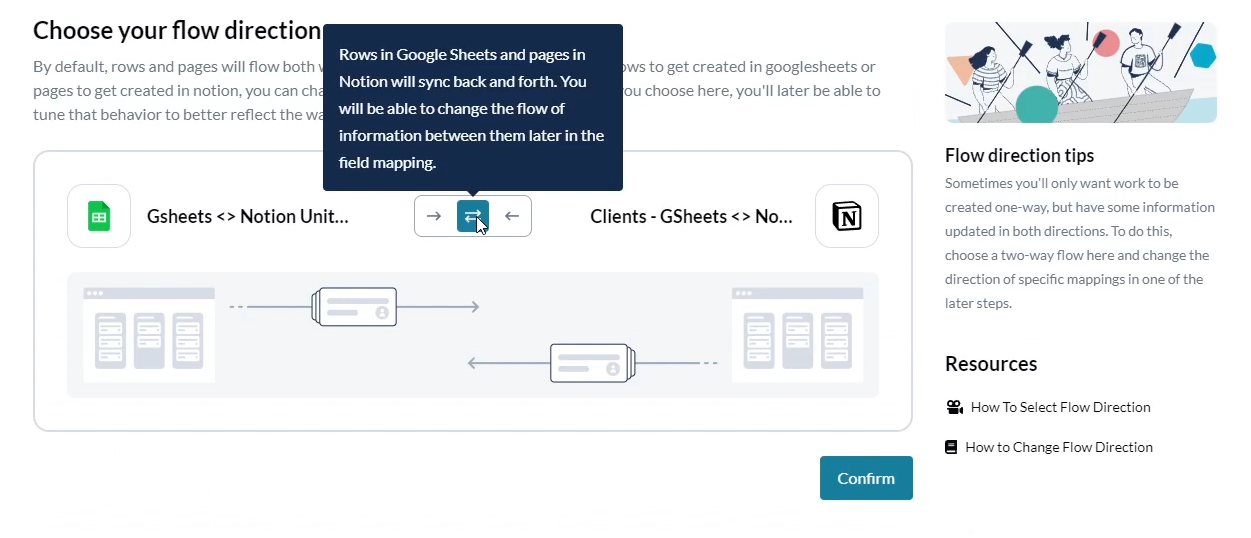
3.3 Review the syncing rules
The rules menu may look a little intimidating at first, but it’s just a way to designate which records will be synced. By default, Unito will pre-populate a set of rules that will sync every new record after or on the current date, but you can add additional criteria to sync a more limited selection.
For your first-time setup, it’s best to leave the rules as they are. Don’t worry; you can sync historical records once you’ve launched the flow.
3.4 Match records between the two tables
Match the records between the two tables based on the column titles. As mentioned earlier, having consistent titles between the two tables will make this step easy.
The “Link to row” and “link to record” options aren’t strictly necessary, but can be a useful way to reference your synced data.
Note: if you have a date-time field in Notion, you’ll see both a “Start date” and an “End date” field. You can just use the “Start date” and ignore the “End date”.
3.5 Launch the flow and test a new record
Now, click on “Launch Flow” to make your flow active. After the “initial sync” dialogue concludes, nothing will happen yet, since the Flow is only set up to sync new records.
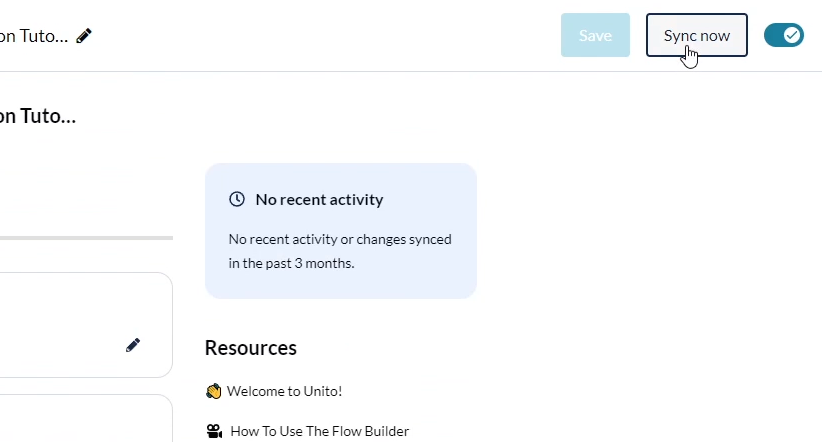
To test it out, add a new record to each table. Come back in about 10 minutes, and you’ll see that each table has been updated with the record from the other table. If you’d like to test immediately, you can just click on “Sync now” at the top of the page after you add your new records.
3.6 Sync old records (optional)
To sync all of your existing records between Google Sheets and Notion, you can navigate to the bottom of the Flow’s page and select “include older work items”. Then, click on “Sync now”.
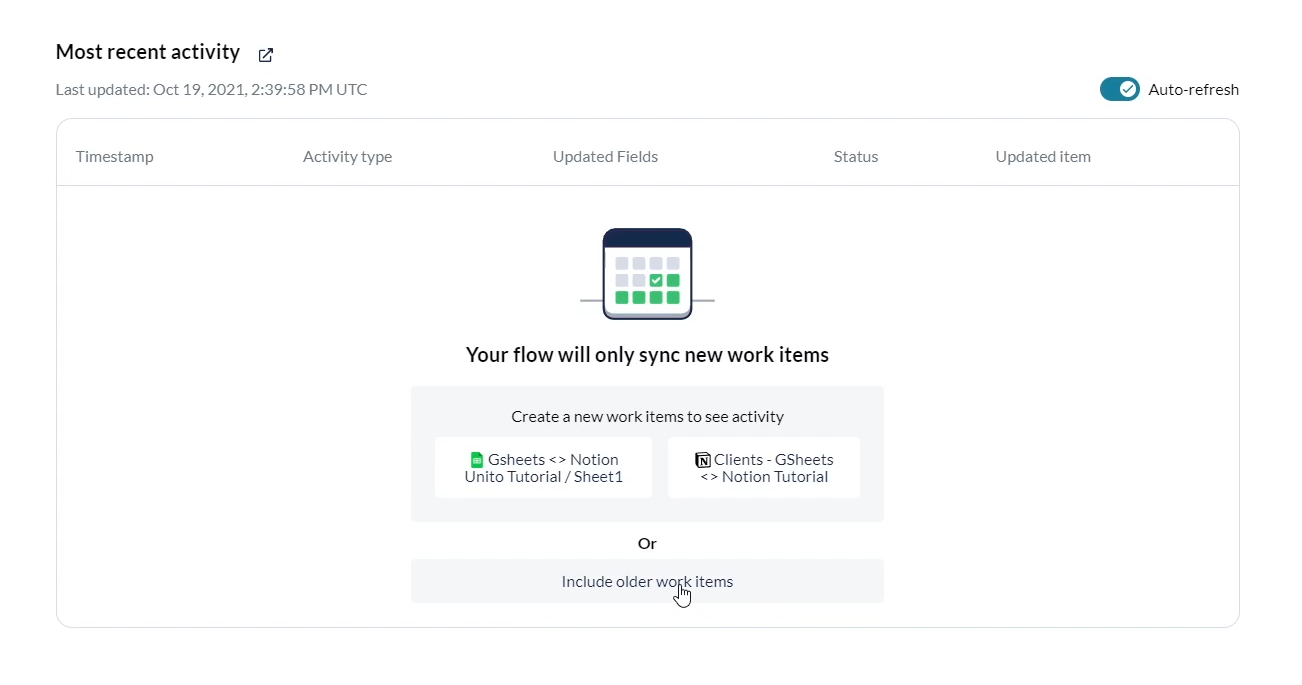
This will start syncing every record between the two tables, which can take a while if you have a lot of data to work with. As each record is synced, you’ll see it appear in the sync history at the bottom of your flow’s page.
Access identical data in all your apps
Now your Google Sheets to Notion sync is all set, and your team can reference identical, up-to-date data in both apps.
If you’d like to learn more about low-code automation tools like Unito, Zapier, Integromat and more, check out our blog or our YouTube channel. You can also follow XRay on Twitter, Facebook, or LinkedIn.

129 • That's how many apps companies were using on average by 2018, based on data from Okta. We're now using so many tools to get our work done that we have to use other apps and services like Producthunt.com just to comb through them all and find the ones that work best for us.
Finding the right tool for the job isn't a decision to make lightly. The apps that support your day-to-day work can either limit you or enable you to be even more productive. They're part of everything you have to do, from onboarding and training new people to creating content and analyzing performance. Picking the right tools and getting the most out of them will always be high priorities on your to-do list.
In this article, we're going to discuss types of tools, evaluation criteria for selecting tools, and some candid thoughts on the subject. This post is part of a series about how we can reduce duplicate tasks to focus on more meaningful ones, and ultimately become more effective at achieving our business goals using the XRay method. If this is the first time you're hearing about the method, you can read our original post here which gives an overview of the concept.
Tool Types
Tools fall under several categories:
- Time (time tracking or calendars)
- Communication (email, phone, instant messaging, etc.)
- Finances (pay, get paid, keep track)
- Analytics (traffic, SEO, numbers)
- Performance (Creative work, strategy, value generating)
We can use these categories of tools to build a holistic picture of what any given workflow looks like. For example, at Checkmate, we would: 1. Sign a contract using Docusign (Communication), 2. Set up a shared folder structure in Google Drive (Performance), 3. Book onboarding meetings with the client through Google Calendar (Time), and 4. Automatically send an invoice via Quickbooks (Finances). Keep in mind, a brief survey was the trigger for those actions above.
Regardless of the tools we used, tasks like signing a contract, sharing a folder, setting up a meeting with the client, and sending an invoice are all things that are essential towards business operations, but none of those tasks are actually generating mindfully created human value. They are simply setting stage to be able to generate value. Tasks like these are just the work between the work.
Non-Value Creation Tools
These are the tasks that unnecessarily distract you and your staff from doing the things they actually need to do to transform value into revenue. The work between the work is mundane; it's procedural and always seems to be done a little bit differently each time. For the most part, these can be considered Robotic Tasks. They do not generate value by themselves. If you're opening up Calendar, email, or Docusign, those tools themselves are usually used for non value-creation activities (i.e. just keeping someone informed, filing something away, updating a metric). When dealing with these tools to assist with Robotic Tasks, it's best to find tools that are connected to broader automation platforms like Zapier, Make, or Workato. There are a ton of different services out there that offer similar functionality.
Value Creation Tools
For the most part, these are your creative tools. Value Creation tools can be things like using Adobe Creative Cloud to create media, or using G Suite apps to make presentations and strategic documents. The exact software will depend on your industry and department, but no matter what field you're in, there are always software tools that you use to create value. Depending on whether you offer products or services, those may be totally different; in some cases, the same tool might be non-value creating for one firm, and value creating for another. The point is the same. Be aware of what tools create value for you. If you're an accountant, Quickbooks is a value creation tool. If you're an artist, it's not.
Value Creation tools are the tools that you use to do the work you are explicitly paid to do.
For example, at Checkmate, software design was one of our main service offerings. That sort of work gets done in Figma, Adobe Creative Cloud, or ProtoPie. It takes thoughtful, creative, and focused time from employees. It wouldn't make logical sense to say a robot could design a UI/UX for a not-yet-designed startup product. This is why that software can be called Value Creation Tools. They let us create value that otherwise wouldn't exist. They deal directly with our real work — the things we were explicitly paid to do.
Value Creation Tools vs. Non-Value Tools
One of these is easily changeable, but the other is not. Non-Value Creation Tools tend to be much easier to replace in the grand scheme of things. It's why companies like Monday.com can blast you with an ad on every YouTube video you watch. The world knows Trello isn't the best tool, but it's good enough to get you in. The question is whether it's good enough to keep you there, or if your operations, templates, assets, and workflows will get too advanced to practically use such a simplified tool. I don't have the answer, but your CEO or COO probably does, or at least an opinion.
Tools are created in the first place to solve a problem. Project Management Sucks? Use Basecamp. Your apps don't talk to each other? Use Zapier. Apple Calendar is just too clunky? Use Woven. Often, you're dealing with scaling problems. You need a tool to do something because it would be harder to do it the 'old way' — the way that worked when your business was smaller. Sure, you could manually send out email campaigns and keep track of the results. Or you could just use Reply.io. Your choice. But the tool should be a reflection of the Business Process that the tool is required for. If a tool isn't required to complete a Business Process in the best way possible, then it deserves the axe 🪓.
Candid Thoughts on Tools
A hammer doesn't make the carpenter. Whatever tools you use, they don't define you as an operator, manager, or do-er. In my experience, it actually doesn't matter what tools you use, so long as the processes you conduct can efficiently create value. That being said, some tools have terrible UX, some tools don't have an API yet, and some tools are inferior to others in certain aspects — all of that is subjective, but of course I have my favorites. Many of them are sprinkled here.
But if you're using Trello and WhatsApp to run your agency right now, more power to you. Once you have 50 people, expect that to be damn near impossible. Don't buy into the sunk cost fallacy; tool selection is something that should be done as needed. Selecting a tool should have a specific purpose and either replace an existing tool or create new value internally or externally. Too often tools are adopted just because they're 'too cool' to ignore, giving the slower adopters of your team whiplash as they try to keep up and learn something new.
Ideally, you should have a process for rolling out new tools to a test group of people before you bring the whole team on board. That way, you can work out any issues or even decide not to use the tool at all without being too disruptive to your business as a whole. This was something learned the hard way.
Action Steps
List all of the tools that your company uses. Yes, all of them. You may have 129 of them (hopefully not, but you might). Think about all the tools needed to create value doing whatever it is you do. List them somewhere, and I assure you - if nothing else, it will help the next person you onboard understand what tool you're going to use to do the next job.
Some of Our Favorite Tools
- LucidChart - Realtime Collaboration, Flow Charting
- Woven - Calendar management
- Slack - Communication that doesn't suck
- Airtable - Organize data, metadata and reusable information
- Figma - Collaborative UI design
- ProtoPie - Extremely High Fidelity Prototyping
- Notion - Knowledge base, document everything
- Dashlane - Password manager, VPN, identity insurance
- Command E - Search your cloud accounts
- Loom - Record screencast videos
- Biscuit - Access web apps FAST
- Apollo - Ideal Customer Profile - List building tool
- Databox - Data visibility layer
- Zapier - Automate connectivity between apps
- Coupler.io - Move data around
- Alfred - Internal productivity tool
- Better Touch Tools - Internal productivity tool
- Bar Tender - Internal productivity tool
- Itsycal - Internal productivity tool
- No Code solutions are also very cool. Here is a huge Trello List - 📣Shout & Thank you to Mariam Hakobyan for putting these lists together.
Next On Spotlight
Now that we've covered tools, we'll be looking at how your tools connect with your business processes, and how you can reduce the number of Robotic tasks that you and your employees are doing manually.


Remote work is becoming more prevalent than ever before, and it’s essential that companies of all sizes learn to adapt to the new status quo.
While the global pandemic accelerated the trend towards working remotely, and even turned it into an urgent necessity for many, working and connecting through software won’t be going away any time soon.
The best talent will look for workplaces that let them spend some or all of their time working from home as they seek to cut down on commutes and achieve a better work/life balance. As you look to find ways to accommodate remote work at your business, you should consider how automation can help to support remote work.
Automation makes it easier to work asynchronously, gives your team convenient access to consistently saved resources, and enables everyone to be more productive.
Promote Asynchronous Work with Automated Check-ins and Notifications
One of the main challenges of having a fully or partially remote team is making sure that everyone stays updated about each other’s progress even when they’re not meeting every day in the office.
The challenge is compounded if your team is spread across several time zones, as one employee may be working while the rest of their team is clocking out - or about to turn in for the night.
With automation, you can create systems that immediately send Slack notifications, update a centralized database or send emails whenever a certain action is completed. You can configure your automations to send unobtrusive alerts that won’t bother your team when they’re off the clock, but will be immediately visible as soon as they’re online.
When check-ins and updates are automated, everyone can stay apprised of each others’ progress without having to interrupt their coworkers when they’re focused on an important task, or taking a moment to recharge.
In a remote workplace, employees will often be on different schedules, due to their time zone, their obligations, or their preference. This makes impromptu check-ins that much more of a hassle, as they might not be available when someone wants an update from them.
Access and Resources
How many times a day do people on your team ask each other for files and data?
Whenever someone makes a file, it’s easy for them to save it in the wrong place, or forget where they put it. While setting guidelines and creating a proper file structure will help a lot, human error will always be a factor - unless you automate your processes for saving and sharing files.
With the right automations, you can make it so every sales report, meeting agenda, project proposal and any other important file will be saved in the right spot every time. Links will also be sent right away to any individuals or teams who need access immediately.
These are great benefits for any workplace, but they’re especially helpful for remote and hybrid offices. The last thing your remote workers want is for their day to be filled with constant interruptions as they help co-workers find files, or reach out for help themselves.
With automated workflows, your team knows where to find everything and can focus more on their work.
More Productive Work
When you automate your team’s robotic work, you enable them to work at the height of their productivity.
Automation removes human error from the equation, making it so your team spends less time doubling back and fixing mistakes. It also reduces the frequent interruptions that arise from sending or receiving simple progress updates, or updating data in multiple pieces of software.
When your team doesn’t have to focus on the tedious robotic work that can be automated, they can devote their full attention to more important tasks. Your sales team can focus on spending time nurturing leads and answering unique questions rather than updating their status in Hubspot or sending out identical emails. Your designers can focus on creating new illustrations and assets rather than uploading and sharing them.
In short, your team can spend more of their time doing what you hired them to do, rather than wasting a large chunk of their time on logistical tasks that don’t leverage their unique and valuable talents.
Again, this is a benefit for any type of workplace, but remote offices will often find this to be especially helpful. A remote workplace works best when you don’t need to check in constantly with your team, and automated workflows will help them to be more productive without needing additional oversight.
Hit the Ground Running with Automation and Remote Work
The continued growth of remote work is inevitable. Even when the current pandemic resolves, talented workers will still want the flexibility of working from home some or part of the time.
At XRay, we encourage every services company to embrace remote work, and to try using automation to support it.
If you’d like to learn more about how automation can help your business, or if you’d like to learn some helpful automation tips yourself, check out our blog or our YouTube channel. You can also follow XRay on Twitter, Facebook, or LinkedIn.

One of the most important elements of an automation is the trigger event that starts it off. Setting up a good trigger that integrates seamlessly into your workflows will make it easy for you and your team to actually adopt the automation and use it to save time.
At XRay, we generally break automation triggers down into 5 main categories: survey-based, multi-survey, software-triggered, synchronization, and scheduled automations.
In this post, we’ll give you a quick overview of each of these automation types, and explain when and why they might be useful.
Anatomy of an Automation
Before we dive into each specific type of automation, let’s take a quick look at how all automations are structured in general.
Automations consist of two main elements: 1 Trigger which kicks off the automation, and 1 or more Actions that follow once the Trigger occurs.
The automation types we’ll be discussing today are defined by the way they’re triggered, because while there’s infinite variety in the actions an automation can perform, there are only a few key ways to start them.
Survey-based Automations
One of the simplest and most popular triggers, a survey-based automation runs whenever you complete a designated survey. For instance, you might fill out a form with some information about your newly signed client to trigger an onboarding automation. That automation would then create a shared Slack channel, a Google Drive folder setup, send a welcome email, and more - all with the client’s name and project info included.
Survey-based automations are a great way to avoid repetition. Instead of filling out the same information in a dozen different places, you can just log it once in the survey and let the automation handle the rest. They’re also very flexible, letting you run the automation whenever you want to rather than waiting on certain conditions being fulfilled.
By the same token, survey automations are easy to keep track of. The person filling out the form will always know when the automation is running, even without consulting the automation history or activity log.
Multi-survey Automations
As you’ve probably guessed, multi-survey automations are similar to survey automations, but involve multiple surveys instead of just one. With these automations, each related survey will feed data into the same database. Once all of the surveys have been filled out to create a complete record, the automation will trigger and run.
Multi-survey automations are useful when one of your workflows requires information from several different people or departments. For instance, an employee onboarding automation might require information from their new supervisor, management, HR, IT, and accounting.
With a multi-survey automation, each department would fill out their own survey to complete the new employee’s record. Once complete, the automation would trigger, sending the new hire some documentation about their responsibilities, temporary login credentials for key accounts, instructions for setting up payroll, and more.
A multi-survey automation can be a little more complicated to set up, but will often be necessary when there isn’t a single person on your team with all the information needed to complete a given workflow.
Software-triggered Automations
A software-triggered automation runs whenever a specified action takes place in a specified app. For example, you can set an automation to run whenever you update a lead’s status in Hubspot, or whenever you add a file to a certain folder in Google Drive. The automation will then use data from that app - like the Hubspot lead or the new document - to perform additional actions.
Unlike survey automations, software-triggered automations are fully passive. You don’t need to perform any extra actions to make them happen; you just conduct your workflows as normal and let the automations run on their own.
Software-triggered automations are ideal when you’re automating a task that needs to be done the exact same way every time. If you always want to create an Airtable link to every document in your “Projects” folder, or if you always want to send a Slack message to your finance team whenever a lead is marked as “Closed/won”, then automating these actions with software triggers ensures they’ll quickly get done exactly the same way every time.
Because these automations just run in the background, it’s important to configure them with Slack or Microsoft Teams notifications. That way, you can keep track of all their activity even though you’re not triggering them manually.
Synchronization Automations
Synchronization automations are focused entirely on keeping different databases in sync with each other. When you set up a two-way synchronization between, say, a Google Sheets file and a Notion table, adding a record to either table will create an identical record in the other table. You can also set up one-way syncs, so updates to Notion would be reflected in Google Sheets, but edits in Sheets wouldn’t be reflected in Notion.
With a synchronization automation, you can easily manage large quantities of data spread across different apps without creating redundancies or inconsistencies.
These automations can be especially valuable for larger companies who create and edit thousands of records every day.
Because synchronization is such a specific niche of automation, it primarily relies on a different set of tools than most other low-code automations. Instead of apps like Zapier and Integromat, synchronizations typically require platforms like Unito or Coupler.
Scheduled Automations
Scheduled automations use the clock and the calendar as their triggers. Instead of waiting for a particular human input or a specific in-app action, scheduled automations simply run at a designated date and time. You can schedule automations to run every hour, day, week, month or year.
You might want to send out a team morale survey every Friday at 2:00pm, or create a report at 9:30am each Monday of all the Jira tasks completed by the engineering team over the previous week.
Like software-triggered automations, scheduled automations are fully passive. They’re a great way to use your existing schedule or to start setting a new one, and they can be a useful way to batch work rather than having it trickle in over time.
Unlike most other automations though, scheduled automations don’t gather much data from their trigger event alone. A software-triggered automation will have access to much of that software’s data, and a survey-based automation will have all the answers to that survey. A scheduled automation will only have the date and time to work with, so you have to make sure to include additional steps to gather necessary information, such as database lookups.
Find triggers that work for your team
Determining how an automation will trigger is one of the most important parts of building an automation. You need to pick a method that suits your workflows and that will make it easy for your team to use the automation.
Whenever you’re working with an automator like XRay, always consider how you want the automation to start. If you have any questions, always feel free to reach out to us directly. You can also check out our blog or our YouTube channel, or follow XRay on Twitter, Facebook, and LinkedIn.

We all want to find ways to make our businesses more productive. Anything that can shave a few minutes off of a frequently repeated process can result in huge savings over the course of months and years.
When trying to streamline processes to save time and money, many companies will likely consider two common strategies: automation and outsourcing.
In this short post, we want to quickly clarify the strategic difference between automation and outsourcing, and demonstrate why we at XRay are committed to using automation to permanently reduce robotic work.
Control and Refine Your Processes with Automation
First, let’s take a look at automation.
With XRay’s method for building automated workflows, the primary goal that guides our efforts is to amplify human output.
We want people to do more with their time at work and be less distracted by the tedious tasks that often clutter their days. We believe that copying and pasting or moving data from one app into another is usually a waste of human potential, and that interrupting more valuable work just to write an update on what you’ve already done or download a document is an unnecessary distraction.
To create more time for mindful work, we focus on collaborating with our clients and members to identify the robotic tasks in their workflows. These are tasks that don’t require any uniquely human characteristics like creativity, analysis, strategy, or thoughtfulness, which means they can be performed by a piece of software without sacrificing any quality. In fact, automation often improves the output of robotic tasks as it creates a perfectly consistent system
When you work with XRay to automate one of your processes, we’ll help you to take control of that process and gain more visibility into it than ever before. We’ll document the automated workflow, track its activity, and refine it over time. If we find an area for improvement, we’ll gladly make and document the change for our members.
Outsourcing
Now let’s turn our attention to outsourcing.
Like automation, outsourcing will remove tedious tasks from your team’s workload. However, unlike automation, hiring another company to perform your robotic work is ultimately a one-sided and partial solution.
While outsourcing might appear to solve the problem from your end, it really just shifts the burden over to somebody else. From our perspective, nobody should have to be doing robotic work all day, no matter where they are in the world or how their labor market is priced.
What’s more, outsourcing the execution of a process typically means that you’re outsourcing control of it as well. You won’t know exactly how your data is moving from Point A to Point B, and your only visibility will come from periodic check-ins and reports. You won’t be able to improve the process or learn from it to refine similar workflows that your team is still conducting, or track the workflow each time it's conducted to gather precise, detailed metrics.
Long-term strategy
Going with either outsourcing or automation is a choice that’s up to each individual business, but we believe that exploring automation will be more rewarding In the long run for most companies. Outsourcing tends to be a race to the bottom, prioritizing cutting costs and replacing people over actually improving a process.
Automation lets you retain control and visibility into your processes, while leaving much of the execution up to software. Rather than replacing your team, it lets them fulfill their roles better than ever, as they’ll have more time to focus on the challenging and valuable work that you hired them to do in the first place. For instance, instead of spending all of their time responding to the 80% of inquiries that can be handled with templates and automated systems, your sales or support team can concentrate their time on the 20% more difficult and complex questions that require human input and ingenuity.
If you’d like to learn more about how automation can help your company to save time and increase output, you can check out our blog or our YouTube channel. You can also follow XRay on Twitter, Facebook, or LinkedIn.
Feel free to reach out to us at any time with questions, and we’d be happy to help.
Not sure where to start with automation?
Hop on a 15-minute call with an XRay automation consultant to discuss your options and learn more about how we can help your team to get more done.
🎙Interview me about my Workflow
Workflows take many different shapes, sizes, and tools. Ever wonder how your workflows compare?
Get interviewed and find out!
while humans get to be mindful.


