The XRay.Tech Blog
Case Study & Tool Belts
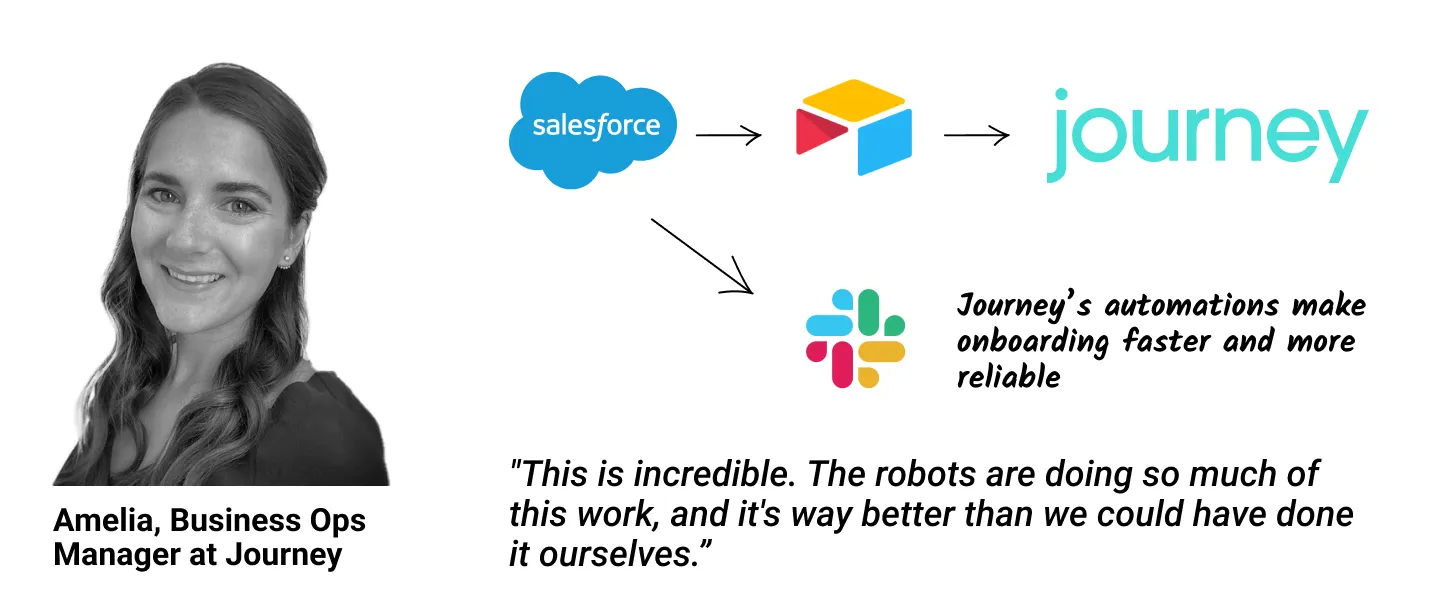
"This is incredible. The robots are doing so much of this work, and it's way better than we could have done it ourselves. The documentation is also amazing – we’re ready to start training our staff how to perform this workflow right away!"

If you’re looking into automating workflows but you’re not sure if your software will be able to support it, don’t worry: in most cases, you won’t have to switch to different apps just to start automating.
With low-code platforms and expert automators, you can automate just about any software that you want to use.
Since most tools can be automated, our approach at XRay is to let our members decide whether they want to stick with the software they’re already using, or if they want to make a switch.
In this brief post, we’ll explain how we’re able to work with a wide variety of software, and how automating your systems can actually make it easier to switch to new platforms in the future.
Automation Happens on the Backend
In a previous post, we demonstrated how platforms like Zapier and Integromat leverage publicly accessible APIs to build automations. You can read that post for more detailed information, but essentially, Zapier sends a command to the app’s API, which in turn prompts the backend to perform the requested actions and calculations.
Since we rarely use the frontend or interface of the applications that we automate, we’re primarily concerned with the data that our automation platforms get from each app’s backend. More often than not, the data that we can pull from two competitor apps is really quite similar.
We can see just how common two apps are on the backend by comparing what triggers and actions are available for them on Zapier. For instance, let’s take a look at what we can do with Hubspot and Copper on Zapier. Both apps are CRMs that let users track projects, deals, and customers (among other features).

When we use Hubspot or Copper as the triggering app, we can see a lot of similar options: New company, new product, new contact/new person, etc. The different terminology used by the two programs muddies the waters a little bit, but you can still see that you’re able to work with largely the same concepts for both.
If we compare Google Drive and Dropbox, we once again see some very similar options for triggers. In this case, there are a couple more options for Drive, but it’s essentially offering the same functionality. With both apps, you can trigger automations based on uploading new files.
And when we check the available actions for both, we get two nearly identical lists.

So whether you prefer Drive or Dropbox (or something else) for your file storage, we can automate it all the same.
Switch Tools Seamlessly with Automated Workflows
What if you’ve started automating your workflows around one program, but you’ve decided you want to switch to something else?
Luckily, the tool-agnostic nature of automation platforms also makes it easy to switch software if you decide you need a change.
If you’ve built your systems around Dropbox but find a better pricing model with Google Drive, XRay’s technicians can help you to make that change. Because they already understand the business goals of your workflows, it’s simple for them to modify each automation to use your new software instead.
These sorts of updates are one of the many reasons why we operate on a membership model rather than on a per-project basis. Plans change, goals change, and tools change. By offering long-term memberships, we make sure that our members’ existing automations can adapt and keep up with their shifting priorities, even as we’re building new ones.
Automation Lets You Focus on Business Objectives
When you’re approaching workflow automation, your top priority as an entrepreneur, executive or manager should be to focus on your business goals, not to worry about which software will support automation. Low-code automation platforms are designed to accommodate most apps, and make it relatively simple to switch apps at any time - provided you have the right assistance.
If you’d like to learn more about automating your software stack, check out our blog or our YouTube channel. You can also follow XRay on Twitter, Facebook, or LinkedIn.
Formatter by Zapier is an indispensable tool for no-code and low-code automators. Whether you need to reformat your data, perform some calculations, or add some simple logic and flow control to your automations, Formatter can help you get it done quickly.
In this post, we’ll show you a few tips for using Utility functions from Formatter. Utilities are mostly focused on working with lists or list items; they’ll let you split up lists, put them together, pick a single item from a list, and more. They’ll also let you build a simple lookup table, giving your automations the ability to handle several different scenarios with a single step.
In the videos below, we’ll show you three key examples to help you get started with Formatter’s Utilities, but there are more available that we won’t be covering in this post. We encourage you to try them out for yourself; you can learn a lot about working with Zapier just through experimentation!
If you'd like to see Formatter's options for working with Text and Date/Time, check out this post.
You can also check out our rundown of Numbers functions in this blog post.
Pick from list
The “Pick from list” function does exactly what its title suggests: it takes a list that you provide and chooses a single item from its contents.
While configuring the step, you can choose whether you’d like to select the first item, the last one, or a random item. As of right now, there are no options for picking the second item, second to last, etc.
At XRay, we’ve used Pick from List to generate a thematically appropriate password for a client’s automatically scheduled Zoom calls. They provided us with a list of words related to their company that met the Zoom meeting password requirements, and we set up their Zap to choose from that list.
A simple step like Pick from List is not likely to revolutionize the way you build your automations, but it can be a very convenient tool in the right situations, and can be particularly helpful when you need to select a random item.
Lookup Table
The “Lookup Table” option is a somewhat more robust feature that lets you create and access a table of key-value pairs within your Zap.
In a key-value pair, a “key” is essentially a title that is associated with a piece of data (the “value”). You can easily find and access a value just by searching for its corresponding key. This can be very useful if you want to input a small piece of data to find and use a much longer output.
For instance, in the example you’ll see in our video above, we enter a paragraph of templated text into an email by simply using a keyword in our Airtable form.
Filling out the form triggers the automation, and the automation uses the contents of the “Project type” field to search for a key-value pair in the lookup table. So by just entering “UX/UI Design” into the form, the automation can find the associated paragraph about UX/UI Design and enter it into our templated email in the next step. If the key word had been “App Development”, the automation would have provided the relevant text for Development instead.
You could also create a lookup field in Airtable with linked records, but using a lookup table directly in Zapier can be a great alternative if you don’t use Airtable, or if you just want a simple lookup with only one value for each key.
Text to line items
The Utilities portion of Formatter has a few different ways for working with line items and lists, such as the “Text to line items” function.
When you use Text to Line Items, you can separate a single piece of text into individual line items. Just enter the text you want to split, and make sure that it’s consistently separated with commas, spaces, semi-colons, or another symbol.
Formatter will then return a series of line items for each segment of your list. For example, “Blue, Red, Yellow” would become:
• Blue
• Red
• Yellow
Like “Pick from List”, Text to Line Items isn’t a groundbreaking feature in formatter, but it can be quite useful. In subsequent steps, it can be much easier to work with distinct line items rather than having to include a full list every time you want to reference part of its data.
Formatter also includes a function to go in the other direction and convert a series of line items into a single list.
Build better Zaps with Formatter Utilities
Formatter’s Utilities menu gives automators several different ways to refine their Zaps with lookup tables, line item functions, and the ability to pick an item from a list. Formatter steps like these can help you to make Zaps with more accurate outputs and build automations that handle a wider range of situations.
If you’d like to learn more about using Zapier and other low-code automation tools, check out our blog or our YouTube channel. You can also follow XRay on Twitter, Facebook, or LinkedIn.

Automation has long been a divisive subject, and the divide has only deepened as technology has made automation more accessible to entrepreneurs and small businesses. At XRay, we believe that the goal of automation should not be to eliminate human jobs, but rather to enable people to perform the best work they can. In our last several posts, we’ve discussed how anyone can start integrating automations into their business to reduce the amount of robotic work bogging them down. In this post, we want to look at the endgame of automated work, and show you how building the right automated infrastructure can lead to more effective and fulfilling work for everyone in your team.
Build an automated infrastructure
For automated work to become an effective component of your overall workflows, you need to build a comprehensive automated infrastructure. In technical terms, automated infrastructure consists of an operational database linked with a suite of SaaS tools and precisely documented business processes. Our documentation post explores the ins and outs of databases in greater detail, but essentially, your operational database should document each of your automations, the tools they use, and the business processes they contribute to. Your documentation should make it easy for anyone at your company to understand how all of your automations work in concert to complete robotic work and better enable your team members to get their jobs done.
While you could potentially create an operational database with any suitable software you prefer, we’ve found that Airtable is the best choice. One of the key features that makes Airtable particularly well-suited to the task is its column IDs. Rather than using letters like other spreadsheet software, Airtable uses unique IDs. This lets you add or rearrange columns without needing to remap all of your automations, which you would often have to do if you added a new column in software like Google Sheets. Your business will always be evolving, and your automated infrastructure needs to have the ability to evolve along with it. Adding or deleting columns in G-Sheets or other apps just creates unnecessary headaches.
Moving beyond the nuts and bolts of setting it up, the goal of automated infrastructure is to weave your automations seamlessly into your business and your team’s daily activity. Establishing an automated infrastructure at your company is about more than just building a whole bunch of automations; it’s about understanding your processes in intricate detail, and knowing which ones can and should be handled by robots. It’s about identifying a consistent order of operations that fulfill your business processes, and using automated tools to enhance and facilitate those operations wherever possible. It’s about creating a documented, transparent, and evolving system that enables the people who interact with it.
Even in automation, people always come first
Automated work can only be successful if the humans on the other end of the automated work are aware of and enabled by the work that was just automated. No matter what your automation does, it doesn't matter if your team has no clue where things are or what happens next. If your project manager doesn’t know about the automatically generated database of client info that you’ve set up, they’ll still have to go digging for that data whenever they need it. To avoid situations like this, make sure your automations are structured to give your team context and easy access to any content created by the automations. You can use an “auto_updates” channel in Slack (or whichever messaging platform you prefer) to give your team regular updates on what your automation infrastructure is doing, or send DMs to the specific team members who need to follow up on the automated work.
It’s also important to include the relevant team members from the moment you start planning and building your automations. When you’re considering automating a task, remember that the people who currently perform that task will have a vital perspective based on their firsthand experience. There may be frequent roadblocks they encounter that the automation will need to account for, or extra steps they’ve added to make the process more effective. Give them a chance to share their views and explain what they would like to see from the automation. Otherwise, you could end up wasting a lot of time and resources building an automation that won’t even be useful for your team.
Create seamless transitions between people and their robot helpers
Another way you can fully integrate automated work into your business is by creating helpful on-ramps and off-ramps. In the XRay method, on-ramps are the actions a human needs to perform to begin an automation. In many cases, on-ramps take the form of a simple form or survey that prompts your team to provide the necessary information. When one of your team members fills out a survey to trigger an automation, they know that the automation has started and they can let the robots handle the next stages of the task.
Just as real-world on-ramps get you on the highway where you no longer need to worry about the tedium of stop signs and red lights, automation on-ramps are the transition point between human work and robotic work. To make that transition as smooth as possible, you should make sure that the forms you use to trigger automations are easy to use and understand. It’s often a good idea to include context about why each piece of information is needed, so that your team understands the purpose of all the data they’re grabbing. You may also want to create a swim lane diagram for your automated workflows that will illustrate exactly where human work ends and automated work begins, so your team has an even clearer picture of where the on-ramps are.
As you might assume, off-ramps are the opposite of on-ramps. When the automation has performed all of its steps and produced the desired data, documents, etc., it should alert the relevant team members that its job is complete, and hand off the new information in a neat package. Creating an activity log and automation updates channel will help keep your team apprised of all your automated activity, but it can also be beneficial to send direct messages to relevant team members when an automation is complete, or create an assignment for them in your task management. You can build those alerts into your automations whenever an automation will require an immediate follow-up, or is particularly important for just one or two of your team members. When you’re building your off-ramps, remember that any data that your team members need to interact with should be human-readable. Your automations can work easily with a series of numbers without much context, but your humans can’t. Spending a little extra time on formatting and labelling the output of your automation can save your employees and colleagues a lot of time and hassle.
Ultimately, the purpose of building on-ramps and off-ramps is to create seamless transitions between automated work and human work. People shouldn’t have to put in extensive effort and dramatically change the way they do things to fit the automations; the autos should meet them where they are and just make things easier.
Automated work enhances human work
At XRay, we don’t see automation as a replacement for human jobs. We see automation as a way to make humans more productive, and to let them focus more on the work that they’re uniquely suited to. There are a lot of things that software can just do better than people, and that people would rather not have to do anyway. Sending invoices, scheduling and logging meetings, basic reports and records - these are the kind of tasks that can be automated so that they’re not cluttering up your daily to-do list. More often than not, a well-designed automation can perform these tasks faster, more consistently, and with fewer errors. When you build an automated infrastructure and fully integrate automated work into your business, you’ll create time for your team to focus on what they’re good at and what they find fulfilling. When your team spends less time logging and recording data, they’ll have more time to analyze and interpret that data. When your team spends less time compiling and searching for client records, they’ll have more time to actually work with your clients and address their needs.
The goal of automated work is not to supplant people from your organization, but to give them the tools they need to perform better and more valuable work.
Automated Work in Action


The conversation around automation is often dominated by discussion of time saving. While it’s certainly true that automation can save time for your company, that’s not the whole picture.
Beyond saving and reallocating time, automation ensures more consistent processes and results, lets you gather pertinent data on all of your workflows, and creates a more fulfilling workplace for your team.
Time Saved is Also Time Reallocated
Of course, properly designed and implemented automations do save you time and money. Each time an automation runs, it performs a process faster than you or your team could have done it manually. Each run adds up to time saved, and time saved is money saved.
However, looking at automation strictly through the lens of time saved might make it seem like a relatively fruitless endeavor. This is because time savings are only the beginning of the value created by automation.
For instance, a closely related but easily overlooked benefit of automation is time reallocation. After all, the time you saved isn’t just a cost reduction on the balance sheet; once you’ve set up an automation to handle one of your robotic tasks, you can repurpose that time into something more valuable, more worthwhile, or more mindful.
The simple metric of saving 10-15 minutes a day might not seem like much, but those extra 15 minutes of focused, productive work can be invaluable. Spending another 15 minutes in a flow state while doing something creative can produce much better results than having to interrupt yourself early to perform a distracting robotic task.
Alternatively, being able to take a 15 minute break to recharge instead of jumping back and forth between different menial tasks can make your entire day more productive and relaxing.
Whatever you choose to do with the time you saved, just remember that automation can deliver both sides of the coin: less time working on robotic tasks, and more time spent on mindful work.
Automation Creates Consistent, Reliable Processes
Errors are an inevitable part of any manual process. No matter how diligent, skilled, and experienced your team is, they’re going to make mistakes from time to time. As human beings, we just can’t help making the occasional typo, or forgetting to send an email, or hitting “reply all” instead of “reply” every now and again.
However, when you automate a process, you ensure that it’s performed exactly the same way every time. The automation will (almost) never forget to run a step, make typos, or mess up a calculation.
Even if you’re not measuring your error rate or time spent fixing mistakes now, you’ll still notice the improved consistency that comes with automating your workflows. When you’ve automated much of the robotic work at your organization, you’ll experience fewer issues with clients, less confusion among your team, and less time wasted on redundant work.
Of course, this reliability is dependent on the automation being set up correctly in the first place, which is why we test our automation prototypes thoroughly before handing them off to our clients.
We also would never claim that automations are perfect. From time to time, your automations will encounter errors. However, many of these errors will simply be caused by the apps you’re automating experiencing downtime. If Slack’s servers are down, the app will be inaccessible whether you’re using it for manual or automated work.
In other cases, you’ll encounter automation errors when an update to one of the programs involved changes the way data is stored or processed, requiring us to fix the automation before it can run properly again. While any error is frustrating, errors in automated workflows will be caught quickly by our error-handling systems, so you’ll experience very little downtime. On the other hand, manual errors often go unnoticed for days or weeks, leaving you with a mountain of work to fix.
Automating Workflows Lets You Gather Data on Everything You Do
Automating some or all of a process is one of the most effective ways to start tracking key metrics related to that process.
At XRay, each automated workflow is incorporated into a larger automated infrastructure. Every time an automated action runs, it creates a record of itself in a centralized activity log. There, you’ll be able to see how often each automation runs, the date and time for each individual run, and any documents or assets produced.
So if you automate the process of uploading a sales report to Google Drive, or sending invoices through Quickbooks, you’ll now automatically gather data on how many reports your team is filing - or how many invoices they send each week and how quickly those invoices are paid.
Whatever you want to track can be recorded in the activity log, so you’ll be able to see how your processes have become more consistent and efficient, and identify areas that still need further refinement.
Automation Leads to More Fulfilling Work
Most knowledge workers don’t want to spend their time every day on the kind of mindless work that can be automated. Instead, they would rather focus on challenging, fulfilling work that actually makes use of their unique talents.
Automation lets your team move their time away from mind-numbing copy-and-paste tasks, and refocus their efforts into work that pushes them to be creative, analytic, strategic, or thoughtful.
Mindful work like that is the kind of work that’s most satisfying for people to perform, and is the kind of work that provides the most value to you as their employer. Automating robotic tasks lets each of your team members focus as much of their time as possible on the work they’re uniquely suited to, rather than spending their time getting ready to work or reporting on what they’ve done.
In the long run, employees who can spend their time on work they enjoy are going to be more likely to stick with your company, and increased retention will prevent the cost and challenges of recruiting new talent.
Save Time, Improve Reliability, and Promote a Better Workplace Experience
It’s easy to think of the value automation as a simple equation of time and money saved whenever the automation runs, but automation offers much more value than that.
Automation lets you reallocate time, produce a more consistent and accurate output, gather data on your workflows, and raise employee satisfaction. If you’d like to learn more about automation, check out our blog or our YouTube channel. You can also follow XRay on Twitter, Facebook, or LinkedIn.

Zapier is a useful tool all on its own, but connecting it with an Airtable Database will give you more control over how and when your automations run. In this post, we’ll show you a few tips for getting started with using Airtable as an Operational Database for your Zaps, and demonstrate how you can use Airtable views to trigger automations based on any conditions that you want.
Why We Use Airtable
At XRay, we typically aim to be as software-agnostic as possible, as automation platforms can usually work well with any tool that you prefer. However, when it comes to creating an Operational Database (ODB) for your automations, we strongly recommend using Airtable over any other spreadsheet or database software.
While there are many reasons for this, one of the most immediate advantages that Airtable offers is its unique column IDs. When you make a table in Airtable, the software assigns each column a unique and permanent ID. Even if you rename or rearrange your columns, the IDs remain intact.
Conversely, in software like Excel or Google Sheets, columns are only identified by their name - typically, “A, B, C”, etc.
This might seem like a minor technical detail, but it’s vitally important when you start building automations that connect to your database.
Zapier locates G Sheets columns based on their letter name, so if you rearrange the columns in your spreadsheet after setting up a Zap, that automation will likely break until you update it with the new column assignments.
For Airtable bases, Zapier looks up information based on the Column ID, so you can freely update your database without having to worry about breaking your automations.
Another key feature that Airtable offers is the ability to make “views”, which is the main focus of this post.
Make Precise, Customizable Zap Triggers with Airtable Views
In many cases, you’ll only want your Zap to fire off under specific circumstances. Airtable’s “view” feature makes it easy to sort and filter your data to control when your Zaps trigger.
When you create a view in Airtable, you can filter your data however you want without needing to alter or duplicate the data itself. Just make a new view using the “Create a view” options in the bottom left of the screen.

You can use filters to determine which records from the original table will appear in this view. You can set virtually any criteria that you want while creating your view.
For instance, let’s imagine that we want to send automated emails to Vice Presidents of Accounting explaining how our company’s services can help their accounting department. In this view below, we’re only including records where the entry for the “job_title” field is “VP accounting”.

Just click on the “Filter” button to add your own filters.

To start a Zapier automation whenever a new record appears in our “VP of Accounting” view, we just choose Airtable for our trigger application, and select “New Record in View” as our trigger event.

Then, we select our base, table, and view from the menu (you may need to refresh the fields if you just created the view).

Now, whenever we have a new VP of Accounting show up in our database, we can trigger an automation that will only apply to them. If we ever want to change our criteria for who receives this email, we just need to adjust the parameters on our view’s filter. We won’t even need to update the Zap itself!
Additionally, by controlling when your Zaps run (or don’t run) with Airtable views, you can save your limited Zapier tasks instead of wasting them on Zaps that will stop once they reach your filter step.
Go Further With Automations
This post only scratches the surface of what Airtable views can do for your Zaps and other automations. If you’d like to learn more and see additional examples, check out our video about Airtable views on YouTube.
If you’d like to learn more about how automations can reshape your company and eliminate robotic work, take a look at our series on the XRay Method.
You can also check out Airtable’s support docs for more info, and don’t hesitate to reach out to us if you have any questions about improving your workflows.
If you’ve explored the no-code and low-code automation space, you’re probably already familiar with programs like Zapier that let you connect your apps together to build automations.
While Zapier is a great place to get started, and an indispensable tool for automators of any skill level, Make will give you access to more advanced techniques.
Make (formerly known as Integromat) is similar to Zapier, but offers a wider range of functions for each of the apps it supports. Conversely, Make doesn’t support as many programs as Zapier, and its more advanced technical features make it a little more difficult to learn.
In this post, we’ll walk you through a couple of simple Make automations to help you get started with the platform and show you how it works. The first automation will create an archive of every message sent in a specific Slack channel, while the second will delete messages from that archive once they’re over 1 month old.
Creating an Automated Slack Message Archive
1. Create a database in Airtable
First, create a database in Airtable where you’ll store your archive. You can also use Google Sheets if you’d like, but you’ll need to modify some of the steps in the tutorial.

2. Create a new Make Scenario
Create a new “scenario” in Make, and give it a descriptive name. You may also want to use folders to keep your automations organized.
3. Add a new Slack module
Unlike Zapier, Make doesn’t fully separate automated steps in “Triggers” and “Actions”. Instead, you’ll have to make a new module and find the right trigger from the list: “Watch Public Channel Messages [Acid]”.

The “ACID” tag means that this is an action that conforms to ACID criteria for database transactions. In Integromat, this effectively means that this module will rollback any actions it performed if it encounters an error. It will either run successfully, or it won't run at all.
You don't worry too much about the ACID tag when you're getting started with Integromat, but it's a good thing to keep in mind as you're building your scenarios.
Sign in to your Slack account, and choose the channel you want Make to watch for new messages.
4. Test your trigger module and review the data
To test your trigger, right click on it and select “Choose where to start” >”choose manually”. Pick a message from the list, and then click on the “Run once” button. You’ll want to do this every time you need to test your scenario.
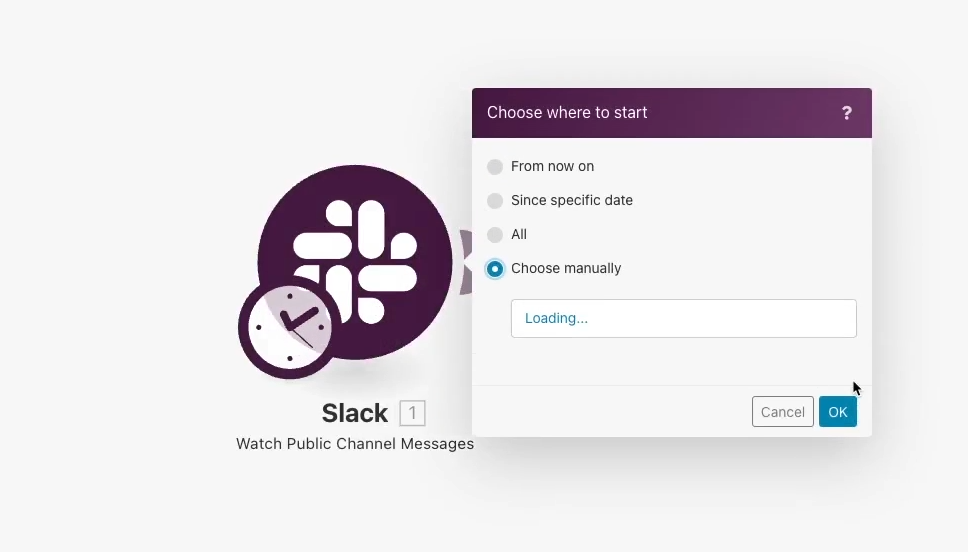
By choosing your starting point manually every time, you’ll ensure that you’re using the right test data.
Check the information that Make pulls in from Slack. You should see things like the user ID of the sender, the message content, the date it was sent, and more.
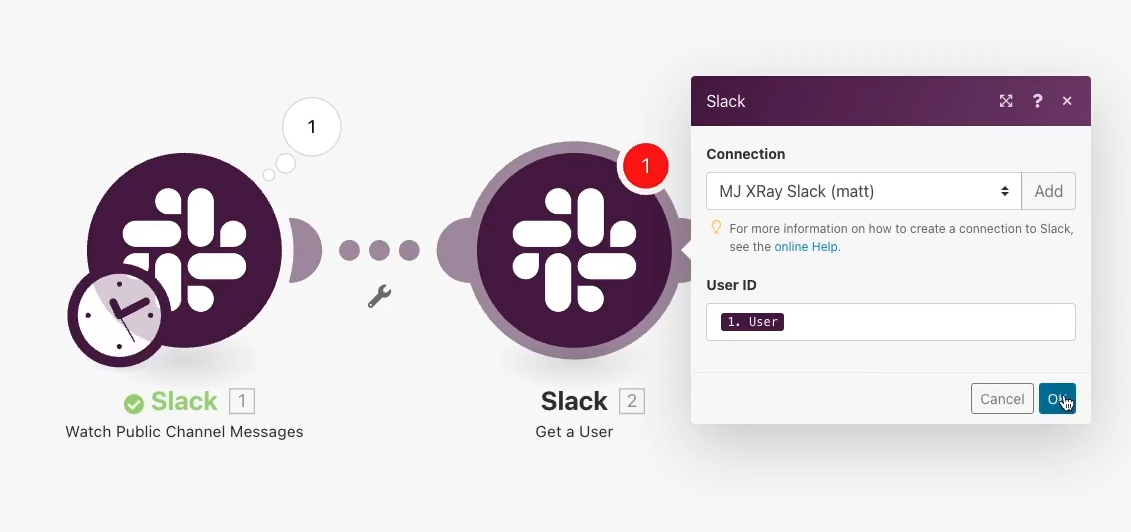
5. New Slack module: Get a User
What you won’t see in the module’s data is the user’s name. If you’d like to attach a name to the message rather than just a string of random characters, you’ll need to add another step to look up the username based on the retrieved ID.
Add a new Slack module, and select “Get a User”. For the ID, enter the “ID” data pulled in by the first module.
Test the scenario again by right-clicking on the first module and selecting “choose where to start manually”, then clicking on “run once”.
Click on the number by the second module to see the data it retrieved, and you should see the user’s name among several other pieces of info.
6. New Airtable module: Create a record
Create a new module and choose Airtable. Select “Create a record”, sign in to your Airtable account, and choose the base and table that you want to use for this automation.
Populate it with the information you’ve gathered from the previous modules, like the message content, its send date, the user who sent it, etc.
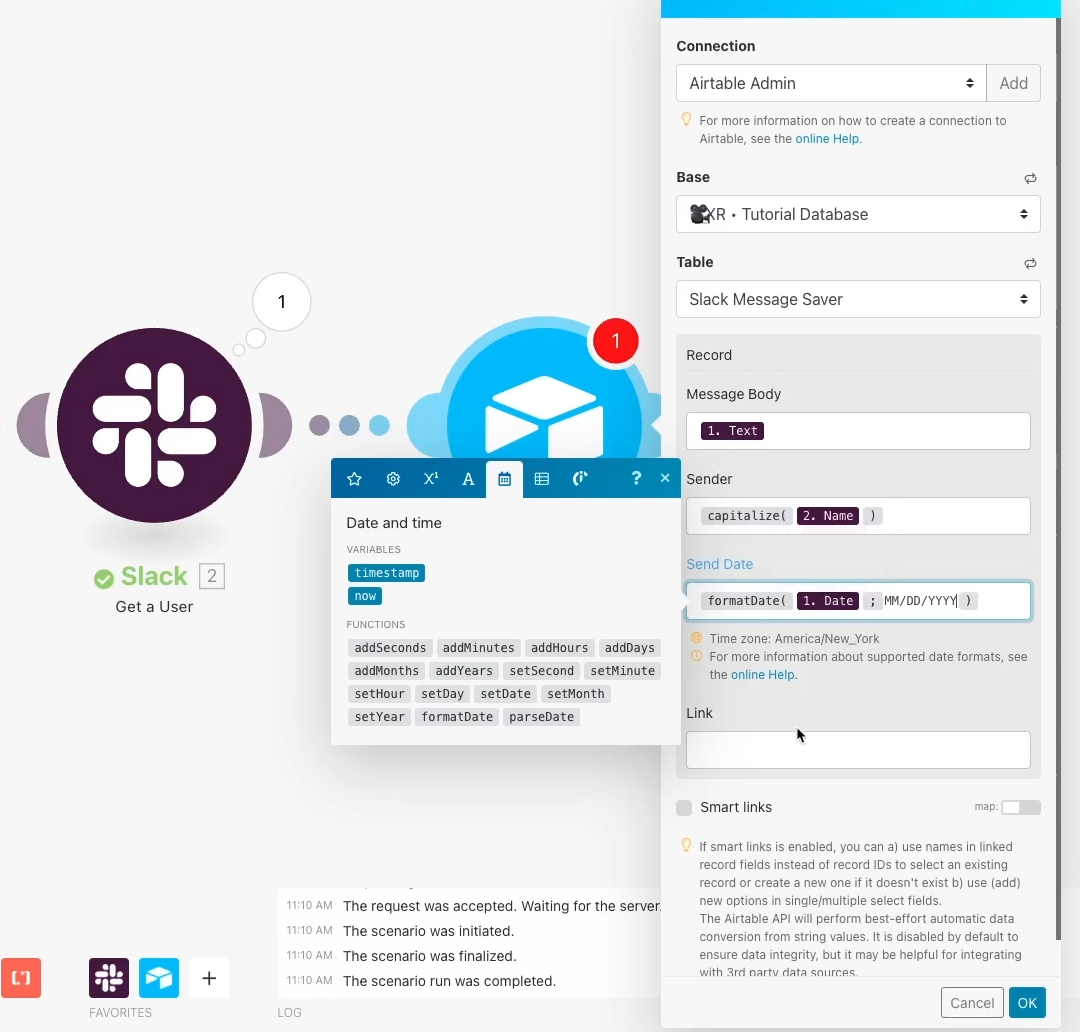
While Zapier requires additional steps to format text and dates, Make allows for easy in-line formatting. Just click on the “A” icon to bring up text formatting functions, or the calendar icon for date formatting.
Once you’ve finished setting up the module, test the scenario again using the same procedure we’ve outlined before.
Check Airtable, and you should see new messages there.
Deleting old messages from the archive
Our second automation will delete messages from our Airtable archive once they’re a month old.
Deleting records is one of the most basic functions that sets Make apart from Zapier. While Make supports deletion in most of its modules, Zapier doesn’t support it in any of their integrations as a rule.
You need to be careful when adding a step to delete records in your automations, but it can be very useful if you don’t want old data hanging around and piling up forever.
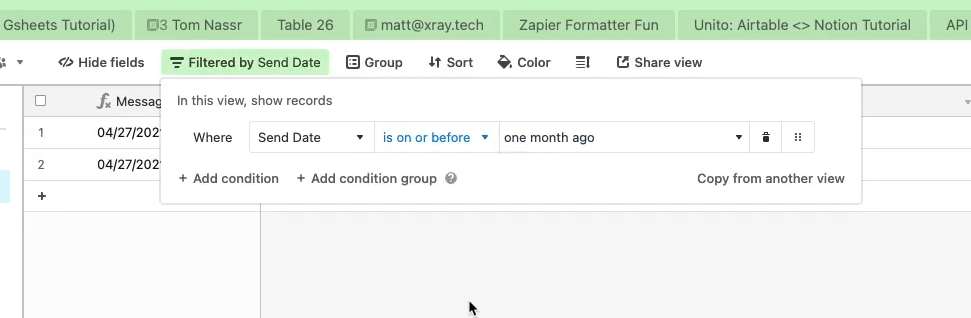
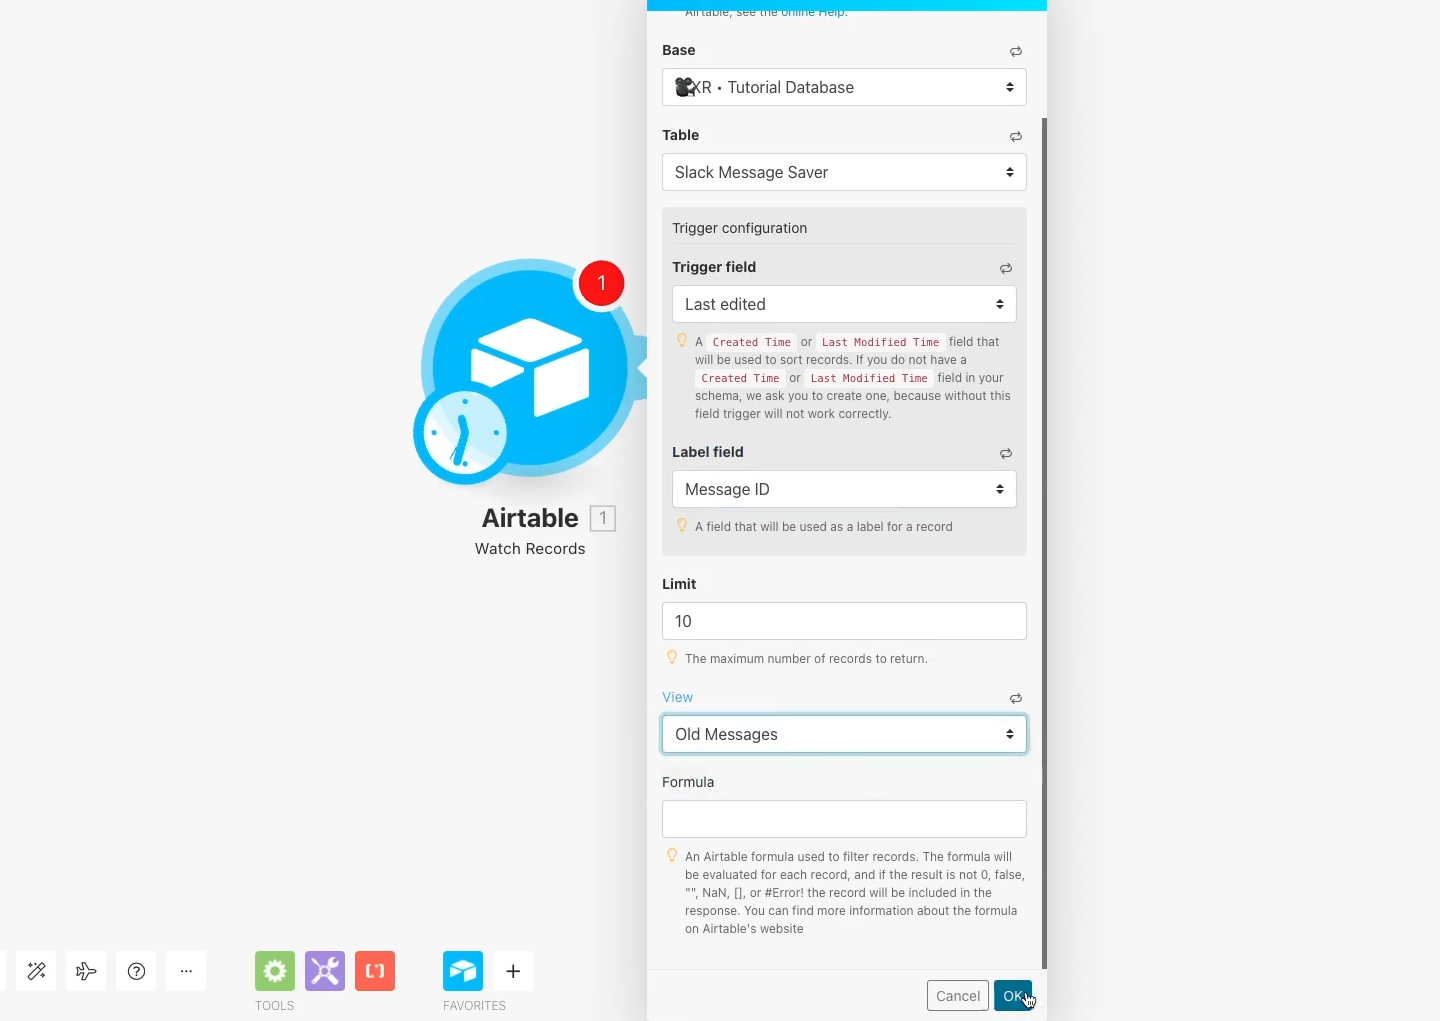
1. Make a new Airtable view
In your Airtable base, add a new view to your table called “Old messages”. Add a filter so that the view will only include records where ‘Send date’ is on or before one month ago.
Our next Make scenario will watch this view for new records. If you don’t have any old records to test with, just change the date on an existing record to make it fit the criteria.
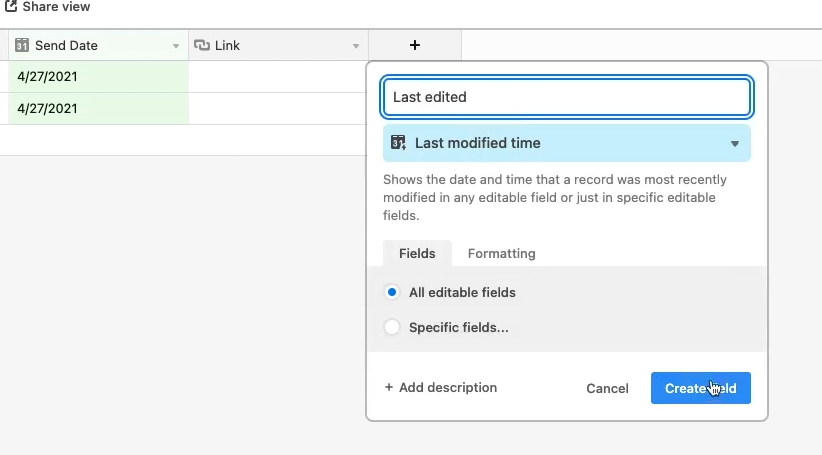
You’ll also need to add a “Last modified” column to this table so that Airtable can tell when each record was added or updated.
2. Create a new Make scenario
Make a new scenario, and choose Airtable for your first module. Select “Watch Records [Acid]”, and pick your base and table. Use your “last modified” column as the trigger field and choose the “Old messages” view.
Test the module, and confirm that the right message(s) have been retrieved.
3. New Airtable module: Delete Record
Add a new Airtable module to your scenario and choose “Delete Record”. Choose your base and table, and enter the record ID that Make retrieved in the first module.
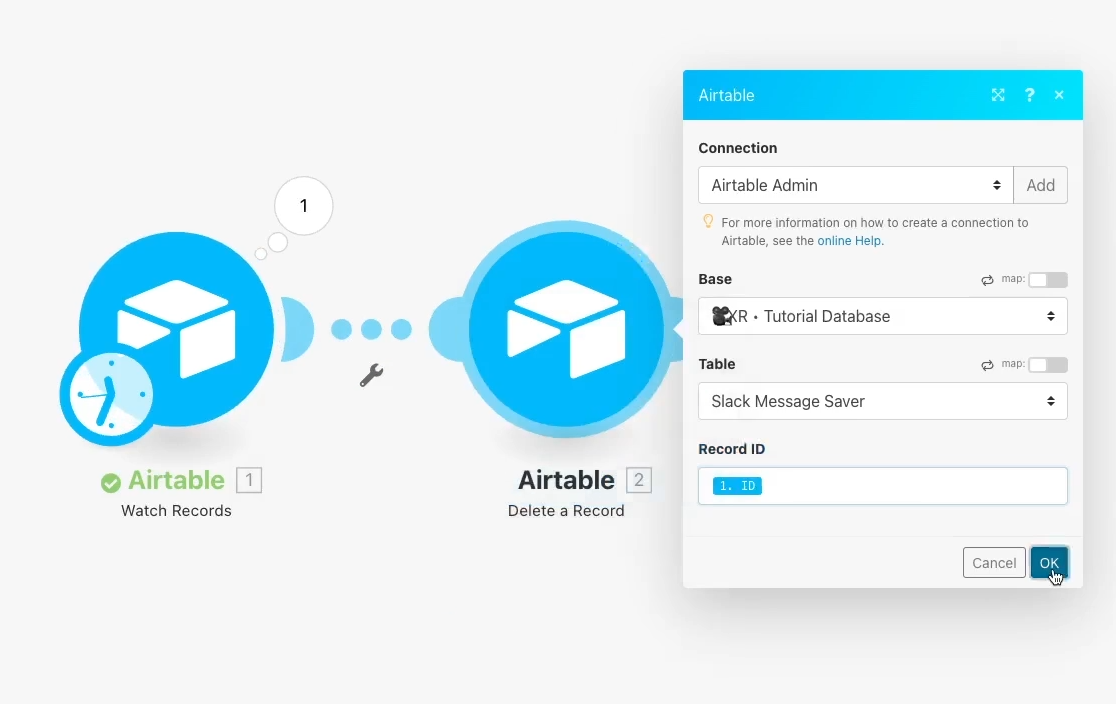
Test your scenario again, and then check Airtable to confirm that your old records have been deleted.
Picking the right tool for the job
When you’re comparing software like Make and Zapier, there’s no one, universal right answer for which software is better. Ultimately, each tool will be better suited to certain situations. If you need more extensive and precise control, Make will likely be the better choice, but it will require some more experience to use. If you need to support a huge range of software, Zapier will likely be the ideal option, but won’t offer as many automated actions.
At XRay, our techs know how to use both of these platforms and more so that they can use the right tool for every job, and we encourage other automators to do the same. If you’d like to learn more about Make, Zapier, Unito, and other automation platforms, check out our blog or our YouTube channel. You can also follow XRay on Twitter, Facebook, or LinkedIn.
Selling your small business can be a challenge, particularly when you’re a service-oriented company. When your company is built on process rather than product, it can be hard to find a way to sell the ideas and procedures that have made your business a success.
If you’re the owner or founder of an SMB and you’re looking to sell your company, you should consider how automation can transform your processes into a more tangible asset and make your business more appealing to potential buyers.
In this post, we’ll show you how automated workflows and an accompanying Process Playbook can become a valuable tool for anyone seeking to sell their company.
What Buyers Want to See in a Company
While there are many different potential motivations that can drive acquisition, let’s focus on buyers who intend to keep running the company that they acquire.
Ultimately, the new owner will want to replicate the success that you’ve had while running the company. They’ll want to move in some of their own staff and pick up right where you left off with your customers or clients, selling the same things and bringing in the same revenue.
How can you convince a prospective buyer that they’ll have everything they need after the ownership transition? How can you show them that you have the formula to success laid out and ready for them to follow?
One way to create a compelling and practical “business bible” is through workflow automation.
Workflow Automation
Workflow Automation is a method of identifying the robotic tasks in your company’s day-to-day work and partially or fully automating them.
At XRay, we’ve found that the most common robotic tasks in a modern office typically consist of simply moving data from one piece of software to another: filling in a report in one app with stats from another, logging a recent project update, or setting the status on a lead after a sales call.
Tasks that essentially amount to copying and pasting data are not worth your time or your team’s, and are the first tasks that we automate with our members. Automating those tasks creates more time and better prepares you for the work that really is worthy of your attention.
When your new leads are mostly handled through automated, templated emails, that gives your sales team more time to interact with the fringe cases, and more time to prepare for the particularly important details.
Automations are a great asset for your business to have when you’re hoping for a liquidity event, as the new owner can assume control of the automations just as they would with a proprietary app or website.
But to really make the case for continuity (and to get the most out of your automations while you’re still in charge), you’ll want to have each automation documented in a Process Playbook.
The Process Playbook: a Guide to Repeatable Success
A Process Playbook is a set of documentation that explains how to accurately and consistently execute any process that you regularly conduct at your business.
Whenever we build an automation for our members or for our internal use, we create another page in the Process Playbook to reflect it. Each page explains what the automation is for, how to use it, where to find any relevant resources, and what manual steps need to take place before or after the automation happens.
As we build more automations for a member, their Playbook essentially becomes a thorough user’s manual on how to operate their business. A document like that is extremely useful whenever you’re hiring new team members, and can be a great asset to show to any potential buyers.
If you think of your business and any staff who will stay on after the transition as the ingredients for success at your organization, then the Process Playbook is the recipe on how to put it all together.
Showing a prospective buyer just a few select pages from your Playbook will go a long way towards reassuring them that they’ll be able to replicate your actions even when you’re no longer the one steering the ship. It simplifies each process into an easily understood set of actions and information that they can put into practice and refine on their own as they get some experience.
Automating to Support Your Exit Strategy
Selling a company is never an easy thing. Finding a buyer, agreeing on terms, and handing off a business that you’ve devoted so much hard work to is a challenge for any entrepreneur.
Automating your workflows when you’re looking to sell your company might seem counterintuitive, but with the right documentation, it’s actually a great way to package your processes as a valuable asset for prospective buyers.
If you want to know more about how automation can help SMBs at any stage in their lifecycle, check out our blog or our YouTube channel. You can also follow XRay on Twitter, Facebook, or LinkedIn.

Something that new or prospective members often wonder about is how we transfer your automations over to you once they’re complete and ready to go live.
Our approach to building automations makes handoff a quick and seamless process, and our documentation ensures that you and your team will know everything required to understand and operate your automations.
In this post, we’ll explain our handoff process and how we document all of your automations to make them easy to use.
Building On Your Accounts for a Seamless Handoff
As we covered in our previous post about XRay memberships, we build automations for our members on their own accounts.
Using secure password management software like Lastpass, we’ll ask you to send us credentials to sign into your automation platform accounts like Zapier or Integromat, along with any other software involved in your automations.
Our techs will then create all of your automations in those accounts, meaning that you’ll have access to your automations as soon as we’ve built them. As such, there’s no need for us to transfer any files in order for you to start using your automated workflows; they’ll be immediately accessible through your existing logins.
Instead, the majority of our “handoff” process is focused on providing you with the documentation your team needs to use the automations effectively.
Robust Documentation Lets You Integrate Automations into Your Business Processes
For each automation that we build, we provide two kinds of documentation: the Process Playbook, and technical documentation.
Process Playbook
The Process Playbook describes clearly and concisely what each automation does, and what your team needs to do to use it. This will also include links to any relevant resources that you might need to complete the workflow.
We like to say that this documentation keeps the humans informed about what the robots are doing. This is especially true in certain cases where the automation will run without any manual interaction at all.
In any case, knowing how to use your new automated workflows is critical to ensuring that your team actually uses the automations and takes advantage of them.
Technical Documentation
While our Process Playbook docs are written by our technicians to summarize and explain each automation, our technical documentation consists of automatically collected metadata stored in an Activity Log.
You can check your Activity Log at any time to see big-picture metrics like how many times a given automation has run or an estimate of the total time saved, or dig in for more granular details pertaining to each individual instance of the automation. Every time an automation runs, you’ll see a detailed record in the Activity Log noting the date and time that it ran, links to any assets the automation created, and other key metadata.
Combined with the Process Playbook, our technical documentation makes it easy to know what your automations are doing at any time.
Find Everything You Need in the Workflow Dash
To make it easy to find and access your automation documentation, we bundle everything into the Workflow Dash.
The Workflow Dash is an app that we’ve developed at XRay.Tech that lets you and your team save links and resources as easily accessible pins on a shared dashboard.
The app is free for our members, and we’ll save all of your documentation and relevant links as Pins in your Workflow Dash. Everything you’ll need to use your automations or train new team members will be just a click away.
The Workflow Dash is just one of the tools that we’re developing internally to help build and manage automations for our members. As new tools become ready for use, we’ll continue to share them
Keep Everything We Build for Your Company
While we always strive to establish successful, long-term memberships, we understand that your business needs and goals may change over time. If you do choose to end your membership, we’ll be sure to transfer any files you need to keep using your automations.
As we mentioned previously, there normally won’t be many files to transfer as we build your automation on your own accounts. Typically, we would just need to send you an Airtable base, as we normally use our own Airtable account for our members for the sake of gathering certain metrics.
Otherwise, everything will already be in your possession on your own accounts, so in the event that we do part ways, you’ll have no problem continuing to use your automations.
Easy Handoff and Delivery
We hope this post has been helpful for clarifying our handoff and delivery processes. Because we work within our members’ systems, we don’t need to transfer many files back and forth. Instead, we focus on organizing and documenting your automations to make them super easy to use.
If you’d like to learn more about how and why XRay builds automations, check out our blog or our YouTube channel. You can also follow XRay on Twitter, Facebook, or LinkedIn.

There are only so many hours in the day, and there seems to be a mountain of things to do. Whether you're in corporate America or whiteknuckling your boot straps at a startup, you know how this feels. The neverending to-do list and ever-growing pile of repetitive tasks can feel overwhelming and frustrating. Sometimes, you might work all day but feel like you’ve accomplished nothing because you were on back-to-back Zoom calls all day.
However, stepping back and breaking your day-to-day work down into its component parts can help to make the whole process much more effective and fulfilling. At XRay, we believe that there are only 3 things that people do at work. (1) We get ready to do work, curating as much information as we need in order to accomplish the task at hand. (2) We actually perform the work, using our CAST Skills to their highest and best ability to create value out of raw inputs. (3) We update our team on the work we just did, making sure that everyone knows the latest progress towards our collective goal.
Understanding the three phases of work and how they can support or detract from each other will go a long way to making your work more productive and enjoyable.
Identify what you need to be ready to work
The vast majority of the time, your day won’t be neatly divided into three distinct stages of preparing to work, doing your work, and updating your team about your work. Rather than preparing for an hour, working for 6 hours, and sending out updates for an hour, it’s more likely that you’ll repeat all of the phases several times throughout the day for separate projects and assignments. You’ll gather information for Client A’s project in the morning, then log an update on your progress for Client B immediately after. Once you’re done with lunch, it’s time for a team meeting to prepare for an internal project, leaving you some time to finally get some work done on your assignment for Client C. In the hectic flurry of to-dos, it can often be hard to identify where preparation ends and the work itself begins.
One of the first steps toward making your work more fulfilling is to determine exactly what “preparing for work” means for you. Start with a single process that you have to perform regularly, and make a list of all of the information you need to have in place before you can start working on it. For example, let’s say you need to create a personalized presentation for each new lead that your sales team pursues. For each presentation, you know you’ll need the company’s name, the name of your point of contact at the company, a description of their problem, the services you’ll offer, and your company’s planned start date.
Action Steps
You can start by just making a checklist to ensure that you seek out all of this information, but much of this information could be gathered more effectively with a simple survey that one of your sales reps would fill out. You could set up an automation to store and format the responses, so that you and anyone who needs the information can access it at any time.
Automating your preparation cuts down on the back-and-forth messages needed to gather information manually, and ultimately makes for a more transparent and accessible process.
Peak performance is the goal
The purpose of optimizing and automating your robotic tasks isn’t just to make those tasks themselves run more effectively, but to give you more focus when performing CAST tasks. When preparation, performing, and updates are blended into one tangled, unexamined process, work quality and personal satisfaction are bound to suffer. If you missed a crucial piece of information during your preparation, you could get blocked on the process in question for hours while you wait for a response. If your status updates aren’t getting to the right people at the right time, your coworkers or clients could end up with misaligned expectations.
When you optimize your preparation and updates to use up less time and reduce distractions, you also create better conditions to focus on your mindful work. When you don’t have to worry about simply fetching information or sending it along to someone else, you can focus on the more important and fulfilling aspects of your work. Instead of having to go looking for data or bugging your coworkers for their updates (or getting bugged with theirs), you can concentrate on your work knowing that the data you need is readily available and that any updates can occur as scheduled. When you can concentrate your attention entirely on the task at hand without having to pause constantly, you can often experience a flow state, where your total focus leads to a deeply fulfilling and almost effortless productivity. With a structured and automated preparation and updating phases, you can devote your full efforts to the creativity, analysis, strategy, or thoughtfulness that your job requires.
Don't let updates eat up your day
Much like preparing to do work, updating your team and clients on the work that you’ve done is a major contributor to your robotic workload. While you sometimes have to communicate some nuance or context, you’re often simply giving a status update on your progress. To avoid spending so much time on simply telling others what you’ve done, start by building up a system of asynchronous communication. With 80% of full-time workers expecting to work remotely at least three days a week after the COVID-19 pandemic, our global economy is relying more on remote work every day. In an environment where we’re rarely face-to-face with our coworkers and spontaneous water cooler chats aren’t possible, asynchronous communication is key to letting each individual within a team operate at their best.
Many workplaces default to ad hoc updates, where team members and managers will sporadically prod their colleagues for the current status of a project or report. Answering your coworkers’ requests and sending out your own can be both a critical time sink and an irritating distraction for everyone involved. Instead of asking for updates as the need arises, you can adapt your current processes to suit asynchronous communication by building in checkpoints in advance.
Action Steps
Map out one of your most common processes step by step and mark the major milestones. The nature of the milestone can vary a lot from task to task, but you generally want to highlight the steps in the process where your work can now enable someone else to take action. As you list the milestone, identify the people who need to be notified once it’s complete. While you could still notify them manually at first, setting up a notification schedule like this will put you well on your way to creating an automated system to notify your colleagues or clients about your day-to-day or week-to-week progress.
Whether you choose to automate the processes or not, the goal is to avoid being reactive whenever possible. Unplanned interruptions throughout your day can cut into your time and make it much harder to stay focused, as even a seemingly brief distraction can cause workers to spend over 20 minutes finding their focus again. By creating scheduled and automated status updates, you can keep people informed of your progress without having to allocate so much of your own time to it.
Improving your work days 1% at a time
The cycle of preparation, performance, and updates defines our day-to-day work. Trying to do all three at once throughout your entire day will only lead to worse results, higher stress, and a reactive work culture. By separating your tasks into their component phases, you can foster a more proactive culture that allows everyone to focus without distractions and start removing robotic work through automations. Instead of your team members having to constantly ping each other on Slack to check the status of each project, they can simply refer to the scheduled updates. Instead of having to hunt down important data while in the middle of drafting a document, your team can avoid interruptions by identifying and gathering all of the necessary data beforehand. Ultimately, the goal is to adjust your workflows to let the humans in your team accomplish more without having to expend additional effort. You can make each week 1% more efficient, effective and fulfilling for your team by organizing their workflows and enhancing them with automation.


The way we do our jobs is continuously changing. Every day, we find and use new tools, copy and paste information all over the internet, and try our best to teach the humans around us what we just did. We figure out what we should be doing through practice, intuition, and critical thinking, but we often lack the resources and clarity needed to document our processes so that they can be successfully transferred to another person or an automation. This blog series introduces the XRay method, which is an approach to defining the components of your business so that you can create efficient, repeatable processes and start automating work that's eating up your team's time. It's a formula to help create more mindful time for humans to focus on the things that matter, rather than the things that are necessary to continue working.
It's simple.
Humans should do human work, and robots should do robotic work.
This is not another SaaS tool.
The XRay method is a way to leverage the tools you already use in a smarter, intentional, and more contextual way to better achieve your business goals.
Let's walk through how you can start identifying and automating your company's robotic tasks. In this article, we'll take a quick look at each of the main segments of the XRay method, while our next articles in this series will take a deeper dive into each topic. If you follow along with the action steps outlined in this post, you'll get a quick and simple version of what the XRay method can accomplish. If you'd like to see more, read the rest of our posts and reach out to us with any questions you might have.
Day-to-day Operations
Every day, there are four components to the work that you and your people engage in. Those four components are Tools (Software), Business Processes, Robotic Work, and Human Jobs.
Software Tools
First, let's talk about Tools. You may use a variety of tools that help your team with everything from time tracking, communication and performance to analytics and finance. These are the pieces of software that let us do our job. Things like G Suite, Slack, Calendar and Mailchimp are all tools that make one little facet of our day-to-day jobs a little easier.
Step 1: List your tools
Catalog all of the tools that you and your team use on a day-to-day basis by generating a list of all the software that you use (spoiler alert, it's probably a long list!).
Don't worry, you will almost definitely forget a tool or two the first time you try to make this list. You can always revise it later if needed.
We recommend saving this list as a database in Airtable and updating it whenever you start using a new tool or stop using an old one. By keeping track of all of the software you use, you can avoid the redundancy of having multiple apps that all do the same thing, and you can start building a picture of where your business-critical data lives.
Business Processes
Business Processes are the overarching steps needed to perform a process. For example, an Employee Onboarding process will have a list of tasks for the company to do, and another list of tasks for the new employee to do.
The list might include items like watch the introduction video, set up your email, share your calendar, make accounts for company software, etc.
All business processes consist of a mix of Robotic Work and Human Jobs. Let's take a look at the difference between these two task types next.
Step 2: List some of your high-level business processes
These could be things like posting to social media, employee or client onboarding, KPI Tracking, etc. If you can, then try to write bullet points about what each step is.
Robotic Work
These are things like copying and pasting information, moving files to different directories, uploading files, or sending a confirmation message once another task is finished.
They take little to no intellectual effort, but are essential for your team to perform their work. Robotic Work is typically a list of tasks that are required to create the right environment needed to perform Human Jobs.
Step 3: Identify which steps in the high level business processes are Robotic.
Some examples of robotic work include:
- Opening email attachments (e.g., new email matching search)
- Logging into web apps (e.g., a tool from the example tool kit)
- Moving files and folders in Drive
- Reading and writing to databases like Airtable or Sheets
- Scraping data from web and docs
- Connecting to APIs
- Making calculations
- Extracting structured data
- Collecting social media analytics
- Following if/then rules
We call robotic work "robotic" because it's the kind of work that can be performed by robots, which is our term for any automation that performs a task. A "robot" could be an automation in Zapier that saves every link you post in Slack to an Airtable Database, or a script that scrapes data from webpages for research.
As this survey from Deloitte shows, RPA (Robotic Process Automation) is growing rapidly and helping companies to improve the quality and consistency of their output on top of saving time. By identifying the tasks that could be performed by robots, you'll already be one step closer to automating those tasks.
Human Jobs
Human Jobs are the parts of a business process that involve mindful tasks, as opposed to robotic tasks. These mindful tasks need to be completed and executed well to ensure that the overall business process is done correctly. Mindful tasks are activities that require creative, analytic, strategic, and thoughtful work. These tasks require your focus and attention in order to be complete. Additionally, they are typically the most fulfilling areas of your work. You're happier when you have time to do more mindful tasks and spend less time on robotic work.
Step 4: Identify Mindful Tasks inside of each Business Process
Some examples of Mindful Tasks include:
- Making strategic decisions
- Building personal or professional relationships
- Collaborating on ideas
- Creating content (graphic, written, video, etc.)
- Interpreting data and trends
- Making moral and ethical decisions
- Granting final approvable on a deliverable
Ultimately, one of the main goals of implementing automation is to create more time and focus for your mindful tasks. Interrupting your complex mindful tasks with a flurry of robotic tasks throughout the day breaks your concentration and requires to spend more time on all of your work, as this APA study on context switching shows.
Automation Infrastructure
In order to remove Robotic Work from your day to day, you'll need to set up some automation infrastructure. This will serve as the backbone of your automations and allow you to accumulate best practices, adopt your highest internal standards, and be as transparent as possible throughout your processes.
Documentation
Documentation consists of the flowcharts, checklists and how-tos that are essential for knowledge transfer as someone new begins to perform various Business Processes. There are two types of documentation that are massively helpful:
- Database - software like Airtable to create databases for your automations, resources, and more
As your documentation about processes get better, so will the information you're able to collect and re-use. That is why Knowledge Bases and Databases are so important. Your automations will constantly be pushing and pulling information from your databases, while you are able to keep your Knowledge Base up to date for all of the Mindful Tasks that you and your people will need to perform.
Some examples of Documentation:
- A flowchart that illustrates one of your business processes step-by-step
- Text documents or video walkthroughs that describe how to complete certain tasks
- A database of your company's key resources, people, tools, networks, and more
- Sample documents that serve as examples of finished deliverables
Step 5 - Document the Mindful Task Processes
Asset Templates
Asset Templates get you 90% of the structure with 10% of the content. They let someone quickly open a template and immediately know what to do. There is a clear starting point (the template) and a clear end point (an example of what 'done' looks like — referenced in Documentation). Google Drive has an entire template library, check it out if you haven't yet.
Step 6 - Create Templates from your best Deliverables
- With Zapier, you can insert information directly into any GSuite document type. Just remove the client specific information and put your variable inside of curly braces.
- For example, at the tops of all my Google documents, I have my Synapse + {{clientName}} in the header. Give it a try on Zapier.
Automated Work
This is where all the magic happens. Leveraging a tool like Zapier.com (alternatives include Make.com, Workato, or native automations in Airtable), you're able to connect multiple tools together into a powerful If→ Then sequence. You could add logic like "if xyz is true, then do A; if not, then do B". It can get pretty sophisticated.
For example, at my software design studio Checkmate.Digital, we had a 35-Step onboarding process that was initiated by an internal, 10 question survey.
Surveys are one of the best methods to automate internal work.
With those 10 questions, we were able to accomplish 35 separate tasks, including:
- Create a Quickbooks Customer, send an invoice, input an estimate
- Create a slack channel & send template messages
- Create gDrive structure, copy & move template files
- Send a "welcome email"
- Schedule the next 5 meetings internally on the calendar
As a CEO, automating these robotic tasks let me know that all 35 steps were always completed quickly, correctly, and consistently.
Operational Clarity
No one is 100% efficiently performing work for 100% of the time they devote to their work. Of course, we, as humans, are not robots. But there is something to be said about emphasizing the clarity of priorities, directions, guides, and checklists. Strong documentation and asset templates create a clear hierarchy of tasks for the people performing the work, and while 100% performance might not be possible, these resources can help everyone to perform better. The result is a simple understanding of context as to why something needs to get done a particular way, and an understanding of purpose behind the individual task.
Note • Operational clarity keeps people from feeling lost, frustrated, and undervalued. The next time you want something done faster and at a higher quality, try starting with an asset template, and make a Loom video of yourself doing it the right way. You'd be amazed at the number of questions you can eliminate.
Passive Data Collection
Automated Work sequences remove the effort from data collection. These sequences can log an email being opened or a survey being completed the instant they happen. Over time, your sequences will accumulate a huge list of events that are happening inside the company. As a result, the status of projects, results, and efforts are captured without the dreaded "how's X going" interruption from upper management. This allows workers to focus on their work, and managers to focus on the results that they are given as a result of work being done. It's non-invasive, it's metadata, and it allows for greater transparency at every level of the organization. Automated work allows data collection without disturbing anyone's workflow.
Note • Next time you ask for an update on a project, think about whether that data point could have been passively collected without disturbing the worker!
Create Time for Better Work
Automating your Robotic Tasks wherever you can frees up more time to focus on your Human or Mindful Tasks, but that's only part of the value you get from automation. The automation process prompts you to put your business processes under a microscope. It requires you to clarify any ambiguity or uncertainty in your processes as you create stable, repeatable processes and comprehensive documentation. As you're presented with new challenges and opportunities in the future, you can mindfully assess and adapt your established processes as needed instead of relying on ad hoc solutions.
If you'd like to learn more about how you can start automating your business processes, just click on "Contact" to reach out to us.


Keeping your databases in sync can be tricky when you have different teams using different software, but Unito makes it easy to keep everything up to date. In this video, we'll show you how to get started with syncing Google Sheets and Airtable with Unito. Read Unito's detailed Google Sheets setup guide here for more information.
As most in the automation space already know, Zapier is a great no-code automation tool for any skill level. It’s easy to get started with, but under the surface, it offers more robust features that advanced users can leverage to build complex automated workflows.
In this post, we’ll share some tips and best practices that will help intermediate to advanced users to navigate some of Zapier’s more technical features, and we’ll give you some of XRay’s own strategies for managing an automated infrastructure.
When you put the concepts in this post into practice, you’ll be on your way to building automations that can effectively automate work for your entire department - or even your entire company.
Filter Your Data for Flexible Zaps
Filters are an underused feature on Zapier that can give you much more control over your Zaps. To use a Filter, add a new action step in any of your Zaps and search for “Filter by Zapier”.
The filter step will stop the Zap from continuing unless it meets certain criteria, which you can set under “Only continue if...:”.
For instance, if you’re setting up a Zap to handle your clients database, you can use a filtering step to only keep going if the client’s status is “Active”. You could use your first steps before the filter to update the client’s record with relevant Google Drive folders and links, and then send a kickoff email only to your active clients that pass the filter.
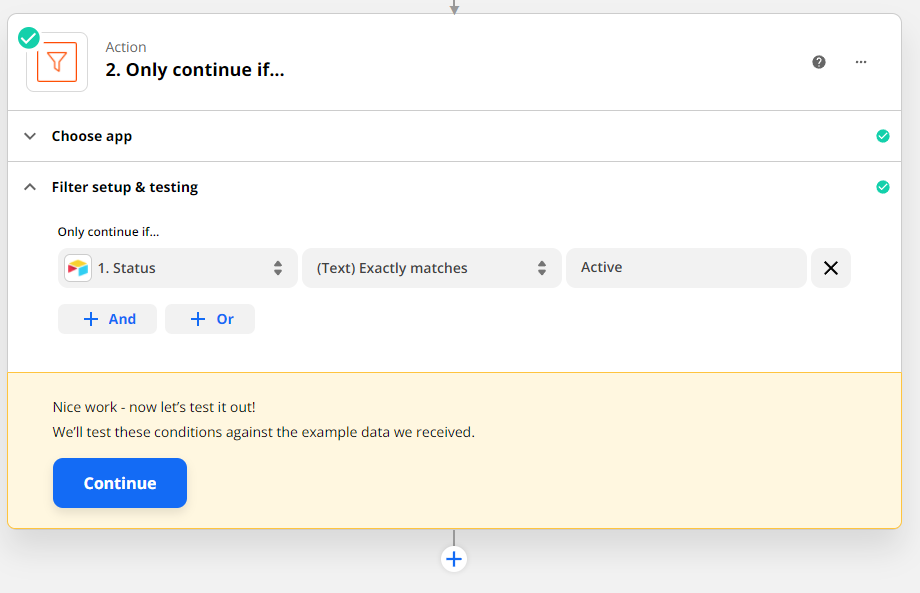
As you’re building your filter step, Zapier will indicate whether or not your test data would have passed the filter. To get the most accurate results while building and testing, make sure to use at least two sets of data: one that should pass the filter, and one that should fail it.
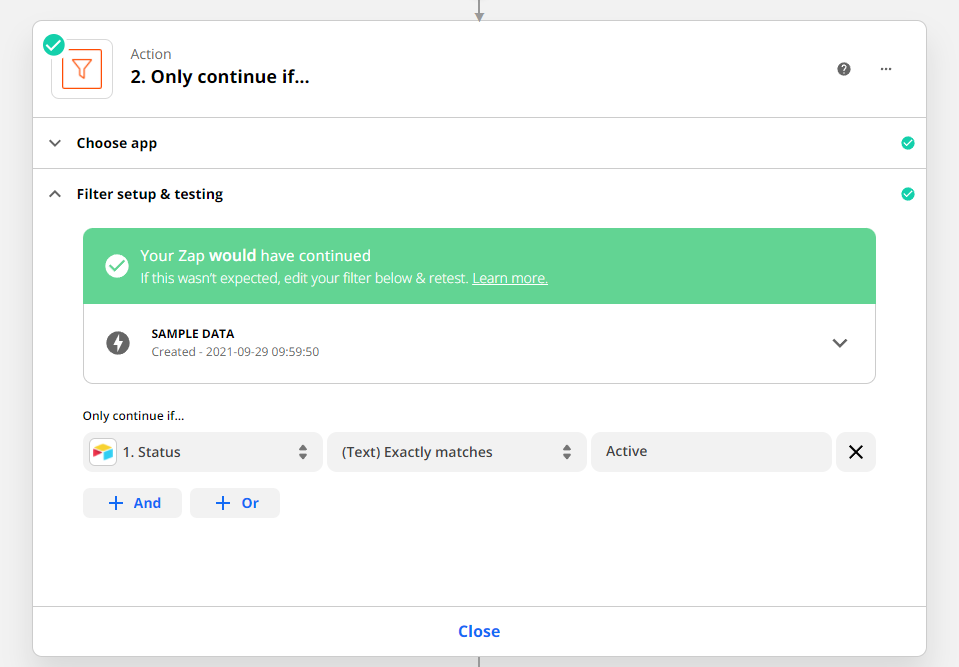
By using filters in your automations, you can cover multiple scenarios with a single Zap instead of making one for each situation, making your automations more flexible and efficient.
Build an Activity Log to Track Automated Actions
As you start creating more automations, it becomes more important to stay aware of what they’re doing and the assets they’re creating. Automations running invisibly in the background can easily create problems as your goals and circumstances change.
Additionally, you’ll likely want to gather metrics on how much time your automations are saving for your team and how your overall output changes over time.
While chat notifications can help you to keep up with your automations on an immediate basis, the best way to gather more meaningful data on your automations is with an activity log.
An activity log is a database that records data each time any of your automations runs. You can build an activity log in any spreadsheet software you prefer, but we’d recommend using Airtable for its views and other features that support automation.
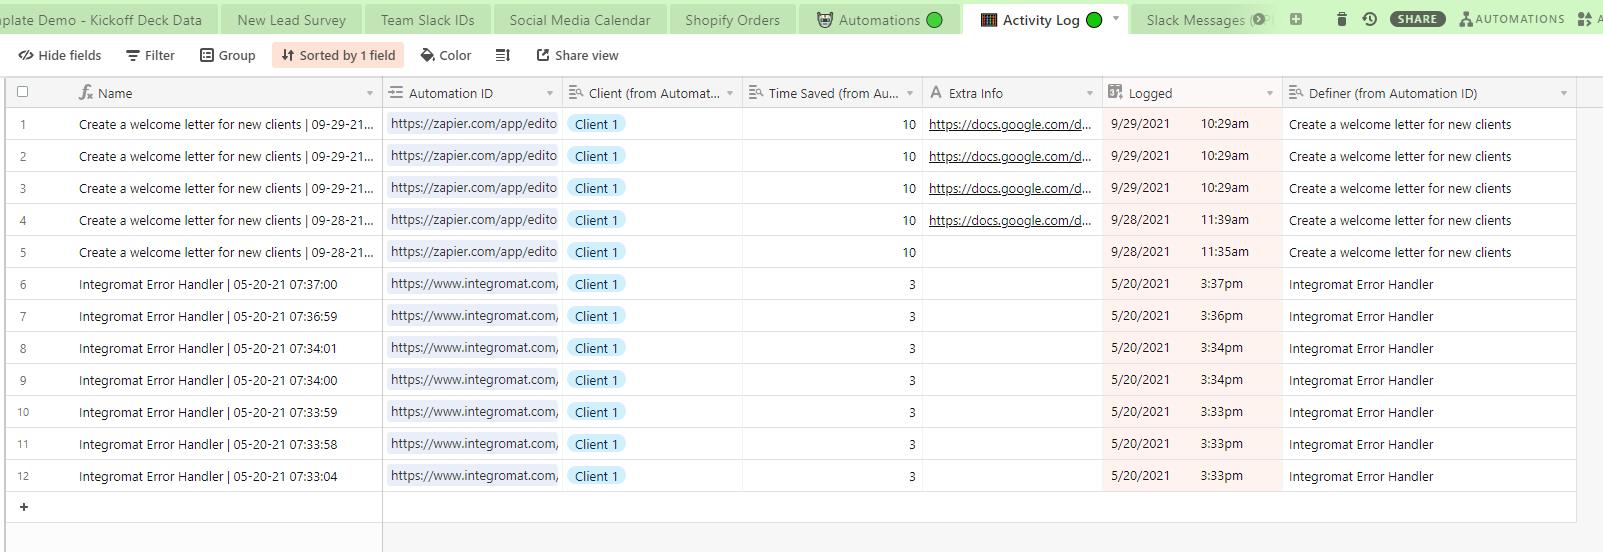
At a minimum, your Activity log should include the automation’s name, a URL where it can be edited, an estimate of the time it saves each time it runs, and a link to any document(s) it created.
To populate your activity log, just add a step at the end of each automation that creates a new record with all of the relevant data.
As your automations run, your activity log will become a useful resource for measuring the efficacy of your Zaps, as well as your automations on other platforms like Integromat.
Three Steps to Debug Your Zaps
No matter your skill level, you're bound to encounter errors in your Zaps from time to time. When you do, you should try to answer three questions to quickly debug your Zap and find the issues causing errors or unexpected results:
1. Did the Zap actually run?
Check your activity log or the Zap history on Zapier. Is there a record of the Zap running when you expected it to? If not, the problem is likely in your Zap’s trigger. If it did run, continue on to Question 2.
2. What data did the Zap run with?
Did your Zap run with the right dataset, and did it include all of the data needed for your Zap to work? If the trigger event alone doesn’t provide you with all of the data you need, you may need to connect to an Operational Database to provide additional information.
3. Is your automation configured to handle the data your Zap ran with?
Did you set up your Zap to work with the data it ran with? This is often an issue when dealing with user-generated data, which can change substantially based on who’s creating it. You may have built your Zap assuming that all of your users would include a subject in their email, or that they would provide a full name in your contact form.
If your Zap doesn’t work with the data it’s encountering, you’ll need to use filters, paths, or other steps to accommodate the real-world scenarios you’re running into.
More often than not, answering these three questions will lead you to the heart of the problem. If you’re still running into issues, you can always reach out to XRay or other Zapier Experts for support.
Make the Round Trip With Your New Assets and Resources
“Round-tripping” is our term for saving or referencing any new documents or resources created by your automation. It’s a simple way to ensure that the output of your automations doesn’t get lost, and can be accessed whenever you need it.
When an automation creates a new asset, be sure to save it (or a link to it) in a relevant database. For instance, if your automation creates a templated Weekly Meeting Agenda for you and your clients, you’ll likely want to save those agendas (or at least the latest one) in your Clients database. That way, you can have a record of everything you’ve discussed with the client week-to-week, and you can send them the agenda in case they’ve lost track of it.

Round-tripping is a simple step, but it’s something that will help to keep you organized as you build an extensive automated infrastructure. When your automations are generating documents, presentations, and reports every hour, it can be easy to lose track of them if they aren’t being immediately saved for reference.
Use Emoji Codes to Create Context in Zapier
Our last tip for this article might sound very simplistic, but it’s an extremely useful way to enhance your Airtable databases for Zapier automation.
As you’re using Airtable in your automations, you’ll notice that Zapier doesn’t always give you much info about your Airtable fields. For instance, if you make a formula field in Airtable, Zapier won’t indicate that it’s a formula field in any way.

In fact, It will appear to let you add data into it as you build your Zap, but the formula field will reject any attempt to directly enter data, whether it’s through manual typing or automation.
Adding emojis to your Airtable column titles is a great way to indicate the field type and how you should handle it as you’re building your automation.
As you can see in the screenshot, we use a 🚫 prohibited emoji for formula fields to indicate that nothing should be entered there, a 🤖 robot face for fields that should be filled in by the automation, and 🙌 raised hands for fields that should be filled in manually later.

All of these emojis show up in Zapier as well, making it easy for you to know what to do with each field. This might not seem very important when you’re building the Zap, but it will be very helpful when you come back to fix a new issue in the automation several months later. When the Zap’s structure is no longer fresh in your mind, reminders like this can be crucial to fixing up a broken Zap.

Automate at any Scale
Zapier is a versatile no-code tool for building automated workflows. As you go beyond building simple automations for yourself and start creating automated workflows to support your team or your entire company, you’ll face many challenges that come with automating at a larger scale.
Staying organized and using all of the tools at your disposal will help you to overcome those challenges and save time for your team.
If you’d like to learn more about building an automated infrastructure, be sure to check out our blog or our YouTube channel. You can also follow XRay on Twitter, Facebook, or LinkedIn.
Google Sheets and Microsoft Excel are great platforms for getting started and prototyping some automation ideas, but ultimately, Airtable offers much better features for anyone looking to build an automated infrastructure to support their company.
As we discussed in our blog and video about using Airtable views as Zapier triggers, Airtable’s features like unique IDs and customizable views make it an indispensable part of anyone’s automation toolbelt.
In this post, we’ll show you how to convert your Google Sheets or Microsoft Excel databases into Airtable in four easy steps. These steps will also work with any program that lets you export a CSV file.
Step 1: Download a CSV of Your Sheet
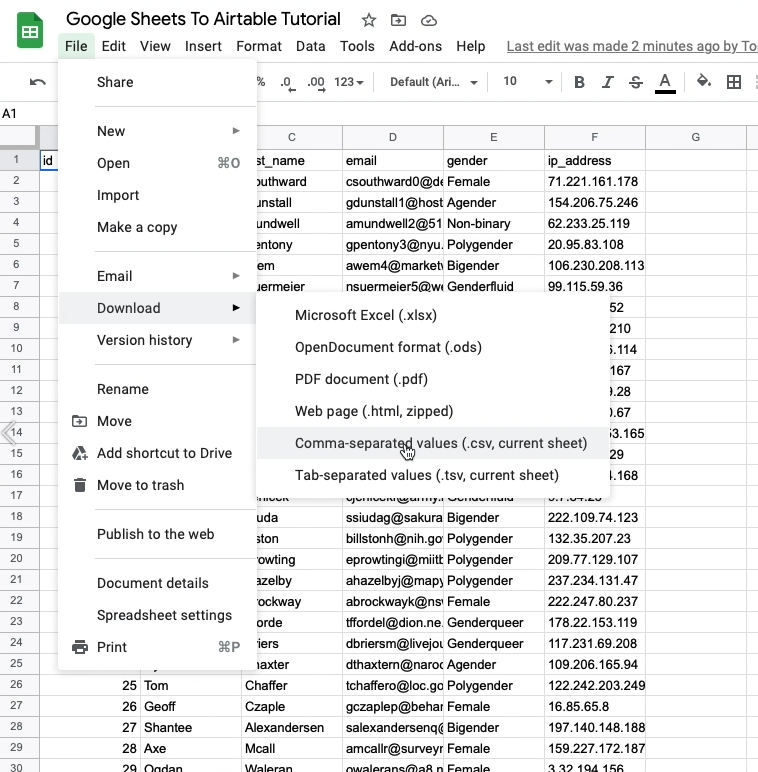
For Google Sheets
Open your spreadsheet in Google Sheets, and download a CSV of your spreadsheet by navigating to: File > Download > Comma-separated values
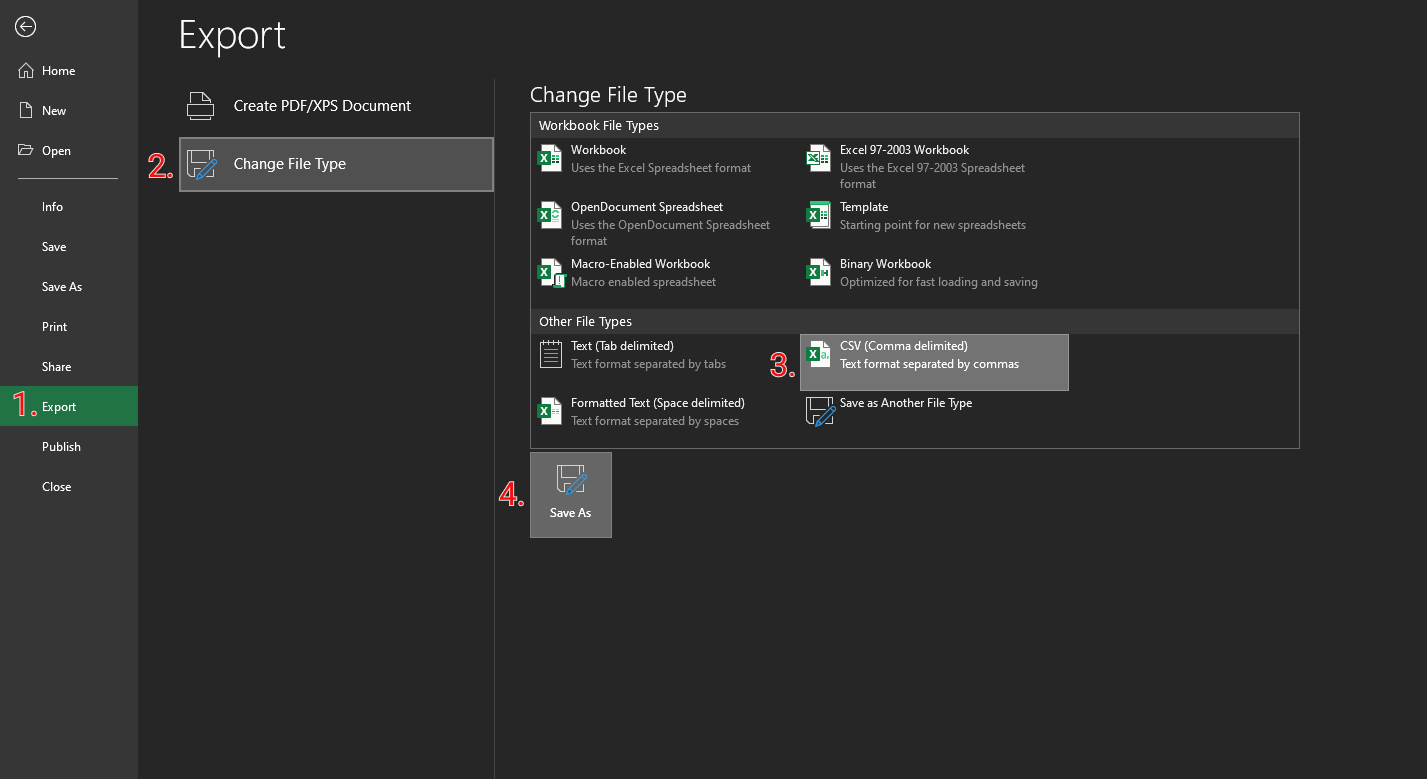
For Microsoft Excel
In the File menu, select Export, then choose Change File Type. Pick CSV under Other File Types, then select Save As to name your CSV and save it in your desired location.
Step 2: Create a New Table in Airtable
Open Airtable and create a new table. Your table can be in an existing base or in a new base. Click on “+ Add or import”, and choose “Import data”.
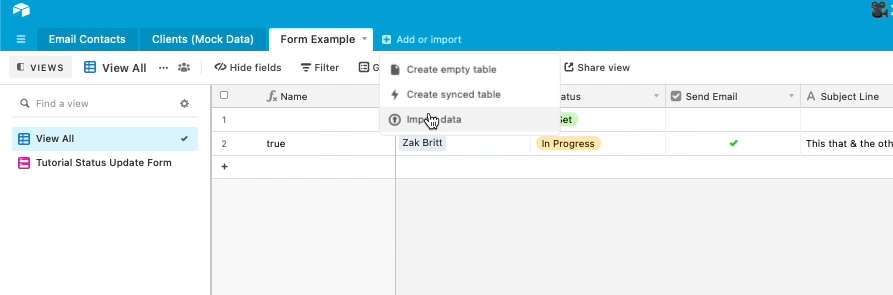
In the menu that pops up, choose “CSV file”
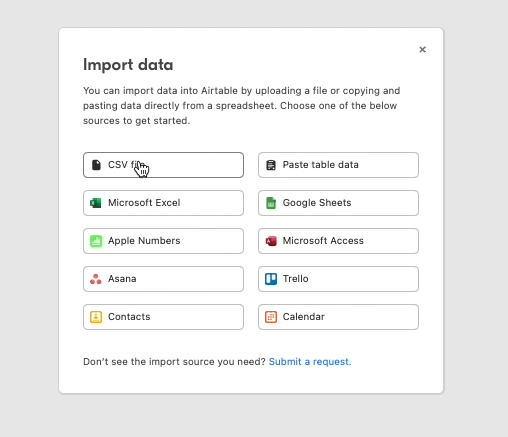
Select the CSV file you saved in Step 1 to upload it.
3. Customize Your Fields
Airtable will automatically select a field type for each column. You can change the field type of each column to better match the data it contains.
Note that some field type options (such as email) won’t be available until you click import. If you don’t see the field type you want, you can leave the field as-is for now and change it once it’s finished importing.
Just click “Import” to finish importing data.
4. Finish Editing Your Field Types
If there are any remaining fields you want to edit, just double click on the field name to change its type.

That’s it! Your Google Sheets or Excel spreadsheet is now in Airtable, and you can start using it as an operational database for your automations.
If you’d like to see some examples of what you can build with Zapier and an Airtable ODB, check out our other blog posts and our YouTube channel. You can learn how to build templated slide decks, upload your Zoom recordings to a YouTube channel, and more.
If you have any questions about how automation can improve your workflows, check out our blog or our YouTube channel. You can also follow XRay on Twitter, Facebook, or LinkedIn.

Interest in automation has exploded over the last few years. Each day, more businesses are starting to understand the potential of letting robots handle the boring and repetitive parts of their workflows.
However, many entrepreneurs and business leaders that are just beginning to explore automation are often unsure of where to begin. Amongst the hundreds or thousands of processes that make up your company’s day-to-day work, where are the best opportunities for automation? And what work should remain in human hands?
In this post, we’ll take a quick look at how to identify the tasks that should and shouldn’t be automated, and we’ll share our handy web app that lets you immediately discover the automation potential of any piece of software.
CAST: The Litmus Test for Mindful Work
Let’s start by looking at the kind of work you don’t want to automate: CAST.
CAST stands for creative, analytical, strategic, and thoughtful, and it’s our method for determining if a given task is worthy of human attention.
If it requires you to be creative, analytical, strategic, or thoughtful, then it’s likely a mindful task that’s worth your time. If not, then it might just be a robotic task that’s ideal for automation.
Creative
A creative task would be something like designing a webpage or newsletter, brainstorming ideas with your team for your latest project, or devising a new solution for a difficult problem.
Analytical
Analytical tasks require you to apply your experience and expertise to derive insights from data, evaluate the success of a given process, or conduct critical research and investigation.
Strategic
Strategic tasks ask you to think about the long-term plan for a project or company; they lean on your decision-making skills and rely on your ability to devise and stick with a broader mission and vision.
Thoughtful
Whenever people are involved, there’s a good chance that you need to approach the work in a thoughtful way. Communicating with customers, collaborating with other departments, or going through team-building exercises all require a personal touch (at least some of the time).
Ultimately, the goal of automation is to free up more of your time to focus on CAST tasks; to spend more of your day on work that actually necessitates and merits
Robotic Tasks: the Best Candidates for Automation
If a task doesn’t require any of the CAST skills, then there’s a strong possibility that it’s robotic work. In other words, it’s quite likely a task that could be performed by software.
Robotic tasks are repeatable. They’re meant to be done the exact same way every time and don’t require any interpretation or specialization. They can be done by just about anyone, as they don’t require any particular skill set or knowledge beyond a general competence with the software involved.
Some common robotic tasks would be setting up Google Drive folders and communication channels for a new client, or copying and pasting some text into a template.
Robotic work is necessary to keep everything running, but it’s not fulfilling to perform and it doesn’t make you a better employee.
Take a look at some of your most common daily workflows and break them down into separate tasks. Which ones involve CAST skills? Which ones are robotic?
XRay.Tools: Find Out How (and if) You Can Automate Your Software
Once you’ve identified some robotic tasks, the next step is to see if the software you use for those tasks can be automated with no-code and low-code platforms like Zapier and Integromat.
When we realized that our own team was wasting too much time on the robotic task of looking up automation integrations, we built a simple little search engine to make it quicker and easier.
Just go to XRay.Tools and enter the name of a program, like Google Docs or Outlook. The app will pull up all of the available integrations on common no-code and low-code platforms.
Even if no integrations show up, it’s still possible to automate your app so long as it has an API. It will just take some more technical knowledge to write the necessary queries. You can reach out to XRay if you’d like to learn more about automating without pre-built integrations.
Automate with Purpose
With so many possibilities, it can be difficult to know where to start with automation. However, if you stick to the goal of creating more time for the work that matters, it often becomes much easier to find the best opportunities for automating your workflows.
Just remember the CAST criteria and start looking for the work that you and your team want to be doing; then, start automating the rest.
If you'd like to learn more about using no-code automation to support mindful work, check out our blog or our YouTube channel. You can also follow XRay on Twitter, Facebook, or LinkedIn.

The no-code/low-code automation space features a multitude of great tools. Each one has its own strengths and use cases, which is why we at XRay just use whichever app is best suited to the task at hand, whether it’s Zapier, Integromat, Unito, or something else.
Sometimes we’ll even use multiple platforms to build a single automation, passing the baton from a Zap to an Integromat scenario to leverage the best features of both apps.
In this post, we’ll show you how you can send webhooks from Zapier to Integromat to build an automation that uses both pieces of software. Finishing off a Zap with a few Integromat steps will let you use some of Integromat’s unique integrations while still building most of your automation with Zapier’s simple and intuitive UI.
Required software
• Zapier: Starter subscription or higher
• Any software required to build your desired automation
Steps:
• Start with an existing Zap
• Create a scenario and webhook in Integromat
• Add a webhook step to your Zap
• Run your Integromat scenario and test your Zap
Start with an existing Zap
To see how the webhook will transfer data from Zapier to Integromat, it’s best to start off with an existing Zap that will already have some data to work with. Just copy any Zap in your library, and try out the webhook step in the copy.
We’ll be adding a webhook to our Zoomtube Zap, which automatically uploads our Zoom recordings to YouTube and transcribes them with Trint. By sending over some key data about the Zoom meeting and recording in our webhook, we’ll be able to use Integromat’s more extensive list of Zoom integrations, like updating and deleting meetings.

Create a scenario and a webhook in Integromat
Create a new scenario in Integromat, and add a new module. Search for “webhooks”, and choose “Custom Webhook” from the list of results.
Click on “add” to create a new webhook. Integromat will automatically generate a name for this webhook, but it’s generally a good idea to rename it to clearly reference the Zapier automation that you’ll be sending data from.
Copy the webhook address to your clipboard, and then return to your Zap.
Add a webhook step to your Zap
In Zapier, add a new action to your Zap and choose “Webhooks by Zapier”. Note that you will need a premium Zapier account to use this feature.

Under “Action Event”, select “POST”. In the action setup, paste the webhook URL you copied earlier into the URL field. You can likely leave the payload type as “Form”, but you may need a different type depending on the apps you’re using as part of your automation. For our example with Google Drive, YouTube, and Zoom, form will work just fine.
Now, under the “Data” section, create a list of key/value pairs, where the key describes the data (Name, Date, etc.) and the value represents the data itself (Mark, 10/20/2022, etc.). In the value section, you’ll probably want to include data from the previous steps in your Zap, like how we’ve included the file name, download link, topic, and other key information about our Zoom recording.

For now, you can leave all the remaining options as they are. You may need to adjust the parameters depending on the apps you’re using. Checking the API documentation for your app is a good way to understand how you’ll need to send and format data if you’re running into any issues.
Click on “Continue”, but don’t test your Zap just yet.
Run your Integromat scenario and test your Zap
Open up your Integromat scenario again and click on “Run Once”. This will trigger your webhook module to start actively waiting for a webhook.

Then, go back to your Zap and test it to send the POST webhook. Finally, go back over to Integromat, and you should see a 1 in the bubble over your module, indicating that it’s received a webhook. Click on the number to see the data sent over. It should match the key/value pairs you set up in the previous step.

Now we can perform any additional steps that we want with this data in Integromat.
The best of both worlds
Zapier supports more applications than any other low-code automation platform out there, but Integromat often has more options for the apps that it does support. Since they both offer different strengths, we say: why not use both?
By sending a webhook from Zapier to Integromat, you can use both apps to build an automation and take advantage of Zapier’s simplicity and Integromat’s depth of integrations all at the same time.
If you’d like to learn more ways to connect the two platforms, stay tuned for a future post about sending webhooks in the other direction - from Integromat to Zapier.
For now, check out our blog or our YouTube channel. You can also follow XRay on Twitter, Facebook, or LinkedIn.
Zapier and Integromat are the two biggest players in the automation space. Both are great solutions for building low-code automations, but each one has its own unique strengths.
When you want to leverage the technical depth of Integromat and the easy-to-use interface of Zapier at the same time, you can use webhooks to connect your Integromat scenario to a separate Zap.
By connecting Integromat to Zapier, you can hand your automation’s data off from one platform to the next, letting you take advantage of Zapier’s wider range of available integrations while still using Integromat to build the core of your automation.
NOTE: If you'd like to move in the opposite direction and send a webhook from Zapier to Integromat, then check out our other post here.
Required Software
• Zapier: Premium Account (“Starter” or higher)
• Any apps you want to automate
Make an Integromat Scenario, or Choose an Existing One
For this tutorial, you’ll need to start with a functioning Integromat scenario. It can do whatever you’d like, so long as it has some dynamic data that you can use to test the webhook.
Create a webhook in Zapier
In Zapier, create a new Zap. Choose “Webhooks by Zapier” as the app, and “Catch a webhook” as the trigger. Continue, and you’ll see that Zapier has generated a URL for that webhook.

This trigger will “listen” for any app that sends some data to that URL, such as your Integromat scenario.
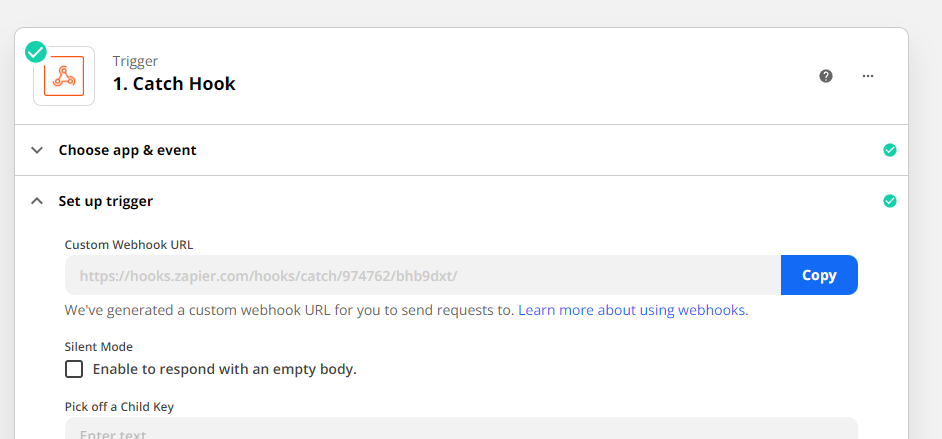
Copy the URL to your clipboard, then return to Integromat.
Add an HTTP module in Integromat
Add a new module to the end of your Integromat scenario. Search for “HTTP” as the app (NOT “webhook”). Set the method to POST, and set the body type as “Multipart/form data”. Some apps may require you to send the data in a different format, but form data will work with most.

Add a key/value pair for each piece of information that you want to send over. The key will be the description of the data, while the value will be the data itself.
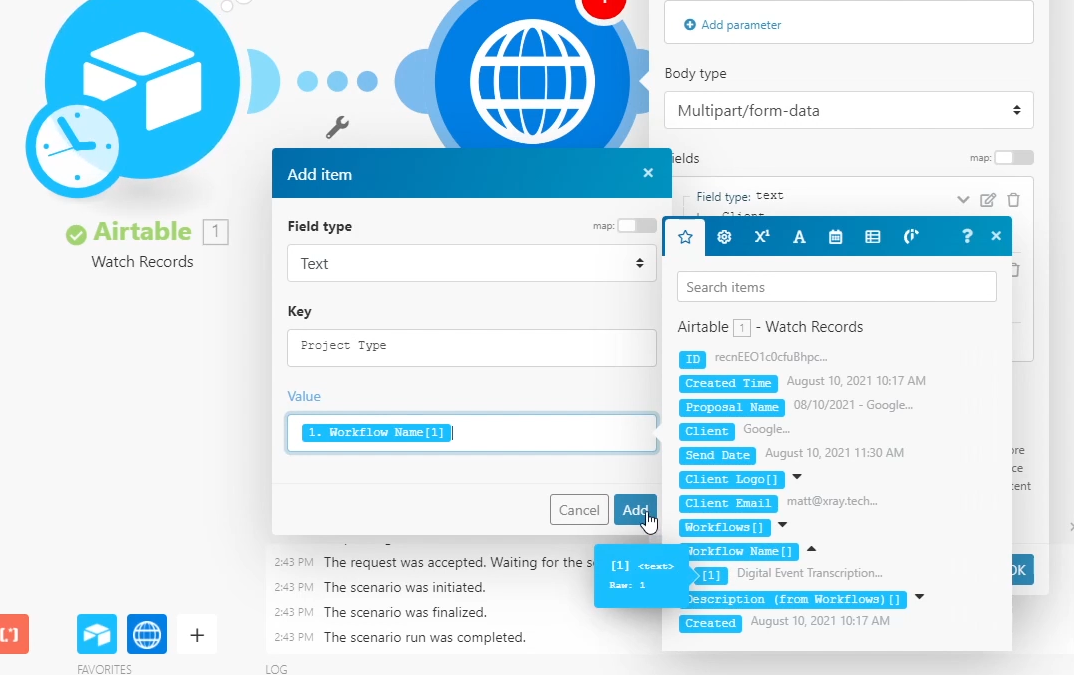
For example, if you want to send over the name and title of someone in your company directory through this webhook, “Name” and “Title” would be the key while “John Smith” and “Sales Associate” would be the values.
Once you’ve added each key/value pair that you want to include, it’s time to test the automation.
Sending a Test Webhook
To test this automation, you’ll want to have easy access to both Integromat and Zapier at the same time.
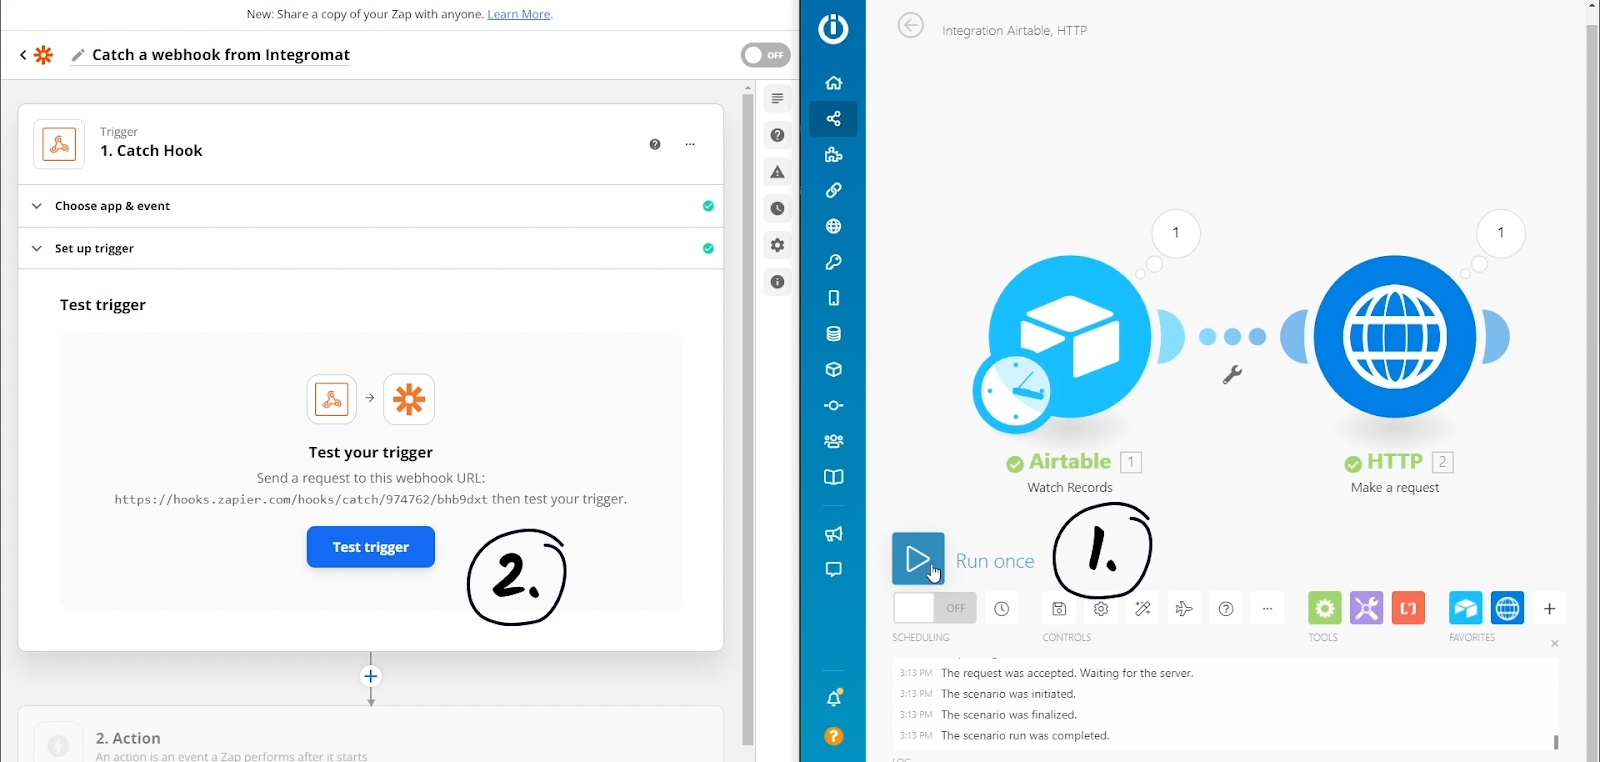
First, run your Integromat scenario to send the webhook. Then, test your Zapier trigger to catch it. Your Zap should pull in some data from Integromat, including all of the information you specified in your form data.
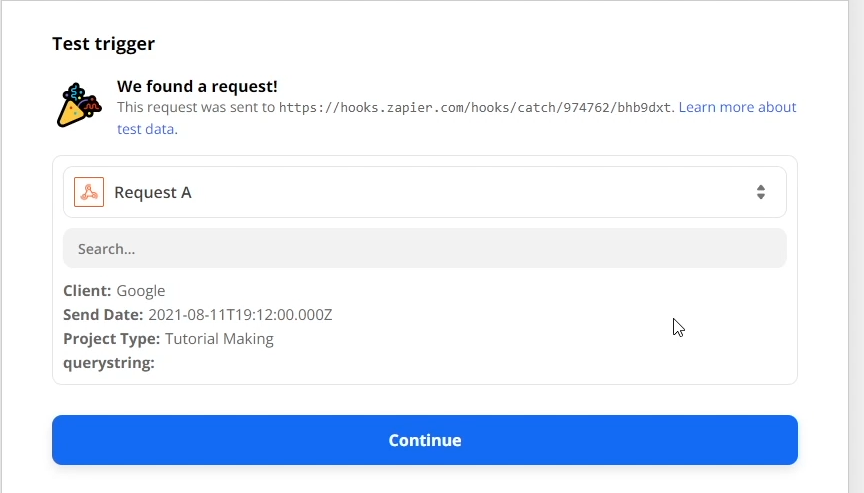
Now you can use that data to continue your automation in Zapier. As you can see in our example, you integrate the information into your Zaps just like data from any other app in Zapier. Here, we’ve included it as part of a Slack message.
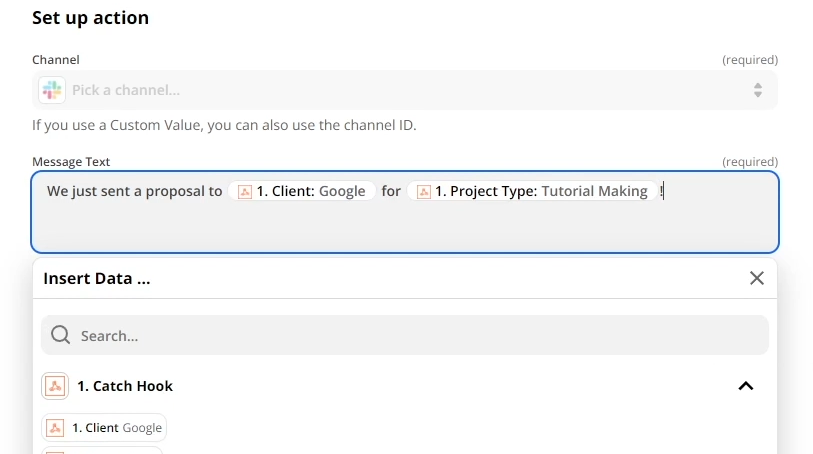
Combine Your Low-code Tools for the Best Results
Now you can send webhooks from Integromat to Zapier in just a few steps.
With so many different automation apps out there, it’s always good to experiment with different software to see what it excels out. If you just pick one app to specialize in, you’ll miss out on the unique benefits that all the others offer.
Why choose between Zapier’s huge library of supported apps and Integromat’s highly technical integrations when you can just use both? All it takes is a simple webhook to connect both in one automation.
If you’d like more automation tips or want to know how XRay can help you to refine your workflows, check out our blog or our YouTube channel. You can also follow XRay on Twitter, Facebook, or LinkedIn.

A company’s value is based on three attributes: their people, their processes, and the assets they produce.
Each of these attributes is closely related to the other. At any company, time is the most valuable resource that people have. They devote their working hours to executing the company’s business processes, ultimately producing digital or physical assets for the company’s clients or customers. In this cycle, optimizing your processes means finding ways for your team members to produce more and better assets in less time.
One of the best ways to boost your team’s productivity and efficiency is with asset templates. No matter what field you’re in, there are always some assets that you need to produce time and time again. Ultimately, your clients’ or customers’ satisfaction with your company will often depend on the quality of the assets you produce. Errors in contracts, presentations, or deliverables can undermine their experience and reflect poorly on your company. Rather than starting from scratch each time, or copying and updating the previous version, the most effective approach for producing commonly-required assets is to create easily accessible templates. Building good templates will reduce ramp time while creating assets, give your teams better access to accurate information, and in many cases will even let you fully automate the process of generating the assets themselves.
Let’s take a look at how you can start creating automation-ready asset templates right now.
Make asset templates for everything you duplicate, before you think you need them
Let’s start at the beginning. When should you begin making templates for your commonly-used assets? In most cases, the answer is: as soon as possible. The moment you’ve identified that you’ll need to create a similar asset many times over, you should start creating a template for it. If you’ve had two successful meetings using a similar presentation deck and you’ve got another similar meeting on the horizon, that deck needs to become a template. If you’ve signed two clients with similar contracts, that contract needs to become a template. If you’ve created two similar style guides for your clients, that design needs to become a template.
When you need to re-create an asset but don’t have a template, you’ll run the risk of making a mistake that we’ve all made at one time or another. It goes something like this: You have a kickoff meeting with a new client in a couple of days. At every deliverable meeting, you present a slide deck with largely the same content every time. Rather than starting from scratch each time, you always copy the previous version and update the relevant info - dates, company names, and a short summary of the deliverable. At the meeting, it’s all going great until slide 4 - because on slide 4, you forgot to change the client’s name from last time. It’s embarrassing, and totally preventable with or without automation.
The “copy and update” workflow may seem convenient at first, but it’s a reactionary way of working. It’s error prone, particularly when you’re short on time - and since it’s an approach which encourages doing things on the fly, it will often leave you short on time. With a template, you can leave obvious placeholders and create a checklist of what needs to be entered each time. In many cases, having templates created and planned out in advance will let you enter information gradually over time rather than rushing to get it done at the last minute, since you’ll know what you need to do ahead of time. There will always be some chance for human error (unless you automate the process), but using templates early and often will make for more reliable, consistent asset creation.
Build your templates with automation in mind, even if you don’t end up automating them
As you build your templates, try to structure them in a way that can enable future automation. You’ll find that the same qualities that make it easy to automate the creation of an asset also make it easier for humans to use the template.
One of your first priorities when building your templates should be to reduce ambiguity. While humans can work with ambiguity, it can often be a waste of time to ask your team members to sift through vague information and instructions. Robots on the other hand can’t handle ambiguity well at all, so you’ll need to eliminate it entirely if you hope to automate your templates. Wherever possible, identify specific variables/segments of your document that will need to be changed. Don’t leave “SmithCo” in your template file; instead, remove the name and replace it with a sort of pseudo-variable that a computer can recognize - and that a human can easily identify, as well. Use a consistent syntax like {{company_name}} and {{start_date}} to give each piece of information a unique identifier. Right off the bat, it will signal to anyone working with the template that the text in question needs to be replaced. In the long term, it will make it much easier for a program like Zapier to find and replace the data.
The next priority is to minimize the necessary changes for each iteration. Much like reducing ambiguity and identifying variables, keeping changes to a minimum will help to make things easier whether you end up automating or not. Making fewer changes for each asset that you need to create will save time for your team if they’re using your templates manually, and will make things simpler when you move on to automation, as there will be fewer data points to keep track of. When creating and refining your template, use generalized language whenever possible to accommodate whatever data might be entered to fill in the placeholders. If you’re referring to people, use gender-neutral terms so the template won’t need to change based on the name of the person mentioned. If you’re referring to quantities, you may want to use terms like “report(s)” to fit any number.
Ideally, if any text, information, or media isn’t a variable that you’ve previously identified, then you shouldn’t have to change it when you’re using the template.
Asset templates should be easy to access and update
Version control: the secret weapon for making your deliverables better each time.
Your asset templates should only ever get better over time. At the very least, you certainly want to maintain their quality and avoid producing outdated documents. The key to putting your templates on an upward trajectory is to establish version control and convenient access for the people who need it.
Everyone on your team who works with a certain asset template should know exactly where to find and how to use the best, most up-to-date version of that template. Fortunately, a lot of tools have easy, out-of-the-box solutions for version and access control. For instance, Google Drive allows you to turn any of your documents into a template in just a few steps, and lets you grant edit or read-only access to whomever you’d like. It also saves previous versions of every document, so you can revert back to older iteration if you change your mind about some recent changes. For designers, a web-based tool like Figma lets everyone work on the same file at the same time, so you don’t have to worry about syncing changes while two designers are updating different parts of a given asset.
Whichever tools you use, the key is to make sure that people on your team aren’t working on old documents or starting from scratch. Creating and updating asset templates lets your whole team leverage the momentum of hundreds of hours of accumulated work. Even your newest employees will be able to easily create assets that match your company style.
As you use your templates, you’ll frequently find reasons to update them. Template updates should typically be led by the people who use them directly. The people who compile and deliver the final version of the template are the ones who are best poised to see where improvements can be made, and their experience and insight should drive any changes that are made to the template. Just make sure that any changes you make to your templates have a valuable purpose. Your updates should be focused on saving you time, simplifying the process when possible, reducing errors, and increasing the quality of the final product.
Well-designed templates pave the way for automation
Creating templates will always let you work more efficiently, but in some cases, templates may be the first step towards eliminating the work altogether. Under the right circumstances, the work of customizing a templated asset can be taken over by a robot (which is what we call any automated system, even if it’s just software).
So how can you tell which templates can be automated? As with any task, the CAST rule applies. If the task is creative, analytic, strategic, or thoughtful, it probably can’t be automated. However, if your asset template just requires you to input simple, known information without any CAST qualities, it might be well-suited for a robot. A kickoff onboarding presentation is a perfect example of the kind of asset creation that can be automated. The only pieces of content that need to change each time are timelines, client name, points of contact, and final deliverables. All of this information is known ahead of time, and doesn’t require any sort of interpretation or elaboration - just copying and pasting, the quintessential robotic task.
You should also consider which tools are involved in the asset’s creation. Nocode tools like Zapier and Integromat let you do nearly anything with common productivity software like word processors, spreadsheets, and presentation tools. However, they don’t have as many integrations with creative software. You’re likely not going to be very successful if you try to automate the process of designing a UI in Sketch, for instance (though AI advances may change that one day). However, you could automate a presentation that you use when delivering the asset to a client.
There are many moving parts in every product and service, and there are many things that just can’t be automated (for now). The key is to always look out for ways to position your asset templates and enable robots to automate some or all of the work away from you.
Get started with templates
Assets are the culmination of your value-generating business processes. All of the time and energy that your team spends at work are reflected in these documents, presentations, and designs. They’re the tangible products that your clients and customers can get value from, even after your engagement has ended.
By making sure your templates are as consistent, reliable, and accessible as possible, you can ensure that your assets will only get better over time. They’ll also act as learning material for new team members, who will be able to start producing quality content without skipping a beat. You’ll even be able to leverage your templates to create assets through automated processes, removing robotic work for the humans in your team.
Action Steps:
- Identify a frequently-used document (or type of document)
- Think about any document that you keep updating and sending out repeatedly
- Create a template for that document
- Using software like Google Drive will make it easy, but you can use any software that’s relevant to the type of document.
- Save the Template in a place where your team can access it, and make sure to grant access to anyone who needs it
- Use the template the next time you need to send out the document
- Evaluate the template and determine if its a good candidate for automation


Client onboarding is a critical task for any service company. Each client needs to be set up the right way in your internal systems, and needs access to key documents, contracts, and communication channels that will guide your engagement.
But as important as onboarding is, most of the tasks that make it up are the kind of repetitive, robotic processes that are perfect for automating to save your team's valuable time and energy.
In this post, we’ll show you an example of the kind of onboarding automation that we build for our members at XRay to help smooth and expedite their onboarding process for clients.
These automations ensure that onboarding tasks are accomplished cleanly, consistently and correctly every time as it creates and shares resources.
Keep in mind that the automation we’ll describe in this post is just a sample of what an automated onboarding workflow can do; members can substitute any software tools they prefer and add additional actions to fit their workflows.
Let's get into it!
How the automation works
In a nutshell, this automation will create internal and shared resources whenever you get a new client.
The automation creates some shared Google Drive folders, sets up a Slack channel for day-to-day communication with the client, creates an Airtable base for your internal documentation and finally sends an email to your new client with a survey for them to complete and links to the docs that were just created.
This automation will make onboarding a more consistent and timely process and eliminate much of the manual repetitive work of onboarding, letting your team focus more time on high-touch interactions with their clients.
Here are the steps in Zapier that make up this automation.
Step 1. The initial trigger for this automation is when a lead is updated to “Closed/Won” in HubSpot (or the equivalent on another software tool such as Pipedrive or Sales Force) or an internal Airtable form is manually filled out.
Step 2. The automation creates a “Customer” folder in google drive.
Step 3. Inside that new customer folder, the automation creates a “Resources” folder...
Step 4. ...and a “Project updates” folder.

Step 5. The automation adds a Statement of Understanding to the “resources” folder by copying an existing file. You can use an automation like this to share templated docs that set expectations, or to share copies of signed contracts.

Step 6: Creates a new Slack channel with the client’s name.

Step 7: Creates a record inside of Airtable as an internal activity log. This is where you can track each action the automation performs and check on the files it creates.

Step 8: Sends an email to the new client to make them aware of their Google Drive link, and prompts them to fill out a short survey. You can fully customize templated emails in Zapier with dynamic data and links to helpful resources.
The Benefits of Automating Your Onboarding Workflow
Consistency
Folders will be created in the right place every time, channels are created uniformly, and you can trust that your onboarding process will be consistent and repeatable.
This allows you to delegate this process to people on your team without needing to teach them the ins and outs of the process. The consistency that automations brings to the table allows you to trust your onboarding process every single time.
Customer Preparedness
New customers and clients will be better prepared for onboarding and their expectations will be set in a more consistent manner. They will better understand how to enable you as their service provider to do what you do best.
Surveys allow you to get any information you need from your clients and paint a clearer picture of your future partnership. Setting client expectations can be vital, and there is not a better, more consistent way to do so.
Progress Tracking
You will be able to consistently track your clients progress during the onboarding process and see at a glance if your client has filled out their surveys.
Everyone has an onboarding checklist, and automating a large chunk of those items can give you a clear picture of where every client is on that timeline. Items will be automatically checked off the list, freeing your time so you can do the manual high-touch things that set you apart from other service providers.
How to Get this Automation
If you want to integrate an automation like this into your workflows, an XRay membership may be a good fit for you. We could build the first version of an onboarding automation in the first 30 days of your membership, and then refine it and build additional workflows that meet your specific needs.
If you want to know more about our services and methodology, visit XRay.Tech and reach out to us; we would be happy to talk with you!
You can also check out our blog or our YouTube channel, or follow XRay on Twitter, Facebook, and LinkedIn.
Date and Time Techniques with Formatter by Zapier
With scheduled actions playing such a large role in automation, it’s no wonder that Formatter by Zapier includes a helpful selection of tools for manipulating date/time data.
These tips will show you some of the possibilities with Zapier’s Date/Time formatter steps, but there are many advanced use cases that we won’t cover here. We encourage you to explore the Formatter step on your own and try out everything it has to offer; you may be surprised at how much it can enable your automations to do!
To get started, just make a Zap with any trigger, and add a step with “Formatter by Zapier” as the app.
Adding and Subtracting Time
Adding time to a given date can be a very convenient way to schedule automations. For instance, you might want to send a check-in email to every new client one week after their project start date. Or you may just want to add some text in a formatted email to remind them about an upcoming deadline.
No matter what you want to add or subtract time for, Formatter makes it very easy. Just select “Date/Time” as your action event and choose “Add/Subtract Time” from the Transform list.
Then, enter your date you want to work with into the input field, and add the amount of time you want to add or subtract into the expression field.
You can write the time interval you want to add in plain language just by typing “1 day” or “4 minutes”. To subtract time, just make it a negative value like “-4 years” or “-3 weeks”.
Test the step, and you’ll see the output. You can then use this result in additional steps in your automation.
Comparing Two Dates
Comparing two dates is a useful method for determining how much time has elapsed between them, or for letting your automations figure out whether or not the two dates match. You could even set up a filter step to only perform certain actions when the two dates aren’t the same, or when they’re at least 10 days apart.
To use the comparison function, just pick “Date/Time” in a new formatter step and choose “Compare dates”. Enter your start and end dates in the appropriate fields, and specify the format of your dates if needed.
Test the data, and Zapier will calculate how much time passed between the two dates, and will indicate whether they’re the same date or not with a boolean “true/false”.
Reformat Date/Time
Sometimes when you’re working with automations and programmatically generated dates, you’ll end up with a long, ugly date and time string that’s not very easy for people to read. Other times, you’ll simply want to change the order of the month and the day for your international customers.
In either case, you can reformat your dates by picking “Date/time” and selecting “Format” from the transform list.
Just enter the date you want to reformat into the “input” field, select a new format for it from the list, and specify a timezone. You can also select the format that your input is using just to make sure that Zapier interprets the data correctly, but it usually works on its own anyway.
Test the step, and you’ll get a reformatted date as the output, which you can use in any subsequent steps in that Zap.
Enhancing your Zaps with Formatter
Formatter is one of the most useful and versatile tools for taking your Zaps up a notch. Whether you want to add some calculations and logic to your automations, or just want to make your text a bit more readable, Formatter will help you to sort out your date/time data.
You can find some more Formatter tips on our previous post here.
If you’d like to learn more about no-code and low-code automation techniques, check out our blog or our YouTube channel. You can also follow XRay on Twitter, Facebook, or LinkedIn.

Zapier is a useful automation tool when it works, and when it doesn’t it can be frustrating and time consuming to manage Zap errors without a process in place.
At XRay.Tech we’ve developed some basic steps to take when troubleshooting errors in your Zapier workflow.
- Go to Zap history
- Click on Zaps Run
- Click on whichever task error you want to fix
- Duplicate your Zap before making any changes (Super important - Zapier does not have version control)
- Review Zap for errors, and edit the step that needs fixing (Note that when you edit your Zap, it automatically turns the Zap off)
- Return to original Zap, make your edits, and turn the Zap on
- Go to Zap history
- Select and replay
First, visit your Zap history, located on the left-hand sidebar menu on your Zapier dashboard.

Next, click “Zap Runs.”

A list of all your Zap runs will appear. You can filter the list using the status bar dropdown menu located above the run Zap list.
Locate the Zap with the error you want to fix.
Be sure to duplicate your Zap before attempting to troubleshoot! Zapier does not have version control editing, so it’s best to copy your Zap and work with a duplicate until you know how to fix the automation so that it runs correctly.
To duplicate your Zap, navigate to “My Zaps” and use the dropdown menu to the right of the Zap.

Once you’ve duplicated your Zap, open the duplicate and locate the error.
Make changes and check for errors. Note that by default, Zapier turns off your Zap as soon as you edit it.
If your changes to the duplicate Zap fix the error, leave it off and head back to your original Zap, make those same changes, and turn the original Zap back on. You can delete the duplicate Zap once the original runs properly.
After fixing the original Zap, navigate to Zap History again and select the Zap runs related to the Zap you just fixed. Hit “Play”, located in the menu just above the Zap runs list. This should run the Zap correctly.

And that's it. Follow these steps (and add in a healthy dose of Googling), and you'll likely be able to address most of the errors that you encounter while using Zapier.
If you'd like to learn more about building and maintaining no-code automations, check out our blog or our YouTube channel. You can also follow XRay on Twitter, Facebook, or LinkedIn.

One common question that we get at XRay.Tech is: is it possible to automate this?
While we’re always happy to help people with their automation questions and goals one-on-one, we also want to provide resources to let anyone figure out what’s possible with automation in seconds. That’s why we recently created XRay.Tools, an automation search engine that lists the available triggers and actions available for any given app.
In this post, we’ll give you a quick walkthrough of XRay.Tools and show you how can create and share a personalized tool belt.
Adding Tools to Your Tool Belt
First, go to xray.tools.
Enter the name of an app that you’d like to automate into the search bar, and select the correct program from the list of results. Keep adding apps until you have a complete tool belt - for instance, all of the apps that your marketing department uses on a daily basis, or all the software involved in your client onboarding process.
Each result will show you which low-code platforms have integrations for that app. For now, XRay.Tools will only show results for Zapier, but we’ll add compatibility soon for other popular platforms like Integromat.
Then, you can click “Get Shareable Link” to generate a link to your toolbelt. You can share this link with automators like XRay.Tech to help start a conversation about what you’re looking to automate.
View Triggers and Actions
You can click on the “View →” button to see a list of all the available triggers, actions, and searches for that app. For instance, let’s take a look at what XRay.Tools shows us for Slack.
Triggers

Triggers are events that start an automation. Picking the right trigger is important, as you’ll often want your automations to run only under specific circumstances.
As you can see, Zapier offers a wide range of triggers for Slack. You can fire an automation whenever anyone posts any message to any public channel, or have it run whenever someone posts to a specific channel.
When planning an automation, seeing the available triggers can help you decide how you want to structure your workflow.
Actions
Actions are automated events that occur after an automation has been triggered. Below are a list of all the available actions in Slack, which mostly pertain to sending messages or managing users and channels.
It’s important to note that your automation can include a trigger from one app and actions from other apps. For instance, you could build an automation where any message sent in a given Slack channel prompts the creation of an email draft in GMail.

Searches
Searches are similar to actions, but are focused on finding pieces of data to use in future steps. The available searches in Slack let you find messages, emails, users, etc. The search step itself just locates a piece of data; you’ll need to add another action step to actually use that data.
For example, you might use “Find Message” to find a message containing the word “Sales”. Then, you could add an action that copies the text of that message to a Google Sheets spreadsheet that your sales team can review later.

A Convenient Resource for Beginners and Experts Alike
We’re building XRay.Tools to be a helpful resource for automator of any experience level. If you’re just getting started, it’s a great way to see what’s possible at a glance.
If you’re more experienced, you can use XRay.Tools as a way to quickly check if the integrations you need are actually available on the platforms you plan to use.
If you’d like more automation tips and resources, check out our blog or our YouTube channel. You can also follow XRay on Twitter, Facebook, or LinkedIn.

As you’re weighing your options for workflow automation, you’re likely wondering what the working relationship between XRay and your organization would be like.
XRay memberships involve close collaboration between our teams as we analyze your business processes, help you identify opportunities for workflow automation, and build automations to create more time for mindful work.
In this post, we’ll tell you about our commitment to our members and what you can do to ensure that your membership is successful. We’ll handle the automations and the data; we just need transparency, access, and clear communication in return.
XRay Handles Data and Automation
Our team will be responsible for building all of your automated workflows and for managing the associated data.
Your XRay techs will design, construct, document, and manage all of your automated workflows throughout your XRay membership. They’ll coordinate closely with your team to make sure the automations suit your business goals, so you won’t have to spend any time building automations yourself.
Once an automation is complete, our team will send you all the documentation you need to run the automations yourselves.
Our team will also establish systems designed to collect, house, and visualize key data generated by your automations. Each time an automated workflow runs, we’ll collect data in an Airtable database associated with that specific run.
Mutual Expectations: Transparency, Access, and Communication
Transparency: Help us Understand Your Business
Each business is unique, and automations work best when they support your company’s specific needs rather than just performing generic actions.
To that end, we ask all of our members to be as transparent as possible about how your business operates and what you hope to achieve with your automated workflows. The more we know about your business processes, the more we can do to calibrate each automation to fit your purposes.
It’s also important for us to understand the people behind the business. Knowing your story and your personal pain points helps us to understand the bigger picture of your automation journey, and lets us build automations that create more time for the work and activities you’d rather be doing.
As a member, we’ll offer a similar level of transparency to you, explaining exactly what we’re doing and why. We’ll also provide frank feedback throughout your projects, even if we think things need to go in a different direction.
Our goal will always be to build the automations that best fit your business and create more mindful time for your team, and mutual transparency will help us to achieve that goal.
Access: Building on Your Accounts
At XRay, we don’t build member automations on a test server or on our own accounts locked away from view until they’re “ready”. We build everything on our members’ accounts, so you’ll have access to the automations as soon as they’re built.
Building in your accounts also makes for a very smooth handoff once each automation is complete, as there are no files to transfer. Instead, we’ll just provide you with documentation that describes what each automation is for and how to use them.
To build in your automation accounts, all we need is access to them. We’ll ask you to share your account credentials through a secure app like Lastpass, which will allow us to log in to your accounts without ever seeing your actual password.
Typically, we’ll just need access to any of the automation platforms you’ll be using - Zapier, Integromat, Parabola, etc. We may also ask you to connect some of your additional counts, like Google Drive or Hubspot, to your automation platforms. When and if you need to do this, we can give you step-by-step instructions to make it easy.
Creating your automated workflows in your company’s software accounts is the fastest and most practical way to proceed, so we encourage all of our members to share any necessary credentials as soon as the membership starts to kick things off quickly.
Communication: Staying in Touch to Keep Things Moving
To maintain momentum during your membership, we’ll establish a regular communication cadence. Each week, we’ll have a 1-hour meeting on Zoom to share our progress, address any outstanding questions or concerns, and plan our next steps.
In addition to our scheduled Zoom meetings, we’ll set up a shared Slack channel for impromptu communication throughout the week. Your XRay team will regularly check on this channel for any new messages, and we’ll ask that you do the same.
We’ll use the Slack channel for urgent or time-sensitive issues that can’t wait for the weekly meeting, or to address issues that are preventing our team from moving forward. We’ll do our best to respond quickly to any message that you send in Slack, and we’ll ask that you make a similar effort as well.
In many cases, our tech team will hit a crossroads and will need you to make a decision before proceeding. Ultimately, we build automations that support your workflows and your business; while our team can rely on their judgment and experience in most cases, there will be situations where only you can make the call for your company, and we’ll let you know when those arise.
Maintaining regular communication lets us build faster and keeps everyone apprised of recent progress and future plans, so we make sure to stay in touch with all of our members through Zoom and Slack.
Building a Partnership
At XRay, we prefer memberships over project-based contracts because we believe it allows us to build a stronger partnership with each of the organizations we work with. Through mutual transparency, access, and communication, we can build automated workflows that completely transform our members’ businesses over time, saving hours of work and creating more consistent and reliable output.
If you’d like to learn more about how we build automations at XRay, check out our blog or our YouTube channel. You can also follow XRay on Twitter, Facebook, or LinkedIn.

If your team is anything like ours, you’re probably sharing helpful and interesting links with each other every day on Slack.
While Slack is a great platform for sharing links and ideas, everything you send quickly gets buried in the infinite scroll of messages. Trying to find a link that someone shared a week ago can be a pain, and you might not have access to it at all if you’re using a free Slack plan.
To make it easy to find and review our Slack links whenever we want, we built a simple Zapier automation to store every link that someone sends to a base in Airtable.
In this post, we’ll walk you through how to build a similar Zap step by step. You can also follow along with our video of this tutorial on YouTube.
Setting up a simple automation like this is a great way for a newer Zapier user to get more familiar with the platform.
Step 1: Create a Channel for Links
First, create a channel in your team’s Slack workspace dedicated to sharing links. This is the simplest way to trigger the Zap and gather your links in one place.
Once the channel is set up, send at least one message in it with a link. You’ll need it to test your automation as you’re building it.
Step 2: Create an Airtable Database
Next, build a simple base in Airtable where you’ll store your links. You can set up your base with just a few columns: a link field called URL, a long text field called Message Body, a short text field called Sender, and a “Created time” field called Created.

Step 3: Create a Zap and a Trigger
Then, create a Zap in Zapier. Your trigger app will be Slack, and the trigger event will be “New Message Posted to Channel.”
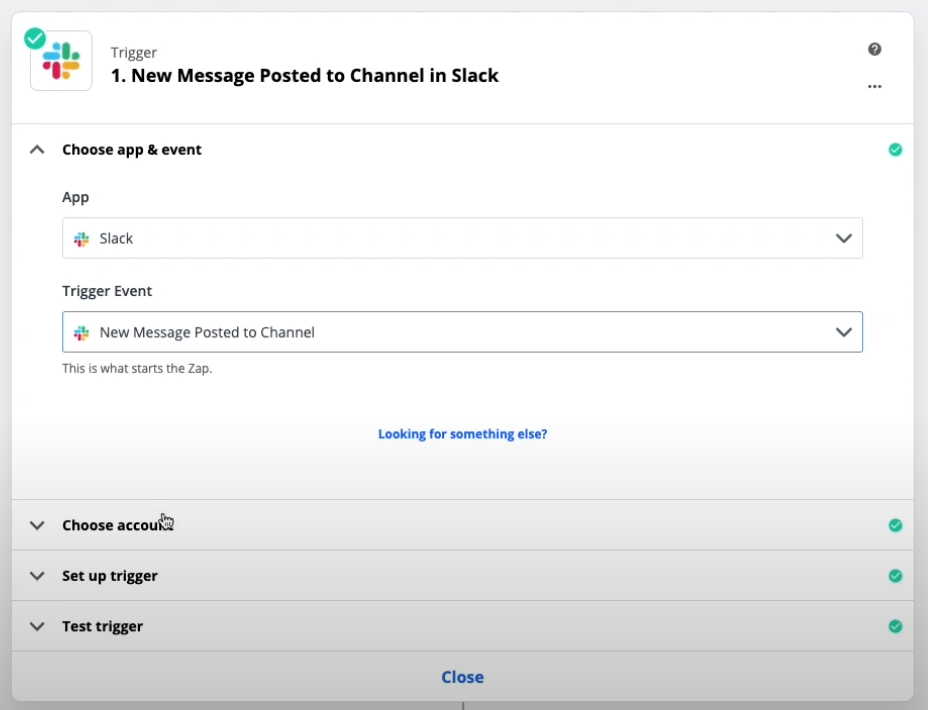
You’ll then have to log in to your Slack account, and select your new channel for sharing links. Set “Trigger for Bot Messages?” to No, just to avoid any potential technical issues like creating an endless loop.
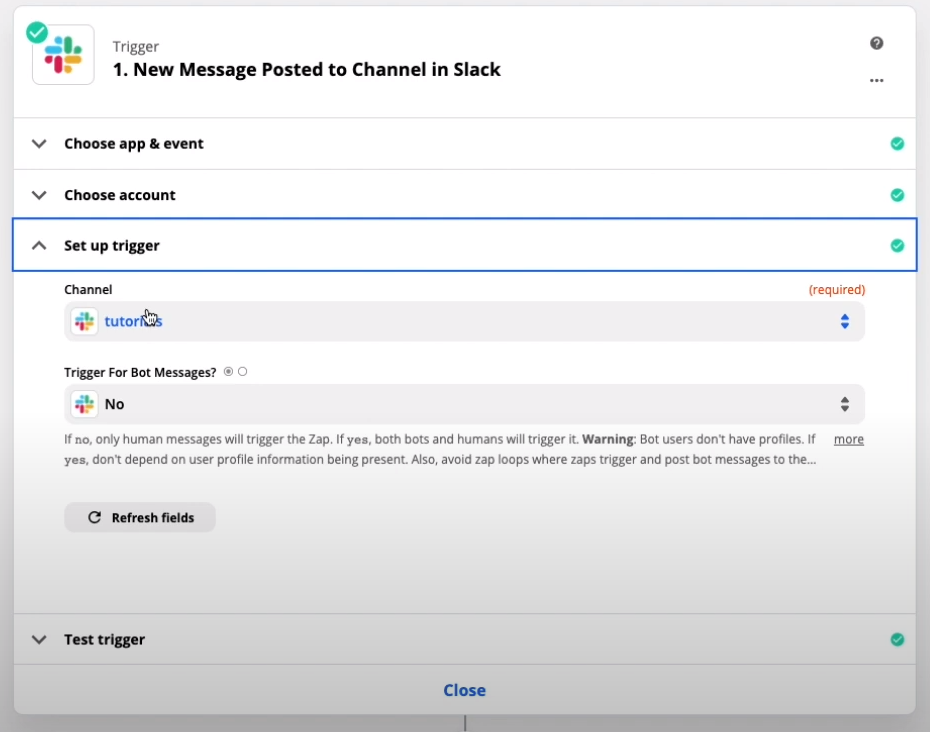
Now you can test your trigger. Zapier should pull in the most recent message you sent in the channel, but you might need to click “Load More” if you sent your message within the last minute or so.
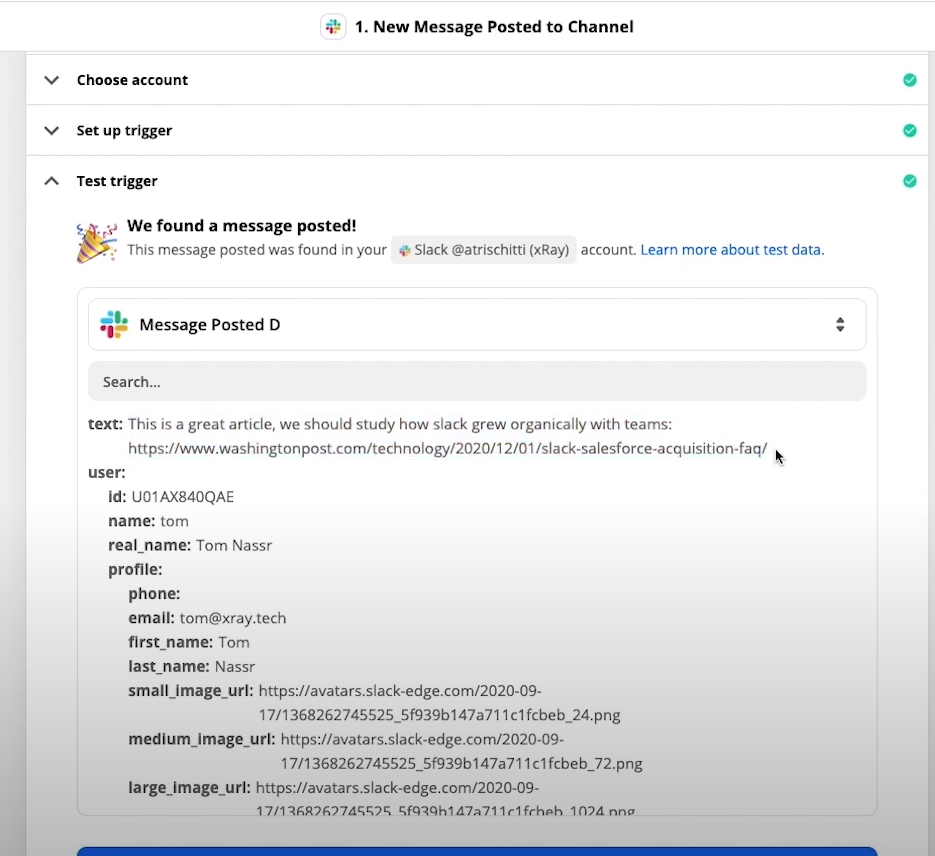
As you can see, Zapier pulls in lots of information about the message, but the main thing we’ll be concerned with is the field called “text” that contains the text of the message itself.
If your trigger worked as planned, you can now move on to the next step: setting up a filter.
Step 4: Create a Filter to Ignore Messages Without Links
Zapier’s Filter app is a useful tool to make sure that your Zaps only continue under specific circumstances. In this case, we only want our Zap to keep running if the message that triggered it contains a link.
To do that, you’ll first make a new action using the Filter by Zapier app, and choosing “Only continue if…” as the action.
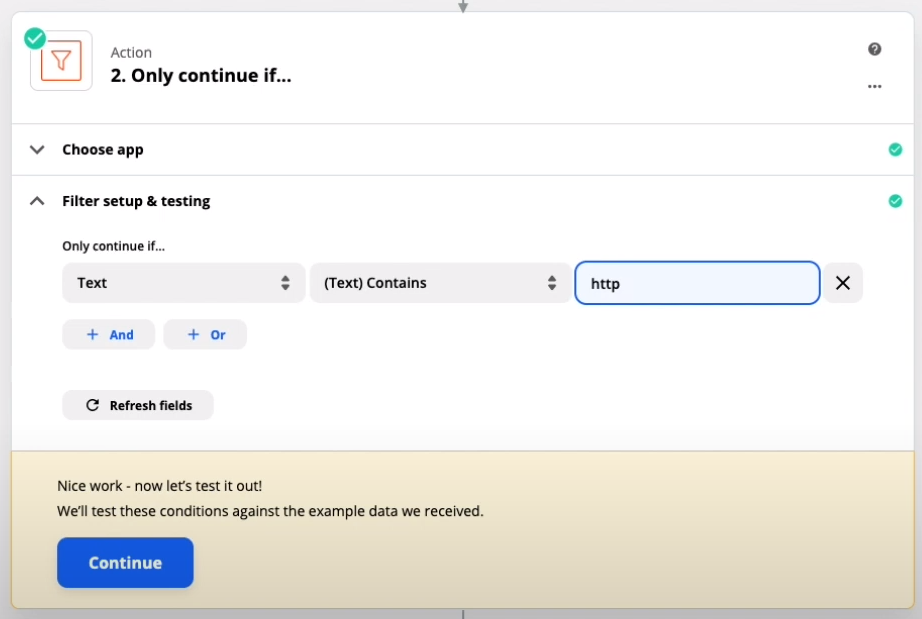
Then, set the filter to Text | Contains | http. This means that the Zap will only continue if the text of the message contains the string “http”, which will be present in all links but rarely mentioned otherwise.
Step 5: Use Formatter to Find the URL
Next, create a step with the Formatter by Zapier app. This app is useful for finding and modifying pieces of text within your Zaps.
Set the action event to text, and then set the transform selector to Extract URL. For the “Input” field, select “1.Text” - the number 1 here just indicates that this is data that Zapier gathered in the first step of your Zap.

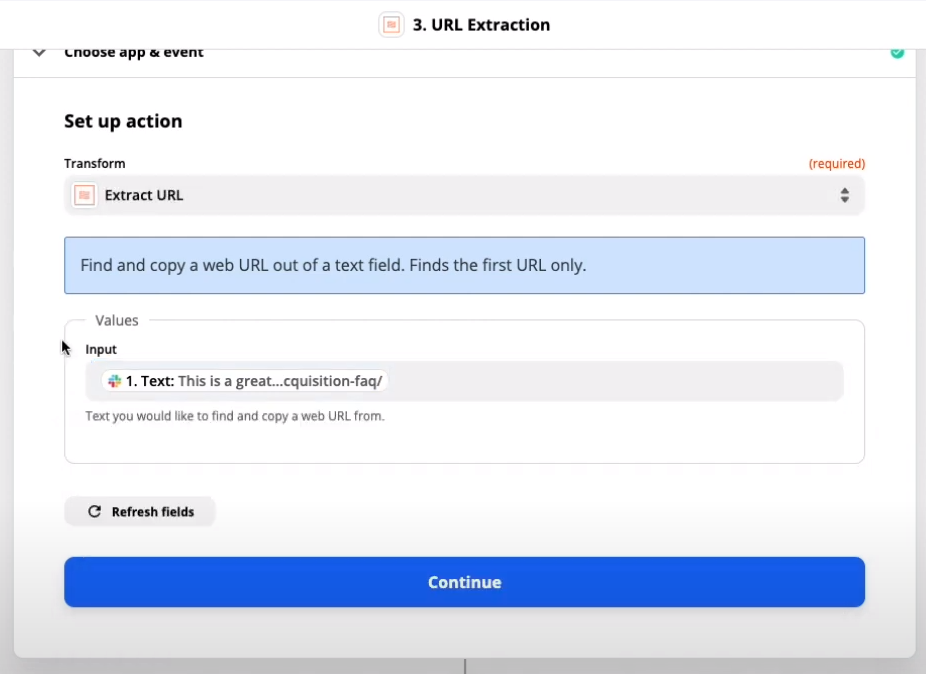
After you click Continue, you should see the link separated out from the rest of the message text. Now you can send this link to your Airtable database.
Step 6: Send Your Links to Airtable
Create a new action, choose Airtable as your app, and choose “Create Record” as the action event.
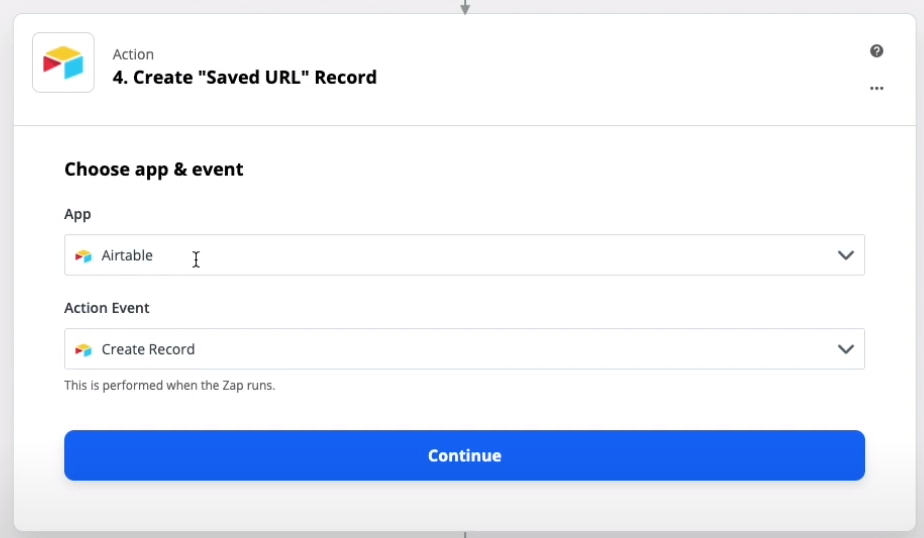
Log in to your Airtable account and choose the Base and Table that you created earlier. Then, fill out each step with the appropriate information.
Make sure to use “3.Text” as the URL, and not a Text snippet from an earlier step. You can also leave the “created” field blank, as Airtable will populate it automatically.

Click continue and test this step. Your Airtable database should have a new record that looks something like this:

Optional Step: Send a Notification in Slack
This step isn’t strictly necessary to make your Zap work, but at XRay, we’ve found that automations work best when they’re transparent and easy to keep track of.
To do that here, you can just create one more step that will make the automation send an announcement in Slack each time it runs. Send the message to a dedicated Auto Updates channel like so:
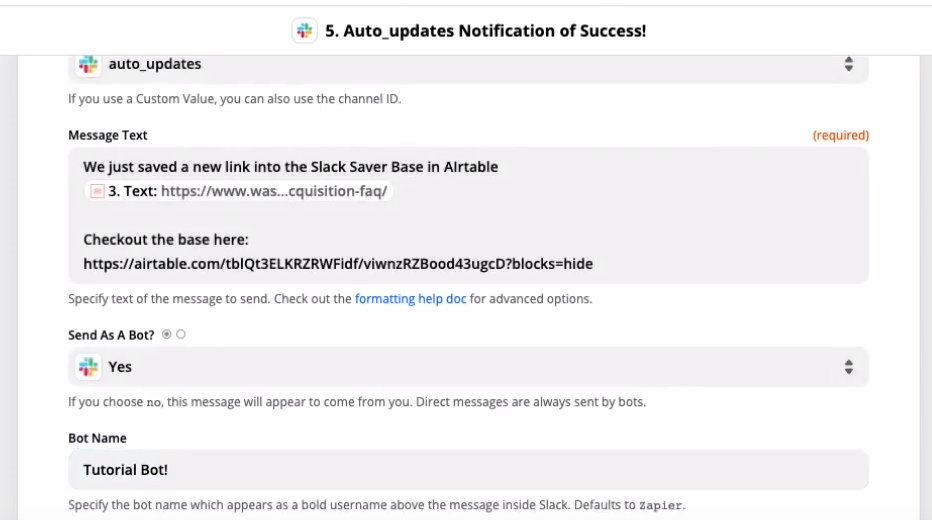
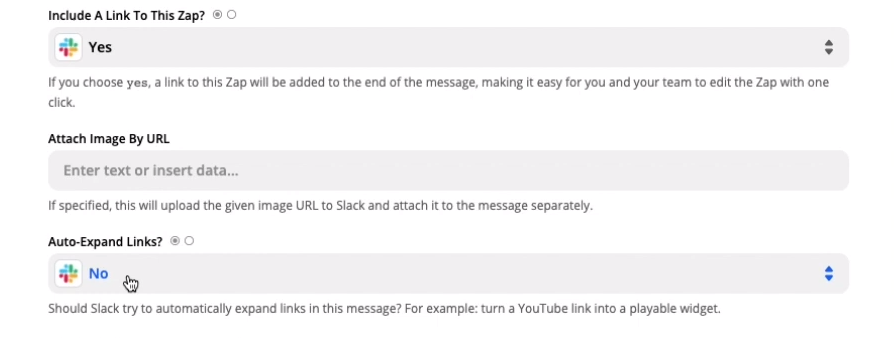
And that’s it! You’ll now have a permanent record of every link you share on Slack, even if you lose access to those messages on Slack itself.
You can check out our blog or our YouTube channel for more tutorials ranging from beginner material to more advanced content for seasoned automators. You can also follow XRay on Twitter, Facebook, or LinkedIn.

Each day, automated systems become more powerful and more capable of completing tasks that we once thought could only be accomplished by human beings. As the amount of uniquely human tasks shrinks, we’re left with an important question: as humans, what do we want to do with the time we call ‘work’?
At XRay.Tech, our goal is to enrich human work by removing the distraction of Robotic Tasks and helping people to focus their attention on more meaningful and valuable work. In this article, we’re going to look at what makes a task worthy of your attention, and how people and businesses can proactively create their future. It's simple robots should do robotic work and humans can do mindful work.
What is a Mindful Task?
One of the core components of the XRay Method is to identify the Robotic Tasks and Mindful Tasks that make up any company’s business processes. Robotic Tasks are repetitive; they’re performed the exact same way every time, and a human touch can’t meaningfully improve the outcome of the task. Whenever you can automate a Robotic Task, you almost certainly should.
Mindful Tasks, on the other hand, are the tasks that are really worthy of human attention. Mindful Tasks fill the mind; they require you to be in the moment and demand your full attention. When you’re working away at a Mindful Task, you’ll often find that you enter a flow state where your deep focus precludes any distraction and results in a total immersion in the task at hand.
After a busy day of work, the Mindful Tasks are likely the highlights of your day. While the routine emails and perfunctory reports and paperwork will fade from your memory as soon as the day is done, the mindful portions of your work will stand out as the activities that defined the day and gave you a sense of accomplishment. Highlights are a simple way of identifying the Mindful Tasks that you enjoy. The book "Make Time" by Jake Knapp and John Zeratsky is the first place I saw this tactic, and I’d recommend checking it out if you want a deeper dive into how you can schedule and spend your time. Another great strategy from this book is to turn off your email notifications so that you’re not constantly distracted by the endless stream of new messages in your inbox.
What Mindful Tasks specifically are will vary based on your job and your role, but for myself, highlights are usually an electric conversation, a 90-minute focus session where I create content, or a big meeting that leads to a new opportunity. Reflecting on our daily highlights lets us identify the work that we find to be challenging, rewarding, and enjoyable. The fulfilling work that Mindful Tasks provide should be preserved, even as we build better systems to automate the rest of the labor.
How to Identify a Mindful Task
Sometimes, Mindful Tasks aren’t necessarily an obvious highlight. That’s when it’s helpful to have a more detailed way to identify the tasks that deserve human attention. At XRay, we have a simple benchmark that we use to help determine at a glance if a task can be considered mindful: CAST. Is the task in question creative, analytical, strategic, and/or thoughtful?
- Creative Examples: UX/UI design, photography, writing
- Analytical Examples: Data analysis, software development
- Strategic Examples: Project management, value creation strategy
- Thoughtful Examples: Relationship building, philosophy, leadership
If so, there’s a pretty good chance that it qualifies as a Mindful Task, and is better suited to a human than to a robot. Of course, there are certainly instances where robots may already have an edge in analytical and strategic tasks. You could easily describe Deep Blue, the computer that beat the world at chess, as excelling at both analysis and strategy. While creativity may seem impossible for a computer to grasp, there are already many songs and articles out in the world that were written by software. However, I think that thoughtfulness will continue to remain elusive for AI and machines for a long time to come. And regardless of these exceptions, using the CAST guideline will usually help you to start determining if a task is mindful or not. Even if we could hand these tasks off to a robot, we may not want to; CAST tasks are typically the kind of work that create the feeling of accomplishment and satisfaction.
Another common aspect of mindful work is that it often involves interpersonal contact. Even if it’s theoretically possible for a piece of software to perform all of the functions of a certain task, it might be inefficient or uncomfortable for other people to interact with it. In professional relationships and partnerships, it’s often important to demonstrate to your customers and colleagues that you’re willing to give them some of your time and attention. In particular, you should avoid creating asymmetric automations that make things easier for you but offer no benefit for any other parties involved, all while leaving them to interact with a machine. Ultimately, it will be very difficult - if not impossible - for any automation to build trust and rapport as effectively as you can face-to-face. For instance, nearly every important transitional period should be handled in person. Hiring a new team member, letting someone go, launching a new project with a client, or presenting a major deliverable all require a personal touch.
Naturally, if a task is simply too complex for a robot, then it must be a human task. No software can automatically write, film, and edit a video. No software can automatically architect, design, develop and publish a complex application. No software can automatically identify a common problem and craft a business strategy, team, and mission to solve it. These are all uniquely human endeavors - at least for now.
The Future of Mindful Tasks
As technology progresses, there will be very few limits on automation’s capabilities. For business leaders, the vital questions will not be about what can be automated, but about what should be automated. To answer the all-important “should” questions, you’ll need to have a deep understanding of your business and goals. As a firm, do you primarily serve your customers or your team? How do you create value, and who do you create it for? Exploring these concepts will help you to better navigate the ever-shifting landscape of automation and make decisions that help you to achieve your goals. Because creating automated systems is itself mindful work. Building a truly valuable automation requires you to understand every facet of the system being automated, and pushes you to imagine a future where the work in question is no longer in the hands of people. Simultaneously, once the work is automated, you have the confidence that it will be completed consistently, correctly, and in a timely fashion.
But you don’t need to wait until you can answer those questions to start thinking about your Mindful Tasks. Start now by making a note each day of your top 3 highlights from the last working week. Make sure to include a note about why they stood out to you. Then, ask yourself: how can I spend more time on the highlights? What’s preventing me from focusing on the work I enjoy? Answering these questions can put you on the path to more fulfilling work right away.
In our next post, we’ll take a closer look at Robotic Tasks, and we’ll show you how (and why) they can be automated.

Not sure where to start with automation?
Hop on a 15-minute call with an XRay automation consultant to discuss your options and learn more about how we can help your team to get more done.
🎙Interview me about my Workflow
Workflows take many different shapes, sizes, and tools. Ever wonder how your workflows compare?
Get interviewed and find out!
while humans get to be mindful.


