The XRay.Tech Blog
Case Study & Tool Belts
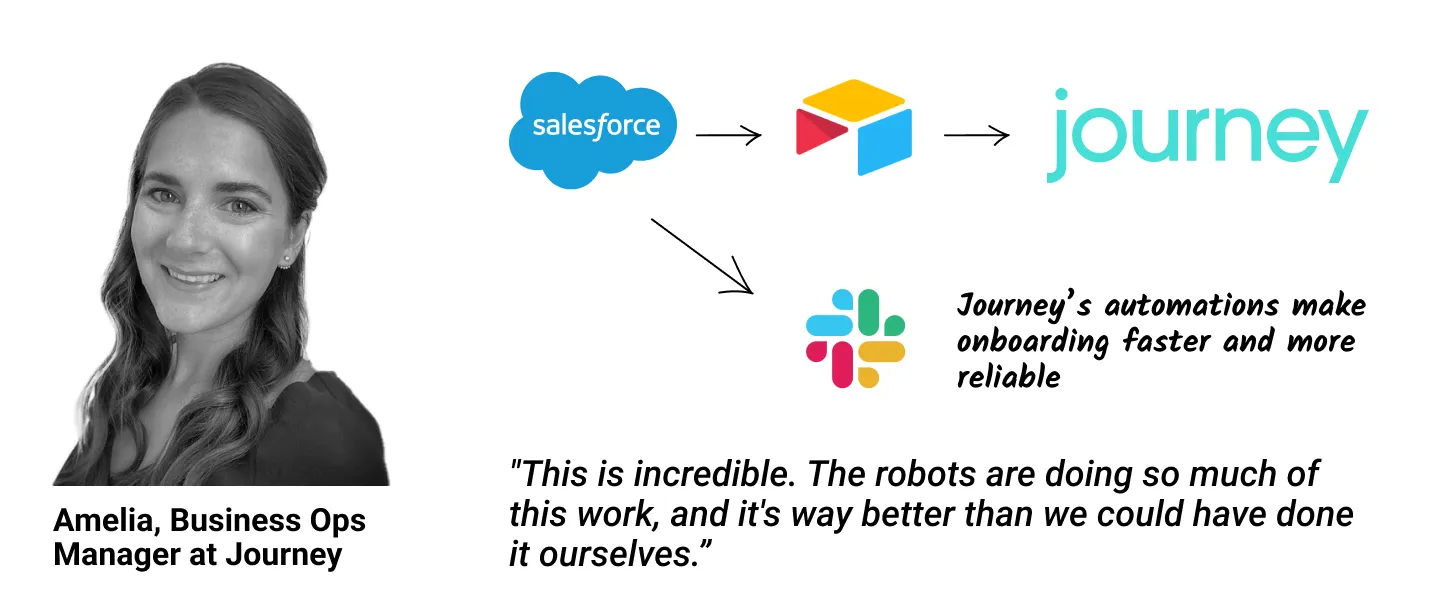
"This is incredible. The robots are doing so much of this work, and it's way better than we could have done it ourselves. The documentation is also amazing – we’re ready to start training our staff how to perform this workflow right away!"
Make (formerly Integromat) offers extensive low-code functionality, making it one of the best automation tools available if you’re looking to build more sophisticated workflows.
In addition to a wide selection of pre-built modules for specific apps, Make also gives users several modules that can work with just about any software, like the HTTP module focused on sending requests to webhooks.
Webhooks let you access an application’s API, transferring data that you can then use in another platform. With HTTP requests and Webhooks, you can connect your Make scenarios to additional automations in apps like Zapier or Airtable,
In this post, we’ll show you how to send HTTP requests in your Make scenarios step-by-step.
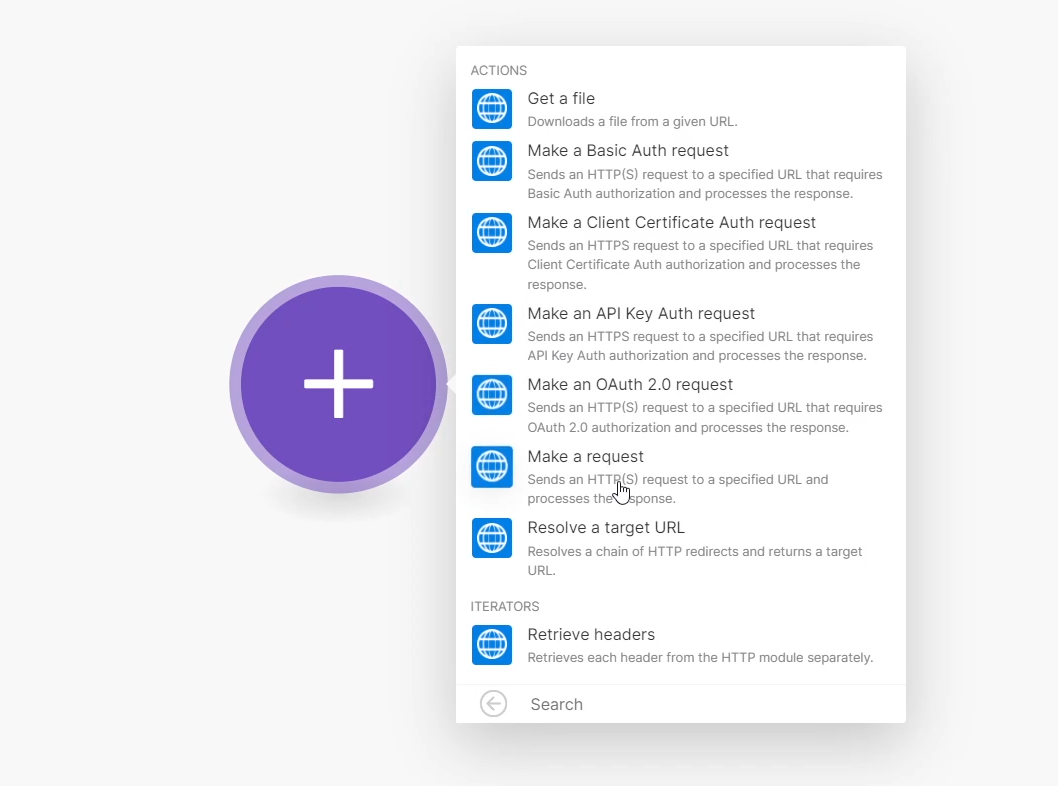
Create an HTTP Module
First, you’ll need to add an “HTTP” module in Make.
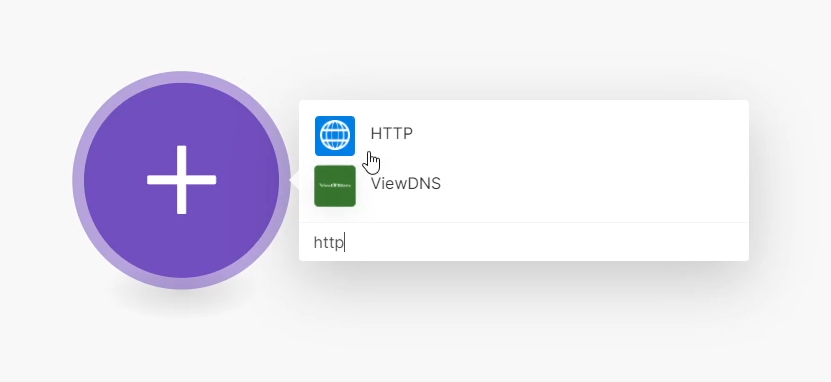
Note: don’t select the “webhooks” module. The webhook module is designed for receiving requests, while the HTTP module is Make’s approach to sending requests.
Search for “http”, select the appropriate module, and choose “Make a request”.
Configure the HTTP module
To fill in the URL and configure the rest of the module, you’ll need to consult the documentation for the app that you’re sending data to.
Their documentation or support guides will show you the appropriate URL, and how the data needs to be configured.
For example, we’re going to send data to an Airtable webhook in order to trigger an Airtable automation.

If we Google “Airtable webhooks”, we can easily find some relevant support docs. You could also search for “[your app] api”, or “[your app] docs” to find what you need.
Designate a URL to Send the Request To
Refer to your app’s documentation to find the target URL you need to send your request to.
With Airtable, the docs indicate that we need to open a table, create an automation, and select “When Webhook Received” as the trigger.
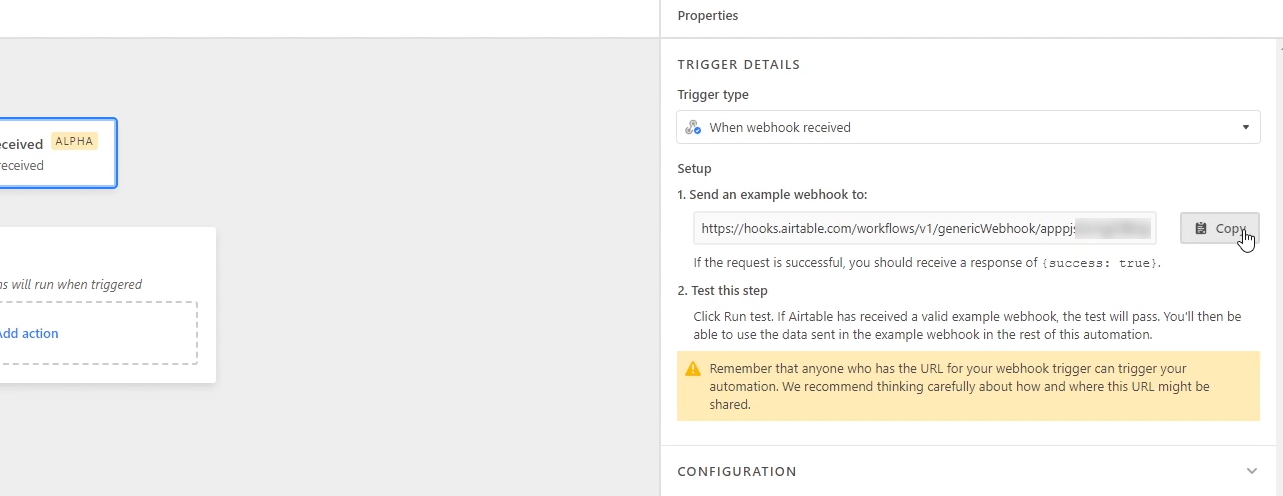
Then, we can see the URL we need in the “Automations” panel on the right hand side of the Airtable UI. We’ll copy it and paste it into our HTTP module in Make.

Select a REST API Method
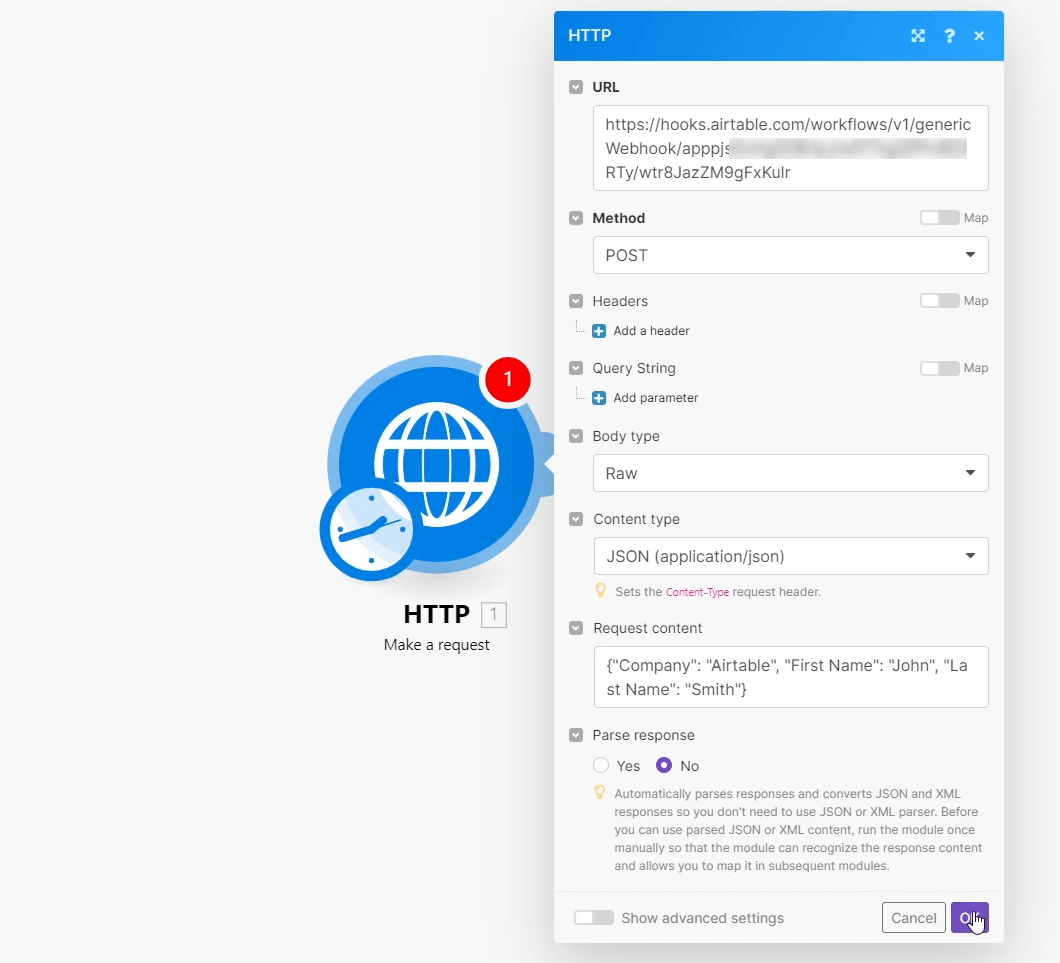
Next, you’ll need to select an option from the Method menu. In most cases, you’ll need to choose “POST” to send data.
If you’re curious about what these other options are for, here’s a quick rundown:
• POST creates new data
• GET finds existing data
• PUT and PATCH are used to update data, and DELETE is used to delete data.
You can check the docs to confirm which method to use, but if your goal is to create new data, you’ll probably want to use POST.
Fill in Headers and Query String as Needed
In many cases, you’ll need to add a header to authenticate your request, but in this case, authentication is already handled by connecting Airtable to Make, so we’ll leave Headers blank.
Adding a query string would let us filter results, but we won’t need one in this example.
Complete the Body Type, Content Type, and Request Content Fields
Check your app’s documentation to find out how the body and content of your request need to be formatted.
Airtable’s Docs specify that we need to format the content as a JSON object, so we’ll choose “Raw” as the Body type and “JSON” as the content type.
Now you need to fill out the “Request content” field with the data you want to send.
For our Airtable example, we need to use JSON formatting for the data to be parsed correctly. You’ll often find examples of how to format your data in the support docs, so it’s often a good idea to start by copying and pasting those examples.
Testing Your Webhook and Request
With your HTTP module fully configured, click “OK”, and then run your module once. You may also need to set your application to listen for incoming requests.
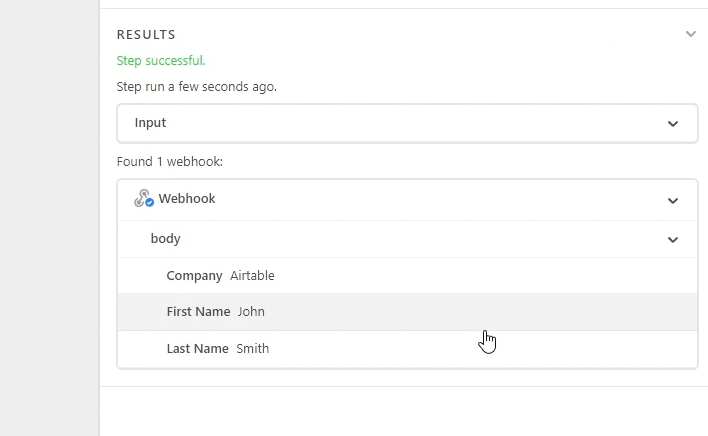
You should see that this module was successful. However, all that means is that sending the request was successful. You’ll need to check the app that you’re sending data to in order to confirm everything worked.
As you can see in the screenshot, Airtable received our request, with each piece of data parsed and formatted correctly. We can now build an automation in Airtable with the data sent through Make.
Build outside the box
Webhooks are a convenient way to send data from one platform to another as you’re building advanced, multi-part automations. You can even use them to avoid making overly complex branching paths within a single automation.
HTTP modules are a versatile tool for constructing automated workflows, and setting them up only takes a quick Google search.
If you’d like to learn more about no-code and low-code automation with apps like Make and Zapier, check out our blog or our YouTube channel. You can also follow XRay on Twitter, Facebook, or LinkedIn.

As a Real estate agent, you have many important tasks that you have to accomplish every day. You need to reach out to potential buyers and sellers, negotiate offers, manage closing, and more.
It can all become tedious, but the good news is that you don’t have to do it all on your own.
With automation, you can eliminate a lot of the monotonous, robotic tasks from your workload and focus more of your time on actually speaking with clients and building relationships.
In this post, we’ll take a quick look at three of the best automations you can use to start saving time today as a real estate agent.
Use templated emails for quicker outreach and response times
Home buyers and sellers have many options when they’re choosing a real estate agent. Quick and informative responses can help you to stand out and keep your clients engaged.
However, drafting emails all day to dozens of leads isn’t a great way to spend your time – especially if you find yourself rehashing similar content each time you write another email. Instead of writing all of your emails from scratch, you can use a simple automation to quickly assemble messages with templated blocks of text.
Here’s how it would work:
For example, suppose that you want to update your client after closing with information and links for movers, cleaners, or other important services.
In many cases, you’ll likely be referring clients to the same information and resources. Rather than typing all of this information all over again for each client, you can use Airtable to make a modular email template.
You’ll save each link, tip, or piece of information as a separate record, and select the ones you want to include in each email.
Once your message is all set, click on “submit” and the automation will send your email.
With an automation like this, you can just select a few options instead of writing an entire message every time. You only need to proofread each content block once, and you’ll be able to send more emails in less time, while still maintaining a personal touch.
Send automatic follow-up emails to promote engagement
Next, let’s take a look at automated follow-up campaigns.
You don’t want to lose clients after only a single showing. You want to keep them engaged over the long term with new offers, new houses on the market, and more.
However, following up with leads and clients every week can take up a lot of time if you do it manually. Instead, you can set up an automation to do all of the heavy lifting for you.
All you have to do is add each of your contacts to the appropriate mailing list, and then write a few emails or text messages to send out automatically.
The automation will send out each message on a preset schedule, so you can send a followup email or text every week asking if they want to see new properties, if they need more information, or whatever else you want.
You could even schedule an email to celebrate your client’s 1-year closing anniversary!
Drip campaigns like this can often be set up within CRMs like Hubspot or email newsletter apps like Mailchimp, but you can also build custom tools to run your campaigns through low-code automation.
By using low-code automation instead of a specific marketing tool, you can view and manage your data in one place, and control every aspect of your campaigns.
However you choose to implement your followup campaigns, they’ll be a surefire way of keeping your clients engaged and getting more repeat business. Plus, most of the work will be done by the robots.
Use an email-scraping automation to quickly file new contact data
Finally, we’ll give you an overview of how you can populate your CRM with an email-scraping automation.
If you use platforms like Zillow, Upnest, or others, they probably send you lots of automated emails about new leads or new listings in your area. These emails can be a great source for finding new buyers and sellers, but adding them into your CRM or another database can be tedious.
In some cases, you’ll be able to integrate the real estate platform directly with a CRM, but depending on the software you’re using, this won’t always be possible
No matter what tools you’re using, you can build a low-code automation to add leads from these emails to your CRM or any other database.
Here’s how it works:
Whenever you get an email in your inbox about a new lead, the automation will identify it by its content. The sender, the subject line, and most of the body will always be the same, so the automation can detect any email that matches those parameters.
Then, the automation will look for the unique content: the lead’s name or email address, or the property listing that the email mentions. That content can then be automatically copied to a database or CRM for easy organization and follow-up.
Real estate platforms like Zillow or Upnest can be great sources for leads, but you don’t want to have to go digging through your inbox just to find their contact information.
Email scraping automations will ensure that all of your leads end up in your CRM or database, without requiring manual data entry
Free up time by automating repetitive tasks
Like any profession, being a real estate agent involves a lot of repetitive, robotic tasks. But thanks to automation, you don’t have to do those tasks yourself anymore. Automated workflows can help you to communicate with your clients and quickly build a database of leads.
If you want to learn more about setting up automations like these, you can check out our blog or our YouTube channel. You can also follow XRay on Twitter, Facebook, or LinkedIn.
Make (formerly known as Integromat) is one of the best automation tools available for builders who prefer a low-code approach over strict no-code.
If you’re familiar with some basic coding principles, an app like Make is an easy way to create more complex and useful automations.
In this tutorial, we’ll show you how to loop through arrays in Make so you can build automations that perform actions for every item in the array. With loops, you could send an email to every address in a list, or assign a task in Notion to every person in an array.
Create a Loop with 4 easy steps
You can loop through an array in your Make scenarios with just a few simple steps.
1. Get an array: use any module in Make to import an array into your scenario
2. Add an iterator: from the Flow Control menu, select “Iterator”. This will signal that you want to start a loop.
3. Add actions: add any actions you want to perform as part of your loop. Every action added after an iterator will be performed once for each item in your array.
4. Add a filter to exit your loop: if you’d like to end the loop and perform subsequent actions only once each, add a filter after the last module in your loop.
That’s all you need to do loop through arrays with the iterator. If you’d like to see how it works in a little more detail, keep reading for a full tutorial walkthrough using an example scenario.
Step 1: Get an array
First, you need to have an array for Make to work with.
In our screenshot below, we have an Airtable base with a linked record field that we’ll be using in our examples. Items in a linked record field are stored as arrays, so this will be perfect for our demonstration. You can follow along with an Airtable base as well, or use any other app you’d like that has an array you can use.
If you’ll be using Airtable along with us, just add an Airtable module in Make, and enter the ID of the record you want to grab.

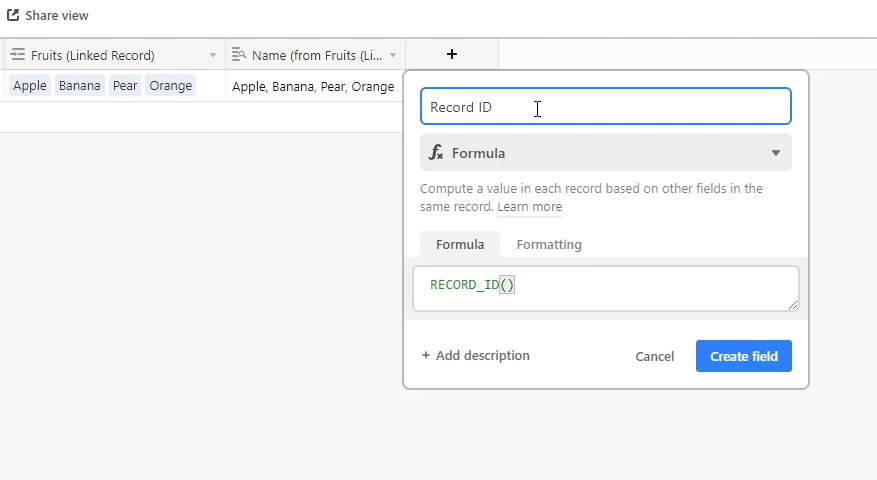
Tip: Getting Record IDs in Airtable
If you ever need to get the ID of an Airtable record, just add a formula field to the table. Enter Record_ID() as the formula, and Airtable will show the ID of that record.
Copy that ID into Make so you can find your record. Run the module, and you should see that Make retrieved the record you identified.
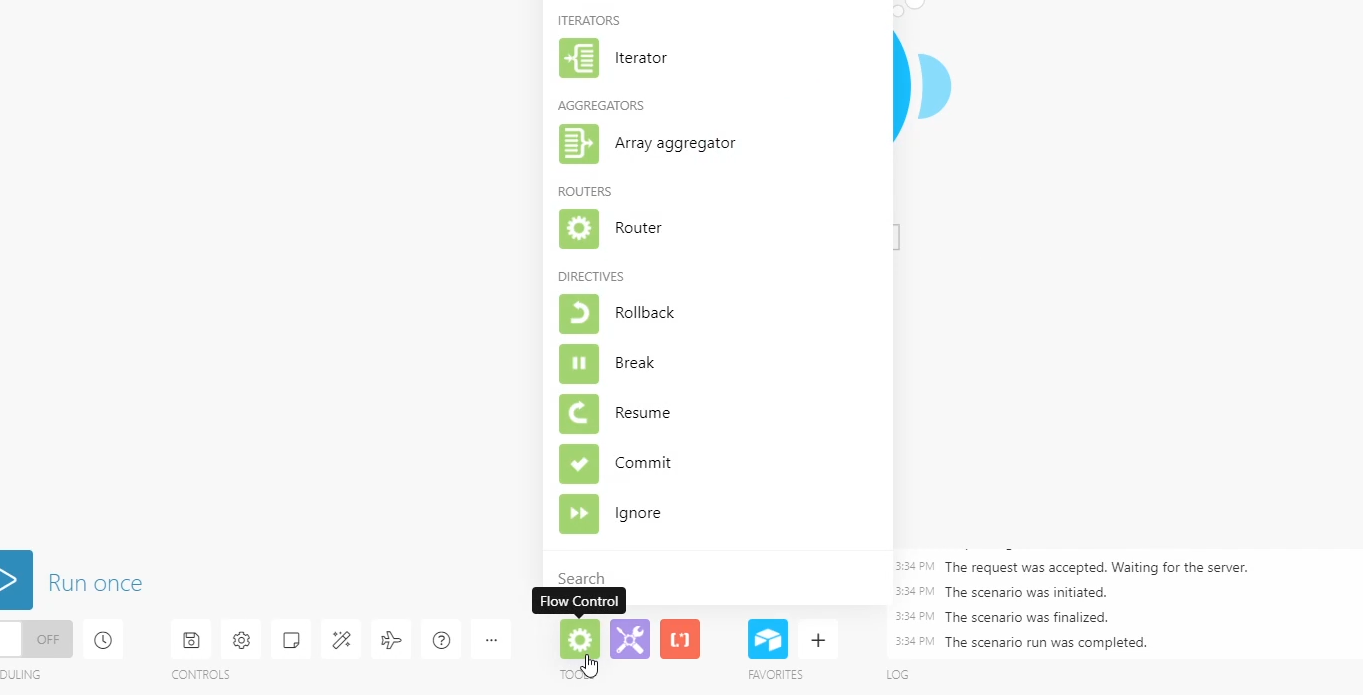
Step 2: Add an iterator
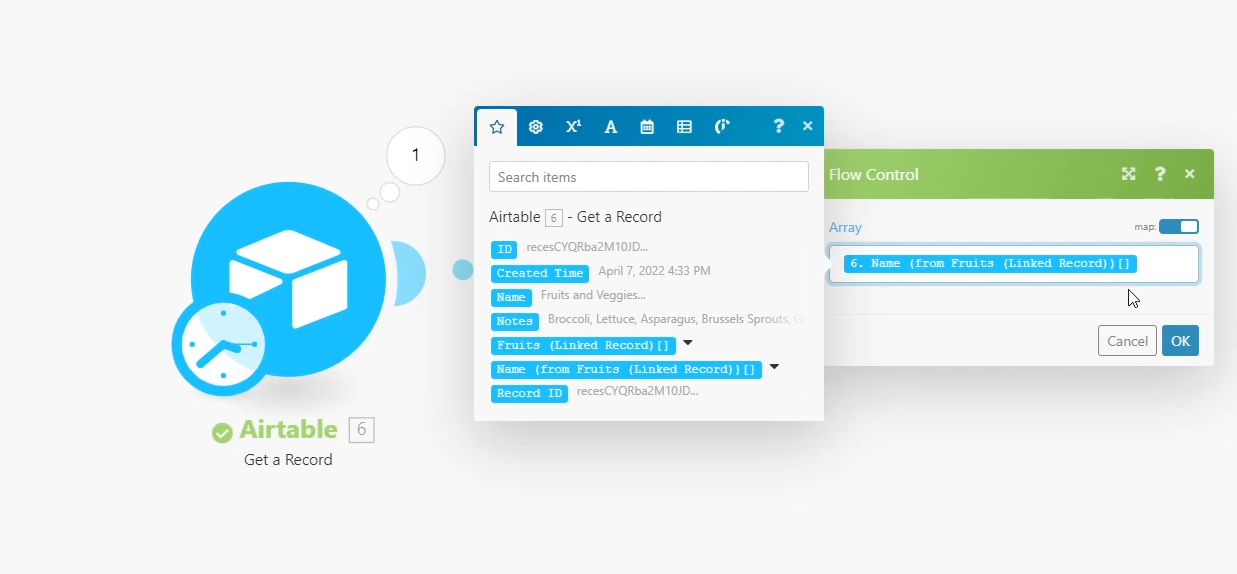
Now that you have a record with an array, you can add an iterator. Click on the green “Flow Control” icon, and select “Iterator” from the menu that pops up.
In the Array field, enter an array from a previous module
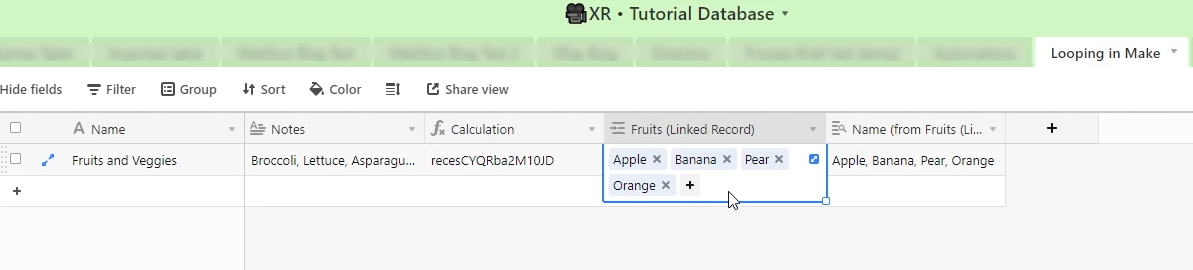
In our example, we’ll choose this data called “Name”, which contains the names of some fruits.
Tip: Identifying arrays in Make
You can confirm that a piece of data in Make is formatted as an array by checking to see if the name ends in brackets like this: [ ]
As you can see in the screenshot above, “Name” is an array, so we can enter it into the array field.
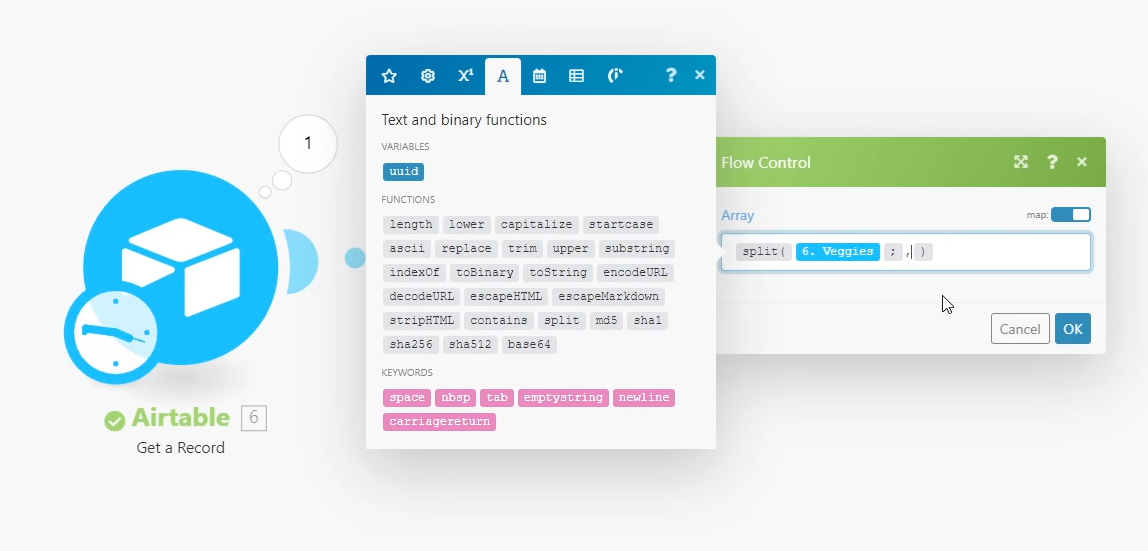
Tip: Converting a list into an array in Make
The array field will only accept an array, but if you’d like to use a list instead, you’ll just need to use a simple formula to convert it.
Just use the “split” formula, put your list before the semicolon, and enter the delimiter that your list uses after the semicolon. In most cases, the delimiter will be something like a comma, or a semicolon.
Step 3: Add actions after your Iterator
On its own, the iterator won’t perform any actions.Instead, it will make it so any module added after the iterator will run once for every item in the array.
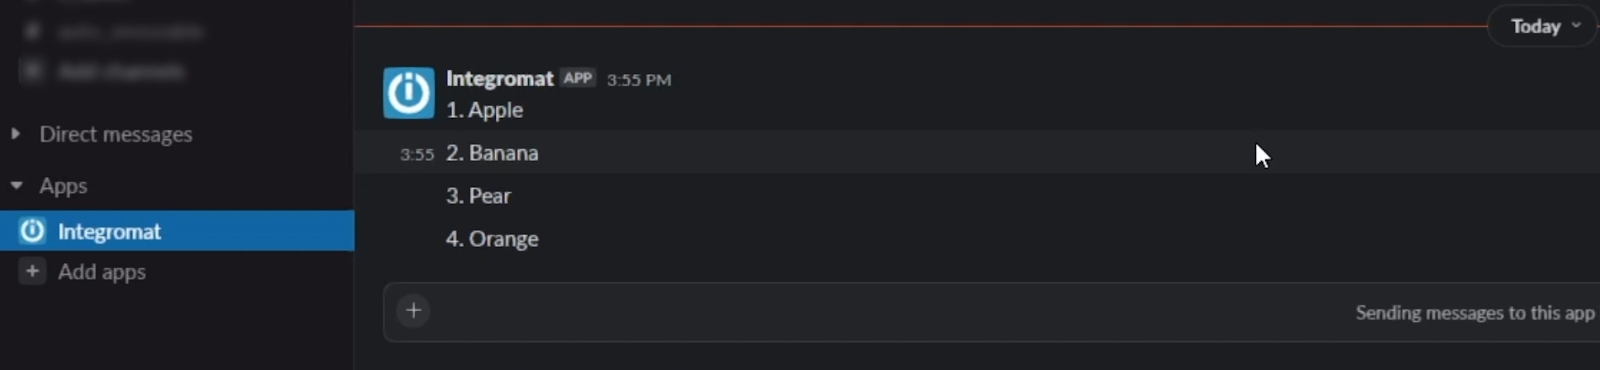
So if you add a Slack message module after the iterator, it will send that message once for every item in the array. If there are 4 items in the array, a single Slack module will send 4 slack messages
In our Slack message, we’ll insert the “Bundle Order Position”, which will show the number 1 for the first item in the array, 2 for the second, etc. We’ll also add this piece of data called “Value”, which is the actual item in the array. In this case, it will be the name of a fruit.

You can enter whatever data you’d like into your message, but including dynamic data like the Bundle Order Position and Value will clearly show you that the automation is running for each individual item.
Click on “Run once”, and you should see several Slack messages pop up. As you can see in the screenshot, we received a message for each fruit in the array, numbered in the order they were in.
Step 4: Adding filters to exit the Loop
That’s all you need to do to set up a loop in Make. But what if you want to perform a single action after you loop through the array?
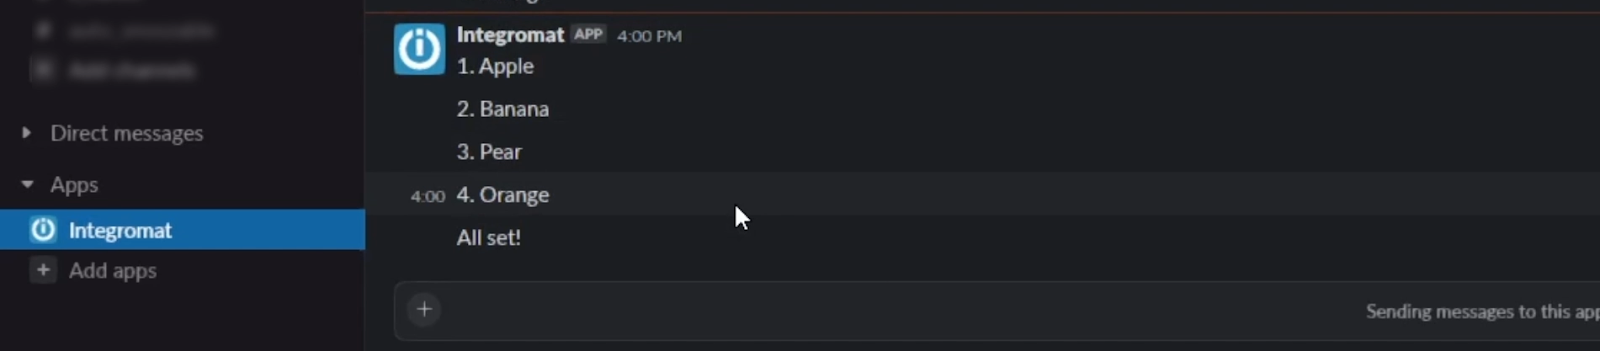
For instance, maybe you want to send a message that says “All set!”
If you add another module to this scenario, it will run the module for each message in the array. In other words, you’d get 4 “All Set!” messages instead of just one.
You can add another Slack module and test it out. Both of your Slack modules should run for each item in the array.
To signal the end of the loop, all you have to do is add a filter by clicking on the small dots that connect your modules.
Set the filter so the scenario will only continue if the Bundle Order Position is equal to the last item in the bundle.
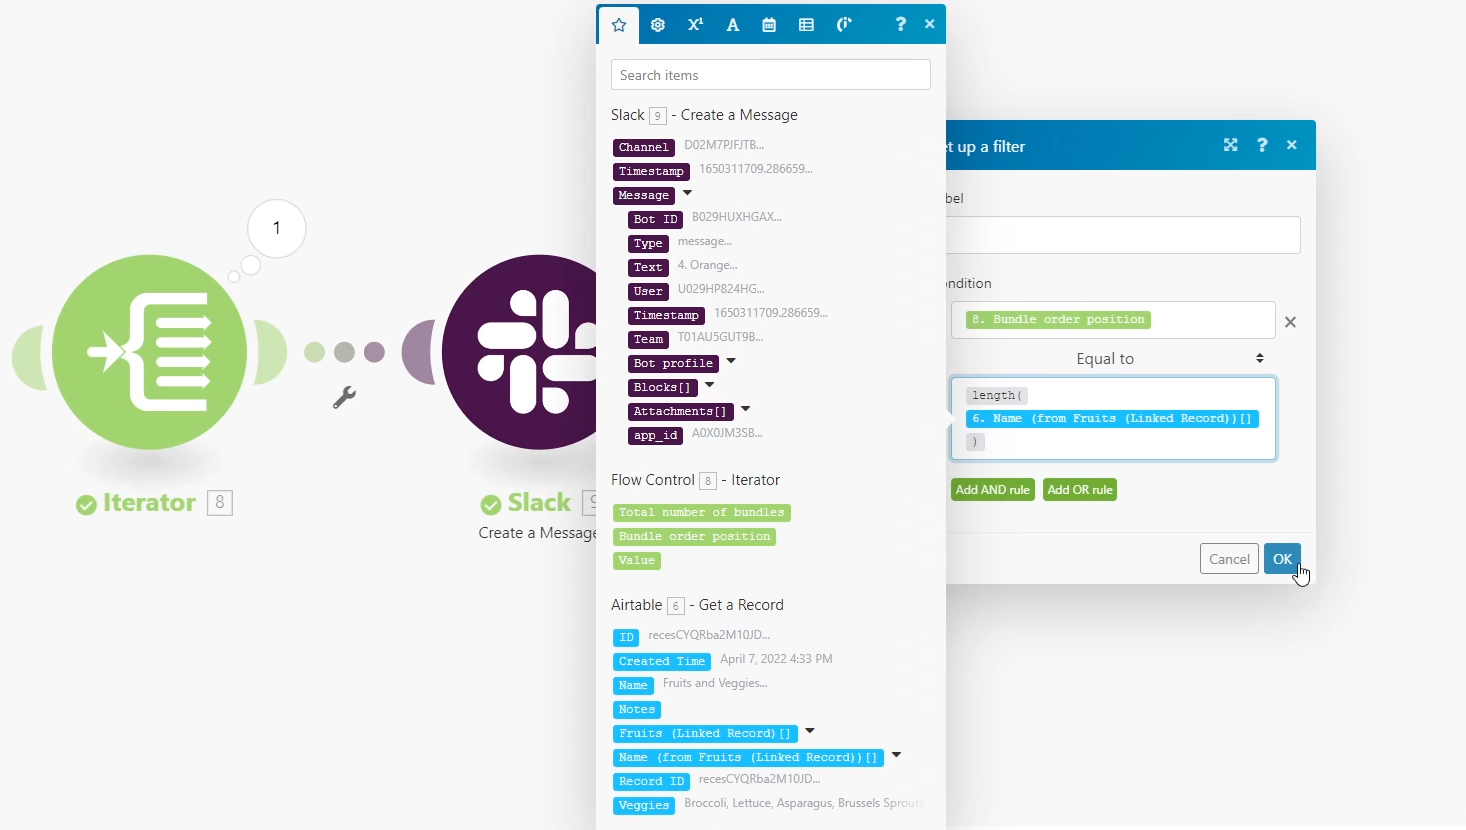
Since we know our Fruits array has 4 items, we could set it to 4. However, you won’t always know offhand how many items there are in a given array. So instead, let’s use the length() function to dynamically set this value to the number of items in the array.
Now, once the iterator runs through the last item, the scenario will continue and perform every subsequent step only once each.
Click “run once” again, and you should see 5 Slack messages: one for each item in the array, and a fifth that says “All Set!”. If so, your iterator is good to go.
Build dynamic automations with loops
Adding loops to your Make scenarios will let you build more effective and versatile automations. They’re a very useful tool for working dynamically with data, even when you don’t know exactly how much data you’ll have to process.
If you’d like to learn more about no-code and low-code automation, check out our blog or our YouTube channel. You can also follow XRay on Twitter, Facebook, or LinkedIn.
Google Drive is a great tool for storing shared documents, but setting up folder structures for new clients and projects can be a tedious task.
In this tutorial, we’ll show you how to automatically create nested folders in Google Drive using Zapier. This means that you’ll be able to make a new folder, create additional folders within that first folder, and so on.
A nested folder automation is a useful addition to a client onboarding workflow, a project launch workflow, or any situation where you need to frequently make sets of similarly structured folders.
Creating folders is a simple automation suitable for any skill level, so you can follow along even if you haven’t used Zapier much at all yet.
Create a Trigger
As with any Zapier automation, you’ll need to have a triggering event before you can add actions like creating folders.
Your triggering event can be nearly anything, but it’s best for this tutorial if your trigger includes data you can use to name your new folders.
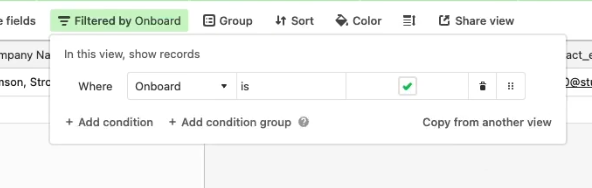
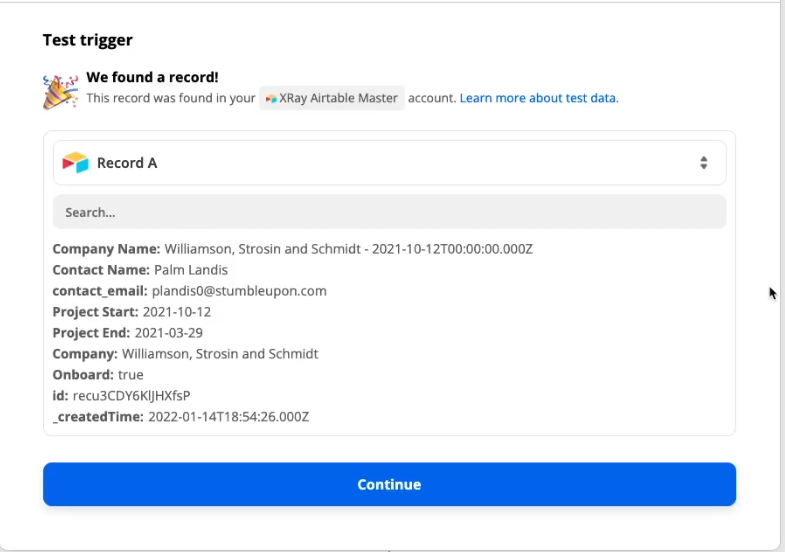
In our example, we’ll use a “New Record” in our Airtable database of clients as a trigger. When we check the “Onboard” column for a client in this database, that record will appear in the “Onboarded Clients” view, and trigger the automation.

Learn more about triggering automations with Airtable views in this post
You can use a similar trigger, or use whichever app you’d like here. Test your trigger to get some data, and continue.
Create a New Folder
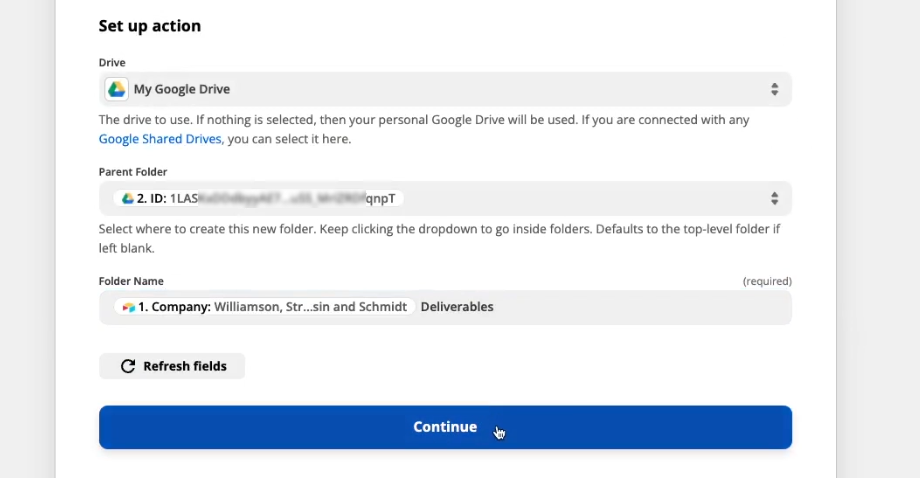
Add a step, choose Google Drive as the app, and choose ‘Create Folder’ as the Action Event. Sign in to your Google Drive account, and continue.
Select the Drive that you’d like to use, or leave the field blank to default to using “My Drive”.
Next, you’ll need to specify the folder where you want to create your first new folder.
The easiest and most reliable way to identify a Google Drive folder in Zapier is to grab it from the URL.
In a separate tab, open up your Google Drive and open up the folder that you want to use. In your address bar, highlight the alphanumeric code after “/folders/” .
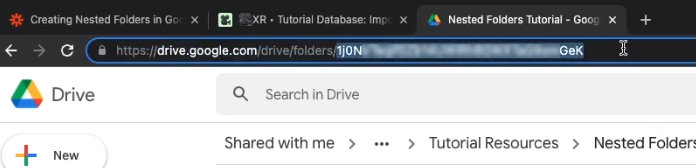
This string of characters is your folder’s ID, and it's the best way to designate a folder for use in Zapier.
Otherwise, you’ll have to navigate a clumsy UI to dig through all of your folders, and depending on the ownership of each folder, you might not be able to find them at all.
So to keep things simple, copy the string of characters after “/folders/” and paste it into the Parent Folder field.

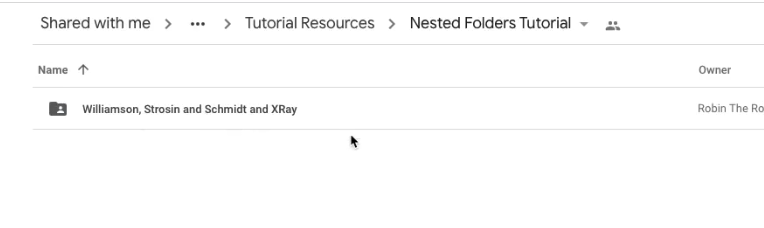
Give your new folder a name. We recommend using data from your trigger to make sure that the name will be unique each time the automation runs. We’ll use the Client Name from our Airtable trigger.
Test this step, and check Google Drive to make sure the new folder has been created as expected. You can enter “alternate” in the “Search folder data…” field to find the alternate link, which is your folder’s URL.
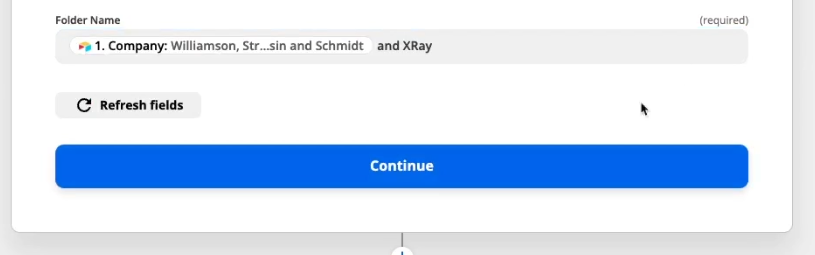
Created a Nested Folder within Your First Folder
To make a folder within the first folder you created, add another Google Drive - New Folder step.
This time, set the ‘Parent Folder’ as the folder you created in the previous step. You’ll do this with the folder’s ID again, but this time, you don’t have to open up a new tab
Click on the ‘Parent Folder’ field, and click on “2. ID”. This means that Zapier will use the ID of the folder created in Step 2.
Give a name to your new folder. We’re going to name ours “{Company} Deliverables”. Continue and test this step.
Once again, you can use the alternate link to pull up your folder in drive and confirm that it worked properly.
If you’d like to add more folders, you can repeat these steps as desired.
Turn on the Zap and give it a live test
Now you can turn your Zap on and give it a complete test all at once. Add a new record to your Airtable view (or do whatever you need to in order to activate your chosen trigger), and wait a few minutes.
Once the Zap runs, it will create all of your folders simultaneously.
A simple automation to save time and stay organized
Now you know how to make nested Google Drive folders with Zapier. This is a simple but useful technique for setting up new clients, new projects, and more. It will also ensure that every folder is created in a consistent way, so you don’t need to waste time looking through disorganized files to find what you need.
If you’d like to learn more about building no-code and low-code automations, check out our blog or our YouTube channel. You can also follow XRay on Twitter, Facebook, or LinkedIn.

An automation is only as good as the data you feed into it.
If you build an automation on bad data, you’ll get a messy automation that’s prone to errors and bugs. If you use high-quality data, you can create a useful and reliable automated workflow.
While you might be eager to start automating your company’s workflows right away, it’s best to ensure that your data is ready for automation before you begin.
In this post, we’ll show you the difference between good data and bad data, and we’ll explain how using the right data will prevent all sorts of problems.
Avoid redundancies in your data
Good data doesn’t have any redundancies
You don’t want to have multiple records for the same person, or the same company, or the same project that you’re tracking.
Redundancy makes it hard to use your data in any capacity, but it’s especially frustrating when you’re trying to build automations.
With a redundant dataset, you might end up running an onboarding automation ten times for the same client, or setting the same task repeatedly for a given project.
If you want to use a dataset for automation, make sure that you only have one entry for each item that you want to track.
Only track relevant attributes
Good data has relevant attributes - and only relevant attributes.
When you’re creating records, it can be tempting to make a field for every conceivable attribute.
But if you’re looking to build automations with your datasets, you should limit your databases to only include fields that are relevant for whatever you’re tracking.
If you’re maintaining a database of the clients you work with, you’ll probably want to include things like their company name, your main point of contact at the company, or their start date - in other words, information that’s relevant to your relationship and the automation you want to build.
In general, you should only include attributes that you intend to use or track. Otherwise, you’ll end up with a cluttered, messy database.
Irrelevant attributes can make it harder to build automations as you comb through a bunch of useless data to find what you’re looking for.
It can also make it harder to add complete records to the database, as all of the superfluous fields encourage your team to take shortcuts and post incomplete records.
Make sure your records are complete
While we’re on the subject, Good data is complete!
Whatever attributes you choose to add to your database, make sure that they’re filled out completely for every record.
If you build an automation connected to an incomplete database, it could prevent the automation from working properly.
For example, let’s say one of your automations is supposed to send out reminders to your client an hour before each of your meetings.
If the client’s “email” field is blank, the automation won’t be able to send them anything, and will just return an error.
Keeping complete records is always a good practice, but it’s especially important if you’re building automations that rely on those records.
Build datasets that easily reveal key insights
Good data can be summarized to easily find key takeaways.
You should be able to take a quick look at your database and immediately see some of your most important metrics.
Your “Projects” database should be able to show you at a glance how many projects your team is working on right now, and which projects have outstanding work or are still awaiting payment.
Getting good summaries out of your data will often depend on many of the other things we’ve talked about in this video.
If you have complete, consistent records with no redundancies, it should be pretty straightforward to find the takeaways that you need.
If you’re not able to learn what you need to at a glance, then you’ll probably need to go back and rethink what attributes you’re tracking.
Once you’re collecting the right datapoints, you’ll easily get the insights you’re looking for.
It all starts with the data
No-code automation is one of the best strategies for optimizing your business and saving time. But before you start connecting your apps in Zapier, Make, or Unito, you need to make sure the data you want to work with is ready to support automation.
Once you’re sure that your data has no redundancies, tracks relevant attributes, contains complete records, and shows you useful insights, you can start building time-saving automations that remove robotic tasks from your workflows forever.
If you’d like to learn more about no-code automation and managing your data, check out our blog or our YouTube channel. You can also follow XRay on Twitter, Facebook, or LinkedIn.
Build a fun word game with no-code tools.
We all know that automation is a great way to save time and be more productive, but life isn’t all about work. Sometimes, you need to take a break from everything and just have a little fun.
In this post, we’ll show you how to build a simple ad-lib word game with Zapier. With this quick and easy fill-in-the-blanks word game, you’ll be able to send a completed story in Slack by filling out a short form.
This quick no-code automation is easy to build and customize, so you can put it together in a few minutes and start having some laughs with your coworkers or classmates.
Required Software
For this tutorial, we’ll be using Zapier, Google Forms, Google Sheets, and Slack.
However, you can use just about any software you’d like. For instance, you can collect your answers with Typefrom instead of Google Forms, or send the finished ad-lib in an email instead of Slack.
Regardless of the specific apps you use, the automation will still work in basically the same way, it’s up to you to pick the software you’d like to use.
Writing the story
First, you’ll need to write the script for your ad-lib story. Here’s what we wrote for our story:
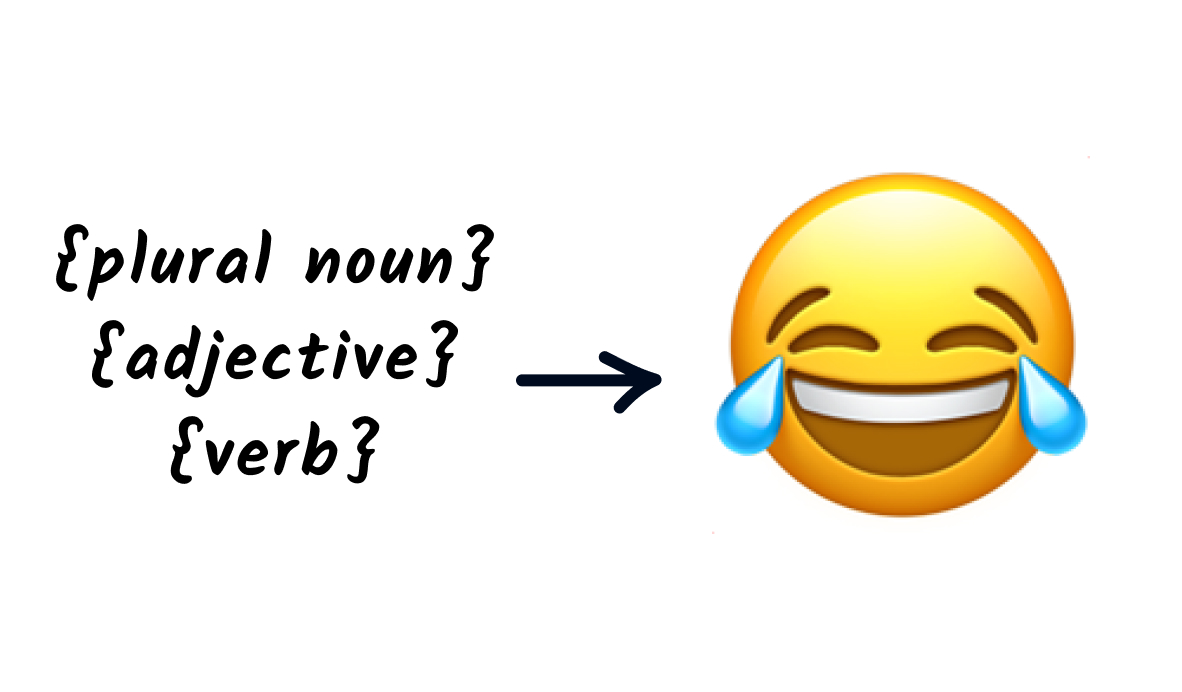
One day, an entrepreneur called {Name} had a very {adjective} idea for an app.
“It’s like {app name} for {plural noun},” they said.
“It will revolutionize the way {plural noun} {pres. verb} {noun}”
They bought office space in a {type of building}’s basement in {city name}, and raised ${number} in venture capital.
{company name} bought the app for over ${number}.
As you can see, this text tells the story of a startup, with several blanks for the player to fill in.
We’d recommend writing your story with actual words first, then going back and replacing a few key words with placeholders: “noun”, “verb”, “adjective”, and other terms like that as appropriate. These are the words that will be filled in every time someone plays the game.
We’ve used curly braces to indicate our placeholders, but the formatting of these placeholders doesn’t matter. They’re just for your convenience as you’re building.
Once your story is all set, it’s time to make a form you can use to collect responses.
Making the form
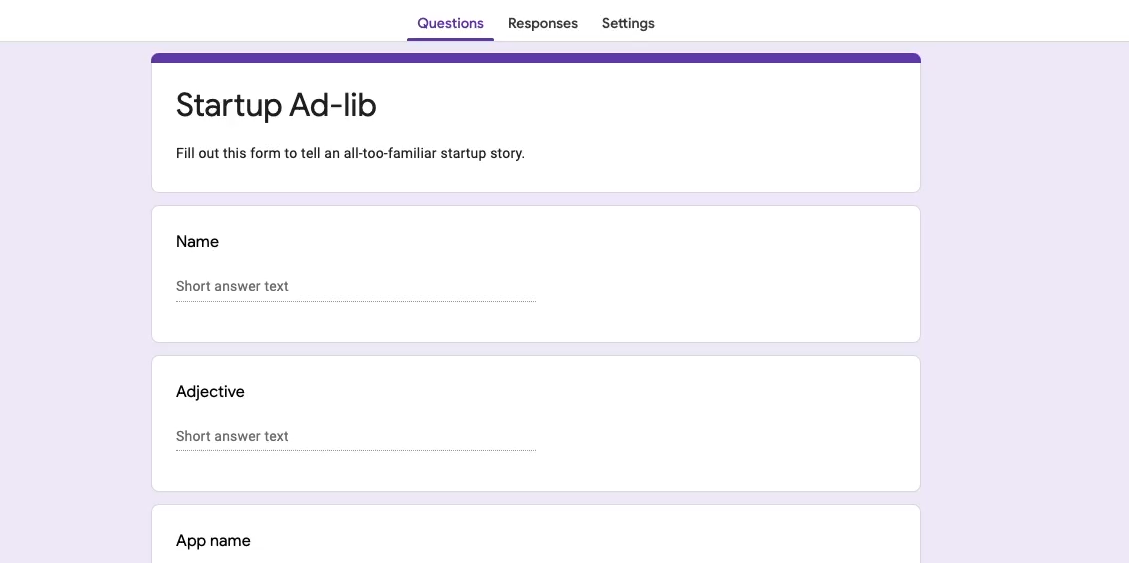
In Google Forms - or your preferred survey app - make a new form, and include a question for each blank in your ad-lib.
As you can see in the screenshot below, our form has a question to match each “noun”, “verb”, or other placeholder.
When your form is finished, create a spreadsheet to collect answers and trigger your automation. Be sure to fill it out at least once so that you have some test data to work with.

With some test data ready to go, you can open up Zapier and start building the automation.

Zap Trigger: New Spreadsheet Row
Create a new Zap, and use “New Spreadsheet Row in Google Sheets” as your trigger.

To identify the spreadsheet you want to use, open up your sheet and grab the ID from the URL bar. The spreadsheet ID is the string of characters between “/d/” and “/edit”. Copy and paste that ID into Zapier.
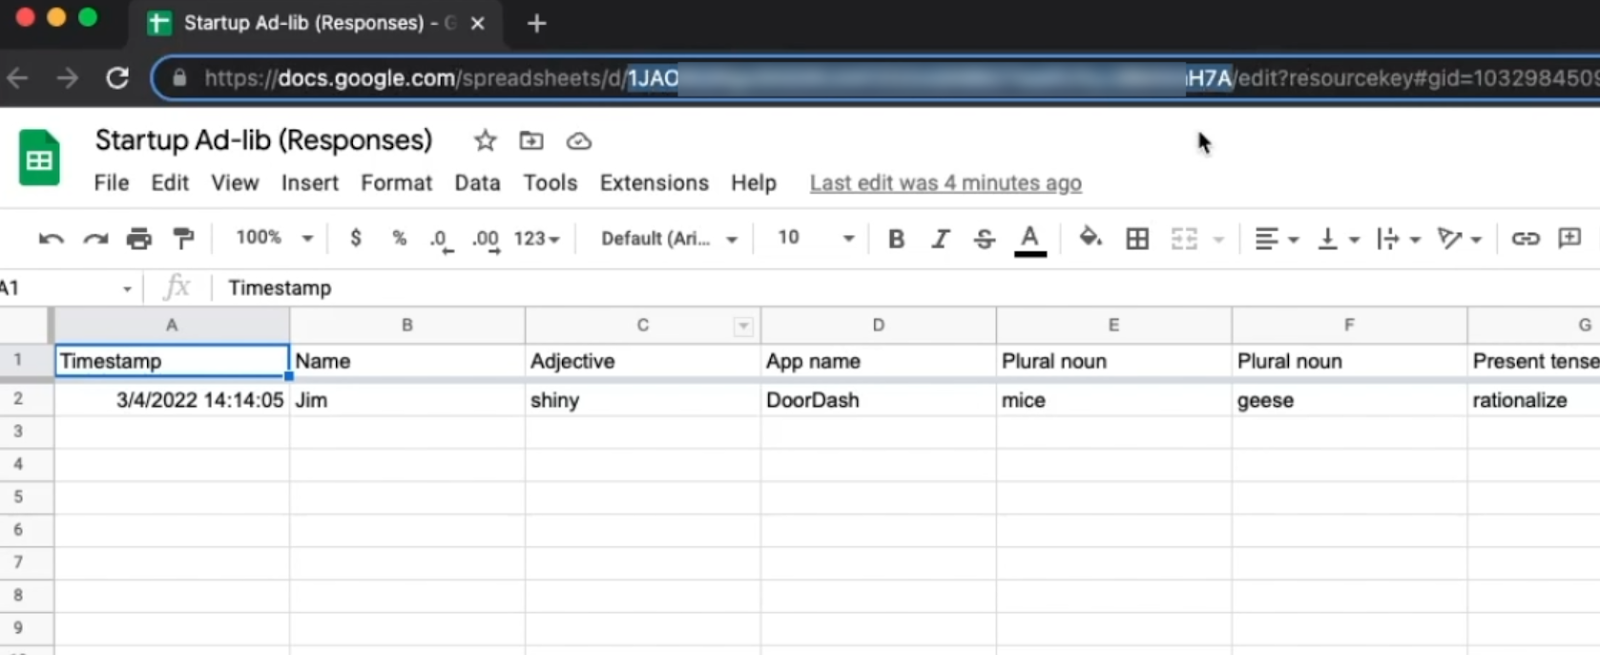
Select the worksheet you want to use, and click continue. Test the trigger, and you should see the answers you filled in earlier.
Zap Action: Send a Slack Message
Now that we have all the data we need to compile our ad-lib story, we’re going to put it all together and send it as a message in Slack.
Add a new step to your Zap, and choose Slack as the app. You can either send a direct message to one person, or send it to a channel for everyone to see.
Copy and paste your story script into the message body, and replace your placeholder text with actual data from the first step. This way, the finished story will say “geese” or “mice” or whatever the player entered instead of “noun”.

Finish configuring your message, and click continue.
Test the step, and you should see a message appear in Slack. Now, you can turn your Zap on, and whenever someone completes the form, you’ll see a completed ad-lib show up in Slack.
Try something new with no-code
While no-code automation is an indispensable tool for improving productivity, it’s also a great way to build a creative and silly project when you’re just looking to have a little fun. Try building this simple game or coming up with your own idea to see what no-code tools can do.
If you’d like to find more no-code automation tutorials, check out our blog or our YouTube channel. You can also follow XRay on Twitter, Facebook, or LinkedIn.

Workflow automation isn’t something that happens overnight. If a workflow is conducted 100% manually today, it will take some time to transform it into a fully (or mostly) automated workflow.
Using an iterative process to build automations will ensure that every stage of the workflow produces the results you’re hoping to achieve, while trying to automate an entire workflow all at once will result in a complicated build process and may produce messy, unusable data.
In this post, we’ll explain how you can expand an automation over time, and highlight the criteria needed to automate additional actions within a workflow.
The Early Phases of Automation: Supporting and Standardizing Manual Work
When you first build an automated workflow, many of the steps involved in that workflow will still require manual human input. In many cases, you and your team will need to gather data from various sources and manually enter it into the automation to produce the desired result.
For instance, an early phase client onboarding automation might require you or other team members to fill out a survey and manually enter the client’s name, the email address for your main point of contact, their kickoff date and other info.
Once the survey is completed, the automation would create some folders, a Slack channel, meeting docs, and other assets.
As you can see from this example, an early phase automation will save you some time, but it will still require a considerable amount of manual input. However, you don’t need to be worried if your early efforts in automation actually involve quite a bit of human work. By automating even a few steps, you’re still creating a much more consistent process, and you can expand on these initial automations to reduce the manual workload over time.
Later Phase Automations: Fully Automated Workflows
As you iterate and add more automated steps to your workflows, a later-phase automation will involve much less manual work. Instead of finding and entering data yourself, the automation will find the information it needs from your databases and apps.
Returning to our client onboarding example, a more mature version of the automation would eliminate most or all of the manual steps. Instead of requiring manual entry in a survey, it would find the client’s name and other info from a database, which would be populated from another automation connected to your email and CRM.
The entire set of automations could run whenever you mark a client as “Closed/Won” in your CRM, or by simply completing a survey with just one or two questions (instead of a dozen or more).
With a later-phase automation, you’ll see greater time savings and even more consistent and reliable output. At the same time, your team will barely have to do any manual work at all to make it run.
Making the Transition to a Fully Automated Workflow
At this point, you might be wondering why we don’t recommend starting with a fully automated solution in the first place. A fully-automated process clearly saves a lot more time, so why even bother with the early semi-automated phase?
Ultimately, it all comes down to data. Before you can fully automate a process, you need to have clean, consistent, and accurate data to support the automation.
If the data for your workflow is coming in from many different sources in different formats and at different times, you’d need to build a highly complex automation just to process and clean all of your data.
In these cases, it’s more efficient to start by automating whatever steps are already consistent enough to support automation, and to fall back on manual work and human judgment to gather the messier data.
Over time, you can improve your data funnels to collect more consistent and accurate information. As you do, you can also automate the steps that use that data.
What starts as a manual process will eventually become fully automated, or something that happens with just a click of a button.
Improving your Automated Workflows Incrementally
When you first build an automation, it will probably be somewhat limited in scope. Even though it will absolutely save you some time and make your process more consistent, there will be a lot of room to grow.
As you make your data cleaner, more accurate, and more consistent, you’ll be able to automate more steps in your workflow. Eventually, you might even be able to automate the entire process from start to finish.
So don’t worry if your initial automation efforts aren’t producing massive time savings. Automation is an iterative process, not a one-time fix. Just focus on getting the right data, and you’ll achieve your automation goals.
If you’d like to learn more about no-code and low-code automation, check out our blog or our YouTube channel. You can also follow XRay on Twitter, Facebook, or LinkedIn.

Modern SaaS tools have opened up a lot of possibilities for marketers, but they’ve also added a lot of tasks to your daily to-do list. Thankfully, no-code automation can help to ease the burden and handle a lot of your robotic work for you.
In this post, we’ll share three of the best automations that digital marketers can use to get their work done faster. These automations will help you to do more work in less time, so you can focus on refining your strategy instead of doing repetitive work. If you’d like to implement any of these automations for yourself or for your company, check out our blog for tutorial resources or reach out to XRay for a membership.
Sending Automated Messages to Inbound Leads
First up is an automation that’s been a huge help for us at XRay: responding to inbound leads with automated messages. This is a simple and flexible automation that can work in a couple of different ways based on your situation and preferences.
Fully automated responses
If you’re dealing with a very high volume of similar requests, fully automated responses can be a great option for sending out answers quickly.
Here’s how it works: whenever someone fills out a form on your site or sends an email to your “contact” address, the automation will send them a templated response with a one-size-fits-all message: basic information about your company, the next steps they should take, etc.
A fully automated solution will let you respond to dozens or hundreds of inquiries without any manual work, but you may be looking for an option with a bit more customization.
Customizable templates
As an alternative to fully automated responses, you could use Airtable to compile a database of pre-written messages. Each message would contain some useful information, a link to a relevant site, or other content.
Using an Airtable survey to send templated messages to your leads will let you personalize each message while still cutting down on repetitive manual work.The survey would let you pick from pre-written blocks to quickly assemble a helpful and relevant answer.
With a survey-driven approach, you can make sure that each inbound lead gets an appropriate, personalized response. If someone wants to know about pricing, you can send them a link to your Pricing Plans page; if they want to know more about how you work, you can attach a case study.
Using a survey to respond to inbound leads requires a little manual work, but still lets you craft high-quality responses to each new inquiry with just a few clicks.
Whichever approach you use, automating your responses to inbound leads will help you to save time and keep your messaging consistent. So stop spending all day writing identical emails to answer identical questions: let the robots shoulder the burden, and start automating your inbound lead funnel today.
Automatically Create Google Slides Presentations with Up-to-the Minute Analytics Data
Next, let’s take a look at an automation that will help you to make visually engaging presentations in Google Slides with your marketing data.
While you’re probably accustomed to combing through Google Analytics to find trends and insights, you’ll usually need something a bit simpler to show to management or other departments.
With this automated workflow, you’ll be able to create charts and graphics in Google Slides that are automatically updated with new data from Google Analytics.
Here’s how it works:
However often you’d like, the automation will fetch data from Google Analytics and export it to a Google Sheet. Then, you just need to create a Google Slides presentation, and add a chart that’s linked to the Sheet.
Whenever the automation updates the data in Google Sheets, the graphic in your presentation will be updated to match
You’ll be able to show your team up-to-the-minute data in a graphic that’s easy to follow, and after the initial setup, you won’t have to lift a finger to make it happen. By automating graphics in your presentations, you can make it faster and easier to share important data with your team.
Create Customized Landing Pages with a Short Survey
Finally, let’s take a look at an automation that can help you to create your marketing campaigns: automated landing page creation.
Crafting targeted landing pages with precise messaging is a great way to speak directly to a specific audience. But creating those landing pages can be time-consuming, and often requires some web design skills that not everyone on your team will have.
With this automation, you’ll be able to create and publish a new landing page just by filling out a quick survey.
Here’s how it works:
First, you just need to create a landing page template in a website builder like Webflow. The automation will work best if you create a “Landing Page” collection, so you can use Webflow’s CMS like you would with blog posts.
Then, you can build an automation to create new pages based on that template. You can just fill out a survey with the text and images that you want to use in your landing page, and the automation will create the page and send you the link.
This kind of automation won’t necessarily save a lot of time, but it’s a great way to get rid of technical barriers to updating your website. Anyone on your team can just fill out a survey to make a new landing page for a targeted campaign. They don’t need to know the first thing about web design or Webflow; all they have to do is write the copy.
Focus on the Work that Matters
Running marketing campaigns requires a lot of repetitive work as you create new ads and content, analyze your results, and keep the conversation going with inbound leads.
Automations like these can’t replace your creativity or your strategic insights as a marketing professional, but they can help you to spend less of your time on tedious robotic work.
So start building some automations today to save yourself some time, and reach out to XRay.Tech if you’d like to start setting up an automated infrastructure for your company.
If you'd like to learn more about no-code and low-code automation, check out our blog or our YouTube channel. You can also follow XRay on Twitter, Facebook, or LinkedIn.

Automated workflows are a great tool for saving time, and with no-code automation, there are more options than ever for automating robotic tasks.
If you’re not sure where to start and want to get results quickly, we’ve put together a list of 5 automations you can build right now to kickstart your automation projects.
We’ll include links to tutorial videos and blogs for every automation, so you can follow along and start building today.
ZoomTube: Free Cloud Storage for Your Zoom Recordings
First, let’s look at an automation we like to call “ZoomTube”.
This workflow saves all of your Zoom recordings to YouTube for free permanent cloud storage.
With the rapid growth of remote work, businesses rely on apps like Zoom more than ever. We all have important conversations, make decisions, and create action items during our Zoom calls
You might even hold virtual conferences or workshops that would be great to record for anyone who missed the event
Recording your Zoom calls lets you save them for future reference, but Zoom’s cloud storage plans are expensive if you’re recording often.
With ZoomTube, you can automatically save your Zoom recordings as unlisted videos in YouTube to create a free permanent archive. ‘
Once it’s set up, all you have to do is record your Zoom calls on the cloud as you normally would. The automation will then upload your recordings to your YouTube account, and send a viewable link to Slack or Teams so you can easily find the video.
You can create a Zoom to YouTube automation in Zapier with just a few steps, so check out the video to build your own ZoomTube automation today.
Creating Templated Presentation Docs
Next, we’d like to show you an automation that will make it easier to prep for all your meetings: automated document creation from templates.
You probably have several documents that you use regularly, like weekly meeting agendas or project delivery decks.
While you may have already converted those documents into templates to save some time, you can make the process even more efficient with this simple automation.
All you have to do is update your template with variables that Zapier can use to swap in different names, dates, etc.
To generate a new document, you’ll just fill out a form in an app like Airtable or Typeform with all of the information that you want to insert into your variables.
You can even set up the automation to make multiple documents at once, or share a link to the newly created document with your clients.
In our video tutorial, we’ll show you how to build your templated documents automation in a few easy steps.
Draft Quickbooks Invoices Automatically When Deals are Updated in Hubspot
Want to make things easier for your billings department? Try out this workflow to draft Quickbooks invoices automatically whenever a deal is marked as Closed/Won in Hubspot
Using this automation is easy, but it does require a little bit of behind-the-scenes setup. In order to automatically match a lead in Hubspot to a client in Quickbooks, you’ll need to set up a database in Airtable. The Airtable database will act as an intermediary, pairing the email addresses from Hubspot with unique Quickbooks IDs. You can also use the database to control the billing amount for each invoice by setting project types or other attributes.
It may sound a little complicated, but we’ll walk you through it step-by-step in our tutorial video. Drafting invoices with just a click in Hubspot is a great way to make sure that the internal handoff from your sales team to your accounting team is fast and accurate, so we really recommend trying this automation out if you’re constantly bringing on new clients.
Check out the video for the full tutorial, and start building!
Automatically Sync Google Sheets, Notion, Airtable and Other Databases
If you’re like most companies, you probably have important databases and spreadsheets in a lot of different apps.
Keeping those databases in sync manually can be a tedious, error-prone process. Thankfully, there’s a much better way to sync your databases, and it’s called Unito.
Unito is a no-code automation platform with a single purpose: syncing your databases across different apps.
When you connect two databases in Unito, records added or updated in either table will be synced in the other, so you can maintain total parity in your data without doing any extra work.
Unito supports Google Sheets, Notion, Airtable, and many other popular spreadsheet and database apps.
On our blog, you can find walkthroughs for setting up syncs between Sheets and Notion, Airtable and Notion, or Sheets and Airtable.
But whatever specific apps you want to use, the principles of setting up a sync are always the same, so don’t worry if you’re not seeing your preferred software in that list; these tutorials will still help you get started.
Setting up a sync in Unito only takes a few minutes, and once it’s up and running, you can rest easy knowing that your data is accurate and up-to-date in every app.
So check out the video and the links to try setting up a Unito sync today, and keep your databases consistent.
An Automated Social Media Calendar Powered by Airtable
Finally, let’s take a quick look at building an automated social media calendar in Airtable.
There are tools that already exist for scheduling your social media posts, like Hootsuite or Buffer, but these aren’t always a great fit for your budget or the tools you prefer to use.
If you’re already using Airtable to manage your company’s data, it can also be a convenient place to schedule all of your social media posts.
Once you have the automation set up, all you have to do is a new record for each post with the text, images, or other attachments you want. Pick the platform you want to publish it on, the date you want to publish it, and add it to the queue.
The social media calendar automation works with Facebook, Twitter, Linkedin, or pretty much any other network you want to use.
Just check out the video or this blog to learn how to set it up. With this automation, you’ll be able to spend less time on publishing your posts, and more time on crafting the right message to send out to your followers.
Getting Started with No-code Automation
No-code automation lets everyone build useful tools and streamline their workflows, regardless of their technical experience. If you want to start automating your robotic tasks, any of these automations can be a great place to start.
If you’d like to learn more about no-code automation, check out our blog or our YouTube channel. You can also follow XRay on Twitter, Facebook, or LinkedIn.

If you’ve spent any time at all exploring the no-code automation space, then you probably already know that Zapier is an extremely useful tool for automating your daily menial tasks and saving time at work.
While ease-of-use is one of Zapier’s strengths, it’s always helpful to have some pointers to get started. If you’re new to Zapier, this post will help you to begin understanding and using Zapier from square one.
We’ll explain what Zapier is for, give you a quick overview of the available plans, and walk you through building your first Zap. You’ll see firsthand how the no-code platform lets you easily send data from one app to another to perform automated actions.
After reading and following along with this guide, you’ll be equipped with all the knowledge you need to dive into Zapier and start building your own time-saving automations.
What Zapier Does and How it Works
How Automations (Zaps) Work
First, let’s cover the basics of what Zapier is, and how it works.
Zapier is a no-code automation platform. It lets you build automations by connecting different pieces of software together and sending data from one app to another.
With Zapier, you can build automations that perform a certain set of actions whenever your specified trigger conditions are met. For example:
• Whenever I get an email from a specific client, send me a copy of that email as a direct message in Slack
• Whenever a deal is marked as Closed/Won in Hubspot, create an invoice in Quickbooks
• Whenever I get a Zoom invitation in my email inbox, create a “Meeting Notes” document in Google Drive
As you can see in the examples above, every Zap has a trigger event that prompts it to run, and at least one action that it performs.
Moving data between apps
One of the key things to know about Zapier is that every step can share its data with future steps. In the CRM -> Quickbooks automation example, Zapier will use the data it retrieves in the trigger step to create the invoice in Quickbooks, dynamically filling in fields with the customer’s name, the billing amount, etc.
The flow of data is what makes Zapier save time. It handles data entry for you, so you don’t have to do it manually or copy and paste. Not only does this reduce the time you spend on tedious tasks, but it also makes your work more consistent as it prevents human error.
Zapier’s Pricing Plans
Use the free plan for this tutorial
Like most SaaS tools, Zapier offers several different subscription options which you can view on their pricing page. For the sake of following along with this tutorial, you can use the Free plan.
If you’re interested in building automations to support your daily workflows, you’ll probably want to look into the Starter and Professional plans for more Zaps and features.
If you’re building automations to support your entire company, you’ll probably need to use the Professional Plus plan or a higher tier.
But for now, just making a free account will be fine.
Building Your First Zap
Connecting Google Calendar to a Spreadsheet
For your first Zap, we’ll show you how to build a simple automation that connects Google Calendar to Google Sheets. Whenever you get a Calendar invite, data about the invitation will automatically be logged in a Google Sheet.
While this automation won’t have a lot of practical applications, it will be a helpful way for you to see how you can manage the flow of data between apps in Zapier.
In addition to a free Zapier account, you’ll also need a free Google account to create this automation.
Creating Test Data and a Spreadsheet
Before you can make any Zap, you’ll need to have some test data to work with.
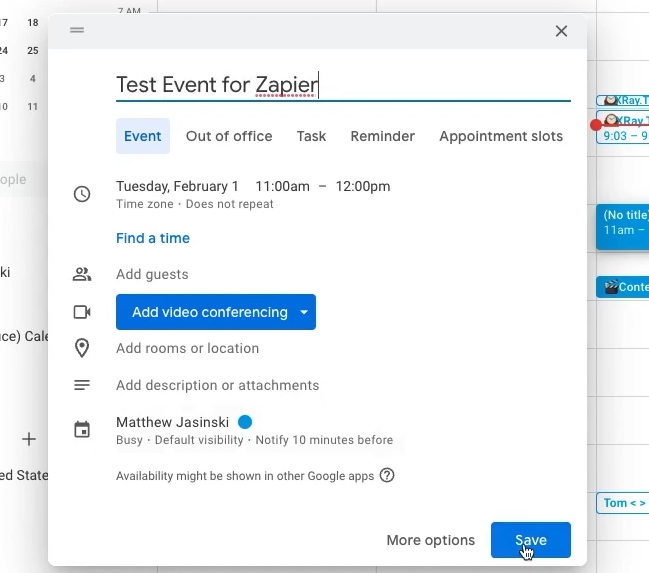
Create a calendar event on any day and at any time to use as test data. If you can, add one of your other email addresses as a guest.
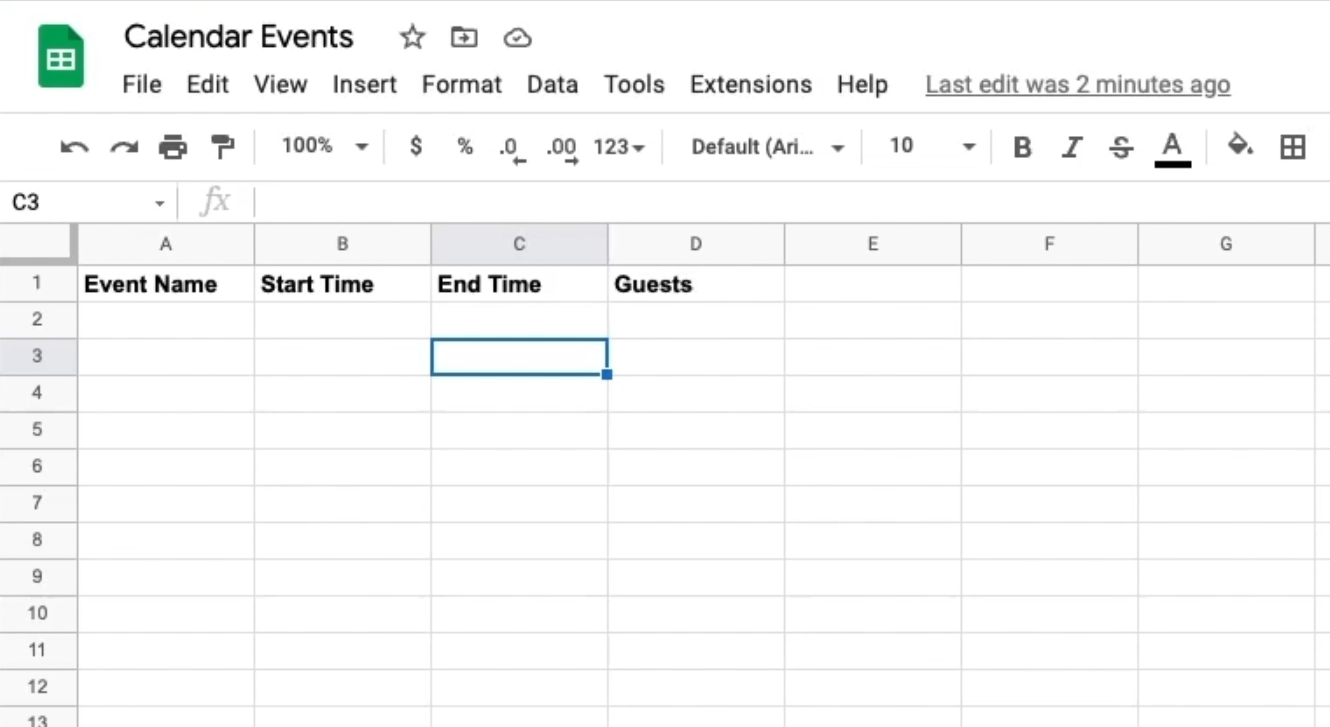
You’ll also need to create a Google Sheet to store Calendar information in. Make a new sheet and a few fields to the top row like Event Name, Start Time, End Time, and Guests.
Creating a New Zap Trigger
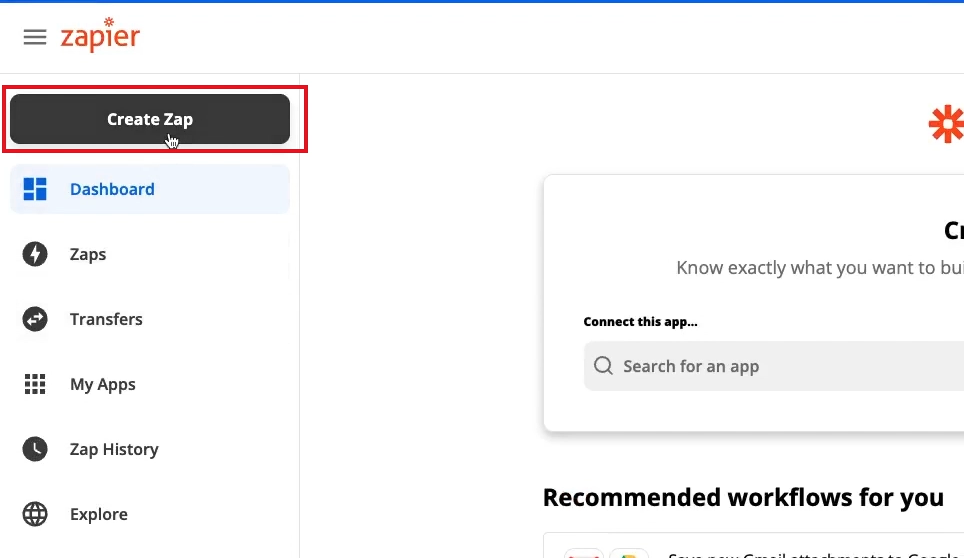
Log in to Zapier and click on the “Create Zap” button.
First, you’ll be prompted to create a trigger. Every Zap needs to have a trigger; whenever the conditions for the trigger are met, the Zap will run.
For this Zap, our trigger will be the creation of a new event in Google Calendar. Select Google Calendar as your app, and choose “New Event” as the Trigger Event.
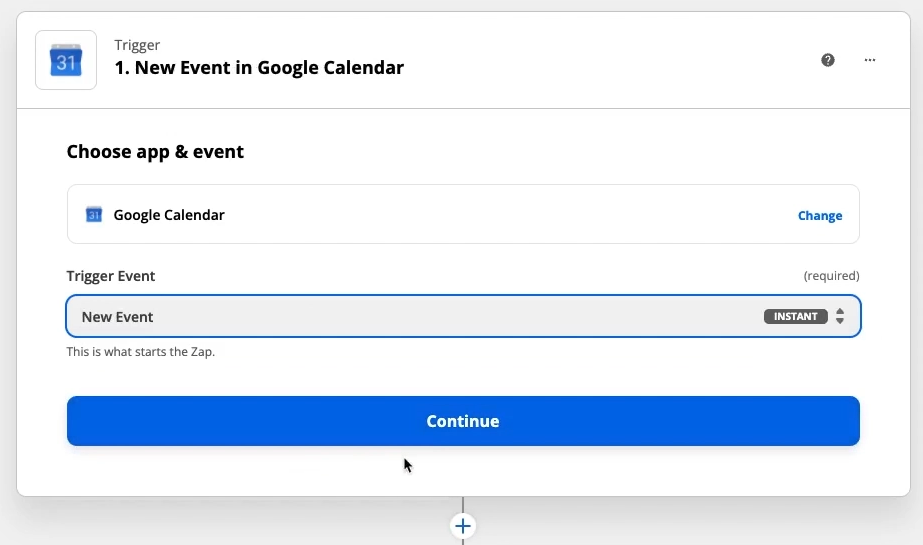
Click continue, and sign in to your Google account. Grant the permissions that Zapier needs, and click on continue again.
Then, you’ll need to specify which calendar you want Zapier to check for new events. This will probably be your main calendar, which will simply be called [youremail]@gmail.com. Once you’ve set your calendar, click continue.
Click on “Test Trigger” to retrieve your first set of test data. You should see the event that you just created.
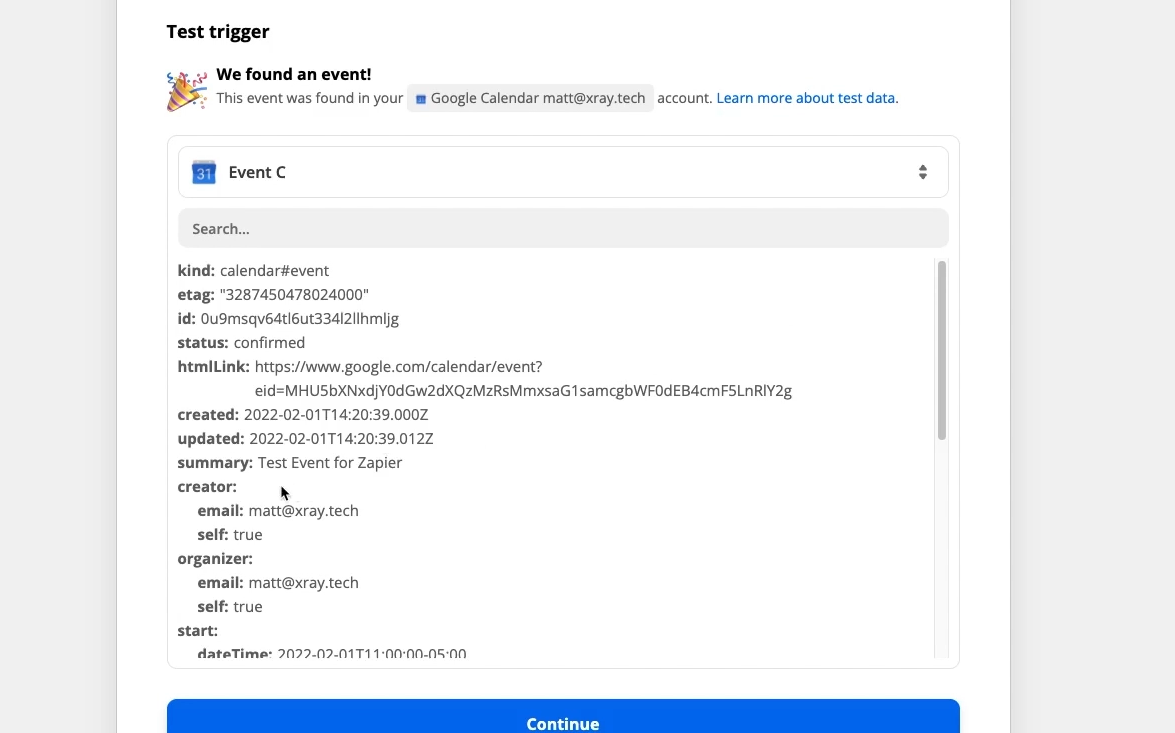
Notice that Zapier has tons of data and metadata related to the event. The wealth of information that Zapier gathers from trigger events lets you do all sorts of things with your automations.
But for now, you’re just going to add some data to your spreadsheet.
Creating an Action Step: Create a New Row in Google Sheets
Click on continue, and add a new step.
Choose Google Sheets as your app, and pick “Create Spreadsheet Row” as your action event.

Sign in to Google Sheets and grant Zapier access.
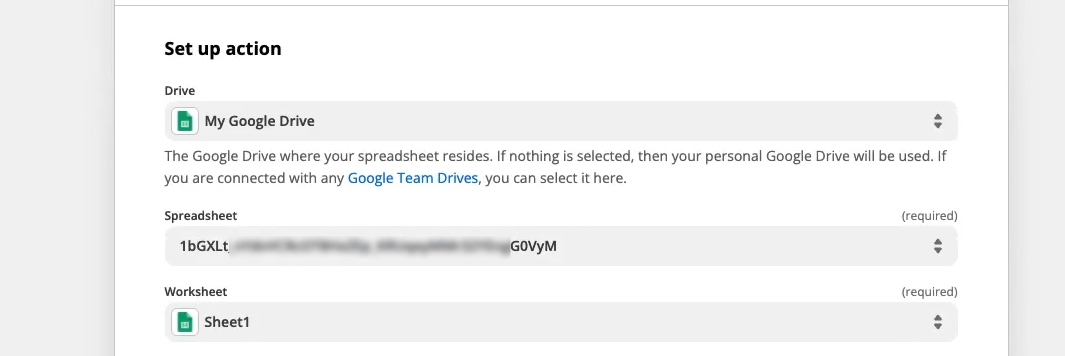
Now, you’ll need to point Zapier to the Google Sheet you want to use. Select the Google Drive where the Sheet is stored (probably “My Drive”). Next, specify the sheet itself.
The most reliable way to specify a Google Sheet or Doc in Zapier is to use its ID. To find the ID, open up the Sheet and drive and copy the string of characters between /d/ and /edit in the address bar.

Paste the ID directly into the “Spreadsheet” field. Pick the worksheet that you want to use in your Sheets document, and wait for Zapier to find your spreadsheet’s fields.
Zapier lets you fill in each field in your spreadsheet from your trigger. As you click on each field, you’ll see a menu to select data from the trigger, so you can map the “1. Event Begins (Pretty)” to the Start Time, “1. Summary” to the Event name, etc.
Note that the “1.” just indicates the data you’re using comes from Step 1.
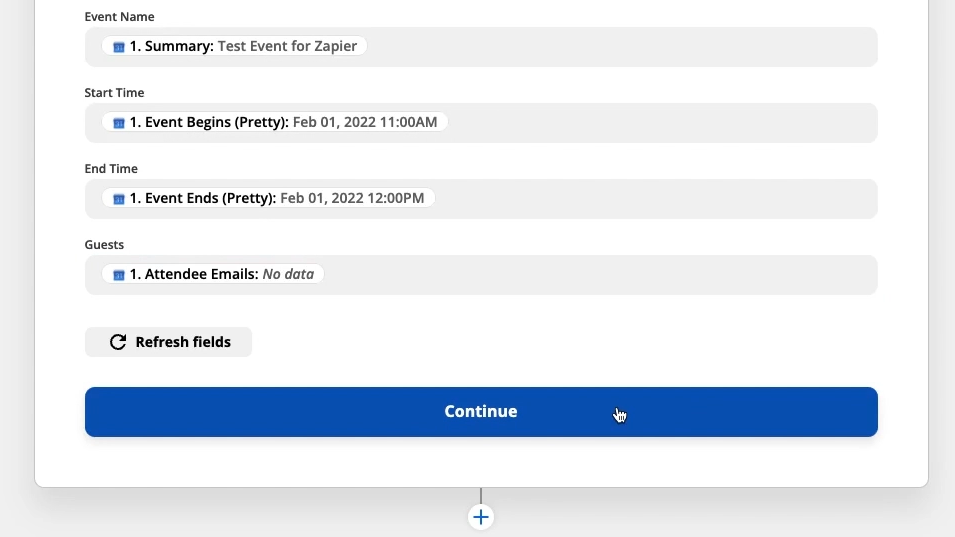
Once you’ve mapped all your fields, click on Continue.
Test your Zap and turn it on
With all your fields mapped, it’s time to test your Zap.
Note: testing an action step in Zapier will actually perform that step. Always use appropriate test data when building a Zap. In other words, use your own email addresses and other accounts that you have access to instead of a client’s.
Click on “Test & Review”, and you should get a success message.
Head over to Google Sheets to confirm that a new row was added.
If you’re satisfied with your Zap, turn it on. You can also give it a live test now by adding a new event to Calendar. Just note that it may take several minutes for Zapier to run your Zap if you’re using the free plan.
Wrap-up
We hope this tutorial gave you a solid introduction to Zapier as an automation platform. It’s one of many no-code apps available that can help to build useful automations or other tools.
At XRay, we strongly believe that you don’t need to be a coder to work with tech and build workflows that save you time.
If you’d like to learn more about no-code and low-code, check out our blog or our YouTube channel. You can also follow XRay on Twitter, Facebook, or LinkedIn.

Automation requires the right mindset to be successful. Building without a strategy can lead to inefficient and less useful workflows which your team won’t want to start using.
On our blog and YouTube channel, we’ve shared many tutorials to help share the technical knowledge needed to build no-code and low-code automations, but we also want to help business leaders to craft their big-picture strategies for automation that go beyond any one app or tool.
In this post, we’re going to share three books you can read now to start preparing for automation. These books aren’t how-to guides, or even books that are strictly about automation at all.
Instead, these are books that will get you into the right mindset for automation. They’ll prepare you with the philosophy you need to make good choices and build your automated workflows the right way.
We’ll tell you a little about each of these books and what kind of lessons you can take away from them. We’ll also include Amazon links where you can purchase the books if you’d like.
The End of Average

Nobody is really average
The first book we’ll look at is The End of Average by Todd Rose. In the book, Rose explores the notion of averages, and highlights how the very concept of “average” can be misleading if it’s not used properly.
To illustrate the point, he cites an example of the US Air Force designing the cockpit for a new plane in 50s based on the measurements of the average fighter pilot. However, they were surprised when their new planes experienced an unusually high rate of crashes. After some thorough investigation, they discovered that no one pilot who flew the plane actually fit the supposedly “average” measurements, making the cockpit uncomfortable for the pilots and more difficult to fly. Going forward, the Air Force abandoned the idea of building a cockpit for a single average, and instead focused on making adjustable seats to accommodate all of their pilots. They quickly found that the crash rate decreased due to the improved design.
This anecdote illustrates that while we often assume that using a statistical average is a good basis for a one-size-fits-all approach, this isn’t always the case. Instead, making sure that something can be adjusted as needed is often a better way to support
Automate for individuals, not for averages
How can you apply Todd Rose’s thoughts in The End of Average to no-code automation?
You can start by building your automations with specific individuals in mind. Instead of creating an automation that aims to solve everyone’s problems all at once, focus on addressing a single person’s pain points first.
Test the automation with that person and tailor it to their needs. Make sure that it really addresses their issues first, so that they can adopt it seamlessly into their workflows. From there, you can start fleshing it out and accommodating more use cases. You can add optional paths into your automations that will only trigger if the user wants them to, or if the
If you just start by building for a generic, “average” user, you may end up building a tool that doesn’t really suit anybody at all.
Buy The End of Average on Amazon
Antifragile

Antifragility produces strength under pressure
Next, we’d like to recommend Antifragile by Nassim Nicholas Taleb. In this book, Taleb introduces the concept of “antifragility” and how it applies to a variety of systems.
Antifragility is meant to be the exact opposite of fragility, and Taleb points out that this isn’t the same thing as strength or sturdiness.
If you drop a wine glass and it shatters on the ground, you’d consider that glass to be fragile. If you were to drop it and it stayed intact, you might call it strong or sturdy.
But what if dropping the glass on the floor actually made it more resilient? If something grows stronger when pressure is applied to it, then it meets Taleb’s criteria for antifragility.
For instance, the human body can be considered antifragile in certain ways. We may get sore at first when we start exercising, but over time, our muscles become stronger and more capable the more we work them out.
For entrepreneurs and business leaders, antifragility means building a company that can respond positively to difficult situations. Challenges should spur growth and evolution, not crisis and panic.
Building antifragile automations
Your workflows and systems aren’t going to remain the same forever. As your business grows and changes, your automations need to be able to keep up. In other words, you need to build your automations with the antifragile concept in mind.
You can’t always predict your future needs, but you can create automations in a way that easily enables updates. Whenever possible or practical, we recommend using an app like Airtable to perform calculations, formatting, and conditional logic rather than including it within your Zaps or Integromat scenarios. Then, you can change your automations with a quick database update.
For instance, let’s say you want to build an automation that sends a progress update to your clients each month. You could set the trigger in Zapier to a scheduled automation that runs every month, but you’d have to turn off and edit the Zap to change that trigger later. Instead, if you set your trigger as “New Record in View” in Airtable, you can change conditions for that view on the fly without having to open Zapier at all.
While it would be nice to build an automation once and just let it run passively, the reality is that you’ll have to make updates sooner or later. Building your automations to be easily updated will make them better able to handle difficult and changing situations.
The Cold Start Problem

Exploring network effects in The Cold Start Problem
Finally, let’s take a look at The Cold Start Problem by Andrew Chen. In Cold Start, Chen examines the power of network effects, and demonstrates how networks can explode with exponential growth once they cross a certain threshold of users.
After reading The Cold Start Problem, you’ll realize that network effects are present everywhere, and they’re actually a huge part of how startups achieve success.
The book focuses a great deal on the semantics of defining how network effects relate to each other, and identifies the component pieces that make up network effects.
While Chen’s book mostly looks at large networks of companies and consumers, you can see a similar phenomenon at work when a company begins adopting automation into their daily work.
Achieving a network effect with automation
As you start automating, you’ll likely begin by building a few individual workflows. At first, it might not seem like your automation efforts will be enough to really save time at a significant scale.
However, one of the benefits of automation is that each automated workflow that you build enables you to create additional workflows. This is because each automation can generate and store critical data related to your business processes, which can then be repurposed to fuel further actions.
For instance, let’s say that you’ve built an automation for new employee onboarding. Whenever you hire a new team member, the automation sends them relevant training material and sets their initial tasks.
As this automation runs, it can create a database with the name and contact info of each new employee, their role, their department, their start date at the company, and more. Over time, you can use that data to add more functions to your automation. You could send each new employee an onboarding feedback survey a month after they start; you could automatically compile reports to see how quickly your new hires are completing their tasks, or how often they access the resources they share.
Regardless of how you choose to expand your automations, you’ll see that adding new features to your automations will only make them a larger and more important part of your daily workflows.
Buy the Cold Start Problem on Amazon
Finding a new perspective on automation
Workflow automation is a great way to save time and produce more consistent results at your company, but it can require adjusting the way you think about your business. If you’re looking to get a fresh perspective that will prepare you for building automations that support your team, these books are the right place to start.
If you’d like to learn more about automation, check out our blog or our YouTube channel. You can also follow XRay on Twitter, Facebook, or LinkedIn.

If you could peer into the future, what would your company look like after you automated your robotic tasks?
In our recent posts, we’ve explained how an automated infrastructure can transform your company from the bottom up. In this post, we’ll show you what your company might look like once you’ve built that infrastructure, and how it will improve the way you work.
We don’t have a crystal ball to show you how your company’s future will unfold, but we can share some of the success stories we’ve built with our members. The automations we’ve built for our members have not only saved them time, but also given them the capacity to do more than they ever could.
Saving Time Every Week with Automation
For many, the primary goal of automation is to save time and accomplish your business processes faster.
No-code and low-code automation excel at shaving minutes off of every robotic task, and the cumulative effects can be staggering.
Saving 3 Hours a Week for Verb
To facilitate one-on-one coaching through their platform, fitness and wellness company Verb creates a profile page on their site for every coach they work with. Each page includes a photo and bio of the coach, and listings for their services.
As a rapidly growing company, Verb had to devote a few hours each week to creating profile pages manually as they onboarded new coaches. Putting together a profile page involved a lot of back and forth to gather all the information needed about the coach, their services, and their pricing. It also required messing around in Webflow and Stripe to create products and publish the pages.
XRay’s automations simplify the process into a single form that Verb can send to their coaches. Once they fill it out, a page is created in Webflow with all of the correct information, including unique Stripe products for the coach’s services. Verb’s team can just review the output and approve it to publish.
Workflow automation massively reduced the amount of time Verb’s team had to spend on coach onboarding. In total, they saved about 3 hours a week on the process.
Reallocating Time to Mindful Tasks
XRay members like Verb have enjoyed huge time savings from automating their workflows, but the benefits of automation go further than that. Automating also lets them refocus their time on work that’s more valuable, and it can create entirely new possibilities.
Creating Time for More Valuable Work
The hours that you save each week with automated workflows aren’t just nice stats for your internal metrics. Every minute and every hour saved by an automated workflow is another minute or hour that your team can devote to tasks that are truly worth their time.
You’re not paying your team just to perform all of the mindless, copy-and-paste tasks that automation excels. You brought them on board for their unique skills; their creativity, their strategic or analytic prowess, their specialized skill sets in design or development or finance.
When you automate your team’s robotic tasks, you’re setting them up to spend more time on valuable tasks that truly require their attention and abilities.
Think about the tedious tasks that fill up your team’s to-do list. Are you getting the most value you can from their output? What would you rather have them focus their time on? Automating their workflows will help you to concentrate your team’s time where it can have the greatest impact for your company.
Unlocking New possibilities with low-code automation
No-code and low-code automations can do more than replicate and streamline existing processes. You can also use tools like Zapier or Integromat to add new features and functions to the tools you’re already using.
For instance, XRay worked with the Entrepreneurship Foundation (EF) to transform a Shopify store into a platform for Connecticut’s student entrepreneurs to sell their products. Directly creating a Shopify profile for hundreds of students would be extremely impractical, so EF needed an alternative solution.
Using low-code tools like Integromat, XRay built a series of automated workflows that let students submit products for EF’s approval. With these automations, EF doesn’t need to do the manual work of uploading each individual product, but still retains control over the products that end up on their Shopify store.
Add-on features like these could be built with code, but a no-code/low-code approach accelerates build time and keeps costs much more manageable.
Ultimately, no-code/low-code automation isn’t just about saving time; it’s also a more accessible way to build nearly any software tool you can think of.
Use Automation to Document Your Processes
Documentation is a key part of the automation process at XRay. Even before you start automating a process, you need to chart it out step-by-step to find the best way to automate certain steps while preserving human inputs at other steps.
When an automation is complete, you have an ideal opportunity to document the process that it supports. Automation ensures that many steps of the process will be performed the same way every time; with the right documentation, you can also instill a similar consistency with your human inputs, and make sure that your team knows how to use the resources that are designed to help them.
Train Your Team with Process Pages
A Process Page is a non-technical document that simply explains what an automation does and how to use it. At XRay, we create Process Pages for every automation that we deliver to our clients.
With a Process Page, you can train your team to use your new automations. Each Page will document any forms or other tools they need to use to launch the automations, and will explain the situations where it’s appropriate to use the automation.
As you build more automations to support your company, you’ll simultaneously build up an extensive set of training documents in the form of Process Pages, which will only make it easier to onboard new team members and enable them to contribute from day one.
Save Time and Focus on What Matters
Building an automated infrastructure to support your company will help your team to save time, focus more of their attention on value-generating tasks, and will enable you to document many of your key processes.
If you’d like to learn more, check out our blog or our YouTube channel. You can also follow XRay on Twitter, Facebook, or LinkedIn.

No-code and low-code automation is growing fast, and each year brings new advances to the technology and new challenges for us to grapple with.
In this post, we’ll take a look at three of the trends that are going to define low-code automation in 2022. These trends will shape the way we build automations, what software we choose to use, and the people that get involved with automation in the first place.
Survey-driven Automations will become a popular solution
The first trend we’ll touch on is the rise of survey-driven automations.
If you’re not familiar with the term, a survey-driven automation is exactly what it sounds like: it’s an automation that runs whenever you fill out a specific survey. Once triggered, the automation can then use data from that survey to perform any automated action that you want.
For instance, you might build a client onboarding automation triggered with a survey. The form might include prompts for information like the client’s name, their project type, the project start date, the assigned project manager, etc.
Once you complete the designated form, the automation could then use the data you entered to execute a series of tasks. It could generate folders in Google Drive and channel in Slack with your client’s name; it could generate a project in Basecamp with to-dos; it could send calendar invites for weekly meetings, and more.
At XRay, we’re seeing survey-based automations becoming a popular choice among our team and our clients because survey triggers are a great way to stay in control of your automations. As the user of the automation, you can decide when it runs and what information goes into it.
For non-technical team members, the precise control afforded by surveys is an enormous advantage. Even without any specialized technical knowledge, they can easily understand how and when to trigger the automation, making it simple for them to take charge of the workflow.
With all of the benefits of survey-triggered automations, we expect them to become extremely popular this year. If you’d like to try building them yourselves, we’d recommend giving Airtable a shot for building your forms and databases. From there, you can try using apps like Slack, email, and Google Drive to create simple but useful automations.
SaaS Tools will focus on in-app automations
Our next trend isn’t one we’re excited about, but it’s definitely something that no-coders will have to deal with a lot in 2022.
As more and more people seek to automate their workflows, many SaaS tools are responding by creating in-app automations, rather than opening up their API to dedicated automation platforms like Zapier and Integromat.
You may have already seen the native automation features in apps like Slack, Quickbooks, Salesforce, Pipedrive, Hubspot, Mailchimp, and more.
Helpful automation widgets in popular software aren’t a bad thing on their own, but they often come at the expense of integrations for that software in Zapier or Integromat. For instance, you can make a poll in Slack with a simple keyboard command, but this feature isn’t available if you’re building a Slack automation in Zapier.
Ultimately, SaaS tools are adding automation directly to their apps because they see automation platforms like Zapier as an off-ramp for their users. After all, if a Zapier automation lets you view all of your aggregated lead data in a convenient Airtable base, you might not bother opening up Pipedrive very often.
For many workflows and use cases, the data a SaaS tool gathers is far more important than the app itself. But each SaaS developer naturally wants to make sure that you’re spending as much time in their app as possible, which is why they often prefer to support in-app automation tools rather than granting public access to those features through their API.
Whenever possible, we recommend using dedicated platforms like Zapier, Integromat, Unito, Coupler or others to build your automations. This will let you keep as many of your automations as possible in one spot, making it easier to track your automated activity and link your automations together for more productive workflows.
We can’t control what each developer decides to include in their API, but we can choose to build a more visible and scalable automated infrastructure anyway.
More people than ever will pick up automation as a second discipline
Lastly, let’s take a look at an awesome automation trend that really represents what XRay is all about.
We’re already seeing professionals from every background imaginable picking up no-code automation as a second discipline, and we’re certain that this trend is only going to continue to grow in 2022.
One of no-code automation’s greatest advantages is that it’s accessible to everyone. You don’t need to have any background in software development or coding to open up Zapier and start connecting your apps.
This year, we expect to see marketers, lawyers, accountants, HR reps, entrepreneurs and more start building automations to save time for themselves and for their team.
If you and your team decide to make 2022 your Year of Automation, we’ve got a tip to help keep things straight as you’re building: make a channel in Slack or Microsoft Teams called something like “Auto Updates”.
As you’re building your automations, add a step at the end that sends an alert to that channel whenever it runs, with a little context about what happened.
Simple messages like “We just received a question from a new lead!” will help to keep everyone aware of what your automations are doing, so they can add them to their workflows as well.
You can check out other tips and tutorials on our YouTube channel if you’re interested in learning more about automation, but you can also learn a lot by just opening up Zapier and trying things out. See what works and what doesn’t, and take it from there.
No-code is empowering everyone to build workflows that boost their productivity, regardless of their background or experience level. This year, we think that more people than ever will start automating, because the one thing we all value is time. So check out some tutorials and start building; it’s probably a lot easier than you think!
A bright future for automation in 2022
2022 is going to be a huge year for automation. Survey-driven automations are going to give people more control over their workflows; in-app automations and limited API access are, unfortunately, going to be a growing annoyance; and more people will pick up no-code automation as a secondary skillset, creating more time for themselves and their team as they build automated workflows.
If you’d like to learn more about automation, check out our blog or our YouTube channel. You can also follow XRay on Twitter, Facebook, or LinkedIn.
.jpg)
While some automations can work as standalone gadgets in your toolbelt, you’ll need to approach automation more systematically to optimize time savings and output boosts at your company.
Instead of thinking about building a series of independent automations, you should plan on creating an extensive automated infrastructure that supports every layer of your business.
Building an automated infrastructure relies on connecting each automated workflow to a centralized database, which we at XRay call an Operational Database, or ODb.
An ODb is a fundamental part of how we build automations at XRay. Building automations around a robust database gives us more options for automating your workflows, and enables low-code automation to support businesses of any size with a reliable automated infrastructure.
In this post, we’ll explain how an ODb extends the functionality of your automations, bridges separate workflows together seamlessly, and helps you to keep track of all your automated activity.
What is an ODb?
An ODb is a centralized database that manages data flowing in and out of your automations. It’s a fundamental part of an automated infrastructure, simultaneously logging metadata about each automation and feeding them with the data they need to perform useful tasks.
At XRay, we use Airtable to create ODbs for our own automations and for our clients. Airtable is a database application with extensive options for syncing, filtering, and reformatting data.
An ODb adds functionality to every automation
On their own, no-code/low-code platforms like Zapier and Integromat are impressive tools that let you connect apps to automate your workflows in all sorts of helpful ways. However, every platform has its limits, and using the basic features of Zapier alone won’t cut it for most businesses.
Perform complex database lookups
Using an ODb lets automators go beyond the limits of automation platforms and build more sophisticated workflows. For instance, while Zapier does include the ability to add lookup tables to an automation, it only allows for records that consist of a single key-value pair. Additionally, each table can only be accessed from within that automation.
Using an ODb, you can perform lookups with unlimited complexity and access the same database from any automation. You can find a client, their project type, start date, assigned team members - whatever data you want to store, collect, and reference. No limits, and no redundancies.
Control when automations run
You can also use an ODb to precisely control and adjust the conditions that trigger an automation to run. Airtable lets you create different “views” that only contain records in the database that meet a certain, specific set of criteria. From there, Zapier allows you to trigger automations whenever a new record appears in a specific view. By combining the two, you can use views to control exactly when your automations trigger, and change those conditions without even needing to open up Zapier or any other automation platform.
Do more with your data
Airtable is a powerful tool in its own right, and using it as an ODb for your automations means you gain access to all of Airtable’s functionality for working with your data. Airtable supports an extensive arsenal of formulas to reformat data, mathematical calculations, and flexible “mini-extensions” to run useful scripts.
Data entry is one of the most common targets for automation, so it’s always helpful to have more ways to manipulate and process the data involved in your automations.
Connect automations together with an ODb
With an ODb, data flows in both directions. As we mentioned earlier, each automation can perform lookups and reference data stored in your ODB.
But each automation can also feed data into your ODb, letting you gather more data each time your automations run. The two-way flow of data makes it easier for you to connect each automation you build to previously established workflows.
Each automation leads into the next
For instance, imagine that you’ve built an automation to support your inbound lead handling process (as we’ve done for our member Squared Away). This automation would collect lots of data about each lead that goes through your system, like their name, company name, project, project start date, point of contact email, etc.
All of that data about your leads will be stored in your ODb as your automations run, without you needing to take any time to enter it manually. So if you want to build another automation that would benefit from using the same data, like a client onboarding automation, it can pull the necessary information right from your ODb. You don’t need to start from square one and build a new database to support the new automation. You can just a few more fields, and you’re good to go.
With an ODb, automations are just siloed, self-contained tools. They all connect together, forming a larger infrastructure that can support actions across different teams and departments around your entire company.
Monitor automated activity with your ODb
When you integrate several automations into your key business processes, it’s important to be able to keep track of what those automations are doing.
As your automations run, they’ll populate the ODb with important metadata: a timestamp of when each automation ran, links to edit the automation in Zapier or Integromat, links to any files or they’ve created, and more.
With an ODb, it’s easier to keep tabs on all of your automated activity, even if you’re using several different automation platforms. Paired with some simple tools like chat notifications, your ODb will help you and your team to be aware of everything your automations are doing, so you don’t need to worry about accidentally performing redundant work or missing critical messages that your automations are sending.
Track KPMs through automation
You can also use your ODb’s activity log to track the performance of your automations and your team. You’ll be able to see at a glance how many times your automations run, how often you’re completing your automated processes, and how much time you’re saving through automation.
Whatever processes you automate will inherently be tracked in the database. If you automate inbound lead handling, you’ll be able to see how many leads are coming in and what your conversion rate is. If you automate
So if you want more visibility into your company’s KPMs, automation with a centralized database is a simple way to achieve it.
Lay the groundwork to scale your automations and gather key metrics
At XRay, we build all of our clients’ automations around an Operational Database. Even if you start with a small, simple automation focused on saving time for a single person, building with an ODb from the beginning will achieve three critical things:
1. It will extend the functionality of each individual automation
2. It will let you build automations that connect to each other, seamlessly sharing and reusing data
3. It will let you keep track of what your automations are doing, and how they’re helping you to save time and boost output.
If you’d like to learn more about how XRay designs and builds automated workflows, check out our blog or our YouTube channel. You can also follow XRay on Twitter, Facebook, or LinkedIn.
Database icon made by Freepik from www.flaticon.com

Every company has limited resources to work with, and getting the most out of those resources is a top priority for many.
You can’t always find additional staff or make more time in the day, so finding ways to increase productivity and efficiency is critical.
Automation is one of the best ways to optimize your company’s talent, their time, and their skills, and it’s becoming more accessible than ever. But with many choices for automation, it might not be clear how to get started or what approach to take. Should you be using tools like Zapier and Integromat to start automating your workflows, or are you better off developing an application to streamline your process?
In this post, we’ll explain why no-code and low-code automation is a better use of your company’s resources than creating custom automation software.
Developing custom software is lengthy and expensive
Custom software can be an appealing solution for workflow automation, but it can also come with a lot of issues that you might not have anticipated. From the initial cost of building your automation to finding engineers to maintain it, custom software is going to eat up a significant amount of your resources.
High cost of custom software
Software development is almost always a costly endeavour. If you’re working with a development agency or contractors, your price tag can easily run into $50k, $100K or more just for the initial build of your project.
Developing the software internally won’t be cheap, either. If you’re using your internal engineering staff to build automations, you’ll likely be consuming the time and attention of some of your best-paid employees who could be working on more urgent tasks. While they’re developing automations for your internal systems, they won’t have as much time to work on client projects and directly generate value for the company.
Long build times
Software development is a lengthy process. Building any product, whether it’s an app designed for customers or an automation for internal use, can often take months or years to finish. Any changes along the way can cause delays and push the timeline back even further.
Complex maintenance
Once it’s built, your software will need constant updates to keep performing at the same level as it does on Day 1. It will need security updates to patch up any vulnerabilities that emerge, and feature updates as you refine the application to suit your company’s needs.
All of these updates will require a developer, and will only add to the cost of your software.
Ultimately, unless you’re selling the application to your customers or clients, developing custom software is likely not going to be a cost-effective or quick way to start automating your workflows. It might be necessary if your company operates in a highly specific niche, but in most cases, no-code and low-code automation will be a better use of your limited resources.
Automating with no-code and low-code platforms is more affordable and faster
What is no-code/low-code automation?
If you’re not familiar with the term, no-code and low-code automation is all about connecting two or more apps together to build automations, all while writing very little code - or none at all. Several no-code/low-code platforms are available today, with Zapier and Integromat being two of the most popular and widely used. Each platform has its own specialties, but they all operate on similar principles.
To build a no-code or low-code automation, you start by identifying a “trigger” event in one of the apps you’re already using. Then, you add “actions” that should be performed automatically whenever that trigger happens.
For instance, you might set New meeting in Google Calendar as your trigger, and send a Slack message as your first action. With that setup, you can have an automated Slack message sent to you with key meeting information whenever one is added to your calendar.
No-code/low-code automations can get much more complex from there as you add more steps, filters, and logic, but simple automations are often a great place to start.
What’s the difference between no-code and low-code?
No-code automations are built without needing to write a single line of code. Instead, everything is done through a simple UI, where you can select items from menus and enter data without any special syntax or formatting. Zapier excels as a fully no-code platform, though it does have low-code capabilities as well.
Low-code automations are still mostly built through a UI, but they can also include a few lines of code for things like API calls, looping, or other more advanced functions. They require some technical knowledge, but you don’t need to be a software developer to build a low-code automation. Integromat is a more robust platform for building low-code automations.
Since the two are so similar, we tend to group them as a single concept: no-code/low-code.
No-code/low-code is an affordable way to automate
Compared with the 5- or 6-figure cost of building a custom application, no-code/low-code automation is a much cheaper solution. Subscriptions to platforms like Zapier and Integromat start at around $20/mo, and even their most expensive plans for enterprise users are only a few hundred per month. Even at the most expensive tiers, no-code/low-code is a fraction of the cost of custom software development.
Start building faster with no-code and low-code
A simple automation like connecting your Google Calendar to Slack can be easily built within a day. More complex automations could take a few weeks to set up, particularly if you want to accommodate several different scenarios with a single automation.
In any case, you can get a no-code/low-code solution up and running much faster than you can get a functional MVP ready for a custom app. The timeframe for low-code will usually be in weeks or a few months, while software development will be several months or over a year.
Low-code means low maintenance
With no-code/low-code, maintenance is (mostly) not your problem. If you’ve got a Zapier automation connecting Hubspot and Quickbooks, each app’s developer will maintain and update their software as needed. Hubspot and Quickbooks will handle their own updates, and Zapier’s team will make sure everything still connects.
Of course, you may want to change how your automation works after testing it out and seeing how it performs with real world data. You’ll need to make any feature updates or changes yourself when building a no-code/low-code automation, but making edits is much simpler when you don’t have to write extensive code to get it done.
Anyone can learn no-code and low-code automation
At XRay, we encourage everyone to build automations that can streamline their workday. While our experienced technicians take charge in building automations for our clients, everyone on our team has been able to create an automation that helps them out, from project managers and designers to content writers and administrators.
Anyone on your team can learn how to build, maintain, and edit low-code automations. Of course, if you’d rather keep your team focused on their current disciplines, automation specialists like XRay can always help to automate your workflows. Even if you’re working with an outside company for automation, it’s still a huge benefit to be able to understand how the automations work, and to be able to make small updates yourself.
Make the most of your resources with no-code/low-code automation
Whether you’re working with in-house developers or through an agency, custom software development can be a lengthy and expensive way to automate your workflows which can be difficult to update and maintain.
For most companies, low-code/no-code automation is a better use of your resources. It’s faster to get set up, the cost is more affordable, and it’s easier to maintain. Plus, you can train your own team to work with low-code automations or even do it yourself.
If you’d like to learn more about how low-code automation can streamline your workflows, check out our blog or our YouTube channel. You can also follow XRay on Twitter, Facebook, or LinkedIn.

No-code and low-code automation is a great way to boost productivity at your workplace and give your team more time to focus on important tasks.
If you’ve dabbled with tools like Zapier, Integromat, or Unito, then you’ve seen firsthand how they can easily connect one app to another to start automating your workflows.
However, you might be wondering how these platforms are actually able to do this. How can they work with dozens, hundreds, or even thousands of apps and access so many commands and functions?
It all comes down to Application Programming Interfaces, or APIs. In this post, we’ll give you a quick overview of what an API is, and how automation platforms use them to let you build workflows.
What is an API?
An API is an interface that lets apps and programmers issue commands to a piece of software. An API for any given application includes a list of commands defined by that application’s developers. If you’re using a project management app, its API would likely include commands for creating and editing tasks, getting information about tasks, and deleting tasks.
One of the main uses of an API is to facilitate communication between the frontend of an app that a user interacts with, and the backend that stores data and runs calculations. Clicking on a button to create a new document in an app like Google Drive will send a command to the backend via the API to create a “document” object with all of the required attributes. All of this communication happens behind the scenes; users only have to interact with the simplified, abstracted UI to make everything work.
But APIs aren’t just about connecting the two sides of an application; they also grant access to external applications and developers. By consulting the API’s public documentation, a developer could write some code to issue commands to an external application. The data gathered from those commands might let a web developer add a Twitter widget to their site that shows new tweets with a certain hashtag in real time.
Developers make APIs and often provide thorough public documentation because they want their apps to be accessible, but to keep things secure, they don’t want to expose the entirety of the software to the internet. An API lets the frontend communicate with the backend, and lets other apps safely connect as well.
In a similar vein, automation platforms can also use APIs to operate applications without requiring constant user input.
How Automation Platforms Use APIs
Automation platforms like Zapier work by essentially adding a simple, user-friendly graphical interface to API calls.
Instead of consulting technical documentation and searching for the functions and parameters that you need to specify to create a new channel in Slack, Zapier provides you with a series of dropdown menus and plain language instructions to let you assemble an API call.
All you have to do is to select the app you want to use, the action you want to perform, and enter some basic data like the channel name.
In other words, no-code platforms like Zapier let you use an API without needing to know any code at all.
Because no-code platforms leverage APIs to create automations, this means they can support hundreds or even thousands of apps. Any program with a publicly documented API could be added to a no-code platform, and a quick search on XRay.Tools will show you that Zapier has added support for many of them.
With the extensive functionality of API calls and the vast array of available applications, no-code platforms give everyone the power to build useful tools without needing to have any programming experience whatsoever.
So if you want to start building a new tool to speed up your workflows, you don’t need to immediately start looking for developers and software engineers to get it done. In many cases, no-code automation tools will provide everything you need to start automating the tedious parts of your workflows.
Once you get started, you can also start learning a little bit of code to take your automations further. This will let you write API calls within Zapier or Integromat, add loops or other useful functions, all while staying within a familiar platform. Techniques like these mark the difference between “no-code” and “low-code”. Both focus on using existing tools to create apps and automations, but low-code requires a little more technical knowledge and experience.
Start Building Automated Workflows Without Learning Code
The structure of modern software has made it possible for no-coders to do more than ever. The no-code and low-code space is growing every day, with apps like Zapier, Unito, Integromat, Coupler and more giving everyone the ability to leverage APIs and build tools that enhance your workflows.
If you’d like to learn more about building no-code and low-code automations, or if you’d like to see how XRay can build automations for your team, check out our blog or our YouTube channel. You can also follow XRay on Twitter, Facebook, or LinkedIn.
How to Make an API Call in Zapier
If you’ve been dabbling in no-code and low-code automation, then you’ve probably already used Zapier to set up a few simple automations.
While Zapier excels as an intuitive, no-code platform, it also has the ability to perform some useful low-code functions that let you do more with your automations.
In this post, we’ll show you one of the most practical low-code functions that Zapier supports: making your own custom API calls.
If you’re not familiar with the term API, you can check out our post here for a thorough explanation of what they are and why they’re important for automation. But in short, an API (Application Programming Interface) is a way to issue commands to an application without using the app’s typical user interface. These commands, usually issued by developers, let someone fetch data from the app, create new data, or edit existing data.
As a low-coder, you can use API calls to add functions that Zapier doesn’t support natively. For instance, if you’re working with Asana, you may have noticed that Zapier doesn’t have an option to create a new section within a project. To do that, you’ll need to write an API call.
In this post, we’ll walk you through setting up an API call to create a new section in Asana, but the principles apply pretty well to any app and action that you want to make an API call for. So even if you’re not using Asana in your workflows, it can still be useful to follow along.
What you’ll need
• An Asana account - a free trial will work
• A paid Zapier account - any level from “Starter” or higher will give you access to premium apps like Webhooks by Zapier
• (Optional) Airtable - we’re triggering this Zap with Airtable, but you can use any app
Creating the API Call
1. Check for an existing integration first
Before going through the trouble of making an API call, check to see if you can use pre-built integrations first.
If we check Asana integration, we see that there’s no step to add a section. That means we’ll need to make an API call in order to create a section as part of our automation.
2. Set up the trigger
Now, you’ll need to create a Zap and add a trigger. Your trigger can be anything; in our example, we’re using a “New Record” trigger in Airtable. The record contains some information we’ll use in the API call, but you can also enter that data manually for this tutorial.
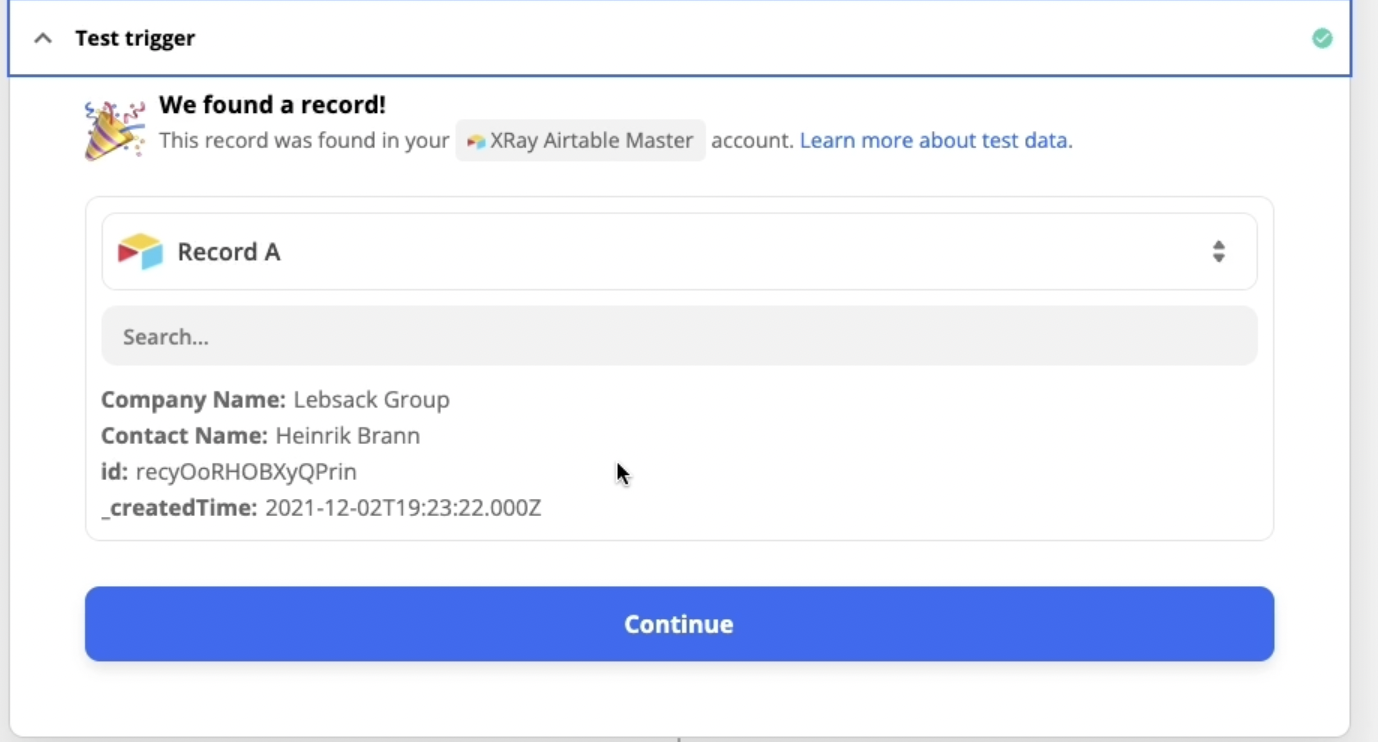
3. Add a Webhook step to create the API call
Add a new step, and choose “Webhooks by Zapier”.
Choose your webhook’s type from the menu. POST will let you create data in the app; GET will retrieve existing data; PUT will update existing data.
Since we want to create a new section with our automation, we’ll choose POST.

Populating the URL
Zapier will now ask you for a URL. This URL is how your webhook will actually be sent, and it needs to have some particular information to communicate properly with Asana’s API.
To figure out what you need to put into the URL for any API, it’s always best to consult the API documentation.
Most modern apps have documented APIs, so you just need to do a quick search for “{app name} API docs” to find them.
When you open up Asana’s API documentation, you can use the search bar on the left of the screen to search for information pertaining to “sections”.
The entry on sections has a lot of information about all the functions you can perform with sections, and what data is needed to complete the command. There’s also example code, which is extremely useful for getting started.

To start, copy the URL from the example code. You’ll need to replace the placeholder text of “{project_gid}” with your Asana project’s actual GID.
To find your GID, open up your Asana project in your browser, and copy the number in the URL between 0/ and /list.
Once you’ve got your Asana GID, paste the completed URL into the field in Zapier.
Filling Out Data Fields
Under “Data”, Zapier lets you assemble a set of key-value pairs to include all of the data needed to execute your API call.
Refer to the API documentation to find out what data you need to include here. To create a new section in Asana, the docs indicate that you only need to identify the project that the section will be created in, and the name of the section.
Since the project is already identified in the URL, you can just include a name for the section. Enter “name” into the key field, and whatever name you’d like in the value. We’ll use data from our Airtable trigger in our example, but you can enter a name from a different source, or just enter one manually.
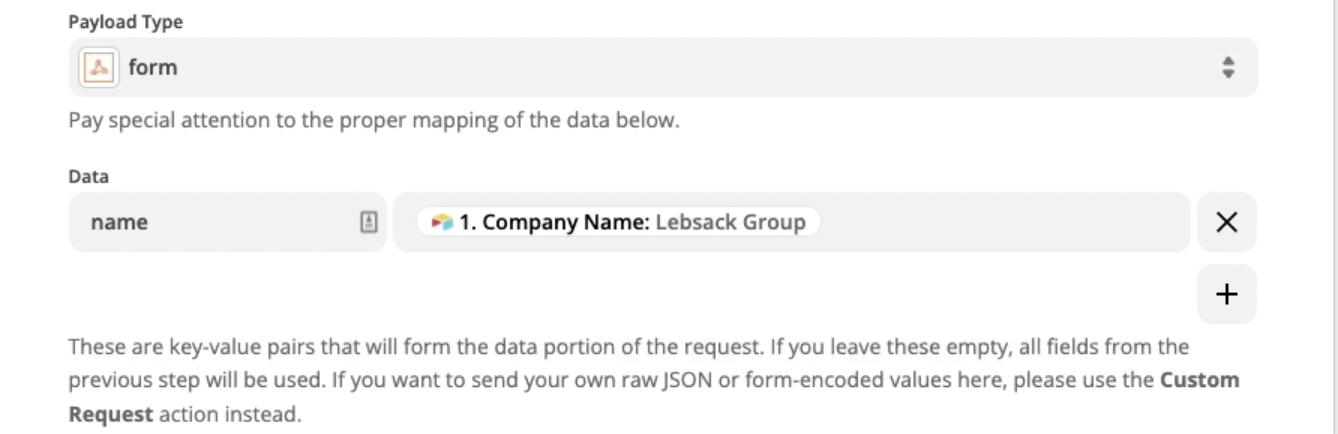
Adding Headers
Headers act as a sort of label for your webhook; they tell the recipient app information about the request that you’re sending.
You’ll frequently need to include authorization data here - a simple credential check to make sure that your request is authorized to access data in your account.
Again, check the API docs to determine what you’ll need to add here. Asana’s docs indicate that we need to include a token authorization.
To get the authorization token, you’ll need to go to your Asana account and navigate to Settings > Apps > Manage developer apps. From there, click on “New access token”.
Name the token and create it. Copy the token, and return to Zapier.
Under headers, enter “Authorization” as the key. For the value field, enter “Bearer” followed by a space, and paste your token in.
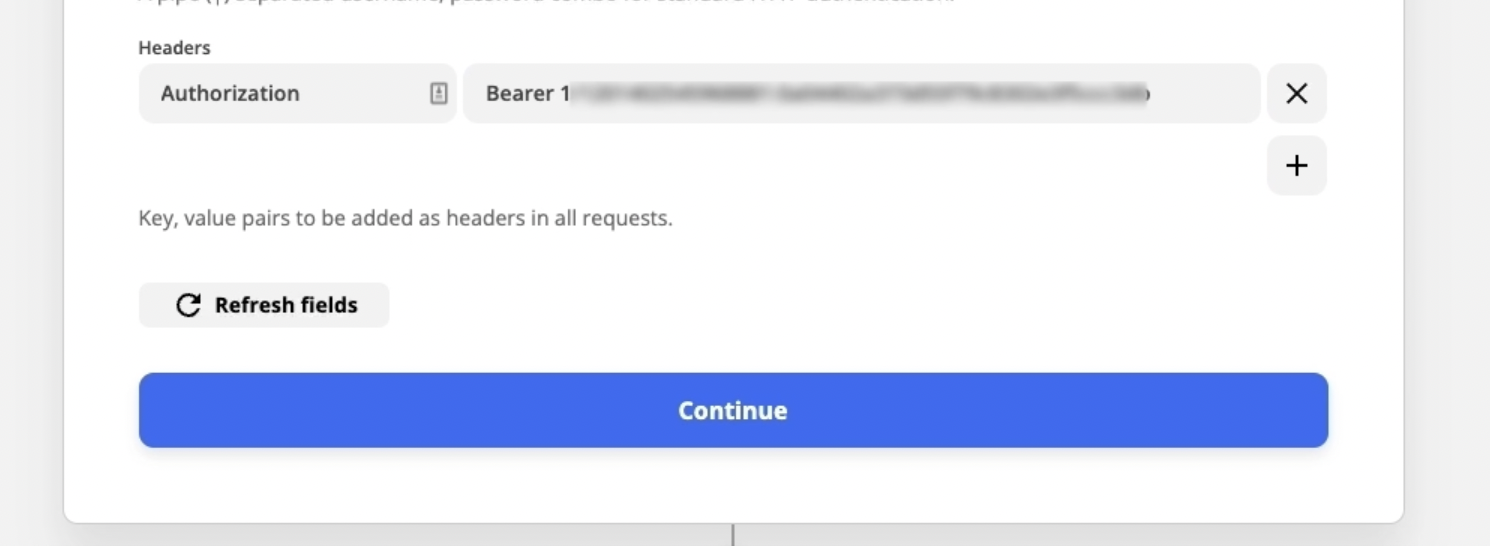
With your URL, data, and headers all filled in, you’re all set to test the automation. It should create a new section in your designated project with the name you provided.
Push Your Zaps Further with API Calls
Now you know the basics of making an API call in Zapier, and you can start adding custom steps whenever Zapier doesn’t support exactly what you want to do.
This post just covers some of the fundamental principles of API calls; you’ll need to do a lot of trial and error on your own to figure out the details. Just remember to always check the documentation when in doubt, and you should be able to find what you need.
If you’d like to learn more about building low-code automations to enhance your workflows, check out our blog or our YouTube channel. You can also follow XRay on Twitter, Facebook, or LinkedIn.

Automating your workflows can often be an overwhelming concept when you’re just starting out. It can be difficult to know where to begin as you search for a way to streamline your work and organize your data across people, teams, and departments.
As low-code automation specialists, we’ve found that the best way to launch an automation project is to start by focusing on a single individual, even if your ultimate goal is to optimize workflows for your entire team.
Building automations to support a key member of your team will be the quickest way to get results in the shorter term, while simultaneously laying the groundwork for automated workflows that will help an entire department - and eventually your whole company.
Turn a team member’s chokepoints into checkpoints
Right now, there’s probably somebody at your company who is putting in great work on a consistent basis, but is getting overwhelmed with the volume of tasks they have to deal with every day.
To start supporting their work with automation, you can begin by looking at your overburdened employee’s bottlenecks. What’s eating up their time? How many of their daily tasks actually leverage their unique skills and expertise, and how many are just tedious robotic work?
When you start building automations for one of your team members, you’ll immediately amplify their output. They’ll be able to spend more of their time making critical decisions and solving unique problems instead of dedicating their time to robotic tasks.
By focusing on a single individual, you’ll be able to complete your initial automations much quicker, as you’ll only need to be concerned with one set of requirements and preferences.
However, building automations for one team member can quickly create benefits for the rest of your company as well.
Expand your automated infrastructure to a team or department
Even when you’re building automations with just one person’s role in mind, you can still establish the beginnings of a scalable automated infrastructure.
One of the key aspects of XRay’s strategy for building automations is to create an Operational Database from day one. An Operational Database, or ODb, is a centralized database that supports every automation at your company. It collects data from multiple sources which can then be plugged into your automations, and it stores data from your automations as they run. An ODb extends the functionality of low-code automation platforms, allowing for database lookups, precise control over automation triggers, and more.
In short, an ODb makes your automations more capable and scalable, and it lets all of your automations use data from each other. When we start building an automation for one role at your company, we’ll also build your ODb in parallel, which makes it easy to transition from automating for a single role to automating for several.
For example, you might start off your engagement with XRay by automating your inbound lead handling process. Your lead handling automation would send templated responses to inquiries and track the progress of each lead as they move through your funnel.
As the automation runs, your ODb would gather key data about each lead, which could then be repurposed in future automations. All of the data about your leads could be used to support an onboarding automation, creating shared folders and Slack channels for any lead that you convert to a client.
When all of your automated data runs through an ODb behind the scenes, you can easily expand the scope of your automations, jumping from a workflow that supports one role to workflows that support whole departments and teams.
Scale to a company-wide automated infrastructure
As you add more automated workflows to your ODb each month, you’ll see that it naturally expands over time to support your entire company. While this will certainly help your whole team to spend less time on robotic work, the benefits will go beyond just saving time.
When the majority of your critical processes are supported by automation, you’ll find that it's easier than ever for your team to work asynchronously. The progress of each project and task will be easily visible to everyone who needs to see it, reducing the need for ad hoc check-ins and interruptions. Files will be stored and shared consistently, making it easy for anyone to find the documents they need to get their work done.
As full or partial remote work is becoming a standard part of business around the world, you’ll need to find ways to make your company maintain its performance when much of your team is working from different parts of the country - or different parts of the globe.
A robust automated infrastructure will enable remote work, and it can all start with a single automation supporting a single person at your company.
Starting small to achieve transformational results
When you first dip your toes into automation, you don’t need to try and overhaul your entire company all at once. Automating your workflows can redefine the way your whole team works, but with an ODb set up by XRay.Tech, you can get there one step at a time.
If you’d like to learn more about how automation can save time and amplify your team’s output, check out our blog or our YouTube channel. You can also follow XRay on Twitter, Facebook, or LinkedIn.
While Zapier is often billed as an automation tool that lets you connect your various apps together, some of its most powerful and helpful features can be found in its own built-in software.
Previously, we’ve covered some of the useful functions that you can access through Formatter by Zapier, and in this final post about the tool (for now), we’re going to take a quick look at some of what you can do with the “Numbers” operations.
As you might have guessed, all of the functions in the numbers section let you work with numerical values, either by reformatting them or using them in mathematical calculations. In the videos below, we’ll show you three of the ways you can use the numbers functions in Formatter, but just keep in mind that there are more options than what we’re including here. Be sure to explore Formatter yourself to find additional useful tricks.
If you're interested in learning about Formatter's options for working with lists, .CSV files, and other useful actions, check out our rundown of Utilities functions in this blog post.
If you'd like to see Formatter's options for working with Text and Date/Time, check out this post.
Format Phone Number
If the output of your automation is a message or email, you want to make sure that the recipient has an easy time reading it. An unbroken string of numbers like 5551235555 might be simple enough for a computer to parse as a phone number, but a little formatting makes it much clearer for a human reader.
With the “Format Phone Number” action, you can automatically format phone numbers to include hyphens, parentheses, and other punctuation to make them easier to read. You can also use local or international formats to help accommodate your clients or colleagues around the globe.
Just enter the phone number you want to edit, pick the new format you’d like to use, and you’re all set.
Math Operations
Even a simple calculation can make a no-code automation much more powerful and let it save a little more time. Whether you need to calculate the total cost of your tracked hourly work, or determine the capacity for your team whenever a new client is added, some quick arithmetic is often needed to make an automation finish everything on your checklist.
With Math Operations, you can perform multiplication, division, addition, and subtraction with dynamic data from your automation, or with constant numbers entered directly into the input field.
Just select the operation that you’d like to use, and enter your inputs one at a time. You can then test the step to see the results. This system isn’t well suited to more complex equations, but it’s very convenient when you just need to implement some simple arithmetic.
Spreadsheet-style Formulas
Like many automators, you may already be familiar with the types of formulas provided in spreadsheet apps like Excel and Google Sheets. If you need to do some more robust calculations in your automations and you’re already comfortable with spreadsheets, then the Spreadsheet-style Formulas action in Formatter will be a helpful tool.
Just add a new Formatter step, and choose “Numbers” and “Spreadsheet-style Formula”. Then, you can just type the formula into the provided field, using data from earlier steps as inputs if you’d like.
If you’re not quite sure about what syntax to use for your formula, Zapier includes a link to their formula guide. Since there aren’t any dropdown or prebuilt options, it’s best to know a bit about spreadsheet style formulas before using this step. But the guide will help you to figure it out even if you’re not an Excel power user.
Work with Numbers directly in Zapier
With automated workflows, it’s often easiest to connect apps with tools like Zapier and Integromat, and to perform any related calculations in spreadsheets like Google Sheets and Airtable. This can certainly be an effective way to build your automations, but it’s always good to know about all of the tools at your disposal. Using the Numbers functions of Formatter can let you perform calculations and format numbers entirely within your Zaps.
If you’d like to learn more about how you can use Zapier and other no-code tools to automate your workflows, check out our blog or our YouTube channel. You can also follow XRay on Twitter, Facebook, or LinkedIn.
What do you do when the data you’re working with in Zapier isn’t quite right?
Maybe the text isn’t capitalized correctly, or you’ve got a whole bunch of extra text when the only thing you’re looking for is an email address. Maybe you want to split up the items in a list, or you just want to make a date look a little more readable.
The answer to all of these problems and more is “Formatter by Zapier”, one of the most useful tools in the no-code automation platform’s toolbelt.
In the videos below, we’ll show you several different ways to transform data with Formatter. This is only a sample of what formatter can do, and we encourage you to explore the other options yourself. You can also leave us a comment if there’s another technique you’d like us to create a walkthrough for.
Make a New Formatter by Zapier Step
To use any of the techniques in our videos, just create a new action in your Zap and search for “Formatter by Zapier” or select it from the menu on the right.
Choose one of the four available actions to start configuring your formatter step: Text, Numbers, Utility, or Date/Time.
Each of the actions will contain several specific operations that you can use to format your data.
Text Transformations
These steps alter text in your data, and can be used by selecting “Text” as your action when you make a new formatter step.
Capitalization
There are multiple options in formatter for changing the case of your text. You can use “Capitalize” to capitalize the first letter of each word, “Titlecase” to capitalize based on title case rules, “Lowercase” to make every letter lowercase, and so on.
Extract URLs, Email Addresses, or Numbers
The text formatter includes several “Extract” operations that will find the first URL, email address, or number in the provided text. Just pick the option that suits what you’re looking for.
Extract Pattern - Regex
If you’re looking for something more specific than what the preset “extract” functions can do, you can also use regex to extract any pattern you want with the “Extract Pattern” function.
Regex, or regular expressions, is a way of searching text for specific character patterns. You can use it to find every word that starts with the letter “a”, or every word that starts with the letter “a”, doesn’t end in the letter “t” and is at least four letters. You can get as specific as you’d like.
Using regex can be pretty tricky, and definitely qualifies as “low-code” rather than “no-code”. If you’d like to learn more about regex, you can check out this guide from developer Mozilla.
You can also visit Regex101 to get more info about regex and test your expressions.
Split Text
The Split Text function lets you take a piece of text and split it into separate pieces of data. You can use it to break up each item in a comma-separated list, or each word in a sentence.
Date/Time
Date/Time transformations give you extensive options for working with dates in your automations. You can reformat complicated timestamps to more human-readable layouts, calculate the time between two dates, add or subtract time to a date, and more.
Reformat Date and Time
As you're building no-code automations, the apps you use will often give you ugly, lengthy date and time data. Check out this video for a quick primer on reformatting date/time in Zapier.
Add or Subtract Date/Time Values
Need to calculate how much time passed between two dates? Just select "Add/Subtract Time" to get started.
Numbers
Formatter's "Numbers" transformations let you perform mathematic calculations and much more. You can use functions from Numbers to format numeric data, run spreadsheet-style operations, and more.
Check out our rundown of Numbers functions in this blog post.
Utilities
Formatter’s Utilities functions give you a few additional ways to work with your data. They’ll let you import a .CSV, add line items to a list, pick an item randomly from a list, and more.
Check out our rundown of Utilities functions in this blog post.
Control your data precisely with Formatter
We can’t always control the data that comes into our automations. User-entered text in website forms or automatically gathered metrics won’t always be neat and tidy on its own.
Whether you need to perform some vital calculations to make your automations work, or just want to add an extra level of polish with correct capitalization, Formatter by Zapier will let you exercise more control over the data in your automations.
If you’d like to learn more about building automations, check out our blog or our YouTube channel. You can also follow XRay on Twitter, Facebook, or LinkedIn.

As you’re exploring your options in the low-code automation space, you’ll likely come across companies like XRay and independent freelancers alike.
While freelancers will typically offer a lower price for their services, an XRay membership provides a better service for organizations trying to save time and refine their workflows at scale.
In this post, we’ll explain how XRay differs from freelancers and why our pricing structure is different. We hope that this information will make it easier for you to decide which approach is best for automating workflows at your company.
XRay’s Expert Technician Team
At XRay, our team of automation technicians incorporates a wide range of skills and experience. Each tech has their own specialities that they bring to the team, giving us a comprehensive set of techniques to apply to each member’s projects.
Some of our technicians are experts at Zapier, while others excel at building automations in Integromat. Some are highly technical low-coders who write custom API calls to build complex automations, and others are focused on business operations and can design automations to fit any use case.
Rather than simply assigning one tech to each client, our membership model lets us rotate our personnel as needed. When we identify new goals with one of our members, we can easily swap in the techs with the right skill set to match the software, use case, or technical challenge of the project.
Freelancers tend to work solo or with a couple of colleagues, and often have a narrower range of expertise. This isn’t a bad thing in and of itself; if you know you just want to build a Zapier automation for Hubspot, a freelancer specializing in Zapier and Hubspot can certainly help you out.
However, if you find that you want to start expanding your automation into workflows beyond Hubspot and start exploring automations that may require custom API calls or different platforms, you’ll be better off with the flexibility of an XRay membership.
Go Beyond Simple Automations with an Automated Infrastructure
At XRay, we don’t just build automations in isolation. Starting from the very first automation that we create for each of our members, we connect every workflow to an Operational Database (ODb). The ODb gathers data each time an automation is triggered and feeds that data into automations as needed.
Using an ODb as an intermediary step in between two applications enables us to build automations that wouldn't be possible by connecting the apps directly, and it lets us collect data that can be used to support any number of future automations.
For instance, one of our members might start out by automating Hubspot to notify their sales team whenever a deal is updated. We could extend this automation to also send a message to accounting whenever a deal is actually closed, and have a summary of the sales figures sent to the leadership team each week in a report.
Ultimately, using an ODb from the start lets us accommodate many of the automations our members will want to build in the future, and contributes to creating a complete automated infrastructure rather than just building a series of separate Zaps and integrations.
While techniques and strategies will vary based on each individual, freelancers typically work on a per-project basis and generally won’t be able to build a system comparable to XRay’s ODb. Again, this approach may suit you just fine if you’re only looking to build an automation or two, but it won’t be sufficient if you’re hoping to automate workflows across your entire company.
Documentation for Ease of Use, Data to Uncover Insights
An automation is only useful if your team knows how and when to use it - or when they know it’s running in the background without any manual input required.
At XRay, our techs provide detailed documentation with each automated workflow to explain what each automation is, how it works, and how to use it. We’ll also include video walkthroughs to illustrate more complicated workflows step-by-step.
We share all of our documentation through the Workflow Dash, an app we’ve developed and include for free in all of our membership plans. The Workflow Dash organizes links like our Notion documentation into easily accessible Pins, which let you view web content right inside the Dash. We’ll also include any forms, surveys, or other resources you need to trigger your automations.
While any good freelancer will certainly do their best to make sure you understand the automation they’ve built for you, they won’t be able to offer something like the Workflow Dash that organizes and contextualizes all of the information you need to operate your automations.
Your Choice
If you’re working on a tighter budget, or if you only have a small, specific project in mind, then a freelancer may be a better fit for your automation plans. However, if you want to build automated workflows that touch every aspect of your organization, an XRay membership is likely going to be the better choice.
If you’d like to learn more about how XRay builds automations to create more mindful time, check out our blog or our YouTube channel. You can also follow XRay on Twitter, Facebook, or LinkedIn. You can also reach out to us at any time if you have questions.

One of the biggest misconceptions about automation is that automating your systems would dramatically change your business processes.
If your workflows are getting the results that you want, then a good automation should support your workflows rather than replacing them.
In this post, we’ll quickly show you how XRay’s approach to automation makes it easier to do what you’re already doing. We’ll also point you to some of our more in-depth articles that can help you to decide what you should and shouldn’t automate at your business.
If It's Not Broken, Don’t Fix It
If you already have a lot of workflows that work great for you, then the last thing we want to do is to disrupt those for the sake of building an automation.
Completely reshaping your processes would only make it harder for you and your team to adopt the new automations, creating totally unnecessary obstacles as you try to scale your business.
What’s more, fundamentally changing the way your processes work could result in an inferior output. Using automations to save time only makes sense if you can preserve or improve the final result; otherwise you’re just trading time for quality.
Our aim is to help you identify the most repeatable and consistent processes that you use every day and to enhance them with automated steps.
Let the Robots Handle the Robotic Tasks
So how do we know which steps to automate in your workflow? To put it simply, we look for the tasks that are already robotic in nature, while leaving you and your team to keep pursuing the mindful tasks that really require human attention.
At XRay, we have a simple set of criteria to determine whether a task is robotic or mindful: C.A.S.T.
Is the task in question creative, analytical, strategic, or thoughtful? If so, it’s probably better left to the capable hands and mind of a human being. You generally wouldn’t want a piece of software designing your website, or setting the mission and vision for a new project.
On the other hand, if a task doesn’t meet any of the C.A.S.T. criteria, then it’s likely a robotic task and a good candidate for automation.
Many of the most common robotic tasks essentially consist of moving data from one place to another: updating a database and a CRM to reflect the latest invoices received in Quickbooks, or sending a message to notify one of your colleagues about a client email.
Automated software can perform robotic tasks just as well as a human could, and can do so faster and with fewer errors. That’s why we focus our automation efforts on robotic tasks first and foremost.
How Automation Works: Turning a 10-Step Process into 3 Actions
Let’s imagine a 10-step process that’s part of a company’s onboarding workflow.
- Supervisor drafts a templated welcome email, including an open invitation for the new hire to ask questions as needed
- Supervisor finds department- or role-specific onboarding material for the new hire and sends it over email
- Supervisor creates first tasks for the new hire in Asana, Basecamp, etc.
- Administrator sends email asking new hire for contact info
- Administrator after the new hire responds, copy and paste the information into the company directory
- HR sends new hire the employee handbook
- HR creates task to read the employee handbook
- New hire poses questions sporadically to supervisor
- Supervisor checks in sporadically with new hire
- New hire checks off all tasks as complete, and notifies supervisor
If a client came to us with a workflow like this, we would recommend automating several steps so that they complete the work more efficiently and consistently.
Instead of drafting the email and creating all of those tasks manually, the supervisor could fill out one simple form that will kick off a series of automations. The automations would then locate the necessary docs for the new hire based on their role, send them a welcome message, and create all of their onboarding tasks.
At each step of the way, the automation would announce its actions in the relevant messaging channels (Slack, Microsoft Teams, etc.), making sure the supervisor, admin, and new hire are all kept in the loop without any of them having to write out updates themselves.
The automation-supported process might look something like this:
- Supervisor fills out a short “New Hire Onboarding” form
- 🤖 - Sends email to the new hire with department- and role-specific documents, and links a form for any questions
- 🤖 - Creates tasks for the new hire in the company’s project management software
- 🤖 - Sends the new hire an email asking for contact information, with the admin CC’d
- 🤖 - Copies the new hire’s response into the company directory
- 🤖 - Sends new hire the employee handbook
- 🤖 - Creates task to read the employee handbook
- New hire - submits questions in the designated form
- 🤖 - Updates supervisor on the new hire’s onboarding progress
- New hire - checks off all tasks as complete. Supervisor automatically notified
The structure of the process stays the same, and all of the same work is completed, but now, humans only have to manually complete three of the steps instead of all ten.
Everyone involved will have that much more time to focus on their important work, instead of looking for documents or sending notifications that could be automatic.
If you’d like to learn more about how XRay can help you to automate your onboarding process - or any workflow loaded with robotic tasks - reach out to us at any time.
If you want to learn more about no-code and low-code automation, check out our blog or our YouTube channel. You can also follow XRay on Twitter, Facebook, or LinkedIn.
There are only three things that everyone does every day at work. No matter what your job is or where you're employed, you are always either (1) preparing to work, (2) doing your work, or (3) communicating with someone (or something) about the work. 📈📉📊
You might start your day opening all of the software you'll need, logging in, and reading over directions from a client or supervisor. That's preparing to work. Then, you do the work itself - in other words, the stuff you get paid to do. For a programmer, it's writing code; for a chef, it's making food. Then, you let the relevant people know that your work is done; a to-do box is checked, and an order is served. ✅🍱
When we refer to "Business Processes", we're talking about everything you do as you go through these three types of activity at work. From signing deals and setting a schedule to actually performing the work and getting paid - they’re all business processes. In this post, we'll talk about three different categories of business processes, and how defining your processes can help you to focus more on generating value, and less on mindless, repetitive tasks. You're probably spending a lot of time right now on preparing to work and reporting your work, and we want to show you how you can reduce that - or even eliminate it altogether. 🤓
This post is part of a series about the Company XRay, a method for creating more mindful time at work. If this is the first that you’re hearing about XRay, you should check out our first post on the topic, which gives a high-level overview of the concept. In our last post, we took a deep dive into choosing and deploying software tools, which you can read here.
Now, let’s start by considering value processes.
Value Processes
Value processes are the activities that generate revenue for your business and are the reason that your company exists. These processes are the work itself, rather than preparing to work or reporting it. For designers, value processes would be the creative steps required to generate a design; for a baker, they would be the steps to mixing ingredients for baking. A business that doesn’t optimize their value process probably won’t stick around very long. Who wants to hire a design firm that can’t make a smooth UX, or a baker that makes bland cakes? No one.
Ultimately, improving your value processes relies on your human abilities. This is human work that relies on quality, creativity, and uniqueness. It's made up of what we call 'C.A.S.T.' tasks; tasks that are creative, analytical, strategic, or thoughtful. C.A.S.T. tasks, and the value processes that they support, need to be done by humans. Accomplishing your value processes is the primary goal of your company, and it's where you should be able to focus most of your time and resources. If you're an engineer, artist, manager, SDR, or any other type of knowledge worker, I'm talking about focus and flow time; the 30-60 minutes you have a day where no one interrupts you, you're focused on the task at hand, and the time seems to fly by; or finally slow down. Being in a flow state is the best way to accomplish your value processes.
However, you'll often find that you end up spending a great deal of time on logistical processes - activities that support your value processes, but don't create value themselves.
You may be restricting your value processes' capacity by neglecting your logistical processes. Every hour spent on paperwork, scheduling, and data look-ups is a context switch that could be spent on the work that actually defines your business and brings in revenue. By taking some time now to define, optimize, and automate your logistical processes, you can devote more of your time and energy to what matters in the long run.
Logistical Processes
Logistical processes are where the average business is going to have the most room for optimization. Logistical processes are all the things you do to keep your business going that don’t directly create value or translate to revenue. You can think of them as the work between the work: they’re the emails you send to let people know that you’ve finished something; the links you need to find to get the right hex codes for your client’s brand colors from the test campaign; the repetitive information that you log specifically to copy and paste. Logistical processes are vital to the survival of your business, but they’re not what you’re getting paid for. It’s perhaps because they fall outside of our areas of expertise that we tend to have sloppy, ill-defined methods and procedures for getting the bs work out of the way of the real work.
When you have issues in your value creation process, it's usually going to be obvious to you and your clients. If your designs are confusing, or if the food you make tastes bad, you'll probably hear about it right away. It can be harder to detect the flaws in your logistical processes. By their nature, flawed logistical processes are poorly-defined and create unnecessary ambiguity. They fail to communicate the necessary information to the relevant people at the right time. When you have messy logistical processes, you might have finished work awaiting review without anyone knowing that it's ready for their feedback. You might have a client who's out of the loop because they weren't added to all of the right communication channels. Even if the work itself is good, the perception of your work will suffer if the logistical processes are causing delays, miscommunication, or are forcing you to redo work.
One of the main goals of the XRay Method is to help companies define and streamline their logistical processes, and even to automate them whenever possible. According to a McKinsey study, workers spend about 19% of their day searching for and gathering information. The study also notes that just creating a simple searchable database for internal company info can reduce that time by 35%. Assembling the right information in order to perform work are the robotic tasks we target. We want to remove them from human workflows, so that people at your company can focus on tasks that deserve their attention and skill, and frankly, make money.
Logistical processes can (and we believe will) be standardized by entity type, business model, geography and more. While value processes can be highly specific to each company, logistical processes can often be applicable to many different companies in different industries. A pizza chef and a sushi chef might not have a lot in common when it comes to making their respective dishes, but they both need to pay their employees in the same way - and it’s not all that different from how a bookstore or a design studio has to pay their employees. Hence the invention of HR software like Zenefits, JustWorks, BambooHR, and others.
By documenting a standard procedure and automating it wherever possible, you give your team more time to focus on revenue-generating activities and avoid the mistakes and confusion that hamper their work every day.
Outlier Processes
Outlier processes are, as their name suggests, a little bit different. An outlier process is any activity that hasn’t typically been part of your business, but that you’re now undertaking. Maybe a client asks for a service that you haven’t offered before, and you’ve agreed to try it out rather than losing the client to another firm. Maybe you've started using a new piece of software, and you need to learn the ins and outs of it and decide whether or not to keep using it.
Whatever the case may be, it’s inevitable that you’ll run into some outlier processes eventually. No business continues to do exactly the same thing day in, day out forever. Sometimes, these new processes can be a great opportunity to create more value or streamline a process. When that happens, the outlier could become a new norm. In other cases, the outlier process might just be a distraction that takes up more resources than it’s worth.
So how do you tell the difference? How can you distinguish between innovation and a waste of time? You can’t always predict what’s going to happen, so the best thing to do is to be methodical and treat each new process as an experiment. When an outlier process arises, document everything that you can! You should have a record of who’s doing what, for how long, the resources they’re using, the results of their work, and any revenue or other value that you can attribute to the process.
Don’t be afraid to say no. In many cases, it’s not worth it to devote time and resources to a new service or product or other activity if it simply doesn’t align with your business goals.
However, if you decide that the outlier process is something that should be a regular part of your business, make sure to analyze it the same way that you’ve done so far with your existing value and logistical processes. When you’re doing something new for the first time, odds are that you won’t be doing it the most efficient way possible. You’ll probably have people doing some redundant tasks, and will likely accomplish most of it manually. Go back and define the value and logistical processes that make up this new process, and find the robotic tasks that you can take off of your (and your employees’) hands.
Outlier Processes are the gradual change agents that let our organizations grow, mature, and evolve over time. There are constantly new challenges arising among your various company functions. Handling an outlier opportunity well typically results in a messy-but-effective first version of getting something done, which could evolve into an entirely new value prop.
Action Steps
Value processes, logistical processes and outlier processes are a part of every business. It’s important to define and analyze your processes from time to time, and consider where your responsibilities fall. How are you spending your time? Are you stuck in one silo, or reactively running between the three?
Here's how you can find the robotic tasks in your workflow and start automating them.
Step 1: List Your Value Processes and Obstacles
First, write down one of your company’s value processes that you would like to focus on. Next, consider the process that you named and identify potential bottlenecks. What can prevent you or your employees from completing this value process efficiently and effectively? What gets in the way of delivering results on time and at the level of quality that you strive for? When you list these obstacles, there’s a good chance you’ll find that many of them relate to your logistical processes; the preparation necessary to do work, or the communication that work was done.
Step 2: List Your Logistical Processes
Next, list out your logistical processes as they relate to delivering or communicating the value process you identified. Document about three of the activities that support this value process, but aren’t directly related to generating revenue. Your list might include processes for onboarding and training new employees, record keeping, payroll procedures, systems for adhering to legal regulation, etc.
For each logistical process that you’ve identified, write out all of the tasks required to complete it. It’s possible that a lot of your activities won’t have a documented procedure in place. If that’s the case, just write down how you or your team did it last time. One of the benefits of going through the XRay method is that you’ll clear up ambiguity in your processes and create valuable documentation of how you’re getting things done. Even though you won’t be able to automate everything, you’ll be able to spot redundant activities and help your team to be more productive the next time someone 'new' comes in.
Step 3: Identify Robotic Tasks
Once you have each of your logistical processes listed out, it’s time to find the robotic tasks in the list - the tasks that you will be able to automate. Look for anything in the list that involves people simply moving information from one place to another without modifying it. Look for repetitive tasks that should be essentially the same every time. Look for the tasks that are all about one-way communication; tasks that just keep someone (or several people) in the loop rather than starting a collaborative effort or conversation. All of these kinds of tasks can and should be handled through automation. Make a list of those tasks, so you can start planning to automate them.
If you’d like help designing and building automations for your robotic tasks, feel free to contact us for more info.


As an XRay membership continues, we’ll often reach a point where our members want to shift focus away from building new automations and instead concentrate on fine-tuning their existing workflows.
We understand that your company’s needs and goals will change over time, which is why we offer maintenance packages that let our members keep working with us at lower cost when they need to pause construction on new automated workflows.
In this article, we’ll give you a brief overview of what we offer in our maintenance packages. If you would like to see pricing information or if you have any questions, don’t hesitate to reach out to us directly by clicking on “Contact”.
Maintenance Packages Overview
With a maintenance package, you’ll be able to keep using all of your automations just as you did during your full membership. Whenever you run into a bug or error, we’ll address it. If you want to make some small updates to your automations, a maintenance plan will let you get it done at a reduced rate.
All of XRay’s maintenance plans include the following core features:
Support for any automations we’ve already built
The primary goal of switching to a maintenance plan is to focus on the automations that are already in your portfolio. With that in mind, all of our maintenance plans include support for any automation that we already delivered to you with a completed Process Page. Each automation will already be configured to alert us to any errors that crop up. Just reach out to us on Slack to get started.
Credits for hourly work, and a reduced hourly rate
Each maintenance membership includes credits for a certain amount of hourly work at no additional charge, and a reduced hourly rate after those credits are already used up.
Continued access to premium software
We use the best tools in the industry to build your low-code automations, and every maintenance membership will let you continue to access the premium and enterprise software that we use at a fraction of the cost.
Benefits of Higher-Tier Maintenance Plans
Every maintenance plan will provide you with the core services listed above, but each package also includes some unique benefits.
More hours of service, better hourly rates
Higher tiers of maintenance plans will include additional credits for hourly work on your automations, as well as a further reduced rate for any work beyond your credited hours.
Support for more complicated automations
Though we strive to use no-code and low-code tools for every automated workflow, technical restraints will sometimes require us to use more advanced software and techniques. Any automated workflows that use API calls, custom integrations, or full applications built by XRay will only be supported by higher tier maintenance plans.
Limited feature updates for current automations
While the main focus of a maintenance plan is to keep everything running as-is, higher tiers also include time for smaller feature updates or changes. These changes will allow you to tweak your automations based on the real-world data you gather from using them every day.
Bugs and Errors vs. Changes and Updates
All of XRay’s maintenance work will fall under of one of two categories:
1. Bugs and Errors
2. Changes and Updates
Each maintenance plan allots different amounts of time and different hourly rates for these two types of work, so it’s important to understand the distinction.
Bug and Error Fixing
Bug and error fixing describes any work that we do to keep your automations running as intended when your full XRay membership ends. Whatever state your automation was in when you switched over to maintenance membership is the state that we’ll strive to preserve.
For example, imagine that one of your automated workflows is supposed to send a Slack message to your head of accounting whenever you mark a deal as “Closed/Won” in Hubspot. If that Slack message suddenly stops getting sent, then addressing that issue would count as bug and error fixing.
Changes and Updates
Any modifications to your automations beyond their intended, documented scope will fall into the category of changes and updates. If you want to alter how your automation is triggered or what any of its actions do, those will typically be considered changes or updates.
For instance, let’s consider our hypothetical Husbpot-Slack automation again. If you want to send the message to the accounting channel instead of your accounting department head, or if you want to send the notification in an email instead of a Slack message, those would be “changes and updates”.
Whenever you come to us with a request during your maintenance membership, we’ll let you know as soon as possible if the work you’re proposing is a bug fix or an update. If you find that you want a lot of updates, we’ll likely recommend that you start up a membership again.


Note: pricing listed above is an estimate, and subject to change based on the technical complexity of your automations and other factors. Please reach out to XRay directly for a specific quote for your maintenance membership.
Choose the plan that works for you
At XRay, our goal is to save time for our members and help them improve their processes along the way. We know that each business is going to have different needs and priorities, so we offer flexible maintenance plans to help our members as their focus shifts away from new automations.
If you’d like to learn more about how we work with our members, or if you’d like some quick automation tips and tutorials, check out our blog or our YouTube channel. You can also follow XRay on Twitter, Facebook, or LinkedIn.
Not sure where to start with automation?
Hop on a 15-minute call with an XRay automation consultant to discuss your options and learn more about how we can help your team to get more done.
🎙Interview me about my Workflow
Workflows take many different shapes, sizes, and tools. Ever wonder how your workflows compare?
Get interviewed and find out!
while humans get to be mindful.


