The XRay.Tech Blog
Case Study & Tool Belts
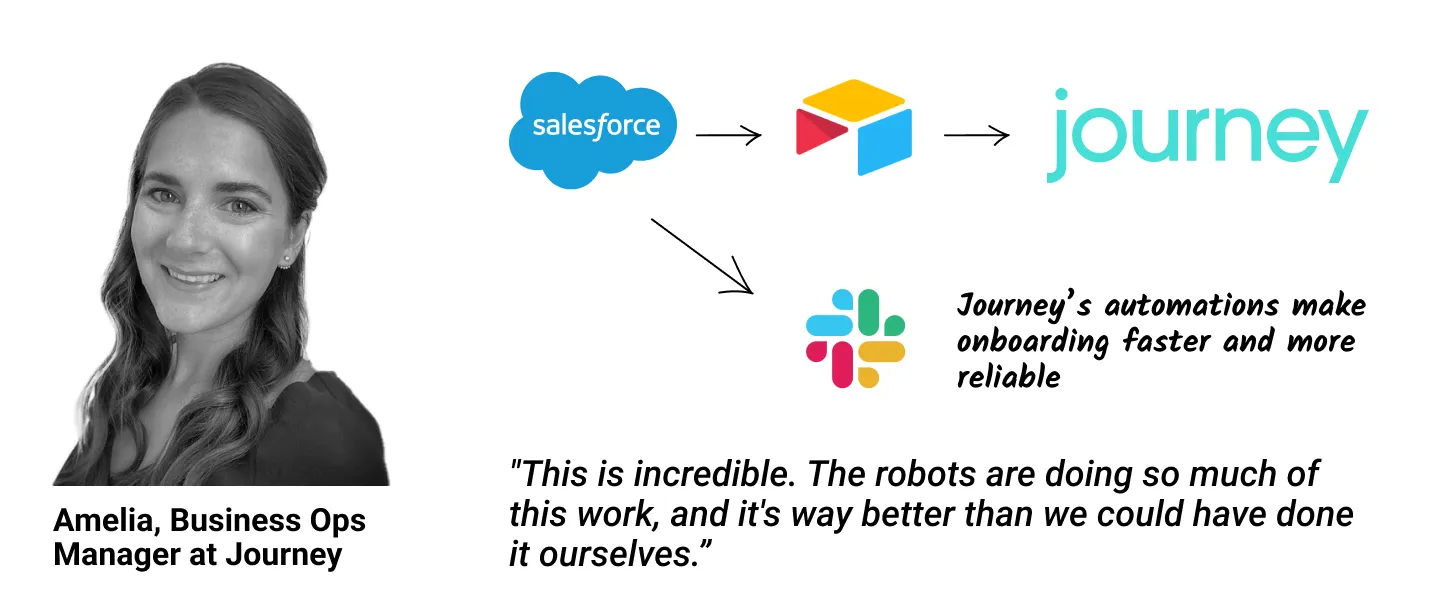
"This is incredible. The robots are doing so much of this work, and it's way better than we could have done it ourselves. The documentation is also amazing – we’re ready to start training our staff how to perform this workflow right away!"

At XRay, we strive to build reliable automations that you can count on for your day-to-day work.
However, bugs and errors are an inevitable part of any software. From time to time throughout your XRay membership or project, you will encounter some issues with your automated workflows.
In this quick post, we’ll explain how you can report those errors so we can get your automations working again as quickly as possible.
Provider reported errors
For most technical errors, you won’t actually need to do anything at all.
These kinds of errors can happen for any number of reasons. One of the apps used in your automation might have been down when the automation tried to run, or the automation might have received text in a field that needed a number.
Whatever the specific reason, if a step of any automation fails to run due to a technical issue, your automation provider – like Zapier, or Make.com – will spot the error. Every automation that we build will be configured to relay these error reports and notify us automatically whenever something goes wrong.
You’ll see these notifications pop up in Slack or your email inbox, and our technician team will address the errors as soon as they can.
If you have any particular questions or concerns, you can always send us a message. But whenever you see an error reported automatically, you’re not required to take any additional steps. Our team’s already on it.
User reported errors
However, not all errors will be reported automatically.
In some cases, you may experience automation issues that don’t show up in our automatic reports.
Again, these errors could happen for several reasons. It might be down to user error. Someone using the automation may have provided inaccurate or incomplete data. In other cases, the automation may run successfully, but may be configured incorrectly.
We’ll usually catch configuration problems while we’re prototyping and testing the automation, but you may want to refine the automation further once you see how it works in the real world.
Whatever the exact cause is, the end result is that while your automation technically ran correctly, it didn’t produce the outcome you needed.
When this occurs, all you have to do is fill out the Membership Feedback form, which you can find in your Workflow Dash. Alternatively, you can send us a message in our shared Slack channel to give us a heads-up.
Whichever channel you use to contact us, just be sure to provide some detail and context about what’s happening. The better we understand what you’re trying to do and what’s not working, the quicker we’ll be able to investigate and solve the problem.
Reach out to XRay when your automations need some fine-tuning
The vast majority of the time, your automated workflows will operate exactly as intended. But when you do encounter bugs or other issues, we’ll do everything we can to get your automations up and running quickly.
Just reach out to us whenever something isn’t working as expected, and we’ll figure out what’s going on.
If you’d like to learn more about working with XRay, check out our blog or our YouTube channel. You can also follow XRay on Twitter, Facebook, or LinkedIn.
No-code automations should fit seamlessly into your workflows, letting you accomplish more without having to drastically change your setup.
With a platform like Make (formerly known as Integromat), you can build automations with tools like Notion that you use for everyday work.
In this post, we’ll show you how you can trigger Make automations whenever you add a new page in Notion, update a database, or add content to a page. And once you have your automations set up, you’ll be able to trigger them by just using Notion as you normally would.
Watch databases or pages
First, let’s take a look at the “Watch databases/pages” module. Like all of the modules we’ll cover in this post, this is a trigger module, so you can use it to launch your scenario in Make.com or Integromat.
Using it will make your scenario run whenever a new page or database is either created or updated in Notion.
Configuring the “Watch databases/pages” module
You can choose whether it will run for databases or pages, but the module itself doesn’t let you distinguish between updates and new items. But don’t worry - we’ll also show you how you can handle that with a filter instead.
To set up the module, just choose whether you want to watch databases or pages, and enter an optional query if you’d like. The “query” field is just a simple keyword search, and won’t be as useful as adding a filter after the trigger.
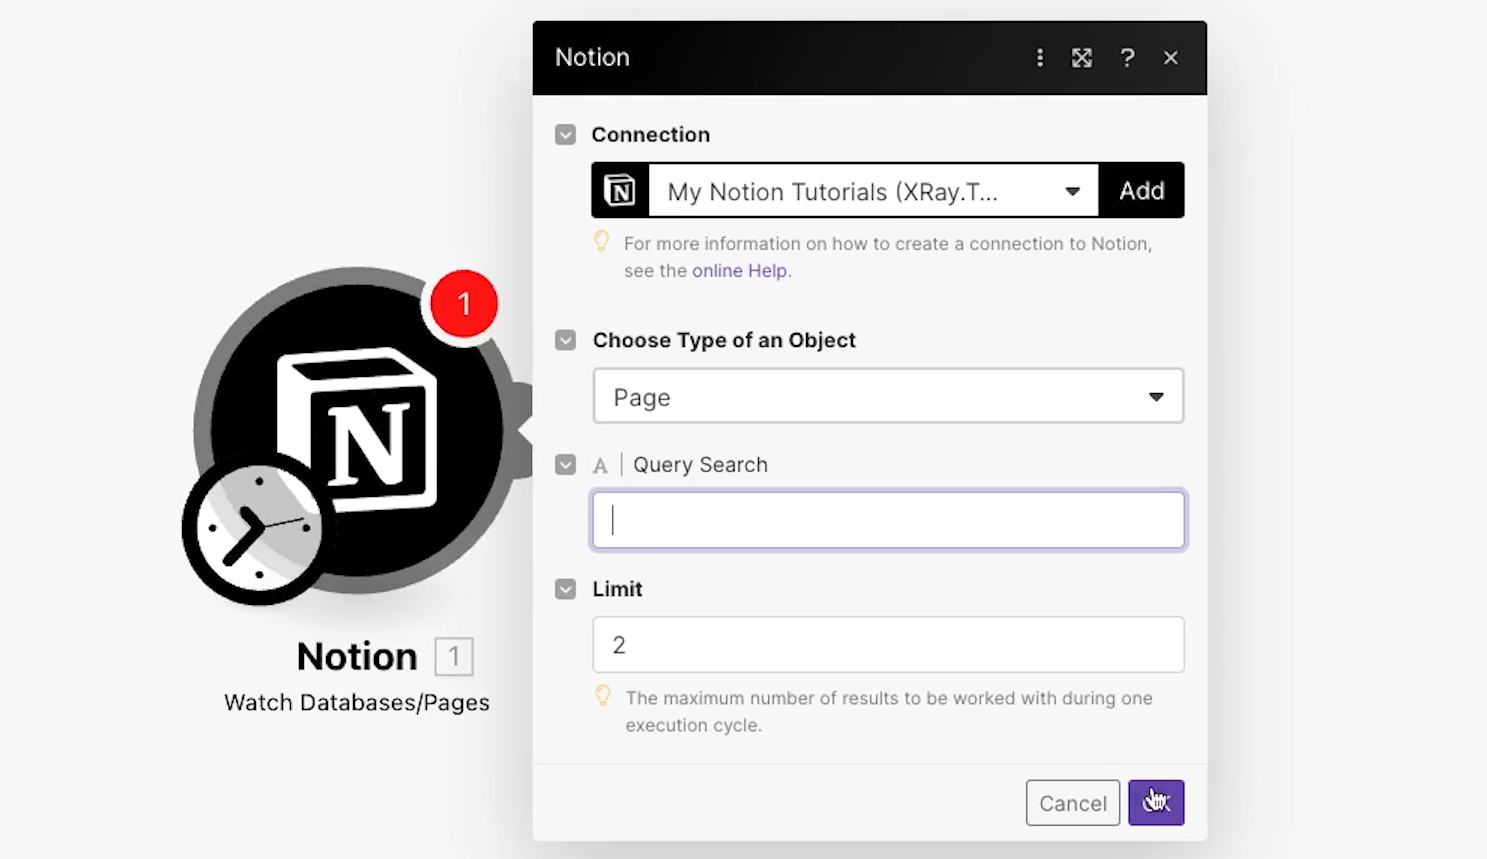
Then, set the item limit, and run the scenario once to grab some data. It will search through all of your databases or pages, so it may take a few moments.
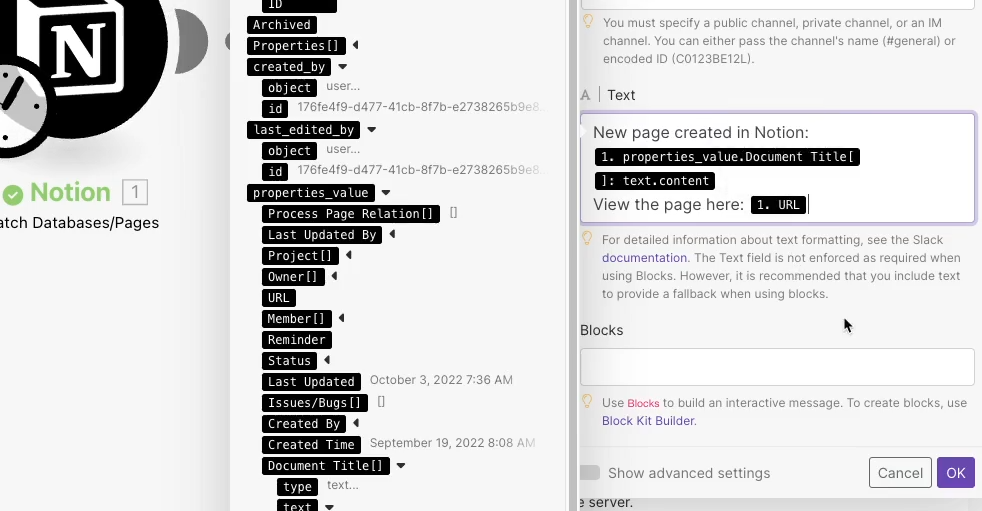
Now, you can use the data it retrieves in future steps in the scenario. In our example, we’ll send a Slack message with the name of the page and its URL.
Use filters to control when your scenario runs
If you’d like to narrow the scope of this trigger, add a filter right after the trigger.
If you only want to complete this scenario for new pages, not updated pages, you can just add a condition that the Created Time must be equal to the Last Edited Time.
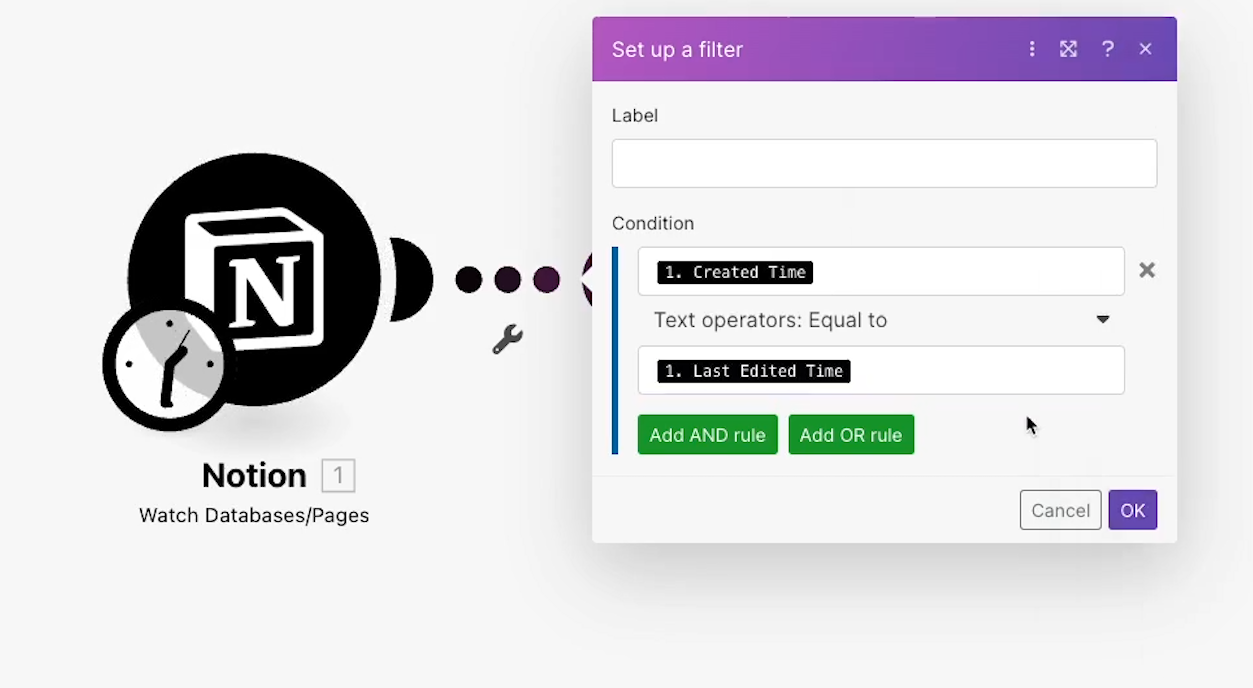
Conversely, you can just swap that to “not equal to” if you want the automation to run for updated pages only.
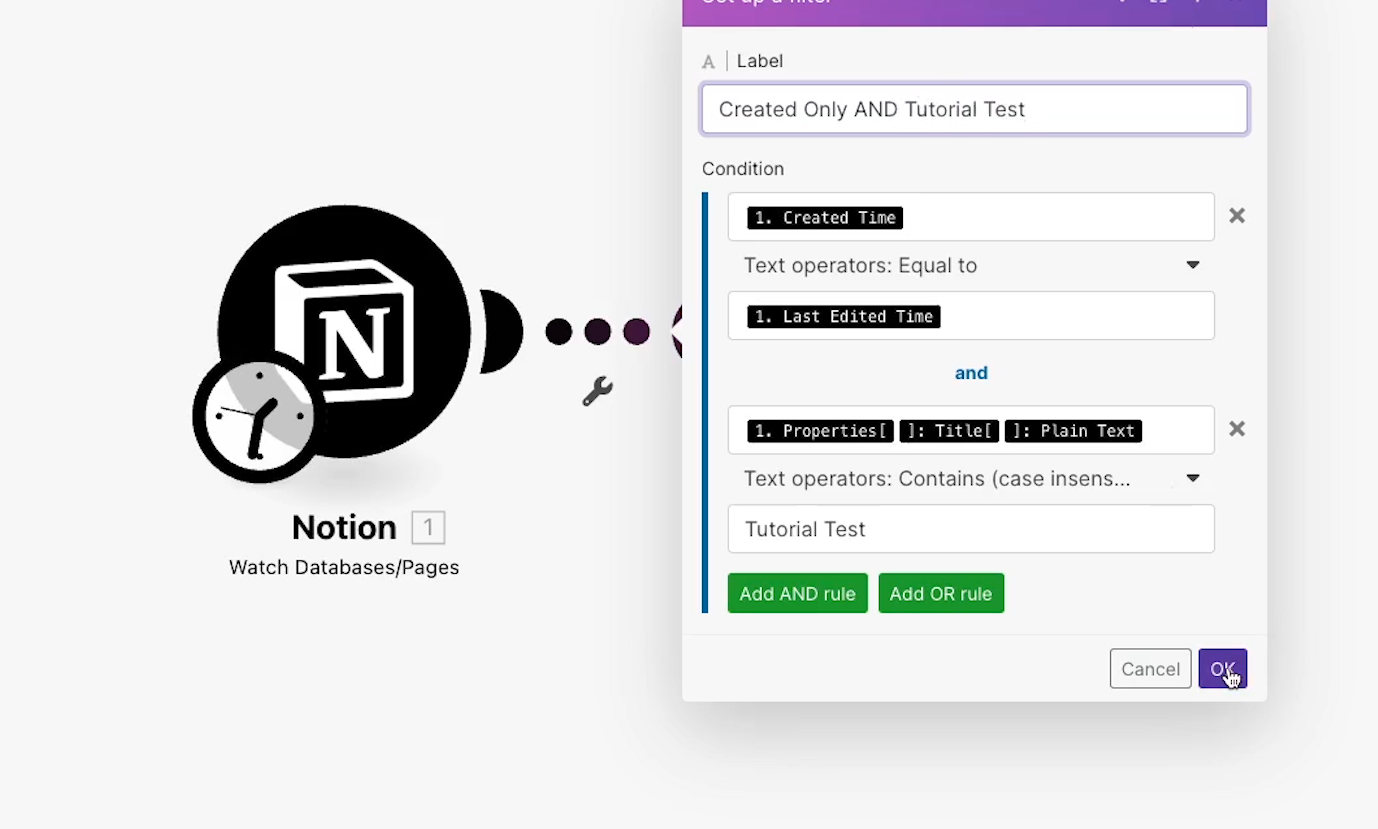
You can also use filters to grab pages with a certain title, a specific contributor, a particular tag, or any other property that you want to search for.
In our example, we’ll add a condition that the title should contain the text ‘Tutorial Test’.
When we turn the scenario on and create a Notion page called “Tutorial Test Page 1”, we see a Slack message appear, showing that the scenario ran correctly.

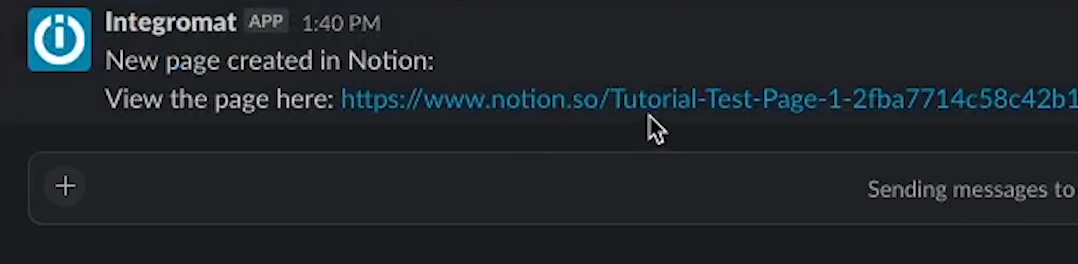
And when we update the contents, we don’t get a Slack message, since the filter stops the automation from continuing.
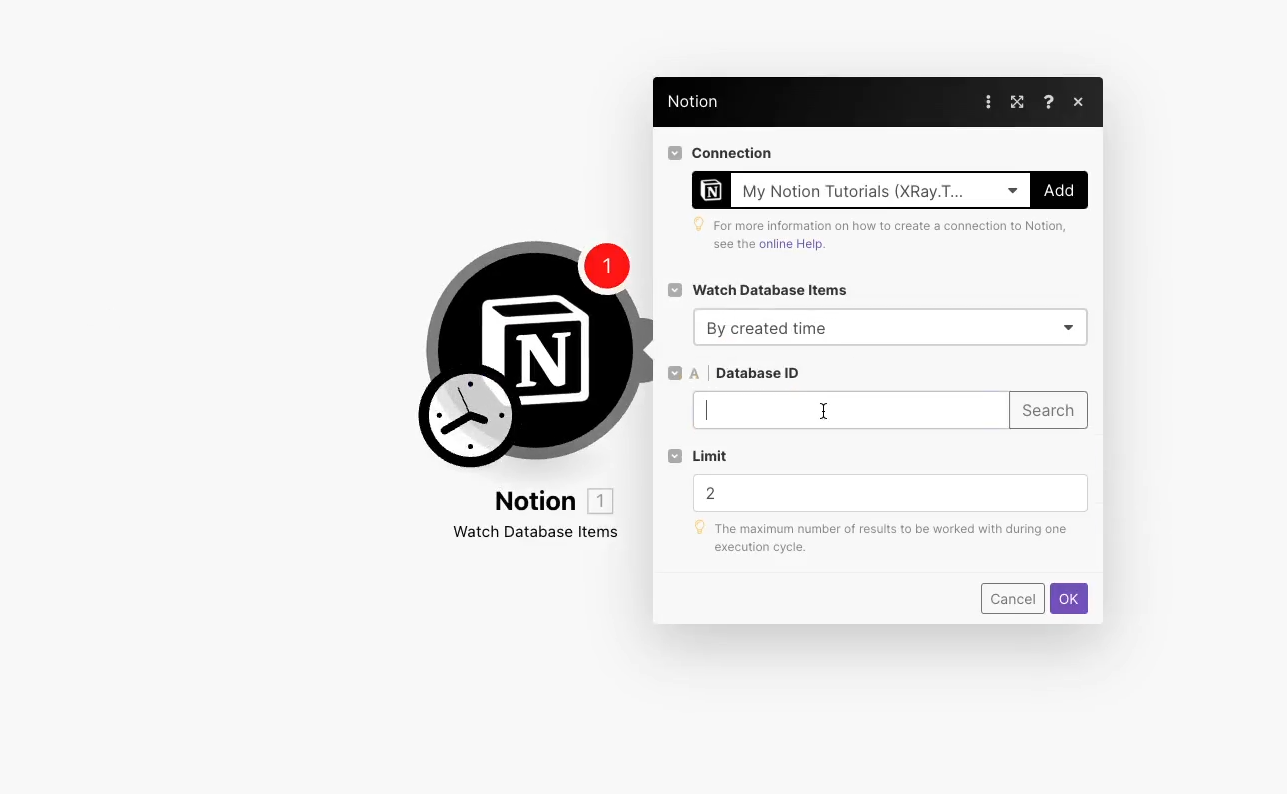
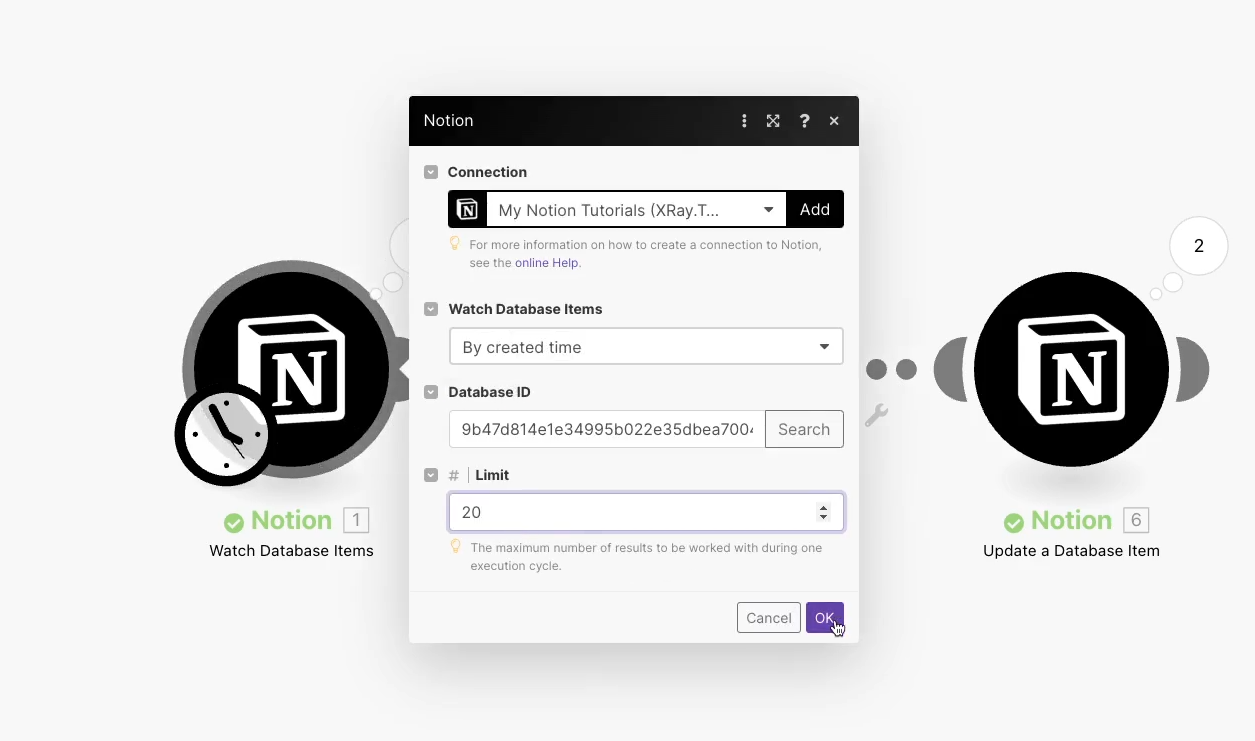
Watch database items
Next, let’s go over the “Watch database items” module. With this module, you can trigger your Make automation to run whenever you add or update items in a specified database.
Configuring the “Watch database items” module
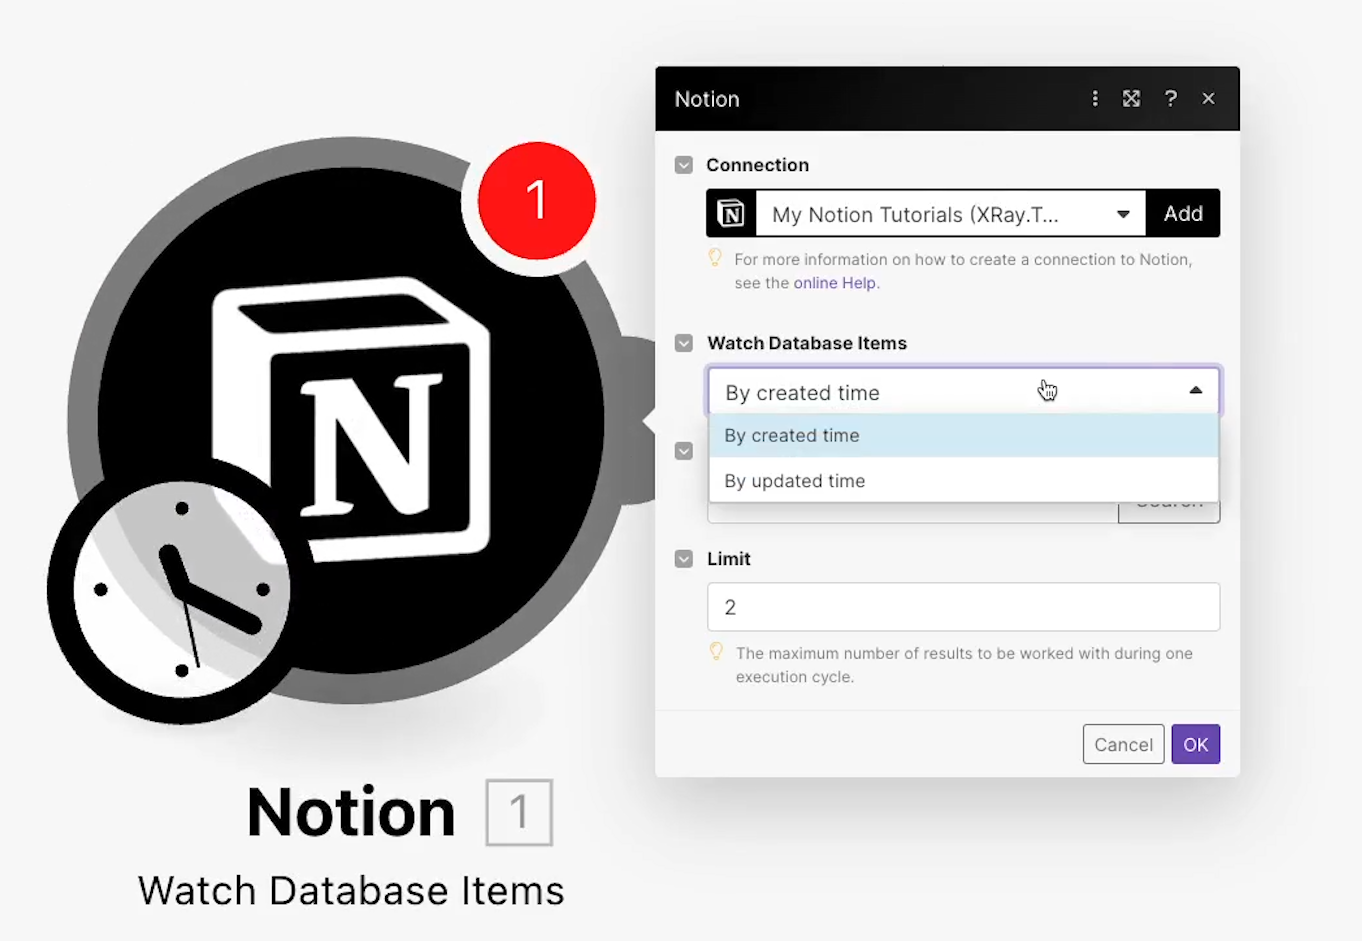
First, add a new Notion module, and select “Watch database items”.
Choose whether this module should watch based on created time, or updated time.
If you choose “created”, then this scenario will run whenever you add a new entry to the database. If you choose “updated”, then the scenario will run whenever an entry is updated OR created.
Then, enter the ID of the database you want your scenario to watch.
To find the database ID, open your database in Notion. In the URL bar, your database ID starts after your workspace name and ends right before the question mark. If you’re using an individual account and don’t belong to a group workspace, the ID starts right after Notion.so forward slash.
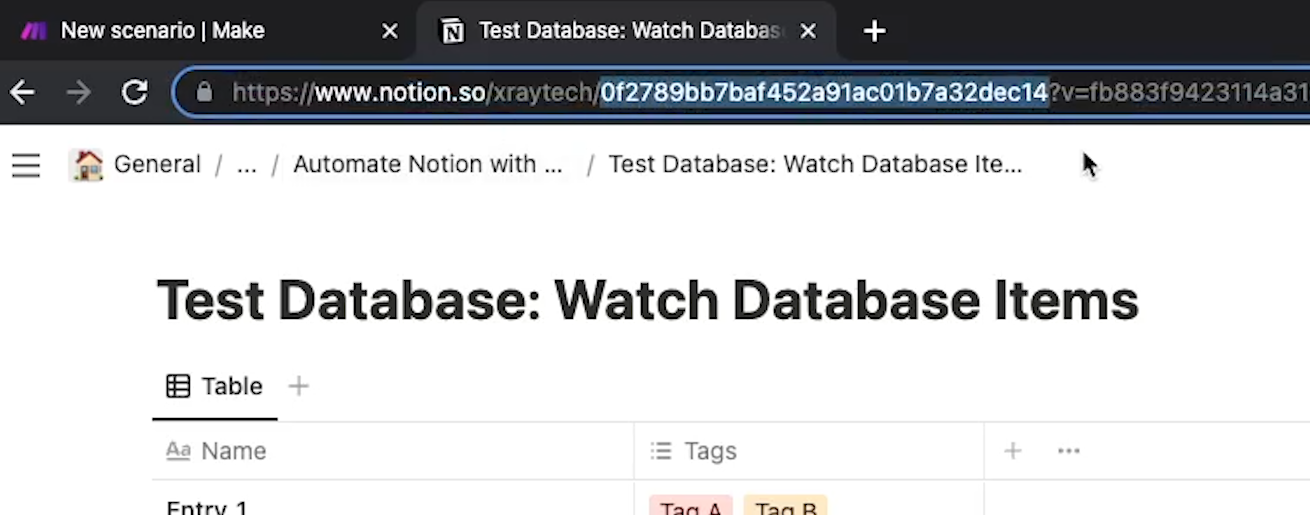
Paste your ID in, and click OK.
Adding additional steps
Run the module once to grab some test data, and then add another step.
In our example, we’ll just send a Slack message to notify us that a record in the database has been updated, and we’ll include a link to the record in question.
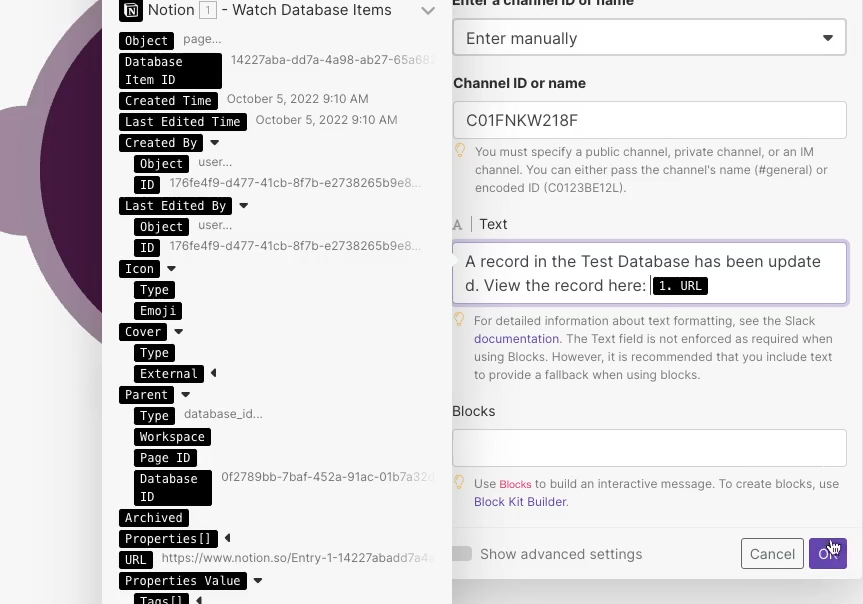
When we turn on and test the scenario, we can see a Slack message appear just as intended.
Note that you can add any actions you’d like here. Make will retrieve a comprehensive list of data about each record that it watches, including all of its properties. You can send that data to Airtable, to Trello, to Basecamp, to Hubspot - any app that’s part of your workflow.
Watch Page Contents
Finally, let’s take a look at the “Watch Page Contents” module. This module will trigger your scenario to run whenever you update the content of a specified page.
Configure the “Watch page contents” module
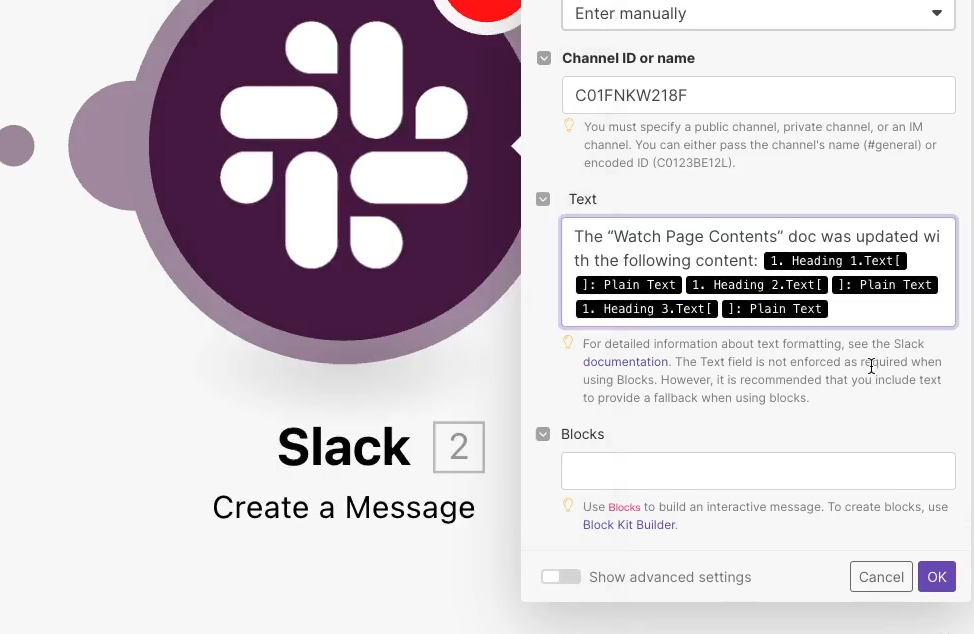
Add a new Notion module, and select “Watch page contents”. There’s a little quirk in this module that may be updated later, but for now, the “Page ID” field doesn’t actually let you specify the page you want to use by entering its ID.
Instead, you’ll have to pick the title of your page from a list, so make sure that the page you want to use has a unique title.

Then you can set the limit for how many items you want to process each time the automation runs.
Keep in mind that this module is looking for content blocks in Notion. Each paragraph, or each heading will be treated as a separate content block.
So if you keep the default limit of 2, it will only be able to process 2 pieces of content since the last time the automation checked the page. Depending on the workflow you’re building, you may want to raise this limit to make sure that the scenario will process all of the content that you need it to check.
Once you’ve set your item limit, click OK, then run the module to get some test data.
Adding additional steps
Then, you can add any actions you like.
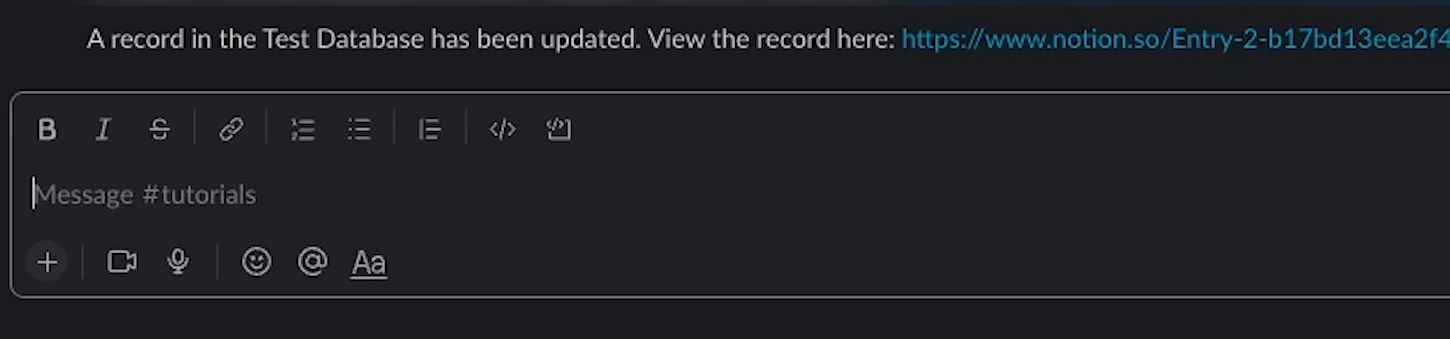
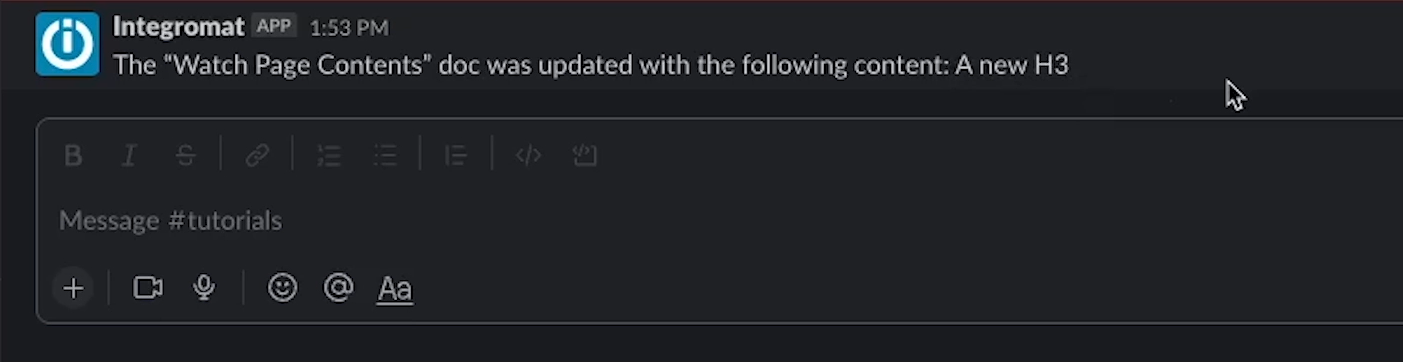
We’ll add a Slack module that sends the text of the content block as a message. This automation will send us a Slack message for every content block that gets added to this page.
If you want the automation to run under more specific conditions, you can add a filter after the trigger.
For instance, we can make it so the automation will only continue if the content that it finds is a heading. In our example, we’ll set a condition that the “Type” property must contain the text “heading”.

Now, we’ll turn the automation on, and we’ll add both an H3 and a paragraph to our test page.
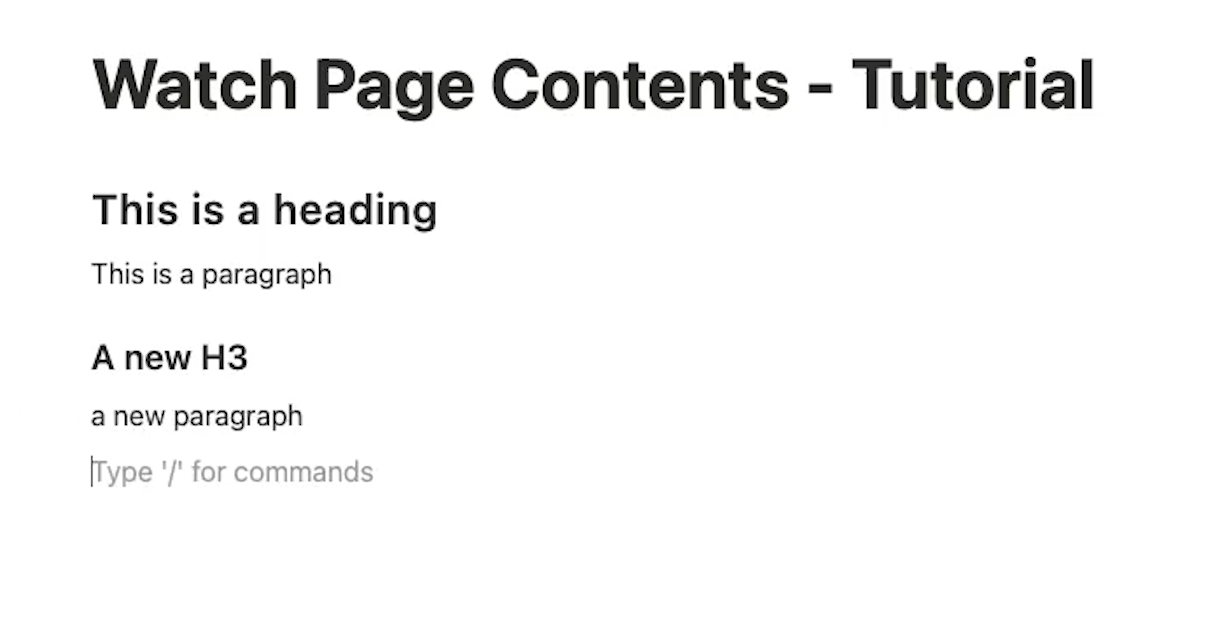
A Slack message appears for the H3, but not for the paragraph, just as we intended.
Automate Notion pages with Make to build seamless workflows
Now you should be all set to start building Make scenarios triggered by your Notion docs and databases. Everything we’ve covered here is just a starting point, of course.
We encourage you to add whatever steps you’d like to build the perfect automation to support your workflows.
If you’d like to learn more about no-code workflow automation, check out our blog or our YouTube channel. You can also follow XRay on Twitter, Facebook, or LinkedIn.

Uptime is understandably a concern for many companies who are exploring workflow automation. You need your automations to run whenever you call on them, or they won’t be very helpful to you and your team.
In this video, we’ll define precisely what we mean when we talk about automation uptime, and we’ll give you an idea of what kind of performance you can count on with XRay’s automated workflows.
Defining Uptime
First, let’s start with a definition of uptime, just to make sure that we’re all on the same page.
We define uptime as the percentage of the time that your automation works as designed when it runs - or when it’s supposed to run.
For example, let’s say you have an automation that sends a welcome email to each new client you sign. The automation triggers whenever you mark a deal as “Closed/won” in your CRM.
In the last 3 months, you had 20 clients sign. The automation ran correctly 18 times, ran with errors once, and didn’t run at all for one client.
With 18 out of 20 runs working correctly, that would count as 90% uptime for that automated workflow.
Out-of-scope use cases don’t count against uptime
One situation that shouldn’t be counted against uptime is when your automation encounters scenarios it wasn’t designed to handle.
To continue with our example scenario, let’s say you sign a client, but they’re not in your CRM, so your “Welcome email” automation doesn’t run at all.
You might have wanted it to run, but unless it was designed with that use case in mind, there was no way it could have run.
Since the automation is working as intended, we wouldn’t count this situation against uptime.
To try and make sure that your automations consistently support all of your daily workflows, we’ll do everything we can to address the most common edge cases that you might encounter.
However, there will always be occasional situations that nobody could have predicted which your automations won’t be able to handle.
Downtime is often caused by the services your automation depends on
One aspect that does count against uptime is when the various services your automations leverage are not working correctly.
Even the largest, most widely-used services available periodically experience some downtime. You might recall Facebook going down for a while due to a new bug in their code.
If the cloud servers your apps rely on are down, or if your CRM is down, your automation probably won’t work as intended.
This is part of uptime and downtime, since it prevents the automations from working as designed, but it’s not something an automator can control.
And ultimately, while downtime from web services will impact your automations, it also would have prevented you from getting the work done manually.
If Google Drive is down, you won’t be able to access it, and neither will your robots.
—
To summarize, uptime is the reliability rate of your automation, excluding scenarios it wasn’t designed to handle.
You might experience downtime due to bugs in the automations themselves, or due to problems with the software and services they rely on.
From time to time, you’ll also likely run into situations that your automation simply wasn’t designed for.
So with all of that in mind, no automator can guarantee perfect, 100% uptime. But what should you realistically expect?
XRay’s Uptime Targets
At XRay, we aim for 95% uptime or higher for each completed automation.
This rate applies to each automation individually. An automated workflow might consist of several automations, so the uptime rate for each workflow will inherently be a bit lower.
If even 1 out of 10 automations isn’t working correctly at any given moment, the end-to-end workflow won’t run correctly.
As your workflows evolve throughout your membership, you will notice that most of your automations run smoothly the vast majority of the time. Only a few automations will emerge to be consistently problematic for a while. These are typically the automations that deal with the most complex or unpredictable aspects of the workflow.
Most automations, once configured and used properly will continue to operate as intended.
Maintain uptime while expanding your automated infrastructure
Ensuring that your automations continue to operate reliably even when you’re adding new workflows is one of our main responsibilities, and one of the key benefits of working with a professional automator.
Once your automated infrastructure is established with a few workflows, adding a new workflow isn’t just like starting over from the beginning.
It needs to fit into the existing workflows without compromising their consistent, correct operation.
This is something that can be very difficult to manage on your own, but when working with XRay, we can ensure that your automations will work as designed in nearly every instance.
Uptime metrics don’t tell the whole story
Though we strive for high uptime for all of our automated workflows, we recommend caution when using uptime as a key metric for your organization’s automation efforts.
Of course, reliability is obviously important. The vast majority of the time, your automations should work exactly as intended whenever they’re supposed to run, and that’s what we provide at XRay.
But if you’re not putting uptime and downtime into context, these stats can be misleading. With a manual process, you often have no idea what your uptime really is. You don’t know if every signed client got a welcome email, or if every online purchase was logged in your inventory.
And worst of all, sometimes you can’t even find out.
With manual systems, you often have to wait for catastrophic errors to occur before you discover a problem.
When you automate your workflows, you gain much more visibility into your processes and data. As a result, you’ll see all sorts of trends, insights, and events that previously went unnoticed - and that includes flaws and errors in the system.
We’ll do everything we can to ensure 95% or higher uptime, but it’s often best to focus on the results anyway.
Is your team able to get more done? Are they able to spend more of their time on making critical decisions? Are your clients happier with the work you’re doing and the support you’re providing?
When you build an automated workflow, the goal is to improve your process and its results. The concrete outcomes of your automations and the value they deliver matter much more than any one metric.
Use reliable automated workflows to get better results
When you work with XRay to start auxtomating your workflows, you can count on them to perform as expected the vast majority of the time. Inevitably, you’ll run into some errors from time to time, but the results for your company will be far better than what you were able to accomplish with manual work alone.
If you have any questions at all about how we build and maintain automated workflows at XRay, please don’t hesitate to reach out.
If you’d like to learn more about XRay’s approach to workflow automation, be sure to check out our blog or our YouTube channel. You can also follow XRay on Twitter, Facebook, or LinkedIn.
Loops are an extremely useful technique for any no-code and low-code automator.
Using loops will let you perform the same actions several times with each item in a dataset. A loop will let you do things like send an email to every address in a list, or update your inventory database for each line item in a receipt.
And if you want to integrate loops into your Zapier automations, you can do it all by just adding a single step.
In this post, we’ll show you how to add a line item loop step by step. We’ll also give you some tips for working with the other types of loops that Zapier supports: text and numbers.
Adding a “Looping by Zapier” step
First, you’ll need to create a new Zap and have a trigger set up to grab some data that you can work with.
In our example, our trigger watches an Airtable base for new records, and we’ve made sure to include some arrays and lists that we can build a loop with.

To add a Loop to your Zap, just add a new step and search for “Looping by Zapier”. Under the Events menu, you’ll see three options. You can create a loop from Line Items, from Numbers, or from Text.
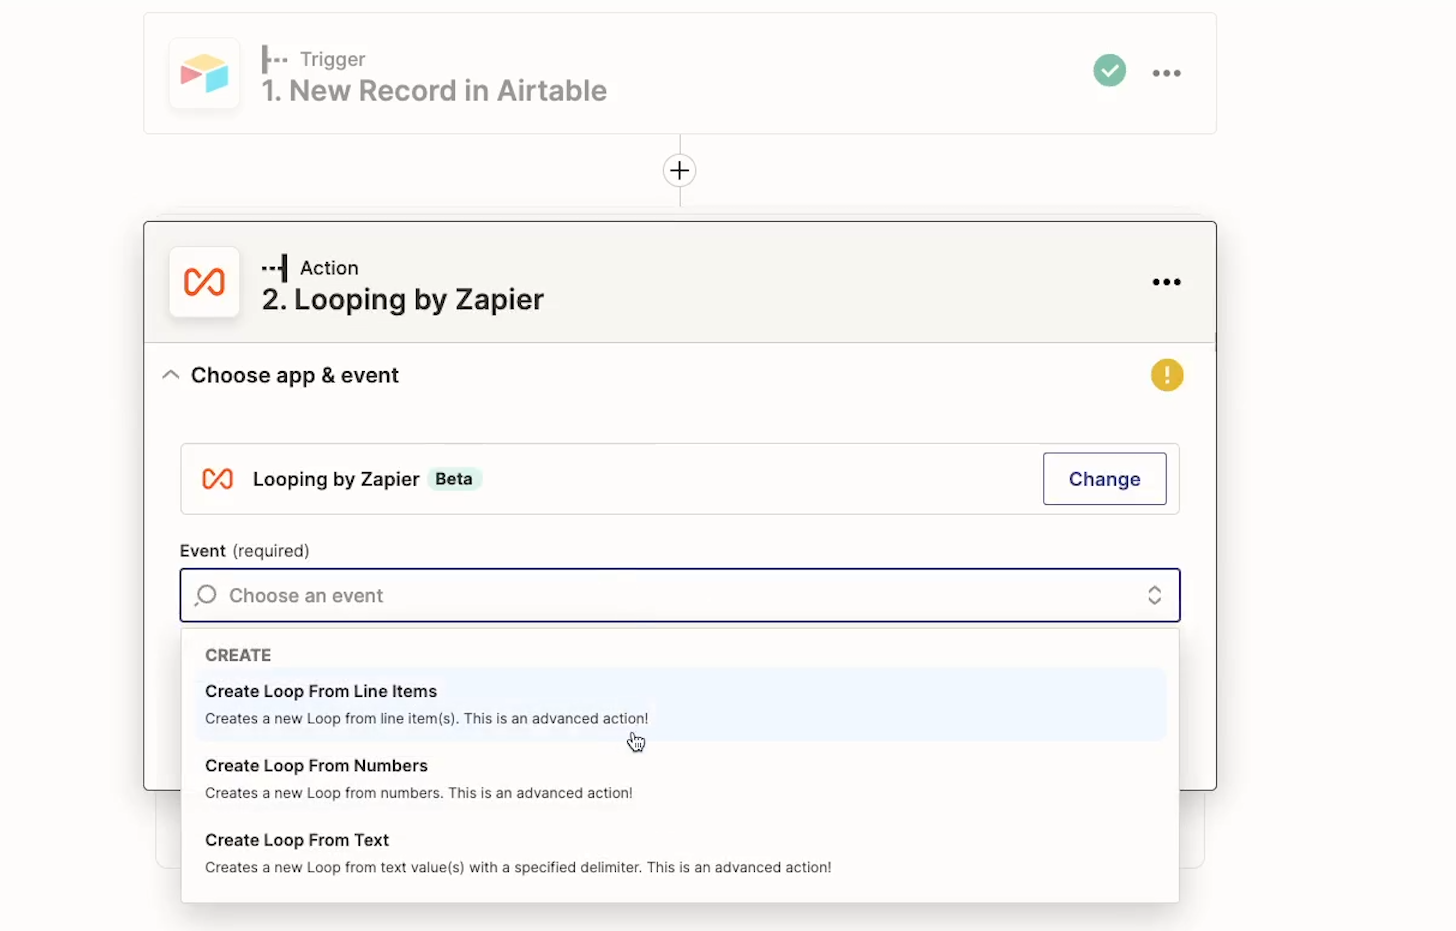
Each of these options works in more or less the same way, but we’ll take you through each one individually.
Looping with Line Items
Start with an array
To create a loop from line items, you need to have a piece of data that’s already subdivided into several components.
In other words, your data will have to be formatted like an array.
In our example trigger, we’re grabbing each new entry to an airtable base, which contains some linked record fields. In Airtable, a linked record field with multiple entries is treated as an array, so this will be perfect for the example.
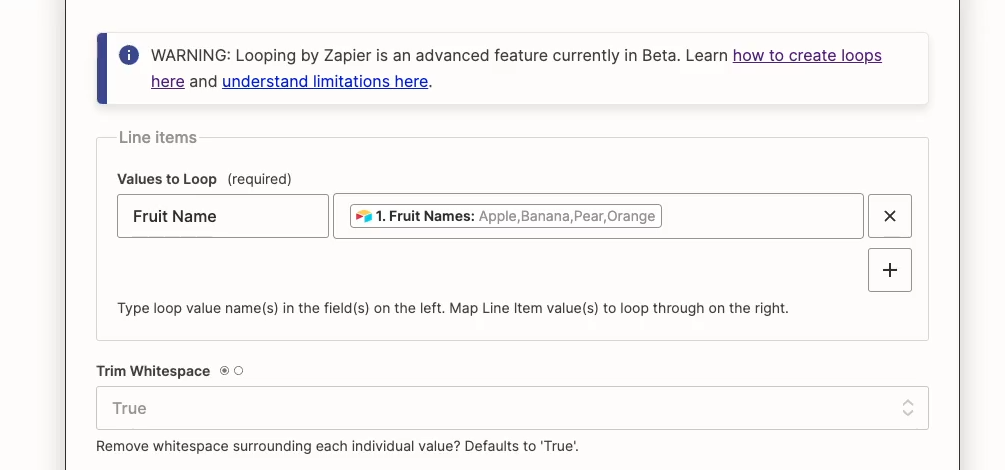
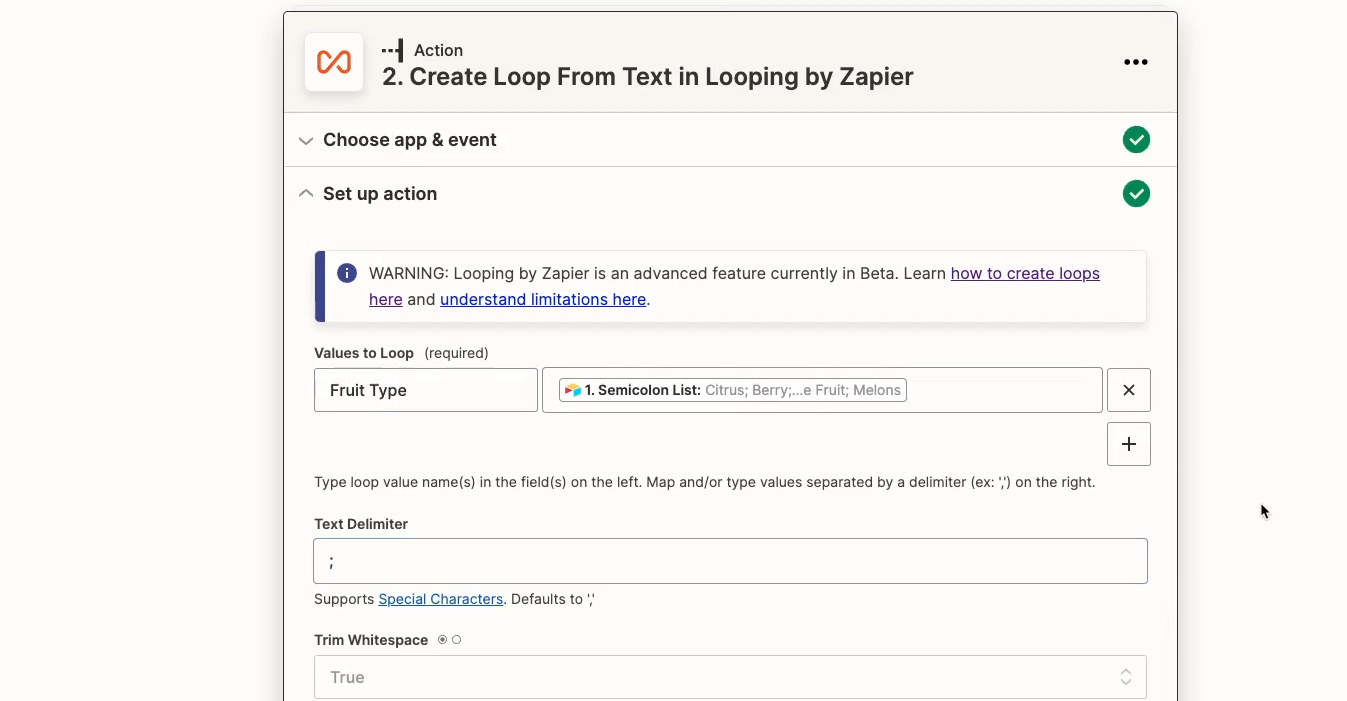
We’ll enter one of the linked fields — Fruit Names — into the second field under “Values to Loop”.
In the first field, you need to enter a label that you want to use for this data. We’ll call it Fruit Name.
Next, choose whether or not you want to trim whitespace. This defaults to “True”, and you’ll usually want to leave it as is.
Configuring your loop
In the “Loop Iteration Counter Start” field, you can pick where the Loop will start counting.
If you set this to 1, then the first iteration of the loop will be called Number 1.
If you set this to 2, then the first iteration of the loop will be called Number 2, and so on.
Note that setting this number to 2 won’t skip the first item in your array; it will just label the first iteration as “2”. You’ll usually want to leave this as 1, but there can be instances where setting it to another number can be useful.
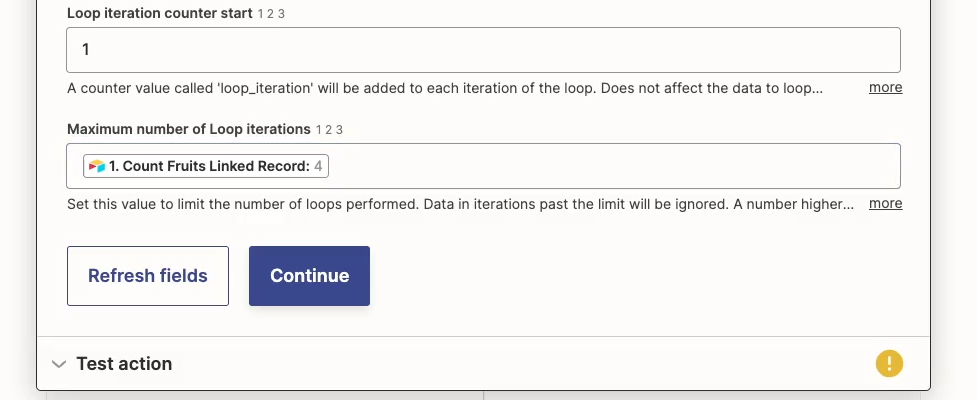
Finally, we have this option for “Maximum number of Loop Iterations”. Setting a maximum will make sure that your automation will stop running even if you’ve accidentally created an infinite loop, and will stop it from consuming too many tasks in your Zapier plan.
Ideally, you should set this number to be the same size as the dataset you’re going to loop through.
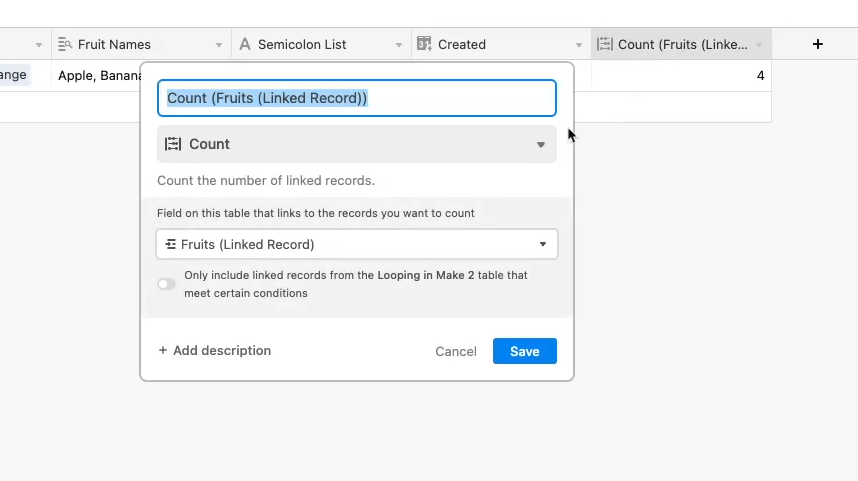
If you’re using an app like an airtable, you can add a field that counts how many records are in your linked field, and use that number as your limit. Otherwise, you can simply estimate and set this number to be just a bit higher than your expected number of items.
Testing the loop and adding actions
Next, test the loop. If you see multiple loop iterations like in the screenshot below, then your loop worked as expected.
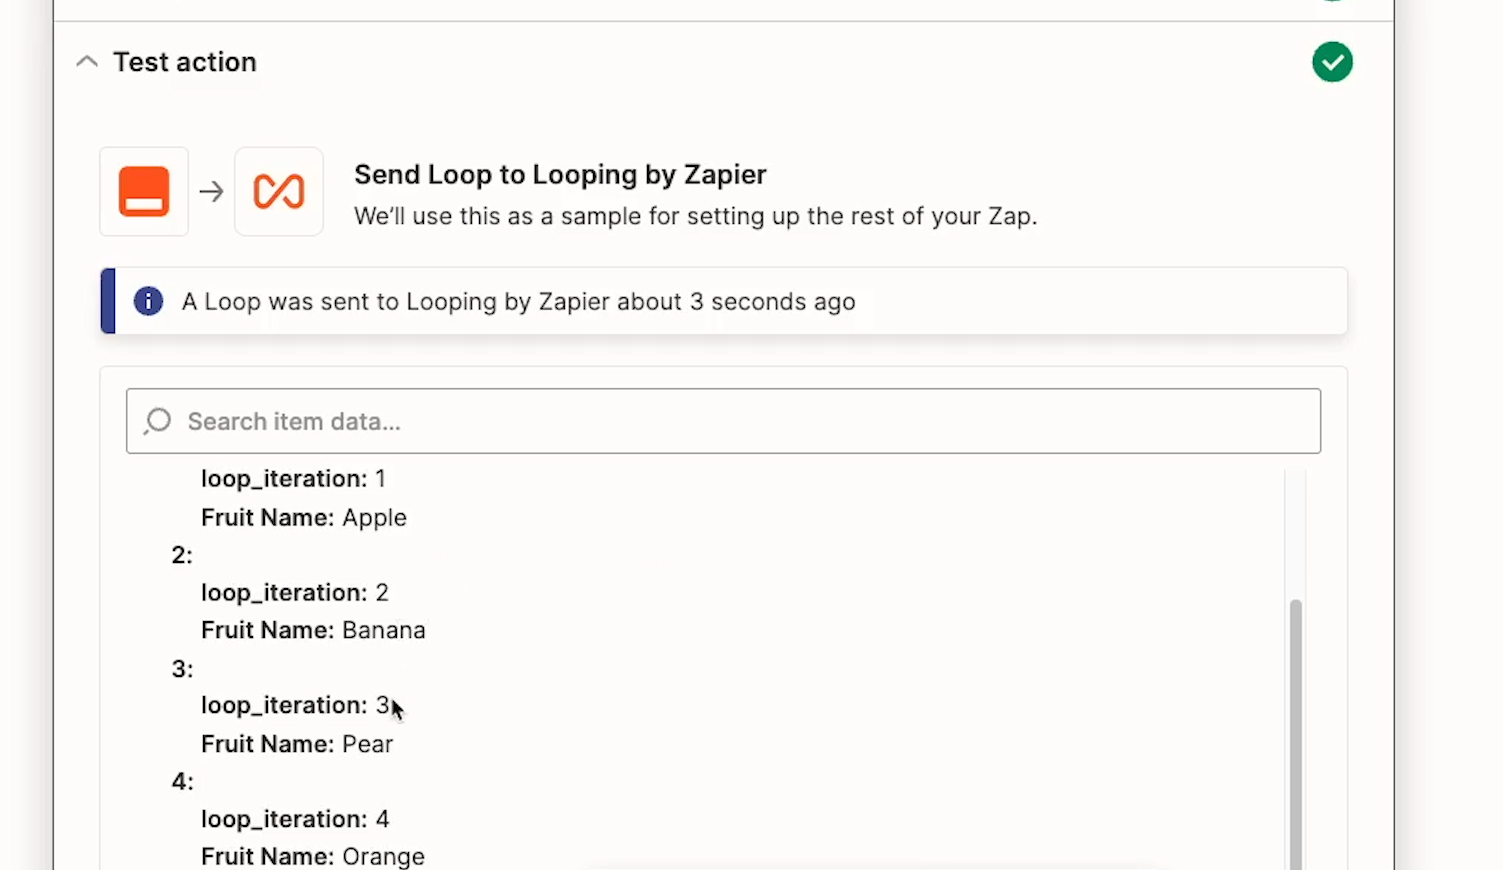
Any actions you add after this step will be performed once for each item in the loop. In our example, we’ll add a step to send a Slack message.
Our message will show us the iterator number, then the name of the item being processed in each loop. Note that these should change for each loop iteration. Even though they only show one value right now, they’ll change as the loop runs.

We’ll get one Slack message for each item in the array, so we should see four messages when the automation runs.
However, when we test this step, we only see one message.
When you run a test in Zapier, the test will only execute the loop once.
If you want to see how the whole thing will run, you’ll need to turn the Zap on and trigger it.
For our example, that means we need to add a new record to our Airtable database once the Zap is published and switched on. Then, when the Zap runs, we can see all 4 Slack messages appear.

You can’t add actions after a loop
When you’re structuring your Zaps that use loops, just bear in mind that any action you add after the loop step will be part of the loop.
If there’s anything that you only want the automation to perform once, make sure it happens before the Loop step, or add a filter that will only be fulfilled after a certain number of runs in the loop iterator.
For instance, you might add a filter that will only let the automation continue if the loop iterator is equal to 6, so those steps will be skipped in every iteration until you’re on the 6th iteration.
Regardless of which approach you use, just make sure that you take a moment to plan how your automation will work when you start implementing a loop.
Now, let’s take a quick look at the other options for creating a loop: text and numbers.
Create a loop with text
Creating a loop from text is very similar to creating a loop from line items, but it lets you work with any list that’s formatted as a piece of text.
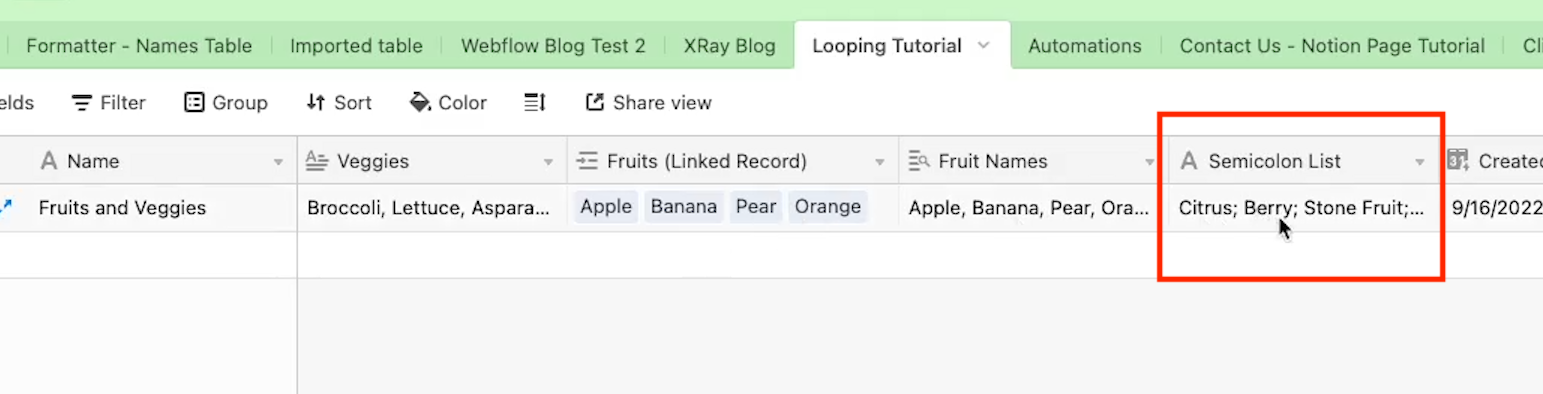
With these loops, your data doesn’t have to be in an array. You just need to have items separated consistently - like with a comma or a semicolon.
Enter the character that splits up your list into the “Text Delimiter” field, and fill in all of the other fields the same as before.
Test the loop, and you should see each item separated into its own loop iteration. Performing actions with this loop will work exactly the same as performing actions with a Line Item loop, so you can refer back to that section for more information.

Create a loop with numbers
Now let’s look at creating a loop with numbers.
This is a bit different from using text or line items. Instead of always looping through every item in a dataset, a numbers loop will simply run as many times as you specify.
With a numbers loop, you have precise control over how the loop runs. You choose the iteration number that it starts and ends at, and how much the iteration number increases with each run.
For instance, you can have your iterator start at 2, then go up by 3 each time, up to a limit of 11.
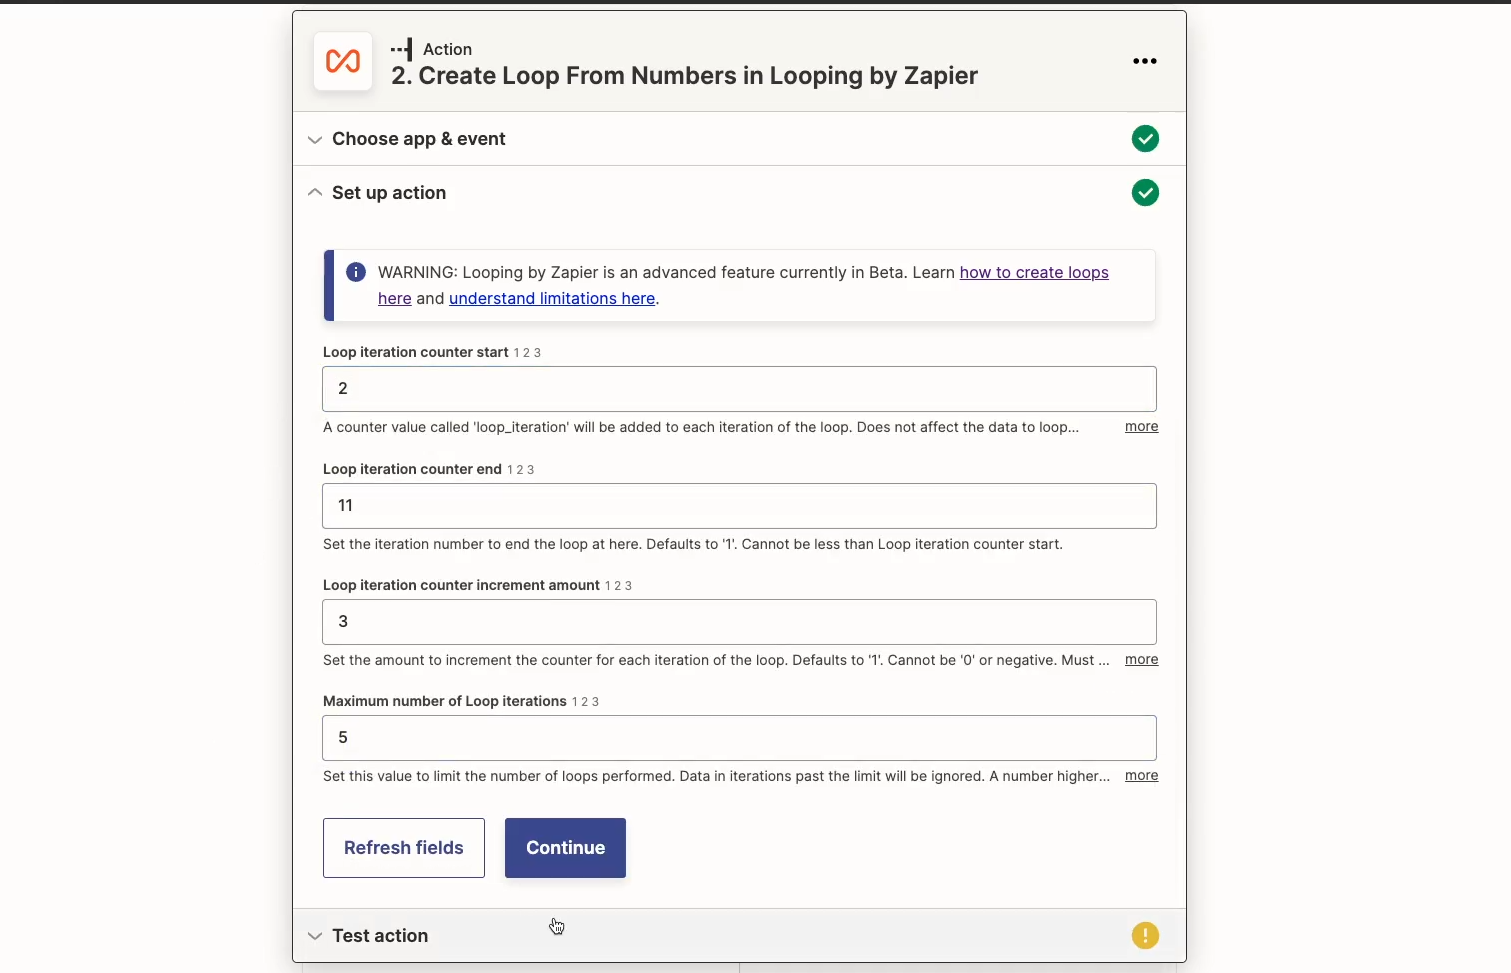
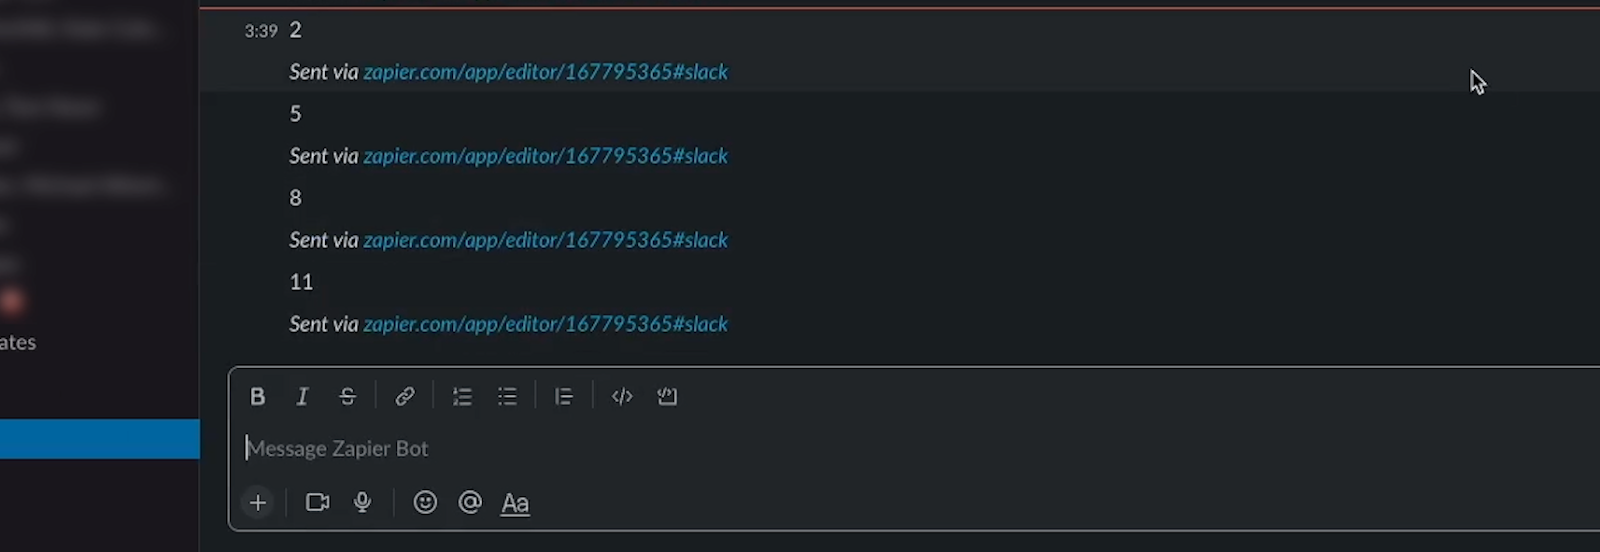
We’ll set up our loop with those numbers, then edit our Slack message, so it will just tell us the current iterator number.

We’ll turn on the Zap and add a new record to trigger it, and we see four messages in Slack: 2, 5, 8, and it stops at 11.
If you’re trying to perform more complex operations with your loop, using the “Numbers” event might give you the flexibility and control you’re looking for.
A simple way to build more powerful Zaps
And that’s all you need to get started. Setting up a loop in Zapier is pretty simple, and it can be a great way to process lists and arrays and turn them into useful, time-saving automations.
If you’d like to explore more automation tutorials, check out our blog or our YouTube channel. You can also follow XRay on Twitter, Facebook, or LinkedIn.
.jpg)
For XRay, a key part of any successful engagement is enabling our members and clients to be fully self-sufficient.
We’re happy to help automate and refine your workflows for as long as you’d like to work with us, but we know your long-term plan will usually be to manage your automations on your own.
To ensure a smooth, successful transition for everyone, we plan for offboarding from day one with a few key strategies.
First, we build your workflows on your accounts whenever possible. Second, we train your team to operate and maintain your workflows. Finally, we provide free software for managing and accessing your workflows in one convenient place.
Let’s take a closer look at each of these components of offboarding.
Building automated workflows on your accounts
From day one, we’ll build everything that we can in your accounts instead of our own. If you don’t have accounts for automation platforms like Zapier or Make.com, we’ll create them for you.
By sharing login credentials through a password manager like Lastpass, you’ll have full control over our access to your accounts, and you can revoke access at any time if you wish.
Building automations in your accounts makes for a smooth transition, with very little data that actually needs to be transferred.
However, there is one key exception to this rule.
Sharing our Airtable infrastructure
Most of the workflow automations that we build require an Airtable database to manage the flow of information.
When we start building your automations, we’ll typically use our own Airtable account to build your operational database. We do this because the features included in Airtable’s enterprise plans are often essential for building no-code workflows, but an Enterprise plan doesn’t come cheap.
You could be paying up to $15 thousand a year for the subscription, and we don’t want you to have to make that kind of commitment to Airtable upfront.
Instead, we’ll host your data on our Airtable account for as long as you’re a member. When you’re ready to offboard, you can either purchase your own Airtable subscription, or you can start a maintenance plan with us to keep access to our Airtable infrastructure at a lower price.
Ultimately, you won’t have to worry about a complicated migration process when you end your XRay membership. The automations we’ve built will already be stored in your accounts, and we’ll walk you through your options for maintaining your Airtable database.
Workflow documentation and training
Of course, offboarding isn’t just about moving data.
Having access to all of your automations and data won’t do you much good if you and your team don’t know how to use them. To make sure you can operate your workflows with or without us, we’ll provide you with all of the documentation and training you need.
Our documentation will include flowcharts, process pages, and video walkthroughs.
The flowcharts will give you a detailed visual overview of an entire automated workflow. They’re great for seeing exactly how data will move between your apps and how each person or department gets involved.
The process pages consist of simple, non-technical written instructions for using each workflow. They’ll explain how to conduct the workflow, and will link directly to any key apps or resources involved.
The video walkthroughs will demonstrate the workflow from beginning to end, so your team can see exactly what they need to do every step of the way.
Training your team to manage the automations
All of this documentation that we’ve outlined is primarily focused on using the automations, rather than maintaining them behind the scenes.
Once you’re no longer working with XRay, you’ll probably want to have someone on your team take over the maintenance of your automated workflows.
We’ll meet directly with anyone who’s responsible for the technical aspects of the automation to explain anything they need to know.
Alternatively, you can sign up for an XRay maintenance plans for continued support at a lower price than a full membership.
At XRay, we want to ensure that everyone on your team is enabled to keep using their automated workflows, even after your membership ends. With thorough documentation and training resources, you’ll be able to keep using your automations without needing to consult us.
Using XRay Workflow to access your workflows and their resources
To easily access all of your automations and documentation, we’ll set you up with XRay Workflow, our own software for managing and sharing resources.
XRay Workflow lets you save any web content as a pin. With pins, you can access web sites and web apps, save and copy text with a click, create markdown documents, or even launch automations.
We use XRay Workflow to deliver every workflow that we build for our members. You’ll see every resource you need to use your automations with full context on a single board.
Accessing your automations and documentation through XRay Workflow is totally free, and you’ll continue to have access to the app even after your membership ends.
Some optional premium features, like publishing public boards, will require a small fee. However, these features won’t be necessary for accessing the workflows that we’ve built for you.
With XRay Workflow, you and your entire team can easily manage your workflows and the critical resources you need to accomplish them.
Preparing for a seamless transition
At XRay, we don’t want to trap our members into being reliant on us. By building on your accounts, providing training and documentation, and giving you free lifetime access to XRay Workflow, we make sure that your team can keep using your automated workflows when you decide to move on.
If you have any questions about offboarding or other stages of the membership lifecycle, don’t hesitate to reach out and ask.
If you’d like to learn more about how we design and build automated workflows for our members, check out our blog or our YouTube channel. You can also follow XRay on Twitter, Facebook, or LinkedIn.

Moving a database from Airtable to Notion is a pretty quick and easy task - unless you’re dealing with linked records in Airtable that you want to preserve in your new Notion table.
A quick CSV export and import will let you migrate most field types from one app to the other, but it won’t keep any linked records you created.
In this post, we’ll show you how you can automatically replace all of your linked records from Airtable with Relations in Notion. You can do it all with just a simple scenario in Make.com.
Just follow along with this tutorial to build and configure your automation.
Exporting and importing your data
Export from Airtable
To begin, you’ll need to export your Airtable base as a CSV, and import it into Notion.
Click on the name of your view in the left side of the toolbar, and select “Download CSV”.
If you have linked records, make sure to download a CSV from the referenced table, as well.

Import to Notion
Then, import your database into Notion.
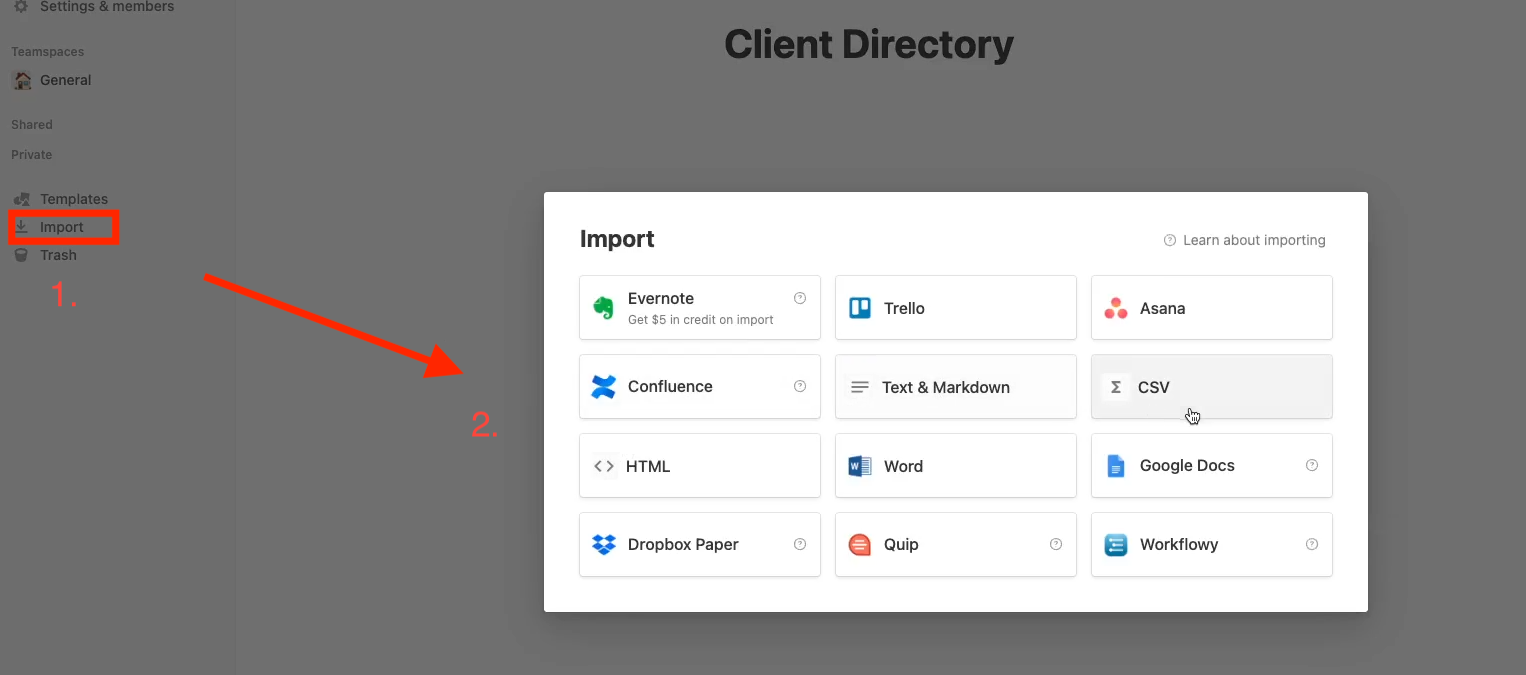
To import the CSVs as inline databases, create a database first. Open the database as a page, then click on the three dots in top right, and select “merge with CSV”.

If you want to create a standalone database instead, click on import in the left hand menu, and select CSV.
Cleaning your database
Once you’ve imported your data, you’ll need to do some quick manual cleaning of your database. Delete any blank records, and fix any field types that were set incorrectly.
As you’re doing this, you’ll probably note that your linked field has been set to Single Select or text.
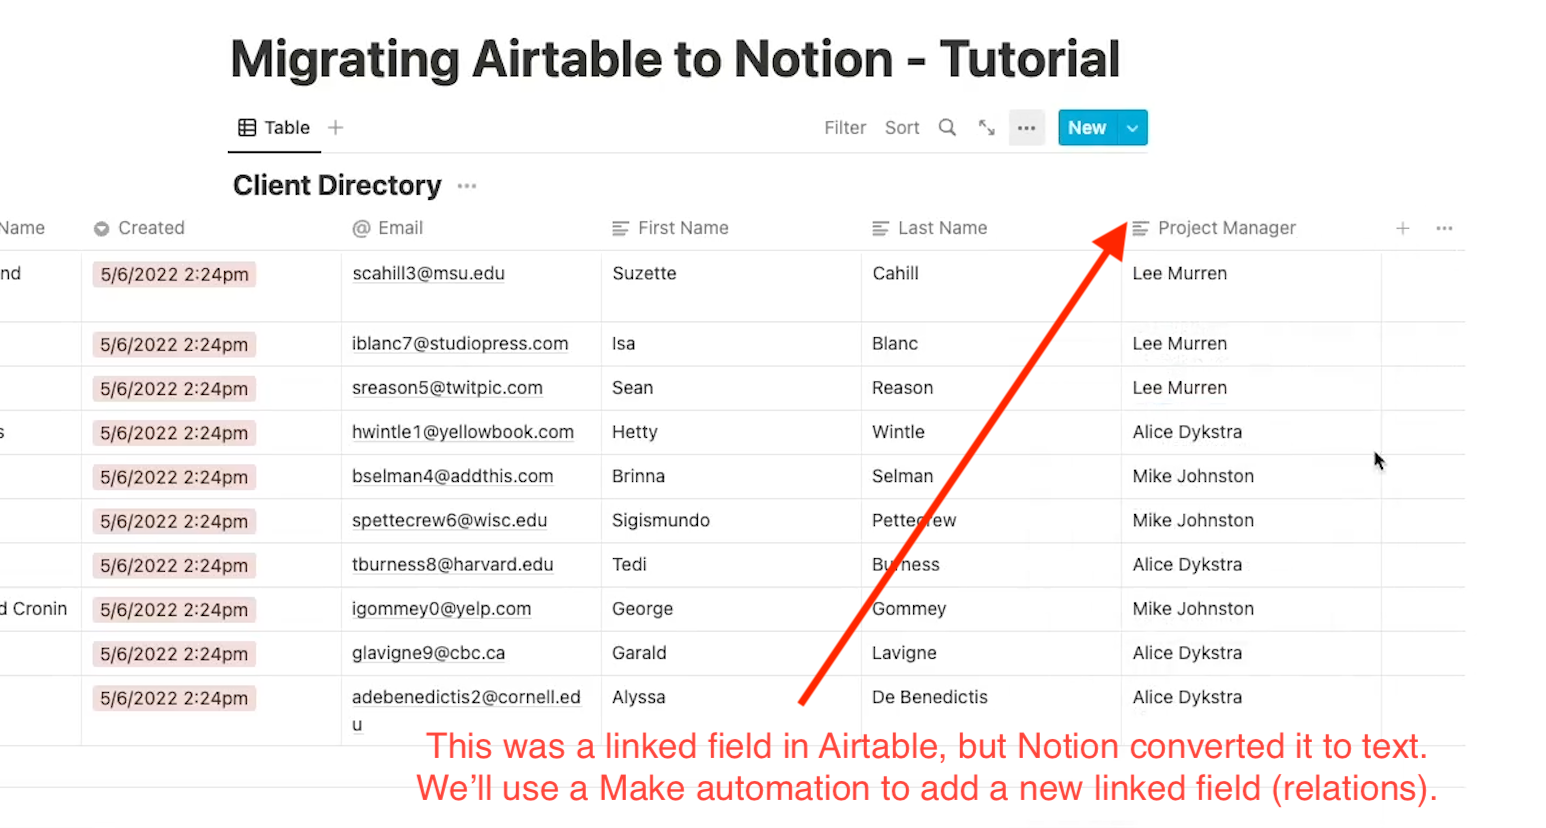
You can repair this connection and preserve the reference with a simple automation in Make.com, but you’ll need to import the referenced table for your linked records first.
Even though the links weren’t preserved, make sure not to delete the field - we’ll need it later.
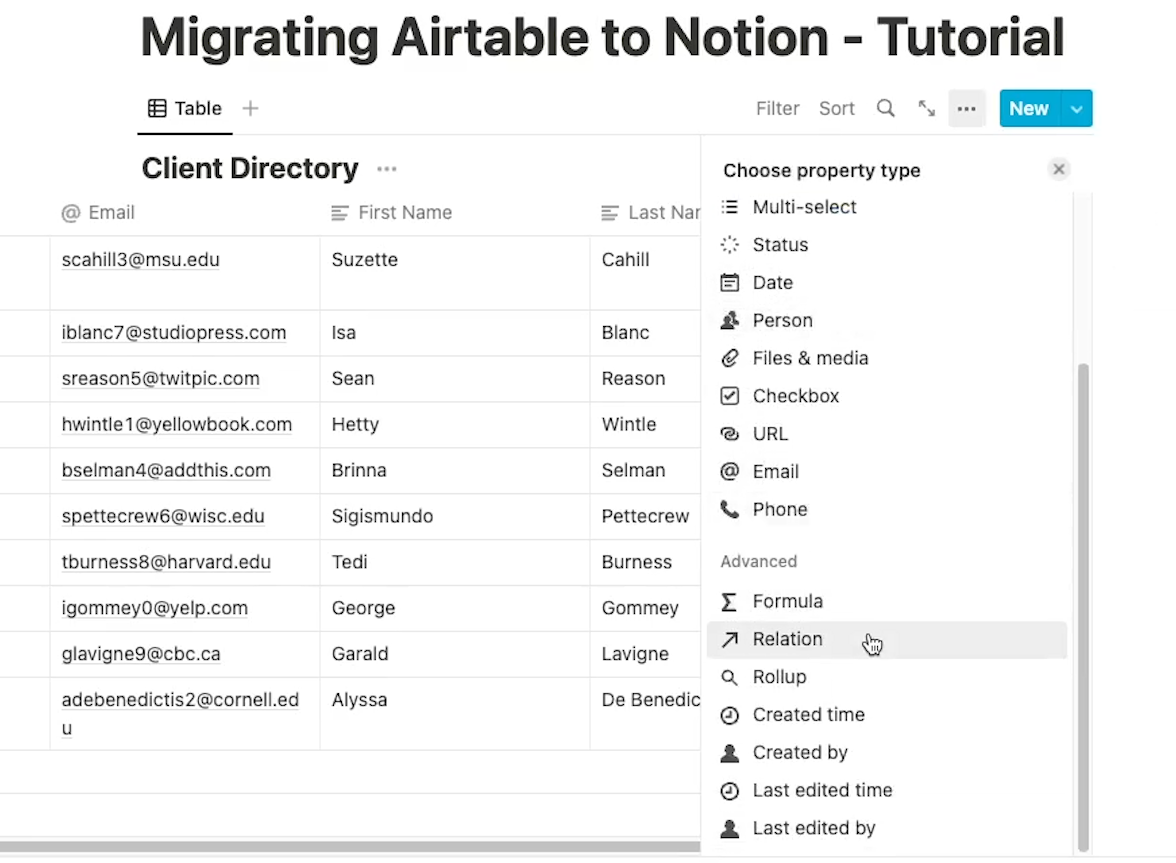
Create a “Relation” field in Notion
Export the linked database from Airtable, and import it to Notion the same way as before.\
Then, in your first database, add a relation field that references your second database. A “relation” in Notion is basically the same thing as a Linked Record in Airtable.
Check the box that says “Show on [your second database]” to make sure it’s a two-way relation; otherwise, this process won’t work.
Filling in the relations field - manually or automatically
If you only have 10 or 15 records, you can probably just go ahead and fill in the relation field manually.
But if you have a dataset with dozens or hundreds or thousands of records, that would involve a lot of tedious, error-prone work.
We’ll show you how you can fill it in with a simple automation in Make.com.
Using Make (Integromat) to automatically fill in the Relation fields
For those who aren’t familiar, Make, formerly known as Integromat, is a no-code and low-code automation platform. It lets you automate actions in web apps with a simple user interface.
If you have coding experience, you can also write custom scripts and API calls in your automations, but you won’t need any code for this automation.
Adding Make as an Integration to Notion
To get started, you’ll need to add Make as an integration to Notion, and ensure that your database is shared with Make.
Once the integration is set up, just follow along with this tutorial to configure each module.
Configuring the Make scenario
Trigger module - Watch Records
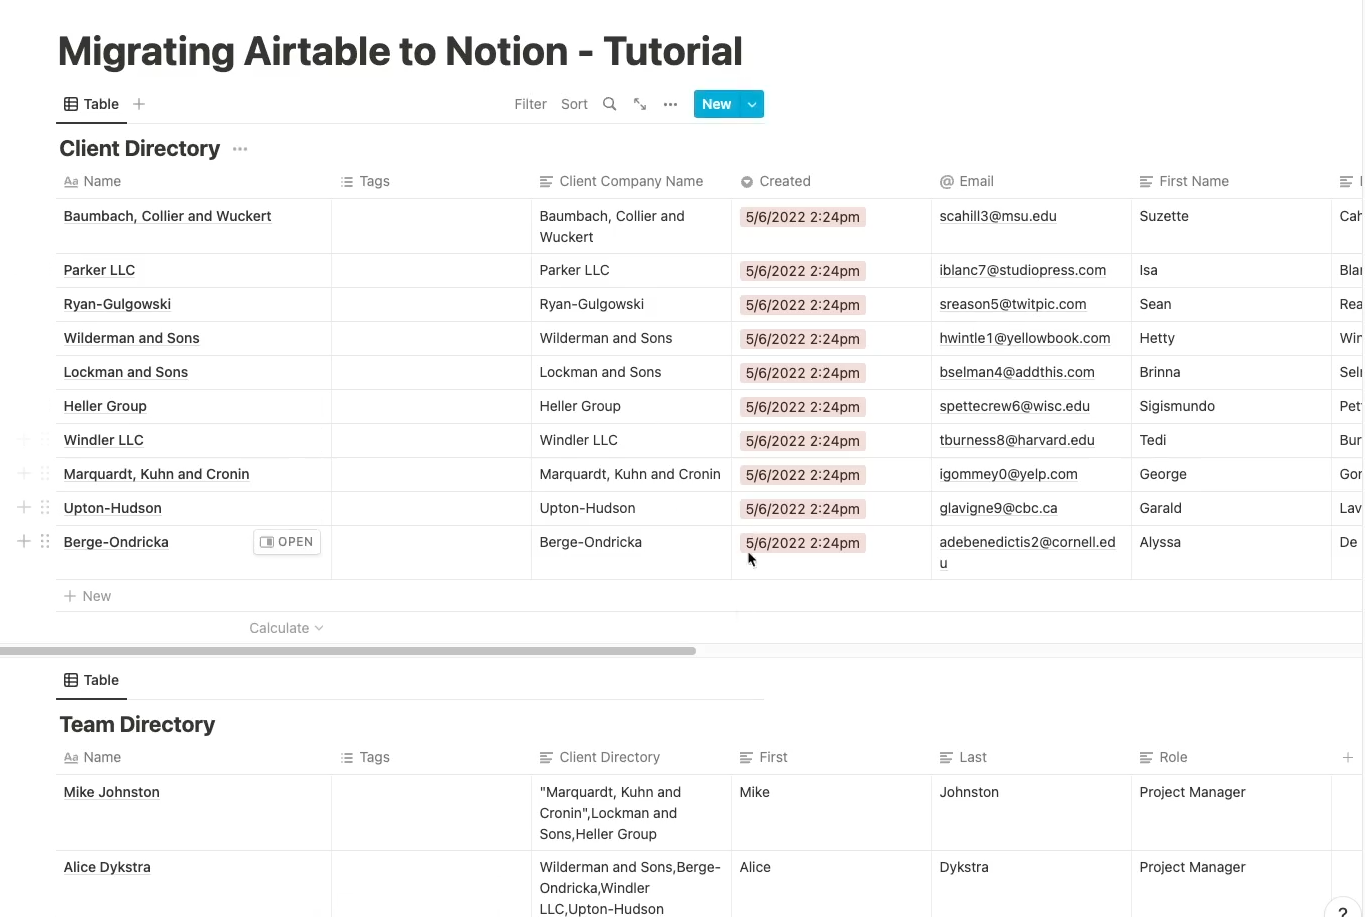
First, we have a trigger module that will watch records in your first database. In our example pictured below, that’s our “Client Directory” table.
Add a Notion module, and choose “Watch Records”.
In Notion, copy the string of characters after your workspace name and before the question mark to get the database ID from the URL bar.
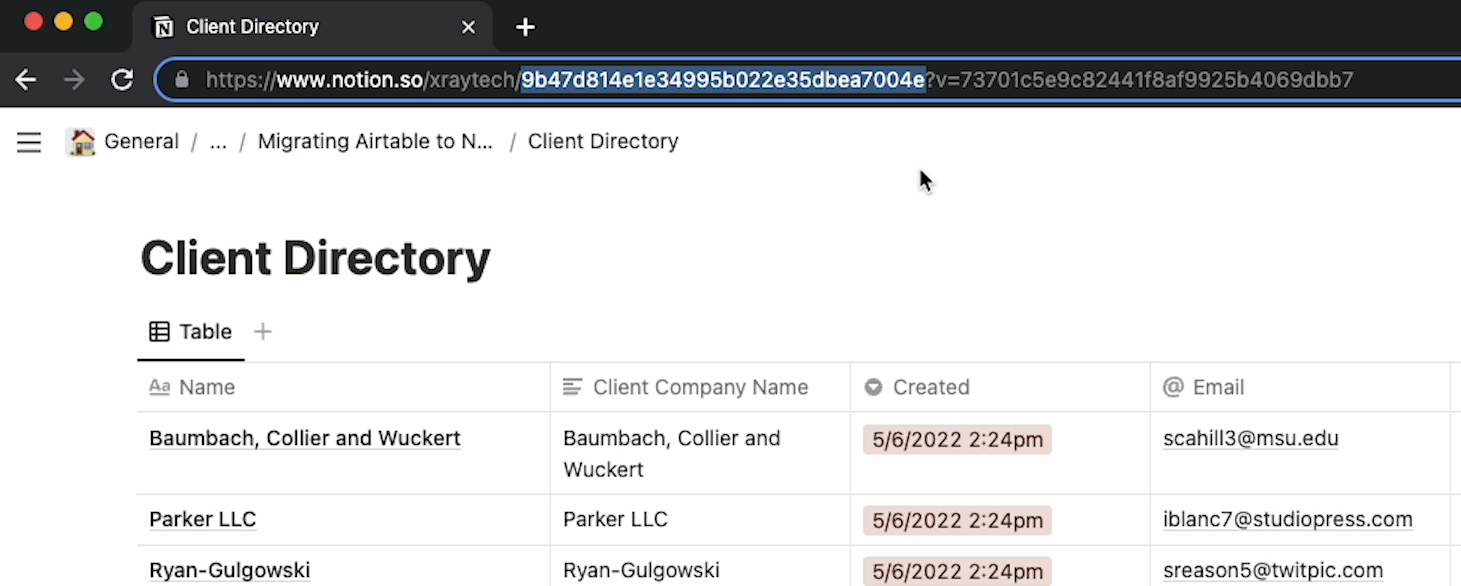
Note: On a personal account, this string will start after Notion.so, since you won’t have a workspace name.
Click ok, and run the module to grab some test data. To do this, right click the module, select “Choose where to start”, “Choose manually”, and pick a record. Then, click “run once”, and you should see some test data here.
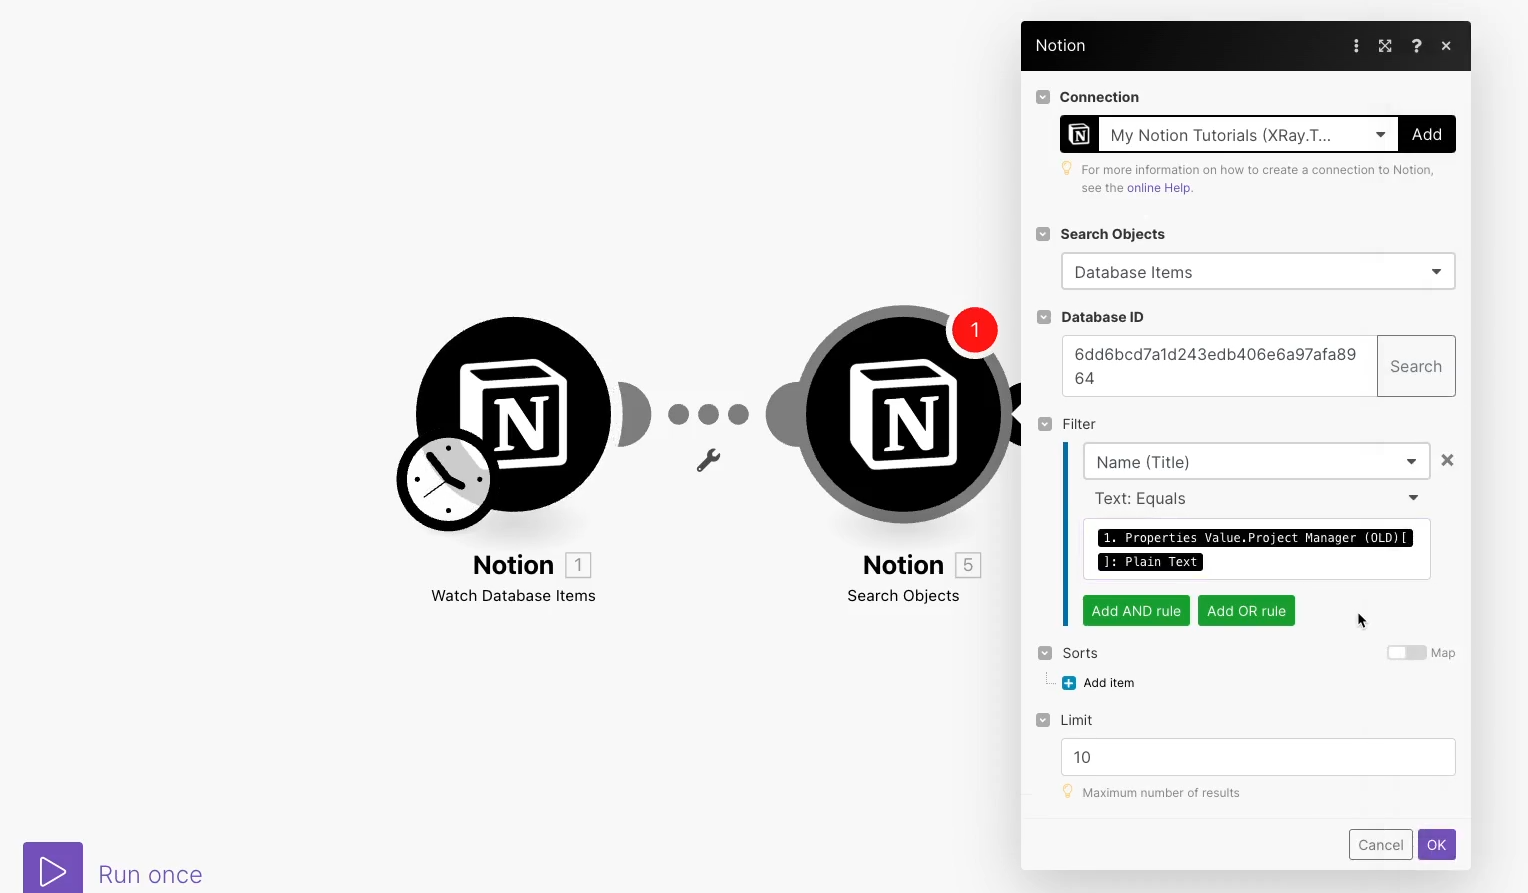
Second module - Search Objects
In the next module, Make will search your second database for a record that matches the text from your broken linked field.
Add a Notion module, and choose “Search Objects”. Provide your second database’s ID, which you can find the same way as the first database’s ID.
Then, in the filter section, select the field that you want to search for, like the record name. Set this to be equal to the content of the broken linked field.
In other words, this search and filter will look through your second database for the title of the record that was supposed to be linked to the first database.
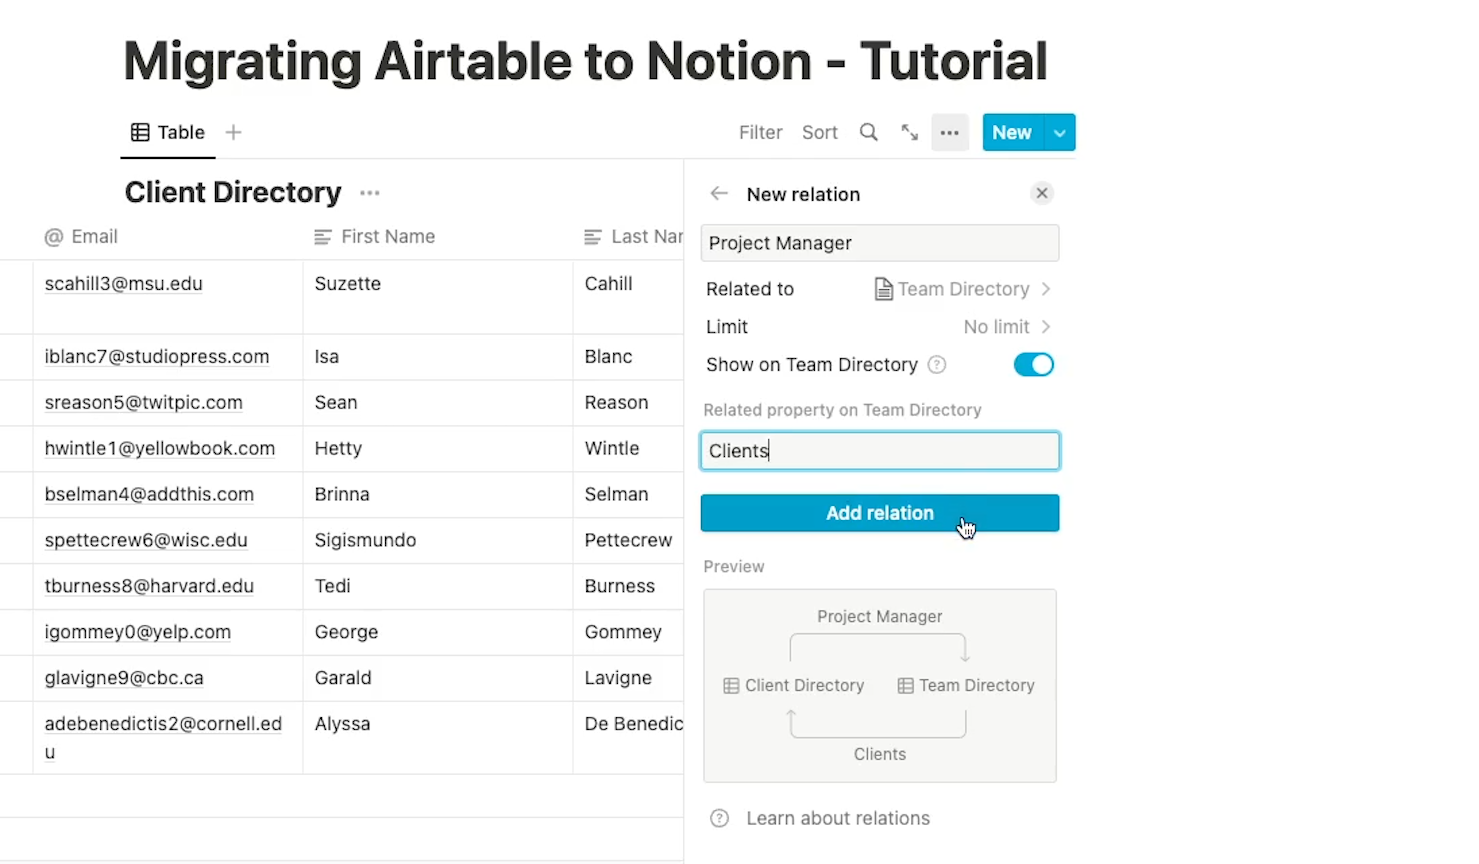
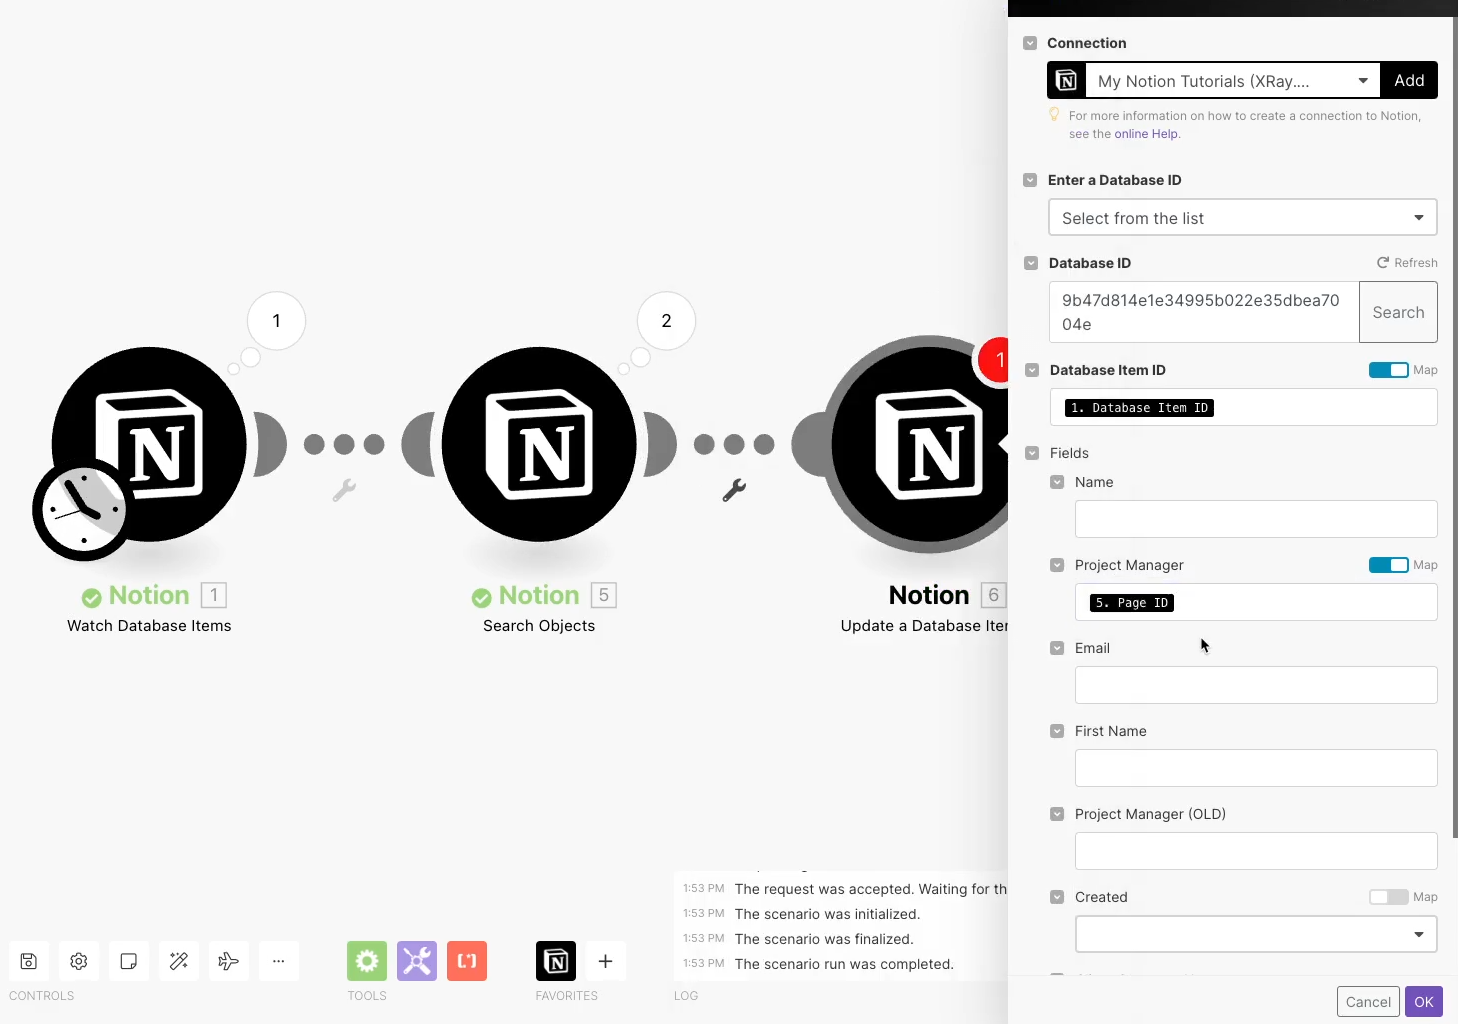
Third module - Update a Database Item
Finally, our third module will update the relation field in your first database with a reference to the record that you want to link.
Add a Notion module, and choose “update a database item”.Enter the ID of your first database. For “database item id”, check the switch that says “map”, and enter the database ID retrieved in the first module.
Then, find the relation field in the list that appears below. Make sure that the “map” option is checked again, and enter the Page ID retrieved in the second module.
You can leave all of the other fields blank. By leaving them blank, Make will just leave the content as it is - it won’t delete anything. Test out your scenario again, and you should see your chosen record update with a relation to your other database.
Run the automation to update every record
If everything looks good, go back to your automation and run it again. This time, set the item limit to however many items you have in your database. It may take a little while to process every record, but it will be much faster than going through every entry manually.
Migrate your Airtable data with a simple automation in Make
And that’s it! You’re all set to migrate your Airtable database to Notion and convert all of your linked records to relations. If you have several of them, just repeat this process for each field.
If you’d like to learn more about no-code and low-code automation, just check out our blog or our YouTube channel. You can also follow XRay on Twitter, Facebook, or LinkedIn.
This article was written by Exalate.
Teams using software to manage their projects store large volumes of business data. This data is vital, but hard to access without using the application that created the data in the first place.
When multiple teams use different platforms, much of their data might become inaccessible to teams using different software. Using an integration to share information between these various platforms can greatly benefit all teams and the organization as a whole.
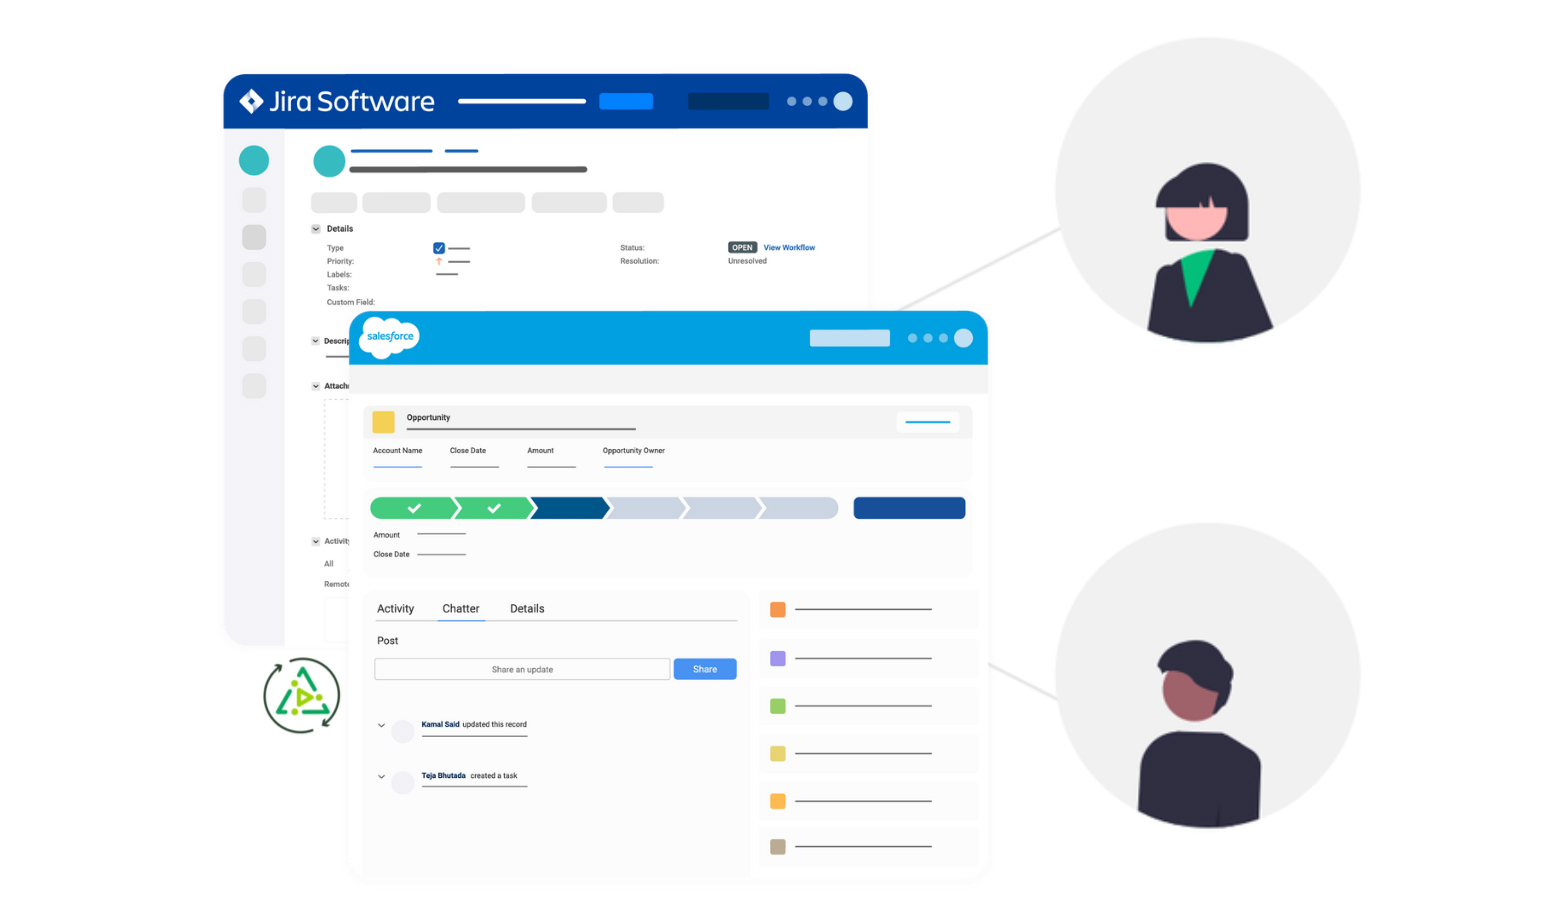
Getting different platforms like Jira and Salesforce to communicate is hard but with the right software, you can share data effortlessly, transforming the reach of your teams and letting each part of your organization complement the others.
Why You Need a Jira Salesforce Integration
With the right integration solution in place, teams can easily decide when and how they need to make specific data accessible to one another through a Jira Salesforce integration.
Here’s a common use case: sales data (including new feature requests) is useful to a project planning team, and the information on new features can be useful to the sales department.
Moving data automatically allows everyone to work together more closely, without the need for manual data transfer or meetings.
How to Integrate Jira and Salesforce in 6 Steps
Here’s how to set up this integration.
Step 1: Install Exalate on Jira
The first step is to install Exalate on both platforms. Let’s start with Jira. Navigate to the Atlassian Marketplace and type “Exalate”. You’ll see a few options appear.

Pick “Jira Issue Sync & More”. Click “Try it free” and follow the guide to install it.
Step 2: Install Exalate on Salesforce
Next, set up Exalate on Salesforce. You can find the Exalate Connector in the appexchange marketplace.
If you require expert help to set up or customize Salesforce, you might want to hire a Salesforce developer from Toptal. Toptal specializes in connecting businesses with top-tier developers to ensure your Salesforce setup is done efficiently.

Click “Get It Now” and follow the prompts to install it.
Step 3: Connect Jira and Salesforce
Now that Exalate is installed on both ends, you can create a connection between the two, starting from either side. Go to the connection screen and click “initiate connection”. You can set up 2 types of connections, basic or script.
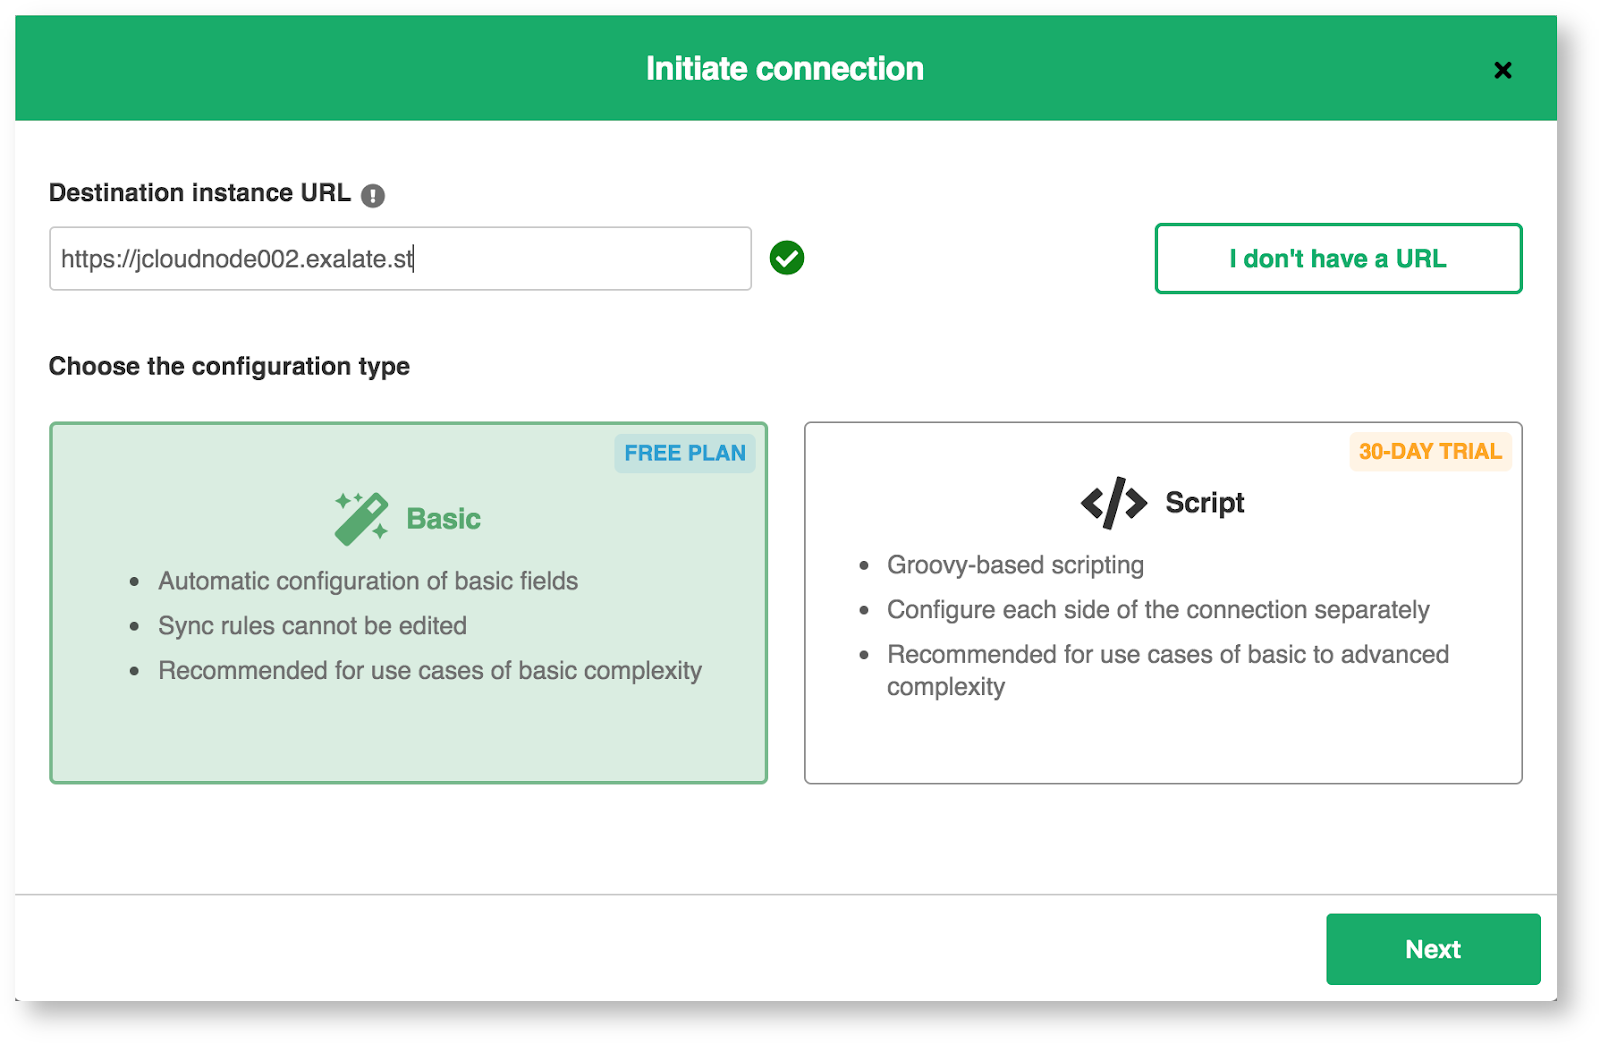
Follow the prompts for either one. You will then see your connection listed in both platforms.
Step 4: Configure Your Connection Rules
If you click the edit button on a connection, you’ll see several tabs. Click “Rules” to edit your connection rules.
Connection rules let you choose how fields are mapped from one item to the other. Exalate allows both teams to control how items are sent from their own platform, and to choose the mappings for incoming items.
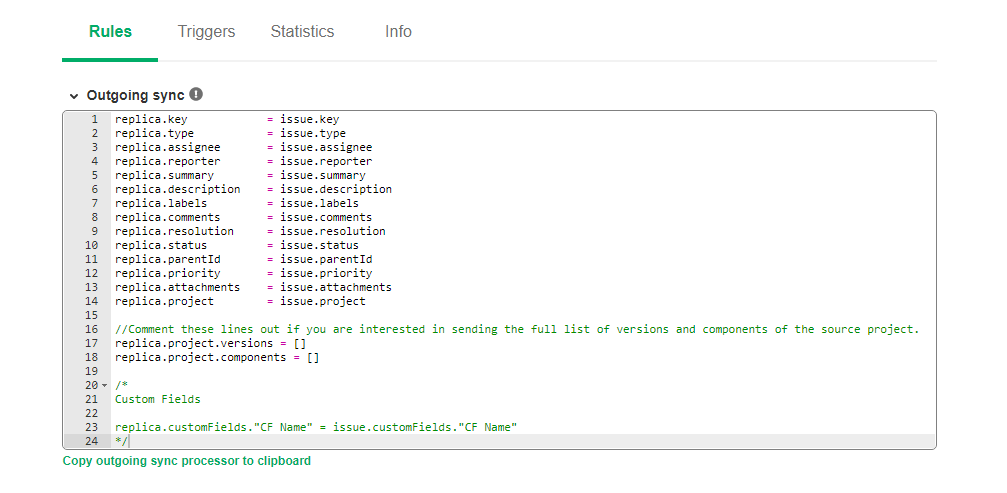
These can be added to, deleted, or commented out to be used later. If you want to map a field to something other than the default, you can change it accordingly.
Perhaps you want to assign a specific person to items on your system, so you could replace the incoming issue.assignee = replica.assignee with issue.assignee = “Mel Henderson”.
If you have coding experience, you can get fancy and combine fields, add a prefix to an incoming value, or use conditional logic to assign values. There is plenty of scope to get creative.
Step 5: Set Up Triggers to Control When Exchange Happens
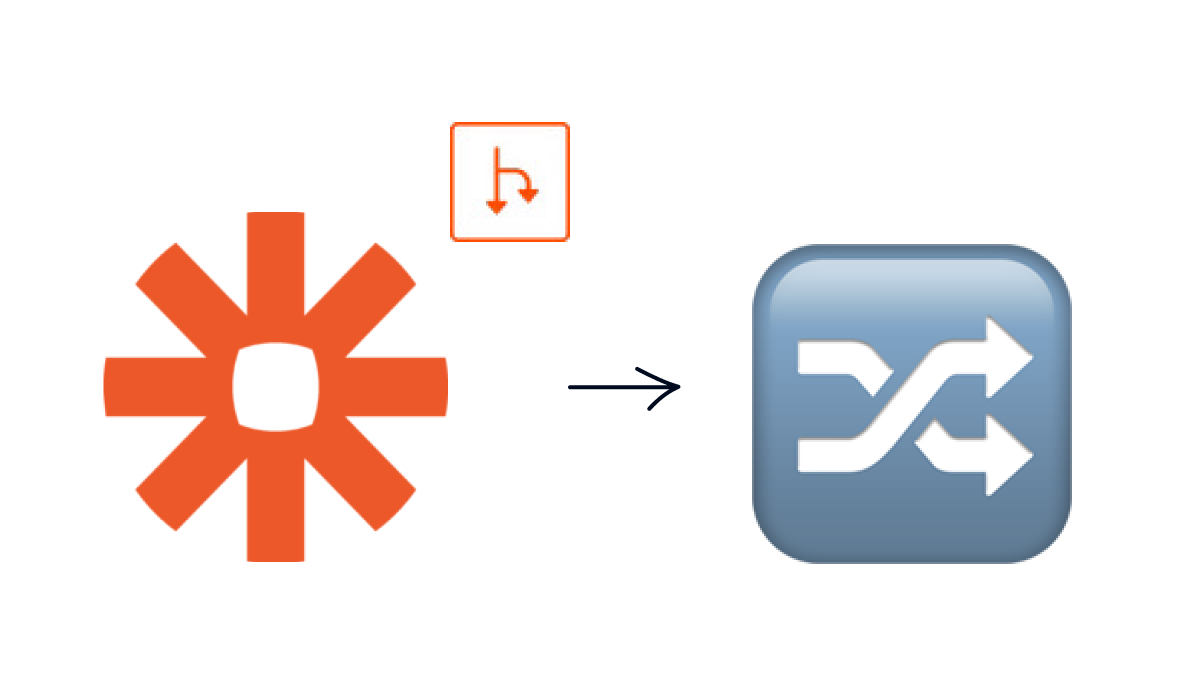
Triggers determine when items are synchronized. Essentially, they’re conditions. Click the “Triggers” tab first and click “Create Trigger” next.
On the screen that pops up, enter a query that matches the items you want synced. You can use triggers to sync all tickets of a particular type, or pick out specific values.
In Jira you use Jira Query Language (JQL). In Salesforce it’s Salesforce Object Query Language (SOQL).
After that, you can add a note to let you know what the trigger is for. Don’t forget to click the “Active” control. When you’re done, click “Add”.
You can create multiple triggers, too.
Step 6: Start Synchronizing Tickets
Now that your connection is ready, it’s time to test it. Create an item that matches the triggers you set previously. Start synchronization by clicking “Bulk Exalate” on the triggers list, then check to see if your item has moved from one platform to the other.
If not, check your sync rules carefully to make sure they cover the item you created. It’s common to make a mistake when you’re new to the system.
Once it’s working as intended, you can go back to work. Any items you create will be shared automatically with your other team.
What are some of the Most Common Use Cases?
There are many scenarios where synchronizing data can help.
For example, let’s consider a development team using Jira to work on new features. The sales team, who work in Salesforce, keeps tabs on what customers are asking for. Tickets dealing with requested features can then be synced into Jira’s system so developers can see them and decide whether or not to add them to the product.
Conversely, the synchronization can also automatically send Salesforce information about which features the developers are working on, and when they are expected to arrive, making it easier for the sales team to inform their leads about upcoming features.
In another scenario, developers might design custom software for enterprise clients. The sales teams can collect specific product requirements or feature requests from key clients residing within Salesforce. For instance, this can be logged as Cases belonging to a key Account or Opportunity.
The sales team could then pass this information to the development team, leading to useful insights for designing custom software tailored toward those clients.
As a final example, let’s imagine that an organization is using Jira as a goal-setting platform, while their sales team is tracking their metrics on Salesforce. By syncing goal-related Jira tickets to Salesforce, they could easily monitor everyone’s progress toward their goals. You can sync goal-related tickets so that they are kept up to date in both Jira and Salesforce. Then everyone can easily monitor progress towards their goals.
Make Informed Decisions with Up-to-date Data
Integrating software platforms sounds hard, but it doesn’t have to be. The right tools make it easy, and with Exalate everything happens automatically. The setup process is quick and straightforward, and allows you to take complete control over what’s shared, and when.
With your integration in place, your teams have more information at their fingertips and can make better decisions. That can only benefit you.
If you want to know more, check out Exalate and learn how it can help connect your teams.
If you’d like to learn more about building no-code and low-code automated workflows, check out the other posts on XRay's blog or our YouTube channel. You can also follow XRay on Twitter, Facebook, or LinkedIn.
If you require expert help to set up or customize Salesforce, you might want to hire a Salesforce developer from Toptal. Toptal specializes in connecting businesses with top-tier developers to ensure your Salesforce setup is done efficiently.

As a manager or executive, you want to see everyone in your organization thrive in their role.
Unfortunately, that doesn’t always happen, and you’ll often see people on your team struggling to contribute at the level you expected.
In many cases, your team’s struggles are all about workflows. More specifically, they’re related to how you’ve defined and documented the workflows that they perform on a daily basis.
In this post, we’ll explain how you can set up precise, context-rich workflows to let your team get the most out of their everyday efforts.
Scattered and vague workflows make your team struggle with their assignments
When people on your team aren’t living up to their full potential, it’s not always a question of talent or motivation. In many cases, people simply don’t have the resources they need to succeed at their fingertips.
If you’re not careful about assembling accurate documentation and keeping it up to date, your team may be sifting through old and misleading information as they try to figure out what to do.
As companies continue to adopt more SaaS tools every year, it can be a challenge for a new hire to sort through all of the apps and resources that they need in order to complete each individual task.
In short, when people have to spend too much of their time figuring out how to use your company’s specific systems, they’re going to find it difficult to deliver great work.
Turning workflows into tangible objects
So what’s the answer? How do you enable people to do their jobs better?
At XRay, we’ve found great results in turning workflows into objects.
For most people and organizations, a “workflow” is just an abstract concept. It describes a set of actions to perform, or a list of tasks and goals to accomplish. But it’s not usually something that exists in one place; it has to be pieced together from a dozen or more disparate sources.
To complete a workflow, you usually need to sift through various pieces of documentation, solicit advice from coworkers, open up several apps, and figure out the parts that are undocumented or out of date.
This haphazard process frequently leads to inconsistent performance and results. In some cases, people on your team might be doing great work that goes unnoticed and unused because it wasn’t submitted to the right channels for review or saved in the right place.
So instead of leaving your workflows scattered and vague, we encourage you to start turning them into more tangible objects. Every workflow should have clear, concise directions and readily accessible resources. Your workflows also need to be repeatable, so that anyone with the right skill set or background can adopt them right away.
How to design a workflow
There are three key components of a workflow as an object: flowcharts, user documentation, and easily accessible resources.
Demonstrate the bigger picture with flowcharts
Flowcharts serve as simple visual documentation that demonstrates the entire workflow. They show how data moves between various apps, departments, and channels at your organization.
Flowcharts illustrate the big-picture context of each workflow, so each user can see how their piece fits into the complete puzzle.
We love using Lucidchart for Flowcharts. Check it out for an easy way to build robust, detailed charts.
Provide context and instructions with user documentation
User documentation consists of concise, step-by-step instructions for how to perform the workflow. The documentation should cover what forms to fill out, what links to use, what decisions need to be made, or any other necessary information.
In most cases, your documentation should be non-technical; anyone in the relevant department or role should be able to understand and follow these docs.
At XRay, we recommend using Notion for documentation. It’s got lots of options for formatting each doc, and adding database attributes to keep track of your information.
Compile all necessary resources into an accessible location
All of the apps, files, links, and other resources that someone needs to accomplish the workflow should be easy to find and access. When your team has everything they need in one place, they’ll be able to minimize context switching and interruptions.
They’ll be able to maintain their focus as they work, and they won’t interrupt other team members just to get access to the resources they can’t easily find.
To organize workflow and share resources with a single click, check out XRay Workflow. Read on to learn more about the software we’ve built to help you manage your workflows and their resources.
Let your team focus on getting work done
With these three components in place, your team will be able to focus almost entirely on the work itself.
For instance, they don’t need to worry about how a presentation should be formatted, or where it should be saved, or who to notify - they can just focus on the content of the presentation itself. And as they find ways to improve the workflows, they can easily update the docs and resources to make the change official.
Using XRayWorkflow to manage your workflows
Using apps like Notion to organize your workflows is a great start, but it still has its limitations. Ultimately, you’re still going to have to leave Notion to open up all of the various apps that make up each workflow.
And as you add more pages to your workspace, it will be difficult to keep everything organized and readily accessible. This results in some significant context switching, which can burn minutes every hour and break focus.
At XRay, we’ve developed an app designed to be the home screen for all of your workflows. We built it to deliver, catalog, and perform workflows, and you can use it to trigger key automations too.
With XRay Workflow, anything on the web can be saved as a pin.
You can save text and links to the tools you already use, or even embed websites and webapps. Everything you need to perform a workflow will be right there on one board, making it easy to visualize, share, and maintain the latest workflow for you and your team regardless of the tools you use.
XRay Workflow is currently in beta, and you can sign up for free here.
Give your team a boost with well-documented workflows
Workflows are the core of what we do every day. Equipping your team with well-documented, accessible workflows is the best way to ensure that they’ll live up to their full potential.
And if you’re interested in using XRay Workflow to manage your workflows, you can sign up today for the free beta.
To learn more about designing workflows and automating robotic tasks, check out our blog or our YouTube channel. You can also follow XRay on Twitter, Facebook, or LinkedIn.

When you’re trying to get started with automation, it’s easy to get paralyzed by choice.
Any app with an API can be automated with no-code tools like Zapier and Make, so your options are virtually unlimited.
To help you launch your automation projects, we’ve put together our top 3 recommended starting points.
Let’s get started!
Method 1: Start with a well-defined, repeatable process
If you’re trying to choose a business process that’s suited to automation, you want to pick a workflow that’s already clearly defined, repeatable and consistent.
A well-defined process
If your process is clearly defined, you should already know every step that’s involved in the process from beginning to end.
You should know every person or department that needs to be notified and when. Then, you can configure every step as needed in your automation without having to rely on guesswork or trial and error.
If you automate a process that’s still vaguely defined, you may be codifying an ineffective solution that will hamper your productivity instead of boosting it.
Repeatability
In addition to being well-defined, it should be a process that repeats on a regular basis. If you only do something once, there’s obviously no point in automating it.
Look for the processes that you’re conducting every day, every week, or every month. Even an annual process may be worth automating if it requires a lot of tedious tasks to complete.
But you’ll see the most dramatic results from automating processes that you conduct frequently. Things like creating documents for daily or weekly meetings, onboarding new clients, or responding to inbound leads are all great processes to automate.
Consistency
Finally, you should look for processes that are consistent - in other words, you should automate processes that happen pretty much the same way every time.
No-code providers like Zapier and Make will let you add conditional logic to support different inputs and circumstances, but your automated processes should still be largely similar every time they run.
For instance, when you onboard new clients, each one may have a slightly different project, but you’ll still probably follow a similar process every time.
You’ll create shared folders and documents, create Slack channels, make a project template in your task manager, and generate other resources.
You can configure your automation to handle a few different project types to produce everything you need to get started with each client. Consistent processes like this are much easier to automate, and are a great place to start.
If you have a consistent, reliable process that you’ve already defined in detail, then that’s a great candidate for automation.
Method 2: Support the people on your team
If evaluating your processes isn’t revealing any clear opportunities for workflow automation, you may want to take a different perspective and think about helping a single individual at your organization first.
Many companies have a talented employee shouldering a huge workload. One effective approach to automation is to start by helping out your overworked employee first.
Build workflow automations that help make their jobs easier. In particular, you should focus on automating their robotic tasks - anything that essentially amounts to copying and pasting data or making documents from a template.
By automating those tasks, you’ll let your rockstar employee focus more on creative, analytical, strategic and thoughtful work.
You’ll amplify their output while simultaneously making their job less stressful. Once you’ve established some automations for one person, you can use them as a foundation for supporting a department - or even your entire organization.
Method 3: Automate your sources of truth
If you’re not able to find any processes or people that you can kick off your automations with, you may want to think about data instead.
What data and resources do you and your team rely on to do your work? These could be customer databases, pitch decks, an employee directory - any kind of data or asset that you use and refer to on a regular basis.
Automate data creation and syncing
You can get started with automation by automating the ways you create your essential data. With automation, you can ensure that you capture every important piece of information as it’s created.
You can also make sure it’s stored consistently and correctly, and that it’s easy to update as needed.
You can create automations that funnel your data from several sources into a single database or document, or establish a single approved method for creating and updating data - like filling out a form or using one specific app.
Automating your data will create reliable and accessible sources of truth. It will make it easier for everyone to do their job, and will reduce errors across the board.
Focus on processes, people, and data to start automating
Workflow automation can be a daunting prospect. You can automate nearly any workflow and any software, so it’s hard to know where to start.
Our recommendation is to focus on well-defined processes, employees that could use a hand, or on key databases that act as your source of truth. Whichever you choose, adopting workflow automation will give you and your team much more time for the work that matters.
If you’d like to learn more about workflow automation, check out our blog or our YouTube channel. You can also follow XRay on Twitter, Facebook, or LinkedIn.

Building no-code automations is an easy and effective way to save time on your everyday tasks. Even simple automations connecting a couple of SaaS tools can help you to get work done faster.
But as you go further with automation, you’ll find that the simple, linear paths that you started out with aren’t enough to handle the more complex workflows that you want to build in apps like Make (formerly Integromat).
Adding paths with a router lets you build more versatile automations that can respond to a variety of different inputs and circumstances.
With a router, you can change your automation’s actions based on different user responses, or have it perform different actions depending on the time of day.
It only takes a few simple steps to add a router to your Make or Integromat scenario, so follow along and get started.
Create a new scenario and add a trigger
First you’ll need to add a module that will act as the trigger for your scenario.
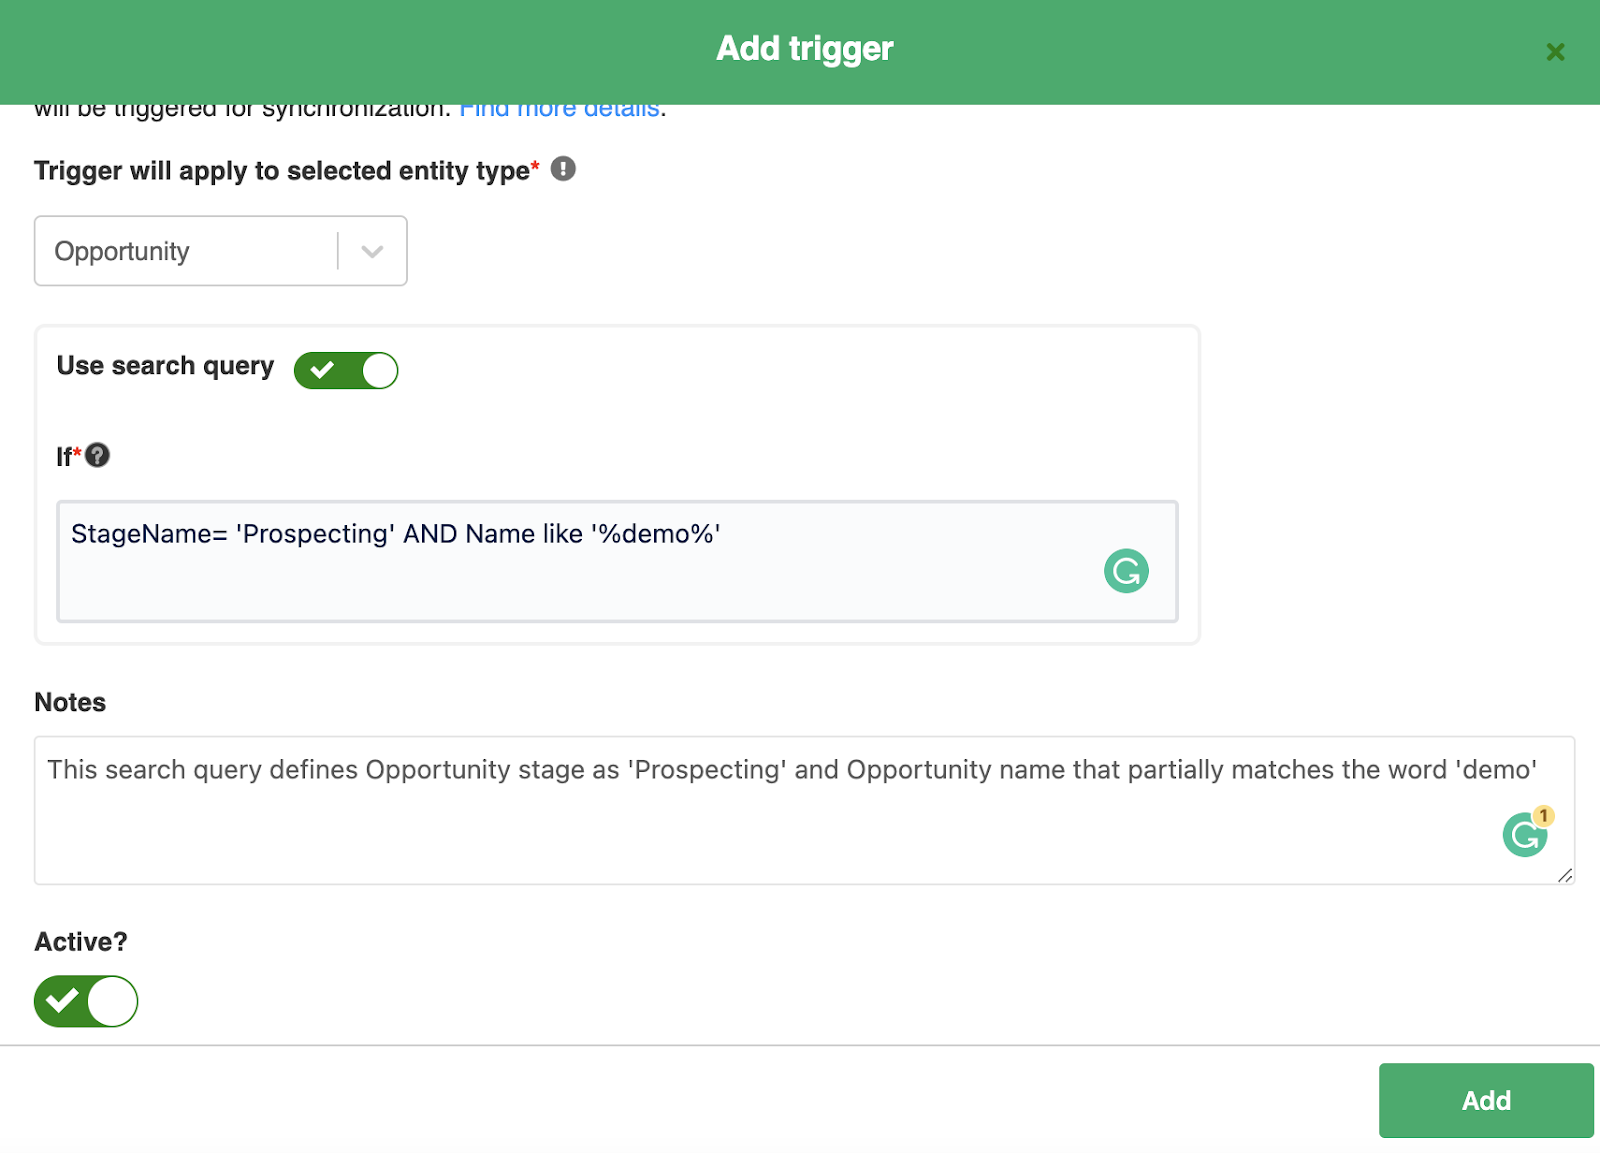
Your trigger module can use any app you’d like. In our example, we’ll use an Airtable module that searches for new records in this view.
The Airtable base pictured below gathers responses from people who fill out a contact form on our website.

The main field we’ll be interested in is “Service Type”. There are three choices for this field: Project, Membership, and Other.
We’ll use routers to send a different message for each service selection. When you’re building your scenario, make sure you know which variable you’ll use as the basis for your separate paths.
Once your trigger module is all set, test it to retrieve some data.

Note: whenever you’re testing your Make scenario, always go back to the trigger module, right click, and select “Choose Where to Start”, then “Choose Manually”. Select the data you want to use, and then click on the Play button to run your automation.
Add your router and filters
Next, add a router to split your scenario into two routes. Click on the “flow control button”, and select Router from the menu that pops up.

Click on the plus button to create two paths that your scenario can follow.

To determine which path the automation will execute, you’ll need to add a filter to each path. Click on the wrench icon and choose “Set up a Filter”.

In our example, we’ll configure this route to run if the service type is set to Membership, so we’ll set the label to “Membership”, and set the condition to 1.Service Type - “Equal to” - “Membership”.
In the first field, make sure to use dynamic data from the trigger or previous steps. If you just enter a static value, you’ll get the same results every time, and your routes won’t work as intended.

For the second route, our configuration will be almost identical, except we’ll swap out “Membership” for “Project”, so this path will run if the user selected “Project.”

Finally, we’ll add a third route that we can use as a fallback. Click on the plus sign in the middle of the router to add an additional path.

Then, click on the wrench to set up the filter.
Set the label to “Fallback” or “Default”, and check “Yes” underneath the text that reads “The fallback route”.

You can leave the condition blank. Your scenario will use this route if none of the other routes’ conditions are met. So if the user selected “Other”, or if we add new Service options without updating this automation, this fallback route will run.
Adding Actions
Finally, let’s add some actions to the scenario.
In the first route, we’ll add a Gmail module. We’ll set the email address provided in the contact form as the recipient for the message, and we’ll fill in a subject line and body text that describe the Membership service option.

To quickly add actions to the other routes, we’ll just clone this module and replace the Subject line and Body with appropriate text.

Once your scenario is complete, it’s time to test it out. When you’re testing an automation with multiple routes, make sure to test with a variety of data that will trigger each separate route to run. That way, you can ensure that each route works as intended.
Building more versatile automations with routers
Now you’re all set to use routers in Make and Integromat. Adding conditional routes to your scenarios will make them much more versatile and useful in real-world situations.
If you’d like more tips for building no-code automations with platforms like Make and Zapier, check out our blog or our YouTube channel. You can also follow XRay on Twitter, Facebook, or LinkedIn.

Workflow Automation is one of XRay’s main tools for designing effective workflows, and it’s a rapidly growing part of every industry.
But many entrepreneurs may not be familiar with workflow automation, particularly when it comes to automation built with no-code tools.
In this post, we’ll explain exactly what workflow automation is, why it can help your company, and how you can get started with automation. We’ll also show
Let’s get into it.
Defining workflow automation
Workflow automation is the act of supporting any business process with automated actions performed by software.
In some cases, an entire process will be automated end-to-end. In other situations, only certain tasks will be automated, while the rest of the process will still be conducted by people.
Automating tasks at any scale
Workflow automation can operate at nearly any scale. On an individual level, you can automate a single simple task, like configuring your email to send an automatic reply at certain times of the day.
At an organizational scale, you can build an automated workflow to handle intricate and important processes, like client onboarding.
A workflow like this would perform tasks like automatically creating folders in Google Drive, creating channels in Slack or Microsoft Teams, provisioning accounts, and setting tasks in Asana, Monday, Basecamp or Jira - or whatever your task management software is.
Workflow automation can help you accomplish a few simple, repetitive tasks; it can help shoulder a massive administrative burden for your organization; and it can do almost anything in between - if you thoughtfully design the way you work.
A quick guide to no-code automation
You can create automations by developing custom software to perform the task, or by using no-code platforms.
Since most of us aren’t Python developers, no-code automation platforms let us build automated workflows without needing to write any code.
No-code tools make automation more accessible
Using a simple interface, they let you construct automations that typically consist of a single trigger and several actions.
The trigger defines when the automation should run, and the actions define what it should do.
There are several automation providers available dedicated to building no-code automations: Zapier, Make, Unito, Coupler, Automate.io, and Exalate, just to name a few.
No-code automation is much more accessible to people who aren’t familiar with software development, and it lets you prototype and build much faster.
The benefits of workflow automation
So why should you automate? What’s the value of handing some of your critical processes over to the robots?
The benefits of automation can vary based on the specific use case, but there are four key advantages that every organization can gain from automation:
• Saving time
• Making your team enjoy their work
• Making your processes more consistent
• Easily tracking key data
• Let’s take a quick look at each of these benefits.
Saving Time
Automation excels at quickly performing highly repetitive, time-consuming tasks. Depending on the process, a single automated workflow can save you up to several hours each week.
At XRay, we’ve helped save clients over 6 hours a week with a lead handling workflow, and over an hour per client with an onboarding workflow.
And that’s just the beginning. If your first automation is designed and built the right way, you’ll have the infrastructure in place to start building more - which means more time saved, and more robotic tasks accomplished.
Make Your Team Enjoy their Work
For knowledge workers, automation isn’t the enemy. It’s not a threat to people and their jobs. Workflow automation supports people as they perform critical tasks, handling the tedious to-dos that nobody likes doing anyway.
When your team no longer has to spend time on robotic tasks, they can devote more of their day to work that leverages their unique skills, making them more productive and more satisfied with their work.
Automation makes work easier, and makes it more fun. When you give your people the superpower of workflow automation, they’re going to love being a part of your team.
Create Consistency for your Business Processes
Automation makes your business processes more consistent.
Before you can automate a process, you have to clearly define how it works. When you conduct it manually, you can leave several steps ambiguous and rely on your team to fill in the gaps with their judgment and preferences.
But when you automate the process, you need to define every action precisely so that software can carry out each step. While people will always make mistakes from time to time, your automated workflows will perform every action the exact same way, every time.
There may be a few bugs to iron out, but your automations will have a much lower error rate than you could ever get from a person.
Easily track key data
One of automation’s most useful benefits is something that many wouldn’t expect. On top of saving time and improving your operational consistency, automation enables you to gather key data about any process that you automate.
The automation providers that you use will inherently keep a record of every time your automations run, so you’ll have a wealth of data regarding the automations themselves, not just the end result.
It only takes a few additional steps to log that data in spreadsheets and export it to convenient data visualization apps. So if you’re looking for deeper insights into specific process performance, automation might be the best choice to capture these meta-statistics.
Getting started with automation
If you’d like to get started with automation, there are several ways that you can begin.
If you’re interested in building automations for your own use, we’d encourage you to try building some workflows on Zapier and Make yourself. You can check out the other videos on our channel for all sorts of no-code automation tips and tutorials. Even just a few simple automations can help you to save some time and organize your work every day.
If you’re interested in building automations to support your entire organization, you can reach out to a company like XRay to discuss your goals and your options. You can visit our website to learn more and schedule a call.
Most automation providers also offer a list of certified experts and partners who can help you to build automations for your company. For instance, you can find Zapier’s expert directory here, or click here for Integromat’s list of partners.
Enhancing your workflows with automation
Workflow automation is quickly becoming a vital tool for organizations of every size. It’s a great way to free up time for your team, make your processes more consistent, and start tracking your organization’s activity. With convenient no-code automation tools, it’s easier than ever to get started.
If you’d like to learn more about no-code and low-code automation, check out our blog or our YouTube channel. You can also follow XRay on Twitter, Facebook, or LinkedIn.

After devoting weeks, months, or even years into a project, it’s an often frustrating fact that everything can still go wrong right at the last minute.
All of the work that goes into a professional project will amount to nothing if it isn’t delivered correctly.
If the client doesn’t know how to use what you’ve made, or if they don’t know where to find the resources they need, they won’t be satisfied with the work you’ve done.
In this post, we’ll explain why delivery plays such a vital role in every project, and we’ll take a look at how you can approach delivery to ensure a successful handoff.
Don’t Drop the Meal Before it Gets to the Table
Imagine that you run a restaurant. Imagine that your chefs have prepared a perfect meal, exactly as the customer ordered it.
They pass it off to the waitstaff, who bring it quickly over to the right table.
Then, just before the server can put the dish down, they slip and the whole meal falls to the floor.
It doesn’t matter how well the food was prepared in the kitchen; if it doesn’t get to the table safely, then you’re in trouble.
You’re going to have to make the food all over again, repeating work you’ve already done and trying desperately to restore the customer’s experience.
How to Ensure a Great Delivery, Every Time
This hypothetical story illustrates a concept that’s critical to any agency or other B2B companies: you need to make sure your delivery method is as good as the rest of the work you do.
Before co-founding XRay, CEO Tom Nassr ran a digital design agency called Checkmate.Digital for several years, along with a few other members of XRay’s current team.
We’ve been in the agency world for a long time now, and these are what we’ve found to be the key traits of a successful delivery.
Easy Access to Key Resources
First, the client needs easy access to all of the work you’ve done. If they can’t find it, they can’t use it, and from their perspective, you essentially didn’t do it.
All of the files, assets, links, forms or resources that they need to use your work should be easily accessible.
Documentation for the End Users
Second, the client needs to know how it all works.
A new website with a fancy CMS won’t do anyone much good if they don’t know how to actually upload content.
Including documentation with your project is always a good idea if you’ve built anything technical for your client.
Documentation for Training
Third, the client needs to be able to train others on their team.
You don’t want the company to drop your product the second that they hire new talent or reorganize.
You need to ensure that they can teach others how to use what you’ve made. So when you’re preparing your documentation, make sure it’s suitable for anyone, regardless of their role or technical skill level.
Keep everything organized
Finally, you don’t want the client to have to ask you to send material again.
Of course, continued communication for new features, new pages or bug fixes is vital for a long-term partnership.
But when your clients are forced to ask you for links, resources, and training docs over and over again, it’s just a frustrating waste of everyone’s time, and it shows that your delivery process wasn’t organized well enough in the first place.
To sum it up, delivery should be well-organized, with links and easy access to everything the client needs to utilize your deliverable.
You should include documentation so they can use the material, and train their team.
And if it’s all working correctly, they’ll never have to ask you “where can I find this?” again.
XRay’s Delivery Solution: XRay.Studio
Using a combination of apps like Google Drive for file sharing and Notion for documentation can be a decent way to conduct delivery.
But having different resources spread across various apps makes delivery messy. It’s exactly the sort of situation that causes clients to lose track of what you’ve sent them.
And if you have clients on different software, your team will have difficulty keeping track of their own work.
Building Our Own Delivery Platform
Since there weren’t any great delivery tools on the market that did what we wanted, we decided to build one ourselves.
XRay.Studio is our own project delivery and workflow management platform. It lets you save links, embed documents and web apps, and share resources from all over the internet on a single board.

Your training docs can be saved right alongside the client’s sign-in portal, or organized in a group with Google drive links for the assets they need to download. So instead of jumping between an email and a Notion page and a CMS portal, your client can just open up an XRay.Studio board and follow the process one step at a time.

All of the information and context they need is right there, so they don’t need to switch between tabs or search for important files. Most importantly, it’s both a surface for your team to organize deliverables internally, as well as a surface that your clients can reference for all the material they need, regardless of the tools used to create it.
Join the XRay.Studio Beta
XRay.Studio is currently in beta as we keep adding and polishing features. If you’d like to sign up for the free beta, just go to XRay dot Studio.
You’ll get a 1:1 onboarding call and be all set to deliver your work like never before. We want XRay.Studio to be the perfect platform for sharing projects and workflows, so your feedback will be essential.
And if you’re not interested in XRay.Studio, you can still follow the delivery tips that we’ve outlined in this post to make sure that you can carry your projects successfully over the finish line.
Craft a Delivery process that lives up to your standards
Ultimately, there’s nothing more devastating than falling at the last hurdle. When you’ve put your best work into a project, you want to make sure that handoff is as smooth as possible.
An organized delivery process with thorough documentation and easy access to key resources is a great way to ensure success. And if you’re interested, we’ve developed XRay.Studio to make delivery as impressive as the work you do.
If you’d like to learn more about designing and optimizing your workflows, check out our blog or our YouTube channel. You can also follow XRay on Twitter, Facebook, or LinkedIn.
No-code automations are a great way to save time and make your workflows more consistent. But sometimes, a simple linear automation doesn’t cut it. In real-world situations, you may need to accommodate variable inputs and multiple scenarios.
In Zapier, Paths let you build more flexible automations that will perform different actions based on a specific variable inside of your automation.
Adding a little conditional logic to your Zaps with Paths will make your automated workflows much more adaptable to your everyday work.
In this post, we’ll show you how to get started with Paths with a quick and easy example.
Building an Automated Email Follow-up for Website Contacts
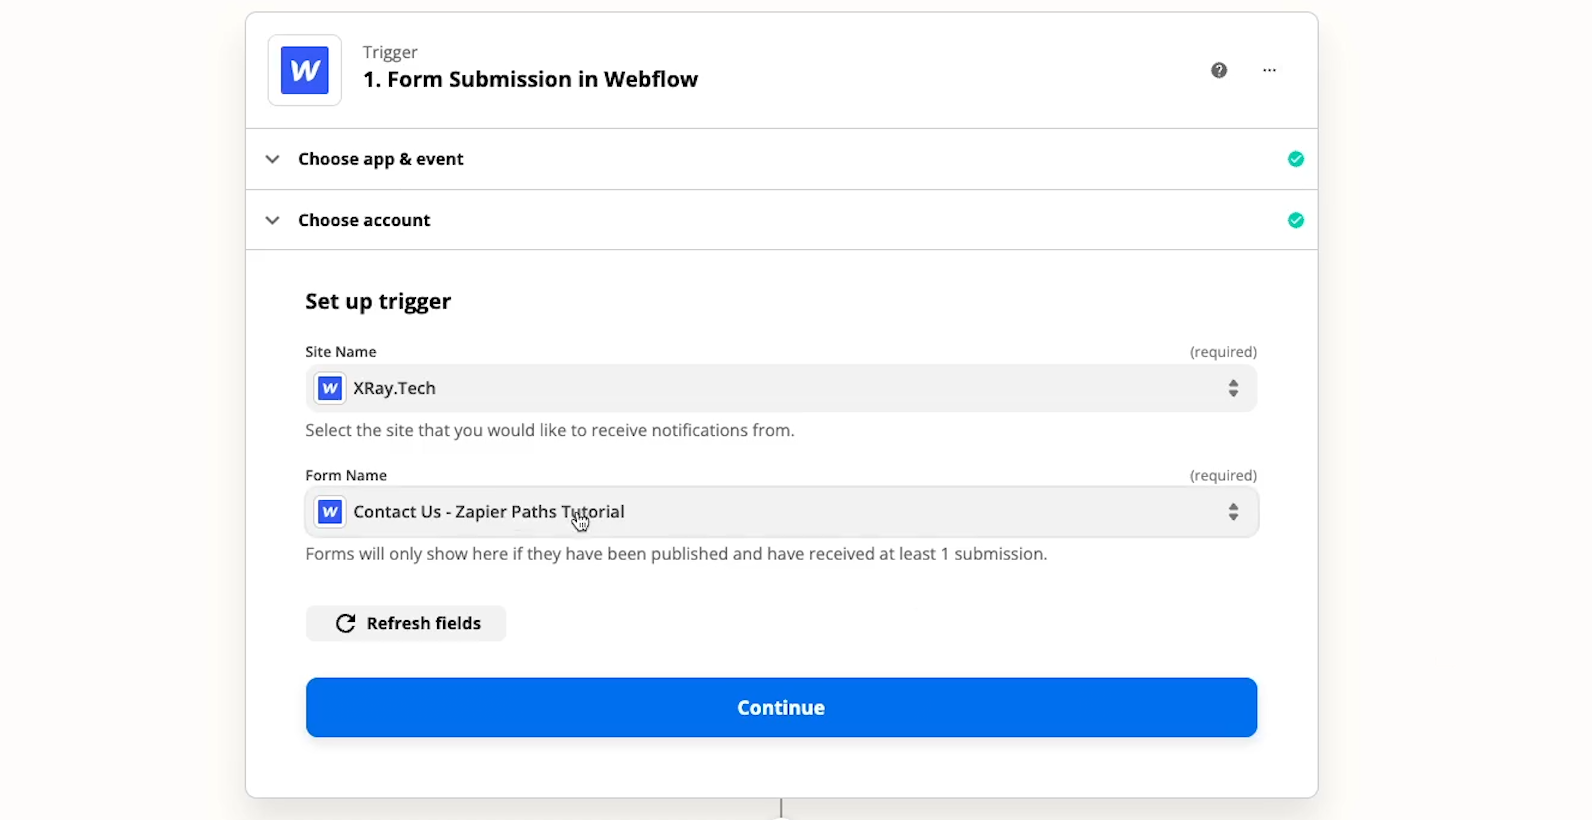
In our example, we’ll create a simple Zap that will send an email to anyone who has reached out to work with us through our Webflow site.
The content of the reply will change based on the information the respondent provided when they filled out the Contact form.
Our Contact form includes a dropdown selection for “Service Type” with three options: Project, Membership, and Other.
We’ll send one message for “Project”, one for “Membership”, and a default message for “other”.
Before you can add paths, you just need to have a trigger to start your Zap. In our example, our Zap will run whenever a new response is recorded in this Webflow form.
Adding Paths to Your Zapier Automation
Building the First Path
To build the first path, add a new action, and click on “Path”.
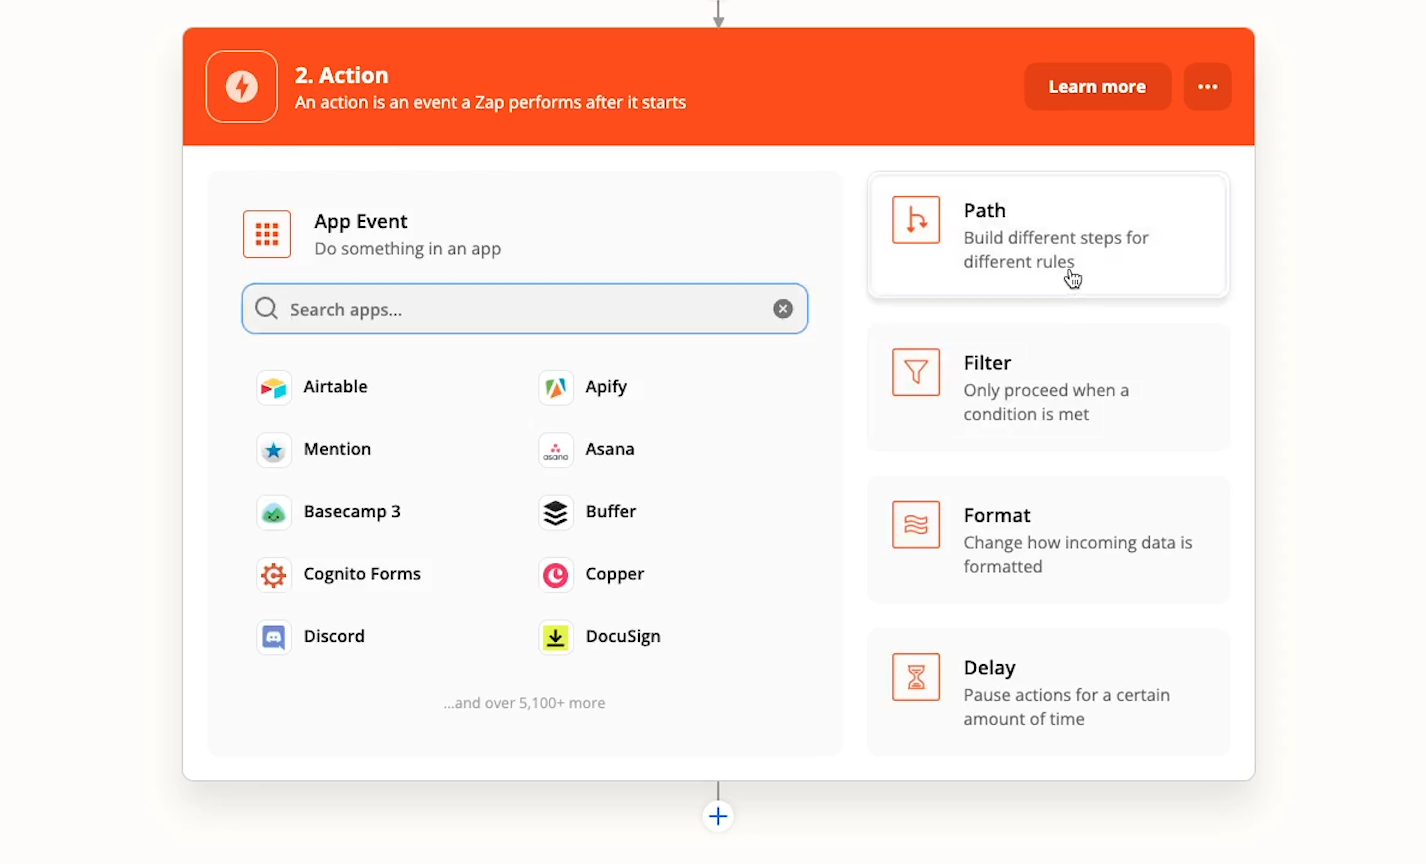
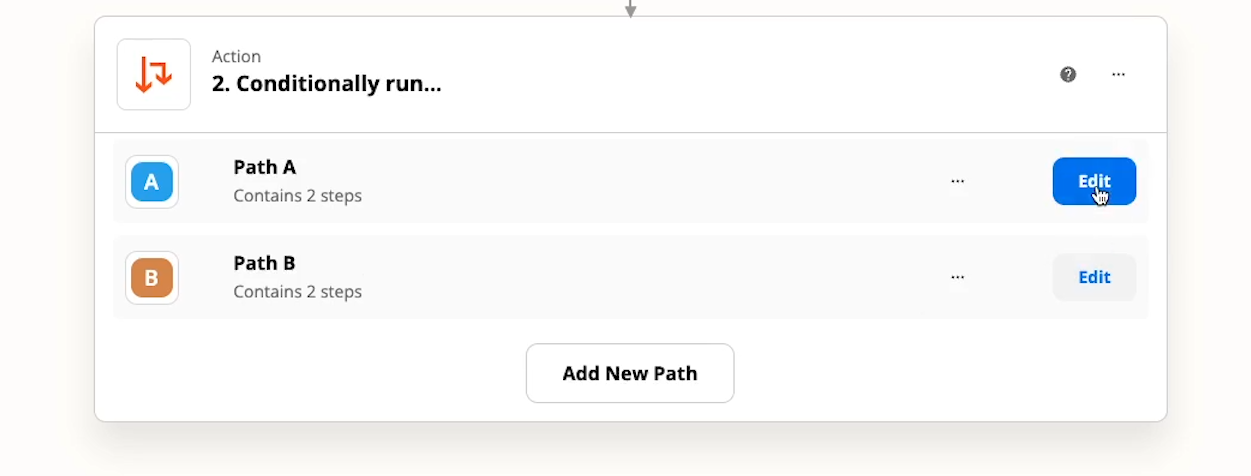
Zapier will now generate two blank paths, labeled “Path A” and “Path B”. Click on “Edit” to edit the first Path (Path A).
Fill in a name for this path, and make sure it’s descriptive. It will be much easier to maintain your automation later if you know what each path does. In our example, this will be the “project” path, so we’ll just call it “Project”.
Setting a Rule for your Path
Now, you need to set a rule. The automation will only continue down this path if the data it’s processing matches this rule.
In our example, the content in Service Type should exactly match the word “Project”.

Once you’ve set your rule, click continue to test it and make sure it works.
Before you continue, you should also make sure to test some data that shouldn’t match this rule.
For instance, in our example, we want to make sure that this path will run when the Service Type is “Project”, but we also want to make sure it won’t run for any other type.
So we’ll go back to the trigger step to choose a different piece of data to work with, and test the rule again.

And just as we hoped, the path wouldn’t have run, because this data has a “Membership” service type.
Adding Actions to the Path
Once you’re confident that your rule works exactly as intended, you can move on and start adding the actions you want to perform in this path.
In our example, we’ll send an email with some project-specific text.
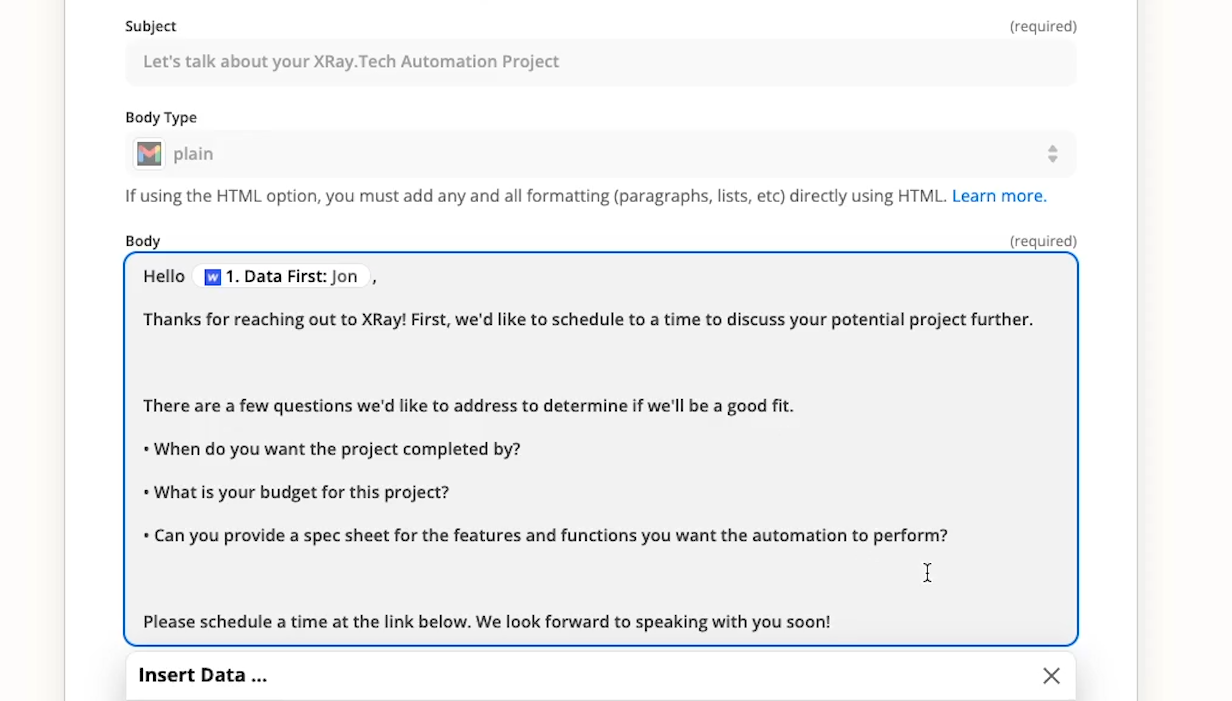
Once you’ve filled out all the required fields for your action, you can test the step.
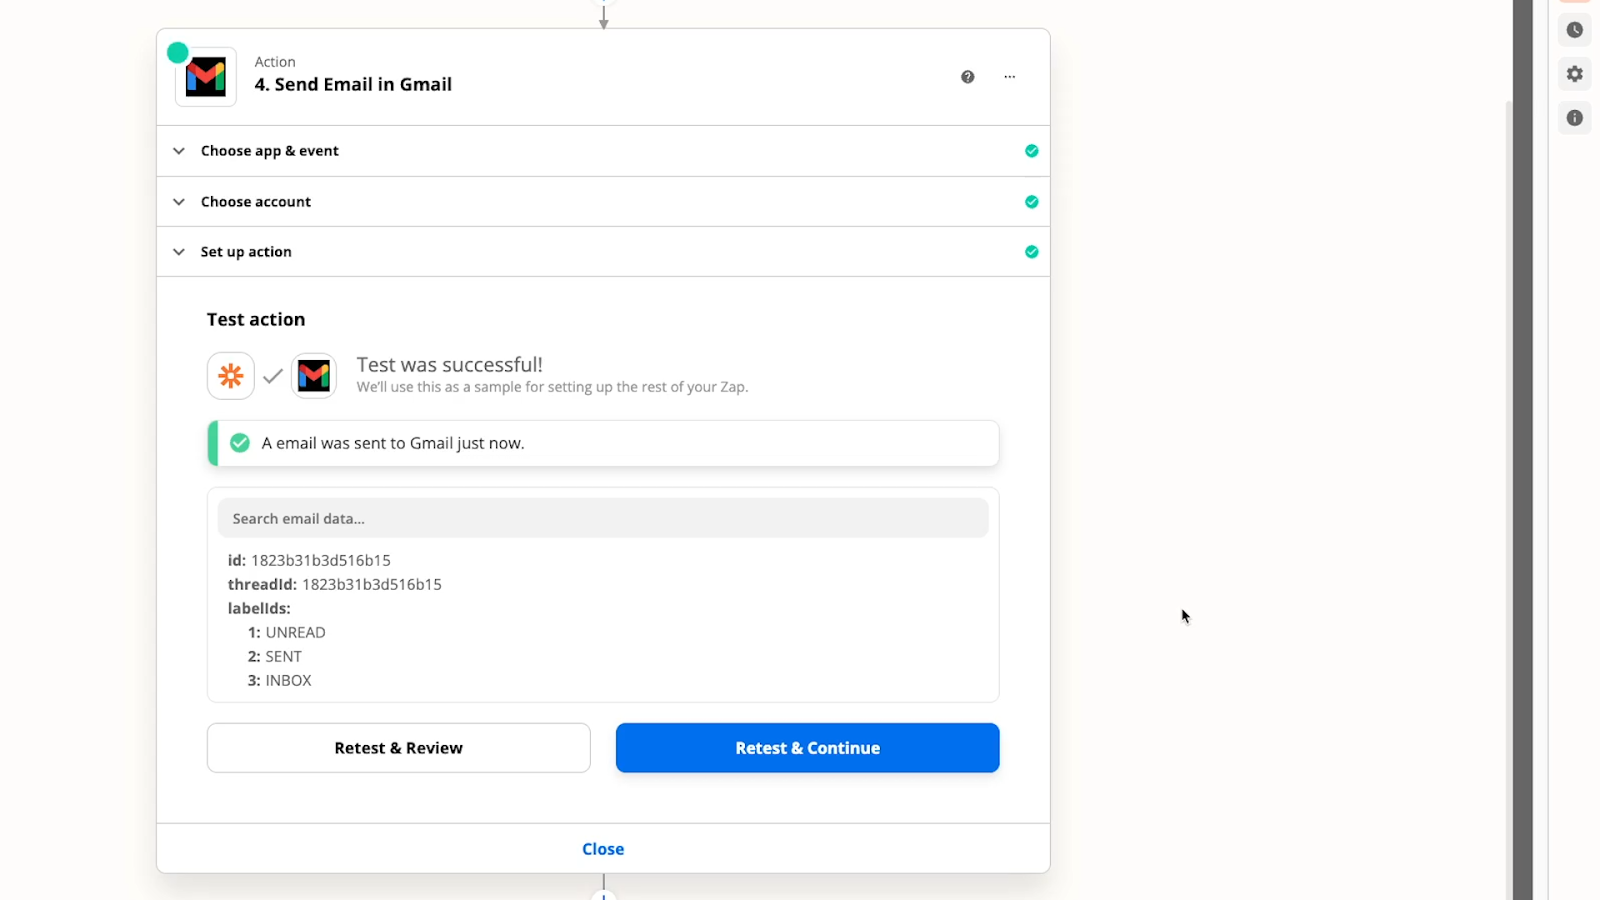
Editing your Second Path
To edit your second path, close the first one, and click “Edit” on Path B. The second path will be set up largely the same as the first, so you can mostly refer to our instructions for the first path again.
In our example, we just want to make sure that the rule for this path will only accept requests that have the service type set to Memberships, so we’ll set up a rule accordingly.
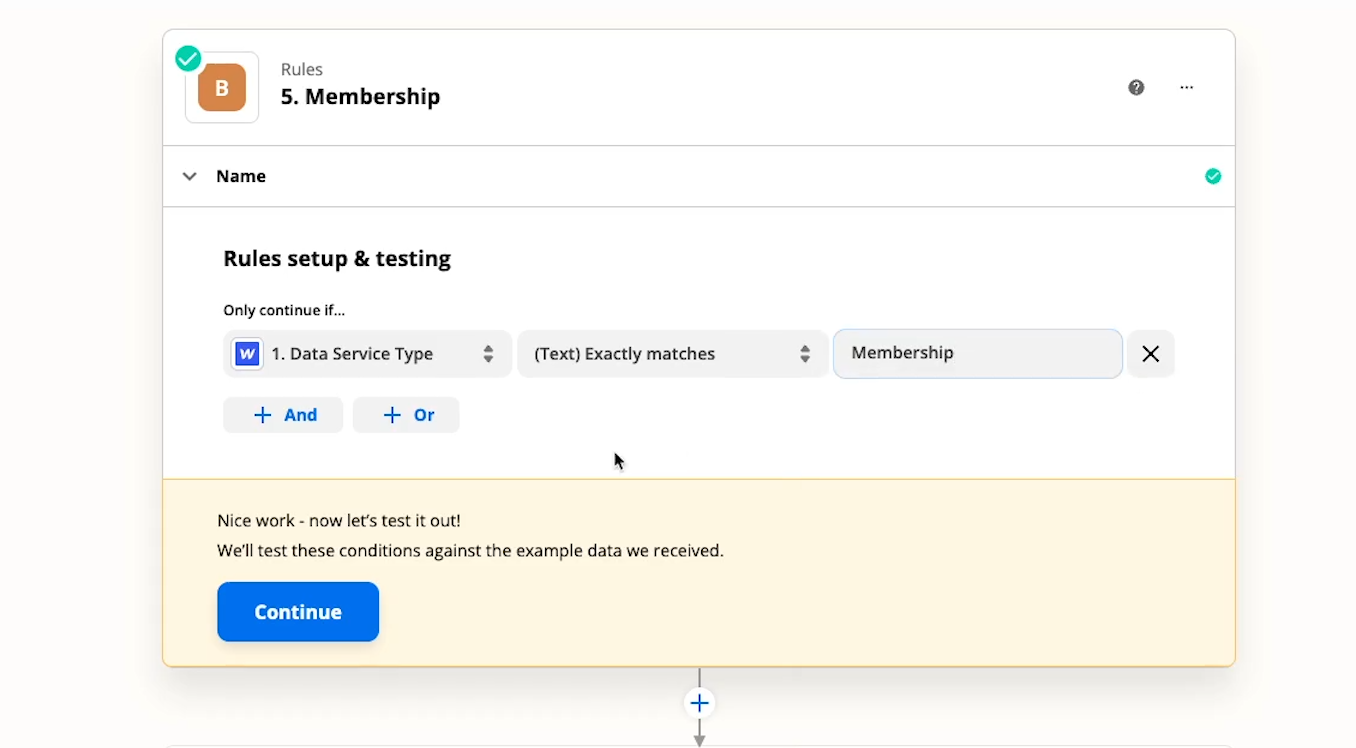
We’ll also include a membership-specific message in the email.

Building a Default Path
Finally, you should set a default path for your automation to use in case it doesn’t meet the conditions for either of your first two paths.
Click “Add new path”, and once again we’ll follow the same steps to create this final path.

However, Instead of creating a path for Service Type responses that exactly match “Other”, we’ll make sure this path can be a catch-all for anything else. Having a default option is a good way to ensure that your automation will run properly no matter what.
We’ll set this path to run if the text in Service Type doesn’t match Project, AND doesn’t match Membership.
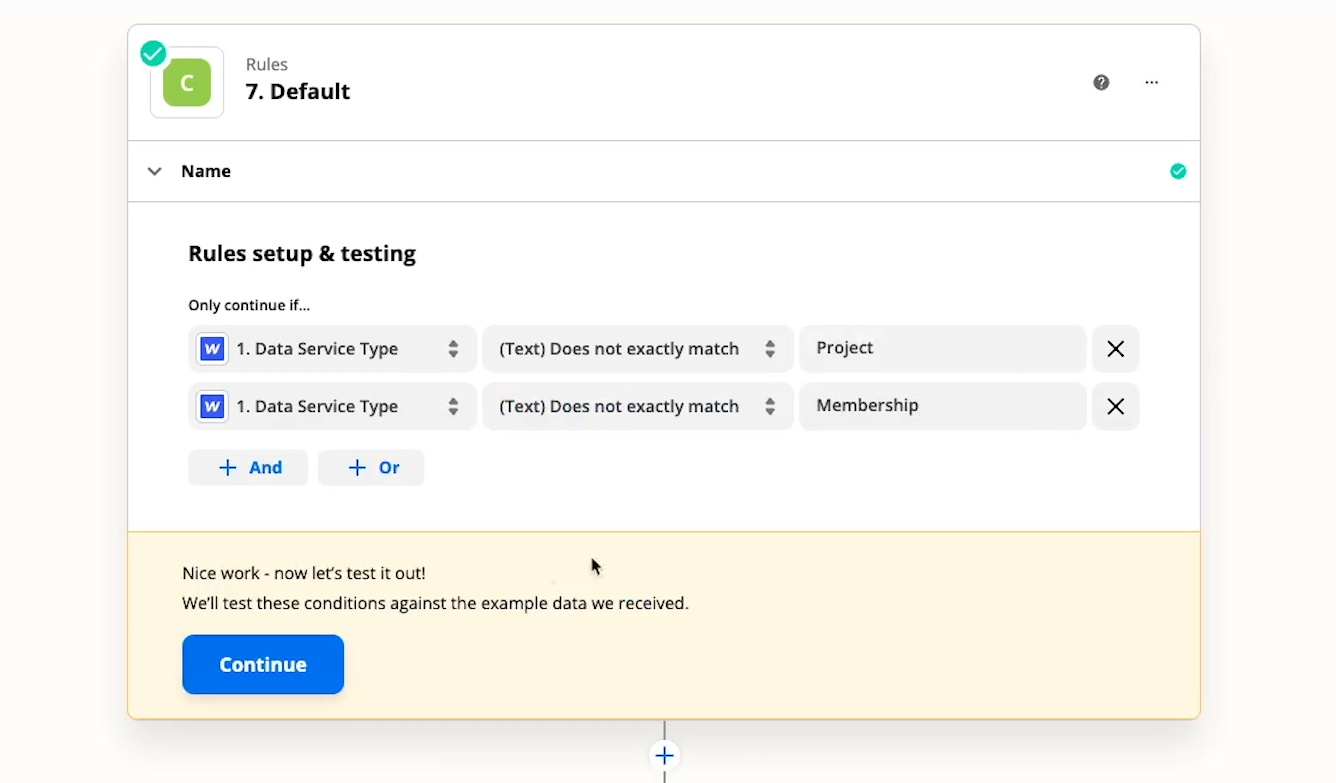
With this rule, this path will run if the user entered “Other”, or if they somehow managed to enter something else in the field. It also gives us a usable default response if we add other service types to the form.
Once you’ve set up your default path, test your automation a few times with some different data to make sure that every path works.
Additional Tips for Using Paths
Here a few other things you should be aware of while using paths:
• You can only make 5 paths per path module in Zapier.
• You also can’t add any actions after a path module.
• You can nest paths within other paths, although we’d recommend Sub-Zaps instead.
Using Paths to Make More Useful Automations
Now you’re all set to start using Paths in Zapier. Paths will make your automations much more useful in real-world scenarios, and they’re very easy to set up. Just make sure to test the automation thoroughly and make sure that you’ve set up your rules correctly.
If you’d like to learn more about building no-code automated workflows, check out our blog or our YouTube channel. You can also follow XRay on Twitter, Facebook, or LinkedIn.

If you’re looking at automation as a way to create workflow magic, you’re looking in the right place. Automation is a great way to help your organization save time and get better results.
But when you’re working with an automator or an automation consultant, it’s easy to fall into the trap of asking for a specific process rather than focusing on the result you want.
Being highly prescriptive about the apps and functions involved might seem like the right approach to building an automation, but in this post, we’re going to explain why you’re better off focusing on the end result and leaving the technical decisions to your automation team.
The Problem with Focusing on a Process
First, let’s consider a hypothetical workflow that you might want to automate.
Let’s say you’re currently gathering responses from your website’s contact form in a Google sheet, and then sending each new contact an email. Then, you keep notes in that same Google Sheet about the contact and how they respond to your outreach.
When you go to automate this workflow, your first instinct may be to keep everything exactly the same, and simply automate steps whenever it’s possible.
This is totally understandable. You know the current process works; you just want to use automation to make it faster and more consistent.
So, you might go to an automation expert and give them some precise specifications to build this automated workflow. Something like this:
• Whenever a new contact is added to the Google Sheet, an email should be drafted and sent to the address they provided.
• When the contact replies to the email, their original record in Google Sheets should be updated with the text and date of their reply.

This spec sheet seems pretty straightforward on the surface, but there’s a big issue with building this automated workflow as specified.
Simply put, Google Sheets is the wrong tool for the job. It won’t work reliably for dynamically finding and updating information, and it won’t scale well if you want to start doing more with this automation.
On a basic level, Sheets can be automated. It can connect with Zapier, Make, and other automation platforms, and it can work fine in certain circumstances. But if you want to regularly update existing records, something like Airtable is going to be a much more suitable foundation to build on.
In many cases, it might just be better to execute this kind of a workflow with a CRM that’s designed for the task.
This is just one specific instance, but it’s a good illustration of the larger problem: there are all sorts of automation pitfalls and best practices that you won’t be aware of.
If you prescribe a specific list of apps and functions that your automation expert should use to build your automation, you’ll likely encounter a variety of technical issues and limitations – particularly as you build more automations on top of your first one.
The Benefits of Focusing on a Result
If you focus on the result instead of the exact process, you’ll likely be much happier with the ultimate outcome.
So what does a result-oriented request look like?
To keep using our Website Contact example, you might tell your automation team that you want to keep a record of every contact that reaches out to you, automatically send them an email, and update their record with a response.

With that kind of a brief, you avoid unnecessary limitations that might make it more difficult for your automations to scale and function reliably.
Your automation team would be able to recommend a CRM tool that is designed for this specific type of workflow, or a tool like Airtable, which could be customized for the purpose.
Let Your Automation Specialists Handle the Technical Work
If you’re still not convinced, it might be helpful to look at the situation from a different perspective.
When something’s wrong with your car, you don’t tell your mechanic how to fix it. You tell them what you think is wrong with it, and describe how it should be working.
You describe your experience with the car, not what’s happening under the hood. You trust that your mechanic will be able to diagnose the issue, and fix it accordingly.
When you bring a workflow to an automation specialist, you should also trust in their expertise of the technical aspects of automation.
Describe the problems you’re having with your current workflow, and describe what you want to be able to do. But be careful about dictating the technical specs up front. You might end up spinning your wheels and wondering why.
Get the Best Automation Outcomes by focusing on the Results You Want
Ultimately, it can be difficult to leave your automation specs open-ended. It might feel like you’re giving up critical control of your process.
But if you trust your automation specialist as a partner and as a collaborator, you’ll be better off letting them make the technical decisions, while you focus on the end results of the automation.
If you’d like to learn more about workflow automation, check out our blog or our YouTube channel. You can also follow XRay on Twitter, Facebook, or LinkedIn.
Airtable is a great application for managing complex and dynamic databases. It integrates perfectly with automation platforms like Zapier and Make, and it also includes some native automation capabilities of its own.
With Airtable automations, you can add or update records in your databases, send emails, and connect to popular apps like Google Docs or Slack.
In this post, we’ll show you how to trigger Airtable automations with webhooks.
Webhook triggers give you versatile control over when and how your automations run, and they let you trigger the same automation from totally different sources.
You can set up webhook-triggered automations with just a few steps in Airtable. Just follow along with this tutorial and you’ll have your automation set up in minutes.
Create an Automation in Airtable
Make a Custom Automation
Start by creating an automation in the Airtable base that you’d like to use. In our example, we’ll use a “Client directory” table in our tutorials base.
Click on “Automations”, then, click “Create Custom Automation”.
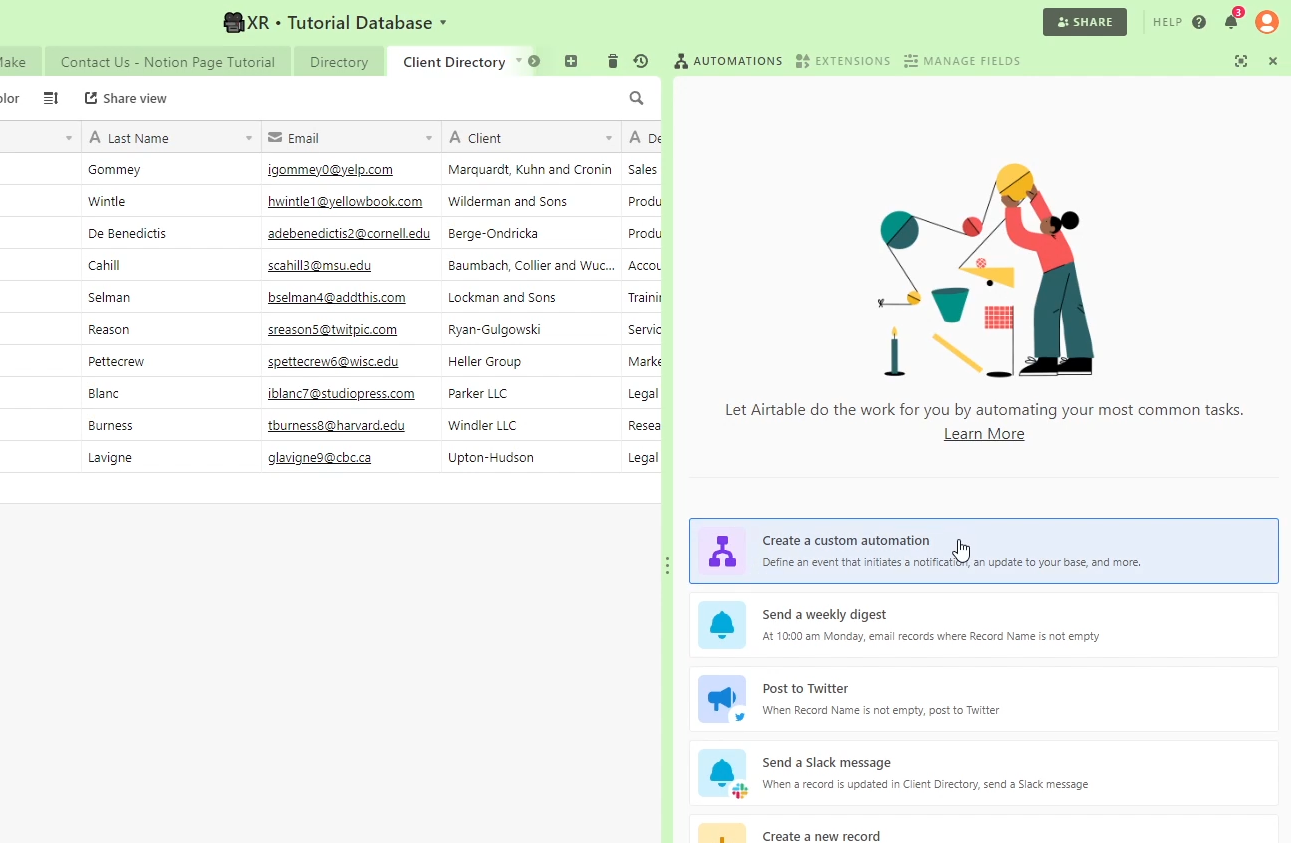
Choose “When Webhook Received” and Copy the Webhook URL
You’ll see a list of triggers here, but to find Webhooks, you’ll need to click on “See all”. From this menu, select “When webhook received”.
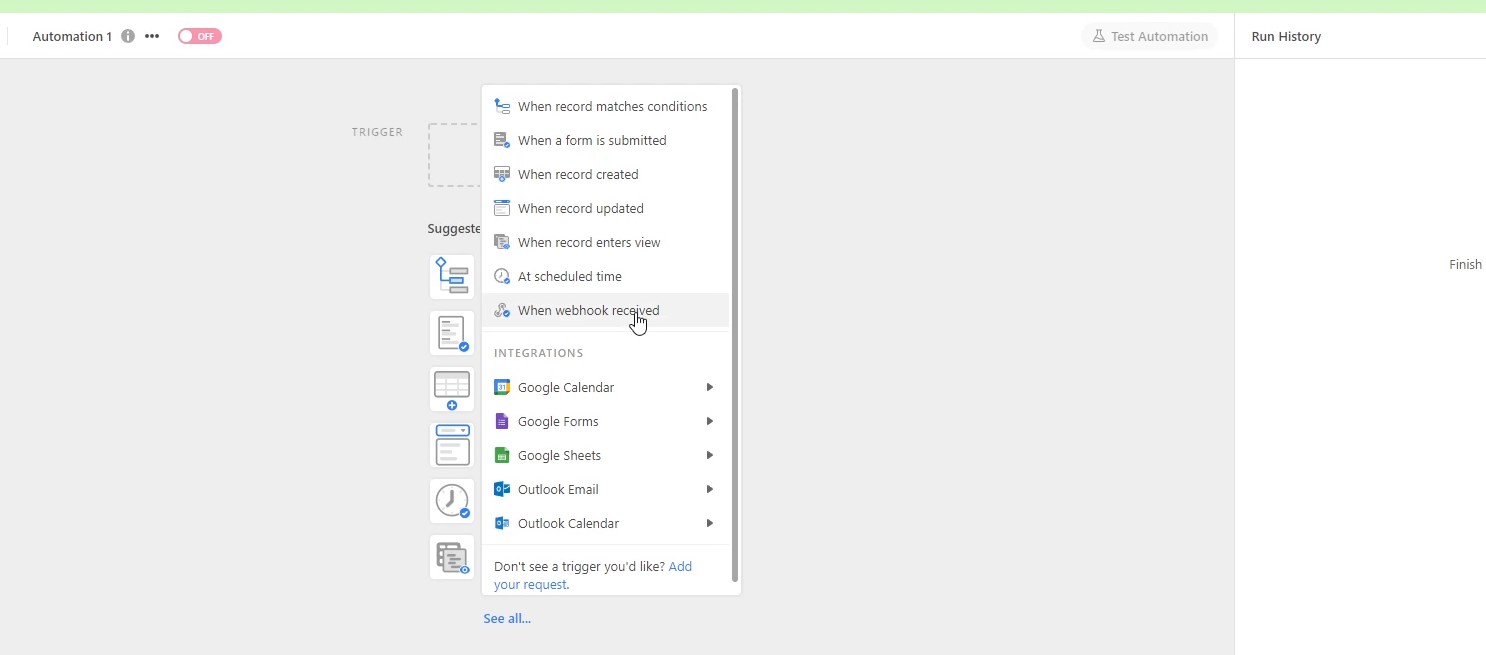
In the “Properties” panel on the right, you’ll see a URL under “Configuration”. This is the URL that you’ll send your webhook to. Copy the URL, and save it for our next step.

Send a Webhook
Use Zapier (or Another App) to Send a Webhook
Now, you’ll need to send a webhook from any app. In our example, we’ll use a simple Zapier automation. Note that you’ll need a premium Zapier account to use its webhooks steps.
Our Zap gets data from a Google sheets trigger, which we’ll send over to Airtable by adding a Webhooks step.
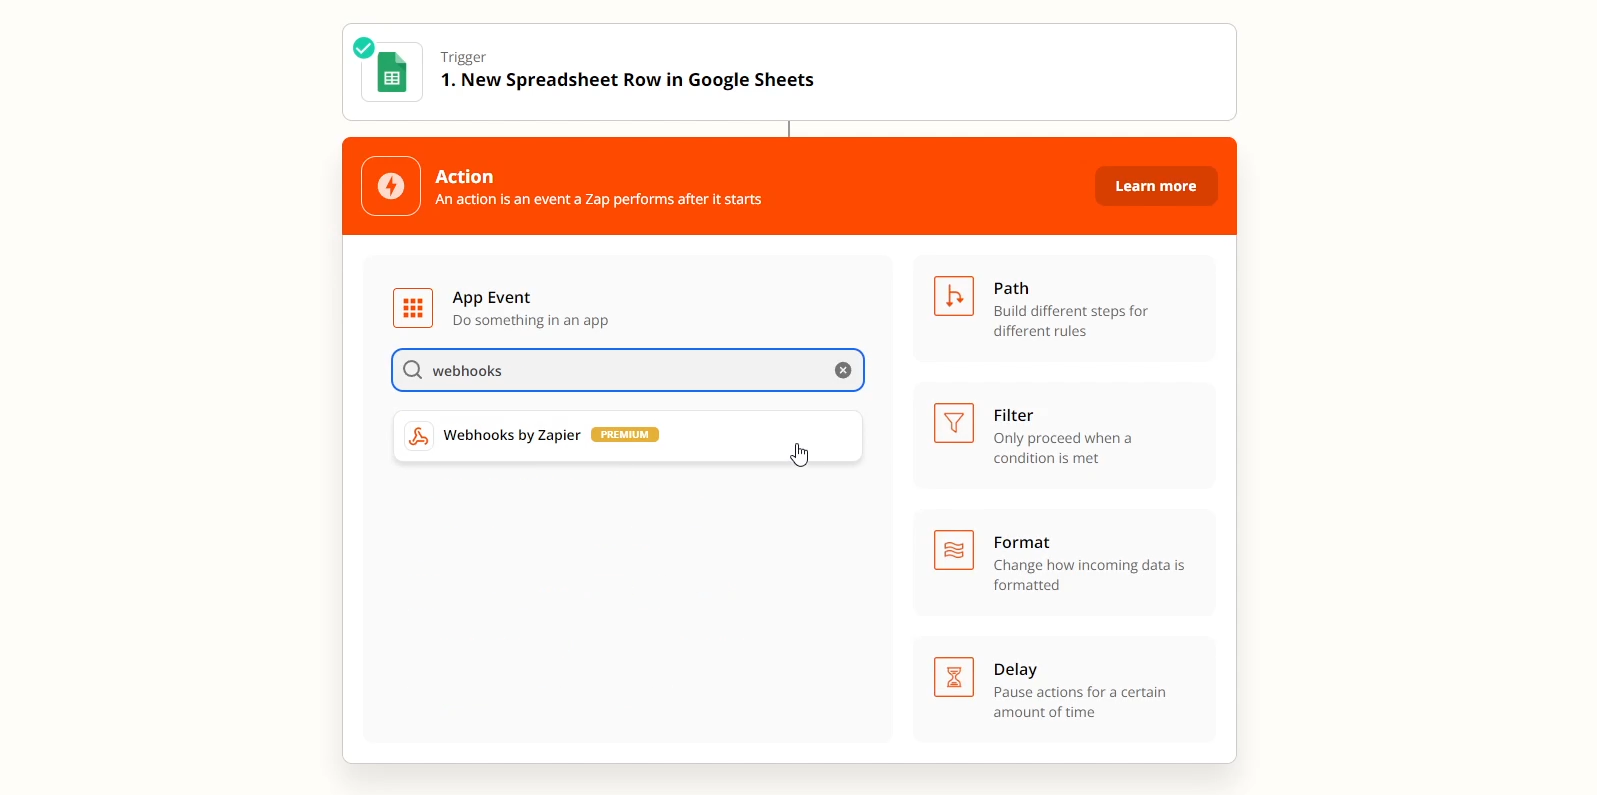
Configure the Webhooks Step in Zapier
To configure the step, you just need to paste the URL we got from Airtable, choose a method, and provide some data.
The method will be POST, since you’re creating new data.
Then, configure the data as key-value pairs. Each “key” will be the title of the piece of data, while the value will be the data itself.
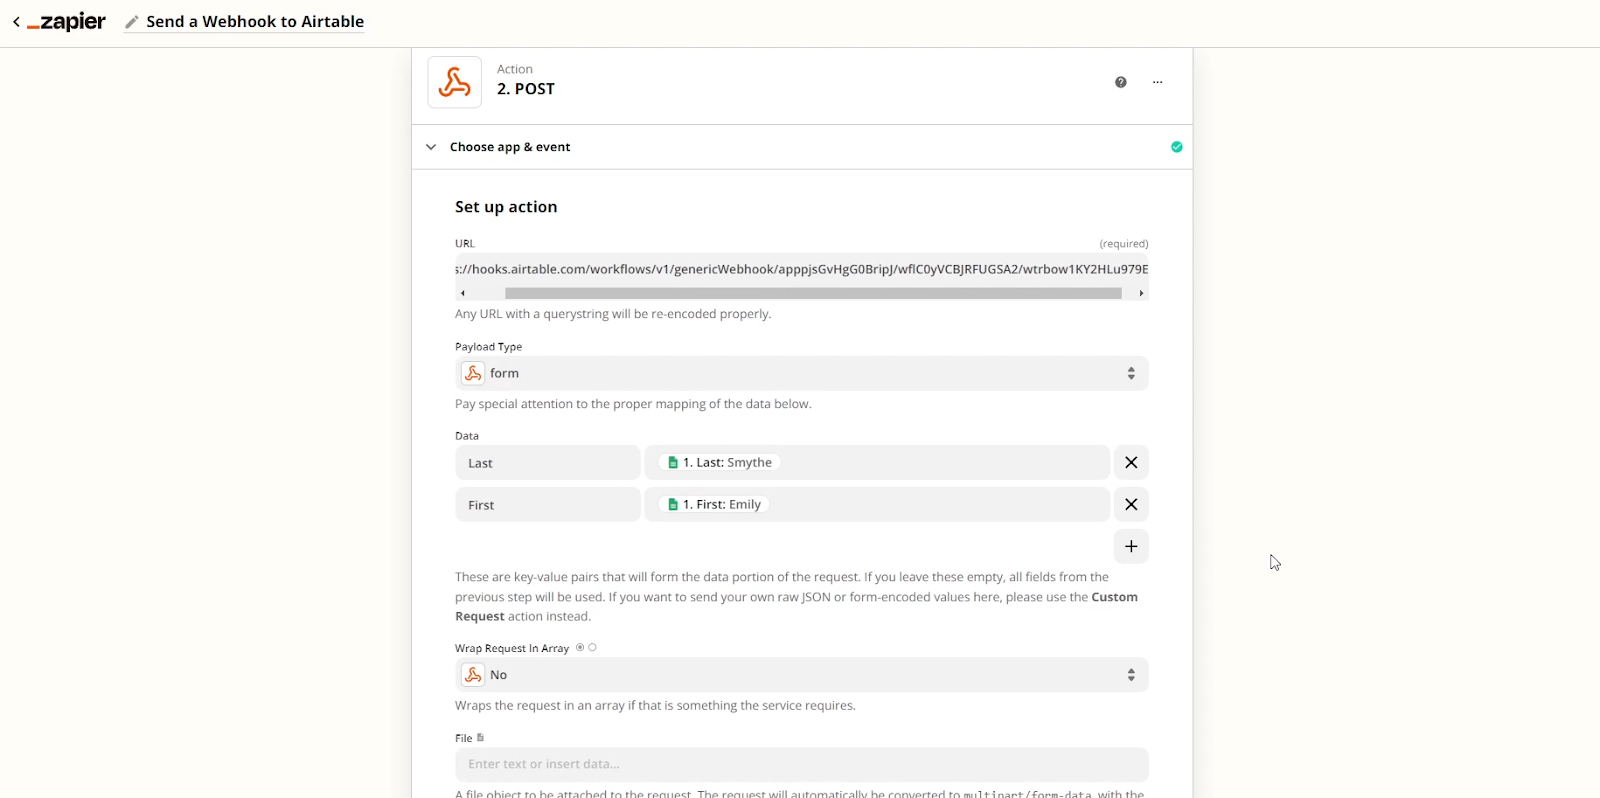
Once you’ve filled in all of our data, you can test the automation to send the webhook, and check Airtable to confirm that everything worked correctly.
You should see all of the data that you sent with your webhook as Key-value pairs.
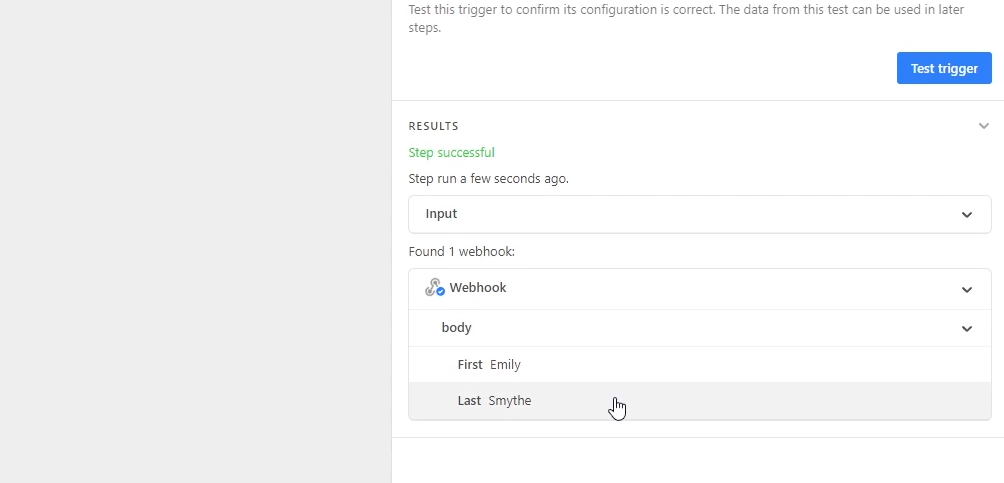
Finish your Airtable automation
Add Actions to Your Automation
Now you can add steps to your Airtable automation to perform actions with the data you sent via webhook. You can add any steps that you’d like, or follow along with our example to see how Airtable can grab dynamic data from the webhook trigger.
In our automation, we’ll create a new Airtable record with the data sent over. To do this, you just need to click on “Add action”, choose “Create Record”, and select the table you want to use.
Using Data from the Webhook
To create a new record with the webhook data, we’ll map each piece of data to the appropriate field. To do this, click on the blue plus sign. then choose “Webhook”. Click on “body” and then select the data you want to use.
Repeat that process for every field that you want to fill in.
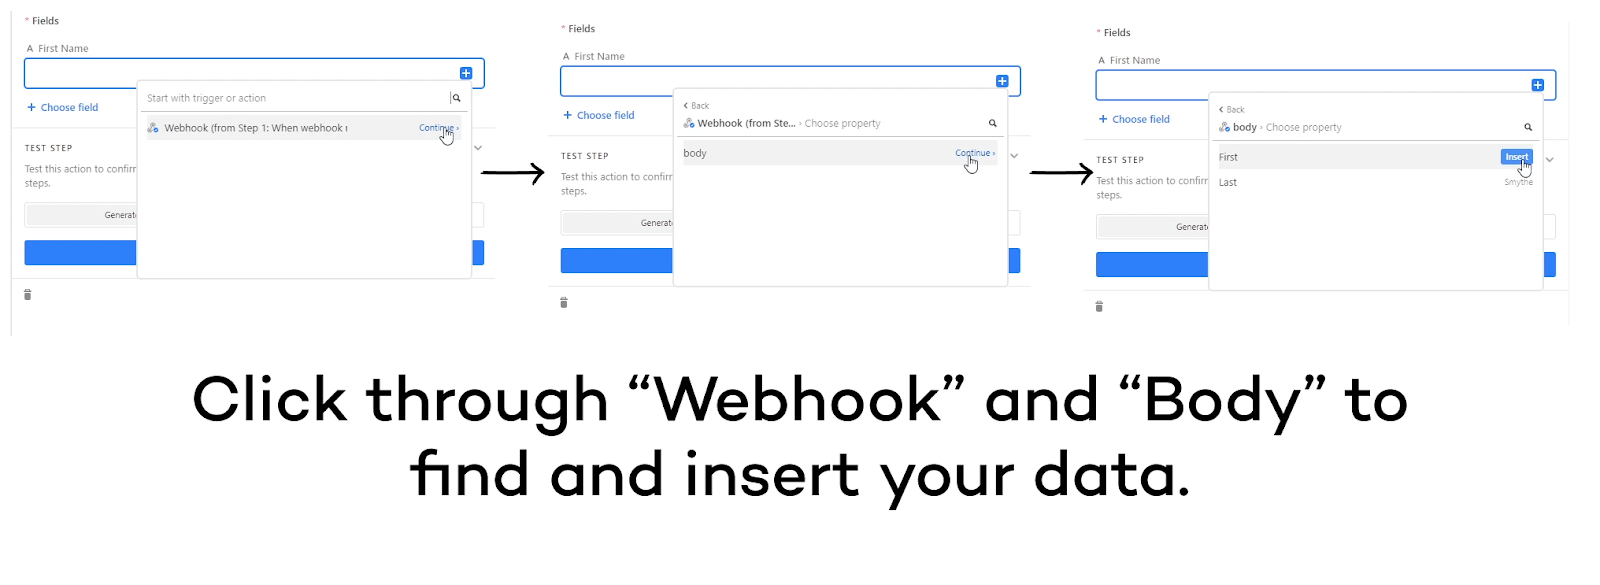
Sending a Message in Slack
Finally, we’ll send a Slack message to make sure we’re notified of the new record.
Click on “Add action”, and choose Slack under “Integrations”. Select “Send message”, and sign in to the Slack account you want to use.
Pick the user or channel that you want to send the message to, and compose the message.
Most of this message will be static text, but we’ll fill in some data from the webhook as well, using the same process as before.
Click on the blue plus, choose webhook, then body, and insert the data you want to use.
Then test the whole automation by clicking on “Test Automation”, and “run automation”.
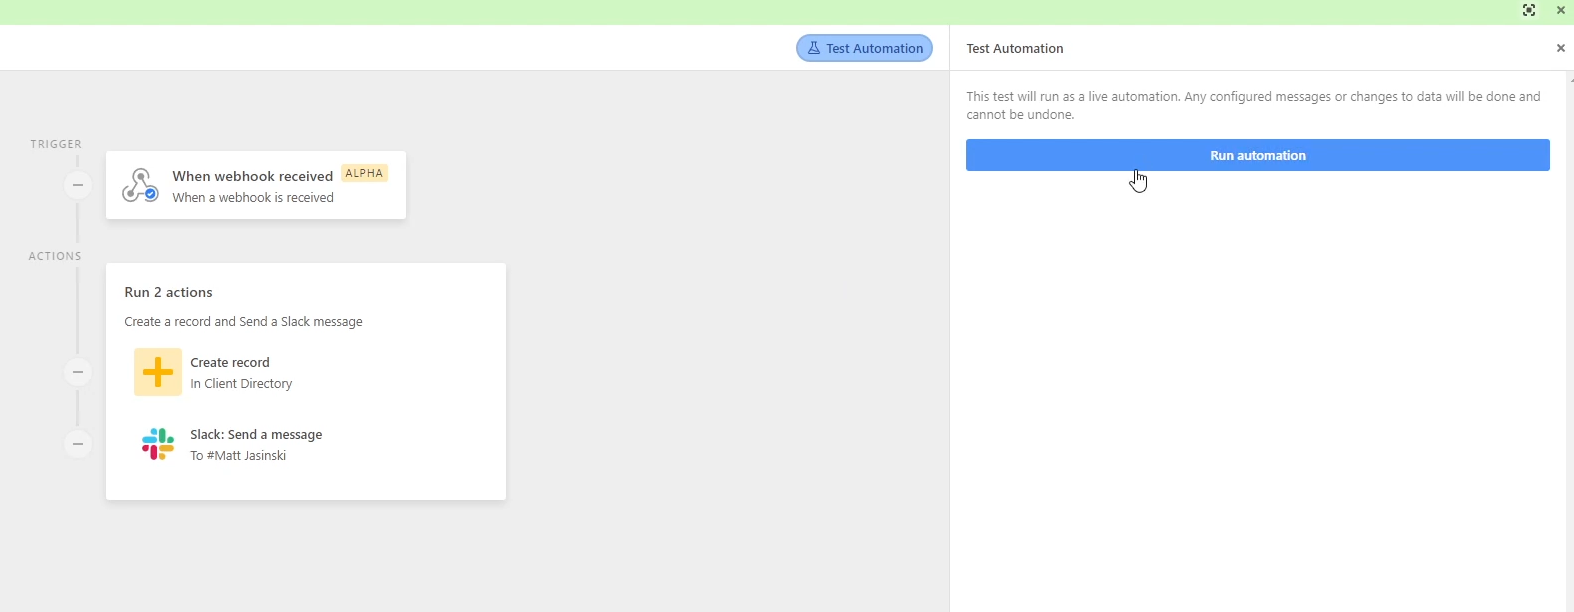
You should see a Slack notification pop up, and if you check Airtable, there should be a new record with the data from your webhook.
Building automations with webhooks
Now you’re all set to start building Airtable Automations with webhooks. Triggering your automations with webhooks is a great way to build versatile workflows that you can launch from any data source.
If you’d like to learn more about building no-code automations, check out our blog or our YouTube channel. You can also follow XRay on Twitter, Facebook, or LinkedIn.

Automation is growing fast. Businesses in every industry are adopting automation as they look for ways to become more efficient.
As more and more people are using automation and talking about it, there’s also quite a bit of misinformation and misconceptions going around.
In this post, we’ll address five of the most common automation myths that we’ve heard at XRay, and explain how automation really works.
Myth #1: Automation is About Downsizing
Automation is not about firing people and replacing them with a few lines of code.
Good automation is focused on supporting people, not replacing them. Workflow automation eliminates tedious robotic tasks, but it doesn’t take away your responsibilities.
If an automation is built the right way, it will always include some vital human checkpoints. Human checkpoints are Critical moments in a workflow where you or your team can review what the automation is doing and choose whether or not to proceed.
By automating robotic tasks and maintaining human oversight, well-designed automations amplify the output of your team so they can accomplish more. They don’t eliminate the need for human involvement and human judgment.
Myth #2: Anything can be automated
While you can automate a staggering array of workflows and applications, the truth is that not every process can - or should - be automated.
You can only automate robotic tasks; tasks that don’t require human creativity, analysis, strategy, or thoughtfulness. For instance, you can’t automate the design and development of an entire website. But you can still automate the creation of a web page based on a template.
Automation excels at performing repetitive, mindless tasks. Anything that essentially boils down to copying data from one spot and pasting it into another is an ideal candidate for automation.
On the other hand, anything that requires human ingenuity can’t be completely automated, which is where those human checkpoints we referred to earlier come into play.
You may be able to automate certain steps of creative or analytical processes, but you’ll still need a human running the show.
Myth #3: Automation reduces quality of Output
A good automation doesn’t result in a worse output.
It’s understandable that you may be afraid of one-size-fits-all automations ruining your workflows. We’ve all had horrible experiences with automated customer support, and you might think that no-code automation would face similar issues.
But while simplistic and poorly built automations might not deliver the quality you’re looking for, a well-built automation can accommodate all sorts of different scenarios and inputs.
In some cases, your workflow may be too complicated to automate - as we just mentioned while addressing Myth #2, not everything can be automated.
But if you can automate a process, the result will actually be more consistent.
An automation won’t forget to perform certain tasks, or make simple mistakes like typos. It will perform the workflow the exact same way every time, with a reliability that you could never expect from a person.
As with any software, there will be some technical errors every now and again, but these won’t be frequent. And ultimately, it will be far easier to notice and fix an automated error than it would be to discover and address each unique human error.
If you’re worried that automation will result in a lower quality output, you can rest easy. With well-designed automation, you can actually look forward to more consistency and reliability, without sacrificing quality.
Myth #4: Automation Limits the Tools You Can Use
Next, let’s tackle one of the most inaccurate myths we often come across: that automation limits the software tools you can use.
In most cases, this just isn’t true.
The beauty of no-code and low-code automation is that it works with nearly any software stack imaginable. Platforms like Zapier and Make support thousands of apps right out of the box, including the most popular and useful software out there.
Even if your apps aren’t natively supported, you can always create custom integrations for them as long as they have an API - and most modern software does. Apart from some very rare exceptions, you can use whatever tools you want with automation.
Myth #5: Automation is Cheap OR Automation is Expensive
Finally, we’re going to cover two closely related automation myths: that automation is very cheap, AND that automation is very expensive.
In our experience at XRay, many people aren’t sure what to expect when it comes to the cost of automation.
In some cases, people think that automation is as cheap as a small monthly subscription.In other instances, people are worried that they’ll be spending as much on automation as they would on a fully custom piece of software.
While both extremes might be true under certain circumstances, the reality is that automation typically comes at a moderate cost - but brings massive benefits for every dollar you spend.
A small monthly subscription is all you need to get started with Zapier or Make, but if you want to really transform your business with automation, you’ll either need to spend a lot of your team’s time on building automations, or you’ll need to work with a company like XRay.
In general, we help companies to automate their workflows for about the cost of one employee’s salary annually. For this price, we provide our entire team’s diverse expertise and build automated systems that support every department at your company.
If you were to try to hire similar talent, you’d probably need to bring several new staff members on board.
So while automation can require a significant investment, the return is more than worth it.
What You Can Really Expect from Automation
That concludes our rundown of the top automation myths. To sum it up:
• Automation is NOT about downsizing;
• NOT everything can be automated;
• Automation WON’T reduce the quality of your team’s output;
• You CAN automate with nearly any modern software;
• And finally, automation isn’t dirt cheap, but like most things, you get what you pay for.
If you’d like to learn more about how no-code automation can transform your business, check out our blog or our YouTube channel. You can also follow XRay on Twitter, Facebook, or LinkedIn.

In a highly competitive marketplace, companies need every advantage at their disposal to distinguish themselves.
With SaaS tools having cemented themselves an integral part of nearly every company's operations, workflow automation is rapidly becoming an indispensable tool for creating efficiencies at work.
If you’ve been on the fence about adopting automation, now is the time to commit.
Automation is Growing Fast
Companies in every industry are rapidly adopting workflow automation. In a 2021 survey, Hubspot found that 76% of marketing companies were already using automation, and ultimately, this number is only going to keep growing.
According to a recent Gartner report, companies have shifted their focus to operational efficiency in the wake of economic uncertainty, and they predict that over 70% of large enterprises will adopt multiple automation initiatives in the next few years.
To put it bluntly, even if you’re not using automation yet, there’s a good chance your competitors are.
The Benefits of Automation for your Company
Of course, we’re not just encouraging you to follow the crowd.
Regardless of what your competitors are doing, workflow automation will provide transformative benefits for your company. When you start automating your robotic tasks, you can look forward to saving a lot of time and ensuring a more consistent output from your newly automated processes.
The exact results can vary, and will depend on your specific circumstances. But you can always count on seeing substantial time savings and improving the quality of your team’s output.
How XRay Has Saved Time and Improved Outcomes for our Members
At XRay, our members typically save dozens of hours each week with the help of automated workflows, and they see more consistent and reliable results.
For example, XRay worked with mental health educators Journey to automate their system for onboarding new accounts.
The automation saves an hour for every client they onboard, and completely eliminates account provisioning as a task for the product team, freeing up valuable engineering resources.
While results can vary significantly, workflow automation is guaranteed to give your team some of their time back, and grow to be a massive strategic advantage. In turn, automation can actually become a vital recruiting tool for your company too.
Attracting the Best Talent with Mindful Work
Right now, employers have to compete to secure the best talent. The job market is hot, and even offering generous compensation might not be enough to hire and keep the best candidates.
You’ll need to create a culture and environment that makes your company stand out to potential recruits.
Use Automation to Support People, Not Replace Them
Workflow automation will help you to establish a workplace culture that promotes mindful work, and lets the robots handle all the tedious, repetitive tasks.
While there’s often been concern that automation will replace humans, the reality is that automated workflows can be designed to support people as they work. According to a report by Wilson Towers Watson, over half of employers are already seeing that the main goal of automation is to “augment human performance”, not to downsize staff.
Ultimately, software developers want to spend their time developing software. Designers want to spend their time designing. Whatever role they’re in, talented employees want to focus on their core competencies, not on copy-paste busywork that’s better suited to software.
Automation will enable your current team and your future hires to focus as much of their time as possible on using their unique skills.
By cutting out the distractions of tedious robotic tasks, workflow automation makes your company an ideal workplace for elite talent.
Start Automating Your Workflows Today
The best time to start automating your company’s workflows is right now.
Think about the repetitive tasks that you or your team are performing every day, or every week. How often are you just moving data from one app into another? Robotic tasks like these are ideal candidates for automation.
Take a look at the tutorials on our YouTube channel, or reach out to us to start automating these tasks. You’ll be able to automatically respond to inbound leads, create presentations, onboard clients, organize and manage your documents, and a whole lot more.
You can also follow XRay on Twitter, Facebook, or LinkedIn for automation tips and tutorials.
Automatically creating projects, tasks, and clients in a time-tracking app like Harvest is a great addition to any onboarding workflow. It will help you to save some time and make your onboarding process much more consistent, as clients and projects are created instantly.
In this post, we’ll give you an overview of what you can automate in Harvest with Make, and show you an example of a scenario you could build.
Automate Nearly any Harvest Action with Make
Nearly anything you can do in Harvest can be automated in Make.
If you open up Make and create a Harvest module, you can see a huge list of options for creating and editing data.

You can work with clients, contacts, projects, invoices, expenses, time entries, and users.
And if the action you want to automate isn’t listed here, it’s most likely covered by the last option in the list: make an API call.
With an API call module, you can query Harvest’s API to perform any action that it allows. It takes a little more work than using the prebuilt modules, but you can easily find the information you need to set up this module in Harvest’s API docs.
And in the rare case that your actions aren’t supported by the API call module either, you can always create an HTTP request to automate an action.
But for the vast majority of cases, the prebuilt modules and API calls will be all that you need.
Example scenario: Create a Client and a Project with Airtable Data
Now, we’ll walk you through building an example scenario that automates some Harvest actions in Make.
This scenario will take data from Airtable and use it to create a new client and a new project associated with that client. Then, we’ll add a little conditional logic to the scenario so it can either find an existing client, or create a new one as needed.
Get Data from Airtable (or Another Source)
First, you need to get some data for your scenario to work with. In our example, we’ll use an Airtable base, but you could also use a CRM or any other data source you prefer.
This Airtable view shows new Projects recently added to the base. Make will watch this view and run whenever there’s a new entry.

You just need to indicate the base, table, and view you want to use. Test this initial step by selecting ‘Choose where to start’, ‘choose manually’, and picking a record.
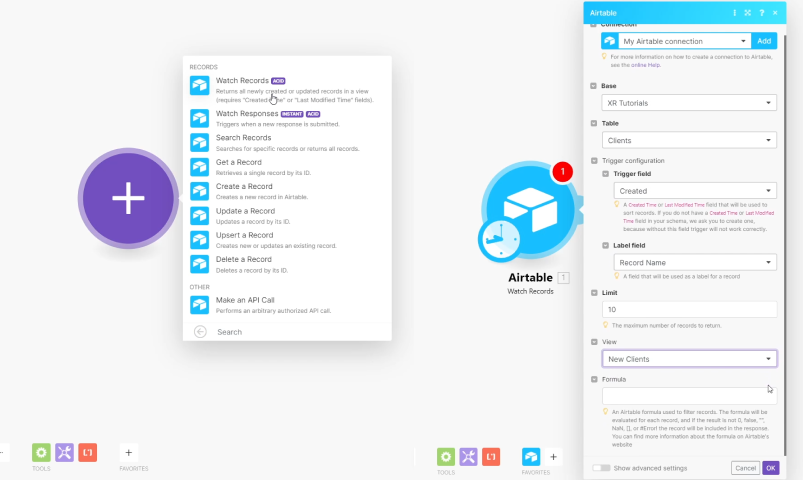
Then, click run once, and you should see that Make found a record. Throughout this tutorial, you can keep using this same method to test the scenario.
Create a Client
Next, create a new Harvest module, and select “Create a Client”. There are only three options we need to fill out here: Name, Address, and Currency.
Fill in Name and Address with Data from Airtable, andl set currency to always be USD by typing “USD” into the field.
There’s one more option hidden behind “show advanced settings”. You can set the client as Active, Archived, or Empty.
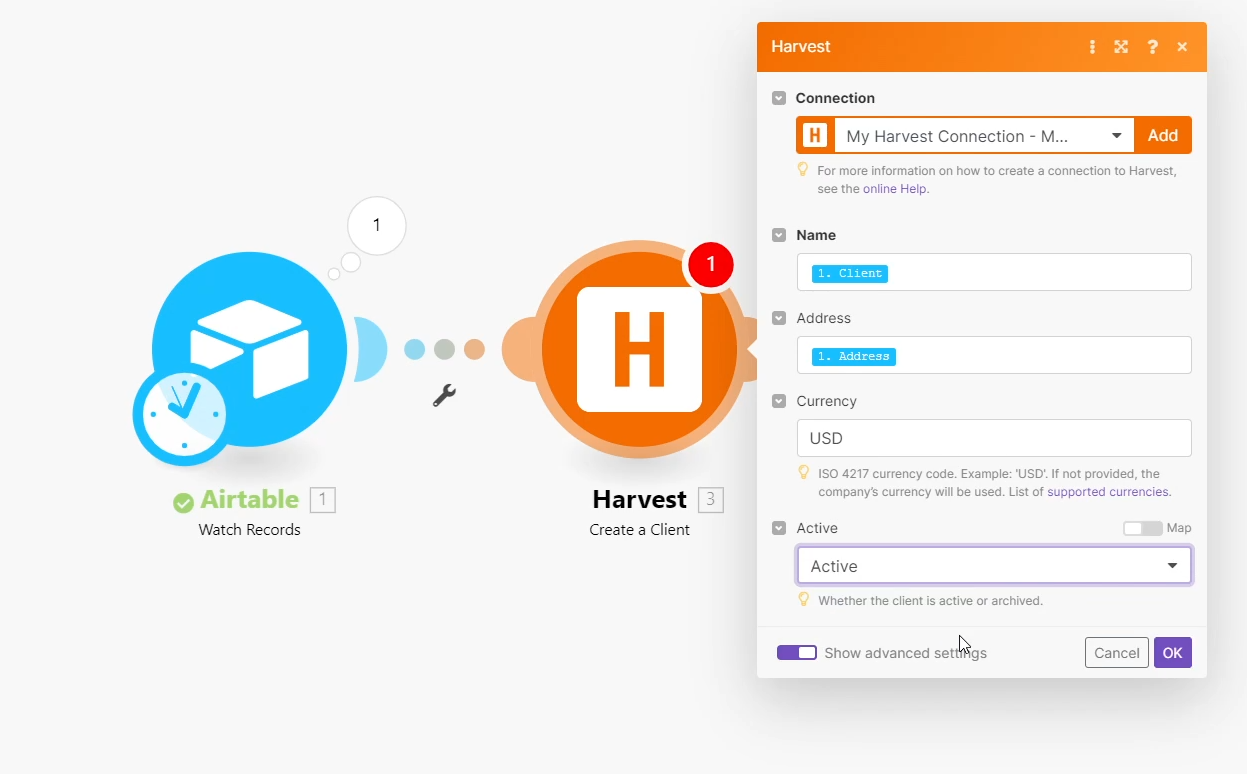
Once this step is configured, test again. Open up Harvest, and you can confirm that the new client is there.
Before you proceed to the next step, delete the client to avoid any duplicates or errors.
Create a Project with an API Call Module
Next, we’re going to have our scenario create a new project. We could use the “Create a Project” module, but we might want to set some projects to Fixed Fee.
In the pre-built “Create a Project” module, there’s no option for that. So instead, we’re going to select “Make an API call”.
Whenever making an API call or using the HTTP module, refer to the relevant docs to find out what information you need to provide. You can find Harvest’s API docs here, and you can generally find API docs for any app with a quick Google search.
With the documentation handy, you can start filling in the API call module. You can also refer to the screenshot below for an example of a completed module.
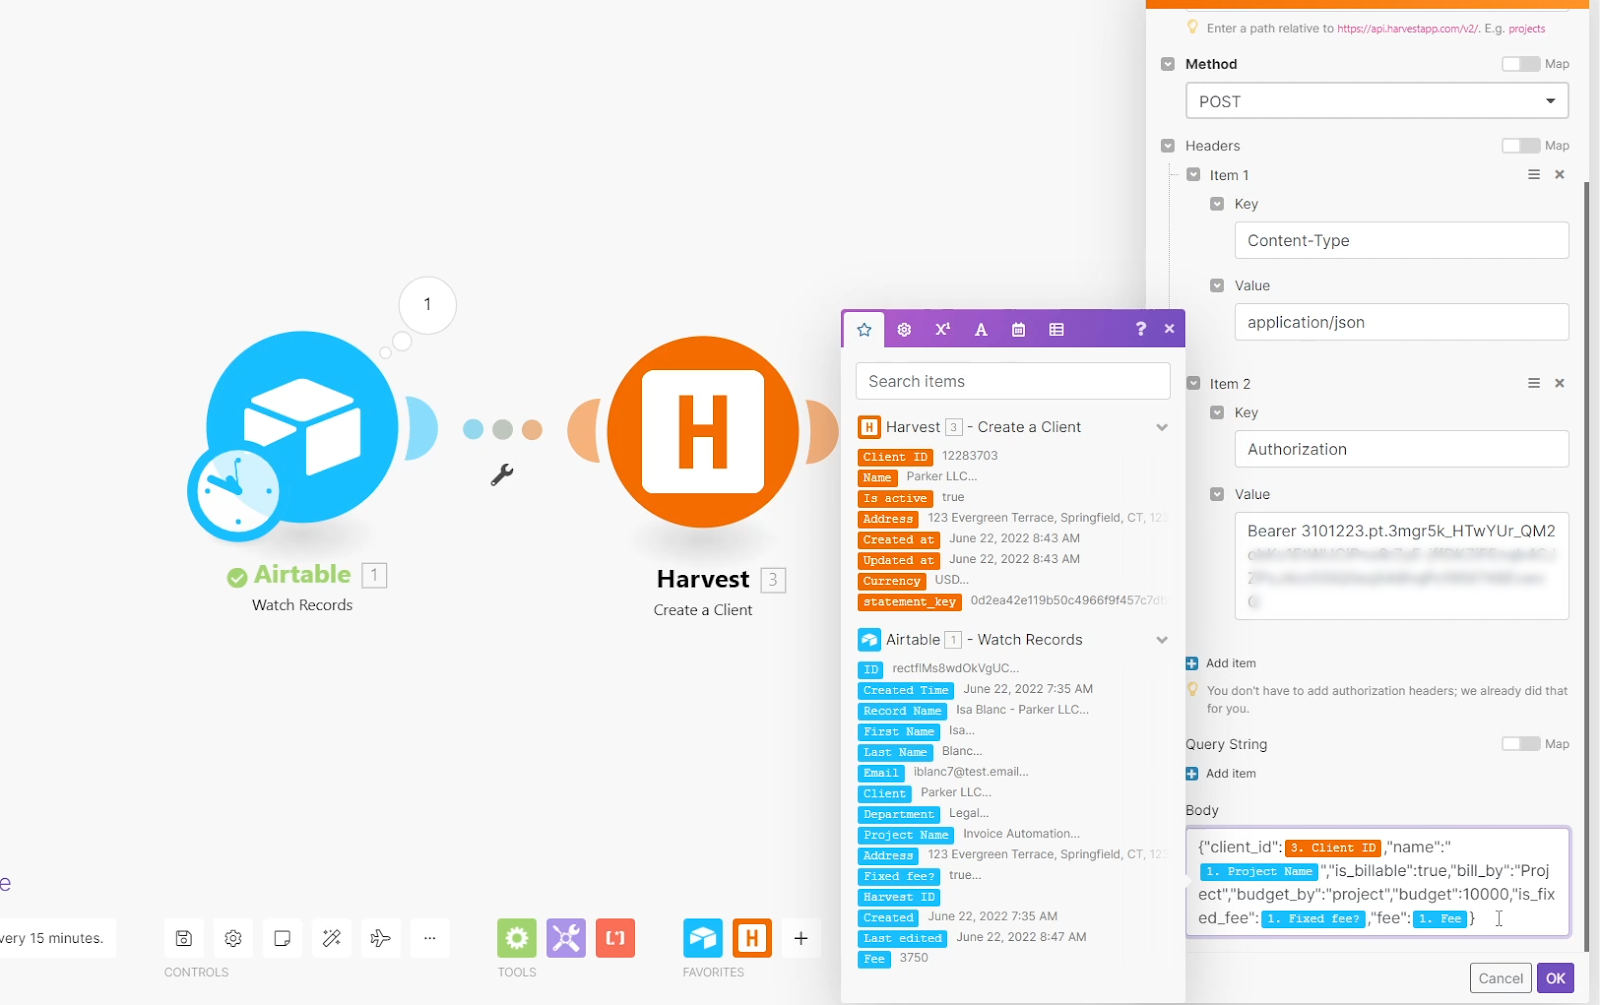
URL and Method
As the helper text in Make indicates, you just need to add a relative path in the URL field, rather than a full URL. Enter “projects”, and select POST as the method.
Headers
In the headers, you should see that a key-value pair for “Content Type” is already filled in. You can leave that as-is, and add a new key-value pair for authorization.
The key will be “Authorization”, and the value will be “Bearer”, followed by an access token. To get your harvest access token, go to the “Developers” section of your Harvest account, create a new token, and copy it.
Then paste it in after “Bearer”. Just be sure to leave one space between “Bearer” and the start of your token.
Query String
If we were making a GET request, we could use a Query String to filter the results, but we can just leave it blank in this POST request. So we’ll skip that for now and fill out the body of our request.
Body
The text here needs to follow JSON formatting, and include every required attribute. To see which fields are required for the “Project” object, we can check Harvest’s API docs.
As you’re filling out the body, you can use data from previous steps for dynamic content. So in this case, our Scenario will fill in the unique Client ID and project name each time it runs, rather than using a static value.
Finally, we’ll add the two optional attributes that we couldn’t access in the prebuilt module: “Is_fixed_fee” , and “fee”. We’ll fill in both of those with data from Airtable. Test the scenario again to make sure everything looks good.
Over in Harvest, we should see that the project was created, and it’s already set to “fixed fee”.
Optional: Add a Router to Improve Your Scenario
This scenario is a good start, but it’s not very flexible. What happens if we add a new project to this Airtable base for an existing client?
The automation will try to create the client again, and encounter an error. We need to add logic to handle likely use cases, and there’s a very easy way to do this.
After the “create a client” step, add a module to update the Airtable record that triggered the automation to run. Then, add the Harvest ID into this “Harvest ID” column.
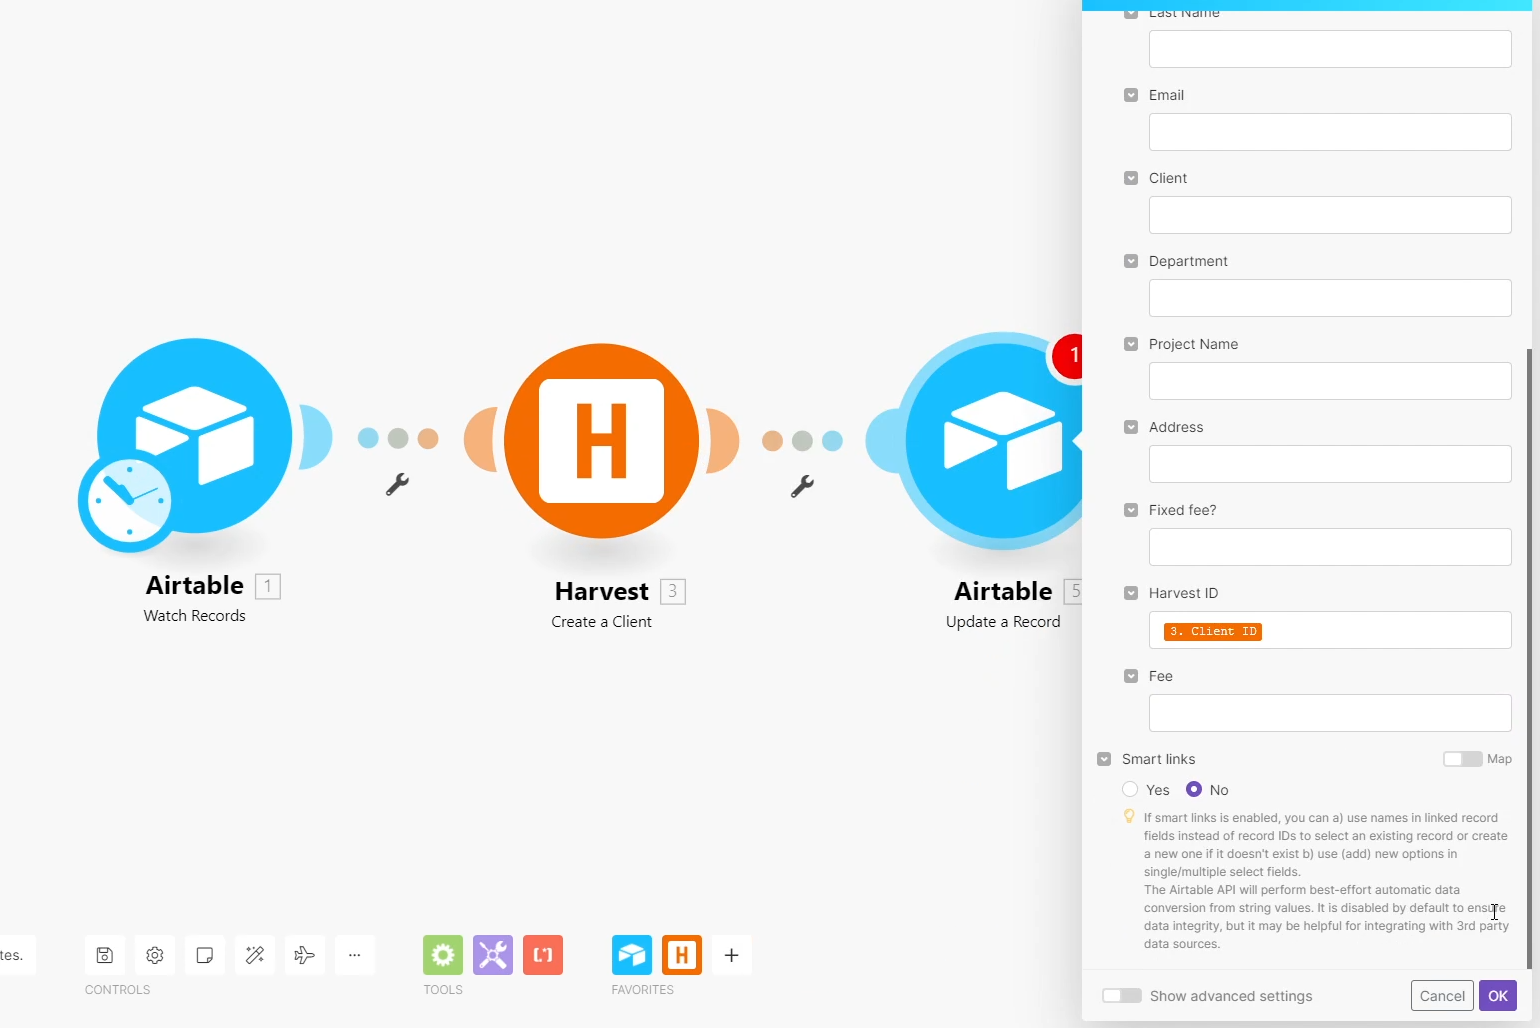
Then, add a router from the “flow control” menu. Set one path to run if the Harvest ID field in Airtable is blank, and have it create a new client accordingly.
If the ID field is not empty, then the automation should run the second path, using the provided ID to find the correct client.
Conditional logic like this can be a little tedious to set up, but it makes your automations much more useful in the real world.
Automate Your Onboarding with Make and Harvest
Now you’re all set to start automating your Harvest projects in Make. Between Make’s pre-built modules and customizable API calls, you can automate nearly any workflow you want.
If you’d like to learn more about building no-code and low-code automations, check out our blog or our YouTube channel. You can also follow XRay on Twitter, Facebook, or LinkedIn.

At XRay.Tech, one of our main goals is to automate common tasks that every business needs to perform on a day-to-day basis.
While every company has a unique focus, we all have to conduct many of the same processes just to keep our businesses running. Every company has to run payroll for their employees; every company has to interview new candidates; and every company needs to draft and send contracts, proposals, and other documents.
In this post, we’ll explain why you should consider automating your document creation workflows, and we’ll show you what the finished automation might look like.
Why automate proposals?
Save Time
The most obvious benefit to proposal and contract automation is that it will save you some time. This is true with just about any automated workflow, and it’s certainly the case with automated documents.
Depending on the length of your contracts and proposals, you’ll probably save about 10-15 minutes per document. That’s not a lot on its own, but it will add up fast if you’re churning out a high volume. For instance, if you’re sending out NDAs every week to potential recruits and vendors, you could potentially save an hour or more each week.
But even if you don’t send out many contracts and proposals, document automation still has some great benefits.
Reduce Errors
With automatically constructed documents, your error rate will be virtually zero. You won’t need to manually search for all of the placeholders you need to fill in, or make sure that you have the right capitalization settings in Find & Replace.
The automation will fill in all the blanks for you, making sure that everything is done consistently and correctly every time.
Track Key Metrics
In addition to saving time and creating a more consistent process, automating your proposals and contracts also makes it very simple to start tracking the workflow and its results.
With just a couple steps in your automations, you can easily keep track of how many documents you’re sending out, how long it takes to get them approved and signed, and more.
And everything can be tracked in the software of your choice - Microsoft Excel, Google Sheets, Airtable, or any other database app you prefer.
How it works
Send Proposals, Contracts, and other Docs with a Simple Form
Using a proposal automation is very simple. All you have to do is fill in a quick survey with the information you need to update.
Just fill in the form with a few names and dates, click submit, and the automation will generate the document for you.
If you’d like, you can also configure the automation to email the proposal out right away, or use an app like Docusign to get an official signature.
Create Each Doc with a Customized Template
Before you can use the automation, you’ll need to create a template for the document in an app like Google docs.
Identify the information you want to update in each proposal, and replace them with variables that an automation app like Zapier can recognize.
Start Building the Automation
If you’d like more detail, you can check out this tutorial for a step-by-step guide. But to keep it simple, you really just need three things to set up a proposal automation:
• A document to use as a template, with all of your variables correctly identified
• A form that can collect answers and trigger the creation of new documents
• An automation app like Zapier to connect the form to the template.
You can use all sorts of apps to build an automated workflow like this: Google Docs, Zapier, Typeform, Airtable, Google Forms, and more. As is usually the case with no-code automation, you can use pretty much any software you’d like to set up this workflow.
How to get started
If you’d like to build this automation yourself, you can check out XRay’s full tutorial on our YouTube channel or on our blog.
If you’re looking for an agency to build this automation and more for your team, you can also contact XRay at our site linked below to discuss options and work with us.
Start Drafting and Sending Automated Documents Today
Drafting and sending documents like contracts and proposals can be a very repetitive process, making it an easy target for automation.
When you automate your documents, you’ll save time, reduce errors, and make it much easier to track the workflow. This is a very easy automation to get started with, so we encourage you to check out the tutorials we’ve linked and give it a shot.
If you’d like to learn more about automating your business processes, be sure to check out our blog or our YouTube channel. You can also follow XRay on Twitter, Facebook, or LinkedIn.
Notion is an outstanding tool for creating highly customizable documents and databases. With a robust feature set and easy usability, Notion is a great choice for maintaining key information and content at your company.
With some simple no-code automation, you can make Notion even more useful.
Automatically creating documents can be a great way to ensure that you keep your workspace organized and up to date.
Creating Notion pages with Make is pretty straightforward, but there are few pitfalls to watch out for.
Read on, and we’ll show you how it works step by step.
Connecting a Notion Database to Make
First, you need a Notion database to add items to. If you don’t have one ready, then make one that you can use as a test. The content of the database isn’t important; you can include any fields and information that you’d like.
To use a Notion database in Make, you just need to make sure that Make has access to the database. To do this, you’ll need to add Make as an integration in Notion.
Click on “Settings & Members”, and select “Integrations”.

Click on “Develop your own integrations” to create a new integration, and give it a name. You can also give it a unique image to make it easier to identify.
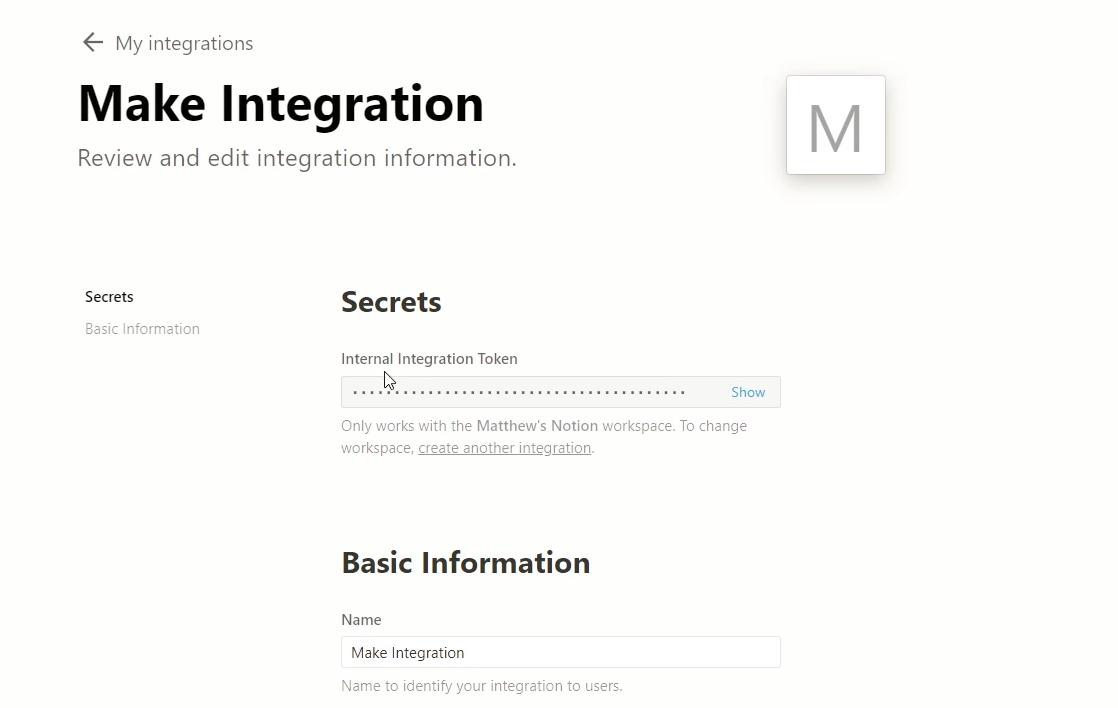
Once you create the integration, copy the token.
When you start making your scenario in Make, you can paste this token to connect your Notion account.
Then, go back to your database, click on Share, and “invite” the integration you just made from the list.

That’s all you need to connect the accounts. Just note that if your database is within another page, you’ll need to make sure that parent page is shared as well
Set up a Trigger Module of Your Choice
You can start this automation with any module that you want to use to gather data.
In our example, we’re using a table in Airtable that collects responses to our ‘Contact Us’ form, so our automation will run every time there’s a new record in this view.
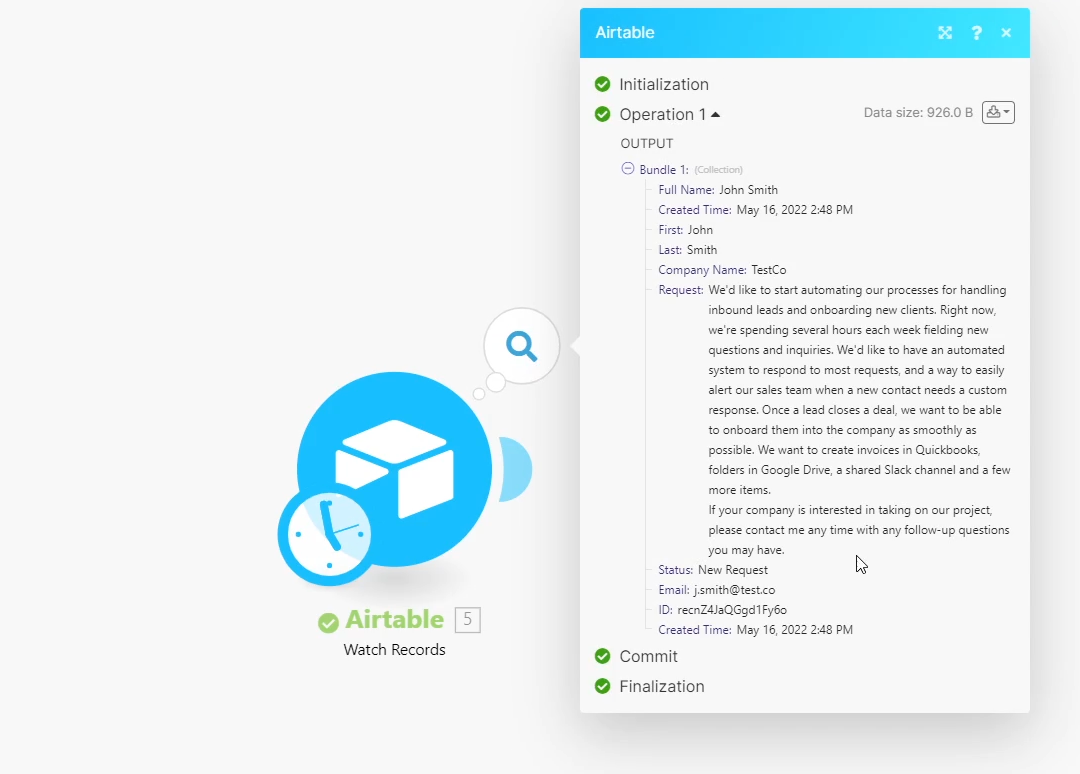
The scenario will collect data from every field in the Airtable record, which we’ll use to create a new database item in Notion.
Create a Database Item with Notion Module
With your trigger module all set, add a Notion module to your scenario. Select “Create database item”, and enter the Database ID.
To find an ID, just open the database in your browser. The database ID is the string of characters after your workspace, and before “?v”. If you’re not part of a workspace in Notion, then the ID will start after “notion.so/”
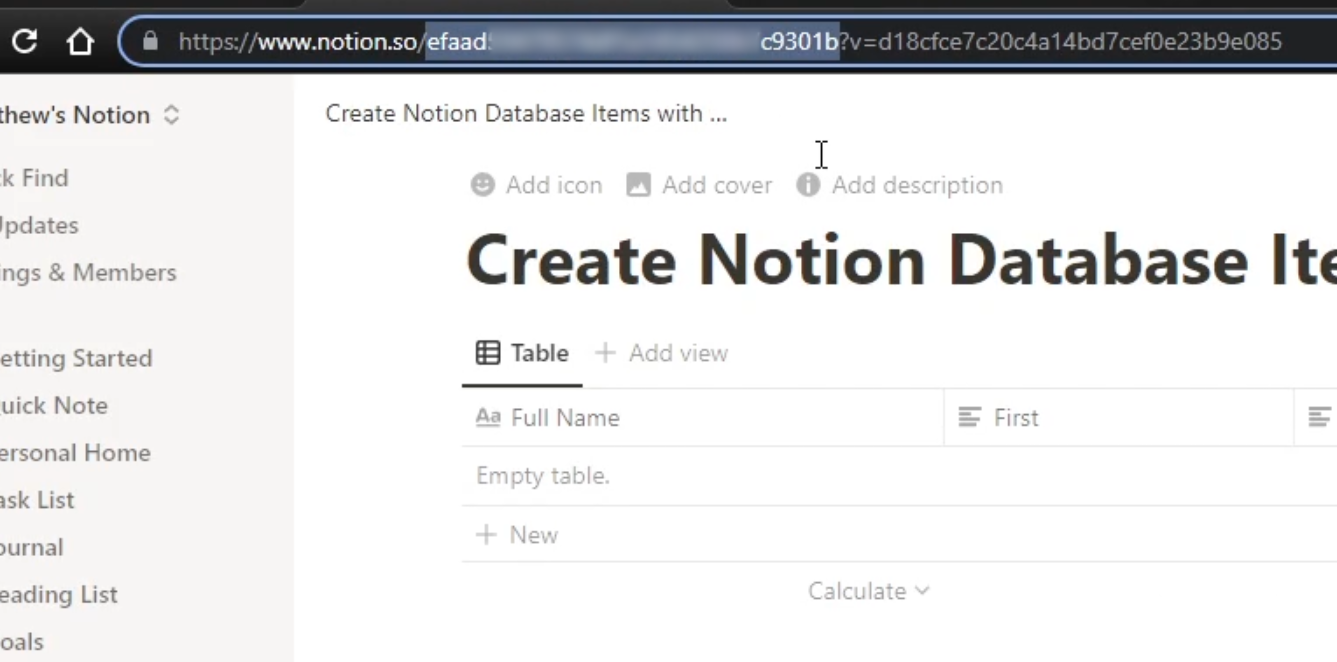
Give Make a moment to find your database, and then map your data in the fields that come up. We’ll map each of our fields from Airtable to a corresponding one in Notion, and then we’ll test the first two modules in the scenario.


You may have noticed that we don’t have a property in the Notion database for the ‘Request’ field.
We could have just created a property and mapped “Request” to it, but since it’s a paragraph of text, we want to add it as page content instead.
Append Page content
To add page content to a database item, add a new Notion module, and choose “Append a Page Content”.
Then, enter the “Database Item ID” from the previous module in the field labeled “Page ID”.
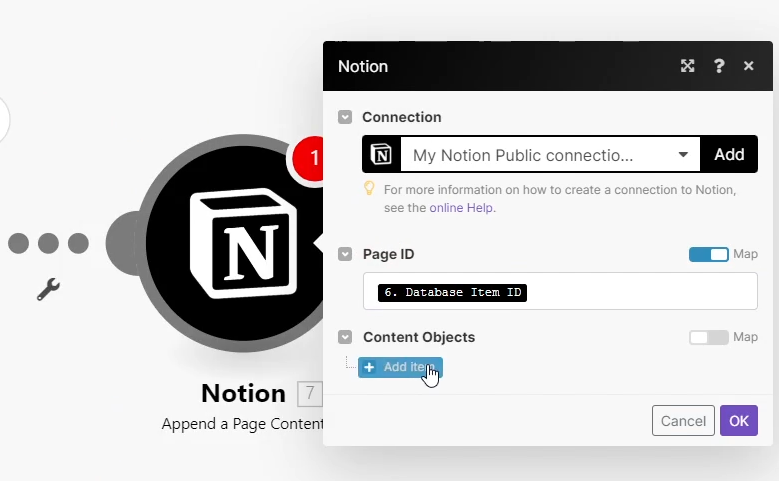
Now, you can add content blocks one at a time. For each block, choose a content block type, such as Heading 1, paragraph, etc. You also need to set a type for the content within that block. Here you can choose from text, mention, or equation.
We’re going to add a static H1 that just says “Request Content”, and then we’ll add a Paragraph which contains the text of the request that we retrieved in our Airtable module.
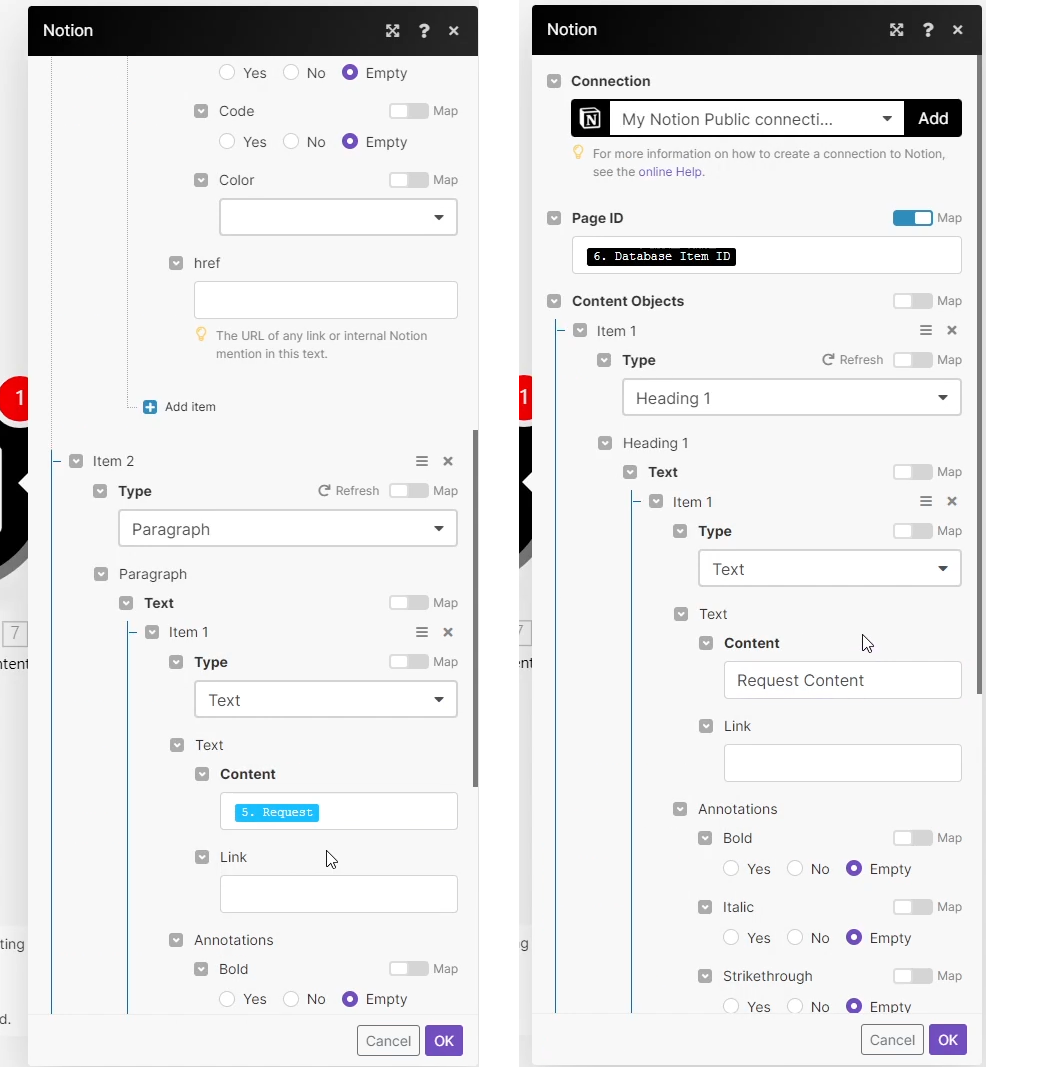
We’ll run this scenario once to test (making sure to delete the results of the previous test first), and we can see that the database item has been updated with some page content.

Creating Pages
Creating pages is very similar to creating database items, so we won’t run through the whole process again. Instead we’ll just take a quick look at the “Create a Page” module and some of the key differences
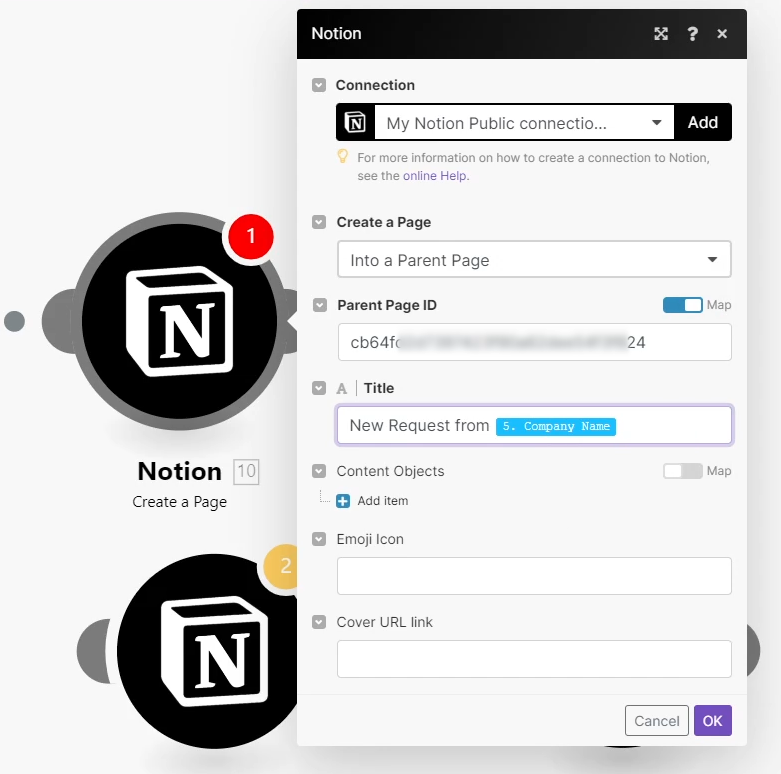
With the Create a Page module, you just add the ID of the parent page, and fill in the required fields.
You’ll note that you don’t have access to many properties when creating a page, so you’ll have to add most of your information as Content Objects, which can be pretty tedious to set up.
This is why we generally prefer to create database items instead, and simply map the information to database properties.
But whichever way you want to go, Make has you covered.
Establish consistency with automated documents
Now you’re all set to start creating Notion pages with your Make scenarios. Automated document creation is a great way to make sure you’re keeping track of important data, and it’s something we use a lot at XRay. With automation, you can ensure that your important documents are always created and stored in exactly the same way.
If you’d like to learn more about building no-code automations with platforms like Make and Zapier, check out our blog or our YouTube channel. You can also follow XRay on Twitter, Facebook, or LinkedIn.

When business leaders consider workflow automation, they often tend to think about saving time above all else.
While time-saving is certainly a key benefit of automation, its full impact extends much further.
Automation lets you track your workflows in detail, making your processes more consistent, and making data visualization easy and effective. In many cases, it will make rich data visualization possible for the first time.
In this post, we’ll explain how no-code automation lets you gather extensive data on your workflows, and enables you to build a business intelligence dashboard.
Track Every Automated Action
Any action that you automate is an action that you can track.
Without automation, your team is constantly performing critical tasks that aren’t being tracked, monitored, or logged in any consistent way.
General tasks might be captured in an app like Asana or Trello, while your inbound lead funnel is managed through a CRM like Hubspot or Pipedrive. All of your team’s activity is scattered among several different apps, and some of their key progress and decisions won’t be logged at all.
You could always assign people on your team to track all of this information, but that would mean hours of manual work, and lots of errors and inconsistencies in your data.
When you automate a workflow, you turn it into a series of events that are inherently tracked and logged. Every time an automation sends an email, creates a document, or updates a record, you can see that event in the automation platform’s history.
And while platforms like Zapier and Make might not be the best place to view workflow data, it just takes one more automated step to store key metrics in Airtable or Google Sheets.
Automating a workflow isn’t just a method for saving time. It’s also the first step in gathering key data about your company and business processes.
Make Your Workflows More Consistent
When a process is fully manual, variation is inevitable. Different people will perform the tasks in different ways, and even if your team generally conducts the process the same way, nobody is perfect, and everyone will make errors from time to time.
The inherent inconsistency in manual processes makes it much more difficult to track your workflows and their outcomes.
When you automate a process, you know that all of its components are performed the exact same way every single time.
For example, if you’ve built automations to support your Project Delivery process, you know that your clients will always receive their finished projects exactly how you planned it.
Every client will get a similar email based on the same template; every client will have a Google Drive link for the finished assets; every client will get a Slack message once delivery is complete.
When your delivery process is conducted manually, having a database that says you’ve delivered 10 projects doesn’t necessarily mean much. You may have conducted delivery 10 different ways, achieving 10 different sets of results.
Once you automate the process, you know what the ‘delivered’ datapoint means. While manual project delivery might change every time it happens, automated project delivery will conduct the exact steps that you designed, every time.
In essence, automating a process also defines the process as a datapoint, setting you up to gather useful data and meaningful insights into your team’s performance of a process.
Automated Business Intelligence
By making your processes consistent and tracking key metrics, automation enables you to set up a robust Business Intelligence dashboard.
Automated KPI tracking and data processing doesn’t end with dumping everything into Google Sheets or Airtable. With no-code automation, any data you want can be sent over to apps like BigQuery or AWS for analysis and visualization.
You can get weekly, monthly, and quarterly reports without having to lift a finger. You’ll see key trends and takeaways at a glance, and you can dig deeper to find insights that will influence your most important decisions.
Automating your systems ensures that your data isn’t locked into any specific app. You won’t have to track your leads in your CRM, or follow employee progress in a task management app. You can see and compare any data you want in any app you want. And all of the syncs and transfers can be configured to run automatically.
Automation lets you capture every workflow, every outcome, and every action that you want to track. It lets you surface critical insights about how you and your team are getting your work done, and enables you to plan your next moves.
The key is being specific and intentional with what questions you want your data to answer, which is something we’ll address in a future blog post.
Discover key insights with no-code automation
While automation is typically discussed as a tool for saving time, some of its most useful and transformative benefits lie in its ability to gather clean data.
With no-code automation, you can make your processes more consistent, easily gather KPIs, and surface all of the information you need in Business intelligence reports. Ultimately, if you want to analyze your company’s performance, no-code automation is the best place to start.
If you’d like to learn more about how no-code automation can support your business, check out our blog or our YouTube channel. You can also follow XRay on Twitter, Facebook, or LinkedIn.

Workflow automations depend on high-quality data. After all, automation platforms like Zapier and Make are essentially just tools for copying and transforming your data.
As we covered in a previous post, using messy and redundant datasets in your workflows can cause a variety of errors and unintended results.
In this post, we’ll share some tips for gathering useful, organized data for your no-code automations. We’ll also share a few techniques you can use to clean up your existing datasets.
Establish a consistent method for creating new data
As we discussed in the last video, inconsistent data is a huge problem when you’re building automations.
One way to make sure that your dataset contains consistent and complete records is to designate a single approved method for adding new data.
When your team needs to create a new record for a client or a project, there shouldn’t be any question about which app to use, or which table to add it to.
For example, you could create an Airtable form designed to let your team add a new client to your directory. Share a link to the form in your documentation, and make it clear to your team that they should always use this form to create a new client record.
In the form, you can set all of the necessary fields to “required”, so you won’t have to worry about ending up with a bunch of incomplete entries that will break your automations in the future.
It can require a little bit of documentation and training, but making sure that your team always adds new data in the same way, will help ensure that your databases are consistent and complete as you start to automate.
Keep each dataset in just one app
Whenever possible, we recommend keeping each of your datasets within one app. Every problem caused by bad data is only made worse when your records are spread across different apps that aren’t connected.
To that end, you should always try to pick an app that suits the data you’re trying to store and access. For most data, spreadsheet-based apps like Airtable and Google Sheets are appropriate, but if you’re managing a set of documents, you might want to use software like Notion instead.
Whichever app you choose for your dataset, maintaining it all in one app will make it much easier to keep everything clean and consistent.
However, it’s not always possible to store all of your records for a given dataset in a single app.
No software is perfect, and there might be times when you’ll need some features that your preferred app just doesn’t offer.
Sync your databases with Unito and Coupler if you need to use multiple apps
If you need to manage your dataset in multiple apps, then you can use synchronization tools like Unito and Coupler to at least make sure that any parallel records stay up to date.
By setting up automatic syncs, you can make sure that any updates you make to a table in Notion are reflected in a similar spreadsheet in Airtable or Google Sheets.
Under any circumstances, limiting your database software to as few apps as possible will help you to keep everything organized. But when you need to branch out into different software, synchronization tools will let you avoid manual data entry and the errors that come with it.
Use simple automated tools to clean up your existing data
The first two tips we mentioned here are great for making sure that your new records are standardized, but what can you do about your existing data?
Ultimately, you can always salvage a messy dataset with some clean-up work. It can be tedious, but a thorough audit will help you to get rid of duplicates and update incomplete records
Fortunately, you don’t have to devote hours to tidying up your records manually. There are several apps, plugins, and native features in common apps that make it much faster to organize your spreadsheets.
For instance, you can use the “Dedupe” app in Airtable. As you might have guessed from the name, Dedupe is an app that helps you to find and delete any duplicate records that you have in Airtable.
Just click on Apps, select “Add App”, and search for Dedupe to add it to your base.

Alternatively, if you’re working in Google Sheets, you can use a native feature to accomplish a similar result. Just click on “Data” in the toolbar, mouse over “Data cleanup” and select “Remove duplicates”.

The app will then walk you through the process of reviewing and deleting any duplicate records in your spreadsheet.
While it’s always best to start with clean data in the first place, it’s never too late to go back and improve a messy dataset. With the help of some native features and plugins, your database apps can help you clean up the data you already have.
Lay the groundwork for great automations with clean data
Gathering good data is essential for building effective and functional automations. Creating data with a consistent process and keeping your records in just one or two apps is a great way to start, and if you need to clean up data you’ve already collected, Airtable and Google Sheets have some simple tools that will let you easily clear out duplicates. Once your datasets are in good shape, you’ll be ready to use them in your automations.
If you’d like to learn more about building no-code and low-code automations, check out our blog or our YouTube channel. You can also follow XRay on Twitter, Facebook, or LinkedIn.
As you build more automated workflows, documentation becomes a very important discipline to maintain. Keeping a handful of Zaps up and running is relatively simple, but once you’ve built several automated workflows, you’ll need a documentation system to keep track of everything.
In this post, we’ll quickly explain the difference between logging and documentation, and we’ll share our best practices for documenting your automations for yourself and other automators.
Documentation vs. logging
First, let’s clarify the difference between documentation and logging.
Documentation consists of descriptions of what an automation does, and how to use it.
Logging consists of metadata generated when your automation runs.
Both are crucial for tracking and maintaining your automations, but in this video, we’ll be focusing on documentation. We’ll tackle logging in a future video.
The Key Benefits of Documentation
One of the main purposes of documenting your no-code/low-code automations is to ensure that any automator who needs to contribute to your automations understands how they work.
Even if you’re a solo automator, detailed documentation can come in handy. An automation you built last week may still be fresh in your mind, but when it runs into an error two months from now, will you still remember how it all works well enough to fix the bugs?
Creating documentation for every automation you build involves a little extra work in the short-term, but it ensures that you won’t need to rely on your memory to fix your automations in the long-term.
With that in mind, there are two main ways you should document your automations: descriptions and diagrams.
Custom Titles: Documenting Within Each Automation
As a basic step towards useful documentation, you should make sure to add helpful context within each automation you build.
Every Zap you create in Zapier, or every Scenario you create in Make should include as much information as possible about how it works.
Give each automation a descriptive title, and whenever possible give each step or action a descriptive name as well.
Instead of naming a Zap “New Contacts”, call it something like “Add New Website Contacts to Directory in Airtable”.
Instead of using the default names for steps like “Create Record”, go with something more descriptive like “Create a Record for the New Contact in the Directory table” (note: some platforms don’t support custom names for automation steps).
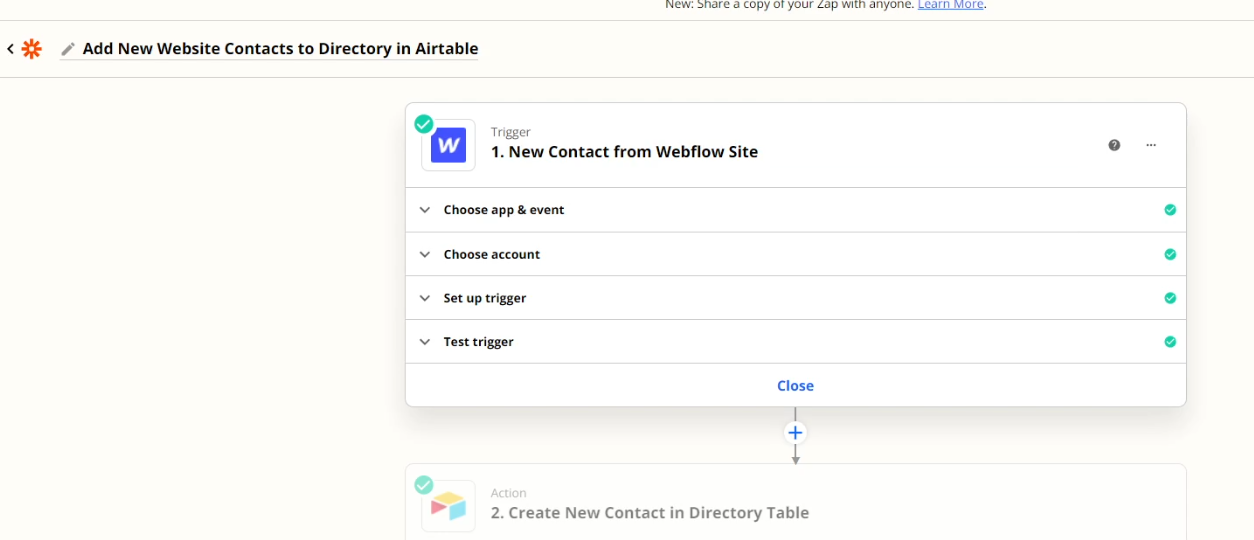
Use your titles to illustrate the purpose of each automated action, and to make it clear where data is coming from and going to.This way, any automator you work with can understand the basics of your automations just by opening up them in Zapier, Make, or another automation platform.
Building Detailed Guides with Technical Documentation
Ultimately, there are limits to what you can document with automation titles alone.For more complex automations, you’ll need some external documentation to really explain the nuts and bolts of important technical decisions.
Technical documentation typically takes two forms: descriptions and diagrams.
Descriptive Documentation
For detailed descriptions, you can use apps like Notion or Google Docs to write summaries of what each automation does and how it works.
In these docs, be sure to include salient details like the logic and technology the automation uses, any common problems it encounters, planned updates, links to relevant API docs and databases, and more.
Treat these docs as all-encompassing “how-to” guides that can train any automator to use, troubleshoot, and update your automations.
Your coworkers and other collaborators should be able to understand the goal of the automation, even if they didn’t build the automation themselves.
BPMN Diagrams
To further illustrate how your automations work, you can use diagrams to add a visual component to your documentation. We’d recommend using Lucidchart to make a BPMN (Business Process Model and Notation) diagram.
A BPMN Diagram will let you chart each step visually, and will clearly demonstrate the flow of data from one app to the next. It will also help you to distinguish automated actions from manual steps at a glance.
Preparing for the future with documented automations
Thorough documentation will make it much easier for you to keep using and maintaining your automated workflows in the long term. With detailed titles, descriptive guides, and simple diagrams, you can ensure that anyone on your team can work on your automations in the future.
If you’d like to learn more about building and maintaining no-code automated workflows, be sure to check out our blog or our YouTube channel. You can also follow XRay on Twitter, Facebook, or LinkedIn.
Airtable is one of the best database apps to use with your no-code and low-code automations. With customizable filters and views, Airtable lets you organize and manage your data with flexibility and precision as you build automated workflows.
One of Airtable’s most useful features for no-coders is the simple Form view option. Form views let you add records to an Airtable database by filling in a prompt for each field.
Forms are a great way to let colleagues and clients contribute to a database, and they help you ensure that you don’t have any incomplete records that could cause errors in your automations. They’re easy to set up, and they’re a very useful tool for any automator to have at their disposal.
At XRay, Form views are one of our most common methods for triggering automations. In this post, we’ll show you everything you need to know to start using them.
Required Software
All you’ll need for this tutorial is Airtable. We’d also recommend using an automation platform like Zapier or Make to see how Airtable Forms can trigger an automation to run.
Making a Form View
First, open up an Airtable base that you’d like to add a Form to. In our example, we’re going to add a form to our Client directory.
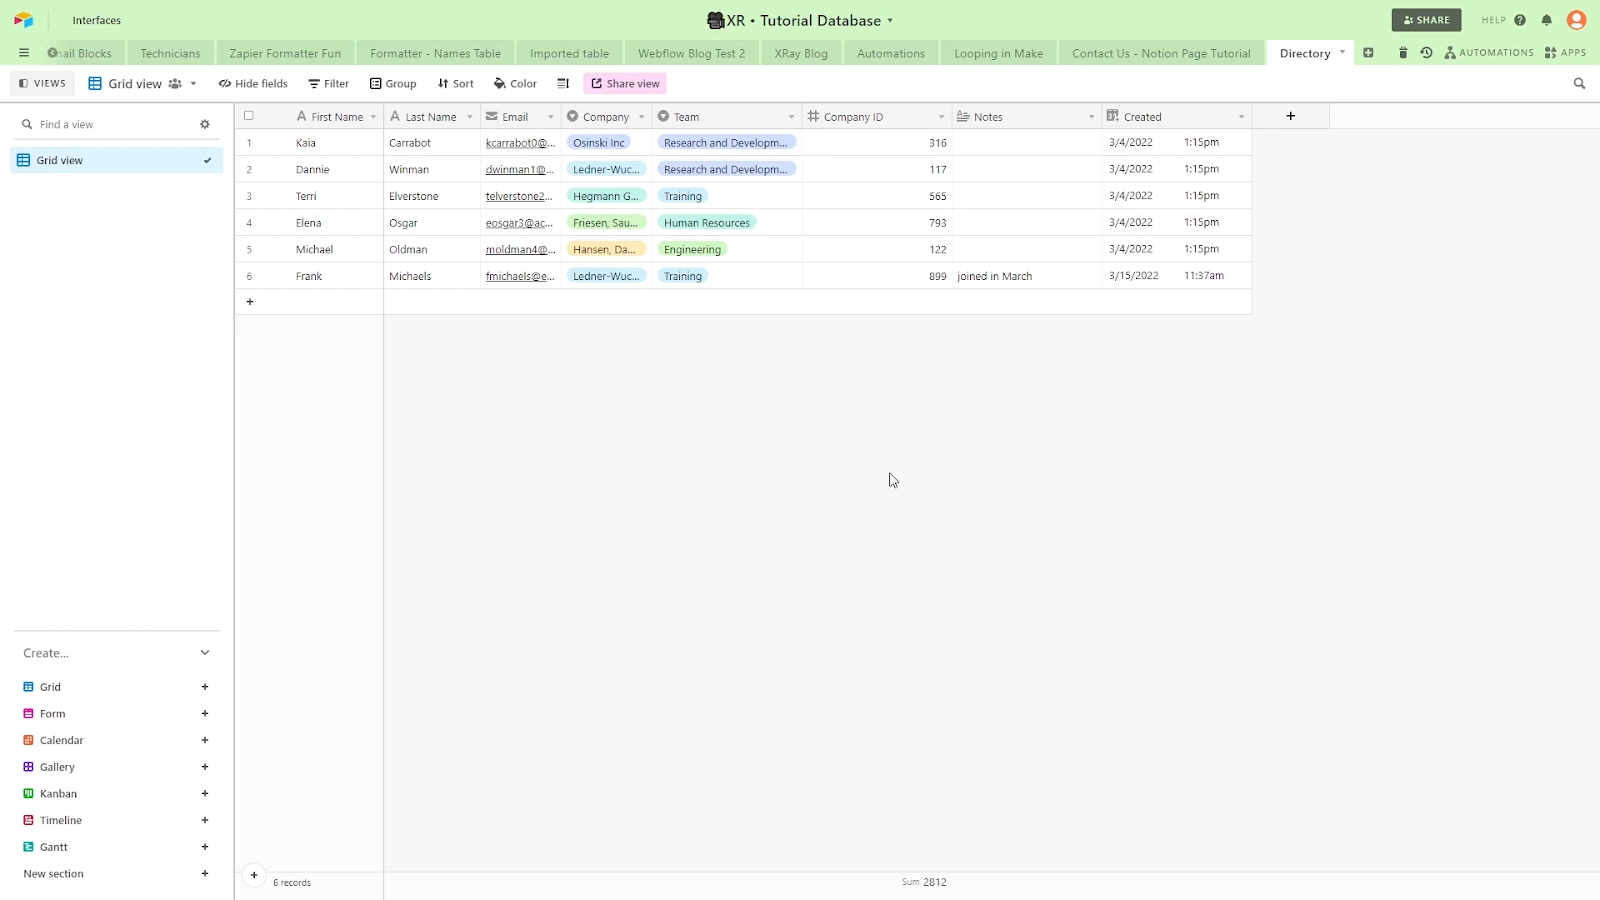
In the “Create” section in the bottom left corner, click on “Form”, and give your Form view a name. Airtable will create a new view that organizes all of your fields as questions in a form.
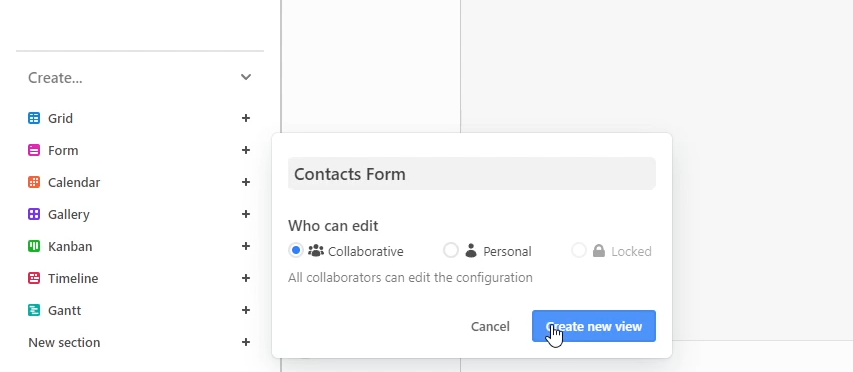
Editing the Form
From here, you can edit your form however you’d like. By default, Airtable will include every field as a question, and it will use the field name as the text of the question. To remove questions from the form, just click and drag them into the “fields” section on the left.
You can also change the text of each question, and add helper text if you’d like to provide more information.
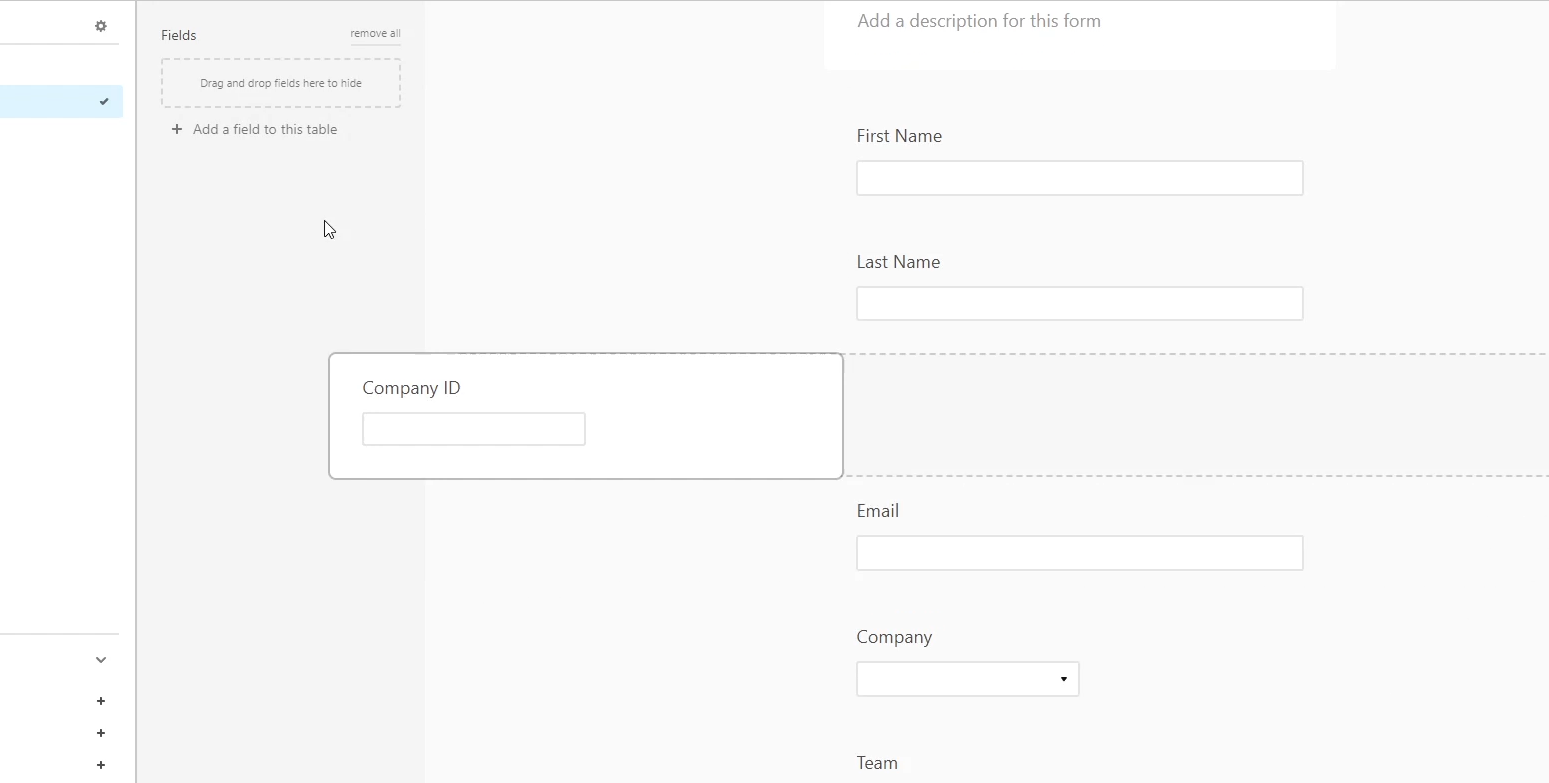
Note that all of your edits will only apply to the Form view. Removing a field from the form won’t delete it from the base or other views. Changing the question text won’t change the names of your fields either.
You can customize your form freely without worrying about messing up the rest of your data.
Once you’ve tweaked your form as desired, you can fill it out to add a record to your table.
Filling out the Form
However, you can’t fill out the form in this editable view. You can enter text into the fields, but you can’t actually submit your answers and create a new record.

Instead, you’ll need to click on “Share form”, and copy the link, or just click on the “Open Form” button. Now, you can answer each prompt and click submit.
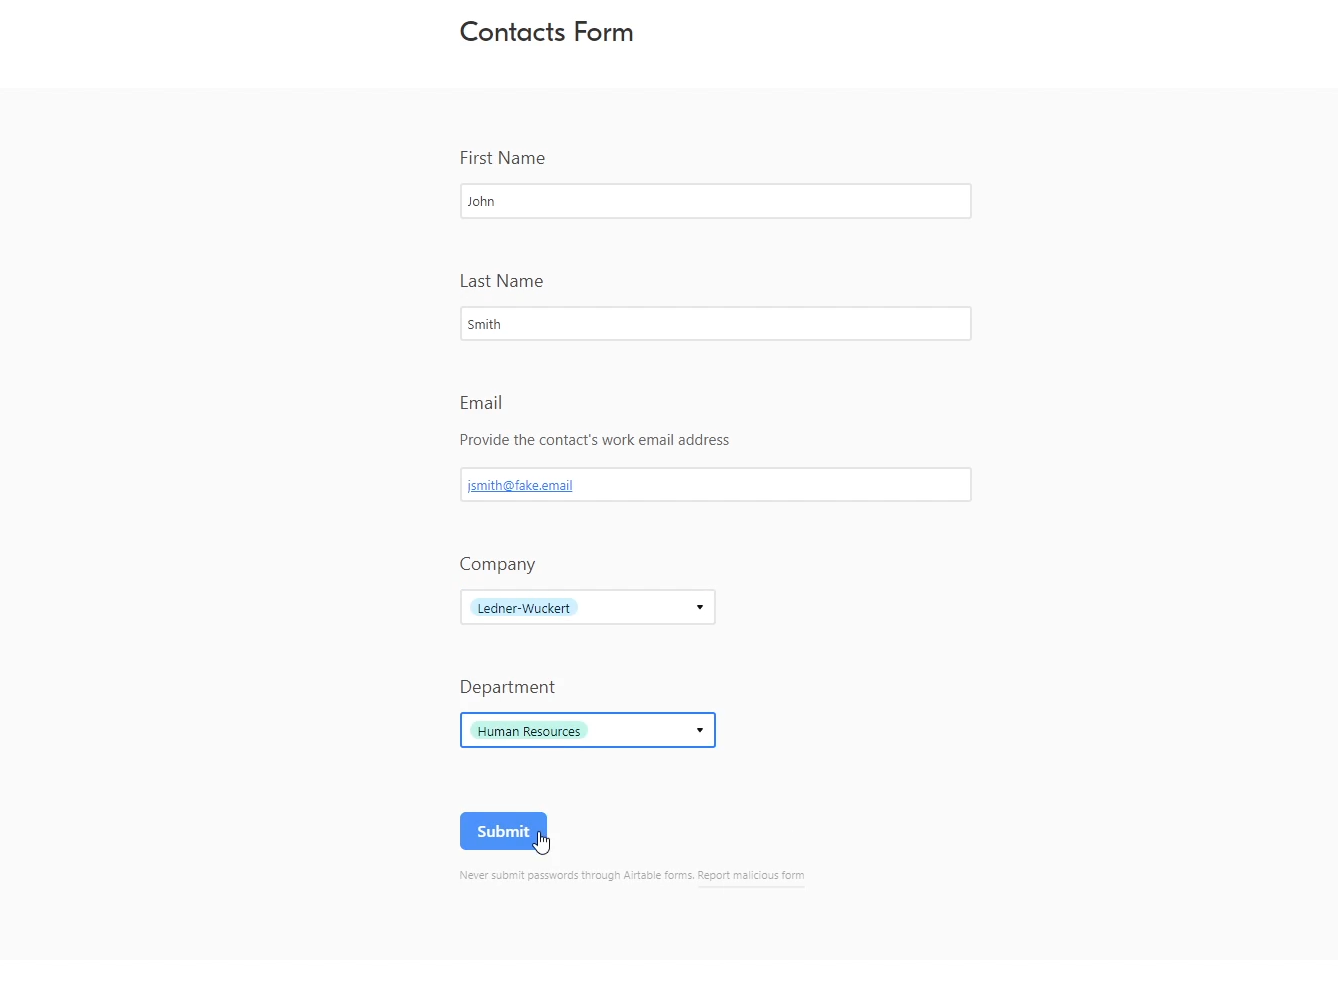
If you return to your Airtable base, you should see a record with your responses.

Triggering an Automation with an Airtable Form
Both Zapier and Make have the option to trigger an automation whenever a new record is added to an Airtable view.
The main thing to keep in mind when you’re using Airtable forms to trigger an automation is that records don’t appear in the form view itself. You’ll need to designate another view (like a Grid) as the view that will trigger your automations.
In our automation, we’ll make a new Grid view called “New contacts” that we can use to trigger an automation. We’ll add a filter so it only includes posts that are a week old or newer.

In Zapier, we’ll create a new Zap, and set the trigger to “New Record in Airtable”.
After we select our bae and table, we can see our two grid views, but not the form view. We’ll select the “New Contacts” view as the one that Zapier should check for new records.
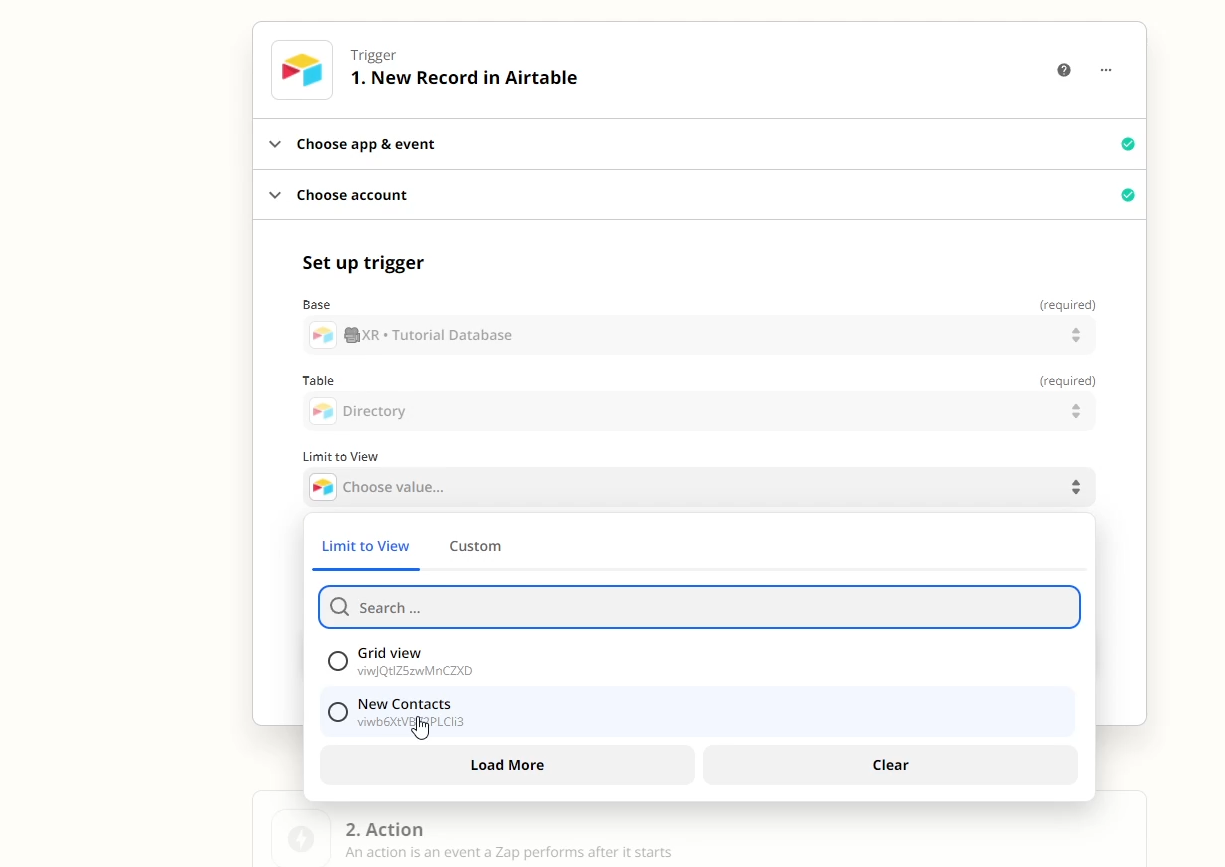
When we test the trigger, we can see the data we just submitted in the form. Now we can continue and build any automation we’d like with this data.
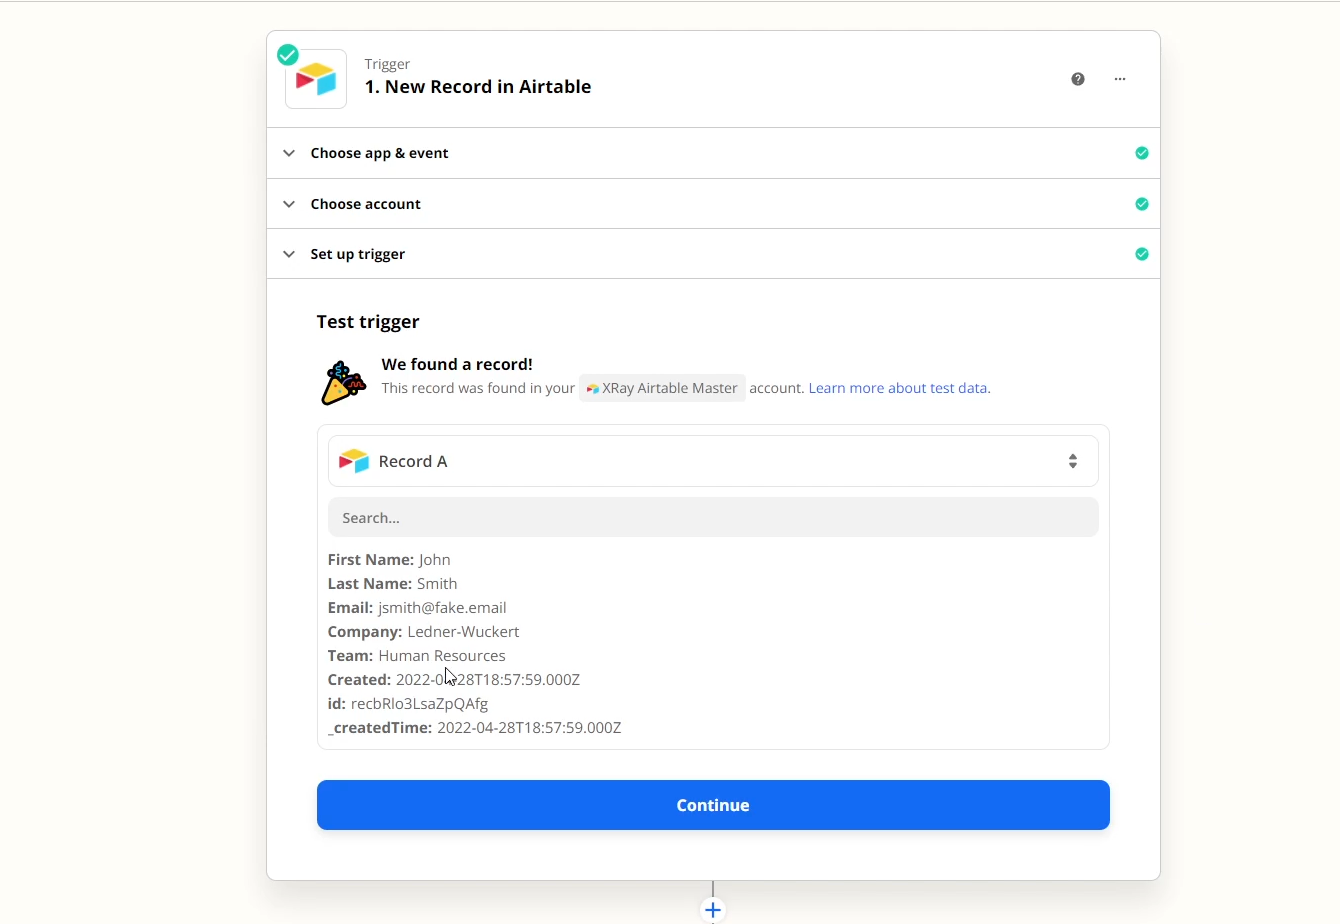
Enable Automations and Let Anyone Contribute to Your Databases
Airtable forms are a great way to let clients and team contribute to your databases without needing to grant them any sort of editing access. Once they submit an answer, you can also easily set up automations to use that data.
If you’d like to learn more about no-code and low-code automation, check out our blog or our YouTube channel. You can also follow XRay on Twitter, Facebook, or LinkedIn.
Not sure where to start with automation?
Hop on a 15-minute call with an XRay automation consultant to discuss your options and learn more about how we can help your team to get more done.
🎙Interview me about my Workflow
Workflows take many different shapes, sizes, and tools. Ever wonder how your workflows compare?
Get interviewed and find out!
while humans get to be mindful.


