The XRay.Tech Blog
Case Study & Tool Belts
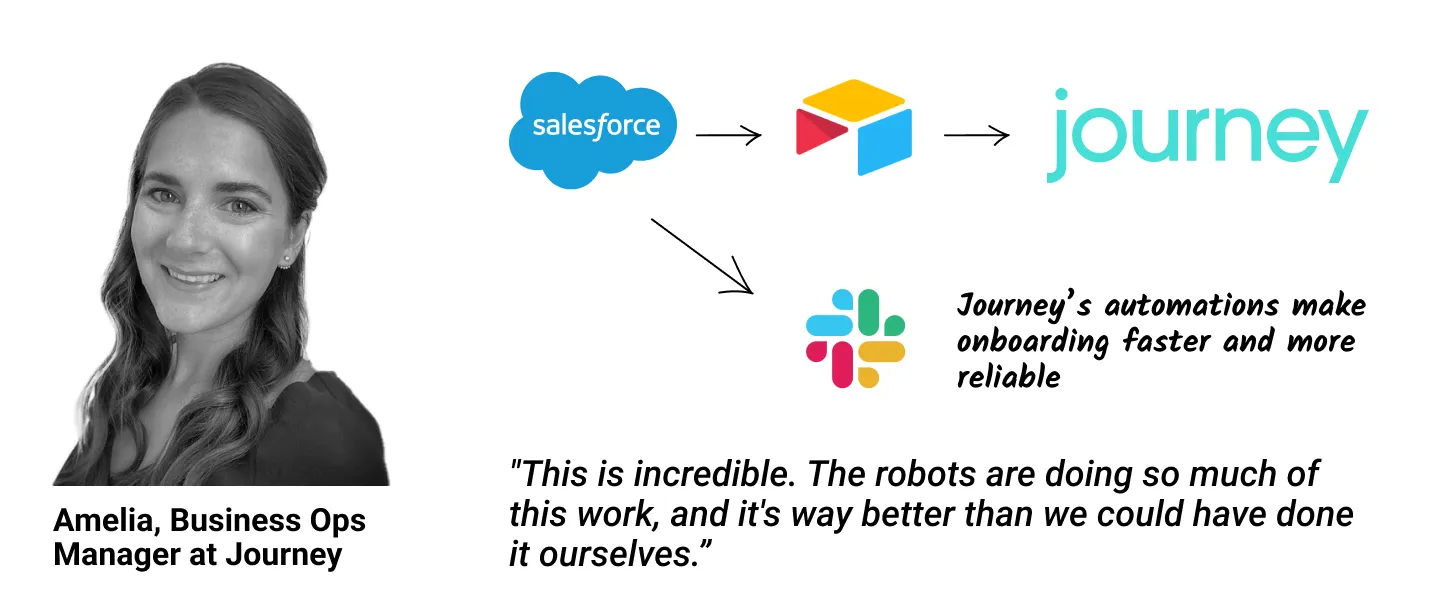
"This is incredible. The robots are doing so much of this work, and it's way better than we could have done it ourselves. The documentation is also amazing – we’re ready to start training our staff how to perform this workflow right away!"

We all want to find ways to make our businesses more productive. Anything that can shave a few minutes off of a frequently repeated process can result in huge savings over the course of months and years.
When trying to streamline processes to save time and money, many companies will likely consider two common strategies: automation and outsourcing.
In this short post, we want to quickly clarify the strategic difference between automation and outsourcing, and demonstrate why we at XRay are committed to using automation to permanently reduce robotic work.
Control and Refine Your Processes with Automation
First, let’s take a look at automation.
With XRay’s method for building automated workflows, the primary goal that guides our efforts is to amplify human output.
We want people to do more with their time at work and be less distracted by the tedious tasks that often clutter their days. We believe that copying and pasting or moving data from one app into another is usually a waste of human potential, and that interrupting more valuable work just to write an update on what you’ve already done or download a document is an unnecessary distraction.
To create more time for mindful work, we focus on collaborating with our clients and members to identify the robotic tasks in their workflows. These are tasks that don’t require any uniquely human characteristics like creativity, analysis, strategy, or thoughtfulness, which means they can be performed by a piece of software without sacrificing any quality. In fact, automation often improves the output of robotic tasks as it creates a perfectly consistent system
When you work with XRay to automate one of your processes, we’ll help you to take control of that process and gain more visibility into it than ever before. We’ll document the automated workflow, track its activity, and refine it over time. If we find an area for improvement, we’ll gladly make and document the change for our members.
Outsourcing
Now let’s turn our attention to outsourcing.
Like automation, outsourcing will remove tedious tasks from your team’s workload. However, unlike automation, hiring another company to perform your robotic work is ultimately a one-sided and partial solution.
While outsourcing might appear to solve the problem from your end, it really just shifts the burden over to somebody else. From our perspective, nobody should have to be doing robotic work all day, no matter where they are in the world or how their labor market is priced.
What’s more, outsourcing the execution of a process typically means that you’re outsourcing control of it as well. You won’t know exactly how your data is moving from Point A to Point B, and your only visibility will come from periodic check-ins and reports. You won’t be able to improve the process or learn from it to refine similar workflows that your team is still conducting, or track the workflow each time it's conducted to gather precise, detailed metrics.
Long-term strategy
Going with either outsourcing or automation is a choice that’s up to each individual business, but we believe that exploring automation will be more rewarding In the long run for most companies. Outsourcing tends to be a race to the bottom, prioritizing cutting costs and replacing people over actually improving a process.
Automation lets you retain control and visibility into your processes, while leaving much of the execution up to software. Rather than replacing your team, it lets them fulfill their roles better than ever, as they’ll have more time to focus on the challenging and valuable work that you hired them to do in the first place. For instance, instead of spending all of their time responding to the 80% of inquiries that can be handled with templates and automated systems, your sales or support team can concentrate their time on the 20% more difficult and complex questions that require human input and ingenuity.
If you’d like to learn more about how automation can help your company to save time and increase output, you can check out our blog or our YouTube channel. You can also follow XRay on Twitter, Facebook, or LinkedIn.
Feel free to reach out to us at any time with questions, and we’d be happy to help.

What is the value of automation?
The most common answers to that question often focus on strictly saving time. While time savings are indeed one of the benefits of automating your workflows, the advantages go far beyond that.
Automation creates value not only by saving time, but also by producing more consistent processes and enabling thorough documentation of all of your key business activities. Additionally, it can help your team to get more work done, even if you think you’re already at max capacity.
Automation Creates More Consistent, Reliable Processes
When you conduct a process manually, it’s inevitable that you’ll see some differences and inconsistencies from task to task. Different people might have their own unique styles that come through in their work; different circumstances might motivate your team to make a peculiar choice on a given assignment; and of course, plain old human error can crop up at any time.
However, when you automate a given process, you ensure that it will be executed the exact same way every time it runs (until you make a change to the automation itself). Low-code platforms like Zapier and Integromat will run each step in sequence without variation, always producing the same results. While a technical error will pop up from time to time, automated error-tracking systems will make it much easier to spot problems and to fix them quickly.
The consistency of automation removes human error from the equation, and it gives you a better set of data to base your strategic decisions on. Since you know automated tasks are performed the same way every time, you don’t have to wonder if some slight variation in the process might be responsible for different results week to week - and you don’t need to worry about a slow transition to an updated process.
Automation Documentation Turns Your Processes into Assets
While low-code/no-code is more accessible than traditional software development, it’s still useful to follow a lot of the principles that have always guided the software world. With that in mind, we at XRay.Tech consider it a best practice to include thorough documentation with every automated workflow we produce.
Good documentation lets the reader know what the automation does, when it should be used, and how to use it. Additionally, it should include links or other resources that might be helpful in operating or understanding the automation.
Finally, documentation for automated systems should also describe the manual steps that people have to perform as part of the automation-supported process. All of this information (along with some tags and attributes for organization) comes together to form a Process Page, detailing exactly how a given process at your company works.
When you build up a Process Playbook of dozens of Pages, it becomes a sort of “Business Bible”; a how-to manual for operating your company. This can be an extremely valuable asset for not only training new hires, but also for meeting with potential investors or buyers.
By building automated workflows and documenting your processes, you can create a tangible asset that represents your company’s operations. It’s an asset that ensures continuity regardless of employee turnover, and makes it easier for investors or buyers to see what you have to offer.
Documented Automated Workflows Push Your Team’s Capacity Even Further
Automation can do more than clarify and maintain your current processes. By saving time for the people at your company, it can also enable them to be more productive, even if you thought your team was already operating at their maximum capacity.
Automating robotic tasks helps to create more time for your team in a few different ways. The most obvious time-saving aspect of automation is that it reduces the amount of the time that your team has to devote to copy-and-paste or data entry work. Automation can easily shave off hours each week that was previously spent simply moving information from one app to another.
But this isn’t the only way that automation saves time for the people on your team. It also helps to reduce the distraction and focus loss that comes from switching back and forth between different tasks.
When your team doesn’t have to worry about a dozen different small tasks throughout the day, they’re not only devoting more time to their core responsibilities; they’re doing so with fewer interruptions, so that they can perform at their best on assignments that require their creativity, analytical skills, strategy, or thoughtfulness.
As a result, you’ll often find that automation enables your team to do far more than they were previously able to, freeing up their time for more valuable and rewarding work.
Streamline and Improve Your Processes with Automation
Automations are a great way to save time, but their value extends far beyond that for a service company. Automated workflows and their accompanying documentation make your processes more reliable and even turn them into a tangible asset. With automations and a Process Playbook supporting their efforts, your team will have more capacity than ever before.
If you’d like to learn more about how automations can help your business, check out our blog or our YouTube channel. You can also follow XRay on Twitter, Facebook, or LinkedIn.

One of the best ways to start unlocking the potential of automation is to start chaining several automated actions together. It’s great to be able to create a slide deck from a template with one form, but it’s even better to make a Google Doc at the same time, doubling your output without doing any extra work.
In this post, we’re going to go a step further and add the final action to the automation that we’ve been building over our last two blogs. With this addition, the automation will draft and send an email with links to the presentation and document that it just created.
If you missed our last two tutorials, be sure to check those out first to learn how to automatically create a Google Slides presentation and a Google Doc from one simple form.
Tutorial Steps:
1. Confirm the setup of your Airtable base
2. Add action: Send an email in GMail
3. Write an email template in Zapier
4. Fill in necessary email fields
5. Add links to your Google Docs and Slides files
6. Test your automation
1. Confirm the setup of your Airtable base
In the last two tutorial blogs, you should have set up an Airtable base with columns that match the variables in your Google Slides and Google Docs templates. You may remember that there was also a “Client Email” that wasn’t used on either of the previous steps.
This final step is where we’ll make use of that email field, so make sure you’ve included it in your Airtable base. If you had to add it in, test your Zapier trigger again to pull in the updated data.

You’ll also want to enter a real email address that you have access to so that you can see the final product of your automation and make any adjustments you’d like to the email template.
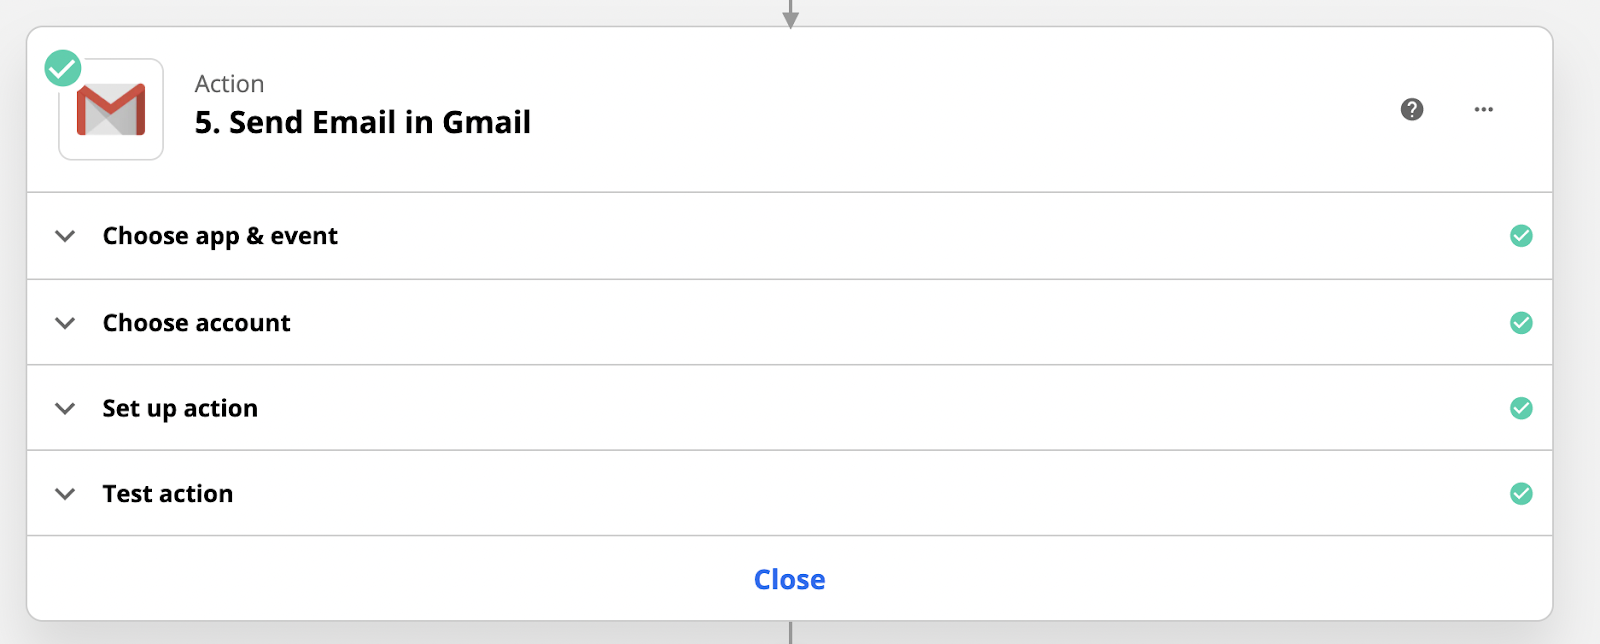
2. Add action: Send an email in Gmail
Now head over to Zapier and open up the automation you’ve been building throughout these tutorials. Add an action to the end of the Zap, and choose Gmail as your app (or your preferred email provider - but bear in mind that the steps might be a little different than what we’ve outlined here). Sign in to your account, select “Send email” as the action, and continue.
3. Write an email template in Zapier
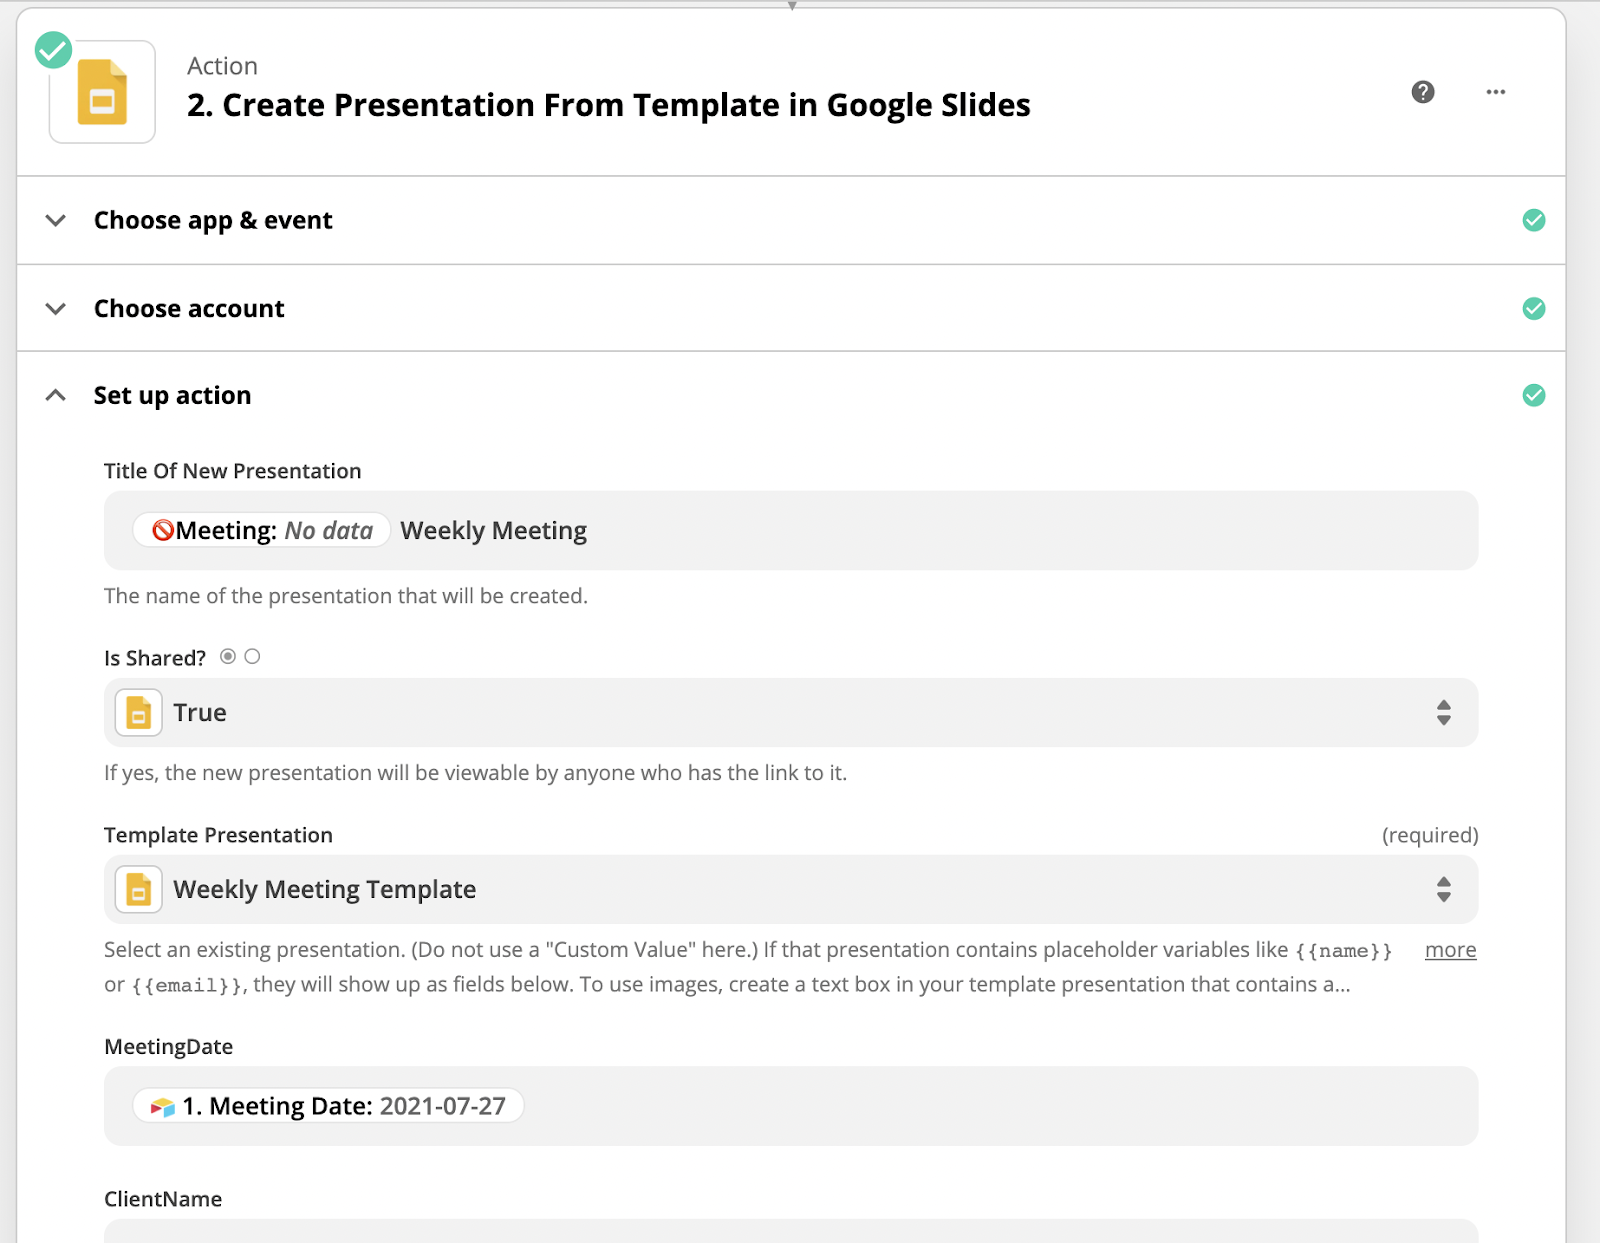
Next, we’ll draft our email template directly in the “Body” field provided by Zapier. You can write whatever you’d like in this message, and use data from previous steps to create dynamic messages that include the meeting date, the client’s company name, etc.
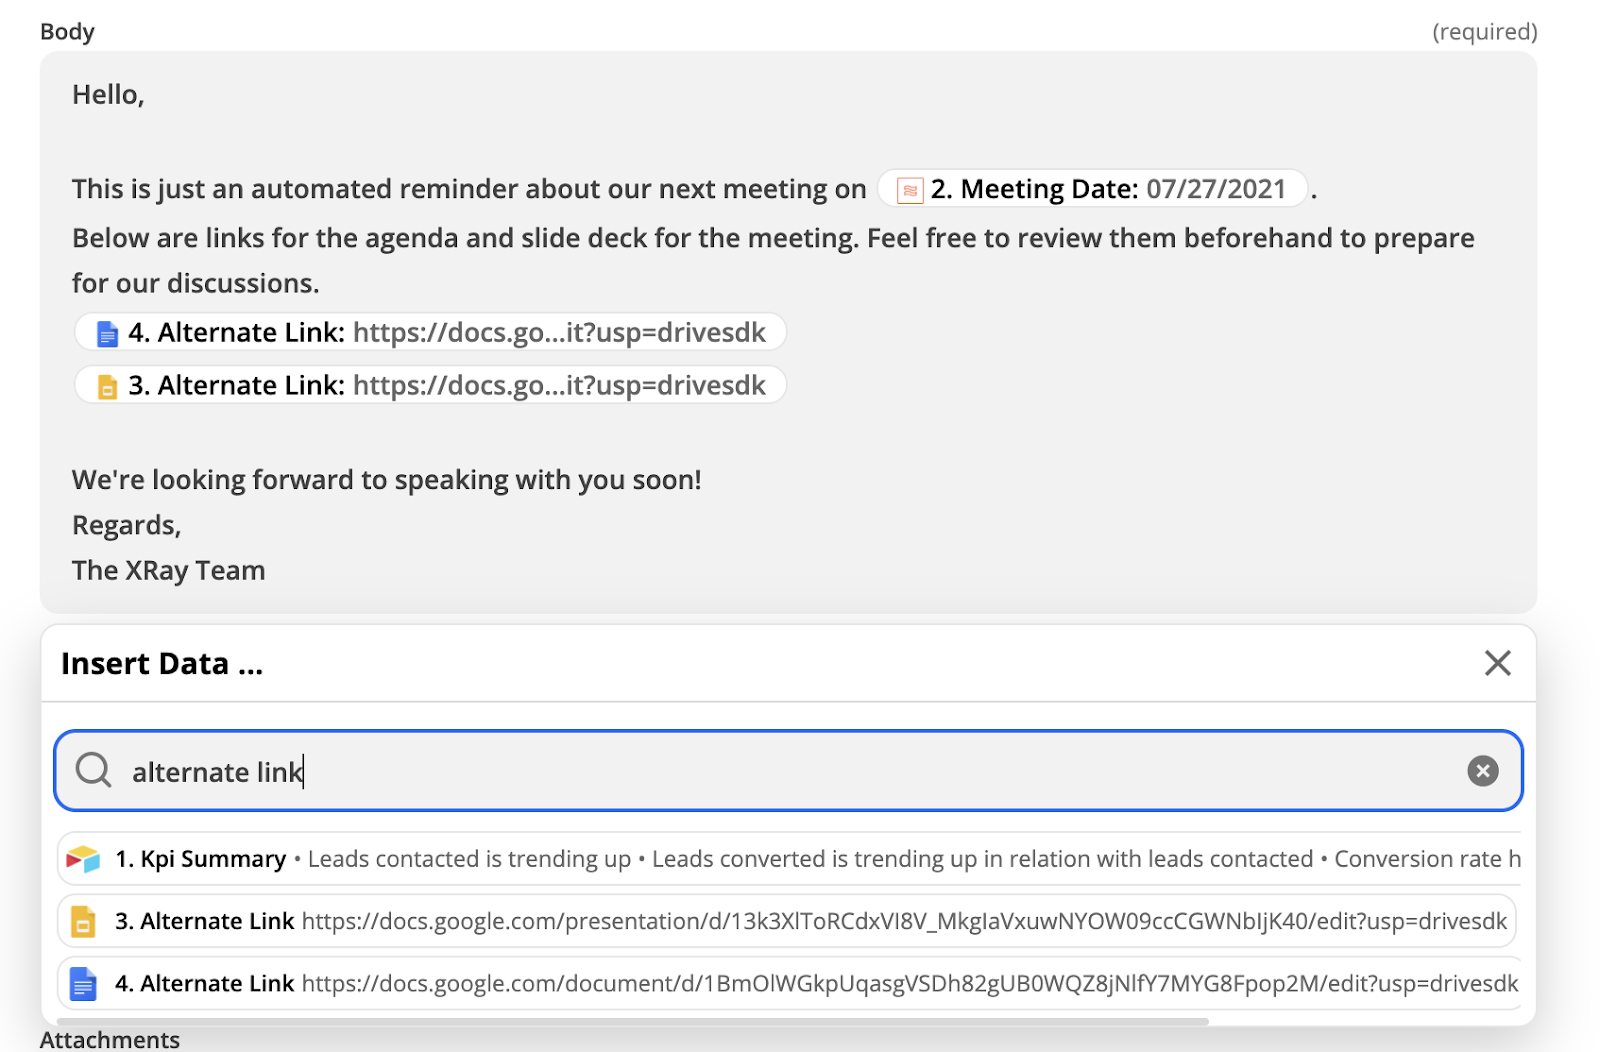
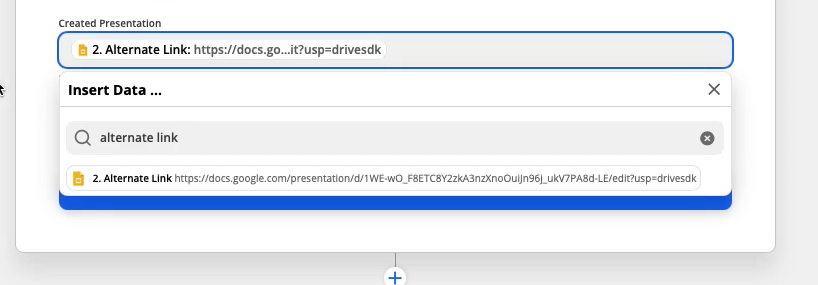
The main aspect we want to highlight here is how to send links to the presentation and document that you just created. To grab a link for the doc, insert data from the step where the doc was created. In the search bar, type in “alternate link”, and insert the piece of data that says “4. Alternate Link”. This “Alternate link” is the URL where you’ll be able to access the document. Then, do the same thing for your slide deck.
4. Fill in the necessary email fields
Now that the body of your email is all set, you’ll just need to fill out the rest of the fields needed to send an email. Subject, from, and CCs or BCCs you might want to add, and the recipient. In the “to” field, you’ll want to add the data for “Client Email” from the Airtable step. This way, it can send the email to whichever recipient you identified when you filled out the form to trigger the automation.
Dynamically generated data like this is a fundamental part of what makes automations useful. Simply performing identical steps and producing identical output with an automation only has limited applications, but creating customized documents from templates can be used in a wide range of scenarios.
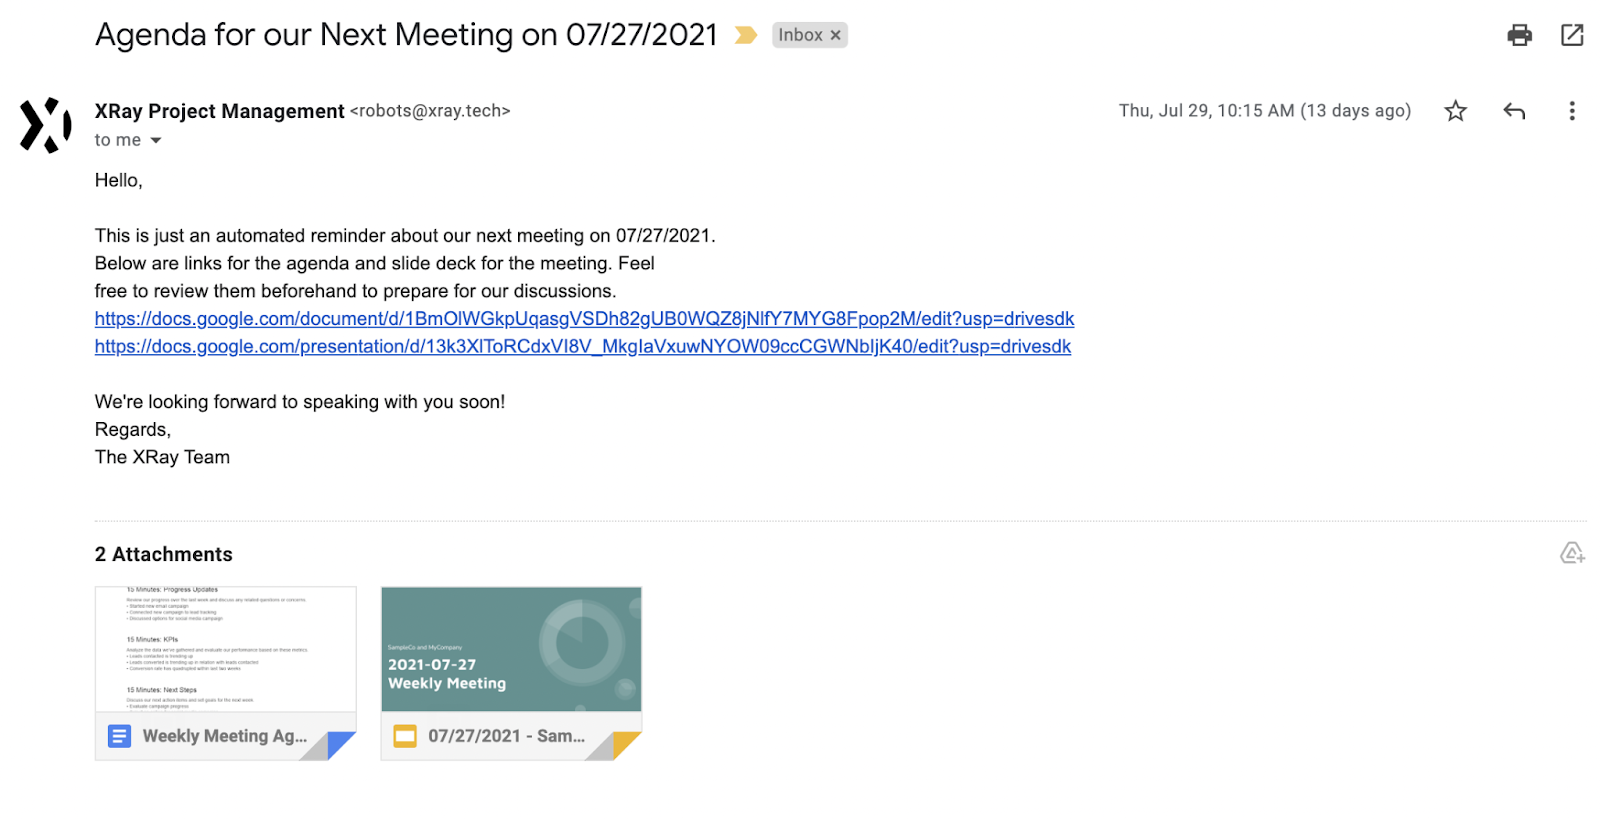
5. Test the automation
With all of your email fields filled out, it’s now time to test the automation. You should see a success message telling you that Zapier just sent an email. Check the email address you provided to see the final message, which should look something like this:
And now you’re all set. Your automation will create a Google Doc, a Slides presentation, and an email with links to both all by filling out a simple form.
Even if you’re not interested in automating your process for meeting agendas, the principles of this automation can apply to all sorts of situations. Consider any templated document that you use regularly, and think about how you can use these steps to automate that process, save time, and avoid errors.
If you’d like to find more automation tutorials or learn about XRay’s approach to automating workflows, check out our blog or our YouTube channel. You can also follow XRay on Twitter, Facebook, or LinkedIn.

Creating documents from templates is a useful way to save time, but automating the process can make it even more efficient and reliable. In this post, we’re going to show you how to create a Google doc from a template automatically.
This is a follow-up to our video about creating Google Slides presentations automatically, so be sure to read that if you missed it. Along with the next blog post, we’ll be building a three-part automation that creates a presentation, a document, and an email all at once.
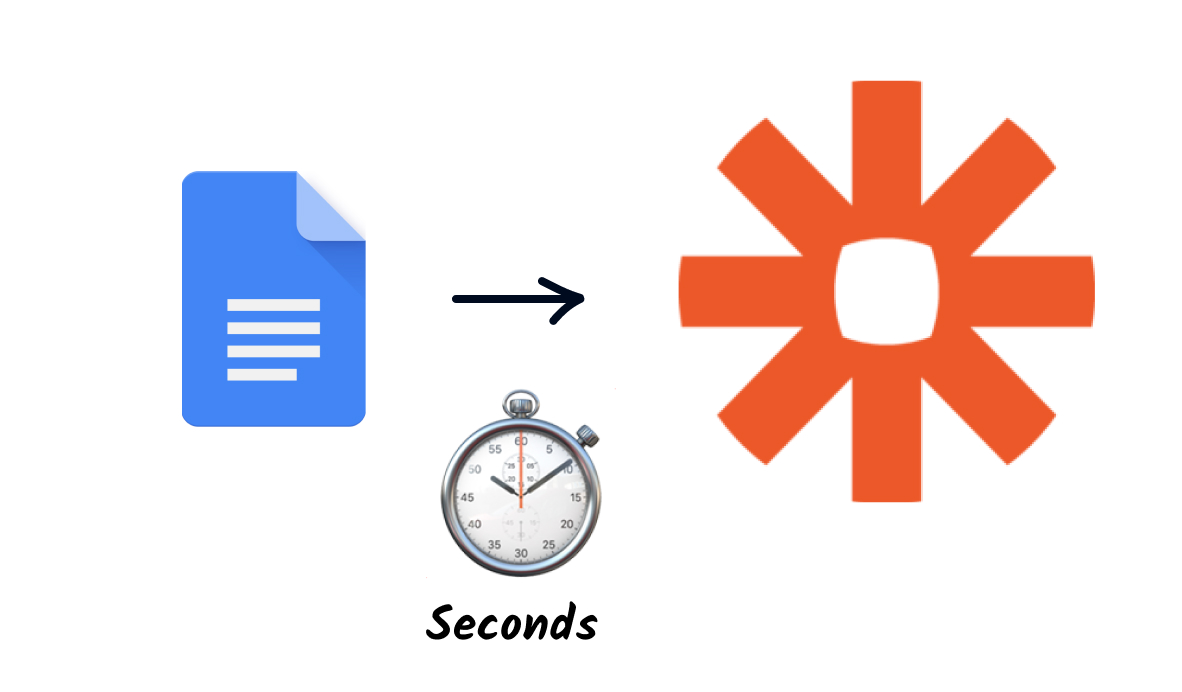
With this automation, you’ll be able to make frequently used documents in seconds - like reports, proposals, or, as in our example for this post, meeting agendas.
1. Create a Google Doc
2. Add {{variables}} to your Doc with curly braces
3. Create an Airtable Base with corresponding columns for each variable
4. Create a Form view and fill it out to create test data
5. Build the automation in Zapier
A. Trigger: New record in View - Airtable
B. Action: Action Create a new Doc from template - Google Docs
C. Match your data to your variables
6. Test your automation
Required Software
To build this automation, you’ll need Google Docs (of course 😁), Zapier, and Airtable. If you’d like, you could substitute Airtable with Google Forms or Typeform, but we recommend using Airtable databases to support your automations.
1. Create a Google Doc
First, we’ll make a Google Doc much like we made our Slides presentation in the last tutorial. Add all of the content and styling that you want to use in the finished document, and make a note of where the Doc is saved in Drive. You may also want to grab the doc’s ID for a future step. To find your Doc’s ID, look for the long alphanumeric string between /d/ and /edit in the address bar.
You don’t need to save this Doc as a template in Drive. Zapier doesn’t use Google’s template system, and will instead make copies of a regular document.
2. Add {{variables}} to your Doc with curly braces
Review your document and identify all the data that you want to update whenever you create a new agenda. In our example, we want to update things like the client’s name, the meeting date, our progress notes, etc.
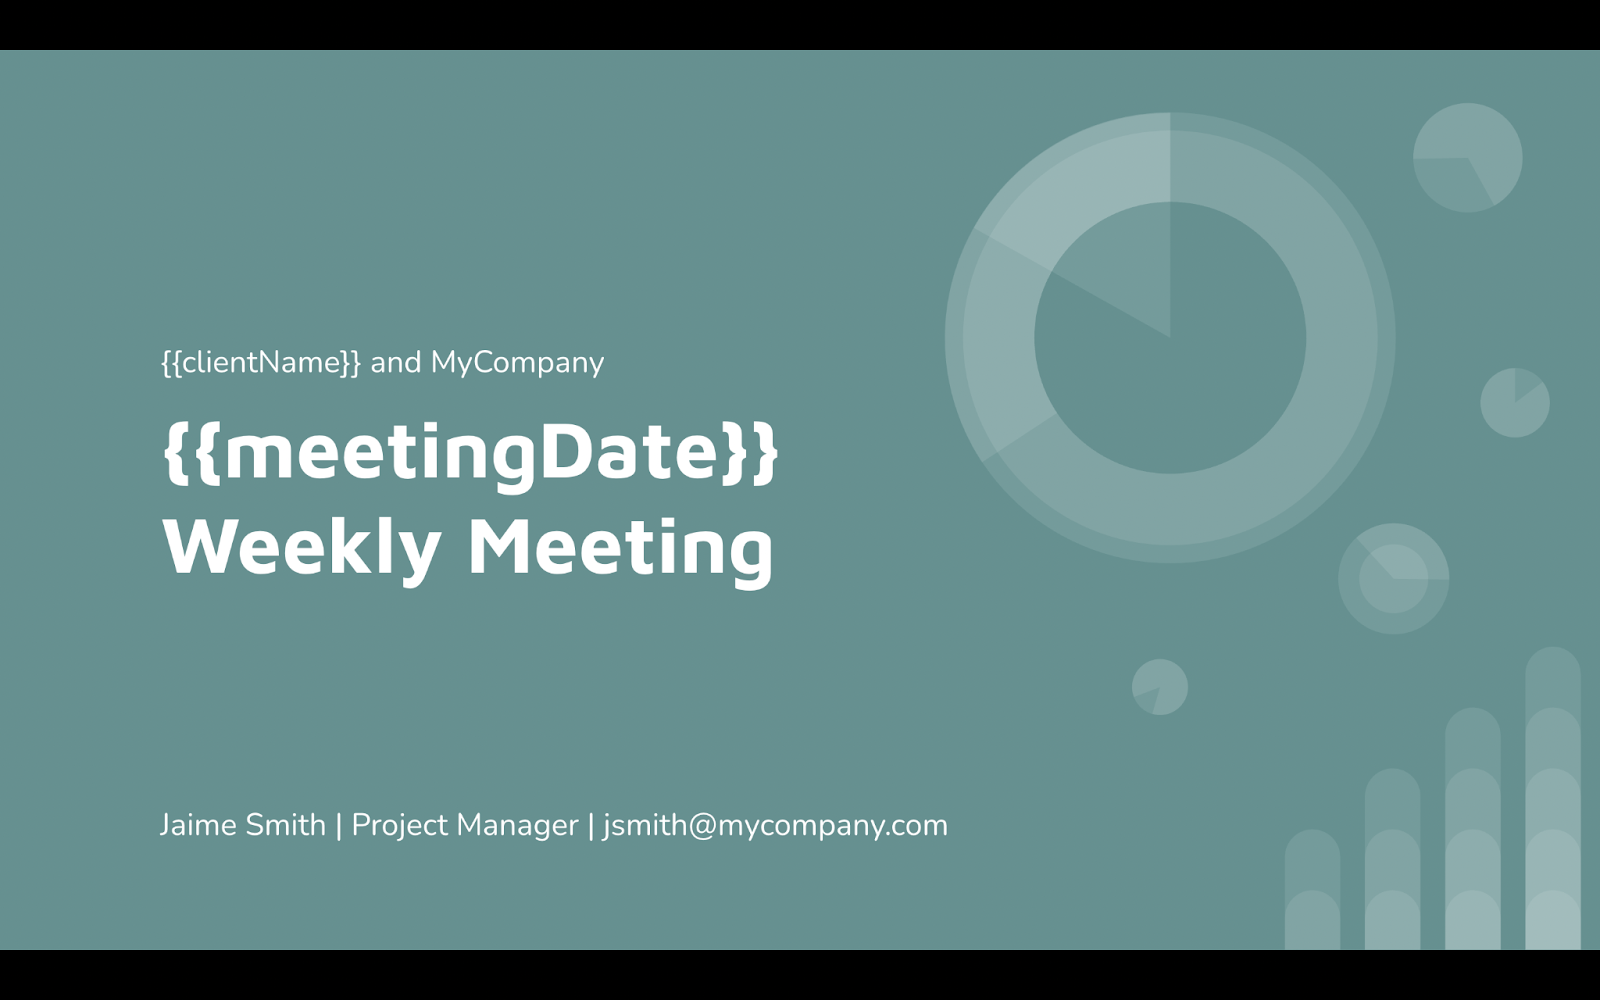
To create variables that Zapier will recognize and update with the data you provide, just type a simple, descriptive name for the variable and enclose it in {{curly braces}}. For instance, we’ve included variables called {{clientName}} and {{meetingDate}}.

Note: you can’t use hyphens or spaces in your variable names, but you can use capital letters and underscores.
3. Create an Airtable Base with corresponding columns for each variable
If you’ve already completed Part 1 of this tutorial to make a Slides presentation, then your Airtable base is all set, and you can move on to Step 5.
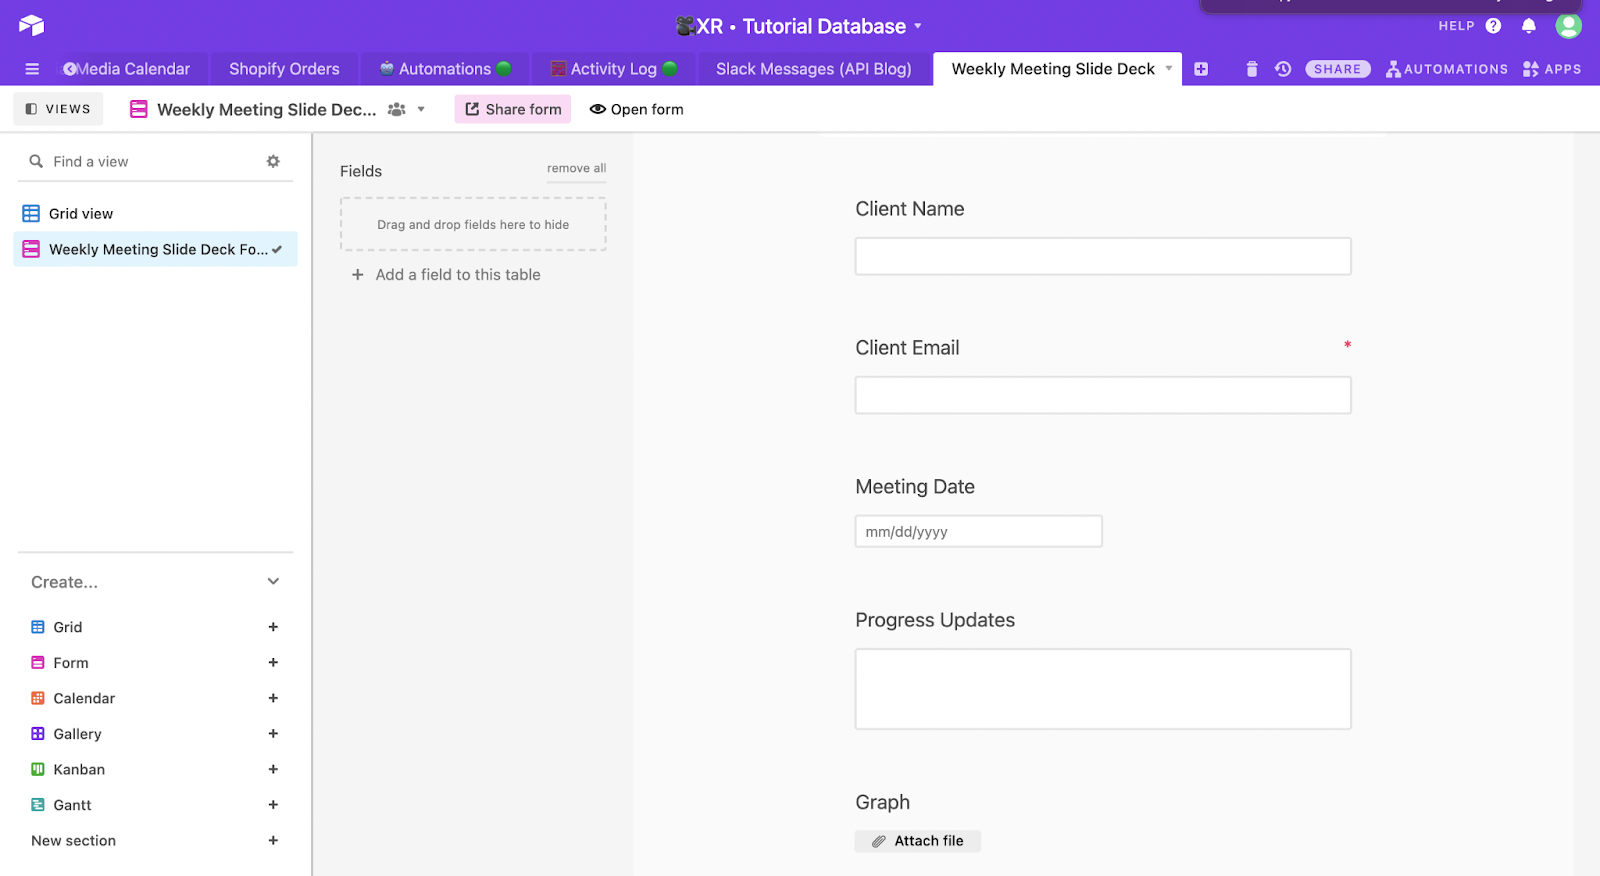
If you skipped Part 1, you’ll need to make an Airtable base that includes a column for each of the variables you created in your Google Doc template. For example, you can see that we have a “Client Name” column for the {{clientName}} variable, and a “Meeting Date” column for the {{meetingDate}}.

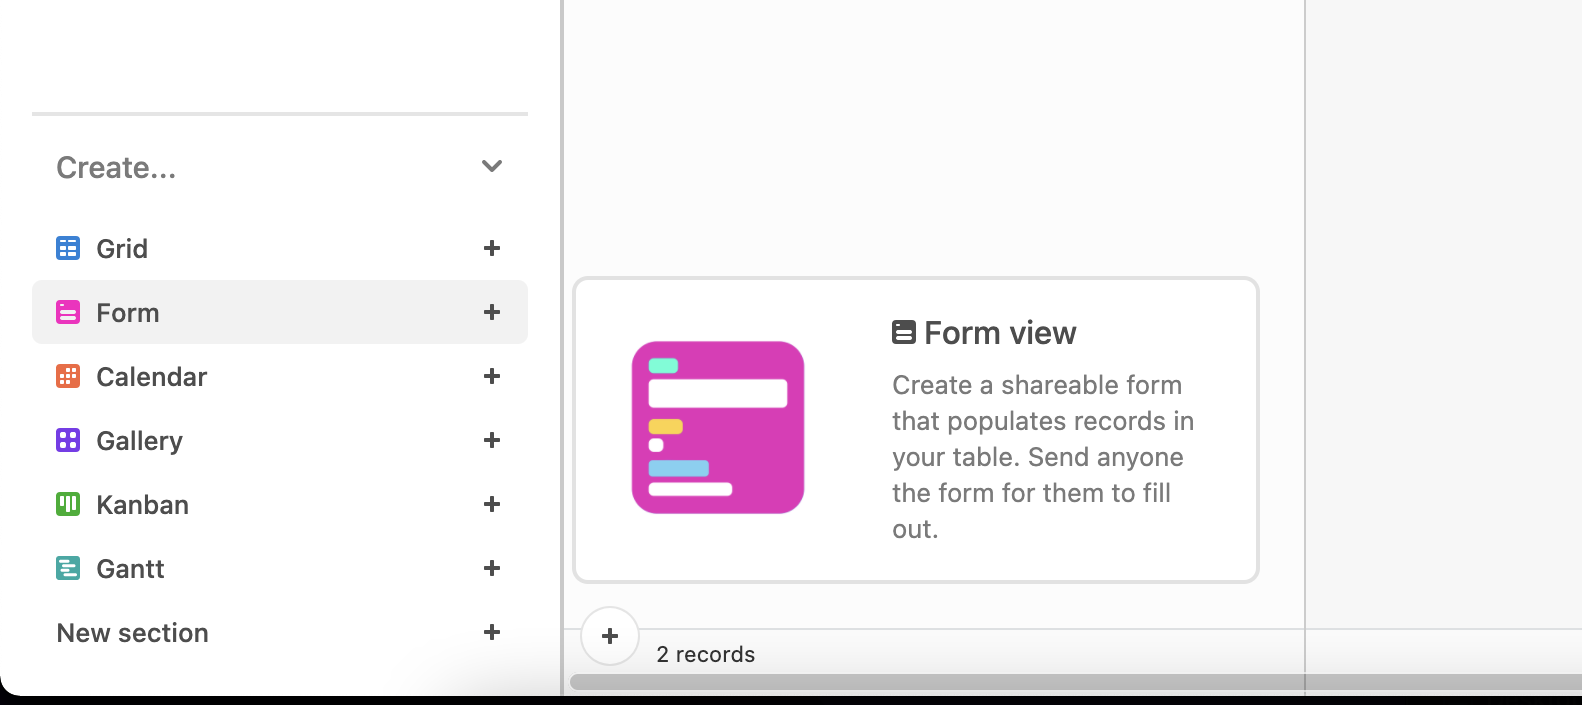
4. Create a Form view and fill it out to create test data
In the same base, create a new Form View. To make a new View, click on the “form view” option in the bottom left hand corner of the Airtable UI. This will create a new view in your base that rearranges your columns into a form.

Add any descriptions you’d like to the form, then click on “open form” to fill it out with test data, which you’ll need to build the automation in the next step. Whenever you’re preparing data for an automation, try to make your test data as realistic as possible to get the best results.
5. Build the automation in Zapier
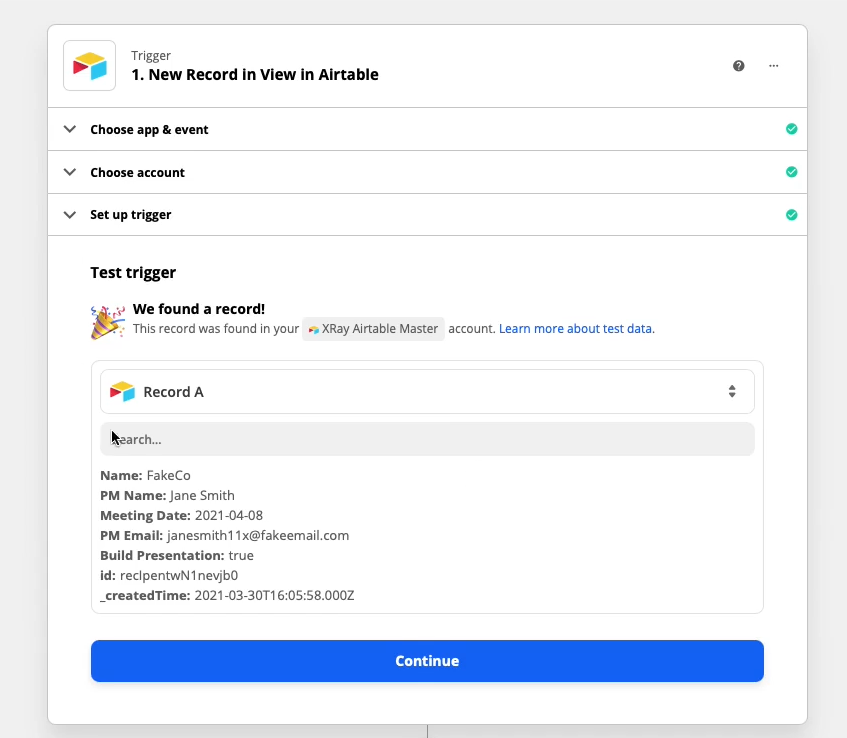
Trigger: New Record in View - Airtable
If you’re following along from Part 1, open up the Google Slides Zap you built and skip to “Action: create a Google Doc from template”.
If you skipped Part 1, make a new Zap. Choose Airtable as the app for your trigger, and set the trigger to “New Record in View”. Choose the base you made earlier, and select the grid view. This means that the automation will trigger whenever a new record is added to your base (i.e., whenever you fill out the form).
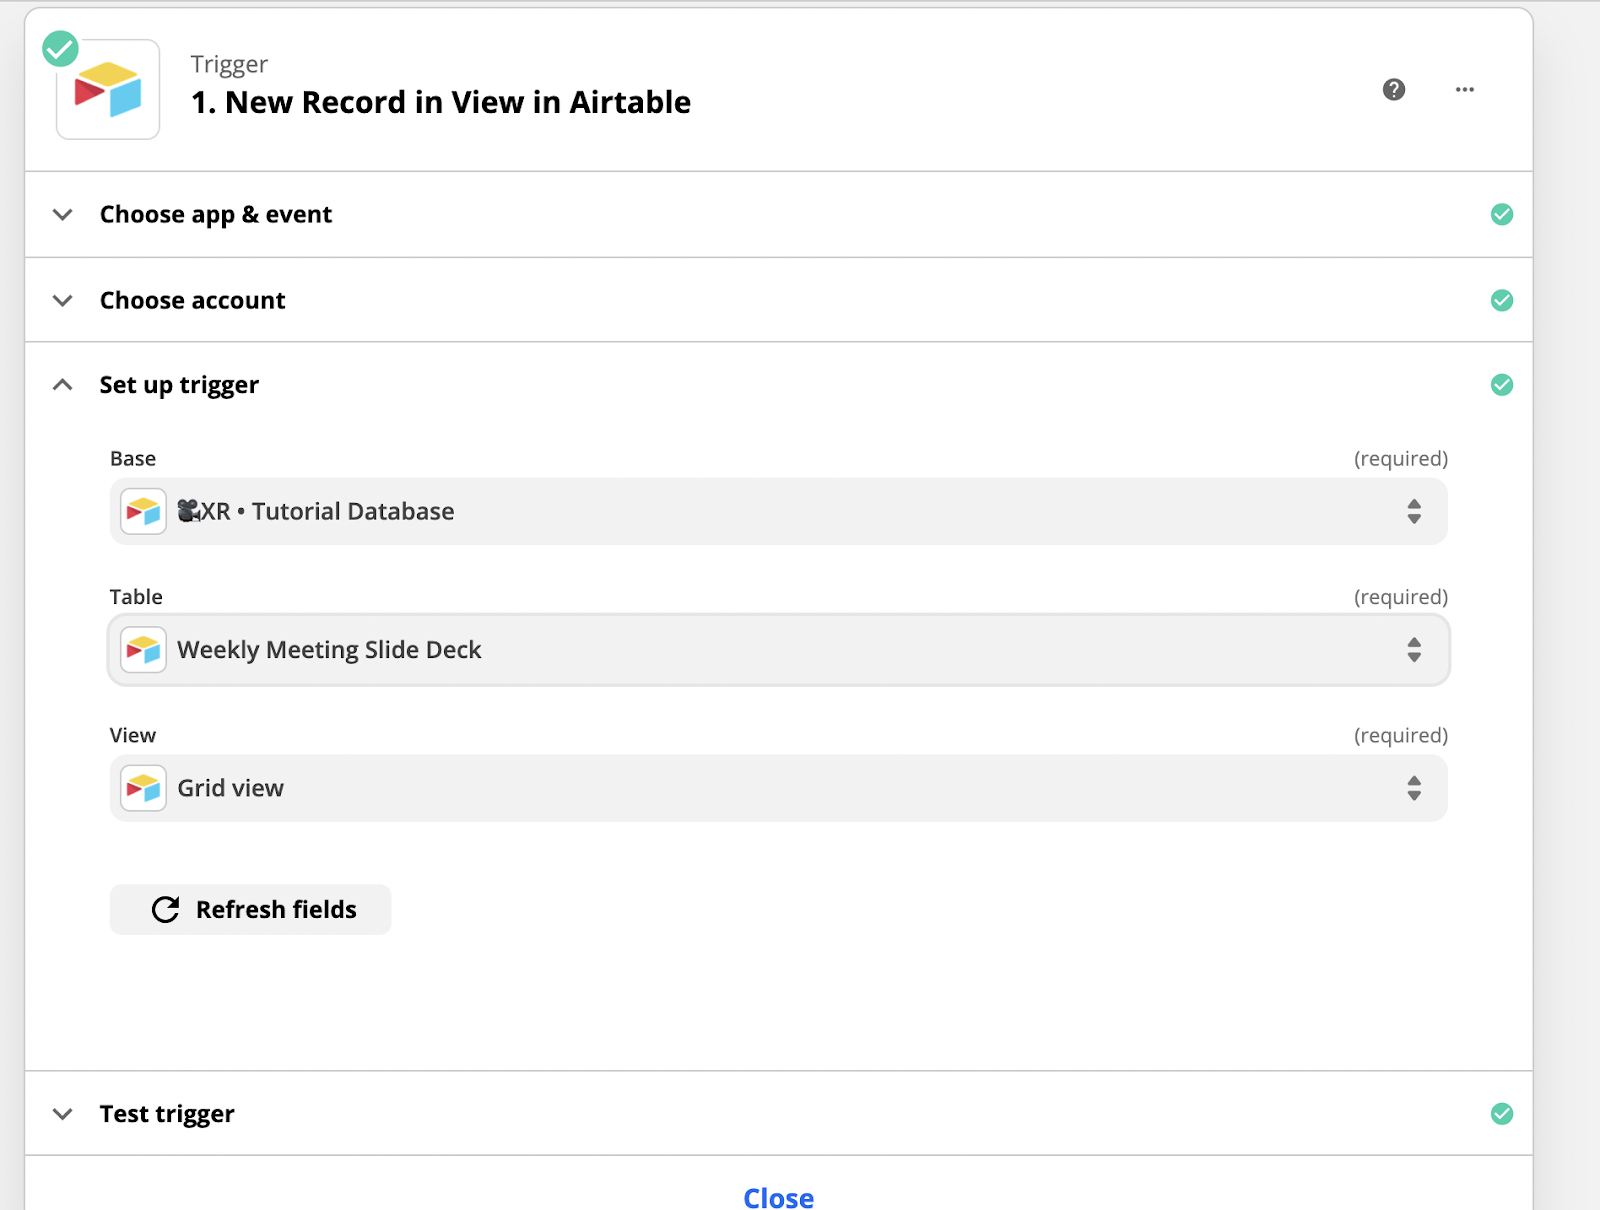
Action: Create a New Google Doc from Template
Add an action to your automation, and select Google Docs as the app. Choose “Create document from template”, and select the document you want to use as a template. You can find it by its name or enter the ID if you’ve copied it.

Then, match each piece of data you’re pulling in from Airtable to the appropriate Google Docs variable. For example, match the “Meeting Date” data to the {{meetingDate variable}}.

Note: if you want each document created from this template to have a unique name, you should use some of your data from Airtable in the title, such as the date and/or client name.
If Zapier hasn’t found a variable that you think should be there, go back to your doc and make sure that you’ve set them up correctly - no spaces, no hyphens, and enclosed in {{curly braces}}
6. Test your automation
Finally, click on “Test and Continue” to test the automation. If it’s successful, you’ll get a success message with lots of data about the document Zapier just created.
Search in that data for the “alternate link” and paste that into your address bar to access the document. You should see a new doc based on your template, updated with data from Airtable.
Reusing Data to Save More Time
Now, your automation will create two assets from one form, saving you even more time that would otherwise just be spent copying and pasting.
In our next post, we’ll finish up this automation with an email that will send both of our docs to a client. If you’d like to learn some more automation tips, check out our blog or our YouTube channel. You can also follow XRay on Twitter, Facebook, or LinkedIn.

Frequently used templates are a great opportunity for automation. Instead of manually entering data into your regular reports or presentations, you could automated that process with a simple form.
In this post, we'll show you how you can automatically create a Google Slides presentation from a template with a simple Zapier automation. This Zap will let you create any frequently used presentation in seconds, such as reports, kickoff decks, or, as in our example for this post, meeting agendas.
This might not sound like much, but when we combine this automation with other actions like creating a Google doc and an email that sends links to both of our documents, you’ll see how quickly automation can amplify your work.
But we’ll cover those steps in our next posts. For now, let’s just look at how you can automatically generate Google slides presentations from a template.
Steps:
1. Create a presentation in Google Slides
2. Add {{variables}} to your presentation in curly braces
3. Create an Airtable base with columns that correspond to your variables
4. Create a Form view and fill it out to create test data
5. Build your automation in Zapier
A. Trigger: New record in view (form view)
B. Create a presentation from template
C. Match your data to your variables
6. Test your automation
Required Software
To build this automation, you’ll need Zapier, Google Slides, and Airtable.
You could build a similar automation using alternative software if you’d prefer, as the same basic concepts will generally apply to other applications. If you’d like to trigger this automation with a survey from Typeform instead of Airtable, that will work just fine.
However, if you want to follow along step by step, we’d recommend using the same programs.
1. Create a Google Slides presentation to use as a template
Create a new Google Slides deck, and fill it in with all the content and styling that you want to see in the final product. You can also copy and paste an existing Slides presentation that you’re using as a template.
Note that you don’t need to save this slide deck as a template in Google Drive. Zapier can’t access Google’s template system, so the automation will be set up to just create a copy of a regular Slides file updated with custom data.
2. Use curly braces to add {{variables}} to your presentation
Once your presentation is ready, identify the text that you want to update each time you create and send out the deck, such as the client’s name, the date of the meeting, your progress updates - anything that needs to be dynamic.
To replace that text with variables that Zapier will recognize, just give your variable a simple name and enclose it in curly braces. For instance, you’d replace the meeting date with something like this:
{{meetingDate}}
You can use underscores or capital letters in your variable names, but it’s best to avoid using spaces. While Zapier can recognize Google Slides variables with spaces, it can’t do the same for Google Docs, so it’s easier to just avoid spaces altogether when working with G Suite.
In the finished automation, your inserted text will adopt the style, size, and placement of your variables, so make sure that your design and layout is set up the way you want it.
You can also replace a variable with an image in Google Slides to add some rich visual content. Just because you’re automating this process doesn’t mean you need to sacrifice the quality of your presentations.
3. Create an Airtable base with corresponding columns for each variable
Next, head into Airtable and create a new base from scratch.
Populate this base with a column that corresponds to each of the variables you just created in your Slides presentation. For instance, you can see that our Airtable base has a field called “Client Name” for the {{clientName}} variable, a “Meeting Date” column for the {{meetingDate}} variable, etc.
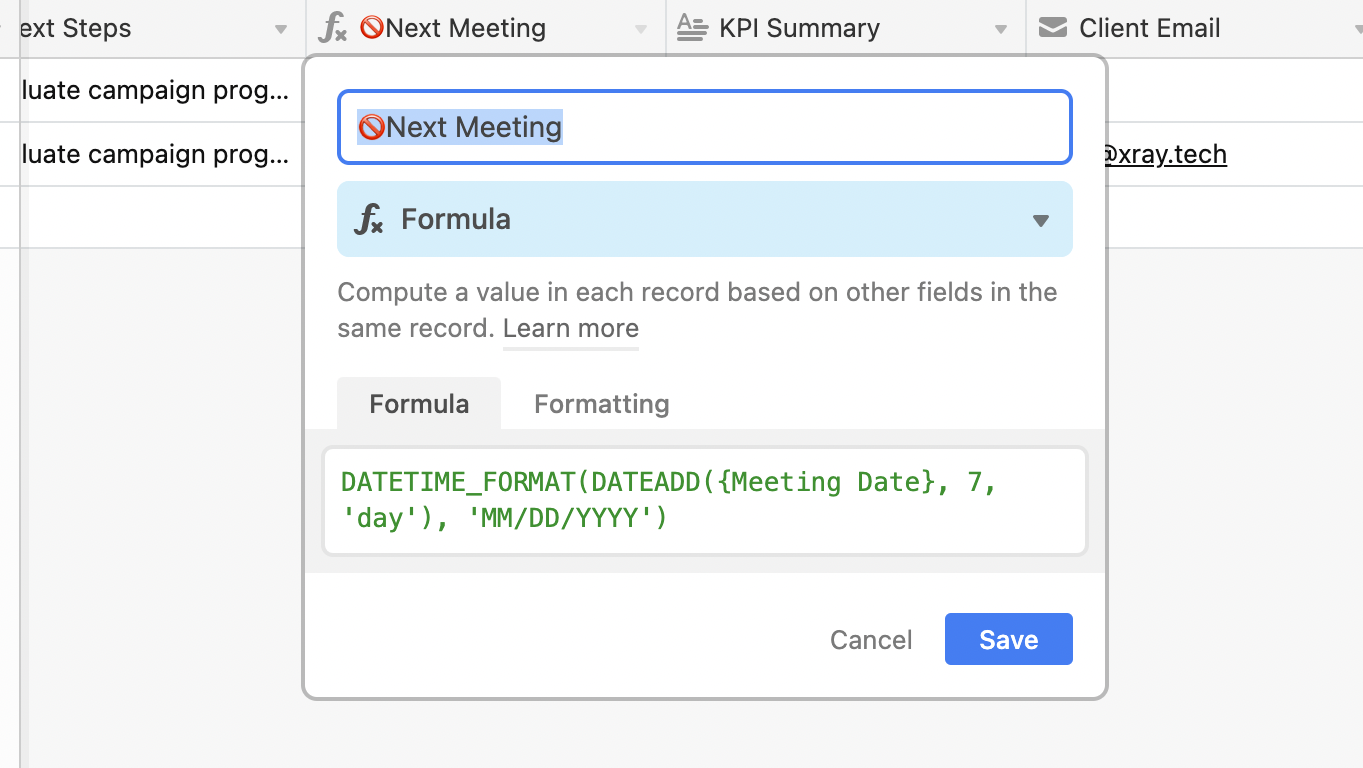
Be sure to set each column to an appropriate type, and make use of Airtable’s functions to perform calculations. For example, we’ve set up a simple function in the “Next Meeting” column to add seven days to the date stored in “Meeting Date”. Adding automated calculations like this makes it even faster to fill out the form and create the deck.
4. Create a Form view in Airtable
In your Airtable base, use the “views” menu in the bottom left hand corner to create a form view.
This will create an editable form that you can use to add records to your base one field at a time. You can add descriptions to each question or prompt, and then click on “open form” to actually enter a response.
Fill out the form with test data and submit it. With our presentation, database, and test data all set, it’s time to build the automation in Zapier.
5. Create the automation in Zapier
Trigger: New record in view | Airtable
To start the automation, choose Airtable as your app, and select ‘New record in view’ as your trigger.
Pick the main grid view and continue.
Action: Create a presentation from template | Google Slides
For the first and only action of this automation (for now), select Google Slides as your app and choose ‘create a presentation from template’ as the action.
Pick the presentation you created in the first step of this tutorial, and match up all of your data from Airtable to the appropriate variables.
If some of your expected variables are missing, go back and make sure you didn’t use any hyphens in the variable names.
Test your automation. It should create a Google Slides presentation with the data you submitted and the styling laid out in the template.
A Simple Start for a Helpful Automation
With this automation complete, now you can make your frequently used presentations in seconds. In our next posts, we’ll build on this automation by creating a step for an automatically-generated Google Doc, and an email that sends both assets to our client.
Get a copy of this Zap from Zapier here.
To learn more about XRay.Tech and how we create more time for mindful work with automations, check out our blog or our YouTube channel. You can also follow XRay on Twitter, Facebook, or LinkedIn.

While Zoom’s recording feature is a great way to temporarily save calls, we at XRay wanted to create a more permanent way to archive our meetings for future reference.
With this simple Zapier automation, you can save your Zoom recordings and share them with anyone without having to take up precious space on your hard drive or pay for a higher-priced tier of Zoom with unlimited cloud storage.
You’ll just need accounts for Zoom, Zapier, Google Drive and YouTube to get started. You can also follow along with our video tutorial.
How to Build the Zap Step-by-Step
- Record a call in Zoom
- Create a trigger action: New Recording in Zoom
- Add an action step: Save File to a Folder in Google Drive
- Add an action step: Upload to a YouTube Channel
Step 1: Record a Call in Zoom
Before you start building the automation, you’ll need to make sure you have a recorded call to use as test data. If you don’t already have a recording in your Zoom account, make one now.
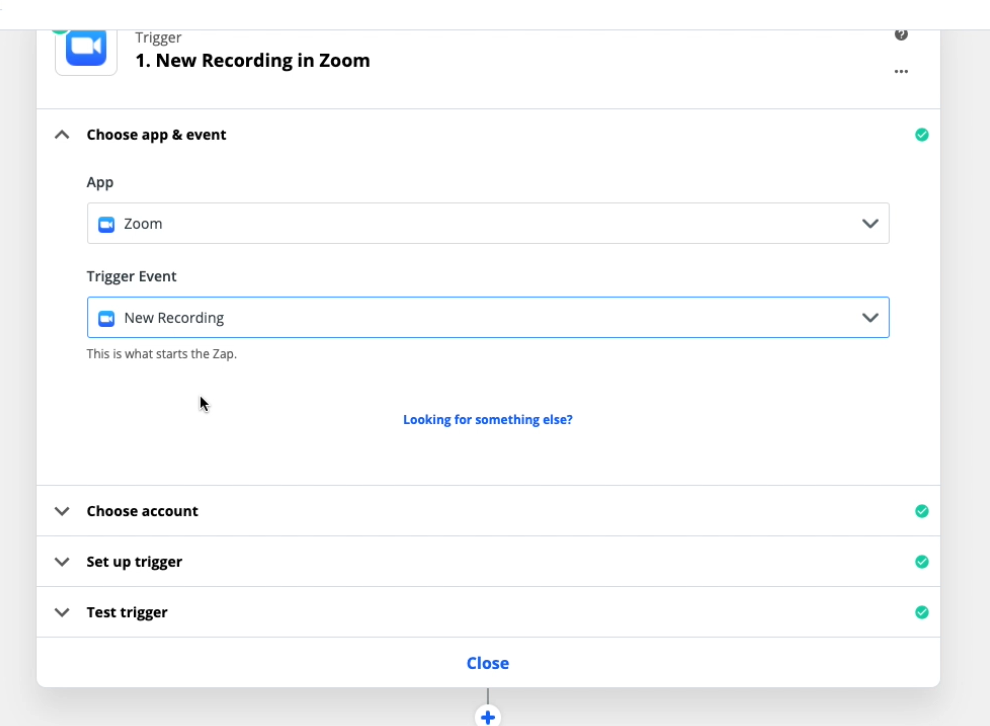
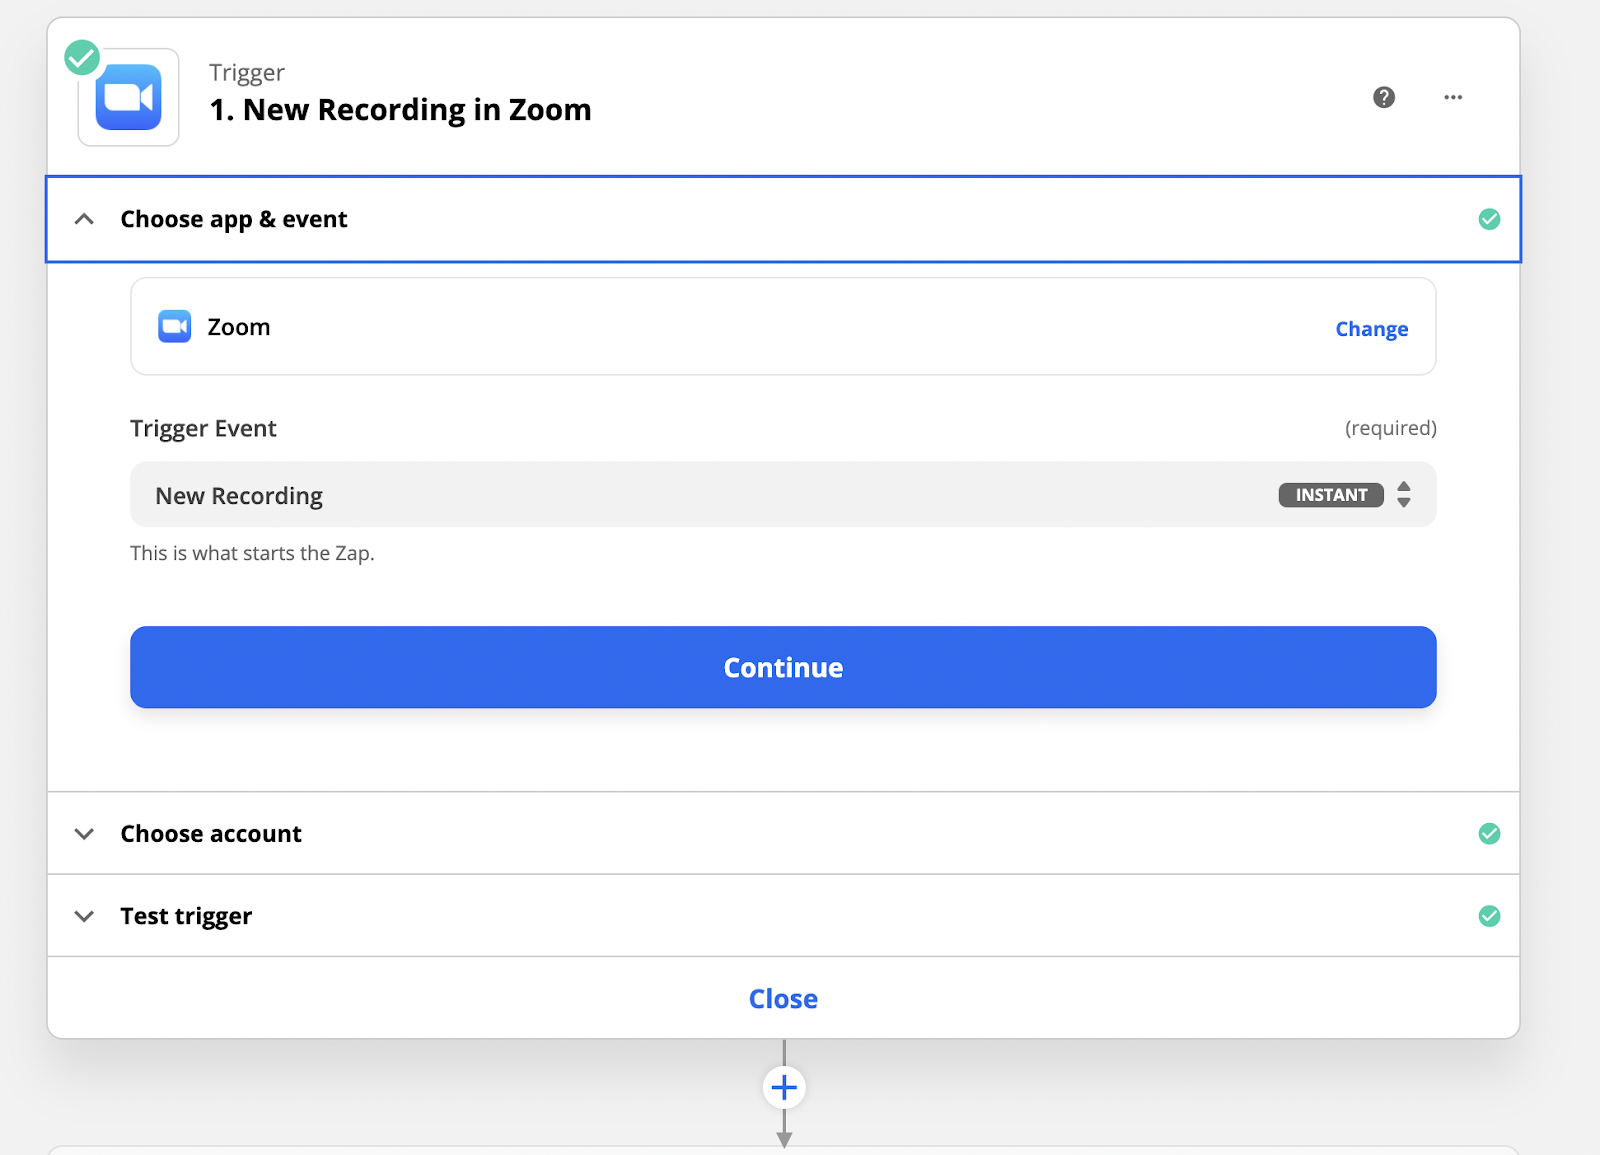
Step 2: Create a trigger action: New Recording in Zoom
Create a new Zap in Zapier, and choose Zoom as your trigger app. Then, select “New Recording” as the trigger event.
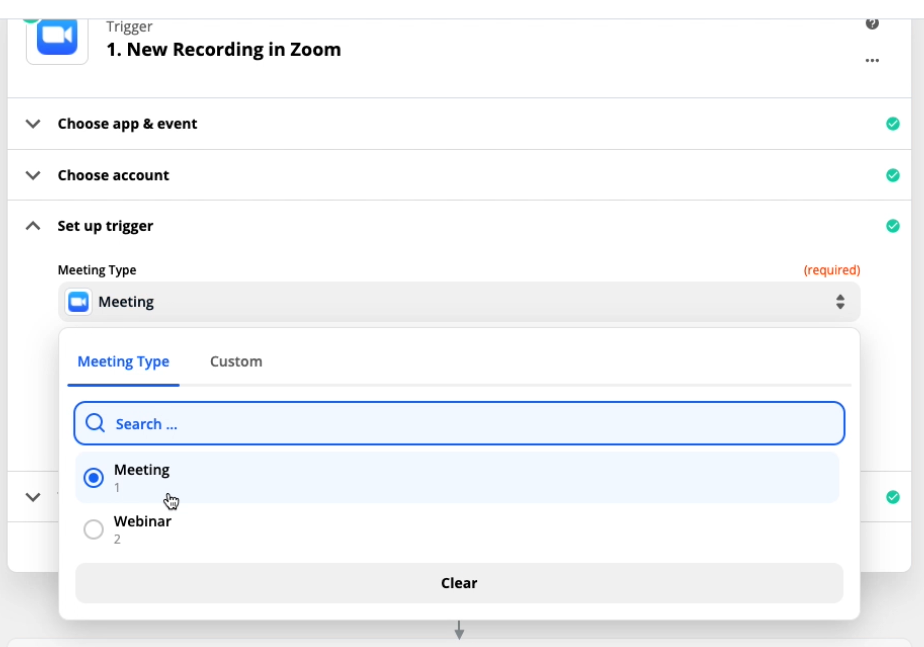
Under “Set up trigger”, choose whether your recordings will be Meetings or Webinars.
If you record both on Zoom, you’ll need to make two separate Zaps to capture them: one with “Meetings” selected, and one with “Webinars” selected.
Next, test your trigger. It should find your most recent Zoom recordings, but you may have to click “Load more” to refresh if you’ve just made a new recording that you want to test.
Note: With certain plans, Zoom only holds your cloud recordings for 7 days.
You’ll see that Zapier’s pulled in all sorts of data from Zoom, but the main thing we’ll be concerned with is the variable called “download_url”.

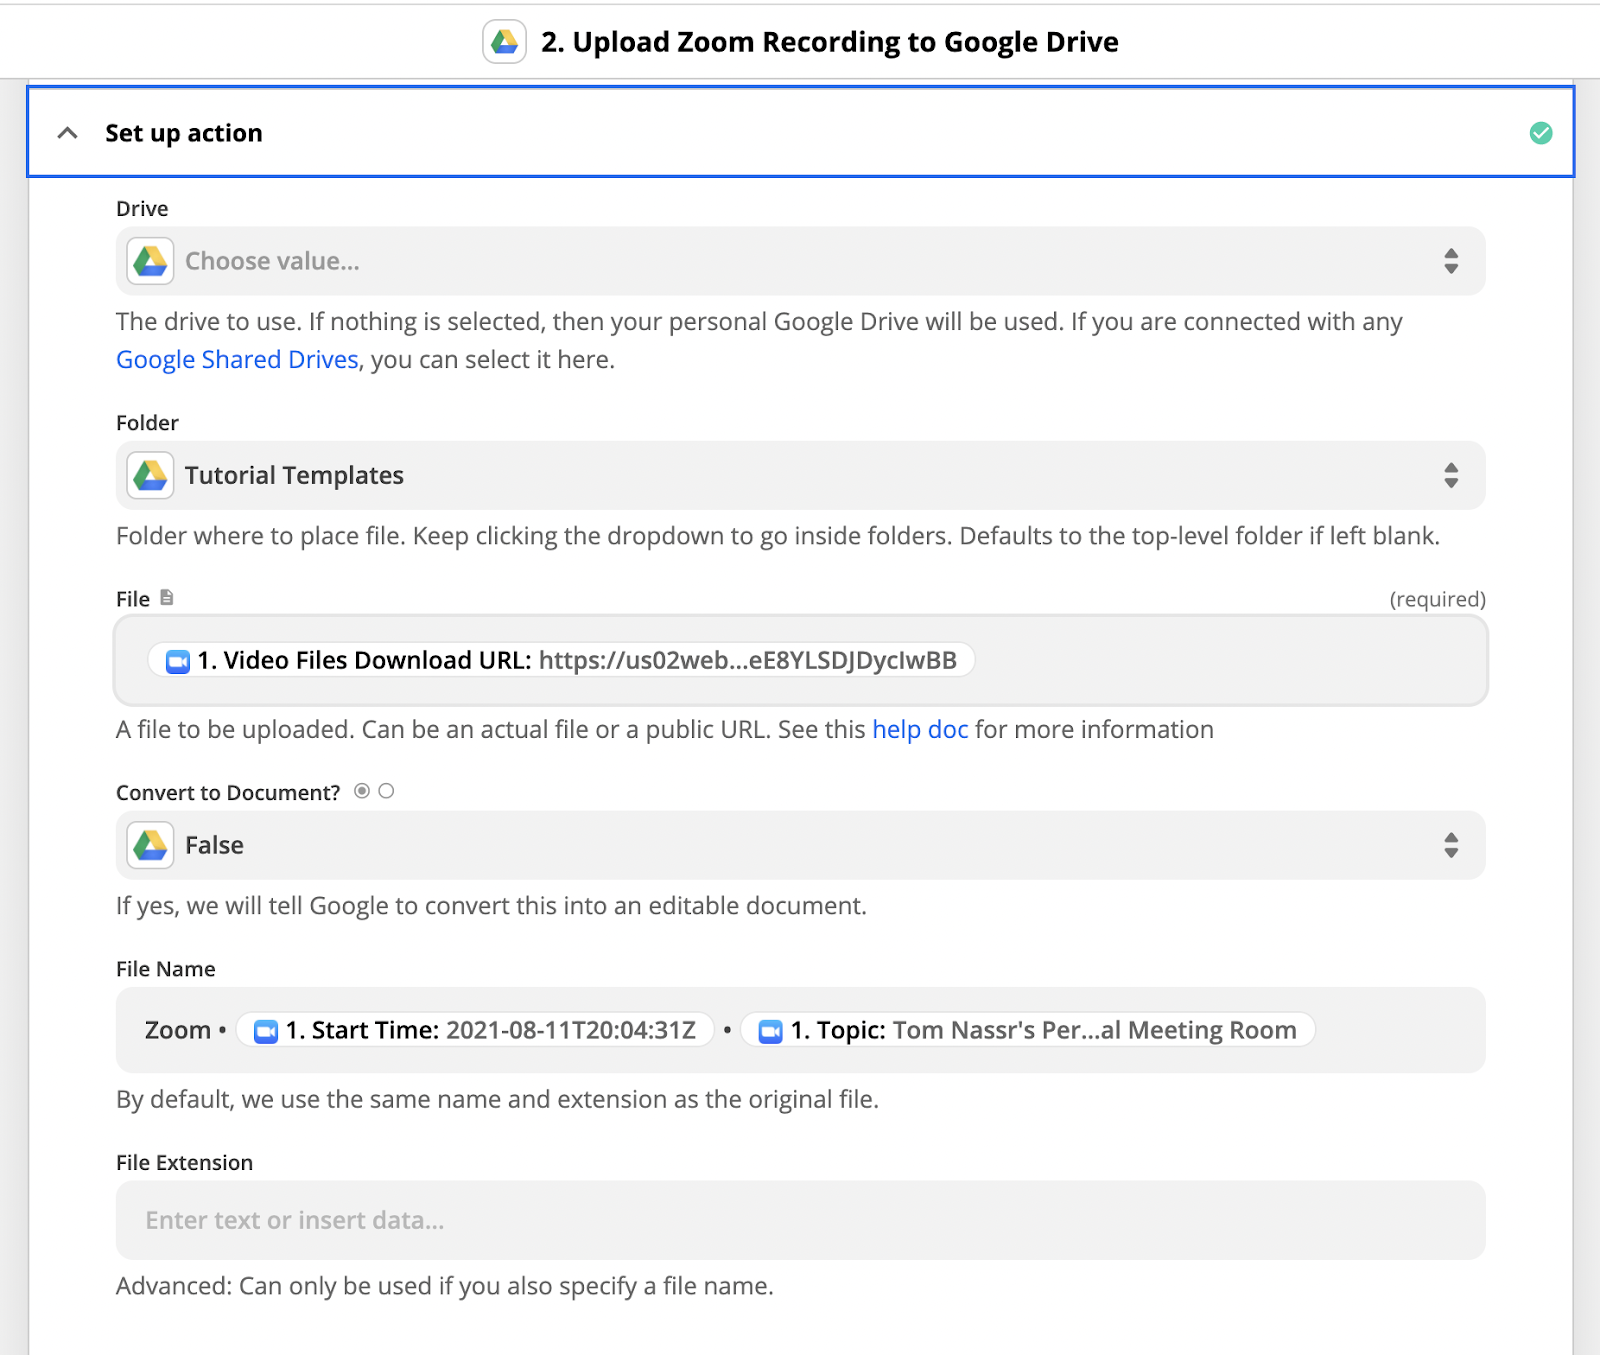
Step 3: Add an Action Step - Save File to Google Drive
Before we can upload your file to YouTube, we need to save it to Drive first. This is because YouTube can’t upload a video from a download link, which is all that Zoom gives us to access our recordings.
Add an action step to your Zap, and choose Google Drive as the app. Then, select “Upload File” as your Action Event

Under Action setup, select your Google Drive account (you’ll need to connect it with Zapier if you haven’t already) and choose the folder you want to save your recordings to.
Then, in the “File” field, use the download URL retrieved in the first step: “1. Video Files Download URL.”
Leave “Convert to Document?” blank, and name your file whatever you want. To give each file a unique name, just select any of the variables that Zapier pulled in: Start Time, Topic, etc.
Lastly, enter “.mp4” as the File Extension to make sure Drive will process the file as a video.
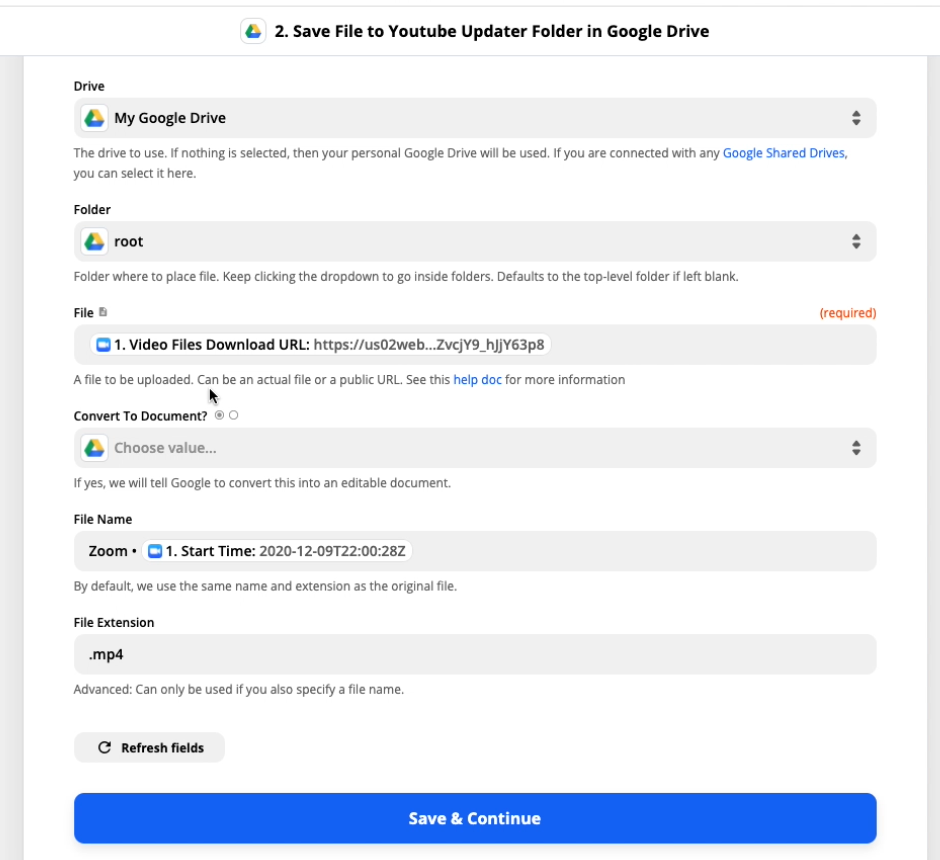
Test this step, then continue if everything worked properly.
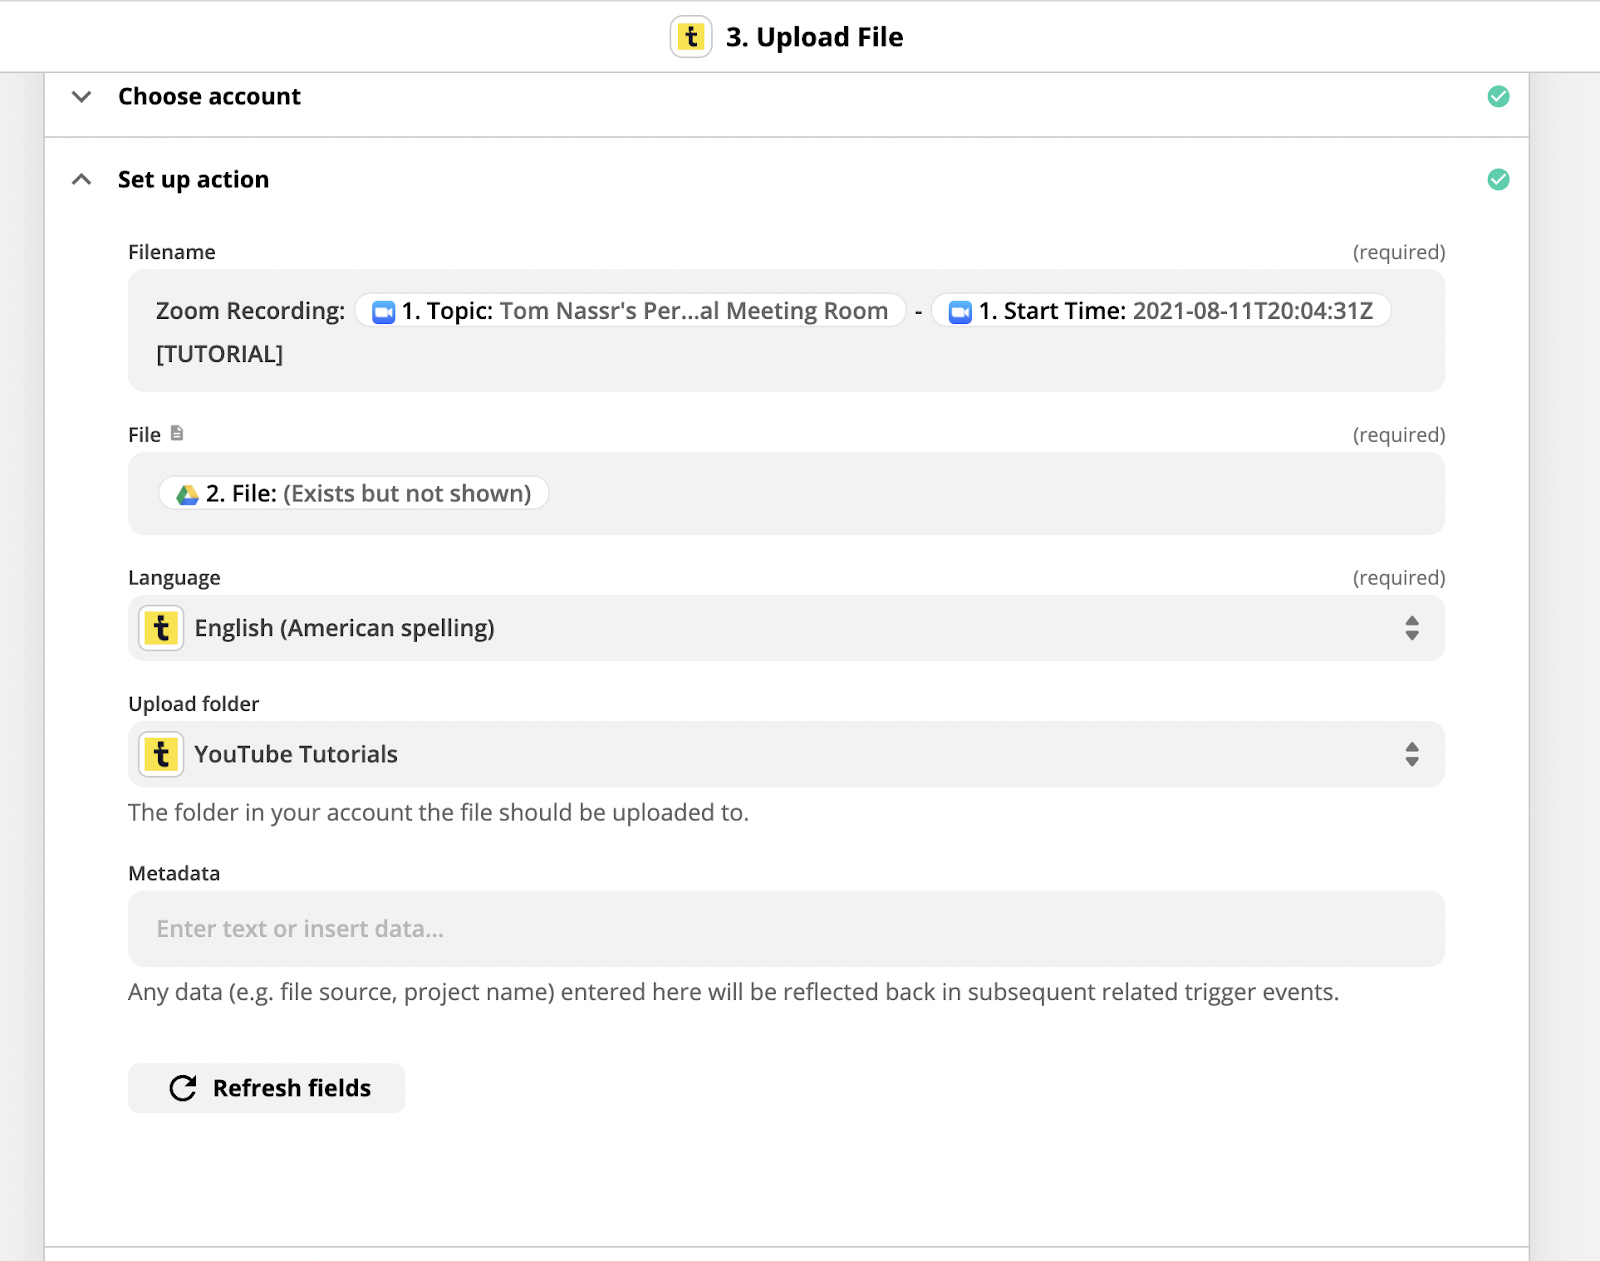
Step 4: Add an action step - Upload to a YouTube Channel
Finally, it’s time to actually upload your video to YouTube.
Add another action step, choosing YouTube as your App and Upload Video as your Action Event.
Fill in the title and description fields with whichever variables you’d like. We’ve chosen the recording Topic for the title and the Start Time for the description.
For the “Video” field, select the variable that says “2. File (Exists but not shown)”. This is the video file itself, and that “exists but not shown” message just means that Zapier can’t show a preview of the video file.

Next, select whether you want the video to Public, Private, or Unlisted. You can ignore the Publish At field, and add any tags you want to the video (but there’s no need to add tags if your video isn’t public). Choose whether or not you want to notify your subscribers, and then click “Save and Continue” to test the step.
If you set up the Zap correctly, you should now see the video getting uploaded to YouTube. You can turn your Zap on, and now you’ll be able to save all of your Zoom recordings without having to pay more for Zoom.
If you’d like to learn more about how automation can support your workflows, be sure to check out our blog or our YouTube channel. You can also follow XRay on Twitter, Facebook, or LinkedIn.

Starting your automation with the right trigger is key to building a helpful automation that people will actually use. If triggering an automation is too complex or requires too much effort, you’ll have a hard time getting your team to adopt it.
In this post, we’ll show you how you can trigger an automation with a simple BCC in an email and copy that email into a Slack message.
To copy this automation and follow along with our quick tutorial, go to the Zap’s public page on Zapier: https://zapier.com/shared/ad8c9ea6d7500e18159fbef41b69d4fd71f1dadf
Required Software
• Gmail (or another email client)
• Slack (or another messaging app)
• Zapier
Automation Steps
1. Designate an address to BCC
2. Trigger: New Email Matching Search
3. Action: New Channel Message in Slack
Step 1: Designate an address to BCC and Send a Test Email
Before you start building the automation, you should have an email address in mind that you’ll direct the BCC to.
For our example, we’ll be BCCing content@xray.tech to have any email copied into a Slack message. You may want to create an alias or a group in GMail to do something similar. You can send messages about leads to marketing@yourcompany, or send client updates to clientrelations@yourcompany.
For the purposes of following this tutorial, you can also just use any email address you have access to, but for building an automation you’ll actually use, it’s best to use a contextually appropriate email address.
Once you’ve picked your address, send a test email with that address BCC’d.
Step 2: Trigger - New Email Matching Search
Now that you have a test email to work with, go into Zapier and make a new automation.
Choose Gmail as your app, and select “New Email Matching Search”. Sign in to your Gmail account and process to trigger setup.
Then, in the “Search String” field, add a search term to find emails with your designated email address like this (without brackets):
bcc: {your@email.address}

You may want to add additional parameters to make the trigger more precise, such as “in:sent”, which will make it so only messages that you’ve sent can trigger the automation.
Test your trigger, and make sure it pulls in the test email that you just sent at the start of this tutorial.
Step 2: New Channel Message in Slack
Add a new action to your automation, and choose Slack as the app. Then select “New Channel Message”. Sign in to your Slack account and proceed to the action setup.

Pick the channel that you’d like to send the message to, and draft the message template. Be sure to include dynamic data from Zapier like the email body (1. Body Plain) and the recipient’s email address (1. To Emails).
Include a link to the Zap so that you can easily access it in case something looks wrong when the message is sent.
Set “Auto-expand links” to “No” if you’d like to keep the message from taking up lots of space, and leave the rest of the settings as they are.

Test the step, and check Slack for the new message. You should see a message that looks something like this:

And you’re all set.
Taking the Automation Further
We’ve set up this automation to be as simple as possible just to demonstrate how BCC triggers work. If you want to build a more robust automation, we’d recommend including a lookup table in Airtable to make it so that you can use a single Zap to copy email messages into any Slack channel based on which address is BCC’d.
You could map messages sent to content@your.company to your #content channel, sales@your.company to sales, etc.
We’ll post a more advanced version of this automation soon, but for now, you can check out these posts on using Airtable as ODb to get a sense of how it works.
Seamless Automated Workflows
At XRay, we want to make work easier and more productive for everyone. We love using simple triggers like this because they integrate neatly into anyone’s workflow. You don’t need to know anything complicated or technical to use an automation; just adding a simple BCC to an email is all you need.
If you’d like to learn more automation tips for beginners or advanced users, check out our blog or our YouTube channel. You can also follow XRay on Twitter, Facebook, or LinkedIn.

Templates are a wonderful time saver at work, making it quicker and easier to whip up a presentation deck or meeting agenda on the fly.
Apps like Google Docs and Slides have easy tools for saving any of your documents as a template that you can reuse whenever you’d like, so you don’t have to start from scratch every time.
But what if we told you there’s an even better way to handle your templates? What if you could automate the entire process of creating docs and presentations from templates, so that all you had to do was fill in a quick form?
It’s true, and the answer is simple: automation.
Automating your templates with Zapier (and a little help from Airtable) will:
- Make it even faster to create docs from templates
- Reduce the chance for errors
- Keep your team in the loop whenever a new document is created
- Allow anyone on your team to create presentations with minimal design or technical skills
In this post, we’ll show you how you can build a Zap to automatically create a Google Slides presentation from a template. Just follow along, and customize your own presentation however you’d like.
Everything we show you in this tutorial will also work for Google Docs, so you can make a text document instead if you’d prefer.
What you’ll need for this tutorial:
- Zapier account
- Google account
- Airtable account
Don’t worry; Zapier and Airtable both offer free accounts which will work just fine for creating this automation.
Step 1: Create Your Presentation
First, you’ll need to make your presentation. For this tutorial, we’ll just make a simple deck with only two slides, but your presentation can be any length that you want.
- Create the file in a convenient spot in Google Drive. You’ll need to access the file path while building the automation.
- You don’t have to save this as a Template; we’ll actually be copying the file itself, not using Google’s built-in template system.
Step 2: Identify and {{Mark}} the Variables
Now, you need to identify the information that will be replaced and filled in each time you use the template. For instance, the client company’s name, your project manager’s name, or the date. These are your variables, and you’ll need to format them a specific way for the automation to work.
Here, we have our client’s name: “NotRealCo”. We’ll replace that with {{client_name}}
You can call you variables whatever you want, but curly braces are essential. Using them will signal to Zapier that you want to use that bit of text as a variable.
- Replace each variable with a descriptive term enclosed in two sets of curly braces, like {{client}} or {{starting_date}}
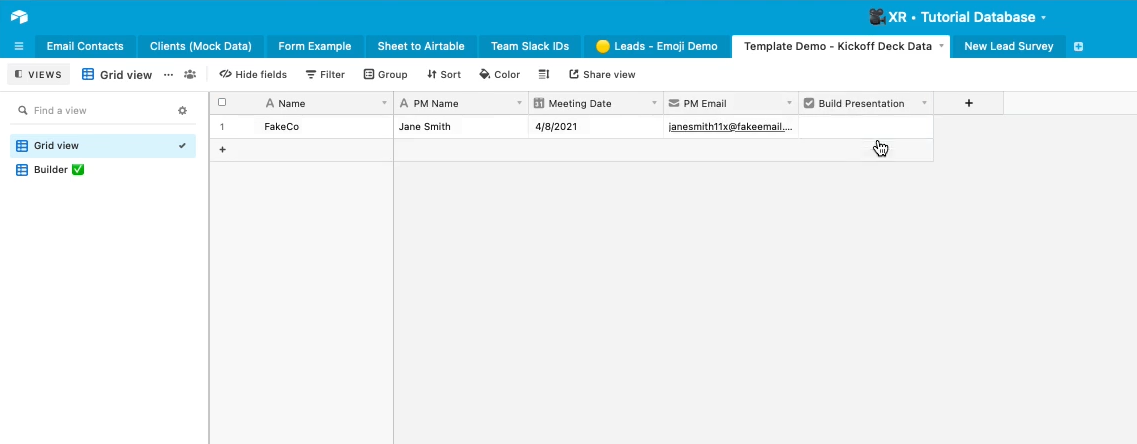
Step 3: Create a Table in Airtable
For this step, we’ll move over to Airtable. Create a new base, and make a new table from scratch within that base.
In your new table, create a column for each of your variables. You can use emojis to indicate which variables you’ll enter manually and which will be the result of a calculation or formula. You can read more about how to use emojis in Airtable here.
Then, add a final column called “Build Presentation”, and make the field type a checkbox. Once you’ve made your automation, you’ll trigger it by checking this box.
- Create a table in Airtable, with a column for each of your variables
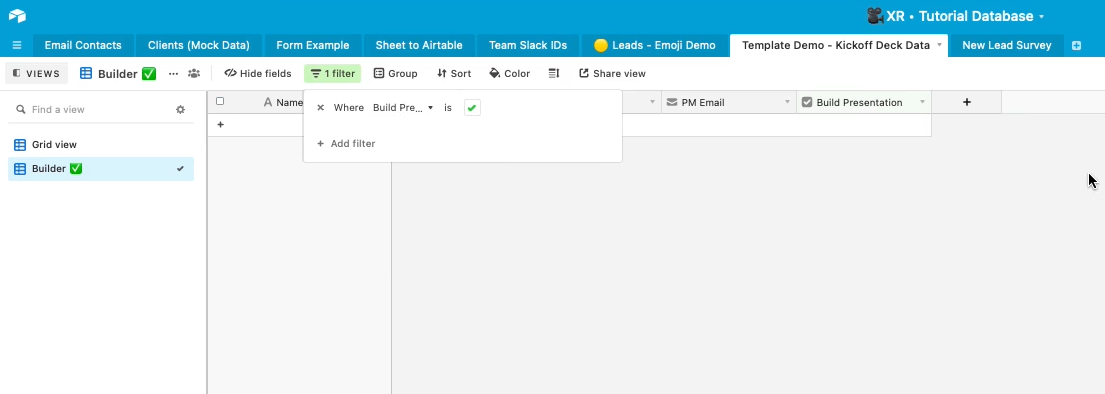
Step 4: Create a New “Builder” View in Airtable
In the same base, create a new Grid view. Click on the “Filters” button to add a new filter: where “Build Presentation” is Checked ✔. Go back to the original grid view, enter some test data into each column, and click on the check mark once it’s all set.
- Create a “Builder” view in the same base, and submit test data from your initial grid view.
Step 5: Set up Your Zap
Now it’s time to bring it all together in Zapier. Create a new Zap, and start with Airtable as your trigger app. Then, choose “New Record in View” as your trigger, and select the base and table, and “Builder” view that you made earlier.
Test your trigger. It should find the data you just added.
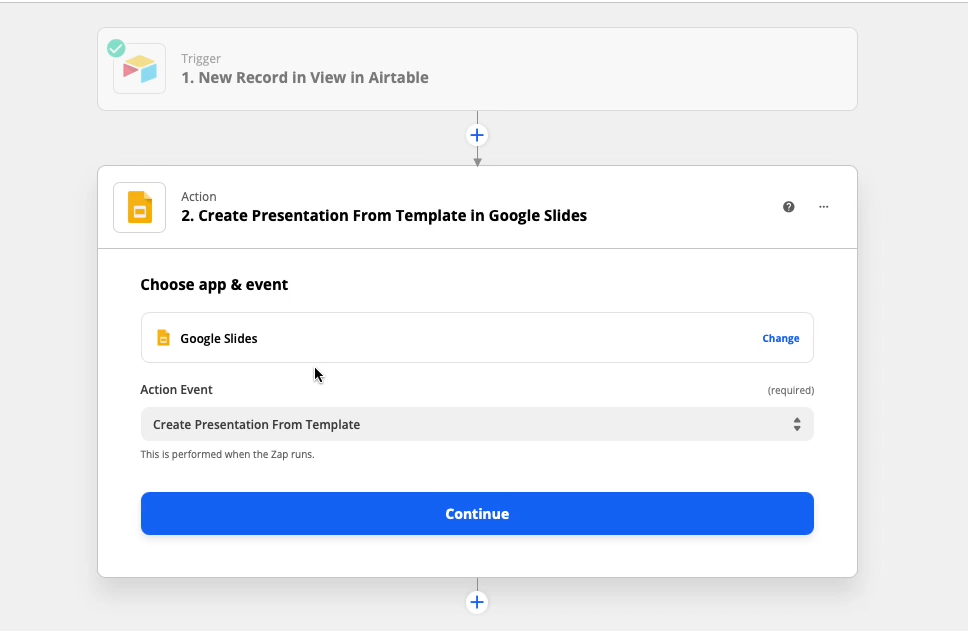
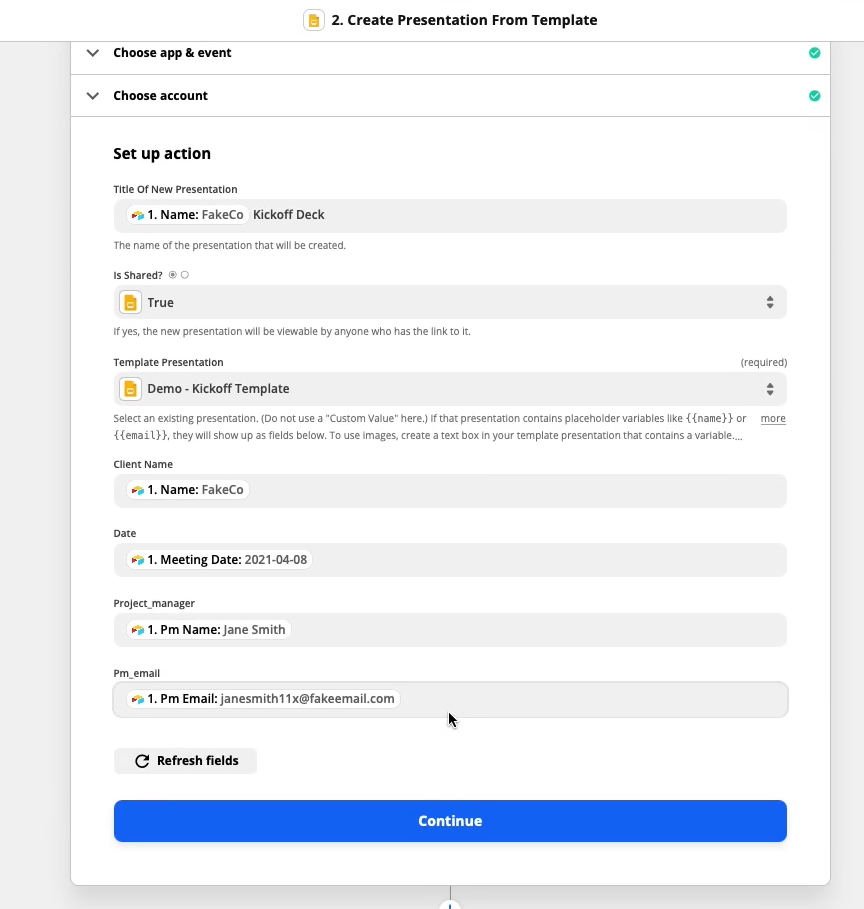
For the Zap’s first action, choose Google Slides and select “Create Presentation from Template”. Choose the deck you made as your template.
In the following steps, match each variable to the data pulled in from Airtable. {{date}} should be filled in with Meeting Date, {{pm_name}} should be filled in with Pm Name, etc.
- Choose the Trigger: Airtable, new record in view
- Create Presentation from template (again, NOT using Google’s template)
- Match each field to your variables
- Test, and you’re done
You can use this form whenever you want to make a presentation. Fast, easy, and anyone can do it.
Optional Step: Link Your Presentation for Reference
Lastly, you can add one more step to your Zap to update your Airtable database with a link to the newly created presentation.
Go back into Airtable, and add one more column called “Created Presentation” and make the field type “URL”.
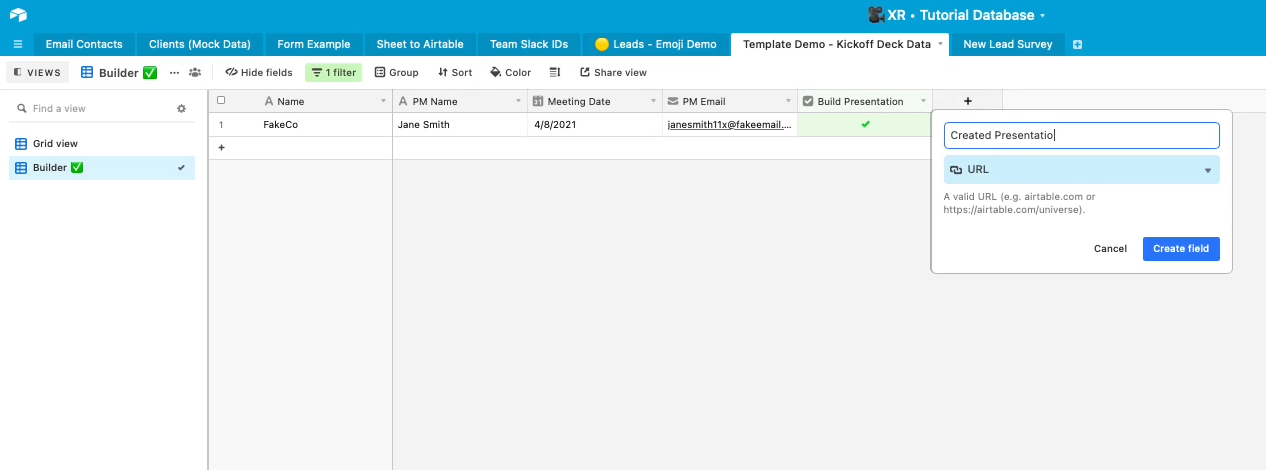
Add another action in Zapier, choose Airtable as the app, and select “Update Record”. Choose your database and view (the original Grid view, not the builder view). To find the record that corresponds with the deck that the Zap just created, click in the “Record” field and select “Custom”. Then, choose “1. Record id” to pull the record’s Airtable ID from Step 1 of your Zap.

Fill in the “Created Presentation” field with the “Alternate Link” from Step 2. This is the presentation’s URL.
Linking it here isn’t strictly necessary, but it’s a great way to keep track of the decks you made from this template.
Save a Little Time to Build Lots of Momentum
Automations like this aren’t going to save you hours every single day, but they will shave minutes off of a robotic task that you might have to do several times a week.
What’s more, using automations for your robotic tasks will help you to maintain focus by reducing context-switching. Instead of going back and forth from one app to another, you can enter everything into one simple form and get a complete presentation in seconds.
Enhancing your workflow with automations, no matter how small, will ultimately help you to work quicker and more effectively.
If you'd like to learn more about no-code workflow automation, check out our blog or our YouTube channel. You can also follow XRay on Twitter, Facebook, or LinkedIn.
Routinely used documents are an important part of any company. Sending out contracts, progress reports, and proposals is an essential part of conducting business, particularly for those in the agency world who are constantly pursuing new clients.
Automating those common, templated documents that you send every week is a great way to start saving time and reducing errors. In this post, we’ll show you how you can build an automation to create and send proposals with just a few clicks.
Tutorial Steps
1. Create a proposal template in Google Slides and add variables
2. Create an Airtable base with fields for each variable
3. Trigger: New Record in View in Airtable
4. Action: Format
5. Action: Create Google Slides Presentation from Template
6. Action: Upload File in Google Drive
7. Action: Delay
8. Action: Send Email in Gmail
How it Works
With this automation, you’ll be able to create and send a customized proposal to a client just by filling out a quick Airtable form. By using linked records, an extremely useful Airtable feature, you’ll be able to prefill paragraphs of text with just a click. By simply selecting the service or package you want to add to the proposal, Airtable will automatically find the associated description.
Once the form is filled out, the Zapier automation will make a copy of your template file, replace the variables with your specified text and data, and email a PDF of that file to your specified client email address.
Copy this Zap:
https://zapier.com/shared/b33e1122a56ef8f679cf610424371e055fd3a66d
Required Software
For this automation, you’ll need:
- Zapier - to build the automation
- Google Slides - to create the proposal template
- Airtable - to build a database and operate the automation
- Google Drive - to store a PDF export
- GMail (or any email client) - to send an email with a PDF attachment
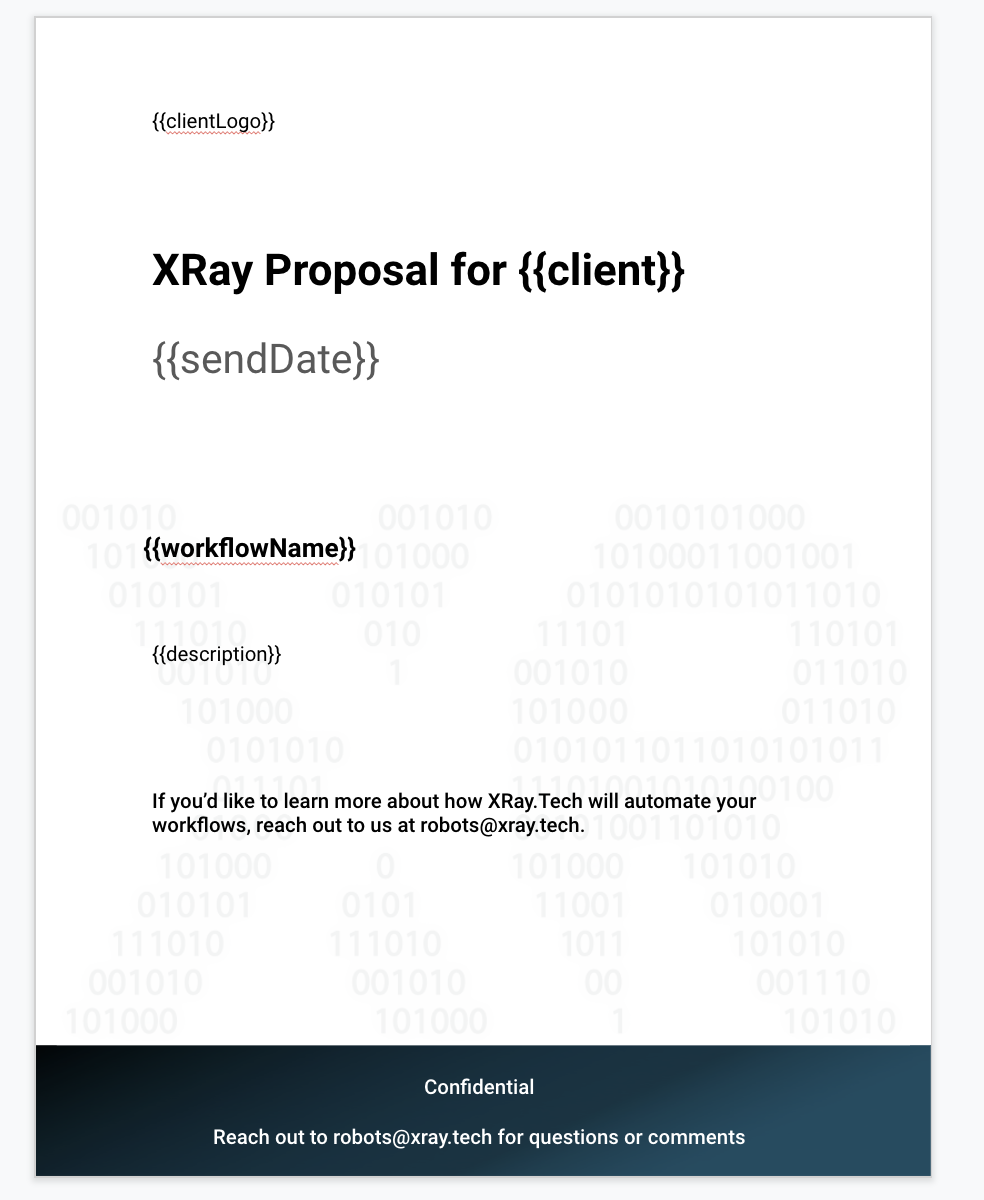
1. Create a proposal template in Google Slides and add variables
First, we need to create a proposal template in Google Slides. While an app like Google Docs might seem like a more appropriate choice, Slides has one key advantage that makes it ideal for this automation: the ability to replace variables with images.
Create your proposal with all of the content, styling, and images that you want in the final version. You can change the layout of the slide to 8.5” x 11” by navigating to File > Page Setup.
Then, identify the content that you want to replace or update each time you create and send a proposal - things like the client’s name, an image of their logo, and the description of the services you’re offering. Replace these pieces of text and images with {{variables}} enclosed in curly braces. Avoid using hyphens or spaces in your variable names.
This notation will let Zapier identify those pieces of texts as variables, and it will be able to insert custom data into them.
Once your proposal template is all set, make a note of the save location or the ID in the address bar between /d/ and /edit. Note that you don’t need to save this file as a template in Google Slides.
2. Create an Airtable base with fields for each variable
Now, open up Airtable and create a new base from scratch. Create a column for each of the variables that you added to your Google Slides proposal template. You can also include a send date and time to schedule exactly when you send the email with your proposal.
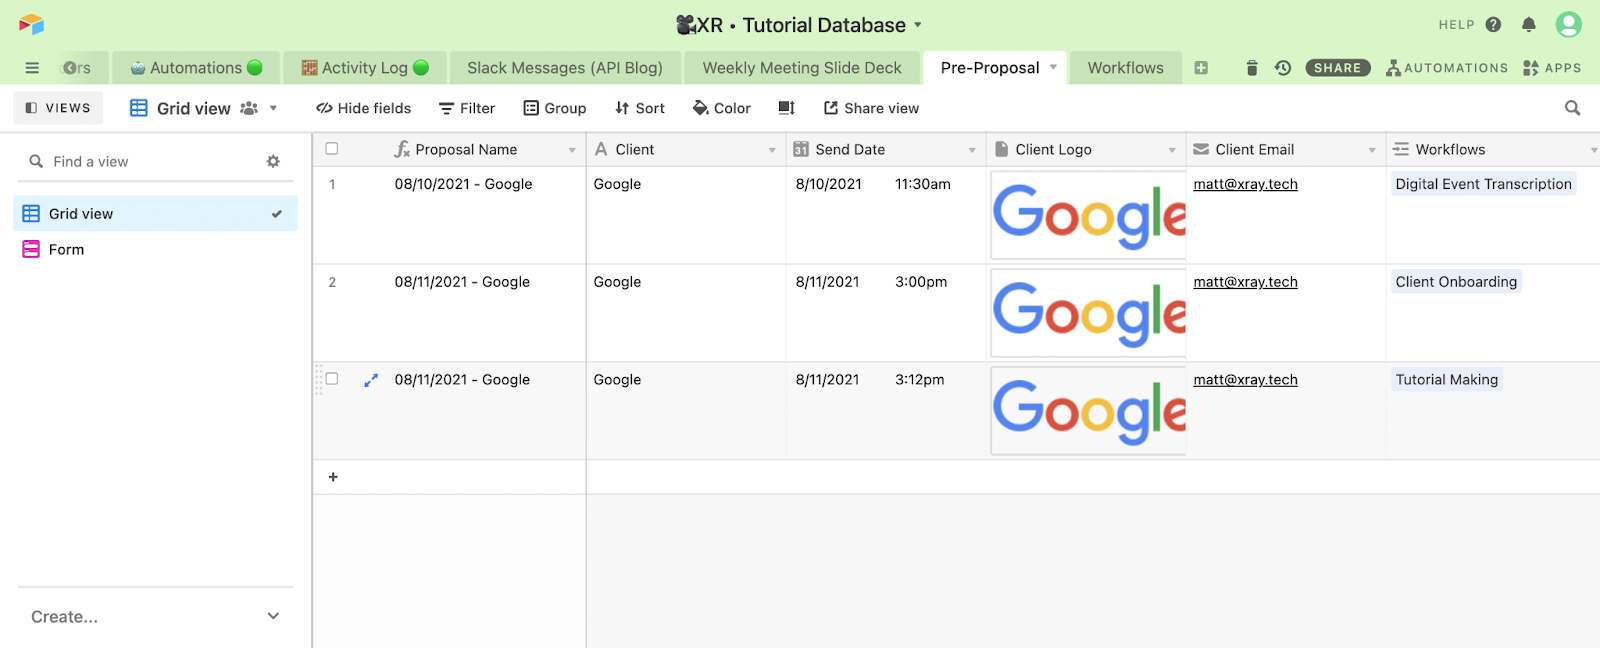
For information like the service title and description, you may want to use a linked record and lookup fields. This will let you add all of your services into a separate table, and simply pick which one you’d like to add to the proposal to have the name and description automatically filled in.
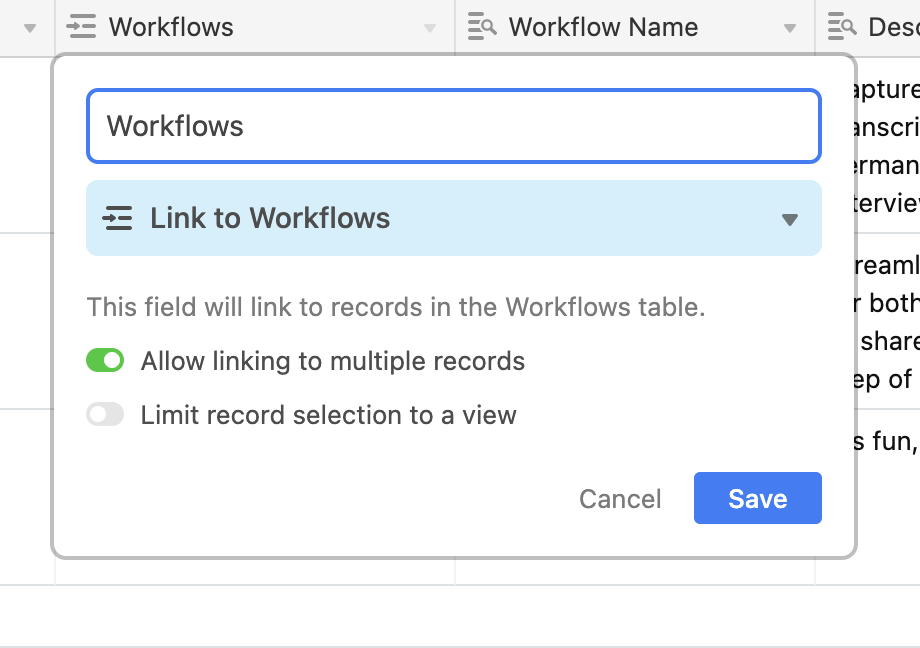
To create a linked table, first make a second table in the same base. Add columns for each piece of information you want to include (in our case, Workflow Name and Workflow Description).
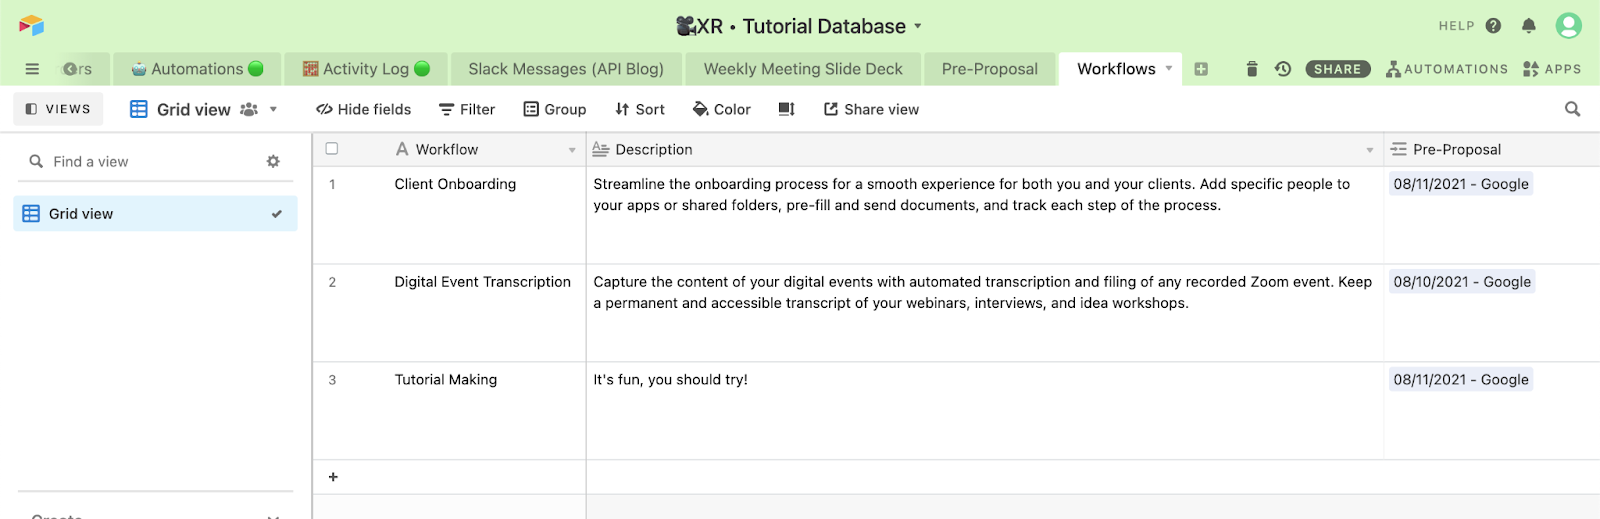
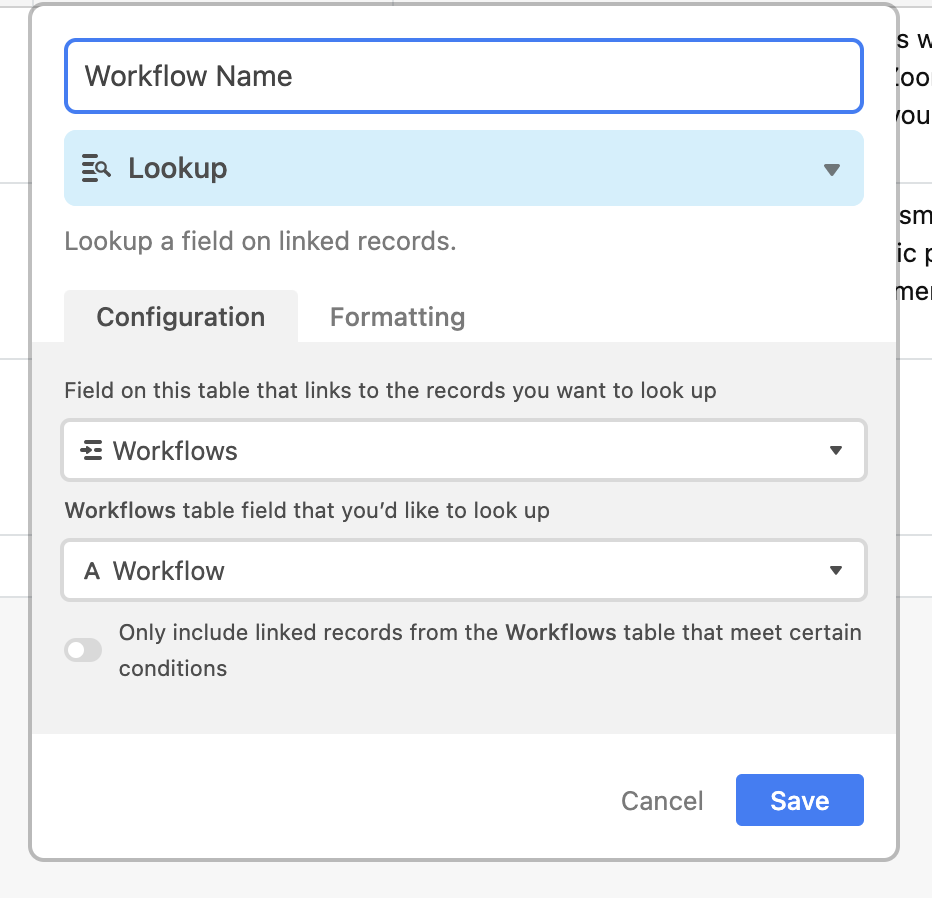
Then, go back to your other table and add a column. Set the type to “linked record”, and choose your other table from the list. Then, make new columns with the type set to “lookup” for each of the pieces of data you want to pull in from the linked record.
Finally, create a form view for your base, open the form view, and fill it out with test data.
3. Trigger: New Record in View in Airtable
Now it’s time to build the automation in Zapier. Choose Airtable as your trigger app, and select “New Record in View” as your trigger. Choose the grid view from the table you created in the previous step.
4. Action: Format
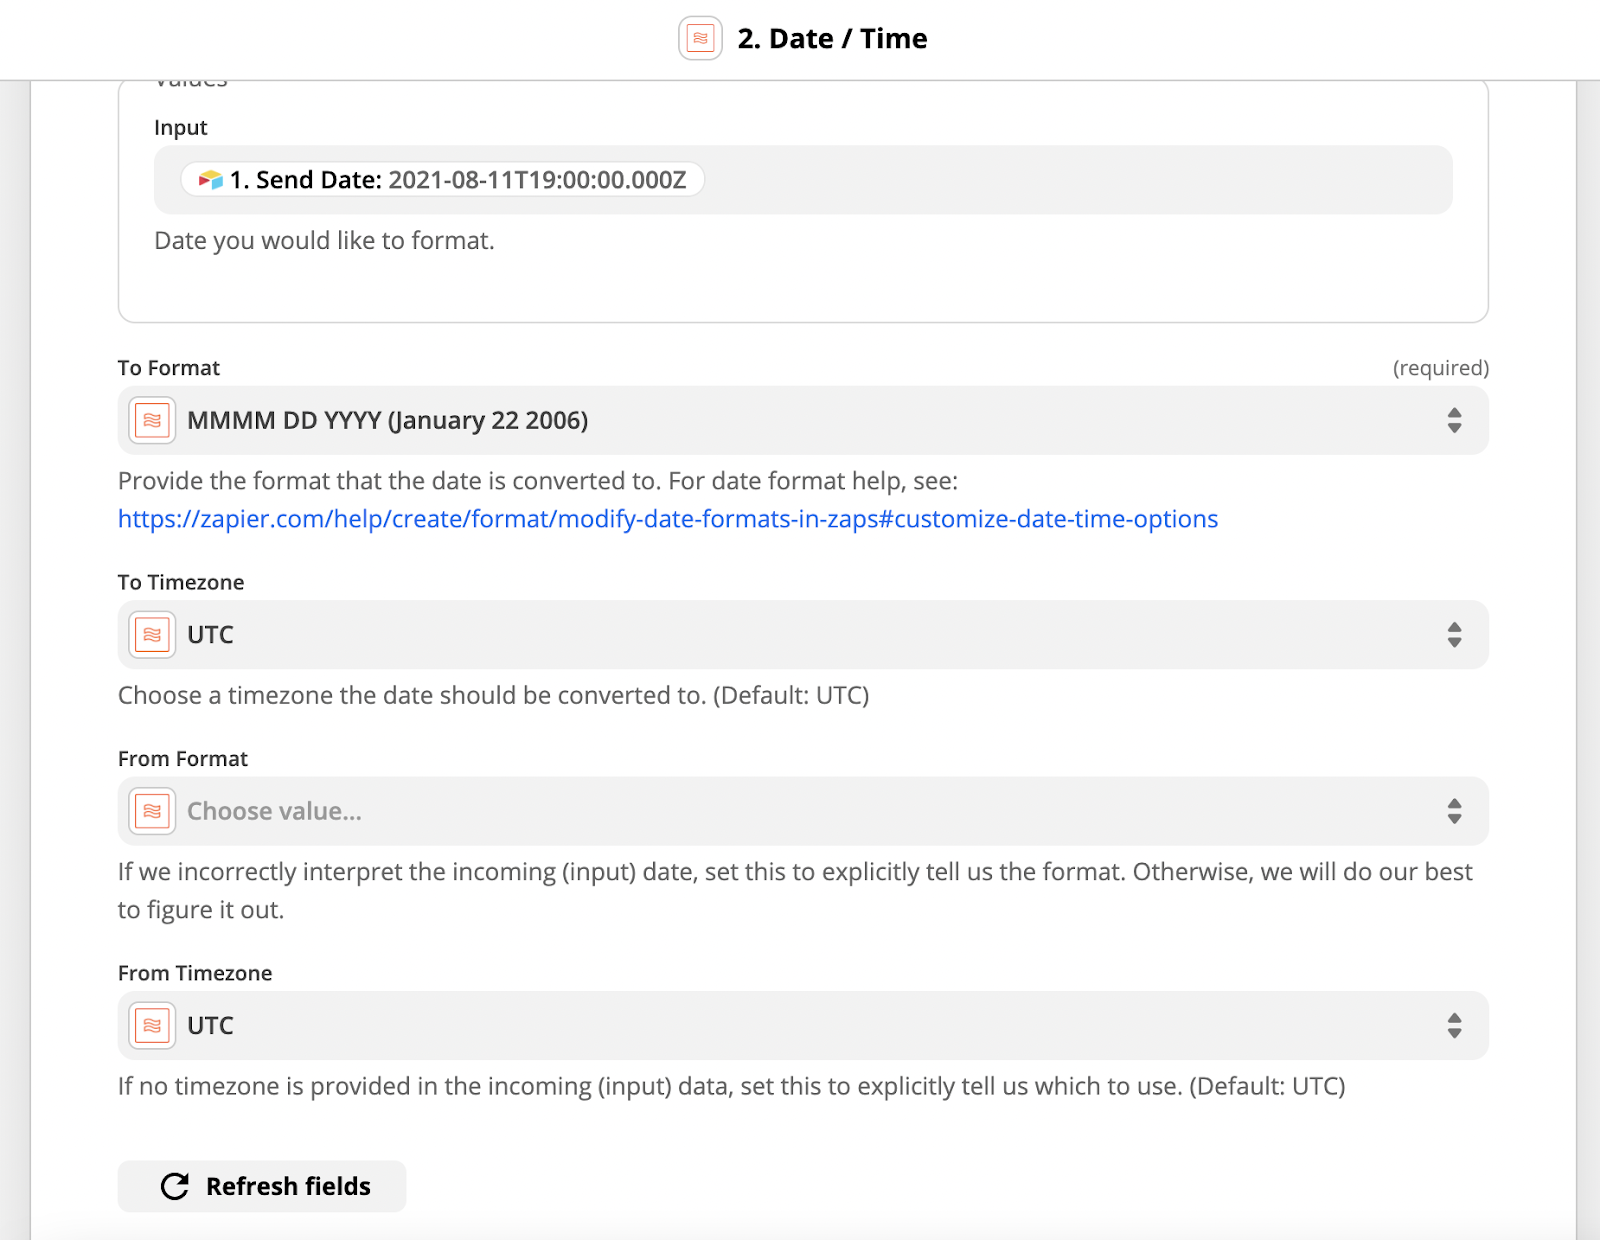
To make our “Send Date” field a bit more readable, we’re going to use a quick “Formatter by Zapier” step to convert it to “August 11” rather than the original long date/time code that we start with. We’ll still use that full date and time later to schedule the email, but this shorter version will look better in our proposal.
5. Action: Create Google Slides Presentation from Template
Choose Google Slides as the app for the next step in the automation, and pick “Create New Presentation from Template”. Find the template file you created earlier, either by using its ID or navigating to its location.
Then, match your data from Airtable to each of the variable fields that Zapier provides. Test the step and continue.

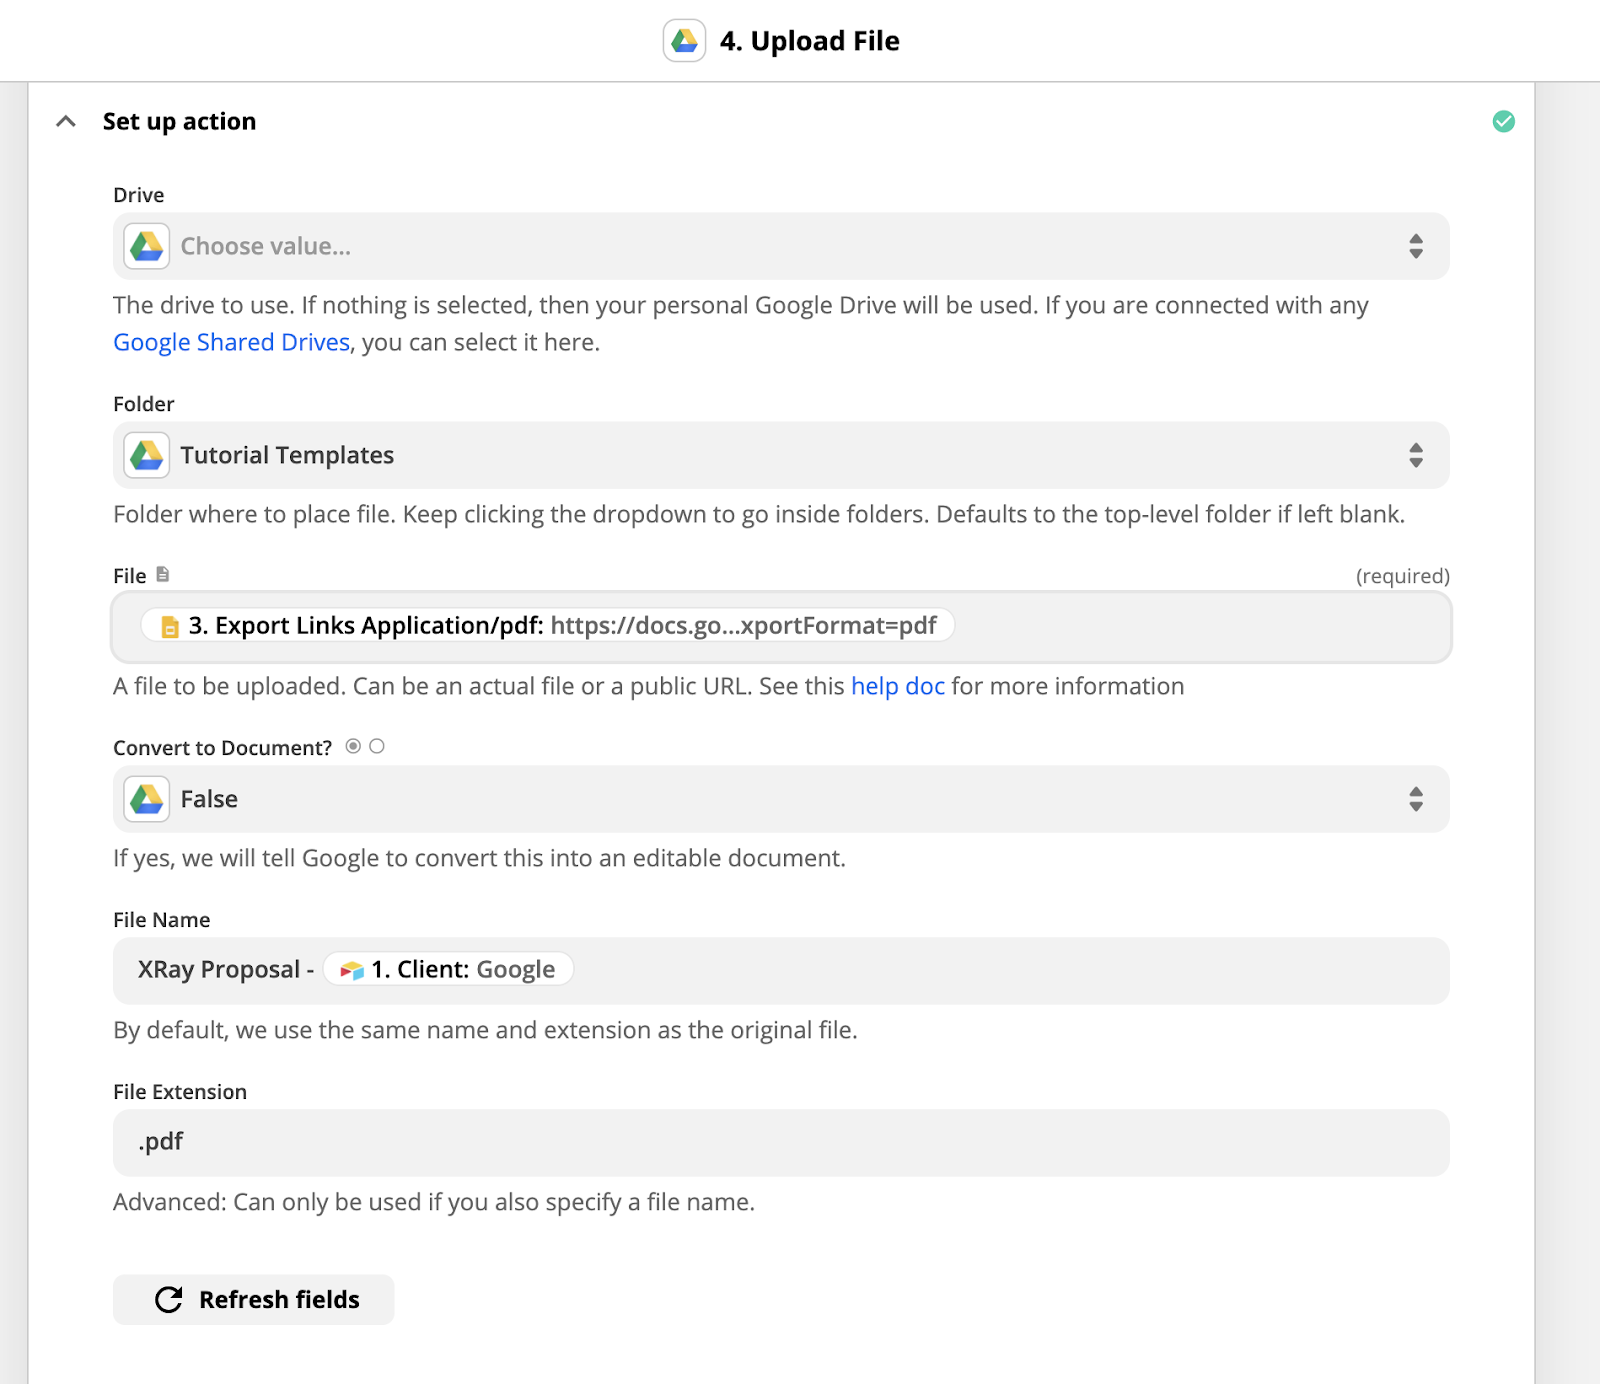
6. Action: Upload File in Google Drive
Next, you’re going to export a PDF of the Slides presentation and save it in Google Drive. To do this, add another step to the automation with Google Drive as the app, and Upload File as the action.
Choose a folder where you want to save your proposal PDFs, and then select “Export Links Application/pdf” from your Google Slides data. Select “False” for “Convert to Document”, and give your PDFs a name.
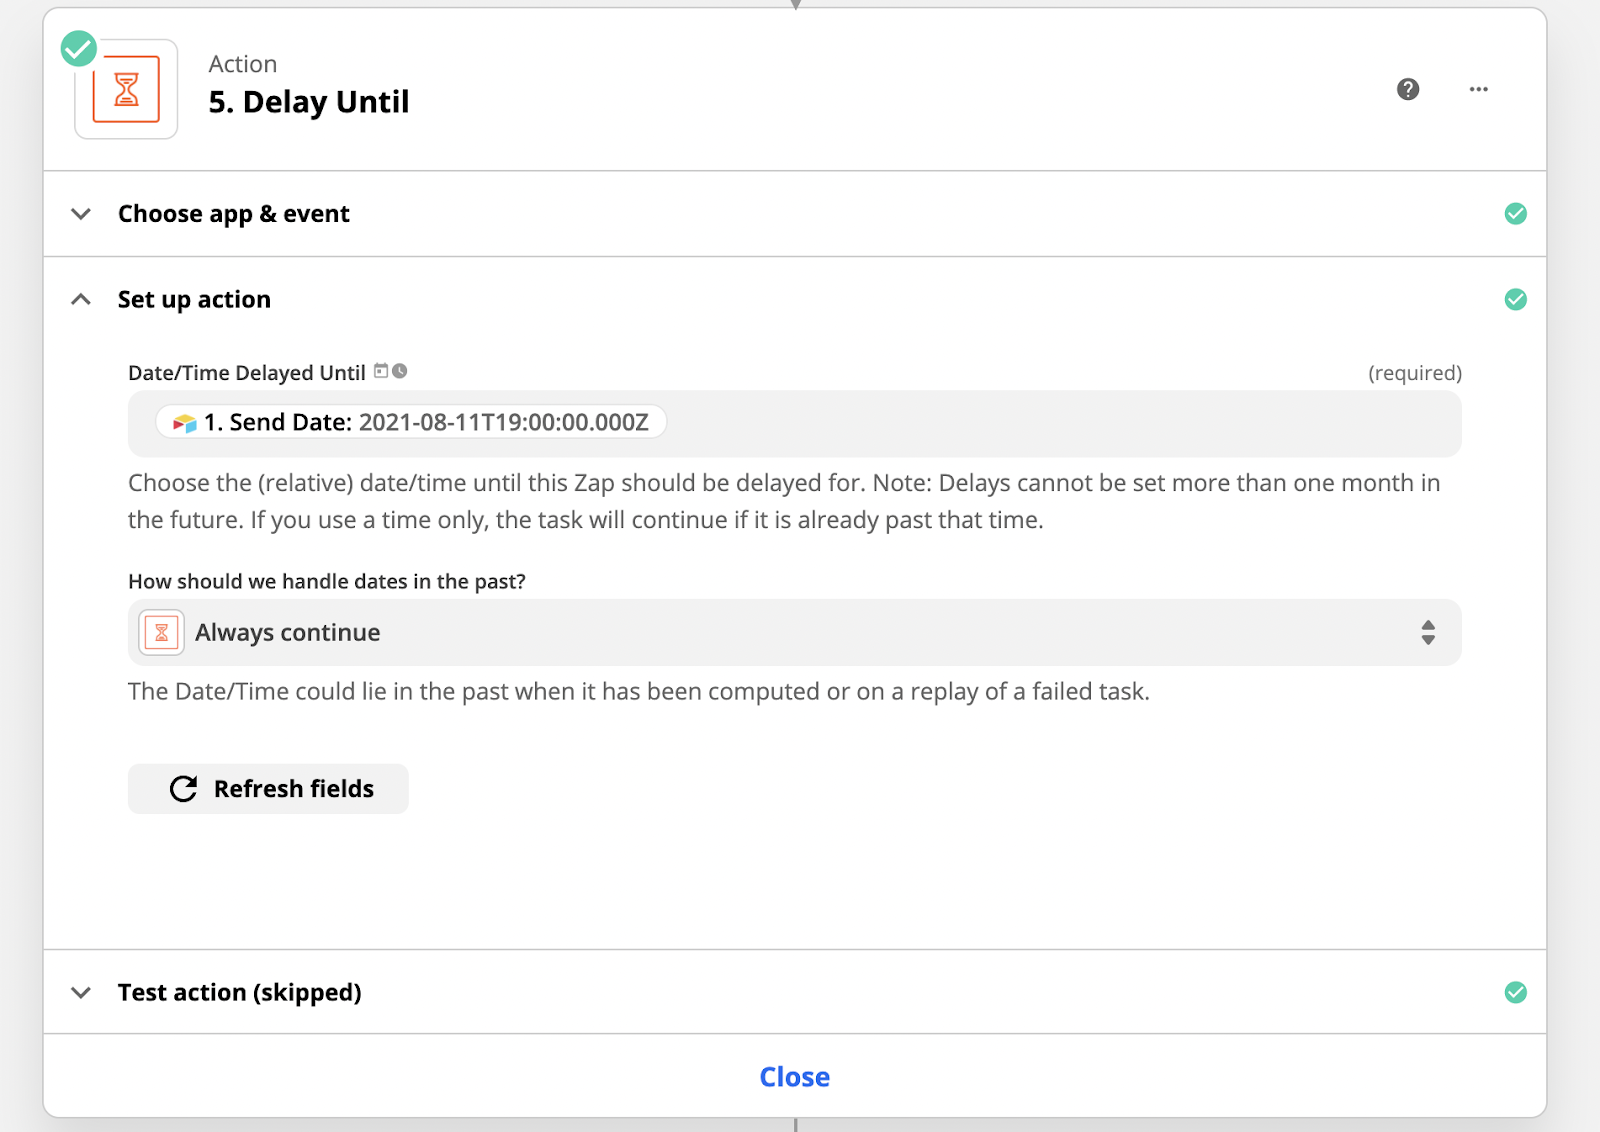
7. Action: Delay
We’re nearly finished with the automation, but first, we’re going to add a quick delay step so that you can schedule the email in advance. This way, you can create proposals well in advance of sending them.
Just add a “Delay by Zapier step”, choose “Delay until”, and set your Send Date from Airtable as the time to delay until.
8. Action: Send Email in Gmail
Finally, we’re going to add a GMail action so you can send your proposal to a client. Pick “Send email” as the action, and fill in the fields with the appropriate data. Be sure to fill the “To” field with the client email that was entered into Airtable, and fill out the body of the email however you want.
Then, under attachments, select “File: Exists but not shown” from the Google Drive step. ‘Exists but not shown’ is just Zapier’s way of saying that it can’t show you a preview of the file.

Test this step, and you should be all set. If you used your own email for the “client email”, you should see a new message arrive in your inbox soon with a PDF attachment.
Turning Templates into Automations
While document templates are already a great step towards saving time and reducing errors, automating those templates takes it a step further. By using an Airtable base with linked records, you can send out an automation prefilled with whatever service and description you want. Since you never have to interact directly with the template, you don’t need to worry about accidentally changing the design or formatting or copying and pasting the wrong data.
If you’d like to learn more about how automation can enhance your workflows, check out our blog or our YouTube channel. You can also follow XRay on Twitter, Facebook, or LinkedIn.
As a global pandemic has prompted a dramatic increase in remote work, video meeting apps like Zoom have been a vital tool for staying connected and conducting everything from routine meetings and casual chats to major conferences and events.
One of the added benefits of using Zoom is the ability to create permanent records of each call. Not only does Zoom offer cloud recordings for all of your calls (if you have a paid plan), but you can also use third-party software to transcribe those calls. Transcriptions are a great way to generate notes, review past meetings, or create content from recorded events.
In this post, we’ll show you how you can build a simple, 3-step Zapier automation that will save your Zoom recordings to Google Drive, and then send them over to Trint for transcription.
Automation Steps
1. Trigger: New Recording in Zoom
2. Action: Upload File in Google Drive
3. Action: Upload File in Trint to Create a Transcription
Required Software
For this automation, you’ll need:
• Zapier
• Zoom
• Trint
Zoom and Trint will both require paid subscriptions for this automation, as Zoom only offers cloud recording for paid plans and Trint is a subscription-only service.
1. Trigger: New recording in Zoom
To start off your automation, choose Zoom as your trigger app and select “New Recording” as the trigger. This will make the automation run whenever you have a new Zoom recording, which will be created whenever you end a meeting that you recorded. Using this trigger makes for a very passive, hands-off automation that will run without requiring any additional input from you and your team.
2. Action: Upload File in Google Drive
Now, we need to upload your new Zoom recording to Google Drive. We’re putting the file on Drive for two reasons:
1. Trint needs an actual file to work with, but Zoom’s Zapier trigger only gives you a download URL. Drive can make a copy of the file from the URL, and then pass the file over to Trint.
2. Zoom only offers limited cloud storage for lower pricing tiers, and copying your recordings to Drive can be a more cost-effective way of holding on to your Zoom videos over the long term.
To create the step, select Google Drive as your app, and pick “Upload File” as your action. Choose a folder to store your videos in, and pick the Download URL that Zapier pulled from Zoom in the trigger step. It should be called “Video Files Download URL”.
Now, give the files a template for their names. You’ll want to use a piece of data from the Trigger step in order to give each file a unique name. For instance, we named our file “Zoom • {1. Start Time} • {1. Topic}”, so each file will have a date/time and topic to differentiate it from the other files.
You can leave the “File Extension” field blank, and test the step. If everything works, it’s time to send the file to Trint.
3. Action: Upload File in Trint to Create a Transcription
To finish this quick automation, we’ll add one more step. Pick Trint as your app, and choose “Upload File” as the action.
Just like in the previous step, you’ll want to use the data Zapier gives you from the trigger step to give each file in Trint a unique name. In our example, we’ve used Start Time and Topic.
For the “File” field, you need to pick from the data that Zapier pulled in from Google Drive, NOT data from the Zoom trigger step. Specifically, you’ll want to pick the data that’s called “File: (Exists but not shown)”. This not-very-helpful name is just Zapier’s oblique way of saying that it can’t show you a preview of the file, which in this case is a video file.
Pick your transcription language, and then optionally pick a folder to save your transcription in. You can leave the “metadata” field blank, and test this last step of the automation. Starting the transcription can sometimes take a long time, and Zapier may return a failure for your test and tell you that the app is unresponsive. Don’t worry; just try again, and it should work.
A successful test will give you a URL where you can see your transcription in progress, although it will likely take some time to complete (particularly for longer videos).
And that’s it! You’ll likely also want to add a Slack notification, or some other heads-up to your team to let everyone know that a transcription has been created and where they can find it. But we’ll cover that and other general best practices in a future blog and video.
Passively Creating a Content Library
With this automation running, you’ll create a convenient record of every Zoom meeting, every brainstorming session, every event, and every other type of call that you use Zoom for. This is a great way to build up a library of material to help generate content or just to use for your own reference.
If you’d like more automation tips or would like to learn about how automated workflows can transform your organization, check out our blog or our YouTube channel. You can also follow XRay on Twitter, Facebook, or LinkedIn.

If you’ve been exploring our blog or our video channel, or if you’ve spoken with one of our automation techs, you might be wondering what your options are for actually working with XRay.
At XRay, we have two main approaches for our automation projects: Blueprint Solutions and Bounties.
Blueprints and Bounties are two distinct ways to launch an automation project, but they’re both aimed at getting started quickly and setting fair, transparent terms that work for both parties.
XRay’s Blueprints and Bounties might be a little different from what you’re used to, so in this post, we’ll explain how they both work.
Blueprint Solutions: Pick an Automation from our Library
Our library of Blueprint Solutions is a selection of pre-designed automated workflows that solve common problems and address frequent pain points.
Every business is unique, but we all have to conduct many of the same workflows, and we have to deal with many of the same frustrations that plague our daily processes and tasks. Things like client and customer onboarding, payroll, lead handling and sales calls, time tracking, and training new team members are tasks that most companies do on a regular basis. Finding ways to streamline and improve these processes can be a great way to save time and set up your team for success more consistently.
Whenever we build an automated workflow that addresses a common issue, we convert it into a Blueprint Solution: a modular, adaptable version of an automation that defines key steps but allows for customization for each client.
When you pick a blueprint from our library, we’ll configure it and build it for your company within a set timeframe. Most of our solutions take about 4 weeks to finish, but you can see a more specific estimate associated with each blueprint.
During our kickoff and early calls, we’ll discuss your requirements, customizations, and adjustments for your Blueprint Solution. These decisions might change the completion timeline for your automation, and we’ll let you know as soon as possible if that’s the case.
As we’re building your automation, we’ll check in regularly on Slack and on our weekly Zoom calls to keep you updated on our progress and get your input for any key decisions we need to make.
Blueprint Solutions are a great way to quickly get started with automation. Just browse the library for a solution that works for you, and we’ll configure it for your company within about a month.
Click here to get started with Blueprints.
Bounties: Name Your Price for a Custom Automation
If you can’t find anything in our selection of Blueprints that fits your company’s goals, then you can submit a bounty to tell us exactly what you’d like to build.
Bounties let you name your own price for a fully custom automation. When you fill out the bounty request form, we’ll ask you to describe what you’d like us to build, and how much you’d be comfortable paying for it. We’ll respond quickly to let you know if we can accept your offer, or let you know if we’d like to propose a counter offer on slightly different terms.
At XRay, we don’t want to dictate your automation’s value to you. We won’t waste your time with long negotiations if we’re not on the same page, and we’ll avoid hourly engagements that quickly become unaffordable for smaller companies.
If you’re not sure where to begin with a custom automation project, it’s often best to start small. Instead of trying to think about your entire company at once, just focus on your most overworked team, or even a single individual. Where are they stuck? What’s eating up their time? What do they need to do each day? Answering these questions and automating their activity can be a great way to create more capacity for them.
To fill out a bounty, just follow this link. Our survey will prompt you for all the information we need to evaluate your request.
A starting point for automated infrastructure
Whether you choose a blueprint solution or a bounty, any project that you do with XRay will lay the groundwork for a broader automated infrastructure, so if you’d like to continue working with us, we’ll be able to expand that initial automation into something that supports your entire company.
If you’d like to learn more about how we build automations at XRay, check out our blog or our YouTube channel. You can also follow XRay on Twitter, Facebook, or LinkedIn.

Because of their names, no-code and low-code automation often get mixed up with software development.
While no-code/low-code has roots in software development and relies on existing applications to work, the two are ultimately distinct disciplines. As such, you’ll get very different services and results from an automator like XRay when compared to a software development shop.
In this post, we’ll clarify the distinctions between automation and software development so that you can figure which is a better fit for what your business needs.
Automation Connects the Apps You’re Already Using
No-code/low-code automation uses platforms like Zapier and Integromat to connect the apps that you use every day. They work based on an “if this, then that” flow of triggers and actions.
For each automation, you specify a single trigger event and one or more actions. Whenever the trigger event occurs, the automation will then perform all of the specified actions.
For instance, if you use the popular kanban software Trello and want to automate it with Zapier, you could set your trigger to be “New Card in Trello”. If you want to have the content of each new Trello card sent to you as a direct message in Slack, you could then pick “Send Direct Message in Slack” as an action event.

The organizational context of each automation is extremely important, which is why our techs always strive to understand the processes and objectives of each of our members. For example, our techs always make sure to configure automation triggers so that they only run under exactly the right circumstances. After all, you don’t want to do things like accidentally send emails to clients that are only meant for internal use.
Ultimately, well-designed automations help you to work faster and more consistently by replacing error-prone manual tasks with mechanically identical automated tasks. Implementing automations is a quick process, and XRay can build and refine your first automation within just 45 days.
Software Development Lets You Build a New App (Which Can Also be Automated!)
Where automation platforms connect existing tools, software development lets you build entirely new ones. If you have an idea for a new messaging platform, shopping app, or rideshare system, you’ll need to work with a software developer to make it happen.
Software development is typically a fairly lengthy and expensive process, as specialized engineers architect and write code to create each feature and function.
XRay.Tech is not a software development agency, and if you plan to make an entirely new app as part of your business, you’ll need to work with a different company. However, we can recommend dev shops that we’ve worked with before.
Additionally, once your app is finished, XRay can automate it with no-code and low-code automations.
Automations Improve Your Business
If you have workflows in place that are getting good results, automations will support your workflows by achieving the same results faster and more consistently.
Software development on the other hand will create an entirely new program for you to sell or to use internally. It may enhance your current workflows, or it may replace them entirely with a new process.
If you imagine your current workflow as a bicycle, building an automation is like upgrading your bike with an electric motor. It's a fast and affordable upgrade, you'll still operate your bike in exactly the same way, and it still is capable of largely the same things - it just makes it faster and easier to do them.
By contrast, software development is more like replacing your bike with a custom-built, all-terrain car. The car is undoubtedly a more capable vehicle in many respects, but it's a total overhaul that will take a lot more time and money.
Pick the solution that works for you
If you're getting the results you need with your current workflow, but just need to get them faster, then automation is what you're looking for. If your workflow requires a comprehensive software tool that just doesn't exist yet, then software development may be what you need.
If you're still not sure whether automation is a good fit for your business, reach out to us and we'd be happy to discuss your needs and goals.
If you'd like to learn more about XRay's approach to workflow automation, check out our blog or our YouTube channel. You can also follow XRay on Twitter, Facebook, or LinkedIn.
Social media managers like Buffer and Hootsuite make it easy to schedule your company’s social media posts across several different channels, but they can get pricey for a small team trying to build a big presence online.
If you're already using Airtable and Zapier, building an automation to schedule your social media posts can be a cheaper and more convenient way to manage all of your channels.
In this post and in our video tutorial on YouTube, we’ll show you how you can use Airtable and a Zapier automation to build an automated social media calendar.
Step 1: Set up an Airtable Base
The first thing you’ll need to do is create a new base and table in Airtable. This is where you’ll write and schedule all of your posts.
You can add any columns you’d like to log data or organize your database (like the “Status” column in our example below), but the only strictly necessary columns will be:
- Post body
- Image (if you want to post images)
- Post date
- Ready to Post (checkbox)
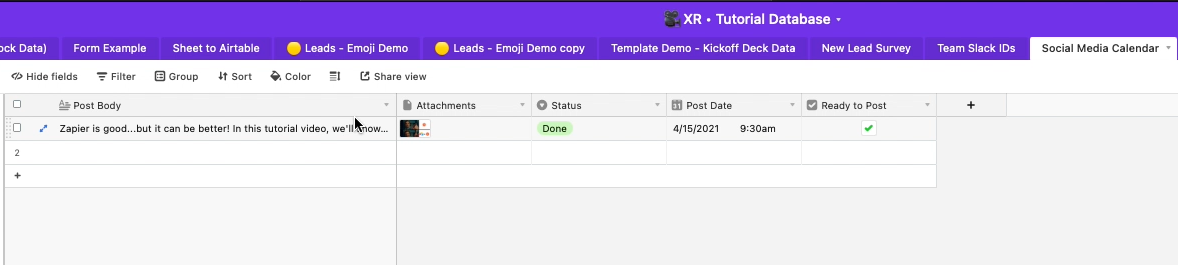
You’ll also need a single-select “Platform” column if you want to post to multiple platforms with your calendar. We’ll cover this in more detail later.
Make sure that your post date column is a date/time field, and make sure to upload your images directly to Airtable. Just posting a link to the image may not work correctly.
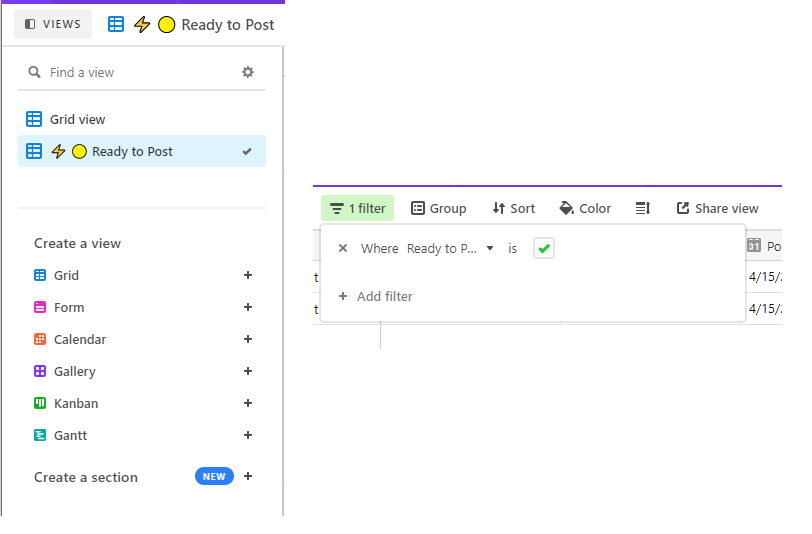
Once all of your columns are set up, create a new view called “Ready to Post”, and filter the view to only display records with a checked box in the “Ready to Post” column.
Once your base is all set up, add a record to use as a test post, and check the “Ready to Post” box.
Note: Zapier will publish your post to your Facebook page when you test the Zap, so make sure it’s something you really do want to share on your page.
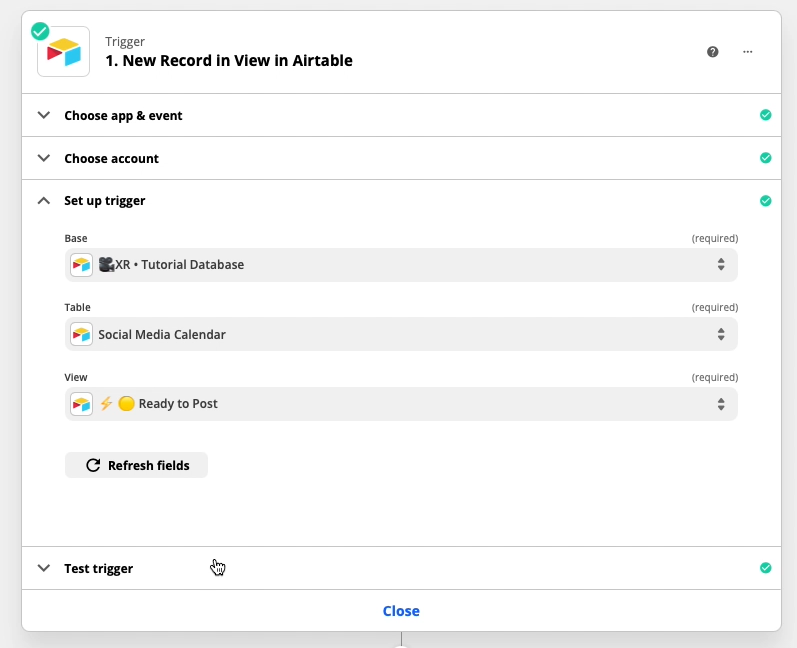
Step 2: Create a Zap with a “New Record in View” Trigger
Next, switch over to Zapier and create a new Zap. To set up the trigger, choose Airtable as the app and “New Record in View'' as the event. Then, select your new base, the Social Media Calendar table, and the “Ready to Post” view.
Now you need to test your trigger. You might need to refresh the fields to get Zapier to find your record.
Once the test is successful, you should see lots of data from the Airtable record. If everything looks right, click “Continue” and add a new step.
Step 3: Add a Delay Step
The next step in your Zap will use the “Delay by Zapier” app. This step is the key to scheduling your posts whenever you want rather than just publishing them immediately.
Select “Delay until”, and use the posting date pulled in from Airtable in the previous step. When your Zap is on, all of the steps after the delay won’t run until that exact date and time.
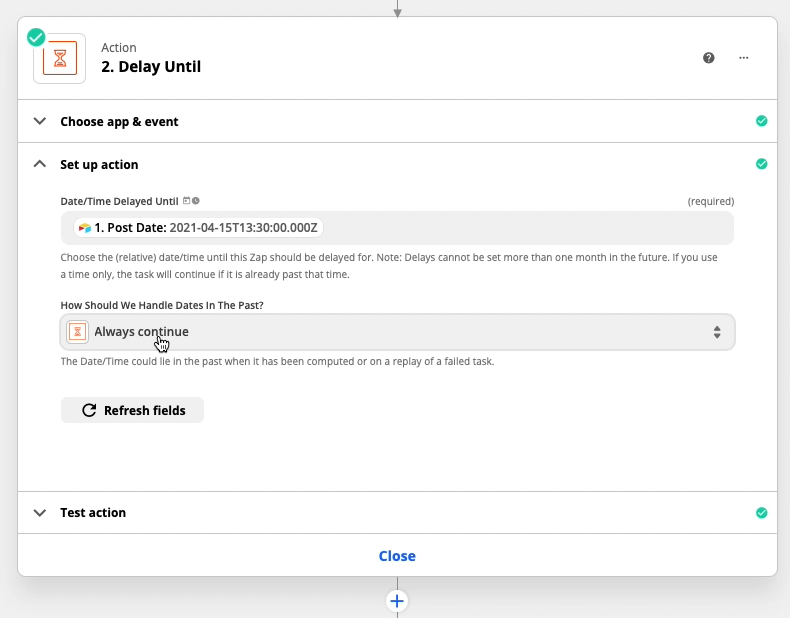
Where Zapier asks “How Should We Handle Dates in the Past?”, it’s generally best to select “Always continue” to ensure that your posts will always get published.
The only limitation to keep in mind with the delay step is that you can only delay for up to 30 days. If you’re planning your posts over a month in advance, you can check out our post and video for how to circumvent this limit.
Step 4: Post to Facebook (or any Platform)
Now that your post is properly scheduled, it’s time to set up a step in Zapier that will actually publish your post when the time comes.
We’ll show you how it works with Facebook, but you can use just about any social media platform that you want; the steps will be very similar.
Create a new step, and choose “Facebook Pages” as your app to post to your company’s page on Facebook, and select “Create a Page Photo”. You’ll need to sign in with a Facebook account that has access to your company’s page to continue.
Then, just fill out each field with the appropriate data pulled from Airtable (see the screenshot below).
For the photo field, be sure to use the variable called “1. Attachments File: hydrate”. This is the image itself, rather than a link to the image or other metadata, and it’s what you need to use to post an image.

Now you can test the step to make sure that it’s set up correctly. Just remember, testing the Zap will publish your post to Facebook.
That’s all you need to get started. If you’d like to use several social media apps with your calendar, you’ll just need one more optional step.
Optional: Set Up Additional Channels
To set up a social media calendar for multiple apps, you’ll first need to jump back into airtable and a new single-select column called “Platform”. Add each platform that you’ll be using as an option.
Rename your Ready to Post view to “Ready to Post - Facebook” and add a new filter to it to only include posts where the Platform = Facebook.

Then, copy the “Ready to Post - Facebook” view for each additional platform you want to use, and update the name and filter on each copy. For instance, a view for Twitter would look like this:

Finally, you can just make a separate duplicated Zap for each channel, and update the “New Record in View” trigger step to match each platform. You could also build it as one Zap with multiple paths if you’re comfortable using that feature, but simply creating multiple Zaps will be simpler if you’re less experienced with Zapier.
Now, you can schedule all of your social media posts in one place without having to use an app like Buffer or Hootsuite.
If you'd like to learn more about no-code automation, check out our blog or our YouTube channel. You can also follow XRay on Twitter, Facebook, or LinkedIn.
Automating your workflows doesn’t always require using robust automation platforms like Zapier or Unito. Sometimes, a simple plugin or two is enough to help you save time and work a little more efficiently.
In this post, we’re going to take a look at two plugins for Figma that will help you to create design assets faster and in fewer steps. Both are totally free, and they only take seconds to download and install.
With these plugins, you’ll be able to dynamically populate Figma text layers with content from a Google Sheet, and instantly export your frames into Google Slides presentations.
Google Sheets Sync
First, let’s dive into Google Sheets Sync, a plugin by David Williames. To get started, you can download and install the plugin here.

Once you have the plugin, create a spreadsheet in Google Sheets with a table of the content that you want to use. Make sure to put your titles into the first row of your spreadsheet. The Google Sheets Sync documentation contains additional information for setting up your sheet.
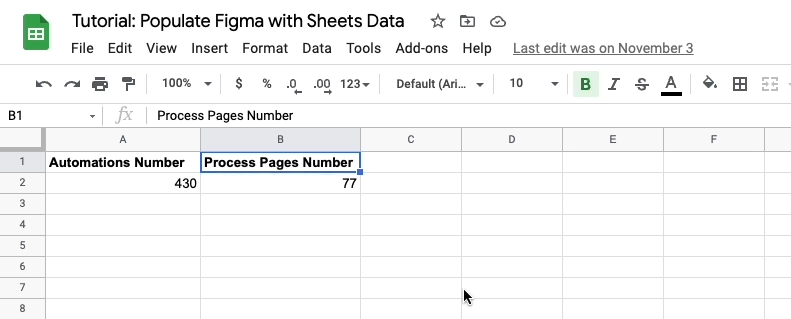
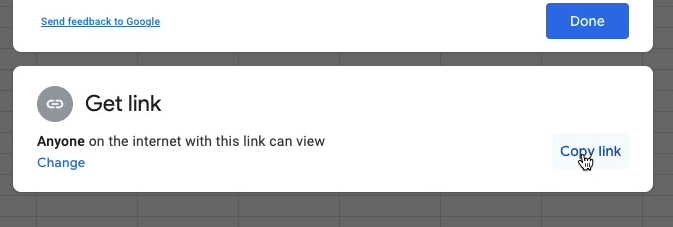
When your sheet is all filled out, click on “Share” to create a shareable link and copy it to your clipboard.
In Figma, rename each text layer that you want to replace with one of the column titles from your sheet. Just remove any spaces, and add a “#” at the beginning of the title. The capitalization of your layer titles doesn’t need to match the capitalization of your Sheets titles. We’ll use camel case in our example, but you can use all lowercase, all caps, or whatever you’d like.
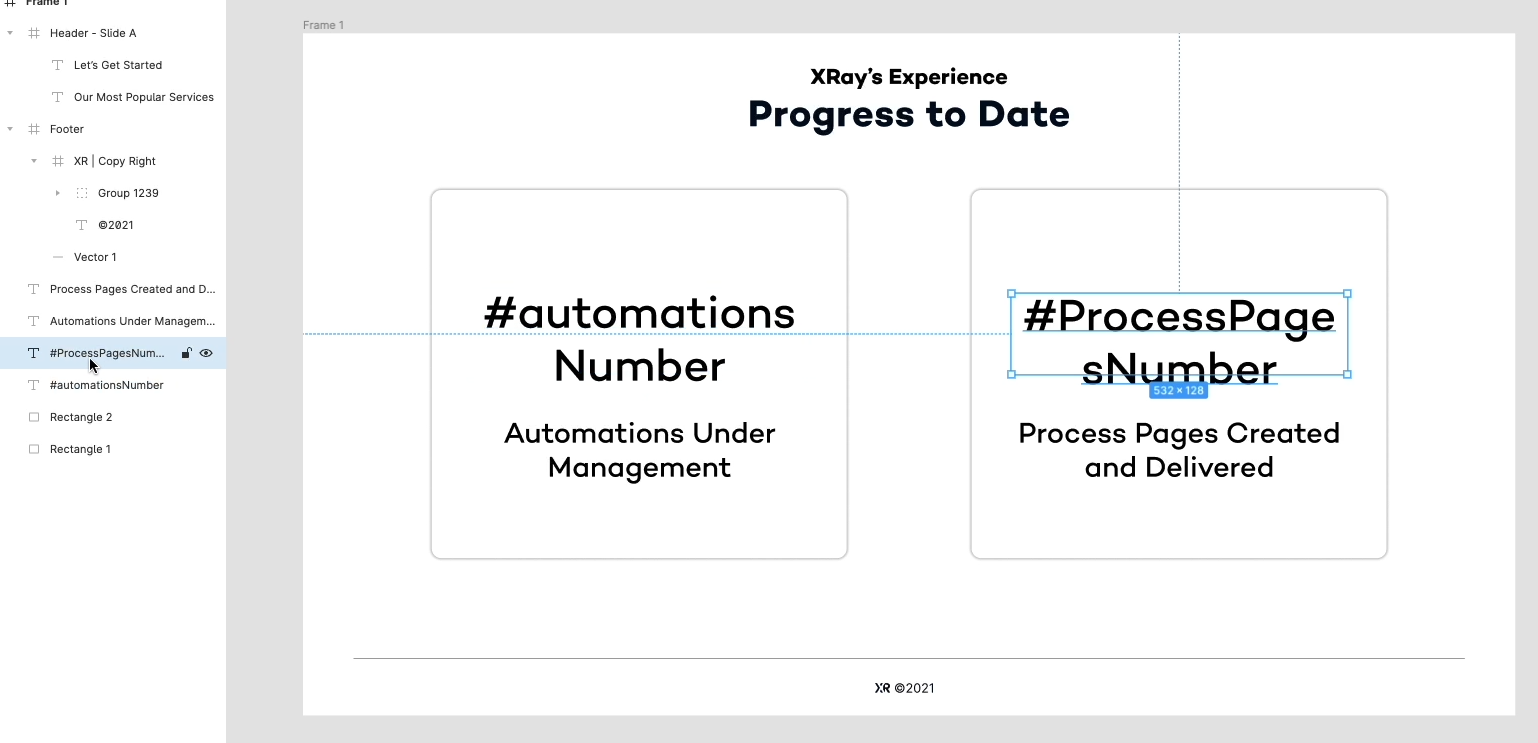
For instance, if your column title in Sheets is “Company Name”, then your Figma layer title should be something like “#companyName”.
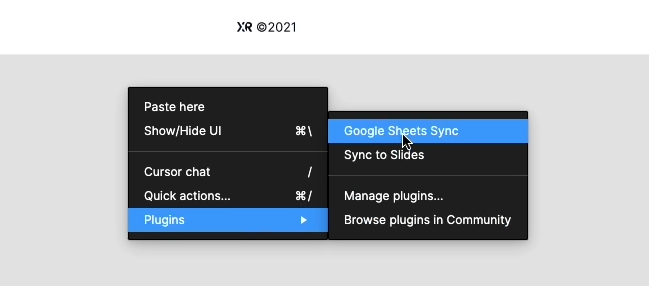
Right click on some blank space in Figma to bring up a small menu. Hover over “plugins” and select “Google Sheets Sync” from the list.
You’ll be prompted to enter the Google Sheets link that you copied earlier. Paste it in now, and click on “Fetch and sync.”
You should see the text in your designated layers replaced with content from your Sheets table. This can be a much faster way to fill in large amounts of placeholder text or real data in your designs.
Sync to Slides
Now let’s jump into another helpful Figma plugin, Sync to Slides.

Figma is a powerful digital design tool, but while it’s a great option for building a slide deck, it’s not the best tool for presenting one. You could use the prototype feature to mimic a slide presentation, but it’s much more cumbersome to edit the order of slides than a simple app like Google Slides.
On the other hand, exporting all of your frames one by one and loading them into Slides can also be a frustrating waste of time, especially when you’re regularly making updates to your presentations.
Sync to Slides by Siddhartha Gudipati lets you export your Figma frames to a Slides deck with just a few clicks, making it easy to do your design work in Figma and conduct your presentations with Slides.
You can download and install the plugin for free here.
To start using the plugin, just create a blank Slides presentation and give it an appropriate name. If there’s a blank slide as part of the default template, delete it - you want a completely blank file to work with.
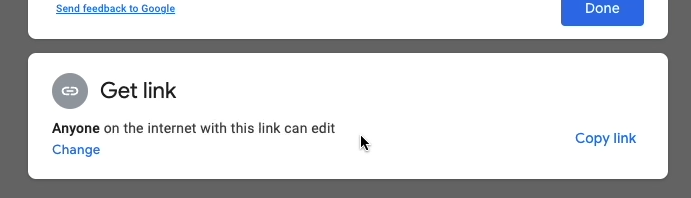
Click on “Share” to get a sharing link. It will need to be set to “everyone with the link can edit”.
Copy the link, and open up Figma. Right click on a blank part of the canvas to bring up a menu. Hover over plugins, and select “Sync to Slides from the list”.
Paste in your Slides link, and select the frames from that page that you want to export. You can also check “All frames” for convenience if you’d like to export everything on the page.
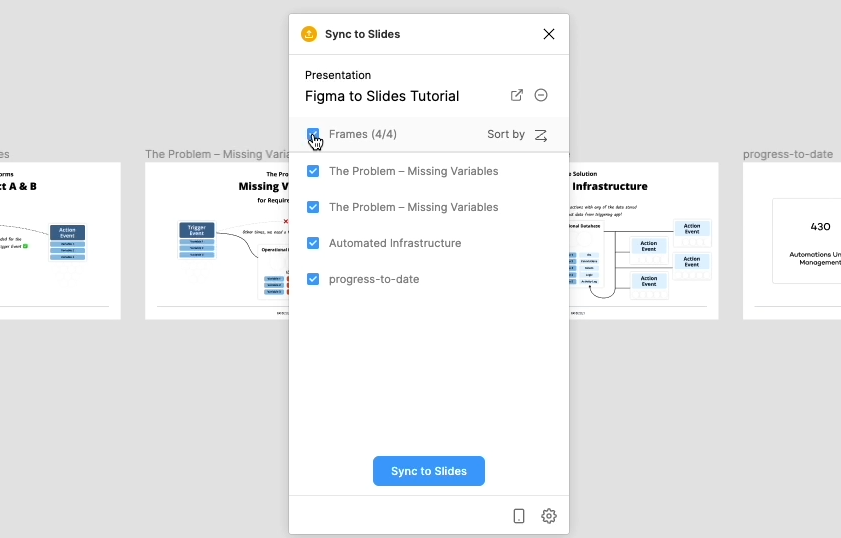
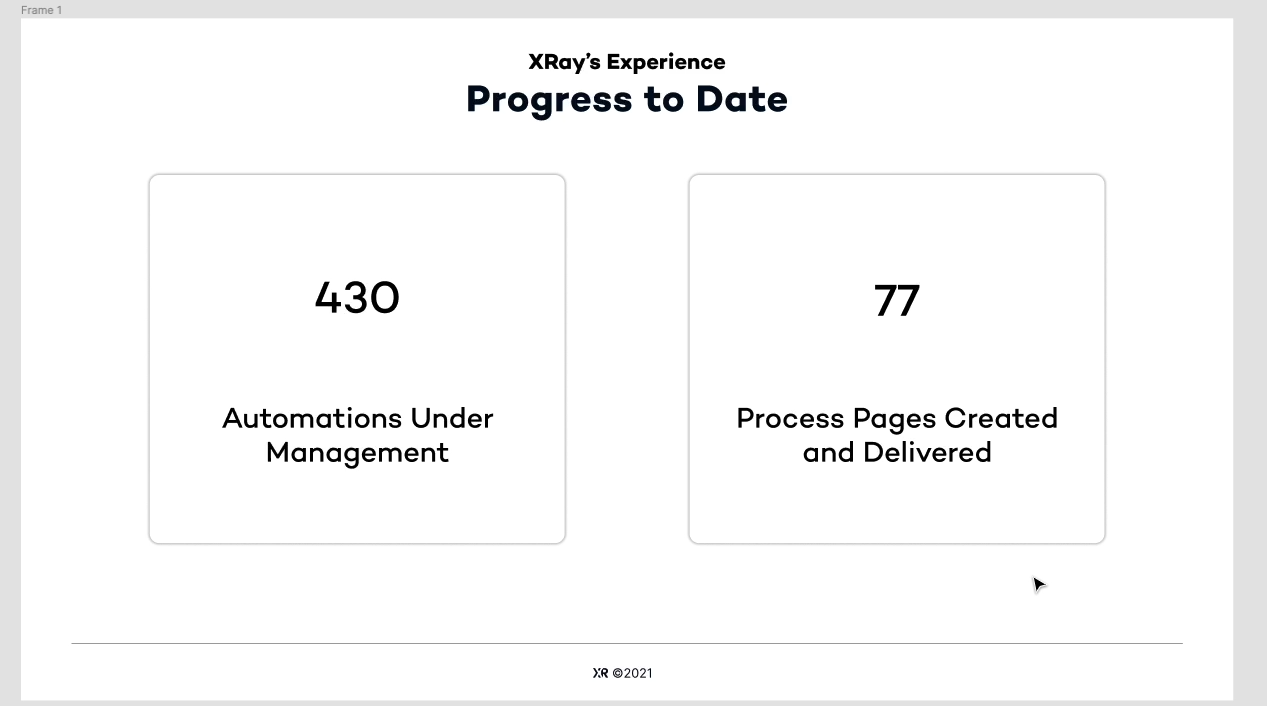
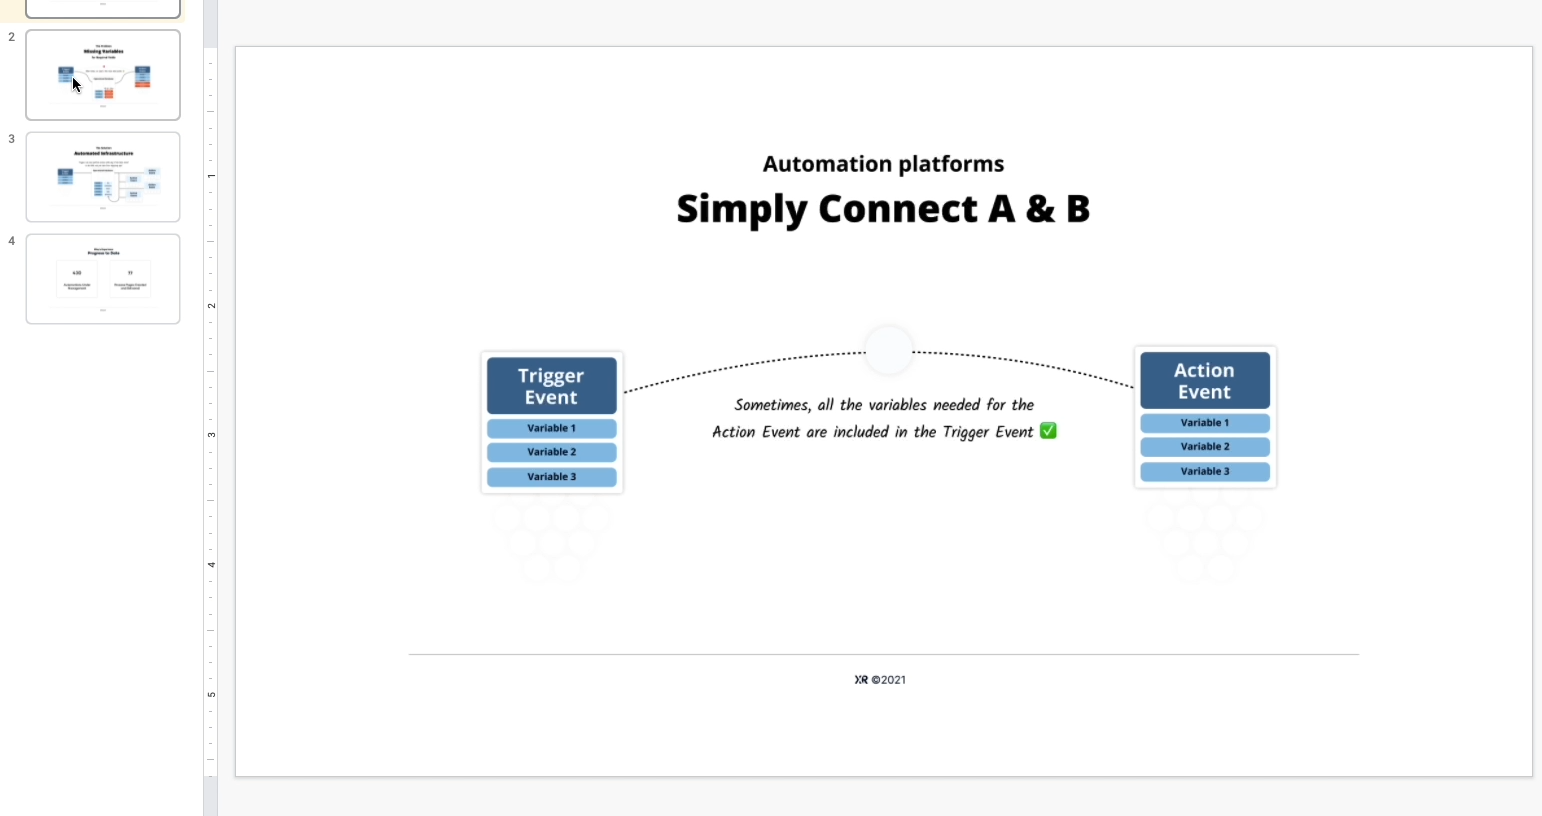
Click the Sync button, and wait a moment for the process to finish. Check your Slides file, and you should see all of your frames exported as images.
Saving time with simple plugins
You don’t always need a complex automation just to save a little time. Simple workflow hacks like installing a useful plugin can also eliminate some robotic work from your daily routine and help you to claim back some time.
These free Figma plugins won’t be saving you hours each week, but they might give you enough time to take an extra coffee break - and sometimes, that’s all you need.
If you’d like to see more tips for streamlining your workflows, be sure to check out our blog or our YouTube channel. You can also follow XRay on Twitter, Facebook, or LinkedIn.

Interest in no-code and low-code automation is rapidly increasing, and if you’re curious about getting started in the space, it’s important to know the best tools to get started with.
In this post, we’ll show you four of the most useful pieces of software in the no-code and low-code automation discipline. This isn’t an exhaustive list of every no-code/low-code tool out there, but it’s a good place to begin if you’re new to the concepts and looking to explore automation.
1. Zapier: Simple No-Code Automation
For a relatively new industry like no-code automation, Zapier is practically a venerable old institution. They’ve been around since the beginning, and their automation platform supports an extensive range of software.
Zapier’s intuitive UI lets you easily build sequential automations, connecting as many actions as you’d like to a specified trigger. For instance, you could set up an automation that triggers whenever you create a new file in your “Sales Reports” folder in Google Drive, and have that automation send a slack message to your #sales channel, and an email to your Sales Manager.

As a no-code tool that lets users build automations completely with a GUI, Zapier is ideal for automation beginners and users with moderate technical abilities. The biggest downside to Zapier is that, while it has integrations for thousands of different tools, its integrations for each app aren’t as deep as other platforms like Integromat. However, Zapier is still the best tool to start with as a beginner.
Try out Zapier at zapier.com.
2. Integromat - Advanced low-code automation
Integromat is a somewhat similar tool to Zapier, but is better described as low-code automation software. Integromat lets you construct automated “scenarios” with branching paths and complex actions. More advanced users can make custom API calls and write code to craft their own integrations, building exactly the automation that they want.
For instance, we built an automation in Integromat for one of our clients that created and published web pages complete with custom Stripe products.

Integromat has far fewer supported apps than Zapier, but lets you do more with the apps that it does support. While Zapier is great for beginners and anyone with at least a moderate level of technical skill, Integromat is more suited to advanced users - people with some coding experience and considerable technical knowledge.
If you’re looking to connect your apps with a low-code approach, check out Integromat.
3. Airtable - Ideal automation database
Airtable isn’t strictly a no-code/low-code automation tool itself, but it is a great app to use in conjunction with platforms like Zapier and Integromat. Airtable is a powerful spreadsheet app with a lot of features and options that make it perfect for use as a database powering your no-code/low-code automations.
At XRay.Tech, we control many of our automations with Airtable forms and views. Forms let you fill out a survey to add a new record to a database, while views let you sort and filter your databases to precise specifications. Since you can trigger Zapier and Integromat automations whenever a new record appears in an Airtable view, this gives you the ability to easily trigger and control your automations.

If you’d like to learn more about how Airtable works, you can check out our blogs on Airtable views and see how we set up an automated social media calendar using Airtable and Zapier.
You can also gather data on your automations as they run and compile it in Airtable, using linked records to create efficient databases documenting the entirety of your automated infrastructure.
Try Airtable at airtable.com
4. Keyboard Maestro - Powerful Keyboard & Mouse Automations
Of the tools on this short list, Keyboard Maestro is perhaps the least well-known, but it offers remarkable value for technical users looking to build automations. Keyboard Maestro is a Mac-only desktop app that lets you trigger automations based on inputs from your keyboard and mouse.
With Keyboard Maestro automations, you can open up all your frequently used apps with a single keyboard shortcut, automatically fill out forms on the web, run scripts to scrape data or generate reports, and more. You can use the app to automate nearly any action that you perform on your computer - so long as you’re willing to spend the time to build the automations.

Like Integromat, Keyboard Maestro is best suited to more technical users. While the app does come with lots of prebuilt automations to get you started, you’ll get the most out of it if you’re able to write some code and build automations that are uniquely crafted to fit your own workflows.
Keyboard Maestro offers a lifetime licence for a flat price of $36, making it a great value in comparison to the other SaaS apps listed here. It also has a free trial, so you can mess around with it and figure out if it’s right for you before you buy.
Download Keyboard Maestro at keyboardmaestro.com
Automation Tools for Every Skill Level
The automation space is quickly growing, and there are tools for everyone to use no matter their technical skill level. Whether you’re a novice just connecting a couple apps in Zapier or a technical wizard building complex data-scraping automations in Keyboard Maestro, the important thing is to find an app that works for you and to start automating the robotic work that eats up your time.
If you’d like to learn more about how you can break into automation, and how XRay can help you to automate your workflows, check out our blog or our YouTube channel. You can also follow XRay on Twitter, Facebook, or LinkedIn.

No-code and low-code automation is often focused on the needs of individual users or smaller teams, but there are many tools in the space that are well-suited to enterprise organizations or any company looking to scale up.
In this post, we’re going to take a quick look at three pieces of software that are ideal for businesses that want to build automations around large complex datasets, create intricate custom workflows, or to sync directly with popular software you’re likely already using.
If you’d like to learn more about these tools, or if there are any that you think we should cover in the future, don’t hesitate to reach out to us!
Sync your databases with Unito
The first app on our list is Unito.
Unito is highly specialized automation software that is entirely dedicated to syncing data between different sources. Each “flow” in Unito lets you identify two apps that you want to sync up and allows you to define exactly how the data should move between the two sources.
With Unito, you can have two databases set to maintain perfect parity, with an update to either one being automatically applied to the other. Alternatively, you can set the sync to only work in one direction, so (for example) updates made to your Google Sheets database will be copied to a Notion table, but not the other way around.
Unito is a great tool for any organization with departments who are all using different software to interact with the same data. Your engineers can keep working in Github, your project managers can keep working in Asana, and your analysts can keep working in Google Sheets; with the right Unito flows, they’ll all have access to the right data without any redundancies or extra work.
Unito doesn’t put any limit on the amount of records you can sync, so you can use it for even your largest and most detailed databases. However, you are limited to a certain number of total flows based on the pricing plan you choose.
The “Personal” plan is only $10/mo and is a great way to try the app out for a while and see if it suits your needs, but does only include up to 10 flows. Higher pricing tiers will let you create and run as many as 80 flows and offer additional features which you learn more about on their pricing page.
To get Unito, visit unito.io
Control automations and connect to apps like Salesforce with Airtable
Airtable is a database app which is somewhat similar to Google Sheets or Microsoft Excel. However, despite the similarities in basic function, Airtable has a robust feature set that sets it apart from other database and spreadsheet software.
Filters, views, and column types give you extensive control over how you display your data, even allowing for several specialized views of the same information. For instance, let’s imagine that you’ve made a table with your company directory. Each record contains an employee’s name, their title, department, start date, and official company picture.
You could then create a view that only includes employees in the marketing department, or a view that only contains employees who joined the company after a certain date. You could even use a gallery view to put the profile pictures front and center to make it easier to browse the table visually. All of these views can be saved permanently for easy access, and won’t alter the actual data itself; they’ll only give you different ways to sort the data.
These view and filter features aren’t just about creating convenient ways to sort data. By triggering automations whenever a new record appears in a given view, you can define precise parameters to start and control your automations in Zapier and Integromat, making sure that automations only run under the exact conditions you define.
Airtable also offers out-of-the-box support to sync with Salesforce, which can be extremely useful if you already have a lot of data living there. With Airtable, you can pull in data from Salesforce to trigger automations while still letting your team work within Salesforce.
You can start trying Airtable with a free account at airtable.com
Build complex custom automations with Integromat
There are many great low-code automation platforms out there, but one of the best apps for larger and growing companies is Integromat.
Integromat lets you build automated “scenarios” that perform actions in nearly any software based on a specified triggering event. Compared with similar tools, Integromat is a highly technical option that lets users make custom API calls, parse data with regex, and build custom integrations to automate any app that you’d like to use.
Though it’s not as easily accessible as other low-code automation tools like Zapier, Integromat is a great choice for those with some background in coding or software development.
With its versatile features, Integromat offers a high level of flexibility and control that make it well-suited to enterprise use. It’s particularly useful for building relatively complex workflows that connect with lots of different apps and touch many different departments at your company. At XRay, we’ve even used Integromat to build automations that publish web pages with custom stripe products.
If you’re looking to amplify the output of your team and make your processes more consistent with automated workflows, Integromat may be a great choice for your company.
Learn more about integromat at integromat.com
Automate workflows at any scale
Automation’s ability to multiply output and capacity has often made it a particularly attractive option for small teams looking to amplify their productivity, but with the right tools, automation can deliver results for companies of any size.
With platforms like Unito, Airtable, and Integromat, enterprise users can manage massive and complex datasets, build versatile and highly technical custom automations, and control those automations from a centralized database.
If you’d like to learn more about how automation can help your company to save time and create more consistent processes, check out our blog or our YouTube channel. You can also follow XRay on Twitter, Facebook, or LinkedIn.
Not sure where to start with automation?
Hop on a 15-minute call with an XRay automation consultant to discuss your options and learn more about how we can help your team to get more done.
🎙Interview me about my Workflow
Workflows take many different shapes, sizes, and tools. Ever wonder how your workflows compare?
Get interviewed and find out!
while humans get to be mindful.


