The XRay.Tech Blog
Case Study & Tool Belts
"This is incredible. The robots are doing so much of this work, and it's way better than we could have done it ourselves. The documentation is also amazing – we’re ready to start training our staff how to perform this workflow right away!"

With automation providers like Zapier, anyone can start automating their tedious tasks without needing to write a single line of code.
All it takes is a few minutes of learning the basics, and you’ll have more time every day for the work that matters.
In this post, we’re going to show you everything you need to know to get started with Zapier and begin automating your work.
We’ll quickly explain what Zapier is, and how it works. Then, we’ll guide you through the process of building your first Zap step by step so you can learn the basics firsthand.
What is Zapier?
First, let’s quickly address an important question that many beginners will likely have:
What is Zapier, and what does it do?
Zapier is an app that automates actions in the software you already use. By connecting your existing web apps together, it allows you to automate the work you’re currently doing manually, or build entirely new automated systems and even prototype your new ideas.
For instance, you could build an automation – or a “Zap” – that runs whenever a Zoom event ends. Then, the automation could download a list of every attendee and find or create matching leads in Hubspot for your team to follow up with.

You could also set up a Zap that watches Reddit for comments matching your specified terms, and add the information to a Google Sheet or Airtable base so you can quickly answer.
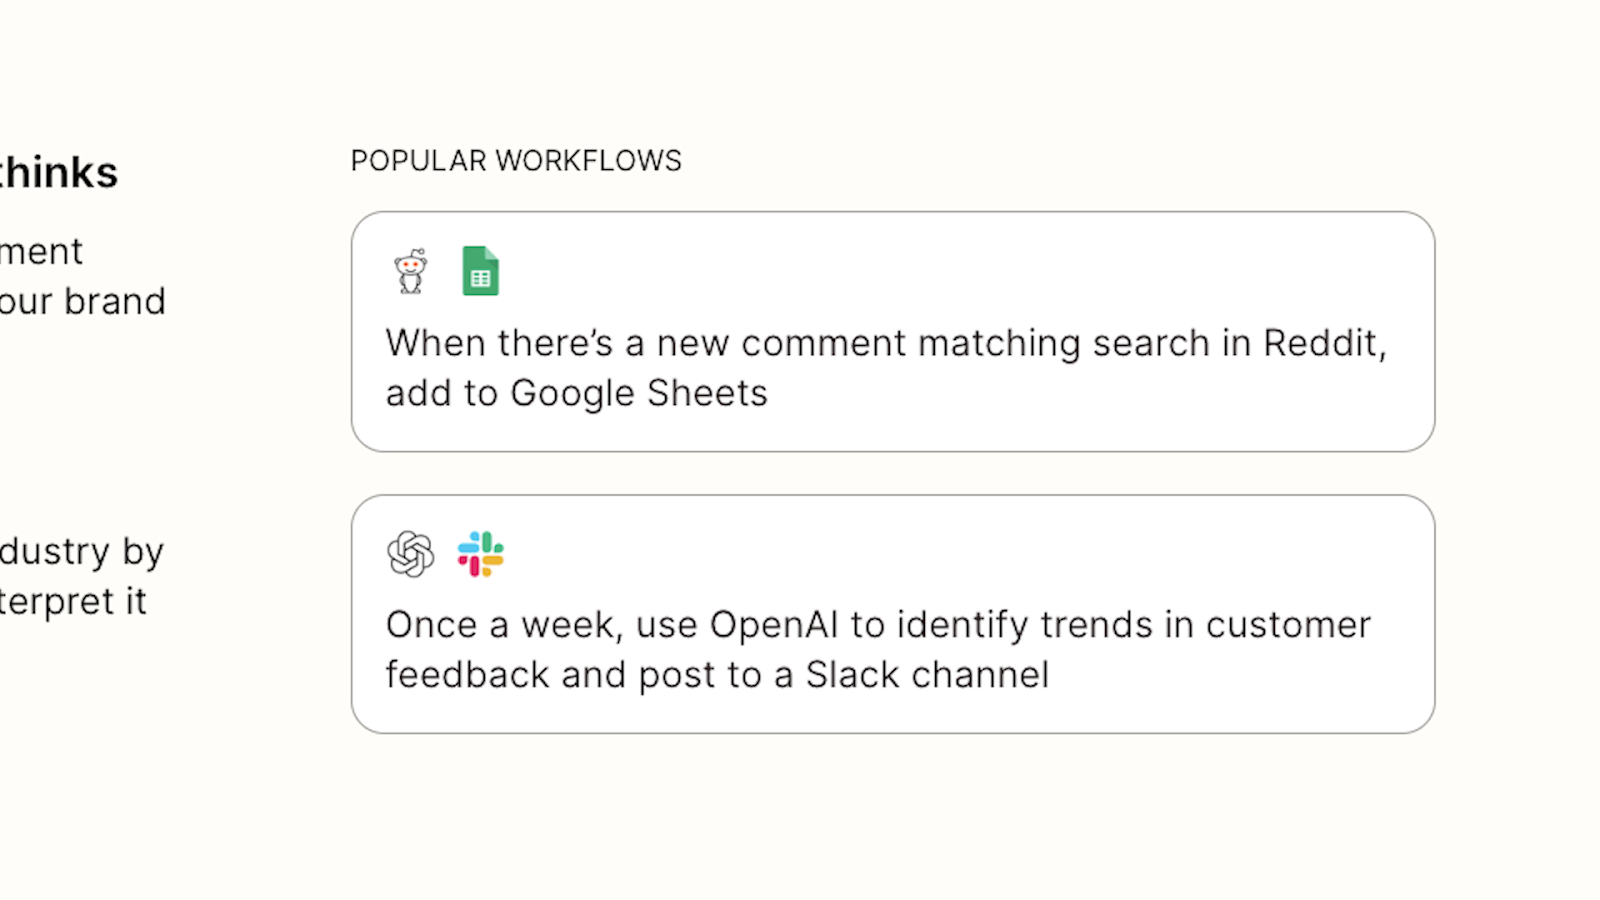
You can even use Zapier to automatically send prompts to AI, making it easy to add AI-generated content to any app in your workflows.
These examples are just scratching the surface. With thousands of apps supported, the possibilities are basically endless.
Zapier also includes several other features that go beyond automation, which you can explore in another post on the XRay blog. But first and foremost, Zapier is an automation provider, so that’s what we’ll focus on in this beginner’s guide.
Building your first Zap to automate your work
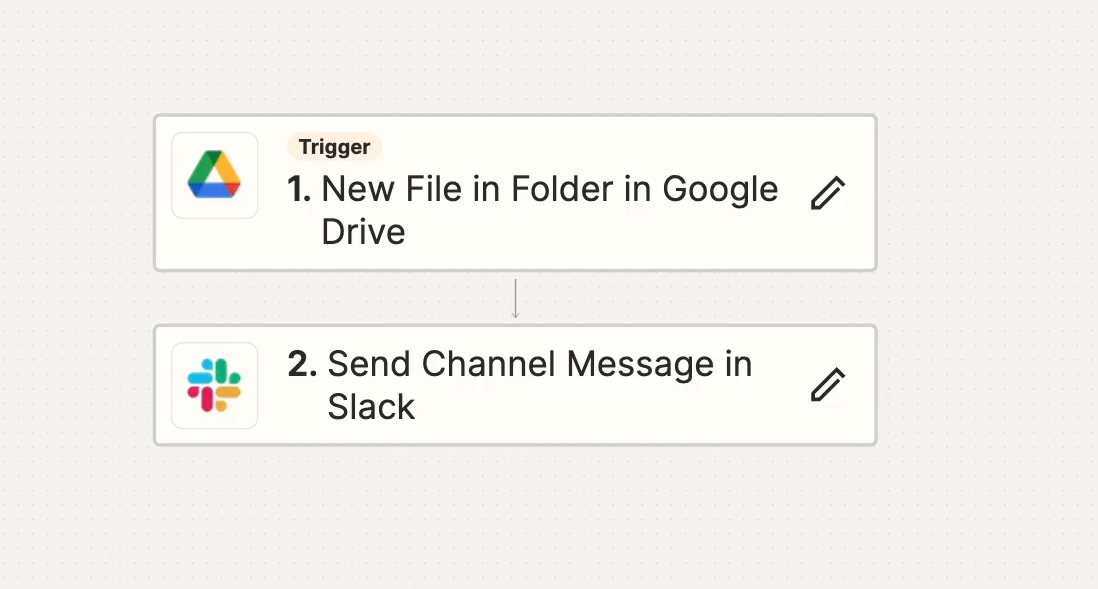
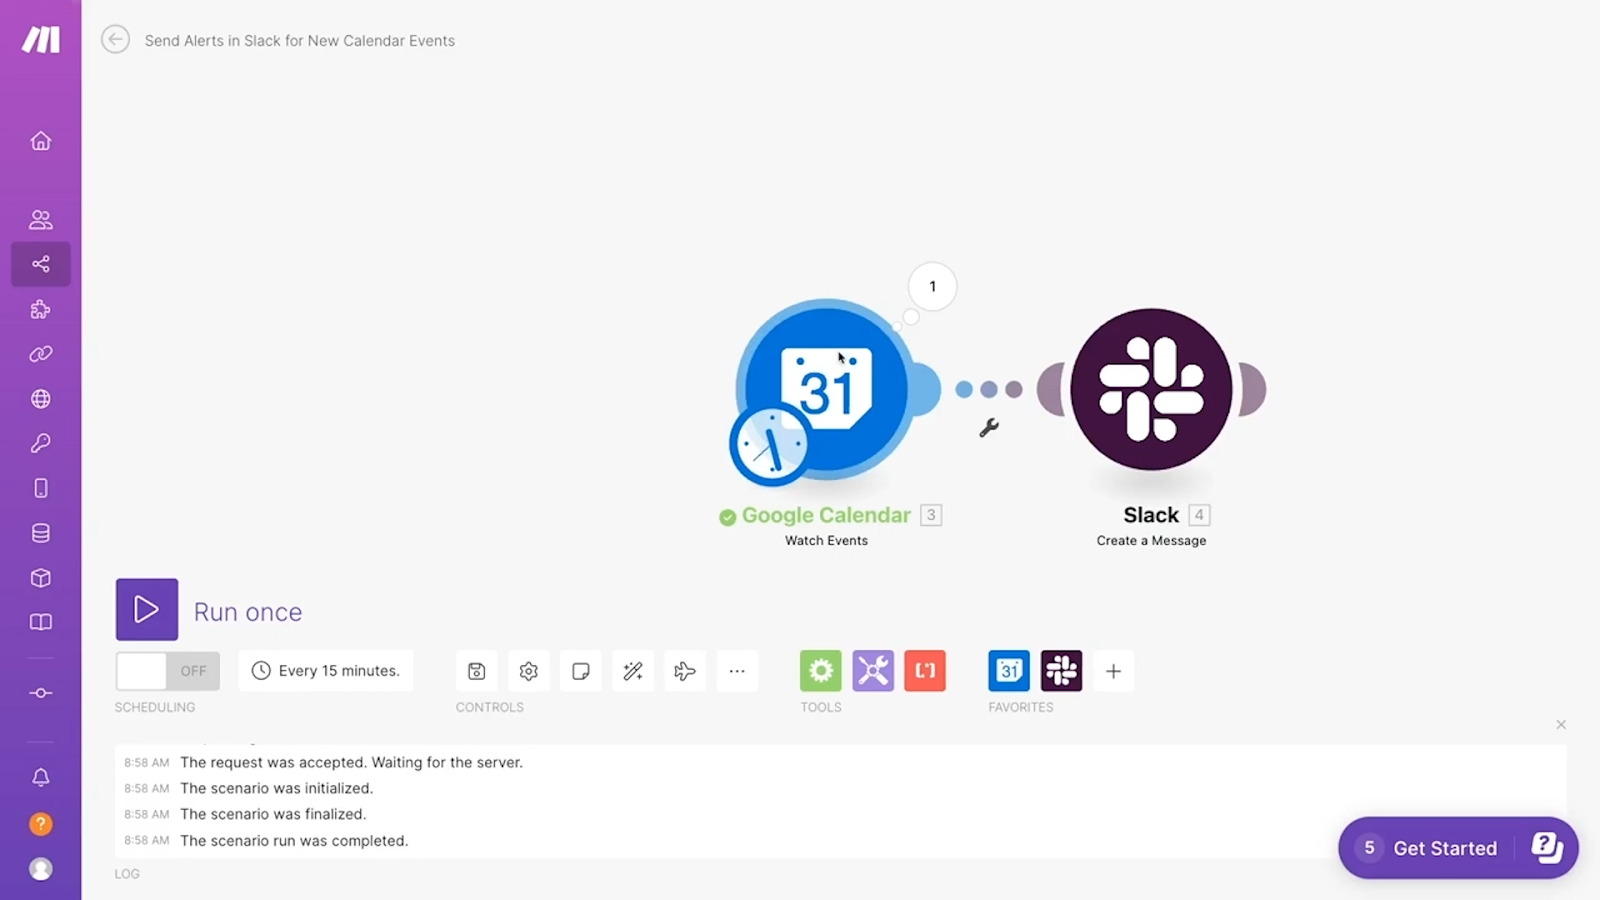
Now, let’s take a look at building your first Zap. Here’s the automation that we’ll be building today:
Whenever a file is added to a specified folder in Google Drive, send an alert in Slack containing a link to the file.
This is a very simple automation, and its practical uses are, we admit, quite limited. However, it’s a great starting point to learn how Zapier works. It creates a playground where you can easily edit the automation, then run a test and instantly see the output in Slack.
These kinds of simple automations are great for trying new ideas and seeing how the data connects, and that’s what we really want you to get from this beginner’s guide.
Note that you could also use similar alternatives for these apps if you’d like. For instance, you could swap out Google Drive for Microsoft OneDrive, or Dropbox in the first part of the automation. The same general principles will apply, but some specific settings and terms used will be different.
Once you’ve got your free accounts set up in Zapier, Slack, and Google Drive, or the other apps of your choice, we can get started.
Create a new folder and a new Zap
Before you create your first Zap, it’s always a good idea to stay organized, so make a folder for your Zap first.
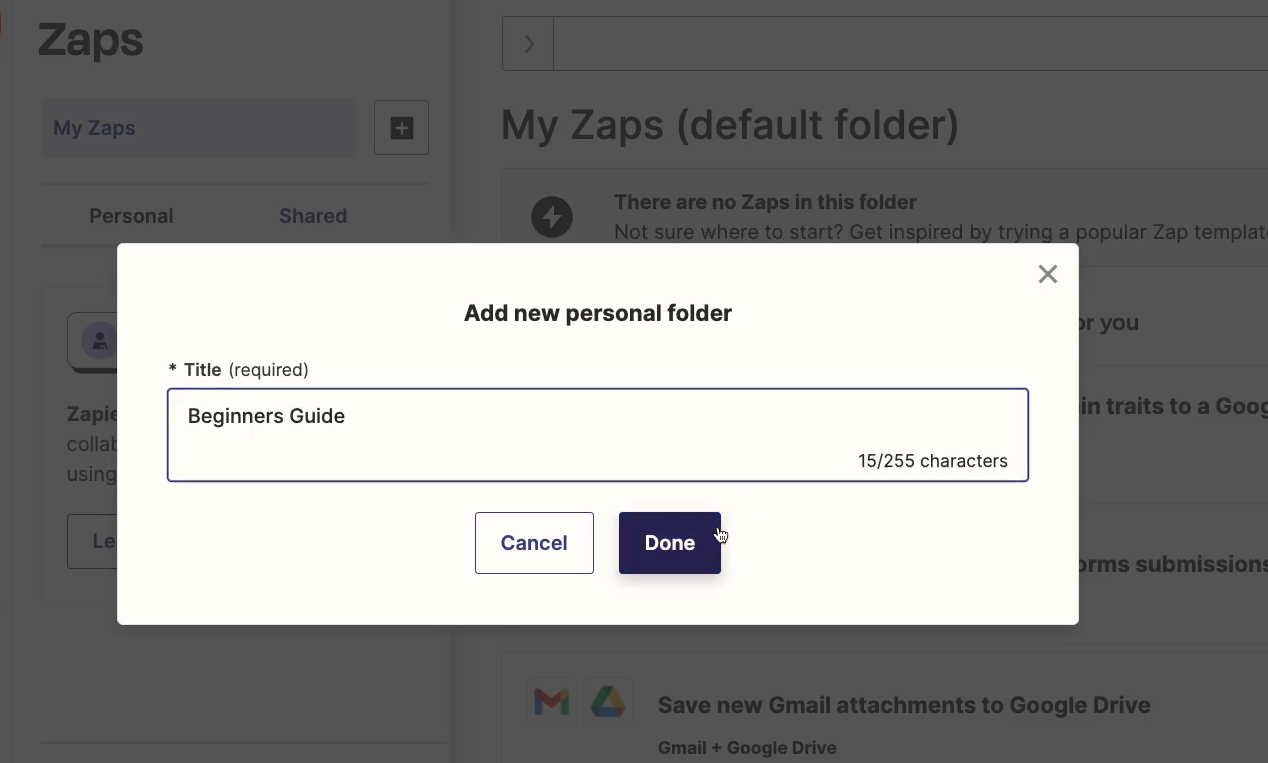
Select “Zaps”, click on the “Create” button, and add a new folder.

Give your folder a name like “Beginner’s Guide”.
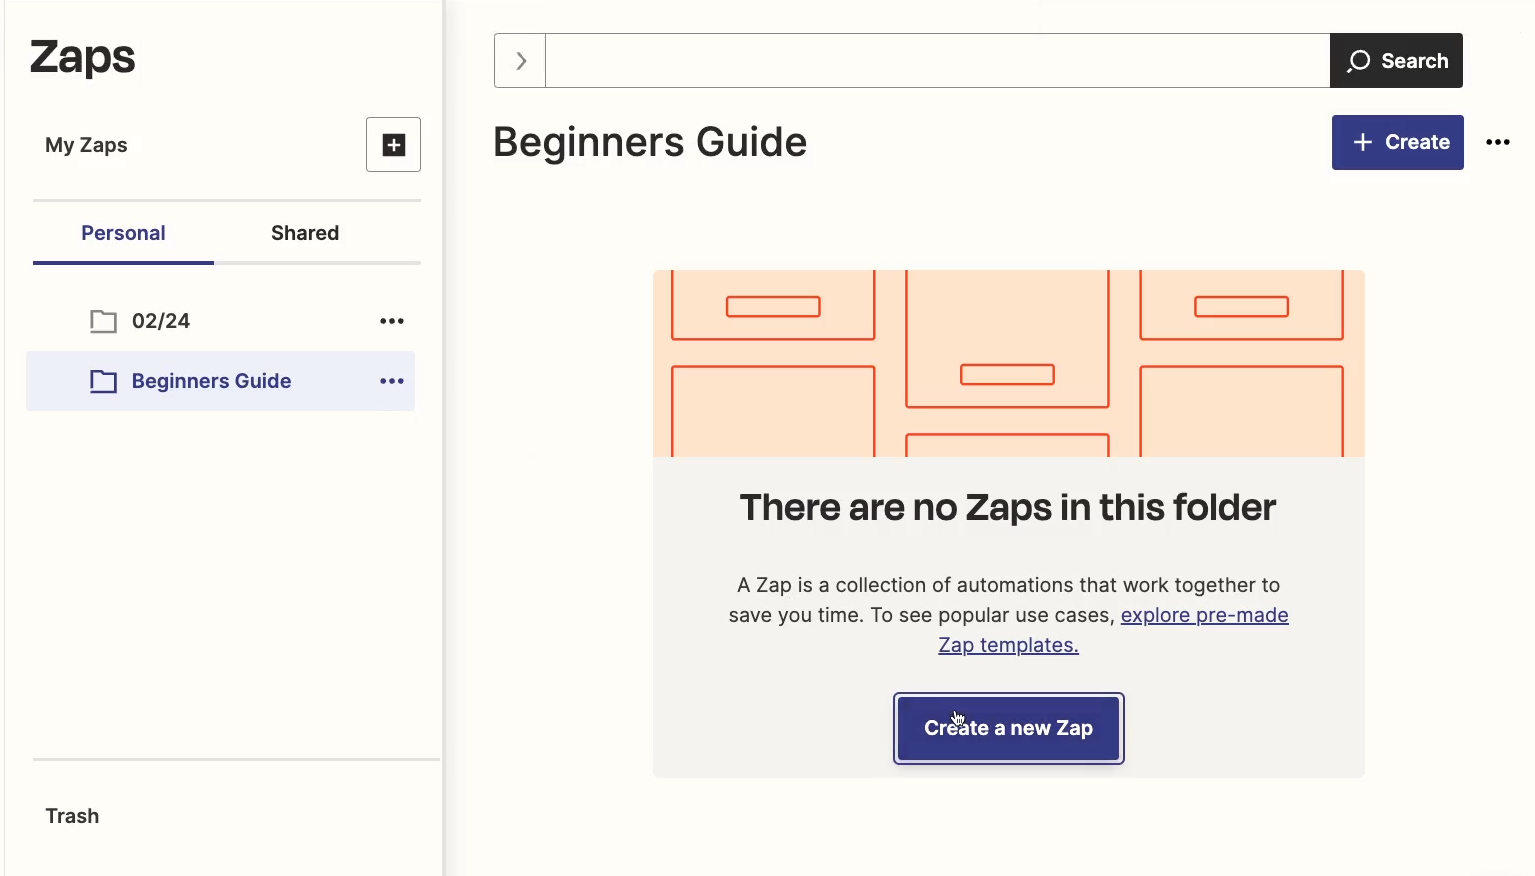
Then, select your new folder, and click “Create a new Zap” to make a new automation within your folder.
Building a Zap manually
The text box at the top of the automation builder will allow you to create a Zap by sending a prompt to AI, but we’d recommend skipping this if you’re a beginner.

The AI output is usually pretty good, particularly when it comes to building short 2-step Zaps, and it can be a great timesaver once you’re more experienced. However, the AI often gives you an incomplete or slightly incorrect automation.
Once you know how to build a Zap manually, fixing these issues will be easy. But when you’re just getting started, it might be more confusing than it is helpful to start off with an AI’s half-finished work.
So, instead of typing anything into this window, we’d recommend starting by filling out your Trigger manually.
Adding a trigger to your Zap
The trigger is what starts your automation. Whenever this condition is fulfilled, your Zap will run.
That’s the basic setup of every automated workflow: 1 trigger that kicks it all off, and one or more automated actions that follow.
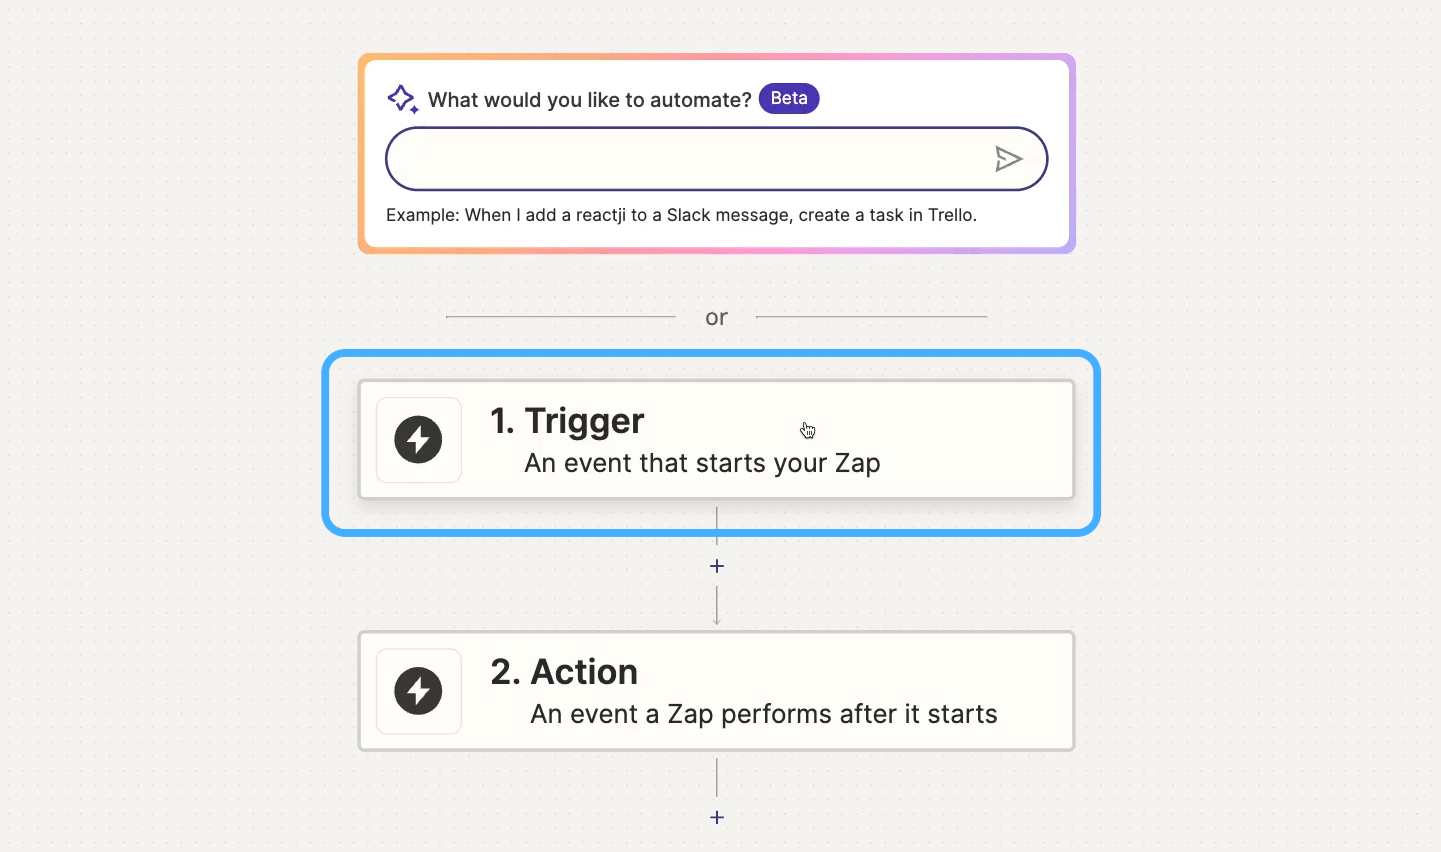
Click on “Trigger” to start setting up your trigger.
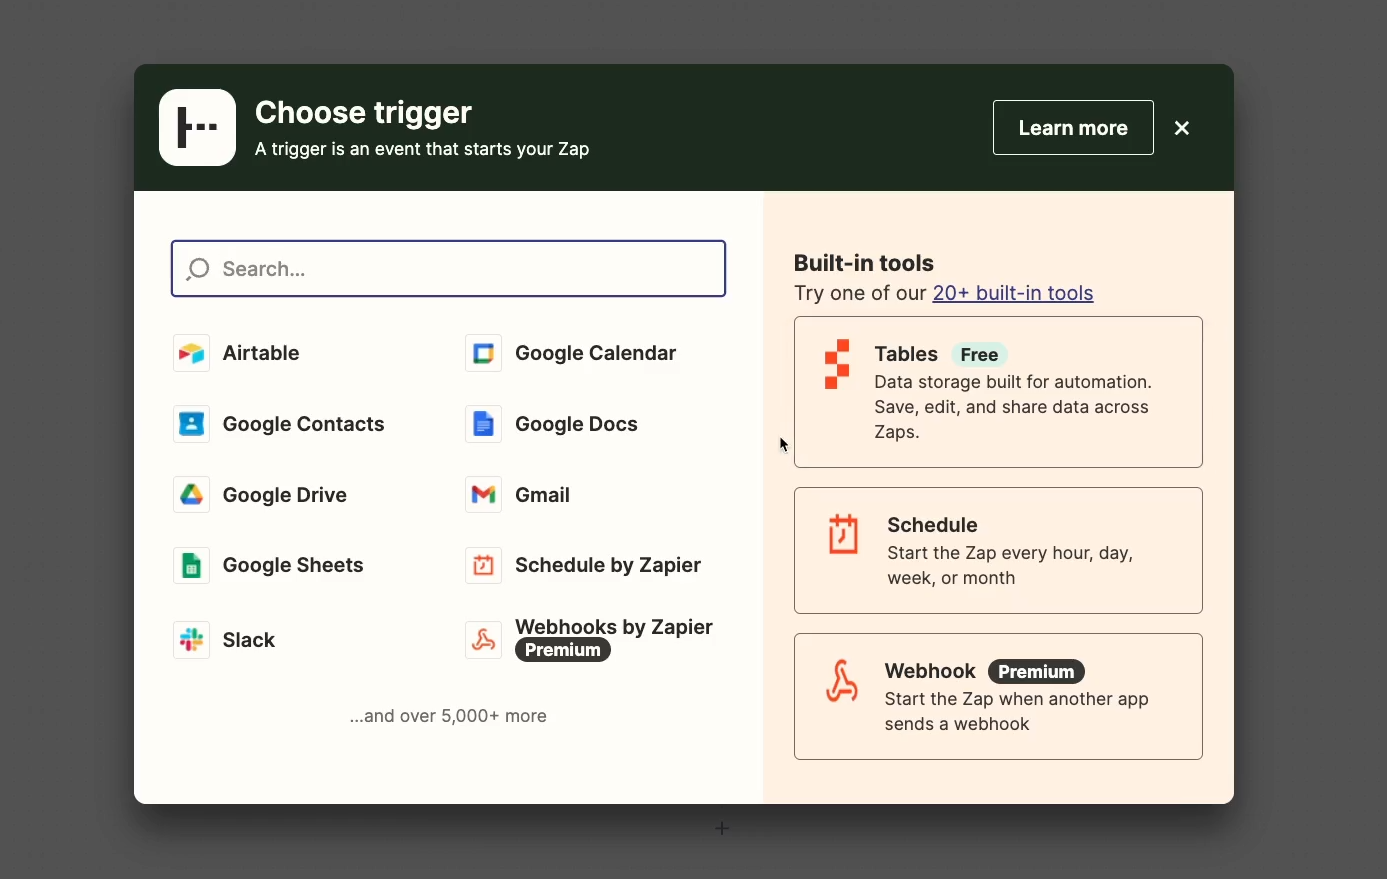
In the window that pops up, you’ll need to pick the app that you want to use to start the automation.
You’ll see a small list of apps in the panel, but you can search the full library of about 7,000 integrations by just entering your app’s name up in the search bar.
You can also set your automation to run based on a schedule, or to launch on demand with webhooks.
If you’re running a software company, and you’d like to add your app to Zapier, just reach out to us to explore your options for building a custom integration. This will allow your users to automate your app with Zapier completely on their own.
For now, just pick “Google Drive” as your trigger app.

Then, you’ll see this panel open up on the right where you can configure your trigger.
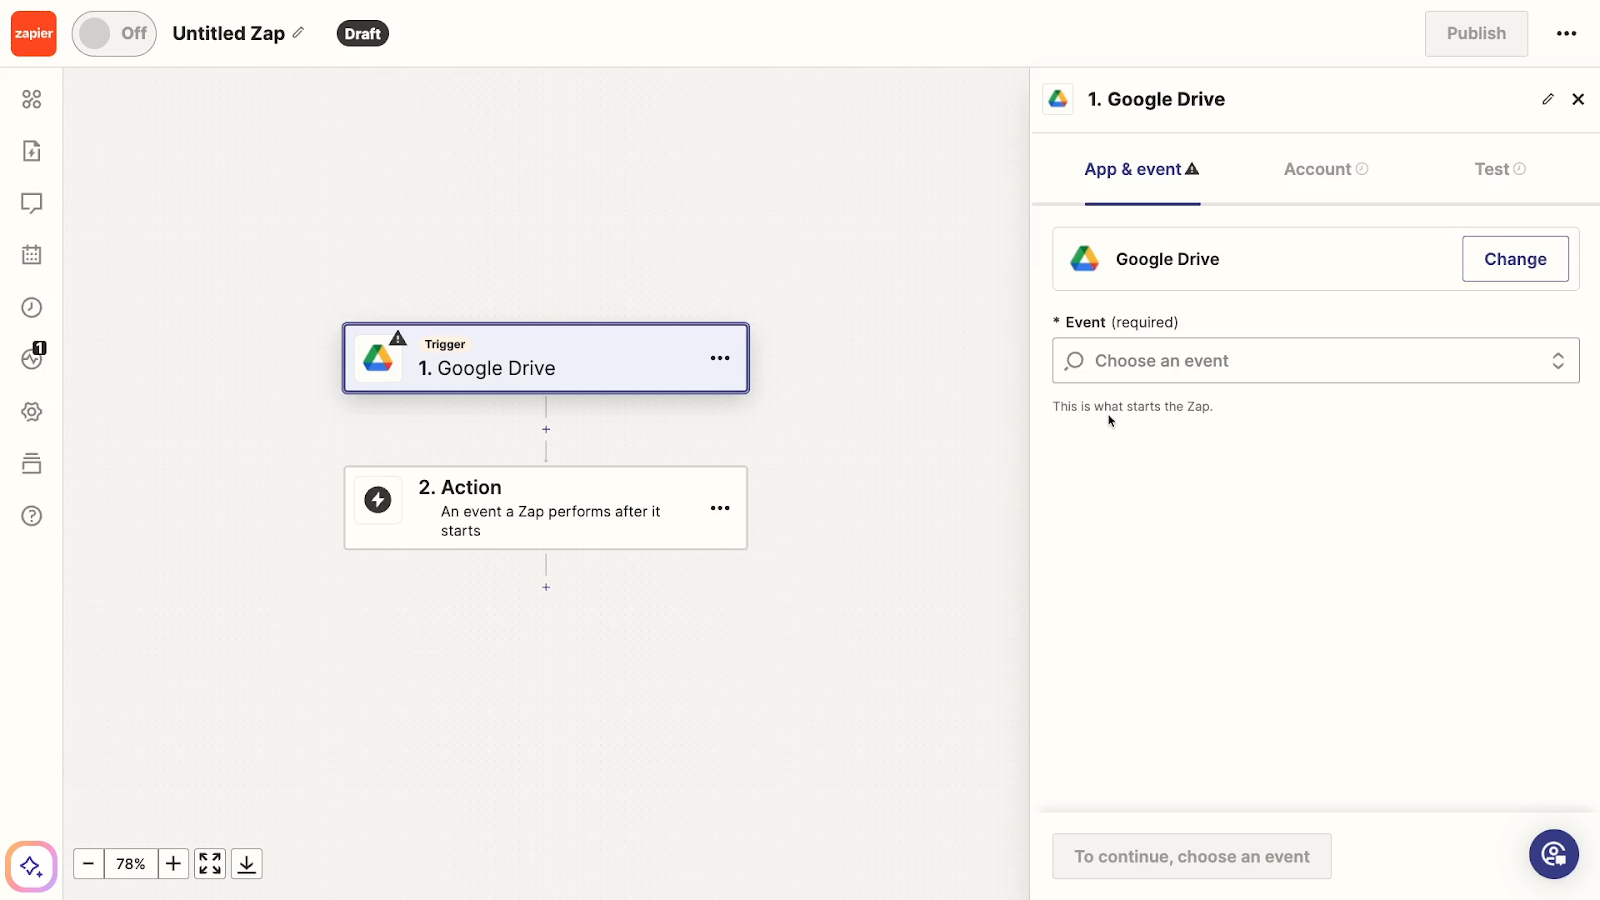
In Zapier’s visual editor, you can add and reorder steps in the flowchart-like area to the left, then edit each step in the panel on the right.
Choose an event for your trigger
Next, you’ll need to specify the “Event” in your trigger.
This is the specific condition that will prompt the automation to run. You’ll often see several options, so just pick the one that’s the best match for what you want to automate.
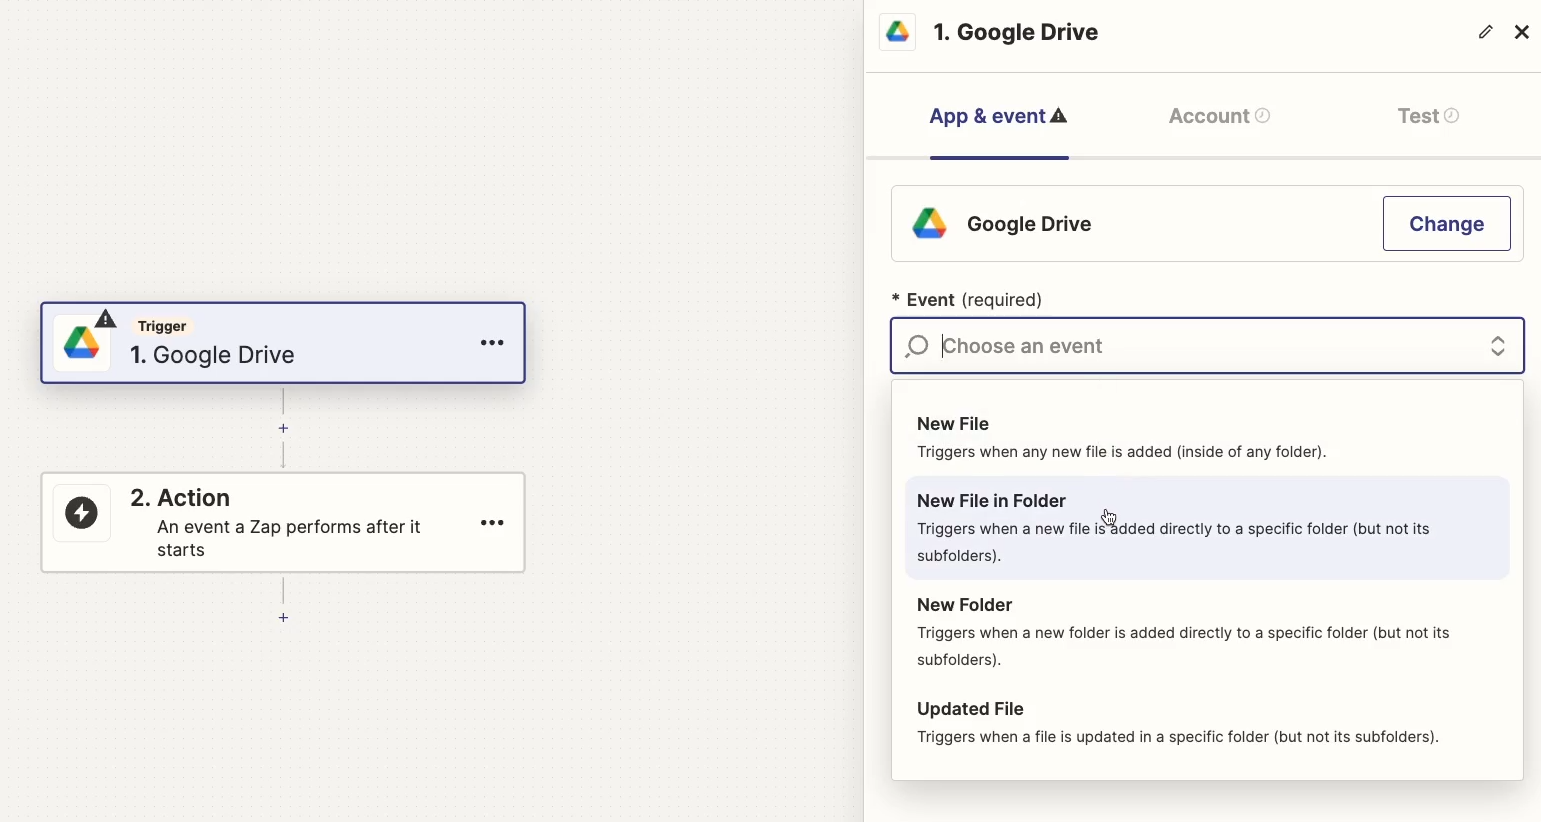
In our case, that will be “New File in Folder”, since we want this automation to run whenever a file is added to a specific folder.
Once you’ve chosen your event, click “Continue” to move on to the “Account” section. Then, you’ll be prompted to sign in to your trigger app - in this case, Google Drive.
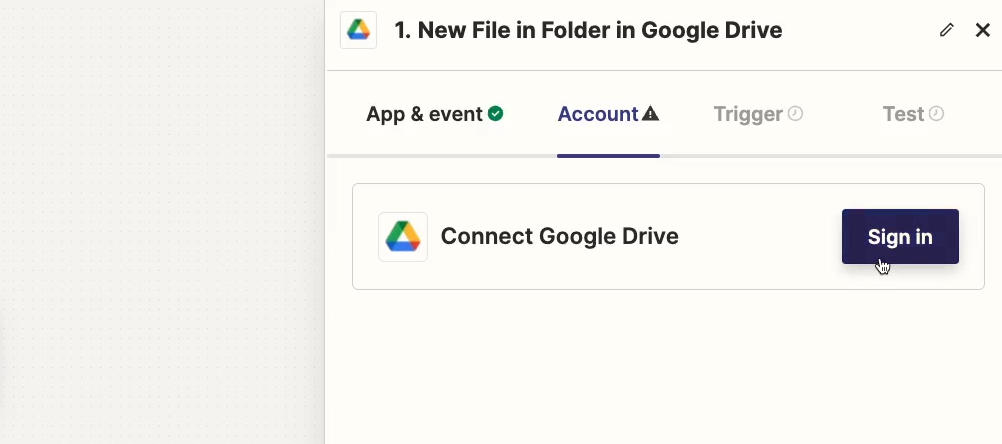
Sign in to your trigger app and authorize Zapier
Click on ‘Sign in’, and grant Zapier the permissions it needs. You’ll always need to sign into your apps and authorize them the first time you connect them to Zapier.

In order for Zapier to work, it needs to be able to act automatically on your behalf through your accounts. If you’d like to learn more about Zapier’s security practices, you can check out our article exploring the topic in depth.
Once you’ve signed in with Google Drive, click on continue.
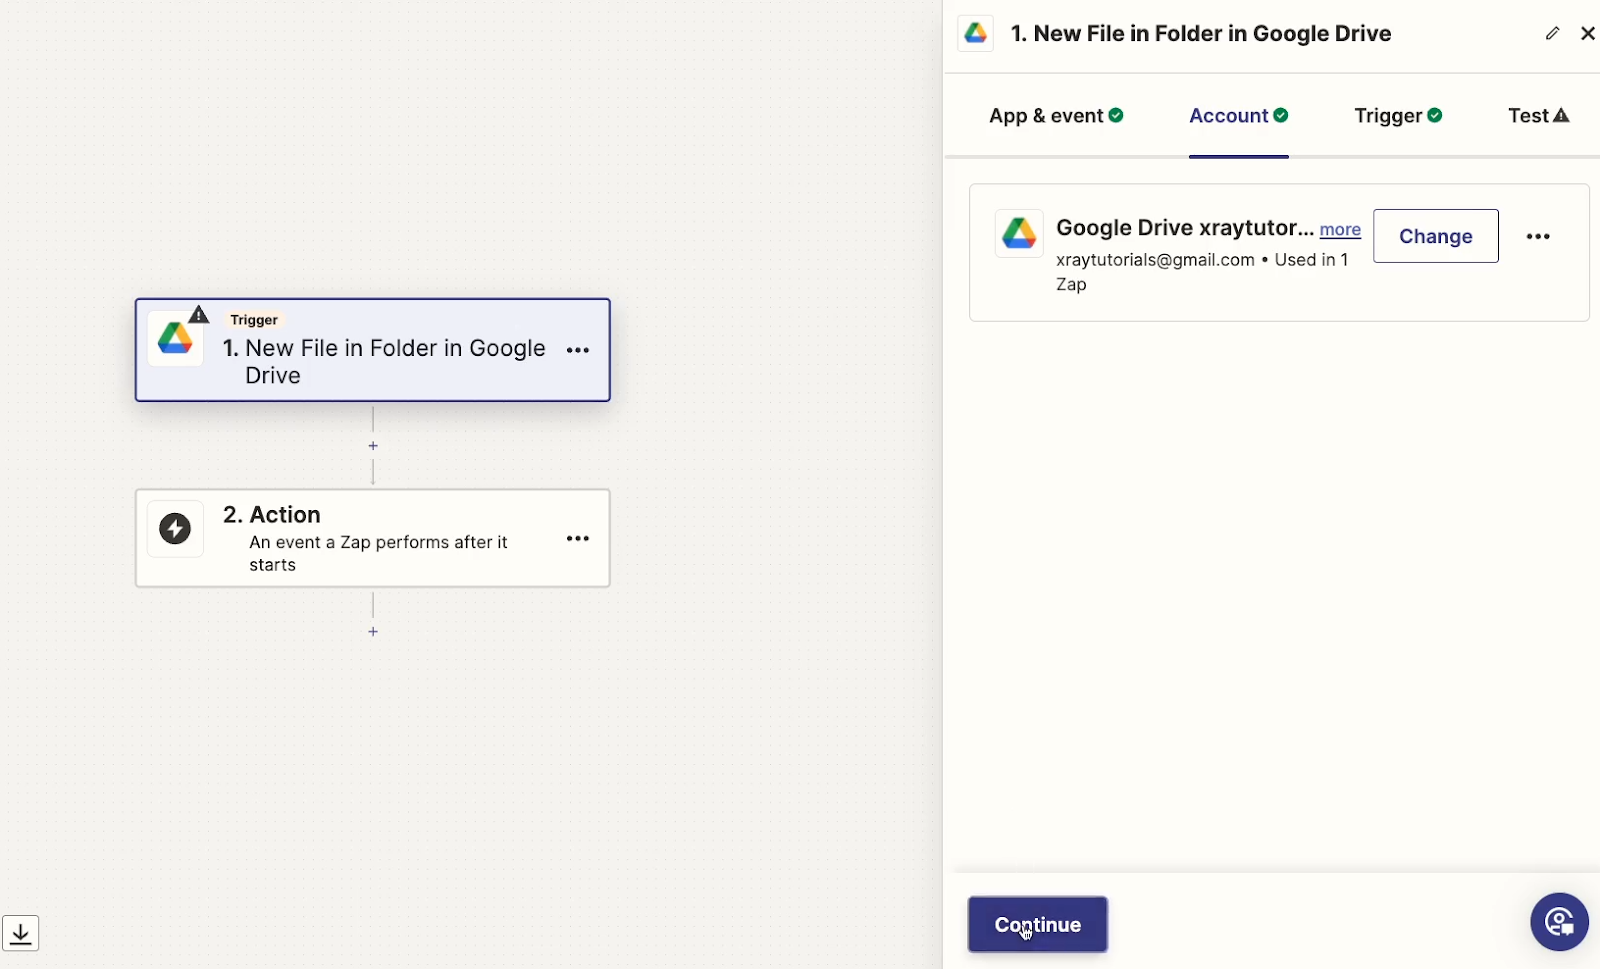
Configure your trigger
Under this “trigger” section, you can specify the data that your trigger should watch.
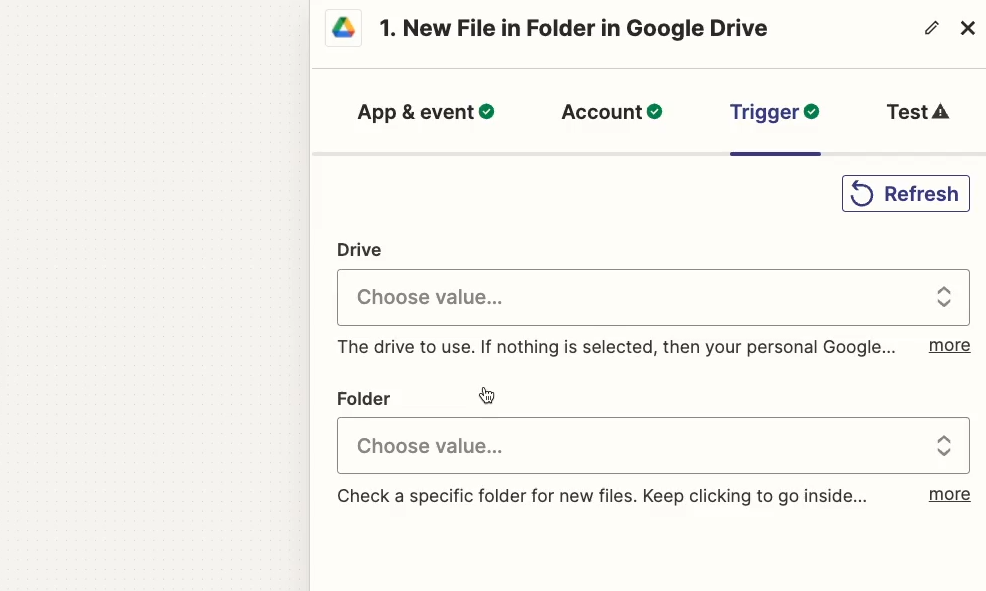
For Google Drive, that means specifying the Drive and Folder to monitor. Zapier will typically provide help text under each field to give you more context.
For “Drive”, they explain that if this field is left empty, it will default to just using your personal Drive - the one listed as “My Drive” in Google Drive. So in our example, we’ll just leave it blank to use that.
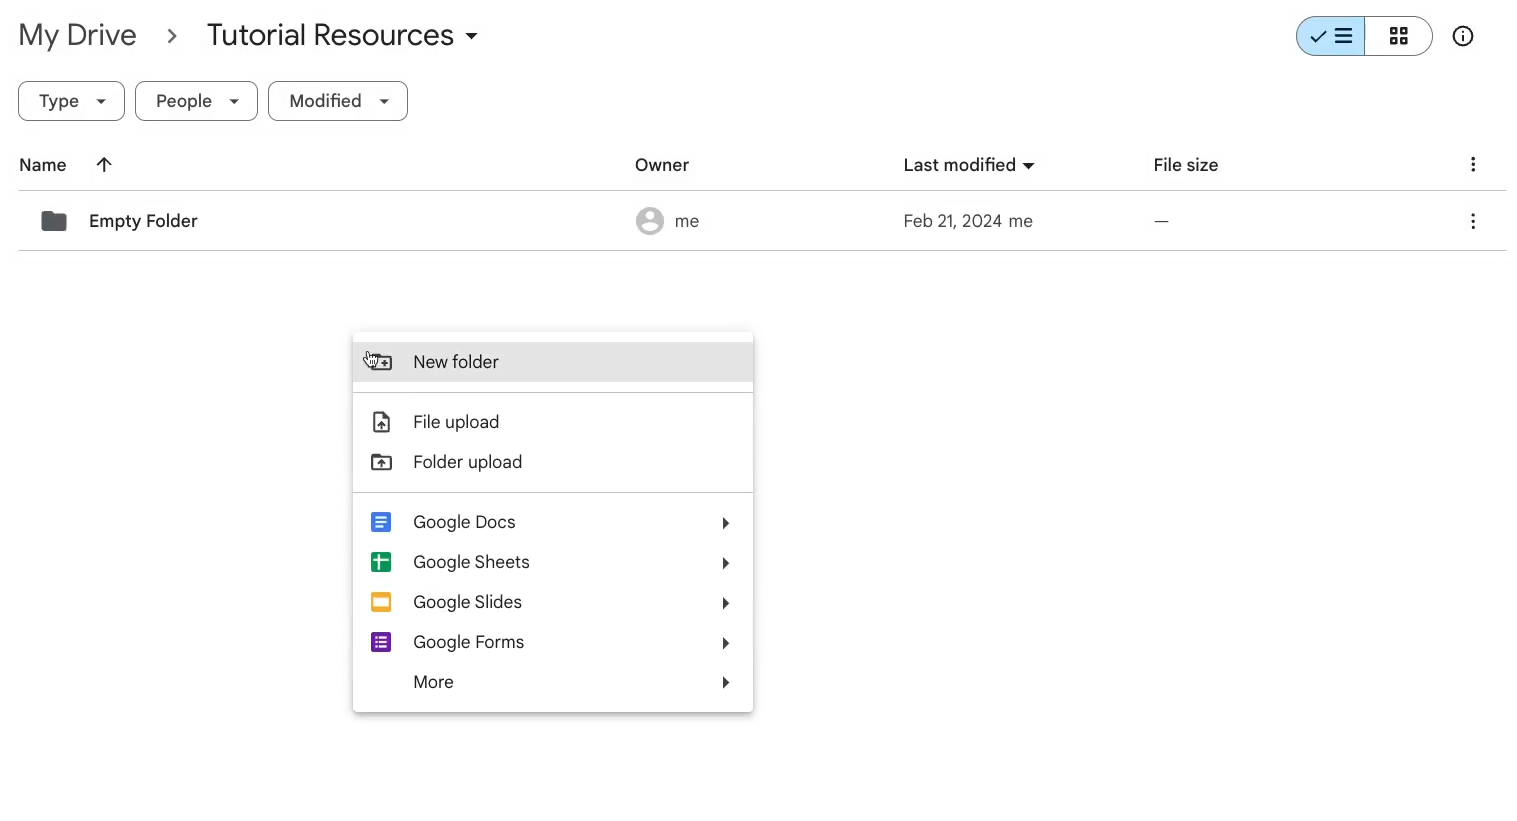
In “Folder”, you’ll need to specify the folder that Zapier should watch. If you don’t have a folder to use, open up Google Drive in a new tab and make one now.
Back in Zapier, you can navigate through your folders and select one based on its name.

Identify folders and other objects by their programmatic IDs
However, whenever possible, we’d recommend avoiding identifying items by their name in automations. When you can, it’s best to use an ID, since IDs remain constant, while file and folder names could change.
Most objects in web apps, such as folders in Google Drive, have some kind of ID associated with them. In many cases, it’s also very easy to find this ID by simply looking at the URL bar.
Go back to Drive, and open the folder you want to use.
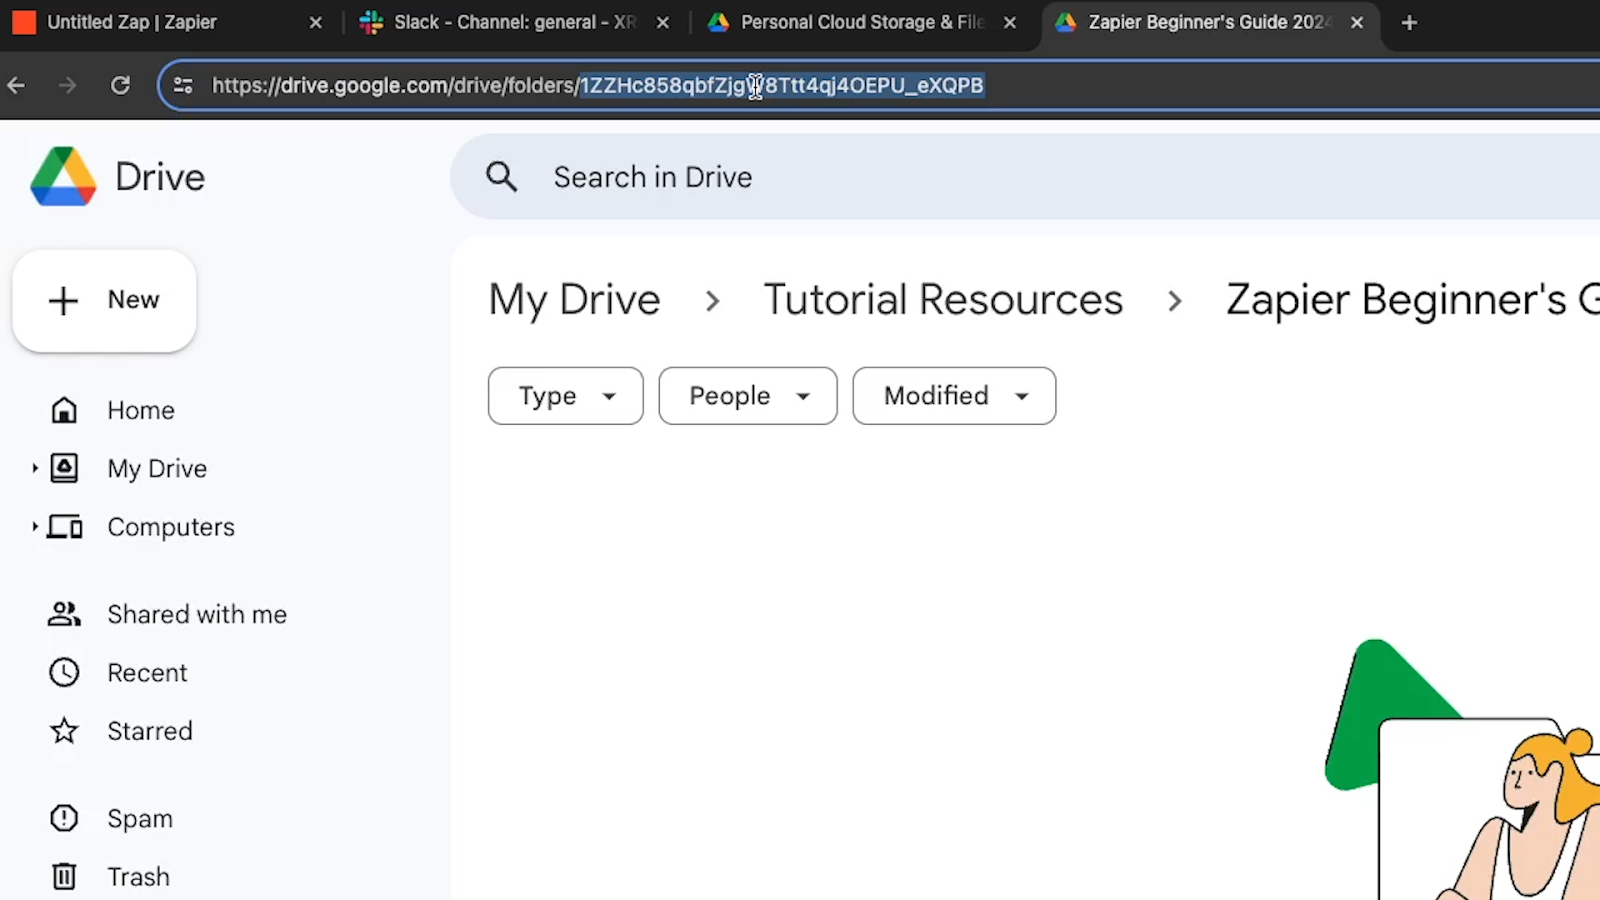
If you look at the URL bar for your folder, you’ll see this string of characters after ‘Folders’. That’s your folder’s ID. Copy it to your clipboard.
Then, go back to Zapier, select the “Folder” field, and choose “Custom”.

Now, you can paste your folder’s ID into the field.
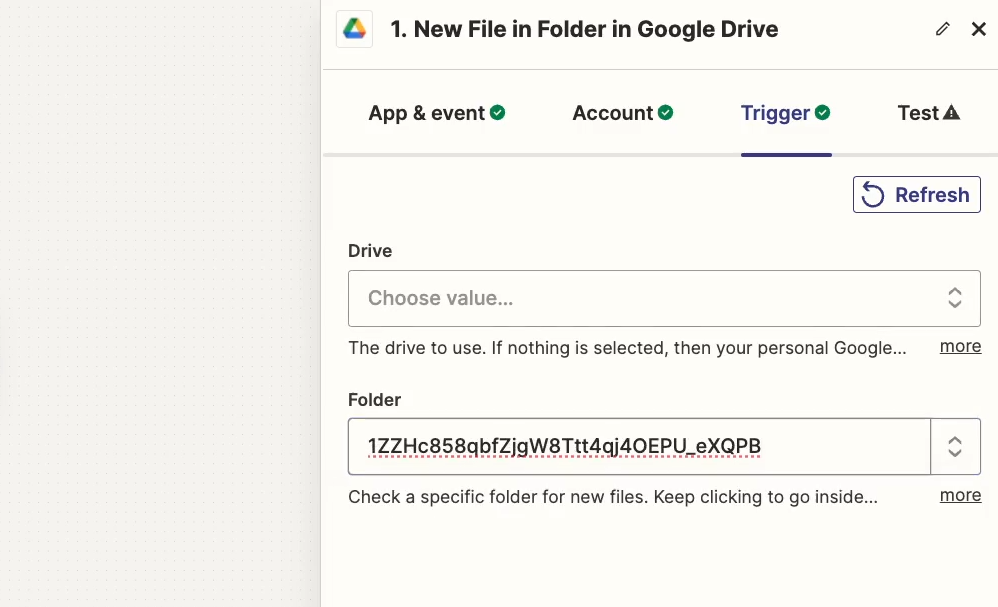
For this tutorial, it’s fine to either use the ID or select the folder from the list. But we’d recommend trying to use the ID first. Techniques like this that create more stable, maintainable automations are a key step to becoming a Zapier expert.
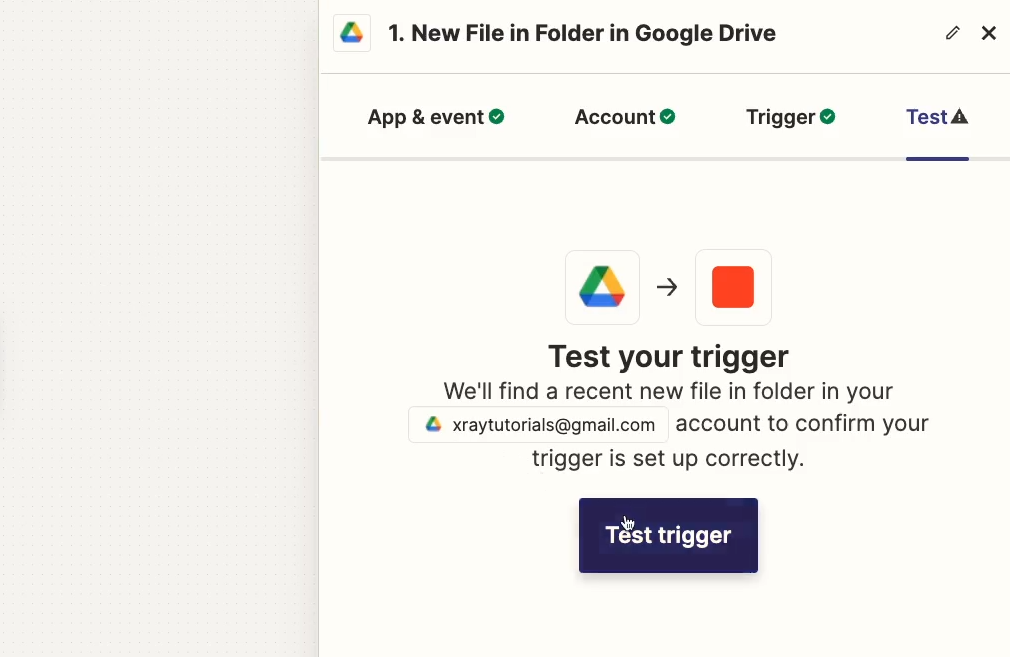
Testing your Zap’s trigger
Once you’ve specified the folder you want to use with either method, it’s time to run a test.
But before you test a trigger in Zapier, you need to have test data to work with. If you don’t have test data to use, you won’t be able to test your trigger, and it will be very difficult or even impossible to build your automation.
For this automation, that means we’ll need to have a file already in the folder, since the trigger is set to watch for new files in the folder. In other words, if there is no file in this folder, the test will fail.
In our example, we’ll add a file now in Google Drive called “Test Proposal”.


Once your test data is all set, go back to Zapier, and test your trigger by clicking on the “Test Trigger” button.
After a couple of seconds, Zapier should give you a list of up to three files found in your folder.

Understanding Zapier’s test data
Zapier triggers will always return a lot of data. For files in Google Drive, this will include things like the file’s URL, its contents, its created time, and a lot more.
Note that different apps will return different data in the trigger. If you’re using alternate apps as you follow along, expect to see data unique to the app you’re using.
Each piece of data – or “variable” – is broken down into labels and values. The labels are in the blue rectangles on the left, while the values for the specific selected record are to the right.
Every Google Drive file pulled into Zapier will have all the same variables with all the same labels, but the values for those variables can be different each time the automation runs.

For instance, every file will have a Title, but that exact title will depend on the doc in question. This is called dynamic data, and it’s a key part of how Zapier works.
But we’ll touch more on that later. For now, continue with this test record and add an automated action to our Zap.
Add an automated action to your Zap
Clicking “Continue” will add a step to your Zap, but you can also click on the plus sign to add an action to your Zap.
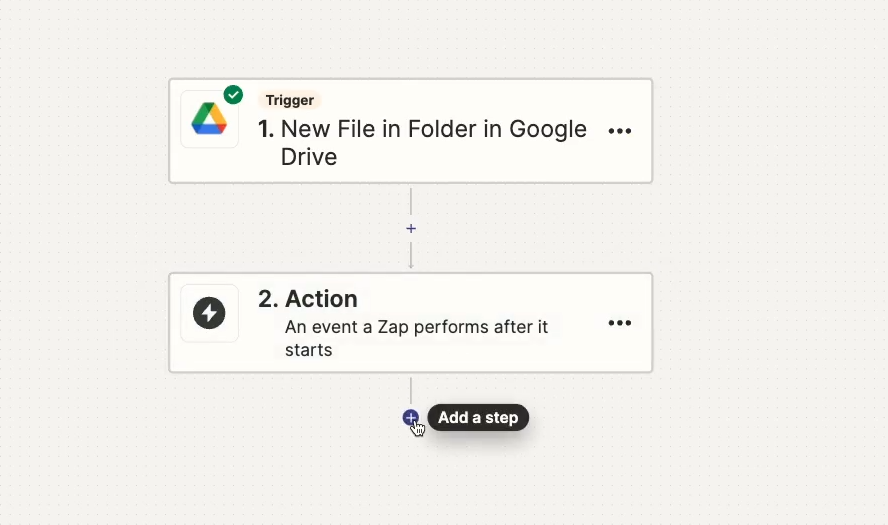
Next, you’ll need to pick an app and an event in the same way you did for the trigger.

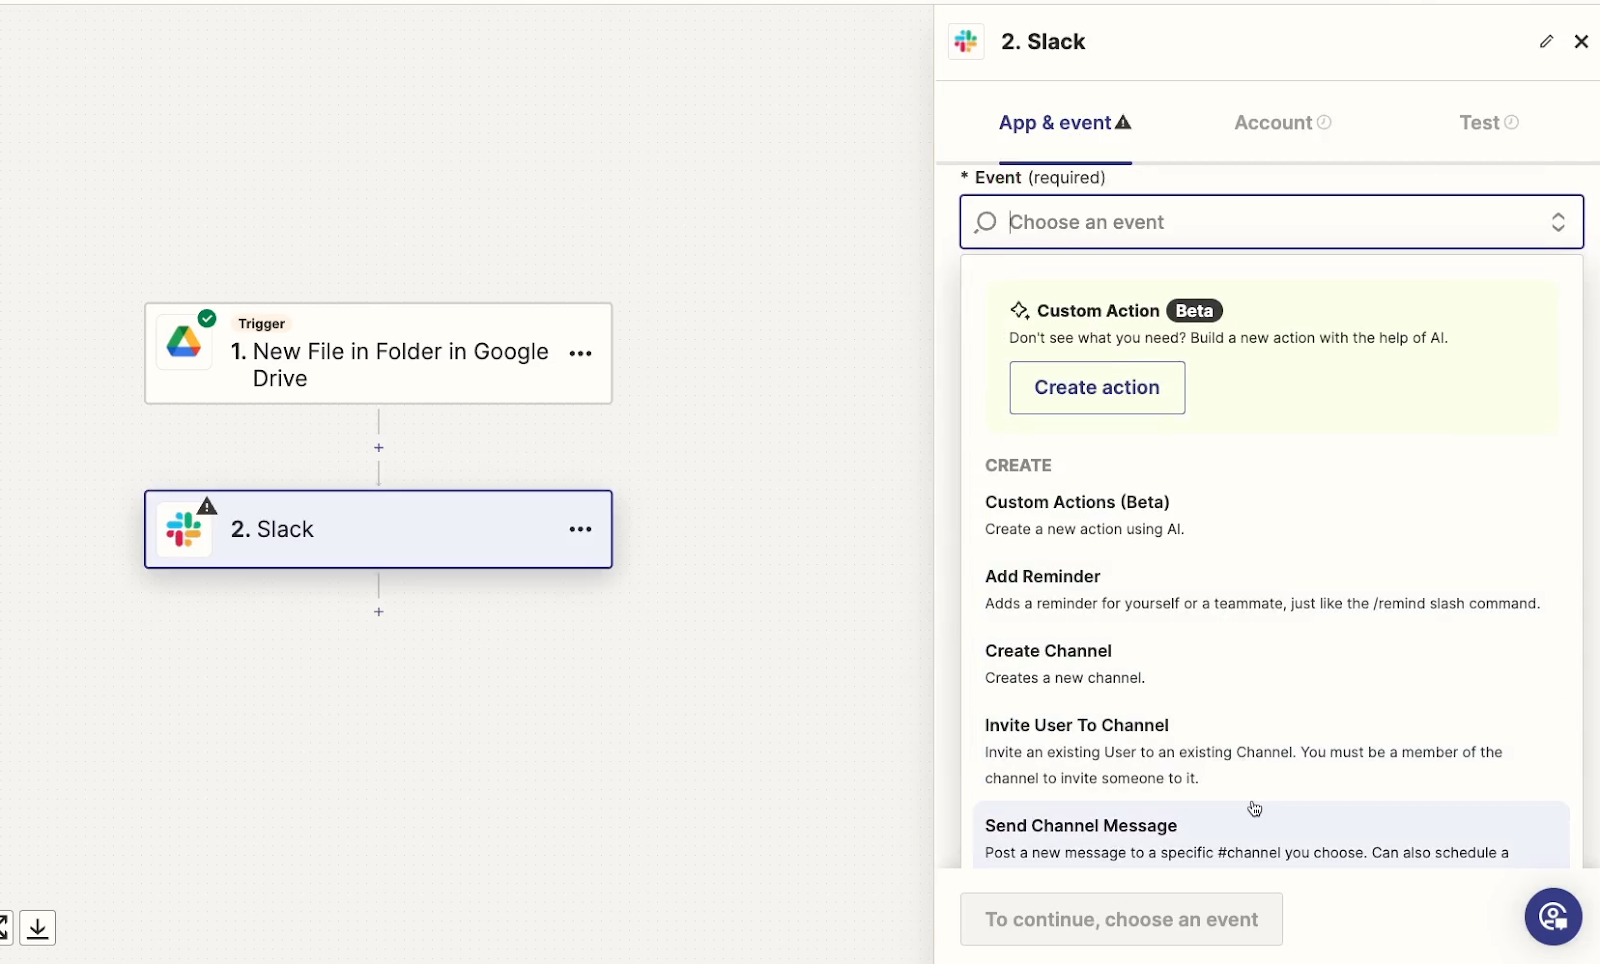
Search for the app that you want to automate. In our case, that’s Slack.
Then, choose the “Event” you want the automation to perform. For our example, “Send Channel Message” is a good match.
Click “Continue” to add the action to your Zap.
Authorize Zapier in your app to automate it
Once again, you’ll need to sign in to the relevant app and authorize Zapier. We’ll sign in to Slack, and allow Zapier the access it needs.

Click “Continue” again, and begin configuring your automated action.
Configuring your automated action
The available fields and settings for an automated action will vary depending on the app, but you can use Zapier’s help text to figure out what you need to provide.
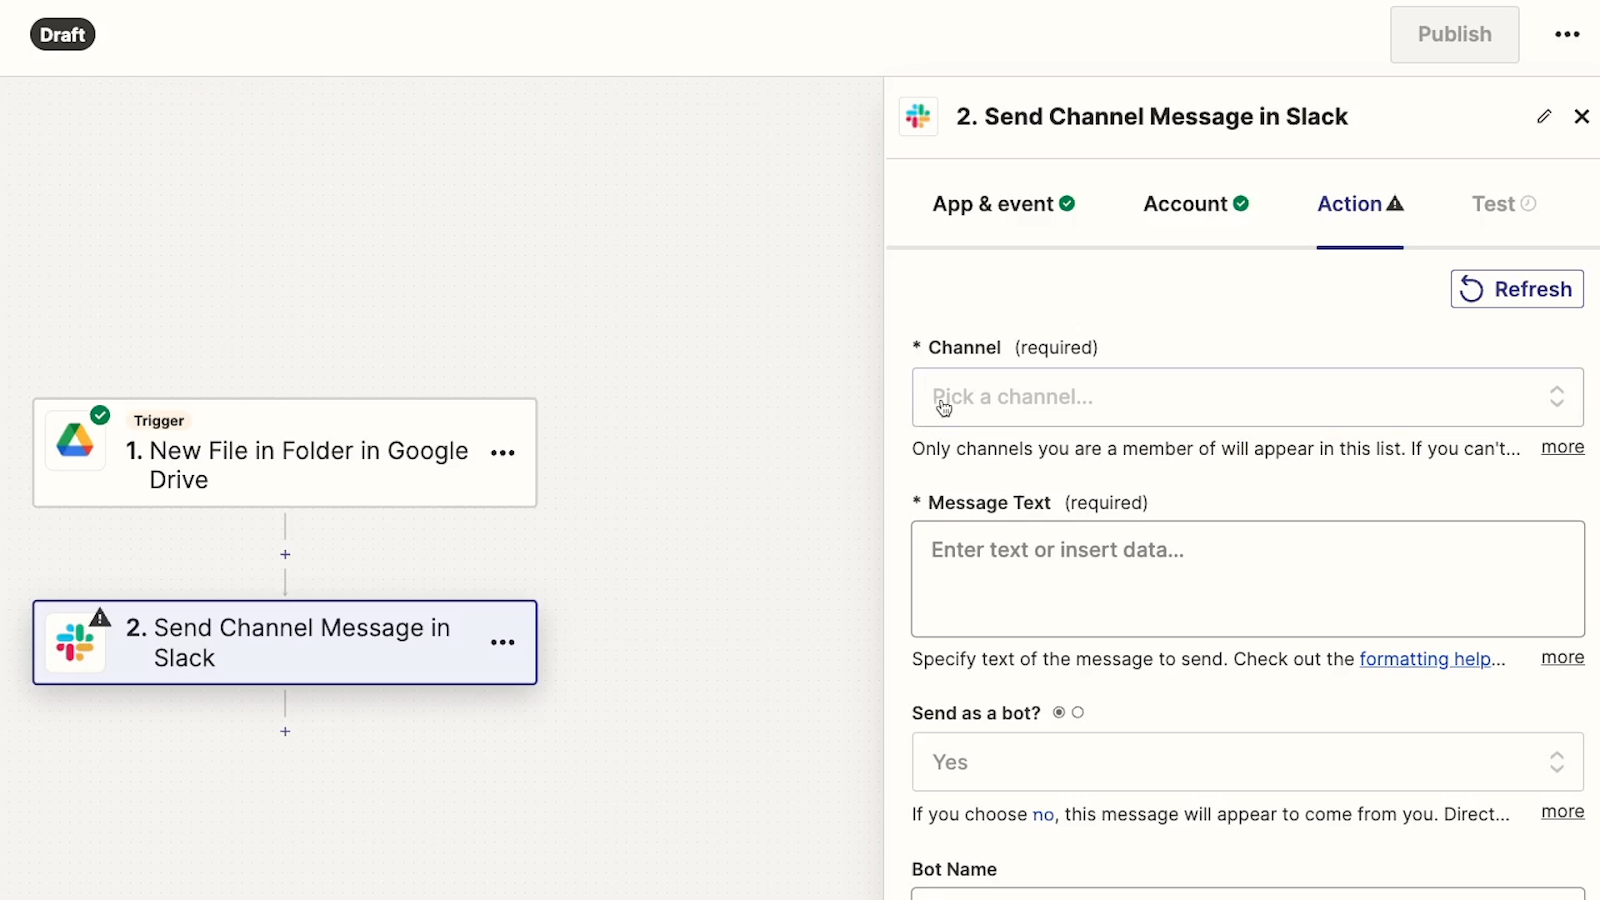
Also note that the required fields will be marked with an asterisk, so you can always start by filling out those. For this Slack message, you’ll need to identify the channel you want to use, and compose the message to send.
To specify a Slack channel, you can once again either pick one from the list, or use the channel’s ID.
To find a Slack channel’s ID, open up the channel in Slack. Then, click on its name at the top of the channel window. At the bottom of the panel that pops up, you can view the ID and copy it to your clipboard.
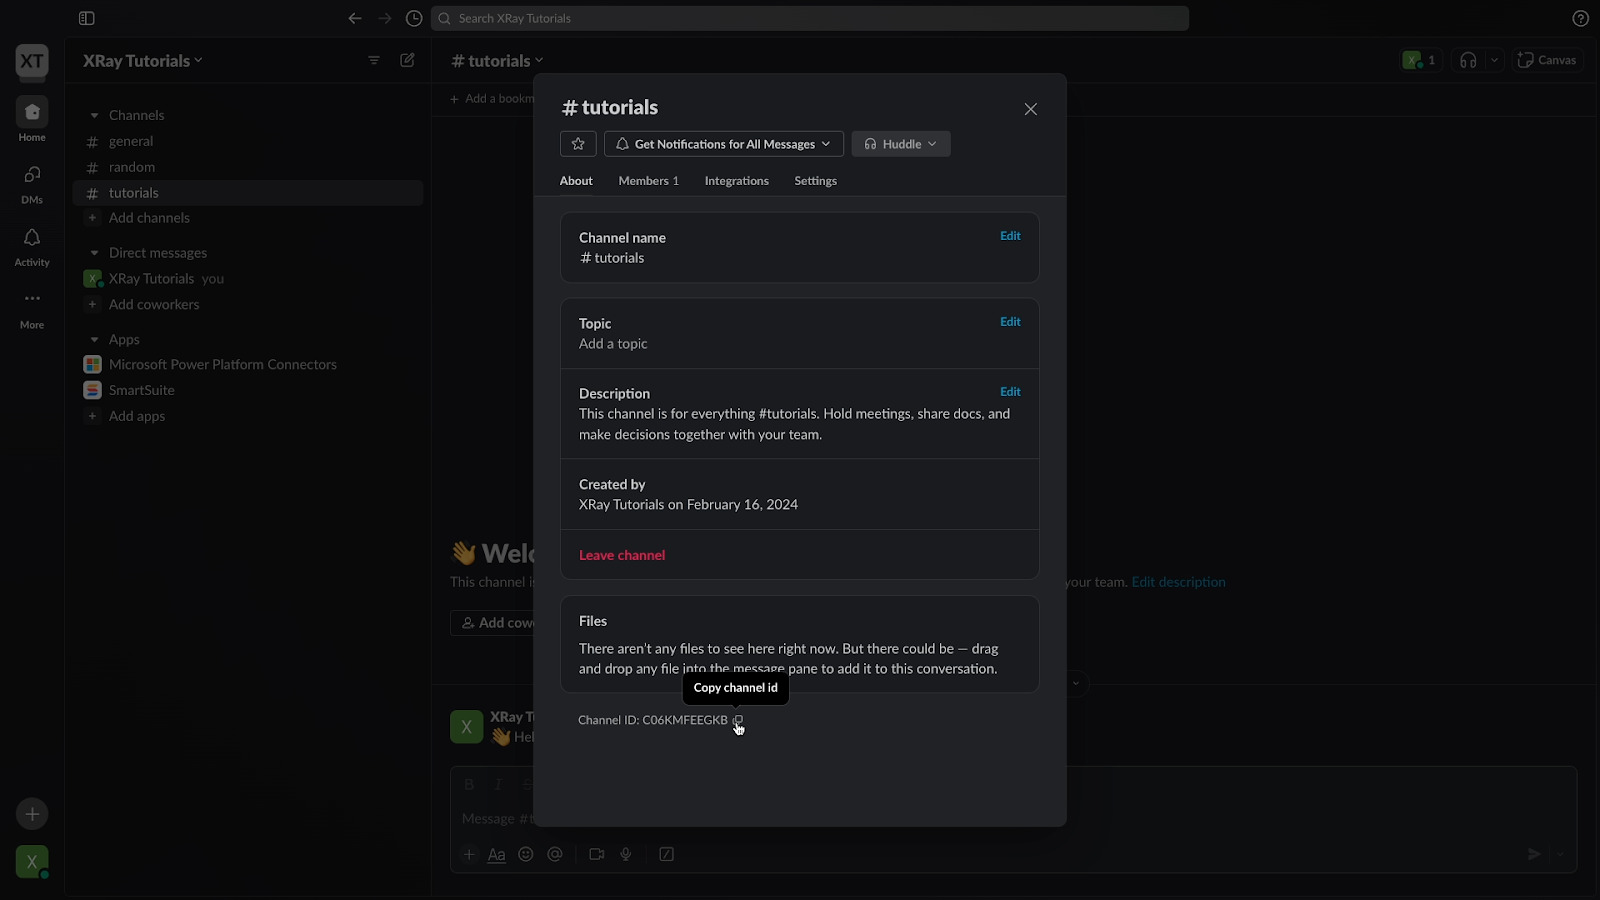
Then, go back to Zapier, click “Custom” and paste the ID here.

But again, choosing from the list is fine, too. Just make sure to use a channel that you don’t mind sending test messages to.
Now, you can compose the message.
Using dynamic data in your automated actions
In text fields like a Slack message field, you can provide both static text, and dynamic data retrieved from the trigger (or other earlier steps).
We’ll start with some static text. Just type a simple message like this:
A new file has been added to the “Proposals” folder.
Then include some labels for the dynamic data we’d like to provide.
File title:
File link:
Download PDF:
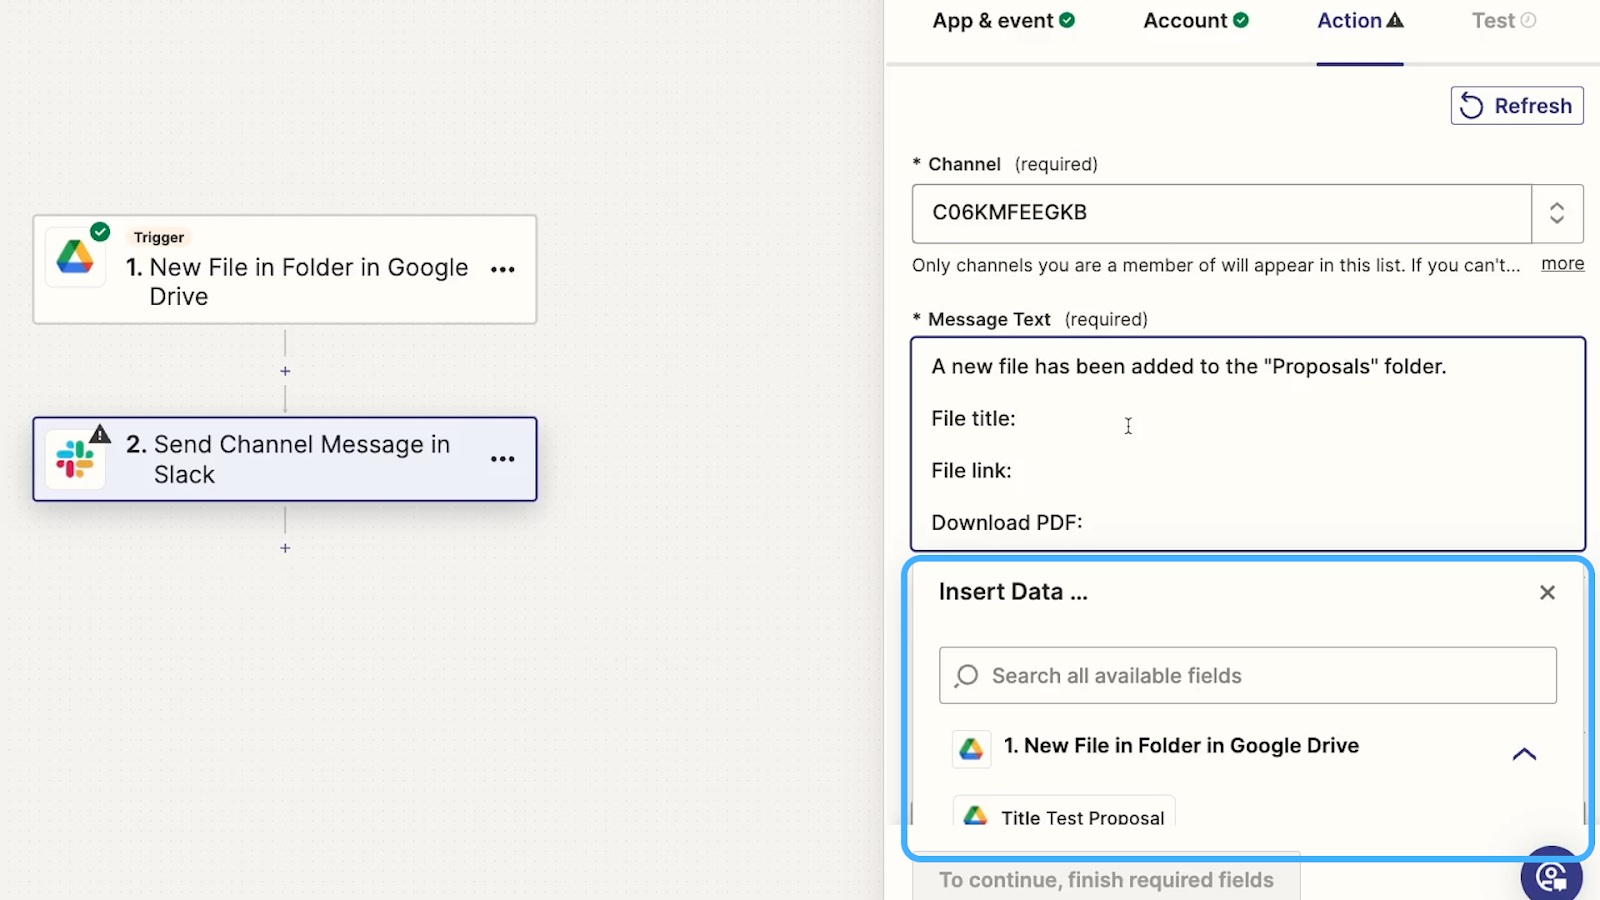
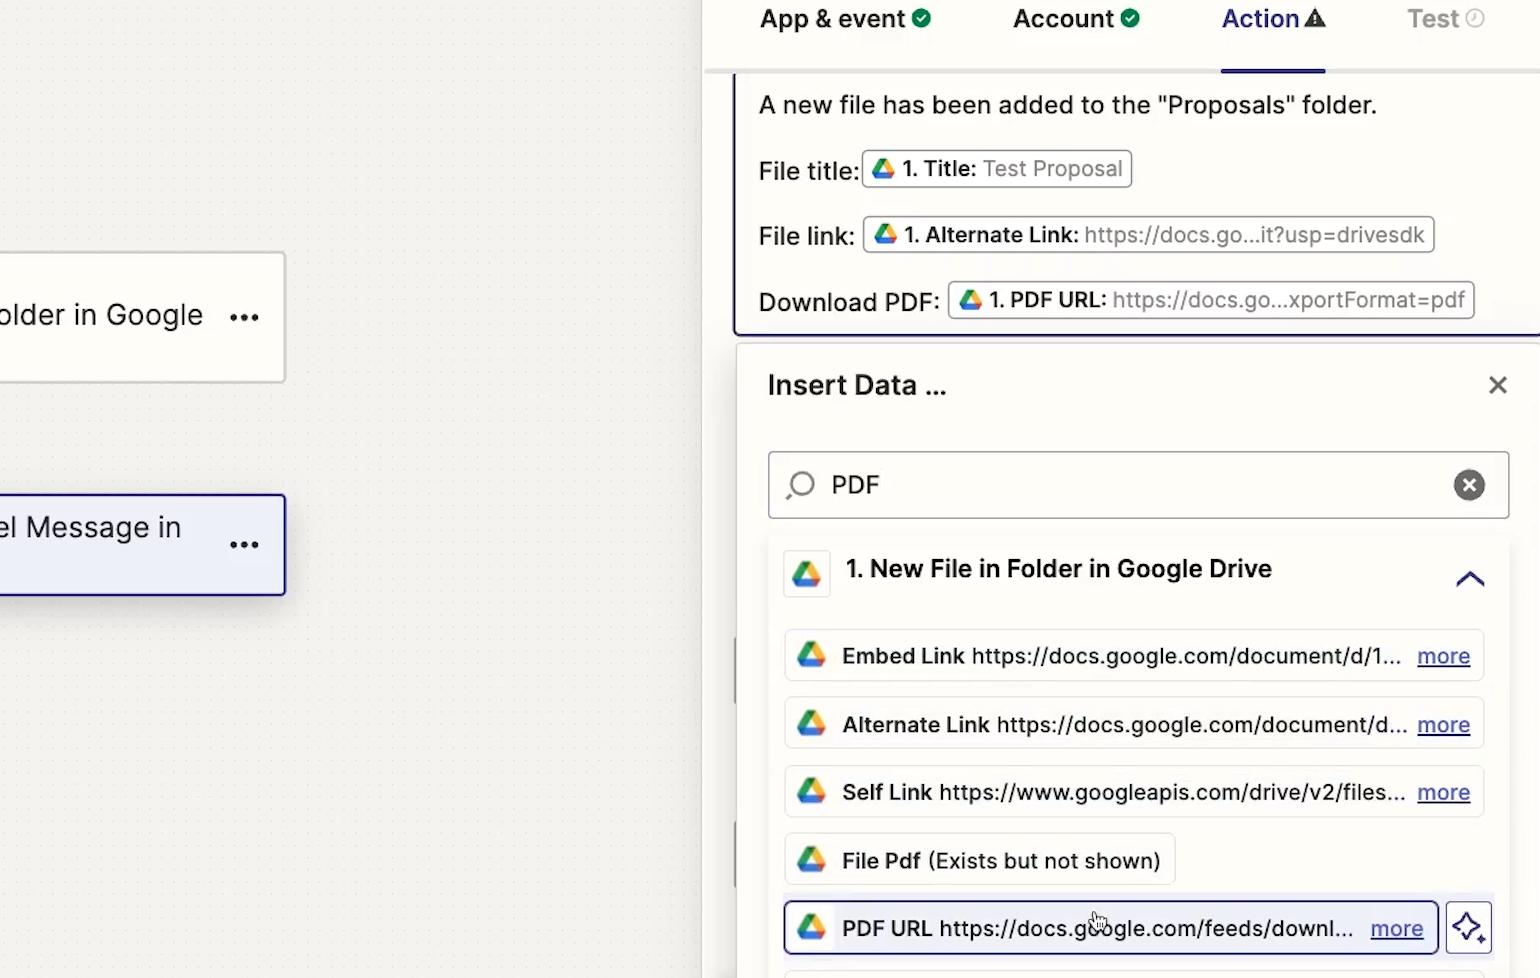
To include dynamic data in your Zaps, just use the “insert data” panel.
The data will be organized by the step it came from. In this Zap, the only previous step is the trigger, so that’s the only step you can see right now.
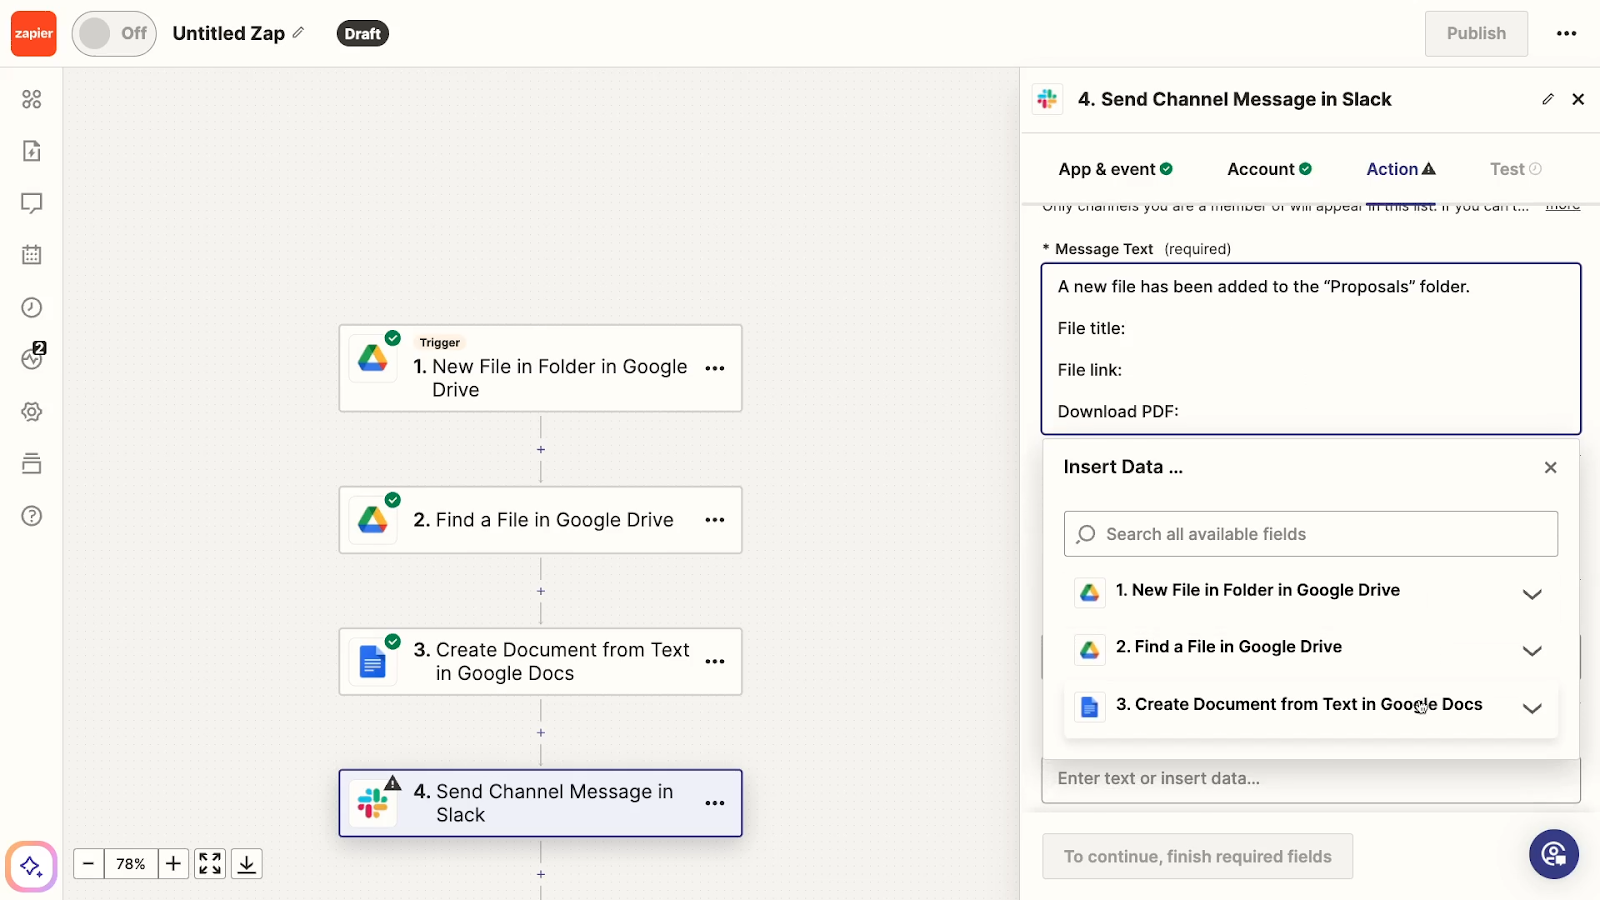
In longer Zaps, like the one pictured below, it’s easier to see how the data is broken up by different steps.
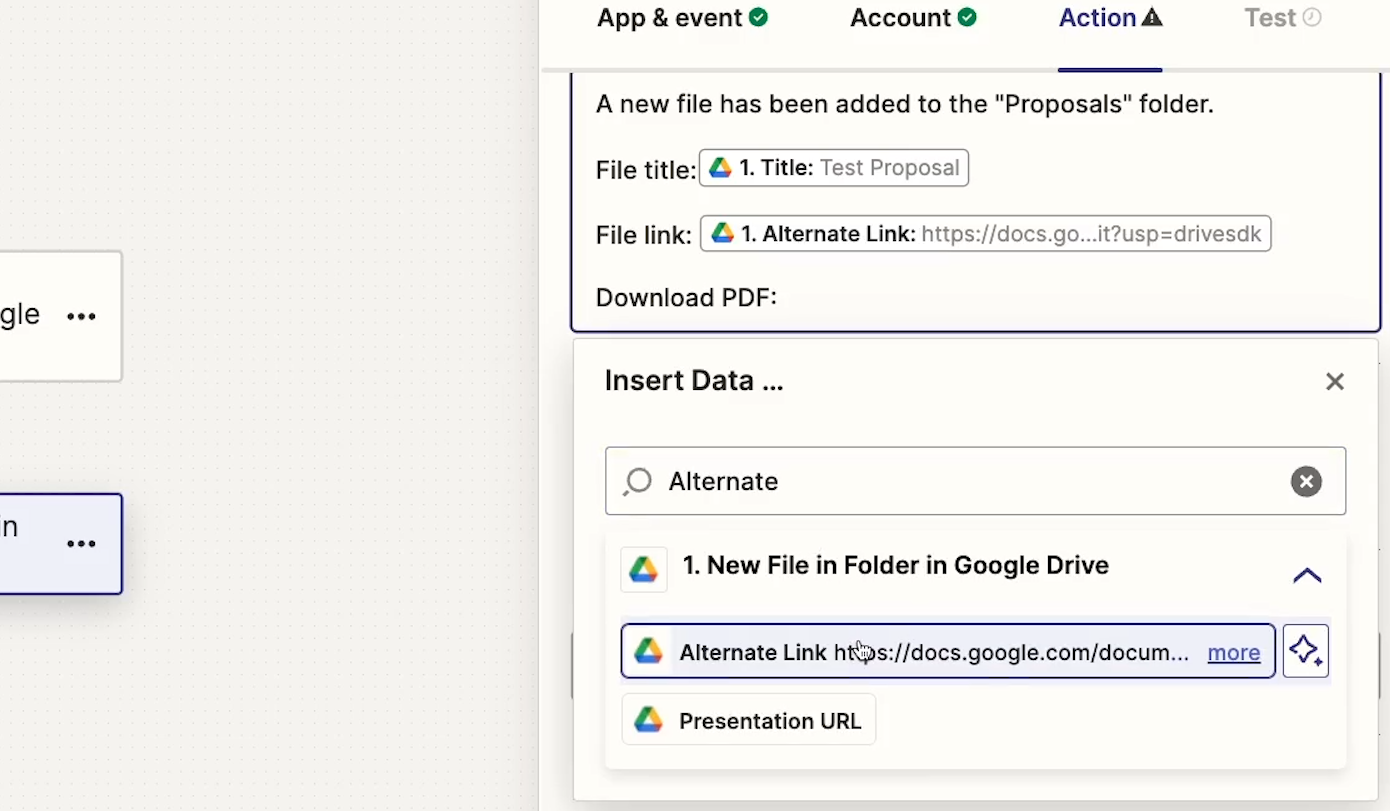
To find a specific variable, you can enter a keyword in the search bar. We want the file’s title, so we’ll search for “title”.

In the results, we can see a variable called title, with the value of “Test Proposal”. Click on it to insert it into your message.
Now, the message will include the title of whatever file triggered the automation to run in the first place.
If that’s “Test Proposal”, it will say ‘Test Proposal’. If the file that triggered the Zap is called “Contract for FakeCo”, it will say “Contract for FakeCo” here.
Note that while you’re building in Zapier, you can see both the variable name (highlighted in yellow below) and the variable value (green).

However, when the message is sent in Slack, you’ll just see the value. That’s why we added a label for “File Title” ourselves as static text.
Adding additional dynamic data
Now, follow the same process to add dynamic data for “file link”. Just note that the main URL for a Google Drive file is called the “Alternate Link”, so that’s what you should search for and insert into your message.
Finally, add a link where users can download this doc as a PDF. That variable is called “PDF URL”.
Now the message is all set.
Configuring optional settings in your automated action
Those are the only required fields, but it’s always a good idea to review the optional settings as well. Send this message as a bot, and give it a unique name. In our example, we’ll call ours “New File Freddy”.
Then, give your bot an icon using Slack’s syntax for emoji. For instance, we’ll use the :file_folder: emoji for ours.
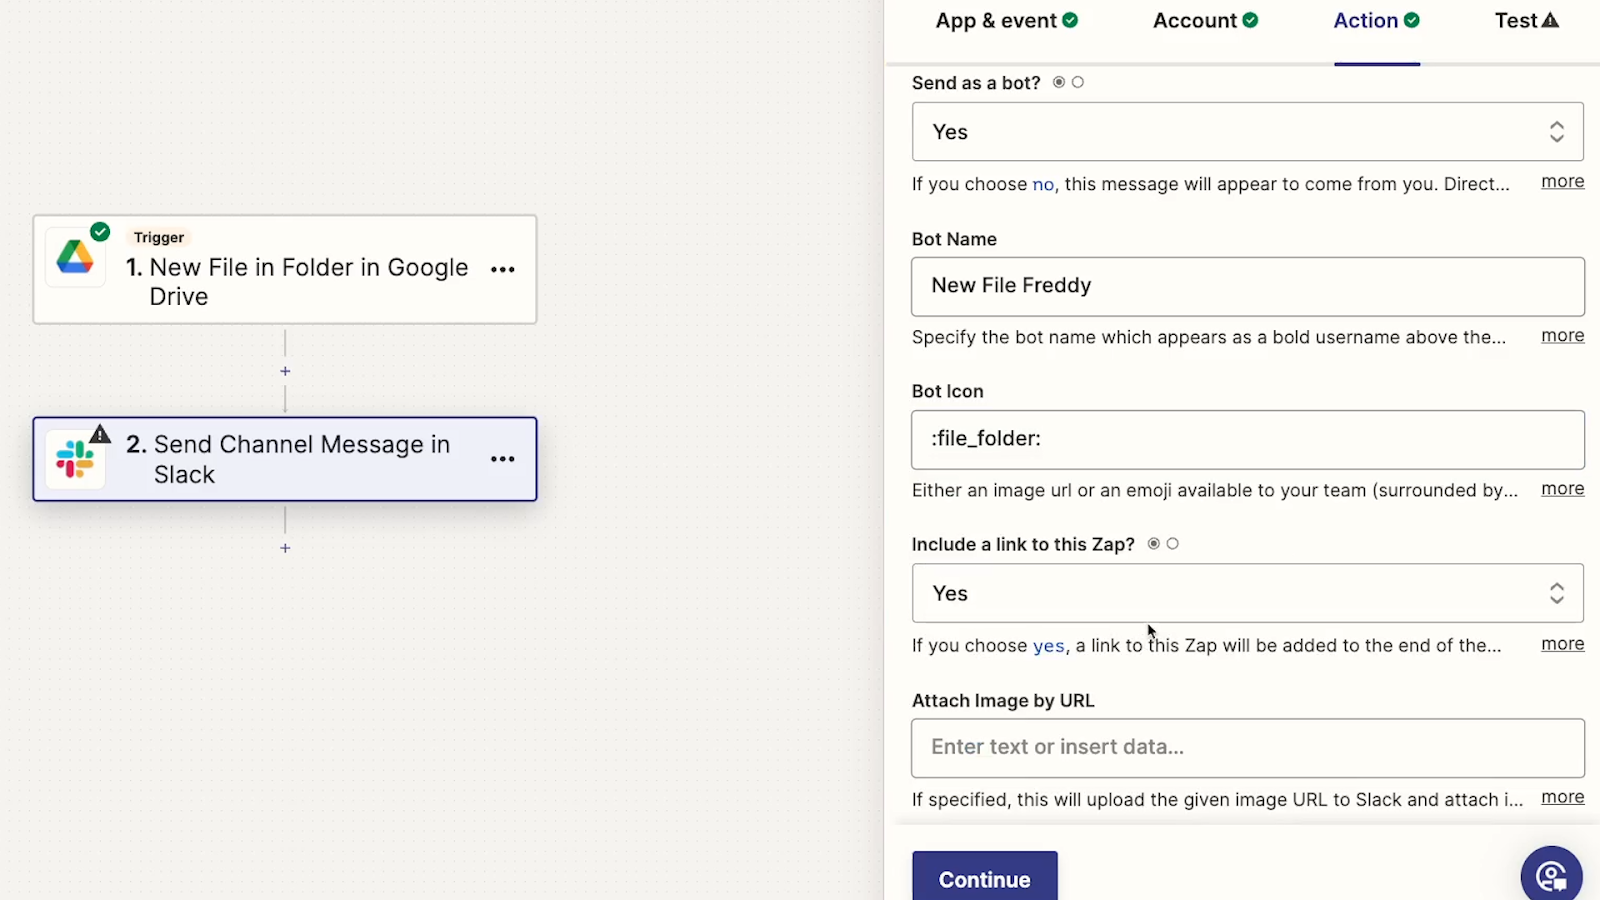
By default, “include a link to this Zap” should be set to “Yes”. Whenever sending automated messages, it’s always convenient to know where that message is coming from, so keep this option enabled.
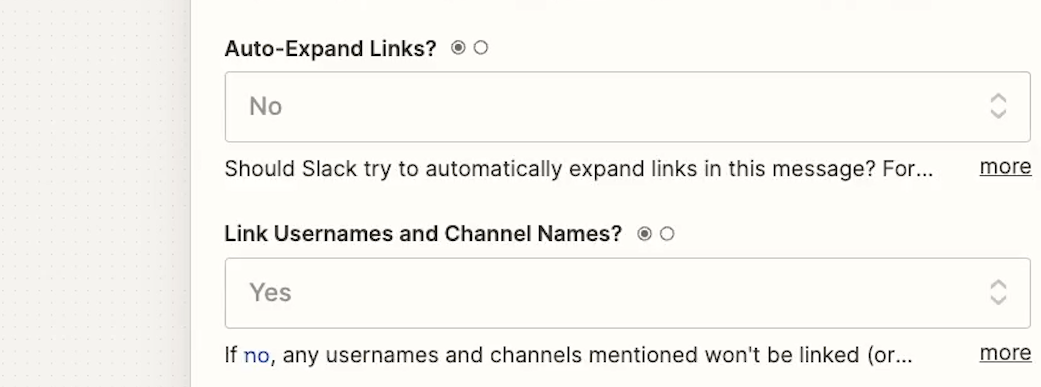
Finally we’d recommend setting “Auto-expand links” to “no”, so the message won’t show previews for all these links we’re adding. That would take up a lot of space, and we’d rather keep Freddy here nice and trim.
You can leave the remaining settings to their defaults.
Once your action is fully configured, click on “Continue” to give it a test.
Testing your automated action
Click on “Test Step” to test your automated action.
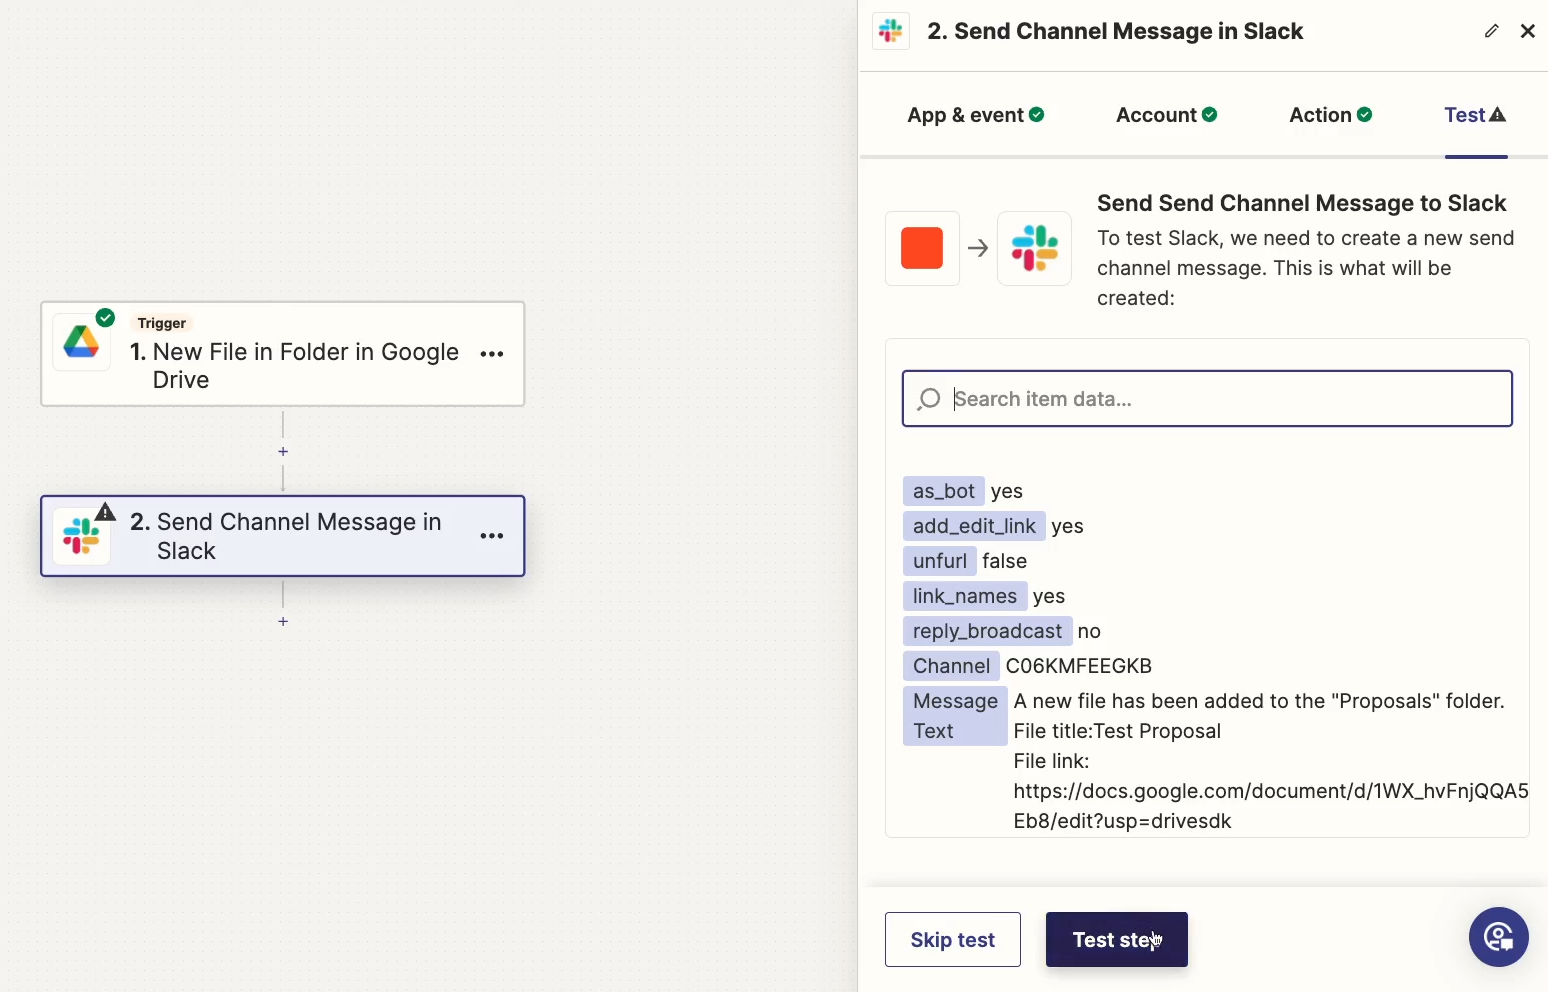
The step will immediately run using the data that you selected in the trigger.
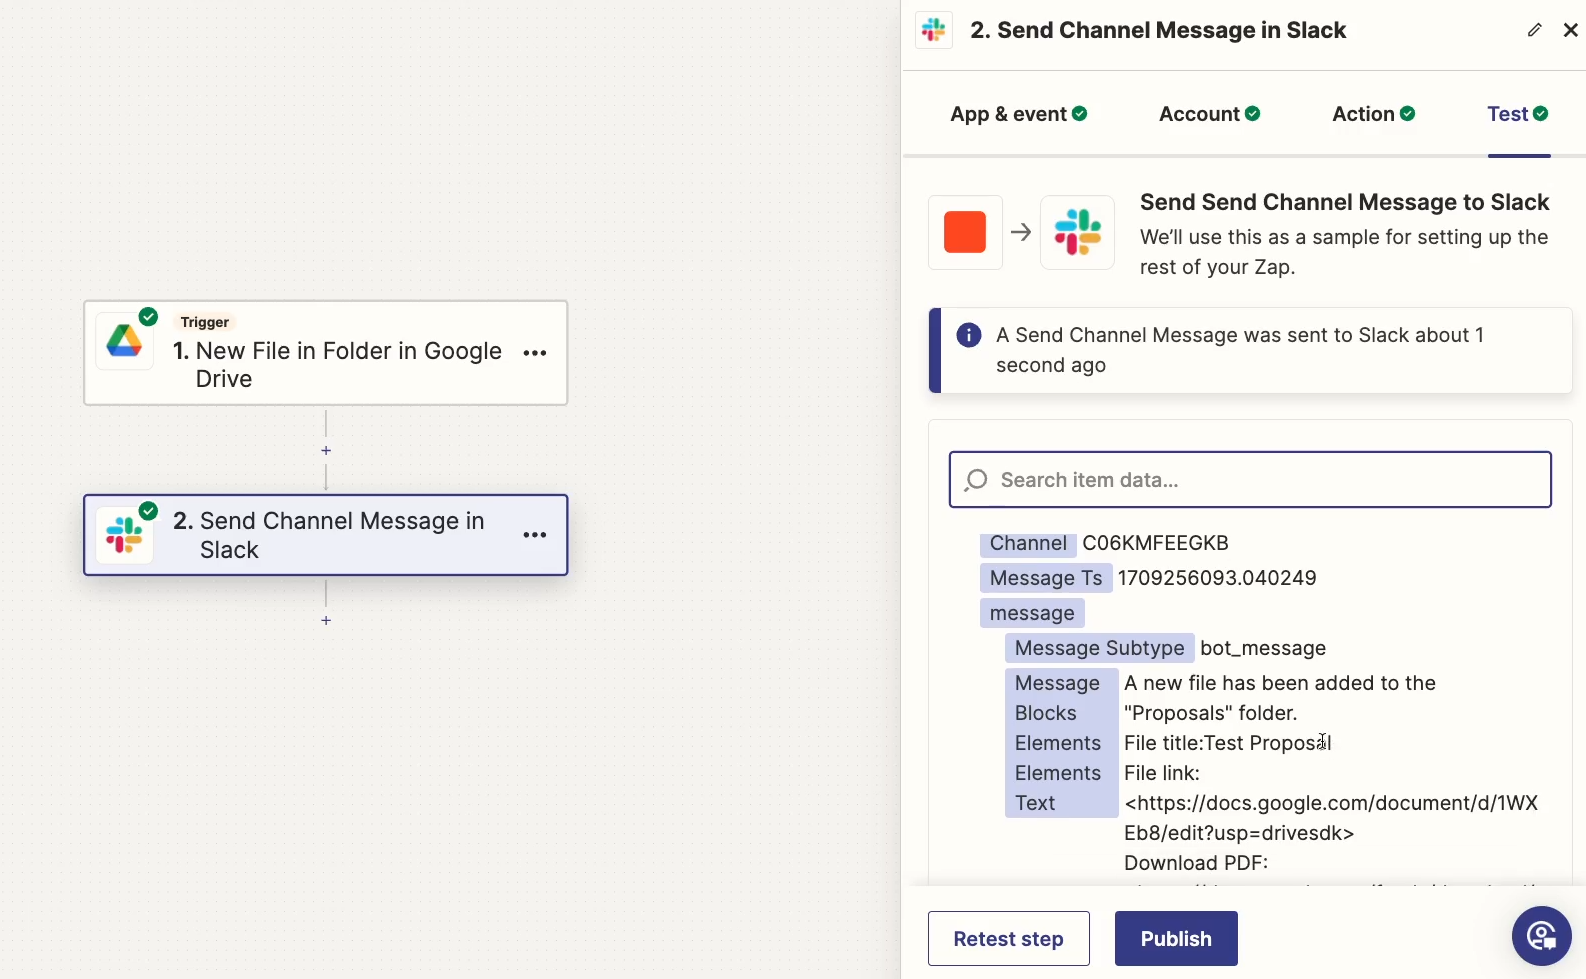
Zapier should give you a success message with a summary of the data that was sent to Slack. But it’s always best to check your apps to see what everything looks like in the wild.
Open up Slack, and check for the message sent by Zapier. In our example, we can see the message right there in the Tutorials channel.
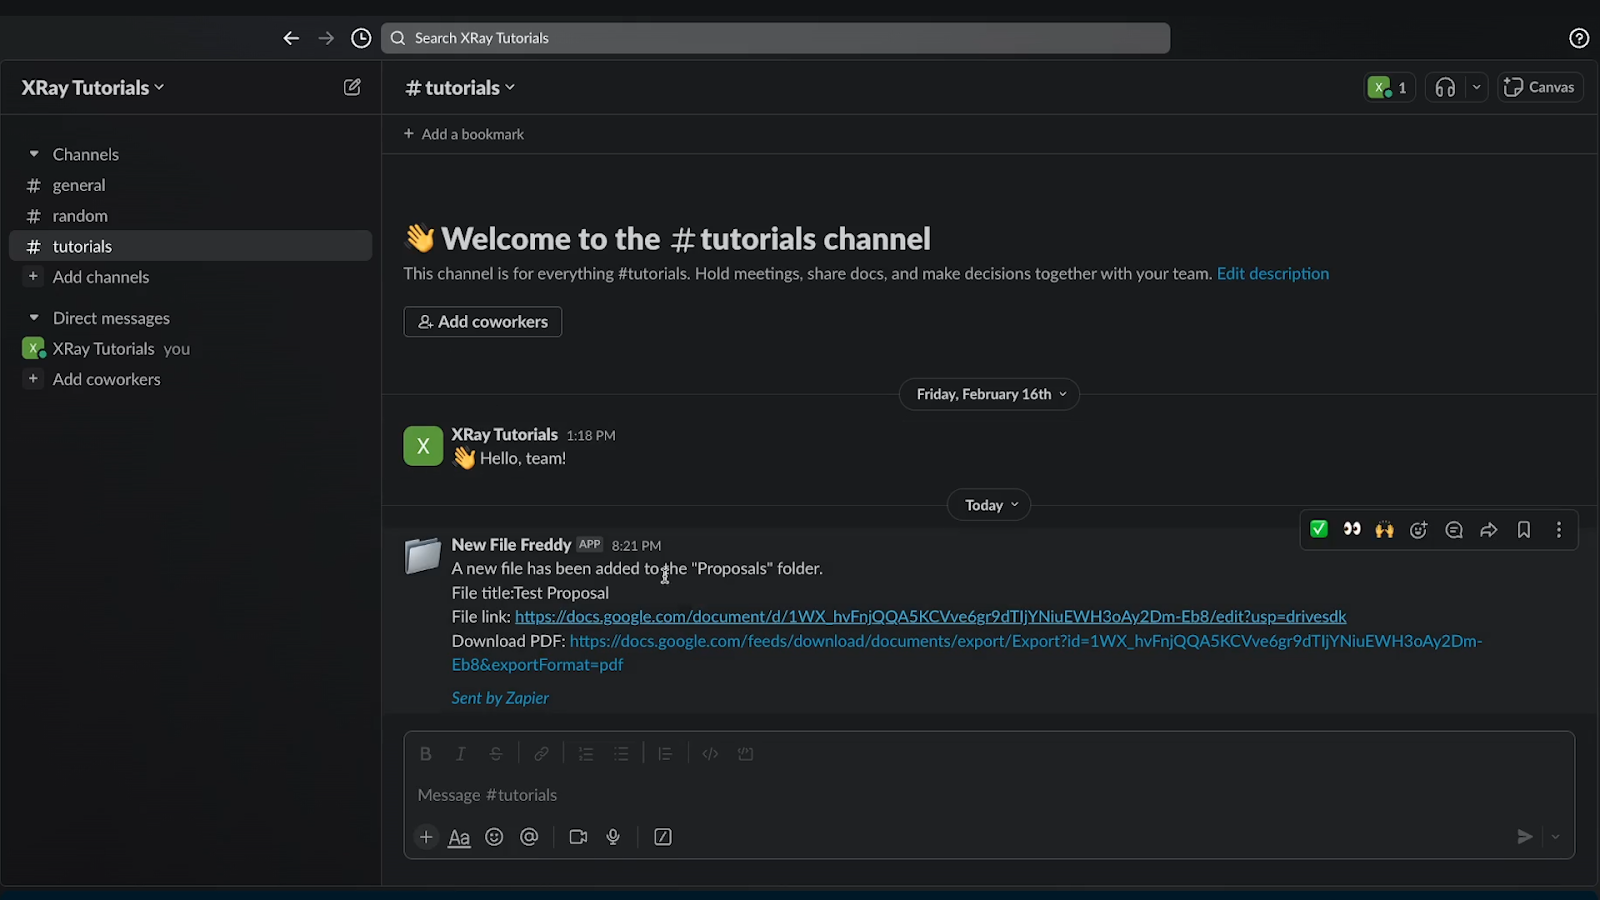
It provides the file name, a file URL, and a PDF download URL. Clicking on the Google Drive link opens up the doc in Drive, while clicking on the PDF link starts downloading it right away.
Everything looks good!
Running a live test for your full automation
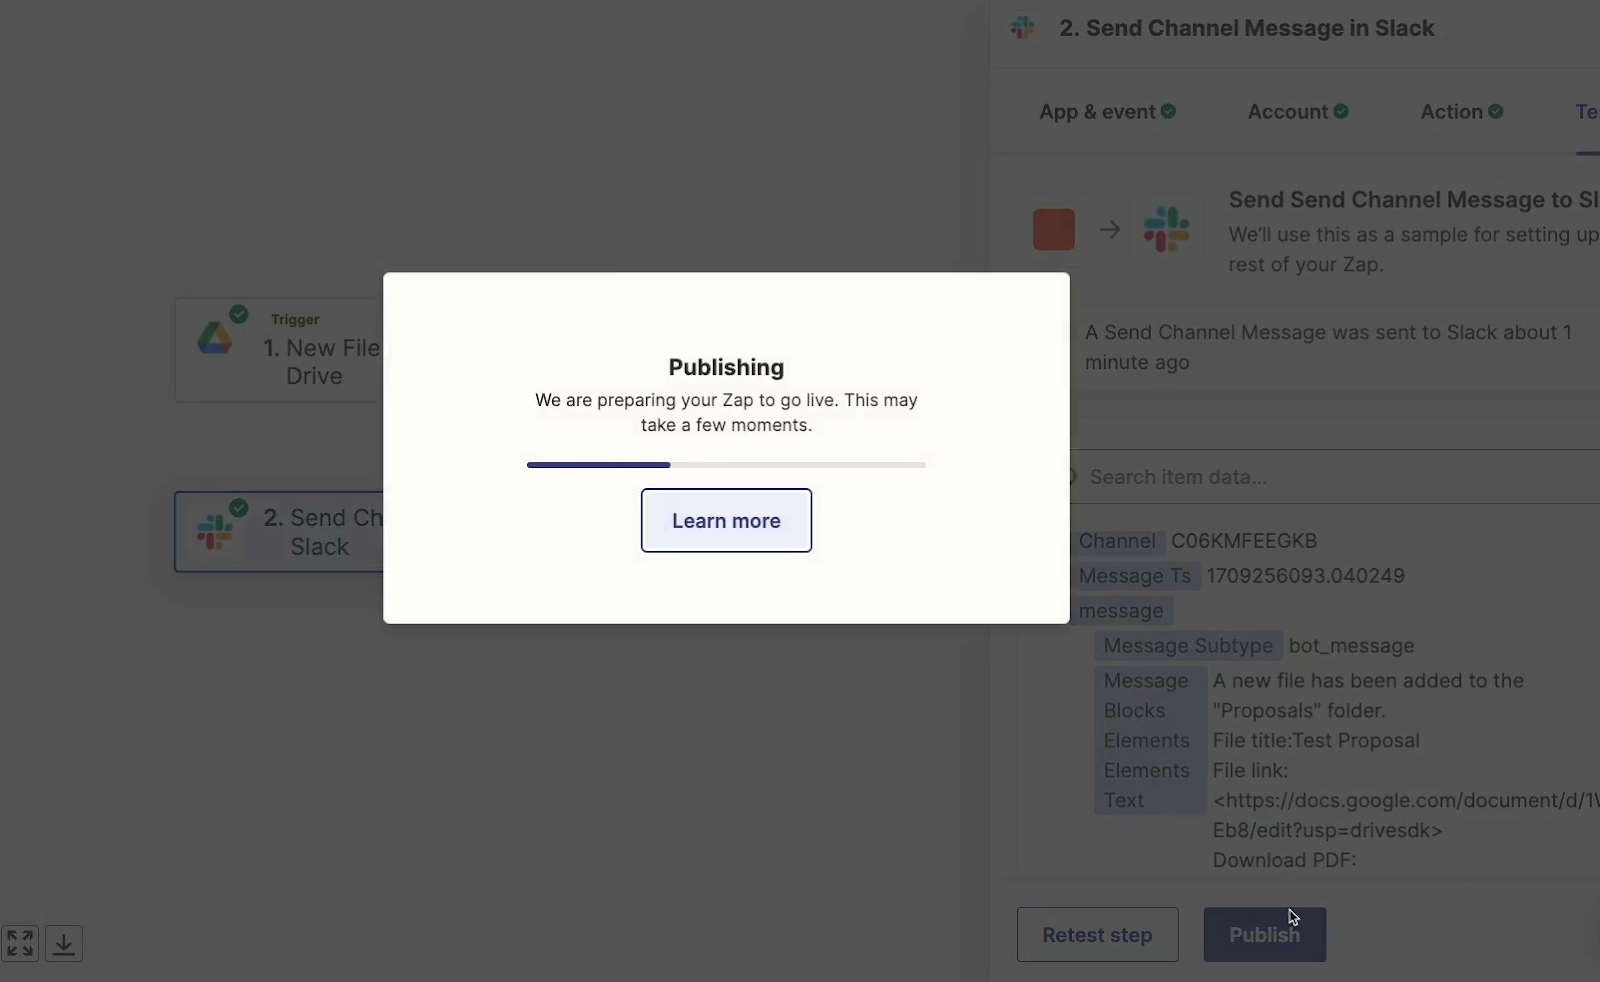
But before we wrap up this tutorial, we’d recommend running a live test to see the full automation work in real-world conditions.
Click on “publish”, and your Zap will be turned on.
To run a live test, just perform your trigger condition while the Zap is on. In this case, that means we just need to add a file to the Google Drive folder.

On Zapier’s free plan, you’ll need to wait fifteen minutes for your Zaps to run.
So take a quick break, and check back in 15 minutes.
After a little wait, you should see a Slack message with links to your newly added file.

Managing your automations and apps in Zapier
Now that you’ve built your first Zap, let’s quickly go over your main resources for viewing, maintaining, and managing your automations in Zapier.
View all of your Zaps
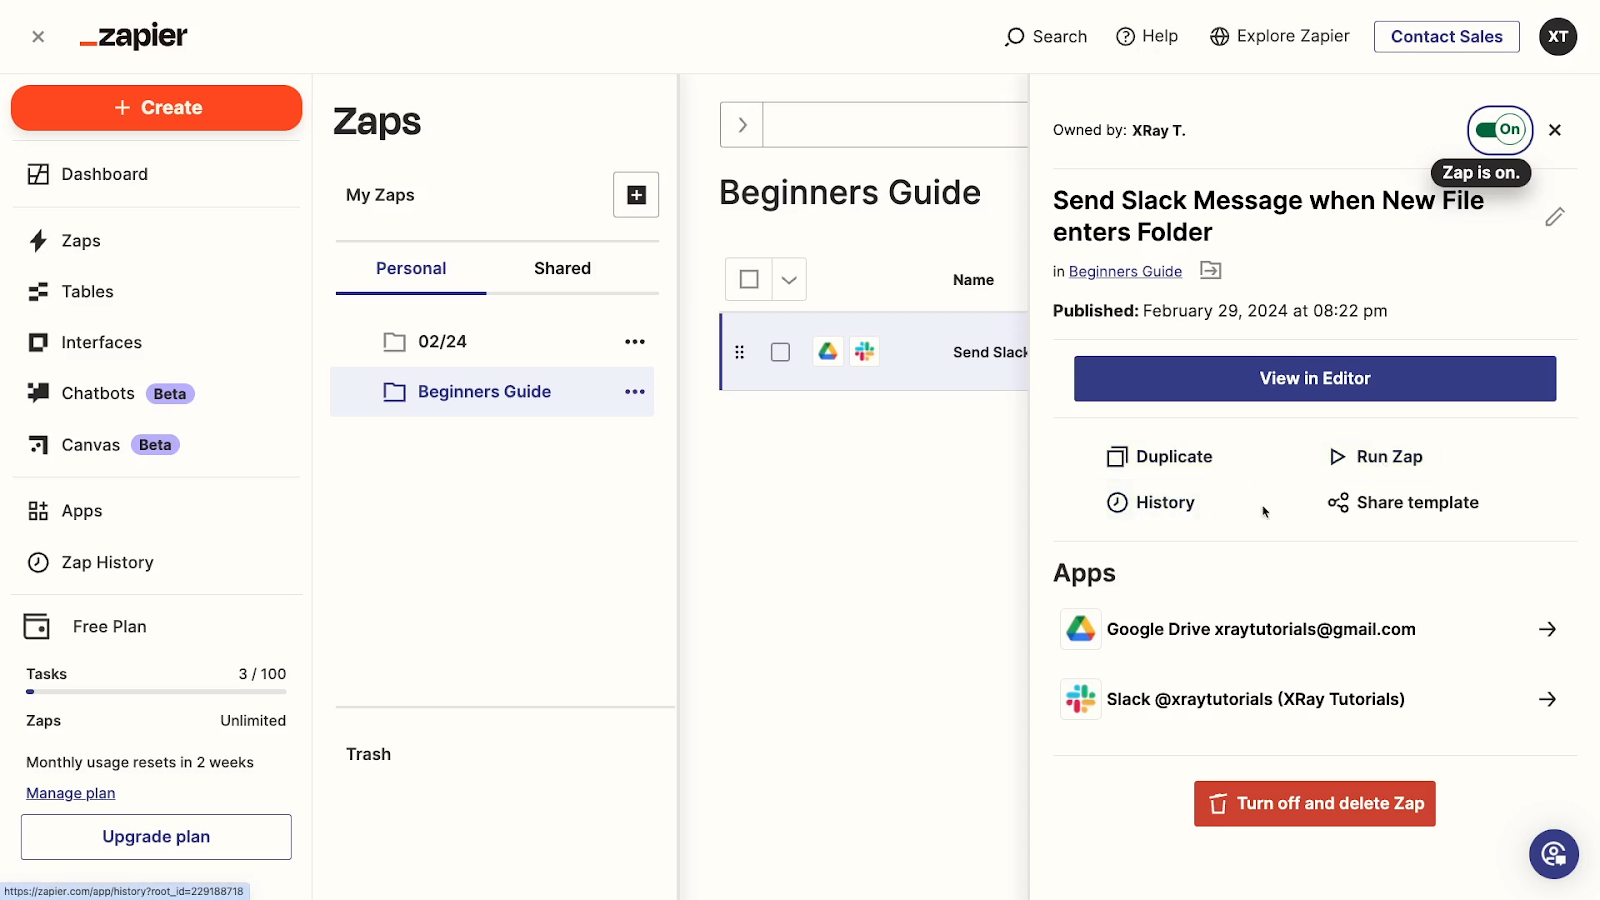
If you click on “Zaps”, you’ll see a list of every Zap you’ve made sorted into user-created folders. We’d strongly recommend using these folders to keep your Zaps neatly organized. In any folder, you can see your Zaps.
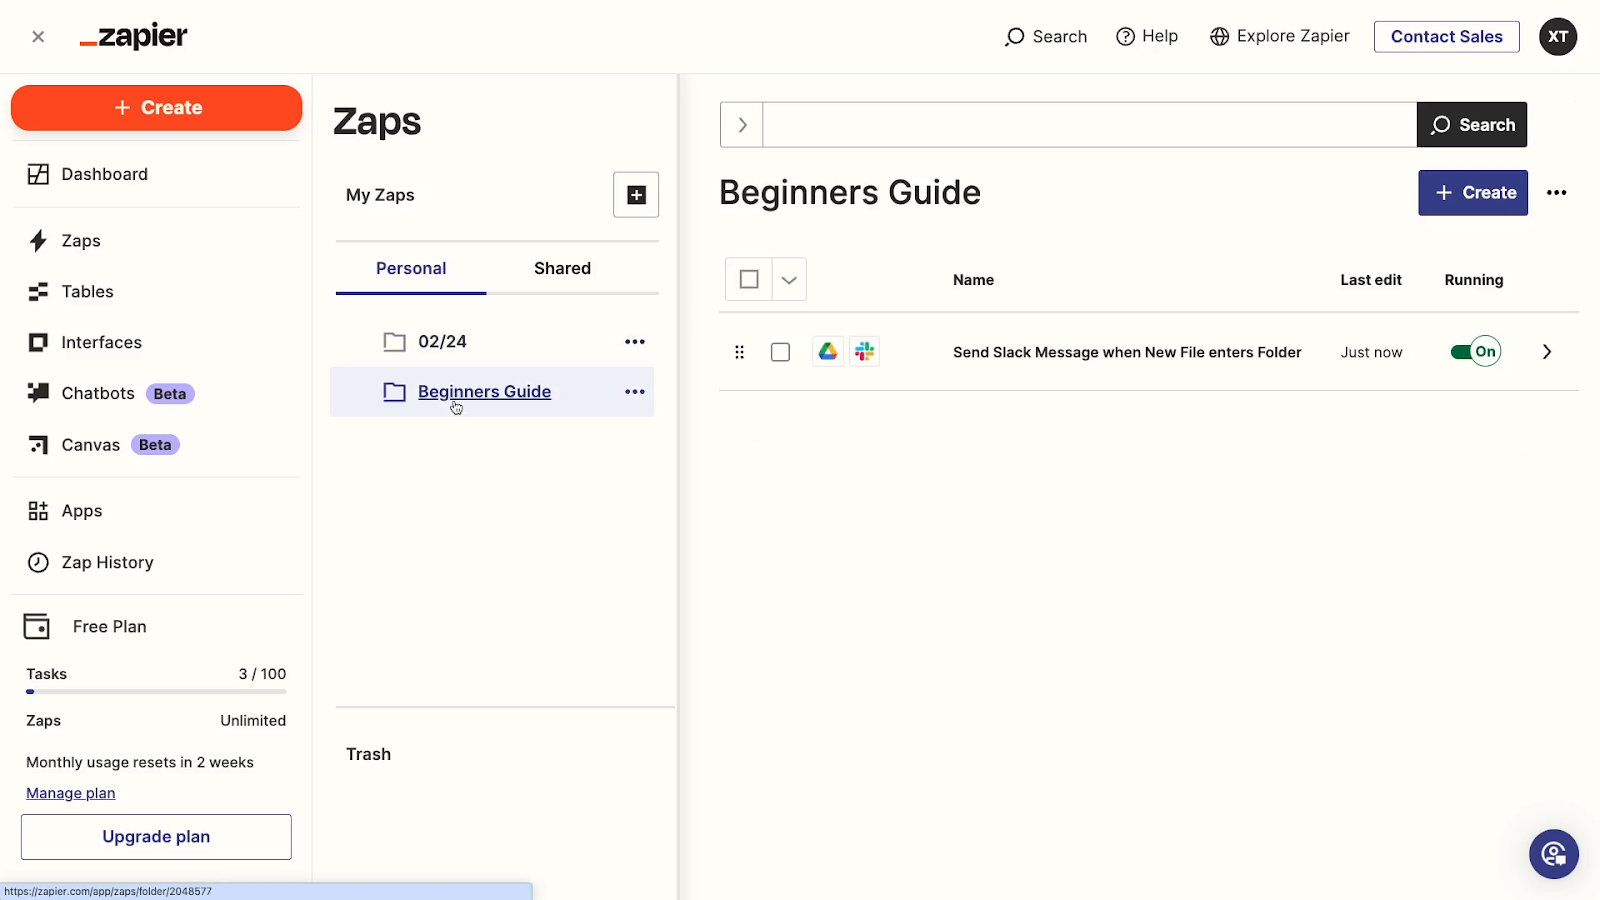
Click on the arrow on the right of any Zap’s name to access additional options, like duplicating the Zap or turning it into a template.
Review automated activity and troubleshoot errors in “Zap History”
Under “Zap History”, you can see a summary of every Zap’s activity on your account. You can filter the entries by date range, specific Zaps, the apps involved, and more to easily find what you’re looking for.
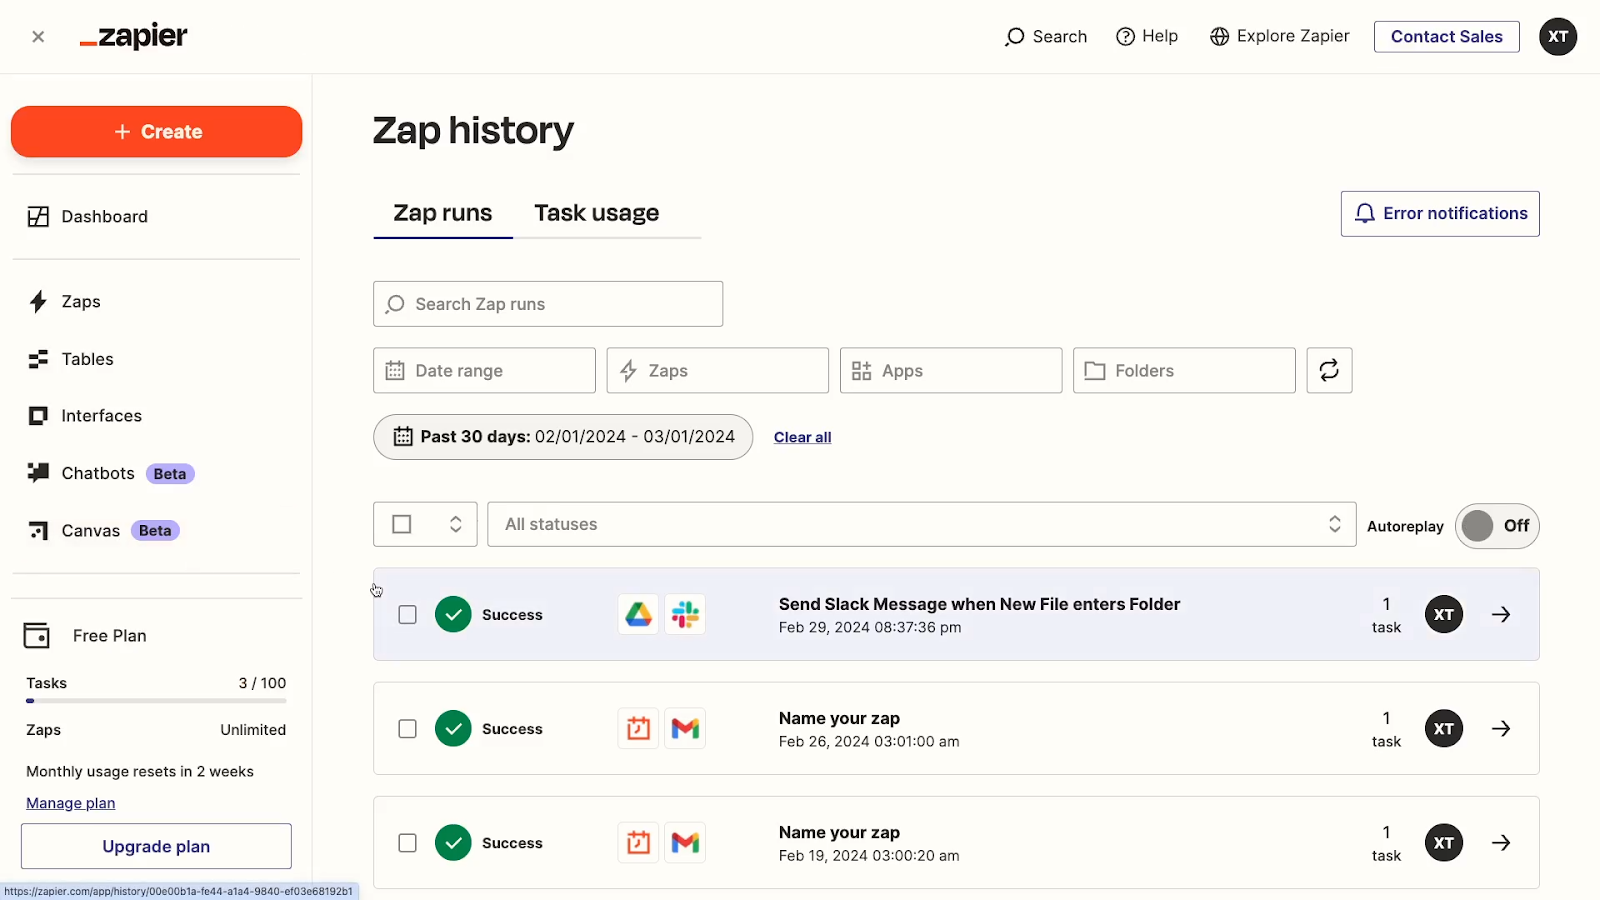
You can also use the search bar to search within both the titles of your Zaps and the data that the Zap processed.
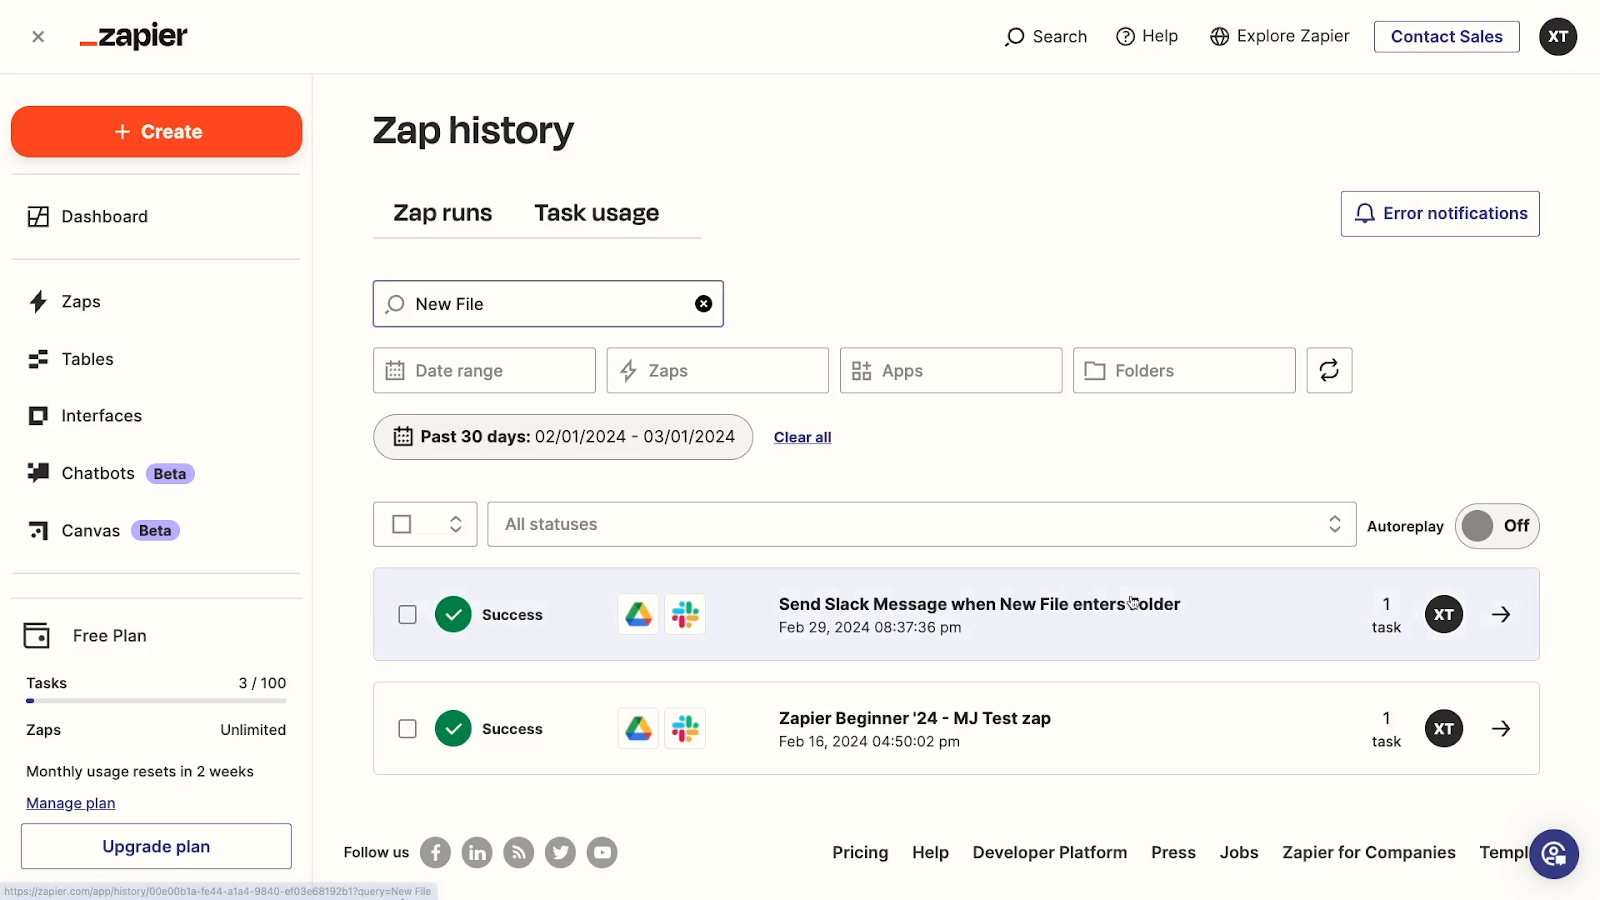
Once you’ve pulled up the history you’re looking for, you can click any of these entries to see more information.
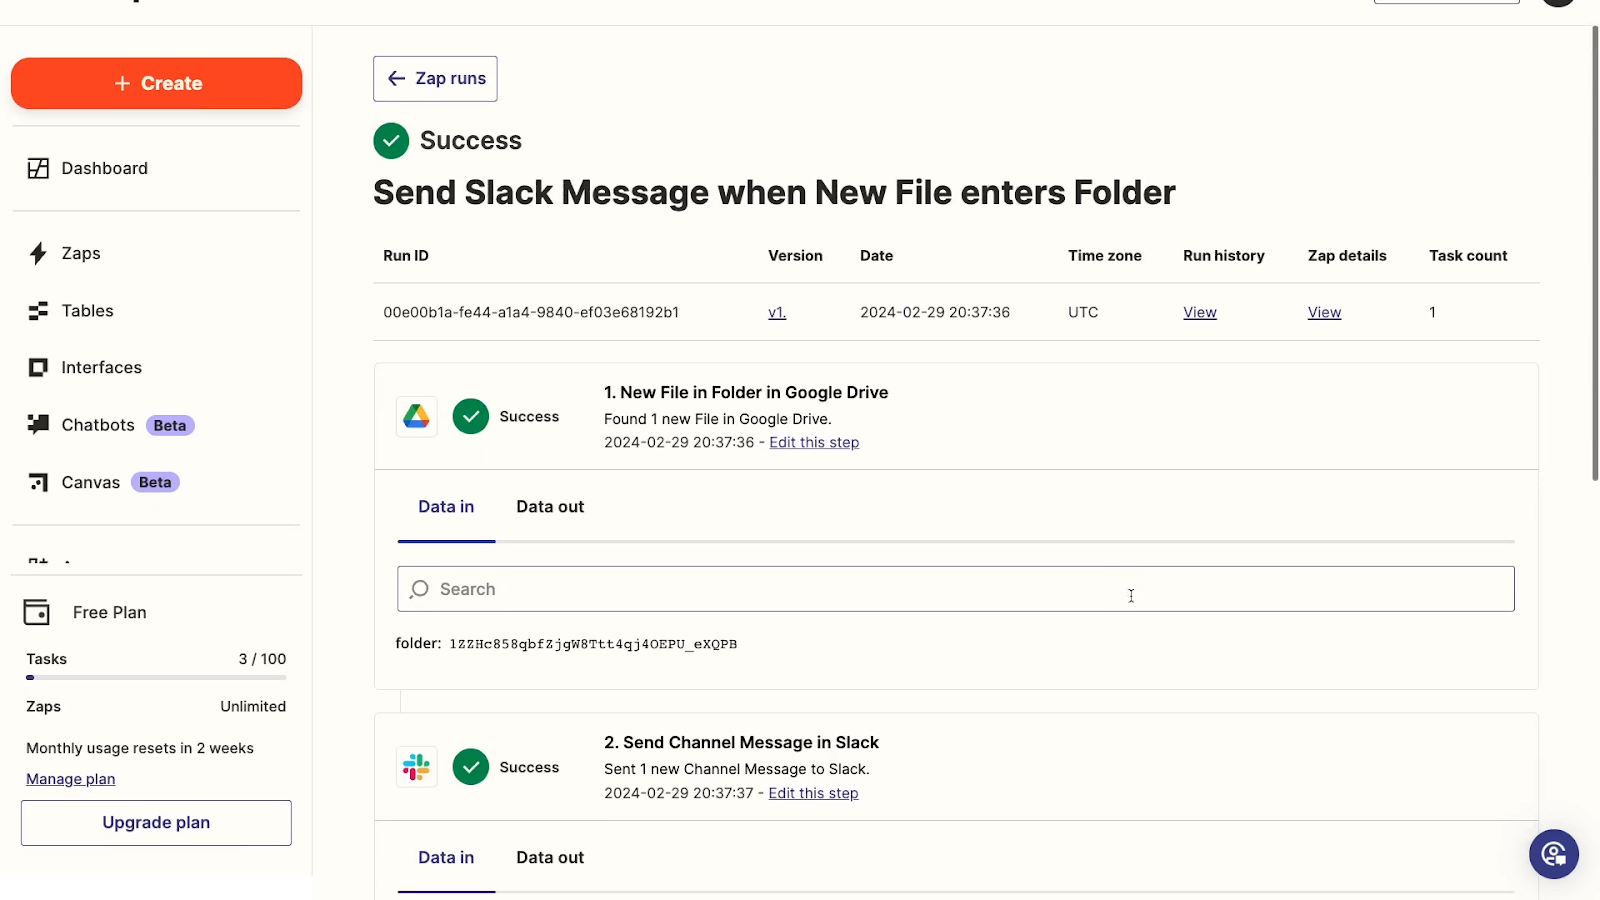
Zap History is the best place to start troubleshooting when a Zap is encountering errors or just not working as expected.
Manage connections in “Apps”
If you click on “Apps”, you’ll see every app connected to your Zapier account. These will be the apps that you’re using Zapier to automate, like Google Drive, Slack, LinkedIn, Hubspot, etc.
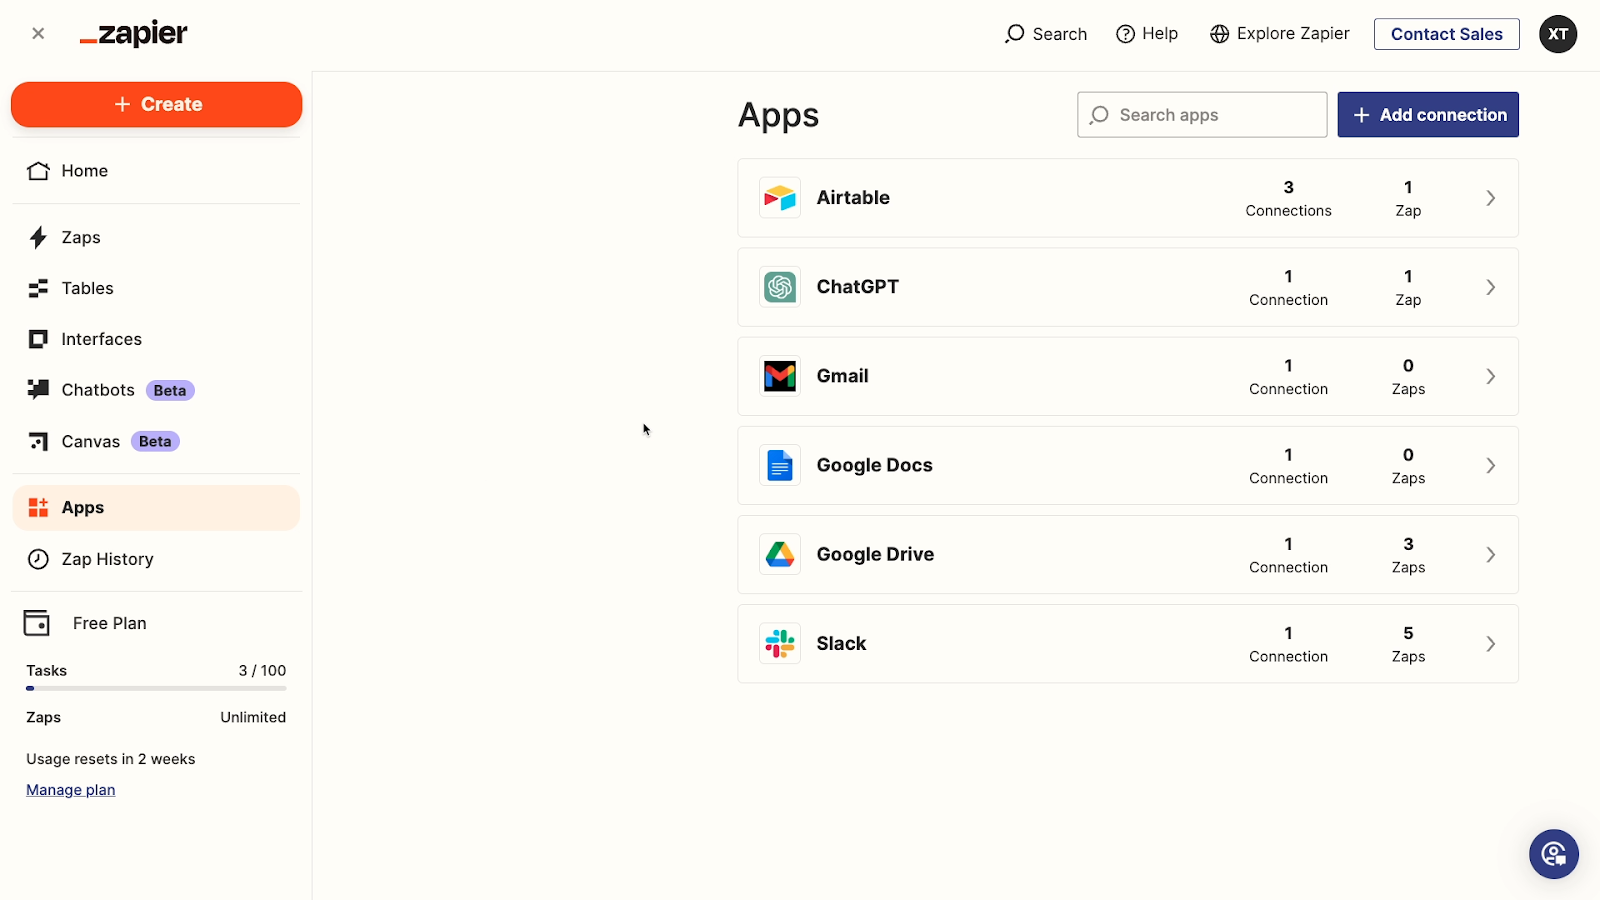
You can click on any individual app to see the specific accounts that are connected to Zapier.
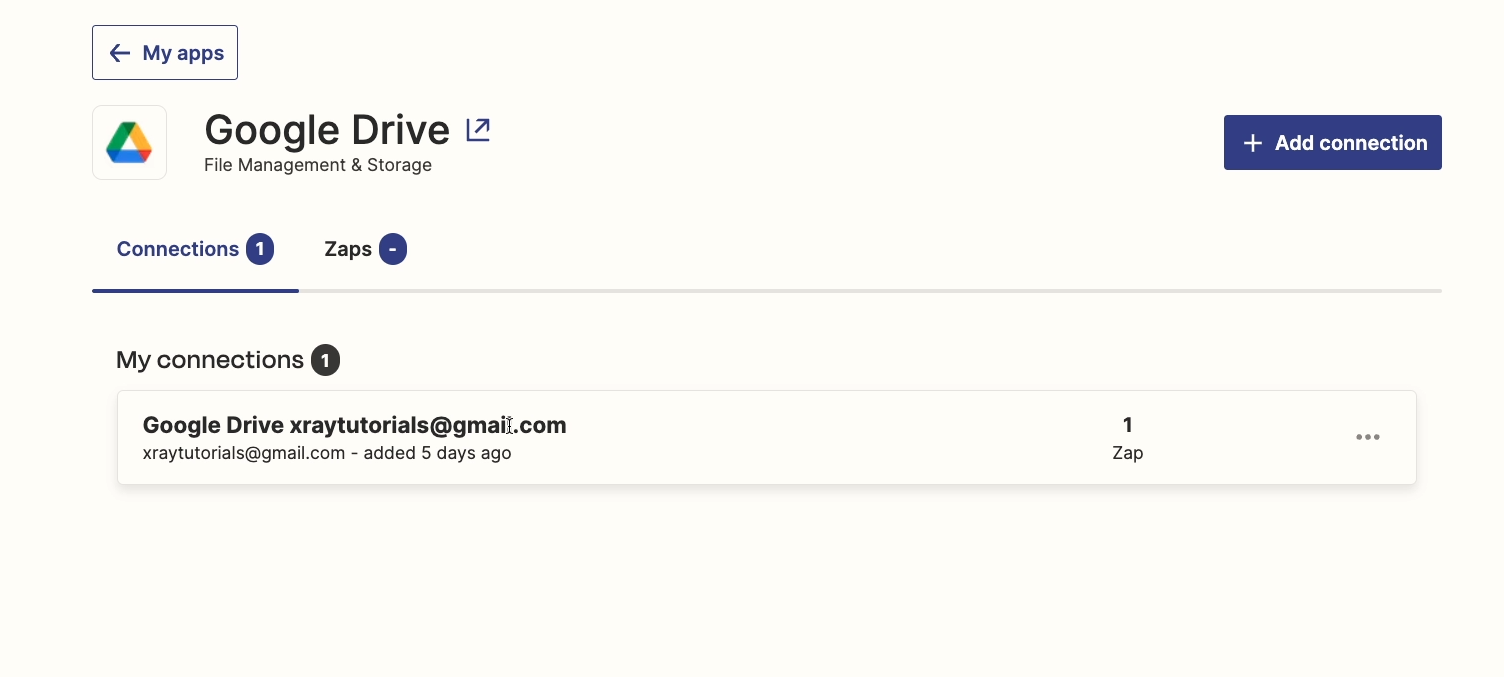
Note that you can add several accounts for the same app to Zapier.
From there, you can test each connection, reconnect it if the credentials have expired, or rename the connection to help distinguish different accounts.

Under the “Zaps” tab, you’ll see a list of any Zaps that use this app across all of your accounts.
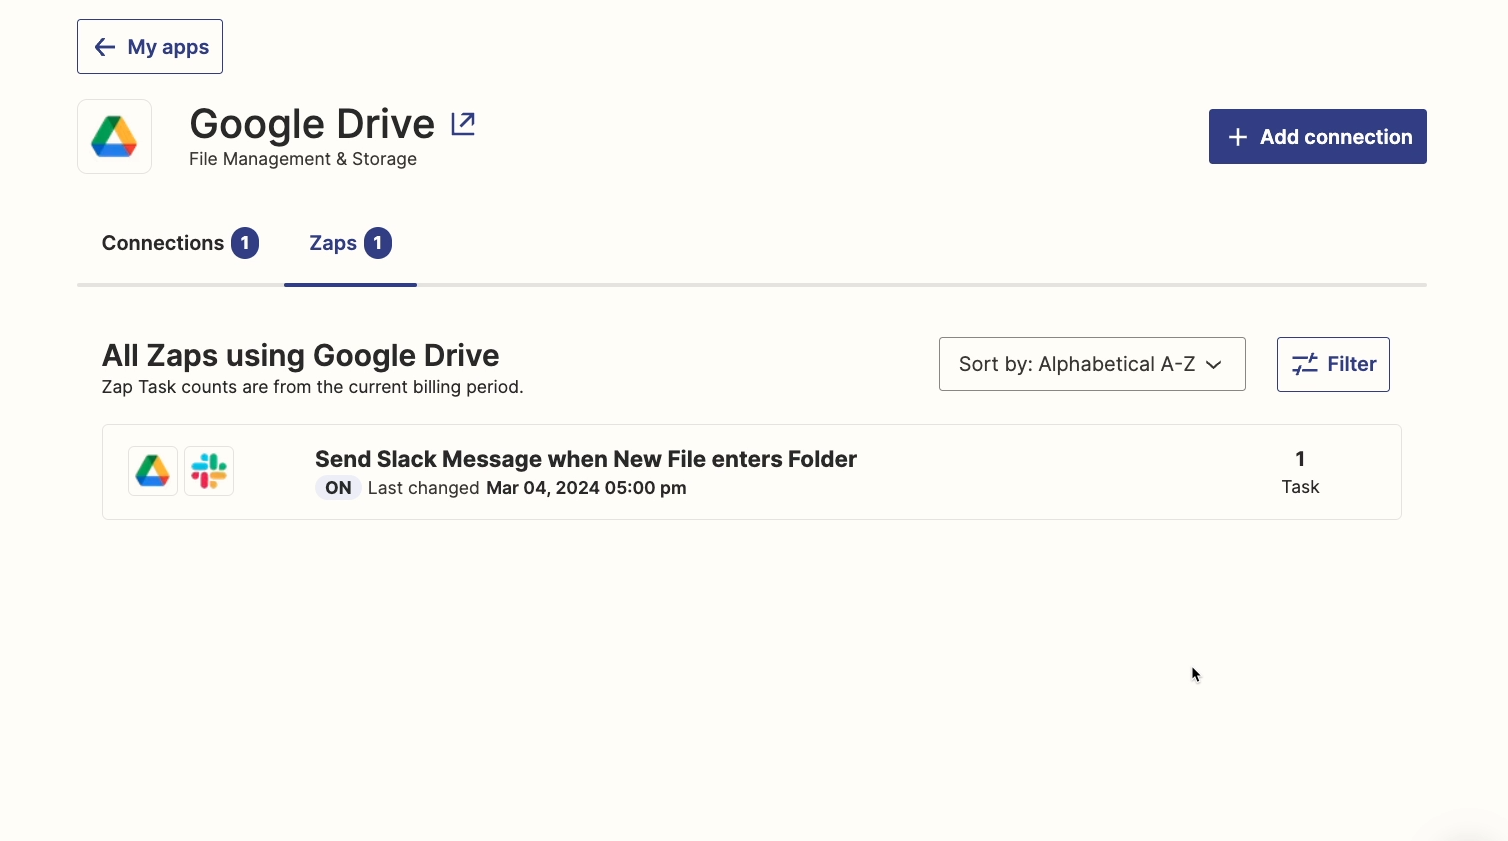
When you’ve only got a Zap or two in your library, these organizational features might not seem very important. But once you start building a larger automated infrastructure, you’ll need to refer back to these options frequently.
Zapier’s Pricing
Now let’s take a look at Zapier’s pricing structure.
Zapier recently overhauled their pricing, so this is worth a glance even if you’ve used Zapier in the past.
Note that you can get a 33% discount on the price of any plan if you pay for an annual subscription. The prices we mention apply to monthly subscriptions.
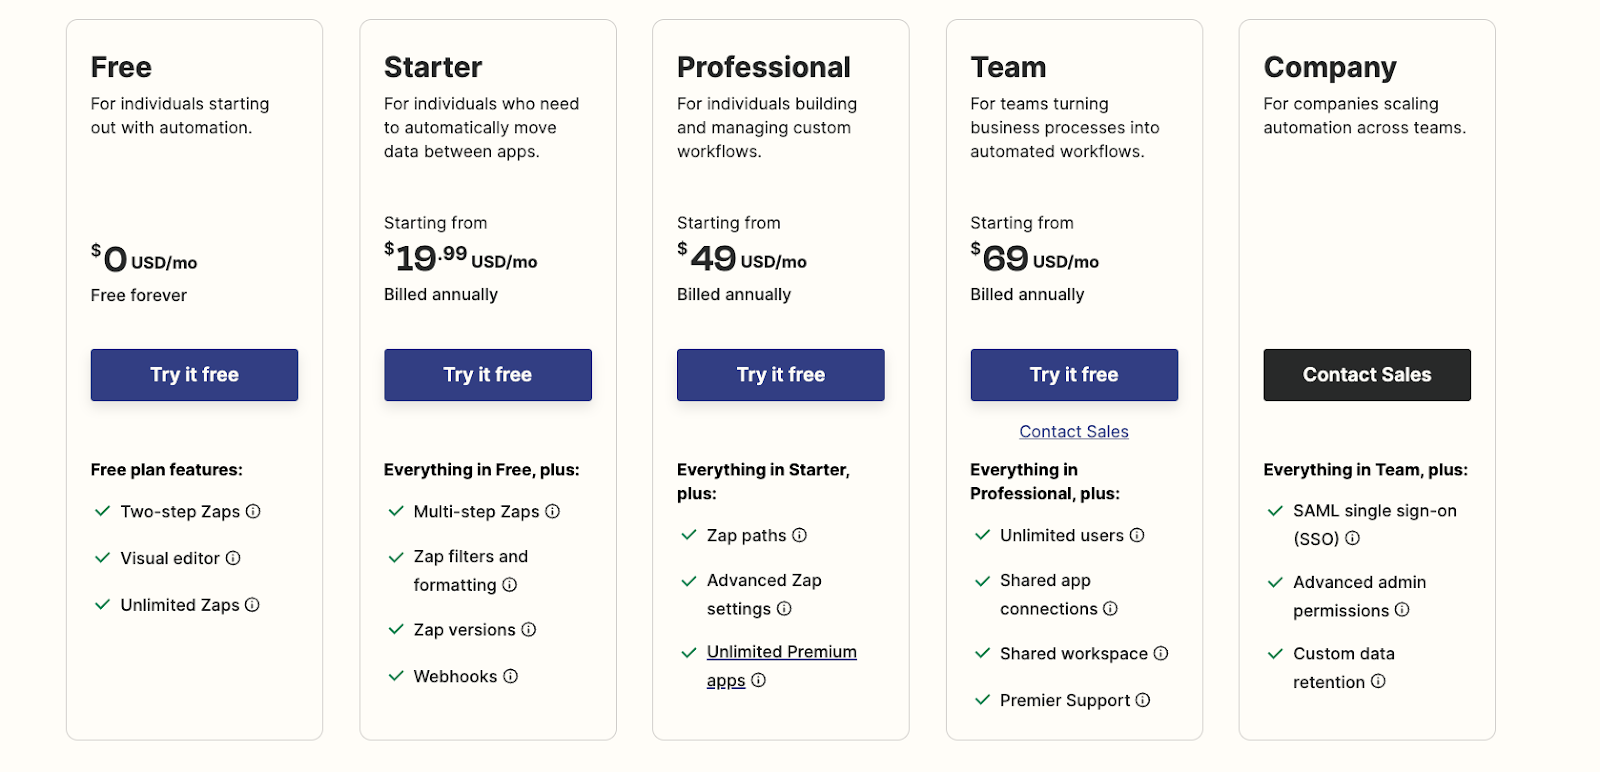
Free plan: a limited option for exploring Zapier
While Zapier does include a free plan, it’s not really going to give you much practical functionality. With two-step Zaps only and just 100 tasks a month, you won’t be able to do much with it except try Zapier out.
Starter plan: basic functionality for $30/mo
For $30/mo, the starter plan unlocks Zapier’s basic features, but limits you to 750 tasks a month, 15-minute wait times to run Zaps, and only 3 premium apps total.
You can check out Zapier’s site for a full list of premium apps, but know that it includes some popular software like Shopify, Salesforce, and PayPal.
The starter plan can be great for an individual builder who’s just getting started, but if you’re looking to extensively automate your work, you’ll probably need to consider the Professional plan.
Pro plan: build advanced automated workflows for under $75/mo
At just under $75/mo, the pro plan unlocks unlimited premium apps, conditional logic in your Zaps, and 2,000 tasks each month. Your Zaps will also run every 2 minutes.
For a solo builder, this will be everything you’ll need to build any automation you want. But for good collaboration features, you’ll need to check out the Team plan, or the Company plan.
Team and company plans: automate your organization starting at $100/mo
The team and company plans, which start at just over $100/mo, offer shared workspaces, shared app connections, a 1-minute wait time to run Zaps, and several other advanced features.
How “Tasks” Work in Zapier
Since it’s an important part of every Zapier plan, we want to take a moment to explain what “tasks” are in Zapier and how they impact your pricing.
You can read this page from Zapier’s help docs for more detail, but here’s the gist of it:
Most successful automated actions count as one task. Zapier’s formatter steps and paths don’t count as tasks, and neither do triggers.
So finding a file in Google Drive to launch a Zap does not consume a task, but sending a message in Slack does consume a task.
You can add more tasks to any of your paid plans for an additional monthly charge. Just open up Zapier’s pricing page and select the amount of tasks you want to see how it affects the price.
Note that while tasks are tracked and limited in every Zapier plan, there is no charge for the data being sent. Other automation providers often limit the amount of data you can process, making Zapier a good choice for automating tasks involving large files and data sets.
What plan do you need to automate your work with Zapier?
Ultimately, if you’re just getting started with Zapier, you can use the free plan to follow along with this tutorial. Then, if you’d like to explore Zapier further, you can try out the starter plan. But there’s really no need to jump to the Pro Plan until you’re already using several Zaps to automate your daily work.
Alternatives to Zapier
With its unmatched and growing library of about 7,000 integrations, its easy-to-use visual editor, and its versatile extra features, Zapier is a popular choice for no-code builders.
However, it’s not the only no-code automation provider available, and its high price tag won’t fit everyone’s budget.
If you’re looking for an alternative to Zapier, you’ll want to consider these options.
Make: advanced no-code and low-code automation at a budget-friendly price
Make, formerly known as Integromat, has fewer integrations than Zapier, but still boasts support for over 1,500 popular web apps.
It likely won’t be as intuitive as Zapier for pure no-coders, but Make is arguably easier to use for users with some technical background. There’s a little less abstraction, and you’ll get more direct control over your workflows in Make.
However, you won’t find as many extras like Canvas, Interfaces, or Tables. However, Make has recently added a new AI builder similar to Zapier’s.
You can learn more about Make in our Make beginner’s guide.
Power Automate: workflow automation by Microsoft
If you’re a Microsoft Office power user, or if your organization is already fully onboard with Microsoft apps, then you’ll probably want to check out Power Automate.
Built by Microsoft, Power Automate includes lots of features for integrating neatly with their other software.
You can check out our Power Automate beginner’s guide to learn more and get started.
Discover what you can automate in your everyday software with XRay.Tools
If you’d like to explore which automation providers support the apps you use every day, just go to XRay.Tools and search for your software.
We’ve indexed Zapier, Make, Power Automate, Workato, Bardeen, and N8N so you can compare top automation providers in one place, triggers to triggers, and actions to actions.
Automate your organization’s workflows with an XRay Membership
While software like Zapier, Make, and Power Automate is easily accessible to any no-code builder, creating workflows that support your entire team or organization can be a difficult task for anyone.
If you’d like to automate your company’s work at scale, a Chief Workflow Officer Membership from XRay will be the better strategic choice. With a CWO membership, we design and build automations with your team’s input, so you can just focus on getting your work done faster than ever.
For approximately the cost of a senior employee’s salary each year, you can amplify the output of your entire team.
You can learn more about XRay’s Membership options or schedule a free discovery call on our services page.
Get hourly support for your automations with LowCodeEngineers
If you’re looking for short-term help with automation instead, you should check out LowCodeEngineers.
LowCodeEngineers is XRay’s solution for quickly connecting small businesses and freelancers to vetted automation experts.
Through this platform you can schedule remote calls for low-code support billed on a convenient hourly basis.
Automate your daily work with Zapier today
With its easy-to-use interface and massive library of integrations, Zapier makes it simple for anyone to start automating the apps they use every day. Build on what you learned in this beginner’s guide and try creating your own automated workflows.
If you’d like to see more automation tutorials and beginner’s guides, be sure to check out our blog or our YouTube channel. You can also follow XRay on Twitter, Facebook, or LinkedIn.
When you’re building no-code automations, you often need to use multiple providers to support a single workflow.
But even as your automations move from Zapier to Make and back again, you need to make sure that your data stays consistent.
That’s why in this post, we’re going to show you how to easily send data between Zapier and Make automations using webhooks or an intermediary database.
We’ll begin by demonstrating how to send data from a Zapier automation to a scenario in Make, formerly known as Integromat. Then, we’ll show you the same thing in reverse - we’ll send data from a Make scenario to a Zap.
Finally, we’ll quickly demonstrate how you can use an app like Airtable as an intermediary database to move data between different automation providers.
To follow along, just open up Zapier and Make, and pick any apps that you want to test out. In our examples, we’ll use Airtable and Slack, but you can choose any software you’d like.
Sending data from Zapier to Make with a Webhooks step
We’ll start with a brief overview of how to send data from Zapier to Make with webhooks. Then, we’ll explain each step in detail.
1. Open or create a Zap with at least a trigger step.
2. Add a “Webhooks by Zapier” step. Choose “POST” as the event.
3. Create a new Make scenario, and choose “Webhooks” as the trigger.
4. Add a new webhook, and copy it to your clipboard.
5. Paste the webhook URL into your Zapier “Webhooks” step.
6. Configure the data you want to send to Make as key-value pairs.
7. Test the automations by running your Make scenario, then testing your Zapier step.
8. Review the data in Make, and add automated steps that use data from the webhooks trigger.
Open or create a Zap and add a Webhooks step
To begin, open an existing Zap or create a new one.
Your Zap needs to at least have a trigger with some test data loaded in. However, your trigger can be in any app that you’d like to use.
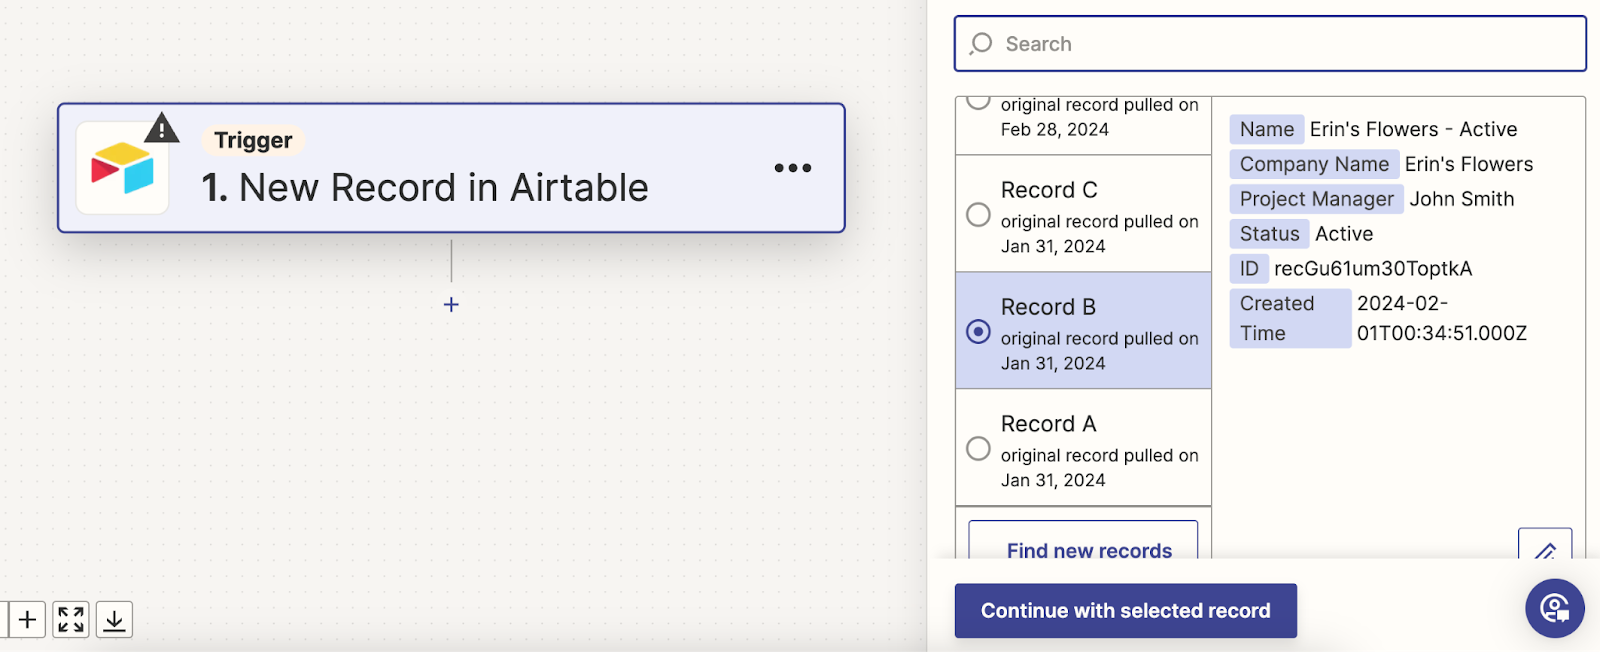
In our example, we’ve retrieved a record from Airtable using a “New Record in View” trigger.
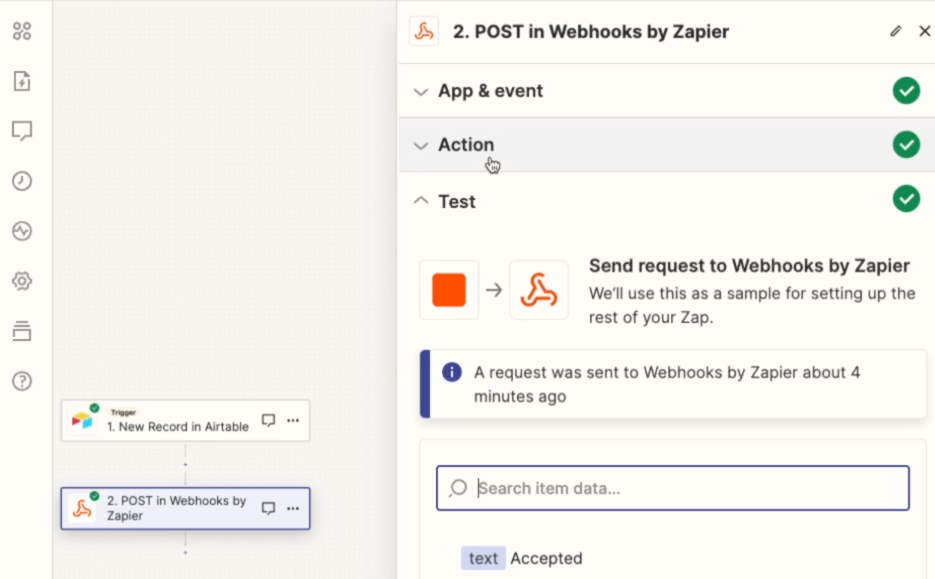
Once your trigger is all set, add a new step to your Zap, and choose “Webhooks by Zapier” as the app.
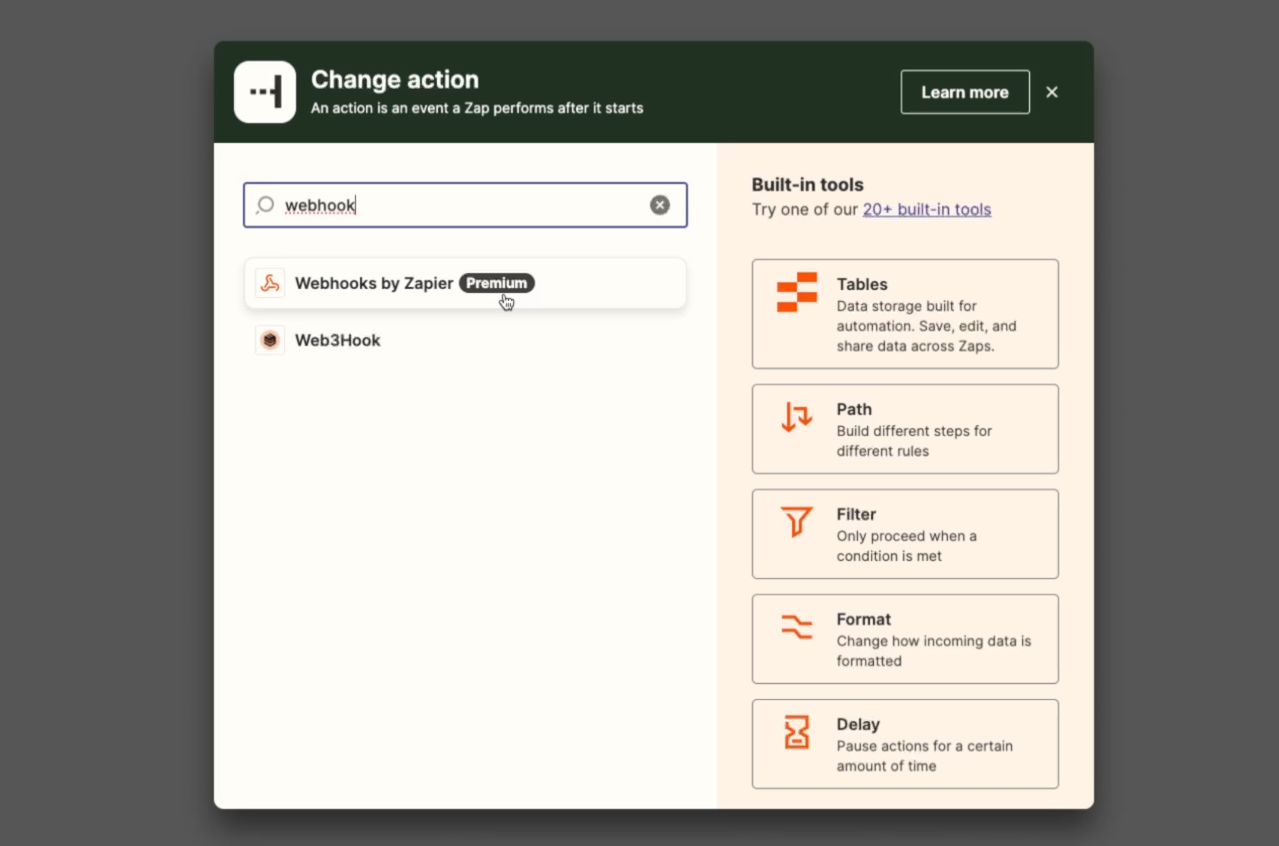
Note: “Webhooks by Zapier” is a premium app, meaning that you won’t have access to it on Zapier’s free plan. If you’re using the starter plan, you’ll be limited to 3 premium apps.
After adding the Webhooks step, choose an event.
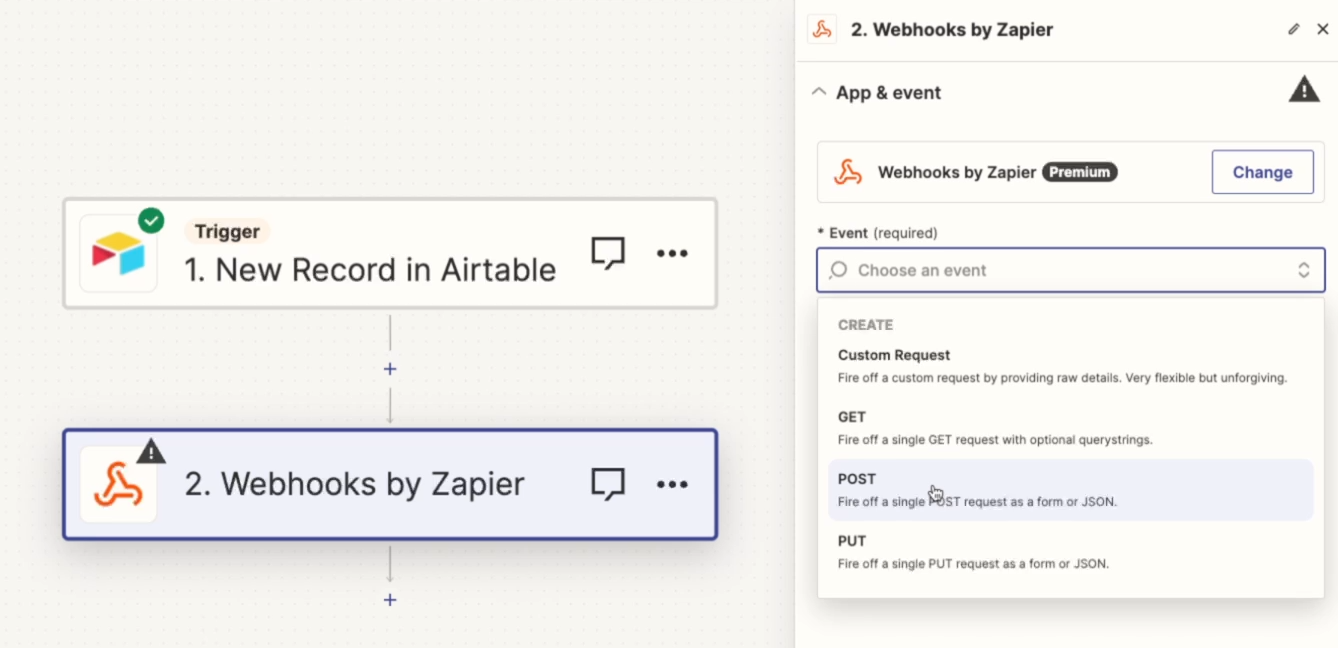
The options you see here represent methods that you find in an API call. “GET” is used to search for data; “POST” is used to create data; and “PUT” is used to create or update data.
Choose POST to send data from Zapier to Make.
Get a URL for your webhook
After choosing your event, you can configure your webhook step.

The first field you need to fill in is the URL. This is the URL you’ll send data to with your webhook.
To generate and copy this URL, switch over to Make.
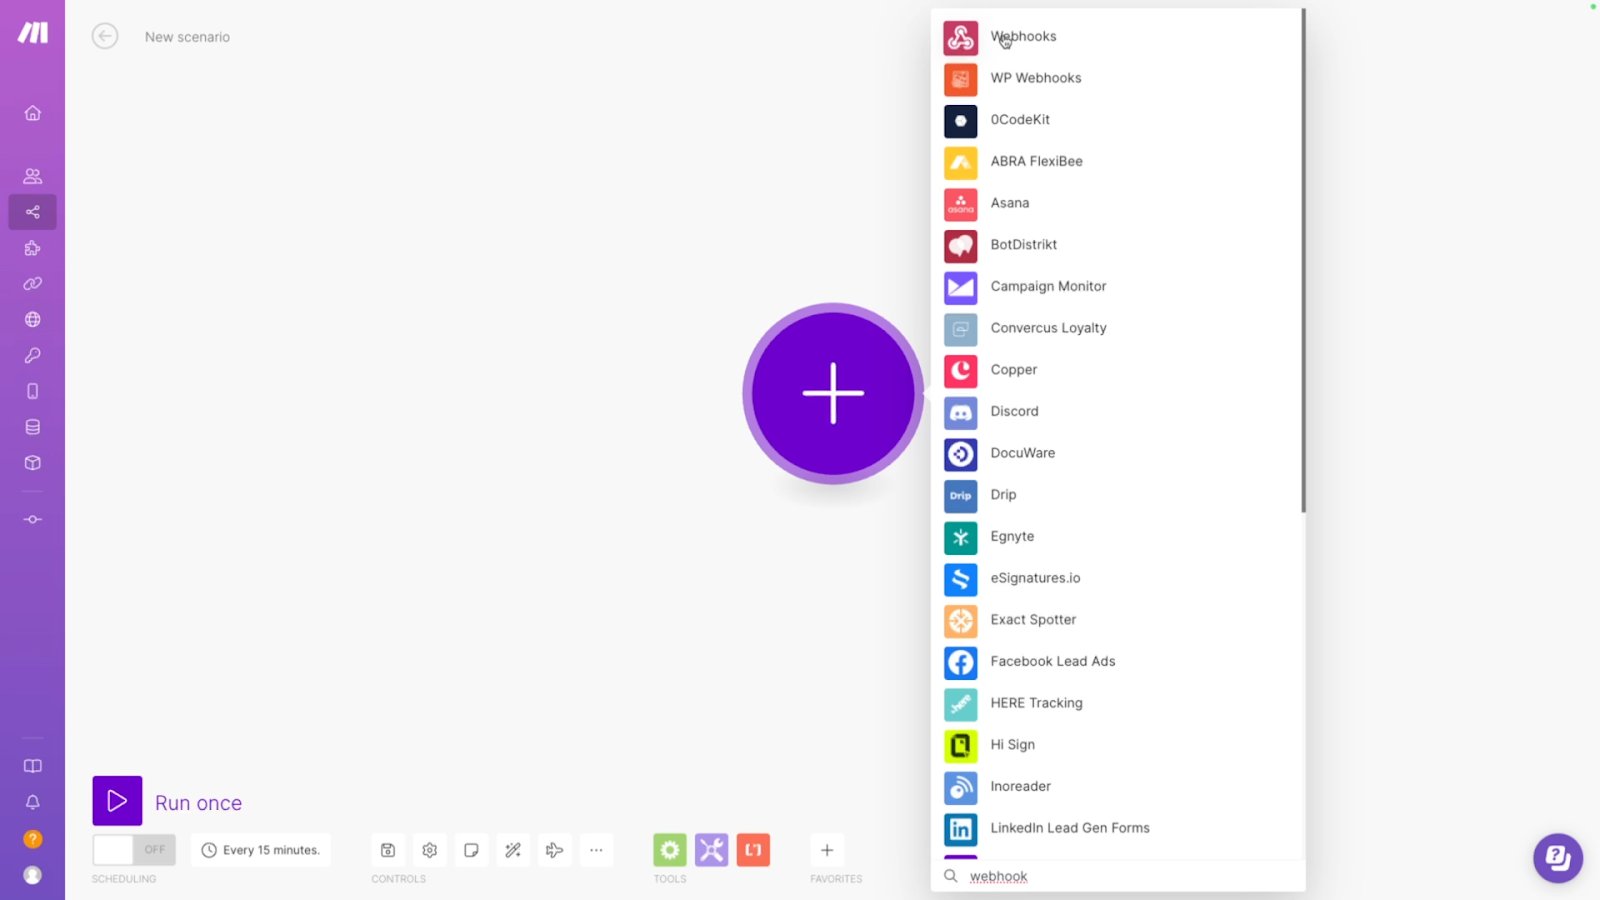
In Make, create a new scenario. For the trigger, search for the “Webhooks” app.
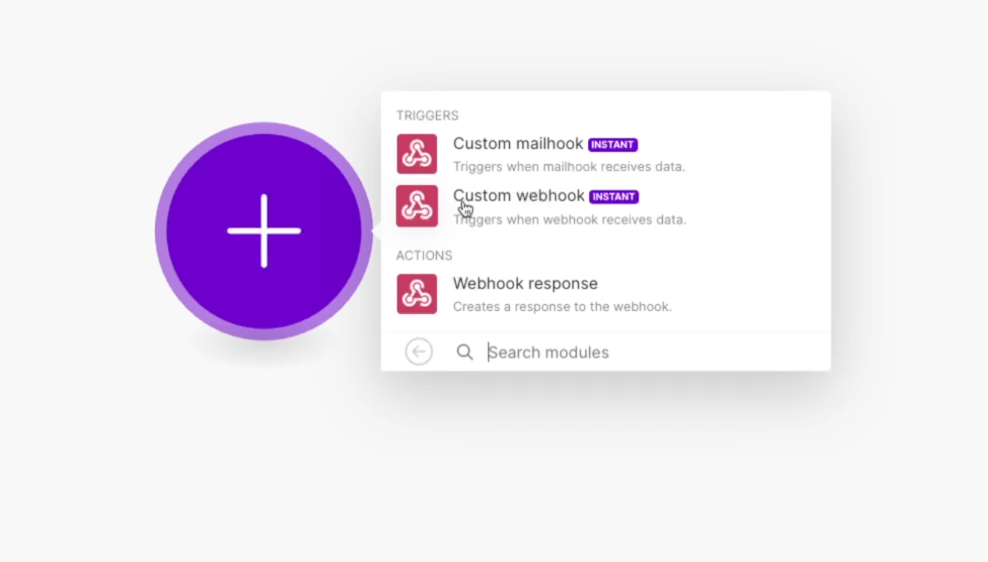
Then, choose “Custom Webhook”.
In your webhooks trigger, you can either choose an existing hook to use for your automation or create a new one.
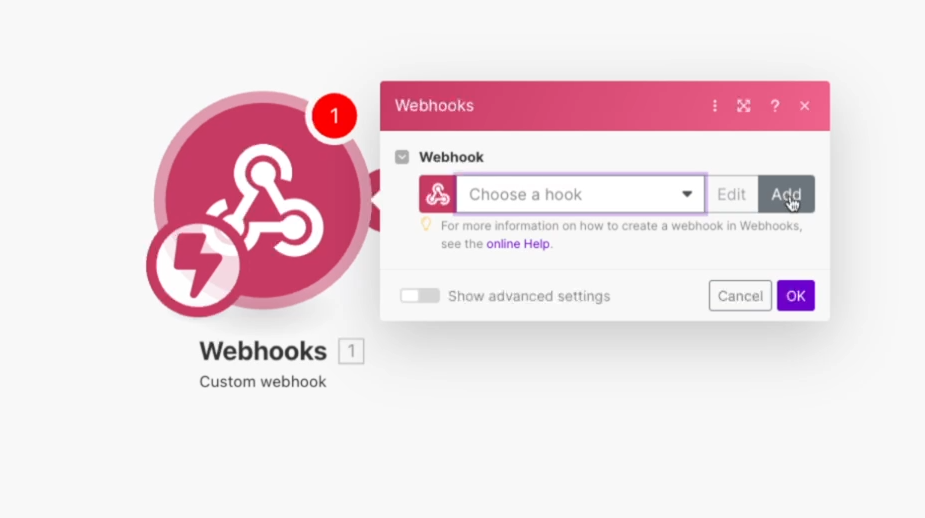
Click on “Add” to create a new webhook. Give it a unique, descriptive name and save it.

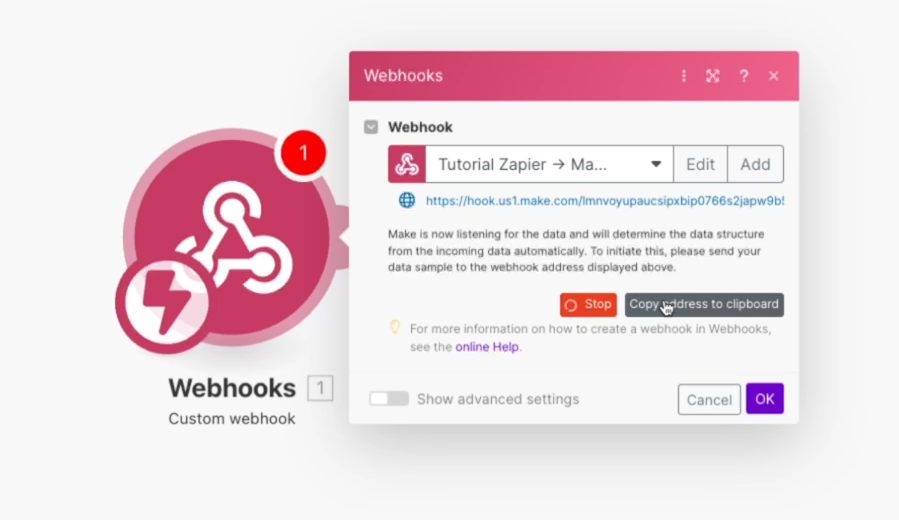
Your new webhook will instantly begin listening for incoming data, but you’ll need to configure your Zapier webhook step before you can send data over.
Click on the button to copy the URL to your clipboard, then return to Zapier.
Configure your webhook step in Zapier
Back in Zapier, paste the URL you copied into the URL field.
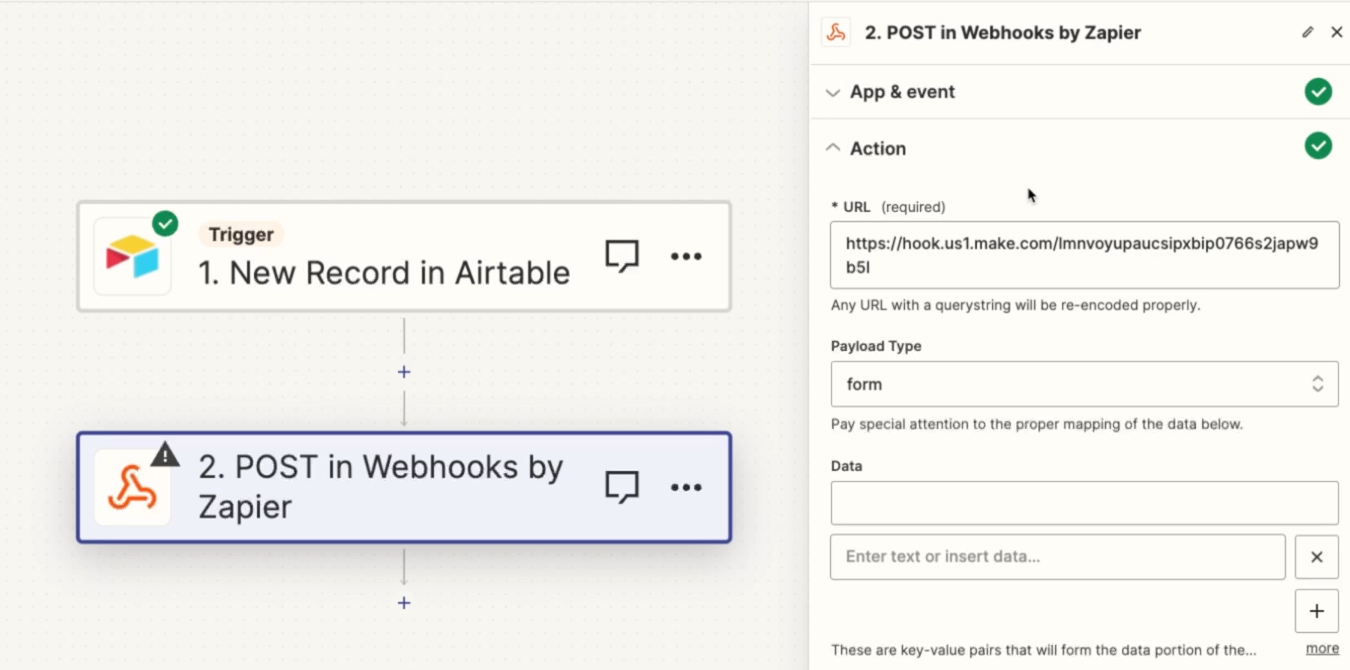
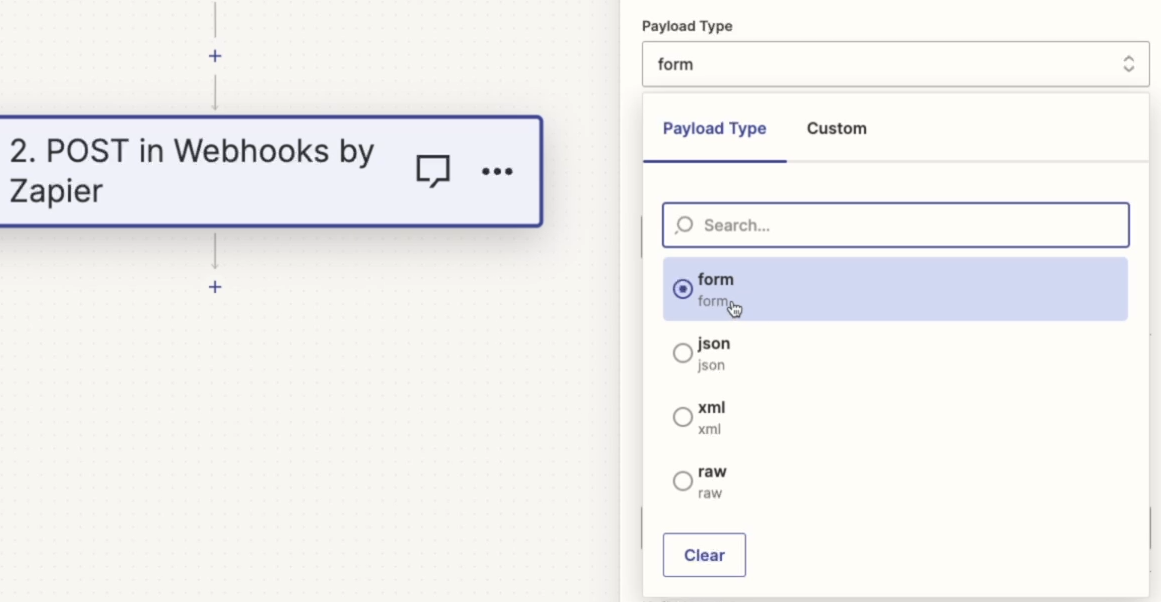
The “Payload Type” will default to “form”, which is what we’d recommend using. You can also use JSON and other formats, but “form” is easiest to work with in Zapier and Make.
Add data as key-value pairs to your webhook step
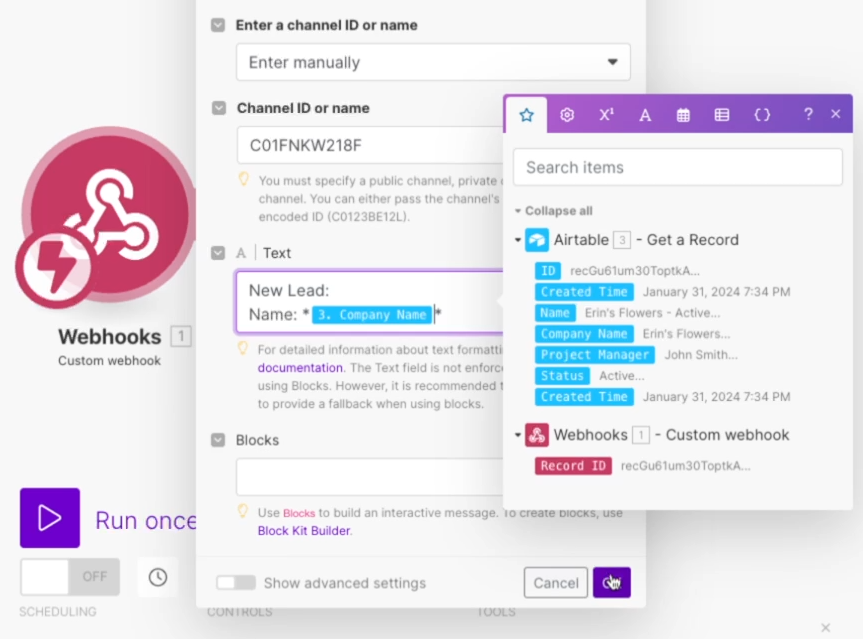
Under the “Data” section, you can create key-value pairs for each piece of data you want to send over to Make. Initially, Zapier only gives you one blank key-value pair, but you can add more by clicking on the plus button.
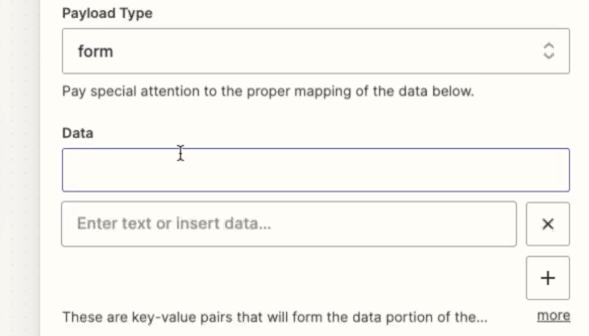
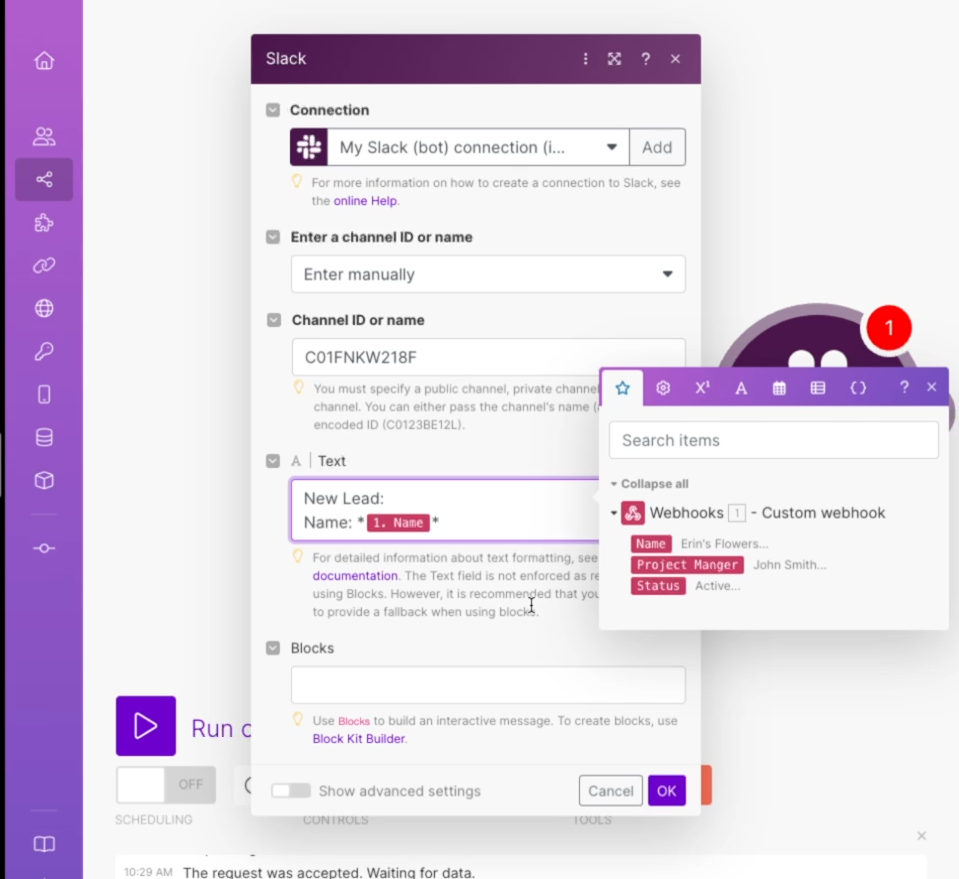
The first field in the pair is the “key”, which is essentially the label for the data you want to send. For instance, this might be “Name”.
The second field is the “value”, which is the actual data you want to send. For example, this would be the company name itself, like “Erin’s Flowers”.
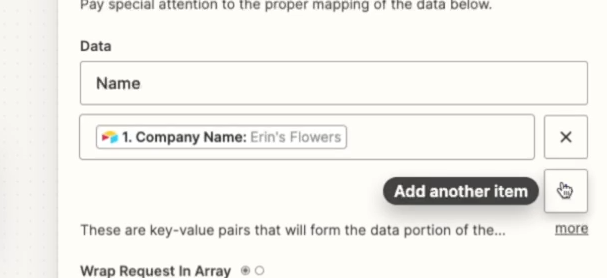
When Make receives this webhook from Zapier, it will process the data with the labels you provide here, so be sure to give them brief, descriptive labels.
You can add as many key-value pairs as you’d like here by just clicking on the plus button. In our example, we’ll also add data for “Project Manager” and “Status”.
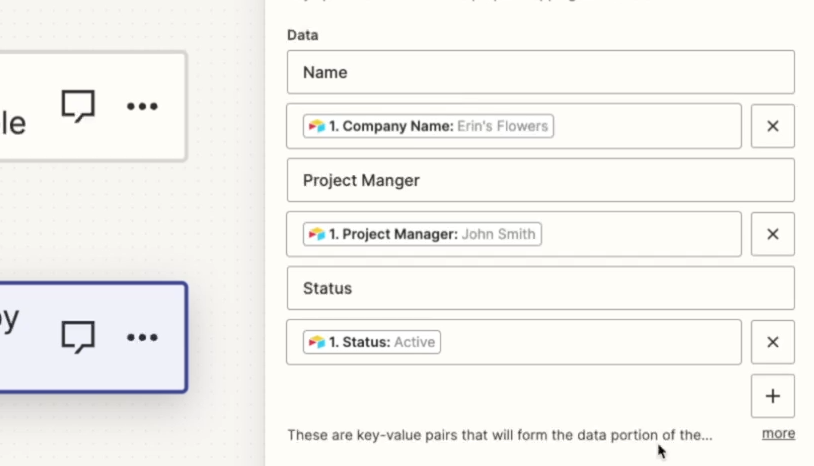
Note that Zapier will handle URL encoding for you, meaning that you don’t need to worry about punctuation and special characters, like the apostrophe in “Erin’s Flowers”.
Once you’ve added all the key-value pairs you want, your webhook is all set. You can leave all of the other settings to their defaults.
Next, it’s time to test what you’ve built and send some data from Zapier to Make.
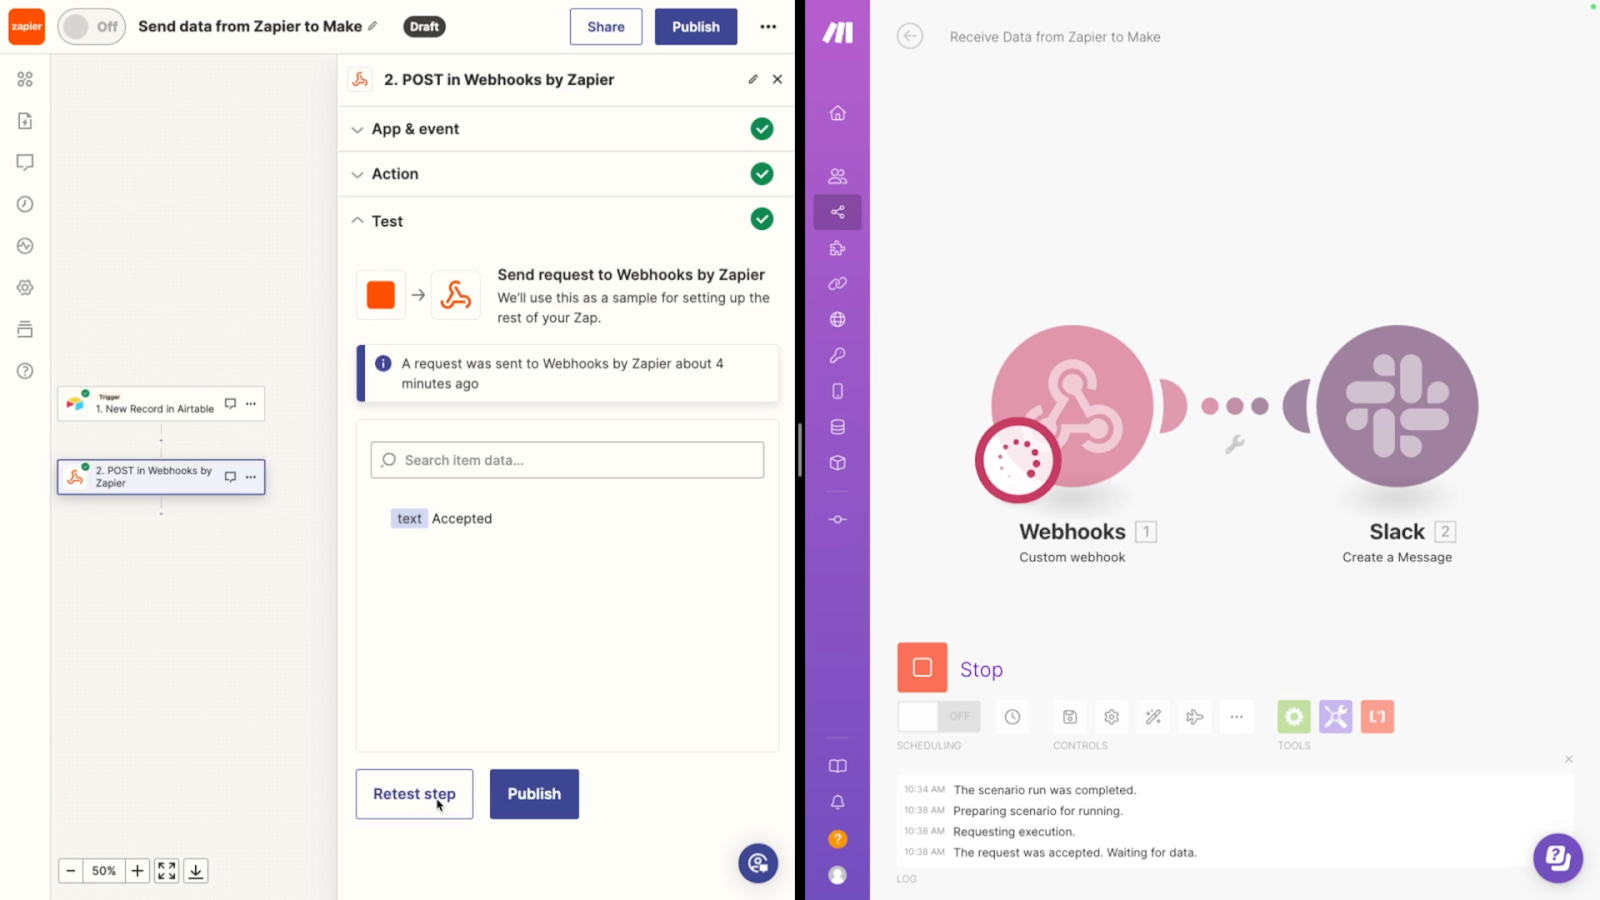
Testing your connection between Zapier and Make
Testing the webhook that bridges your two automations will require switching back and forth between Make and Zapier, so you may want to open them up side-by-side on your desktop.
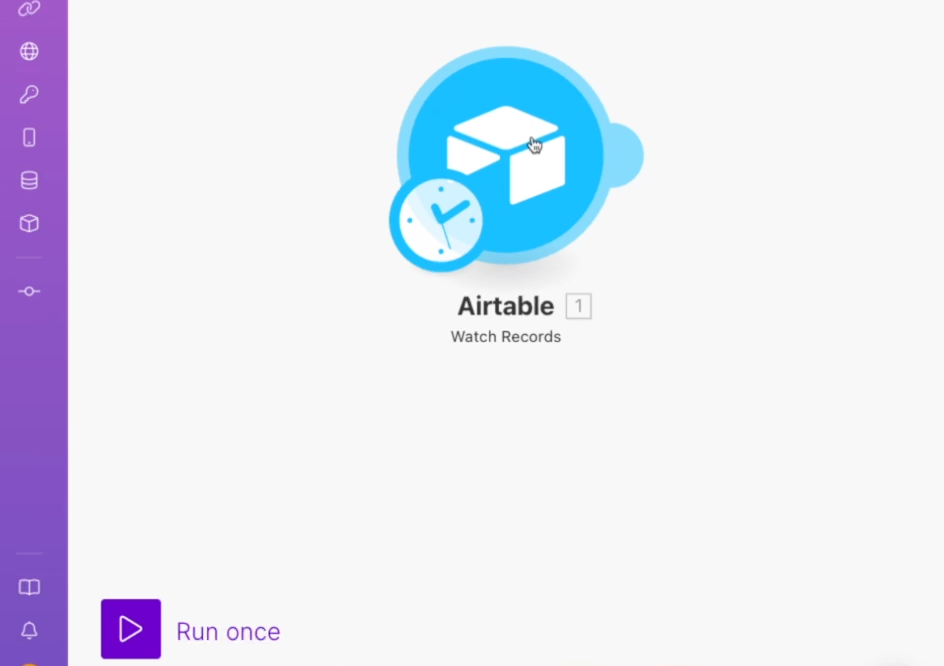
Open up the Make scenario you created earlier.
To make sure that it’s listening for incoming data, run the scenario by clicking on “Run once”.

Then, switch back to Zapier and test your Webhooks step.
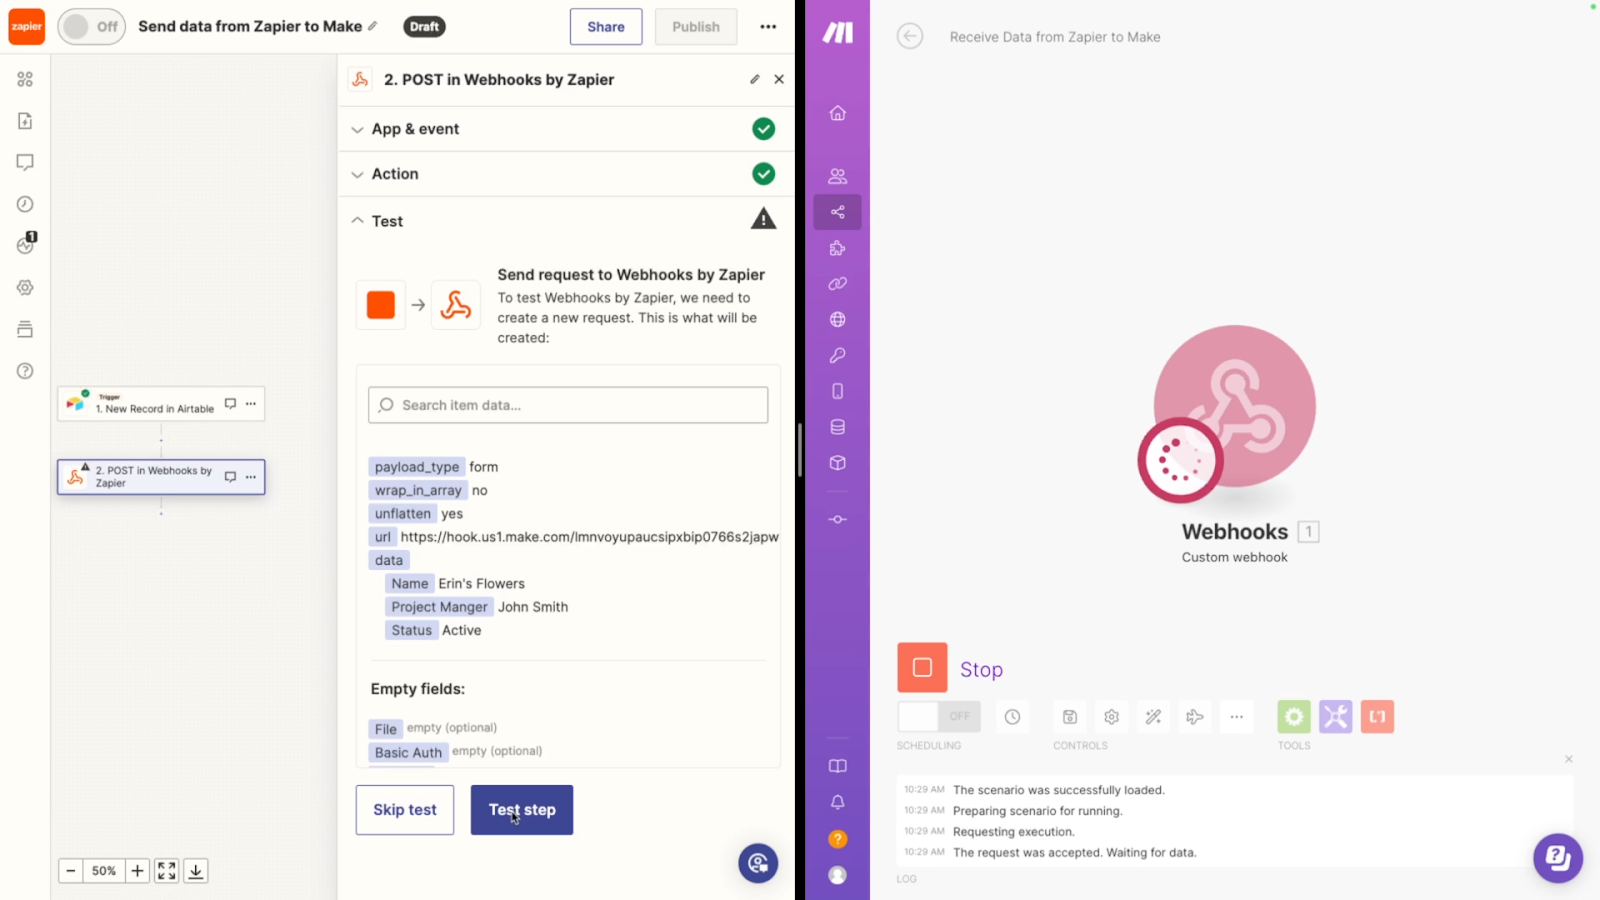
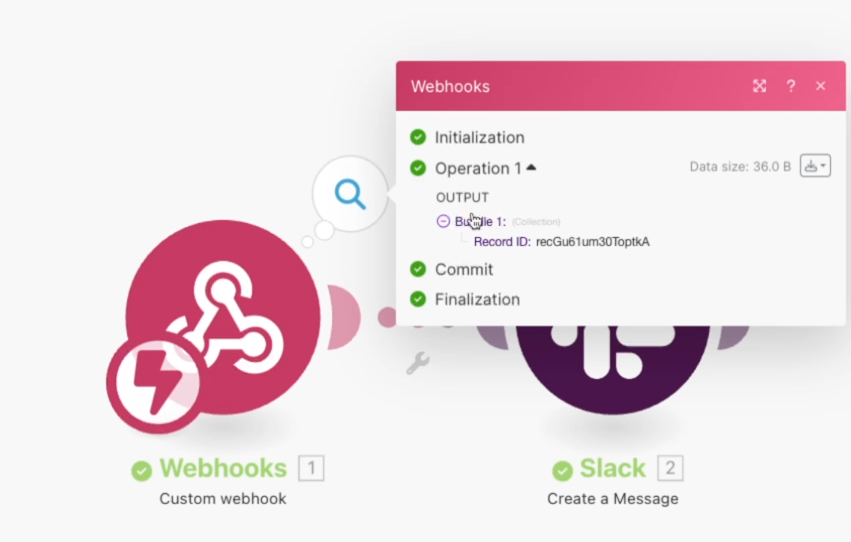
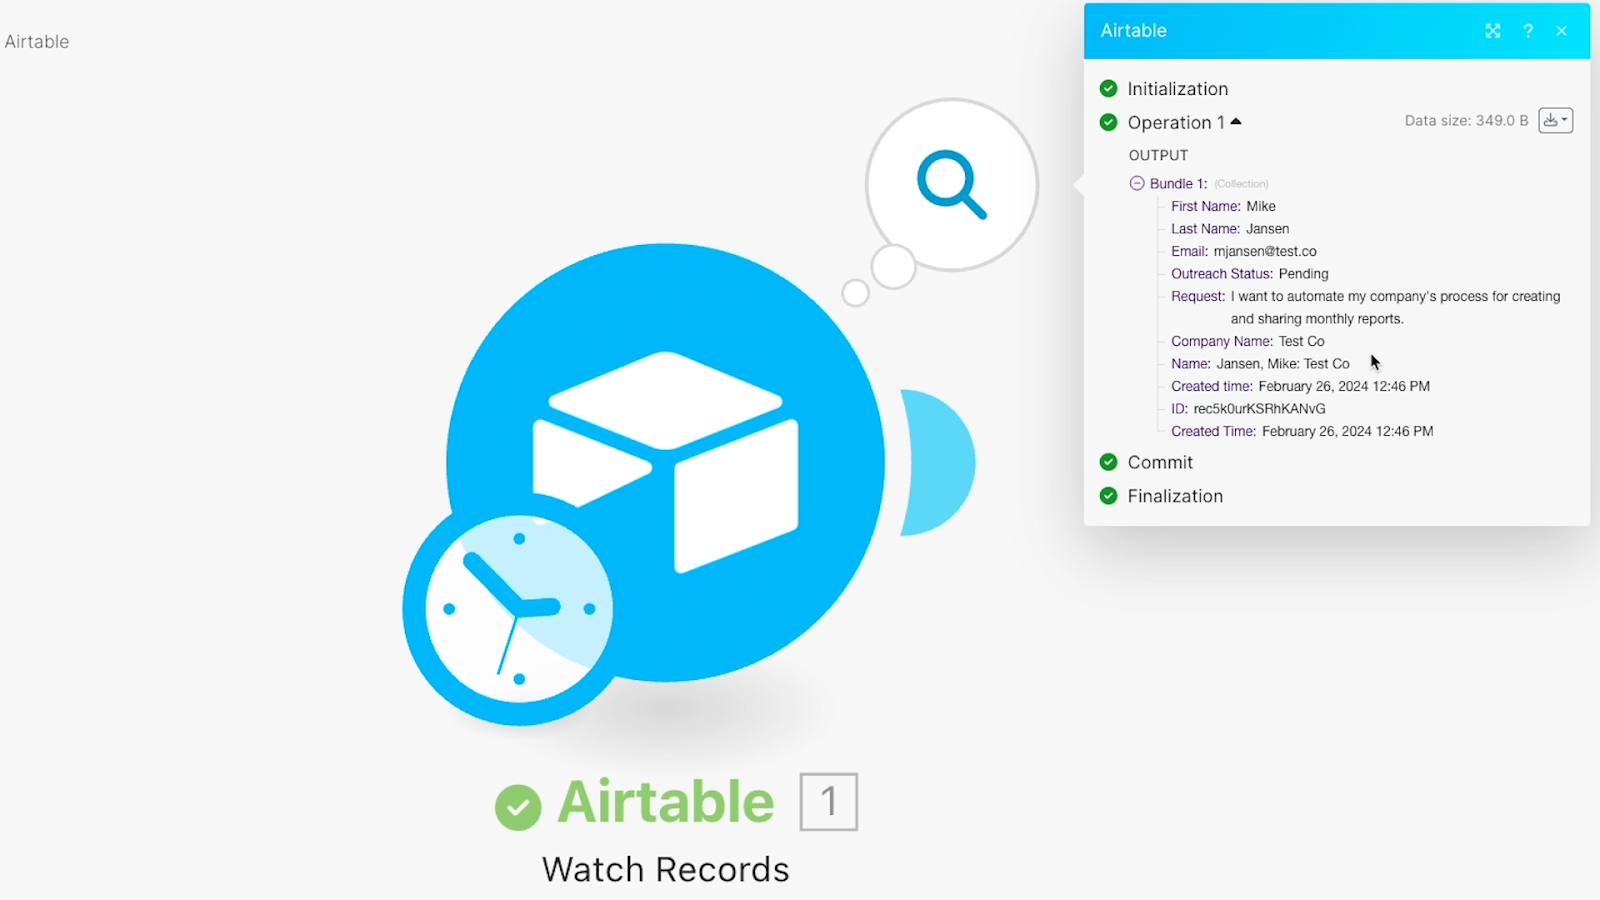
Make should instantly receive data from the test. Click on the number over your Make trigger to review the “bundle” it retrieved.

You should see all the information from your key-value pairs, with the labels and data that you configured in Zapier.
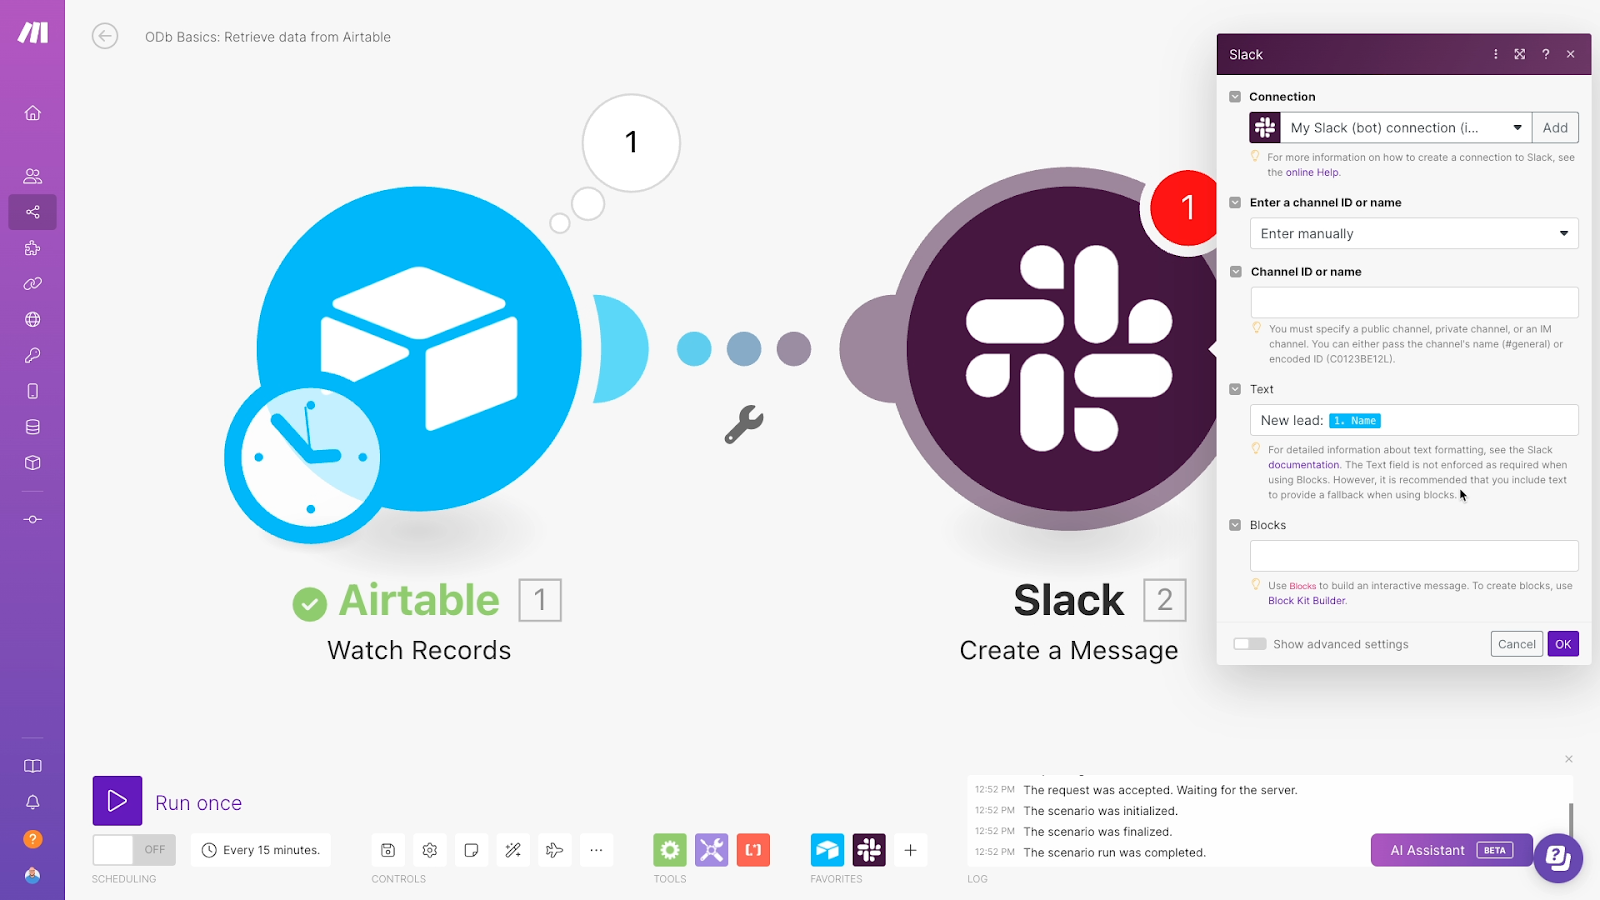
You can now use this data just like you would use variables retrieved from any app in Make.
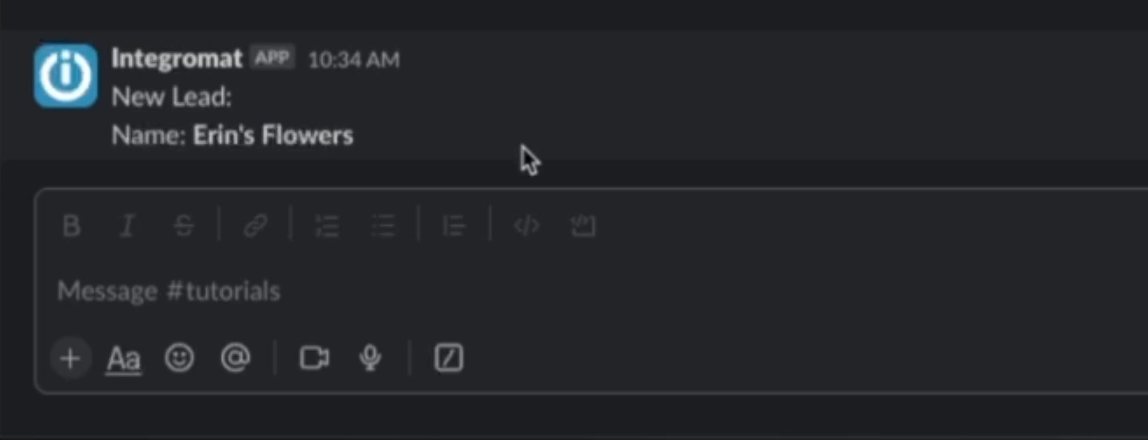
For example, we’ll add a Slack step to the scenario that sends a message to our Tutorials channel with an alert about a new lead. We’ll just include the lead’s company name in the message.
After adding any steps you’d like to include in your scenario, make sure to give the whole workflow a test.
Click on “Run once” in Make, then “Retest step” in Zapier.
Then, open up any relevant apps to confirm that your data was sent correctly. When we open up Slack, we can see the message we sent.
Sending data from Zapier to Make with a single lookup ID
As an alternative to creating a separate key-value pair for each data point, you could use a webhook to send a unique ID for the record in question.
Then, your second automation can use the ID to look up the relevant record and retrieve all of its data at once.
This method will require an additional search step in your automation, and will be slower than an instant webhook-based automation. It also requires you to use an app like Airtable that associates each record or object with a unique ID that can be retrieved by Zapier. While most apps do use IDs like this, they won’t always be very easy to find with Zapier.
Conversely, it’s easier to maintain and update automations built with this technique, since there’s only a single piece of data being sent. Additionally, it can be a bit more secure to avoid sending each data point individually to a webhook.
Updating your automations to use a lookup ID
Note: we’re going to demonstrate a lookup with Airtable. This process will work with many other apps, but the exact variables and their names will be different.
Using a lookup ID instead of several key-value pairs is a simple change.
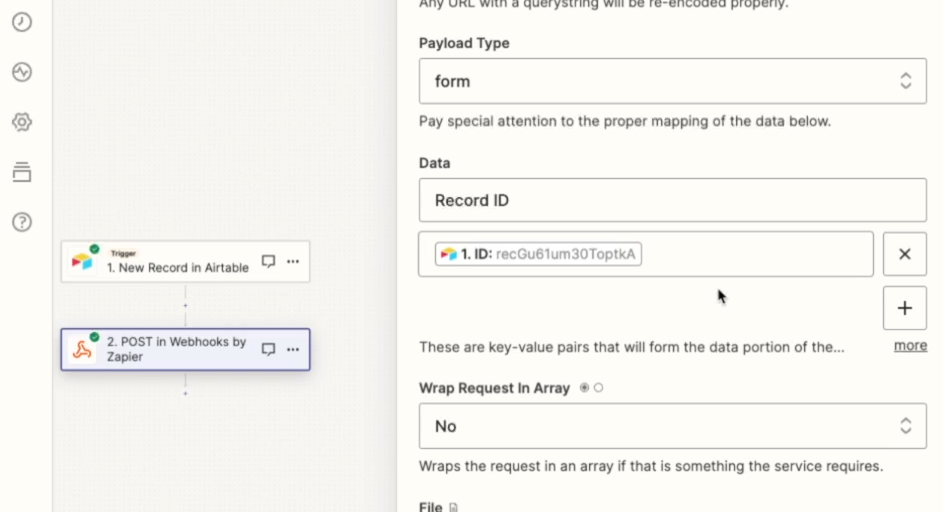
Open Zapier, and edit your Webhooks step.
Remove all of your key-value pairs except for one. In this pair, enter “Record ID” as the key, and enter the record ID retrieved by Zapier in the value field.
Test the automation once again using the same approach as before. Click “Run once” to ensure that the Make scenario’s webhook is listening for requests, then test your Zapier automation.
After running the test, check Make to review the data your webhook trigger received. You should see a single piece of data – the Record ID sent by Zapier.
Adding a lookup step to Make
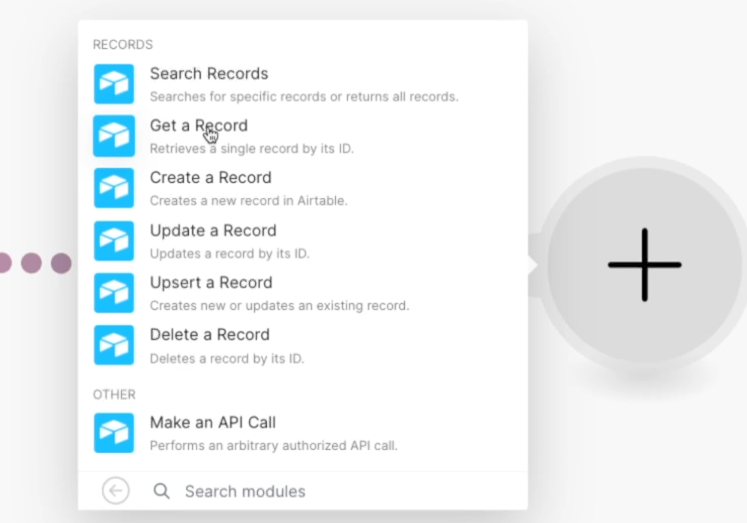
Add a new step to your Make automation to find the record or object by its ID after the trigger (and before the Slack step). Add a step and choose the app you want to perform a lookup in.
We’ll choose Airtable as our app and select “Get a Record” as the event. If you’re using a different app, you’ll still likely use a “Get” or “Find” event.
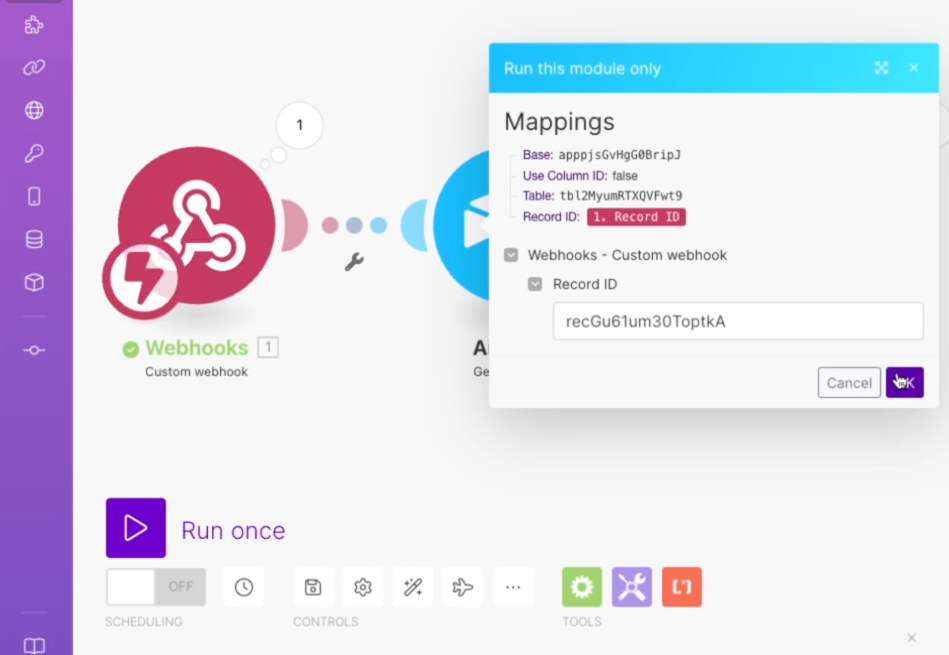
Configure the step to search for the record or object in the correct location. For Airtable, that means we need to identify the base and table, and use the ID retrieved in the Webhooks trigger.

Test the step to load in some data. You’ll have to copy and paste the record or object ID manually for the test.
If you examine the lookup step’s data, you should see all of the information from the record that was retrieved.
Finally, update any subsequent modules to use data from the lookup step rather than using data from the trigger, which is no longer present.
Test the entire workflow again to confirm that it all works. Run the Make scenario, then test the Zap.
Check that all of the steps after your lookup worked correctly. In our example, a Slack message was sent successfully, so our automation is all set.

Sending data from Make to Zapier
Now let’s cover how the same process works in reverse, and explore sending data from Make to Zapier with Webhooks. It’s ultimately pretty similar to sending data in the other way, so we won’t go into quite as much detail.
1. Open or create a Make scenario with at least a trigger step.
2. Add an “HTTP” step, and choose “POST” as the event.
3. Create a new Make scenario, and choose “Make a request” as the event.
4. Create a new Zap with a “Webhooks by Zapier” trigger. Set the event to “Catch a Hook”.
5. Copy the provided URL and paste it into your Make HTTP request.
6. Set your HTTP request method to “POST”, and choose “multipart/form-data” as the body type.
7. Configure the data you want to send to Zapier as key-value pairs.
8. Test the automations by running your Make scenario, then testing your Zapier webhooks trigger.
9. Review the data in Zapier, and add automated steps that use data from the webhooks trigger.
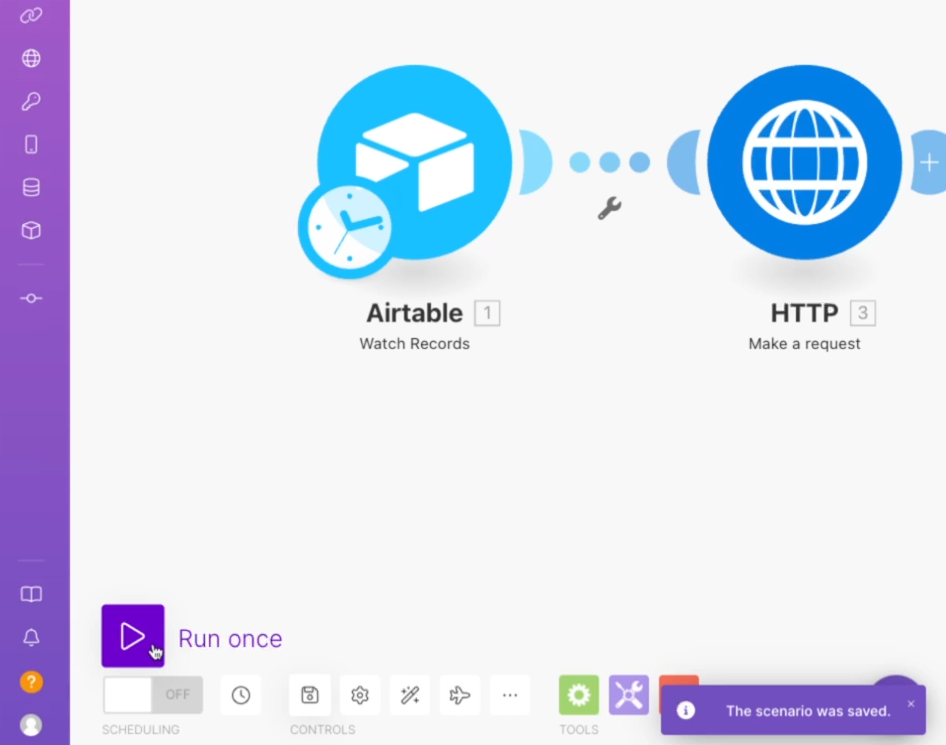
Add an HTTP step to a Make scenario
Begin with a scenario in Make. Your scenario should have a trigger that you’ve already tested and loaded data into.
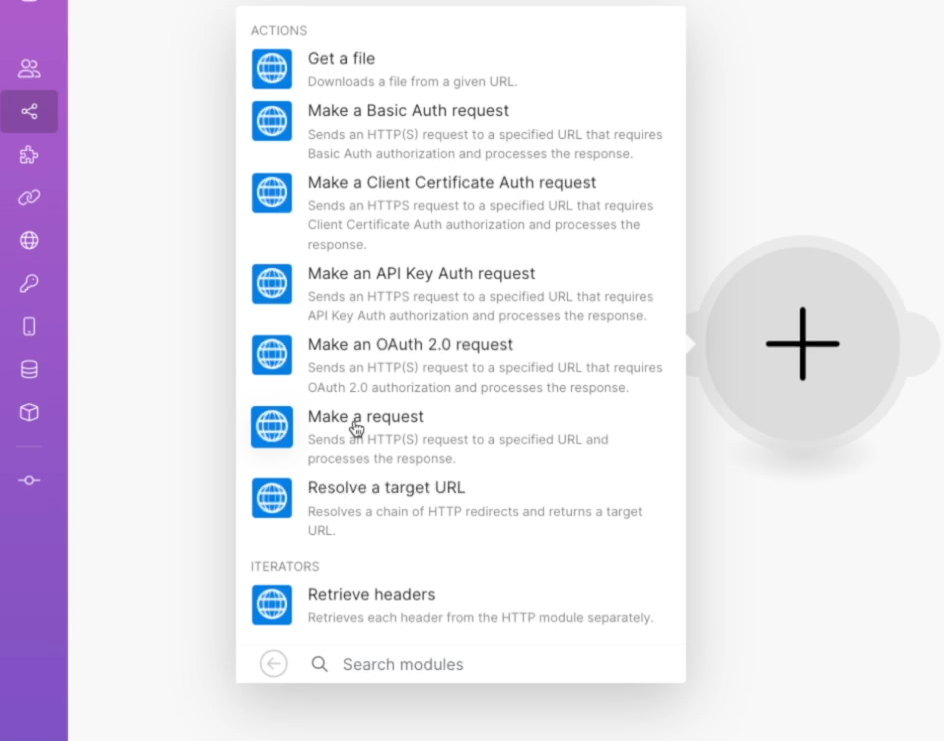
Add a new module to the Make scenario, and choose “HTTP” as the app (NOT webhooks).

Select “Make a request” as the event.
To configure the request, you’ll need a URL to send the request to, which you can generate in Zapier
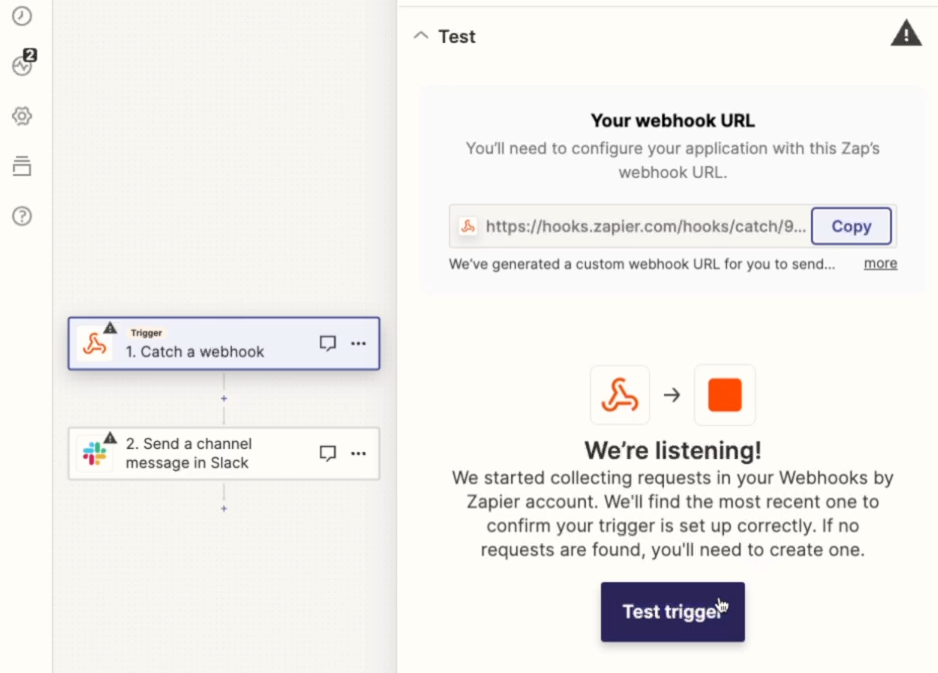
Create a webhook trigger in Zapier
In Zapier, create a new Zap. Choose “Webhooks by Zapier” as your trigger, and select “Catch hook” as the event.
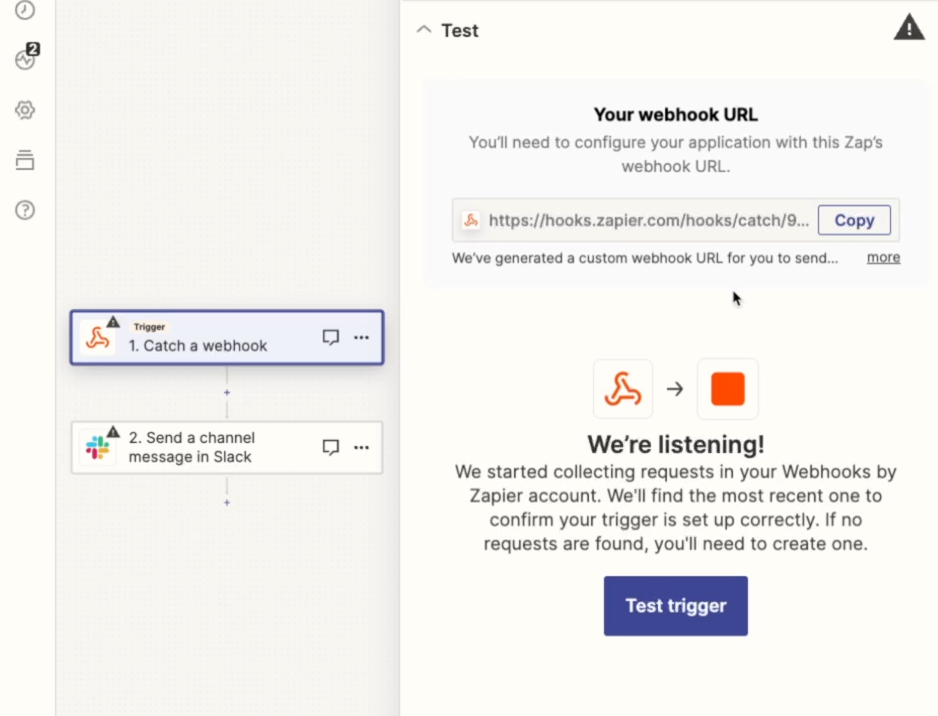
Click “Continue”. In the test window, a URL will be generated for this webhook. Copy it to your clipboard.
Configure your HTTP request in Make
Go back to your Make scenario, and paste the URL into the URL field.
In the “Method” dropdown, select “POST”, and set the body type to “multipart/form-data”.

For each piece of data you want to send from Make to Zapier, you’ll need to add an item under the “Fields” section.
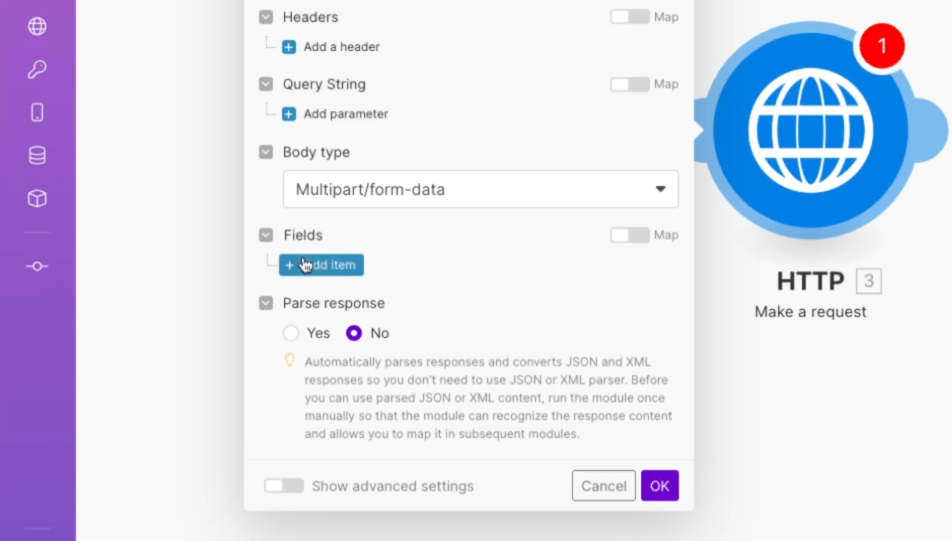
For each item, set the type to “Text”. Then, provide a label for the data in the “Key” field, and the data itself in the “Value” field. Like Zapier, Make will handle URL encoding for punctuation.
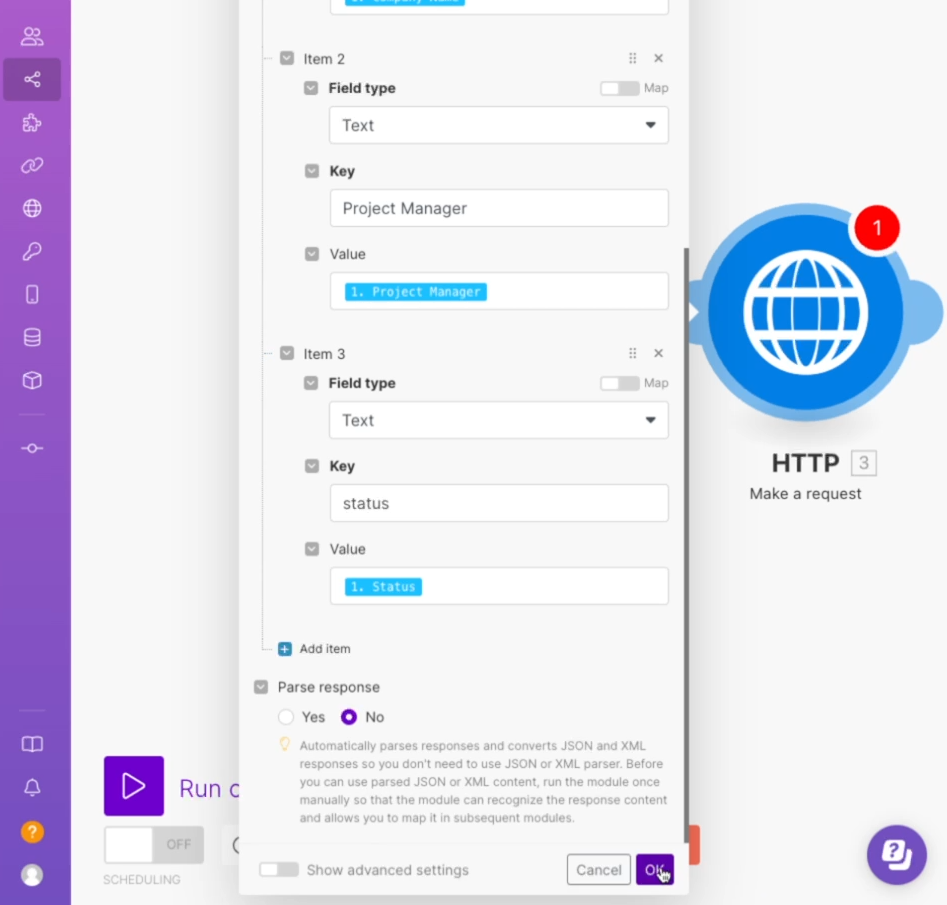
Once you’ve finished adding all the data you want to send as key-value pairs, click “OK” to save and close the module.
Then, test the scenario to send a request to your Zapier webhook.
Finish your test in Zapier
Go back to Zapier, and test your webhook trigger.
You should see the test data that you sent from Make.
[test data]
You can now add steps to your Zap that use the data retrieved in the webhook trigger.
Using a Record ID instead of several key-value pairs
Just like with Zapier, you can use a single key-value pair containing a record ID instead of sending each individual piece of data. Just be sure to include an additional lookup step in your Zap as well.
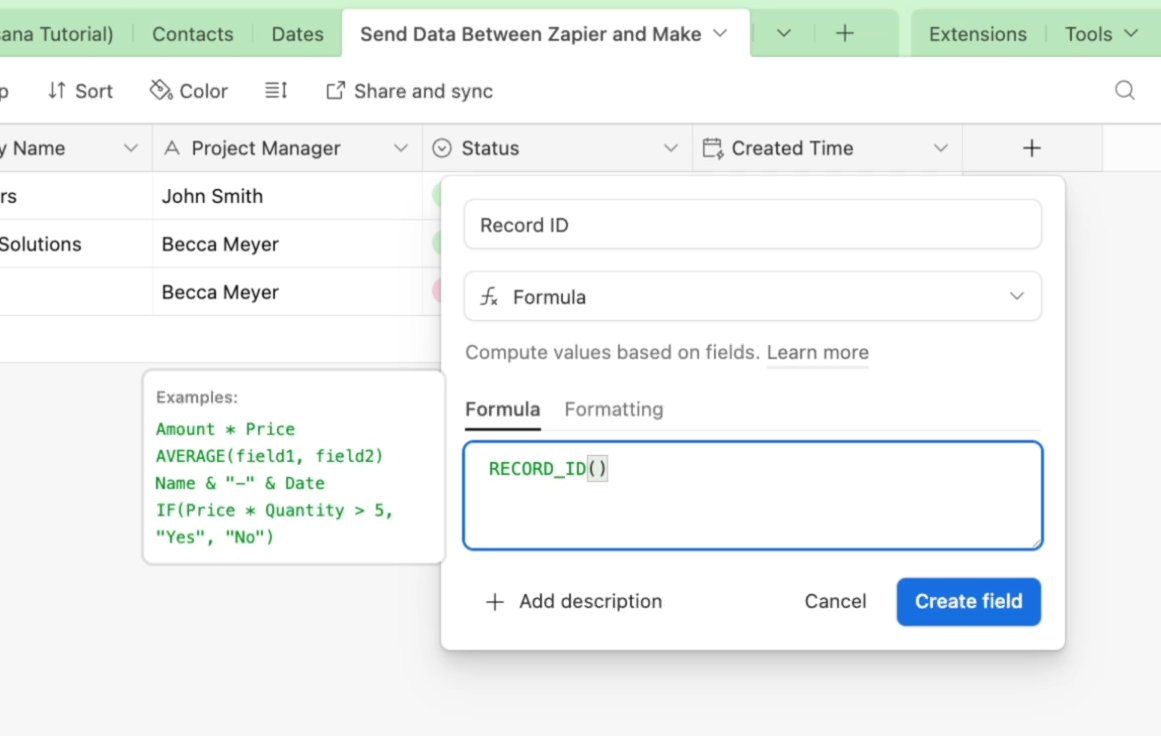
Note that should also add a Record ID field to Airtable, because it will make it much easier to search for a matching record by its ID in Zapier.
You can use the RECORD_ID() formula to display the ID of each record.
Operational databases: an alternative to webhooks
In addition to using webhooks, there are some other ways to run sequential automations in Zapier and Make.
For instance, you could also create an operational database. This is a database that stores and manages data for all your automations.
With an Operational Database, you could use Zapier to start a workflow, and drop some data off in Airtable.

Then, Airtable would trigger a Make automation to run that uses the same data.
That way, the Make automation can reference the data created or updated by Zapier without needing to involve webhooks at all.
And of course, you could switch the order of the providers if you want - it would work the exact same way if you started with Make and picked things up with Zapier.
Just like with webhooks, there are some pros and cons to this method. It’s going to be a bit slower than using instantaneous webhooks, and it could be a bit easier for your team to accidentally break the automation by editing your Airtable views.
But on the other hand, it gives you more visibility into the process, allowing you to see the data every step of the way. You could also add a human checkpoint here, where a person would review and approve the data before allowing the automation to continue to the next step.
Use Guardian to manage errors in all your automation providers in one spot
When dealing with multiple automation providers, you should try out Guardian by XRay.
Guardian aggregates error emails from multiple accounts into one place making it easy to detect and manage automation errors across your accounts and your clients’ accounts.
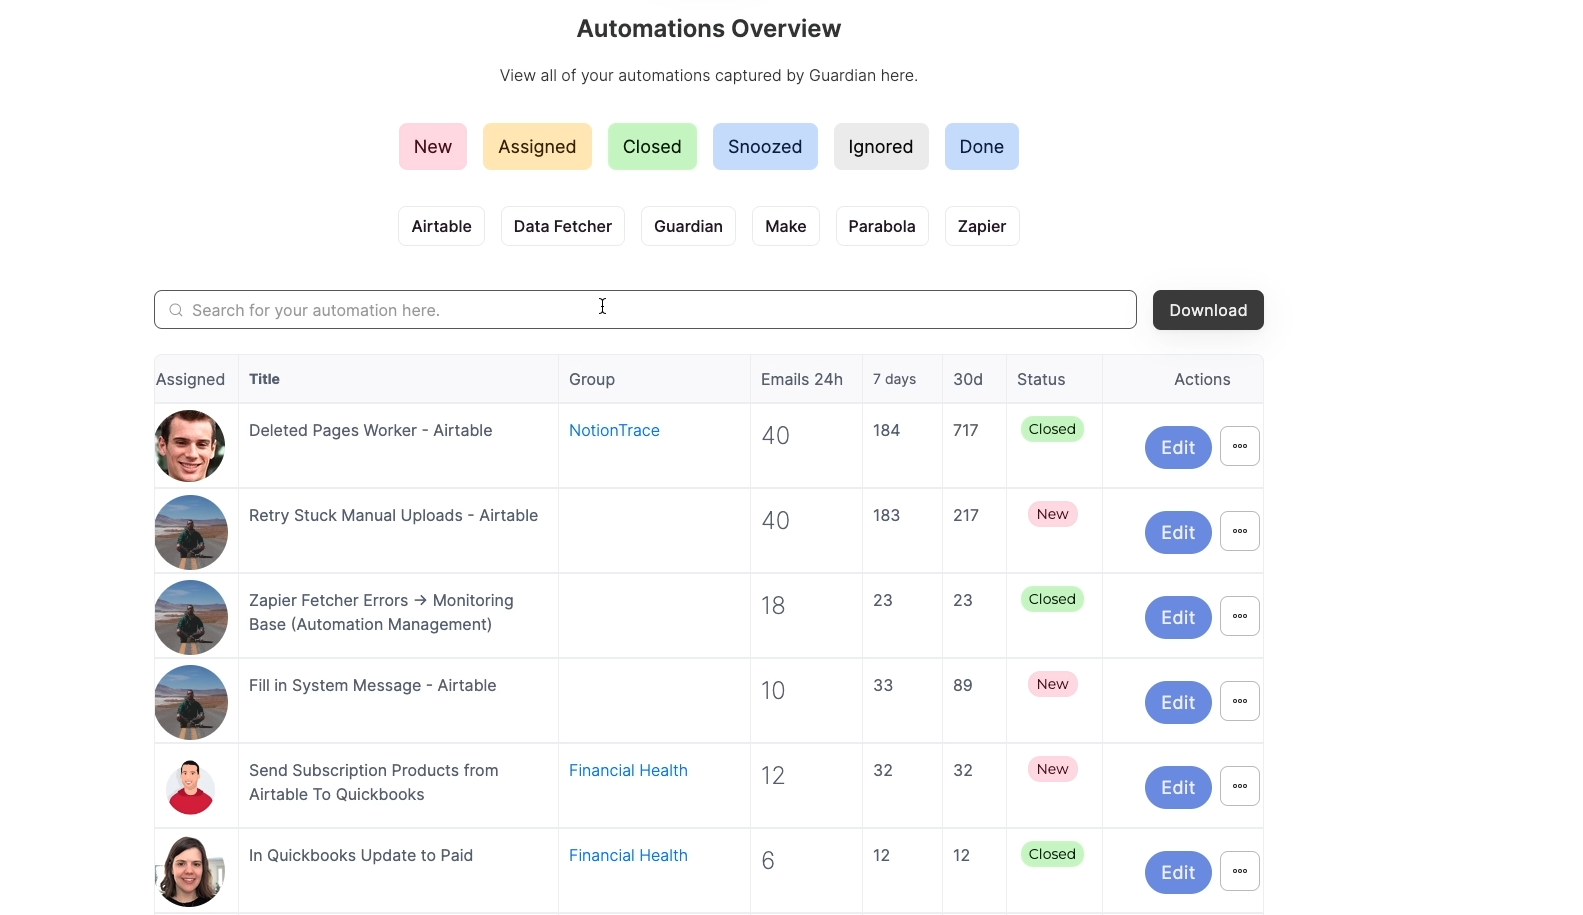
Just go to guardian.xray.systems to get started.
This is a must-have if you’re managing automations in several providers with multiple clients.
Easily send data from one automation provider to another
With webhooks or operational databases, it’s easy to send data from one automation provider to another. You can set up a simple automated step to directly send all the data you want, send over a record ID for a quick search, or deposit data into an operational database and retrieve it with the next automation.
No matter which approach you choose, you can seamlessly build a single workflow that spans multiple automation providers. To learn more about building automated workflows, check out our blog or our YouTube channel. You can also follow XRay on Twitter, Facebook, or LinkedIn.
When you’re working with Google Docs, it’s often better to send your clients and collaborators a PDF export rather than sharing a direct link to the doc.
With Zapier, you can easily incorporate PDF exports into your automated workflows just by adding a step and picking the right variable. In this tutorial, we’ll show you how it works and go over some of your key options.
What you may not realize is that you can use Zapier to automatically send a PDF of any Google doc by just picking the right variable.
Exporting a link vs. exporting a file
Before we begin, it’s important to note that you have a key choice when sharing a Google Docs PDF via Zapier.
A “Find a File” step using either Google Docs or Google Drive will be your most versatile choice. When you use a “Find” step, Zapier will return both a PDF export link, and the PDF itself.
Note: the “New File” trigger in Google Drive and the “New Document” trigger in Google docs will provide you with the same data, as well.
If you use a “Create a Document” step with the Google Docs Zapier integration, then you’ll be limited to an export link.
When you send your PDF to another app with Zapier, some apps will require a link; others will require the file itself.
We’ll show you how both variables work.
Sharing a Google Docs PDF file with Zapier
When you use a Google Drive step to find a Google Doc, you can easily retrieve the PDF file, or a download link for the PDF.
This is the most flexible option that will accommodate most use cases, so we’ll start here.
1. Add your trigger or search step to retrieve a Google Doc
You can use either a “New File” trigger or a “Find a File” search step in Google Drive’s Zapier integration to retrieve the file. You can also use similar steps in the Google Docs integration, but we’ll demonstrate how it looks with Drive.
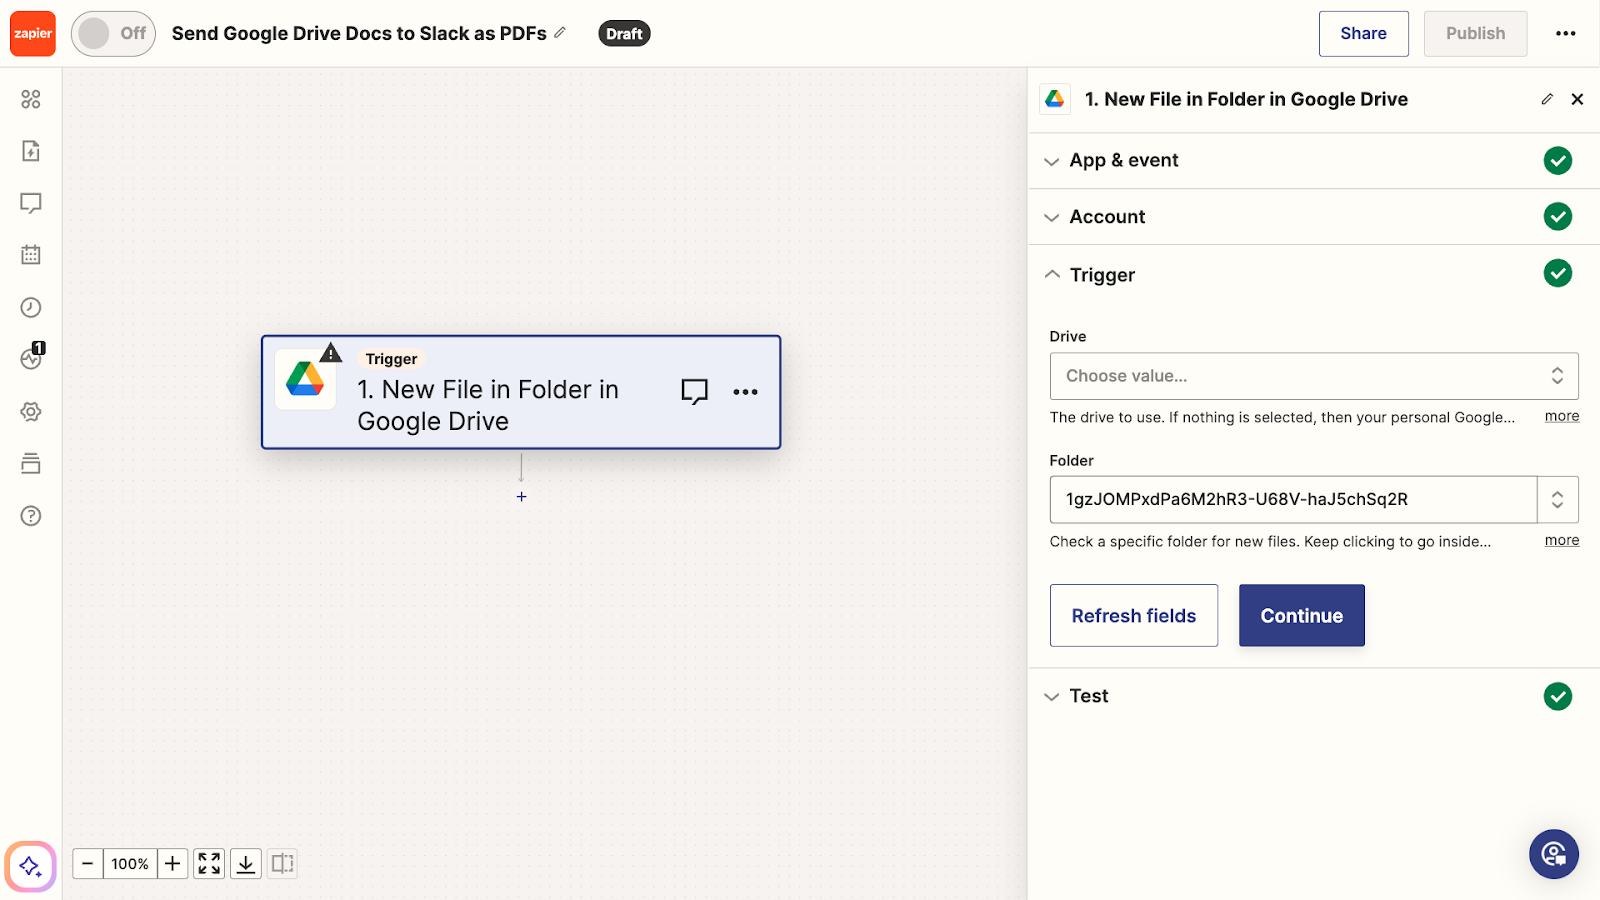
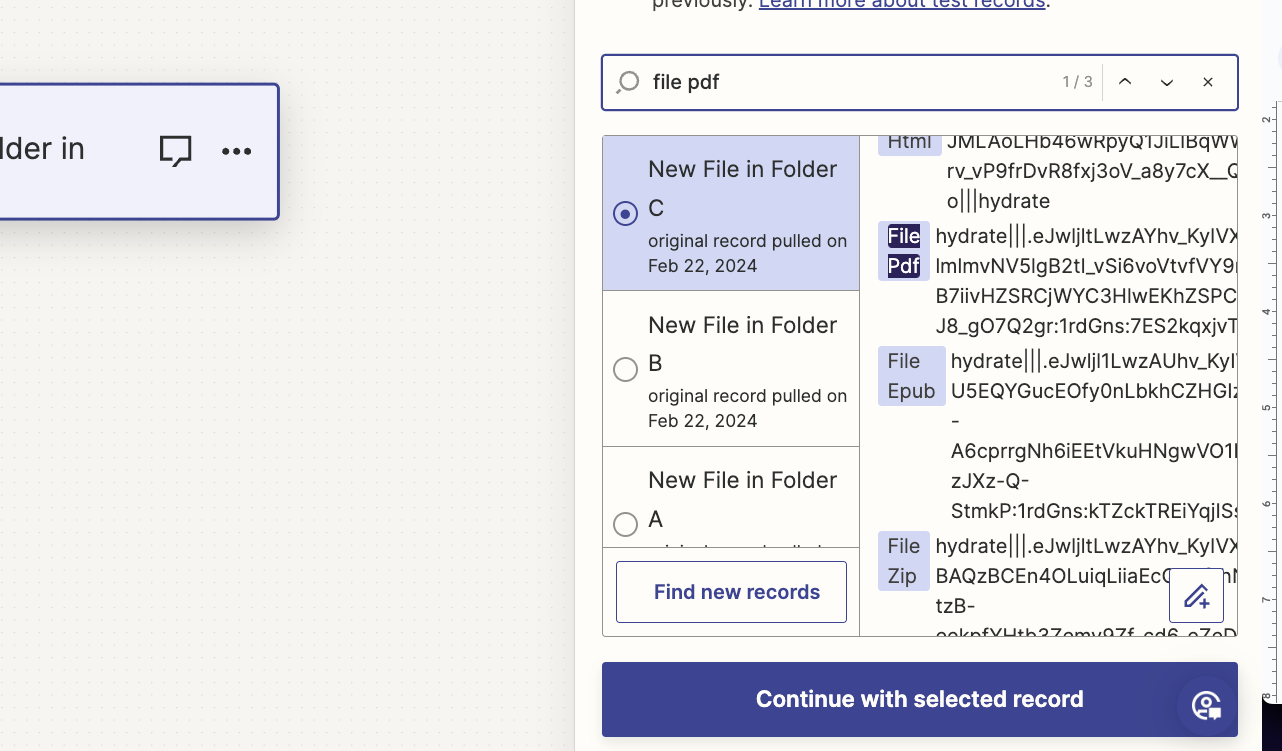
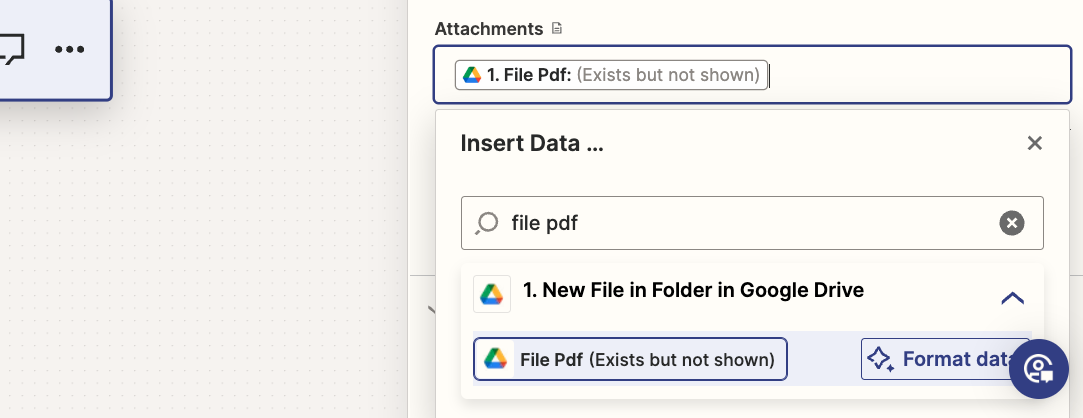
2. Test the trigger or search step and review the returned data.
You should see a “File PDF” variable that will let you send a PDF export of your Google Doc.
There will also be a “PDF URL” or “Export Links Application PDF” variable that will let you share a link where users can download the PDF.
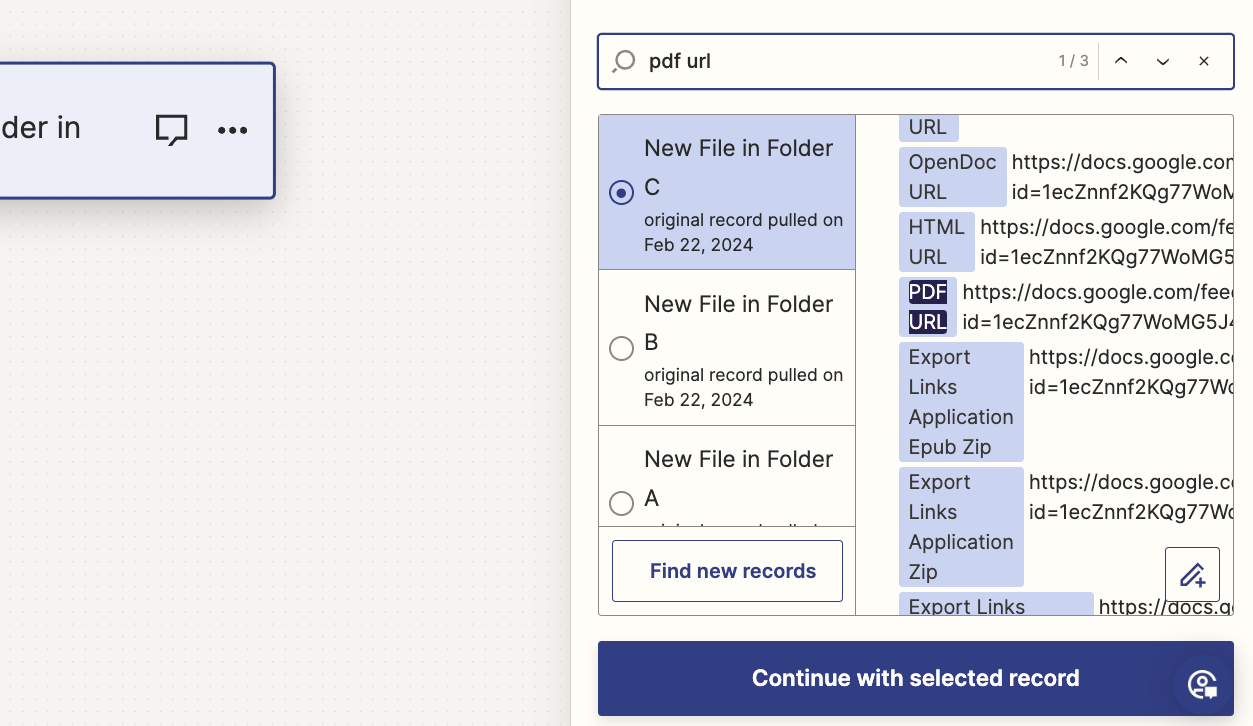
The distinction between sending the file vs. sending the download link may seem subtle, but some apps will only accept a link, while others will only accept a file.
3. Add an automated action to send your PDF to another app
You can now send your PDF link or file to nearly any app that’s supported by Zapier, such as GMail or Slack.
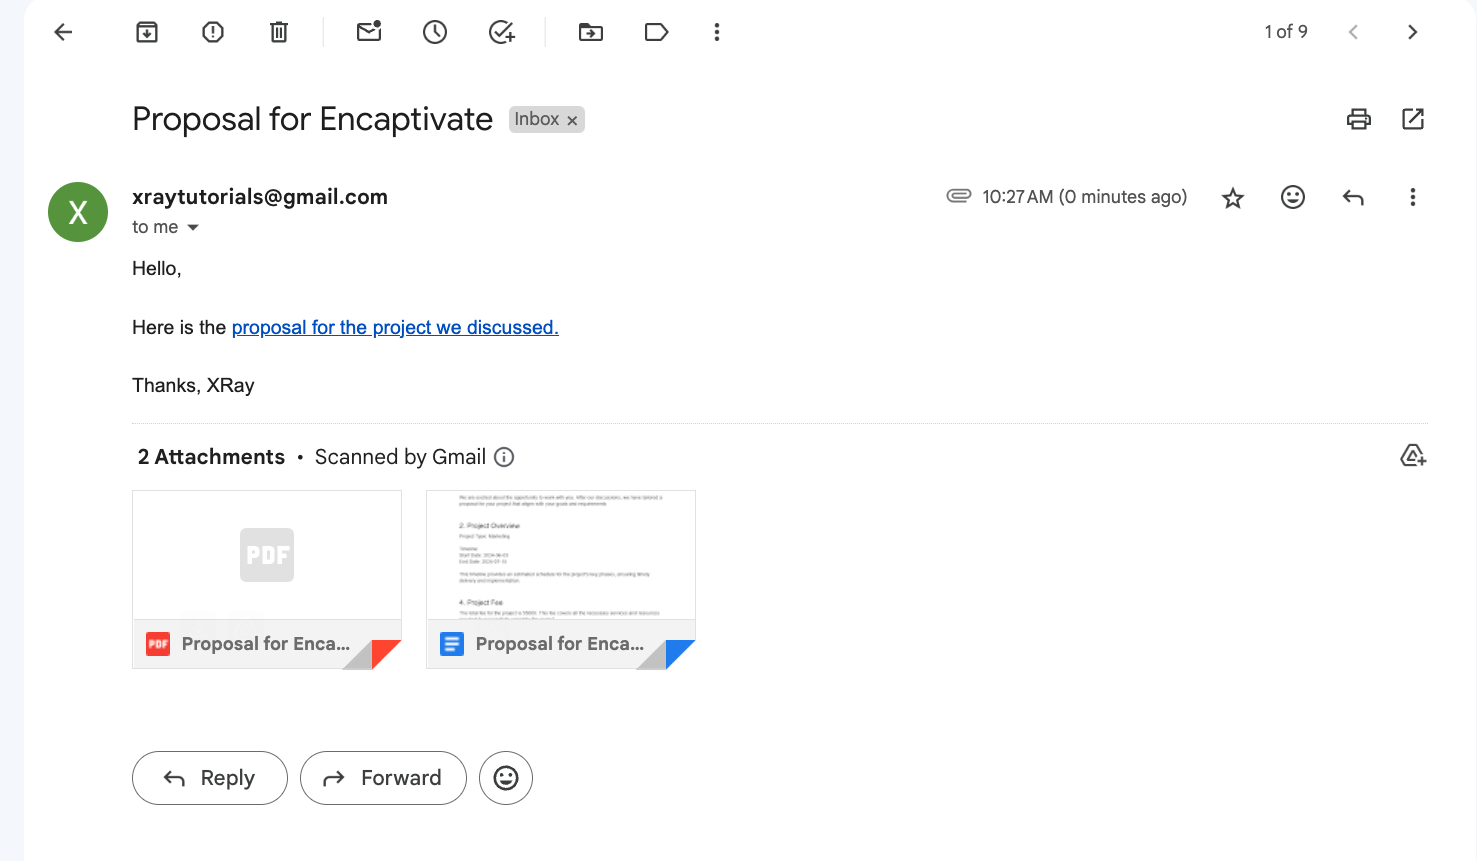
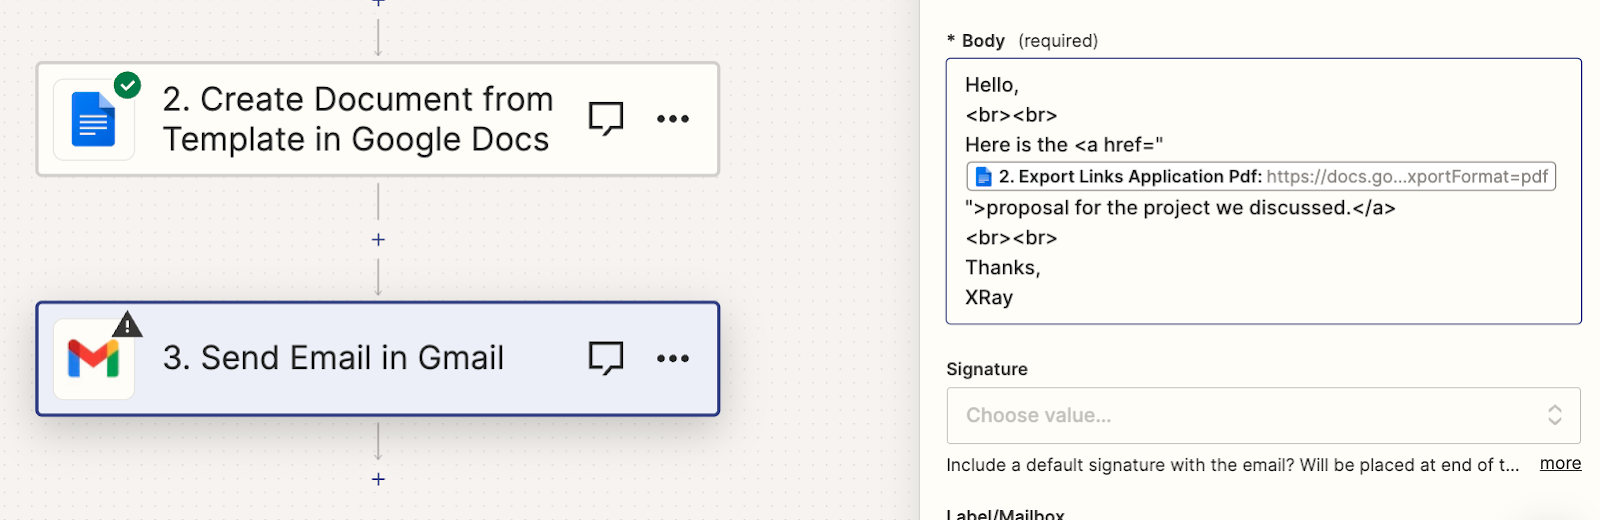
For instance, if you’re sending the PDF in an email, you can insert the download link into the body of your email.

You can also add either the file or the link to the email as an attachment.
When a user clicks on the download link the email, the file will immediately begin downloading.

Note: the link appears as an attachment as well in Gmail since Gmail will scan the email for links and include them in the “attachments” section. Clicking on the link in the body or the attachments section will produce the same results.
When they select the attached file, they’ll be able to view the PDF in their browser and download it if they wish.

Bonus tip: Embedding a link in text
If you’d like to embed your download link into your message text:
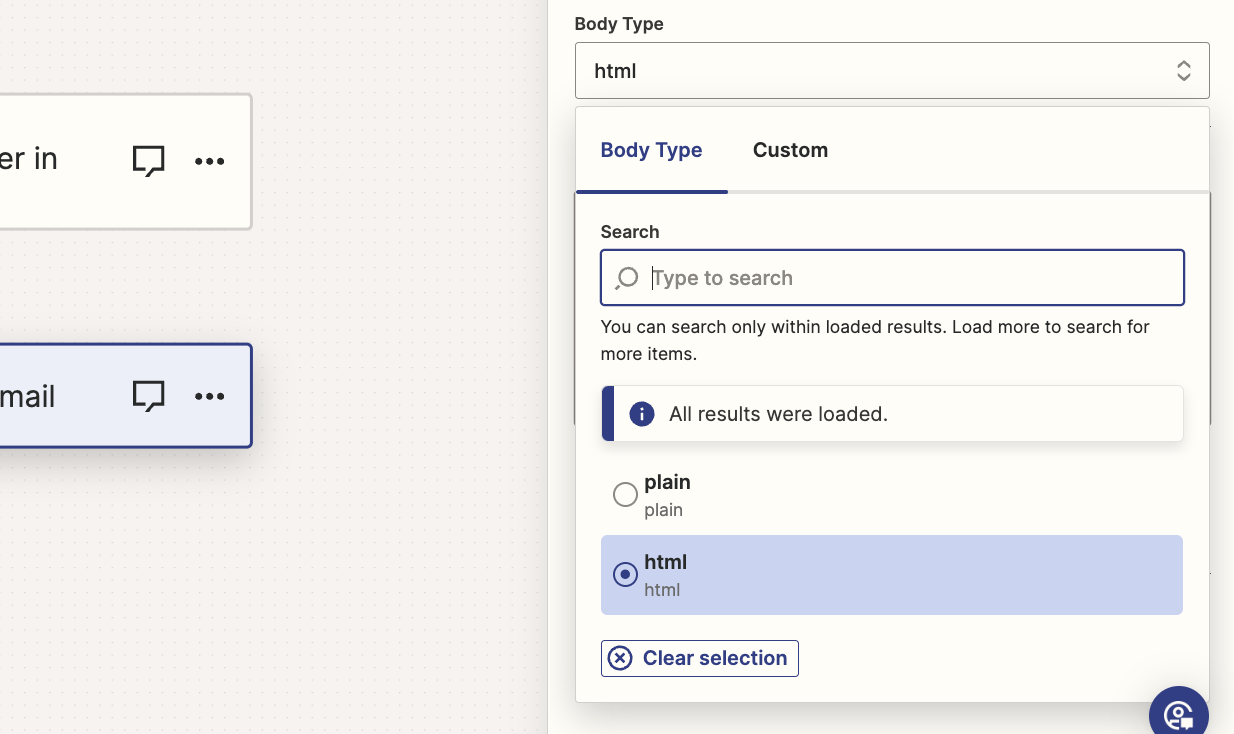
1. Change the email body type to HTML.
2. Use an HTML link tag to embed your link into some text, using this format:
<a href=”url”>Text to embed link in</a>
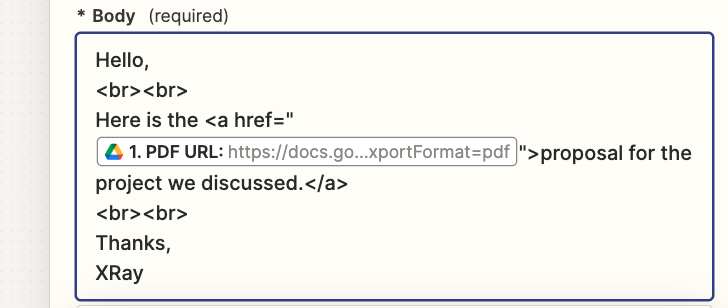
Make sure to include other appropriate tags, like line breaks (<br>).
When the email is sent, the recipient will see the hyperlinked text instead of the full URL in the email body.
You can learn more about HTML tags on W3Schools.
Exporting a Google Docs PDF download link with Zapier
If you’re using a “Google Docs: Create a Document” step in Zapier, you can only retrieve a PDF download link from the newly created document. You won’t be able to access a variable for the PDF itself.
However, this may still be a preferable option in some use cases, since it won’t require an additional step just to find the doc.
1. Add a “Create a Document” step with Google Docs.

2. Test the step and review the test data.

With the “Create a Document” step, you’ll only have an “Export Links Application PDF variable”, which is a download link for the PDF.
3. Add a step to send the PDF download link to another app
You can send the PDF link in any app you’d like. If you send it a field that supports HTML, you can embed the link into text using an HTML link tag.
Automatically send your Google Docs PDFs anywhere
With Zapier, it’s easy to automatically get a PDF for a Google Doc and send it to anyone. Just pick the right variable from the list, and you’ll be good to go.
If you’d like to see more automation tips, tutorials, and beginner’s guides, check out our blog or our YouTube channel. You can also follow XRay on Twitter, Facebook, or LinkedIn.
Is your to-do list getting a little too long? Are you tired of wasting your time with dull, repetitive tasks? Thankfully, there’s a simple solution to these common problems. With no-code automation, anyone can start removing tedious work from their daily schedules.
In this post, we’re going to show you everything you need to know to get started with an automation provider that’s perfect for anyone already using Microsoft apps at work: Microsoft’s Power Automate.
We’ll introduce you to Power Automate, explain what it does, and show you how it works. We’ll walk you through the process of building your first automation, or “flow” in Power Automate step by step.
In our example flow, we’ll connect OneDrive to Slack for simple alerts, so you can see how the platform works firsthand.
Finally, we’ll go over some pricing info and briefly explore what distinguishes Power Automate from other automation providers, like Zapier and Make.
What is Power Automate, and what is no-code automation?
First, let’s cover the basics of Power Automate.
Power Automate is a no-code automation provider developed by Microsoft. Power Automate supports Microsoft’s popular suite of business software, as well as hundreds of other cloud-based apps.
Tip: You can see a complete, indexed list of every app that Power Automate supports on XRay.Tools. You can also see which apps have integrations in other automation providers like Zapier, Make, and N8N.
Every automated flow in Power Automate runs whenever its specific triggering event occurs. There are a few different trigger types you can use:
• App triggers: These triggers will launch an automation whenever a specific event occurs in a designated app. Example: Create a message in Microsoft Teams whenever there’s a new file created in a specific OneDrive folder.
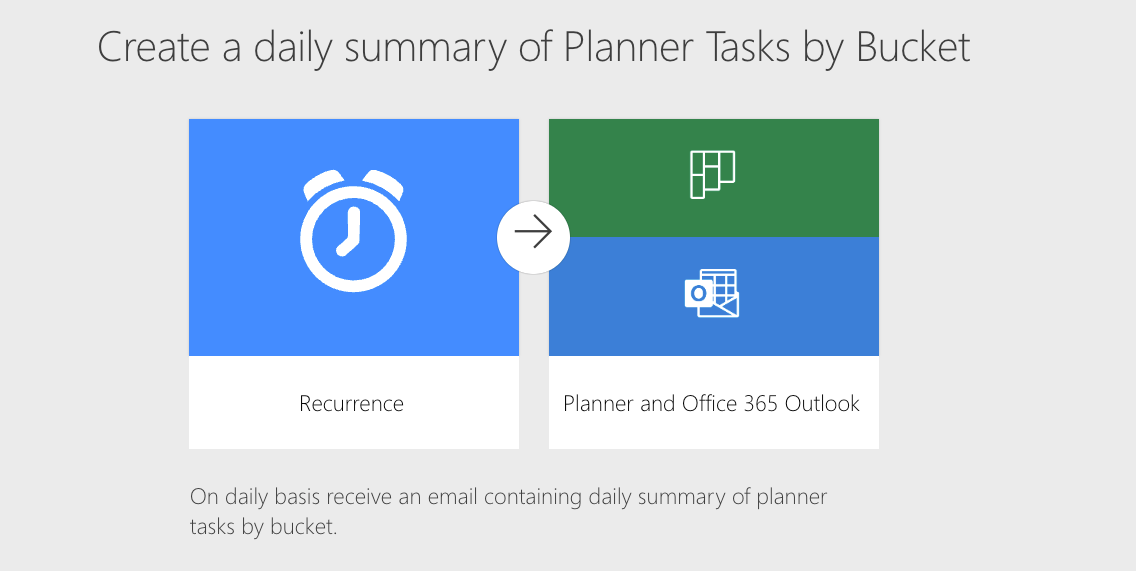
• Scheduled triggers: Launch at automation at a scheduled time. Example: Send a summary of all your tasks in Planner to your email inbox every day at 8:56 AM.
• Button triggers: Launch an automation by clicking a button. Example: Schedule a meeting in Outlook for the next available half hour at the press of a button.

RPA in Power Automate
In addition to automating web apps, Power Automate also supports robotic process automation, or RPA.

With RPA, you can automate work in your desktop applications. This can be a very useful feature, but since we’re primarily focused on web-based automation on this blog, it’s not something we’ll be covering in this video.
Let us know in the blog feedback survey if you’d like to see a video exploring Power Automate’s RPA features.
But for now, let’s dive into building your first automated cloud flow in Power Automate.
Build your first flow in Power Automate
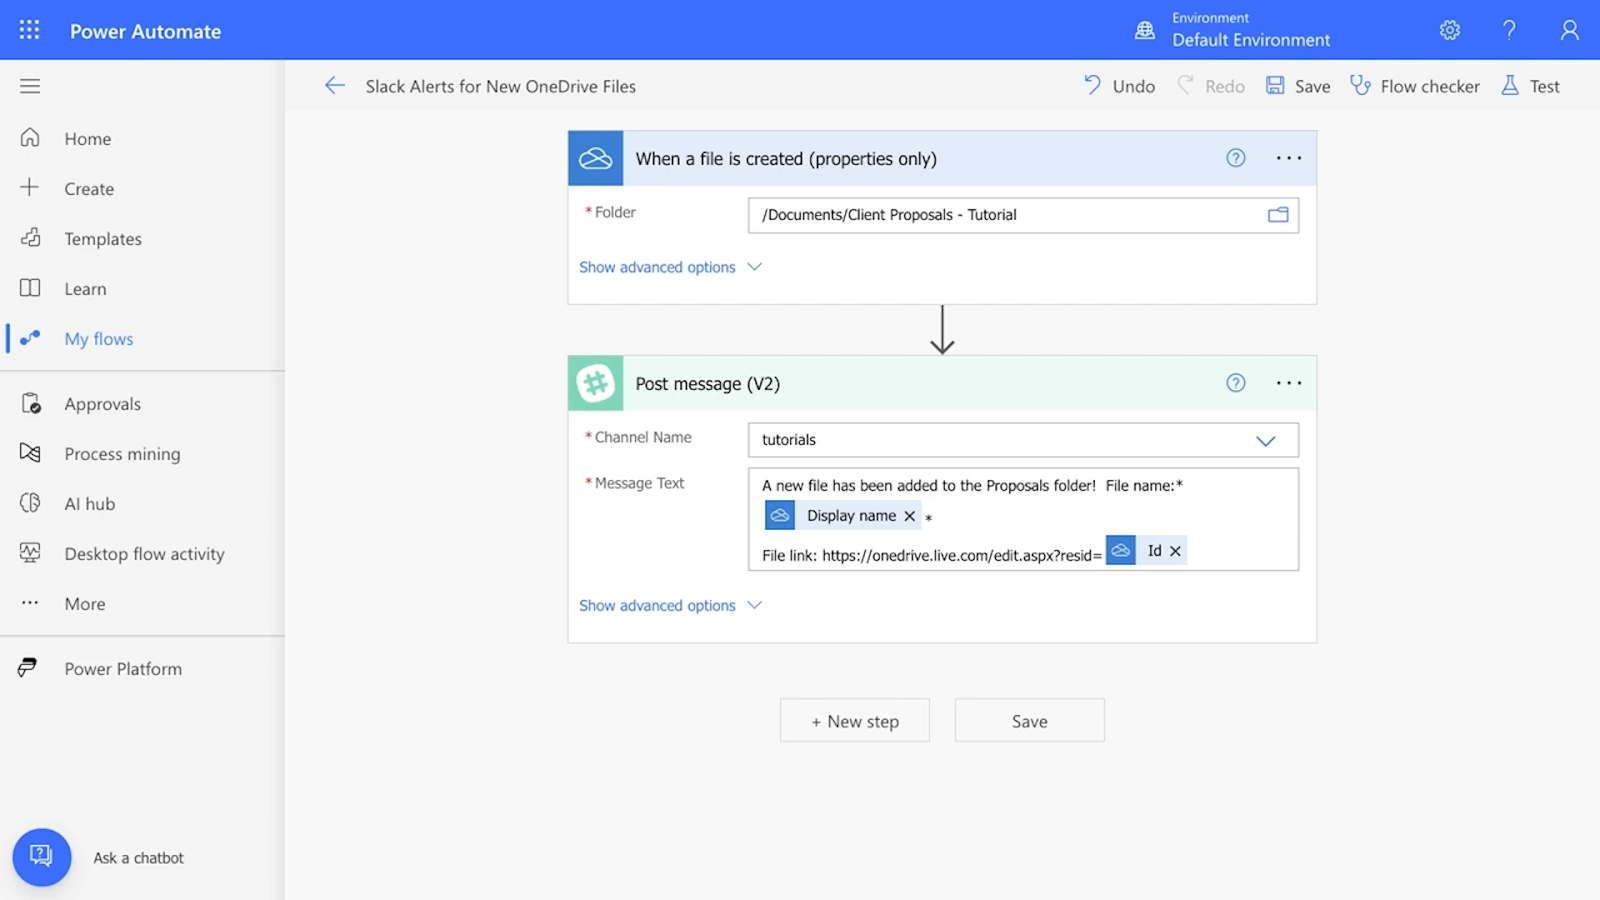
Here’s the automation we’re going to show you how to build:
Whenever a new file is created in a specific OneDrive folder, send an automated alert to a specific channel in Slack.
Note that this automation would also work with Microsoft Teams, but your Teams account will need to be part of a company or school’s workspace; individual accounts won’t work.
Accounts and software: what you’ll need for this automation
To build this automation, you’ll just need free accounts in:
• OneDrive
• Slack
We’d recommend using the same Microsoft account for Power Automate and OneDrive.
1. Create a new cloud flow in Power Automate
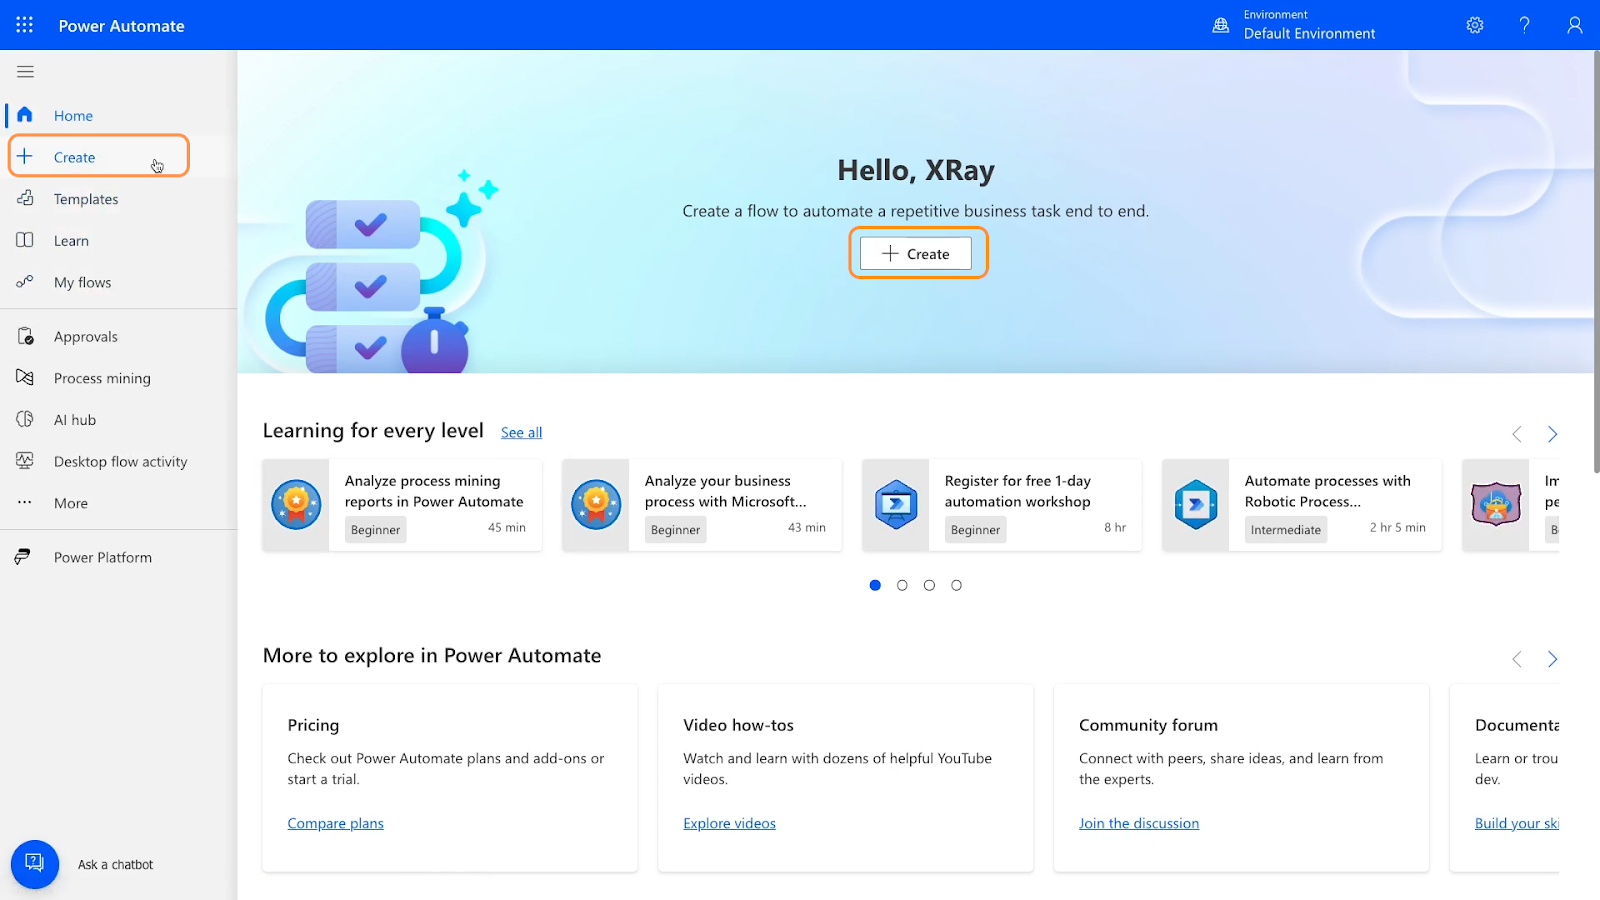
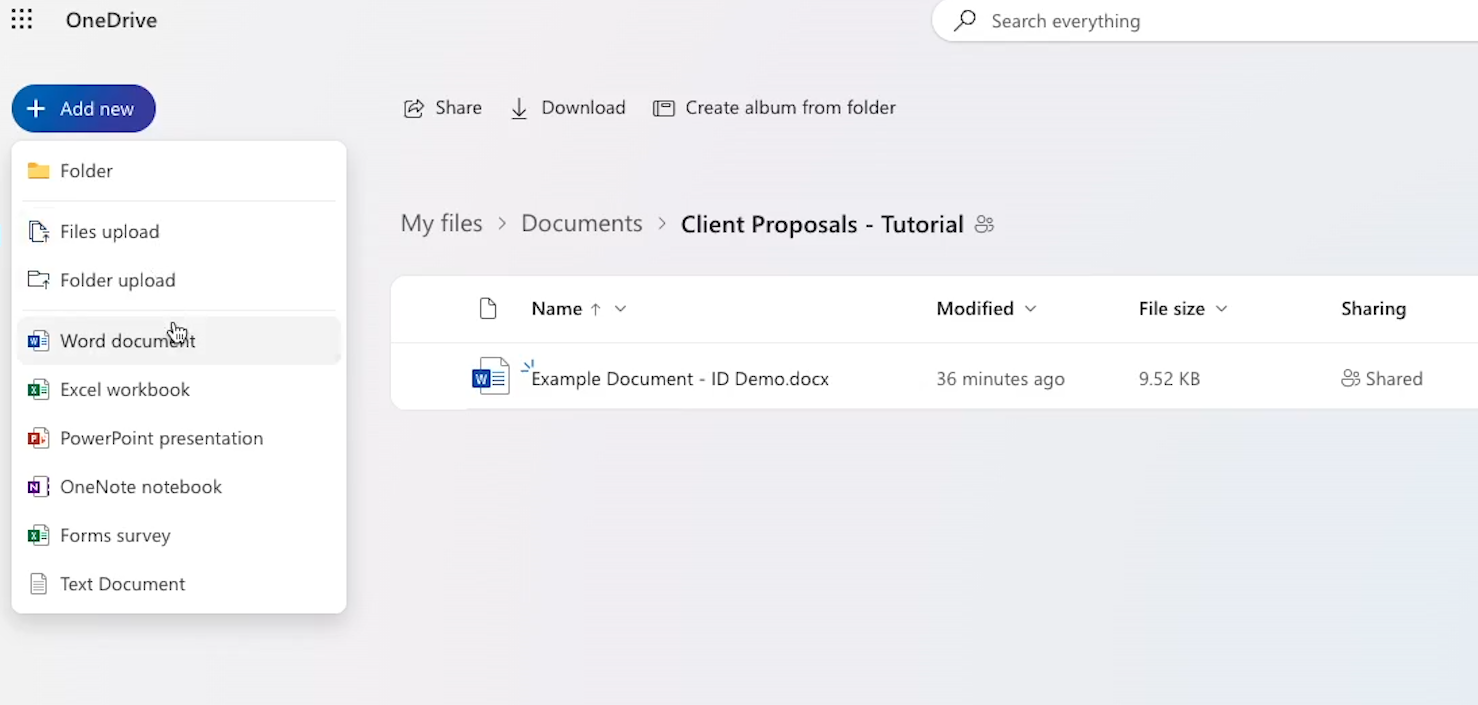
To begin building, open up Power Automate, and create a new flow.
To start creating a new flow, you can click "Create" either in the middle of the home screen or on the left-hand sidebar.
Different flow types in Power Automate
Then, you'll see several options to choose from:
“Instant cloud flow” lets you start an automation in your web apps by pressing a button or sending data to a webhook.
“Scheduled cloud flow” allows you to set up an automation to run at specific times, and is also designed for web apps.
“Desktop flow” is for automating tasks on desktop applications.
And finally, “Process mining” helps you pull and analyze data from your Microsoft apps.
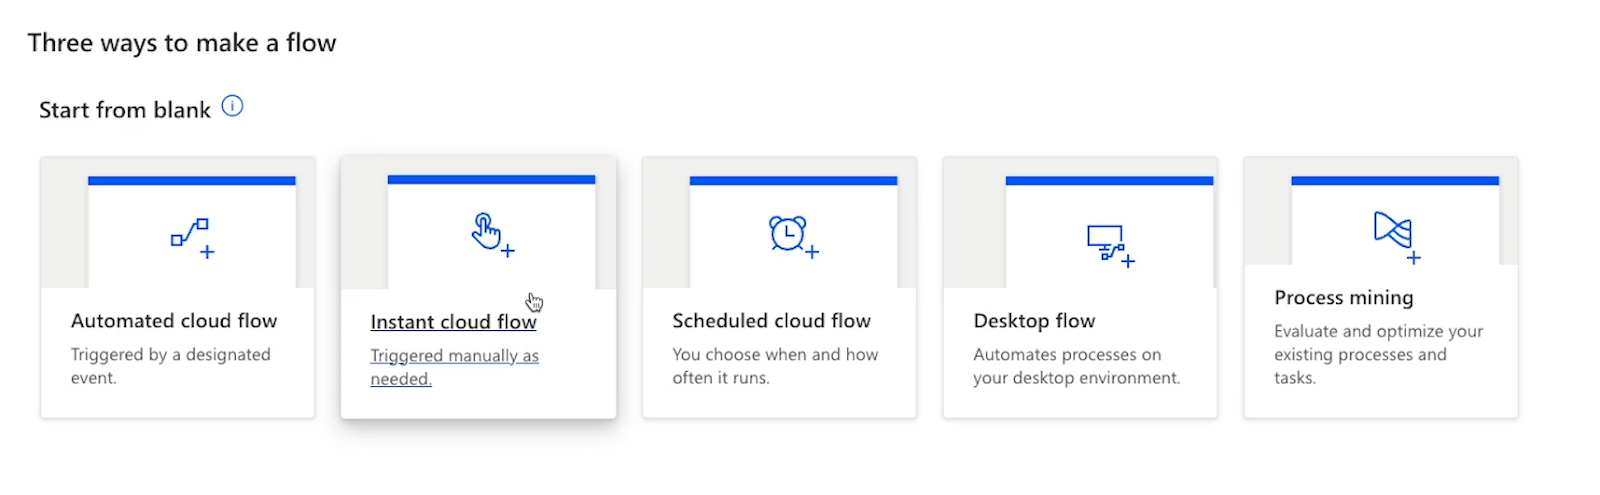
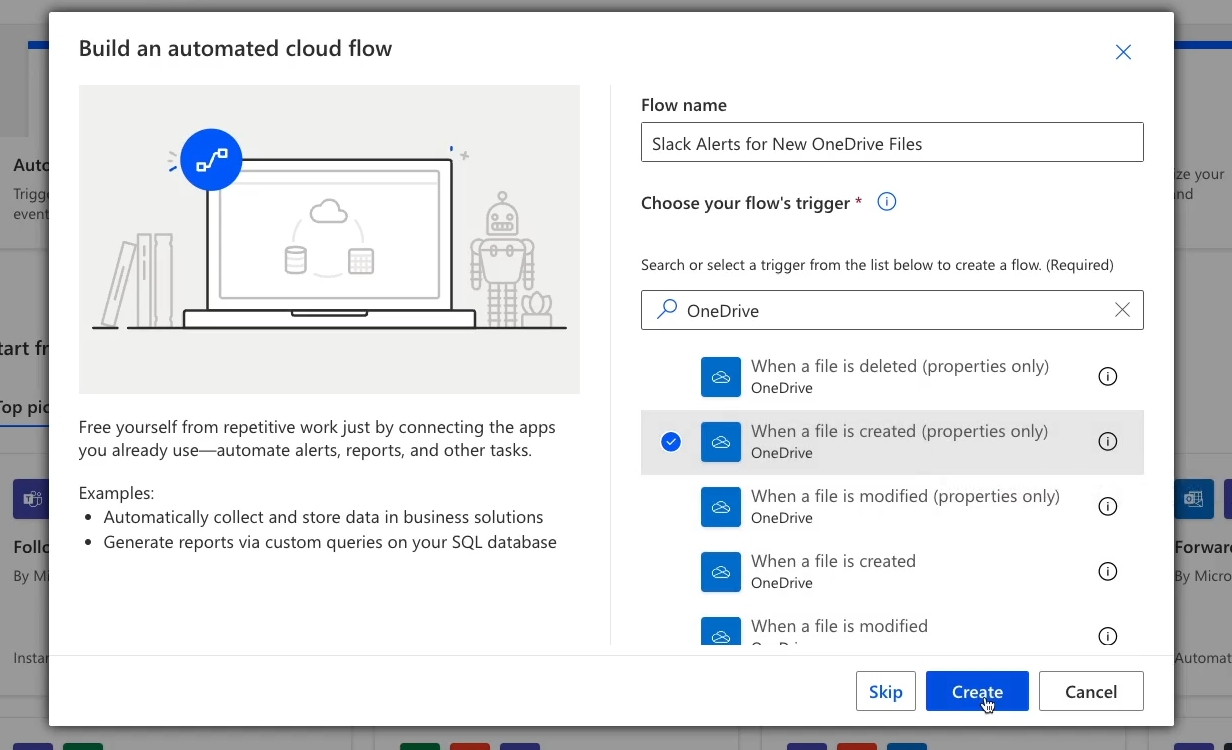
However, for our purposes today, we’re going to use the first option: “Automated cloud flow”.
This option triggers automated actions in any web app when a certain event happens in another web app.
Click "Automated cloud flow" to create your new flow.
Name your new flow
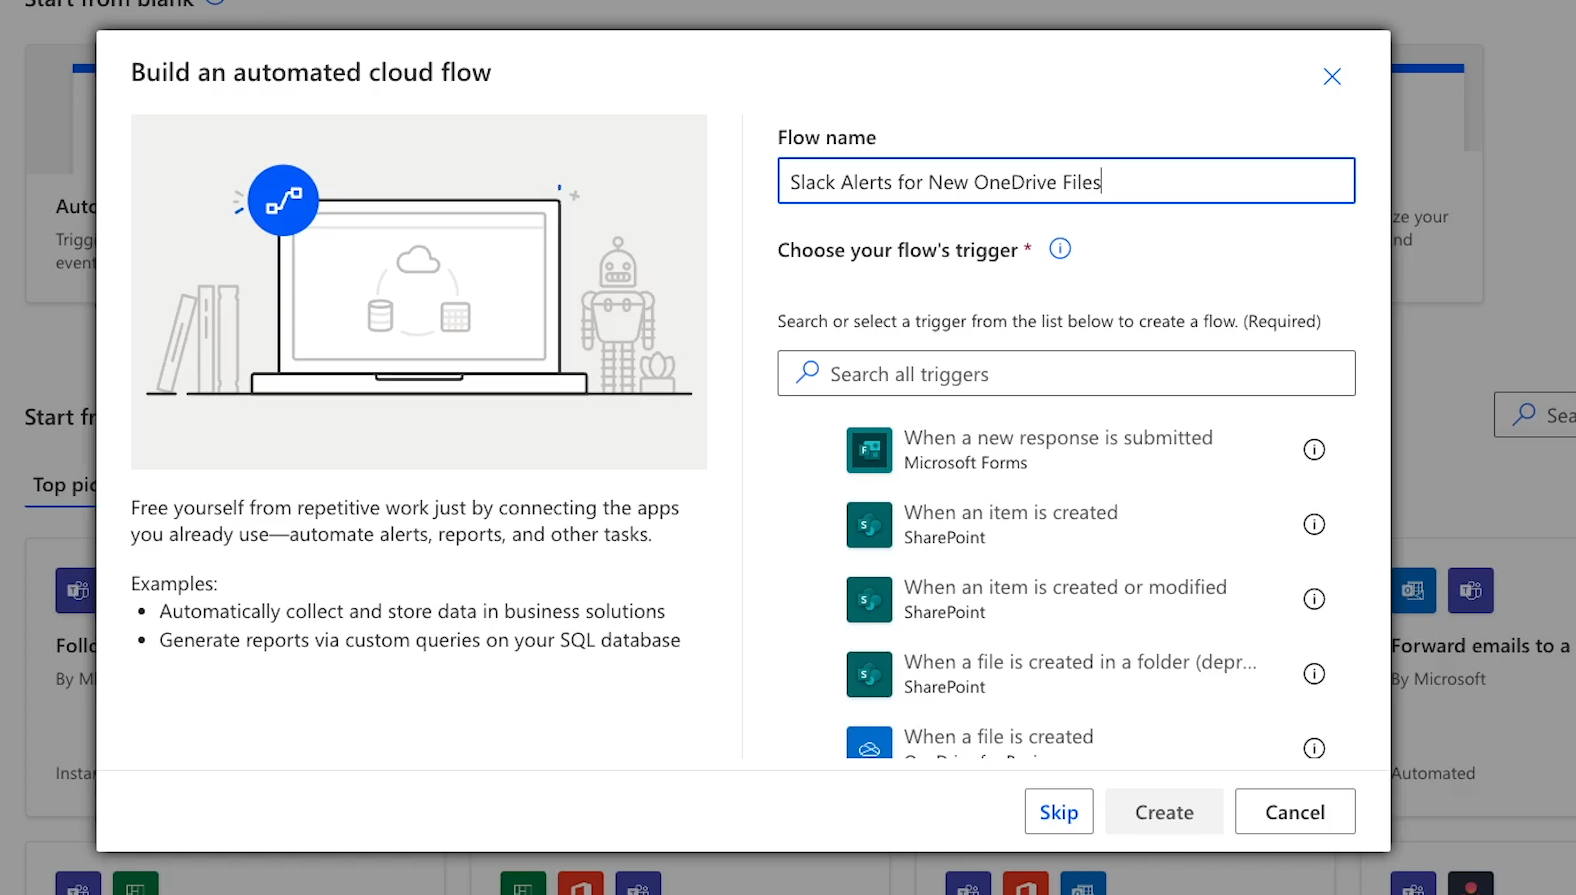
Next, you need to name your flow. Make sure the name is brief but descriptive. For instance, we’ll title our example “Slack Alerts for New OneDrive Files”
As you start building more automations, you’ll want to make sure you can easily keep track of each flow and what it does.
After entering a name, you can pick the app and event that start the flow.
2. Add a trigger to your flow
Look up the app you're using – in this case, OneDrive – and find a trigger that fits what you need. For this automation, select "When a file is created (properties only)".
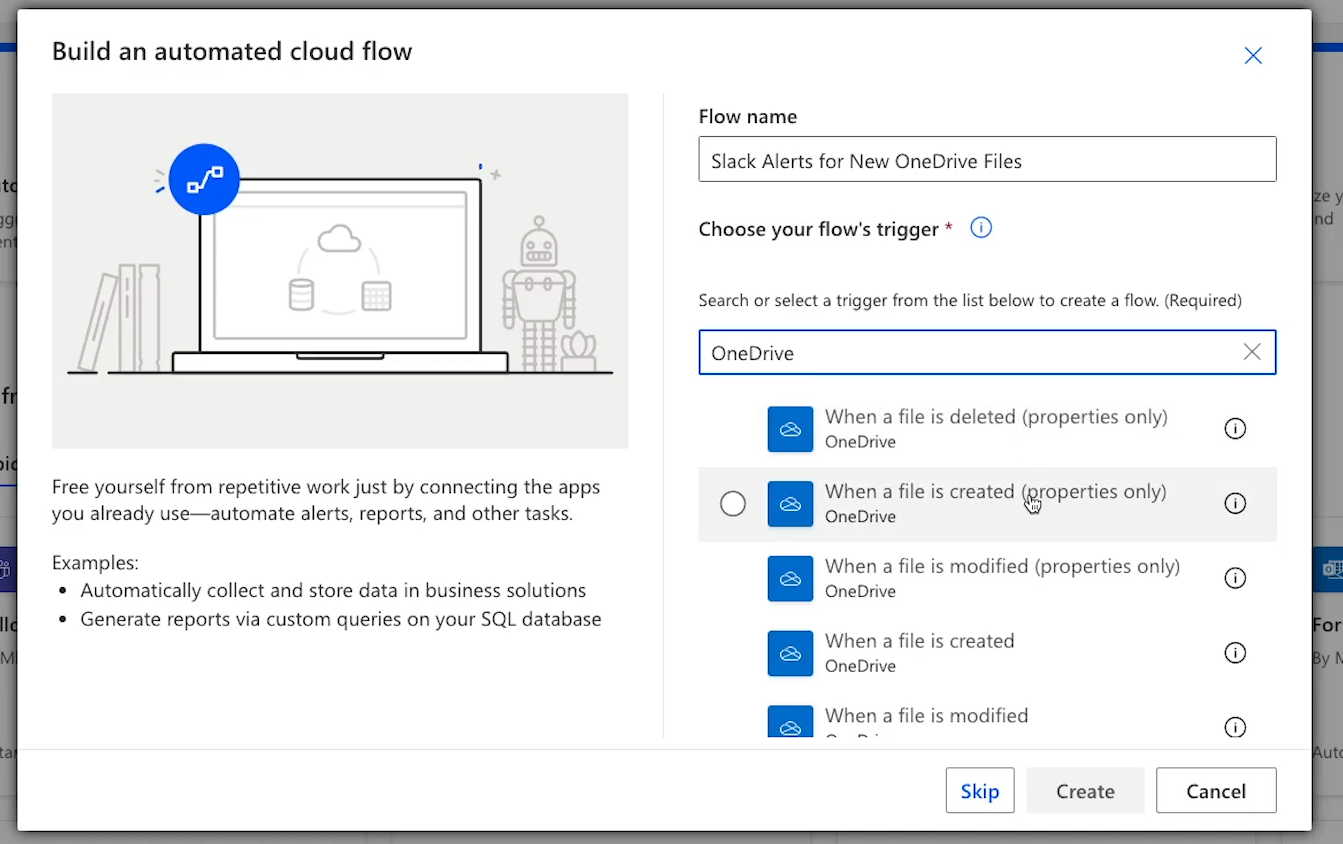
If you're not sure which trigger is best, you can do a quick Google search for more info, or just try using a trigger and see what data it gives you.
After choosing your trigger, click "Create."
Then, you'll need to authorize Power Automate to use your information by signing into your trigger app, like OneDrive, and giving Power Automate permission to access it.

Configure your flow’s trigger
Now, you need to configure your trigger.
Configuration typically requires specifying the exact folder, document, or other location that the trigger needs to monitor.
For this OneDrive trigger, you only need to specify a folder.
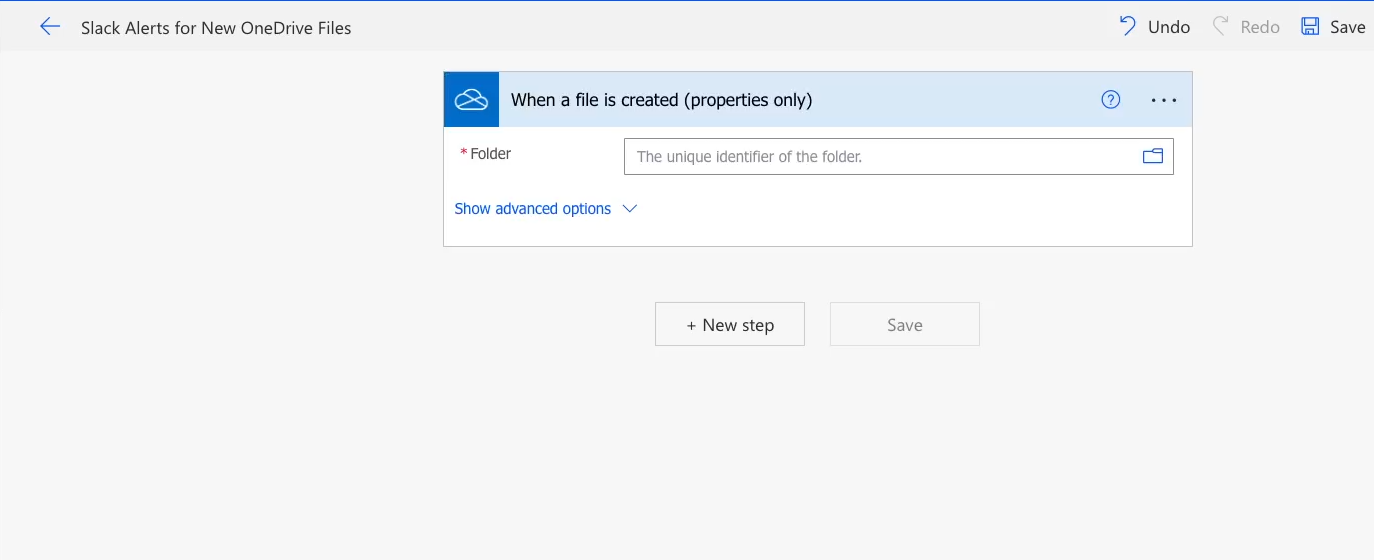
Click on the folder icon to open up your OneDrive directory, and then pick the folder you want.
Note that you can open a folder and look for subfolders by clicking on the arrow next to each folder’s name.
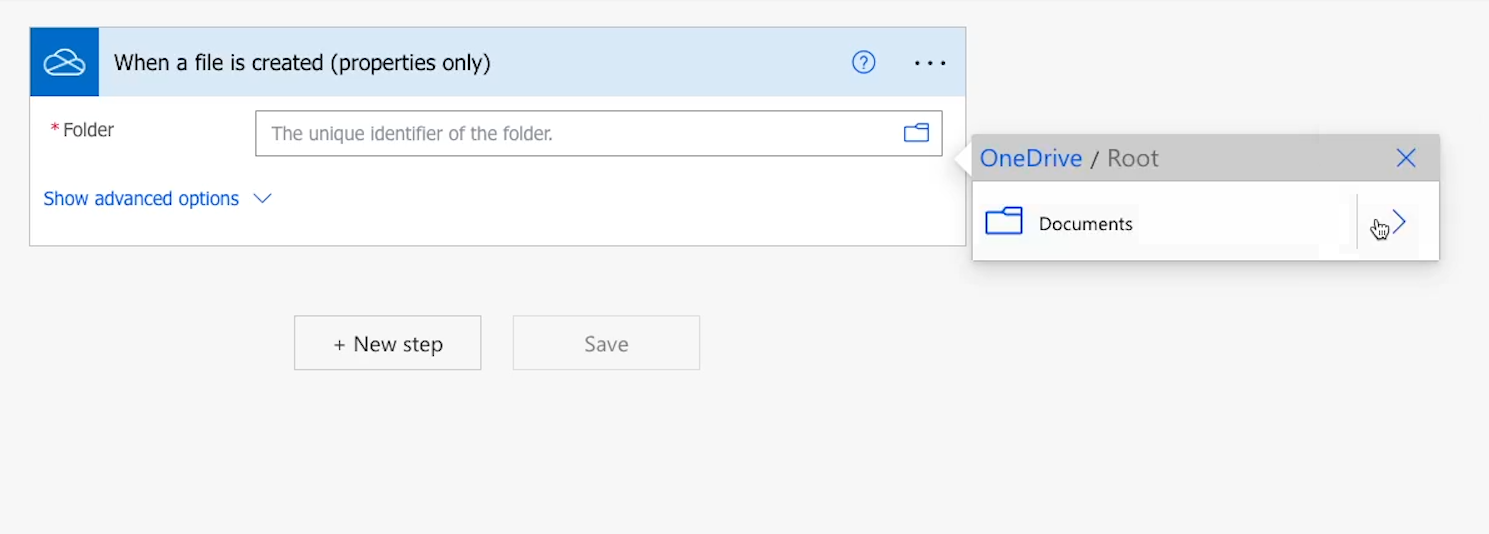
In our example, we’ll choose the "Client Proposals - Tutorial" folder.
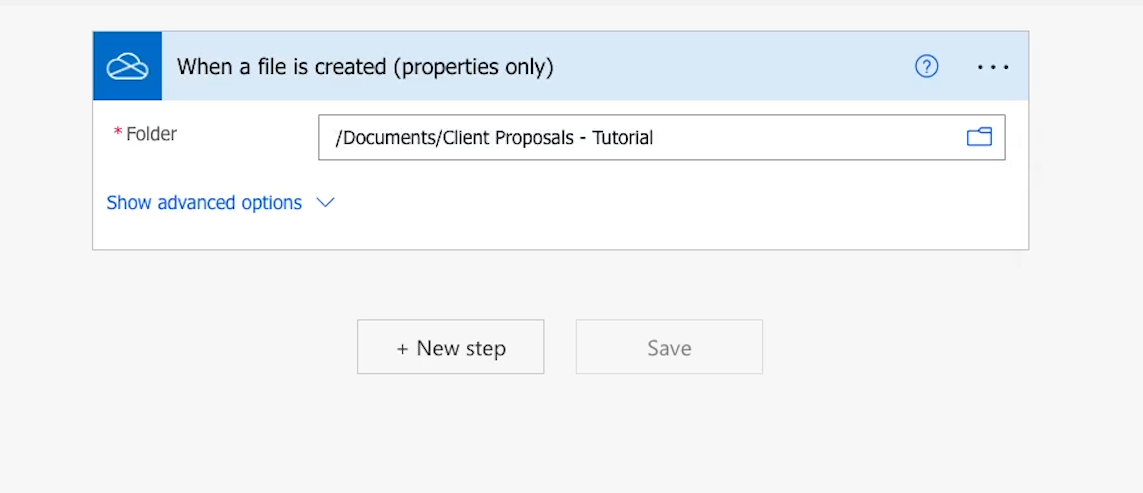
Identifying a folder is the only necessary setting for this trigger, but it’s always a good idea to explore the advanced options for any trigger before continuing.
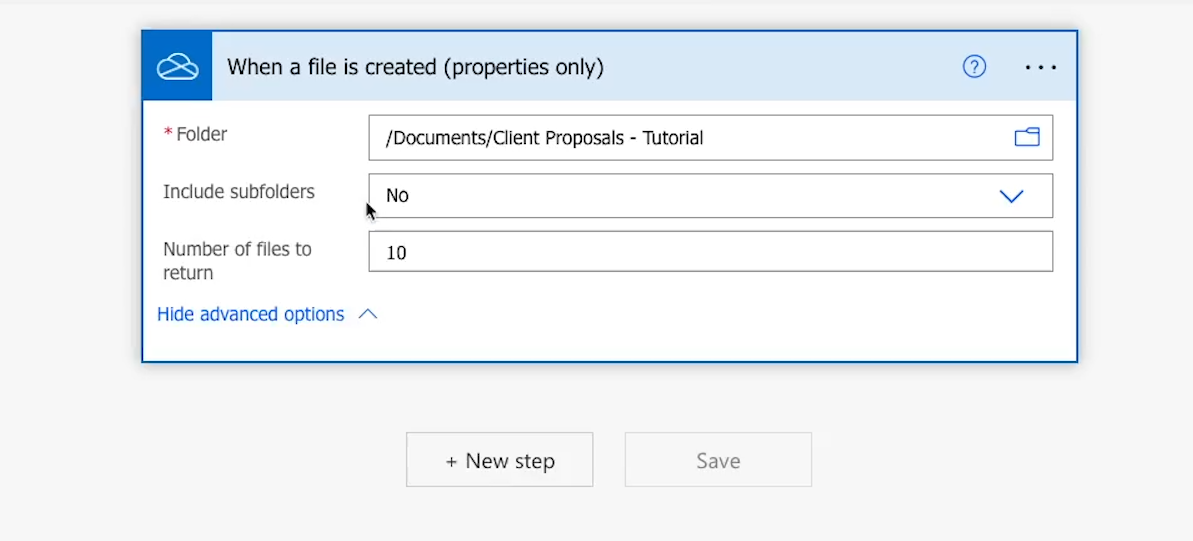
Under "Show advanced options”, you’ll find two additional settings: "Include subfolders" and "Number of files to return."
Enabling the "Subfolders" option will ensure that the automation also runs when a file is added to a subfolder of your designated folder.
The "Number" setting allows you to choose the maximum number of files to return.
For our example, we can leave these settings to their defaults. However, these could both be very useful if you’re working with a lot of files and subfolders.
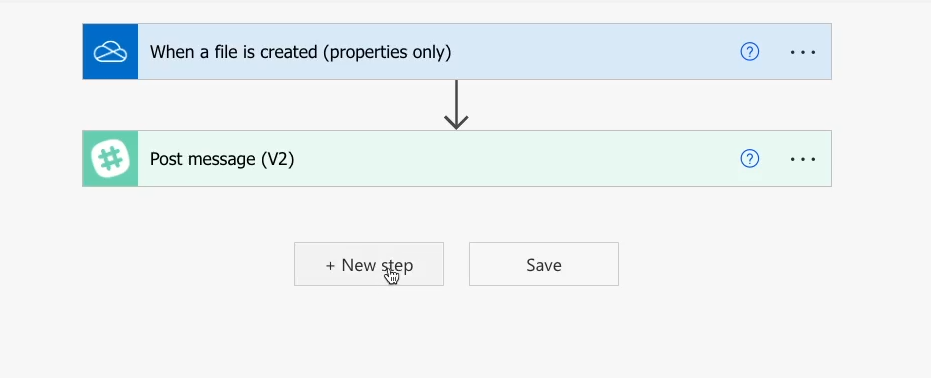
With the trigger all set, click "New step" to add an automated action to your flow.
3. Add an automated action to your flow
Just like with your trigger, you can begin adding an automated action by searching for the app you want to use. In our example, we want to send a Slack message, so we’ll search for "Slack."
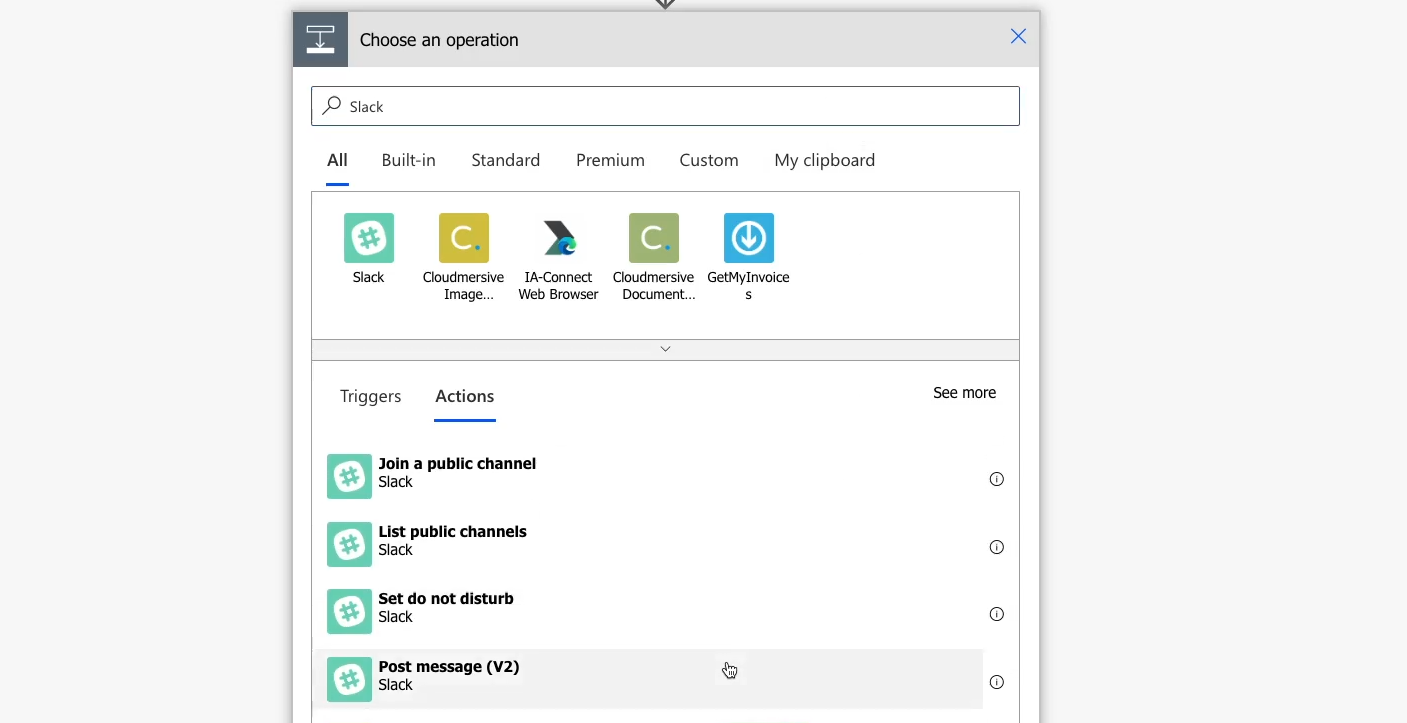
Then, pick an appropriate action from the resulting list. Since we want to send a message, "Post message" is the best match.
Tip: Automation providers like Power Automate rely on APIs to connect to other apps. Understanding API basics and methods like POST and GET will make it much easier to automate your work!
Next, you need to sign in to authorize the app, since Power Automate requires authorization in every app it connects to. Just like with OneDrive in the trigger, you need to sign in to Slack and grant access to Power Automate.

It's important to note that you may need to complete the authorization process twice, as Power Automate may time out while waiting for you to sign in.

If this happens, just try again, and your connection should be successfully authorized.
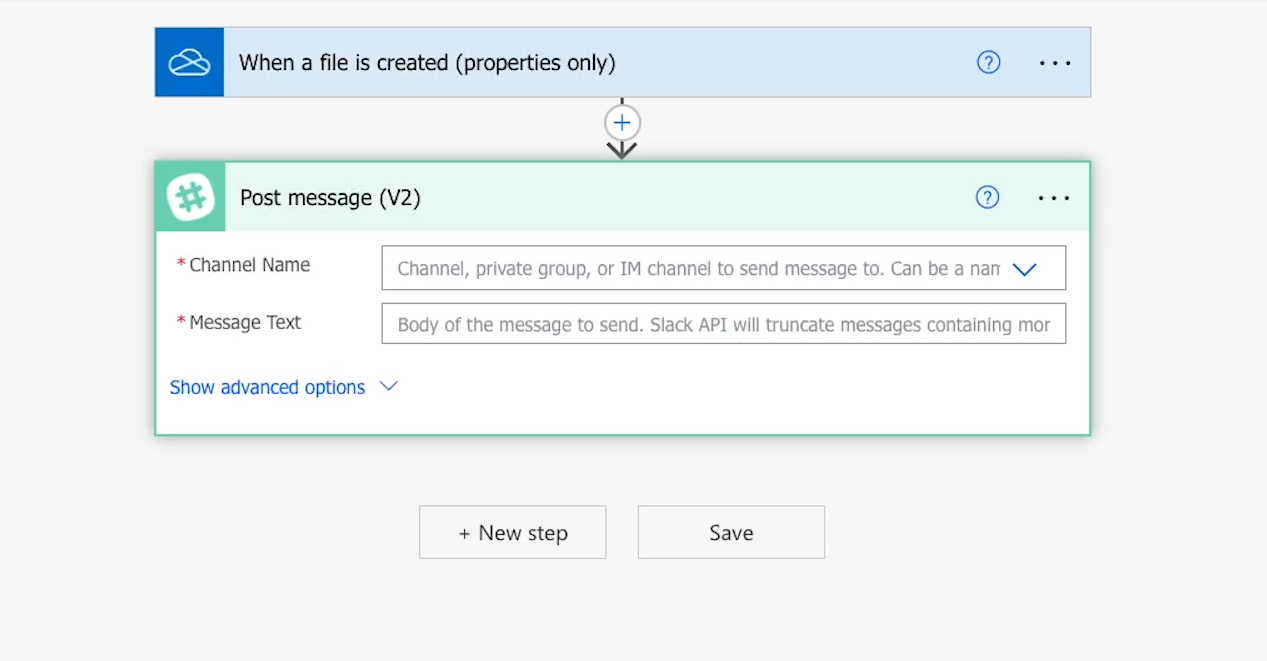
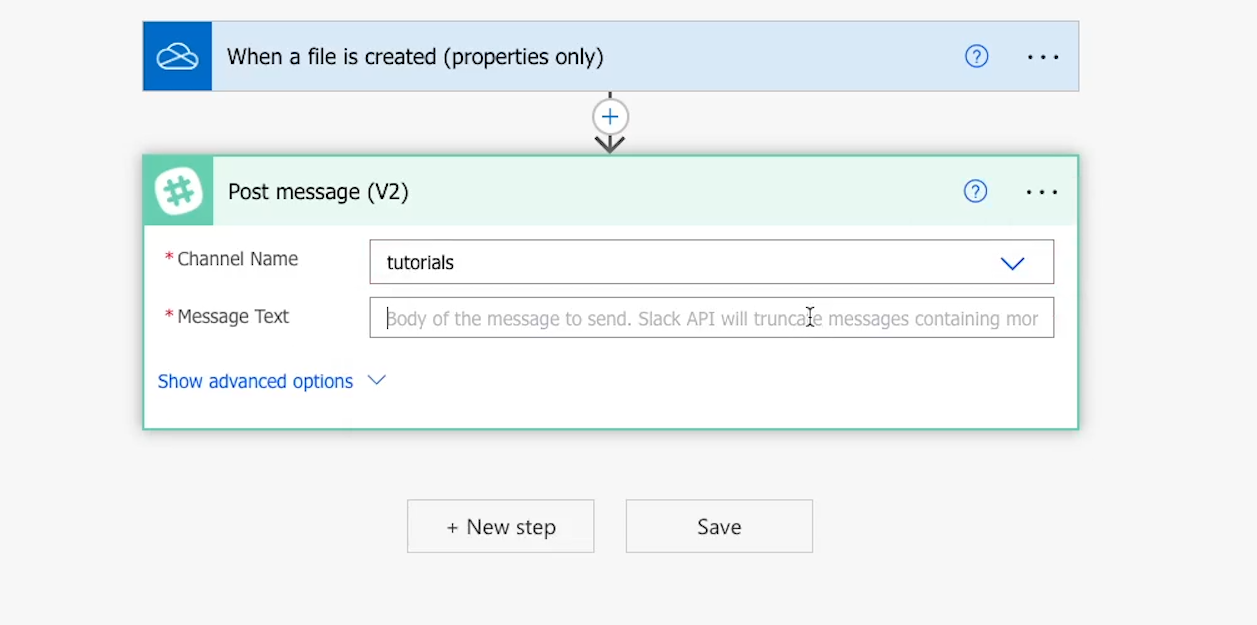
Configure your automated action
Once you're signed in, you'll see some options for configuring your automated action. Initially, only a couple of options are shown for Slack: channel name and message text, both of which are required.
To pick a channel name, click to pull up a list of all the channels in your Slack workspace.
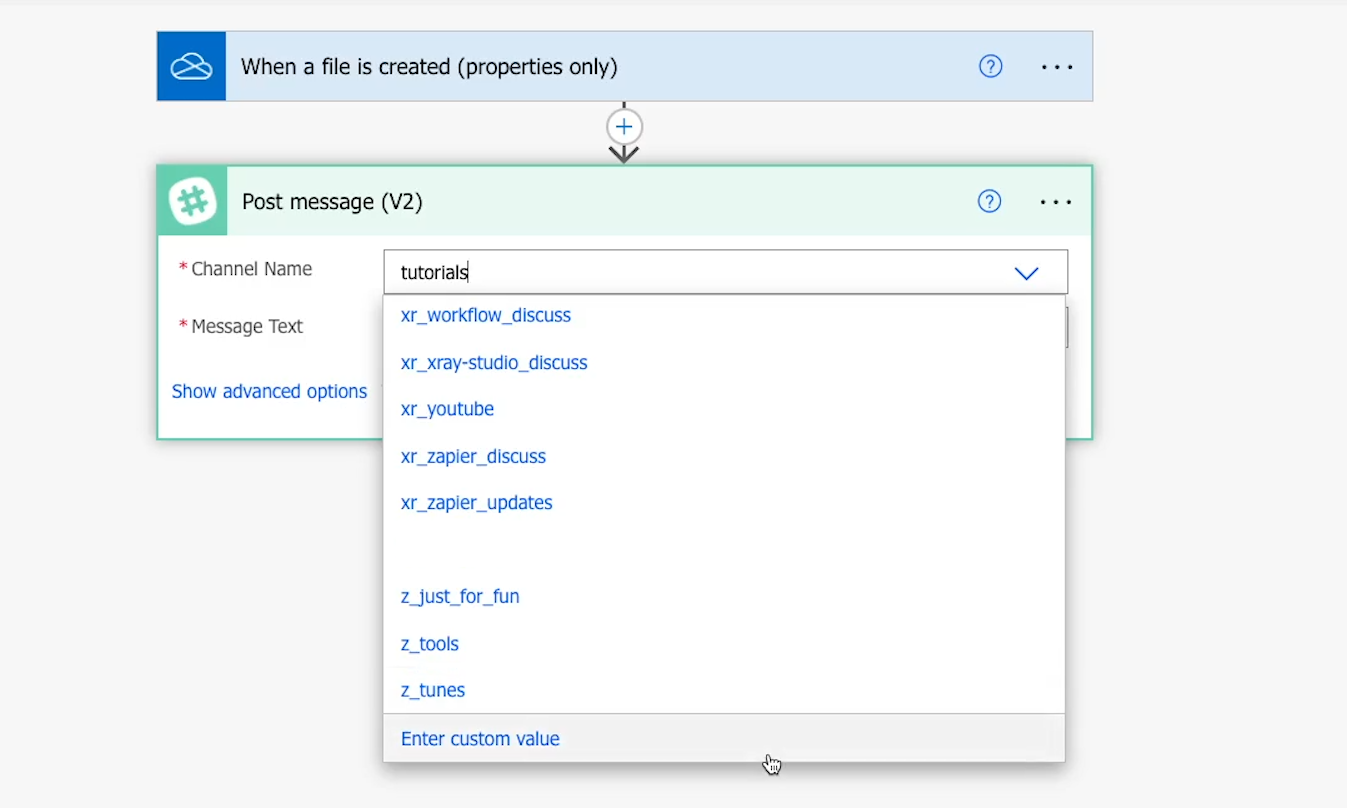
You can also scroll down to the bottom and select “enter custom value,” which will allow you to identify a channel by its ID.
At XRay, we typically recommend using IDs to identify channels, folders, documents, or any data in automations because IDs remain constant while file names can change, which may break automations.
However, for this tutorial, either method will work; you can pick from the list or enter the ID.
Tip: to find a Slack channel’s ID, open the channel in Slack. Click on the channel’s name, and scroll down to the bottom of the window that pops up. You’ll see the channel ID there.
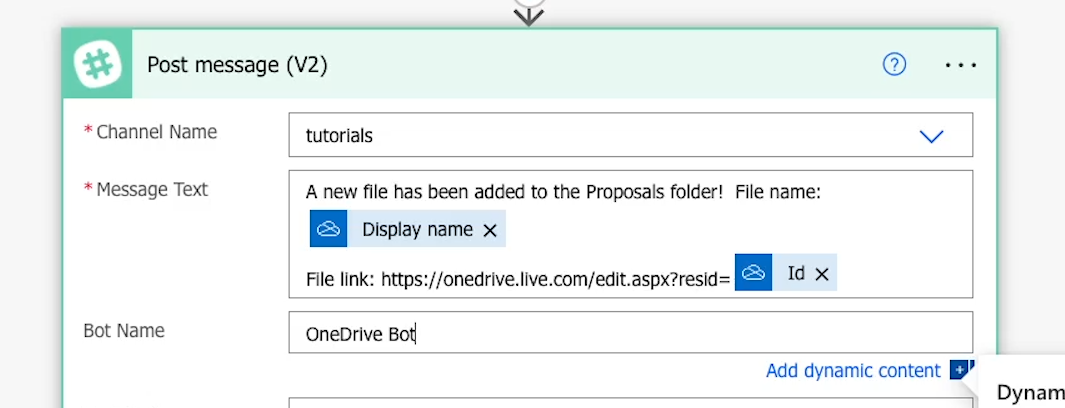
Next, you can compose your message in the “Message text” section.
Entering static text into Power Automate: composing your Slack message
In any text field in Power Automate, you can either enter text directly or retrieve “dynamic content” from an earlier step in the automation.
Dynamic content refers to data that has been retrieved, created, or updated by the automation. We’ll show you how this works as we put together this Slack message.
We’ll start with some static text for our alert:
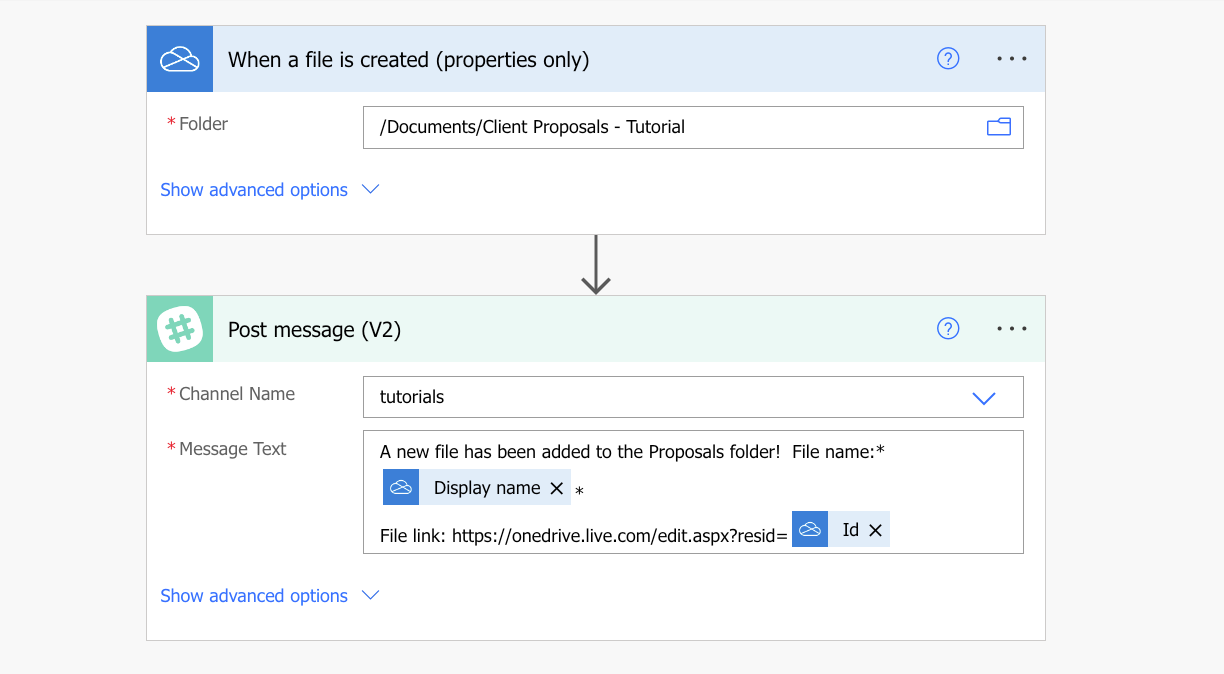
“A new file has been added to the Proposals folder!
File name:”

This is all static text, which means it will be exactly the same every time the automation runs.
But now, we'll add some dynamic content to actually retrieve the name of the file that triggered the automation.
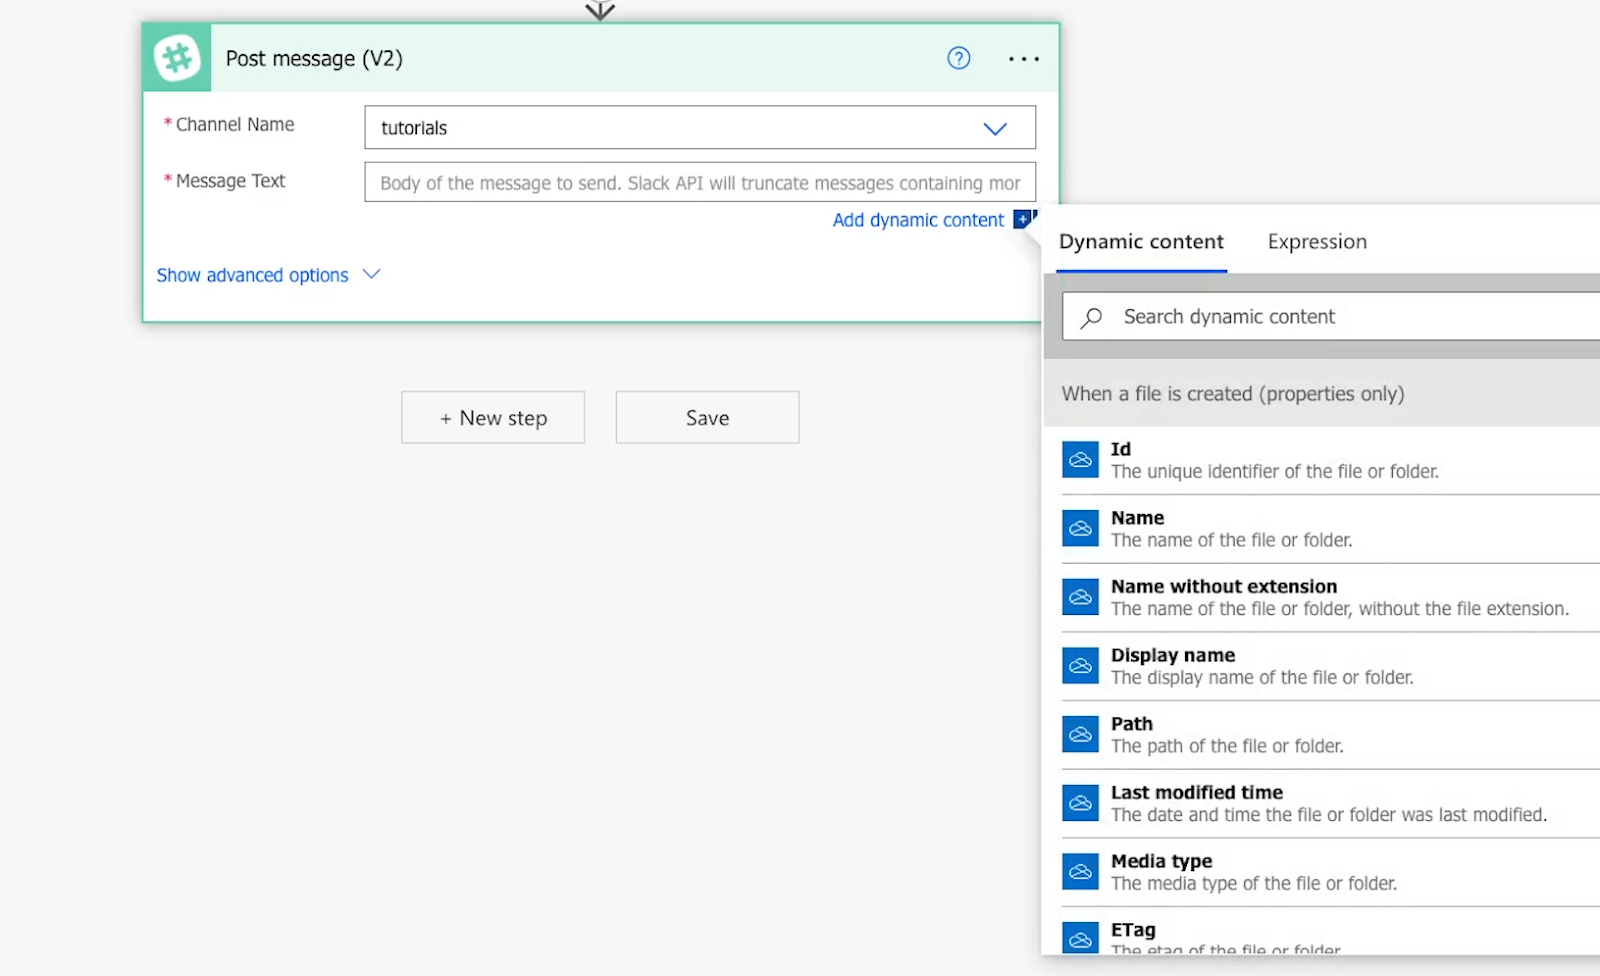
Working with dynamic content in your Power Automate flows
To add dynamic content, click "Add dynamic content" beneath a text field if the window isn't already open.
Then, select the content you want to insert. We’ll choose "Display Name" to get the name of the file.

If the file that triggered this automation is called "Document A", then the “Display name” variable will say "Document A" here in place of “Display name” when the automation runs.
If the file is called "Document B", it will say "Document B", etc.
Dynamic content is referred to as "dynamic" because it changes to reflect the data that triggered the automation, or the data that the automation creates or finds while running.
You can use dynamic content to retrieve data like the name of a file, the time it was created, its contents, and other useful information.
However, sometimes, you’ll need to combine dynamic data with custom static text to produce the value you want.
Combining static text and dynamic content
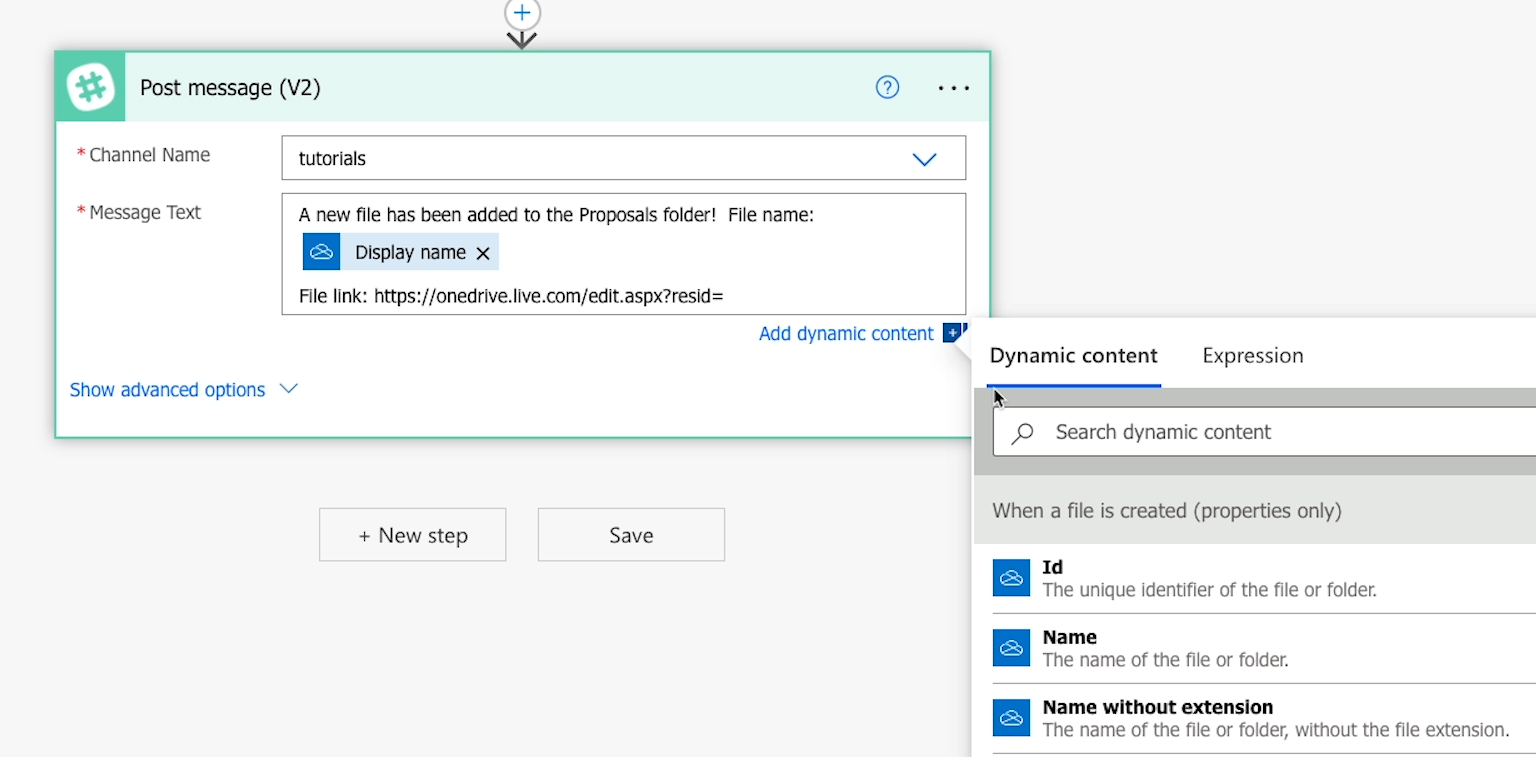
For example, let’s say we want to add a link where we can open the document directly. We’ll go ahead and add a static label: "File link".
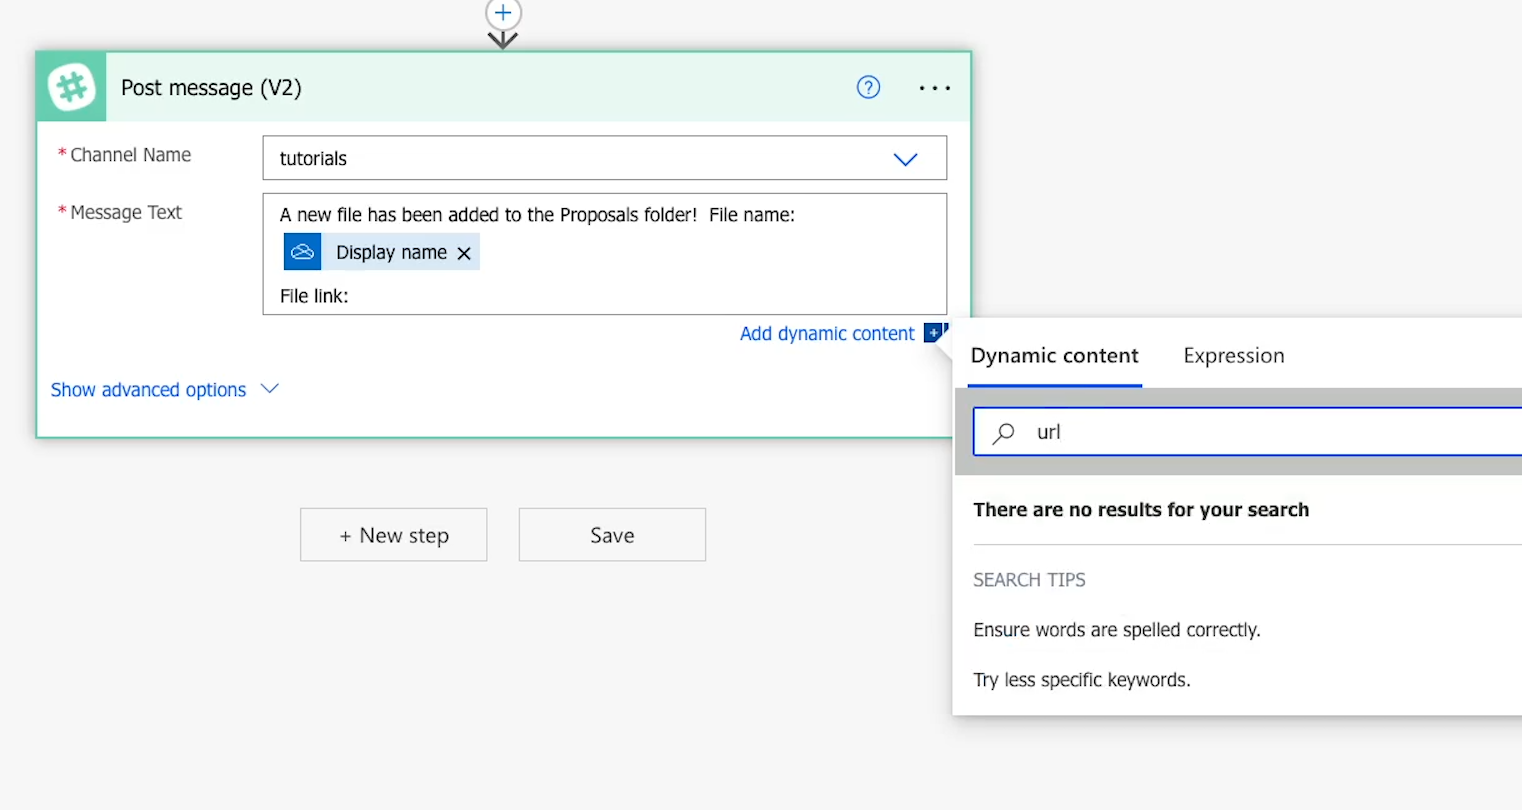
Then, we'll search within "dynamic content" for "link" or "url", but there aren't any results. However, there is a piece of dynamic content for “ID”.
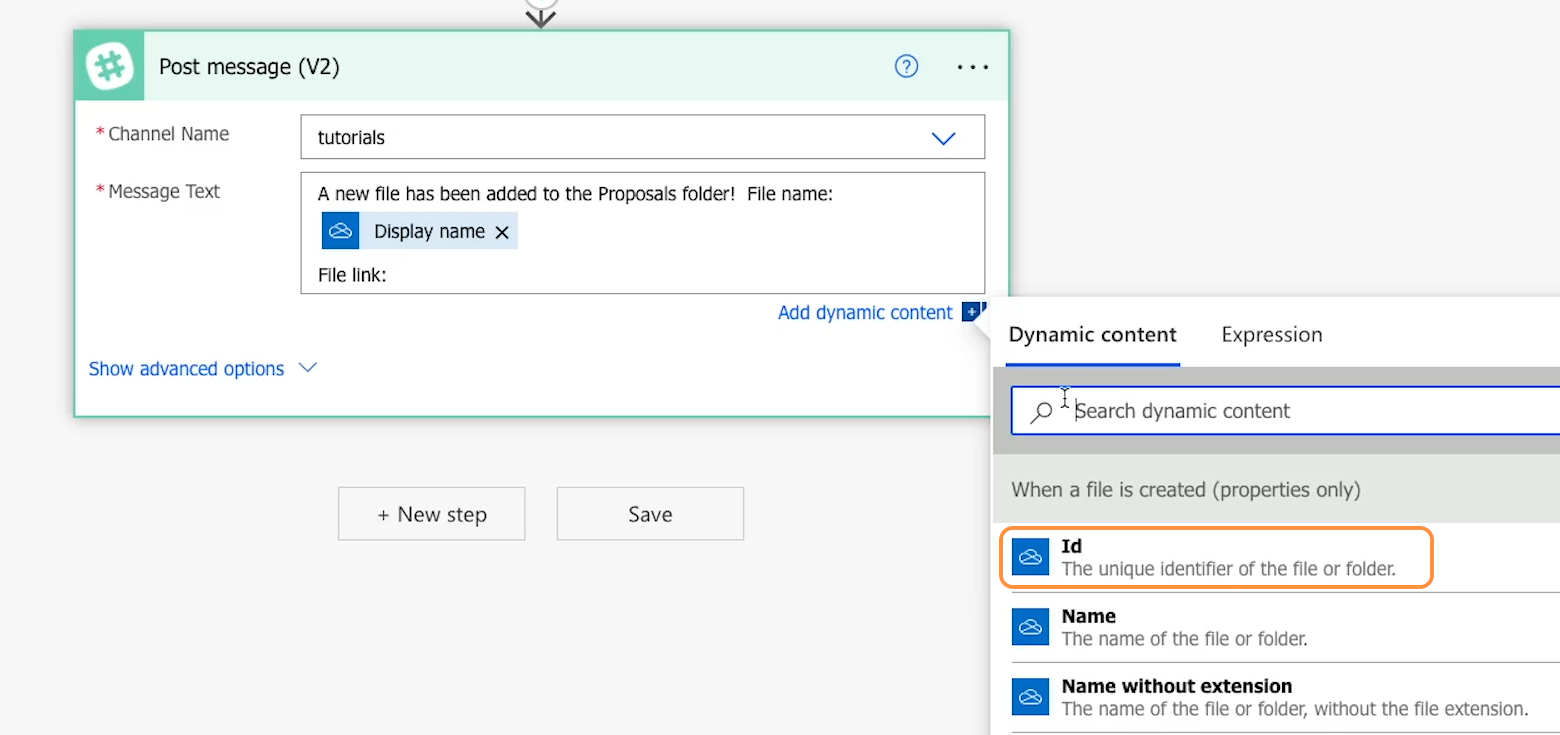
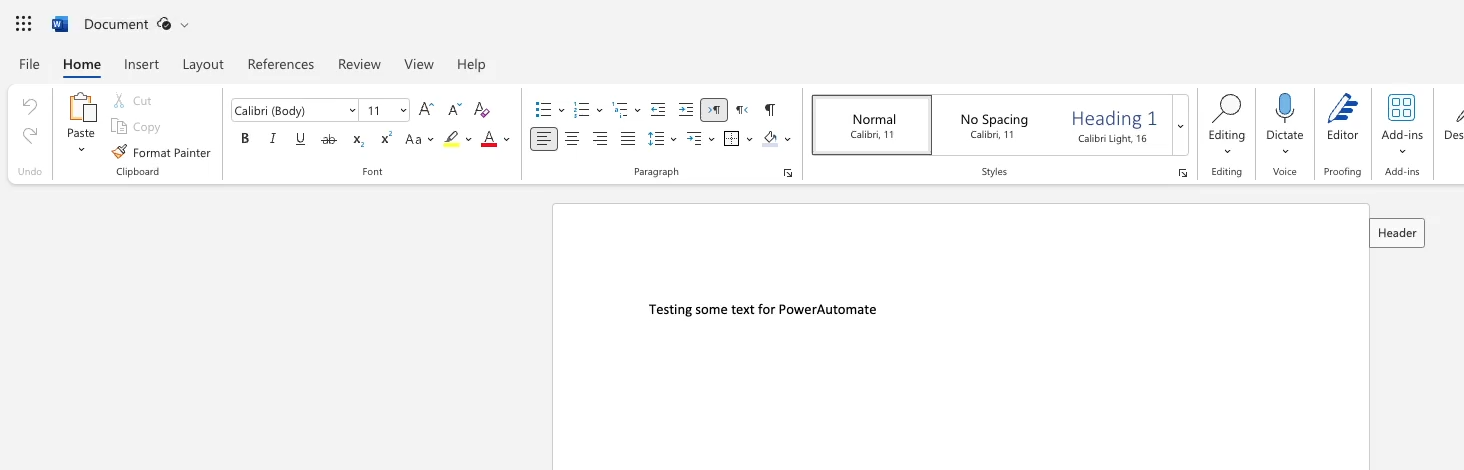
If you open a document in OneDrive, you’ll see that the URL includes an ID.
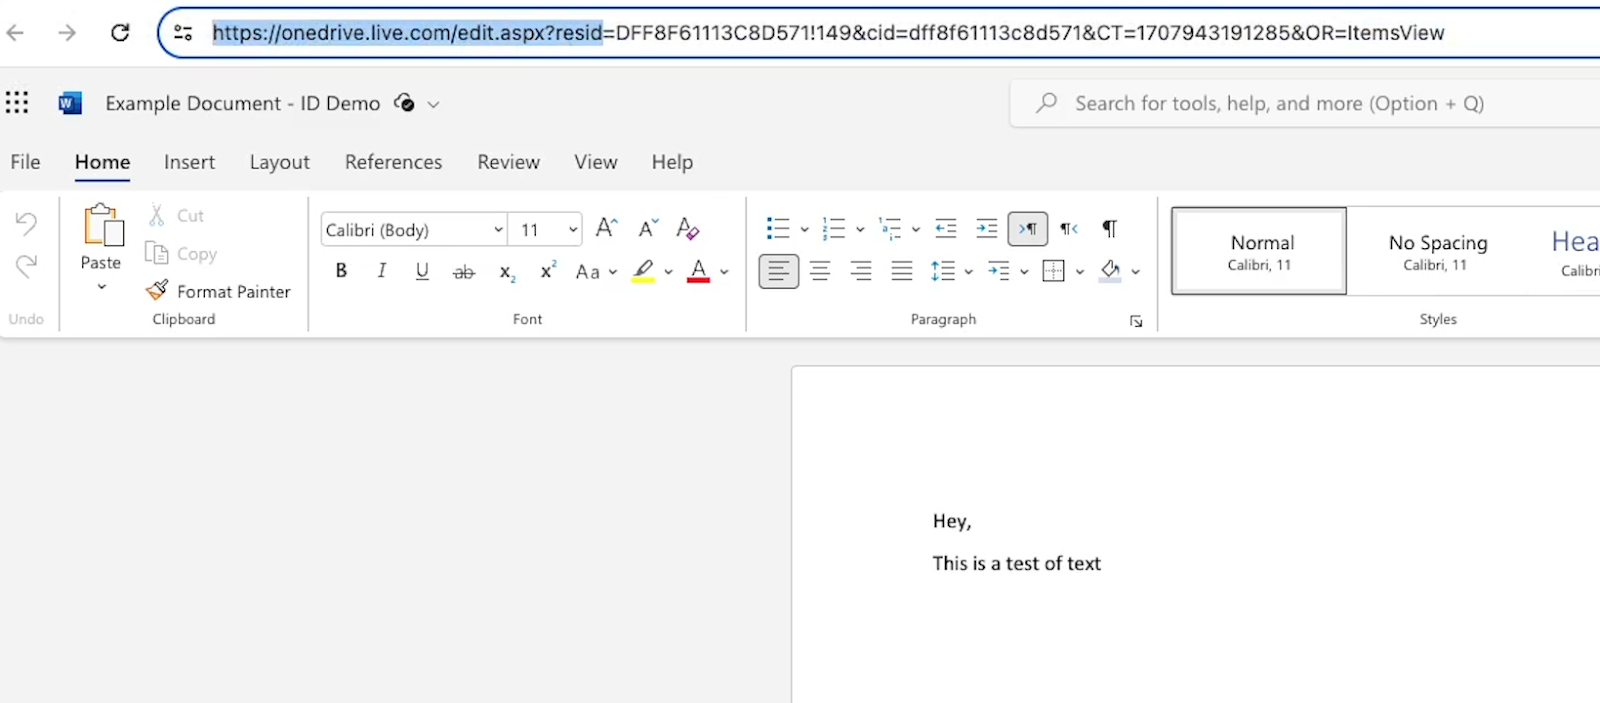
So even though there isn’t a specific item for “link”, we can append the ID to some static text to build the URL we need.
We’ll copy the first part of the URL—everything before the ID—and paste it into our message as static text.
Then, at the end of that, we'll insert dynamic content for the file ID with no spaces between the static text and dynamic content.
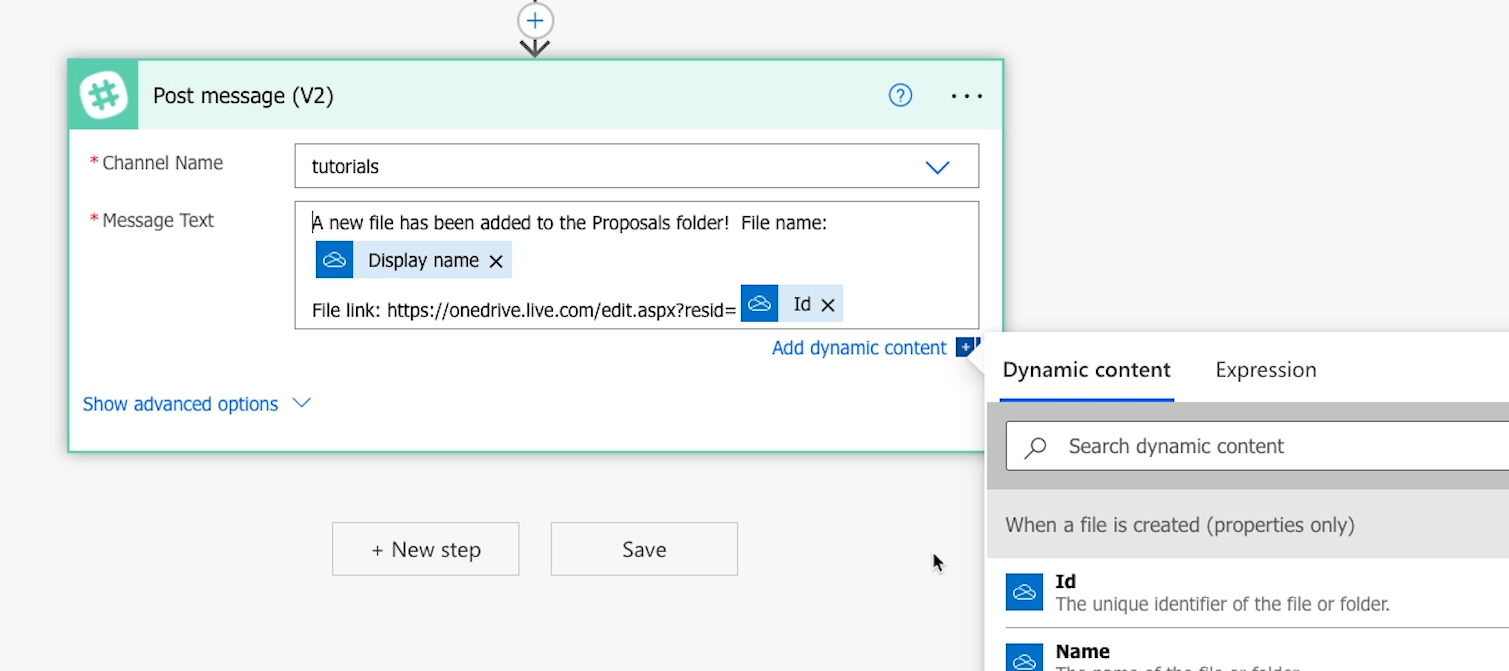
This approach will create a complete OneDrive URL where our team can open and edit the file.
Automation providers like Power Automate won’t always include the exact data points you were looking for, but you can often use what they provide to build what you need.
Combining dynamic data with static values is a common pattern you’ll repeat as you continue to build more no-code and low-code automations.
Note: This method will work to create a functional URL for a Word Document in OneDrive, but may not work for other file types.
4.Configure advanced options for your automated action
With both the channel name and message text fields filled out, the only two required fields for the Slack message are complete.
However, just like with the trigger, it's a good idea to check the advanced options for your actions to see additional useful settings before you continue.
To access the advanced options for any automated action, click "show advanced options."
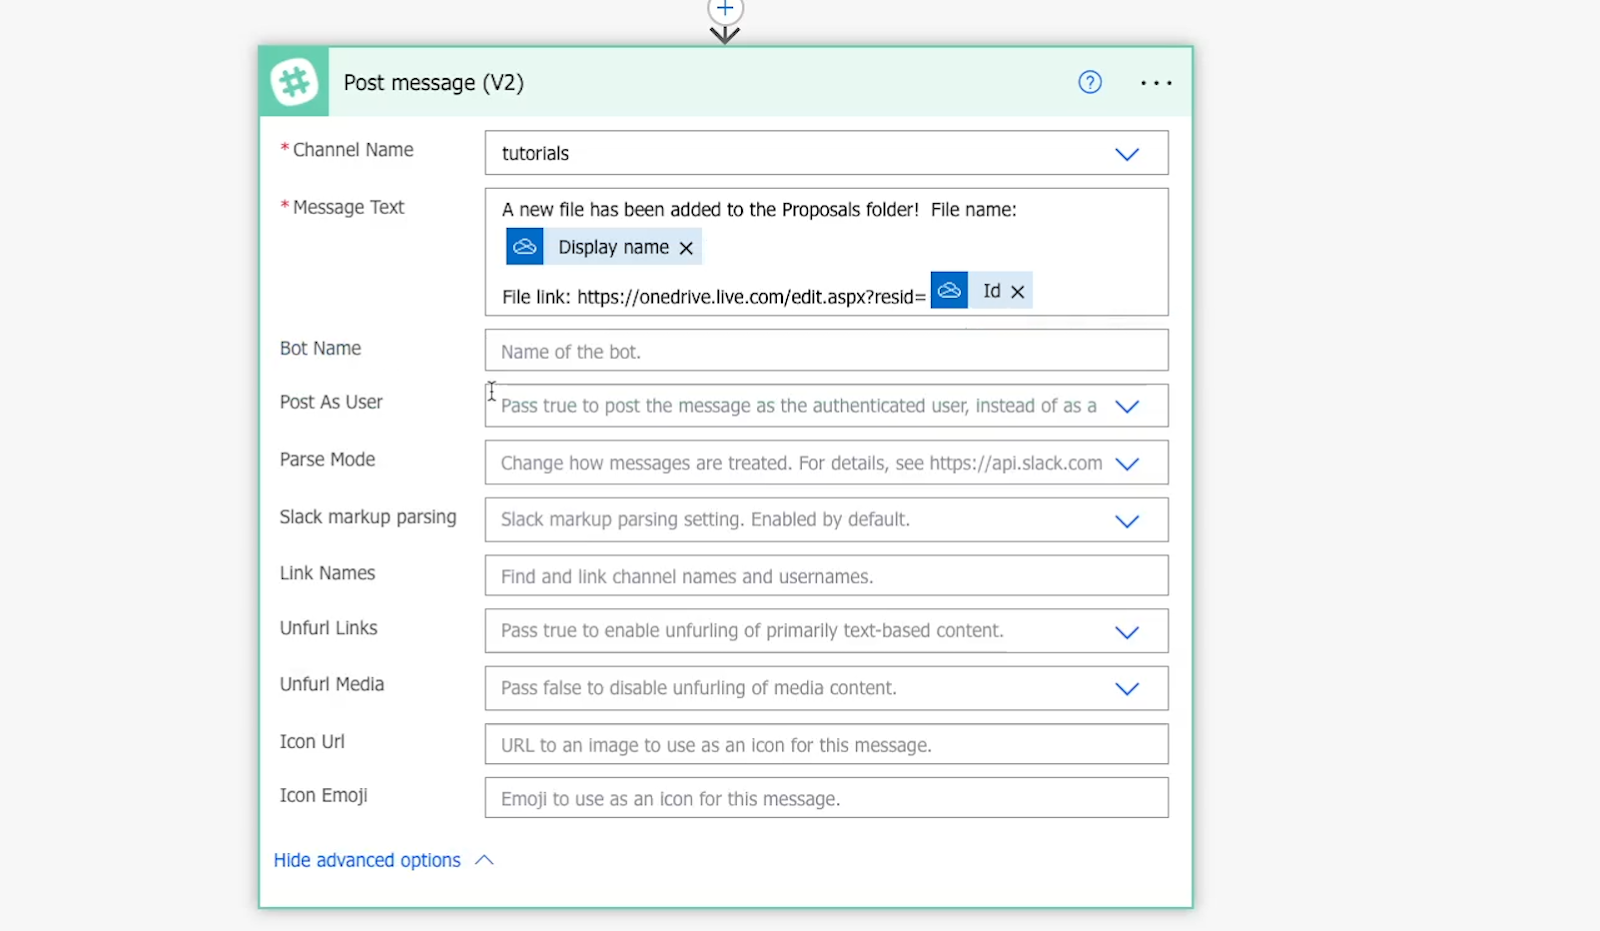
For Slack messages, “advanced options” reveals several more settings. While we won't go into detail about all of them, there are a few worth highlighting.
For instance, there’s "Bot Name." This lets you give your bot a unique name in Slack, instead of it just being identified as Power Automate.
This is useful for giving context for different automations that are sending alerts or messages.
For this automation, we’ll give our bot the name "OneDrive Bot."
“Slack markup parsing” is enabled by default, which means you can use markdown in your message, and Slack will format it accordingly.
To demonstrate how this works, we'll add asterisks around the display name to make it bold.
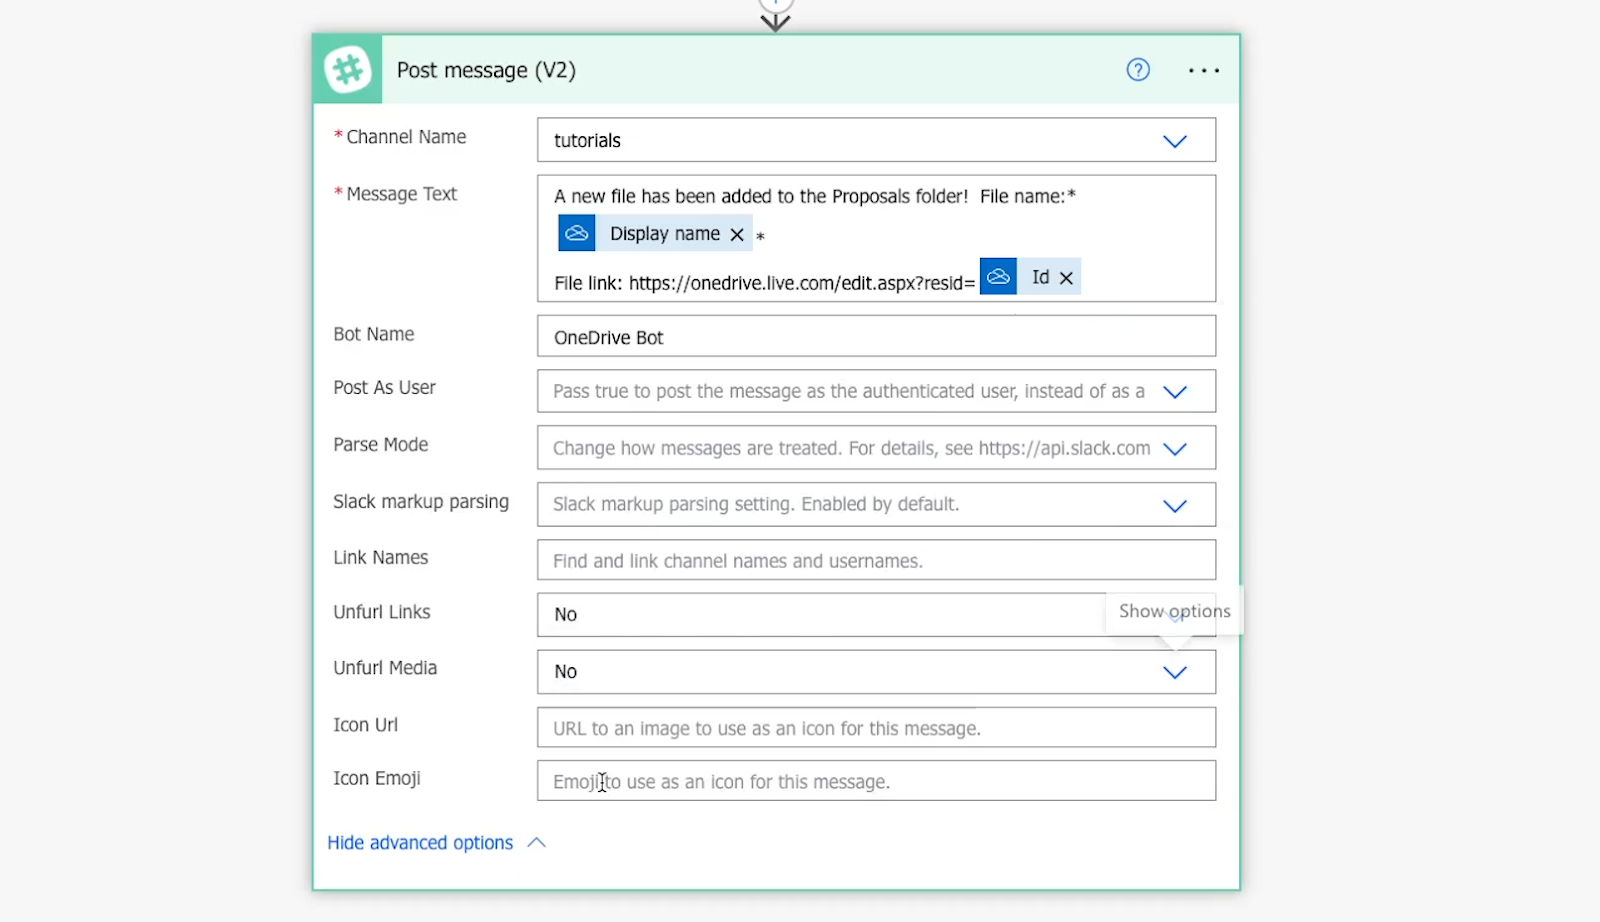
A couple other settings to consider are "Unfurl links" and "Unfurl media," which we'll set to "no" to avoid having the message take up too much space.
Additionally, you can customize the appearance of your bot message with "Icon URL" or "Icon Emoji." We'll add a :file_folder: emoji to give our message a unique look.
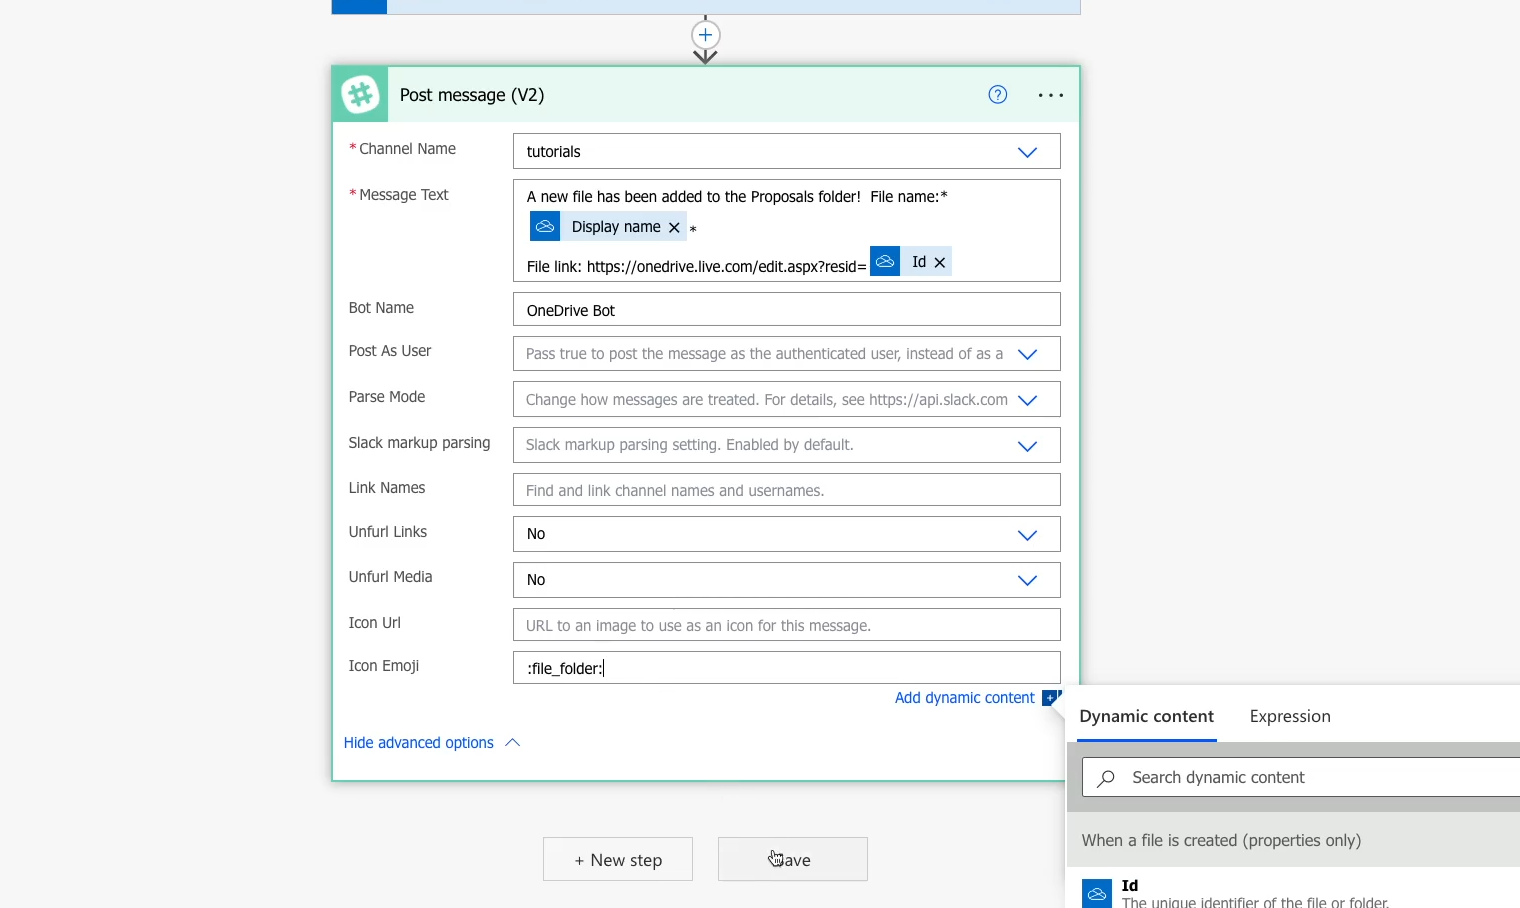
5. Test your automated flow
Once your message and settings are all set, you can click “Save” to save your choices.
After saving, a green banner will appear at the top of the screen recommending that you test this flow.
To test your automation, click on 'Test' in the top right corner.

You’ll have the option to choose between testing "manually" or "automatically."
Based on our experience, manual tests tend to be more reliable, and you’ll often be required to conduct a manual test before the option for an automatic test will be available.
As such, you’ll likely want (or need) to run a manual test first.
After selecting “manually”, click "Test."
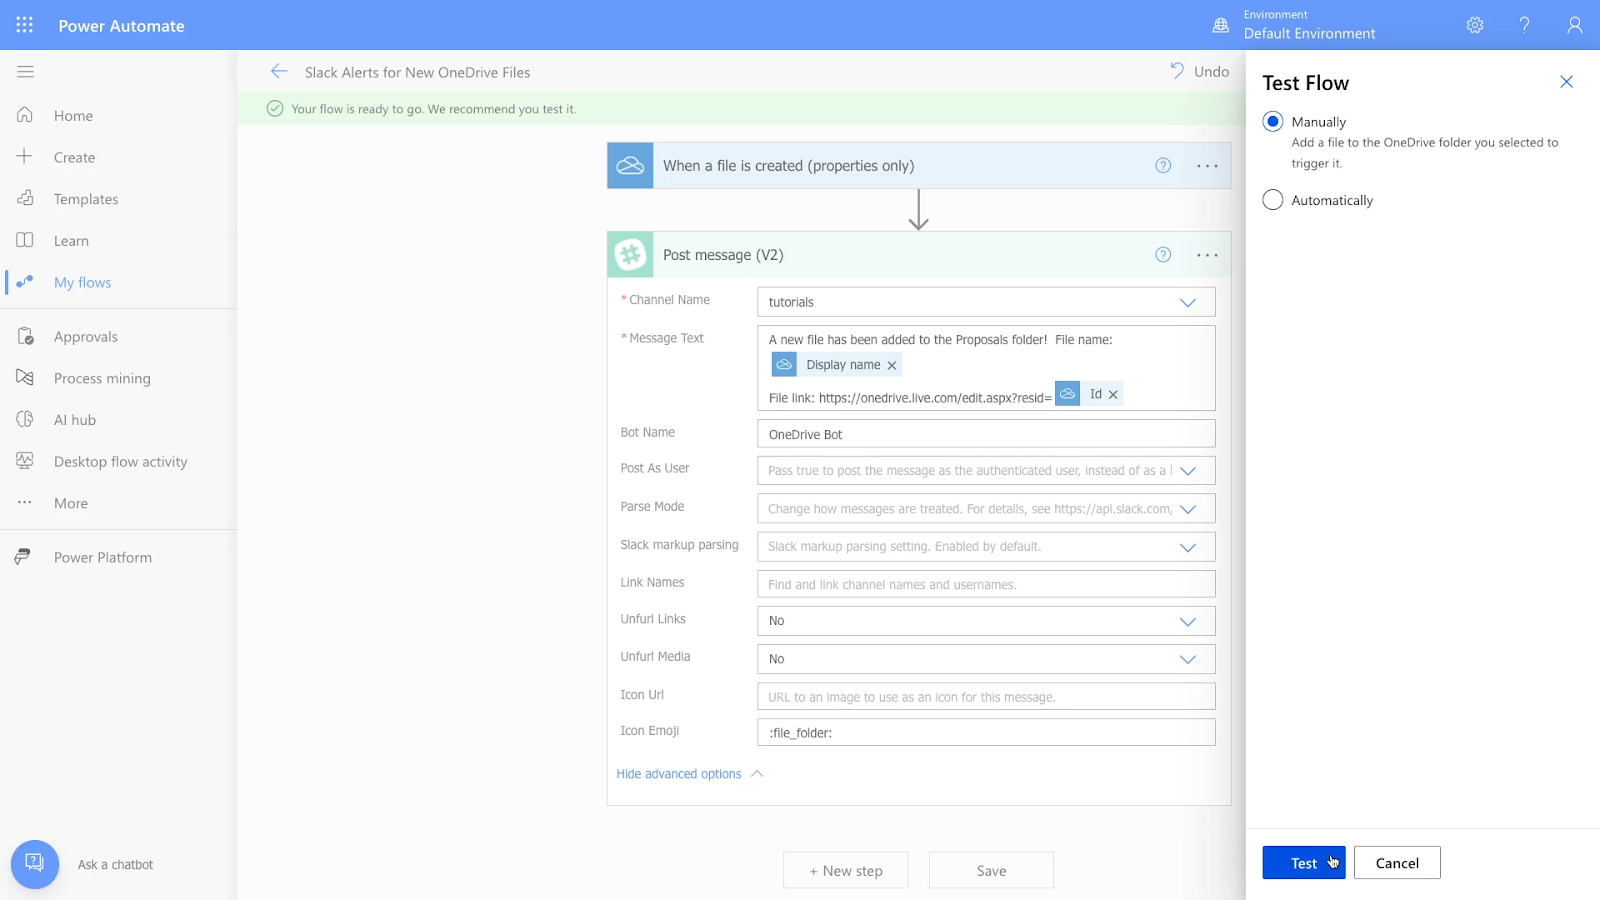
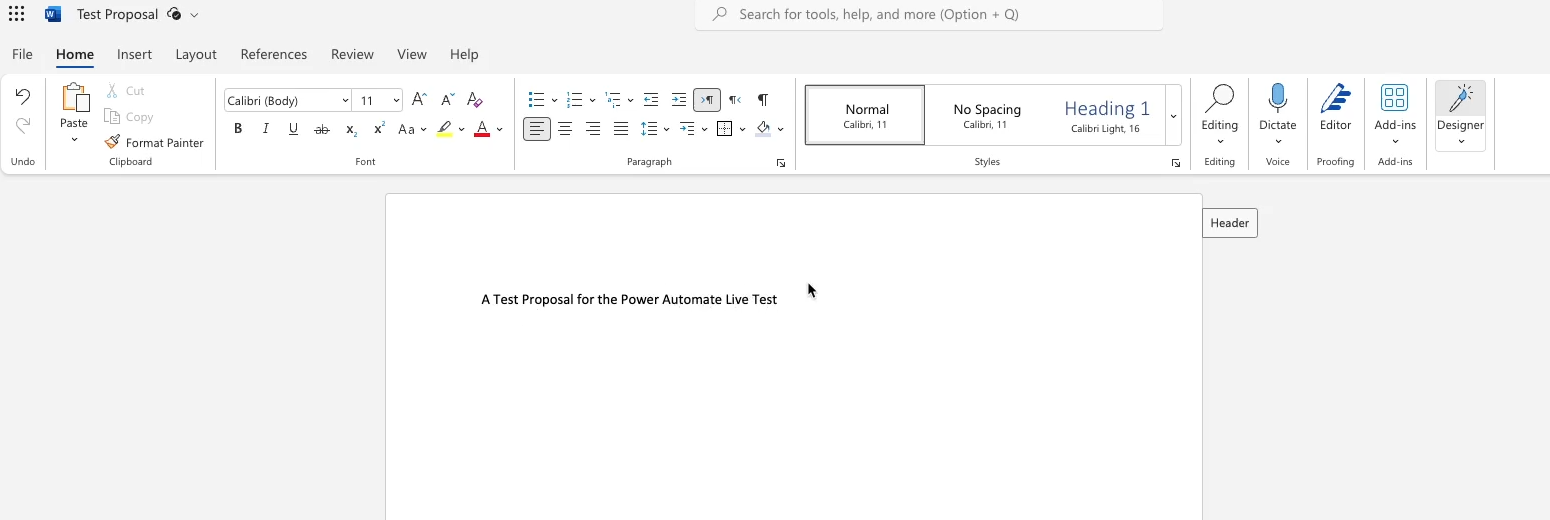
To perform a manual test, you’ll need to fulfill the trigger condition that launches your flow. In this case, that means actually adding a file to your designated OneDrive folder.
To confirm that the automation ran as expected, check Slack for a new message.
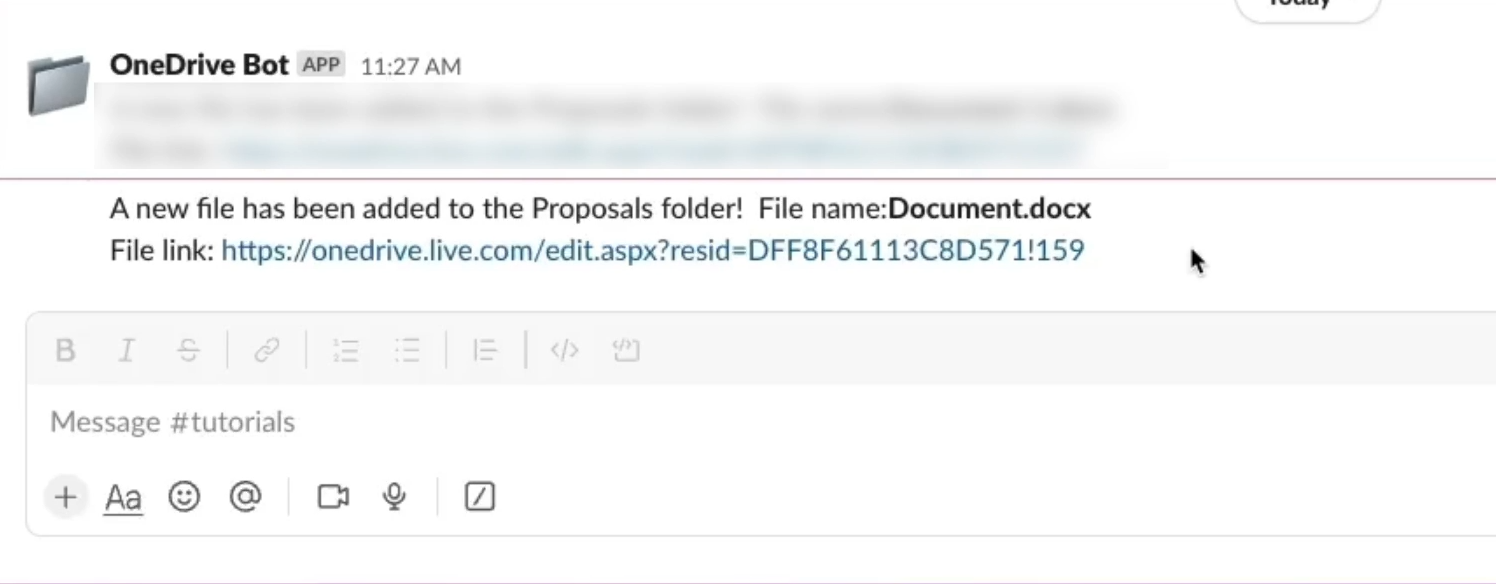
In our test, pictured above, the automation ran successfully. The file name is bolded, and there’s a link to open and edit it. Clicking on the link confirms that the correct URL has been created using static text and dynamic content.
Since this is a manual test, you’ll have to add a new file to the OneDrive folder designated in your automation.
Running a live test
The manual test confirms that the automation is set up correctly, but it’s always a good idea to run a live test as well.
With a live test, you’ll see how the automation will perform as it’s really used going forward, which can be a little different from your manual tests.
To conduct a live test, just fulfill the trigger condition again. You don’t need to click on “test” or any other menu option first.
However, after adding another file to your OneDrive folder, you won’t see a new Slack message immediately. On the free plan, Power Automate takes up to 15 minutes between each run.
Grab a sandwich or work on something else for a bit, and check back later.

After 15 minutes, you should see a new message in Slack that links to your latest file in OneDrive.
With your automation fully tested, save your work and click on the arrow in the top left to exit the flow builder.
6. Add an action to instantly alert you to errors
Finally, there’s one more action to add to the automation before it’s complete.
While it’s not strictly necessary, we’d recommend including a step in the automation that will immediately alert you if your flow encounters an error.
By default, Power Automate will send error warnings to the email attached to your account. However, these warnings don’t get sent very often. It appears that Power Automate only sends out one email each week for your errors, and all of your errors will be consolidated within a single email.
For important automations and steps, you’ll want to know immediately if they aren’t running correctly.
Save and exit before adding an error notification step
It’s critical to make sure that you have saved the flow and exited it at least once by clicking on the arrow in the top left of the flow builder.
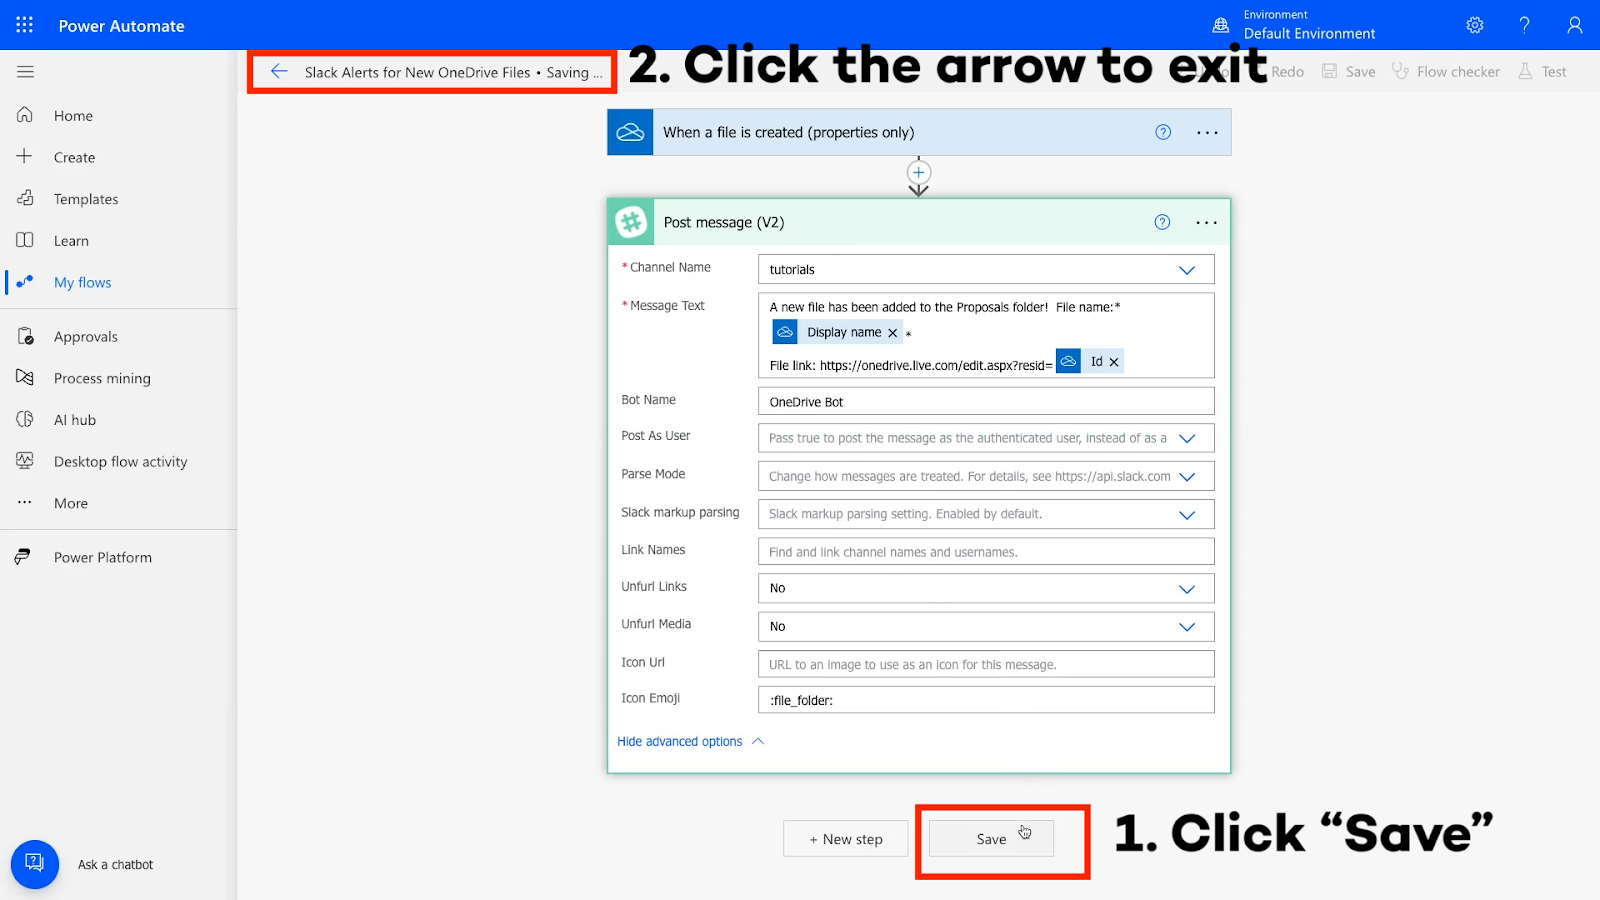
Otherwise, the flow’s URL will be a unique URL designed to create a new flow, rather than a URL that points to your specific automation.
To build an effective error notification, you’ll need to reference the automation’s URL, so make sure to save and exit your flow if you haven’t done so already.
Adding an error notification step
To set up an error alert for any step in an automated flow, begin by editing the flow from your “flows” menu.
Add a step after the action you want to receive alerts about. In our example, we’ll add the step after the Slack message.
Search for “Notifications” as the action.

Then, choose whether you want Mobile or email notifications. For this example, we’ll use Email. This will send a message to the email address that’s associated with your Power Automate account.
Next, you can configure the conditions the notification will be sent for.
Click on the three dots menu, and select “configure run after”.

Then, choose when the notification will be sent. You can choose to send it when the selected step has: Succeeded, Failed, been Skipped, or Timed out.
In our example, we’ll select “failed” and “timed out”.
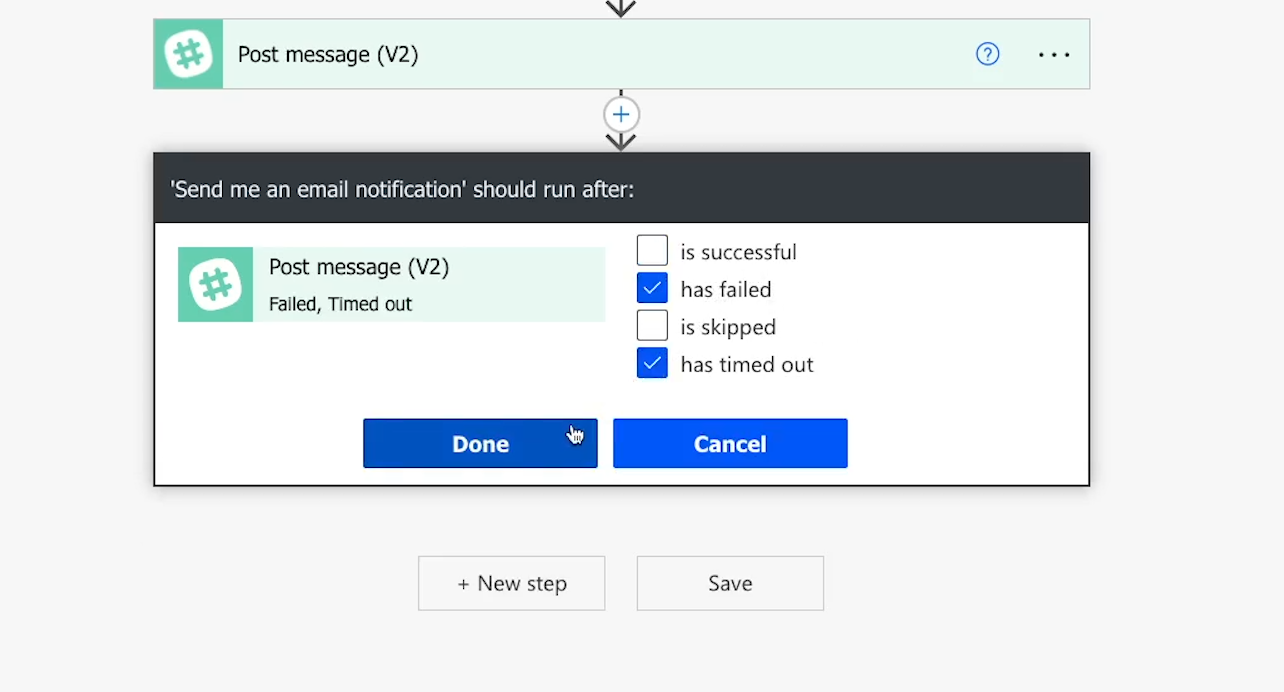
Click “Done” to commit your choices.
Next, you’ll need to compose the subject and body of the message that gets sent.
For the subject in our example, we’ll write ‘Your “Slack Alerts for New OneDrive Files” flow has encountered an error.’
Then, in the body, we’d recommend including a brief message and a link to the automation so you can easily open it and investigate the error.

You can use HTML link tags like this to reference the flow’s URL:
<a href=”url”>link text</a>
With your message configured, you can save your flow again.
You’ll now receive instant alerts when your Slack step doesn’t run correctly, instead of needing to wait for Power Automate’s default emails.
With your error notification set up, you’ve built your first flow in Power Automate and are all set to start using it to automate your work.
Manage errors in several automation providers with Guardian by XRay
If you’re currently a Zapier or Make power user, and want to add Power Automate to your stack, you should check out Guardian by XRay.
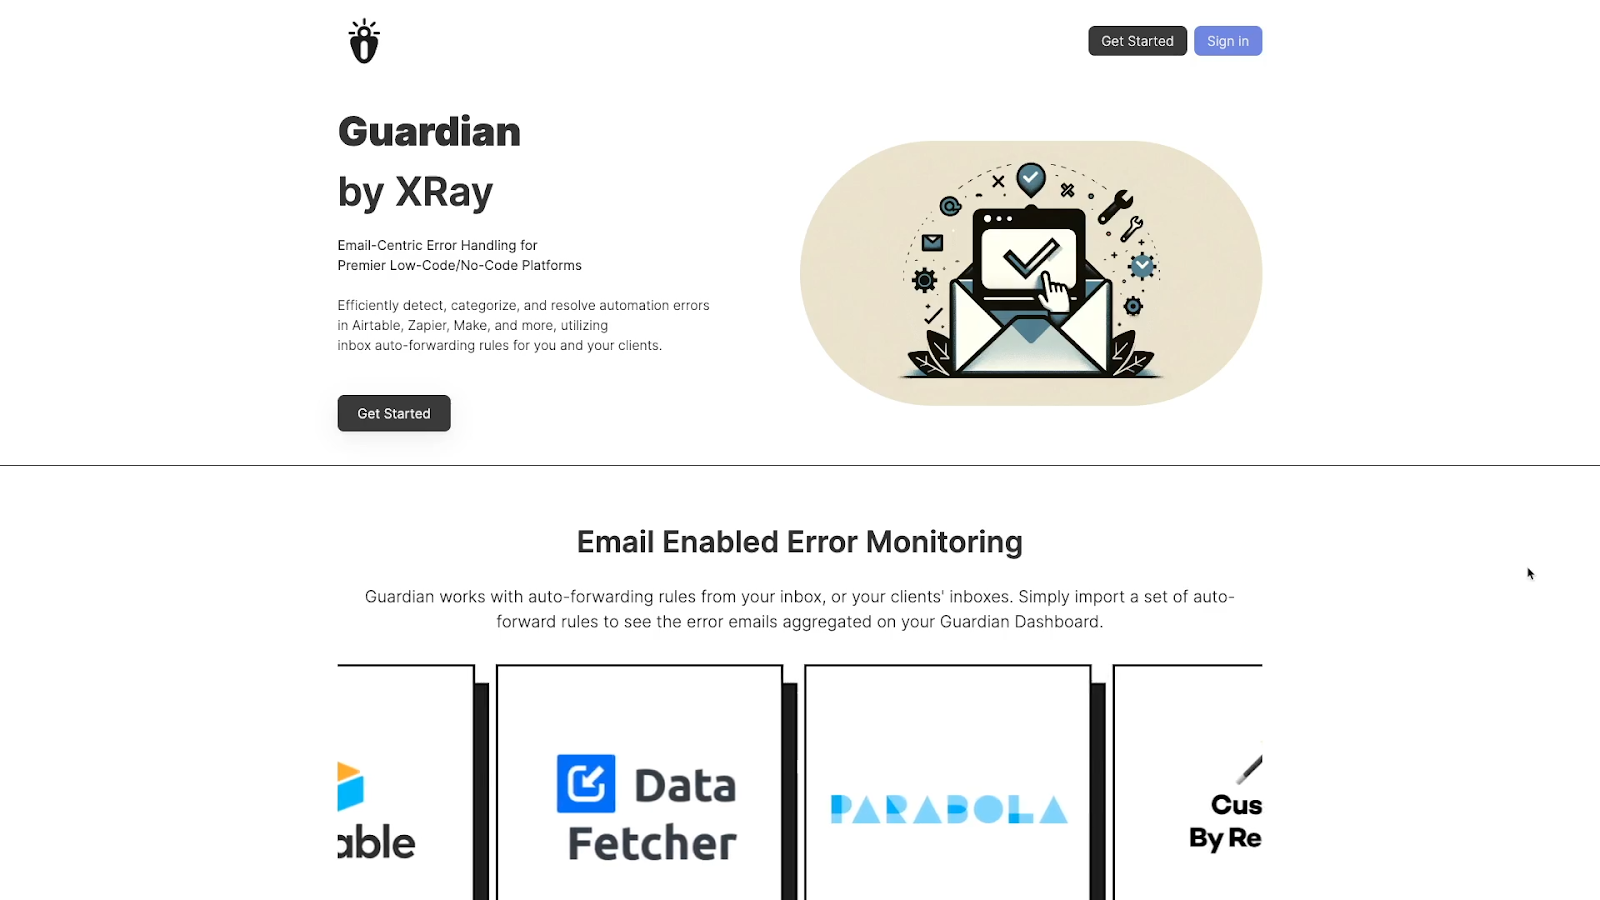
Guardian will aggregate all of the error alerts you receive from all of your automation providers in one place so you don’t lose track of any bugs.
It also gives you a convenient portal where you and your team can collaborate to discuss errors and fix them.
Just go to guardian.xray.systems to get started.
Other features in Power Automate
Next, we’d like to briefly cover a few of the other interface items and features that can be helpful as you’re using Power Automate.
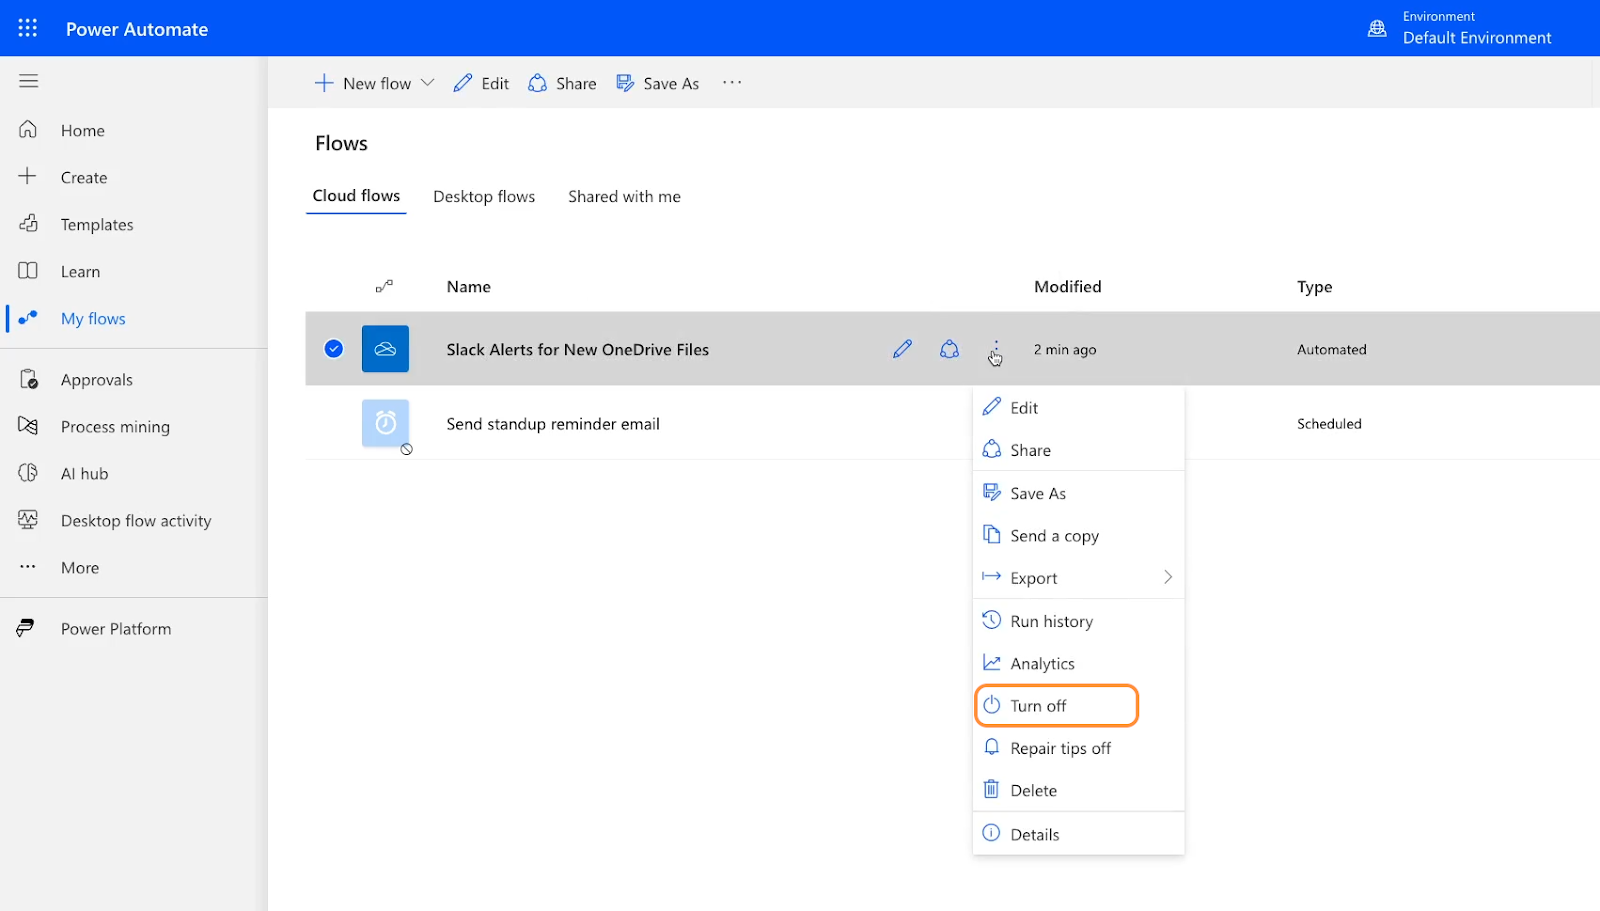
My flows
Click here to see a list of every flow you’ve built. Hover over any of them to see more options, like editing the flow or turning it off.
Cloud flow activity
Click on “more” in the left hand sidebar to reveal this option.
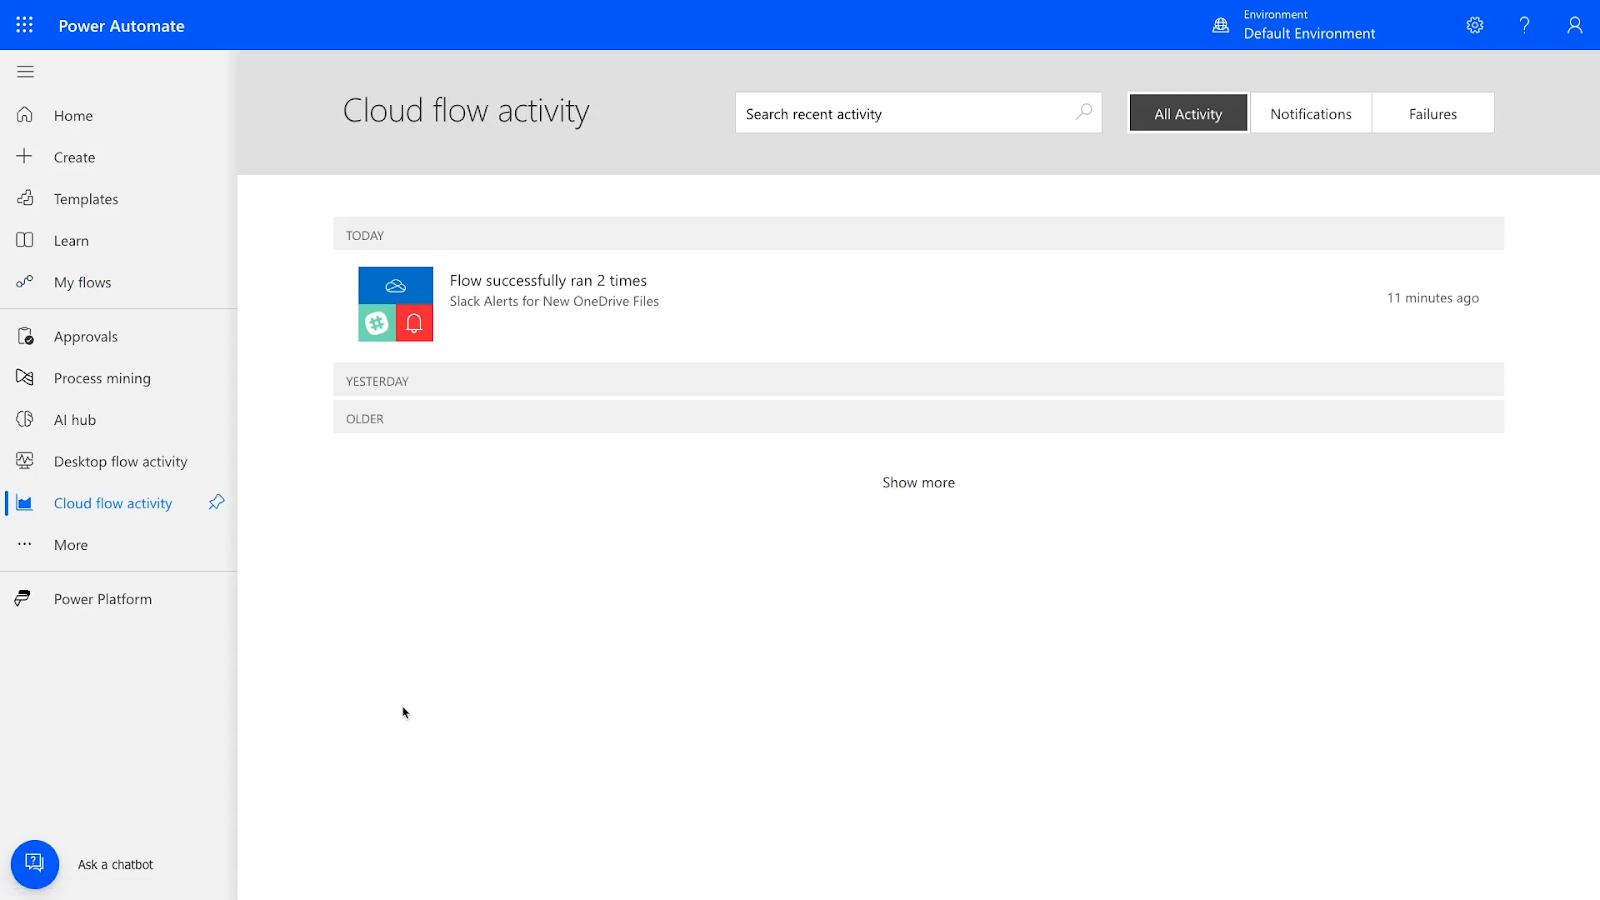
If you select “Cloud flow activity”, you’ll be able to view all of your web-based automation activity in one spot. This can be a great way to see what your automations are doing at a glance.
Connections
“Connections” can also be found in the “More” sub-menu.
Under “Connections”, you can view and manage all of the apps that you’ve connected to Power Automate.

If Power Automate is having issues accessing any of your connections, you’ll be able to see that here. You can also share and delete connections here, or update your connections to use different credentials.
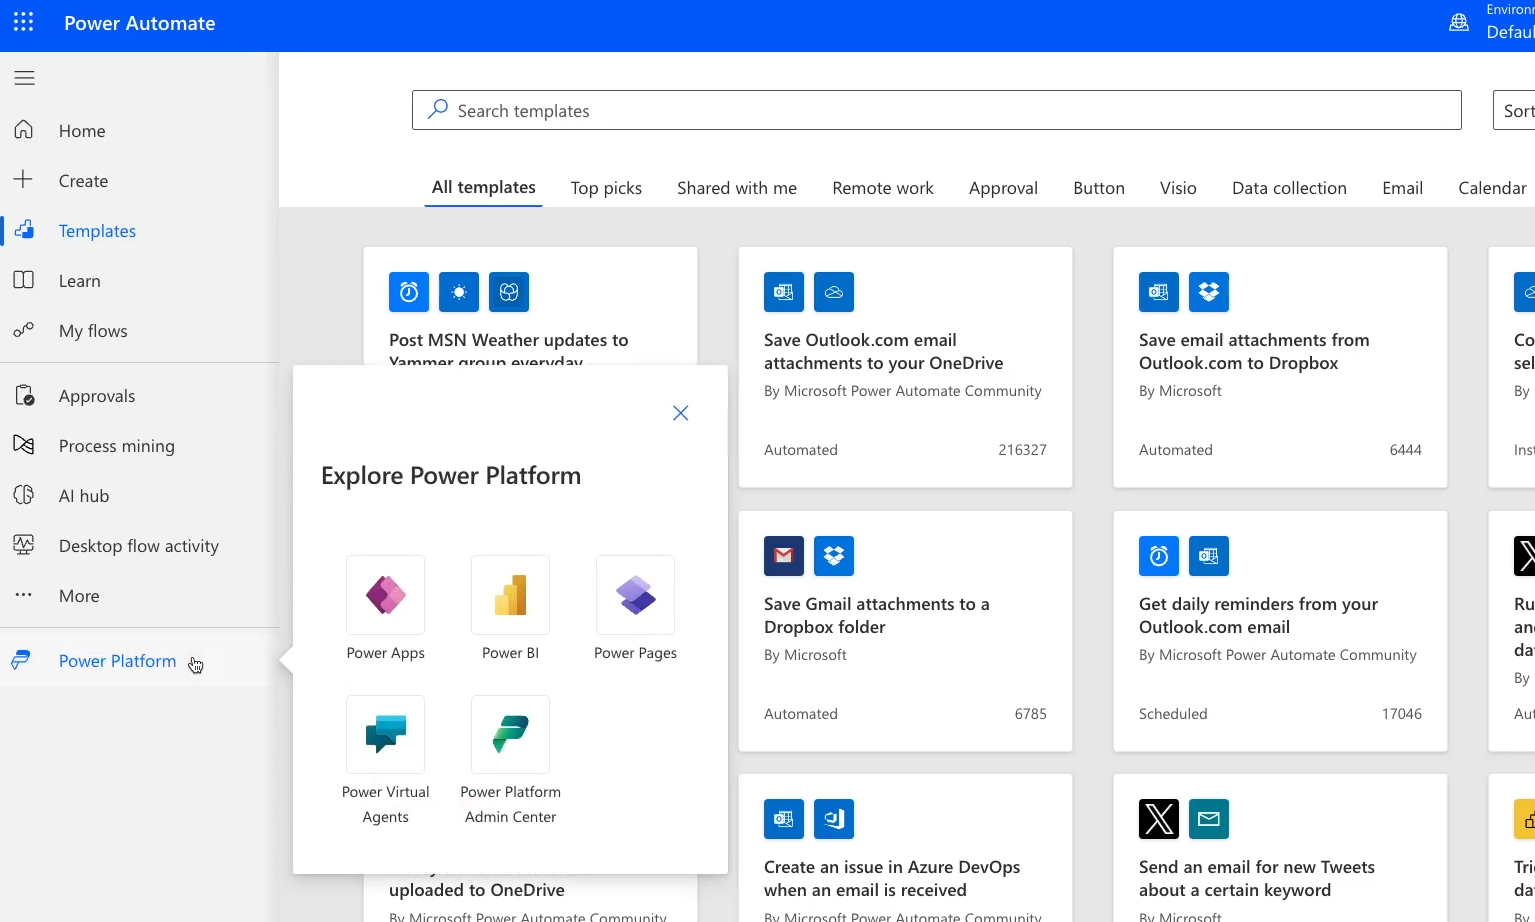
Templates
If you click on Templates, you’ll see an extensive library of automation templates created by Microsoft’s team and regular Power Automate users.

These templates can be a good source of inspiration and are an easy way to start building a new flow.
Learn
Clicking on “Learn” will open up a new tab with lots of documentation and training material for Power Automate.
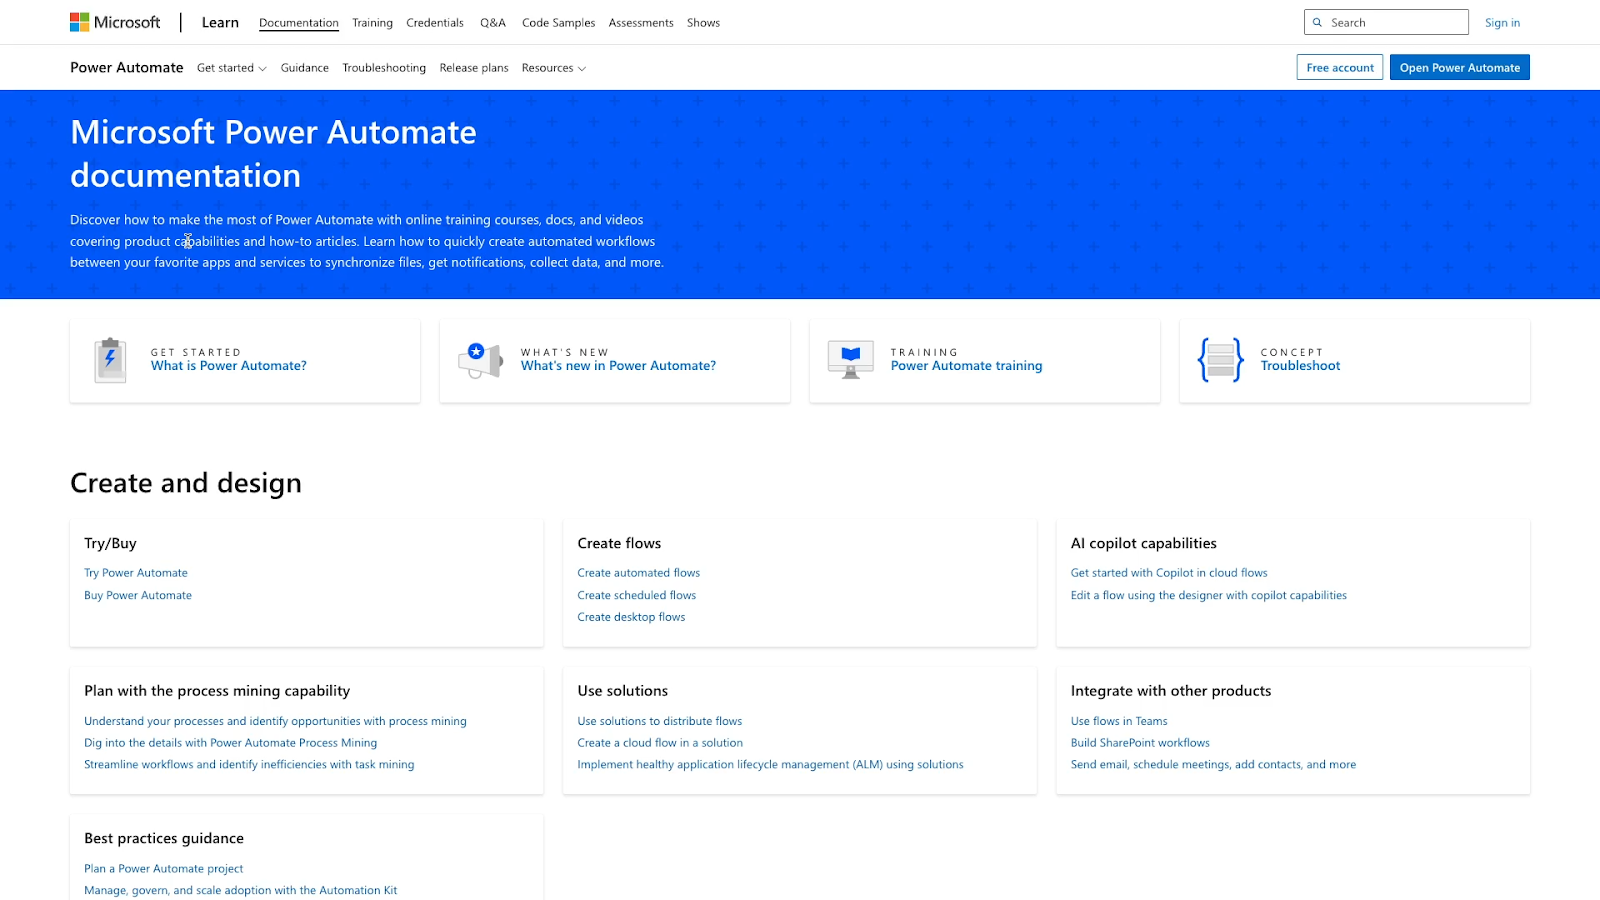
With these docs, you can learn how to create new flows and discover every technical detail of the platform.
Approvals, Process Mining, and AI Hub
These three options – Approvals, Process Mining, and AI hub – are all advanced features that require a premium account to access.
Similarly, “Desktop flow activity” requires a professional or educational workspace, and won’t be available on a personal account.
Finally, “Power Platform” will take you to software for business intelligence, app development, and app connectivity.
These can all be valuable tools for enterprise teams, but they’re very much beyond the scope of what you’ll be doing as a beginner in Power Automate.
Power Automate’s Pricing
There are a few different pricing plans available for Power Automate which can suit various budgets and use cases.
To learn more about Power Automate’s pricing, you can take a look at this page on their website.
Power Automate Free Plan
Cost: Free
Features: Build basic cloud flows. Limited to “Standard connectors” only.
Note: By creating an account with Power Automate, you will automatically start with this free plan.
Power Automate Premium
Cost: $15/user/month
Features: Premium Connectors, Desktop automation (RPA), Process Mining, AI builder
Power Automate Process
Cost: $150 per bot per month
Features: Run an unattended desktop flow with unlimited users
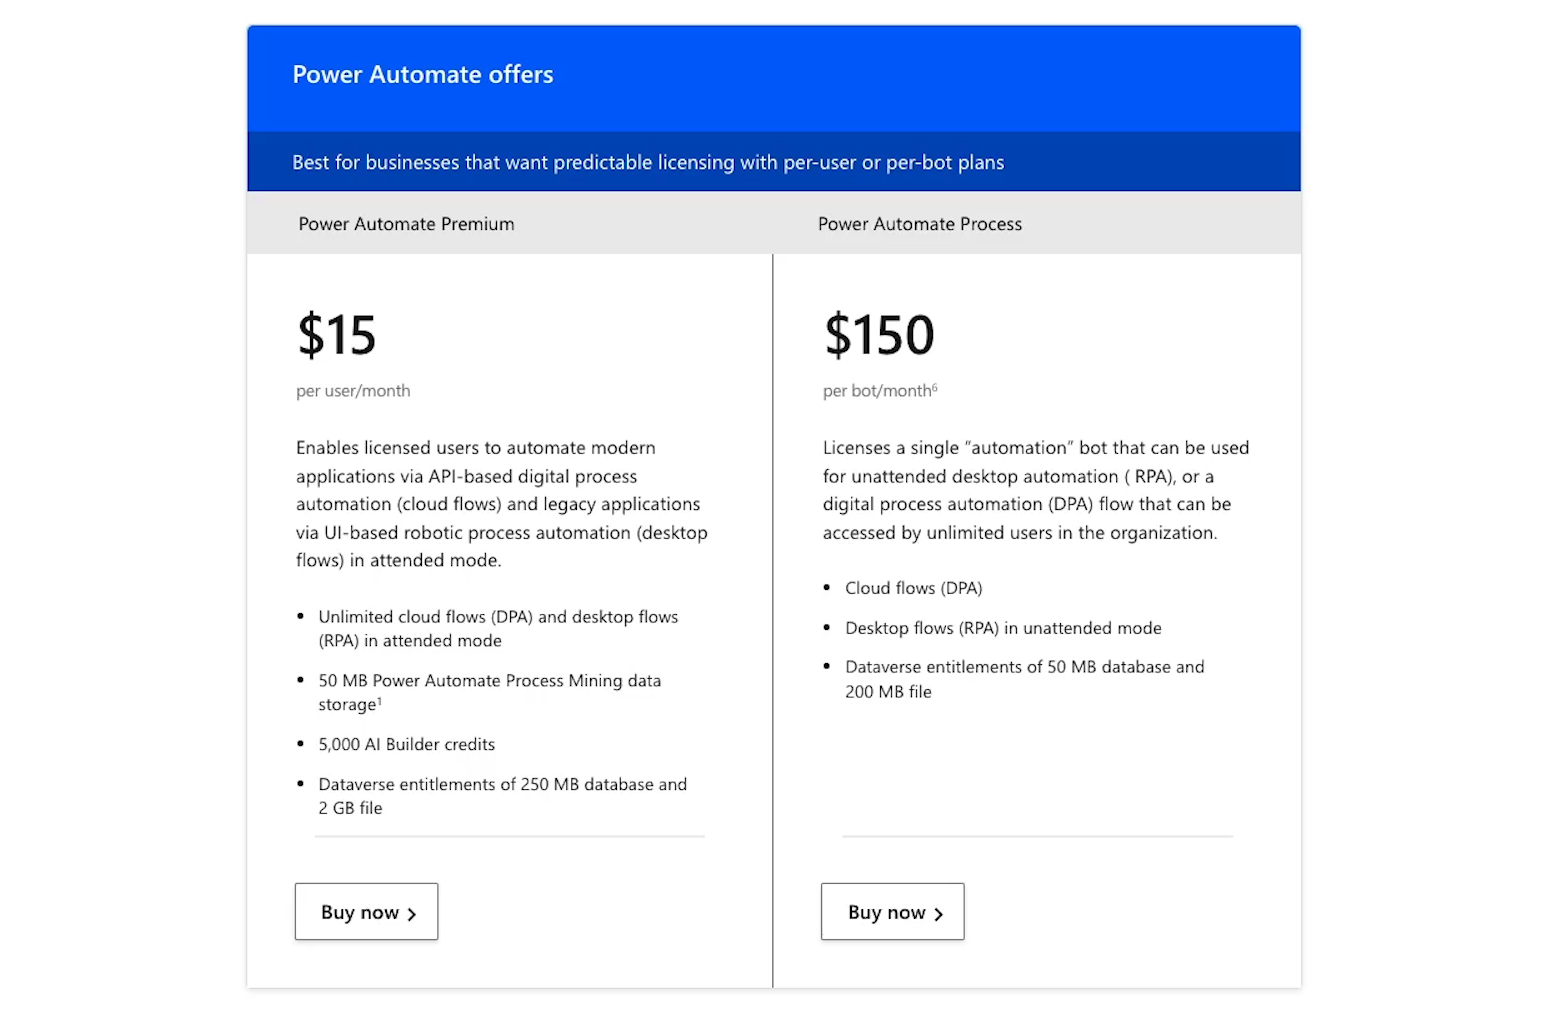
Both paid plans also offer add-ons for hosted RPA, AI builder, and process mining.
For enterprise users, we’d recommend reaching out directly to Microsoft to learn more and discuss your needs.
What sets Power automate apart
Power Automate is not your only option for building no-code automations.
There are many different providers available, with Zapier being the industry leader and Make being another good alternative.
Let’s take a quick look at how Power Automate stacks up to the competition.
Advantages of Power Automate
Power Automate has several advantages, especially for users who are already invested in Microsoft's ecosystem.
It’s better suited for Microsoft's own applications and is more specifically tailored to enterprise use cases.
In comparison, Zapier and Make are more naturally suited to small businesses. Without a team like XRay building and managing your automations for you, it can be difficult to use these providers in an enterprise environment.
Power Automate also offers desktop automation and process mining capabilities in addition to cloud flows.
These features aren’t available at all in Zapier or Make, which are focused entirely on automating cloud software.
Disadvantages of Power Automate
However, Power Automate also has its cons. It has fewer integrations than the competition and is not as easy to use.
Zapier and Make feature intuitive drag-and-drop interfaces for building your automations, and Zapier keeps adding additional tools to make it easier than ever to create automated workflows.
For instance, you can start building Zaps or even create custom automated actions by just writing out a quick AI prompt. In contrast, Power Automate’s builder interface is limited to more basic functionality.
Choosing the right automation provider
Ultimately, if your team is already heavily invested in the Microsoft ecosystem, Power Automate will be a natural choice due to its features tailored for Microsoft applications.
Just be sure to enter all of your apps into XRay.Tools before you start building to see if Power Automate supports them all. If not, you can also try out Zapier or Make.
Automate your team’s work with no code required
Automating your company’s work doesn’t require any code or custom software. With automation providers like Power Automate, you can eliminate tedious chores from your to-do list in a matter of minutes.
Try it out today and start creating more time for yourself and your team.
If you’d like to learn more about designing and building no-code automated workflows, check out our blog or our YouTube channel. You can also follow XRay on Twitter, Facebook, or LinkedIn.

Whether you’re planning an automation or just trying to document a process at work, flowcharts are an indispensable tool for workflow design.
In this post, we’re going to share 5 flowcharting apps (and 1 bonus utility) that you can use to start mapping your workflows right now.
These apps range from free tools for casual presentations to robust, enterprise-grade software and solutions, so there’s something here for every use case.
1. Lucidchart: Enterprise-ready technical diagrams
Lucidchart is a powerful flowcharting app that’s great for knowledge workers in any industry. Through its easy-to-use web app, you can access an extensive library of chart elements, including common standards BPMN.
In addition to creating detailed technical diagrams with a diverse array of shapes and elements, Lucidchart also enables you to leave notes and comments for your team.
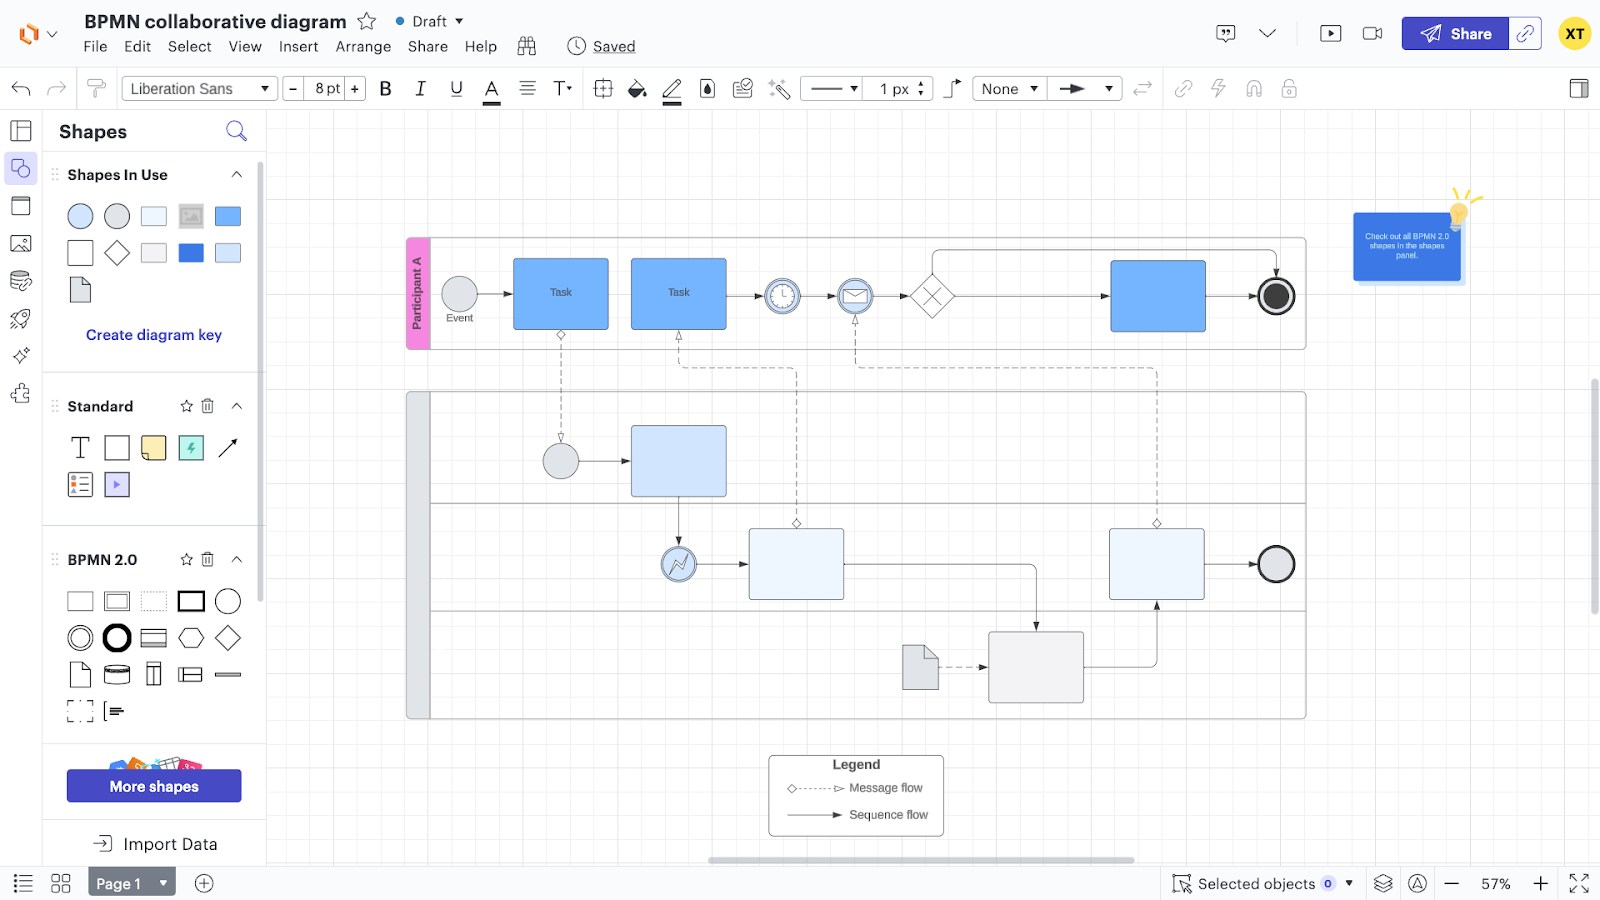
Lucidchart also features several integrations with popular software from Google, Microsoft, and Atalassian, making it easy to quickly create charts out of the data you have in other apps.
The main drawbacks of Lucidchart are that its free plan is limited to only 3 documents, and it comes with a relatively high learning curve. It won’t be the most intuitive choice for users without significant experience in creating flowcharts.
Lucidchart pricing overview
Free plan limited to 3 documents, 60 shapes per doc
$8/mo for individual plan; $9/user/mo for team plan; contact sales for enterprise pricing
Lucidchart pros and cons
Pros:
• Great for creating detailed, technical flowcharts
• Extensive library of shapes, with standards like BPMN
• Integrates with popular enterprise software
Cons:
• Limited in free plan
• Relatively high learning curve
View more details about Lucidchart’s pricing
2. Miro: a Lucidchart Alternative Focused on Collaboration
Miro offers similar features to Lucidchart, but places a greater focus on collaboration. In addition to flowchart features, Miro provides tools for brainstorming, whiteboarding and more.
On paid plans, Miro includes useful interactive features like timers, voting, and video chat.
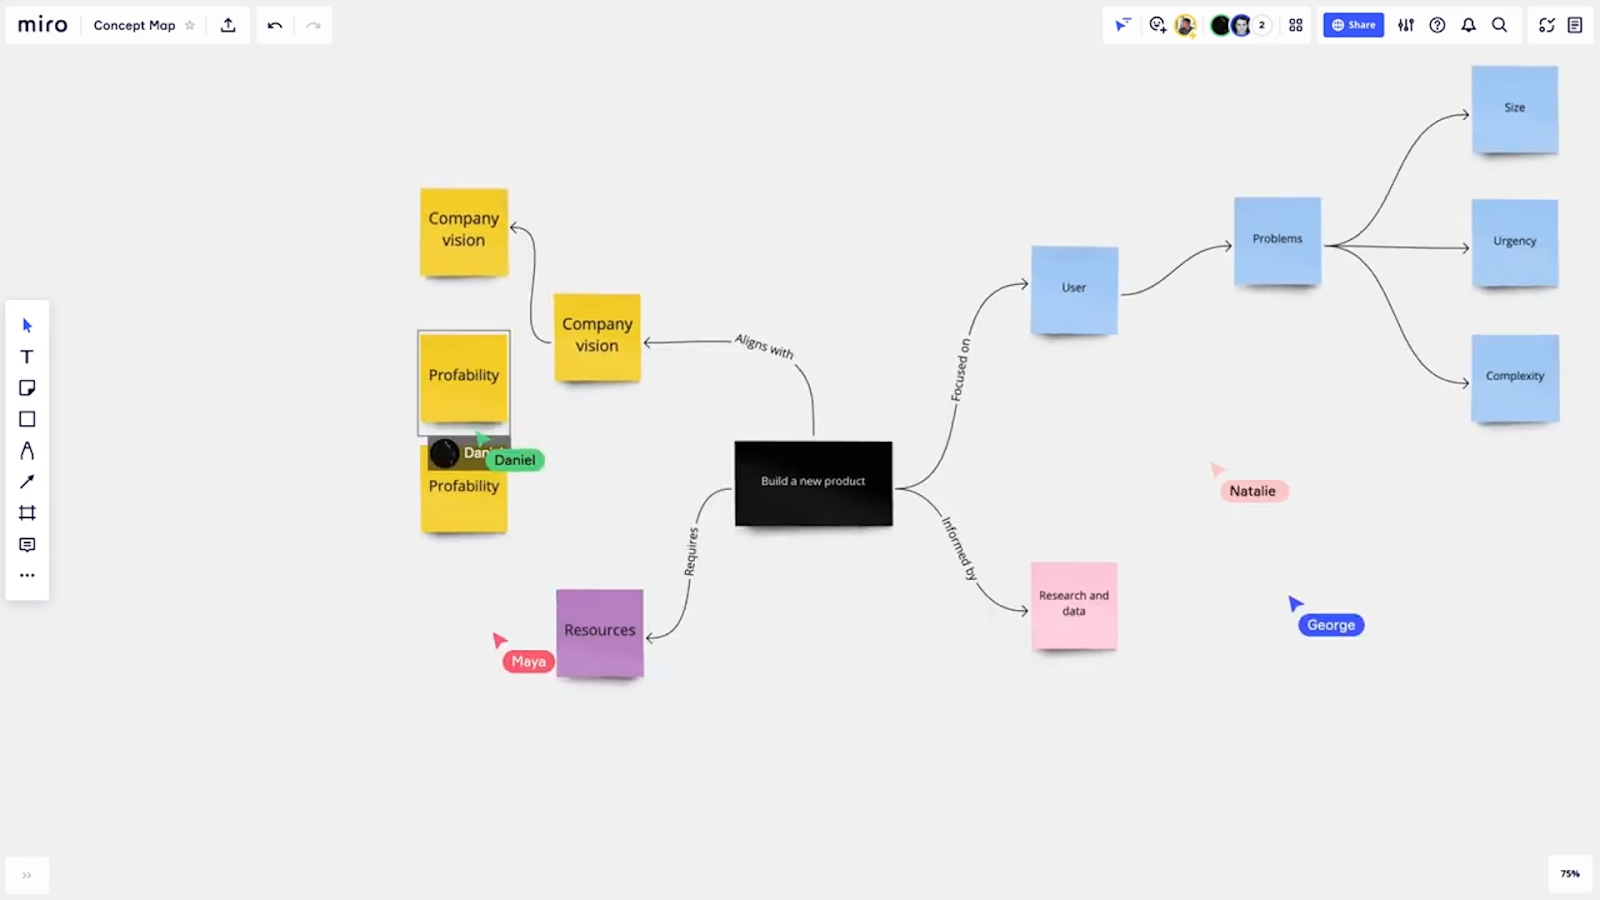
Like Lucidchart, Miro also includes an extensive list of integrations with popular software, allowing you to connect with Zoom, Slack, Google Drive, and hundreds of other apps.
If you’re looking for a tool primarily to build flowcharts, then Miro’s free and starter plans may fall short. You’ll have to spring for the business plan to unlock shape libraries like BPMN.
However, if you’re looking for a tool that enables remote workshops and planning sessions, then Miro will be a great choice.
Miro pricing overview
Free plan limited to 3 boards
$8/mo for Starter plan; $16/user/mo for business;
Miro pros and cons
Pros
• Great collaboration features
• Flowchart features comparable to Lucidchart on business plan
• Many integrations with popular apps
Cons
• Limited flowchart options on Free and Starter plans
View more details about Miro’s pricing here
3. Draw.io or Diagrams.net: Free, No-frills Flowcharts
Diagrams.net offers a robust tool for building flowcharts with common standards like BPMN, but unlike Miro or Lucidchart, this app is completely free to use.
However, don’t expect to find the same sort of integrations or collaboration features that you’d find in other software. Diagrams.net gives you an excellent flowchart builder, but that’s pretty much it.
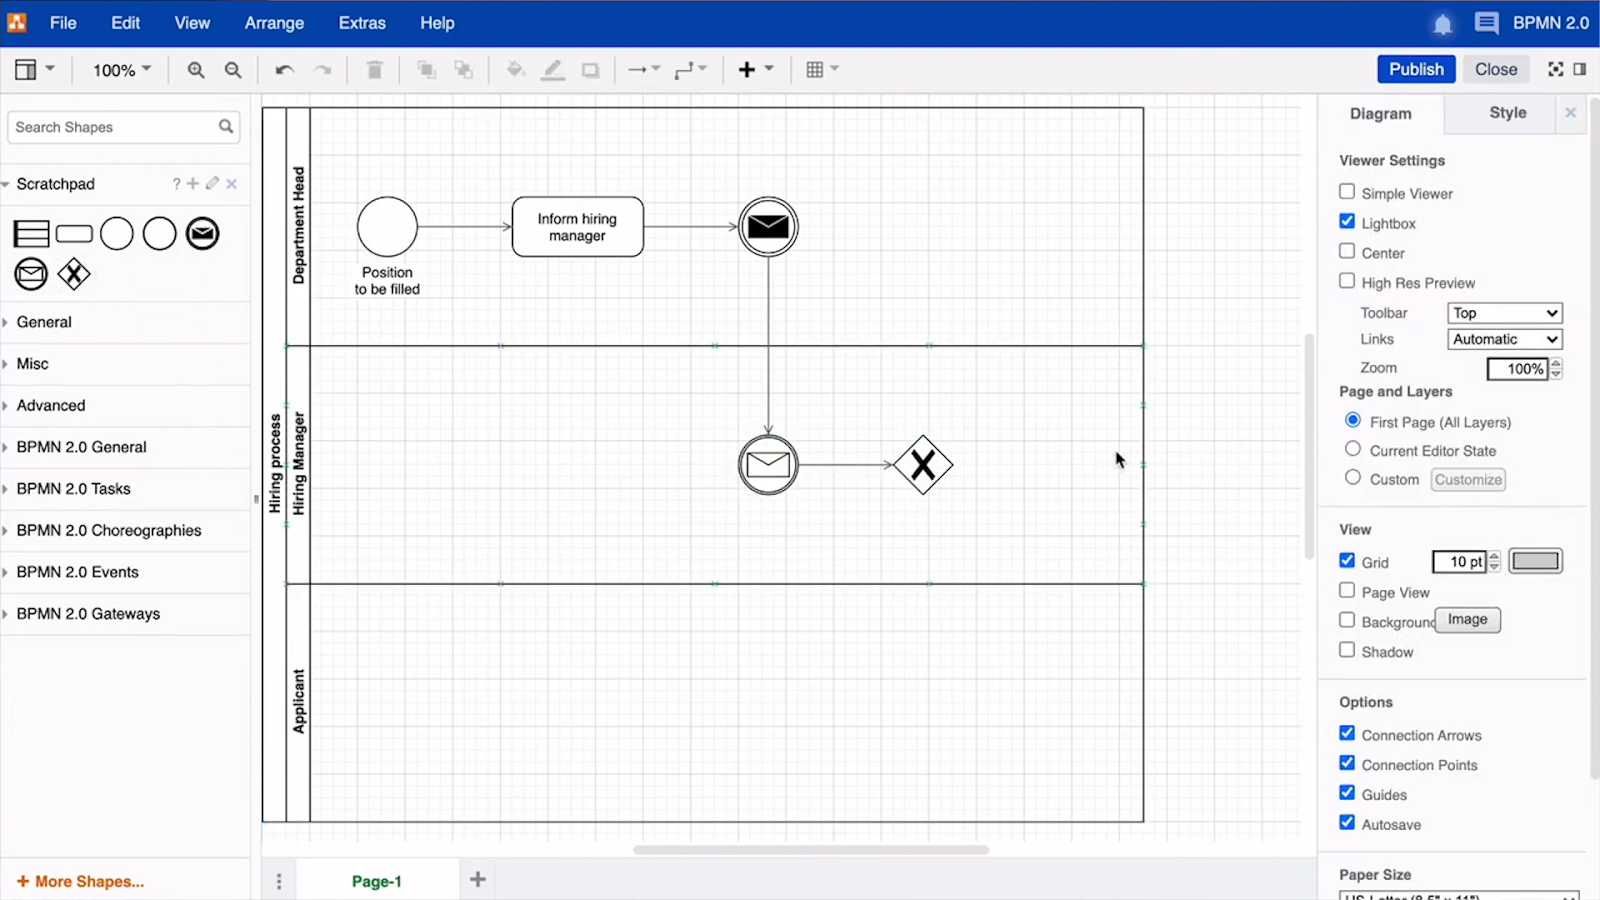
All of your docs can either be saved locally or in cloud storage apps like Google Drive or OneDrive, but there are no features for managing teams or access for each doc.
If you'd like to integrate Diagrams.net with Atlassian software like Confluence or Jira, you’ll need to use the enterprise version of the app called Draw.io. There’s no detailed pricing structure disclosed, but Draw.io gives a few examples, noting that a plan for up to 20 users would cost $20/mo.
Diagrams.net & Draw.io pricing overview
Diagrams.net is free to use
Contact Draw.io for enterprise pricing
Diagrams.net & Draw.io pros and cons
Pros
• Free plan allows for unlimited flowcharts, access to BPMN and more
• Uses your own cloud storage for easy file access
Cons
• No integrations except on enterprise (Draw.io) plan
Create free flowcharts at diagrams.net
4. Zapier Canvas: Connect to Your Zaps in Your Workflow Designs
Canvas is a flowchart feature built directly into Zapier. In addition to a few simple shapes for basic flowcharts, Canvas also allows you to reference any of your Zaps, Tables, and Interfaces.
When you reference a Zap, you’ll also be able to show every step of that Zap in your flowchart. Every reference will also include a link to open and edit the associated asset.
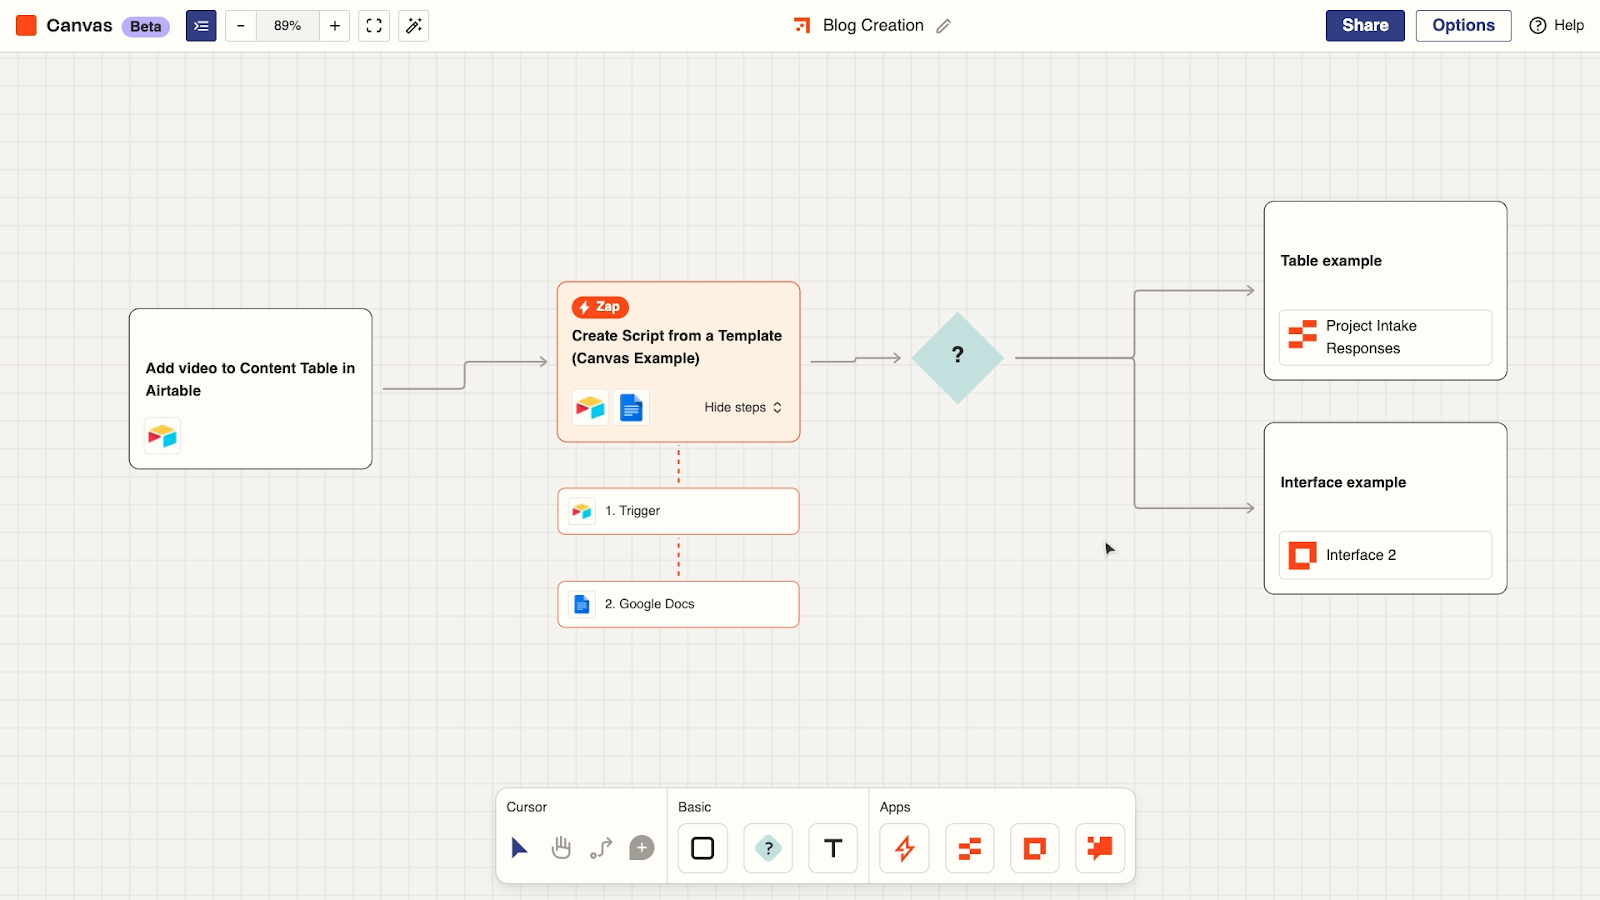
While it won’t have much utility for anyone who isn’t already using Zapier, Canvas has a lot of potential for Zapier power users who want to plan or document their automated workflows.
Canvas is currently in beta, and is free with any Zapier plan. Just like Zapier Tables, we expect that Canvas will eventually come at an additional cost once the beta period is over.
Zapier pricing overview
Free plan available
Starter: $20/mo; Professional: $50/mo; Team: $70/mo; contact sales for Enterprise pricing
Zapier Canvas pros and cons
Pros
• Plan and document workflows right alongside your Zapier automations
• Reference Zaps directly in diagrams
Cons
• Little utility if you don’t use Zapier already
Learn more about Zapier’s pricing here
Part 5 - Canva
While the other apps in this list so far have focused on technical use cases, Canva brings more aesthetic flair to the table.
Canva is a multi-purpose, user-friendly digital design app. You can use it to design assets like slideshows, social media ads, company one-pagers, and simple flowcharts. It even includes a library of stock photos and graphics that you can use to quickly flesh out your designs.
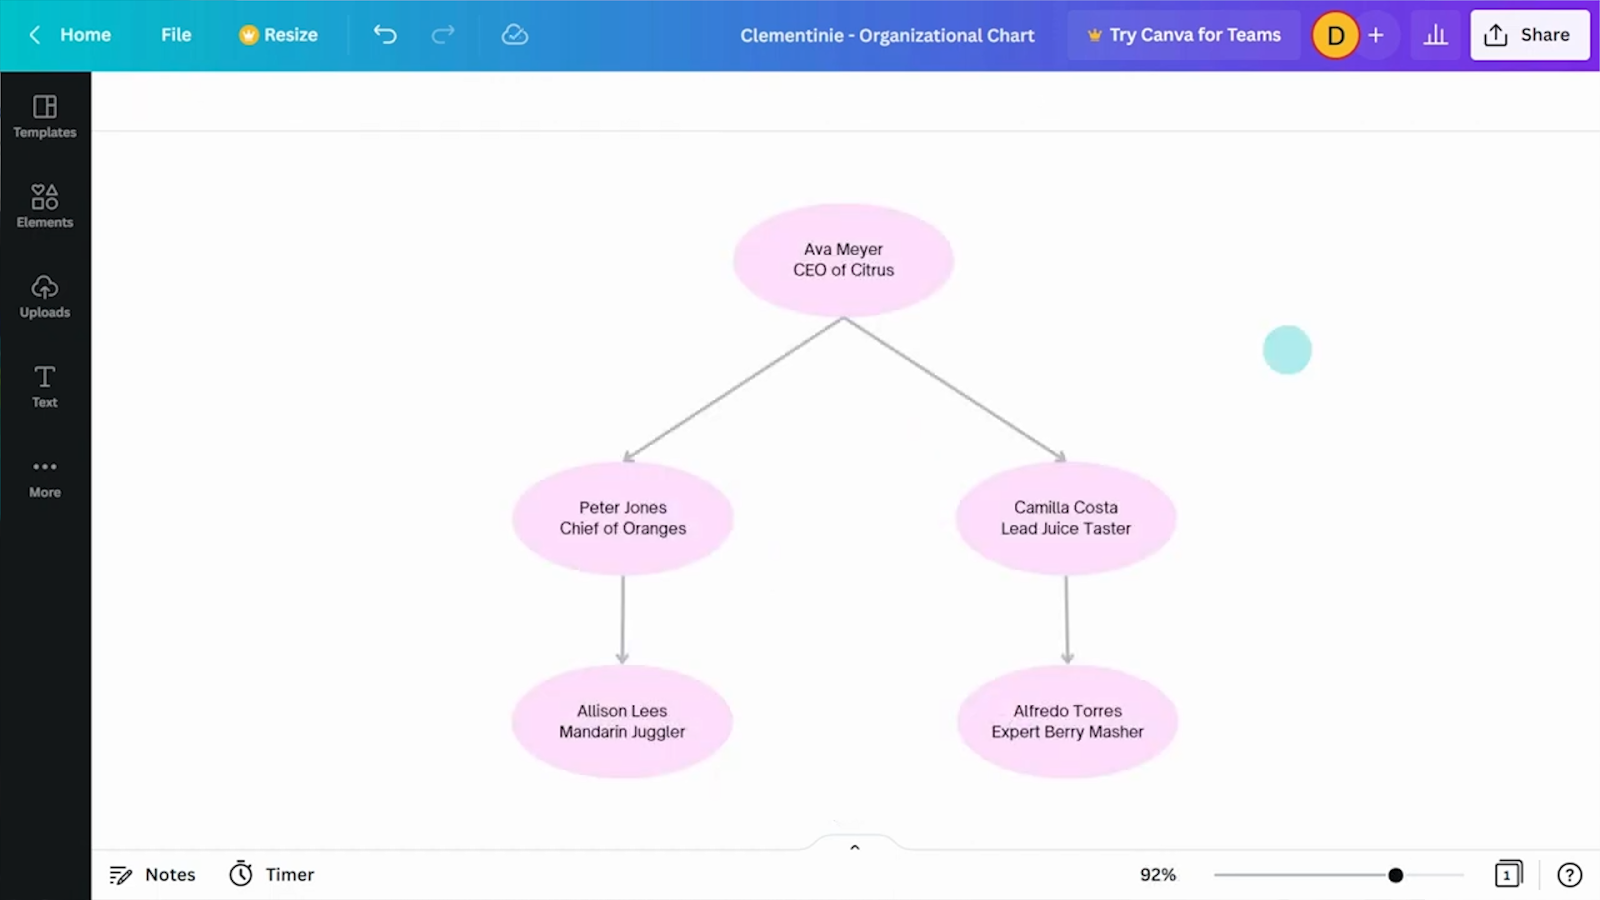
As a jack-of-all-trades design app, Canva offers a little bit of everything, but lacks depth in each specific area. You won’t be able to access premade BPMN libraries in Canva, and instead will have to rely on basic shapes for your flowcharts.
Canva is best for small teams looking for a general design app, and typically won’t be a good fit for highly technical or enterprise use cases.
Canva pricing overview
Free plan available
Canva Pro: $120/yr; Canva Team: $160/user/yr; contact sales for Enterprise pricing
Canva pros and cons
Pros
• Generous free plan with 5GB of cloud storage, library of stock photos
• Intuitive design app suits many use cases
• Affordable for small teams
Cons
• Not ideal for technical diagrams
Learn more about Canva’s pricing here
Bonus: Use AI and Mermaid.js to generate simple flowcharts
Finally, let’s take a look at creating flowcharts with AI via Mermaid.js.
Mermaid.js allows users to create charts and diagrams using simple markdown syntax. You can learn more about the syntax here to create your charts manually, but you can also use an AI chatbot like ChatGPT to draft the markdown for you.
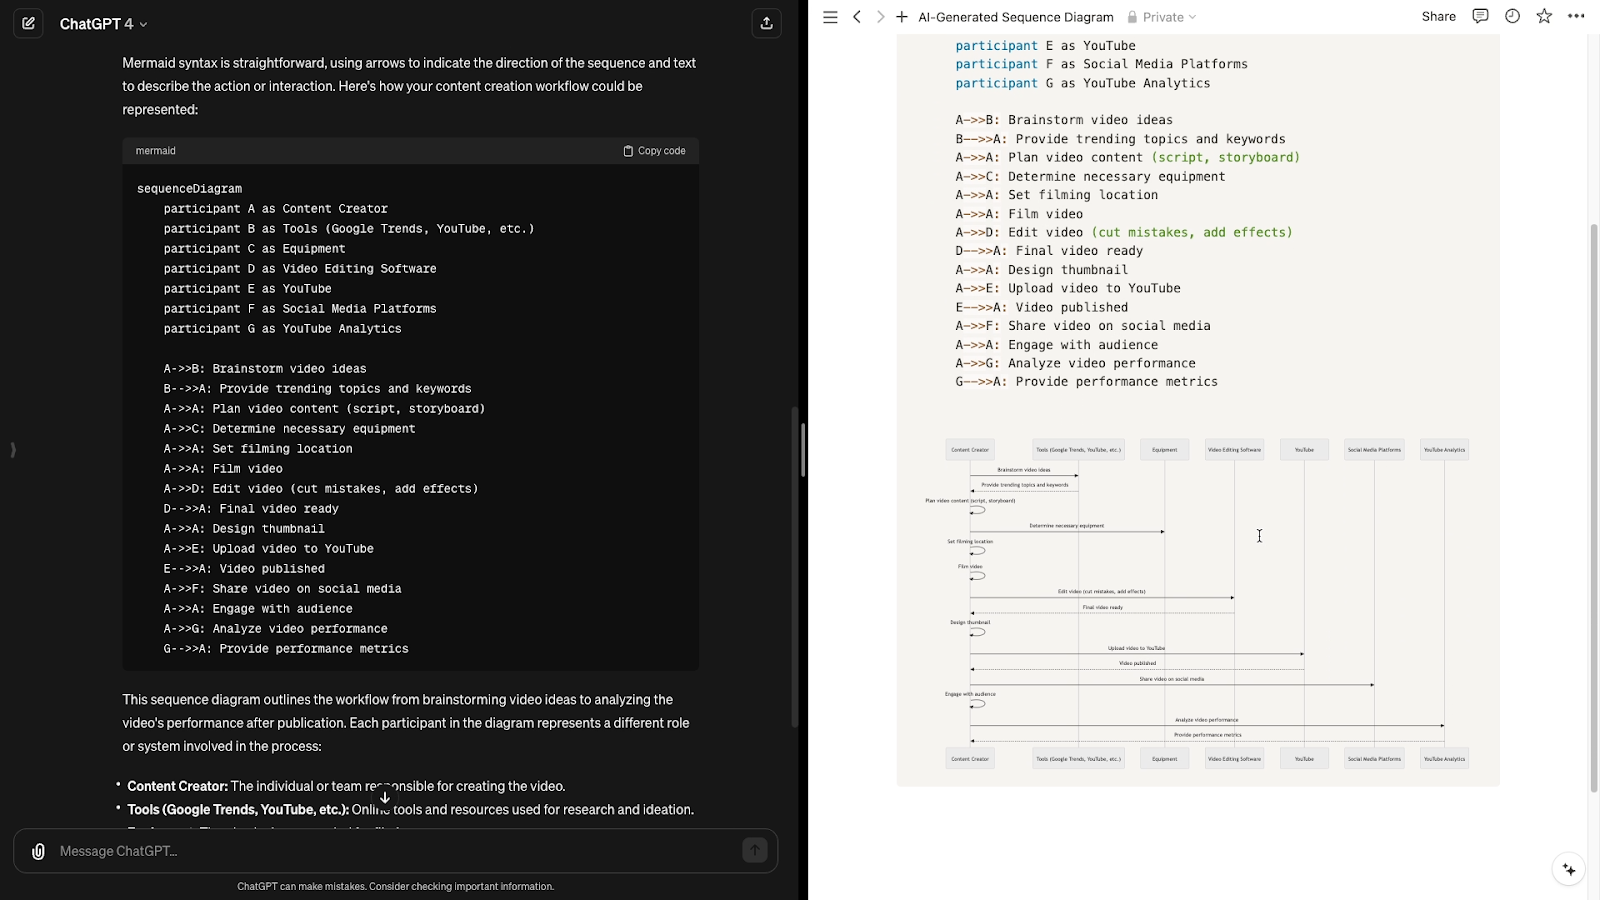
Then, you just need to copy the text into an app that supports Mermaid diagrams, like Notion or VS Code. In Notion, just type “/mermaid” to bring up a Mermaid code block where you can render a diagram.
If you’d like help designing a workflow, check out the Workflow Designer’s Assistant, XRay’s custom GPT designed to help anyone optimize and automate their work. Note that this assistant will require ChatGPT Plus to use.
Mermaid pricing overview
Mermaid diagrams can be created for free using tools like ChatGPT, Notion, and VS Code
Design, plan, and document your work with these flowcharting tools
Flowcharts can help you organize your thoughts, plan an automation, or add a little visual flair to a presentation at work. There are a lot of tools out there for the job, and between the six we mentioned in this post, there’s something for every budget and use case.
If you’d like to learn more about streamlining your everyday work, check out our blog or our YouTube channel. You can also follow XRay on Twitter, Facebook, or LinkedIn.
There’s no need to waste your time sending the same email over and over again. If there’s a reminder or a message you need to send out repeatedly, you can easily automate it in a few simple steps.
In this post, we’ll show you how to set up automated recurring emails in Outlook or Gmail with Power Automate or Zapier.
If you’ve never used Power Automate or Zapier before, don’t worry. These workflows are very simple, and are great ones to get started with.
Automating Outlook Emails with Power Automate
Overview
1. Access Power Automate from Outlook
2. Create a new Scheduled Flow
3. Set your automation’s frequency
4. Add a “Send an Email” step
5. Compose your scheduled email in Power Automate
6. Test your automated flow
Access Power Automate from Outlook
You can access Power Automate from Outlook by clicking on the square of dots in the top left to access more apps.

From there, click on “All apps”

Then, scroll down to “Power Automate”. Click on it to open up Power Automate.

If this is your first time using Power Automate on this account, you’ll have to pick your region, and then click “Get started”.
Create a new “Scheduled Flow”
Click on “Create” in the middle of the screen to create a new automation from scratch.
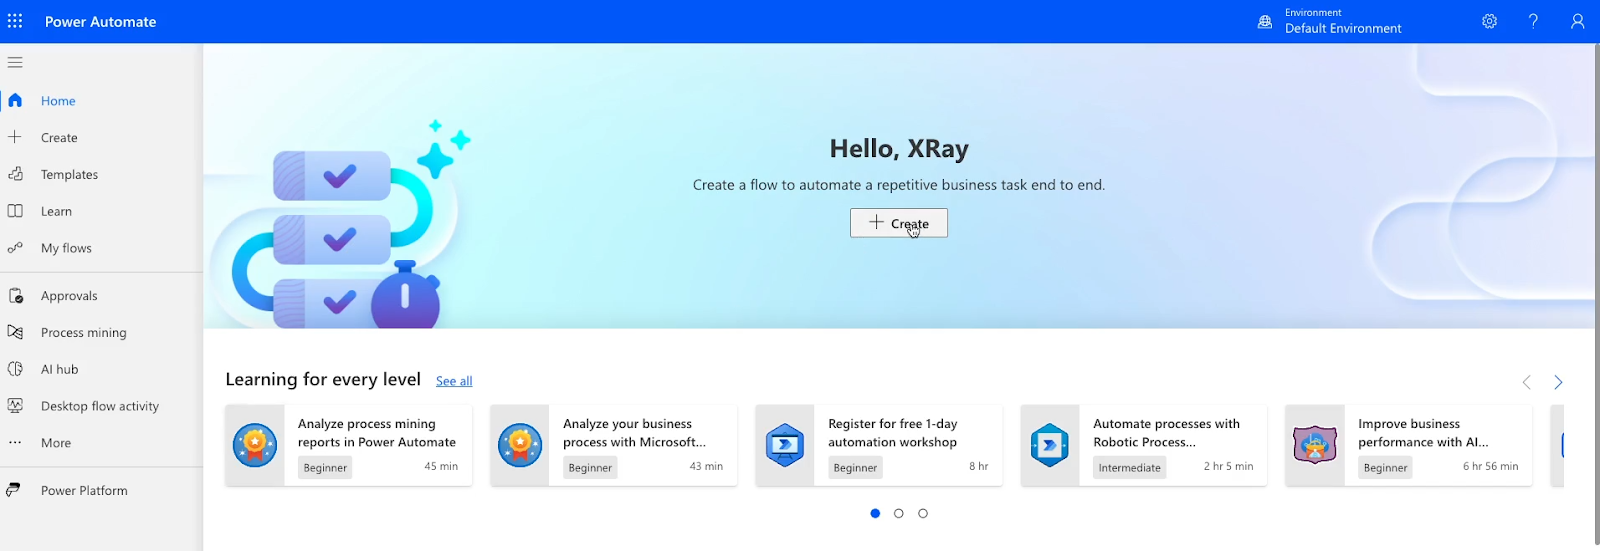
To create an automation that runs at a designated time, pick “Scheduled cloud flow”.

Then, give your flow a name.
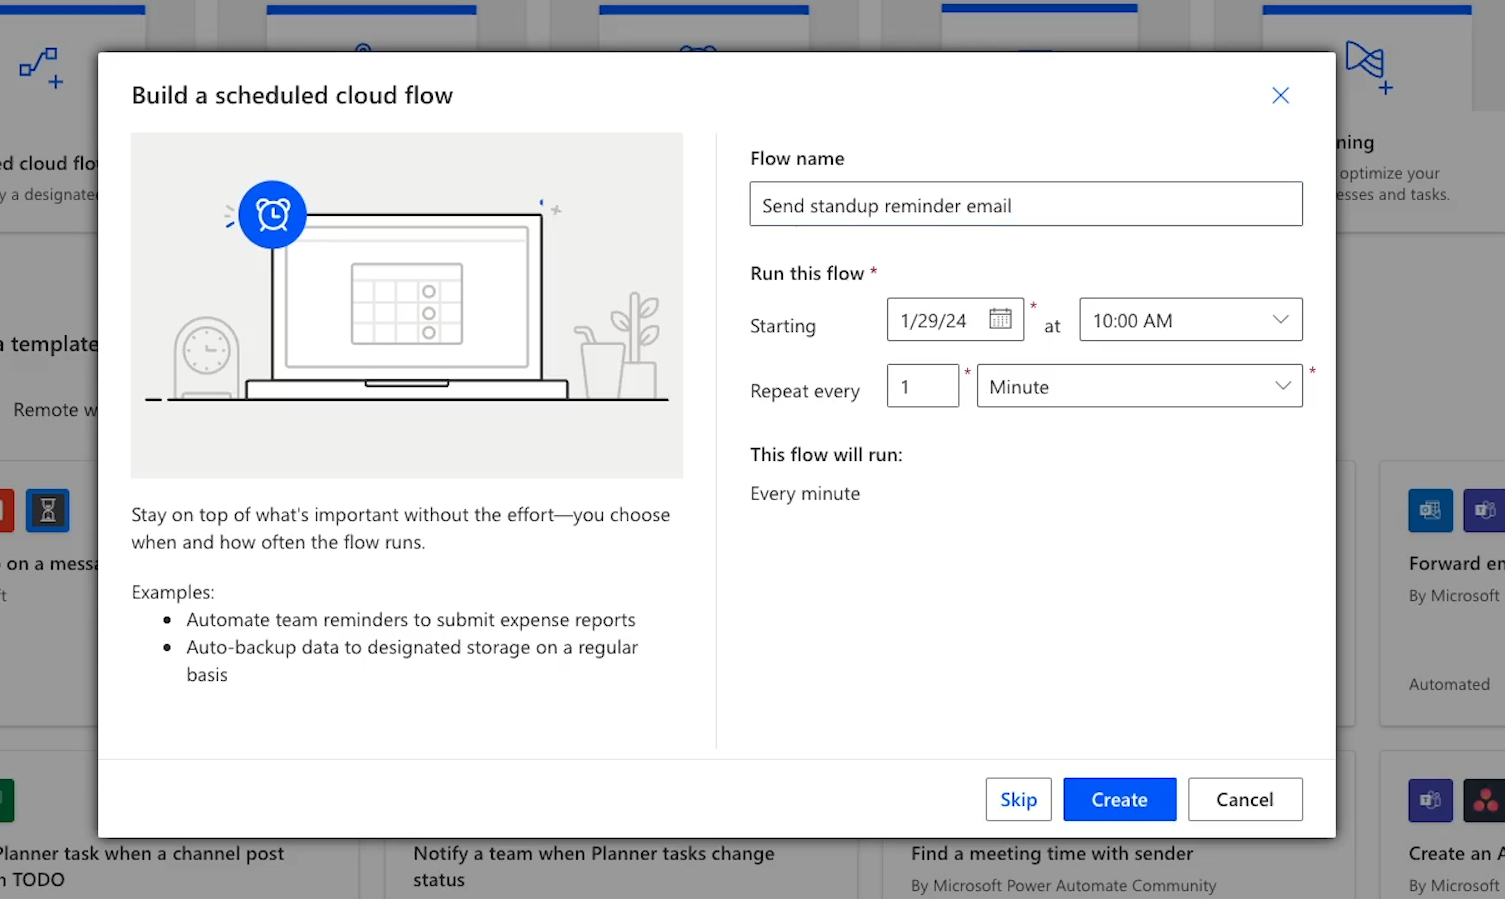
Under “Run this flow”, you can choose when your automation will start running. By default, it will start running immediately, but you can delay until later if you’d like.
Then, set how often the automation will run. It will default to running every 1 minute, but you can customize this to whatever you’d like.
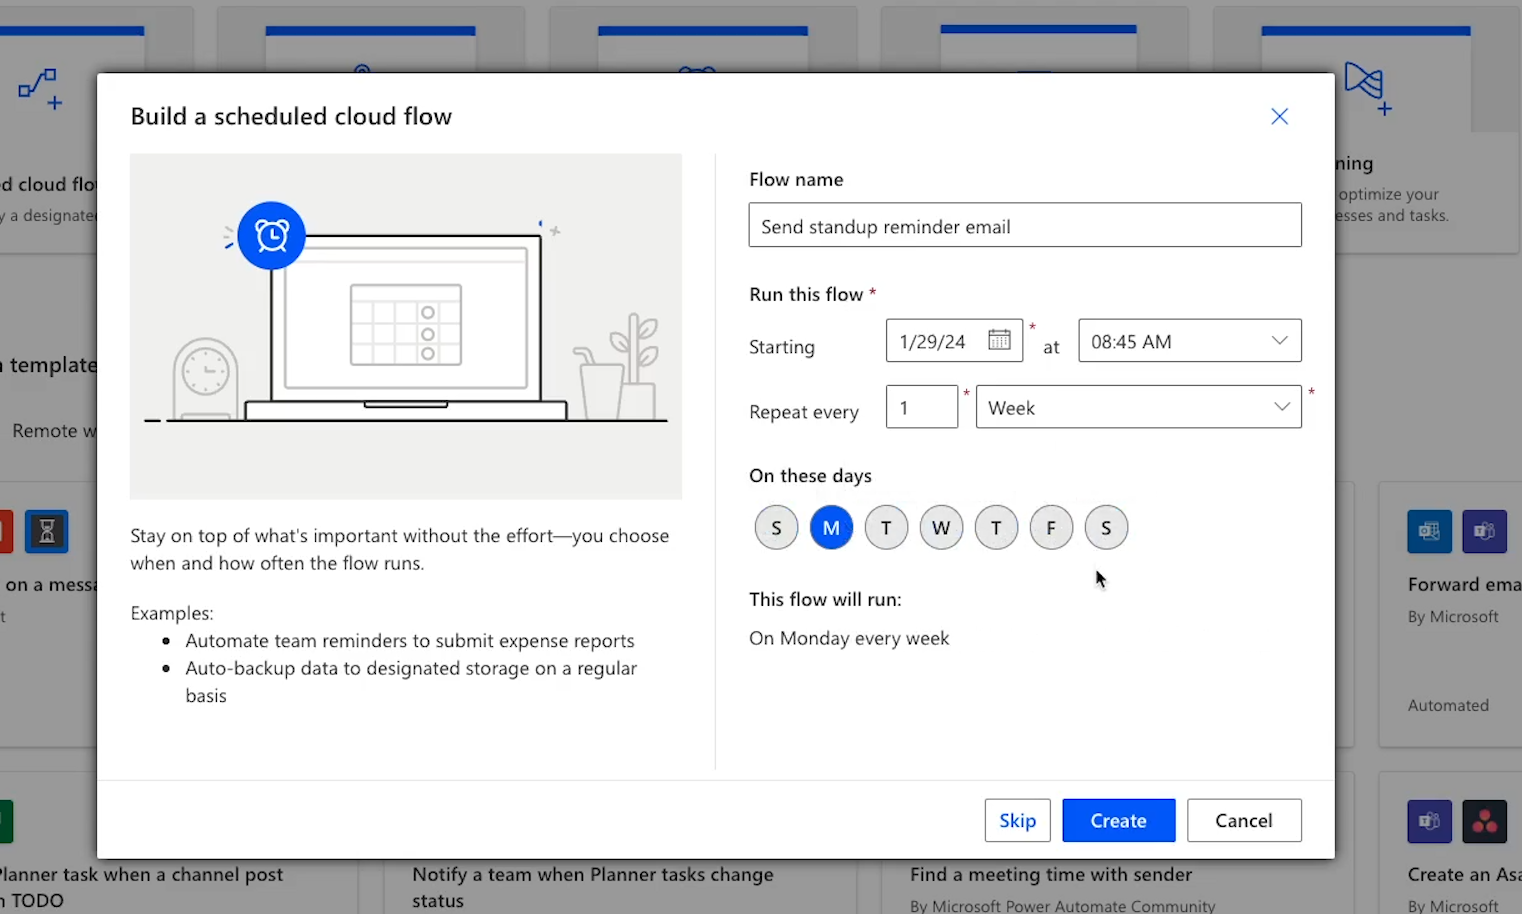
If you’re not sure, you can always just pick something for now and change it later.
Once you’re all set, click on “Create” to make a new flow with these basic settings.
Set your automation’s frequency
With the flow created, you’ll need to provide a little more detail about how often the automation will run in the “recurrence” step.

Your flow will already be set to run at whatever interval you specified when you created it, but can change its frequency here if you’d like, or further customize the schedule under “advanced options”.

For instance, you can specify the time zone, the days the automation will run, and the specific time the flow should run.
Note that you’ll need to set the hours and minutes separately for the time, and Power Automate uses a 24-hour clock.
So 8:45 AM would be “8” for the hours and “45” for the minutes. 3:15 PM would be “15” for the hours and “15” for the minutes.
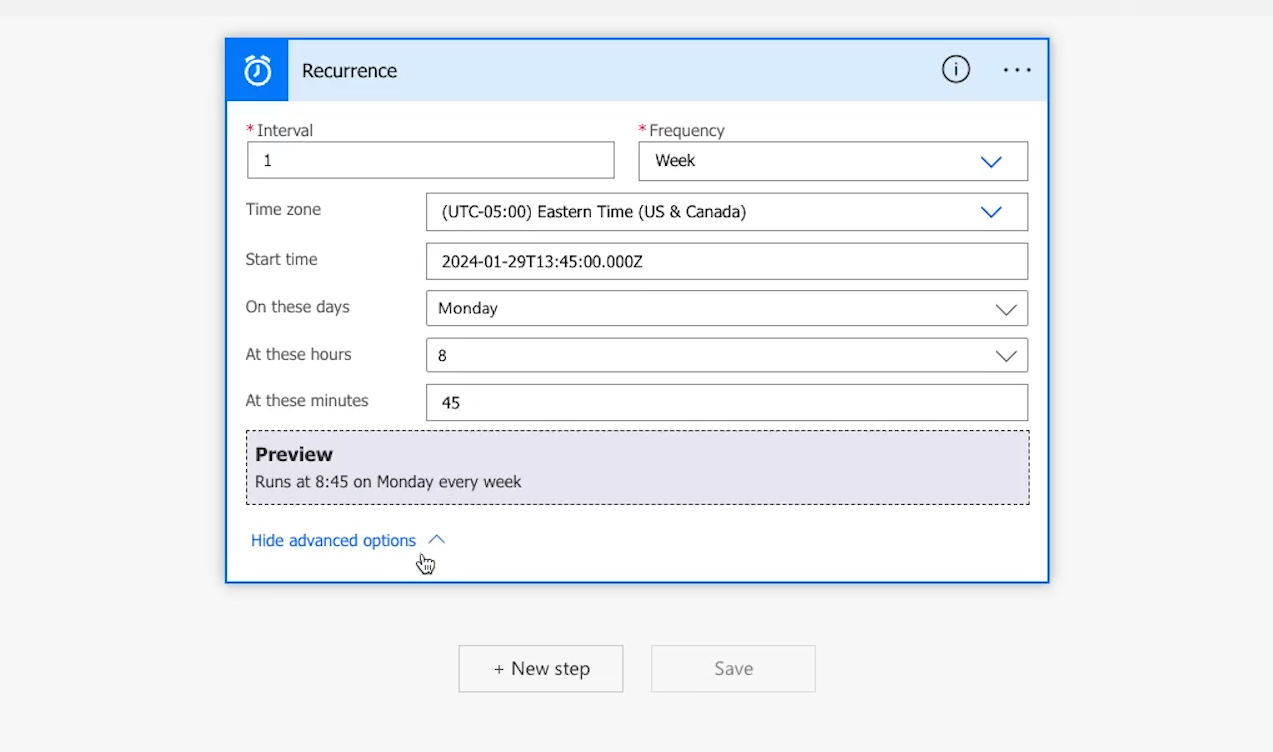
Add a “Send an Email” step to your flow
Once your “recurrence” schedule is set up, click on “New step” to add an automated action. This is where you’ll configure the email that gets sent out.
You’ll be prompted to choose an operation. Search for the name of the app you want to automate. In this case, that will be Outlook.
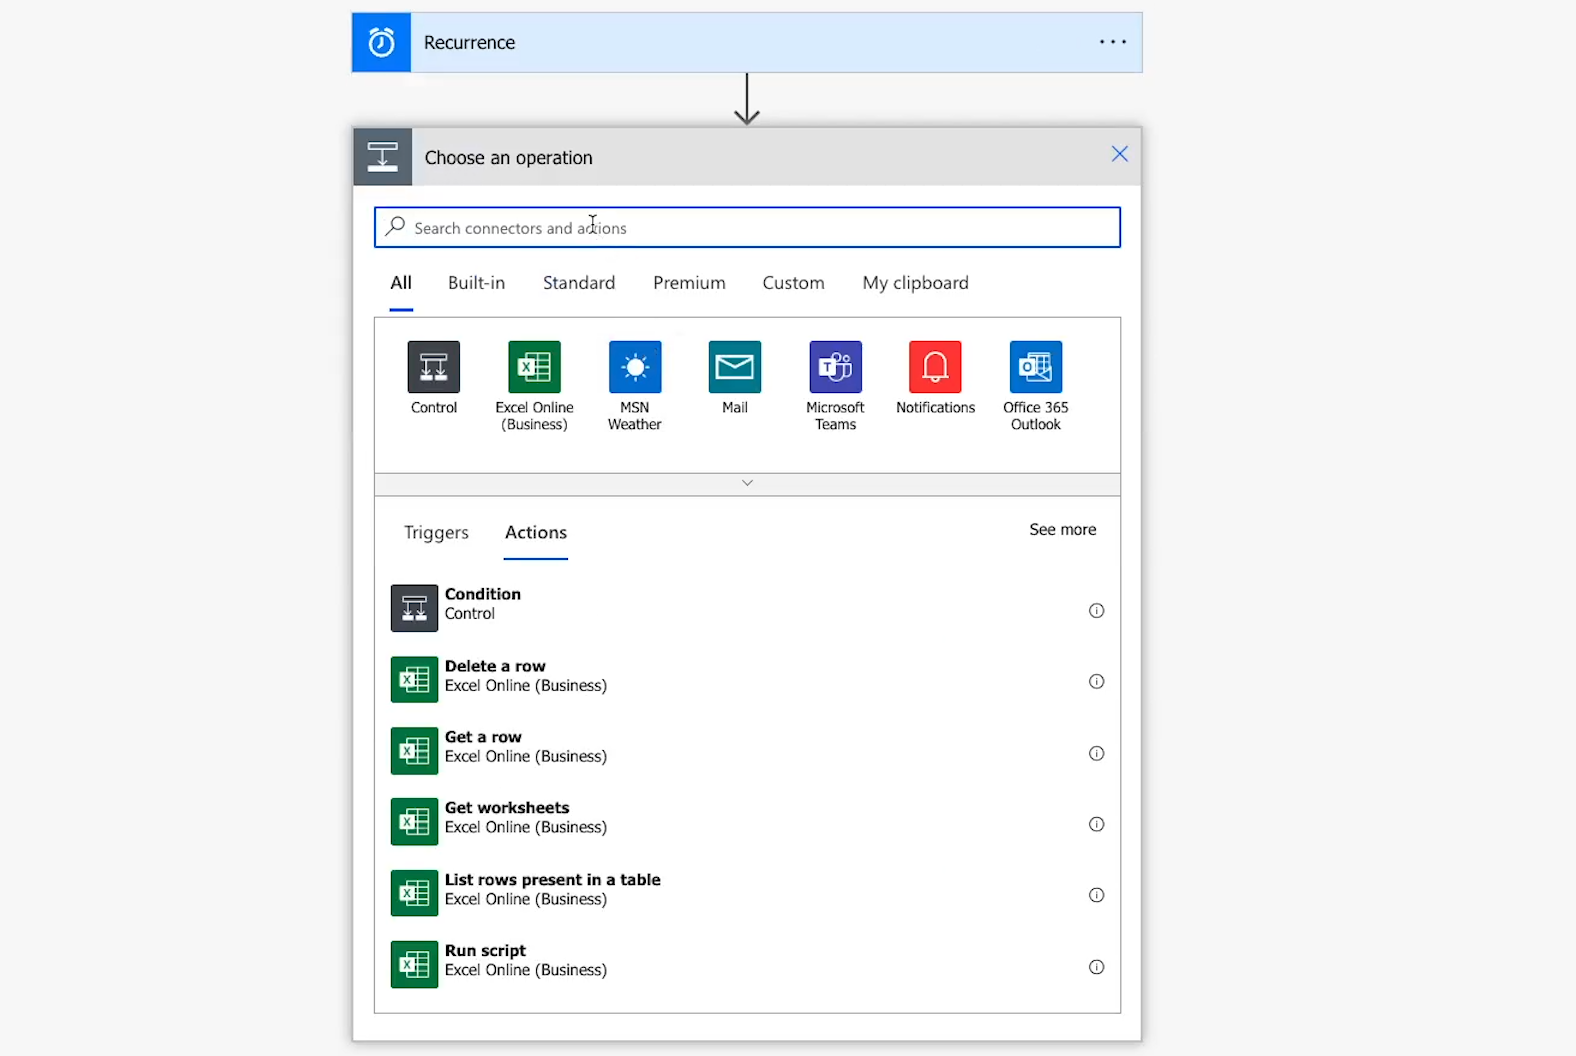
Pick “Outlook.com” from the list of results.

Next, you need to choose a specific action to perform with this app. Select “Send an email”.
Once you’ve chosen your action, you’ll be prompted to sign in to your Outlook account to authorize it here in Power Automate.
Sign in, then click on ‘Accept’ to allow Power Automate to view and automate your Outlook data.
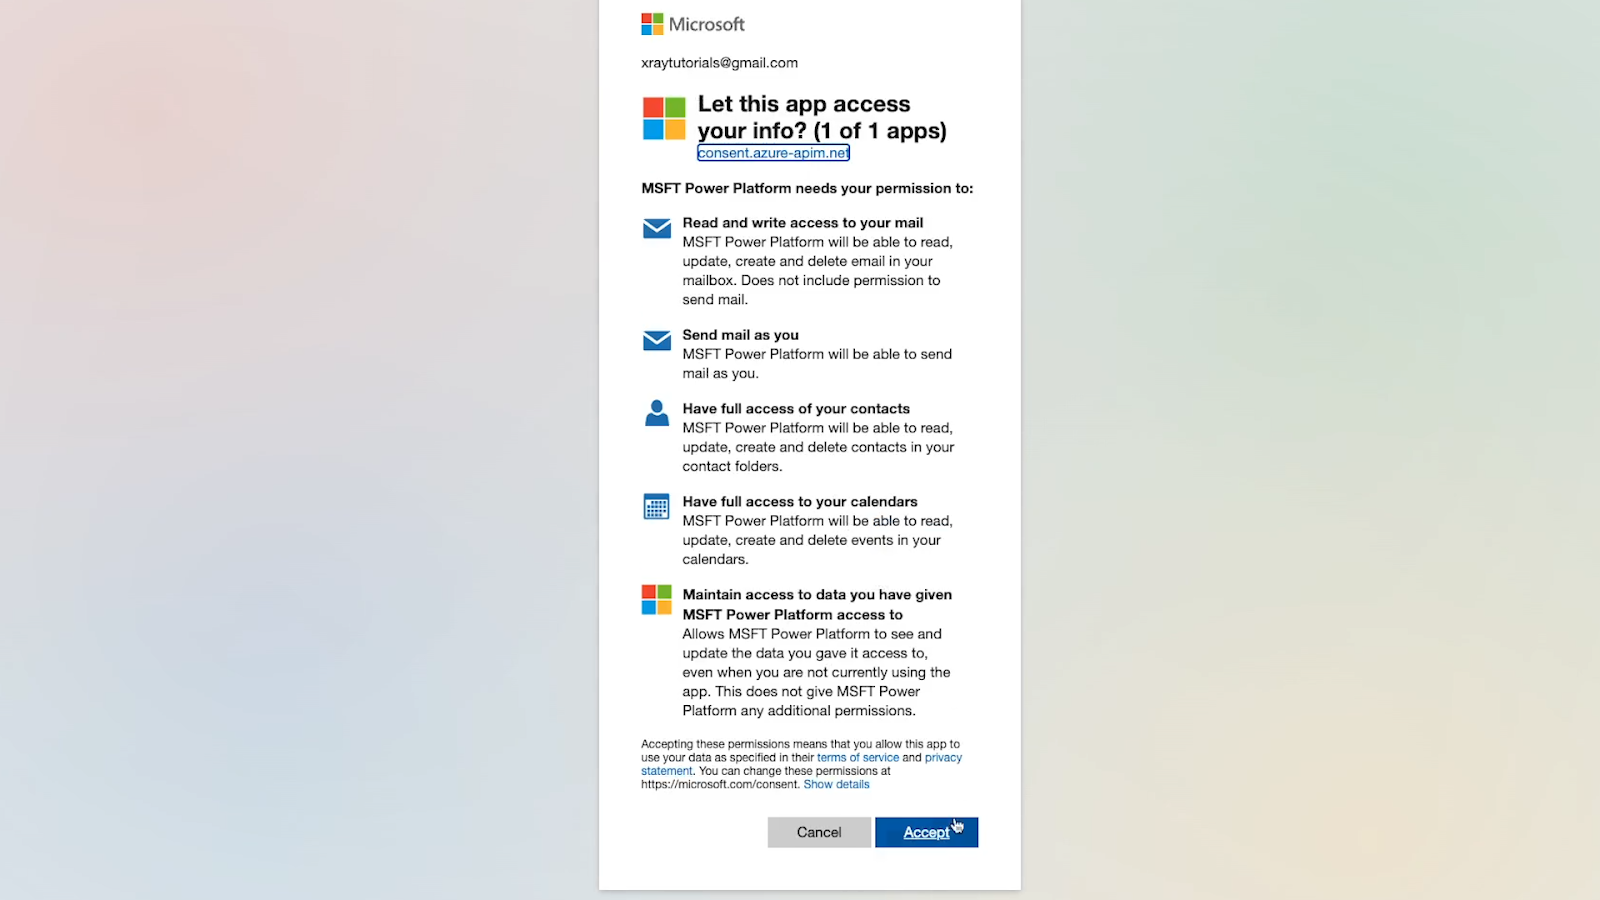
Compose your scheduled email in Power Automate
Now, you just have to compose the email that you want to send. Fill out the “to” field, the subject, and the body with whatever you’d like.

To begin with, you should make sure to send it to an email address that you have access to for easy testing. You can always change it to your actual desired recipient later.
In the body, you can write and style text just like you would in the normal Outlook email client. For example, in the image below we’ve applied a bold style to the start time in our message.
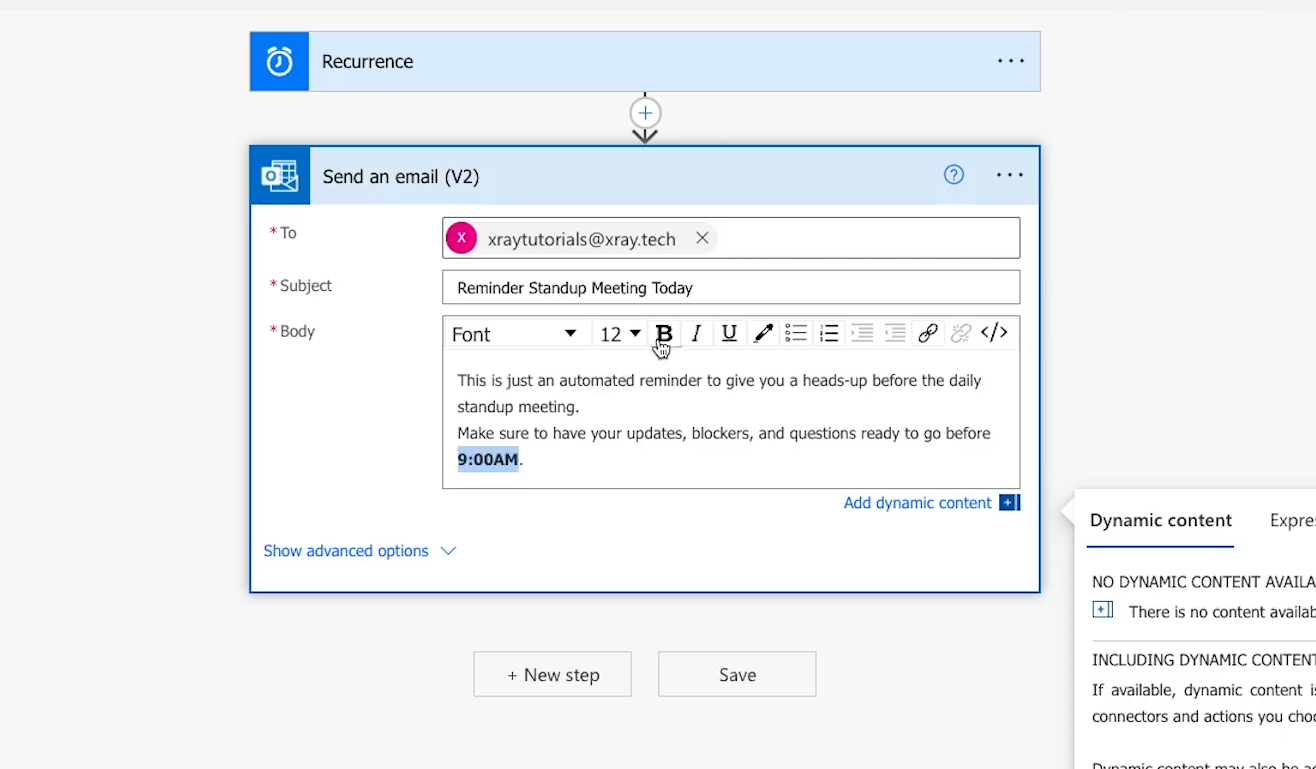
If you’d like to access other options such as adding a BCC, uploading attachments, or setting a different “From” name, you can find those and more under “show advanced options”.
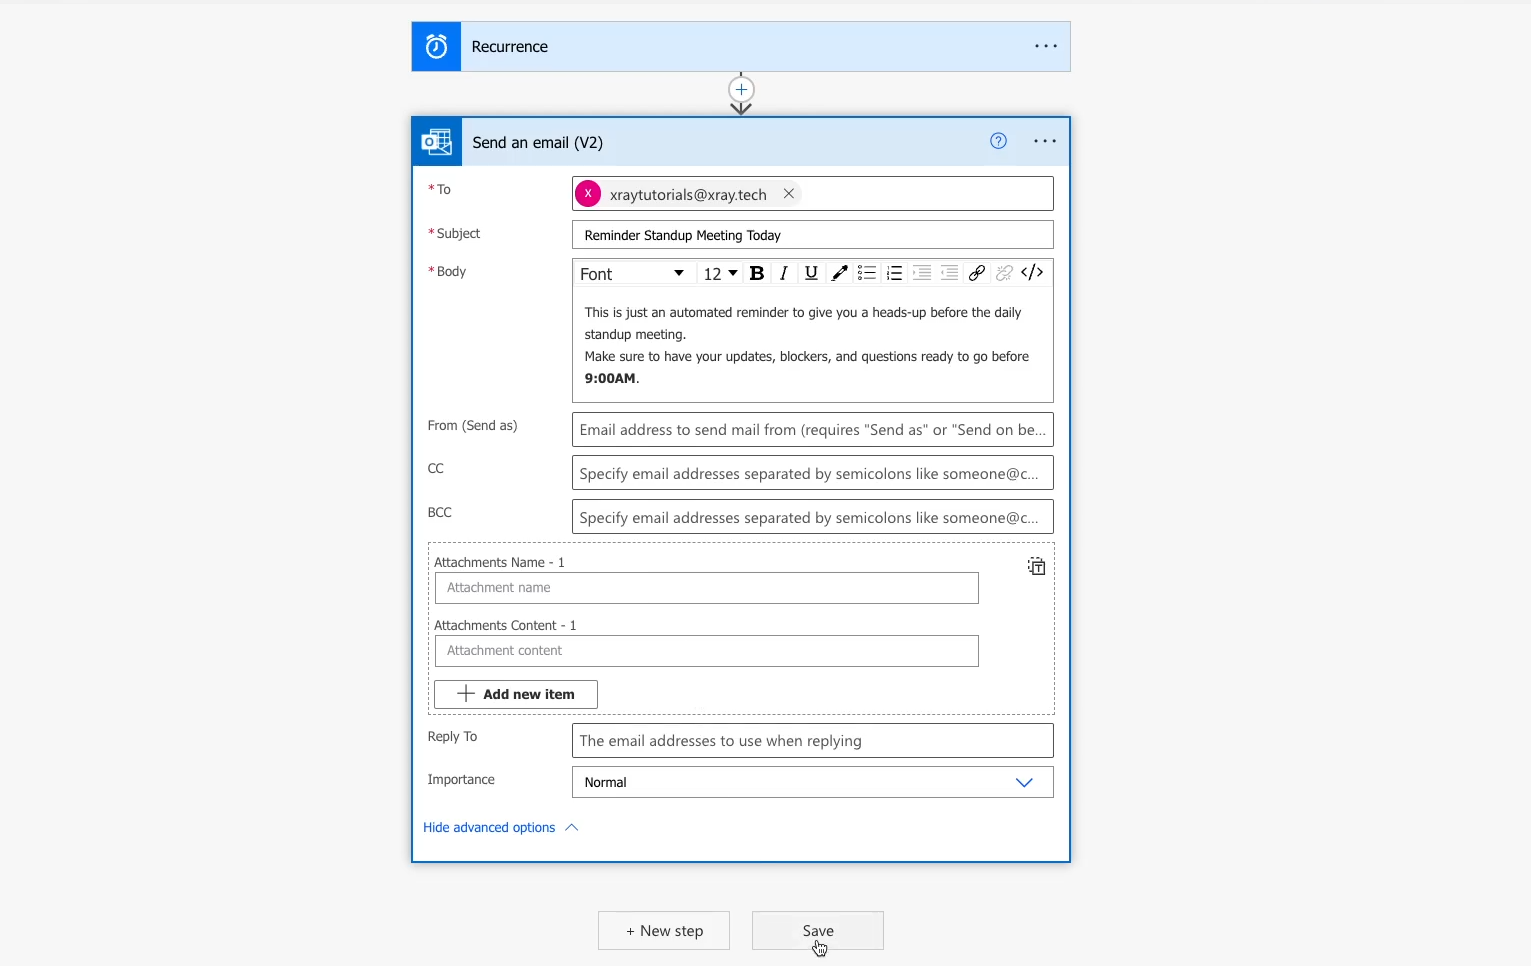
Once your email is all set, click on “save” to finalize your settings.
Test your automated flow
When you save your configured action, you’ll see a green notification banner at the top of the flow editor encouraging you to test your automation.
Click on “Test” in the top right to run a manual test.
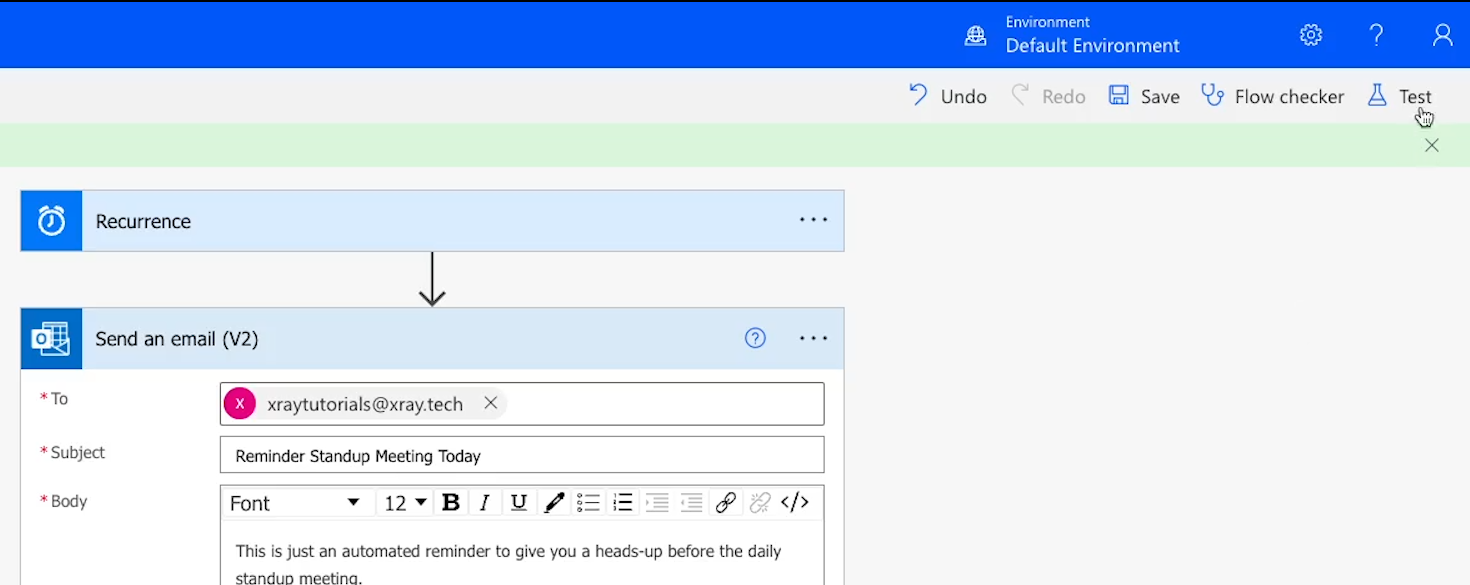
This will let you run your configured action and will actually send an email, so make sure it’s set to send to an appropriate address.
Check “Manually”, and click on “Test”
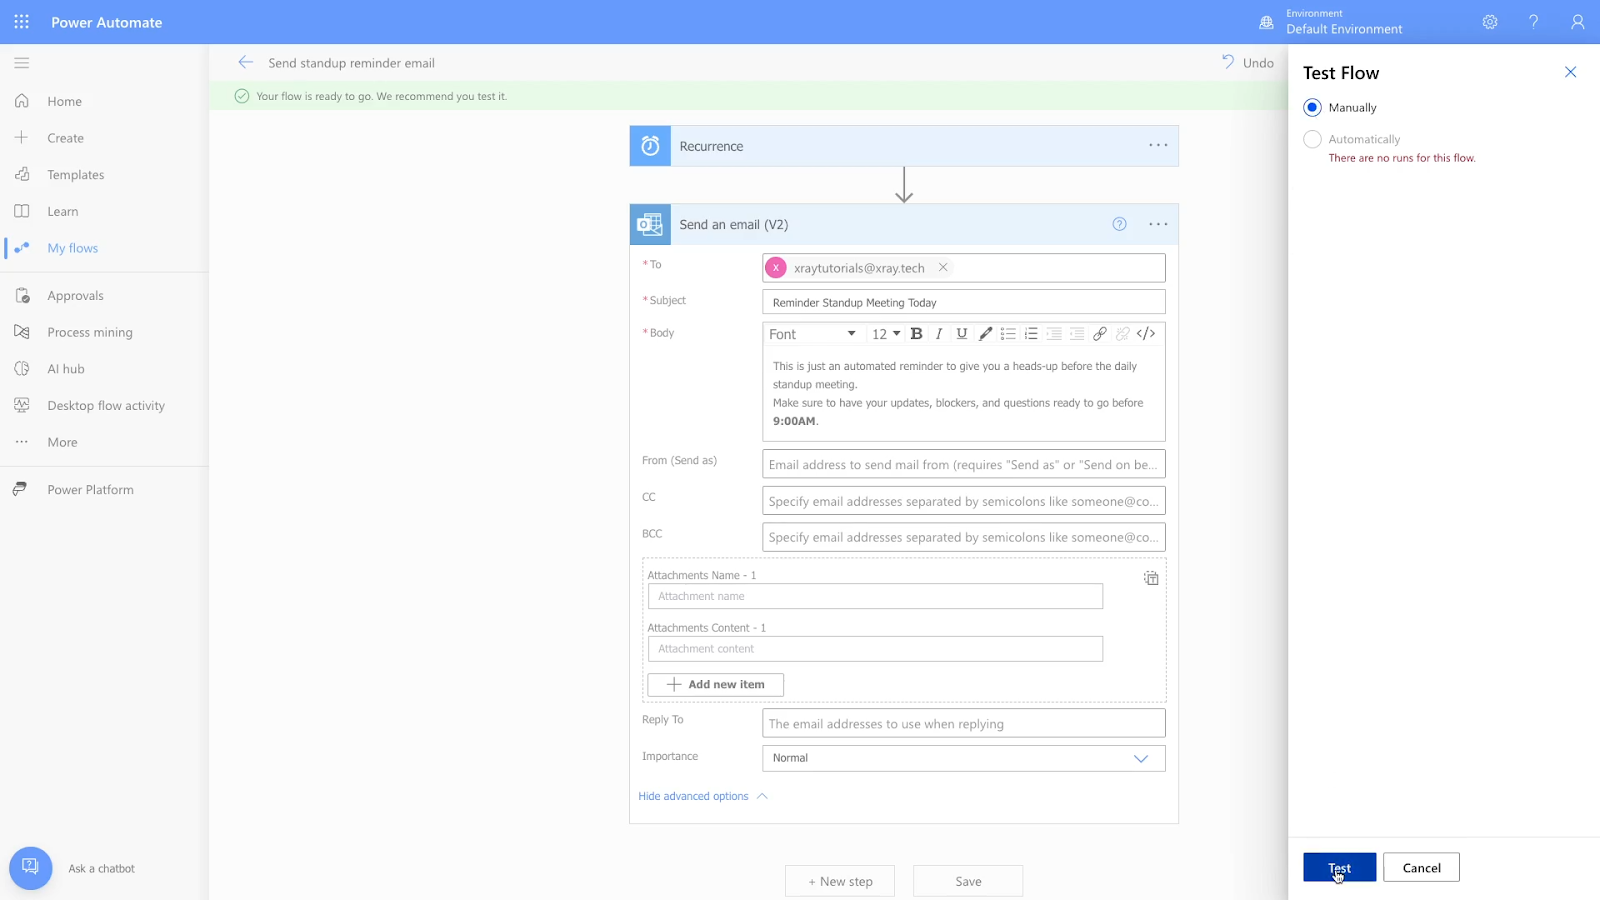
Then, click “Run Flow” to initiate the test.
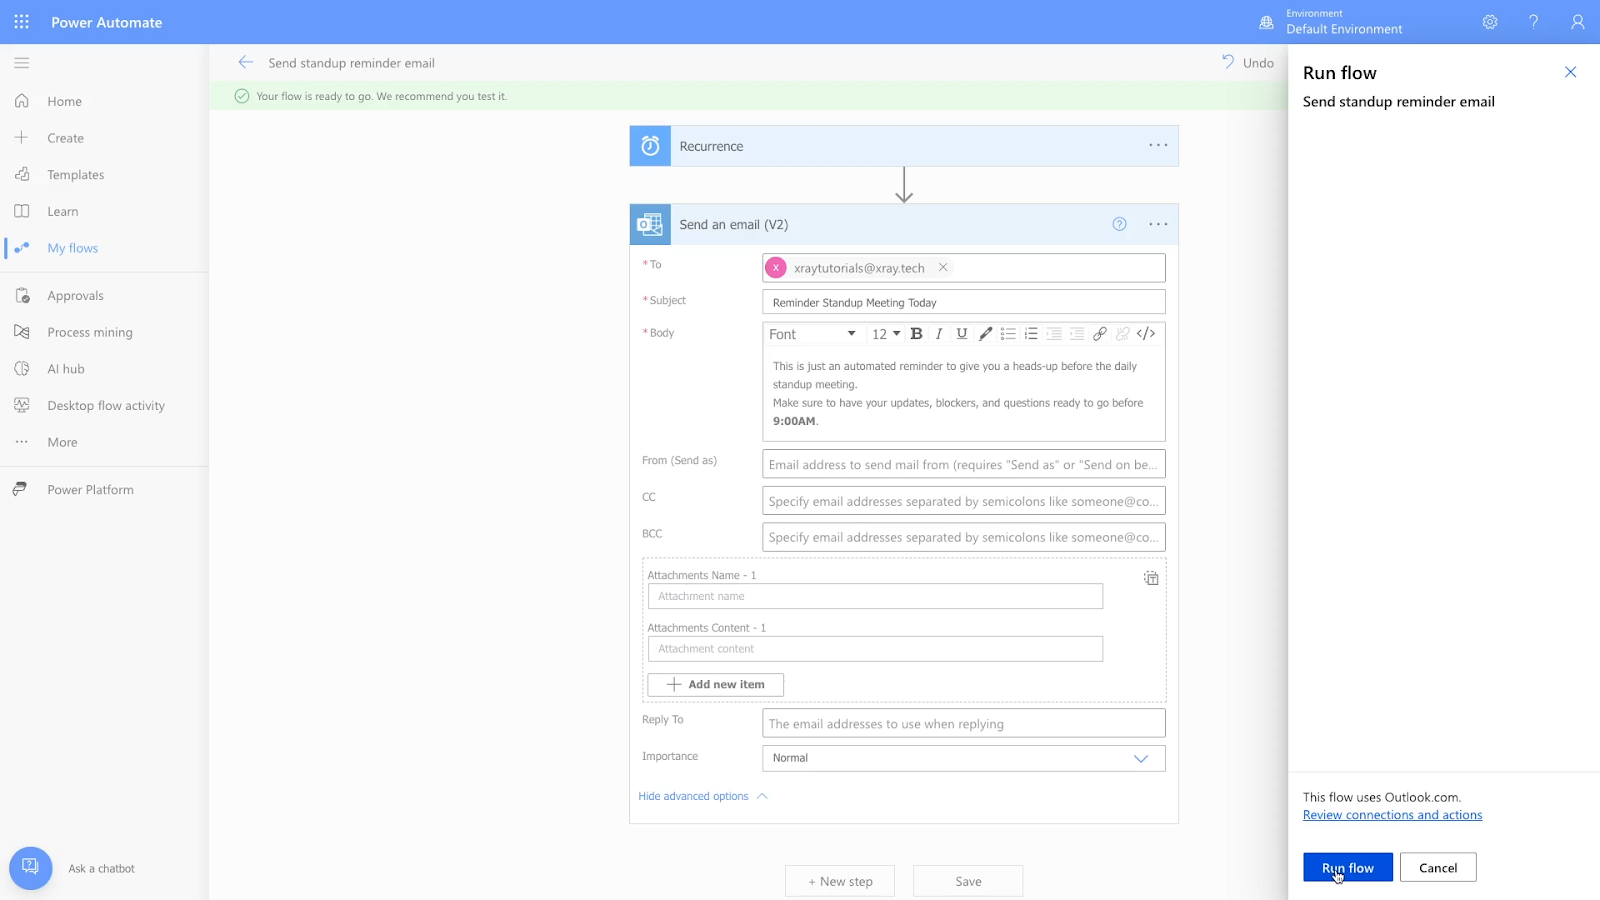
Power Automate should indicate that the test was successful. You can click “done” to dismiss the message.
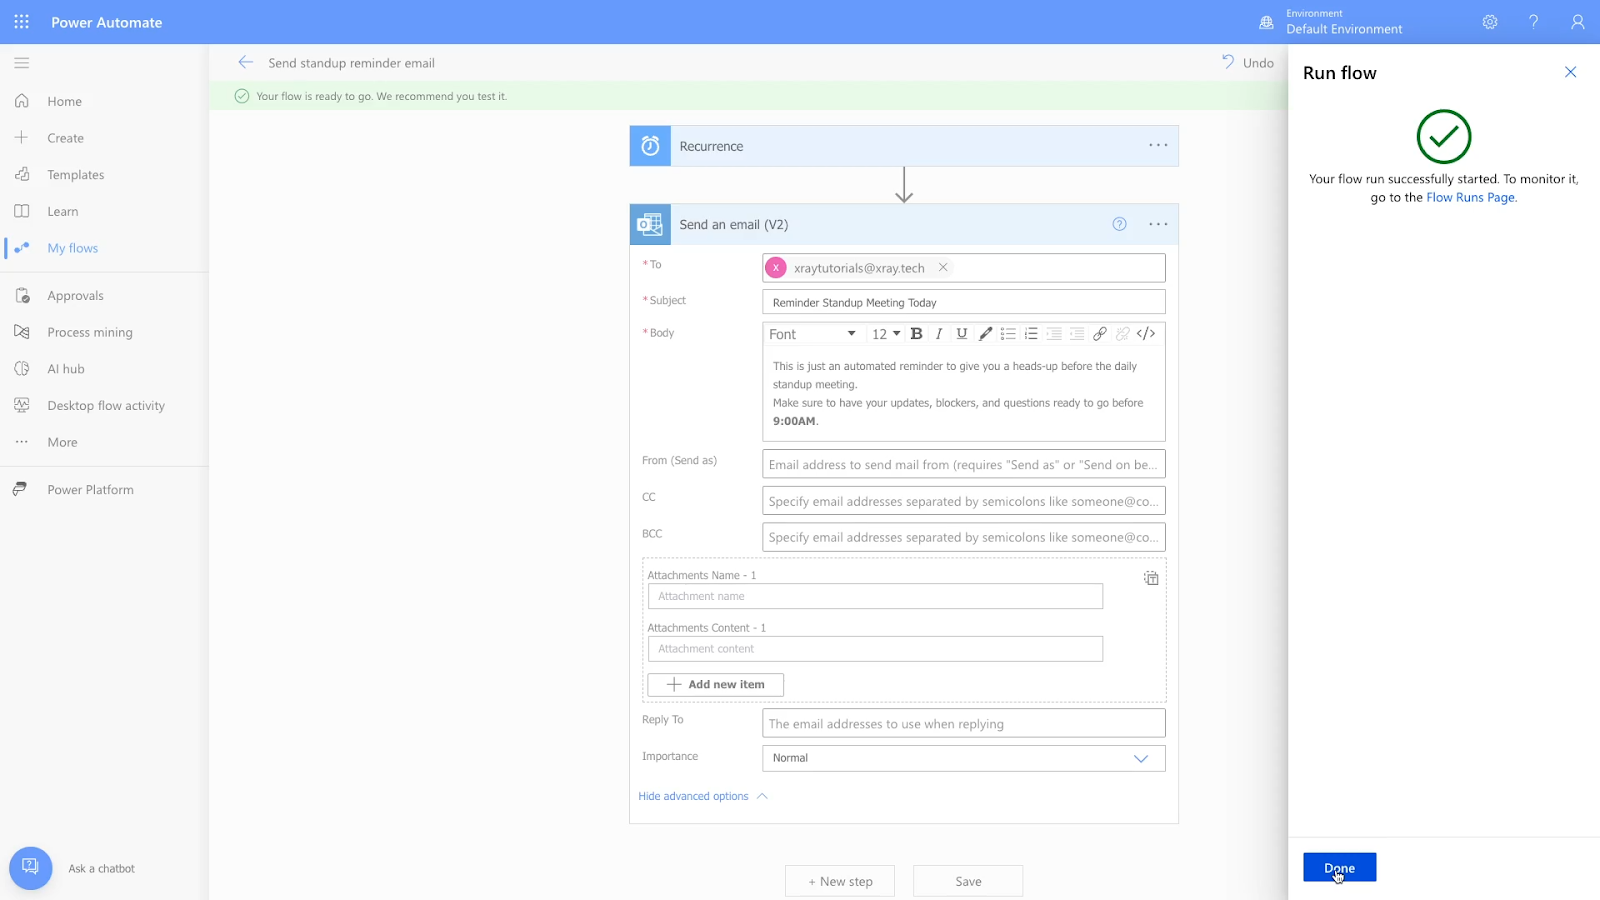
To ensure that your test ran correctly, check your inbox for the new message.
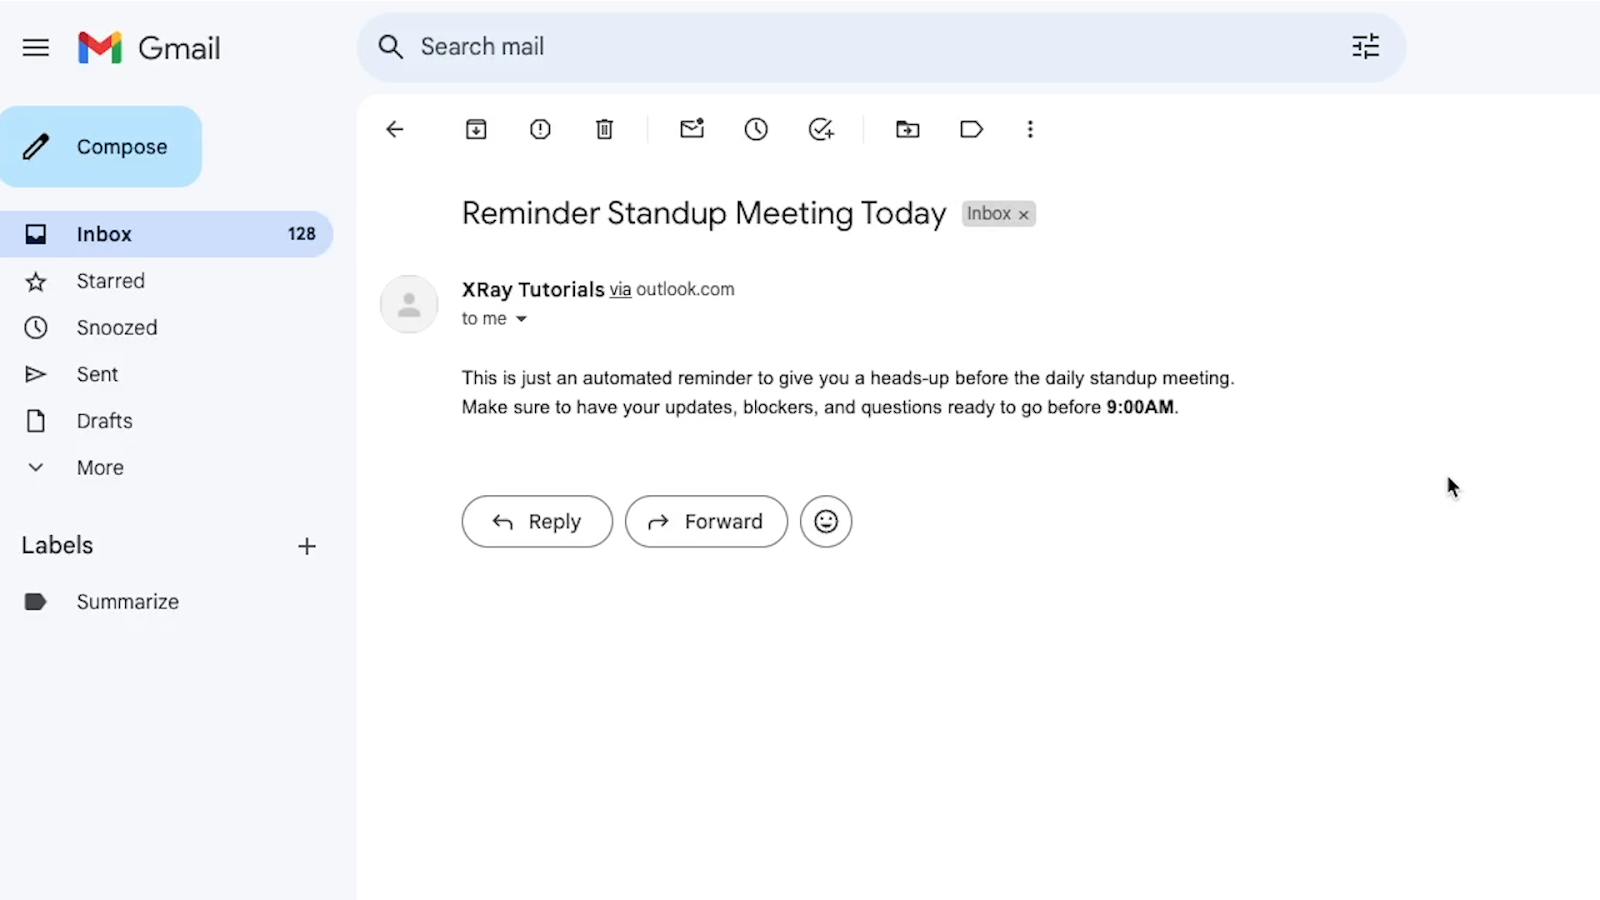
Managing a flow in Power Automate
You should note that any flow with fully configured, saved steps like this one will be automatically set to “On”.
That means it will run as scheduled every week until you update it, or turn it off.
If you’d like to manage your flows at any time, just click on “My flows” in the left hand menu.
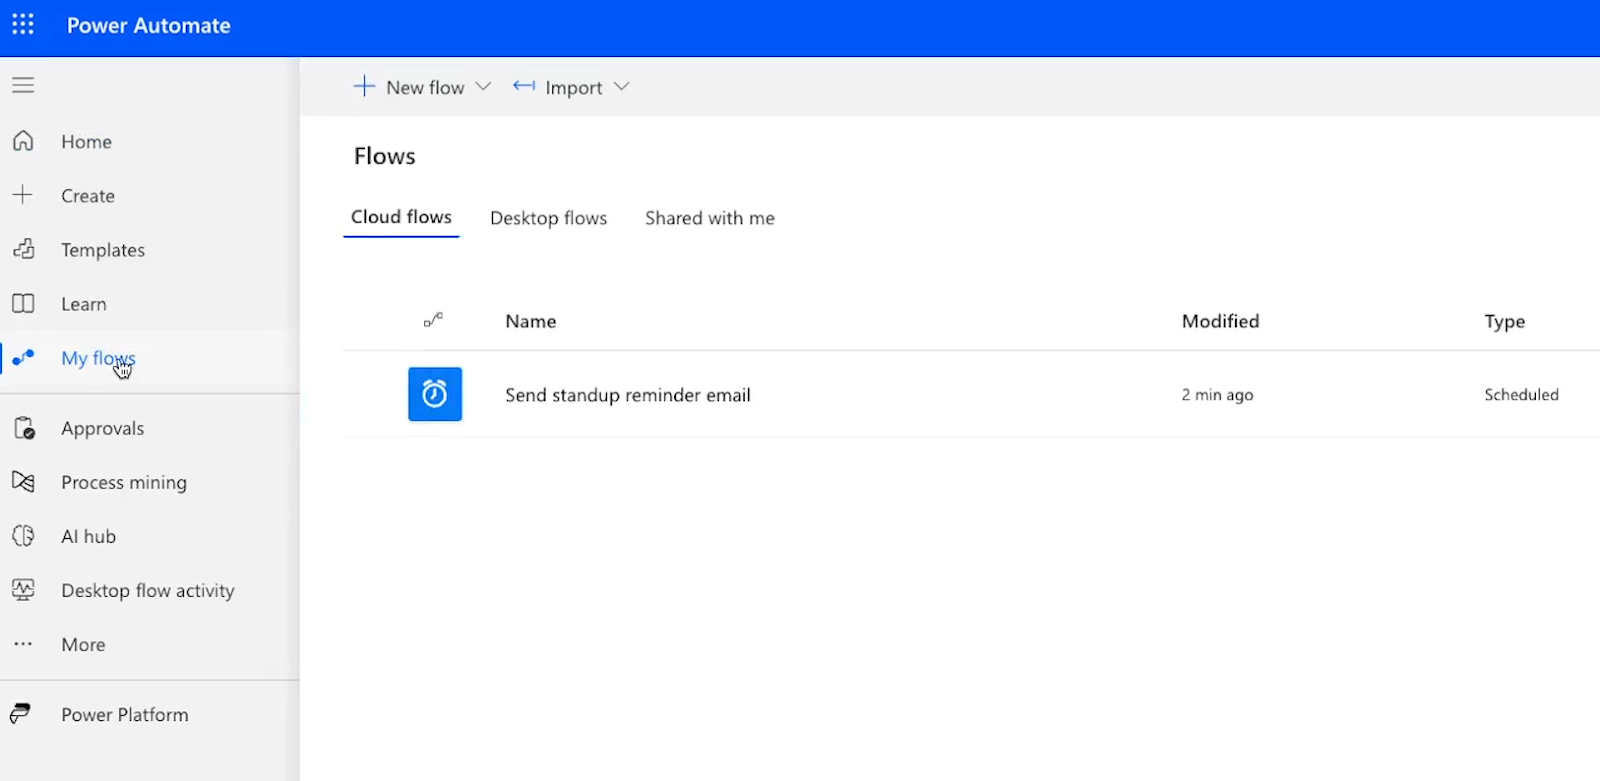
From there, you’ll see a full list of all your flows. You can hover over any of them to see several options.
For instance, you can click on the pencil icon to edit the flow.
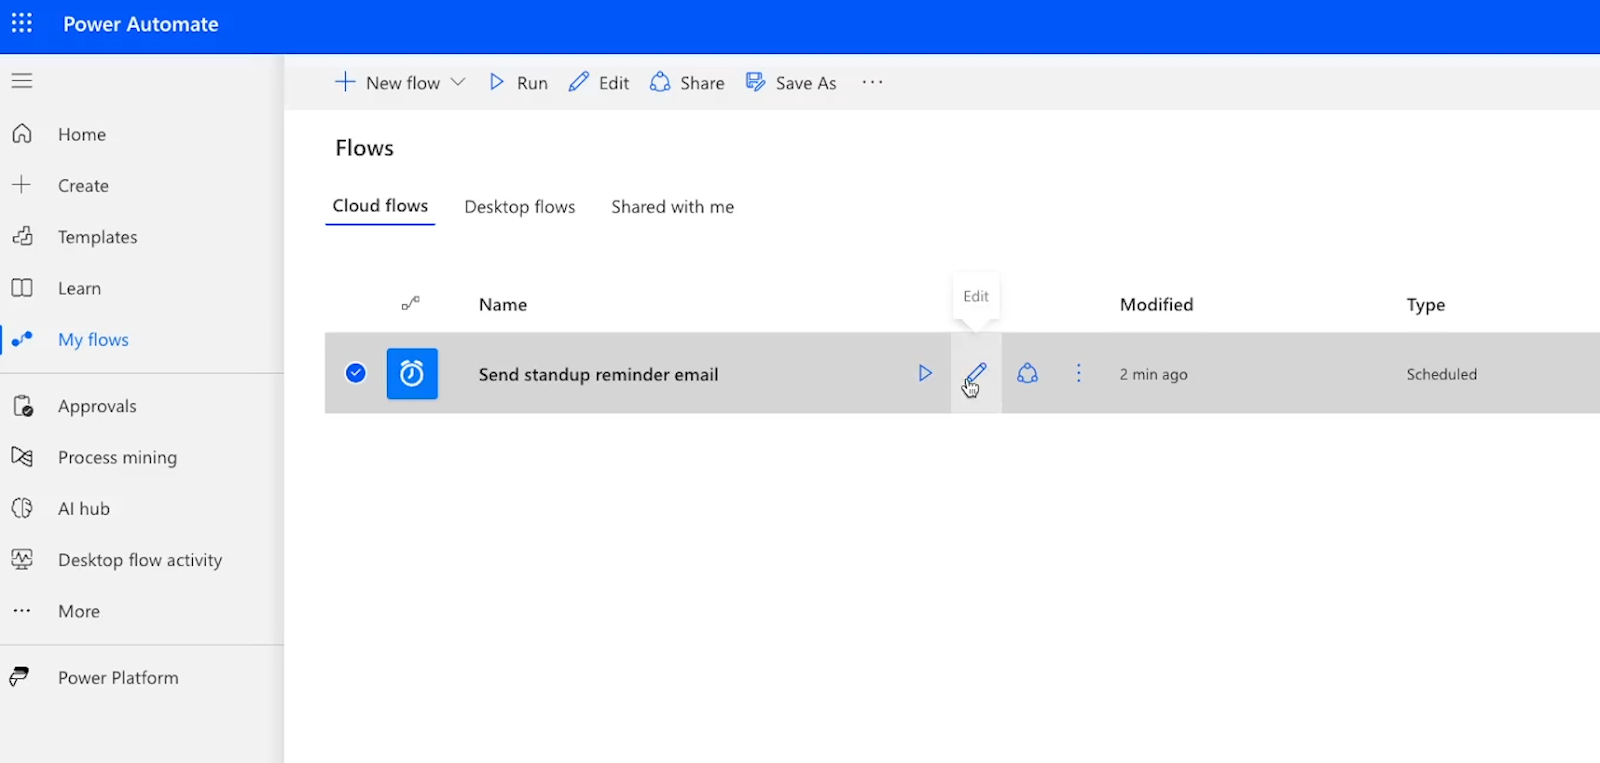
You can also click on the three dots to see more options, like “Run history” and “turn off”.
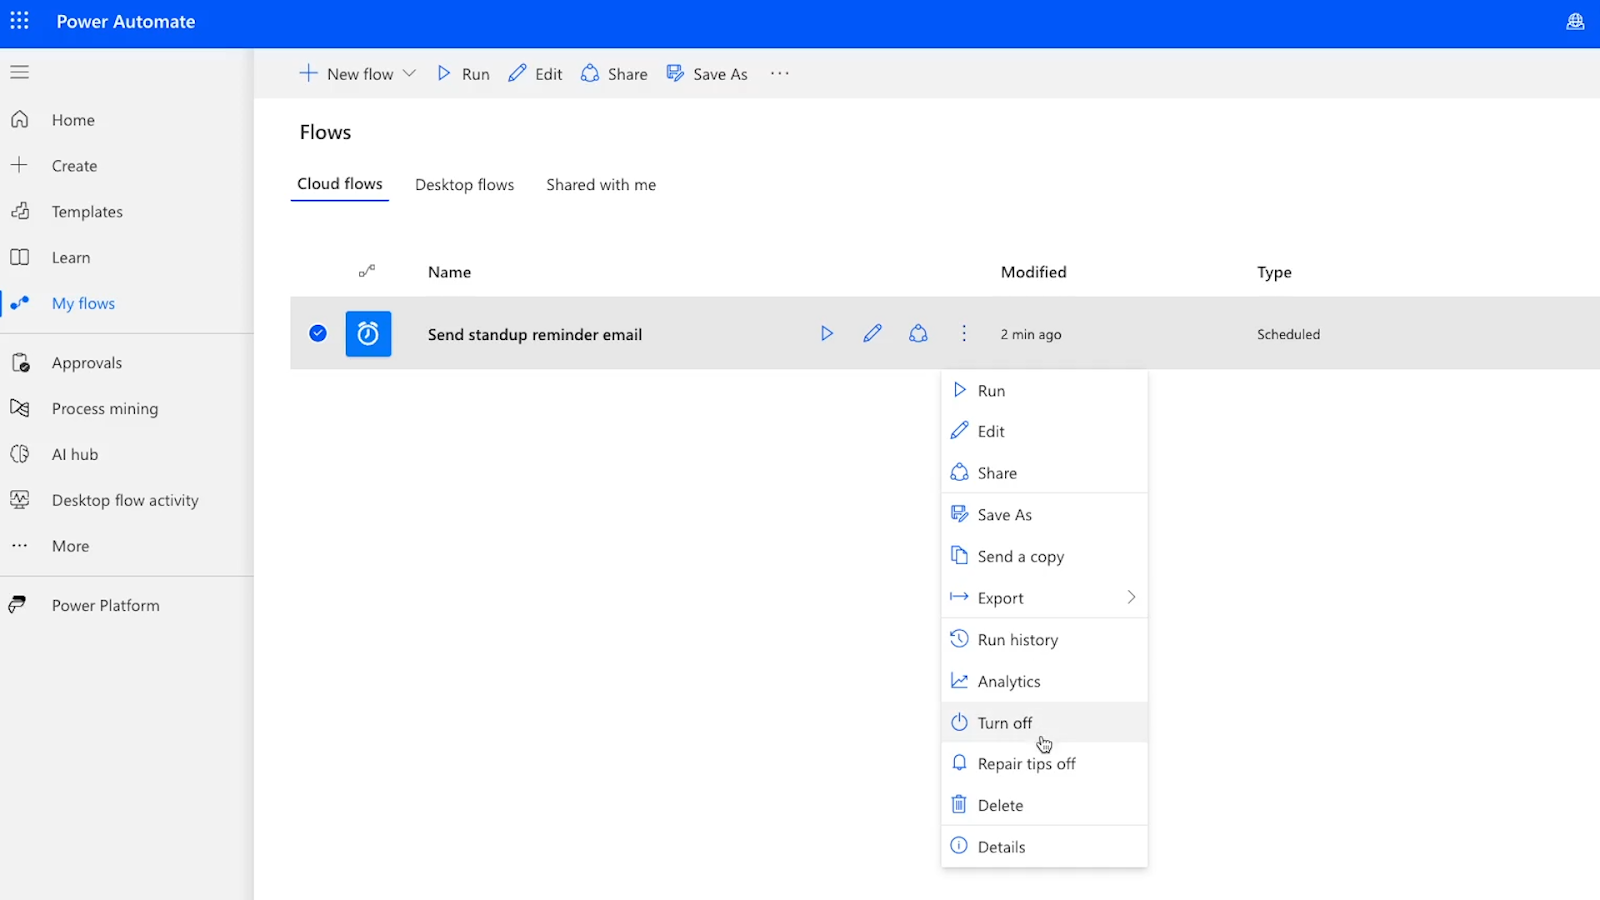
If you’re building a test automation just to figure out how Power Automate works, you’ll probably want to turn it off so you don’t send and receive a bunch of junk messages.
Alternative: Automate Recurring Gmail Emails in Zapier
Simple automations like this can be built in virtually any automation provider, and can use nearly any email service. Power Automate is a great choice if you’re already invested in Microsoft’s ecosystem, and if you only want to build relatively simple automations, its free plan is all you need.
But if you’re already automating your work with another provider like Zapier, you could easily create an identical workflow there, too, and you could swap out Outlook for Gmail.
We’ll quickly show you how that works. If you’d like to learn more details about building automations in Zapier, check out our Zapier Beginner’s Guide.
Create a “Schedule” trigger
Create a new Zap, and choose “Schedule by Zapier” as the trigger. Then, set the “Event” to your desired frequency (e.g., every week, every day, etc.)

Next, identify the precise time you want the automation to run. For a weekly automation, you’ll need to pick the day of the week and the time of day for the automation to run.
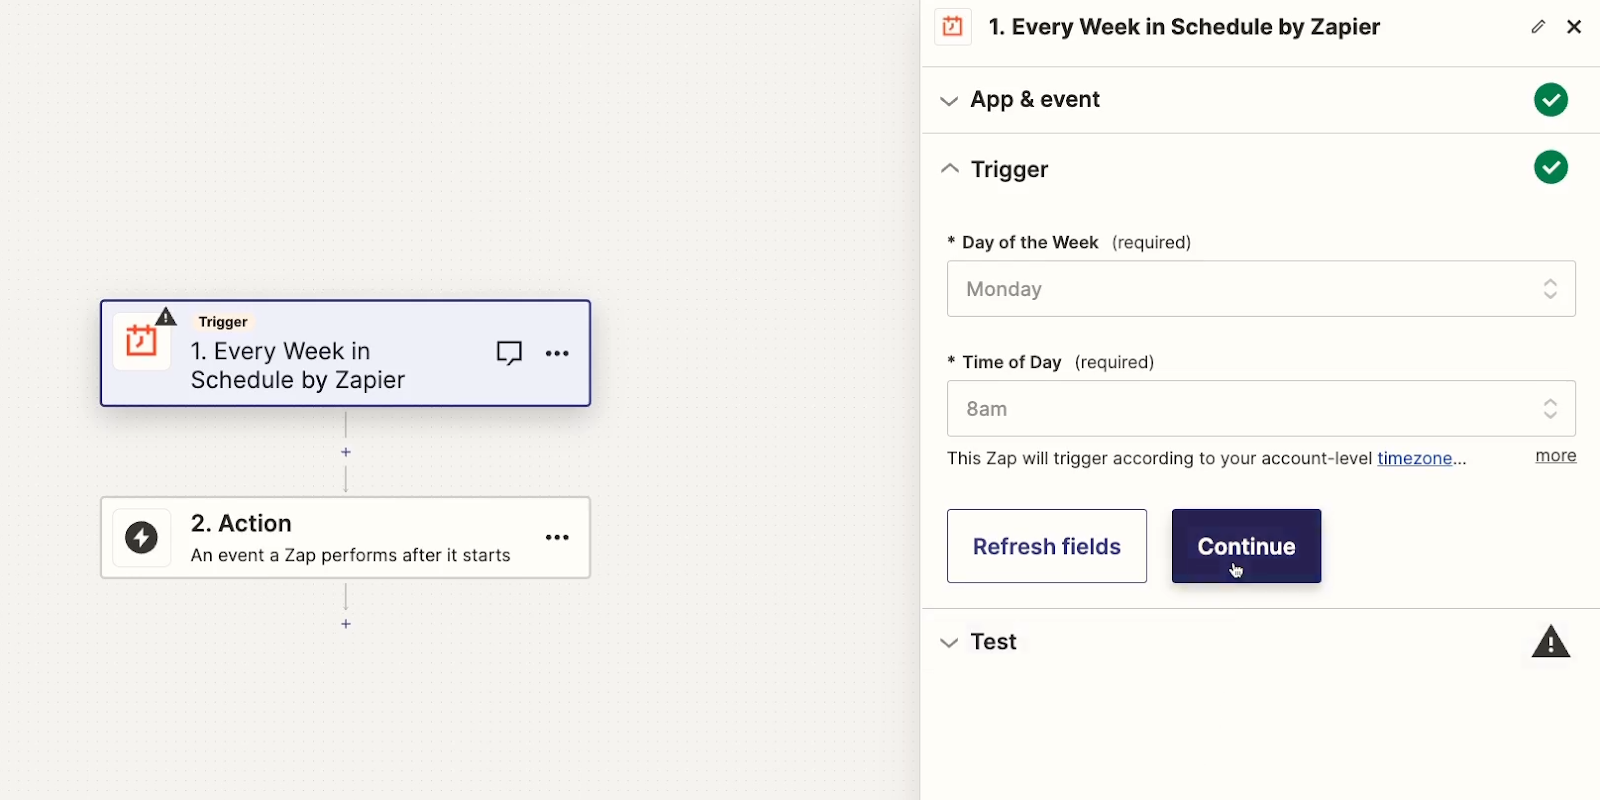
Then, run a test to retrieve a sample date that Zapier can work with.

Add an automated “Send email” step
With the trigger all set, you can add a Gmail action to send the email. Pick “Send email as the event, and sign in to Gmail.

Zapier gives you many more options upfront than Power Automate does. However, most of these are optional. The only strictly required fields are the “To” field, the subject, and the body.

Unfortunately, there aren’t any easy ways to easily style body text in Zapier. Your only choices are plain text, or to use HTML and style everything directly using HTML tags.
Test your Zap
Once you’ve configured your email, you can test the step in Zapier.
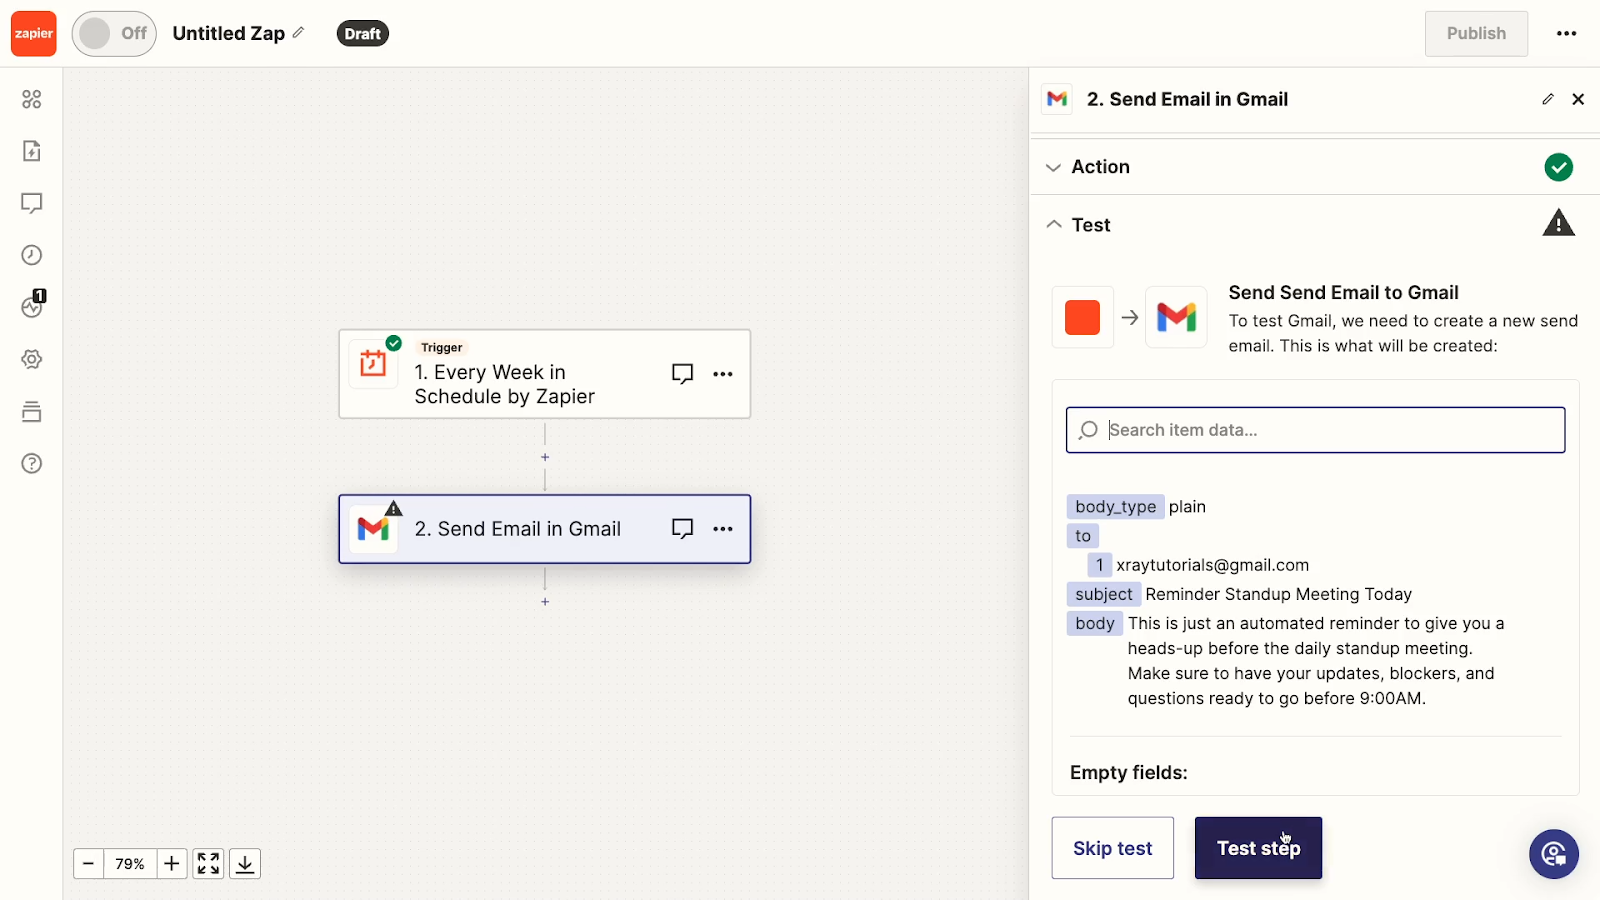
A successful test will send an email to the address you specified, and return some data about the email that was sent.
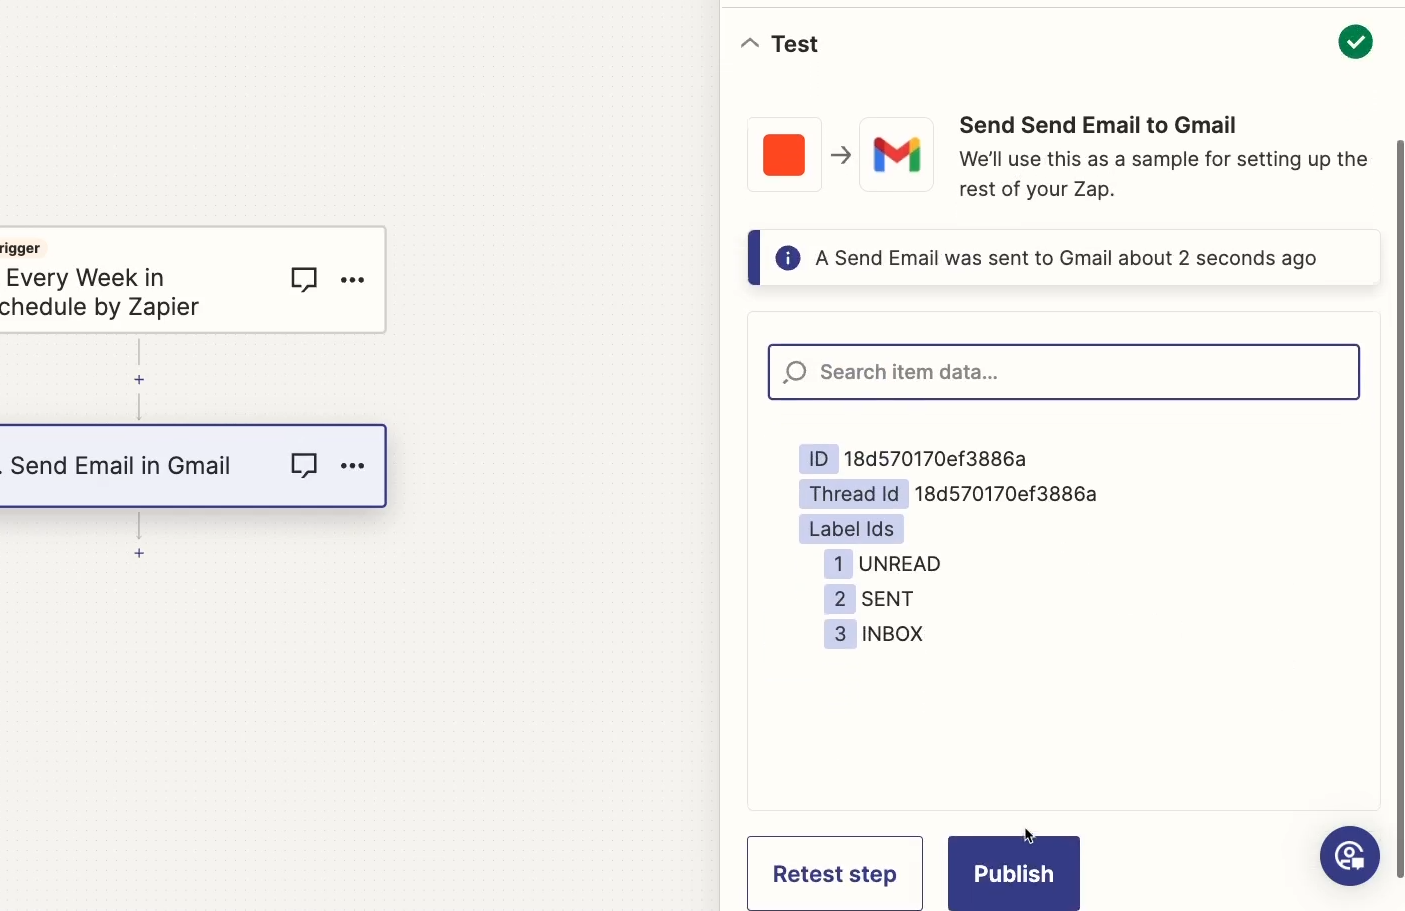
Just like with Power Automate, it’s best to confirm that the email was correctly sent to your inbox.
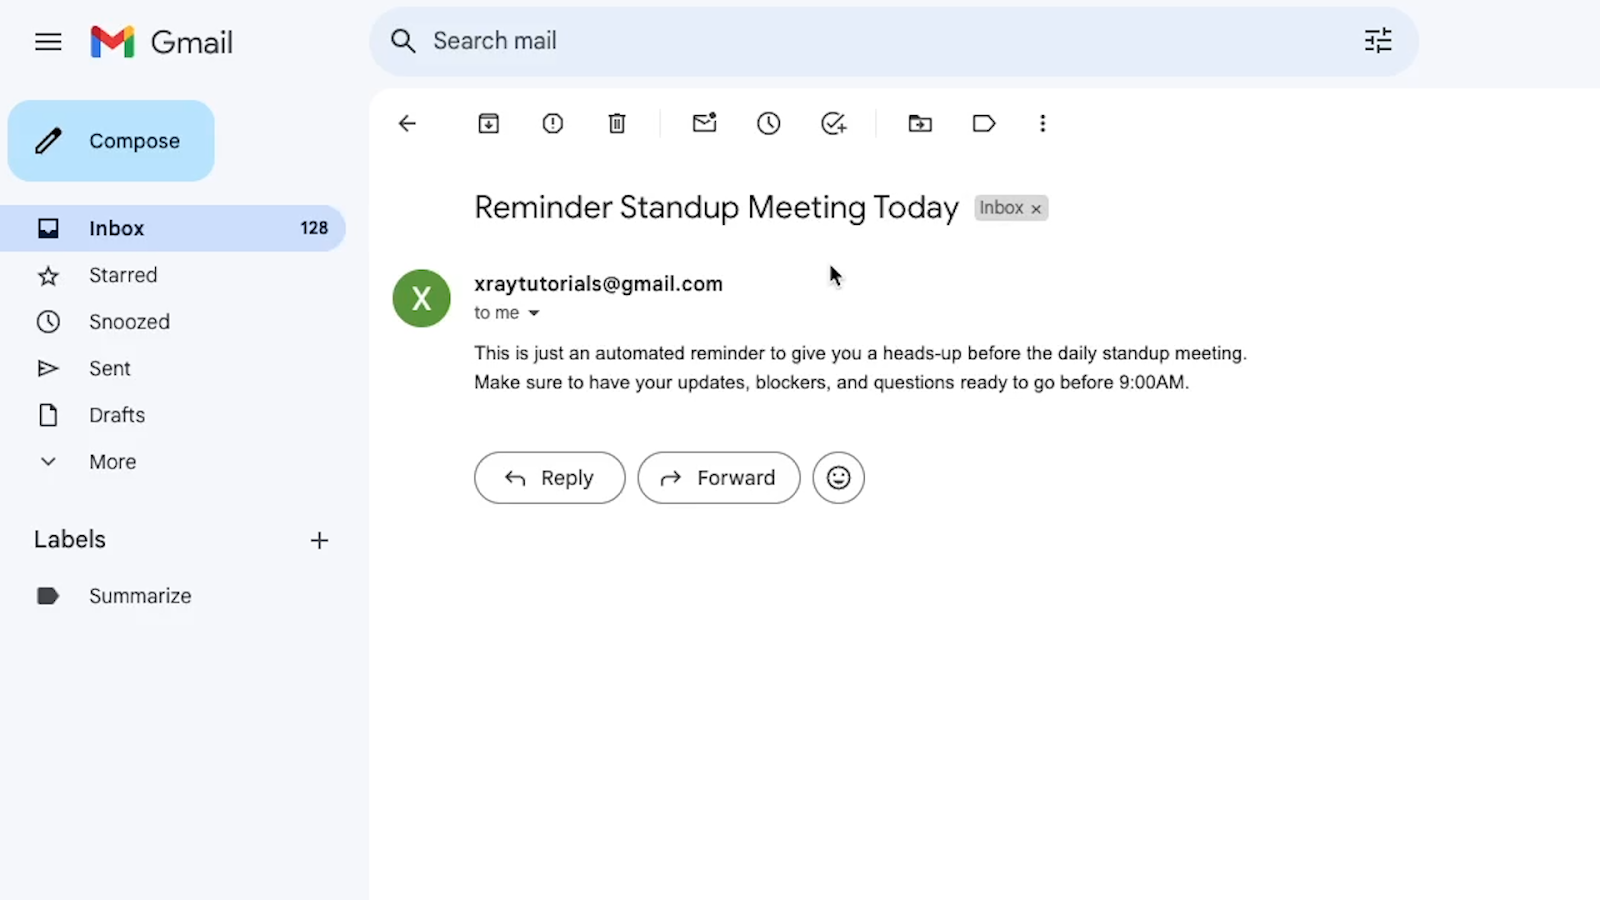
Publish your Zap and turn it on
Unlike your Power Automate flows, your Zaps won’t turn on by themselves. You’ll need to click on “publish”, then your Zap will be set to “On”.
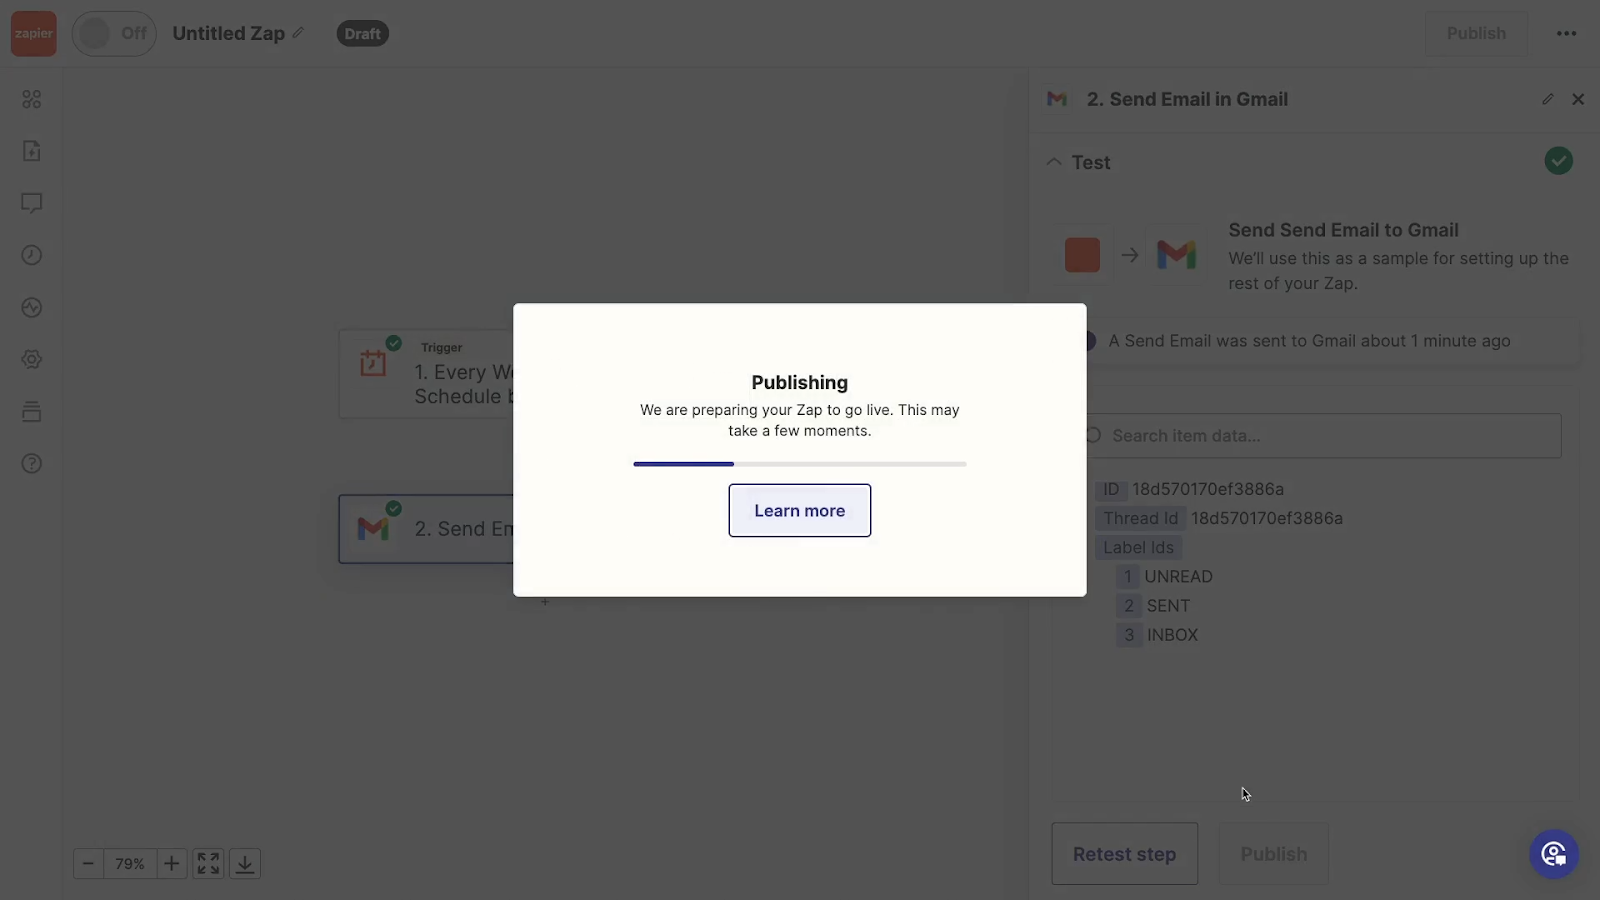
You can turn it off or on at any time just by clicking on the toggle.
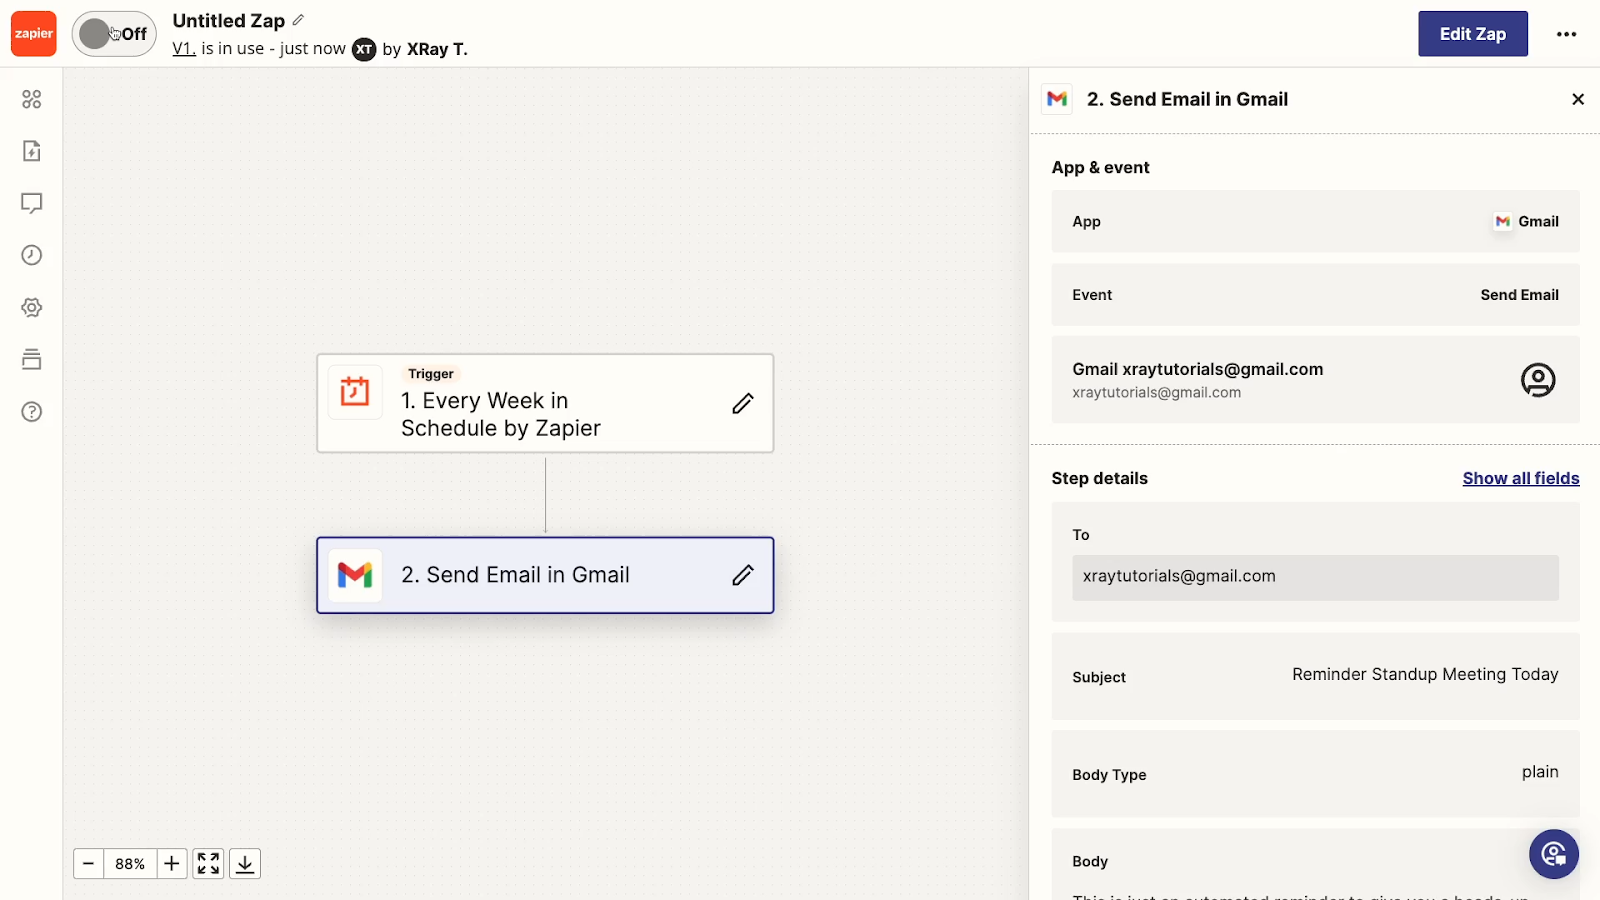
Building a similar automation in Make: limitations and challenges
You could also build a similar automation in Make, formerly known as Integromat, but connecting your email accounts will be a little more complicated.
We’ve made a tutorial explaining the process for connecting your personal GMail account to Make, which is much more involved than similar automations in Power Automate or Zapier.
And no matter what workflow you want to automate, your first stop should always be to check XRay.Tools so you can see which providers support the apps involved. With most popular apps, you’ll often see that you have several choices. Just use whichever you’re most comfortable with, or whichever one fits your budget best!
Use automation to quickly boost your productivity
Automating simple workflows like this can add up to something that’s more than the sum of its parts.
With just a few minutes in Power Automate or Zapier, you can start each week with one quick task already checked off of your to-do list.
So check it out today to start sending out recurring emails from Outlook, and explore the thousands of other actions you can automate.
If you’d like to learn more about automating your work, check out our blog or our YouTube channel. You can also follow XRay on Twitter, Facebook, or LinkedIn.
When people are exploring your site, they want quick answers to their questions.
With an AI assistant built in OpenAI and supported with your company’s key information, you can give your customers and leads accurate answers to critical questions in seconds.
In this post, we’ll show you how to set it all up with an OpenAI assistant, a form, a text document, and a simple Zapier automation.
For this tutorial, we’ll demonstrate an example automation that lets users easily interact with an AI to get a quick quote for your services.
We’ll show you how to create an AI assistant that refers to an external document like a pricing guide, how to set up a form to gather user requests, and how to build an automation that sends those requests to the AI, and sends the final quote back to the user.
This same basic automation can be used to automate any number of customer interactions. You could also use it to help visitors to your site determine which service is the best fit for them, or to help them troubleshoot common errors and issues.
Whatever you’d like to build, just follow along with this tutorial to get started.
What you’ll need to build this automation
First, let’s quickly cover the software and accounts you’ll need for this tutorial.
To create and upload a doc with supporting information, you’ll need an app like Google Docs or Microsoft Word.
To gather user requests, you can use an app like Airtable, Typeform, or Google forms.
To store those requests, you’ll need a database or spreadsheet app like Airtable or Google Sheets.
Just to keep things simple, we’ll be using Airtable for both the database and the form, but you’re free to use any apps you’re comfortable with.
You’ll need an OpenAI account with payment credit for API charges. To be clear, this isn’t the same thing as ChatGPT Plus. Instead of paying a $20/mo subscription, you’ll be charged a very small fee for each message sent – typically less than a cent per message. You can go to platform.openai.com to set up your account.
Finally, you’ll need a Zapier account with a starter plan or higher. The free plan limits you to two-step Zaps, and this automation will require more than two steps. However, if you’re new to Zapier, you can always use a free trial instead to get started.
Now let’s start building our automation-supported AI assistant.
Create a document with pricing rules or other company information
First, you’ll need to create a document that includes relevant information for building a quote, or for handling any other user request that you may want to automate.
This document is the primary source of information that will let your AI assistant give a good answer, so make sure it’s as comprehensive as possible.
You may already have a document like this on hand, but if not, you can create this doc in any app like Google Docs, Microsoft Word, or a similar word processor. As long as the app lets you export your doc as a PDF, it will be fine.
Below, you can see a pricing sheet for a fictional painting company.
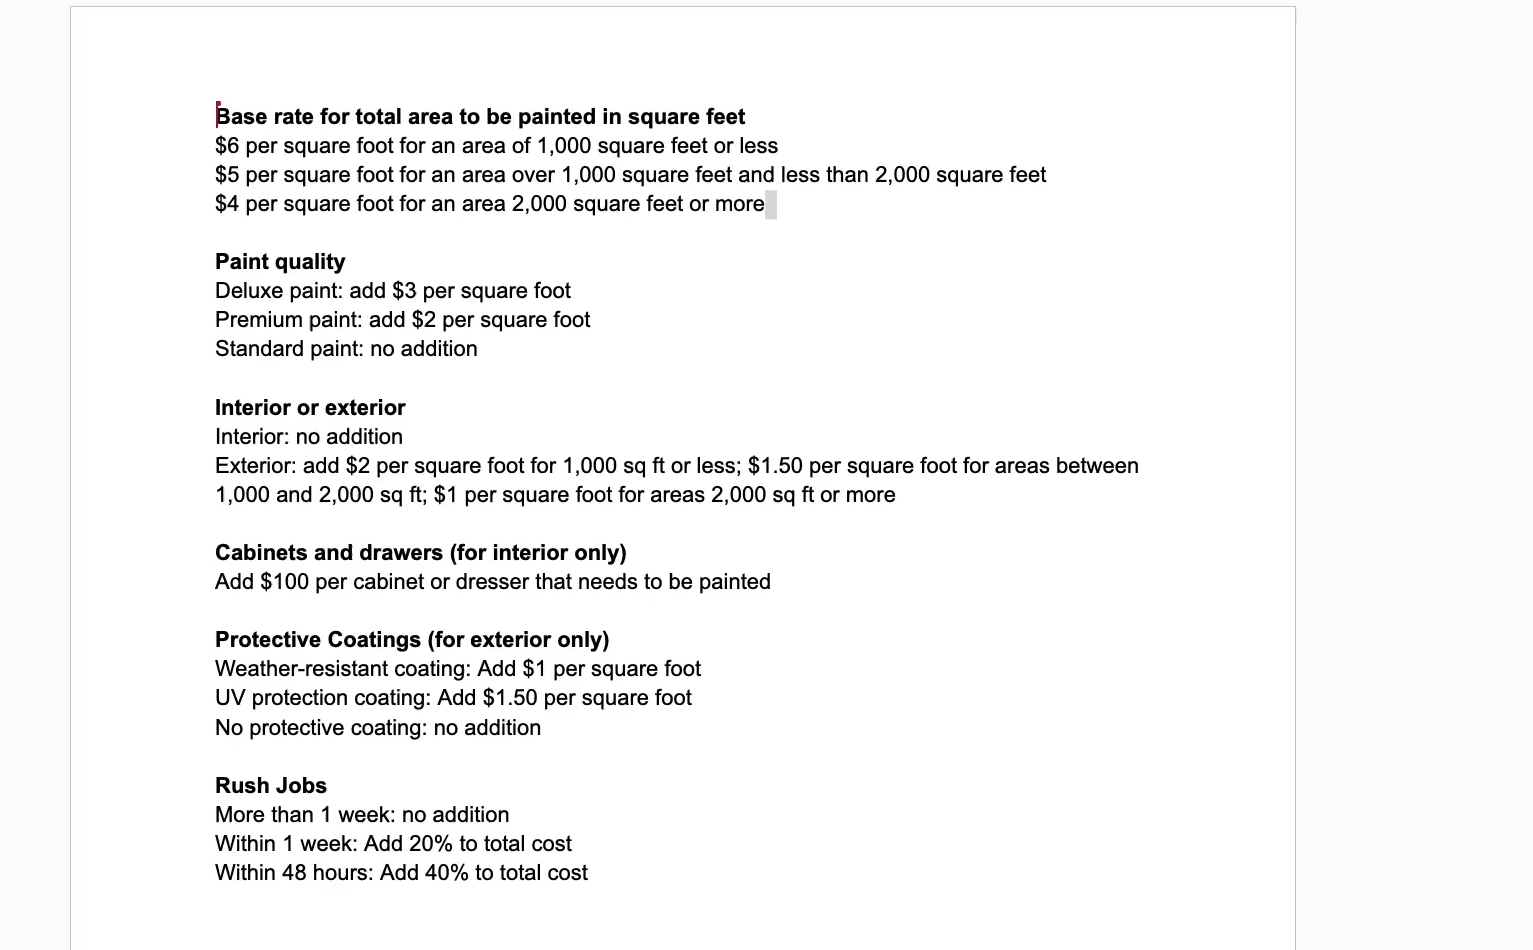
It covers all of the parameters that the company will use to draft an estimate, including the total square footage, interior or exterior, the timeline for completion, and more. Once your pricing guide or other document is ready, export it as a PDF.
In Google Docs, you can export a PDF by clicking on “File” and hovering over “Download”. Then, just select “PDF Document”.
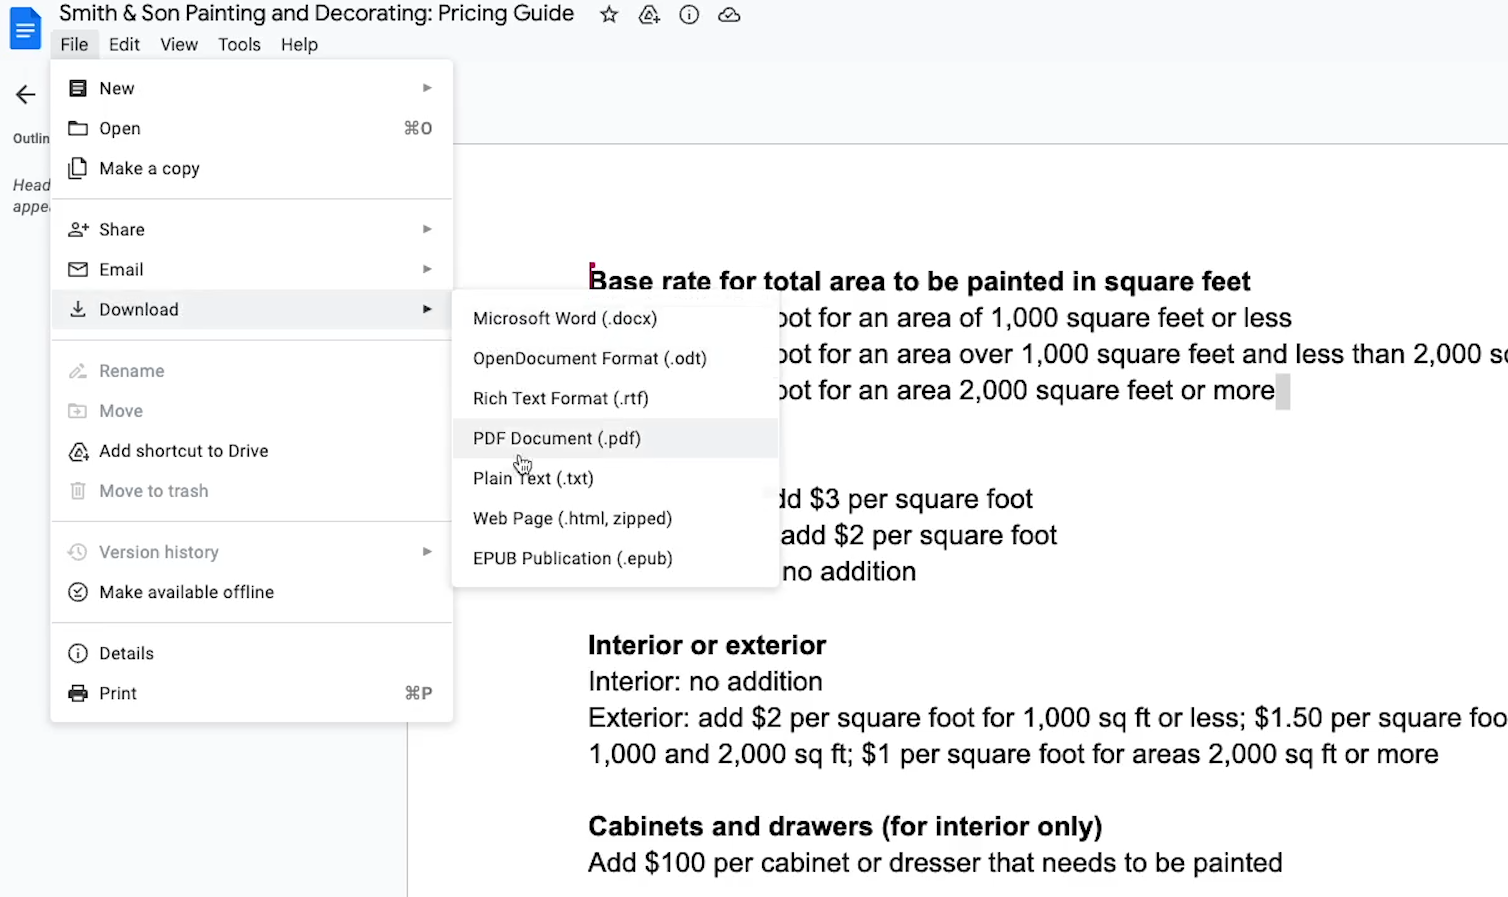
Create an OpenAI assistant
Next, you’ll need to create an OpenAI assistant that can calculate an estimate based on this document.
To begin, go to platform.openai.com, and sign in to your account. You’ll need to have a payment method on file, and you’ll be charged for using OpenAI’s API.

However, these charges will be very small. They’re based on the length of each message and the model you use, but in most cases, each message will cost less than a cent.
Additionally, new accounts begin with a $5 API credit, so you can try it out without even spending a penny.
Once you’re signed in and your account is set up, click on “Assistants” in the left hand menu.
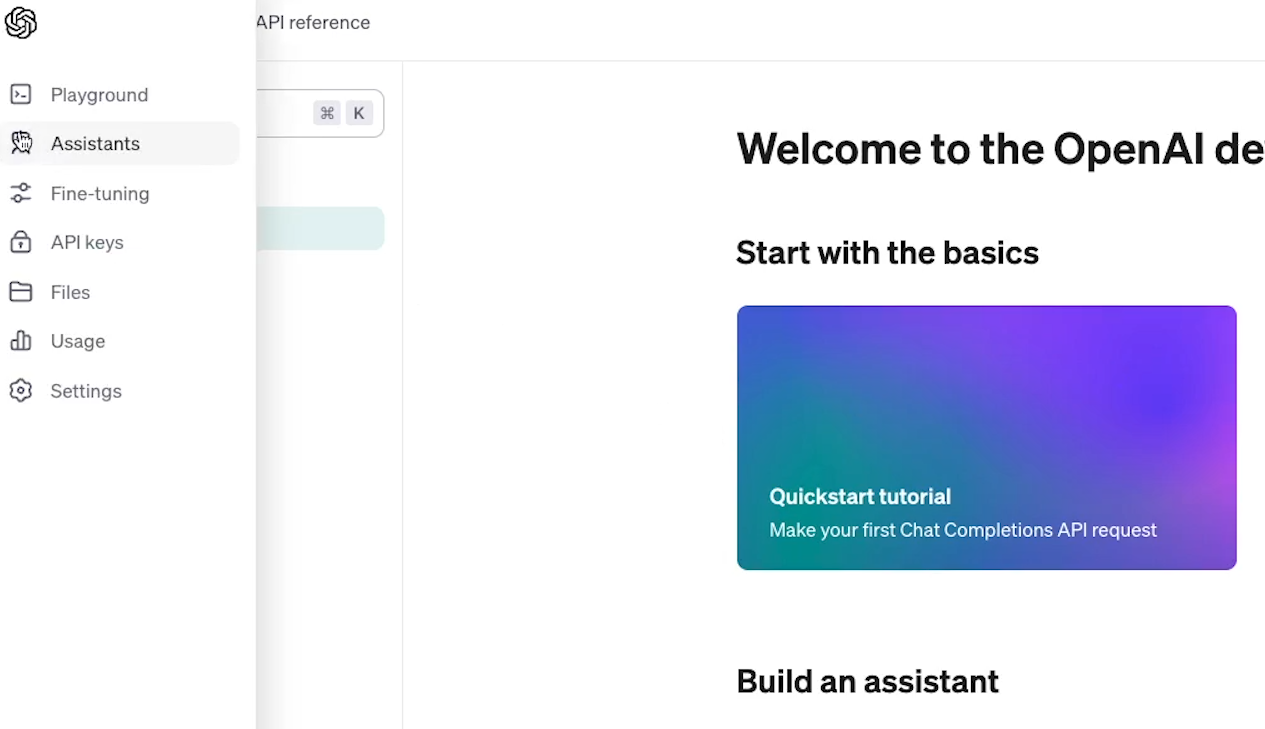
Then, create a new assistant.
Give your assistant a descriptive name. In our example, we’ll call ours “Painting Estimate Assistant”.
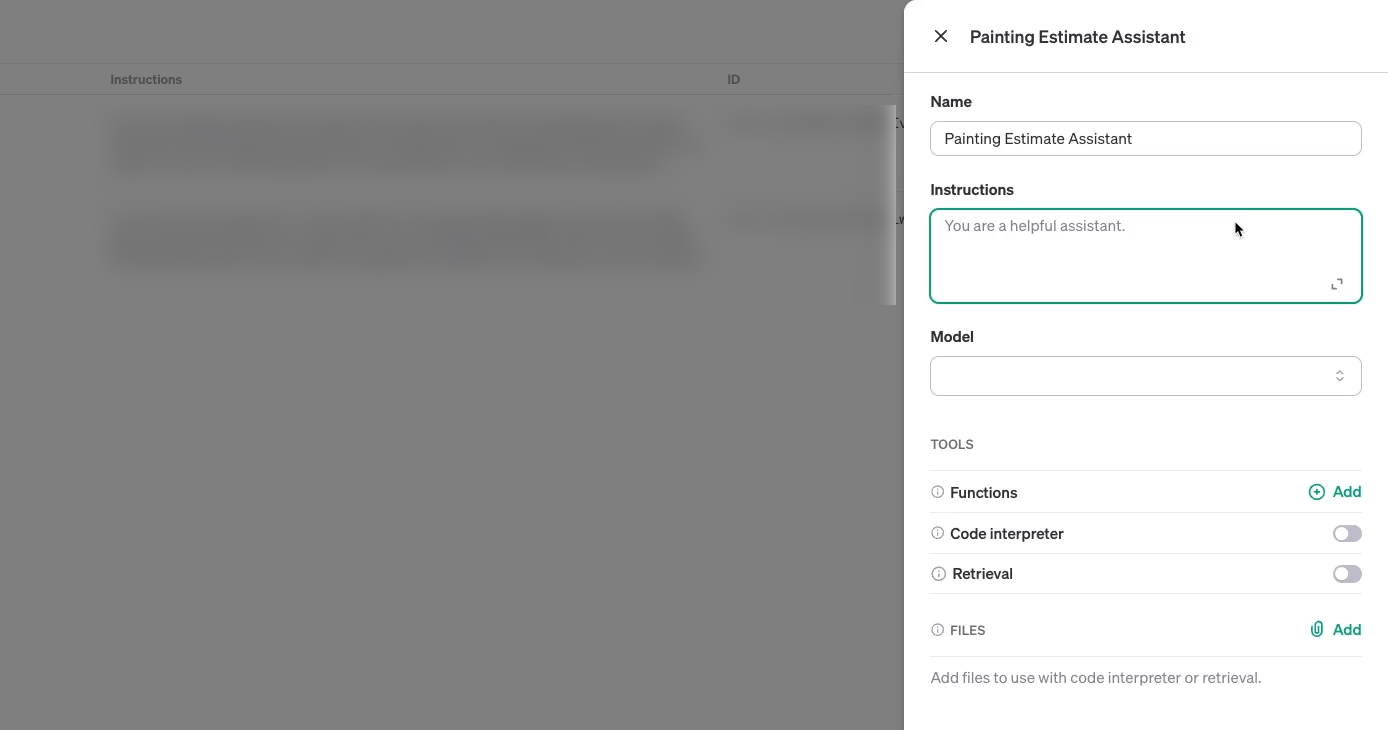
Configure your OpenAI assistant
To start setting up your OpenAI assistant, give it some instructions. This is where you can tell it how to behave. Be sure to describe exactly what you want the assistant to do, and what tone it should adopt. Don’t worry if you miss out on some details when you first draft your instructions, though; you can always update it later.
We’ll start with the following directive:
“You are a helpful assistant who gives users quick estimates for painting jobs through Smith & Son Painting and Decorating. You help them to understand what price they can expect to pay for painting based on the parameters in the attached pricing guide.
Always start your estimate by stating the total estimate, then explain how the full calculation works.
Be sure to use a friendly tone; you're speaking with customers and leads for the company you represent!”

You could copy and paste all of the pricing information here in the “instructions” field if you’d like, but we’d recommend attaching it as a separate document instead.
Ultimately, it will make it a bit easier to update and maintain the assistant when you need to make changes to either the pricing guide or the basic instructions.
You can just check the file name to make sure you have the most up-to-date version of the pricing guide without needing to read through all the text and look for discrepancies.
Upload files for your assistant to reference
Next, you can upload your pricing guide or other docs to give your assistant data that will inform its answers.
Scroll down to “Files”, and click on “Add” to upload your doc.
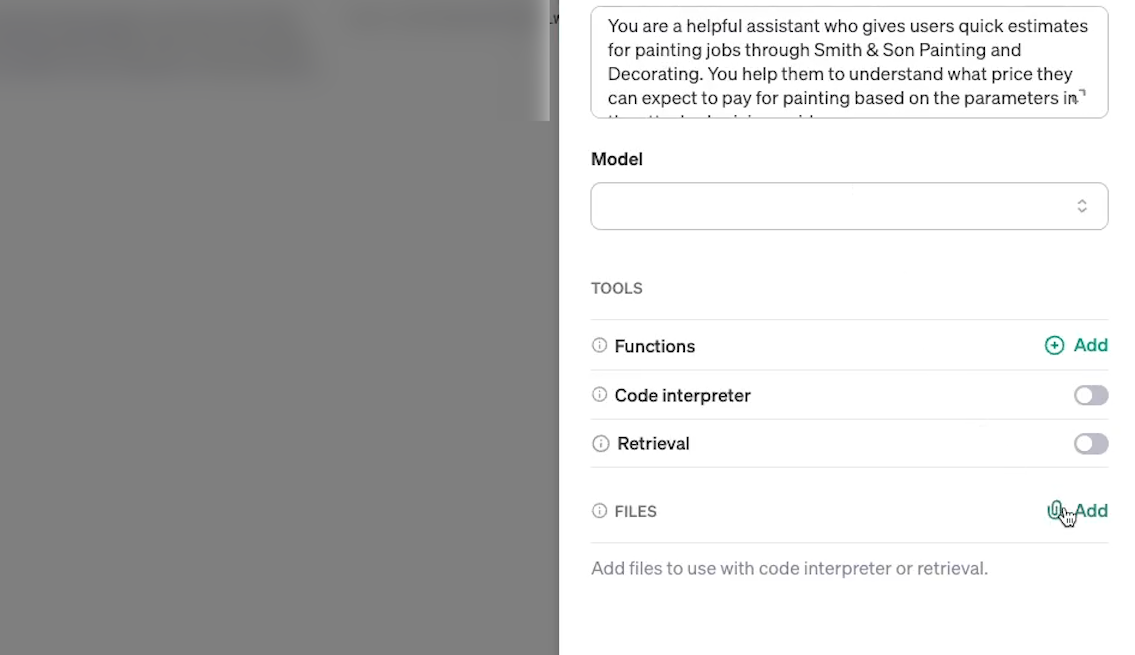
Then, to make sure that the assistant can access the doc, enable “Retrieval”.
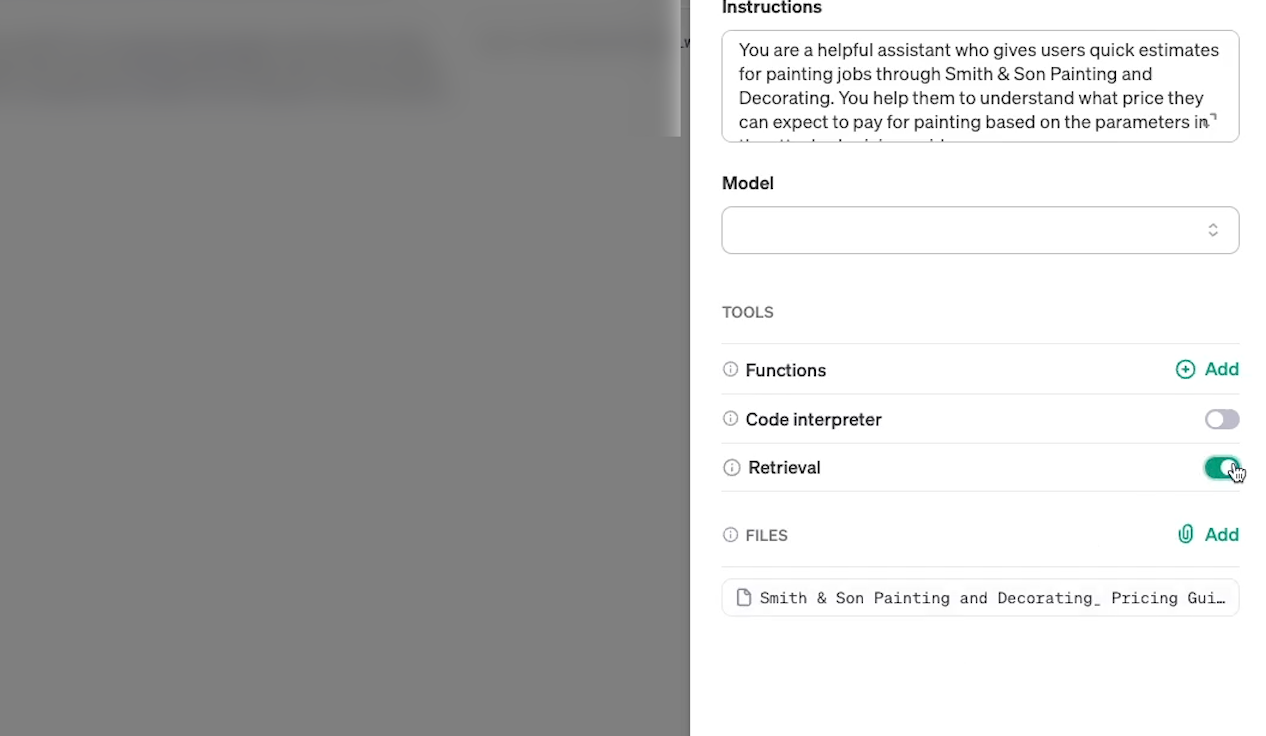
Choose a model that supports document retrieval
Go back up to the “model” field underneath the instructions. This is where you’ll pick the exact model that the AI assistant should use. Different models will have different capabilities and pricing structures, with more advanced models typically costing a bit more. You can learn more about that on the pricing page on OpenAI’s website.
For this tutorial, we’d recommend using GPT4-1106. You can also use GPT3.5 Turbo-1106 if you’d like, as both models support document retrieval.

However, while the 3.5 model is cheaper than GPT4, we found that it was more prone to mathematical and logical errors while testing. If you want to ensure your answers are as accurate as possible, it’s probably worth it to use GPT4 instead.
Finish configuring your assistant and test it
You don’t need any functions or code interpreting for this assistant, so you can just leave both of those fields blank. Once your assistant is configured, click on “Save”.
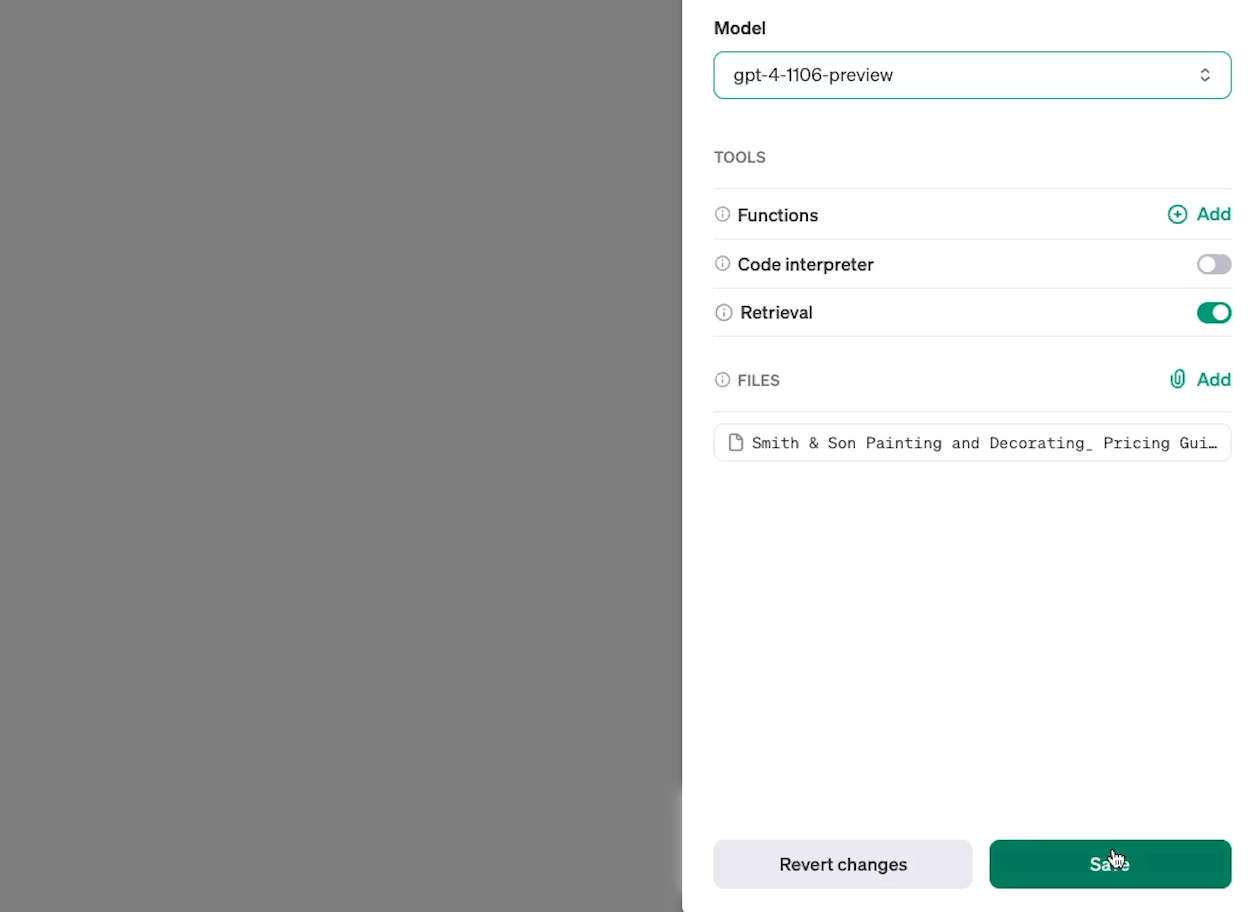
With your assistant all set up, it’s time to test it out.
To try out your assistant, just click on the three dots next to its name and select “Test in Playground”.
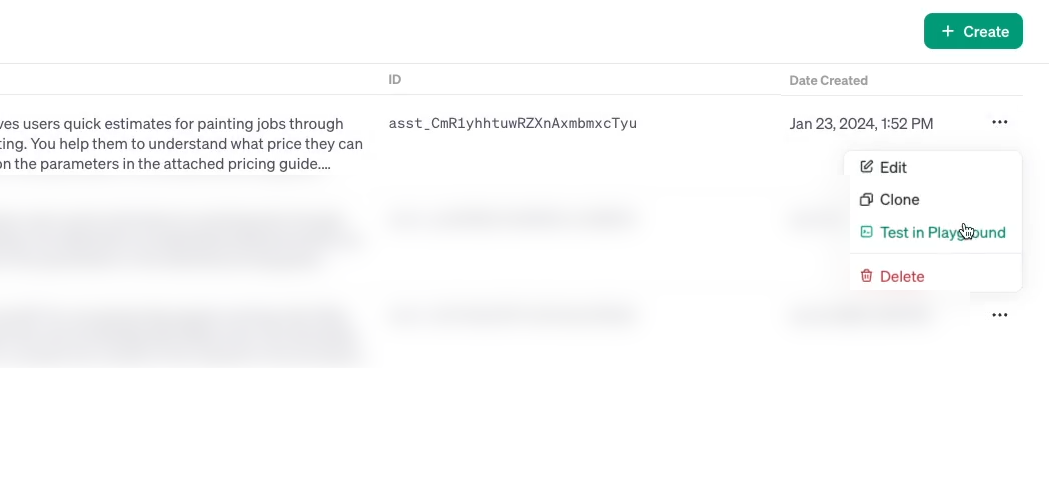
This will open up a simple interface where you can view and edit your assistant’s settings on the left, and send messages on the right.
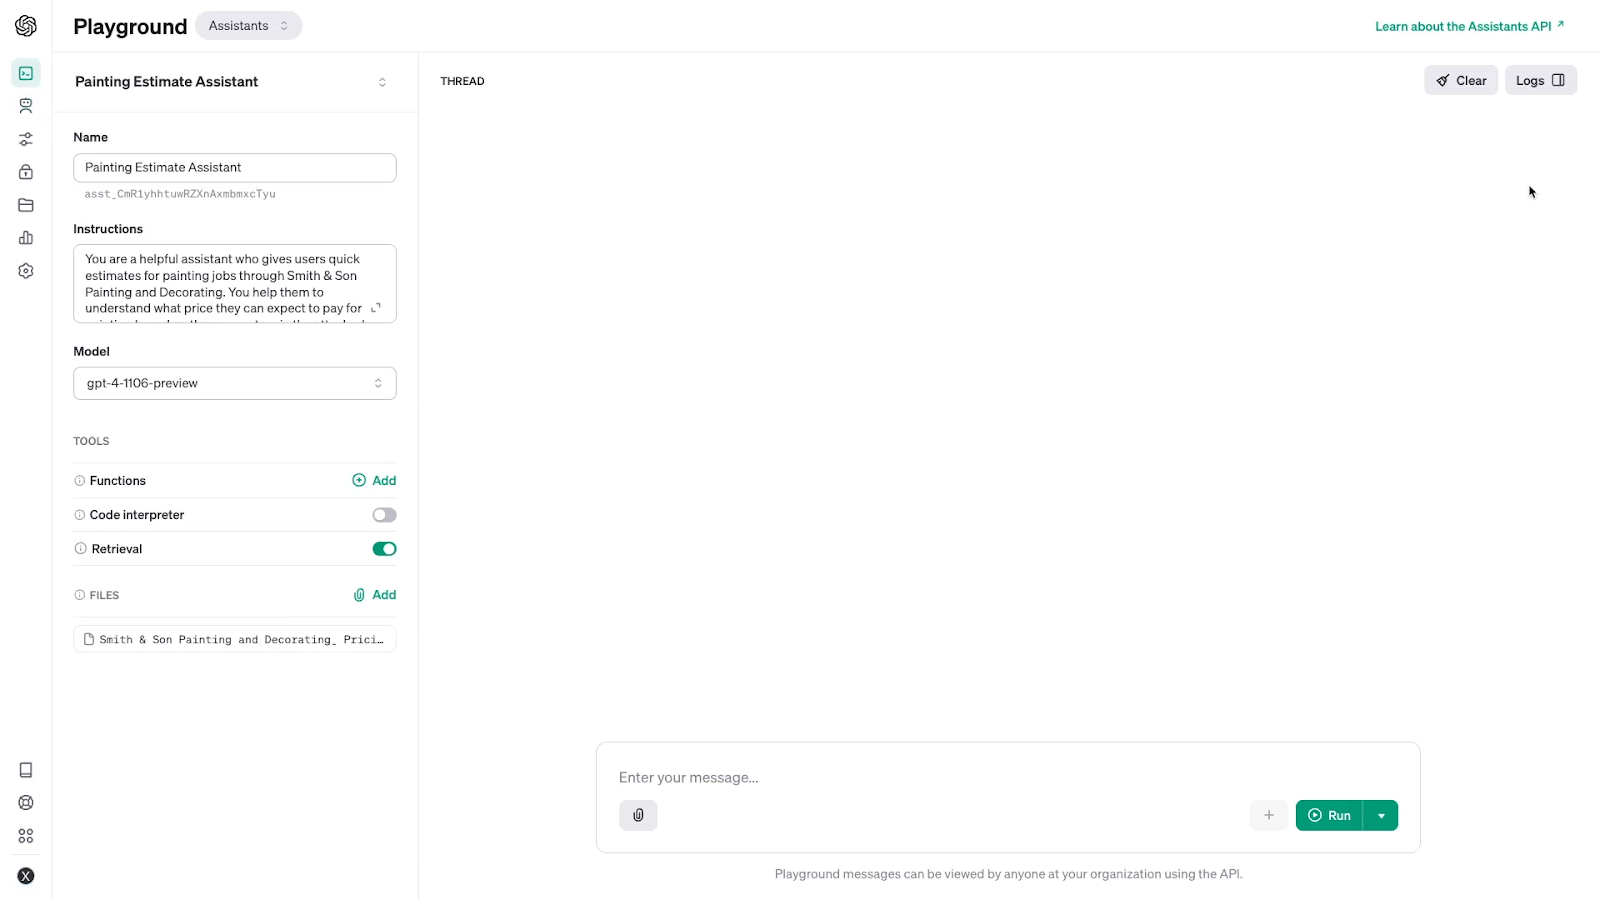
Note that sending messages through the playground will still incur charges, but as we noted earlier, these will be very low amounts. You’re likely to be charged less than a cent per message with most models and messages.
In our example, we’ll send a simple prompt that covers all of the key parameters in our pricing guide:
“I need to paint the exterior of a 3,000 square foot home using weather-resistant, premium paint. I need the job to be completed within a week. How much will that cost?”
Then, we’ll click run to send the message.
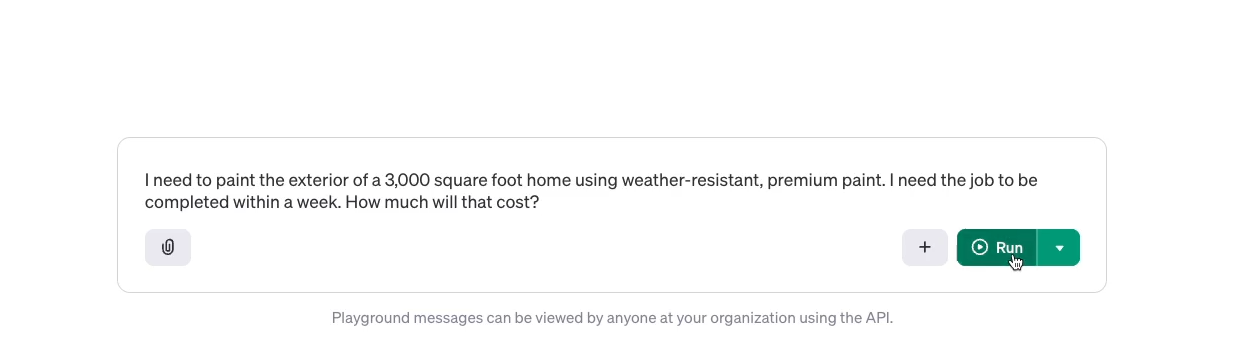
When you send messages with the testing playground, you’ll have to wait a little bit for the response, and you won’t see the AI’s message being typing out one word at a time like with ChatGPT. Instead, after a few moments, your AI assistant’s response should appear in full.
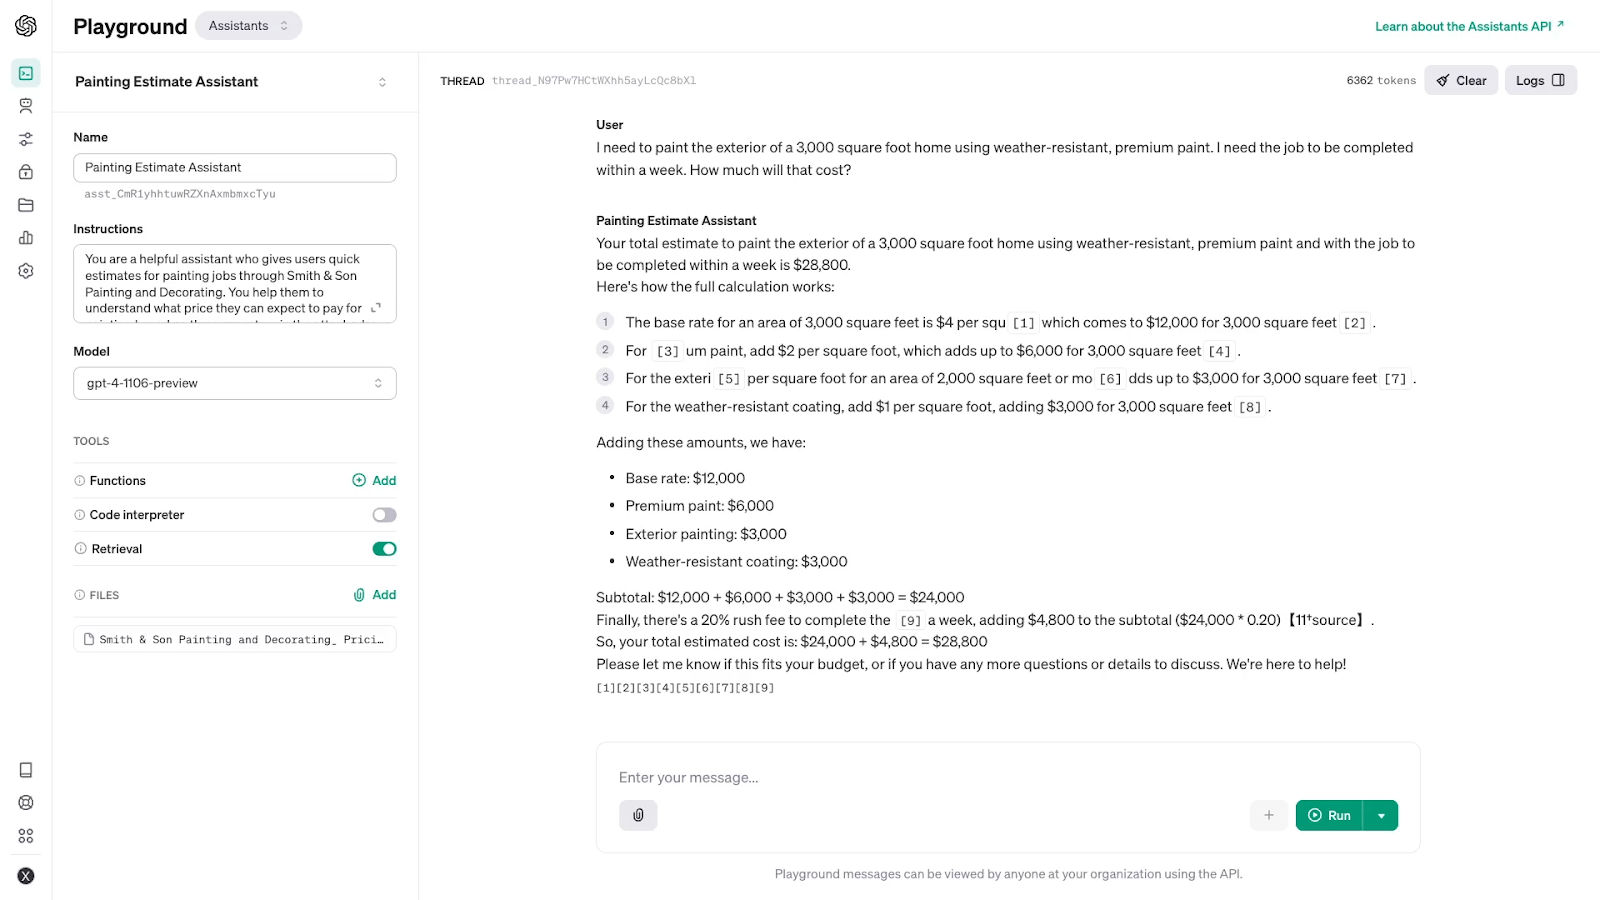
As you can see in the image above, our AI assistant has given us a thorough breakdown of the price based on the parameters outlined.
Unfortunately, its answer does contain some inaccurate calculations, but it ultimately corrects itself and arrives at an accurate estimate based on the pricing guide. It’s not quite as elegant as we might like, and adjusting the instructions and our pricing guide would likely help to improve its answers.
If you’d like to tweak the assistant’s behavior, you can edit its settings in the left hand panel.
For the sake of this tutorial, we’ll leave the settings as they are. Even if the answer is a bit clunky, the assistant does consistently arrive at the correct estimate by the end of its response, and that’s fine for demonstration purposes.
Create a form to collect user requests
Once you’ve got your assistant up and running, you’ll need to create a form where users can submit a request for a quote. Each new form submission will be sent to your OpenAI assistant via Zapier, making it easy for your users to get an AI response through a simple, familiar form interface.
You can create your form in any number of apps. Just make sure that for whatever app you’re using, the form responses will be collected in a convenient spot.
To make things easy, we’ll just use Airtable.
Airtable is a versatile database app that lets users create forms out of a database, and embed those forms into any website. You can learn more about using Airtable in our Airtable beginner’s guide, or see how it stacks up to Google Sheets in our head-to-head comparison.
If you’d like to follow along with Airtable as well, you can create a free account to get started.
In our database pictured below, we have a table with a column for each piece of data that we’ll need, such as the total square feet, interior or exterior, and other key information.
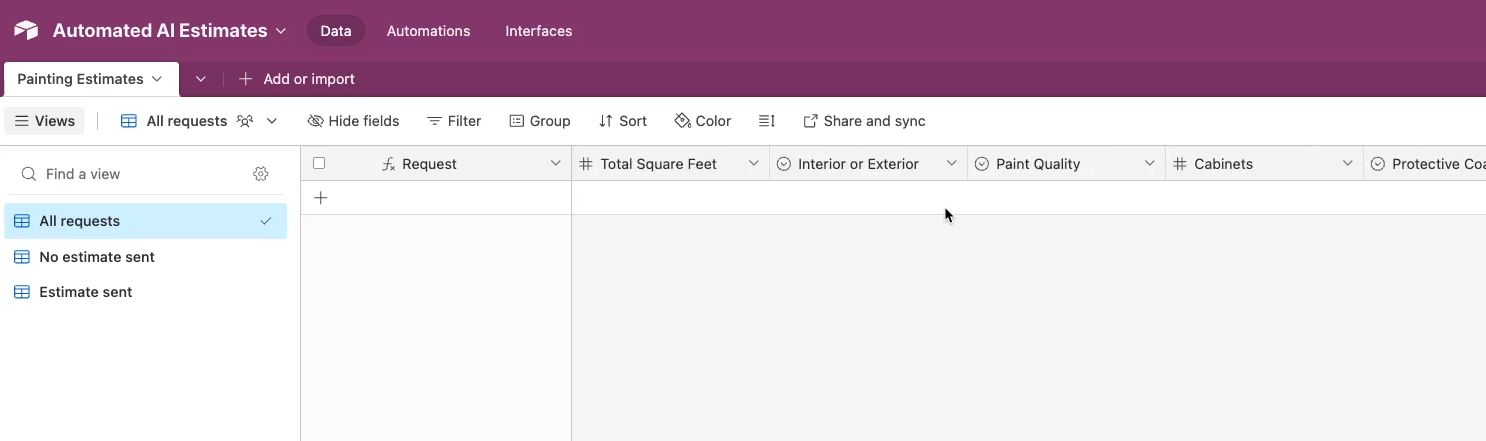
We’ve also included a view for new requests that haven’t received a response yet.
Configure your form
When we create a form view, every column is converted into a label with a field for user input, except for automatically populated fields like “Created Date”.

You can just edit these labels into simple questions for a more user-friendly experience.

You can also remove fields from the form if you’d like. We’ll remove the “Estimate Sent” field, since that’s not something the user should fill in; instead, we’ll update that column after sending the user their quote.

In our example, we’ll use some simple conditional logic to ensure that the question about cabinets is only visible when the user asks for an “interior” quote, while the question about protective coatings will only be visible for “exterior” jobs.
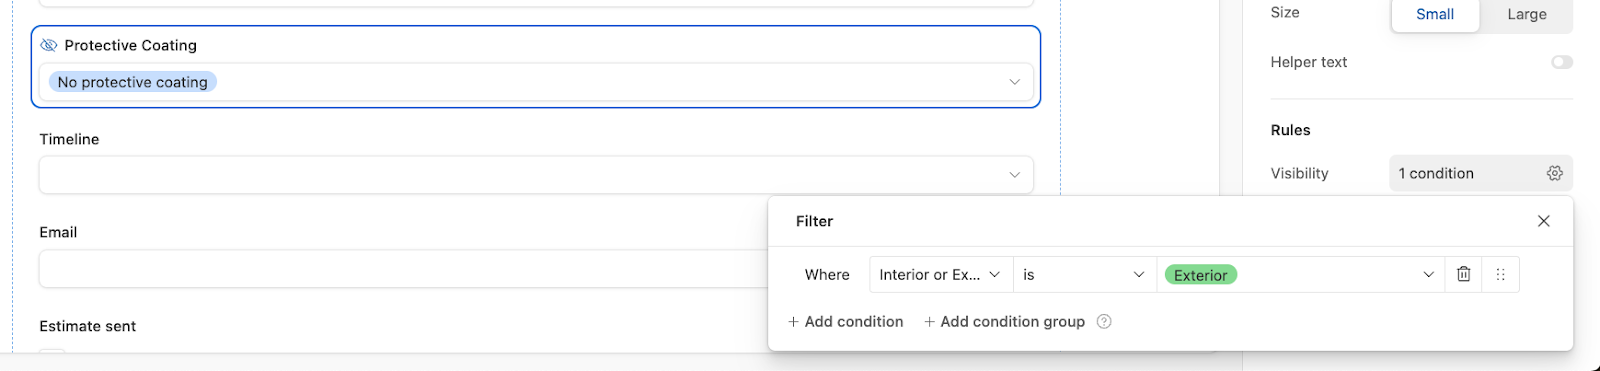
Each field will have a default value to ensure that it has data for Zapier to retrieve, even if the user didn’t see the question in their form.

Use your form to create test data
Once your form is all set, publish it, and copy the link where it can be accessed. If you want this form to be publicly accessible, make sure to enable that here.
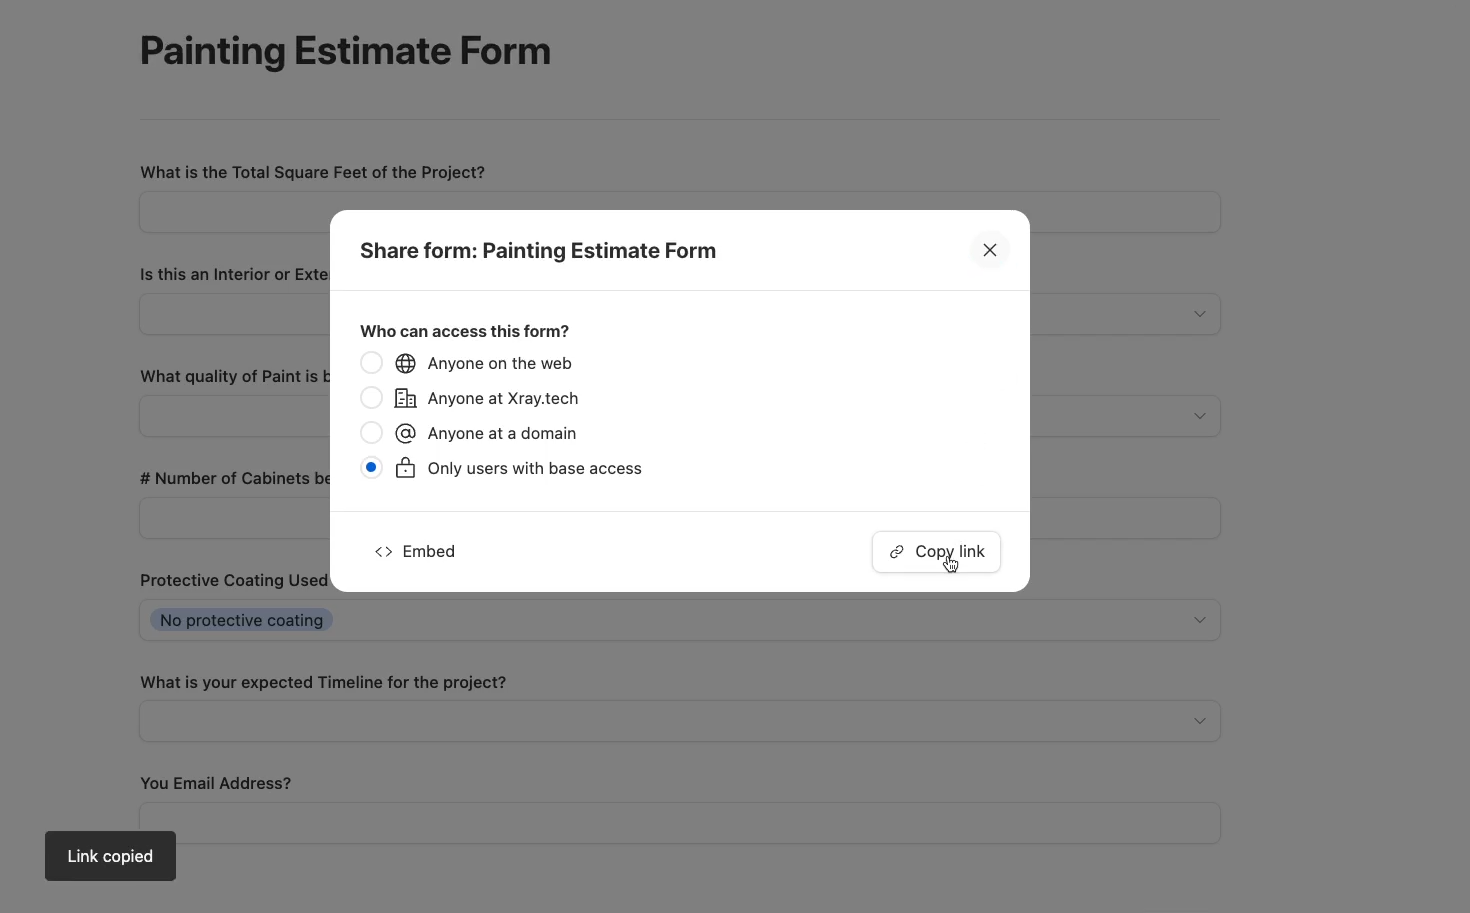
Then, open up your published form and fill it out with some test data so you’ll have something to work with as you’re building your Zap.
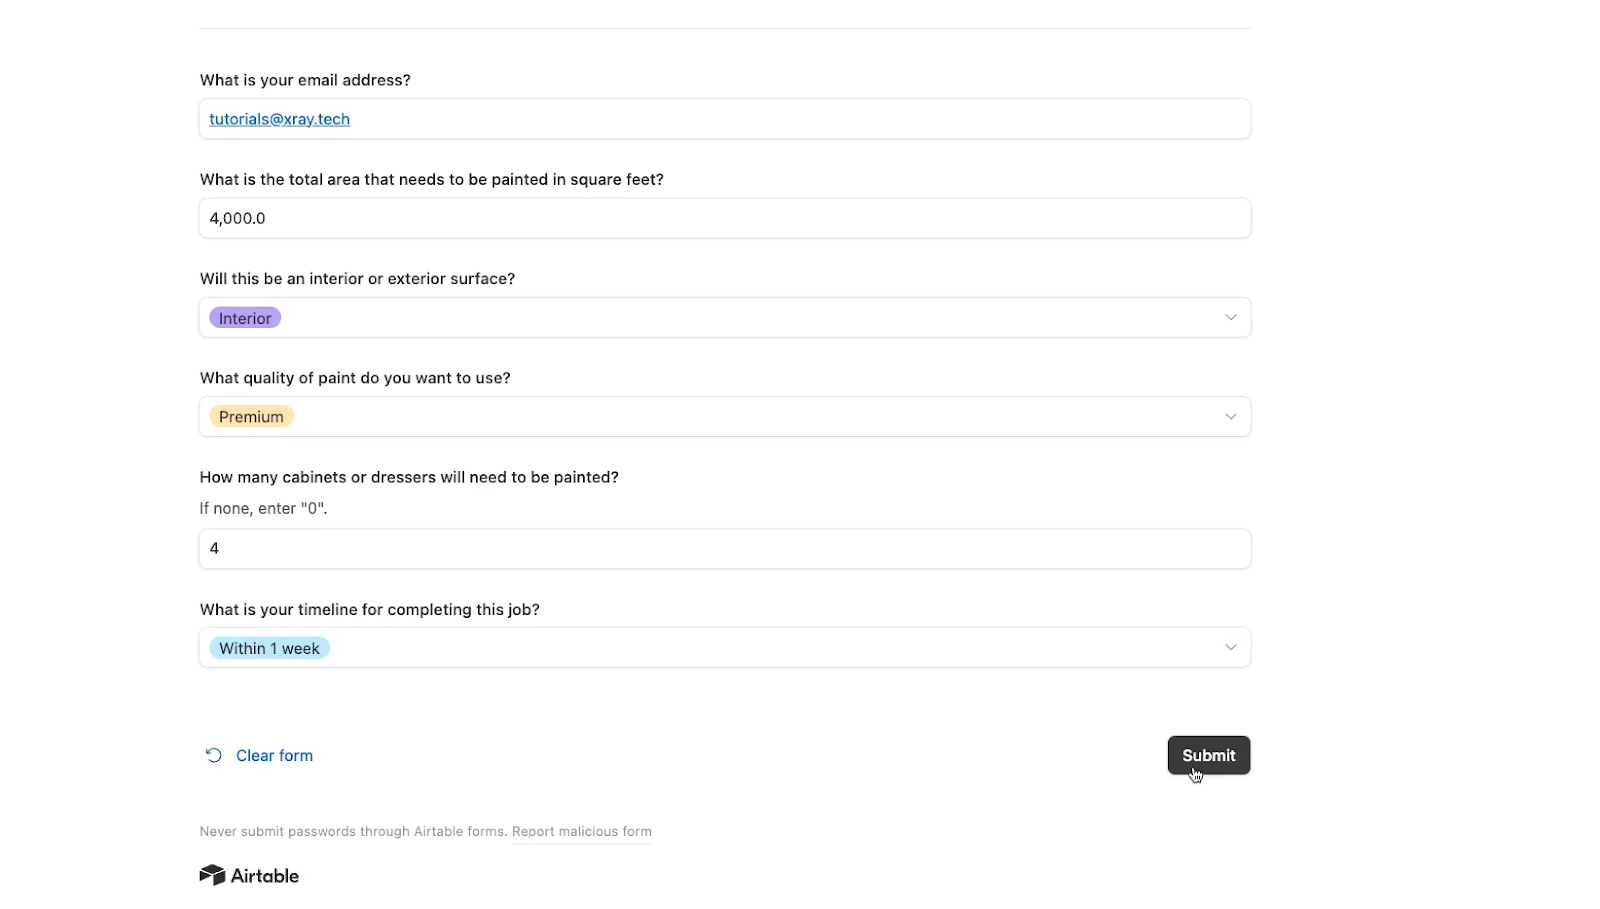
When you return to your Airtable base, you should see a record with the data you just entered.
Again, you can use any form and database apps that you want. Just make sure that your form submissions will be easily accessible in something like Airtable or Google Sheets.
Create a Zap to send form submission to your AI assistant
Now, let’s create a Zap to send your user’s form submissions to your AI assistant.
To start, create a new Zap in Zapier. For your trigger, choose “New Record”, or an equivalent option for your app. Then, sign in to your account.

Next, pick the specific base and table you want Zapier to watch. You may also want to specify a view like “No estimate sent” to make sure that you don’t send estimates out twice for the same request.
Once your trigger is configured, give it a test. In your test results, you should see the same record that you submitted earlier. If not, check that you’ve identified the right table, base, and view, and ensure that there’s a record in Airtable for Zapier to retrieve.
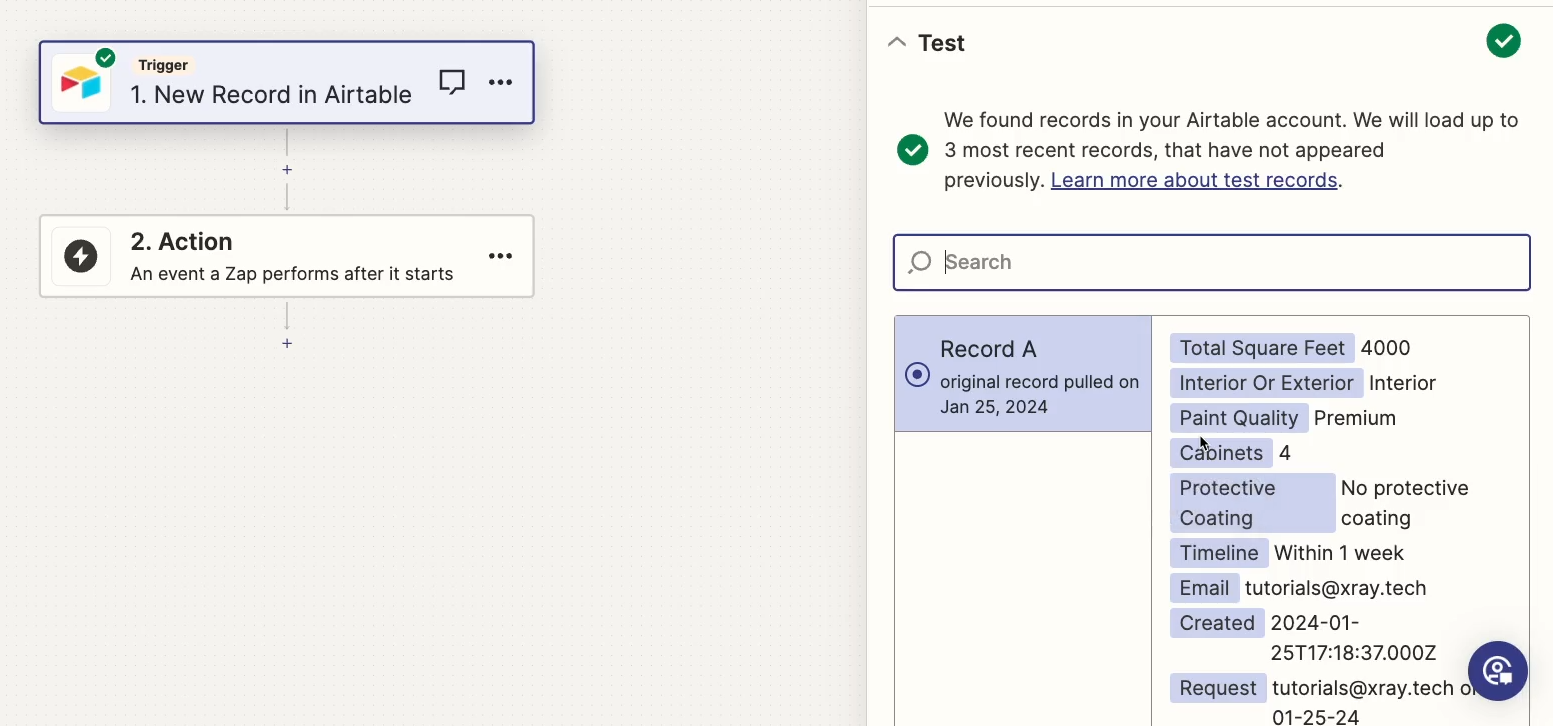
Add a ChatGPT action to your Zap
Next, add an action, and choose ChatGPT as the app. For the event, select “Conversation with Assistant”.

Sign in with your Open AI account. This should be the same account that you used to create the assistant.
Now you can compose the message that will be sent to your OpenAI assistant. Make sure to use all of the relevant data from your form here, along with labels so the assistant can easily parse it.
In our example, we’ll keep it simple:
“Please provide a quote for a painting job based on the following data:”
Then, we’ll list out all of the key parameters retrieved from the form.
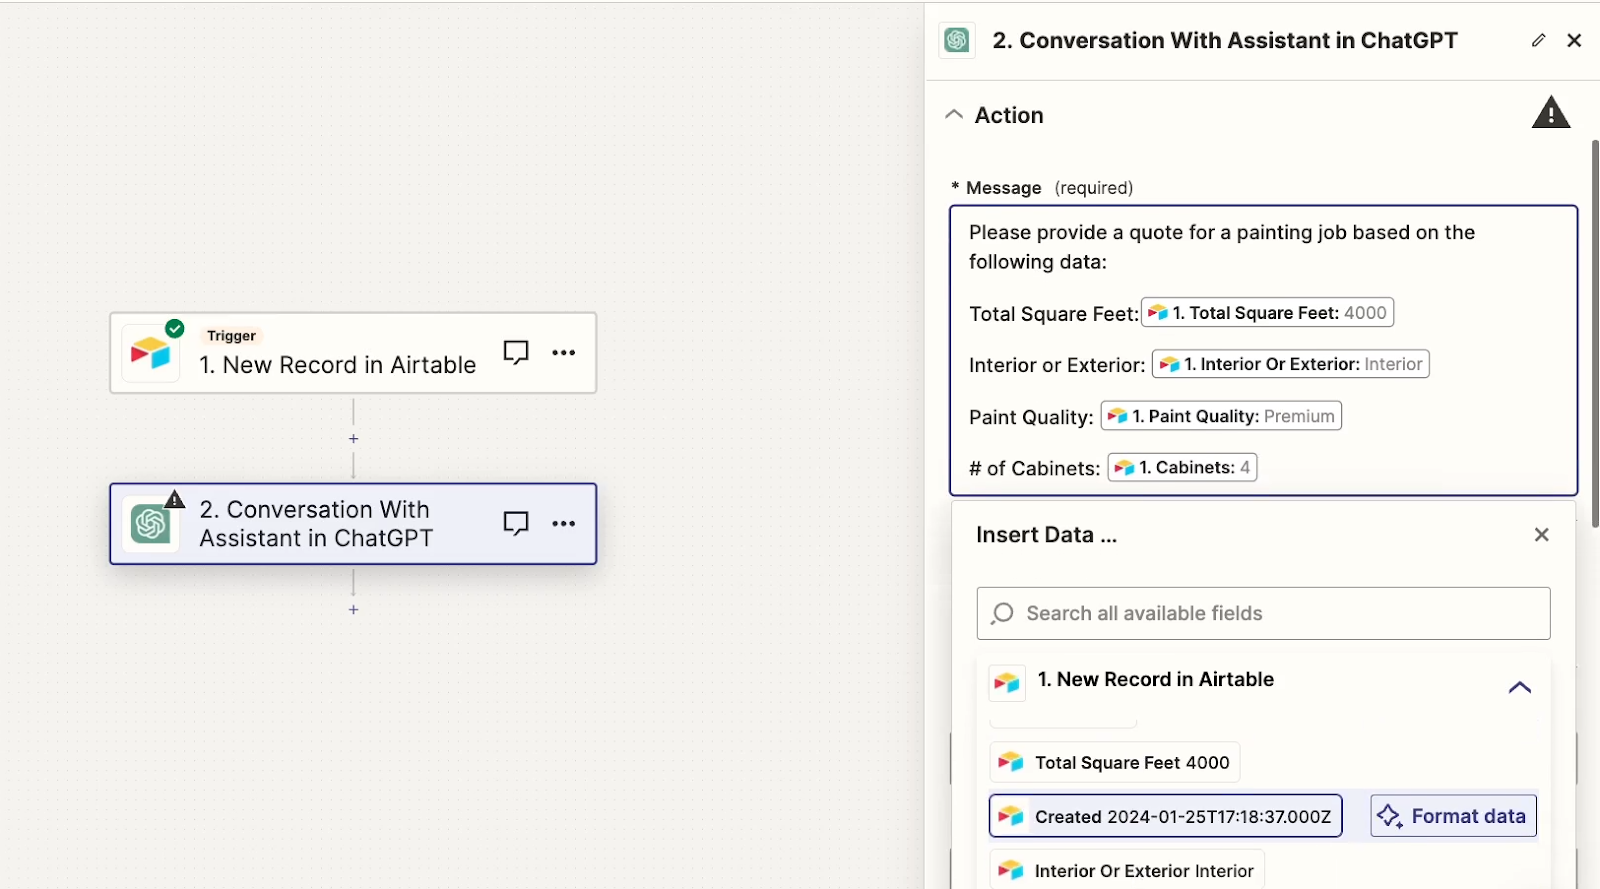
Configure the automated conversation with your assistant
Once you’ve finished your message, pick the assistant you want to use from the list. If you don’t see it here, make sure that you’re using the correct account and organization.
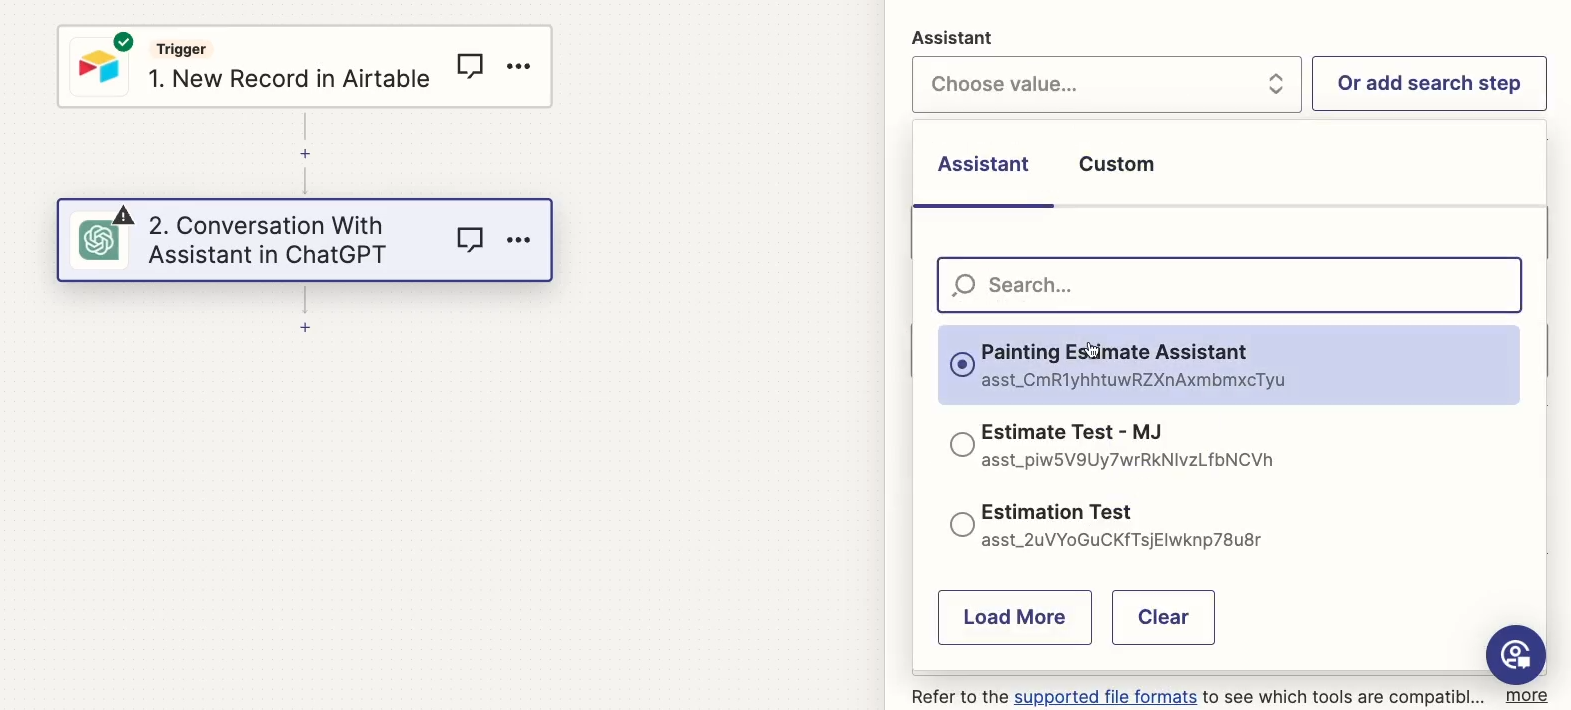
All of these other options visible here represent the same settings that you already saw and configured in OpenAI when setting up your assistant.
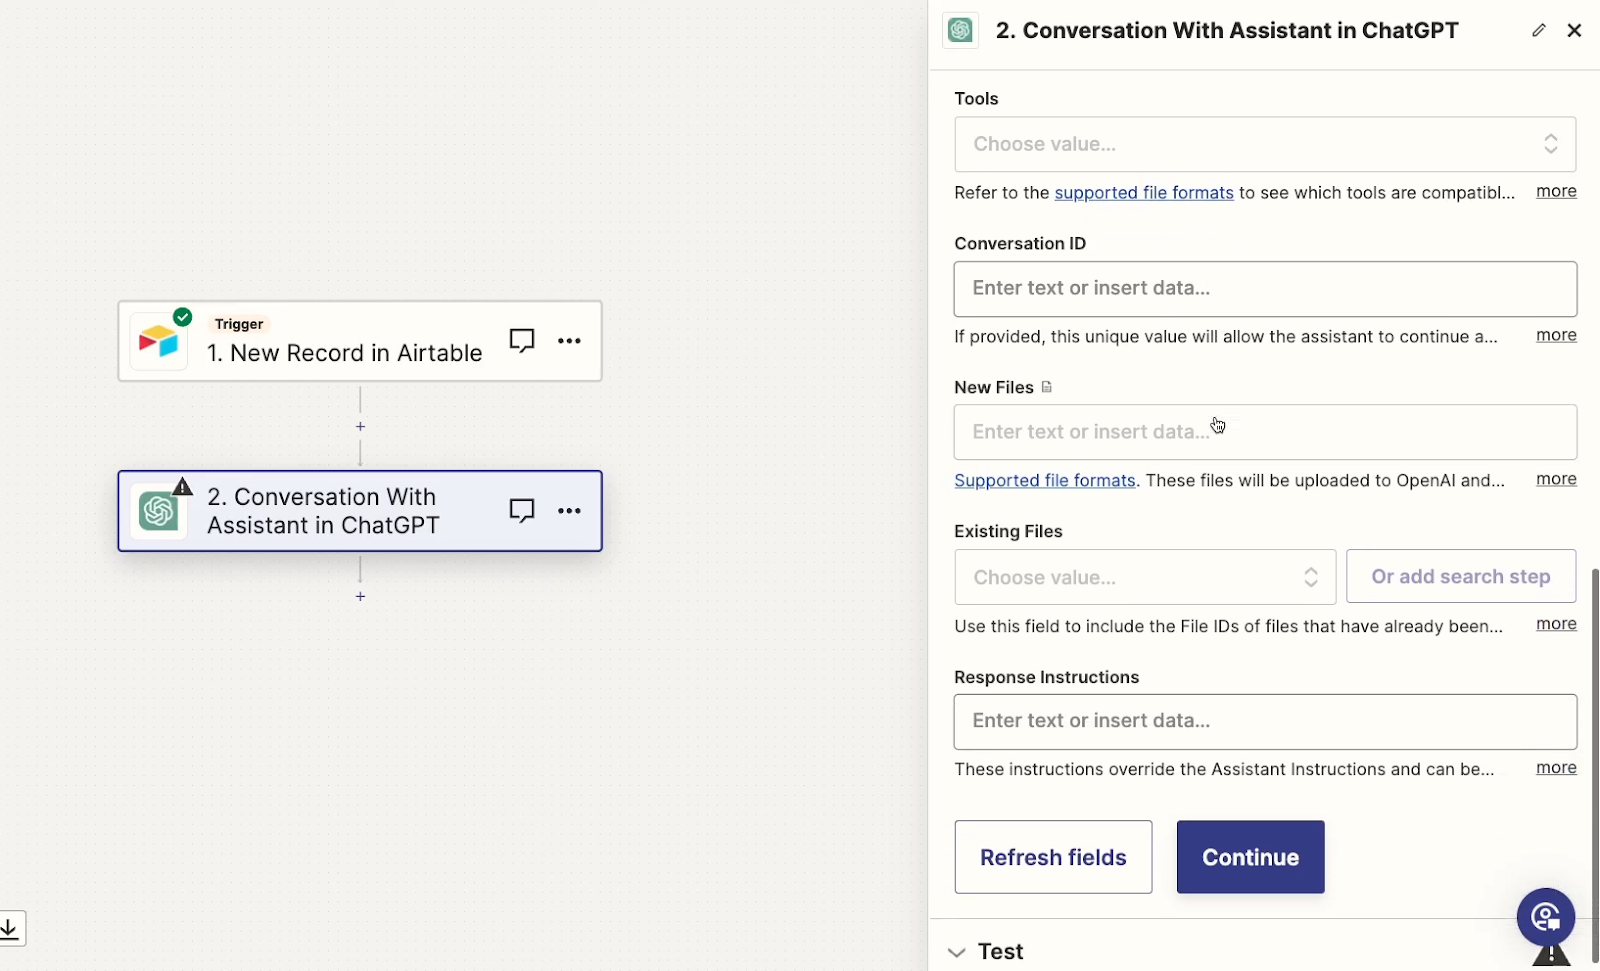
If you leave any of these options blank, it will default to whatever the matching setting is in OpenAI. So, for instance, if you don’t select a model in Zapier, then the assistant will use the model you selected in OpenAI.
If you leave all of these remaining settings blank, the assistant will use all of the settings you selected in OpenAI.
However, if you want the automation to override any of those settings, then you can fill out your preferred parameters here.
In our example, we’ll just stick with all of the options we specified in OpenAI, so we’ll leave all of these fields blank.
Send the AI assistant an automated test message
Next, give your ChatGPT step a test.
When you’re using AI actions in Zapier, you’ll have to wait a little longer than usual for the test to run. Once your test is complete, you can scroll down through the returned test data to find the AI’s output.
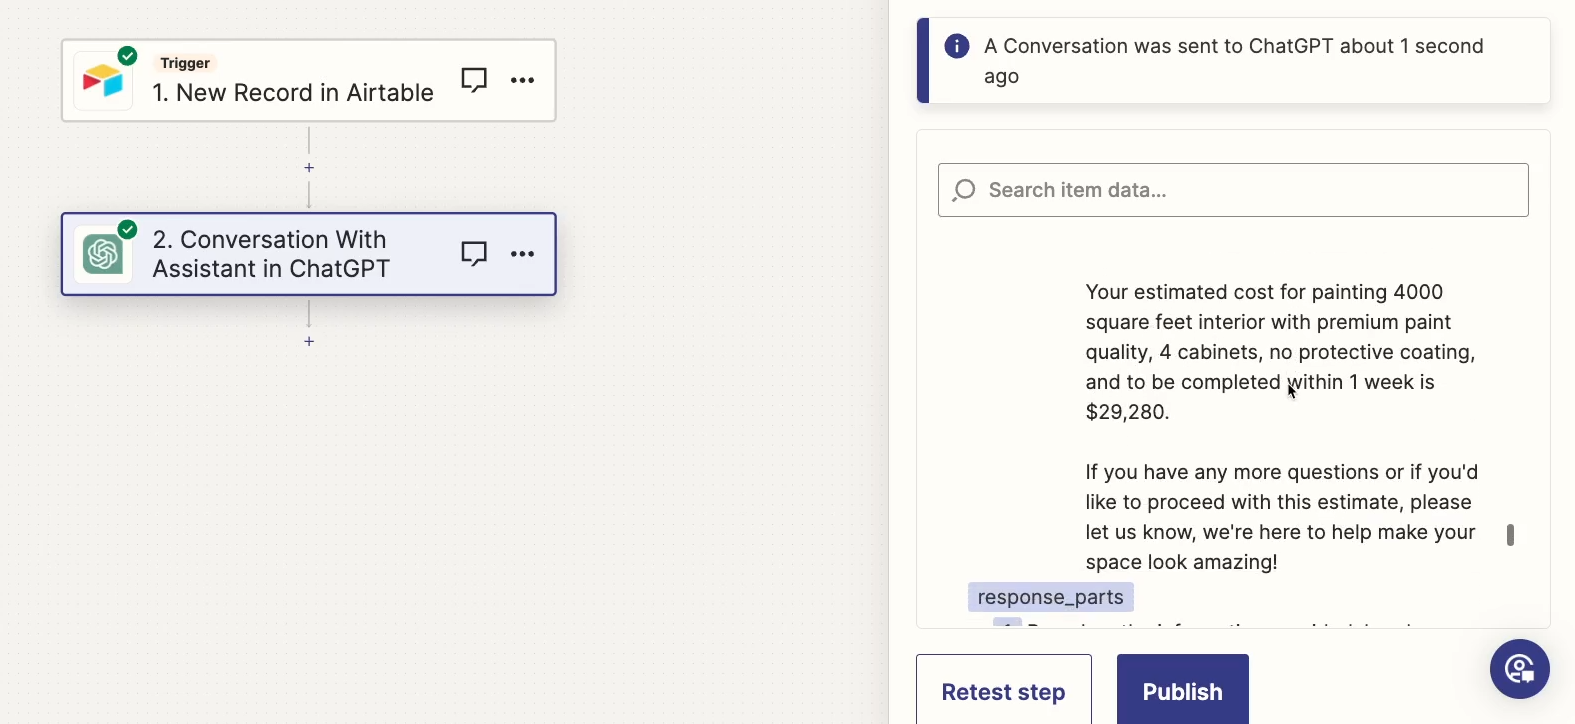
Check the answer to ensure that it’s accurate. In our example, the final estimate offered by the assistant matches our pricing guide.
Send the AI assistant’s answer to the user
The last two steps are to send this AI generated message to the user who submitted the request, and to update the corresponding record in Airtable to indicate that an estimate was sent.
We’ll go over both of those quickly, since they’re pretty simple.
Send an automated email
Just add a Gmail step, or a step for any other email client that you prefer, and compose a message that includes the AI’s response.
In your message, be sure to note that the estimate is generated by AI, and its accuracy isn’t guaranteed. Let the customer or lead know that they should reach out to you directly for more information.
The AI’s answer is stored in a Zapier variable called “Full Response”, so be sure to include this variable in your message, as well.
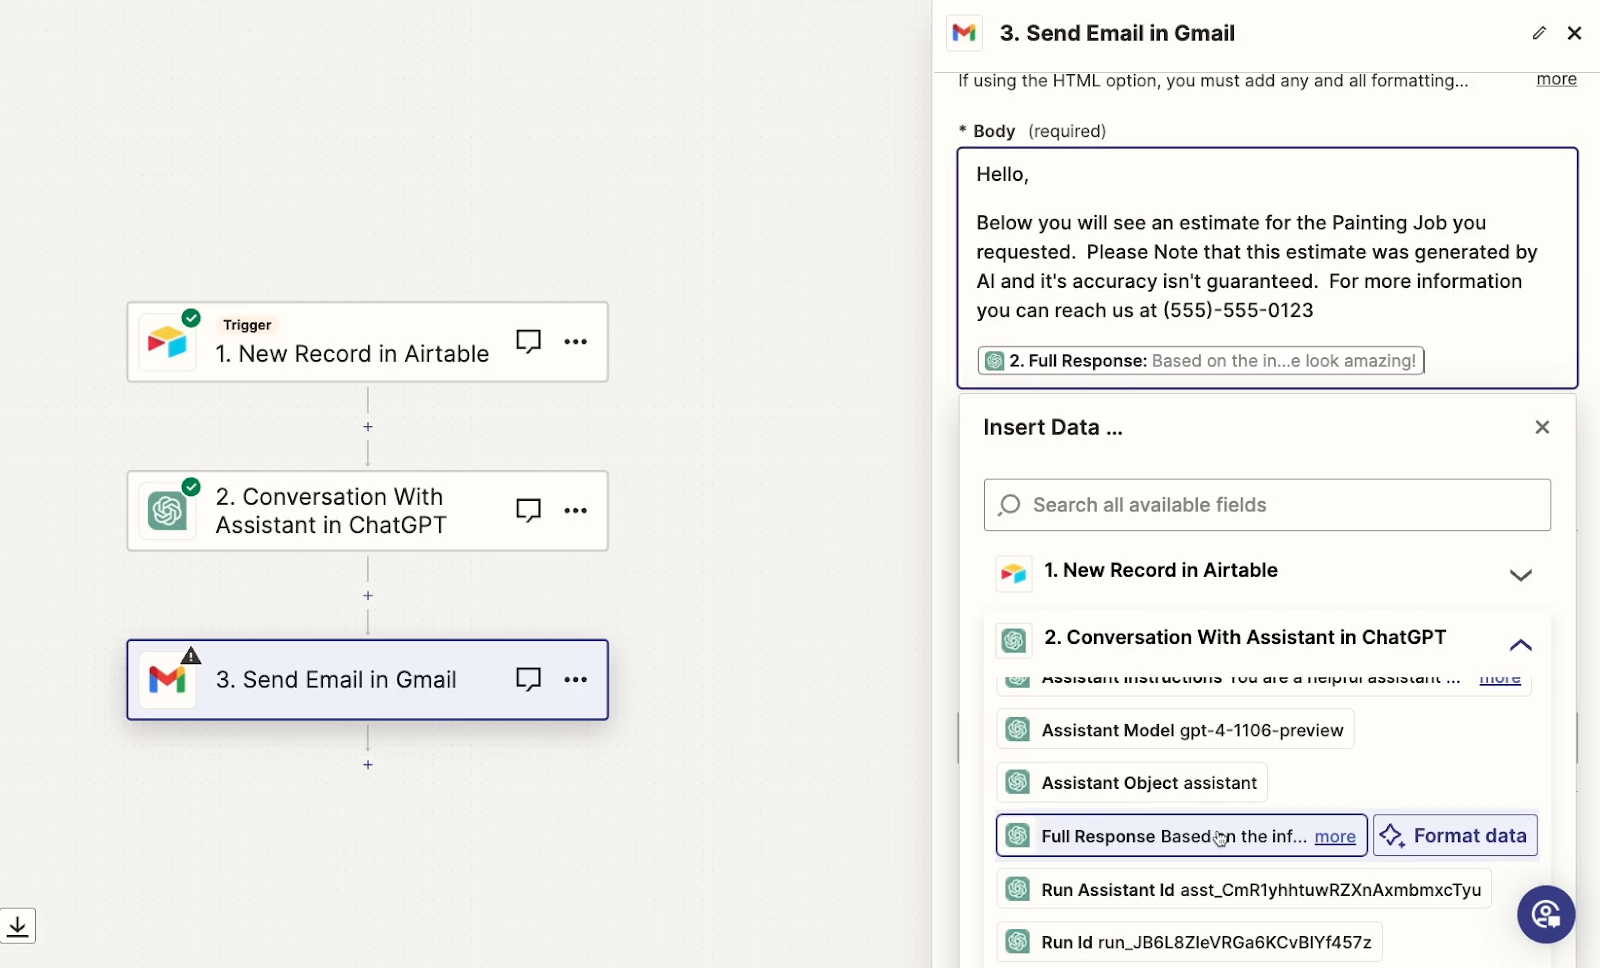
Once your message is all set, test the step.
After you conduct a successful test, check your inbox to see the message that Zapier sent. Below, you can see the message we received after testing our step.
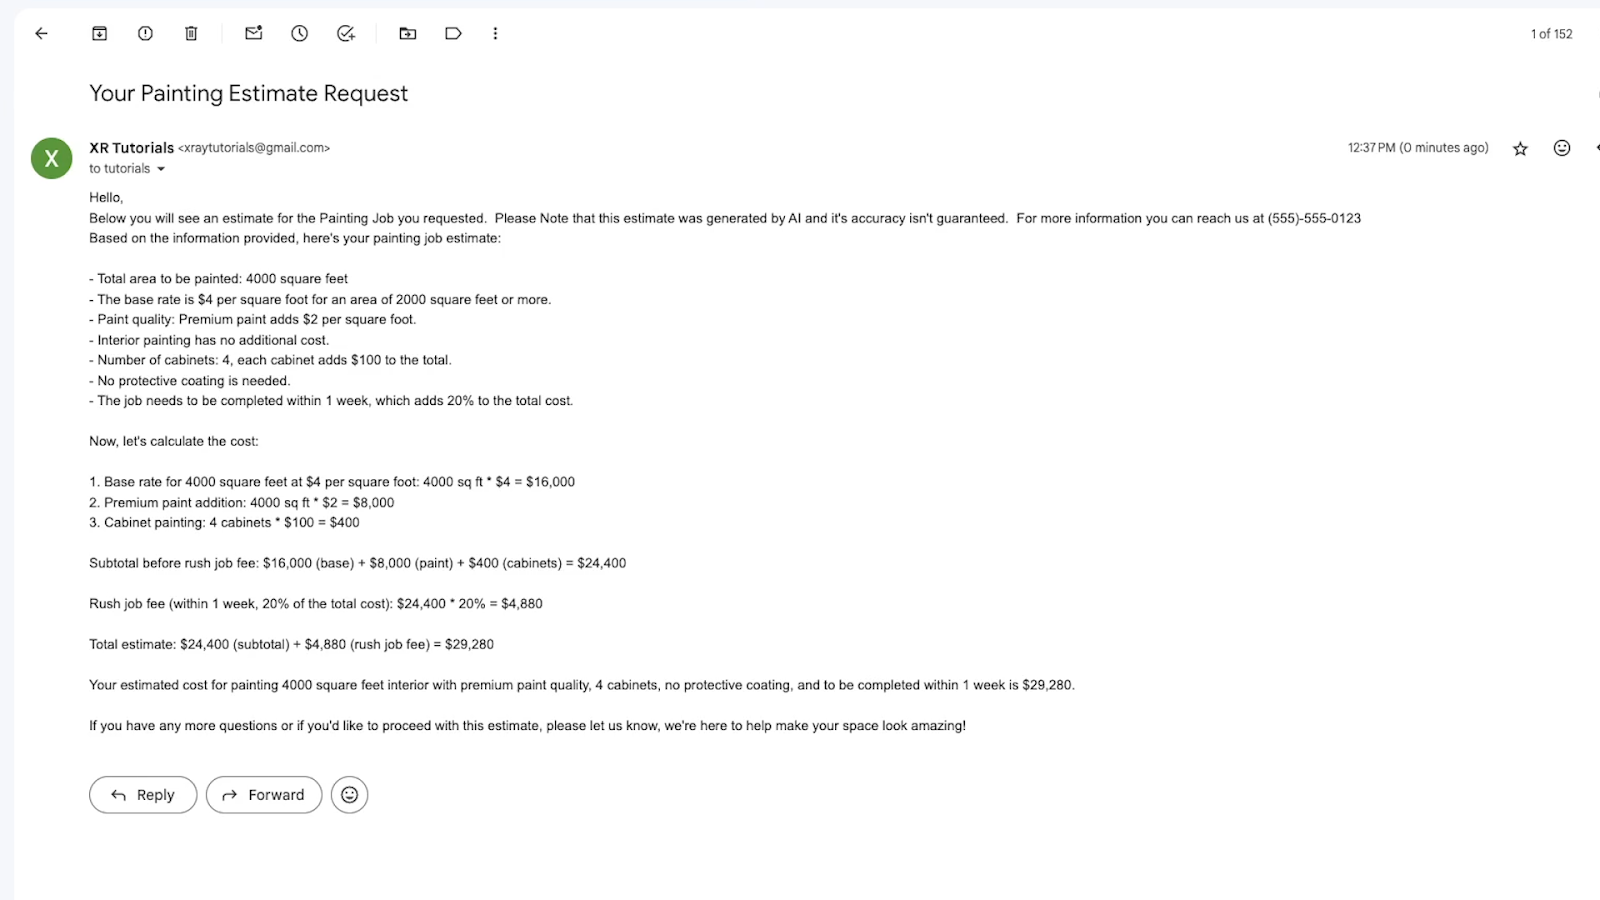
Add a step to update your Airtable records
Finally, we’d recommend adding one more step to update the Airtable record that triggered the automation, indicating that the user received an AI response for their request.
You may also want to include the text of the estimate in a “Notes” field.
You can see our configuration for the “Update a Record” step below:
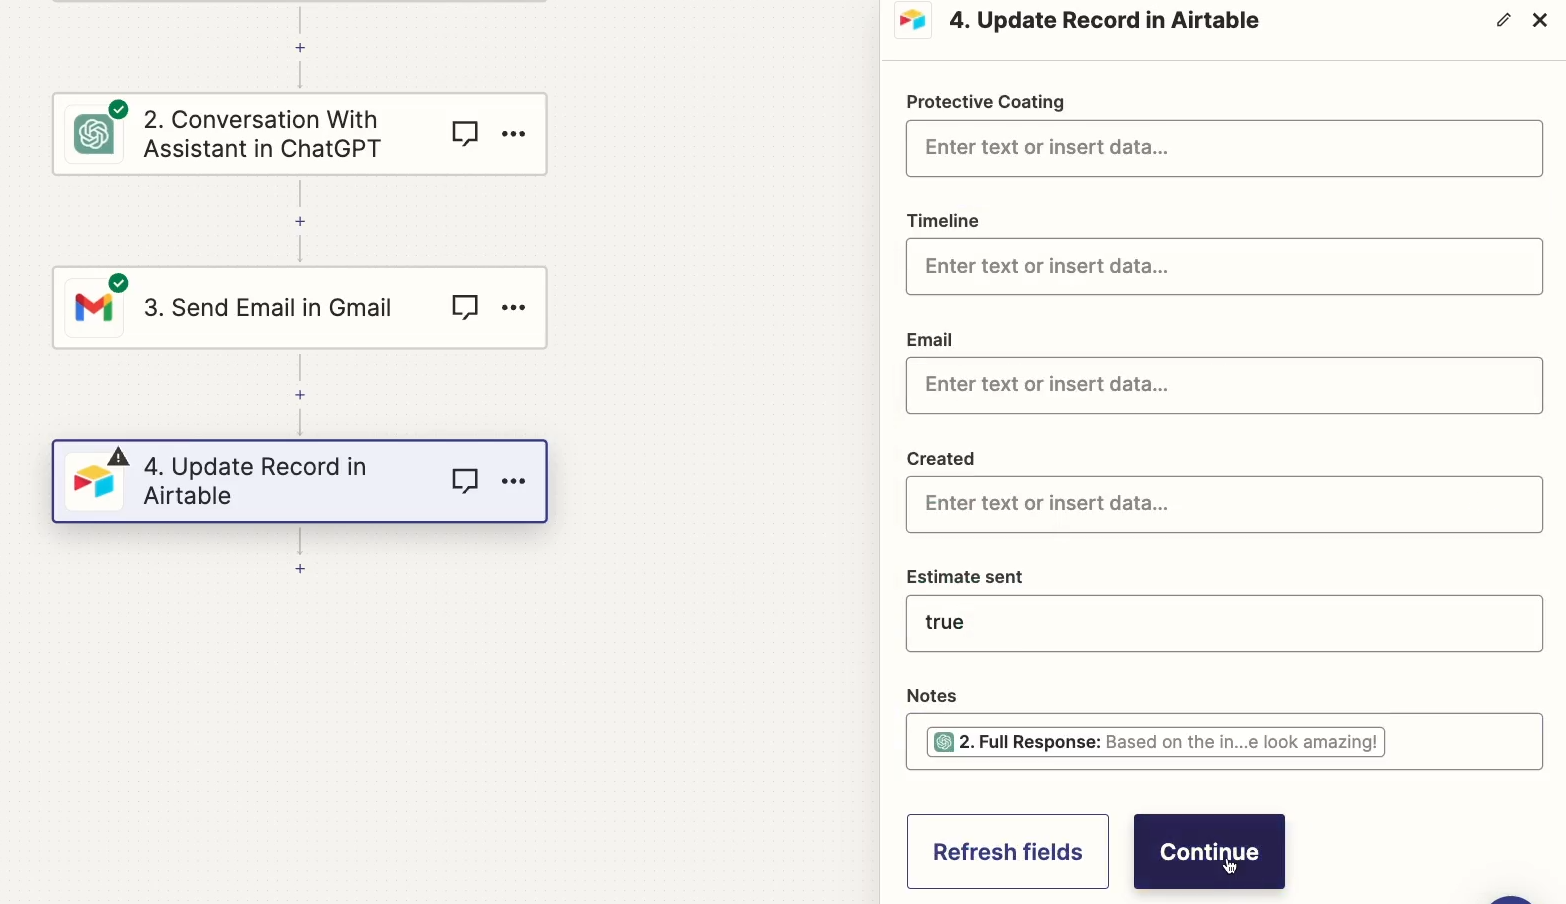
Test your Airtable step, then check your base. In our base, we can see that the checkbox in the “estimate sent” field is filled in for our test record.
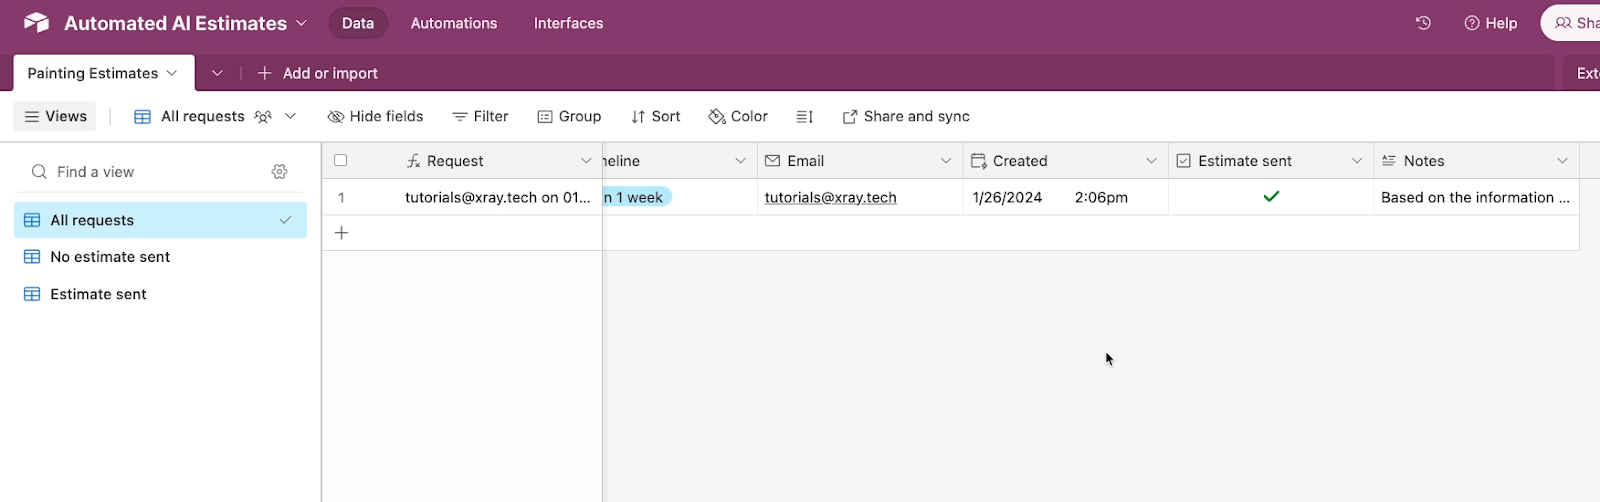
The record no longer appears in the “No estimate sent” view, and instead can be seen in the appropriate “estimate sent” view.
Run a live test of your entire automation
Once you’re done configuring and testing each step individually, turn the automation on and publish it.
Finally, it’s always a good idea to give everything a live test.
In our example, we’ll fill in the form one more time.
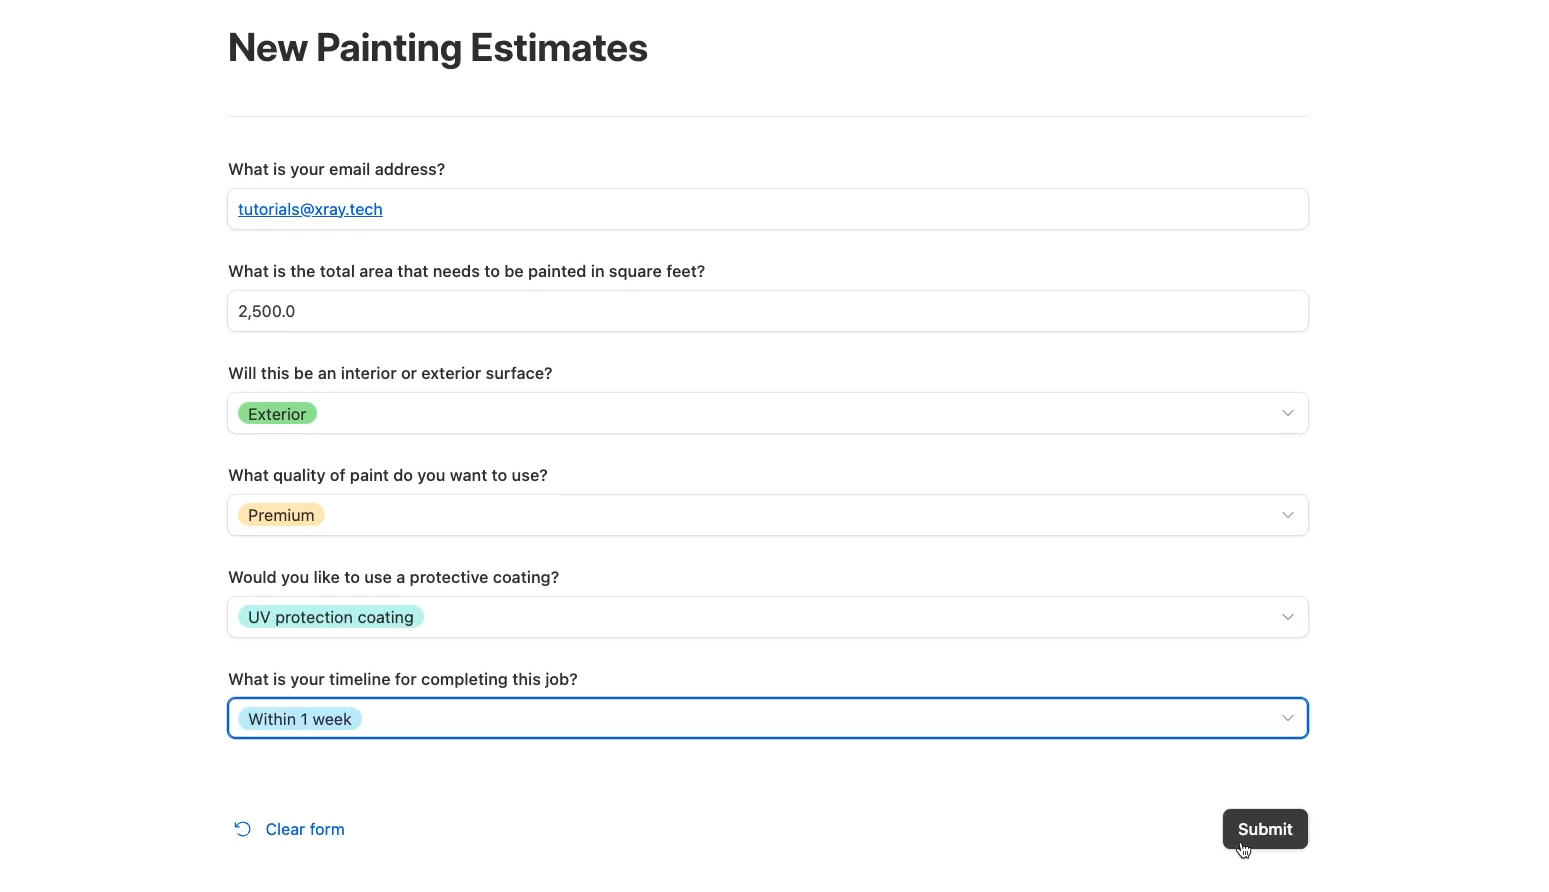
After a couple minutes, we receive a message in my inbox with an AI-generated quote.

Use automation and AI to save time and create a better customer experience
With an automated AI assistant you can give your customers and leads accurate answers faster than ever before. It may take some trial and error to craft an assistant that gives perfect responses, but it’s worth it to create a better experience for your customers and to enhance your capacity to answer incoming questions.
If you’d like to learn more about streamlining your work with automation and AI, be sure to check out our blog or our YouTube channel. You can also follow XRay on Twitter, Facebook, or LinkedIn.

Zapier makes it easy to connect your web apps together and automate your tedious work.
But does that convenience come at a cost? Does Zapier’s security live up to the standards that your company needs, and is it HIPAA compliant?
In this post, we’re going to explain why Zapier is safe to use, as long as you take the same reasonable precautions that you would with any other web app.
And at the end of this article, we’ll explore the most stringent of security standards – HIPAA – and see if Zapier can adhere to those regulations.
Why Zapier needs to access your apps
First, let’s take a look at how Zapier works, and why it needs permissions that might initially make some users uneasy.
As an automation provider, Zapier’s main purpose is to connect multiple apps - and their data - together. With Zapier, you can automate the software your team uses every day, like Google Drive, Hubspot, Airtable, Excel, or thousands of other apps that Zapier supports.

Quick tip: Check out XRay.Tools to quickly search a complete indexed list of every Zapier integration, along with 5 other automation providers.
In order to automate these third-party tools, you have to give Zapier access to your apps, and you have to give it permission to act on your behalf.
For example, if you want Zapier to perform a certain action whenever you get an email, then you’ll need to grant Zapier permission to view your email inbox in Outlook or Gmail.

Similarly, if you want Zapier to generate documents in Google Drive, you need to give Zapier permission to create data through your Google account.

When you’re connecting an app to Zapier for the first time, the request for permissions may seem a bit intrusive at first, but they’re really just asking for what’s necessary to automate your tools. Without these permissions, you’d be very limited in what you could automate.
Of course, there are some things you can build with Zapier tools and public data alone. You could potentially use Zapier tables to store all of your data in the backend, build automations connected to public newsfeeds, and publish everything to a Zapier interface.

However, this isn’t the way most people will use Zapier most of the time. In the vast majority of circumstances, you’ll need to connect your other software to Zapier in order to make the most of the platform.
How Zapier secures your data
To be clear, granting Zapier access to your apps doesn’t make Zapier a security risk in and of itself. You can confidently give Zapier the permissions it needs, because Zapier is designed to comply with modern security standards for web apps.
We won’t go into deep technical detail right now or cover every aspect of Zapier’s security, but we want to highlight some key things you should know about how they handle your data.
Certified security standards
First off, Zapier has received third-party certification from auditors, so you don’t just have to take their word for it that they’re being responsible with your apps and data.
They’ve received third-party auditor certification with the AICPA, and you can read the full report on Zapier’s security and compliance page.

Zapier is also compliant with the EU-US Data Privacy Framework Program. This ensures that data can be transferred from users in the EU to a US-based company like Zapier while still respecting all of the relevant EU data privacy laws.
Authentication and 2-factor login
Next, it’s important to remember that every app you connect to Zapier needs to be authenticated first.
The exact methods for authorizing each app vary. It will depend on the app in question, and how those developers built their Zapier integration.
Zapier encourages OAuth V2 or API Keys, and these are the most common authentication methods you’ll see. But regardless of the exact method used, you’ll always need legitimate credentials to automate an app with Zapier in the first place.

For an added layer of security, you can always enable 2-factor authentication on your Zapier account. That would require you to use an app like 1Password in conjunction with your password whenever you want to log in.

Even if someone obtained your username and password, they still wouldn’t be able to sign in without the temporary code shown on your authenticated device.
Data encryption and privacy
Next, whether you’re using 2-factor authentication or not, your Zapier data is encrypted using 256-bit AES encryption, an international standard for data security. This is the same standard you use at checkout whenever you buy something online with a credit card from any reputable retailer.

Additionally, any of your data that’s stored in Zapier will only be used for your Zaps. As Zapier notes on their data privacy page, your data is not sold or marketed to third parties.

And if you do ever run into any issues, Zapier has a security support team available 24/7.
In short, there’s really no need to worry when you connect your apps to Zapier. They’ve built a secure, reliable automation platform, and in our time building thousands of Zaps for our team and our clients, we have yet to encounter a serious security threat.
General best practices for using Zapier securely
Everything we’ve covered shows that Zapier lives up to modern security standards for web applications.
But Zapier, like any app, can be compromised through human error if you don’t take basic security measures. So here are some quick tips that you can follow to ensure that Zapier and your other software isn’t at risk.
Use unique passwords for your logins
First – and you’ve probably heard this one before, but it bears repeating – don’t reuse passwords.
This applies to any and all software. If any app you use suffers a data breach, then your password for that app could be exposed.

If you’ve reused that password in different apps, that makes it easy for malicious actors to access several of your accounts with one set of credentials.
That’s why you should always use unique passwords for every app, even if it gets difficult to remember them all. In that case, you can always use a password manager like 1Password to securely store your credentials, and even safely share logins as needed with your team.
Share your Zapier connections carefully
On the subject of collaborating with your team, our next tip is a little more specific to Zapier:
Always be intentional about sharing app connections with your team in Zapier.
On team accounts, any app connection can either be kept private to you only, or shared with your team.

Sharing a connection with your team can be very convenient, since it will allow them to build Zaps using your authenticated account, but it’s not always appropriate to share your connections.
For instance, you might want to set up a Zap that sends emails from your individual Gmail account in your company workspace.
Sharing your individual Gmail account would allow users to read all the messages in your inbox and even send emails on your behalf via Zapier. You probably don’t want to give your entire team the ability to do that.
But thankfully, Zapier makes it easy to avoid granting too much access. You have full control over every app you connect to Zapier, and you can choose who to share it with – if anyone.
Consider the permissions granted to each account
Along similar lines, remember that when you connect an app to Zapier, the connection will usually have all of the same permissions and abilities that the associated account has.
So for example, let’s say there’s a document in our Google Drive account called “Q4 2023 Financial Report”.
The tom@xray.tech account has full access to view and edit the document, but the matt@xray.tech account has view-only permissions.

If Tom connects his Google account to Zapier, any Zaps he builds with it will be able to edit the Financial Report doc.
But if Matt connects his Google account, any Zap he builds will only be able to view the doc, and won’t be able to edit it.
In the “Append Text” step pictured below, this Zap will try to use Matt’s Google account to add the words “Test Text” to the Q4 Financial Report.


In the “Append Text” test below, you can see that the test result just says “No data available”. The Zap was able to send a request to edit the doc, but the doc remains unchanged because Matt’s account doesn’t have edit access.

And if we check the document in Google Drive, we can see that its text hasn’t been changed. There’s no “Test Text” at the end of the doc.

As this example illustrates, the permissions each user has when they use an app directly will also carry over to using the app automatically via Zapier.
However, in some cases, you can set the permission levels separately by using a Personal Access Token to authenticate the app. Unfortunately, this option is only available in a few select apps, like Airtable.
In general, the best approach to using Zapier securely is to stick with the same precautions that you’d use with any web app. Keep your passwords complex and unique, and make sure you only grant necessary and appropriate permissions to your teams.
Zapier is not HIPAA compliant
Before we wrap up this post, we want to point out that in spite of its high security standards, Zapier is not HIPAA compliant.
HIPAA, or the Health Insurance Portability and Accountability Act of 1996, is a US law regulating the use of patients’ private medical information. Understandably, this law has some very strict requirements for how medical information can be stored and accessed.

On their data privacy page, Zapier plainly states that they don’t support the use of Protected Healthcare Information covered by HIPAA, and won’t sign a BAA certifying that your Zaps comply with HIPAA if you ask.
We at XRay don’t represent Zapier, and this is just our opinion. But we believe the choice to not support HIPAA compliance mostly comes down to the extremely flexible and variable nature of Zapier and its integrations.
You may have noticed in this post and in others on our blog, we don’t usually call Zapier an “app”, but rather a “provider”.
Of course, technically speaking, it is a software application. But Zapier’s purpose is to connect other apps together to build something new. It doesn’t just have a predefined set of functions that you can perform. It lets you build almost anything you can think of using other tools.
With so many possibilities for what their users can build, we think that Zapier can’t realistically guarantee that users won’t build something that exposes protected information.
Zapier can’t control how other apps handle and process your data, and they can’t feasibly track every update to every one of the thousands of apps they have integrations for.
As such, a lack of HIPAA compliance shouldn’t be seen as an indication of poor security. It’s just not a practical goal for an automation provider with open-ended functionality to ensure that all of their integrated apps meet the extremely specific standards set forth in HIPAA.
This is certainly frustrating if you’re hoping to automate work related to the healthcare industry, but for most Zapier users, it’s ultimately not a reason to worry. Zapier still uses industry-standard security to protect your data, as we’ve covered in this post.
If you do need to build an automation that’s HIPAA compliant, reach out to us. You can schedule a free consultation to discuss your plans and your options.
Securely automating your apps with Zapier
As you work online, it’s always important to strike a balance between privacy, security, and productivity. There are a lot of malicious actors out there who will try to steal or expose data online, but keeping all of your data offline just isn’t a practical option.
Business runs on the web, and automation providers like Zapier let you automate that business using industry-standard encryption, authentication, and data privacy policies to keep you safe. Just take sensible precautions, as you would with any software, and you can confidently use Zapier to automate your work.
If you’d like to learn more about building workflow automations, check out our blog or our YouTube channel. You can also follow XRay on Twitter, Facebook, or LinkedIn.

Is your team getting bogged down with repetitive, mindless tasks?
Is critical data at your company getting siloed into apps where you don’t have access?
Are you getting frustrated with tasks that aren’t getting performed the right way?
For large and growing companies, the answer to all of these problems is the same thing: a Chief Workflow Officer Membership with XRay.Tech.
In this post, we’ll explain the ins and outs of one of our most popular service offerings, the Chief Workflow Officer Membership.
The CWO Membership is a great way for enterprise companies or rapidly growing smaller businesses to create more reliable results, save time on tedious tasks, and prepare your business to leverage AI.
If you’d like to learn more about XRay’s services, you can check out our case studies or our services page.
For now, let’s dive into the Chief Workflow Officer Membership.
CWO Membership basics
Let’s start with the basics. What is a Chief Workflow Officer Membership at XRay?
With a CWO Membership, our team at XRay becomes your company’s Chief Workflow Officer for as long as you retain your membership.
Whenever you want to improve a process or a workflow, we’re your first call. We design a better way for your team to work with the tools you’re already using, enhanced with automation and AI.
If one of your departments needs to see data created by another department in an app they don’t have access to, we’ll connect the pipes. If your team is wasting time on repetitive tasks, we’ll automate them with Zapier, Make, or other AI tools.
If you need to organize data, resources, and apps to make it easier for someone to get their job done, we’ll design and build a custom interface that puts it all in one convenient spot. If you want to get your company ready to use AI, we’ll help you to clean and structure your data so you can start building effective, automated prompts.
Our team of consultants will work with you to improve, update, and streamline any mission-critical process at your company.
Leverage an automated infrastructure to streamline work across teams and departments
However, the objective of a CWO Membership is not to create a series of disjointed automation, or point solutions.
When you start a membership, we help you create a reliable and scalable automated infrastructure that enables you to connect your teams, your software, and your data.
With all of your apps working together in concert, you and your team can make better decisions each day, as your choices will be informed by accurate, up to date information coming in from every relevant source of truth.
For an example of how it all works, I want to quickly tell you about our work with Boston BioProducts, a pharmaceutical reagent manufacturer and supplier.
CWO Membership case study: Boston BioProducts
We started a CWO Membership with Boston BioProducts in October of 2022. Boston BioProducts was (and still is) a rapidly growing company, and they were worried that the software they built their company on would no longer be sufficient.
Instead of continuing to use off-the-shelf apps like Magento and Quickbooks, they were considering switching to an Enterprise Resource Planning solution, which could have cost hundreds of thousands of dollars for the software alone, would have required 10-12 months to implement, and would have necessitated their team to be retrained on a whole new set of tools.
Instead, they were able to scale their systems with a CWO Membership at a much lower cost, and got to keep using the same software they were familiar with in the process.
XRay’s solutions for Boston BioProducts
In the initial months of their membership, we built an automated infrastructure in Airtable that unifies all of their orders, so that both standard and custom orders were processed through the same ecommerce platform and other internal fulfillment systems.
Once the order is received, Boston BioProducts’ team can then approve the order with a single click in Airtable, instantly sending data to Shipstation so the order can be packed and shipped.
That same centralized Airtable base also supports an automated system for creating and logging new products, adding to their catalog of over 20,000 unique SKUs.
Boston BioProducts creates as many as 35 unique products every week to meet the needs of their diverse, global customer base.
With a simple algorithm implemented by our team, they can now create a properly formatted, unique ID for each item in Airtable. Once the item is created in Airtable, it’s automatically synced to other relevant apps like Magento and Quickbooks.
Previously, SKU creation and management happened entirely within a single Excel file, which was difficult to scale as their business continued to grow.
Results of Boston BioProducts’ CWO Membership with XRay
Because we started by building an automated infrastructure and connecting all of Boston BioProducts’ essential software, every new workflow connects seamlessly into their larger systems.
And as a result, Boston BioProducts has been able to reduce the time spent on order processing by 75%, and the time spent on creating new products by 90%.
Specific results will depend on your company and your goals, but Boston BioProducts is a great example of the outcomes you can expect from a CWO Membership with XRay, especially if you’re experiencing rapid growth and have concerns about scaling your internal systems.
CWO Membership timelines and cadence
Next, let’s look at the cadence of a CWO Membership.
By design, these memberships are highly collaborative. Our consultants will become part of your team, and will schedule regular meetings so we can share updates, address any obstacles that emerge, and set goals together.
It’s important to note that our consultants don’t just offer an expert opinion. They’ll also design and build the systems that you need.
Unlike the typical agency assembly line, your projects won’t get handed off to Junior teams that aren’t aware of the bigger picture. Your workflow consultants who understand your business will also be the ones doing the technical implementation. It's the same people every step of the way.
Advancing your workflow priorities with regular meetings and updates
Here’s how a membership usually works.
Each week, you’ll have a meeting with your lead XRay consultant and project manager, scheduled at a time that’s convenient for you.
Often, many of your key stakeholders will also need to be present at these meetings. These will be the people in charge of the various workflows that you want to automate or optimize. Essentially, they’re the decision makers or owners of a given process.
Our focus will vary somewhat based on your specific goal, but we typically begin a membership by establishing reliable centralized sources of truth.
In other words, we want to make sure that you have accurate and relevant information in all of your critical software before we begin automating any actions between your software.
Once your data is in order, we can start supporting any workflow with automated actions or AI output.
Collaborative workflow design
Your goals for what we accomplish are ultimately up to you, but we’ll always share our expertise to help you make an informed decision. You should think of us as being both a strategic and technical resource as you encounter forks in the road.
After selecting a goal to pursue, we’ll hold discovery meetings with your key stakeholders so we can document exactly how the process is conducted today, and highlight areas for improvement. We’ll also make note of what information each person involved in the workflow needs to see and act upon.
Once we understand how the process works in its current state, our team will design an optimized workflow that uses technology like low-code automation or AI as needed. At XRay, we always try to use our members’ existing software in conjunction with automation providers like Zapier and Make to build robust, cost-effective solutions.
Keeping as much of your existing tooling as possible will ensure an easy learning curve for your team and a much faster transition to the new workflow.
Prototyping, testing, and refining
After getting your approval for the workflow design, our consultants will start building a prototype that focuses on delivering the most important functionality and accommodating the most common use cases.
Once each feature in the prototype is tested and working up to expectations, we’ll move on to handling more niche circumstances.
For instance, if we were building an employee onboarding workflow, we would likely start by focusing on the process for onboarding full-time employees - assuming you’re mostly hiring full-time team members.
Once that part of the workflow is established and working correctly, we would build functionality to support onboarding part-time employees, interns, and contractors, assuming those are less common for your business.
Automating or optimizing each workflow will be an iterative and collaborative process, and we’ll need your cooperation as we test each component to make sure it meets your expectations and addresses fringe use cases.
Automate additional workflows or switch to maintenance
Once we’ve finished optimizing one workflow, we can move onto another priority. You’ll quickly notice that as we continue to expand your automated infrastructure, new possibilities open up for additional, related automations.
Or, if you’d rather put a pause on implementing new solutions, you can switch to a maintenance membership.
Coming in at a lower cost than a full CWO Membership, a maintenance plan will keep XRay’s consultants on retainer to keep your current automations up and running. We’ll also be available to answer any questions you might have and discuss your plans for the future.
No matter what your goals are, with a Chief Workflow Officer Membership, XRay becomes a strategic partner for your business, helping you to design and implement automated workflows that support your entire team. Our number one goal is to make sure that you can accomplish more with the resources and people you already have.
To learn more, check out our services page or reach out to XRay and schedule a free consultation.
Get quick low-code support with LowCodeEngineers
The Chief Workflow Officer Membership is an ideal choice for large and growing businesses who need to transform or scale their operations. However, If you’re looking for smaller-scale low-code automation support, then a full membership might not be the best fit for you.
If you need some quick help with an automation or a smaller low-code project, then you should check out LowCodeEngineers instead.
LowCodeEngineers is built by XRay.tech, and connects businesses and entrepreneurs with vetted low-code experts.
Through our simple platform, you can book sessions on an hourly basis to fix bugs in your automations, receive one-on-one low-code training, leverage the most advanced features of your favorite tools, and much more.
Just go to lowcodeengineers.com to begin, or watch our recent video explaining how LowCodeEngineers works.
Find a better way to work with an XRay CWO Membership
You and your team have your hands full simply doing your jobs. Let XRay analyze how you work and enable you to get the most out of your time each day.
With a Chief Workflow Officer Membership, your team’s work will become more consistent, you’ll have more time to devote to critical challenges as tedious tasks become automated, and you’ll be able to continuously improve your internal operations at a predictable monthly cost.
Just schedule some time here to book a free consultation call.

Tracking all of your blogs, videos and other content can be difficult. Task management apps are often aimed at generalized projects and to-do lists, so they’re not suited to unique needs of content creators.
What you really need is something that you can customize to your own purposes. That’s why we’re going to show you how to manage your content pipeline with a custom system in Airtable.
In this post, we’ll share an example of how you could set up a content management base in Airtable. We’ll show you some fields and views you can use to organize your data, and we’ll also demonstrate some forms, interfaces, and automations that can help you streamline work with your team.
To get started, you can copy our base from this link, or find the base along with other helpful resources on XRay Workflow.
The base that we’ve shared is just a starting point. In this guide, our aim isn’t to dictate a specific content management style you should use, but rather to give you some inspiration and show you some of the extensive possibilities that Airtable offers for customization.
Let’s jump into it and explore how you can manage your content creation with Airtable.
Getting started with Airtable
To use this guide, you’ll need to be familiar with the basics of Airtable. If you’re brand new to the app, you’ll want to check out our Airtable Beginner’s Guides. You can begin with the fundamentals in Part 1, before moving on to the more advanced techniques in Part 2.
Use different field types to track specific attributes and resources
First, let’s look at the basic setup of the base.
The exact configuration that works best for you will depend on your specific circumstances, but we want to quickly highlight some key field types that you’ll probably want to consider.
Again, you can copy our base here to get started.
Log basic information with text, date, and select fields
You’ll likely want to use several text fields for basic info about each piece of content, like the title, description, or SEO terms.

You can also use date fields to track things like the publishing date of each piece, or the recording date.
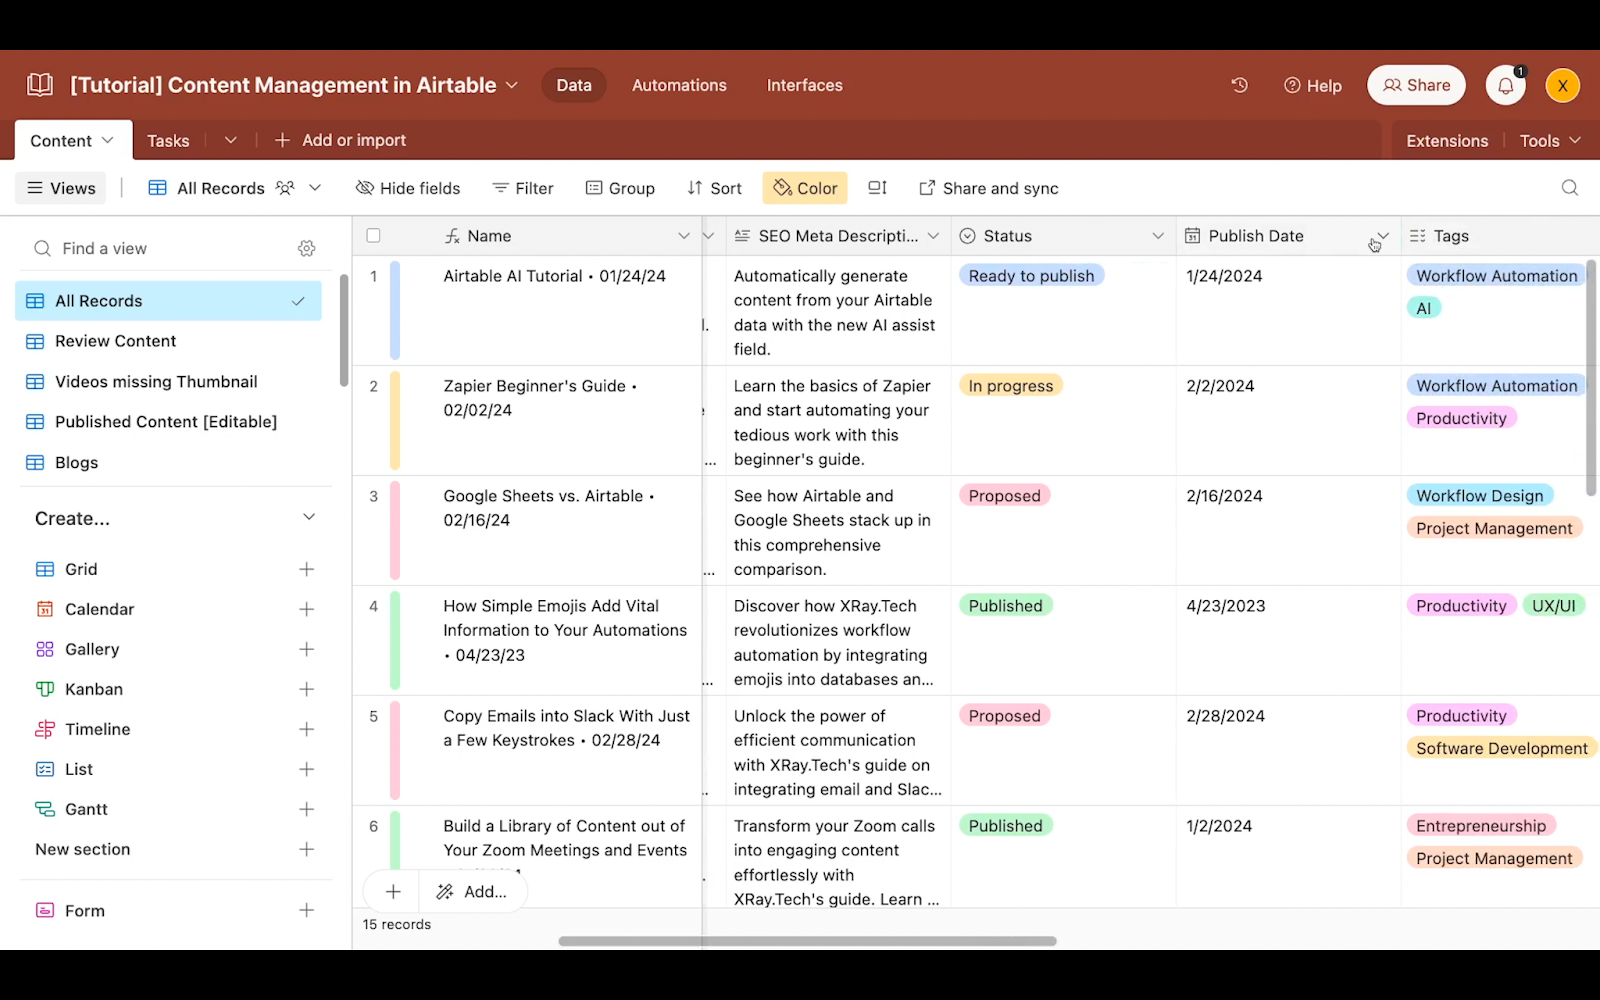
Airtable also offers single- and multi-select fields which can be great for logging status, descriptive tags, content type, and more.

These kinds of basic field types, along with phone number, email, and URL, are all pretty self-explanatory fields. You can just choose whichever field type suits your data best.
However, there are a couple of especially important field types that we want to cover in a little more detail.
These are attachment and linked record fields.
Upload assets to Airtable with attachment fields
Attachment fields allow you to upload a file and store it in your Airtable base. Your exact storage limit varies based on your subscription level, but at any tier, you’ll have plenty of space to store lots of text and image files.
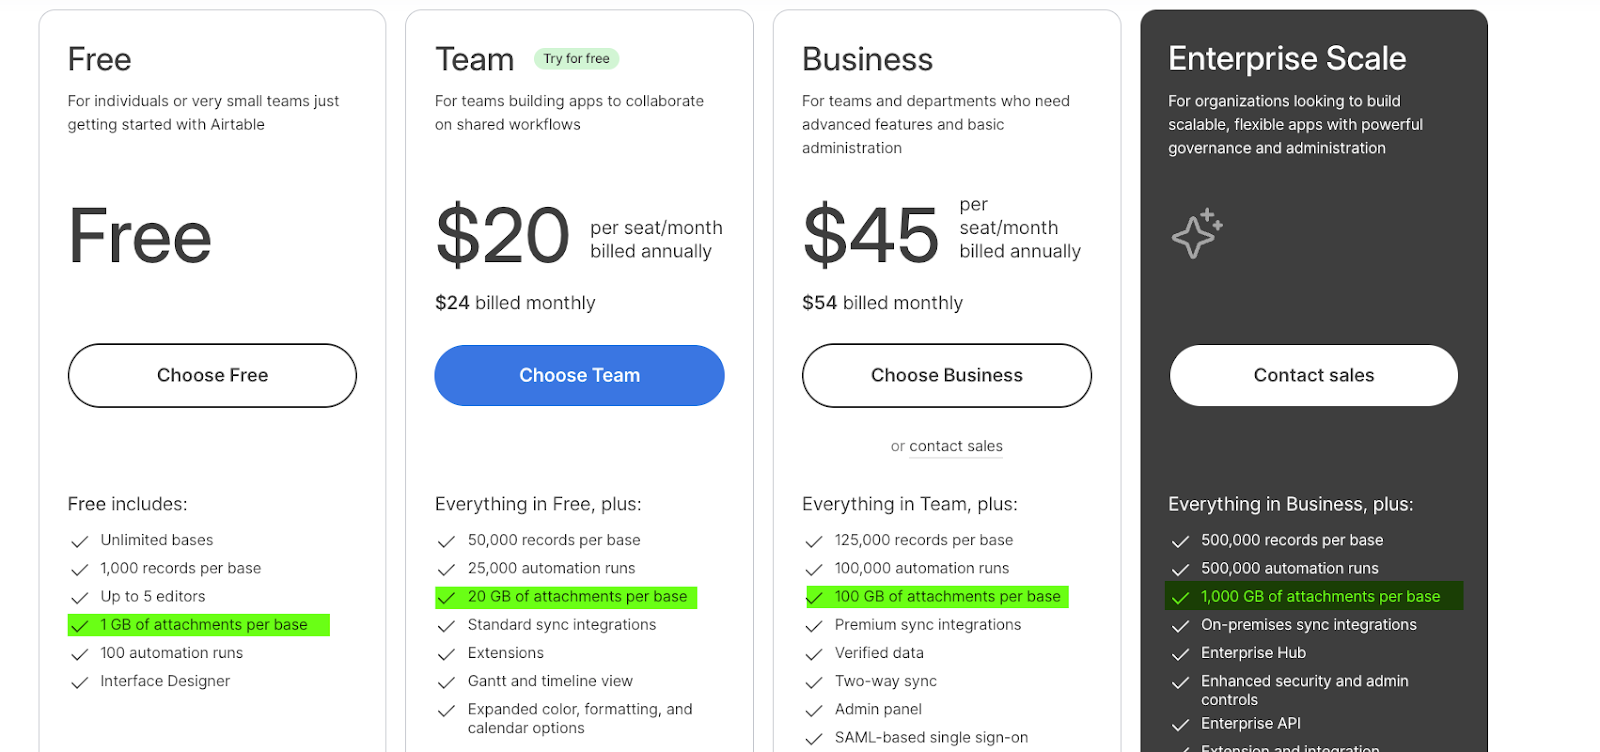
This means you can easily upload articles from a Word doc, thumbnail images for a video, supporting illustrations for a blog and other similar assets with ease.
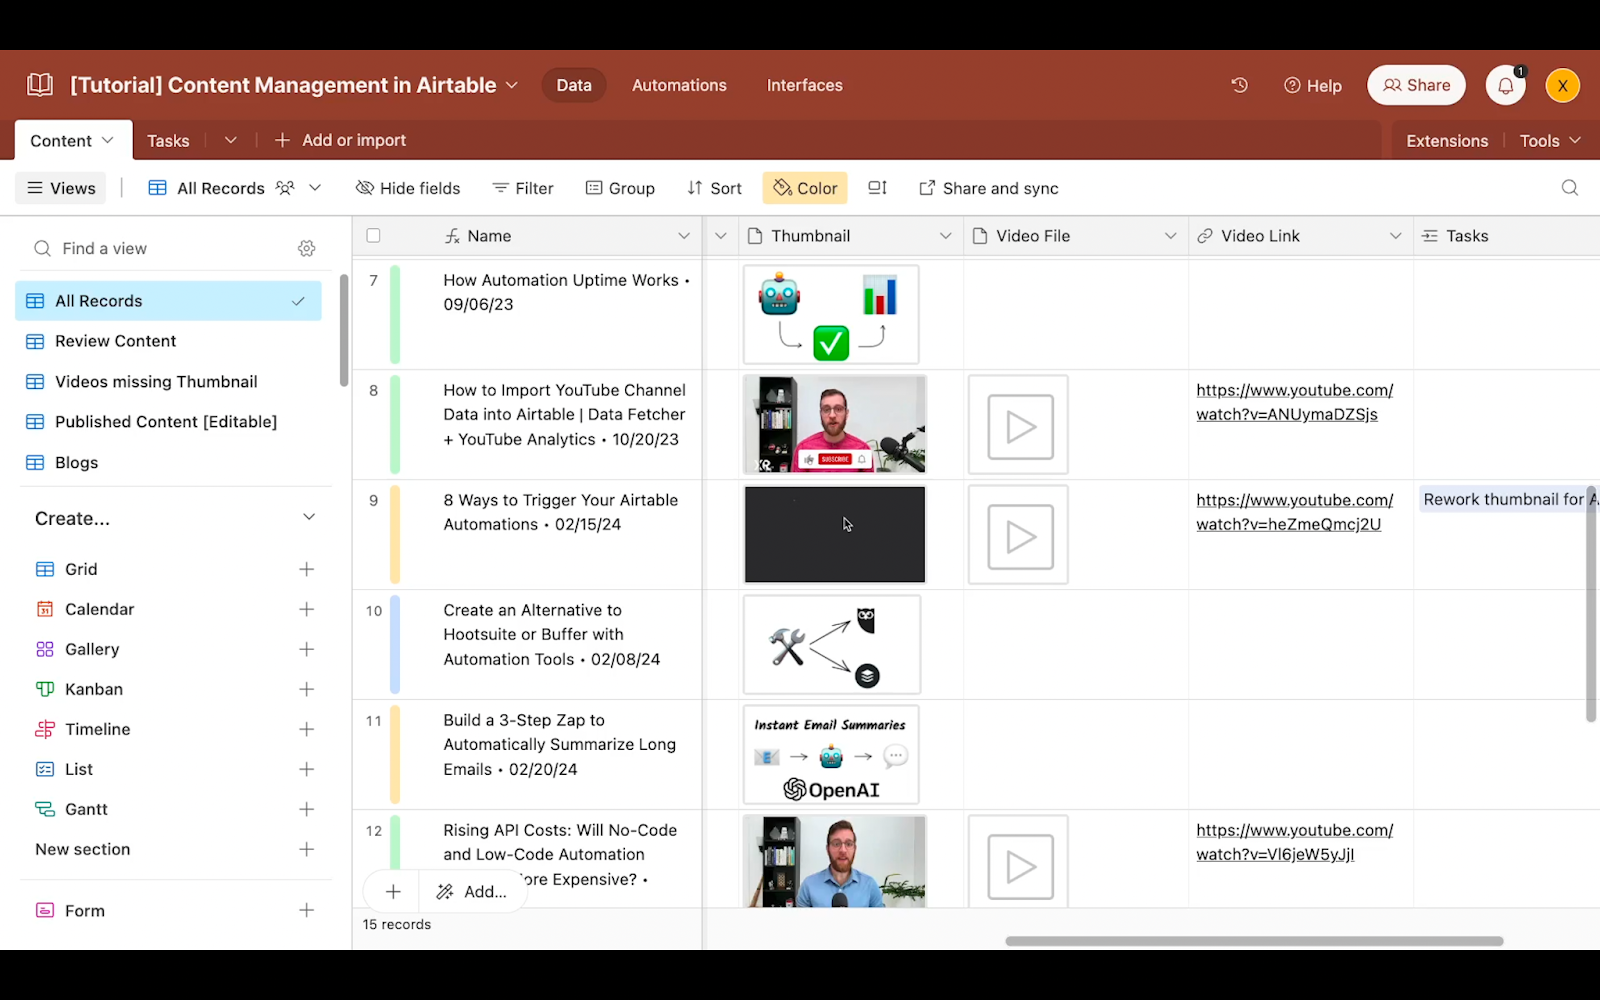
However, to accommodate regular video uploads, you’ll probably need either a business or enterprise plan.
But if you’re on a lower tier and still want to reference video files in your base, you can always just use a URL field to link to your large files in Google Drive, Dropbox, OneDrive or any other cloud storage provider.
No matter you choose to use attachment fields, they can be an extremely convenient way to include your assets right alongside their associated content.
Use linked records to associate data in Airtable
Another great tool for connecting your data together in Airtable is the ability to link records.
Linked records let you associate a record in one table with a record in another through a special field type. They can be a great way to track separate but related data, and they are one of the reasons that Airtable is so popular among large and growing teams.
For instance, you might want to associate each piece of content with any related tasks. In the same base, you could have one table for your content, and another for your tasks.
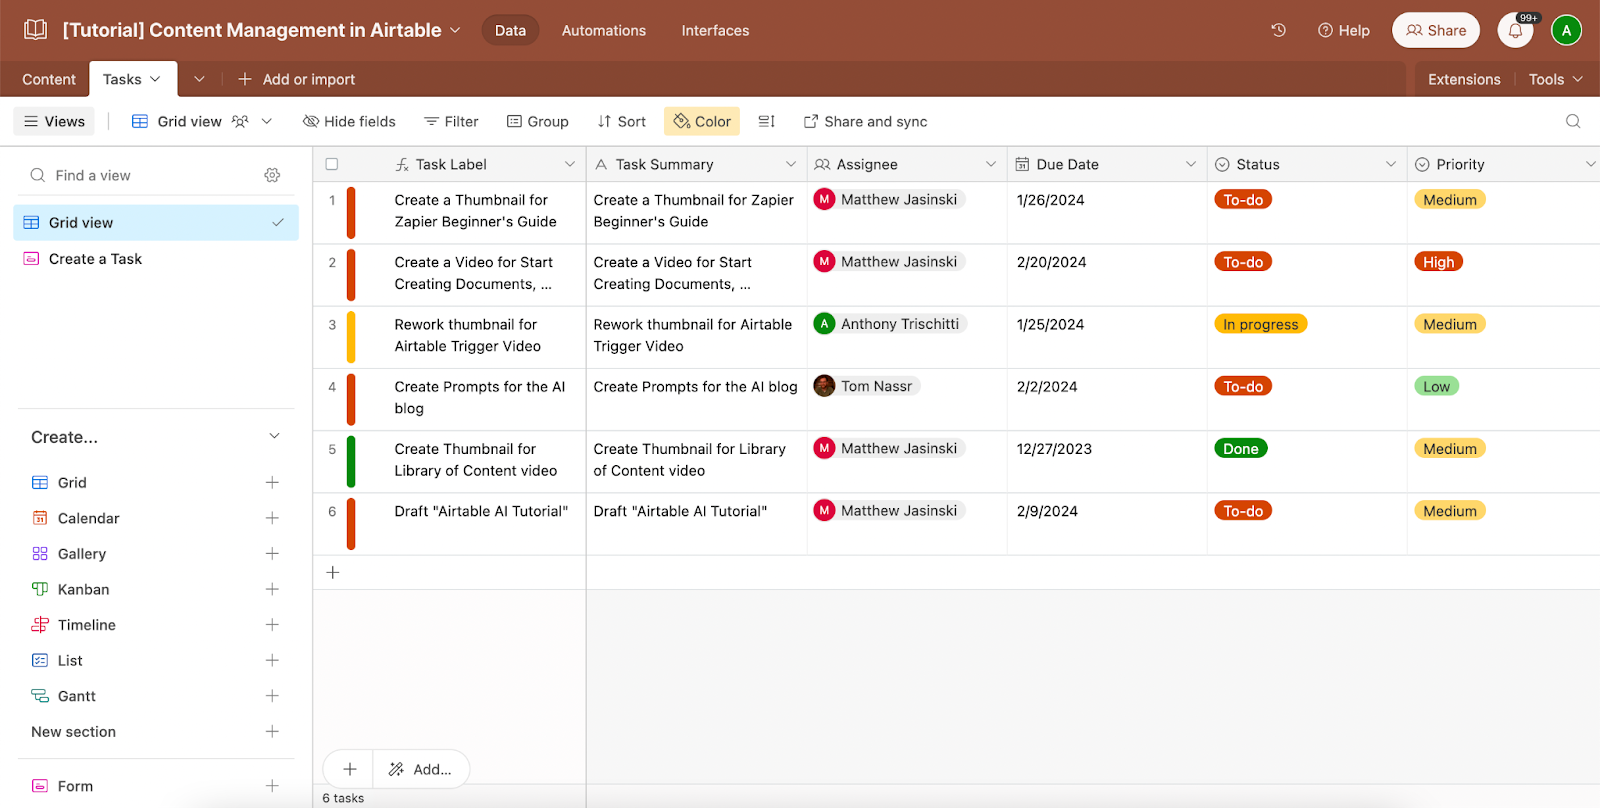
Then, in a linked record, you can simply associate each task with the relevant piece of content.
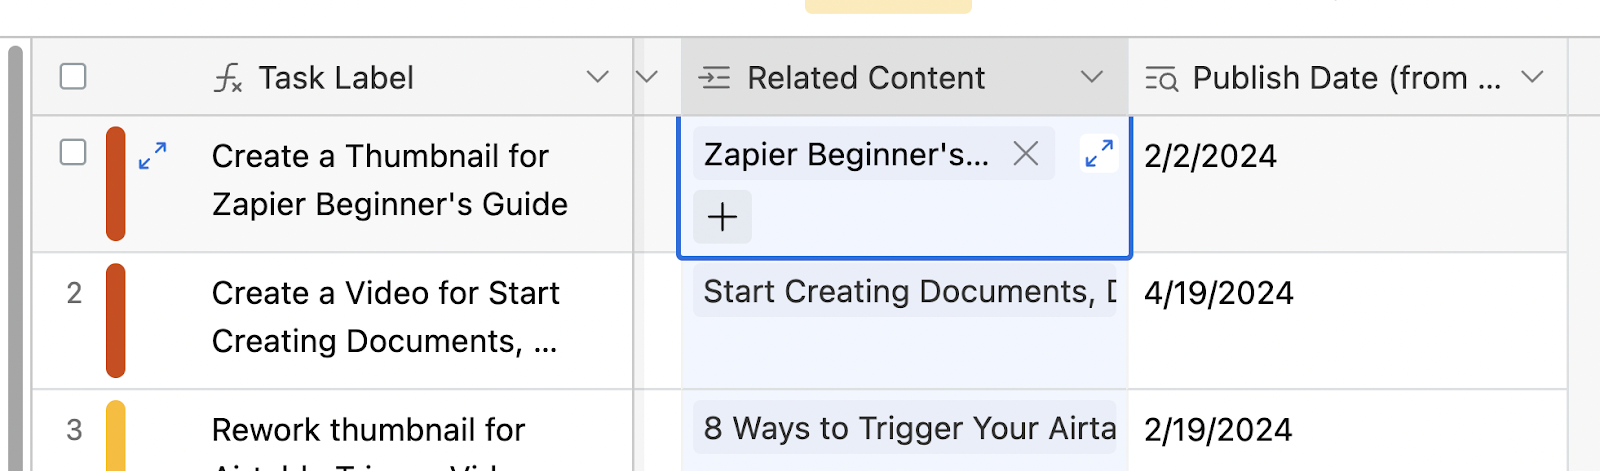
By including a lookup field, like the “Publish Date” pictured above, you can automatically pull in data from the other table.
So for example, we can see that the task pictured below is associated with the “Airtable AI tutorial” video, which is scheduled to be published on February 12th.

If you change any of the information in a linked record, those changes will instantly be reflected anywhere the record is referenced.
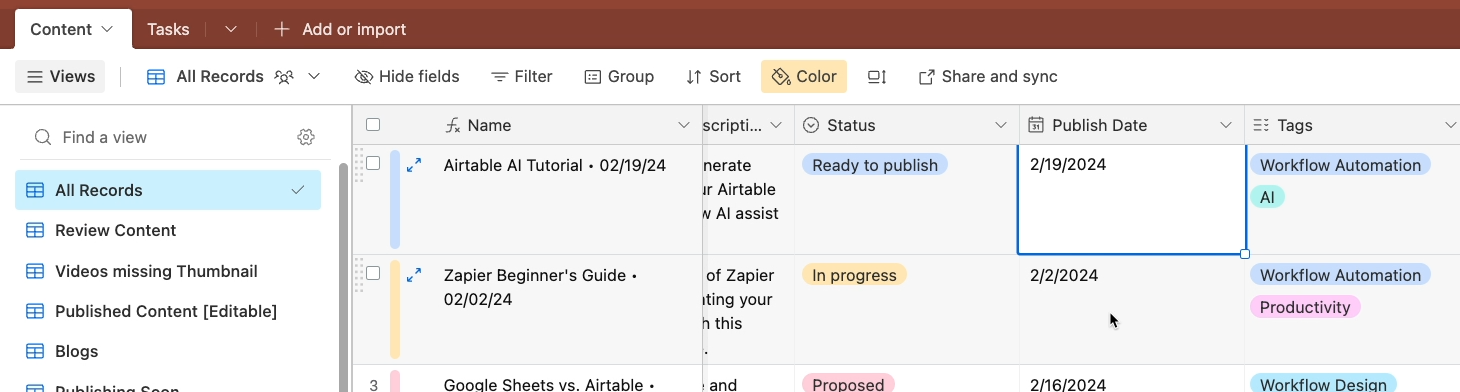
For example, if we change the Publish Date of the content to the next week, we can see that the update is immediately reflected in our linked record.
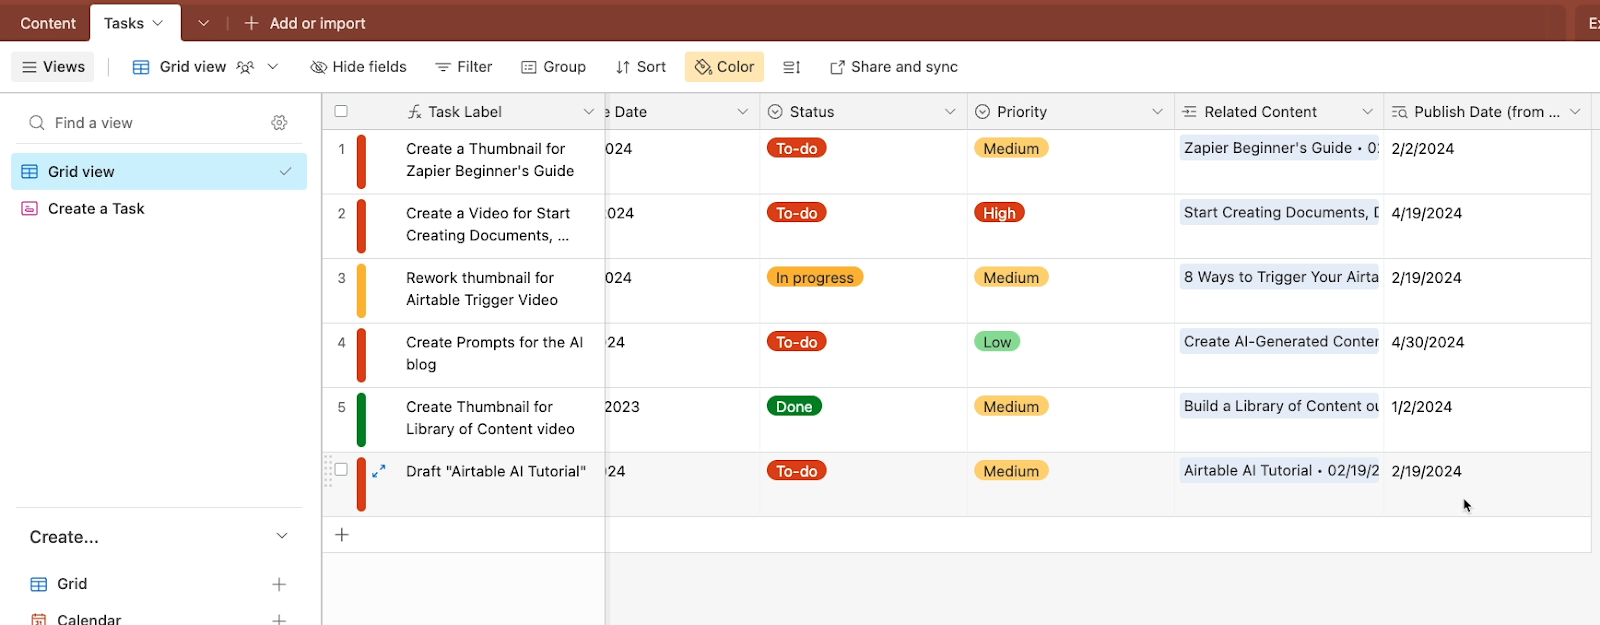
Linked records and lookups like this are a convenient way to surface the same information in multiple spots without redundant data entry or copying and pasting.
Format text and data with formula fields
There’s one more field we want to highlight before we move on to custom views. This is a field type and technique that can also help you to save time on edits.
With a formula field, you can populate a field with the output of any function you enter.
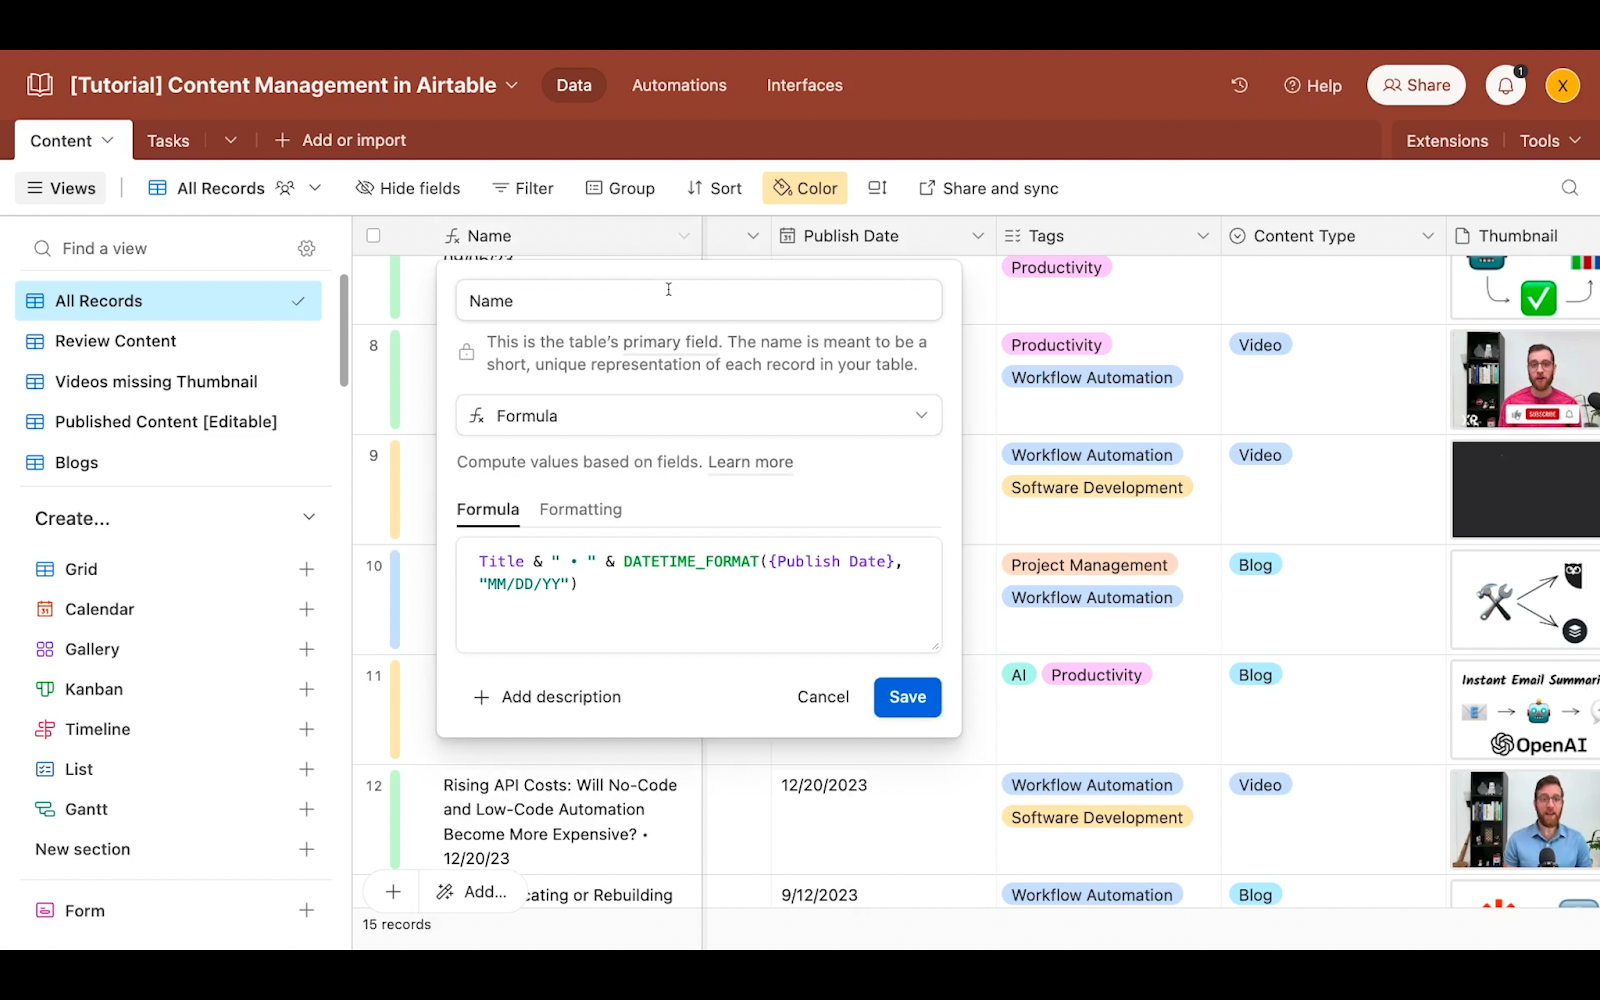
The options are pretty much endless, but one very simple formula is to concatenate the contents of various fields in your table along with additional text.
Another option, included within the same pictured formula, is to reformat the contents of any date field to whatever style you’d like.
We always like to use formula fields as the “primary field” in our bases at XRay, and we always recommend new Airtable users to do the same. This lets you easily keep naming conventions consistent, and update those conventions when needed.
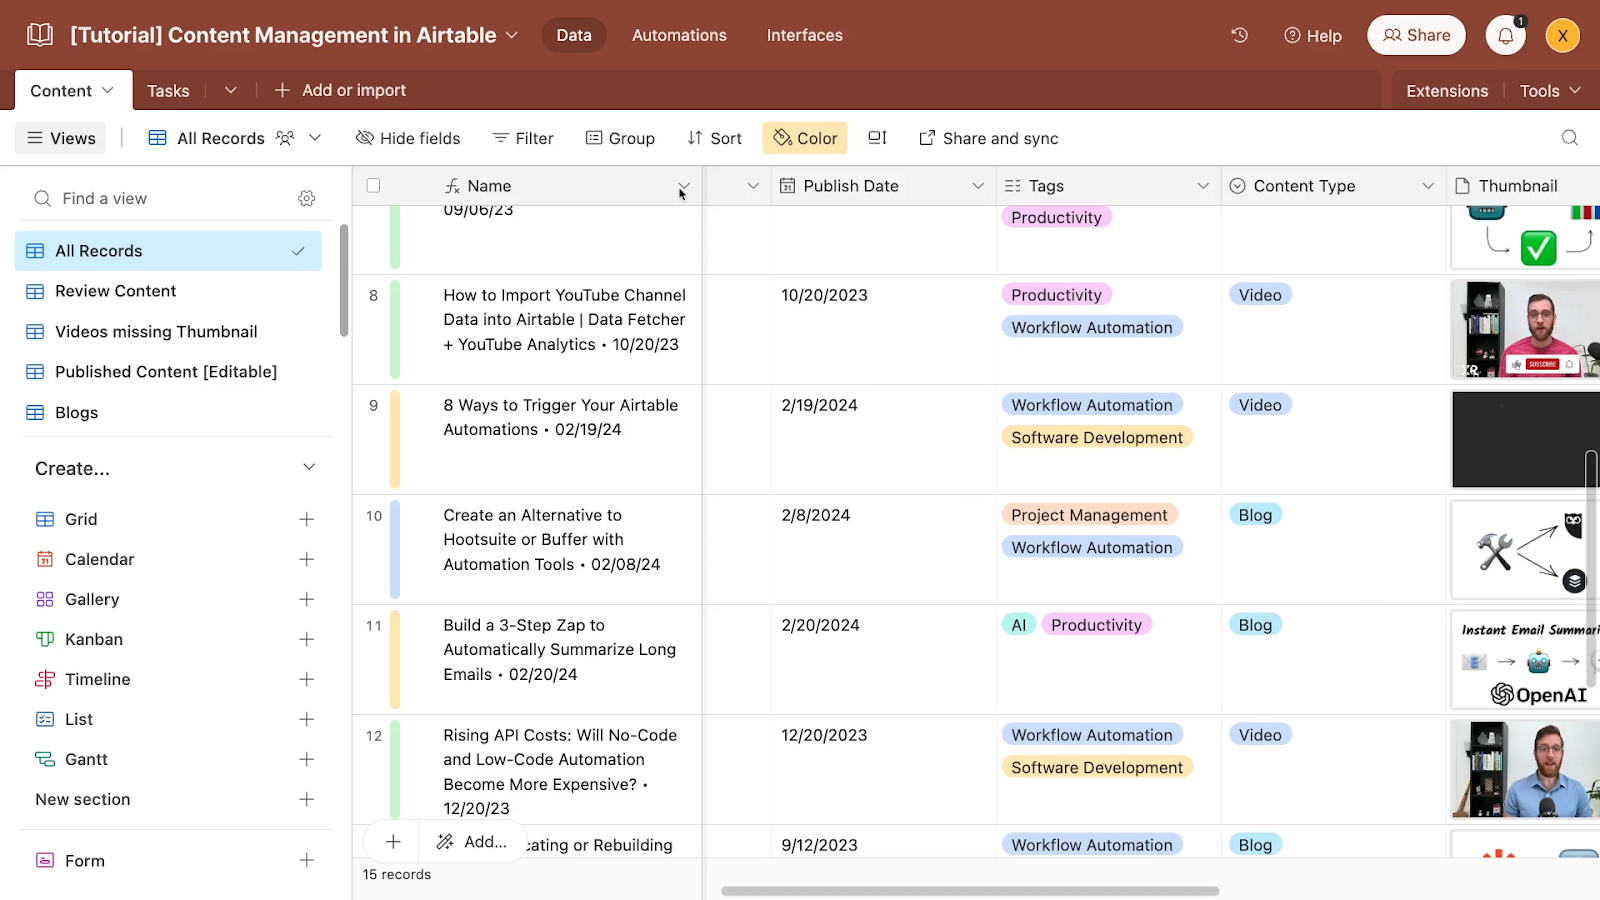
Right now, this field combines the title and publishing date of each piece of content, but we can easily change it to show the content type instead.
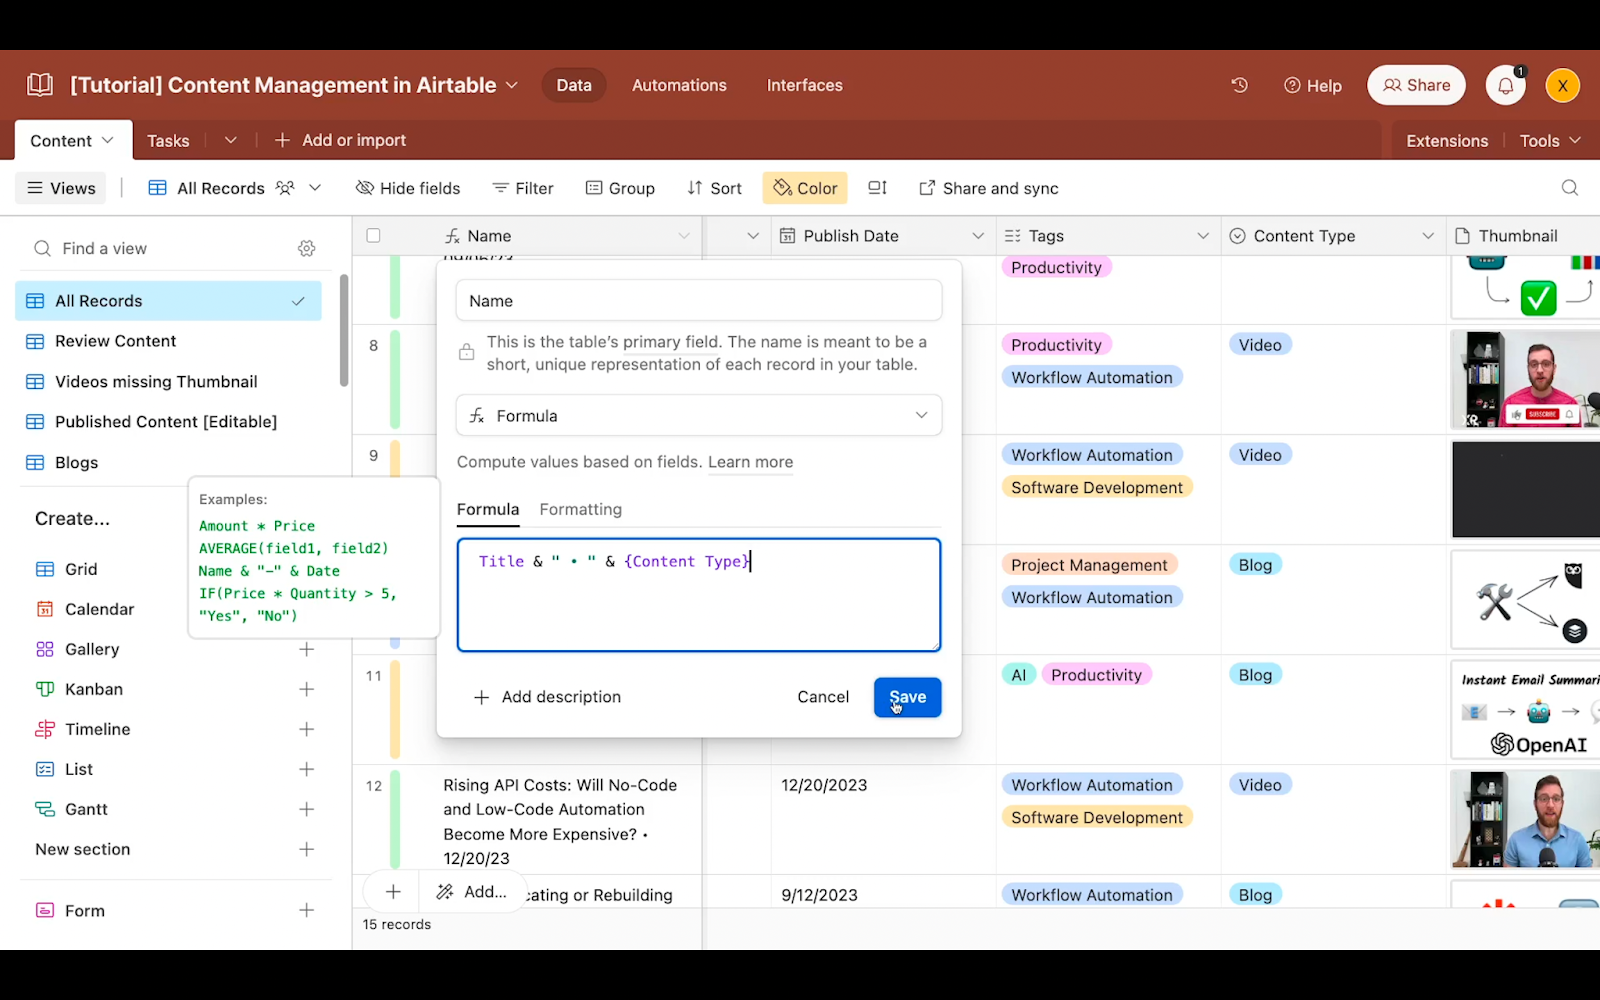
Once you save the changes you make to a formula, the column will immediately update for every record in your table.

With formulas, linked records, attachments, and a whole host of other field types, you can set up your content base to track any attributes you want.
Use custom views to surface important and urgent data
With all of your fields set up, the next step is to apply filters and create unique views to easily surface critical or time-sensitive data.
For instance, you might want to create a view with a filter applied to show only content that’s incomplete.
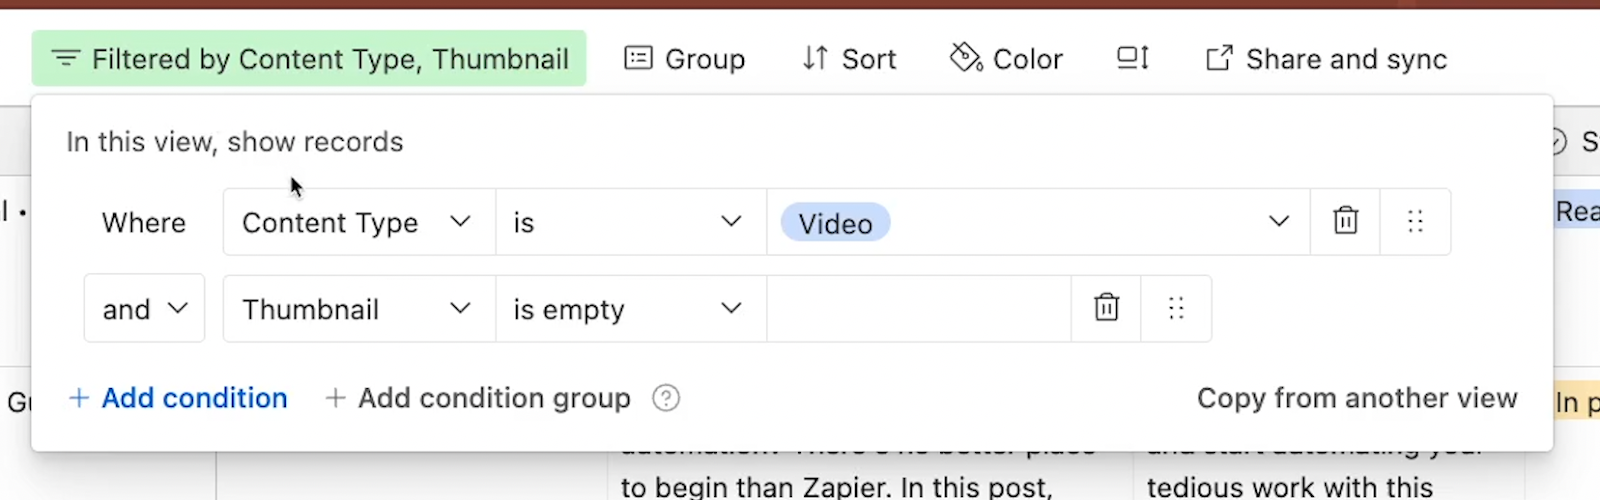
Our filter in view pictured here is set up to display any content not marked as “published” or “Ready to publish”. With a view like this, you can instantly see any content that still needs work, and exclude everything that’s already published or ready to go.
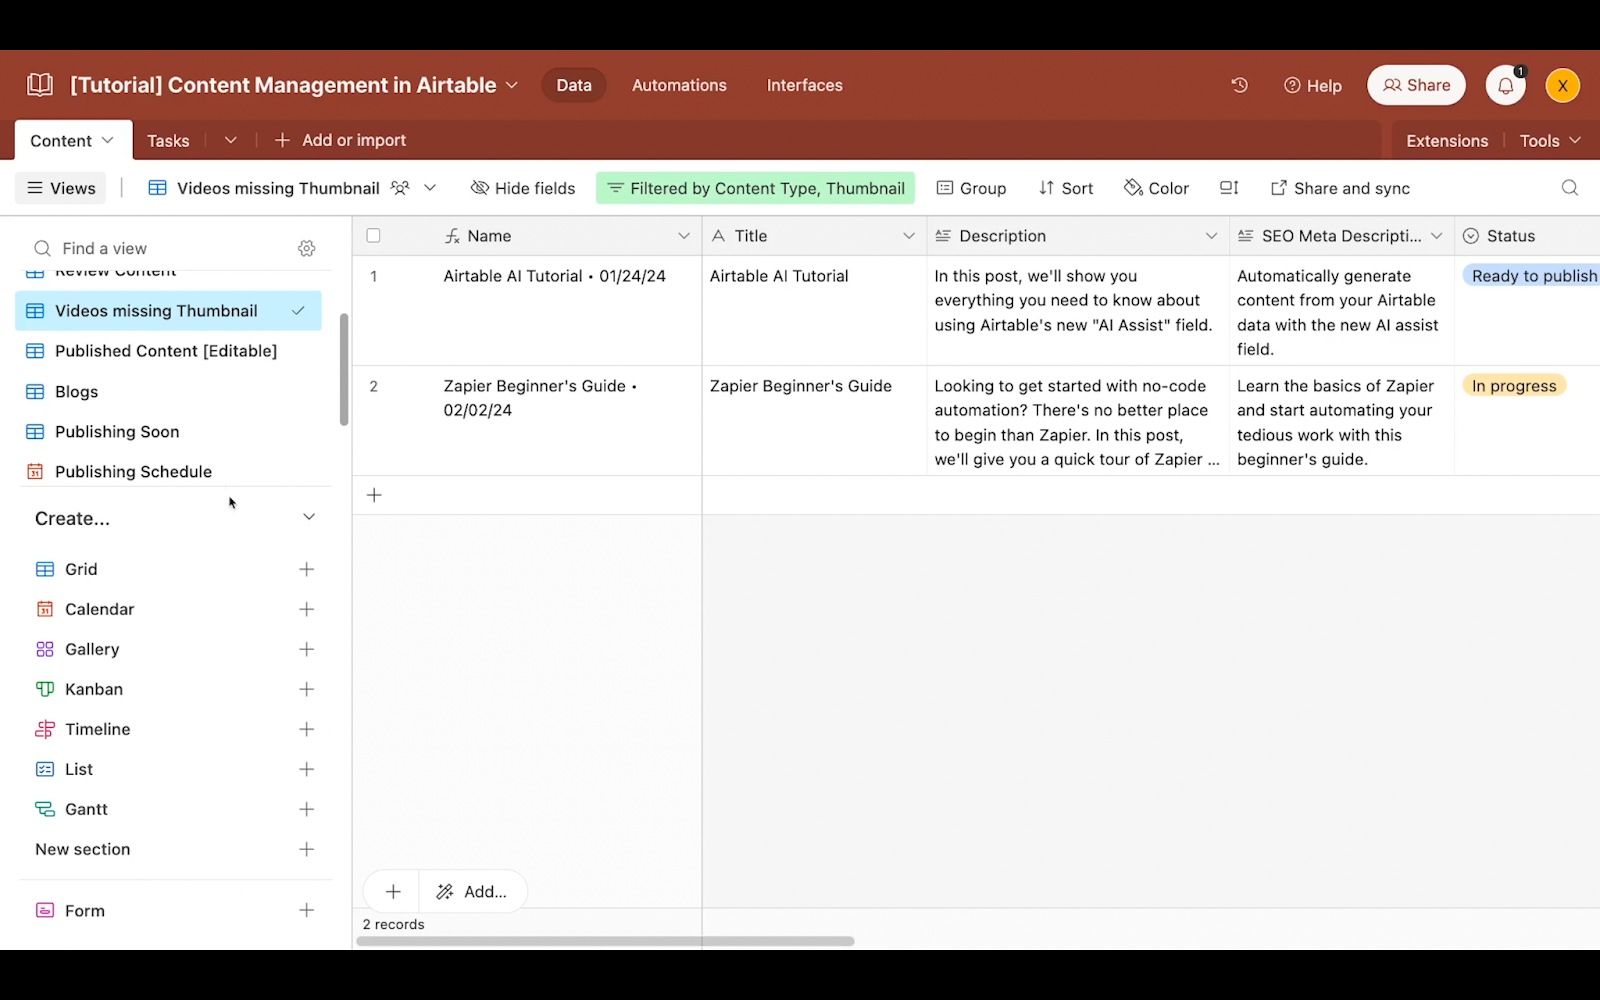
Alternatively, you may want to set a view that only shows videos scheduled to be published in the next two weeks.
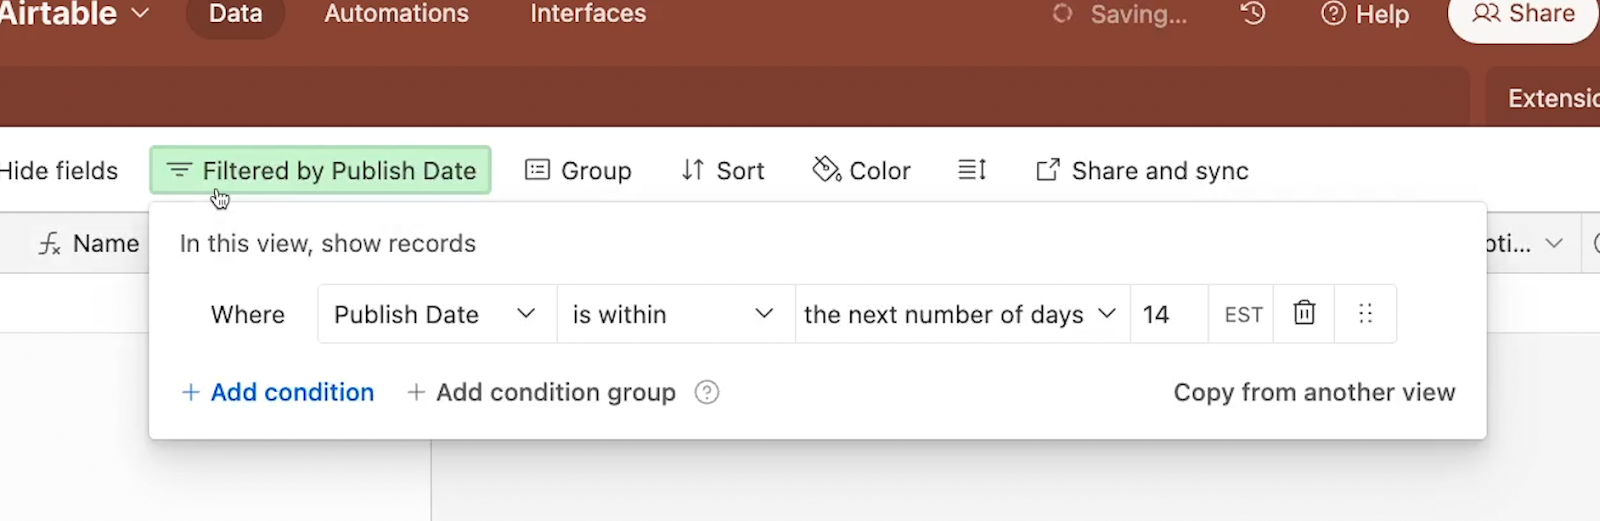
Or you might want to create a view that displays any videos missing a thumbnail in the “Thumbnail” attachment field.

Note that the condition here consists of two parts. It specifies “Video” as the content type, and looks for records with an empty “thumbnail field”.
[
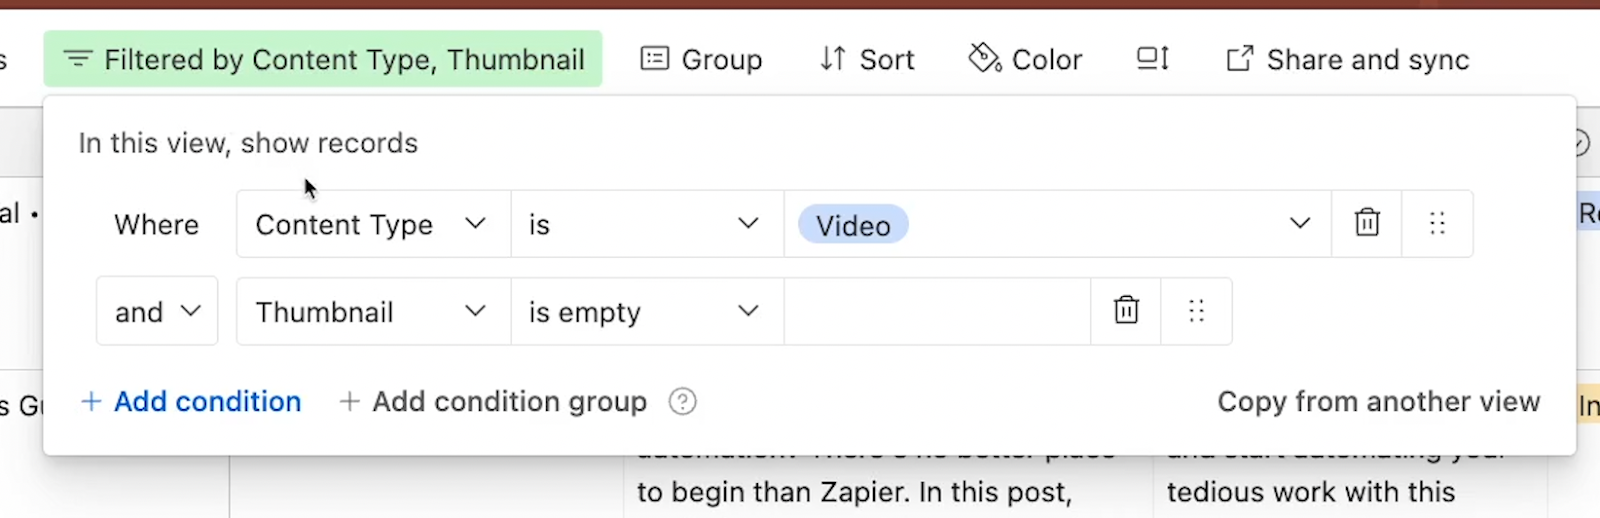
You can combine any number of conditions that you want about any fields in your table. It’s entirely up to you.
Preserving your table setup while creating new views
Adding filters and views will never delete data, but it may make it harder to find records that are hidden from most of your views by certain filters.
To help keep things clear, there’s three simple steps we’d always recommend when you want to experiment with new filters
1. First, make sure to always keep an “All Records” view that contains your entire data set, with no filters applied. Even if you don’t use this view very often, it will be useful to keep for reference.
2. Whenever you want to experiment with a new or updated filter, make a brand new view first.
3. If a view was just used to experiment and the filter doesn’t need to be preserved, add a note to the title to indicate that it’s safe to edit with an [Editable] or [EditMe] tag.
These sorts of techniques are very simple, but maintaining visibility and clarity can be essential when you’re collaborating with your team.
Create dynamic and engaging layouts with unique view types
However, views aren’t just for adding and saving filters to a spreadsheet.
You can also break away from the standard grid view and use other options for more dynamic arrangements.
For instance, you might want to use a calendar to see your posting schedule and line it up with other important events and milestones.

You could also use a gallery to easily identify each piece by its unique thumbnail or hero image.
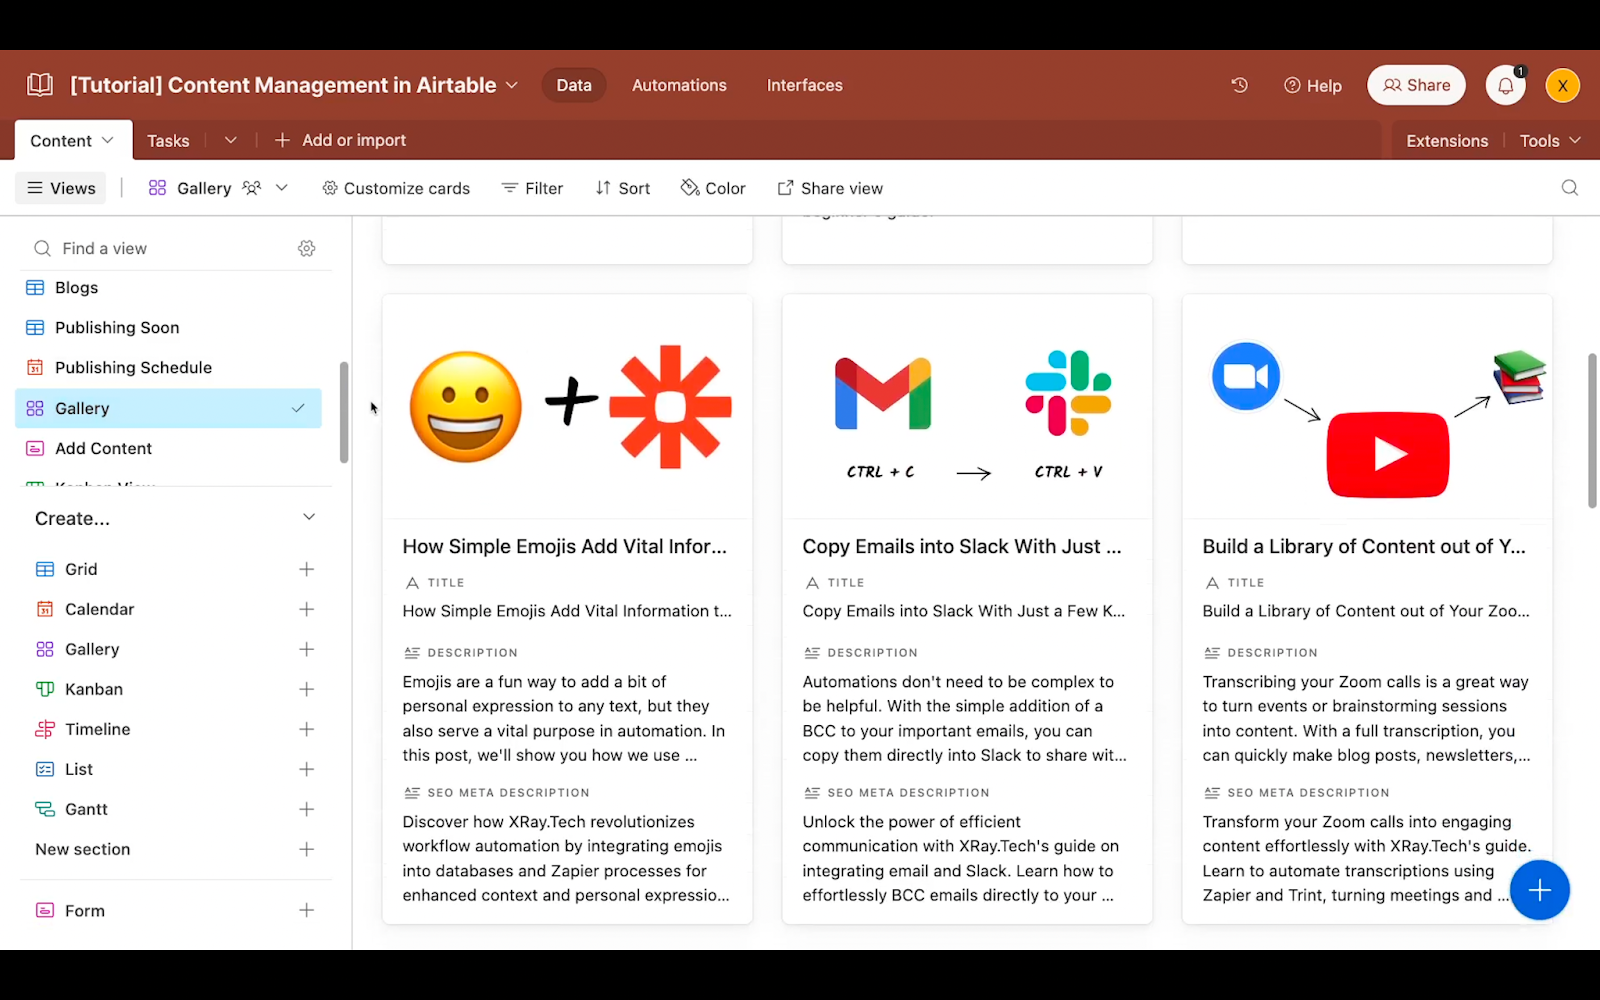
And you could use a kanban board to easily view and update tasks.
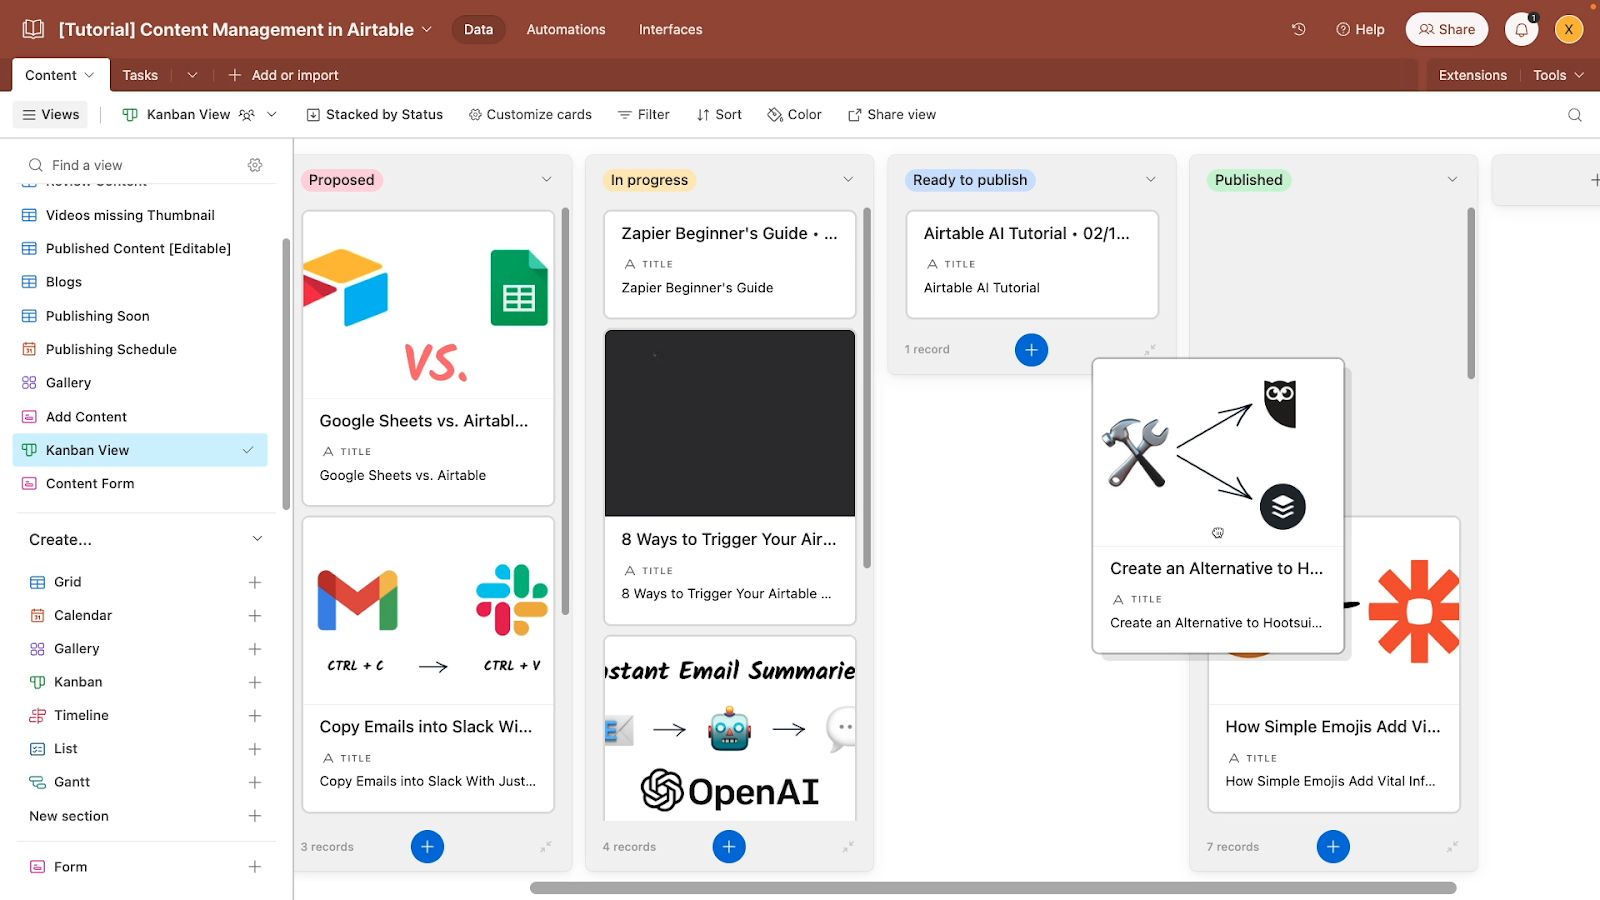
These view types help you transform your Airtable data into a dynamic, interactive portal to create and edit your content however you’d like.
Essentially, with filters and views, you can create a setup that suits any task or process that you need to perform.
When it comes to filters and views, there’s a lot to explore. We’ve added a few to our example base to give you a sense of what you can do, but you can also find more information in the second part of our Airtable beginner’s guide.
Use forms and interfaces to collaborate with your team
The field types, filters, and views that we’ve covered so far are all helpful for organizing your data.
Next, let’s look at how you can share your data and collaborate with colleagues, partners, and anyone else on the web.
Your main tools for collaboration in Airtable will be forms and interfaces.
Let anyone add new records with forms
Airtable forms are created with the “form” view type. It converts each field in a table into a question in a survey.
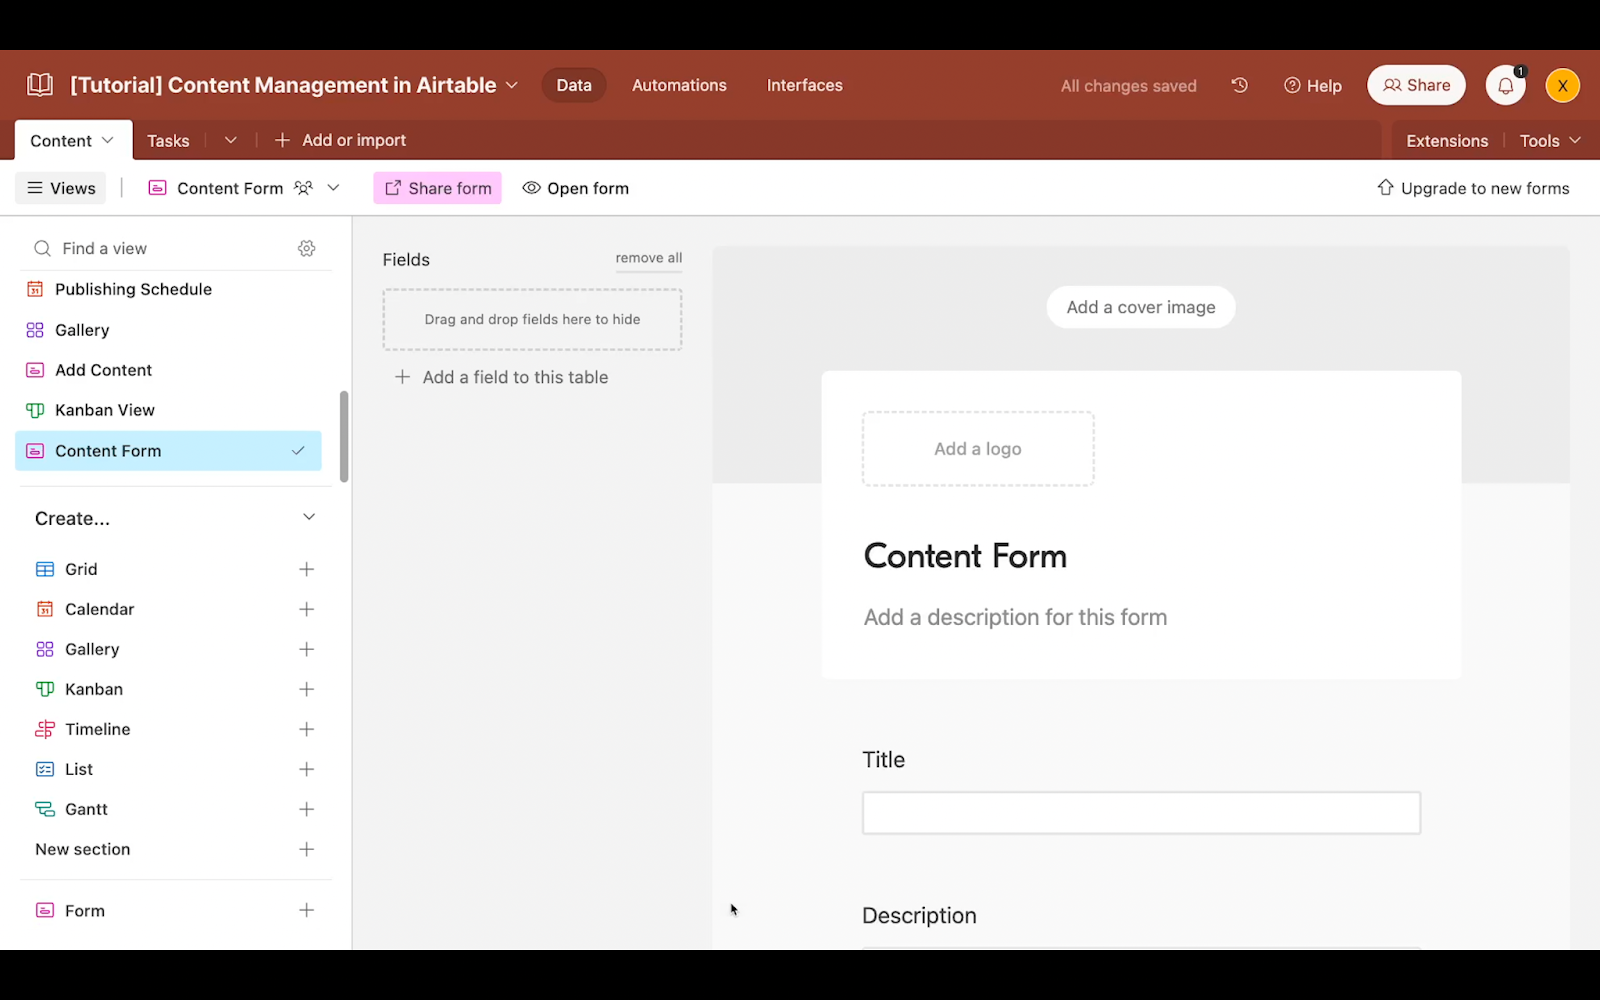
Then, you can customize the survey by removing or adding fields, and changing the labels and question text.
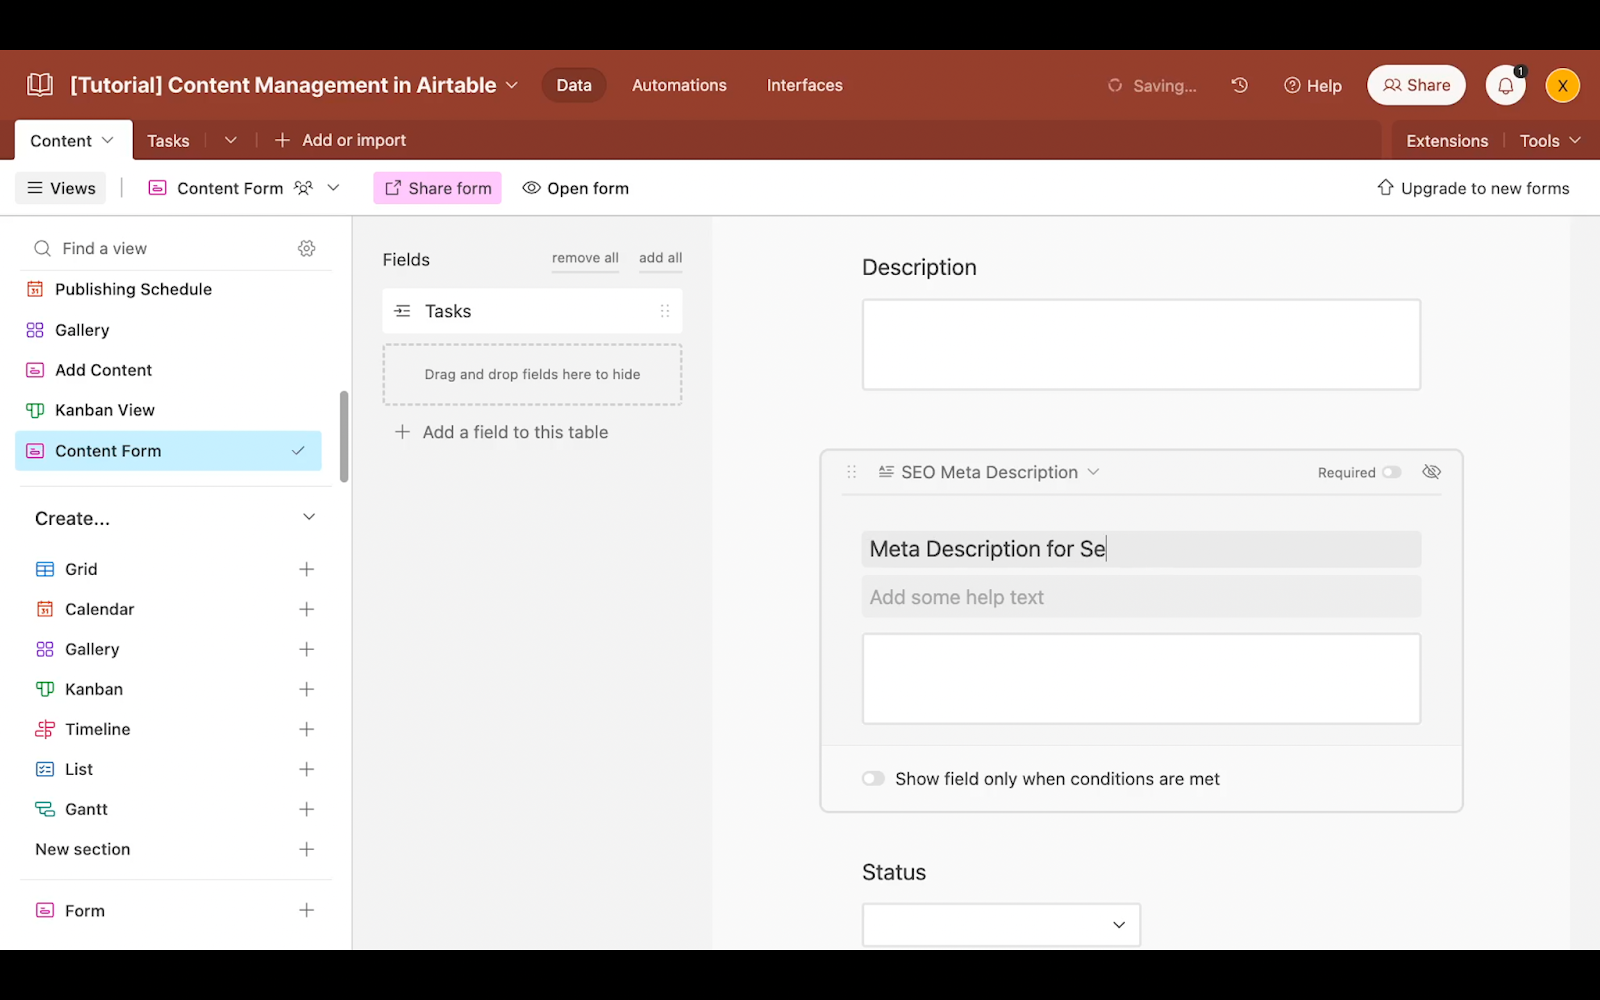
Anyone with access to the form URL can fill it out to submit data, even if they don’t have direct access to the Airtable base. This can be a great way to let your team contribute even if they’re not going to use Airtable enough to justify adding a seat to your plan. For instance, you might want to use a form to gather content ideas from anyone on your team.
However, forms only offer a single way for users to interact with your data, since all you can do with a form is submit new records.
Build custom collaborative layouts with Airtable interfaces
If you want to allow more extensive options like viewing data and updating records, then you’ll want to check out interfaces.
Interfaces allow you to create custom layouts containing configurable views of your data. Permissions for interfaces can be controlled separately from the permissions for the base itself.
This means that you can grant users on your team access to an interface without granting them access to edit the base itself. They will be restricted to the interface you designed for them, without the ability to edit that interface’s components, and they won’t have access to the ‘data’ tab where all of your records and views are stored.
There are tons of options for setting up an interface, and we cover all of the basics in Part 2 of our Airtable beginner’s guide.
But in general terms, you can customize your interfaces to display only the data, reports, and actions that are relevant to a certain user or role.
For instance, you might want a graphic designer to only view their tasks in a Kanban board, and upload files to the “thumbnail” field.
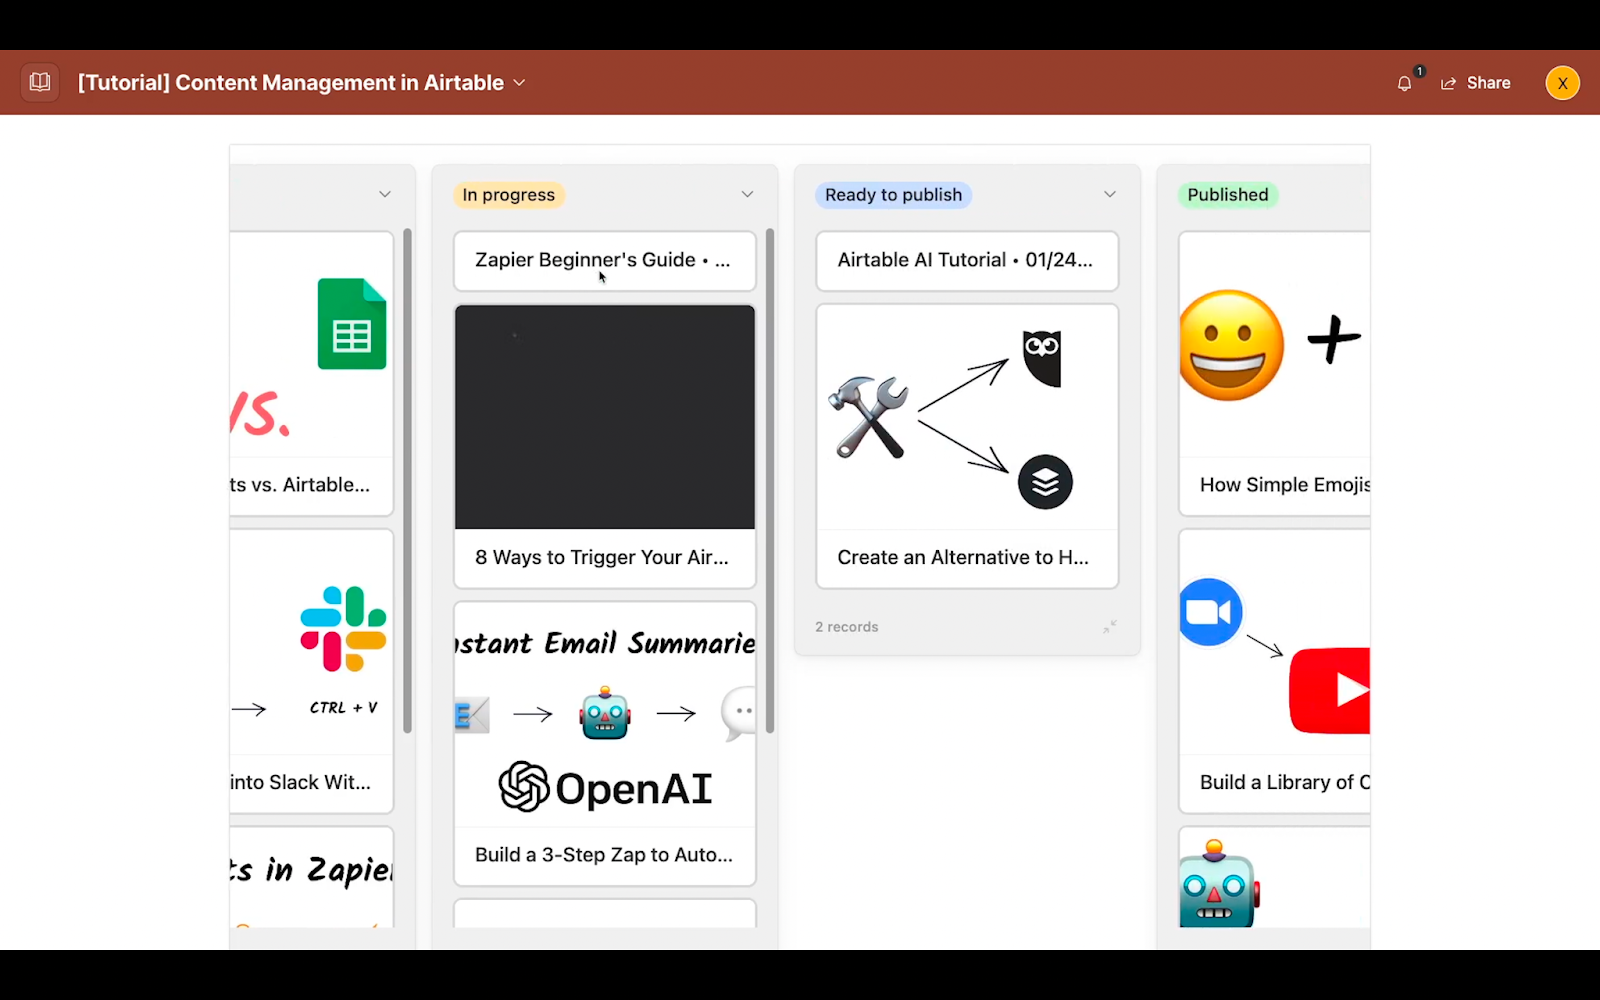
In this interface, we’ve added a Kanban board component to display tasks, and grid view component that only includes the “Thumbnail” attachment field and few other key pieces of information.

Now we can just share a link to this interface with our designer, and they’ll see only the information they need. They won’t be overwhelmed with dozens of irrelevant records and fields.
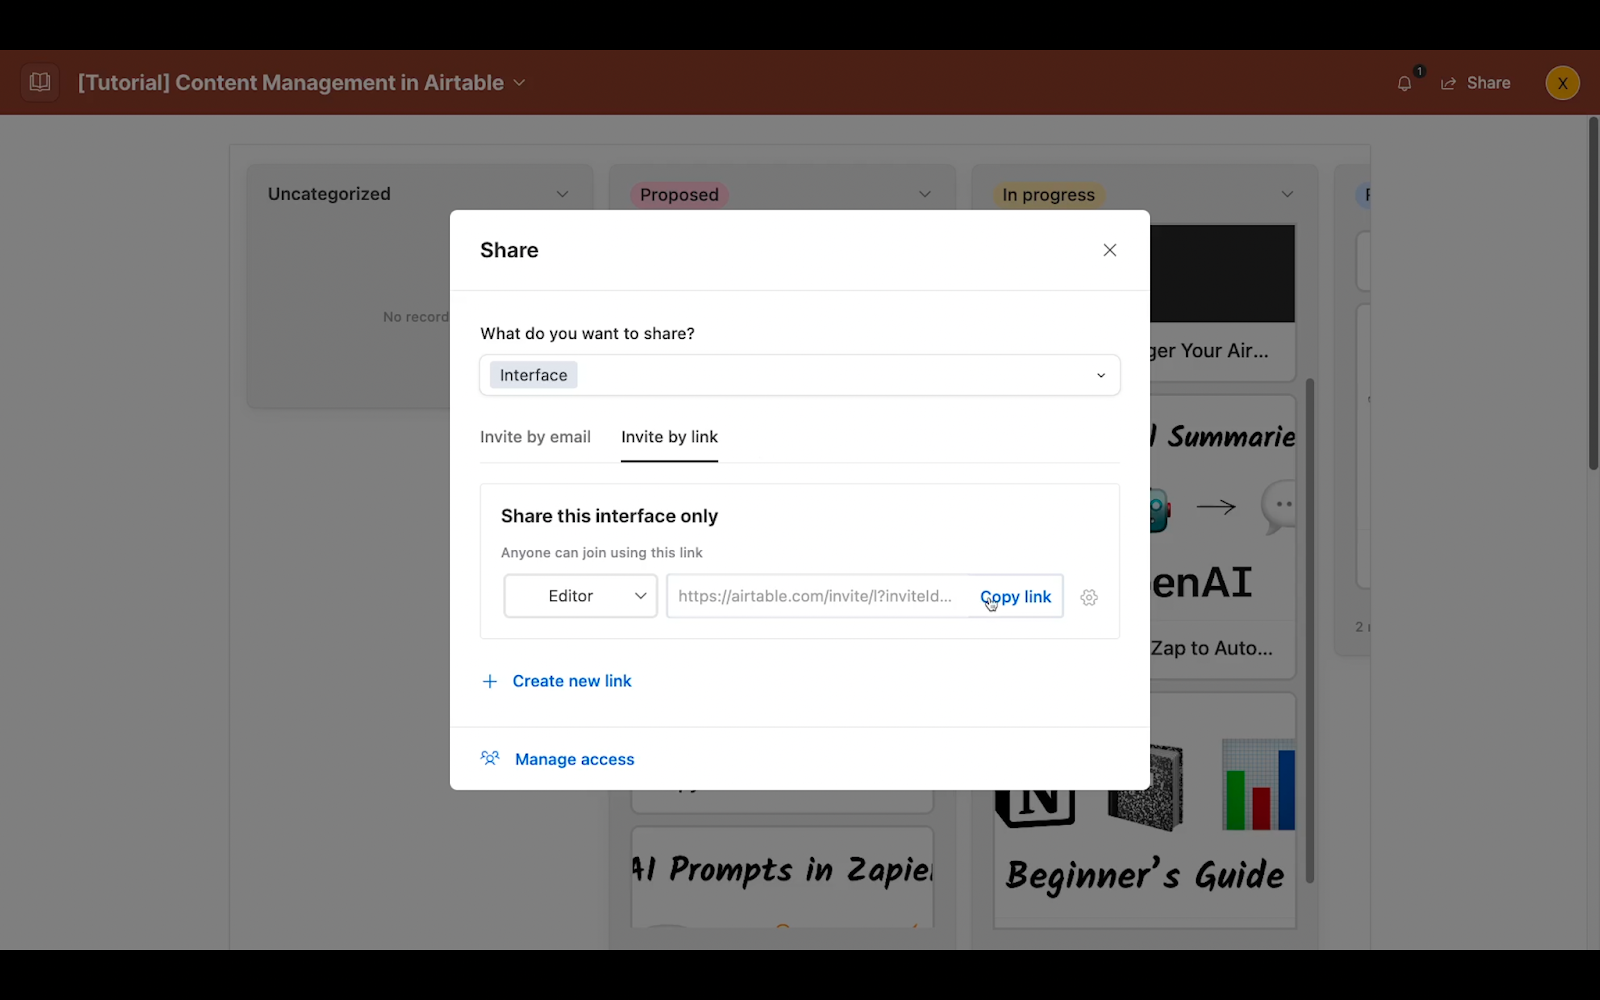
With forms and interfaces, you can give your collaborators careful access to a specific, curated part of your Content management base, and keep the rest private.
Use Airtable automations to streamline your workflows
Let’s wrap things up by taking a look at how you can make Airtable do a lot of your work for you.
With Airtable automation, you can remove tedious tasks from your workflows and make your outputs more consistent.
Airtable automations can connect with several popular apps like Google Docs and Sheets, Jira, Asana, Slack, Salesforce, and more.

For example, you can use Airtable automations to create new records in your Airtable bases, or push information to the apps we just mentioned.
Automation example: create a task and template for every new blog
The automation pictured below runs whenever a new record is added to the “blogs” view.

That view just has a filter so only records with the “blog” type are shown.
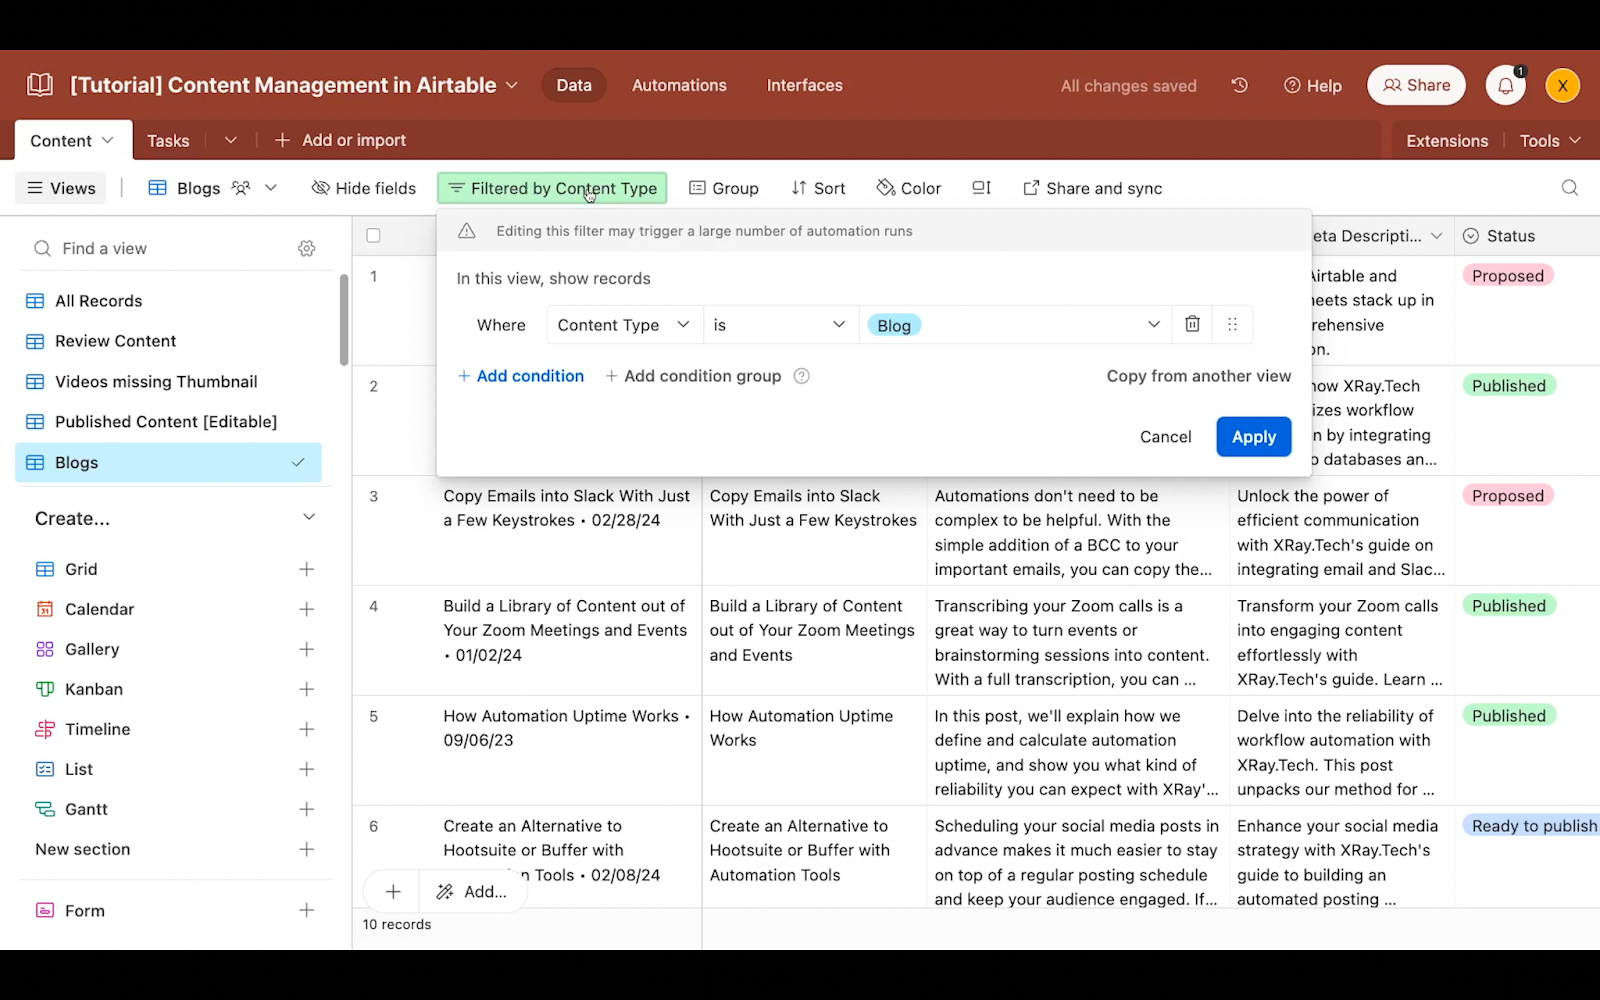
View-based triggers are an easy way to control automations, but you can see a full rundown of airtable automation triggers in this article if you’d like to understand each available option.
Next, the automation creates a placeholder document from a template that we’ve configured in this step.
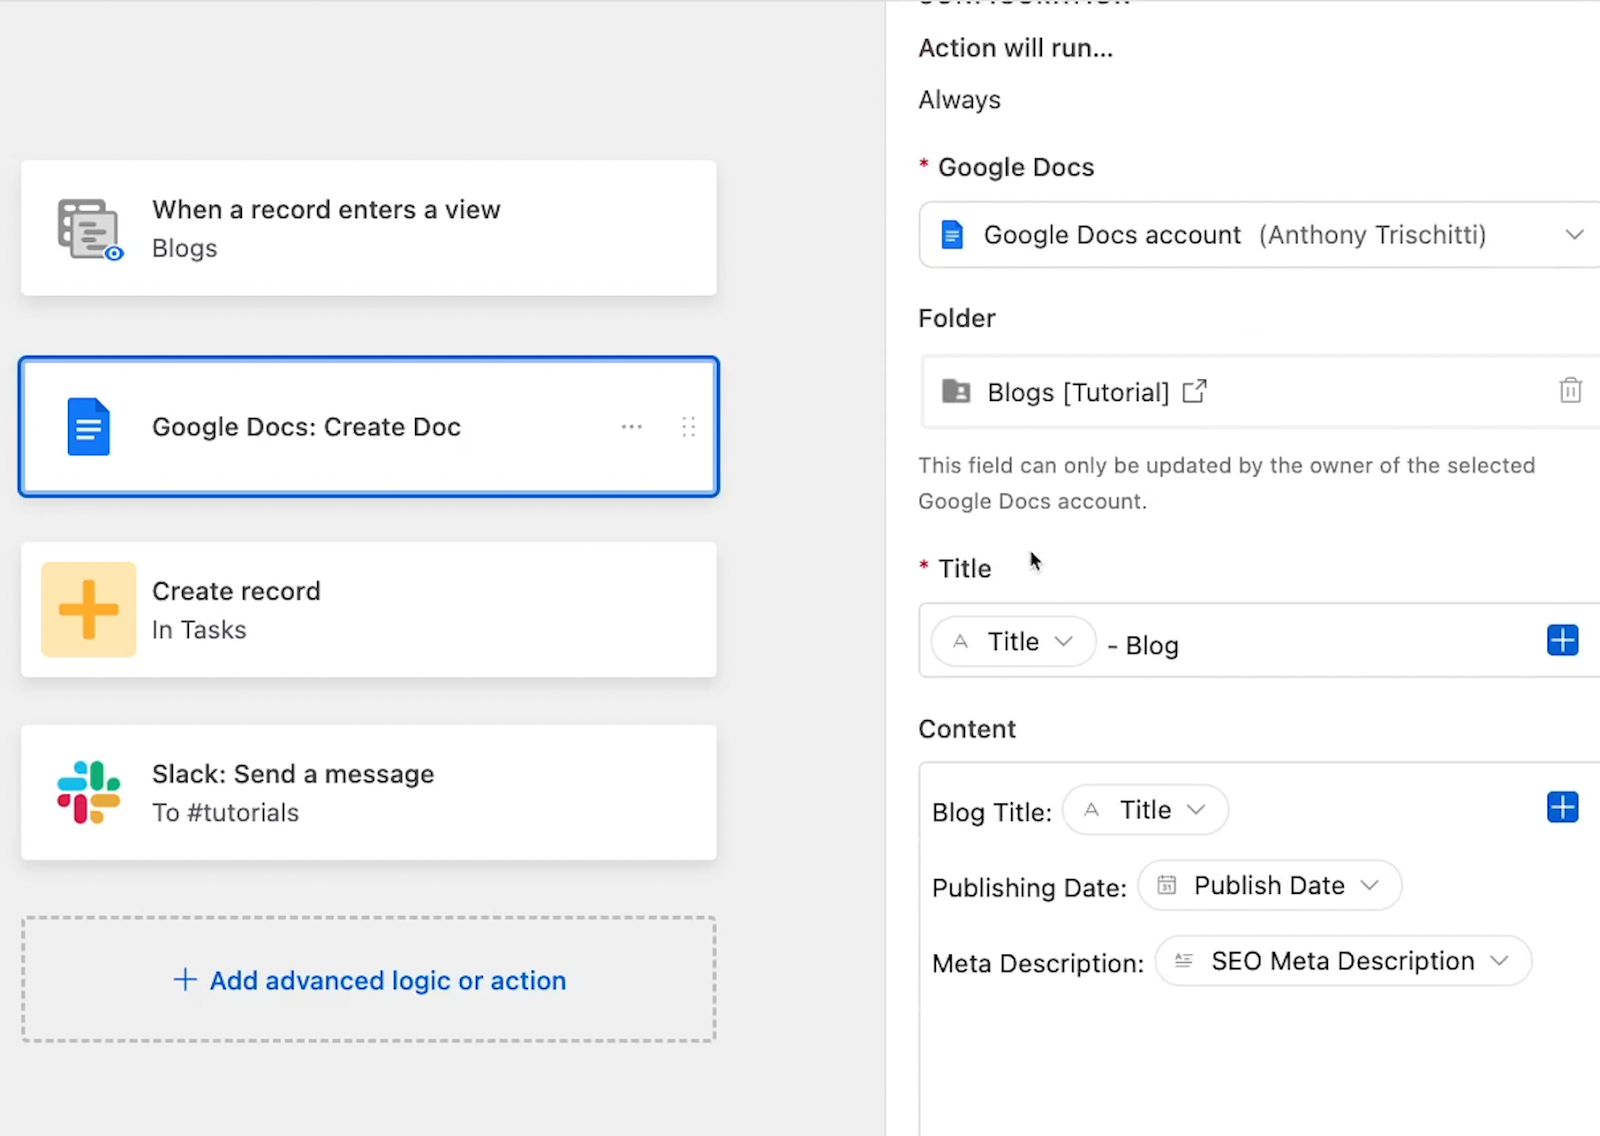
The document name and other info come from data in the Airtable record that triggered the automation. Being able to pull data from your Airtable records and put it into other apps is a big part of what makes automations useful.
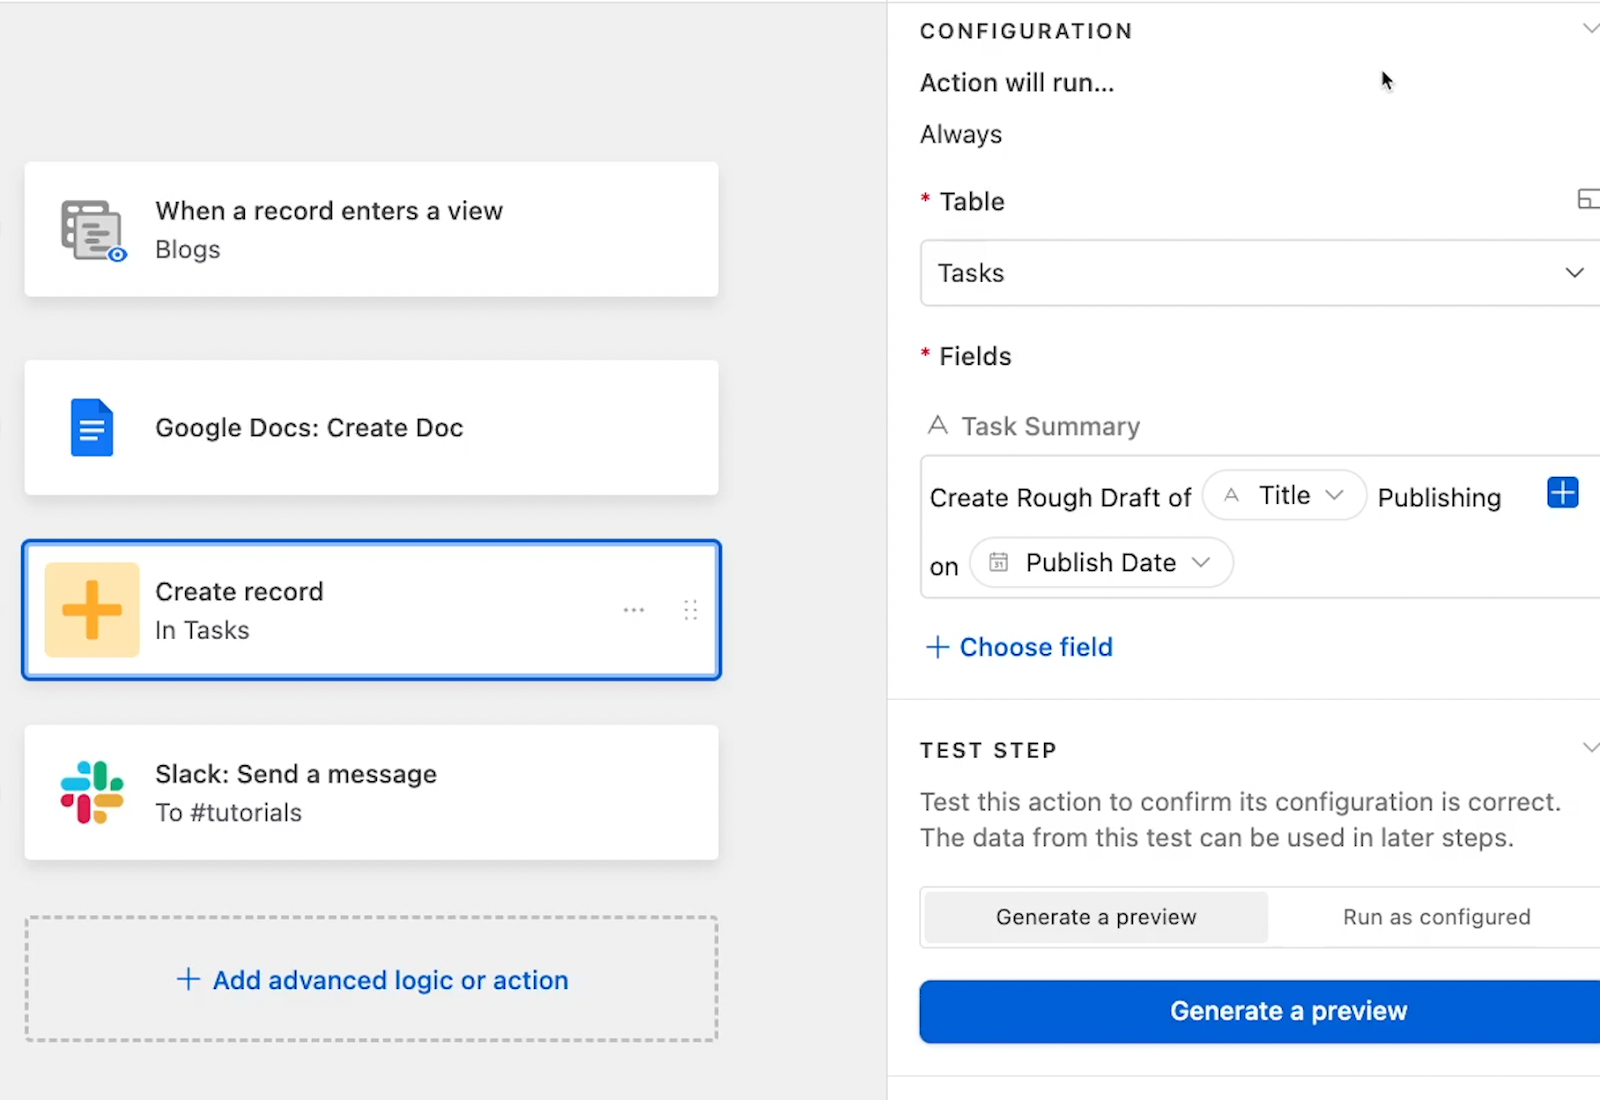
Next, our automation creates a new task in the “Tasks” table of our content base. This will be a templated task that simply asks the user to create a rough draft of the blog.
Once again, several key pieces of information are filled in using data from the Airtable record, such as the blog’s name and the publishing date. But we can also include data from the previous automation step, like grabbing the URL of the newly created doc.
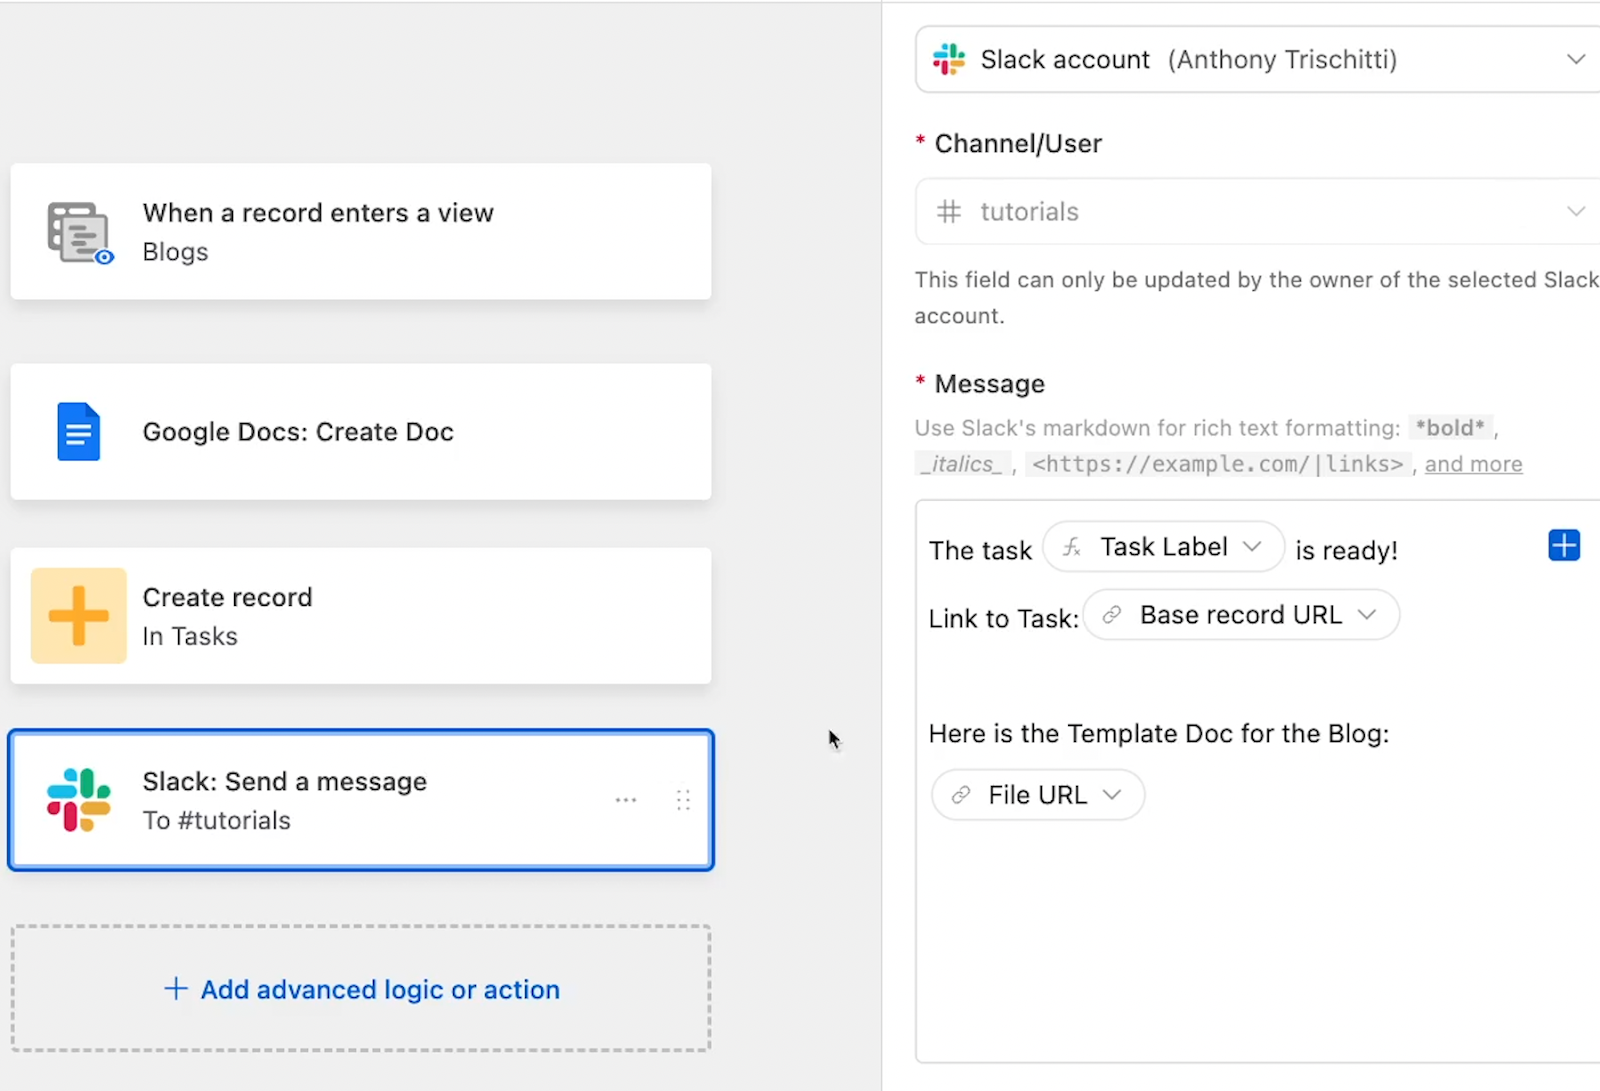
Finally, the automation sends a Slack alert to let us know the task and placeholder doc are ready. The links are dynamically pulled from the previous steps in the automation, so they’ll always point to the right task and doc.
Let’s see the actual output of this automation. Pictured below, you can see the Slack message sent after adding a new blog to the Content table.

When we click on the links in the message, we can see a correctly formatted task and document.
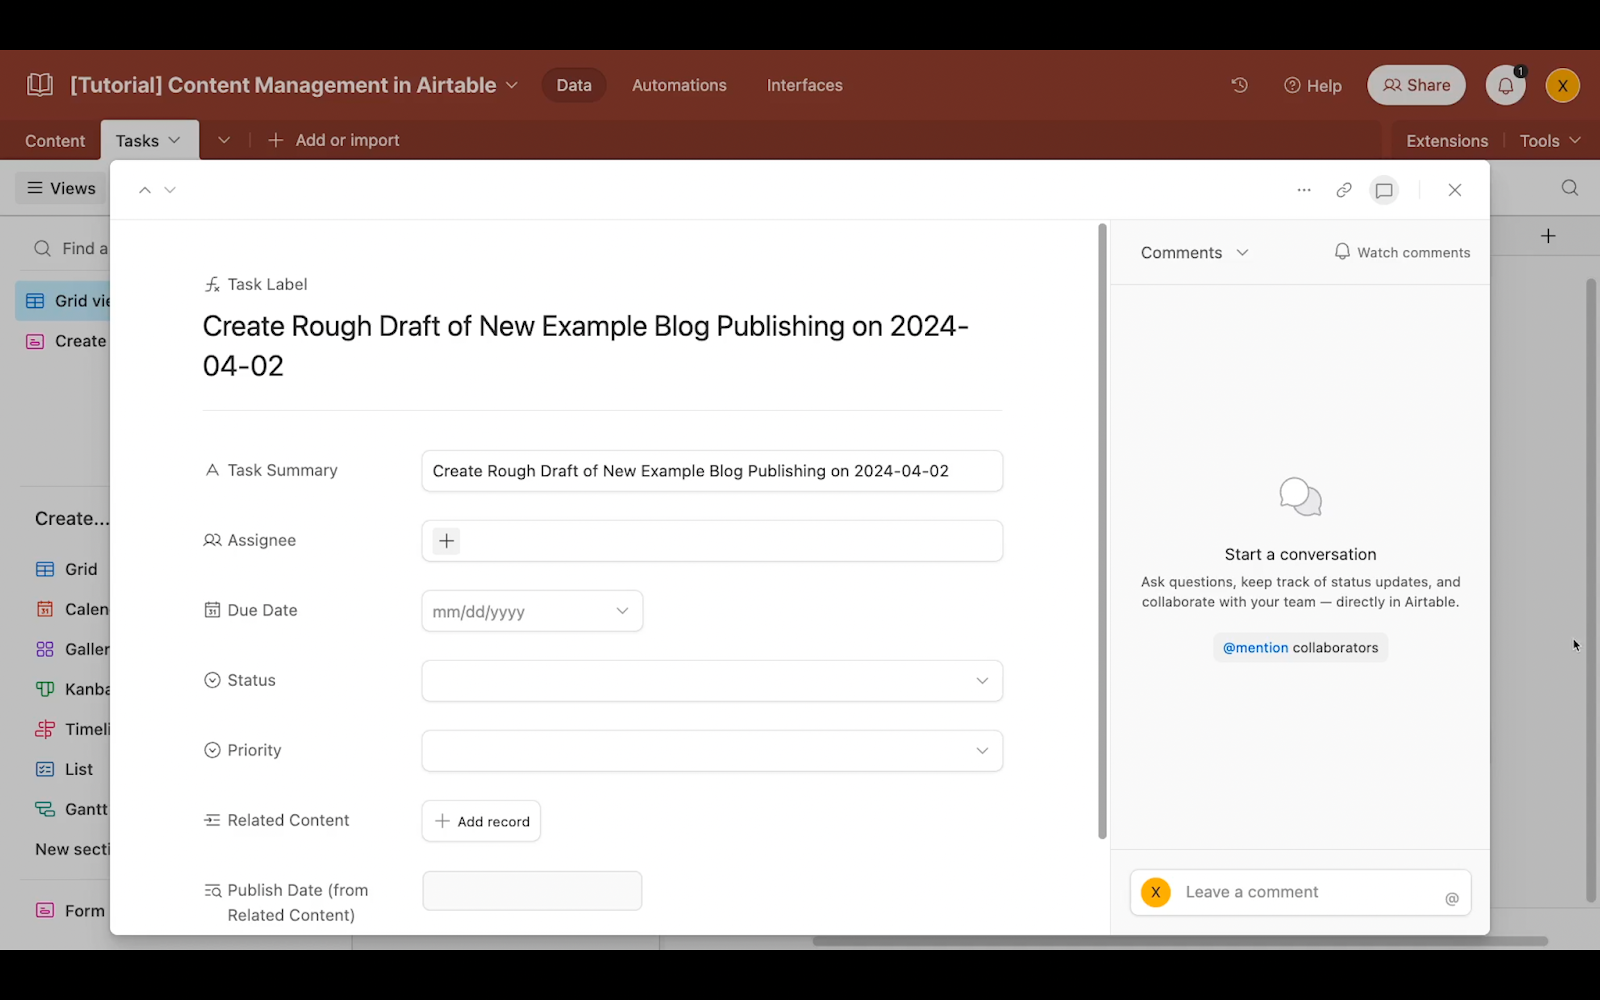

Explore the possibilities with Airtable automation, Zapier, Make, and more
The workflow we’ve described is just an example of the kinds of tasks and actions you might want to automate with Airtable. Try automating any task that always has to happen when you create a new piece of content, or when you publish it.
For instance, you might want to have an automation that creates a new task to review any newly added content, or an automation that sends newly published posts to Hootsuite.
As we noted, you can automate many tasks in several popular apps with Airtable, although its native integrations are pretty limited.
If Airtable doesn’t have support for the app you’re looking for, you can also turn to dedicated automation providers like Zapier, or Make.
Remember, Airtable is a database first and foremost, and it works well with any no-code automation provider, or with several at once. This means you can use any automation providers that you’d like along with Airtable to easily automate additional tasks.
Whether you want to stick with native Airtable automations or use an automation provider to extend Airtable’s capabilities, organizing your data in Airtable is a crucial first step to automating your work.
Create and customize your own content management base
Tracking and managing your content can be difficult, but Airtable makes it easy to follow your progress, store images, run relevant automations, and share your work with collaborators.
Try setting up your own Airtable base for your content today. It will make your whole process easier and more efficient in no time. If you’d like to learn more about optimizing your workflows with no-code and low-code tools like Airtable, Zapier, Make, and more, be sure to check out our blog or our YouTube channel. You can also follow XRay on Twitter, Facebook, or LinkedIn.

As you’re building Zaps, you’ll often notice that you need to pull in additional data that Zapier can’t get from your trigger and action steps.
If you find yourself constantly adding several search steps to get all the information you need, you should consider using Zapier tables to store and reference your commonly used data instead.
In this guide, we’re going to show you how you can create tables in Zapier, then quickly reference them in any Zap or interface. We’ll also explain you may want to use a dedicated database app like Airtable instead.
Whether you stick with Zapier’s built-in tables or use a separate database app, organizing your data into easily searchable formats will help you to design and build much more efficient automations.
Zapier tables: an overview
First, let’s take a quick look at what Zapier tables are and how they work in general. Zapier tables are essentially simple spreadsheets that you can use to store data.
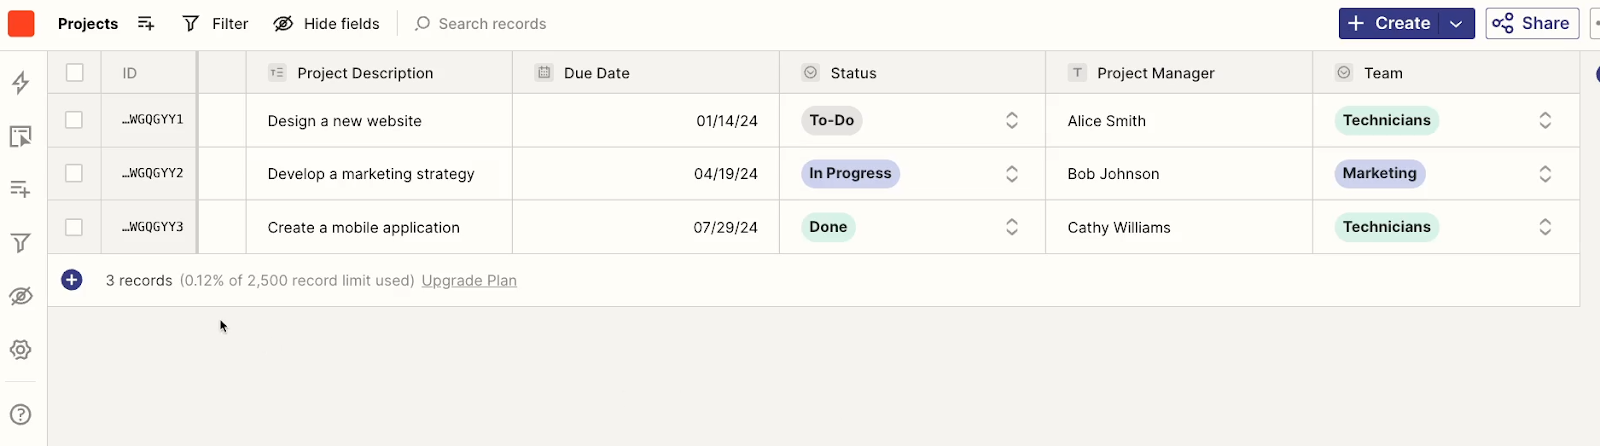
They include several basic field types, like text, dates, dropdowns, and even buttons that can launch specific Zaps.
How to create and manage tables in Zapier
To make a new table or edit your existing ones, just click on the “Tables” icon in the left hand menu. That will take you to a page with all of your current tables, if you have any.
From the “Tables” page, click on the “Create” button in the top right to make a new table.
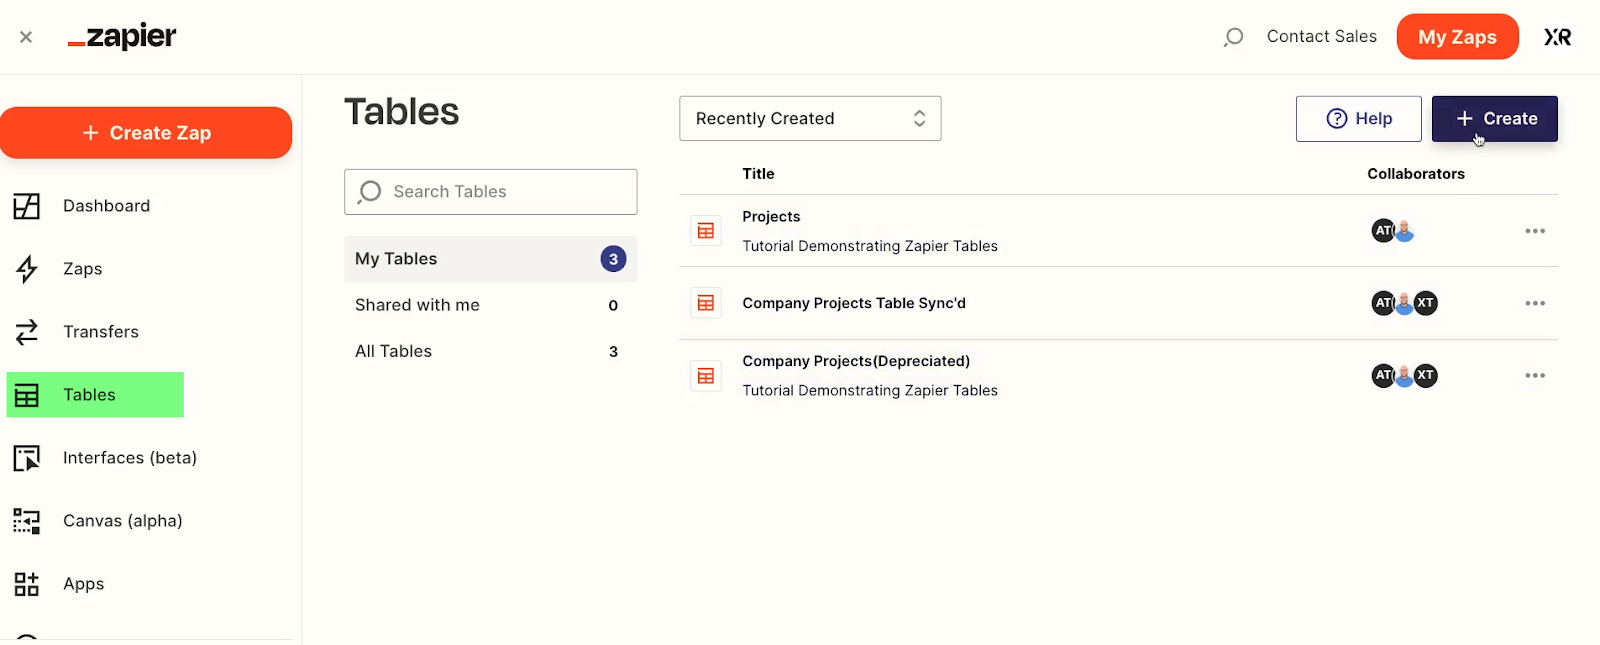
In the window that pops up, you’ll see a gallery of templates that you can use to get your table started. You can also choose a “blank table” if you’d prefer to start from scratch. Alternatively, you can import data from Airtable, Google Sheets, or a CSV file.
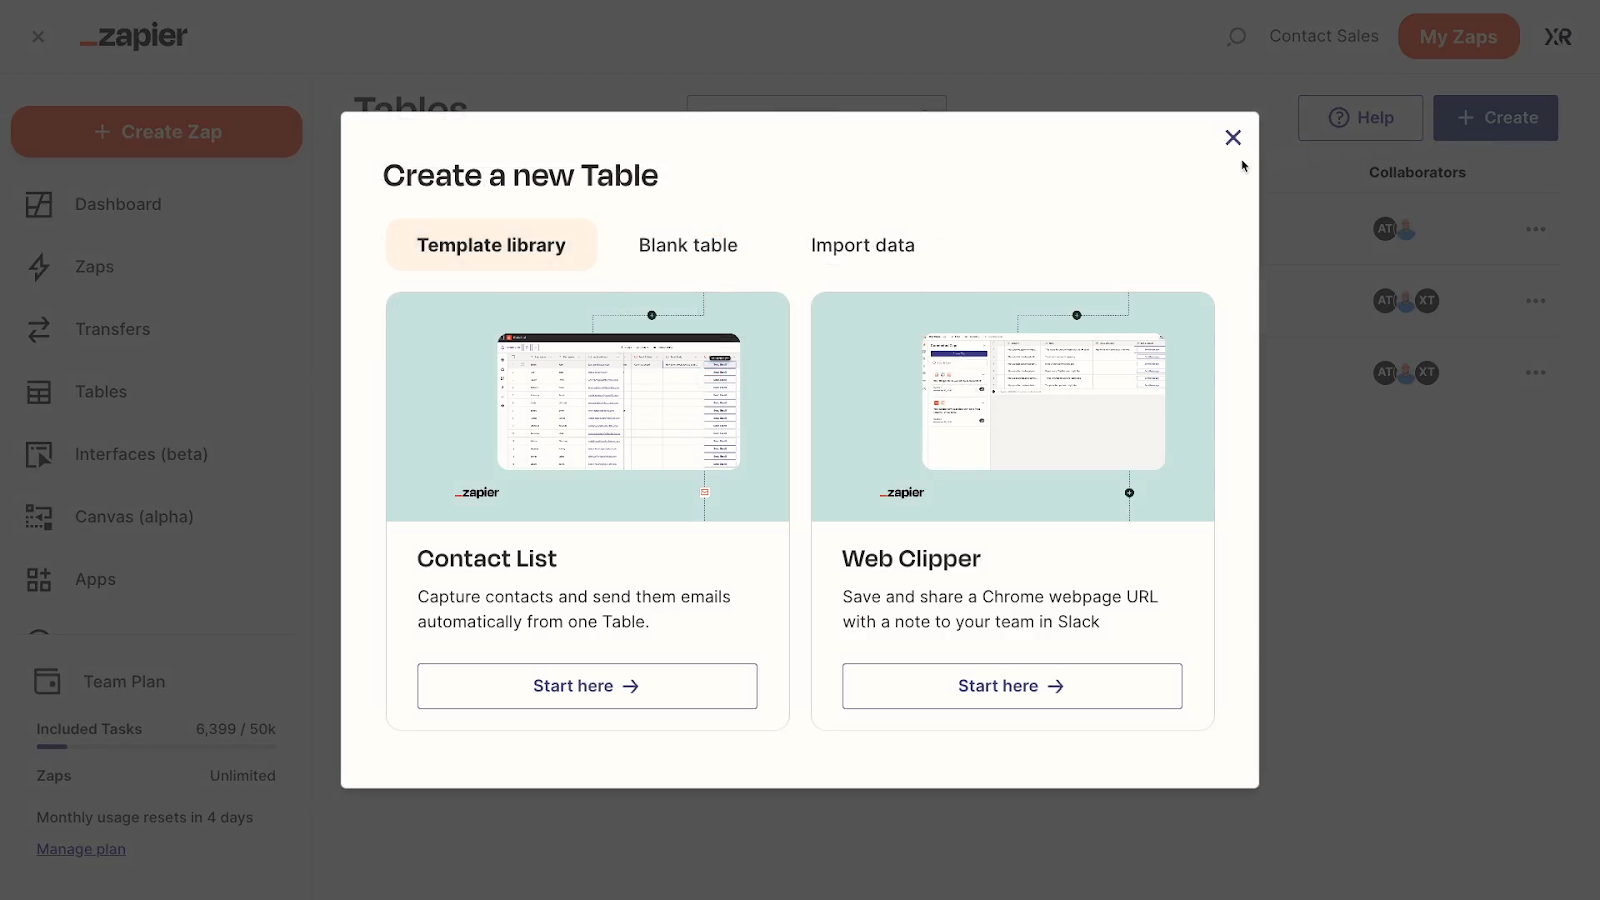
If you create a table from scratch, you’ll see a pretty standard spreadsheet with three default fields.
Edit fields
To edit an existing field, just click on its name and select “edit field”. There, you can change the field name and type, adjust the text alignment, and add an icon.
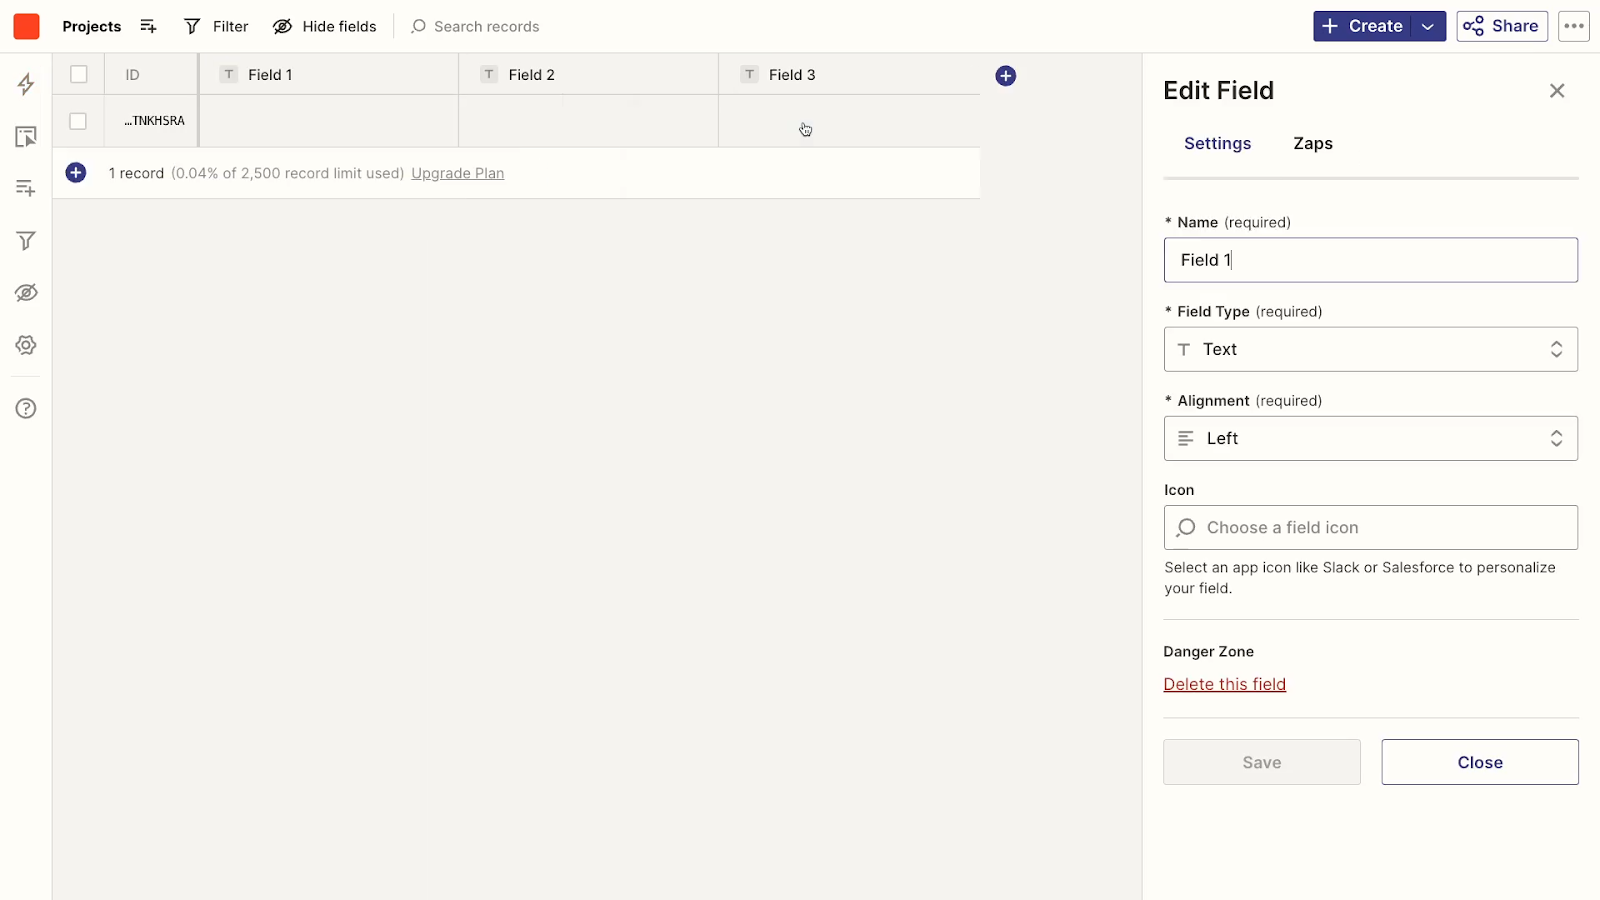
Import data into a table
To import records into a Zapier table, click on the three dots in the top right, and select “Import Data”.

Then, upload a CSV of your choice.

Creating custom views and filters
With some data in place, we can see how filters and views work. Click on the “views” icon to see all of your views.
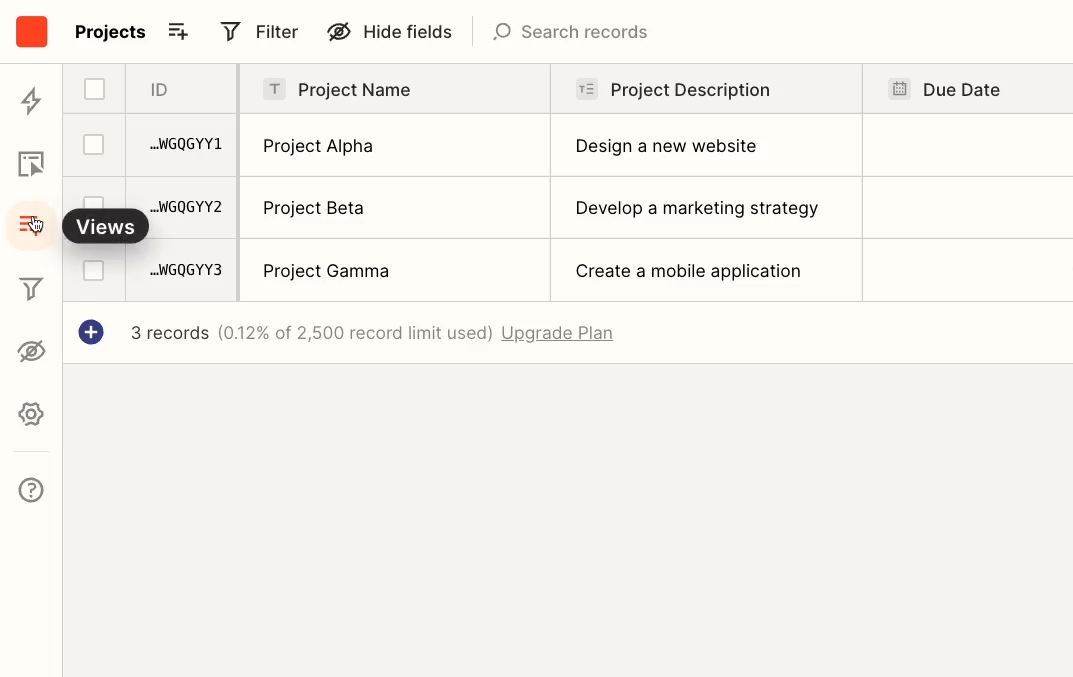
A view is a saved configuration for viewing your data. You can apply filters to a view so that it only shows a certain subset of your data instead of every record. The default view begins without any filters applied.
Click “Create view” to make a new view.
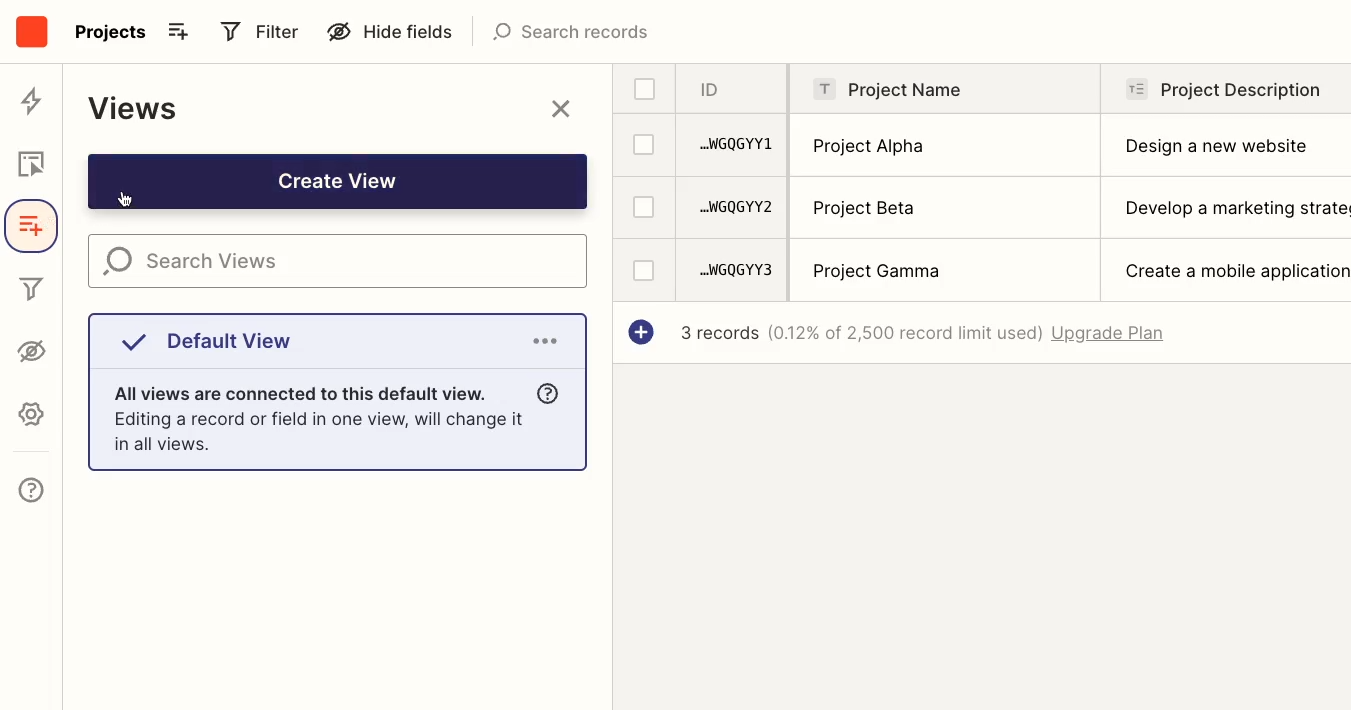
Then, click on “Add filter” to limit the records that are displayed in this view.
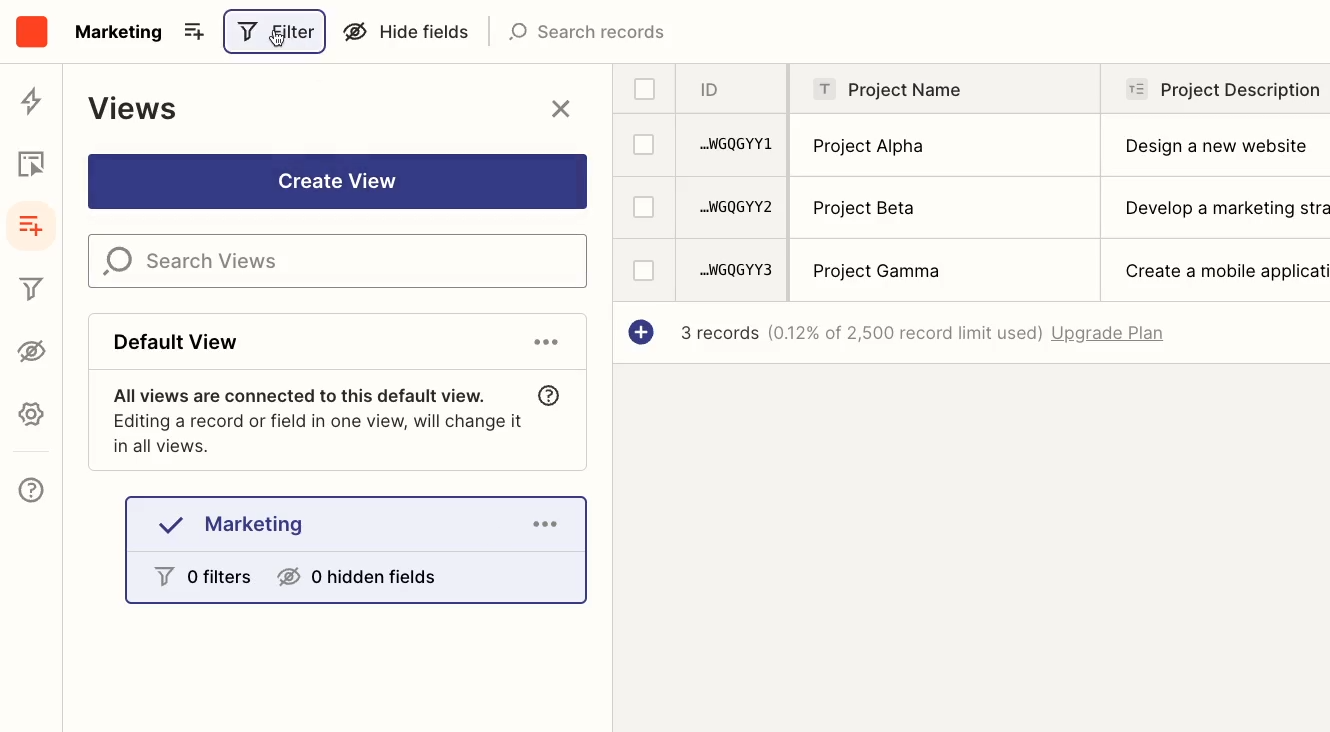
Set any condition you’d like to filter your records. You can base your conditions off of any field in your table.
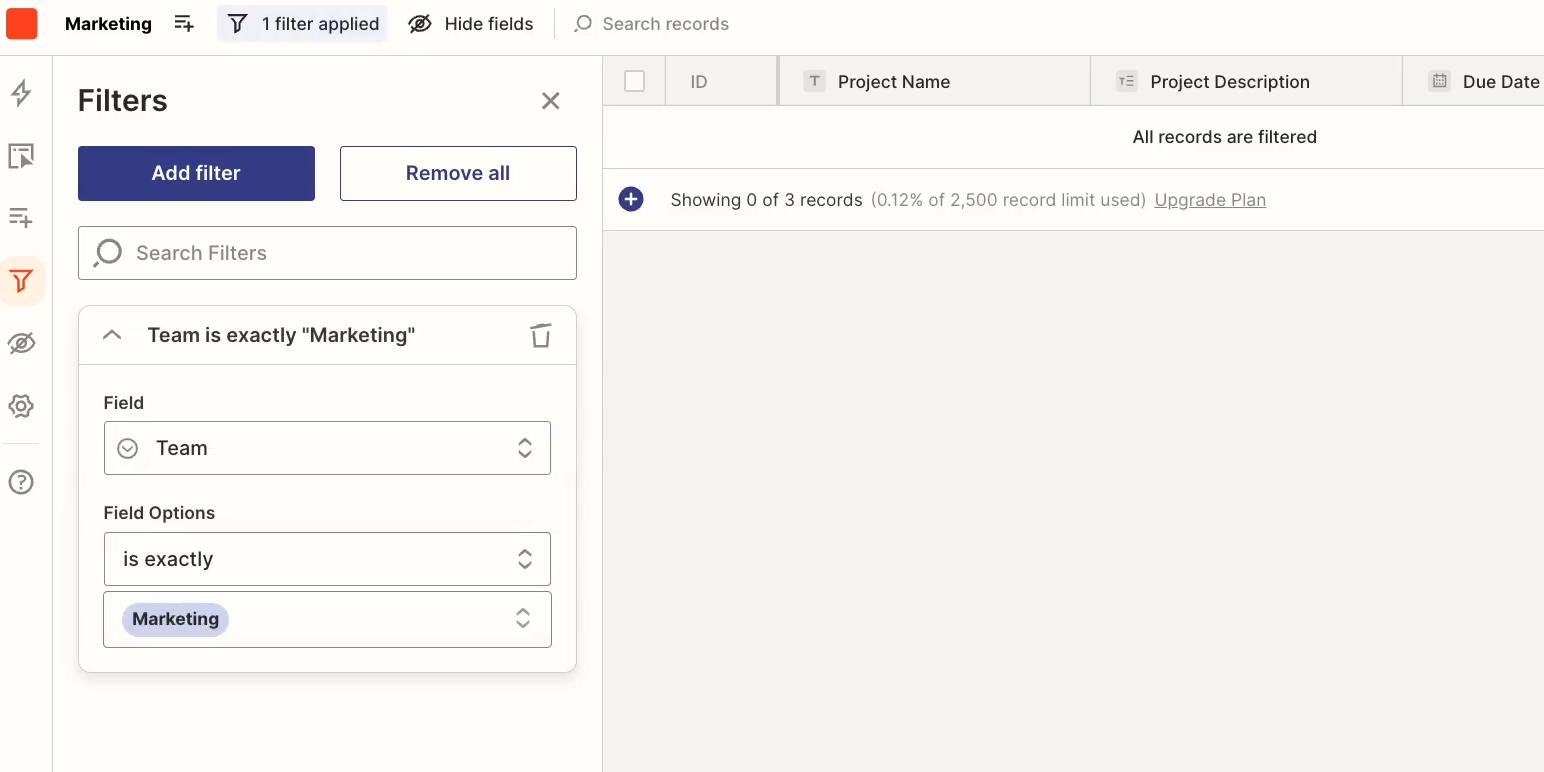
To switch back to the default view, or any other view, just click on the views icon, and select the view you want to see.
Sharing tables with your team
To share a table with a colleague, open up the table you want to share. Then, click on this ‘Share” icon in the top right.

If your Zapier account is part of an organization, you can set permission levels for each person at your company, or set permissions for the entire organization.

You can choose between Builder, Editor, View Only, and No Access. Click on “Learn more” here for an explanation of each permission level.
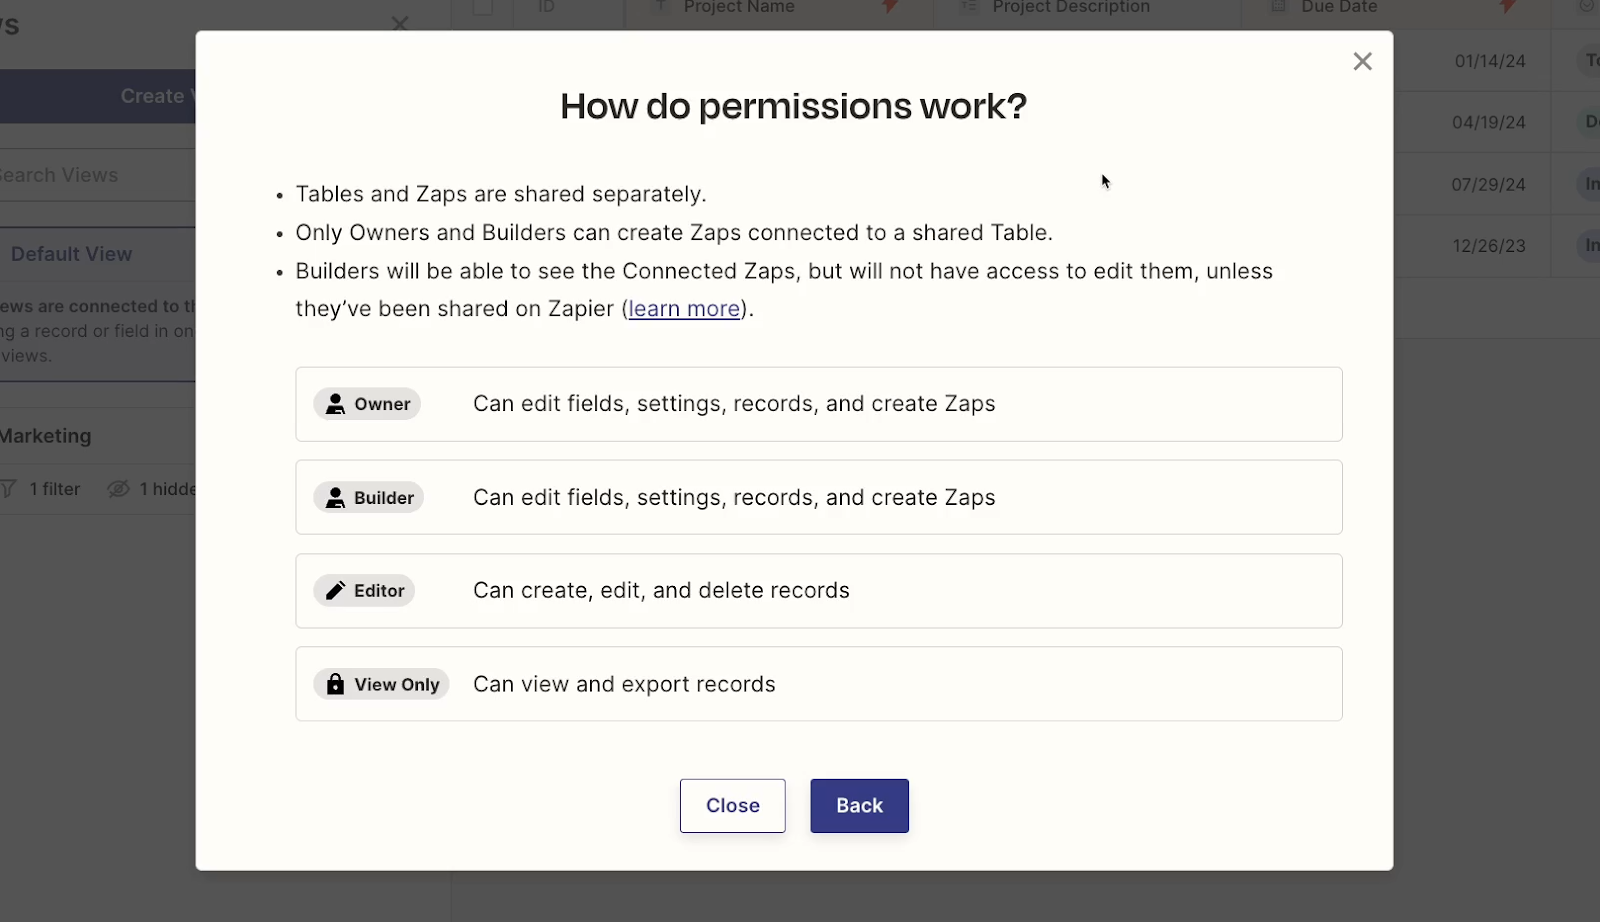
In short, builders can do anything, editors can do anything except create related automations, and view-only users can just see data.
Sharing tables with anyone on the web
If you’re working with an individual account or want to share the table with people outside of your organization, you can create a public link instead.
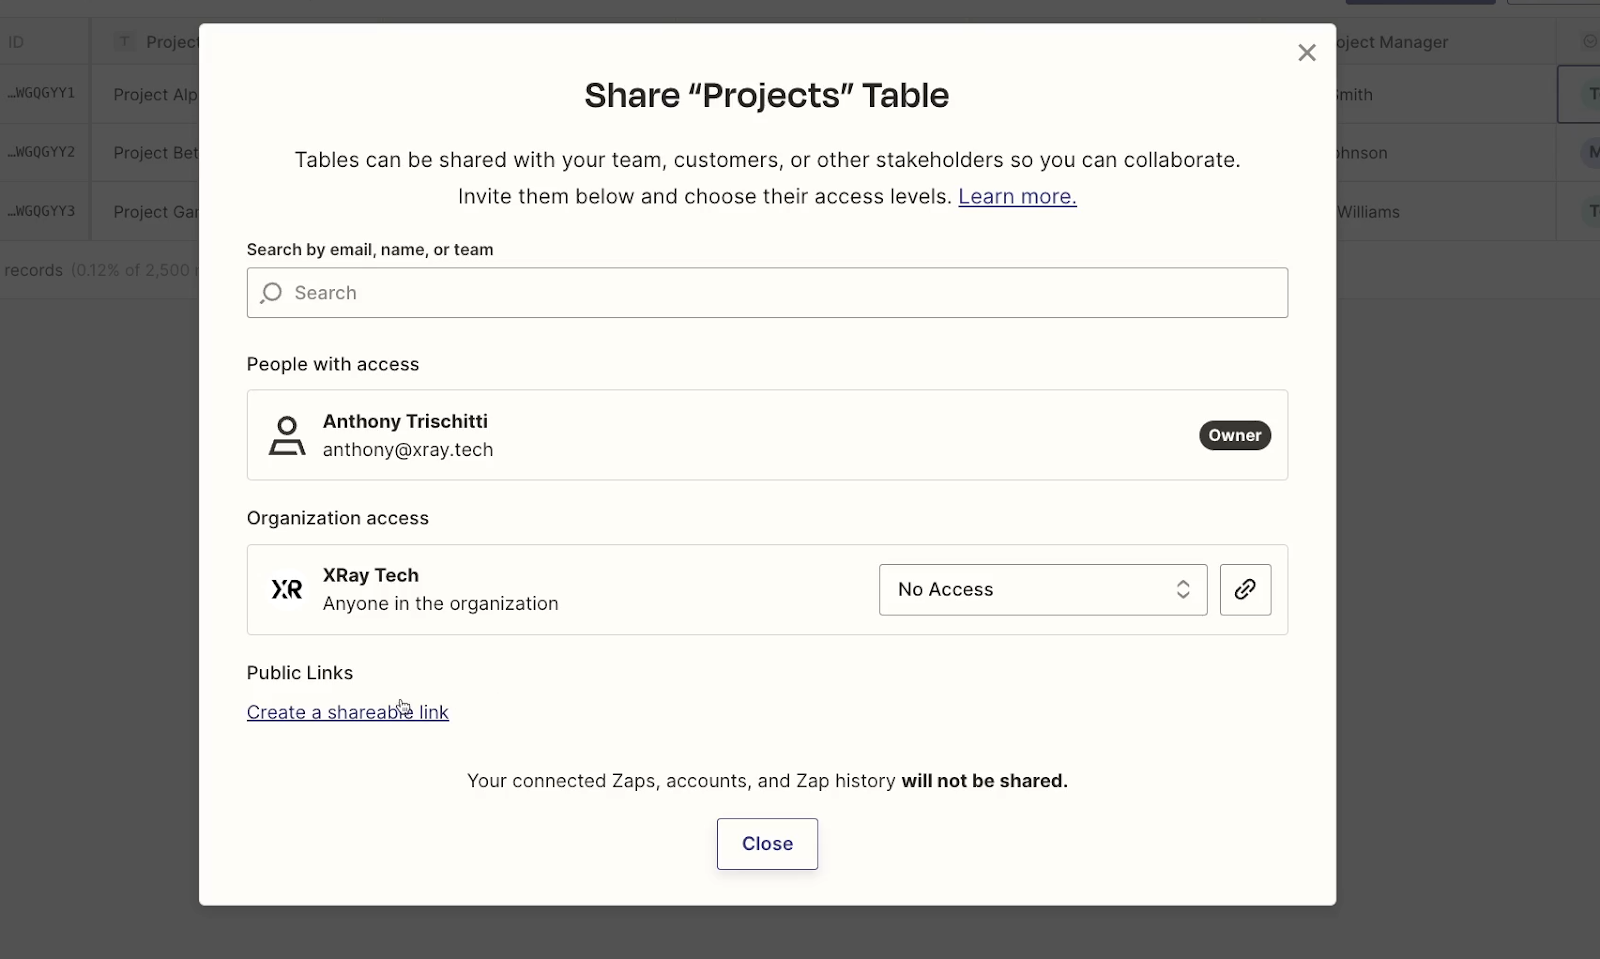
However, the only permission options for a public link are “editor” and “view only”.
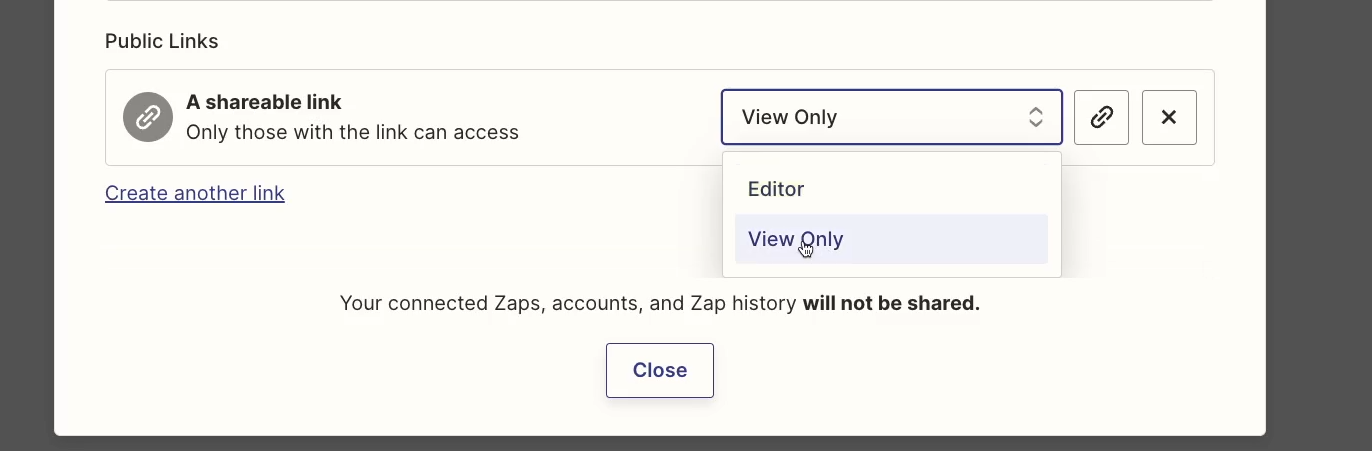
Once you’ve created a public sharing link, you can click on the link icon to copy it to your clipboard. When someone opens the link, they’ll be able to see your table, even if they don’t have a Zapier account or aren’t signed in.
Sharing views
You can also share specific views by selecting the menu attached to that view, and clicking “Share view”. From there, you’ll see similar sharing options as before.
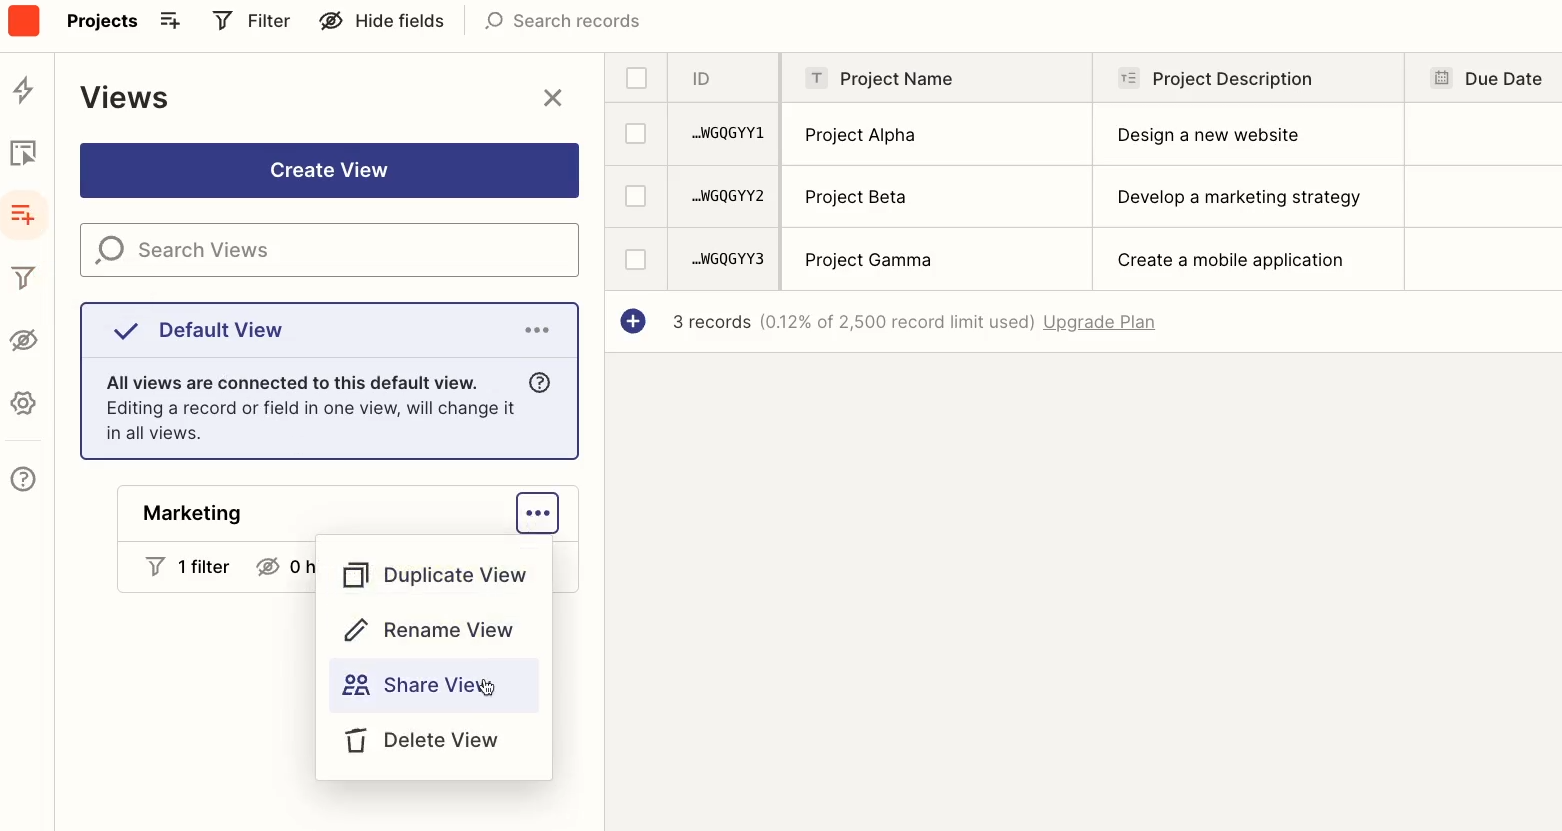
Zapier tables pricing
You can try out Zapier tables for free with any Zapier plan, but you’re limited to 10 tables and a hundred records per table.
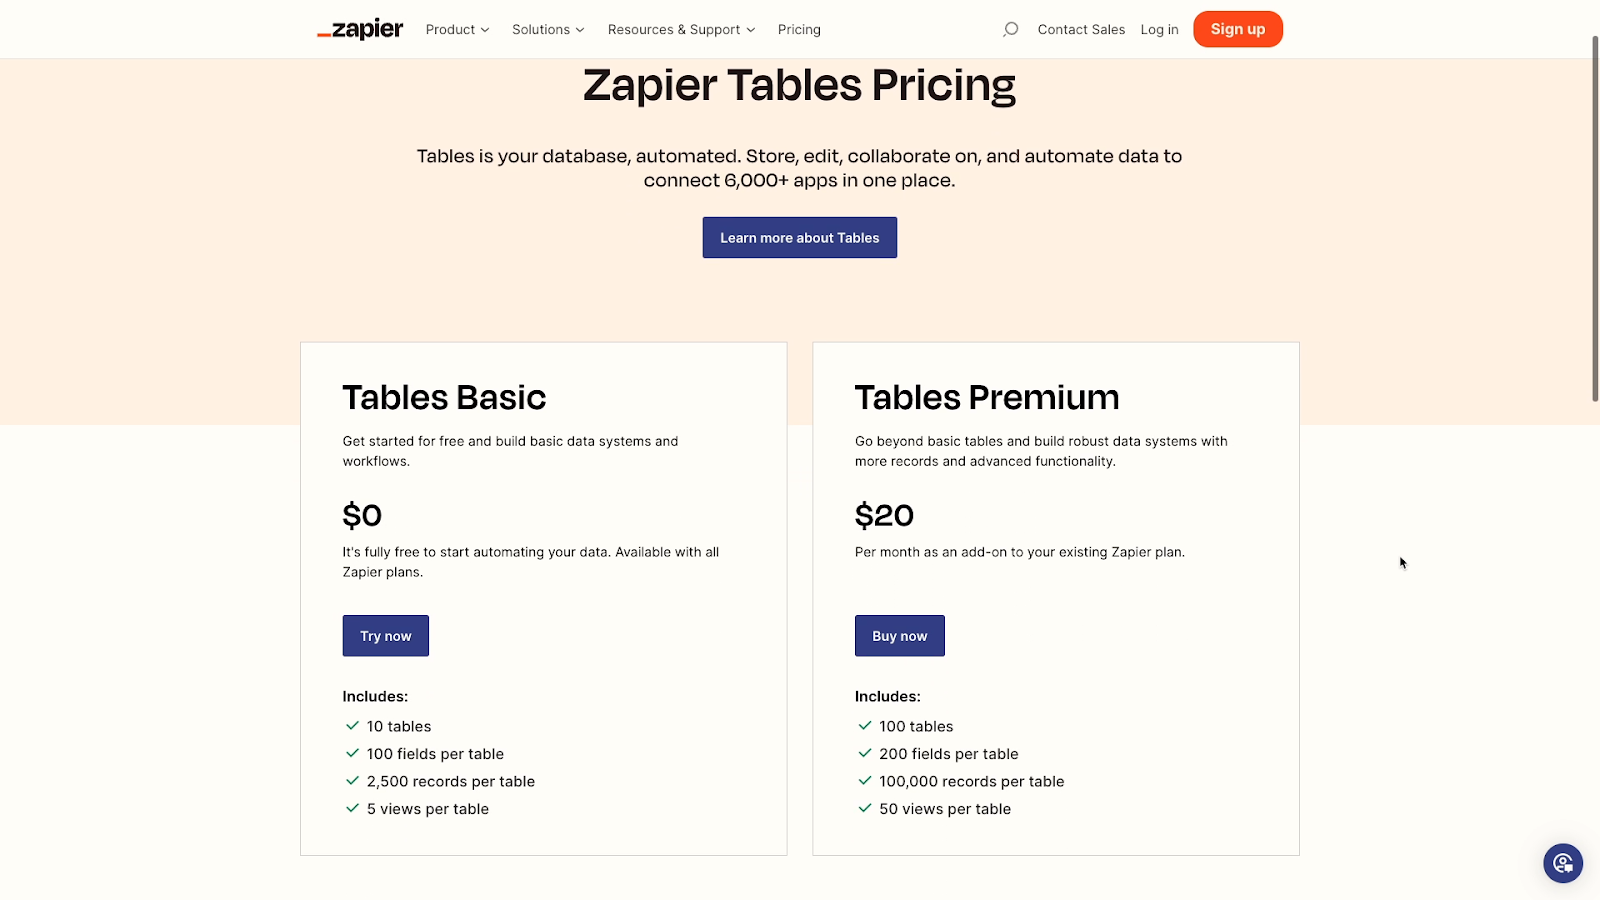
You can unlock 100 tables with 100,000 records each for $20/mo on top of your existing Zapier subscription.
Zapier tables vs. lookup tables
Before we explain how to use Zapier tables in more detail, it’s important to clear up one possible area of confusion.
Zapier tables are not the same thing as the “Lookup tables” that you can create through a Zapier formatter action.
Lookup tables only allow for key-value pairs, meaning they’re limited to one label and one data point. There are no field types or other database features available in lookup tables. They’re also attached to whatever Zap they’re built in, and cannot be referenced from any other Zaps.
Lookup tables are useful when you need to create a variable that can change to several different values based on a particular condition. For instance, you might want to have a message in your Zap that changes based on the day of the week.
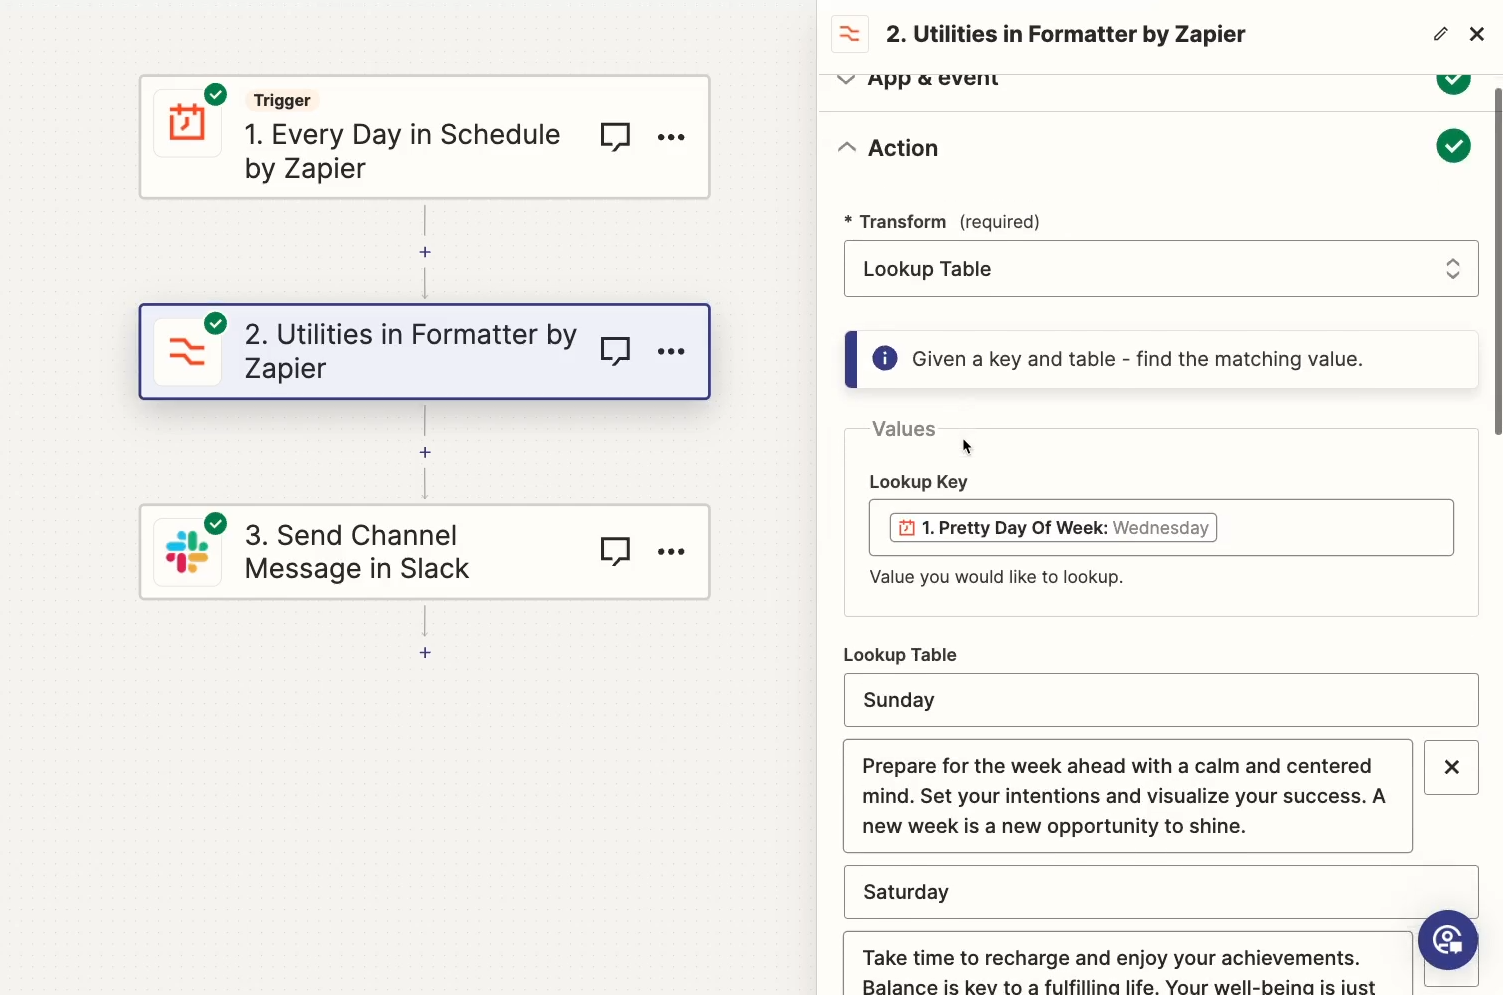
In your lookup table, each key would then be a day of the week, and the value would be the related message. Data like this wouldn’t need to be referenced elsewhere, so it would be totally suitable for a formatter lookup table.
When and how to use Zapier tables
There are 3 main ways to use Zapier tables with automations and other Zapier features.
1. Reference tables in your Zaps. Like any other database or spreadsheet app, you can use Zapier tables in triggers, actions, and searches in your Zaps.
2. Launch automations from buttons in your tables. With the “button” field type, you can launch a specified Zap whenever you click on the button in your table.
3. Connect tables to interfaces. With Interfaces, another Zapier feature, you can create a simple web page that includes any of your tables, as well as forms, chatbots, and other components.
Let’s cover each of these options in more detail.
Referencing Zapier tables in your Zaps
Referencing a Zapier table in your Zaps is very simple. In essence, you can treat them like any other spreadsheet or database that you might use in Zapier.
You can trigger your Zaps to run whenever a record is updated or added to a specific table.
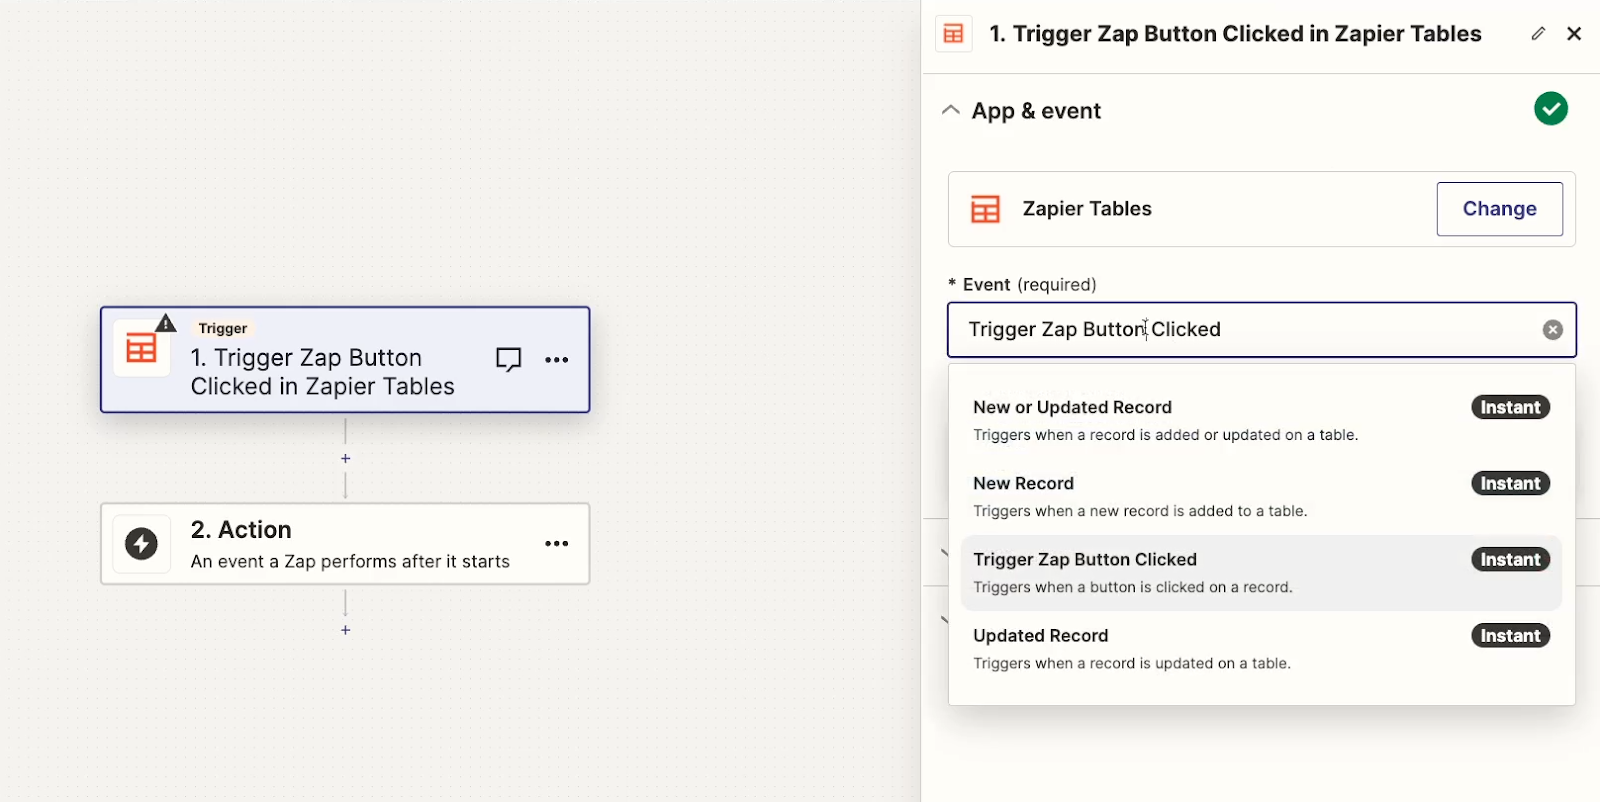
You can add actions to create or edit records.
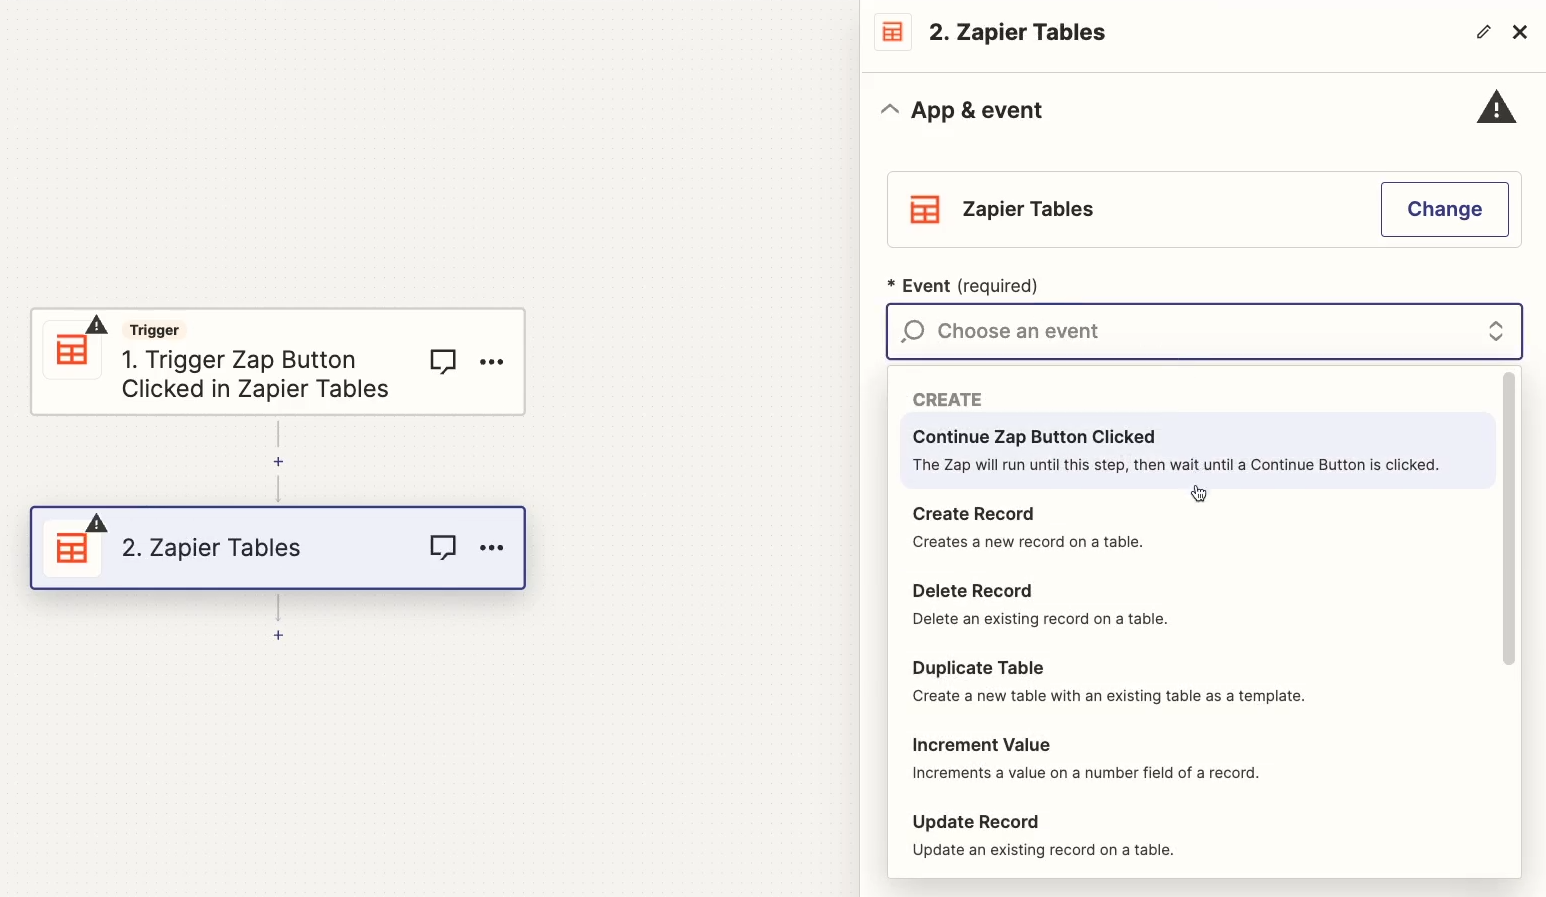
And you can add search steps to find data that’s already there.
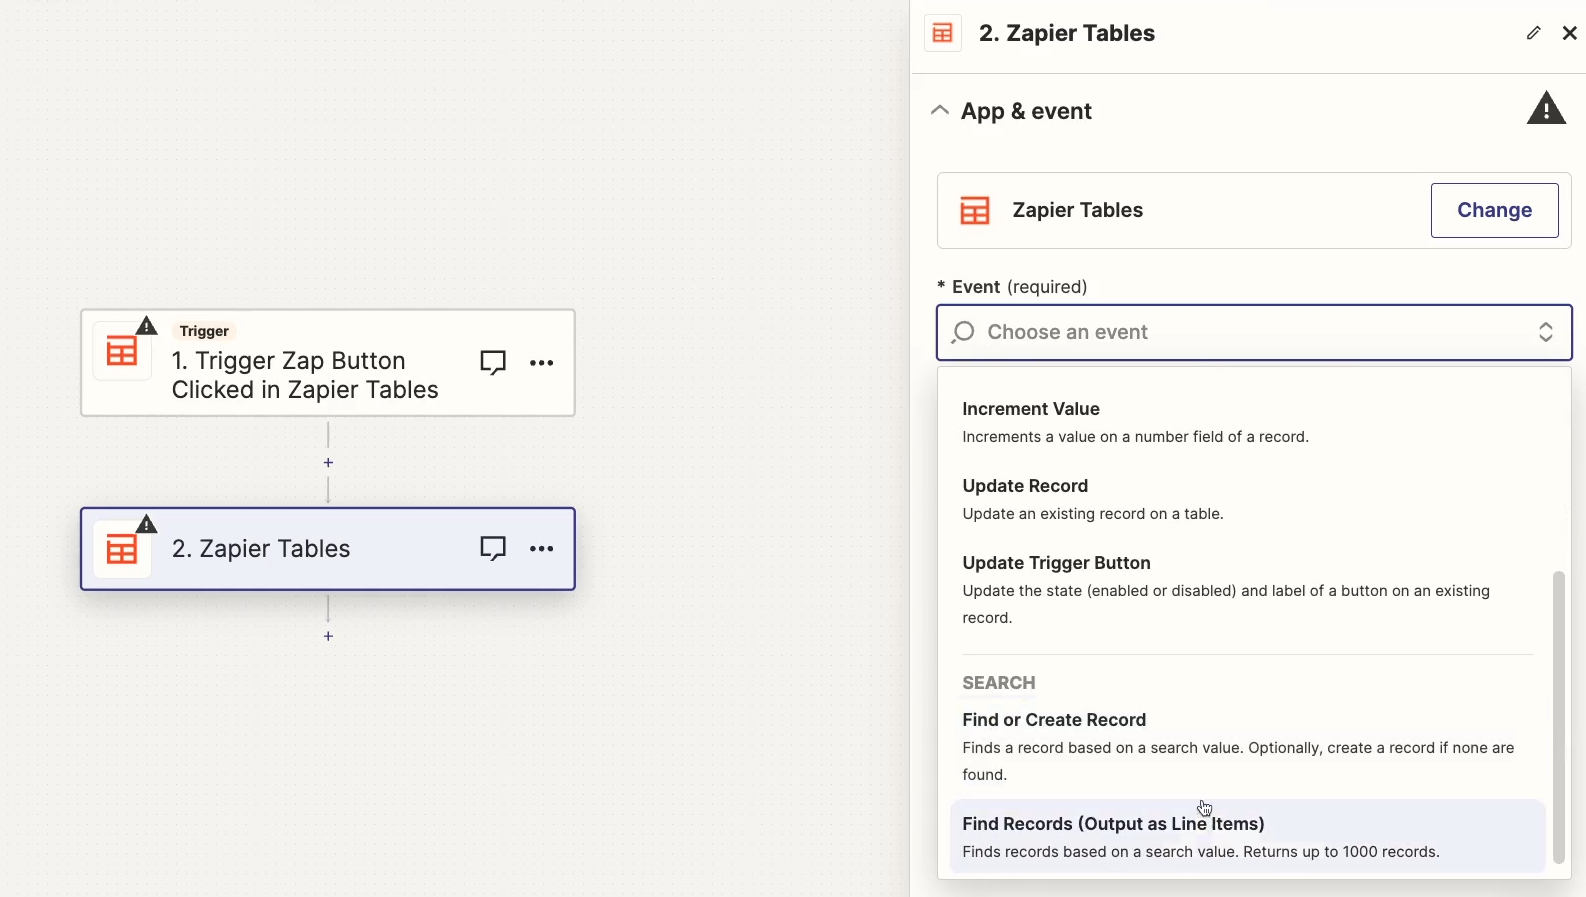
Just add an action in Zapier as you normally would, and search for “Zapier tables”. Then, choose the action you want to use.
Launching Zaps from a Zapier table with buttons
However, there’s another option for automating your Zapier tables that looks a little bit different from your standard Zap: launching Zaps from buttons.
When you add a “button” field, every record will include its own button that you can click to launch a Zap.
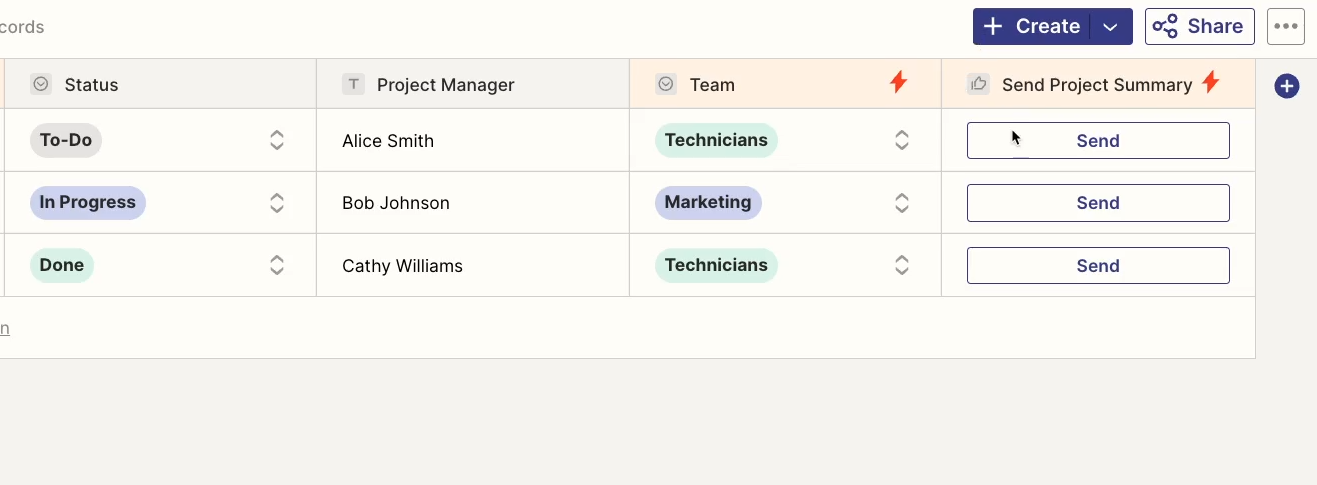
When the Zap runs, it will pull in all of the data from the record that you clicked on.
Adding a button to a table in Zapier
To configure a button in a Zapier table, go to your default view and add a new field. Currently, you can’t add Zaps to any buttons created in custom views.
Choose “button” as the type.
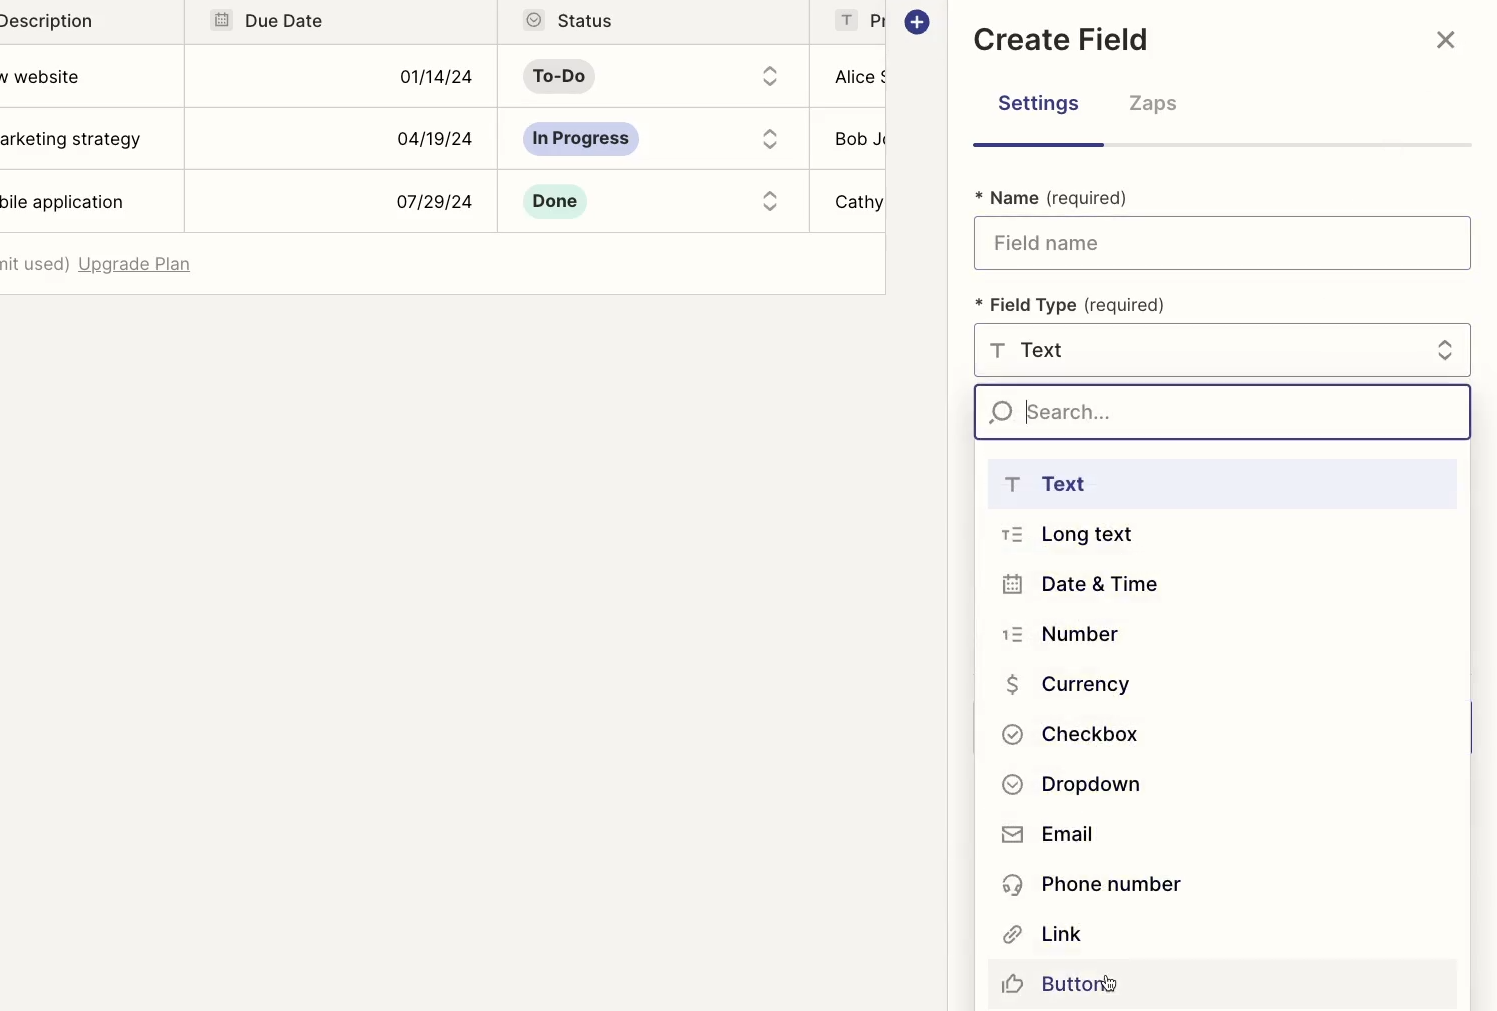
Give your button any name you want and style it however you’d like.

The “type of button” field will default to “Trigger Zap”, which is what you’ll want to use. There’s also an option to use buttons to resume an automation, but this is an experimental feature that we won’t be covering in this post.
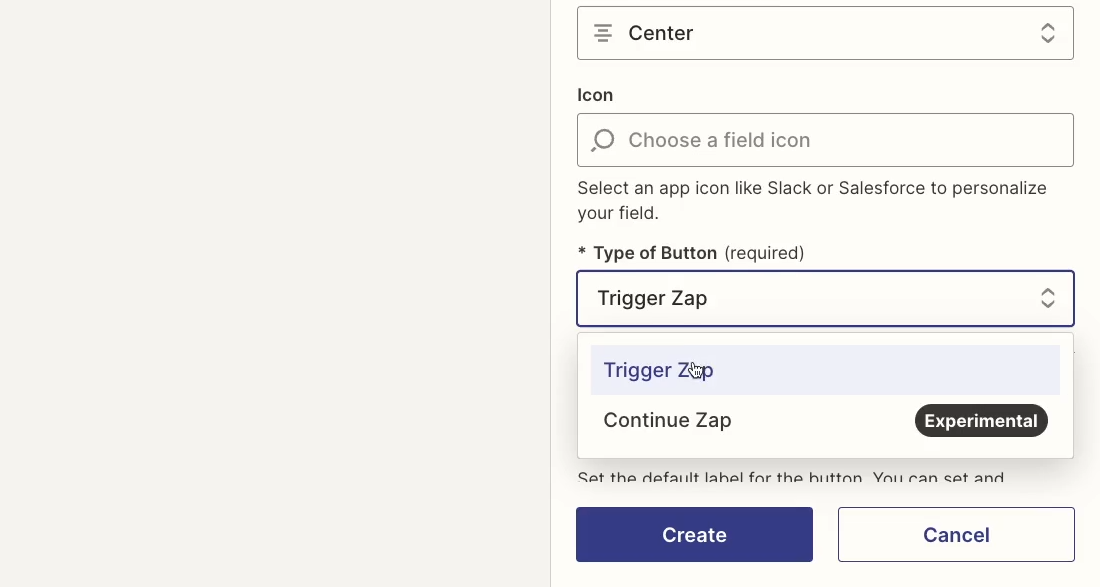
You can leave the default state to “enabled”. “Disable button when clicked” is a good option if you want each automation to only run once per record. Otherwise, leave it unchecked.

With your settings configured, create your field.
Connecting a button to a Zap
Initially, your button will just say “Set up button”, but that’s fine. Click on the button to finish setting it up.
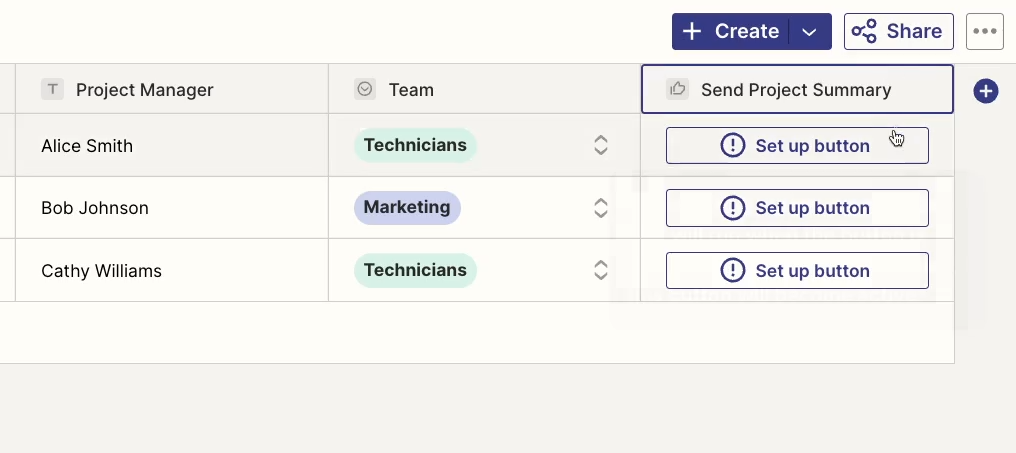
Choose the “Zaps” tab. From here, you can create a Zap that will run whenever the button is clicked.
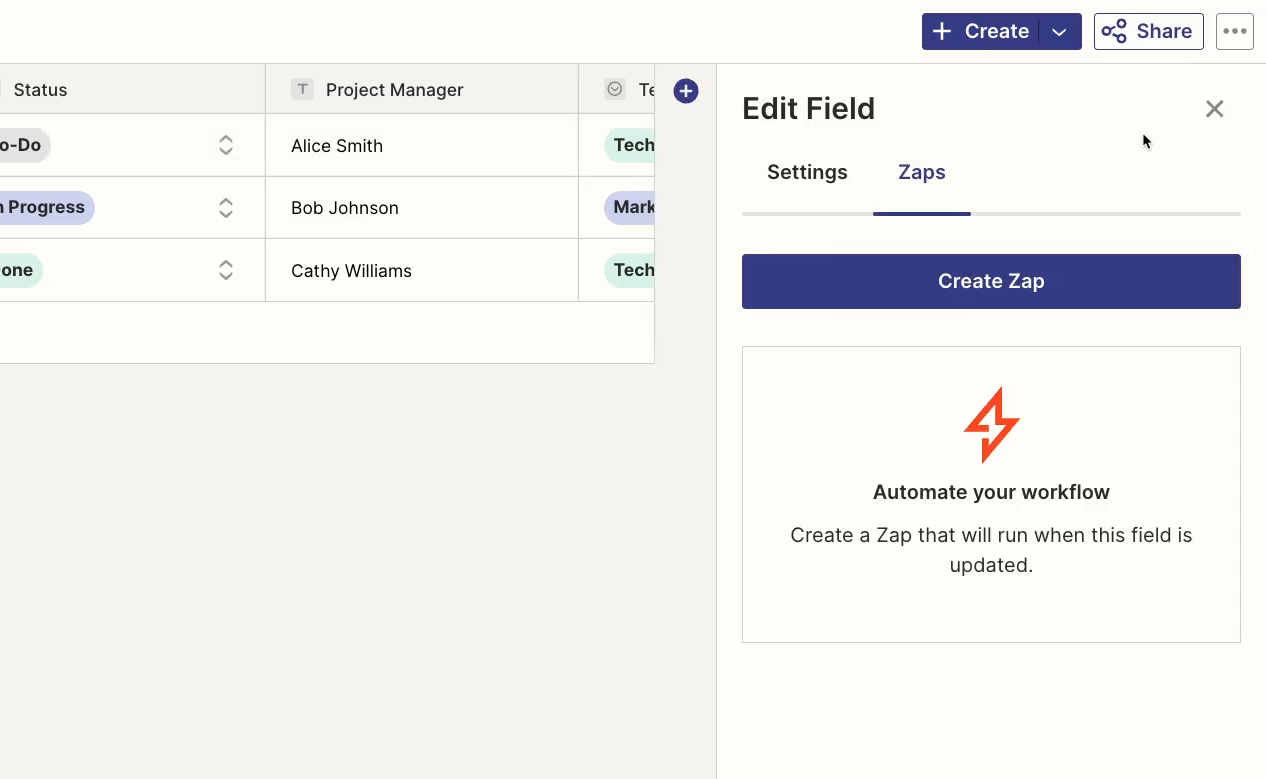
Building this Zap works like any other Zap. The trigger step will pull in information from the record you clicked on.
For example, we’ve created a simple automation that sends an update in Slack about the selected record in our “Projects” table, with some basic information about the due date and status.
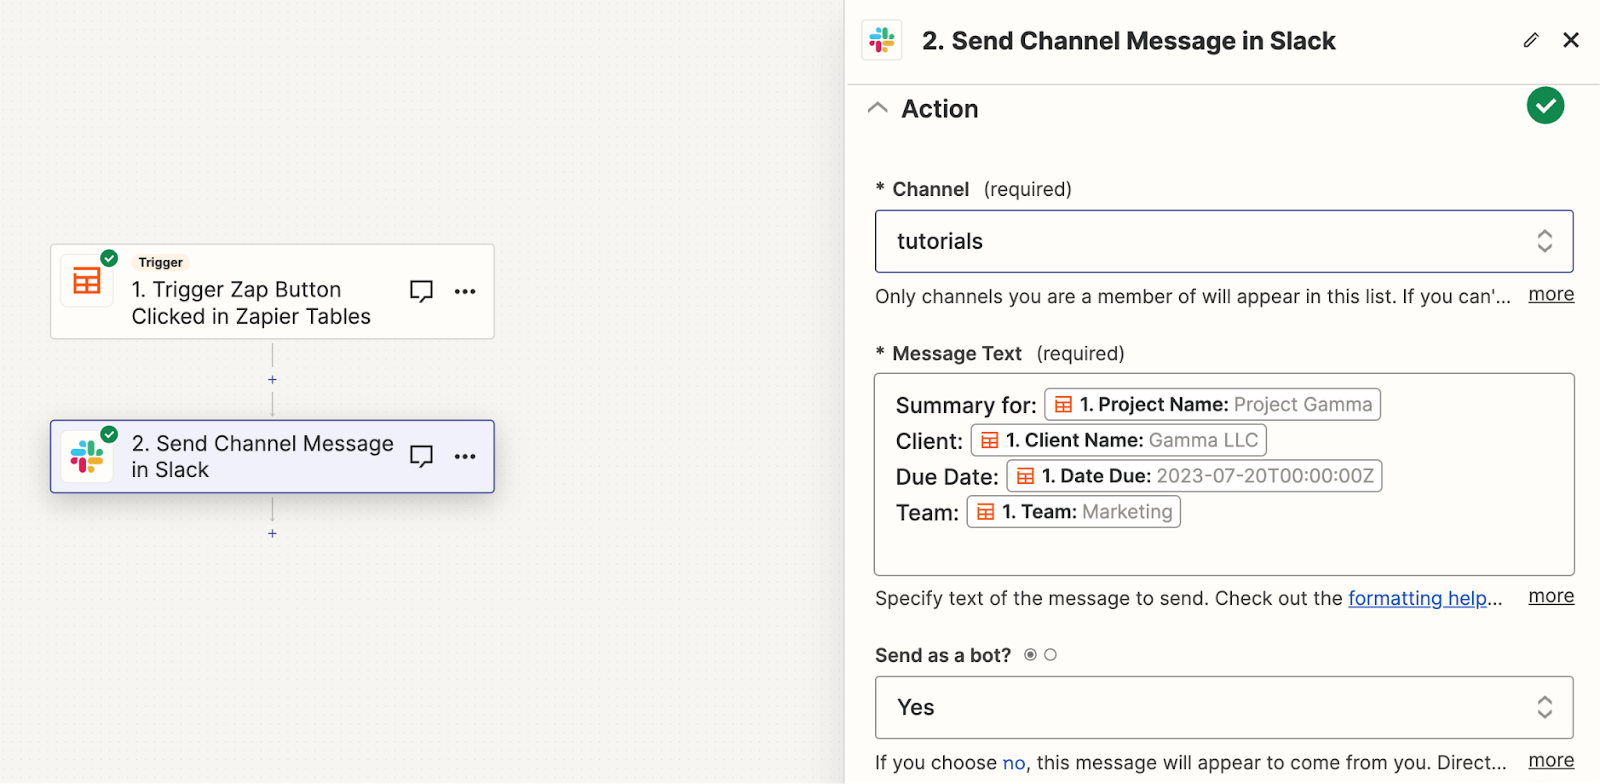
Make sure to publish your automation and turn it on when you’re done, otherwise the button won’t work.
Then, go back to your table and select the button field. After a few moments, the “Zaps” tab should display your newly created Zap.
However, your button may still say “Set up button”. If it does, refresh the page. You should now see the correct label on your button.
Once your button displays the correct text, click on it to test it out.
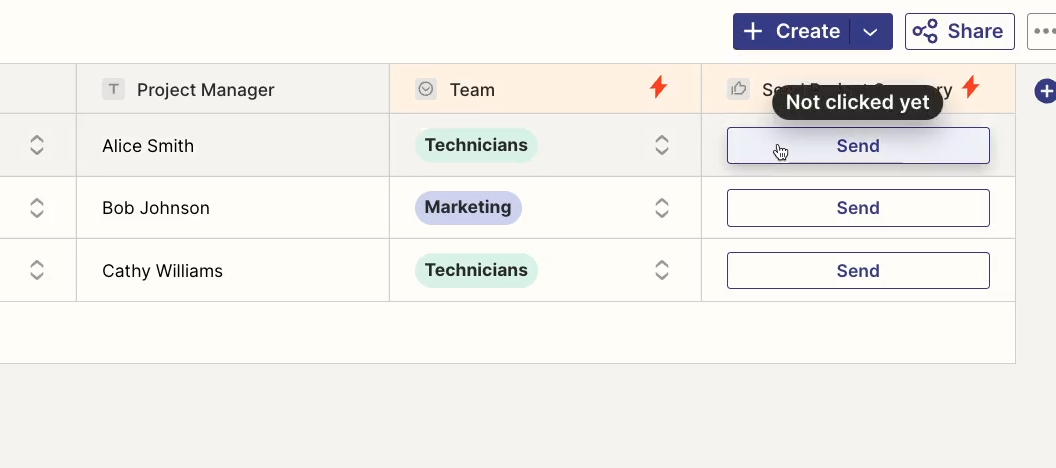
For example, when we click on our button, we see a message in Slack, just as expected.
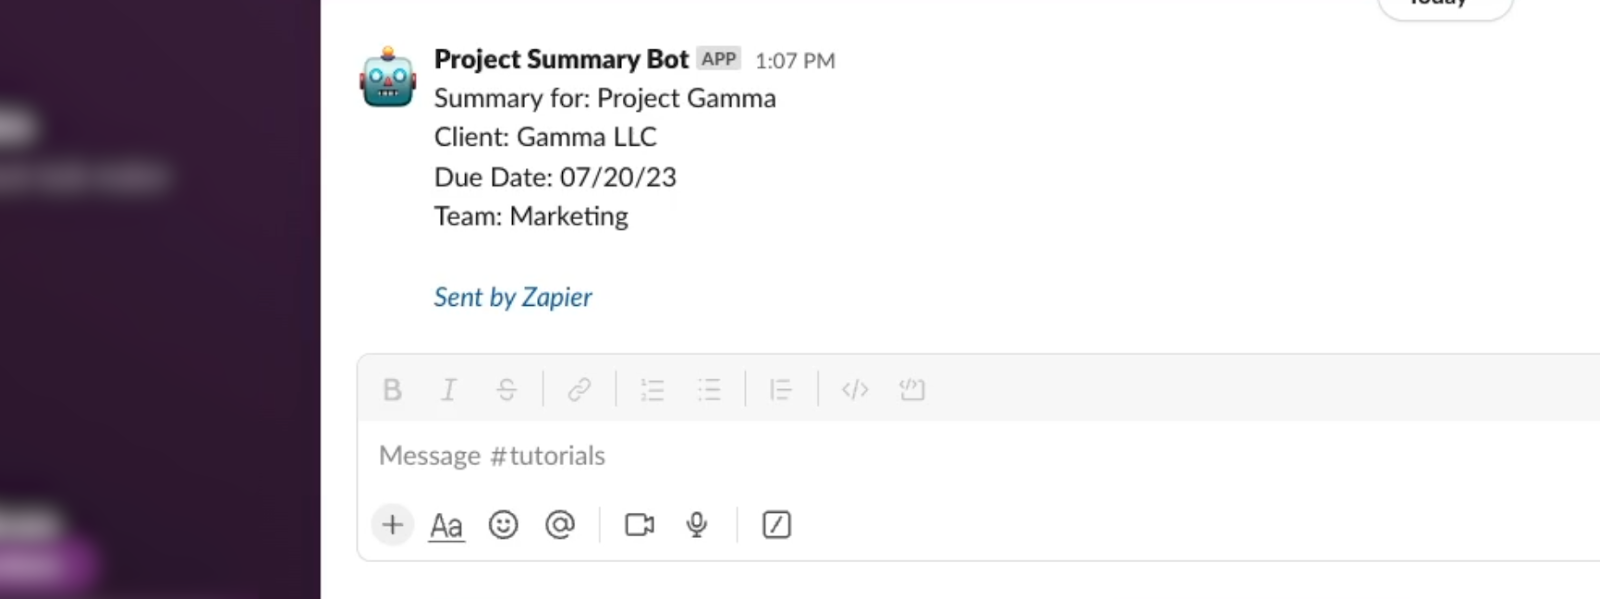
Directly connecting your tables to Zaps is easily one of the most useful aspects of tables. If you’re a Zapier builder first and foremost, tables will give you a lot of easy ways to organize your data and keep everything in one place.
How to use Zapier tables with Zapier interfaces
You can take tables and automations even further by connecting them to Interfaces, another Zapier feature that was somewhat recently.
With interfaces, you can create a simple web-based UI where you can store links, forms, tables, and more. You can even add an AI chatbot to a Zapier interface. Check out our previous tutorial to learn more about that.
Use tables to gather form submissions in interfaces
If you’re adding a form to your interface, you’ll need to connect it to a Zapier table. Then, any responses to your forms will automatically populate the table.
To get started, create a new interface from the “Interfaces” menu, and add a new page. Then, add a form component to that page.
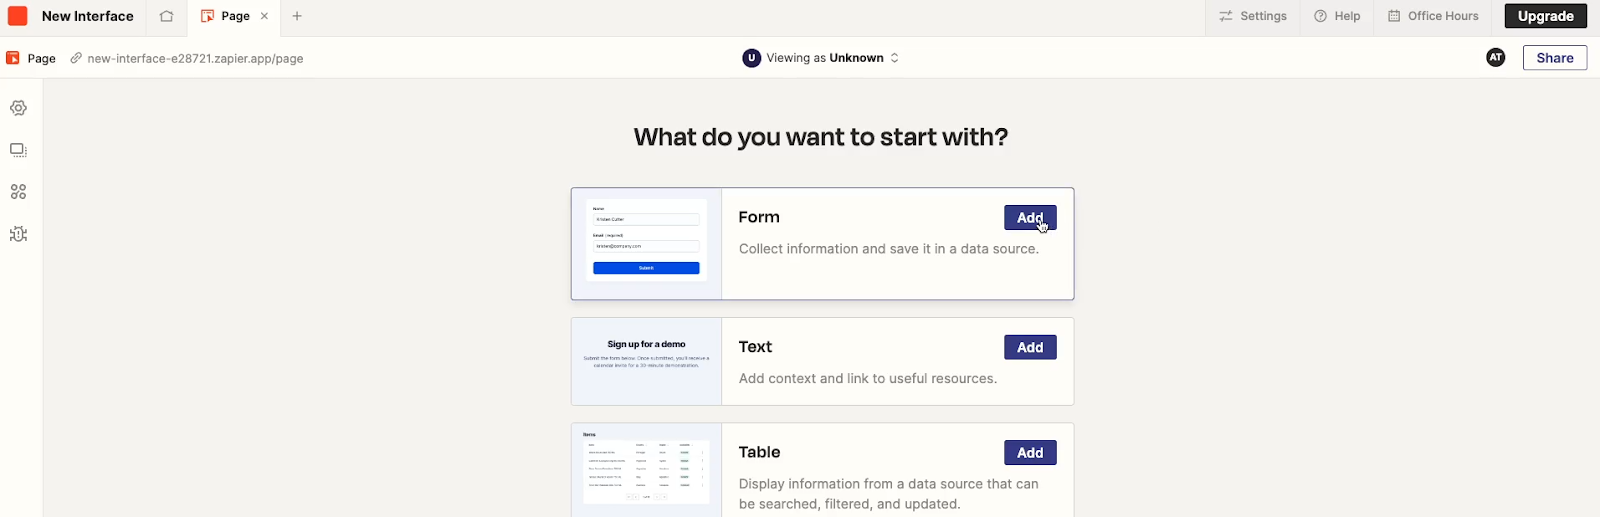
Once you add a form component, you can either pick an existing table to connect it to, or create a new one.
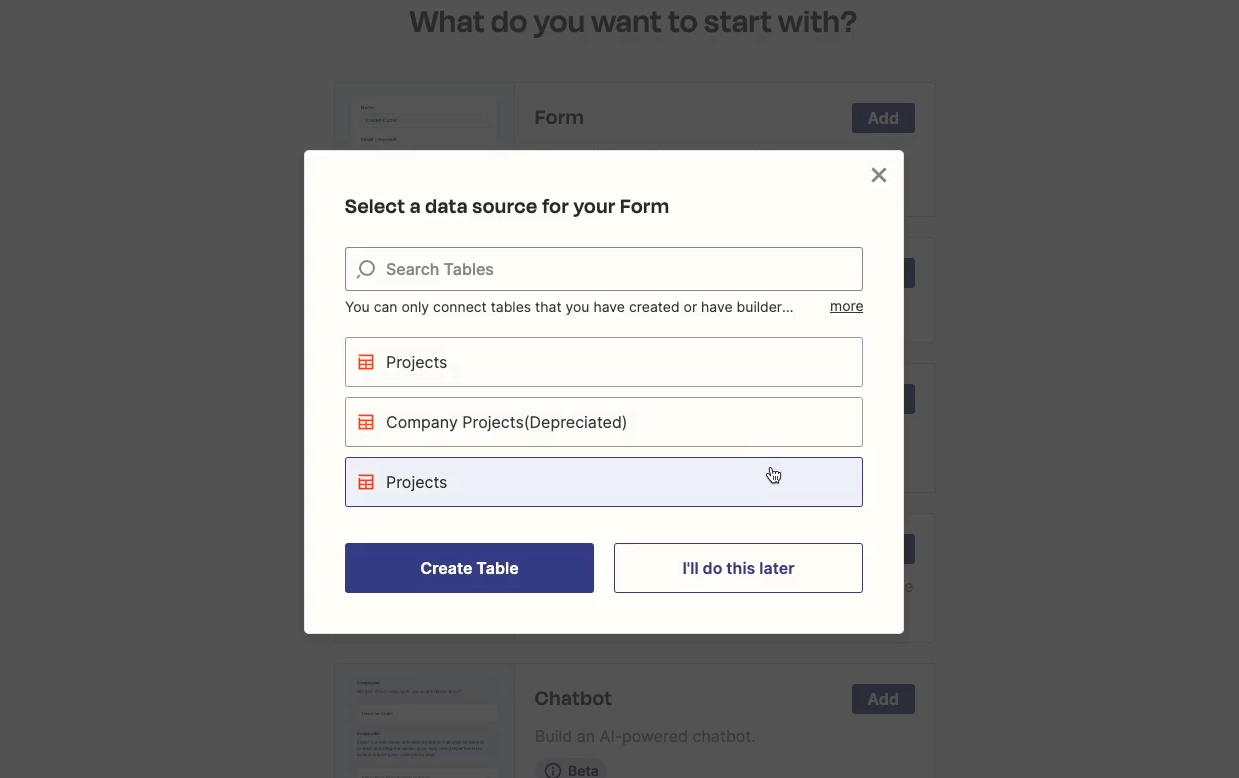
When you connect to an existing table, Zapier will automatically include a form question for each of the fields in the table.
You can click on the form to edit it. You can add or remove fields, or just change their text. You can also add placeholder text here, or set certain fields to ‘required’.

Once you’re finished, open up your page and test out your form.
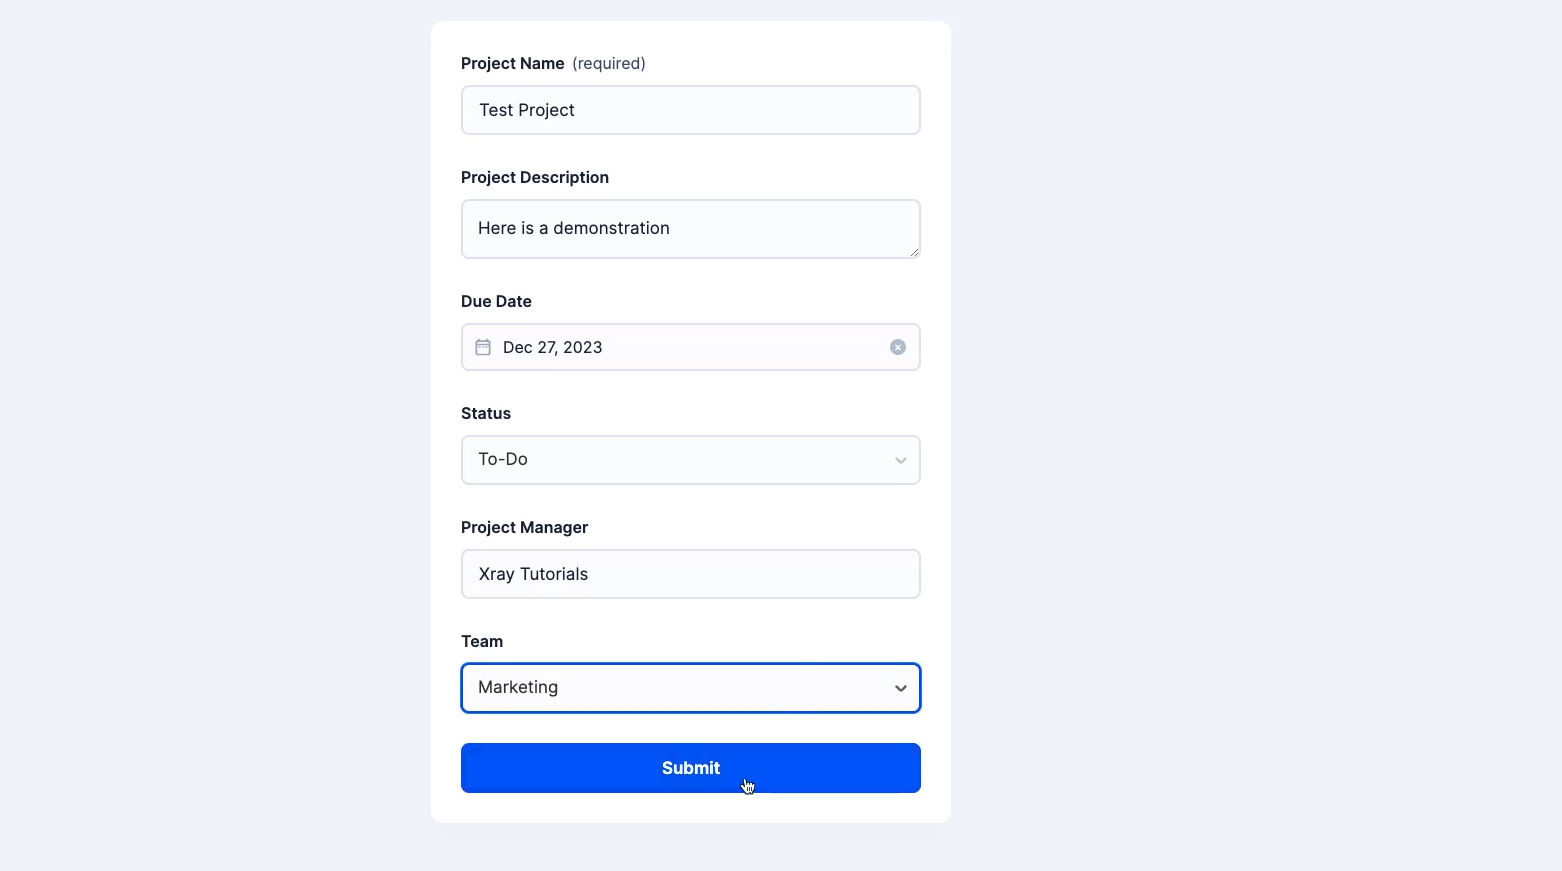
When you submit a response, a corresponding record should be added to your table.

Using tables in Zapier interfaces can be a great way to gather data from your team or from anyone on the web. But you’re not limited to just collecting data with interfaces.
Creating kanban boards from Zapier tables
You can also use your Zapier tables to create customized Kanban or Table components in your Zapier interfaces. These are both different ways to display an existing Zapier table.
Since a Table component in an interface is pretty similar to a standard Zapier table, we’ll focus on the Kanban component.
Pick a page in your Zapier interface, or create a new one. Then, add a component and choose “Kanban”.
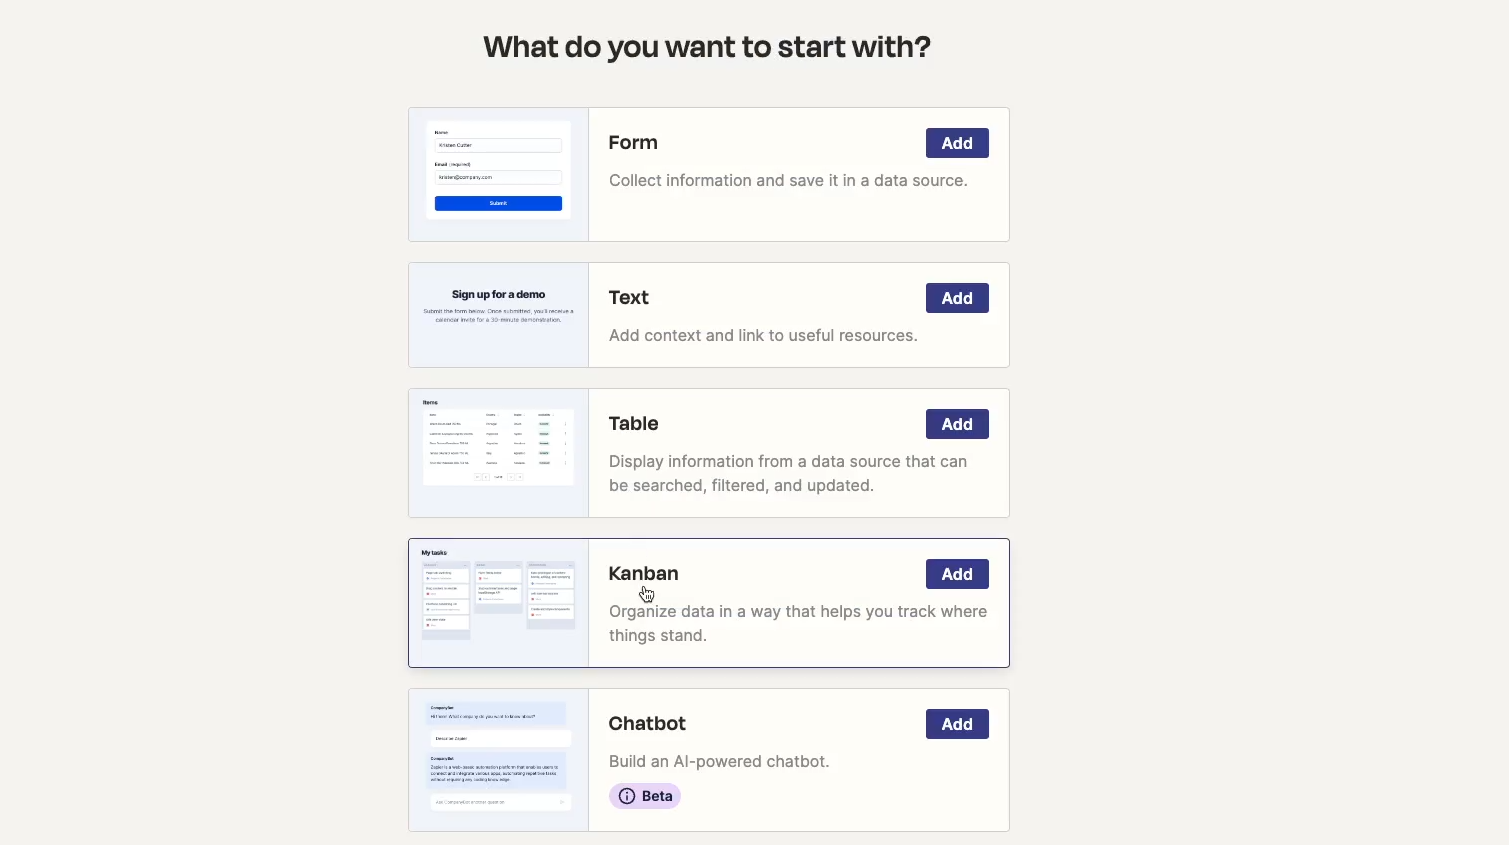
Connect your Kanban component to an existing table.
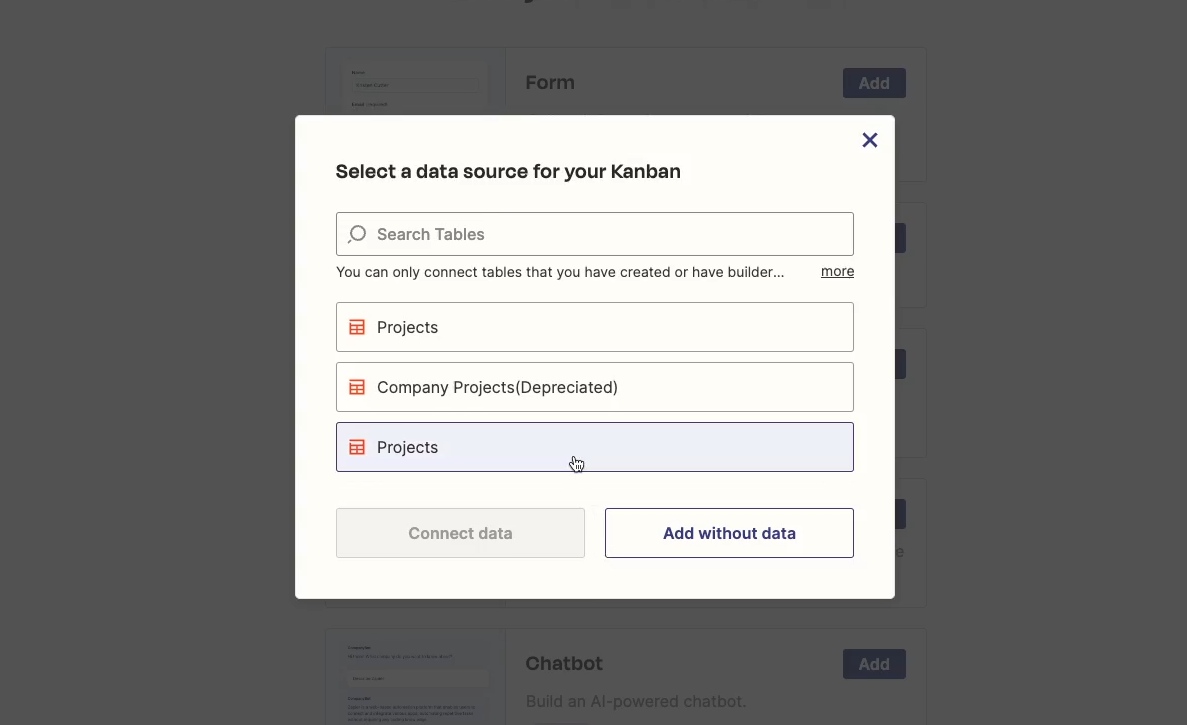
Then, pick a field to group by. This has to be a dropdown field, like the “Status” field pictured below.
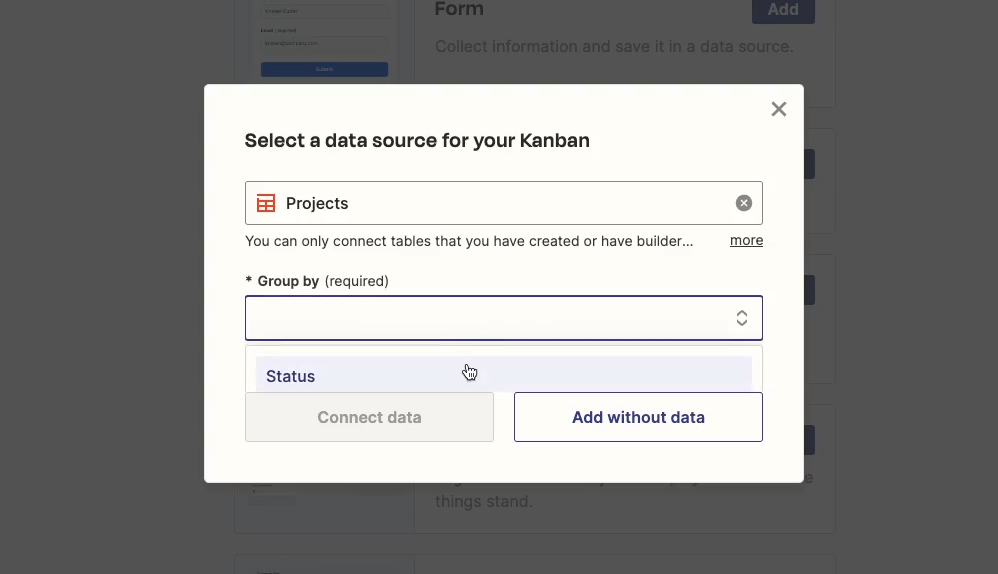
Next, you can choose which columns to display and in which order. Finally, you can pick the fields that you’ll use as the title and description for each card.
Then, click “connect data” to finish setting up your Kanban board. You may have to wait a moment for your data to load.

Once it’s ready, open up the page to see the kanban board in action. You should be able to drag and drop cards between columns.
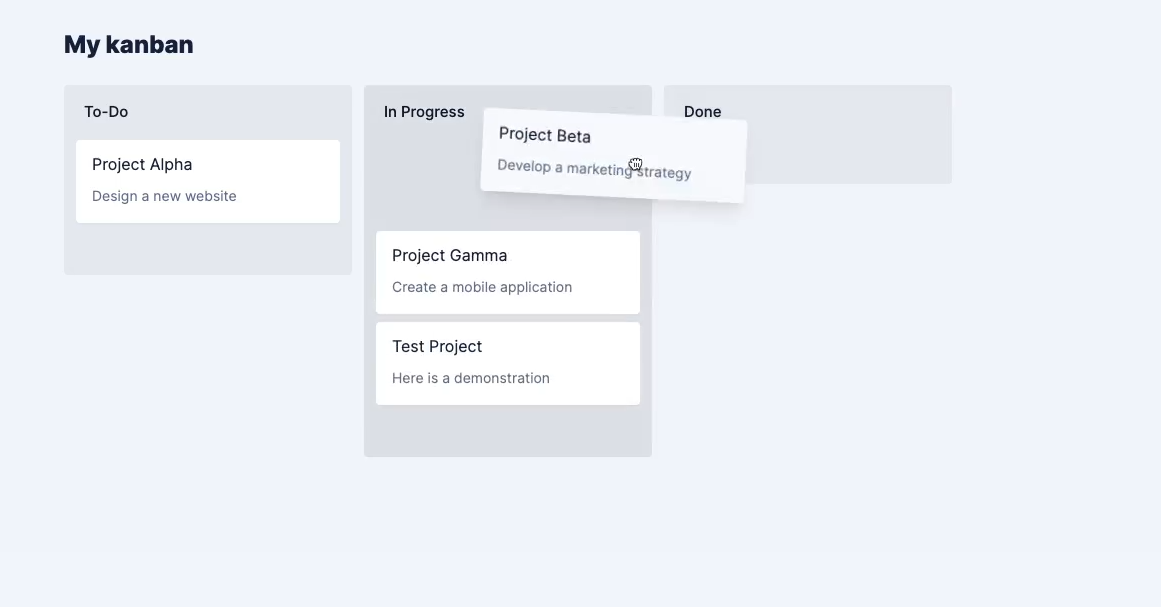
Note that doing so will update whatever field you’re using to group your cards.
Editing permissions for your Kanban board
Back in the interface editor, you can control user permissions. You can set whether or not users can drag cards, create records, edit records, or delete records. Each of these settings can be managed separately.
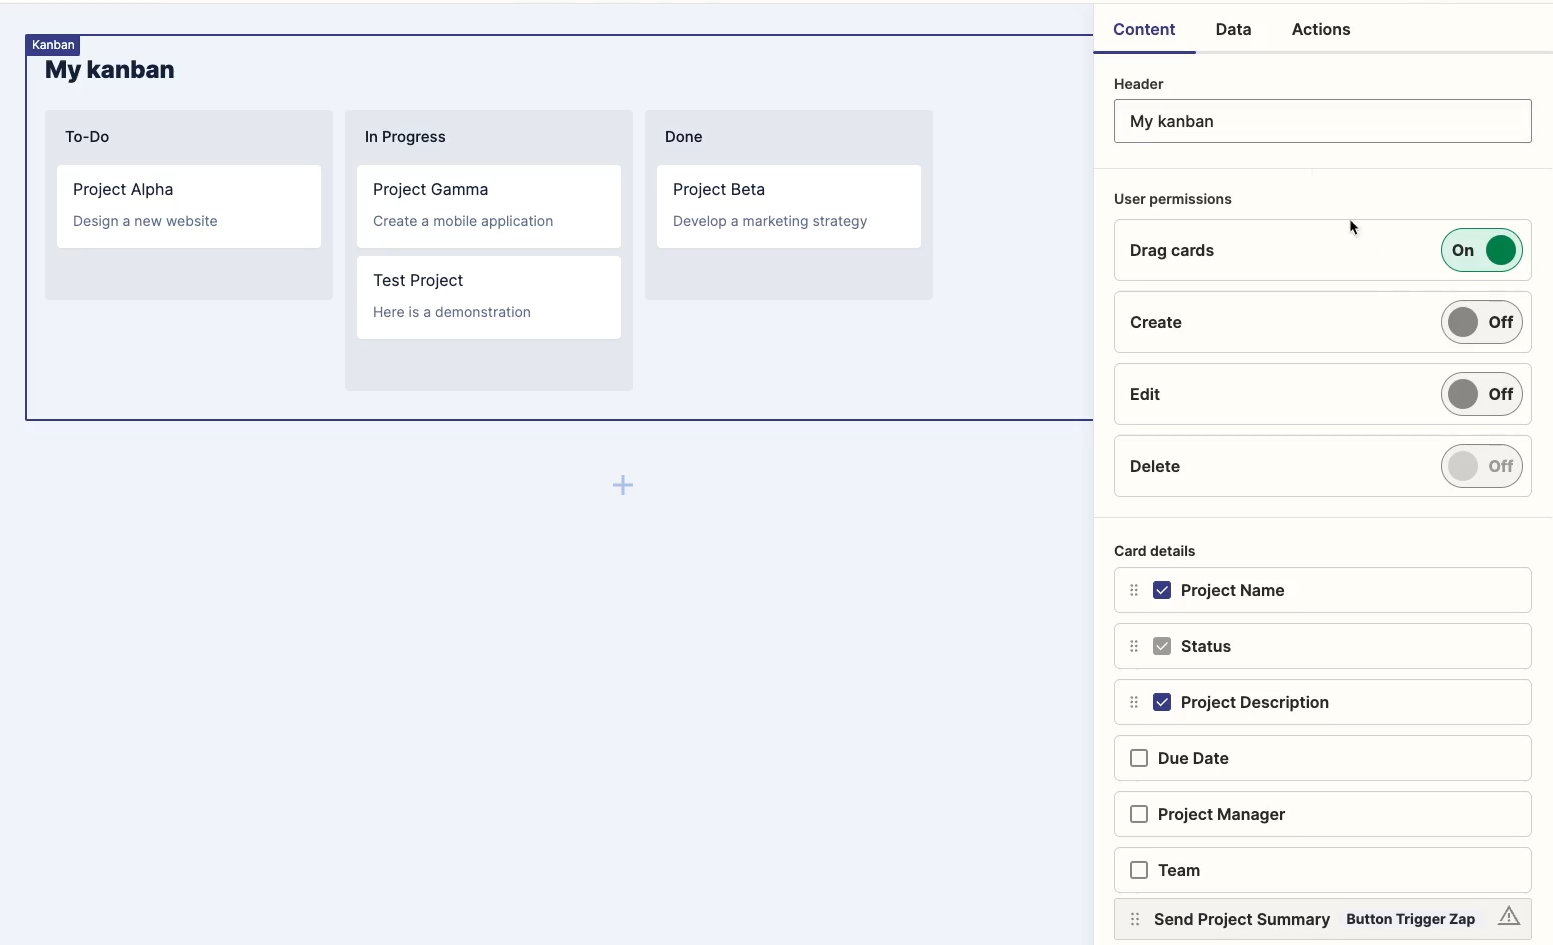
Under “Actions”, you can also configure automations that will run whenever a card is created, updated, or dragged into a certain column. Then, you can build a Zap that will launch when that specific event occurs.
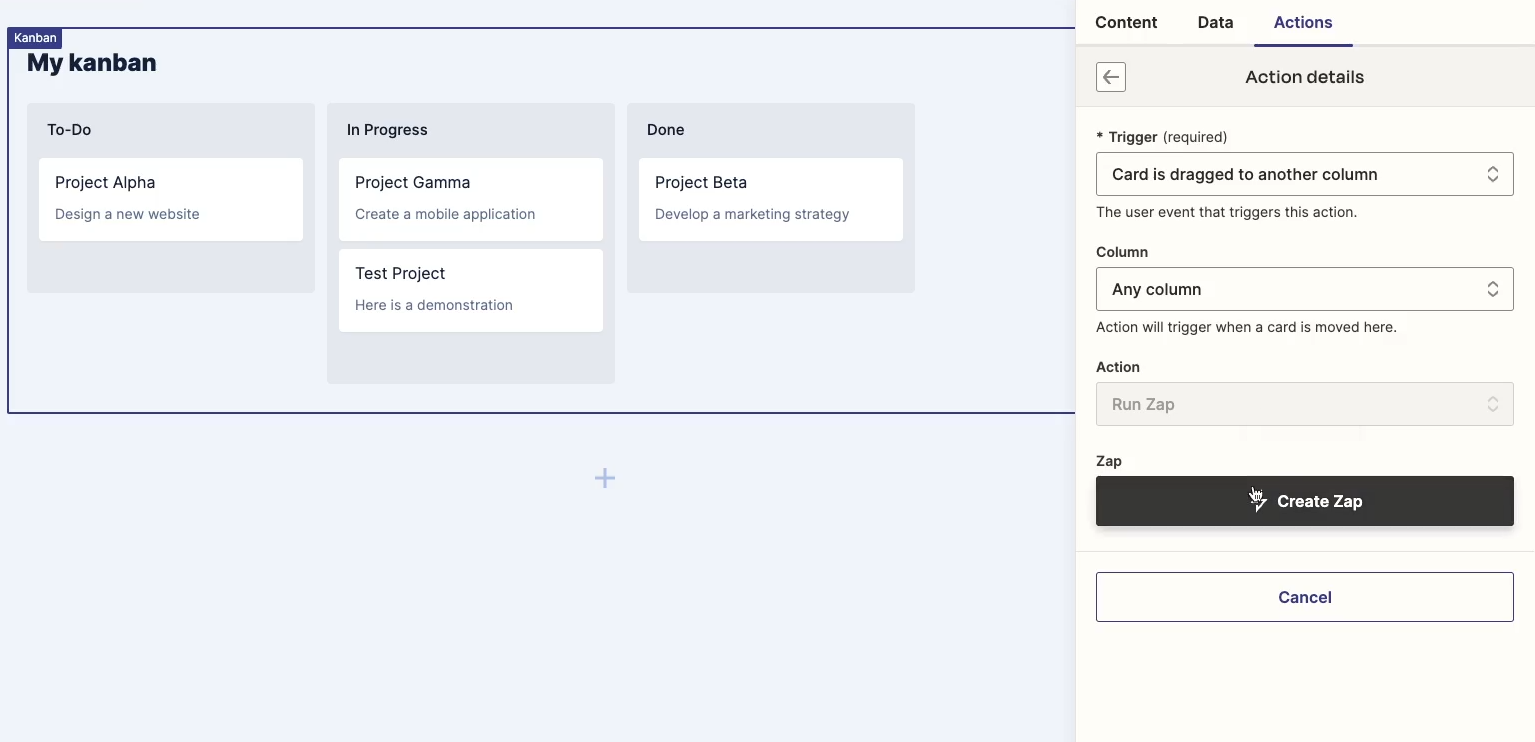
While Zapier might not be the first app you think of when it comes to building an interface, it can be a good choice for Zapier power users and teams that rely heavily on Zaps already.
With constantly expanding features for kanban boards, forms, and more, Zapier interfaces are quickly becoming a genuinely useful tool. However, they still have a ways to go before they can stand shoulder-to-shoulder with the likes of Airtable.
Using Airtable for a more robust automation database
Ultimately, Airtable still offers much more robust database and interface options than Zapier. This isn't very surprising, considering that Airtable is, first and foremost, a database application.
In contrast, Zapier's primary focus is on building no-code automations, a domain where it truly excels, being widely recognized as one of the largest automation providers in the world.
In short, Airtable has more of everything that you might want from a database. It has more view types, with a variety of options like Kanban boards, timelines, galleries, and more.
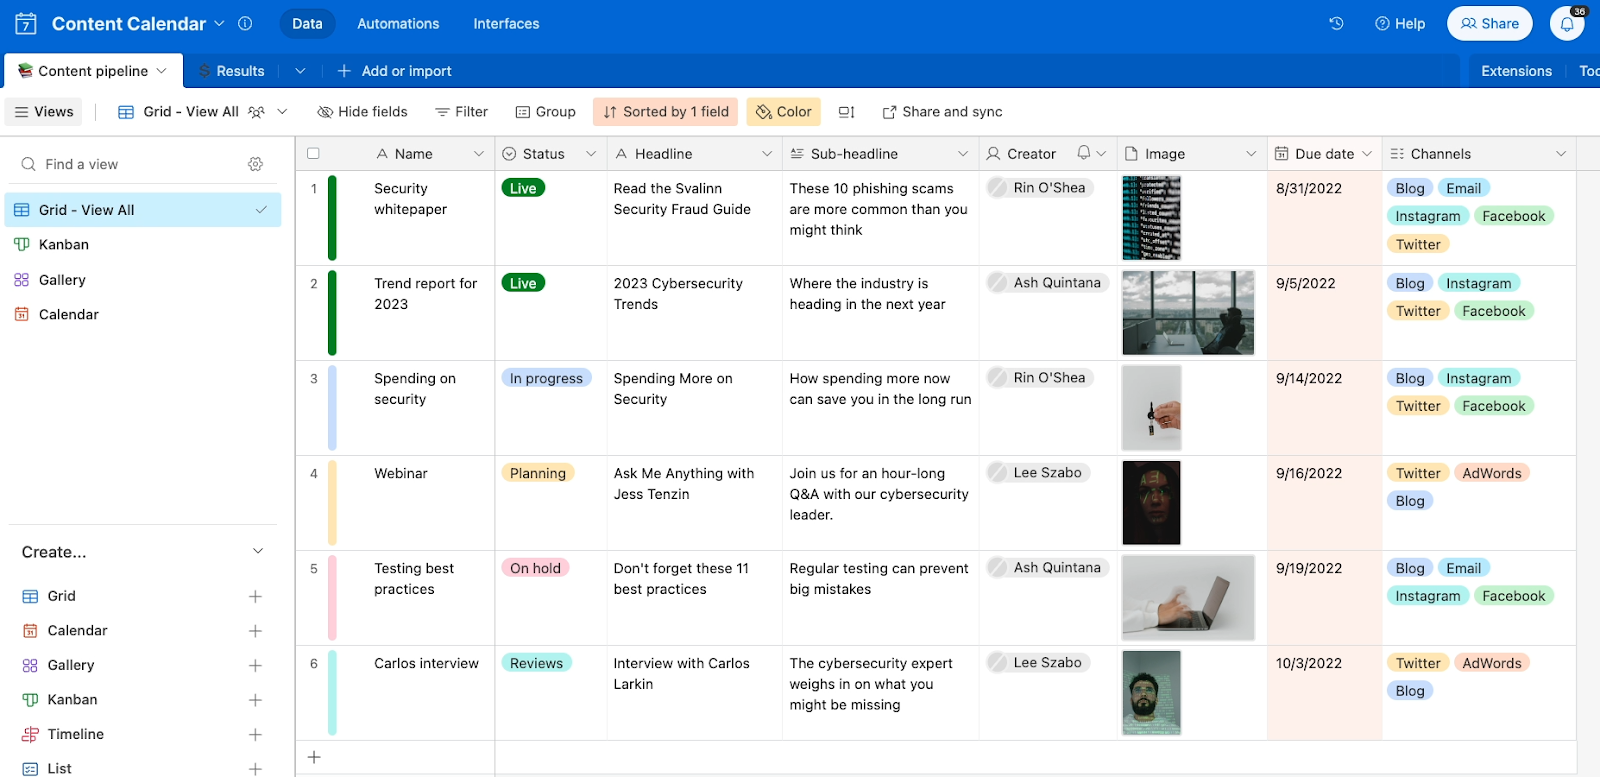
These diverse views cater to different project management styles and data visualization needs, making it easier to manage and interpret your data - especially for enterprise grade users.
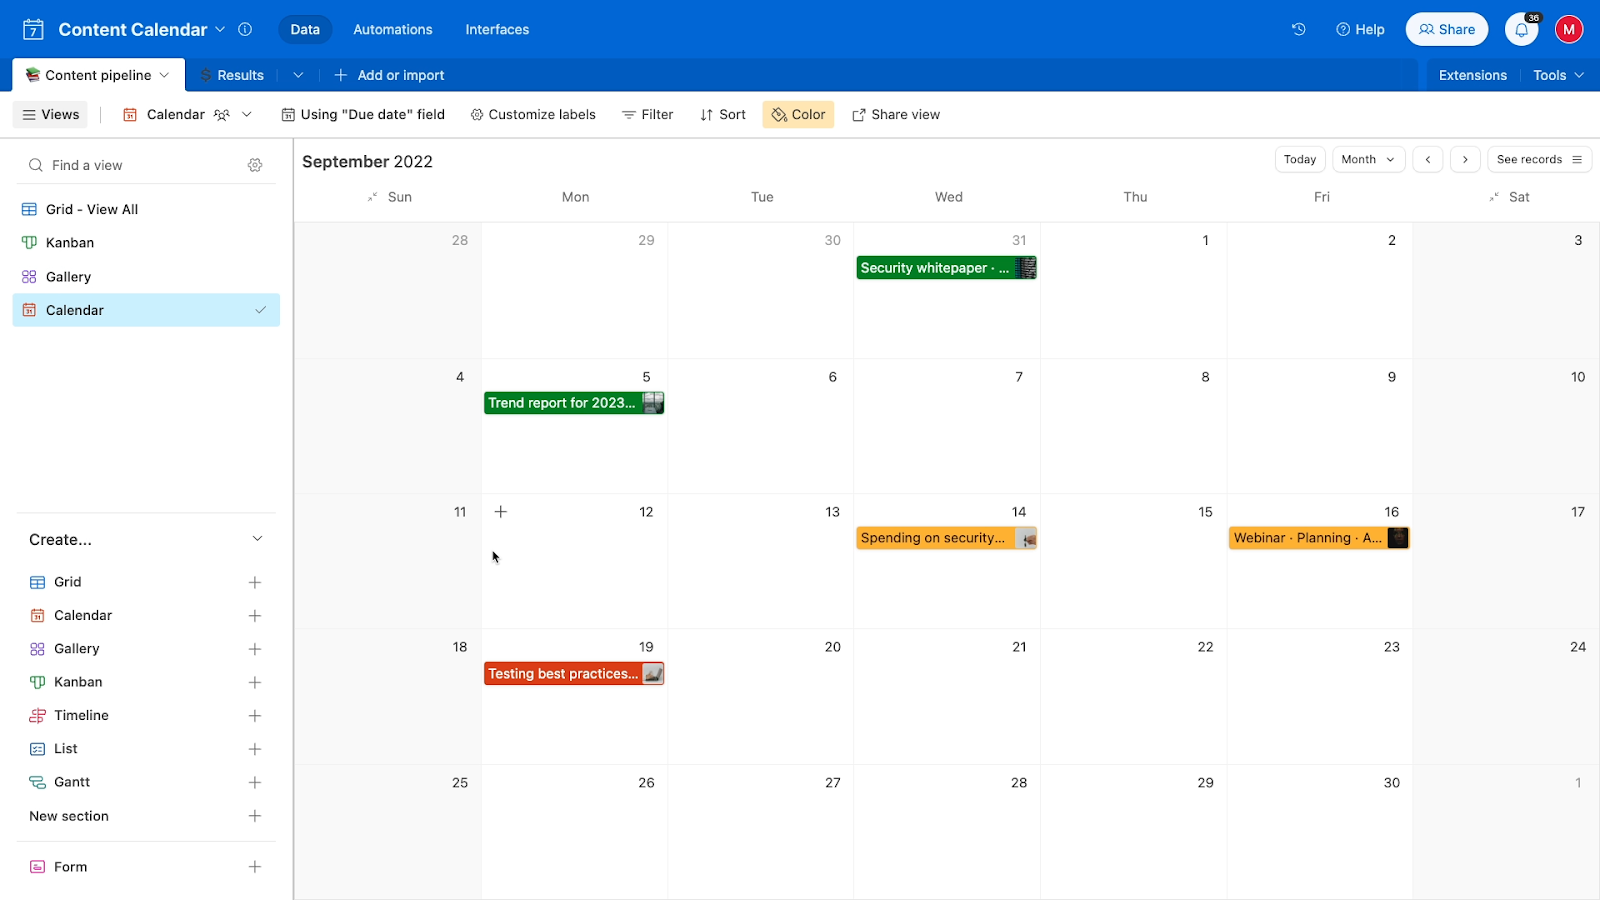
Linked records in Airtable
Airtable also includes Linked Records, which is a vital feature for connecting your data and avoiding redundancy.
Linked Records allow you to associate records in one table with records in another table. It's particularly useful for maintaining consistency across different parts of your database.
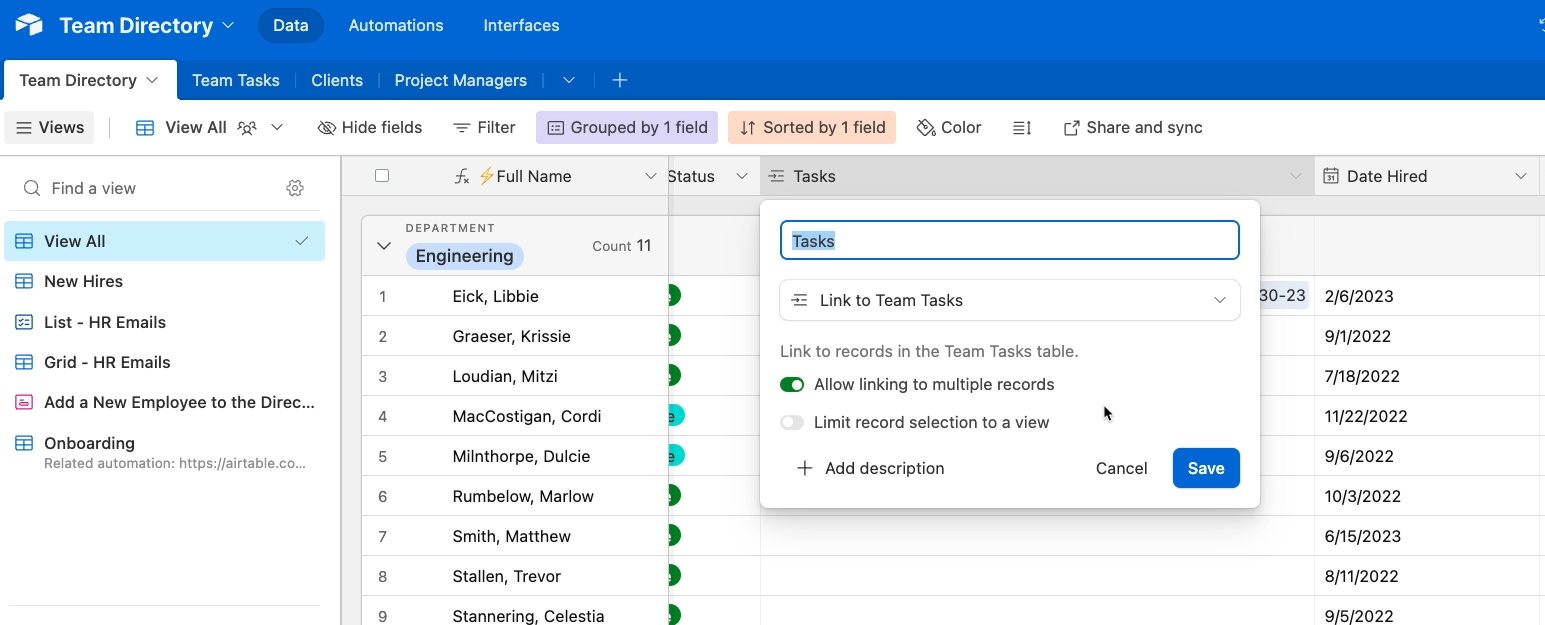
For instance, you can create a single “team directory” table and reference it in various areas like project management, task management, and client onboarding.

This not only cuts down on redundancy but also ensures data integrity across your workflows.
Airtable formula fields
Airtable also provides a “formula” field type, which lets you populate the contents of a field with a formula.
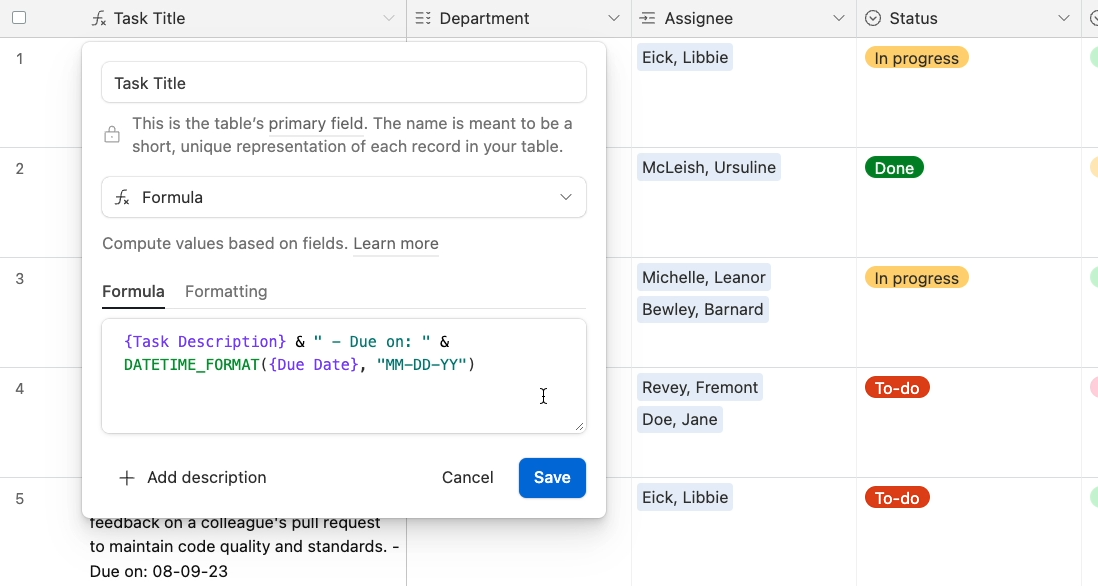
This feature is incredibly useful for automatically calculating values, reformatting text, or adjusting dates and times based on other data in your table.
Other Airtable features
Airtable’s form views are also much quicker to set up than a form component in a Zapier interface, and Airtable’s interfaces offer more customization than Zapier’s.

And finally, when it comes to collaboration, Airtable provides more granular control over what users can see and edit. This level of detail in permission settings can be crucial for managing team access to sensitive or critical data.
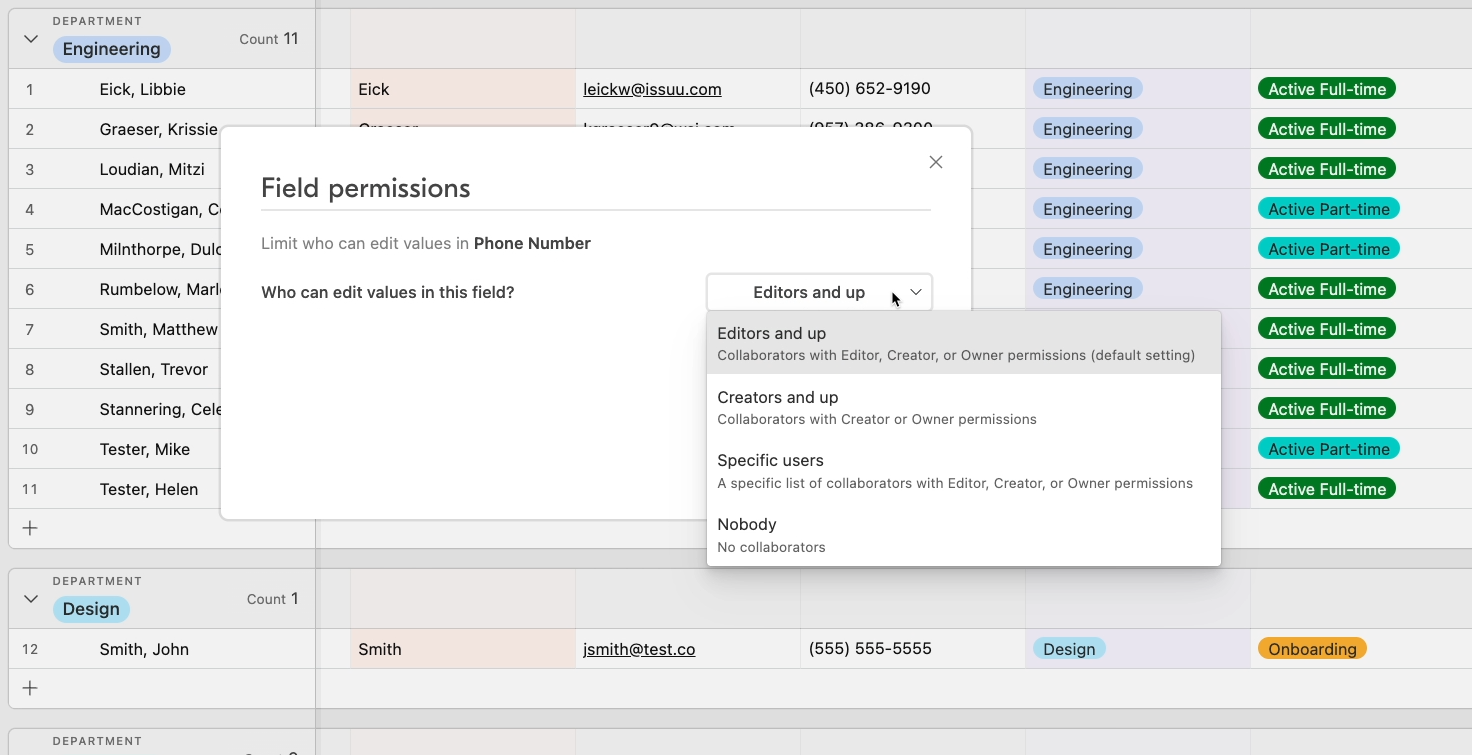
Zapier tables or Airtable?
The main downside of Airtable is the downside that all SaaS tools share: it's another application to manage, and unlocking all its features requires a paid plan.
However, if your data needs are relatively simple and your primary focus is on automations, Zapier’s integration with its own Zapier Tables might be sufficient.
Zapier Tables, while not as feature-rich as Airtable, offer a convenient way to have your automations and data in a single app, streamlining your workflow processes. This can be particularly useful if you’re building an automation for a client, and want to simplify the information they need to access the finished product.
If you build your workflow using Zapier tables and interfaces, they’ll only need one login to access everything, and that can make things much simpler for less-technical users. But for most use cases, we’d recommend using Airtable as your data storage, and Zapier for automation.
However, no-code builders should always be aware of the tools at their disposal, so we encourage you to try Zapier tables out for yourself to see how they might fit into your workflows. No matter where you start, you can always migrate to another database with a simple CSV export.
Experiment with Zapier’s growing roster of features
Zapier continues to expand its platform, moving beyond automation and into data management, AI, interfaces and more. Zapier tables might not be unseating Airtable any time soon, but they’re a welcome addition to Zapier that can be useful in many situations.
If you’d like to learn more about automation tools like Zapier, Make, Airtable, and more, be sure to check out our blog or our YouTube channel. You can also follow XRay on Twitter, Facebook, or LinkedIn.
How to Export Your Airtable Data to Excel
Transfer Your Data and Keep Airtable and Excel in Sync
Are you trying to work with your Airtable data in Excel? Airtable is great as a flexible, modern database with support for custom views, integrations, automation, and more.
However, for Excel power users, nothing can compete with the complex calculations offered by the venerable old software, so exporting your data from Airtable is sometimes the best choice.
In this post, we’re going to show you three easy ways to transfer your Airtable data to Excel, or keep both databases synced up automatically.
We’ll start with a simple CSV export. Then, we’ll show you a couple of automation tools you might want to try to set up an ongoing sync between the apps.
Method 1: Export and Import a CSV
First, we’ll start with exporting a CSV from Airtable so you can edit your data in Excel. You can export an Airtable view as a CSV in a few easy steps:
1. Open the view that you want to export data from. You can only export one view at a time, and your exported CSV will only contain the records that are visible in your chosen view.

2. Click on the view name, and select “Download CSV” from the dropdown. Name your CSV whatever you’d like and save it to your computer.
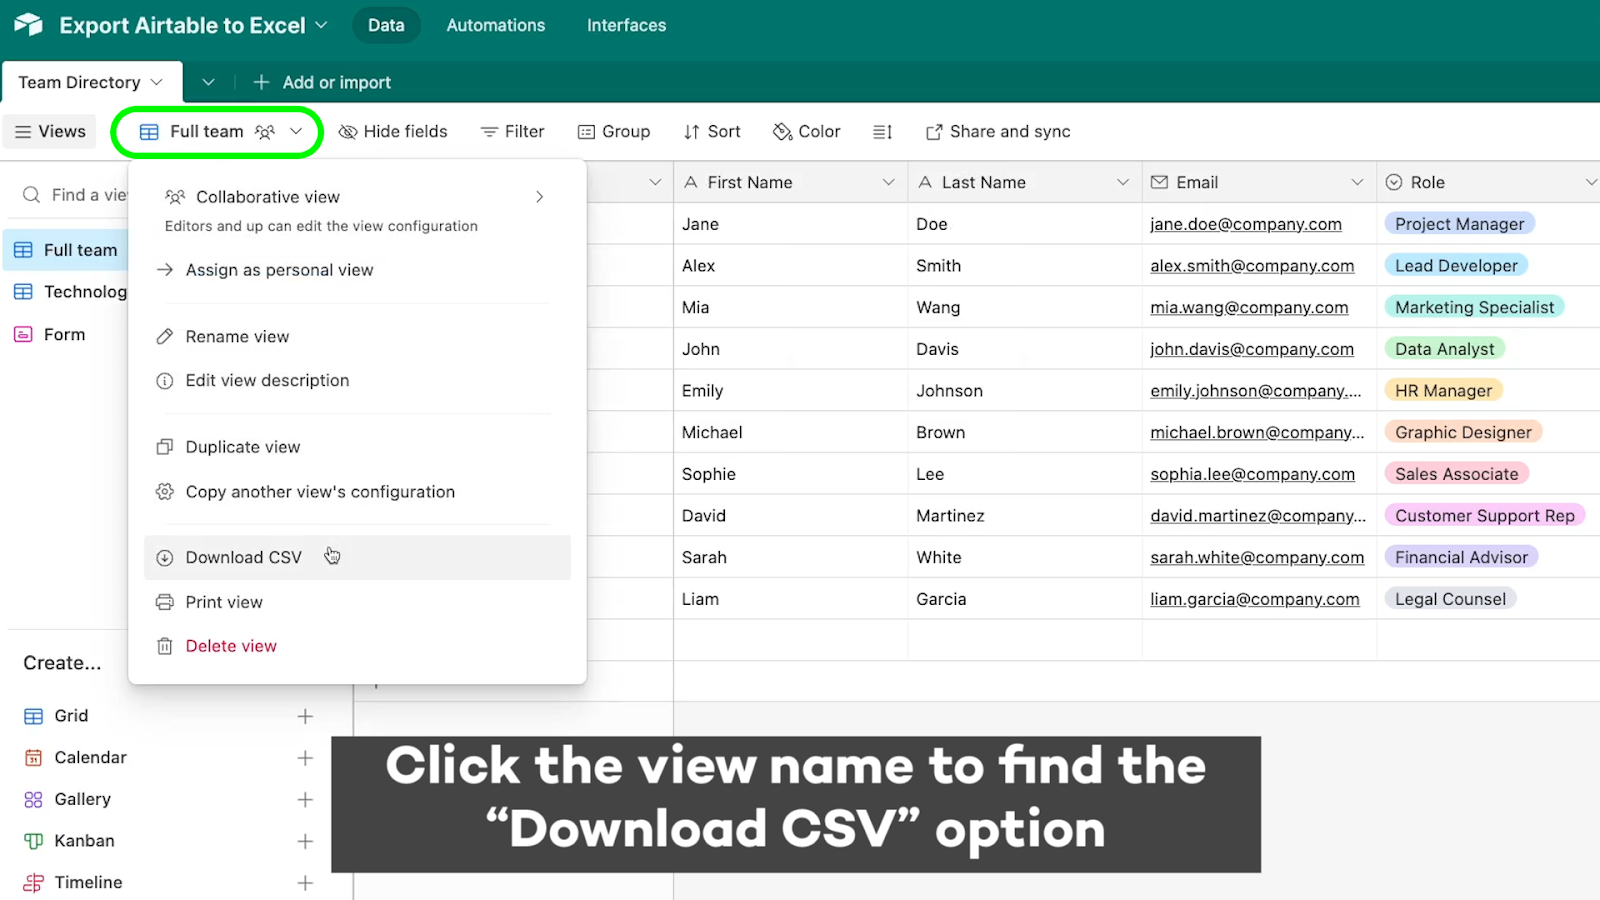
3. Open your exported CSV in Excel. You can use either the desktop app, or use the online version of Excel and upload the file to OneDrive.
In the screenshots below, we’ll use the web version of Excel with OneDrive. Click on “upload”, and choose your exported CSV.
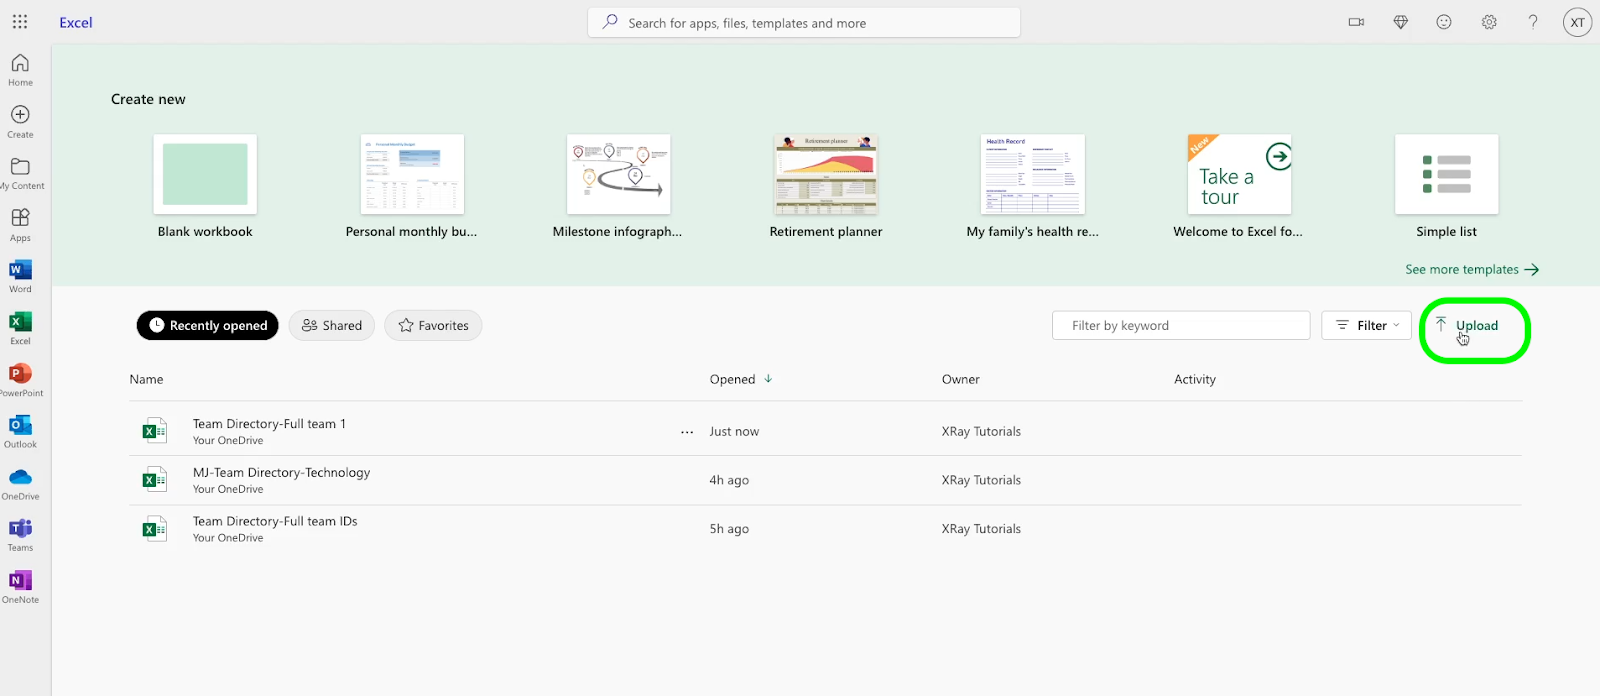
Excel will take a moment to convert the file, and open it up as a spreadsheet.
All of your data should be present, but the Airtable field types will all be changed to standard spreadsheet columns.
A CSV export like this is the easiest way to do a one-time bulk transfer from Airtable to Excel. But what if you want to keep Airtable and Excel data synced?
Method 2: Sync new Airtable records to Excel with Zapier, Make, or Powerautomate
If you want any kind of a live connection between Airtable and Excel, you’ll need to set up an automation to do it.
You can automate Airtable and Excel with several no-code tools, like Zapier, Make, or Power Automate. Just go to xray.tools and search for “Airtable” and “Excel” to see the full list of providers and the actions they support.
Automating a one-way sync with Zapier
Building a one-way sync with any of these tools is very simple. We’ll quickly show you how it works in Zapier, but the basic principles will be very similar in other automation providers.
You can copy our Zap template to get started. You’ll need to sign in to Zapier to view the template.
Note that this will only work with Excel files stored in OneDrive. Zapier won’t be able to locate files that are only stored locally on your computer.
1. Set up a trigger in Zapier that runs whenever a record is either updated or created in your Airtable base. Ensure you select the correct base and table, and if necessary, limit the trigger to a specific view.
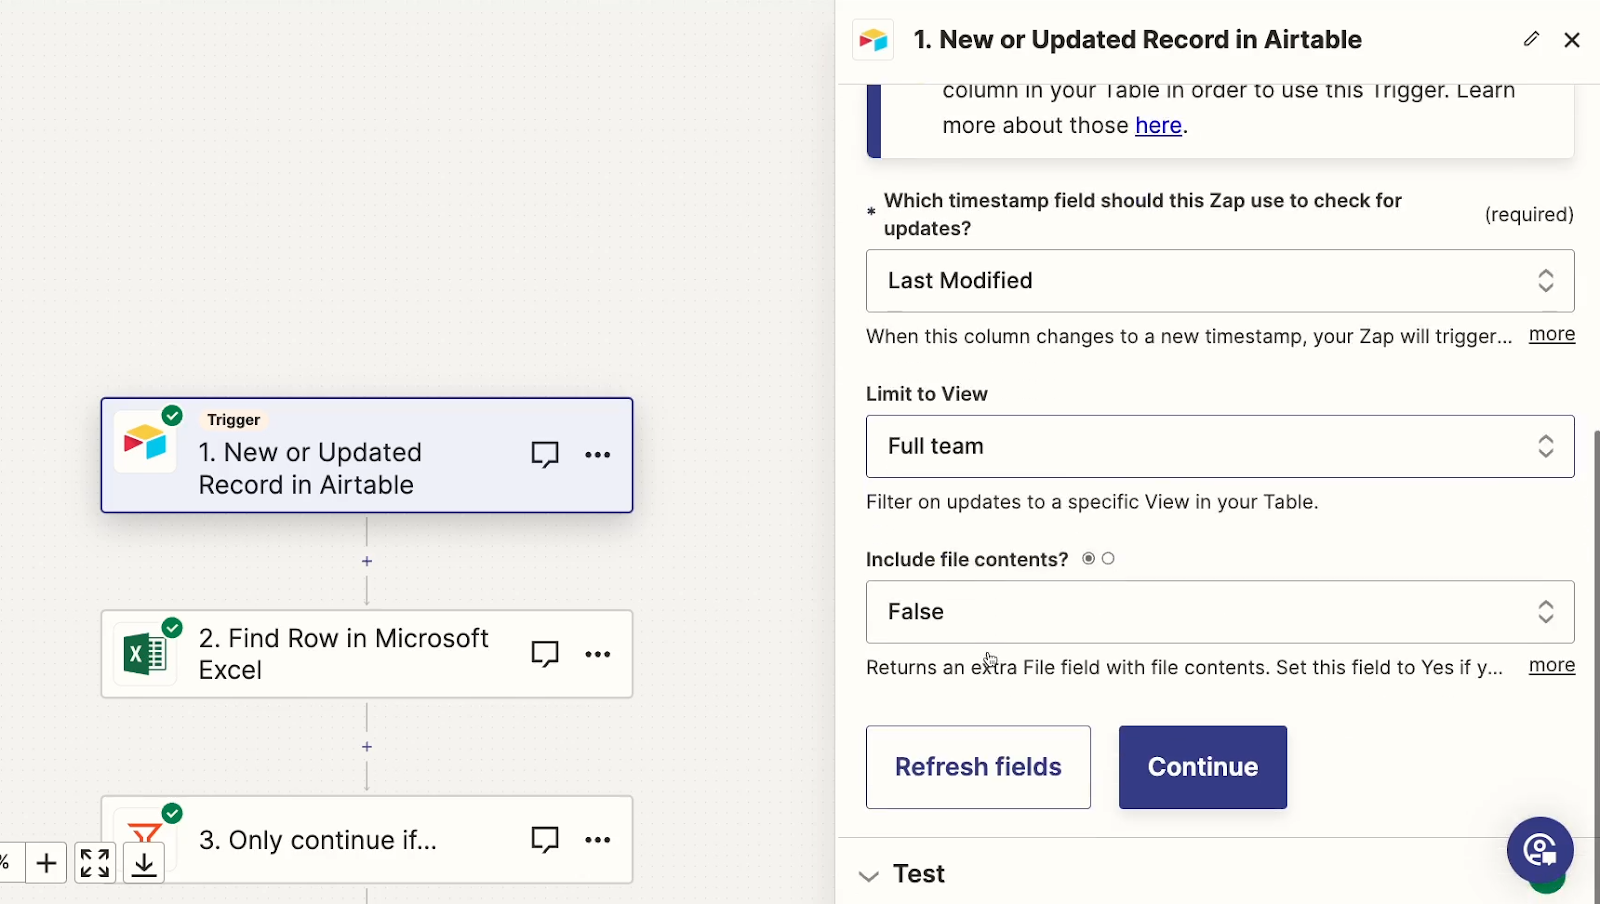
2. Add a search step to find the corresponding row in an Excel file that matches the Airtable record initiating the automation. You'll need to identify the exact Excel file and worksheet to use, as well as choose a column to search by.

To accurately find matching records in Excel, include the Record ID from Airtable as a column in Excel (i.e., create a formula field in Airtable with the RECORD_ID() function before exporting your initial CSV). We’d recommend using a fixed alphanumeric code like this for identification to maintain data accuracy, rather than using a name or title which may change.
3. In the same search step, configure the option to create a record in Excel if no match is found. Enable this setting and map each field from Airtable to the corresponding column in Excel.
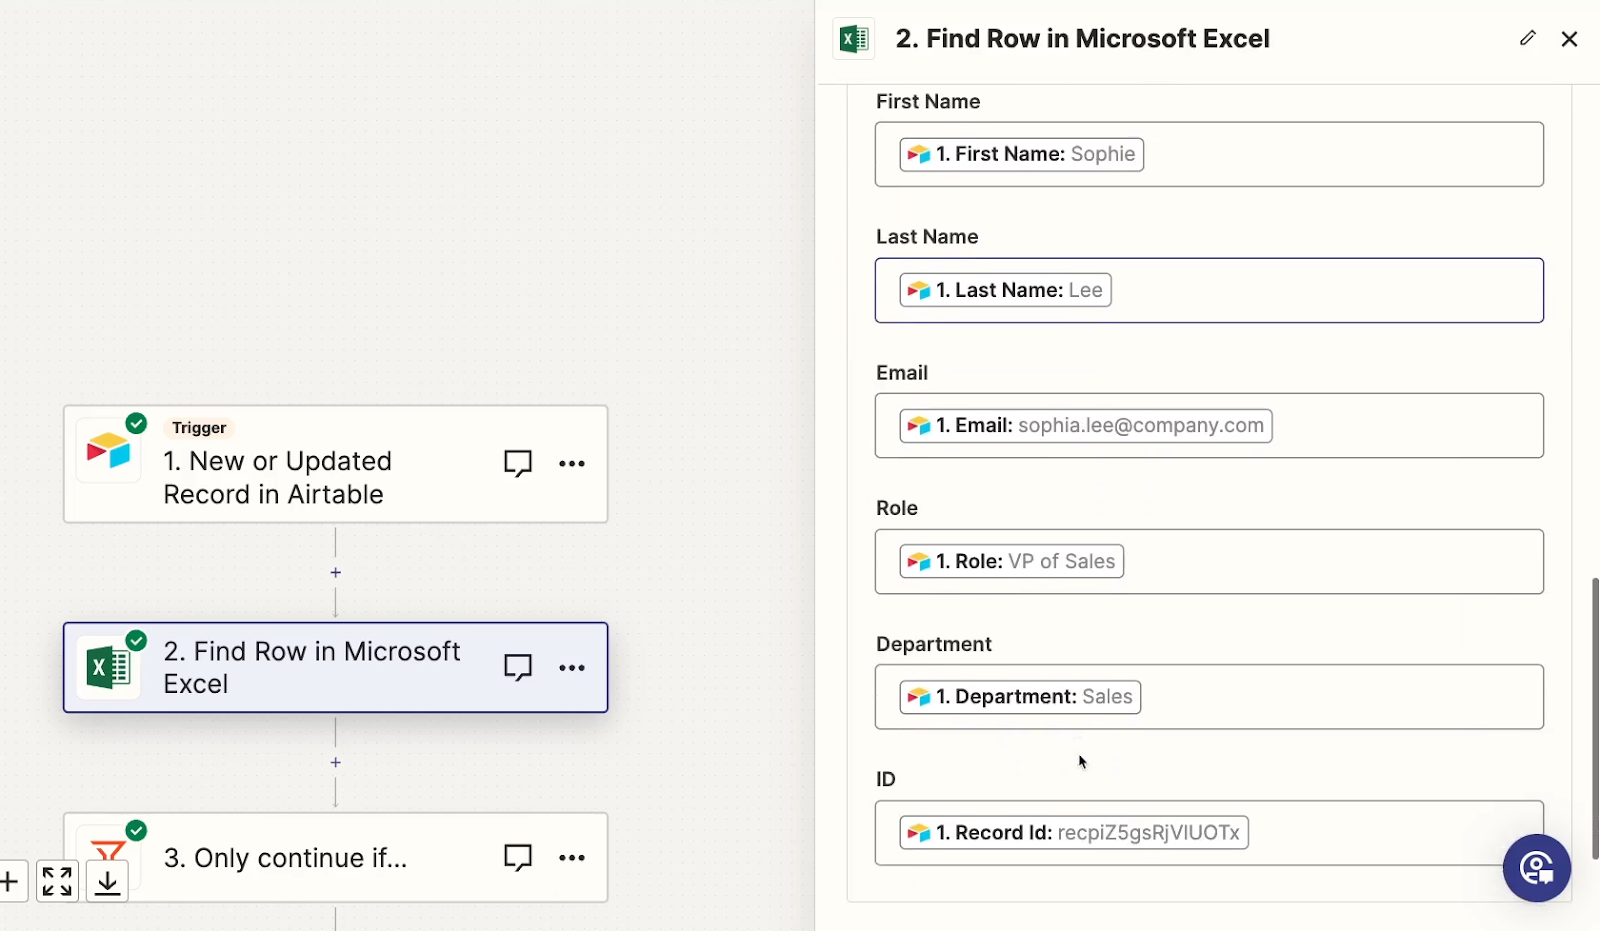
4. Add an optional filter. Consider adding an optional filter step to check whether the previous "Find" step located an existing record. The automation will only proceed to the final “update” step if a record was found.
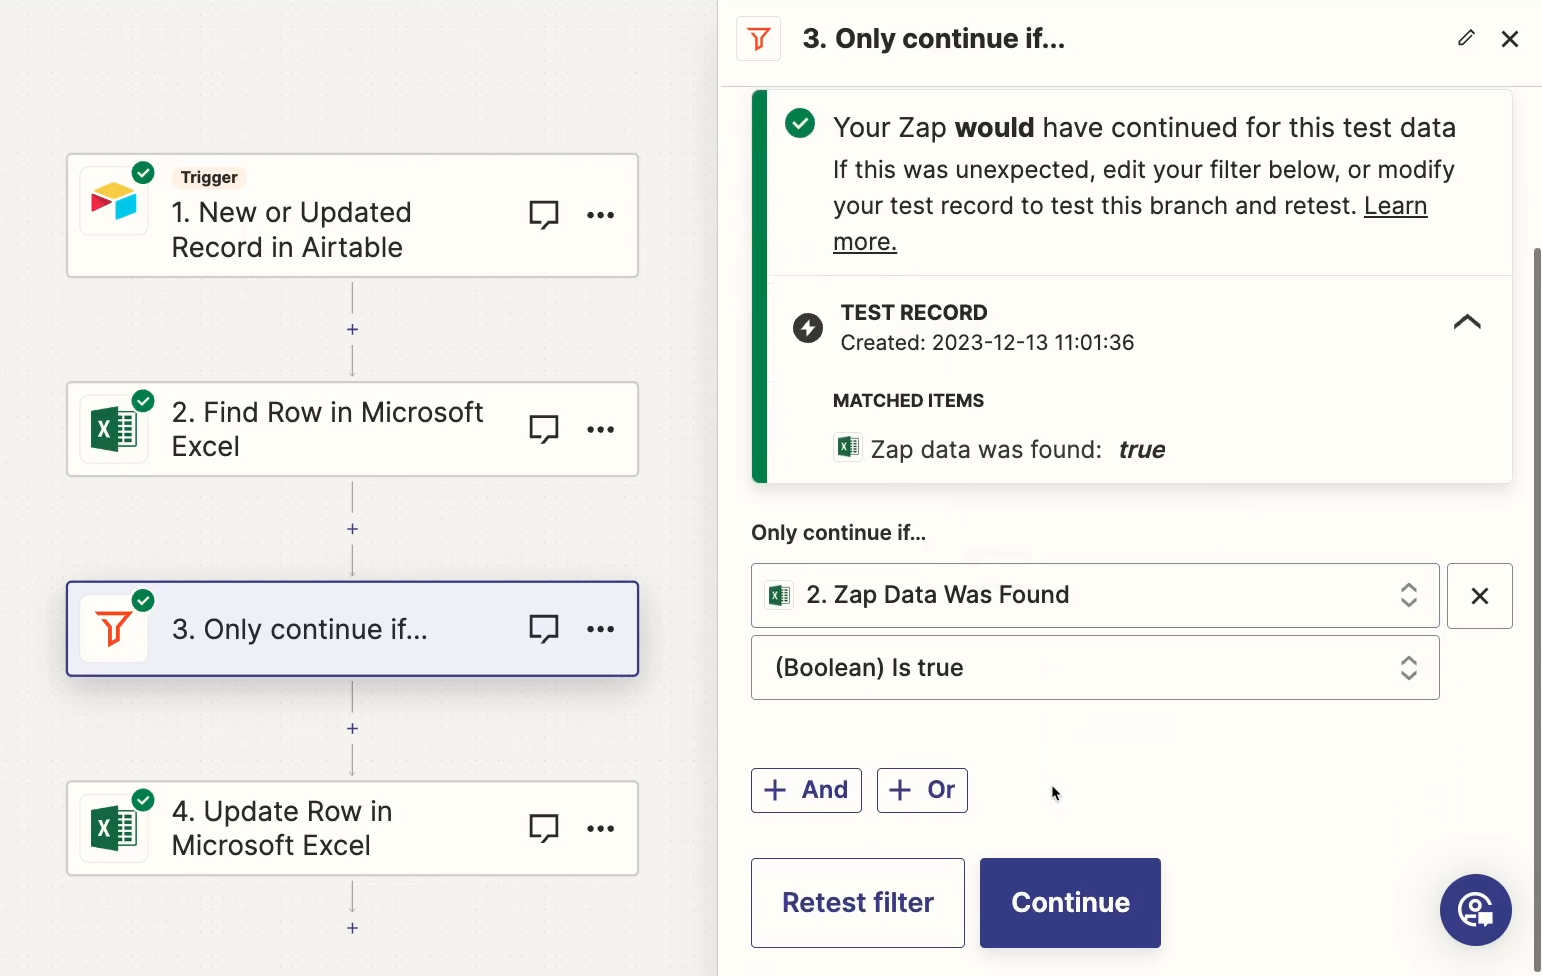
NOTE: using a filter step only counts as a task in Zapier if its condition is met. Therefore, when a record is updated in Airtable, this automation will consume three tasks, while creating a new record will consume only one task.
If you don’t include a filter, the automation will always use 2 tasks.
Decide whether to include the filter based on your expected frequency of creating new records versus updating existing ones, as this can impact your task usage and potentially affect your monthly Zapier billing.
5. Finally, include an “update” step to modify the contents of the row found in Excel. In this step, map every Airtable field to its corresponding Excel column, except for the “ID” field, which should remain unchanged. This ensures that any updated fields in Airtable are reflected in Excel, maintaining data consistency across both platforms.
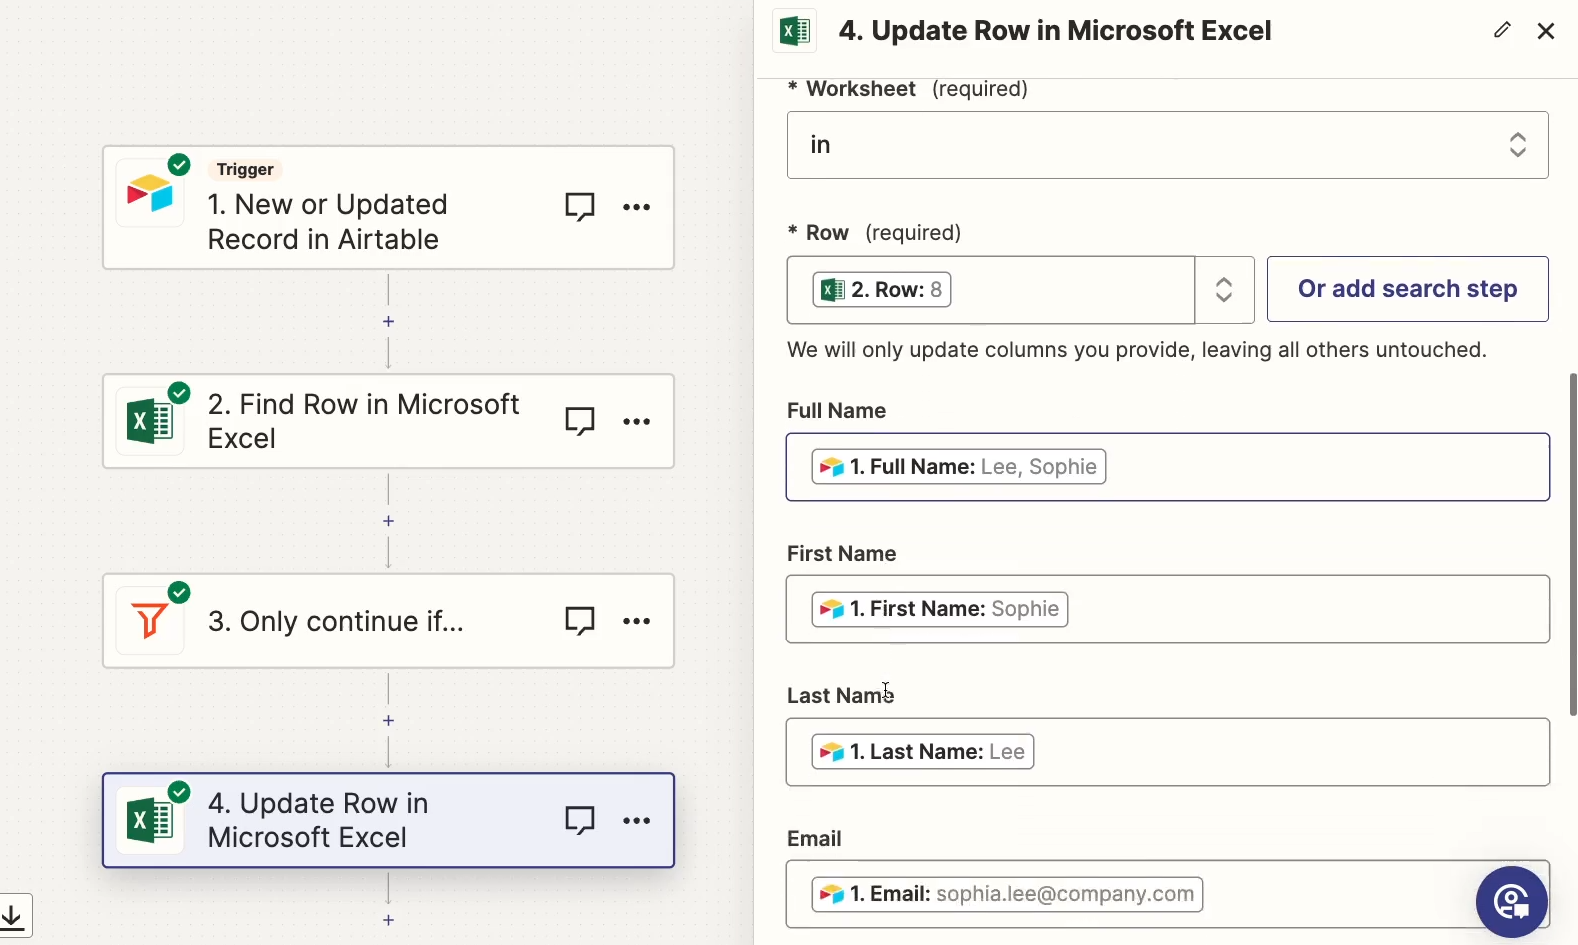
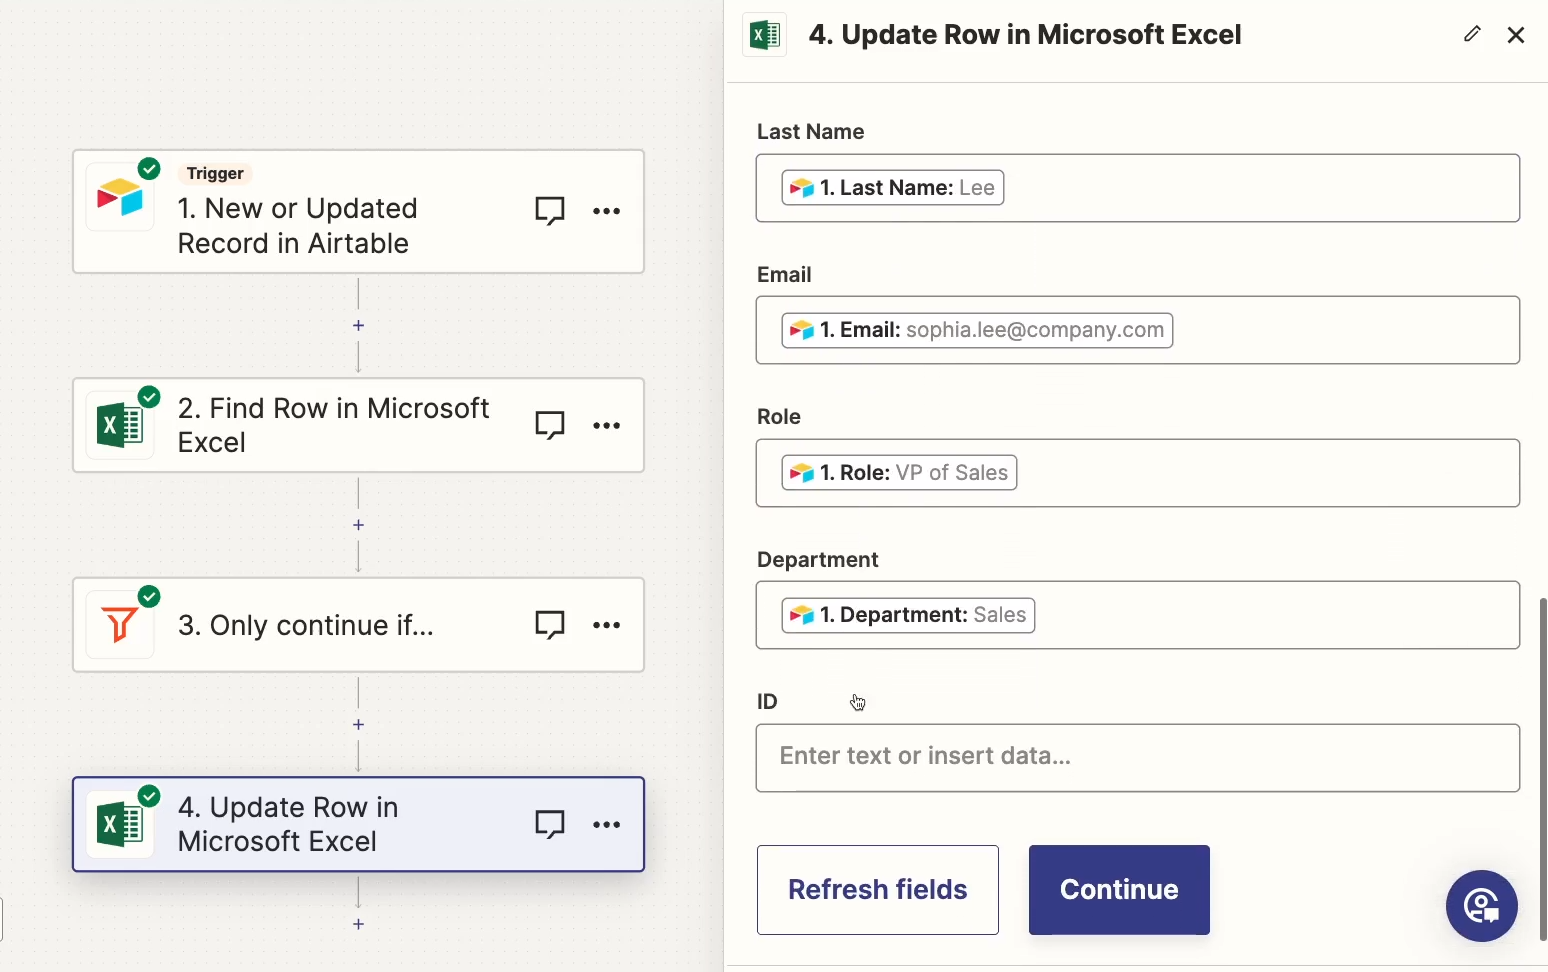
Testing your Zapier automation
Once your automation is all set up, give it a test to confirm that everything’s working correctly. Add a new record to your Airtable base, then edit a separate record.
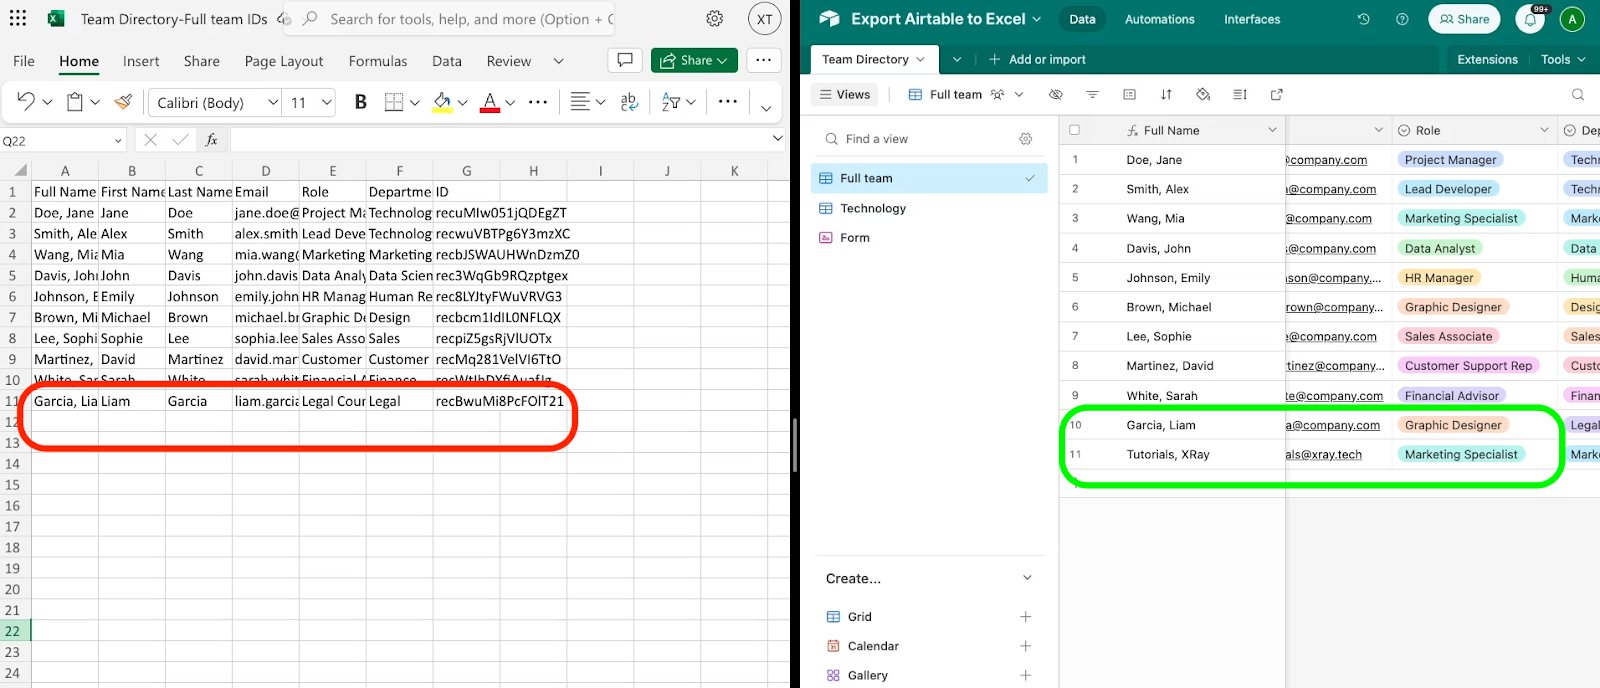
You may have to wait up to 15 minutes based on your Zapier subscription plan, but the changes should be reflected automatically in Excel.

Best suited to a 1-way sync
Setting up a 1-way sync like this only takes a few minutes in apps like Zapier or Make, and plans begin at around $20 a month for Zapier and $10 per month for Make.
You could also potentially create a 2-way sync by creating an additional automation that swaps the apps. However, you would also need to add filters or conditional paths to check the “last modified” time in each app in order to avoid a loop of infinite updates.
Your provider would stop your automation from running eventually if you made a mistake like that, but you could easily consume hundreds or thousands of tasks if you’re not careful, so I wouldn’t really recommend that approach.
Instead, if you need a 2-way sync, you should try a tool that’s designed for the job, like Unito.
Method 3: Create a 2-way sync between Airtable and Excel with Unito
Unito is an automation provider focused entirely on syncing databases between two apps. It supports software like Airtable and Excel, as well as Notion, Google Sheets, Asana, Hubspot, and dozens more.
You can explore this tutorial on XRay’s YouTube channel for more information about using Unito. While the tutorial uses Google Sheets, it’s very similar to syncing with a worksheet in Microsoft Excel.
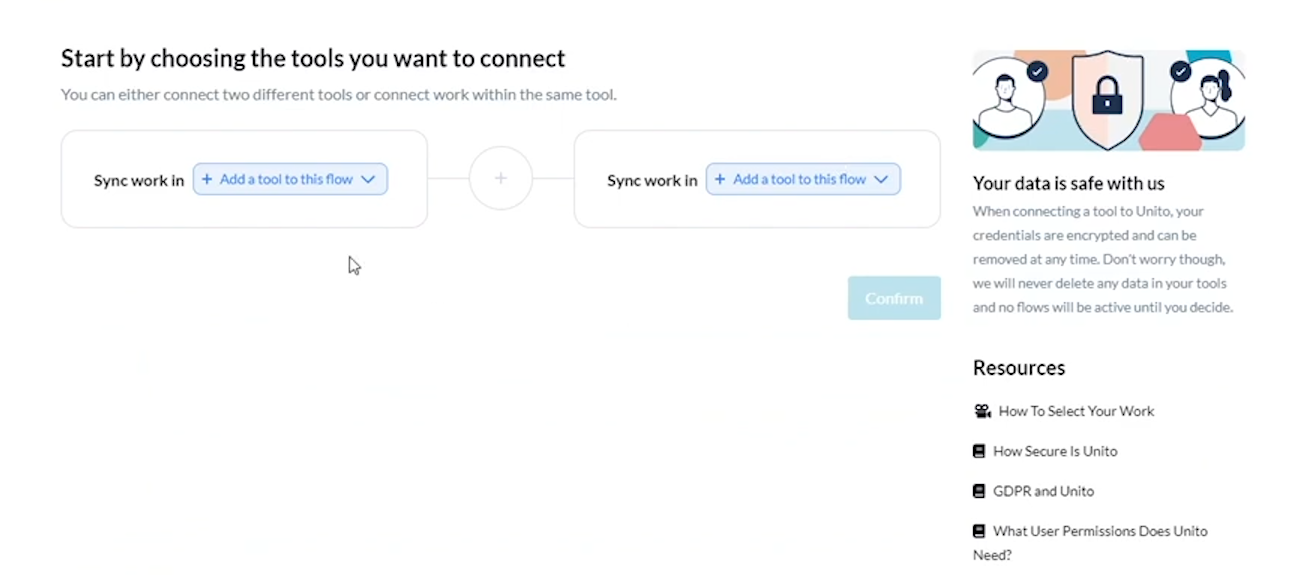
Unito will also walk you through each step. In essence, all you need to do is pick the apps and databases you want to sync, authorize by signing in with your accounts, and map the fields that you want to sync.

Then, once your sync is enabled, your data will update automatically in the background.
Just bear in mind that Unito will only work with Excel files stored in OneDrive. Locally saved files won’t be accessible to web apps like Unito.
Unito is a very simple and effective solution for creating a 2-way synchronization, but the convenience comes at a price. Unito’s plans begin at $100 per month, and there is no free plan available.
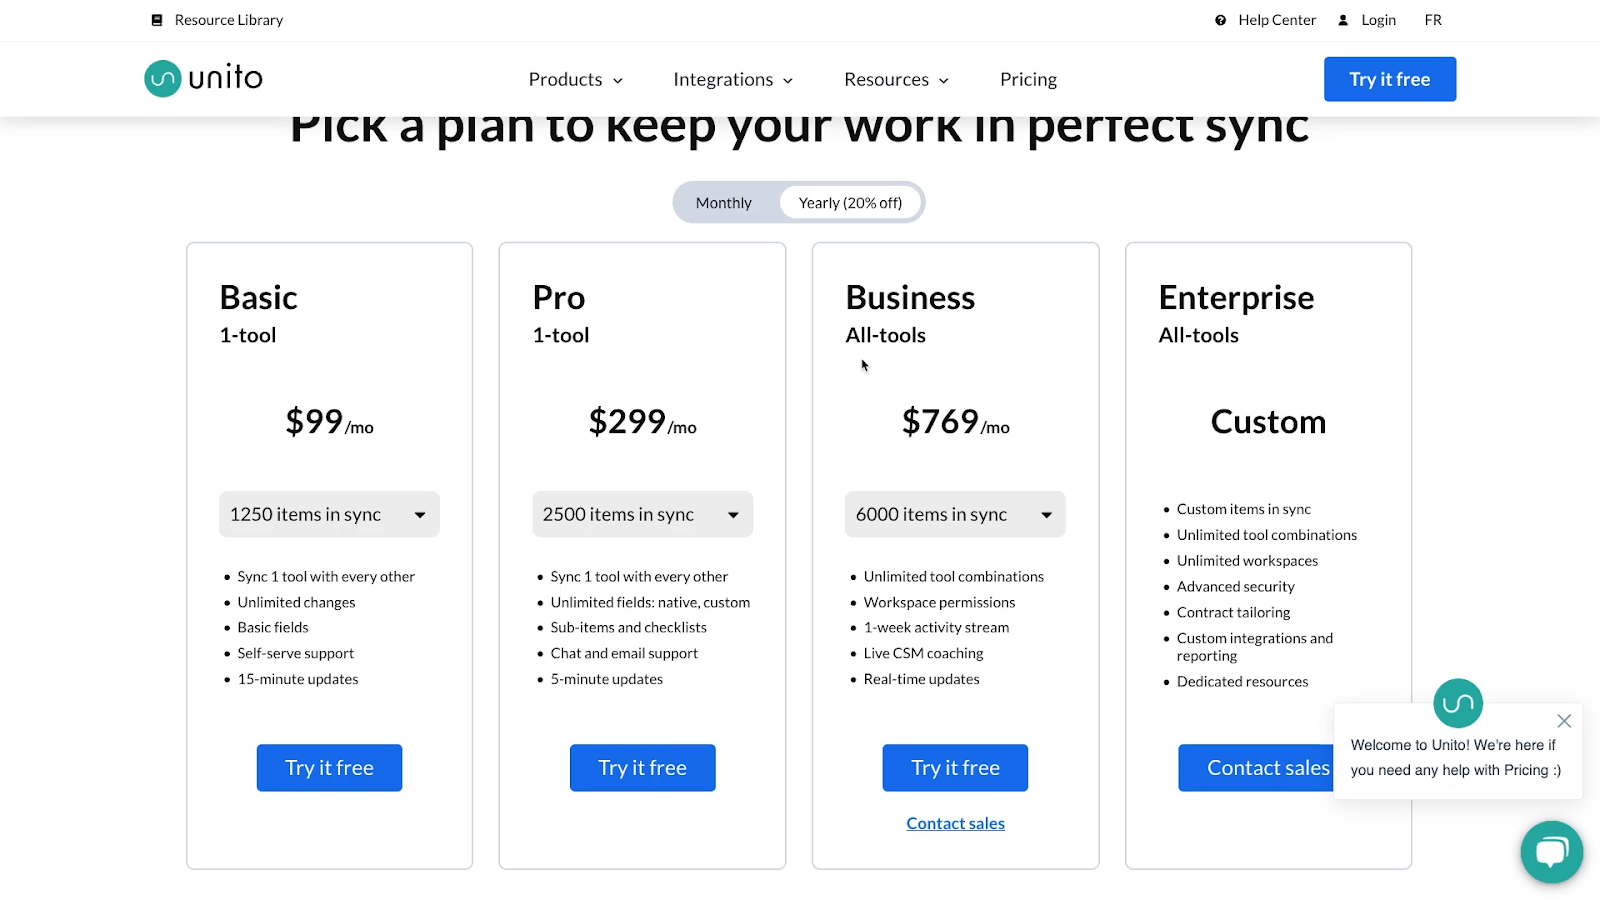
However, if you’re currently trying to keep two databases synced up manually, Unito could save you several hours each month, making it well worth the cost. Ultimately, it will be up to you and your circumstances.
Transfer or sync your Airtable data to Excel to get the best of both apps
For a quick one-time transfer of your Airtable data to Excel, you can just export a CSV of an Airtable view. To set up a one-way sync, any popular automation provider like Zapier or Make will get the job done. And if you want to create a permanent two-way sync between the apps, try out Unito to get things set up fast.
If you’d like to learn more about connecting your tools to streamline your work, be sure to check out our blog or our YouTube channel. You can also follow XRay on Twitter, Facebook, or LinkedIn.

With the rapid emergence of so many advanced AI tools, Artificial Intelligence has become an inescapable topic in the business world.
But even with AI’s current ubiquity and accessibility, it’s not always clear how your business can actually start leveraging this technology in a practical way.
That’s why in this post, we’re going to quickly show you five different ways any company can begin using AI right now.
We’ll be covering a wide range of tools, from the extremely popular ChatGPT to newer and lesser known options you won’t want to miss, so stick around to the end.
Most of these tools offer free trials or affordable plans, so no matter what your budget is, there’s something for you in this list.
Let’s get started!
Ask a Chatbot for help on any task
AI chatbots are great for quickly performing a wide range of tasks. They’re the perfect resource when you need to get familiar with an unfamiliar subject, draft or revise some text, or even analyze the strengths and weaknesses of a new idea.
You could even ask the chatbot to assume the identity of your ideal customer and explain how your product or service could be improved.
Not only do you typically get reliable answers, but it’s also much quicker than wasting a busy colleague’s time with the same request. If you have any idea you want to explore, or any challenge you’re stuck on, just turn to a friendly chatbot to jumpstart your creativity.
AI Chatbots you can use right now
There are several options out there for general purpose AI chatbots. Here are three of the easiest and most effective chatbots that you can try today.
ChatGPT by OpenAI
Of course, there’s always ChatGPT. You’ve certainly heard of it by now, and you’ve probably tried it out firsthand to see how shockingly effective it is at holding conversation, brainstorming, writing code, and even generating images.

Claude by Anthropic
Claude, by Anthropic, offers a very similar experience to ChatGPT, but its free versions are generally considered to be technically superior to ChatGPT’s free version, GPT3.5.
However, the premium GPT4 still edges out Claude’s own paid option when looking at technical benchmarks.

Microsoft Copilot
Alternatively, if you’d like to integrate your AI chat right into your searches, then Microsoft's Copilot will be an ideal choice for you.

Copilot can help you get answers on the web much faster by synthesizing several pages of results into a single, concise response.
However, it’s only available in two browsers: Google Chrome and Microsoft Edge.
AI Chatbot pricing
All of these AI tools offer free plans, but you can also get premium subscriptions to Claude or ChatGPT for $20/mo if you want to unlock premium features and guarantee access even when the app is busy.
Whichever Chatbot you choose, using it will be very easy. Just ask any question that’s on your mind, and get an instant response.
You’d be surprised at how much they can help you to clear writer’s block, get quick answers, and solve technical problems.
Set up an automated prompt
If you find yourself asking an AI for the same task or the same document repeatedly, then you may want to set up an automation to run the prompt for you with the click of a button.
For instance, you might want to set up an automation that uses AI to generate social media posts from a blog title and introduction paragraph.
Alternatively, you could configure an AI automation that extracts key data points you need from a long meeting transcript or recording.
How automated AI prompts work
There are a few different tools and methods you can use to automate your AI prompts, but they all boil down to the same idea.
Instead of entering a prompt into a chatbot conversation window, you’ll preconfigure a prompt that can be filled in with a few variables and sent to OpenAI’s API.
Automate AI prompts with Airtable
One of the easiest ways to automate AI prompts is by using Airtable.
If you have an enterprise plan, you’ll gain access to the AI Assist field type, which will let you create a prompt by combining the contents of various fields in your table.
Then, you’ll get the response in a separate field of the same table.

You can check out our tutorial here for information about using Airtable’s AI assist field.
Automate an AI prompt with Zapier or Make
If you don’t already have an Enterprise account for Airtable, then it will be much cheaper to set up the automations with tools like Zapier and Make instead.

Zapier and Make are no-code automation tools that let you automate thousands of actions in popular web apps, including sending prompts to OpenAI.

They both have free plans, as well as affordable paid options that begin at around $10/mo for Make or $20/mo for Zapier.
To get started, check out our tutorial for automating OpenAI prompts with Zapier, or our similar tutorial about Make.

Creating an automated prompt involves a bit more work than just using a Chatbot, but it’s a great way to make your most common AI tasks more consistent and reliable. With automated prompts, you can elevate AI from an ad-hoc improvised solution into a fully integrated part of your workflows.
Create custom, royalty-free graphics with AI
AI Language models like ChatGPT often get the most attention due to their easy accessibility, but AI is not just limited to creating text.
With models like Dall-E and tools like Midjourney, you can use AI to create detailed graphics in any style with a simple prompt.

AI image generation can be a quick and cheap way to obtain a custom illustration, icon, or other graphic when your project simply doesn’t have the budget for a human artist or illustrator.

When to use AI-generated images
Note: the following is NOT legal advice. Consult with your own legal team before using AI images in your project.
Although the legal details of AI are still being worked out, currently, any graphics generated by AI are not protected by copyright, and you won’t have to pay any royalties to use the images commercially.
However, this also means that anyone else can theoretically reuse those images as well, so we wouldn’t recommend using AI to generate key aspects of your brand, like your logo or a mascot.
AI image generation is better suited to creating one-off graphics for specific pages on your site, for a newsletter, or for a blog.
Getting started with AI images
To begin making graphics with AI, you can just go to Midjourney.com and sign up for the beta. You’ll get a free trial that includes about 25 prompts to get started. After that, paid plains begin at $10/mo.
Alternatively, ChatGPT plus includes Dall-E image generation with its $20/mo subscription fee.
With both apps, you’ll find that sending image prompts can be a little more complicated than going back and forth with text alone. However, after you get the hang of it, you’ll be designing awesome graphics in no time.
Use new AI features in your current software
Everything we’ve highlighted so far has been a standalone tool, but many apps are actually integrating AI directly into their existing software.
Many of the tools you likely use every day are creating fantastic ways to streamline and enhance your daily work with AI. As just a few examples, you can see new AI features in Notion, Arc Browser, and Zoom.
Use Notion AI to quickly transform and generate text
In Notion, there’s a new AI assistant integrated seamlessly into your pages and content.
You can see more detail in our Notion AI tutorial, but in essence, Notion AI lets you simply highlight text to send a related AI prompt, or open up a familiar chat window to submit your request.

All of the AI answers are output directly onto your current Notion page, and they include all of Notion’s native styling options.

Notion AI costs $10 per user per month on top of your existing Notion plan.
Get AI answers about any web page with Arc
In the web browser Arc, you can now use an AI-assisted “find” function powered by Anthropic.
Just type cmd + F and ask the AI anything you’d like about the current page you’re visiting.

It will then give you an answer based on the page’s contents, making it faster than ever to get the information you’re looking for.
Arc and its AI functions are free to use, but it’s currently only available on Mac and iOS devices.
Summarize and enhance your meetings with the Zoom AI Companion
Zoom’s new features use AI to summarize meetings, add chapters to meeting recordings, give feedback on your presentation skills, and more.
The Zoom AI companion is included with any of Zoom’s paid plans, which start at $16 per user per month.

This quick list is just scratching the surface. Hundreds of tools are building native AI features right now.
Check to see if the apps you’re using every day have added new AI functions. These features will help you get your work done faster and more effectively with barely any learning curve at all, since they’re built right into the apps you already rely on.
Create a custom AI chatbot for your company
Finally, the last recommendation that we wanted to discuss today is to create a custom chatbot for your company.
These chatbots will train an AI on any unique data that you have about your business. This could be your website, blogs, case studies, videos, or any other material you have on hand.
In addition to uploading data en masse, you can also provide a specific directive to further refine the chatbot’s behavior and tone.
You could create a chatbot that responds to general inquiries, or make one that serves a more specific purpose like helping a new team member navigate your employee handbook.
AI chatbots are a rapidly growing service, with many companies emerging over the last year that specialize in producing them.
Build a chatbot trained on your company’s data with Chatbase
For instance, there’s Chatbase. Built on OpenAI, Chatbase integrates neatly into any website with a simple embed code snippet, making it easy to answer any questions a prospective customer might have.

Create chatbots, automation and more with Stack AI or Respell
If you’re looking to go beyond just creating a bot that answers questions from clients and leads, you may want to consider a platform like Stack AI or Respell.

While they both allow you to create a Chatbot, each platform also promises wide-ranging support for workflow automation with AI tools.
Build an internal chatbot with a custom GPT
And as always, you can also turn to the reigning king of AI, ChatGPT.
In a recent update, OpenAI added the ability to customize ChatGPT’s behavior with a user’s own data and instructions, creating custom GPTs for nearly any purpose.

However, for the time being, there’s no easy way to embed a Custom GPT into your own website. If you want to create a seamless experience for your users, the other software we’ve mentioned will likely be a better choice.
But if your use-cases are primarily internal, a custom GPT is a reliable option
Creating a custom chatbot will generally be a bit more difficult and pricey than the other strategies we’ve discussed, with many of these apps starting at around $100/mo or more for a team plan.
However, getting a good chatbot up and running can save you countless hours on fielding basic inquiries, and can provide your users with more consistent answers. If you want to get your customer interactions down to a science, an AI chatbot is the way to go.
Get ahead of the crowd with AI
Integrating AI into your company is not just about adopting the latest trend in tech. It's about reshaping how you work, enhancing your team’s creativity, and making all your operations more efficient.
As AI continues to evolve, its potential applications in the business world are practically limitless. Use the techniques we’ve covered in this article to start embracing AI today and stay ahead of the curve and your competition.
If you’d like to learn more about optimizing your workflows with AI and automation, be sure to check out our blog or our YouTube channel. You can also follow XRay on Twitter, Facebook, or LinkedIn.
For no-code builders, nothing was more annoying than getting a Zap set up only to realize that Zapier didn’t actually support the actions that you want to automate.
Of course, you could always create a custom action with an API call, but that could be pretty tricky if you didn’t know how to code.
Thankfully, Zapier has now added a new beta feature to create custom actions with a simple AI prompt.
In this post, we’re going to show you how to use App Extensions to build almost any action that you want in Zapier – no code required.
We’ll explain how App Extensions work, and we’ll show you how to create and use extensions step by step.
We’ll focus on using AI prompts to build an extension in this guide, so no coding knowledge is required. However, a little familiarity with web development and APIs may make things a bit easier.
Let’s get started!
What is an App Extension in Zapier?
First, let’s start with the basics: what is an app extension?
An app extension is a way to add a custom action to an existing Zapier integration. It’s useful when Zapier doesn’t have native support for what you want to automate.
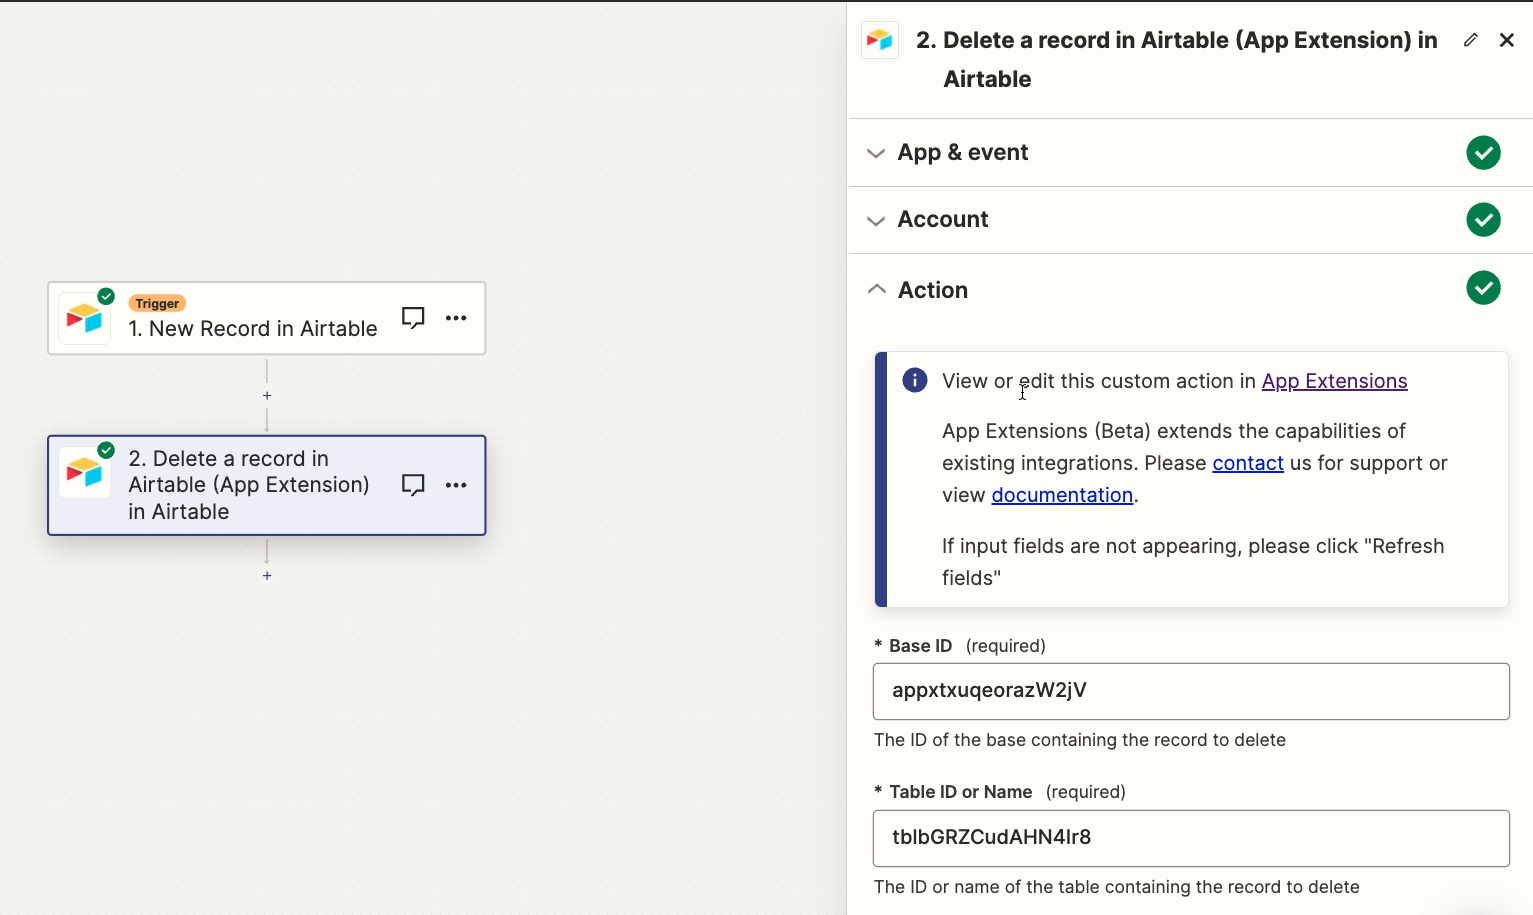
To easily see what Zapier or other automation providers natively support, you can just do a quick search for the apps you want to automate on XRay.Tools. If you don’t see your desired action in the list, then it’s not supported.
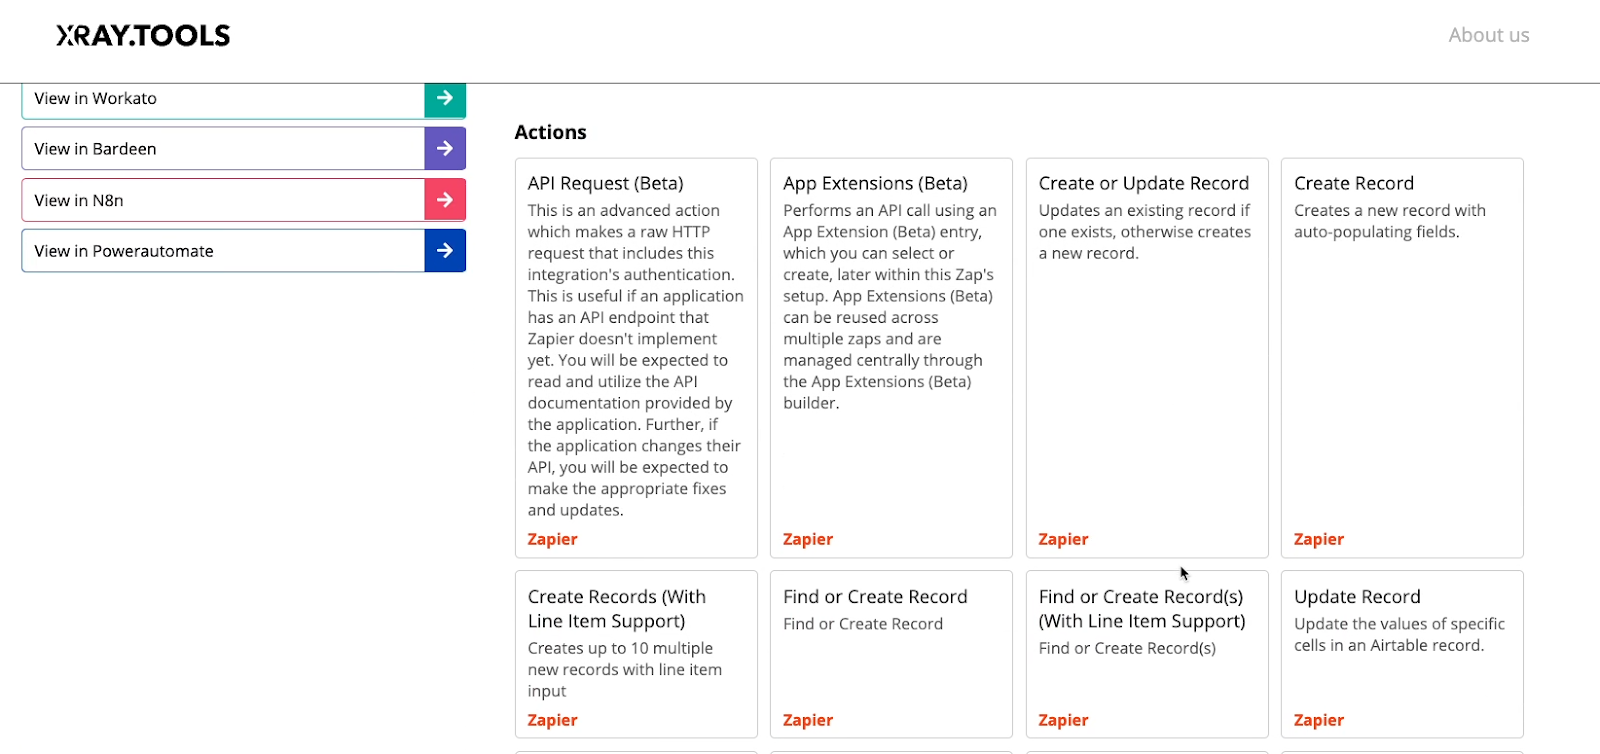
For instance, Zapier never supports automatically deleting objects in your software, so if you’d like to add a “Delete” step to an automation, you’ll need to use an app extension.
You can use extensions to automate any action that’s supported by the relevant application’s API. You can check your app’s API docs to see what is and isn’t supported if you’re not sure.
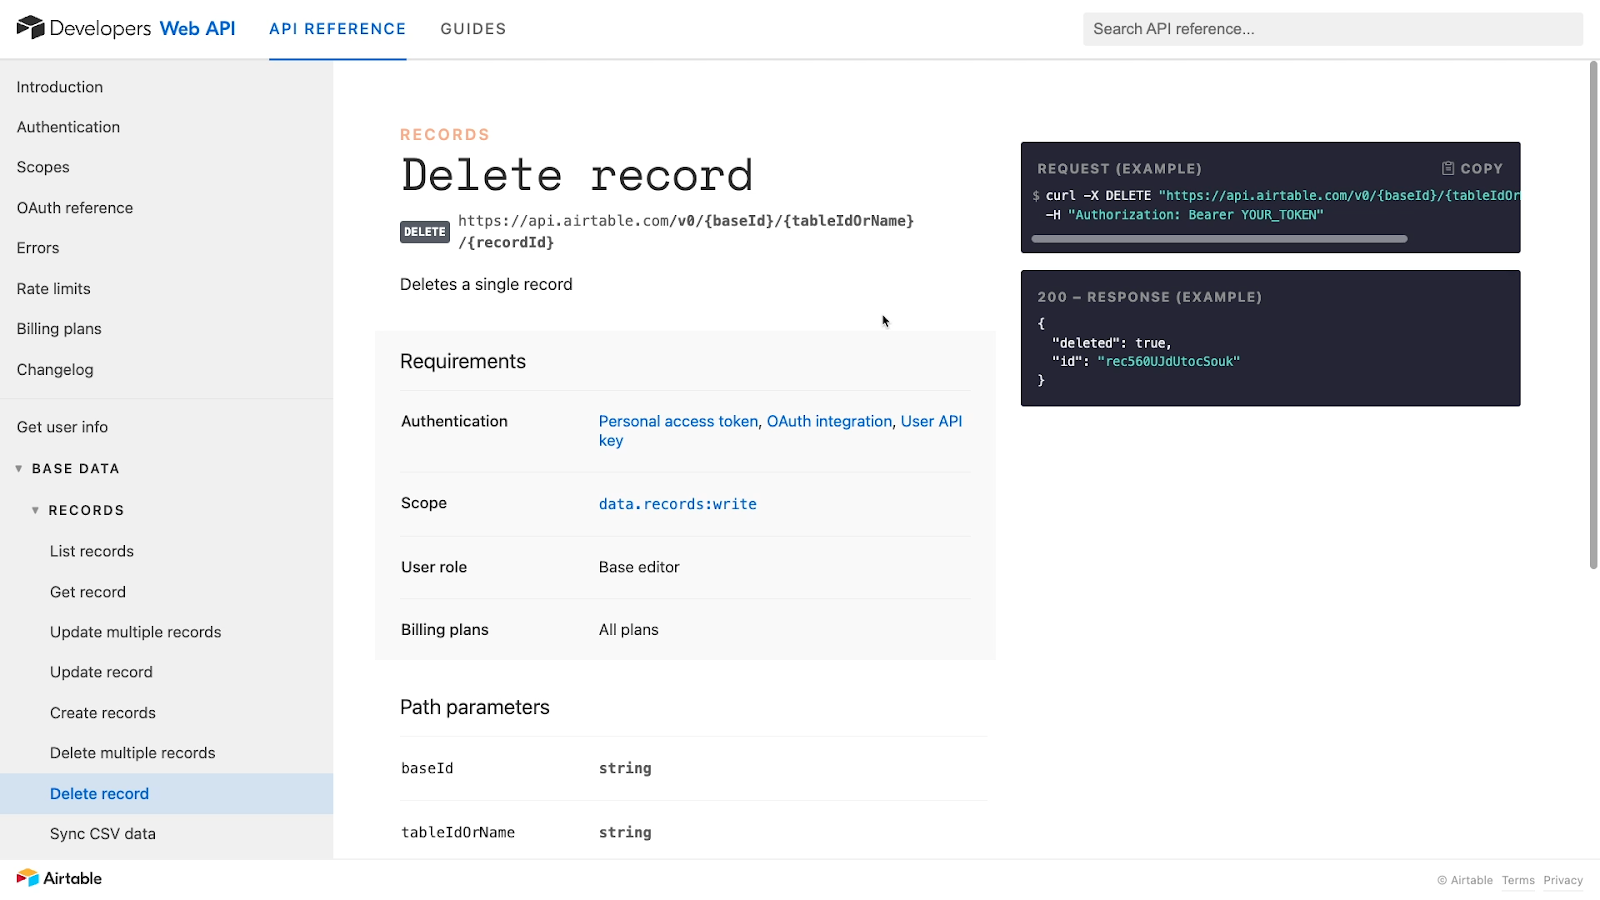
If you’d like to learn more about APIs and low-code building in general, you can explore some of the articles listed here:
• Why you can automate nearly any web app
• How to write API calls in Zapier
• Understanding API price hikes
Using App Extensions in your automations
A finished app extension will closely resemble a normal action in Zapier
Once it’s built, you’ll be able to select it from the appropriate app’s “event” list, fill in its required inputs, and use it like any other action.
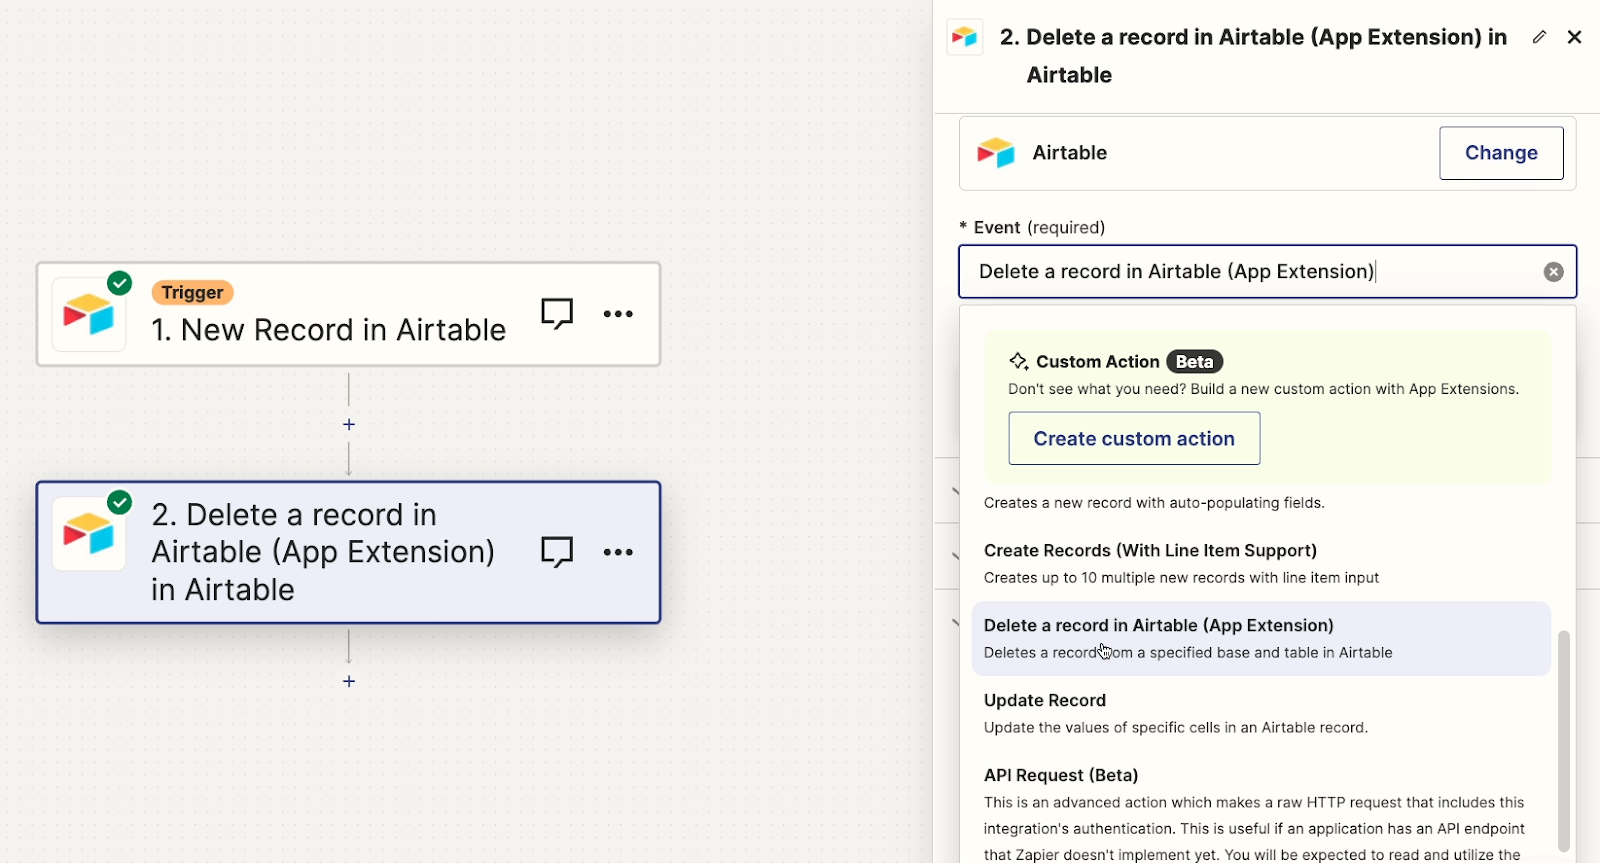
Just note that you’re not currently able to create custom triggers, just actions. Additionally, Extensions are a beta feature, so they’re still evolving as users try them out.
Quickly build an App Extension with AI
Some simple actions will only require filling in a URL and identifying a few key variables, while some more complex actions will require some scripting.
However, any action can be built manually, or created with a quick AI prompt.
Even if you’ve never so much as written an API call before, you can start adding custom actions to your Zaps.
Automatically deleting old records in Airtable: our example automation
For this tutorial, we’re going to use our Zapier extension to automatically delete records from Airtable.
Below, you can see a possible trigger for this automation. It runs whenever a record enters the “Archived - Ready to Delete” view in a “Tasks” table.
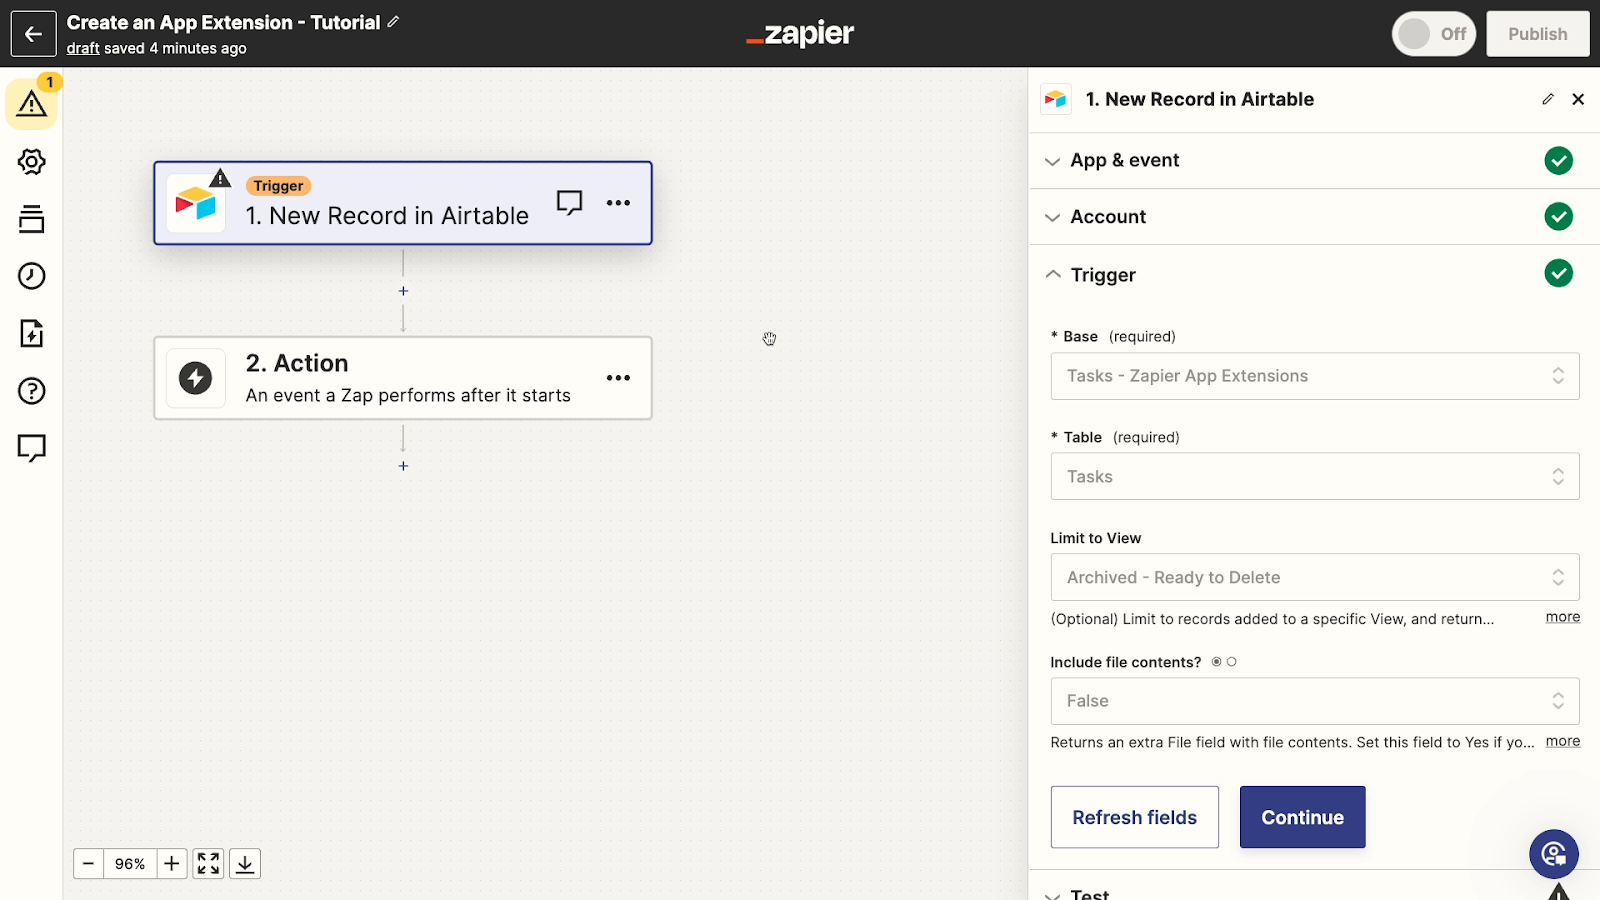
In the Tasks table, records enter the “Ready to Delete” view when they match the following conditions:
• The status must be “archived”
• The created date must be more than 1 year ago

As you can see below, there are a few records in the Tasks table that match those conditions.
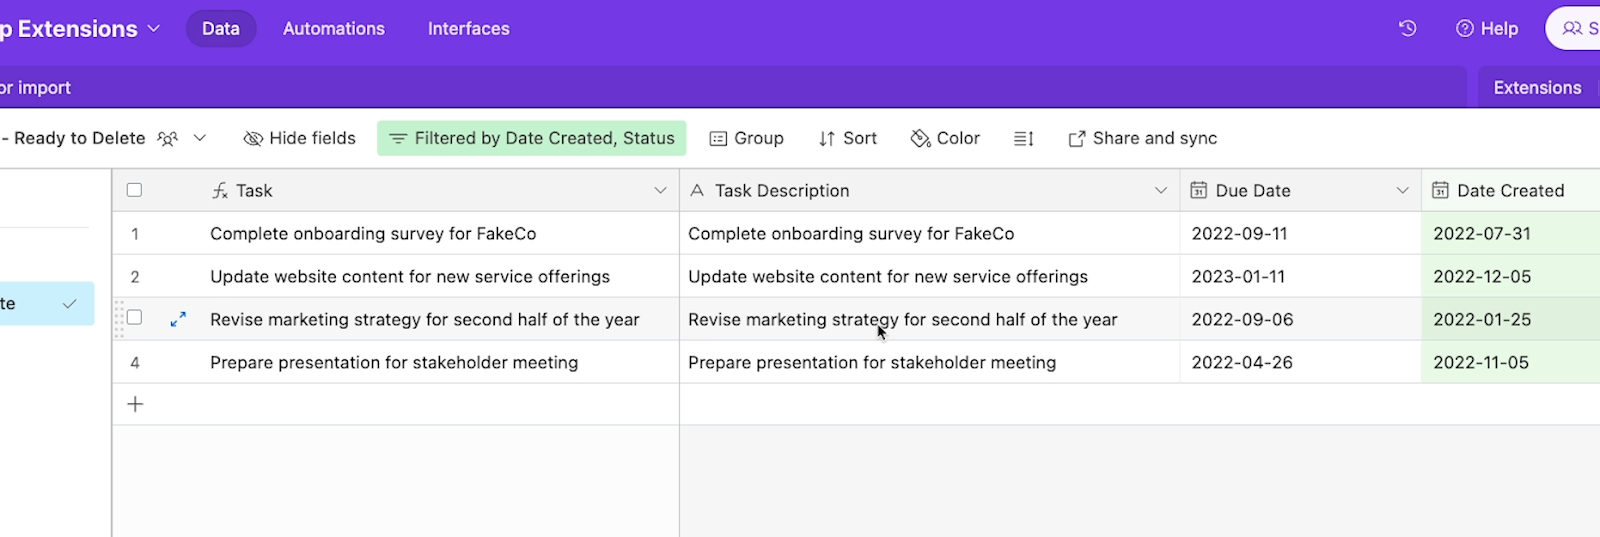
WARNING: Be careful when deleting data automatically
Before we continue and demonstrate how to create a custom App Extension, we want to give you a quick warning first.
Always be careful when using automations to delete data.
Deletion will usually be permanent, even when conducted through tests.
Before proceeding with any automation that’s designed to delete data, back up any relevant data. To quickly back up almost any database, you can always just export a CSV.
Additionally, while building the automation, make sure you choose the right app, database, table, profile, and other information while configuring actions.
How to create an App Extension in Zapier
With your data backed up, let’s dive into creating a Zapier Extension with AI.
To create an extension, begin by opening up a Zap. Currently, you can’t create extensions for triggers. They only work for actions and searches. Hopefully, Zapier will update this feature soon to include triggers.
For now, you’ll need to create a trigger manually as you normally would in Zapier. For our example, we’ve already created an Airtable trigger, as we covered earlier.
Give your trigger a test to pull in some data. After testing our trigger, we can see an old record that’s ready to be deleted.
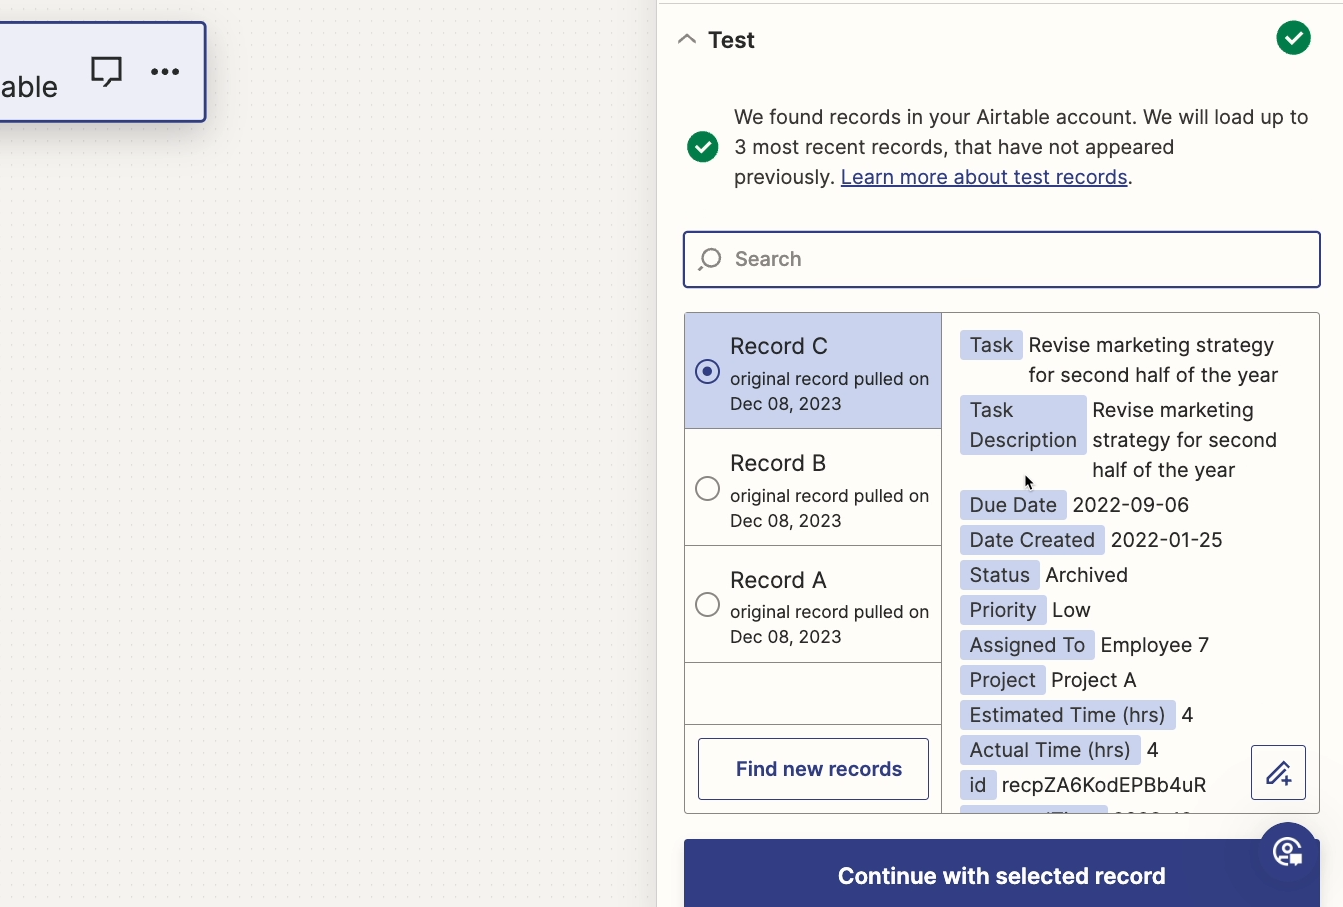
Next, add an action and pick the app that you want to use. For our example, we’ll use Airtable, since we want to delete a record from an Airtable base.
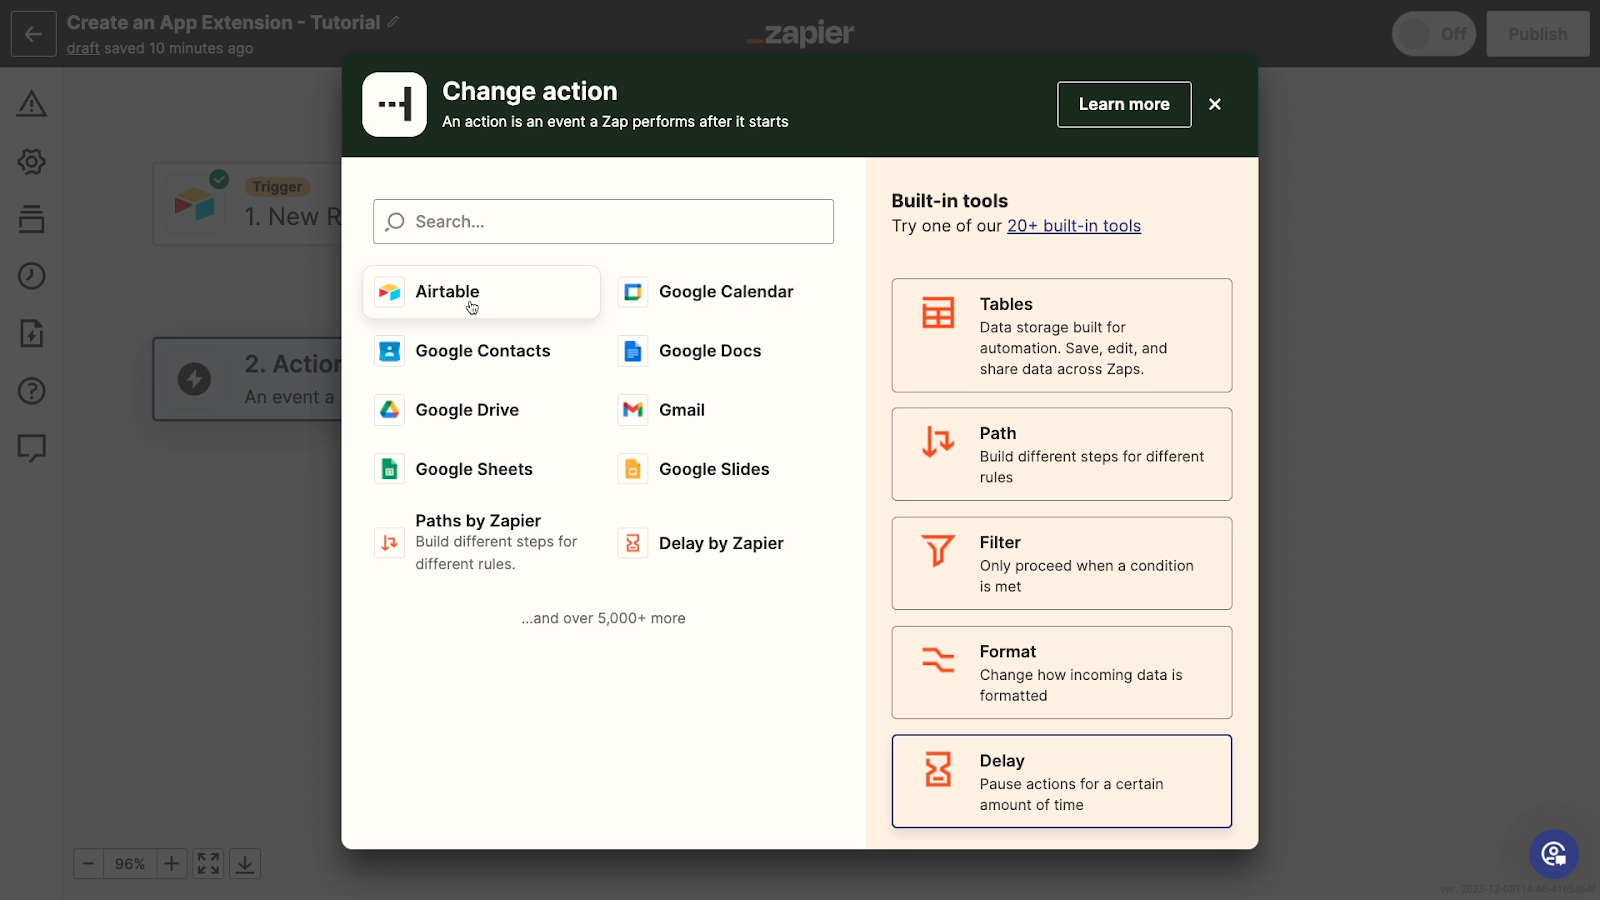
Then, click on the ‘Event’ dropdown. At the top of the menu, you should see an option that says “Custom Action (Beta)”

Click on “Create Custom Action” to open up the Zapier extensions page.
Start creating an App Extension with an AI prompt
At the top of the page, you’ll see a large section where you can enter an AI prompt.
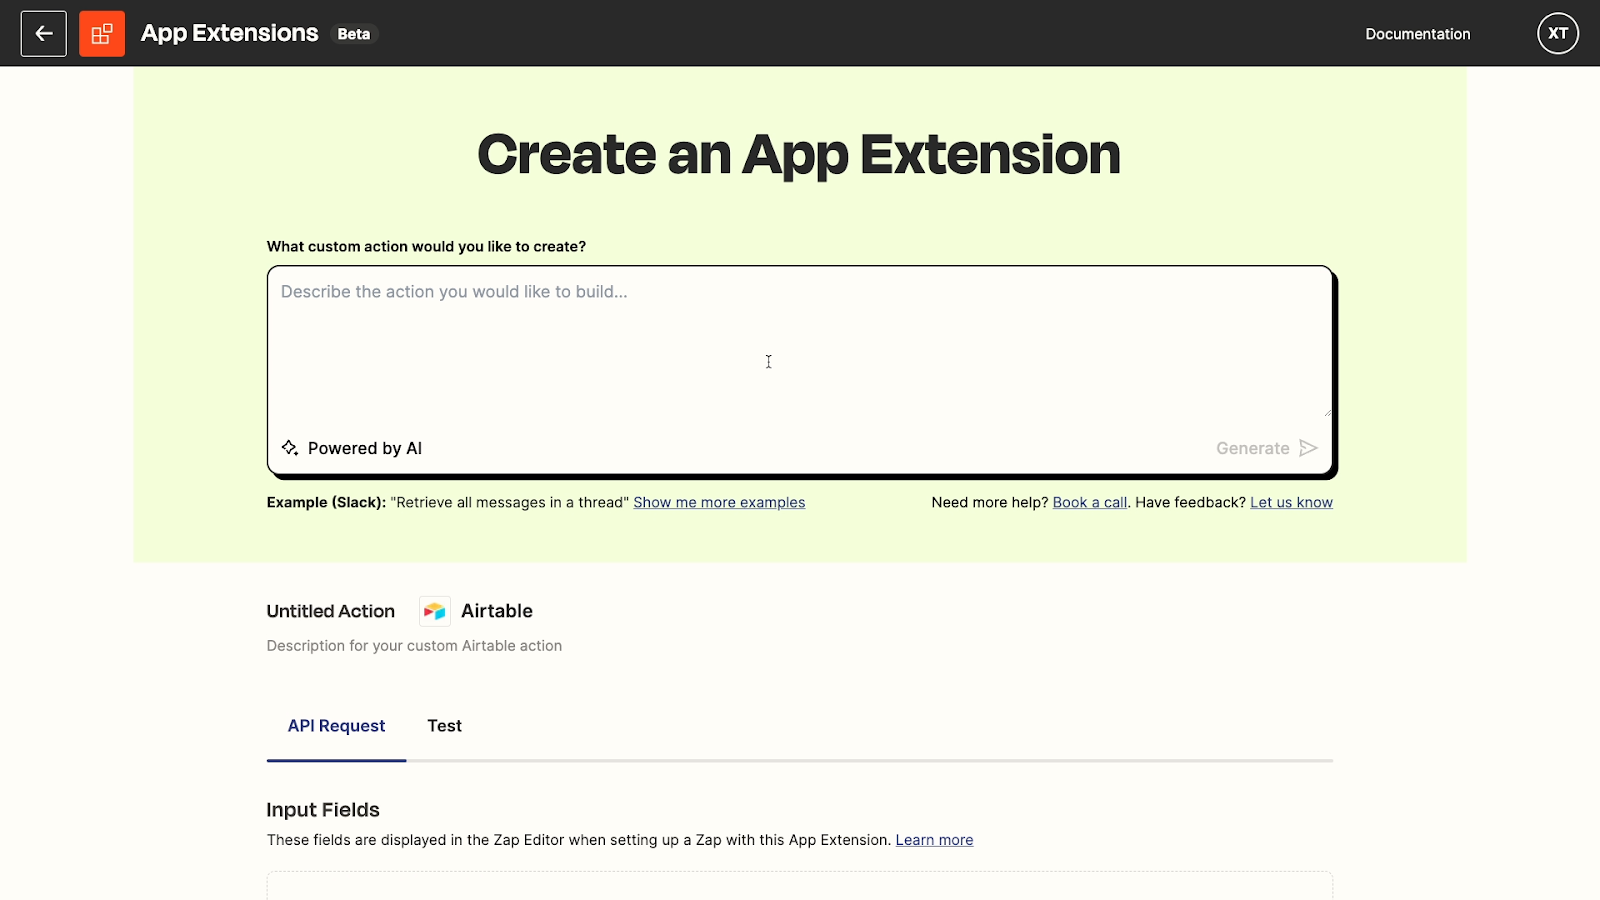
If you scroll down the page, you’ll see fields and menus which will let you build the extension manually.
But as we noted earlier, we’ll focus on building with AI for this tutorial. After you enter an AI prompt, all these sections will be filled in for you.
Go back to the AI prompt section at the top of the page, and enter a prompt describing what you want to build.
Be direct, and be as specific as possible. In our case, our prompt is going to be very simple: “Delete a record in Airtable”.
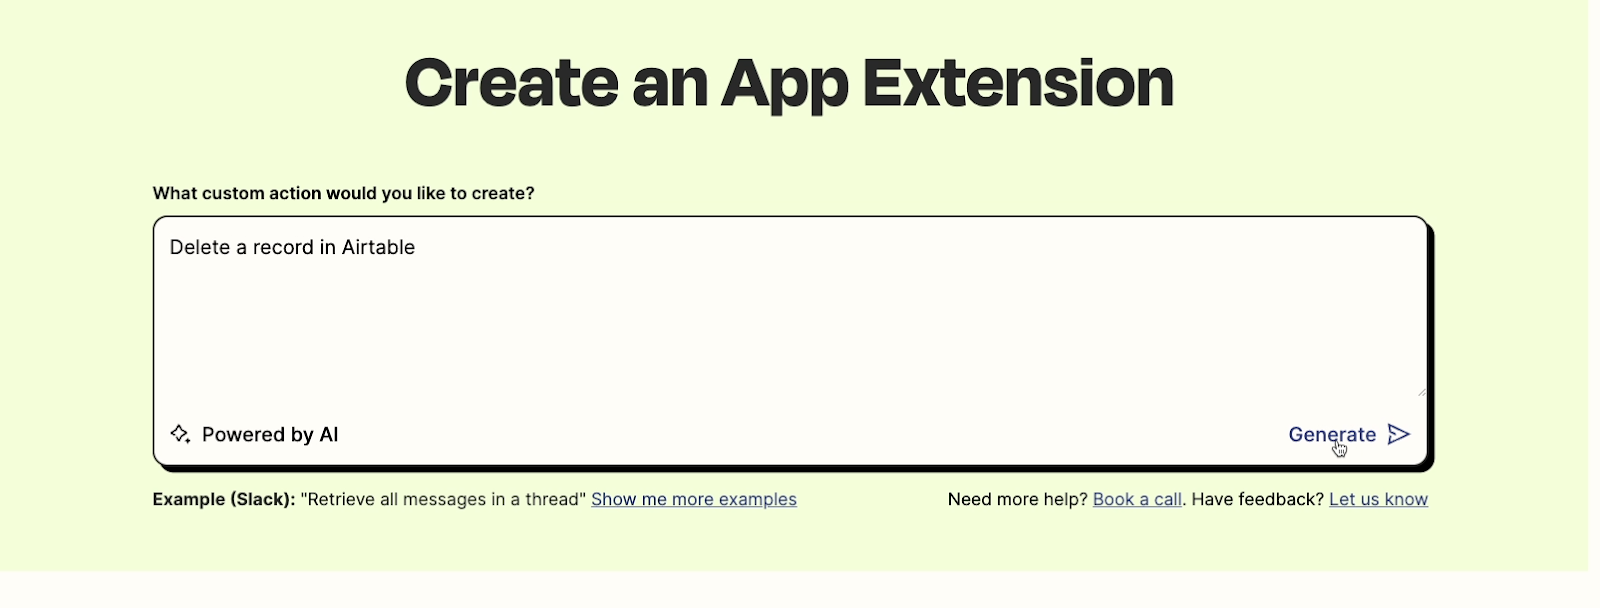
Once it’s all set, click “generate” to submit your prompt.
Review and edit the AI-generated extension
Next, you’ll see three options that attempt to recreate what you’ve described in your prompt. You can read the summary of each option for more information about what the action does. Note that the API method will be listed in the top left.
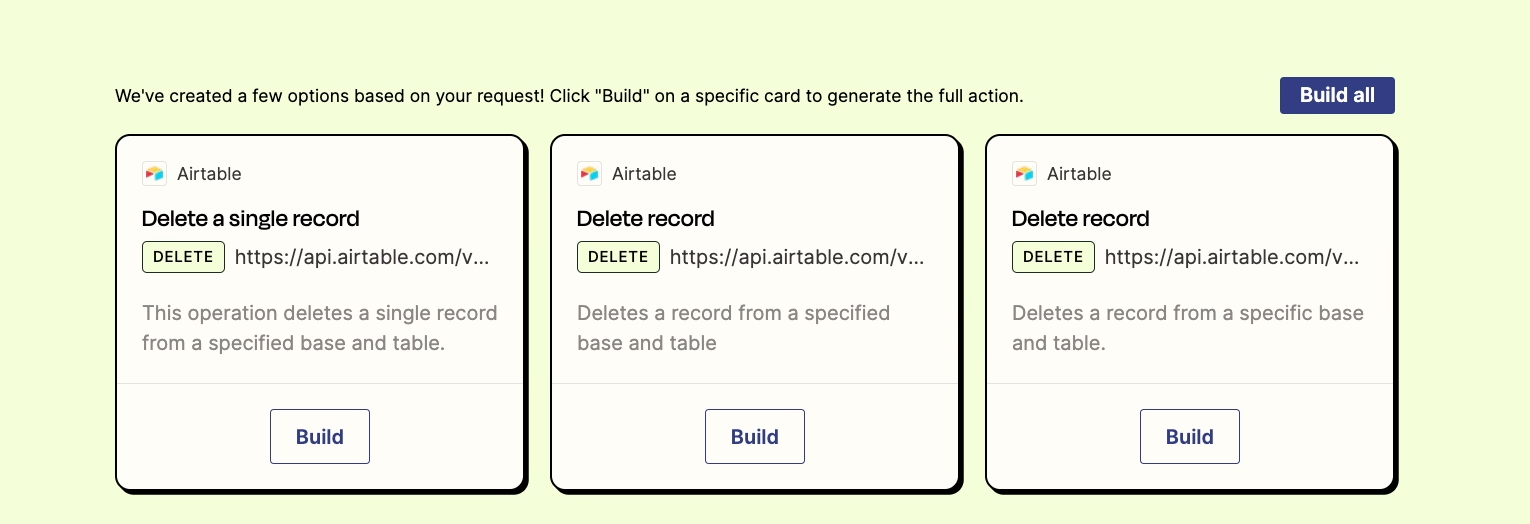
For our extension example, the method for each option is always DELETE, since we want to delete a record.
If you want to create an object, you should see POST as the method. To update, you’ll need to use either PATCH or PUT, and for a search, you’ll need GET. Make sure to pick an option that uses the appropriate method.
Zapier also includes the exact API route here, but unfortunately, it’s heavily truncated. We can only see the start, which doesn’t really tell us much. All we can see is that it’s accessing the Airtable API - which is pretty obvious. To see more information about any of these potential extensions, click on “Build”.
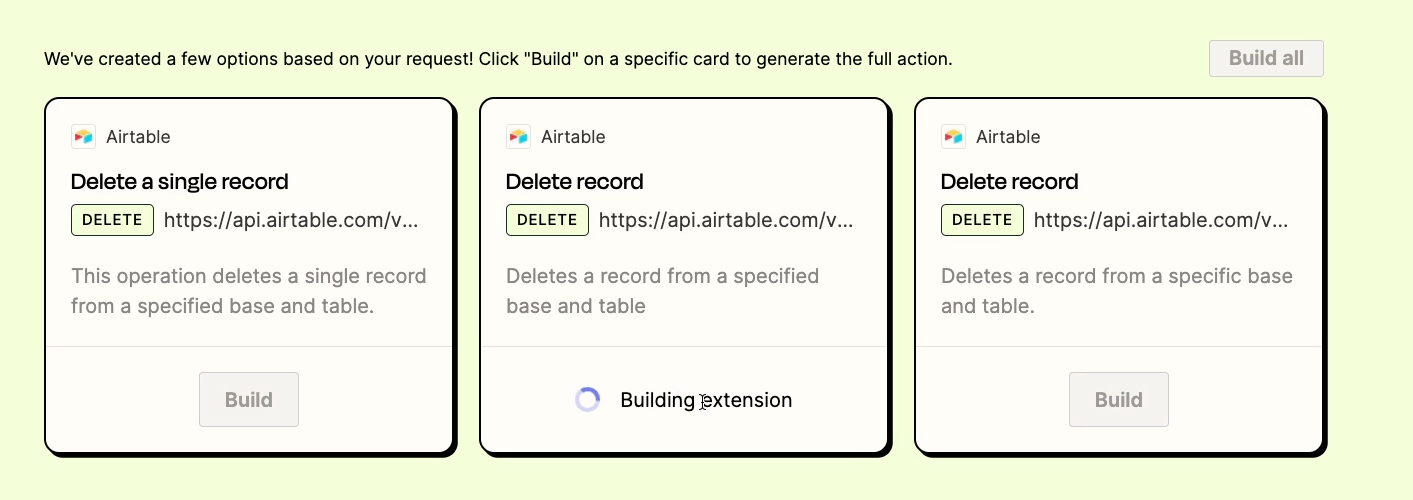
Once you click “build”, Zapier will actually start creating the extension in the background. This can take a little while.
When the extension is ready, you have the choice to either preview it or use it right away. It’s best to take a closer look at what the AI put together before continuing, so click on “Preview”.
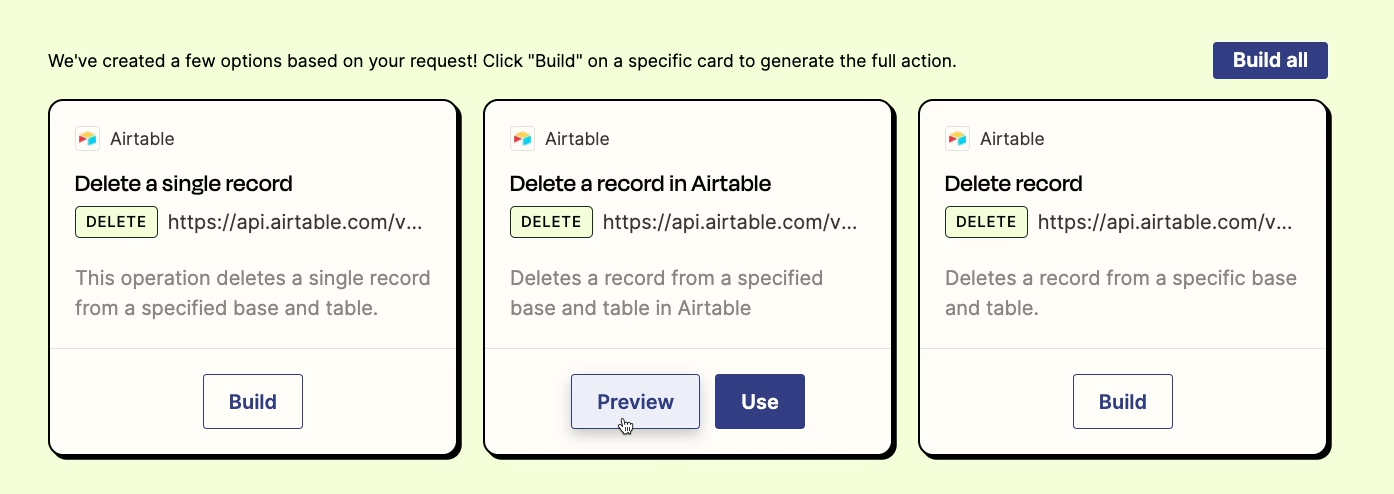
In the preview window, you can see more detail about the extension the AI created.
Review the API Method and URL
Under “API”, you’ll see a small table with the Method and URL being used in the extension. Just as before, we can see that the method is DELETE. But now, we can see the full URL.
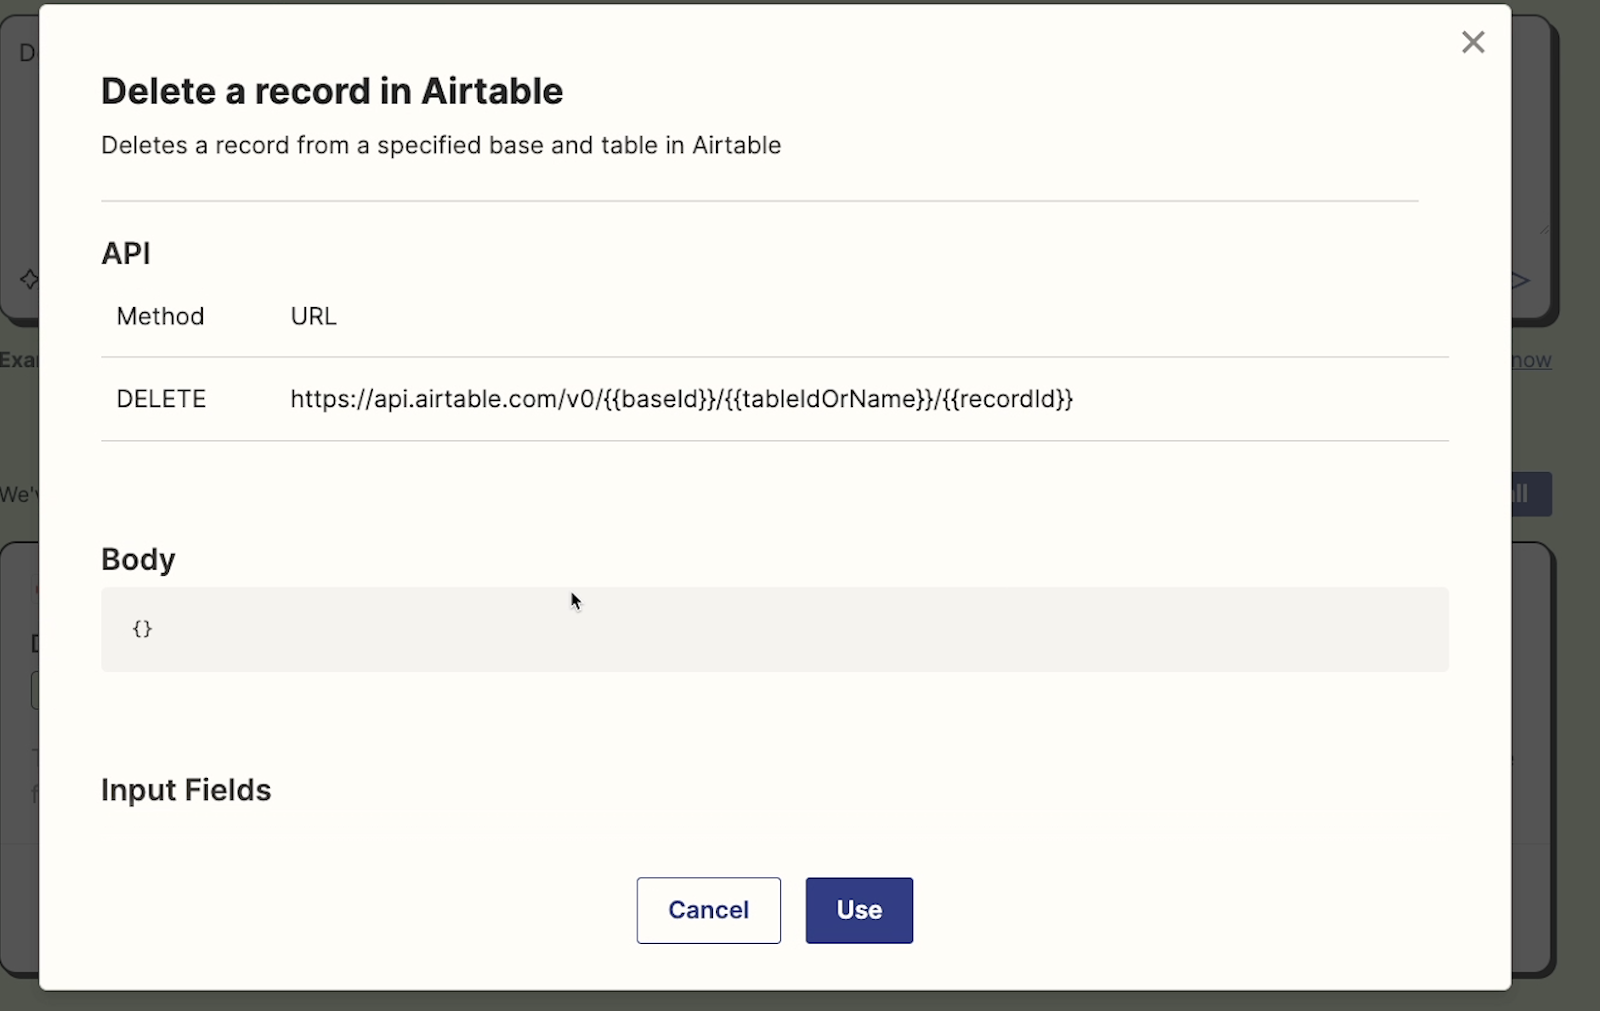
The curly brackets indicate variables that you’ll have to fill in when you add the step to your Zap. For our example, we’ll need to identify the base, table, and record ID.
Add custom code to the body if needed
If custom code is required, it will be written in the “Body” section. It won’t be necessary to enter anything here for our example, since we’re just deleting the record identified in the URL.
For other actions, though, you might need to add more information here. In general, though, the AI should take care of it for you. Most API calls have URL encoded data, which doubles as instructions. This means that the method and the URL (complete with variables) are often the only pieces of information that you need for a successful API call.
Review input fields
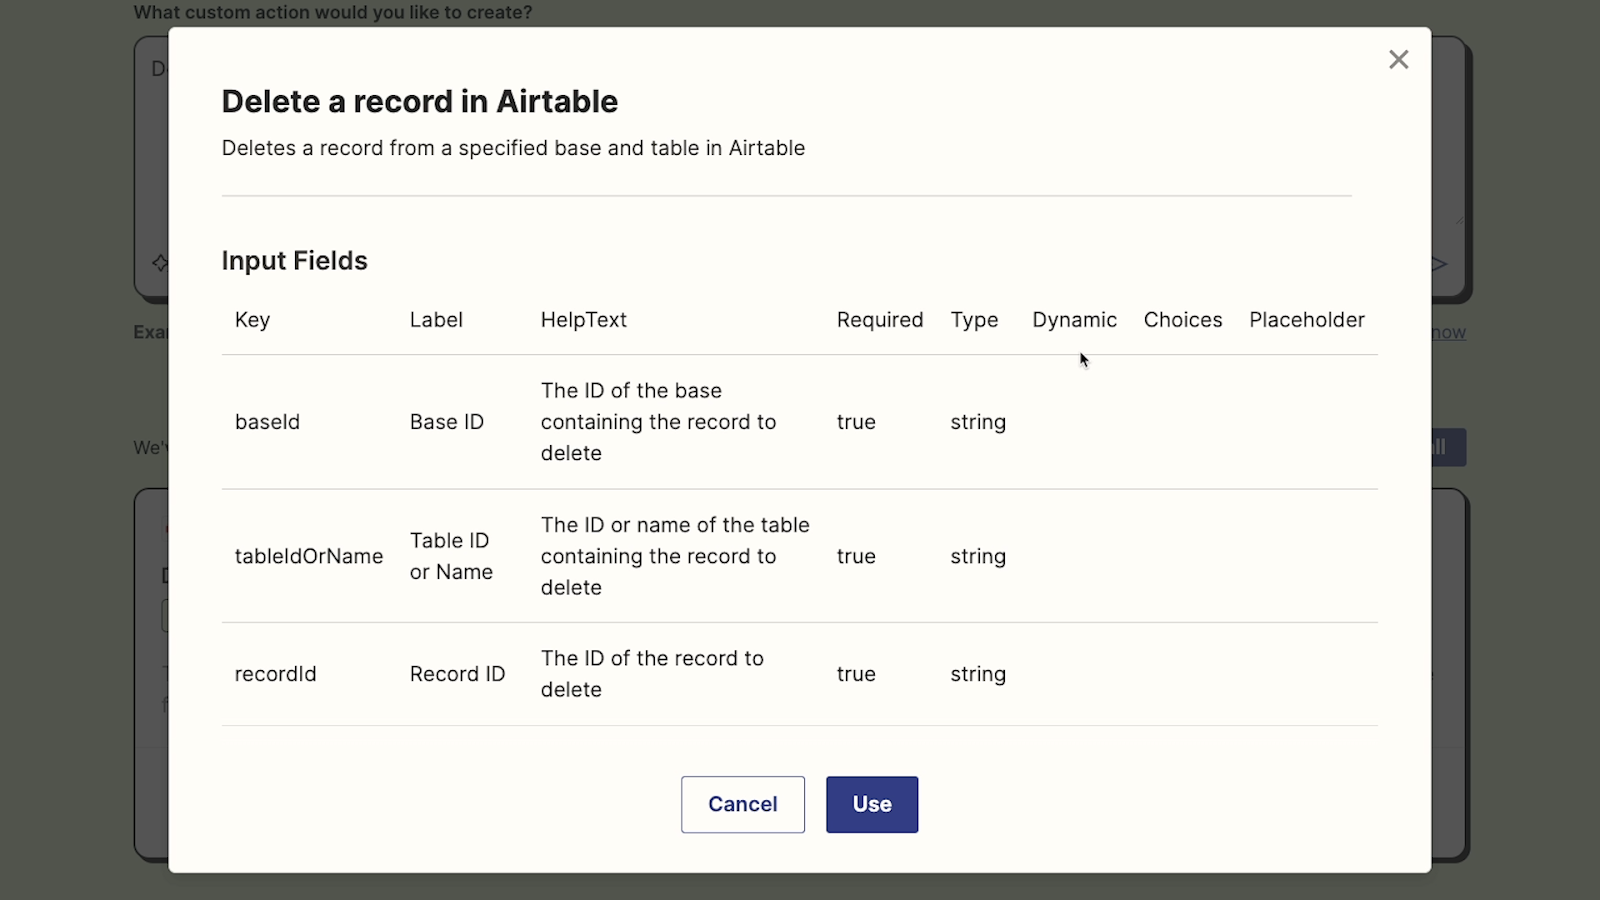
Under Input Fields, you can see all of the information that can be filled in when using the extension as a step in one of your Zaps. In this table, you can see several attributes for each input field.
• Key: Used behind the scenes to identify the field. You can see this in the URL, for instance.
• Label: Identifies the field to users
• Help Text: Provides explanations on what the data is used for.
• Required: Indicates if the field is mandatory, with required fields marked as "true".
• Data Type: Shows the type of data needed (e.g.,string [text], numbers, date/time, etc.).
• Dynamic: Specifies if the field has a dynamic dropdown menu for input.
• Choices: Lists multiple choices for fields set up as dropdown menus.
• Placeholder Text: Displays example or guiding text for each field.
Note that these fields here won’t always match up 1:1 with the variables in your extension’s URL. That just happens to be the case for our example. As you build your own extension, you may see some variables in the “Body” portion instead.
Take a moment to review all of the info listed in the preview window. If it looks good, click on “Use”.
Finalizing and using your app extension
The preview window will close, and you can scroll down to see your extension’s settings.

Everything you see here should match what you already saw in the preview, but now, you can edit or update anything that you’d like. Just make sure to reference your app’s API docs to make sure your edits are correct.
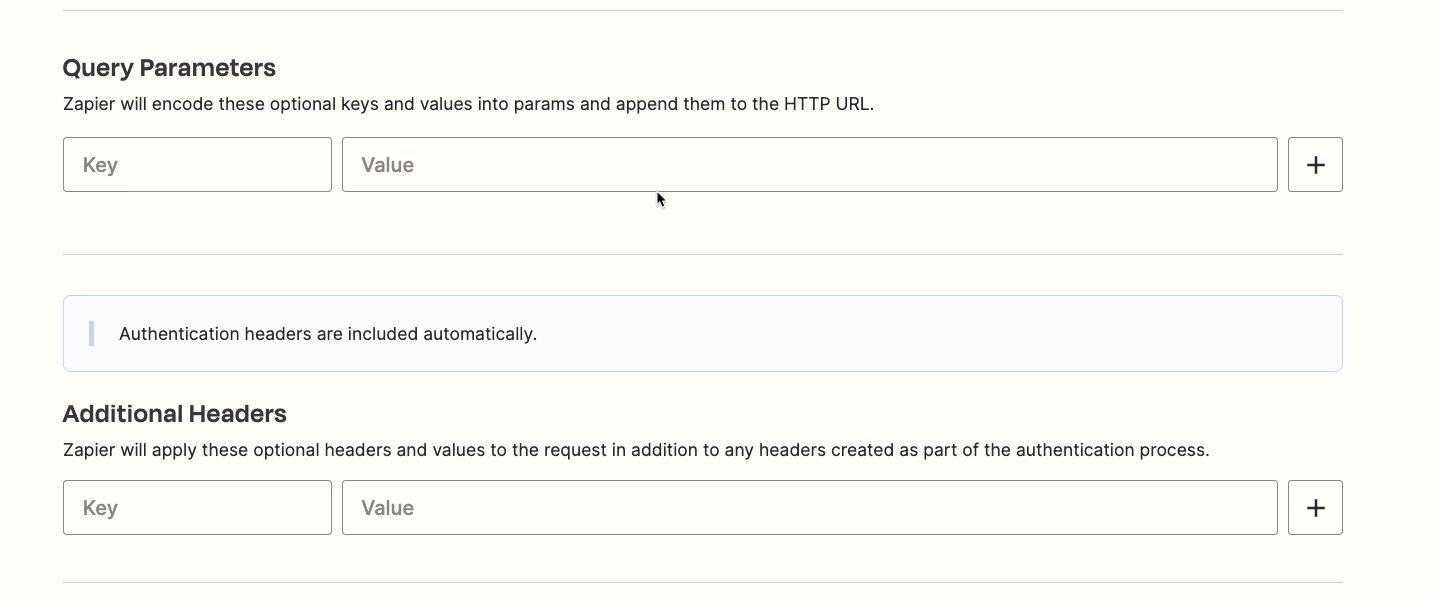
You can also add query parameters or additional headers to further refine the data created or retrieved, though that won’t be necessary for our “Delete” action.
Once you’ve confirmed all of your settings, your extension should be ready to go. Click “Save” to complete the extension and commit any changes you made. Then, publish it so it will show up in your action list.

Accessing your app extension
Now you can return to your Zap. Refresh the tab in your browser so Zapier retrieves the latest data from your extension. Go back to action in progress, and click on ‘Event’. You should see your new extension as an option. Click on it to use it.
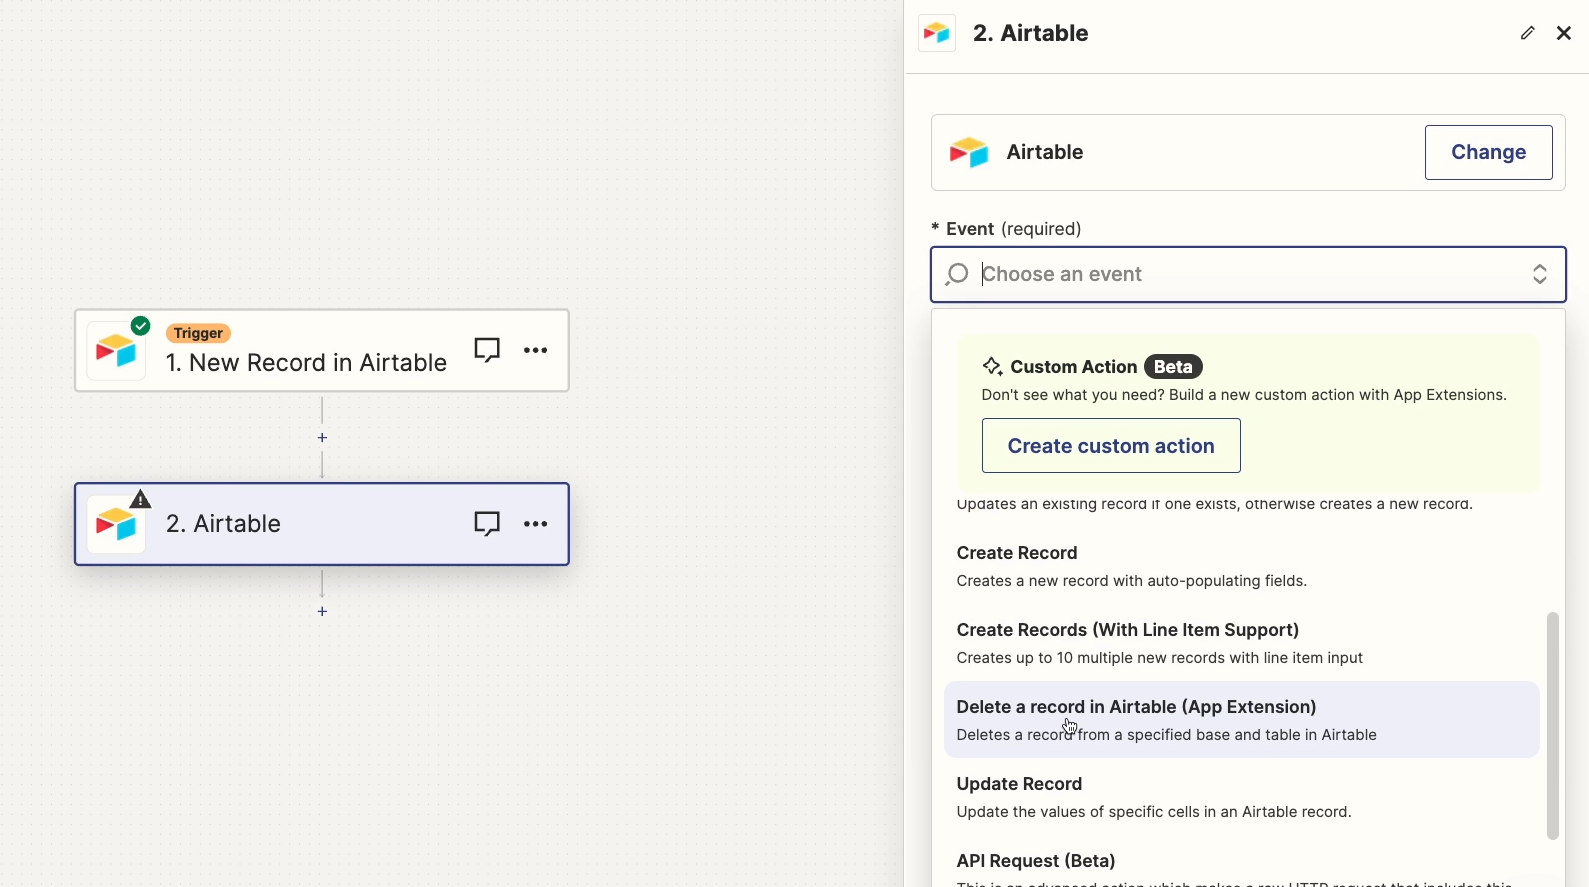
Sign in or choose an existing authorized account to use for this action.
Now, you can configure the custom extension like any other action in Zapier. For our “Delete a Record” action, we’ll just fill in static values pointing to the right base and table. Then, we’ll retrieve the record ID dynamically from the trigger.

Once you’ve filled in all the necessary fields, give your action a test.
Pictured below, you can see the test record that Zapier retrieved. This is the record that should be deleted when we run the test.

Now we’ll test the action in Zapier.
Testing your app extension
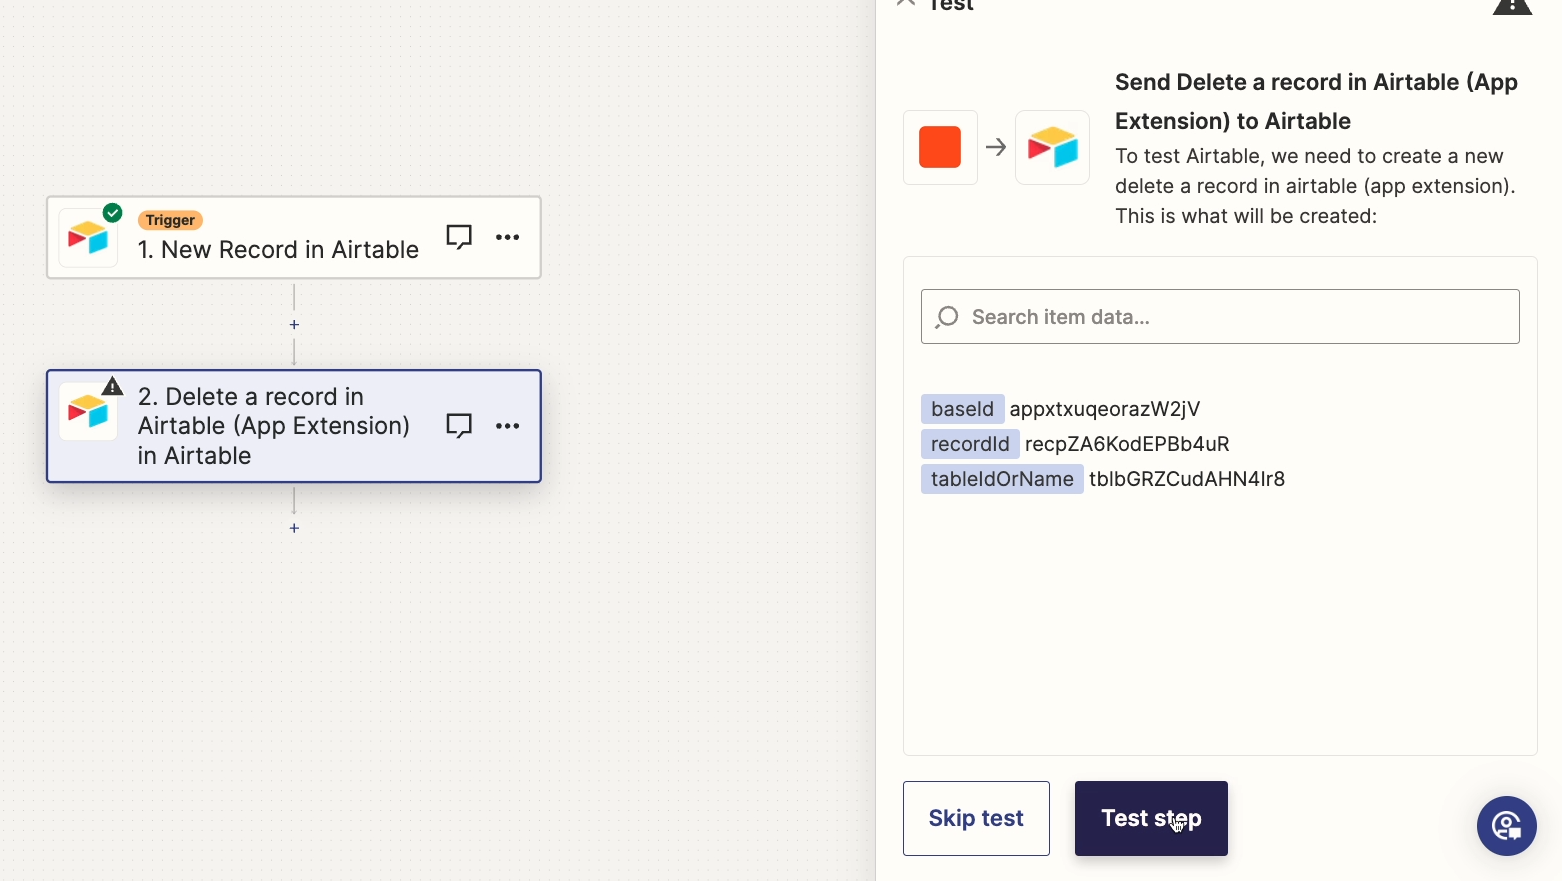
The test appears to be successful, as indicated by the 200 response code.
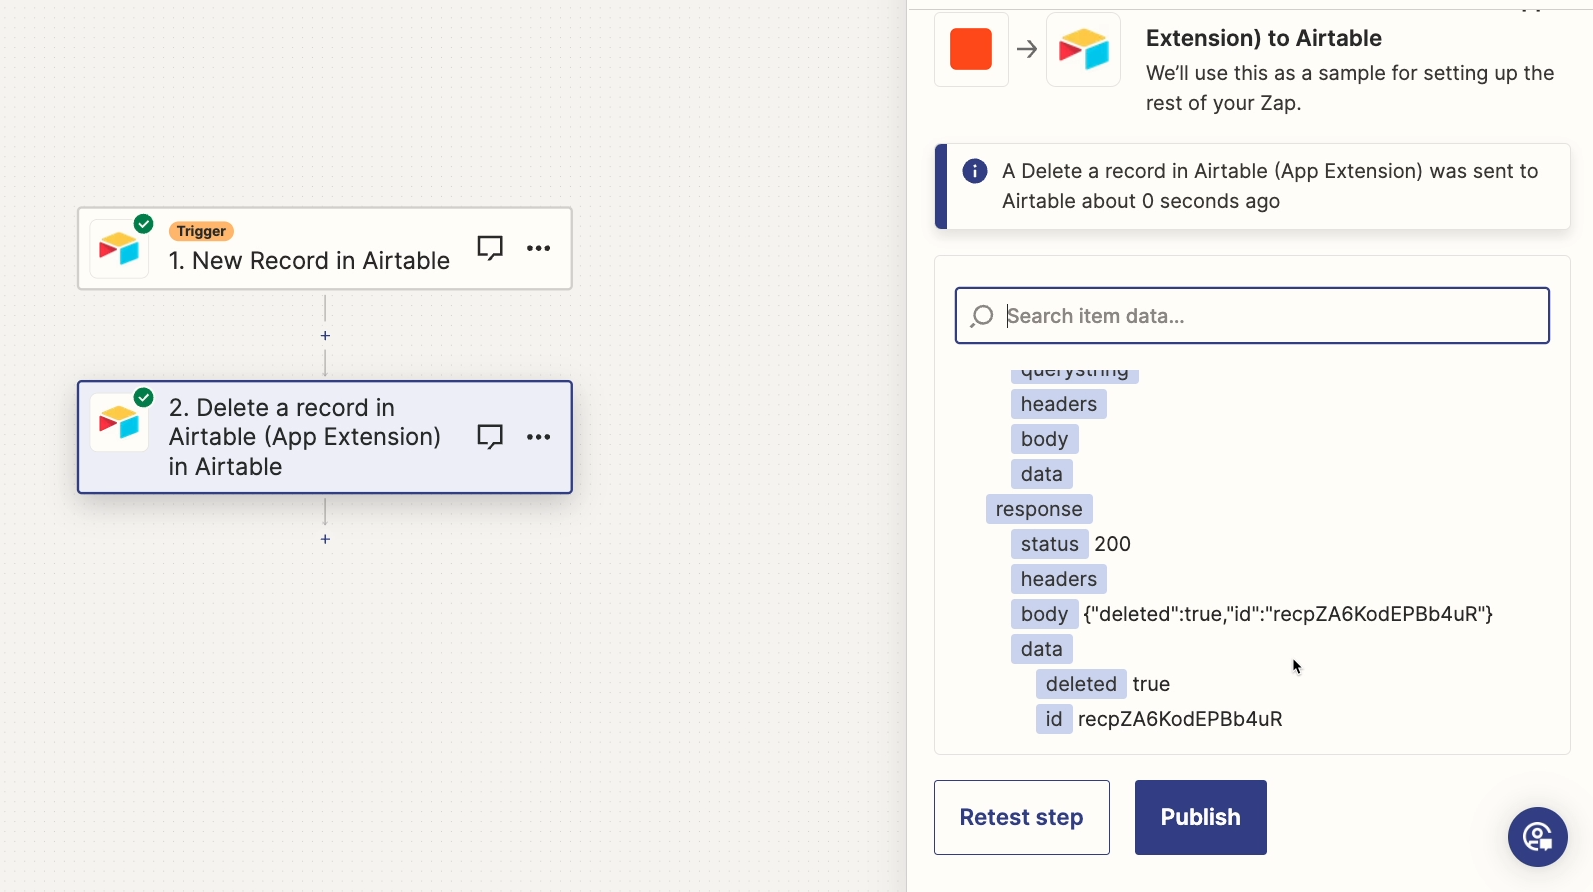
If your extension doesn’t work, you’ll likely see a 400 or 500 server code instead. You can see a fun reference guide here fur every possible server code.
However, it’s always possible that your extension may have technically worked and run correctly, but isn’t actually configured the way you want it to be. If, for example, the AI chose the wrong method and tried to update data instead of deleting it, you may see a “successful” 200 message even when your extension isn’t getting the desired results.
As such, it’s always a good idea to check your apps after running a test in Zapier to make sure that data was deleted, created, or updated in exactly the way you intended.
When we check our example Airtable base, we can see that the chosen record was deleted.

Again, as we noted earlier, be very careful when using a Delete action. It will immediately and permanently delete your data, so make sure you’ve configured everything correctly and backed up any important data before proceeding.
If you need to update your Extensions, just go to zapier.com/app/extensions.
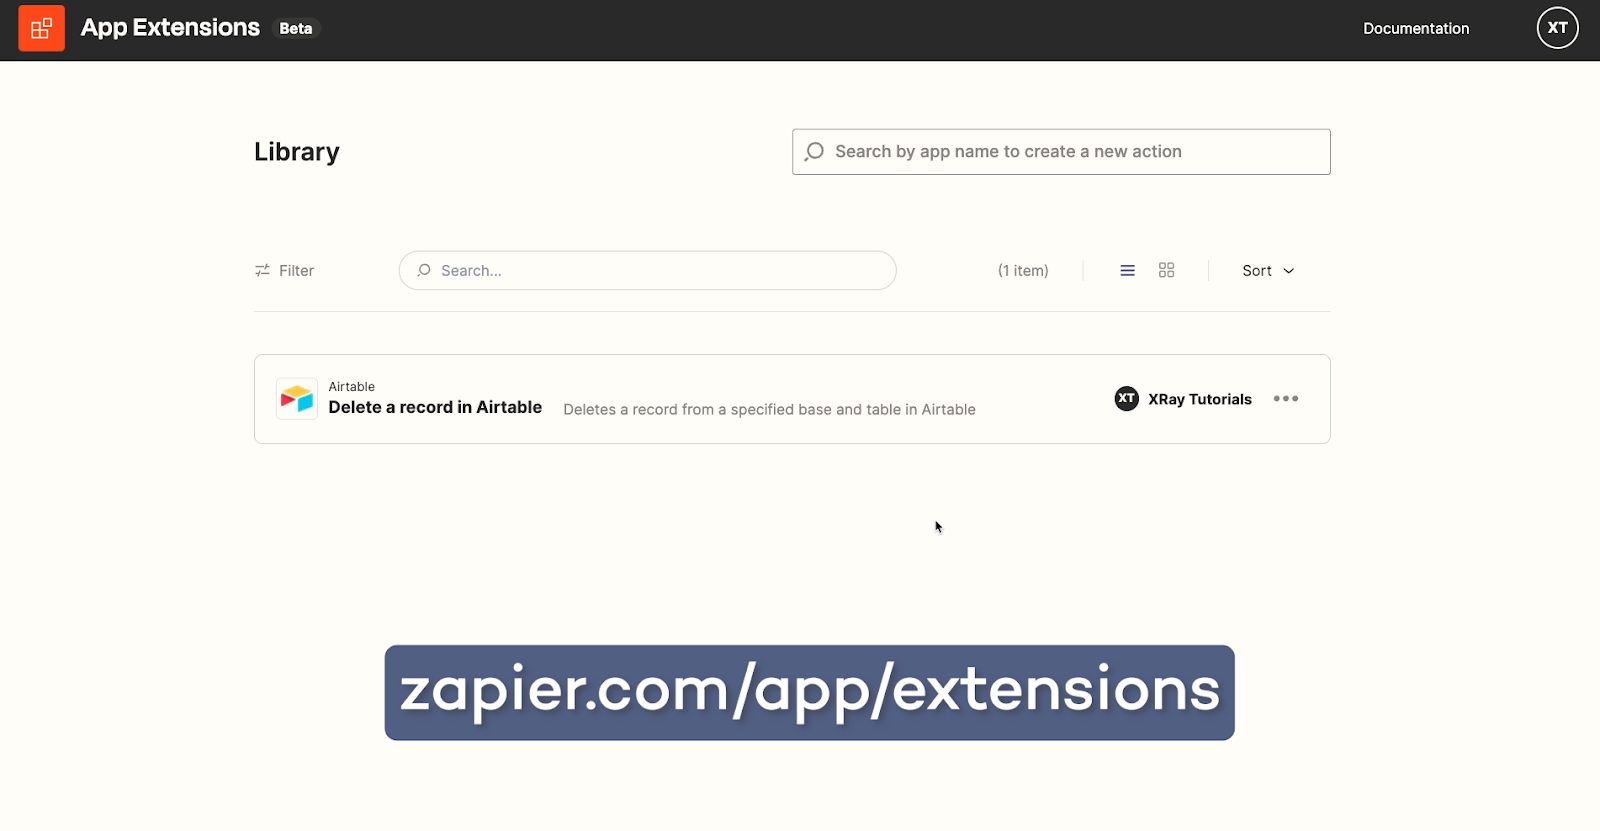
Then, select the extension you want to review, and make any edits you’d like. You can also add new extensions from this page.
Easily add support for custom actions in Zapier
Zapier doesn’t always support every action you want to automate right out of the box.
But with Zapier extensions built by AI prompts, it’s easier than ever to add any functionality you want to your Zaps, so give it a shot today.
To learn more about using Zapier and its latest features, check out our blog or our YouTube channel. You can also follow XRay on Twitter, Facebook, or LinkedIn.
Beginner’s Guide to Softr
How would you like to build a web app without writing any code at all?
With Softr, you can do just that.
In this post, we'll show you how to get started with Softr and begin building no-code web apps that connect seamlessly with Airtable.
We’ll explain what Softr is, and we’ll walk you through the process of building your first Softr app connected to an Airtable database.
Throughout the guide, we’ll demonstrate how to connect a data source, display and edit a list of items from that data source, create new pages, and add custom blocks to your app.
We’ll also cover several options for managing users in your Softr app, like creating a sign-in page and setting up user groups. Along the way, we’ll cover lots of different settings for customizing the visual layout of your web app and other configuration options.
Lastly, we’ll take a quick look at the pricing plans that Softr currently offers.
If you’re brand new to Softr and want to start building no-code web apps quickly, this beginner’s guide will be the perfect place to start, so let’s jump into it!
What is Softr?
We’ll start with the basics. What is Softr?
Softr is a tool for building no-code or low-code web apps while using data from apps like Airtable. In a certain sense, Softr is loosely similar to website building apps like Webflow, Wix, Wordpress, and others.
But the key difference is that Softr natively connects with data sources like Airtable and Google Sheets, and enables users to sign in and access that data. This lets you easily build a database-connected web app without needing to write any code at all.
Build a no-code web app with an Airtable backend
A record in Airtable or a row in Sheets becomes a dynamic object in your Softr Web app.
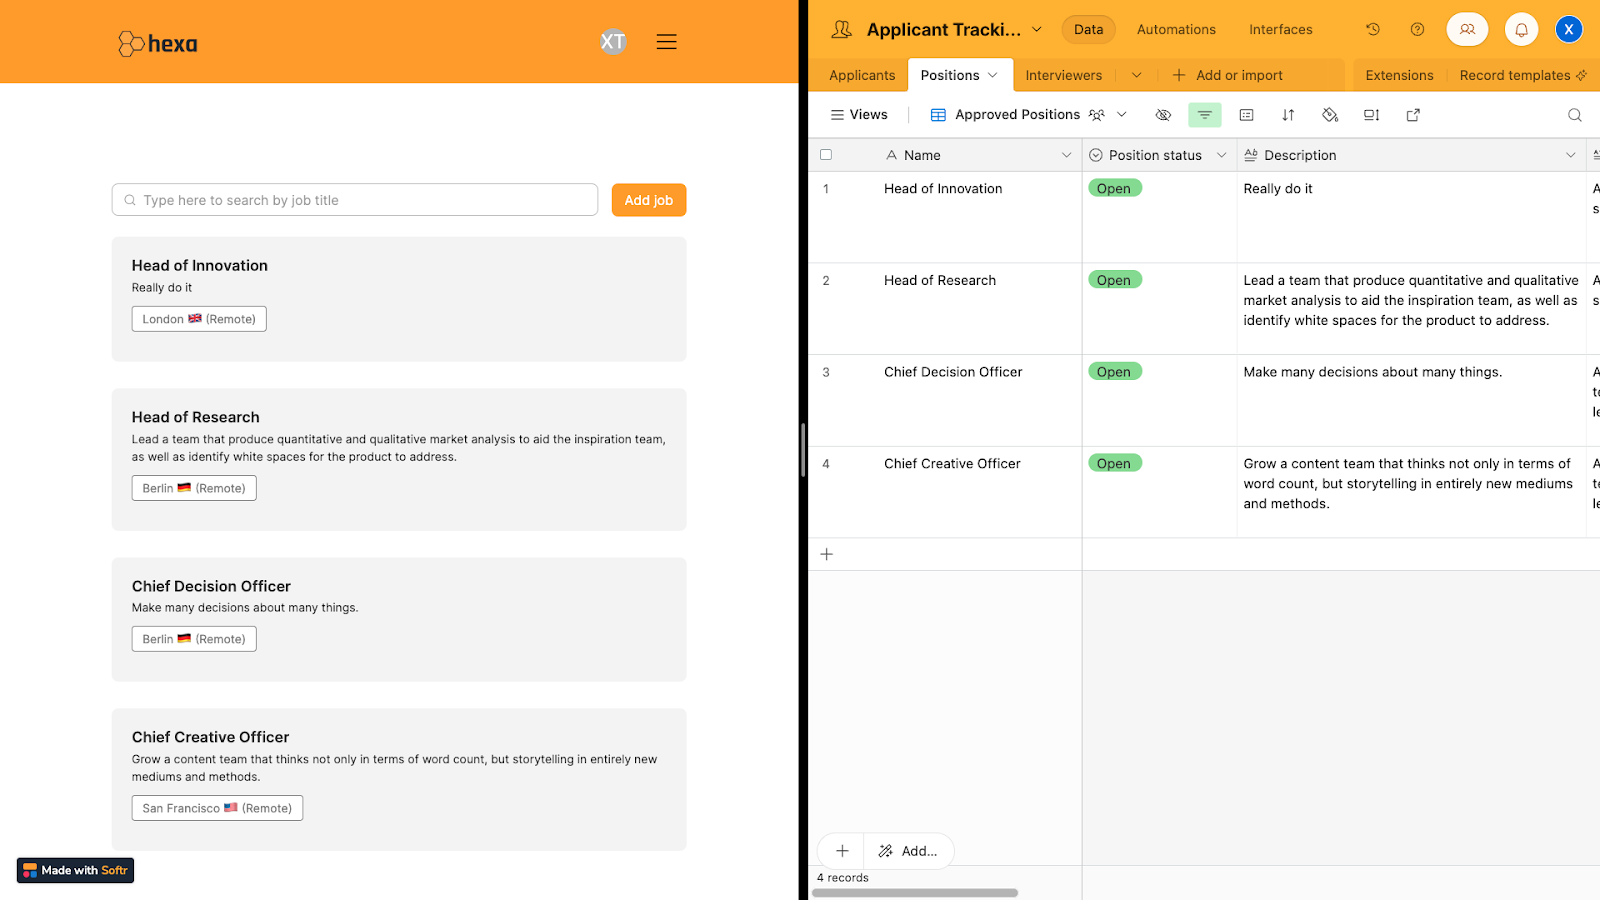
Softr makes it simple to create portals where colleagues, clients, investors, students or anyone else you want can sign in. Then, they’ll be able to view the data you’ve stored in Airtable and interact with it just like they would in any modern web or mobile app.
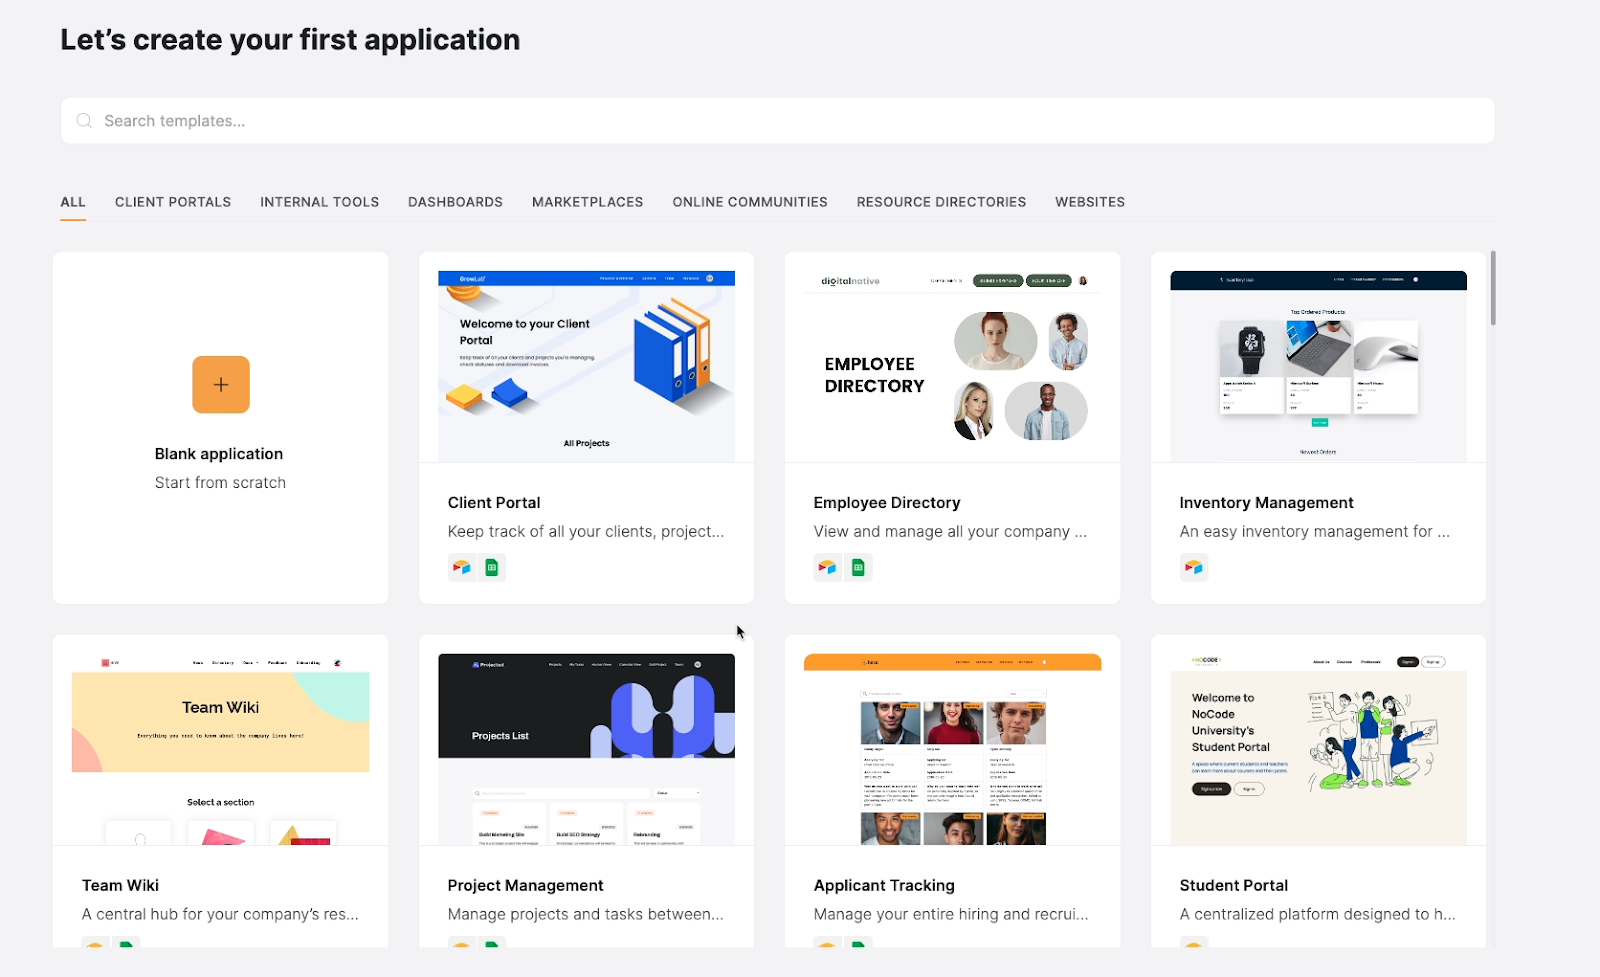
Essentially, Softr lets you create a public front end for an Airtable backend, giving you a convenient way to view, share, and update your Airtable data.
Limited aesthetic customization
However, there is a tradeoff. While Softr is great at connecting to your Airtable data, it has far less visual customization than a typical website builder like Webflow or Wix.
If your project is an informational site first and foremost, you’ll likely be better off with a run-of-the-mill website builder.
However, if you want to build a no-code web app that supports user sign-in and is populated by dynamic data sources like Airtable, Softr is a great choice.
With all of that in mind, let’s dive in and start building your first Softr app
Create your first app and connect a data source
To dive into Softr, we'll show you how to set up an account and build your first web app step by step.
In our example, we'll be building a Job applicant tracking portal, but the basic principles for creating a Softr app and connecting to a data source will apply to any project you want to create.
You can also use Softr to create a client portal where your clients can access your shared documents and assets.
Alternatively, you could create an app that compiles key metrics for investor reports.
Or you could even connect your Softr app to ChatGPT for AI-generated summaries and meeting transcripts.
Create a Softr account and follow along for free
Whatever you want to build, go to softr.io to get started.
Then, sign up for a free account, or sign in if you already have an account.

Next, Softr will ask you some questions about how you want to use the app.
Your answers will supposedly personalize your experience a bit, but really, these are just there to give Softr’s marketing team some useful data. You can fill in whatever you’d like here.
Once you've finished the survey, you'll see an option to start a free trial of Softr’s premium features.

You can start a free trial if you’d like, but everything we're covering today will be accessible through the free plan, so it’s not necessary for this tutorial. You can follow along even if you've already used up your free trial.
Pick a project from the template gallery
Next, you'll see a screen with several templates you can use to create your first project.
Templates are an easy way to get started, but they’re not required to create an app in Softr.
You can always select “blank application” if you’d like to build your app from scratch.
However, we'll be starting with a template in this tutorial.
By using one of Softr’s templates and copying their provided Airtable base, you can create and edit a functional app much faster than starting from scratch.
In the Softr template gallery, you’ll see templates for an employee directory, inventory management, project management, a student portal, and a lot more.
To preview any of these templates, you can just click on them. Select the “Applicant Tracking” template to take a closer look.

On the left, you'll see a text description of the template and all its features. On the right, you can find screenshots of what the template actually looks like, along with a live preview.
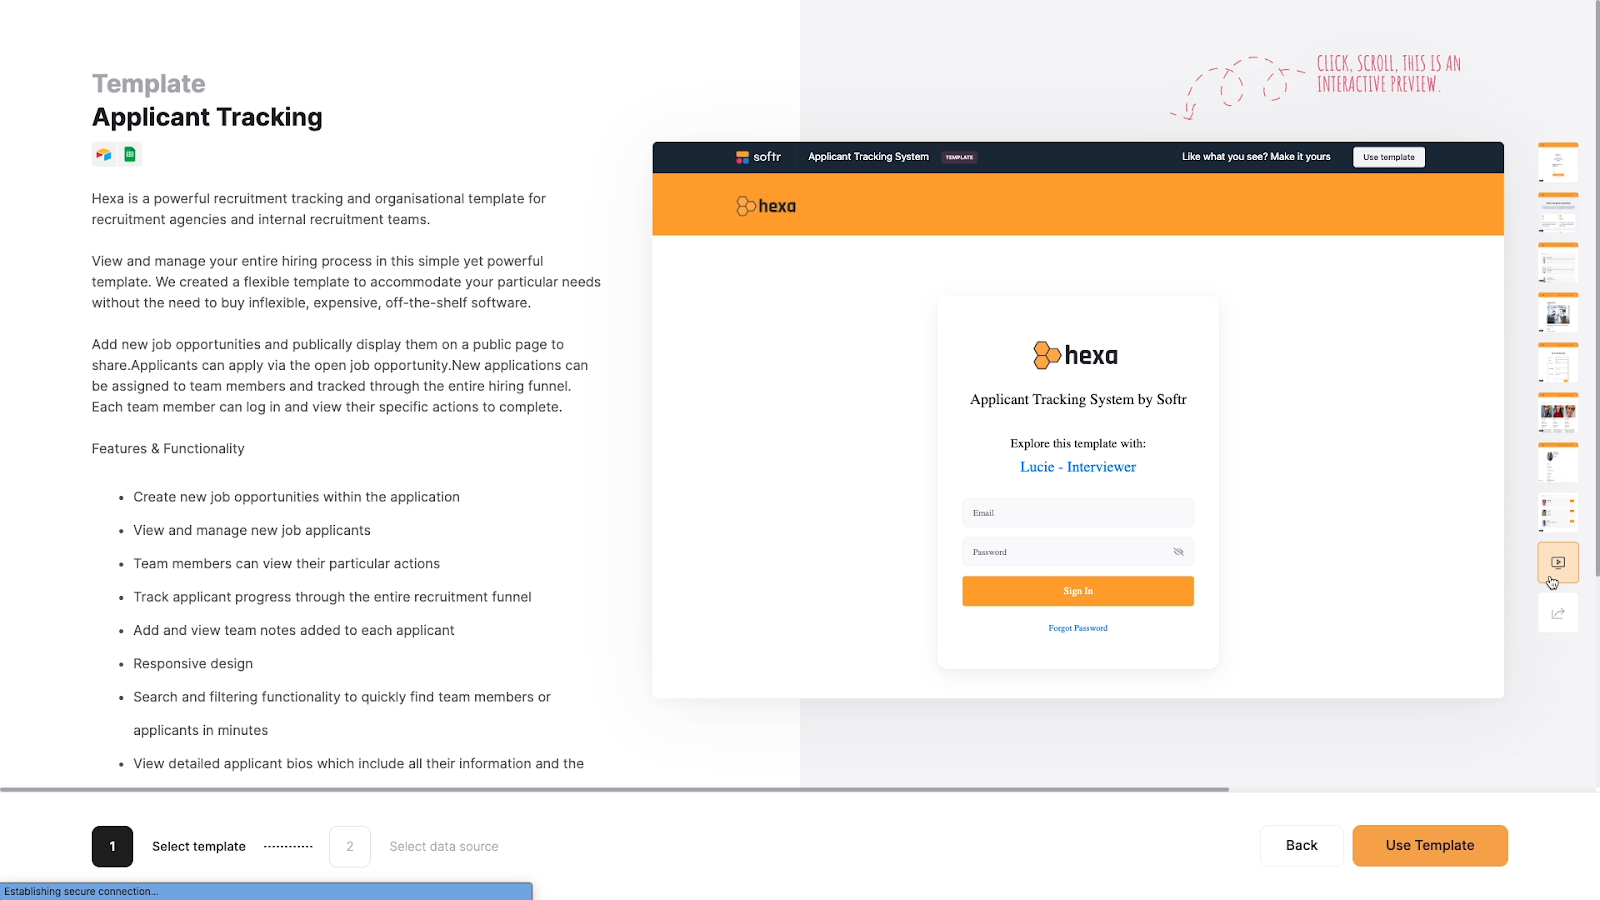
Click “Use template” to apply it to your app.
Configure your Softr app
Now, Softr will quickly walk you through what you need to do to complete the initial app setup.
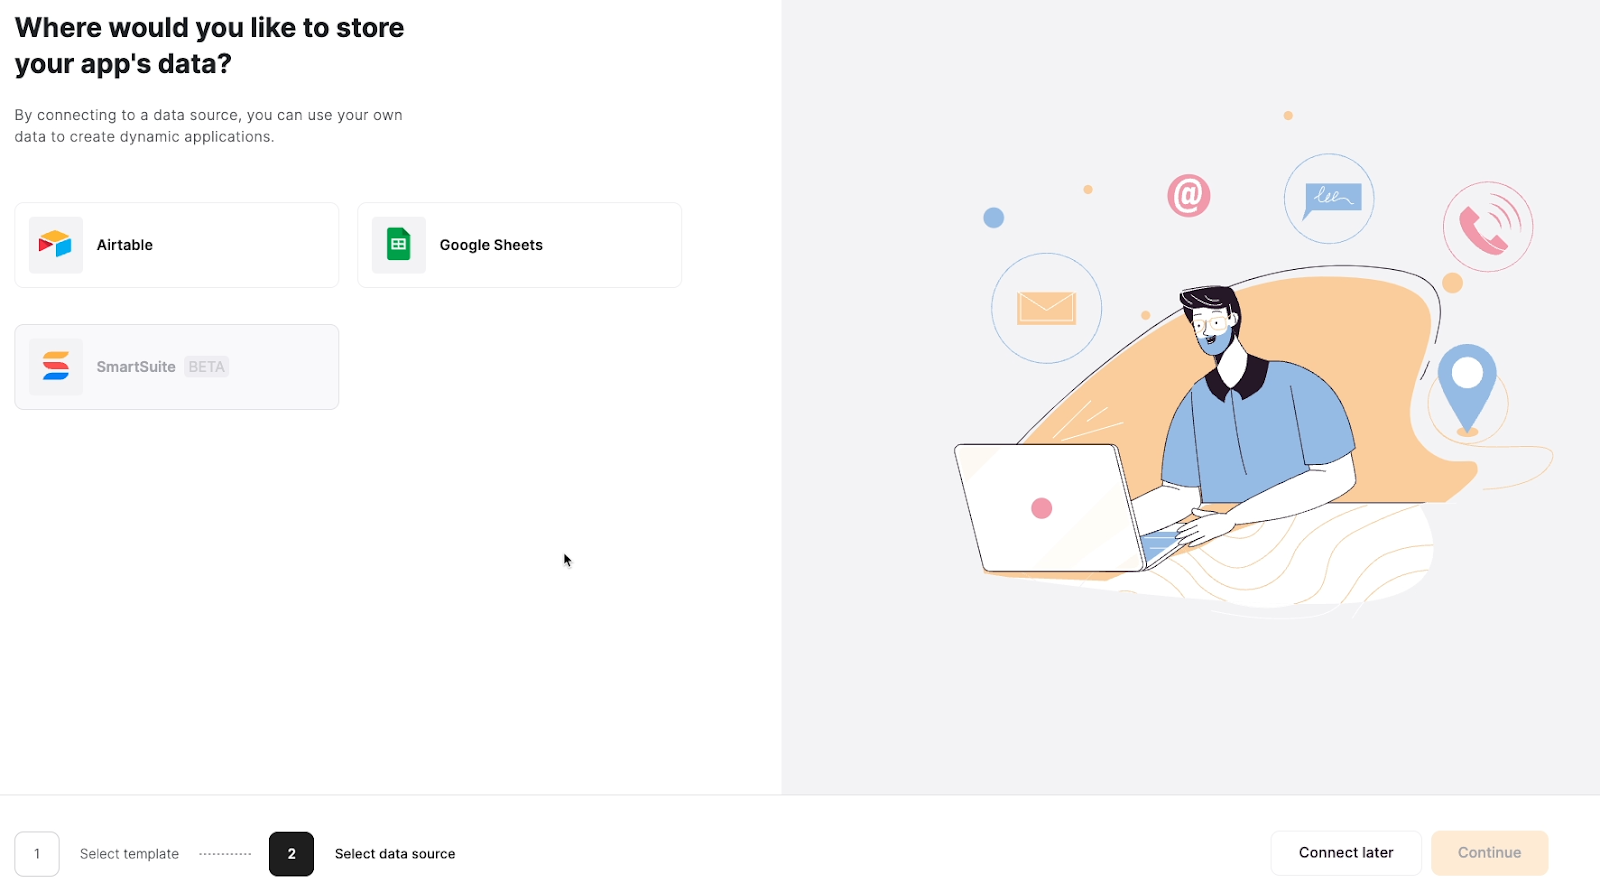
You’ll need to:
1. Connect a data source (Airtable)
2. Grant Softr access to your Airtable workspace
3. Copy Softr’s template to your Airtable workspace
Softr will walk you through each step as you go. Note that if you create a new Airtable workspace during step 2, you may need to click on “Cancel”, then “Retry” the authorization process. That will refresh the list of available workspaces.
Review the Airtable template base
Once you’ve copied Softr’s template to your workspace, it will open up in a new tab in your browser.
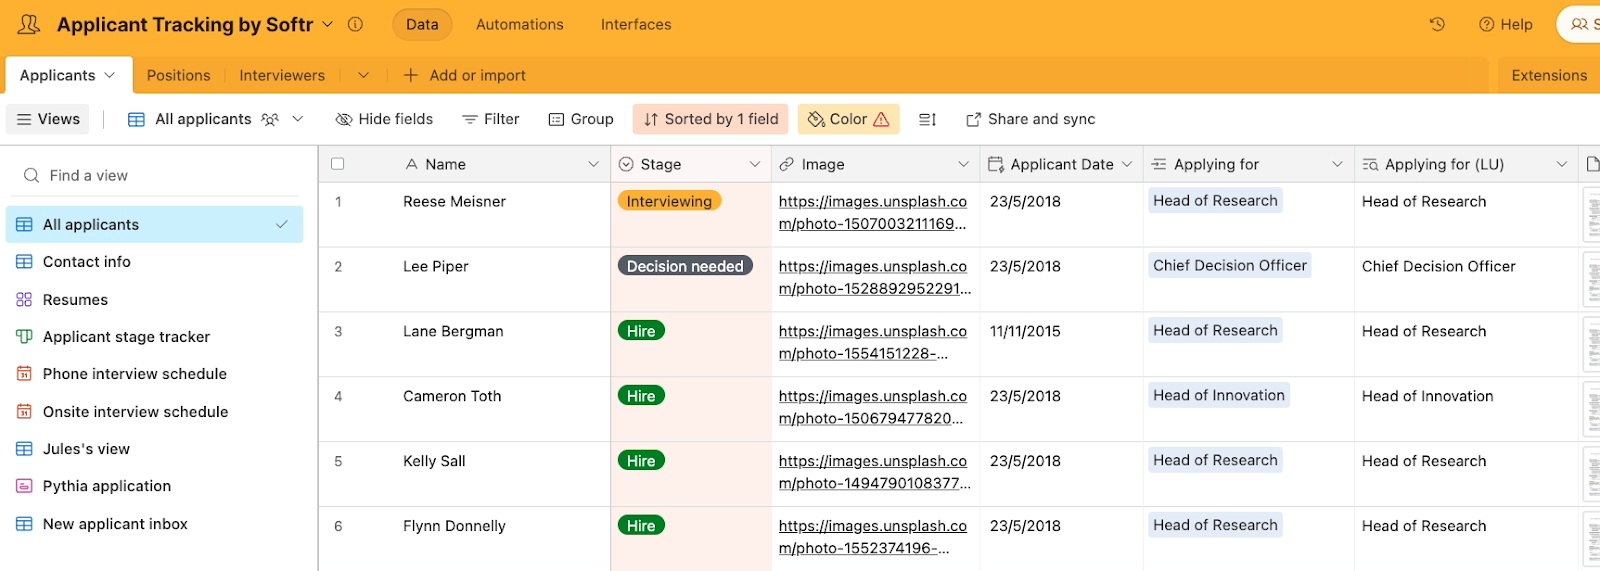
As you're reviewing this copied base, just note that some features may not work if you're using a free plan in Airtable.
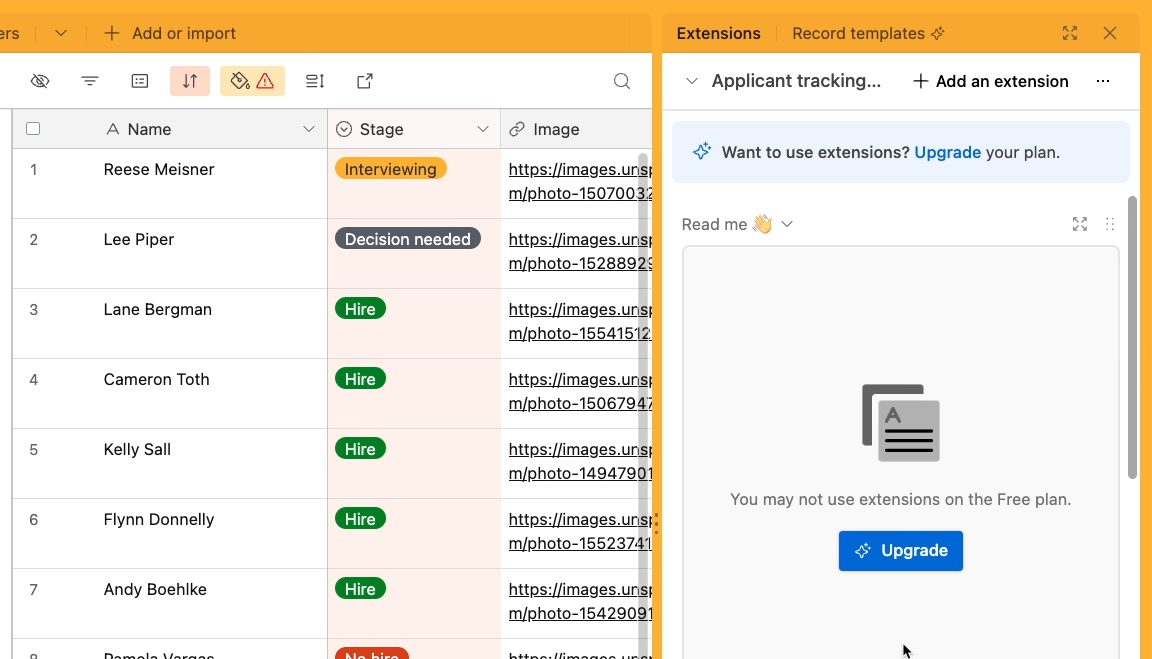
For instance, any extensions like the ReadMe won't be accessible. However, you can find the ReadMe in the resources board for this beginner’s guide.
Additionally, despite these extensions not working, the connection between Airtable and Softr will still work just fine.
Finish your initial app setup
After taking a look at the newly copied base, you can switch back over to Softr.
Softr confirms that the template base has been copied to Airtable, so you can click “Create Application” to finish the initial setup of your Softr app.
The next screen you’ll see confirms that the connection has been established.
Click “Go to app” to open up the editor where you can view and manage your new Softr project.

In this editor, you can add pages to your app, add content blocks to your pages, and customize several technical settings.
But we'll cover all of that later.
First, let's see how the connection works between Airtable and Softr.
Testing the connection between Airtable and Softr
When you connect a Softr web app to an Airtable base, you establish a 2-way connection you can use to create, edit, and share data. You can use records in Airtable to populate content blocks in Softr, and you can use Softr to create and edit records in Airtable.
When you create a Softr app from a template, Softr will automatically create a connection to Airtable for you.
If you’re brand new to Softr and want to learn exactly how this connection works, we’d recommend making a few edits to the Airtable base to see what happens in Softr. If you’re already familiar with how this connection works, you can skip to the next section of this guide: “Adding a new page and a dynamic list to your Softr app”.
For instance, in the Softr site, you can find a list of “Open positions” on the “Jobs” page: Head of innovation (with a brief description in Dutch), Head of Research, Chief Decision Officer, and Chief Creative Officer. Each job has a title, a description, and a location.
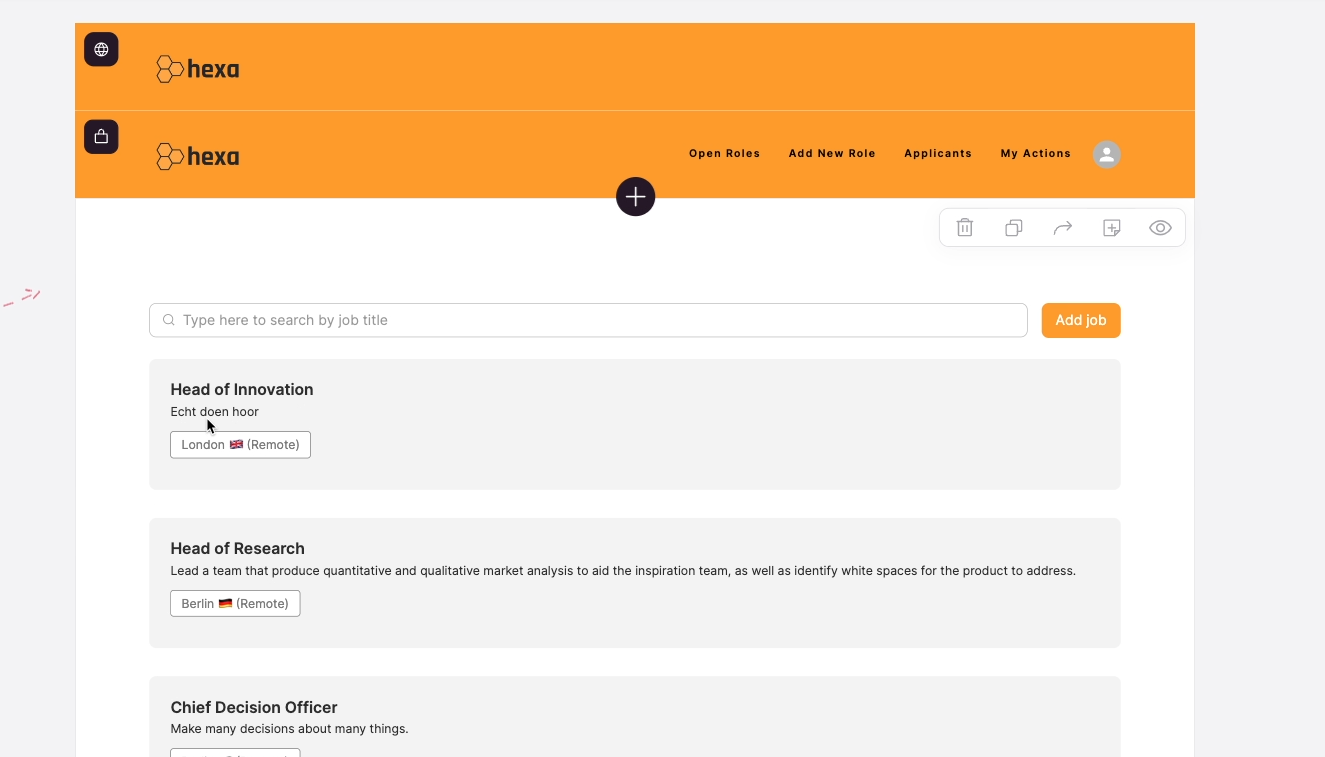
All of these jobs and their data come from the connected Airtable base. Click on the block in the editor to open a configuration panel. In this panel, you’ll see a “source” tab. This will show you the Airtable account, base, table, and view that the block is pulling data from.
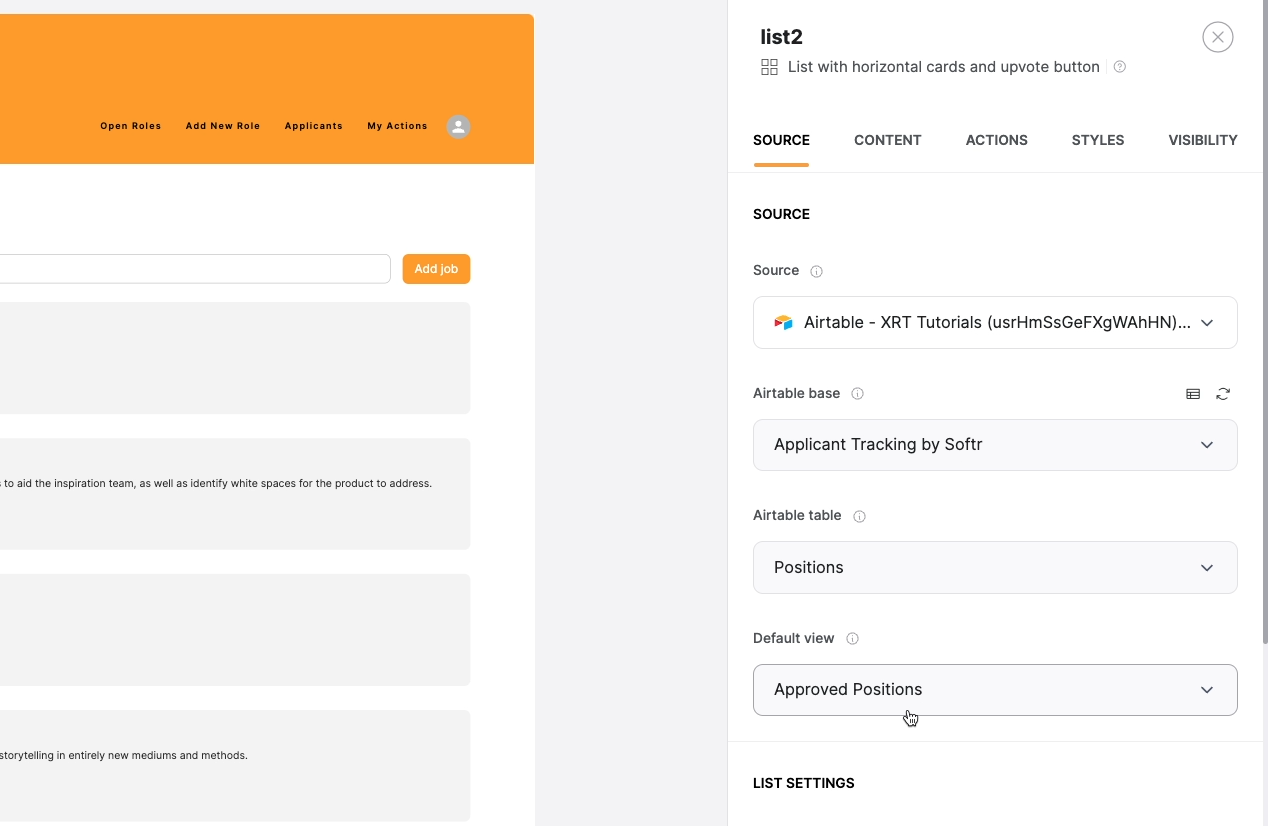
In this case, we’re looking at records from the “Approved Positions” view of the “Positions” table in the Applicant Tracking base. You can open Airtable to confirm that the data matches up.
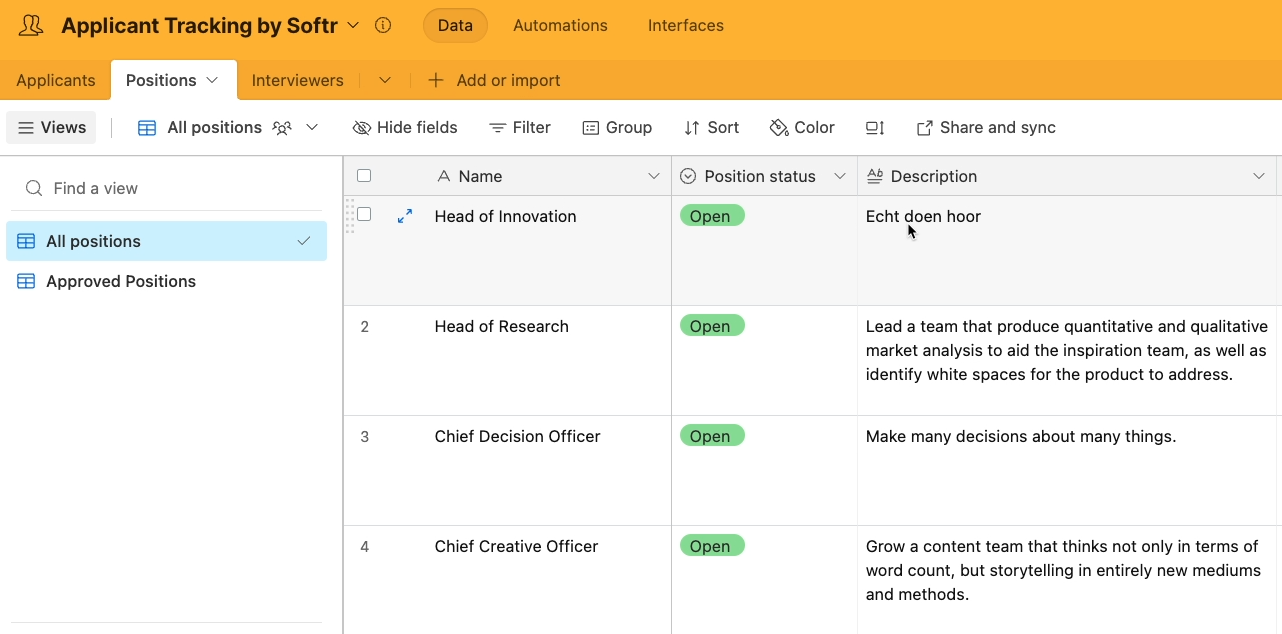
You should see the same jobs here that you saw in Softr, including this short description for “Head of Innovation” in Dutch.
Editing your app’s data through Airtable
You can still freely edit data in an Airtable base that’s connected to Softr. According to ChatGPT, that means something like “Really do it”, so let’s change this description to “Really do it” in English.
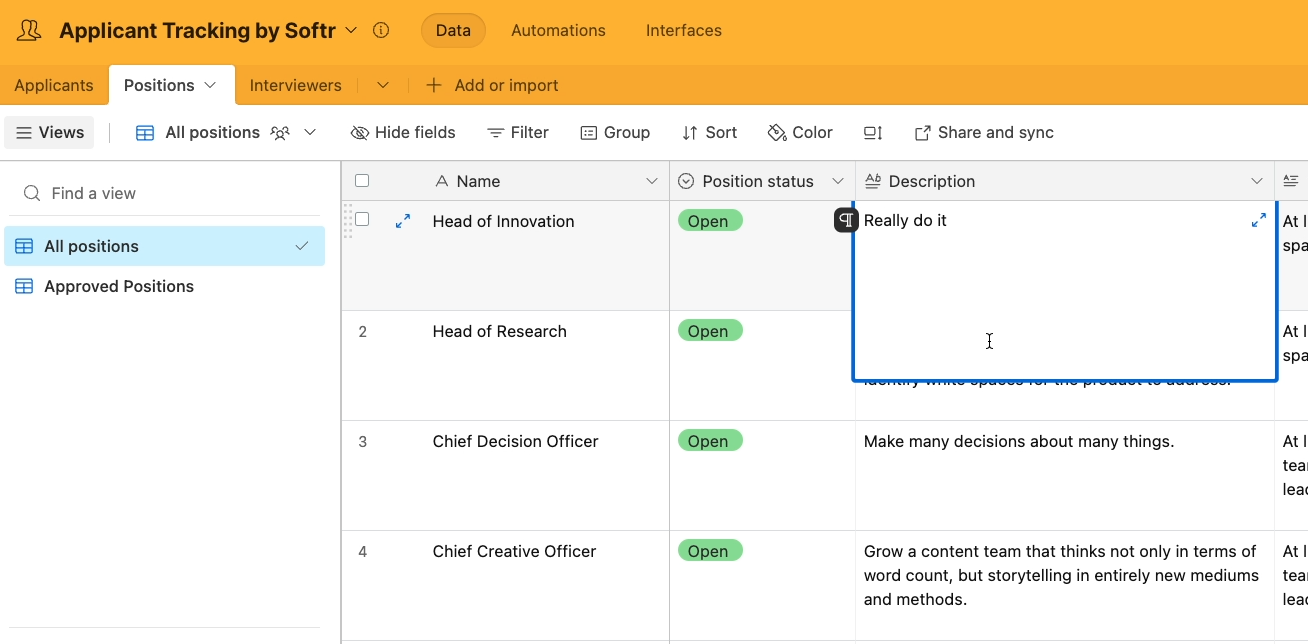
Once you’ve edited your connected data in Airtable, you can go back to Softr and refresh the page.

Now, the old Dutch description is replaced with one in English.
And with Softr, you’re not just limited to editing existing records. You can also add new records to the Airtable base, or delete the ones that are there, and your changes will be reflected in Softr.
But while it can be nice to edit your web app’s data from Airtable, one of the key benefits of using Softr is that you and other authorized users can also manage data through the web app itself. This can be a convenient way to let collaborators contribute to your Airtable bases without needing direct access.
Editing your app’s data through Softr
While you could achieve similar results with an Airtable interface, a Softr portal will often create a better experience for less technical users. In the Applicant Tracking template, Softr has given us an easy way to add new jobs on the aptly named “Add Job” page.
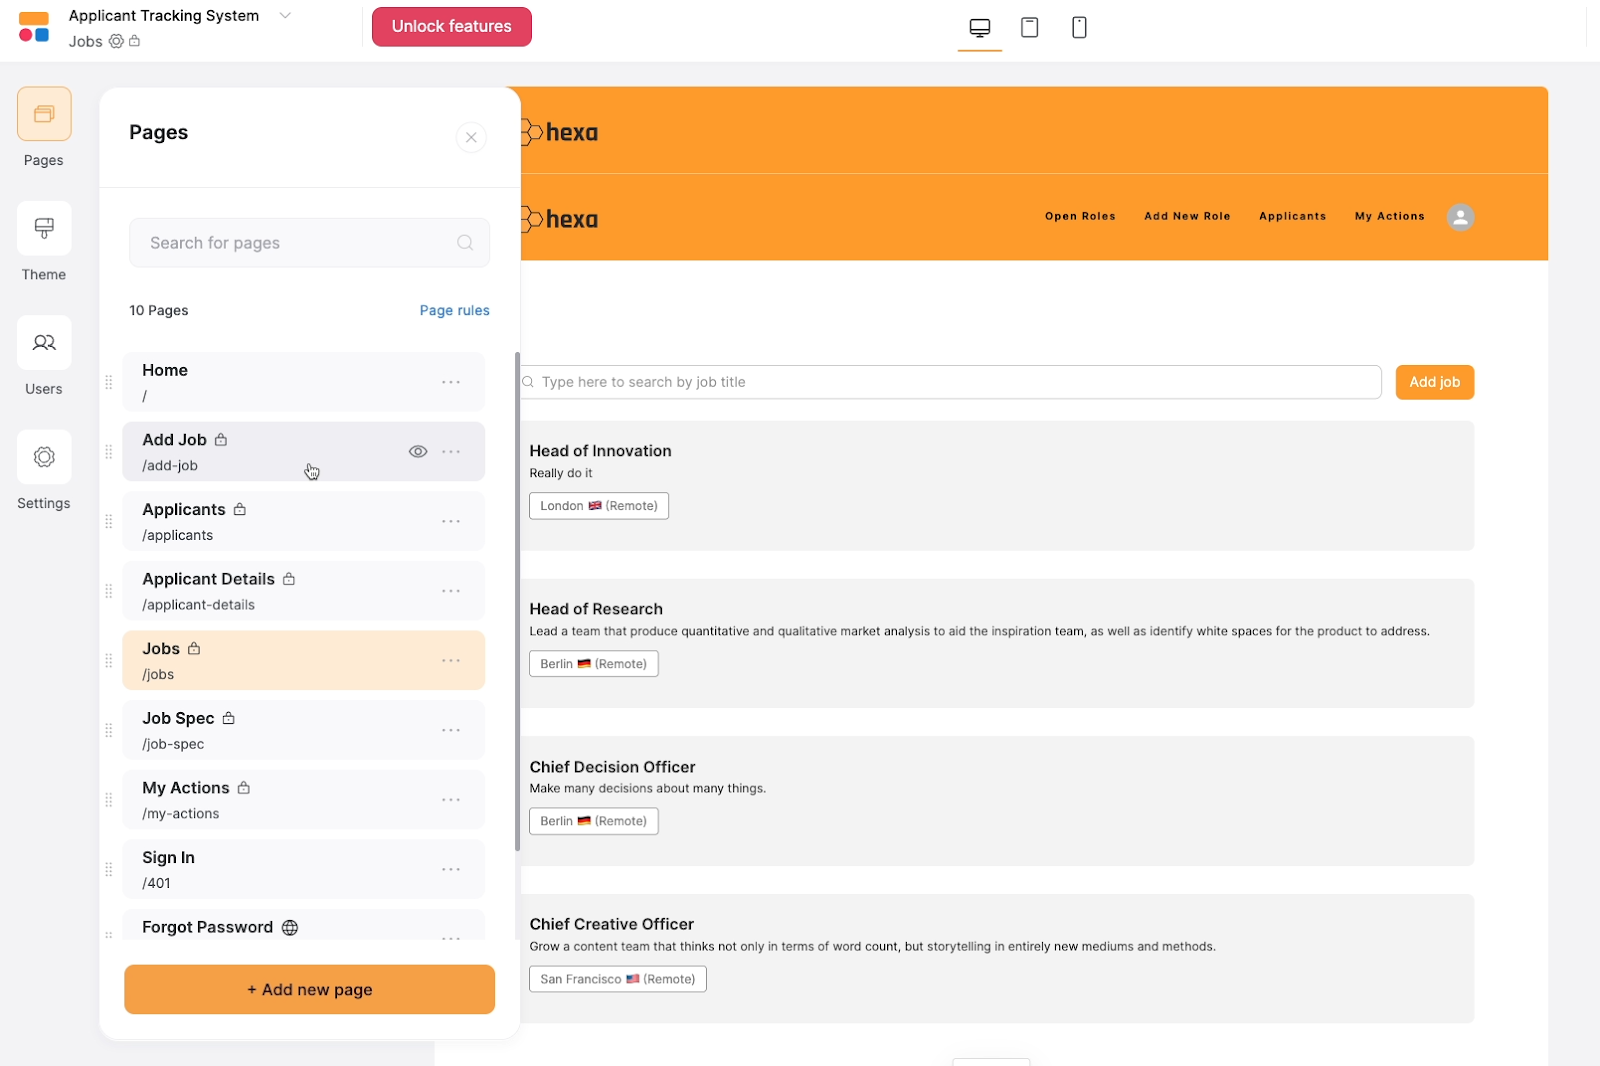
If you look at the “Add Job” page in the editor, you can see a form for adding a new job, and you can see that the form is connected to the “Positions” table of your Airtable base.

To submit a response, you’ll have to view the live page to see the most recent published version of your app.
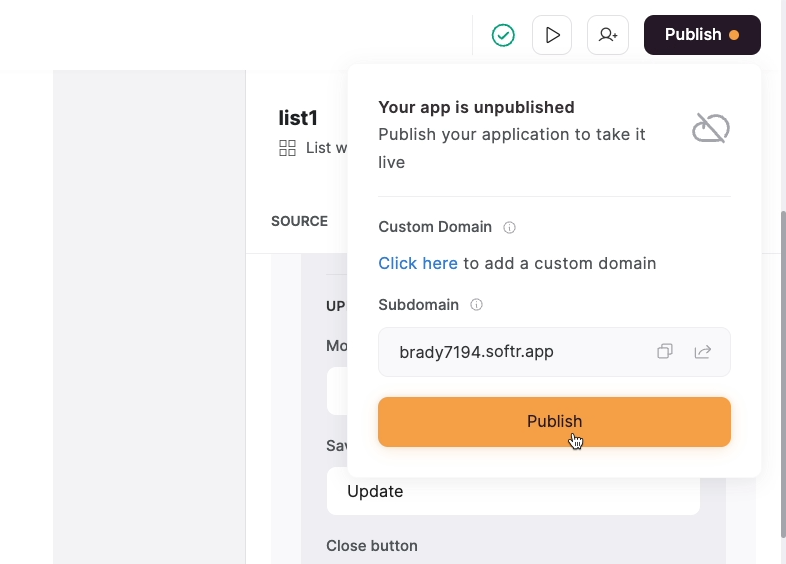
Alternatively, you can click on the Preview button to see your app with all of your unsaved changes.

If you need to sign in, just click on this link to sign in as “Lucie”, a profile that Softr created for anyone to test out the template with. We’ll add a method for signing up with your real email account later on.
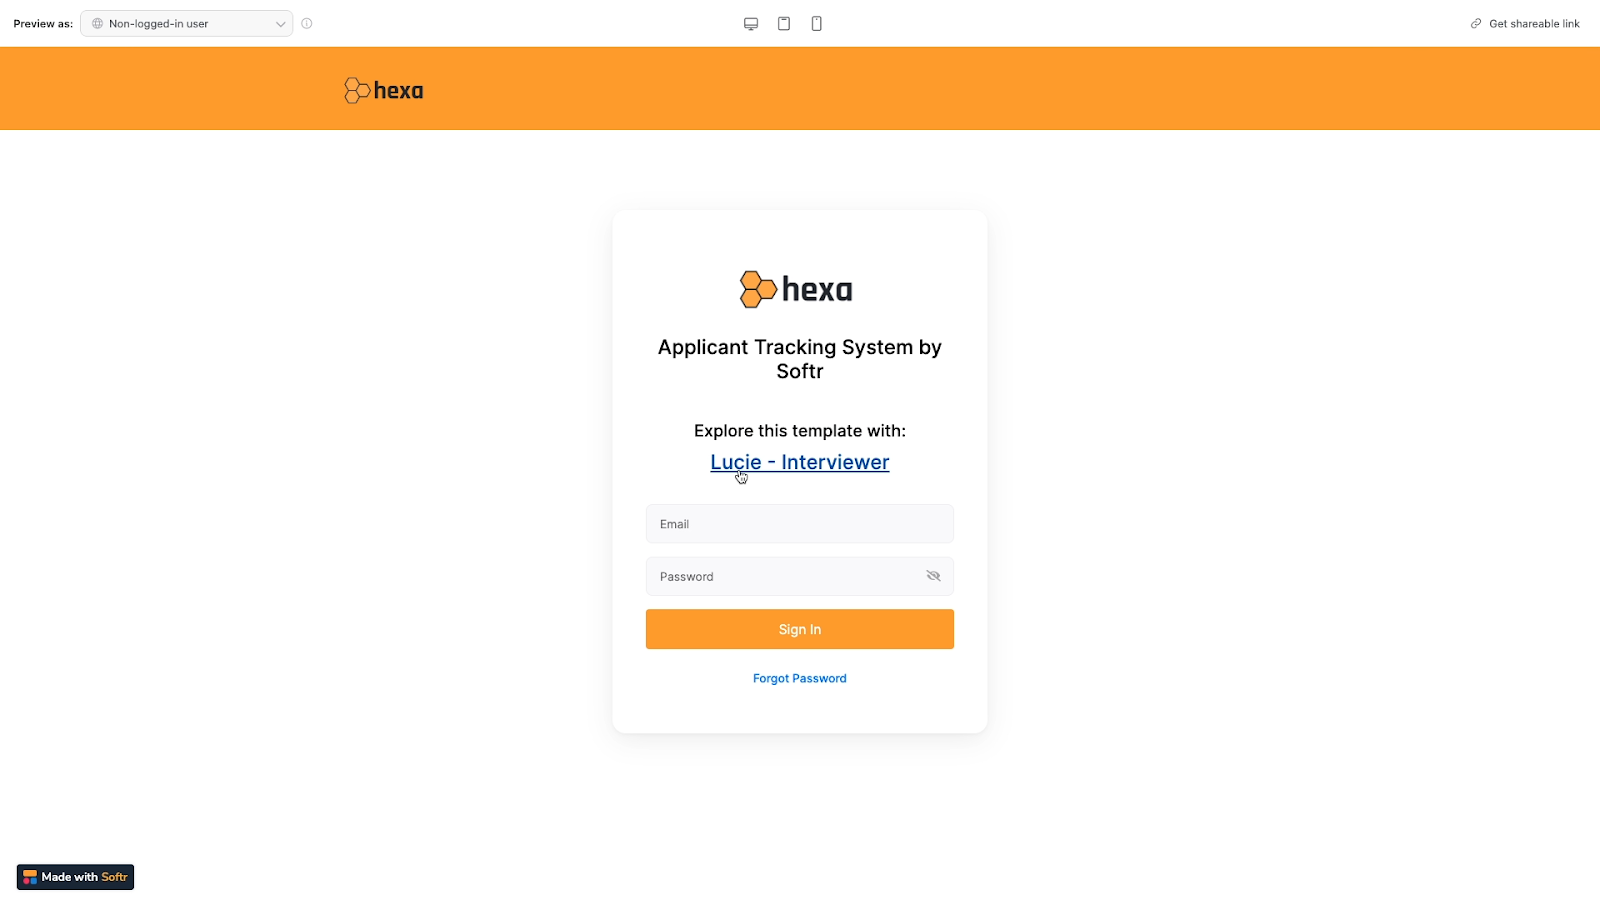
Now fill out the form with a test response.

When you click “Add job”, it says a new role was successfully added. But when you check the “Open Roles” page again, you won’t see the newly submitted job.
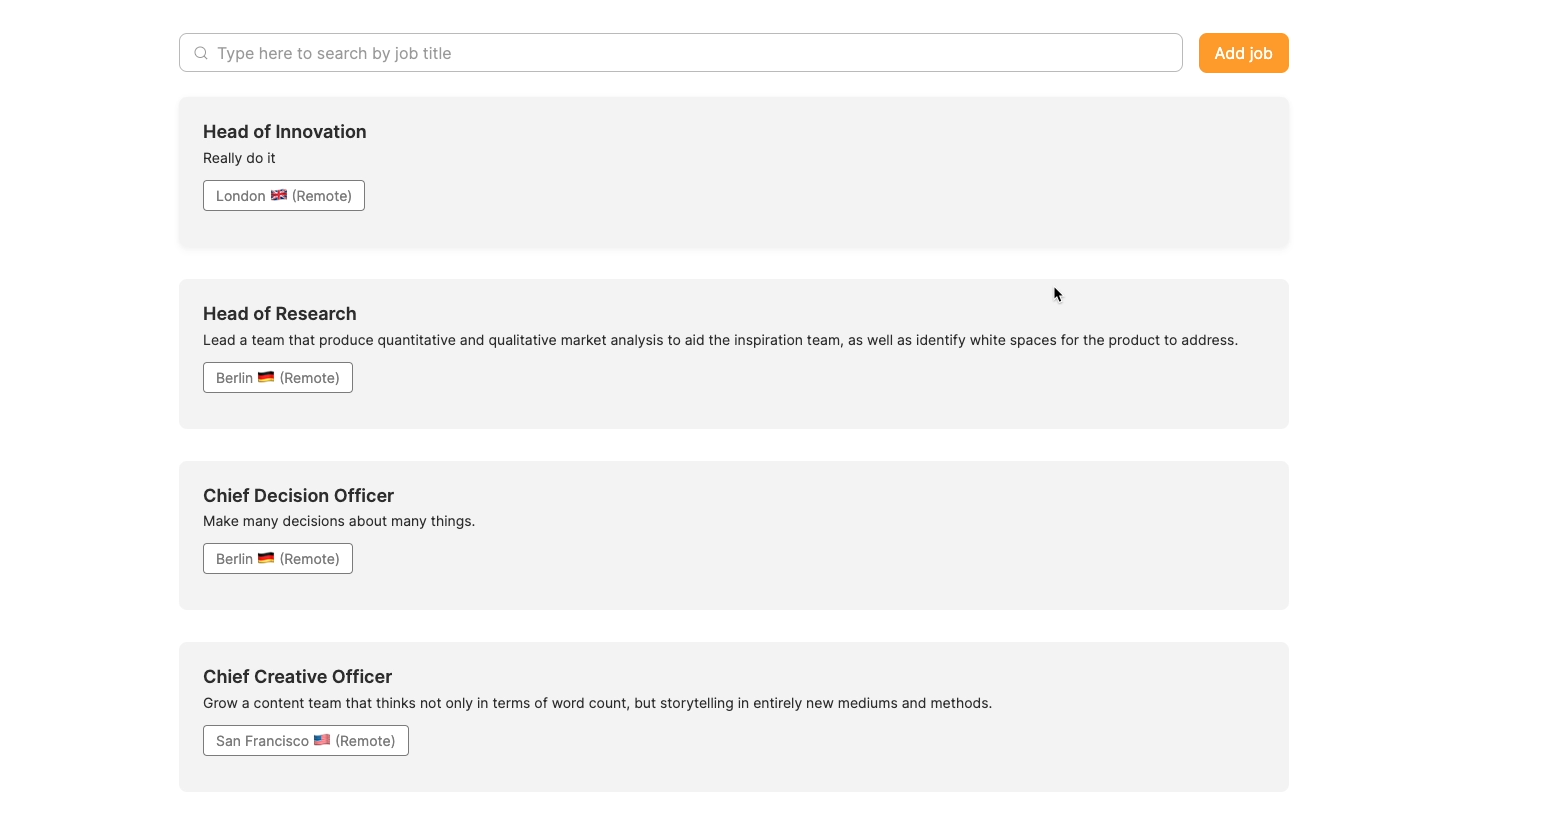
If you go back to the editor, you can see why. The “Open roles” list pulls data specifically from the “Approved Positions” view.
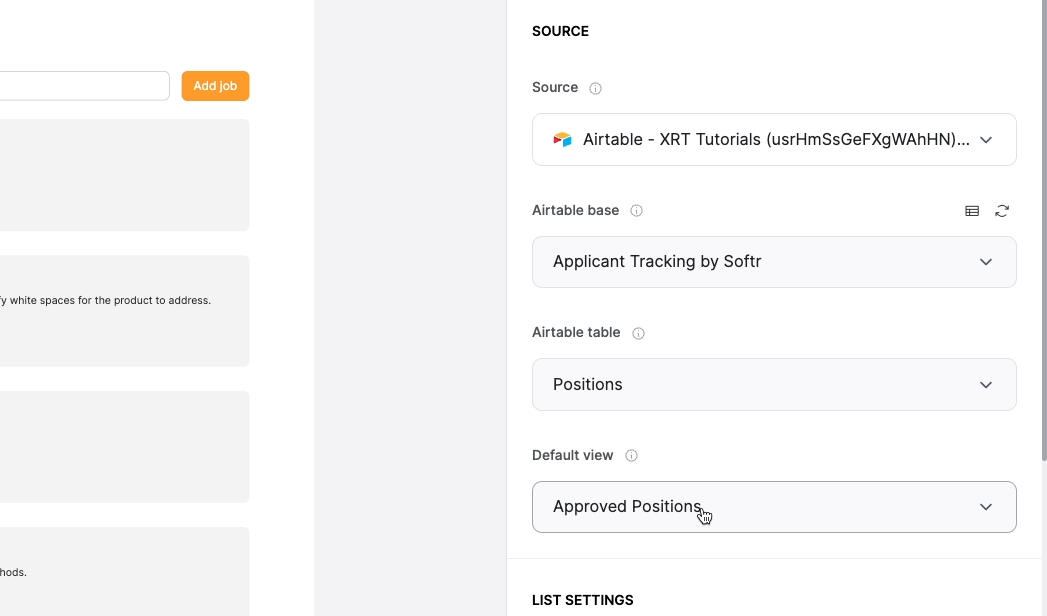
When we submitted a job through the form, the “Approved” field wasn’t included, so the job wasn’t marked approved. Over in Airtable, we can see our submission in the “All positions” table, so the form worked correctly.
The job just needs to be approved first before it can appear in the “Open roles” list. We could update the job listing in Airtable, but instead, we’re going to show you how to make a new page in this Softr template specifically for approving jobs.
Adding a new page and a dynamic list to your Softr app
By creating a new page to approve jobs, you'll learn how to:
• Create and link pages
• Add and customize blocks
• Manage data coming from an Airtable connection
Let’s get started!
Add a page to your Softr app
To add a page to your Softr app, click on “Pages” in the left-hand menu. Then, select “Add new page”.
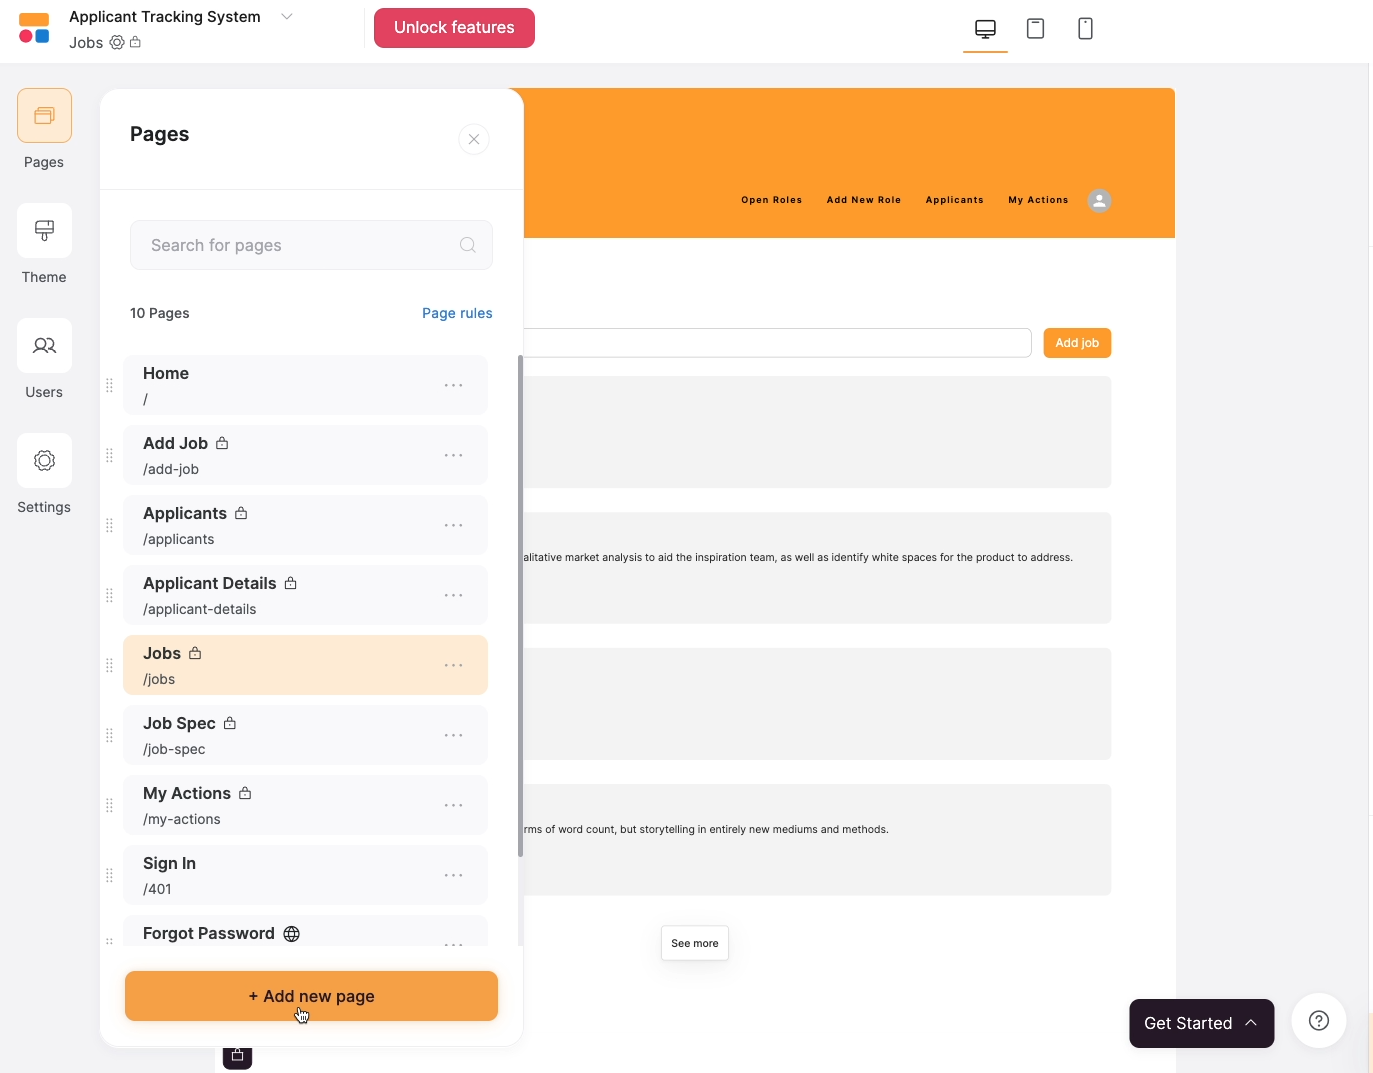
Your new page will essentially be a blank slate to start from. The only content you’ll see will be the header and the footer, which are automatically added to every page on your Softr app. Both of these can be edited and styled from the home page.
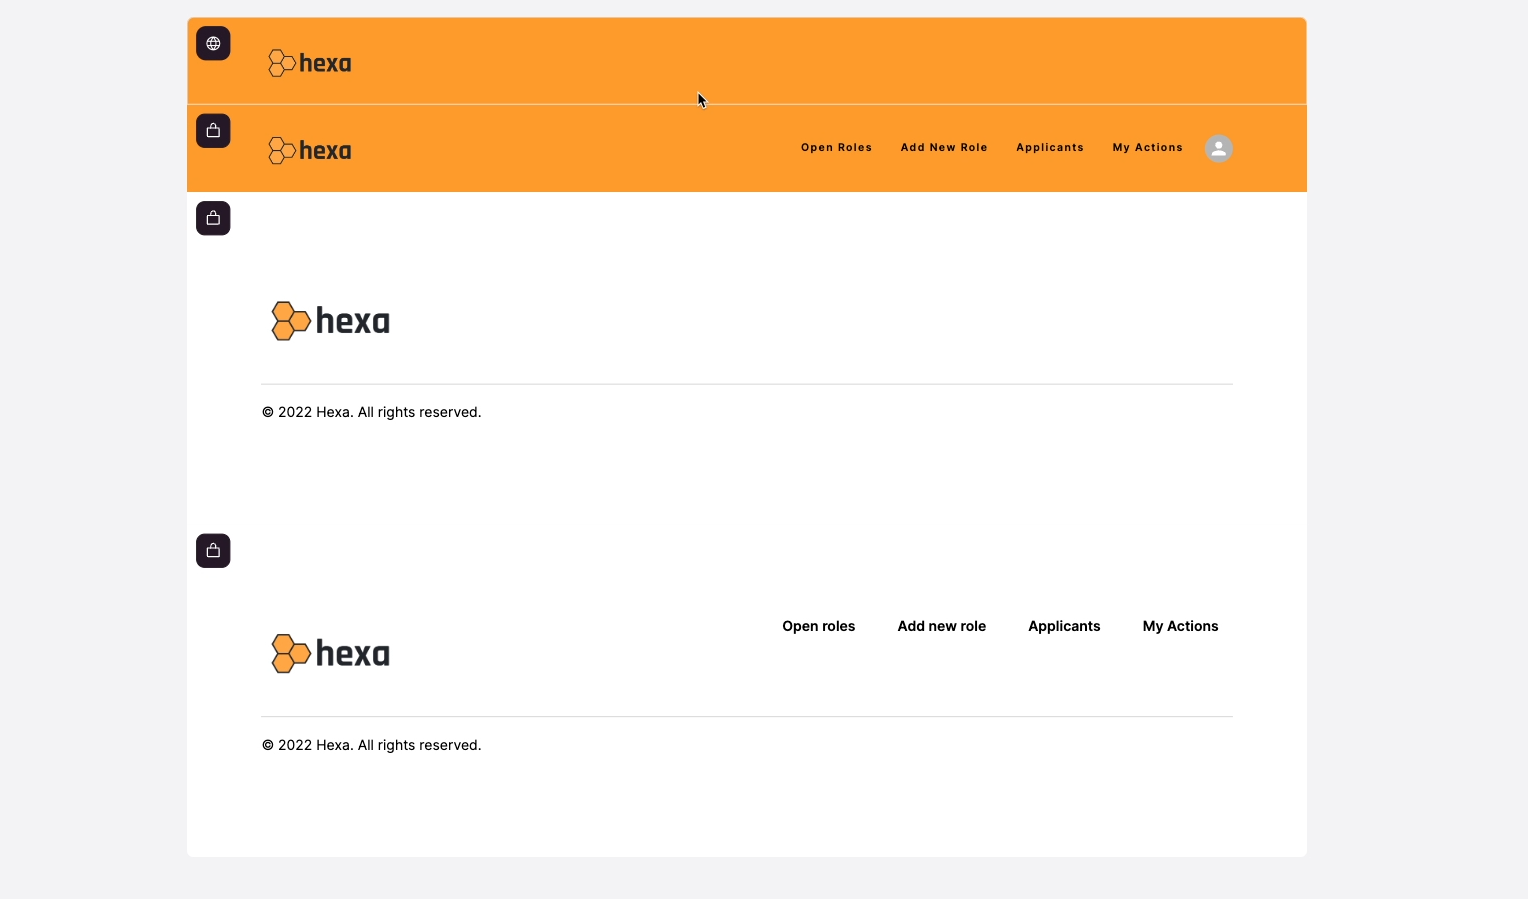
Add a block to your new page
To add a new content block to your page in Softr, just hover your cursor beneath the header, and click on the plus sign.

You’ll see a menu of blocks that you can add to the page, sorted into two main categories: Dynamic and static. Dynamic blocks are populated with data from a source like Airtable, while static blocks will simply display the text, images, and other content that you provide directly. Let’s start with a static block.

We’ll add a hero section to this page that explains what it’s for. As you’re perusing the various content blocks in Softr, bear in mind that all of these elements can be customized. Most buttons, labels, and images can be rearranged, hidden, or deleted if you want.
Don’t worry about finding something that looks exactly like what you want. Just pick any block that looks pretty close. We’ll go with “Hero with call to action”.

We don’t really need that button, but it’s no big deal - we can just remove it later. When you click on the block, Softr will add it to your page below the header.
Editing and configuring a Softr content block
Now, let’s edit our new hero section. Click on any block to open up a configuration menu on the right.

For the most part, Softr does not use a drag and drop interface. Instead, you’ll usually edit each block by selecting it, then configuring it through menus like this.
In this “features” tab, you can edit things like the block’s title and subtitle, the hero image and its layout, and more. We’ll add a brief title and subtitle to the block.
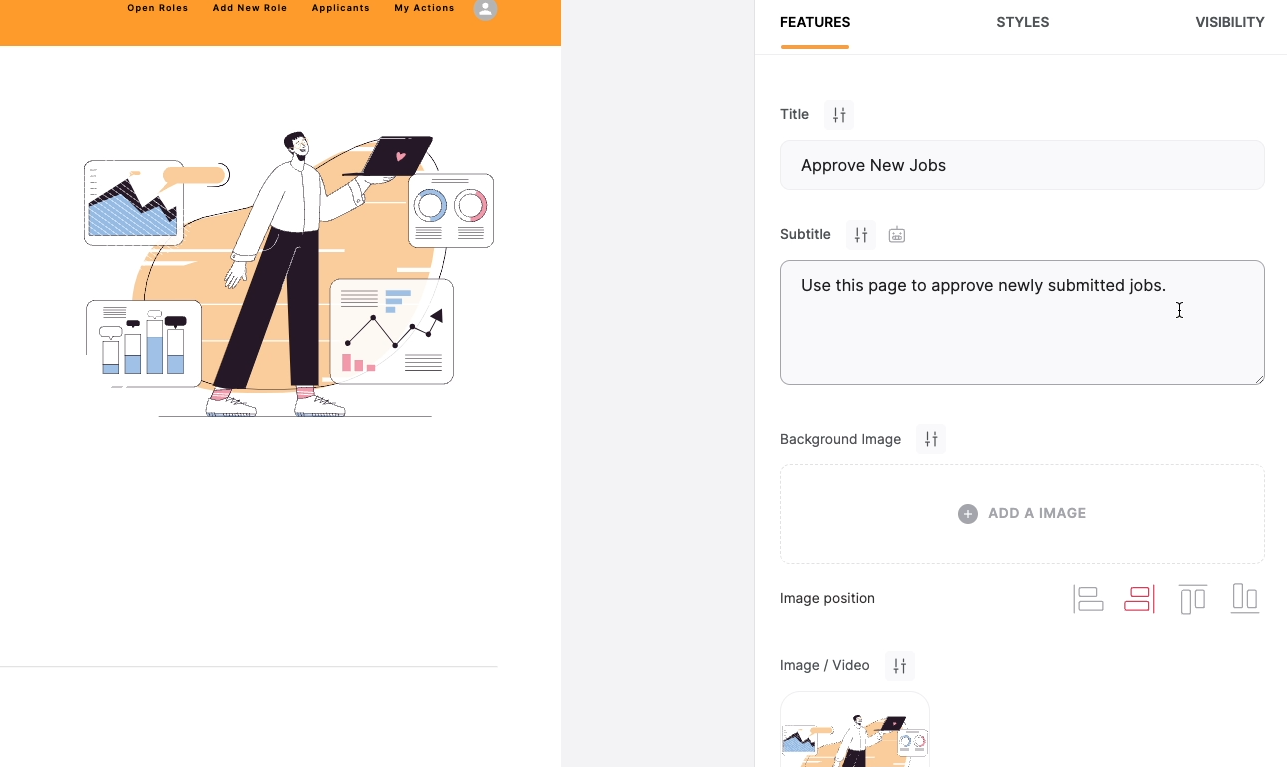
Any elements in a block that you don’t want to display can often be hidden or deleted. Just select the element in the right-hand menu, and look for a delete (trash can) or hide (eyeball) icon.
For instance, we’ll delete the button from our hero block .
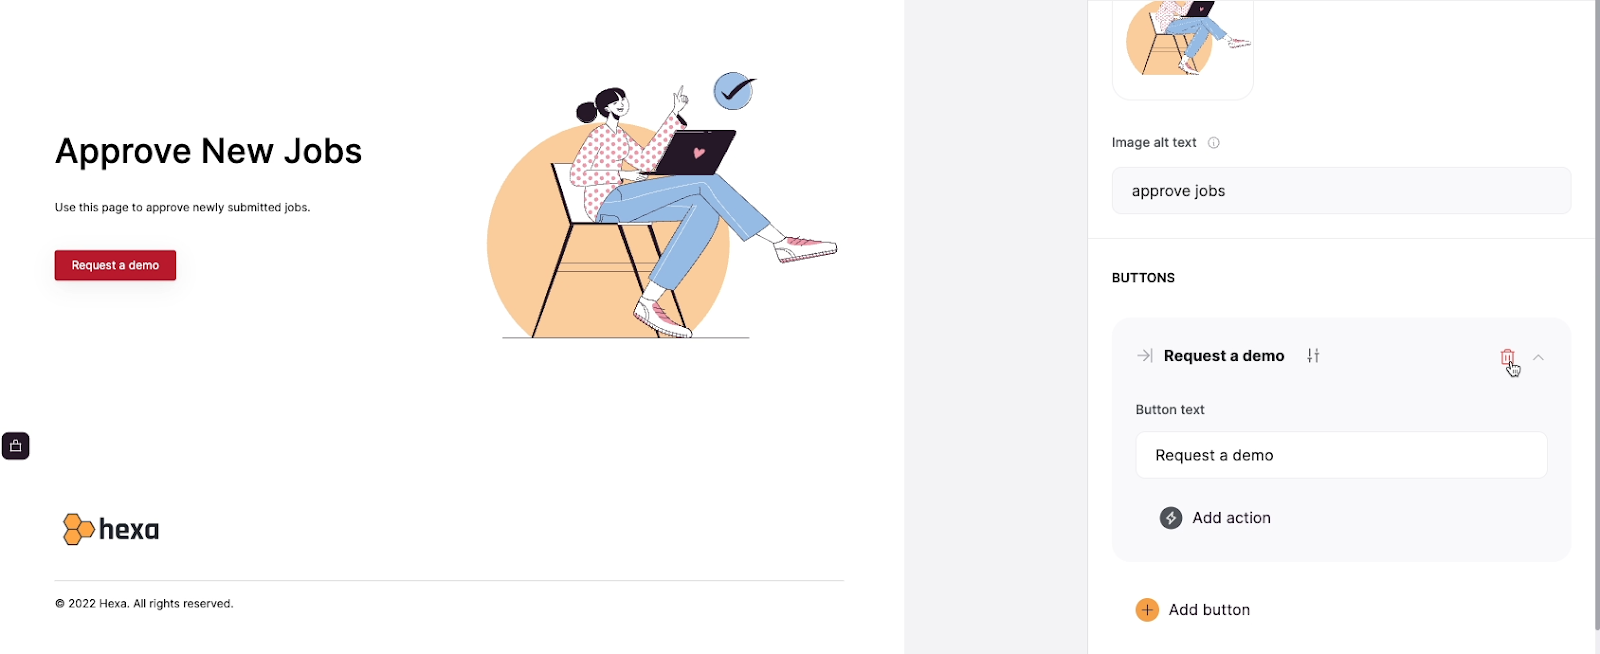
The other two tabs, Styles and Visibility, are available in every block in Softr. Under “Styles”, you’ll find some additional visual customization options. You can adjust the padding at the top and bottom of the block, change the background color, and add borders if you’d like.
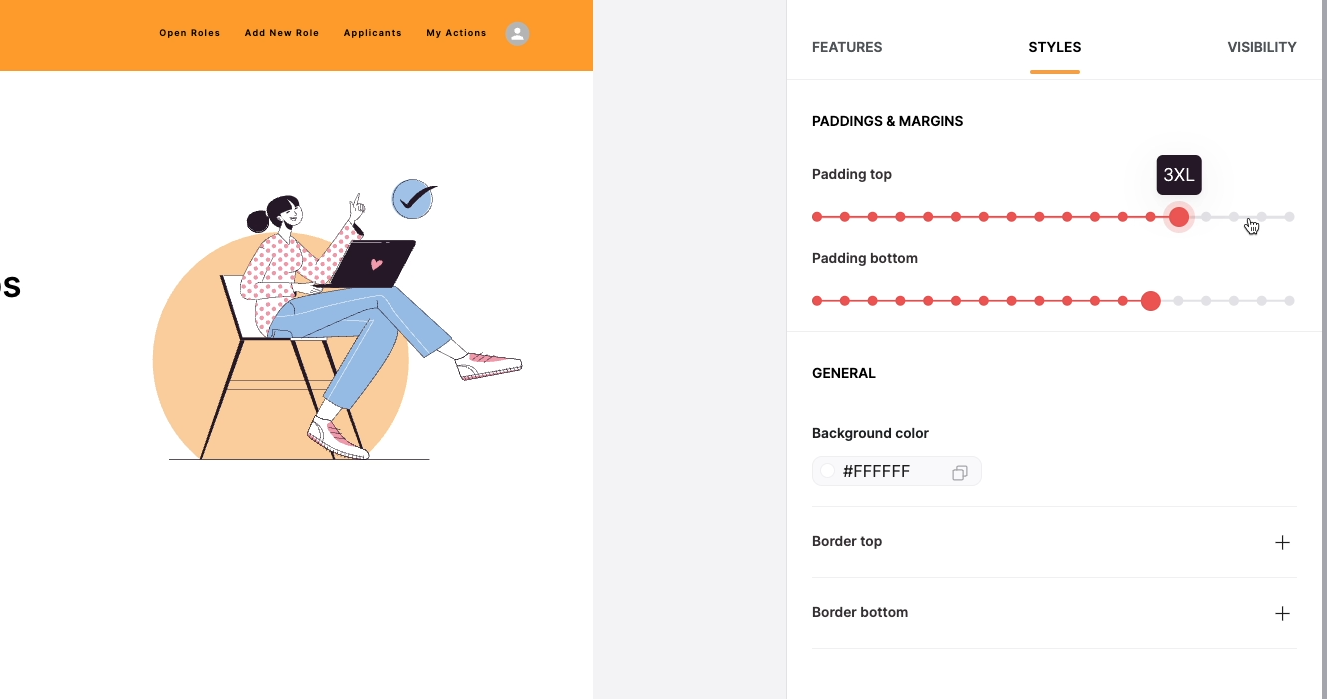
Under visibility, you can choose to make the block visible only to users who are signed in.
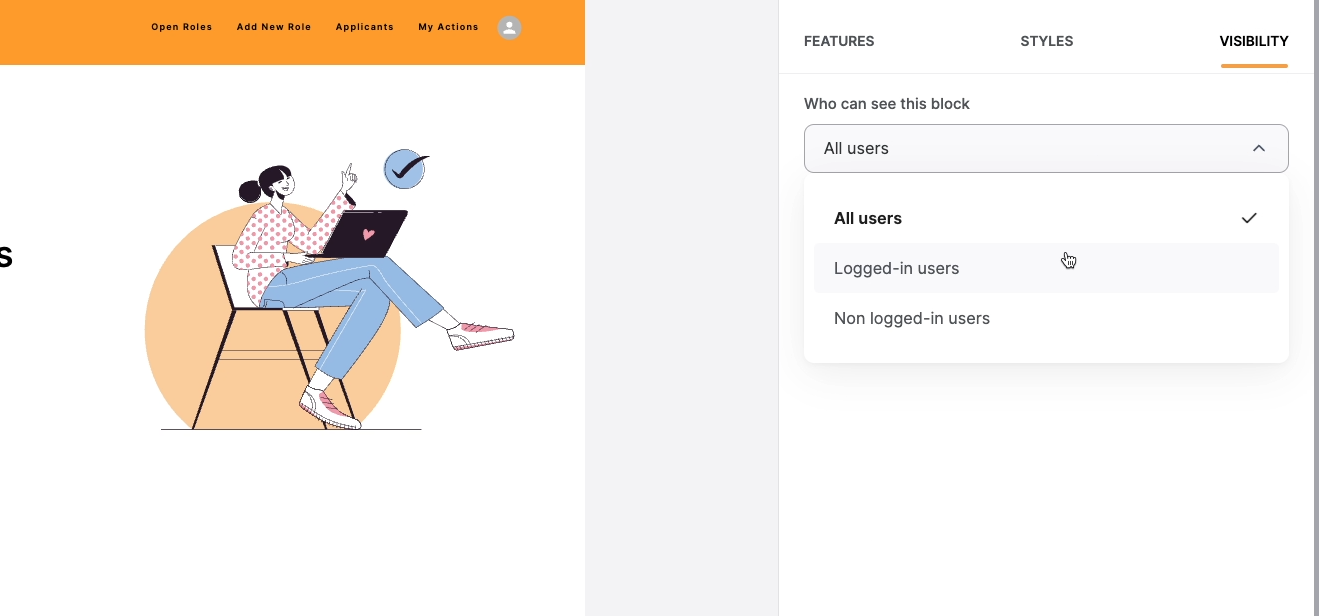
From there, you can also choose to further restrict visibility to users who are signed in and belong to a specified user group. We’ll cover user sign-ups and user groups in more detail later on.
For now, this static hero block is all set. Next, let’s add a dynamic block where we can approve jobs.
Add and configure dynamic blocks to your Softr app
To update data in Airtable from Softr, you’ll need to:
1. Add a dynamic list block to your page
2. Add an “Edit” action to a button in that list block
Add a “list block” to your Softr page to display data from Airtable
Add a new block to your page by hovering your cursor underneath any block, and click on the plus sign.
Then, browse through the blocks available under the “Dynamic” tab.
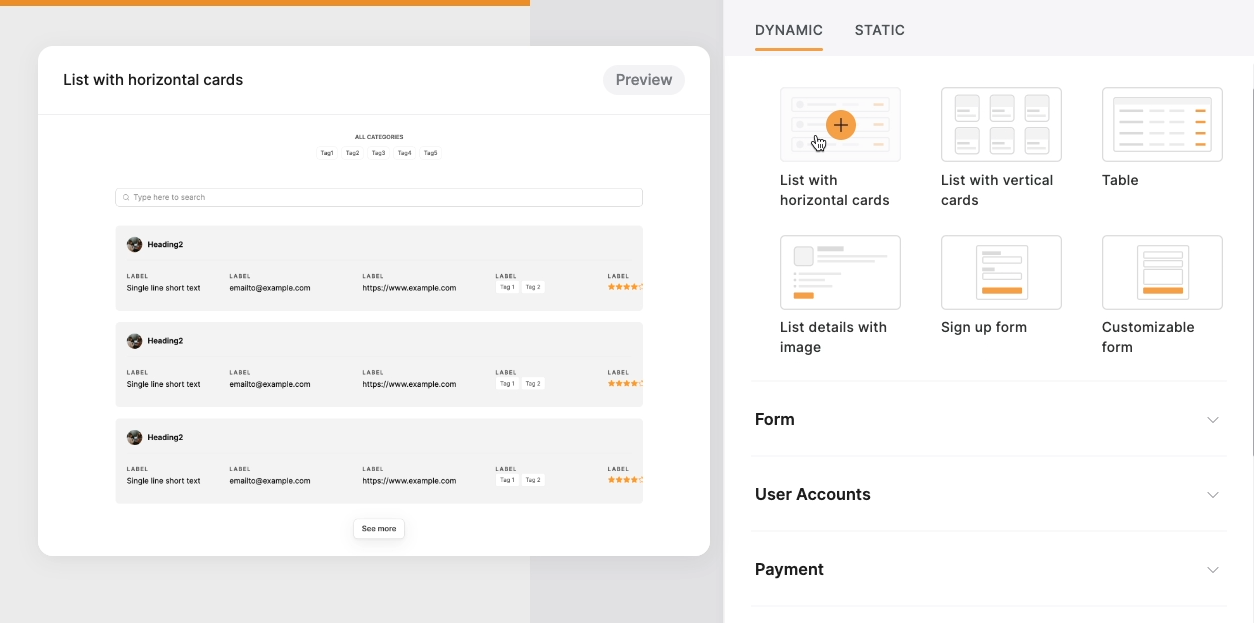
You can choose any of them, but we’ll go with the “List with horizontal cards” block in our example. If you don’t see that option under “Suggested blocks”, just scroll down for more categories.

Next, under this source tab, you’ll need to specify where the data that populates this list should come from.
You’ll have to pick from data sources already connected to Softr, like the Airtable workspace you connected to the app when you created it. Then, select the base. With this template, the relevant base will be called “Applicant Tracking by Softr”.
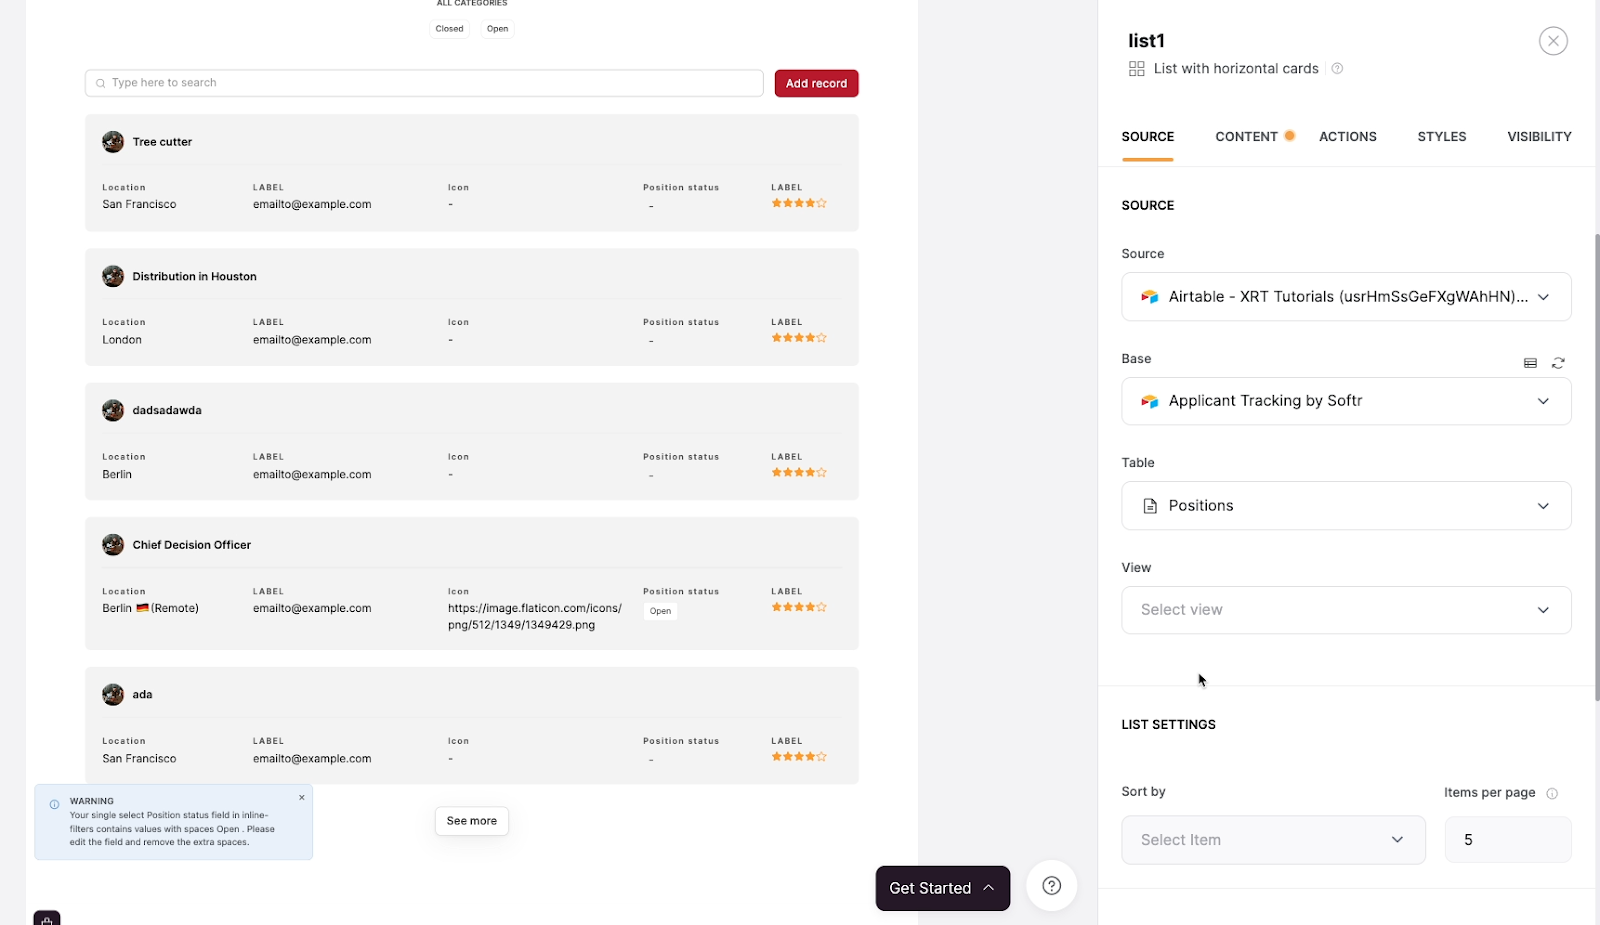
Select the table you want to refer to. We want to edit the job listings in this block, so that will be “Positions”. Once you’ve chosen a table, Softr will begin auto-mapping fields from Airtable to the list. It might not map all of the fields very well, but it should at least give you a decent starting point. You can update it later to map all of the fields to the correct content.
Filter your data in Softr by creating views in Airtable
Next, choose a view to display. You can choose any view that you want. But since this page is all about approving jobs, it would make sense to limit the list to only show jobs that haven’t been approved yet.
You could do that with a filter in Softr, or we could accomplish the same thing by creating a dedicated view in Airtable.
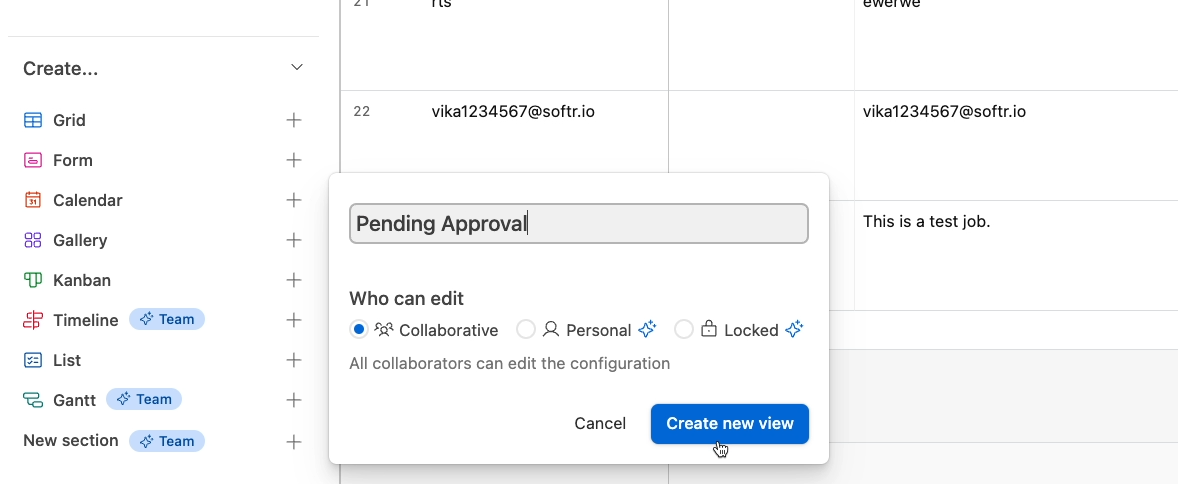
We’ll switch over to Airtable and quickly make a filtered “Pending Approval” grid view that only shows records where the status of the “Approved” field is not “Approved”.
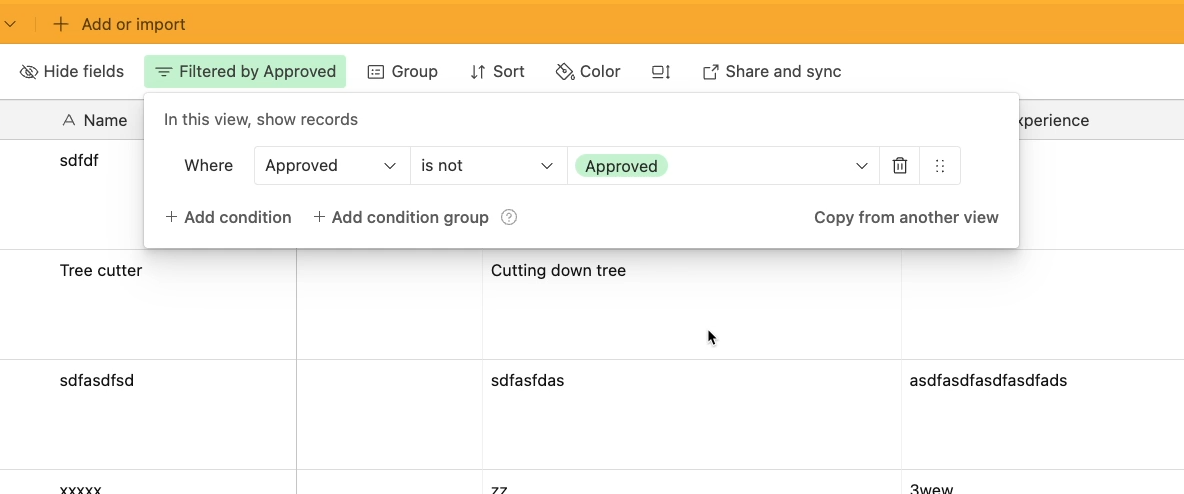
After creating a new view in your connected Airtable base, you may need to refresh the base in Softr. You can do that by clicking on the “refresh” icon next to the base’s name.
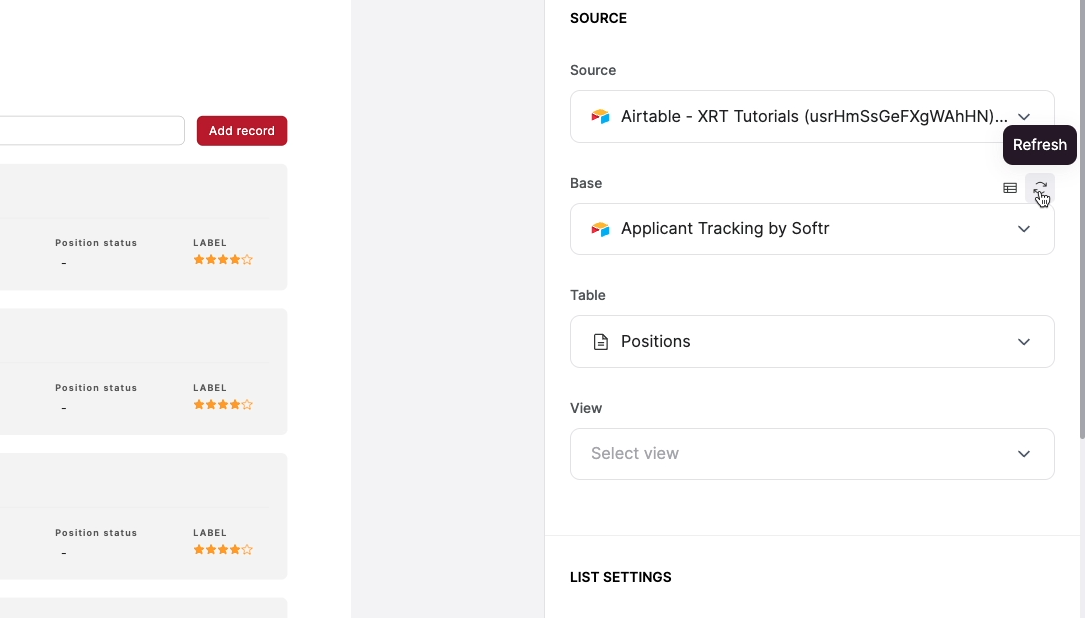
After refreshing, select your newly created Airtable view.
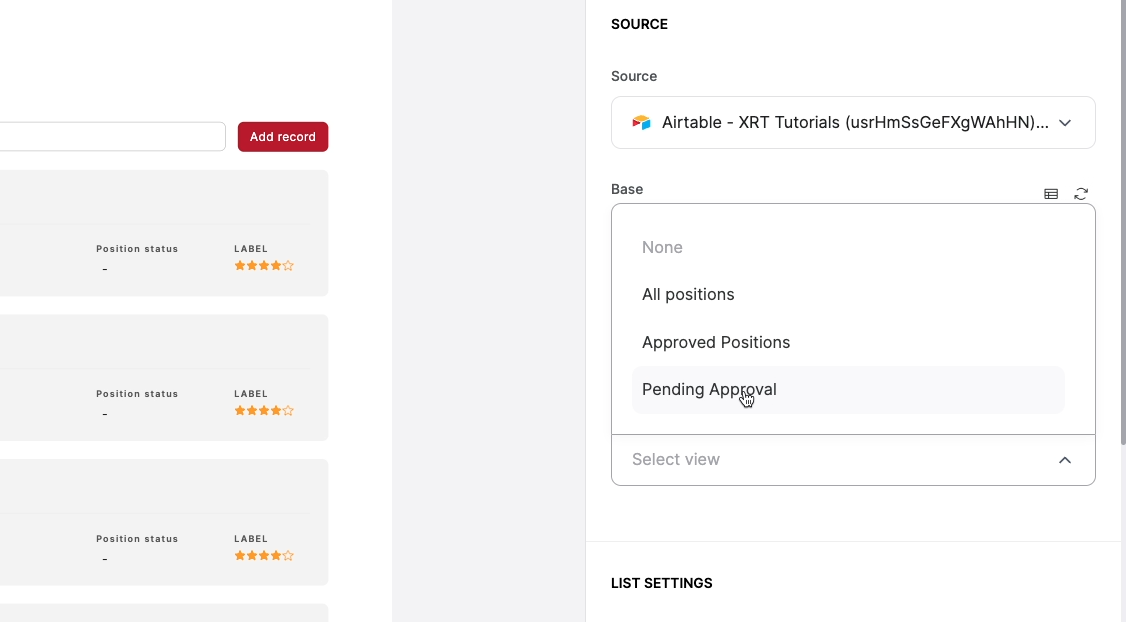
Now, the list will only display records from the “Pending Approval” view.
Under “List settings”, you can choose how many items to display on each page, and set a sort order. You can choose to sort by any field from your Airtable view, even if that field isn’t mapped to any content in the list.
Adding conditional filters in Softr
Next, you can narrow down your list further by adding conditional filters. You can set conditions here much like you would in Airtable. However, as Softr notes when you start creating a condition, “Editing mode doesn’t show accurate filtered results”. The items you see on the left may not reflect the items that you’d see in the published app.
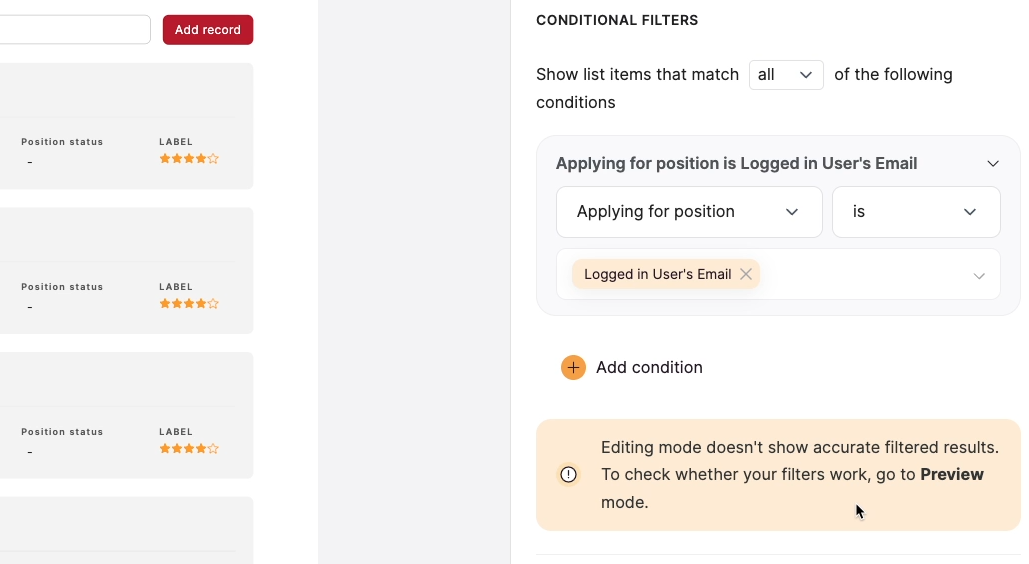
Because of these limitations in Softr filters, you may prefer to apply all of the filters you want to an Airtable view, then set that view as the default for your list. That way, you’ll see an accurate list of data even when you’re in editing mode.
However, you may not always want to clutter up your Airtable base with another view, so the choice is up to you.
For our example, we’ll just display all the records in our chosen Airtable view, and skip adding any conditional filters in Softr.
Add an empty state to your Softr list
Next up, you can choose what to do when your filter returns no results. In other words, if there are no jobs to display here, this is what Softr will display instead. By default, the list will show an “empty state” message.
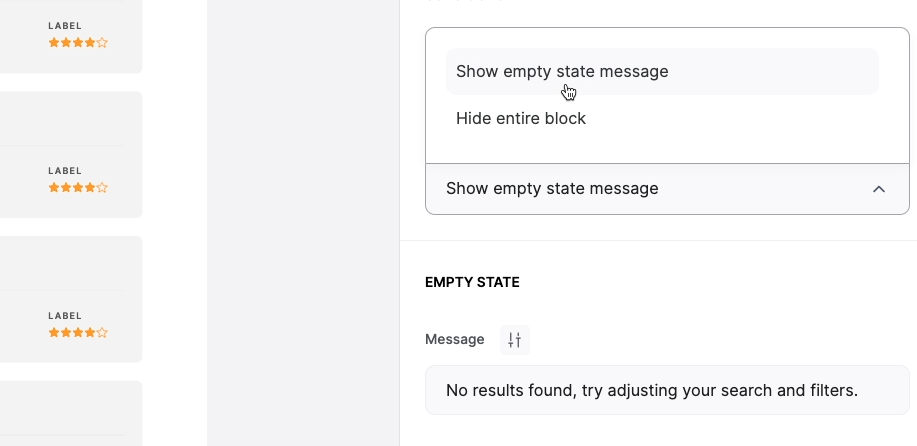
You can customize that message under the “Empty State” heading here. Alternatively, you can choose to hide the block entirely if there are no results to show. We’ll go with an empty state message, and customize it a bit for our use case.
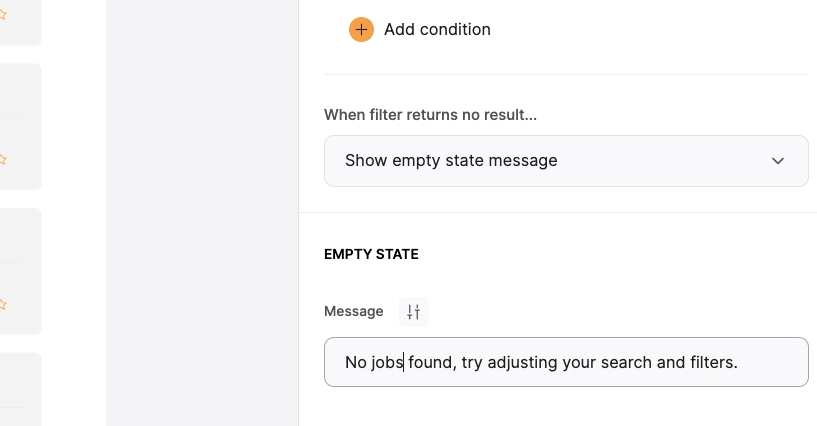
That covers all of your options in the Source tab.
Choose what data to display in your list block
Under the “Content” tab, you’ll see several options for configuring what data is displayed in your list, and how it’s styled.

There are lots of useful settings here, but the most important option is “item fields”. This is where you can choose which fields from Airtable are displayed in your list, and what they look like.
You’ll see all of the fields that Softr automatically mapped here, and you can edit them however you’d like. For instance, this first H2 content area that acts as a title for each item is mapped to the “Name” field.
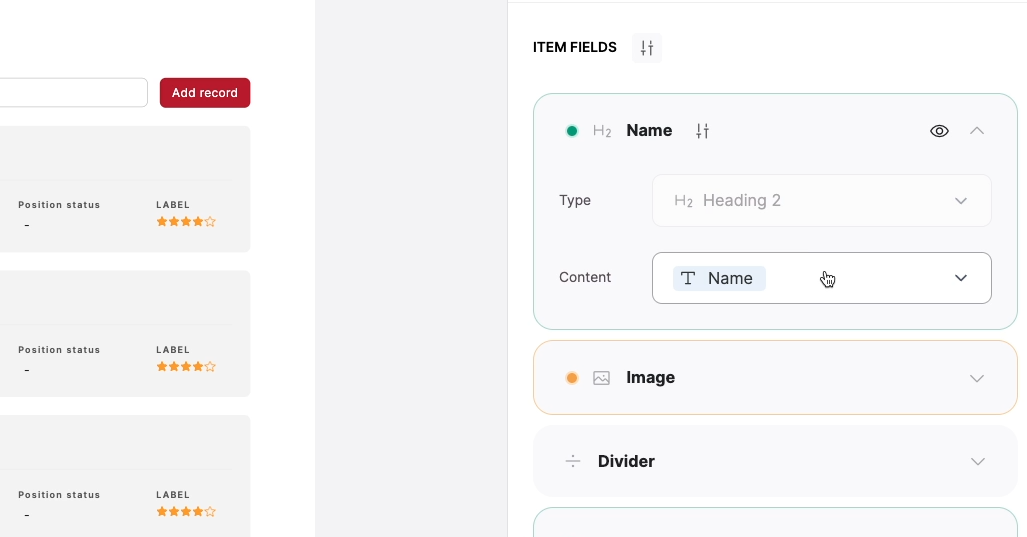
When you select any item here, you can adjust various settings. Since this H2 is a key part of the list block, you can’t change its type.
However, you can change the field it’s mapped to, or click the “hide” button if you don’t want it in your design.
In our example, we want to keep the H2, but we don’t really need the image or the divider, so we’ll hide both of those.
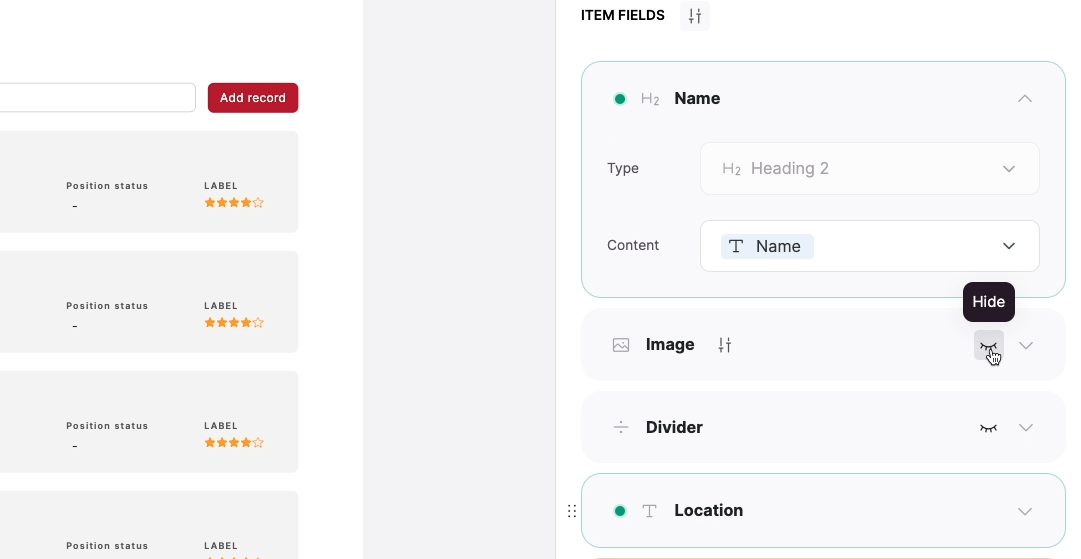
Next, the design has an element for an email address, but that’s not relevant to our data, so we’ll delete that, along with the icon and star rating elements.
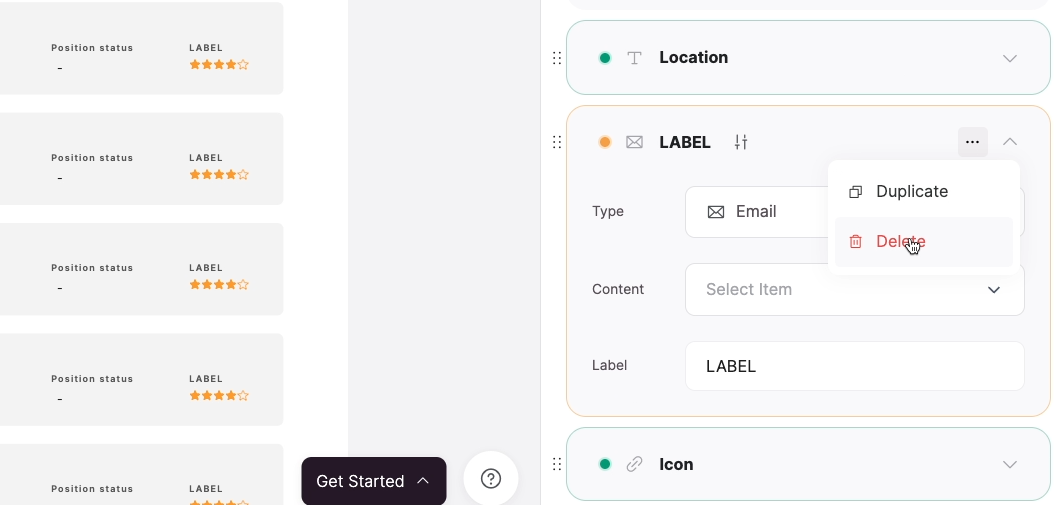
Add fields to a list block and map content
Our list is looking a little barren now, but we can easily fill in these cards with more pertinent information now. First, we’ll add a field for the description.
To add a field to a Softr list, just click on “Add field”. Then, choose the field type.

For instance, we’ll use “Rich Text”.
For “Content”, choose the field from your data source that this field should be mapped to. In this case, that will be the “description” field.

Note that as soon as you map the field, you should see the content appear in the editor.
Finally, you can give this element any label you want. We’ll just call it “Description”.

That gives each job listing a little more context. To finish up, you can add and map any other fields you’d like.
If there’s a field you want to include that isn’t in Softr’s Airtable template, just add it to Airtable directly, then map it to your list in Softr.
Add a button to edit records in your Softr list block
After mapping all of the fields that you want to include in your list block, you can now see all of the data from your chosen Airtable view.
However, you still need to add a way to edit that data.
To edit items in an Airtable database from Softr, you need to add a button from the “Actions” tab in the block configuration menu, and set up an action for it to perform.
Topbar buttons
You should see that an “Add record” button is already included here under the “Topbar Buttons” section. Buttons added in the Topbar section will always perform the same action.
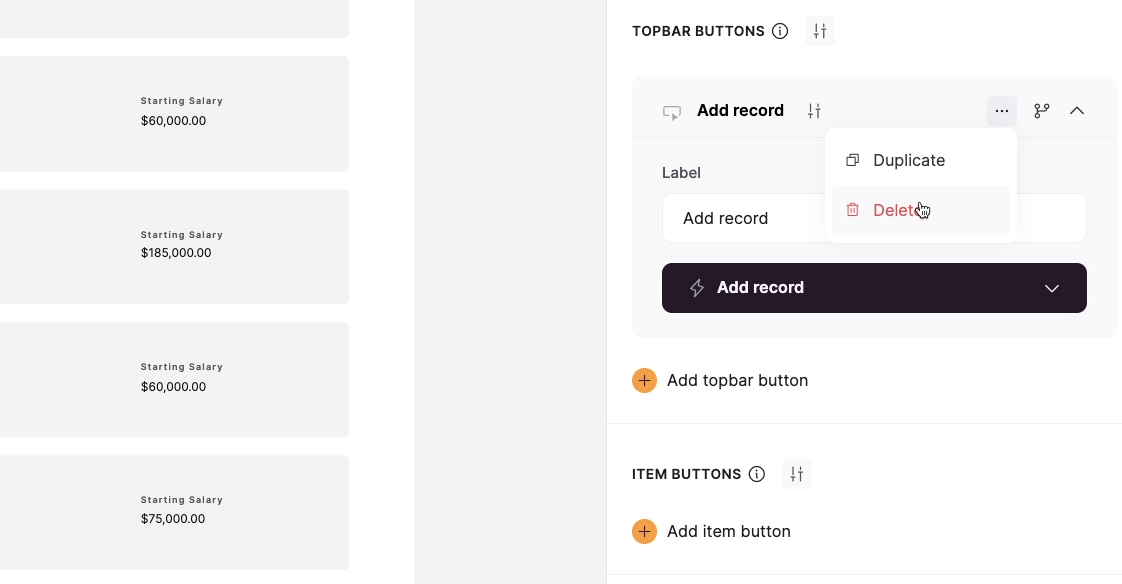
For instance, they can open up a specific URL, scroll to a point on the page, or let you add a record - which is what the default button in this block is set up for.
Since you have a way to add records on another page in this template, you can just delete this button.
Editing records with an Item Button
To edit a specific record, you’ll need to add a button in the “Item Buttons” section.
An “Item button” will perform an action related to the item that it’s connected to. When you add an item button, you have a few options. The button could open the details page for each record, or perform similar actions to a top bar button, like “open URL” or “scroll to”.

To edit a record, you’ll have two options: “Edit record” or “One-click update”.
“One-click update” will let you update a single field of the record to a specific value by just clicking once on the button.
“Edit record” enables users to manually edit records however they’d like for specific fields you configure.
Let’s use “Edit record”.
Once you add an “Edit record” button, you’ll see all of the fields that can be edited when clicking on the button.
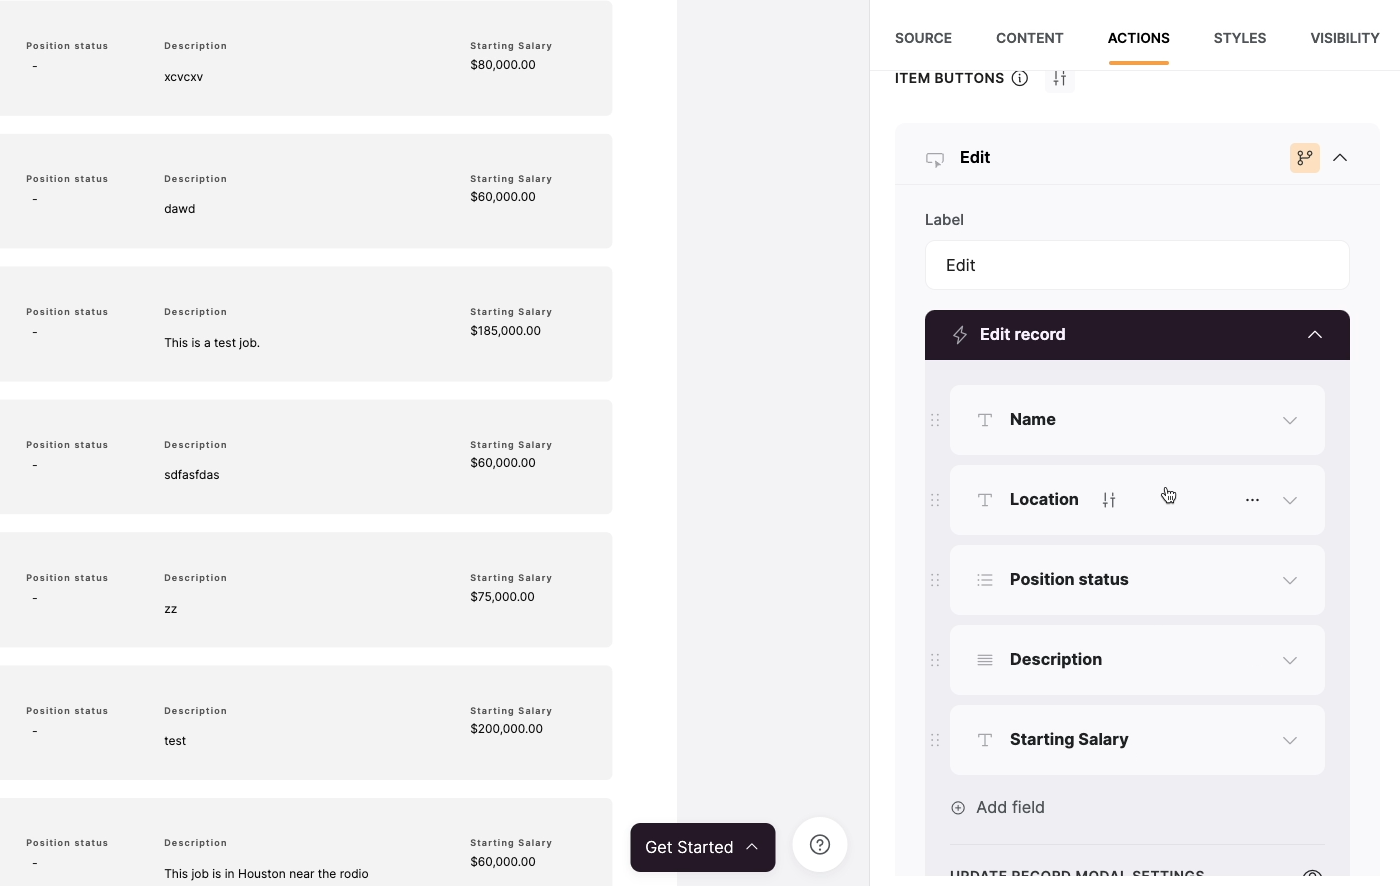
By default, Softr will only include the fields that are mapped to your list, but you can also add other fields from your Airtable view here.
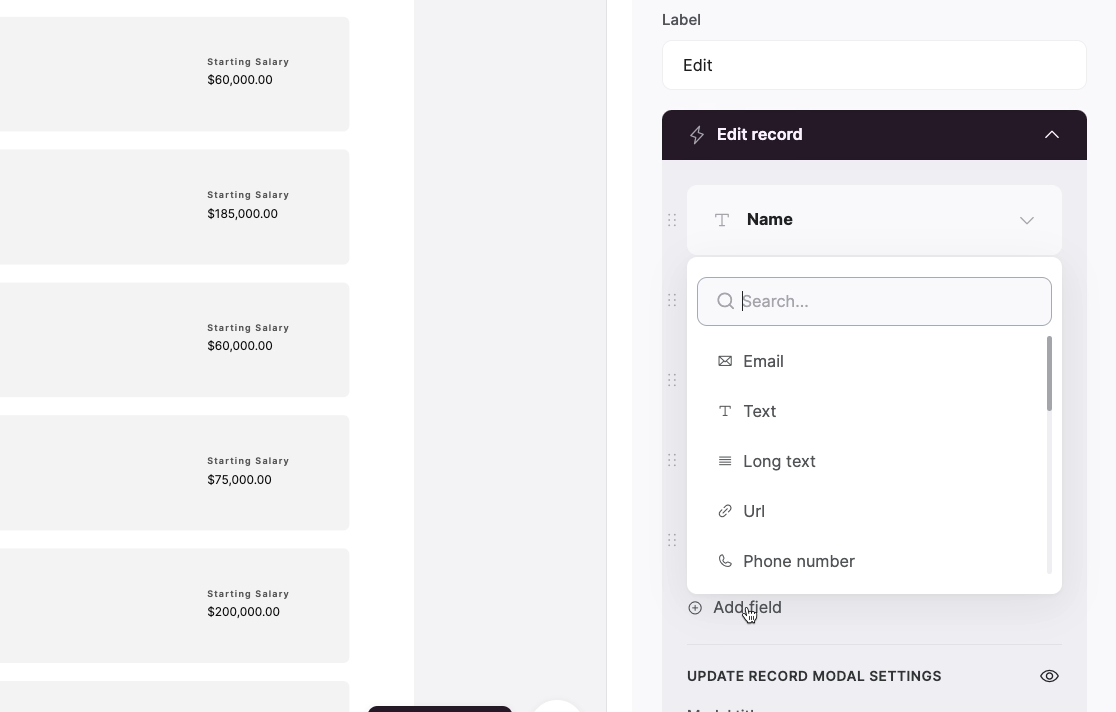
Just click on “Add field”, choose the field type, and map it to the corresponding Airtable field. We’ll add a dropdown field for the “Approved” field and sync the options from Airtable.
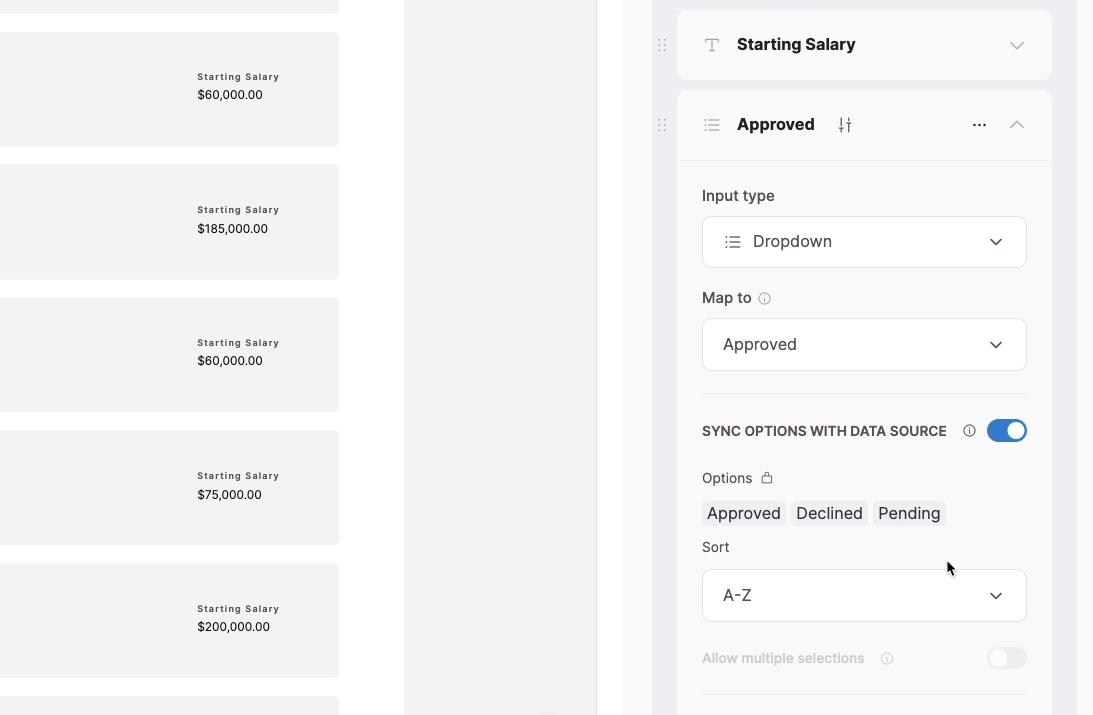
Then we’ll give it a label and placeholder text.
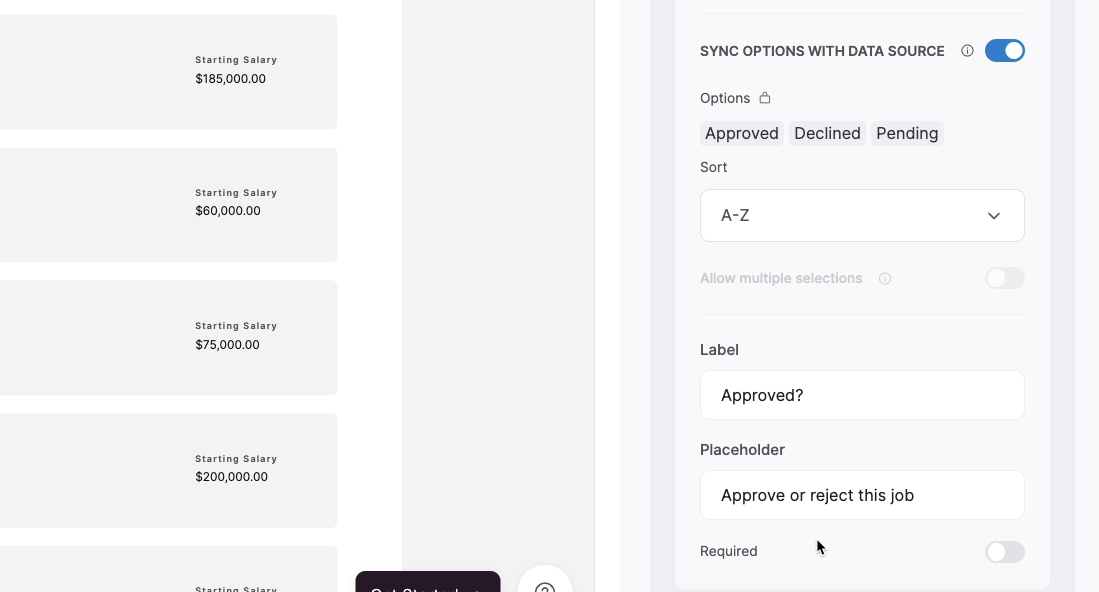
You should now be able to update your Airtable records from the Softr app, so give it a try. Click on the preview button to open up the app.
Click on the “Edit” button to edit any record.
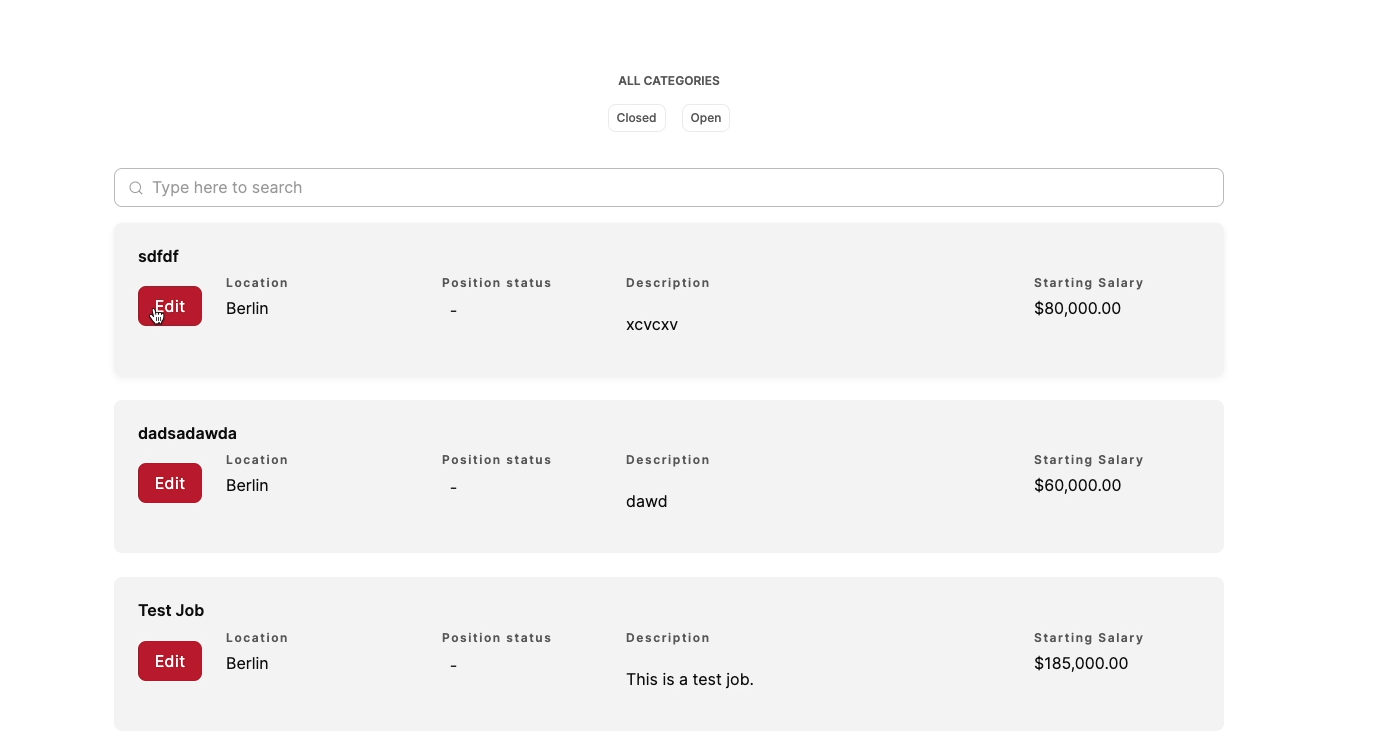
For instance, we’ll just pick the first one in the list. We’ll change the name to “Test record - updated through Softr”. Then, we’ll set the status of the “Approved” field to “Approved”.
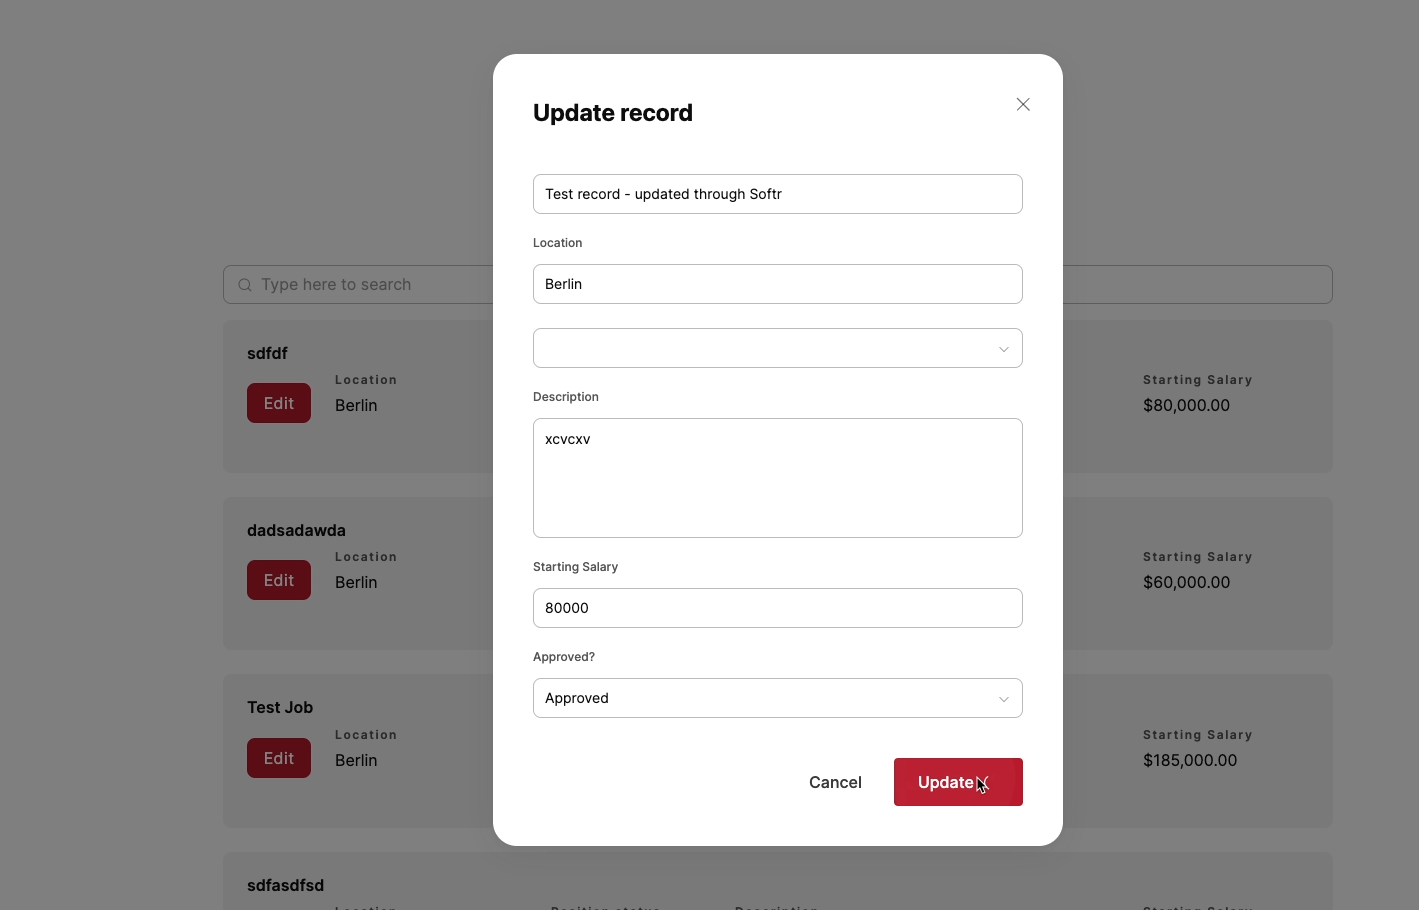
To submit your changes, click on the “Update” button.
Immediately, the record will disappear from your Softr list.
That’s a good sign - your connected Airtable view only displays records that aren’t approved, and you just approved this one. As such, it shouldn’t be included in that list anymore.
Just to confirm that you were able to update the Airtable record via Softr, check your Airtable base. You should see your test record in the “Approved Positions” view.
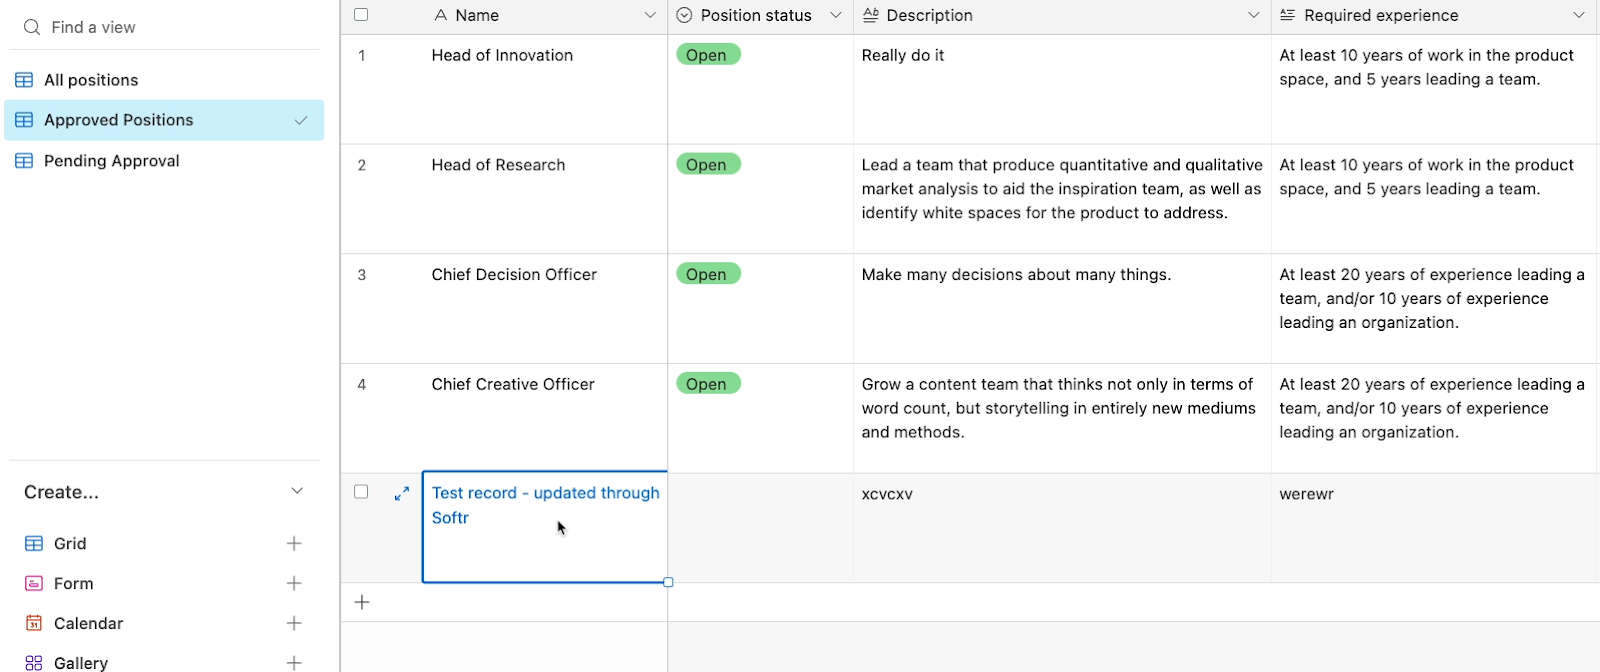
Adding a page to Softr’s navigation menu
Before we move on, the last thing you’ll need to do with this page add an easy way for users to find it.
Whenever you add a page, it won’t be added to your app’s top nav menu automatically. If you want it to be easily discoverable, you’ll have to add it manually.
To add pages to the top nav in Softr, open up your Softr project in the editor. Then, click on “pages” and open up the “Home” page. In Softr, you can only edit the header and footer from the Home page.
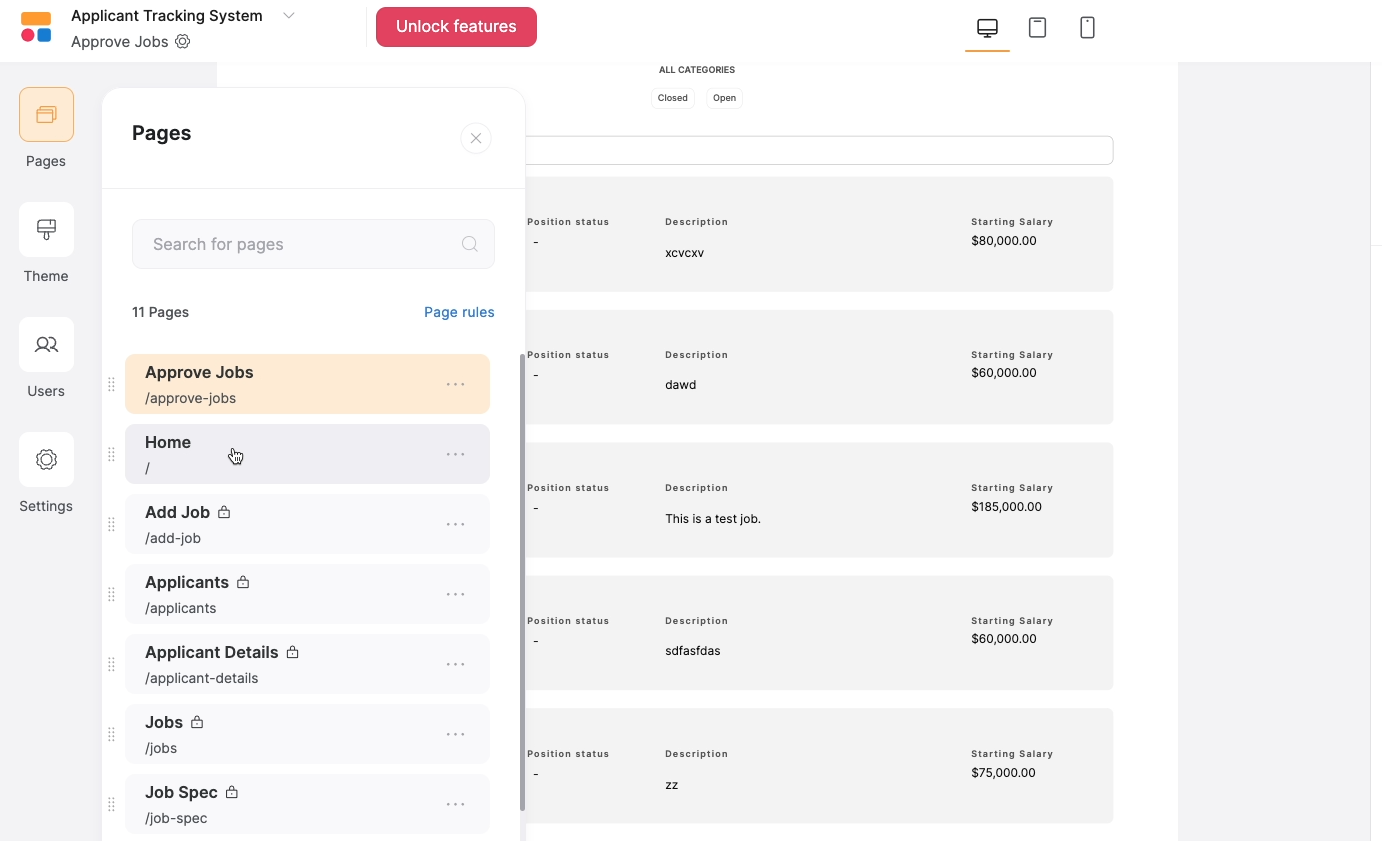
Select the header block, then scroll to the bottom of the “Links” section and add a link.
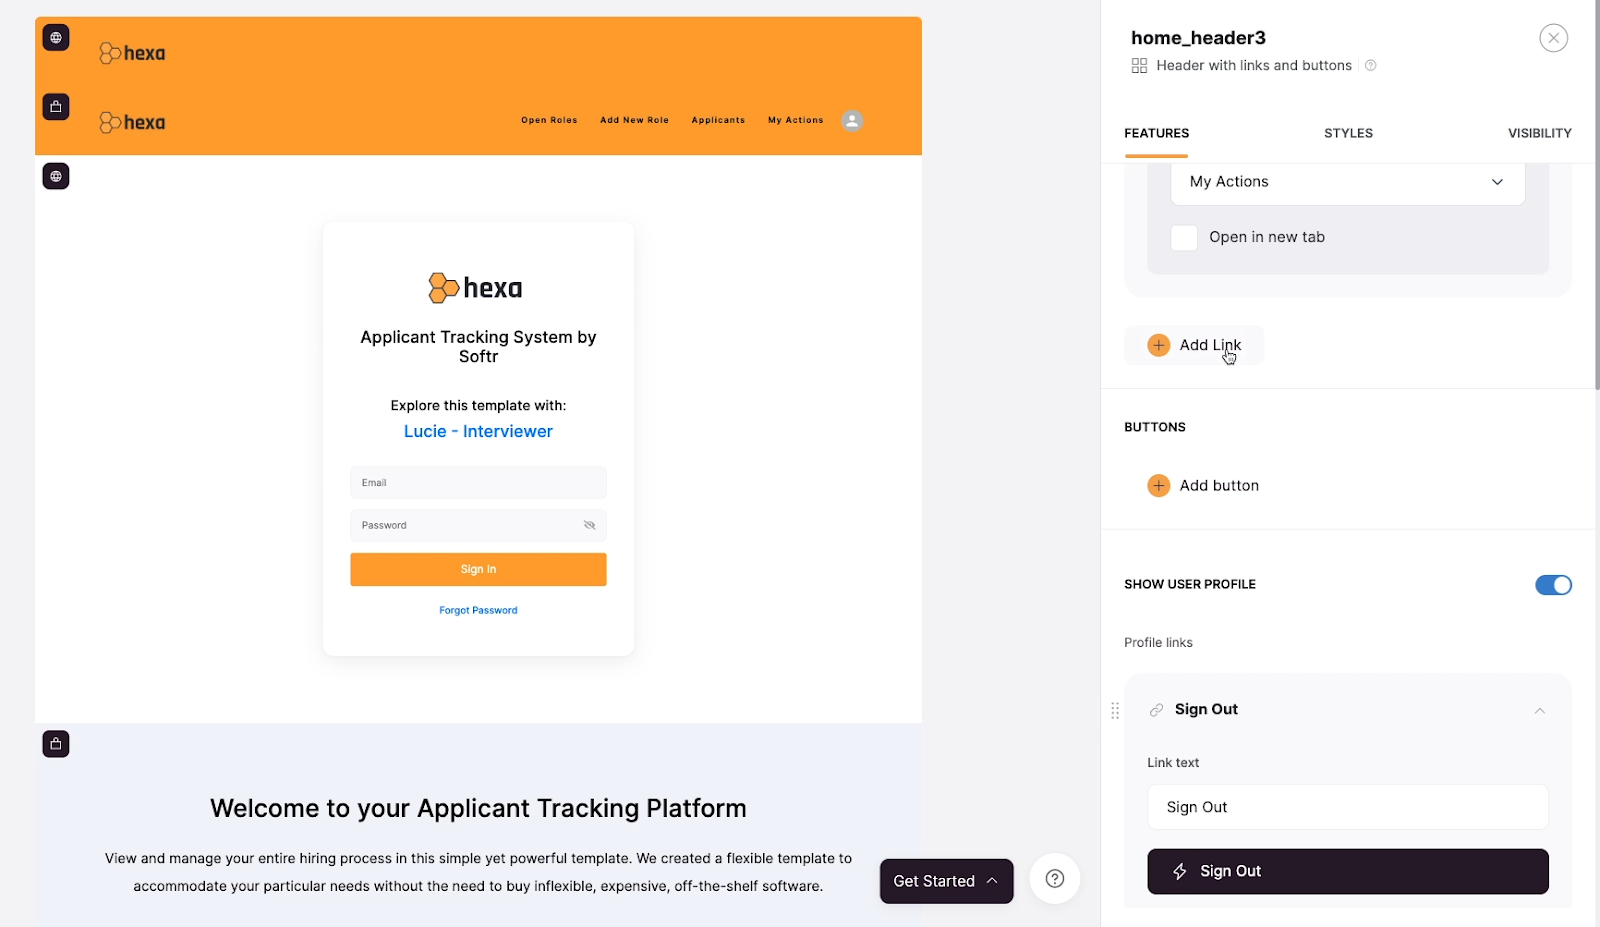
Give it a name. Call it something like “Review Jobs”. Then, add an action, and choose “Open Page”.
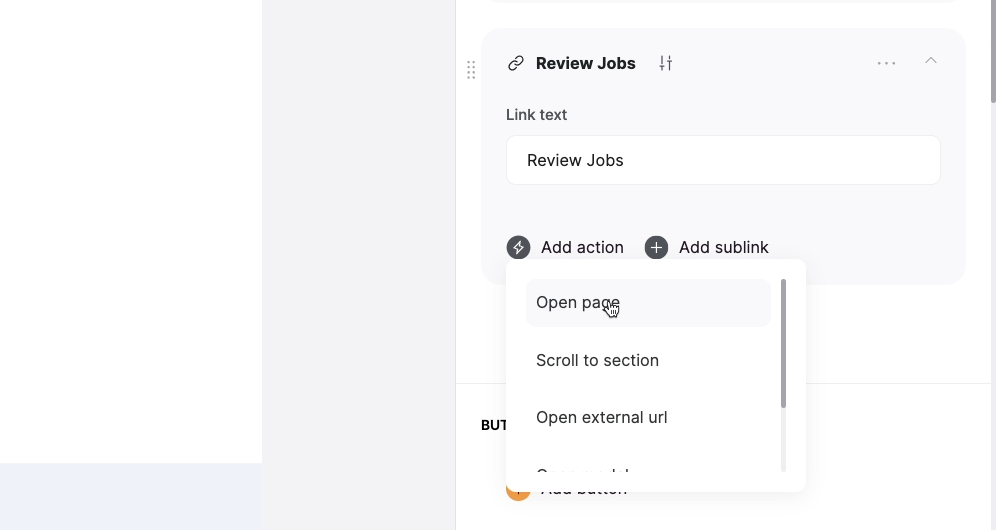
Select the “Review Jobs” page you made earlier.
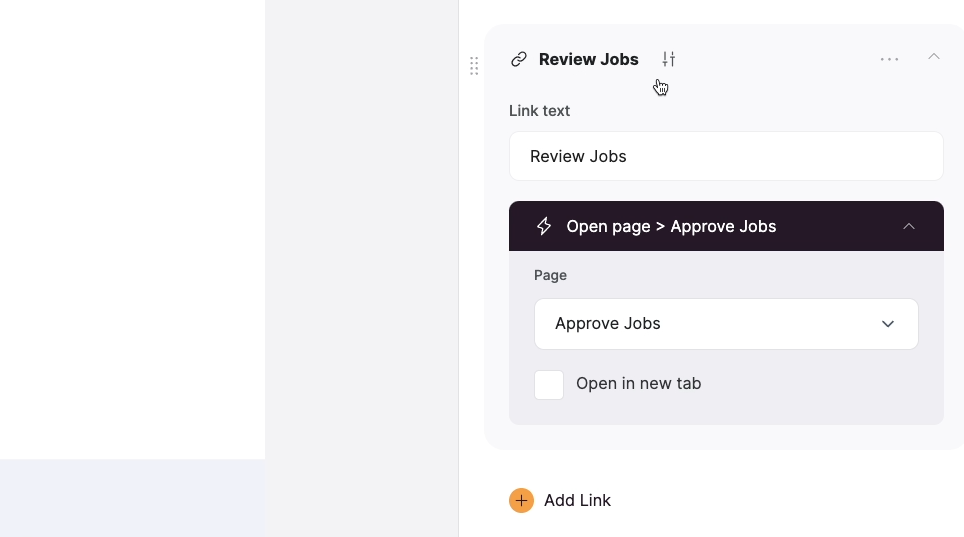
Publish your changes, then open up your Softr site.
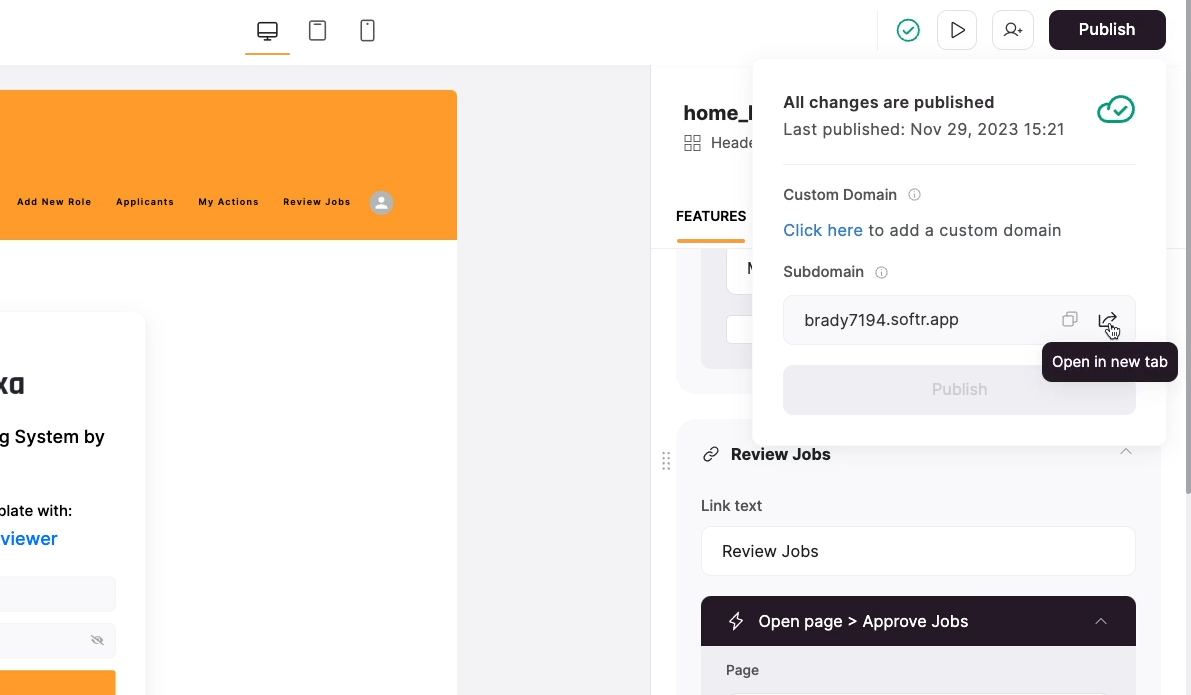
Now, you can click on the “Review Jobs” nav item on your live app to open the page you just made.
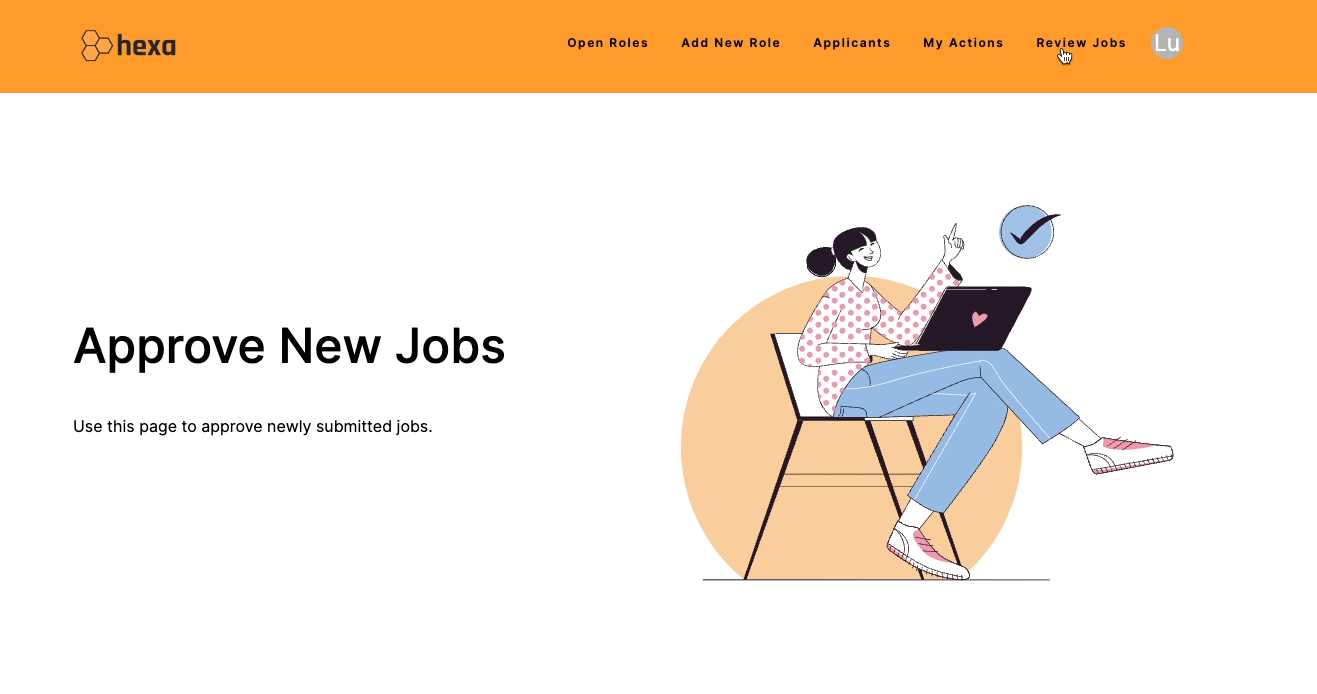
All the pipes are connected, and you can now update Airtable records from Softr.
Create a user sign-up page in your Softr app
Our app is starting to come together, but you may have noticed that there’s no way for users to sign up!
You can sign into the “Lucie” account with the credentials that Softr provided, but there’s no button or option to sign up and create a new account in the template. Creating and managing users is one of the most useful features of Softr, so let’s dive into creating a user sign-up feature and the appropriate page.
Add a sign-up block to your app
First, we need to add a new page to our app. Name this page “Sign Up”. This will be the gateway for new users to create their accounts.
On your new “Sign Up” page, add a dynamic block under the header. Scroll down to the “User accounts” section and select the “Sign up” option.
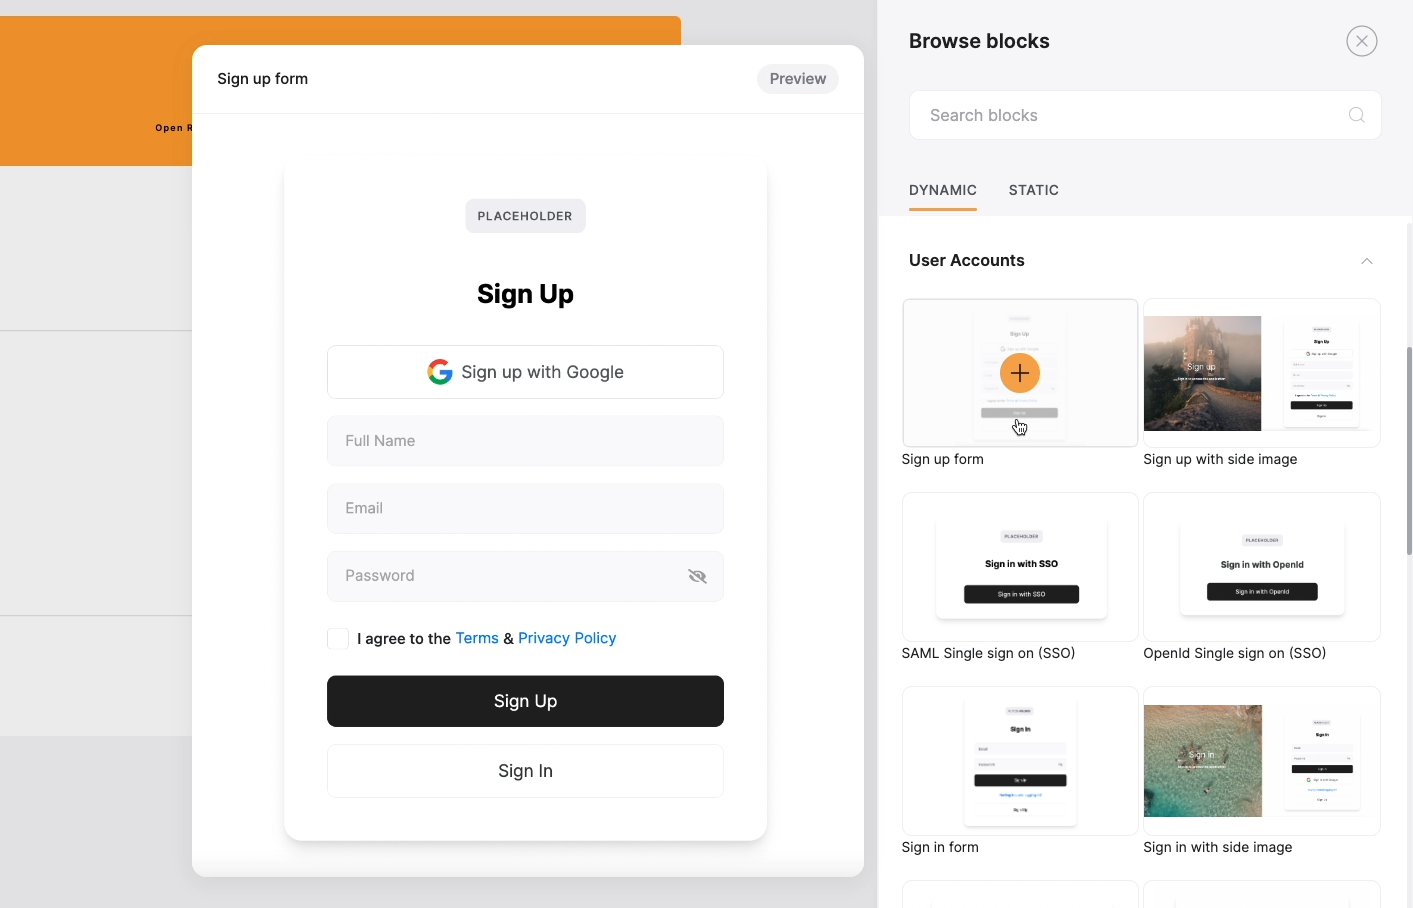
Under the “Features” tab, you can choose which elements are present in your sign up form and customize some design settings. For instance, you can add your own logo and background image to match your brand's style.
Under the “Sign up Form” heading, you have a couple of important options.
“Form container” will just add a drop shadow and rounded corners to your form, but “Sign up with Google” and “Domain-based sign up” are important functional choices.
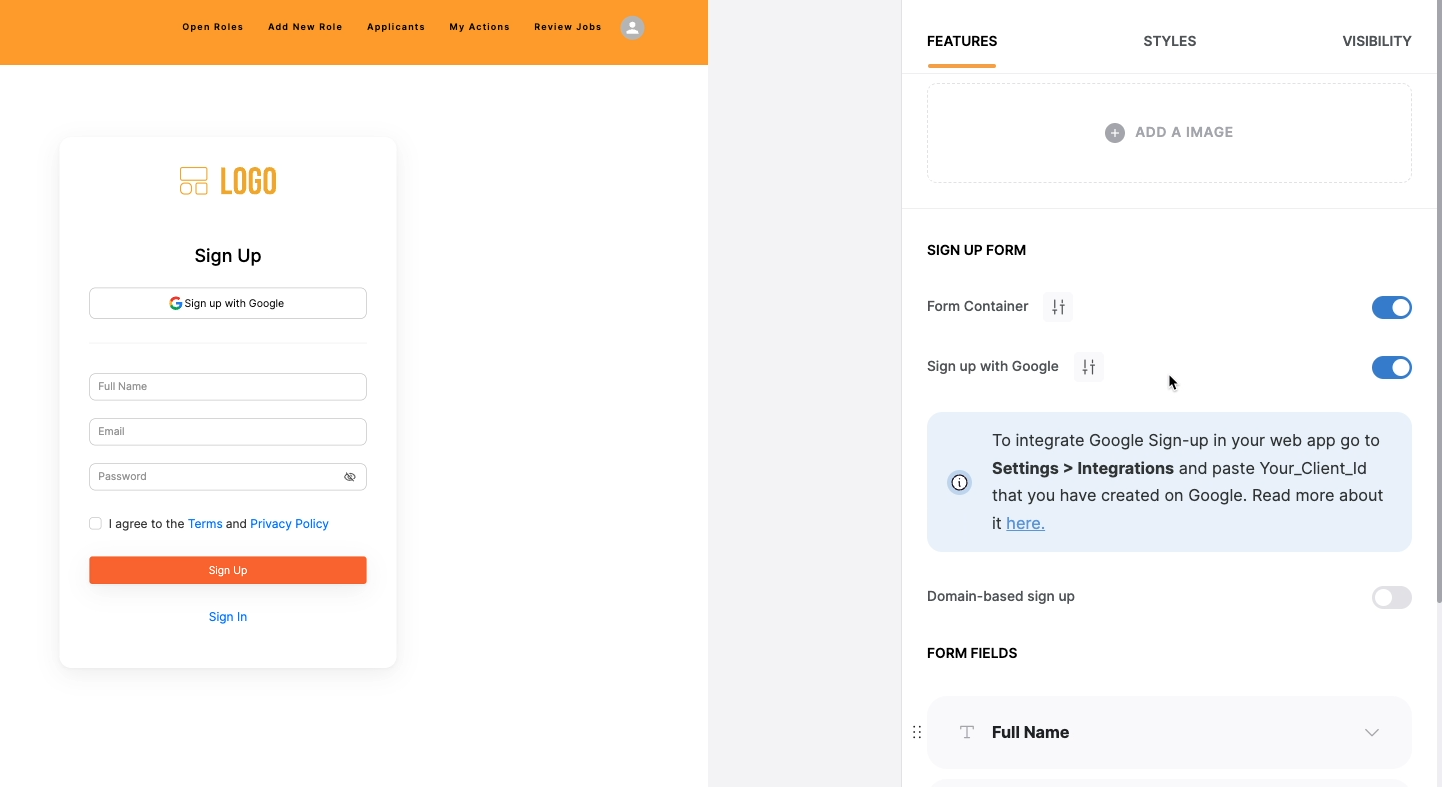
If you enable the “Sign up with Google” feature, you can let your users sign up with Google OAuth for a streamlined process. However, this requires additional setup with Google Cloud, so we’ll skip it for the time being.
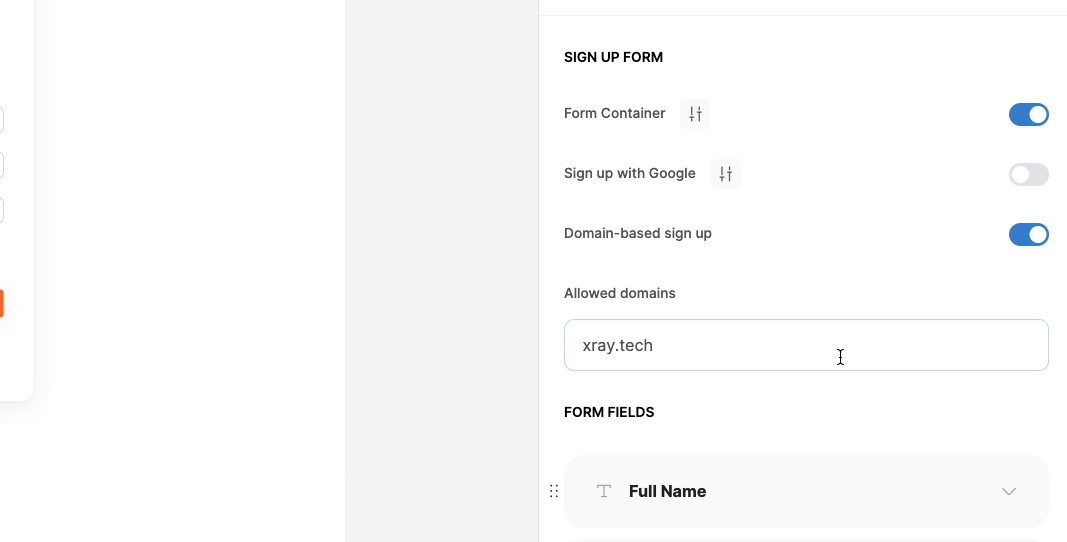
Domain-Based Sign-Up is a fantastic feature for building internal apps. It allows you to restrict sign-ups to users from a specific domain. For our example, we could limit sign-ups to email addresses that include the “xray.tech” domain, ensuring only our team members can create accounts on our app.
Customize your sign-up form
Next, you’ll see options to choose which fields you want to include in your form. Softr provides default fields like Full Name, Email, and Password, but you can add any other fields that you’d like here. For instance, you might want to include “Company Name” or “Job Title”.
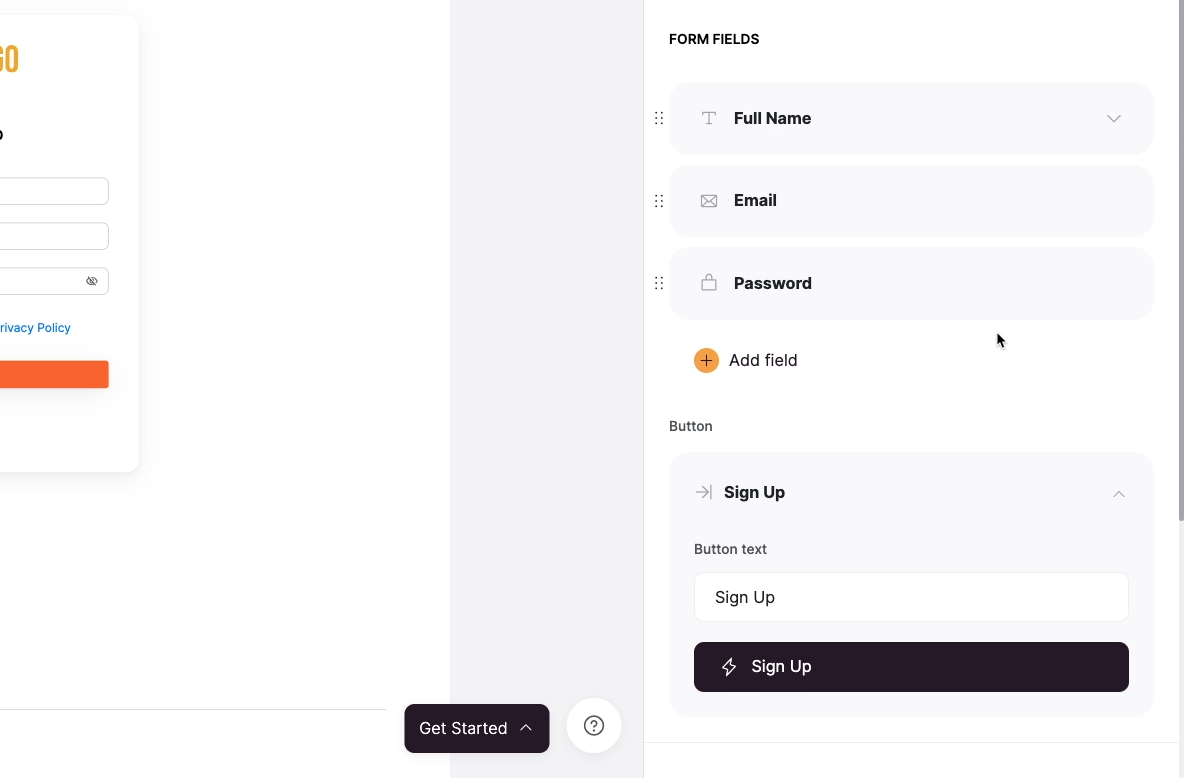
In the “Terms and Conditions” section, you can decide whether or not to display links for terms and conditions. Providing terms and conditions is crucial for GDPR compliance, so be sure to enable this if you’re looking to adhere to their regulations.
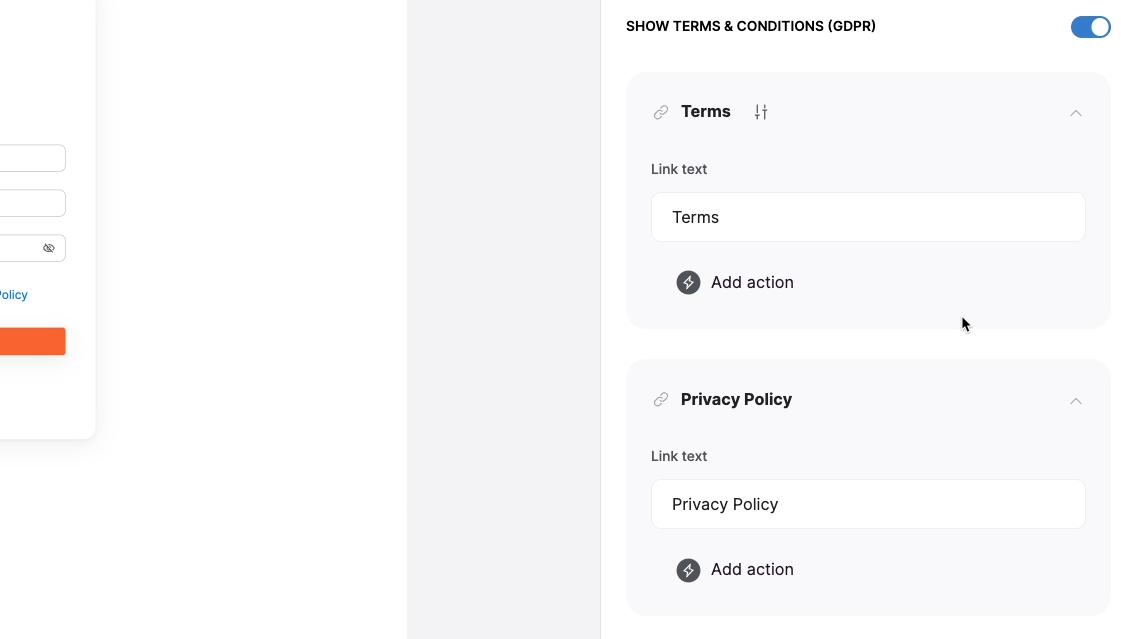
Add a “Sign In” option
The “Show sign-in” button will add a sign-in button to your form for users that already have an account. By default, this button isn’t linked to any action, so you’ll need to set it up.
Add an action.
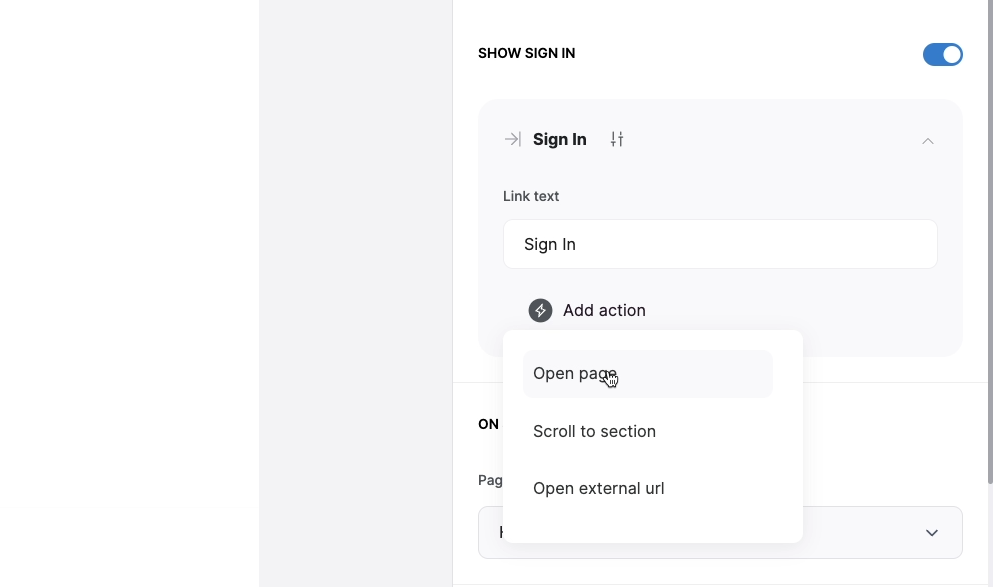
Then, have your “Sign in” button open up the “Sign in” page that already exists.
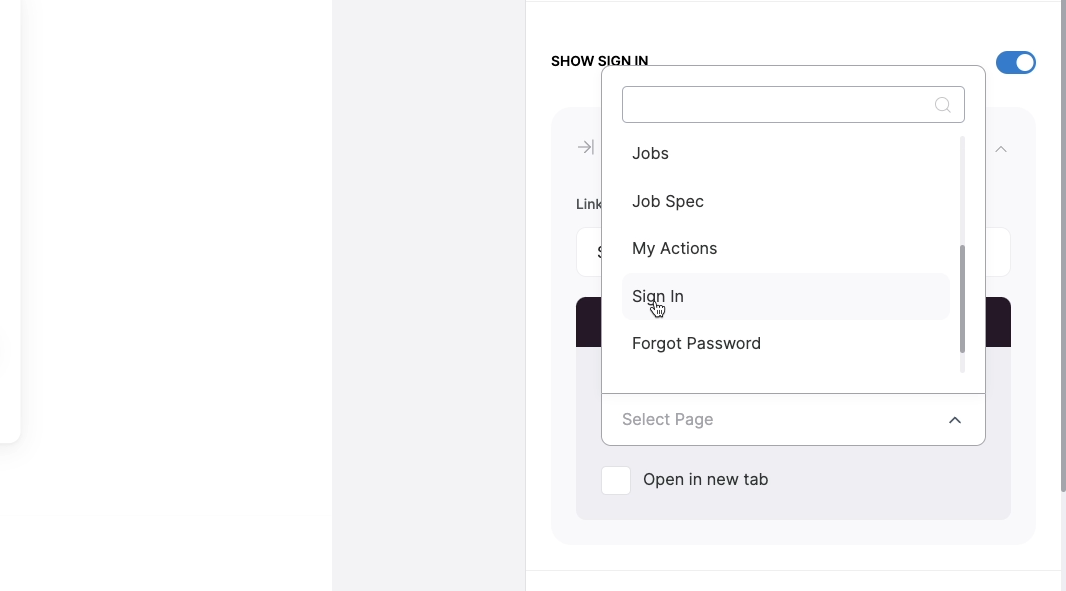
Next, you can configure the form to redirect users to a specific page once they sign up. The default is set to the Home page. You can just leave that as-is.
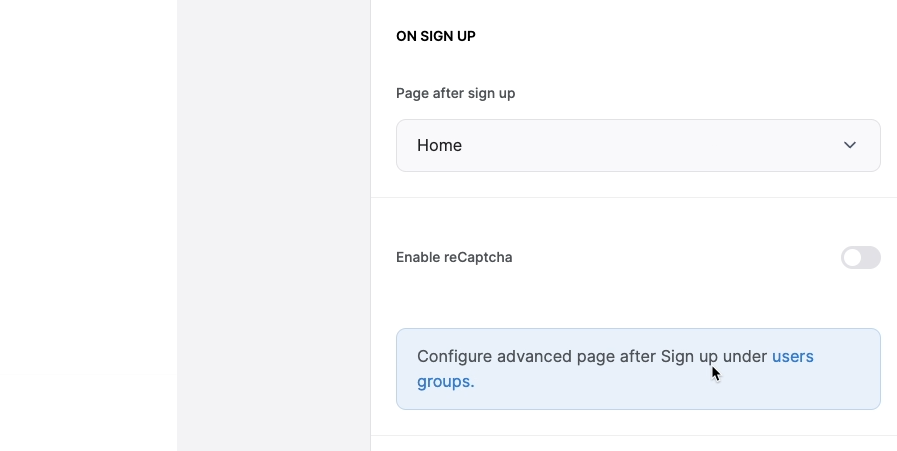
To prevent bot sign-ups, you can enable reCAPTCHA. This feature, like Google Sign-Up, requires additional setup with Google, so we’ll skip it for now.
Connect your sign-up form to the “Sign In” and “Home” pages
Your sign-up form is all set now. You can also customize the styles and visibility of your sign-up form, just like any other block in Softr, but we’ll leave those options as they are in our example.
The last thing you need to do before you can properly test your Sign Up form is to add it to the existing “Sign in” page and “Home” page.
Go to “Pages”, and select either of the two pages. Then, click on the “Sign in” block. Scroll down to the “Show Sign Up” toggle, and enable it.
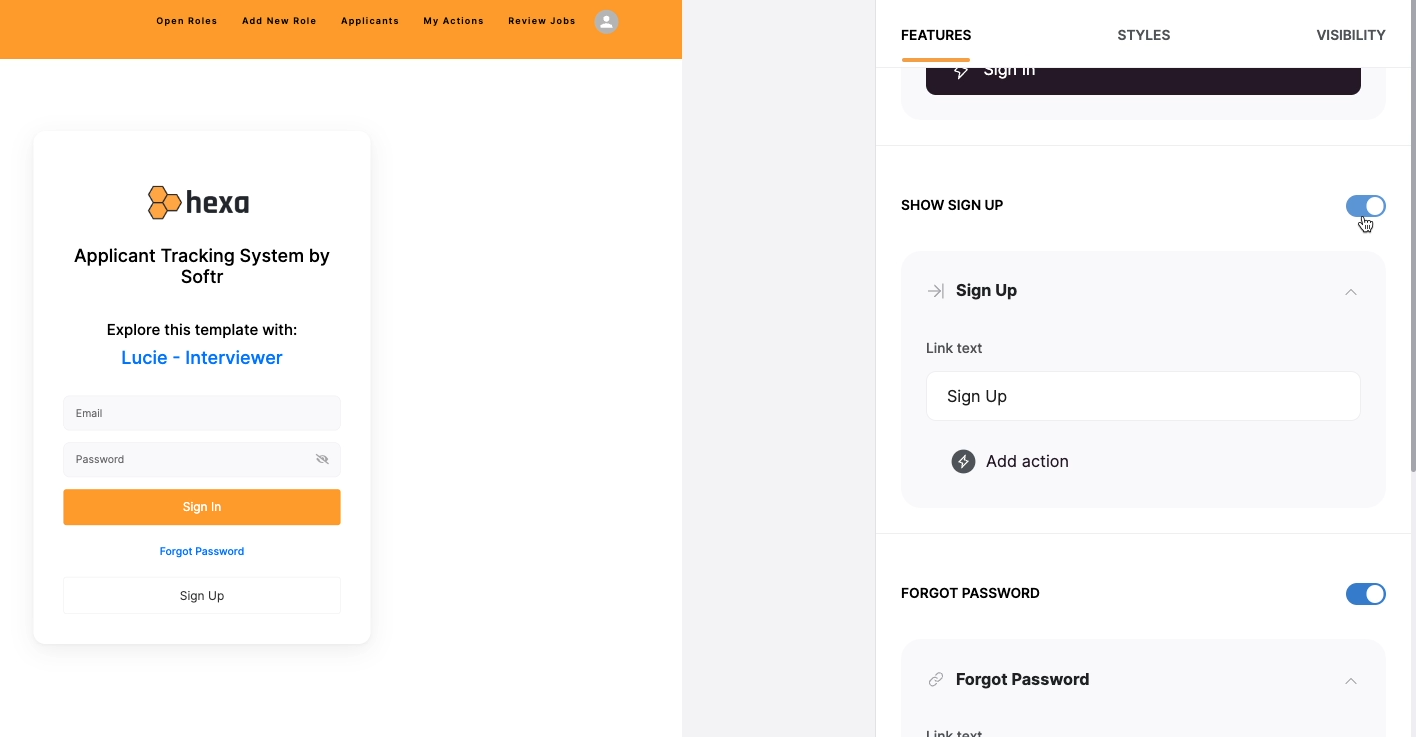
Then, add an action to open up the Sign Up page.
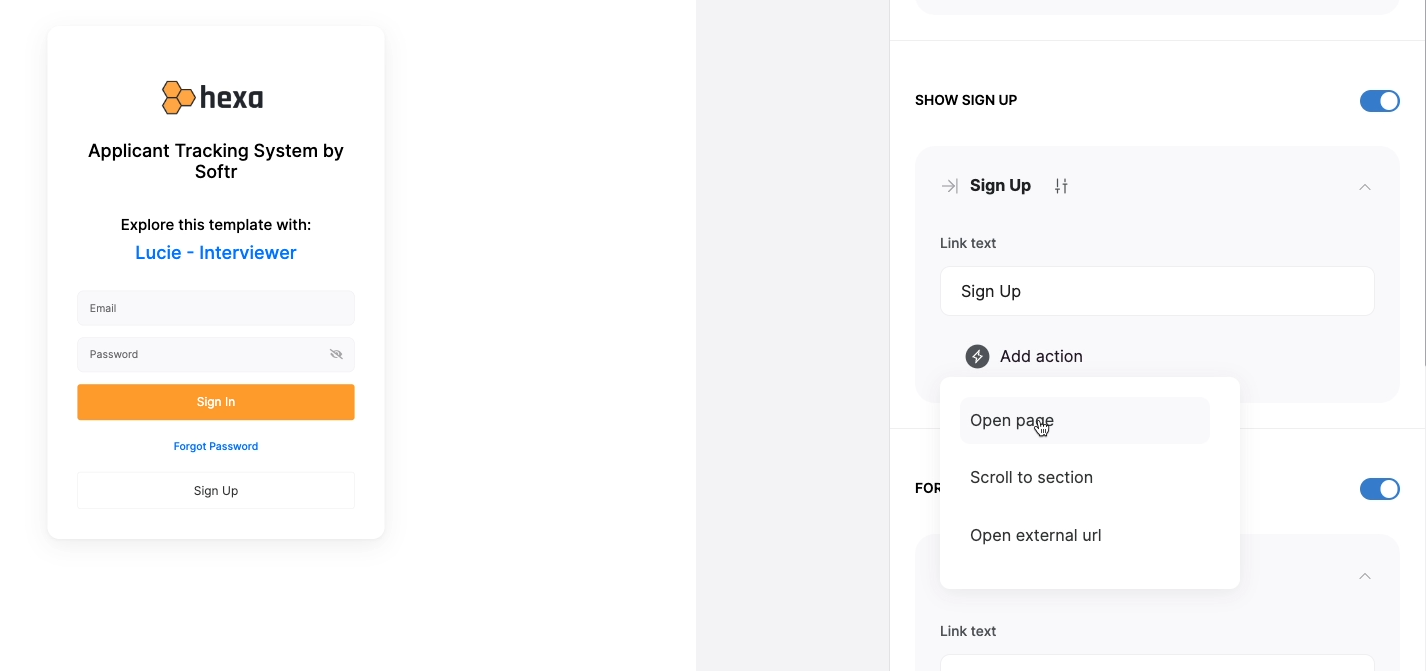
Repeat this process for the other page, so that you have a “Sign Up” option on both the “Home” and “Sign In” pages.

Publish your changes, then open up your app.
Testing the sign up feature
If you’re already signed in with the “Lucie” profile, sign out.
Then click on the “Sign Up” button and create a new account.
Once you’ve created your account, you’ll be taken to the homepage, and you should see your account’s initials in the top right-hand corner.
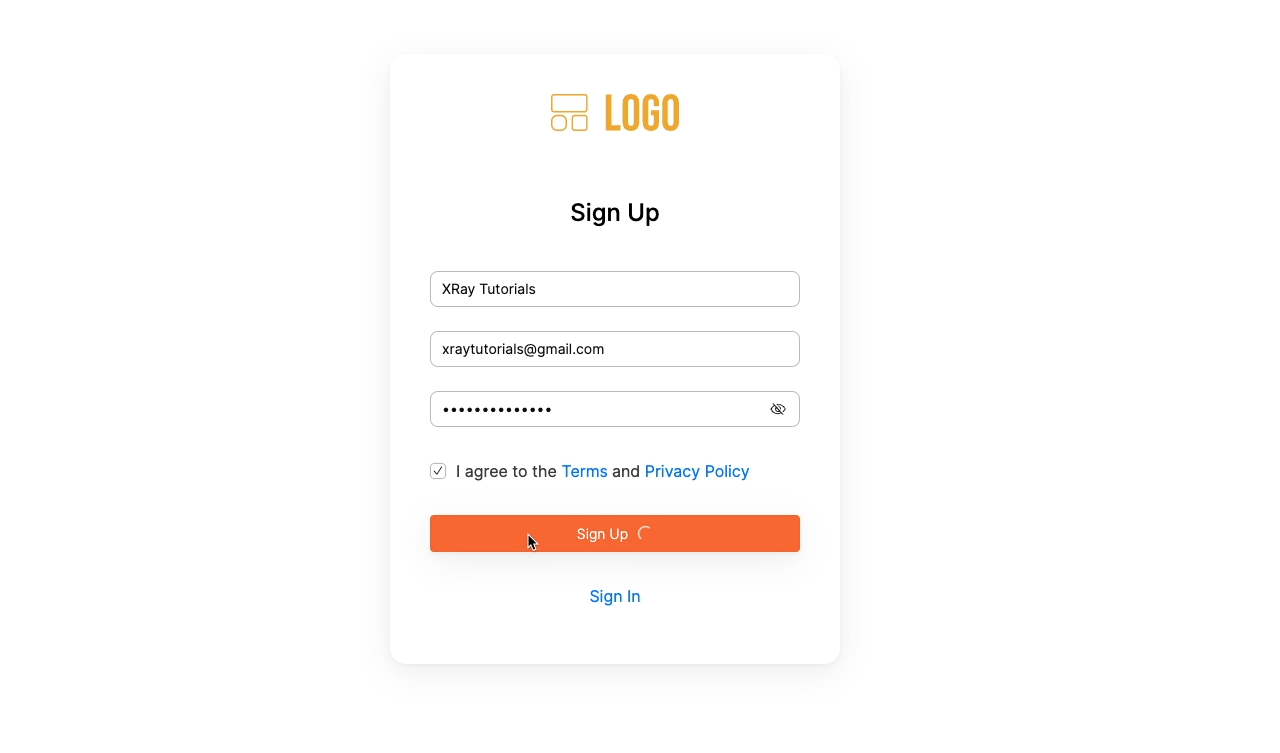
You should now be able to use the app just as you could before with the example credentials provided by Softr.
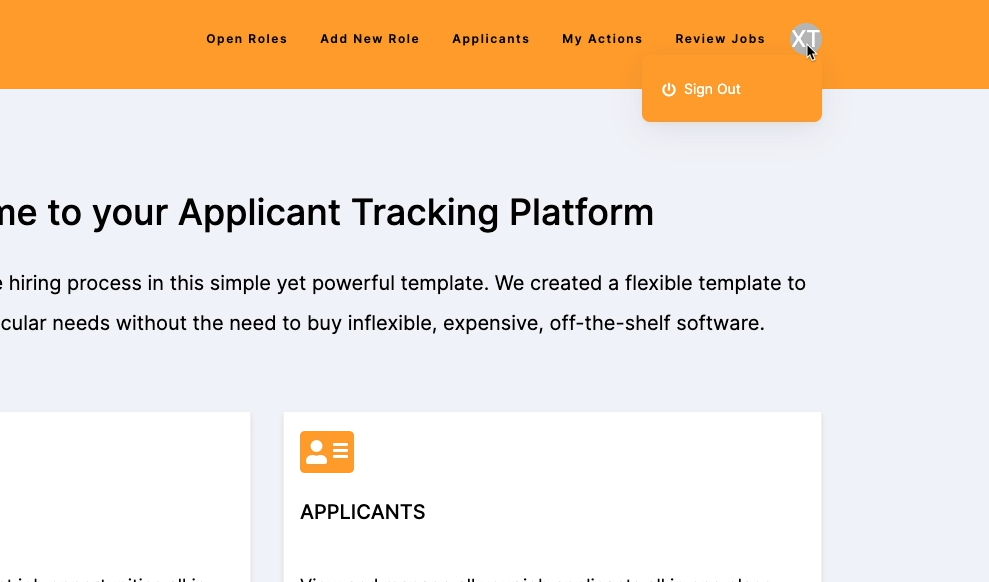
Create user groups in Softr to manage access
Now that you’ve enabled users to sign up, you may want to explore user groups to control which content is visible to which users.
Right now, our example app here is focused entirely on applicant tracking. But later, we may want to add basic task management, or time-off requests and other HR options.
Not every page and block will be appropriate for every single user, even if they’re signed in and verified as part of the company.
For example, you may only want hiring managers to see the “Review Jobs” page and be able to approve or deny job listings. To do that, you can create a user group.
Add a user group in the “Users” menu
To create a user group, click on “Users” in the left-hand menu of the editor.
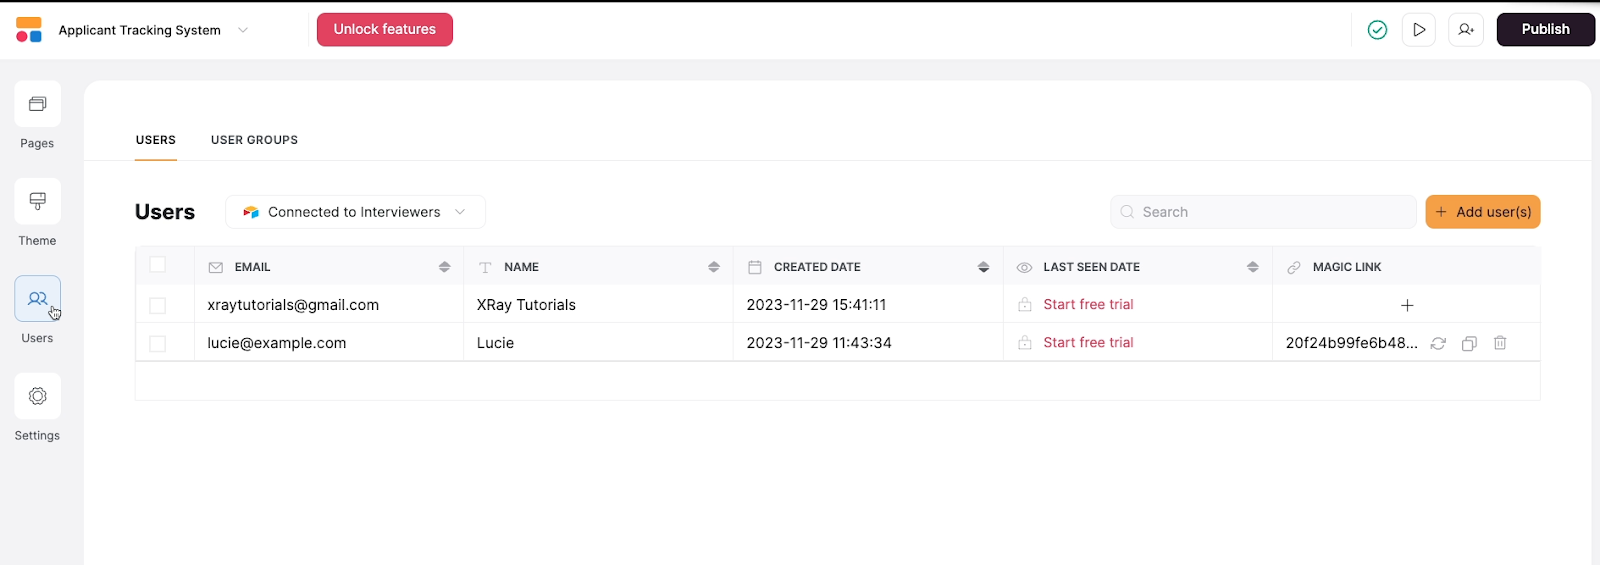
You’ll see a list of all your app’s users here. Note that you will be able to see their names and email addresses, but passwords won’t be exposed.
Select the “User Groups” tab, then click on the “Add user group” button.

Give your group a name. We’ll call ours “Hiring managers”.

Then, you’ll be able to choose the people that will belong to this group. You can either add users manually, or add them automatically based on certain conditions.
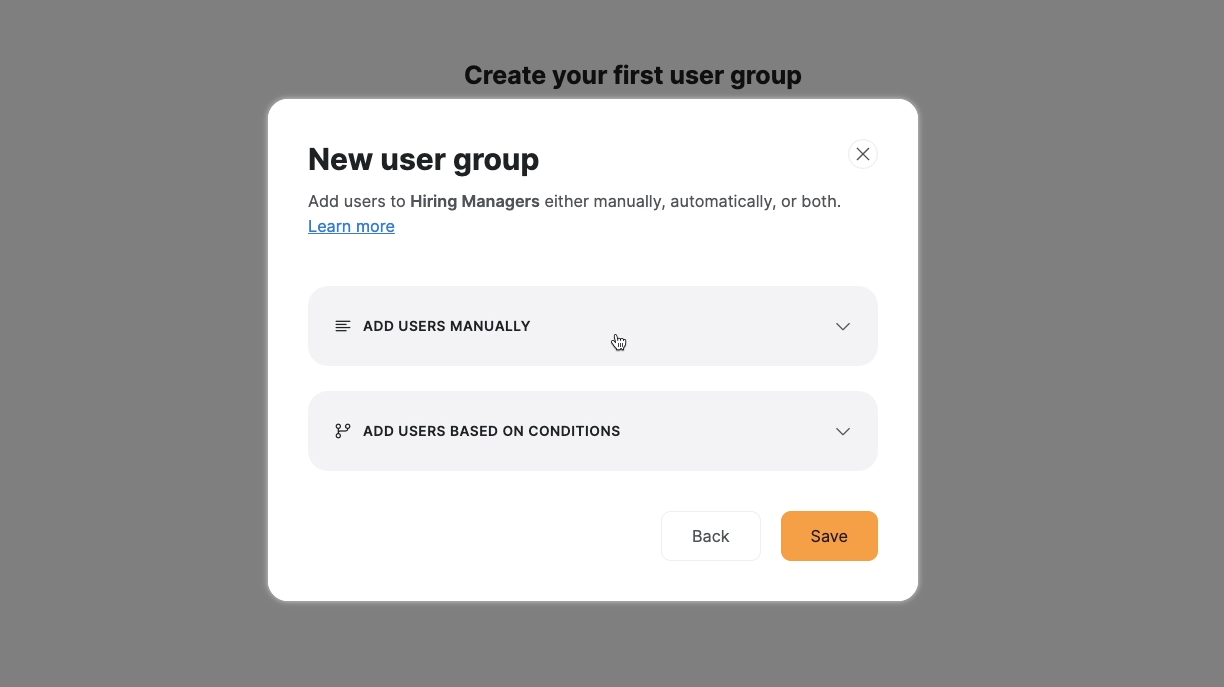
You can set these conditions based on any data that’s available in the user’s Airtable record connected to your Softr app. For instance, you might want to add an “Internal” user group for every user with an email address from your company.
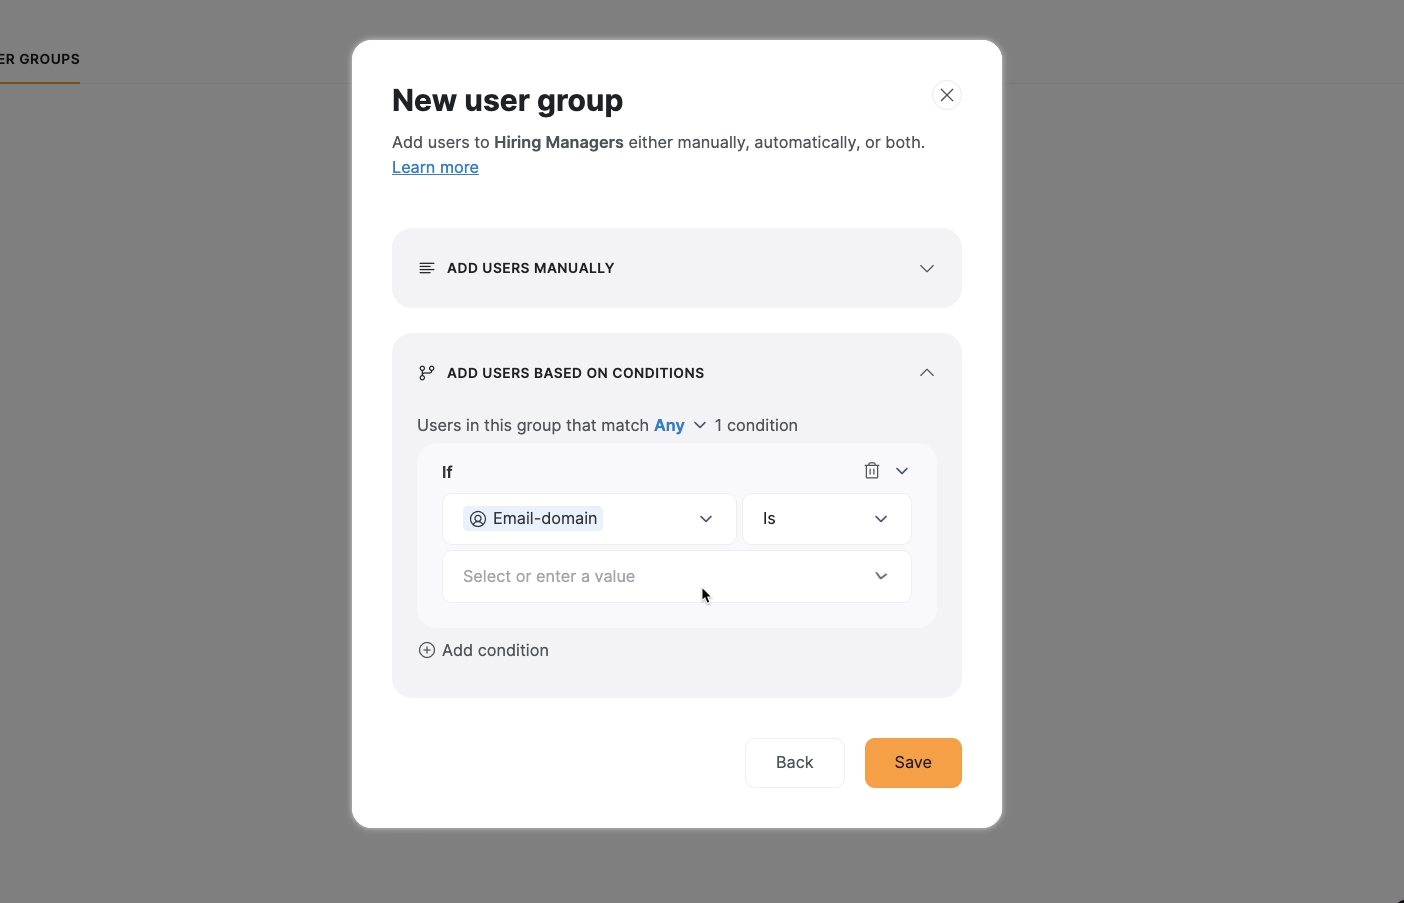
For our “hiring managers” group example, we’ll just add users manually. We’ll add the account we just created to the group. Once you’re done adding users, click on “Save”.
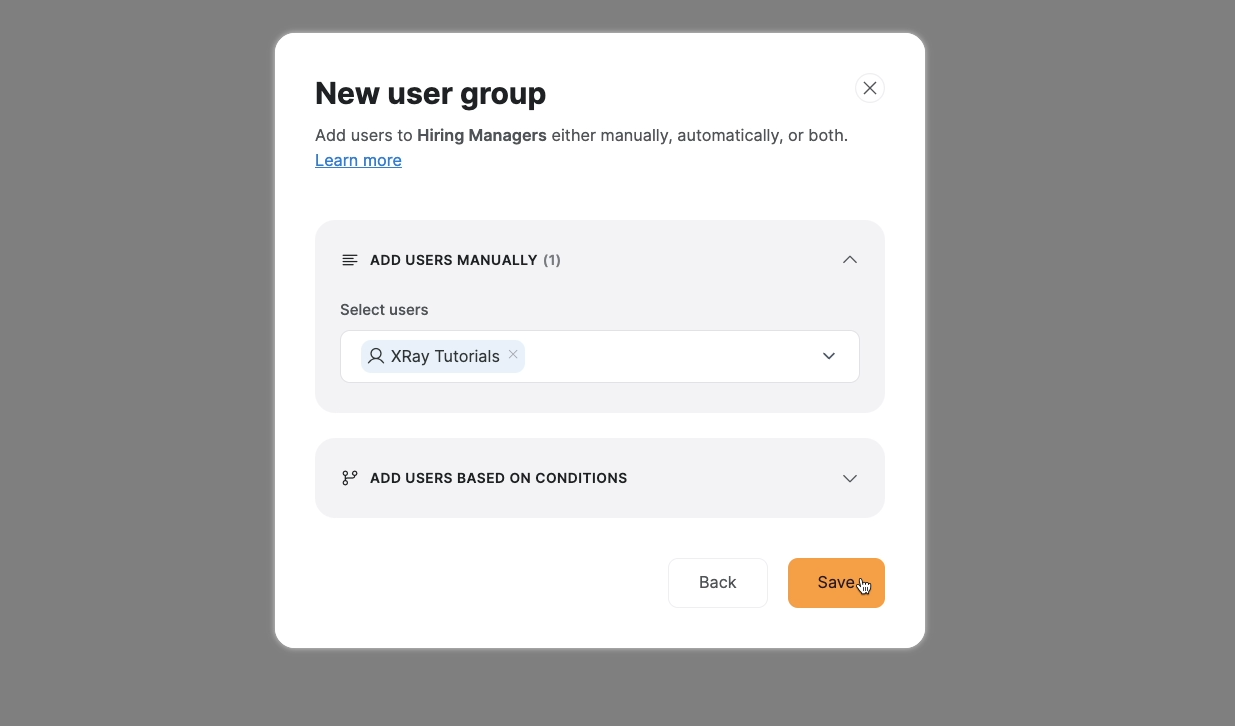
Restrict pages and blocks to specific user groups
Once you’ve created at least one user group, you can make it so certain pages and blocks are only visible to specific user groups.
To set the visibility of a page (such as the “Approve Jobs” page), open up the “pages” menu, click on the three dots next to the name of the page you want to edit, and select “Settings”.
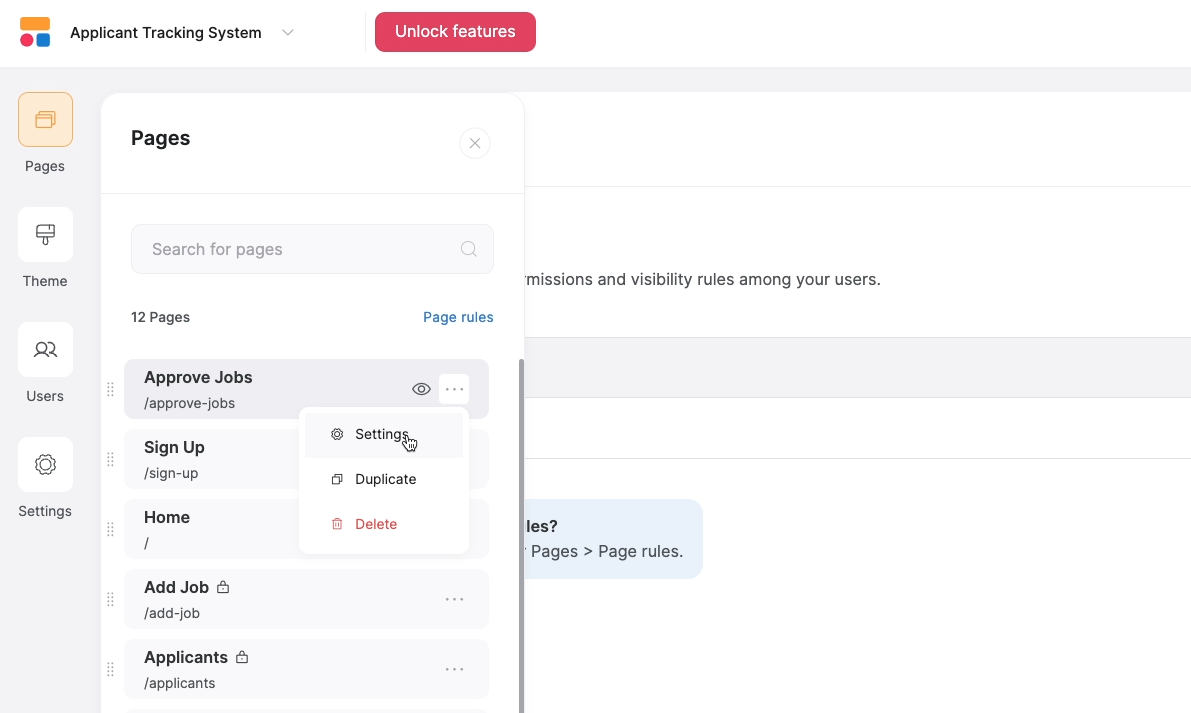
Then, select “Visibility”.

Under “who can see this page”, you can make your page visible to all users, logged-in users, or non-logged-in users. We’ll choose “logged-in users”.
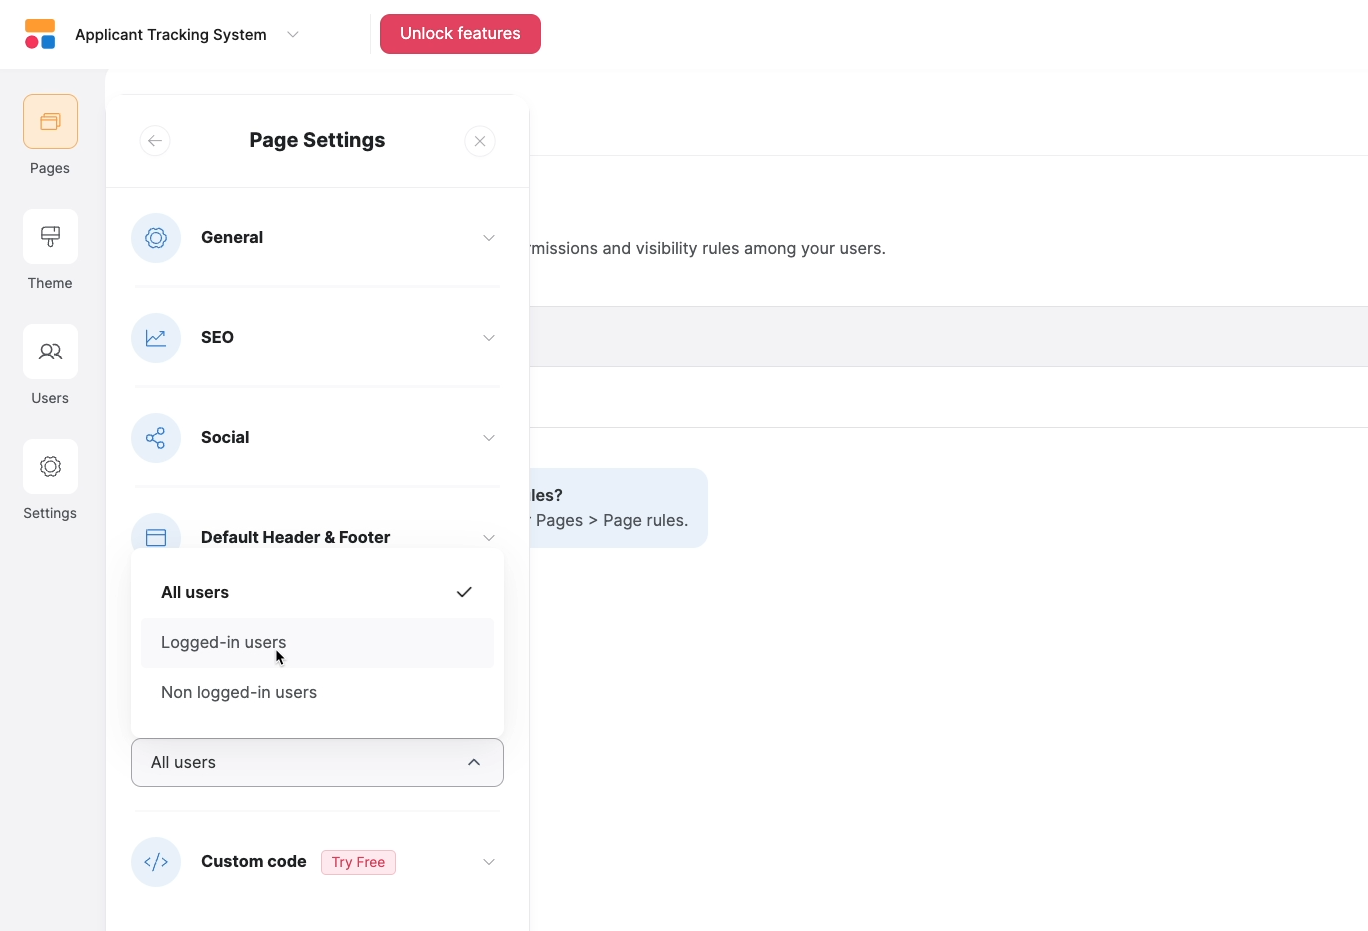
Under “Which user groups”, you can narrow the visibility down to specific user groups. We’ll choose the only user group so far: “Hiring managers”.

Once you’re done configuring the page’s visibility, click on “Save”.
Testing a page’s visibility settings
After changing visibility settings, publish your site and give your page a test to make sure everything is working as expected.
To test thoroughly, you should sign in with one account that can see the page, and one account that can’t. You can use the “Lucie” account to help test the app.
When we access the site with our XRay Tutorials account, we can see the “Approve Jobs” page, since that account is part of the “Hiring Managers” group.

But when we sign in with the Lucie account, we only see a “permission denied” message. This is exactly what we expected, since Lucie is not in the Hiring managers group.
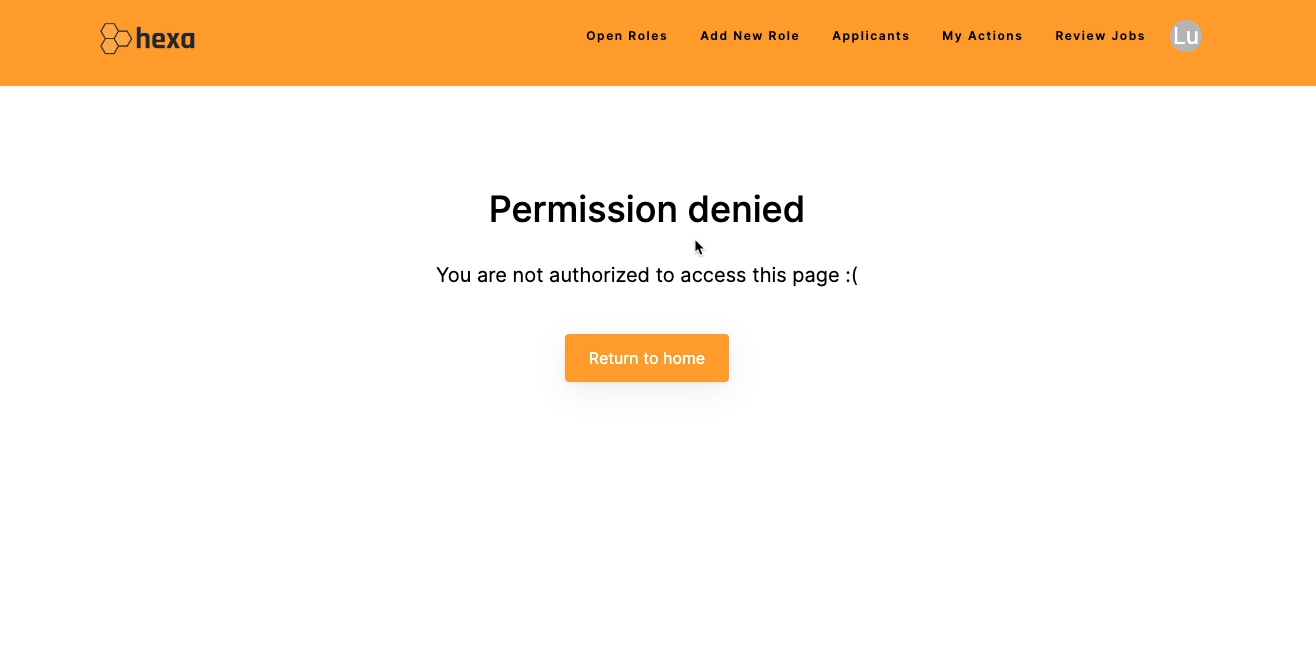
Be careful when creating user groups and setting visibility
With user groups, you can create content for everyone at your company with a single Softtr app.
You can even create groups for public-facing content, so anyone can sign up and only see what’s appropriate for them. However, you may want to consider making separate apps for internal use and public deployment.
Softr itself is very secure, but if you’re managing public and internal users in the same app, picking the wrong setting could expose sensitive data.
Additionally, you’ll need to be careful about adding users to multiple groups, particularly if you’re adding them automatically through conditions. They might gain access to pages you didn’t intend for them to see.
Ultimately, Softr gives you all the tools you need to structure your apps however you’d like. It’s up to you to choose how to set everything up.
A quick overview of Softr’s “Themes” and “Settings” menus
Before we wrap up this guide with a quick look at Softr’s pricing, we wanted to briefly cover a few of the important options that you’ll find in the left-hand menu.
There are too many features here to cover them all in this guide, but we want to highlight a few things that can help as you’re building your apps.
We’ve mentioned it already, but we want to reiterate that “theme” is the best starting point for setting the overall visual style of your app.
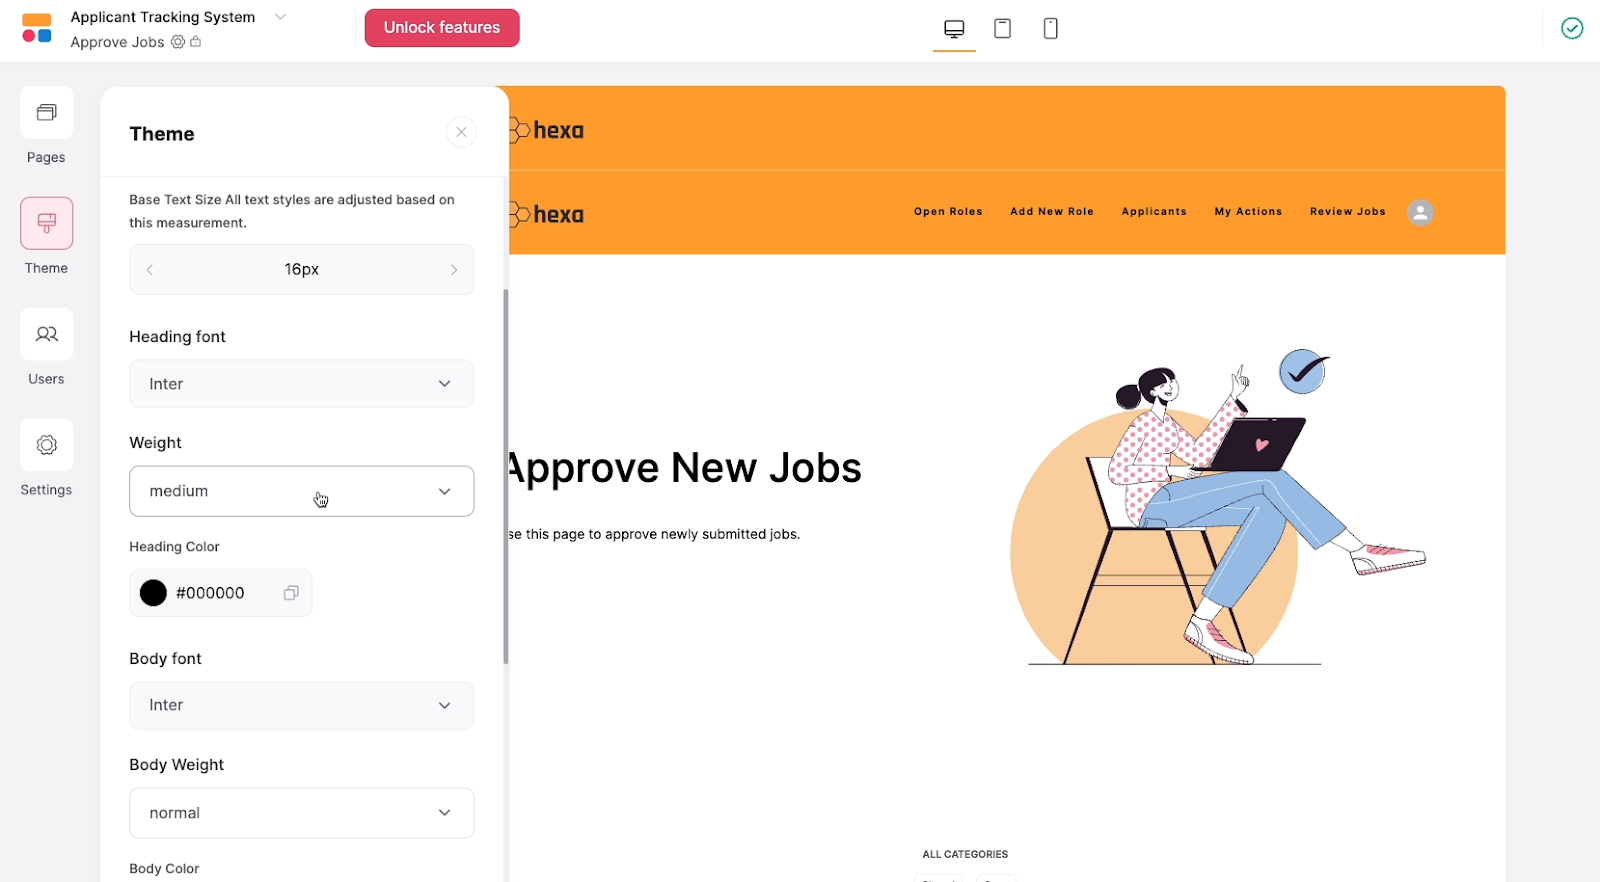
This is where you can set typography, button and highlight colors, display width and more.
Next, the “Settings” button includes about a dozen options for configuring your Softr app. This is where you can set a custom domain, upload a favicon, manage data sources, enter meta tags for SEO, and more.

Some options, like “custom code” will require a paid plan, but you can try them out with a free trial if you’d like.
One last option we want to highlight is app history.
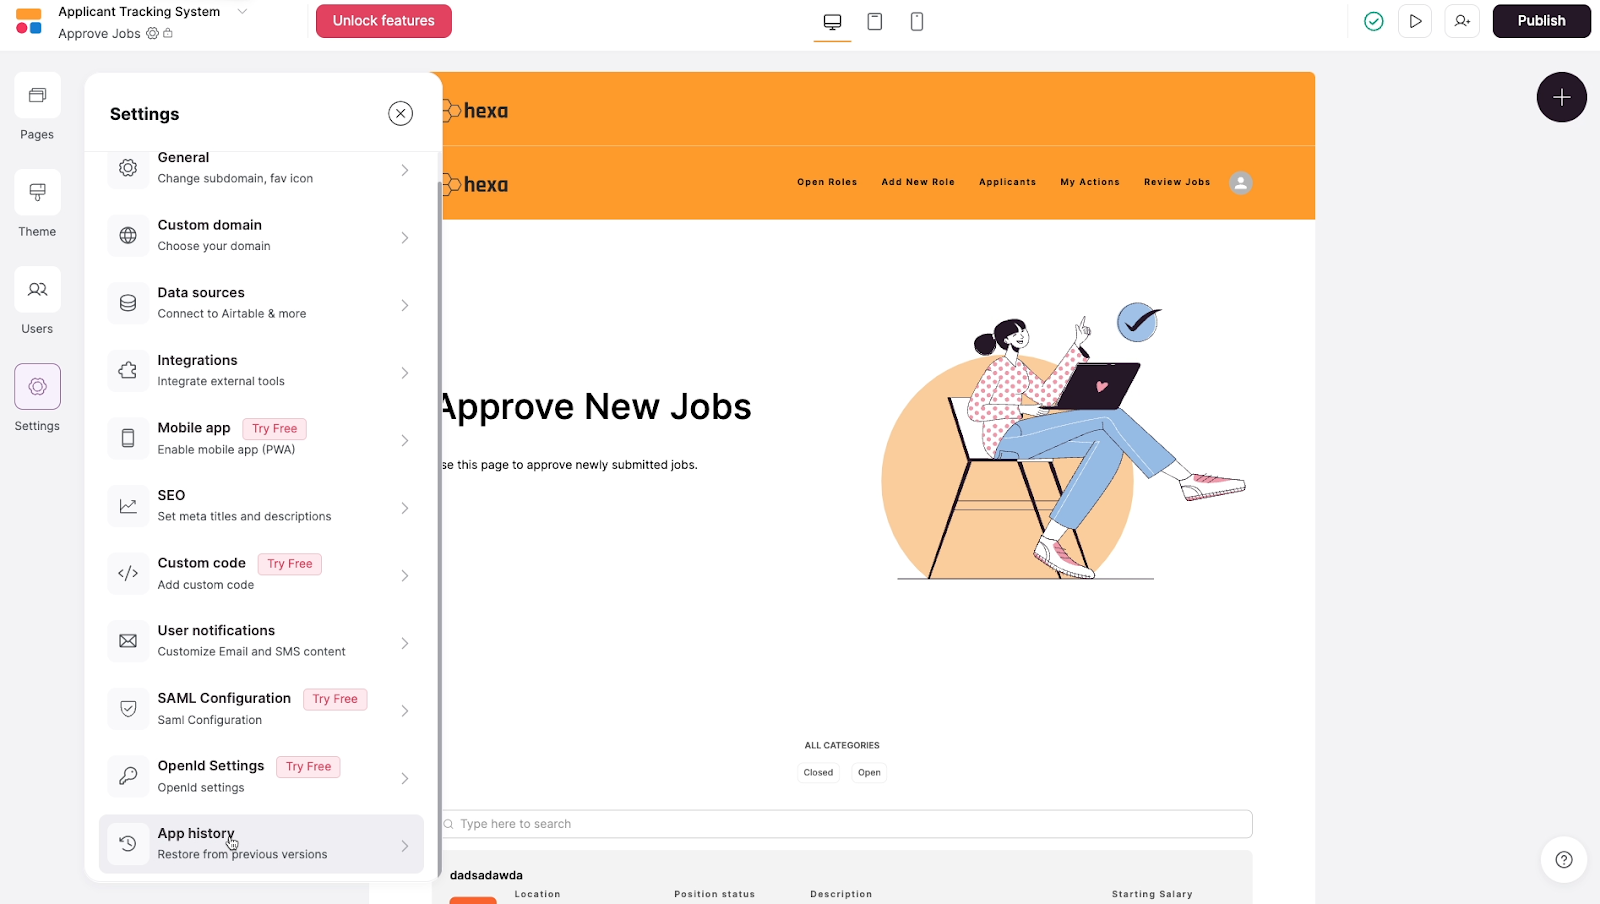
Softr automatically saves snapshots of your app over time. If something goes wrong while you’re making changes and you can’t figure out what happened, you can restore one of these snapshots to quickly get everything working again.
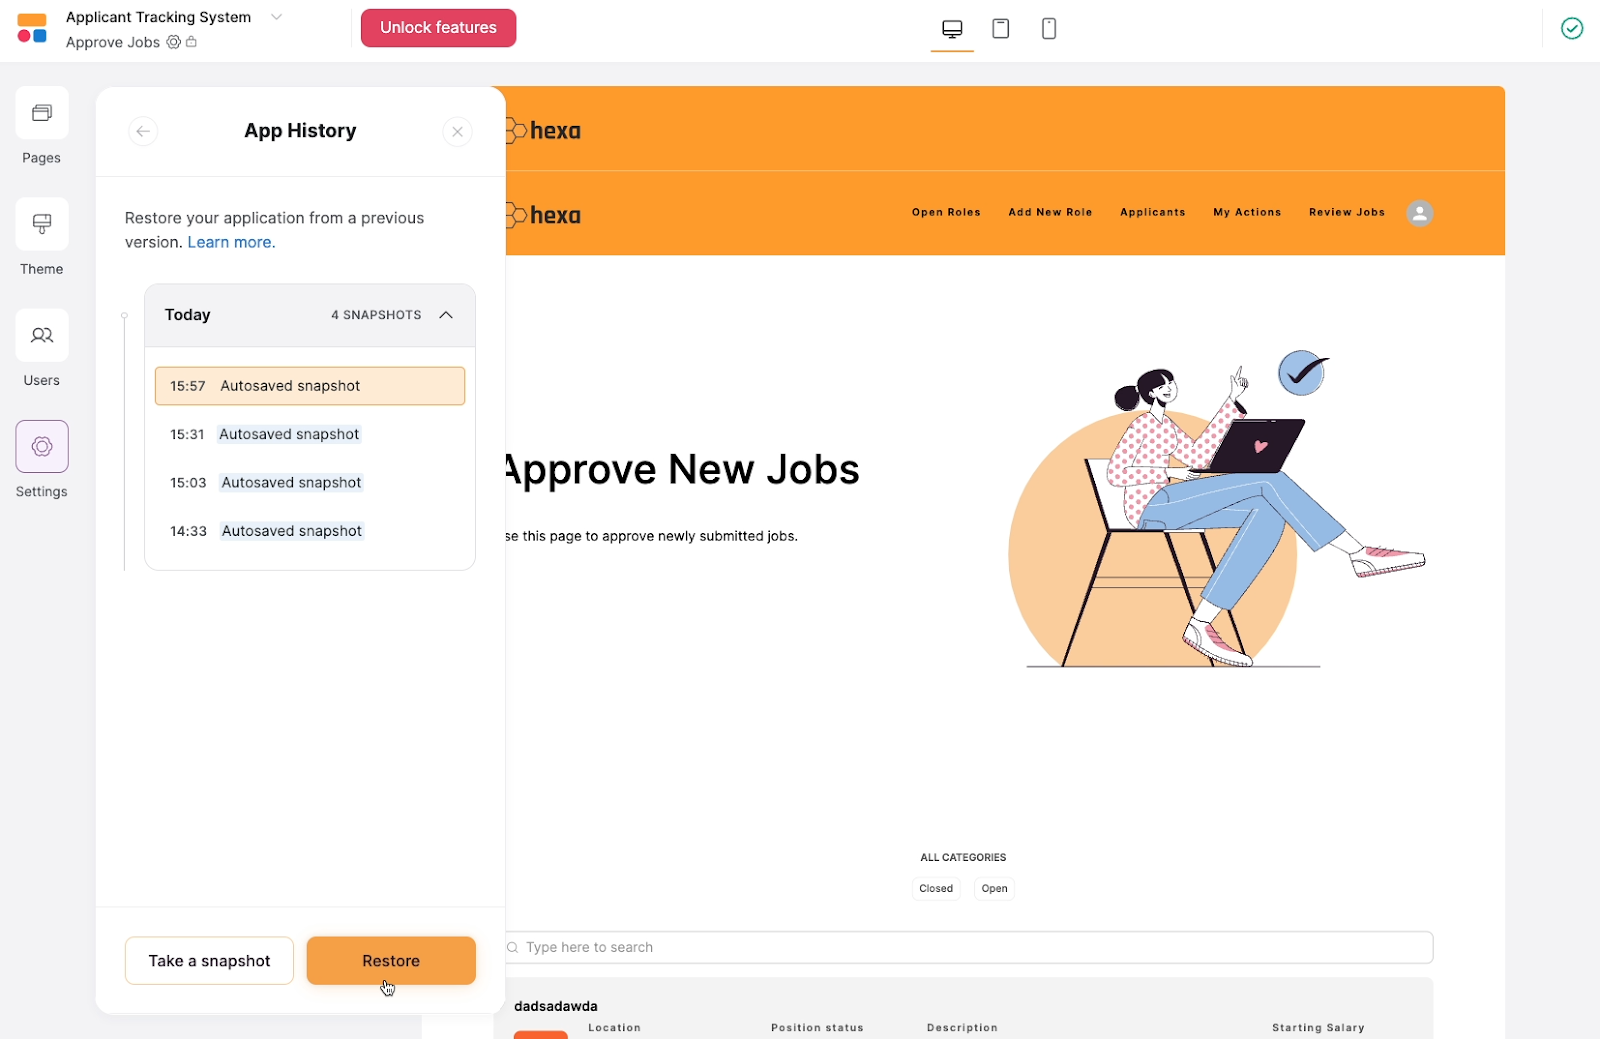
This can be a lifesaver when you’re encountering issues in your app, especially if you’re working with custom code, so remember that it’s there if you need it. You can also create a snapshot manually if you know you’re about to be making some big changes and want a reliable version to fall back to.
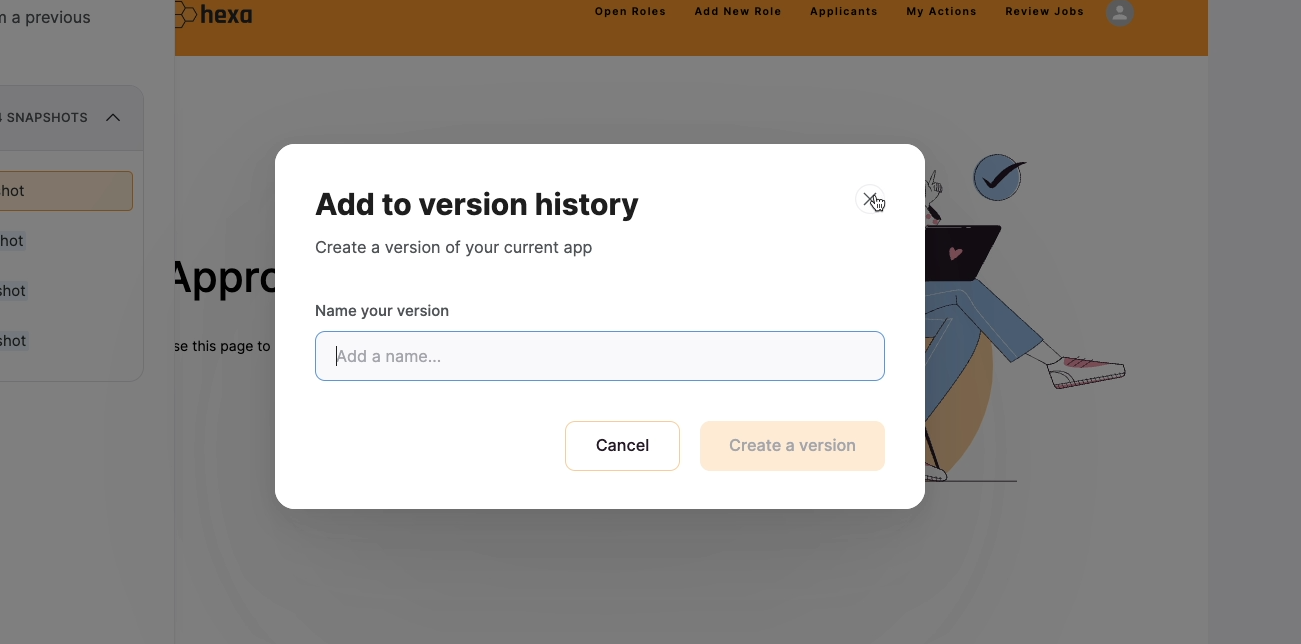
Softr’s pricing options
Finally, let’s go over Softr’s pricing options. You can see all of their current pricing plans in the image below, or go to their pricing page for more information.
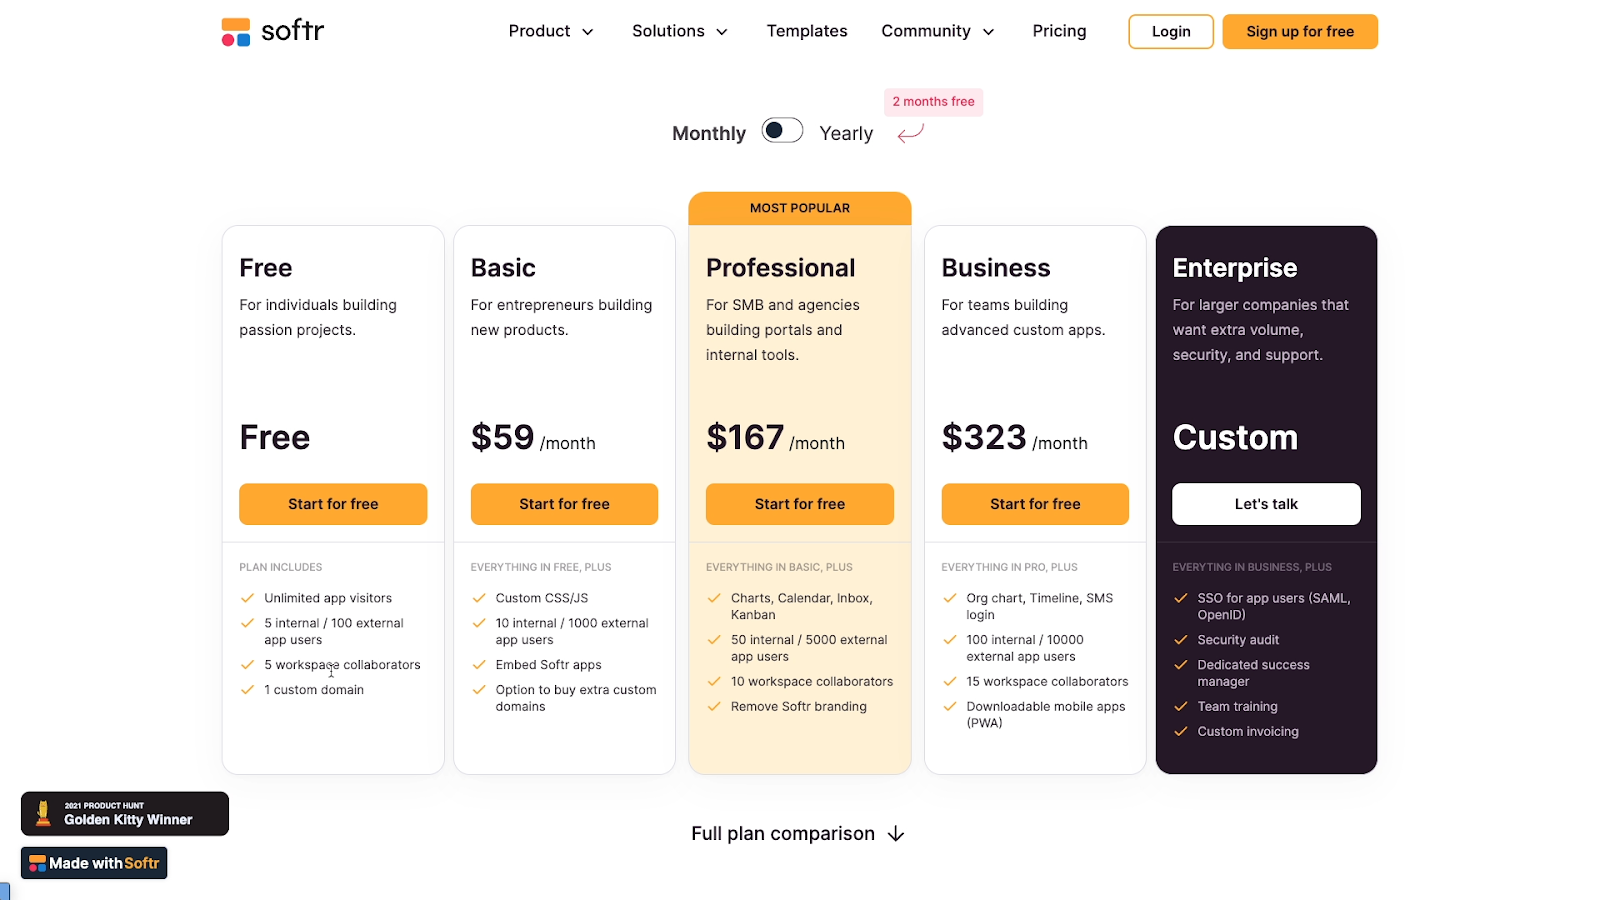
Softr offers a free plan, which is great for trying the app out and evaluating how well it will fit your project.
However, it does have quite a few limitations, and won’t be suitable for building professional projects at a larger scale. You’re limited to 5 internal and 100 external users, 5 workspace collaborators - people helping you build, and 1 custom domain. Also, several blocks and features are not accessible in the free plan, like custom code blocks.
If you’re looking to launch an app with Softr, you’ll likely need to consider a paid plan. These subscriptions start at $59/mo for the “Basic” tier and go up to $323/mo for the “Business” tier. At every subscription level, you can get a small discount if you pay a single annual fee instead of a monthly charge.

There are several specific features unlocked at each level, but in general, higher tiers add more users, more collaborators, and more custom domains to your account. If you’re prototyping a product or building an internal tool, you can probably get by with a basic or pro plan.
If you’re building a public-facing product or a product for a client of yours, the Pro plan might work out, but Business will likely be a better fit. If you’re planning on building an Enterprise app for your organization with Softr, you’ll need to contact Softr’s sales team to discuss the exact features you’ll need, and get a custom quote.
Ultimately, Softr is priced competitively with other website builders like Webflow and no-code app builders like Bubble, but is much more friendly to first-time builders. If you’re OK with giving up some aesthetic customization, Softr can be an incredible tool for building a product fast.
Build a fully functional web app without any code required
If you want to build a web app, don’t let a lack of coding knowledge hold you back. With low-code tools like Softr, anyone can prototype and build a fully functional product.
After following the steps in this guide, try building anything you’d like in Softr. You’ll be surprised at what you can do without needing to write a single line of code.
If you’d like to learn more about getting started with no-code tools like Softr, Zapier, Airtable and more, be sure to check out our blog or our YouTube channel. You can also follow XRay on Twitter, Facebook, or LinkedIn.
Want to skip the hassle of copying and pasting all your blogs from Notion into Webflow?
With Whalesync, you can sync a Notion database with a Webflow collection, so every new or updated record is automatically added to your Webflow site without needing to enter your data all over again.
In this post, we’ll show you how to set up a sync that will let you draft and edit content in Notion and automatically sync it to Webflow. Then, when you’re ready to publish, you can just change the status of a single field in Notion to make your post live.
Of course, even though we’re demonstrating this sync with a blog, the technique we’ll show you will work with any kind of collection that you’re using in Webflow.
Team directories, job listings, events, recipes - whatever you’re managing in Notion and Webflow, you can sync it with Whalesync.
Let’s get started!
What is Whalesync?
First, let’s quickly go over the basics of Whalesync.
Whalesync is a specialized no-code automation provider. It focuses entirely on syncing databases in different apps.
The software lets you set up one-way or two-way syncs between popular tools like Notion, Airtable, Google Sheets, Webflow, Hubspot, Shopify, and more.
It’s a great tool for automatically keeping your data consistent and up to date, no matter where it’s stored.
You can learn more about Whalesync on their website. You may also want to explore similar syncing tools like Unito and Exalate.
While Unito and Whalesync are both suitable for most companies, Exalate is more of an enterprise solution, with specialized integrations for software like Jira, Zendesk, and serviceNow.
Now that you’re familiar with the basics of automated syncing software, let’s set up a sync between Notion and Webflow using Whalesync.
Preparing your Notion database and Webflow collection
First, before you even open up Whalesync, you’ll need to do a little setup in your Notion database.
All you need to do is:
1. Rename your fields to match your webflow collection
2. Add a “Webflow status” field
3. Create a new view in Notion for your drafts
Open the database where you store your blogs, or whatever other data you want to sync to Webflow.

The vast majority of Notion content and field types are supported in Whalesync, so you can leave all your existing fields as they are.

Whalesync even supports syncing page content, so you can write your blogs as Notion pages within each database item and sync those pages to Webflow complete with all their styling and formatting.
However, while your basic field setup doesn’t need to change, we would recommend making sure that your fields all have the same name as their counterparts in Webflow.
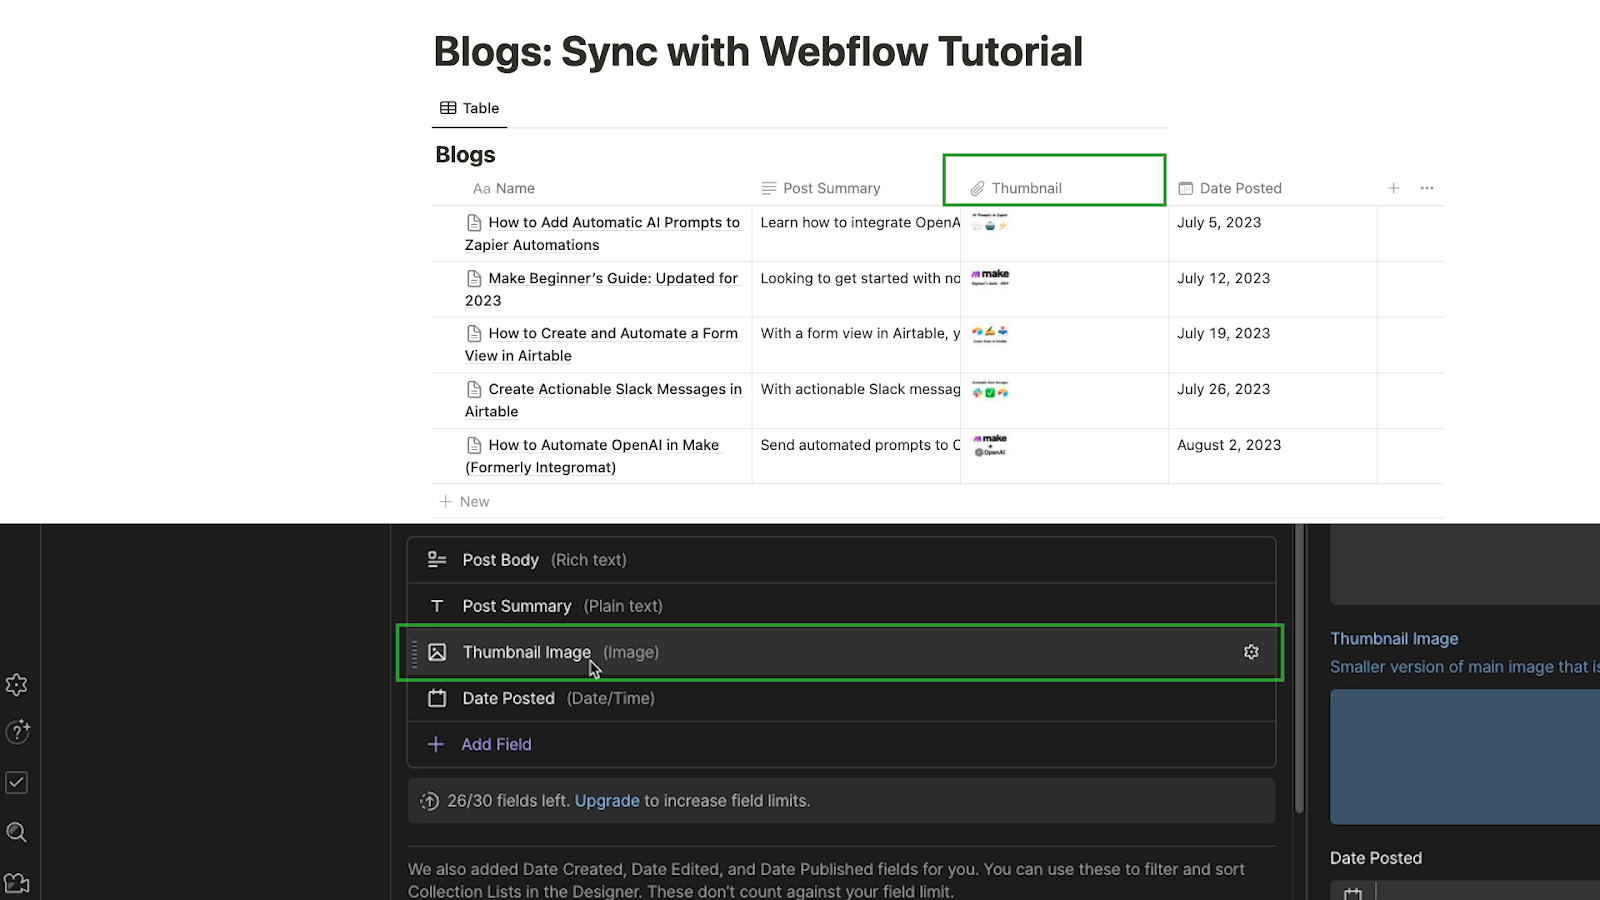
That will make it quicker to get your tables matched up in Whalesync.
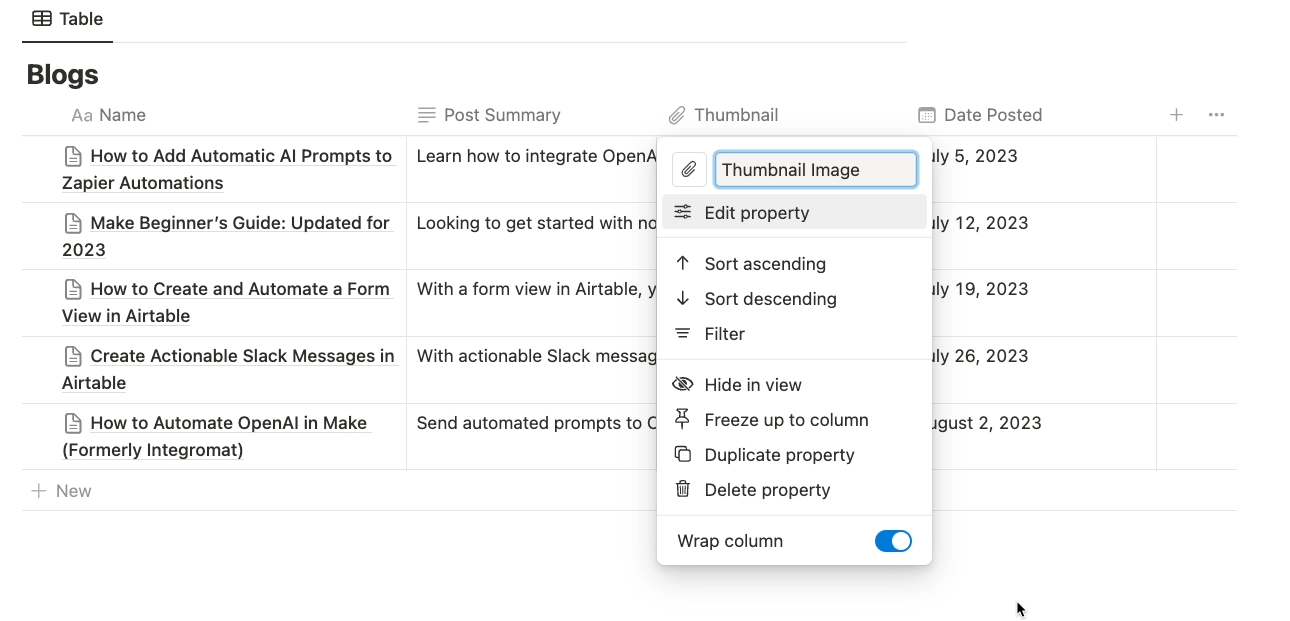
Add a “Webflow Status” field to Notion to save blogs as drafts
Once your field names are all set, you just need to add one specific field: “Webflow Status”.
If you don’t include this field, every item from your Notion database will be immediately published when it’s synced to Webflow, and you probably don’t want that.
Most likely, you want to be able to work on your drafts in Notion, and then publish them only when they’re ready.
Add a new property, and choose a “Select’ field. Name it “Webflow Status”.
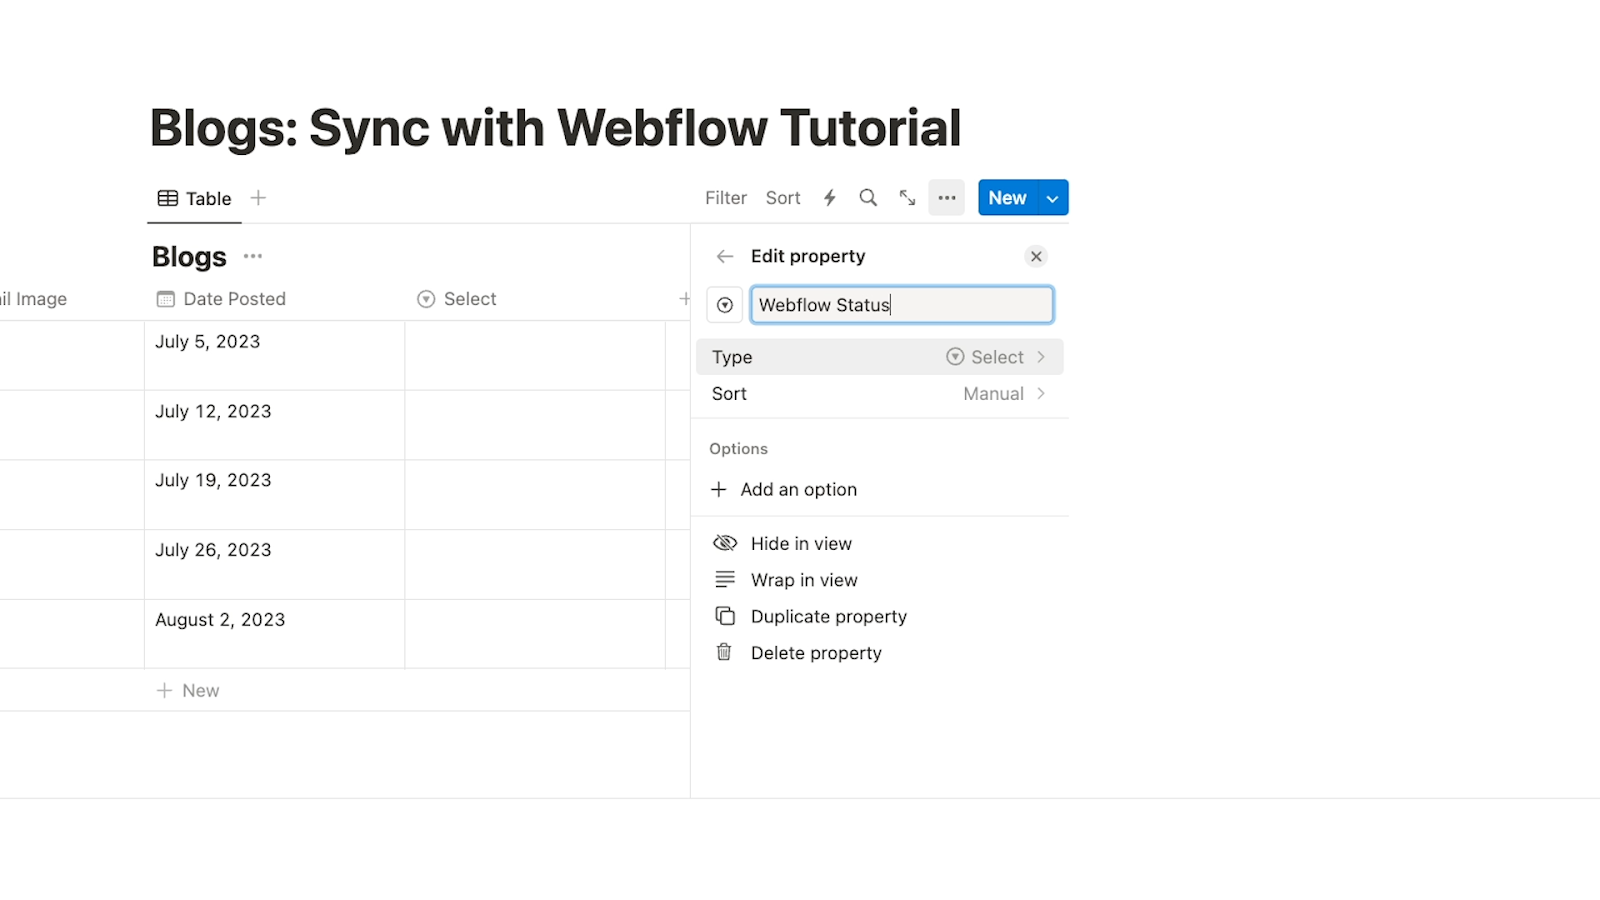
This field must include the following three options: Draft, Active, and Archived. These options will match up to “Draft”, “Published”, and “Archived” in Webflow.
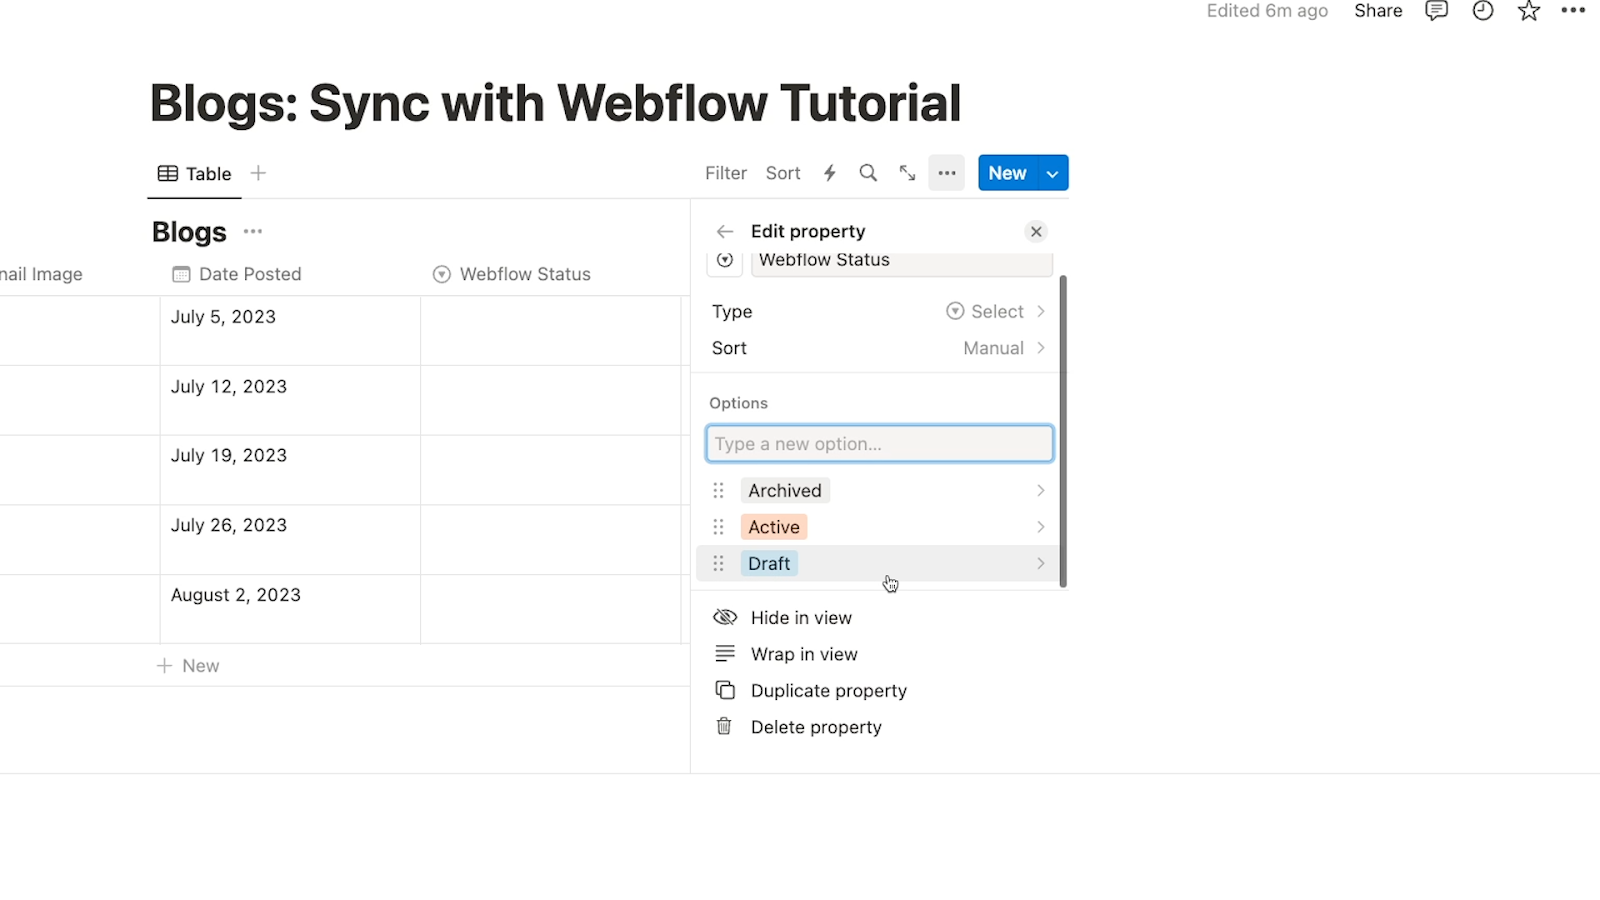
Add a “Drafts” view to Notion to ensure new posts are set to “Draft”
Finally, we’d recommend adding a “Drafts” view to your Notion database.
It’s not strictly necessary, but it should make it much easier later on to ensure that your newly created posts aren’t set to “staged for publish” in Webflow.
Create a new view and name it something like “Drafts”.
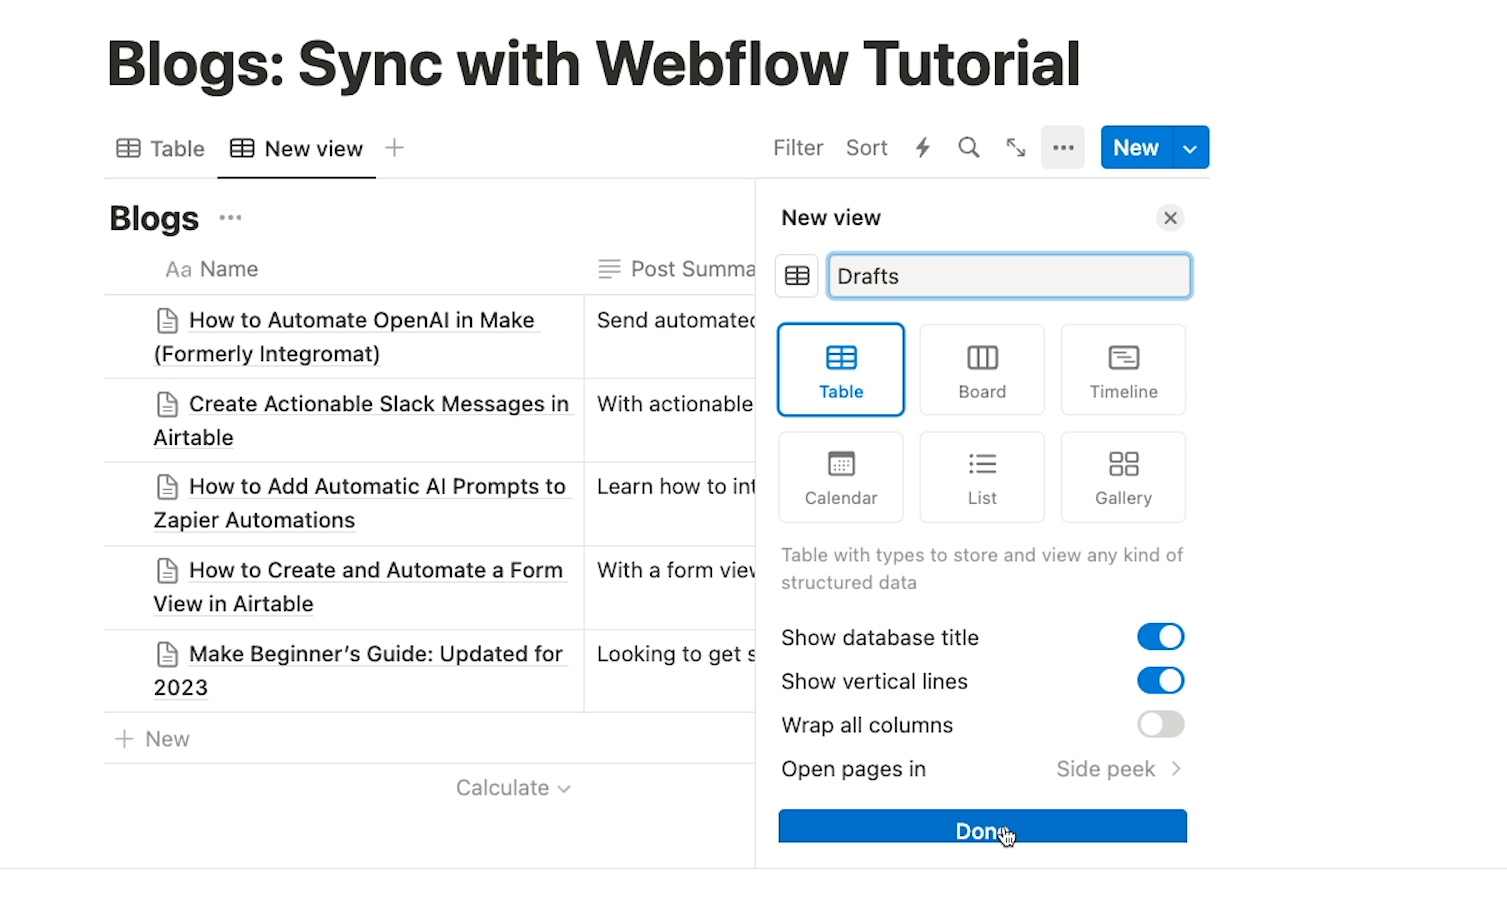
Then, add a filter, and set it to “Webflow Status” is “Draft”.
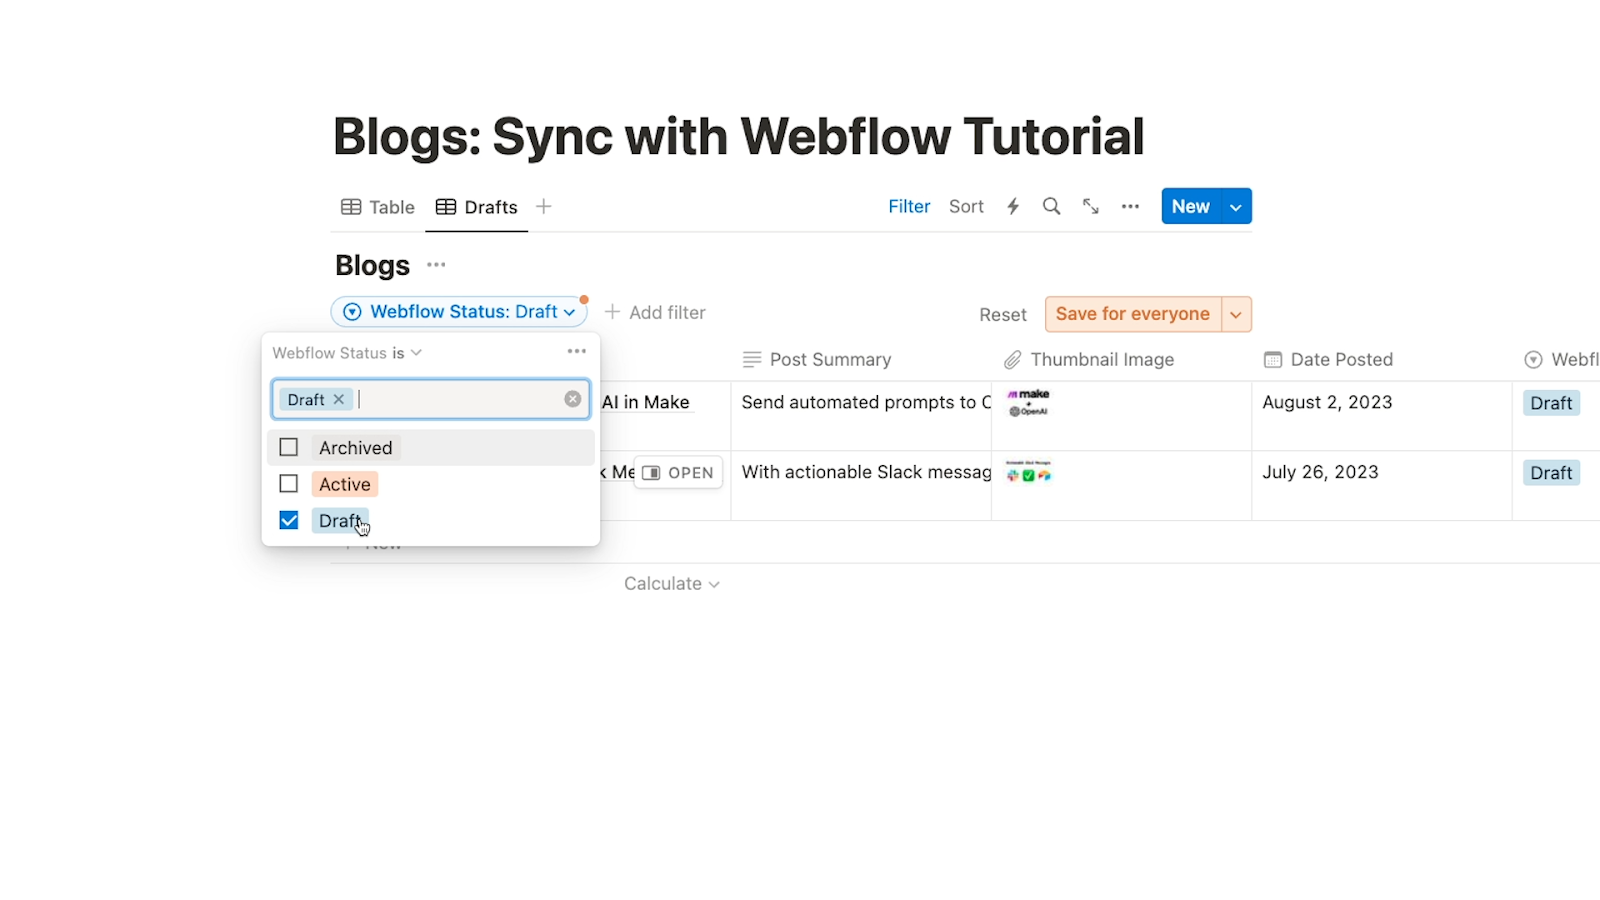
When you add new posts to this view, they’ll automatically be set to a “Draft” status.

If you create a record with no status in Notion, it will default to “Staged for Publish” when it’s synced to Webflow through Whalesync.
That means they’ll be published the next time you publish your webflow site, which might not be ideal.
With your properties named consistently, a webflow Status field added, and a new view called “Drafts”, your Notion Database is ready. Let’s check in on Webflow quickly before jumping in to Whalesync.
Check Webflow and Notion for redundant data
There’s nothing you necessarily need to do to prepare your Webflow collection before connecting it to Notion.
However, note that Whalesync will sync all records in both databases during its initial setup, even if it creates duplicates.
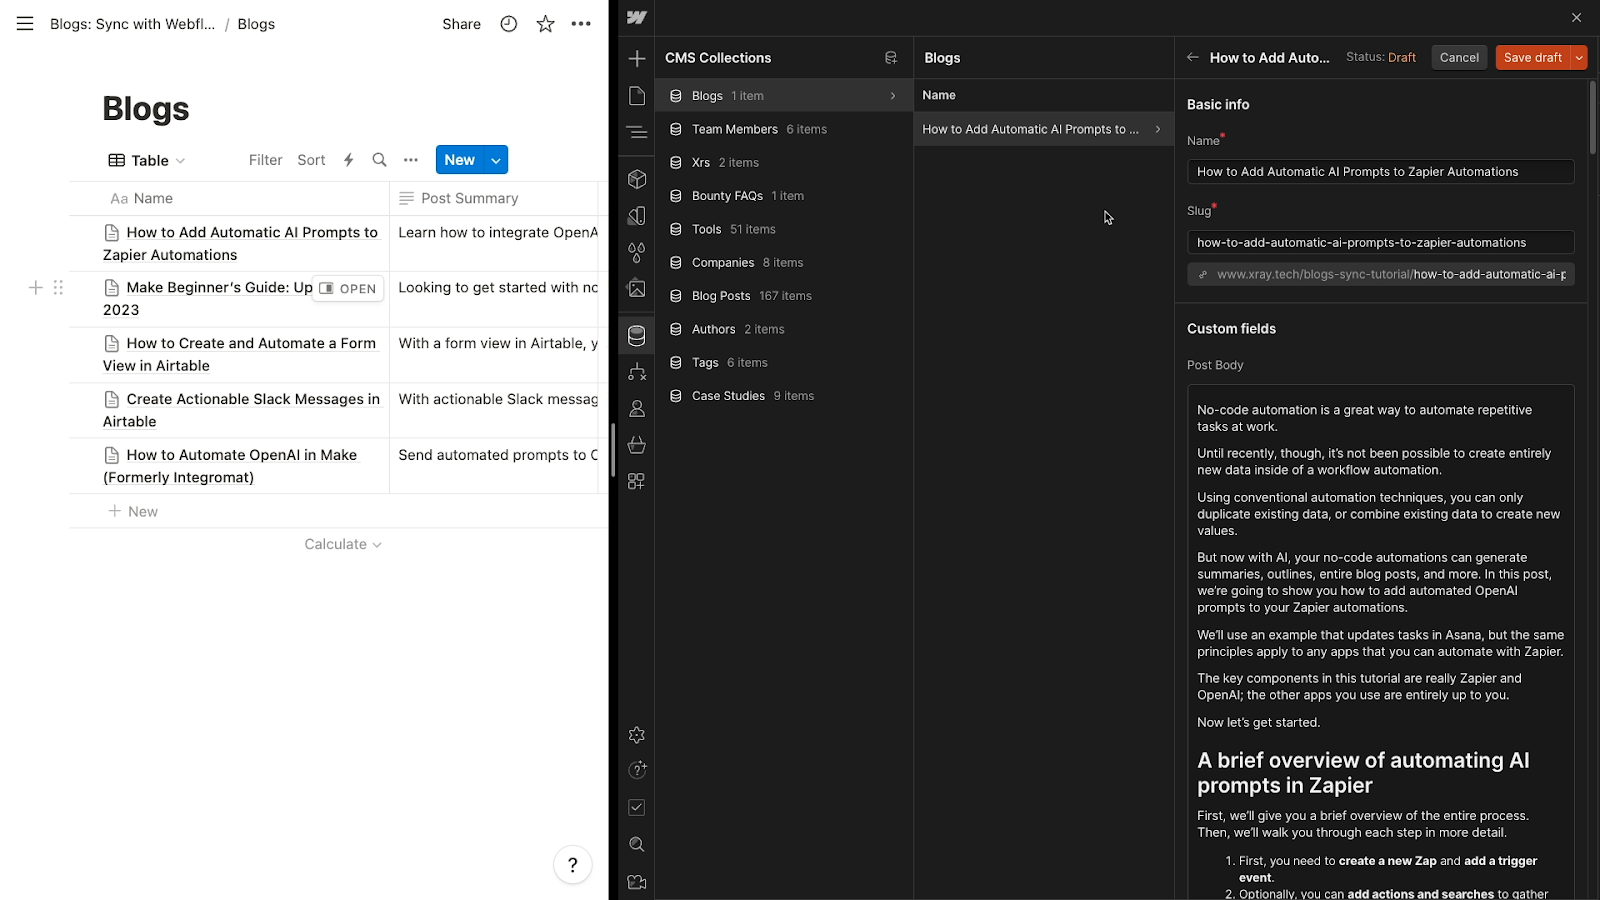
As such, you may want to delete existing data from either Notion or Webflow before creating your sync to avoid duplicates (but not both).
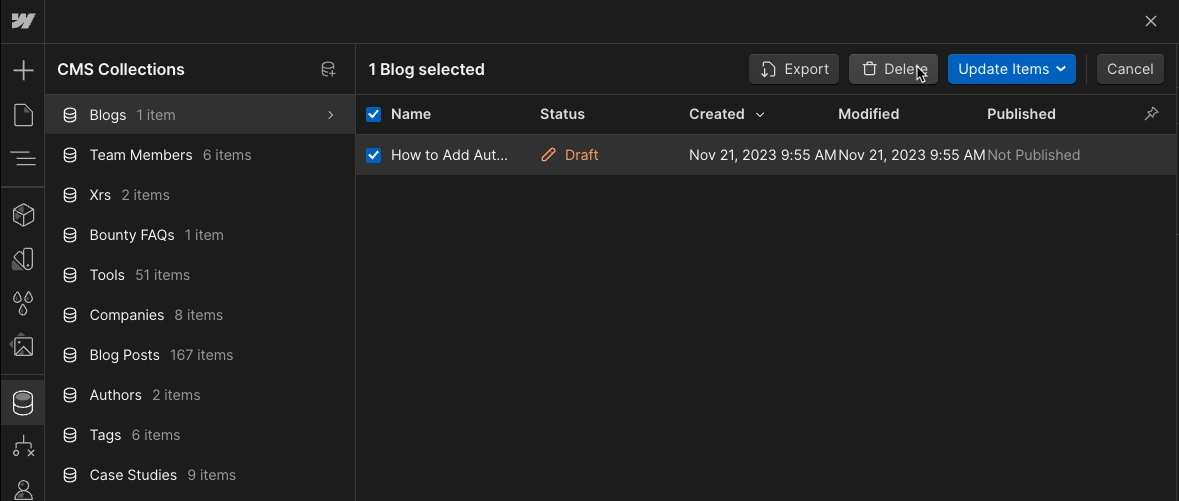
Alternatively, you may just want to delete any duplicates that get created after your sync is complete. It’s really up to you.
Additionally, bear in mind that Whalesync won’t create duplicates after the initial setup. Instead, each piece of content will be updated to match your latest changes.
Sync Webflow and Notion with Whalesync
Now let’s connect Notion and Webflow with Whalesync.
Go to whalesync.com, and sign in or create a free account. Note that there is no free plan for Whalesync, but there is a two-week free trial.
Once you’re signed in, Whalesync will take you to your Dashboard. From there, create a new Base. This is what Whalesync calls the automation that syncs your databases.
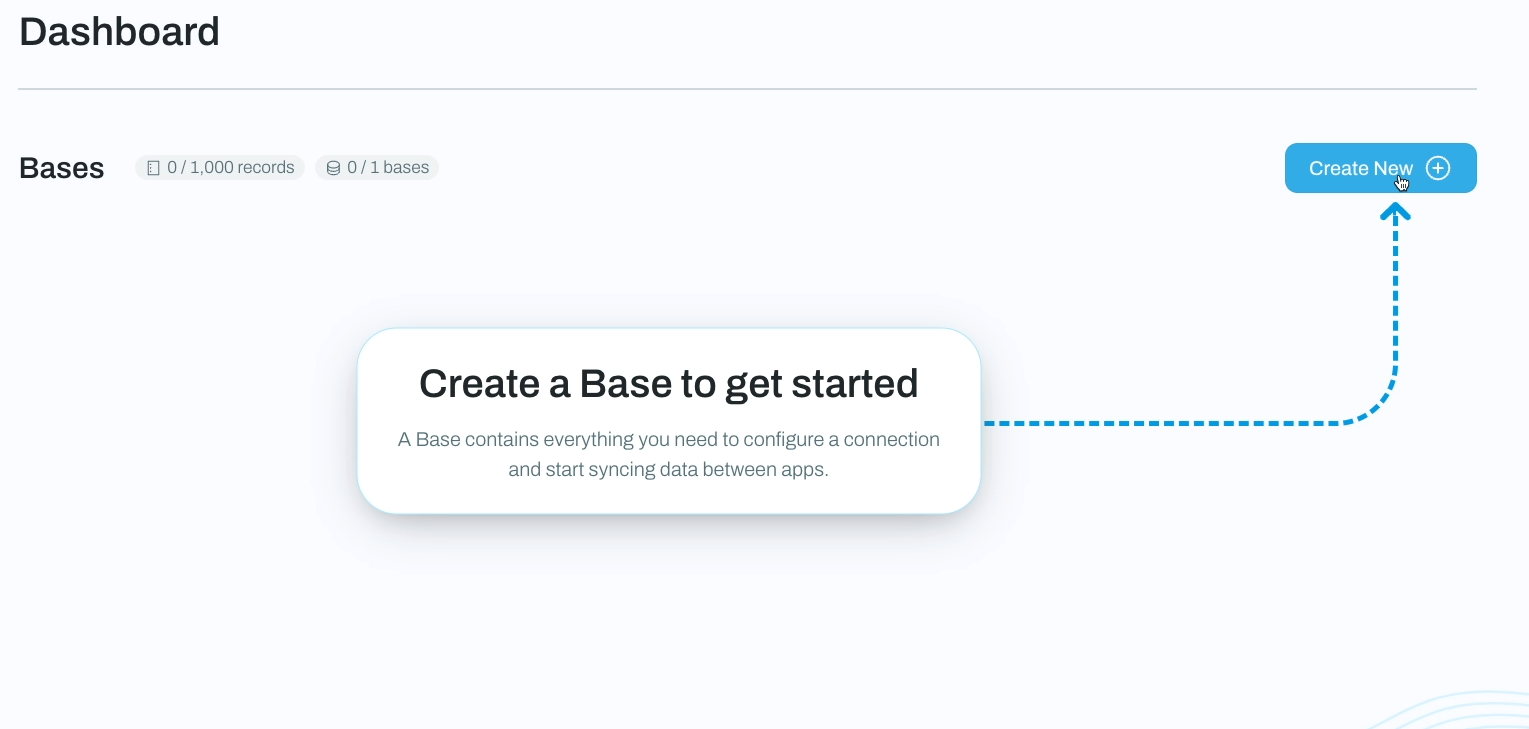
Choose and authorize your apps
Once you’ve created a base, Whalesync will prompt you to choose the two apps you want to sync.

You can pick either one first; the order doesn’t matter here. We'll pick Notion, then click “Authorize.”
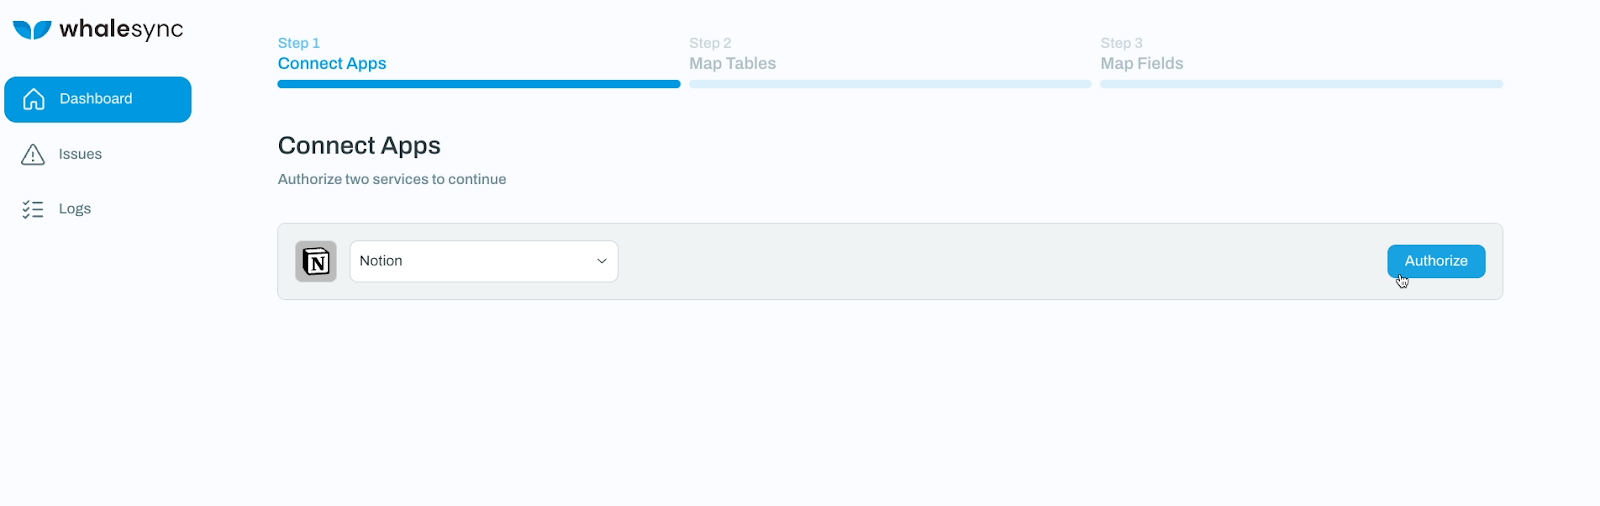
On the next screen, you need to select pages in Notion you want to authorize Whalesync to access. Make sure to select the page where your Notion database is stored.
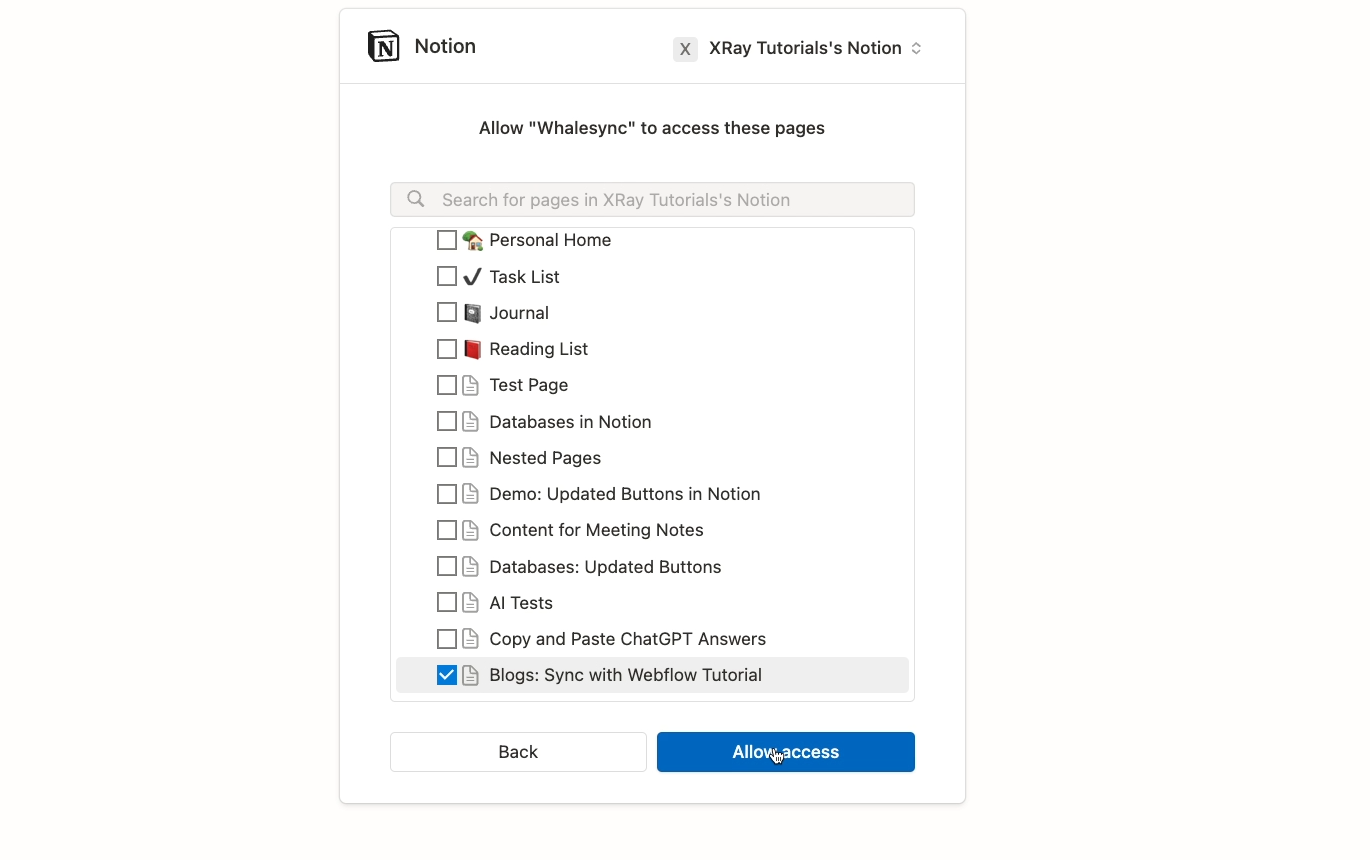
If you run into issues connecting Notion when you select a single page, try authorizing your entire workspace.
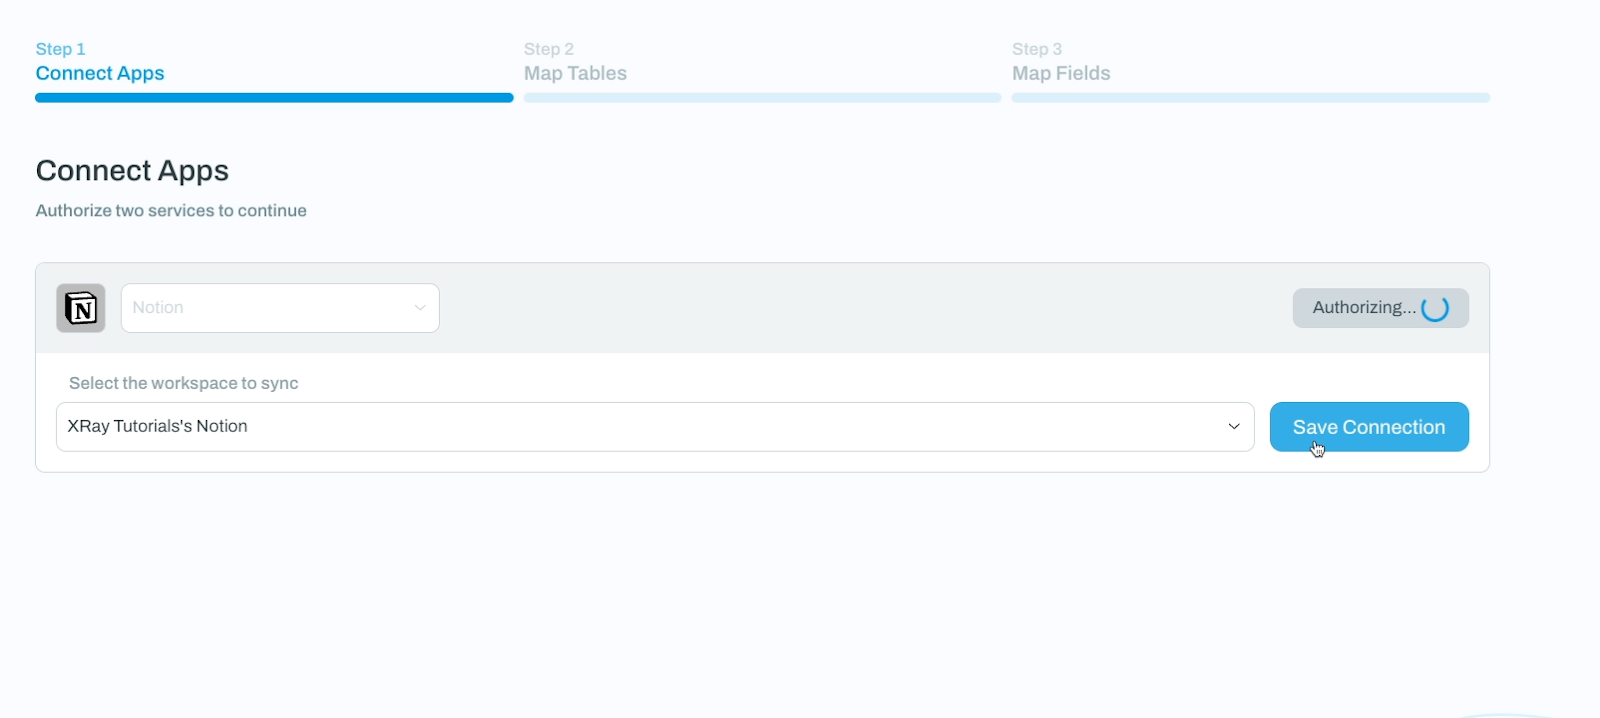
Click “Allow Access”, then save the connection.
Next, connect your second app: in this case, that’s Webflow.
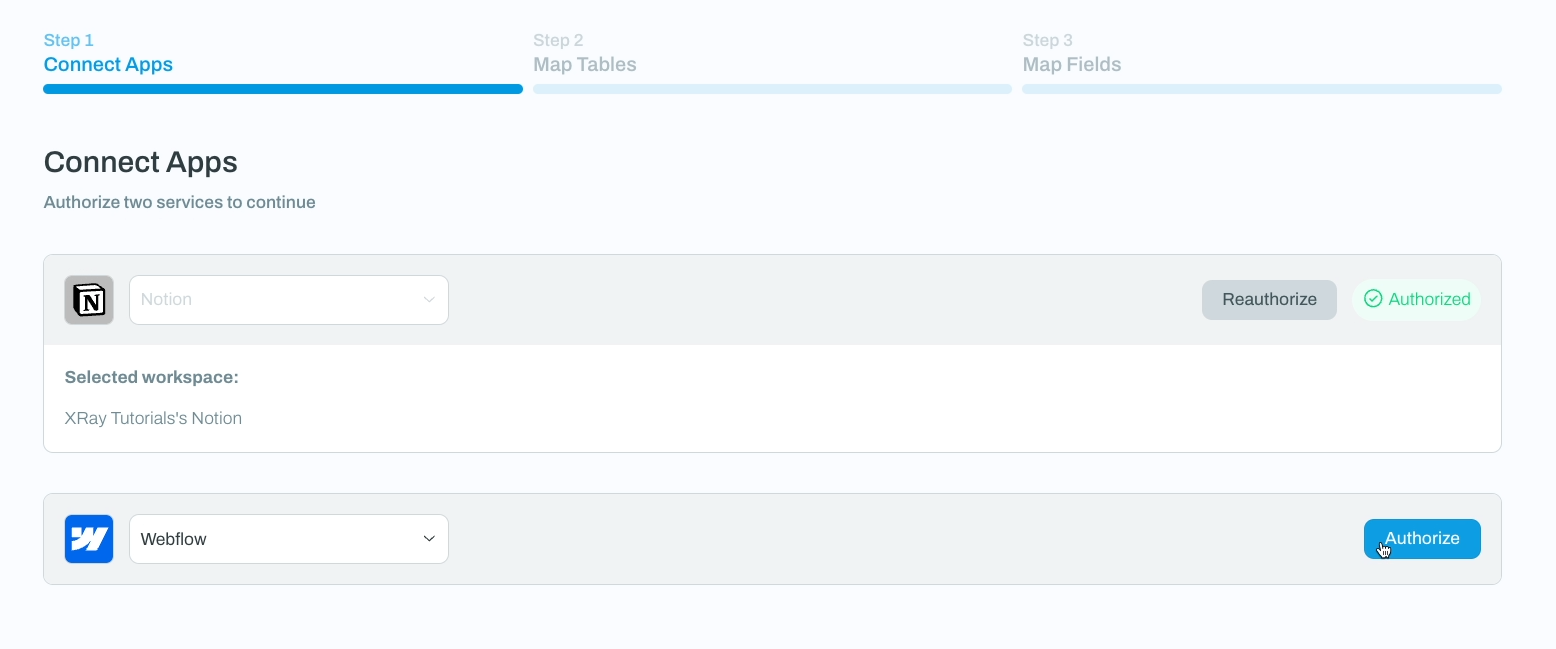
Once again, click “Authorize”, then choose the workspaces or sites that you want to allow access to.

Click on “Authorize app”, then save your connection.
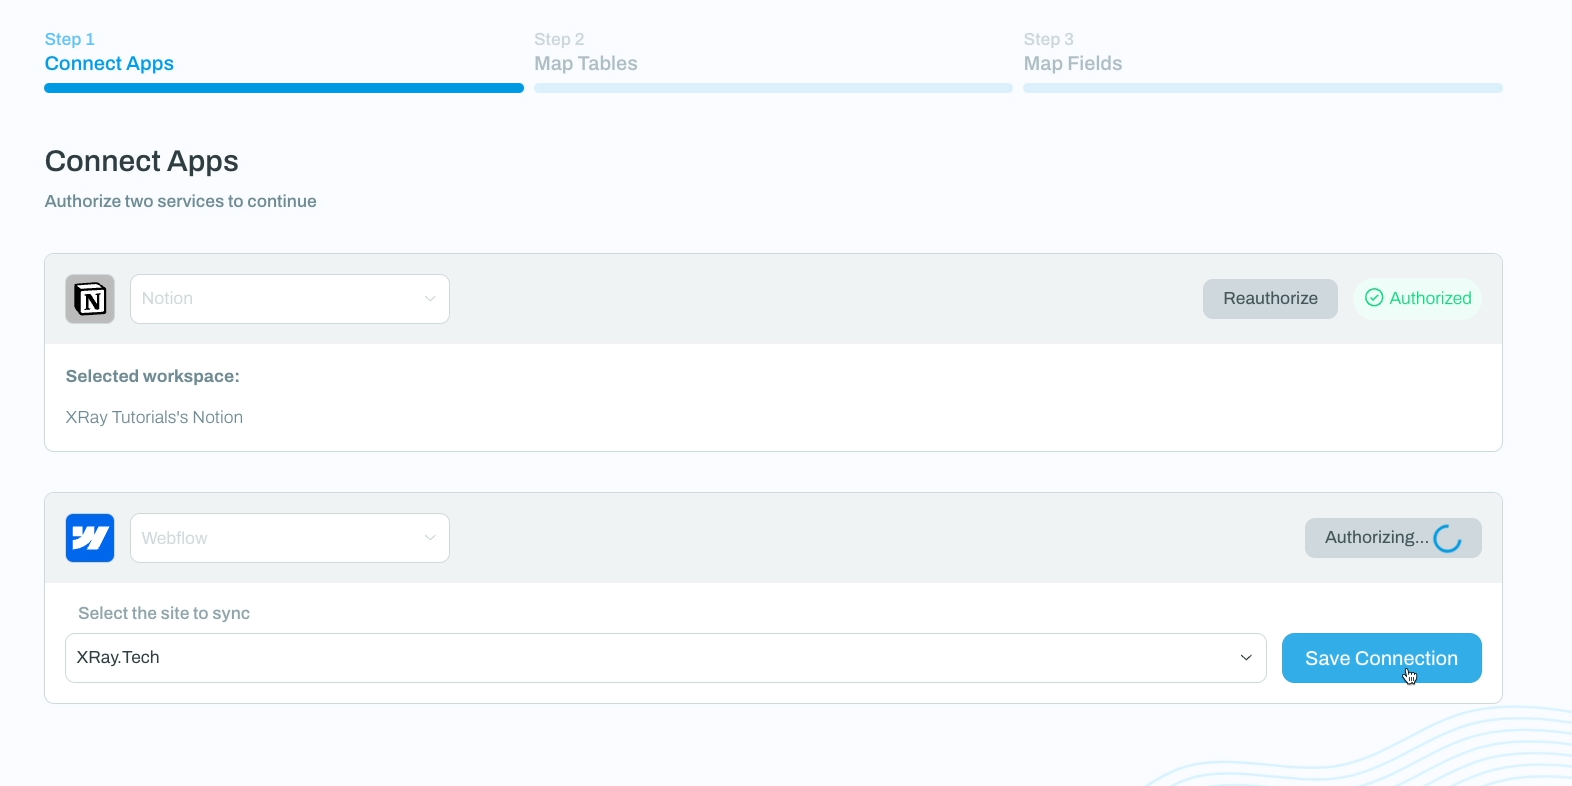
Map your tables and choose your sync direction
With both of your apps selected, you can now map your tables to tell Whalesync which specific data sources you want to connect.
Click “Map tables” to begin.

Choose the Notion table and Webflow collection you want to sync. Whalesync will automatically look for identically named tables and collections, and will select them for if it finds any matches.

But if your tables have different names, you can just select them manually.
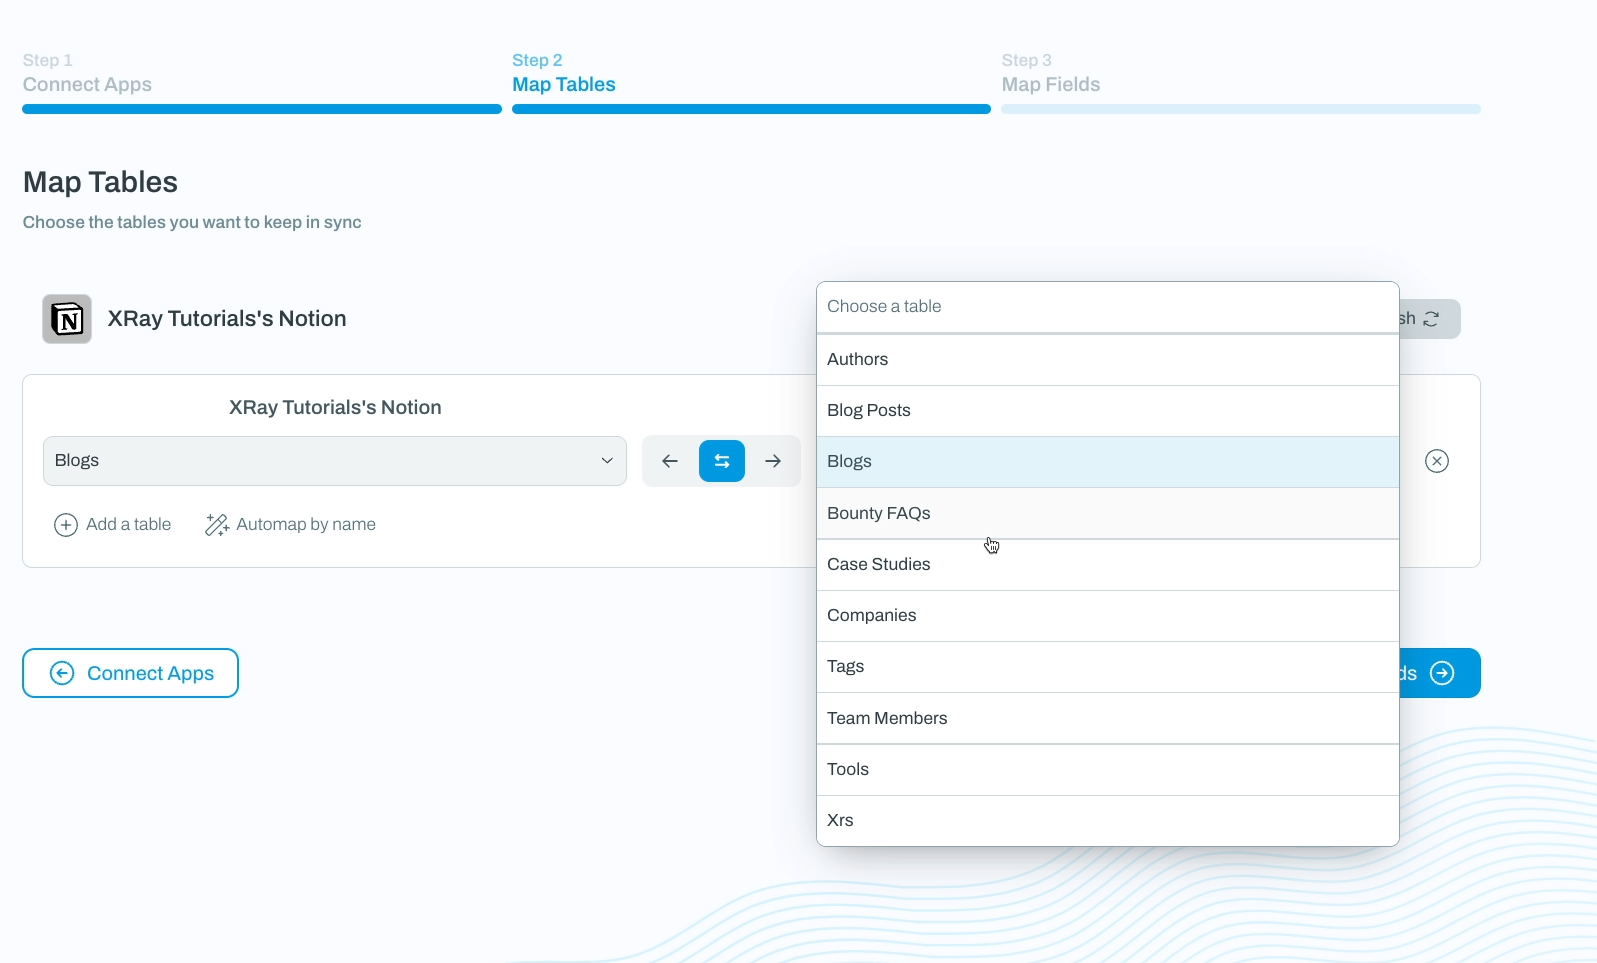
Then, choose the sync direction that you’d like to use. You can choose either a one-way sync, or a two-way sync.
With a one-way sync, changes will only be updated in one direction. In Whalesync’s menu, the arrow points to the app that will be updated.
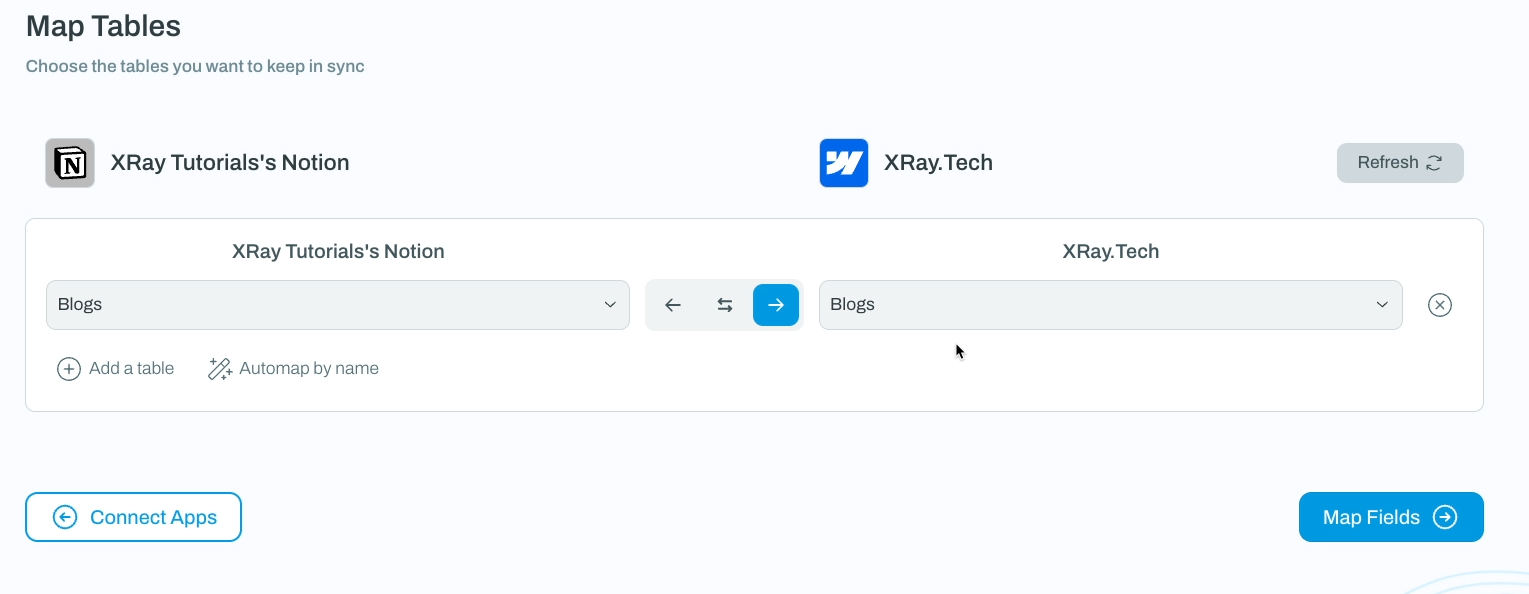
If you choose a one-way sync with the arrow pointing to Webflow, changes in Notion will be reflected in Webflow, but changes in Webflow will not appear in Notion.
A one-way sync like this can be good if you only ever intend to edit in one of your apps.
However, if you’re looking to use a one-way sync, you may be better off using an app like Zapier or Make to build the automation, especially if you’re not planning on syncing other databases.
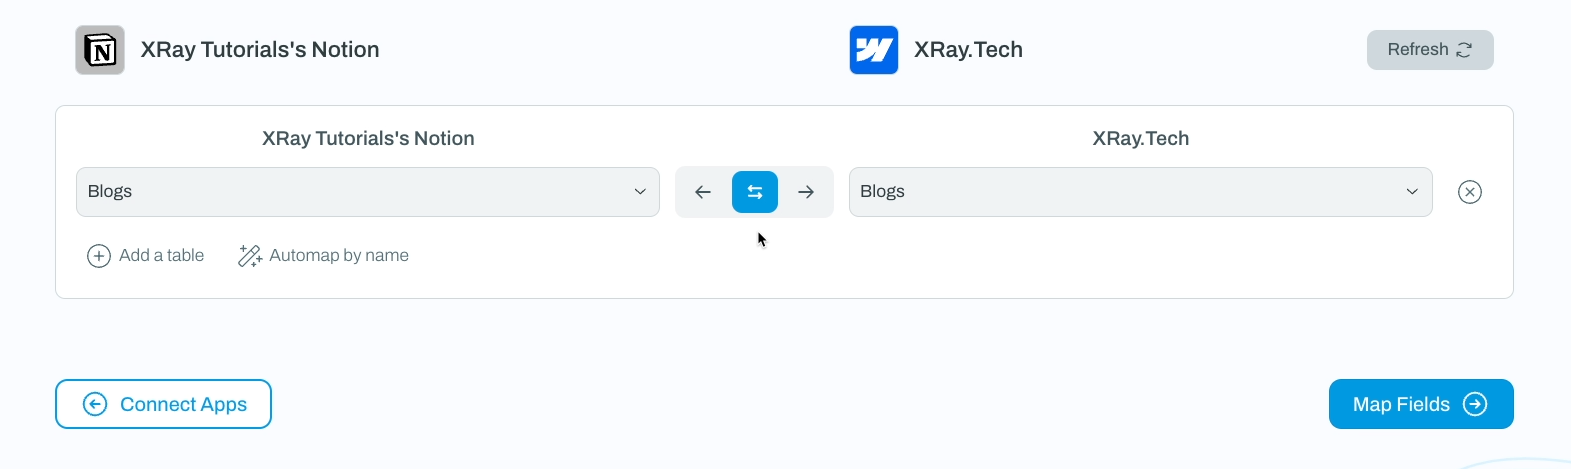
On the other hand, with a two-way sync, changes in either app will be reflected in the other app.
We’ll use two-way sync for our demo today.
Next, click “Map fields.”
Mapping fields between your databases
Now, you can specify which Notion fields correspond with which Webflow fields. By default, Whalesync will try to match fields with identical names in both sources.
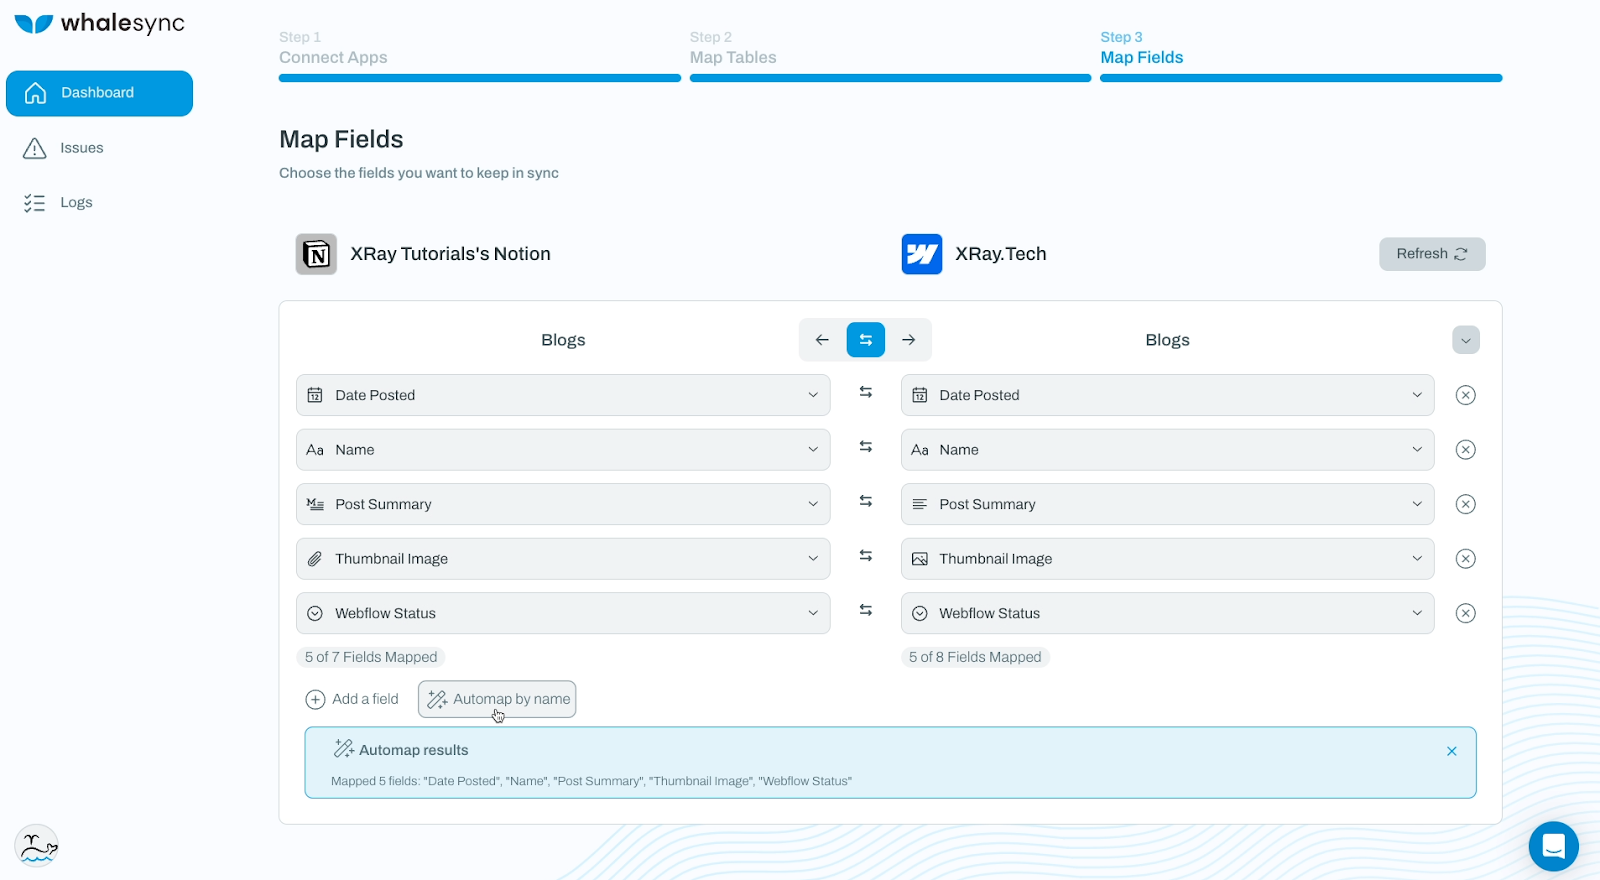
You can also prompt Whalesync to try automapping again by clicking on “Automap by name”.
However, if Whalesync missed anything, or if your sources don’t have identically named fields, you can just use the dropdown menus to pair them up manually.
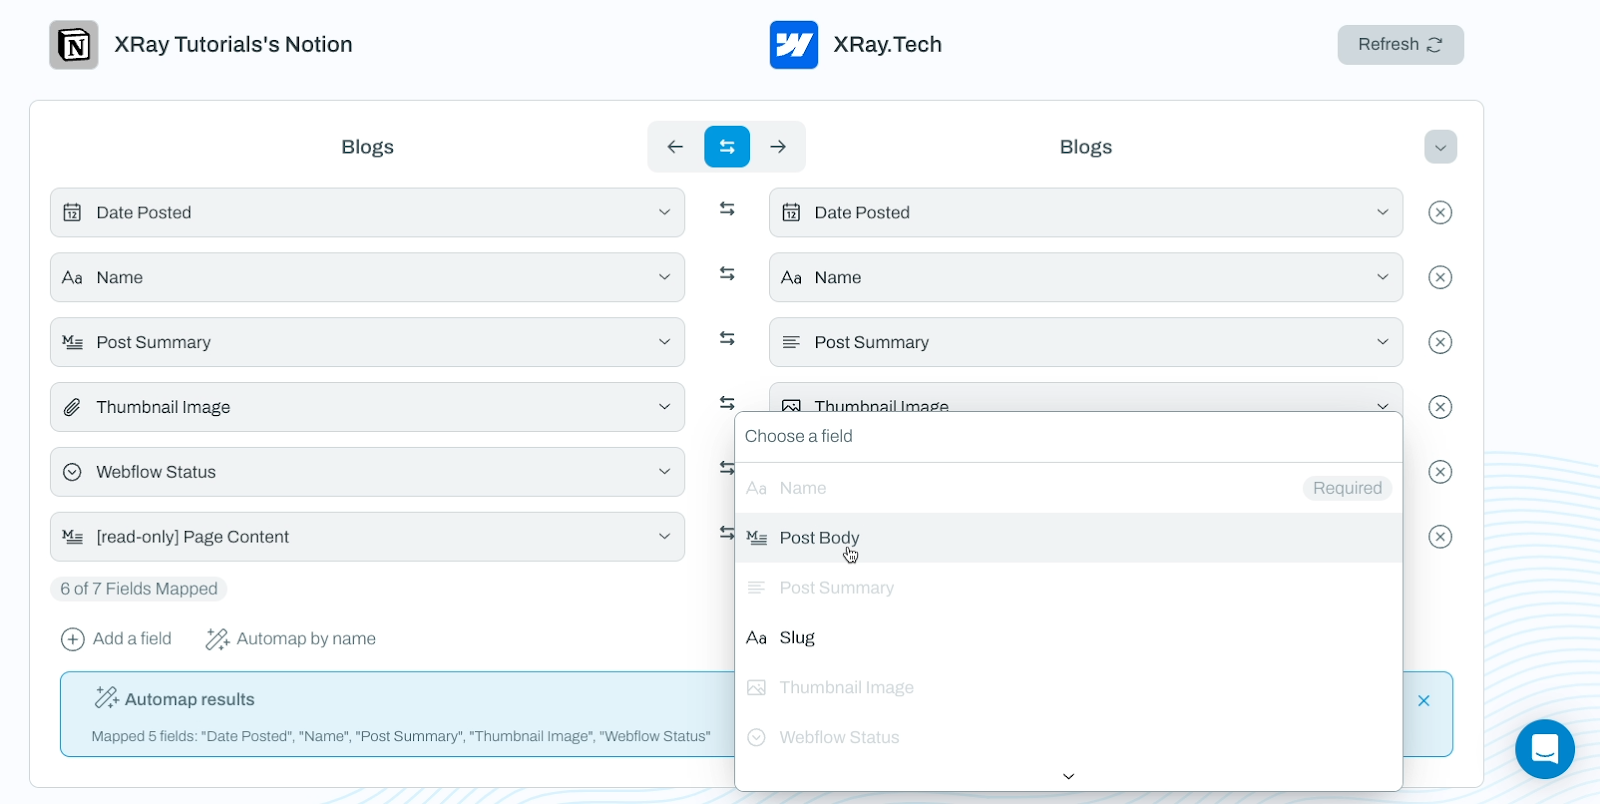
Note that while nearly all of the fields we’ve selected in our example will support a two-way sync, the “Page Content” from Notion can only sync in one direction.
It can only update from Notion to Webflow, not the other way around.
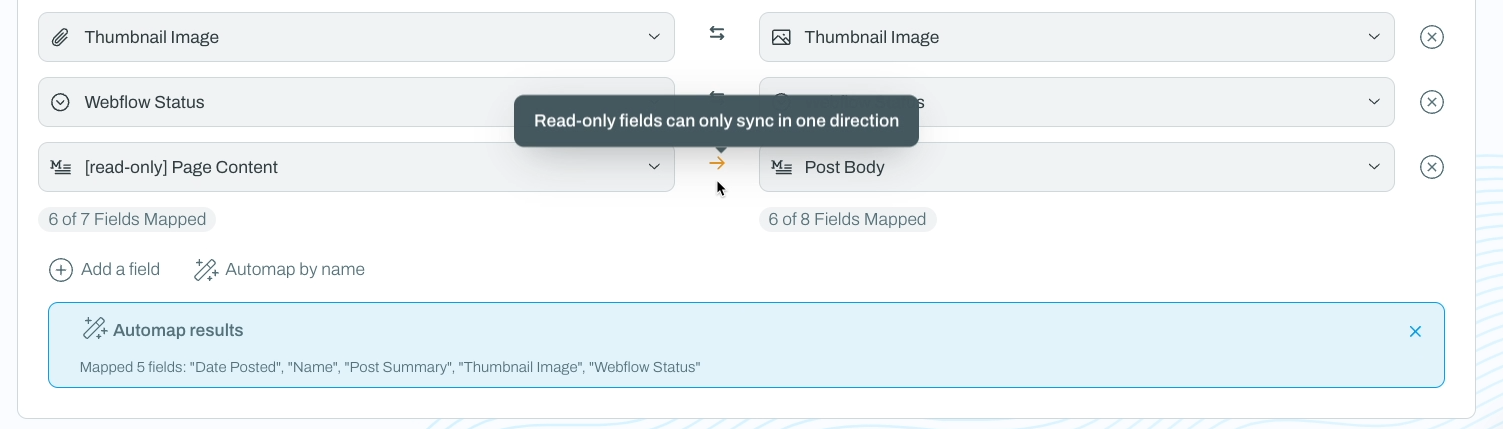
If we used a text field instead of the Page Content from Notion, we could get a 2-way sync. However, by pulling the page content from Notion, we can also preserve all of the heading levels and other rich text styling.
Plus, it’s much more natural to write and edit blogs in a Notion page rather than in a database field. Ultimately, we believe the benefits of using Page Content outweigh the downside of a one-way sync.
Once all of your fields are mapped correctly, click on “Save base”. Then, you’ll see a brief summary of the base you’ve created and its fields.
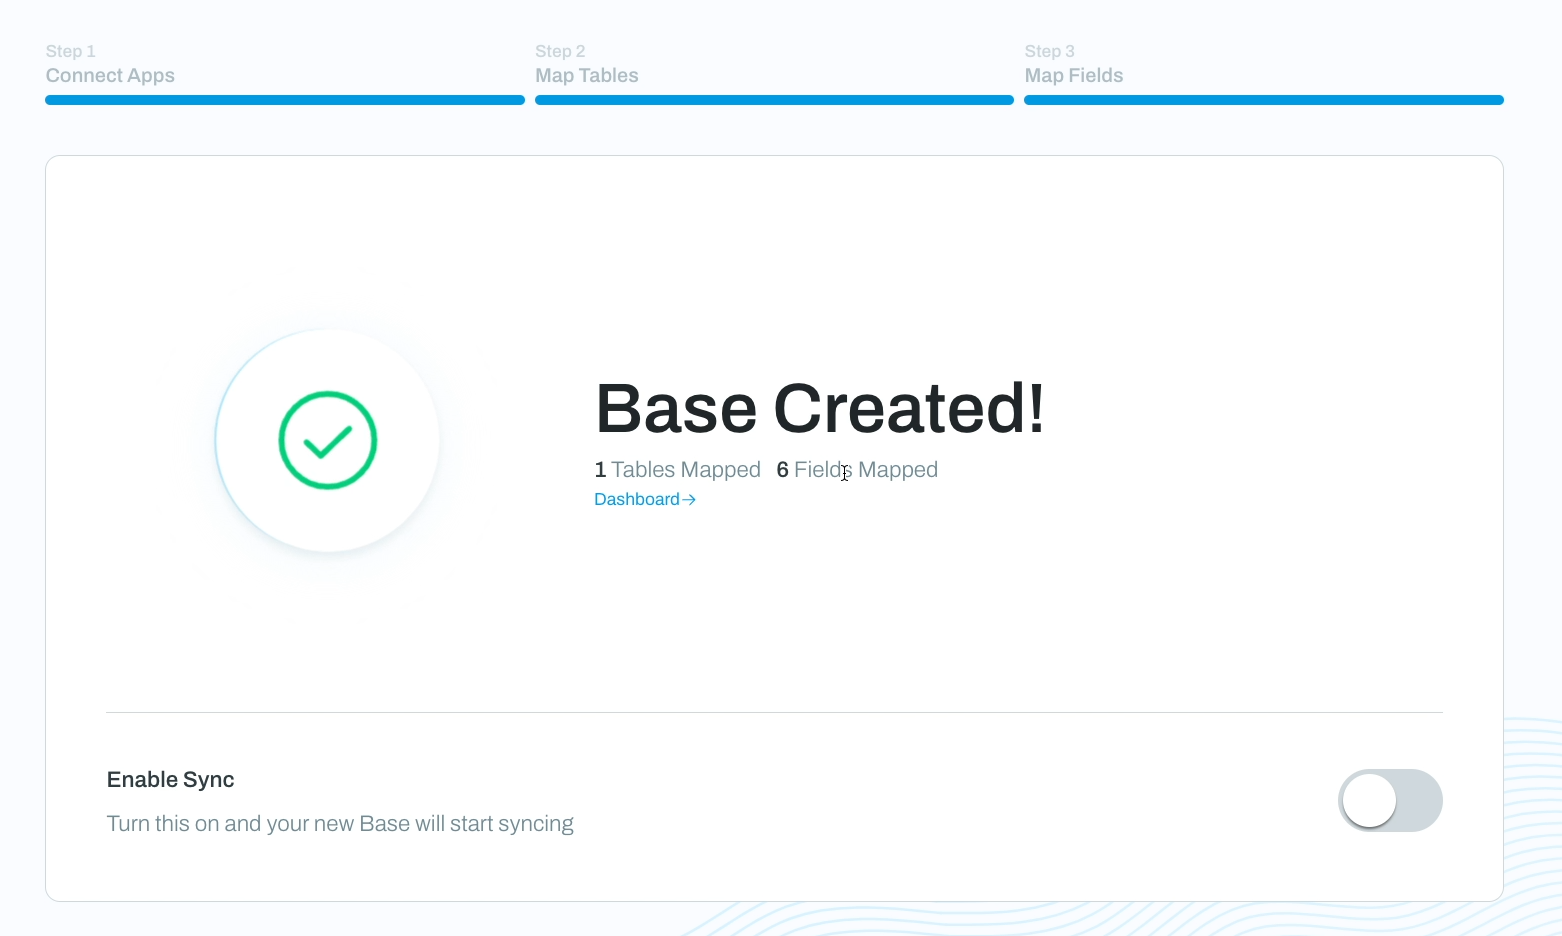
Enable and test your sync
Click on “enable sync” to activate your automation.
You’ll immediately see this pop-up window with a few warnings about how Whalesync interacts with Webflow.
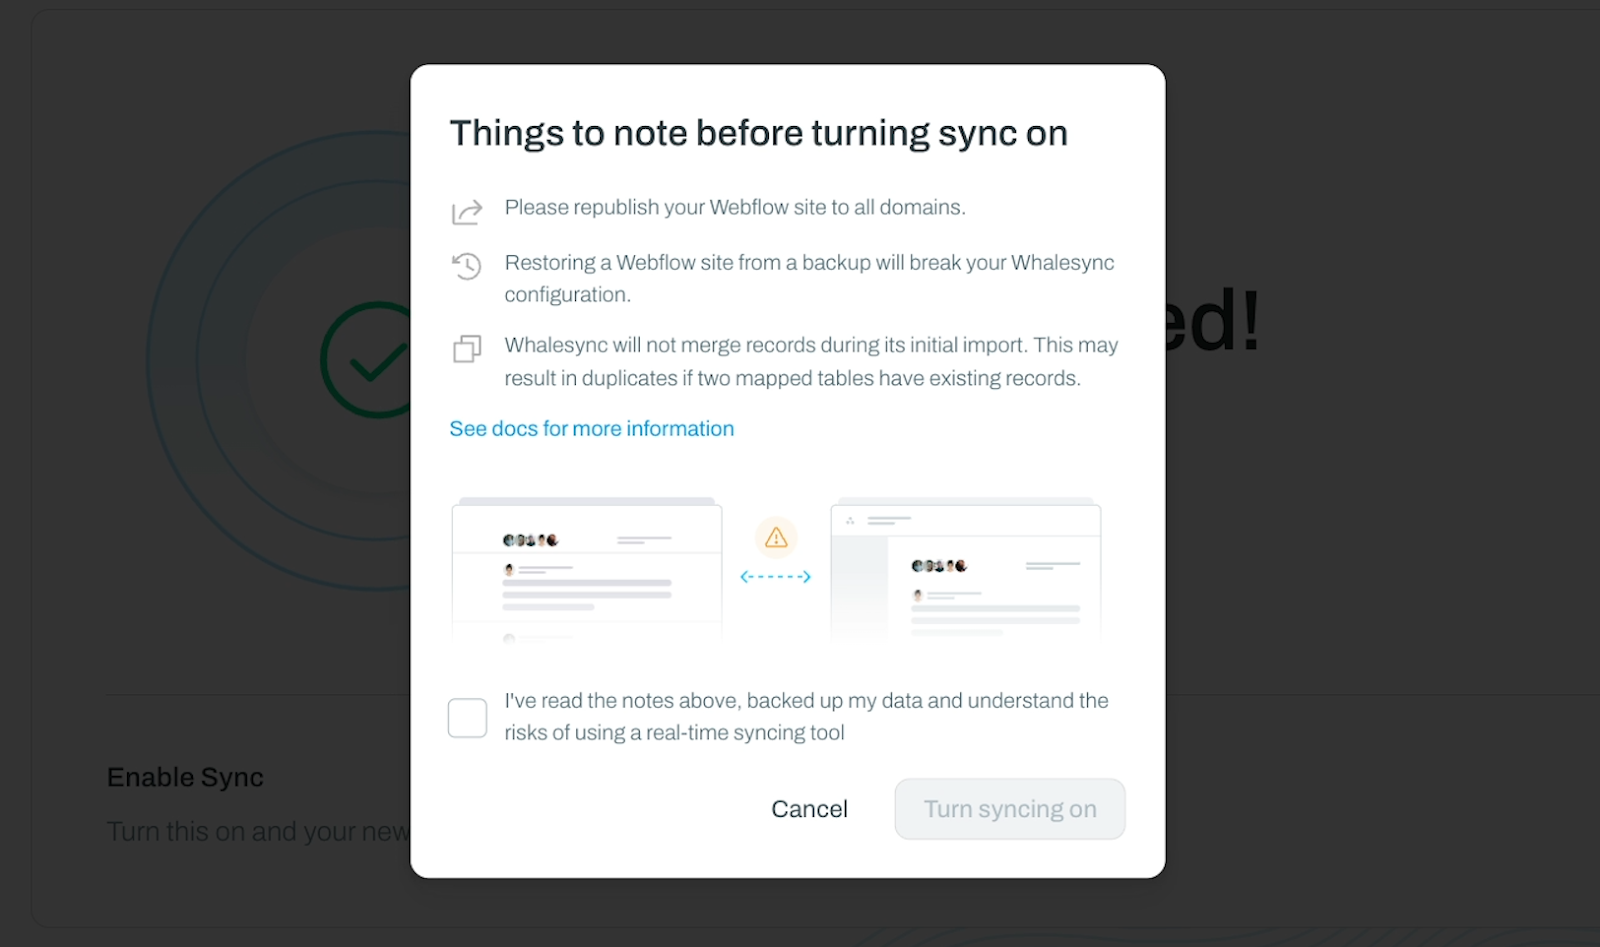
First, it says that you should publish our webflow site before enabling the sync, so do that before proceeding.
Next, it says that restoring your Webflow site to a previous backup will break the sync, so just keep that in mind going forward. Worst case scenario, you can always just rebuild your sync. It just takes a couple minutes.
Finally, it notes that the initial sync will not merge records. Like we mentioned earlier, if you have the same blogs in Notion and Webflow already, you’ll end up with duplicates, so you may want to delete data in one location before beginning the sync.
With all of that in mind, check the box to acknowledge Whalesync’s warnings, and click “turn syncing on”.
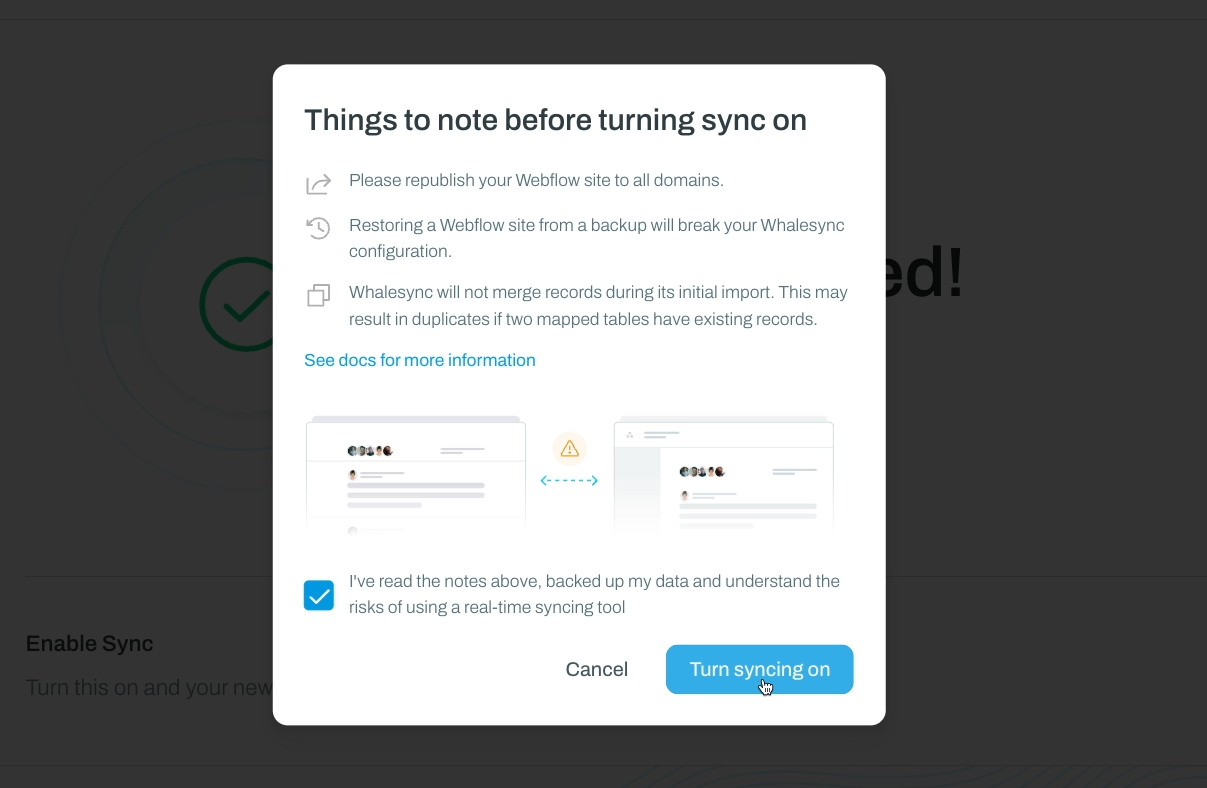
Whalesync will immediately begin syncing your blogs between Notion and Webflow. This may take a few minutes if you already have lots of blogs to sync.
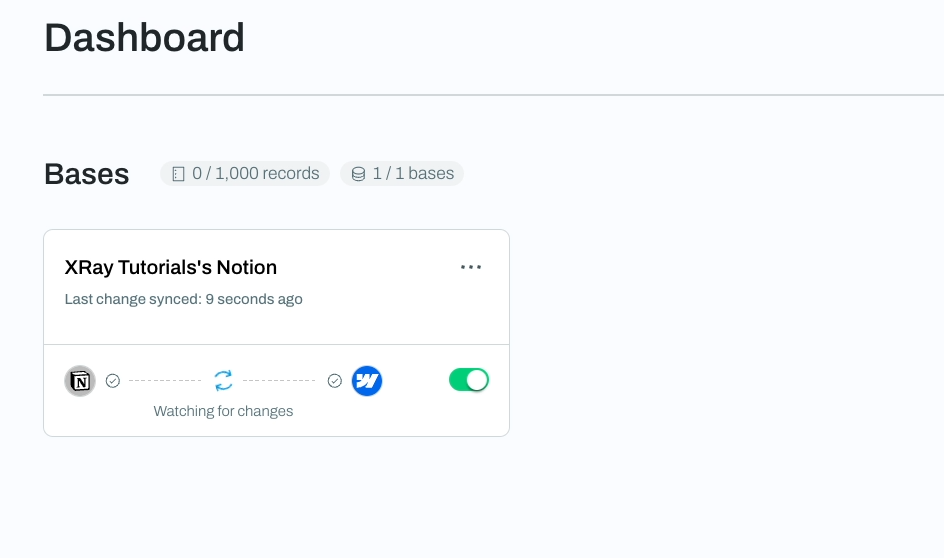
Once it’s finished, check your Notion table and Webflow collection. You should see that they both include identical content now. Note that you may need to refresh Webflow to see the latest data.

Finally, to make sure the live sync works, add a new blog to the ‘Drafts’ view of your Notion table.
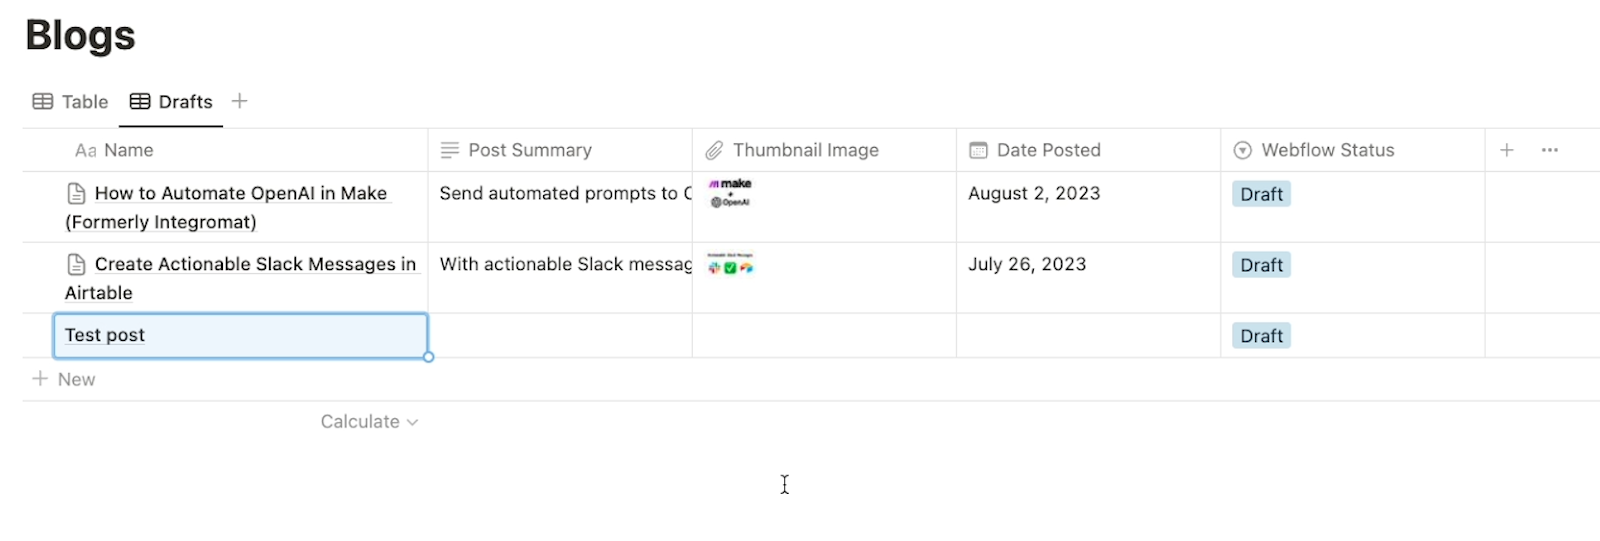
Then, check your Webflow Collection. Again, you might need to refresh.
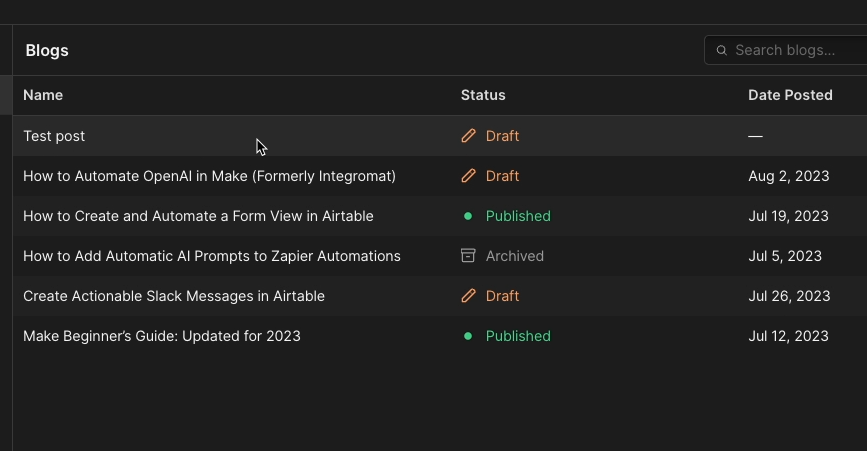
In our Webflow example collection, we can see the test post we just created. And critically, it’s set to “draft”, so we don’t need to worry about this incomplete blog getting published.
Now, to test that the sync works in both directions, we’ll edit the post summary in Webflow.
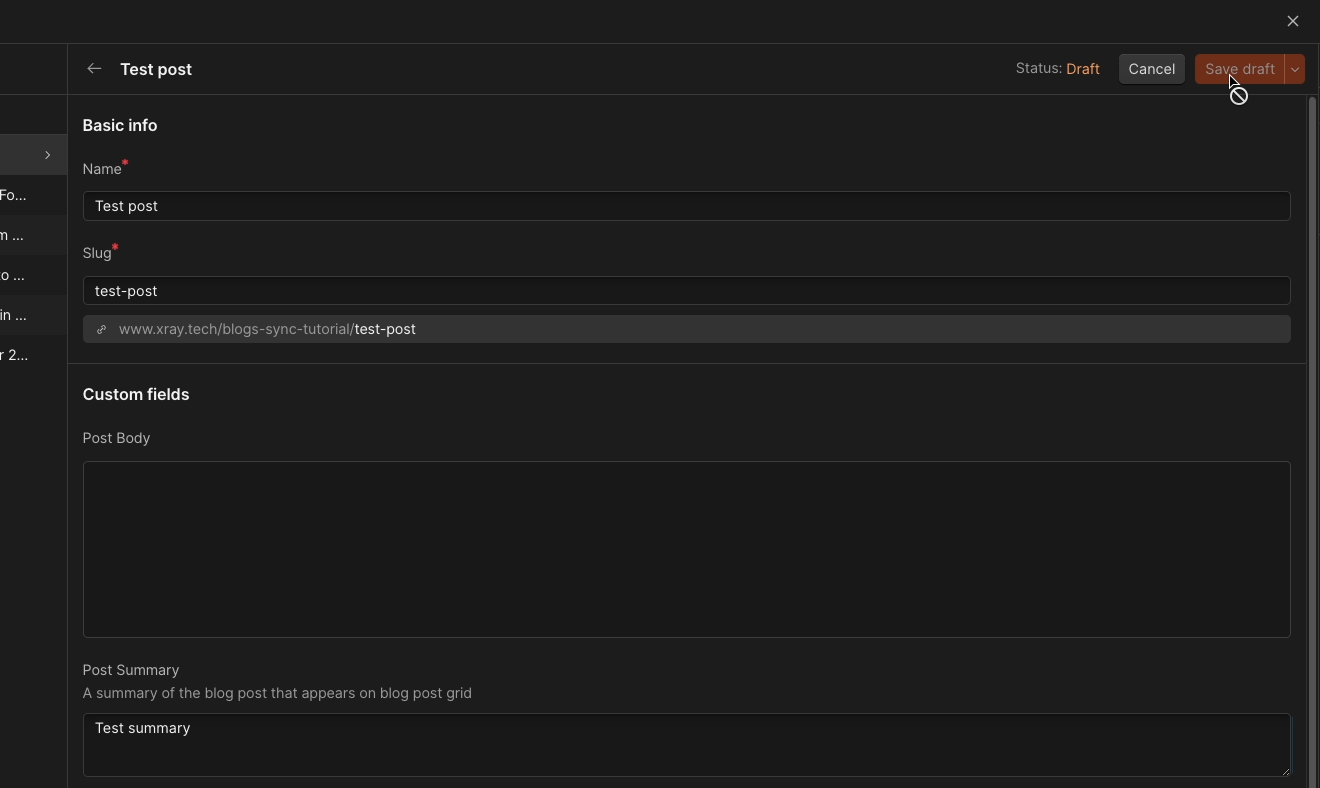
When we go back to Notion, we can see the summary updated to match. The sync is working exactly as expected.

If you want to check the status of your sync, or disable it, you can just navigate to your Whalesync dashboard.
As long as your sync is enabled, your data will be updated automatically in the background.
You can just use Notion and Webflow to create and update your content, and everything will be kept up to date for you.
Track your automations with XRay Workflow
When you set up an automation like this that silently moves data around for your team, it’s always a good idea to keep track of each important piece of the workflow.
With XRay Workflow, you can save the links to your Webflow site, your Notion database, and your Whalesync dashboard on a dedicated workflow board. Then, you can include critical documentation so everyone knows how to use and maintain the automation.
That way, as your automated infrastructure grows, you can quickly reference and access the critical systems that control each process.
If you’d like to try XRay Workflow, just go xrayworkflow.com and download the app for free.
Skip tedious work and avoid errors with automated syncing
While apps like Webflow are great for publishing your content to the web, it’s often much more convenient to create and manage everything in Notion. With syncing tools like Whalesync, you can ensure that your data stays up to date in both sources without having to perform any manual edits or tedious copying and pasting.
If you’d like to learn more about syncing and automating your company’s data, be sure to check out our blog or our YouTube channel. You can also follow XRay on Twitter, Facebook, or LinkedIn.

Zapier is a great platform for building no-code automations, but testing each automated action can often be a little cumbersome.
Luckily, Zapier has introduced some new features that streamline testing, letting you edit test data directly and test several steps at once.
In this post, we’re going to quickly show you how to use these new testing features in Zapier.
We’ll start by demonstrating how you can duplicate and edit your test records however you’d like.
Then, we’ll show you how you can process several untested steps with a single click.
How to duplicate and edit test data in Zapier
Previously, if you wanted to test your Zap with different variables, you would have to create a new piece of data in your triggering app every time. This could become particularly frustrating when testing several paths in the same Zap, since each path may require different values.
Now, you can build and test your Zap with a single piece of test data, and duplicate it to edit the variables however you’d like within Zapier.
Here’s how to edit your test data in Zapier five quick steps:
1. Test your Zap’s trigger with at least one piece of test data.
2. Choose the test data you want to use as a starting point.
3. Click on the “Duplicate to Edit” button in the bottom right.
4. Edit any variables that you’d like in your test data.
5. Test your Zap with your customized test data.
Example: editing test data to quickly test paths
When you have a Zap with multiple paths, editing your test data can be an efficient way to test each path and its rules without needing to leave Zapier.
For instance, we’ve built the Zap pictured below that creates new tasks in an Airtable base whenever a new project is marked as “Ready for Onboarding” in a separate Airtable base.

The specific tasks that the automation creates vary depending on the project type, so we have three paths here to accommodate each type.
We’ll test the trigger step to pull in the single record that we currently have in the “Projects” table, and we can see that the “Project Type” is set to “Workflow Audit”.

That will work for Path A - Workflow Audit. But what if we want to test the steps in Paths B and C, or check that Path A will correctly reject different project types?
Duplicate and edit test data
To edit your test data in Zapier, just open the test data in the trigger step and click on the “Duplicate to Edit” button in the bottom right.
This will create a new test record that’s identical to the original. But now, you can click on any variable in this “Modified Record” to change its value.
We’ll change the “Project Type” to “Workflow Automation.”

You can also duplicate modified records by clicking on the “Duplicate” button.

We’ll make another test record, and change the Project Type to “CWO Membership”.

To keep all of your test records straight, you can rename them by clicking on the three dots next to the record name and selecting “rename”

Then, enter any name you’d like. We’ll call them “Membership” and “Automation”.

Unfortunately, you can’t currently rename the original records retrieved when testing the step. These will always be called Record A, Record B, Record C, etc.
Using modified test data
Once you’ve duplicated and edited your test data, you can use it like any other test data in Zapier.
All you have to do is select the test record you want to use in the trigger, then test the relevant steps in your Zap as you usually would.
For instance, we’ll start by selecting the original record retrieved (Record A).

Then, we’ll test the rule for Path A.

And we can see that it would have run, since the Project Type is “Workflow Audit”.

But we want to make sure there won’t be any false positives here. That’s where our customized test data comes in handy.
We’ll go back to the trigger and switch to our “Membership” test data.

Then, we’ll test the Path A rule again. This time, the path would not have run, since the project type is not “Workflow Audit”.

We can now continue to go through our other paths and test them the same way, switching the test data as needed.
At no point do we need to leave Zapier or create new data in Airtable or any other app. We can just swap out test records in Zapier and keep building and testing right here.
Streamline your testing with customized test data
This is a massive update for seasoned no-code builders who are getting their hands dirty in Zapier every day.
When you’re creating a Zap from scratch or doing some regular maintenance, constantly going back and forth between your app and Zapier to create new test data can be a huge pain.
Now, even if your Zap has several branching paths, you can get all the test data you need from editing a single test record.
WARNING: Custom test data may be misleading
One thing to note here is that you can edit test data in any way that you’d like.
While this is extremely convenient, it also means you might end up creating records that don’t match the kind of data that your apps would actually produce.
For example, the “Name” field in all of our test records says “TestCO • Workflow Audit”, even when we’ve changed the Project Type to something else

In the Airtable base that triggers our Zap, the “Name” field is a formula field that concatenates the client’s name and project type.

If we change the project type directly in Airtable to “Automation” or “Membership”, the “Name” field updates instantly to reflect that.

However, when we edit a test record in Zapier, the “Name” field does not change automatically.
It’s not really important for testing the Zap we’ve set up here, because our paths rely on the “Project Type” field, not the “Name” field.
However, if your Zap relies on a formula field or some other value generated by the app, you may need to be careful about editing your test records.
Depending on how you edit your test records, you might create variables that don't reflect the data your Zap will actually encounter.
Consequently, your tests might be misleading about how your Zaps will actually perform when you finally turn them on!
You have the freedom to edit your test data however you want, so use your judgment to ensure your edited test-data is realistic for your automation.
While editing test data is great for making quick changes to a Zap, I’d recommend always using at least one real, unmodified piece of test data to confirm your automation works as intended before going live with it.
Testing several steps at once in Zapier
Modifying test data isn’t the only new option for streamlining the building and QA process in Zapier. Now, you can also test several steps in a Zap at once, instead of testing each step one at a time.
Here’s a quick outline of how to test several untested steps at the same time:
1. Open the Zap you’d like to test. This Zap must have steps that haven’t been tested yet.
2. Click on the status icon in the top left of the Zap builder.
3. Click on “Test steps” to test every untested step at once.
NOTE: this will run every untested step in every path, regardless of which paths your data actually matches.
For more detail, explore our example provided below.
Testing several newly added steps
In our example, we’ve just added a new Slack alert step to the end of each Path in our Zap.

Because these steps are at the end of each path, there’s no reason to think that they’d change how the overall Zap and its logic work.
That makes this an ideal situation to use the mass testing feature. We just need to make sure that each new step works on its own; we don’t need to check the underlying structure of the whole automation.
To test all of these steps, we’ll click on the status icon, which is already warning us that we have untested steps in this Zap.

Then, we’ll click on “test steps”.

Zapier will now run each of these steps one after the other. As a result, we’ve got three new Slack messages in the tutorial channel.

Normally, this Zap should only run down one path and produce one Slack message, but since we used a mass test, we got all three messages from all three paths.
Be careful when using mass tests in Zapier
However, if you’re working with paths, you should not rely solely on a single mass test like this.
At some point before publishing your Zap, you should test one step at a time to verify that your paths work as intended.
Like a lot of Zapier’s recent updates, mass testing will only be useful in certain situations. But for power users creating long, multi-step Zaps, this could be a huge time-saver when verifying small additions to your automations.
Refine your Zapier workflows with new testing features
Workflow updates like this might not be as flashy as some of Zapier’s recent AI additions, but they can still be incredibly useful for no-code builders.
As you’re building your next Zaps, try editing your test data or testing several steps at once. Integrating these new tools into your processes will let you create and update your automations faster than ever.
If you’d like to learn more about building no-code automations with tools like Zapier, check out our blog or our YouTube channel. You can also follow XRay on Twitter, Facebook, or LinkedIn.

Zapier has always been a simple, accessible tool for creating automations.
But with Zapier’s latest AI features, building Zaps is getting even easier and faster than ever.
In this post, we’re going to show you three of Zapier’s new AI tools that can generate formatter steps, code blocks, and even entire Zaps based on short AI prompts.
All of these are beta features, so they’ll likely change significantly over the next several months as Zapier collects feedback and refines their software.
However, they already show a lot of potential for transforming the way that we build Zaps. There’s a lot to cover, so let’s get started!
Create formatter steps with AI
To start, we'll show you one of the most useful AI features that Zapier’s added recently: AI-assisted formatter steps.
With Zapier’s new AI-assisted formatter steps, you can create and configure a formatter step with a prompt instead of manually entering each setting.
Format data in Zapier without looking up syntax
This can be especially useful if you’re not sure about all of the exact syntax and options you need to enter to get the output you want.
There are dozens of basic actions that Formatter can run, from regex and text formatting to math operations and date/time utilities. Now, you can access all of these from the same place with an AI prompt.
How to add an AI formatter step in Zapier
Adding a formatter step with AI is simple, and only takes a few steps.
1. Open up the Zap where you’d like to add your formatter step.
2. Select any step that includes the data you wish to format.
3. Hover over the data you want to format, and click “Format data”
4. Enter your prompt in the window that pops up. Briefly describe what you want in plain English.
5. Click “Create step”.
6. Review and test the formatter Zap created by the AI.
Check out our example for a detailed demonstration of how it all works.
Example: reformatting date and time in Zapier with AI
In the example below, our Zap sends Slack alerts for new messages in a Gmail inbox. Among other data, the Slack alert includes the date and time the email was sent.
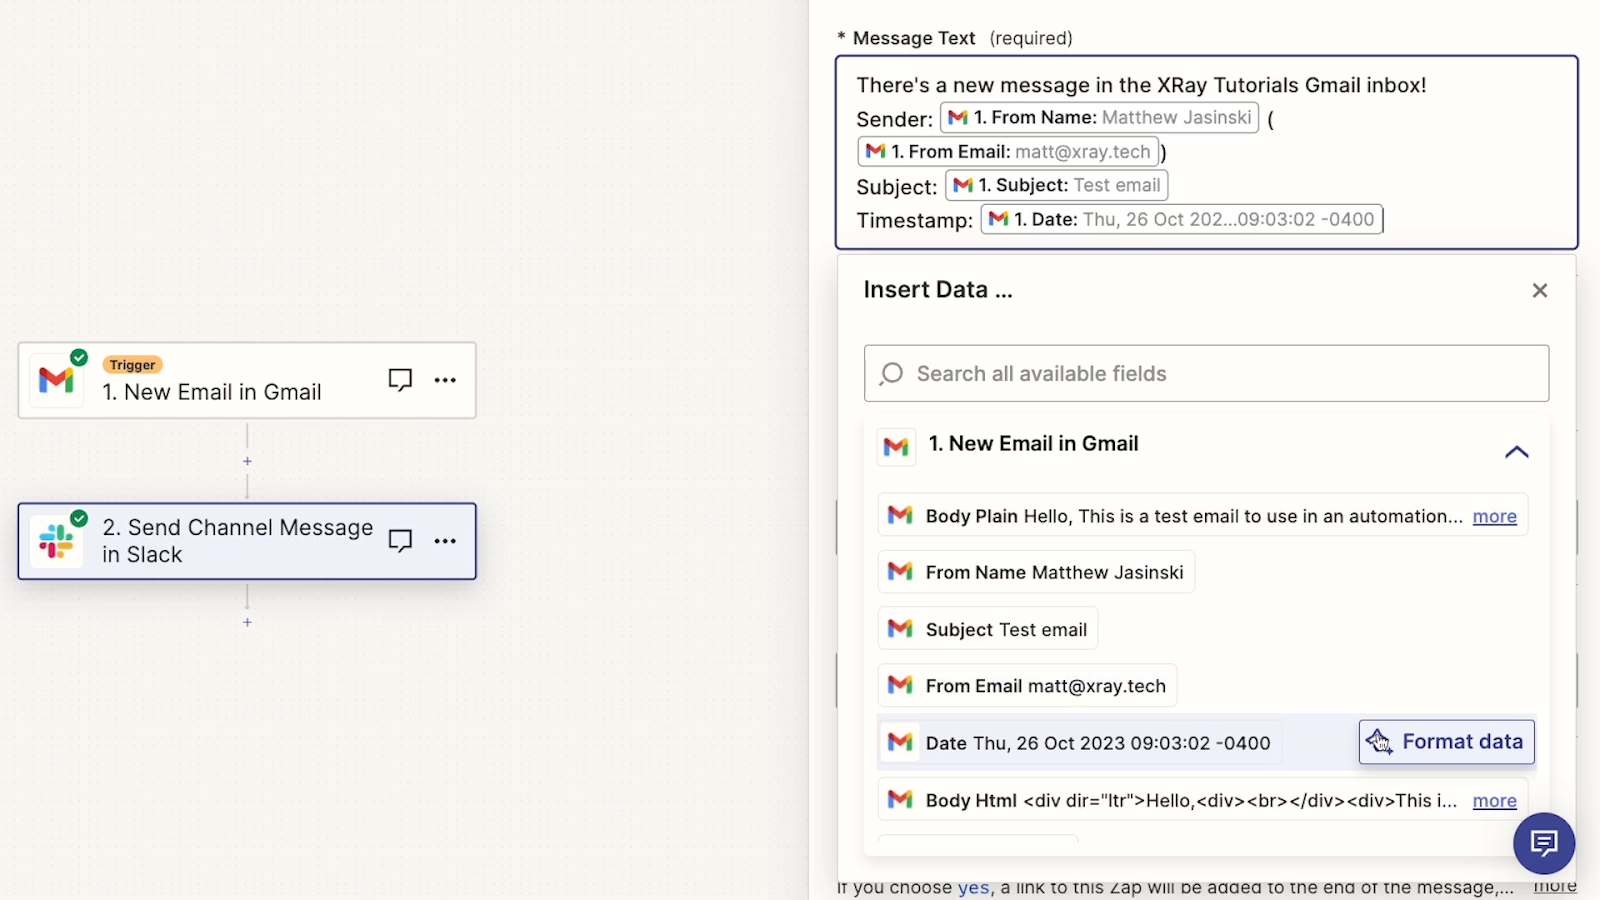
Let’s say we want to reformat that date and time to include the full name of the month, and a simple twelve-hour time in our local time zone - eastern US.
We’ll click on “Format”, then enter the following prompt into the window:
Change the format to use the full month name and 12 hour time (EST)
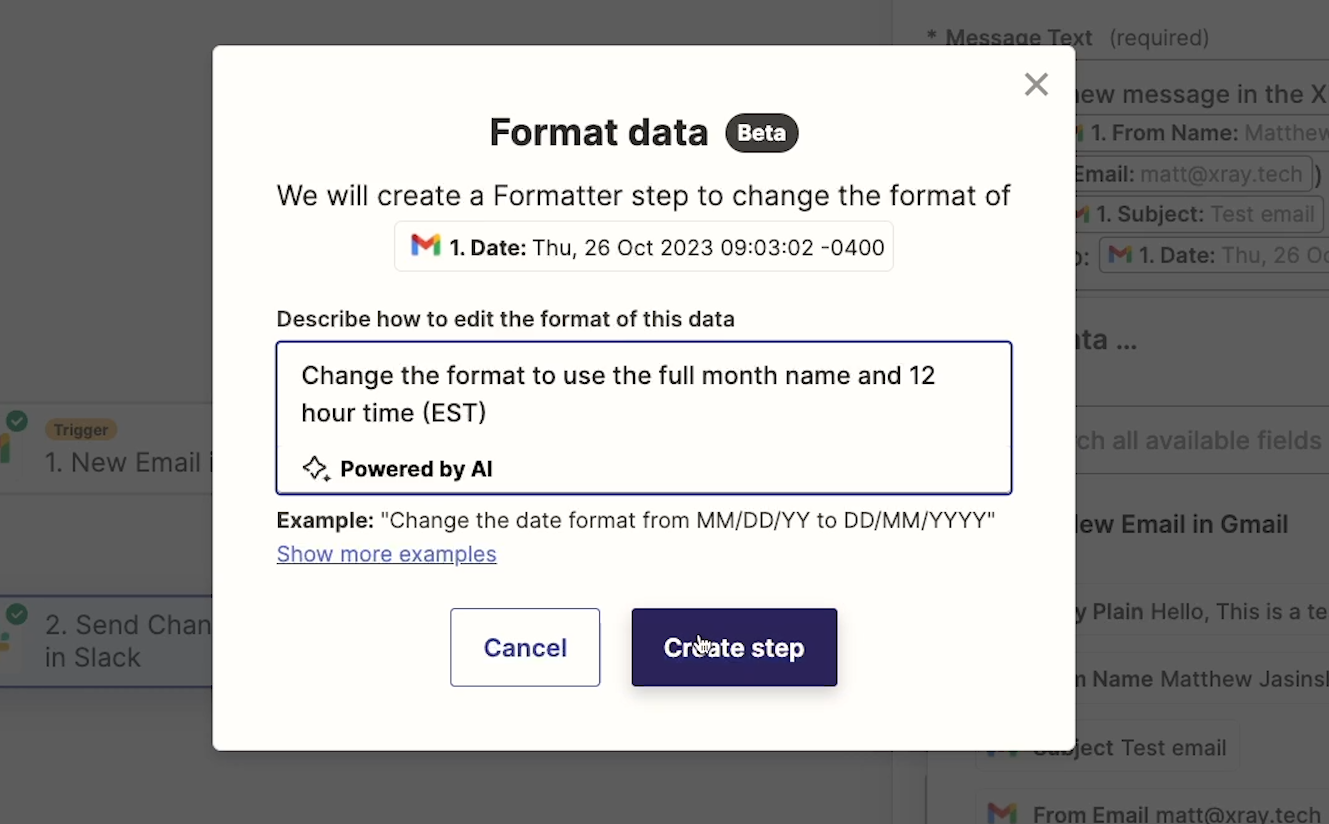
Note that we’re not specifying the exact syntax to use with “MMMM/DD/YY”, etc. This level of specificity is usually not necessary; the AI should be able to determine the right format based on natural language.
We’ll click “Create step” to generate the formatter action, then review the results.
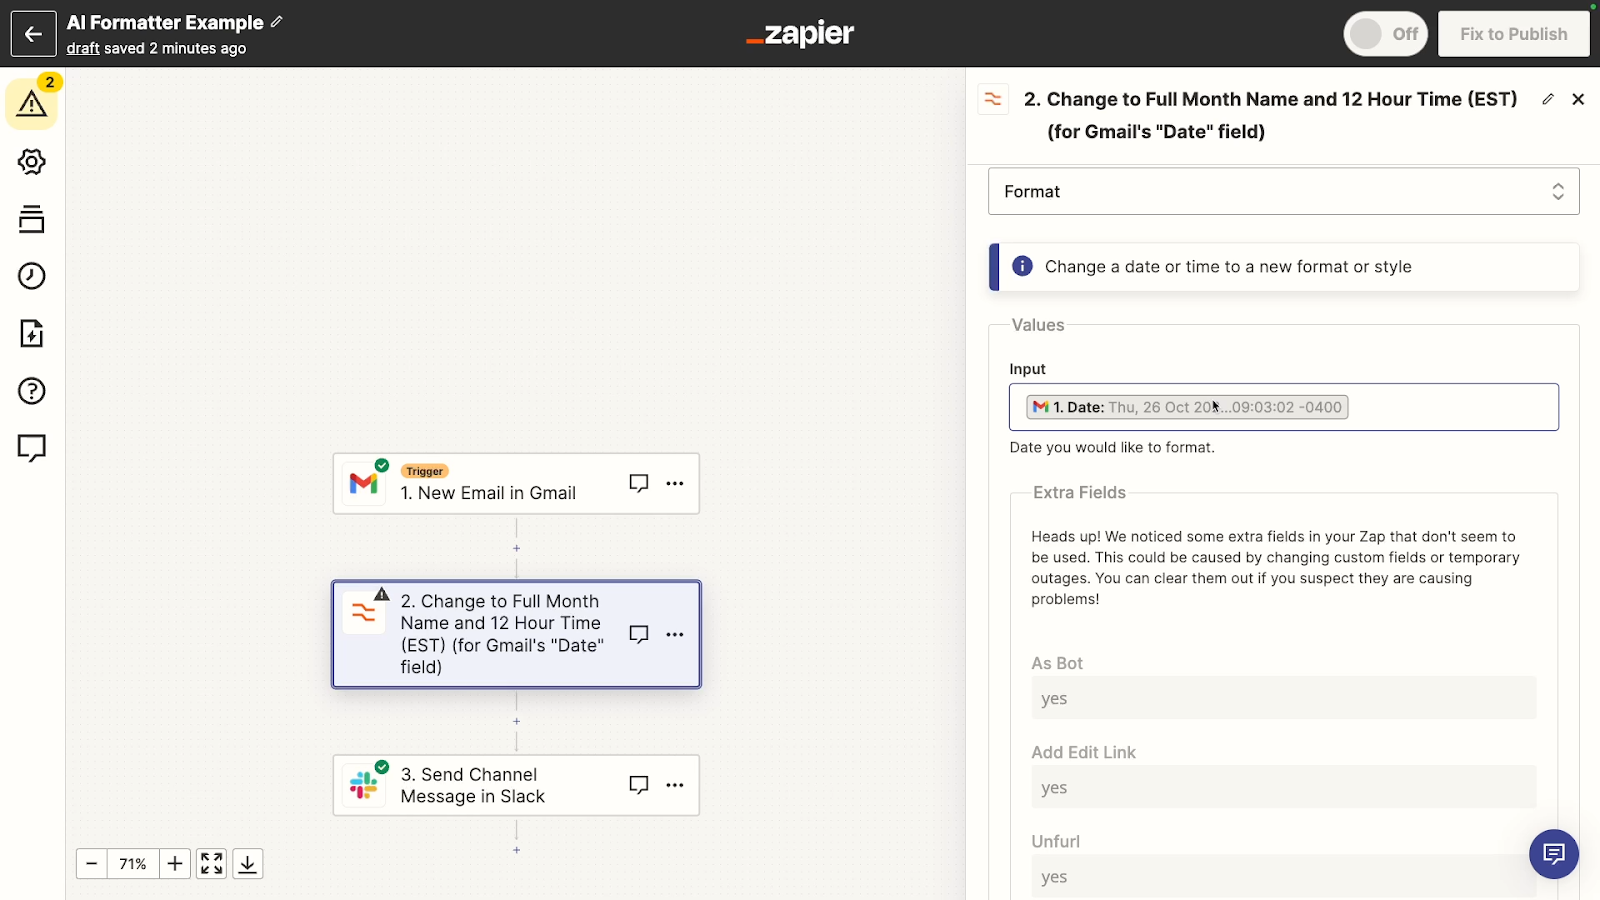
Immediately, we can see that a formatter step has been added before our Slack step.
However, there are several unused fields in the formatter. You may see this happen a lot with AI-generated steps in Zapier, but you can just delete these fields.
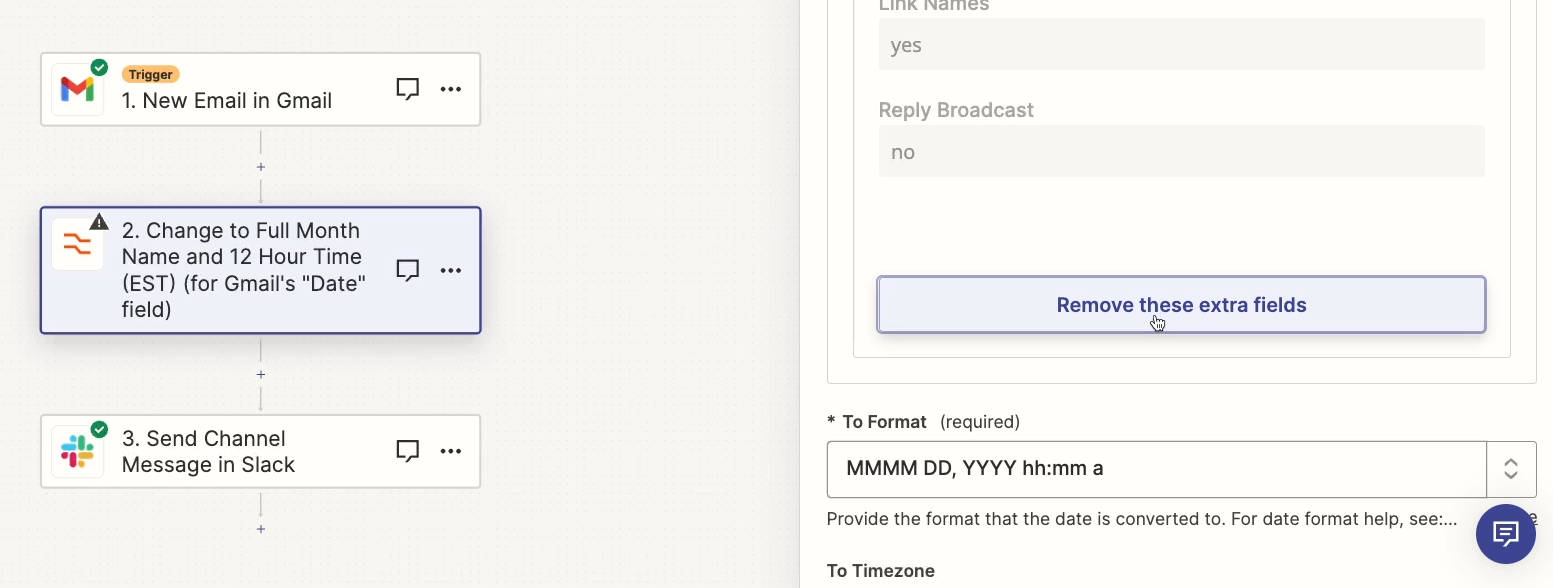
With those removed, it looks like we’ve got a good formatter step.

The time format looks like it’s probably correct, and the time zone is correctly set to EST. We’ll give it a test to be sure everything worked.
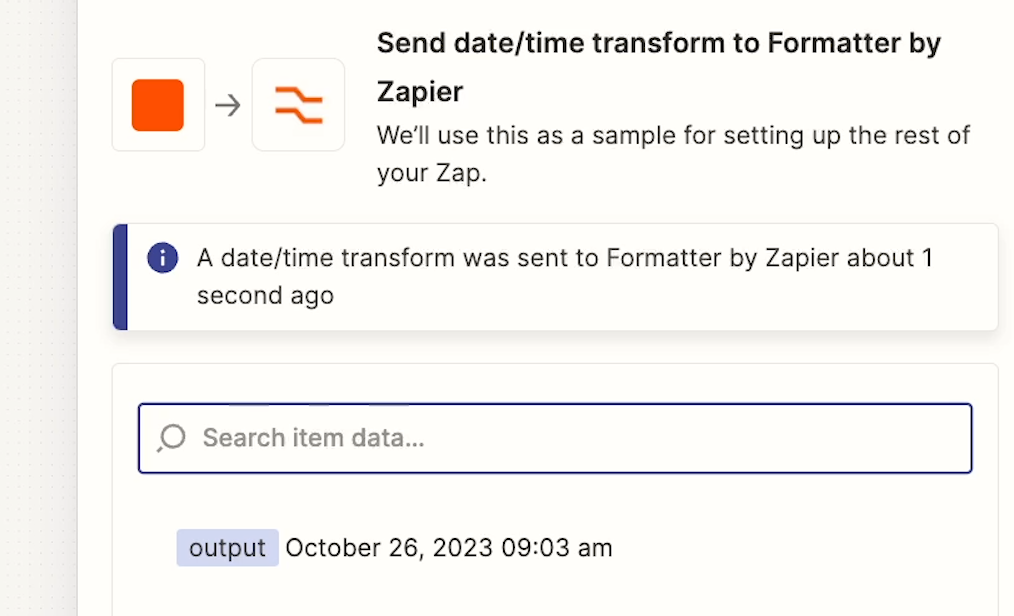
When we test the step, we can see that the date and time are reformatted exactly how we wanted.
Creating a static step with AI
To be clear, Zapier will only use AI to configure the formatter step and add it to the Zap.
When the Zap runs, it won’t send any sort of AI prompt. It will just use the formatter step as it’s configured.
A convenient and reliable shortcut for adding formatter steps
Ultimately, “Format with AI” is great for quickly adding formatter steps when you don’t know the exact syntax or appropriate formatter option you need to use. It lets you skip looking up precise information about various ways of formatting data, and instead lets you quickly add a new step to your Zap with a short prompt.
This is one of the best use cases we’ve seen so far for AI in automation. By using AI to create a formatter step, we can save a lot of time that would have been spent on searching for the right tools and syntax to use.
But unlike a lot of other AI implementations, the output here is static. Once we have a formatter step we like, we can keep using it in our Zap permanently. We don’t have to worry about an inconsistent AI giving us poor answers half the time our Zap runs.
Additionally, using the formatter step in the future doesn’t require us to keep sending API requests to an AI, meaning that it doesn’t come with any additional charges or count against an OpenAI credit limit. We can just keep using the formatter step that we know will work for as long as we want. And for now, Zapier isn’t charging any additional fees to use this - or any other AI feature.
Add custom code to your Zaps with AI
The next AI tool that we’ll look at offers a lot of the same benefits, as it will let us generate a static Zapier action with an AI prompt.
Let’s explore generating code blocks in Zapier with AI prompts.
Now, we love no-code solutions at XRay. They’re fast to build and easy to maintain, even for people with less technical knowledge.
But sometimes, a bit of code is necessary to elevate your automations from good to great.
In many cases, adding a code step to your Zap won’t be strictly required, but it may help to reduce several formatter steps or awkward paths modules into a single, efficient step.
And now, with Zapier’s new AI generation features, you can include code blocks in your Zaps, even if you don’t know how to code at all. Let’s see how it works.
How to add AI-generated code to your Zapier automations
1. Add a step to any Zap, and choose “Code by Zapier” step as the action
2. Choose the language you want the code to be written in (JavaScript or Python)
3. Click on “Generate with AI”
4. Enter your prompt into the window that pops up. You can describe what you want the code to do in simple language.
5. Click “Generate Code”.
6. Review the AI’s output and add it to your Zap.
For more detail, check out our example below.
Code example: parsing and reformatting names in text fields
In our example, we’ll use a code step to extract names from an Airtable text field. Each record in the Airtable base has one or more names in this field, along with a long URL. We’ll ask the AI for a code step that removes the URL, and reformats the names from “First Last” to “Last, First”.
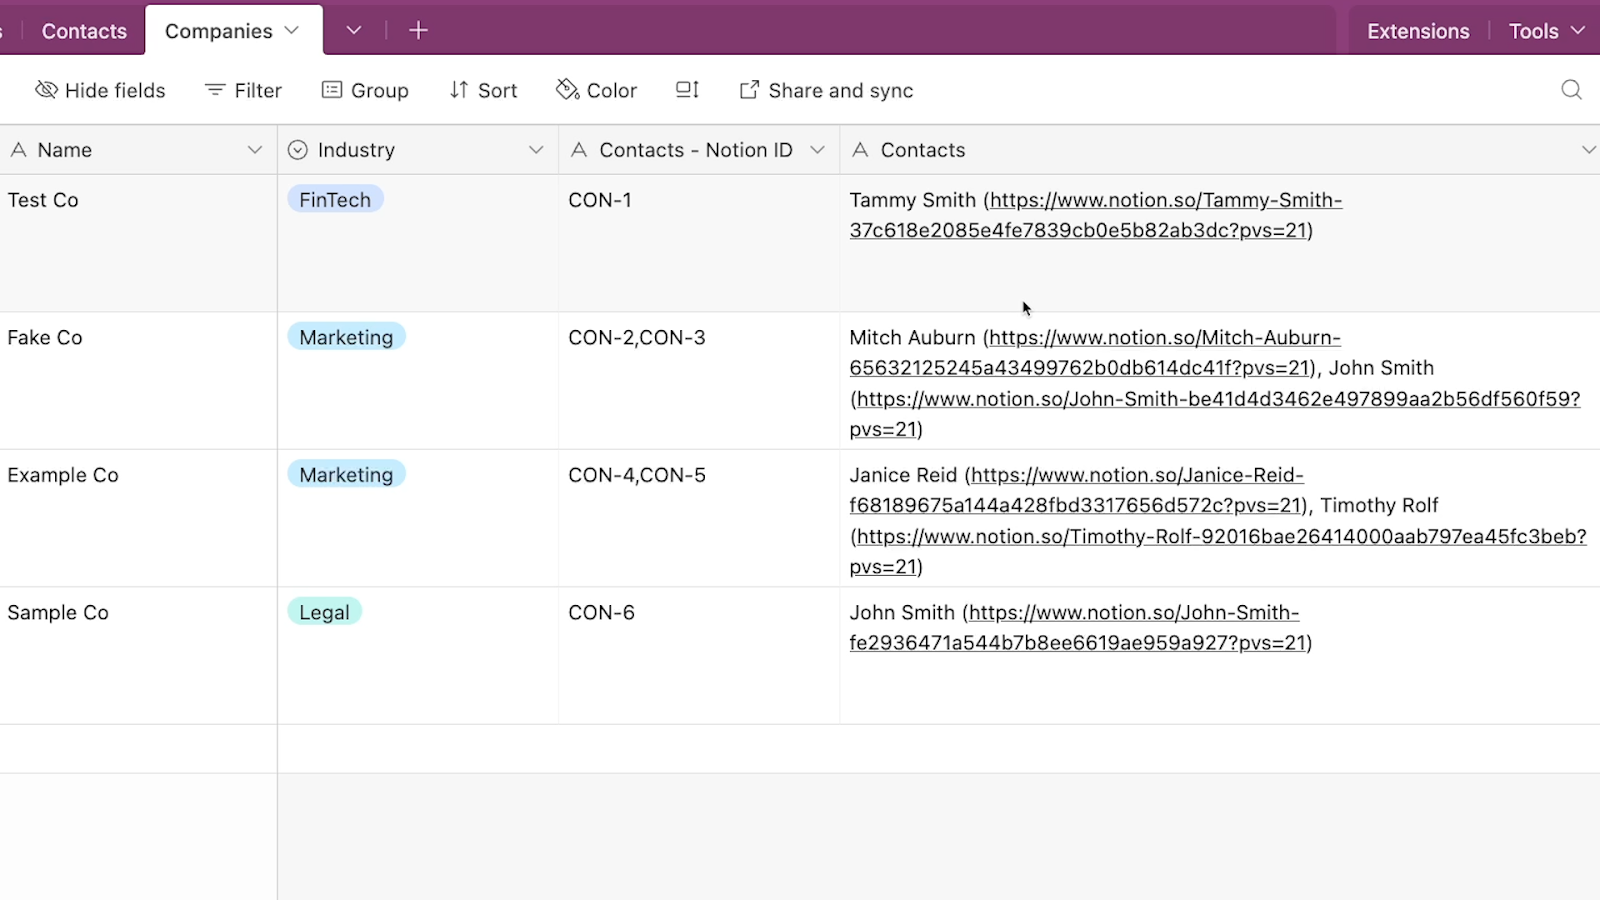
The Zap runs whenever a new record is added to this Airtable base. To add an AI-generated code, we’ll need to add a “Code by Zapier” step to our Zap.
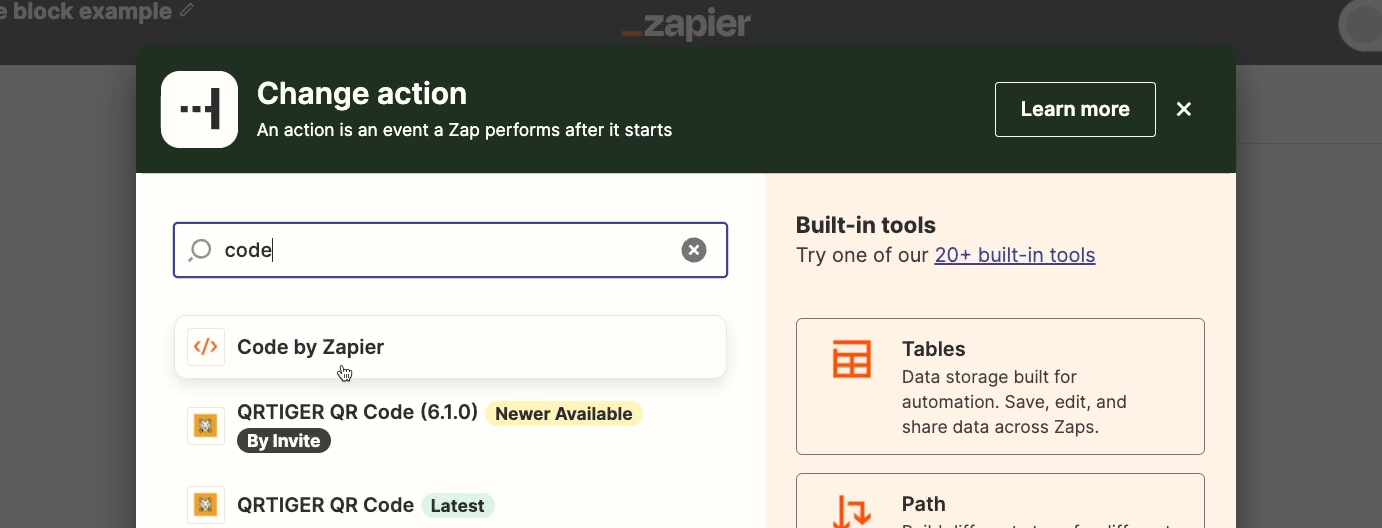
Then, we’ll need to choose whether we want to have the code written in JavaScript or Python. If you want to be able to edit the AI’s output, you should choose the language you’re more familiar with.
However, Zapier’s AI is capable of generating fully functional code without any user edits, so you can still try it out even if you don’t know how to code with either language.
We’ll choose Python.

You’ll then see a configuration menu where you can set up the code step manually. You can leave all of those fields blank, and just click on “Generate with AI”.

Next, you’ll see a window pop up where you can enter your prompt for the AI. Describe what you want the code to do, and be specific about the data it should retrieve and transform. However, you don’t need to use any technical language or syntax here.
We’ll enter the following prompt:
Extract any names found in the "Contacts" field. Each name should consist of a first name and a last name (e.g., "John Smith"). Exclude any URLs or other symbols. Output the names retrieved with the last name first (e.g., "Smith, John").
Once your prompt is ready, click “Generate code”.
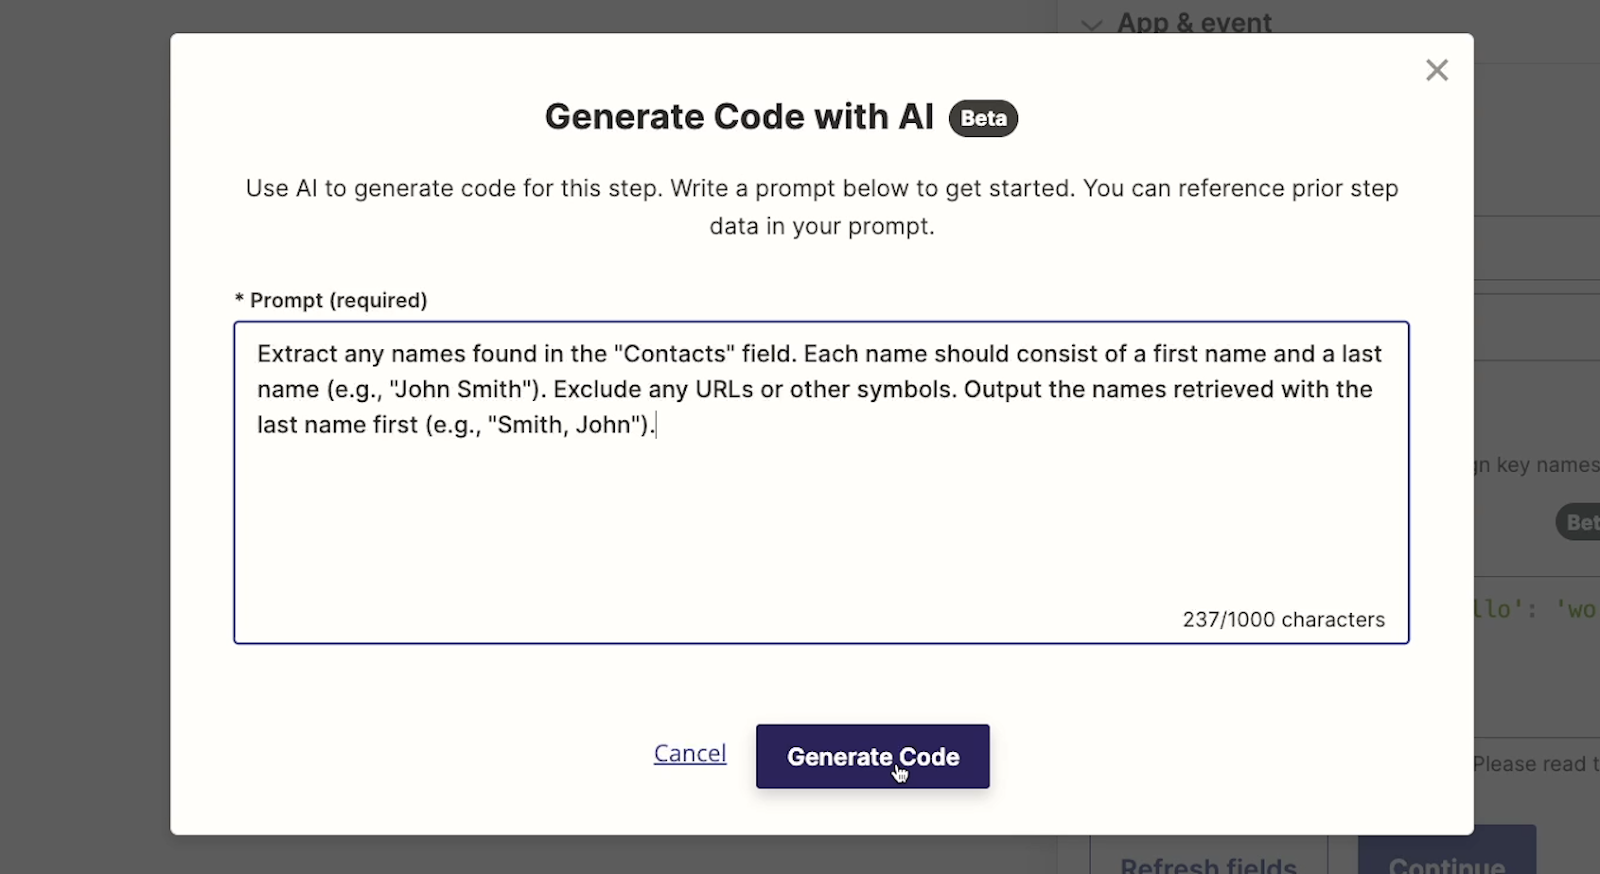
On the next screen, you can review the code that the AI wrote under the “Code” tab. If you’re a no-code builder, you might not be totally sure what you’re looking at. However, the code will likely be commented so you can at least understand what each part of it does, even if you’re not familiar with the exact syntax involved.
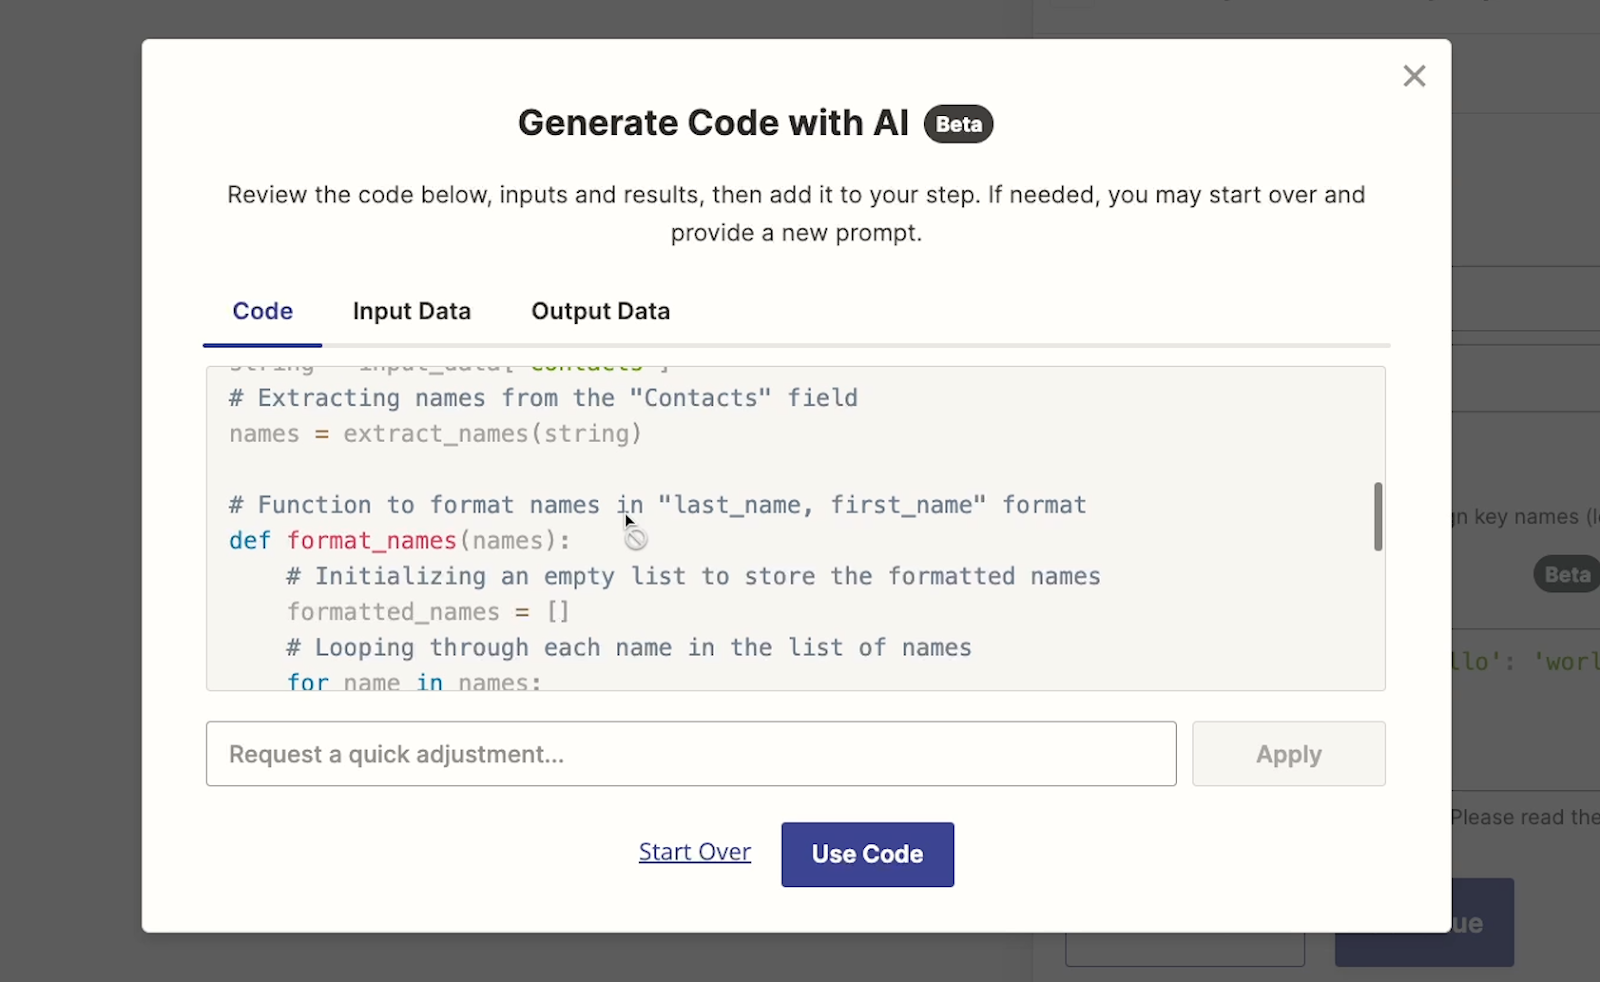
Under the “Input Data” tab, you can see which Zapier variables the code step pulled in. In our example, it just used the “Contacts” variable, since that’s the only data we specifically referenced in our prompt.
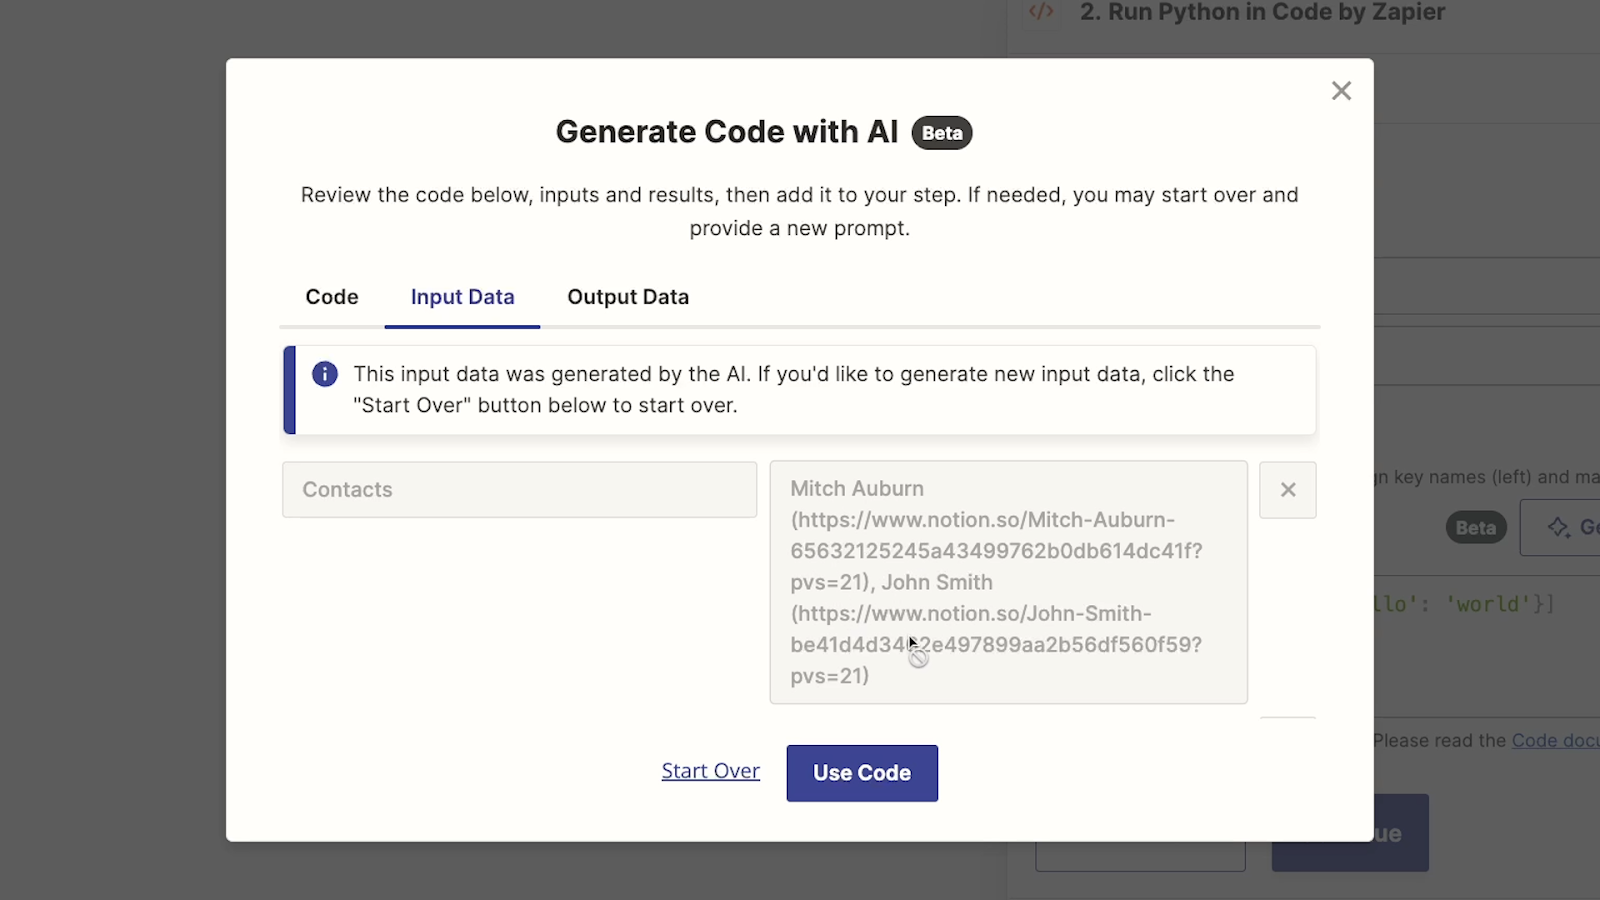
Under “Output data” you’ll be able to see what the code produces as an output, but you’ll need to click on “Run code” first.

When we run our code, the output is exactly what we wanted. Two names are extracted from the field and rearranged into a “Last, First” format.

If you’re happy with the AI-generated code, click on “Use Code” to add it to your Zap.
Now, you can treat the code step like any other action in Zapier.
Unlock the power of code in your Zaps with the help of AI
By just writing a simple prompt in plain English, we were able to add some code to our Zap, eliminating the need for several formatter steps.
You could also use a code step to handle complicated if/then statements, branching paths, and more.
Even if you have absolutely no coding experience at all, you can now get all the benefits of incorporating a little bit of code in your Zaps by simply writing a quick AI prompt in simple language.
Build a full Zap with AI
Finally, let’s take a look at building an entire Zap with a single AI prompt.
But, before you get too excited, we need to warn you: this feature is not quite as impressive as it sounds.
At least, not yet.
For now, it’s very similar to the Zapier plugin in ChatGPT. We covered this plugin in a separate blog which you can read here.
Like the ChatGPT plugin, building a Zap with AI really only builds the beginnings of a Zap. It will create steps, choose apps, and select actions for you, but each step will likely not be configured very well - if it’s configured at all.
However, if you’re building a long Zap with several steps, getting everything started with an AI prompt could still be a useful time saver, so let’s see how it works.
How to generate a Zap with AI
1. Create a new Zap
2. Enter your prompt in the window at the top of the screen. Focus on the apps and actions you want; many configuration details will likely be ignored anyway.
3. Click on “Generate”.
4. Review the AI-generated results and try them out
For example, we’ll try to create a Gmail and Slack automation using the following AI prompt:
When I receive an email in my Gmail inbox (xraytutorials@gmail.com), send a Slack alert about the email in the tutorials channel of XRay’s Slack workspace. In the alert, include the email’s subject and sender, as well as the date and time the email was sent.
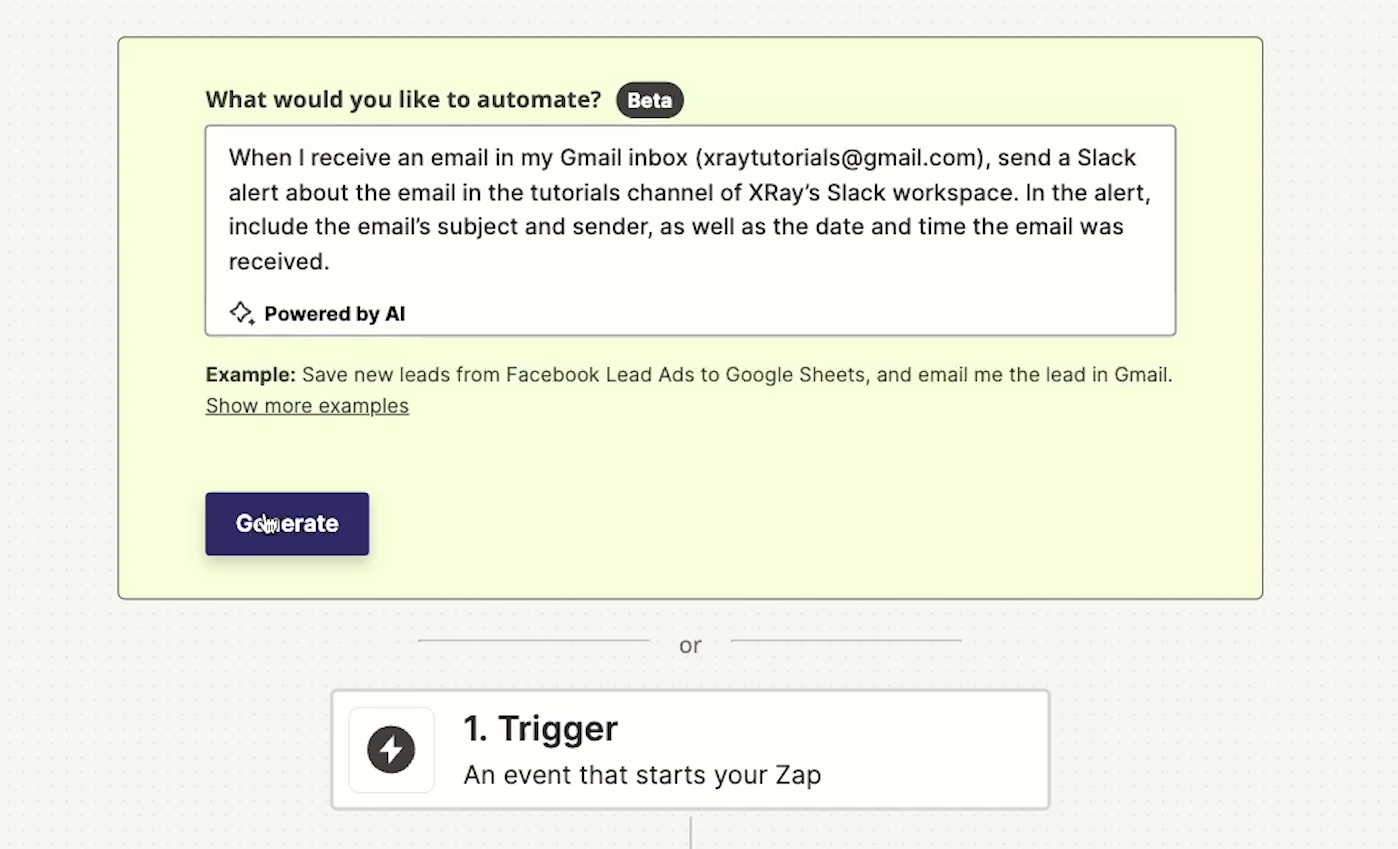
When we look at the AI output, we can see that it correctly created a Zap with a Gmail trigger and a Slack action. Click on “Try it” to apply the steps to your Zap and view more details of its configuration.
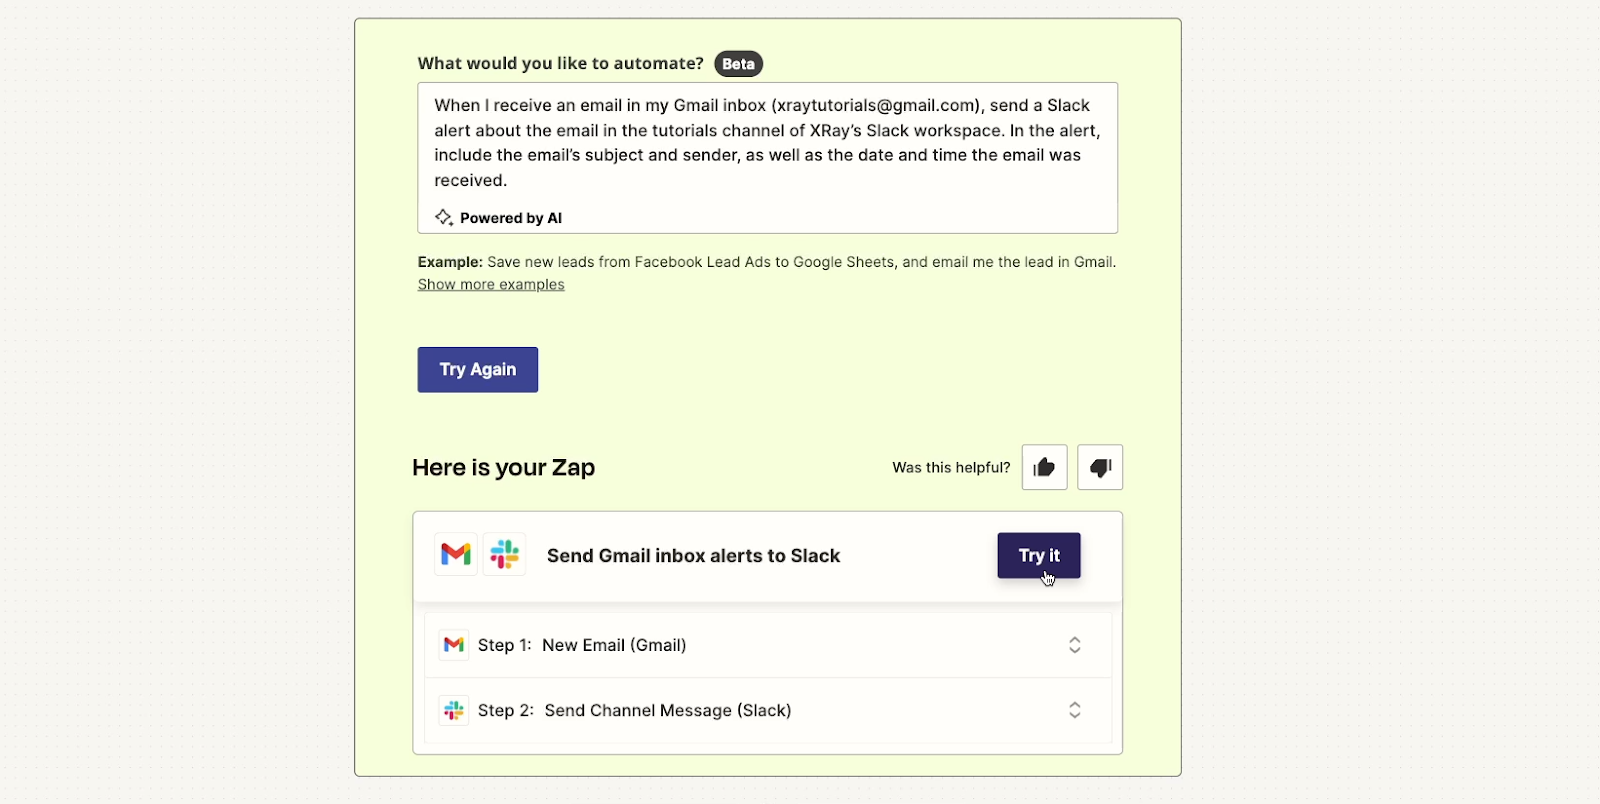
After applying the steps to our Zap, we can see that while the AI was able to correctly pick the right apps and actions, it wasn’t able to sign in to any of our accounts.
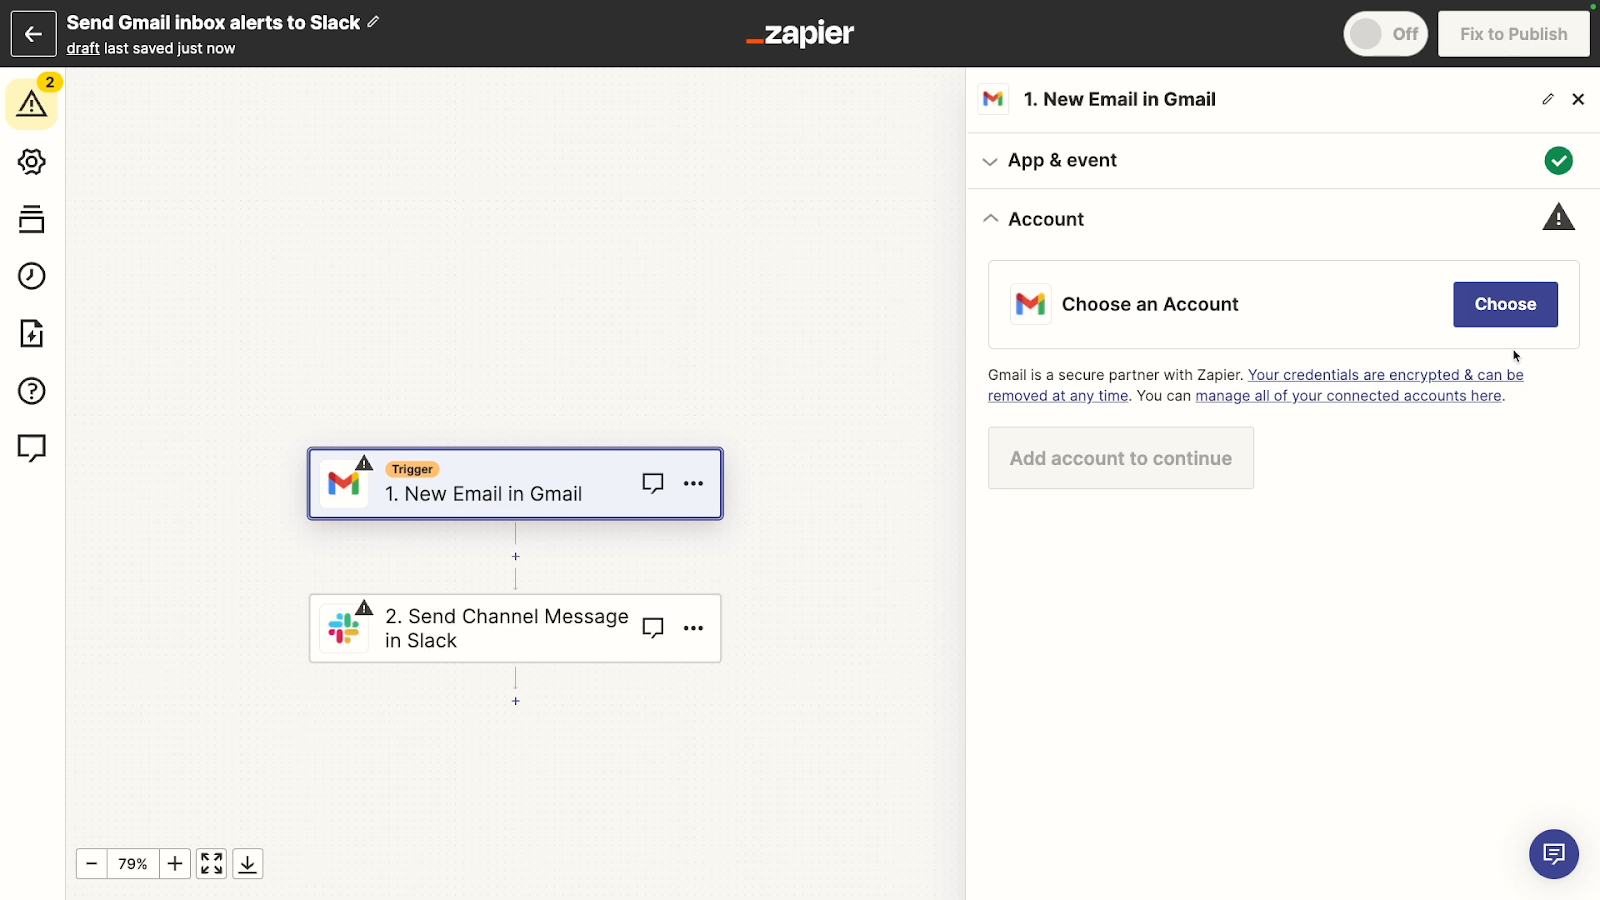
In Slack, the AI did not choose the channel that we specified in the message, either.
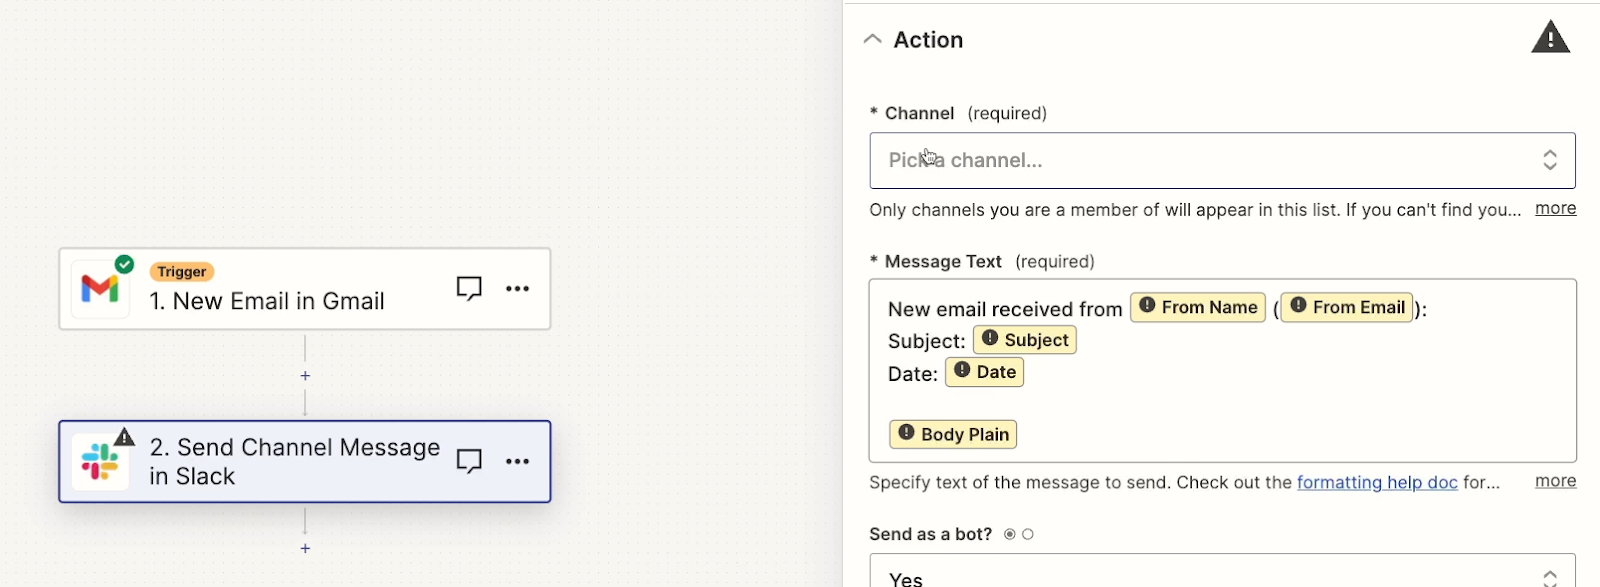
However, the AI did make a somewhat successful attempt at filling in the message per our instructions.
Unfortunately, even though the AI chose all of the correct names for the variables, none of them are actually mapped in Zapier. This is why they’re all yellow and have an exclamation mark. Click on each of these unmapped variables and selecting the matching variable from the list will replace them automatically.
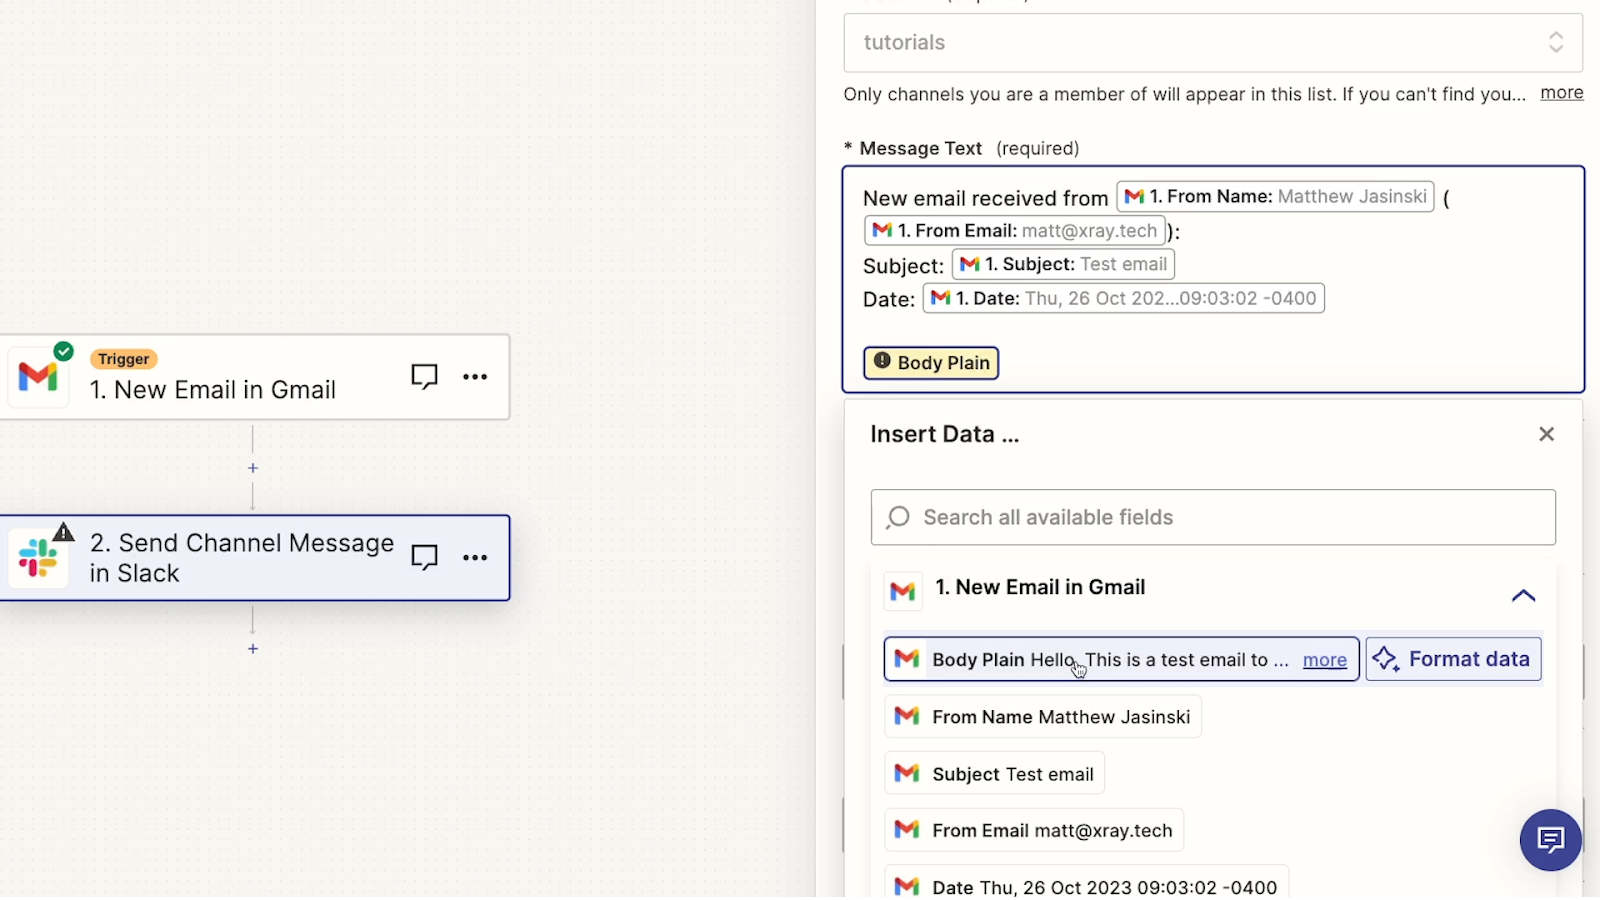
Otherwise, all other configuration options are left to their defaults.
Using AI-generated Zaps to get a head start
Ultimately, Zapier’s UI has started us off with a workable beginning of a Zap.
In general, the best way to use AI-generated Zaps is to just briefly ask for the apps and actions you want to use, since that’s all the AI will likely be able to set up, at the time of this recording.
You can also provide a bit more detail about what you want to include in text-based fields, since the AI may be able to fill those out pretty well.
However, you’re limited to 400 characters in your prompt, so you’ll need to keep it short, anyway. Hopefully, Zapier will keep improving the AI and make sure that it can properly map data in its answer.
All things considered, the other AI features we covered in this post are definitely going to be more useful for most builders right now.
Build faster and more advanced Zaps with new AI tools
AI continues to open up new doors for no-code and low-code builders. Like many apps, Zapier is eagerly embracing the opportunities offered by the AI revolution, and as a result, it’s getting even faster and easier to build automations on their platform.
We encourage you to explore these new AI features for yourself, and try using prompts to build the Zaps, formatter steps, and code blocks that you need.
If you’d like to learn more about no-code automation and AI tools, be sure to check out our blog or our YouTube channel. You can also follow XRay on Twitter, Facebook, or LinkedIn.
In the vast majority of cases, connecting apps to Make (formerly Integromat) is extremely easy to do.
Unfortunately, connecting a personal Gmail account is a bit more complicated.
To make sure you can automate your Gmail inbox with Make, we’ve put together this quick tutorial to show you how to create a connection for a personal account.
In this post, we’ll show you how to create a project in Google Cloud that you can use to authorize and connect your Gmail account to Make, formerly known as Integromat.
Then, we’ll show you how to add the connection to Make and test it out with an automated scenario.
Let’s get started!
Overview
1. Create a project in Google Cloud with the Gmail account you wish to connect to Make
2. Enable Gmail’s API in your project
3. Create an OAuth consent screen where you can sign in via Make
4. Set your project’s scopes to determine the actions Make can perform through Gmail
5. Add test users. Your email will likely be the only test user.
6. Create credentials to use to authorize Make
7. Add a new connection in Make, and sign in with the newly created credentials
8. Test your Gmail connection in Make to verify it’s set up correctly
If you’re a no-code builder without any programming experience, this might seem a little intimidating, but don’t worry. It’s actually pretty simple to put together.
You’re essentially going to be creating a project just to authorize Make to access your Gmail account. You won’t publish the project, and instead will only grant access to test users - and the only test user will be our own email address.
NOTE: These steps don’t apply to Google workspaces
First, we want to emphasize that this tutorial is only for connecting a personal Gmail account to Make.
If the Gmail account you want to use is part of an organization, then these steps won’t be applicable.You can just connect your company account the same way you would connect any other account.
With that out of the way, let’s start creating a Make connection for a personal Gmail account.
Creating a Google Cloud project
To begin, go to https://console.developers.Google.com/ and sign in with the Google account that you want to use in Make.

Even though you’re going into the Google Developer’s site, you don’t have to write any code to set up this integration.
You’ll also only have to do this once for each personal Gmail account that you connect. You won’t need to revisit this Cloud project every time you want to build a new automation for your inbox.
If you’ve never used the Google Cloud console before, you’ll have to agree to the terms of use. Then, create a new project.
If you already have one or more projects, you can click on the selector in the top left to create a new one.

Otherwise, you should see a button in the top right that says “Create a project”.
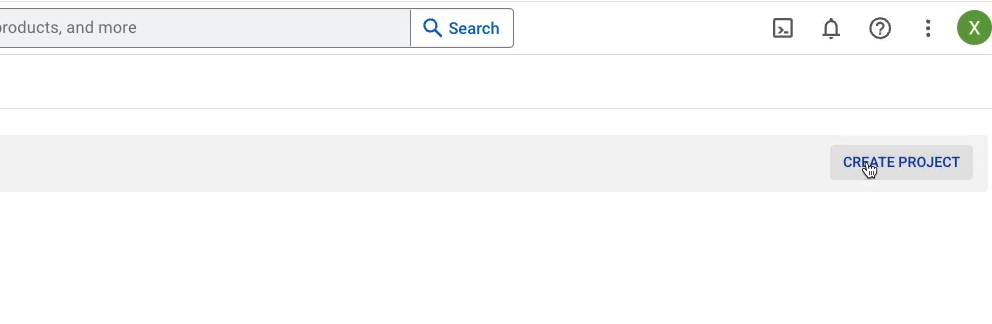
Give your project a name, and click “Create”. Then, just wait a moment for Google to finish actually creating your project.
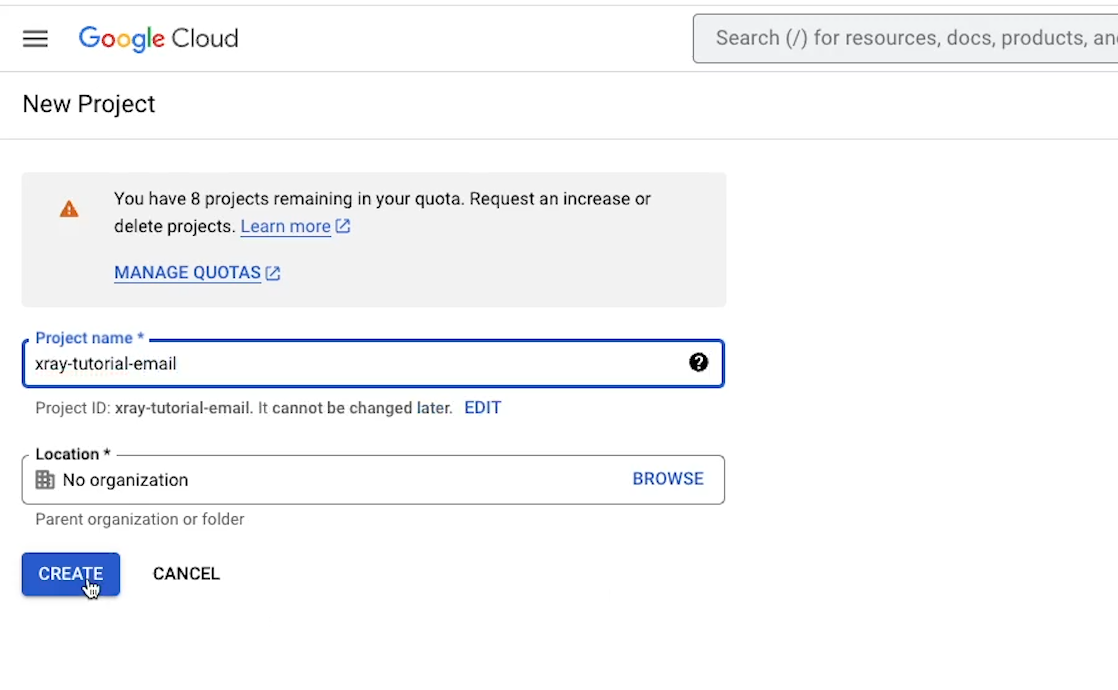
Enable the Gmail API
With the project created, you now need to enable the API that you want to use.
APIs, or application programming interfaces, are how modern web apps communicate with each and execute actions in each other’s software.
Make is going to use the Gmail API to watch your inbox, send emails, and perform any other actions that you want to automate.
To enable the Gmail API, click on “Enable APIs and Services”.

Then, search for Gmail in the search bar in the middle of the page.
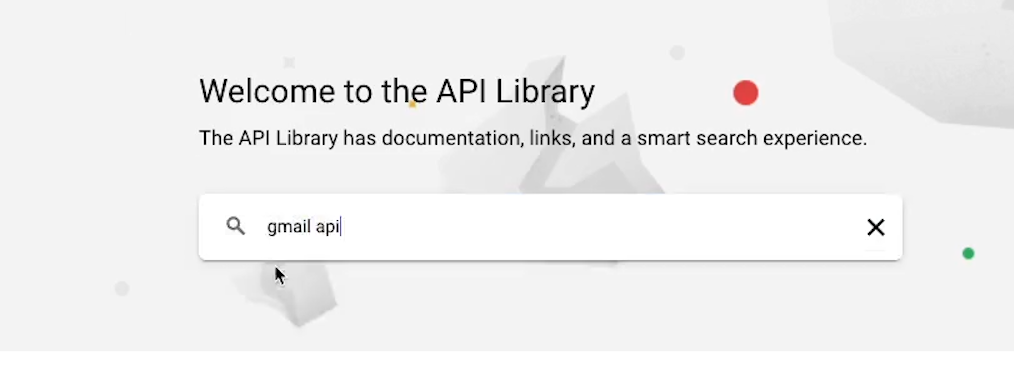
You should get two results: GMail API, and Gmail Postmaster Tools API. Choose the first: Gmail API.
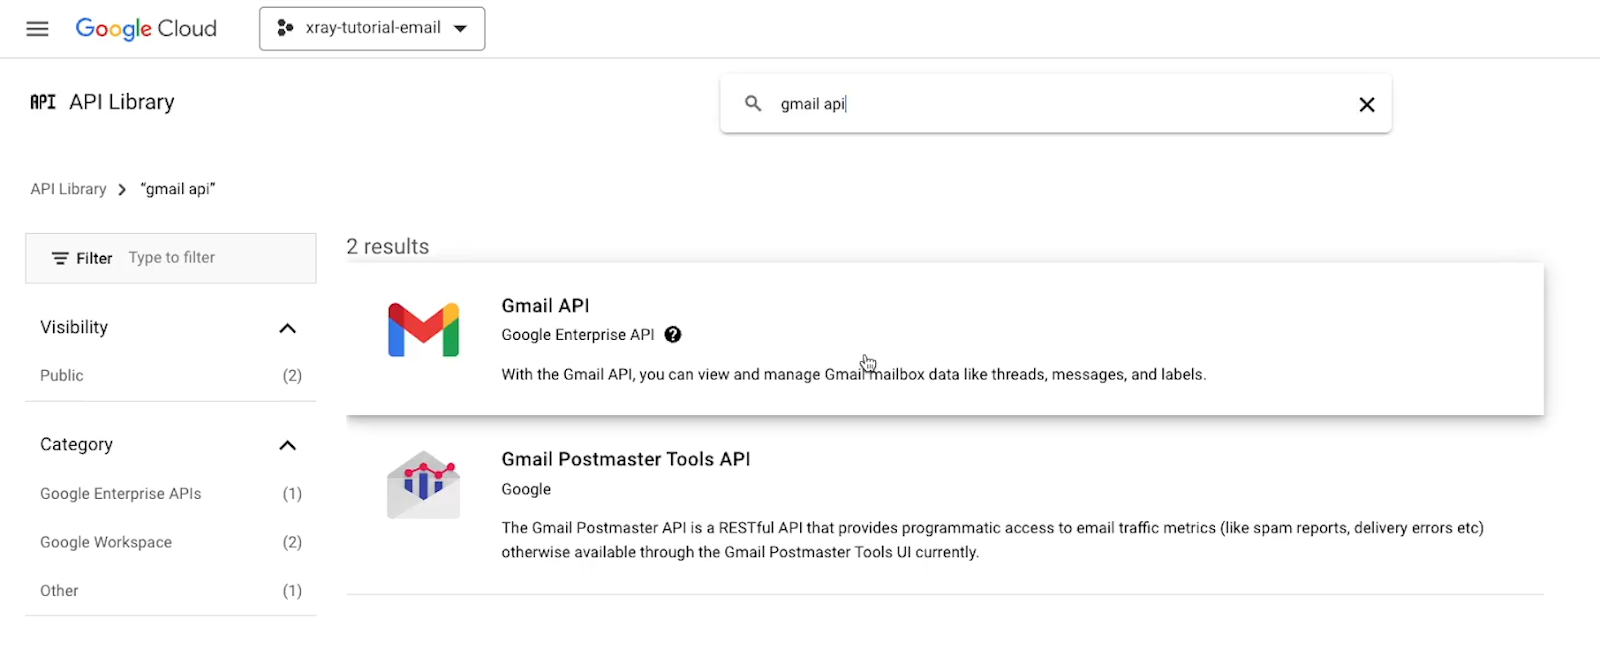
Then, click on “Enable”.
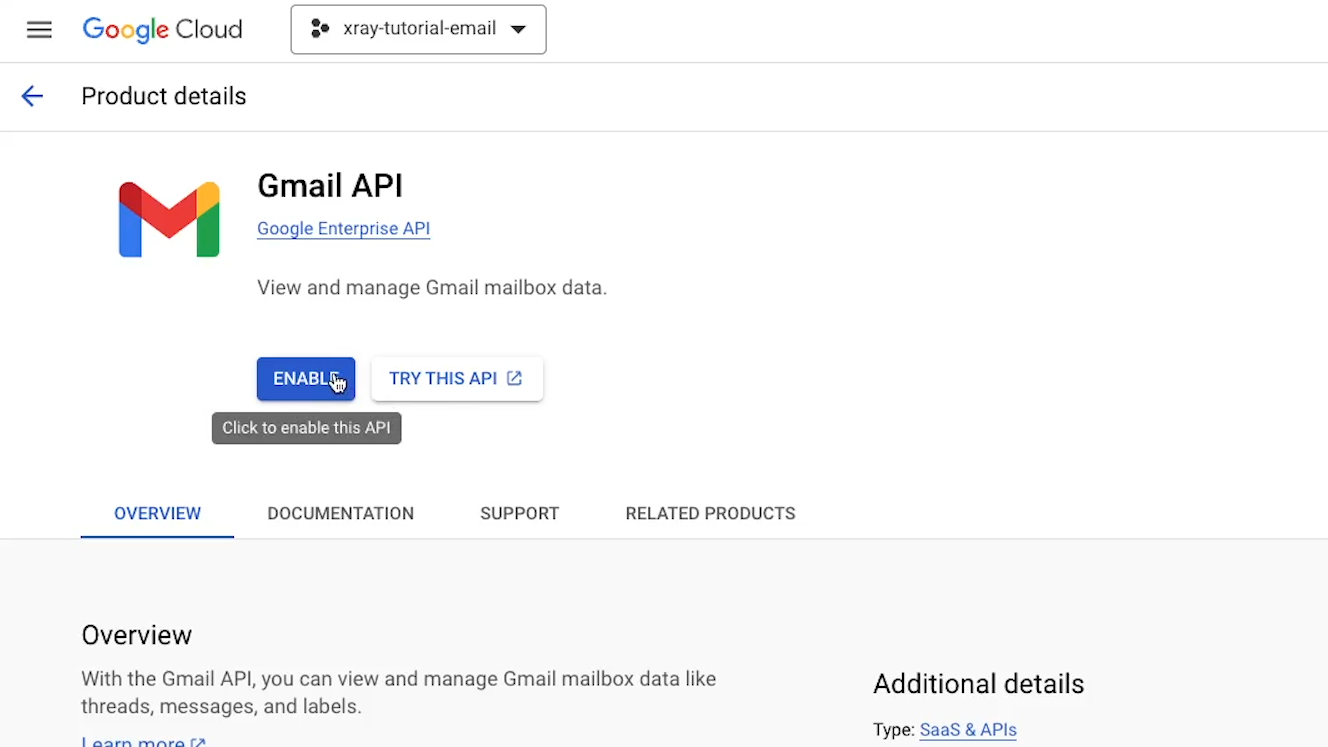
Create an OAuth consent screen
Next, you’ll need to create an authorization screen that will let you access this project from Make.
Click on “OAuth Consent Screen” to create this portal.
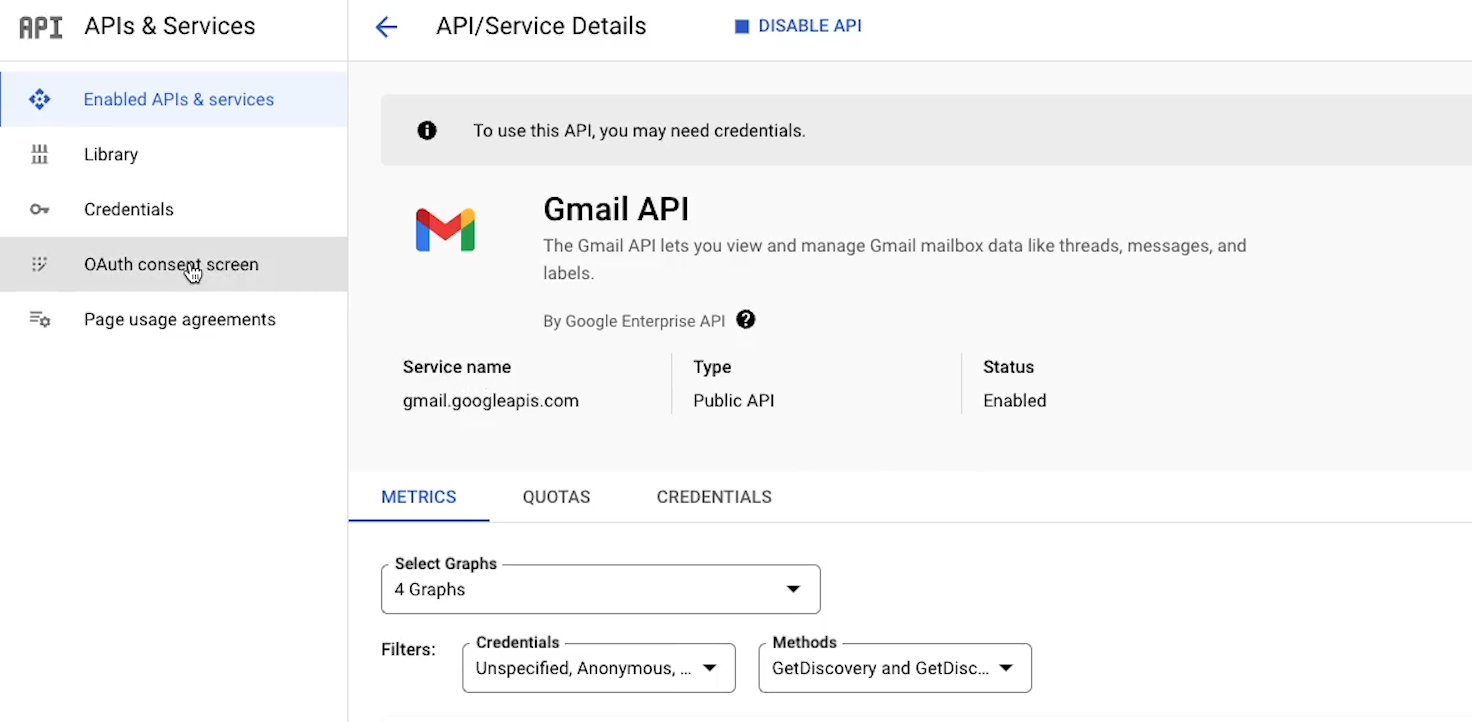
Then, you’ll need to specify the user type as internal or external. “Internal” would allow other users in your organization to access this project.
However, since you're building an integration for a personal Gmail account, that doesn’t really apply. Instead, choose “external”.
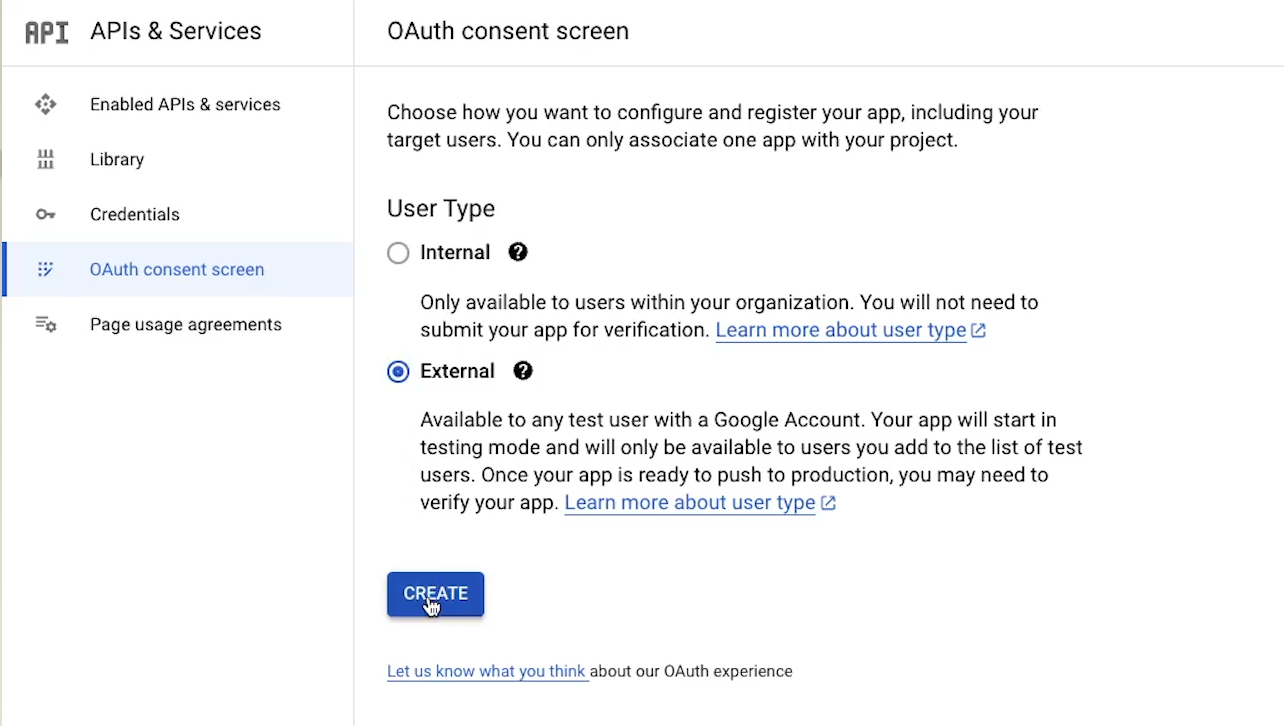
Then, click create.
Next, you’re going to need to provide some basic information about the application. Provide a name for the application that’s asking to access your Gmail account. You can just enter something simple and descriptive like “Make Gmail integration” here.

Then, you’ll need to provide a “user support email”.
Nobody will be able to use this integration except the people you personally authorize as “test” users later on, so don’t worry. Nobody will be seeing this and emailing you.
You can just pick your Gmail address from the dropdown.
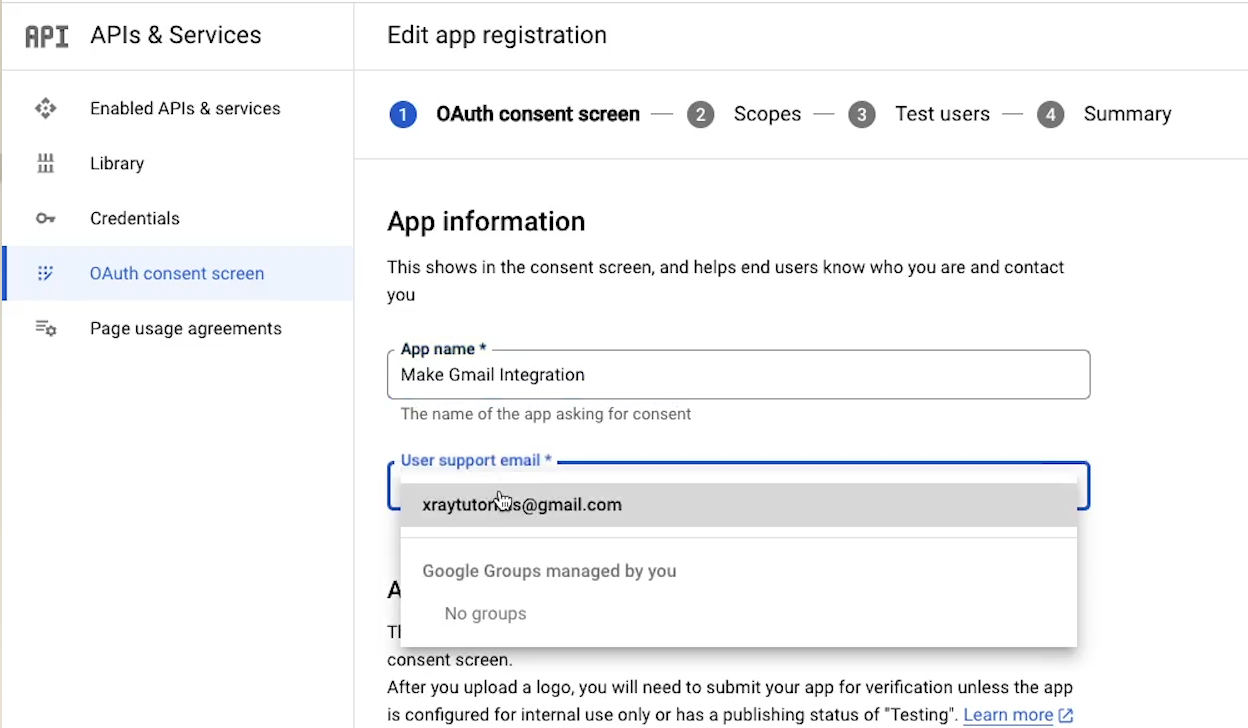
Next, you can upload an app logo, but there’s really no need to do that. You can just skip it. You can also skip adding any App domain info.
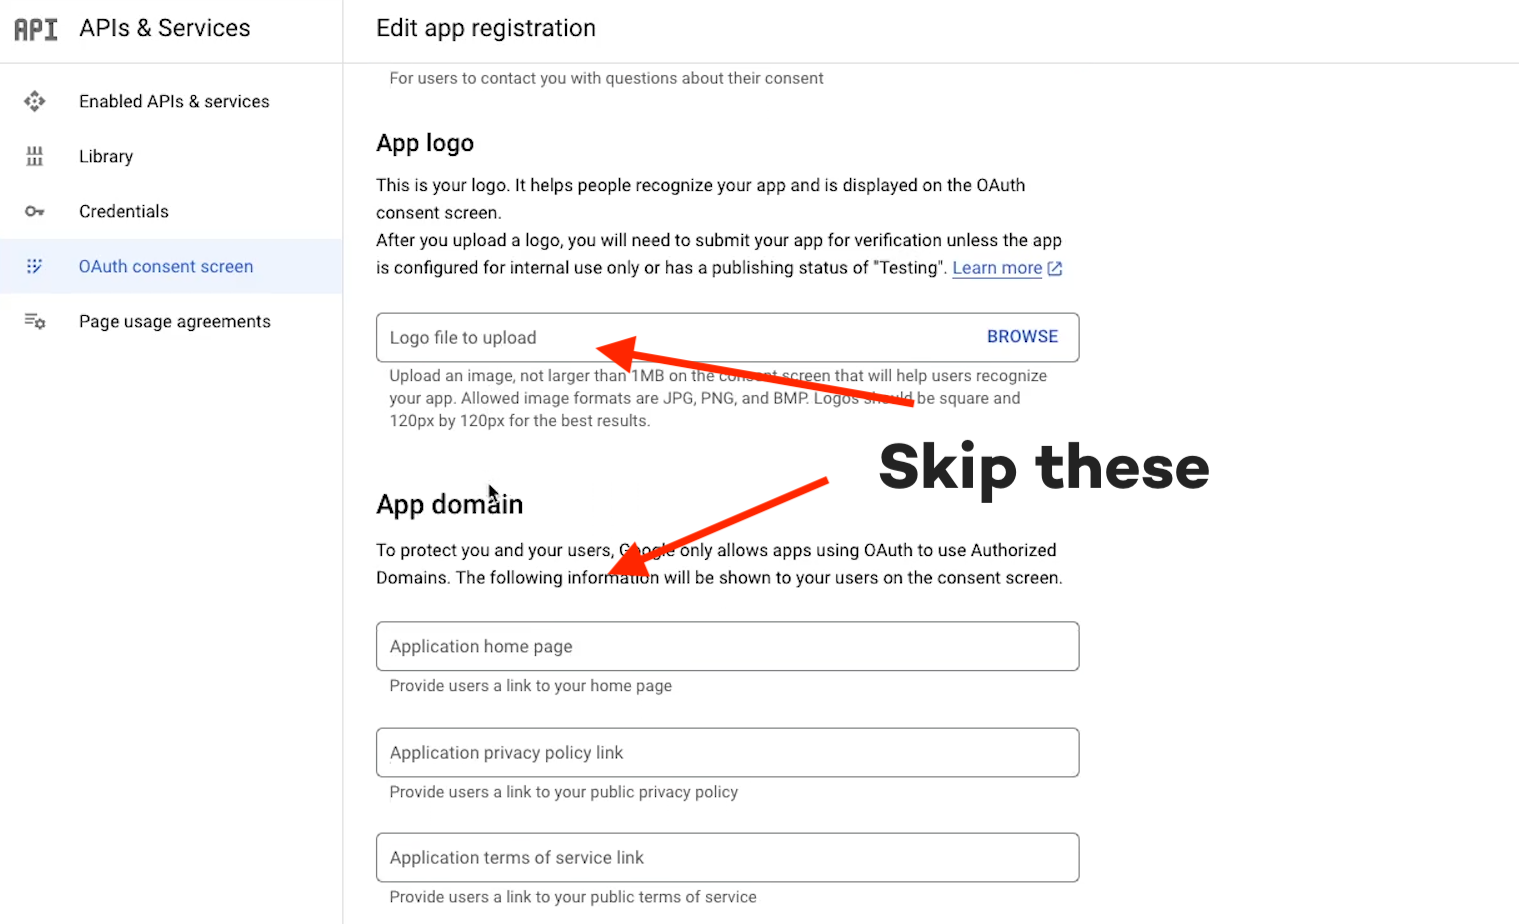
If you were building an integration for public use for your own application, providing these links and resources would help users to learn more about your application and its policies.
Since you’re just making a private integration to use Gmail with Make, you don’t need to add anything here.
Add authorized domains
However, you will need to add the actual domains that will be allowed to use the Gmail API through your account.
You’ll need to add two domains here: make.com, and integromat.com

As you may be aware, Make used to be known as Integromat until a somewhat recent and syntactically inconvenient rebrand.
The old name is still sometimes used on the backend, so it’s important to include both domains.

Once both domains are entered, you need to provide “Developer contact information”. Google will send any relevant updates about your project to the email you enter here.
In most cases, you can just enter your Gmail address in this field.
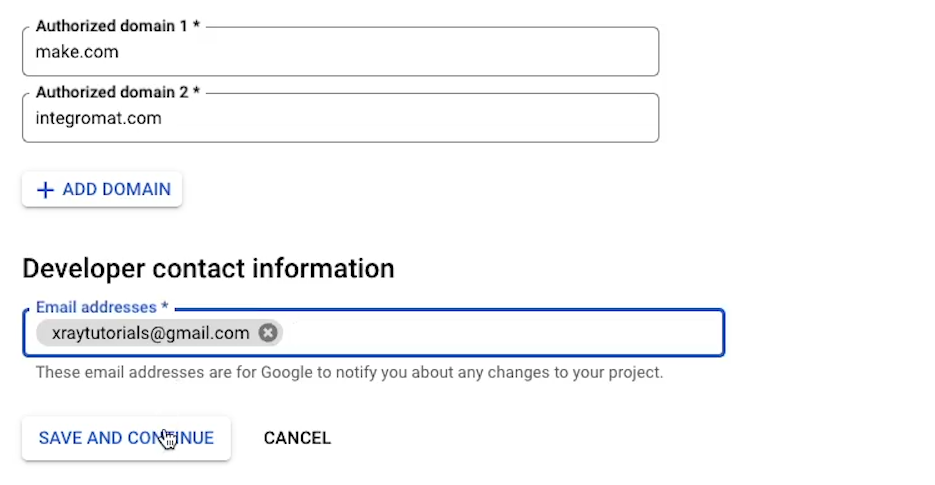
Then, click “Save and continue”.
Set your project’s scopes
Next, you’ll be taken to the “Scopes” screen. Here, you can determine what the integration will be allowed to do with the Gmail API.
This is where you can explicitly allow it to access certain methods or actions.
Click on “Add or remove scopes”.

Then, click on the filter, and search for “Gmail”.
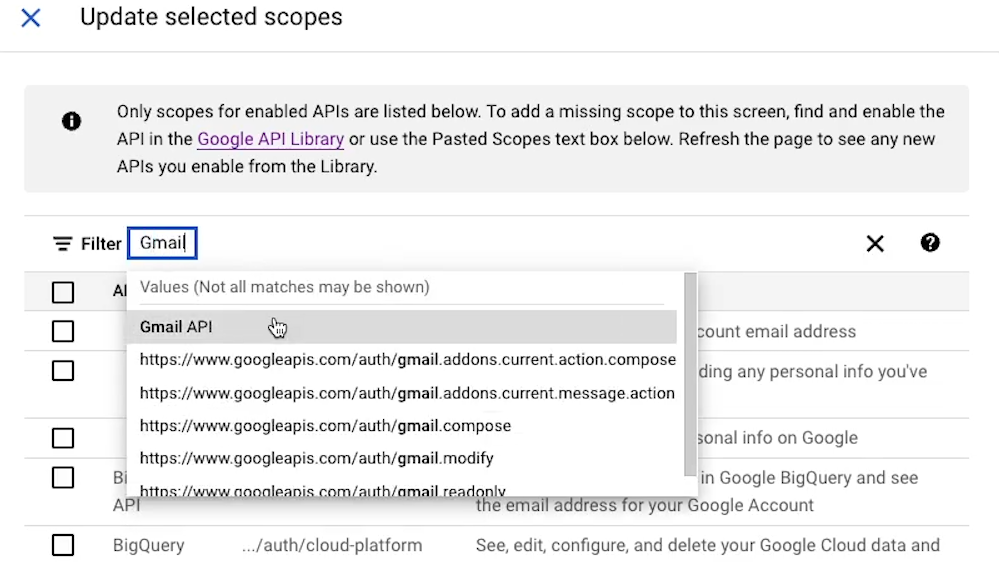
Select “Gmail API”.
This will limit the results to methods from the GMail API, which is all we’re concerned with today. According to Make, you’ll need to allow the following scopes:
• mail.Google.com General (Read, Write, Compose)
• .modify
• .compose
• .readonly
• .metadata
• .insert
• .send
• .labels
These are the minimum requirements for integrating your Gmail account with Make. Some specific actions may require additional scopes.
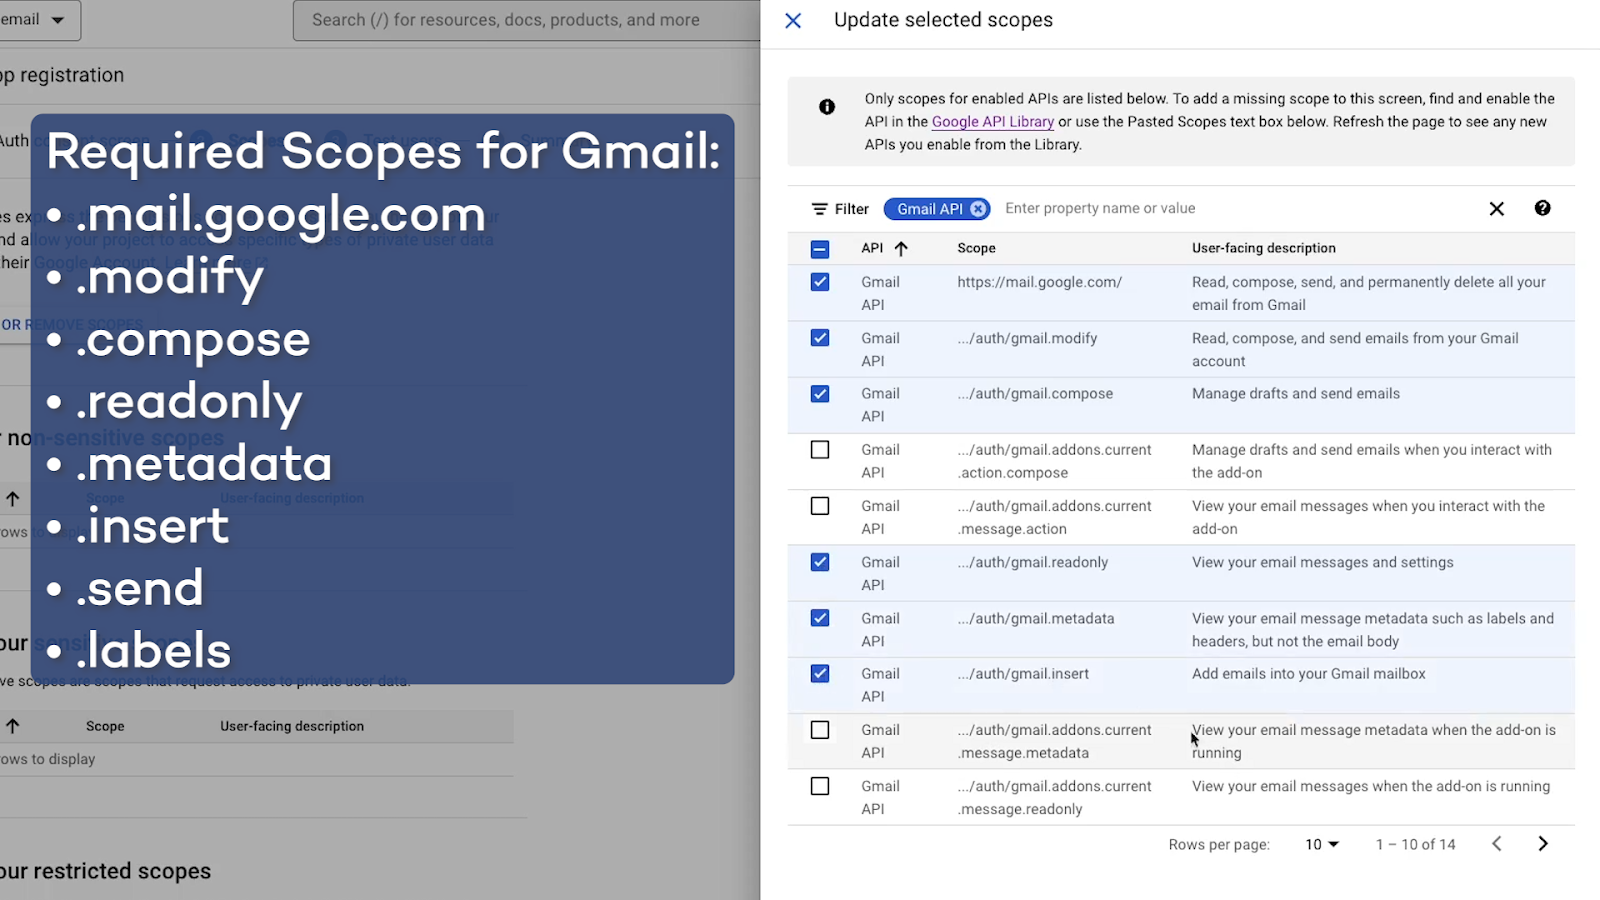
Select each of the required scopes, then click “update” to save your selection.
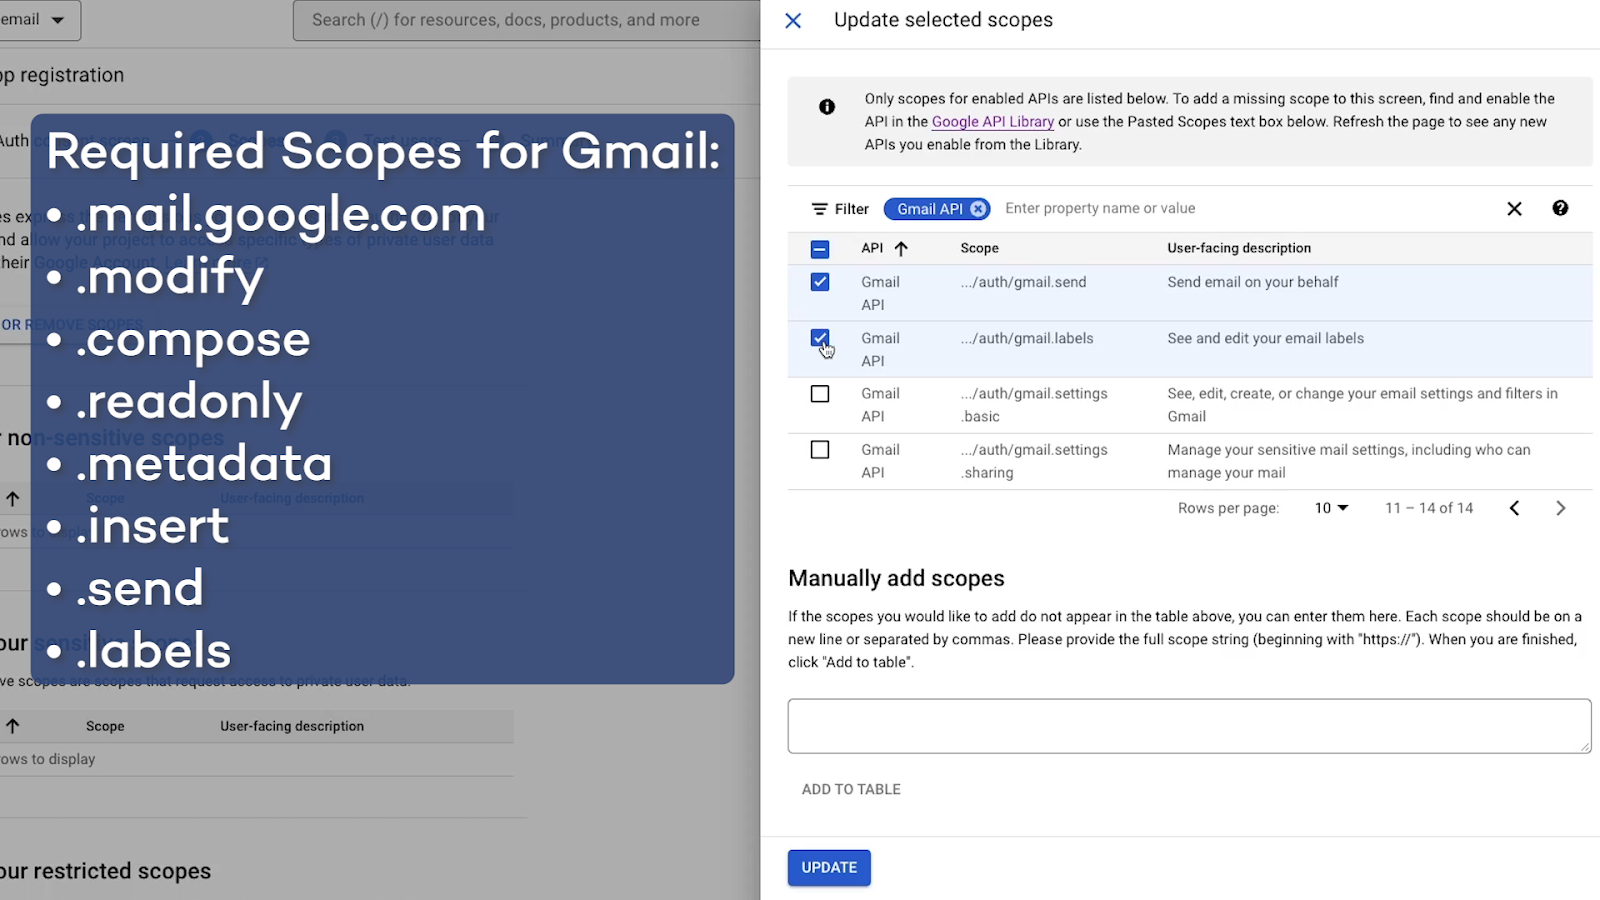
Google will automatically sort the scopes into “Sensitive”, “Non-sensitive”, and “restricted”. You can review these scopes to ensure everything was properly added, then click “Save and continue”.
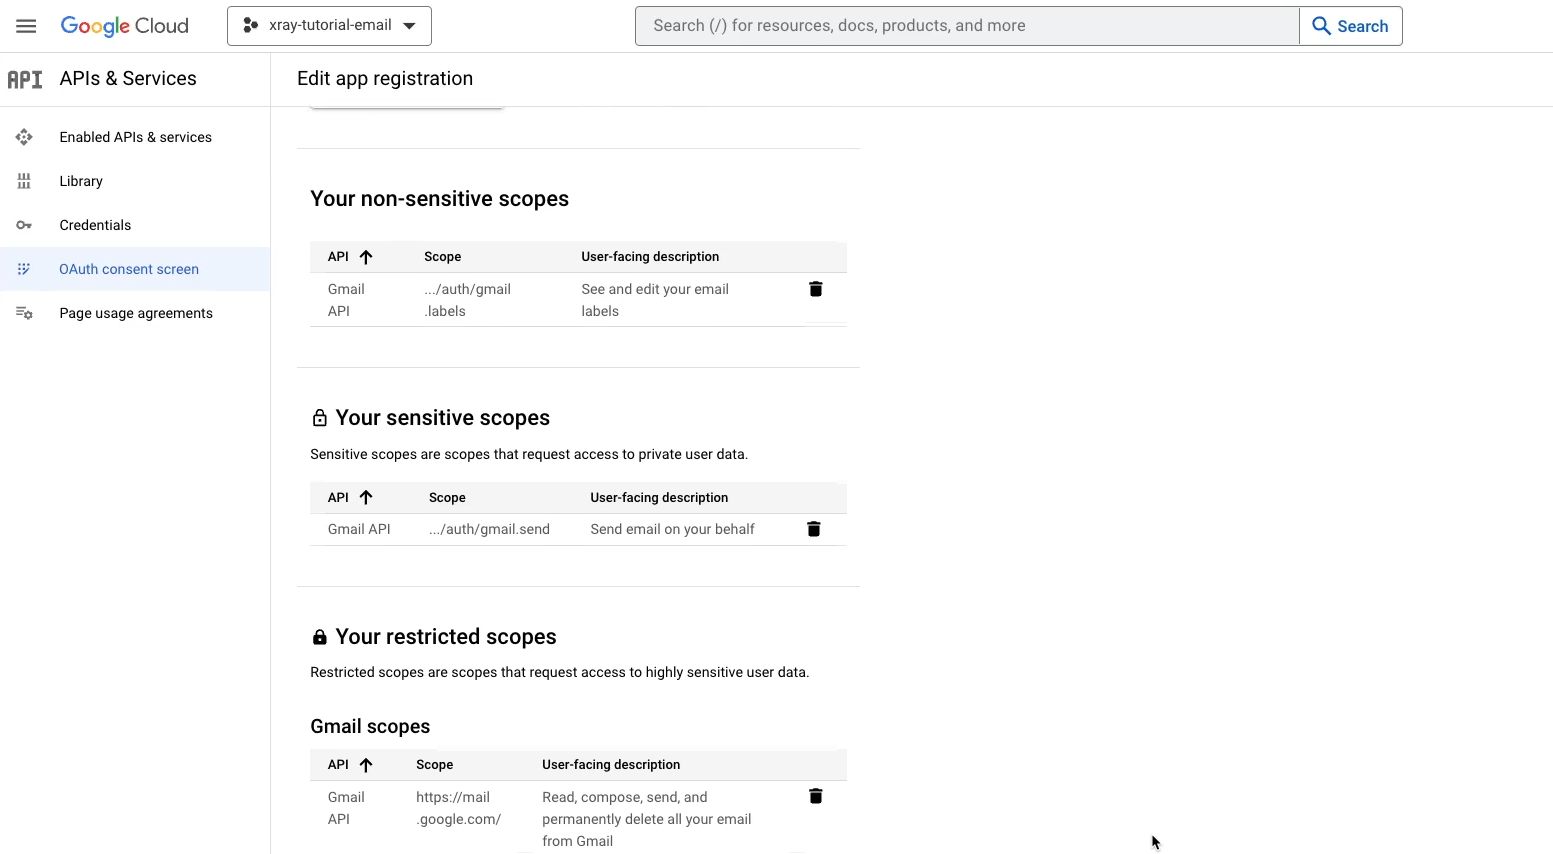
Create a test user
Next, you’ll be prompted to create test users. As Google notes here, these are the users who will be able to access your project while it’s still in “test” mode.
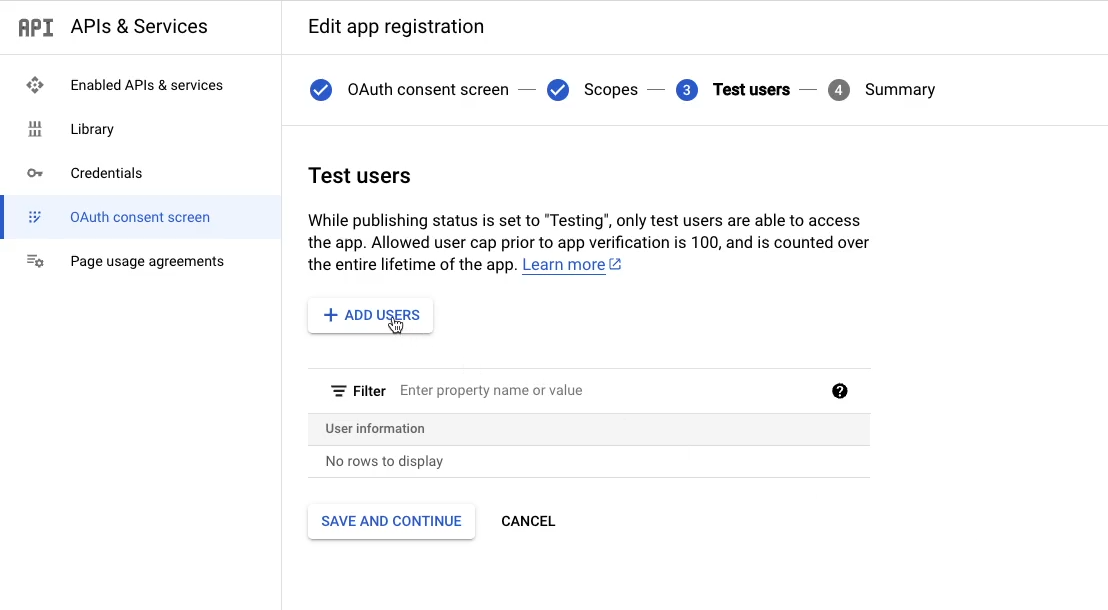
Ultimately, that’s how you’re going to keep this project. You won’t be publishing it, so anyone who needs access will need to be listed here. You should only need to provide the Gmail account that you want to use in Make.
Add that email address, and click “Save and continue”.
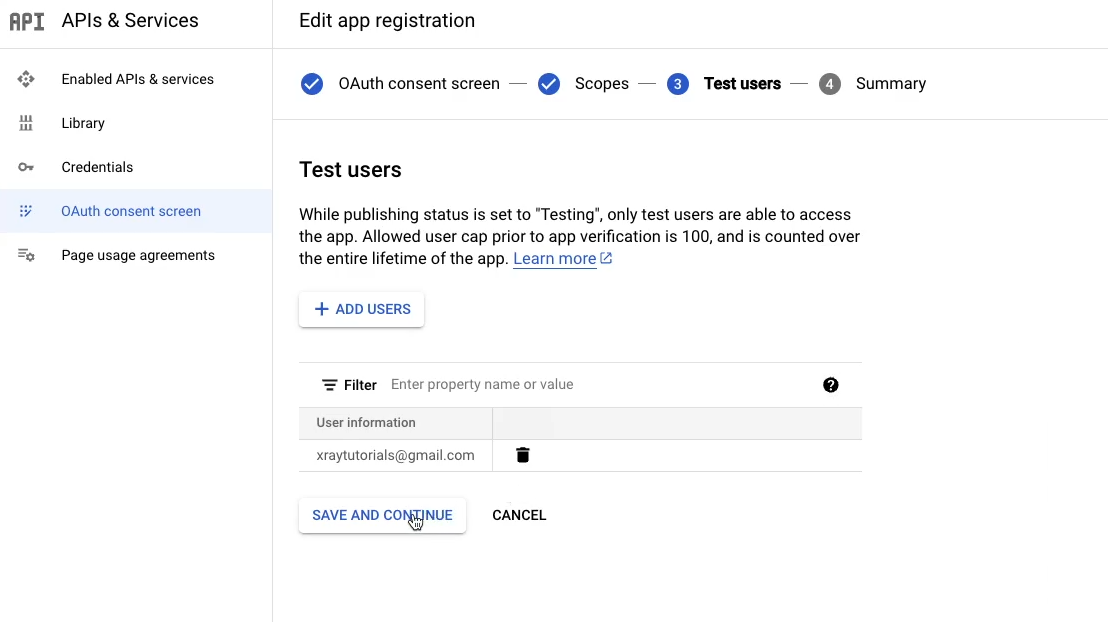
Create credentials for Make
Next, you’ll see a summary of all your choices and settings. There’s nothing you need to do here.
Instead, just click on “Credentials”.
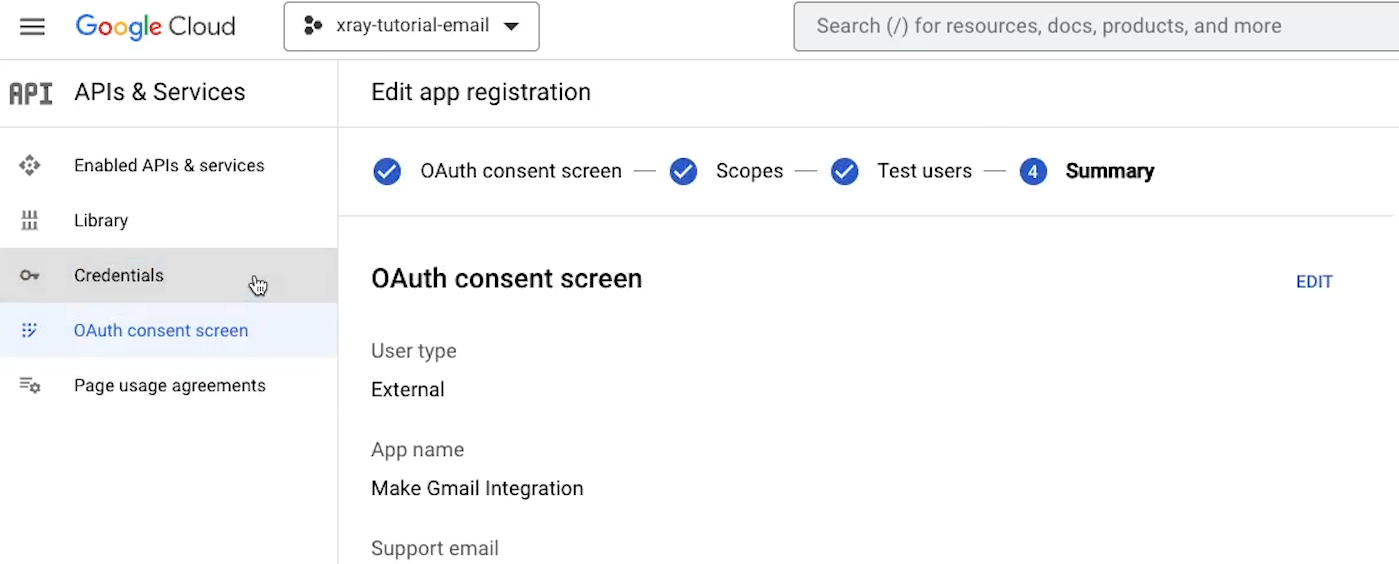
Then “Create Credentials” and select “OAuth client ID”. This will let you create an ID and “secret” that you’ll need in Make.
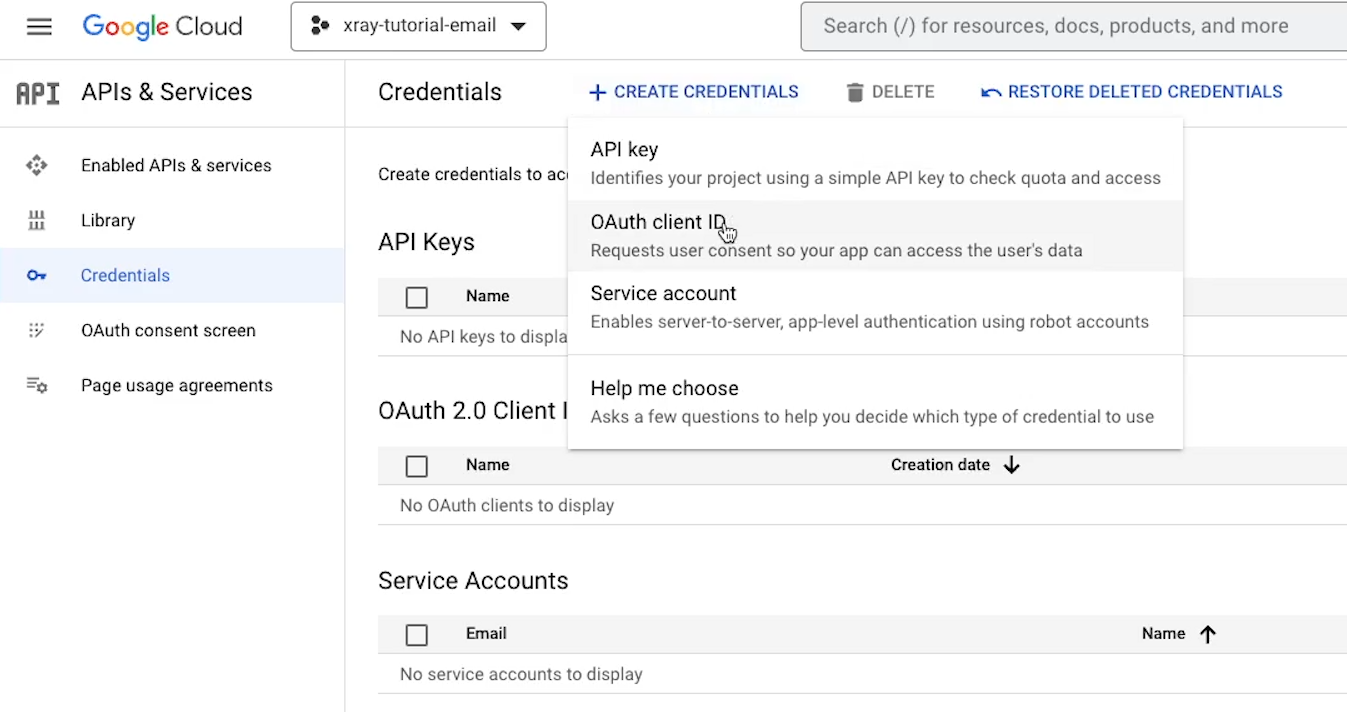
For the application type, choose “web application”.
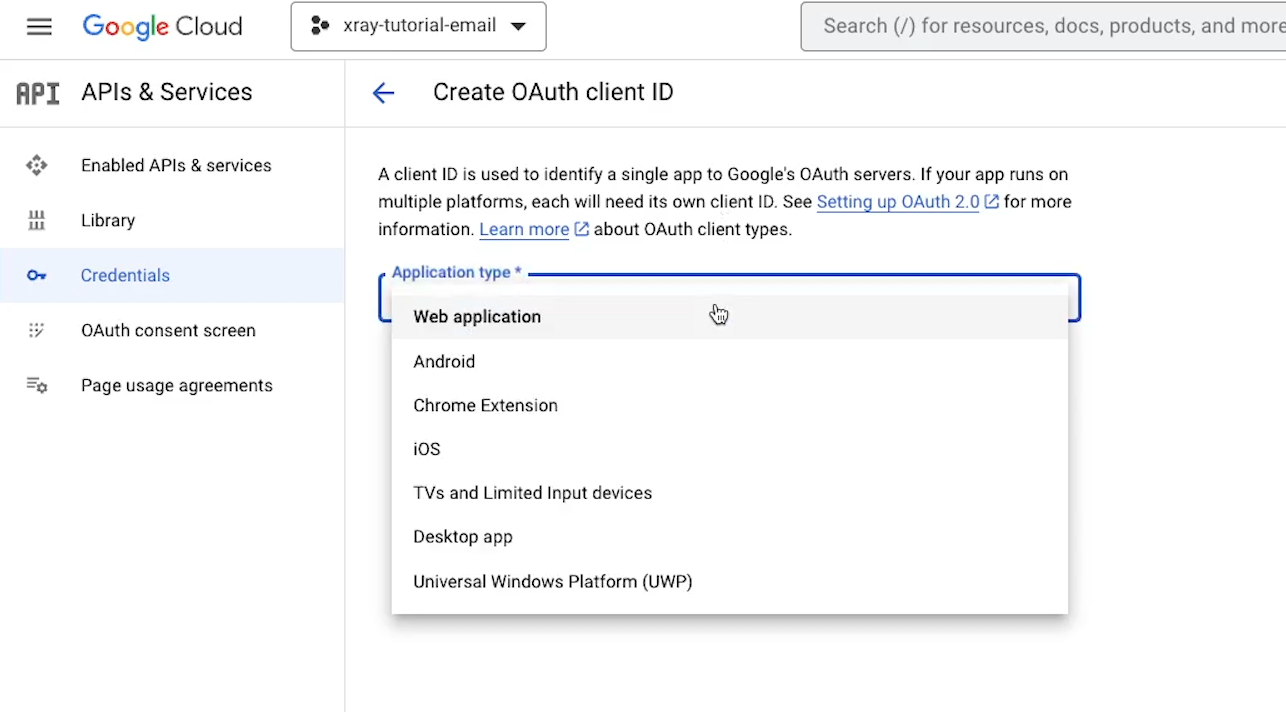
Then, give the app a name. As Google notes, this won’t be seen on the frontend, so you can enter anything you’d like here.

You don’t need to provide any “Authorized Javascript origins”, but you will need to add an “Authorized redirect URI”.
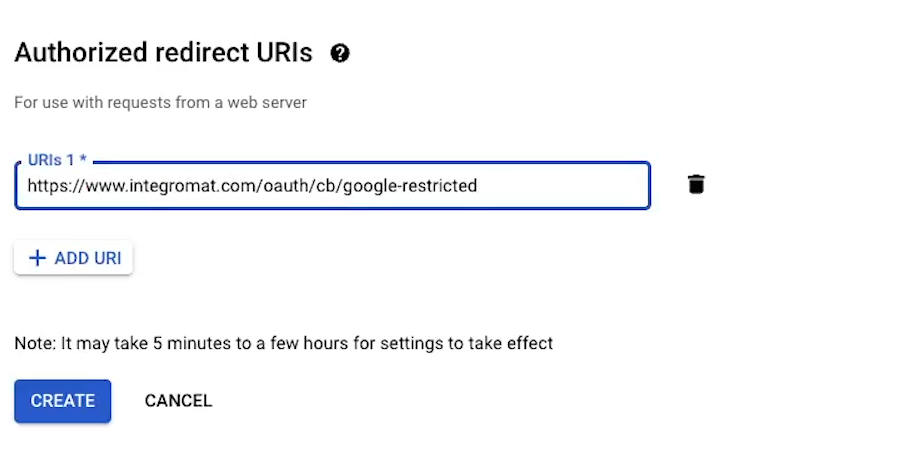
Here’s the URI that you’ll need to enter to authorize Make:
https://www.integromat.com/oauth/cb/google-restricted
Note that, as we said earlier, they’re still using the “integromat” domain.
With the URI in place, click on “Create” to finish generating these credentials.
A pop-up will appear that displays the Client ID and Client Secret that you’ll need to enter later in Make, so copy those to your clipboard.
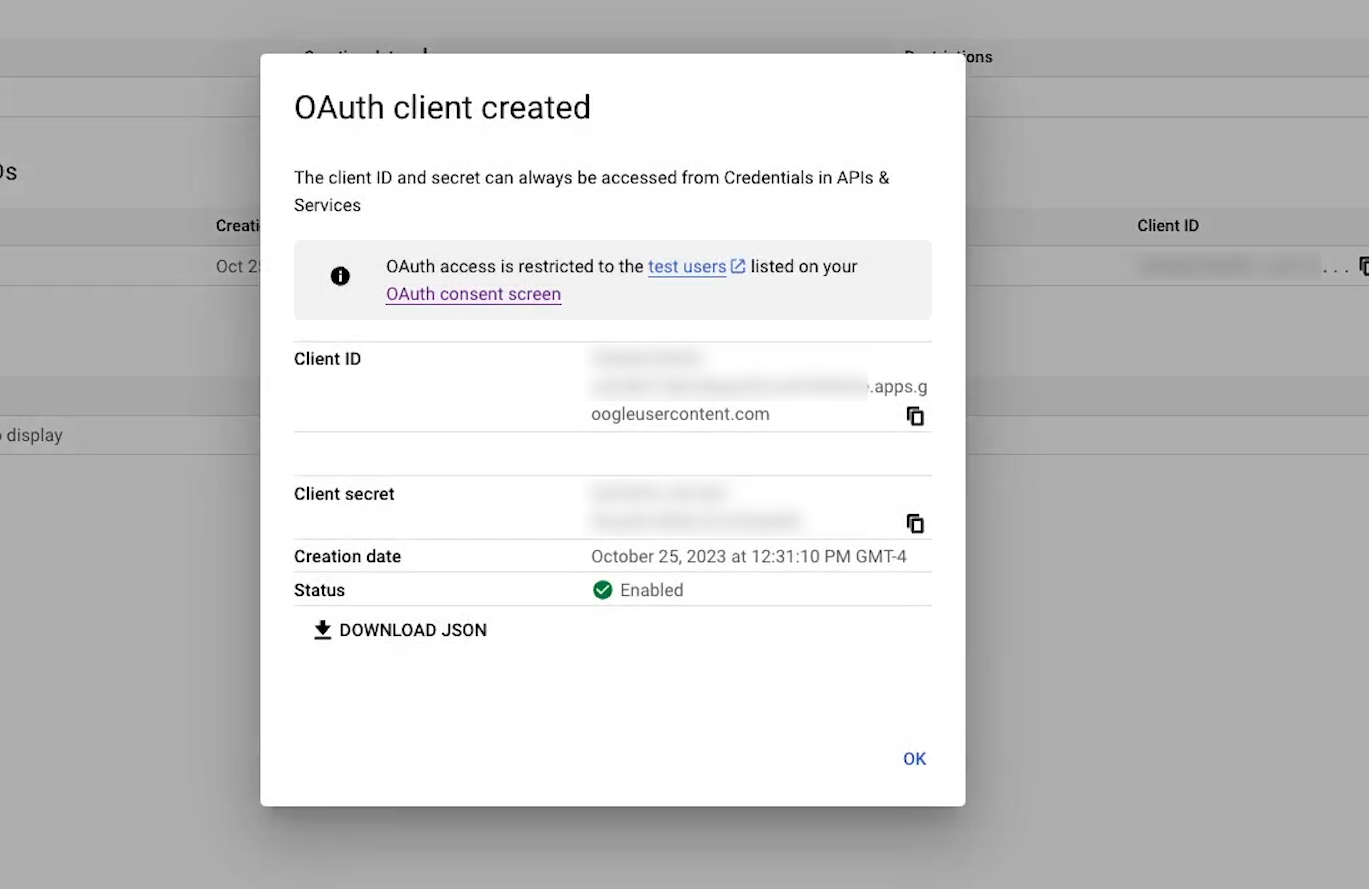
If you need to find this information later, just sign in the Google Cloud console, access your project, and click on Credentials.
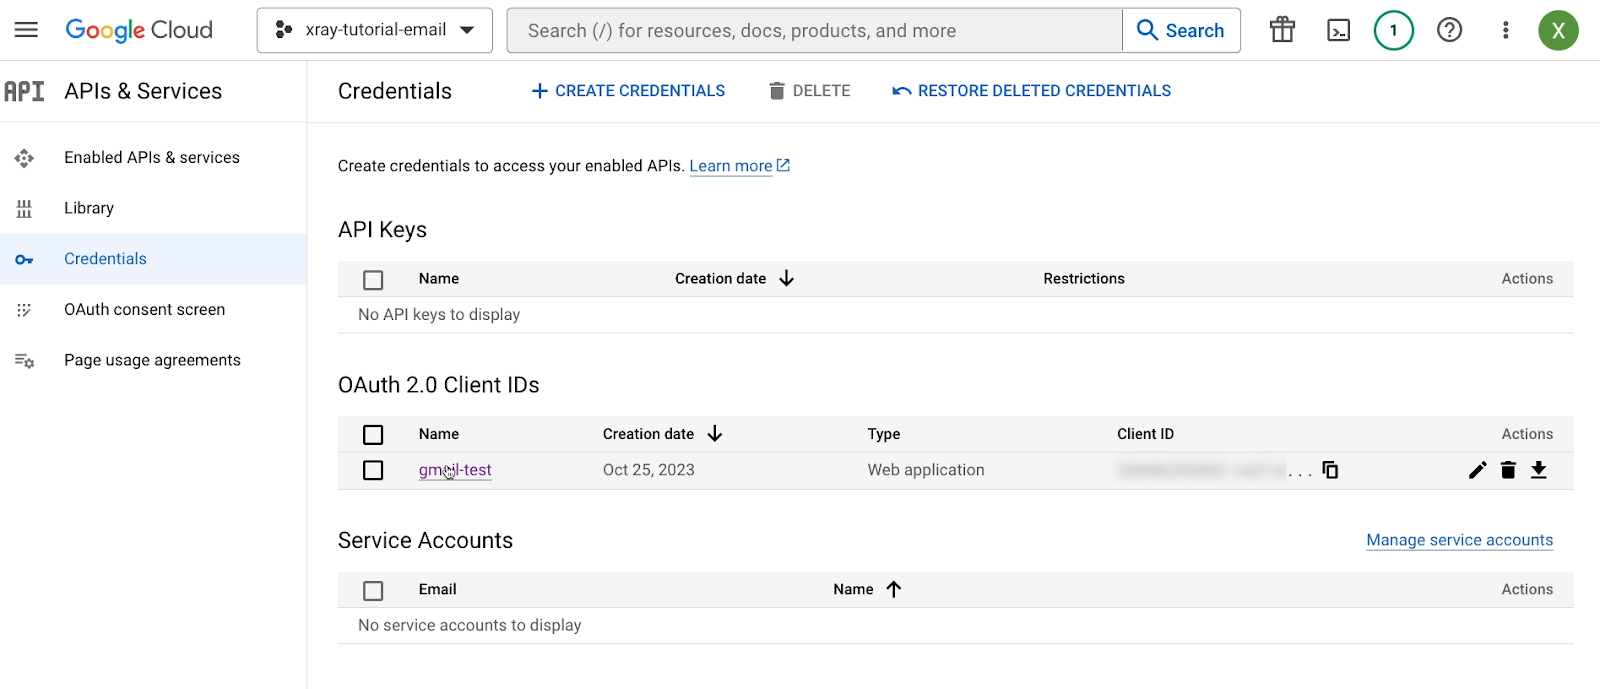
Then, you can find the credentials under OAuth 2.0 Client.
Your Google project is now all set. Next, we’ll show you how to establish the Gmail connection in Make.
Add your Gmail connection to Make
To add your personal Gmail connection to Make, you’ll need to create a new scenario and add a Gmail module to it.
You can choose any action here. For example, we’ll add a trigger module with the “Watch emails” event.
Next, you’ll need to add a connection.

Give your connection a name, but do NOT click on “Sign in with Google” yet. First, you need to toggle “show advanced settings” on.
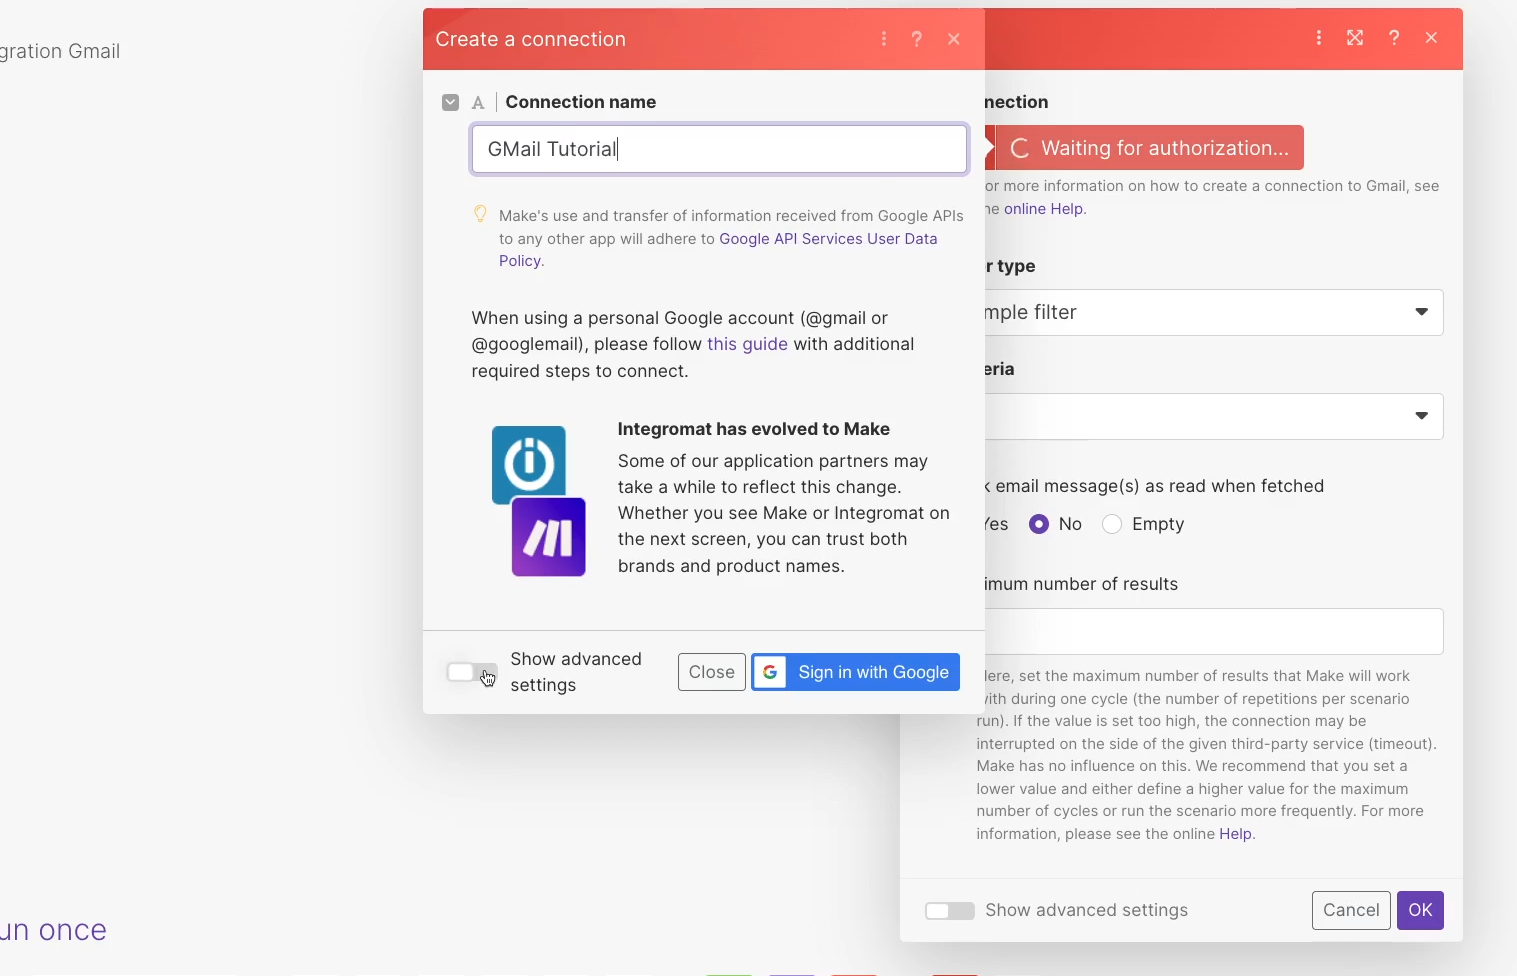
You’ll see two fields where you can enter your Client ID and Client Secret.
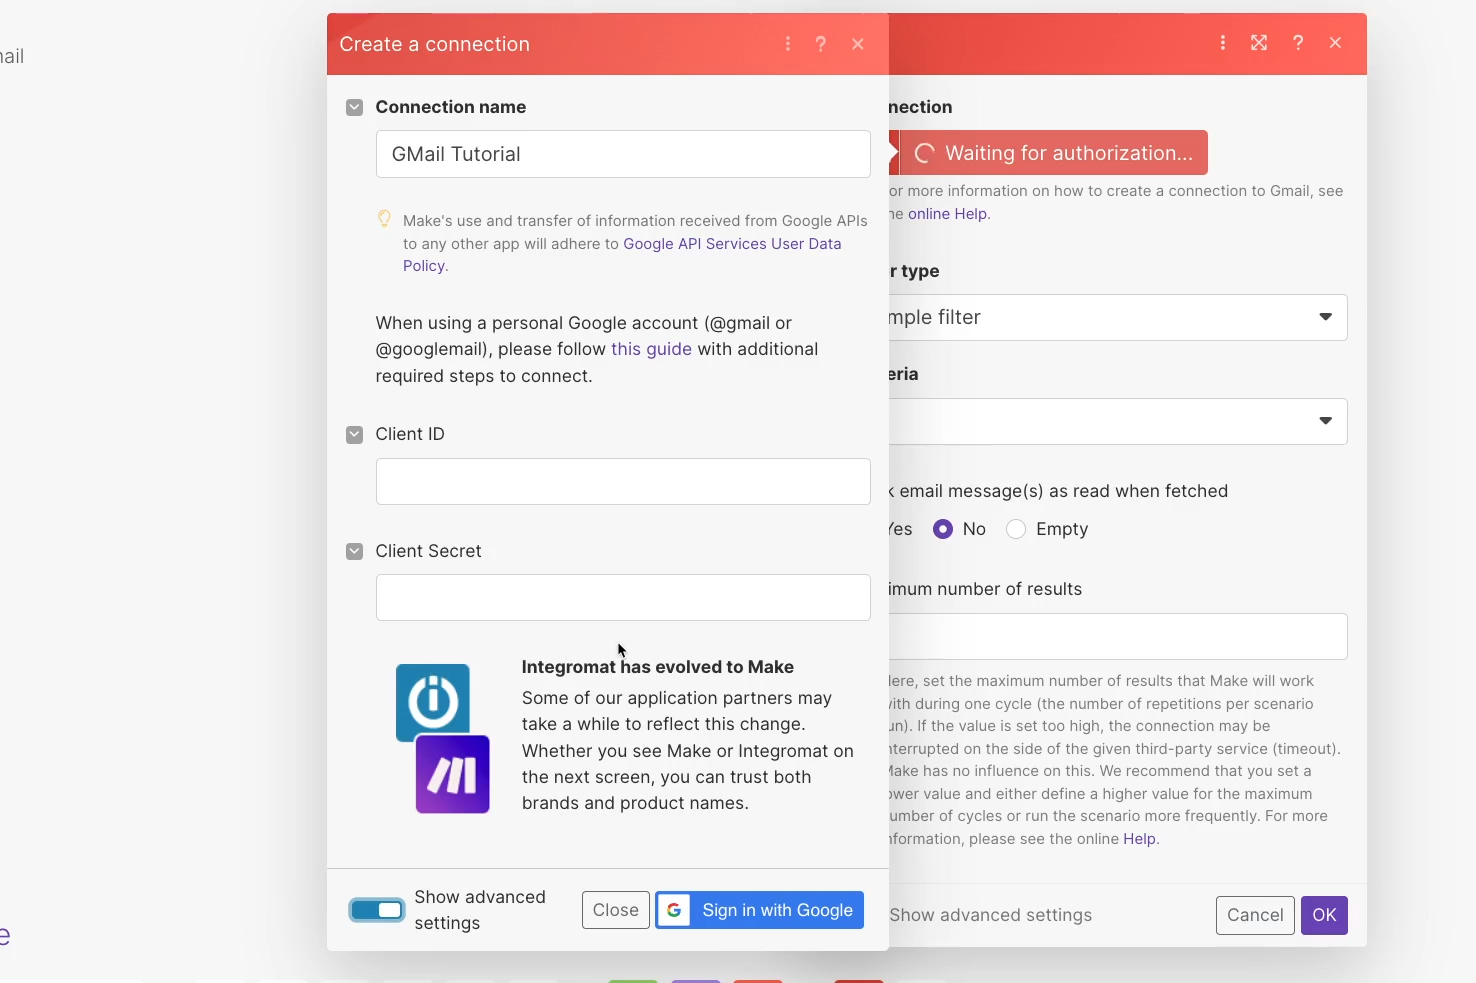
If you haven’t already, copy those from your Google Cloud project and paste them into the appropriate fields.
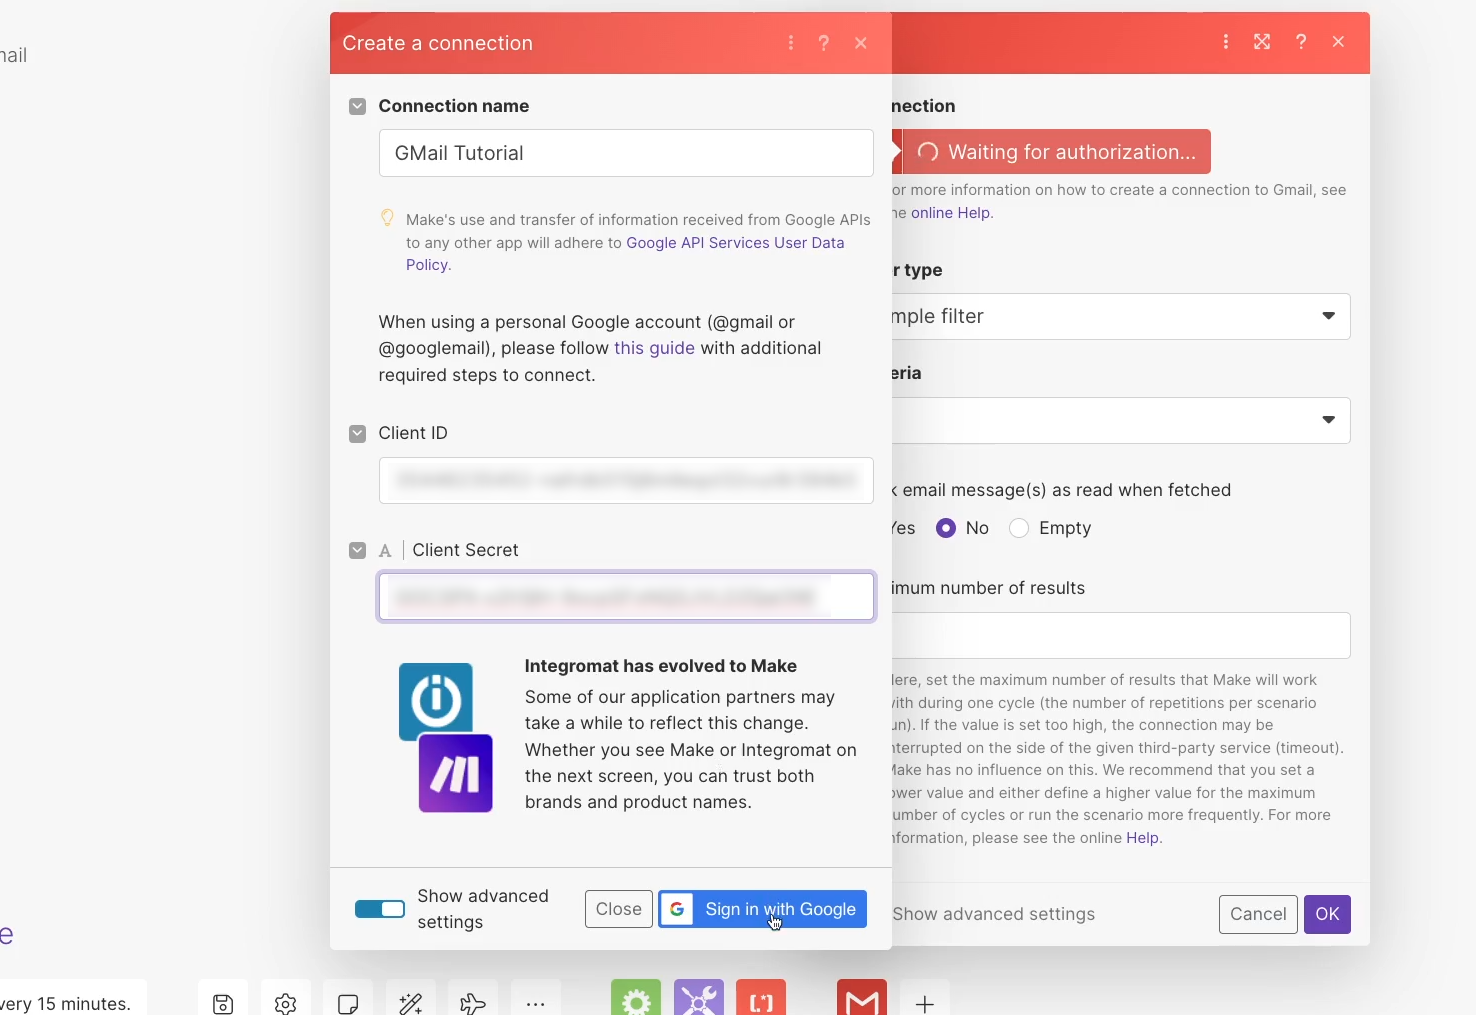
Now, you can click “Sign in with Google”, and log in with the Gmail account that you want to use.

You’ll see this warning pop up, but you can just click on “Continue”.
Then, check the box at the top of the window to allow Make (or Integromat), to read, compose, send, and delete mail on your behalf.

Click “Continue” again, and you should be all set. Your connection will now be added to your Make account.
However, just to be sure that everything’s working as intended, it’s best to give your new Gmail connection a quick test.
Testing your Gmail connection in Make
First, finish setting up the “watch emails” trigger to verify that Make can actually retrieve emails from your inbox. You can configure the settings however you’d like.
In our example, we'll keep it simple. We’ll just have it watch our inbox for all emails.

Once the module is set up, give it a test. Right click on it and select “choose where to start”. Pick “Choose the first email”, and click on the email that you want to use as test data.
Then, click on the “Run once” button in the bottom left.
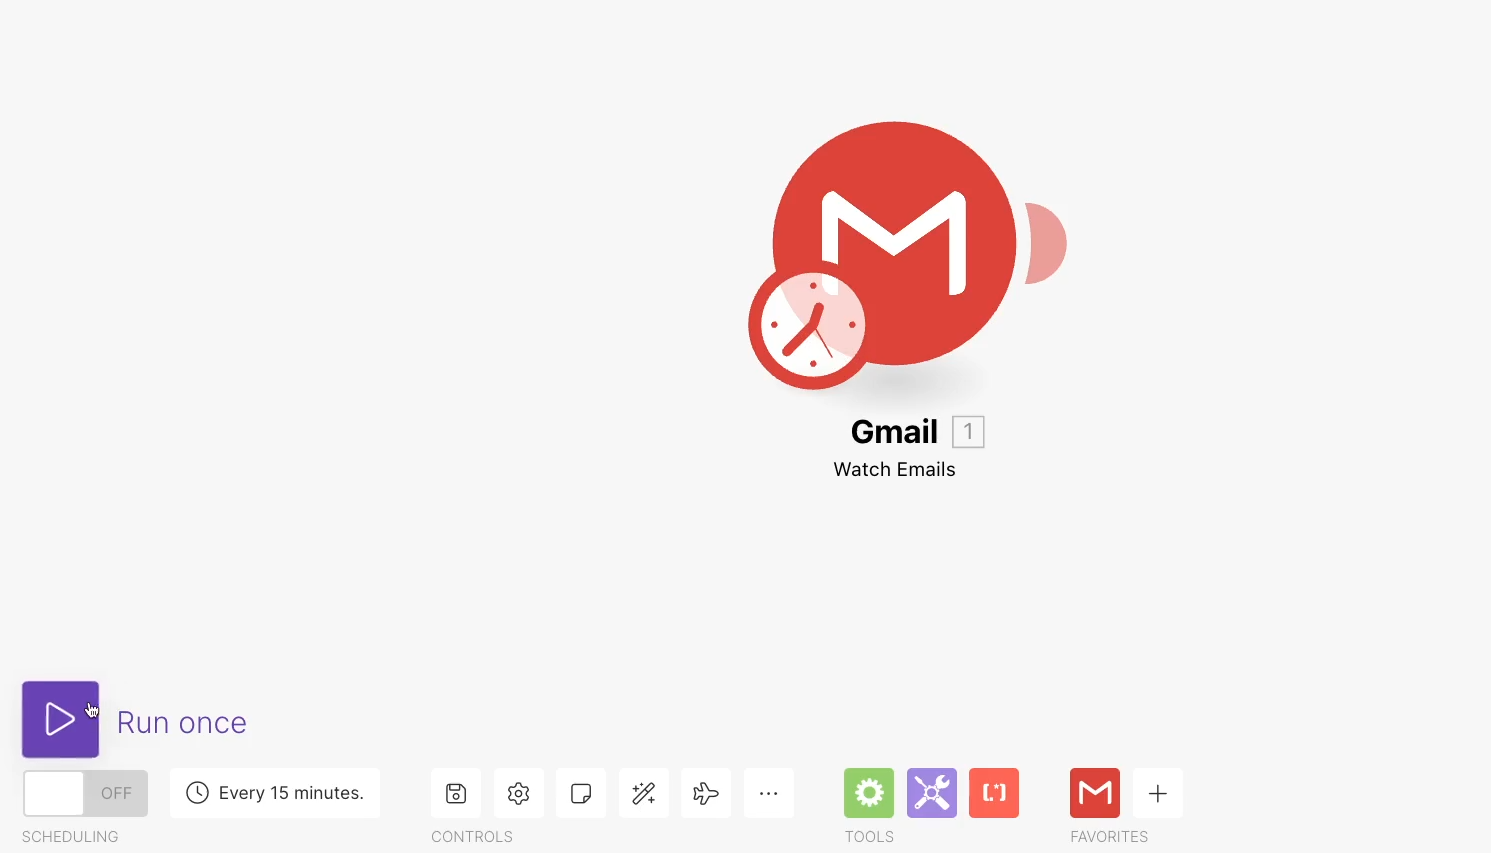
The module should run and retrieve an email. As usual in Make, you can click on the number above the module to see details about the information that it processed.
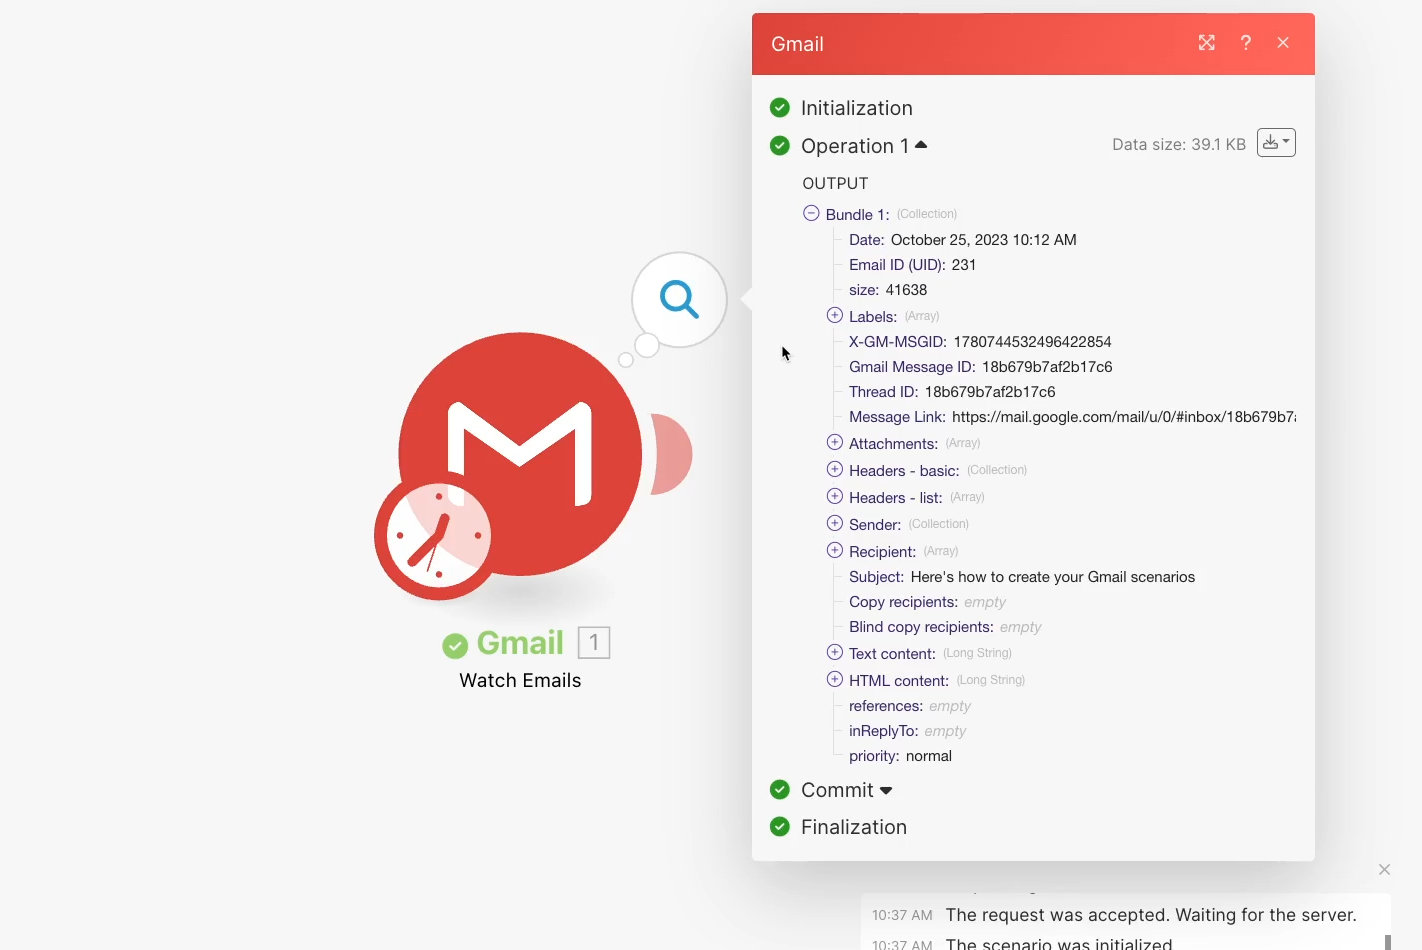
So we know that we can read emails with our Gmail connection. Now let’s make sure we can send them, too.
Testing a “Send email” module
Add another Gmail module to your scenario, and choose “Send an email”.
In the “to” field, enter any email address that you have access to. Then, compose any message that you’d like. In our example, we’ll just send an email that says there’s a new message in the tutorials inbox, and throw in some of the data retrieved in the trigger.

Once you’ve finished writing your email, click “OK”. Then, go back to the trigger module to test the whole scenario.
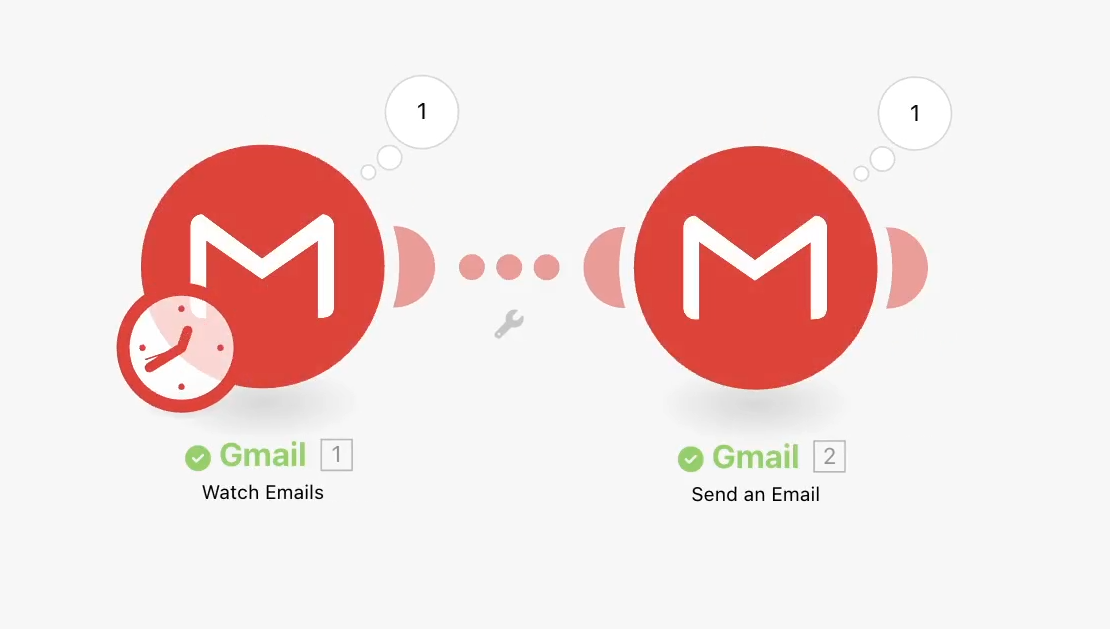
If everything looks good in Make, check your inbox to confirm that you received the message.
Zapier: an easier but pricier alternative
If this whole setup was a little too complicated for you, you could use your personal Gmail account on Zapier without needing to setup a Google cloud project.
In this case, simplicity comes at a cost, as Zapier will be about 3 times more expensive in the long run.
Automate your Gmail inbox in Make with a few extra steps
In most cases, connecting apps to Make just takes a few clicks. However, when you want to use a personal Gmail account, things get unexpectedly complicated.
But by following the steps we’ve shown you here, you should be able to start automating your Gmail inbox with Make in no time.
If you’d like to learn more about building no-code and low-code automations, be sure to check out our blog or our YouTube channel. You can also follow XRay on Twitter, Facebook, or LinkedIn.

Airtable forms are an easy way to gather data from clients, coworkers, or anyone on the web.
While it’s usually appropriate to let users respond to your forms however they want, it’s often best to pre-fill some fields for them to reduce errors and keep your data consistent.
In this post, we’re going to show you how to set up pre-filled fields in your Airtable forms with customized URL attributes.
First, we’ll walk you through the basic process for adding pre-filled fields to an Airtable form with URL encoding.
Then, we’ll show you the specific details you need to account for when pre-filling select fields, linked records, and date/time fields.
Finally, we’ll demonstrate how you can hide your pre-filled fields to make sure your users don’t edit the pre-filled values you’ve provided.
Setting up pre-filled fields is an easy way to make your Airtable forms more powerful, so let’s jump in and get started!
Adding a “prefill” attribute to an Airtable form URL
To begin making an Airtable form with pre-filled values, you’ll need the URL of an existing Airtable form. Be sure to copy the form’s URL where people can submit responses, and not the URL of the base.

Then, append a question mark and the following pre-fill attribute to the end of the URL:
?prefill_Field+Name=Value
The field name should be typed exactly as it appears in Airtable, including capitalization. This syntax is case sensitive.
Both the field name and the value that you want to pre-fill will need to utilize URL encoding for special characters and spaces.
For instance, any space should be entered as “%20”, or as a plus sign (+). You can find more information about URL encoding here.
For example, pre-filling the “Text Example” field with the phrase “Prefilled Sample Text” would look like this:
https://airtable.com/appsRo48XxUBLNapQ/shr0CakvQO9NeYtLJ?prefill_Text+Example=Prefilled+sample+text
When someone opens the form with that prefill text appended, they’ll see the “Text Example” field filled in just as we specified.
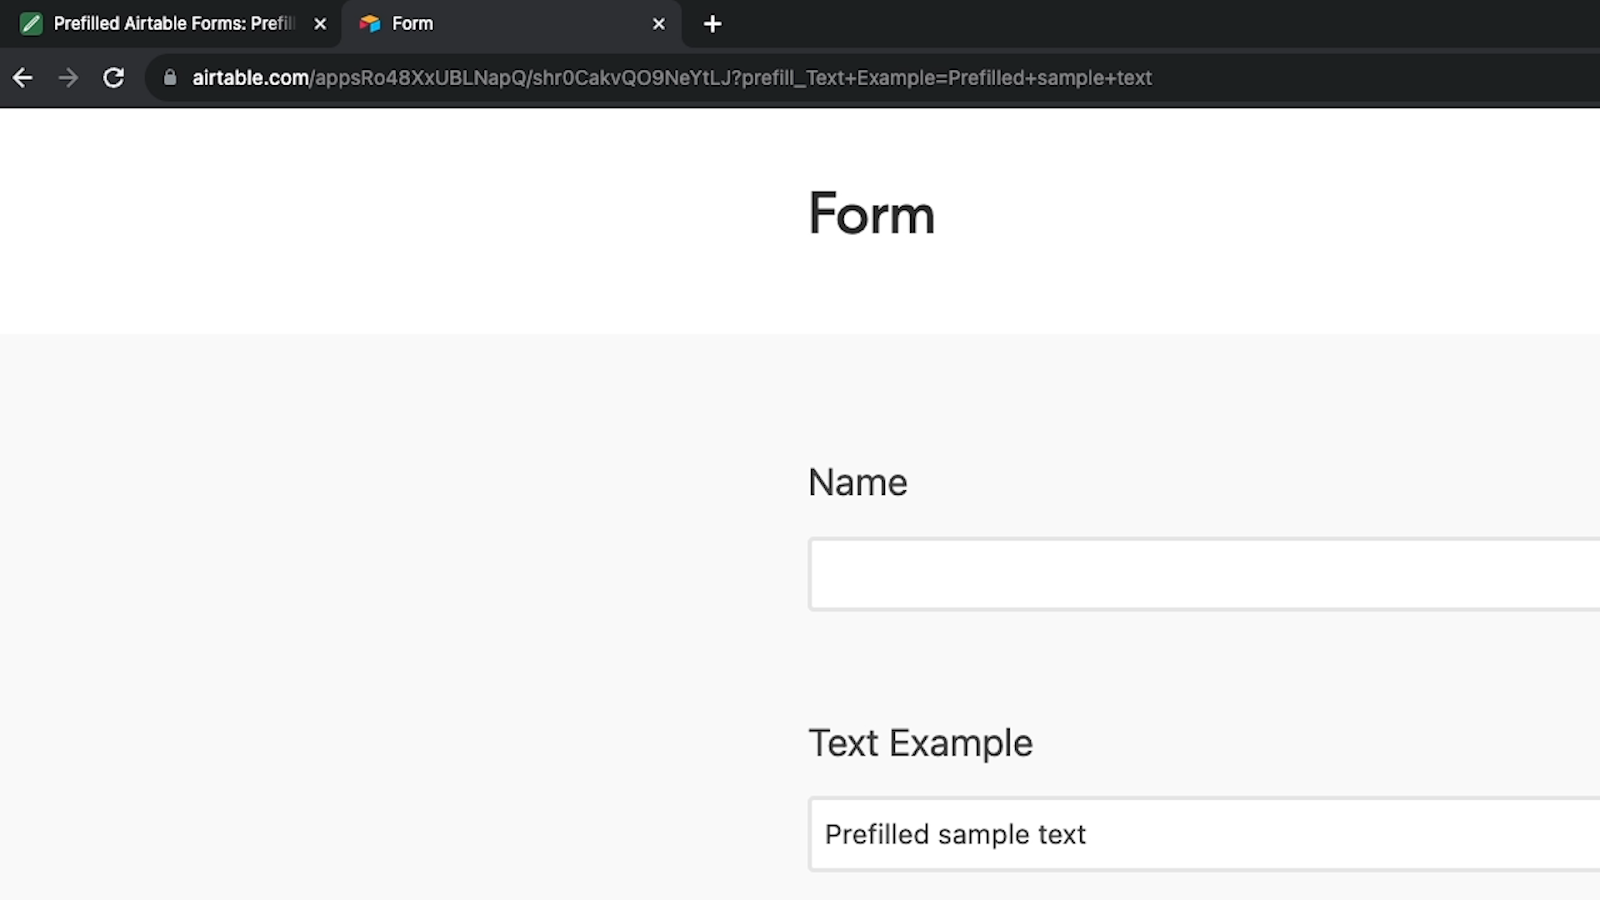
Using field IDs instead of field names
If you think your Airtable field names might change, you may prefer to use the field ID to identify the field that you want to pre-fill instead of using its name.
To access a field’s ID, begin by opening up your Airtable base and selecting “Manage Fields” under the “tools” menu. Here, you’ll see more information about all of the fields in that particular table.

Click on the small settings icon on the top right, under the “Add a new Field” button. This will allow you to toggle column visibility, giving you access to all the fields’ metadata. Check the box next to “Field ID” to make the ID of each field visible.
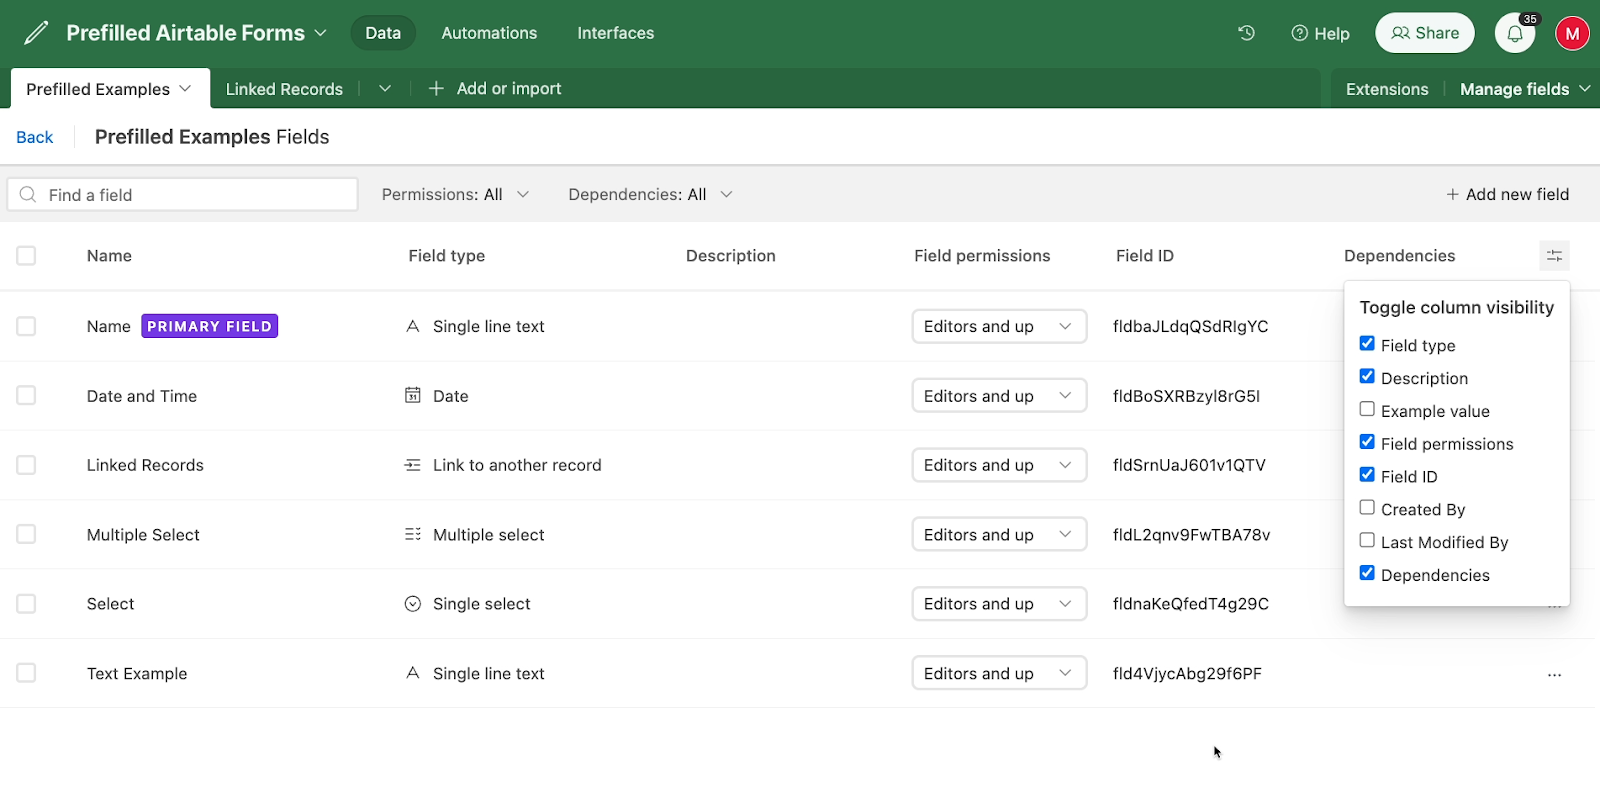
Copy the ID of the field that you want to prefill, and add it to your URL in place of the field name in the following format:
?prefill_FieldID=value
For example, when we replace the “Text Example” field name with its ID, our new pre-fill URL looks like this:
?https://airtable.com/appsRo48XxUBLNapQ/shr0CakvQO9NeYtLJ?prefill_fld4VjycAbg29f6PF=Prefilled+sample+text
When we open the link, it fills in the “Text Example” field in the exact same way as before.
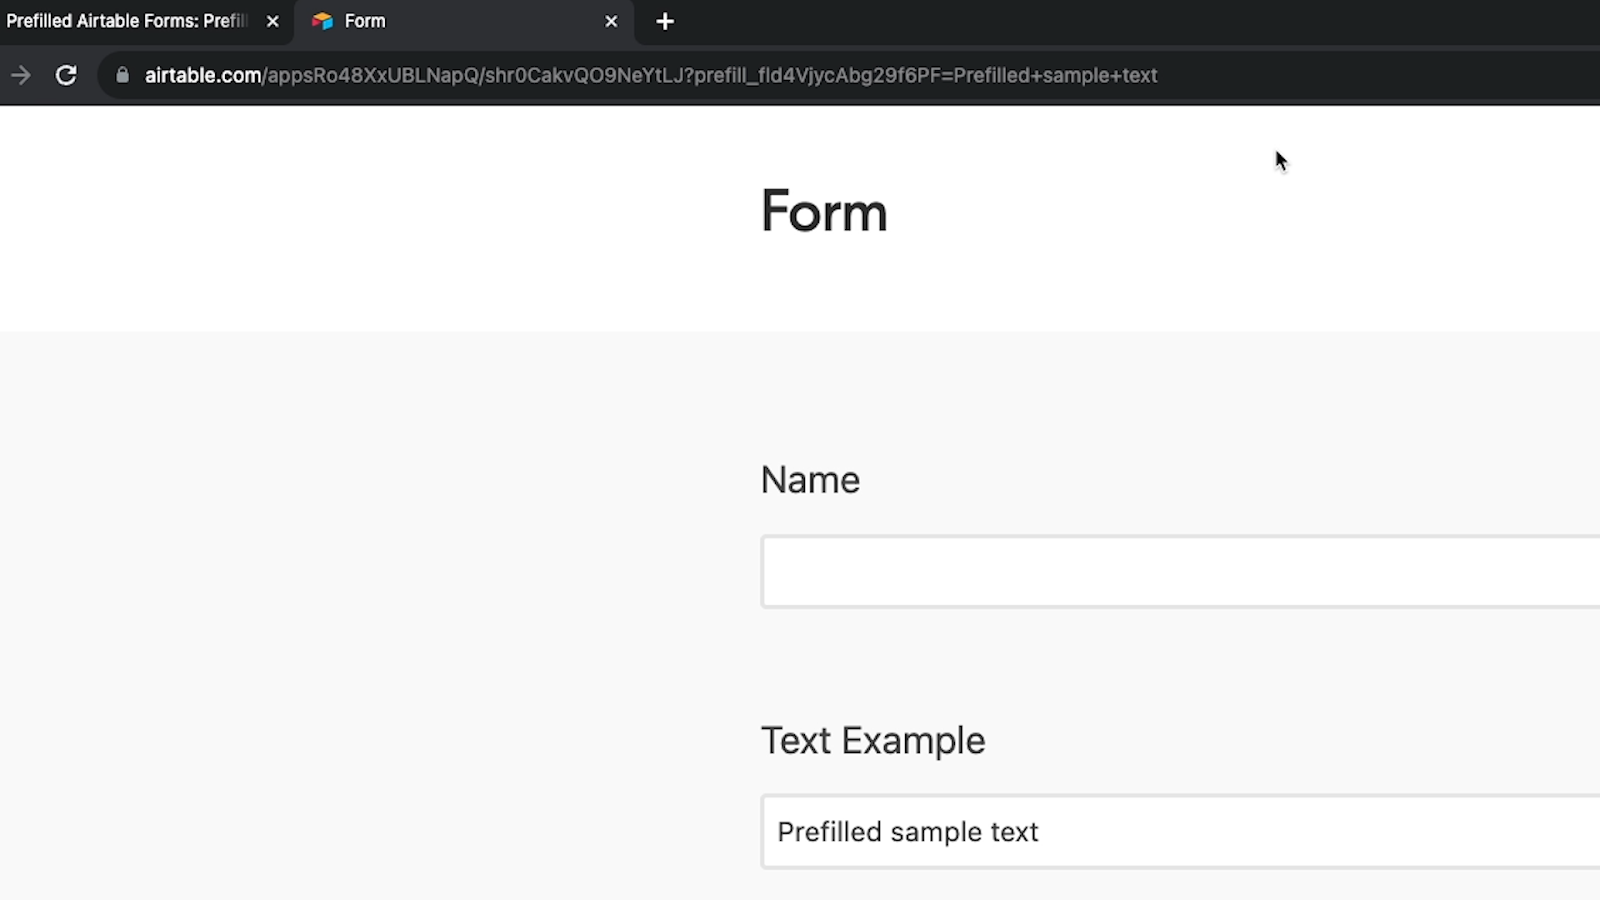
By using the ID instead of the name, you can freely change the field name at any time in the future, while maintaining the pre-fill you’ve already configured.
However, for this tutorial, we’ll keep using field names so it’s easier to follow along.
Pre-filling select fields
Pre-filling single- and multi-select fields works in largely the same way as pre-filling a text field. Just enter the name of the option that you want to pre-fill after the equals sign in this format:
?prefill_Field+Name=Select+Option
For example, we’ll use the following attribute to pre-fill the “Select” field with “Option2”.
?prefill_Select=Option2
When we open the form, it fills in the Select field with Option2.
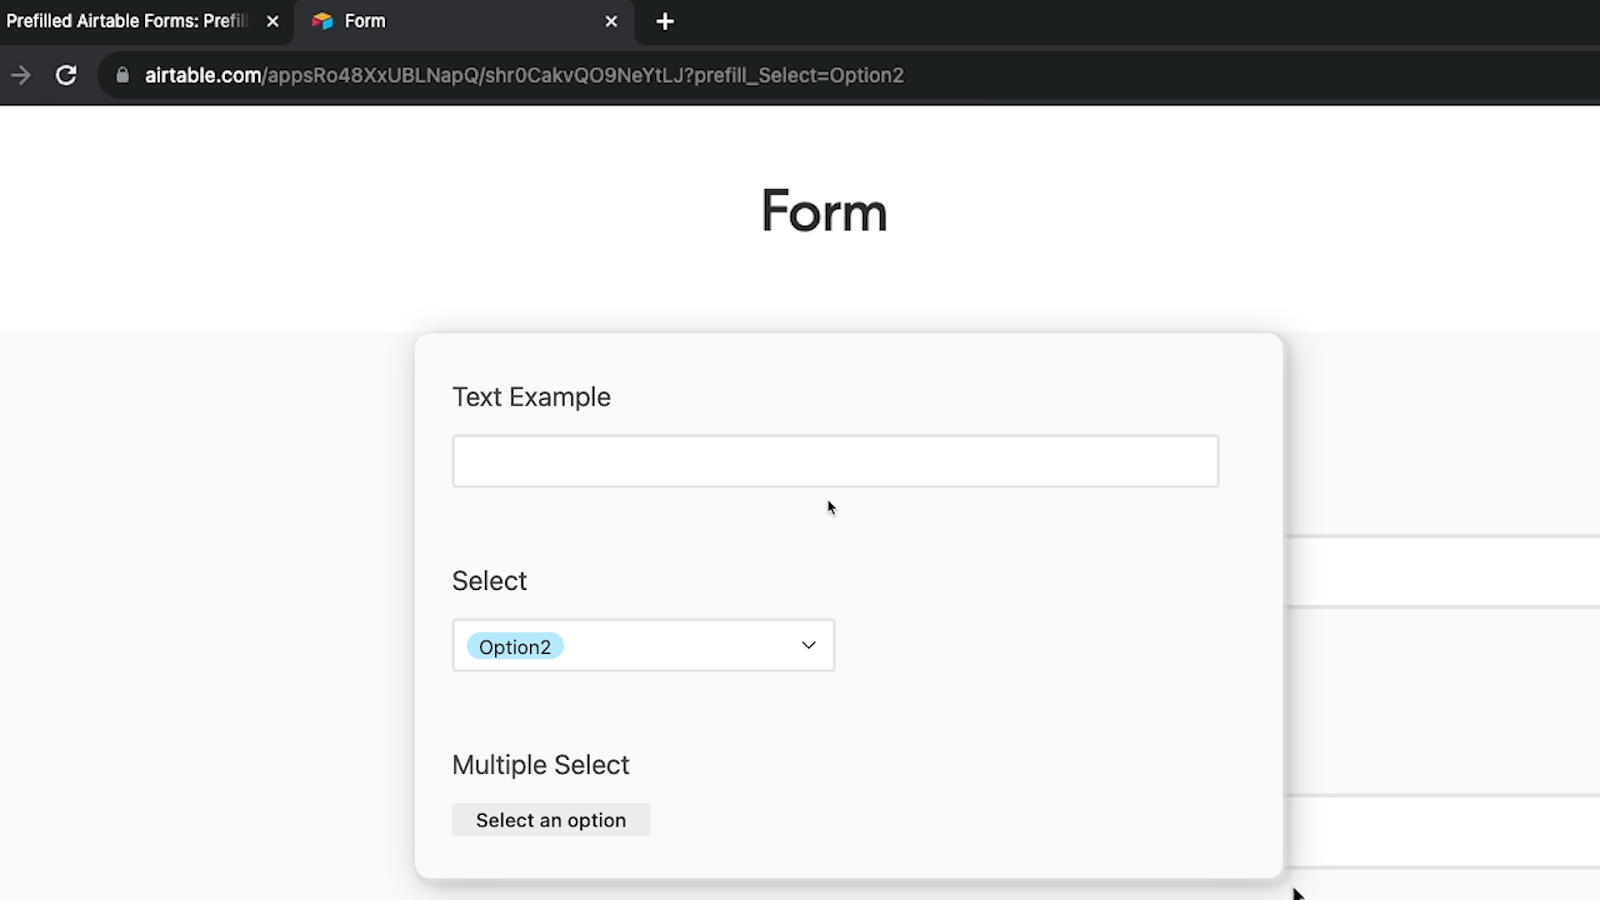
Note that if you enter an option that doesn’t exist yet in the select field, the field won’t be pre-filled, and the option won’t be added to the table.
You’ll have to pick from existing choices. This applies to multi-select fields as well.
Pre-filling multiple select fields with several choices
If you want to enter multiple choices into a multi-select field, just separate them with a comma and no space.
The format looks like this:
?prefill_Field+Name=Option1,Option2,Option3
For example, we’ll make a pre-fill URL to add “B” and “D” to the multiple select field.
?prefill_Multiple+Select=B,D
When we append that attribute to our form URL and open the form, we can see the multiple select field pre-filled like we specified.
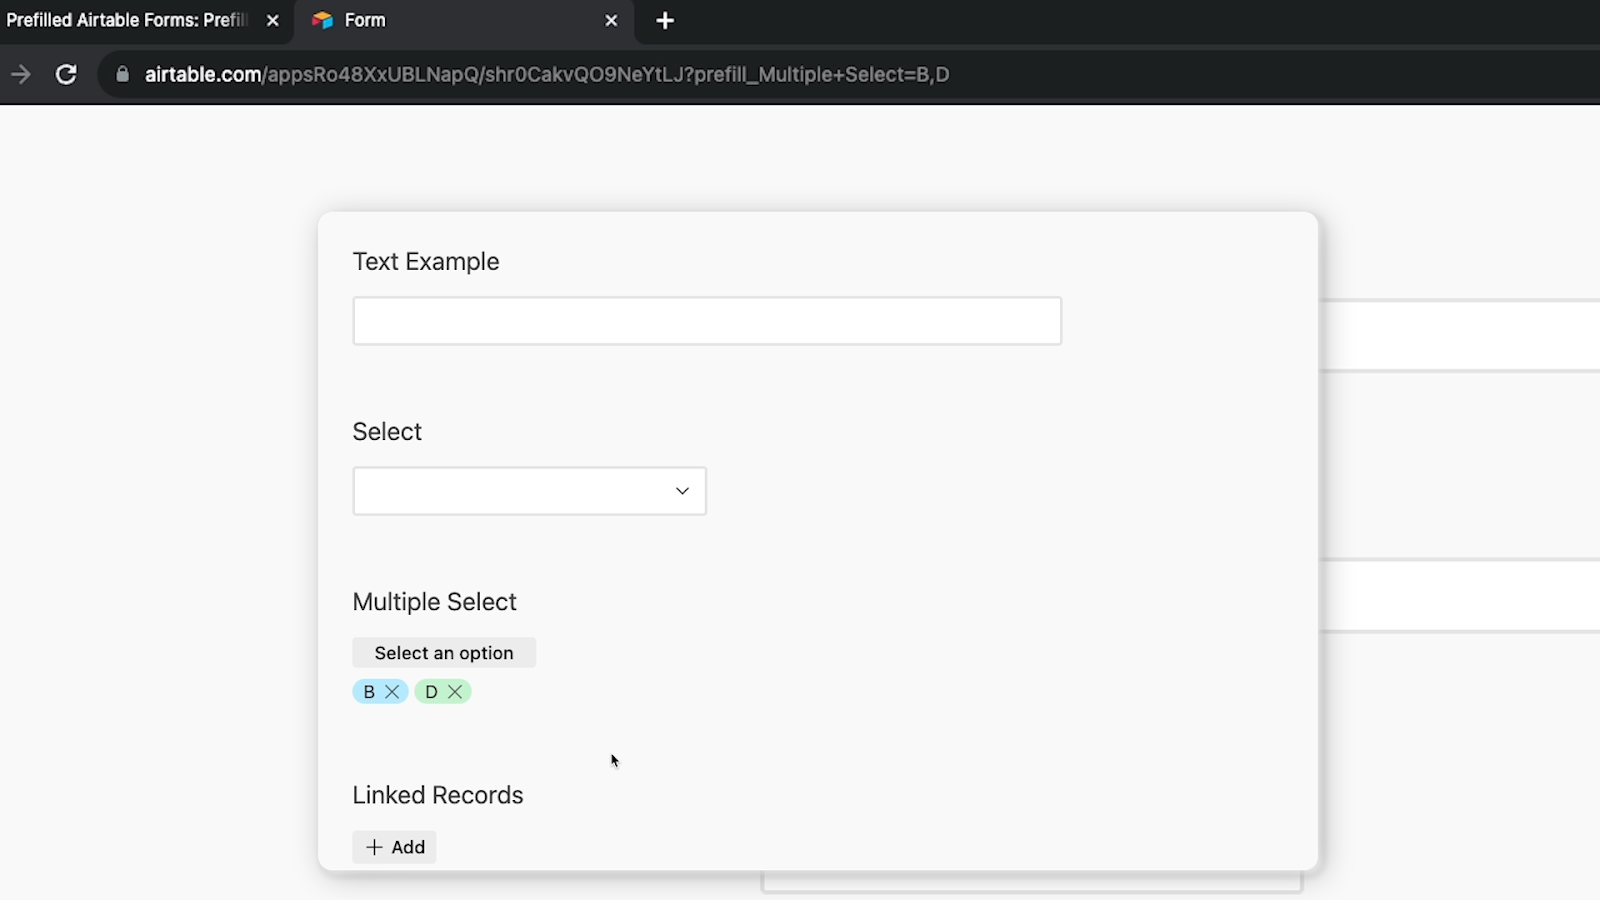
Pre-filling several fields in the same URL
You can also pre-fill several fields at once if you want. You just need to separate each pre-fill with an ampersand (&). Here’s how you’ll format the attributes:
?prefill_Field+Name=Value&prefill_Field+Name2=Value2&prefill_Field+Name3=Value3
Note that you’ll still need to use the word “prefill” before each value that you want to automatically fill in, but you only need one question mark.
We’ll combine all three pre-fills that we’ve done so far into a single pre-filled URL.
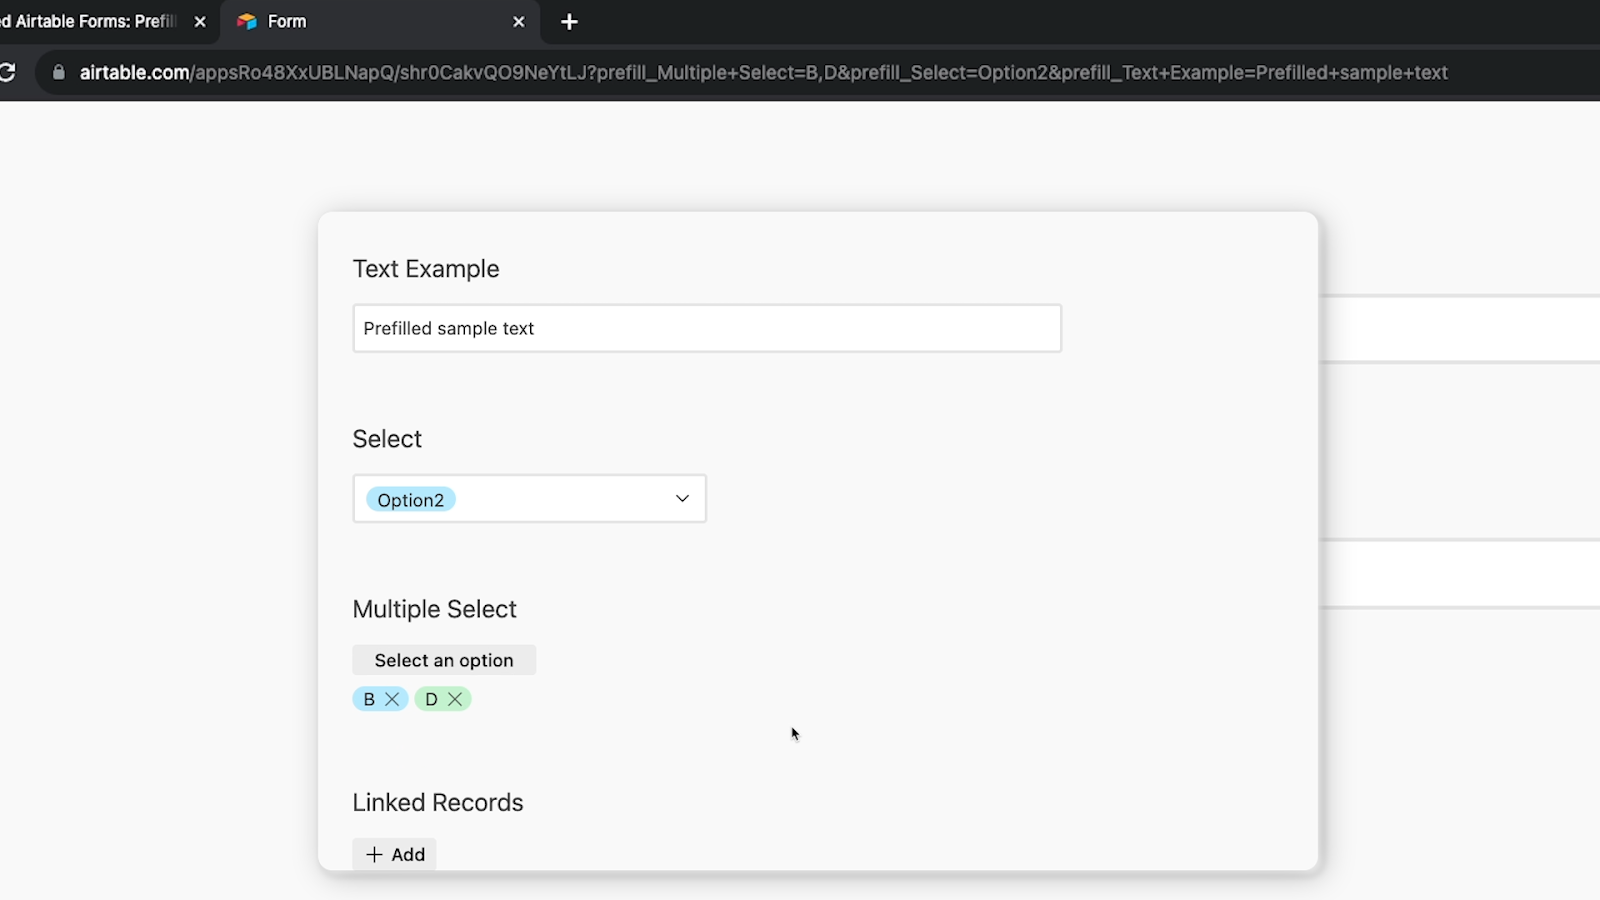
As you can see in the screenshot above, the multiple select field is set to B and D, the single select field is set to Option2, and the text field is “pre-filled sample text”.
You can essentially pre-fill as many fields as you’d like. Just note that you’re limited to 1600 characters in the URL.
Pre-filling linked records
Pre-filling other field types, like linked records or date and time is a little different, but still very simple.
Let’s start with linked records.
To pre-fill a linked record in an Airtable form, add a prefill attribute to the end of the form URL, then specify the Record ID of the record that you want to pre-fill. The format looks like this:
?prefill_Field+Name=rec123456789
There are two easy ways to grab a record’s ID in Airtable.
Find an Airtable record ID by expanding the record
One way is to open your Airtable base, and expand the record that you want to link. Then, copy the ID from the URL bar. The record ID will always start with “rec” and end before the question mark.
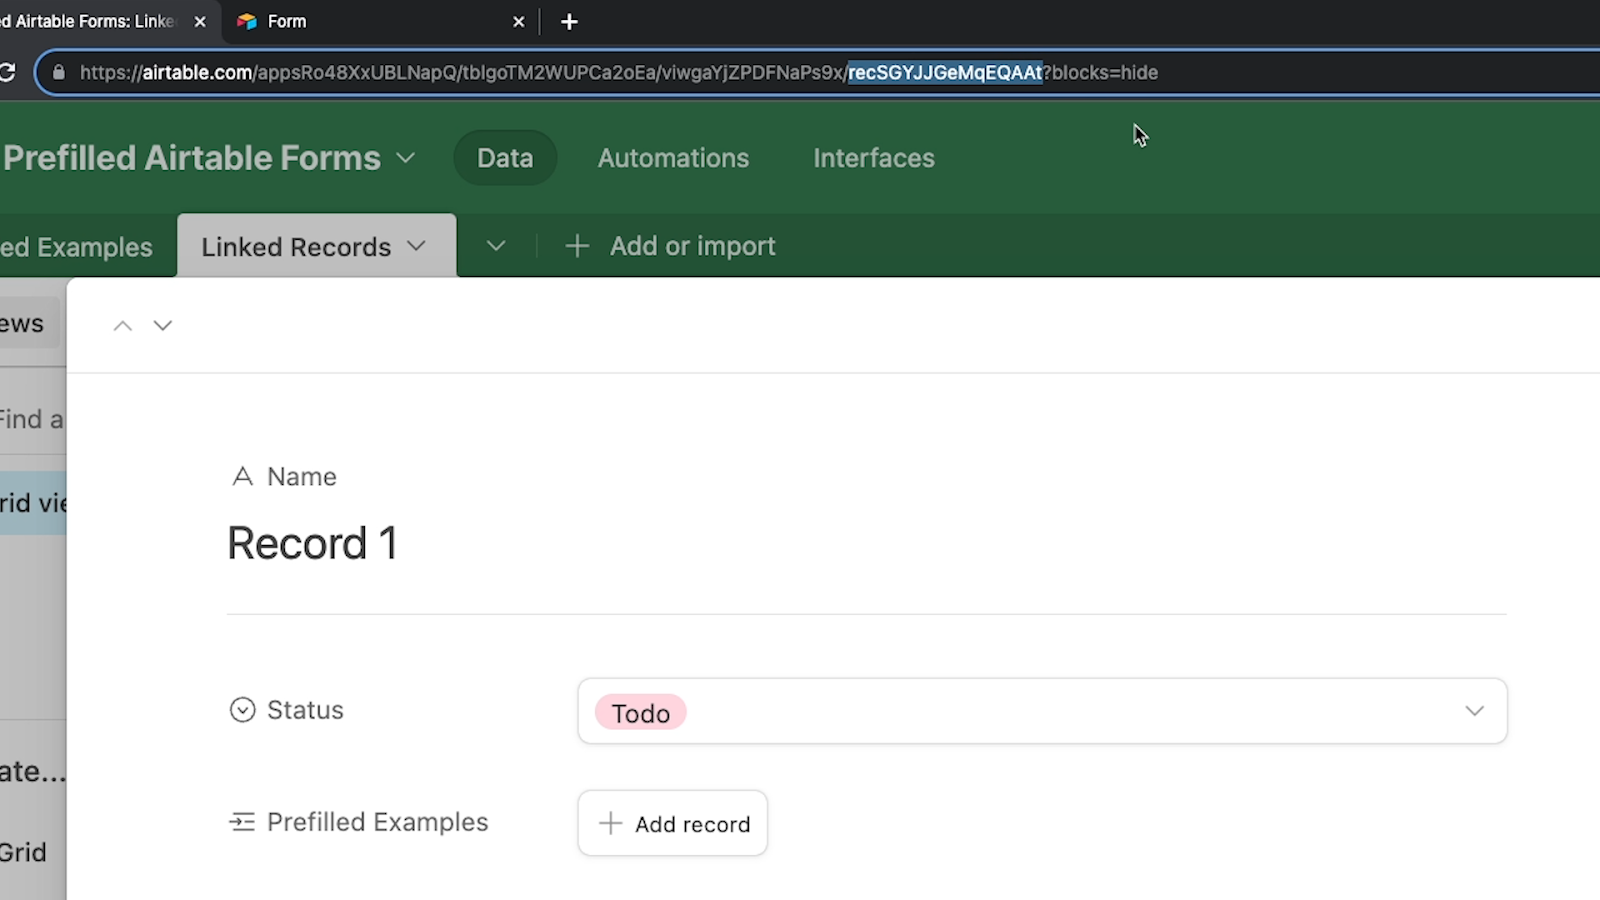
Find an Airtable record ID with the RECORD_ID() function
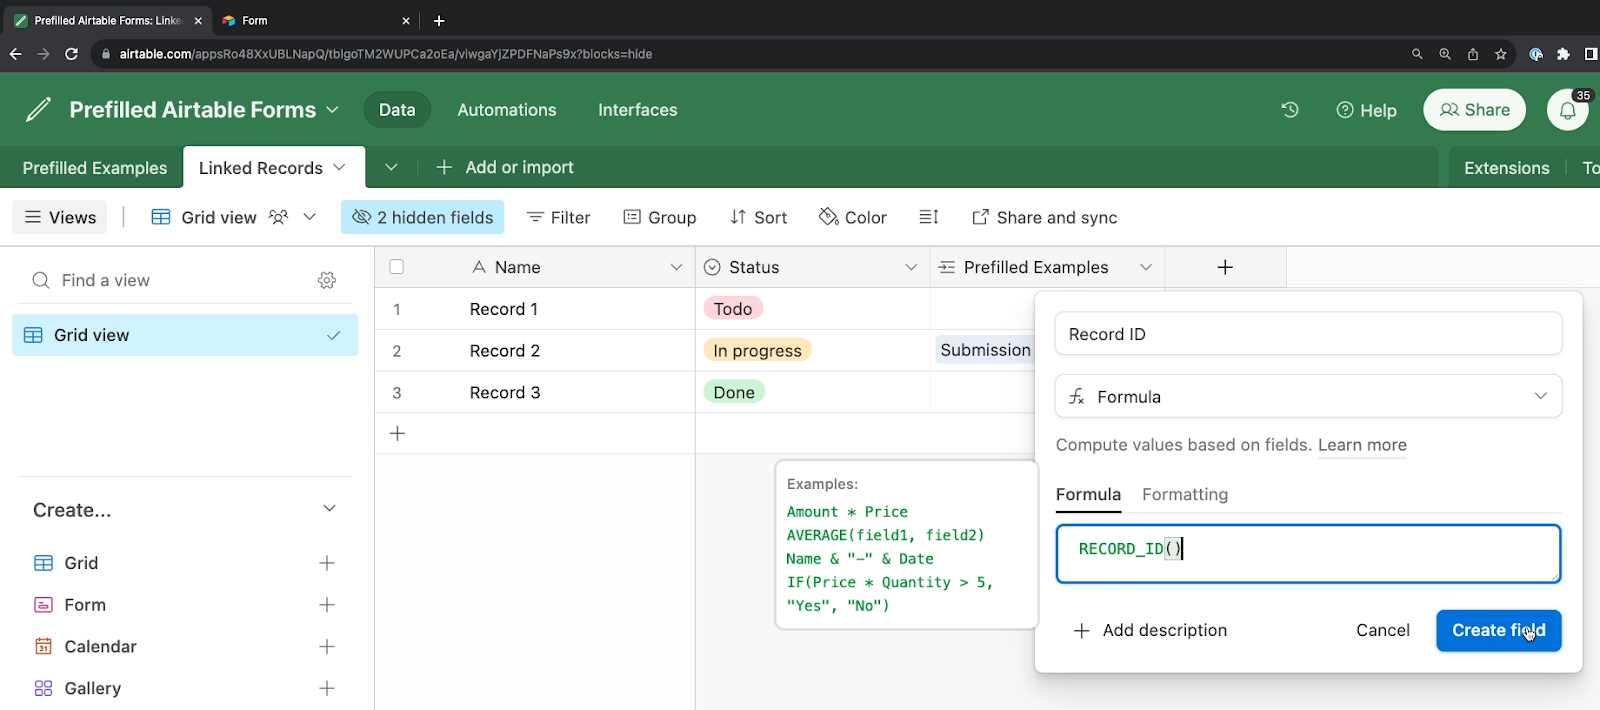
Alternatively, you can add a formula field to the table, and enter the RECORD_ID() function. Then, you can just select the right cell and copy it to grab the ID for a given record.

Once you have the record ID, paste it into your pre-fill URL. For example, we’ve copied the ID for “Record1”, and added it to our form URL.
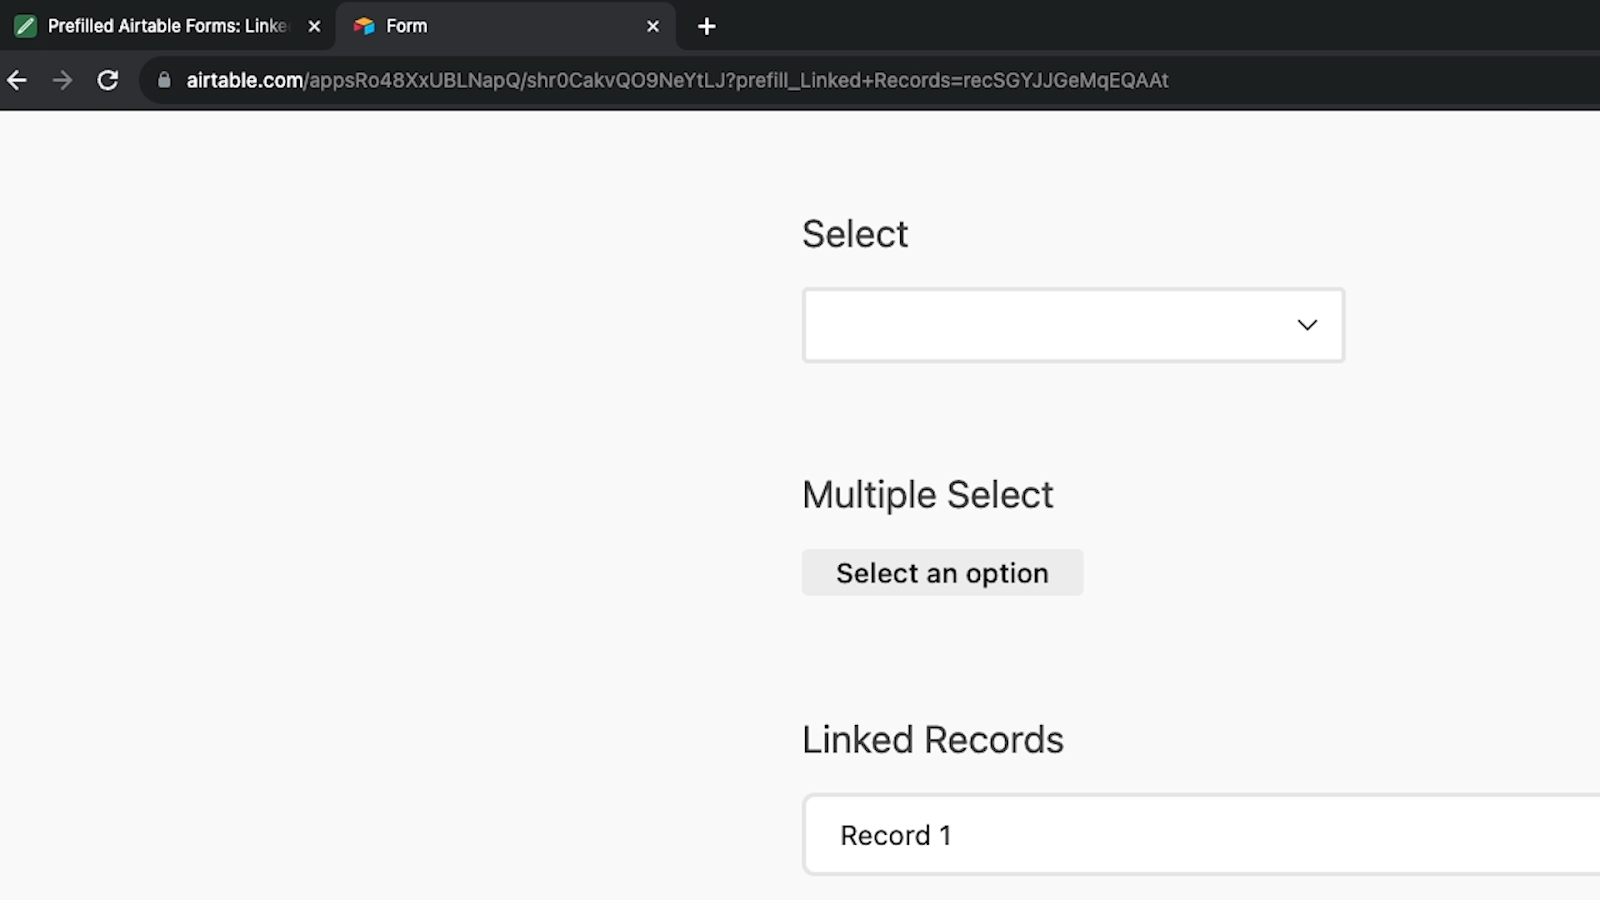
Just like with multi-select fields, you can pre-fill several records in a linked record field - as long as linking multiple records is enabled in the field settings. Just separate each record ID with a comma.
Pre-filling date and time fields
Pre-filling a date and time field works similarly to pre-filling text and linked records, but does require you to use ISO 8601 formatting for the date and time.
You can find more information about ISO 8601 formatting here.
Here’s the format for a date and time pre-fill in an Airtable form:
?prefill_Field+Name=[YYYY]-[MM]-[DD]T[HH]:[MM]:[SS].[MMM]
To clarify, you’ll need to provide a 4-digit year, 2-digit month and 2-digit day, all separated by hyphens. Then, enter “T” to separate the date from the time.
For the time, you can provide 2 digits each for the hour, minute, and second, all separated by colons. Then, you can add a period and 3 digits for milliseconds. The time zone will depend on your Airtable settings.
For example, if we want to fill in the field called “Date and Time” with February 1st, 2024 at 5:30 PM, we’d enter the following:
?prefill_Date+and+Time=2024-02-01T17:30:00.000
If you don’t want to include seconds or milliseconds, you can either set them all to zero or just leave them out.
When we open the form URL with the pre-fill attribute above, the date and time are filled in correctly.
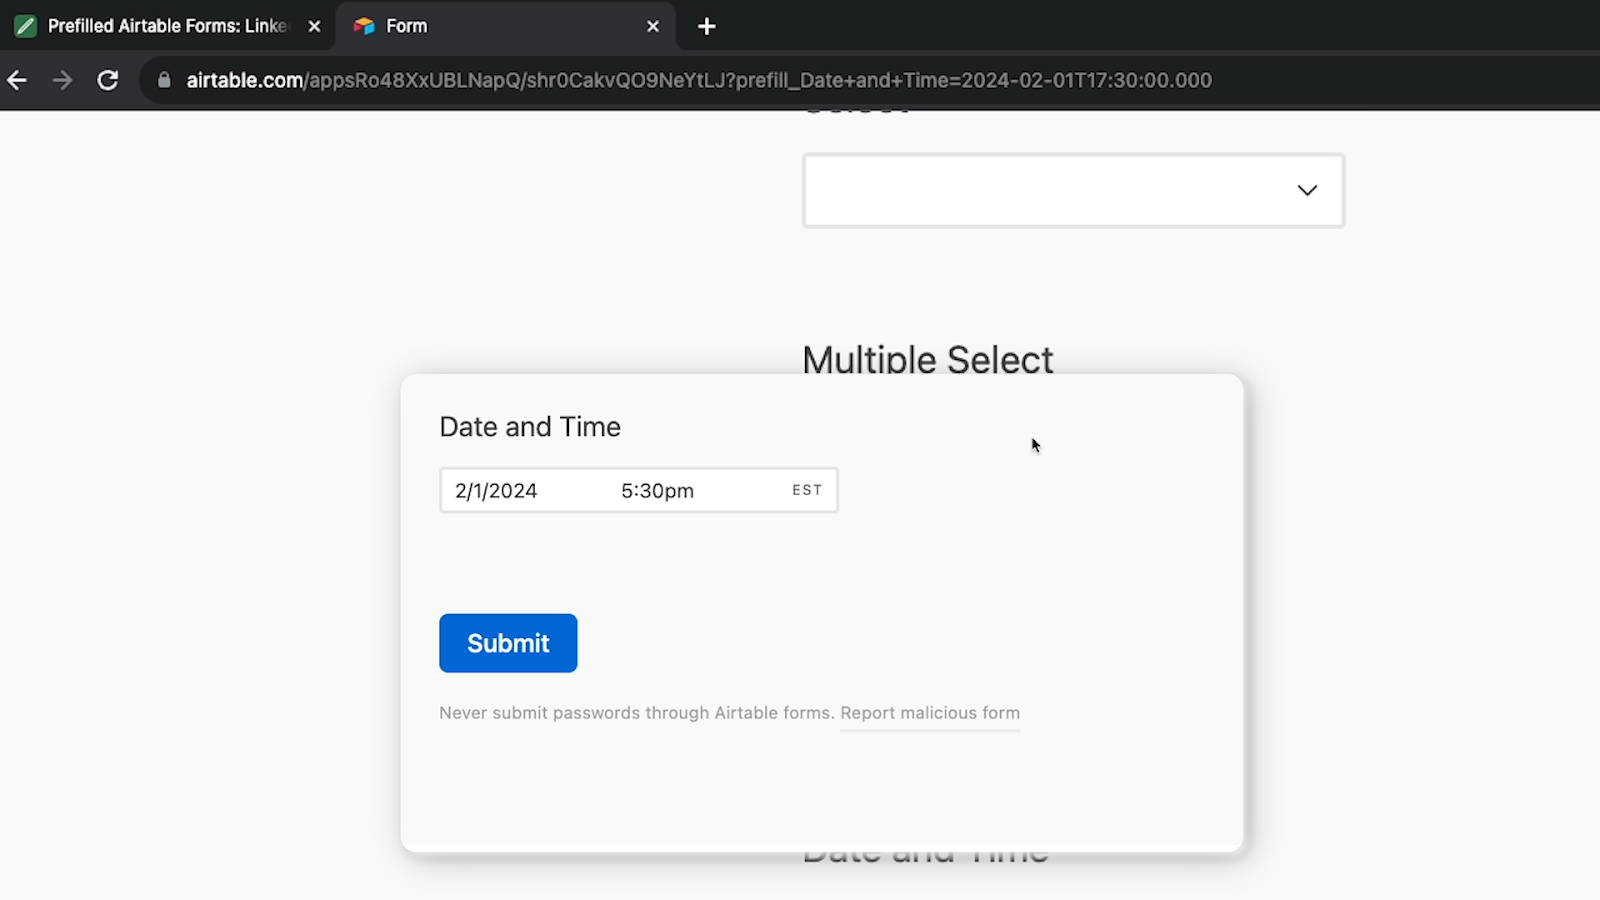
How to hide pre-filled fields in Airtable forms
In many cases, you might want to hide the fields you’ve pre-filled to prevent users from accidentally editing the data that you pre-filled.
To hide a pre-filled field, you just need to add another attribute to your form URL. The formatting will look like this:
?prefill_Field+Name=Value&hide_Field+Name=true
Let’s say we want to pre-fill the Linked Records field with Record 1, and hide the Linked Records field. That would look like this:
?prefill_Linked+Records=recSGYJJGeMqEQAAt&hide_Linked+Records=true
When we open up the form, we can’t see the “Linked Records” field, so we know the “hide” attribute worked.
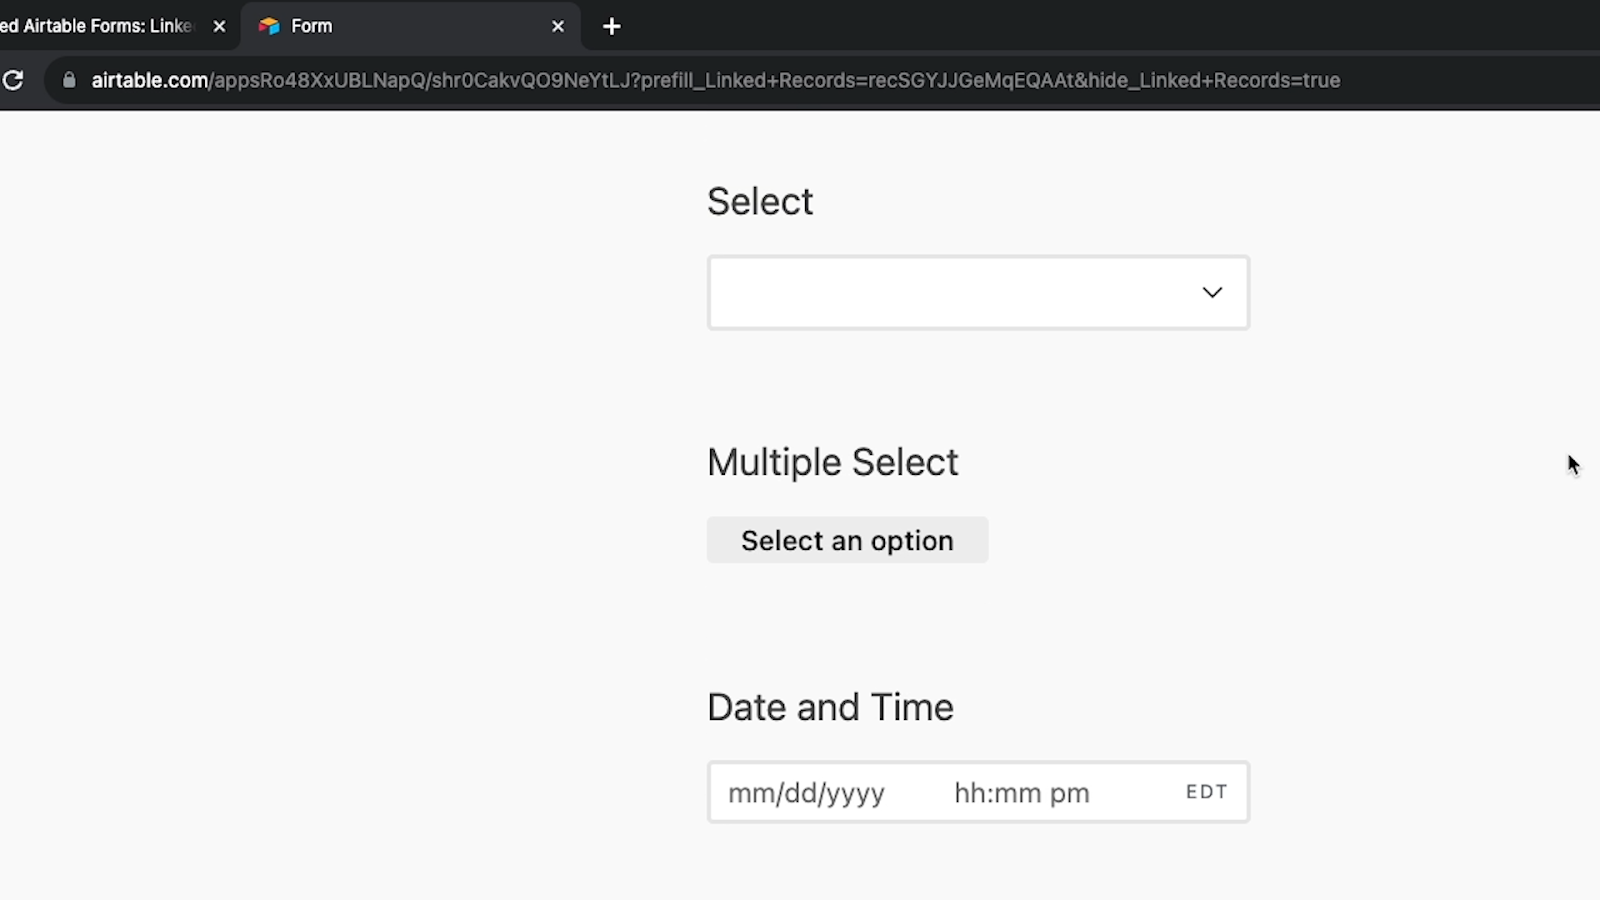
But since we can’t see the field, we don’t know if pre-fill worked too.
To make sure that the pre-fill was configured correctly, we’ll just. “Hidden field test” in the “Name” field, and submit the form.
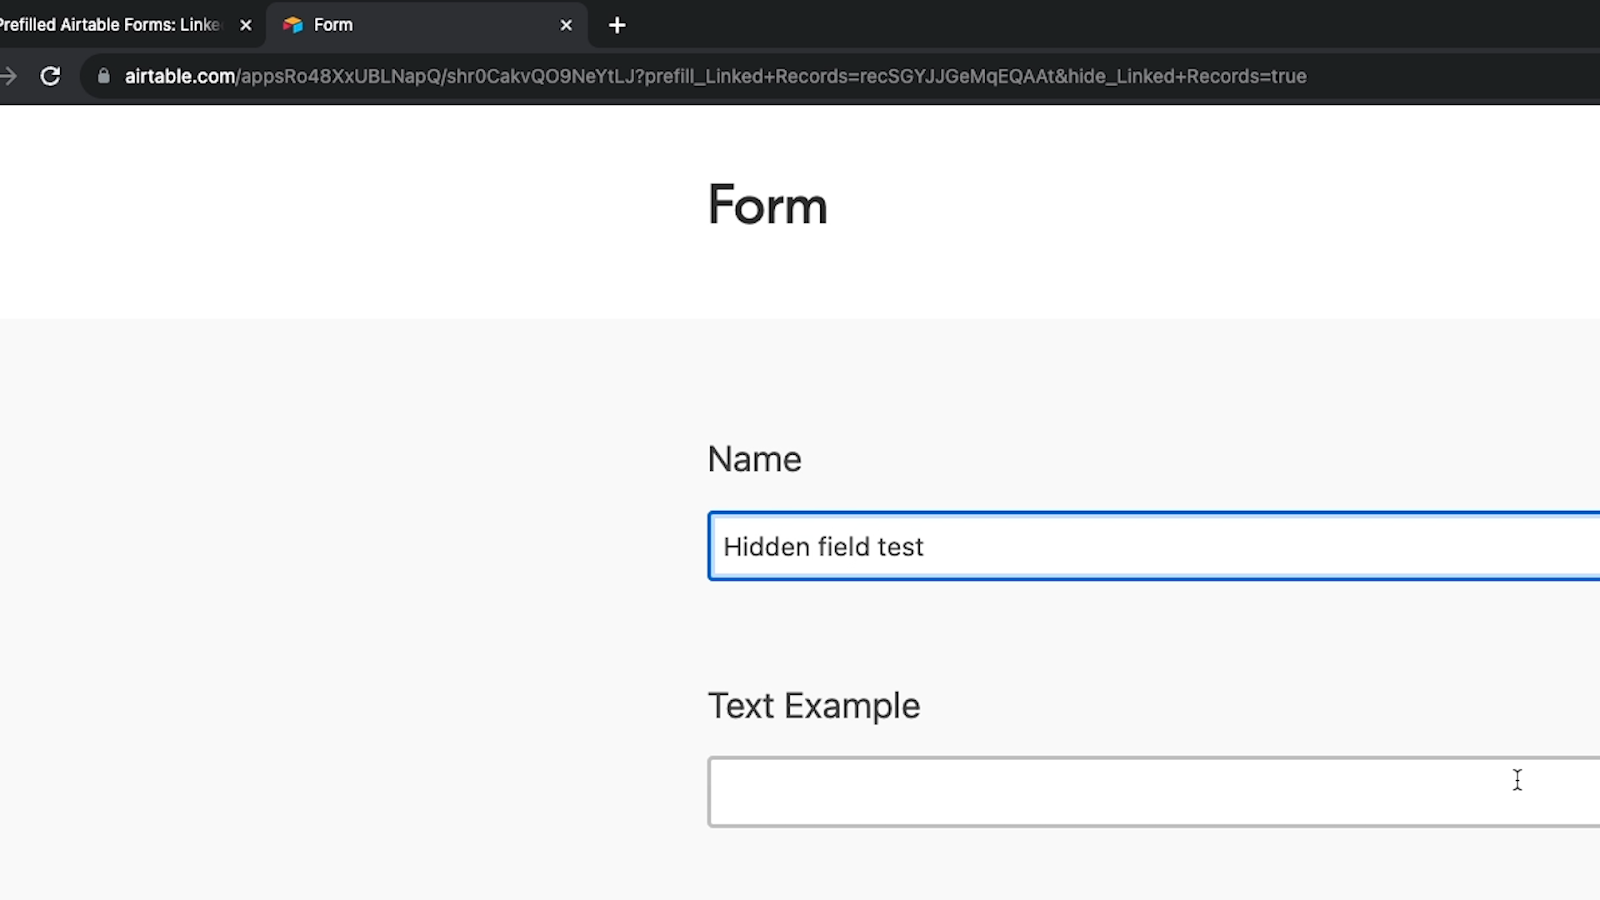
Back in the Airtable base grid view, we can see the record we just submitted, and “Linked Records” is filled in with “Record 1”, so we know the pre-fill worked, too.

When it’s appropriate to hide fields
One thing to note when hiding records is that your users could always theoretically delete your “hide” attribute from the URL and reveal the hidden field, then edit it however they’d like.
Hiding a field isn’t a secure way to prevent edits, and shouldn’t be used to prevent access to a field with private or sensitive information.
Instead, it’s really about convenience and reducing errors.
You should use it to help people save time and pre-select the value they would need to select anyway. Hiding the field just makes it much less likely for the user to accidentally pick the wrong value.
Simplify Airtable forms with pre-filled fields
That covers all of the basics of creating pre-filled Airtable form fields with custom URLs. By creating and sharing these links, you can streamline the process of filling out a form for your clients, colleagues, and collaborators.
If you’d like to learn more about no-code tools like Airtable, Zapier, Make, and more, be sure to check out our blog or our YouTube channel. You can also follow XRay on Twitter, Facebook, or LinkedIn.

Every low-code builder runs into problems from time to time.
But where do you go to find the help you need to quickly fix some bugs? Where can you go to work and learn alongside a vetted low-code expert?
As a low-code agency, we want to make it as easy as possible for anyone to find the quality low-code support that they need, or to offer their services as a builder in this emerging space.
That’s why we’re pleased to introduce you to LowCodeEngineers.
What is LowCodeEngineers?
LowCodeEngineers is XRay’s new service for connecting anyone with low-code experts who can build, fix, or update their low-code projects.
LowCodeEngineers can help you to design and deploy a site in Webflow, create an automation in Zapier or Make, set up a database system in Airtable, and a whole lot more.
Engage with low-code experts on an hourly basis
You can get support at any scale from LowCodeEngineers. Whether you want help on a long-term project or just need another set of eyes for a quick fix, LowCodeEngineers has you covered.
You can hire vetted builders on an hourly basis for convenience and flexibility. Just go to lowcodeengineers.com, book some time and describe your goals to get matched with a qualified expert.
We handle all of the logistics; you just need to show up to the call and be ready to talk about what you want to have built.
After your call, you’ll be sent an XRay Workflow resources board with all relevant materials from your call.
How to use LowCodeEngineers as a customer
So how does it work?
First, let’s take a look at how you can use LowCodeEngineers to book time with an engineer. Then, I’ll give you some information about signing up as an engineer if you’re looking to get paid for working with the tools you know and love.
Book 1, 4, or 10 hours to get started
To get started, just got to lowcodengineers.com, and click on “Hire an Engineer” at the top of the page.

Then, choose the amount of time you want to schedule. We offer packages of 1, 4, and 10 hours.

This will take you directly to a booking calendar showing every available time slot with a qualified low-code builder. Pick a time that works for you, then enter your email to receive a verification code.

The verification code just helps us to keep the site and everyone’s appointments secure.

Describe your project, your problems, and your goals
Fill in your name and phone number. Then, we’ll ask you for some basic information about you and the support you’re looking for.
The more detail you provide here, the better we’ll be able to match you with the right expert. Make sure to note all of the software that you’re using, the problem you’re experiencing, and what you’re trying to accomplish.

To finish scheduling your appointment, you’ll need to enter your payment information and click “Pay now”.

Every appointment is billed at a rate of $250 an hour. This rate makes it affordable for anyone to get hourly low-code support, and ensures that we can provide fair compensation for the network of expert builders on the platform.
Manage your LowCodeEngineers projects with an XRay Workflow resources board
Once you’ve scheduled some time, we’ll automatically send you your own personalized XRay Workflow board for managing your LowCodeEngineers appointments.

XRay Workflow is a tool that we’ve built to organize and share resources from anywhere on the web.

On your board, you’ll see a brief slide deck explaining the process of working with a low-code engineer, including the Rules for the Call, and the 100% regund guaranteed policy.

You’ll also see XRay.Tools, an automation search engine built by XRay.Tech to help you discover what you could automate with the tools you’re already using.
Additionally, you’ll see a pin called “Debriefs”.

This is where all of your meeting recordings, AI summaries, and full transcripts will live for every appointment that you book with LowCodeEngineers.
This resources board is also where your engineer will save resources for you to review another time. Things like API docs, useful links, or even tutorial videos that the engineer wants to share with you will all be referenced in this one resources board.

After your call is finished, you can return to your board to review material from previous sessions, or to book more time with your engineer.
How to use LowCodeEngineers as a low-code expert
LowCodeEngineers is just as easy for everyone on the other side of the equation.
If you’re a low-code builder looking for a good way to get paid for your expertise, then LowCodeEngineers is right for you.
With hourly engagements, we excel at flexibility. Whether you’re a freelancer or a full-time professional starting a side hustle, you can find gigs that fit your schedule on LowCodeEngineers.
If you’re interested, just go to lowcodengineers.com and click on “Become an Engineer” to apply today.

That link will take you to a calendar where you can schedule an interview with the team responsible for vetting your expertise.

Be prepared to give a demo of a system you’ve built on your tool of choice, and let us know what your availability is for taking on new customers.
If you’re approved, you’ll be onboarded into LowCodeEngineers, and you’ll be able to claim appointments.
You’ll also get access to XRay Workflow as an editor so you can see and manage all of the resources boards for the customers that you’ve claimed.

This shared resources board gives you control over all the information that the client can see, and helps focus their attention on the aspects of your work that require their input or acknowledgement.

No more messing around with negotiations, or writing out complicated contracts, or figuring out ways to send and receive payment.
Just claim a request, show up to the appointment, and share your expertise.
All the project management that used to bog you down will be taken care of: from followup emails and payment to call recordings and transcripts. LowCodeEngineers handles all of the logistical tasks, so you can focus on doing the work.
Why we created LowCodeEngineers
We built LowCodeEngineers to help everyone in the low-code space, from builders and agencies to companies and entrepreneurs trying to save some time with low-code tools.
For low-code builders, finding work can often be a challenge. And frankly, freelancer sites like Upwork and Fiverr are a race to the bottom.
They encourage talented freelancers to constantly undercut each other’s prices in an extremely competitive environment, while leaving much of the logistical work up to the users.
Negotiating terms, requirements, and timelines for each project is left up to each individual builder, adding unnecessary complication to every task.
And things aren’t any better for the customers and clients in this setup.
Projects and problems come in all shapes and sizes.
Sometimes, you’re just looking for a quick fix, and it’s not worth it to hire an agency on a monthly retainer. But scouring typical freelancer sites makes it difficult to find someone with proven experience, in addition to the unavoidable negotiations.
LowCodeEngineers makes it easy for anyone to book time with a vetted expert, complete their project or fix some bugs, and get back to work.
For experts, LowCodeEngineers makes it easy to apply, offer their services, give support, and build a book of business.
With automated and AI systems for project management, it's never been easier for an expert to manage dozens of clients.
Book low-code support from vetted experts at an affordable rate
Now there's a better way to work in the low-code space. For a flat hourly rate of $250, LowCodeEngineers connects you with vetted low-code builders who can keep your projects moving along.
And with software like XRay Workflow and XRay.Tools, you and your engineer can easily stay connected and informed of what's possible with the low-code apps you already use.
Just go to lowcodeengineers.com today to try it out.
If you’d like to learn more about building low-code projects, be sure to check out our blog or our YouTube channel. You can also follow XRay on Twitter, Facebook, or LinkedIn.

If you’re making the switch from Notion to Airtable, you might be worried about losing all of the useful Relations that keep your databases linked.
Luckily, with a couple super easy formulas, you can quickly convert all of your Notion Relations into Linked Records in Airtable.
In this post, we’re going to show you how to quickly migrate your data without losing valuable connections.
We’ll start by showing you how to export a Notion database and import it into Airtable. Then, we’ll walk you through a couple of quick formulas and field edits that will let you automatically re-establish your Relations from Notion as Linked Records in Airtable.
Let’s get started!
One-time migration vs. synced databases
Before we show you the entire process for exporting your data and creating linked records, we just want to be clear that the setup we’re going to demonstrate is only suitable for a one-time transfer.
If you want to keep a permanent sync between Notion and Airtable, you should check out automation providers like Whalesync or Unito, that specialize in synchronizing databases between different apps.
These apps will let you maintain parallel databases in Notion and Airtable, and update the appropriate records whenever you make an edit to either database.
On our blog, you can find tutorials for syncing Notion and Airtable in either Whalesync or Unito.
However, if you just want to make a one-time switch from Notion to Airtable, the technique we demonstrate in this tutorial will be perfect.
With all of that in mind, let’s take a look at the process for migrating your Notion databases and transforming your relations into linked records in Airtable.
Overview
First, we’ll give you a quick overview of the whole process. Then, we’ll go into each step in detail.
1. Open your Notion databases that are linked with a relation.
To start, open up your Notion databases. We’ll call them Database A and Database B. It doesn’t matter which is which; we’re just using these labels to make it clear when we’re working in one vs the other.

2. Add a unique ID to Database A
Add a new property to Database A. Choose “ID” as the type. Enter a name for this field, like “Notion ID”, and provide a prefix to use in the ID.

NOTE: If you have a field in Database A with unique values for every record, you don’t need to add an ID. For instance, you might be able to use an “email address” field instead. However, adding this ID only takes a few moments, and ensures that you’ll have a unique value associated with each and every record. This will be essential when you’re creating linked records in Airtable.
3. Add an ID rollup to Database B
Add a rollup to Database B to look up the ID field for each related record from Database A.
4. Export your Notion databases
Export both of your databases as CSV files. You can find the “export” option in the three-dot menu in the top right.

5. Import your databases in Airtable
Import the databases into Airtable as new tables, and adjust the field type during the import configuration.
Make sure the relation and rollup fields are set to “single line text”.

6. Turn Database A’s primary field into a formula field
Then, duplicate the primary field in Database A, and change the original primary field into a formula. The formula will just display the contents of the Notion ID field. Alternatively, you can use the formula to point to any other field that will have a unique value for each record.

7. Convert Database B’s former rollup field into a linked record
Open up Database B.

Convert the old rollup field into a linked record.

Airtable will now treat the text in these fields as names of records in Database A, and since you changed the primary field to display a unique ID, it should find the correct matching records.

8. Delete unused fields and update the primary field
Now the link has been rebuilt, you just need to delete any old unused fields, and change the primary field in Database A to something that makes it easier for a human to identify each record.

For instance, we’ll just change it so it includes the name and title of each contact.

That’s how the transfer works in a nutshell, but you can read on for more detail about each step.
Preparing your Notion databases for export
To start, open up the related Notion databases you want to export.
On the Notion page pictured below, we have two related databases that we want to export to Airtable: Contacts, or ‘Database A’, and Companies, or ‘Database B’. A two-way relation connects each contact to a company.

We’ve put both databases on the same page for convenience, but it’s OK if your databases are on different pages.
Before you can export your databases, you’ll just need to add a couple fields to make sure you can easily rebuild the relations as linked records.
Add an ID field to Database A
In Database A, add a new property and choose “ID” as the type. Then, enter a prefix to use. For instance, each record in our Contacts base will have an ID of “CON”, then a number.

Give this property a name, and save it.
Add a rollup in Database B to look up the ID
Then, open up Database B and add a Rollup property. Select the relation to Database A, and give it a descriptive name. Then, set the rollup to look up the “ID” field you just created in Database A.
By giving each record in Database A a unique ID, you can ensure that Airtable will be able to find the correct record to link to later - even if you have multiple records with the same or similar names.

For instance, you might have two contacts both named “John Smith”, so using the name alone would produce inaccurate results.
By searching for the unique ID instead, you should avoid the vast majority of potential errors.
Alternatively, you could skip adding the ID to Database A if it already has a field with a unique value for each and every record. In many cases, an ‘email address’ field might work for this purpose.
However, using a dedicated ID field is a foolproof solution that will work for any context, so that’s what we’ll demonstrate.
Once your Notion databases are set up with unique IDs, you can go ahead and export them.
Export your Notion databases as CSV files
To export a database, open it up as a full page.

Then, click on the three dots menu in the top right corner of the screen, and select “Export”.

The “export” option will let you export the entirety of your currently selected page, including any databases on that page. When you open the database as a full page, the database is the only item that will be exported.
Configuring your export settings
Export format
By default, the “Export format” should already be set to “Markdown & CSV”, which is what you’ll want to use.
Include databases
For every exported database, Notion will create two CSVs. One of these files will always include all of the records in the database.
The “Include Databases” setting will let you choose whether you want the other CSV to include the current view you’ve selected or the default view of your database.
Choosing “Current view” will just make it so the other CSV uses your currently selected view. If you select “Default view”,the other CSV will use whatever view you’ve designated as the default view for the database.
Include content
The “include content” option allows you to choose whether or not you want to include images in your export (if any are present on the page).
Include subpages and Create folders for subpages
For a database export, you can usually leave “include subpages” unchecked.
If you are including subpages, you can also choose whether or not to create folders for those subpages.
With all of your settings configured, click on “Export” to save your database. The exporting process can sometimes take a while as Notion creates the necessary files and compresses them into a .ZIP archive.
Once your export is ready, you can save it to your computer.

The randomly generated title isn’t very descriptive, so you’ll probably want to rename the archive.

When you uncompress it, you’ll see a folder with two CSV files. Both will have the name of your database, and one will also say “All”.

The “All” CSV will include every record in your database, and is the CSV you’ll usually want to use. The other will include the default view, or the “current” view, as you selected during the exporting process.
Import your databases into Airtable
To import your database into Airtable, open up an Airtable base you’d like to use. Click “Add or import”.

Then select “CSV file”. Upload your CSV exported from Notion for Database A.

Then, choose whether to create a new table, or to add the data to an existing table. We’d recommend always creating a new table, unless you already have a table formatted with all of the fields you need.

Next, you’ll need to adjust your import. Airtable will try to set appropriate field types automatically, but you’ll usually need to adjust its selections a bit.

As you’re adjusting the fields, be sure to set the former relation field from Notion AND the ID field to “Single line text”.

Under “Other settings”, make sure that “use first row as headers” is checked to use the first row in your CSV as field titles instead of making it a record.

Once your configuration is all set, click “Import”.

Reviewing and adjusting your imported database
Repeat the same process to import Database B. Then, make sure to give both databases descriptive names in Airtable.

Note that the data in the old relation fields in our databases look a little different than they did in Notion. Each record includes the Notion URL for its related page.

This is another reason why we want to use an ID to find each record instead. With the added URLs, these records in Database B don’t exactly match the names listed in the “Contacts” table.
If we just converted this old relation field into a linked record, it would create new records that would include the name and Notion URL as the person’s name - and every other field would be blank.
To help prevent confusion later on, I’d recommend renaming your old relation fields from Notion. For instance, you can just add an {OLD} tag to the fields for the time being.
Now, let’s use some simple formulas to rebuild your relations as linked records.
Rebuilding relations as linked records in Airtable
First, go back to Database A - for us, that’s “Contacts”. Then, duplicate the “primary field”. That’s what Airtable calls this first field on the left that acts as a label for each record.
Click on the primary field, and select “duplicate field” to make a copy to the right.

Then, give the newly copied field a new name to distinguish it from the primary field - like “Contact name”.

Use a formula to display the Notion ID as the primary field
Next, change the primary field to a formula instead of just a text field. Click on the primary field, and select “edit field”.

Then, change the field type to “formula”.

Don’t worry; this formula’s going to be very easy. All you need to do is display the contents of the “Notion Contact ID” field - or whatever you’ve named your field that holds the Notion ID you created earlier.

Just start typing the field name, and select it from the list when it pops up.
Click on Save to commit your changes, and click “Convert” on the warning about changing field types.

With your formula set, the primary field for every record will display exactly the same value as the Notion ID field.

Note that this isn’t a permanent change. It’s just a step towards rebuilding the relations as linked records with these two newly imported tables. We can (and will) change the formula again later.
Convert the old rollup field into a linked record
Open up Database B - for us, that’s Companies. The old relation field that linked database B to Database A in Notion is called “Contacts”.

We’d recommend changing its name to avoid any confusion - we’re just keeping it here for reference, and we’ll delete it later anyway. We’ll add an {OLD} tag at the beginning.

The “Contact ID” field was a rollup in Notion - it looked up the Notion ID for the linked contact.
As such, it lists an ID for each related contact.
If we convert this field to a linked record connected to the Database A - Contacts table in Airtable, then Airtable will automatically look for any records with these IDs in the primary field.
That’s why we updated the primary field in the Contacts Database to use each record’s Notion ID instead of the name.
Change this field’s name to something that reflects the database you want to link to (like “Contacts”) and change the field type to linked record.

Pick Database A (e.g., our “Contacts” table), ensure that “allow linking to multiple records” is enabled, and save the changes.
Once again, you need to confirm that you want to change the field type.

And you can skip adding any lookup fields for now.

If you’re working with a larger database with thousands of records, this might take a minute or two.
But with a small database like the one in our example, the change happens immediately.
The “Contact ID” field is now a linked record connecting Contacts to Companies.
Of course, these Notion IDs don’t make for the best labels. Not for humans to read, anyway. So to wrap things up, just go back to Database A - Contacts, and change the primary field formula to directly reference the “Contact Name” field instead of the Contact ID field.

We’ll also include their title.
Feel free to format your primary field however you’d like. You can concatenate any data you want from each record into the primary field with a formula.

With the primary field updated, let’s go back to Database B - Companies, and check the linked record. Instead of IDs, we see names and titles now.
And when you compare the new linked record field to the old relation field, you should see the names all match up.
You can confidently delete the old relation field from both tables, and you’re all set to use your new Airtable database with linked records!
Check out our Airtable beginner’s guides to learn about adding automation, interfaces and more to your new Airtable system.
The importance and utility of primary fields in Airtable
Before we wrap up this post, we just want to note how useful the primary field in Airtable can be, and to emphasize a point we bring up often in Airtable tutorials.
It is always a great idea to use a formula as the primary field instead of static text.
In this case, using a formula lets us give our records one label that works well for rebuilding links, and immediately switch it to another label that’s easier for people to read.
And if we want to change this primary field again in the future, we just need to edit the formula once, and every record will reflect the new format instantly.
Setting up a formula for your primary field is just one small aspect of organizing your database, but it can pay huge dividends when you need to edit your data. Just keep that in mind as you add new bases, and tables to your Airtable Workspace.
Data migration made simple with Airtable formulas
Moving your data from one app to another can be a pain. Luckily, a simple CSV export and import will take care of migrating your fields, and with Airtable, preserving your Notion relations just takes a few more steps.
With a simple formula in Airtable and a couple quick field edits, you can rebuild as many linked records as you want in a matter of seconds. If you’d like to learn more about managing your data in apps like Notion and Airtable, be sure to check out our blog or our YouTube channel. You can also follow XRay on Twitter, Facebook, or LinkedIn.

Getting started with Zapier is easy, but building scalable and flexible automations for you and your team can take a little more work.
Today, we’re going to share five of the key automation concepts that will help beginners to understand how Zapier really works.
We’re going to cover test data, variables, default values, paths, and run history. These aspects of Zapier are essential for building and maintaining Zaps that support real companies in practical use cases.
We’ll explain how they all work, and we’ll demonstrate some practical examples that you can build to try them out for yourself.
Understanding these systems and tools will help you to leverage Zapier as a time-saving resource for an entire team and not just for an individual user.
There’s a lot to cover, so let’s get started!
Creating test data for your Zaps
First, let’s start by taking a look at test data.
Test data is a concept that we’ve touched on in our Zapier beginner’s guide, as well as many other Zapier tutorials on our blog. However, it’s worth taking a moment to explain test data in detail.
Test data is an essential part of any automation. You cannot build a Zap without test data.
For instance, if you want to build a Zap that runs whenever a new event is added to a specific Google Calendar, you need to have an event on the calendar that you can use as test data before you start building the Zap.
Any data in your trigger app can be used as test data, but you usually should pick something that has all of the information you intend to use in your automation.
For example, if you want to reference the Zoom link from the Calendar event in your Zap, you should use an event with a Zoom link as your test data.
Let’s see what a good test looks like, and what a bad test looks like.
Here’s the automation that we want to build.
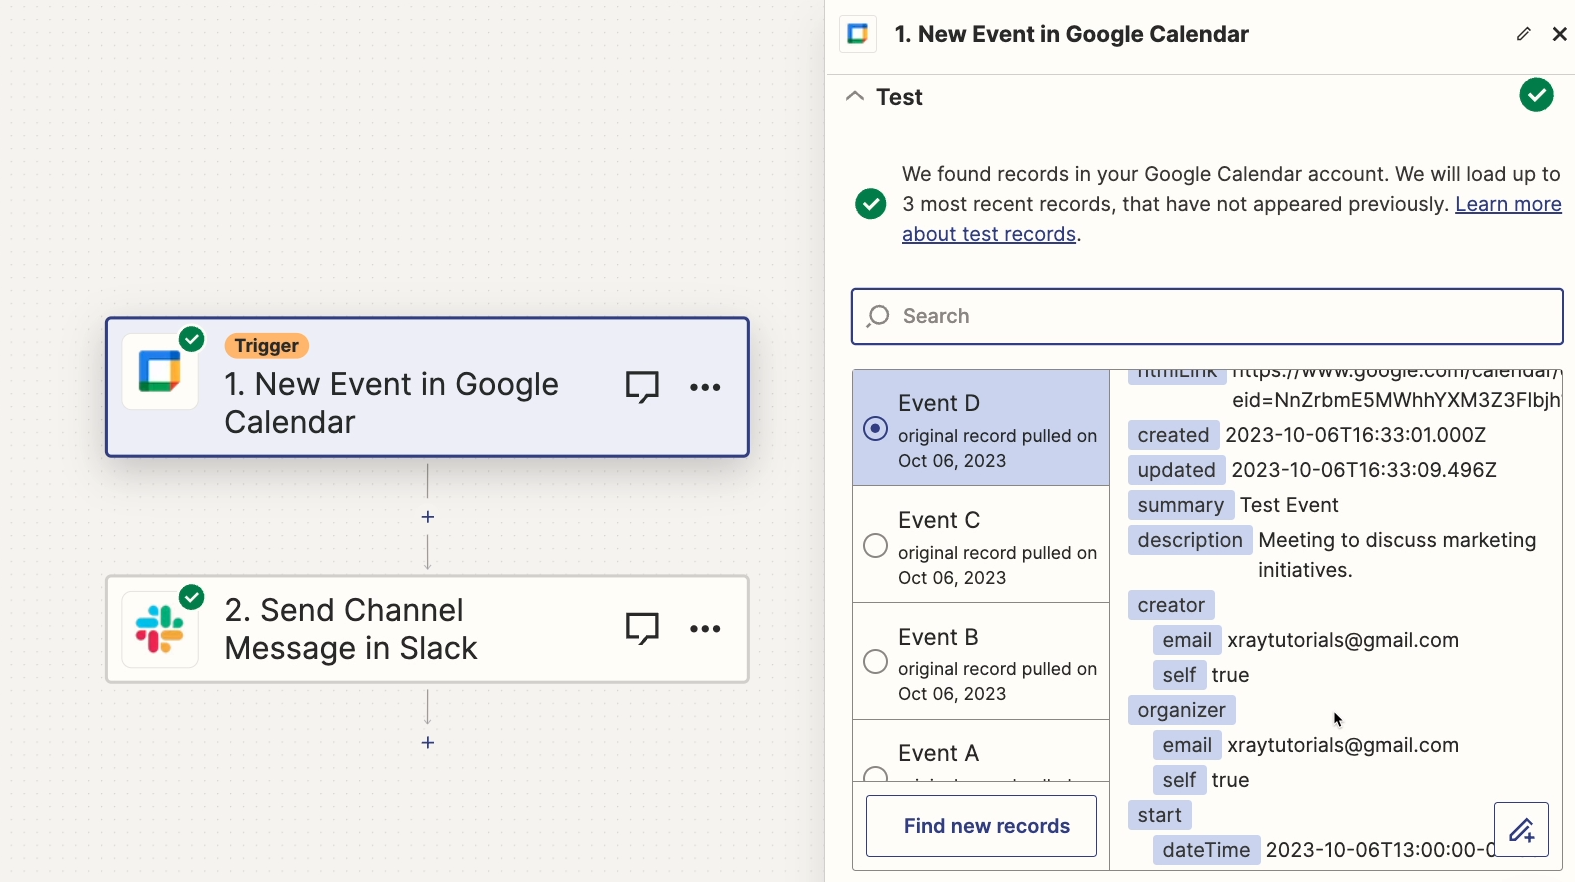
Whenever a new event is added to the calendar, send a Slack alert in the “tutorials” channel.
The Slack message will list the Event title, Attendees, the Start Time and Date, the Description, and the Zoom link for the meeting.
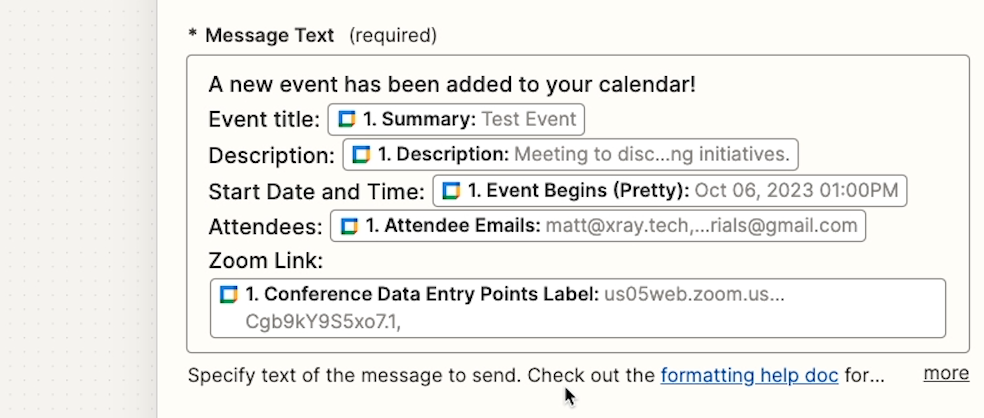
Creating complete test data
First, we’ll take a look at creating good test data.
Since we want to launch our automation whenever there’s a new Calendar event, we need to have a Calendar event ready to test.
We’ll make a Google Calendar event called “Test Event”. Giving it a name like that will make it easy to identify it later in Zapier.
We’ll be sure to include every data point that we want to use in the Slack message: attendees, a description, and a Zoom link for conferencing. The event already has a title, and every event must include a start time by default.
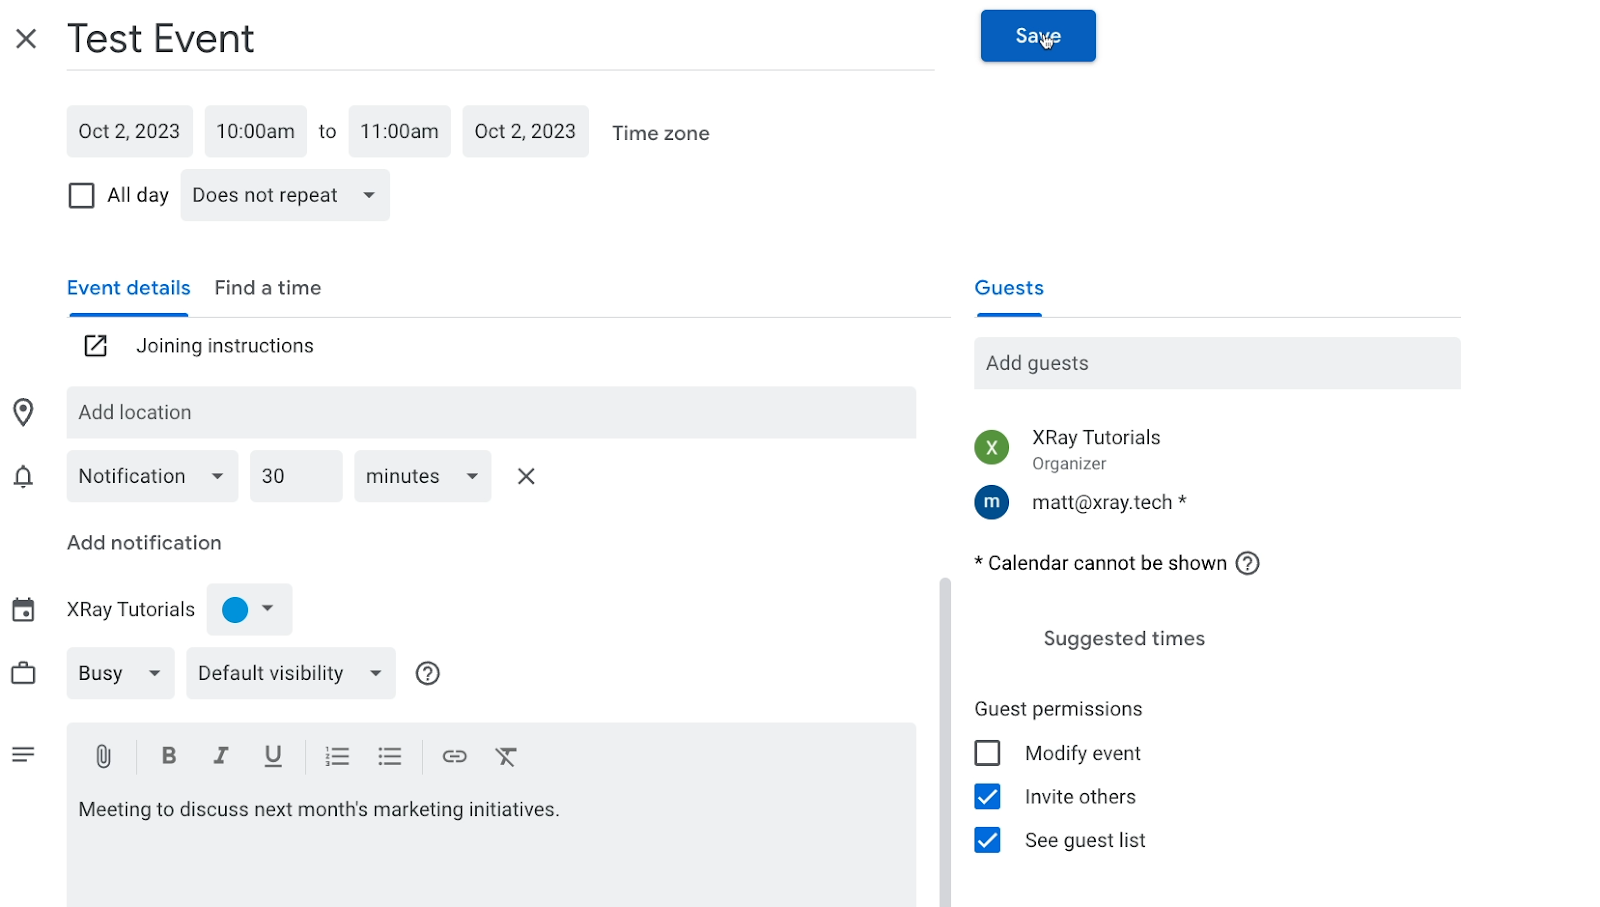
This event has all the data we want to reference in our Slack message, so we can start building our automation.
Using complete test data to build a trigger
With your test data prepared, you can create a new Zap and start configuring the trigger. In our example, we’ll choose Google Calendar as the app. Then, we’ll choose our Google account.

The triggering event will be “New Event”. And we’ll pick the calendar that we want Zapier to watch.
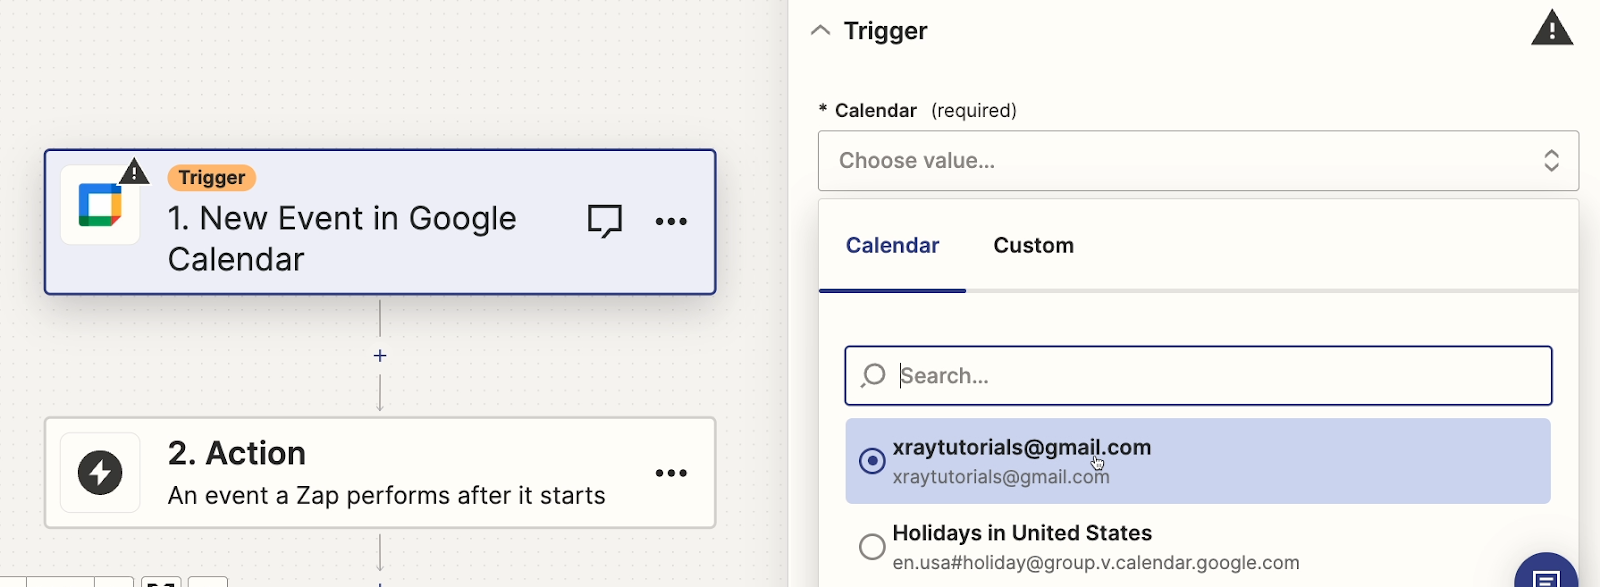
Always make sure to select the calendar, folder, database, etc. where you just created your test data.
Once you’ve finished setting it up, Zapier will prompt you to test the trigger. While you can skip testing on any actions you add to your Zap if you really want to, you cannot skip testing the trigger.

You need to test your trigger before you can turn on and publish your automation. So to continue our example, we’ll run the test.

Zapier will retrieve up to three recent pieces of data that match your trigger conditions. If your test data doesn’t show up here, you can click on “Find new records” to see more recent data.
Keep in mind if you’re expecting test data and don’t see it, it's likely something is configured incorrectly in your trigger. You might be watching the wrong folder or the wrong calendar, for instance.
But we can see an event with title (or “summary”) of ‘Test Event’, so our trigger is configured correctly.
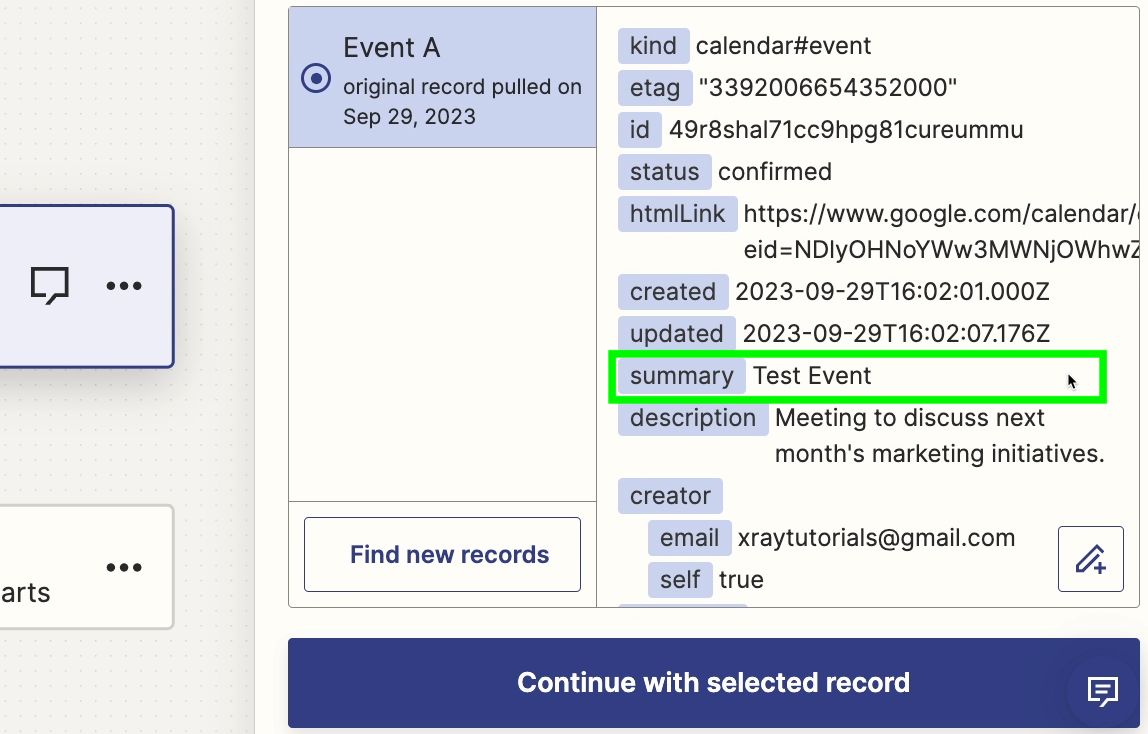
As you can see, Zapier retrieved a wealth of information associated with this Calendar Event. This is typical for Zapier triggers, and is going to be useful as we start building our Slack message.
After building our trigger and testing it with complete data, we know that Zapier can find the data it needs to start running the automation.
Now, we want to build and test the action that we want Zapier to perform whenever a new Calendar event is created.
Using test data to build an automated action
After you’ve finished building and testing your trigger, click on “Continue with selected record” and add an action to your Zap. For our example, we’ll add a Slack action, and choose “Send channel message”.
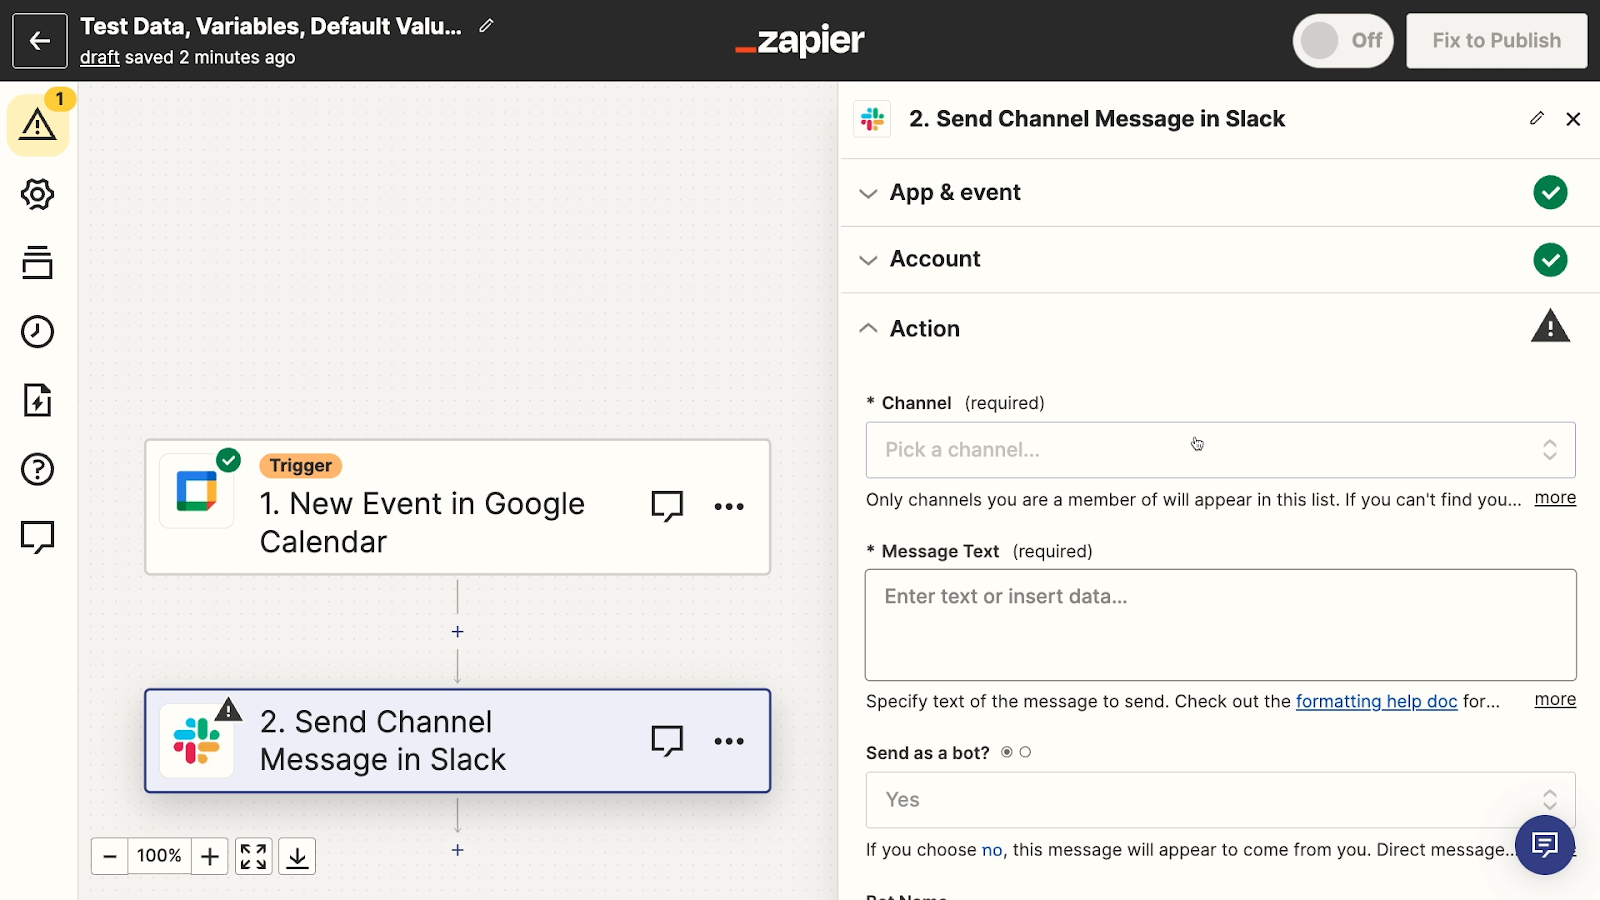
Now, you can configure your action however you’d like. In our example, we’ll compose the message, and include some of that data that we retrieved in the trigger.
In our message, we’ll include the event summary, the description, the start date and time, the list of attendees, and the Zoom link.
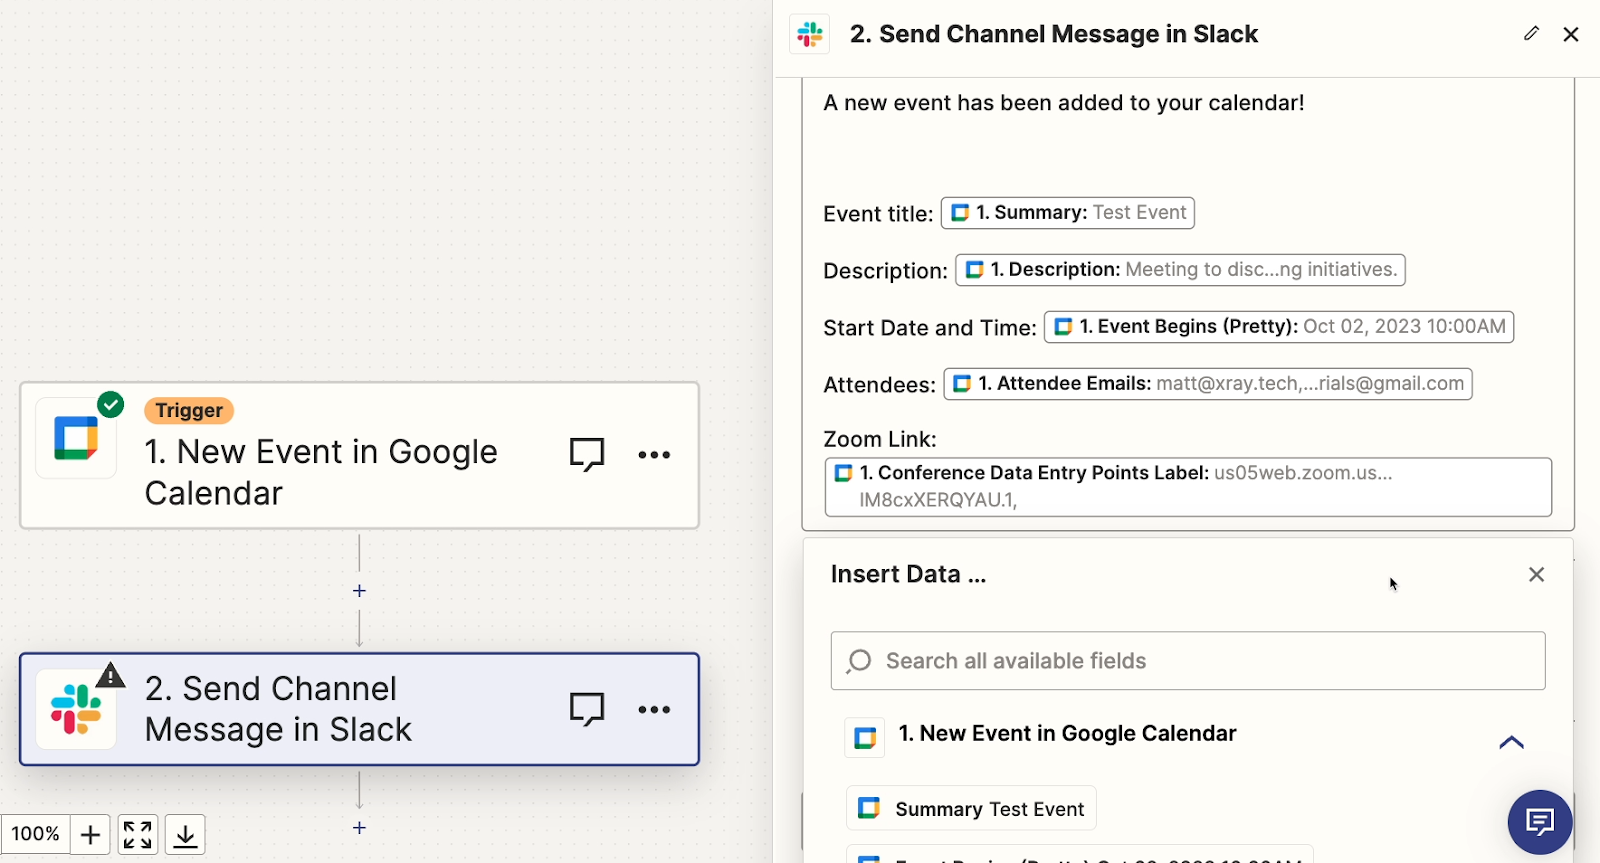
While most of the data that you want to use should be pretty easy to find, sometimes the data you retrieve in Zapier won’t be labeled very clearly.
For instance, the link for the Zoom call in a Google Calendar event is called “Conference Data Entry Points Label”.
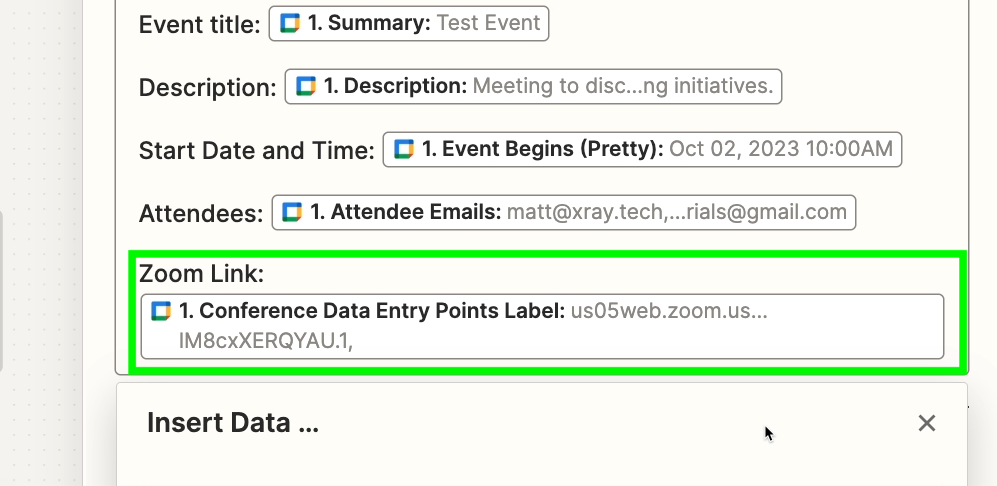
In some cases, Google Calendar will copy the Zoom link to the “Location” field as well, but that depends on each user’s Zoom and Calendar settings.
Use the search bar to find data
This is one of the reasons why test data can be so useful. Inside of the results, you have access to a search bar which you can use to find specific data points.
For instance, when we search for “Zoom”, the results show us the URL that includes the term “zoo”’, which is how we can find out that it’s associated with the “Conference Data Entry Points Label” variable.
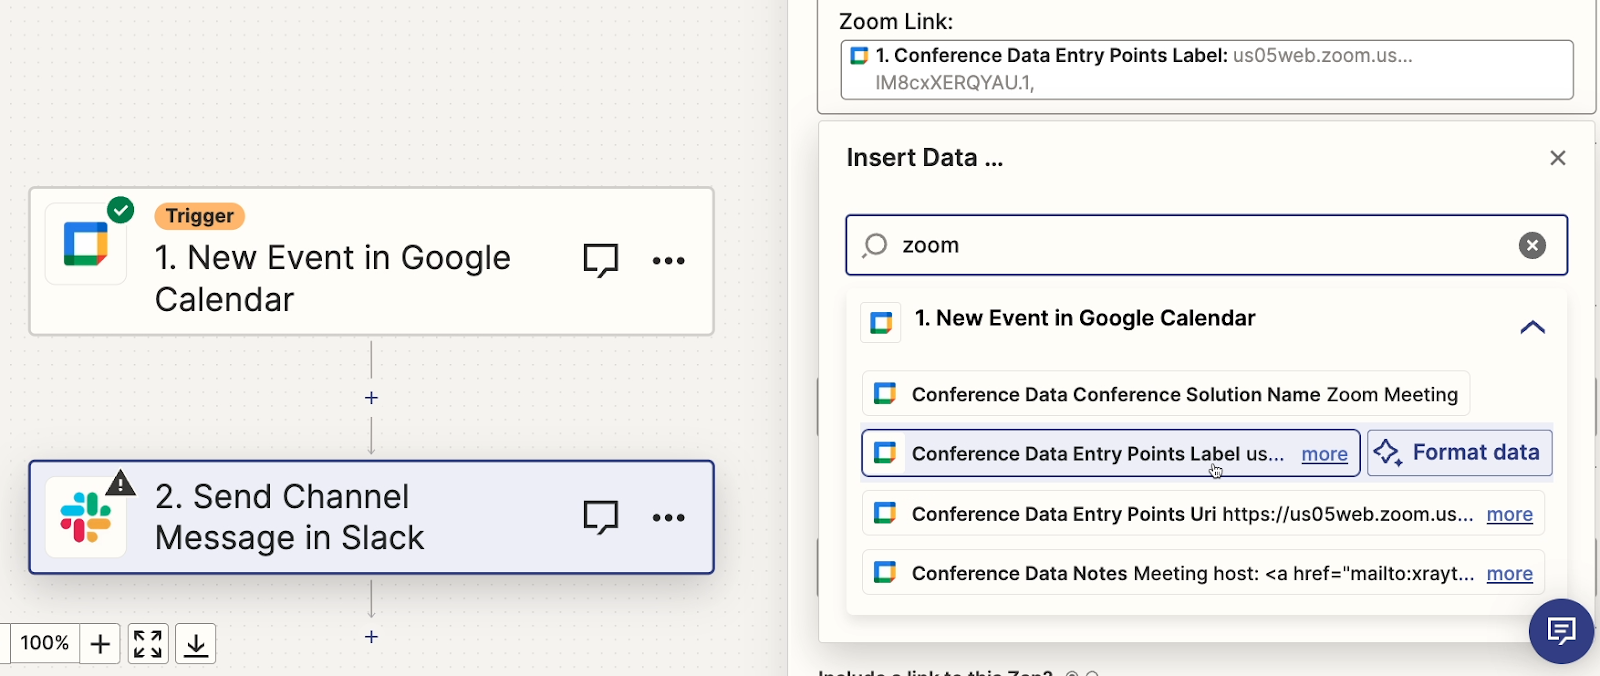
So we’ll add that data into our Slack message along with the other information, and finish configuring this step with a few other settings.
Once you’ve finished configuring your action, it’s time to give it a test. Testing actions in Zapier is optional, but we would almost always recommend testing every single step while you’re building.
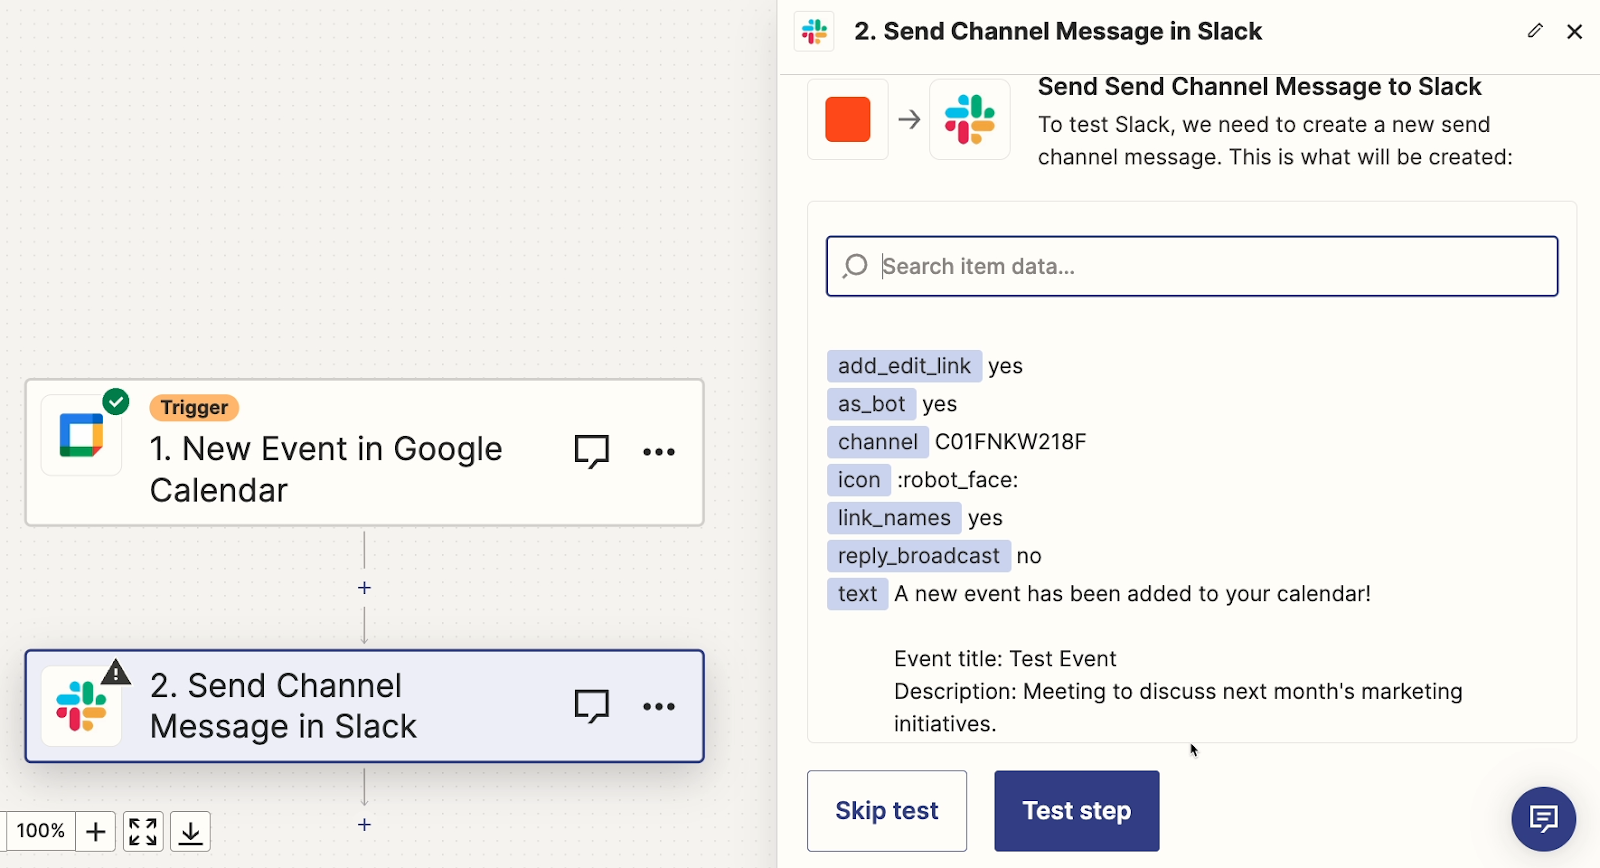
Testing an action in Zapier
Note that testing an action in Zapier will actually run that action in your software, and will use the test data that you loaded into the trigger.
So, for instance, testing a Slack message step will actually send a Slack message based on the specific Calendar event we selected when we tested the trigger.
When you’re creating test data, you’ll want to make sure to use appropriate channels, email addresses, and accounts. You don’t want to bug clients or colleagues with test messages while you’re building.
With all that in mind, we’ll run our test and send a Slack message to our tutorials Slack channel.
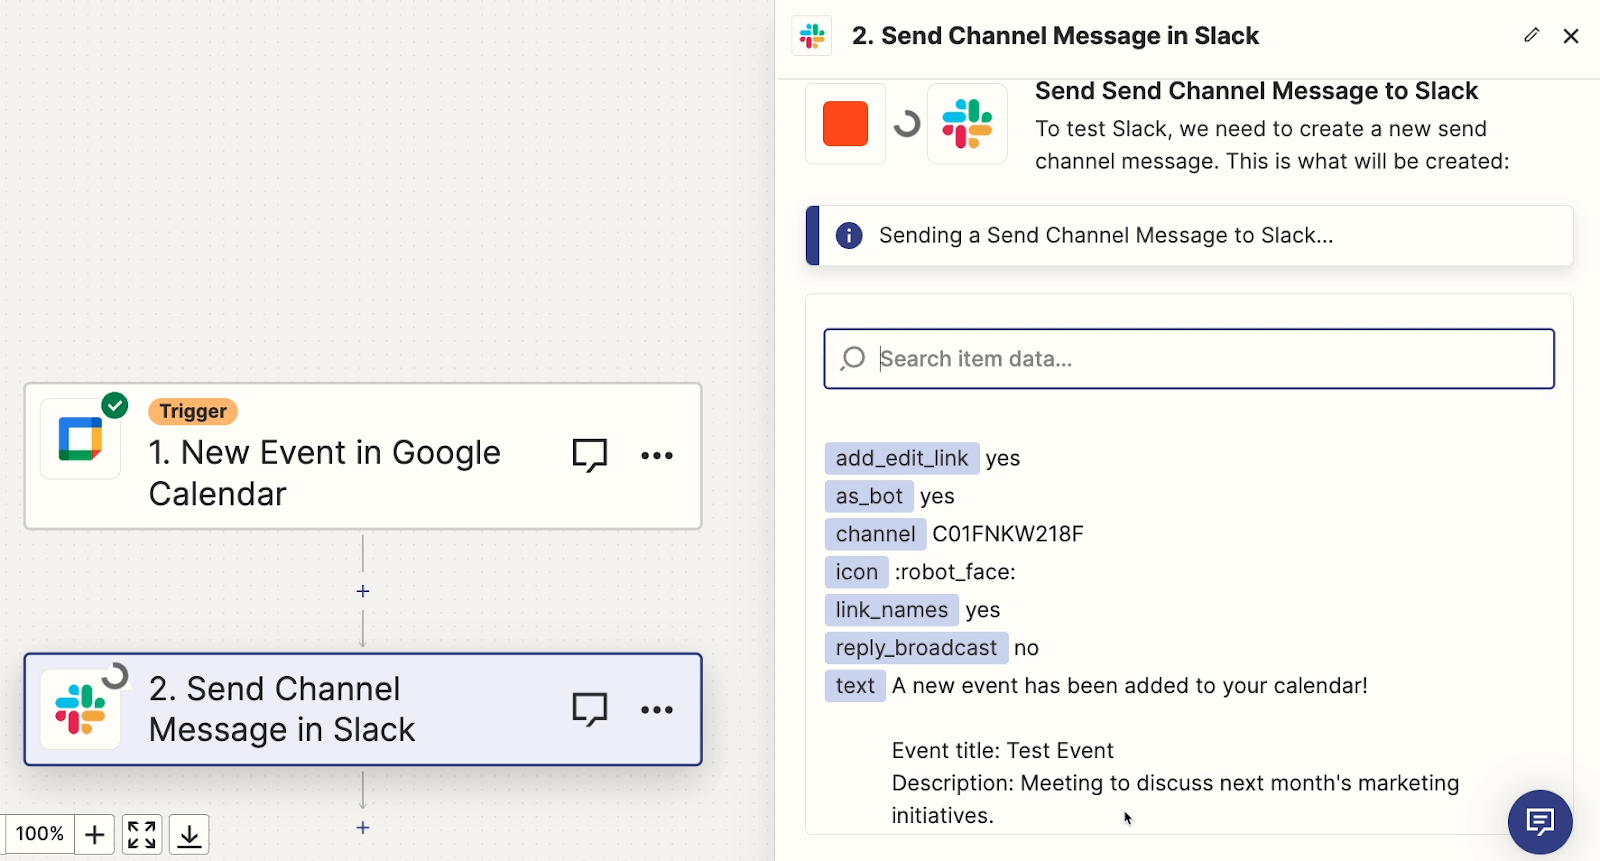
After testing your action, Zapier will confirm that your action worked correctly, or provide you with an error message if it encountered a problem.

However, it’s always a good idea to open up any app where you expect to see new or updated data.
For example, when we check Slack, we can see the message in the tutorials channel. There’s lots of useful information about the new Calendar event, including the Zoom link.

You should also confirm that all of the information your Zap created is correct and functional. When we click on the Zoom link, we can confirm that we’re taken to a Zoom meeting.
Our test is complete, and we know that our automation works. But what if our test data didn’t have all this information?
Testing Zaps with incomplete data: missing and empty variables
If your test data is missing important pieces of data, it becomes much more difficult to build your desired automation.
To demonstrate how this works, we’ll go ahead and create some test data that’s missing key pieces of information we need in our automation.
We’ll create a new Calendar event called “Test Event - No Zoom, No Description”, and we won’t include a Zoom link or a description.

Now we’ll go back to Zapier, and re-test our trigger with the new incomplete calendar event.
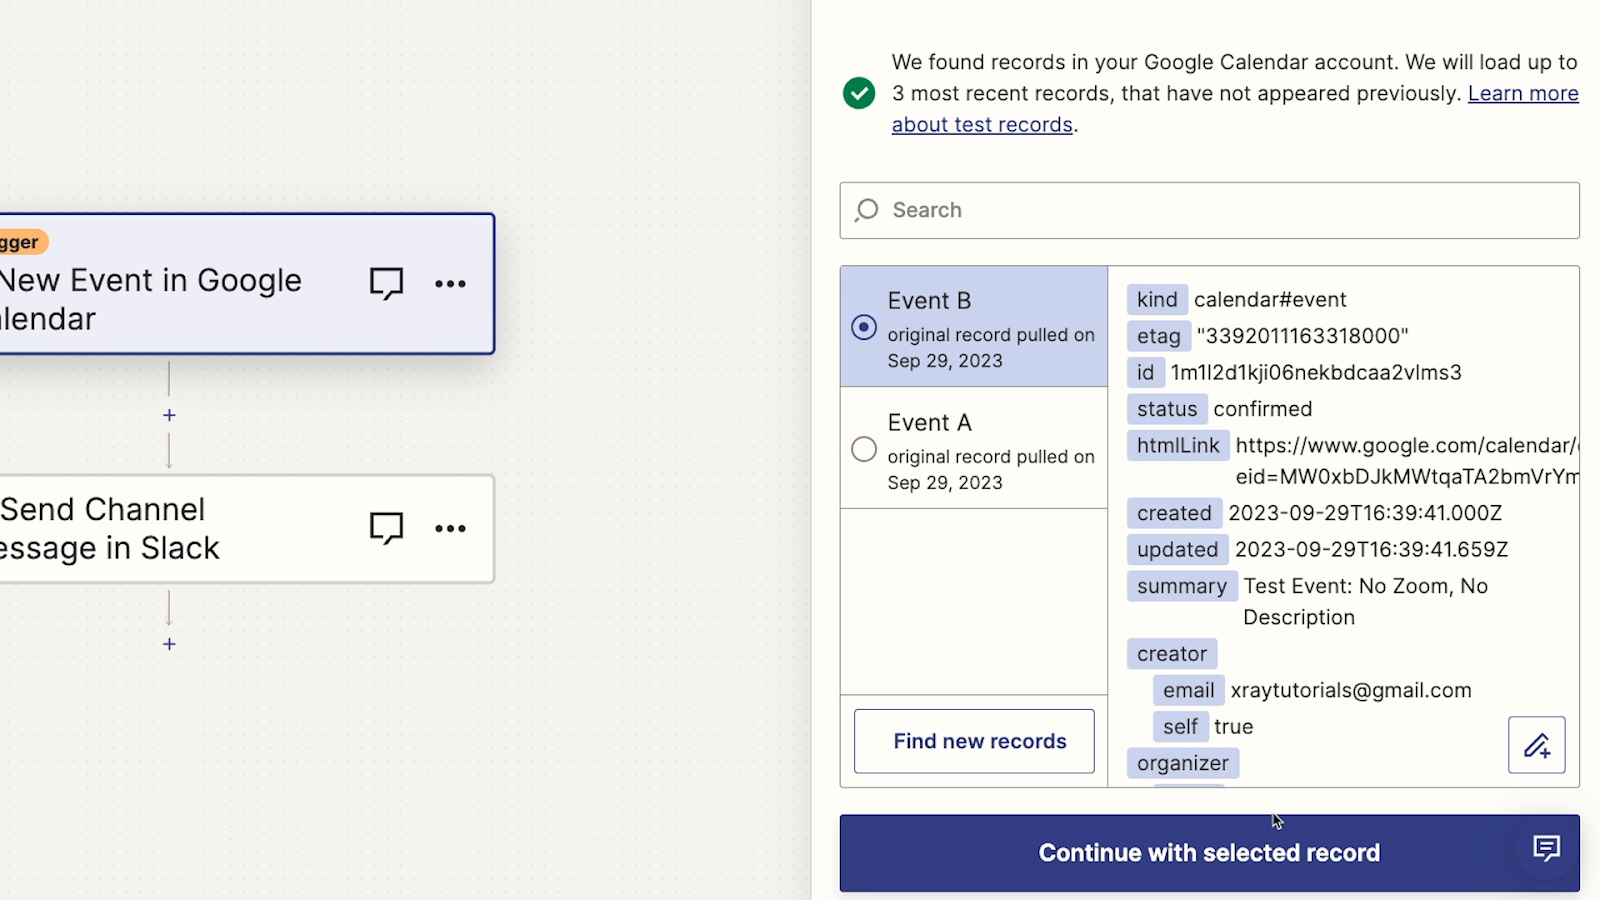
Then, we’ll add a new Slack message and start filling it like before.
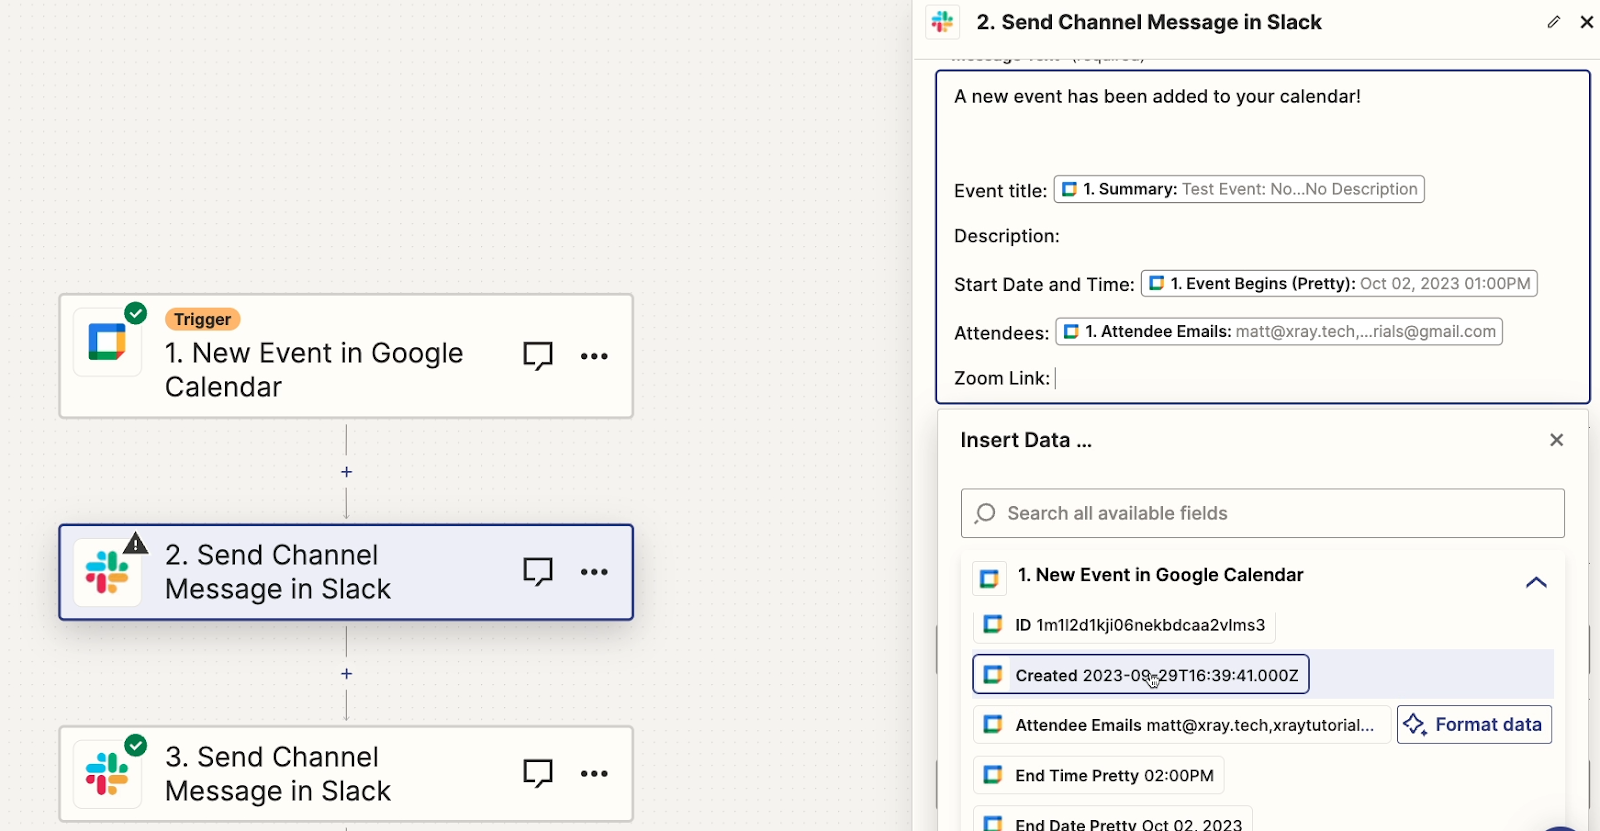
However, we can’t find the Zoom link this time. When we search for “Zoom”, or “Conference Data Entry Points Label”, the variable that we saw in our earlier test data isn’t there at all.
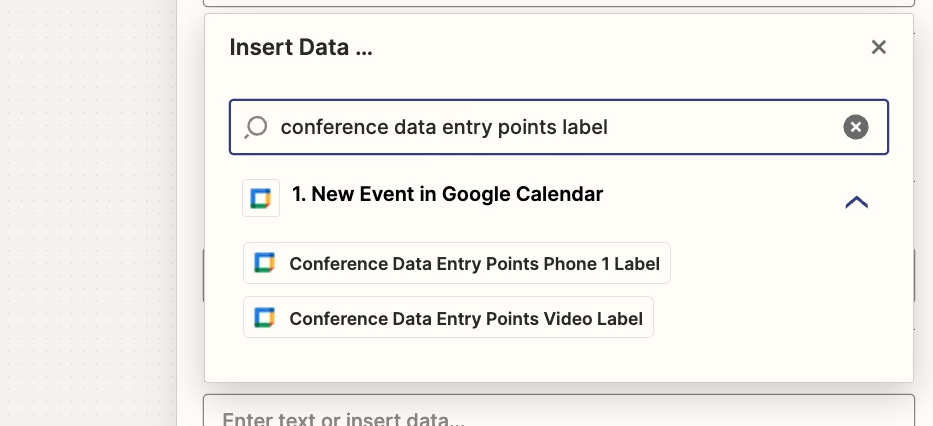
Because our Google Calendar test data is incomplete, there’s no way to add a Zoom link to our Slack alert.
On the other hand, you’ll note that the “Description” variable is still available, even though it’s empty.
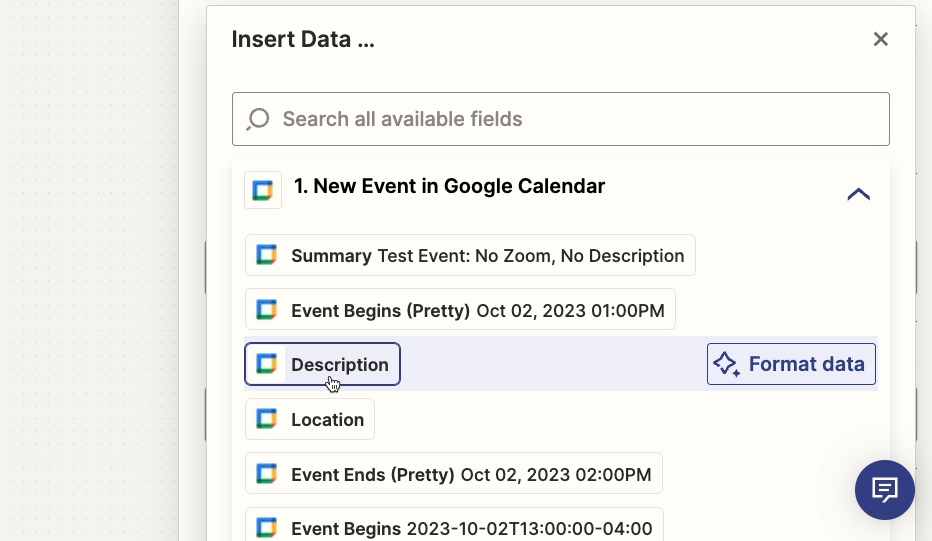
--
With incomplete test data, you’ll encounter both of these scenarios. Some variables will be missing entirely, and others will be blank.
This means you won’t be able to add the missing variables as you’re configuring action steps. And while you can add the blank variables to your action steps, you won’t be able to confirm their contents or formatting when you run a test, since there’s no data there.
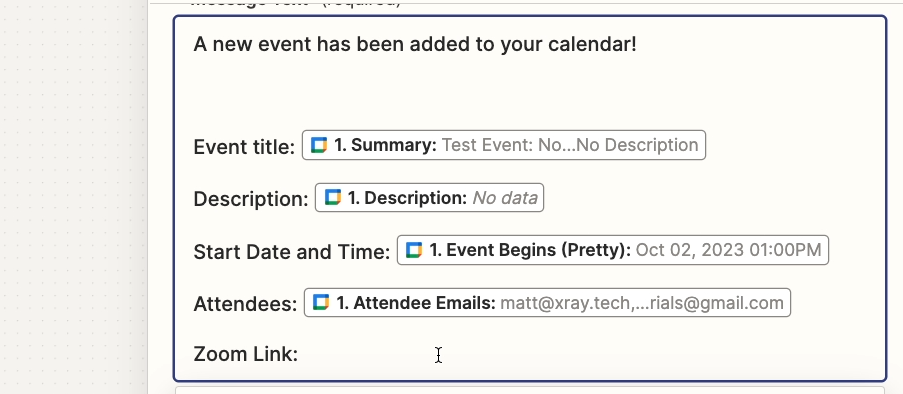
When we test the Slack message step, we can see that there’s no Zoom link, and no description.
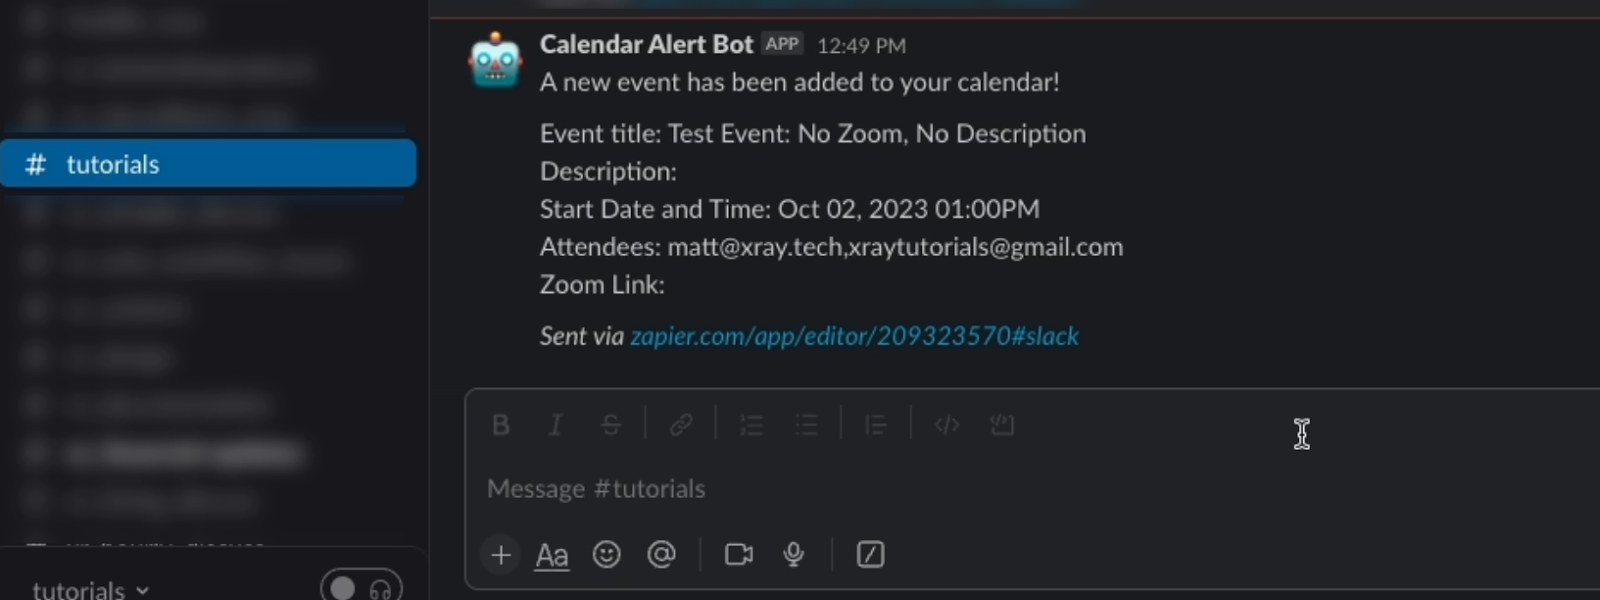
With incomplete test data, we can’t build the automation that we want (a Slack message including a Zoom link), or confirm that it’s working as intended.
That’s why your test data should have every bit of information that you intend to include in your ideal automation. If anything, you should err on the side of using more data than you think you need.
Understanding variables in Zapier
As you’ve been reviewing our examples, or as you’ve been using Zapier, you may have noticed that the data retrieved in Zapier always follows a similar format.
Both events we tested had labels for nearly all of the same information. They both had labels for Summary, Attendees, Start Date, and Description, but the specific data or value associated with these labels differed for each event.
[test data - annotate “variable” and “value”
These are what we call “variables”. In Zapier, a “variable” refers to every piece of information retrieved from any step in your automation
A variable can be something like a Calendar event’s name, or its start time.
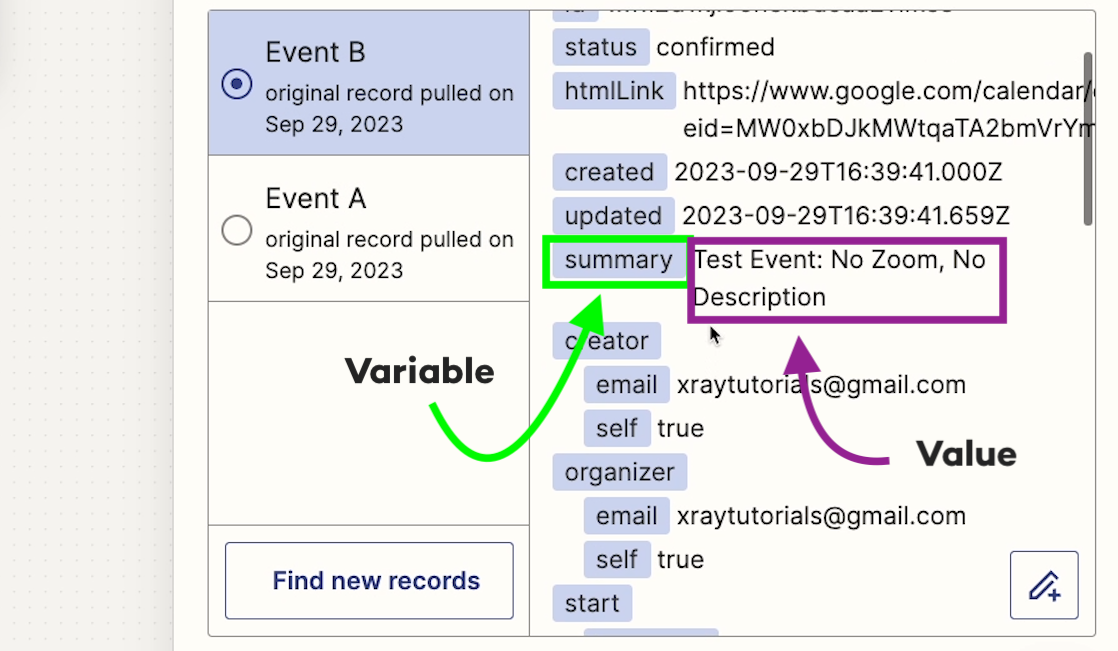
If you’re automating a CRM like Hubspot, you’ll see variables for each contact’s name, their deal status, and dozens of other attributes unique to each contact.
If you’re automating your ecommerce store in Shopify or Magento, you’ll see variables relating to product prices, variants, and descriptions.
Regardless of the app involved, variables describe all of the available attributes for whatever digital object Zapier is processing.
Every calendar event will always include a similar list of variables in Zapier, and every Hubspot contact will include the same list of variables as every other contact.
Using variables to build more useful Zaps
The variables are always the same, but the values - the actual data associated with each variable - can change every time.
That’s why they’re called variables, and why we build automations. That ability to include dynamic data is one of the things that makes Zapier so useful.
In our simple automation with Slack alerts for calendar events, the alert is only really helpful if it includes the right details and Zoom link for each new event.

In other contexts, using variables can help you to accommodate an entire team with a single automation instead of building a unique Zap for each person.
Instead of sending an email to a single, fixed address, you could send an email to a dynamically retrieved address that will reflect the data that triggered the Zap to run.
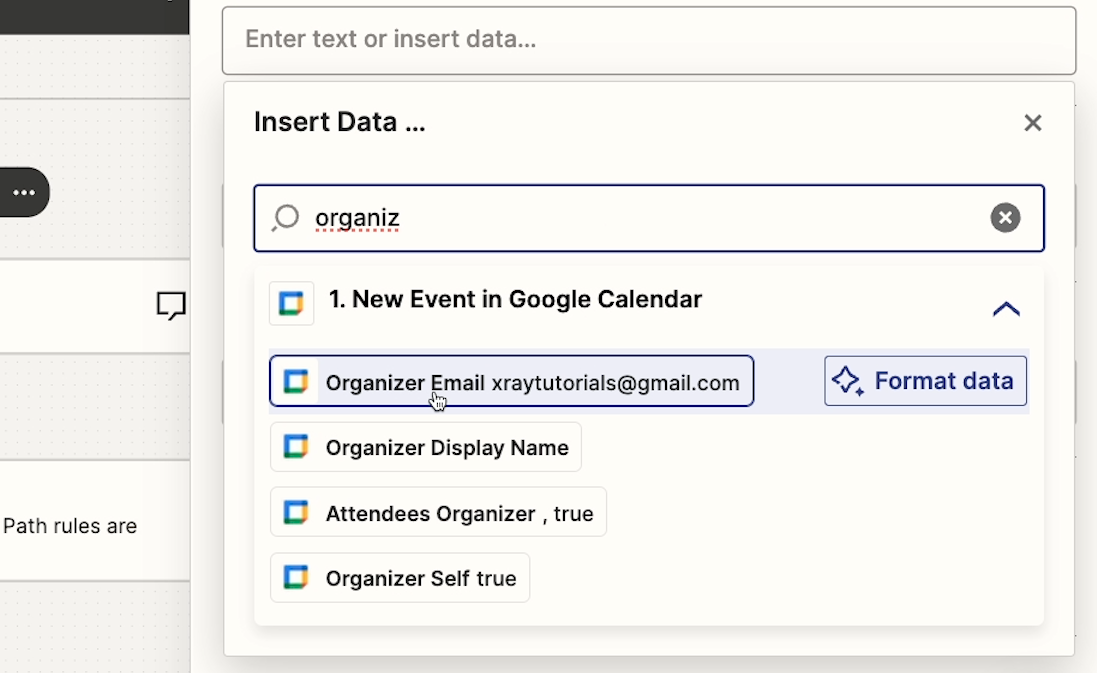
Replace missing or empty variables with default values
With purpose-built test data, we can always control what information we include, and what information we leave out.
But when your Zaps are live and taking in data from the real world, inconsistencies are inevitable.
We could design and build an automation that assumes people will always provide a description and a Zoom link, but we know that sometimes, people might forget to add them to their events.
And when they do, what happens to the automation?
Thankfully, Zapier provides some simple ways to respond to different data with different actions. All you have to do is add Default Values or Paths to your automation.
We’ll start with Default values.
Adding default values to a Zap
Default values can be used to provide a fallback value for an empty variable.
For instance, if a calendar event is missing a description, we can use a default value to use the text “No description provided” instead of just having a blank space.
To get started, add a new action and choose “Format”.
Your formatter step must be placed after the trigger, and before any action where you want to include the default value. So in our case, it needs to go before the Slack message.
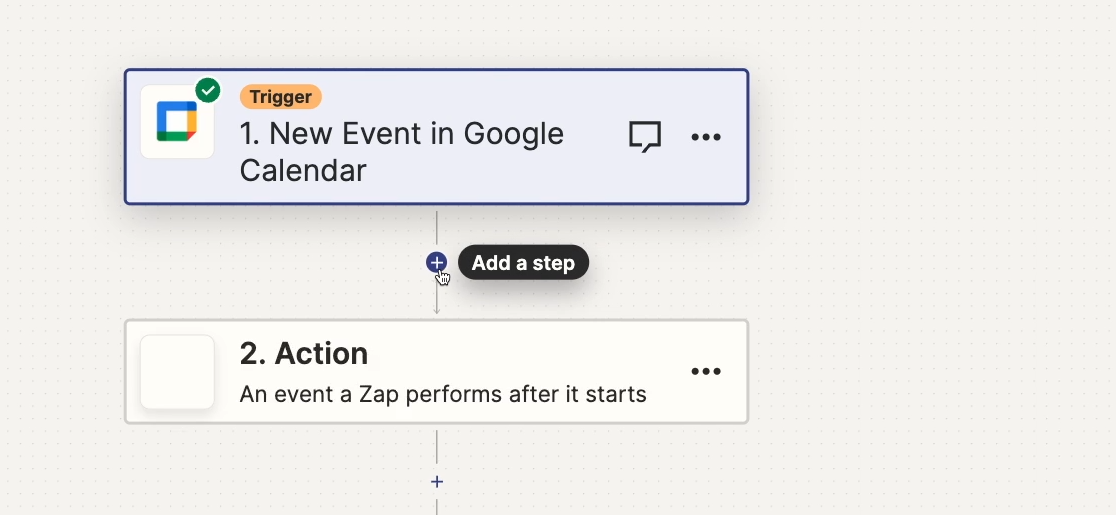
Formatter is a Zapier tool that allows you to reformat text, numbers, lists, and more.
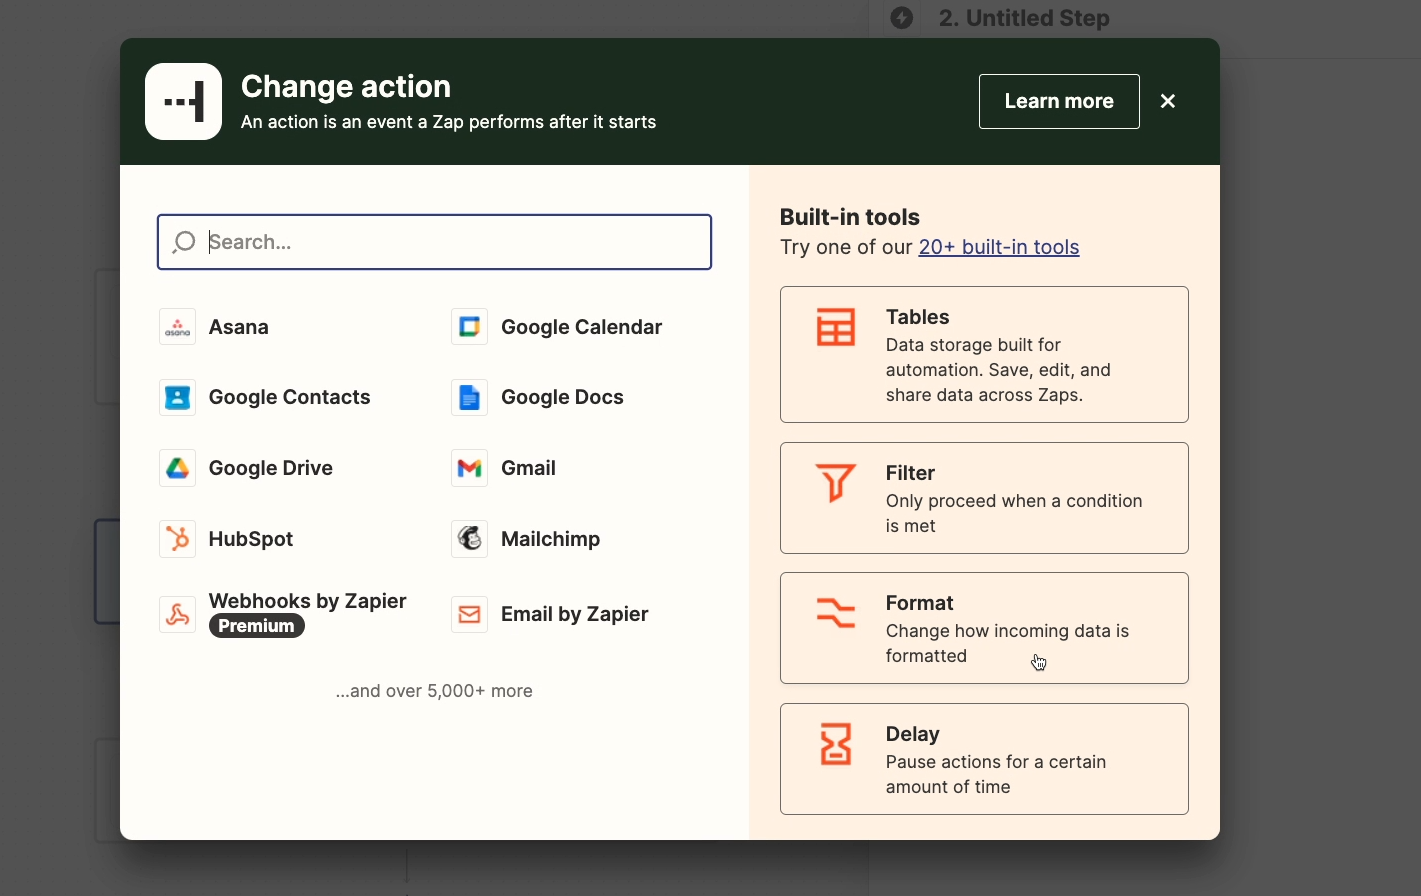
For the event, choose “Text”, and select “Default Value” as the action.

Then, choose the variable that you want to replace if it’s empty. In our example, that will be the “Description”.
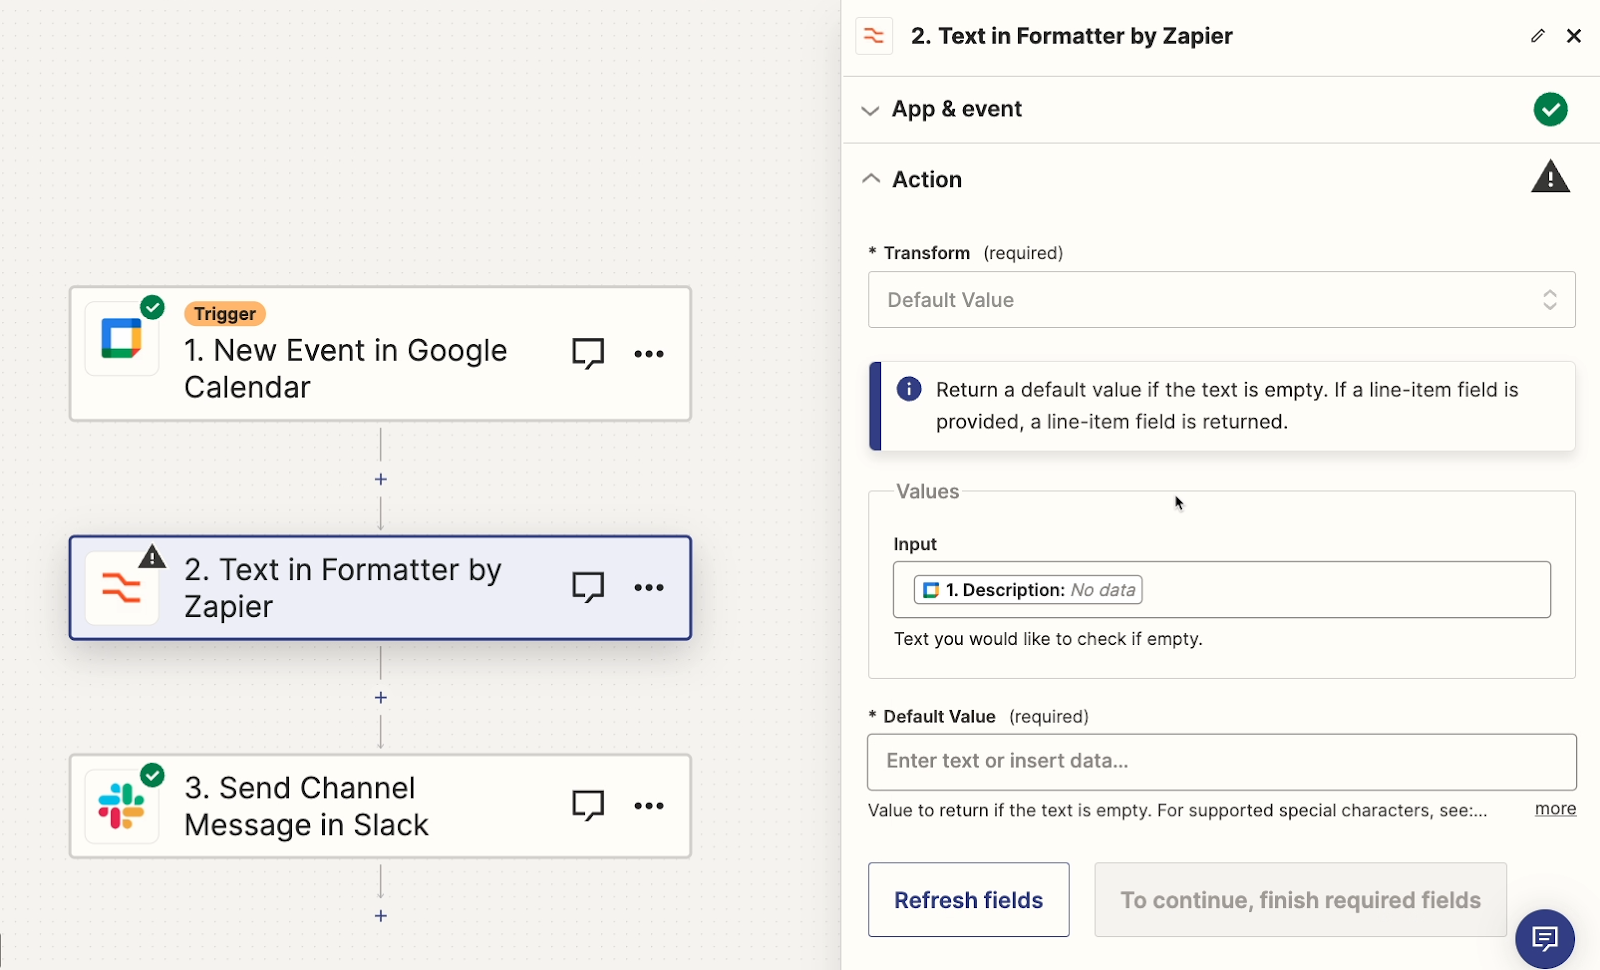
Enter the text that should be used as a default value if the chosen variable is empty. We’ll enter “No description provided”.
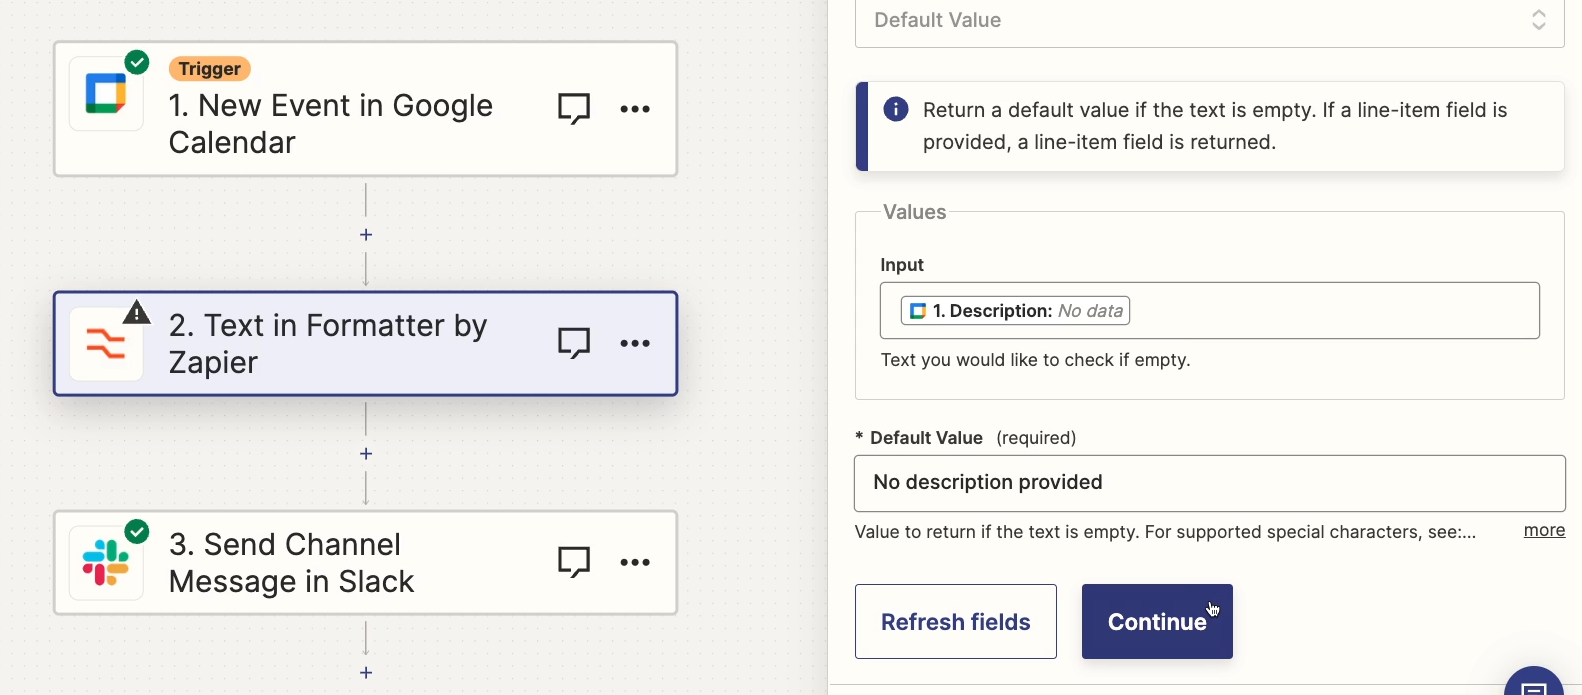
Once you’ve created your default value, give it a test. You’ll want to test your default value twice: once with test data that includes data for the variable you want to replace, and once with test data that’s missing data for the variable you want to replace.
That way, you can confirm that the default value is only used for empty variables.
To start, we’ll go back to the trigger and select a Calendar event without a description.
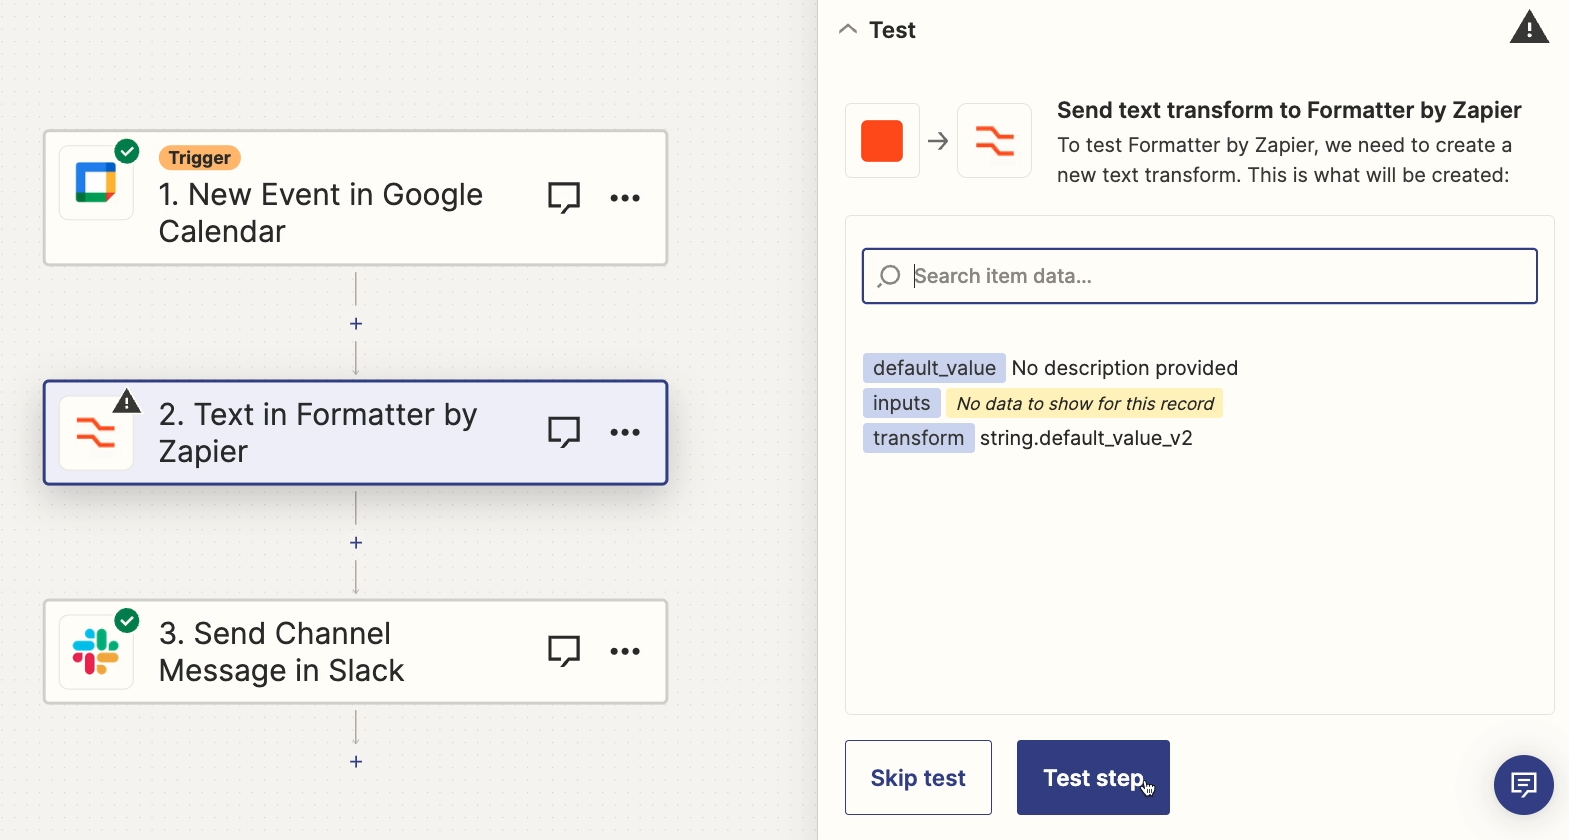
Then, we’ll test the formatter step again.
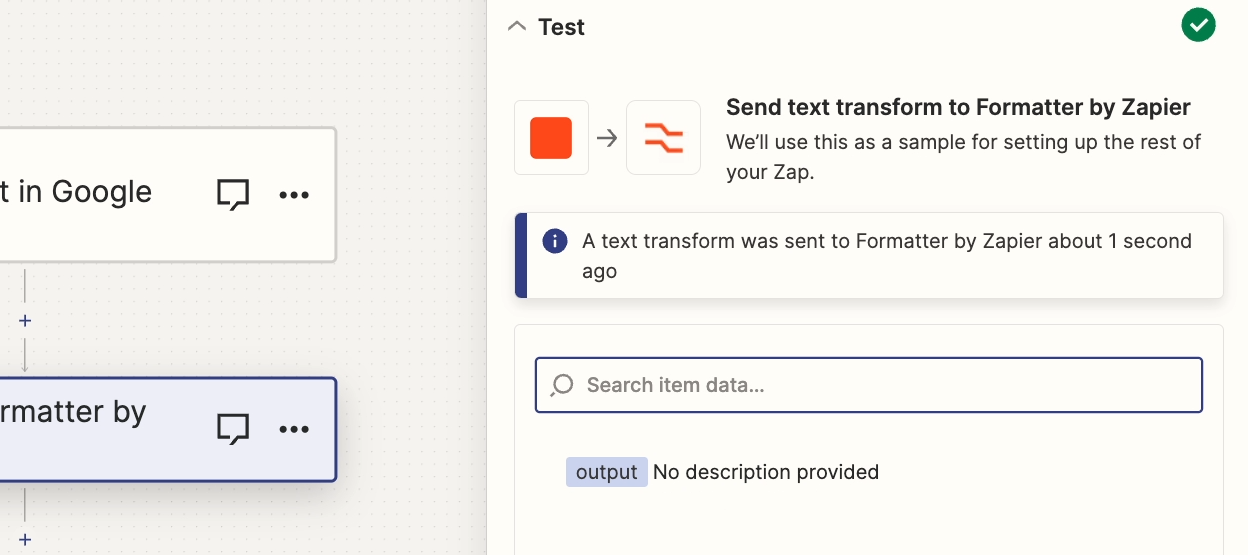
And as you can see, it replaced the blank variable with “No description provided”, just as expected.
Next, we’ll test the step again with an event that does have a description.
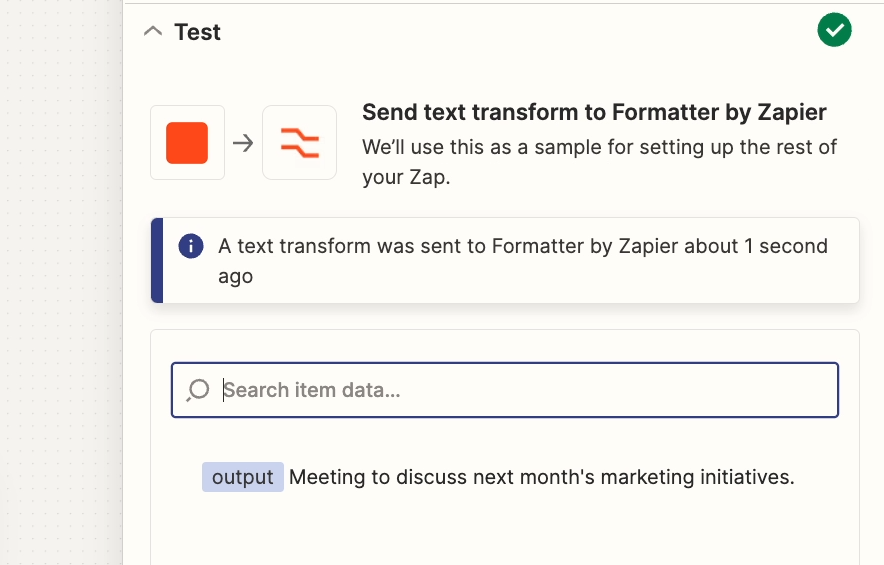
And this time, it leaves the text as is.
As we noted earlier, whenever you’re working with default values or paths, you’ll want to test each possible outcome that you’ve added to the Zap.
Add multiple default values to your Zaps
If you’d like to add multiple default values, add a new formatter step for each one.
Just remember to place the formatter step before any action where you want to use the default value.
When you add multiple formatter steps, it’s also helpful to rename them so that you know what each step does. “Formatter” can transform data in dozens of different ways, so “Formatter” alone is a very vague title.
We’ll add another formatter step to our Zap to provide a default value for a missing Zoom link.
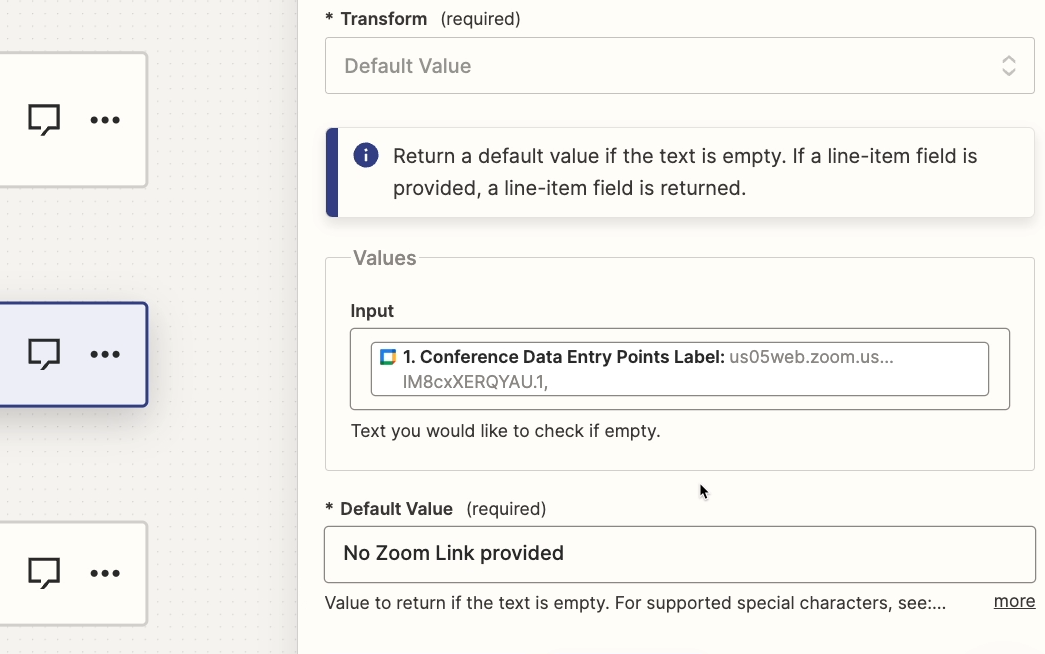
Then, we’ll rename both formatter steps to keep things organized.
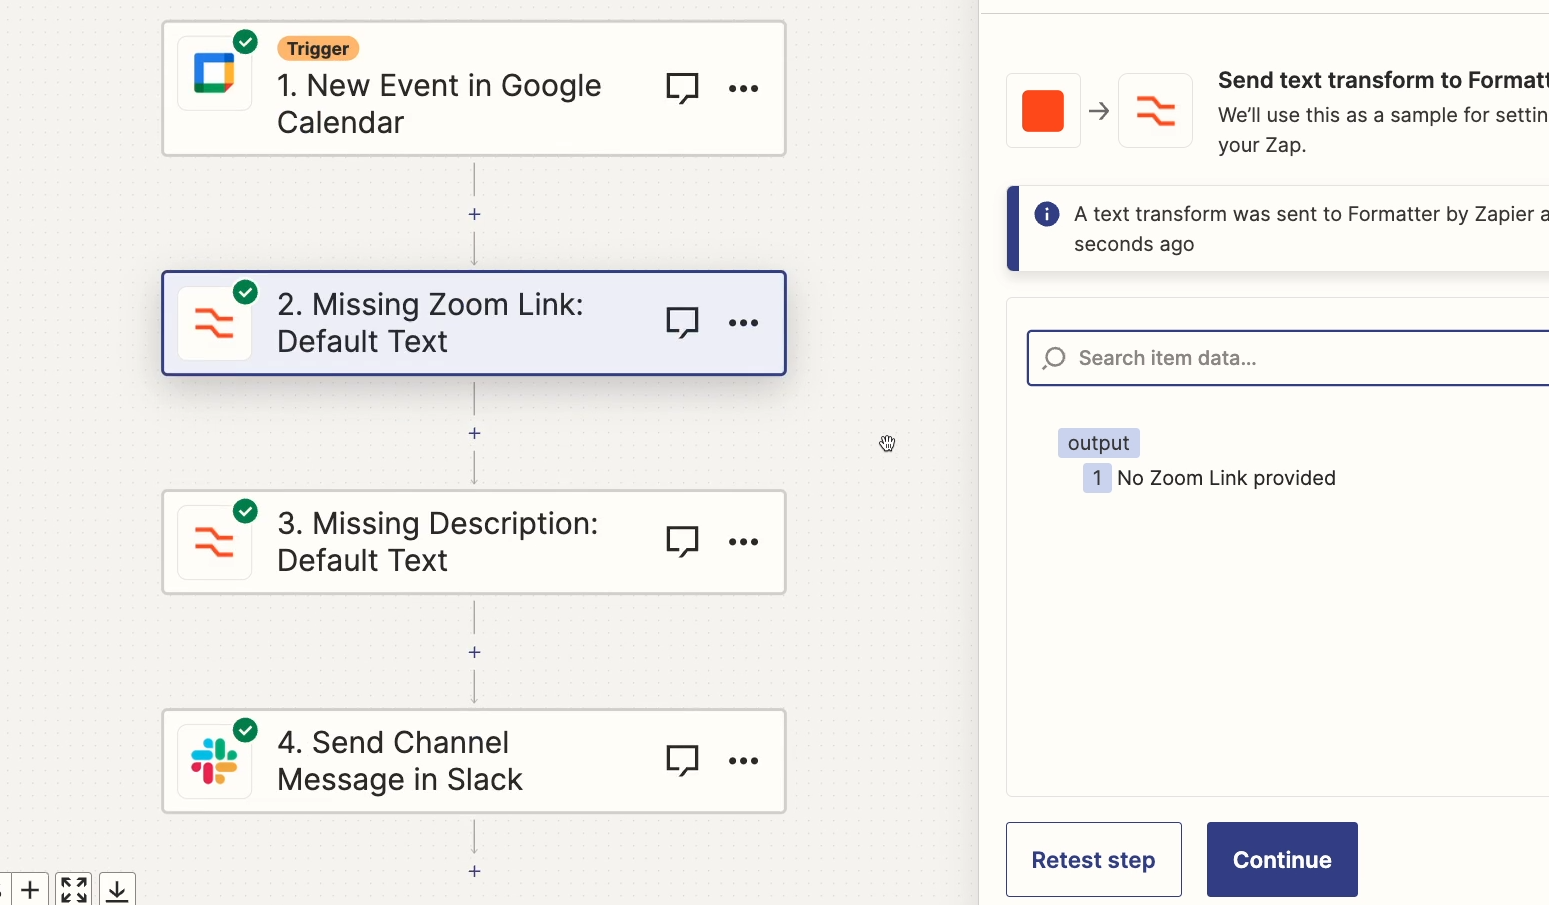
With both default values ready, any alert will use default values as needed to replace missing variables.
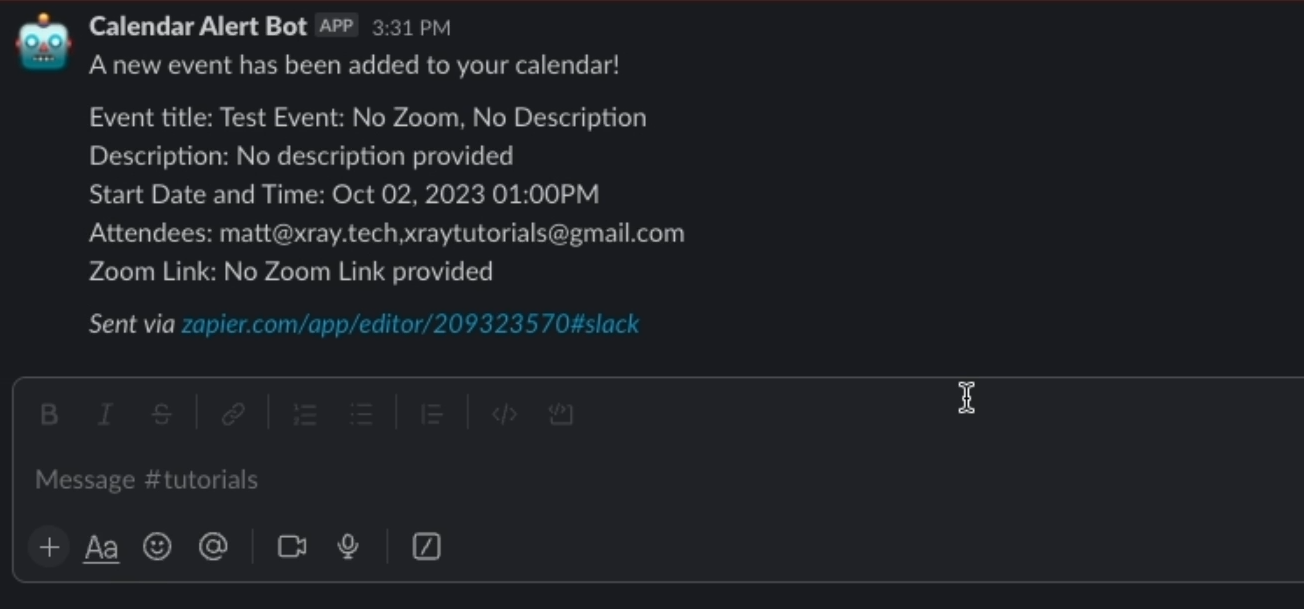
To be thorough, you should test your automation with each possible configuration. In our example, that would involve testing once with a Zoom link and no description, once with a description and no Zoom link, once with both, and once with neither.
But we won’t waste your time showing you all of those tests. Just remember to test every configuration that you can when building, within reason.
Perform different actions in the same Zap with paths
Default values are great for replacing text.
But what if you want your automation to actually perform different actions based on different inputs?
To do that, you’ll need to use Paths. Adding paths will give your automation multiple potential outcomes.
Each path will include an associated condition. If the data your Zap is processing meets that condition, it will run down that path.
Let’s see how paths look in action.
Adding paths to your Zaps
We’ll add a couple paths to our Calendar alerts Zap: one for events that don’t include a Zoom link, and one for events that do.
This time, instead of just having a warning that no Zoom link is provided, we want to email the organizer of the event and ask them to add a Zoom link.
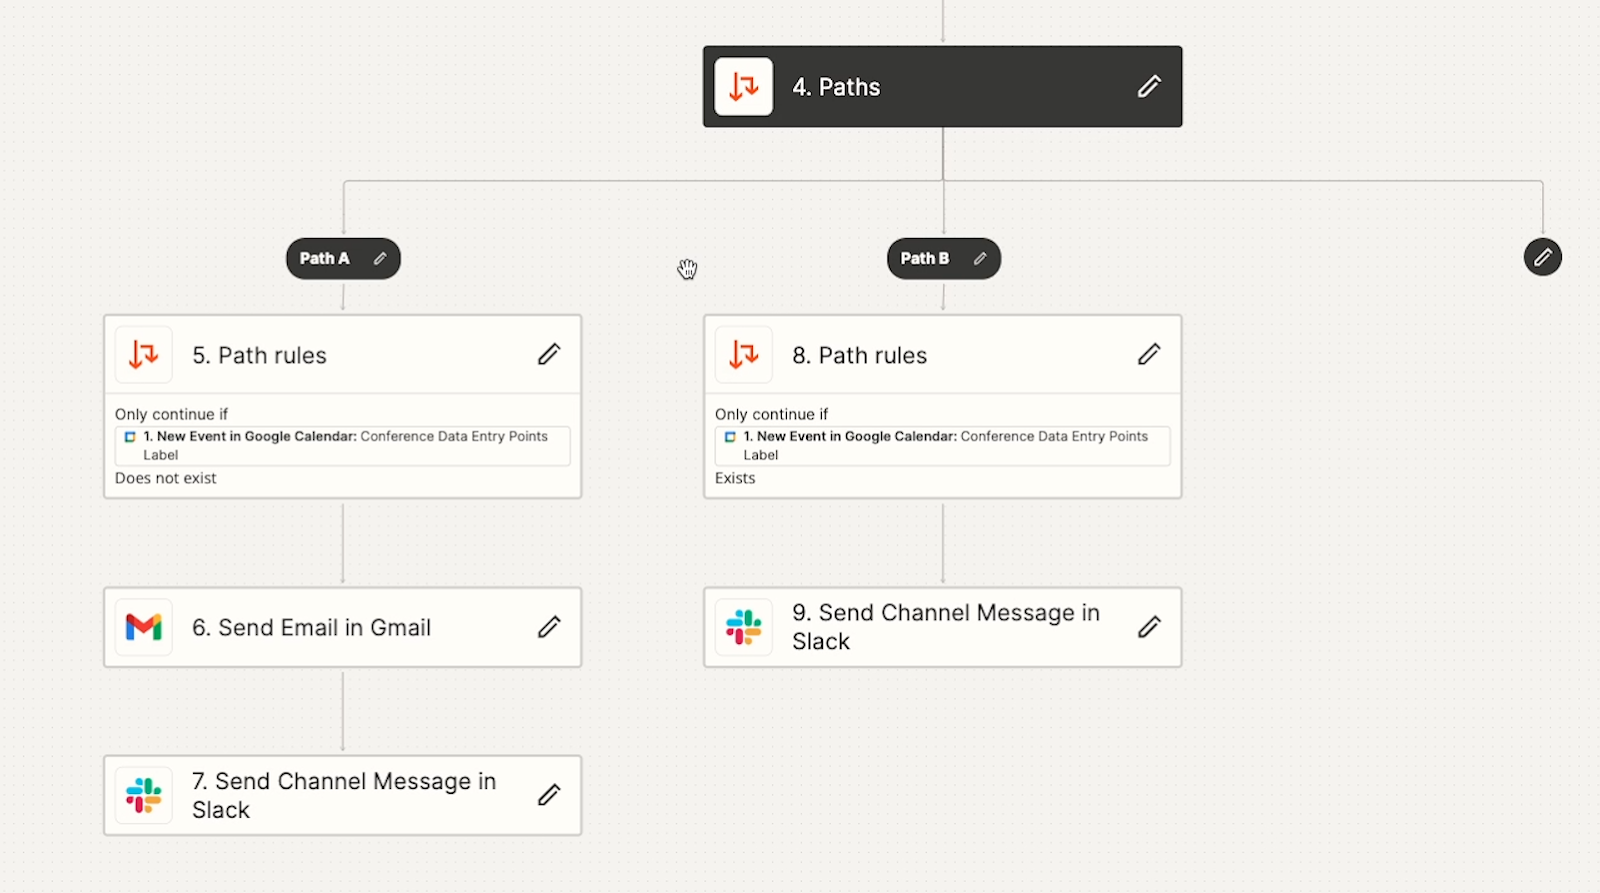
To add paths, add a new action to your Zap. Note that paths need to be the last action in your Zap.
Then, select “Path” from the app menu.

Instantly, you should see two branching paths added to your Zap. Each path starts with a “Rule”.
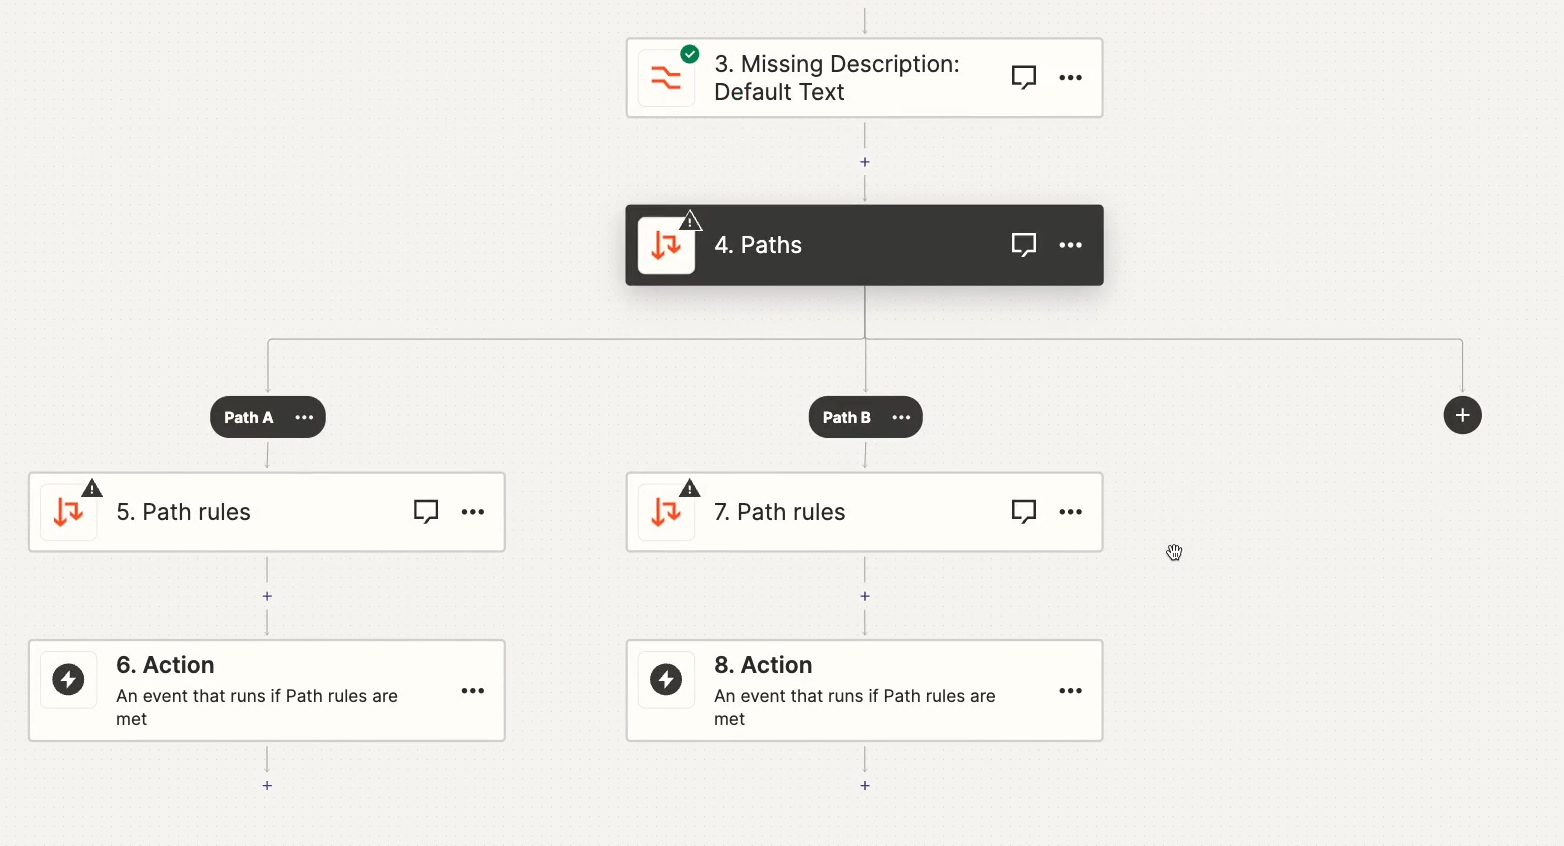
The rule is where you’ll configure the conditions that make the Zap select the appropriate path.
Click on the rule under path A to configure it.
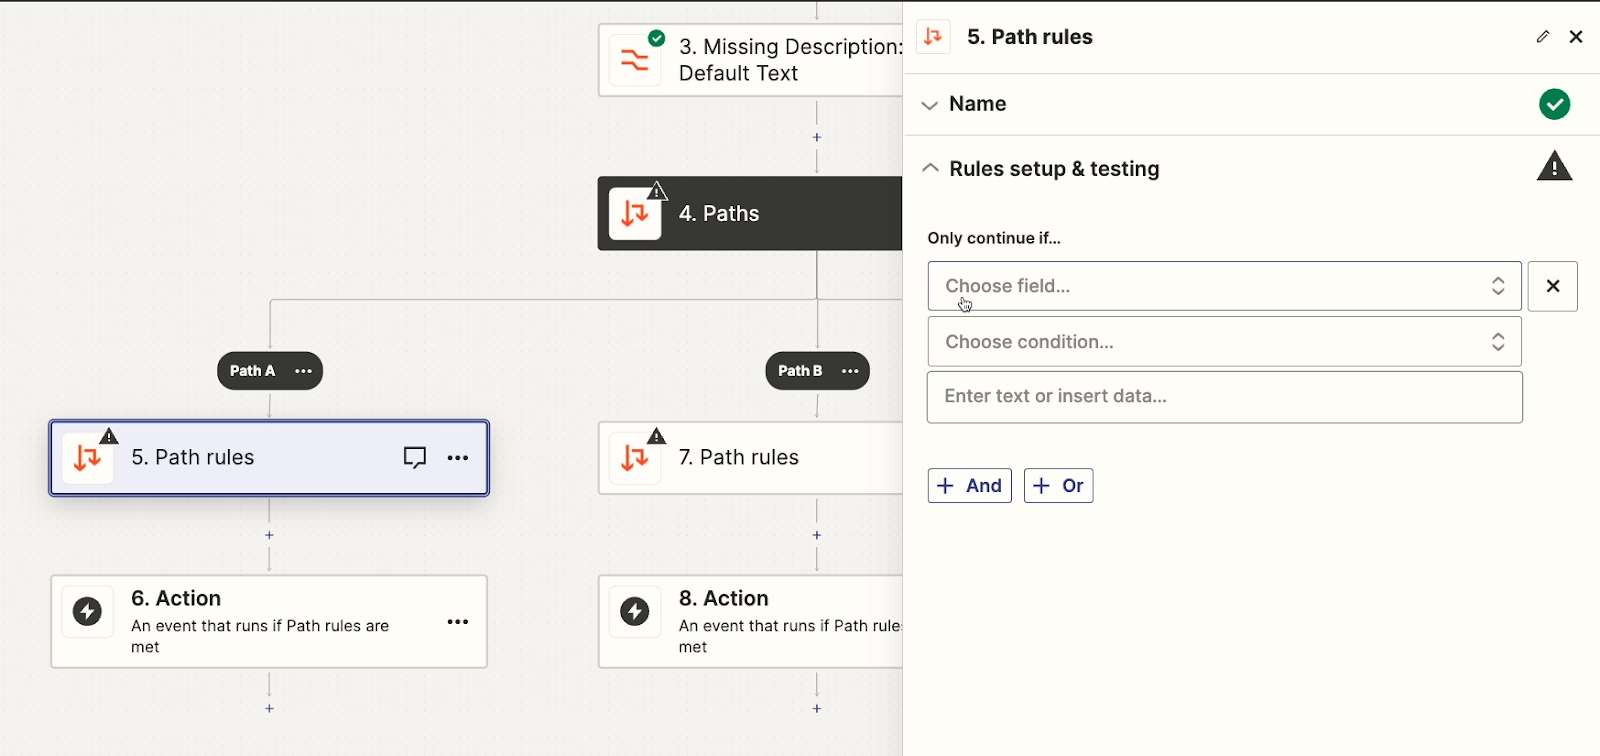
We want this path to run if the Calendar event is missing a Zoom link, so we’ll set the condition to “Conference Data Entry Points Label” “does not exist”.
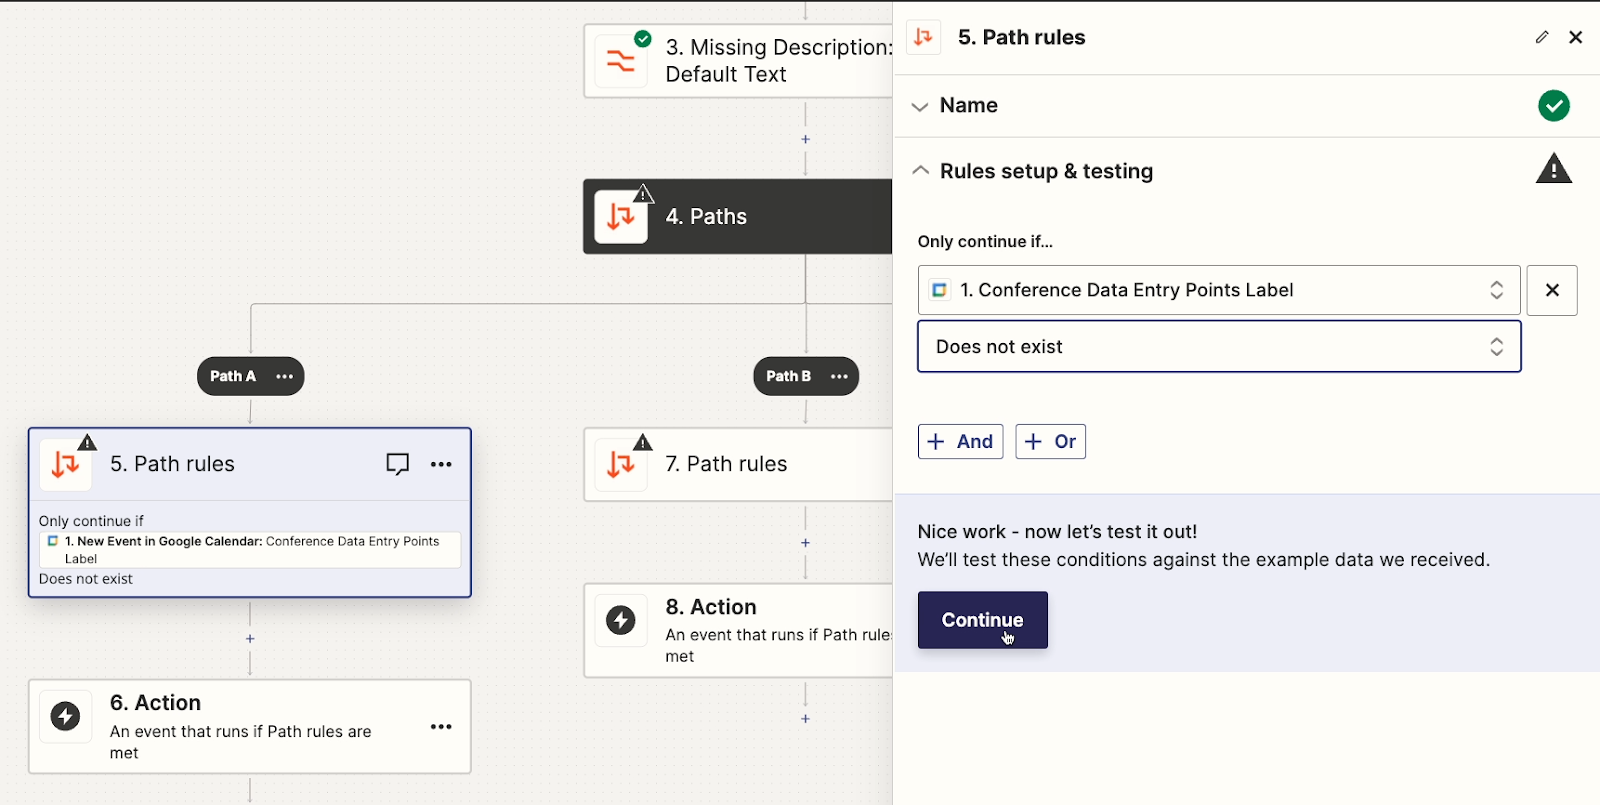
Then, we’ll give it a test by clicking on “Continue”.
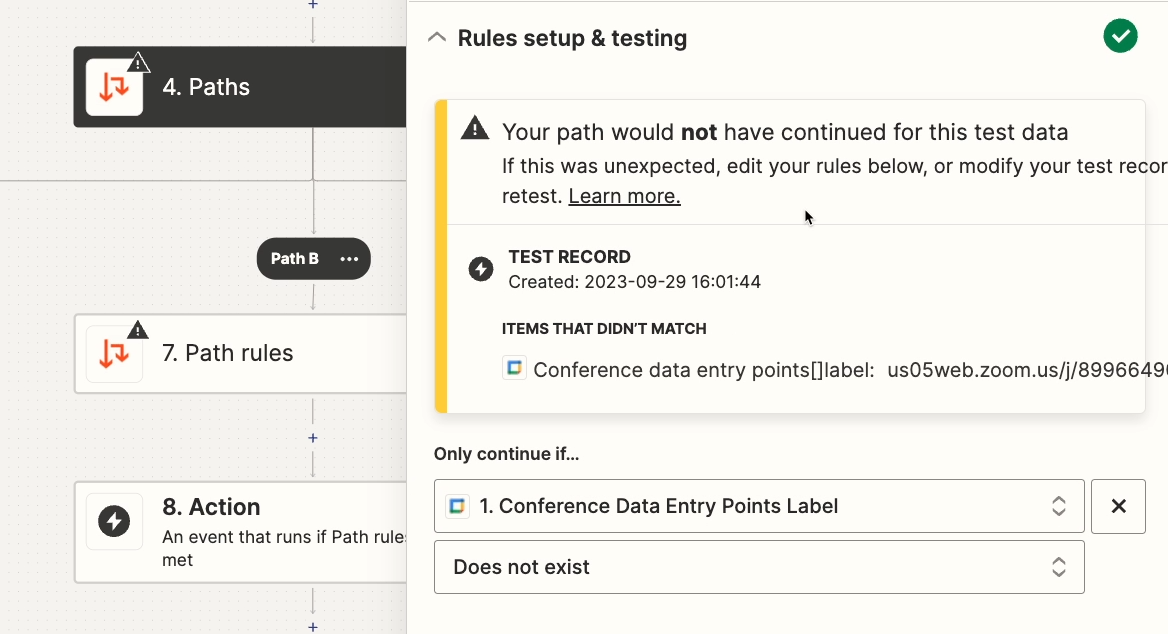
The automation says this action would not have continued down this path, since the Zoom link is there.
To finish testing this path’s condition, we’ll update the test data to an event without a Zoom link.
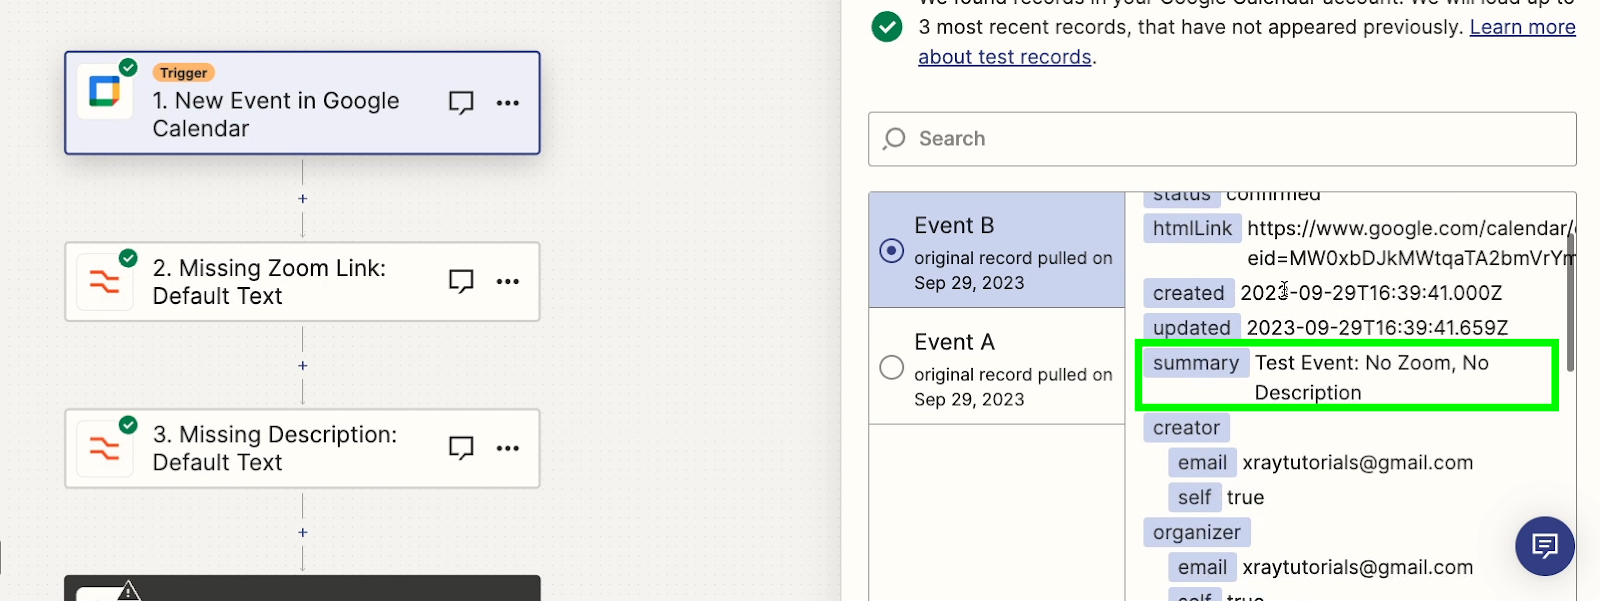
Then, we’ll retest both formatter steps before finally testing Path A’s condition again. The path now says that it would have continued.
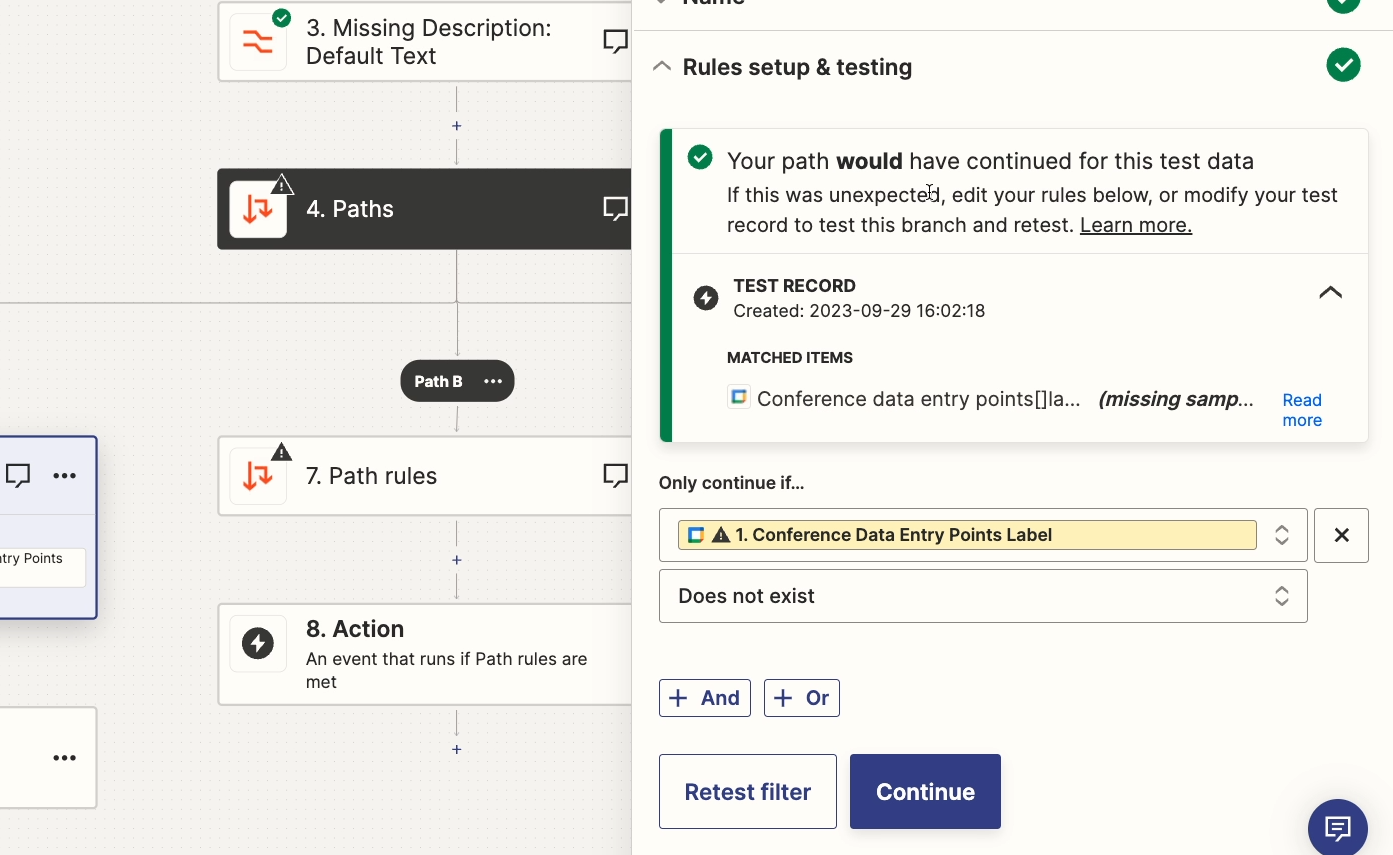
Once you’ve configured and tested the path’s condition, you can add any actions you want to the path.
We’ll add a Gmail step, and set up an email that will go to the event organizer, asking (politely) to add a Zoom link to the event.
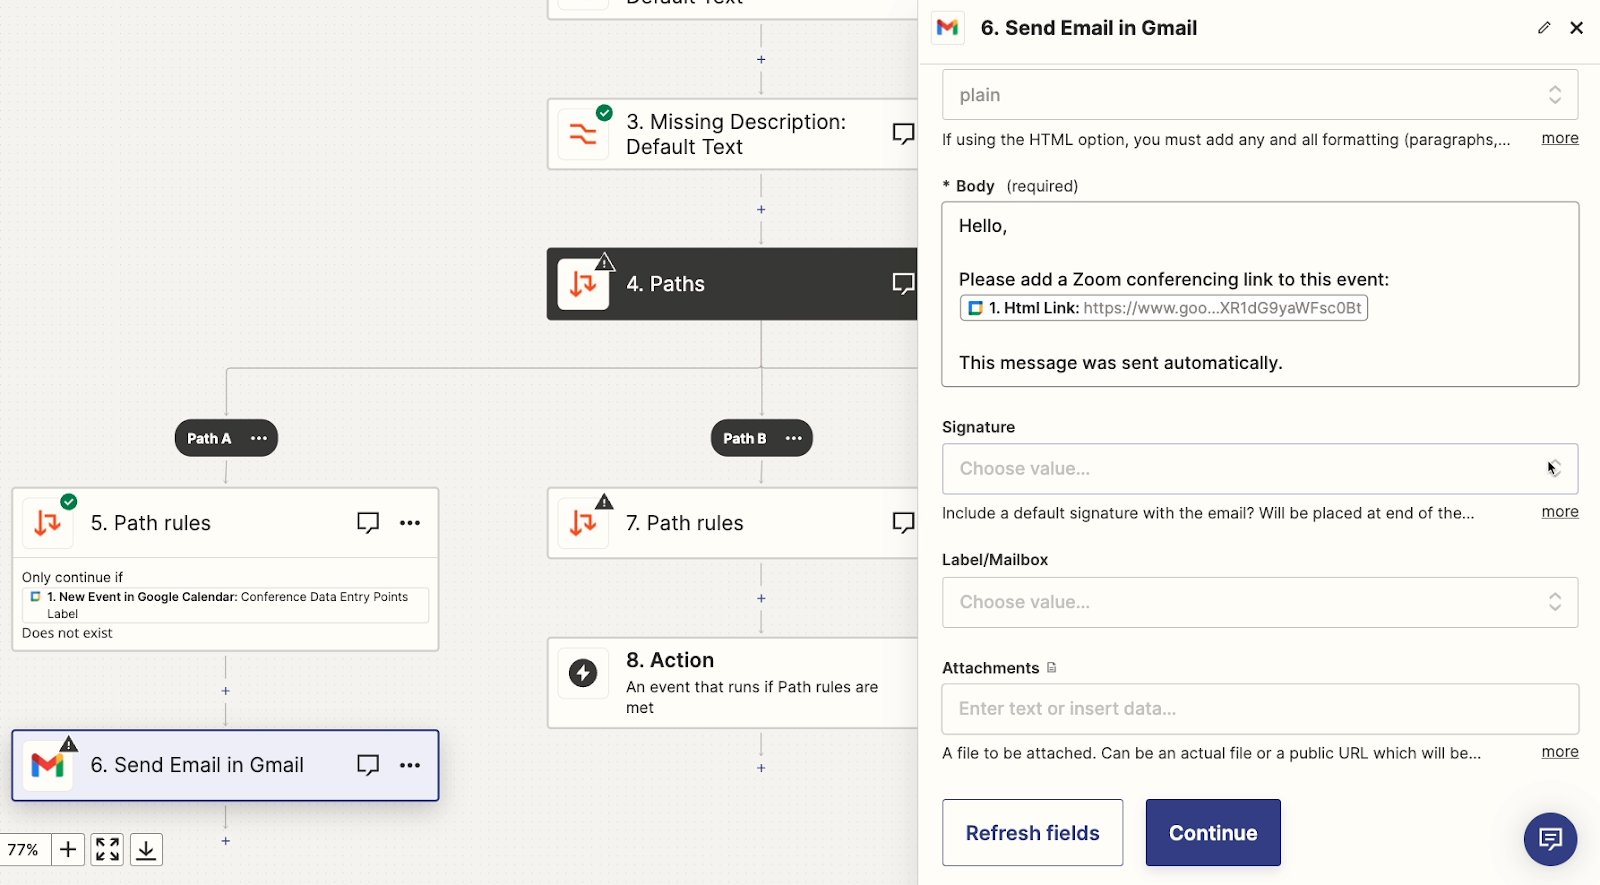
Test any steps you add to Path A. Then, configure Path B.
Configuring a second path
You can set up the rule for Path B the same way as Path B, but be careful when you’re designating the rules for each path.
Multiple paths can run at the same time. However, this can often lead to confusing and redundant results.
In most cases, it’s best to set up all of your paths at a single junction to use mutually exclusive conditions. That way, you’ll be able to ensure that, logically, only one path can run at any given time.
For our example, we’ll set Path B’s condition to “Conference Data Entry Points Label” “exists”. Since it’s the exact opposite of Path A’s condition, we know that only one path can run at once.
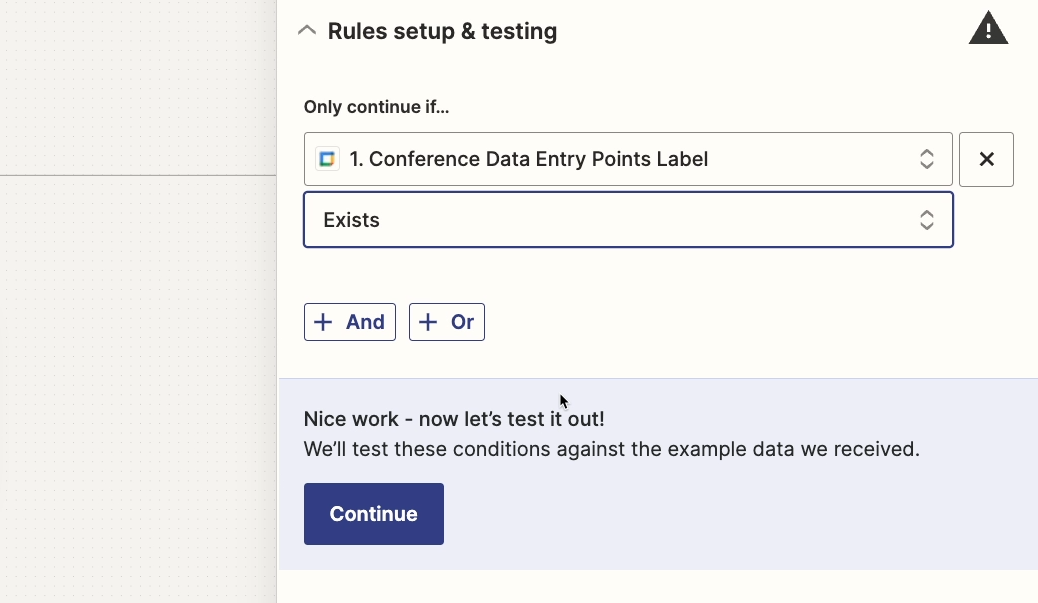
Then, we’ll copy the Slack step from earlier in our automation into both Paths A and B.
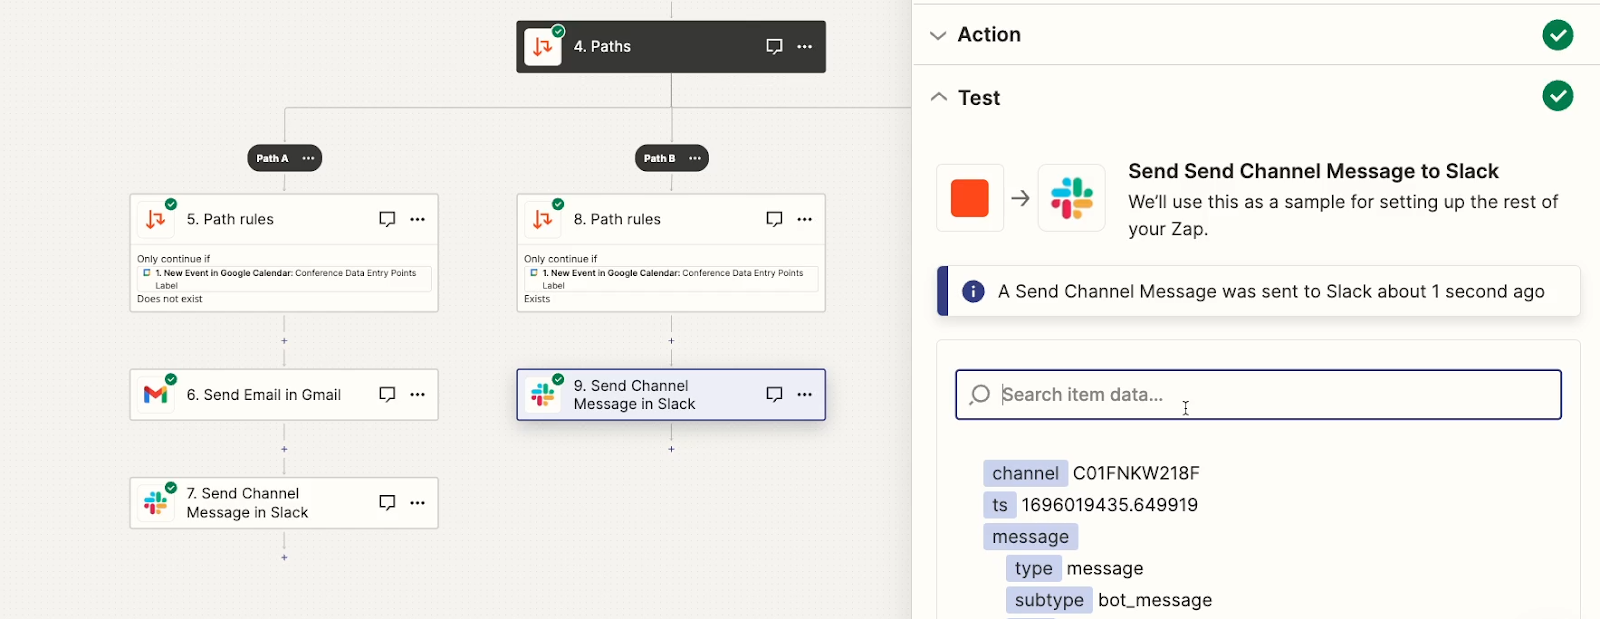
Add (almost) as many paths as you’d like
Note that you can add up to 10 paths within a single path module. From there, you can also nest path modules inside of paths, potentially adding over a hundred paths to a single automation.
Of course, just because you can doesn’t mean you should. Be careful not to make things more complicated than they need to be.
Exploring Zap history to troubleshoot and fix errors
With all the variables and paths you might be adding to your Zaps, there are many different ways your automations might run, and many different outcomes they could produce.
When something is not working, or not working as expected, you might not always be sure which path ran - or which one was supposed to run.
That’s why it’s good to check Zap history whenever your automations aren’t working as expected, or are hitting frustrating errors.
Zapier keeps a log of all your Zaps’ history. You can access it by just clicking on the Clock icon in the Zap editor.
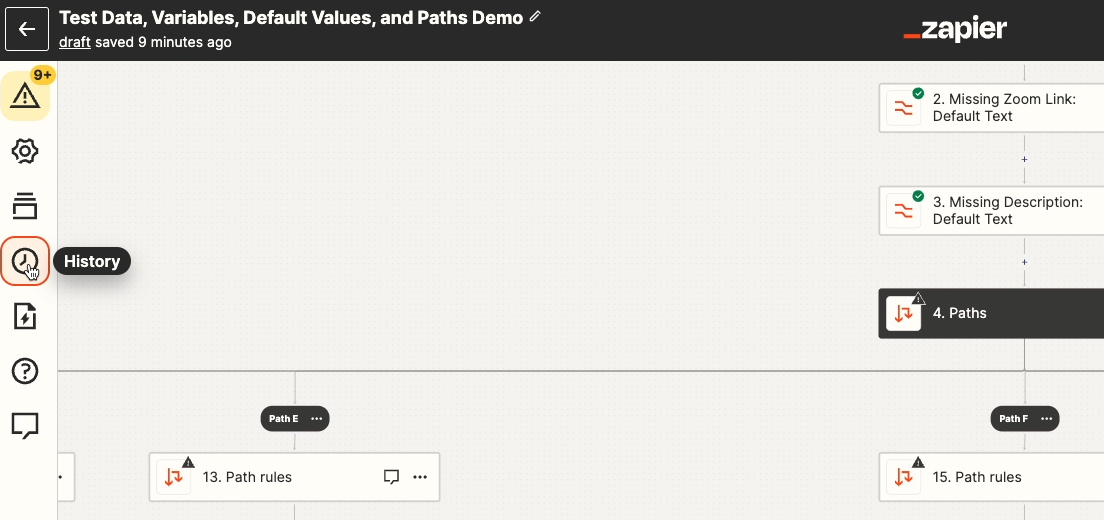
You can also find history from your Zapier homepage by checking the panel on the left.

In your history, you can see every action run by your account.
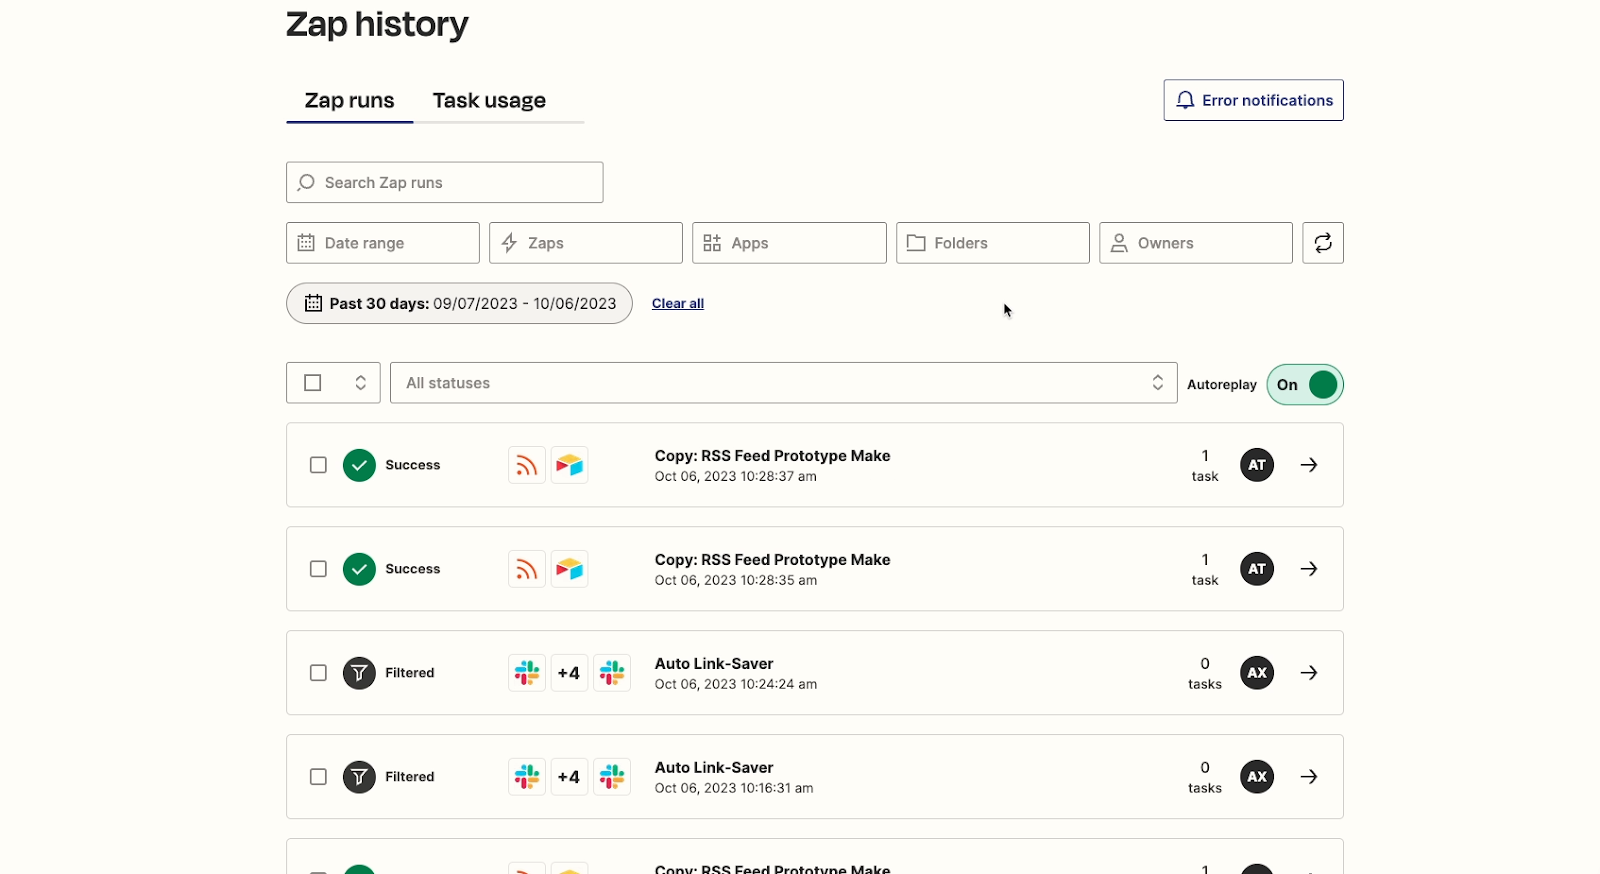
You can filter by date range, the name of the Zap, the apps involved, the folder the Zap is stored in, or the Zap creator.
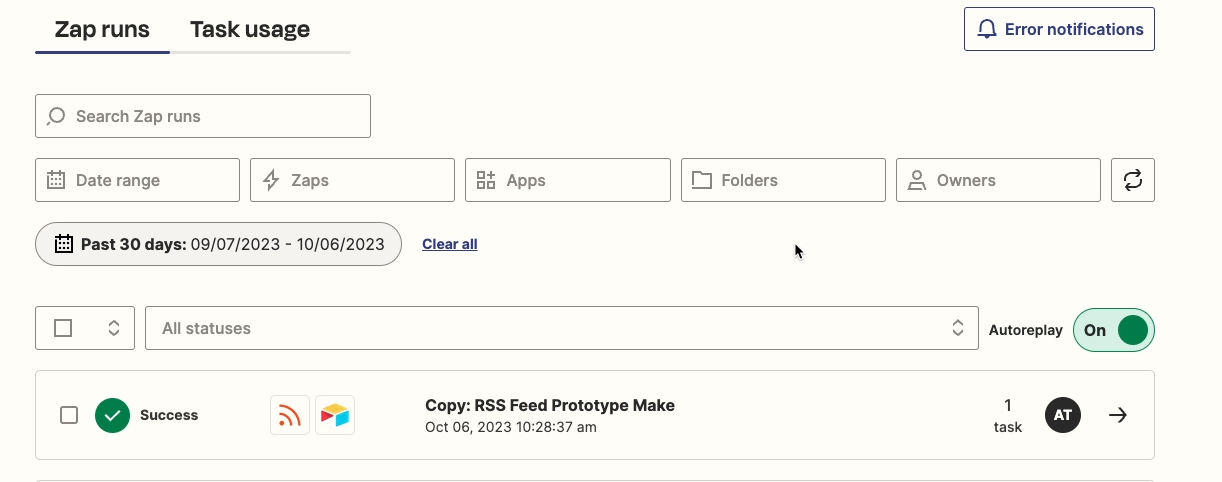
You can also use the search bar to search for keywords across Zap titles and the data that your zaps processed when they ran.
When we filter our history by our “Test Data, Variables, Default Values, Paths Demo” Zap, we can see a few results. Note that you’ll only see runs that occurred while your Zap was turned on and published. You won’t see tests in Zap history.
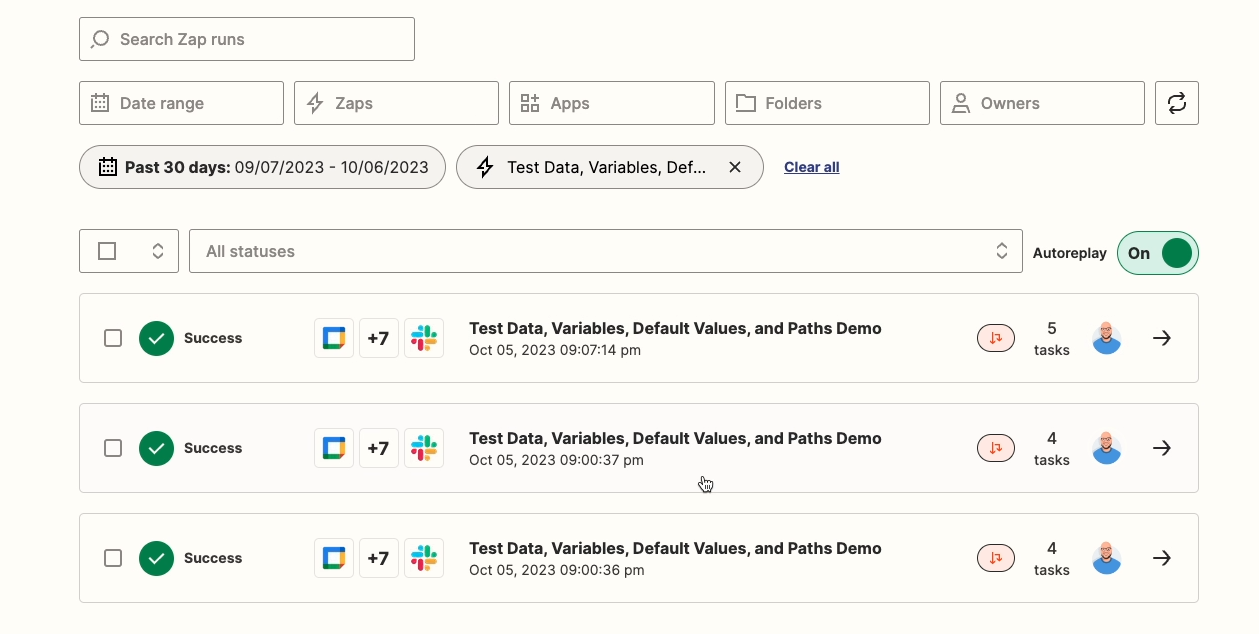
You can click on any of these entries to see more details.
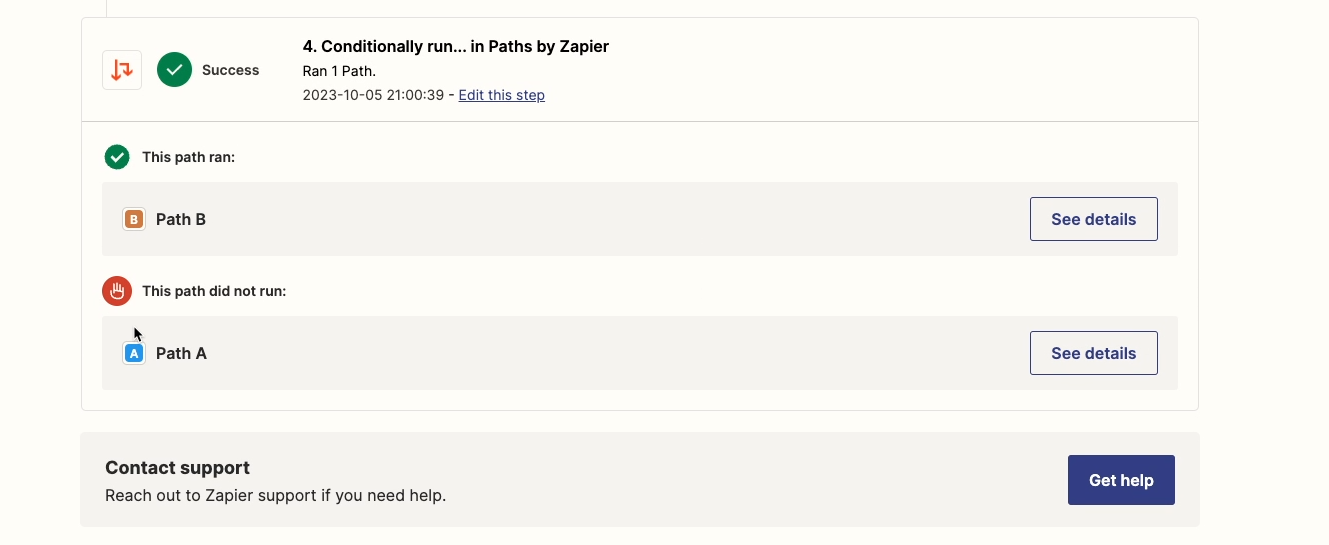
When we select an entry, we see a list of every action that ran, and a clear breakdown of which paths ran, and which paths didn’t.
Reviewing the history will let you see exactly where a Zap encountered an error, and will provide an error message explaining what happened.
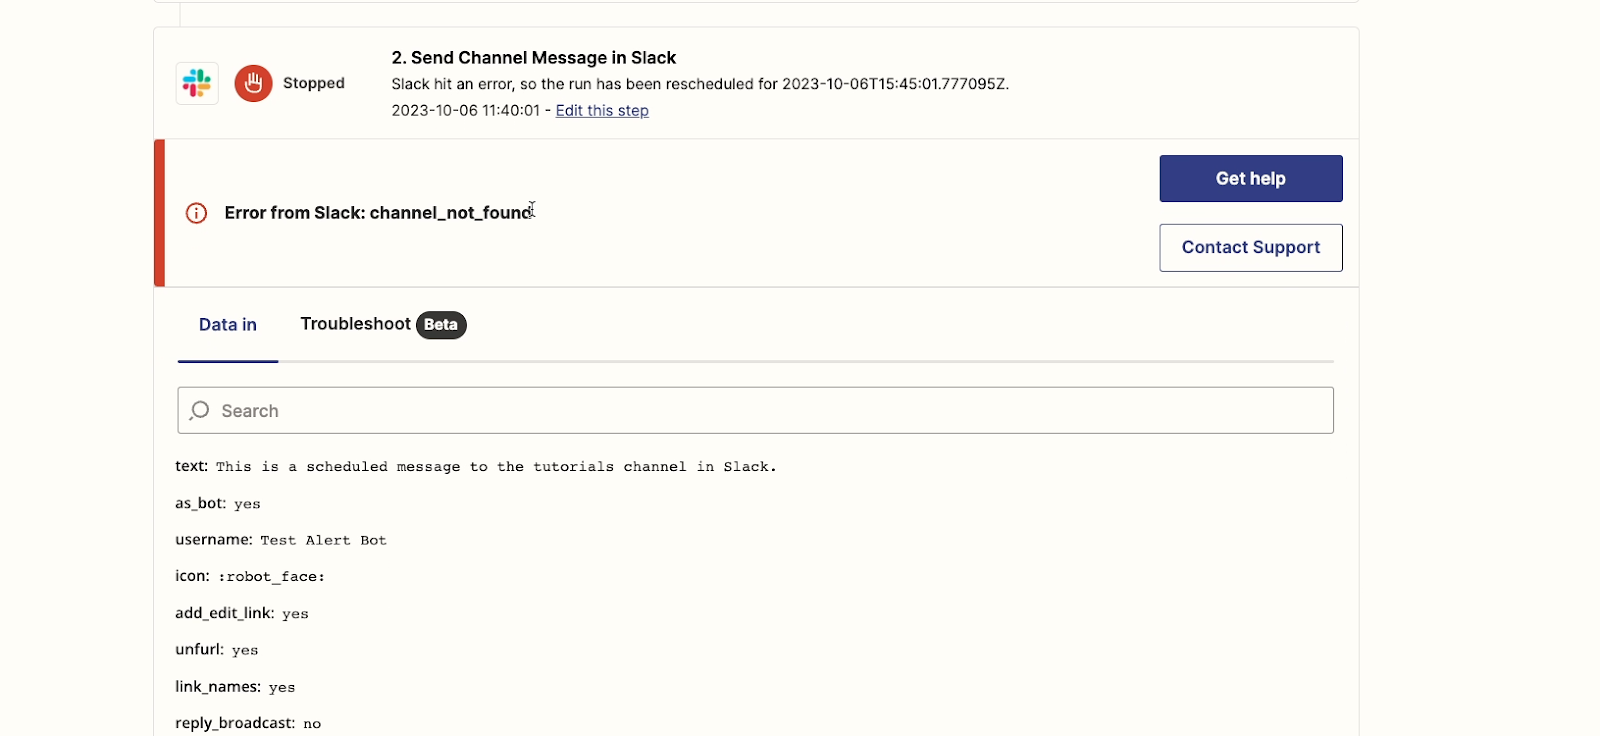
The error messages are often clear and helpful, but can sometimes be a little vague. These errors usually come from the app that you’re automating, not Zapier itself. A quick Google search with the error message usually helps.
Be vigilant with your zap history; it is the key to understanding what happened, and will guide you to a solution. Checking the history tab should always be your first step whenever a Zap isn’t working as expected.
Build advanced automations with a user-friendly platform
Zapier is an excellent automation platform for no-code beginners. But even a user-friendly platform like Zapier has the potential to build sophisticated automations that handle variable data with different outcomes.
Understanding how test data, variables, and paths work will help you to build more useful, robust Zaps for your team. And keeping an eye on the history tab will make it easy to fix any problems that crop up.
If you’d like to learn more about building automations with no-code providers like Zapier, be sure to check out our blog or our YouTube channel. You can also follow XRay on Twitter, Facebook, or LinkedIn.
With AI’s sudden rise to prominence in the last year, there are more AI tools available than ever.
Whether you want to use a standalone Chatbot or an AI utility integrated directly into your favorite apps, there’s an option out there for you.
In this post, we’re going to take a closer look at two specific AI tools that you might be considering: ChatGPT and Notion AI.
We’ll see how both of them stack up to each other, and we’ll help you to answer the question: is Notion AI worth it?
We’ll compare the features of ChatGPT and Notion, and we’ll explore how each app can fit into your workflows. We’ll also break down pricing for both Notion AI and ChatGPT, so you can decide which is the better value for you and your team.
Let’s get into it!
UX Comparison: Enter prompts directly in Notion, or send messages to a standalone chatbot
First, let’s take a look at the key differences between each AI tool’s User Experience, or UX.
ChatGPT’s UX: a familiar messaging layout
ChatGPT is a standalone chatbot.
To use ChatGPT, you just need to create an account at chat.openai.com, enter your prompts in the text box, and wait a moment for your AI answer.
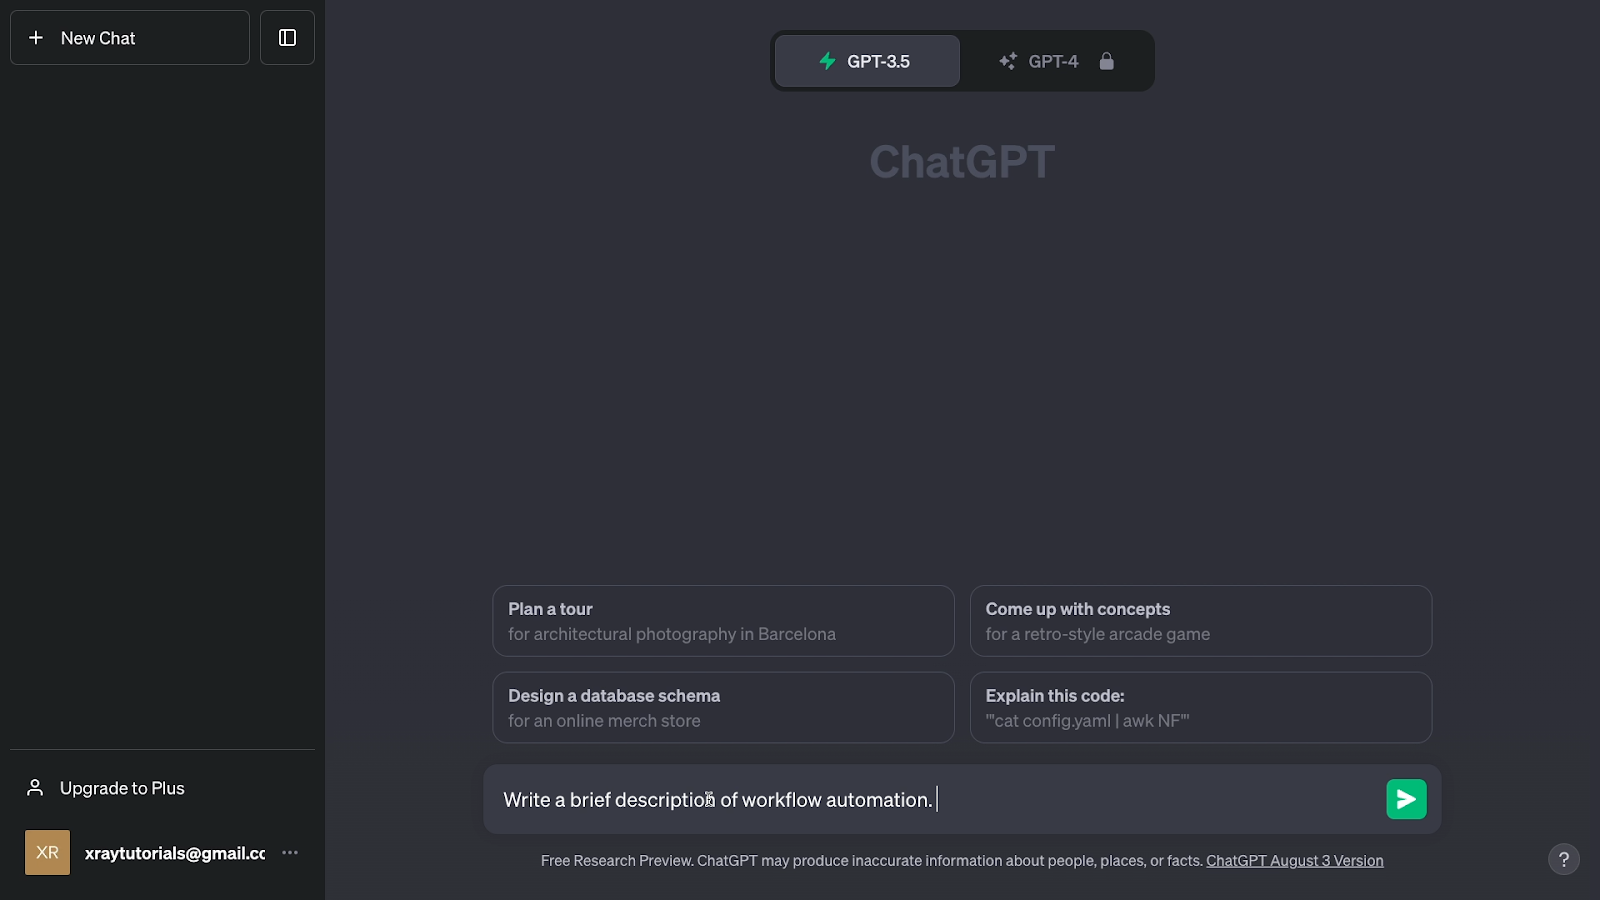
The UI is essentially a standard messaging interface. You’ll see every recent chat in a menu on the left, and you’ll see your conversation with the AI in the main window in the middle of the screen.
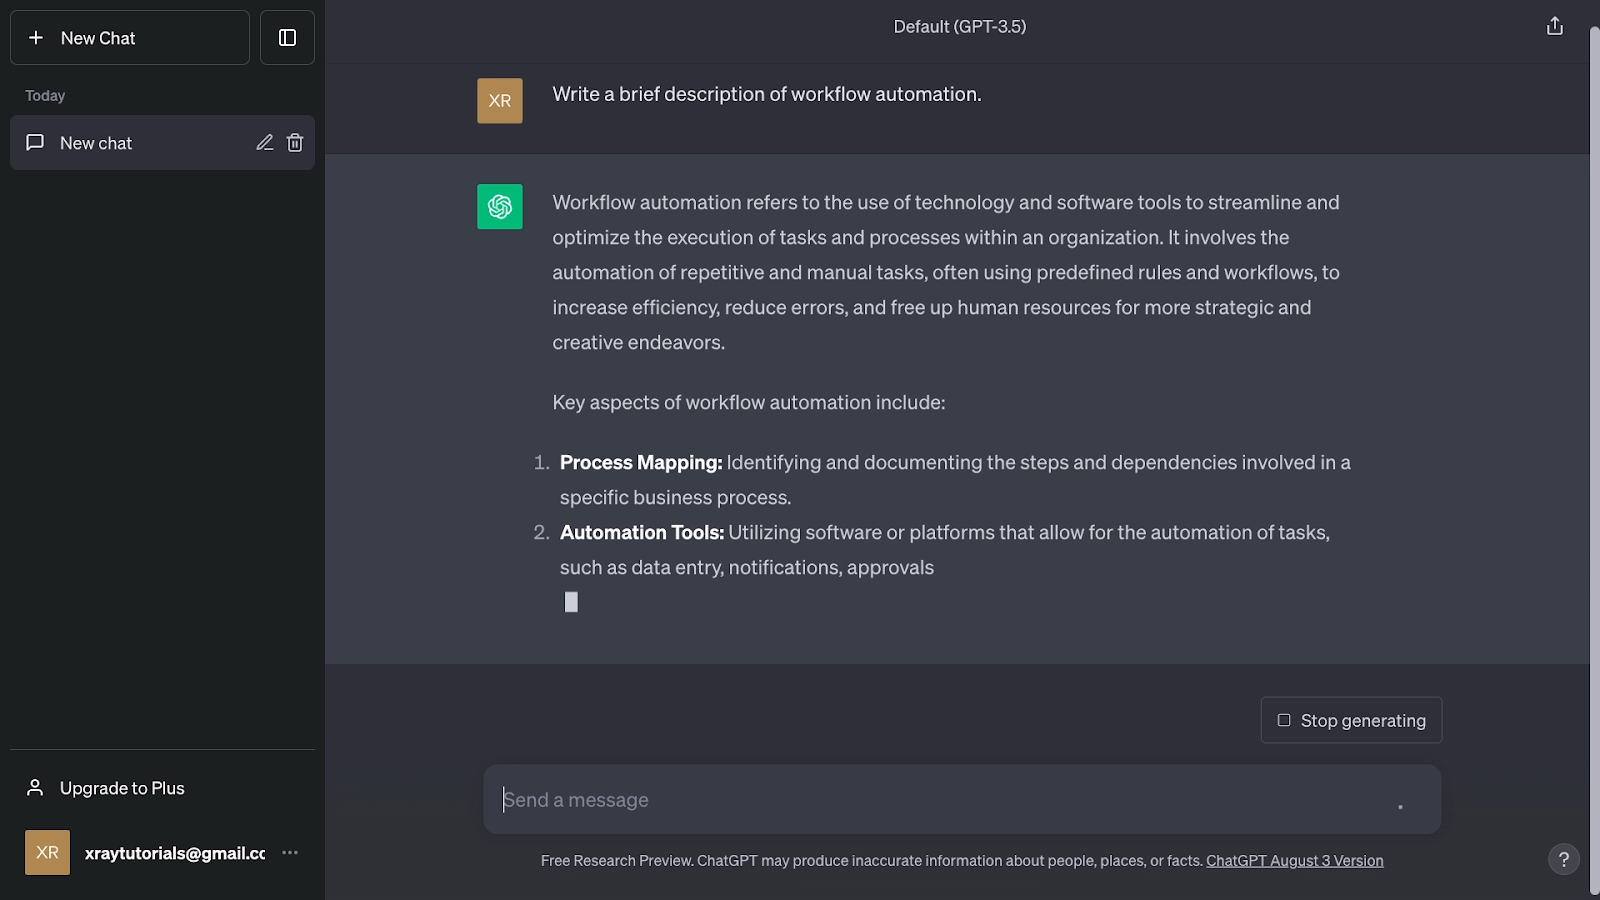
On the ChatGPT homescreen, you’ll see a few suggestions for prompts that you might want to send.
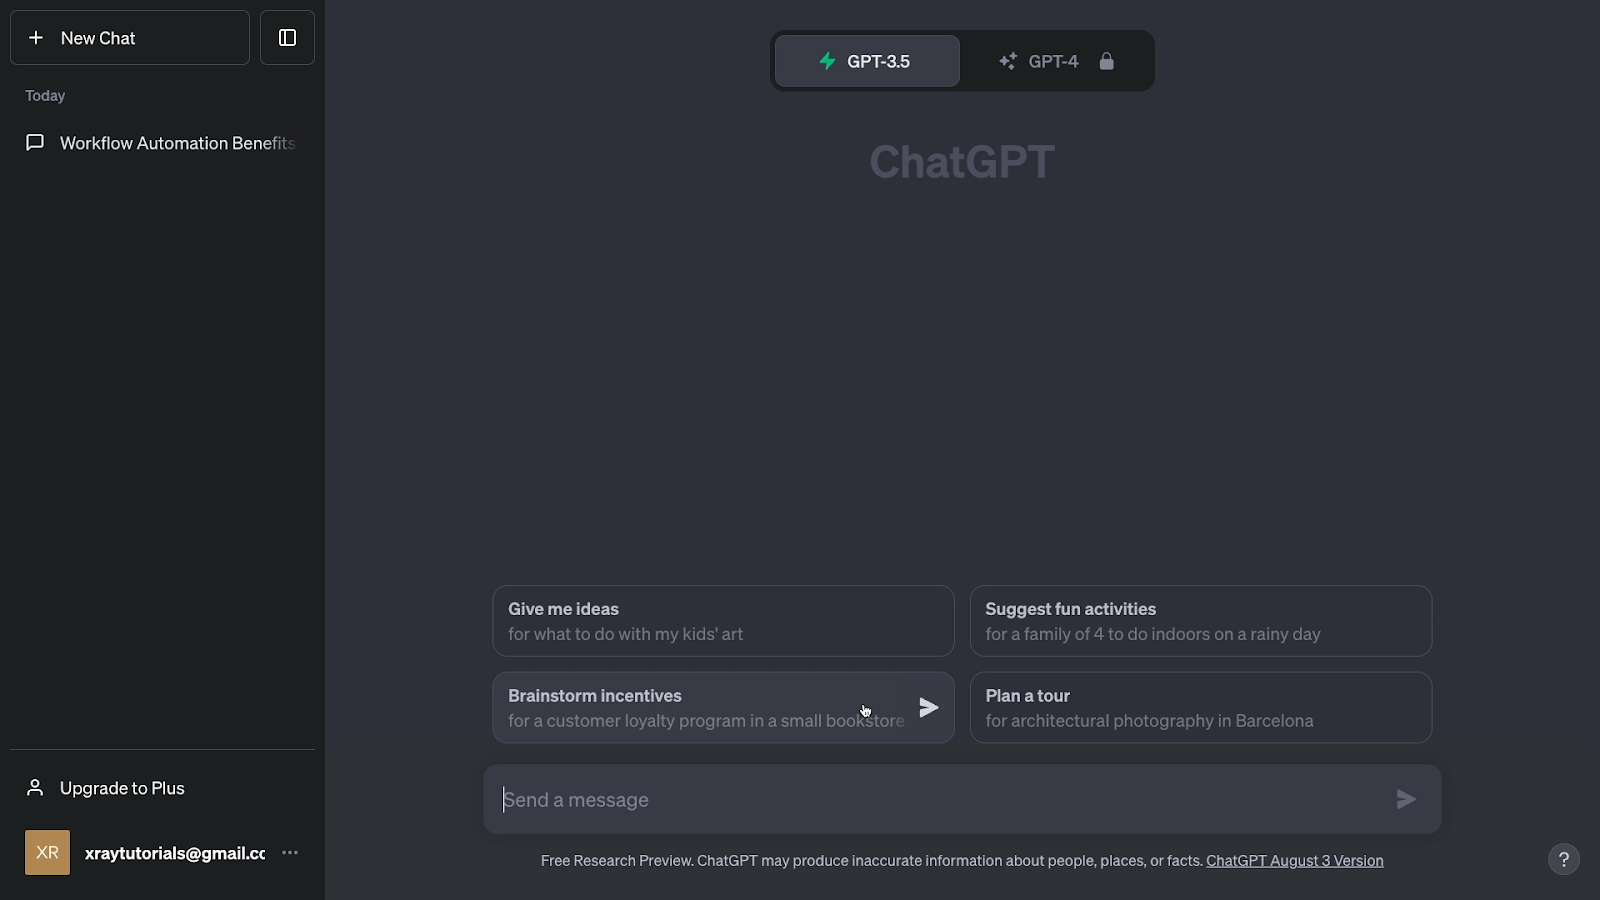
Clicking on any of these will instantly enter the prompt into a new ChatGPT conversation, and ChatGPT will immediately begin generating its answer.

Notion AI’s UX: direct integration into your documents
While ChatGPT is a standalone app, Notion AI on the other hand is an integrated AI tool that’s built directly into Notion.
If you’re not familiar with Notion, it’s a highly versatile app for creating documents, tracking projects, and building a wiki for your team.
Each page or table can be extensively customized with configurable blocks, including a recently added block for Notion AI.

Like any block, Notion AI can be accessed by simply typing forward slash, and searching for its name.
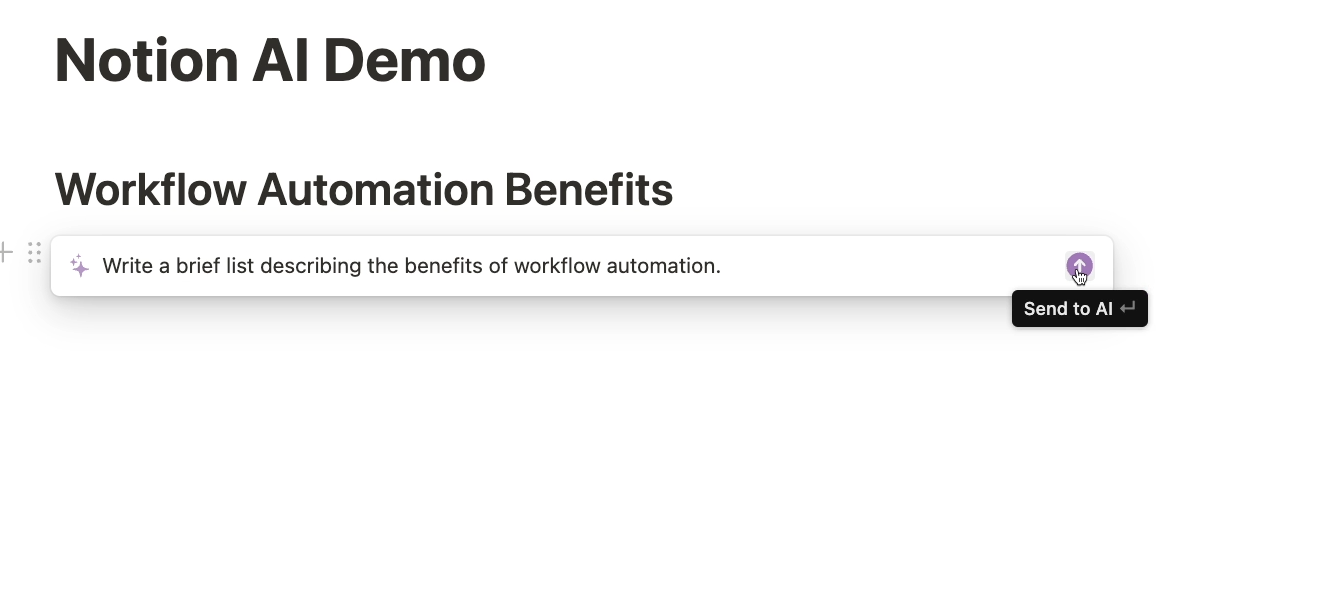
Once you’ve accessed Notion AI, you can enter a prompt into the text box in basically the same way as you would in ChatGPT. You’ll then see several options for inserting the response into your Notion document.
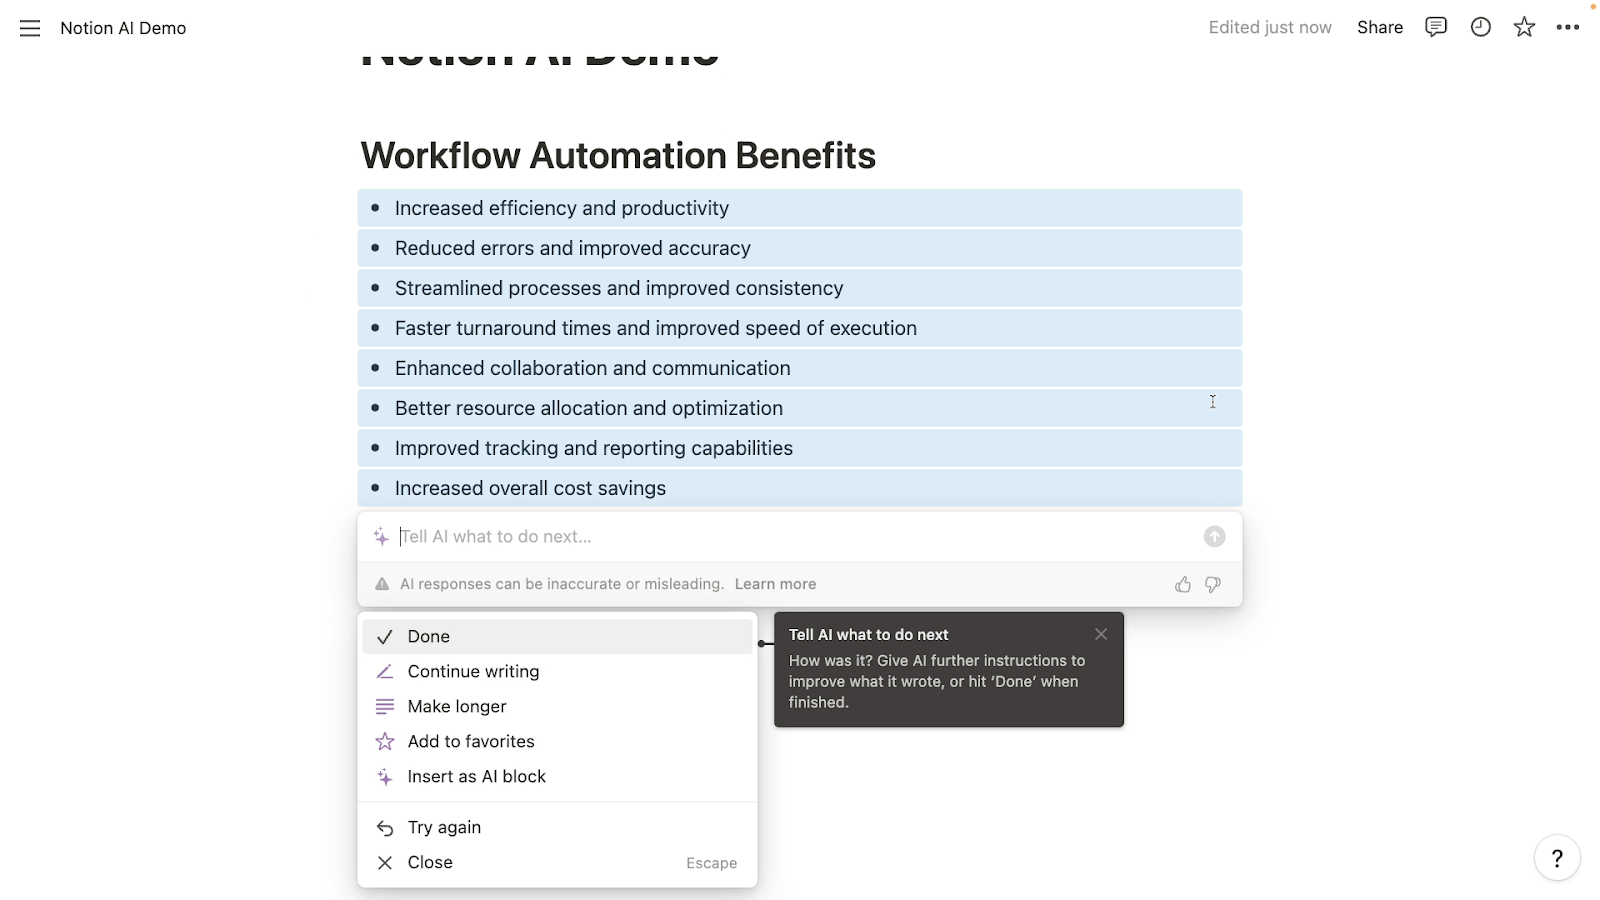
Similarly to ChatGPT’s suggestions, you can also use some of Notion’s preconfigured prompt templates.
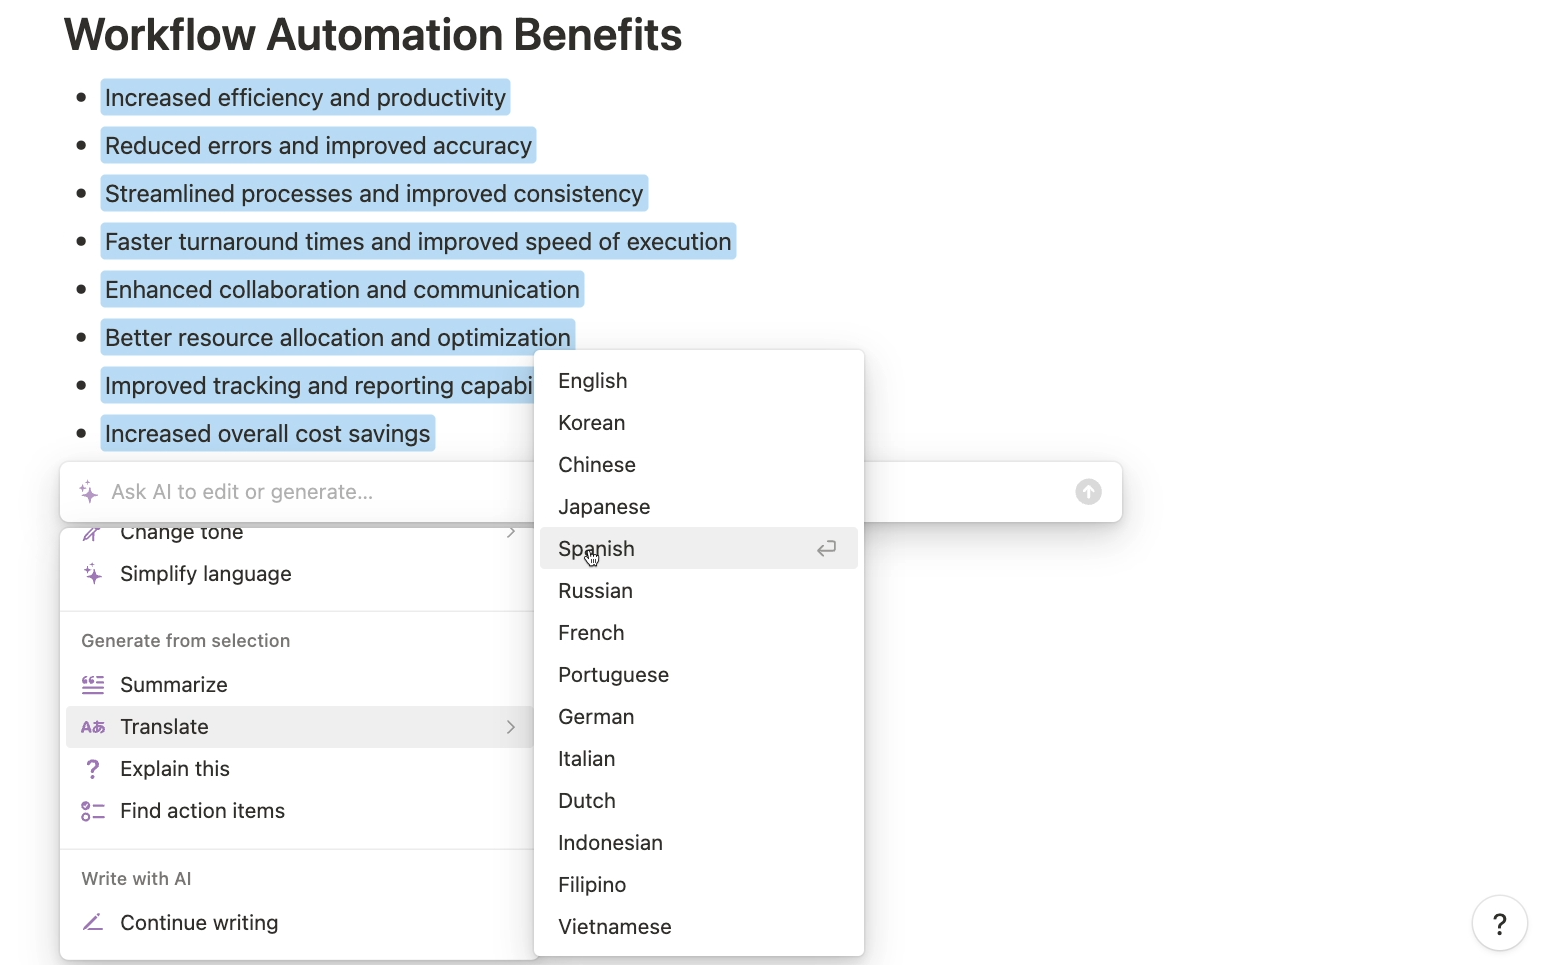
These will automatically enter a prompt to perform common actions like translating text, or finding action items.

However, Notion AI also offers a couple alternative ways to enter your prompts.
Highlight text to quickly reference it in your Notion AI prompts
If you want to reference an existing document or passage of text in your prompt, you can simply highlight that text in Notion, then type a related prompt.
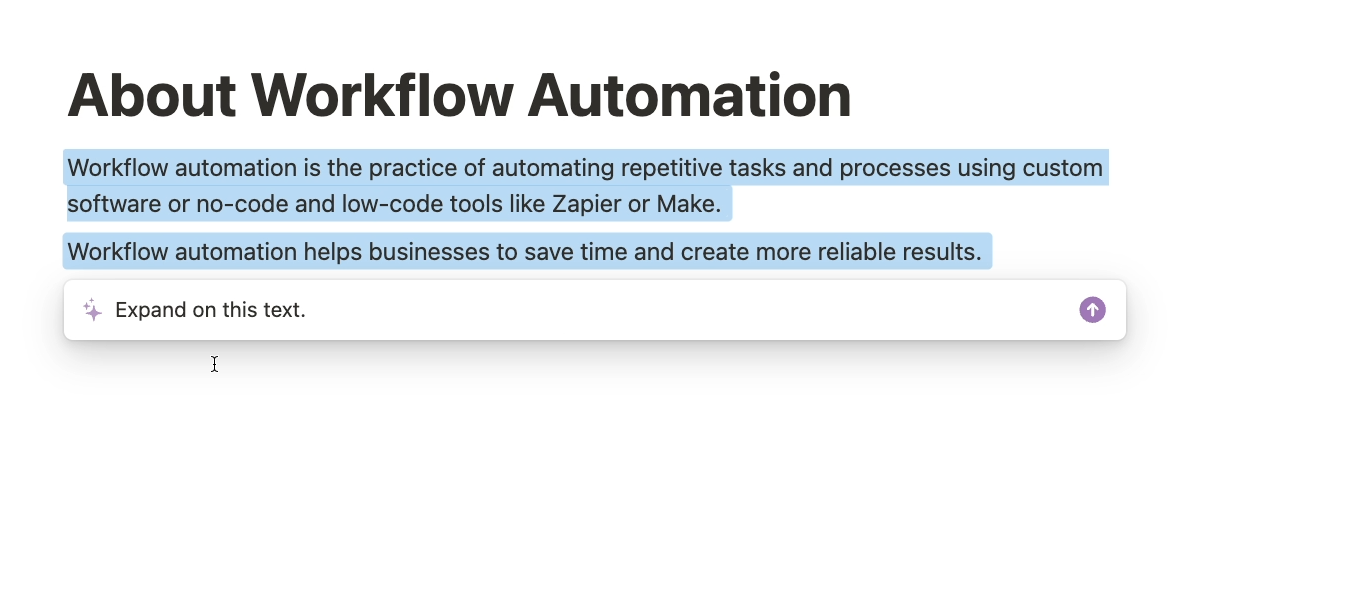
For instance, you might want to ask Notion AI to expand on the highlighted text, or to change its tone and style.
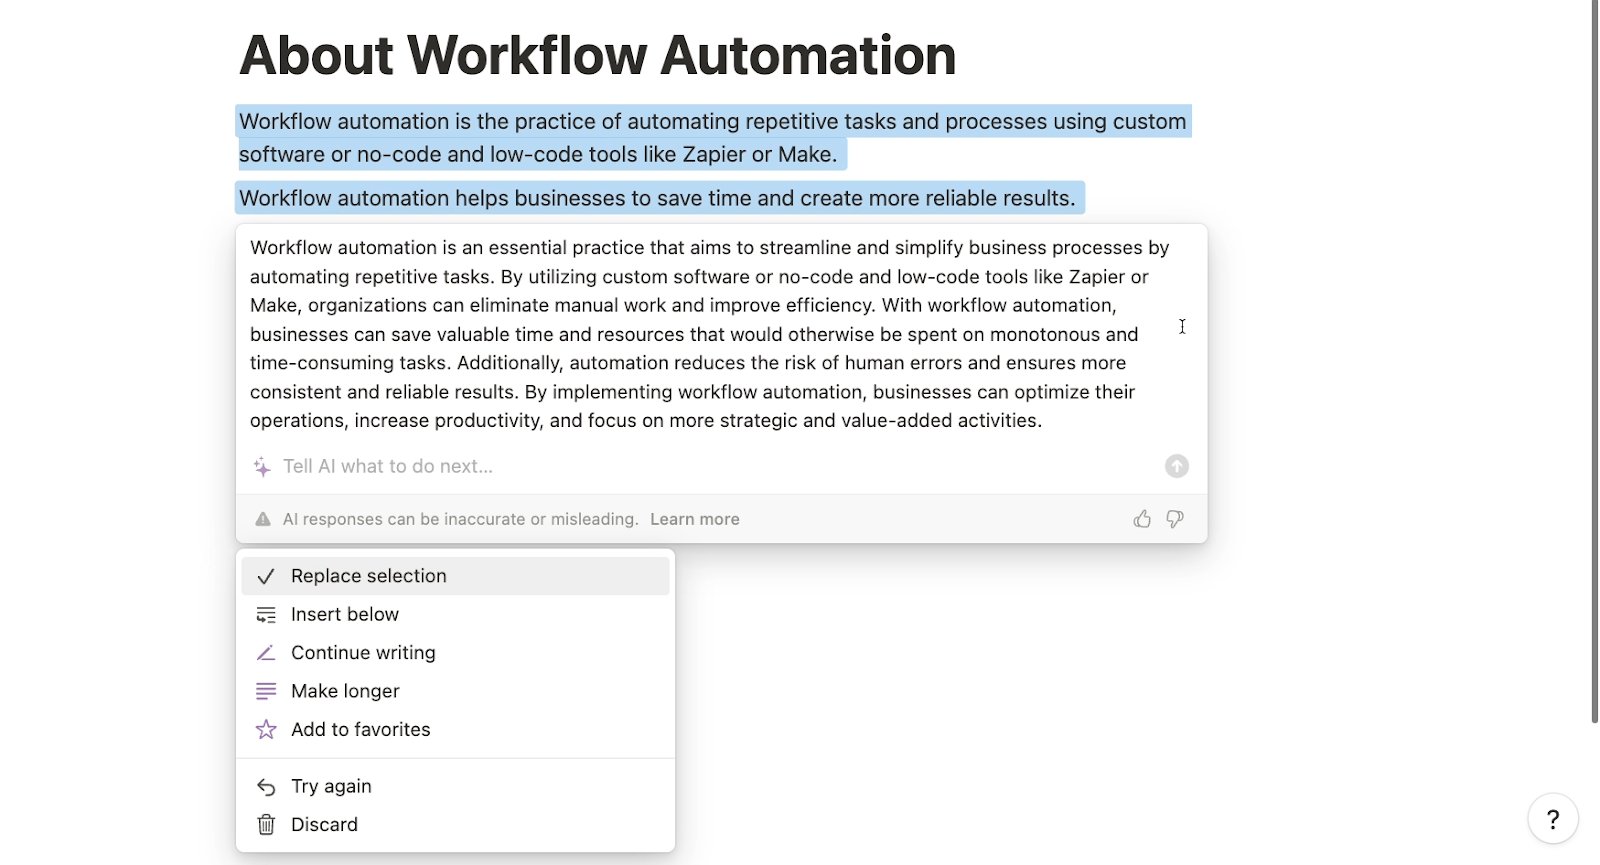
Finally, Notion AI also allows you to create AI blocks. AI blocks allow you to run a prompt with the click of a button.
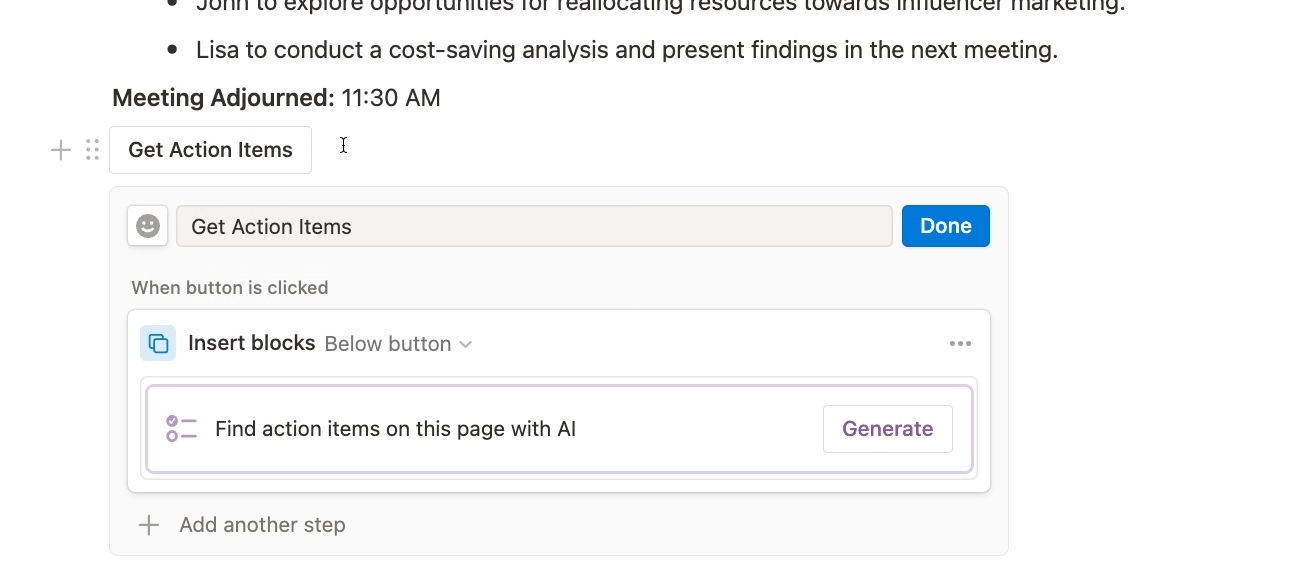
For example, you might add an AI block with a “Find Action items” prompt into a meeting notes template.

That way, you can just click on the AI block to get a summary of each meeting after you’ve filled in the notes.
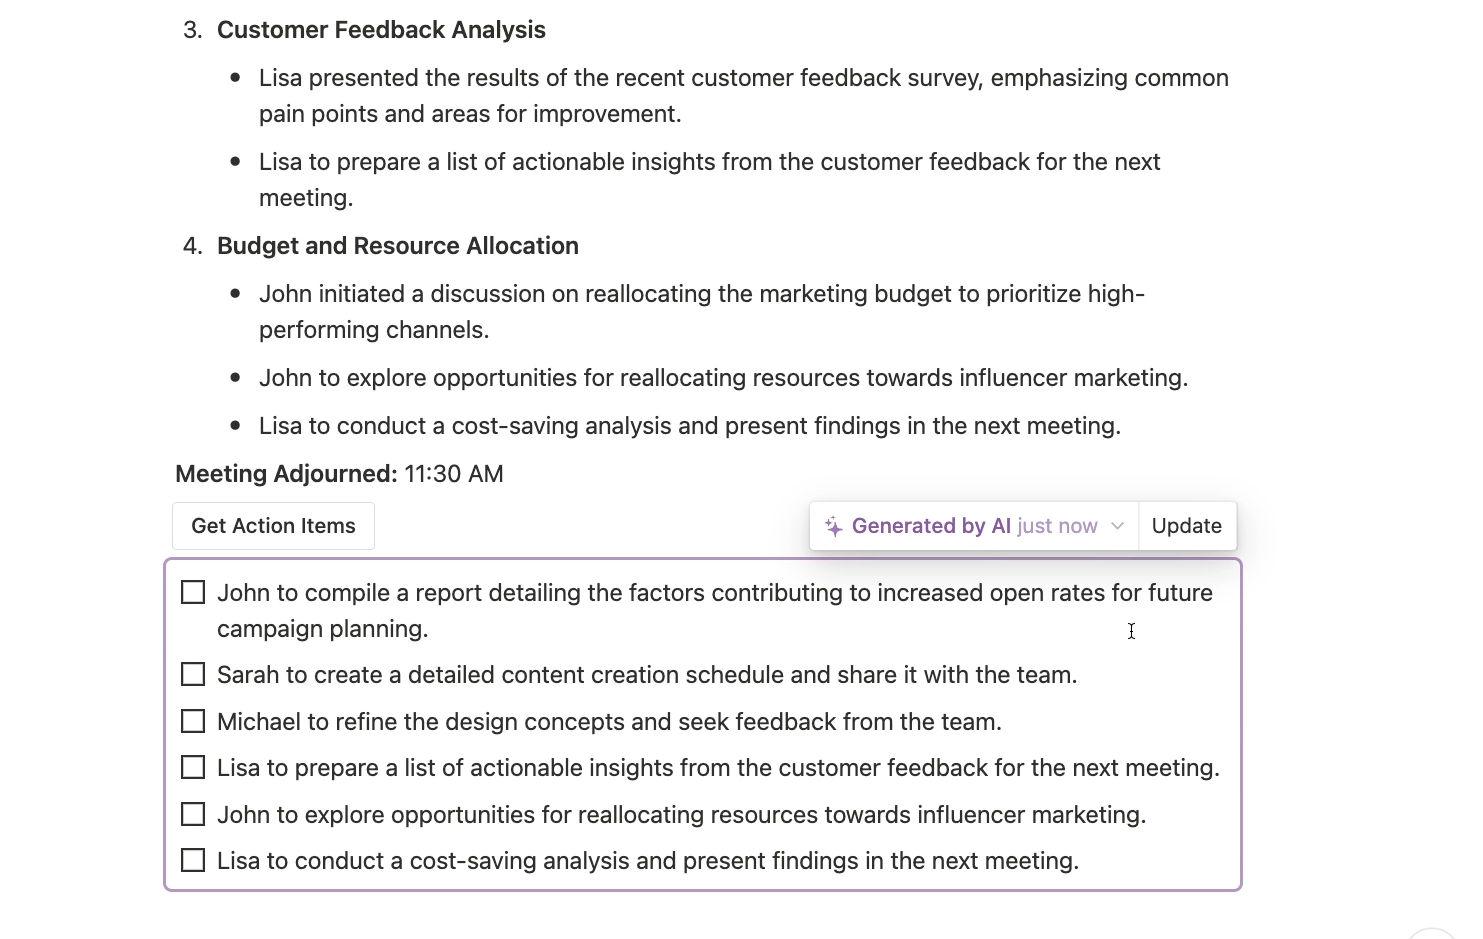
Ultimately, ChatGPT and Notion AI offer two very different ways of interacting with AI. But do these AI tools actually perform different functions?
Notion AI and ChatGPT’s Functionality
Despite their distinct user experiences, Notion AI and ChatGPT actually boast very similar capabilities.
Generate creative writing samples, brainstorm ideas, and more
Relying on language models, both can generate realistic text for nearly any context or use case you might think of.
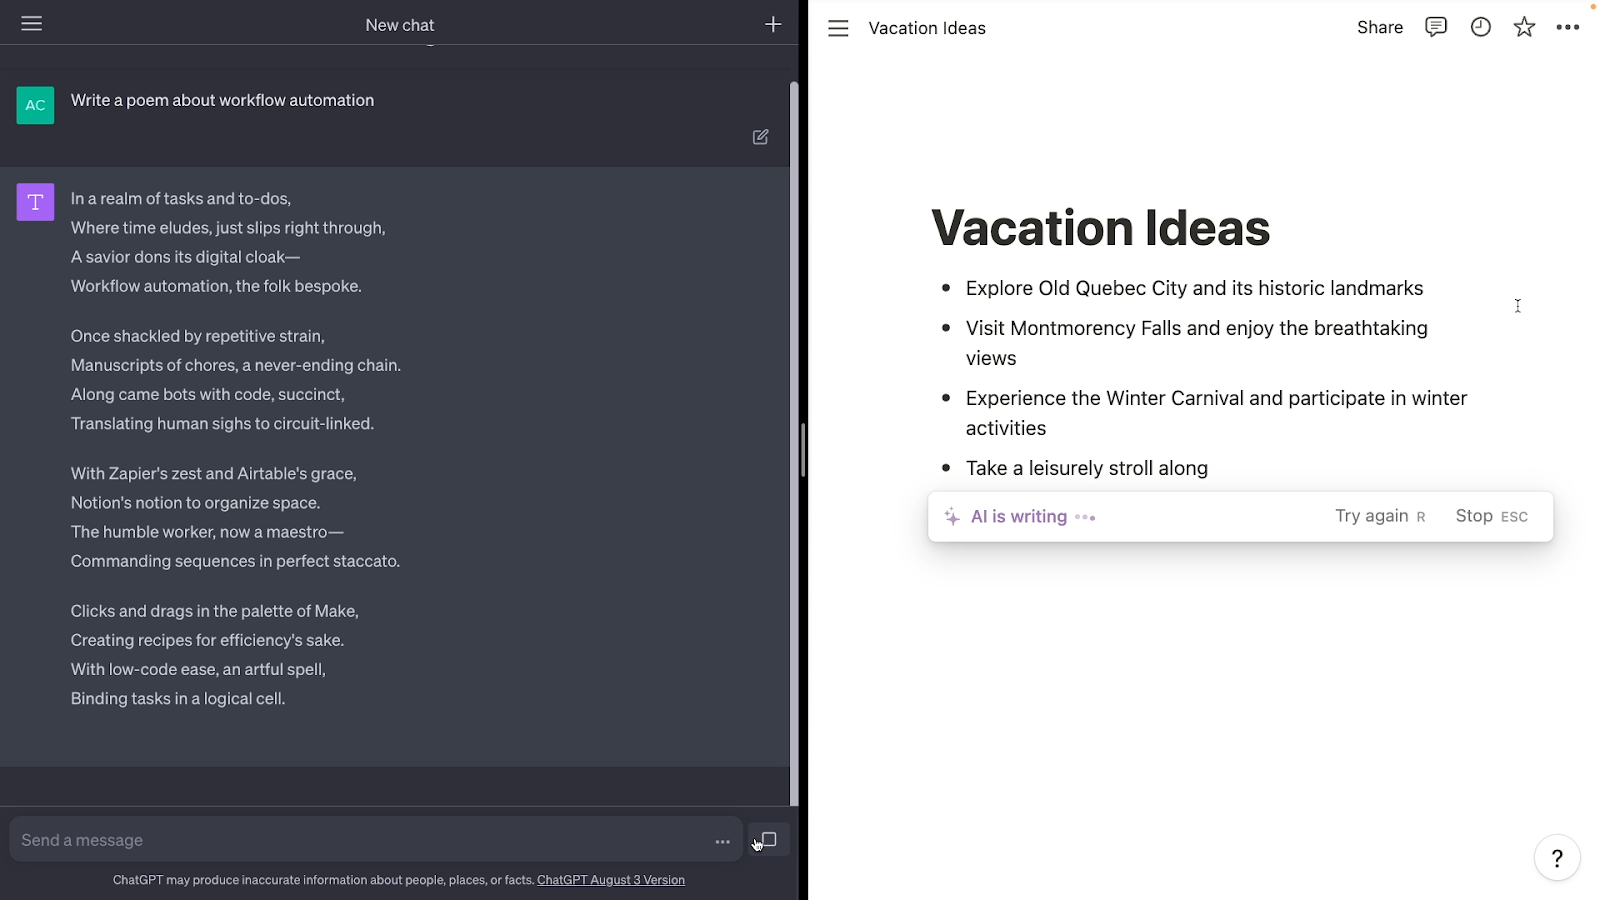
They can handle creative writing like poems, draft marketing copy for a newsletter, offer up a list of vacation activities for you and your family, or brainstorm a chore schedule for keeping the house clean.
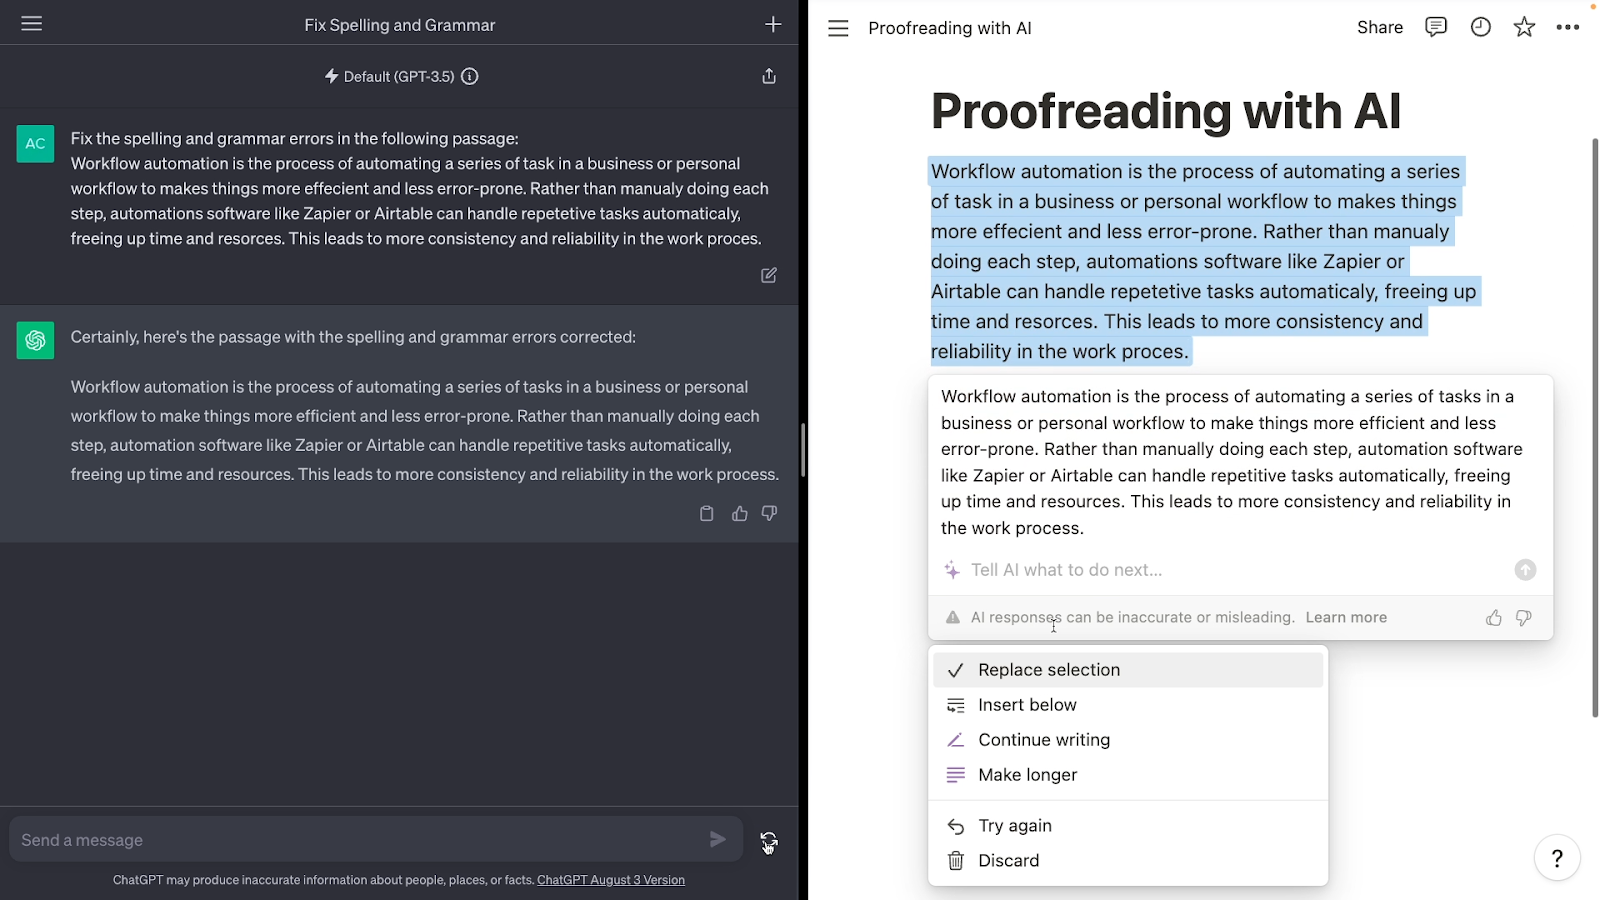
Notion AI and ChatGPT can also help you to check the spelling and grammar of a passage of text, or translate it into another language.
Write code with ChatGPT and Notion AI
You can even ask both AI tools for help writing code and scripts, although their answers won’t always be 100% reliable.

However, they’re usually an excellent starting point for building a section on a webpage, or creating a function to use in Google Sheets or Airtable.
Ask for styled and formatted text with markdown
Both Notion AI and ChatGPT are also capable of formatting the text that they generate.
Using a simple syntax called “Markdown”, which is very popular in web applications, they can add headings to their answers, apply bold or italic styles, and even create tables and checkboxes.
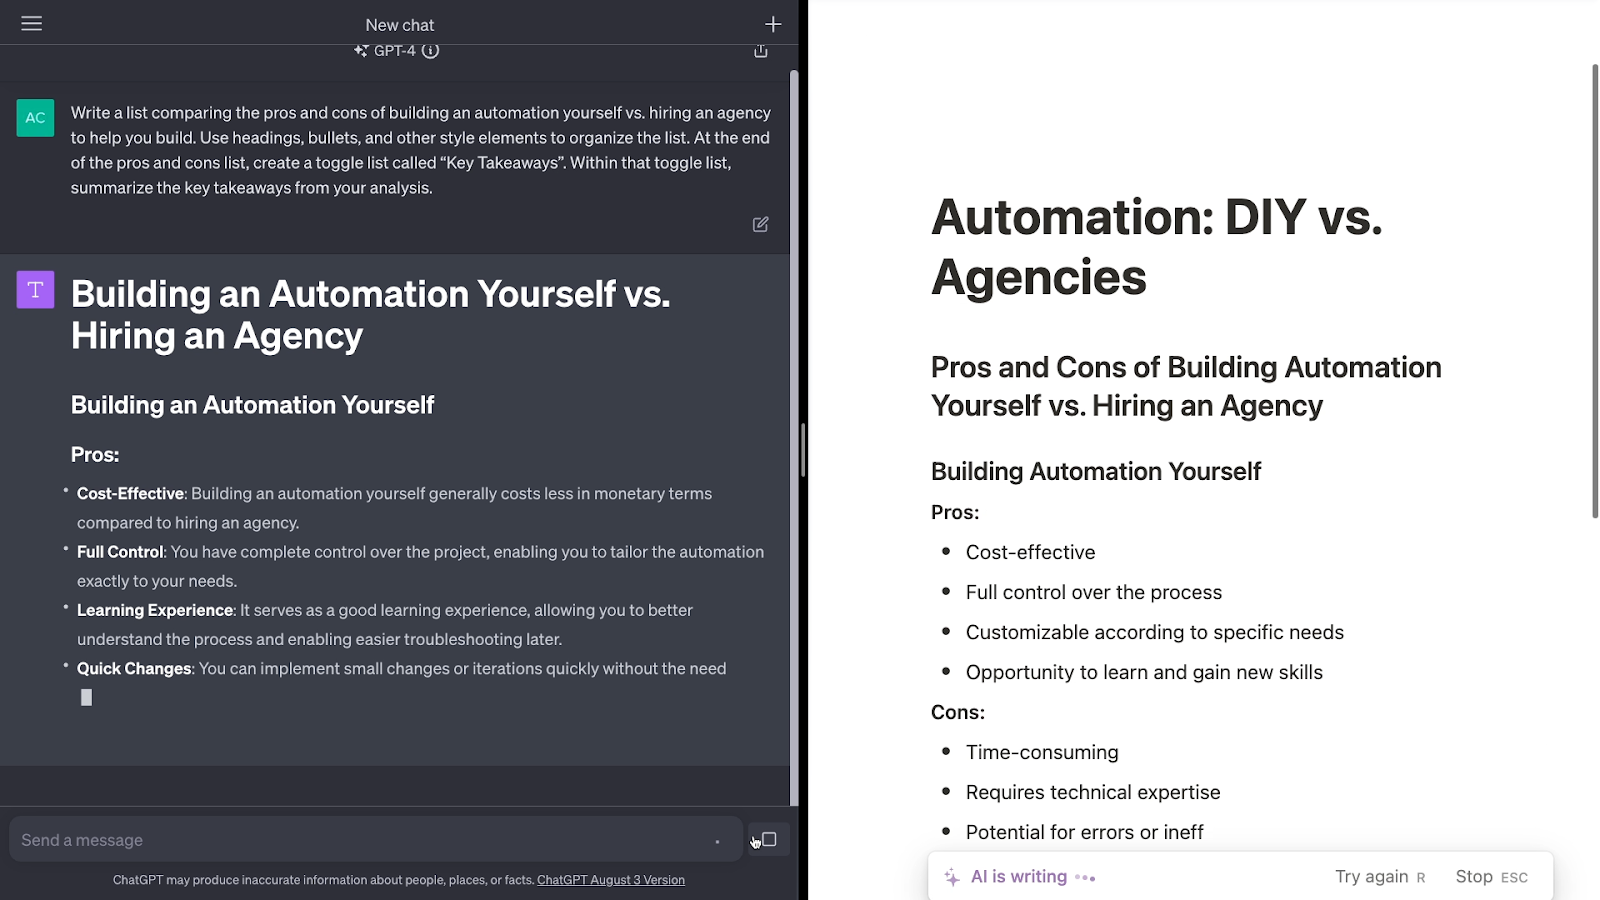
After some testing, the only difference we’ve found so far is that Notion AI can create fully functional toggle lists, while ChatGPT seemingly can’t.
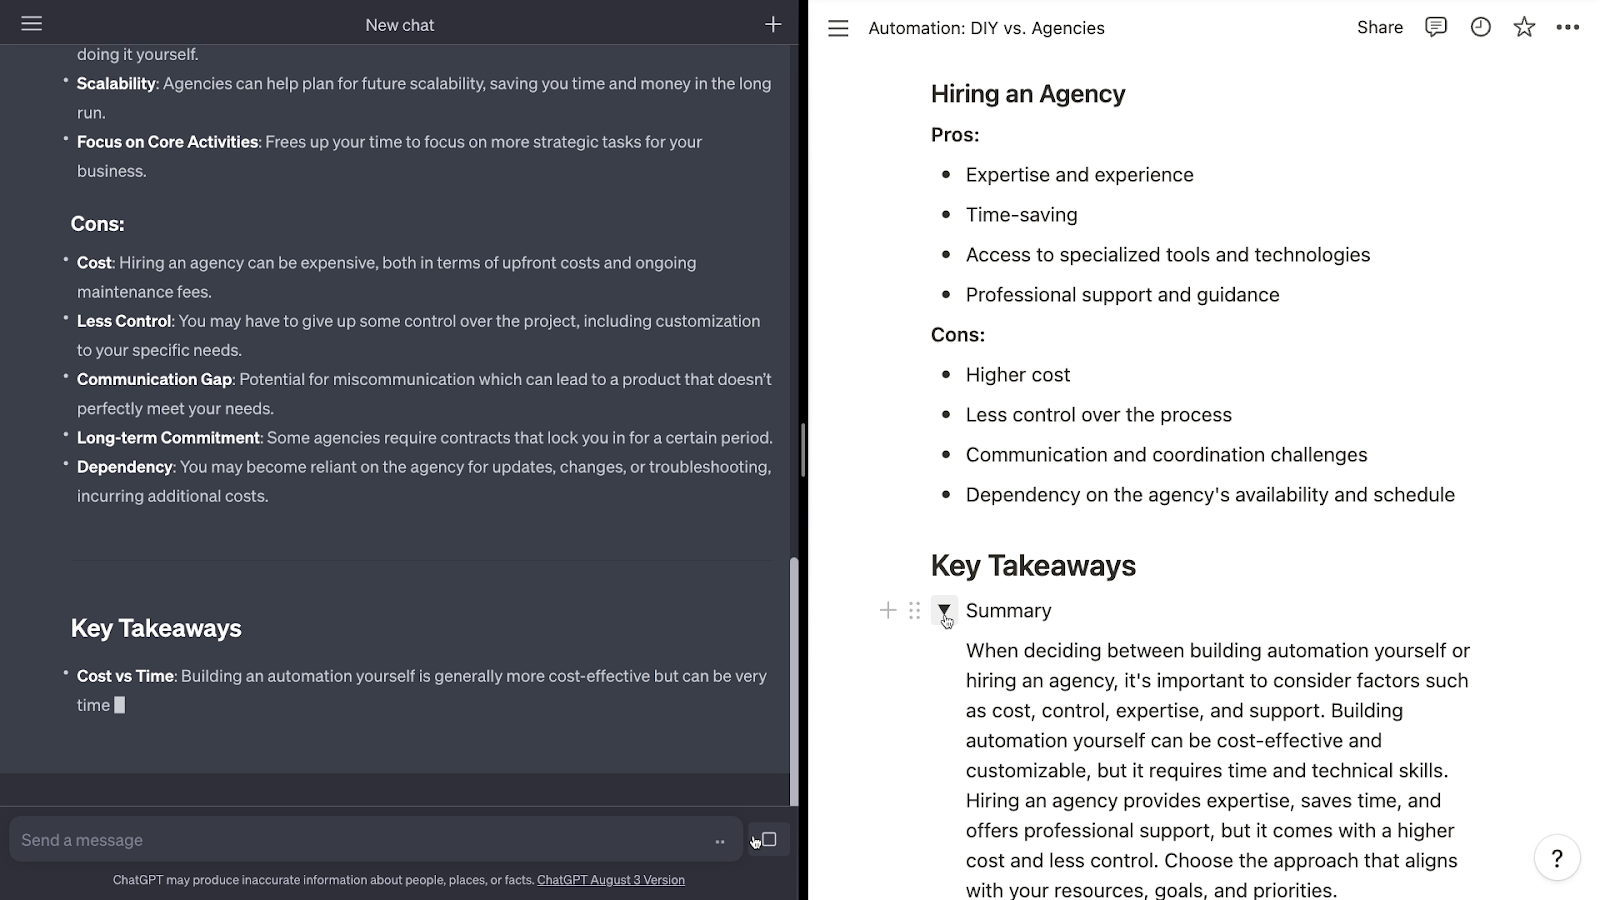
.
Use Notion AI for automatically styled blocks, or copy and paste from ChatGPT
Since Notion uses markdown to format all of its blocks, any formatting that Notion AI uses will be applied in the app.
All of the headings, text styles, tables, and other formatting options will work in the exact same way as any formatting that you apply manually in Notion.
When you copy text generated by ChatGPT, you’ll also copy the markdown formatting along with it.
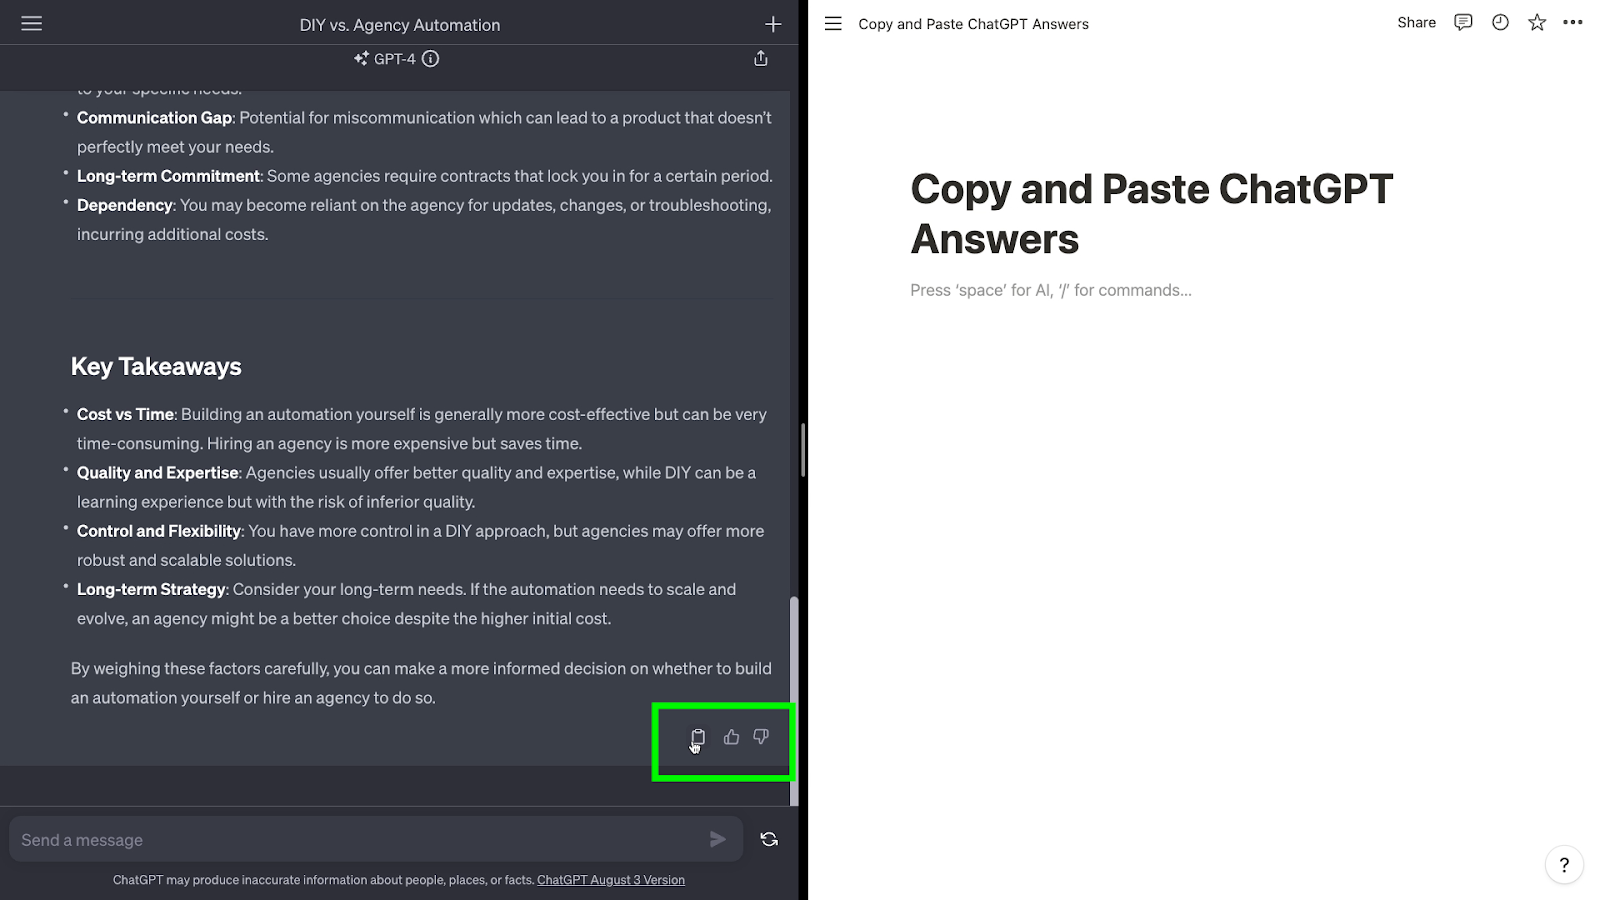
Then, when you paste the text into an app like Notion that supports markdown, all of the formatting will be preserved.
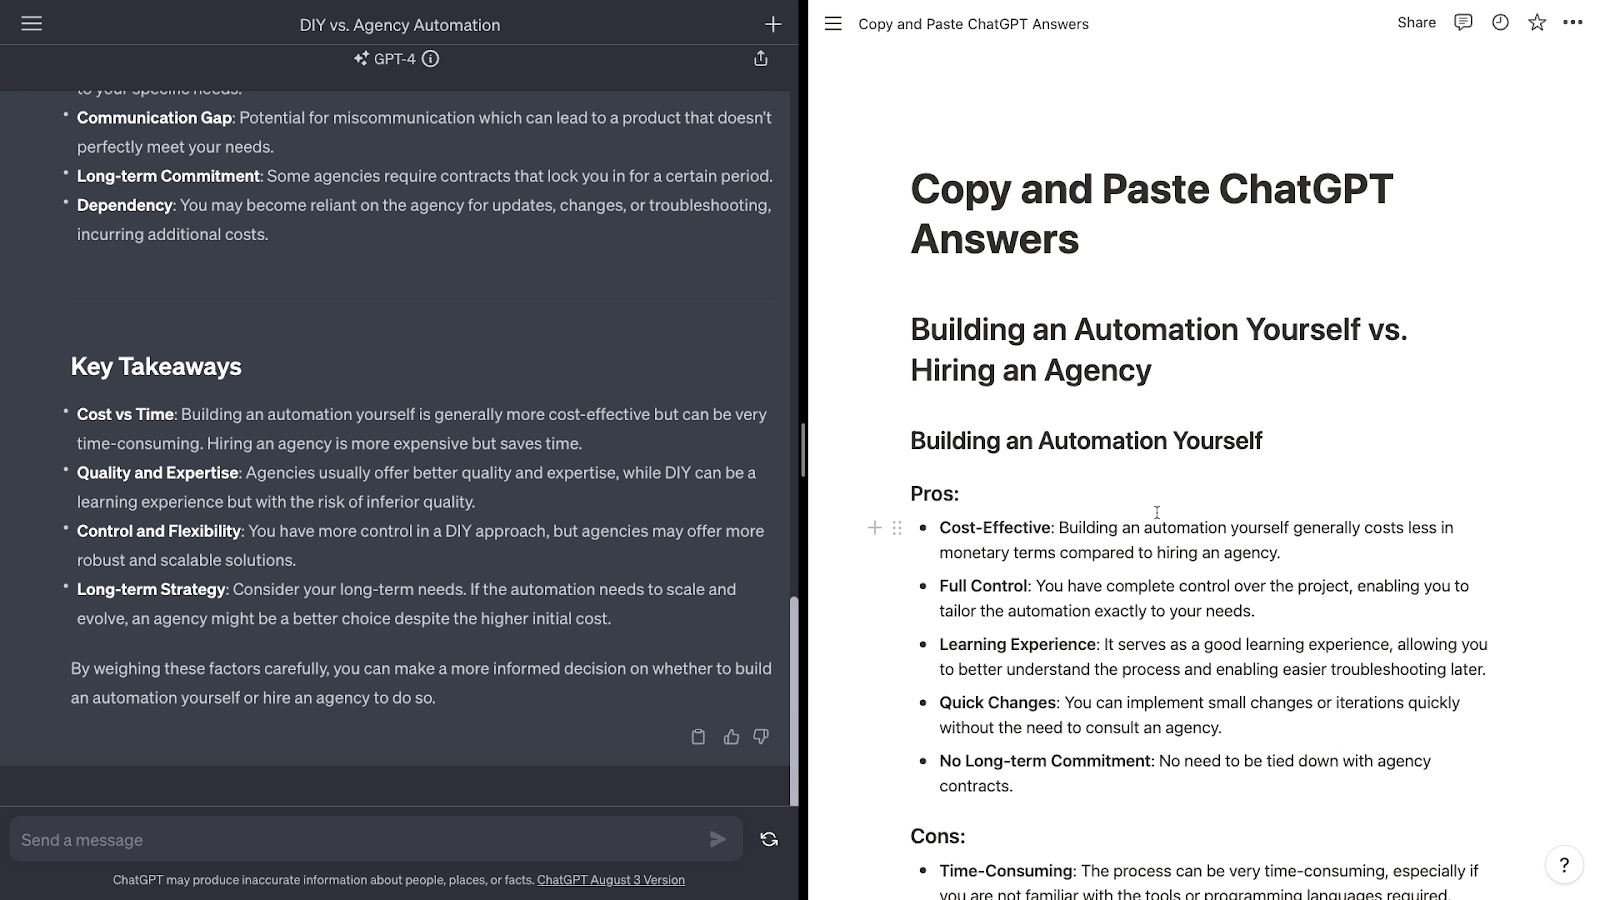
Ultimately, both Notion AI and ChatGPT can provide fully formatted and styled text in response to your prompts.
However, if you’re using ChatGPT, you’ll need to copy and paste the AI’s answer into whatever app you’d ultimately like to store or publish it in. With Notion AI, your formatted answer will already be generated in an app that’s ideal for keeping track of your documents.
Shared limitations: focus on language tasks, not math
Just as the two AI tools have similar strengths, they also have similar weaknesses.
As AI language models, they’re excellent at producing sentences that sound like they could have been written by a human. But they’re not always so great at math, or even just counting.
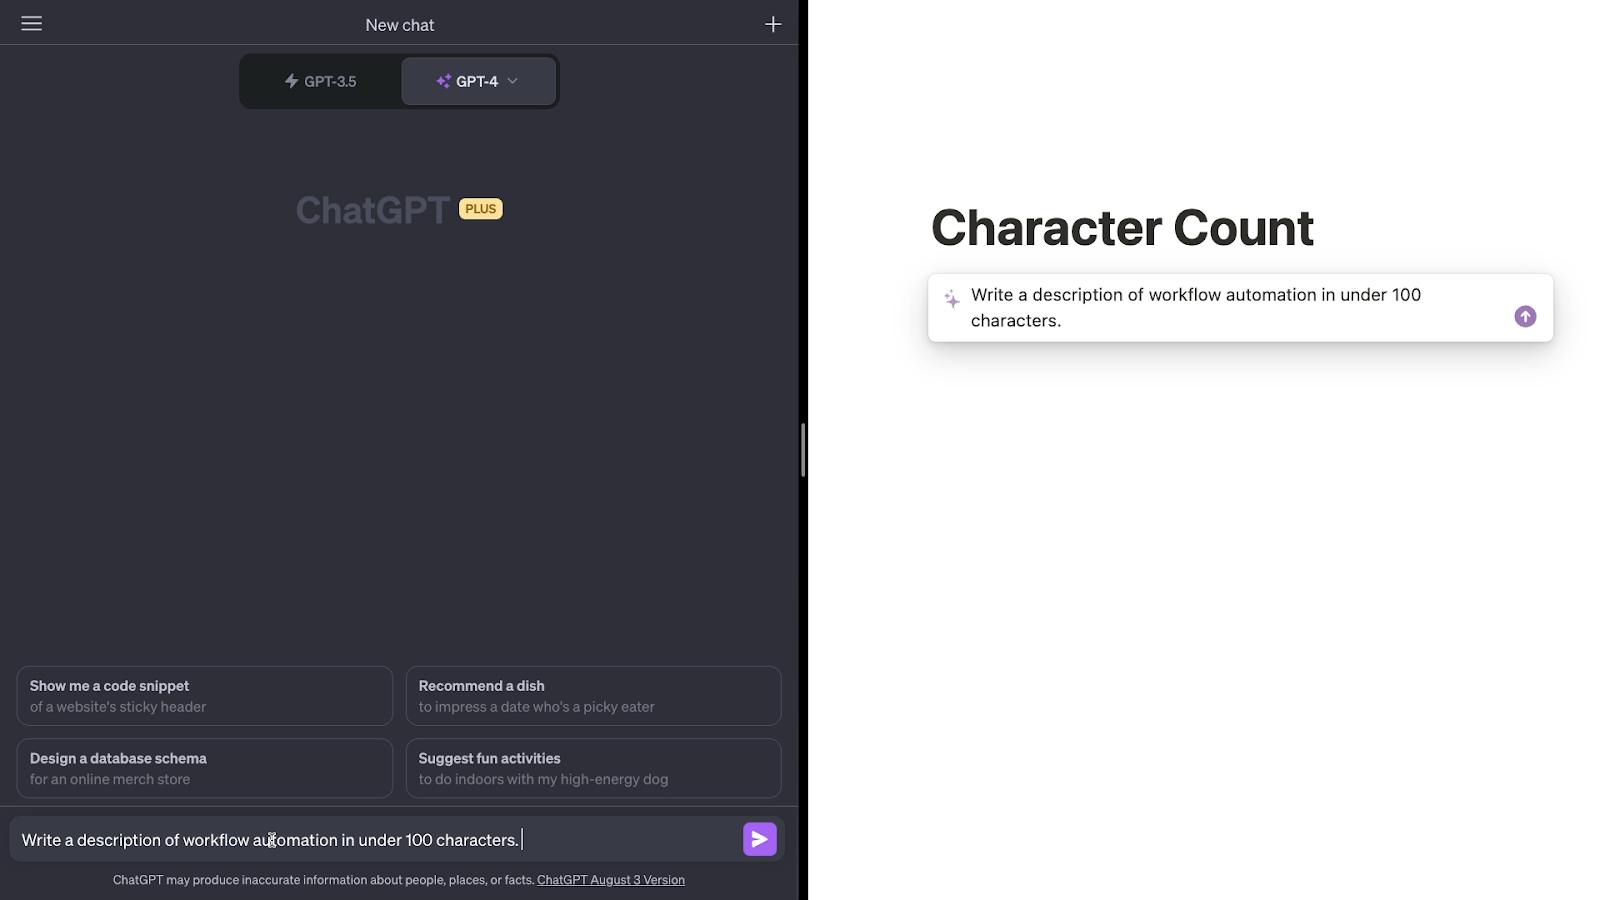
Complicated math problems often stump both AI tools, and neither is particularly good at sticking to a word or character limit. In the image below, you can see that ChatGPT managed to stick to our request to provide a description of less than 100 characters, while Notion overshot the mark.
However, ChatGPT also frequently fails to abide by character limits.
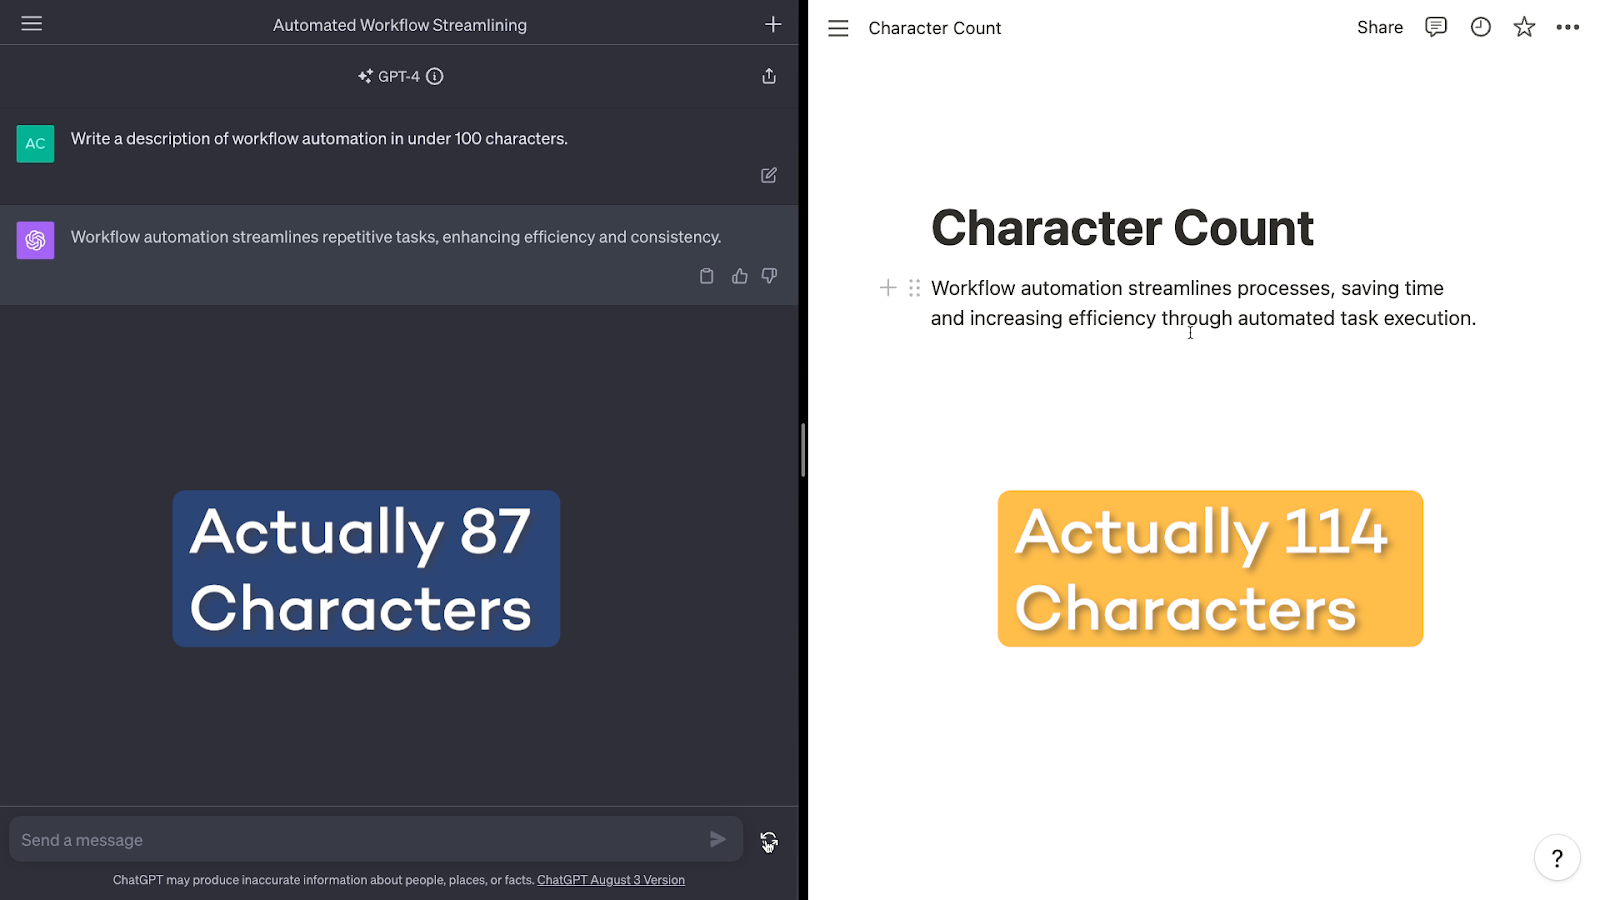
As long as you’re using these AI tools for the language processing that they’re meant for, they can both perform virtually all of the same tasks - and perform them well.
The key difference is that Notion AI’s answers are integrated directly into your Notion pages, while ChatGPT’s answers will need to be copied and pasted into another app.
If Notion is a key part of your workflows, Notion AI could be a much more efficient AI tool. However, if you’re not already a Notion user, or if you want to use AI prompts to generate text in several different apps, Notion AI won’t offer as much of a benefit.
ChatGPT and Notion AI’s language models
With our earlier talk of language models, some more technical readers might be wondering: which models do Notion AI and ChatGPT actually use?
Choose from GPT3.5 and GPT4 in ChatGPT
The answer for ChatGPT is very simple. As you can see when you open up the app, ChatGPT offers two models at the time of writing: GPT3.5, and GPT4.
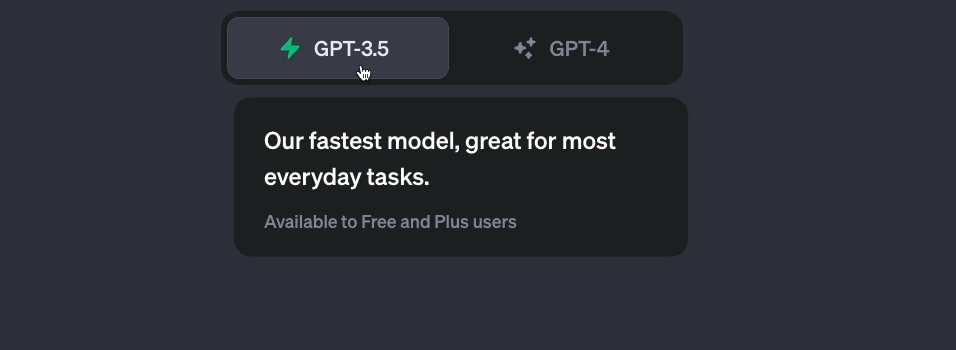
However, GPT4 is only accessible to users with a “Plus” plan. We’ll discuss that plan in more detail in the pricing section of this article.
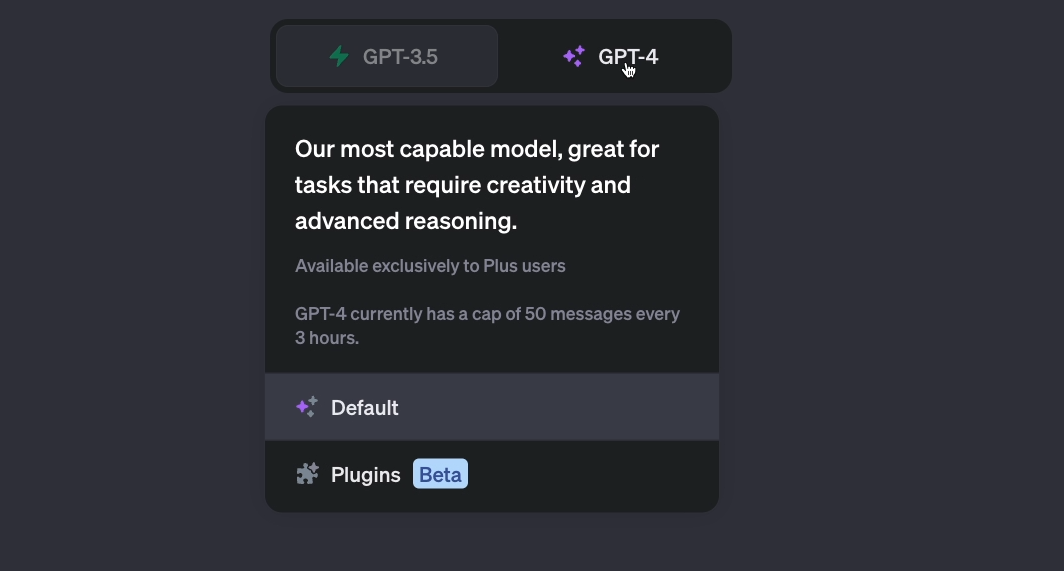
3.5 and 4 are similar language models built by OpenAI, the organization that developed ChatGPT.
However, GPT4 is a more advanced model. It’s been trained with more parameters, and is better suited to complex creative tasks.
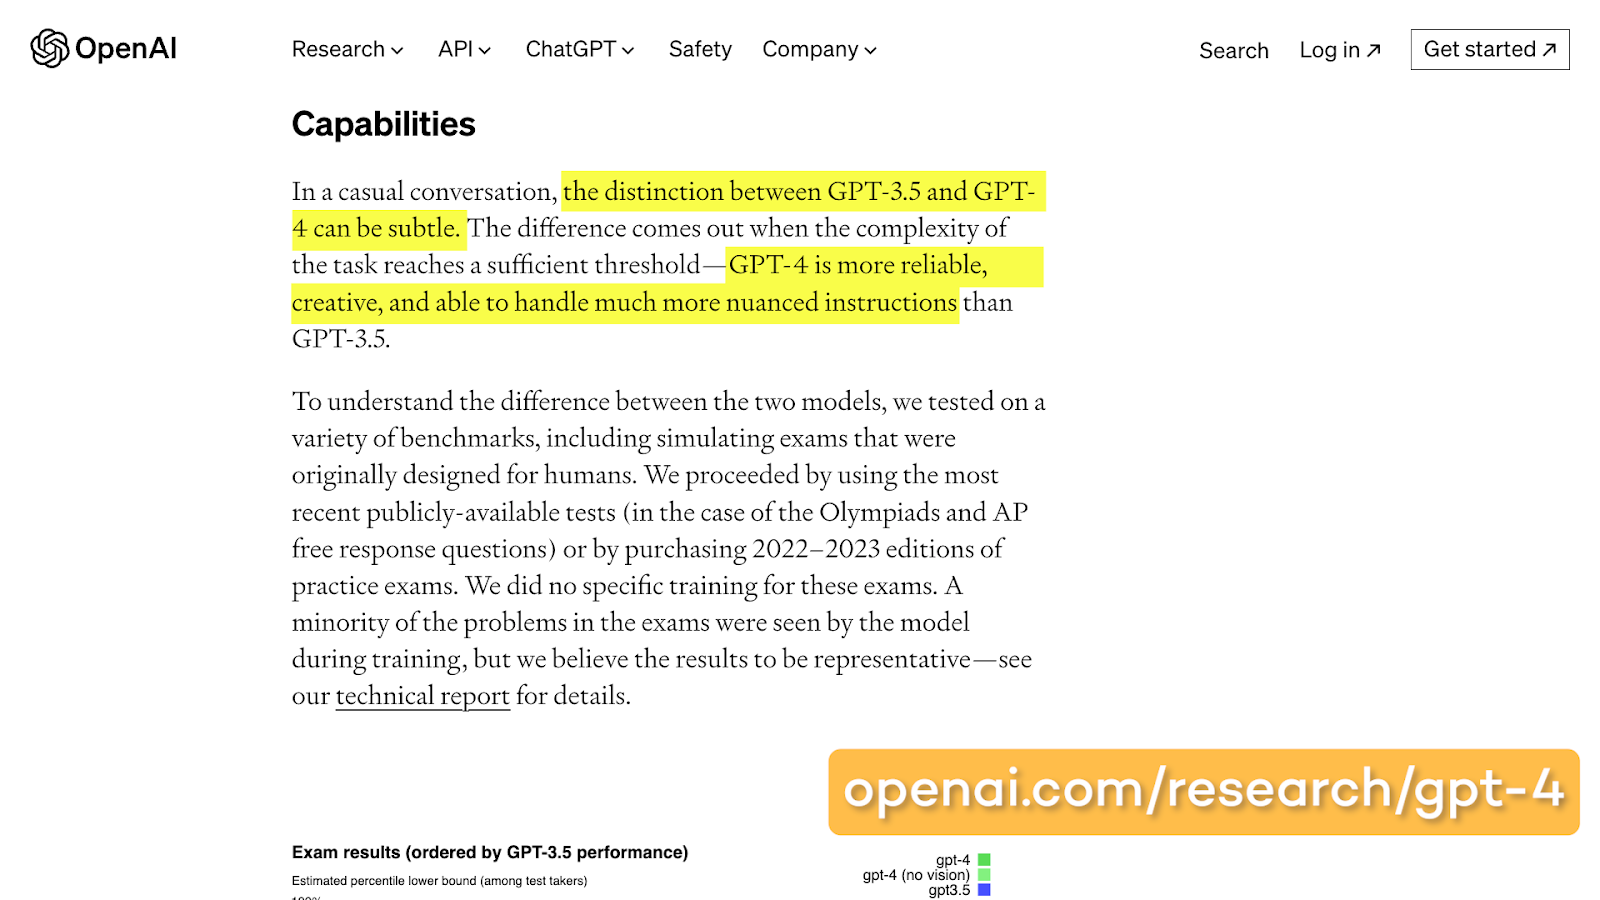
You can learn more about the specific details of each model in OpenAI’s documentation, or in this OpenAI research page.
Notion AI: no clear answers, but likely built on OpenAI language models
While ChatGPT openly advertises their language models, Notion isn’t quite so forthcoming.
Notion doesn’t disclose any information about the exact language model, and if you turn to Google, you’ll see there’s some confusion on this topic.
Some sources claim that Notion AI uses Anthropic’s Claude LLM, while others state that Notion AI is using LAMDA, an open-source model released by Meta (aka Facebook).
However, based on Notion’s official documents, it appears that Notion AI is using a language model developed by OpenAI. In all likelihood, this is some version of ChatGPT, but we can’t be sure which one precisely.
When Notion AI first rolled out, Notion Expert Thomas Frank noted that their product terms stated:
“Notion uses technology provided by OpenAI, LLC (“OpenAI”) to provide Notion AI.”

Unfortunately, the product terms page that he referenced is no longer accessible.
However, in the “Supplementary Terms” page for Notion AI, it’s stated that:
“you may not use the Notion AI features in a manner that violates any OpenAI Policy”
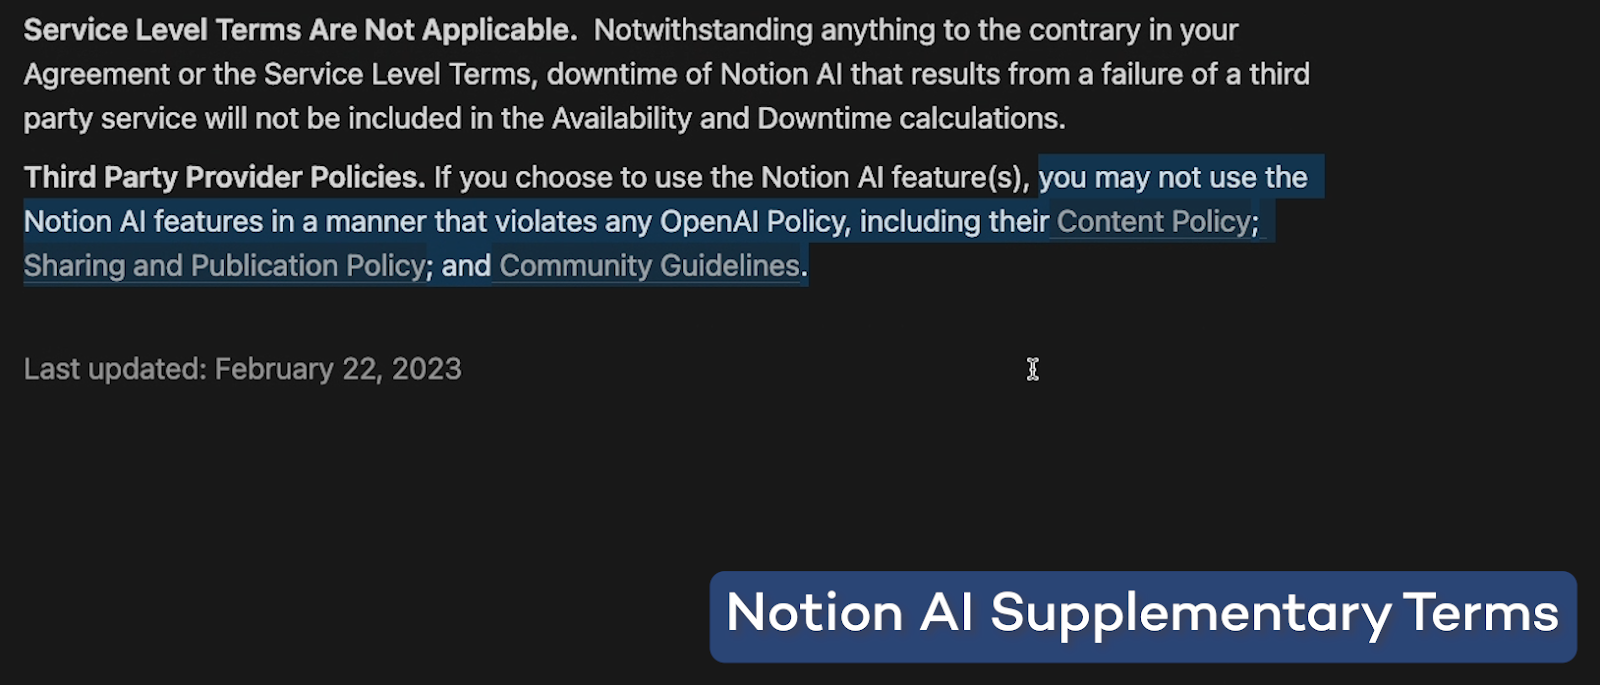
So despite some claims to the contrary, it seems almost certain that Notion AI is using an OpenAI language model.
GPT3.5 Turbo is generally one of the most commonly used models for third-party apps, but there are several other models they could be using.
At any rate, it’s pretty clear from their output that Notion AI and ChatGPT are using similar models. But if you want to ensure that you have access to GPT4, you’ll need to use ChatGPT Plus.
ChatGPT and Notion AI’s pricing plans
While we’re on the subject of ChatGPT Plus, let’s talk pricing. At first glance, both AI tools appear to offer roughly comparable pricing, but in most cases, ChatGPT will be significantly cheaper for teams.
ChatGPT’s pricing
ChatGPT offers two plans: a free plan, and ChatGPT plus, which costs $20 per month.
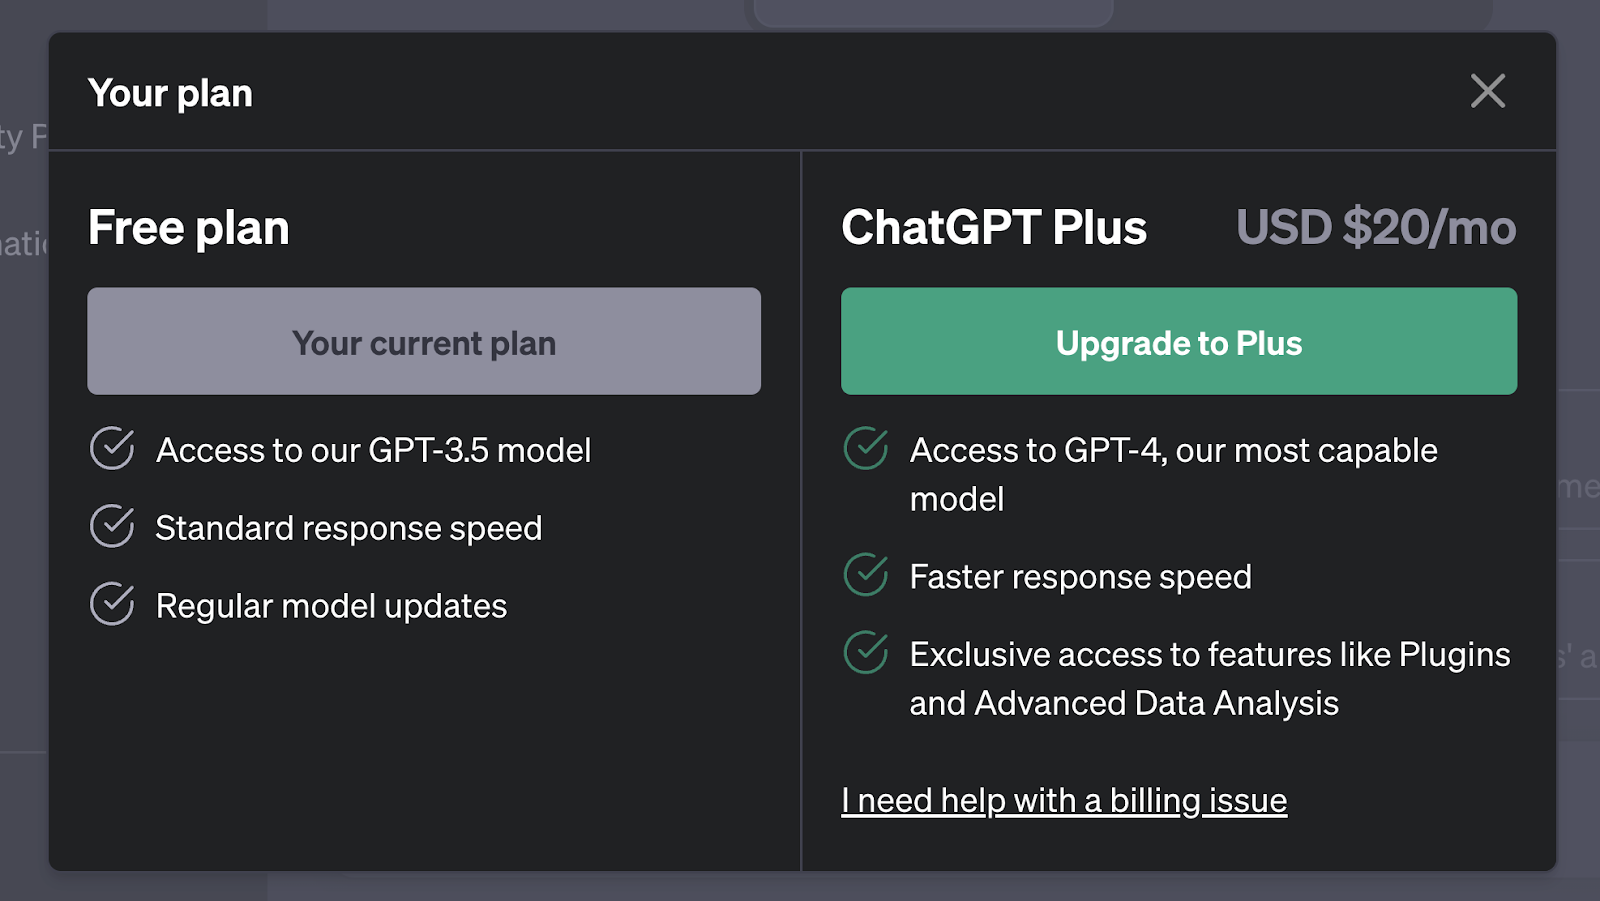
The free plan provides access to the GPT3.5 language model only, and imposes no hard limits on how many messages you can send.
However, you may lose access to ChatGPT whenever the app is experiencing heavy traffic.
ChatGPT Plus features
ChatGPT Plus grants you access to GPT4, and ensures that you can access the app at any time. As long as ChatGPT isn’t experiencing a total outage, you’ll be able to use it.
With ChatGPT plus, you can send unlimited messages with GPT3.5, and 50 messages every 3 hours with GPT4.
Note that this limit has already been raised once since ChatGPT plus launched, so it may continue to increase.
You can also use optional plugins with GPT4. Note that these plugins may require paid plans of their own, but many are free to use - at least for now.
Several of the plugins are still in beta, and may introduce paid plans once they’ve completed a release version.
Notion AI pricing
Notion AI offers a free demo, and an add-on for paid plans that costs $10/mo.

The free demo provides each Notion user with a limited number of AI requests. The exact limit depends on how many people are in your Notion workspace. Larger workspaces get more free Notion AI prompts.
Unfortunately, the limit isn’t readily visible until you’re nearly at the limit already, but it appears that users get at least 20 requests they can use to try out Notion AI.
A paid Notion AI plan has no hard limitations, but Notion does note that your usage may be limited if it’s deemed excessive.
Notion often lists Notion AI at $10 per user per month, but this is a little misleading.
You already need to have a Notion paid plan to sign up for Notion AI, and their paid plans start at $10 per user per month.
Both $10 charges can be brought down to $8 per month if you pay annually, so Notion AI will cost you either $16 or $20 per month at a minimum if you don’t already have a Notion subscription.
Adding Notion AI for every user in your workspace
Perhaps the biggest difference in pricing is that you have to purchase Notion AI for every user in your workspace, while a single ChatGPT Plus account can be easily shared with a few users through a password manager like 1Password.
So when you’re comparing the pricing of both platforms, remember that the $10 per user per month charge will apply to every user in your Notion workspace.
Finding the right AI tool for you and your team
Ultimately, Notion AI is great for Notion power users.
If Notion is the backbone of your company, holding your wikis, docs, and data, Notion AI is well worth the extra $8-10 per person per month, as long as you’re planning to make AI content writing a central part of your everyday work.
With Notion AI, you can stay focused in Notion instead of going back and forth to copy and paste text out of a standalone app like ChatGPT.
However, if you want to add your AI output to several different apps, sticking with ChatGPT is likely the better choice.
Additionally, if you want a robust free option for long-term use, ChatGPT will be the clear winner.
With so many AI tools available today, there’s something for every use case. Whether you prefer a standalone app or an integrated utility, there’s a tool that can fit your use case.
If you’d like to learn more about AI and workflow automation, be sure to check out our blog or our YouTube channel. You can also follow XRay on Twitter, Facebook, or LinkedIn.
Not sure where to start with automation?
Hop on a 15-minute call with an XRay automation consultant to discuss your options and learn more about how we can help your team to get more done.
🎙Interview me about my Workflow
Workflows take many different shapes, sizes, and tools. Ever wonder how your workflows compare?
Get interviewed and find out!
while humans get to be mindful.


