Getting started with Zapier is easy, but building scalable and flexible automations for you and your team can take a little more work.
Today, we’re going to share five of the key automation concepts that will help beginners to understand how Zapier really works.
We’re going to cover test data, variables, default values, paths, and run history. These aspects of Zapier are essential for building and maintaining Zaps that support real companies in practical use cases.
We’ll explain how they all work, and we’ll demonstrate some practical examples that you can build to try them out for yourself.
Understanding these systems and tools will help you to leverage Zapier as a time-saving resource for an entire team and not just for an individual user.
There’s a lot to cover, so let’s get started!
First, let’s start by taking a look at test data.
Test data is a concept that we’ve touched on in our Zapier beginner’s guide, as well as many other Zapier tutorials on our blog. However, it’s worth taking a moment to explain test data in detail.
Test data is an essential part of any automation. You cannot build a Zap without test data.
For instance, if you want to build a Zap that runs whenever a new event is added to a specific Google Calendar, you need to have an event on the calendar that you can use as test data before you start building the Zap.
Any data in your trigger app can be used as test data, but you usually should pick something that has all of the information you intend to use in your automation.
For example, if you want to reference the Zoom link from the Calendar event in your Zap, you should use an event with a Zoom link as your test data.
Let’s see what a good test looks like, and what a bad test looks like.
Here’s the automation that we want to build.
Whenever a new event is added to the calendar, send a Slack alert in the “tutorials” channel.
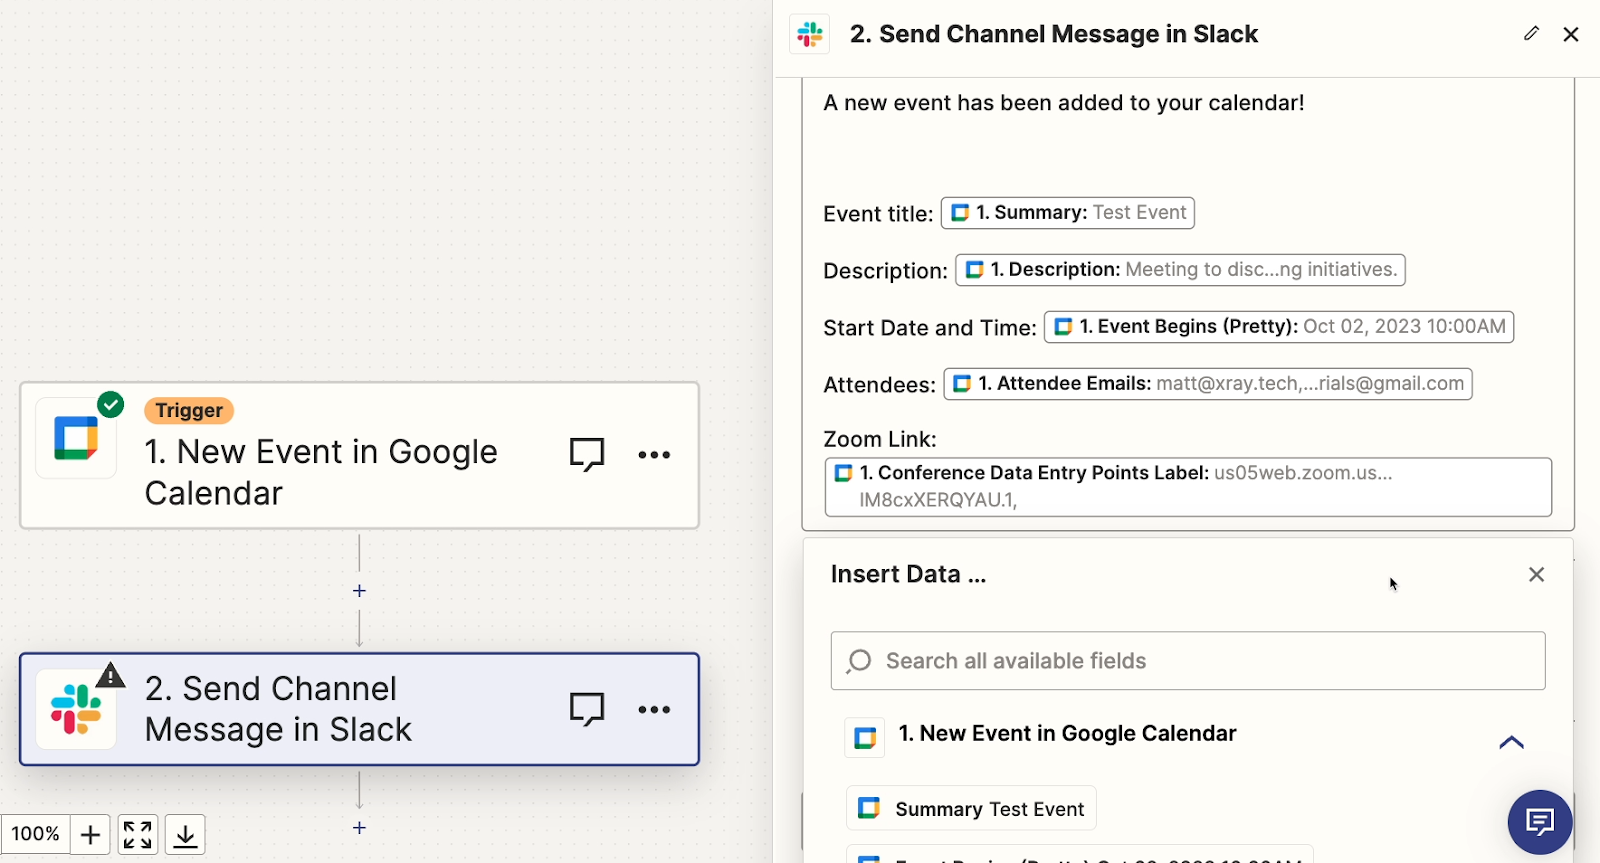
The Slack message will list the Event title, Attendees, the Start Time and Date, the Description, and the Zoom link for the meeting.
First, we’ll take a look at creating good test data.
Since we want to launch our automation whenever there’s a new Calendar event, we need to have a Calendar event ready to test.
We’ll make a Google Calendar event called “Test Event”. Giving it a name like that will make it easy to identify it later in Zapier.
We’ll be sure to include every data point that we want to use in the Slack message: attendees, a description, and a Zoom link for conferencing. The event already has a title, and every event must include a start time by default.
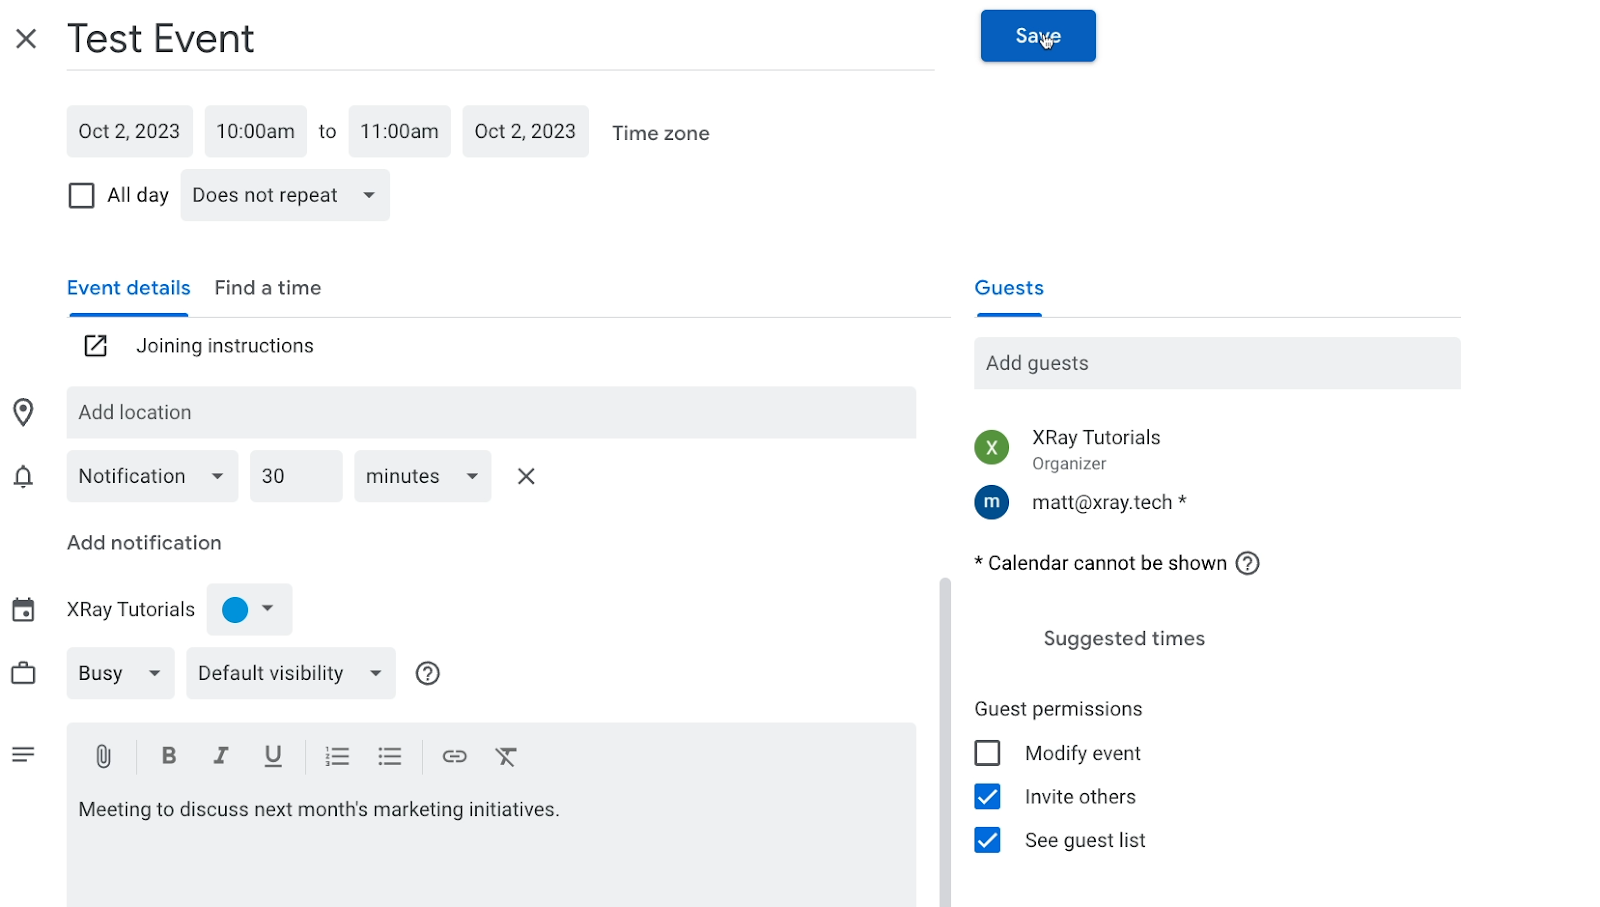
This event has all the data we want to reference in our Slack message, so we can start building our automation.
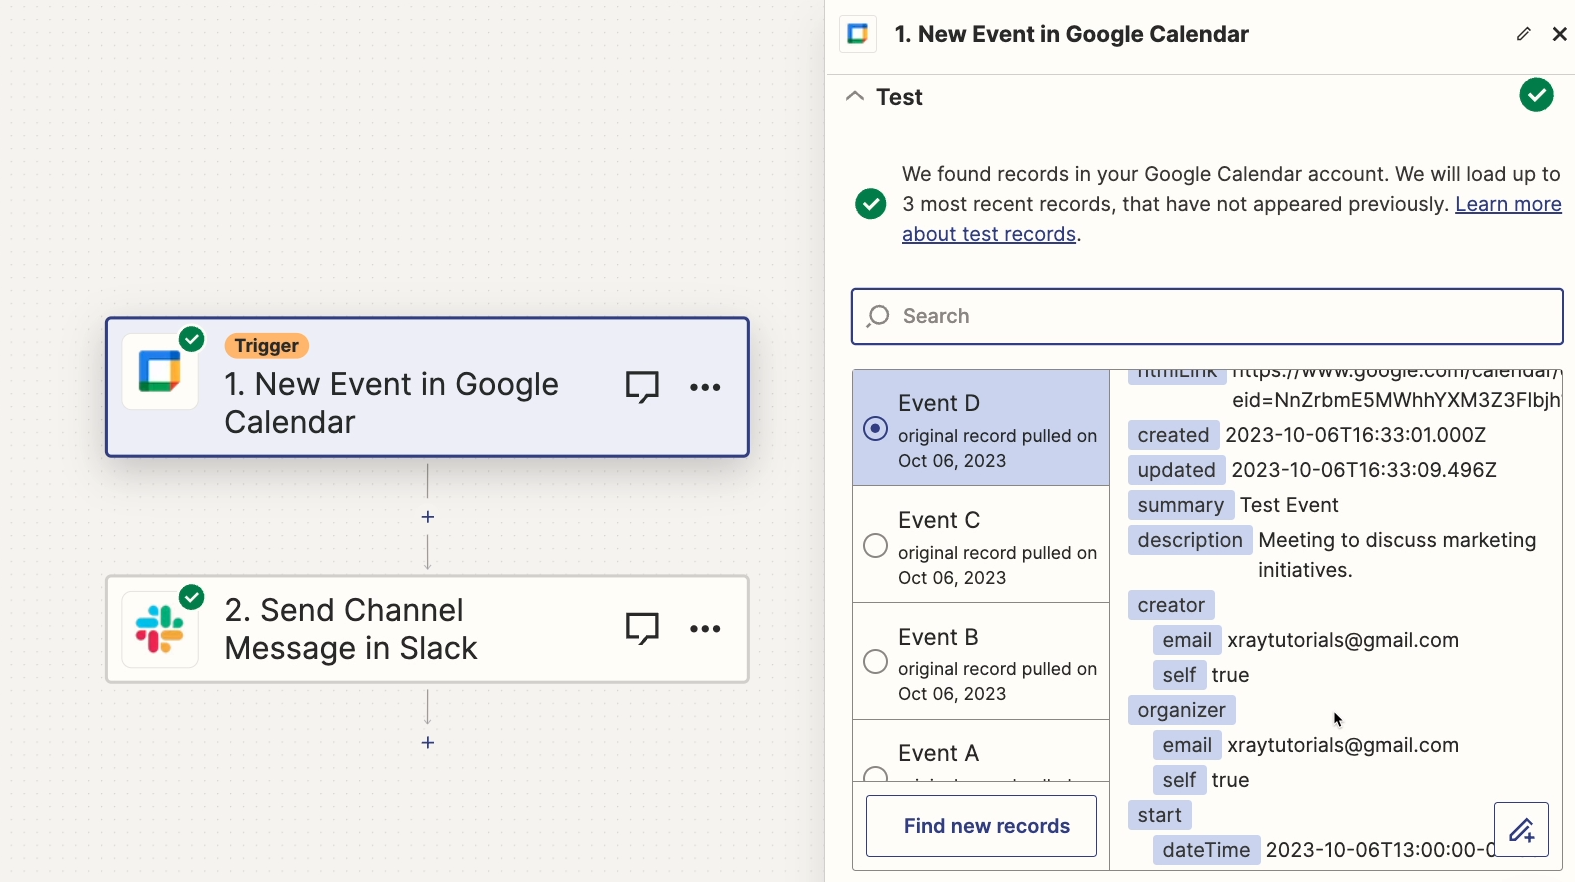
With your test data prepared, you can create a new Zap and start configuring the trigger. In our example, we’ll choose Google Calendar as the app. Then, we’ll choose our Google account.

The triggering event will be “New Event”. And we’ll pick the calendar that we want Zapier to watch.
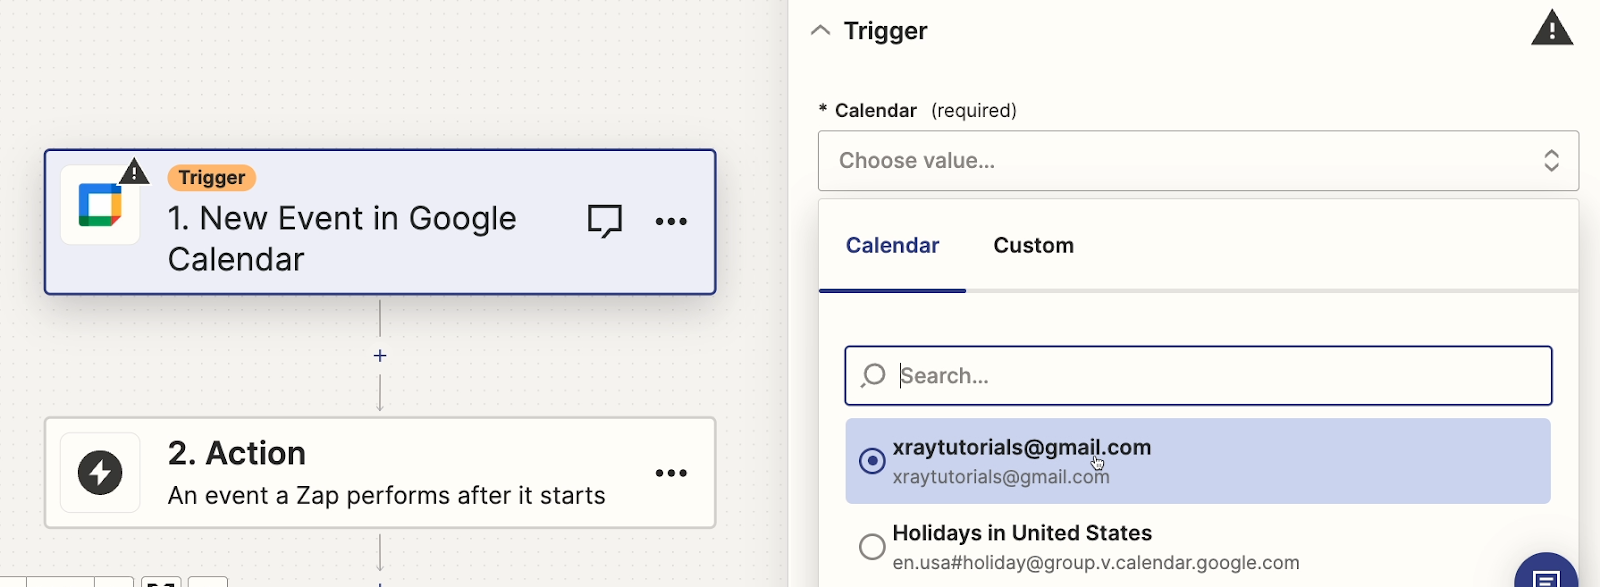
Always make sure to select the calendar, folder, database, etc. where you just created your test data.
Once you’ve finished setting it up, Zapier will prompt you to test the trigger. While you can skip testing on any actions you add to your Zap if you really want to, you cannot skip testing the trigger.

You need to test your trigger before you can turn on and publish your automation. So to continue our example, we’ll run the test.

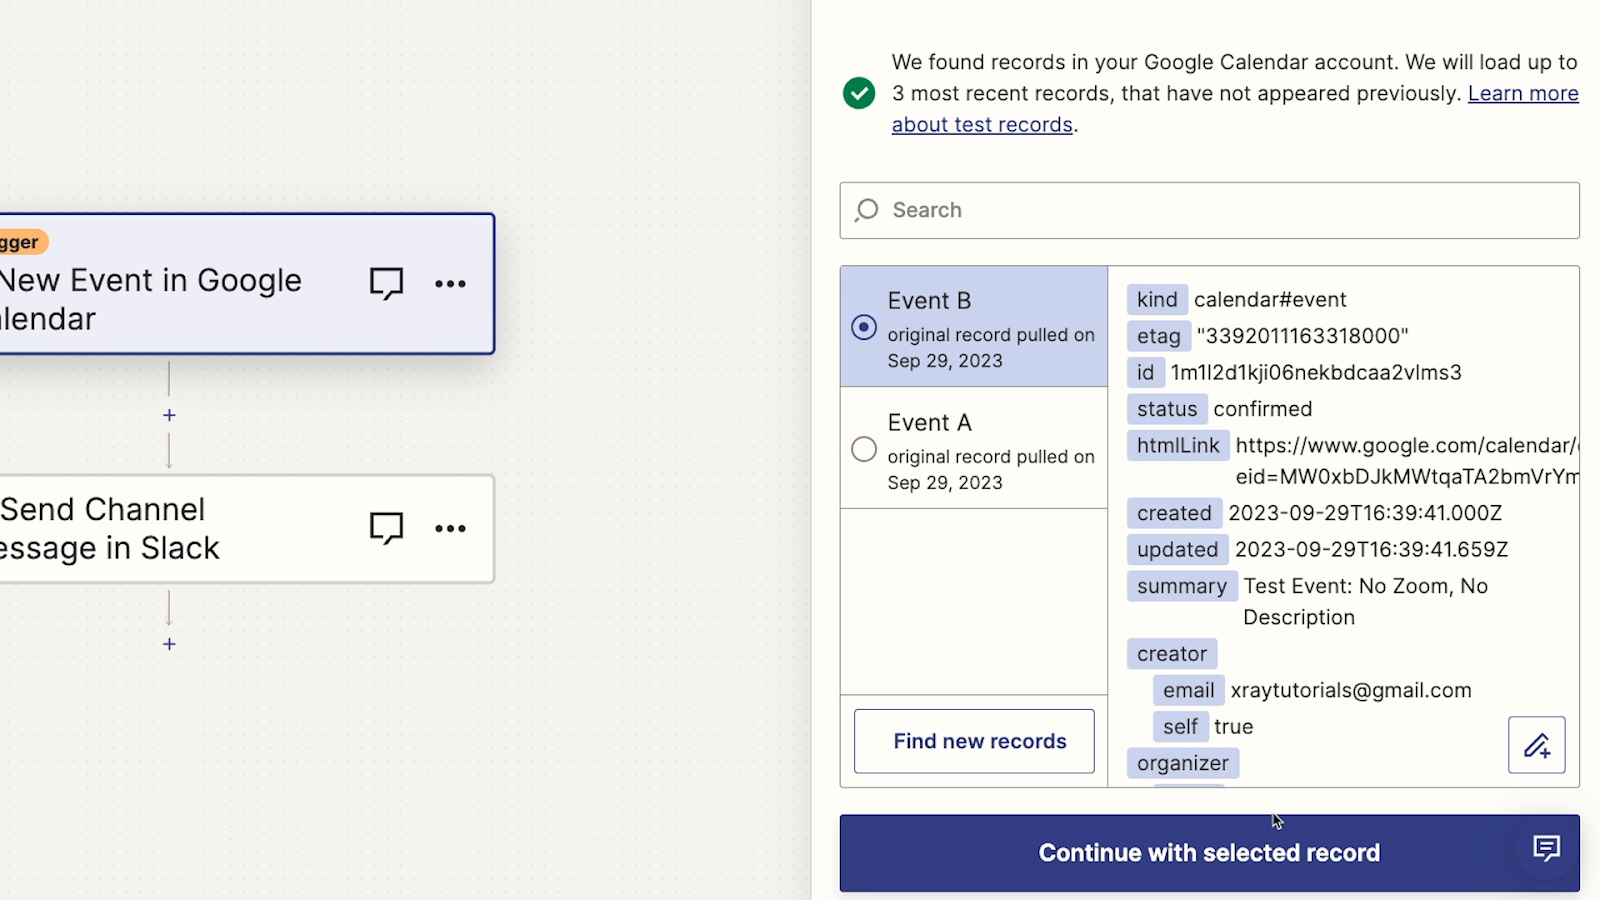
Zapier will retrieve up to three recent pieces of data that match your trigger conditions. If your test data doesn’t show up here, you can click on “Find new records” to see more recent data.
Keep in mind if you’re expecting test data and don’t see it, it's likely something is configured incorrectly in your trigger. You might be watching the wrong folder or the wrong calendar, for instance.
But we can see an event with title (or “summary”) of ‘Test Event’, so our trigger is configured correctly.
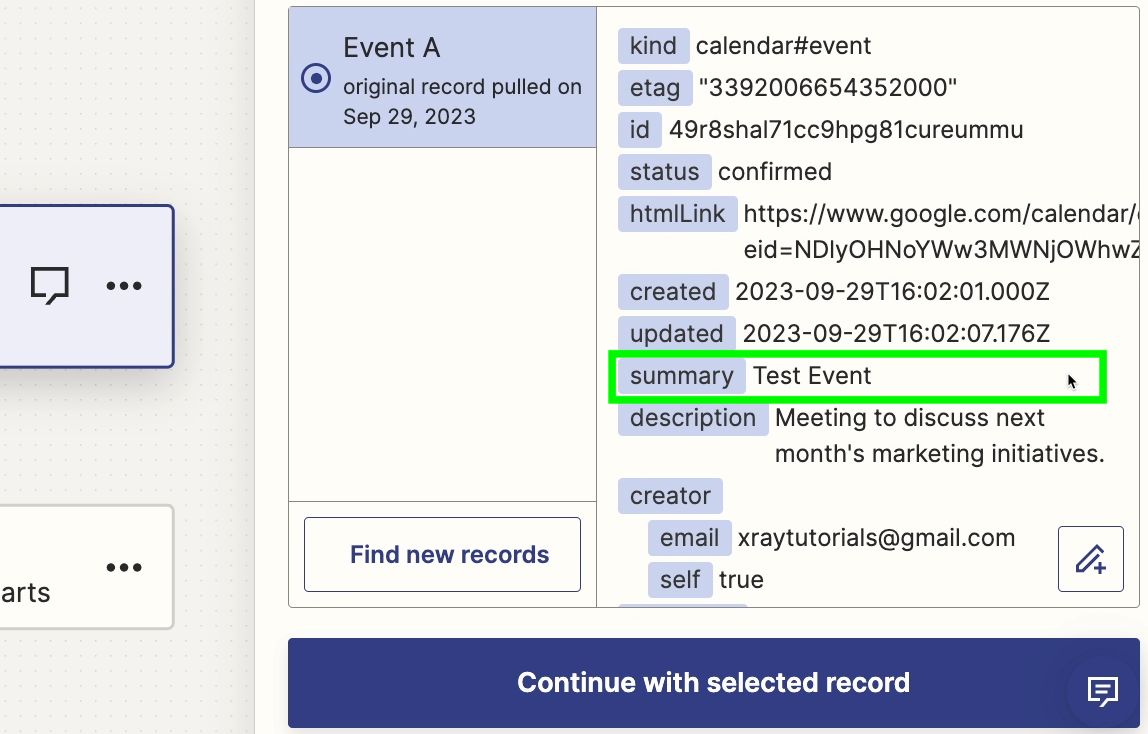
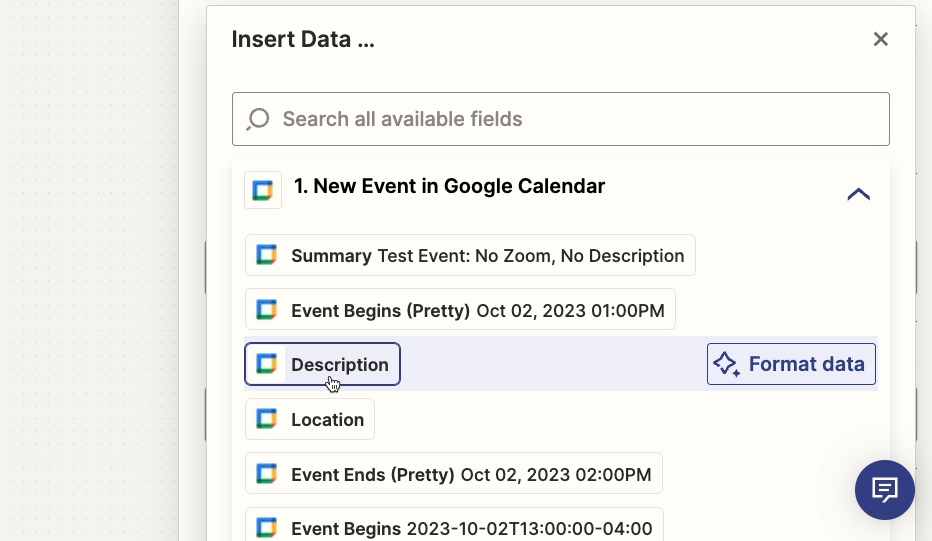
As you can see, Zapier retrieved a wealth of information associated with this Calendar Event. This is typical for Zapier triggers, and is going to be useful as we start building our Slack message.
After building our trigger and testing it with complete data, we know that Zapier can find the data it needs to start running the automation.
Now, we want to build and test the action that we want Zapier to perform whenever a new Calendar event is created.
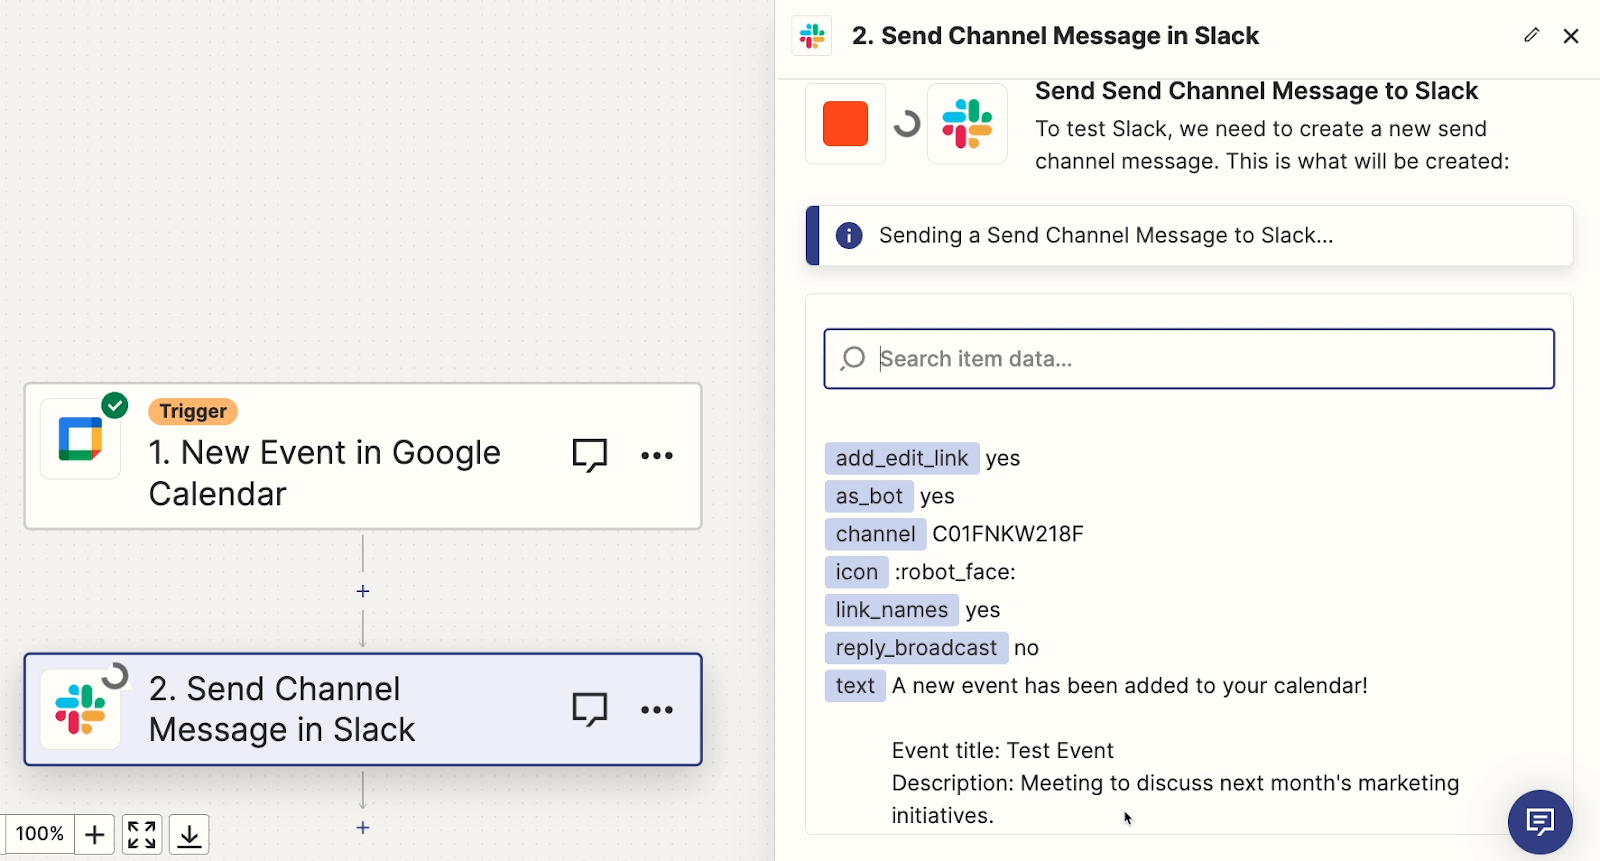
After you’ve finished building and testing your trigger, click on “Continue with selected record” and add an action to your Zap. For our example, we’ll add a Slack action, and choose “Send channel message”.
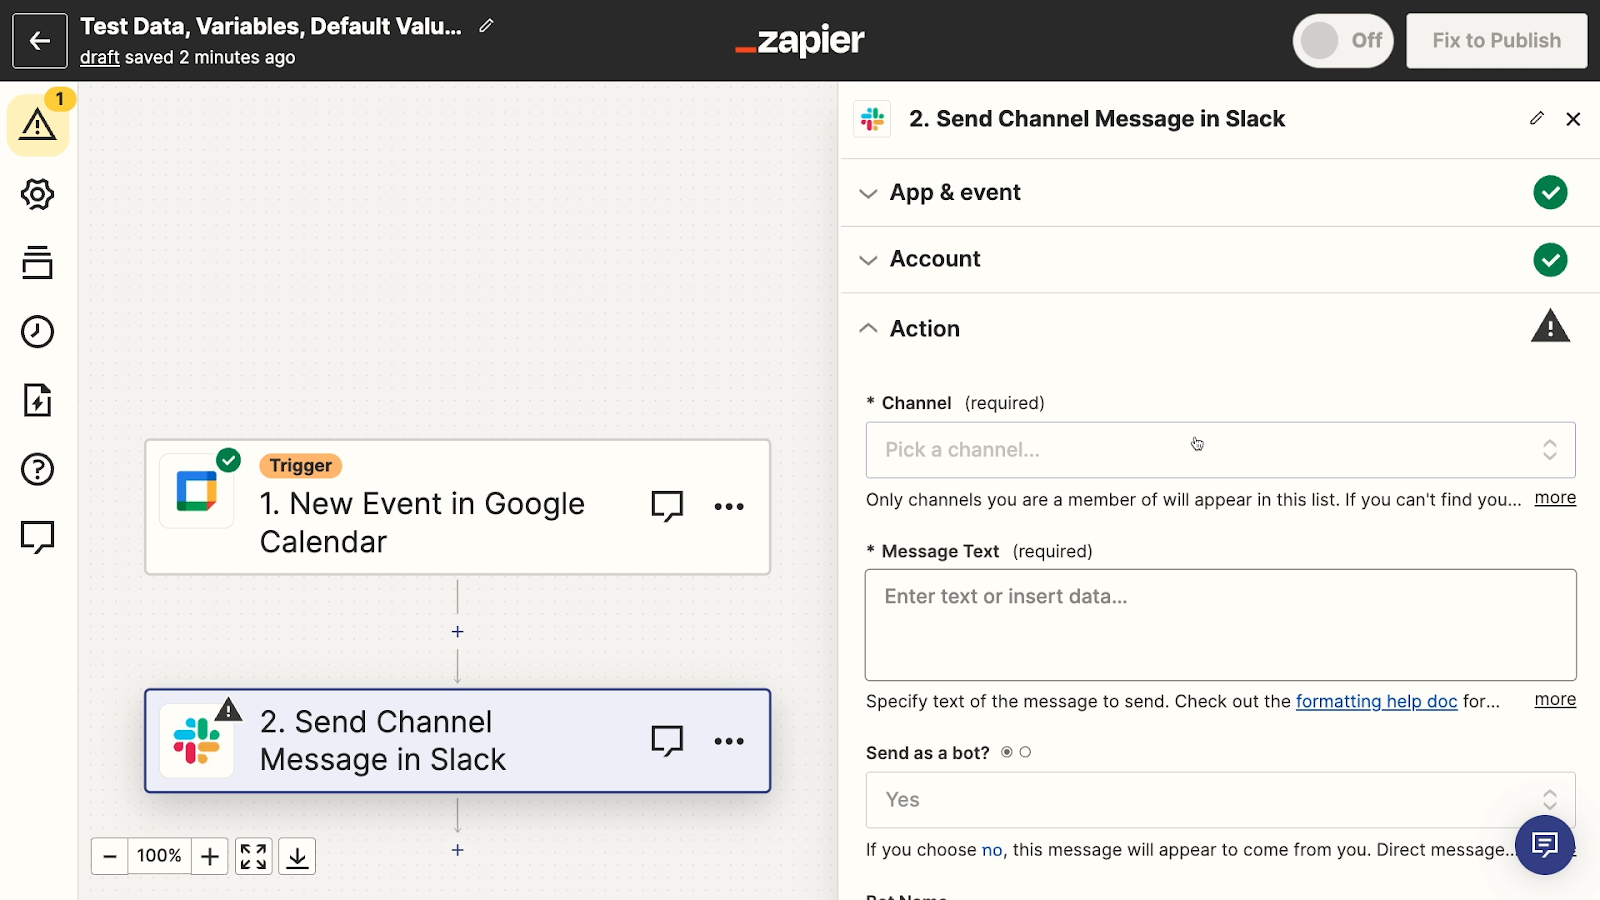
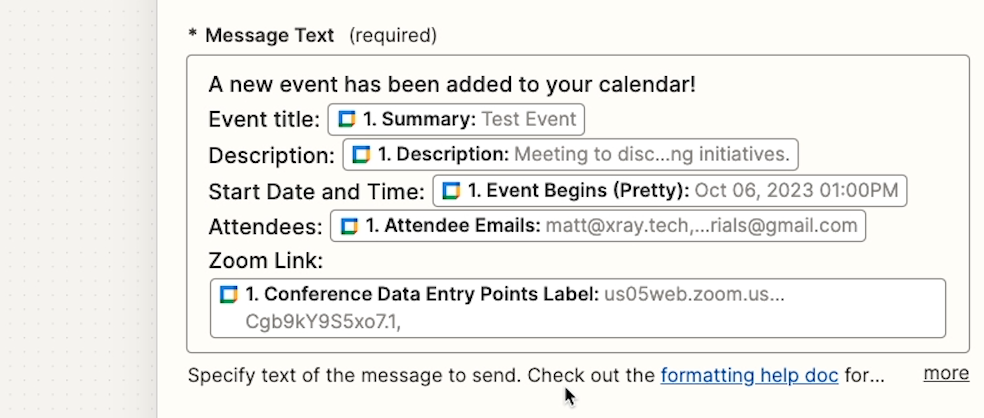
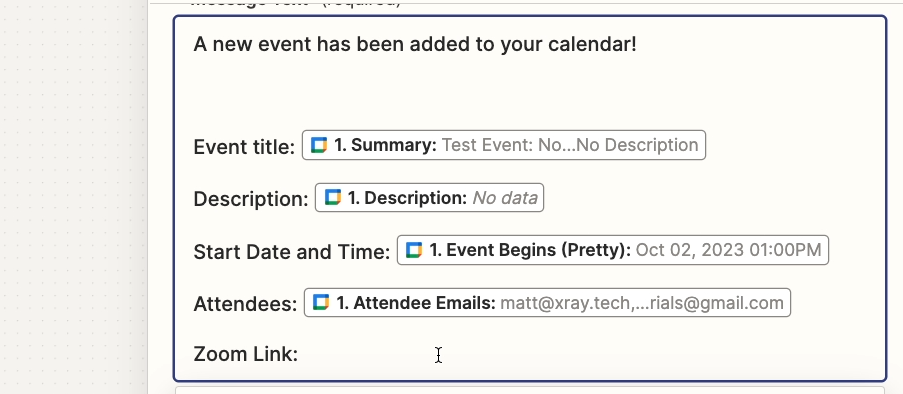
Now, you can configure your action however you’d like. In our example, we’ll compose the message, and include some of that data that we retrieved in the trigger.
In our message, we’ll include the event summary, the description, the start date and time, the list of attendees, and the Zoom link.
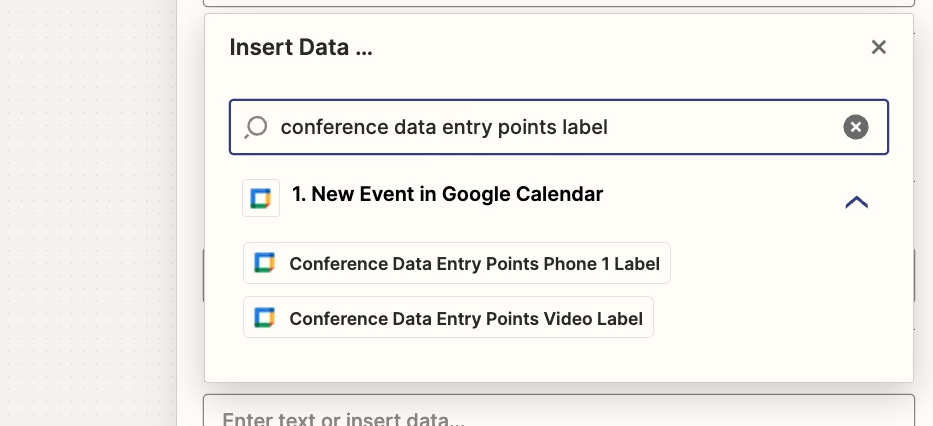
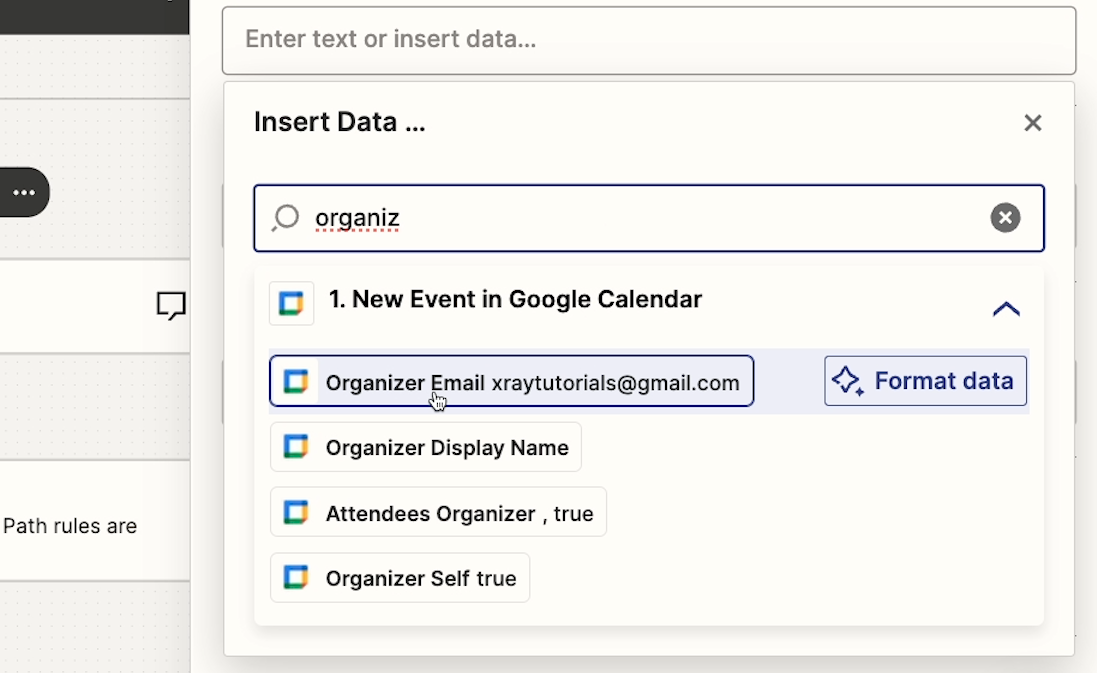
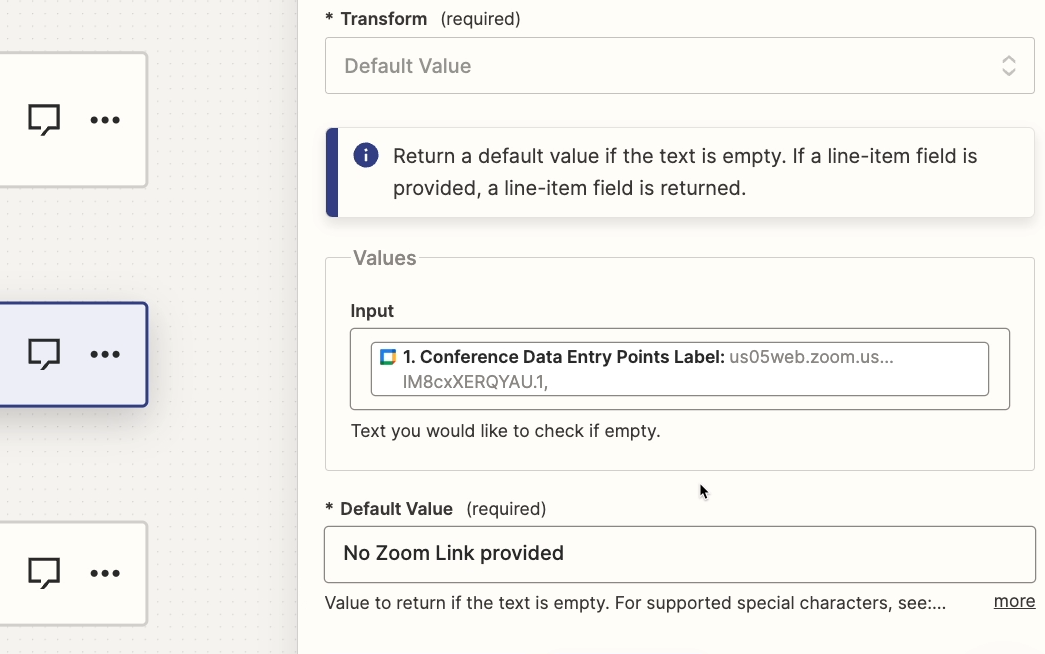
While most of the data that you want to use should be pretty easy to find, sometimes the data you retrieve in Zapier won’t be labeled very clearly.
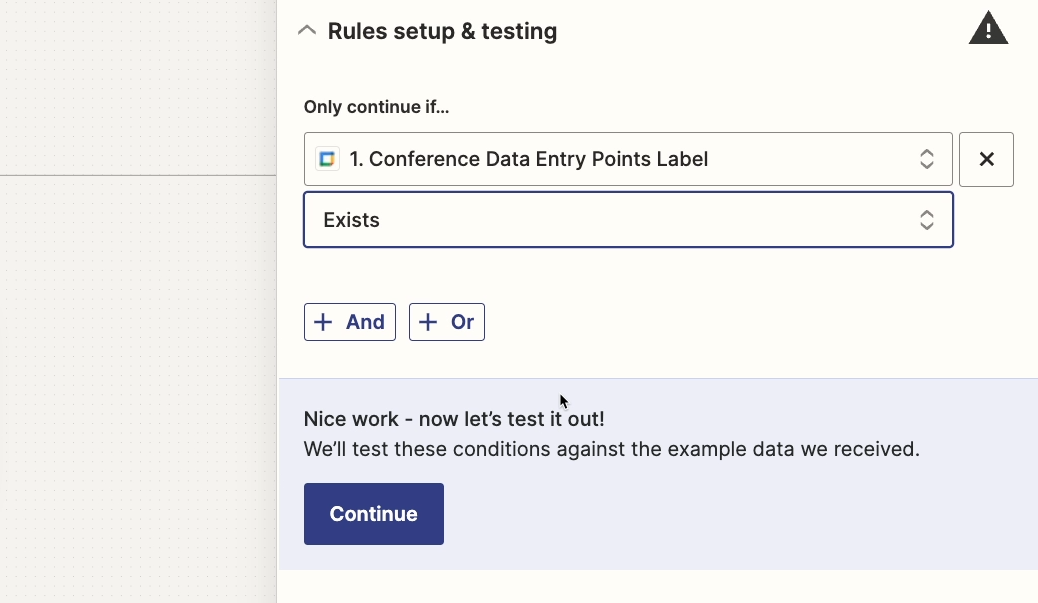
For instance, the link for the Zoom call in a Google Calendar event is called “Conference Data Entry Points Label”.
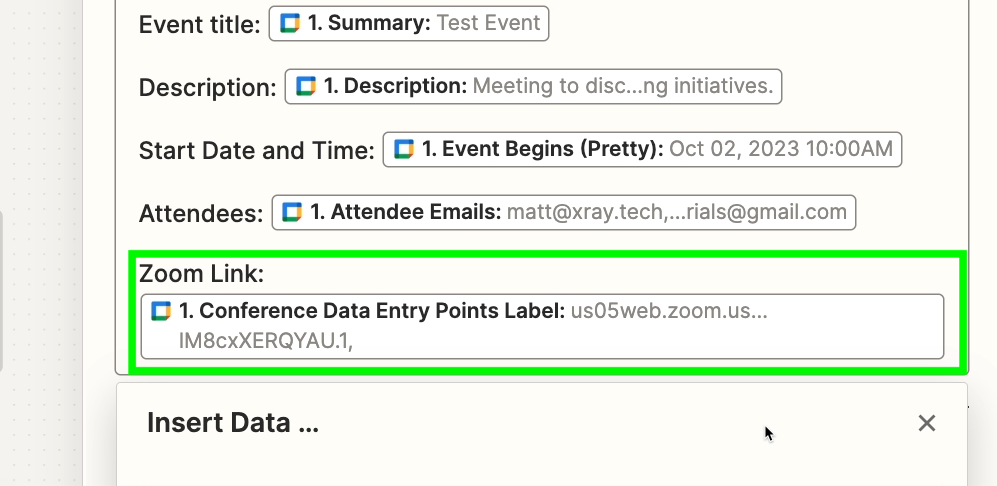
In some cases, Google Calendar will copy the Zoom link to the “Location” field as well, but that depends on each user’s Zoom and Calendar settings.
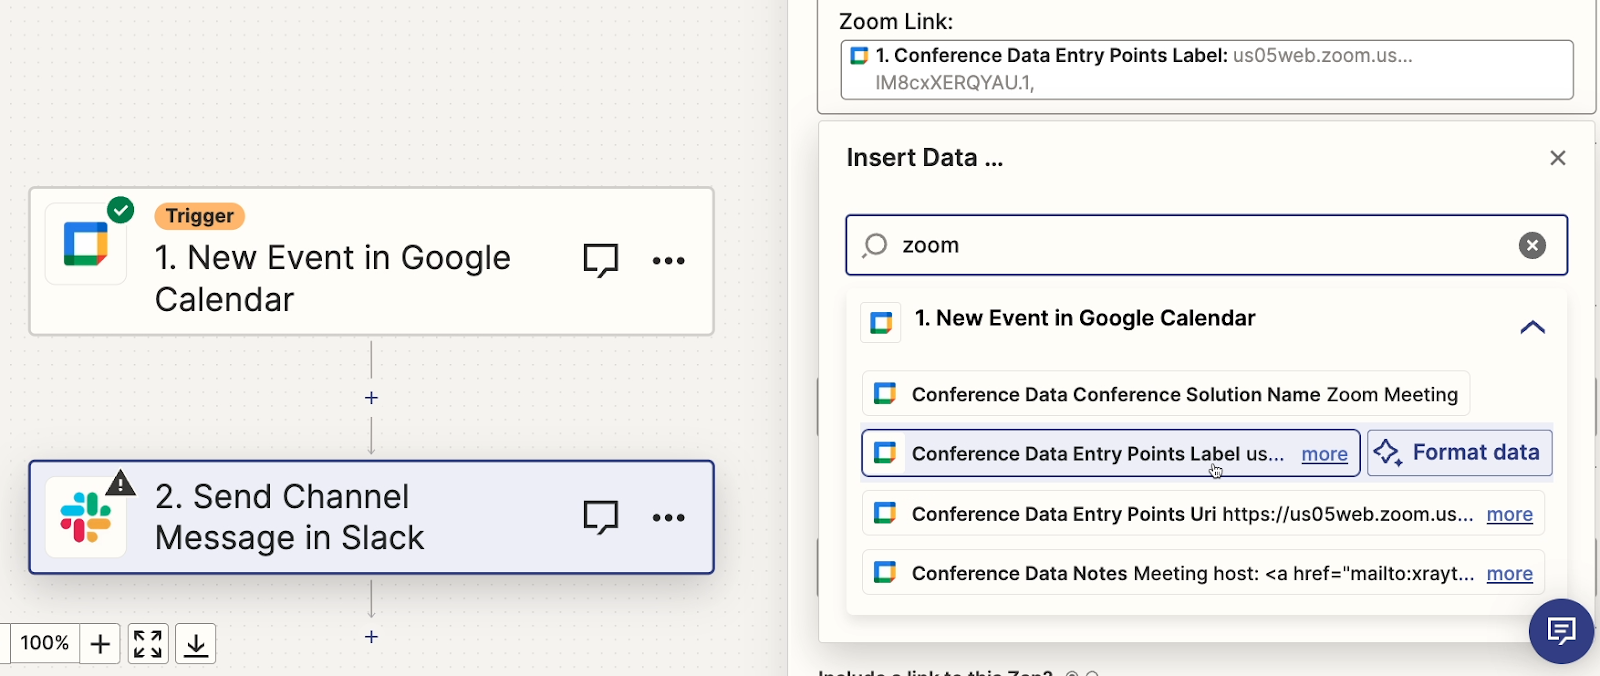
This is one of the reasons why test data can be so useful. Inside of the results, you have access to a search bar which you can use to find specific data points.
For instance, when we search for “Zoom”, the results show us the URL that includes the term “zoo”’, which is how we can find out that it’s associated with the “Conference Data Entry Points Label” variable.
So we’ll add that data into our Slack message along with the other information, and finish configuring this step with a few other settings.
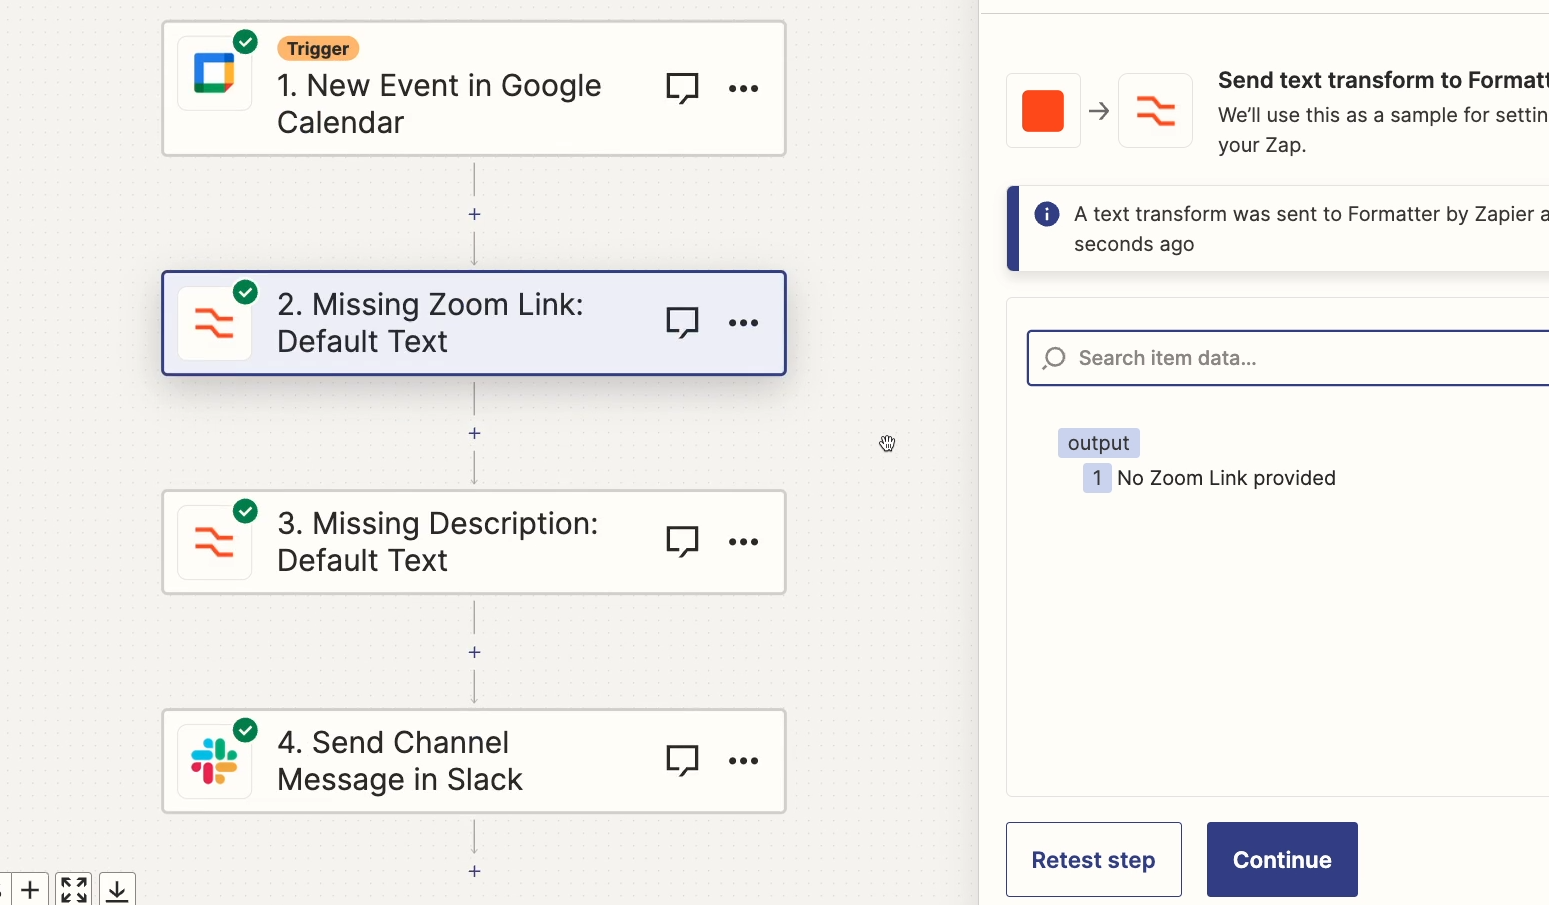
Once you’ve finished configuring your action, it’s time to give it a test. Testing actions in Zapier is optional, but we would almost always recommend testing every single step while you’re building.
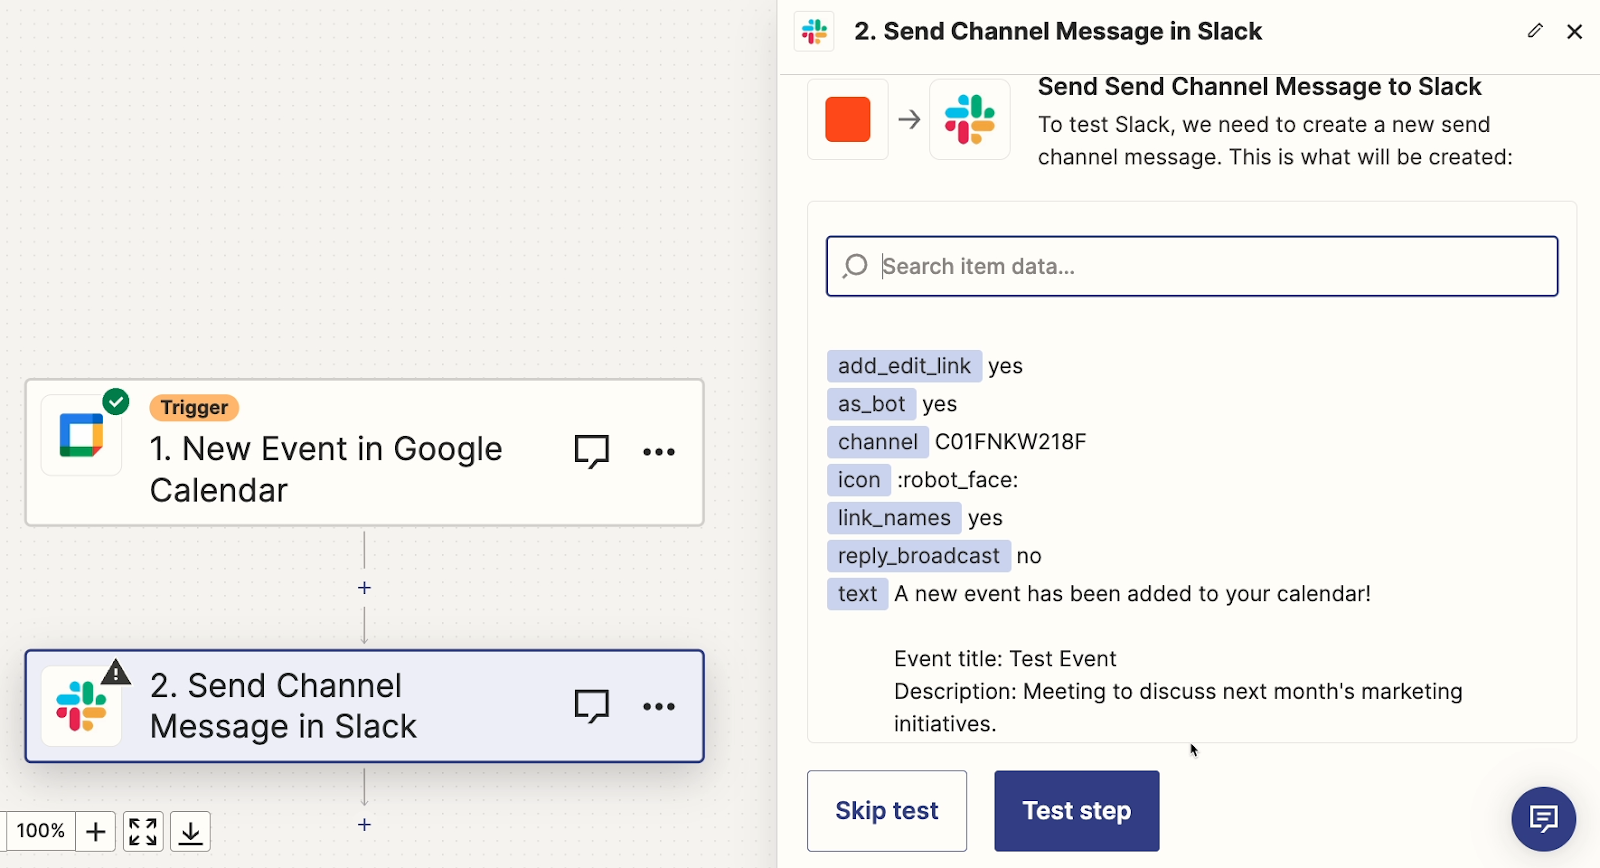
Note that testing an action in Zapier will actually run that action in your software, and will use the test data that you loaded into the trigger.
So, for instance, testing a Slack message step will actually send a Slack message based on the specific Calendar event we selected when we tested the trigger.
When you’re creating test data, you’ll want to make sure to use appropriate channels, email addresses, and accounts. You don’t want to bug clients or colleagues with test messages while you’re building.
With all that in mind, we’ll run our test and send a Slack message to our tutorials Slack channel.
After testing your action, Zapier will confirm that your action worked correctly, or provide you with an error message if it encountered a problem.

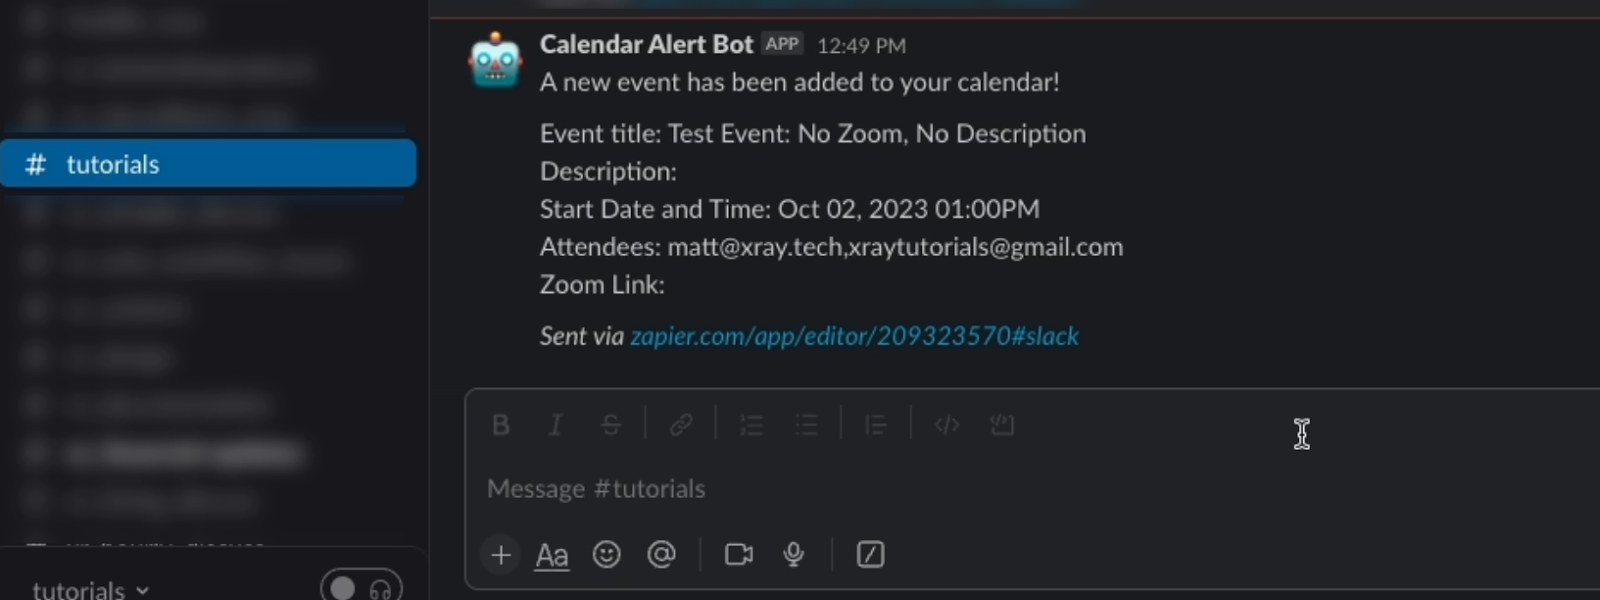
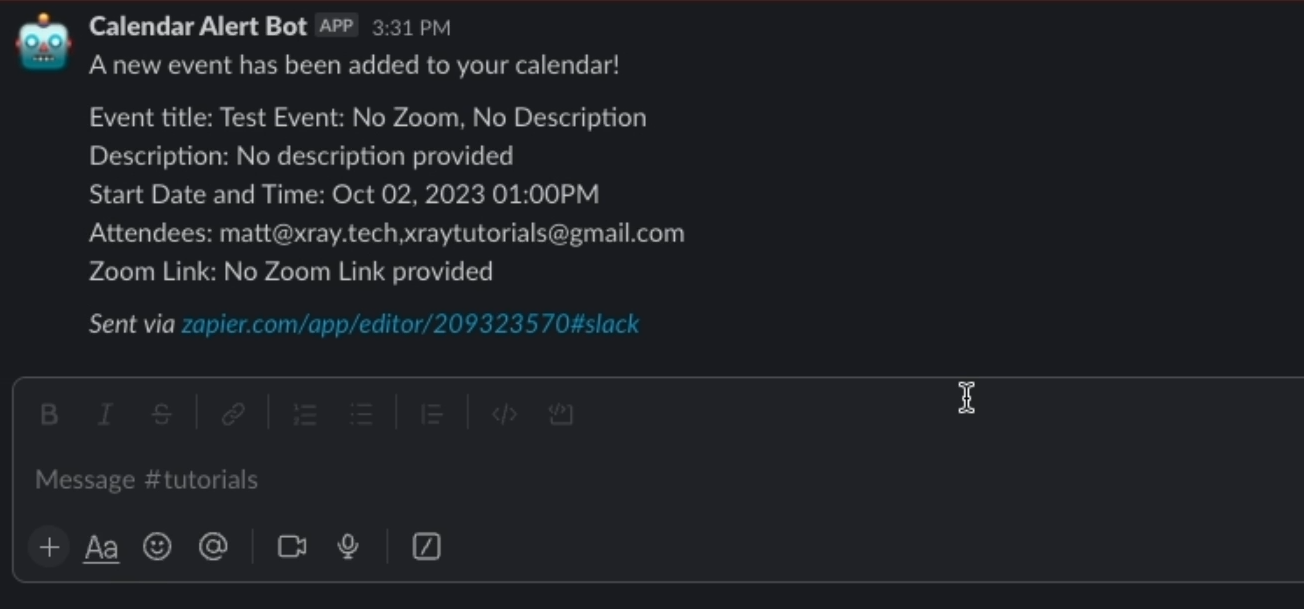
However, it’s always a good idea to open up any app where you expect to see new or updated data.
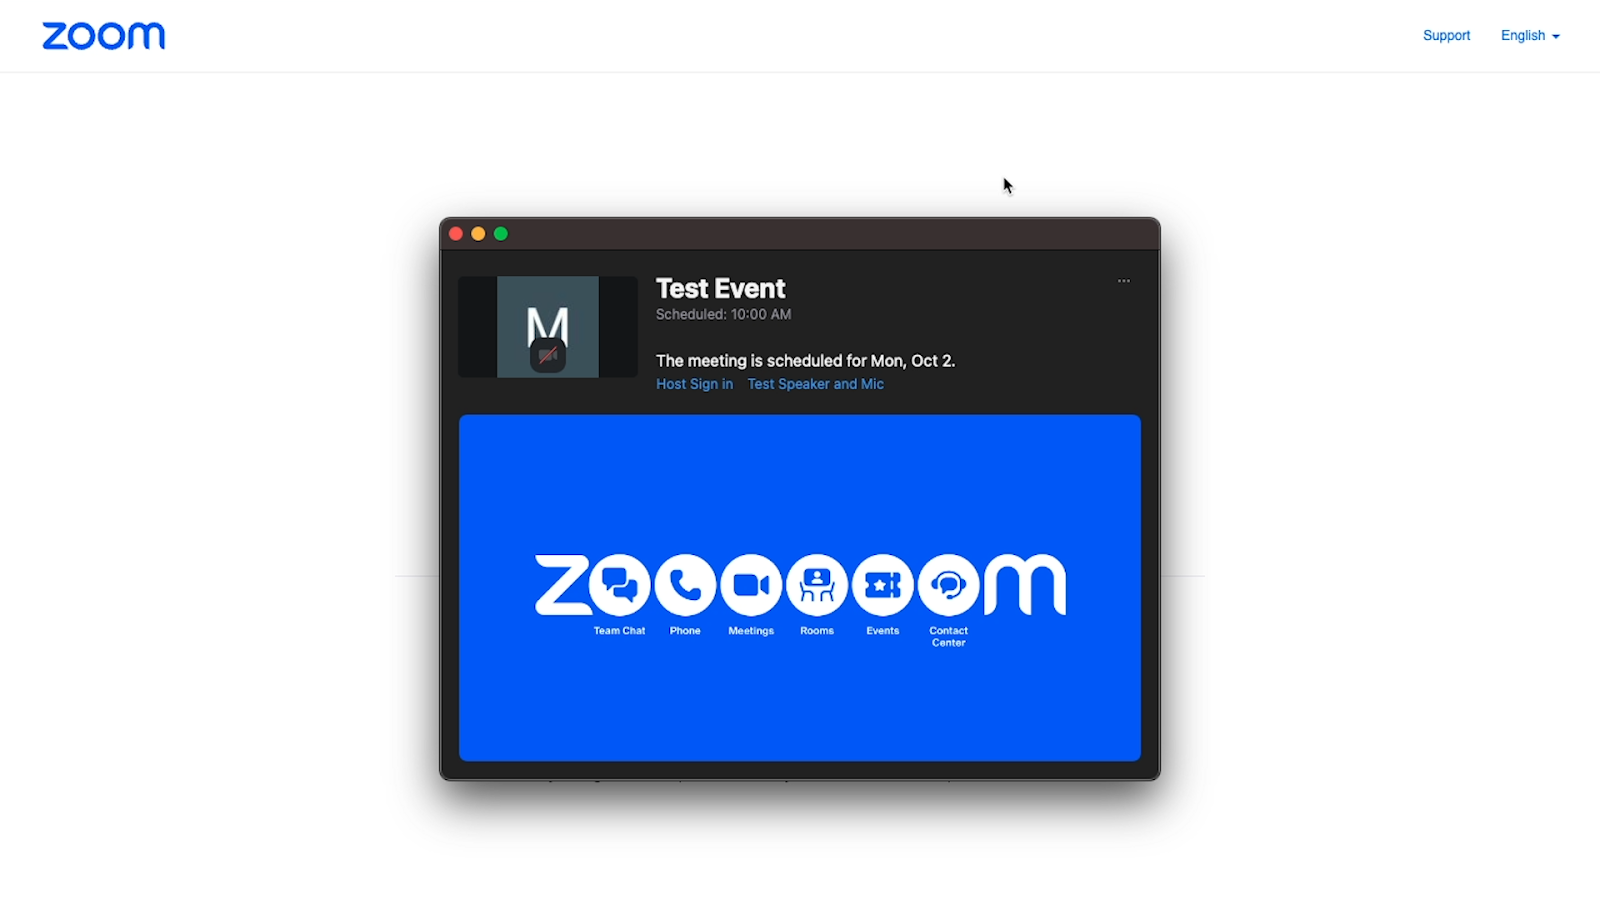
For example, when we check Slack, we can see the message in the tutorials channel. There’s lots of useful information about the new Calendar event, including the Zoom link.

You should also confirm that all of the information your Zap created is correct and functional. When we click on the Zoom link, we can confirm that we’re taken to a Zoom meeting.
Our test is complete, and we know that our automation works. But what if our test data didn’t have all this information?
If your test data is missing important pieces of data, it becomes much more difficult to build your desired automation.
To demonstrate how this works, we’ll go ahead and create some test data that’s missing key pieces of information we need in our automation.
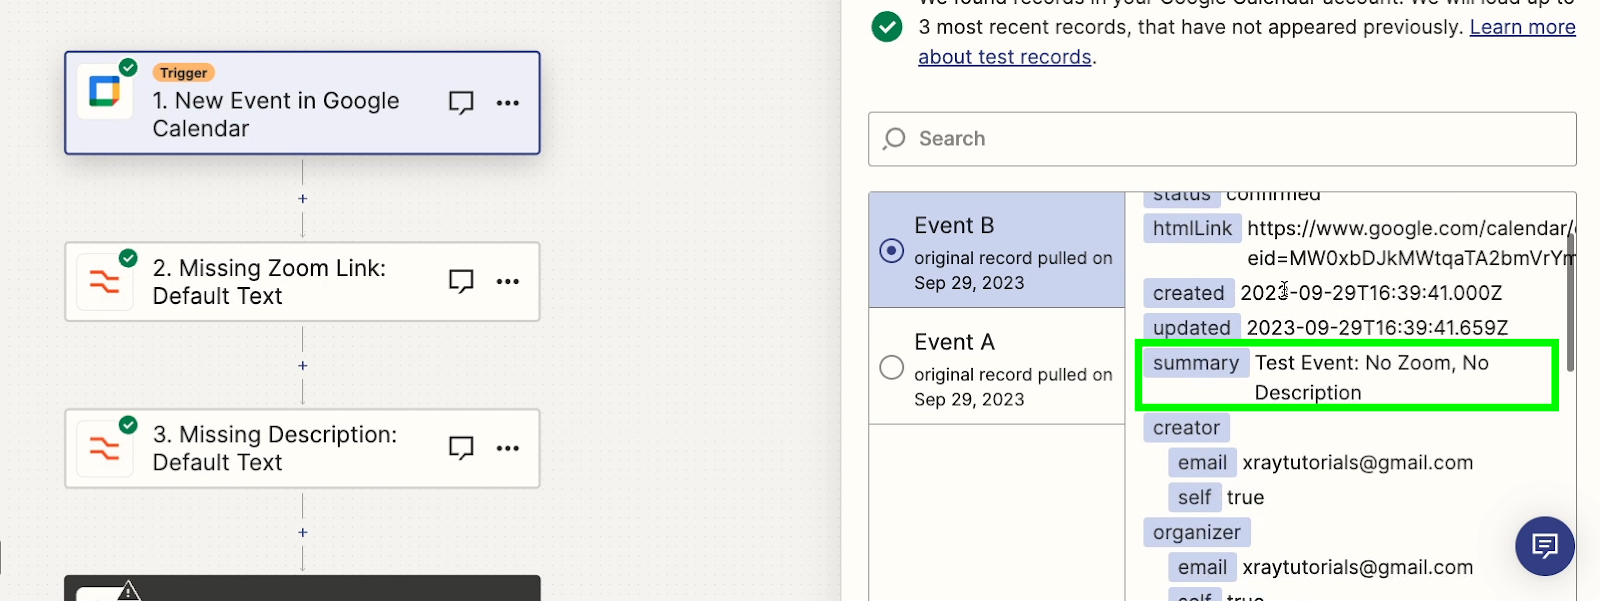
We’ll create a new Calendar event called “Test Event - No Zoom, No Description”, and we won’t include a Zoom link or a description.

Now we’ll go back to Zapier, and re-test our trigger with the new incomplete calendar event.
Then, we’ll add a new Slack message and start filling it like before.
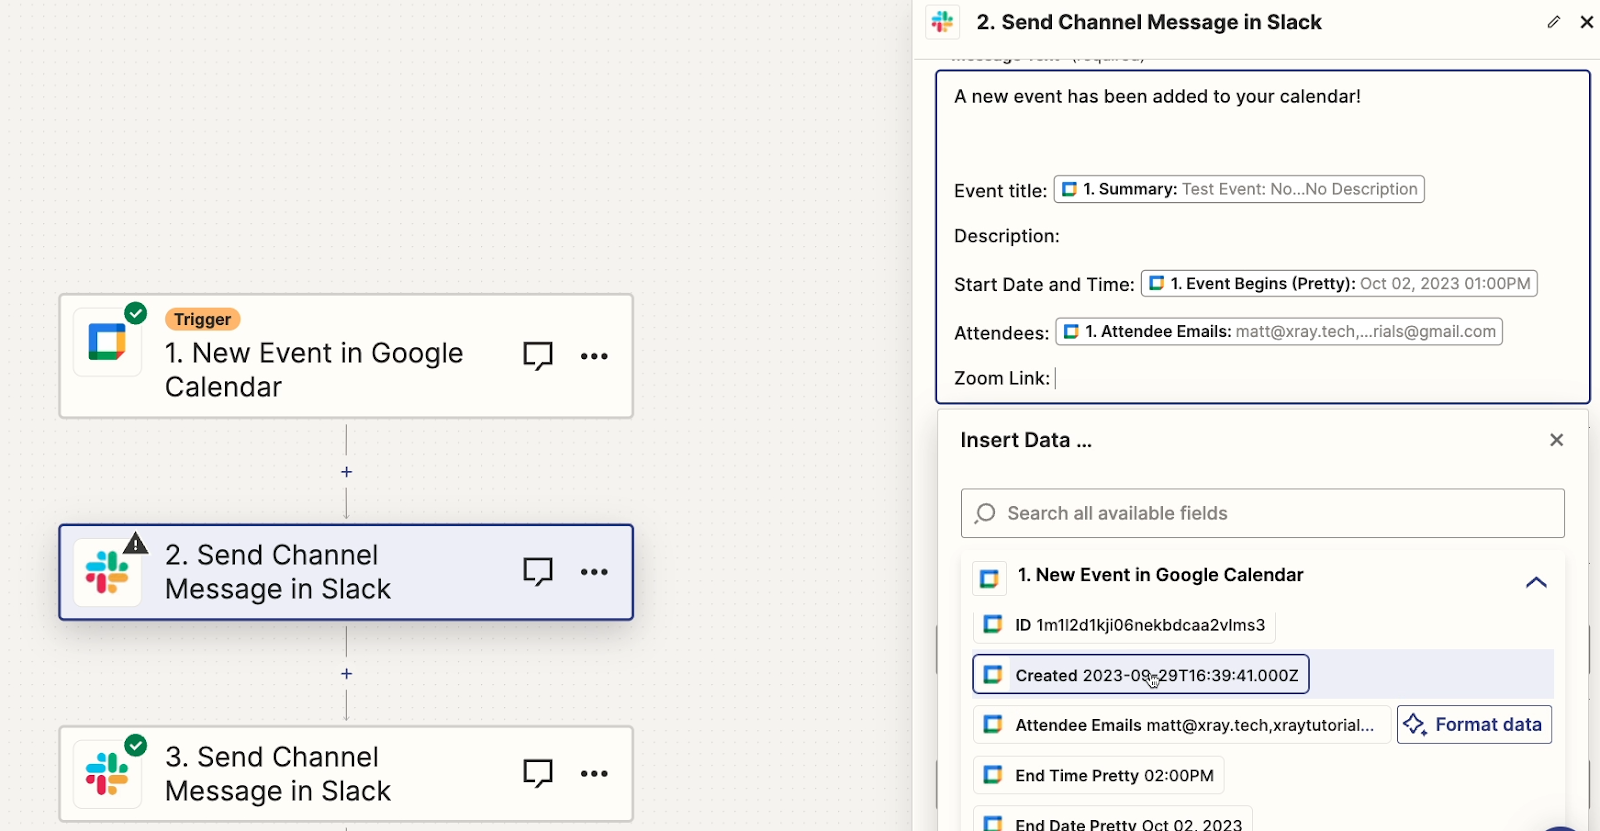
However, we can’t find the Zoom link this time. When we search for “Zoom”, or “Conference Data Entry Points Label”, the variable that we saw in our earlier test data isn’t there at all.
Because our Google Calendar test data is incomplete, there’s no way to add a Zoom link to our Slack alert.
On the other hand, you’ll note that the “Description” variable is still available, even though it’s empty.
--
With incomplete test data, you’ll encounter both of these scenarios. Some variables will be missing entirely, and others will be blank.
This means you won’t be able to add the missing variables as you’re configuring action steps. And while you can add the blank variables to your action steps, you won’t be able to confirm their contents or formatting when you run a test, since there’s no data there.
When we test the Slack message step, we can see that there’s no Zoom link, and no description.
With incomplete test data, we can’t build the automation that we want (a Slack message including a Zoom link), or confirm that it’s working as intended.
That’s why your test data should have every bit of information that you intend to include in your ideal automation. If anything, you should err on the side of using more data than you think you need.
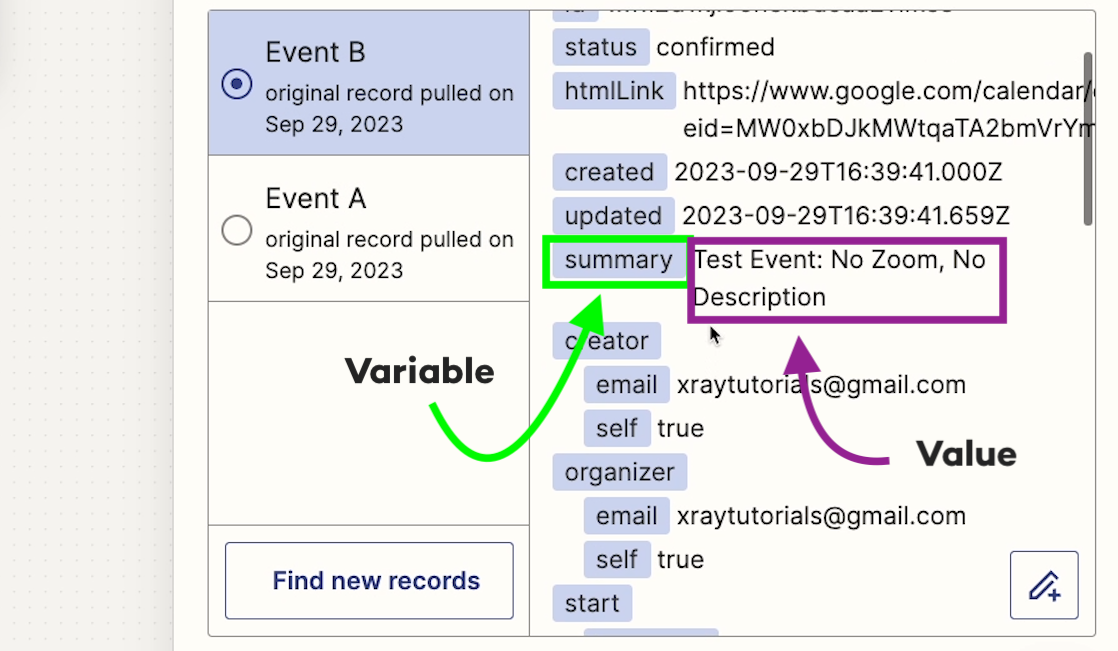
As you’ve been reviewing our examples, or as you’ve been using Zapier, you may have noticed that the data retrieved in Zapier always follows a similar format.
Both events we tested had labels for nearly all of the same information. They both had labels for Summary, Attendees, Start Date, and Description, but the specific data or value associated with these labels differed for each event.
[test data - annotate “variable” and “value”
These are what we call “variables”. In Zapier, a “variable” refers to every piece of information retrieved from any step in your automation
A variable can be something like a Calendar event’s name, or its start time.
If you’re automating a CRM like Hubspot, you’ll see variables for each contact’s name, their deal status, and dozens of other attributes unique to each contact.
If you’re automating your ecommerce store in Shopify or Magento, you’ll see variables relating to product prices, variants, and descriptions.
Regardless of the app involved, variables describe all of the available attributes for whatever digital object Zapier is processing.
Every calendar event will always include a similar list of variables in Zapier, and every Hubspot contact will include the same list of variables as every other contact.
The variables are always the same, but the values - the actual data associated with each variable - can change every time.
That’s why they’re called variables, and why we build automations. That ability to include dynamic data is one of the things that makes Zapier so useful.
In our simple automation with Slack alerts for calendar events, the alert is only really helpful if it includes the right details and Zoom link for each new event.

In other contexts, using variables can help you to accommodate an entire team with a single automation instead of building a unique Zap for each person.
Instead of sending an email to a single, fixed address, you could send an email to a dynamically retrieved address that will reflect the data that triggered the Zap to run.
With purpose-built test data, we can always control what information we include, and what information we leave out.
But when your Zaps are live and taking in data from the real world, inconsistencies are inevitable.
We could design and build an automation that assumes people will always provide a description and a Zoom link, but we know that sometimes, people might forget to add them to their events.
And when they do, what happens to the automation?
Thankfully, Zapier provides some simple ways to respond to different data with different actions. All you have to do is add Default Values or Paths to your automation.
We’ll start with Default values.
Default values can be used to provide a fallback value for an empty variable.
For instance, if a calendar event is missing a description, we can use a default value to use the text “No description provided” instead of just having a blank space.
To get started, add a new action and choose “Format”.
Your formatter step must be placed after the trigger, and before any action where you want to include the default value. So in our case, it needs to go before the Slack message.
Formatter is a Zapier tool that allows you to reformat text, numbers, lists, and more.
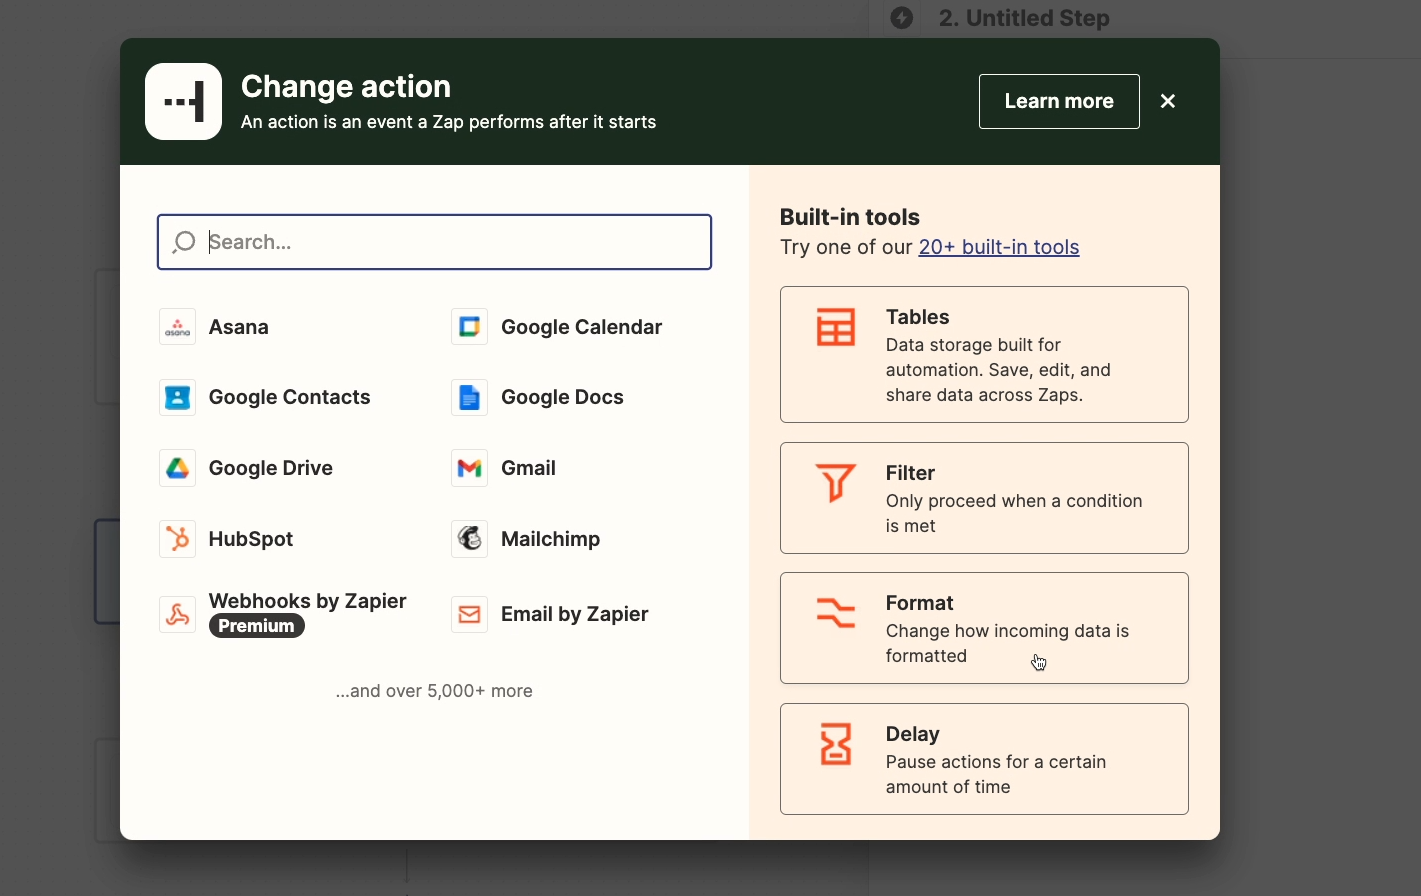
For the event, choose “Text”, and select “Default Value” as the action.

Then, choose the variable that you want to replace if it’s empty. In our example, that will be the “Description”.
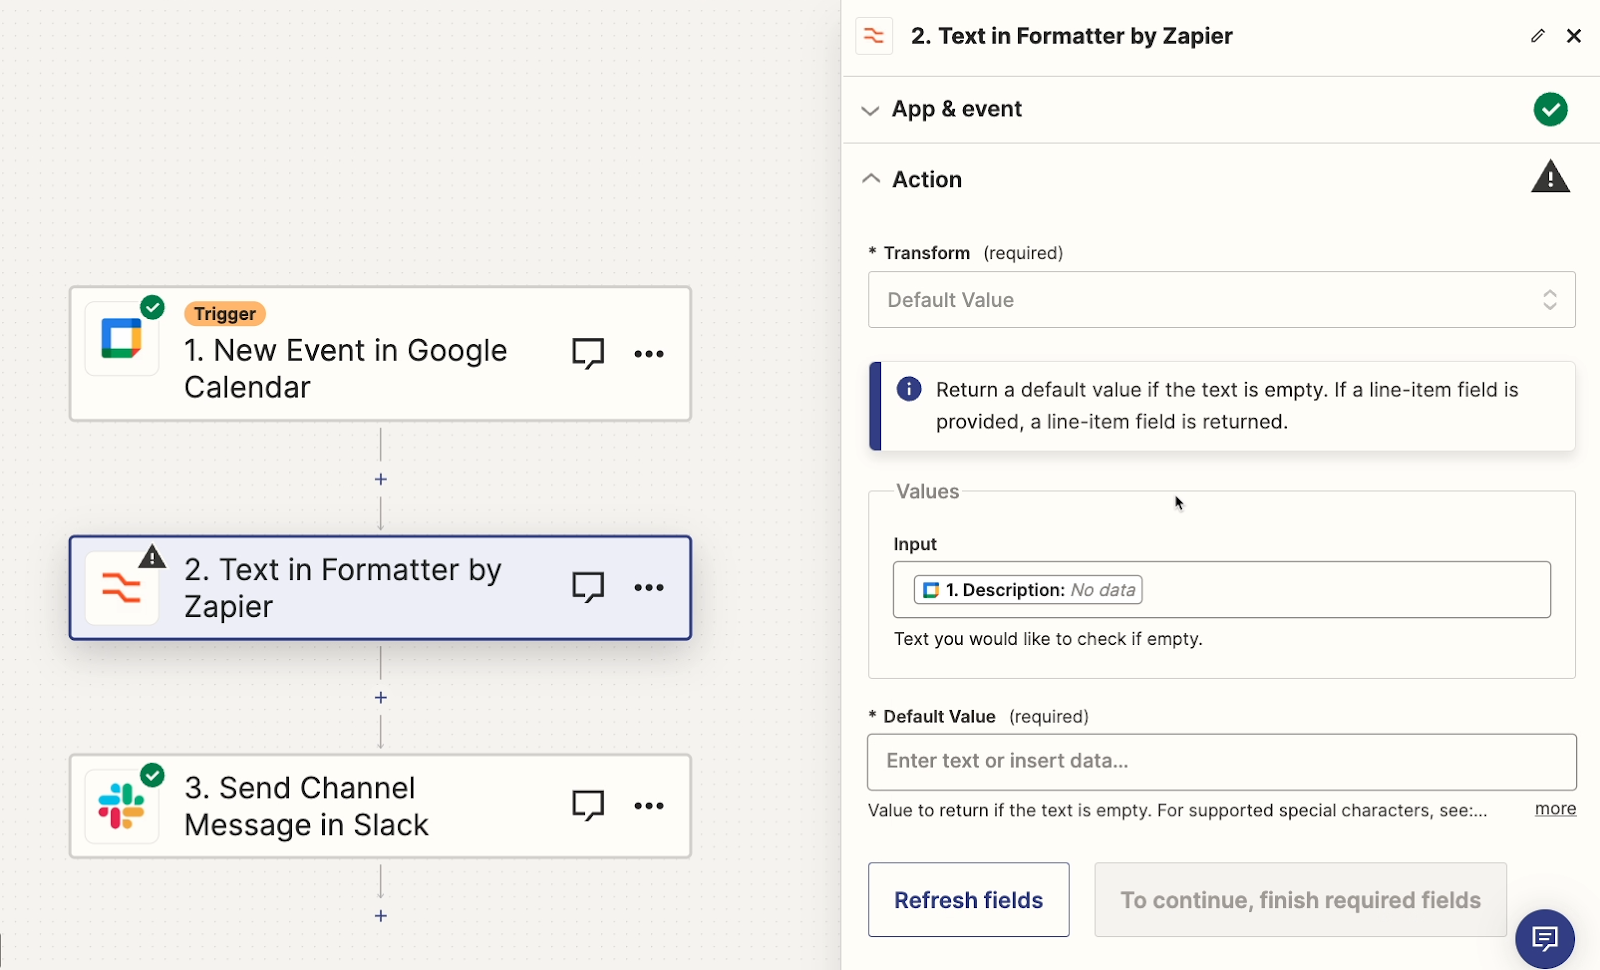
Enter the text that should be used as a default value if the chosen variable is empty. We’ll enter “No description provided”.
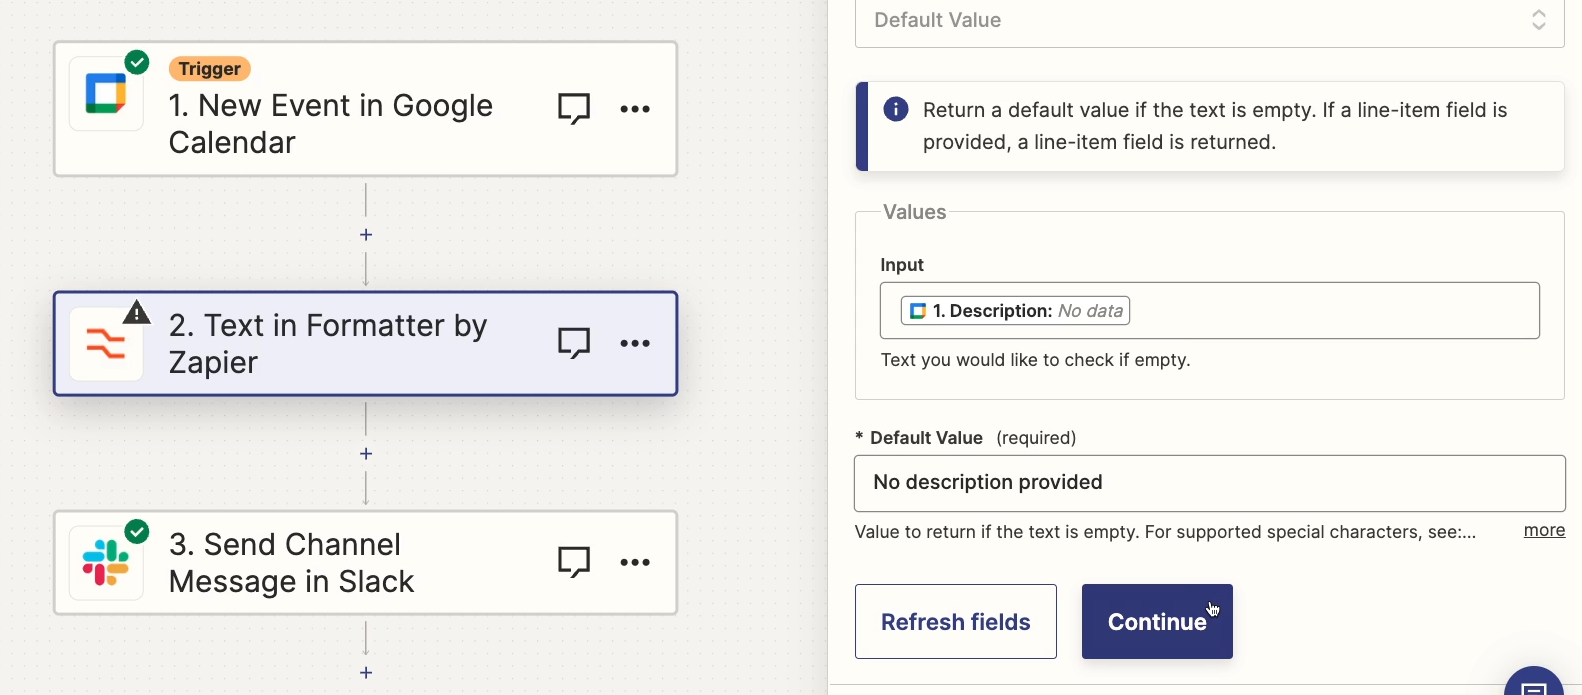
Once you’ve created your default value, give it a test. You’ll want to test your default value twice: once with test data that includes data for the variable you want to replace, and once with test data that’s missing data for the variable you want to replace.
That way, you can confirm that the default value is only used for empty variables.
To start, we’ll go back to the trigger and select a Calendar event without a description.
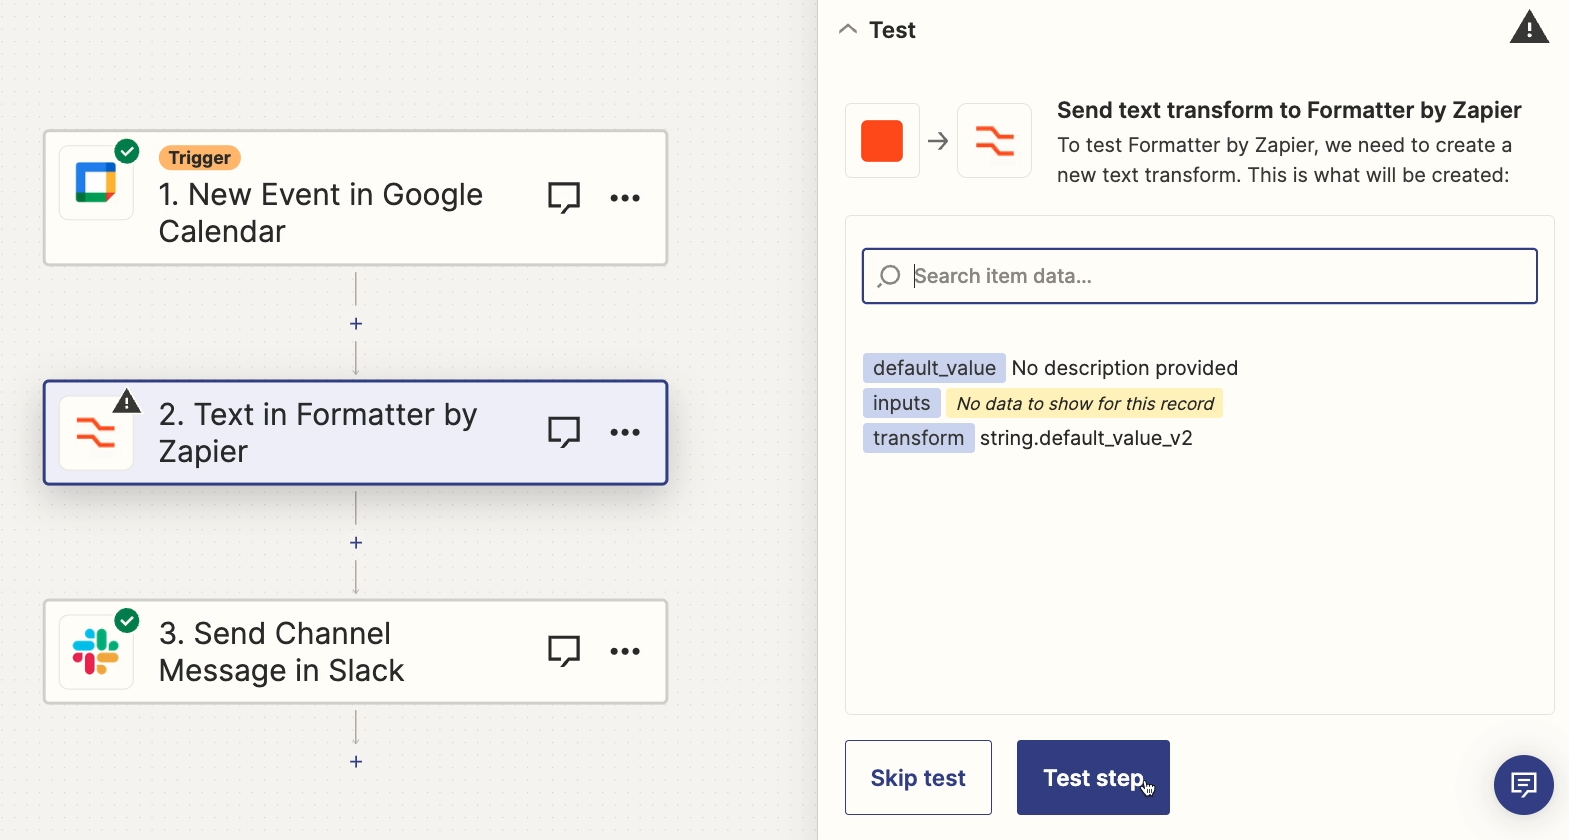
Then, we’ll test the formatter step again.
And as you can see, it replaced the blank variable with “No description provided”, just as expected.
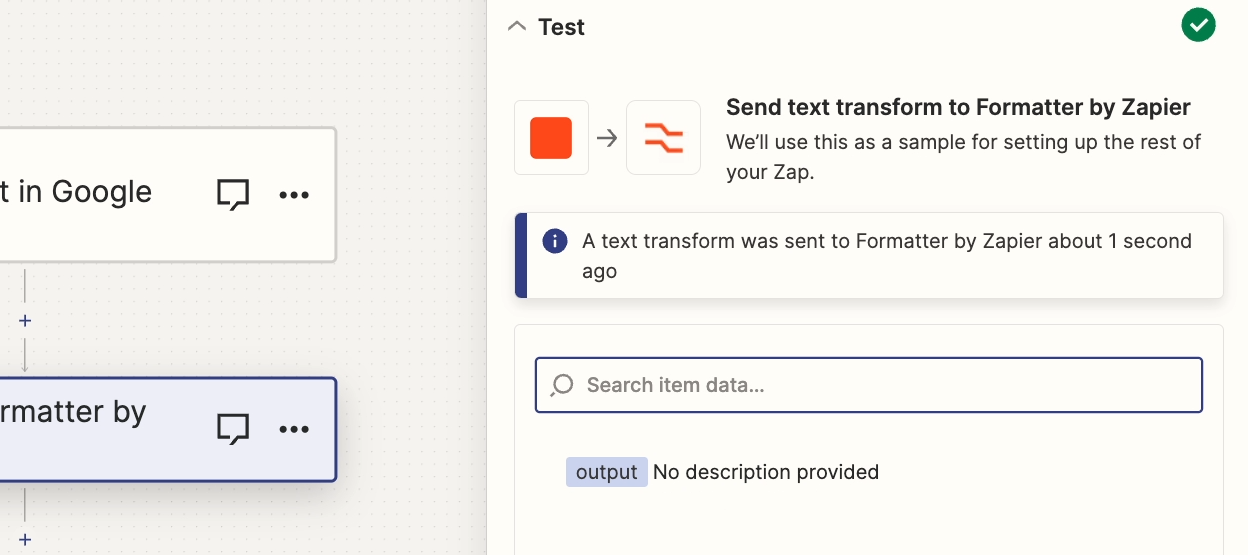
Next, we’ll test the step again with an event that does have a description.
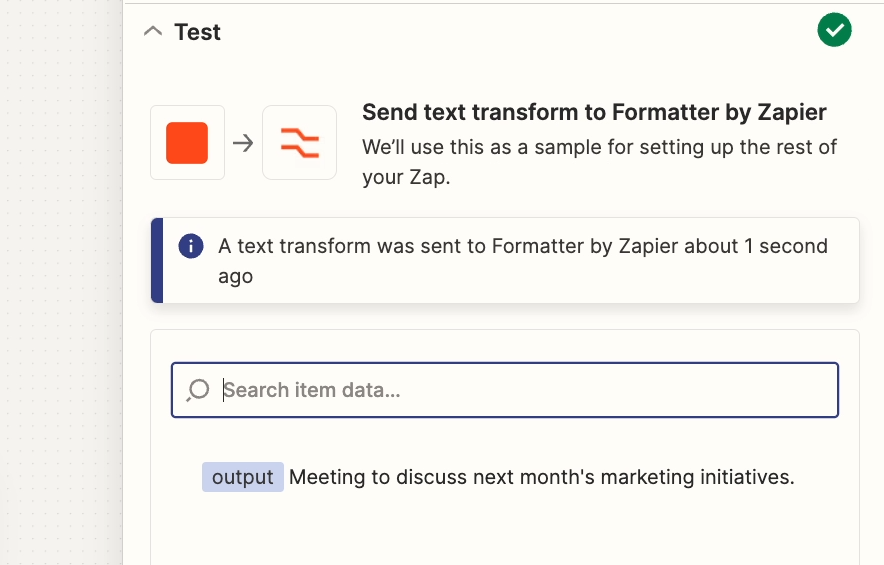
And this time, it leaves the text as is.
As we noted earlier, whenever you’re working with default values or paths, you’ll want to test each possible outcome that you’ve added to the Zap.
If you’d like to add multiple default values, add a new formatter step for each one.
Just remember to place the formatter step before any action where you want to use the default value.
When you add multiple formatter steps, it’s also helpful to rename them so that you know what each step does. “Formatter” can transform data in dozens of different ways, so “Formatter” alone is a very vague title.
We’ll add another formatter step to our Zap to provide a default value for a missing Zoom link.
Then, we’ll rename both formatter steps to keep things organized.
With both default values ready, any alert will use default values as needed to replace missing variables.
To be thorough, you should test your automation with each possible configuration. In our example, that would involve testing once with a Zoom link and no description, once with a description and no Zoom link, once with both, and once with neither.
But we won’t waste your time showing you all of those tests. Just remember to test every configuration that you can when building, within reason.
Default values are great for replacing text.
But what if you want your automation to actually perform different actions based on different inputs?
To do that, you’ll need to use Paths. Adding paths will give your automation multiple potential outcomes.
Each path will include an associated condition. If the data your Zap is processing meets that condition, it will run down that path.
Let’s see how paths look in action.
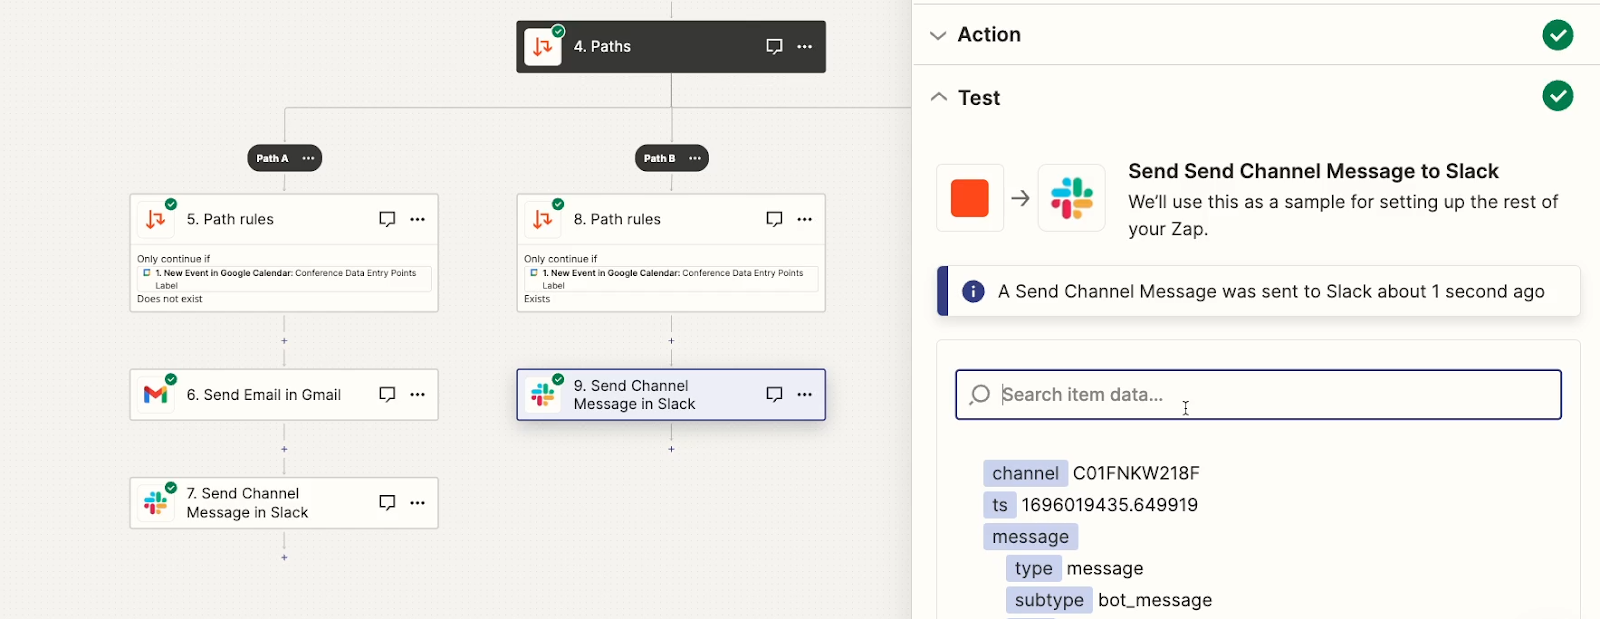
We’ll add a couple paths to our Calendar alerts Zap: one for events that don’t include a Zoom link, and one for events that do.
This time, instead of just having a warning that no Zoom link is provided, we want to email the organizer of the event and ask them to add a Zoom link.
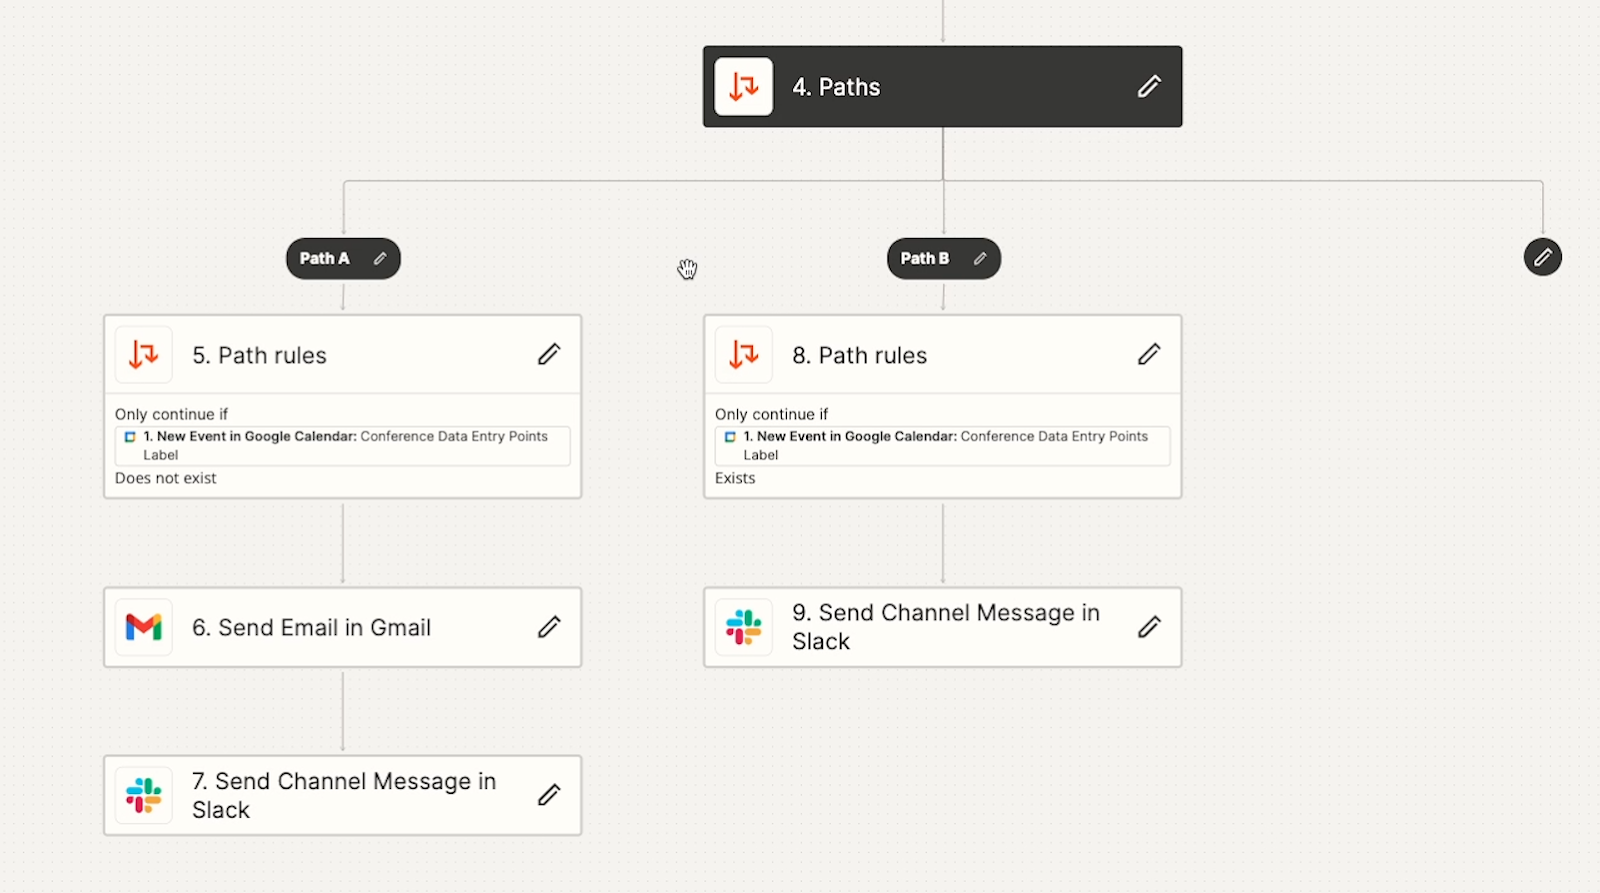
To add paths, add a new action to your Zap. Note that paths need to be the last action in your Zap.
Then, select “Path” from the app menu.

Instantly, you should see two branching paths added to your Zap. Each path starts with a “Rule”.
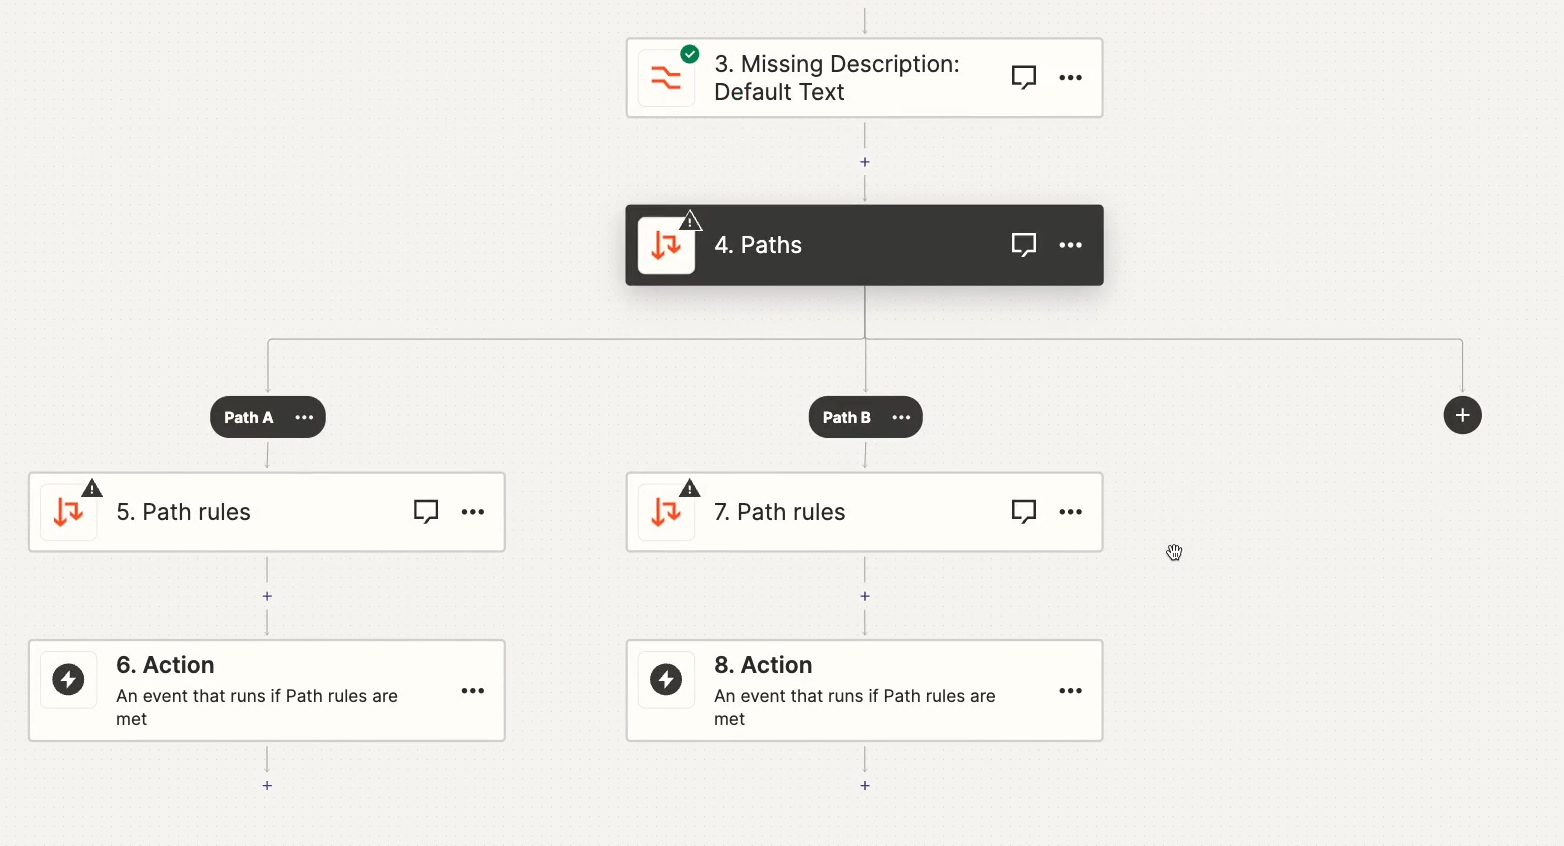
The rule is where you’ll configure the conditions that make the Zap select the appropriate path.
Click on the rule under path A to configure it.
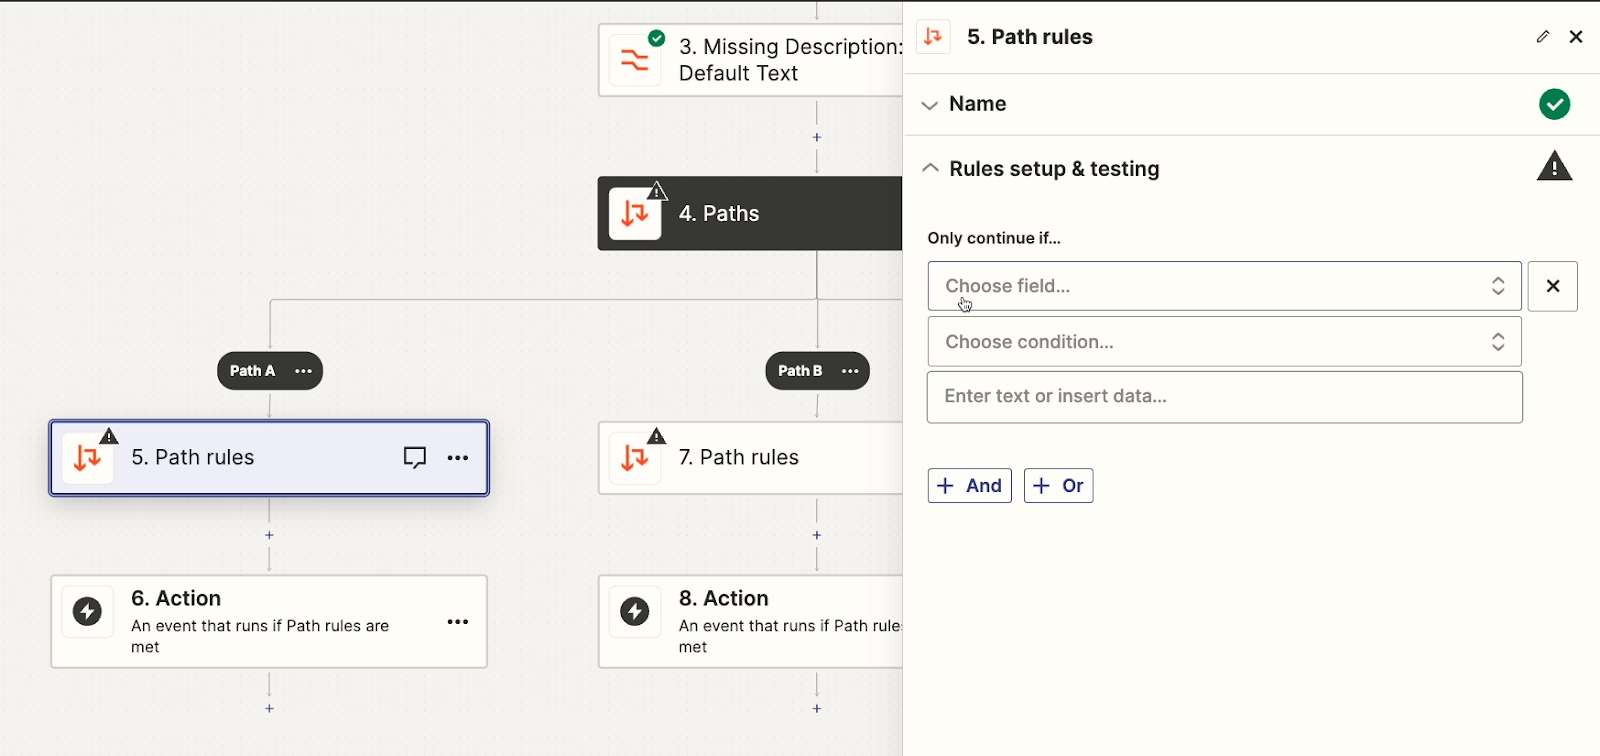
We want this path to run if the Calendar event is missing a Zoom link, so we’ll set the condition to “Conference Data Entry Points Label” “does not exist”.
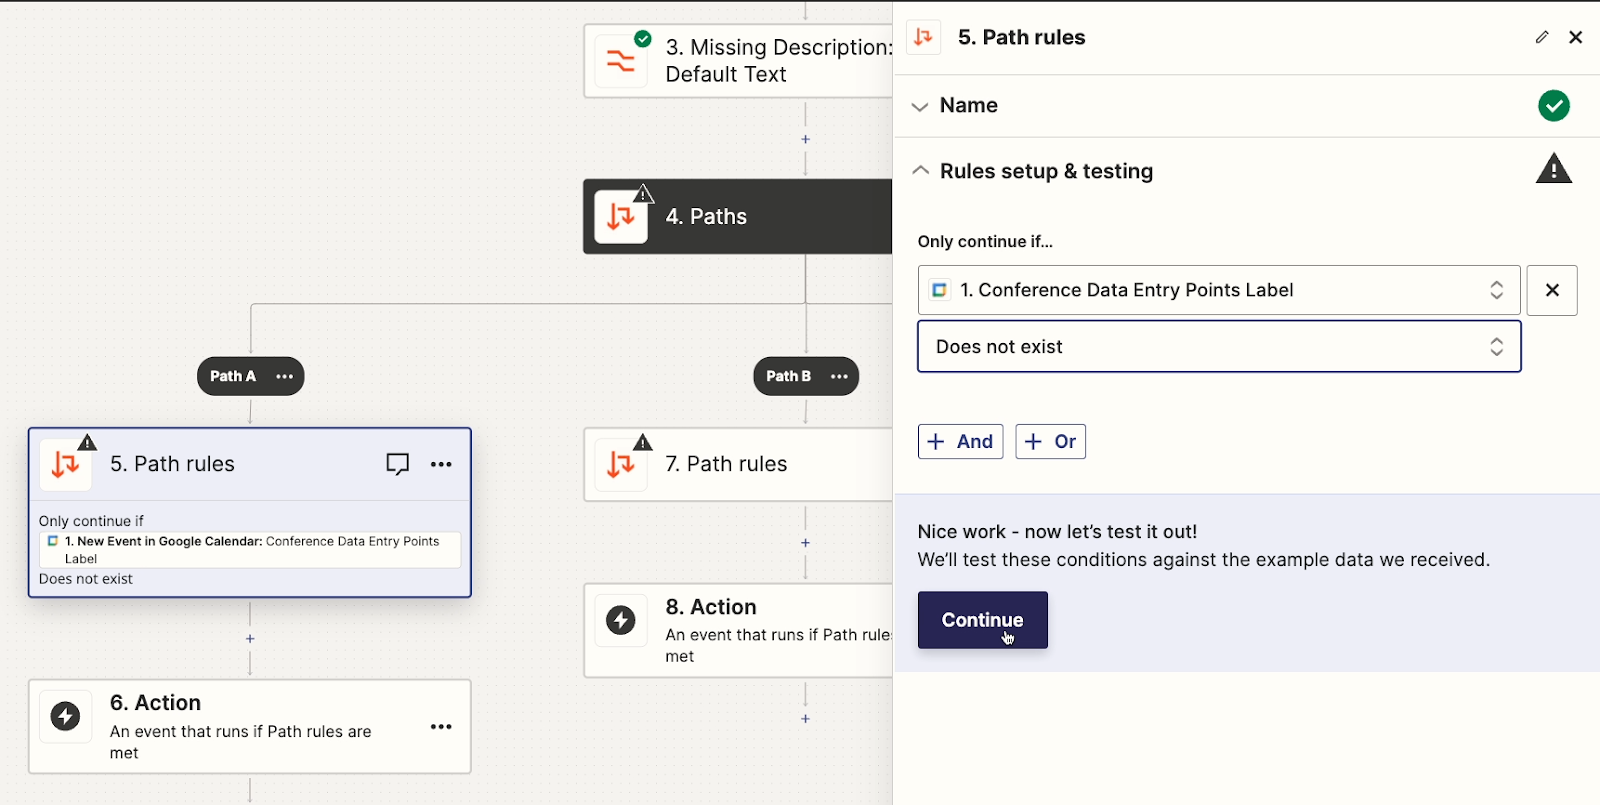
Then, we’ll give it a test by clicking on “Continue”.
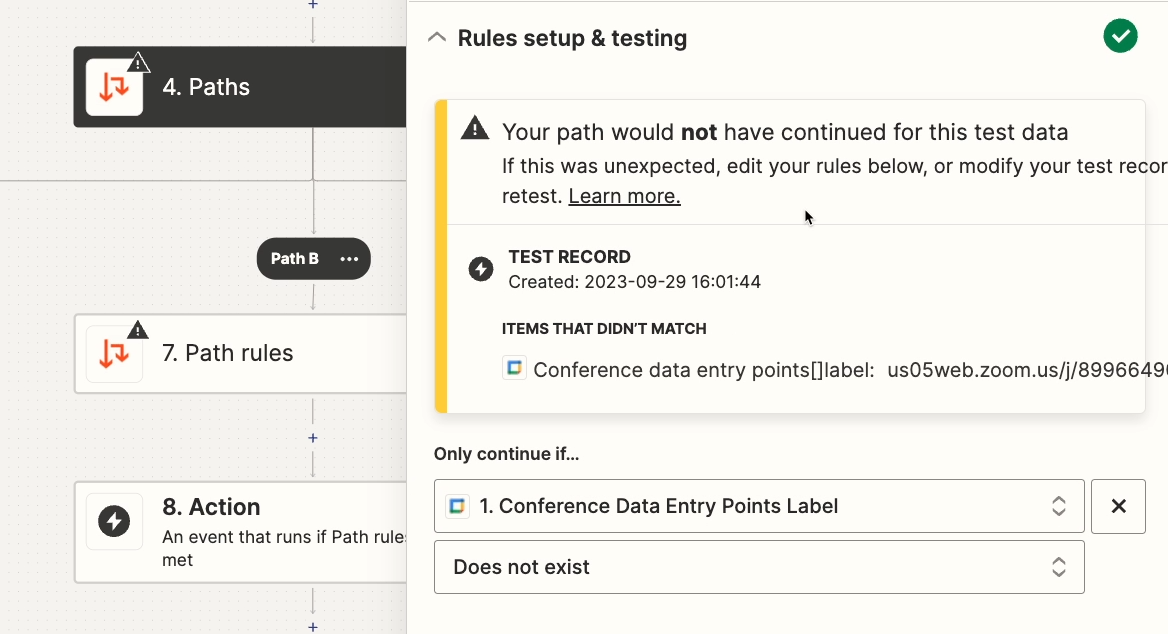
The automation says this action would not have continued down this path, since the Zoom link is there.
To finish testing this path’s condition, we’ll update the test data to an event without a Zoom link.
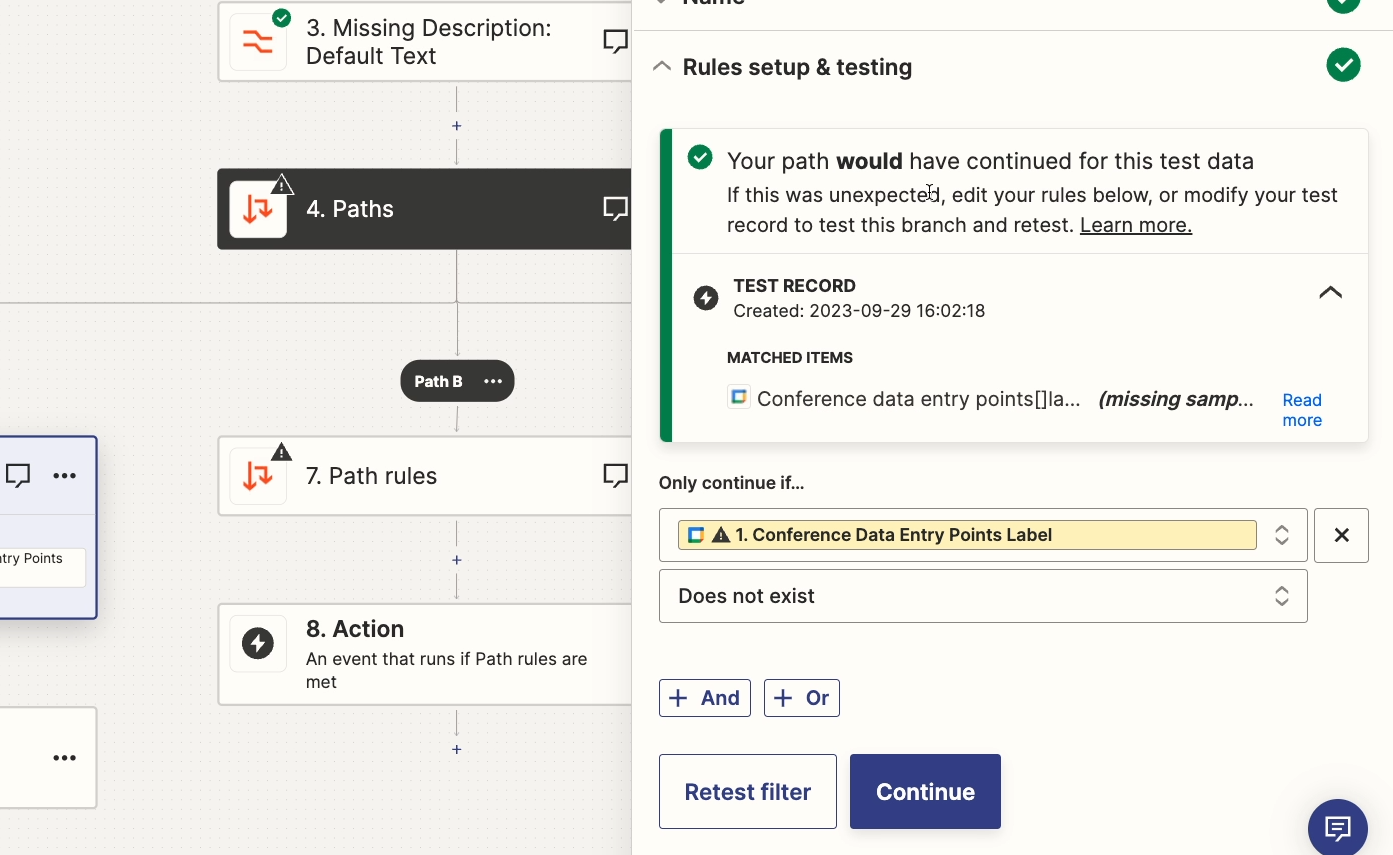
Then, we’ll retest both formatter steps before finally testing Path A’s condition again. The path now says that it would have continued.
Once you’ve configured and tested the path’s condition, you can add any actions you want to the path.
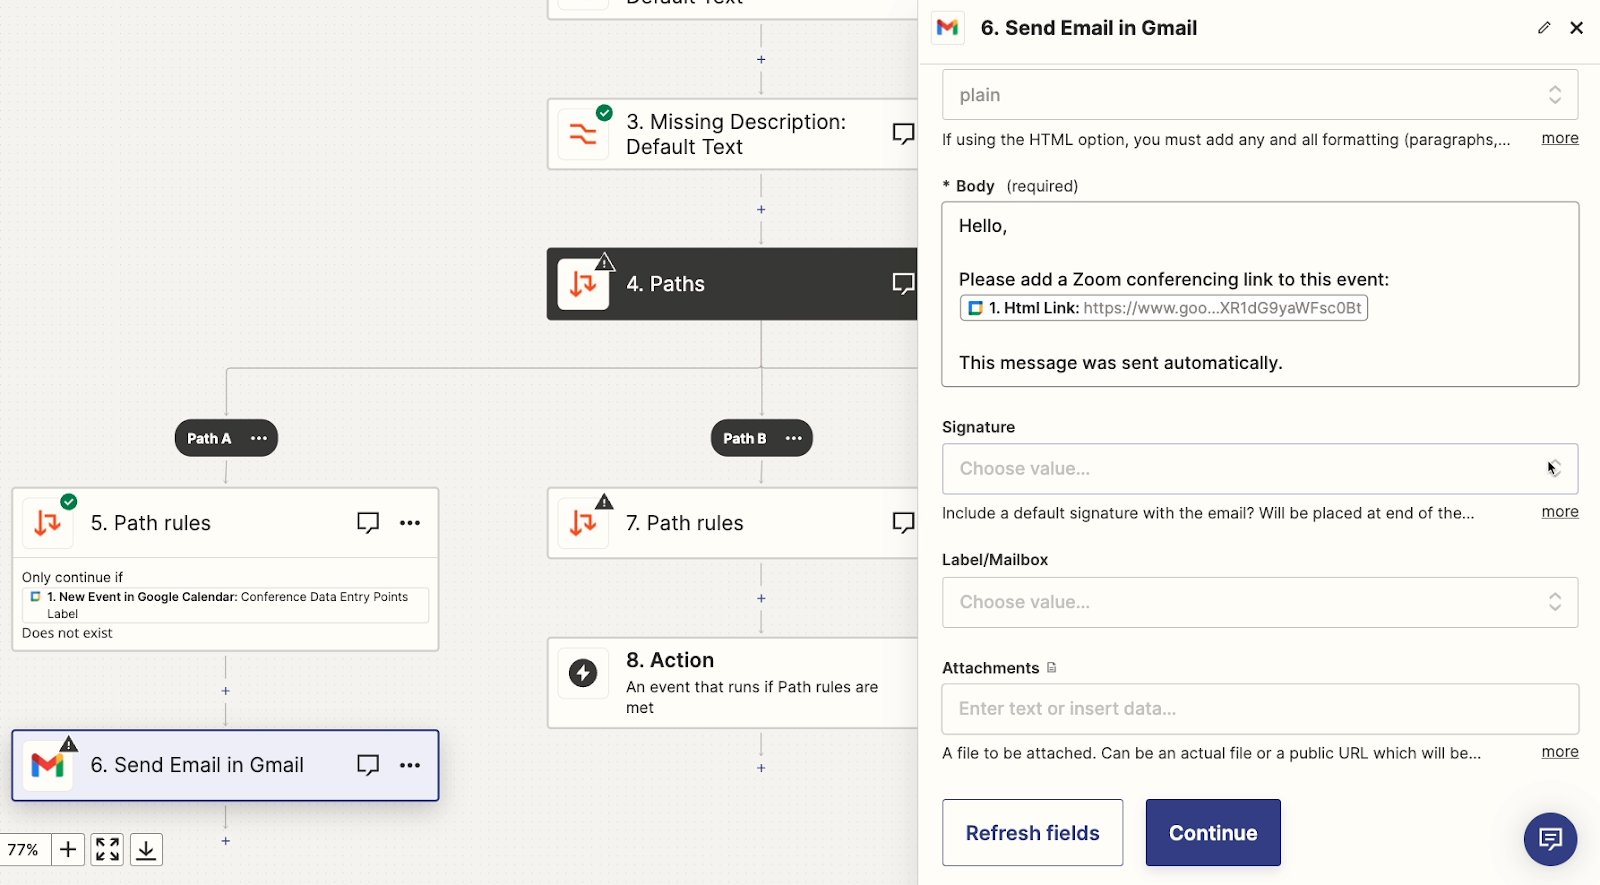
We’ll add a Gmail step, and set up an email that will go to the event organizer, asking (politely) to add a Zoom link to the event.
Test any steps you add to Path A. Then, configure Path B.
You can set up the rule for Path B the same way as Path B, but be careful when you’re designating the rules for each path.
Multiple paths can run at the same time. However, this can often lead to confusing and redundant results.
In most cases, it’s best to set up all of your paths at a single junction to use mutually exclusive conditions. That way, you’ll be able to ensure that, logically, only one path can run at any given time.
For our example, we’ll set Path B’s condition to “Conference Data Entry Points Label” “exists”. Since it’s the exact opposite of Path A’s condition, we know that only one path can run at once.
Then, we’ll copy the Slack step from earlier in our automation into both Paths A and B.
Note that you can add up to 10 paths within a single path module. From there, you can also nest path modules inside of paths, potentially adding over a hundred paths to a single automation.
Of course, just because you can doesn’t mean you should. Be careful not to make things more complicated than they need to be.
With all the variables and paths you might be adding to your Zaps, there are many different ways your automations might run, and many different outcomes they could produce.
When something is not working, or not working as expected, you might not always be sure which path ran - or which one was supposed to run.
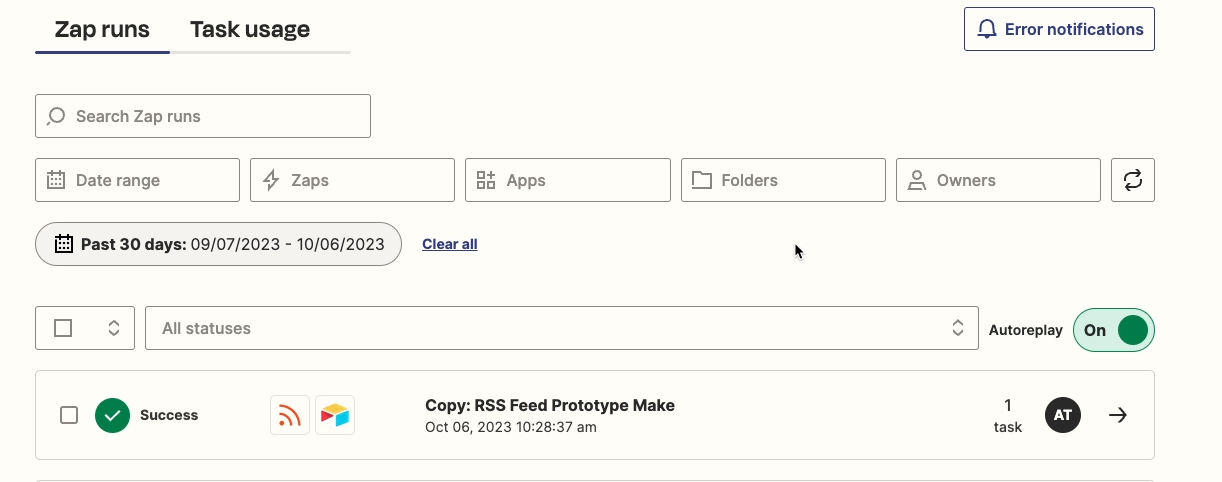
That’s why it’s good to check Zap history whenever your automations aren’t working as expected, or are hitting frustrating errors.
Zapier keeps a log of all your Zaps’ history. You can access it by just clicking on the Clock icon in the Zap editor.
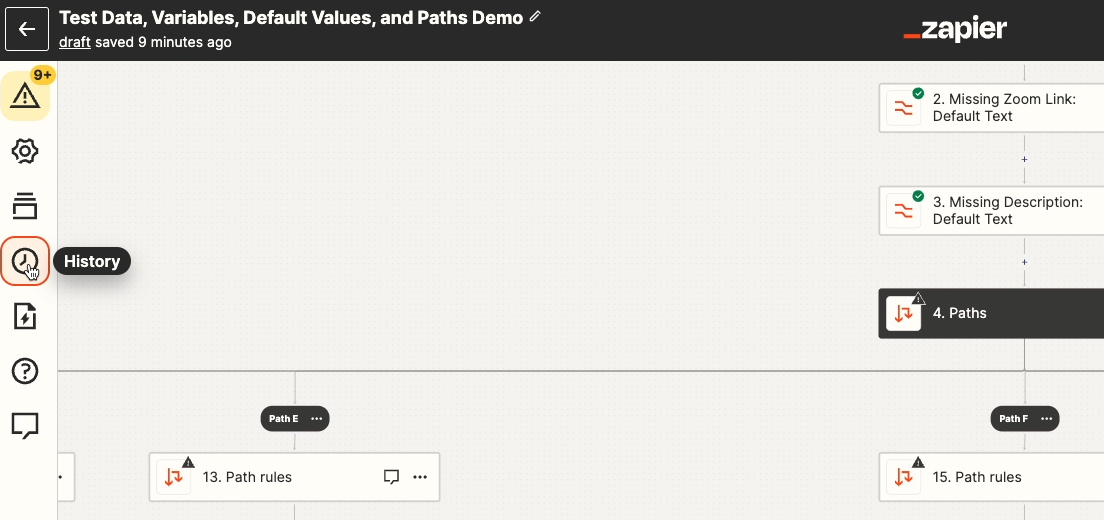
You can also find history from your Zapier homepage by checking the panel on the left.

In your history, you can see every action run by your account.
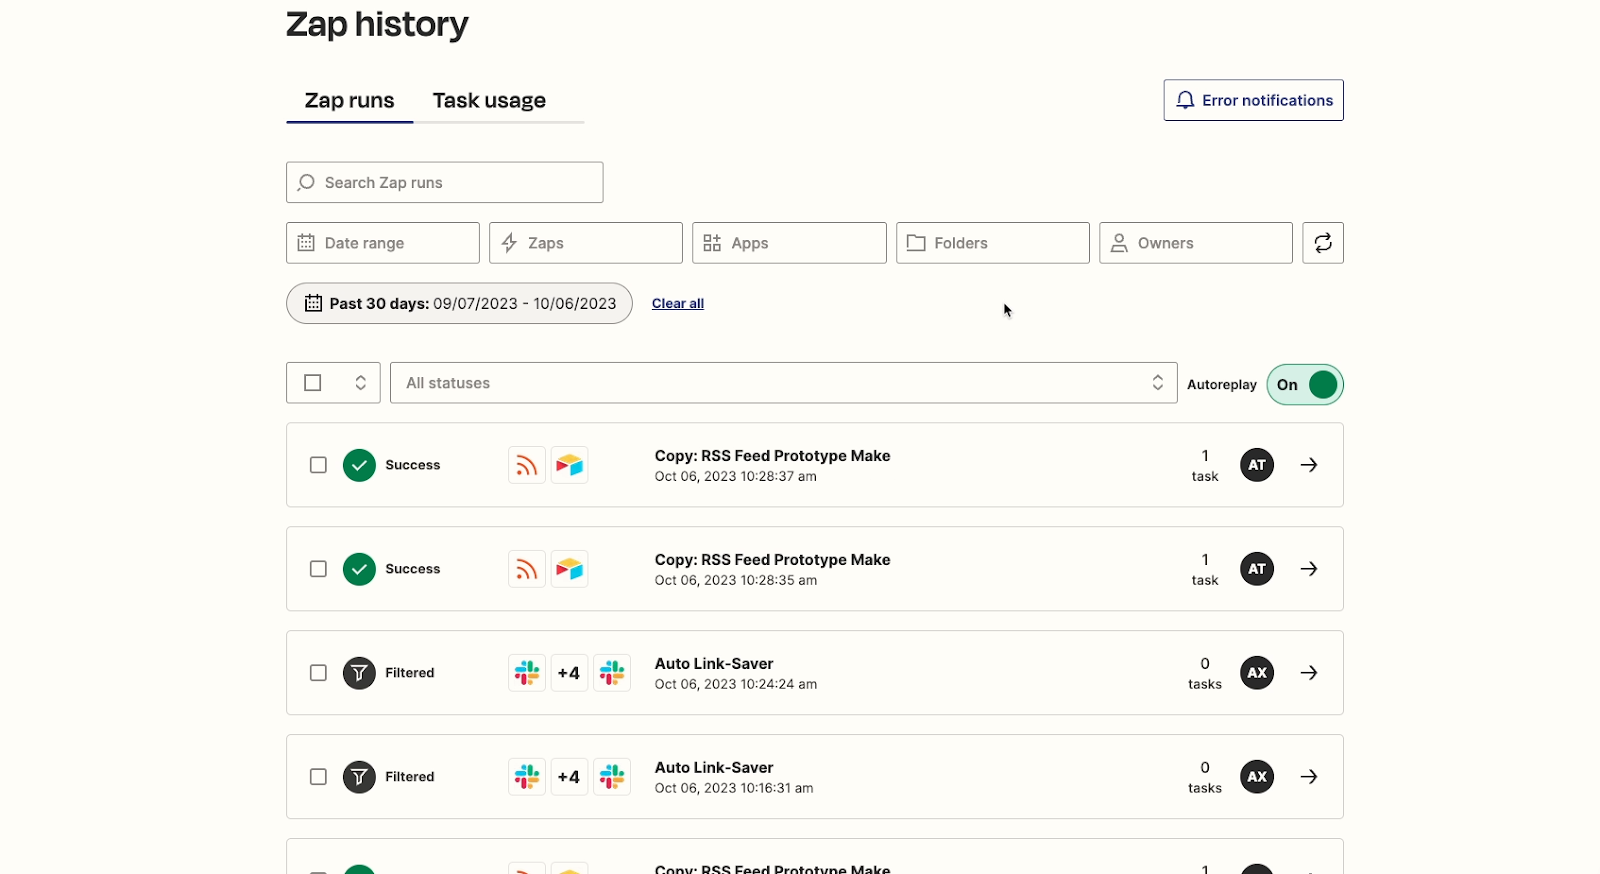
You can filter by date range, the name of the Zap, the apps involved, the folder the Zap is stored in, or the Zap creator.
You can also use the search bar to search for keywords across Zap titles and the data that your zaps processed when they ran.
When we filter our history by our “Test Data, Variables, Default Values, Paths Demo” Zap, we can see a few results. Note that you’ll only see runs that occurred while your Zap was turned on and published. You won’t see tests in Zap history.
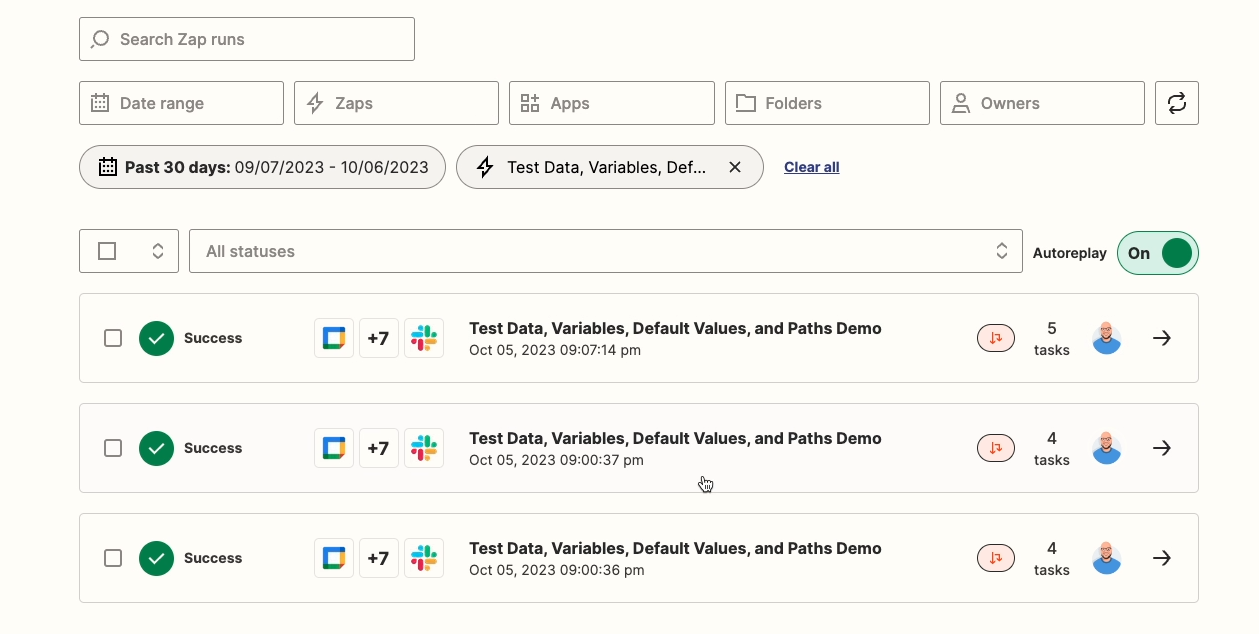
You can click on any of these entries to see more details.
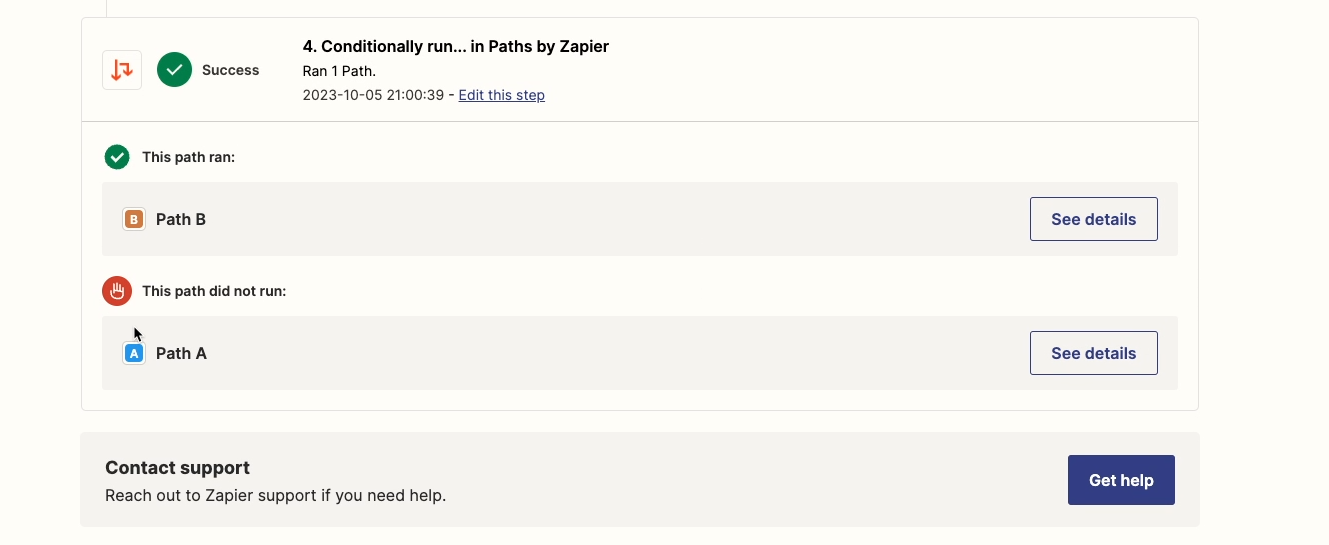
When we select an entry, we see a list of every action that ran, and a clear breakdown of which paths ran, and which paths didn’t.
Reviewing the history will let you see exactly where a Zap encountered an error, and will provide an error message explaining what happened.
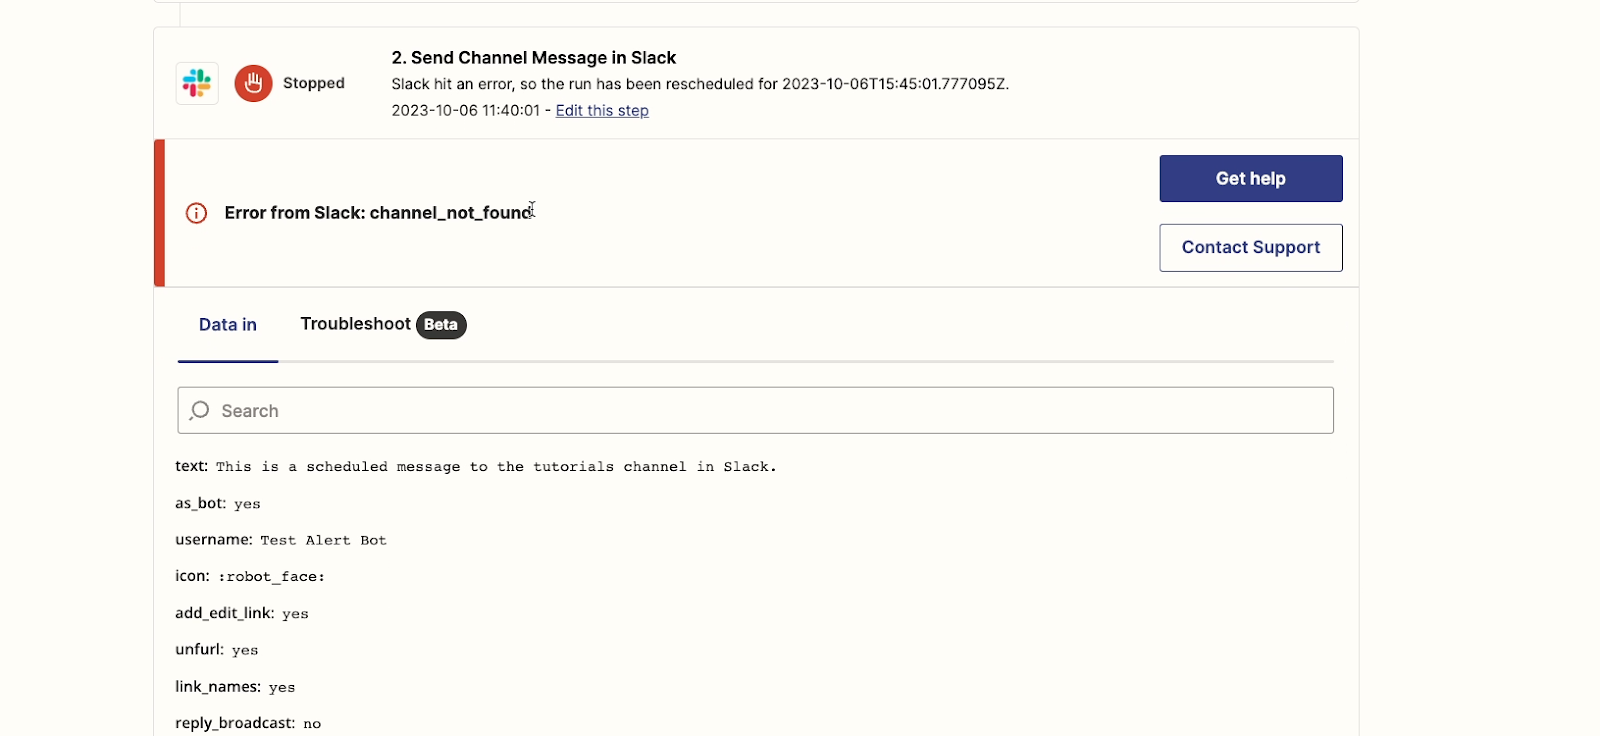
The error messages are often clear and helpful, but can sometimes be a little vague. These errors usually come from the app that you’re automating, not Zapier itself. A quick Google search with the error message usually helps.
Be vigilant with your zap history; it is the key to understanding what happened, and will guide you to a solution. Checking the history tab should always be your first step whenever a Zap isn’t working as expected.
Zapier is an excellent automation platform for no-code beginners. But even a user-friendly platform like Zapier has the potential to build sophisticated automations that handle variable data with different outcomes.
Understanding how test data, variables, and paths work will help you to build more useful, robust Zaps for your team. And keeping an eye on the history tab will make it easy to fix any problems that crop up.
If you’d like to learn more about building automations with no-code providers like Zapier, be sure to check out our blog or our YouTube channel. You can also follow XRAY on Twitter, Facebook, or LinkedIn.