Zapier launched in 2012. For over a decade, it's been the most practical way to connect the apps your business already uses and get them talking to each other without writing a line of code.
But 2026 Zapier is a different product than the one most people picture when they hear "workflow automation." AI is now built directly into the platform, and that changes what's possible in a significant way.
This guide will walk you through three levels of Zapier automation: classic workflows, AI-enhanced workflows, and AI agents.
To show how each one works, we'll build the same workflow three times — starting simple, then making it progressively smarter.
Start at the beginning, even if you're tempted to skip ahead. The basics make everything else easier to build and maintain.
Workflow automations in Zapier are called “Zaps”. Each Zap has two key components:
• A trigger — the event that starts the automation
• One or more actions — what happens after the trigger fires; typically creating or finding data

With this simple structure, you can retrieve data from any one of your web apps and send it wherever you’d like, eliminating tedious admin tasks and keeping your critical information consistent.
Triggers and actions are pulled from Zapier's library of over 9,000 web app integrations, including software like Google Drive, Microsoft Teams, Hubspot, Jira, Notion, and many more.

Basically, if you use it for work, it's almost certainly in there.
For our example, we're going to build a workflow that watches a Gmail inbox and sends a Slack message for every new email. Simple, but it illustrates everything you need to know about how Zaps work.
You can also follow along with free accounts for all three apps – Zapier, Gmail, and Slack.
To make a new Zap, sign in to Zapier and click “Create”.

Then, select “Zap”.
Your trigger is the starting point. It watches an app for a specific event and kicks the Zap into motion when it happens.
To create your trigger, click on the blank trigger in your canvas, and search for the app you want to watch. For our example, we’ll choose Gmail.

Choose the specific event you want to trigger on (a new form submission, a new row in a spreadsheet, a new message in a channel, etc.). To build our automation, we’ll use the “New emails” event.

Sign in and authorize Zapier to access your trigger app (usually just a login, or an API key — Zapier will tell you which).

Click “Continue”, then configure any available filters to narrow down when your trigger fires.
Most triggers also let you specify where to look — which inbox, which database, or which folder. For Gmail, you can apply label filters to catch only certain types of messages.
For now, we'll keep it simple and trigger on all new emails in our inbox.

Click “Continue” again to proceed to testing.
Testing isn't just about confirming the trigger works — it's how Zapier fetches real data for you to work with, and it’s an essential step to make sure you can set up your actions correctly.
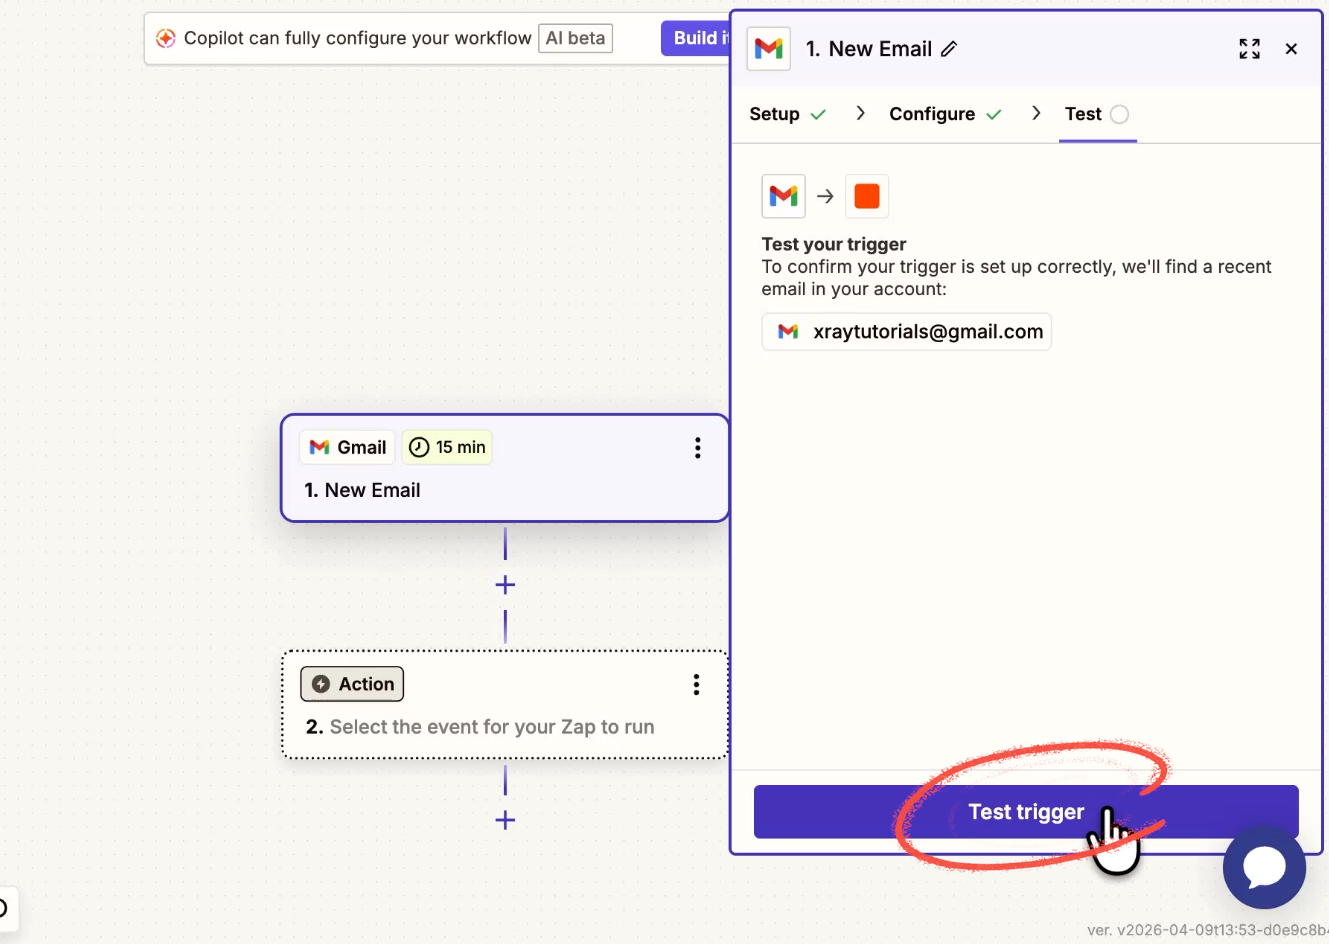
When you click “Test trigger”, Zapier pulls in recent records that match your configuration.

Click into the results and you'll see every piece of data available from that app.

Gmail returns the sender name, sender address, email body, send date, any attachments, and more — far more than you'll need for any one workflow. You'll use this data to build the rest of your Zap.
Pick any suitable record from the test results, and click “Continue with selected record”.
Now, Zapier will prompt you to add an action step.
Search for the app you want to connect to. For our example, we’ll select Slack from the list.

Choose the specific event you want to perform in your app. We’ll choose "Send a direct message."

Just like your trigger app, you’ll need to connect your action app’s account and authorize Zapier to access it. Then, continue to configuration.

In any action field, you can type static text, or click the plus button to pull in dynamic data from your trigger or earlier steps. This is how data flows from one app to another.

For our workflow, we’ll compose a message using dynamic variables from the Gmail trigger — sender name, subject line, send time.
A couple of tips for Slack specifically: use asterisks to bold text, and turn off link previews in the additional settings. Expanded links take up a lot of space and clutter the message.
You’ll also want to make sure to include a link to the Zap. Three months from now, you probably won't remember what the automation is named or where you put it. A direct link in the notification means you can find it in seconds. Your future self will thank you.

Test the action before you move on. Zapier will actually perform it during a test — so make sure you're comfortable with what it sends (and where it sends it to) before you click “Test”.

You should see a message that the test was successful, including a summary of the data that was created.

However, it’s always a good idea to confirm the test yourself. Head over to your action app and take a look at what Zapier made.

If your test looks good, the Zap is all set. Click “Publish” to turn it on.

Your Zap will now look for new emails in your inbox periodically and trigger whenever it finds one. On a free plan, Zaps can only run every 15 minutes, but paid plans reduce the polling time down to 1 minute.
The workflow above is useful, but it's very rigid. It sends a nearly identical Slack message for every email, no matter what.
This is where AI steps change things. Instead of just routing the email to Slack, we can have Zapier analyze it first, give us a summary of the message, and flag whether it needs a response.
There are two ways to send AI prompts inside a Zap:
First, you can connect directly to an AI platform using an API key (OpenAI, Anthropic, Google Gemini, etc.).

This gives you the most control and access to the latest models, but there's usually a small per-prompt cost on top of your Zapier subscription (although Gemini does offer free limited use of its API).

Your second option is to use "AI by Zapier," which is built into the platform and includes several models at no extra charge. This is the easiest option if you're just getting started.
Just note that you will need a paid Zapier plan in order to publish a Zap using a “Premium” app like AI by Zapier, or any Zap that includes more than 2 steps. You can build and test with Premium apps or multiple steps as much as you’d like for free, but you won’t be able to turn those Zaps on.
Configuring an AI step
Click on the plus sign after the trigger to add a step between the Gmail trigger and the Slack action.

When you set up AI by Zapier, you'll see a few key settings:
• Model — Options marked with a lightning bolt are free to use on your plan
• Input fields — Attach variables from your trigger or other steps as labeled inputs, which you can reference in your prompt
• Knowledge sources — Optionally connect a database or upload a file (useful for style guides, FAQs, or company-specific context)
• Prompt — Write instructions in plain language, and use the plus sign (or forward slash shortcut) to insert dynamic data from earlier steps. You can also ask Zapier's AI to help you write or improve the prompt.
• Output fields — By default, the AI’s response will be stored in a single “Output” field, but you can split it into multiple custom fields for more granular data.
For our workflow, we'll use a free AI model.

We’ll insert the email body and other details into a prompt that asks the AI to summarize the message and tell us whether it needs an urgent reply.

We’ll skip the input fields and knowledge sources for this example – all the data we need is included in the prompt already.
Since we’re asking the AI for two distinct things – a summary and an urgency rating – we’ll add an output field for each.
Click “Add field” to add a new output field.

Give the field a name and choose an appropriate type (e.g., Text, Single select). You can also optionally add a description to give the AI more context about what should go into that field.

We’ll make the Summary field a text field, while the Urgency Level will be Single Select with three options: High, Medium, and Low. That way, we’ll ensure consistent ratings for every email.
Use "Generate preview" to test the output.

If everything looks good, go back to your Slack message and insert the AI response. That will either be a single variable called “Output”, or your custom Output fields.

If you’d like to see the new output of this version of the Zap, you can test the Slack action again.
The Zap looks almost identical to before. But now every Slack notification arrives with a summary and a clear signal about what needs your attention, rather than just a simple copy and paste of the email body. That's a meaningfully different tool.
The AI workflow above is smarter, but it still fires and sends a message every time. Every email gets summarized. Every email generates a Slack message. The system has no ability to decide whether it's worth alerting you in the first place.
We could add a filter, but it can be difficult for a simple, programmatic filter to accommodate every possible email that we might receive. Which exact keywords should it look for, and which should it include?
Creating that filter would take a lot of time and trial and error.
But an AI agent can make that call with a couple minutes of setup.
Instead of following a fixed script, agents use judgment. You give them tools and instructions, and they decide what to do based on what they encounter. For our email workflow, that means the agent can read each message and choose whether it actually warrants a Slack alert — or do nothing if it doesn't.
Zapier's agents are included on all plans and have access to the same 9,000+ integrations, with authorization handled automatically. That makes them one of the fastest ways to stand up a working AI agent without managing infrastructure yourself.
Free plans include 400 agent actions each month. You can increase this limit by upgrading to a paid plan.
How to build one
Go to Create → Agents in your Zapier dashboard and create a new agent from scratch.

You'll configure four things:
• Trigger — Same as a regular Zap. We'll use the same Gmail trigger we've been using throughout.
• Tools — The apps and specific actions the agent is allowed to use. Be deliberate here. We want it to be able to send Slack DMs, so we'll grant that — but we won't give it the ability to post to channels. Narrowing access limits the damage if the agent makes an unexpected decision.
• Knowledge sources — Optional. Upload files or connect databases the agent can reference (style guides, SOPs, product info, etc.).
• Instructions — A plain-language prompt that tells the agent what to do. Reference the tools by name so the agent knows what's available, and enter variables just like any other step in Zapier.

To configure each tool, click on the three dots and select “Configure”.

Configuring an action in a Zapier Agent is very similar to configuring the corresponding action in a regular Zap, but with one key difference.
For every field, you can choose a specific setting or content yourself, or you can let the agent decide what to enter.
This is what really sets agents apart from normal Zaps. You can enable them to make decisions without needing your direct guidance.
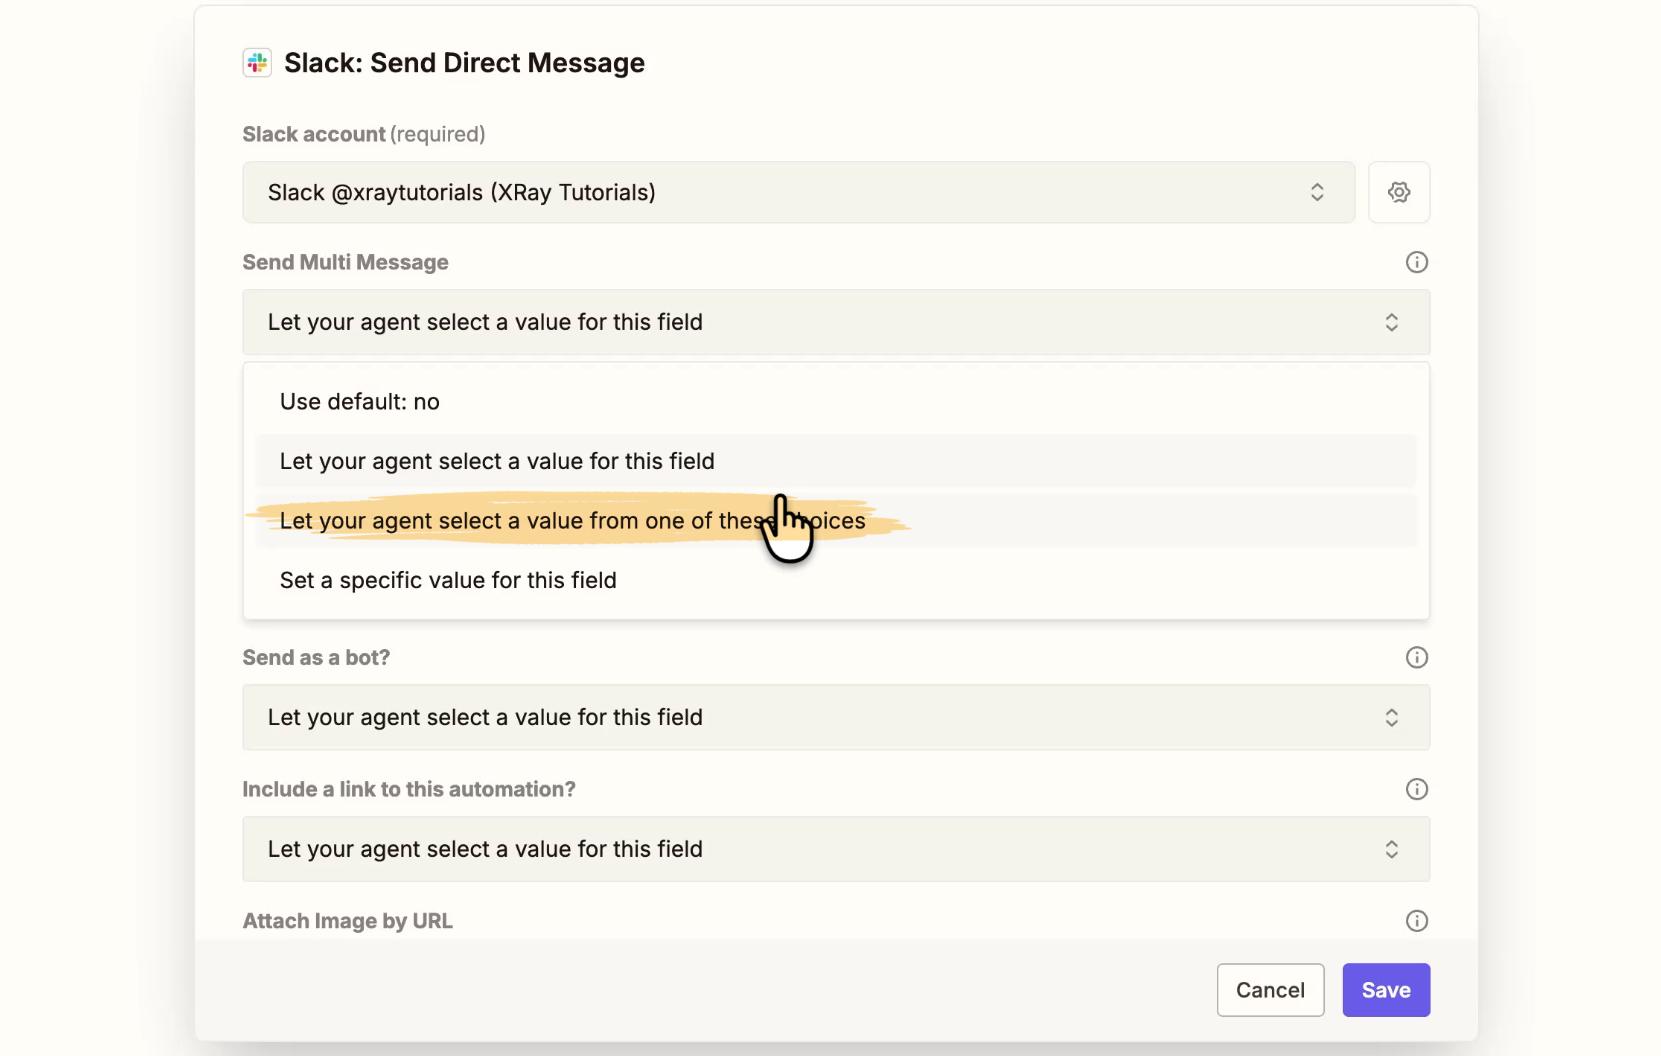
Naturally, you should be careful about how much leeway you give to your AI agents. Letting them fill in fields themselves can be a timesaver, but can also introduce more risk into your workflows if the agent hallucinates or makes a mistake.
In our example, we’ll still configure most of the fields manually, such as providing a single, static recipient for the message (ensuring that the agent won’t bother anyone else on the team by mistake).
However, we’ll let the agent compose the message on its own. That’s where we want it to use its creativity in describing and summarizing the email content.

Once your agent is all set up, click "Agent preview" to test before publishing.

The agent will look for recent data to process. Ours finds an email, and considers it important enough to send a Slack alert.
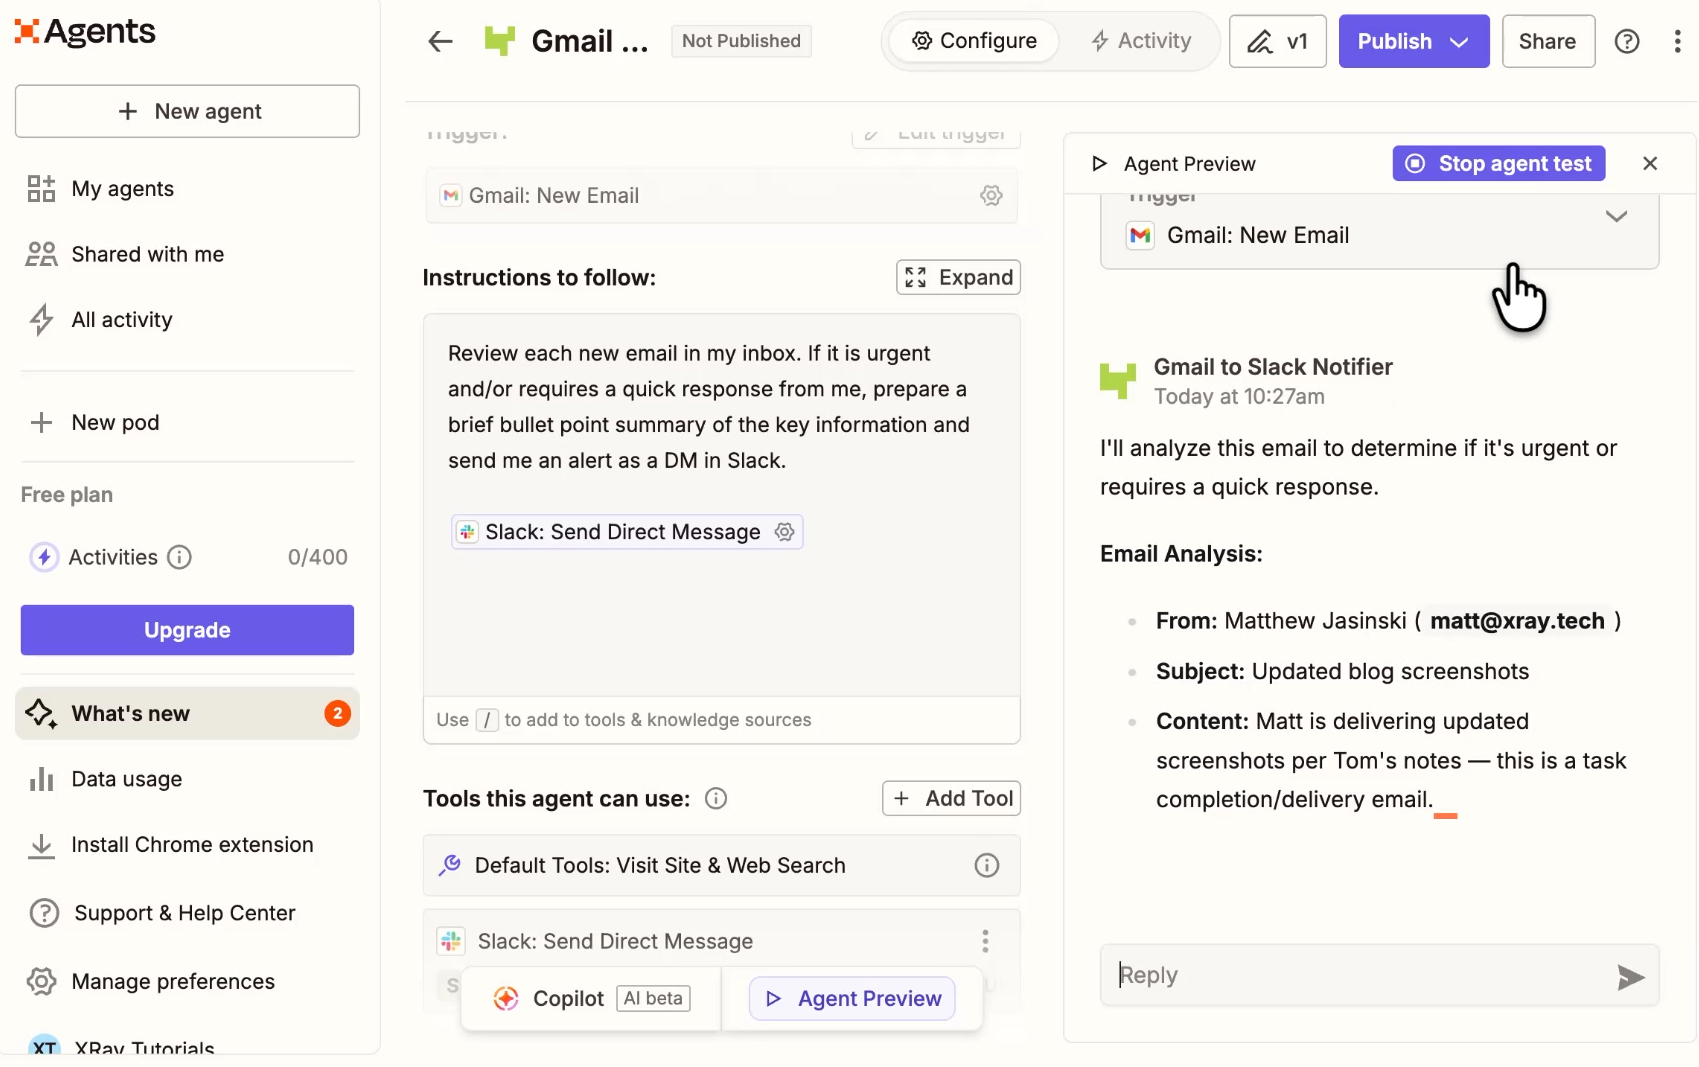
When the agent is live, it will run its actions autonomously. However, while testing, the agent will ask for your approval before performing any actions.
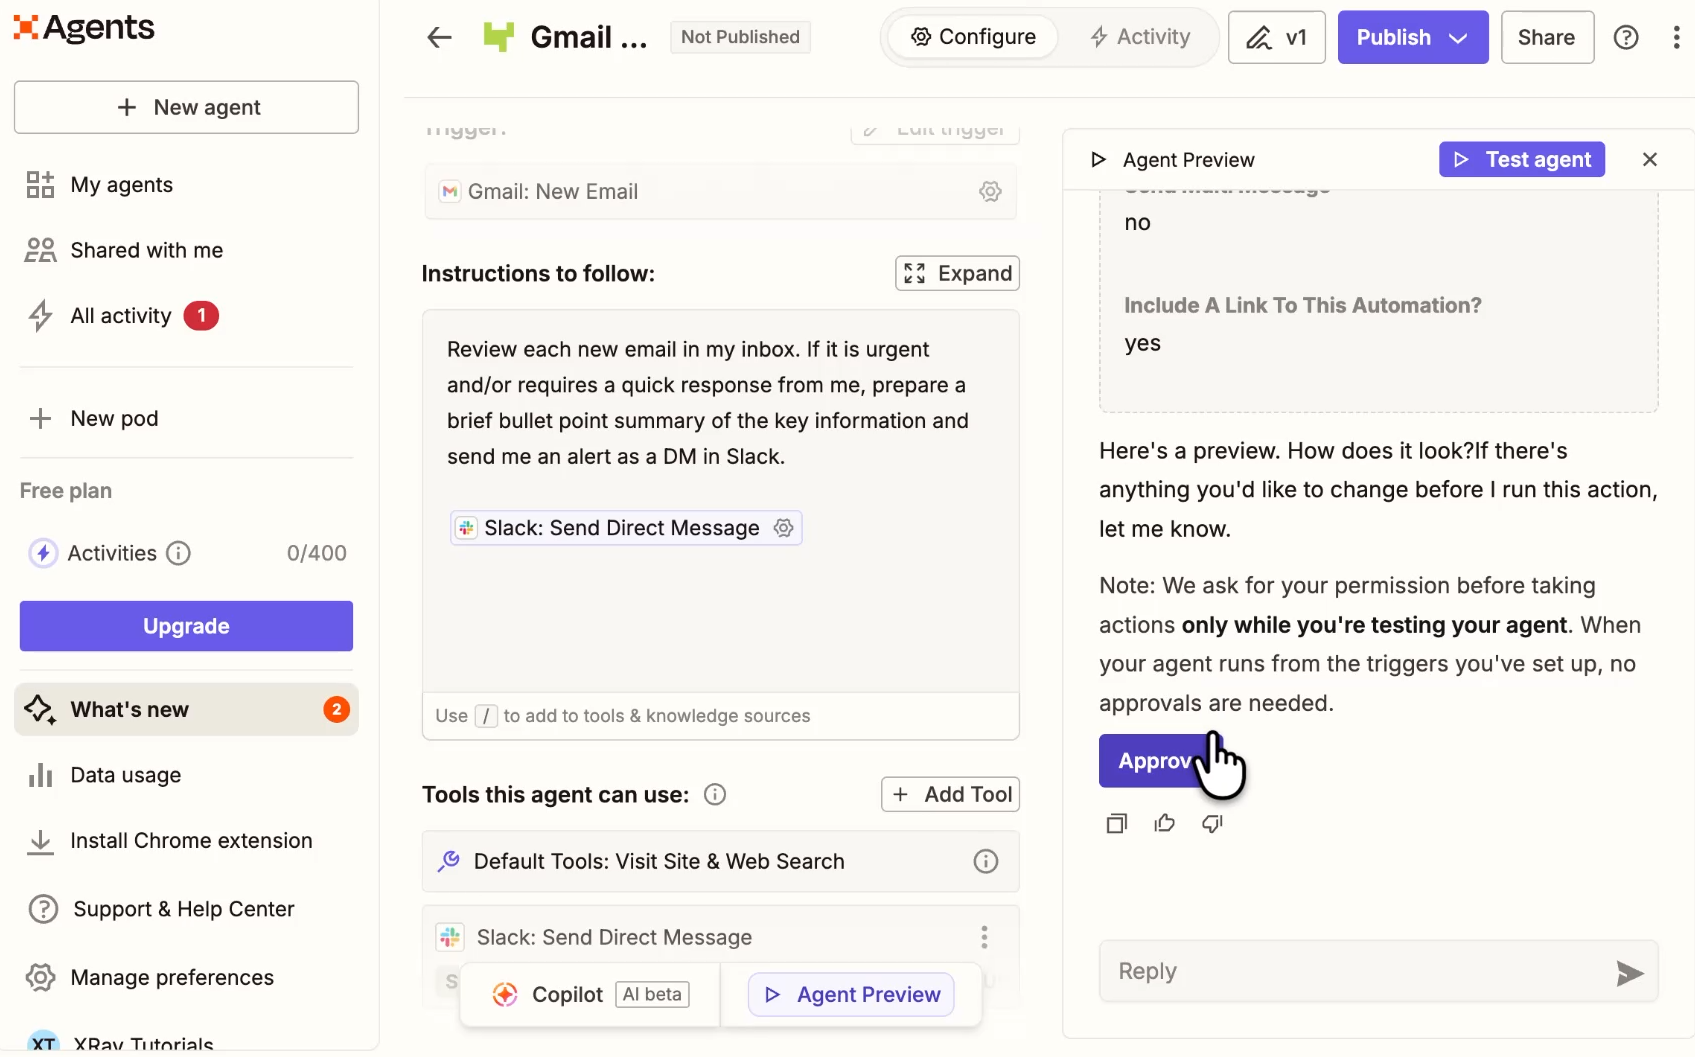
When we click approve, it sends a Slack message, which you can see below.

Once your agent is all set, click “Publish” to activate it.
With Zapier AI Agents, we can build a version of our email workflow that actually thinks. A classic Zap pings you for everything. The AI workflow pings you for everything but adds context. The agent decides whether to ping you at all — and only acts when the email is worth your time.
Don't default to the most complex option. Match the tool to the job.
• Classic Zap — Use this when you need something to happen the same way every time, without exception. Reliability is the whole point.
• AI workflow — Use this when you need to process or transform data before it moves to the next step. Summaries, classifications, rewrites.
• AI agent — Use this when the right action depends on complex context and variables. You want the system to think, not just execute.
Most real automation stacks use all three.
Zapier's power isn't in any single workflow — it's in the compounding effect of handing off task after task to automated systems. The more you automate, the less time your team spends executing and the more time they spend deciding.
Start with one workflow. Build it, test it, and publish it. Then look at what's next on your to-do list and ask the same question: does a human actually need to do this?
Most of the time, the answer is no.
If you want to explore what's possible in Zapier before you build, head to search.xray.tech — our free automation search engine lets you browse what's available across Zapier and other platforms by app or use case.
And if you'd rather build alongside an expert, that's what XRAY is here for. Schedule a free consultation at the top of this page to discuss your options.