Automating Your Forms with Jotform Workflows: A Complete Guide
With Jotform's latest Workflow features, it's easy to build simple automations for approving documents and more. We'll show you how it works in this beginner's guide.
January 6, 2025
Forms are one of the most common starting points for automation. They’re an easily accessible and shareable way to collect the data that drives our automated workflows.
In this post, we’ll explore Jotform's newly updated Workflows feature, which combines robust form building with native automation capabilities.
Note: This post and its associated video are sponsored by Jotform. However, all opinions expressed are our own.
What is Jotform?
Jotform is much more than your standard form builder. While it includes all the basic fields you'd expect, it also offers advanced features like payment processing, digital signatures, and CAPTCHA integration.

Using its drag-and-drop interface, you can create everything from simple contact forms to full-featured storefronts.

Building an automated expense reimbursement workflow
Let's look at how to create a practical automated workflow in Jotform through a real example: an expense reimbursement process.
Our workflow will:
1. Collect expense details and receipts through a form
2. Route the request to a supervisor for approval and signature
3. Upload approved requests to Google Drive
4. Create follow-up tasks for software-related expenses
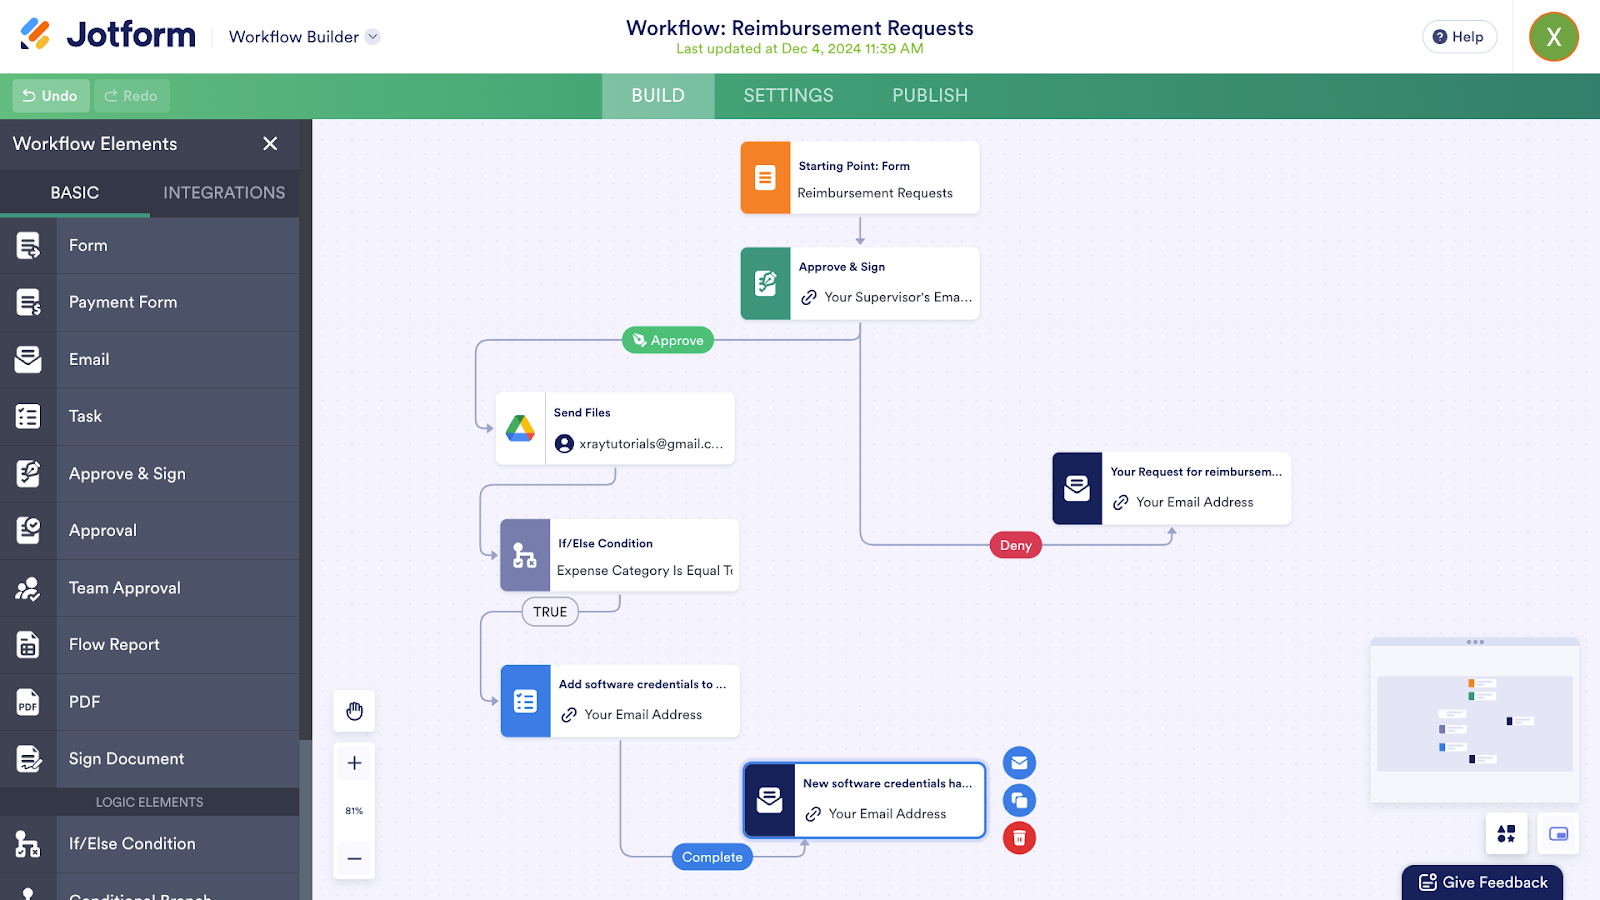
Here's what makes this particularly powerful:
Jotform can handle the entire approval process in a single workflow. Unlike other automation platforms where you might need multiple workflows for a multi-step approval process, Jotform lets you build the complete flow in one place.
Key features
Approval management
• Built-in approval routing
• Digital signature collection
• Ability to request additional information
• No time limits on approval waiting periods
Conditional logic
You can create different paths based on form responses. In our example, software-related expenses trigger additional tasks automatically.
Integrations
While not as extensive as dedicated automation platforms, Jotform connects with popular services like Dropbox, Salesforce, HubSpot, Mailchimp and Google Drive – which we’ll use in this automation.
Step 1: Create your form
First, create a form with these essential fields. You can include additional fields if you’d like, but the ones listed here will be necessary for the automation as we’ve built it.
• Name
• Email address
• Supervisor's email
• Expense category
• Total cost
• File upload for receipts


Step 2: Create a new workflow
Navigate to the Workflow Builder (click the arrow next to "Form Builder")

This will create a new workflow with just one element: “Starting Point: Form”. That means that your automation will activate whenever someone submits your form.
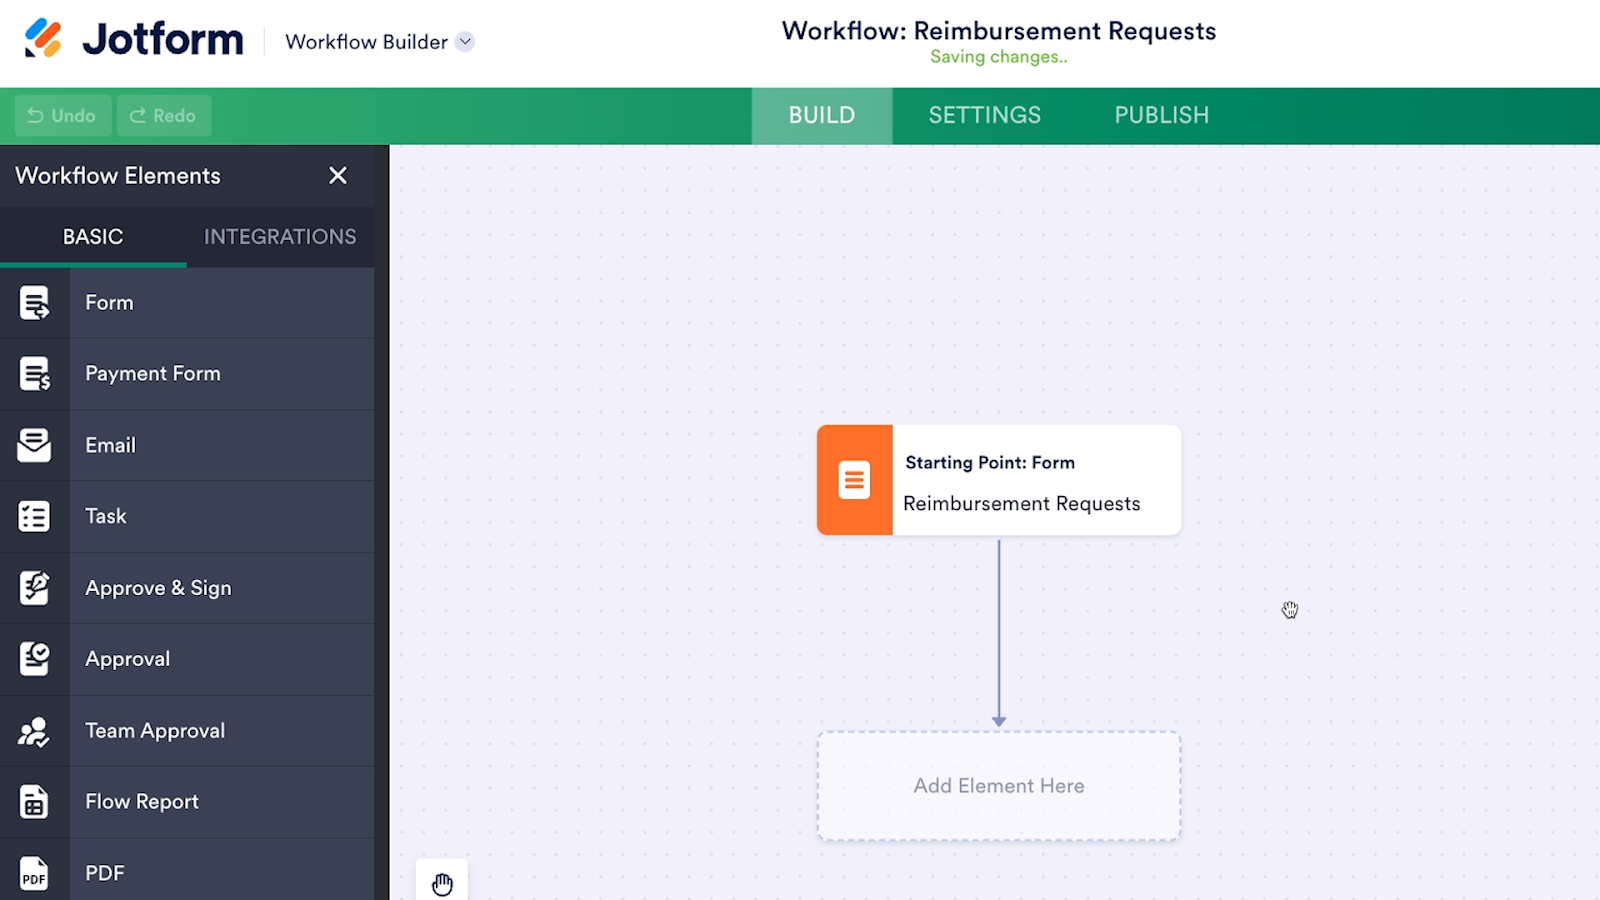
Step 3: Add approval process
With the “Approve & Sign” element, you can easily integrate an authorization step into your form workflow.
1. From the “Workflow Elements” panel, drag the "Approve & Sign" element into your workflow
2. Configure the settings:
• Set "Approve" and "Deny" as the two possible outcomes
• Enable signature requirement for the “Approve” outcome only
• Set the reviewer as the supervisor (Select “form fields” and insert the supervisor email field)
• Enable "Request More Information" in advanced settings
• Allows the supervisor to request additional info before making a decision
• Set completion rule to "Require response from one person"
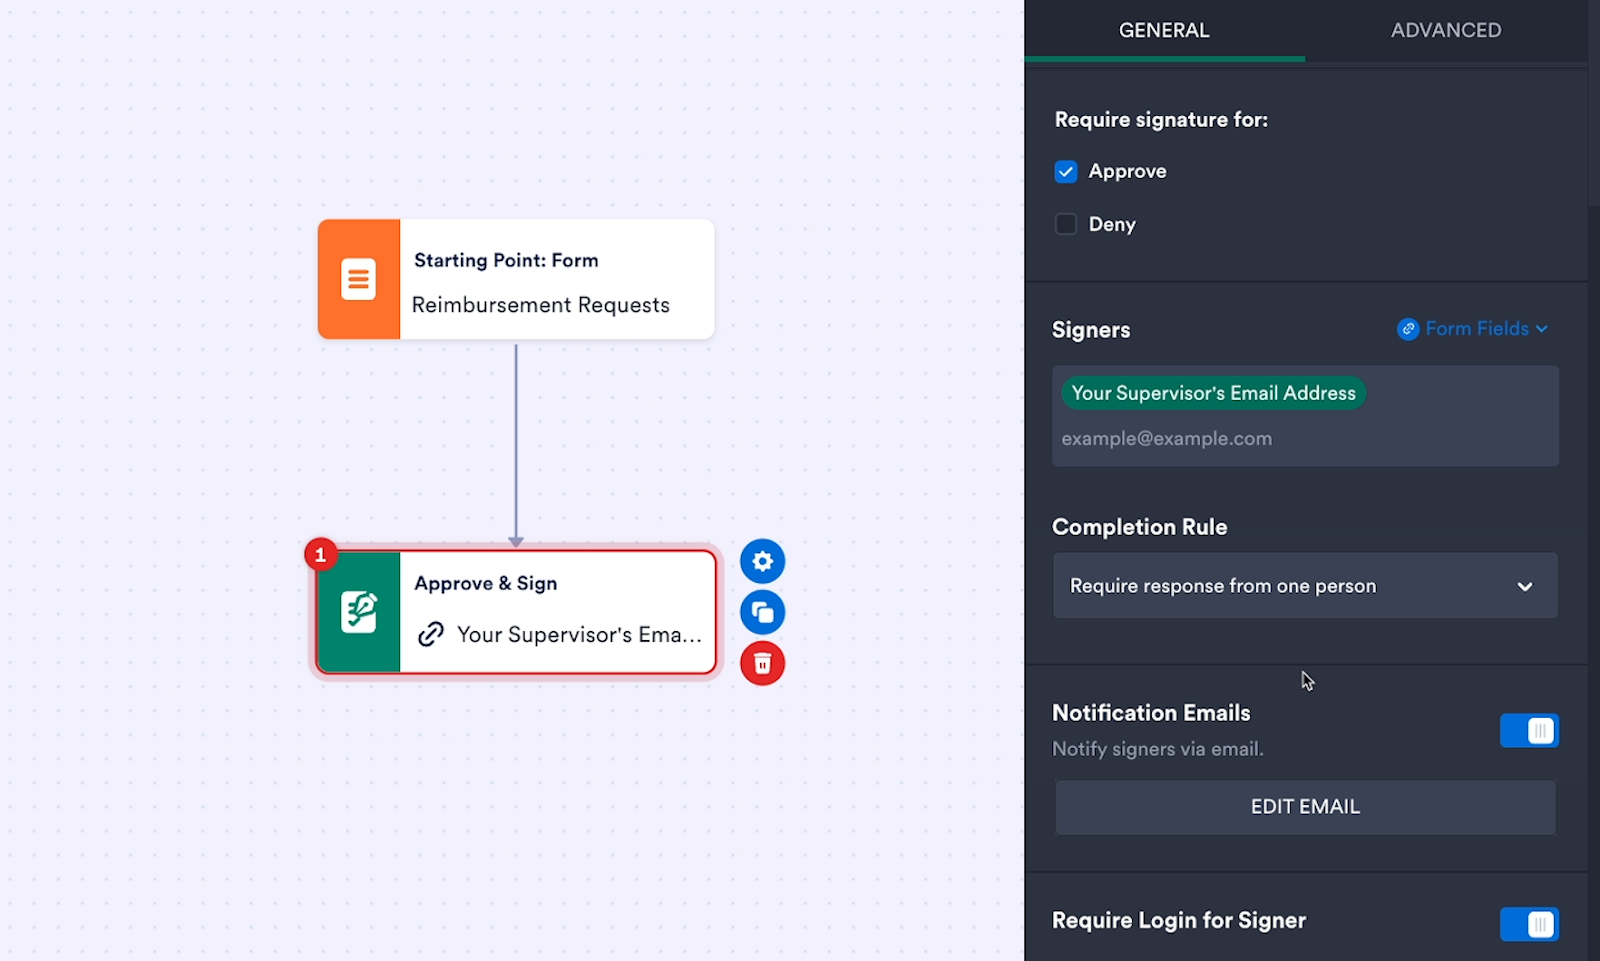
The completed action will send a notification to the designated supervisor, asking them to approve or reject the request for reimbursement.
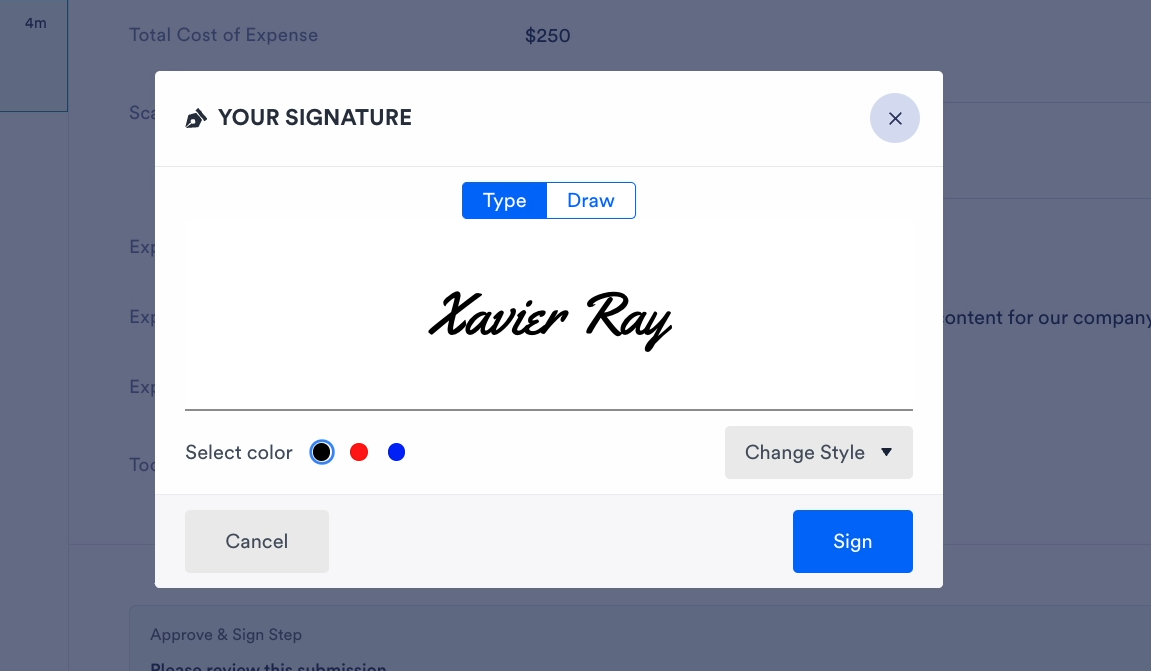
If the supervisor approves the request, they’ll need to provide their signature as well.
Step 4: Configure the “Deny” path
Next, you’ll need to create automated actions for both the “Approve” and “Deny” outcomes that result from the approval step.
We’ll begin with the “Deny” path in our example, since it will be shorter – just one step alerting the original form submitter that their request has been denied.
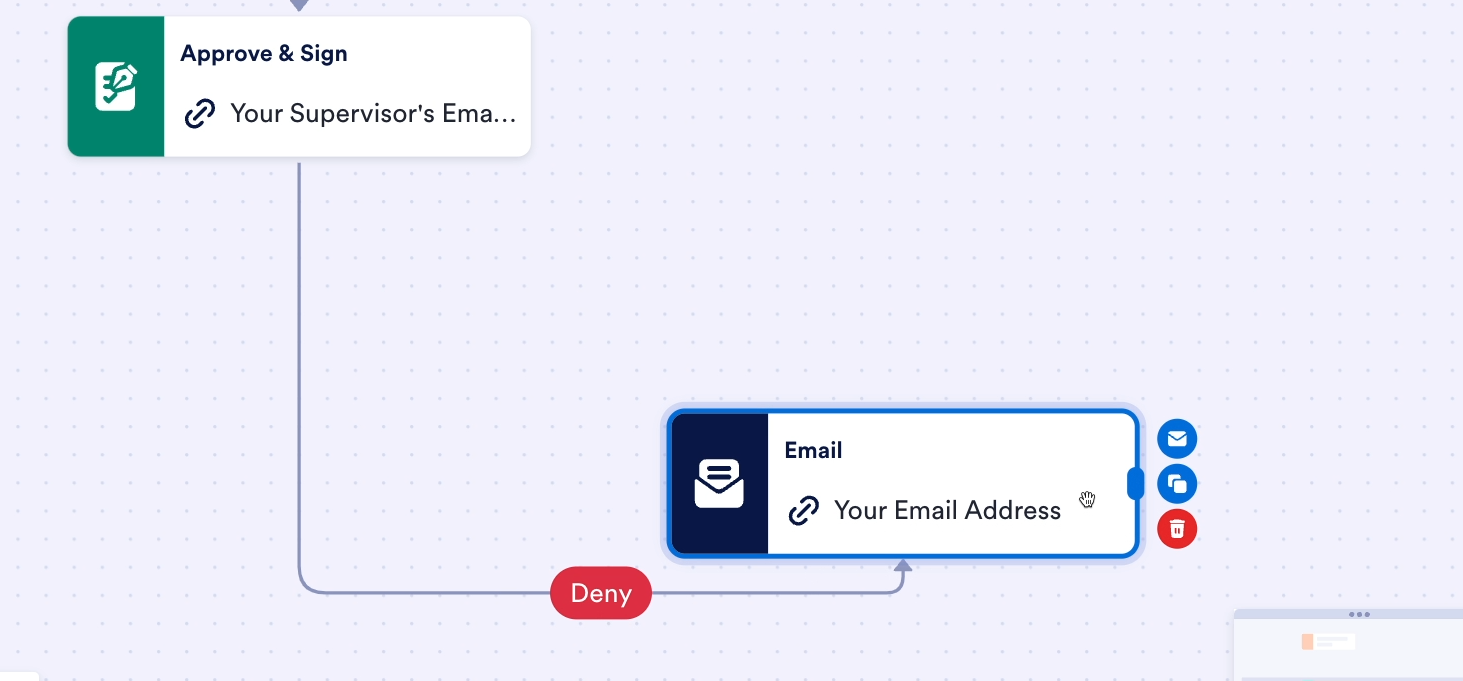
1. Click and drag to draw a new path out of the approval step
2. Set the path to trigger for the "Deny" outcome (click “Select outcome”)
3. Add an "Email" action to the “Deny” path
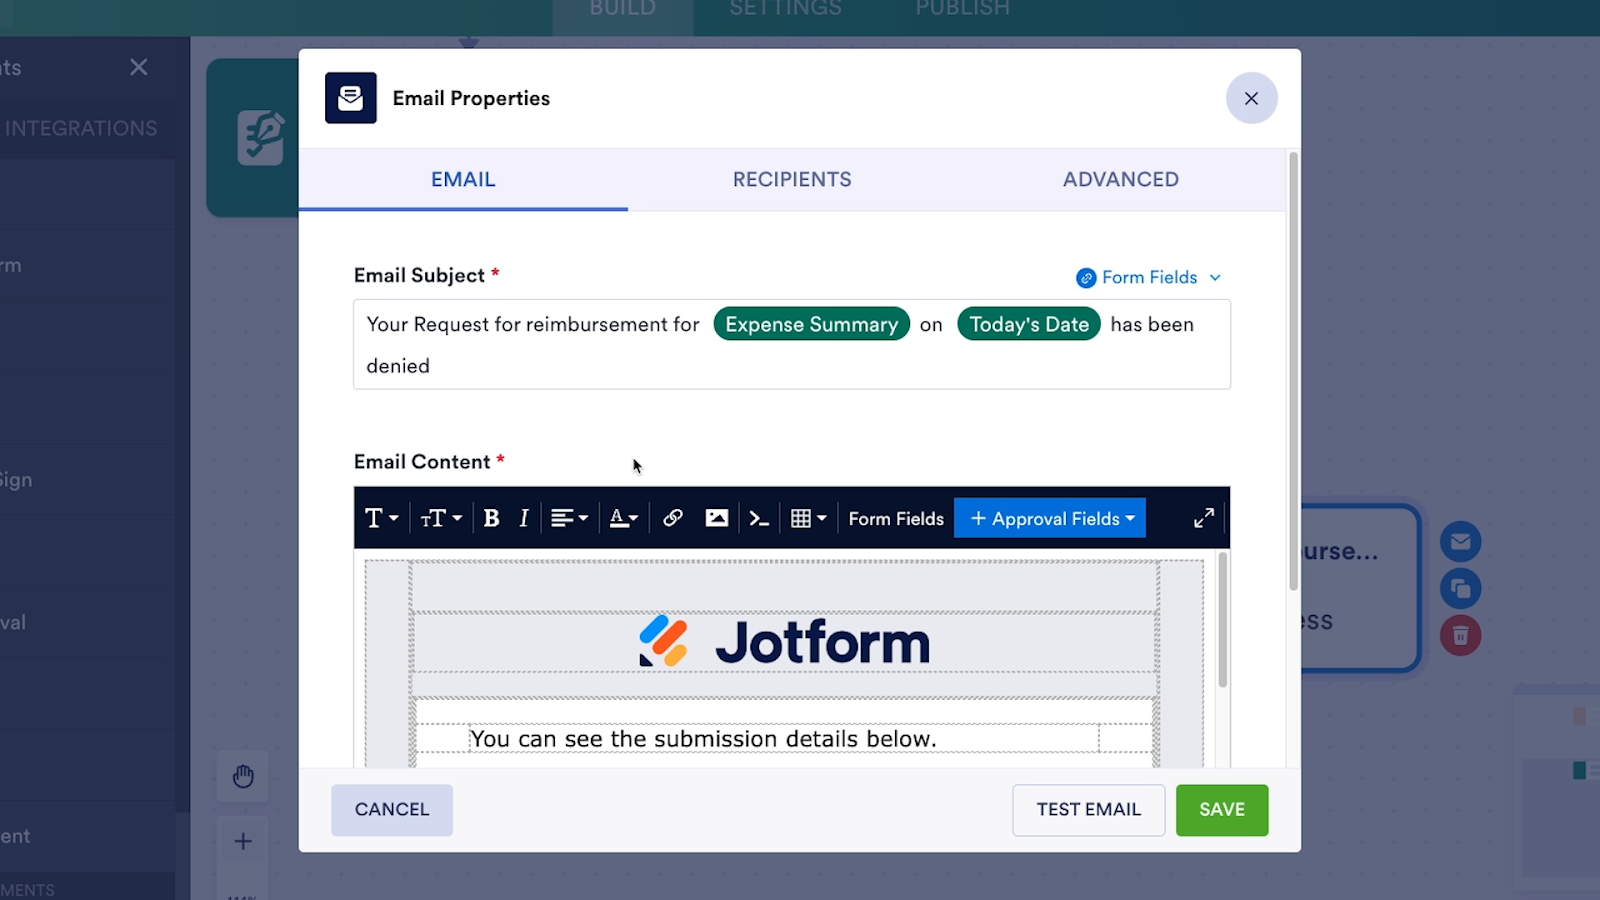
4. Configure the email:
• Set recipient to the original submitter’s email address
• Customize the subject line with expense details (Click “Form fields” to insert data)
• Use the template to include form submission details
• Add a custom message explaining the denial
Step 5: Set up the approval path
With the “Deny” path all set, you can now create an “Approve” path that will include automated actions that run when a request is approved.
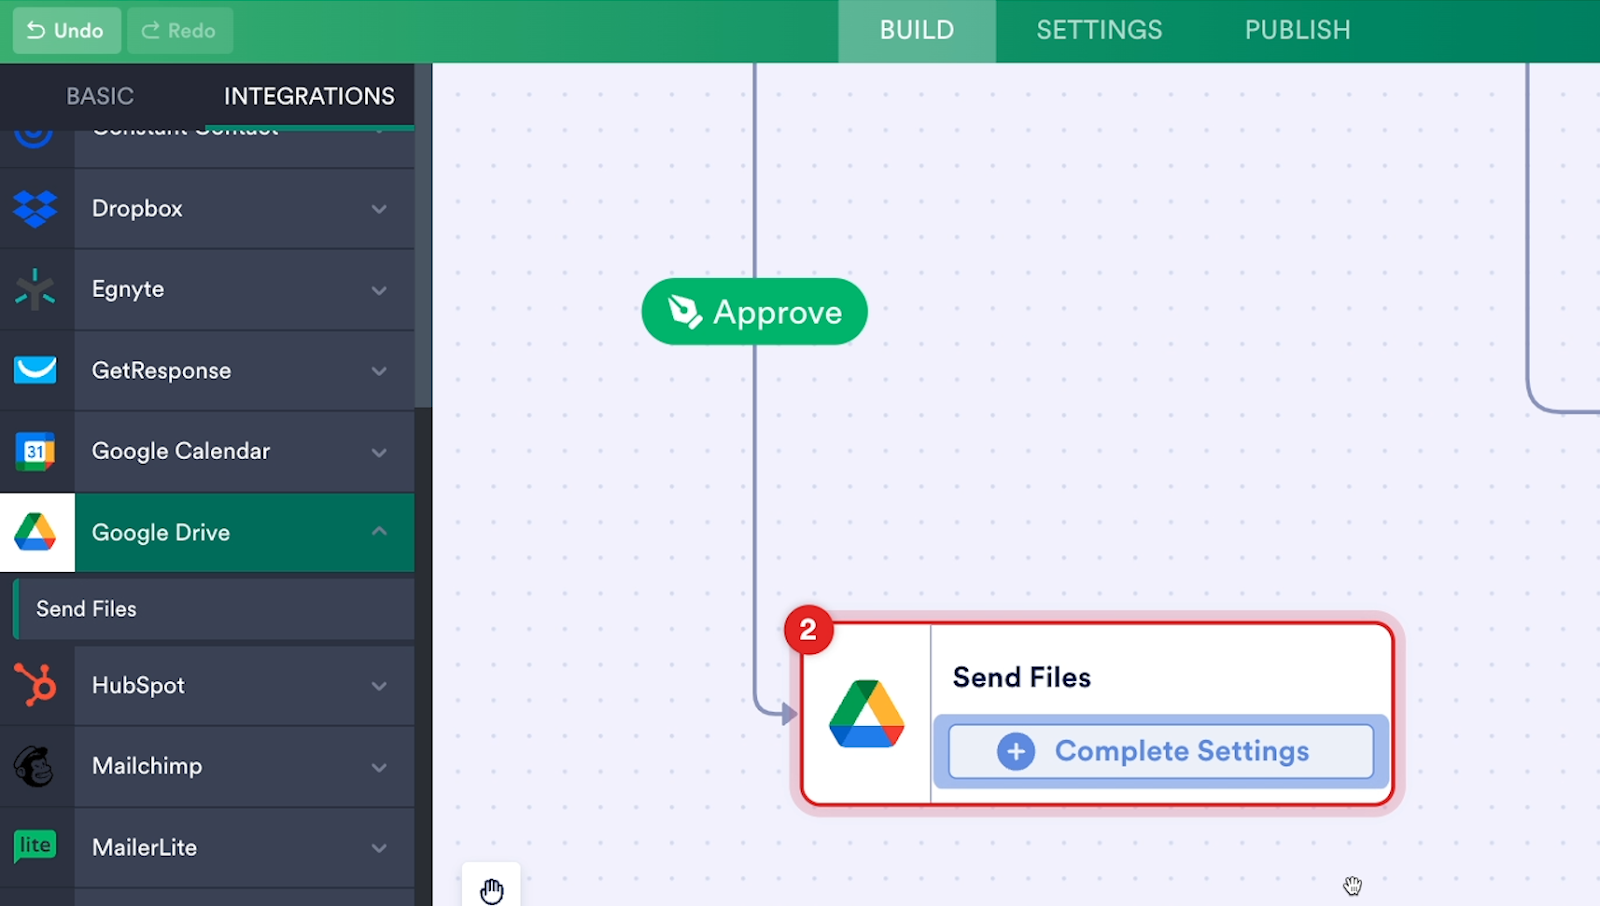
1. Draw a new path leading from the “Approve & Sign” step.
2. Set the path to run for the “Approve” outcome (click “Select outcome”)
3. Add a Google Drive - Send Files step from the “Integrations” tab
4. Configure the Google Drive integration:
• Connect your Google Drive account
• Designate a folder to store form responses and uploaded files
• Enable subfolder creation for each submission
• Choose to upload both the submission PDF and receipt files

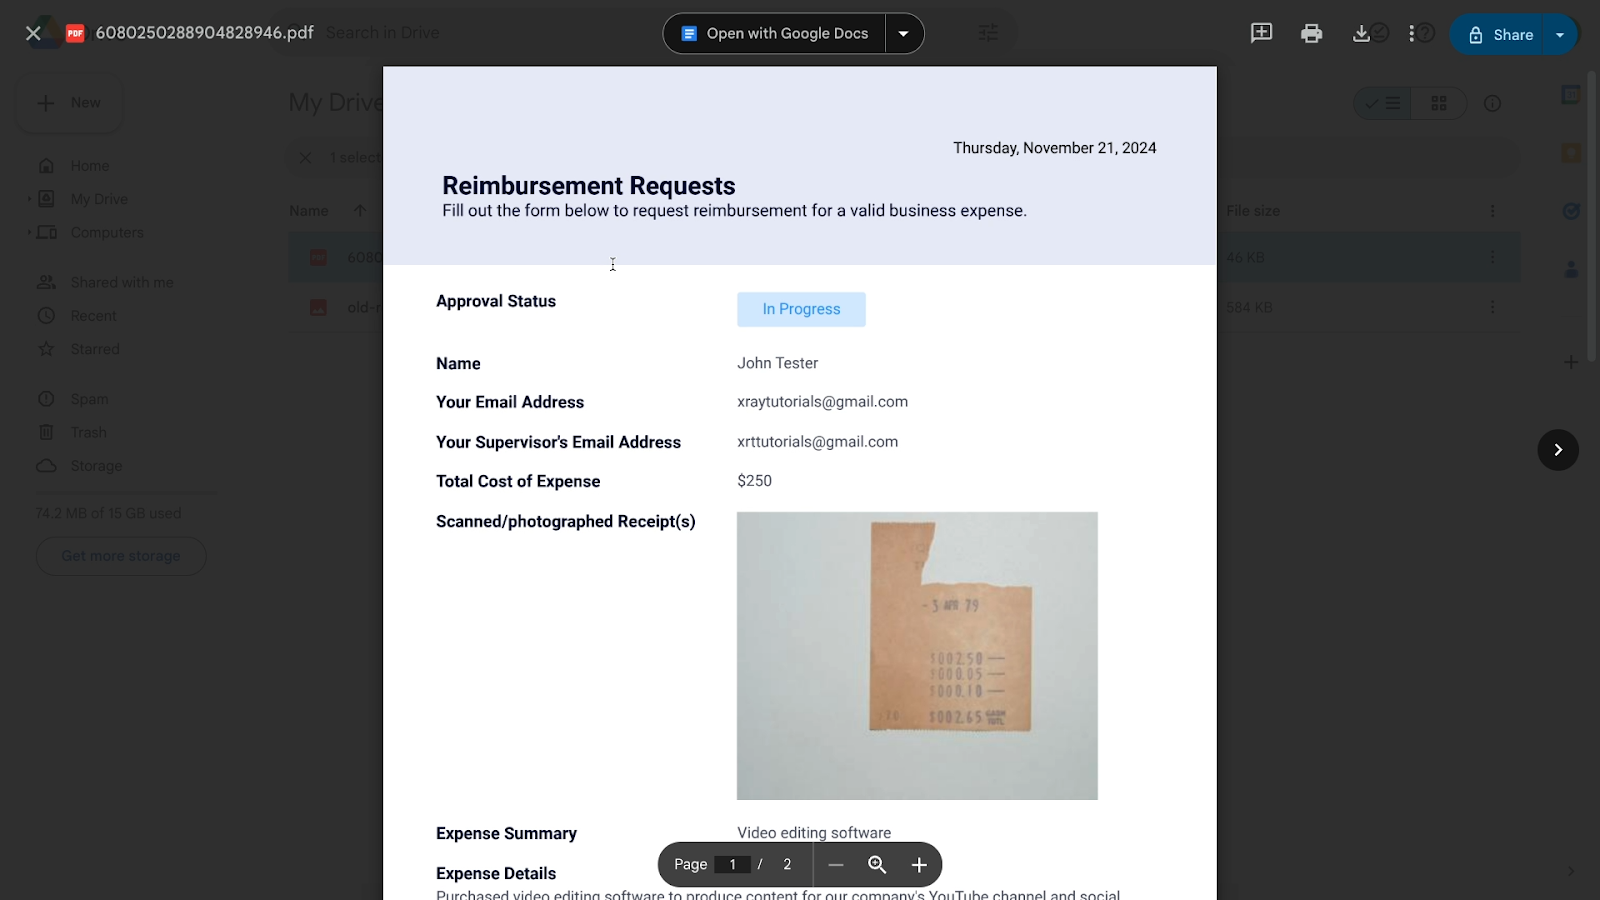
With these settings, the Google Drive step will upload a PDF summary of every approved submission, along with copies of any files that the user uploaded (e.g., receipts).
Click “Save” to complete the step configuration.
Step 6: Add conditional logic
The automation could stop here, but we’ll add a few more steps to demonstrate Jotform’s conditional logic capabilities.
After a reimbursement request is submitted, the automation will check to see if the expense category is set to ‘Software’. If it is, then Jotform will create a task for the original submitter to add relevant credentials to the team’s password manager.
If the category is set to anything else, then this task won’t be created.

1. Draw a new path leading from the Google Drive step
2. Add an "If/else condition" to the new path
3. Set condition: If "Expense Category" Is Equal To "Software"
Step 7: Add an automated action to create a task
Just as you needed to add “Approve” and “Deny” paths following an approval step, you’ll also need to add “True” and “False” paths following the conditional logic step.
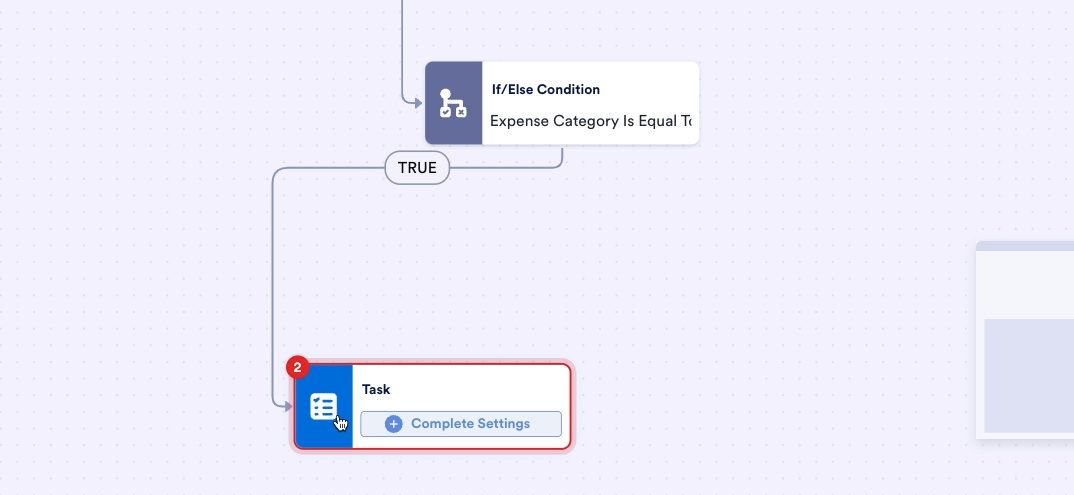
• Draw a new path leading from the If/Else condition element.
• Set the “Branch” to “True” (click “Select Branch”)
• Add a "Task" element
• Configure the task:
• Set a clear title (e.g., "Add Software Credentials to Password Manager")
• Write a detailed description explaining what needs to be done
• Leave the outcome as default "Complete"
• Set the assignee to the original submitter using form fields
• (Optional) Enable email notifications and customize email

Step 8: Complete the “True” branch by adding an email notification
Because your Task step has an outcome (i.e., the task is marked Complete), you need to provide a path that follows from that outcome.
In our example, we’ll just add a simple path that sends an email alert when the task is completed.
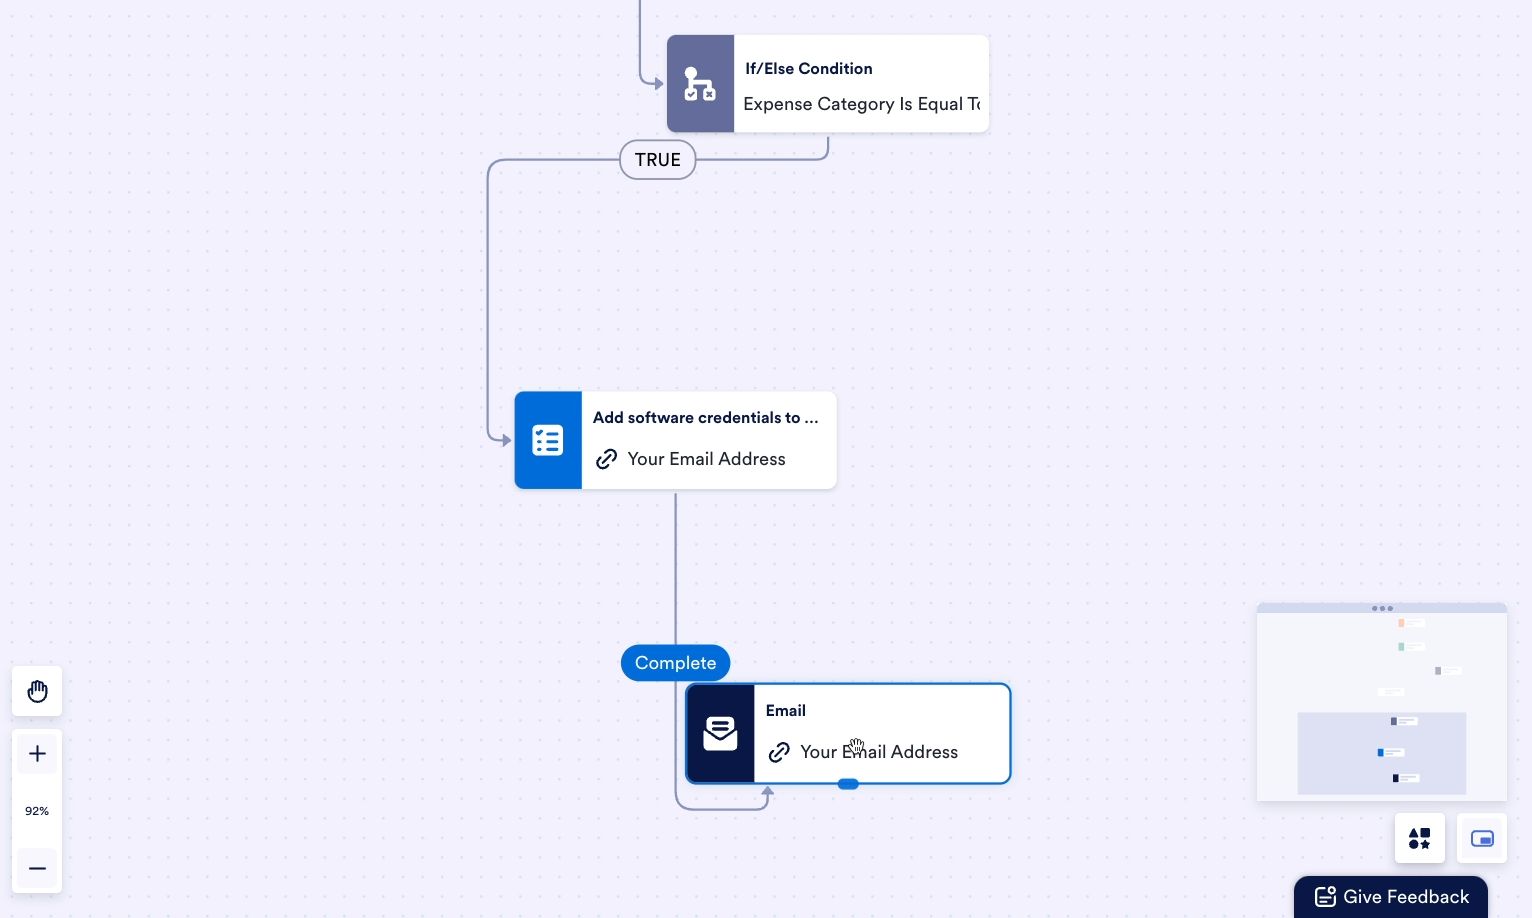
1. Draw a path from the “Task” step
2. Set the outcome to “Complete” (click “Select Outcome”)
3. Add an "Email" action
4. Configure the email with any desired details
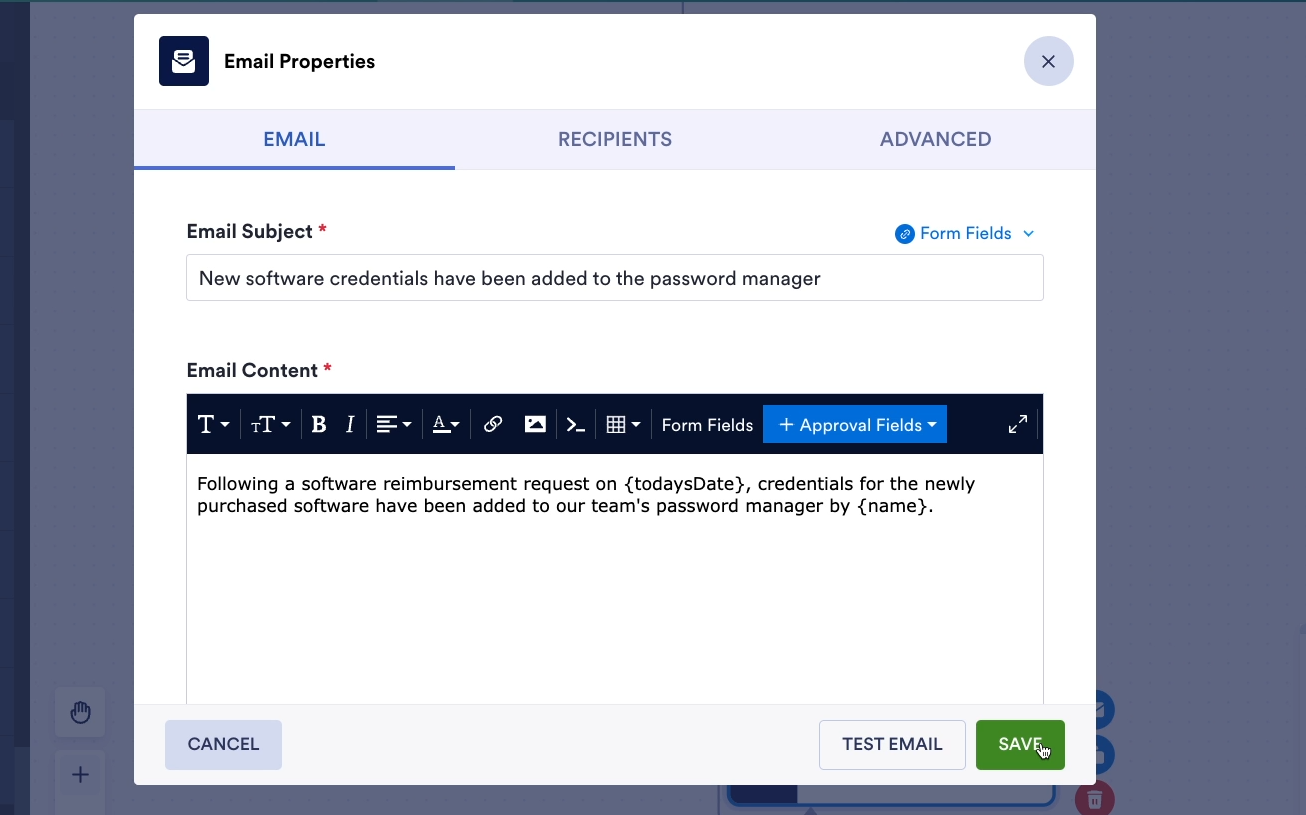
Since there’s no outcome associated with “False”, you don’t need to create a path in the workflow for “False”. The workflow will simply stop at the conditional logic step if the condition is not evaluated to be True.
Testing your workflow
Before using any workflow with your team, be sure to test it thoroughly by running through every step with test data.
For instance, to test this workflow, you would need to:
1. Submit a test form response
2. Check that approval emails are received
3. Verify Google Drive uploads work correctly
4. Test both approval and denial paths
5. Confirm conditional tasks are created appropriately
6. Test with different expense categories
Remember to test all possible paths through your workflow to ensure everything works as intended before sharing the associated form publicly or with your team.
As we tested our example workflow, we received an automatic request for a signature:
And the approved request was uploaded to Google Drive as a PDF:
Pricing overview
Next, let’s review Jotform’s pricing, and discuss how Jotform can fit into your automation stack.
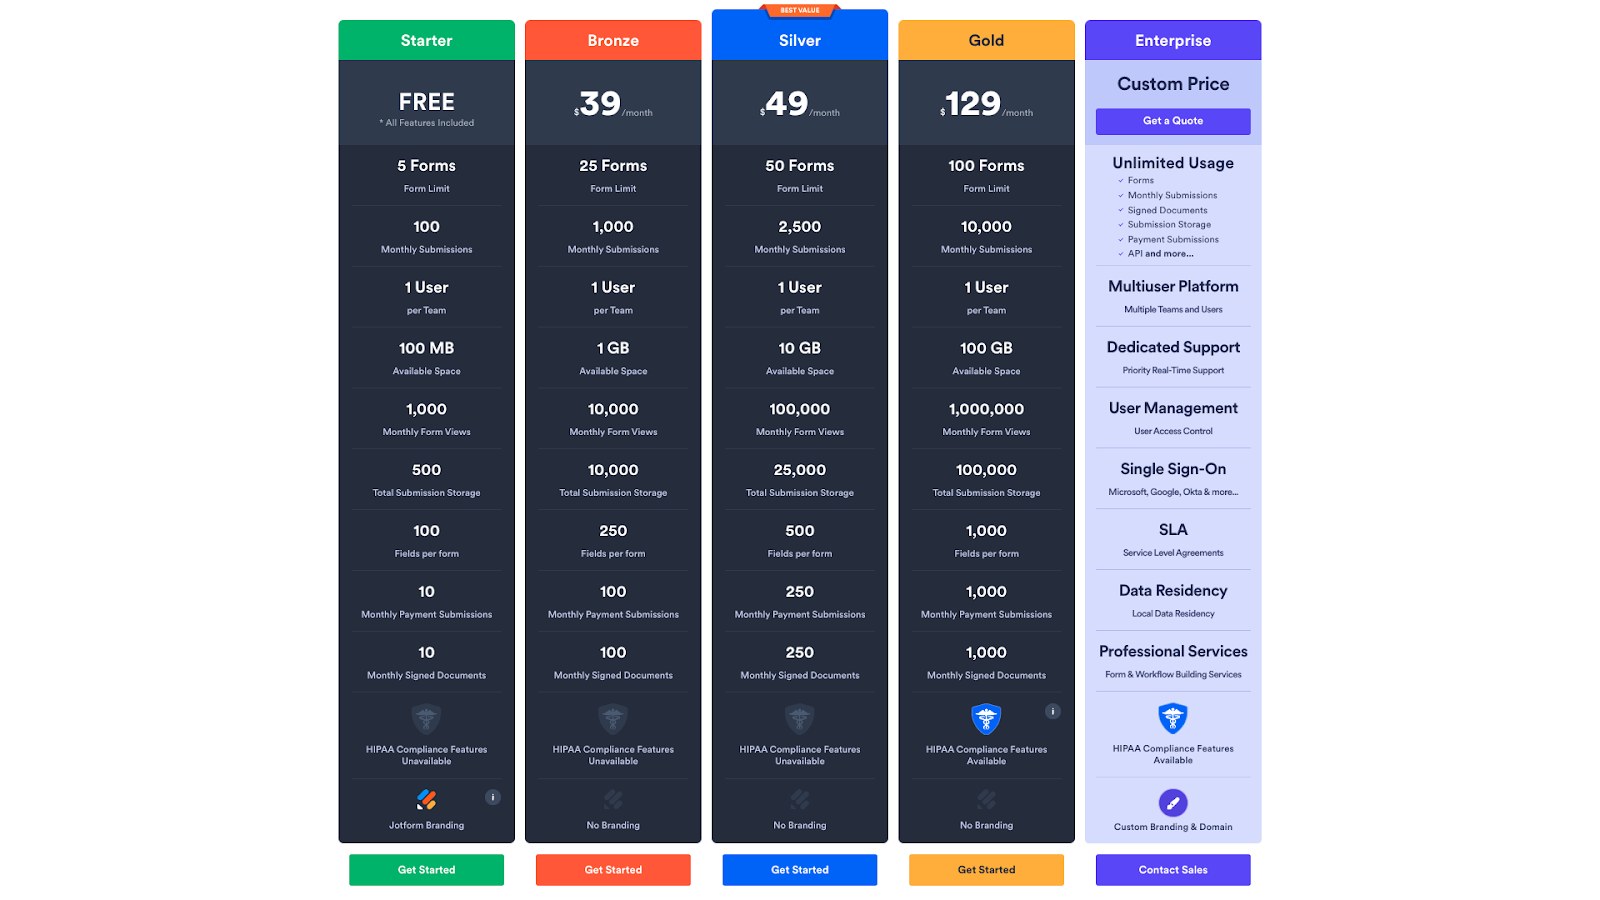
First and foremost, you should note that automated Workflows are included on all Jotform plans – even the free plan.
We’ll give you a brief overview of some of the key features available at each tier, but you can explore Jotform’s pricing and features in more detail on their pricing page.
Free plan
The free plan gives you a lot of room to try out Jotform and explore its features. For instance, you can build everything we created in this tutorial using a free plan.
The main limitations on the free plan are general usage restrictions: you’re limited to 5 forms, 100 submissions a month, 100 MB of storage, and so on.
Each paid tier will expand on these limits, and will unlock a few unique features as well.
Bronze tier
For example, on the Bronze tier, starting at $39/mo, you can remove Jotform branding from your forms.
Gold tier
On Gold, which starts at $129 a month, you’ll be able to access HIPAA compliance features.
Enterprise
On the Enterprise plan, which will require a custom quote from Jotform’s sales team, you can add multiple users to a single Team account.
Note that you can get a discount on all of these prices if you pay annually instead of monthly.
How Jotform Workflows fit into your software stack
Jotform Workflows shines when you need to:
• Build form-based automation quickly
• Handle complex approval processes
• Combine form features like payments and signatures with automation
However, it's not meant to replace full-featured automation platforms like Zapier or Make. Instead, it works best either for form-centric workflows or in conjunction with other automation tools.
Both Zapier and Make support Jotform, so you can build third-party automations in addition to the automations you build with Jotform workflows.
The ability to handle multi-step approvals in a single workflow is particularly impressive, and the native integration with Jotform's robust form features makes it a compelling choice for many business processes.
What sets Jotform apart is how it combines advanced form features with automation capabilities. While it may not replace your existing automation tools entirely, it offers a unique and valuable approach to form-based workflows that could streamline many of your business processes.
To get started with Jotform, you can create an account for free at jotform.com.
—
To learn more about automating your team’s daily work, be sure to check out the other posts on our blog or our YouTube channel. You can also follow XRay on Twitter, Facebook, or LinkedIn.
Similar blog posts
