ChatGPT is quickly becoming an indispensable tool at work. Whether you need help brainstorming new ideas, want to edit the style and tone of a piece of writing, or just need to quickly draft some social media posts, AI chatbots are rapidly becoming a go-to resource for busy knowledge workers.
And all you need to do is give ChatGPT a good question or prompt to get started.
But what if an AI assistant could handle the entire task with a prompt alone? With the new Zapier plugin for ChatGPT, we’re closer to that future than ever.
In this post, we’ll show you how to use Zapier’s ChatGPT plugin step by step, and explore some of the early possibilities with this beta feature.
Let’s get started.
First, we’ll give you a brief demo of the Zapier ChatGPT plugin, and a quick overview of how it works.
Then, we’ll take a closer look at every step of the process.
1. First, sign up for Zapier and ChatGPT Plus. A free ChatGPT account won’t work.
2. In your ChatGPT settings, enable plugins.
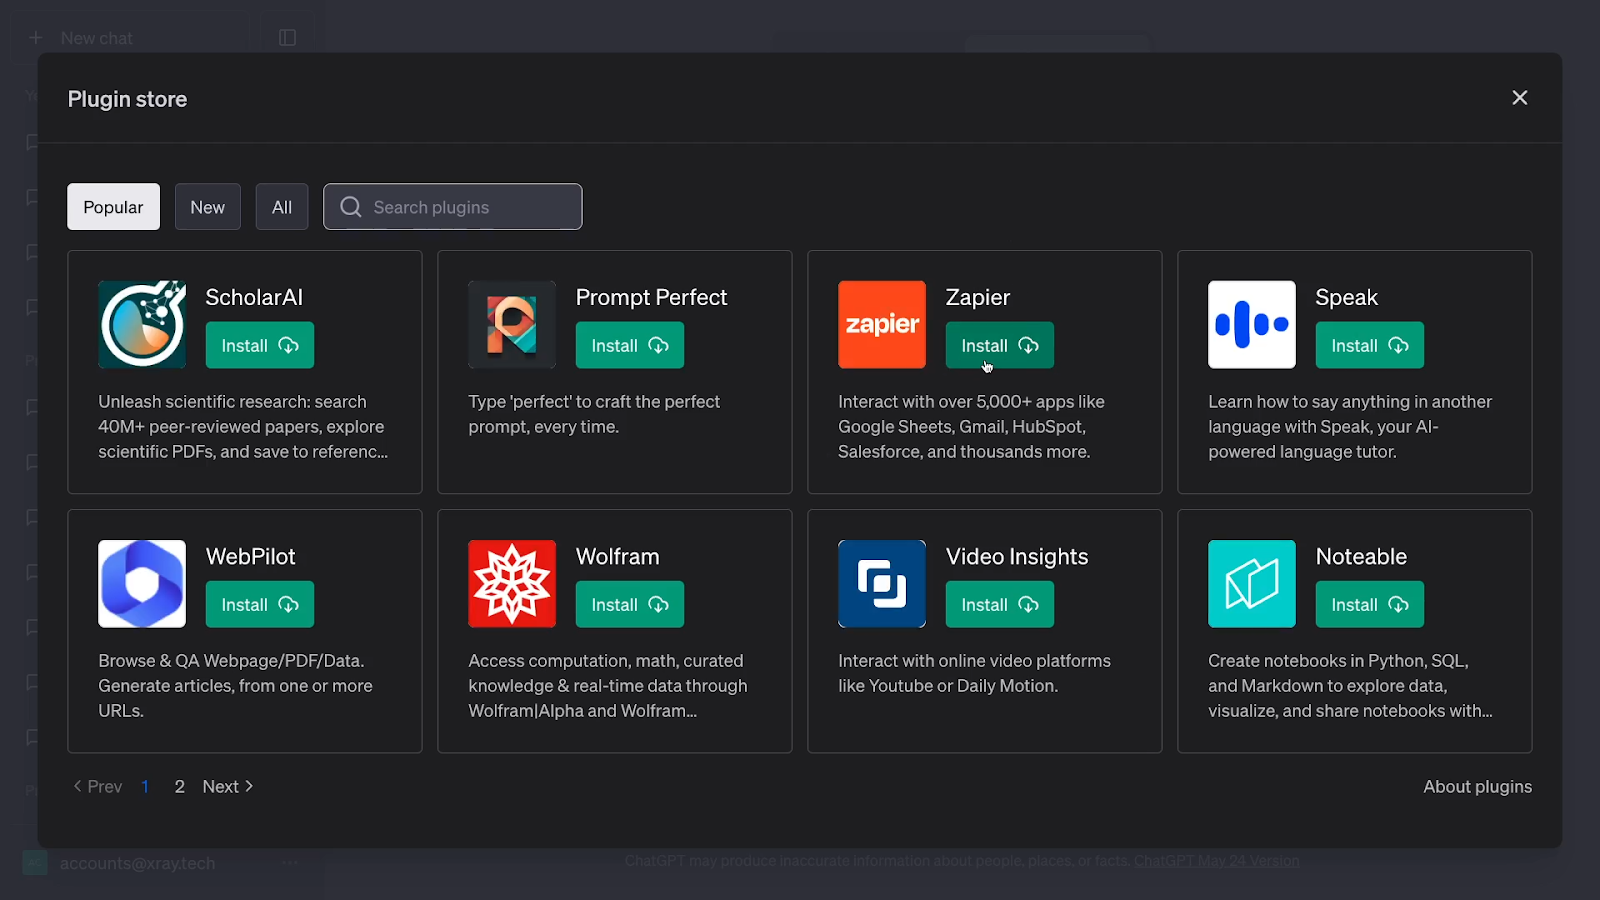
3. Click on the “no plugins enabled” message to open the plugin store and add the Zapier plugin.
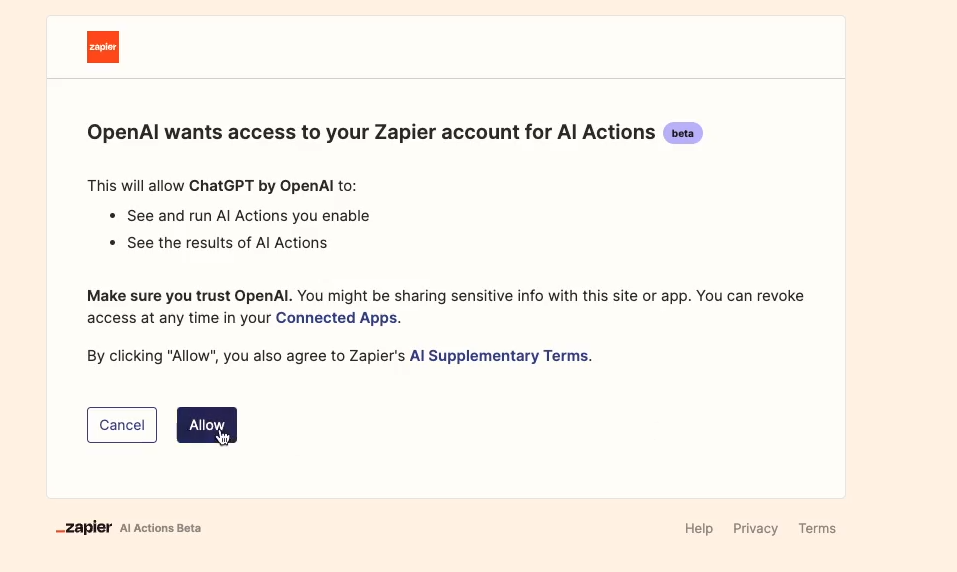
4. Authorize ChatGPT to access your Zapier account.
5. Create an automated action you want to trigger with a prompt.
6. Enable the action. Return to ChatGPT and ensure that the Zapier plugin is enabled.
7. Send a relevant prompt to ChatGPT. You’ll need to check its work and approve each step before it runs.
That’s how the Zapier’s plugin for ChatGPT works in a nutshell. Note that you can create several Zapier actions. ChatGPT will choose which to use based on the prompt that you’ve entered.
Next, we’ll explain each of these steps in more detail, but first, we just want to note that this plugin is still in an early beta.
In its current state, it’s a very interesting piece of tech with a ton of potential, but for now, it has some pretty limited use cases in the real world.
Ultimately, all of the actions that you can perform with the plugin can also be performed with normal Zapier automations.
Language models like ChatGPT generally can’t execute actions beyond generating and formatting text. With this plugin, ChatGPT is relying entirely on Zapier to automate tasks in your other apps.
As such, this plugin doesn’t really give you access to any new abilities yet; just a different way to access the same abilities. In most cases, you’ll be able to build more reliable and scalable automations with traditional Zaps.
This is particularly true if you’re building for an entire team, and not just for personal use.
However, the plugin still represents a lot of exciting possibilities. If you’re a builder, or if you lead your own automation agency, it’s definitely worth checking out.
It’s only a beginning, but it’s easy to see how this could become the basis for a fully-fledged virtual assistant powered by AI. Getting an early peek at this kind of development is well worth it if you’re already using ChatGPT Plus.
And if there are any tasks that you’re already relying on ChatGPT for every day, like drafting messages or summarizing long pieces of text, you may find that the Zapier plugin offers a more convenient workflow for you.
With all of that mind, let’s dive in and take a closer look at each step of setting up and using the plugin.
NOTE: you may see some “Browse with Bing” features in our screenshots. Since we created this tutorial, OpenAI has indefinitely disabled the Browse with Bing feature. It’s not necessary for any of these tutorial steps; it was simply located within the same plugin menu area.
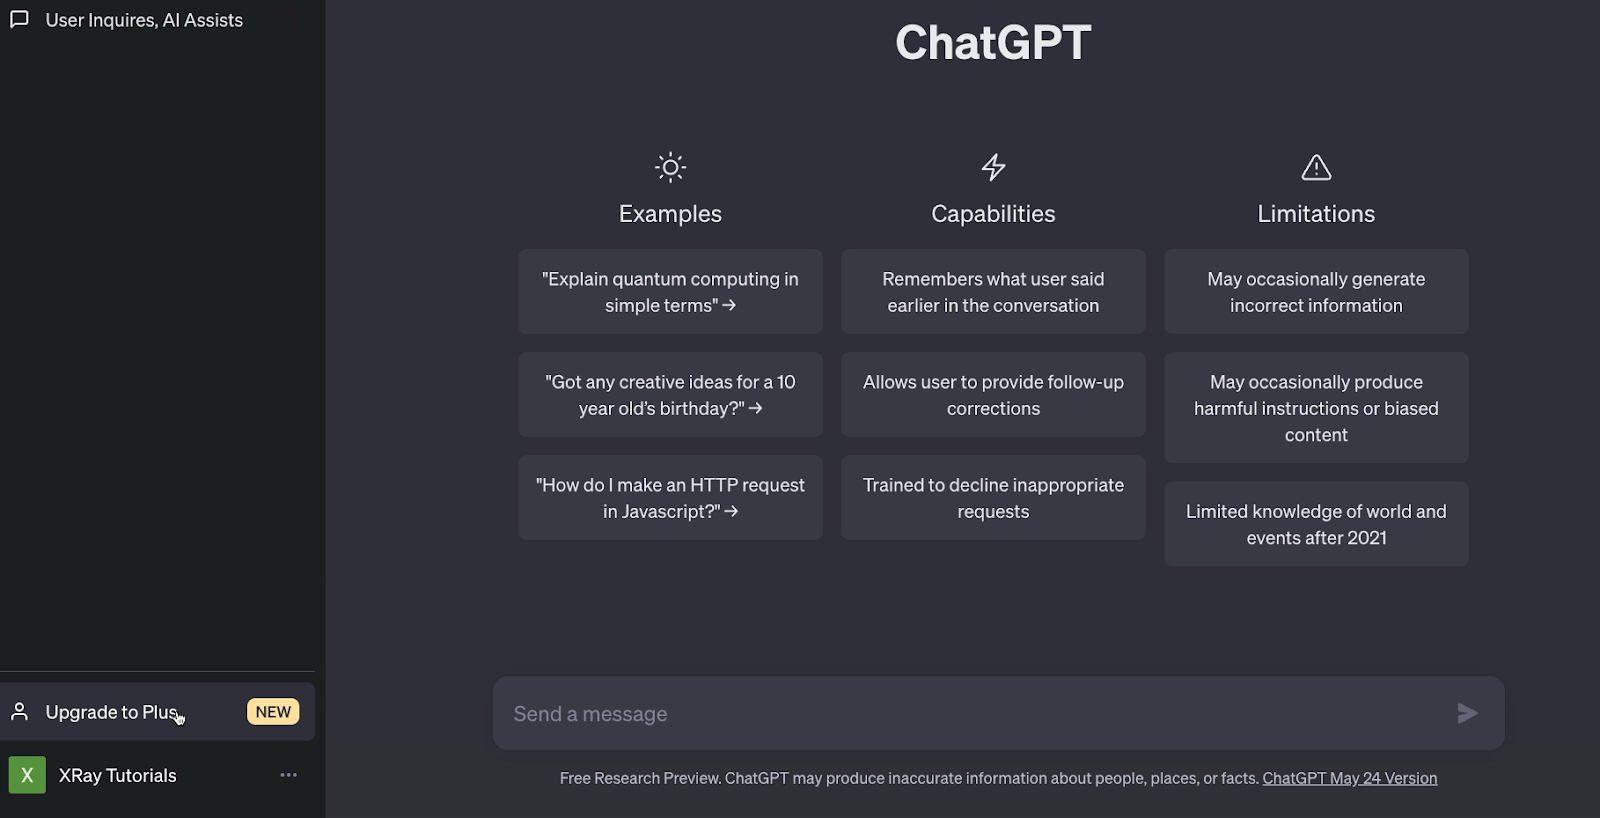
First, you’ll need to have a Zapier account and a ChatGPT Plus subscription. Unfortunately, a free ChatGPT account won’t work.
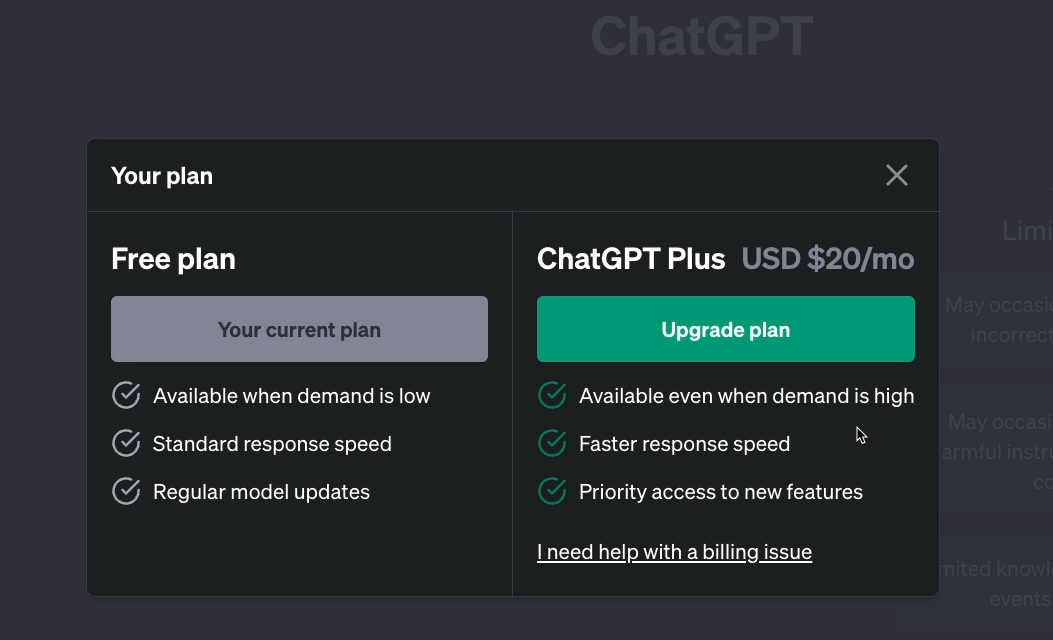
The ChatGPT Plus plan will grant you access to beta features, such as this plugin. It also gives you access to the GPT4 model. GPT4 is a more advanced language model compared to 3 or 3.5, and delivers much more creative and convincing responses.
However, it does tend to be a bit slower, and OpenAI will limit you to 25 GPT4 messages every 3 hours.
If you don’t have a ChatGPT plus account, go to chat.openai.com, and click on “Upgrade to Plus” in the bottom left of the screen.
You’ll then see pricing and feature details for ChatGPT Plus. All of the specifics are subject to change, but currently, it costs $20/mo.
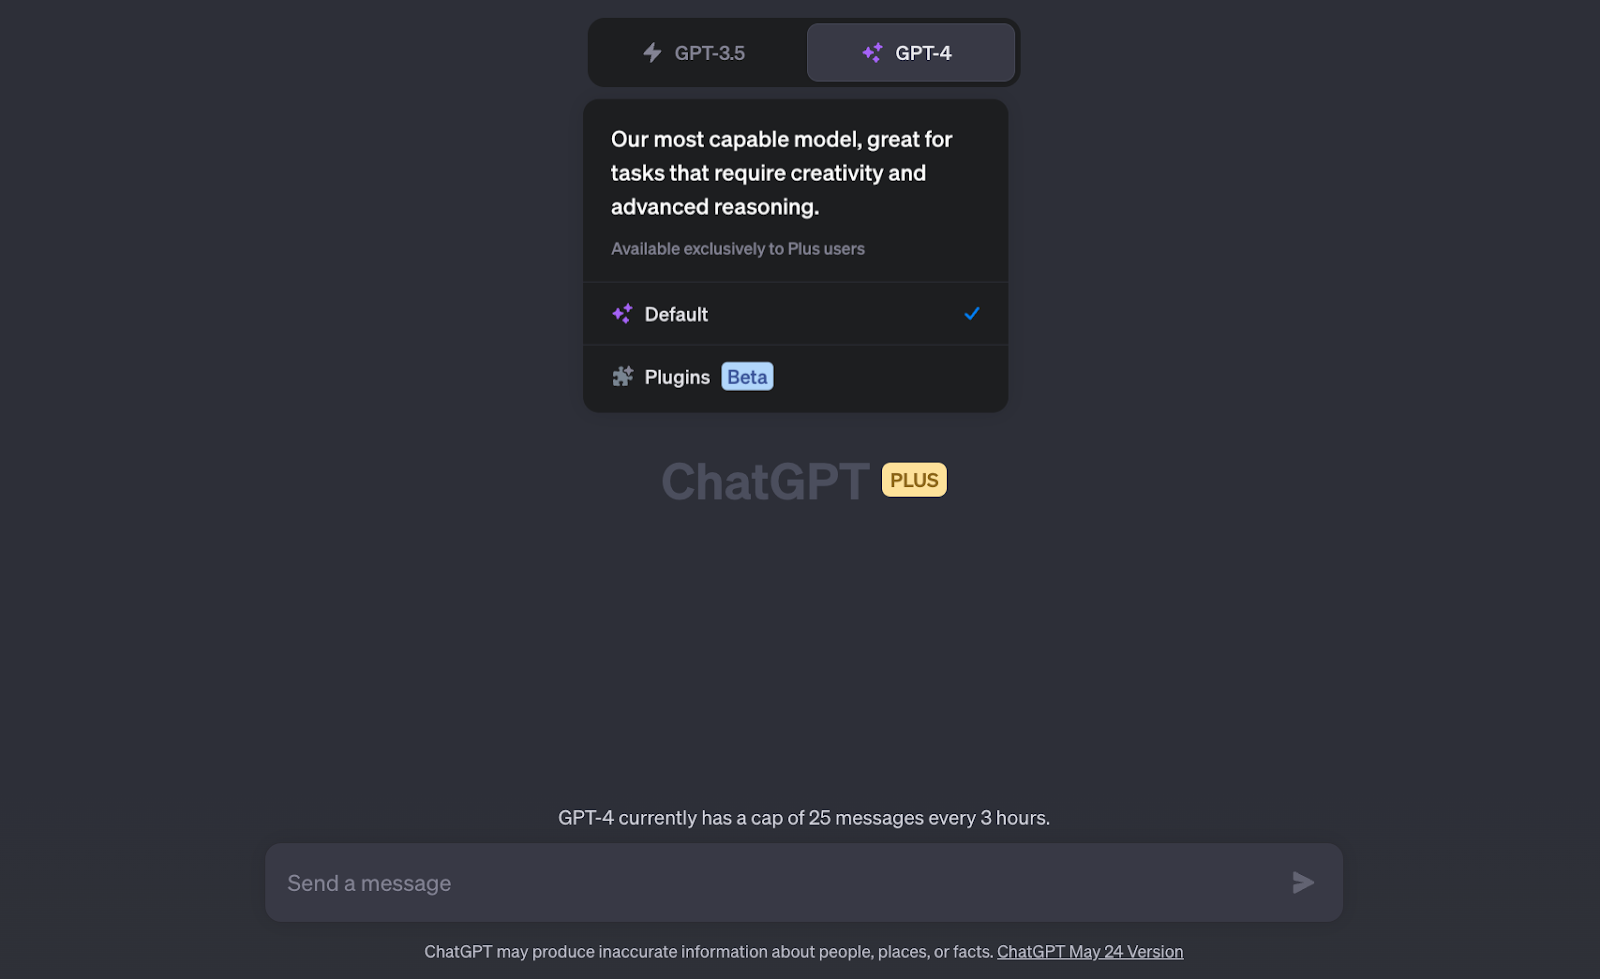
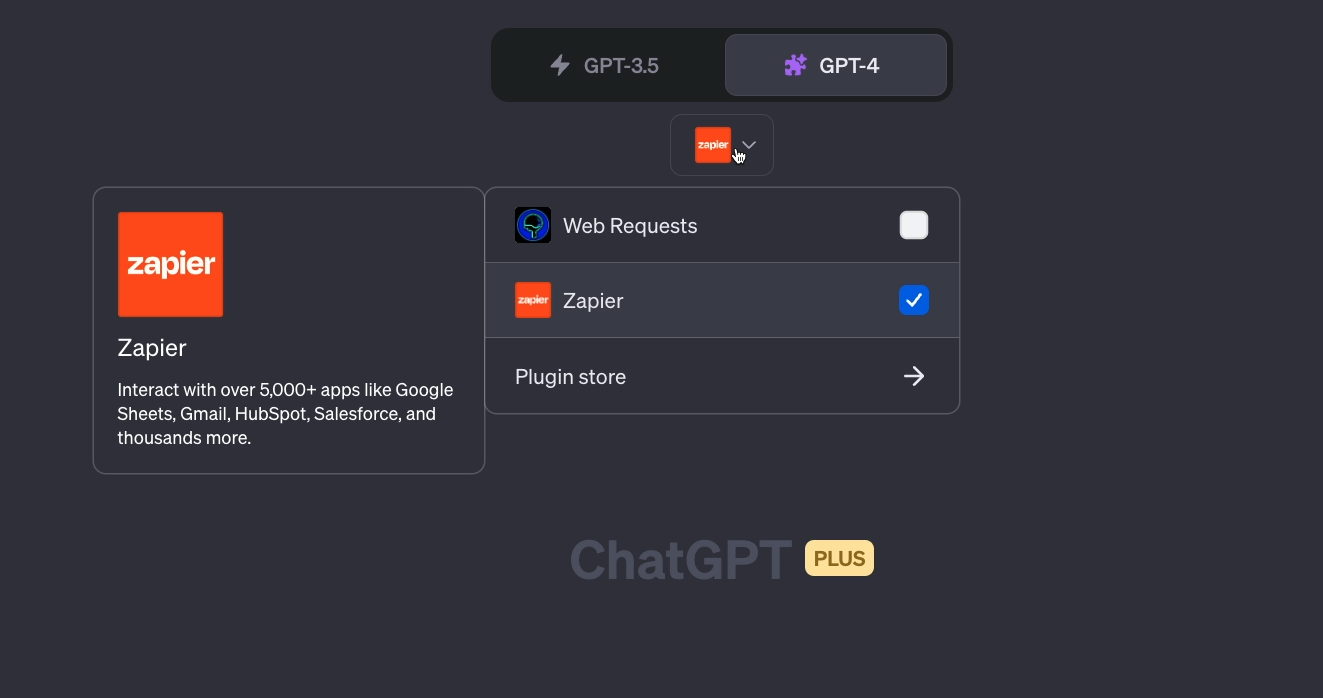
Once you’ve upgraded your account, go back to chat.openai.com, and start a new chat. You should now have the option to select ChatGPT4 as your language model.
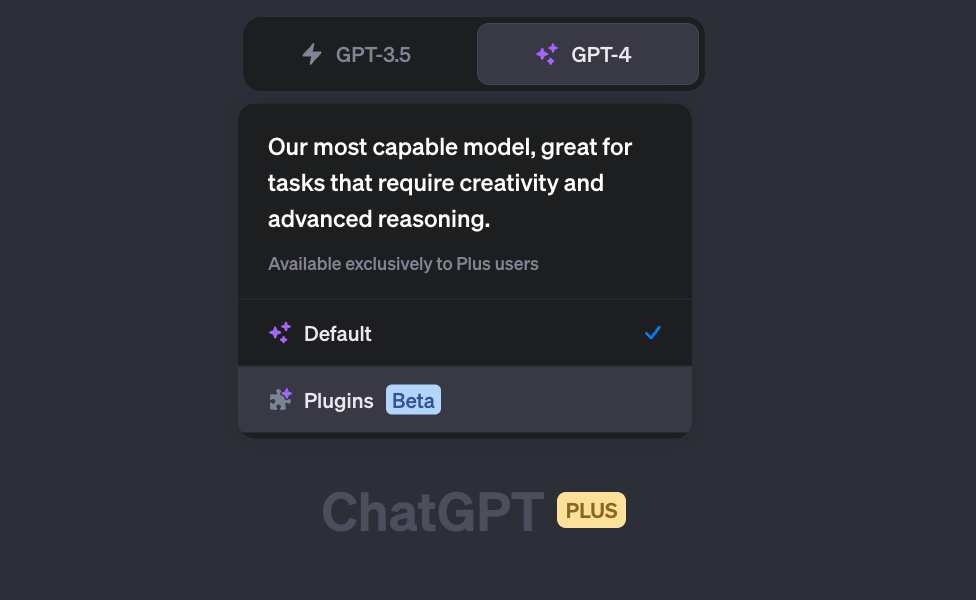
When you mouse over GPT4, a dropdown menu will appear with a couple of options: Default and Plugins [Beta].
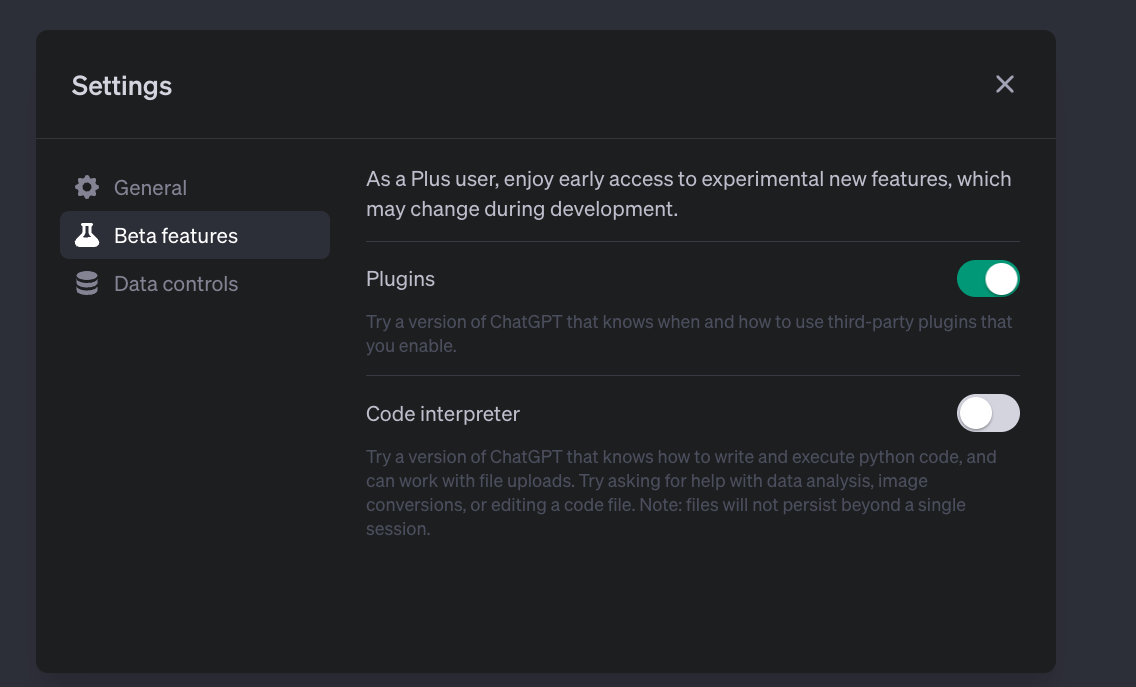
If you don’t see these options, you’ll just need to quickly adjust a setting. Click on your account in the bottom left and select “settings”.

Select “Beta Features”, and enable plugins.
Then return to the chat and hover over GPT4 again. Click on “plugins” to allow ChatGPT to incorporate plugins like Zapier into its responses.
At the top of your chat window, you’ll see a message that either shows your currently selected plugin, or will say “No plugins enabled” if you haven’t added any plugins yet. Click on this message, then choose “Plugin store”.
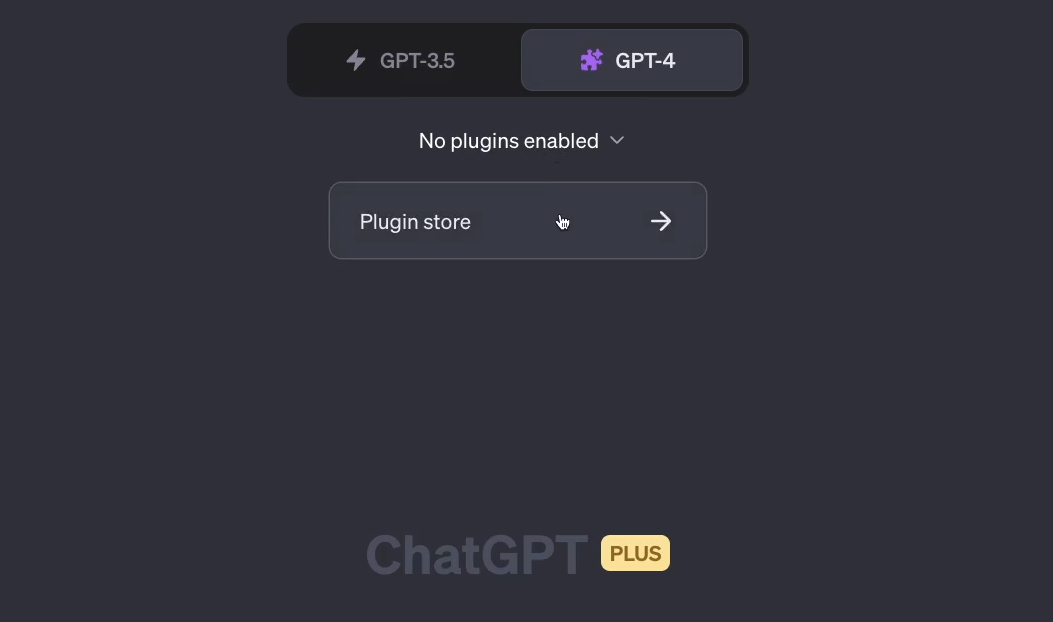
Search for Zapier, or select it from the list if it appears as a featured result.
Then, log in to your Zapier account if you aren’t already signed in, and authorize it to connect to your ChatGPT account.
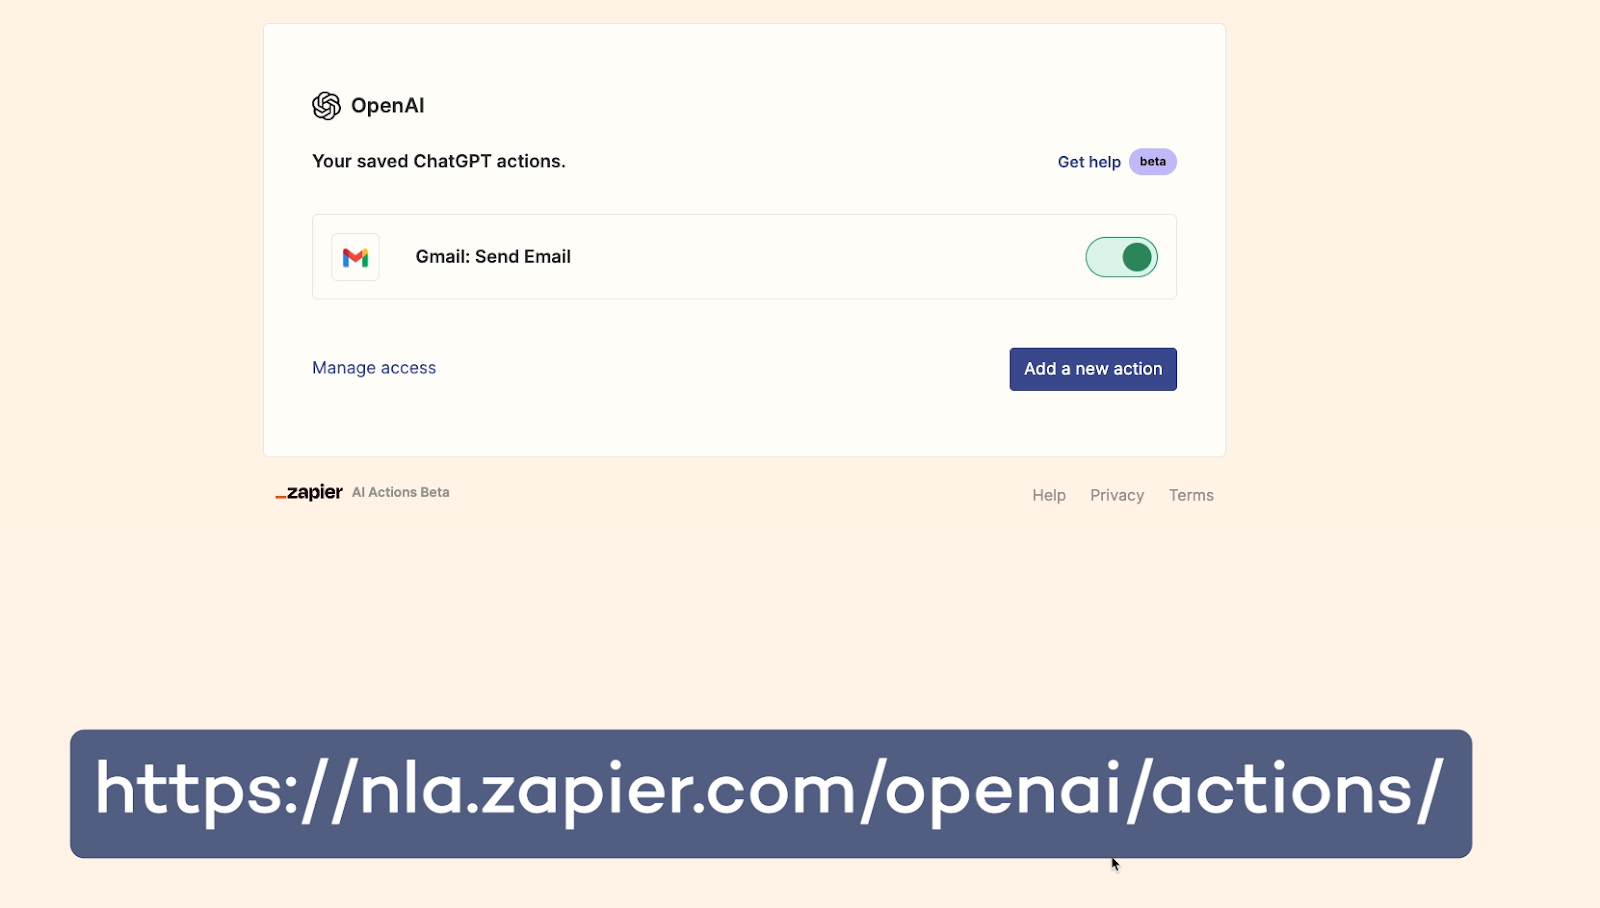
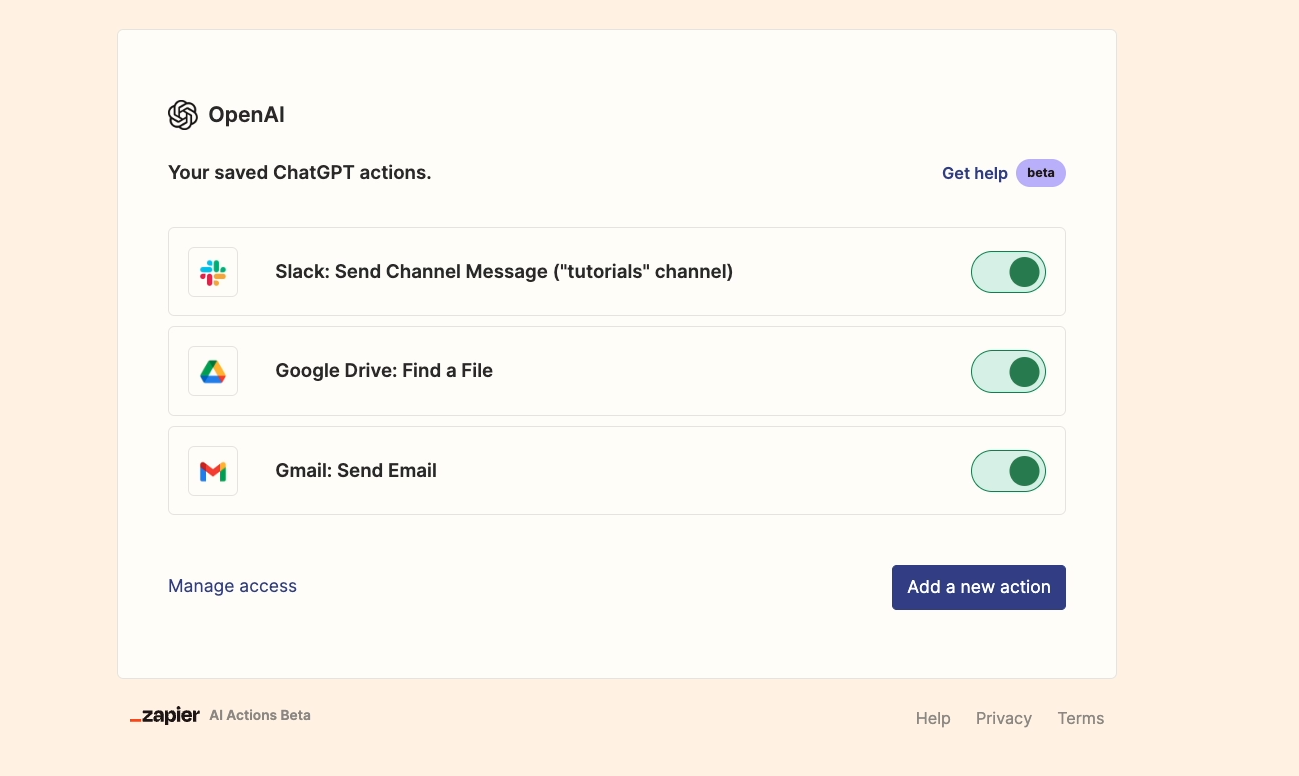
The plugin will then immediately take you to an “actions” screen. This is where you’ll see any Zapier actions that you’ve created for ChatGPT to use. You can also use this page to create new actions, or edit and delete your existing actions.
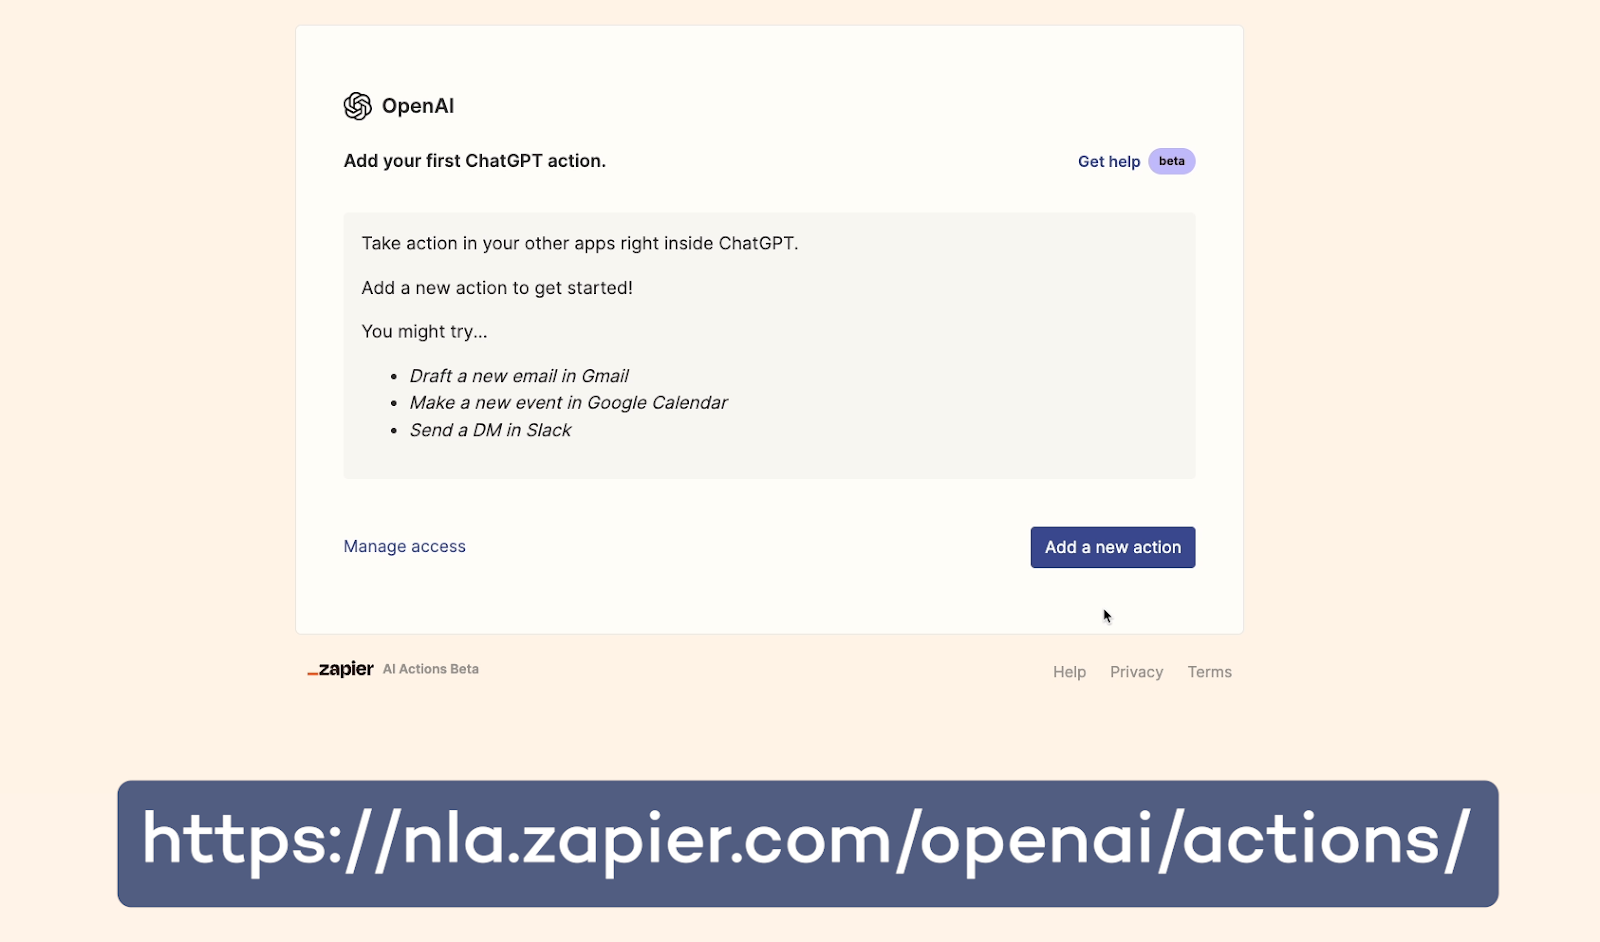
Let’s create a new action so we can set up a task for ChatGPT and Zapier to perform. This action page that Zapier opens up is currently the only place you can manage your actions.
There’s no menu item for it yet in Zapier’s main app. If you need to find the page again later, just go to https://nla.zapier.com/openai/actions
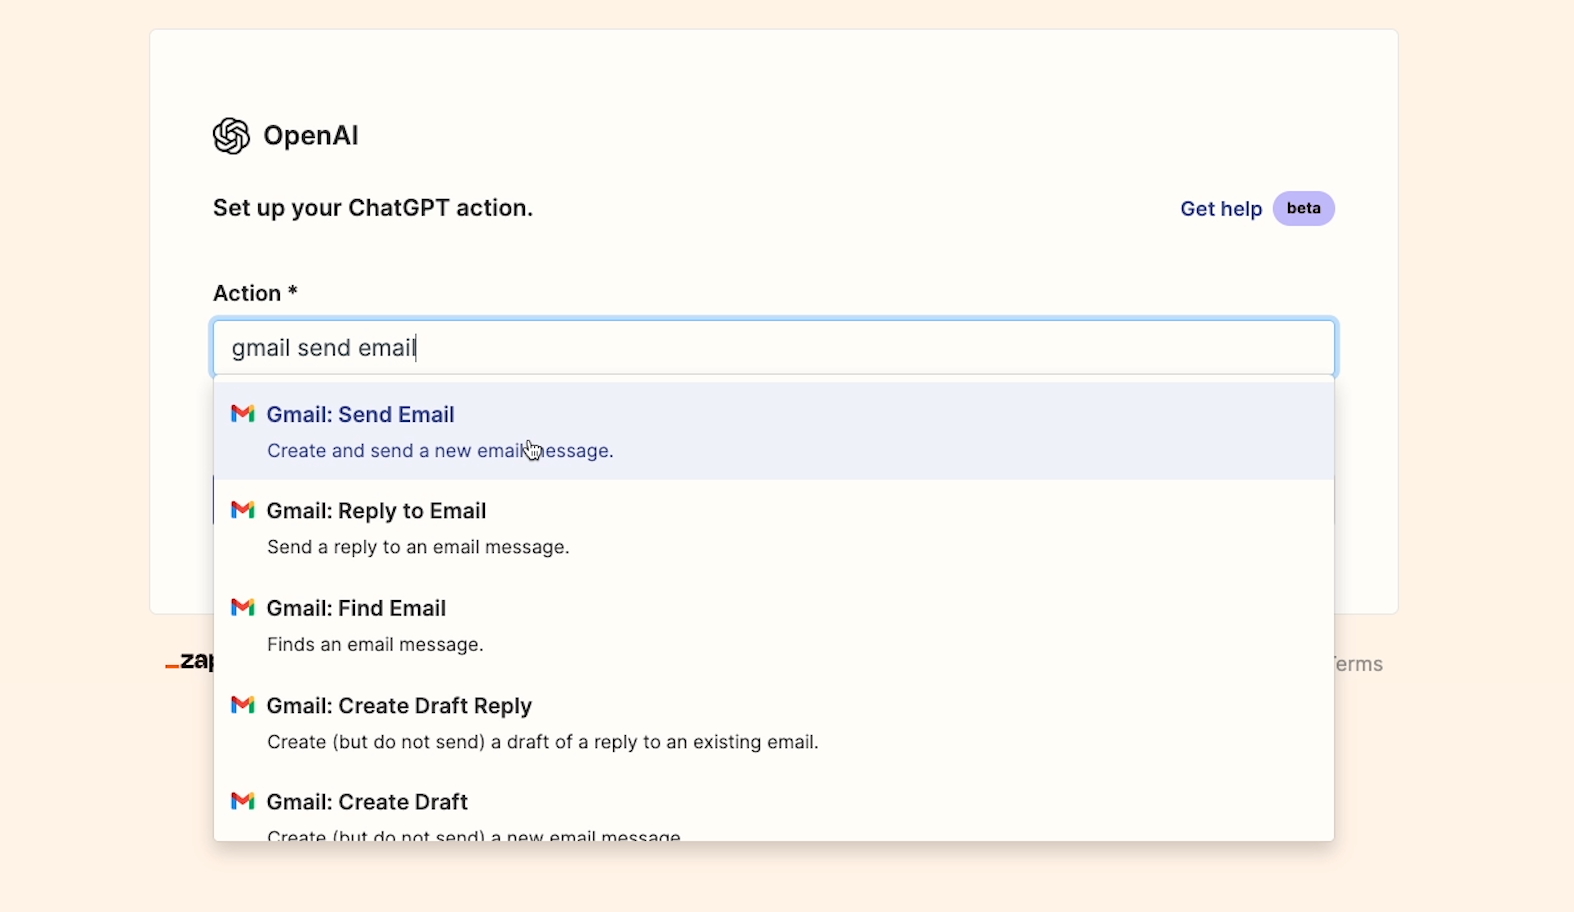
From the actions screen, click on “Add a new action”. Then, you’ll need to search for the automated action that you want Zapier to set up for ChatGPT.
This is a little different from your typical Zap setup. Instead of picking an app and then picking an action, you’ll have to search for both at once.
In our example, we’ll set up a simple action that lets ChatGPT send emails through a Gmail account. We’ll search for “Gmail: send email”, and select the appropriate action once it appears in the results.
Once you choose the action you want to use, you’ll need to configure it.
Zapier will display a small selection of the most important options for configuring the action, but you can click on “Show all options” to see the rest.

For every field, you’ll essentially have the option of providing a preconfigured piece of data or letting AI guess what to use.
How you fill in these fields will depend largely on the action you want to set up. You’ll need to consider the scope of what you want to do with the Zapier plugin.
For instance, if we want to set up an action to always send emails to the same recipient, we could provide that recipient’s address in the “To” field.
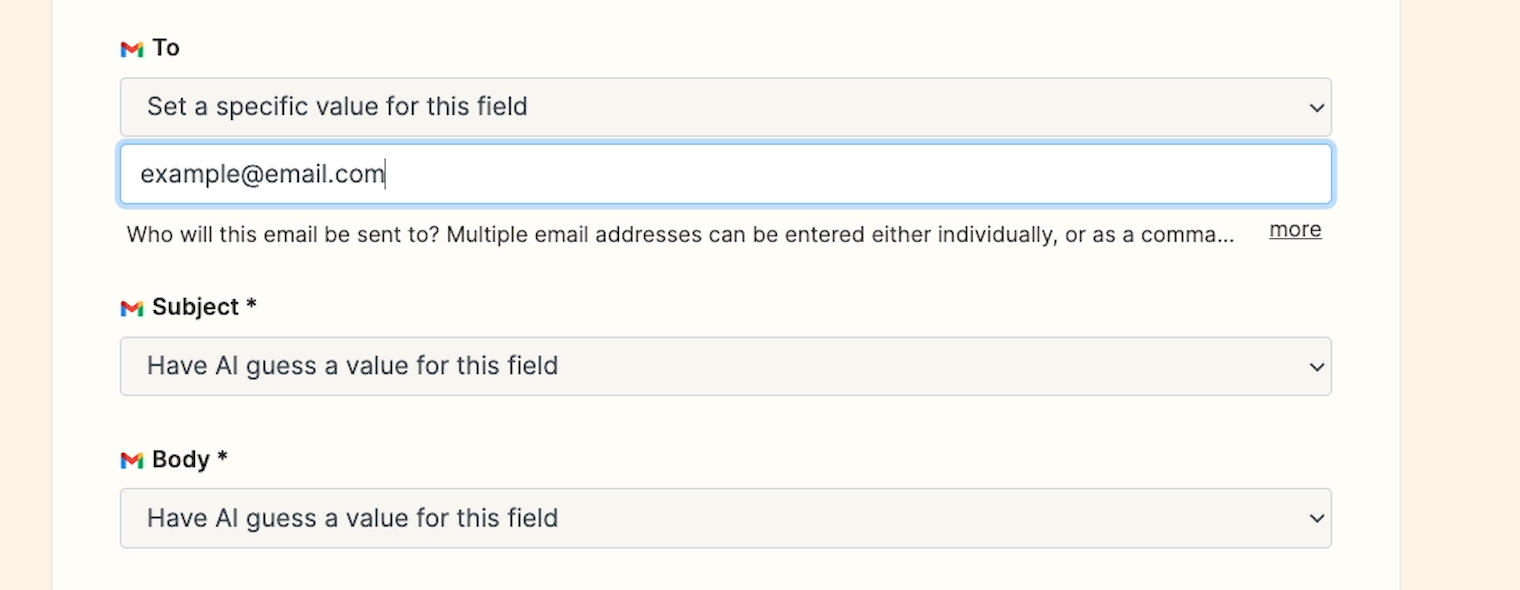
But if I want to be able to ask ChatGPT to send emails to anyone, it’s better to let AI guess what contents to use for the “To” field.

You can also choose to not include a value for each field if you want to ensure that ChatGPT always leaves it blank.
We’d recommend trying out a few different settings to see what works best for your scenario. While the plugin is in beta, any tasks it uses won’t count against your total in Zapier, so you should feel free to experiment.
However, the messages will still count against your 3-hour message limit in ChatGPT.
For now, we’ll stick with a simple setup. we’ll just connect our GMail account, and let AI guess for all of the rest of the values.

That way, we can use the prompt to tell ChatGPT who to send the email to, who to CC, and what the content should be.
To finish setting up an action, just click on “Enable action”. If you want to edit or delete any of your actions, just return to the actions page.
Now that we have an action enabled, let’s send a prompt and try it out.
First, make sure that you’re using ChatGPT4 with plugins enabled, and that the Zapier plugin is selected.
Then, send a message that’s relevant to the action you’ve configured. For example, we’ll send a prompt that says:
“Send an email to xraytutorials@gmail.com. Ask XRAY to schedule a meeting next week to discuss our next Zapier tutorial. The tone of the email should be professional and friendly.”
Now, ChatGPT will start processing its response. It can take a few seconds for it to get going, and you’ll see this message about using Zapier at least once.

Wait a few moments for ChatGPT to finish composing its response. The exact text will vary, but if you’ve asked it to perform an action that you’ve configured, it should tell you that it prepared the action with Zapier, but you need to review its output and confirm it first.
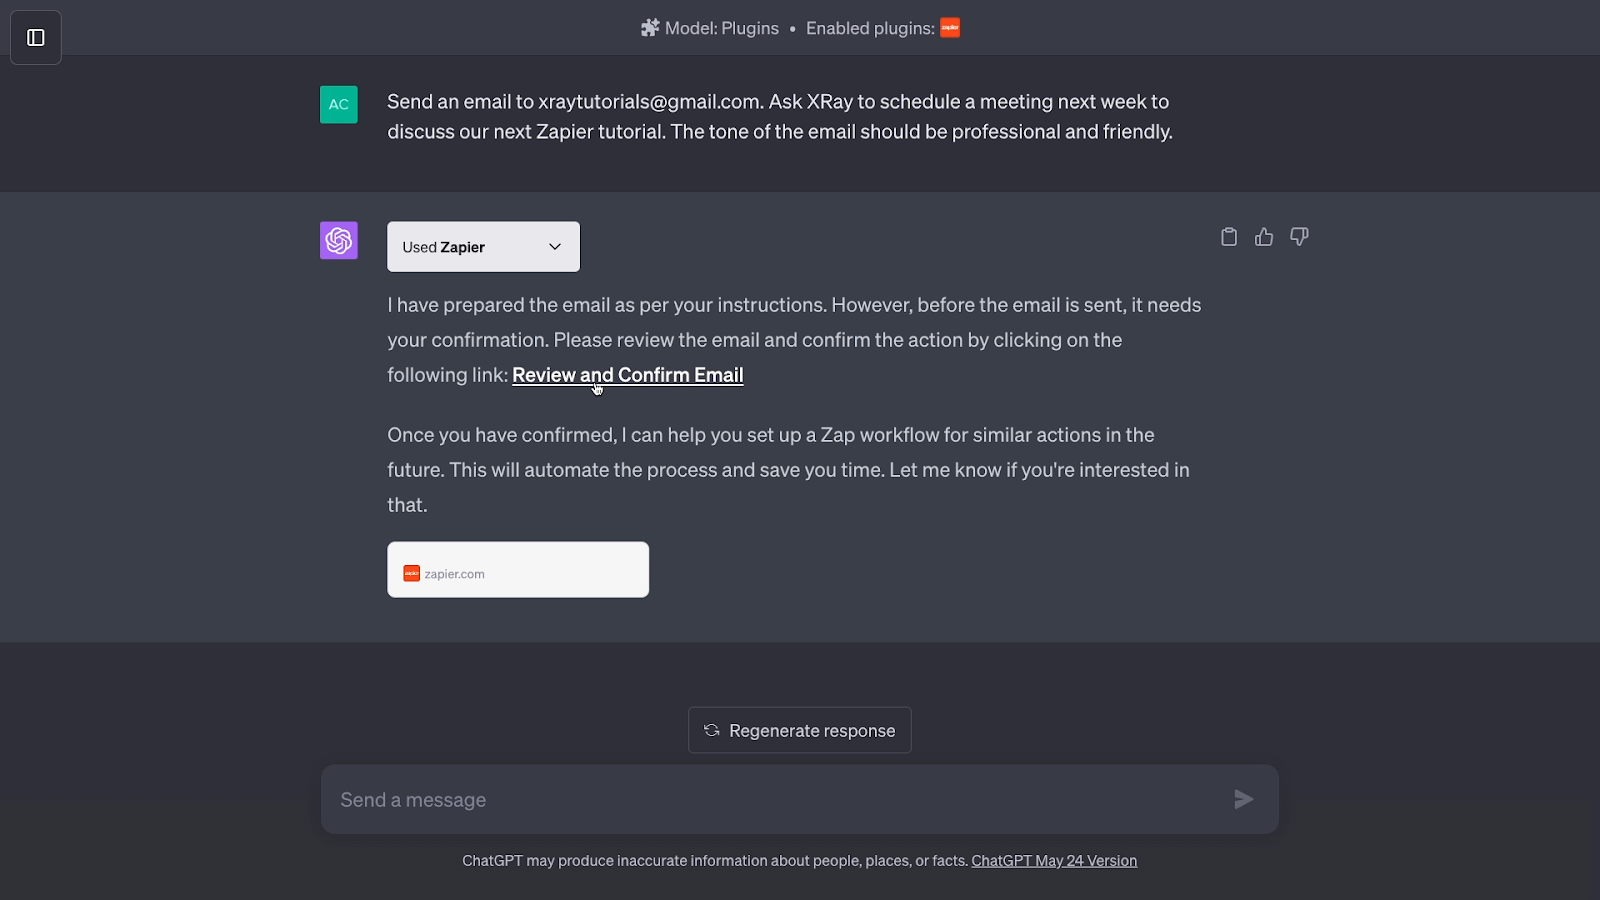
Click on the link that ChatGPT provides and check its work. You can edit any of its choices, and click on “Run” once you’ve determined it’s ready to execute.
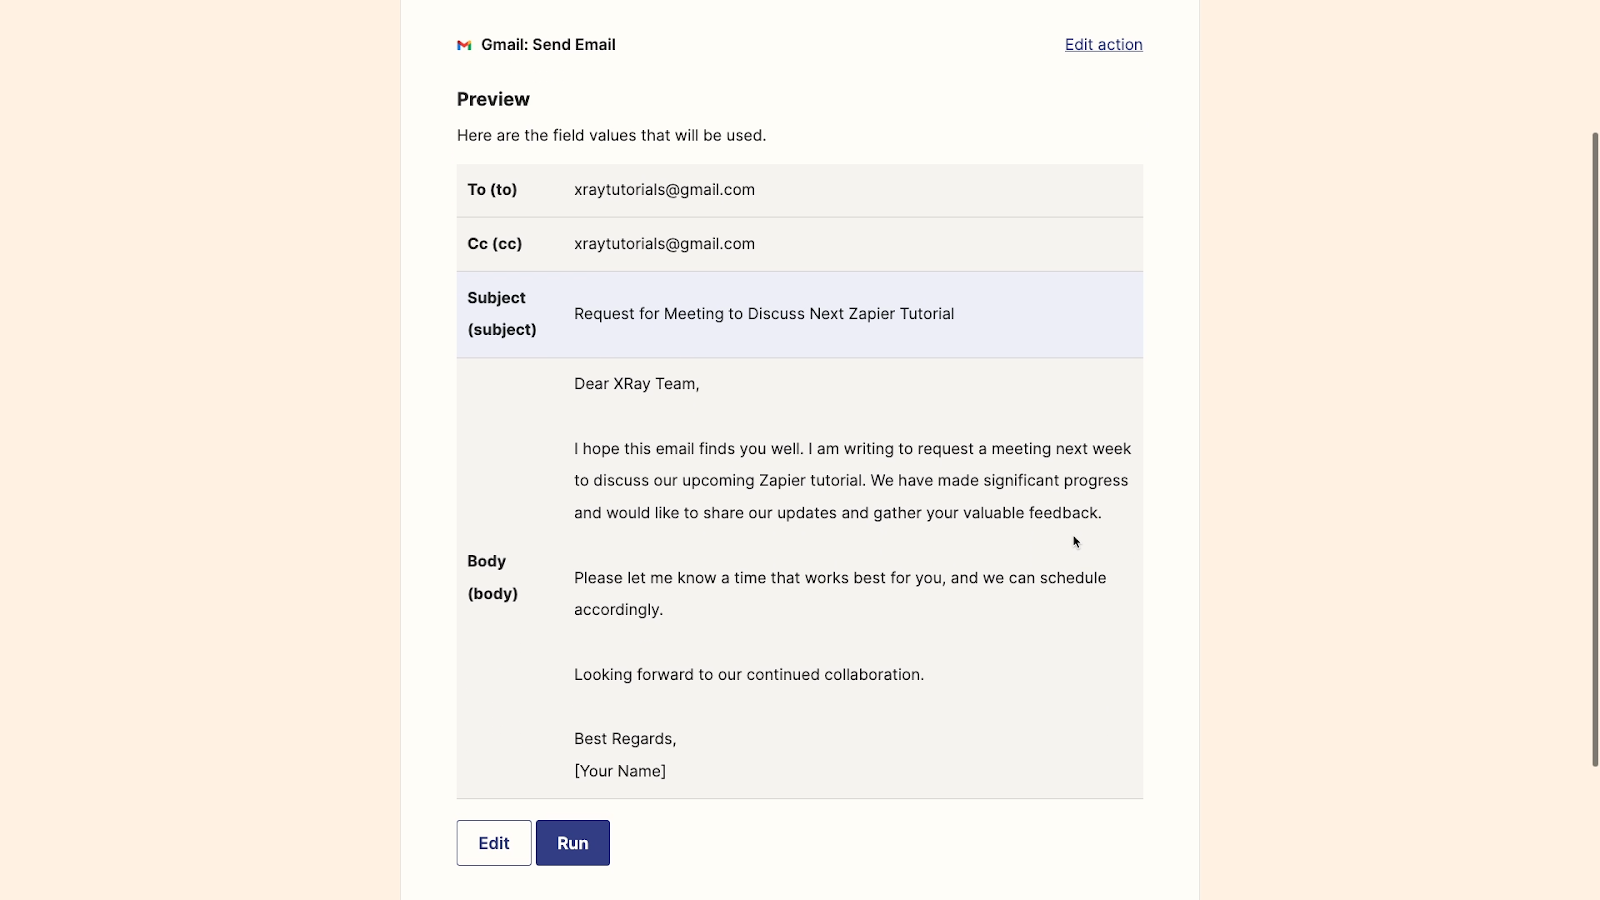
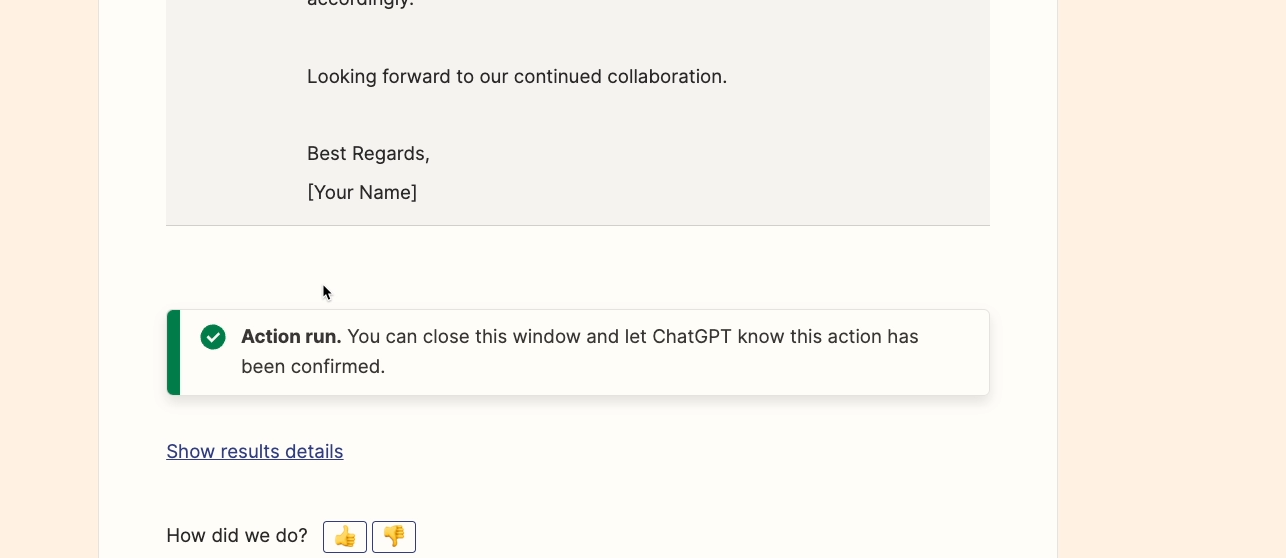
This message looks good, so we’ll click on “run” without editing anything.
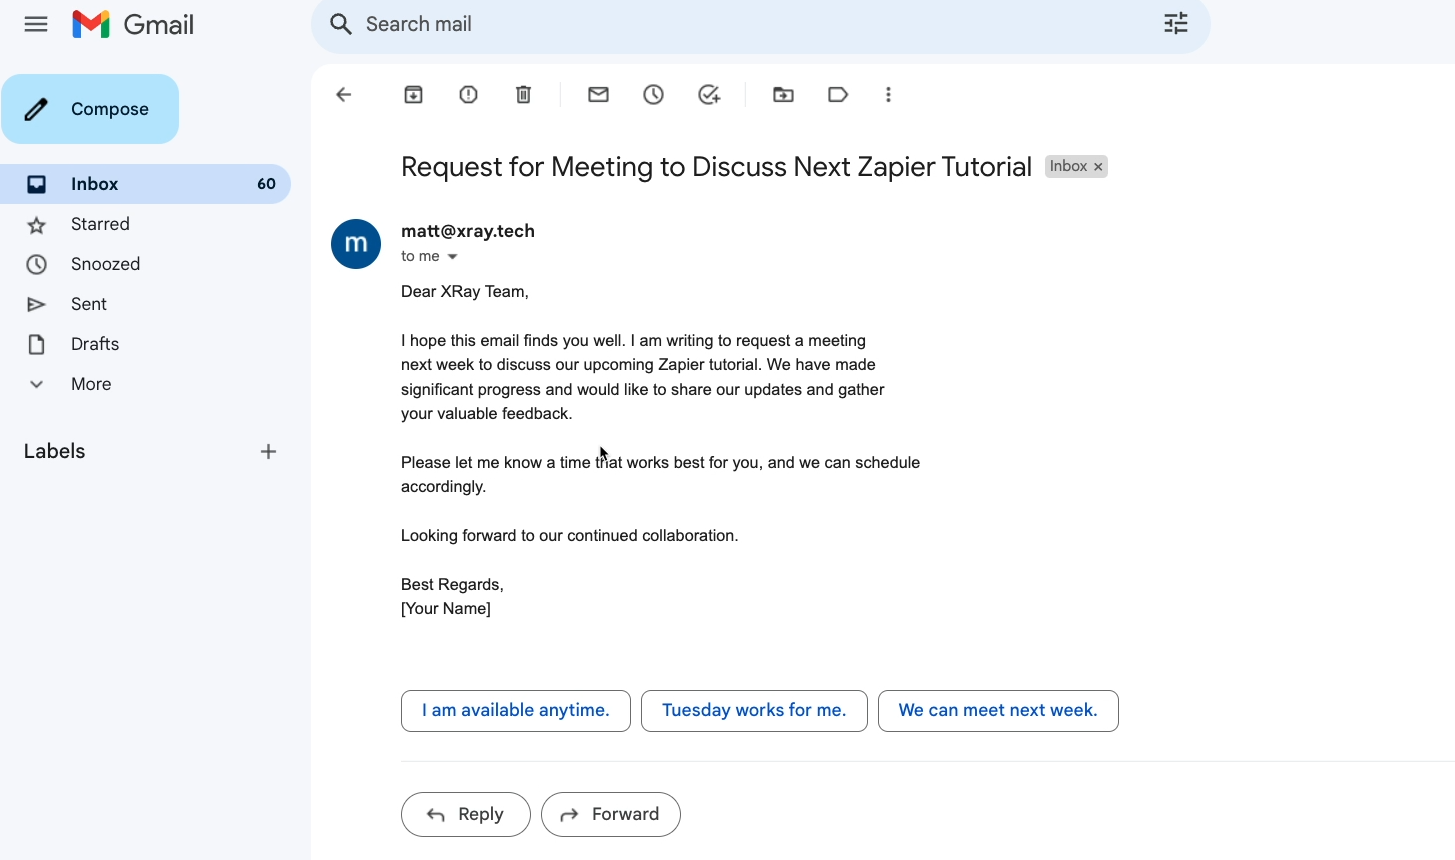
When we check the XRAY Content inbox, we can see the email that Zapier and ChatGPT just sent.
In many cases, ChatGPT will offer to set up an automation in Zapier to automate the task in the future. Unfortunately, this isn’t quite as useful as it sounds.
While the Zapier plugin for ChatGPT can actually create a new Zap for you, it typically won’t be able to reliably configure the steps.
We’ll ask Zapier to create an automation just as it offered to. We’ll specify that it should be scheduled to run every Monday at 3:05PM.

ChatGPT tells us it’s created a Zap that matches our parameters. We’ll click on the link it gave us to check it out.
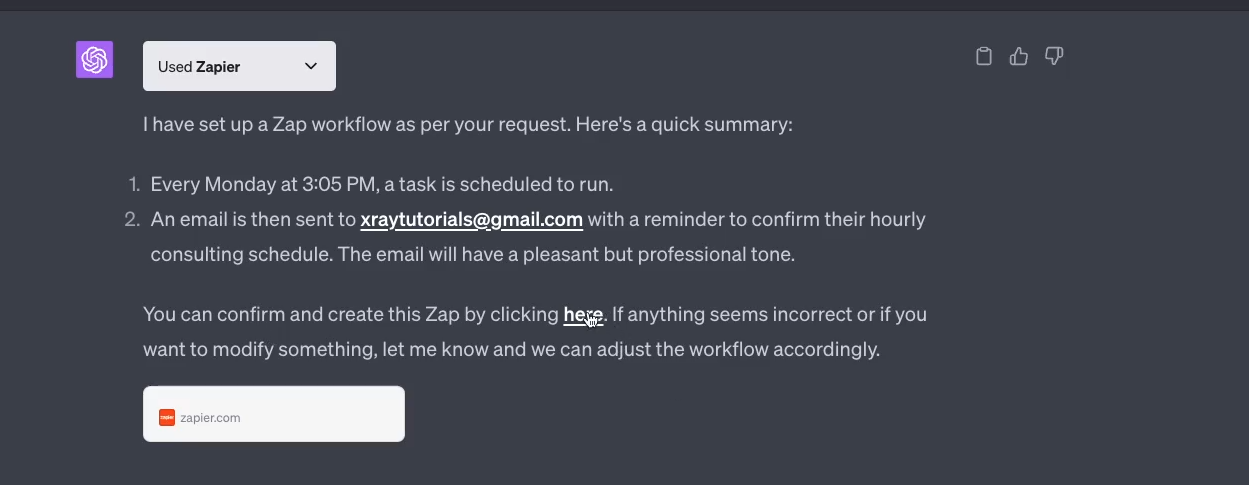
As we can see, the automation isn’t actually scheduled; the title has just been edited. No other settings have been configured.

As in these examples, you’ll usually need to fill in all of the fields, and fix any errors it made in the setup.
Hopefully, Zapier will continue expanding this plugin. It would be awesome to build Zaps entirely with natural language prompts.
But for now, it can really only create basic placeholder Zaps.
That covers all the basics of using the Zapier plugin in ChatGPT, but before we wrap up this tutorial, we just want to show you one more thing.
We’ve already seen how the plugin handles a single action and prompt, but you can also set up several actions and have ChatGPT draw on all of them as needed.
Let’s see what that looks like in practice.
We’ll quickly create two additional actions: one to find files in our Google Drive account, and another to send direct messages to a Slack channel.
Then, we’ll ask ChatGPT to search for a file containing this text: “GPT Plugin Test”.

Just as before, we’ll have to click on the link and confirm the operation.
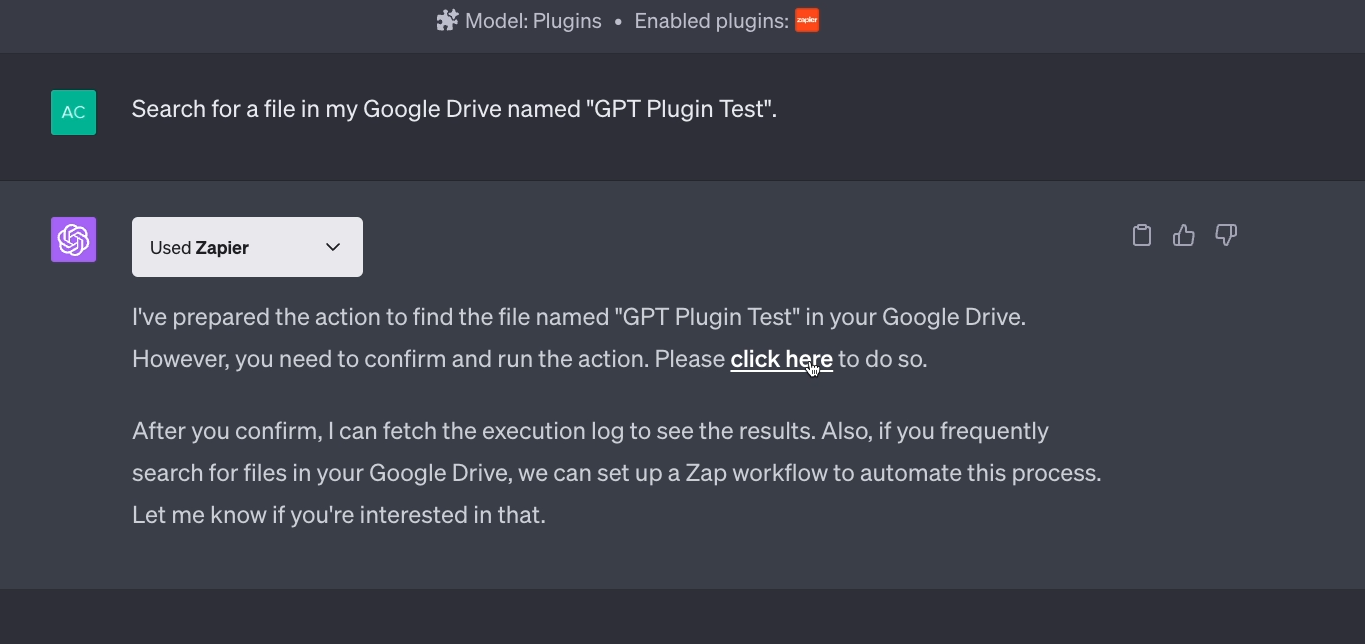
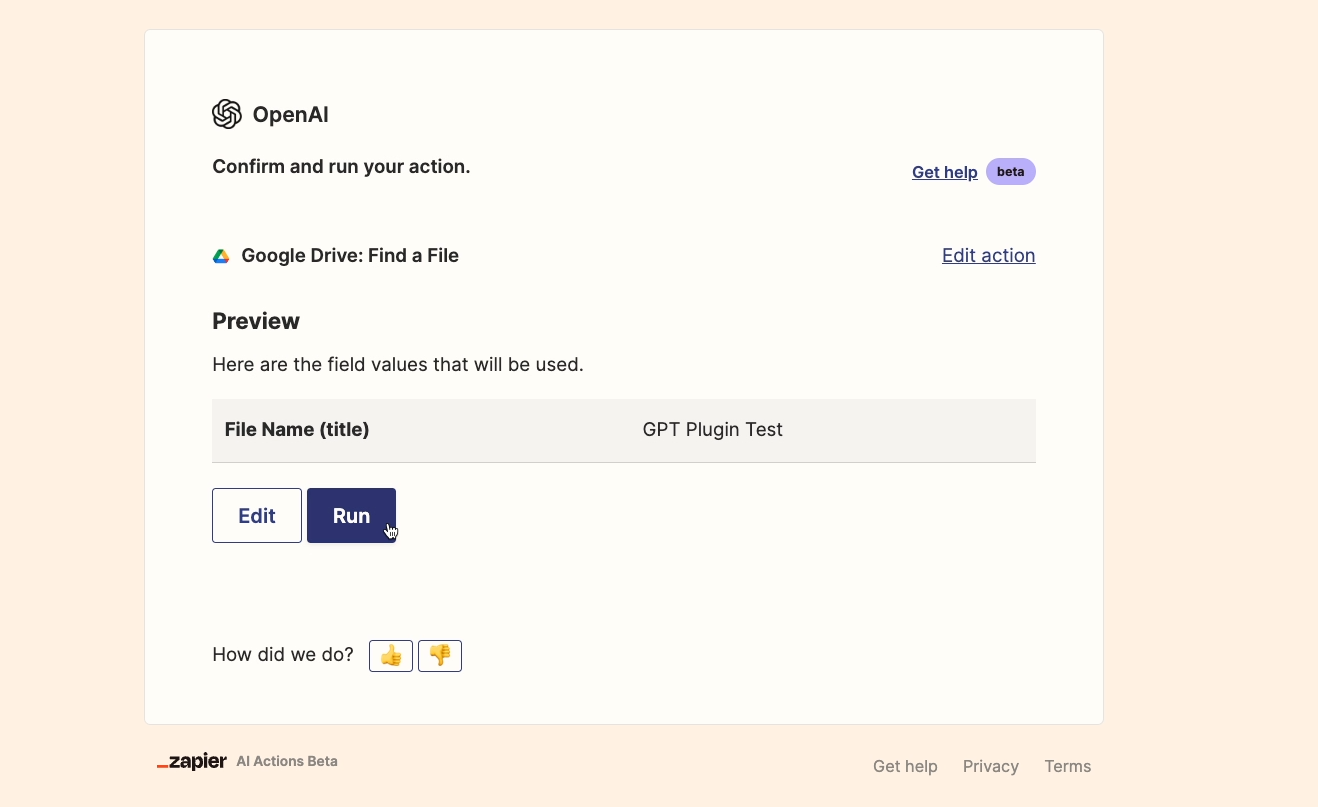
Since this action is a search, we’ll also have to manually send a message confirming that GPT should run the action. Once we do, it finds a few files that match our search term.

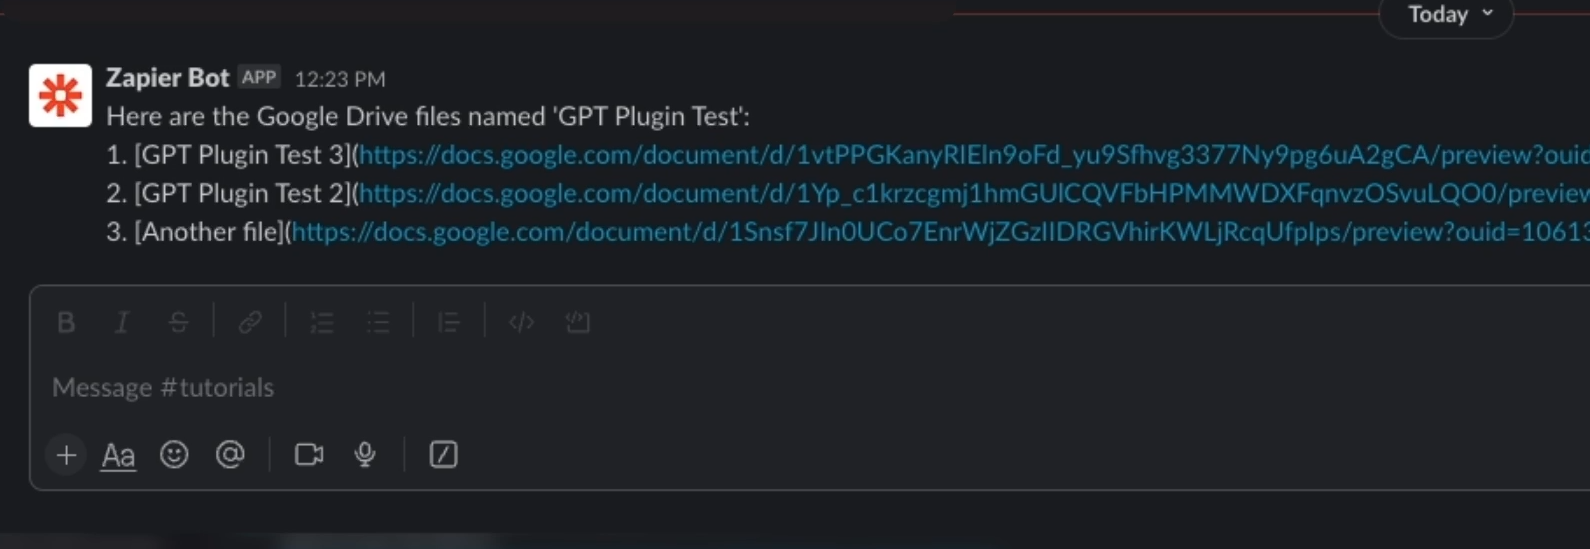
Now we’ll ask it to send those files’ URLs in Slack.

Once again, we’ll need to confirm the action.
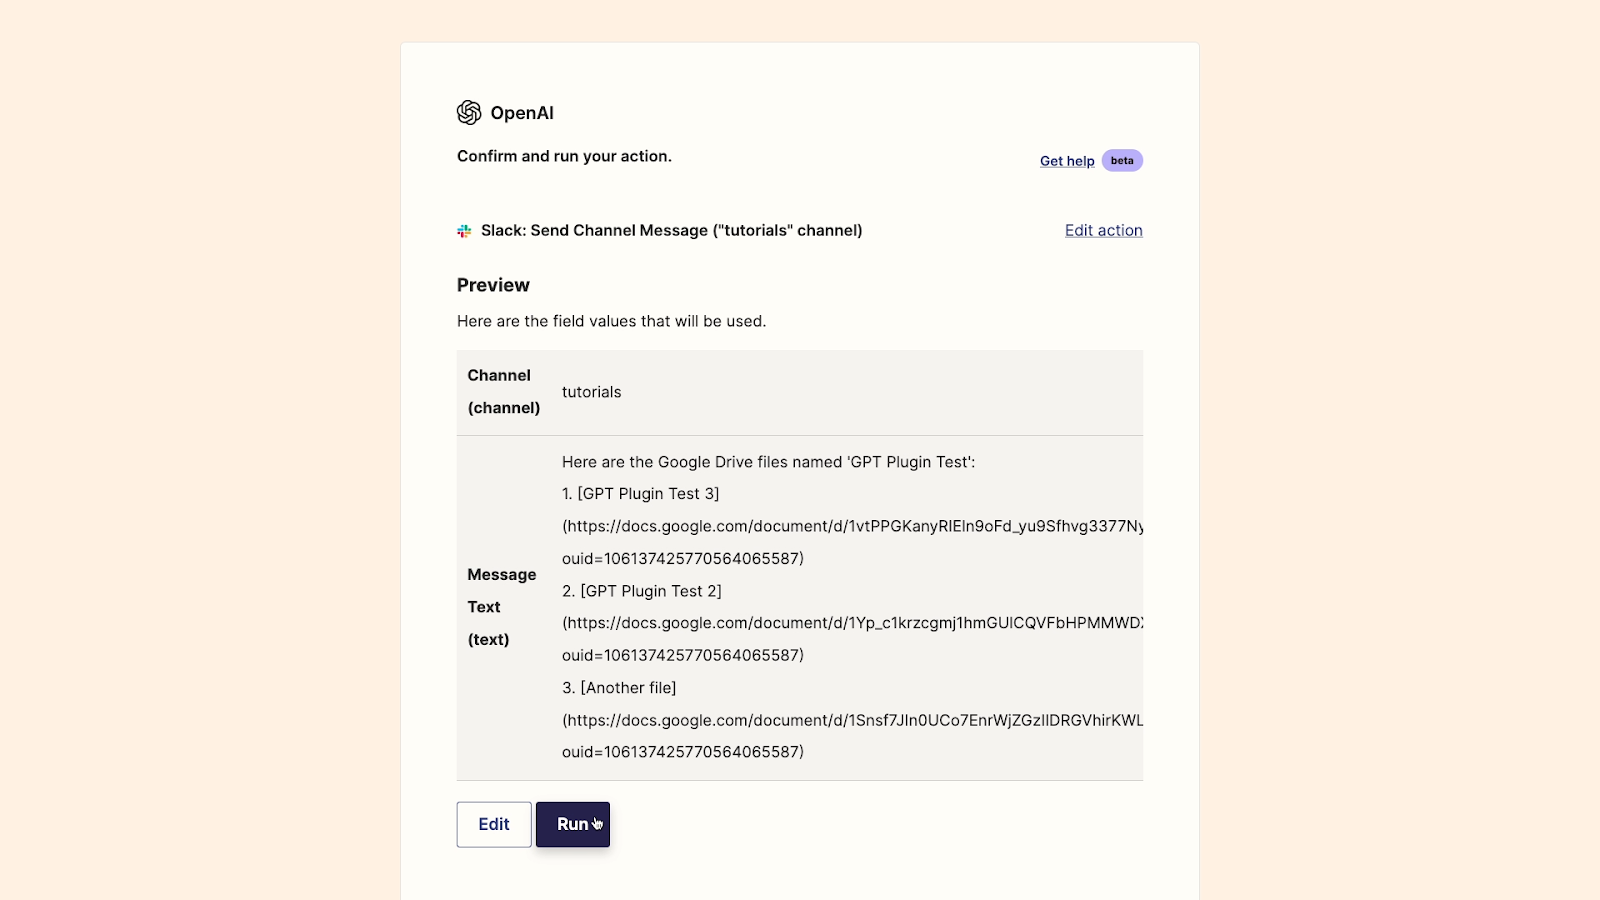
And now we’ve got the links in Slack.
With all of the required approvals, the process doesn’t necessarily save that much time, but it does prevent needing to open up several different apps to perform the task.
Setting up several different actions will definitely make your Zapier plugin in ChatGPT much more useful.
Exciting new AI tools and use cases are emerging every day. New options like the Zapier plugin for ChatGPT are still in the early days of development, but they hold tremendous potential.
It might be a bit clunky today, but with a plugin like this, we’re seeing the beginnings of a legitime virtual AI assistant that can find files, send messages, and perform all sorts of productive tasks. Check it out today to see what’s possible.
If you’d like to learn more about workflow automation, AI, and more, be sure to check out our blog or our YouTube channel. You can also follow XRAY on Twitter, Facebook, or LinkedIn.