


Zapier has always been a simple, accessible tool for creating automations.
But with Zapier’s latest AI features, building Zaps is getting even easier and faster than ever.
In this post, we’re going to show you three of Zapier’s new AI tools that can generate formatter steps, code blocks, and even entire Zaps based on short AI prompts.
All of these are beta features, so they’ll likely change significantly over the next several months as Zapier collects feedback and refines their software.
However, they already show a lot of potential for transforming the way that we build Zaps. There’s a lot to cover, so let’s get started!
Create formatter steps with AI
To start, we'll show you one of the most useful AI features that Zapier’s added recently: AI-assisted formatter steps.
With Zapier’s new AI-assisted formatter steps, you can create and configure a formatter step with a prompt instead of manually entering each setting.
Format data in Zapier without looking up syntax
This can be especially useful if you’re not sure about all of the exact syntax and options you need to enter to get the output you want.
There are dozens of basic actions that Formatter can run, from regex and text formatting to math operations and date/time utilities. Now, you can access all of these from the same place with an AI prompt.
How to add an AI formatter step in Zapier
Adding a formatter step with AI is simple, and only takes a few steps.
1. Open up the Zap where you’d like to add your formatter step.
2. Select any step that includes the data you wish to format.
3. Hover over the data you want to format, and click “Format data”
4. Enter your prompt in the window that pops up. Briefly describe what you want in plain English.
5. Click “Create step”.
6. Review and test the formatter Zap created by the AI.
Check out our example for a detailed demonstration of how it all works.
Example: reformatting date and time in Zapier with AI
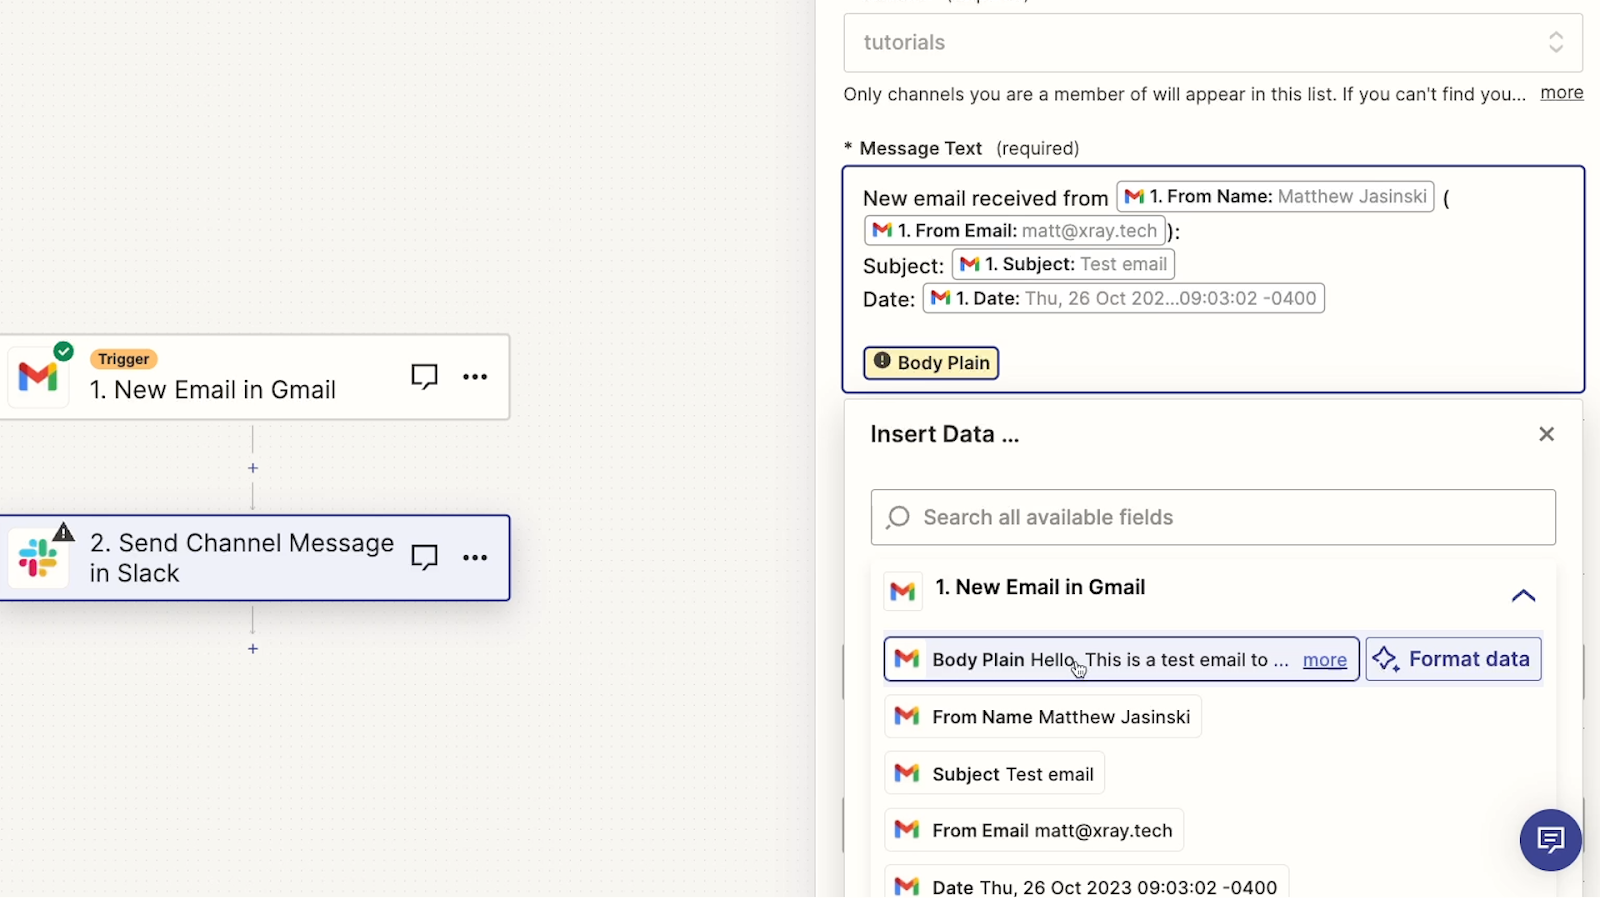
In the example below, our Zap sends Slack alerts for new messages in a Gmail inbox. Among other data, the Slack alert includes the date and time the email was sent.
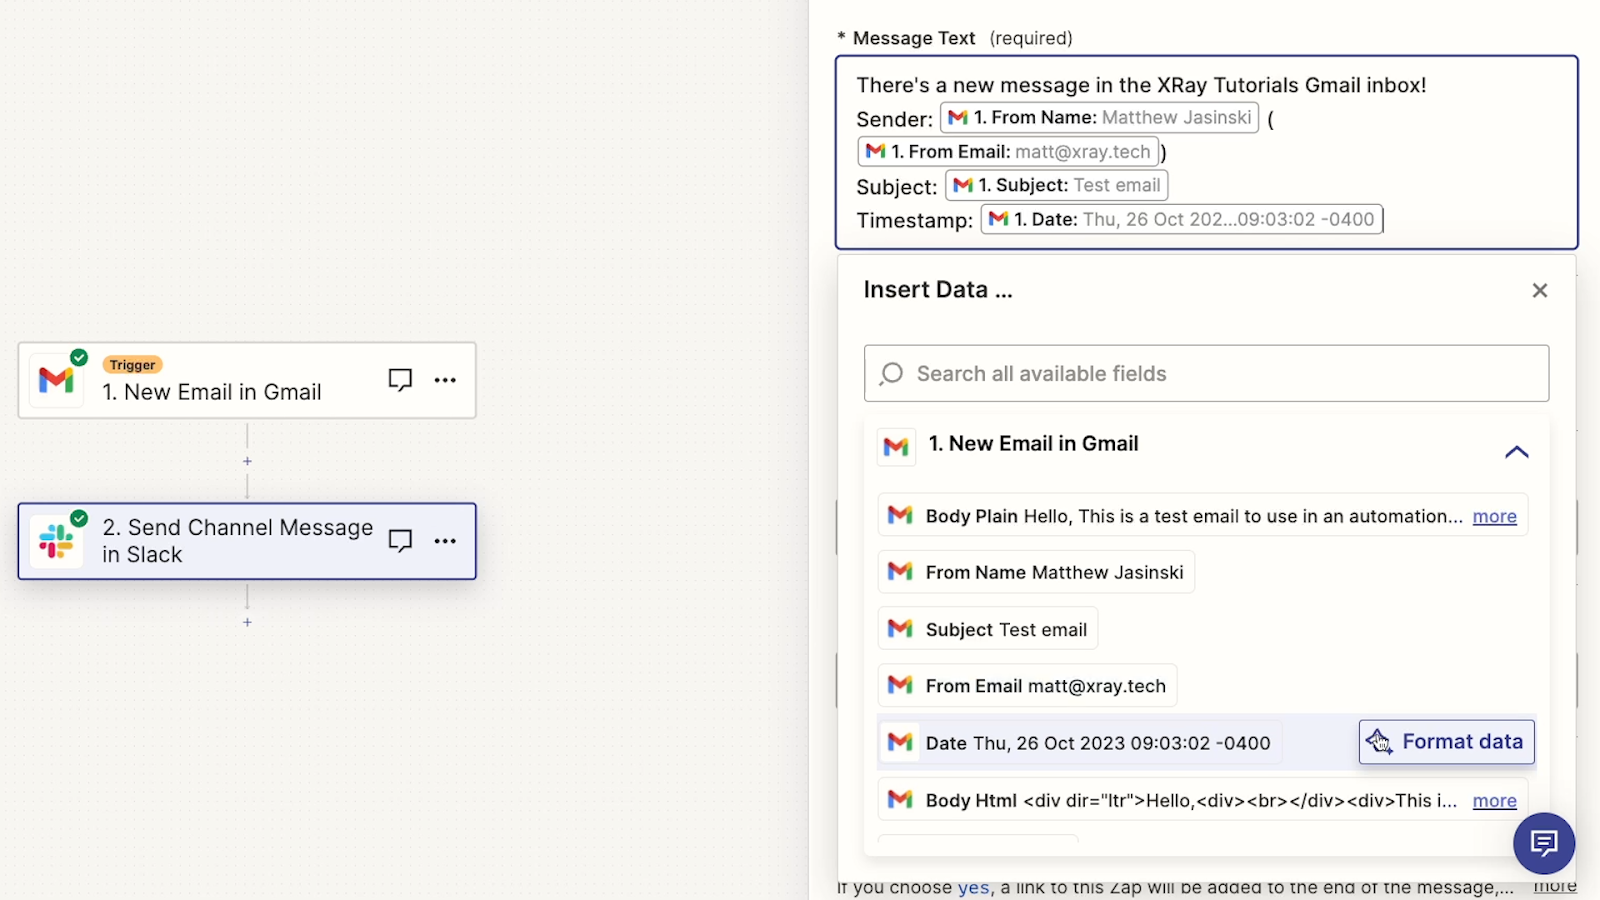
Let’s say we want to reformat that date and time to include the full name of the month, and a simple twelve-hour time in our local time zone - eastern US.
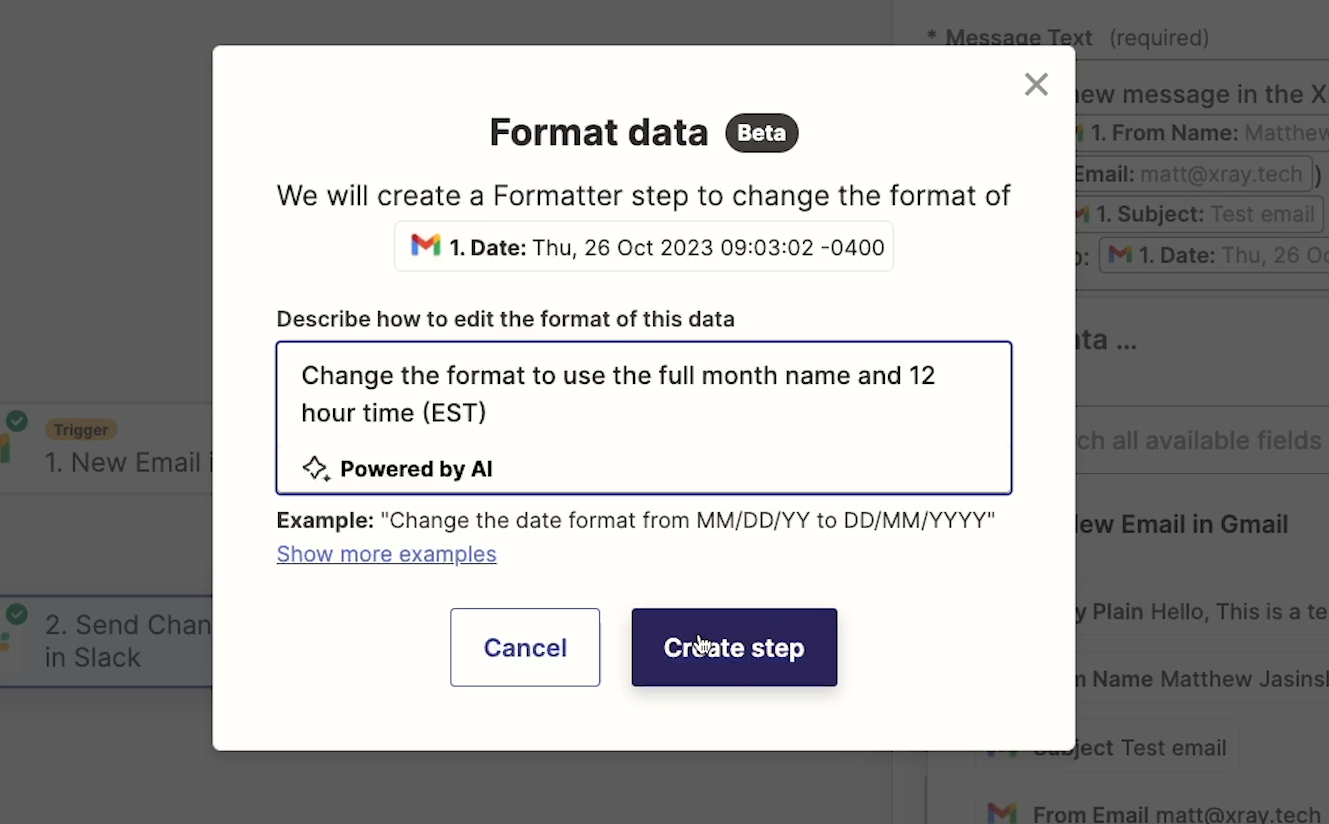
We’ll click on “Format”, then enter the following prompt into the window:
Change the format to use the full month name and 12 hour time (EST)
Note that we’re not specifying the exact syntax to use with “MMMM/DD/YY”, etc. This level of specificity is usually not necessary; the AI should be able to determine the right format based on natural language.
We’ll click “Create step” to generate the formatter action, then review the results.
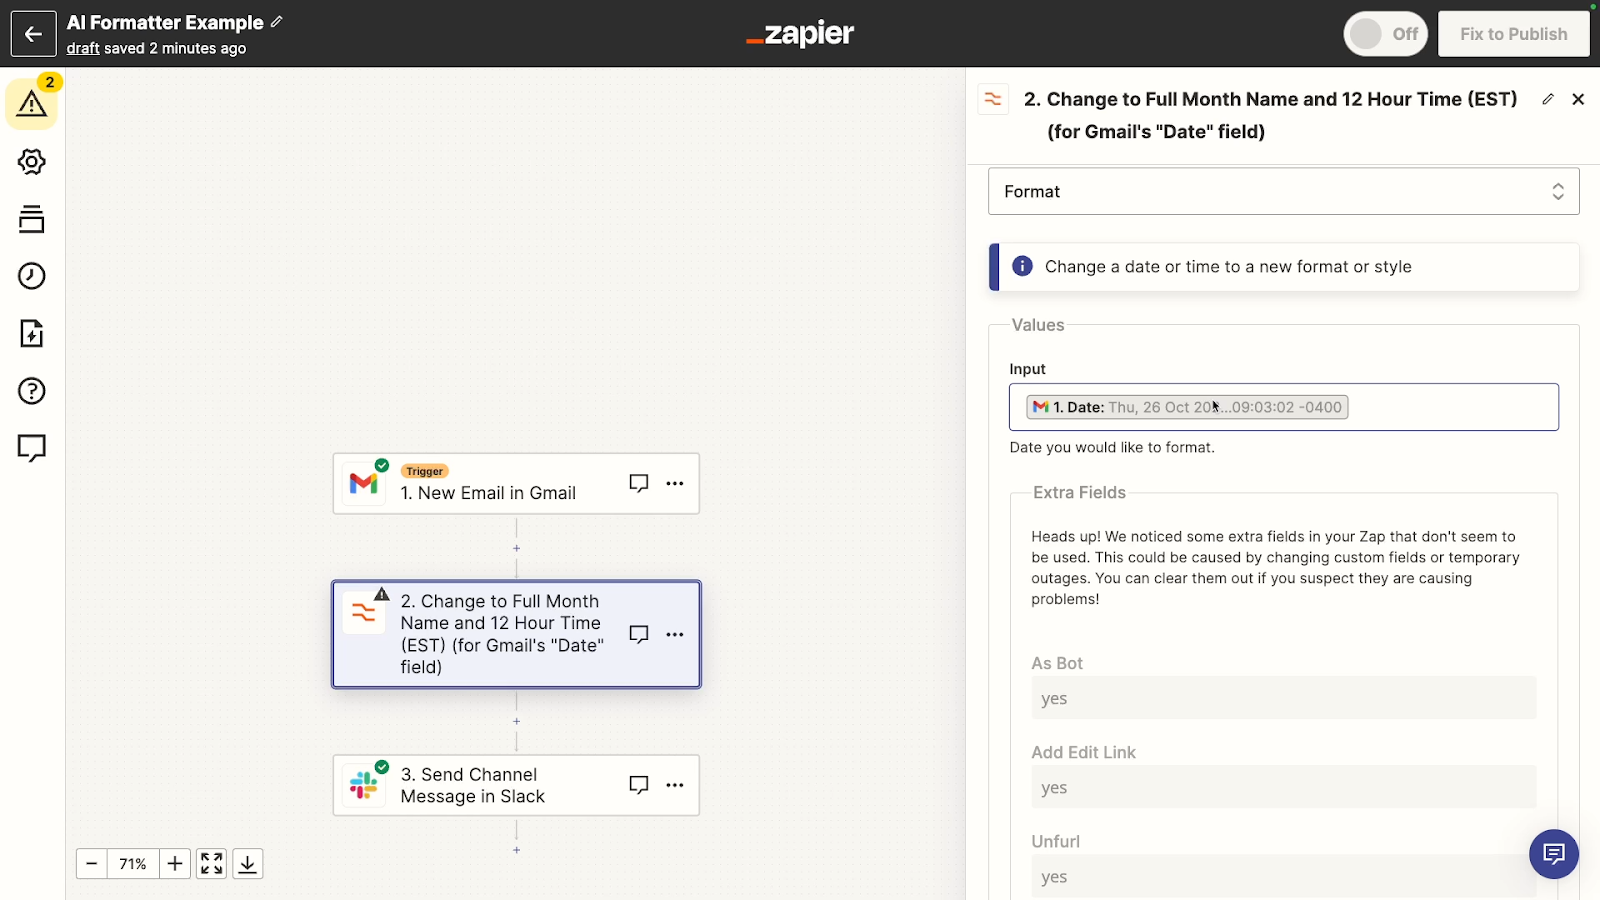
Immediately, we can see that a formatter step has been added before our Slack step.
However, there are several unused fields in the formatter. You may see this happen a lot with AI-generated steps in Zapier, but you can just delete these fields.
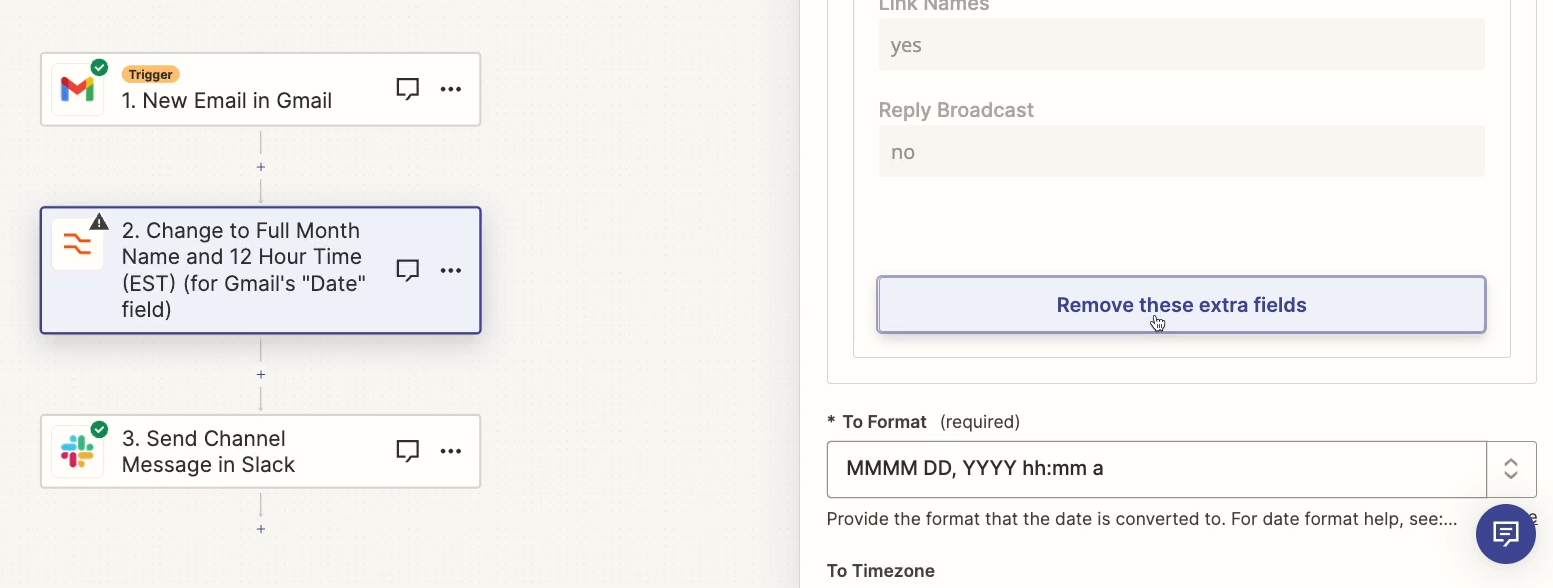
With those removed, it looks like we’ve got a good formatter step.
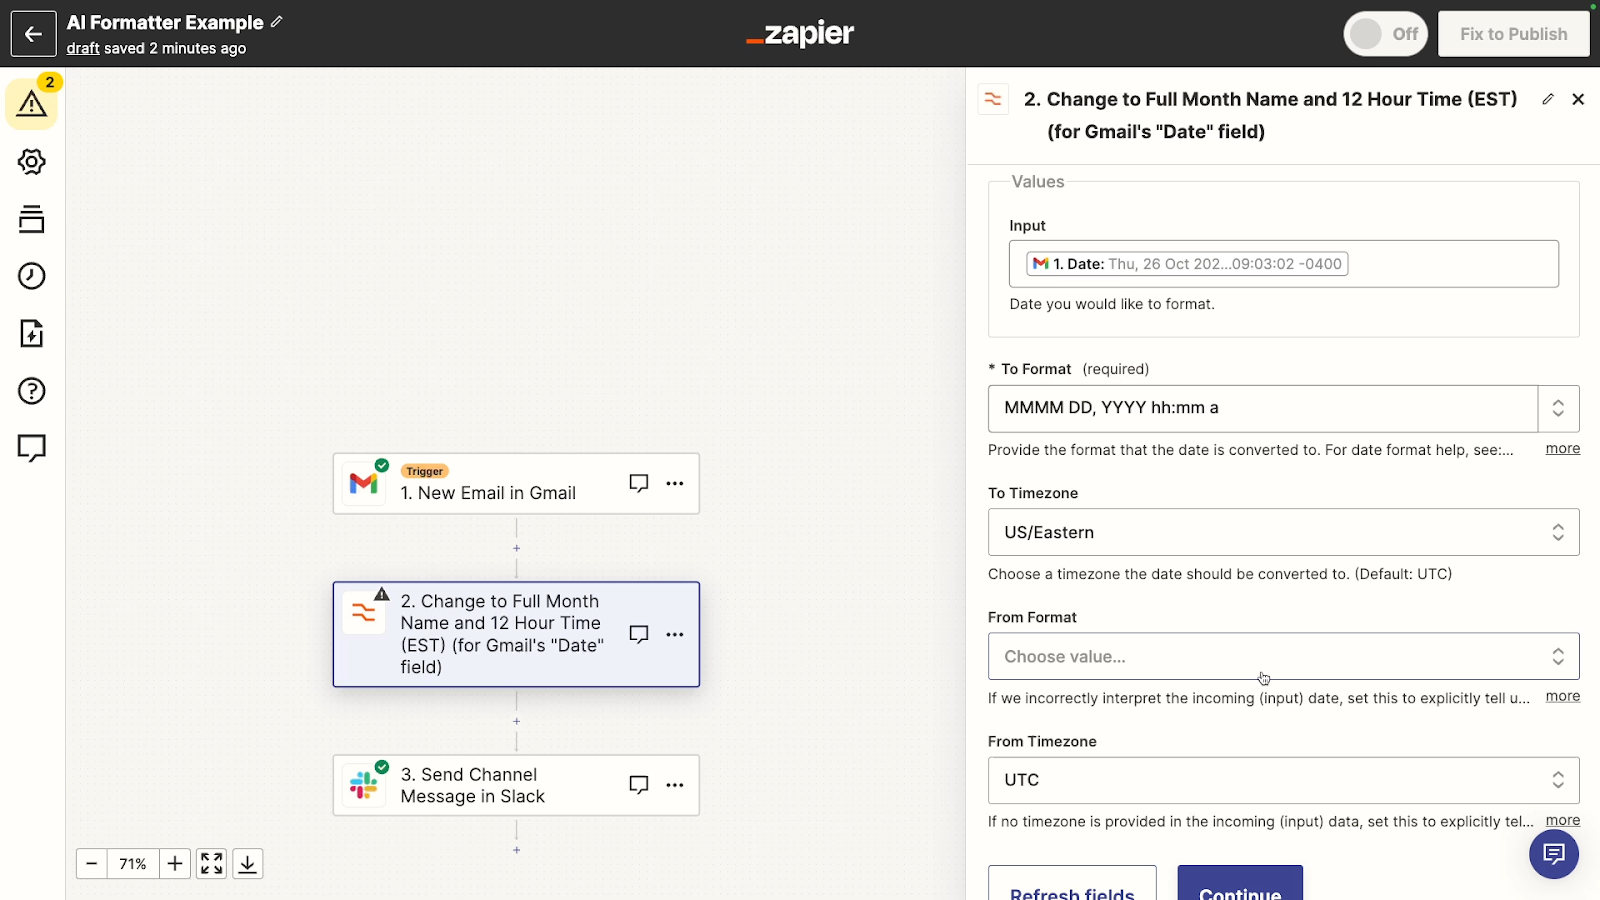
The time format looks like it’s probably correct, and the time zone is correctly set to EST. We’ll give it a test to be sure everything worked.
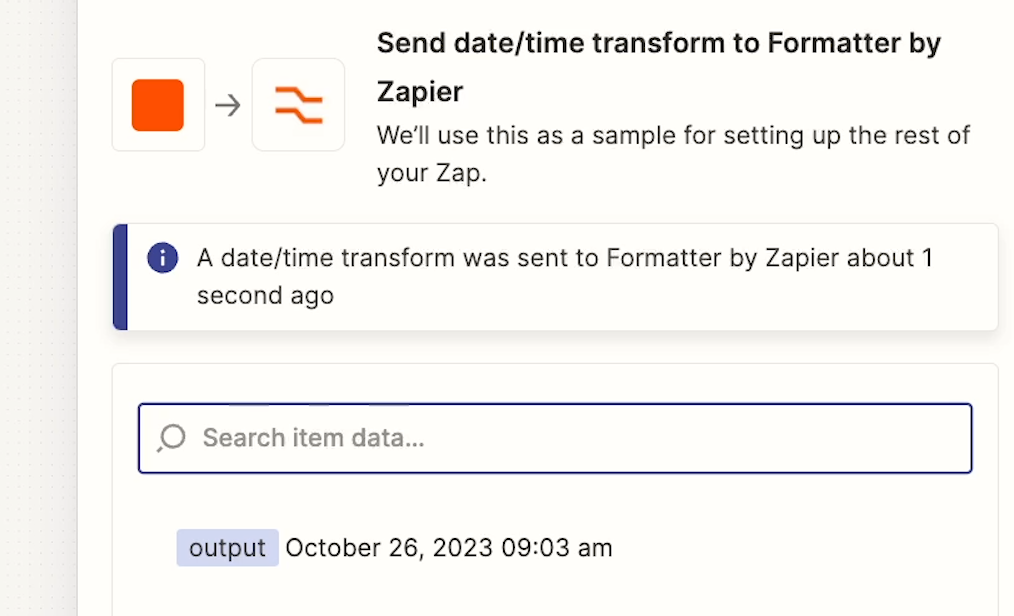
When we test the step, we can see that the date and time are reformatted exactly how we wanted.
Creating a static step with AI
To be clear, Zapier will only use AI to configure the formatter step and add it to the Zap.
When the Zap runs, it won’t send any sort of AI prompt. It will just use the formatter step as it’s configured.
A convenient and reliable shortcut for adding formatter steps
Ultimately, “Format with AI” is great for quickly adding formatter steps when you don’t know the exact syntax or appropriate formatter option you need to use. It lets you skip looking up precise information about various ways of formatting data, and instead lets you quickly add a new step to your Zap with a short prompt.
This is one of the best use cases we’ve seen so far for AI in automation. By using AI to create a formatter step, we can save a lot of time that would have been spent on searching for the right tools and syntax to use.
But unlike a lot of other AI implementations, the output here is static. Once we have a formatter step we like, we can keep using it in our Zap permanently. We don’t have to worry about an inconsistent AI giving us poor answers half the time our Zap runs.
Additionally, using the formatter step in the future doesn’t require us to keep sending API requests to an AI, meaning that it doesn’t come with any additional charges or count against an OpenAI credit limit. We can just keep using the formatter step that we know will work for as long as we want. And for now, Zapier isn’t charging any additional fees to use this - or any other AI feature.
Add custom code to your Zaps with AI
The next AI tool that we’ll look at offers a lot of the same benefits, as it will let us generate a static Zapier action with an AI prompt.
Let’s explore generating code blocks in Zapier with AI prompts.
Now, we love no-code solutions at XRay. They’re fast to build and easy to maintain, even for people with less technical knowledge.
But sometimes, a bit of code is necessary to elevate your automations from good to great.
In many cases, adding a code step to your Zap won’t be strictly required, but it may help to reduce several formatter steps or awkward paths modules into a single, efficient step.
And now, with Zapier’s new AI generation features, you can include code blocks in your Zaps, even if you don’t know how to code at all. Let’s see how it works.
How to add AI-generated code to your Zapier automations
1. Add a step to any Zap, and choose “Code by Zapier” step as the action
2. Choose the language you want the code to be written in (JavaScript or Python)
3. Click on “Generate with AI”
4. Enter your prompt into the window that pops up. You can describe what you want the code to do in simple language.
5. Click “Generate Code”.
6. Review the AI’s output and add it to your Zap.
For more detail, check out our example below.
Code example: parsing and reformatting names in text fields
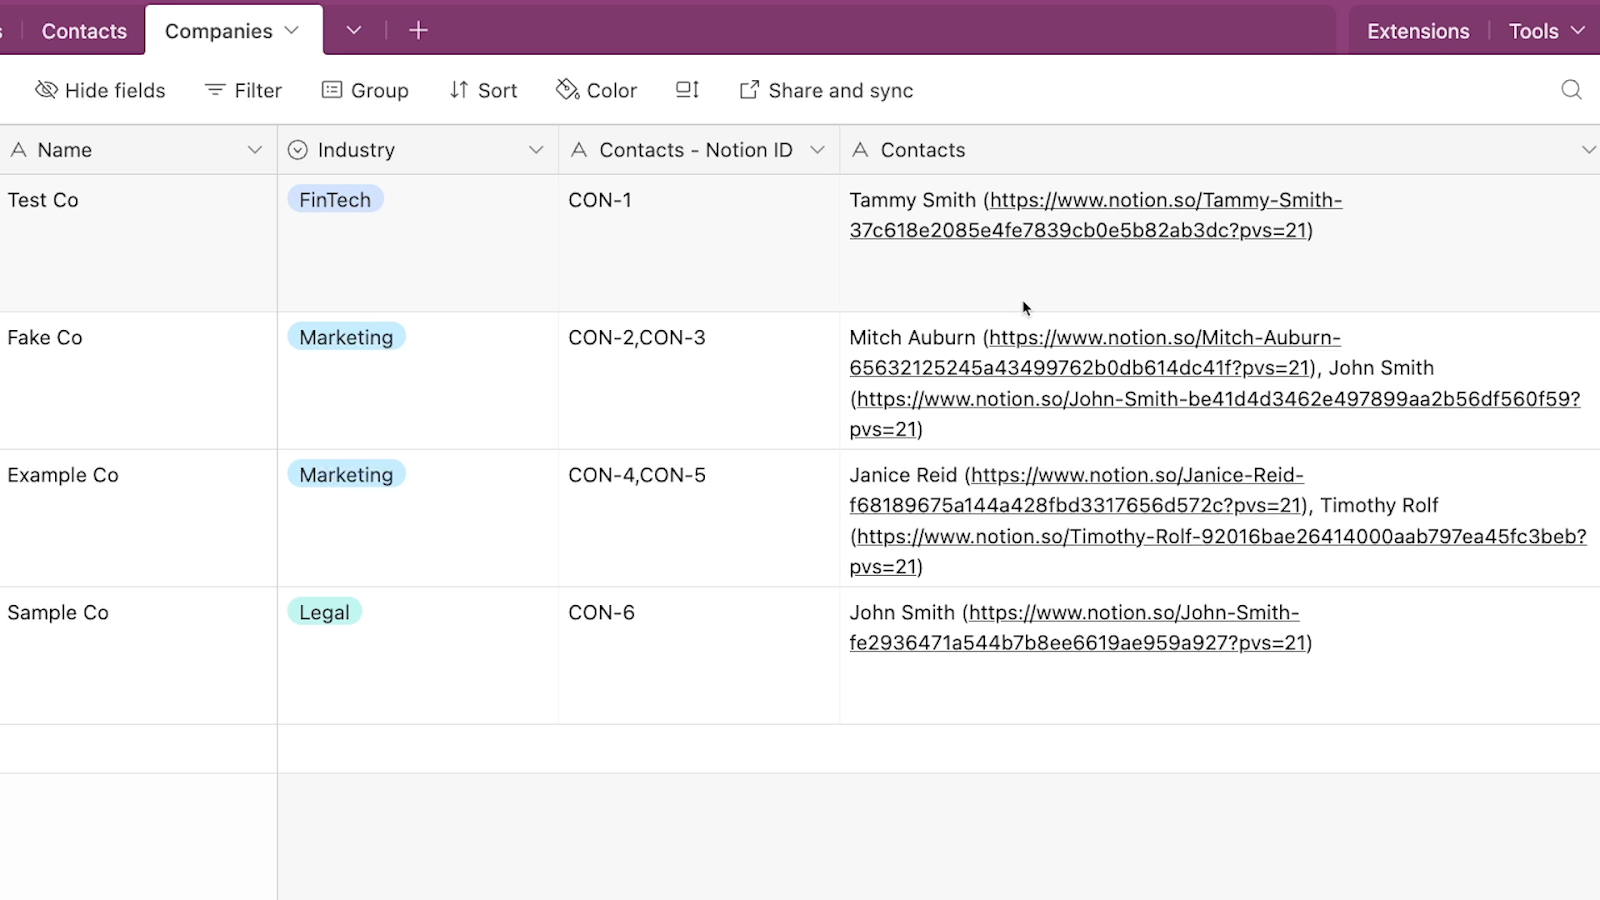
In our example, we’ll use a code step to extract names from an Airtable text field. Each record in the Airtable base has one or more names in this field, along with a long URL. We’ll ask the AI for a code step that removes the URL, and reformats the names from “First Last” to “Last, First”.
The Zap runs whenever a new record is added to this Airtable base. To add an AI-generated code, we’ll need to add a “Code by Zapier” step to our Zap.

Then, we’ll need to choose whether we want to have the code written in JavaScript or Python. If you want to be able to edit the AI’s output, you should choose the language you’re more familiar with.
However, Zapier’s AI is capable of generating fully functional code without any user edits, so you can still try it out even if you don’t know how to code with either language.
We’ll choose Python.
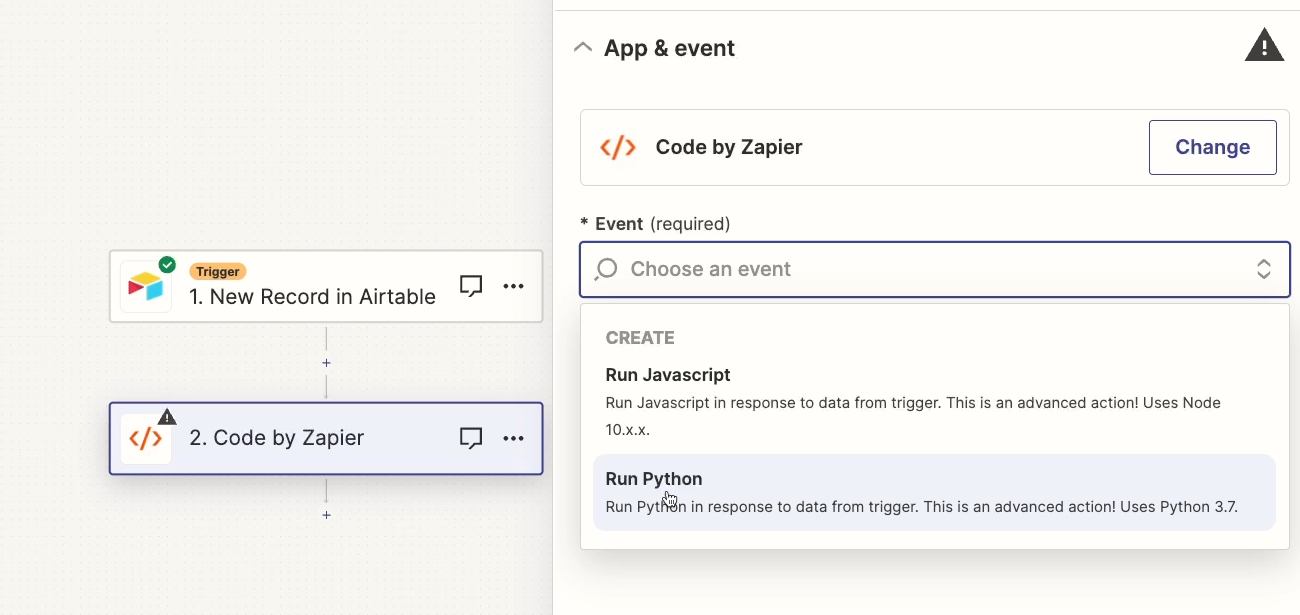
You’ll then see a configuration menu where you can set up the code step manually. You can leave all of those fields blank, and just click on “Generate with AI”.
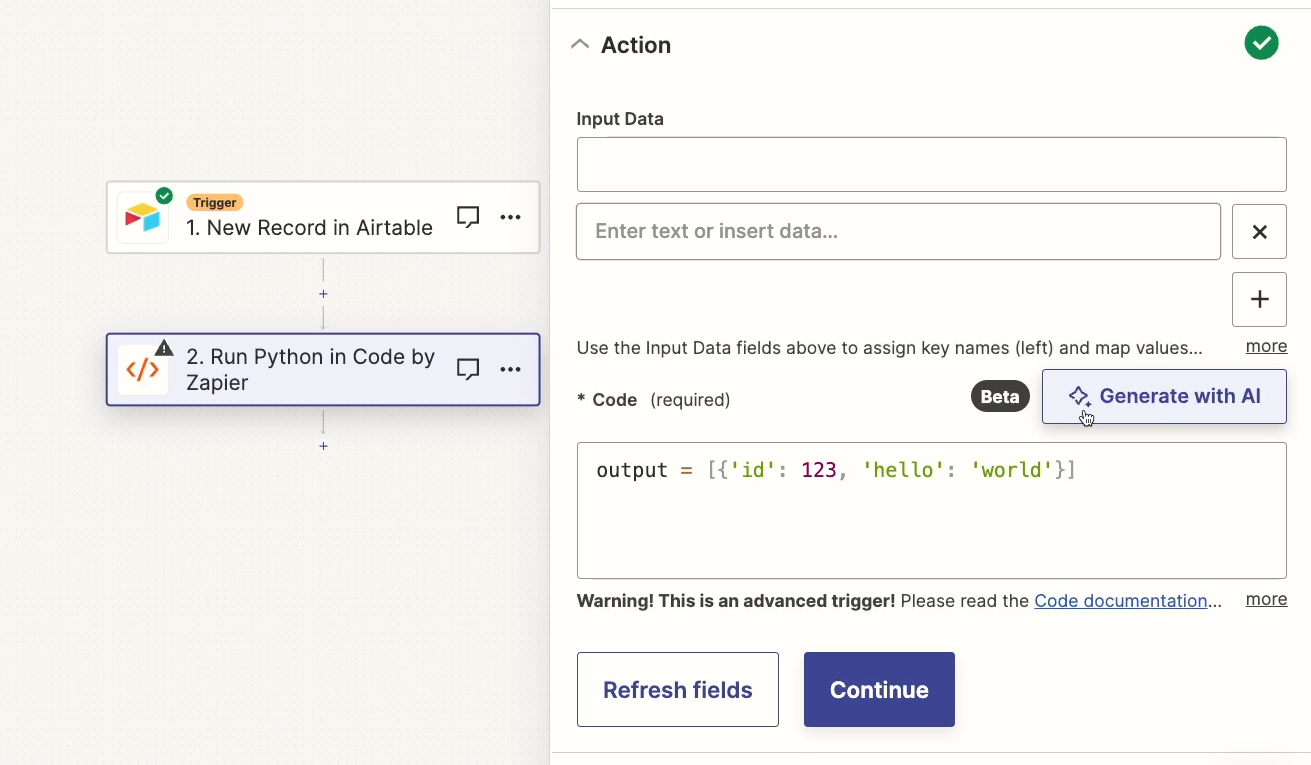
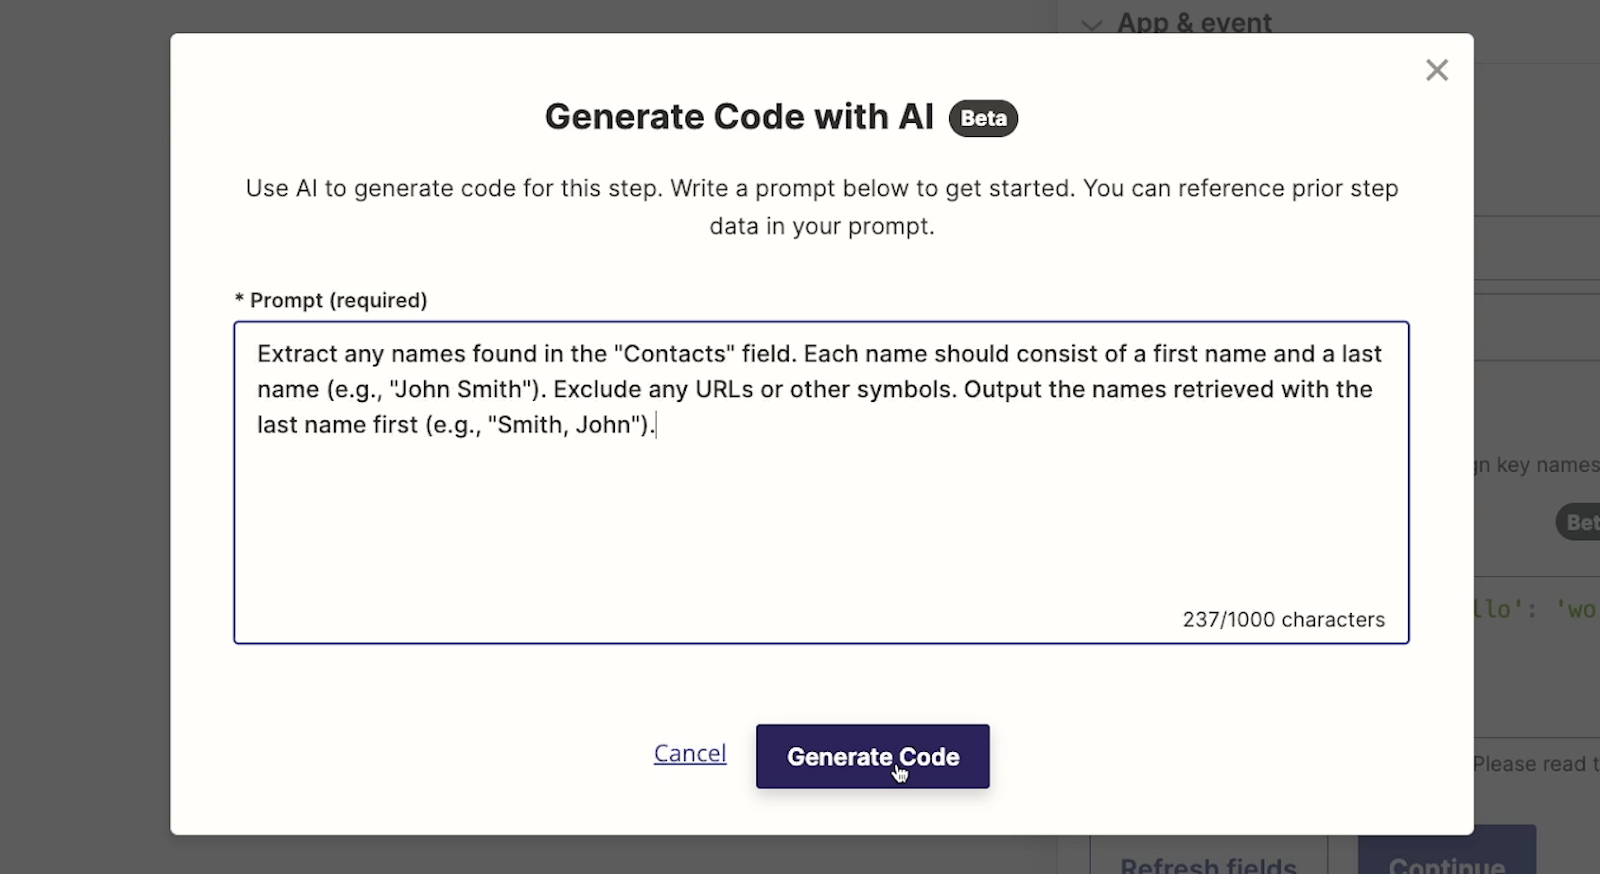
Next, you’ll see a window pop up where you can enter your prompt for the AI. Describe what you want the code to do, and be specific about the data it should retrieve and transform. However, you don’t need to use any technical language or syntax here.
We’ll enter the following prompt:
Extract any names found in the "Contacts" field. Each name should consist of a first name and a last name (e.g., "John Smith"). Exclude any URLs or other symbols. Output the names retrieved with the last name first (e.g., "Smith, John").
Once your prompt is ready, click “Generate code”.
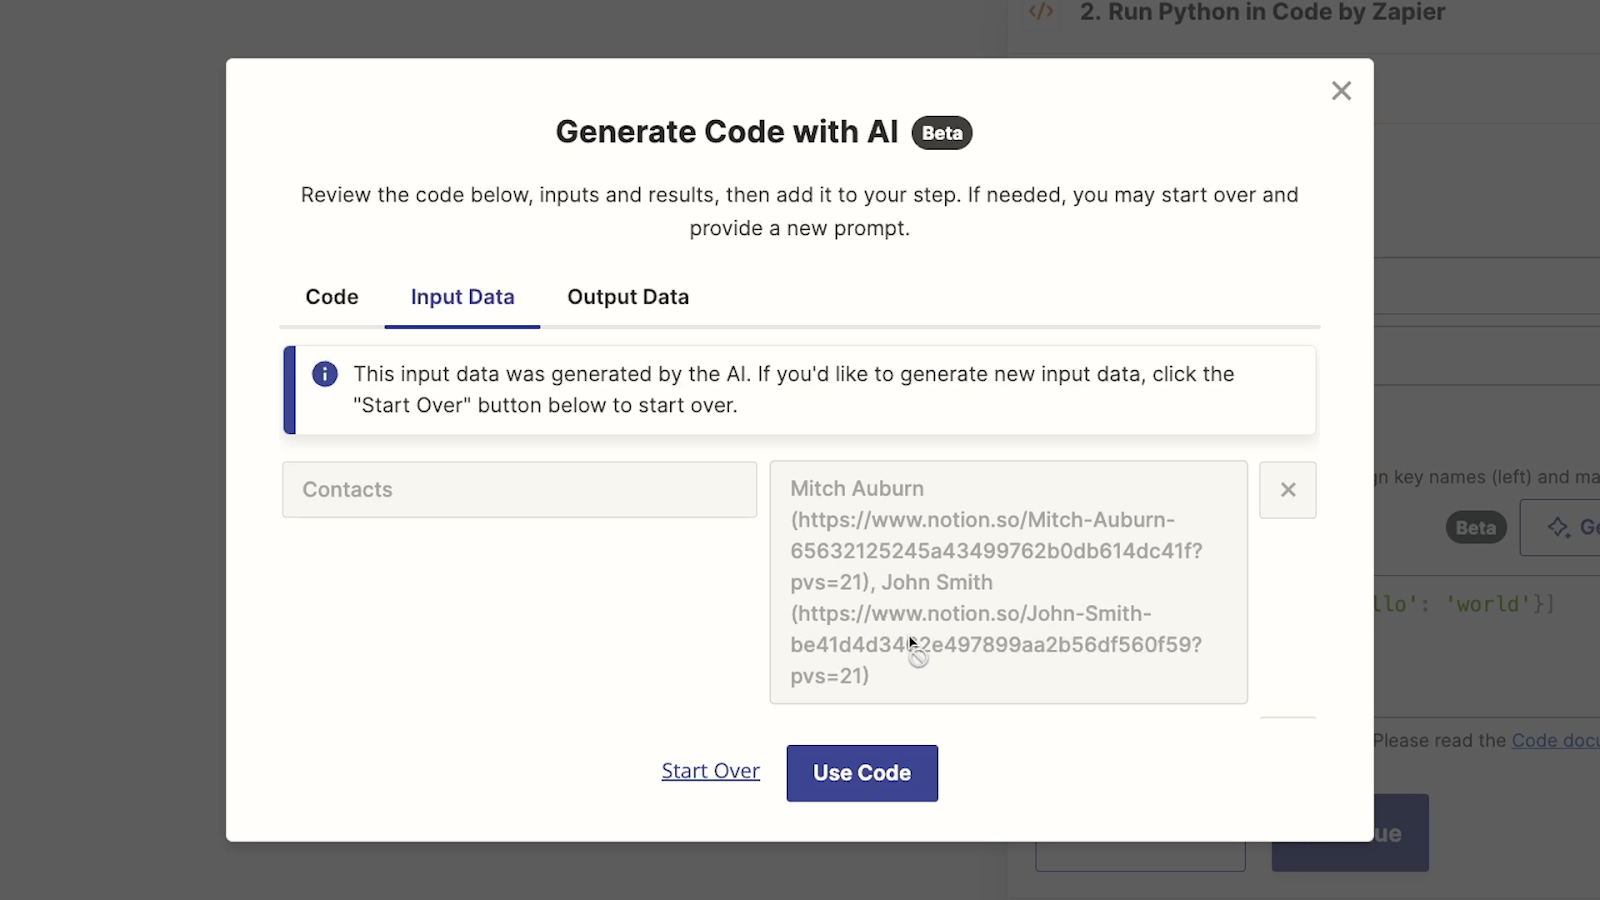
On the next screen, you can review the code that the AI wrote under the “Code” tab. If you’re a no-code builder, you might not be totally sure what you’re looking at. However, the code will likely be commented so you can at least understand what each part of it does, even if you’re not familiar with the exact syntax involved.

Under the “Input Data” tab, you can see which Zapier variables the code step pulled in. In our example, it just used the “Contacts” variable, since that’s the only data we specifically referenced in our prompt.
Under “Output data” you’ll be able to see what the code produces as an output, but you’ll need to click on “Run code” first.
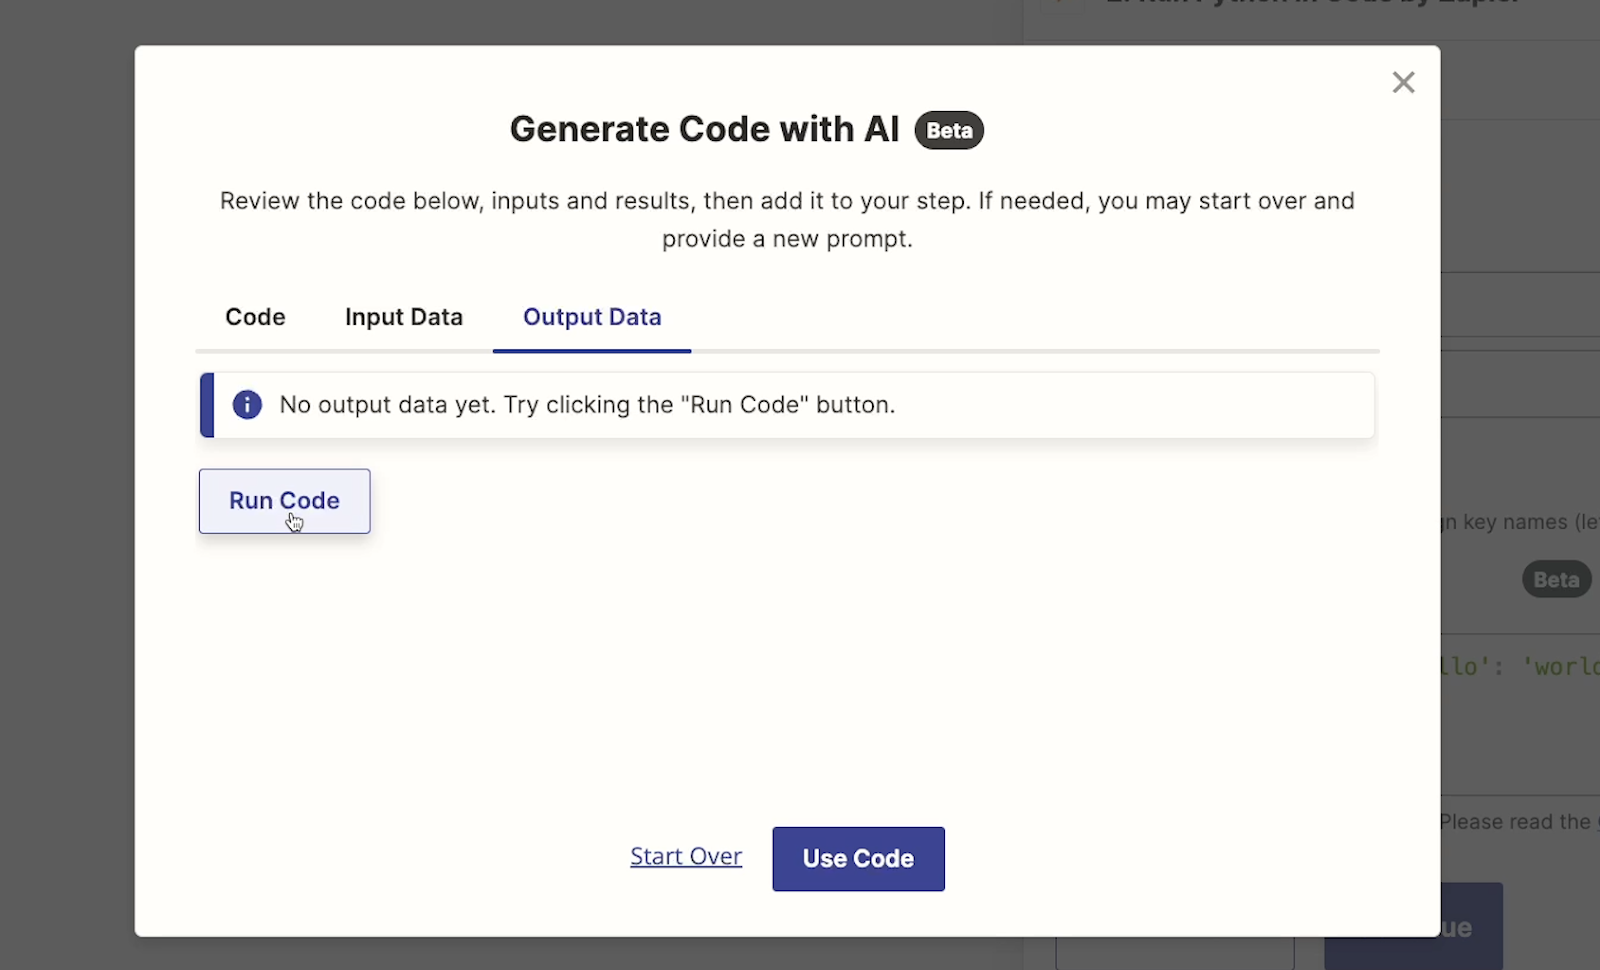
When we run our code, the output is exactly what we wanted. Two names are extracted from the field and rearranged into a “Last, First” format.
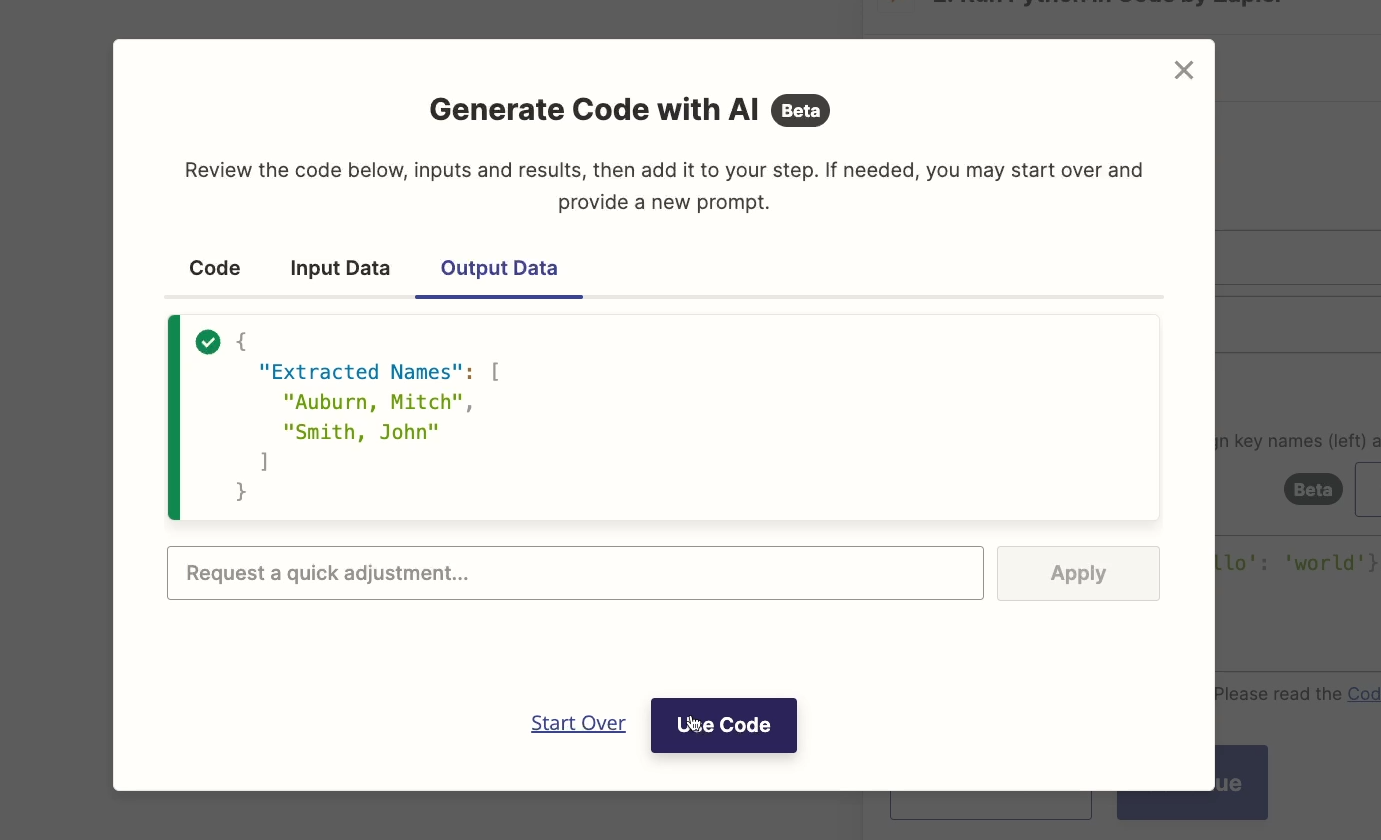
If you’re happy with the AI-generated code, click on “Use Code” to add it to your Zap.
Now, you can treat the code step like any other action in Zapier.
Unlock the power of code in your Zaps with the help of AI
By just writing a simple prompt in plain English, we were able to add some code to our Zap, eliminating the need for several formatter steps.
You could also use a code step to handle complicated if/then statements, branching paths, and more.
Even if you have absolutely no coding experience at all, you can now get all the benefits of incorporating a little bit of code in your Zaps by simply writing a quick AI prompt in simple language.
Build a full Zap with AI
Finally, let’s take a look at building an entire Zap with a single AI prompt.
But, before you get too excited, we need to warn you: this feature is not quite as impressive as it sounds.
At least, not yet.
For now, it’s very similar to the Zapier plugin in ChatGPT. We covered this plugin in a separate blog which you can read here.
Like the ChatGPT plugin, building a Zap with AI really only builds the beginnings of a Zap. It will create steps, choose apps, and select actions for you, but each step will likely not be configured very well - if it’s configured at all.
However, if you’re building a long Zap with several steps, getting everything started with an AI prompt could still be a useful time saver, so let’s see how it works.
How to generate a Zap with AI
1. Create a new Zap
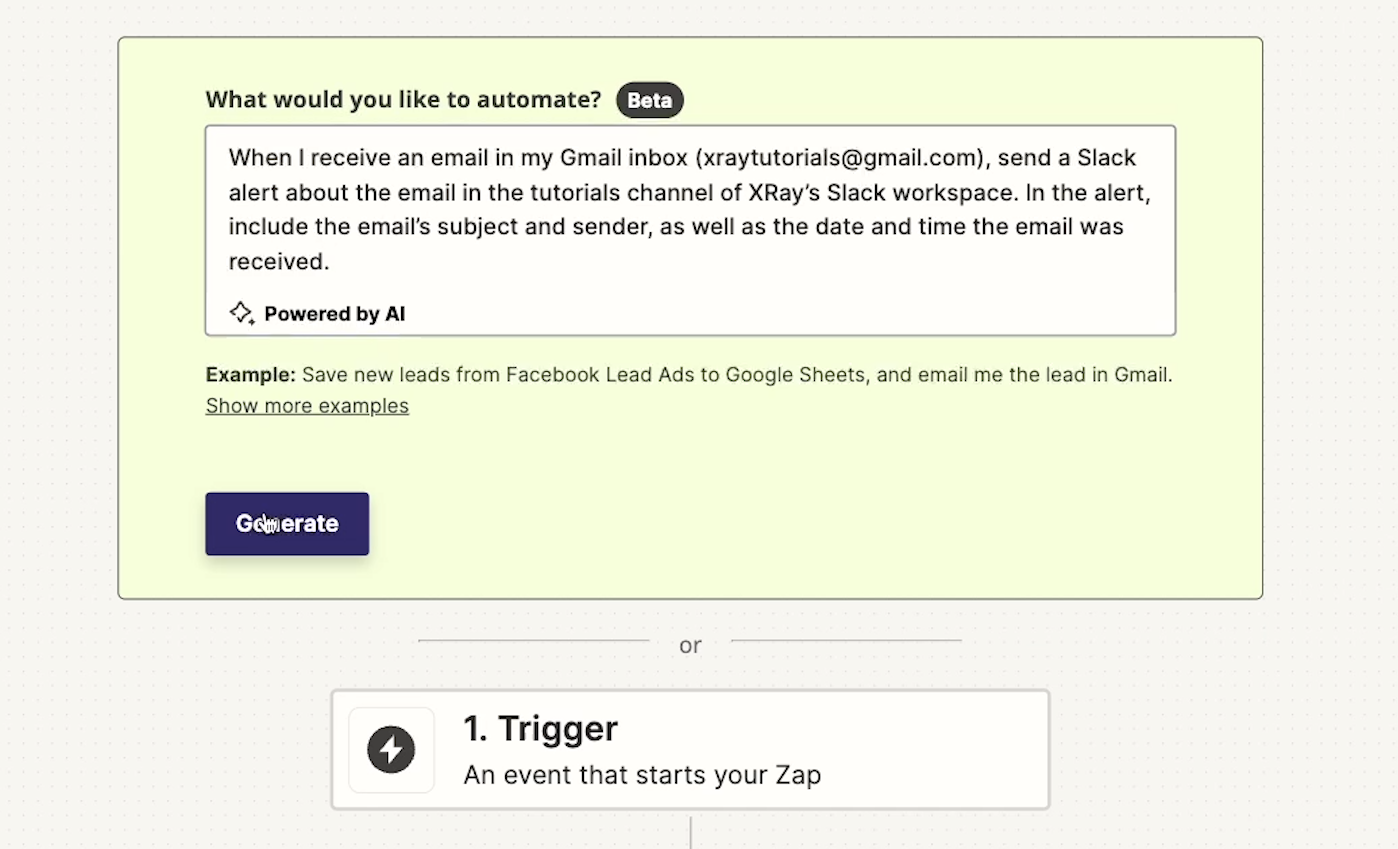
2. Enter your prompt in the window at the top of the screen. Focus on the apps and actions you want; many configuration details will likely be ignored anyway.
3. Click on “Generate”.
4. Review the AI-generated results and try them out
For example, we’ll try to create a Gmail and Slack automation using the following AI prompt:
When I receive an email in my Gmail inbox (xraytutorials@gmail.com), send a Slack alert about the email in the tutorials channel of XRay’s Slack workspace. In the alert, include the email’s subject and sender, as well as the date and time the email was sent.
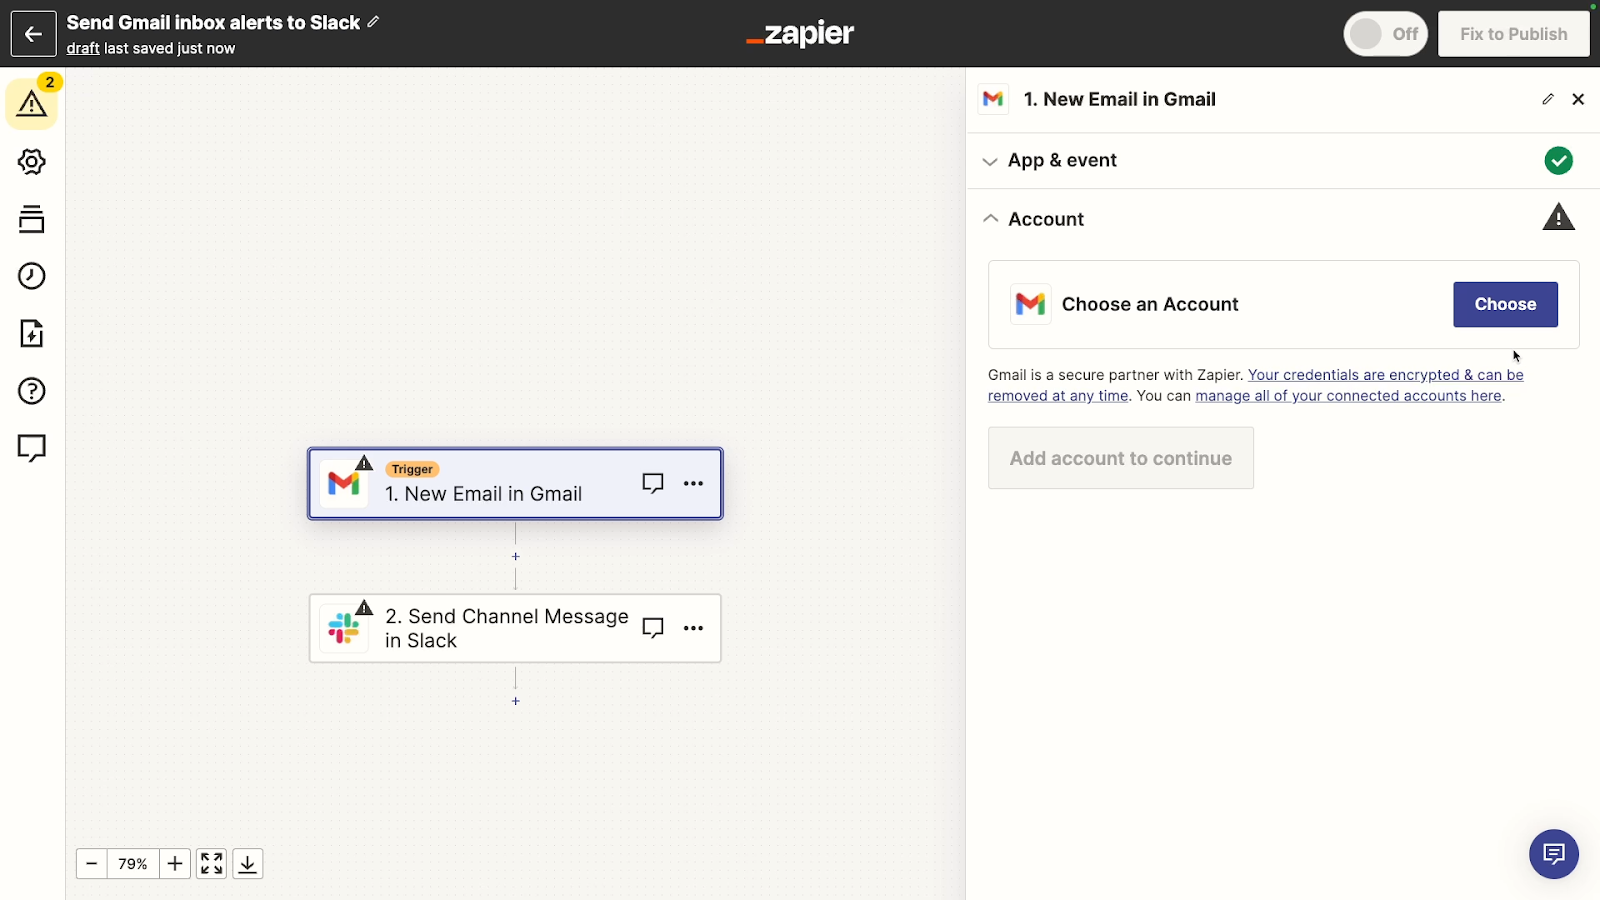
When we look at the AI output, we can see that it correctly created a Zap with a Gmail trigger and a Slack action. Click on “Try it” to apply the steps to your Zap and view more details of its configuration.

After applying the steps to our Zap, we can see that while the AI was able to correctly pick the right apps and actions, it wasn’t able to sign in to any of our accounts.
In Slack, the AI did not choose the channel that we specified in the message, either.
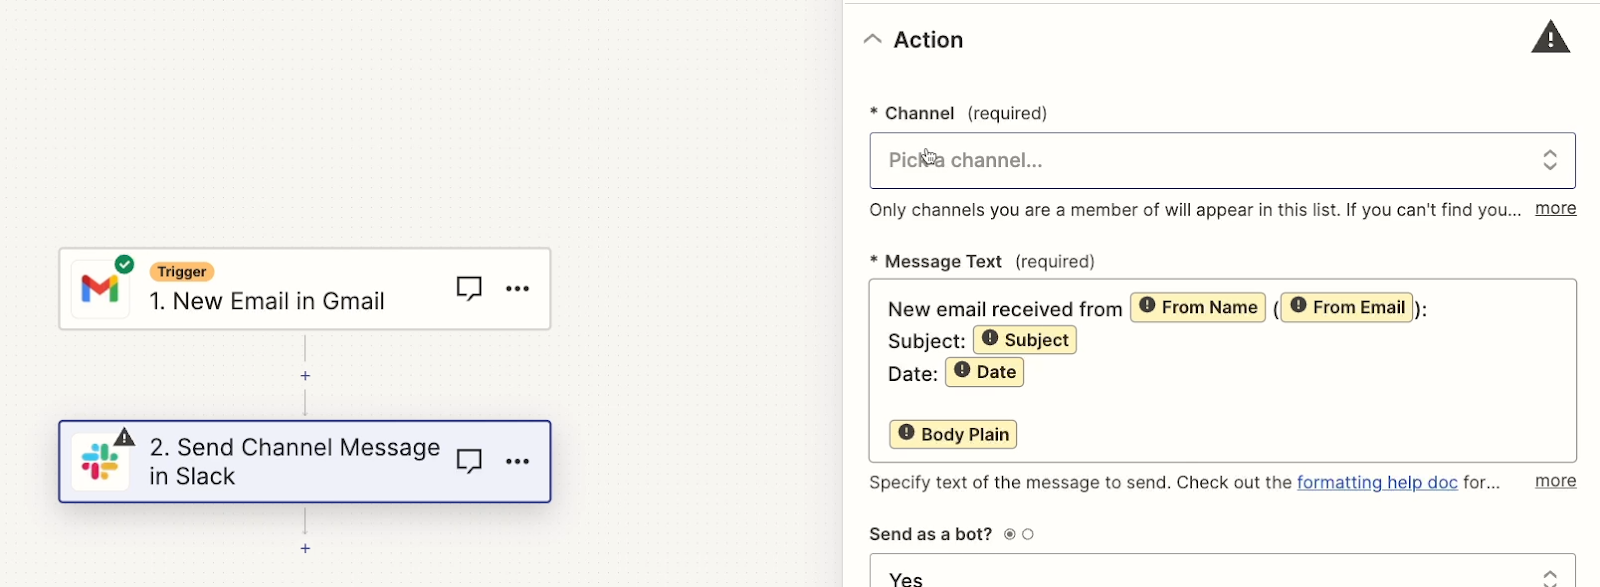
However, the AI did make a somewhat successful attempt at filling in the message per our instructions.
Unfortunately, even though the AI chose all of the correct names for the variables, none of them are actually mapped in Zapier. This is why they’re all yellow and have an exclamation mark. Click on each of these unmapped variables and selecting the matching variable from the list will replace them automatically.
Otherwise, all other configuration options are left to their defaults.
Using AI-generated Zaps to get a head start
Ultimately, Zapier’s UI has started us off with a workable beginning of a Zap.
In general, the best way to use AI-generated Zaps is to just briefly ask for the apps and actions you want to use, since that’s all the AI will likely be able to set up, at the time of this recording.
You can also provide a bit more detail about what you want to include in text-based fields, since the AI may be able to fill those out pretty well.
However, you’re limited to 400 characters in your prompt, so you’ll need to keep it short, anyway. Hopefully, Zapier will keep improving the AI and make sure that it can properly map data in its answer.
All things considered, the other AI features we covered in this post are definitely going to be more useful for most builders right now.
Build faster and more advanced Zaps with new AI tools
AI continues to open up new doors for no-code and low-code builders. Like many apps, Zapier is eagerly embracing the opportunities offered by the AI revolution, and as a result, it’s getting even faster and easier to build automations on their platform.
We encourage you to explore these new AI features for yourself, and try using prompts to build the Zaps, formatter steps, and code blocks that you need.
If you’d like to learn more about no-code automation and AI tools, be sure to check out our blog or our YouTube channel. You can also follow XRay on Twitter, Facebook, or LinkedIn.


