AI tools like ChatGPT are an extraordinary resource for streamlining your every day work.
But if you’re still entering all of your prompts directly into ChatGPT, you’re missing out on some huge time savings.
AI becomes even faster and more convenient when you start automating all of your commonly used prompts.
In this post, we’re going to show you how to automate your OpenAI prompts using Make (formerly known as Integromat).
We’ll demonstrate how to start automating your OpenAI prompts in Make using a simple example that summarizes emails in your Gmail inbox. Once you learn how the OpenAI module works in Make, you’ll be able to connect to any other app that you’d like.
Let’s get started!
First, we’ll give you a brief overview of how to use OpenAI prompts in Make. Then, we’ll walk you through the whole process in detail with an example scenario.
1. Create a new scenario and add a trigger module.
2. If you need additional data for your prompt, add search modules as needed.
3. Add an OpenAI module. Choose “Create a completion” as the event.
4. Configure your prompt. Include dynamic data retrieved from earlier steps as desired.
A. Choose a language model.
B. Add a system message if desired to give the AI general directives.
C. Add a user message containing your specific prompt.
D. Adjust the model’s creativity with temperature and Top P.
5. Add additional modules to send the AI’s output to other apps.
To follow along with this tutorial, you’ll need accounts in Make and OpenAI.
Note that sending requests to the OpenAI API will incur a small charge.
You can see all the details on the API pricing page, but in general, you’re looking at charges of a few cents per request – or less.
Additionally, every new OpenAI account includes a $5.00 credit for API usage. If you’ve already used up your complementary $5.00, log into the OpenAI API portal, go to “billing overview”, and add a payment method.
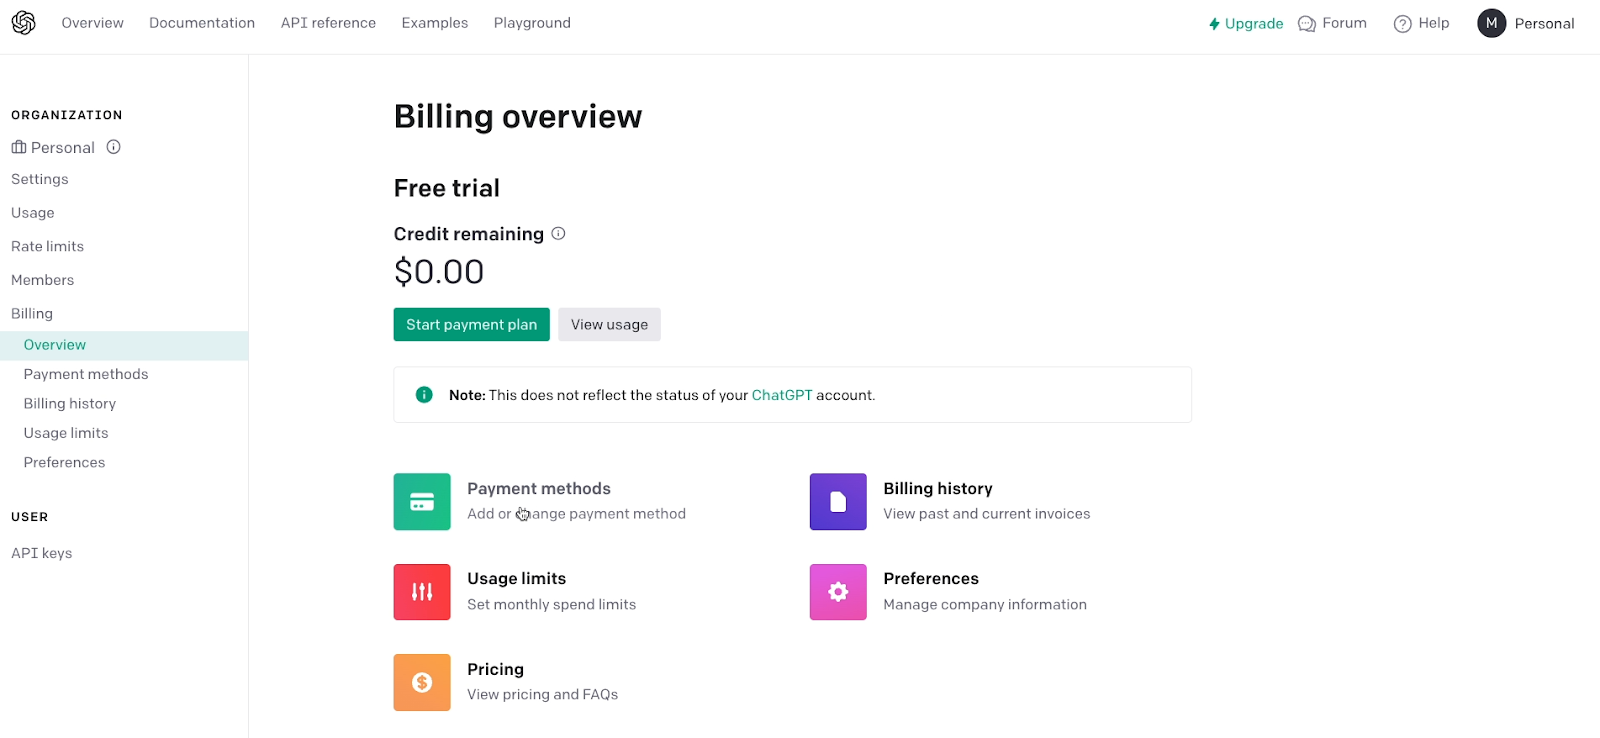
There’s no set monthly fee to use the API; instead you’ll just be charged for your usage each month.
You’ll also need a free Gmail account if you don’t already have one.
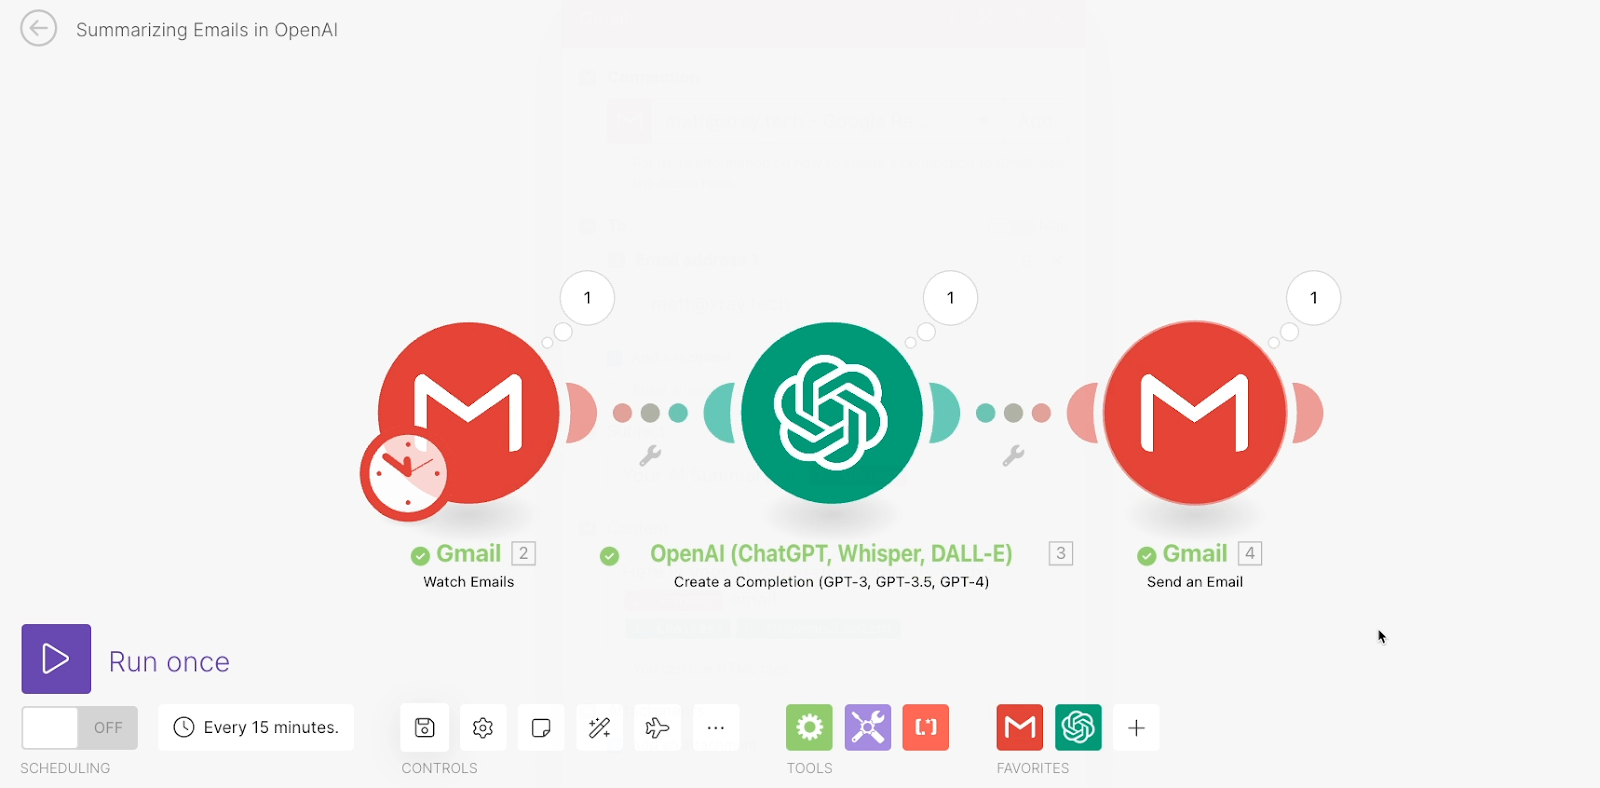
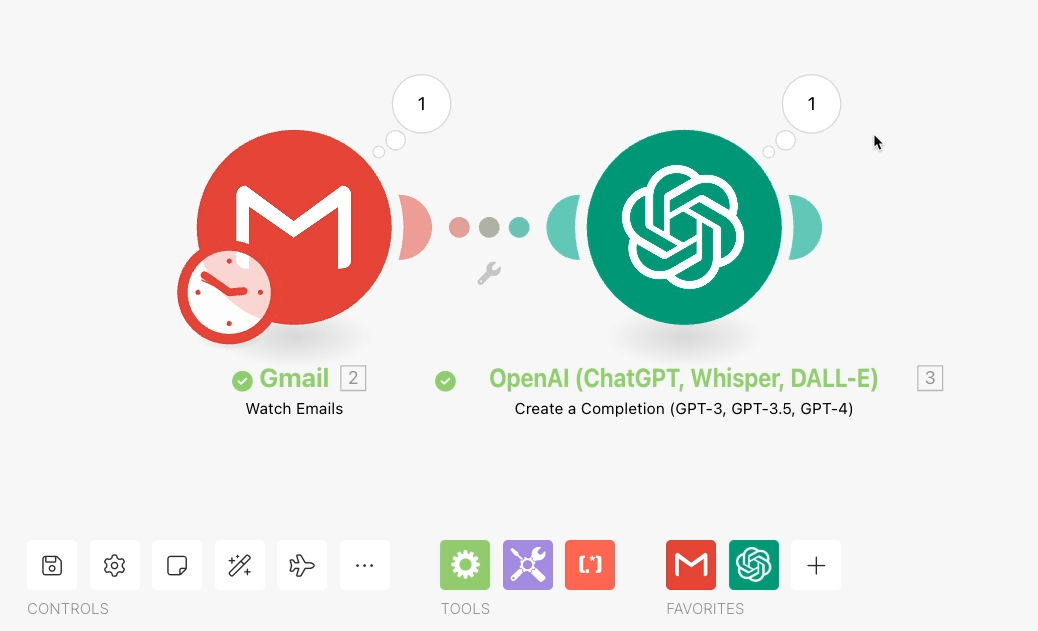
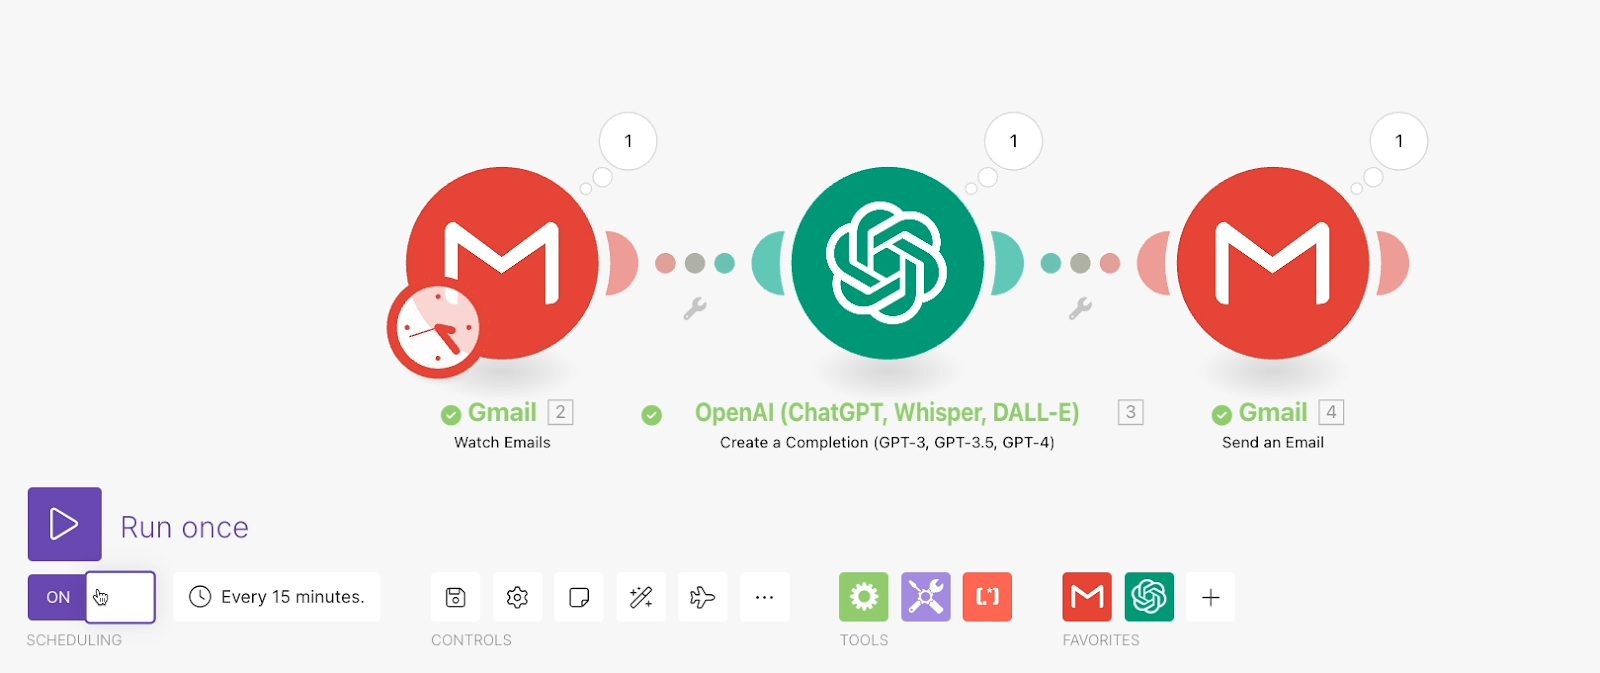
Here’s the full automation that we’ll be building today:
Whenever we add the “Summarize” label to an email in Gmail, the automation sends the contents of the email to OpenAI and requests a summary. Just for fun, we’ll ask for a sarcastic and snarky summary. Once it’s generated, that summary is emailed back to us.
This scenario we’re working with in this video is just an example to help you get started. As we go, we’ll explain the general purpose of each step, so you can switch out specific apps for different software, or add additional actions to your scenario.

However, if this is your first time working with OpenAI and Make, you’ll probably want to follow along step by step to get familiar with all of the options.
To begin, you’ll need to open up Make and create a new scenario.
The first element of any automated scenario is the trigger. The trigger determines when your automation will run.
When you make a new trigger for your AI automation, you need to consider when you want to run your prompt, and what app you want to get data from when you build your prompt.
These choices will determine which app you use for your trigger, and which specific event you use.
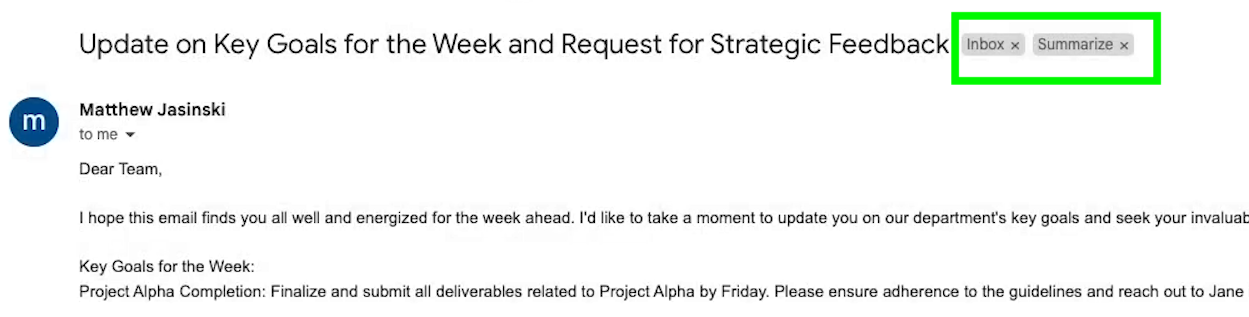
For our example, we want to run our prompt whenever we get a new email in Gmail with the “summarize” label. That means we’ll be using a “Watch emails” trigger in Gmail.
But first, we need to create the “Summarize” label in Gmail and apply it to a message so we have some test data to work with.
Go to Gmail and open up an email to summarize. Pick an email to use as a test.
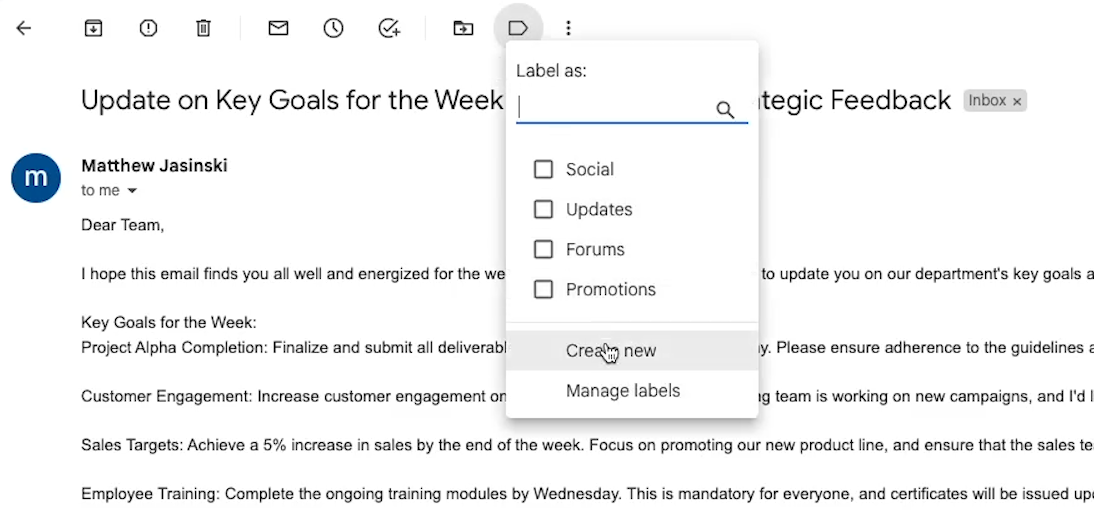
Click on the tag icon at the top of the email, create a new “Summarize” label, and add it to the message.

Now your test data is all set. Let’s go back to the scenario builder in Make.
Select the app you want to use for your trigger. In our case, we’ll use Gmail, and we’ll choose “Watch Emails” as the event.

Choose your Gmail account, or add a new connection if you haven’t connected Gmail to Make already. Whenever you automate an app using Make, you’ll need to create a connection to authorize Make on your behalf.

With Gmail authorized, we can now start configuring the trigger.
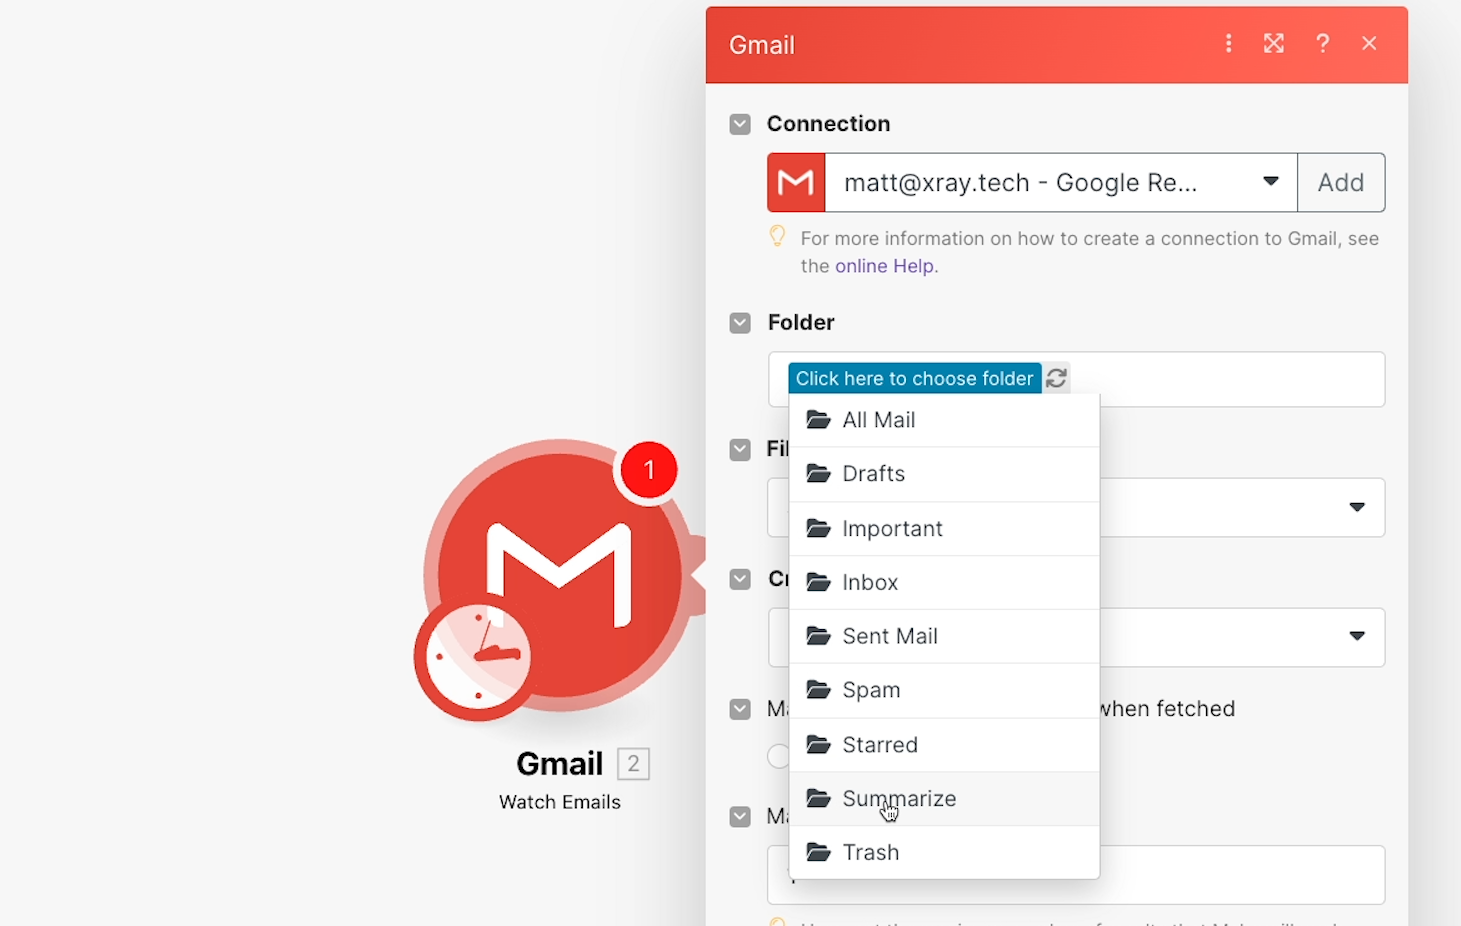
We don’t want the automation to run for every new email - just for emails that have our “Summarize” label.
Gmail creates folders for your custom labels, so we can choose the corresponding folder by clicking on this “Click here to choose folder” button.
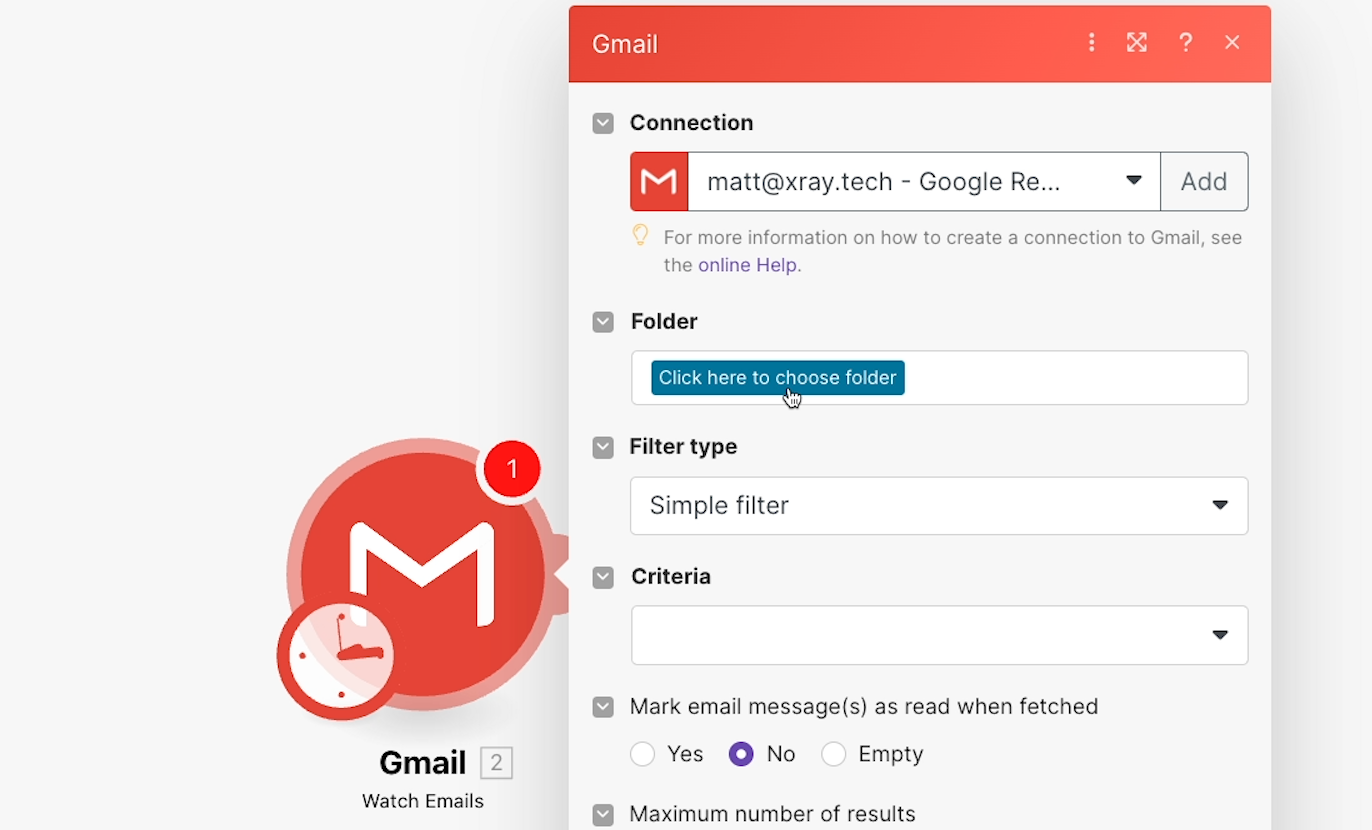
Select the “Summarize” folder from the list that appears. This will ensure that the automation only processes emails that are in the summarize folder.
As you’re configuring your trigger, make sure that your settings are as specific as possible to avoid having your automation run when you don’t want it to.
Next, Make provides an option to set the “Filter type”.
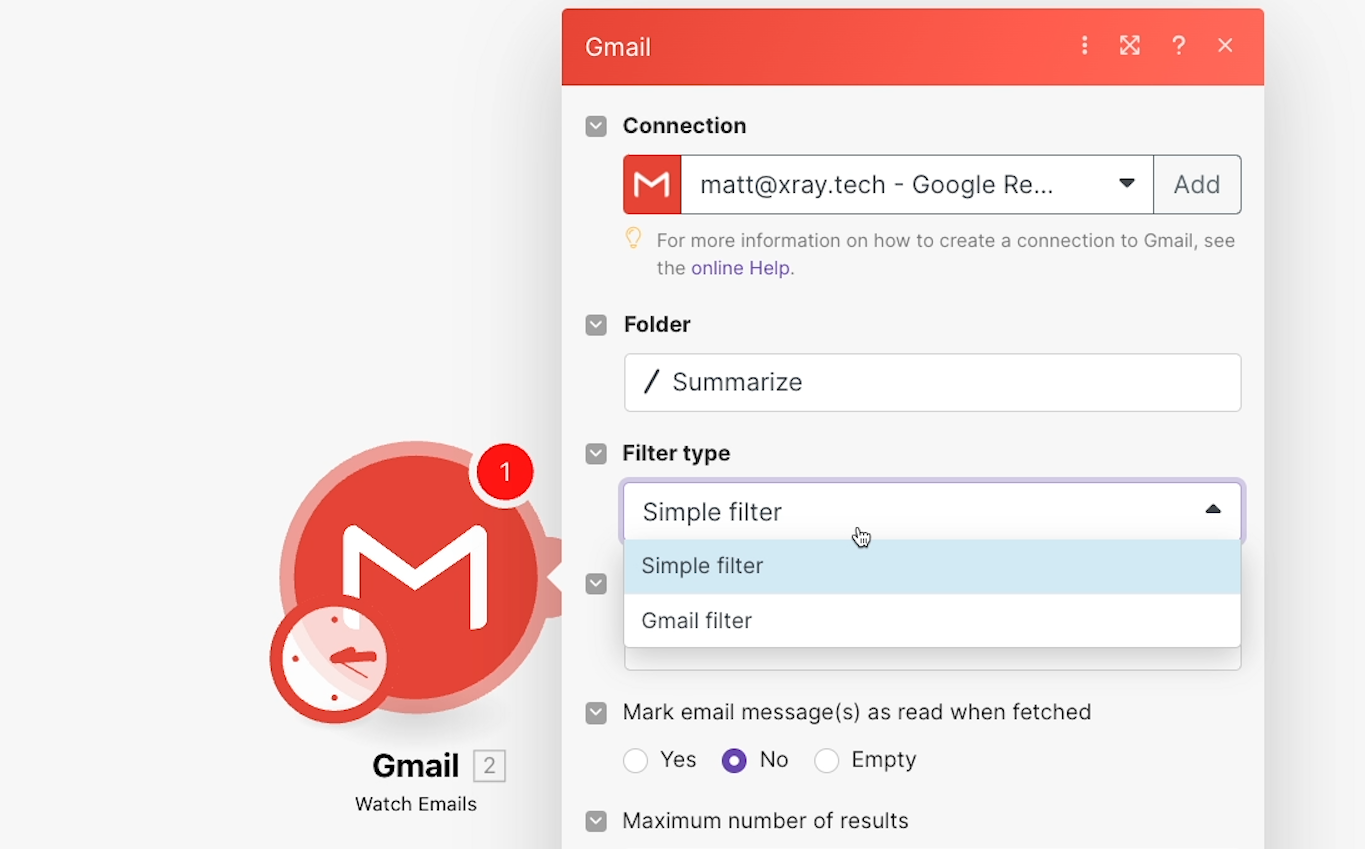
You could change this to “Gmail filter” if you wanted to enter a query and further limit the emails that Make watches for. However, for our example, we’ll leave it as a “Simple filter”. Limiting the trigger to the “Summarize” folder is enough.
In the “Criteria” dropdown, you can choose whether the trigger will run for all emails, unread messages only, or read messages only. In our example, we’ll choose “All”
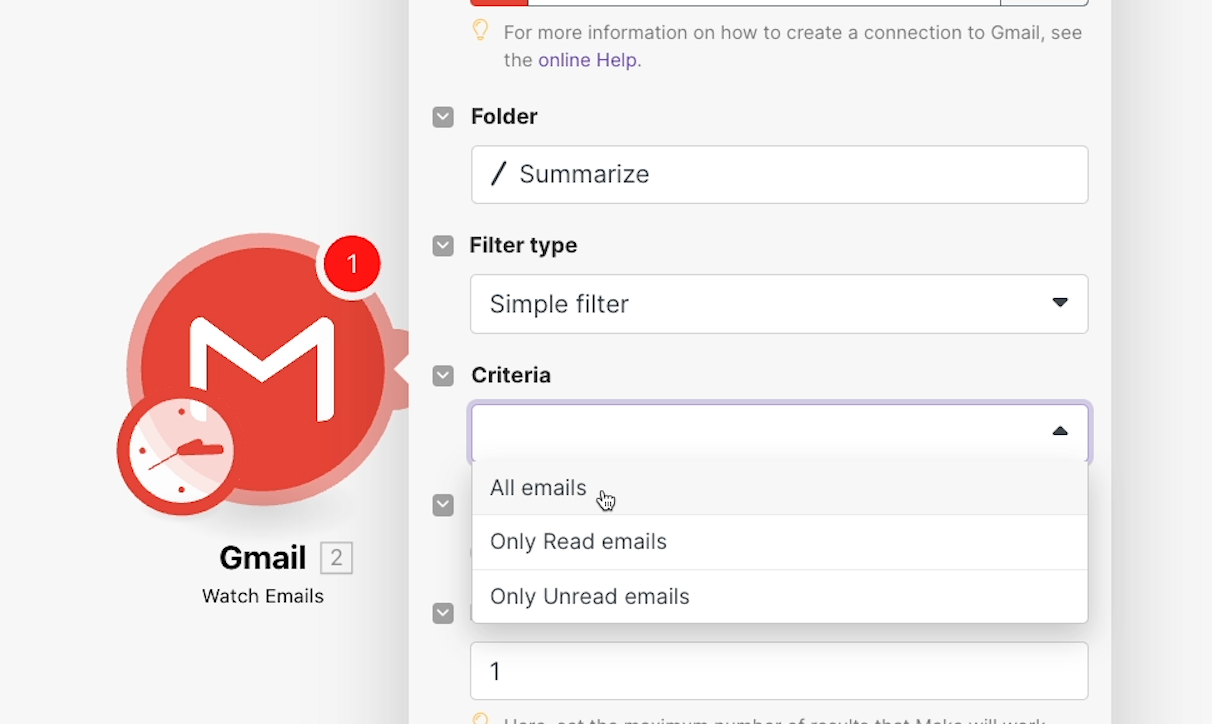
Finally, you can set a maximum number of results.
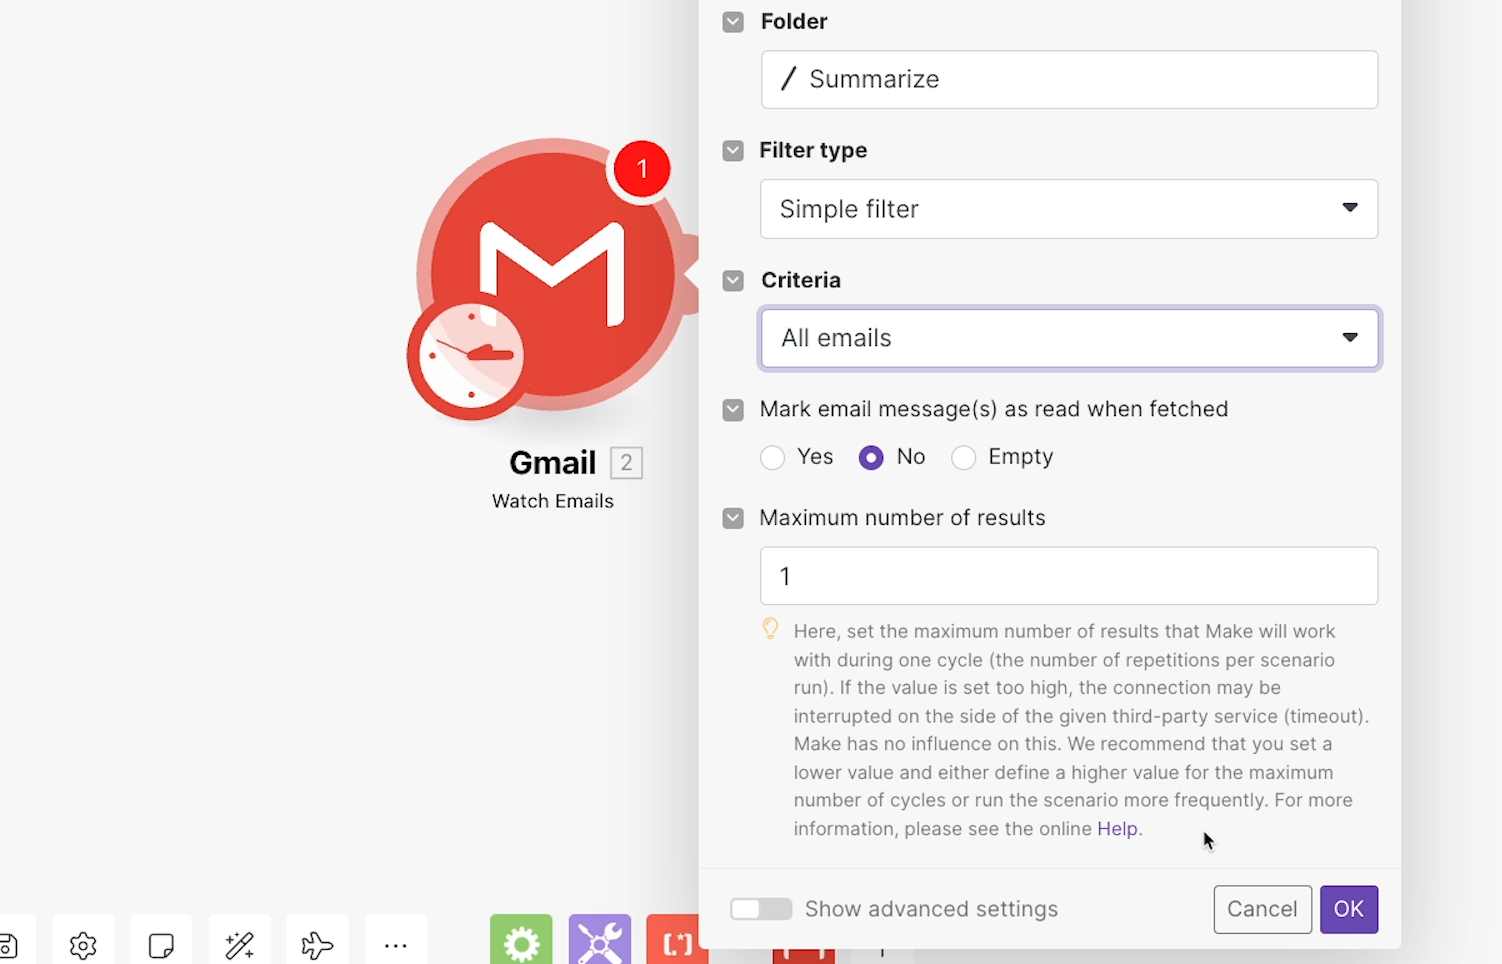
As Make notes in the warning message at the bottom of the configuration window, setting this number too high could cause apps to time out as they wait for Make to process several results.
For the sake of easy testing, we’d recommend using a limit of 1, so your scenario will only process one email at a time.
Once your trigger is fully configured, you can click on “OK” to close this window.
Now you’ll need to test the trigger. Testing the trigger will prompt the scenario to search for data that matches your configured settings. In this case, that means Make will search for an email in your Gmail inbox with the “Summarize” label. You can then use the data from that email to build the rest of your automation.
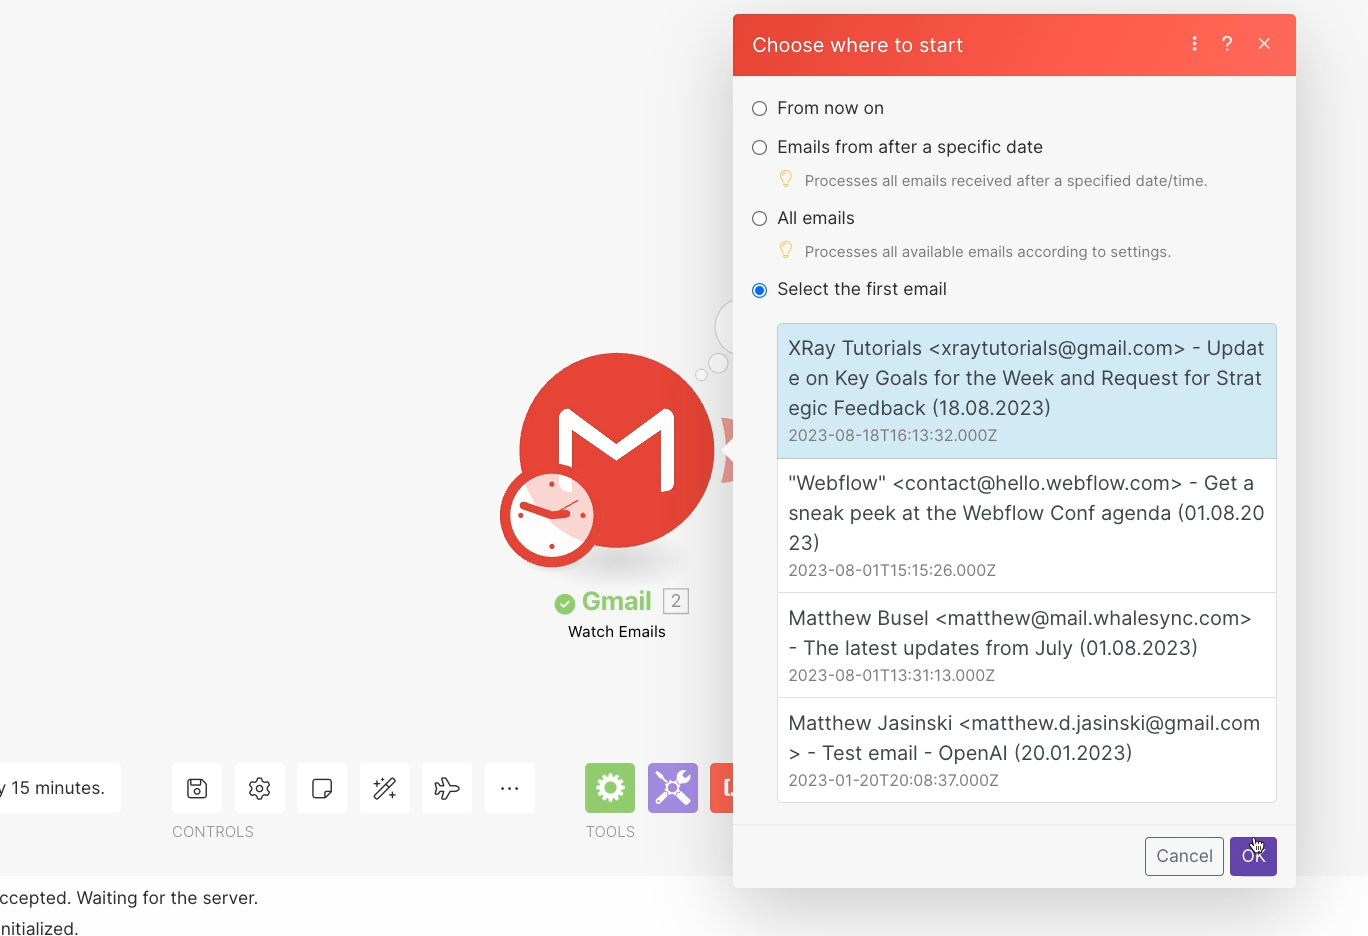
To start testing, right click on the module, and select “Choose where to start”. Note that you may also be automatically brought to the “Choose where to start” menu the first time you close the trigger window.

Click “Select the first email”. This means that you’ll choose the email you want to use manually, rather than letting Make select one by default.
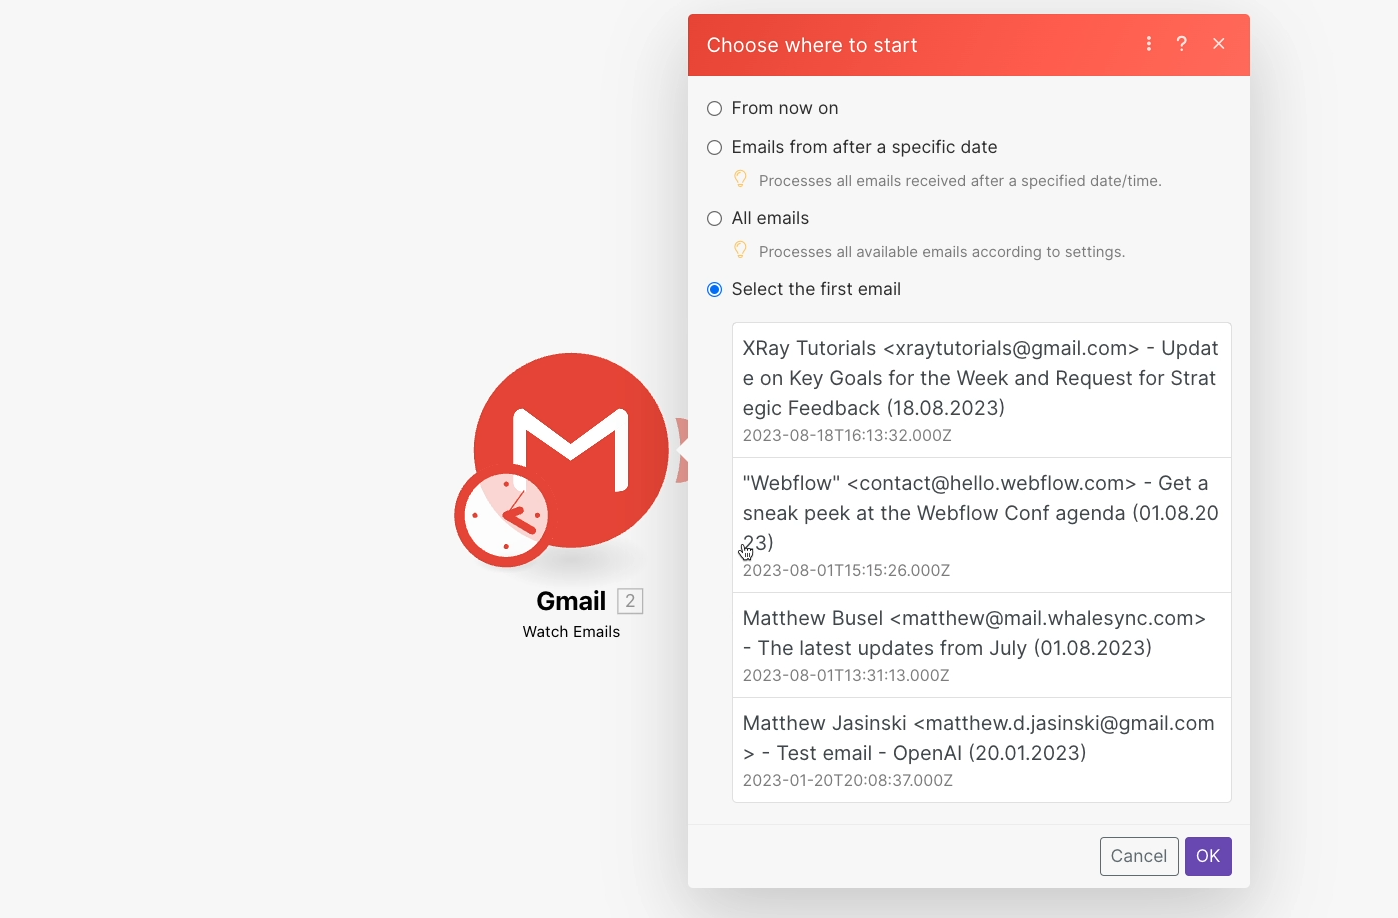
Then, choose an email from the list that appears. You should see every email from your inbox with the “Summarize” label, which may only be one email if you’ve just created the label.

Click OK to confirm your selection and close this window.
Then, click “run once” in the bottom left to run your trigger module.
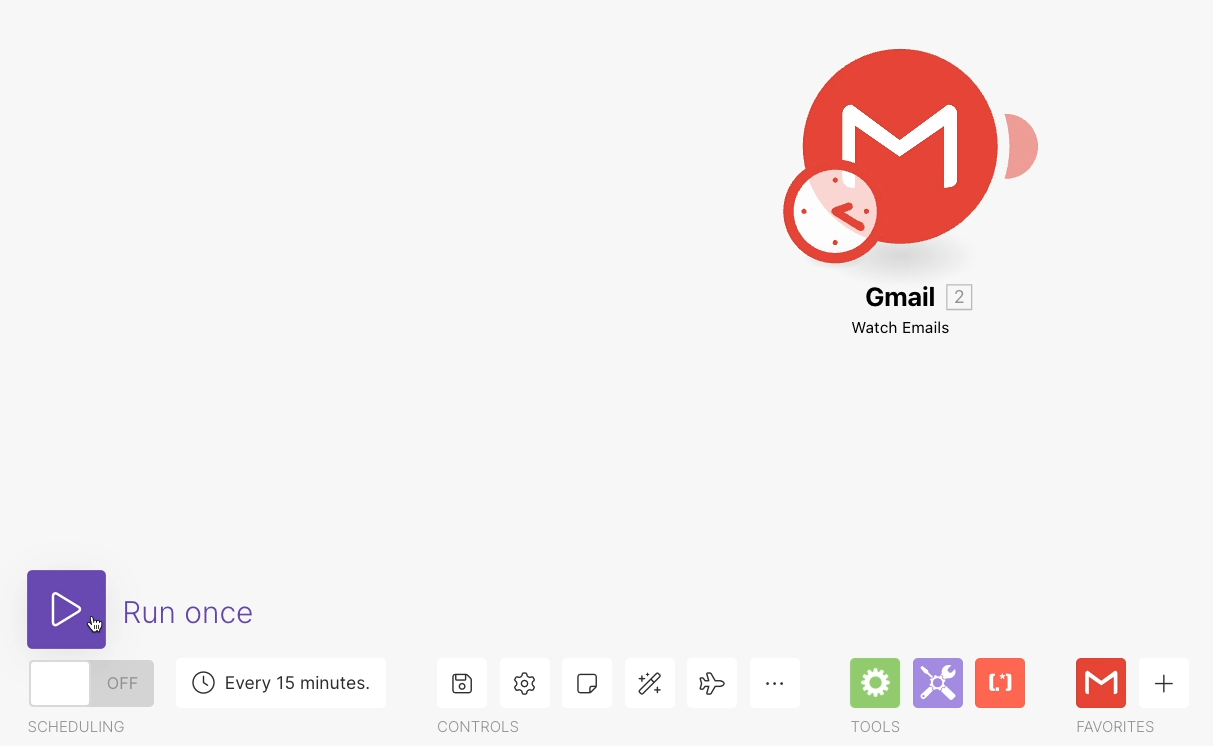
After the test runs, you should see a number over your trigger module indicating how many bundles of data it retrieved. A “bundle” refers to whatever object the module processed. In this case, each bundle is an email in Gmail, but with other triggers, these could be rows in Google Sheets, products in Shopify, messages in Slack, etc.
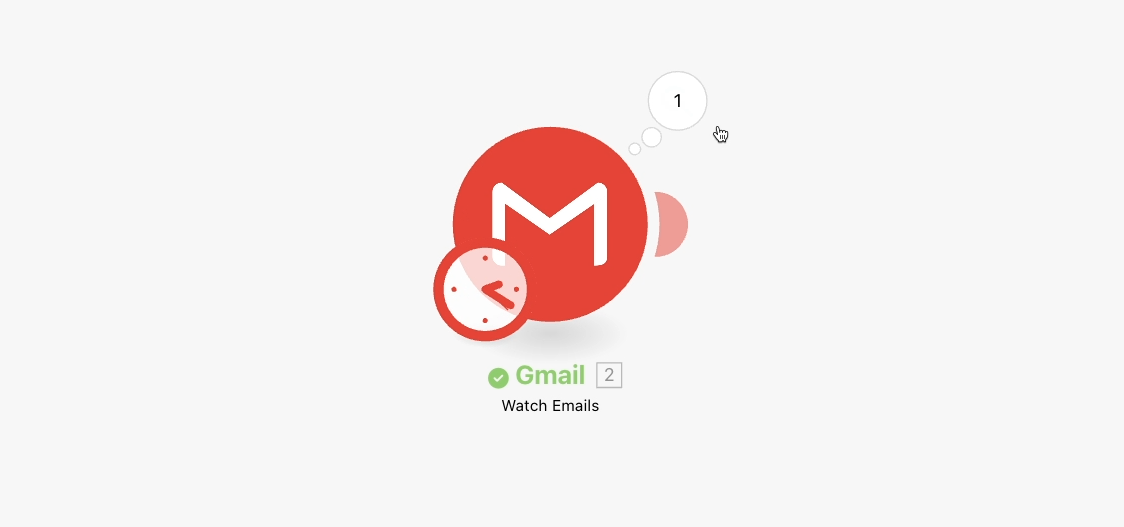
Click on the number to see more info about the data, and confirm that the trigger processed the right email.
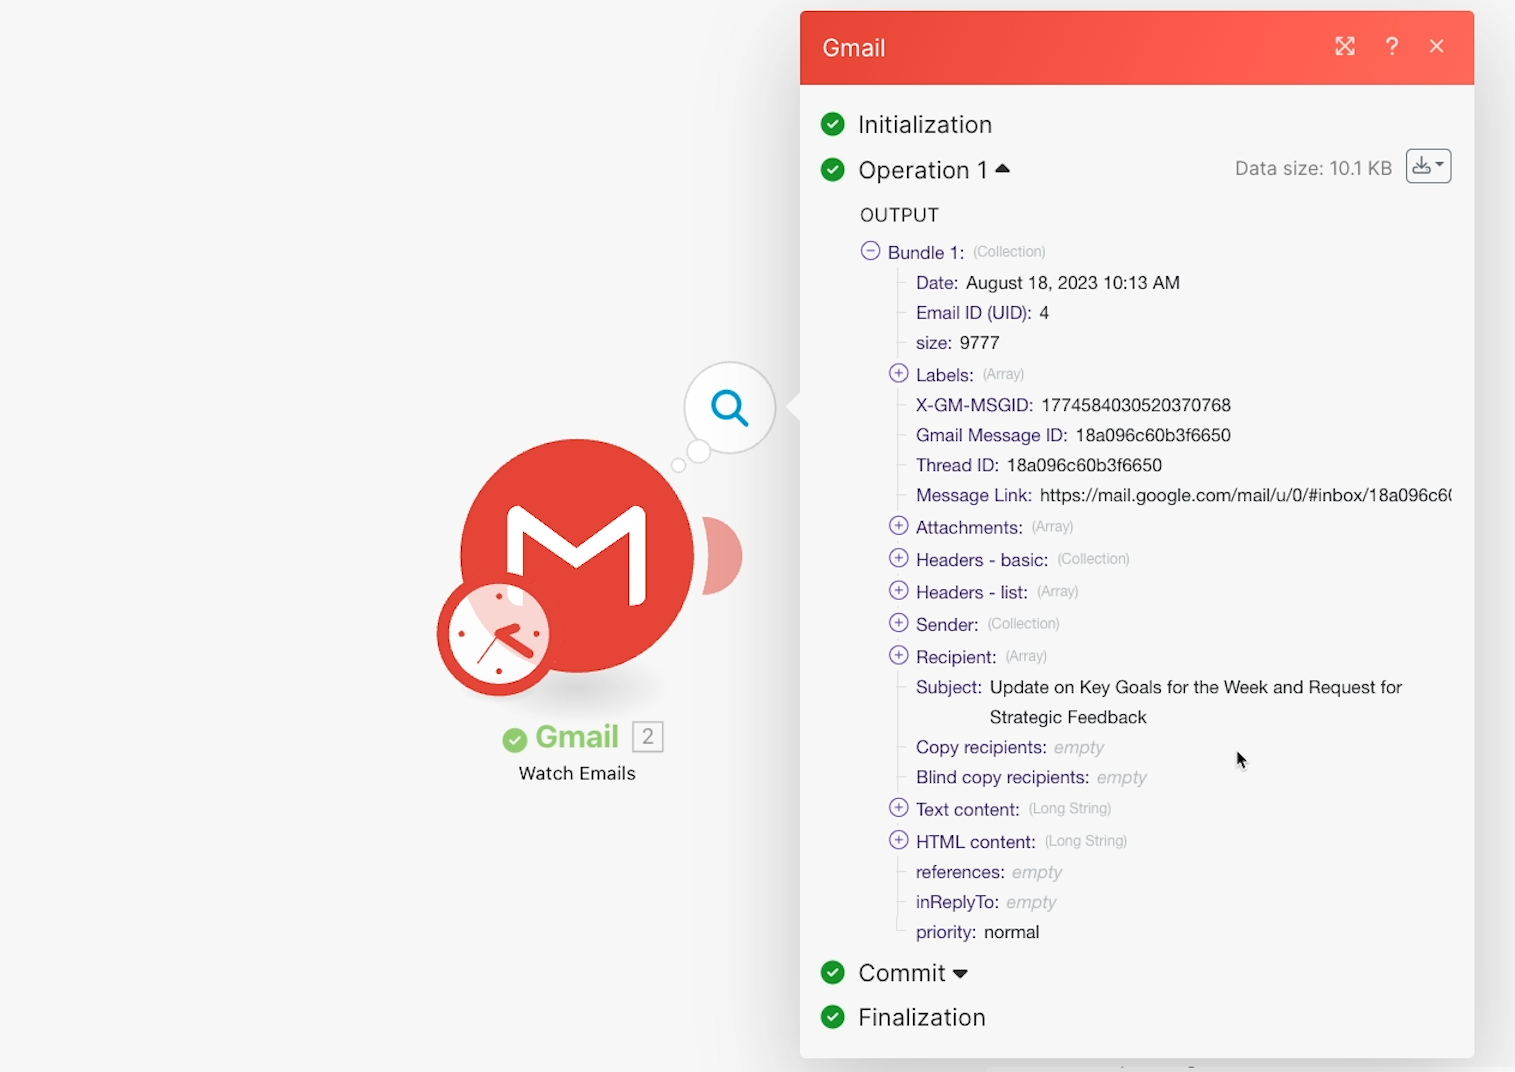
If everything looks good, you can start adding automated actions to our scenario. If you weren’t able to find the email you wanted, make sure you applied the correct label and chose that same label as the folder in your trigger.
With this Gmail trigger module in place, we have all the data we need for our example scenario.
To build our prompt, we just need the email, and some other directions that we’ll enter directly into the OpenAI module.
However, if you need any additional data to inform your own custom prompt, you can add steps to search for that data now.
For example, you might want to look up the email’s sender in your CRM or in an Airtable database.
Just add a new module, choose the app you want to search in, and select an appropriate search action to find the data you want to include in your prompt.

However, since we have all the data we need for our example, we’ll continue on and add the OpenAI prompt.
Now, we’ll build the part of our scenario that actually sends a prompt to OpenAI.
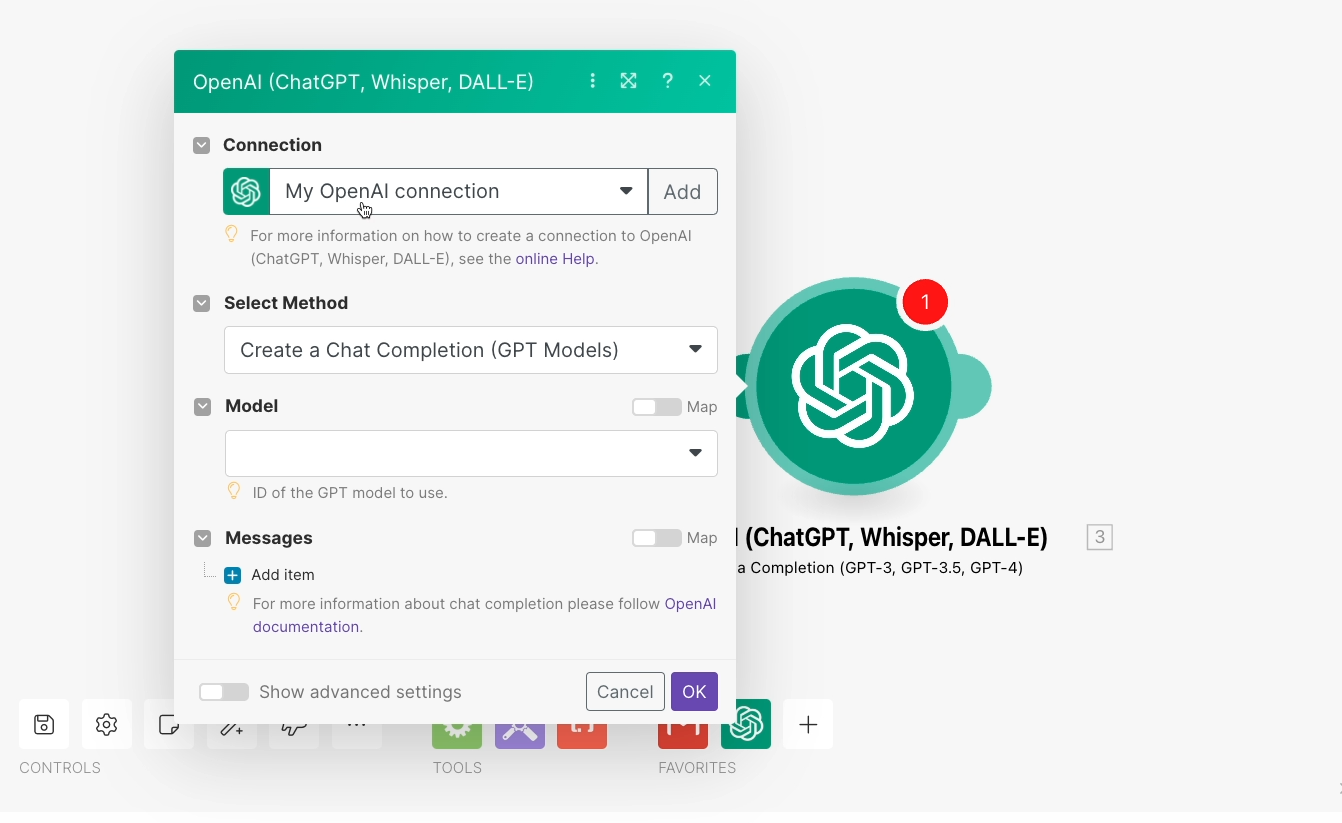
Add a new module, and search for “OpenAI”. In Make, the OpenAI module is currently named “OpenAI (ChatGPT, Whisper, DALL-E)”.

For the action, choose “Create a Completion”. This action will allow the scenario to send a prompt to OpenAI and get the AI’s response.

Choose your OpenAI account or connect a new one to Make.
Just as a reminder, you will need to have a payment method on file to use OpenAI’s API, and each request – including tests in Make – will incur a charge. However, you may still have a $5.00 API credit from opening a new OpenAI account.
Based on OpenAI’s current pricing, each request in this scenario should only incur a charge of a few cents or less, if you use all the same settings we do.
Once you’ve chosen your account, you can start configuring the module.
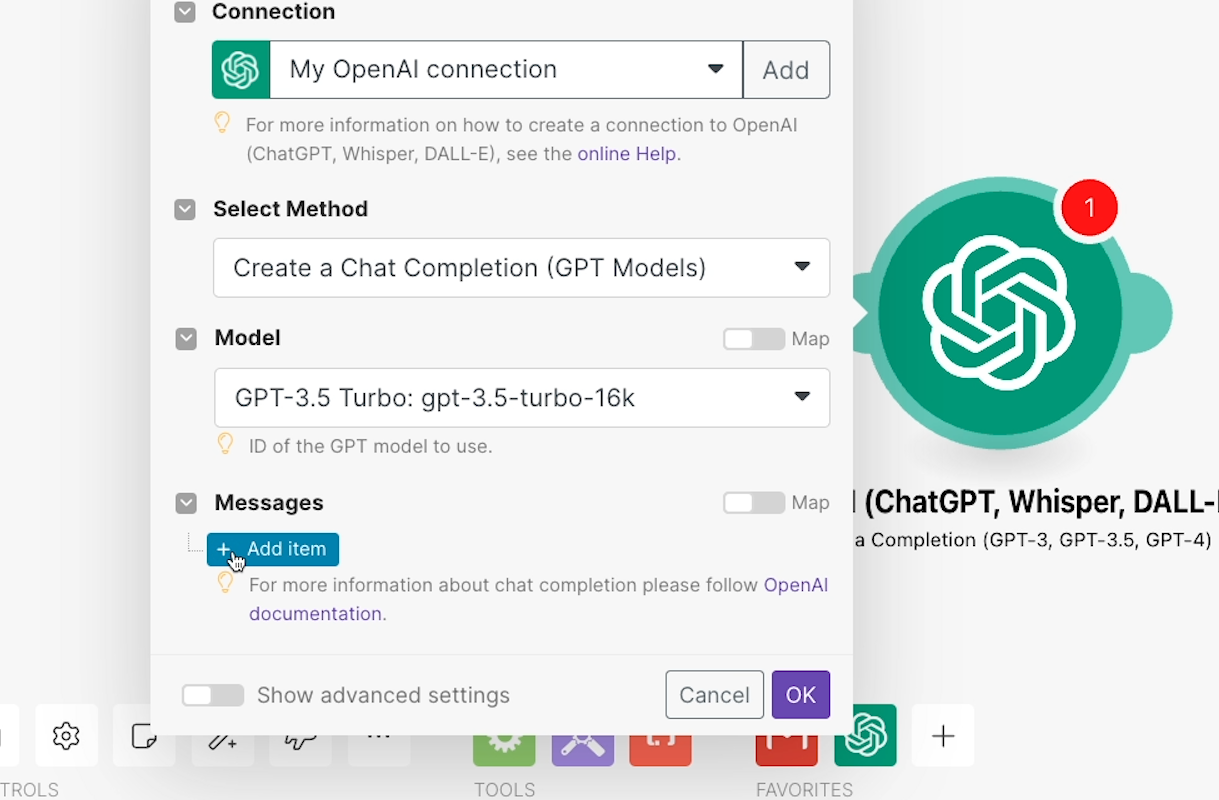
First, you’ll need to choose the language model you want OpenAI to use. Different models have different pricing, different speeds, different amounts of context they can use, and other unique aspects to consider
You can learn more about the details of each model in OpenAI’s API docs.
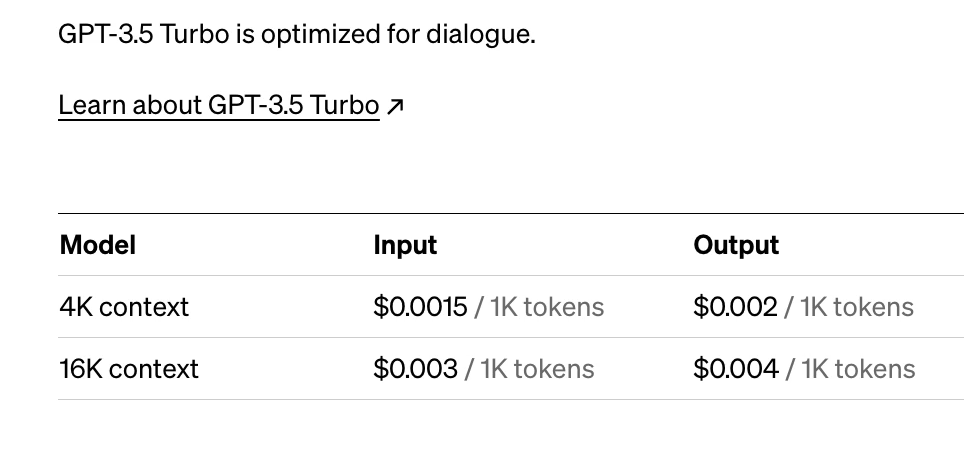
For this tutorial, we’d recommend using GPT3.5 turbo 16k. This model charges very low rates, and features a high amount of context, so it’s good for building and testing an automation summarizing long text.
GPT4 is generally a better model, of course, but it’s also about 10 times more expensive, so we’ll stick with GPT3.5 turbo.

Next, you can tell the AI how to behave and give it a prompt to complete. Click on “Add item” under “Messages”.
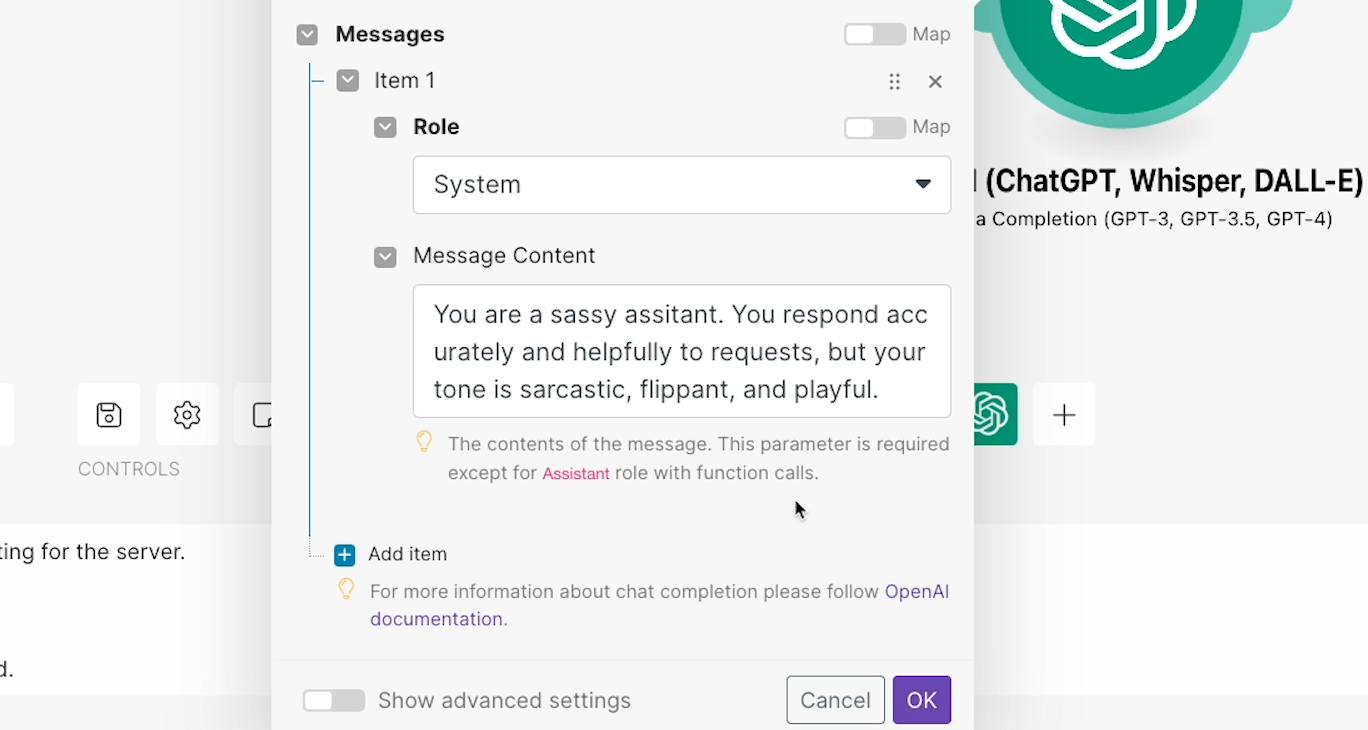
The first item will be a “System” message that instructs the AI how it should behave in general.
This is not strictly necessary. If you don’t provide a system message, the AI will default to the identity of a “helpful assistant”. But if you want a more specific style or tone, you can define it with a system message first.
Choose “System” as the role.
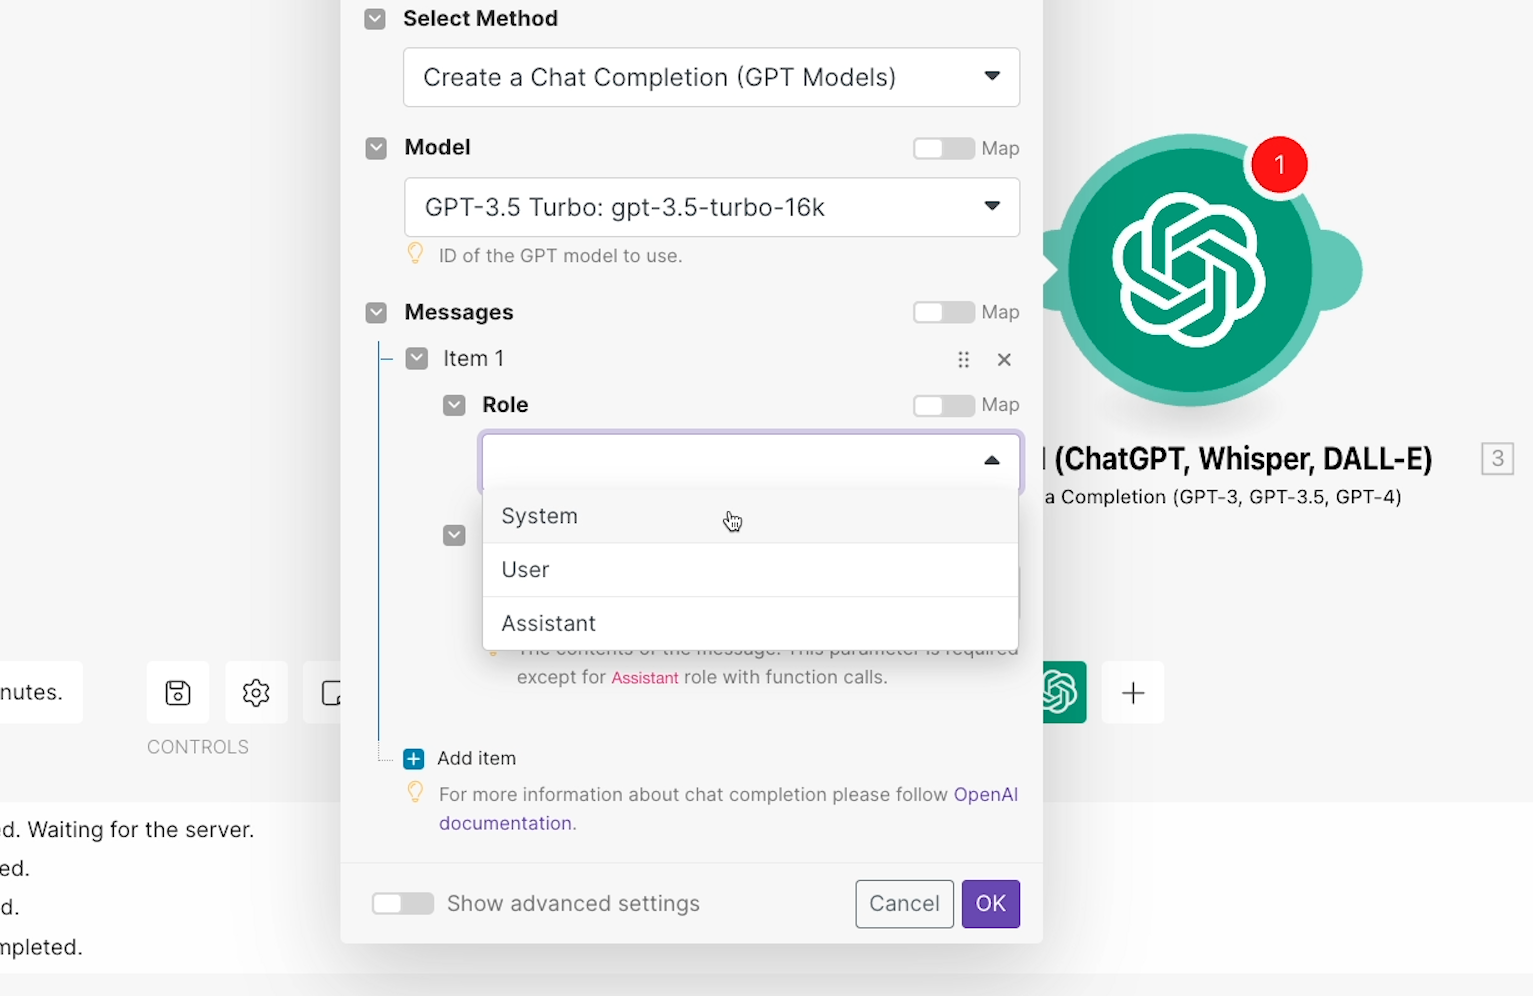
In the “Message Content” field, describe how the AI should respond to requests and what identity to assume. You can enter anything you’d like here.
For instance, we’ll say “You are a sassy assistant. You respond accurately and helpfully to requests, but your tone is sarcastic, flippant, and playful.” There’s no harm in giving our AI answers a little more personality.
After the optional system message, you can provide your specific prompt.
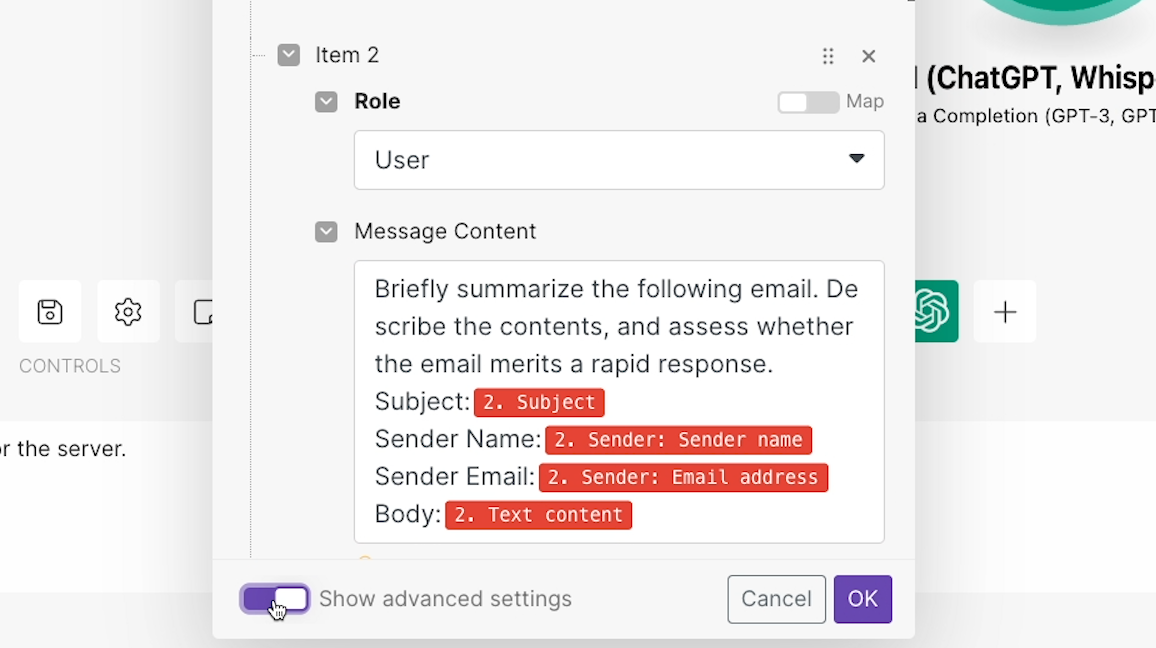
Add another item, and set the “Role” dropdown to “User”. In other words, we want the message to take the role of a user entering a prompt into ChatGPT.
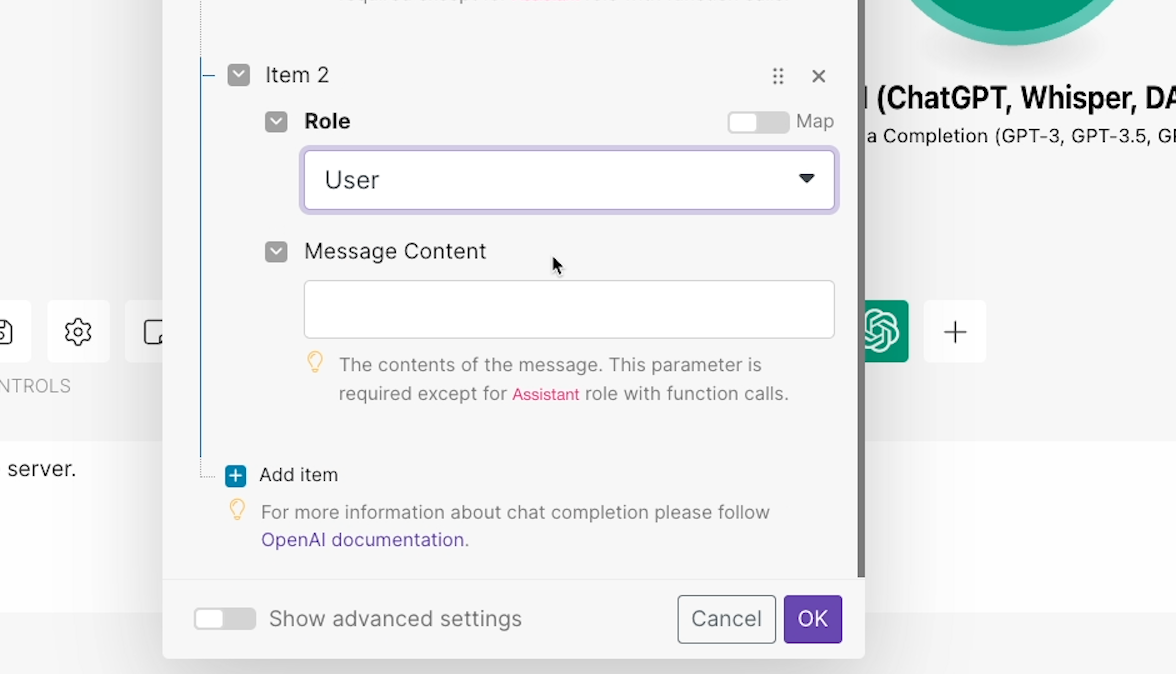
In “message content”, you can enter your full prompt. Be sure to include data from your trigger or optional searches as applicable.
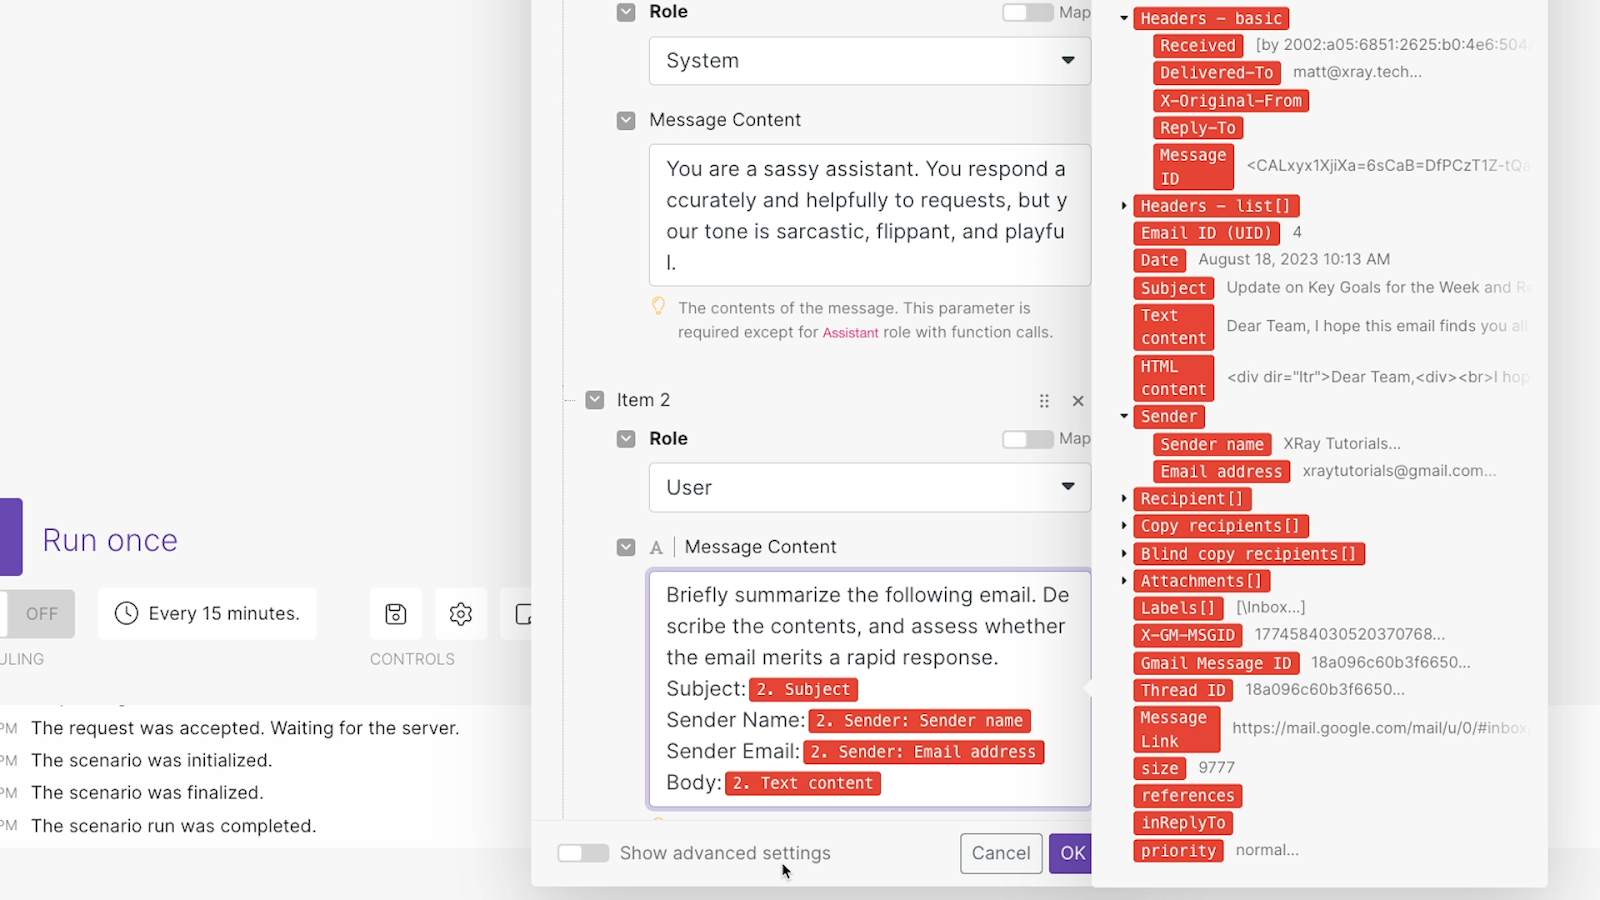
In our example, we’ll enter a prompt asking to summarize an email. Then, we’ll provide key pieces of data from the email that triggered the automation: the subject line, the sender name and email, and the body, which is called “text content” in Make.
If you click on “Show advanced settings”, you’ll see a few more options for configuring your OpenAI prompt.
First, you can limit the length of the response by defining a maximum number of tokens that it should use. Note that 1,000 tokens are equal to about 750 words.

NOTE: While we were preparing this tutorial, we noticed that this field may not work exactly as described. Even though the default is listed as 16 tokens, the automation still provided an answer consisting of over 200 tokens. It’s possible that “16” here means 16,000, as 16 tokens would be a very short response.
Hopefully, Make will update or clarify this option soon.
With “Temperature” and “Top P”, you can set how creative the AI will be with its answers on a scale of 0 to 1. A lower number in either of these settings will result in more factual and less creative answers.
They both default to 1, so you may want to lower these to around 0.7 if you want to get somewhat more accurate answers.
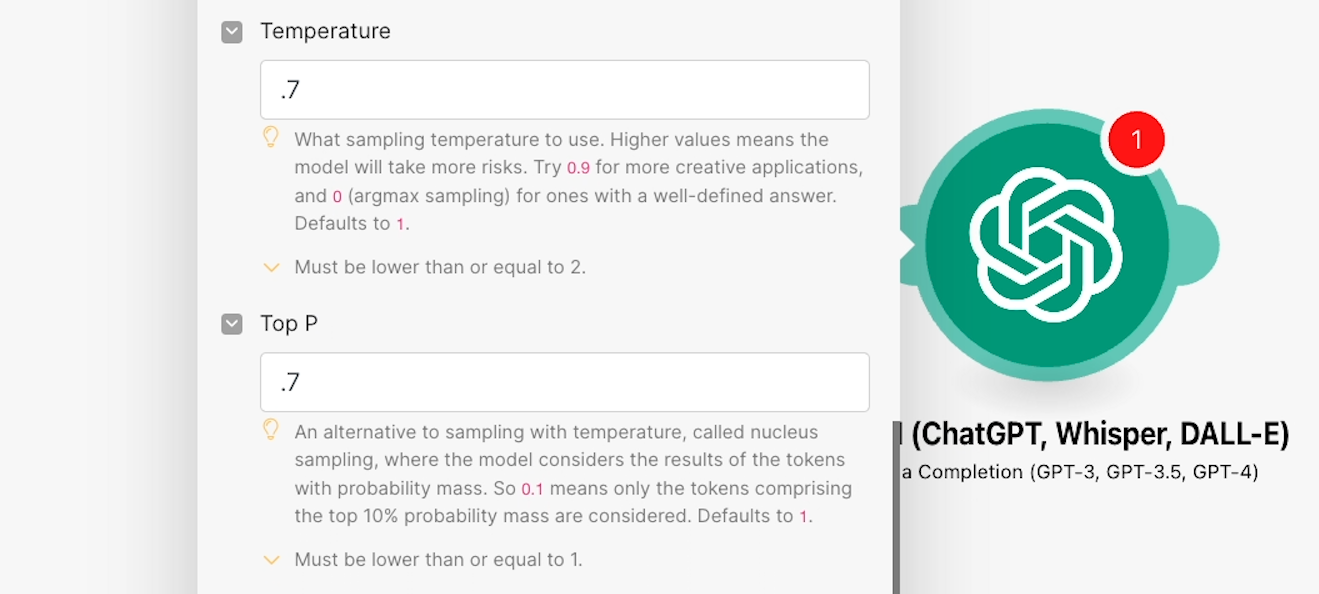
Just note that even if you set these to 0, there’s never a guarantee that AI will be 100% accurate. Hallucinations are just a risk we take with this tech.
In the “Number” field, we can determine how many answers the AI will provide to our response. This defaults to 1, but you can raise this number if you want it to make multiple attempts.
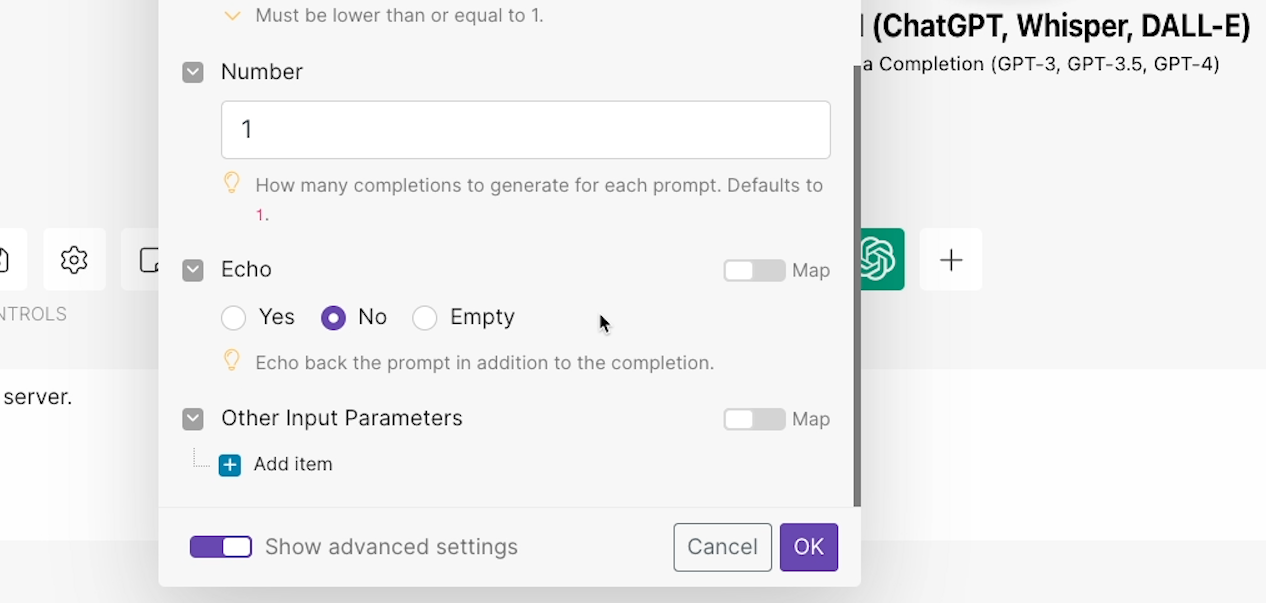
With ‘Echo”, you can choose whether or not the AI will echo back the prompt that you entered at the start of its response. We’ll choose “no”.
Finally, you can add additional custom parameters under “Other Input Parameters” if you’d like, but this is a bit more advanced and won’t be necessary for most prompts.
Once your message is ready, click OK, and test the full scenario. Just as a reminder, testing will consume operations in your Make account, and will incur small charges from OpenAI’s API.
Repeat the same testing process as before. Right click on the trigger module, select “Choose where to start”, and click “Select the first email”.
Pick your email, click OK, then click “Run once”. You should see a number over your OpenAI module.
Click on it to see the message that OpenAI generated in response to your prompt. You’ll have to dig into a couple of menus first - you can find the output under “Choices”, “1”, and “message”.
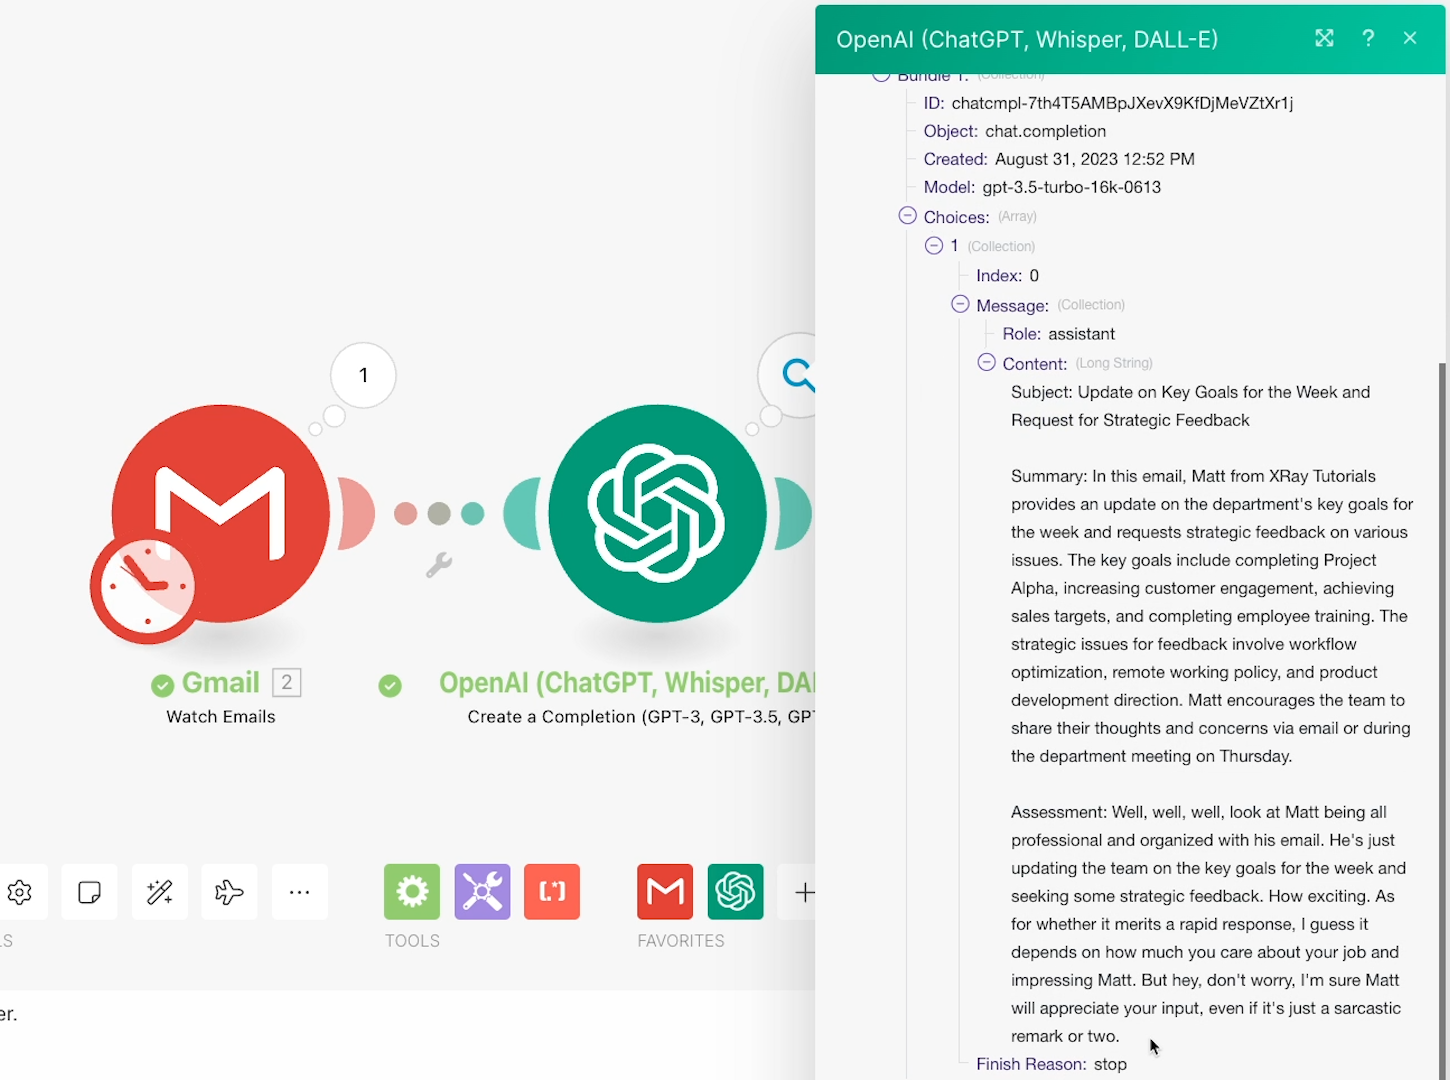
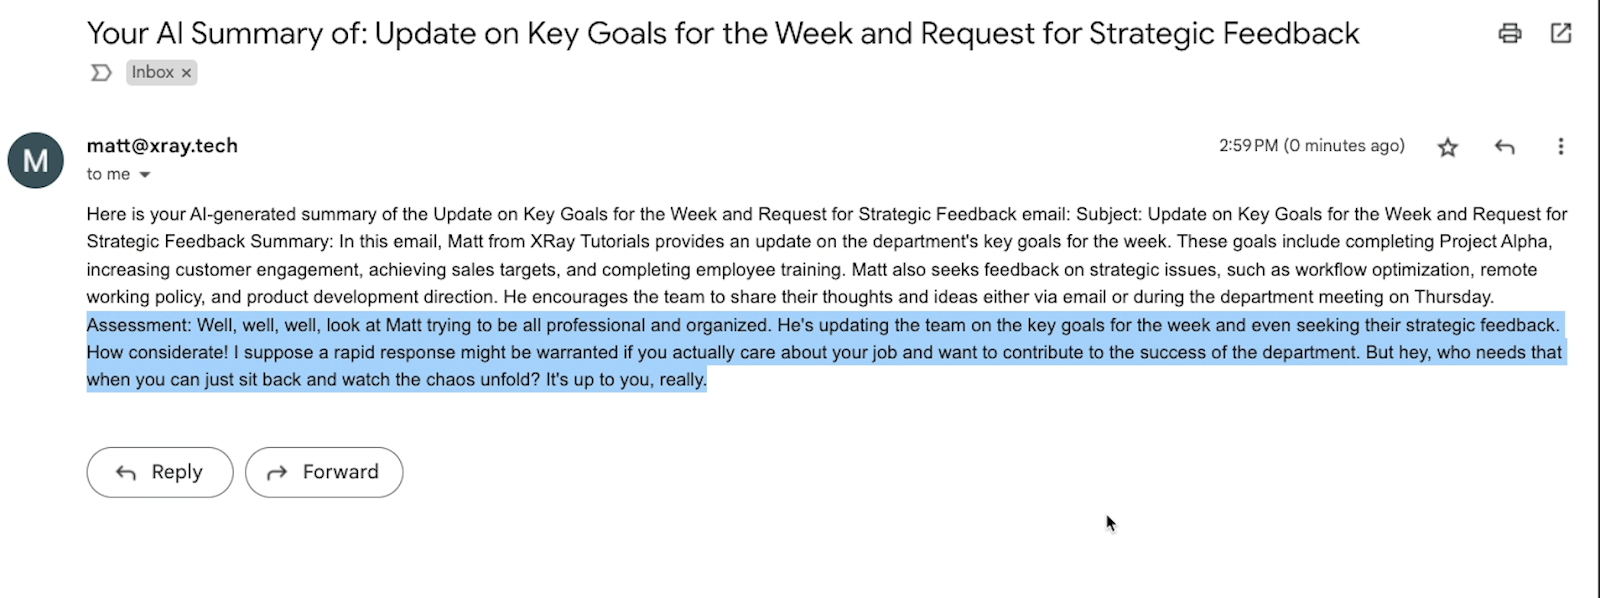
Above, you can see the response we got. Definitely a bit of sass, just like we asked for, but still a pretty good summary.
Your “Completion” action should have correctly generated a response to your prompt. Now, you can send that response anywhere you’d like.
You can put it in a Slack message, save it to an Airtable database or Google Sheets, add it to a Notion page - whatever you want.
For our example, we want to email the AI’s output back to the original recipient of the summarized email.
So we’ll add a new module, and search for Gmail. Then, we’ll choose “Send an email” as the action.
In the “To” field, we could either enter a static email address or choose to send the email back to the recipient of the original email.
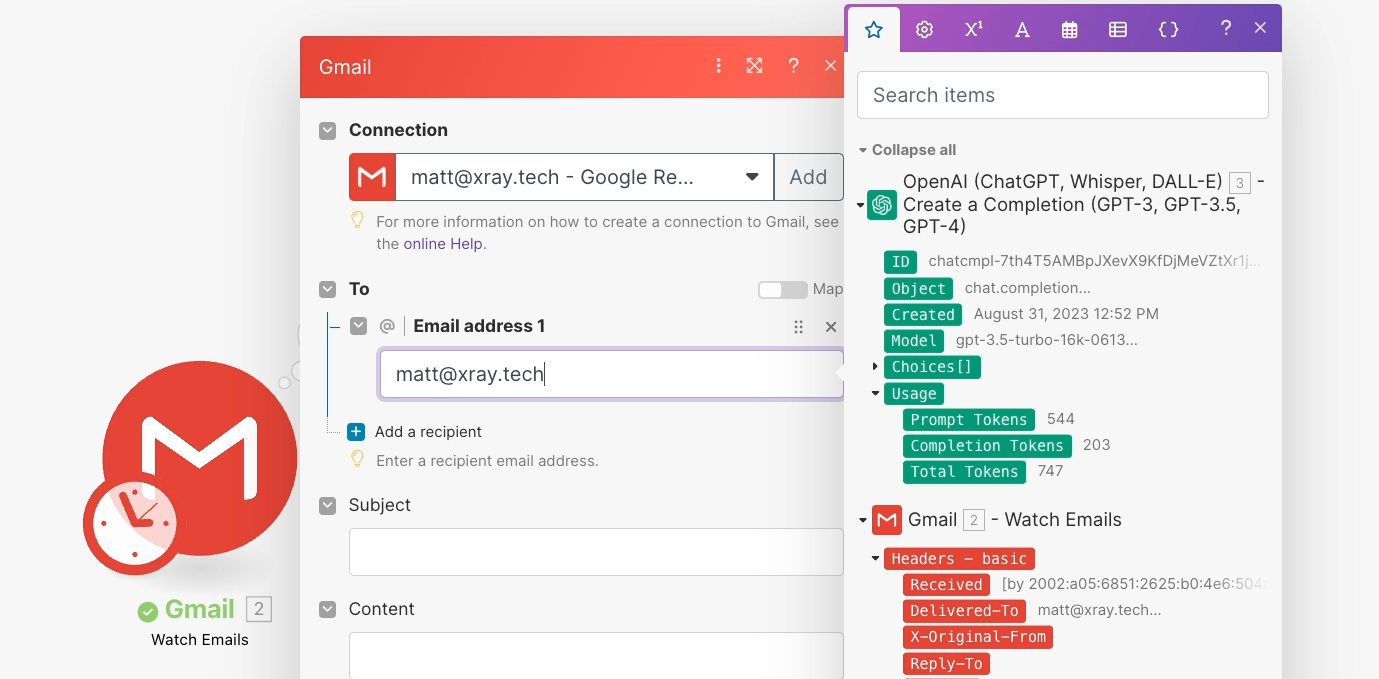
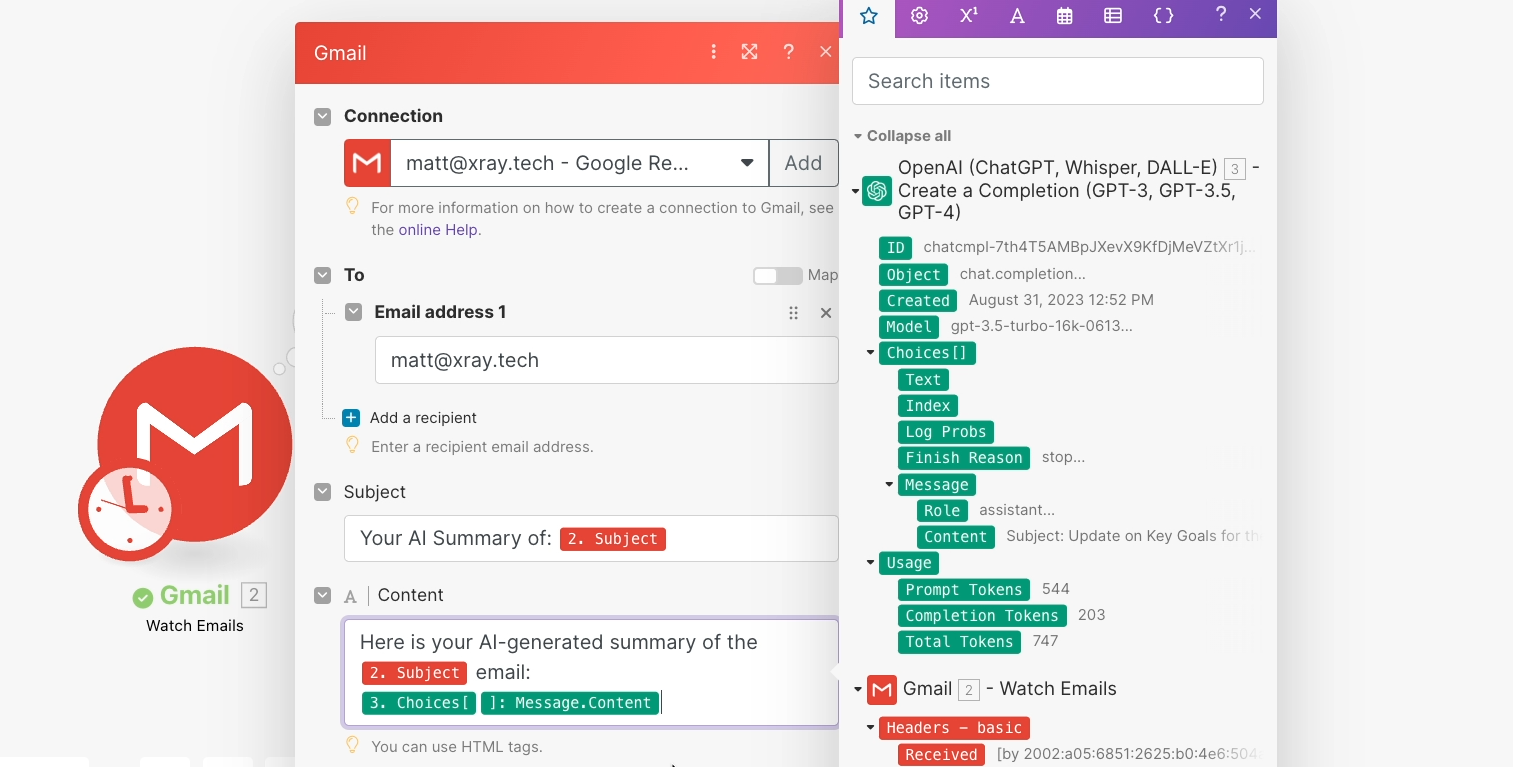
For the subject line, we’ll enter: “Your AI summary of: [original email subject line]”. We’ll use data from the trigger to dynamically generate the correct subject line from the original email.
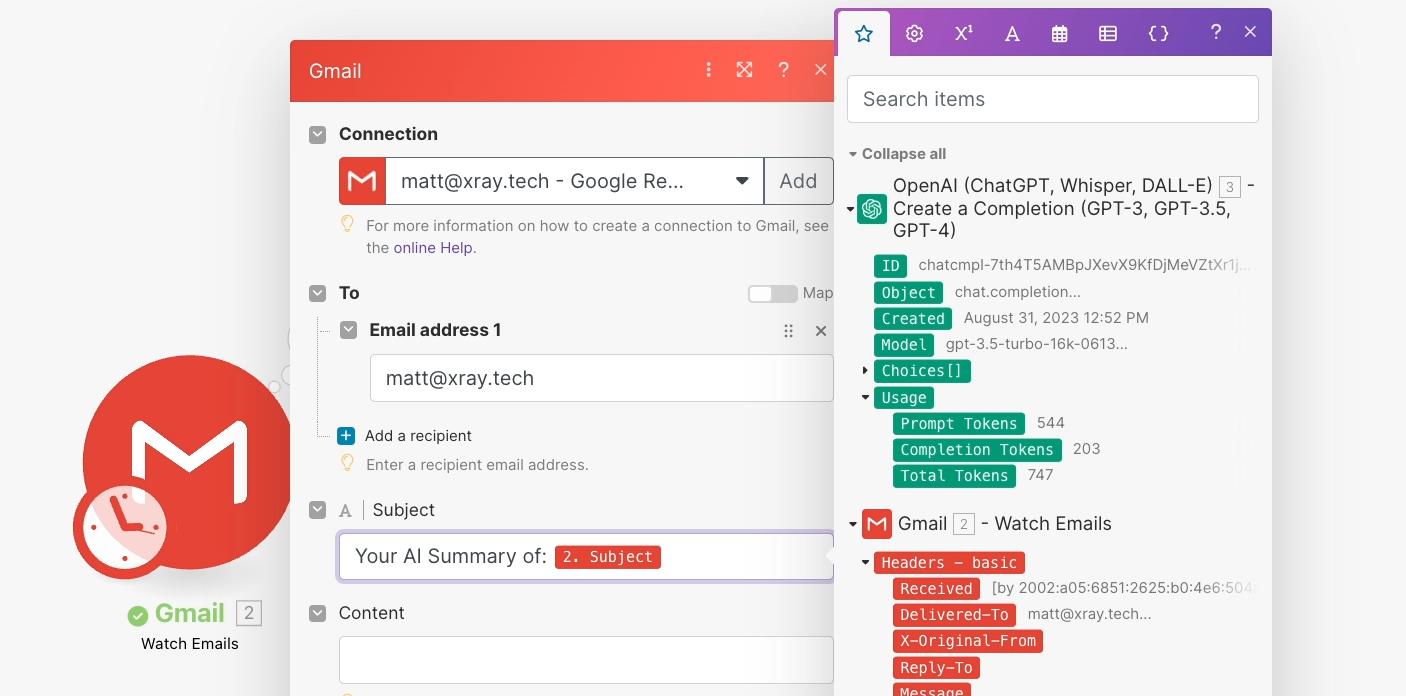
Finally, we can compose a message.
“Here is your AI-generated summary of the "[subject]" email:”
We’ll replace [subject] with the actual subject retrieved in the trigger. Then, after this brief message, we’ll add the AI’s output. You can find that under Choices > Message > Content.
Once you’re finished configuring the module, click OK to close it.
Test one more time, again using the same manual process as before. Now, when we check our inbox, we can see the message complete with our sassy AI summary.
Everything looks good, so we’ll go back to Make, save the automation, and turn it on so I can start using it.
For many of us, AI is rapidly becoming an integral part of our daily workflows. Like with any other app we rely on every day, automation can make our workflows faster, more consistent, and more reliable.
Build on this quick example that we’ve shown you today, and explore what you can do when you combine tools like Make and ChatGPT.
If you’d like to learn more about workflow automation and AI tools, be sure to check out our blog or our YouTube channel. You can also follow XRAY on Twitter, Facebook, or LinkedIn.