


Template buttons in Notion just got a whole lot better.
Now, in addition to adding any content blocks you’d like with a click, you can create new pages, update database items, and even create content with AI.
In this post, we’ll walk you through all of the latest features in Notion buttons, including new AI prompts, adding and editing pages in databases, and a couple of great new UX additions.
Let’s get started!
Creating quick templates with AI features
Adding a new button
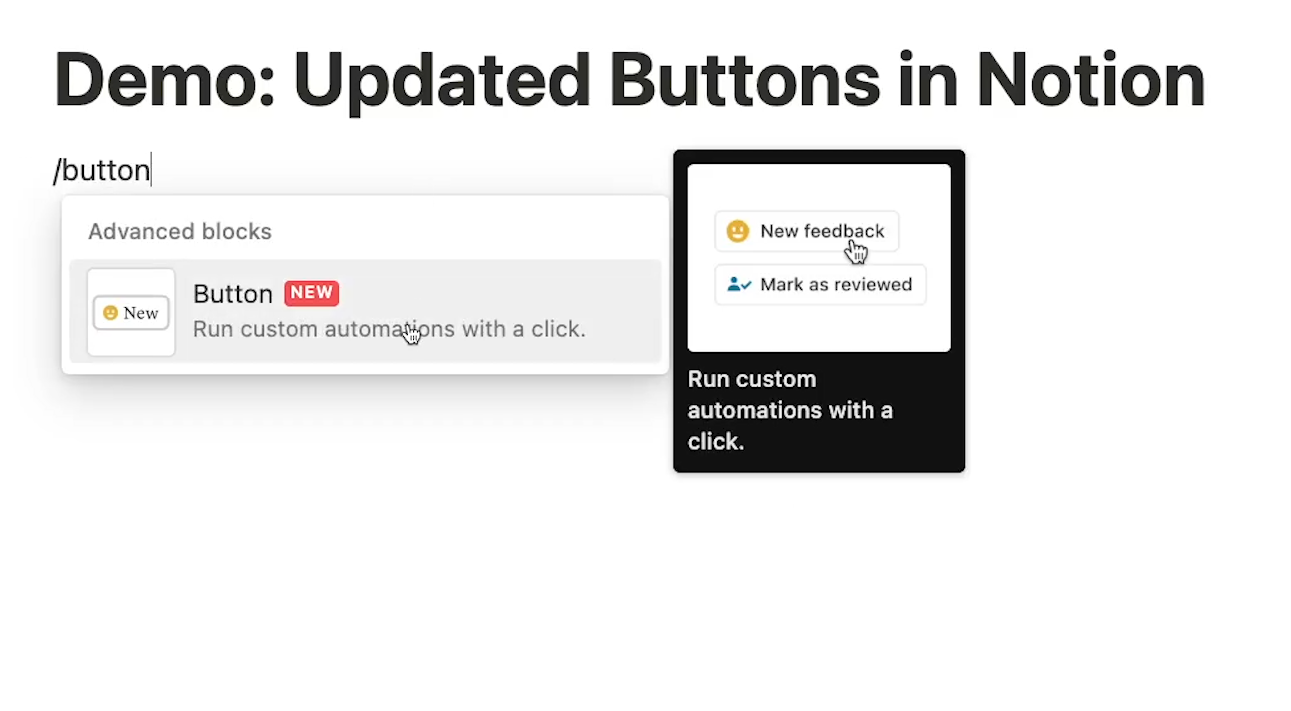
To access buttons, you can just pull up the content block menu on any page.
Type “/button”, and click or press “enter” to add a button to your page. This will immediately open up a module where you can create and configure your button.
The module will instantly open up the “add a step” menu, which will let you add an automatic action that will occur whenever you click on your finished button. After you’ve added your first step, you can just click on “add a step” again to add another step to your button.
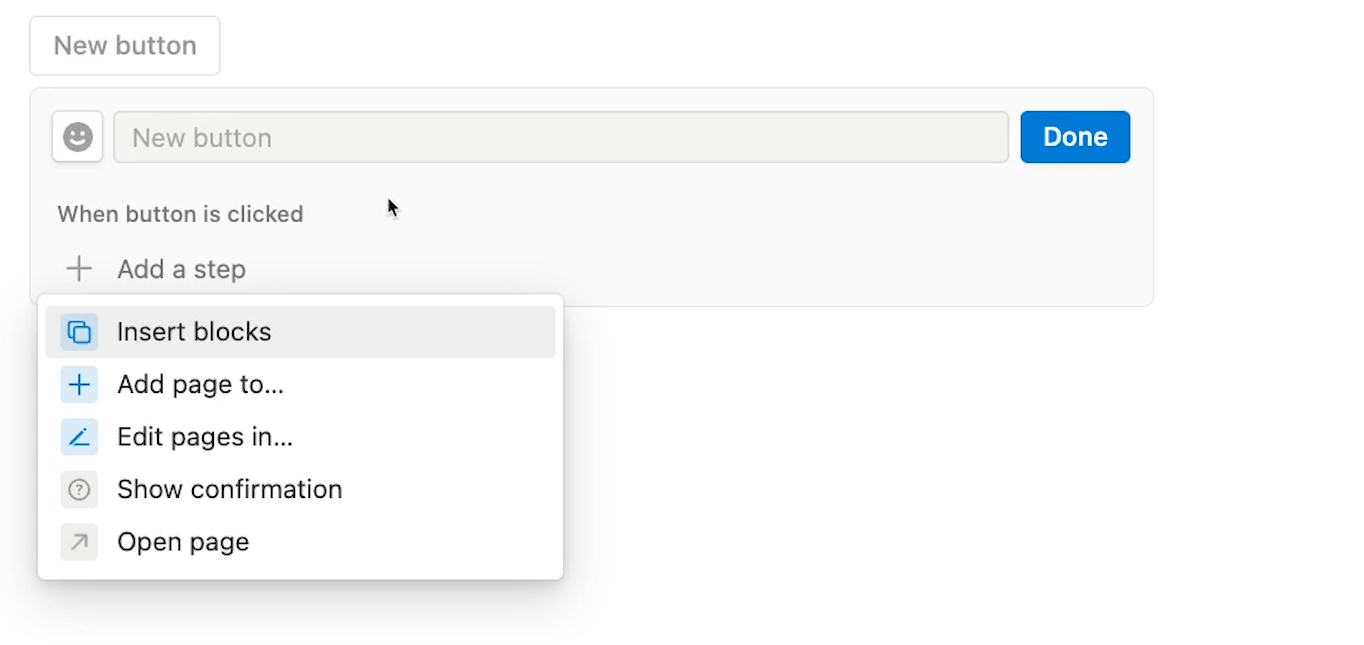
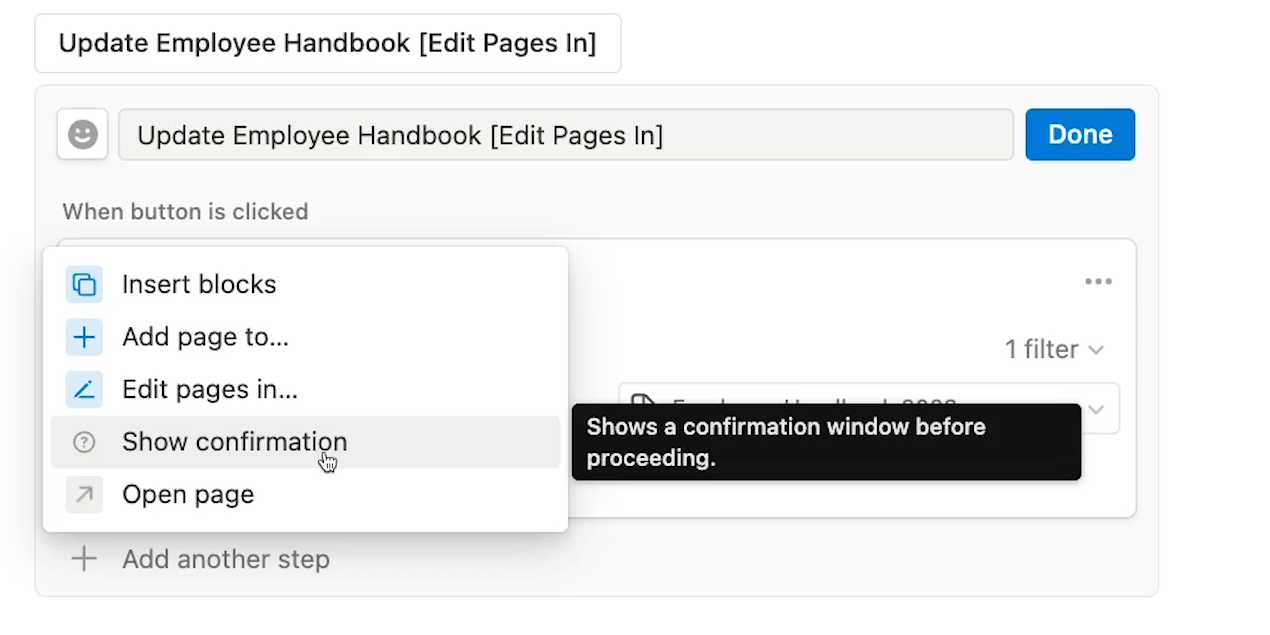
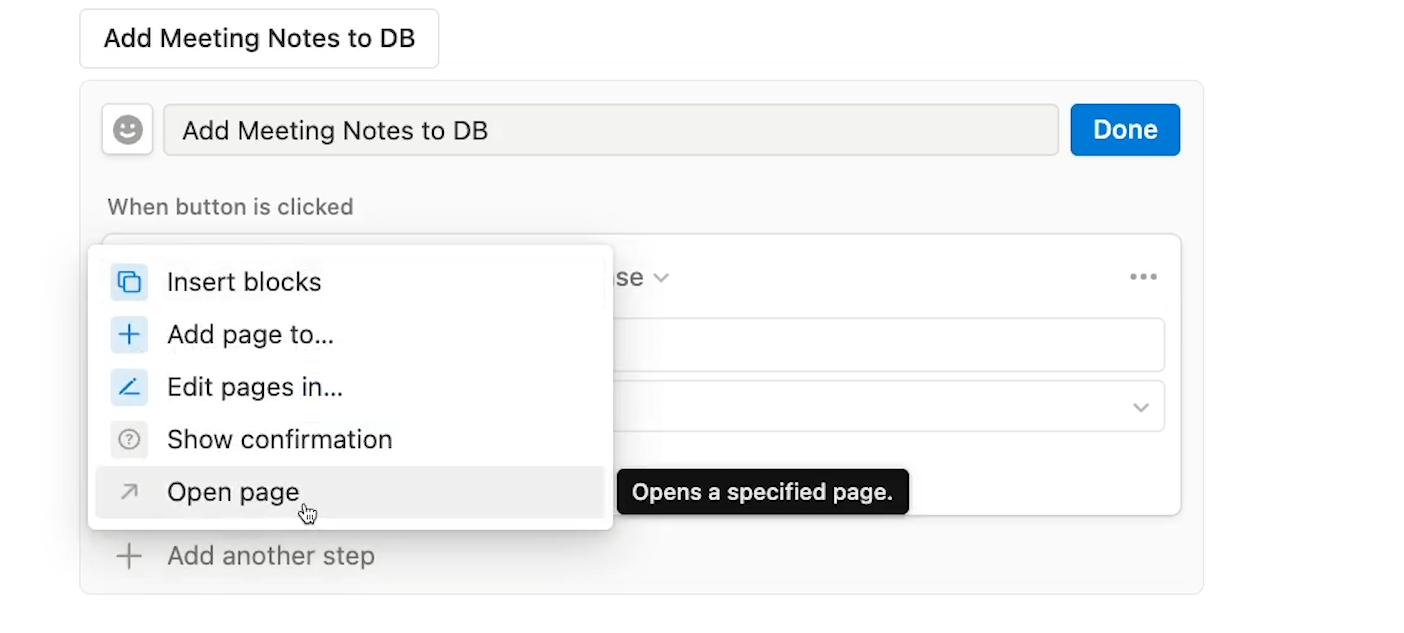
Currently, Notion gives you five different options for steps: “Insert blocks”, “Add page to…”, “edit pages in…”, “Show confirmation”, and “Open page”.
Let’s go through these options one at a time.
Use “Insert blocks” to create convenient templates
“Insert blocks” will be very familiar if you were using Notion template buttons before the recent update. It will allow you to define a set of blocks to use as a template.
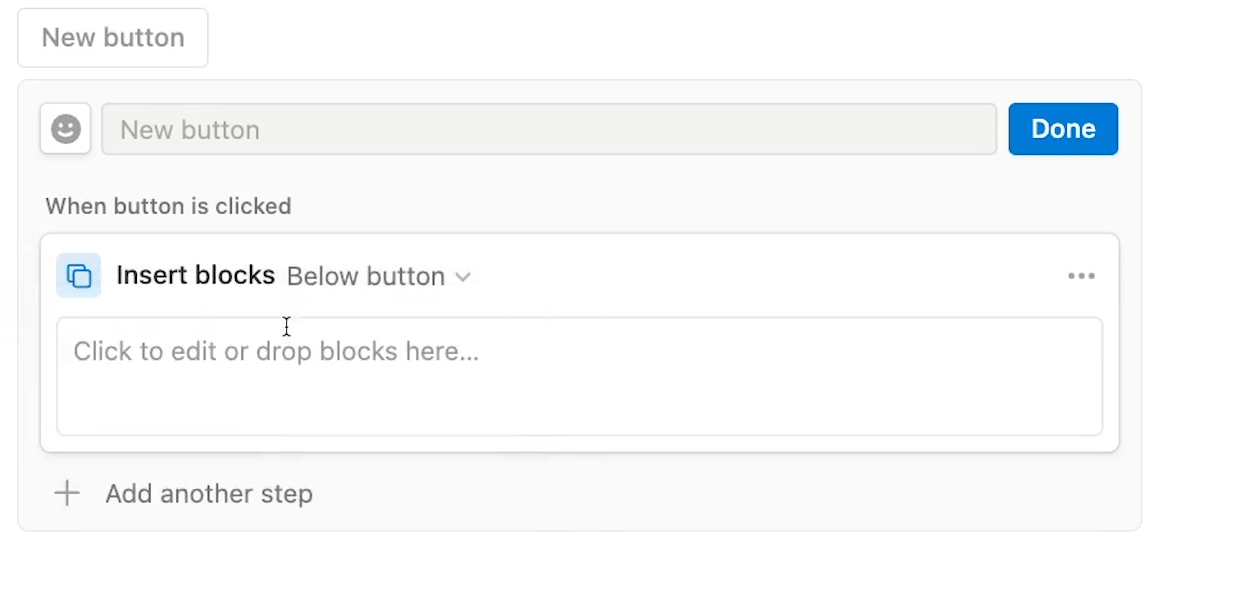
Then, whenever you click on the finished button, Notion will add the blocks in your template to the page.
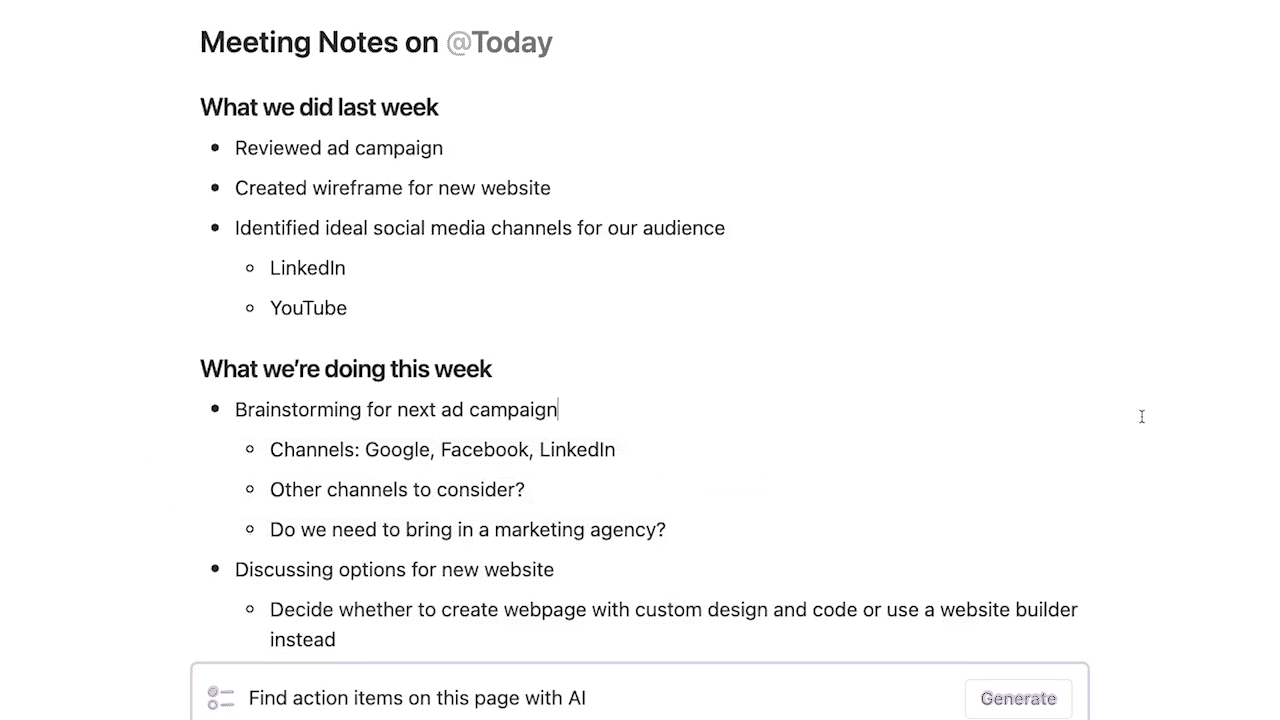
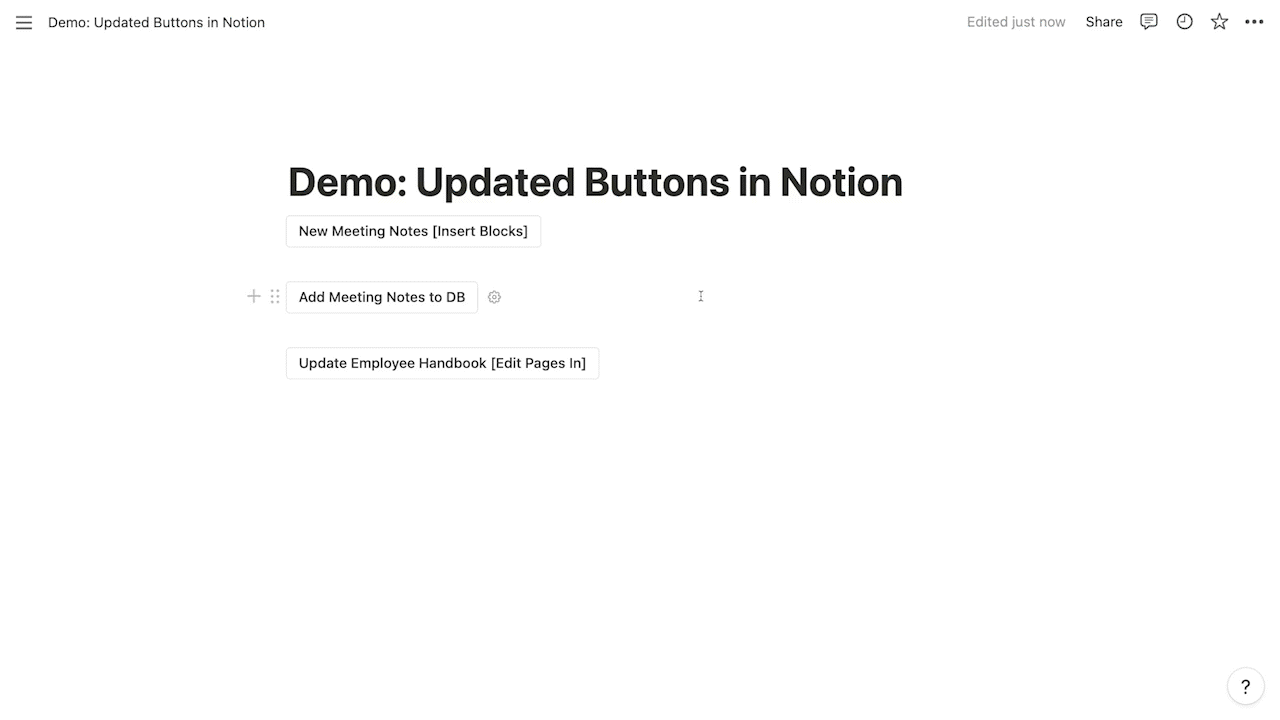
For instance, we’ll quickly put together a meeting notes template with a few headers to serve as section titles, and a couple of bulleted lists for notes. We’ll name our button “New Meeting Notes”, and click “Done” to save it.
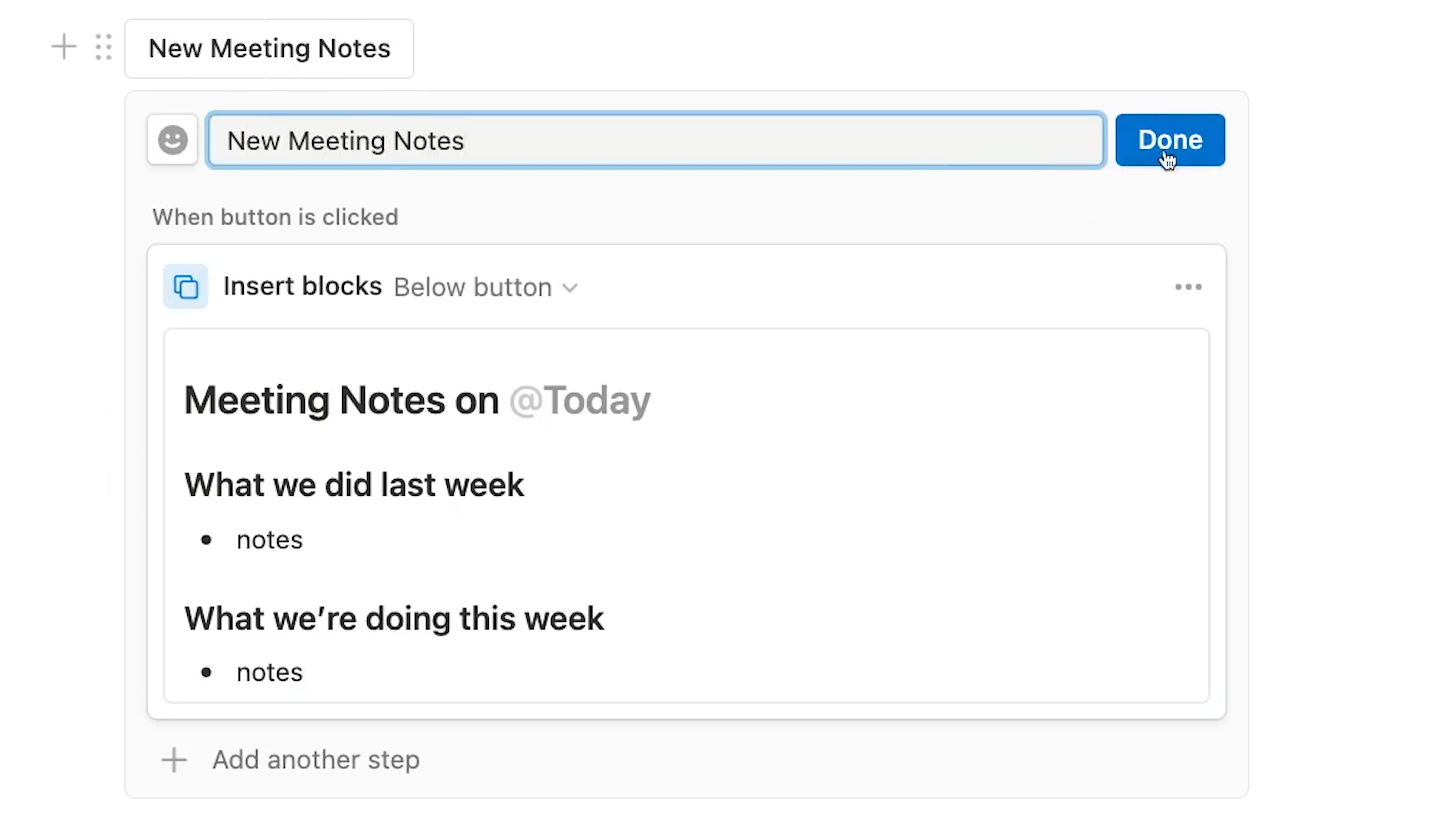
Now, when we click on “New Meeting Notes”, the template is instantly duplicated on the page.
Again, this is nothing new if you’ve been using template buttons for a while.
Using AI features in buttons
What is new is the suite of AI features that Notion has added, which work very well with the “Insert blocks” function in buttons.
Notion has added some fantastic new AI features to their app, which we covered in a recent post.
Now, they’ve created some convenient AI blocks that you can add to your buttons, so you can run prompts with a single click.
Let’s edit our Meeting Notes button to see how these AI features work.
In the same “insert blocks” step, we’ll type “/ai” to bring up a few AI blocks.
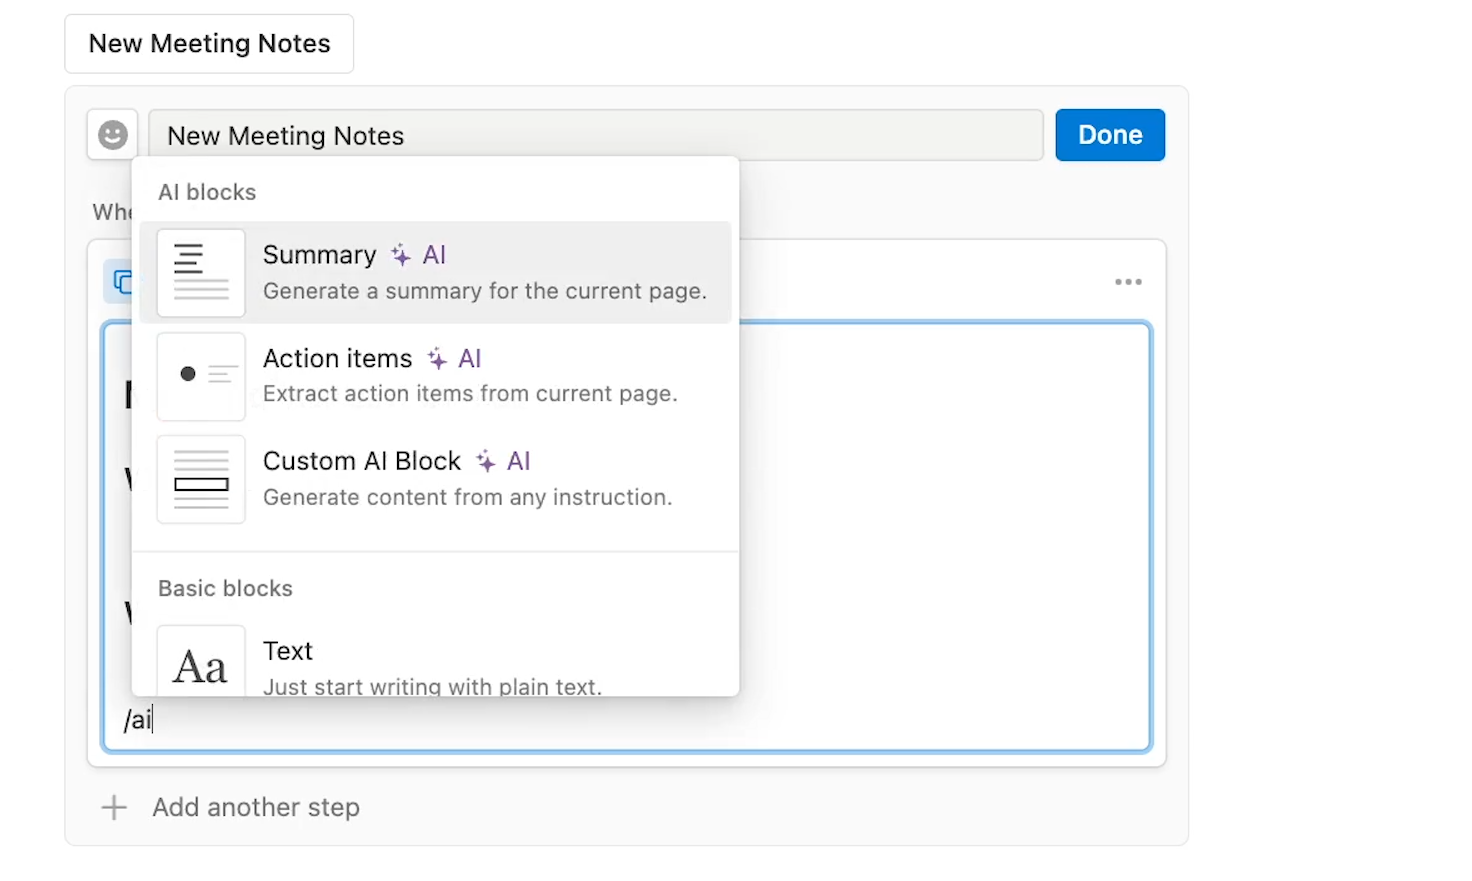
These first two options – Summary and Action Items – are preconfigured buttons themselves.
Clicking on them will prompt Notion’s AI to summarize the contents of the page, or generate a list of action items from the page’s content.
Buttons nested within buttons can be a little confusing, so we’ll show you how this works step by step.
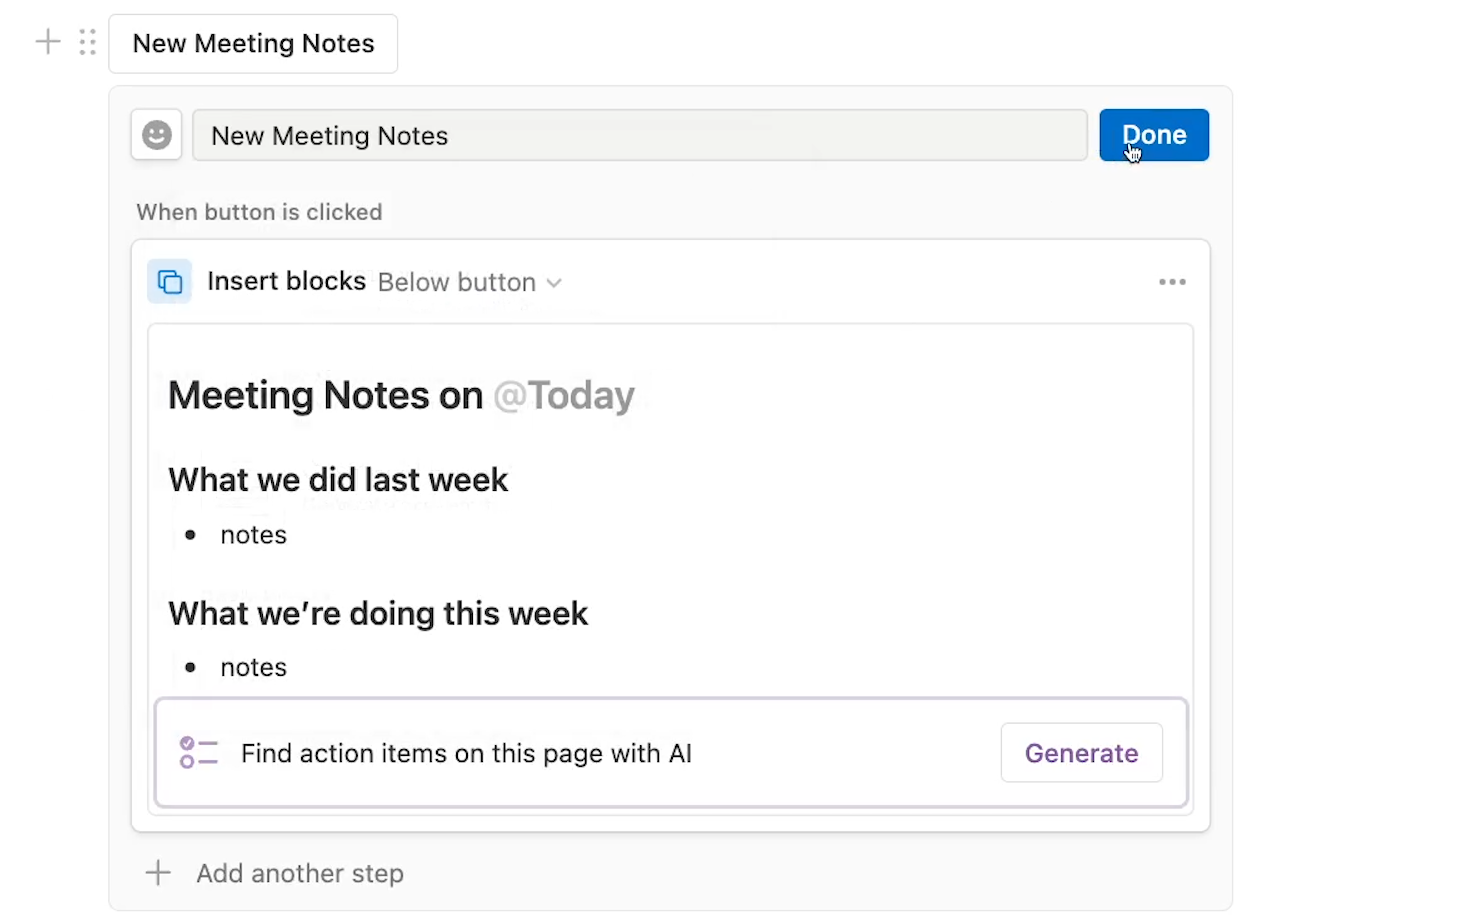
We’ll add an “Action Items” button to our “New Meeting Notes” button template, and click on “Done” to save our changes.
Now, we’ll click on the New Meeting Notes button.
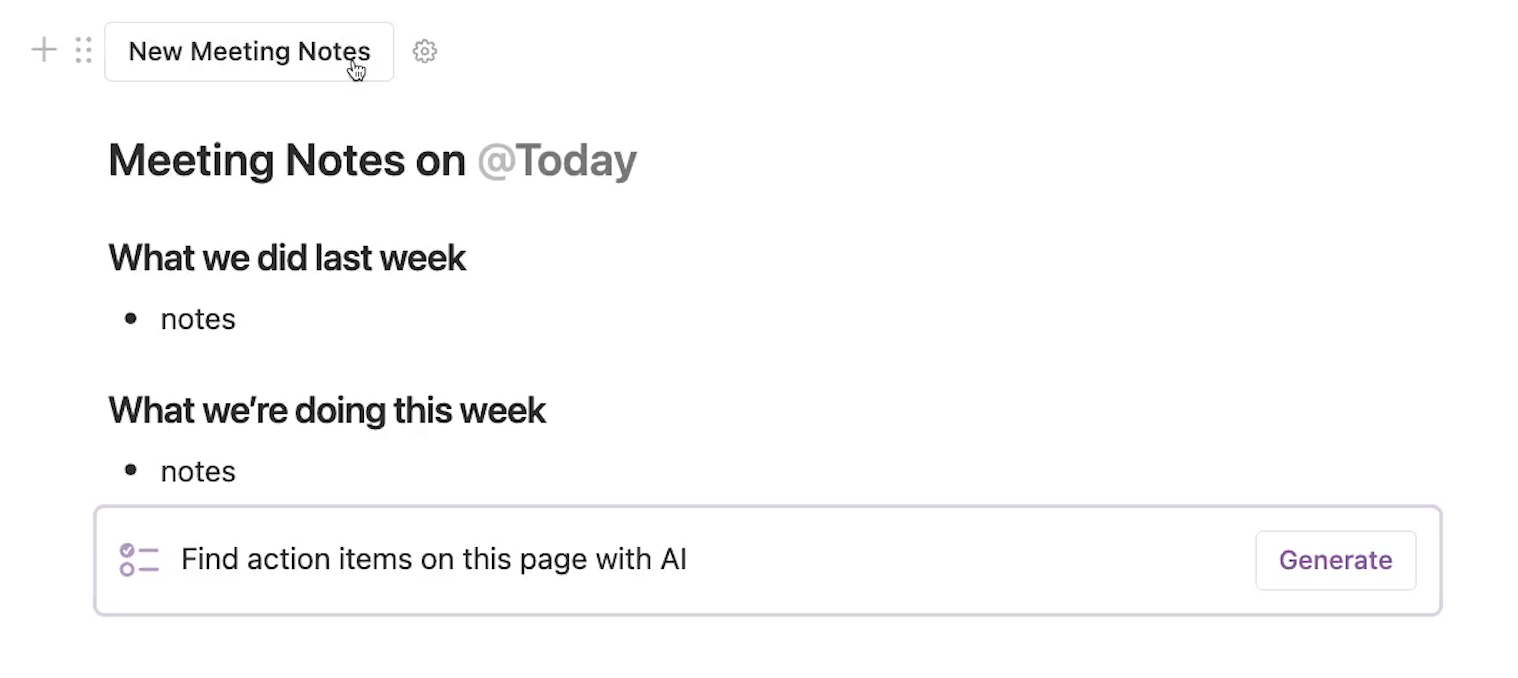
The button generates the same template as before, but now it includes an AI prompt at the bottom.
We’ll fill in the meeting notes with some actual content, then we’ll click on “Generate” to create a list of action items from the page’s contents.
And in a couple seconds, Notion generates a pretty good list of tasks.
The summary button works in exactly the same way as the Action items button, so we don’t need to go through that step by step.
Using custom AI blocks
However, “Custom AI block” is a little different. With “Custom AI block”, we can create a block with a prefilled prompt of our own.
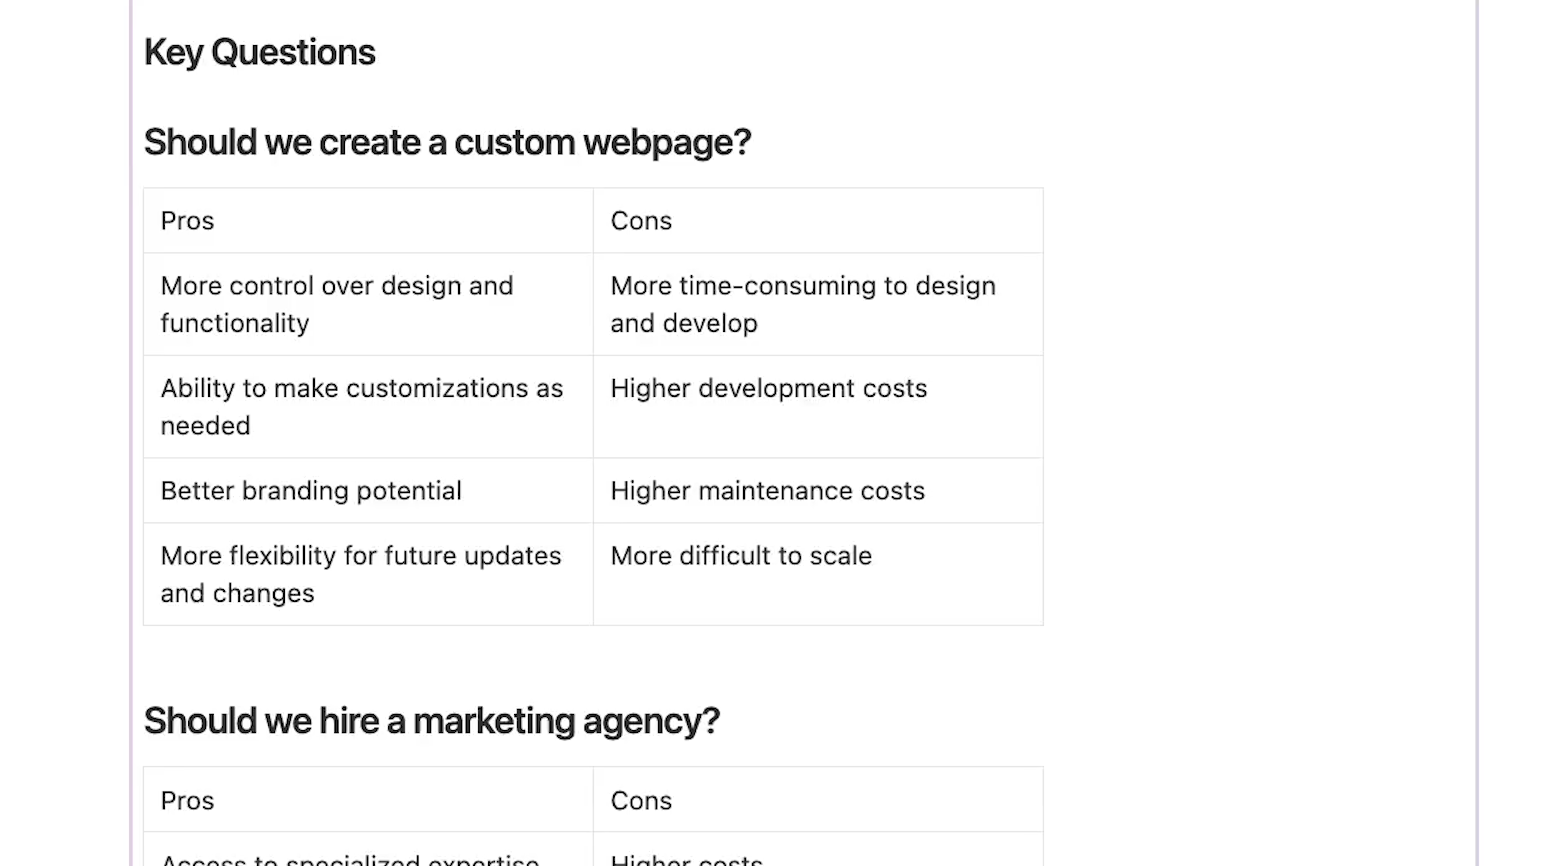
For instance, let’s add a “Key Questions” section to the meeting notes template.
Then, we’ll add a custom AI block with the following prompt:
Create a two-column pros and cons list assessing each question listed under “Key Questions”.
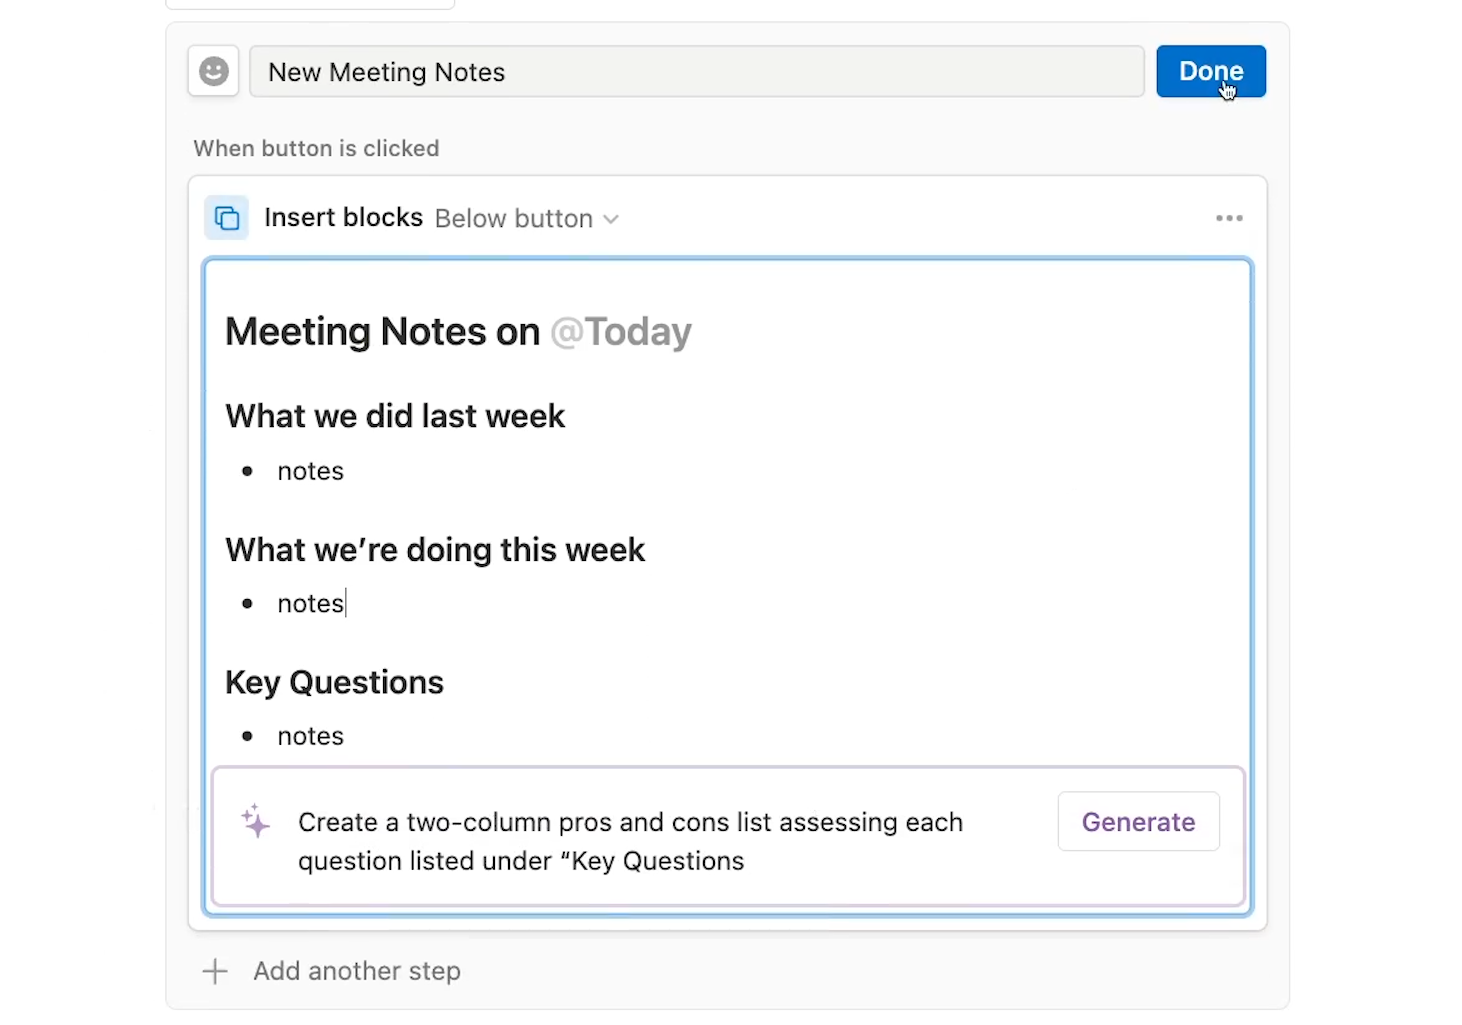
We’ll click on “Done” to save the button.
Then we’ll click on the meeting notes button to generate the template.
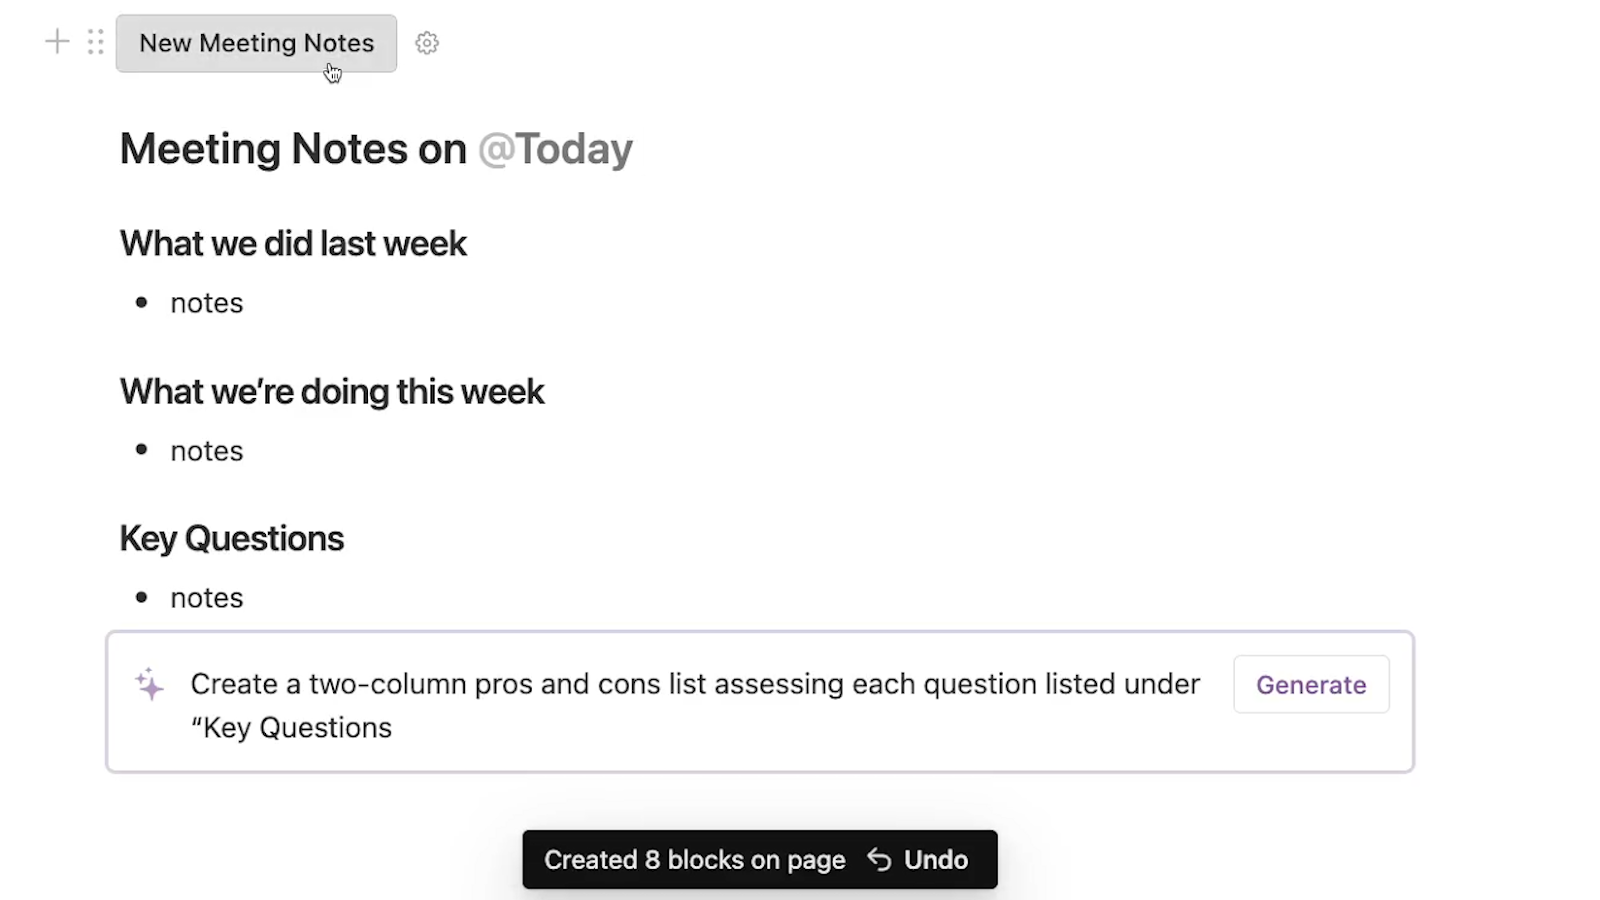
We’ll manually add some content into each section, including key questions, so that the AI prompt will have something to work with.
Then, we’ll click on the AI prompt.
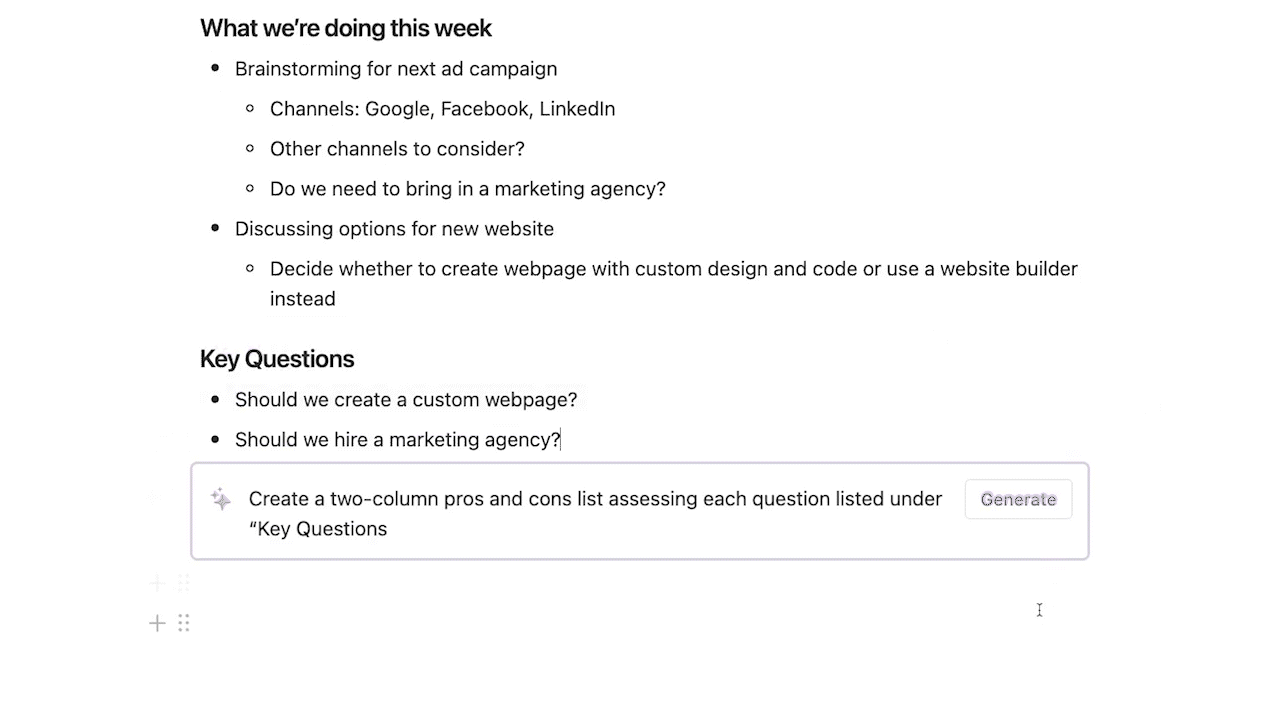
In a matter of seconds, we have a neatly organized 2-column layout with some legitimate pros and cons for each question.
Combining AI prompts with buttons can help you to complete repetitive work or get insights from AI in much less time.
Now let’s take a look at the other new features in Notion buttons.
Adding and editing pages in databases
Automatically adding pages to a database
“Add page to” will let you add a page to a database of your choice whenever you click on the finished button.
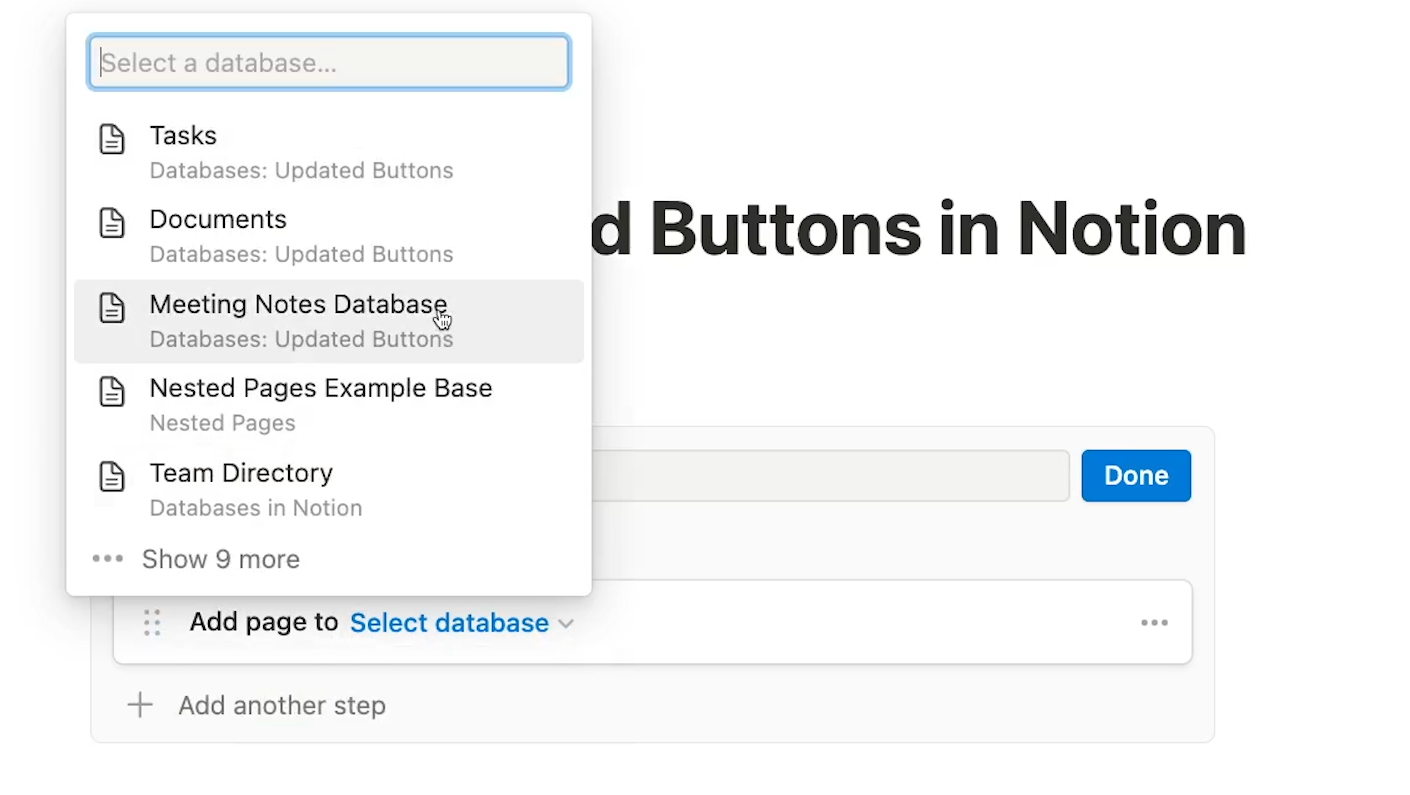
Just choose the database you want to add pages to, then configure how the page will be set up.
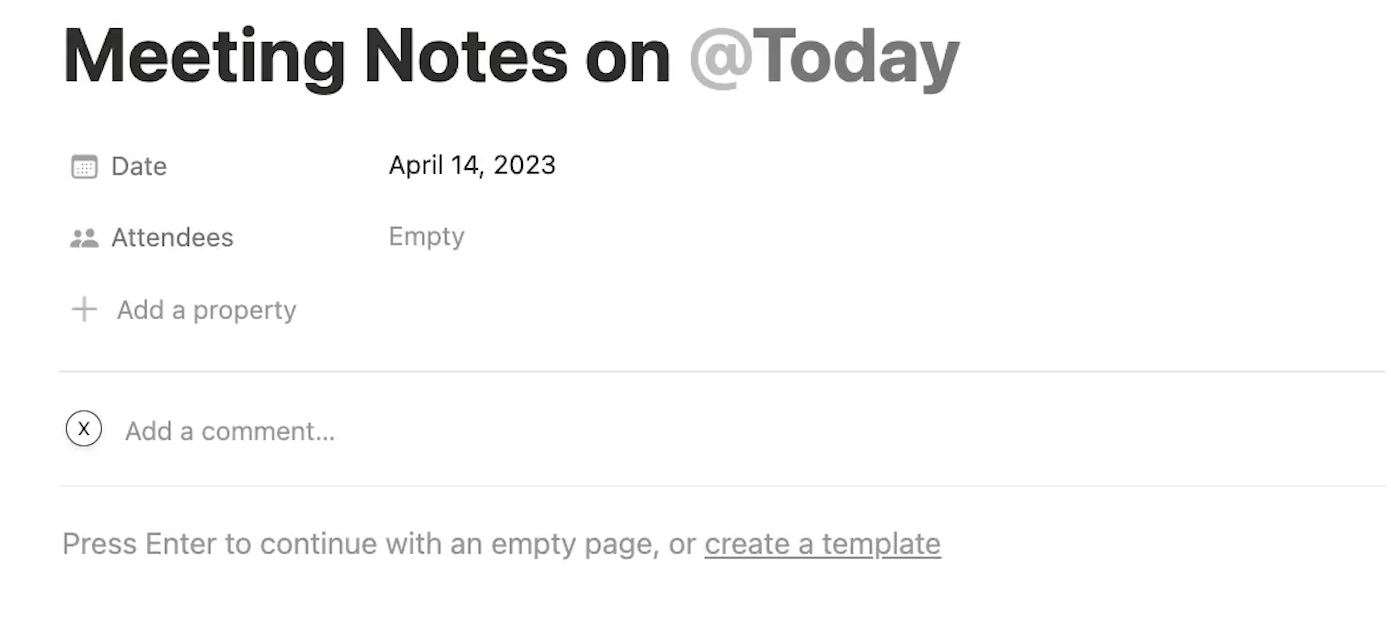
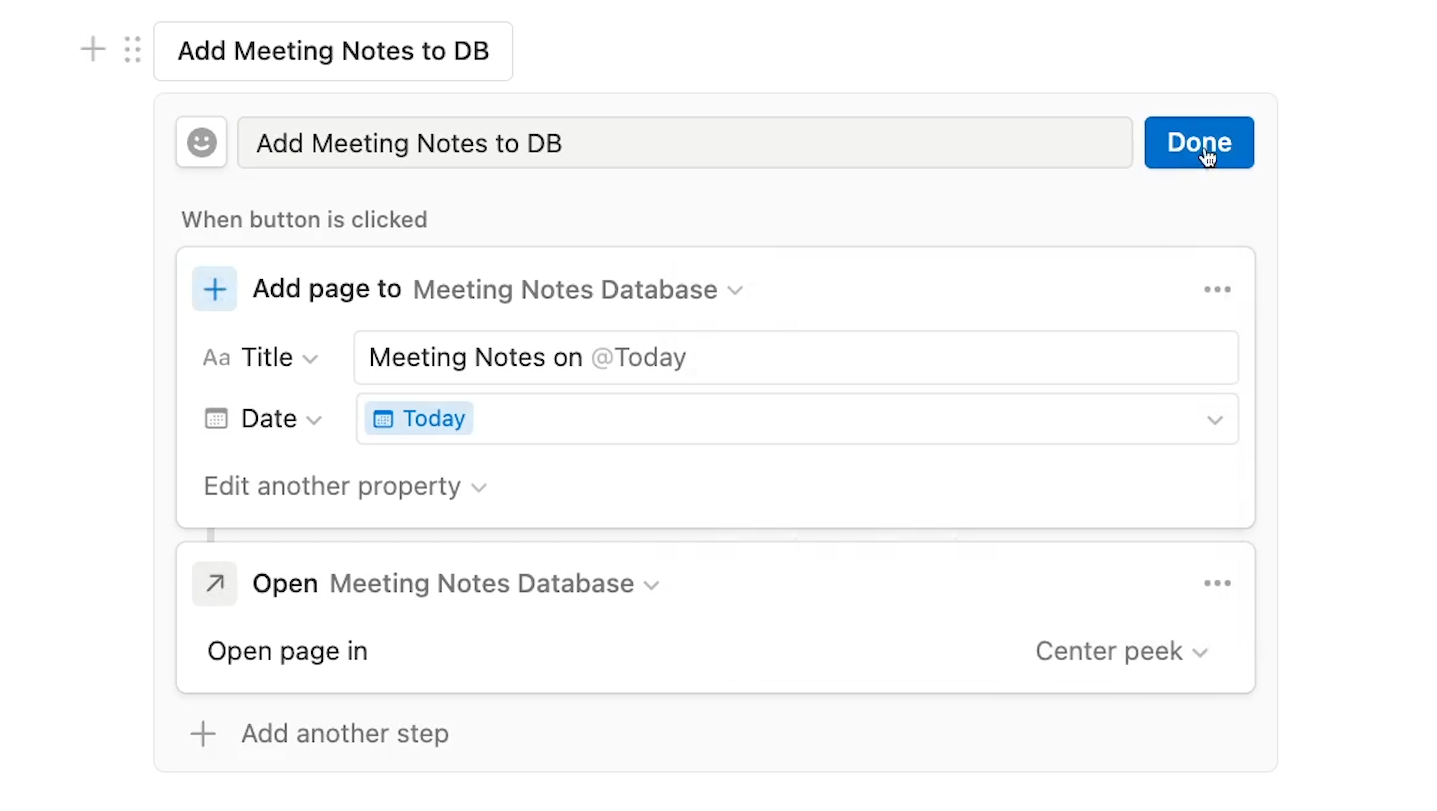
First, choose “Add page to” from the button menu. Then, choose the database you want to add pages to. In our example, we’ll choose the “Meeting Notes Database”.
You can add content to any field that’s already in the database, or just leave them blank. In our example button, we’ll fill in the title and the meeting notes date by adding properties for both, but we’ll leave attendees blank.
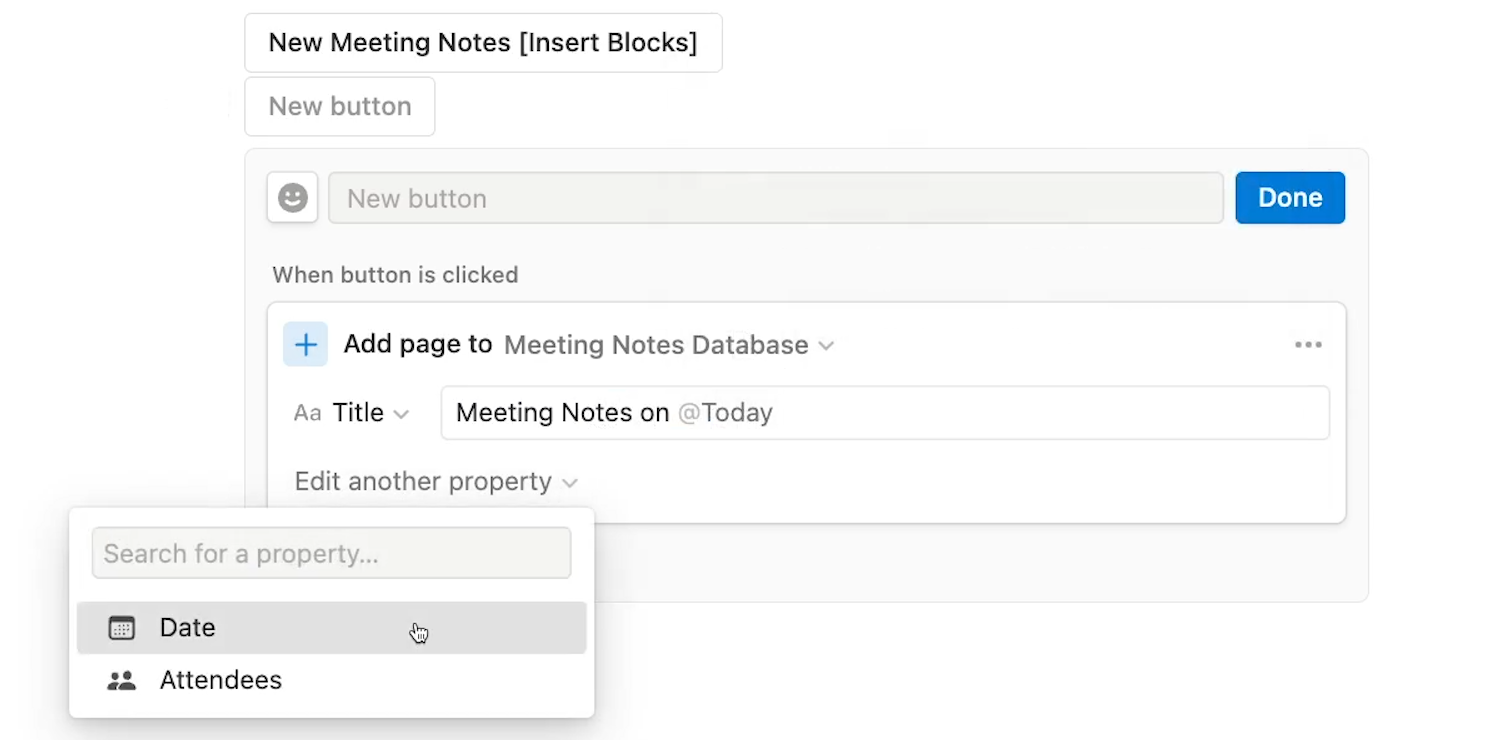
We’ll give our button a title, and click “Done” to save our changes.
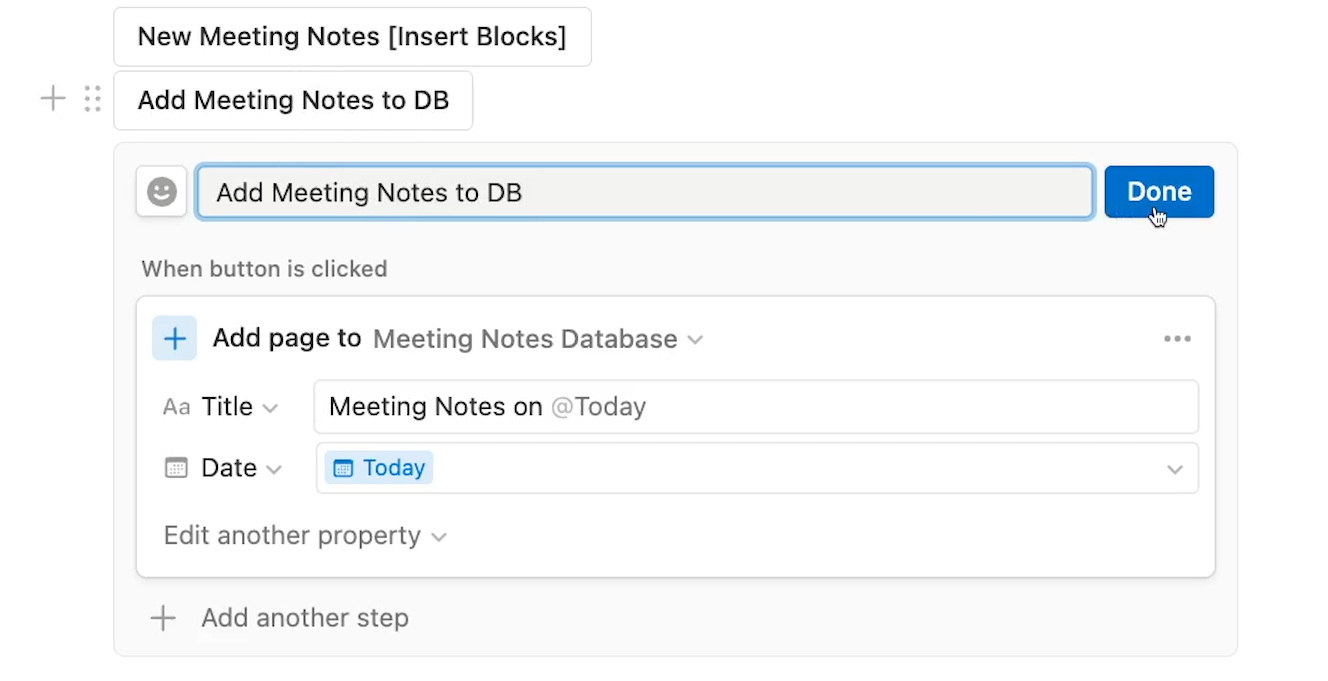
Now, when we click the “Add meeting notes to DB” button, a new page is instantly created in our database.
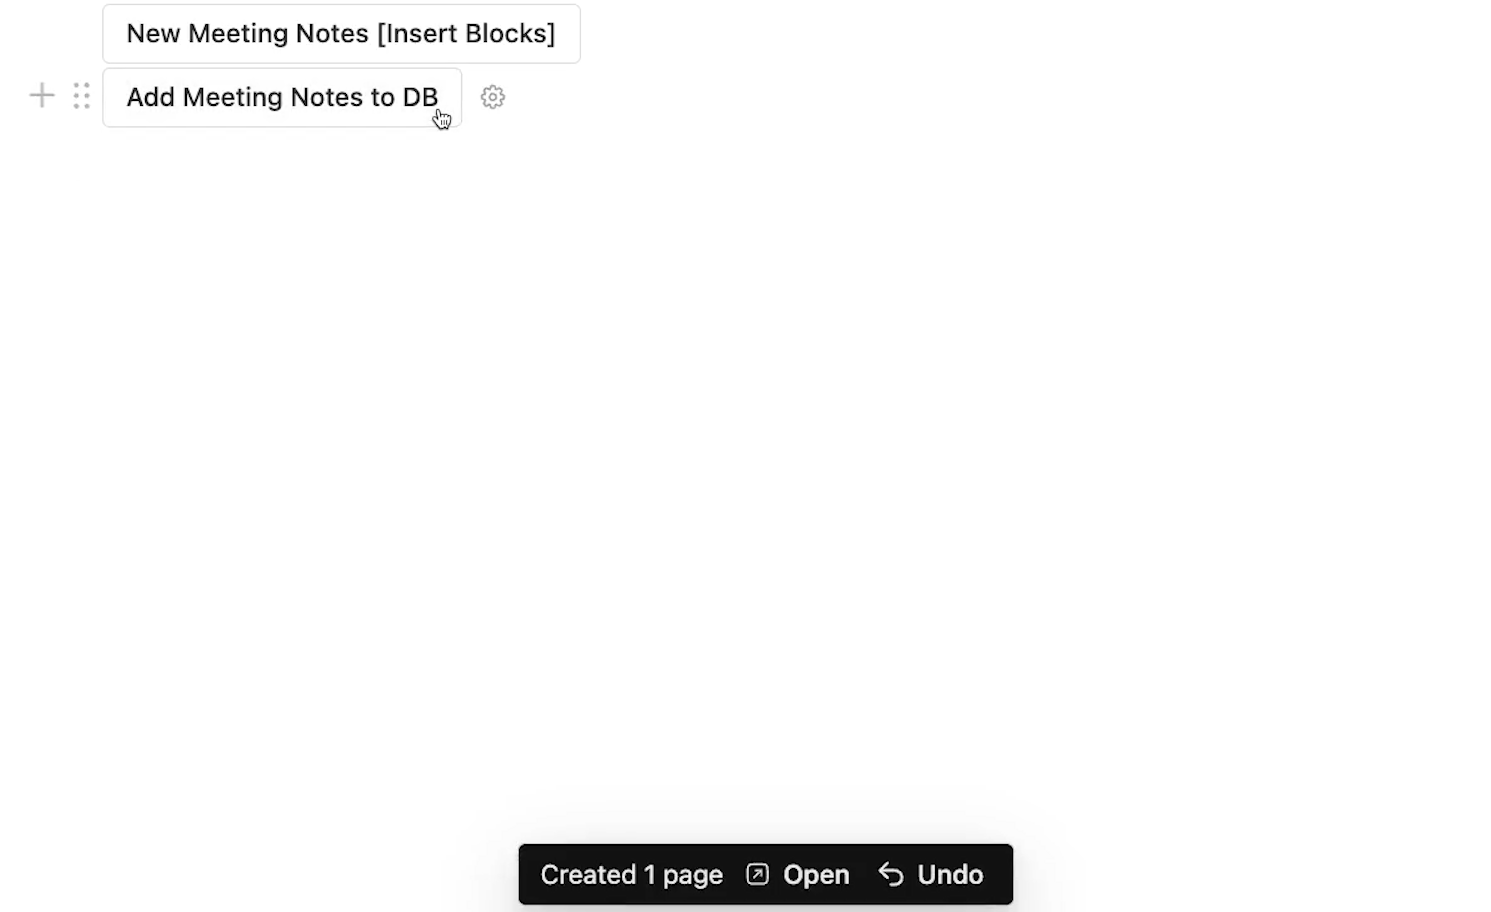
In the pop-up at the bottom of the screen, there’s a handy link that will take us to the newly created page.
Automatically editing pages in a database
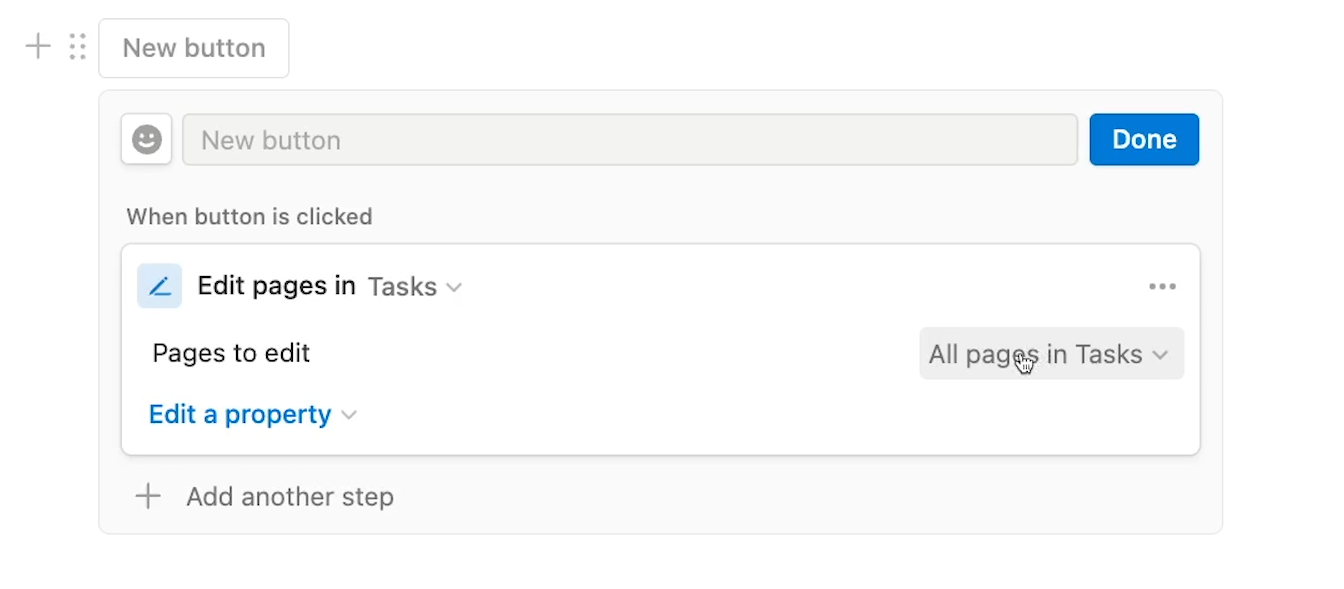
“Edit pages in” will let you automatically update pages in a database based on your own custom filters and configuration.
You can use this function to instantly update dozens or hundreds of records at once instead of making the same changes over and over again manually.
For example, you might want to move the due date for every task that’s currently due on a company holiday.
Or you might want to remove every task that’s assigned to your recently promoted Project Manager and reassign them to your new hire.
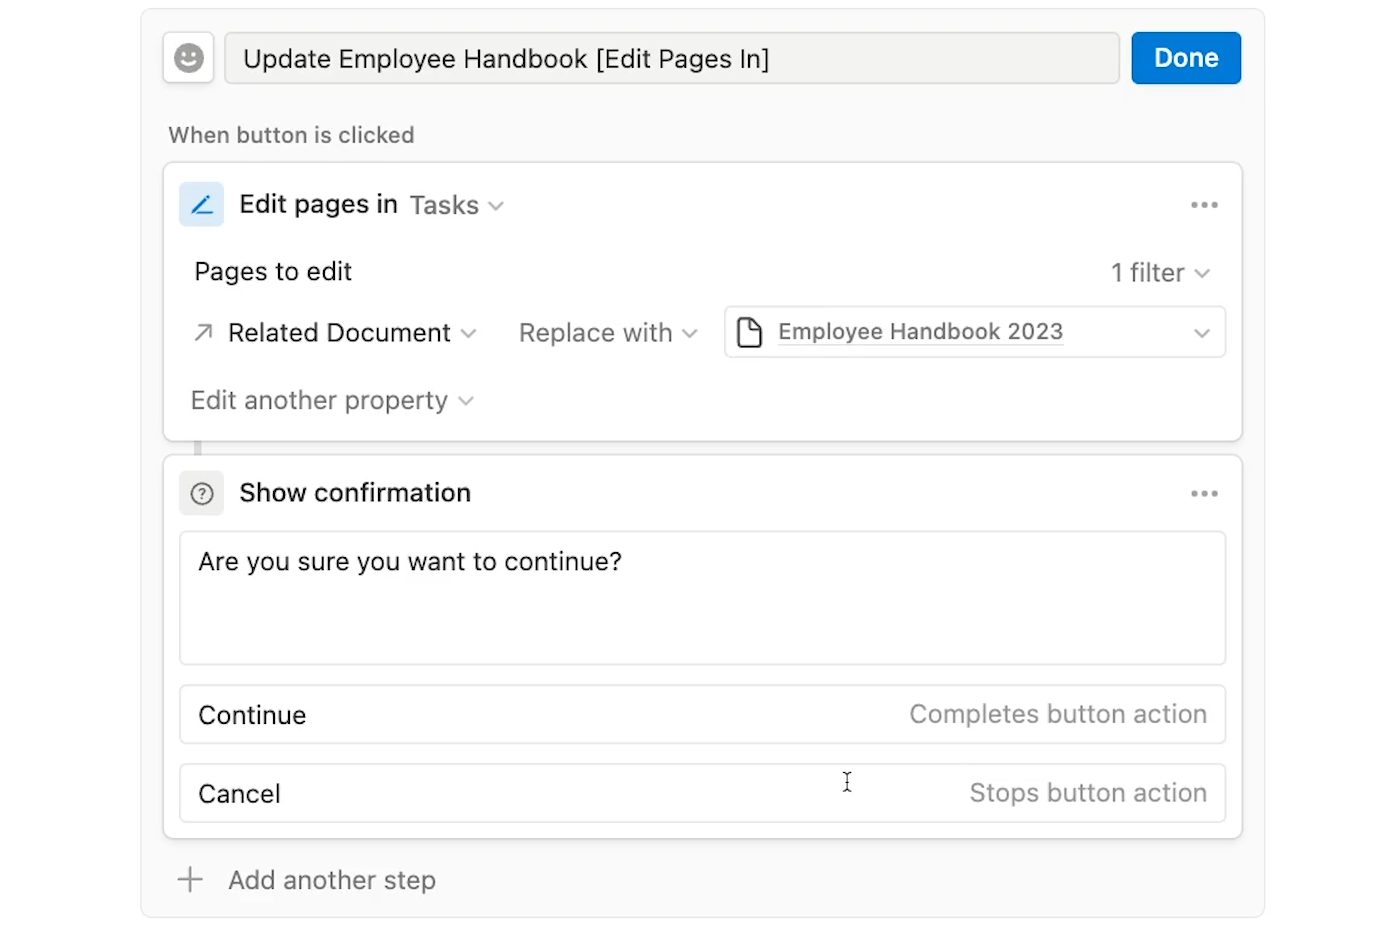
The “Edit pages in” function works with any field type, including “relation” fields.
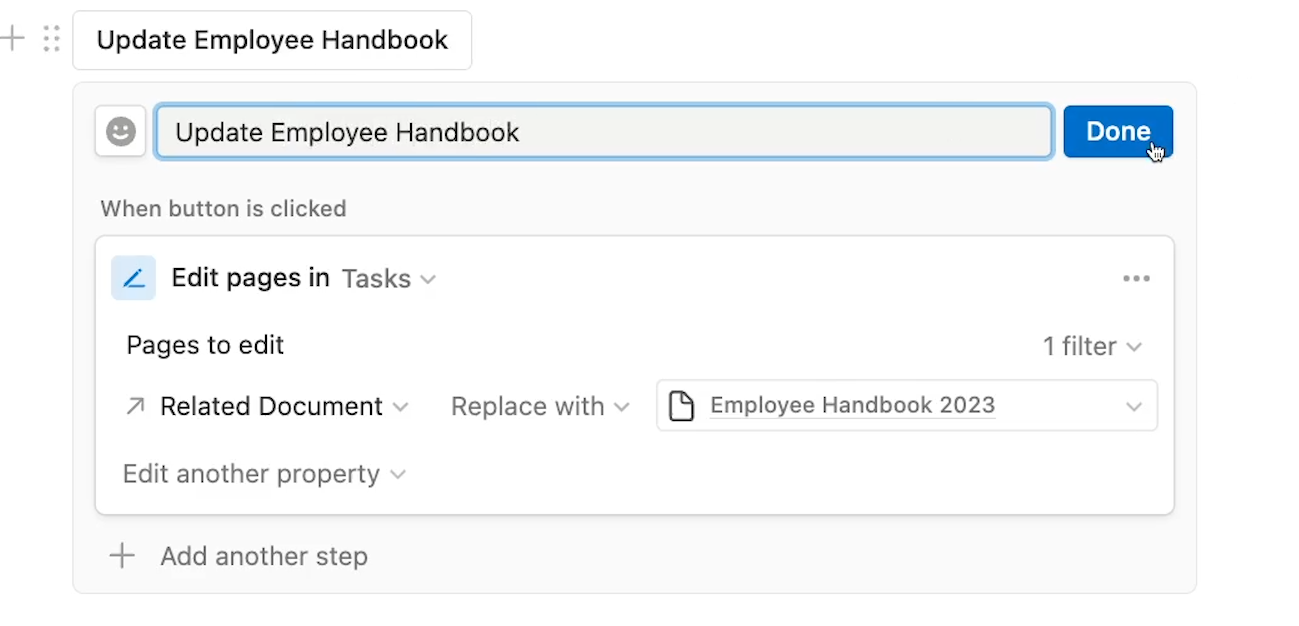
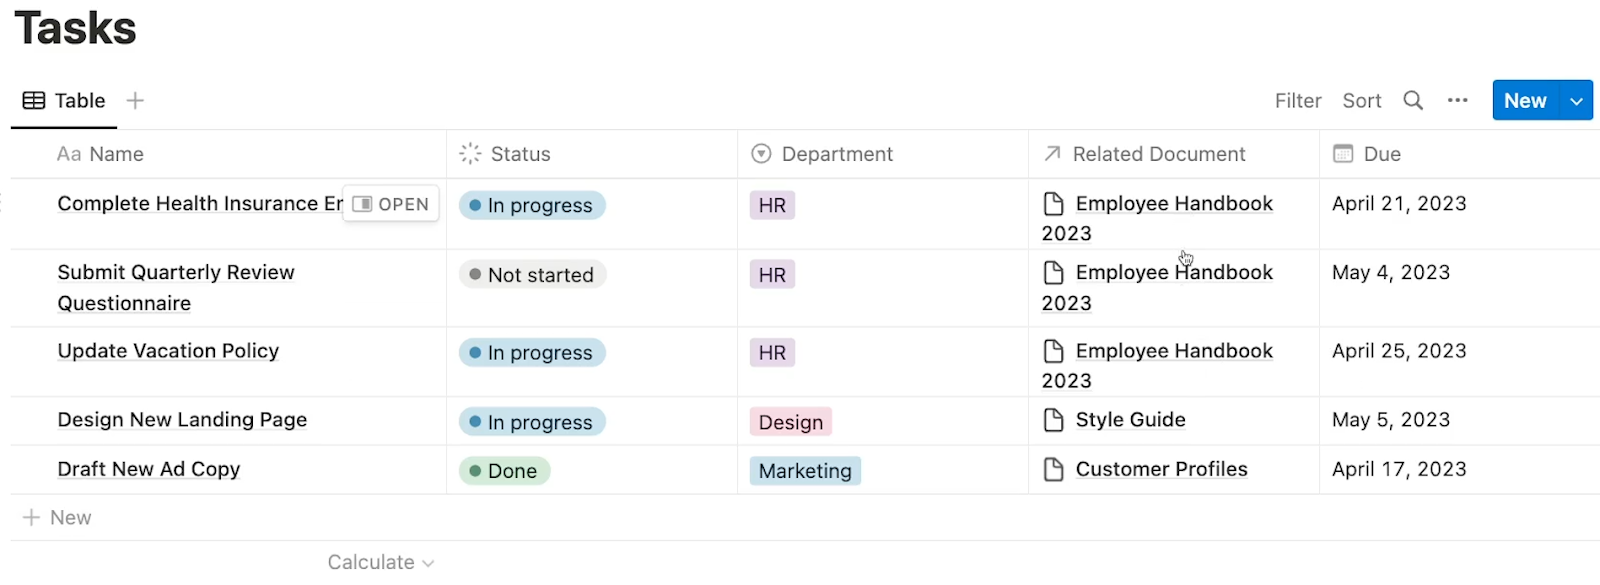
In our example, we’ll update all of the HR tasks in our “Tasks” database with a relation to our employee handbook from 2023, replacing all of the relations to “Employee Handbook 2022”.
First, add an “edit pages in” step to your button. Then, pick a database to edit pages in.
You can edit all pages in the database, or click on the dropdown to add a filter to identify the specific pages you want to edit.
In our example, we’ll set up a filter to only edit the tasks which have their “Department” set to “HR”.
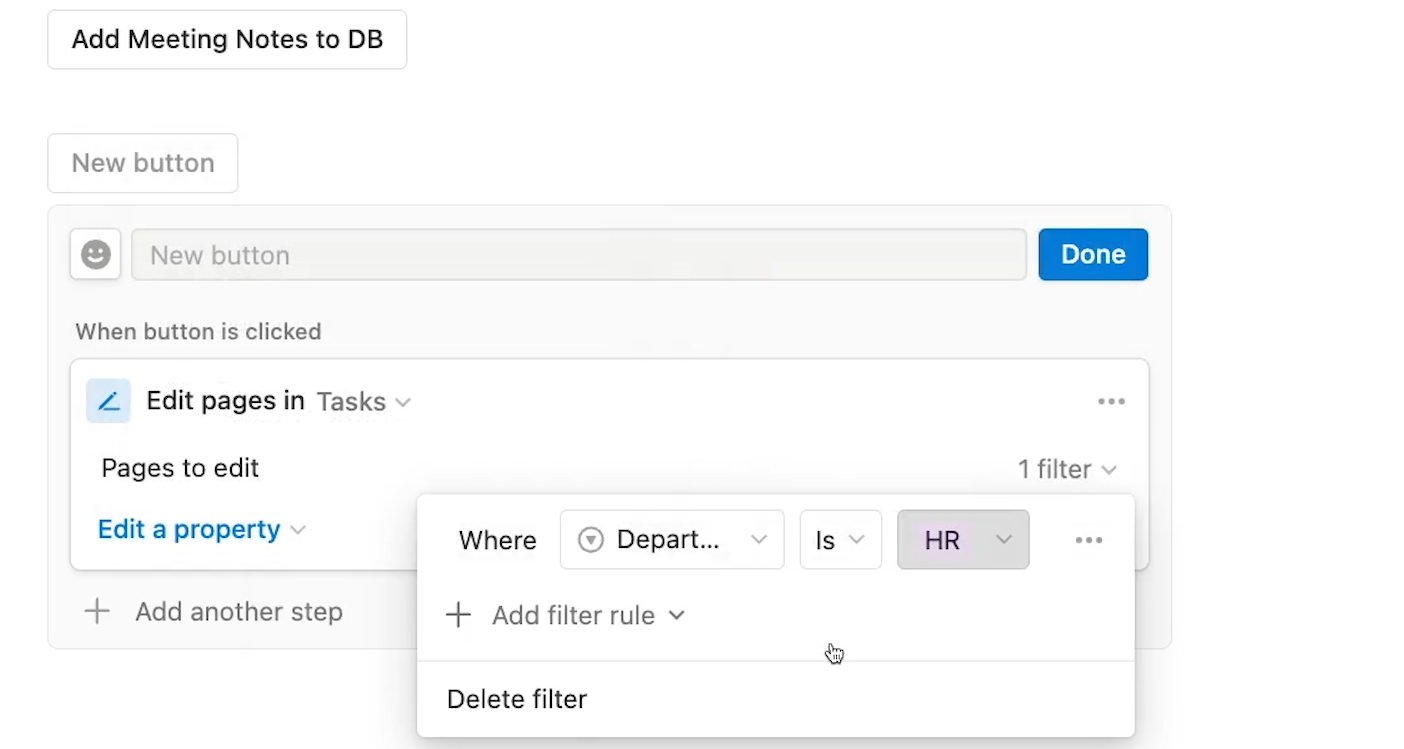
Then, we’ll click on “Edit a property” to update the “Related Documents” field. We’ll select the “Related Documents” property and “Replace with” Employee Handbook 2023.
When you click your finished button, all of your updates will happen automatically. Once the automation starts, there’s no way to stop the changes.
The pop-up at the bottom of the screen tells you how many pages were updated, and gives you a link.
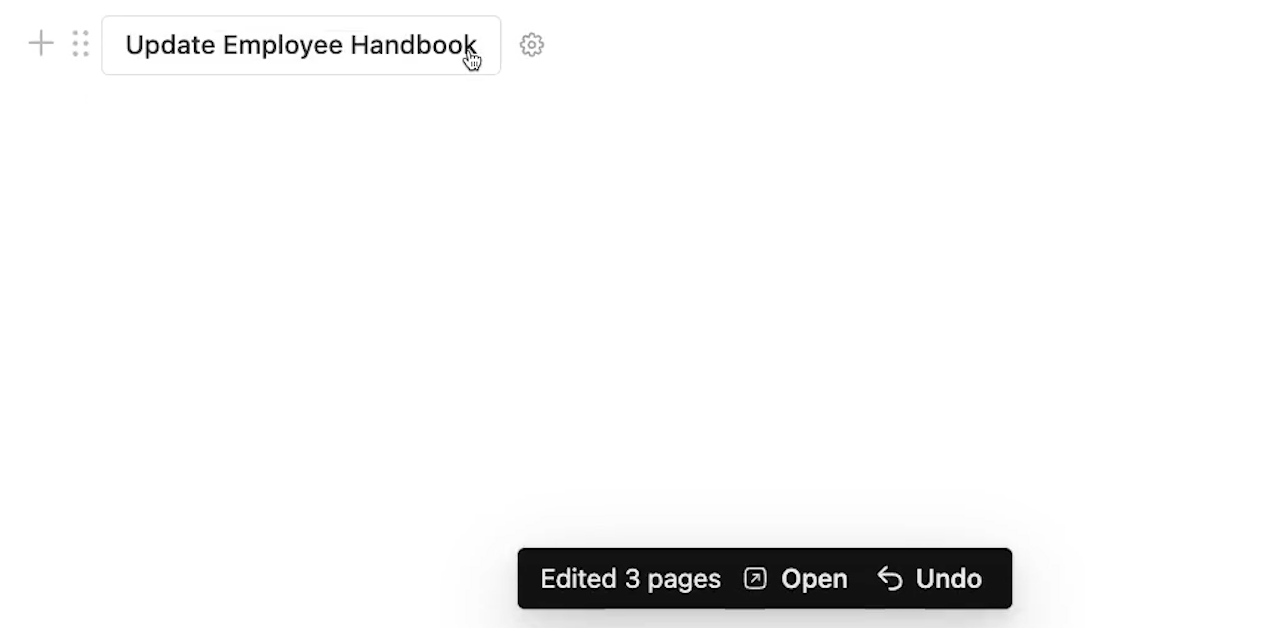
If only one item was edited, then the pop-up will link directly to that one page. If the button updated several items, then the message will link to the edited database instead.
Utility steps: adding confirmation buttons and automatically opening pages
The last two steps we’ll cover today are focused on improving the user experience of your buttons.
With these features, you can add a confirmation dialogue to your buttons, and automatically open a specified page.
Let’s start with Show confirmation.
Show a Confirmation before launching your automations
It can be pretty risky to let users make extensive changes to your databases with a single click. After all, anyone might click it by accident and run hundreds of changes that shouldn’t have happened.
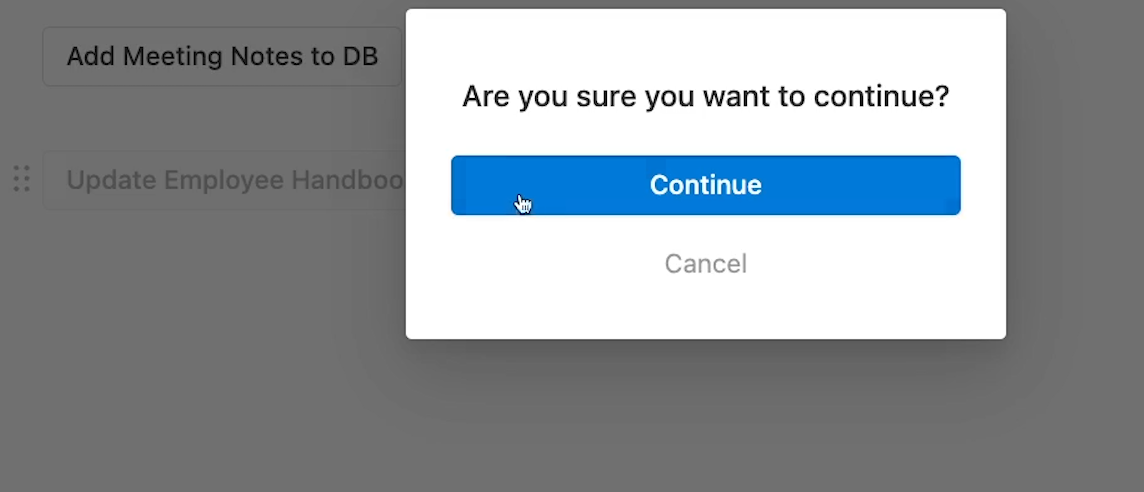
With a Confirmation step, you can easily add a simple safeguard that will prompt the user to confirm their action a second time before running the automations in your button.
To add confirmation to any button in Notion, just edit the button and add a new step. Then, choose confirmation.
You can customize all of the text in the confirmation dialogue, including the labels for both buttons, but we’ll leave them to their defaults in our example.
Then, move the confirmation step up to the top of the list, so it’s the first action that the button performs.
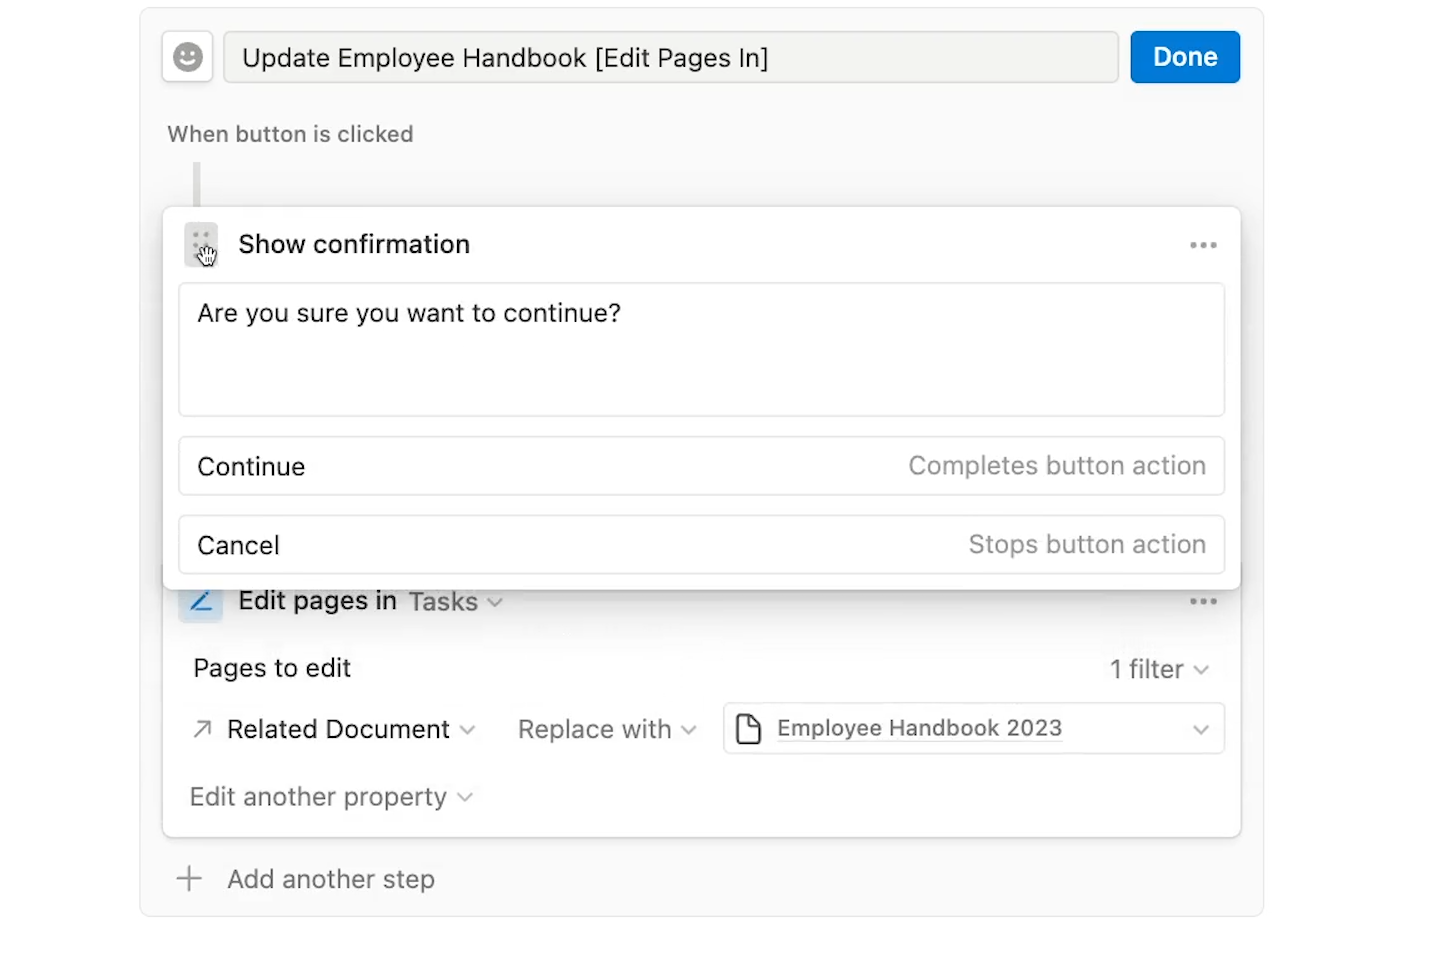
Always make sure to place the confirmation step before the action that you want to include confirmation for.
Click “Done” to save your changes.
Now when you click on the button, a modal pops up asking whether you want to continue or cancel. Clicking “Cancel” will prevent the automation from running.
Automatically open any page
Finally, let’s take a look at “Open page”.
With “Open page”, your button will automatically open up whichever page you choose. This can be a useful function to add to any button that adds new pages or edits existing ones.
The built-in pop-up dialogue will include links to whatever was edited or created, but that message is easy to miss, and opening the page automatically will save you a click.
To add an open page step, add or edit any button in Notion, add a step, and select “Open page”.
Choose the page you’d like to open. We’ll set it to open up the Meeting Notes Database in our example.
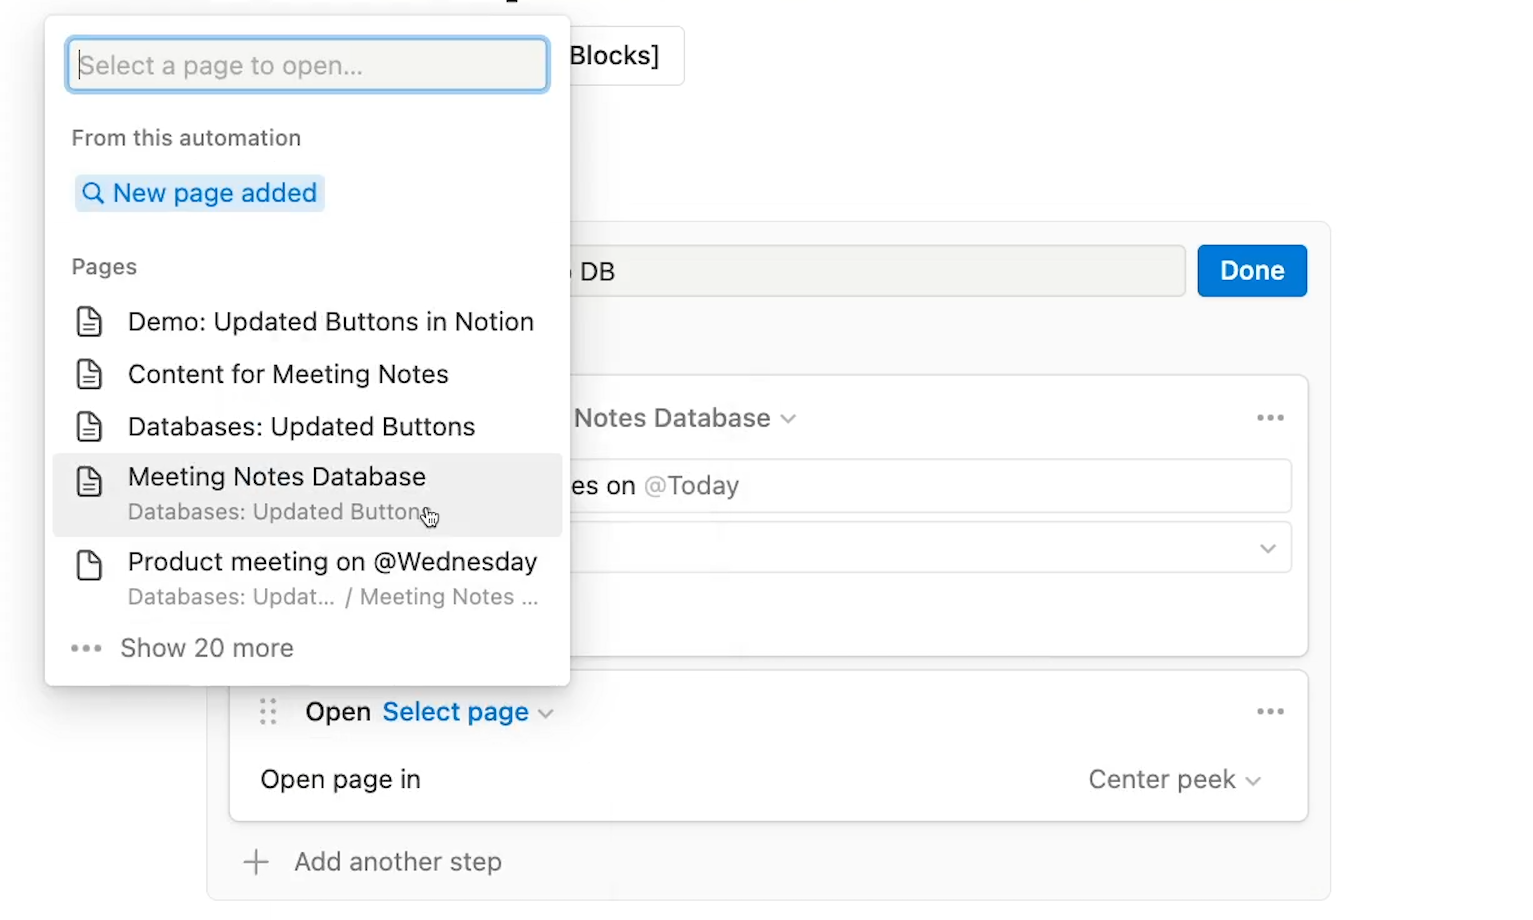
You can choose to have it open up in side peek, center peek or full screen.
We’ll choose center peek, and click “Done”.
Now when we click the button, the new page is created, and the database is opened up automatically.
Automate your workflows with Notion’s buttons
Notion’s new button features preserve everything great about template buttons, and add new automated actions to let you be more productive.
With the ability to create new pages, update database items, and even use AI to create content, these buttons have become surprisingly powerful little tools for workflow automation.
Try them out today, and start saving time on all your tedious tasks in Notion.
If you’d like to explore more tips and tutorials about no-code workflow automation, check out our blog or our YouTube channel. You can also follow XRay on Twitter, Facebook, or LinkedIn.


