No-code and low-code tools let anyone automate their workflows, prototype ideas, and even create fully functional web apps.
One of the best names in the no-code/low-code space is an app that often doesn’t get the recognition it deserves in an industry that’s dominated by Zapier.
In this post, we’re going to show you how to get started with Make.
Formerly known as Integromat, Make is a powerful and affordable platform for no-code and low-code automation.
We’ll show you how to start automating your work with Make today, with absolutely no coding experience required.
We’ll explain what Make is, we’ll show you how to build your first automated scenario step by step, and we’ll give you a preview of Make’s unique features that simplify complicated automation logic.
First, what is Make?
Make is a no-code and low-code automation provider. As we’ve already alluded to, you might recognize it by its previous name, Integromat.
They rebranded the app over a year ago and made some changes behind the scenes. However, for users, the platform works in the exact same way.
If you’ve used Integromat in the past, you can think of Make as the same thing with a new coat of paint.
For those who never used Make under any name, here’s how it works:
Make lets you connect two or more web apps to automate actions in those apps with scenarios.
In your scenarios, you can specify that whenever a certain event occurs in one app, Make should automatically perform one or more actions with another app.
For example, a scenario might look like this:
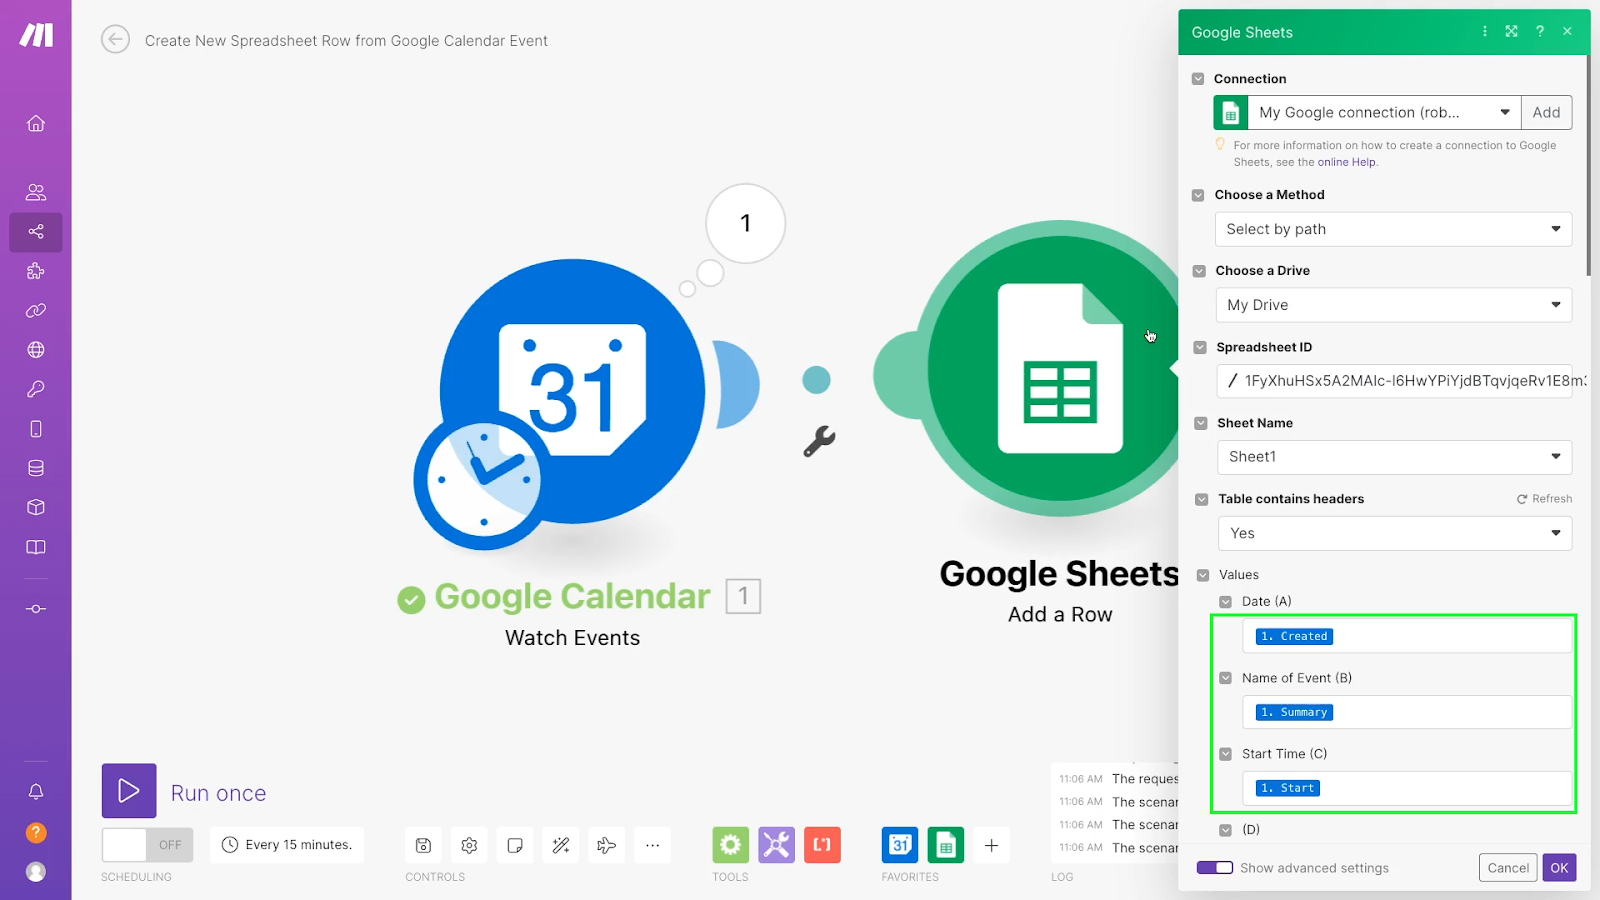
Whenever a new event is added to Google Calendar, create a new spreadsheet row in Google Sheets with the details of the event.
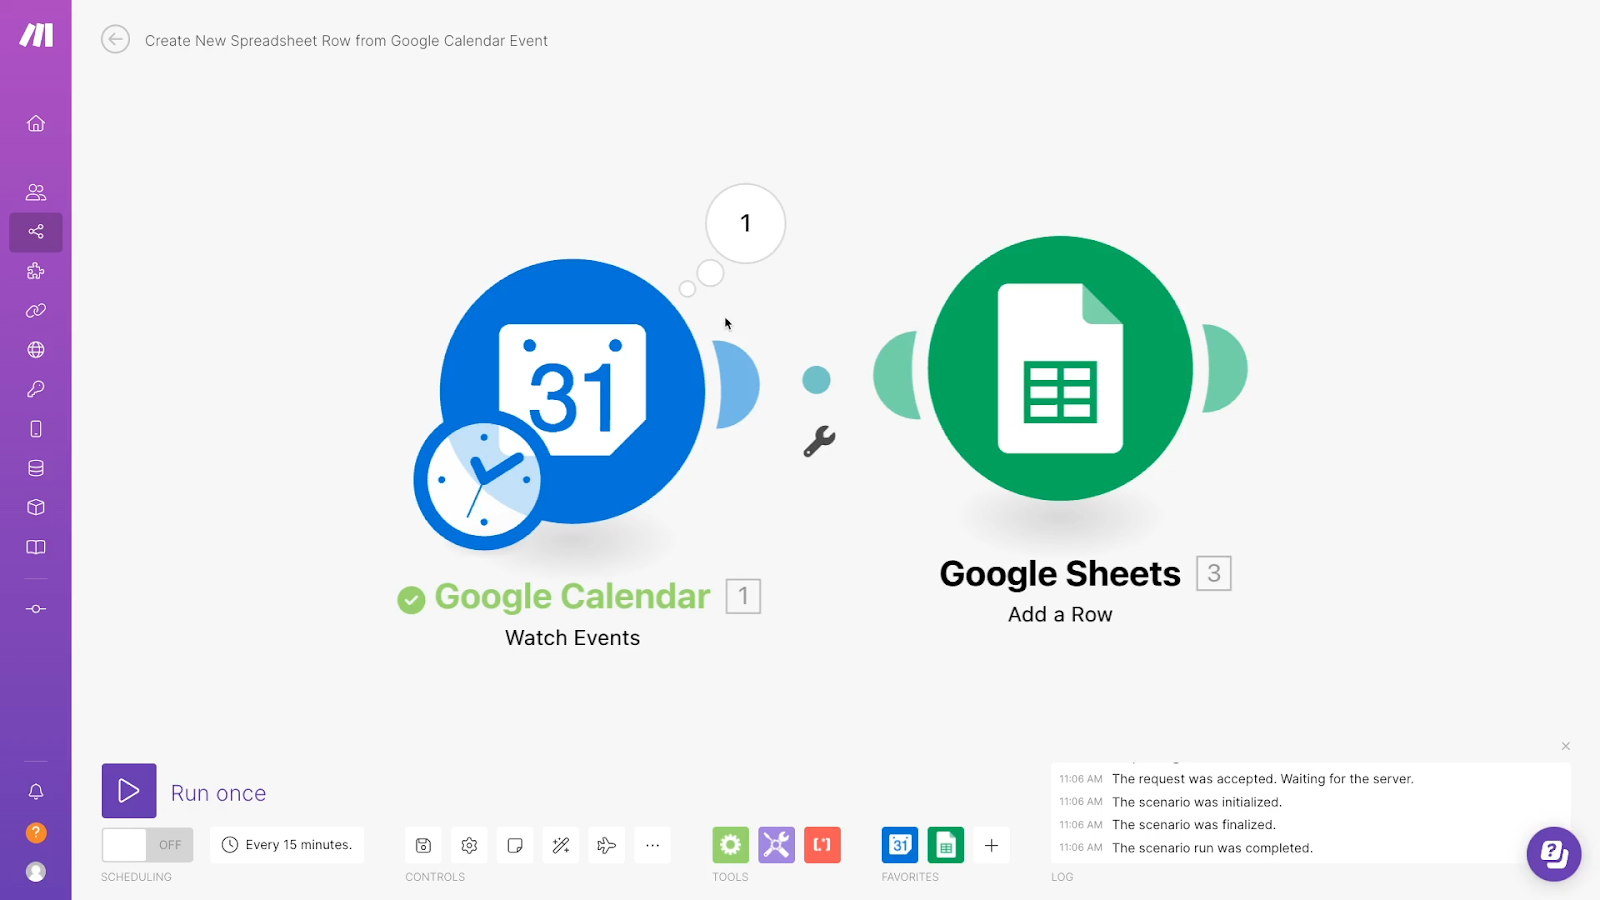
The first circular module is our Google Calendar trigger, and its parameters specify exactly what the scenario should watch for - new events in our chosen calendar.

The second module is our Google Sheets action, detailing which data should be added to which column, and pulling that data from the Google Calendar event retrieved in the trigger.
You might also build a scenario with Gmail, OpenAI, and Slack.
Whenever a new tag is added to an email in Gmail, summarize the contents with an OpenAI prompt. Then, send the resulting summary as a DM in Slack, our team’s messaging software.

You can see a very similar setup here compared to the first example: a Gmail trigger, an OpenAI action, and a Slack action.
Automations like this can all be built without writing any code at all. Everything is built with a drag-and-drop visual interface.
However, compared to competitors like Zapier, Make is also great at supporting low-code automation
A low-code automation augments a no-code workflow with very small amounts of code, like an API call to perform an action that isn’t natively supported in Make, or a Regex script for precise text parsing and replacement.
So if you have some coding experience, or want to learn a bit about coding, Make is a great platform to use for automation.
However, coding knowledge is not necessary at all to use Make, and this tutorial will not require writing a single line of code.
Before we build our first scenario, let’s take a look at how scenarios in Make work.
As you’ve already seen illustrated with a couple of examples, every automation in Make is built on the same basic structure
Every scenario consists of a trigger module, and any number of actions and searches that follow that trigger.
Let’s add a little more context to those terms.
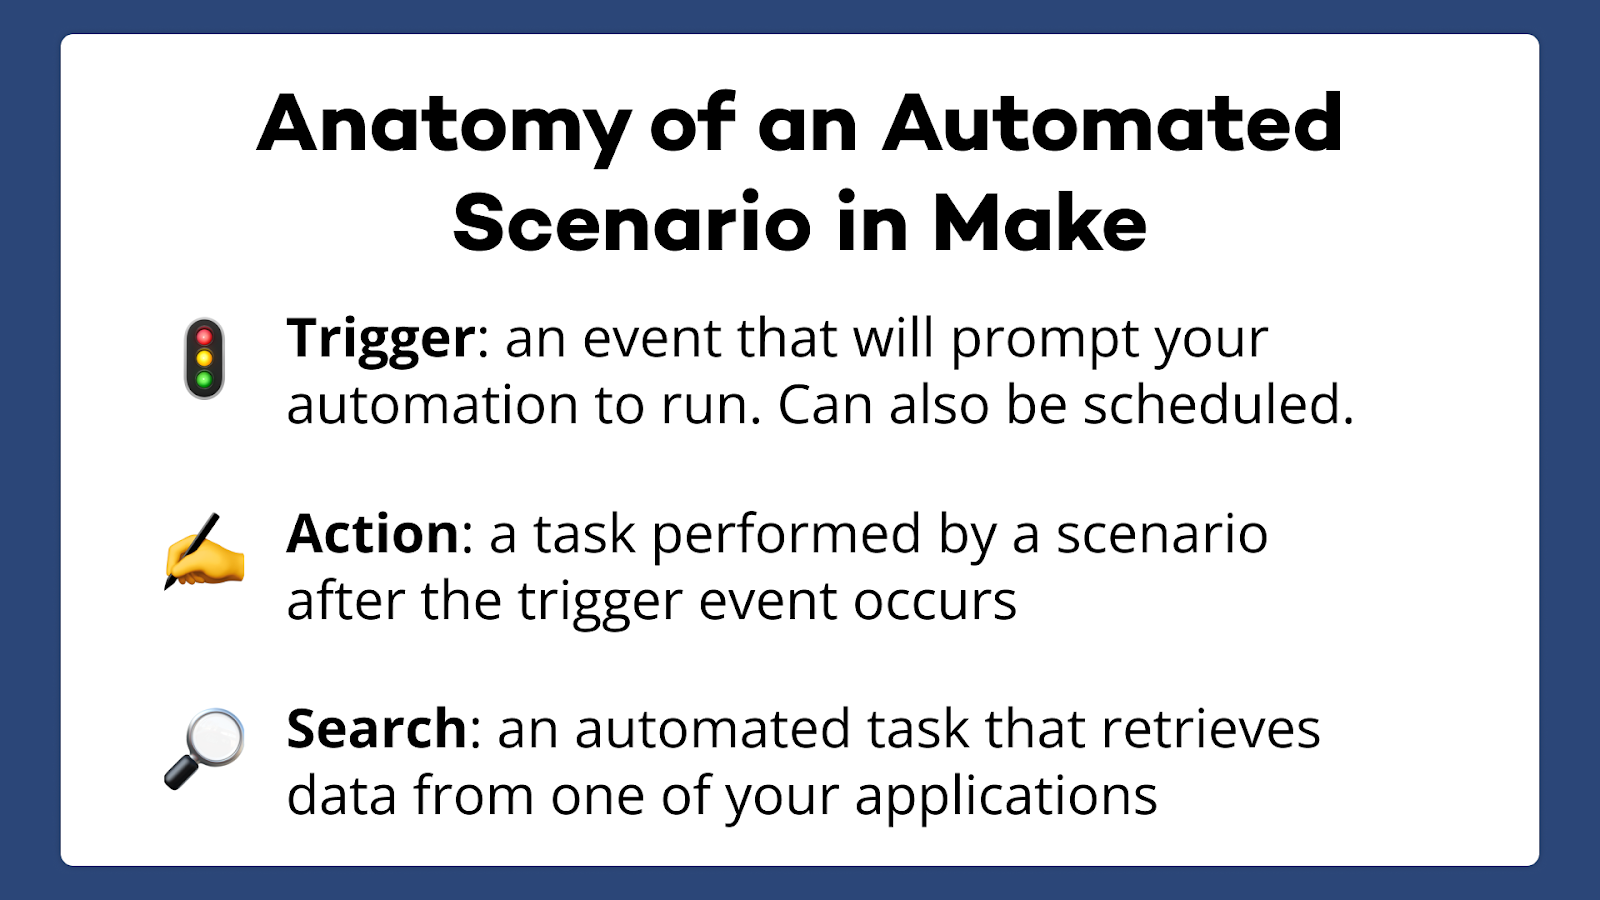
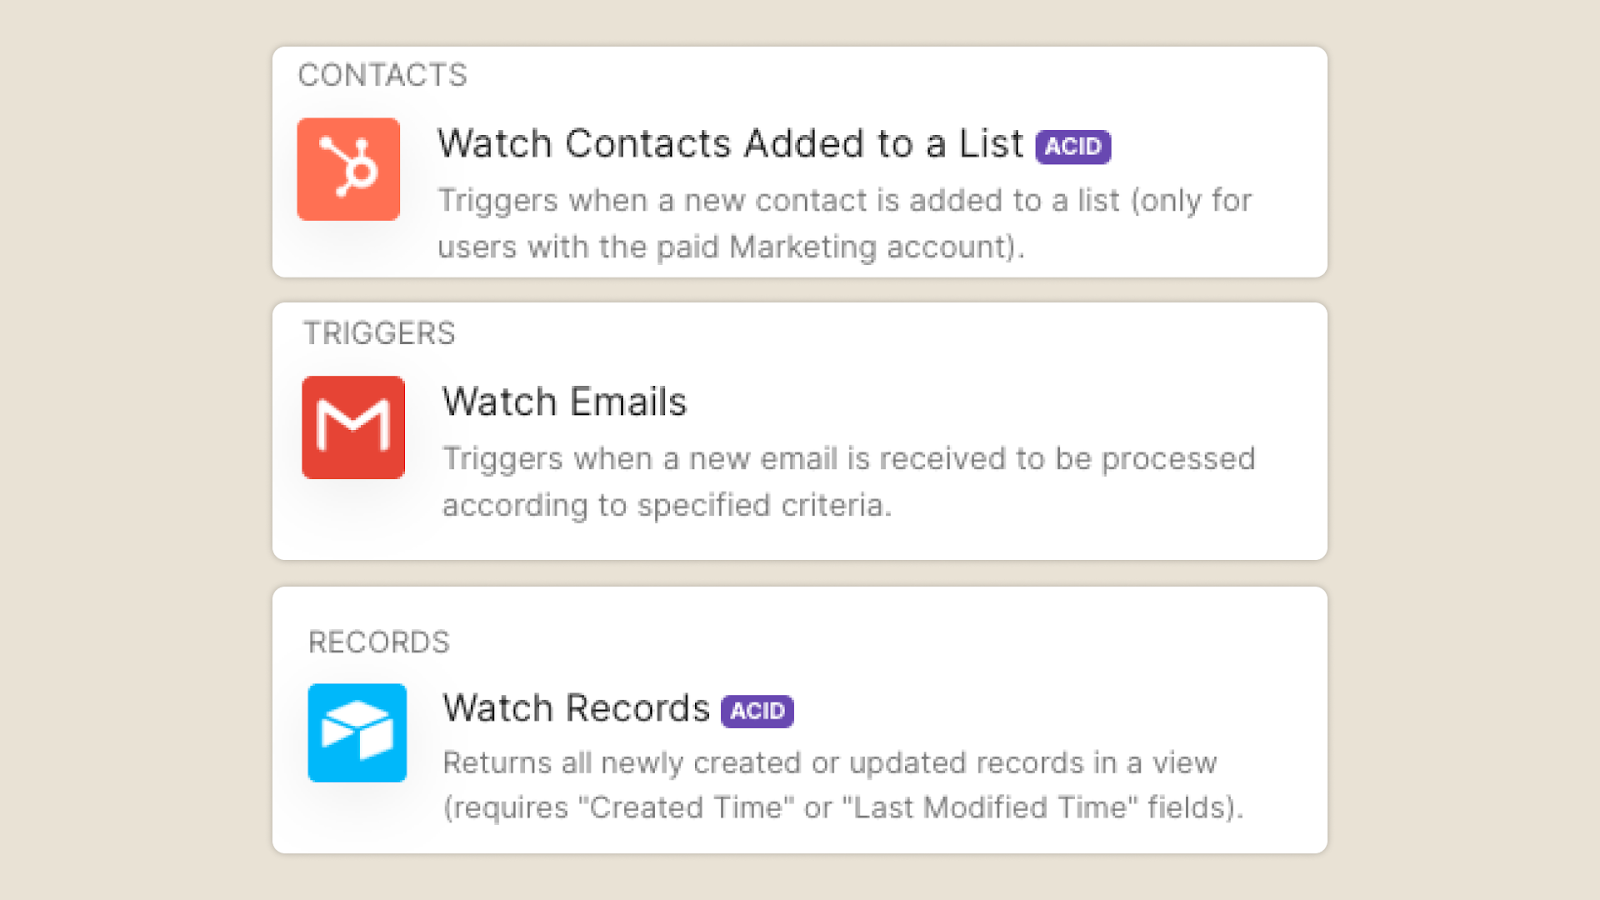
In an app like Make, a trigger is the event that prompts your automation to run. A trigger can be based on an event in any app that Make supports.
For instance, your trigger can be configured to run when you add a new contact in Hubspot, when you get an email in Gmail, or when a new record is added to a view in Airtable.
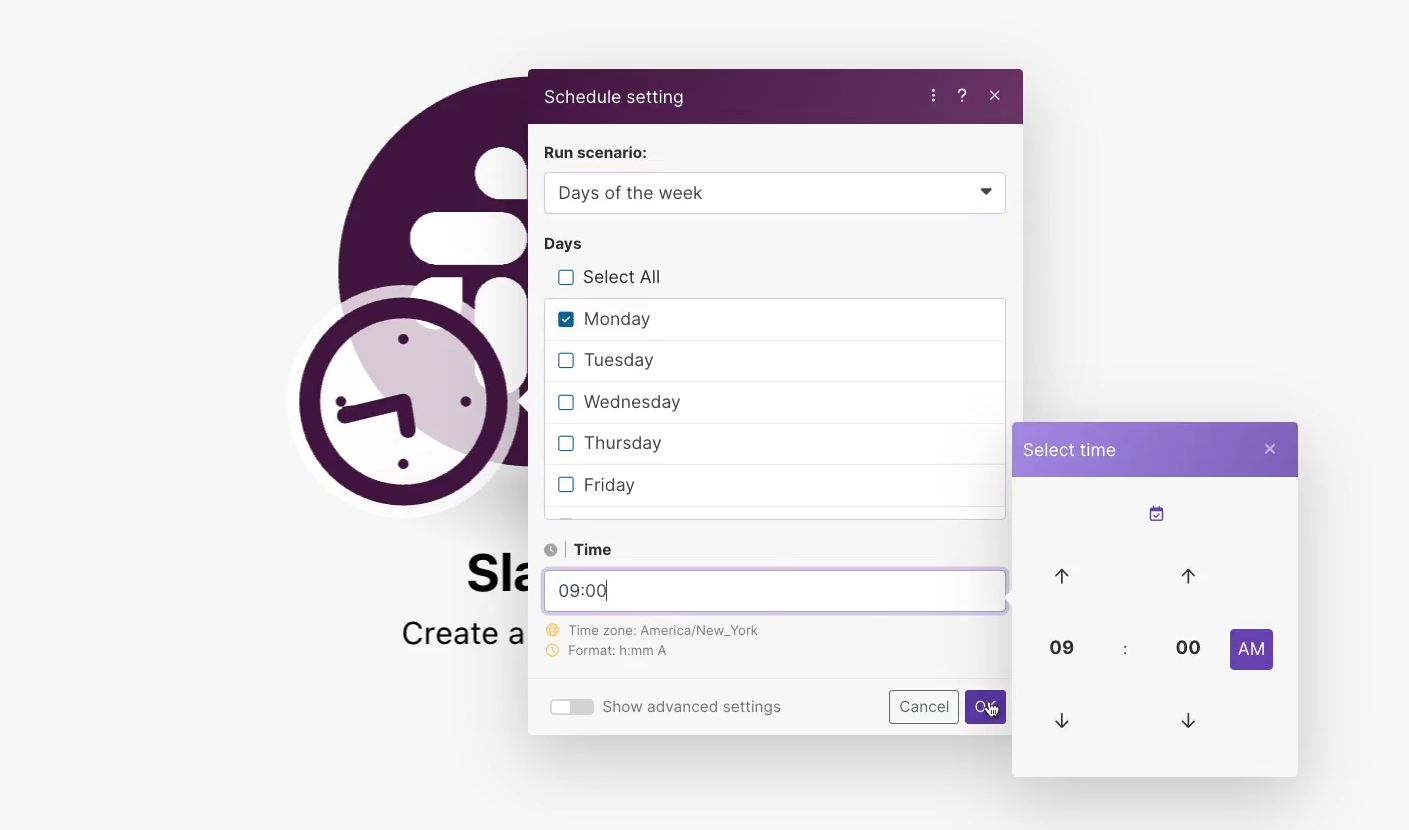
You can even schedule the automation to run at a specific time, rather than waiting for a particular event to occur in a designated app.
For instance, you might schedule a Slack message to send in your #general channel every Monday at 9:00AM that asks your team to share their focus and their goals for this week.
Once the trigger event is fulfilled, your automation needs something to do.
An action module will automatically perform any action that you configure.
This could be something like creating a new document from a template in Google Drive or Notion, adding or updating rows in spreadsheets, sending messages through email, Slack, or teams, and much much more.
You can also use modules in your Make scenarios to find data instead of creating it. This is what we call a search module.
For instance, you might want to look up a record in a spreadsheet app like Google Sheets or Airtable, or you might want to find a contact in a CRM like Hubspot or Pipedrive.

You can use a search module to find those records, then use an action to send that data to another app.
There are thousands of apps and countless events that can be automated with Make, so we can’t cover them all with an exhaustive list in this guide.
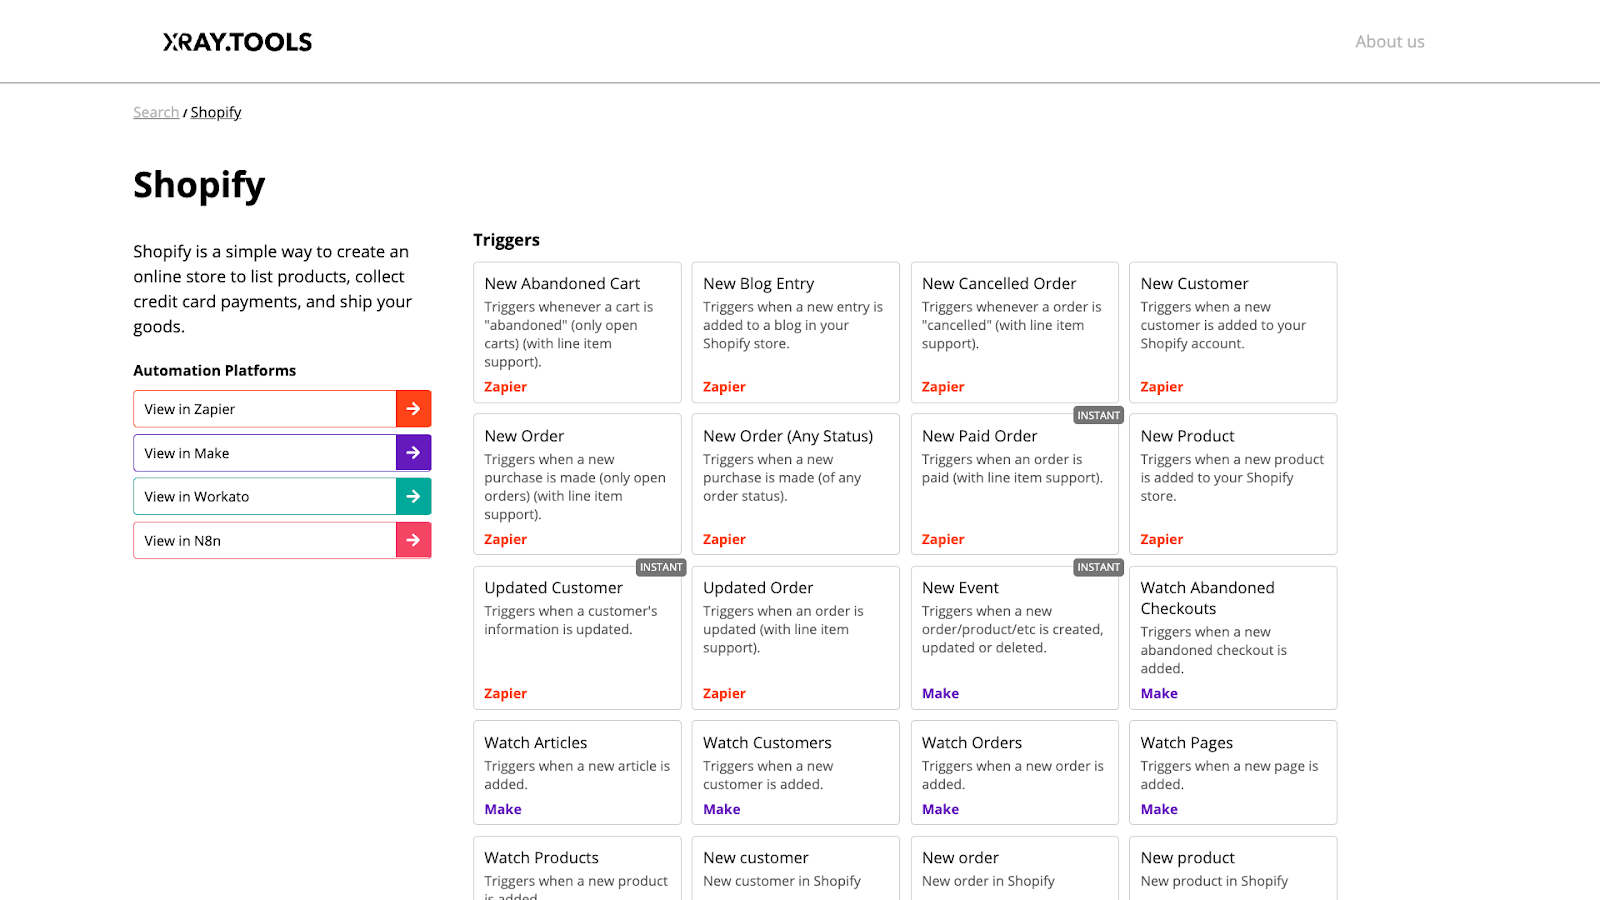
However, we do have an easy way for you to find out if Make supports the apps that you’re already using.
Just go to www.xray.tools, and search for the software that you use today, like Google Drive, or Microsoft Teams, or Shopify – any web app that’s part of your day-to-day work.
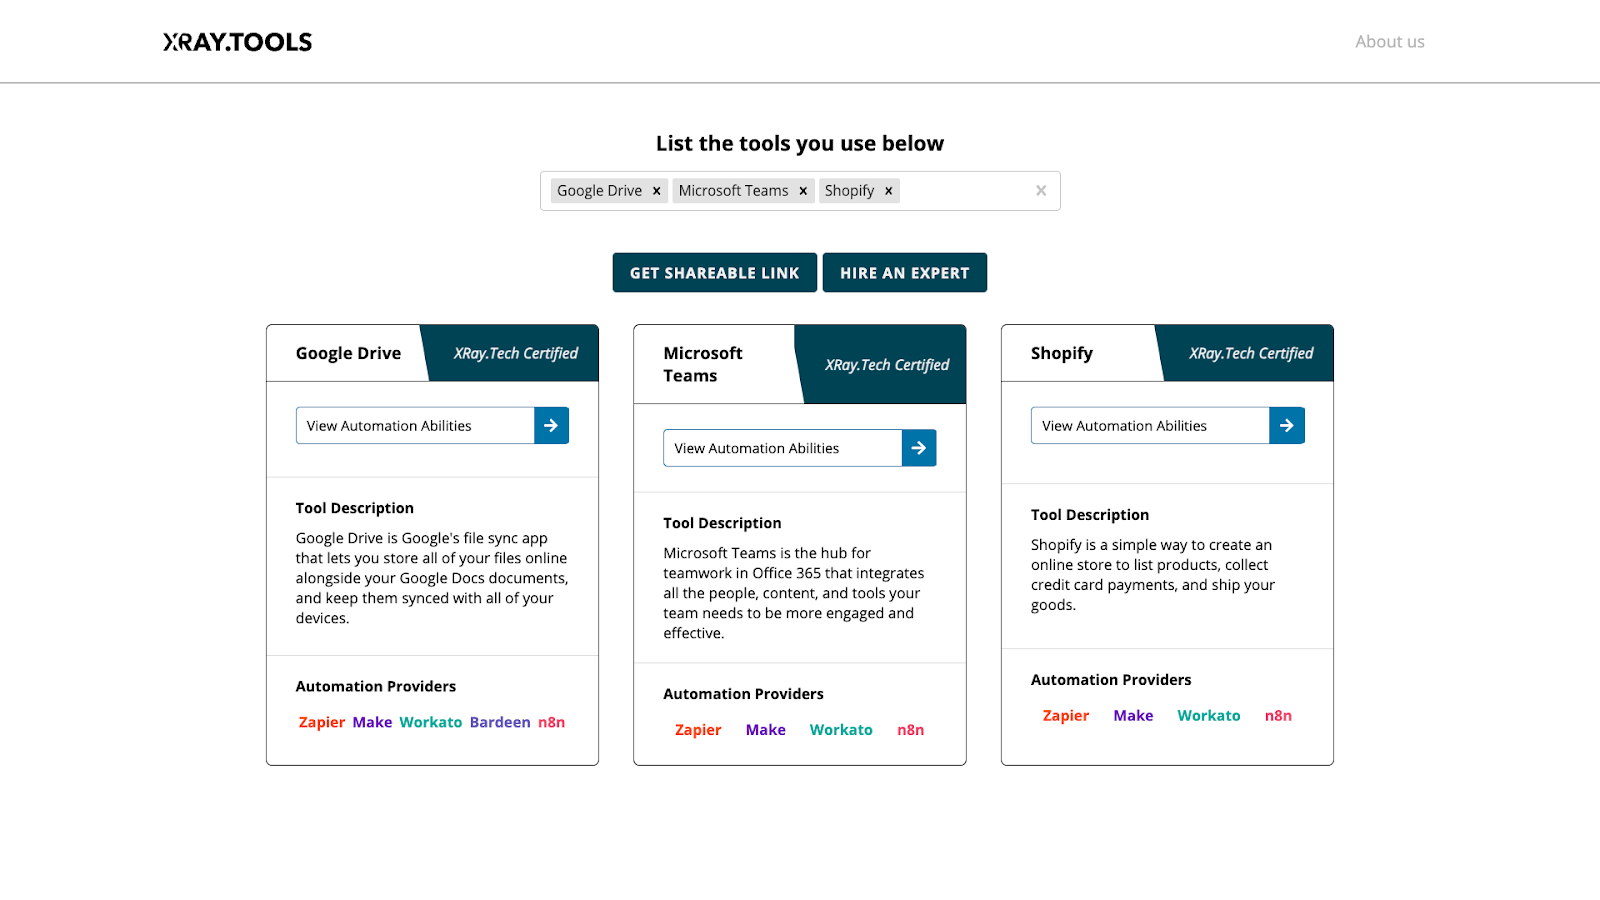
Then, XRAY.Tools will return a list of every available trigger, action, and search for your app in Make, Zapier, Workato, and other platforms.
While every automated scenario in Make begins with a trigger and at least one action, you’re not limited to a strictly linear flow.
With tools like routers, filters, and various functions, you can build versatile scenarios that respond appropriately to different input.
We’ll give you a preview of these options a bit later on in this guide, but you can also check out our other Make tutorials for more detail.
For now, let’s start building our first scenario.
For our example, we’ll build a simple automation that sends an alert in Slack whenever a new event is added to our Google Calendar.

Once we’ve built and tested the basic automation, we’ll add a simple function to improve the formatting of our scenario’s output.
We’ve chosen these apps because they both offer free signup, and they’re very simple to use for this tutorial. You can use different software in your scenario if you’d like.
Make uses a similar configuration setup for most apps.Once you learn how it works with a couple of tools, you’ll be able to apply those same concepts to nearly anything else you want to automate in Make.
Some of the specific configuration options might not be relevant to your apps, but the same principles will still apply.
Everything we’ll do today can be built with a free Make plan.
Make’s paid plans unlock additional features, which you can learn more about in our Zapier vs. Make comparison article.
To get started, you’ll need to sign up for Make if you haven’t already, and log into your account. You should also log into Google Calendar and Slack.
Open up Make and click on “Scenarios” on the left hand panel.

Next, click on the plus sign next to “Folders” to make a new folder where you can store your scenario.
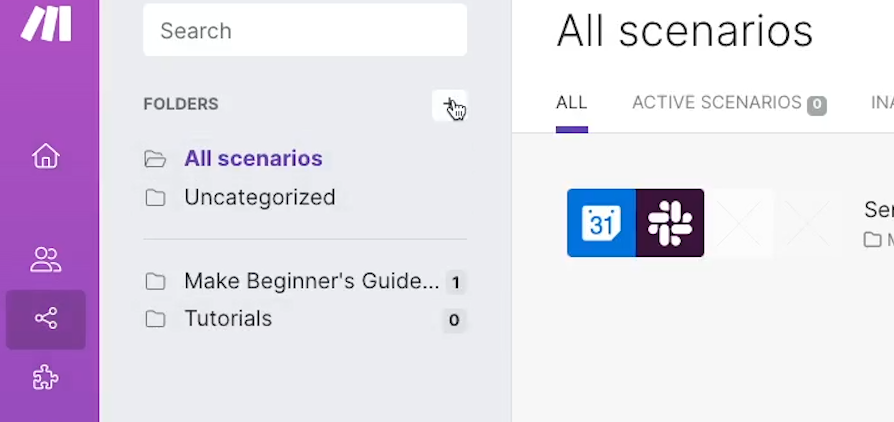
Give your folder name like “Make Beginner’s Tutorial”, and click “Save”.
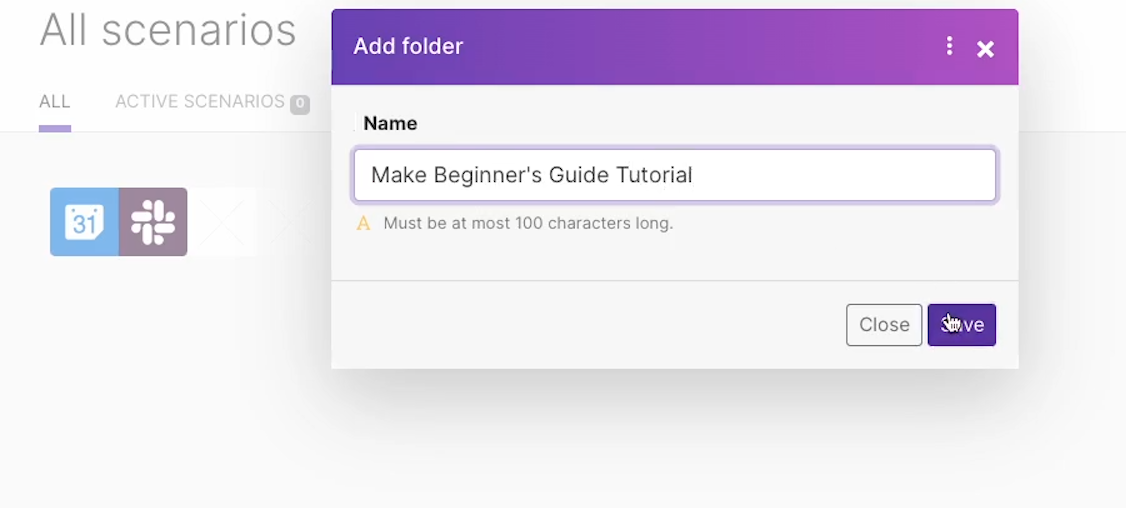
This isn’t strictly necessary. You could always just make a new uncategorized scenario. However, we’d always recommend staying organized from the very beginning.
Building the habit from the outset will make it much easier for you to find and maintain your automations later.
Select your newly created folder, then click the “Create a new scenario” button to make a new scenario within that folder.
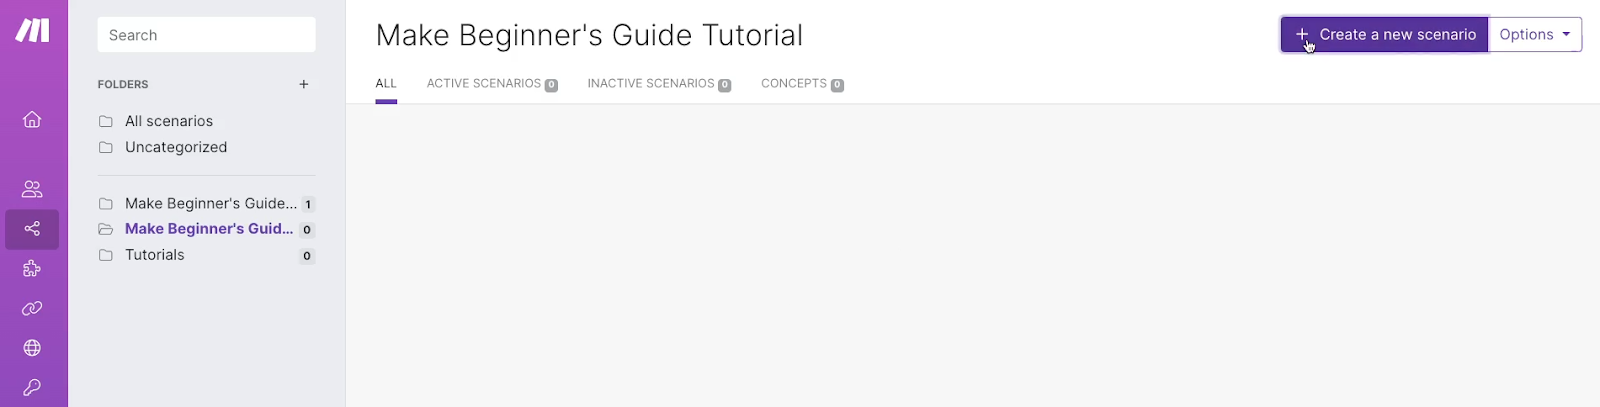
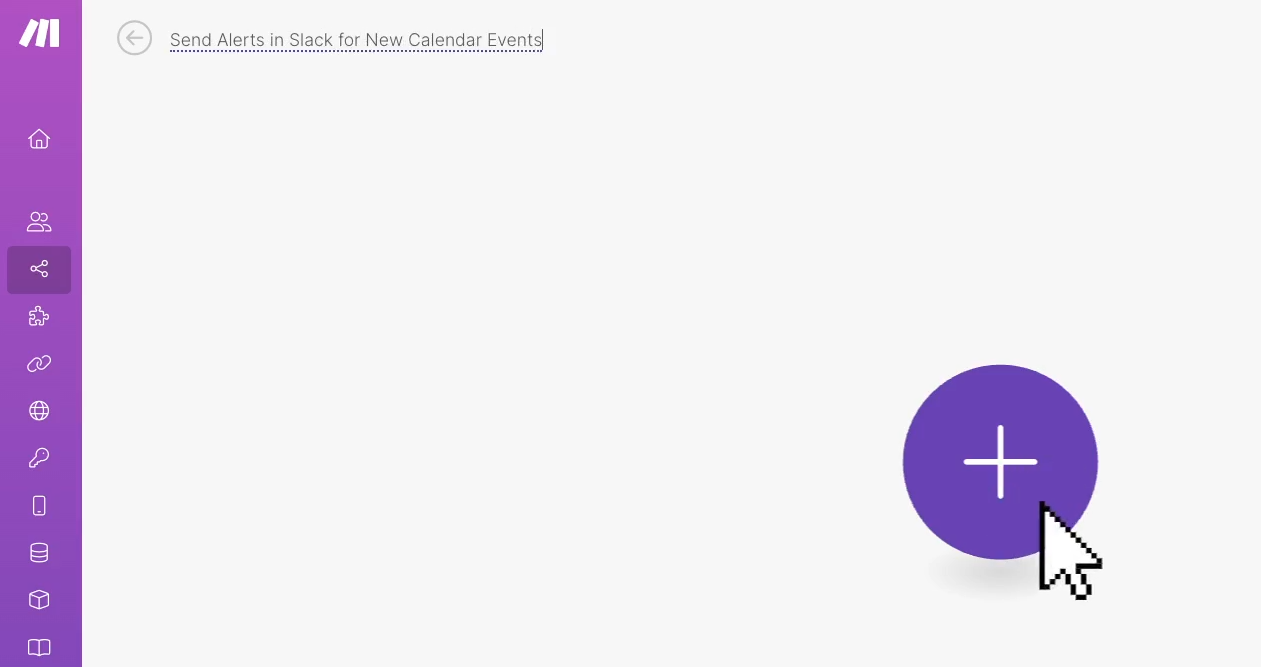
Make will now open up the scenario builder. Right away, you should give your scenario a descriptive name. We’ll call ours “Send Alerts in Slack for New Calendar Events”
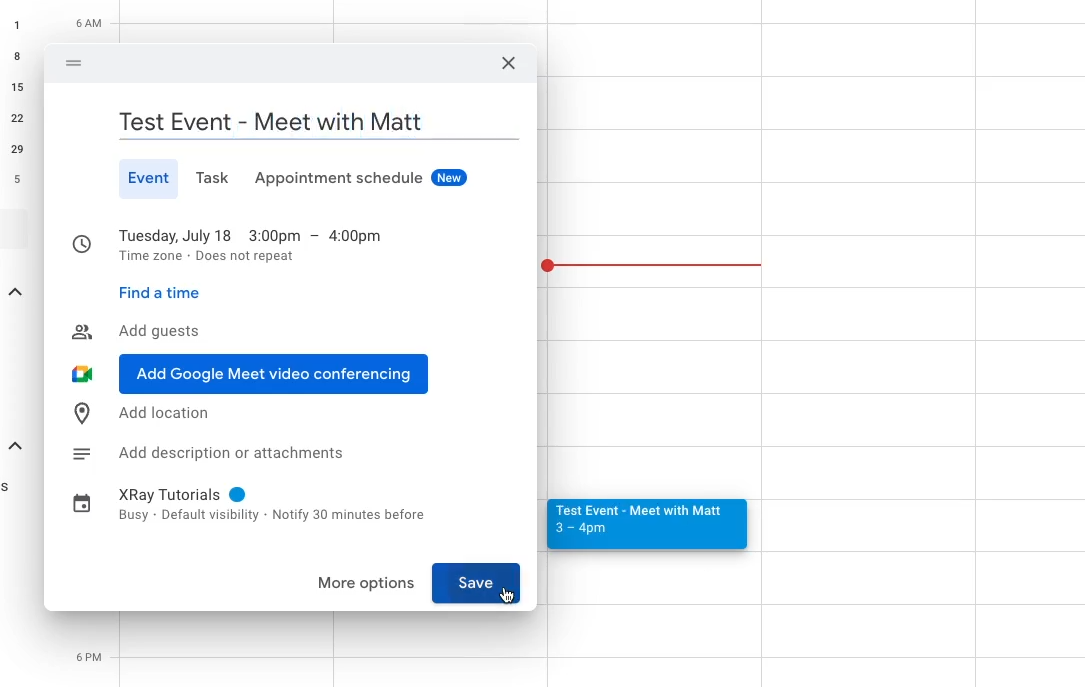
Before we start building, we need to have some data to test our scenario with. Whenever you’re building an automation in Make or similar platforms, you always need to have test data to confirm your automations work correctly every step of the way.
In this case, that means you need to have an event already on your calendar. Create an event that you can use as test data.
In our example, we’ll create an event called “Test Event - Meet with Matt”.
Now, we can go back to Make’s scenario builder and add our trigger.
Click on the plus button in the middle of the screen to add a new trigger module. Then, search for the app you want to use. For our example, we’ll search for Google Calendar.
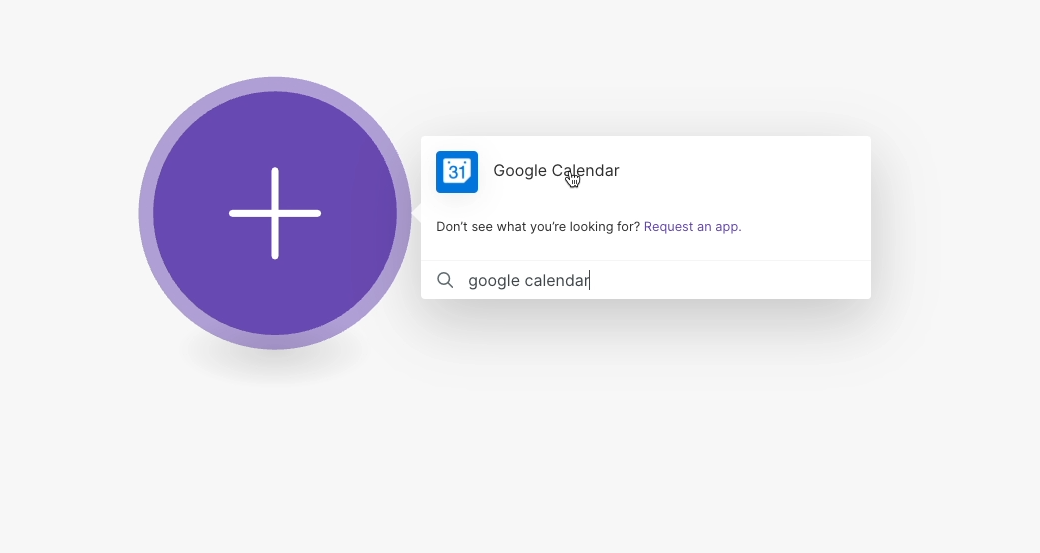
Click on your app when it pops up in the list of search results.
Next, you’ll need to choose the exact trigger event you want to use. Each event will include a short description of what it does and how it works.
Unlike Zapier, Make doesn’t always sort events into separate “trigger” and “action” categories. You’ll see triggers, actions, and searches all in the same spot.
Triggers usually start with “watch” or “new”, rather than “create”, “find”, or “get”.
We’ll choose “Watch Events” to watch for new events added to the calendar

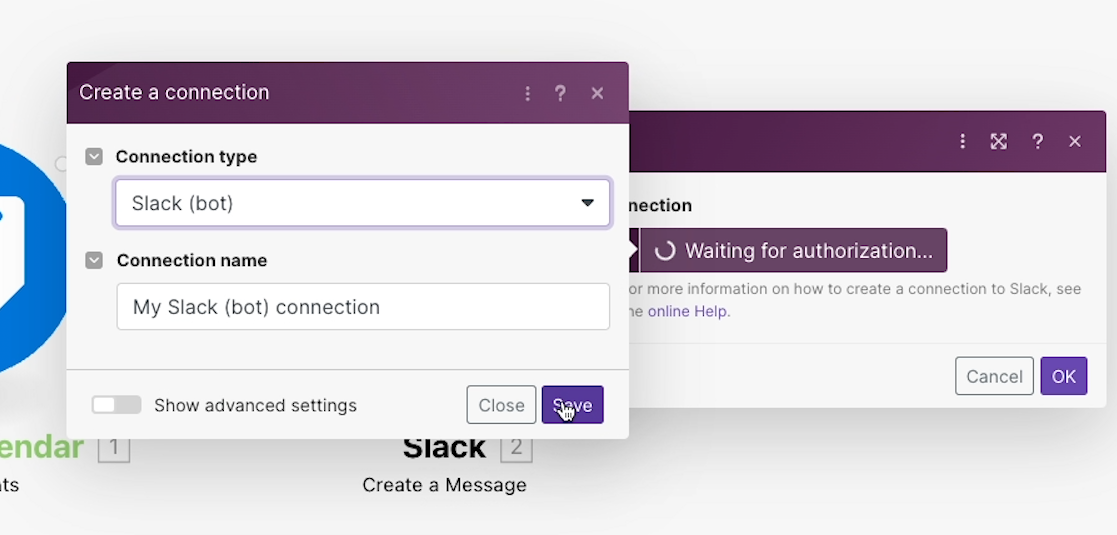
Once you’ve chosen your trigger, you’ll be prompted to create a connection.
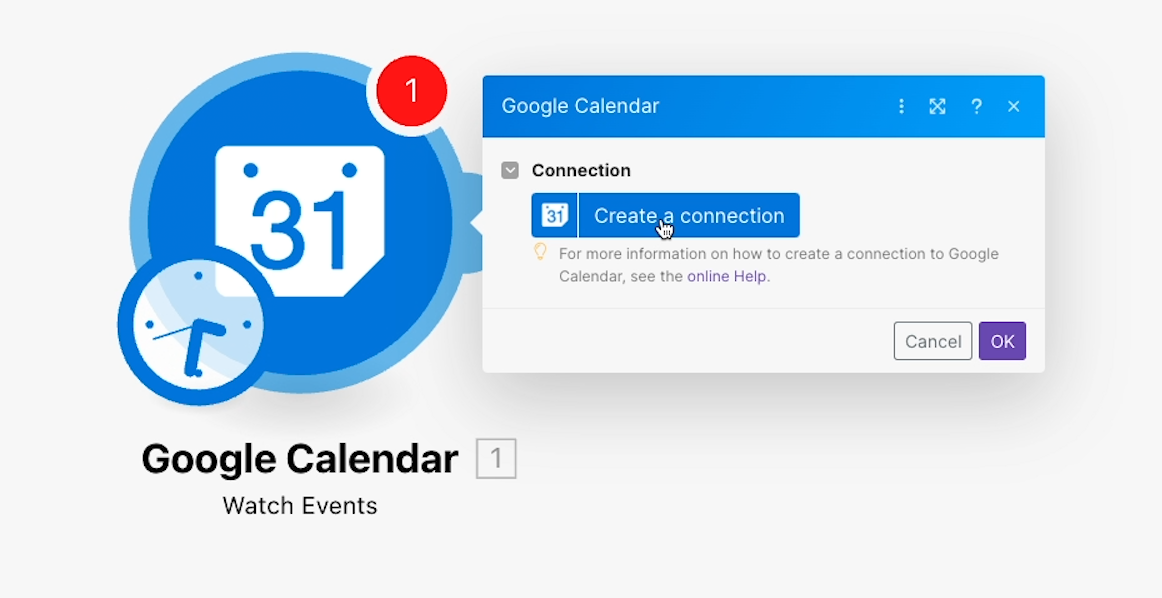
To automate any app in Make, you need to log into that app and authorize Make to act on your behalf. To start, just click “Create a connection” to authorize Make with your app.

Next, you’ll see this warning about Make’s rebrand.
Since Make used to be called Integromat, your app may still use that name during the authorization process.
This is nothing to worry about. Make and Integromat are the same product made by the same company, so it’s still safe to authorize the app even if it’s using the name “Integromat”.

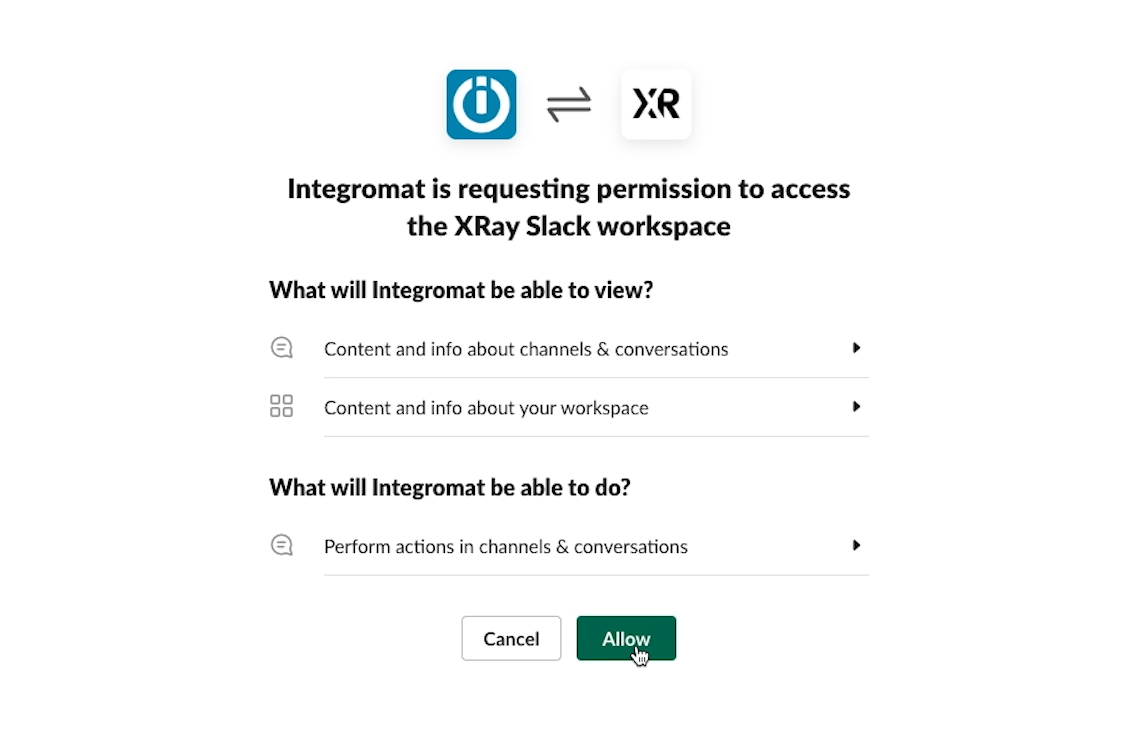
Give your connection a descriptive name, and sign in with your credentials for the app in question. You’ll then see a list of the permissions Make requires.
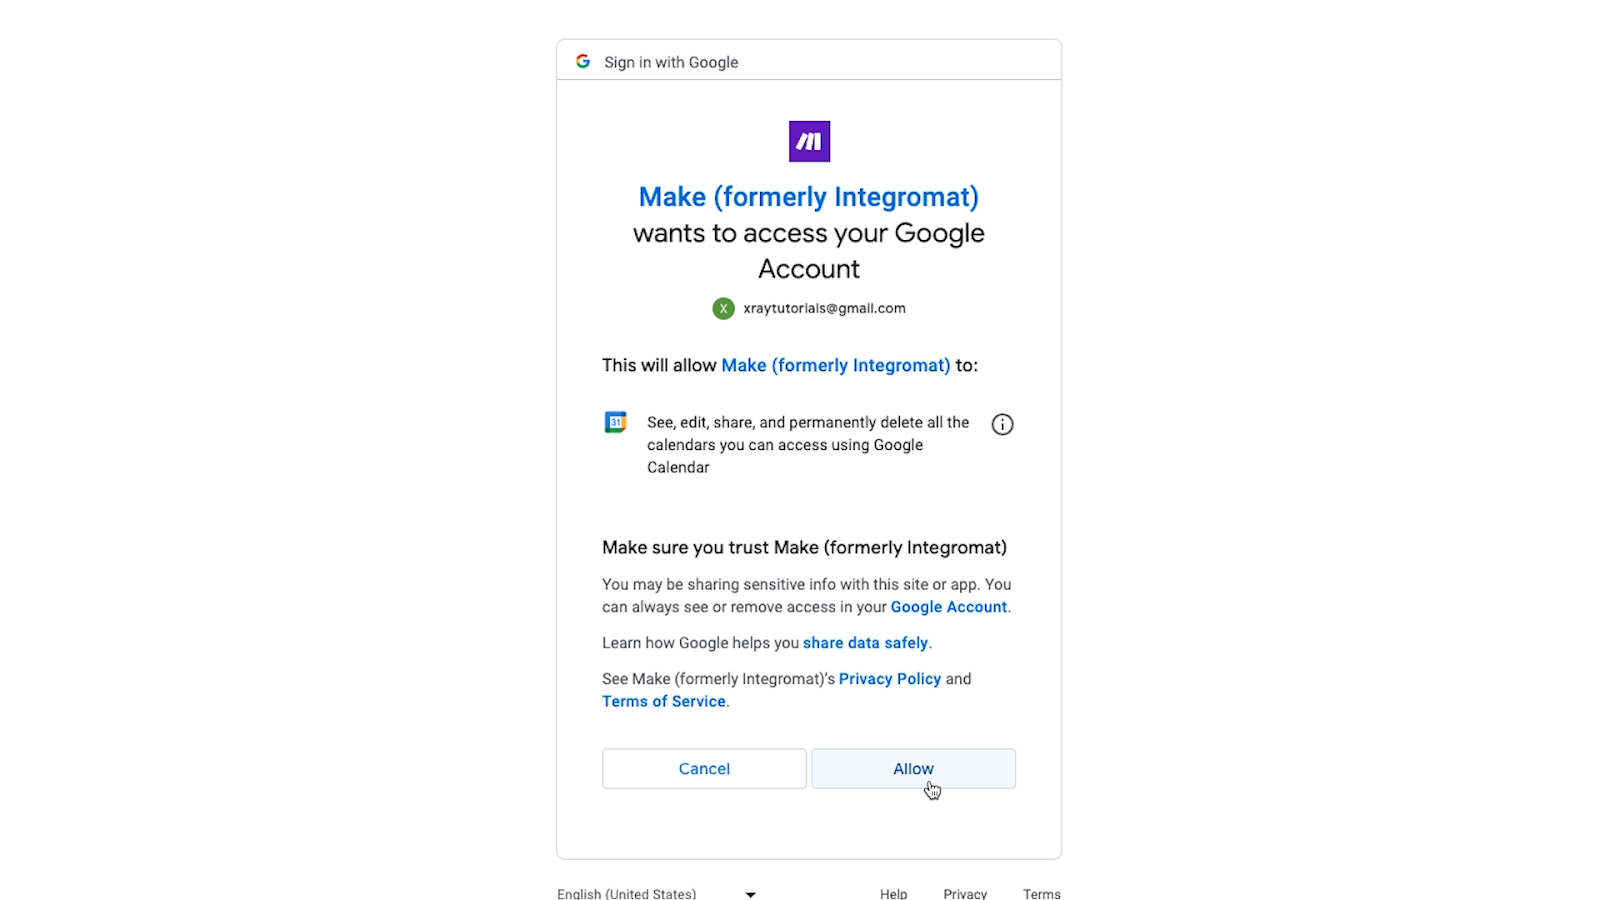
Click “Allow” to authorize and continue.
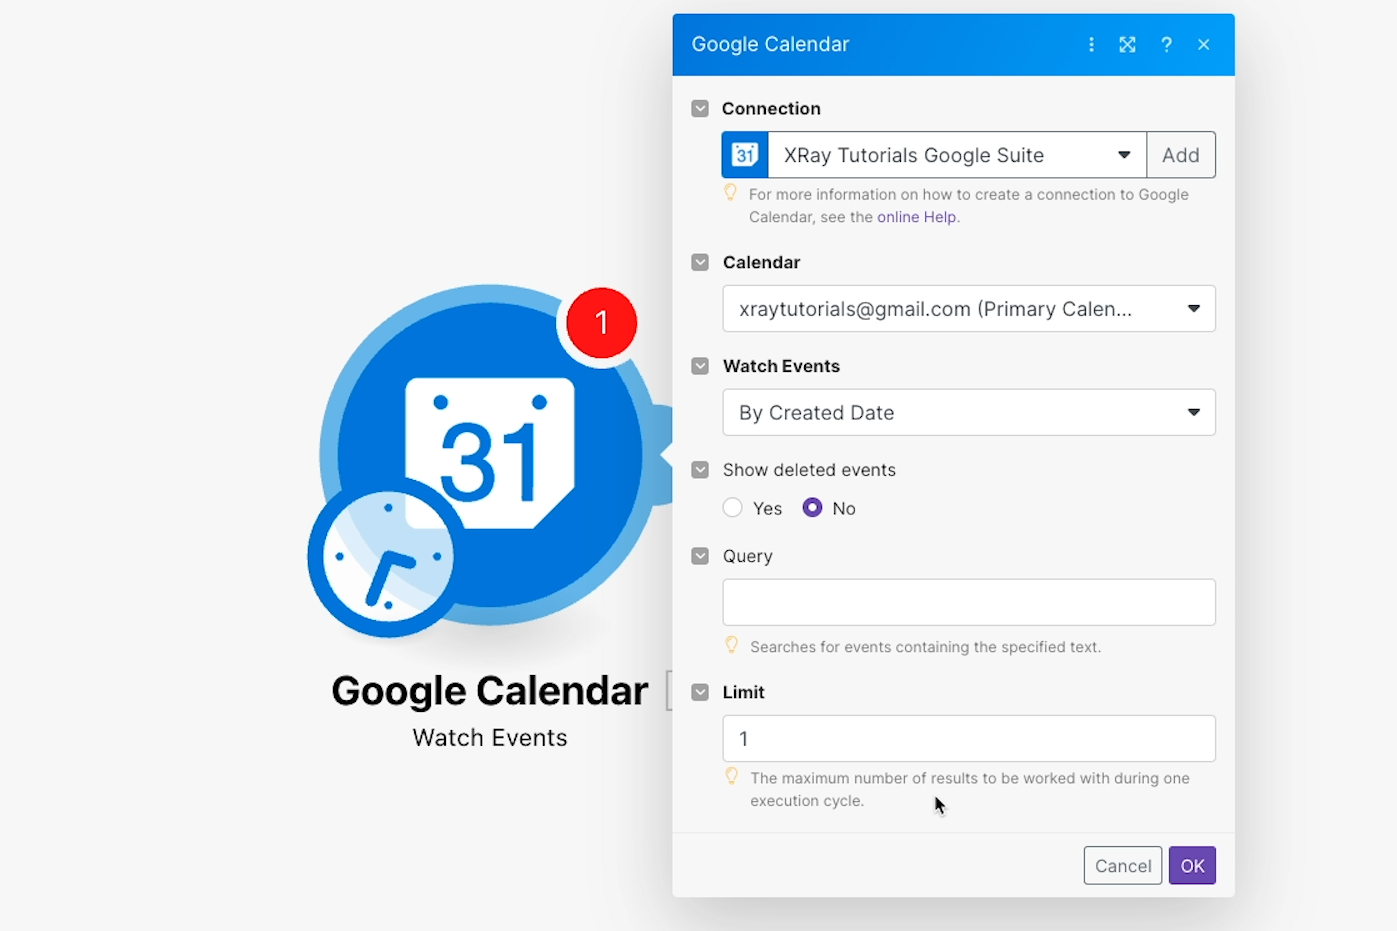
Once you’ve authorized your app, you’ll be returned to the scenario builder, where you can configure your trigger
With “watch” triggers like this one, you’ll typically need to specify what you want Make to watch – which workspace, which folder, which spreadsheet view, or in this case, which Calendar.
That way, Make will only run for the Calendar you’ve specified, instead of running for every calendar in your account.
First, select the calendar you want Make to watch. This should be the calendar where you added your test event. We’ll select our primary calendar.
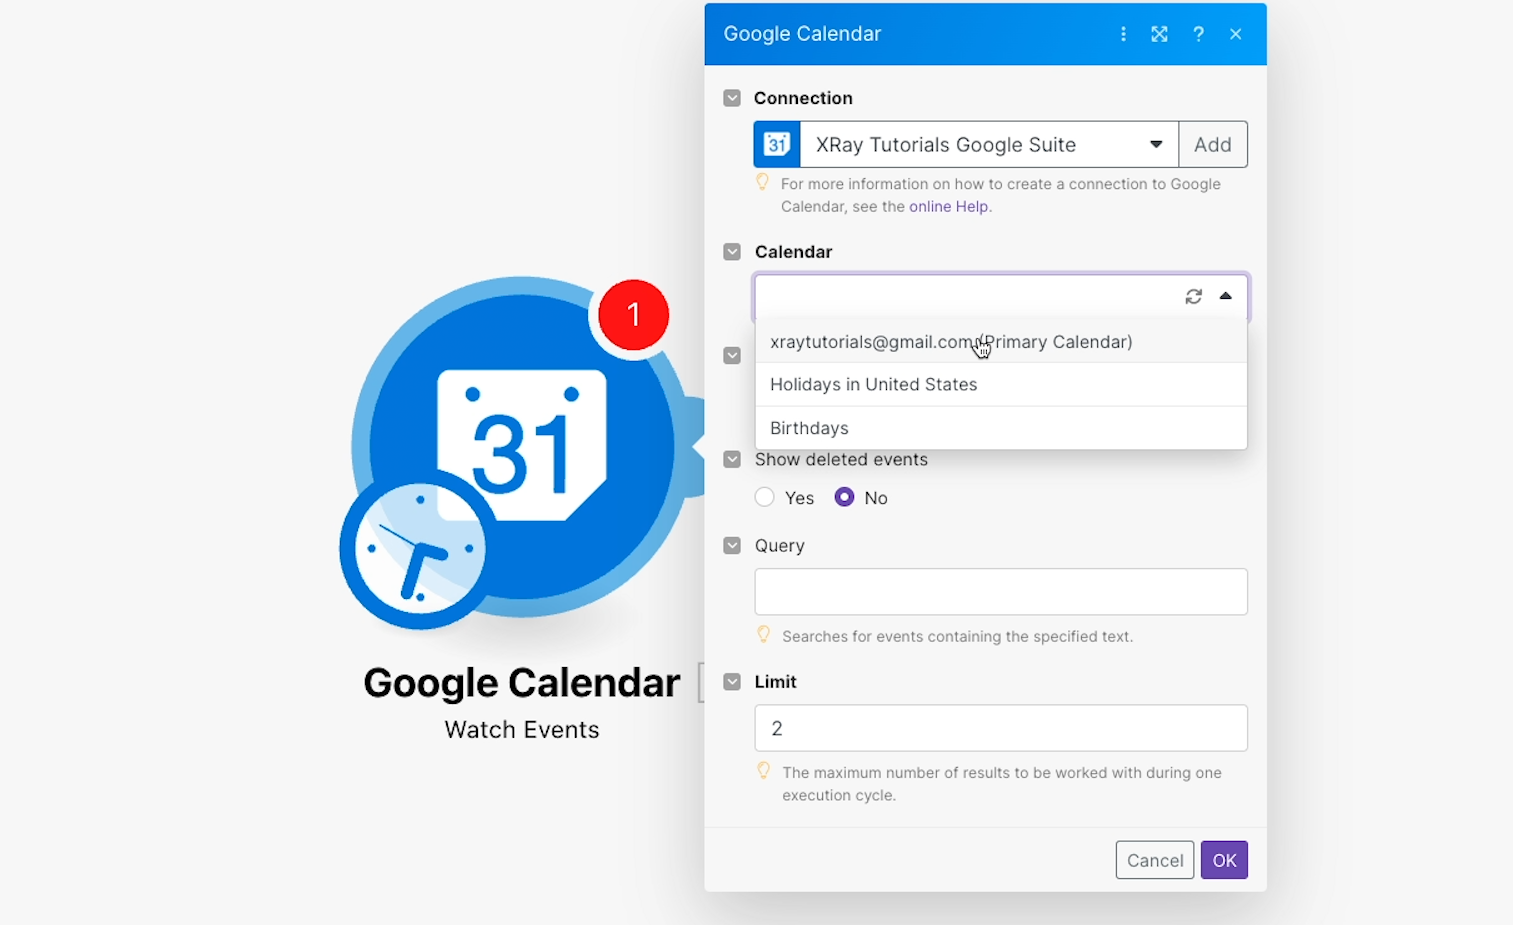
Next, you’ll see a couple of fields for “Query” and “Limit”. Both of these are often included in many “Watch” triggers in Make.
By providing a query, you can ensure that your scenario only runs for items that match your search. Your search will need to use any special syntax required by the specific app.
To get started, we’d recommend leaving the query field blank, but you can always go back and add a query later if you want.
“Limit” lets you determine how many new records this scenario can process at one time. It defaults to “2”, but you can set this to any number you’d like.
For this tutorial, we’d recommend setting it to “1”. Otherwise, the automation may run twice every time you test it, and you’d just be burning operations needlessly.
We’ll discuss Make’s operation limits in more detail later on - for now, just know that testing your scenarios will use up operations, and you’re limited to 1,000 operations each month on the free plan.
With all of these options configured, you can click “OK” to finish setting up the trigger.
Now, you need to test the trigger to make sure it can find your data.
After closing the configuration window, you should see this “Choose where to start” dialogue. If it doesn’t appear automatically, you can right-click on the trigger module and select “Choose where to start” from the list.
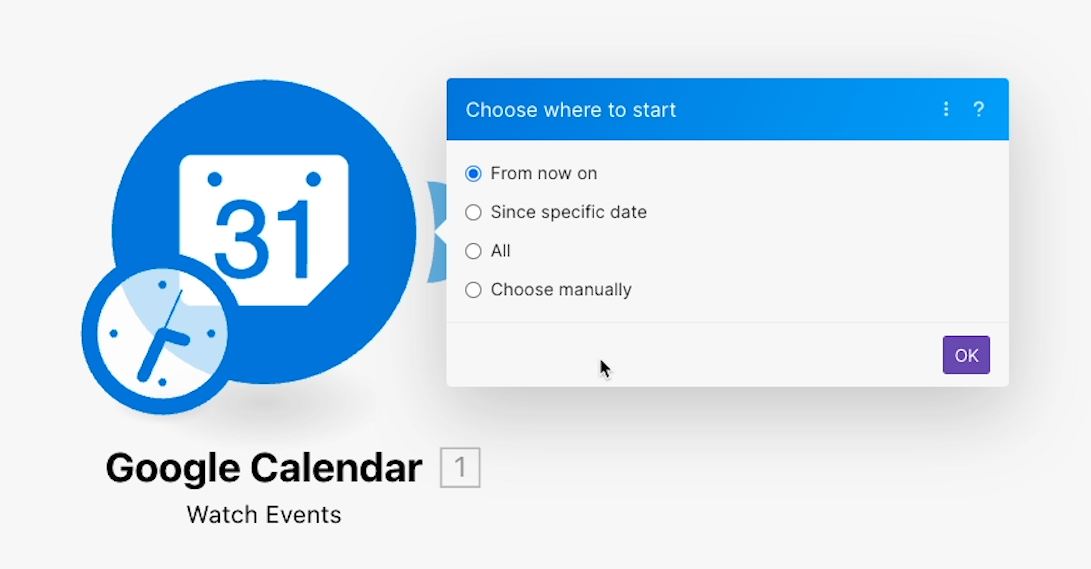
Select “Choose manually”, and you should see some data appear. If you don’t see the event you created earlier, make sure it’s in the right calendar, and make sure that your trigger is set to watch the right calendar.
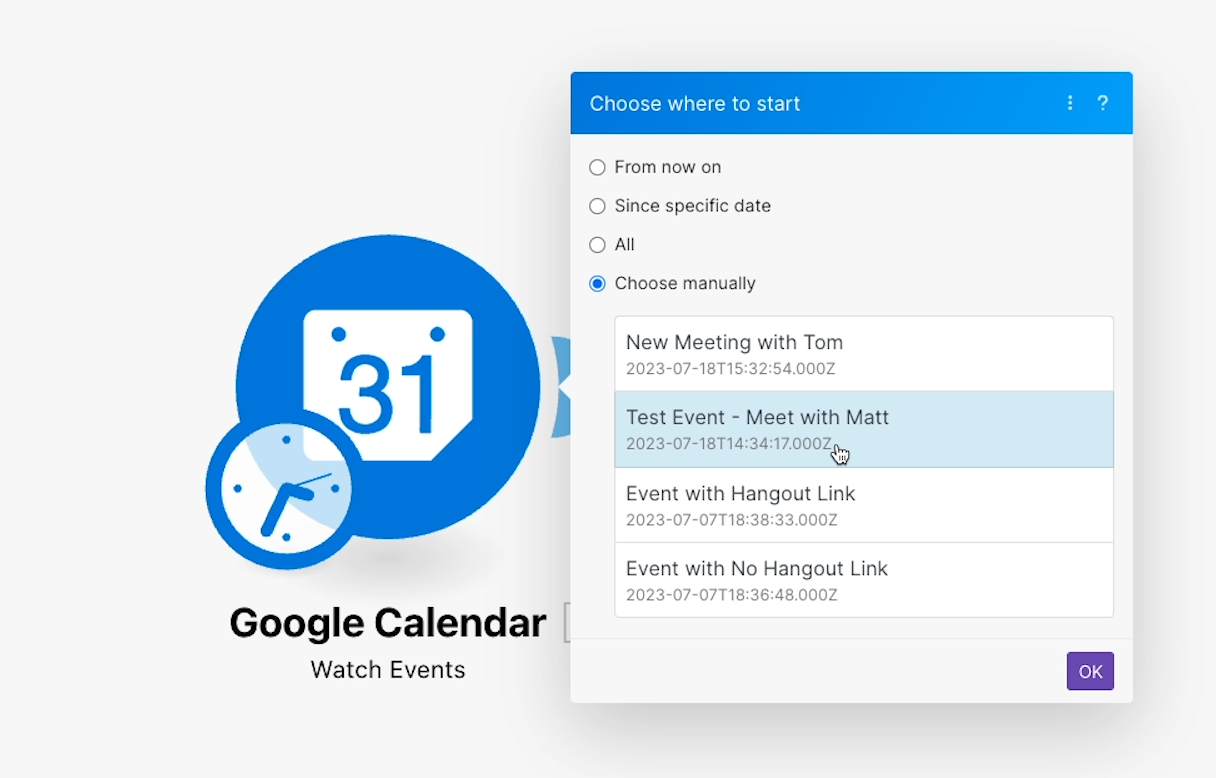
If your test data is there, select it and click “OK”.
By selecting where to start, you’ve now told the trigger module to start with your test data when it runs, but it hasn’t actually run yet.
To run your trigger and have it gather your test data, you can either right-click on the trigger module and select “run this module only”, or click on “run once” in the bottom left to run the entire scenario (which, for now, is just a trigger).
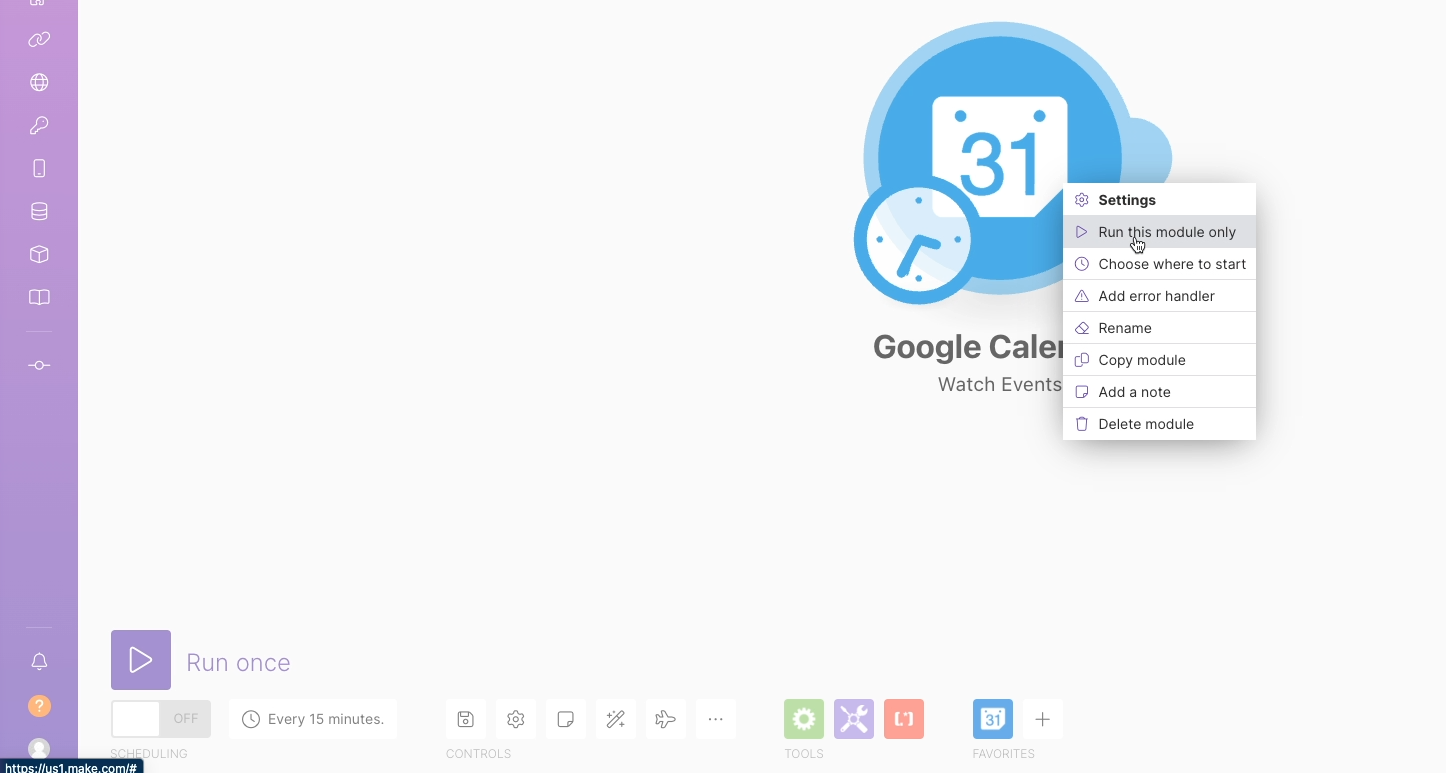
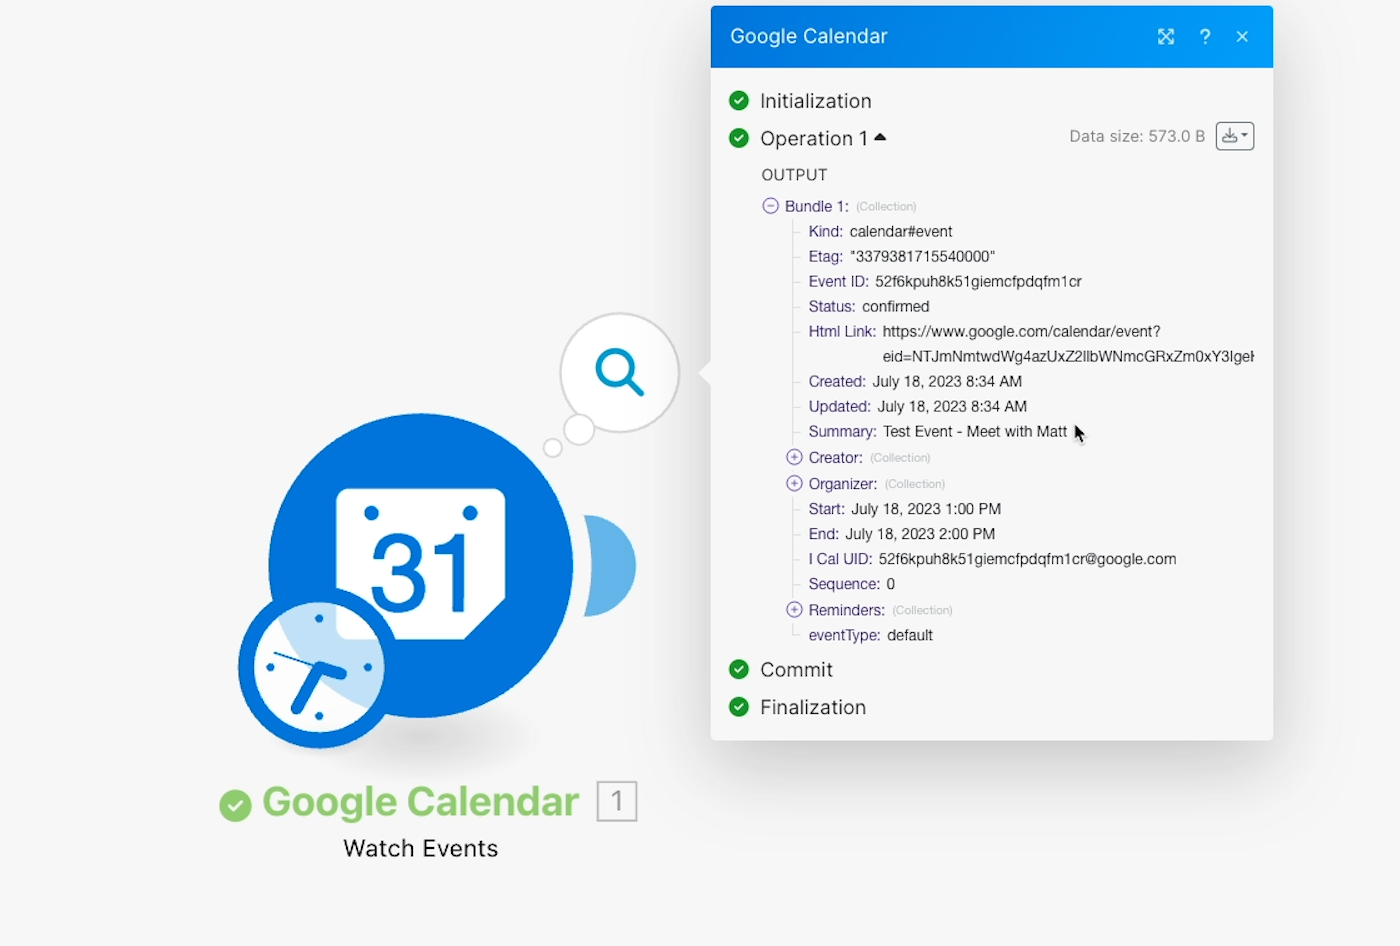
Once you run the trigger, you should see a green check and a number appear above the module. This number indicates how many “bundles” of data the trigger module processed in its test. If you’ve set the limit to 1, you should only see 1 “bundle” here.

You can click on it to see more information about the data retrieved, and confirm that your test data is there.
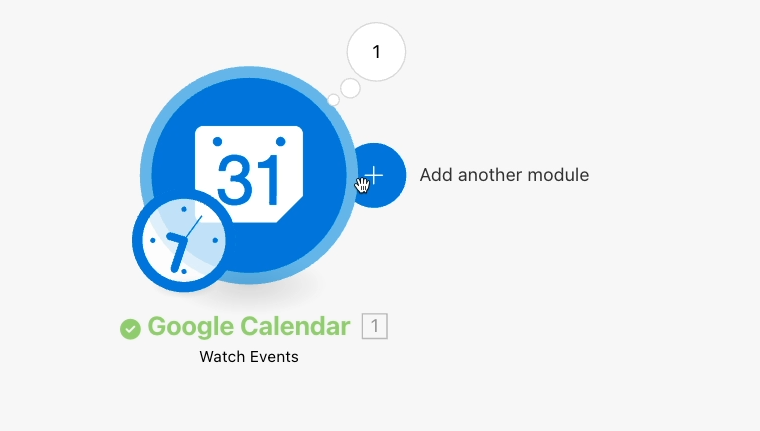
Now, your trigger is set to run every 15 minutes and watch your specified calendar for new events. Each new calendar event will prompt the automation to run.
Close this window to continue.
The first step of our scenario is complete, but now we need to add a module that will send us a Slack alert for this calendar event.
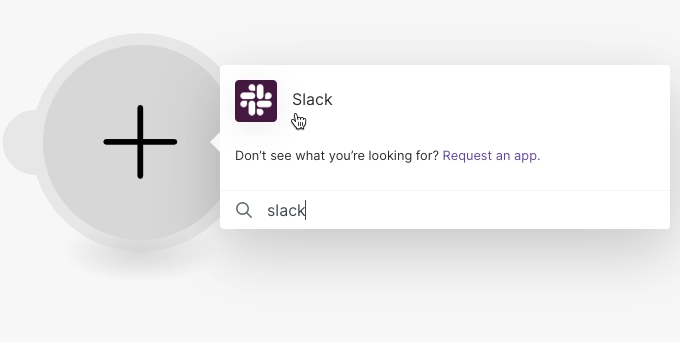
Hover over the trigger module, and click on the plus sign.
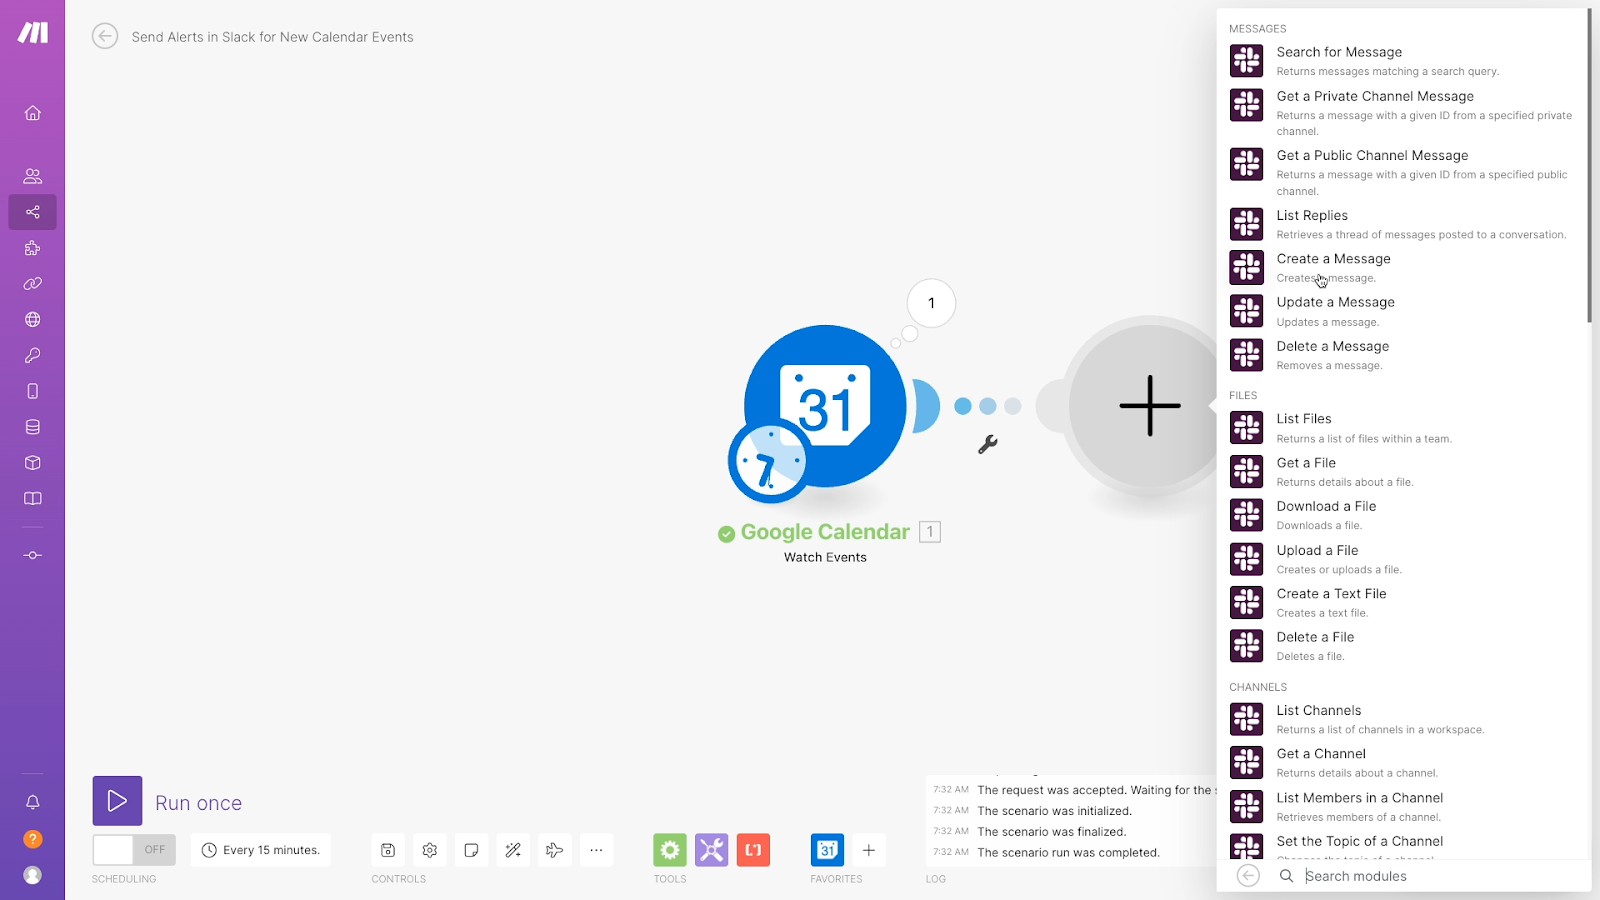
Search for the app you want to perform an action with. For our example, we want to use Slack to send a message, so we’ll search for Slack and select it from the search results.
Then, choose the action you want Slack to perform. Whenever you’re trying to pick an action in Make, just look for whatever phrasing is closest to the action you want to perform.
Since we want to send a message, we’ll select “Create a Message”.
Just like with Google Calendar, you’ll need to authorize Make to automate Slack with your account.
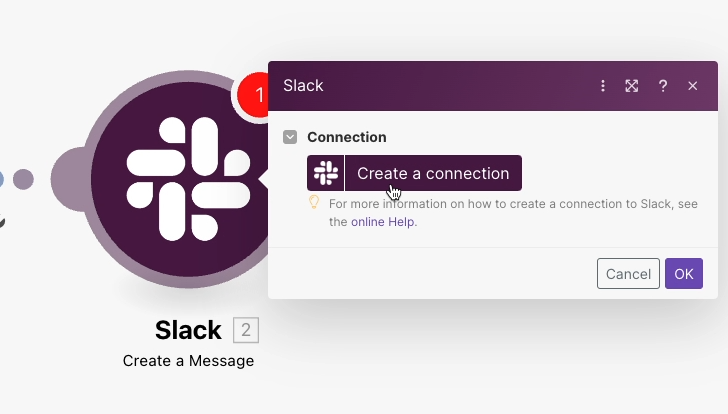
But first, Make requires you to choose a connection type. This is particular to Slack, and isn’t something you’ll always need to do.
Since we want to send messages with this automation, we’ll need to choose “Bot”, not “User”.
Now, you can follow the same steps as before to authorize Make to use Slack.
Note that in Slack, Make is still referred to as “Integromat”, just as we had warned it might be. But again, this is nothing to worry about - just a simple rebrand.
Click allow to authorize Slack and continue.
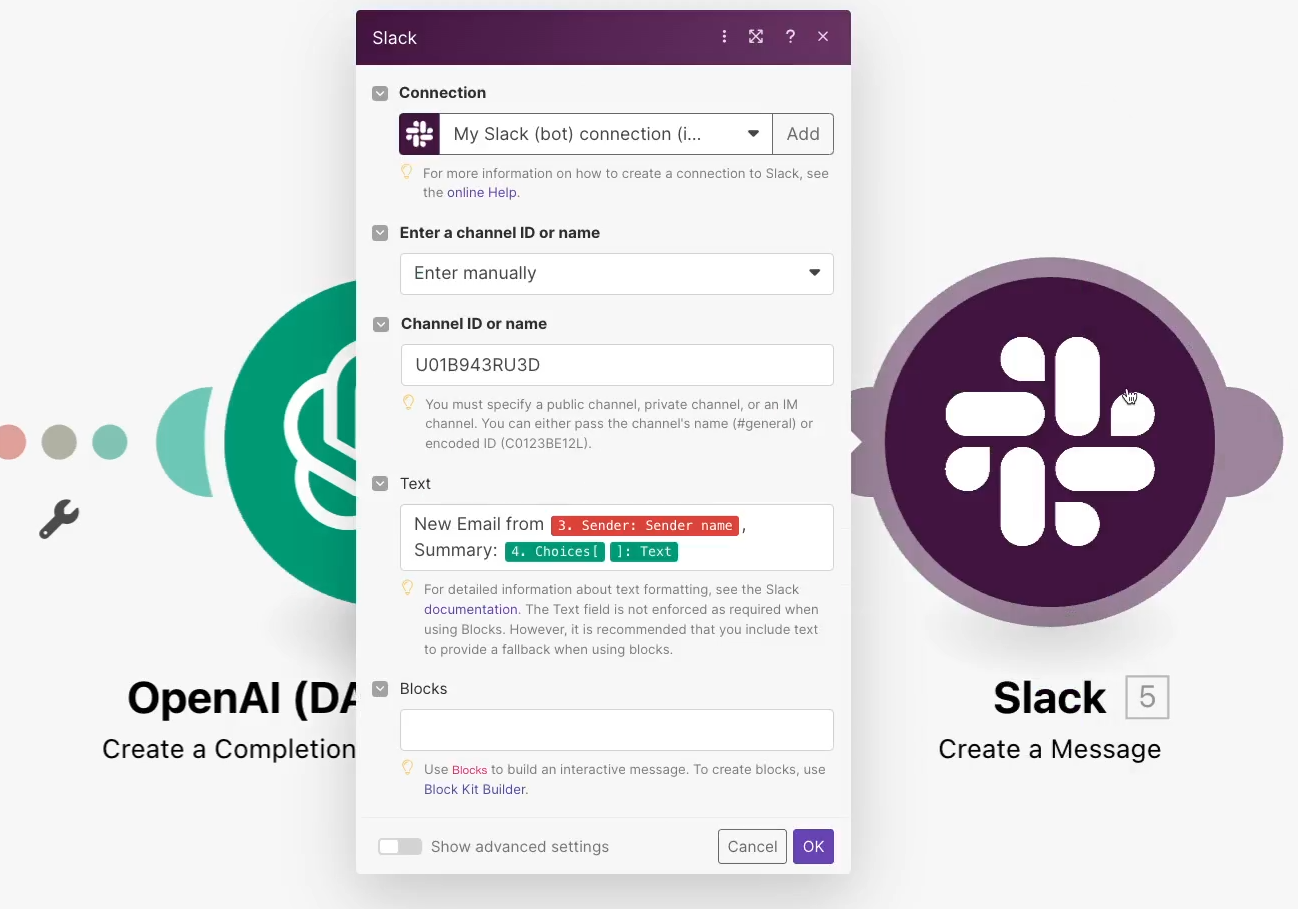
Just like with a trigger module, every action module needs to be precisely configured so Make can perform the action you want.
You’ll typically need to identify where you want to create or update an item, the name of the item, the text to use for the message or body, and other similar attributes.
Make will describe each one and let you provide it in this simple form layout.
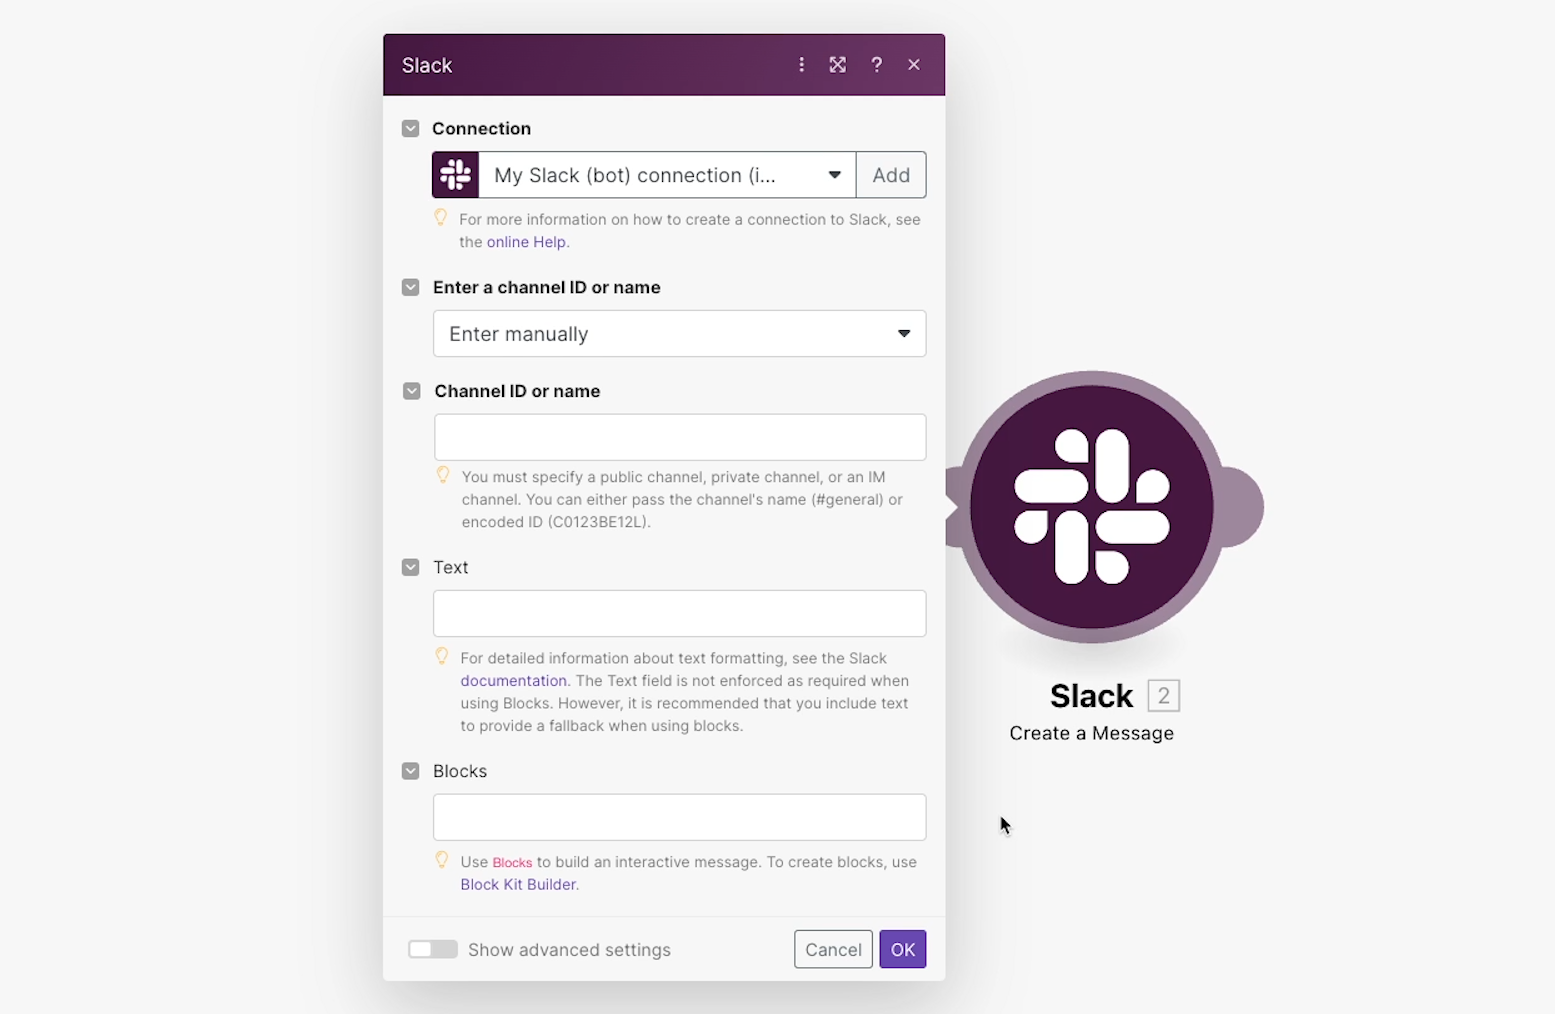
For Slack, we need to select the channel or user we want to send a message to.
This first option gives us the choice to enter our channel manually or select it from a list. This is a common choice you’ll see in Make modules. You can identify objects in your app by using their ID, or by finding its name in a dropdown menu.
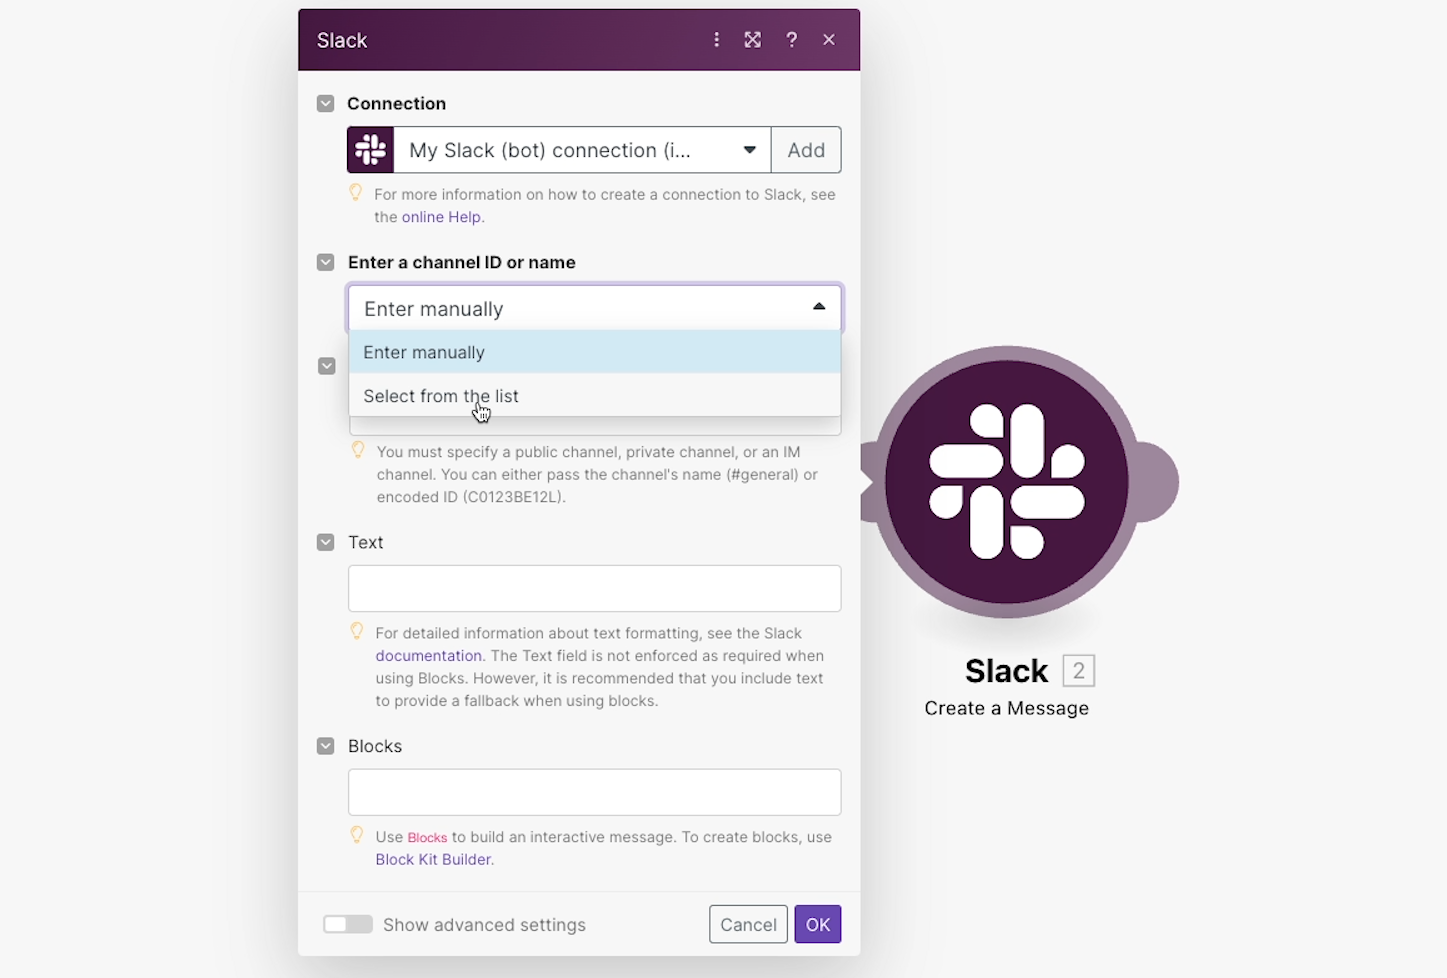
Whenever possible, we’d recommend entering the object’s ID manually. The ID is a fixed value that won’t change, so it’s more precise and reliable than a name that might be updated at any time.
If you need the ID of something in a web app, you can often find it in the URL bar. But if you can’t find the ID, then selecting the item from the dropdown menu should work just fine.
In Slack, you can easily find the ID of any channel by clicking on the channel details. You can also find your own user ID to send a direct message to yourself.

Copy the ID of the channel you want to send the message to, and paste it into the channel ID field.
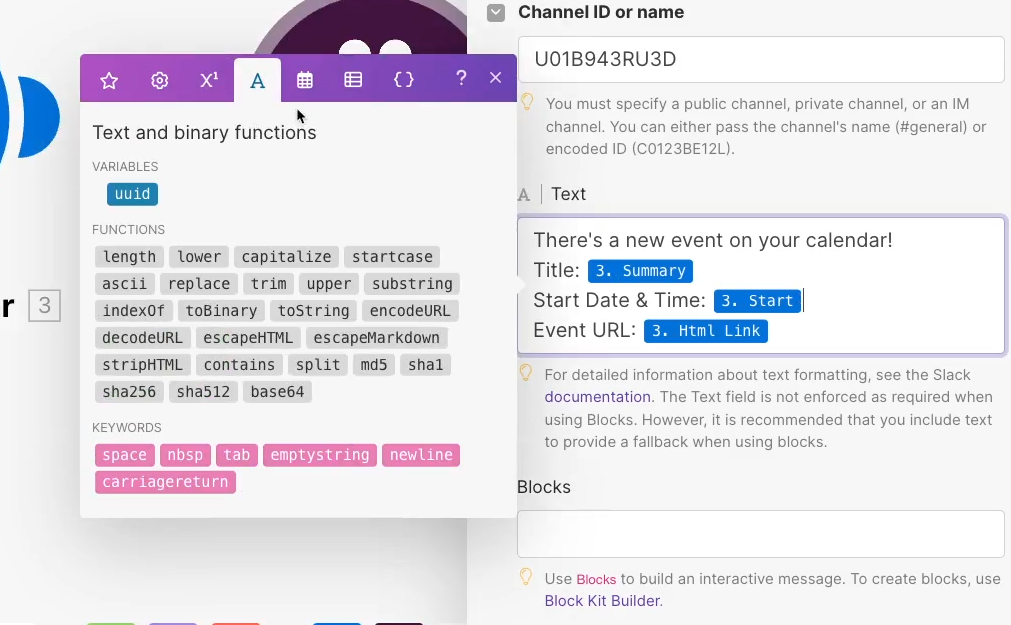
Next, you can fill in the text of the message that Slack will send.
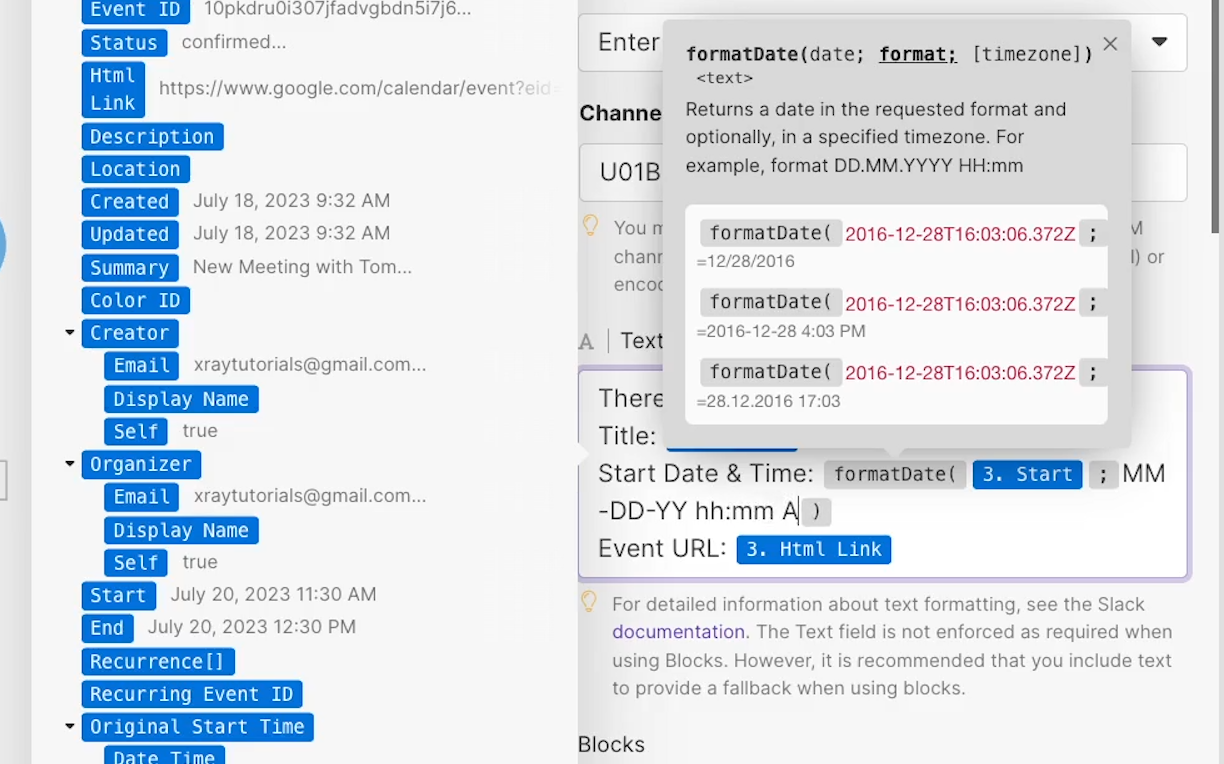
In any text field in Make, you can enter a combination of static text, dynamic data retrieved from earlier modules, and even functions and custom variables.
To start, enter the static part of the message by typing it directly into the “Text” field: “There’s a new event on your calendar!” Make sure to include labels for the Title, Start Date and Time, and the event’s URL.

Next, you can add some dynamic data to provide the actual title, Start time, and URL for whichever calendar event prompted this automation to run.
You can find dynamic data in the panel that appears whenever you select a text field. Data retrieved by earlier modules, like our trigger, will be under the “Star” tab.

The other tabs include functions to work with number, date/time, and text – we’ll explore them a bit more later on.
For now, let’s look for the data we want to add to this message.

The blue variables (outlined in green above) represent the title of each piece of data Make retrieved, while the gray text (outlined in purple above) indicates the value of that variable for the current test data.
You’ll always see the same blue variables for every Calendar event, but the gray text will be unique to each event.
We can see the title of our event next to “Summary”: “Test Event - Meet with Matt”. Every calendar event will have a “Summary”, but each event will have a unique name for its Summary.
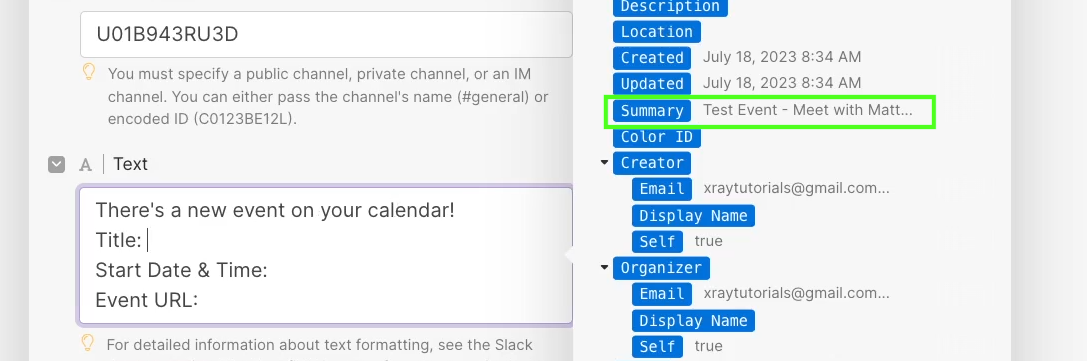
Add the “Summary” object to your text after “Title: “
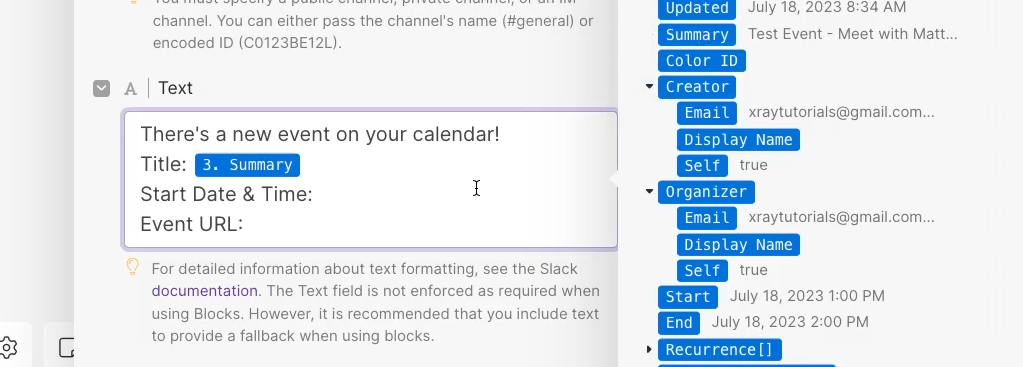
Next, you can see the start date and time labeled as “Start”, while the URL is called “HTML link”. Add both of these to your message in the appropriate spot.

Your basic message is all set, but you should configure a few more settings first before you test it out.
Click on “show advanced settings” to reveal a few more options.

Set both of the “unfurl” options to “No”. That way, the Slack alert won’t show large link previews with every message.
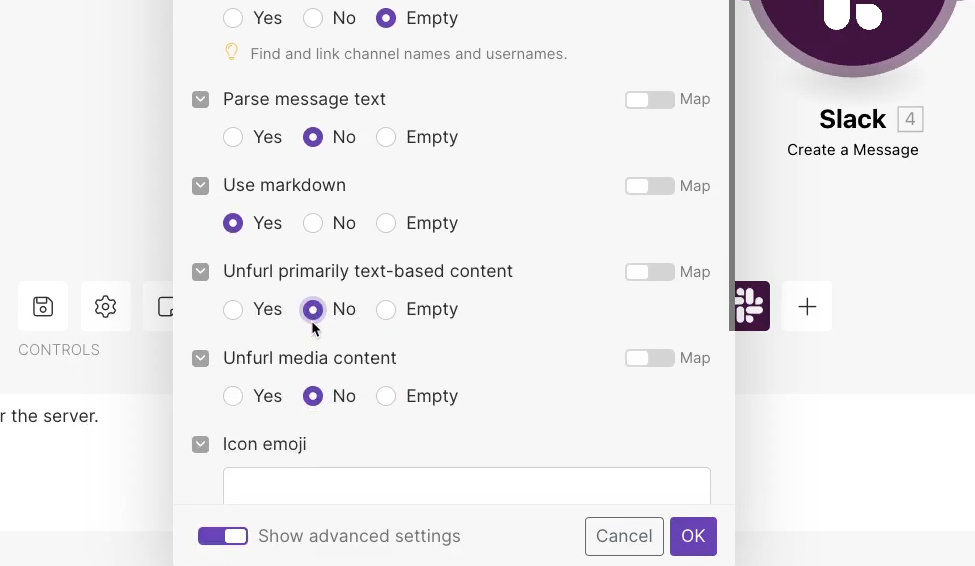
Then, add an icon emoji, like :date:, and a unique username for your Slack bot.
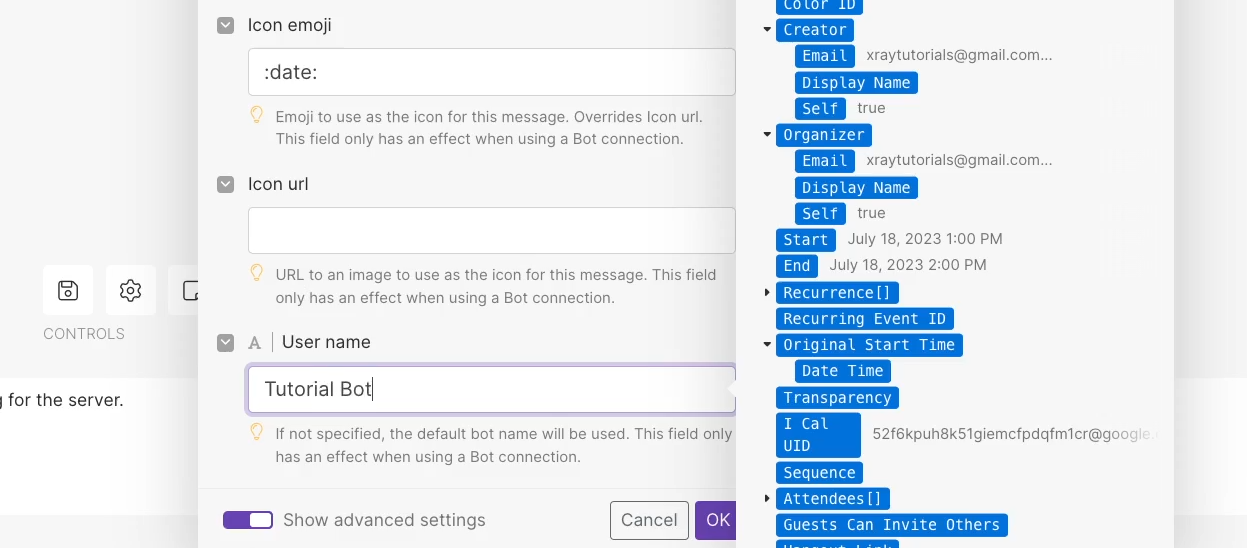
This will give it a little personality, and help to distinguish it from any other automated alerts you might set up.
Now that the action is fully configured, click “OK” to close the configuration window.
To test a complete Make scenario, we recommend always choosing a manual starting point, just like we did when we tested the trigger alone.
Right click on your trigger module and select “Choose where to start”. Then, click “Choose manually”.
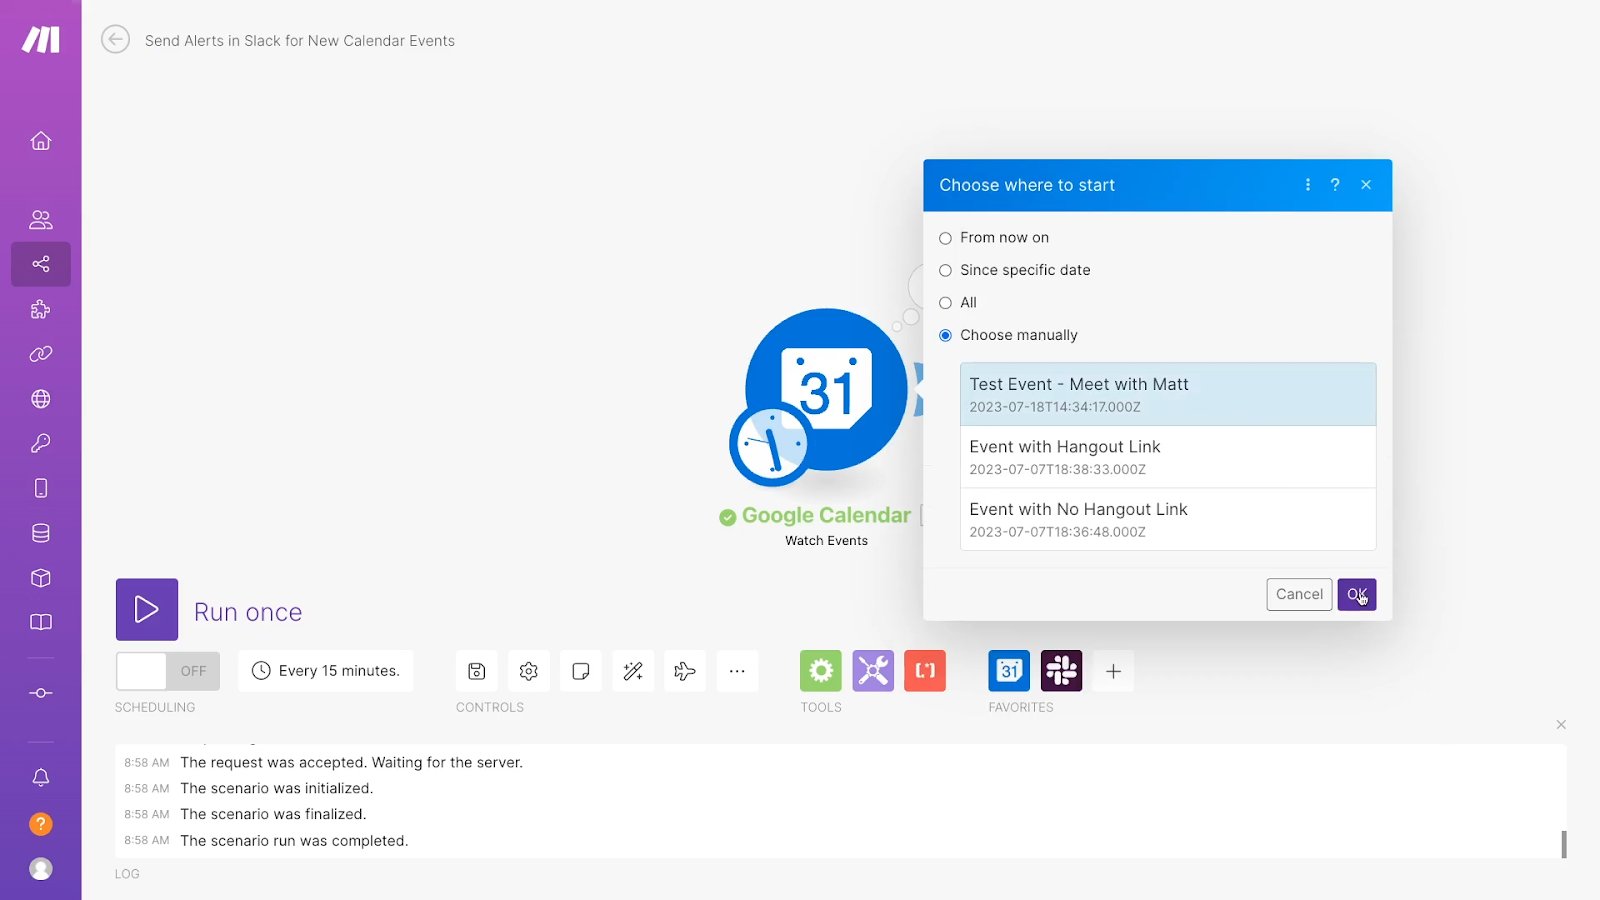
Pick the record you want to use. Then, click “Run once”.
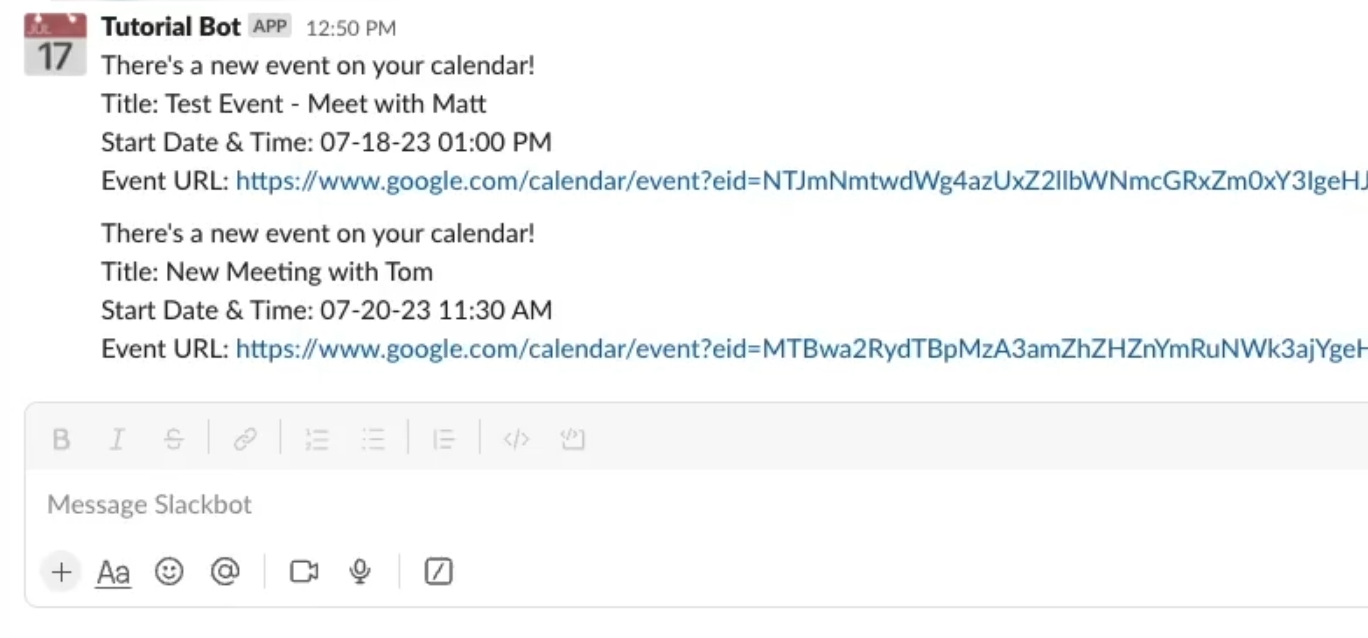
Your action should run instantly. When you check Slack, you should see a new alert.
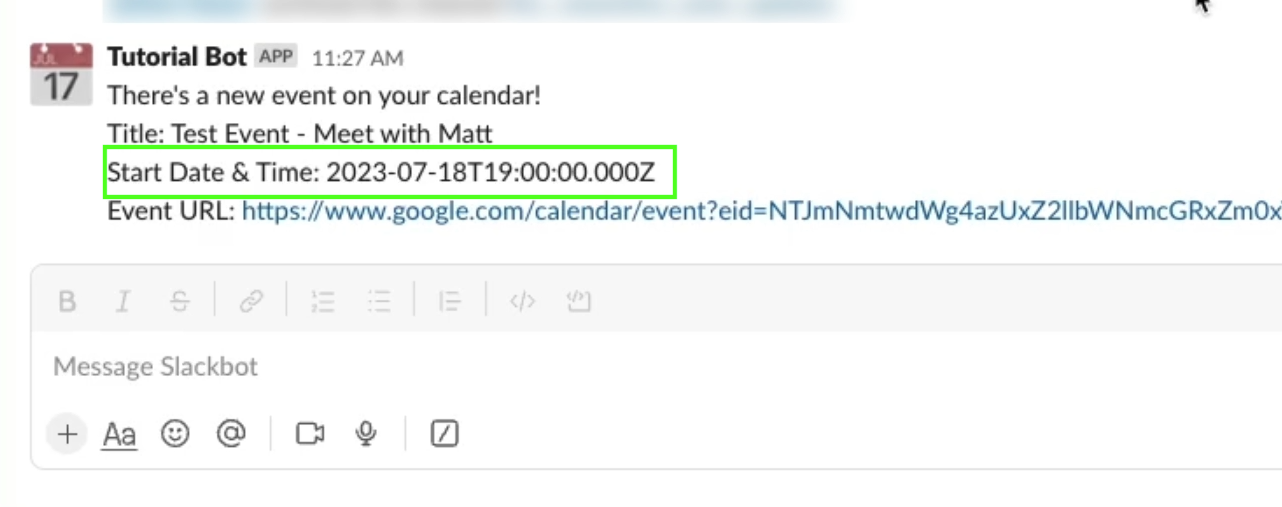
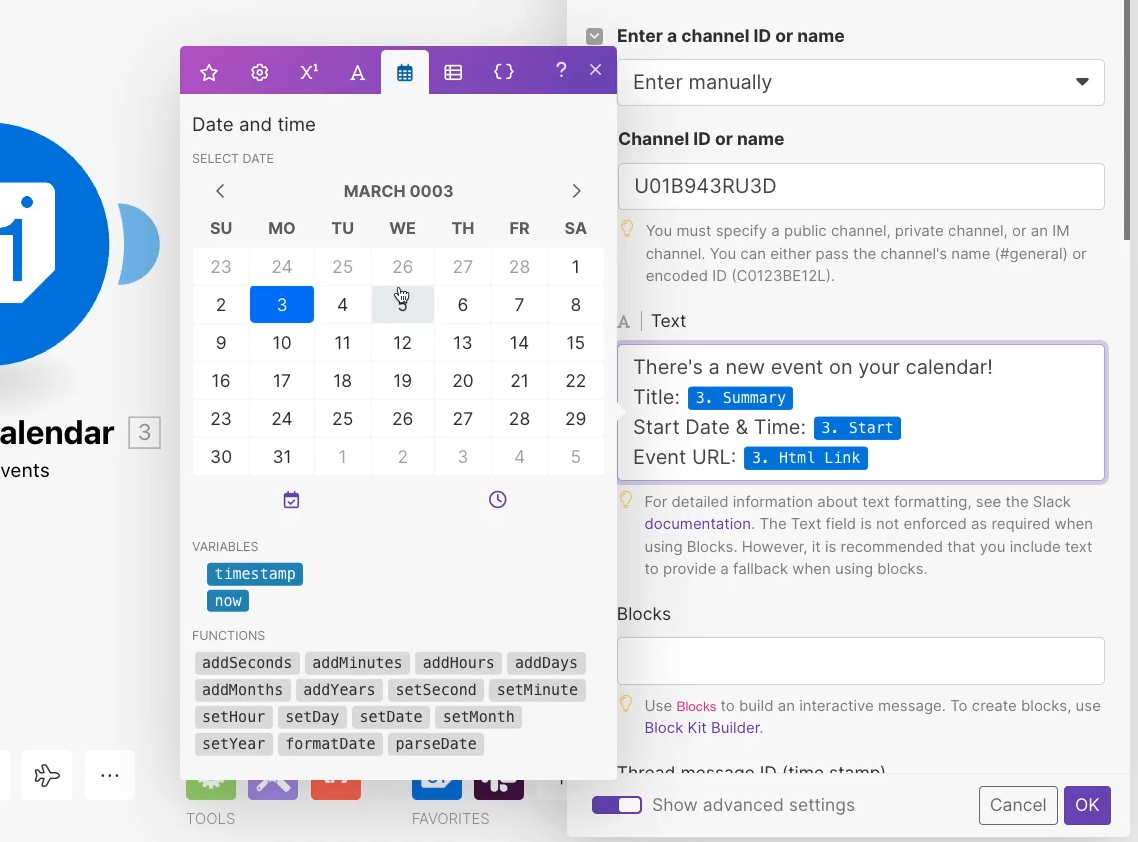
Everything looks correct in our test, but the date and time aren’t exactly easy to read.
Thankfully, Make has an easy fix for that - but we’ll cover that in a moment, after we’ve finished testing and activating this scenario.
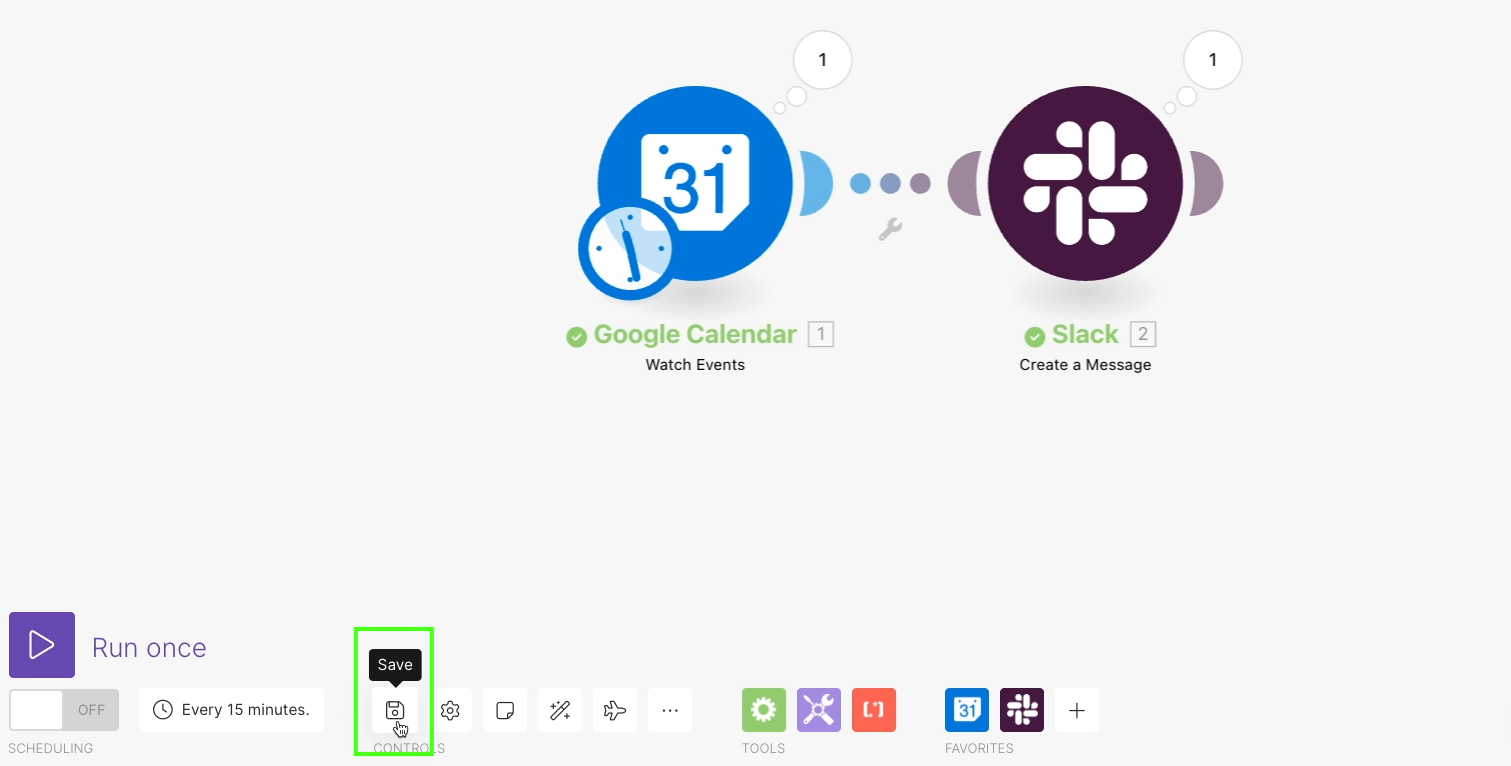
With a successful test, we’re ready to turn on the automation.
First, always click on the “save” icon before switching any scenario to “on”. Make does not automatically publish your changes. If you turn your scenario on without saving first, it may operate without your latest changes.
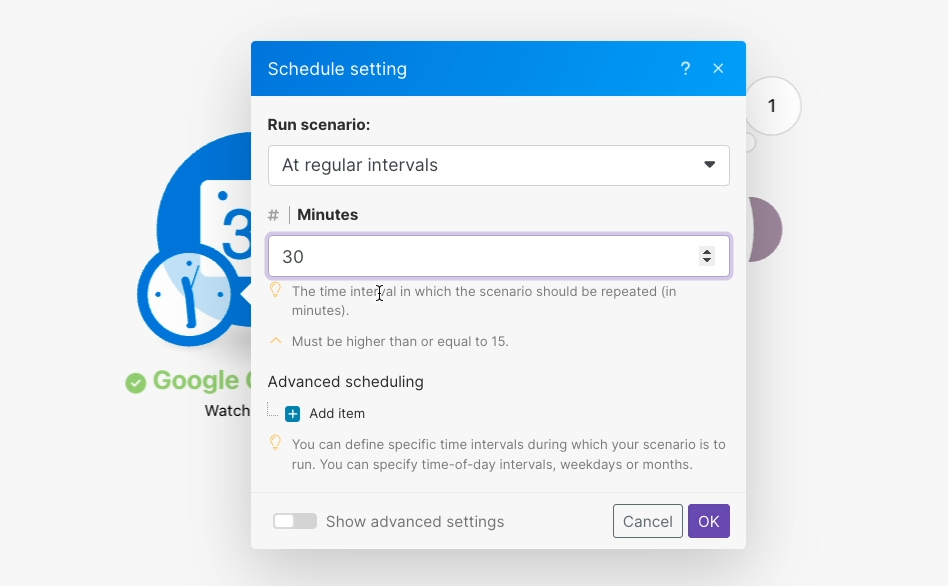
Next, you need to set the interval that your scenario runs at. On a free plan, you’re limited to running your scenarios at intervals of 15 minutes or more. On higher tiers, your automations can run every minute.
It’s important to note that every run of a scenario will consume at least 1 operation, and the free plan is limited to 1,000 operations per month.
Even if the trigger doesn’t find any data and the subsequent action doesn’t run, it will still use an operation for the trigger. Testing your scenario will also consume operations for every module ran.
A 15 minute interval for this trigger means 4 runs an hour, which translates to nearly 100 operations every day, and over 2,500 operations every month for the trigger alone.
But there are some simple ways to reduce the amount of operations your scenarios consume.
First, you can set the interval to be less frequent. For instance, you might double the interval to 30 minutes. Just click on the button with a clock icon and a listed interval, like “Every 15 minutes”.
In this same menu, you can also select “advanced scheduling” to set specific timeframes and days the scenario should run.
For instance, you could set the scenario to run from 9:00am to 5:00pm on Monday- Friday.
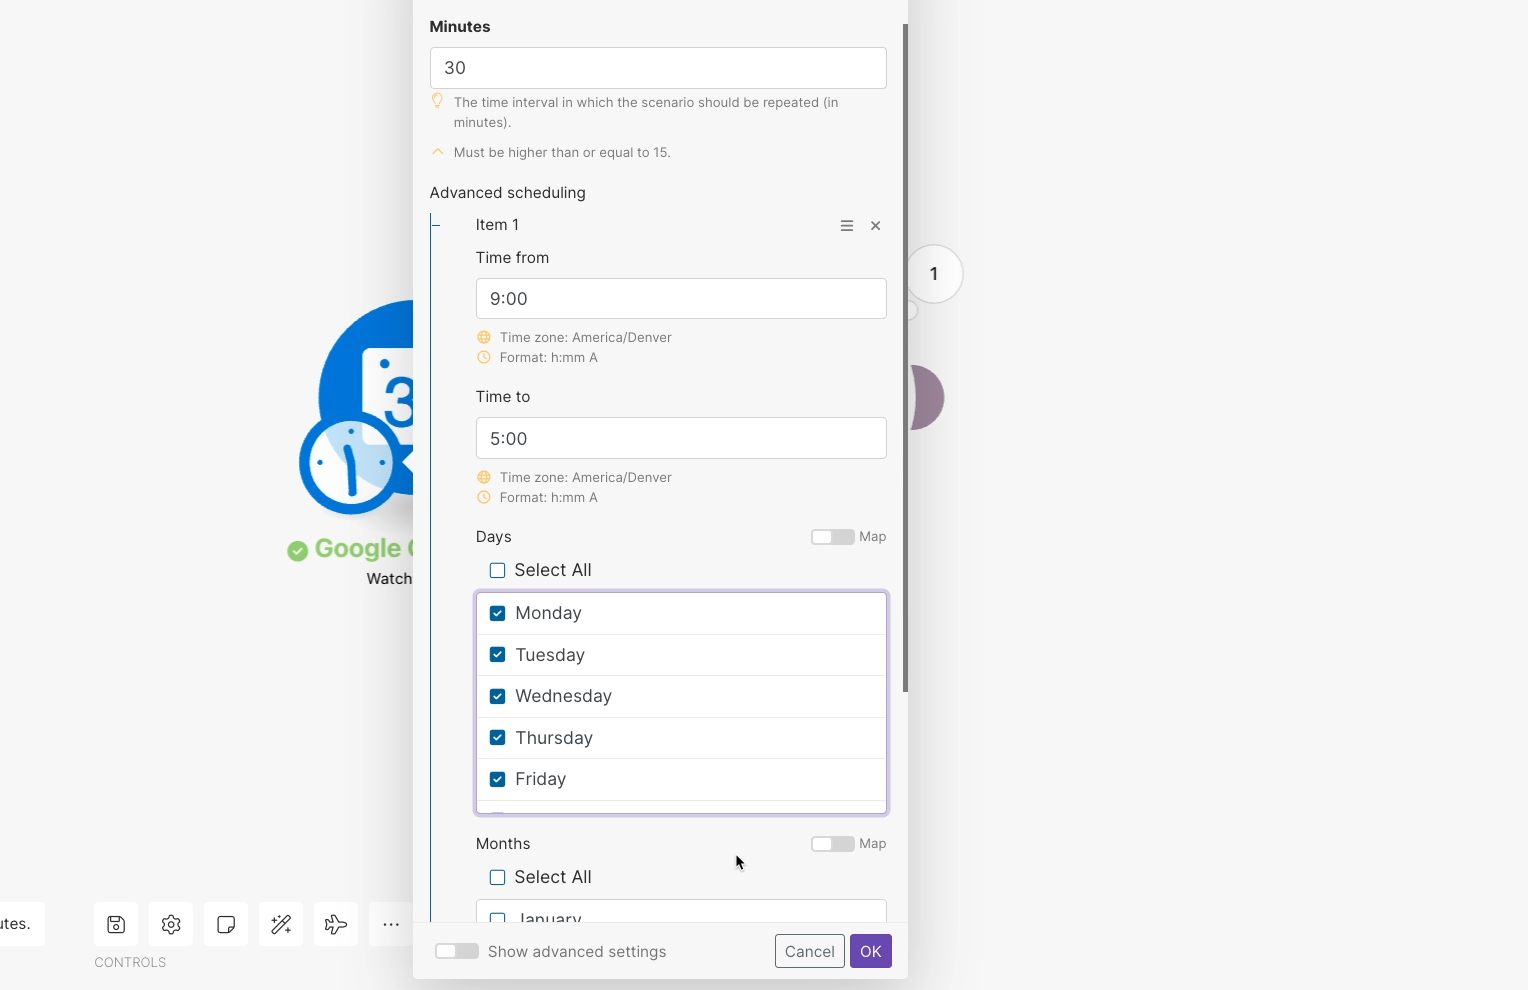
This results in a bit under 350 operations each month for the trigger. That’s still a substantial number, but it’s a fraction of what we had before, and it doesn’t waste operations on weekends and nights.
For low-coders, many watch triggers like this can be replaced with webhook triggers. You can check out our tutorial for using webhook triggers in Make, but just note that it’s a bit more of an advanced tutorial.
Once you’ve configured the scheduling to your liking, you can finally switch the automation on.
To fully confirm that it’s working as intended, give it a live test by creating a new event in Google calendar.
Within your scheduled time frame (which is 30 minutes in our case), you should get your alert in Slack.
Once you get the message, you’re all set!
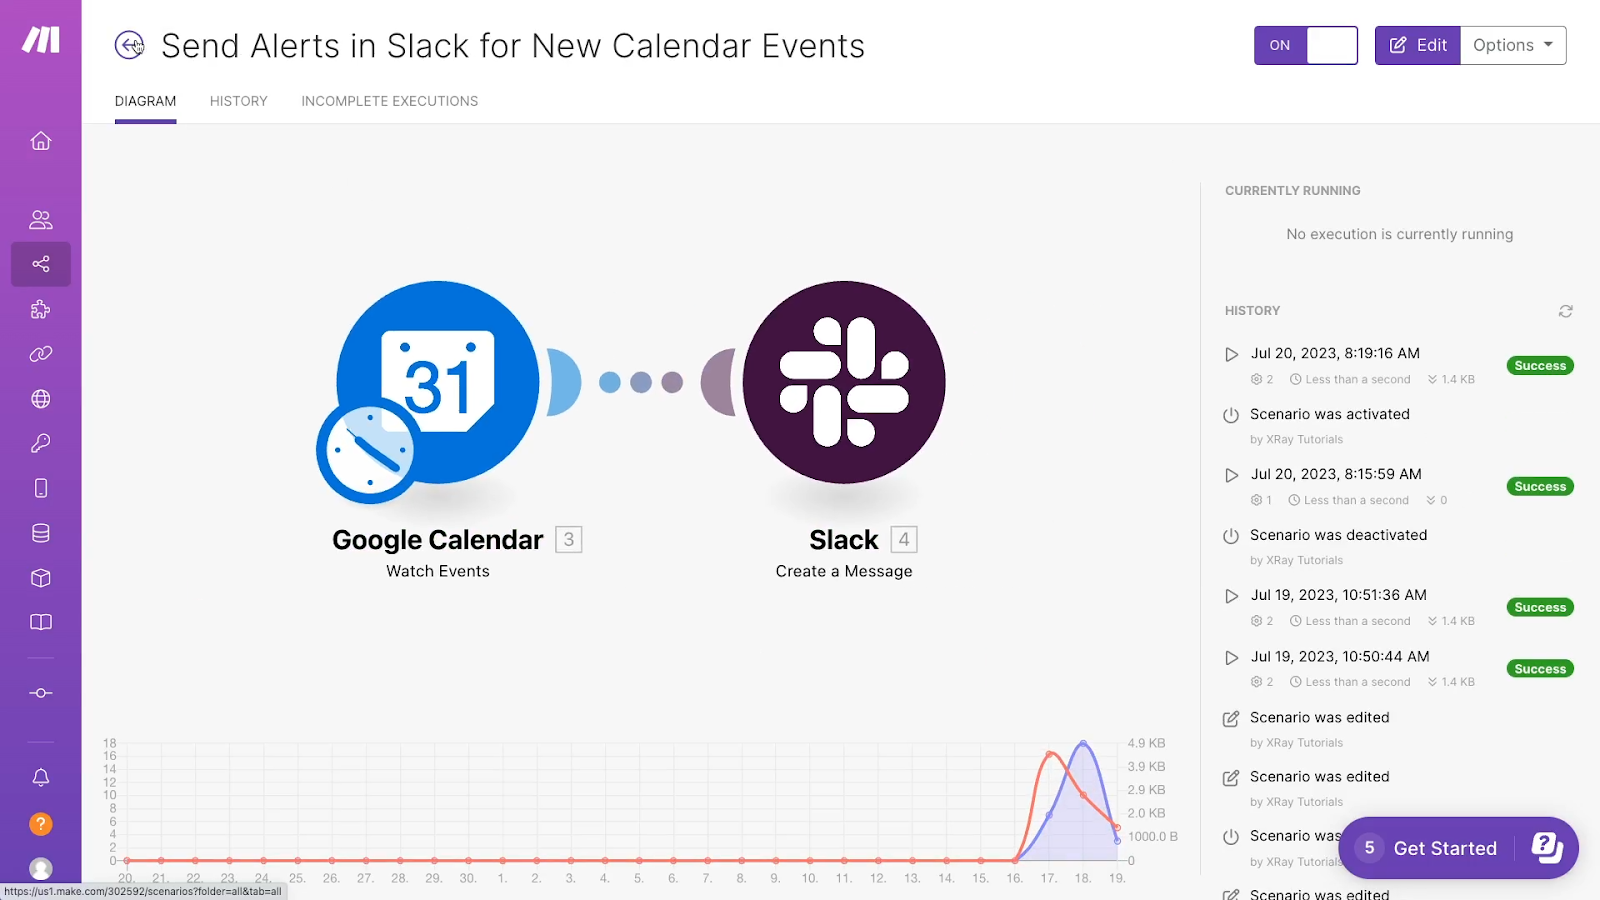
You’ve finished your first scenario in Make.
Click on the arrow in the top left to exit the scenario builder. On this screen, you can view the operations and data that your scenario has consumed to date.
If you need to raise your limits, paid plans will offer more operations and data every month. Ultimately, while the free plan is great for giving Make a try, it’s not ideal if you intend to use Make long-term to automate your work.
Fortunately, Make’s paid plans are very affordable. You can learn more about them at Make’s pricing page, or in our Zapier and Make comparison guide.
Just be sure to turn off this example scenario later if you don’t intend to keep using it. After all, you don’t want to burn all of your operations for the month with this tutorial.
What we’ve built so far is a very simple scenario, but we’ve mentioned that Make can do a lot more than a simple linear automation like this.
Since this is a beginner’s guide, we won’t go into too much depth, but we want to give you an idea of how Make’s more advanced tools work.
As we mentioned earlier, Make offers several tools and functions for transforming your data.
To finish this guide, we’re going to improve this scenario with a simple function to reformat the date and time in our Slack message.
To add a function, go back to the Slack module, and select the Text field.
All of these tabs contain several functions to run mathematical calculations, edit text, format dates, and more.
We’ll use a function to reformat the date in our message into something that’s easier to read.
Select the calendar icon for date-time functions.
Then, you can hover over any function, like this “formatDate” one, for more info.
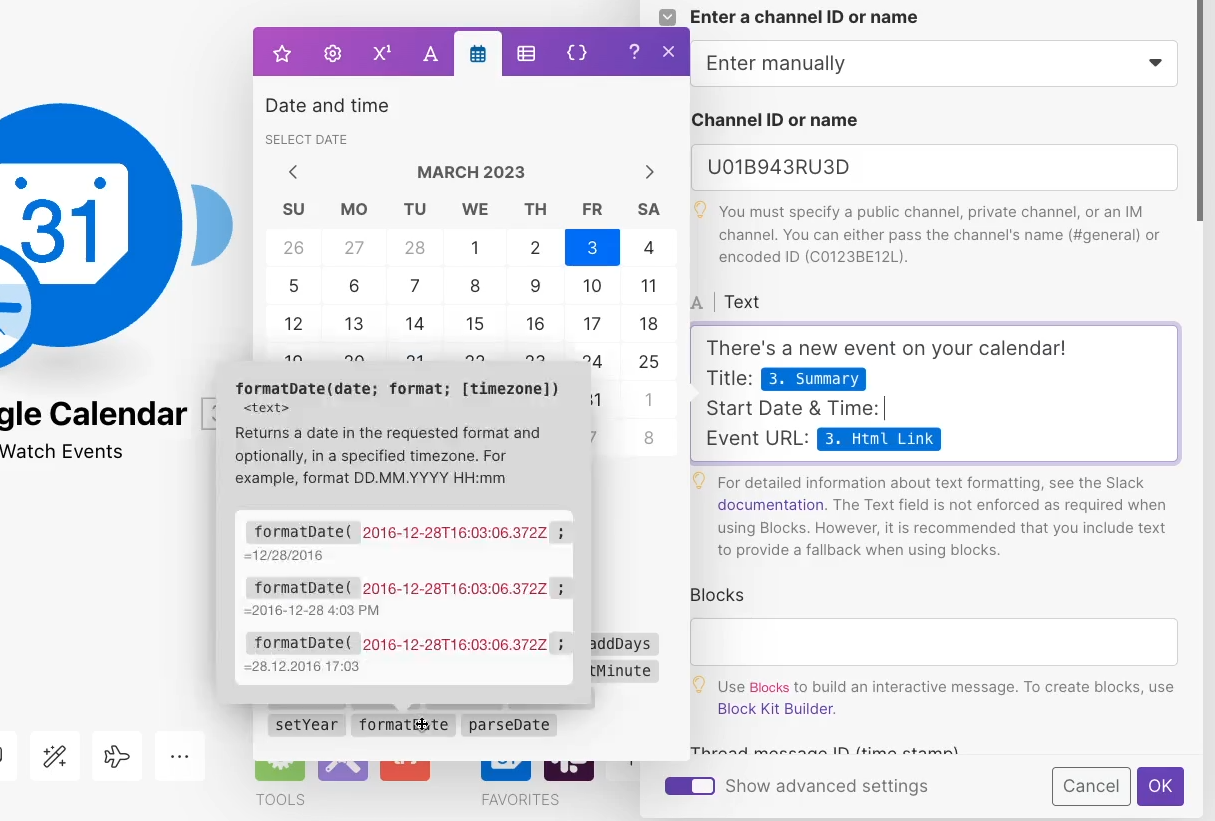
Click on the “formatDate” function to add it to the text field.
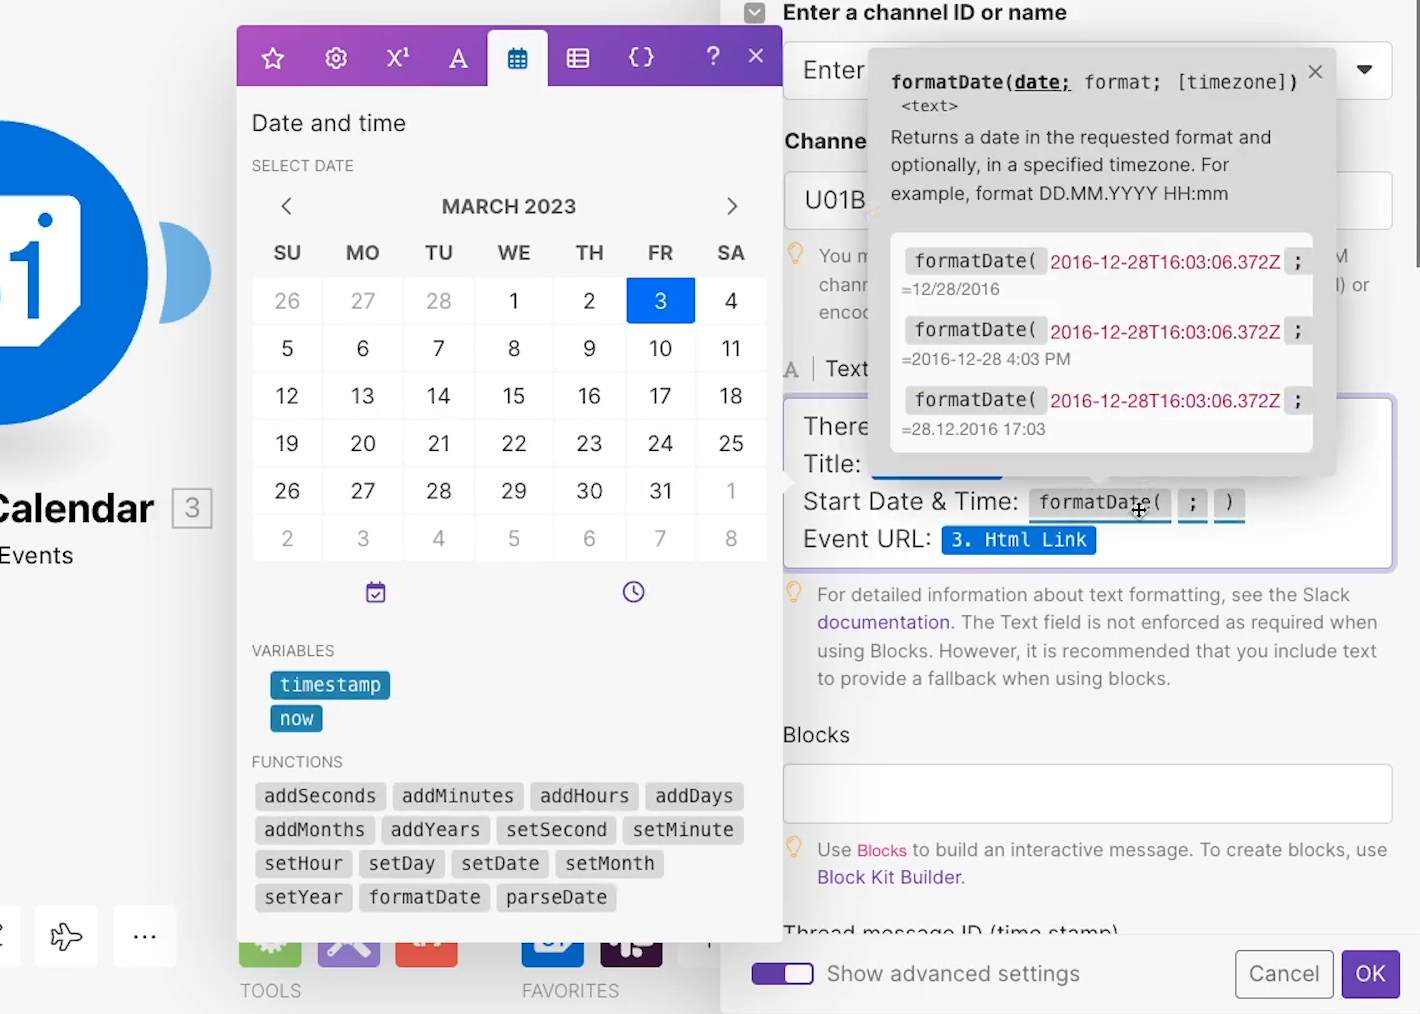
Hovering over any function you’ve added to a text field brings up a tooltip that explains the data (or arguments) you need to provide.
Before the semicolon, you need to enter the date you want to format as the first argument. Put the “Start” date variable there.
Note: it will often be easier to delete any variables you want to use in functions, and add them back in after you’ve entered the function.
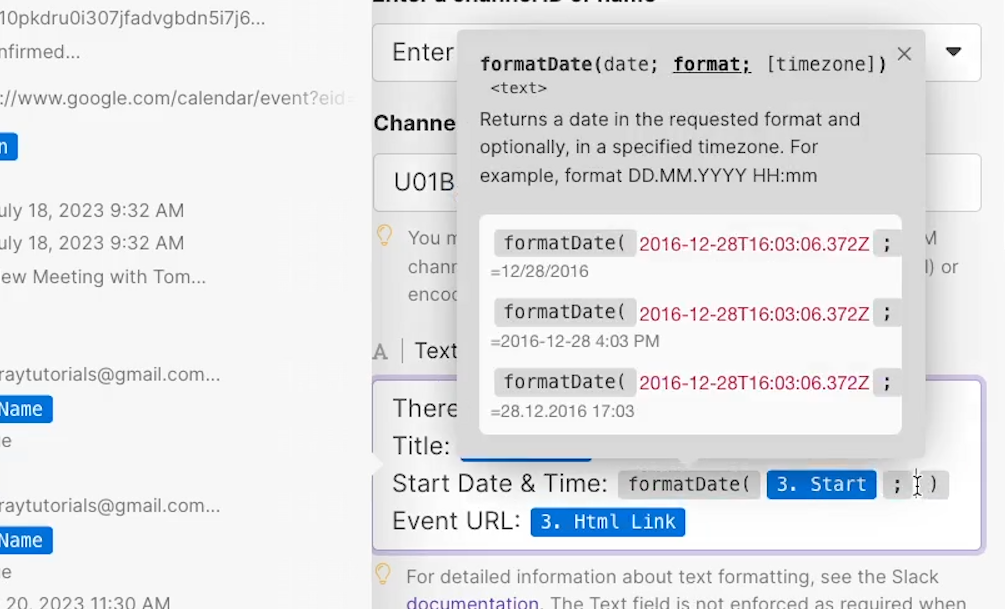
After the semicolon, you need to provide the format you want to use as the second argument. Here’s a help page from Make that lists several possible date formats.
We’ll use this format:
MM-DD-YY hh:mm A
So dates will be formatted with 2 digits each, and the time will be displayed in 12-hour format with AM or PM.
The function is complete.You can click OK to close the module, save your changes to the scenario, and test it again.
Now, when you check Slack, we should see the date is formatted correctly and is much easier to read.
If you’d like to learn more about using any function in Make, you can just hover over it and read Make’s helpful tool tips.
You can also check out our post about using functions in Make for a step-by-step guide.
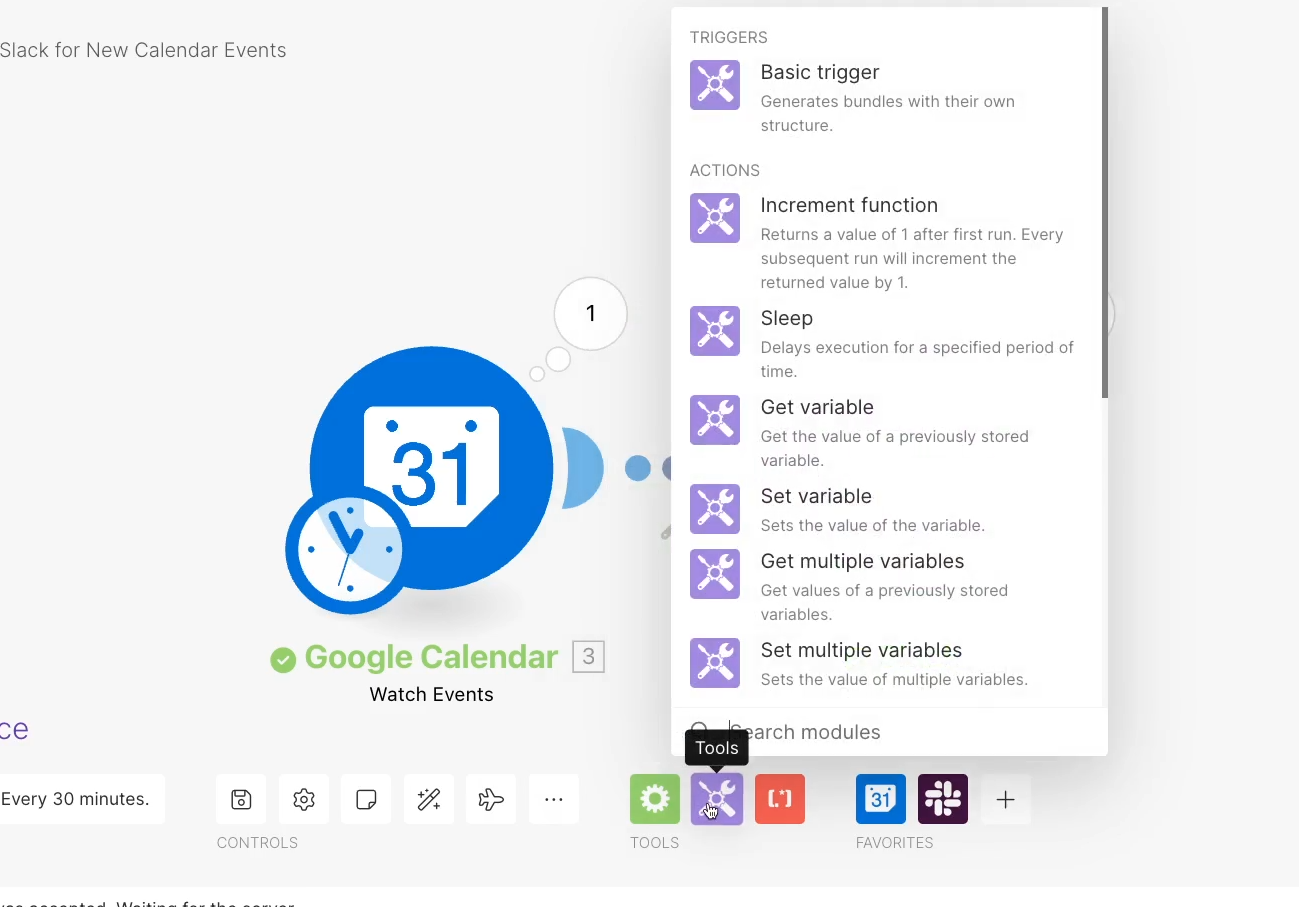
At the bottom of the scenario builder, you’ll also see these buttons: Flow control, tools, and transformers.
Flow control will let you add different paths to your automation, or loop through sets of data.
We have some posts about using certain flow control options like routers and repeaters.
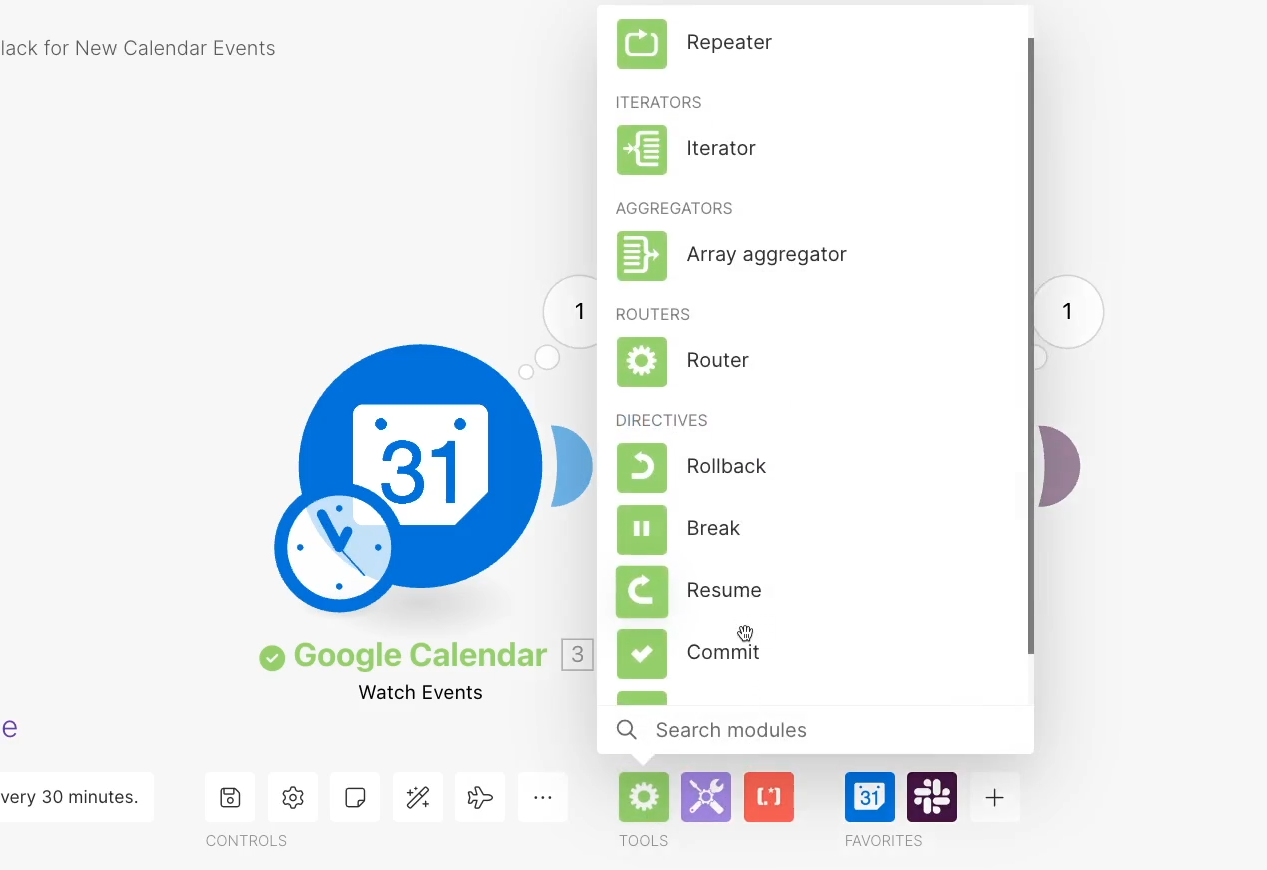
“Tools” are used to add custom variables, text, and more to your scenario.
You’ll also see options that let you pause your automation for a set period of time, as well as switch functions for easily handling several different inputs.
Text parser lets you use regular expressions or regex to parse text, or to extract elements from a web page.
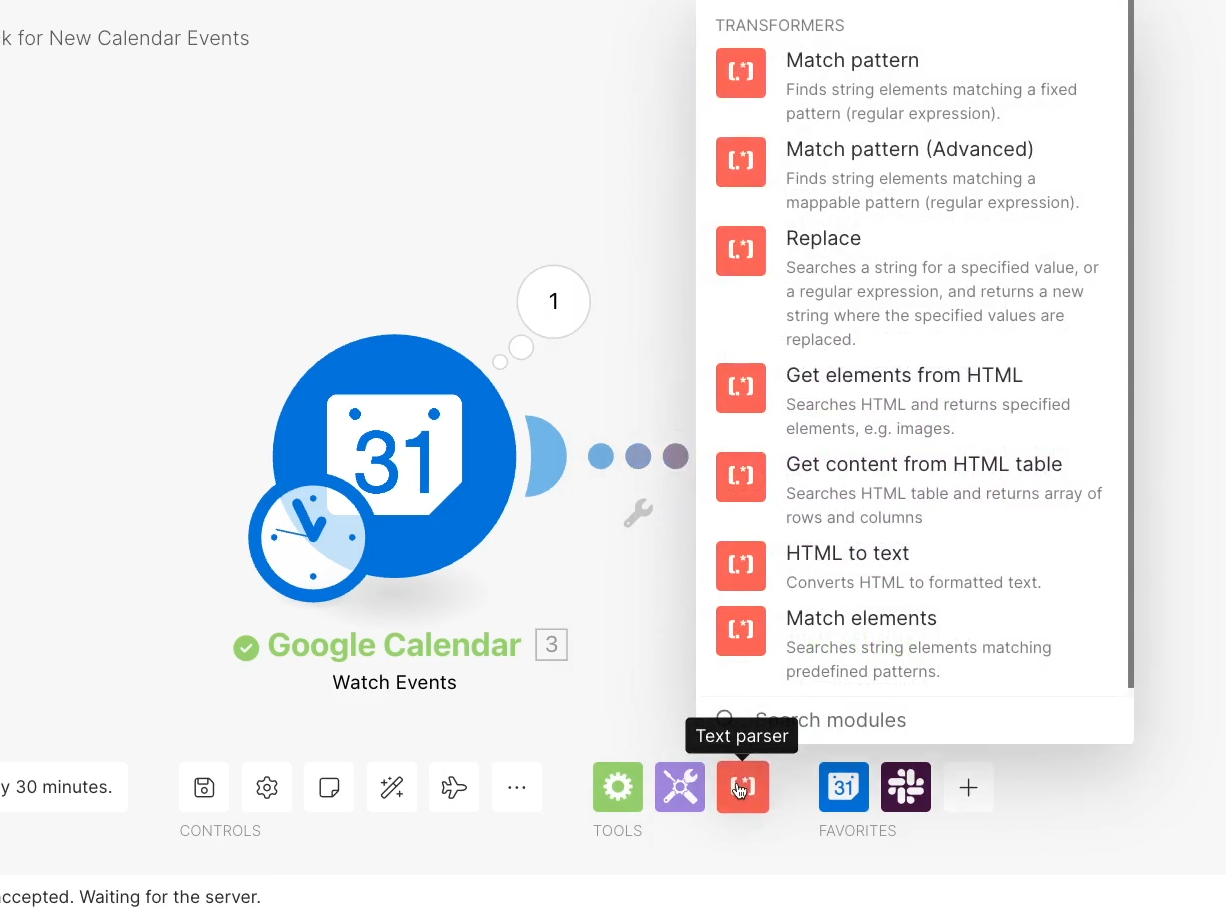
We won’t be using these in this beginner’s guide, but we encourage you to explore them on your own after getting started with Make.
Now that you’ve tried out Make, you might be considering a paid subscription. You can see Make’s pricing page here for more information.
To give you the main takeaway for Make’s pricing compared to Zapier’s, Make is way, way cheaper, and generally better for more advanced low-code automation, even if it has fewer integrations.
Try it for free first to see if it’s a good fit for you or your company, then find a plan that works for you.
Whether you’re new to automation or looking for an alternative to Zapier, Make is a great choice. Just do a quick search on XRAY.Tools to see if your apps are supported, and start building.
If you’d like to learn more about no-code and low-code tools like Make, be sure to check out our blog or our YouTube channel. You can also follow XRAY on Twitter, Facebook, or LinkedIn.