

For no-code builders, nothing was more annoying than getting a Zap set up only to realize that Zapier didn’t actually support the actions that you want to automate.
Of course, you could always create a custom action with an API call, but that could be pretty tricky if you didn’t know how to code.
Thankfully, Zapier has now added a new beta feature to create custom actions with a simple AI prompt.
In this post, we’re going to show you how to use App Extensions to build almost any action that you want in Zapier – no code required.
We’ll explain how App Extensions work, and we’ll show you how to create and use extensions step by step.
We’ll focus on using AI prompts to build an extension in this guide, so no coding knowledge is required. However, a little familiarity with web development and APIs may make things a bit easier.
Let’s get started!
What is an App Extension in Zapier?
First, let’s start with the basics: what is an app extension?
An app extension is a way to add a custom action to an existing Zapier integration. It’s useful when Zapier doesn’t have native support for what you want to automate.
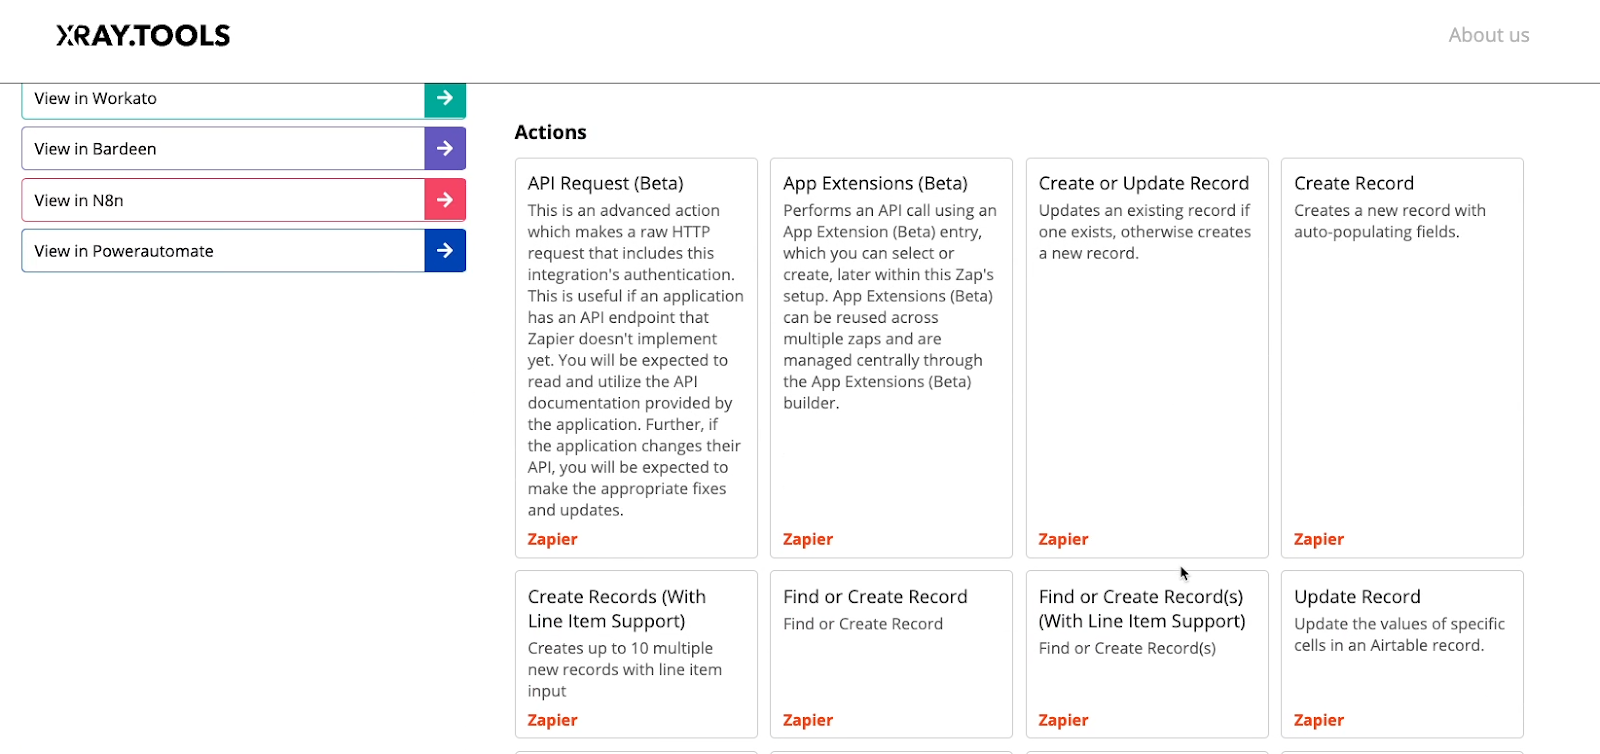
To easily see what Zapier or other automation providers natively support, you can just do a quick search for the apps you want to automate on XRay.Tools. If you don’t see your desired action in the list, then it’s not supported.
For instance, Zapier never supports automatically deleting objects in your software, so if you’d like to add a “Delete” step to an automation, you’ll need to use an app extension.
You can use extensions to automate any action that’s supported by the relevant application’s API. You can check your app’s API docs to see what is and isn’t supported if you’re not sure.
If you’d like to learn more about APIs and low-code building in general, you can explore some of the articles listed here:
• Why you can automate nearly any web app
• How to write API calls in Zapier
• Understanding API price hikes
Using App Extensions in your automations
A finished app extension will closely resemble a normal action in Zapier
Once it’s built, you’ll be able to select it from the appropriate app’s “event” list, fill in its required inputs, and use it like any other action.
Just note that you’re not currently able to create custom triggers, just actions. Additionally, Extensions are a beta feature, so they’re still evolving as users try them out.
Quickly build an App Extension with AI
Some simple actions will only require filling in a URL and identifying a few key variables, while some more complex actions will require some scripting.
However, any action can be built manually, or created with a quick AI prompt.
Even if you’ve never so much as written an API call before, you can start adding custom actions to your Zaps.
Automatically deleting old records in Airtable: our example automation
For this tutorial, we’re going to use our Zapier extension to automatically delete records from Airtable.
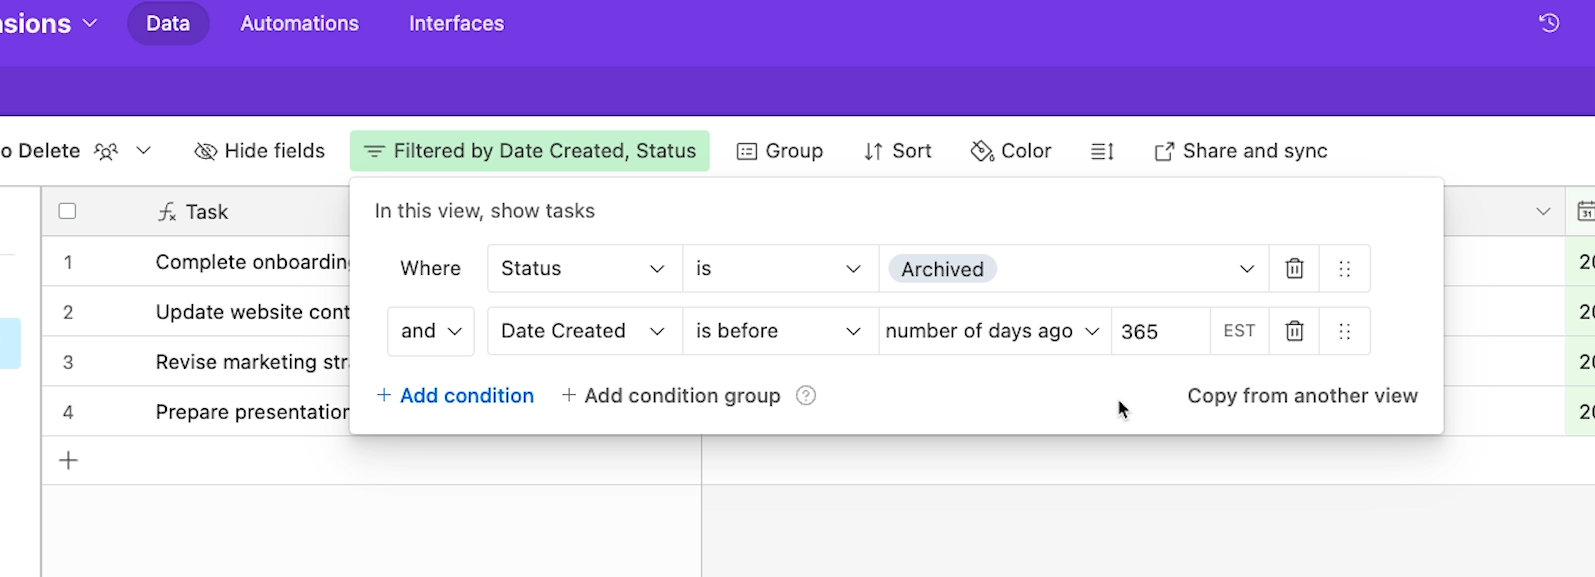
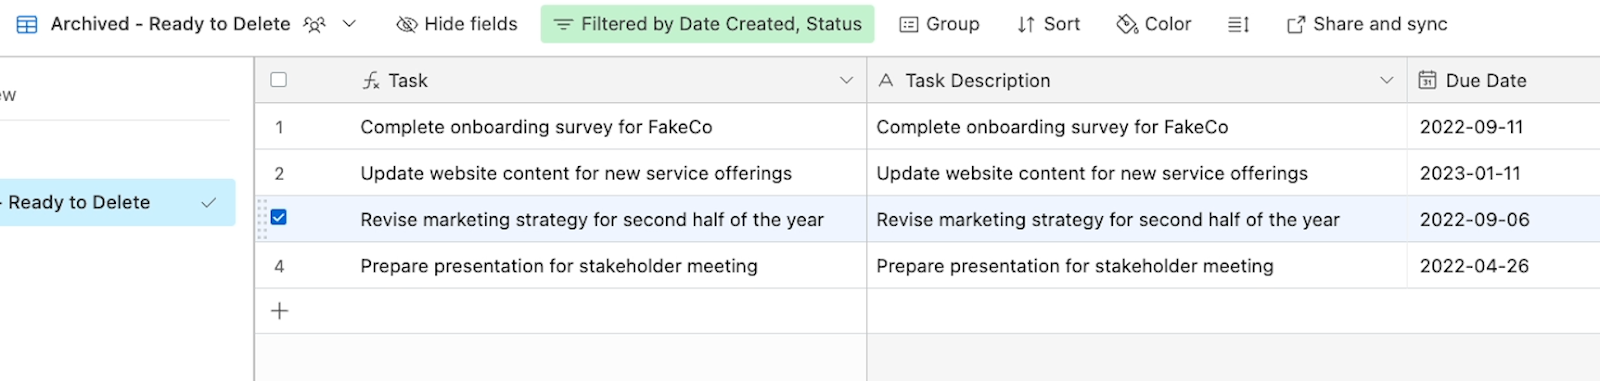
Below, you can see a possible trigger for this automation. It runs whenever a record enters the “Archived - Ready to Delete” view in a “Tasks” table.
In the Tasks table, records enter the “Ready to Delete” view when they match the following conditions:
• The status must be “archived”
• The created date must be more than 1 year ago
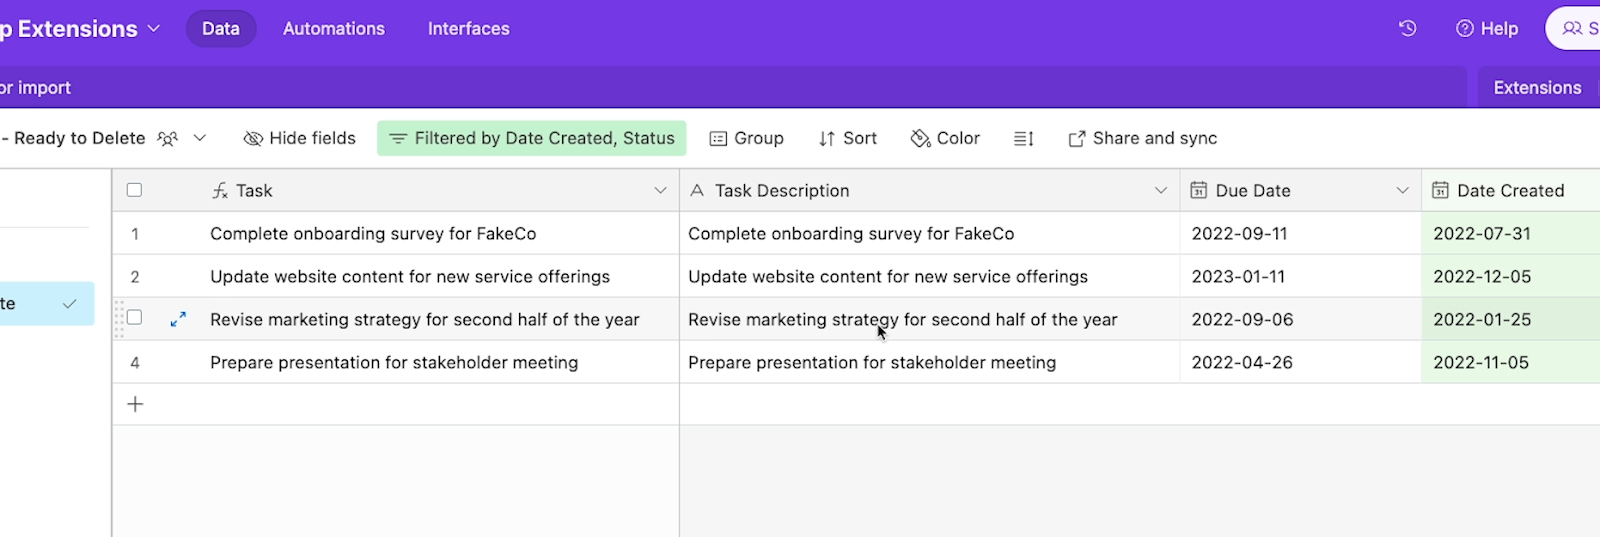
As you can see below, there are a few records in the Tasks table that match those conditions.
WARNING: Be careful when deleting data automatically
Before we continue and demonstrate how to create a custom App Extension, we want to give you a quick warning first.
Always be careful when using automations to delete data.
Deletion will usually be permanent, even when conducted through tests.
Before proceeding with any automation that’s designed to delete data, back up any relevant data. To quickly back up almost any database, you can always just export a CSV.
Additionally, while building the automation, make sure you choose the right app, database, table, profile, and other information while configuring actions.
How to create an App Extension in Zapier
With your data backed up, let’s dive into creating a Zapier Extension with AI.
To create an extension, begin by opening up a Zap. Currently, you can’t create extensions for triggers. They only work for actions and searches. Hopefully, Zapier will update this feature soon to include triggers.
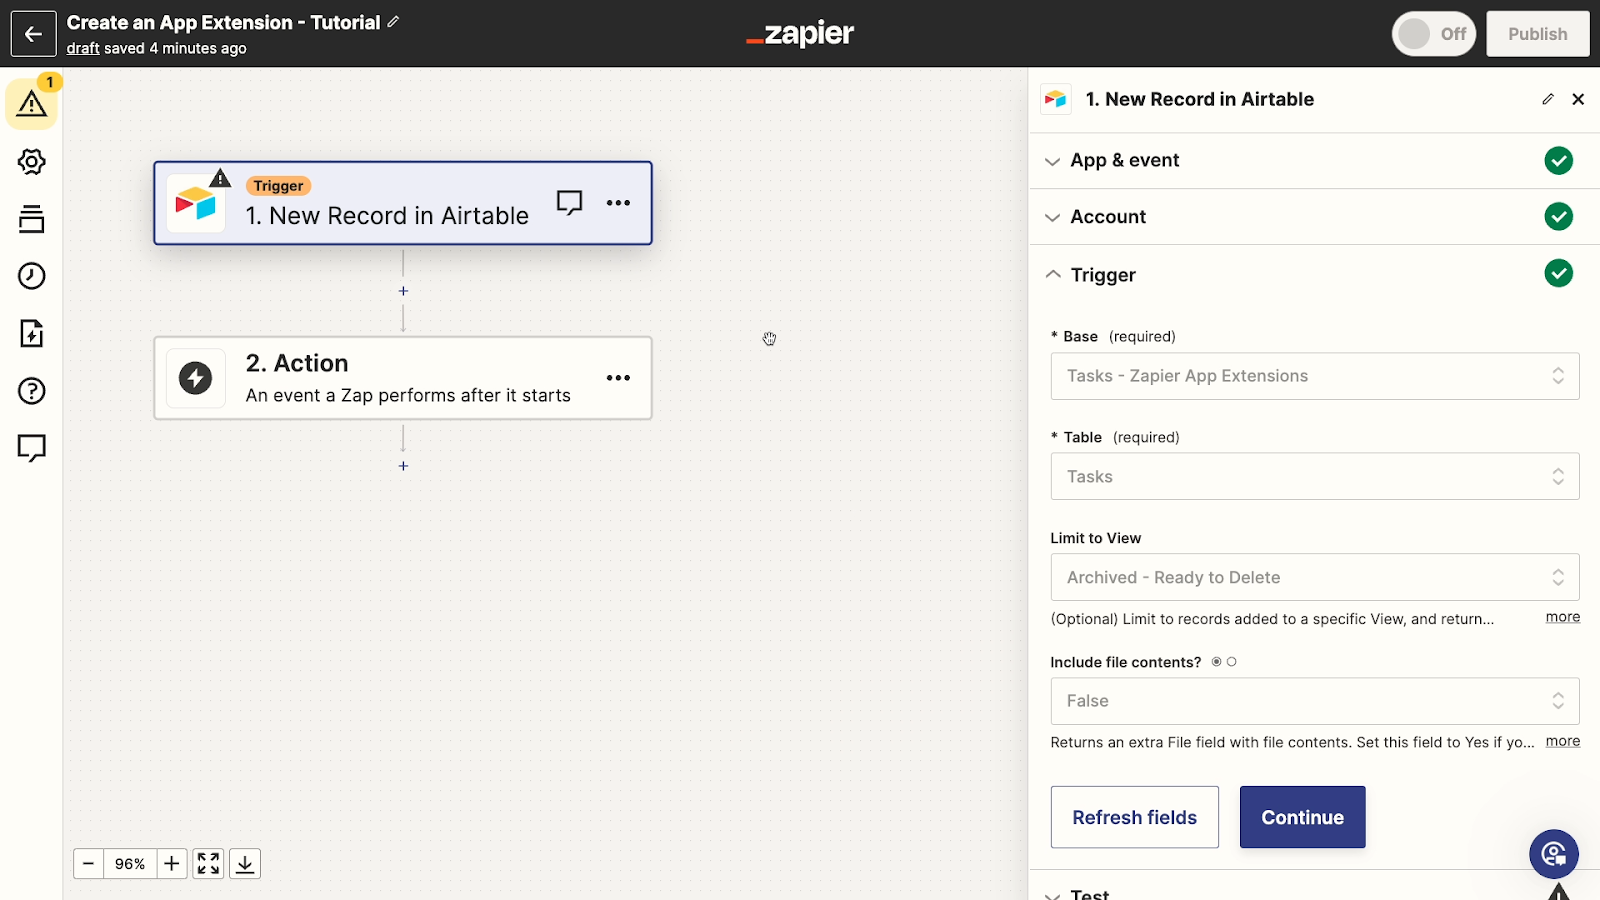
For now, you’ll need to create a trigger manually as you normally would in Zapier. For our example, we’ve already created an Airtable trigger, as we covered earlier.
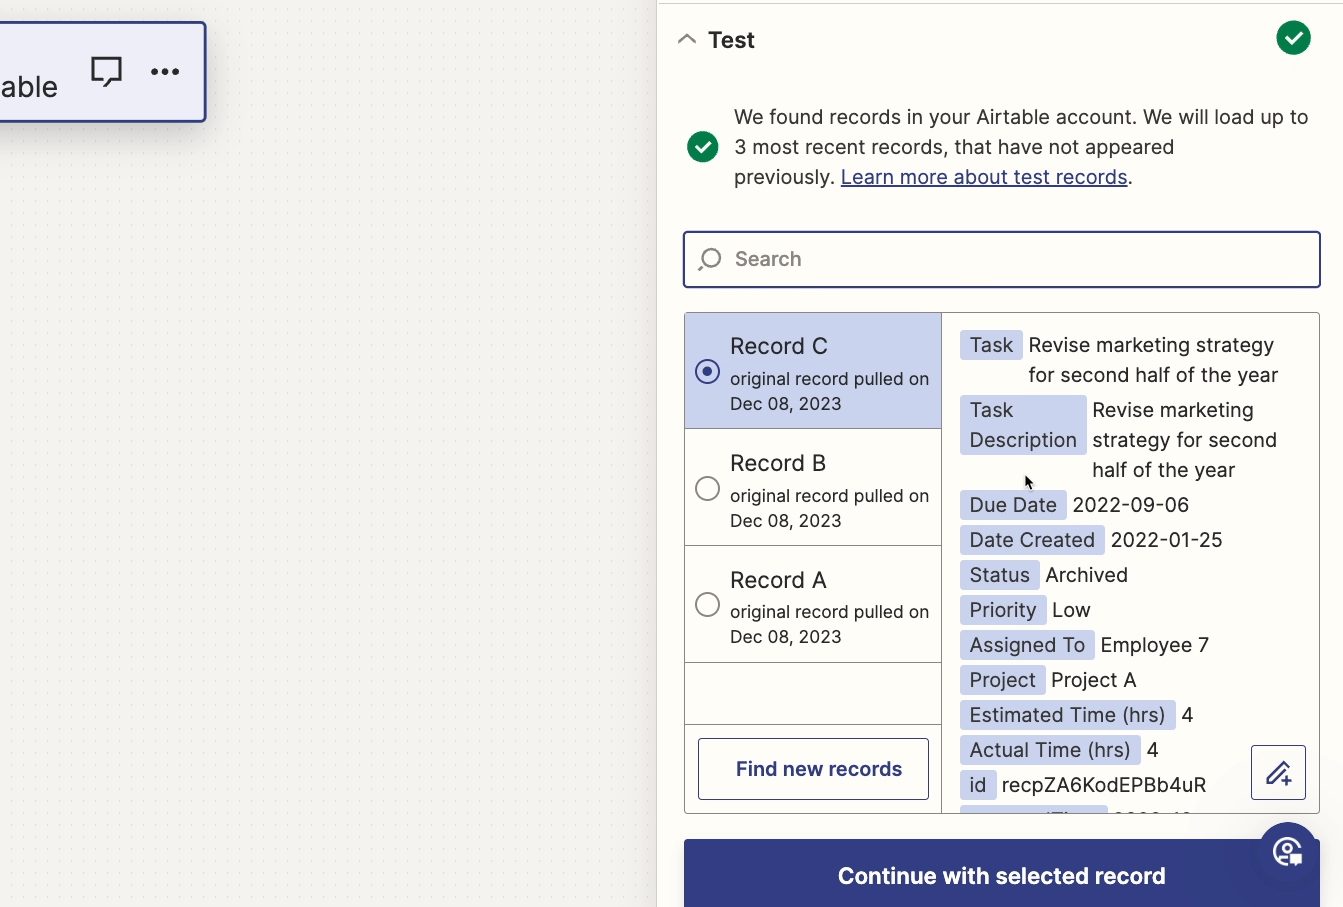
Give your trigger a test to pull in some data. After testing our trigger, we can see an old record that’s ready to be deleted.
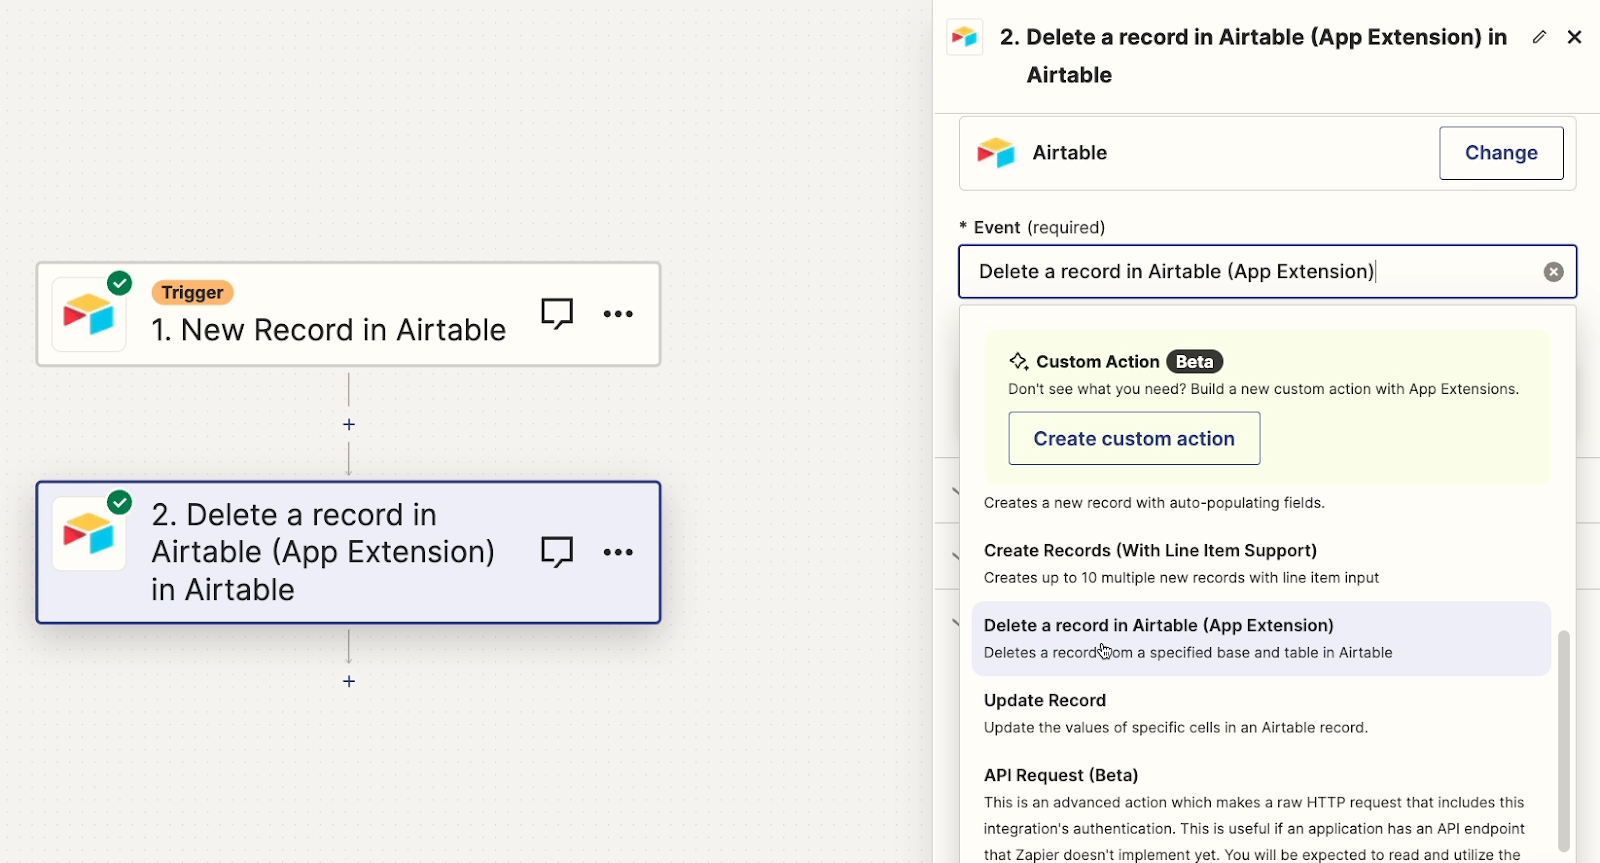
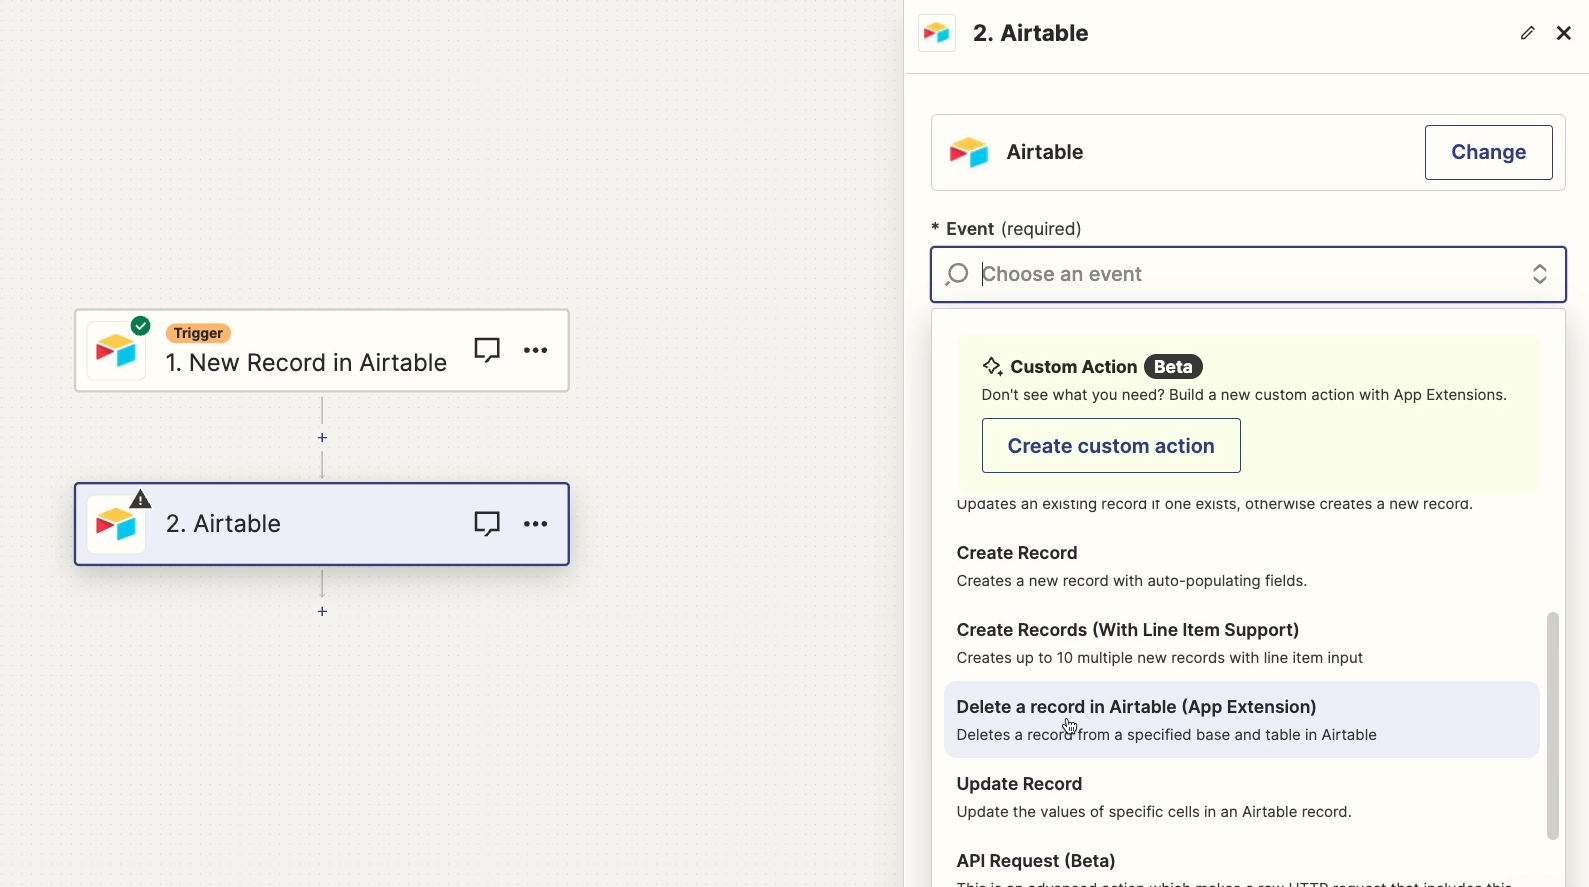
Next, add an action and pick the app that you want to use. For our example, we’ll use Airtable, since we want to delete a record from an Airtable base.
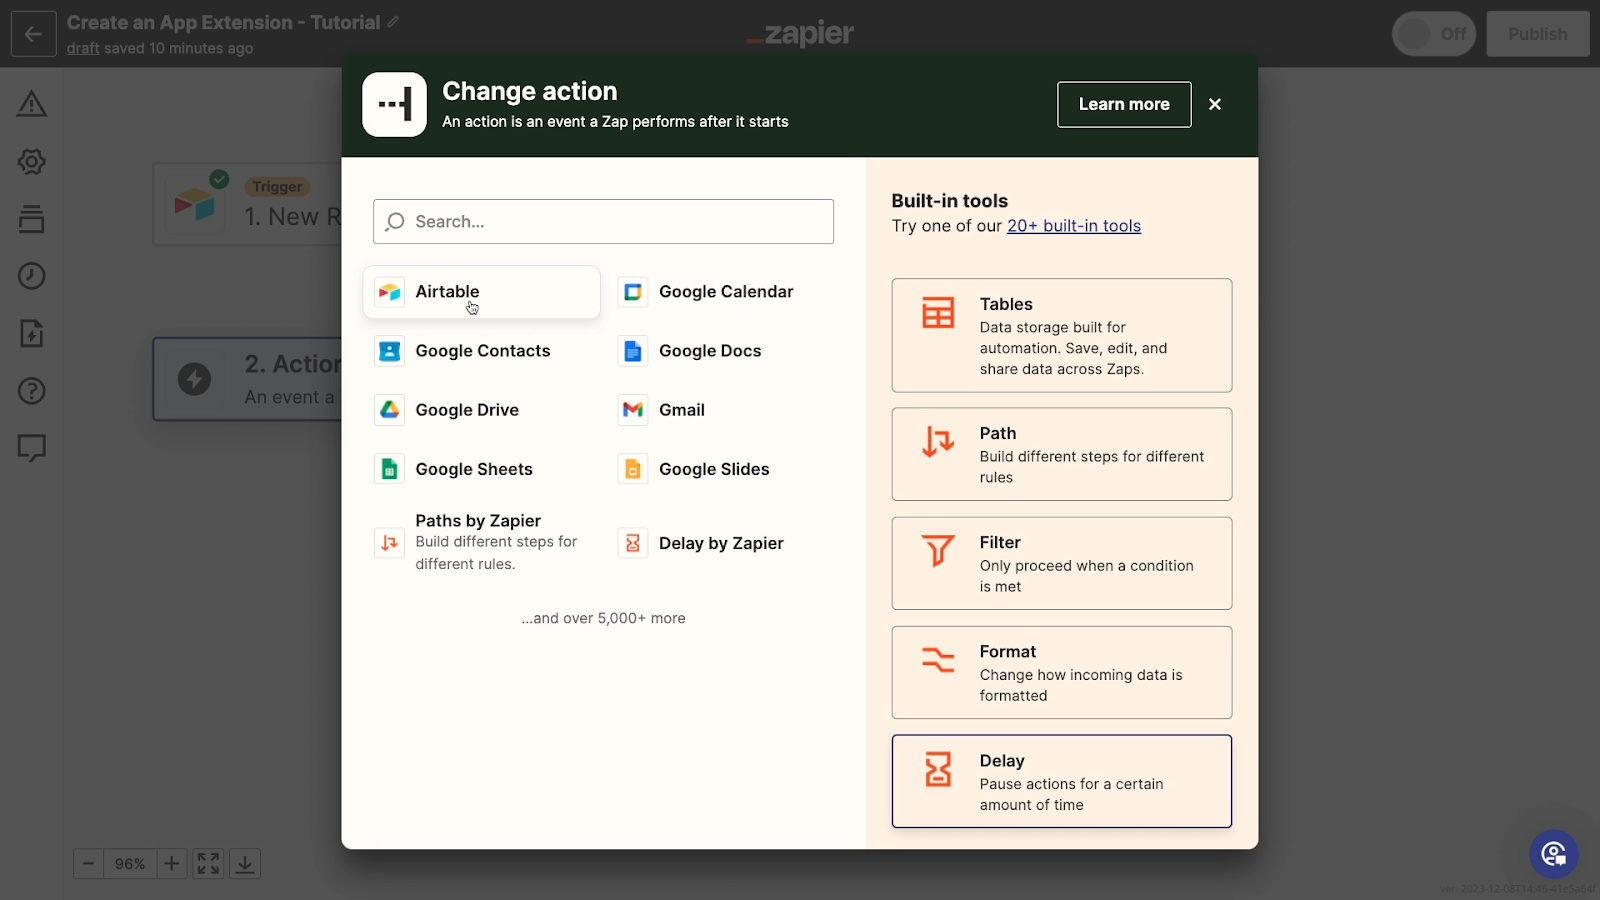
Then, click on the ‘Event’ dropdown. At the top of the menu, you should see an option that says “Custom Action (Beta)”
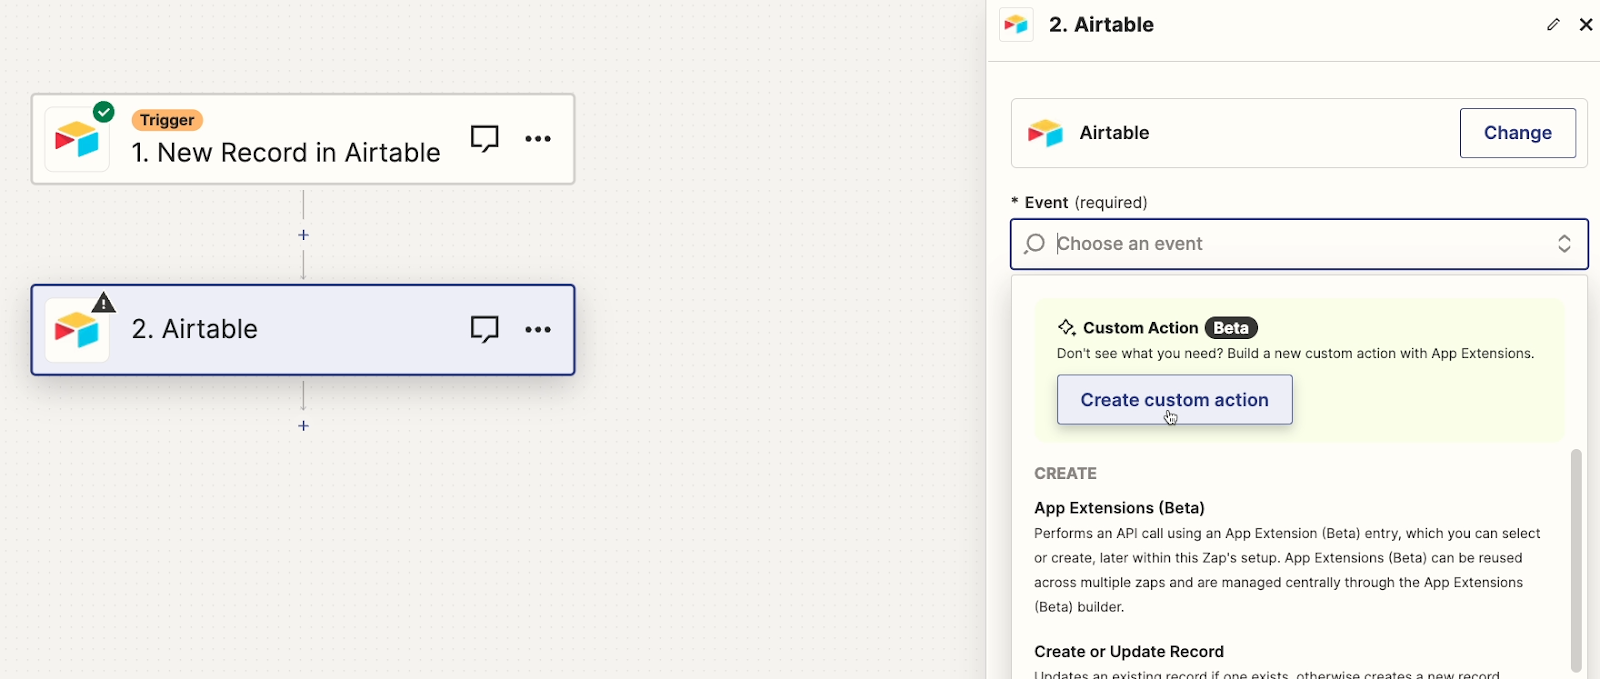
Click on “Create Custom Action” to open up the Zapier extensions page.
Start creating an App Extension with an AI prompt
At the top of the page, you’ll see a large section where you can enter an AI prompt.

If you scroll down the page, you’ll see fields and menus which will let you build the extension manually.
But as we noted earlier, we’ll focus on building with AI for this tutorial. After you enter an AI prompt, all these sections will be filled in for you.
Go back to the AI prompt section at the top of the page, and enter a prompt describing what you want to build.
Be direct, and be as specific as possible. In our case, our prompt is going to be very simple: “Delete a record in Airtable”.

Once it’s all set, click “generate” to submit your prompt.
Review and edit the AI-generated extension
Next, you’ll see three options that attempt to recreate what you’ve described in your prompt. You can read the summary of each option for more information about what the action does. Note that the API method will be listed in the top left.
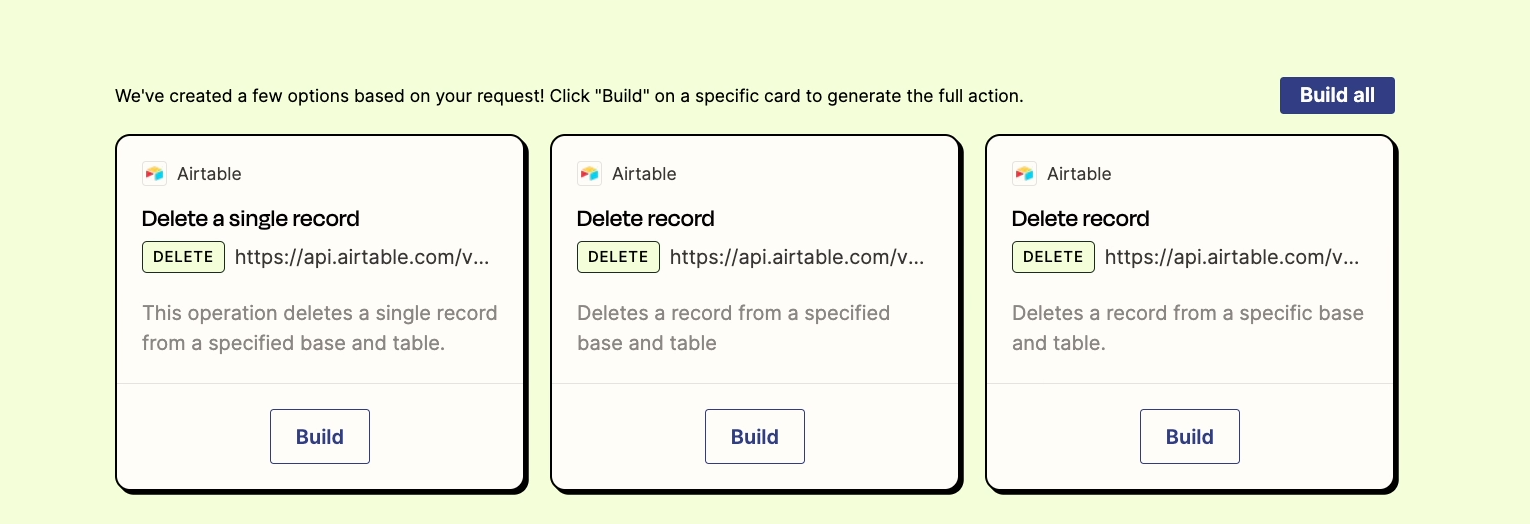
For our extension example, the method for each option is always DELETE, since we want to delete a record.
If you want to create an object, you should see POST as the method. To update, you’ll need to use either PATCH or PUT, and for a search, you’ll need GET. Make sure to pick an option that uses the appropriate method.
Zapier also includes the exact API route here, but unfortunately, it’s heavily truncated. We can only see the start, which doesn’t really tell us much. All we can see is that it’s accessing the Airtable API - which is pretty obvious. To see more information about any of these potential extensions, click on “Build”.
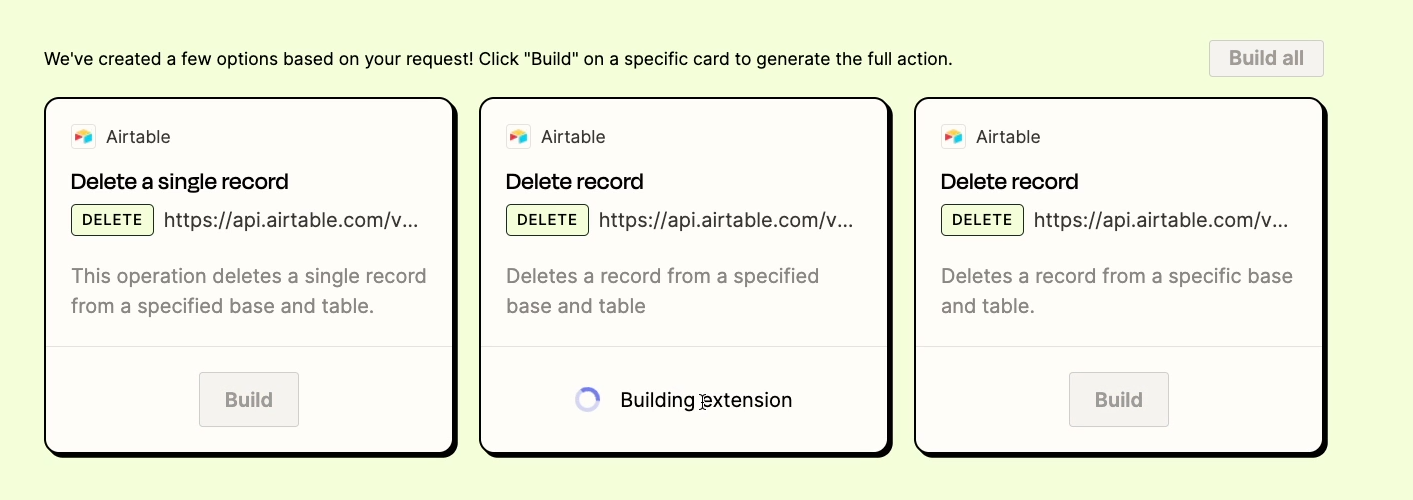
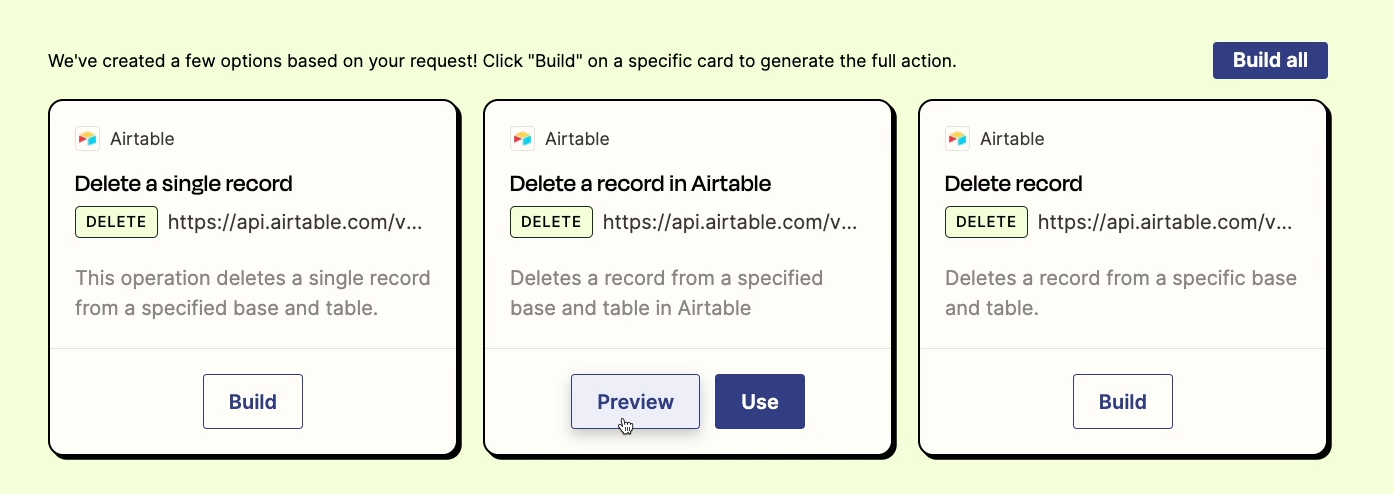
Once you click “build”, Zapier will actually start creating the extension in the background. This can take a little while.
When the extension is ready, you have the choice to either preview it or use it right away. It’s best to take a closer look at what the AI put together before continuing, so click on “Preview”.
In the preview window, you can see more detail about the extension the AI created.
Review the API Method and URL
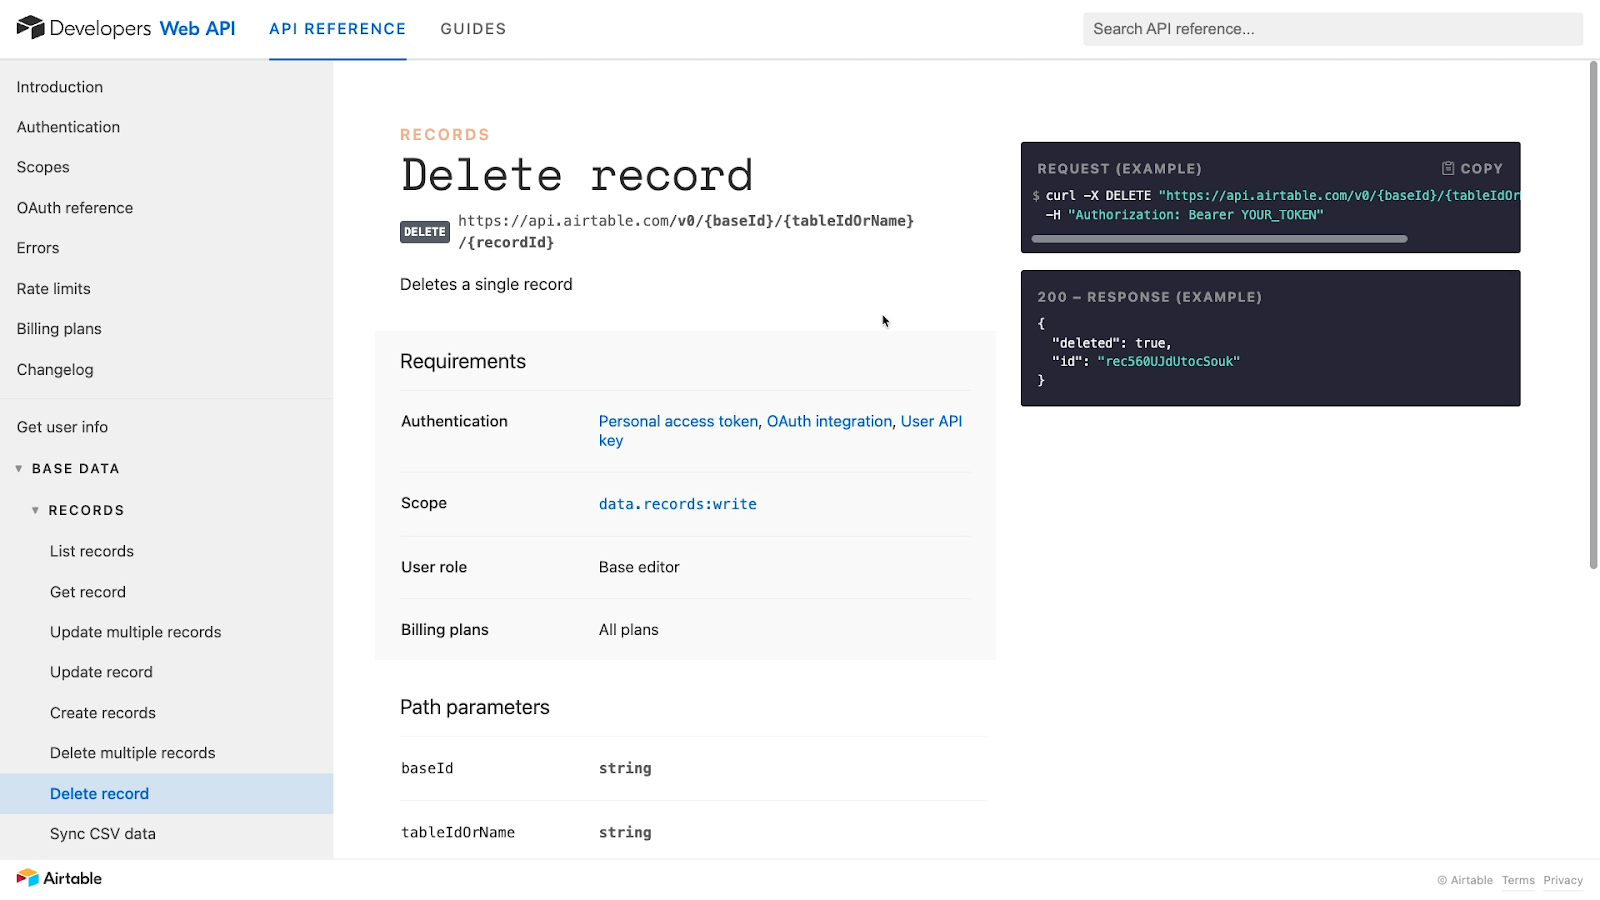
Under “API”, you’ll see a small table with the Method and URL being used in the extension. Just as before, we can see that the method is DELETE. But now, we can see the full URL.
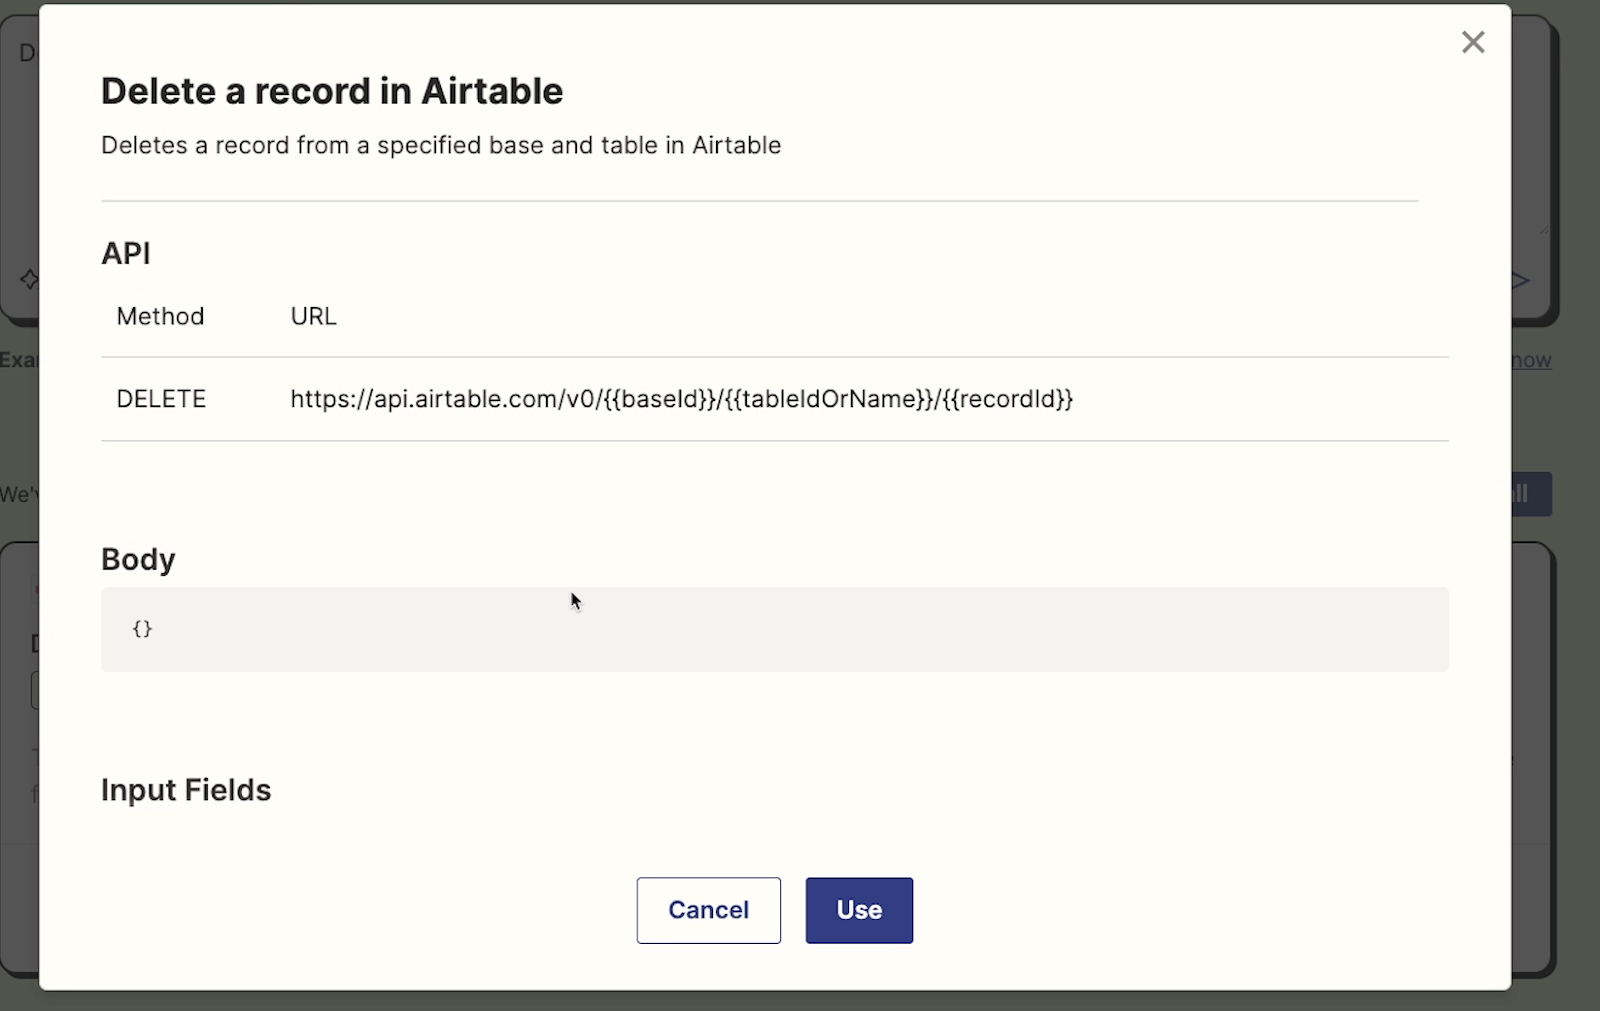
The curly brackets indicate variables that you’ll have to fill in when you add the step to your Zap. For our example, we’ll need to identify the base, table, and record ID.
Add custom code to the body if needed
If custom code is required, it will be written in the “Body” section. It won’t be necessary to enter anything here for our example, since we’re just deleting the record identified in the URL.
For other actions, though, you might need to add more information here. In general, though, the AI should take care of it for you. Most API calls have URL encoded data, which doubles as instructions. This means that the method and the URL (complete with variables) are often the only pieces of information that you need for a successful API call.
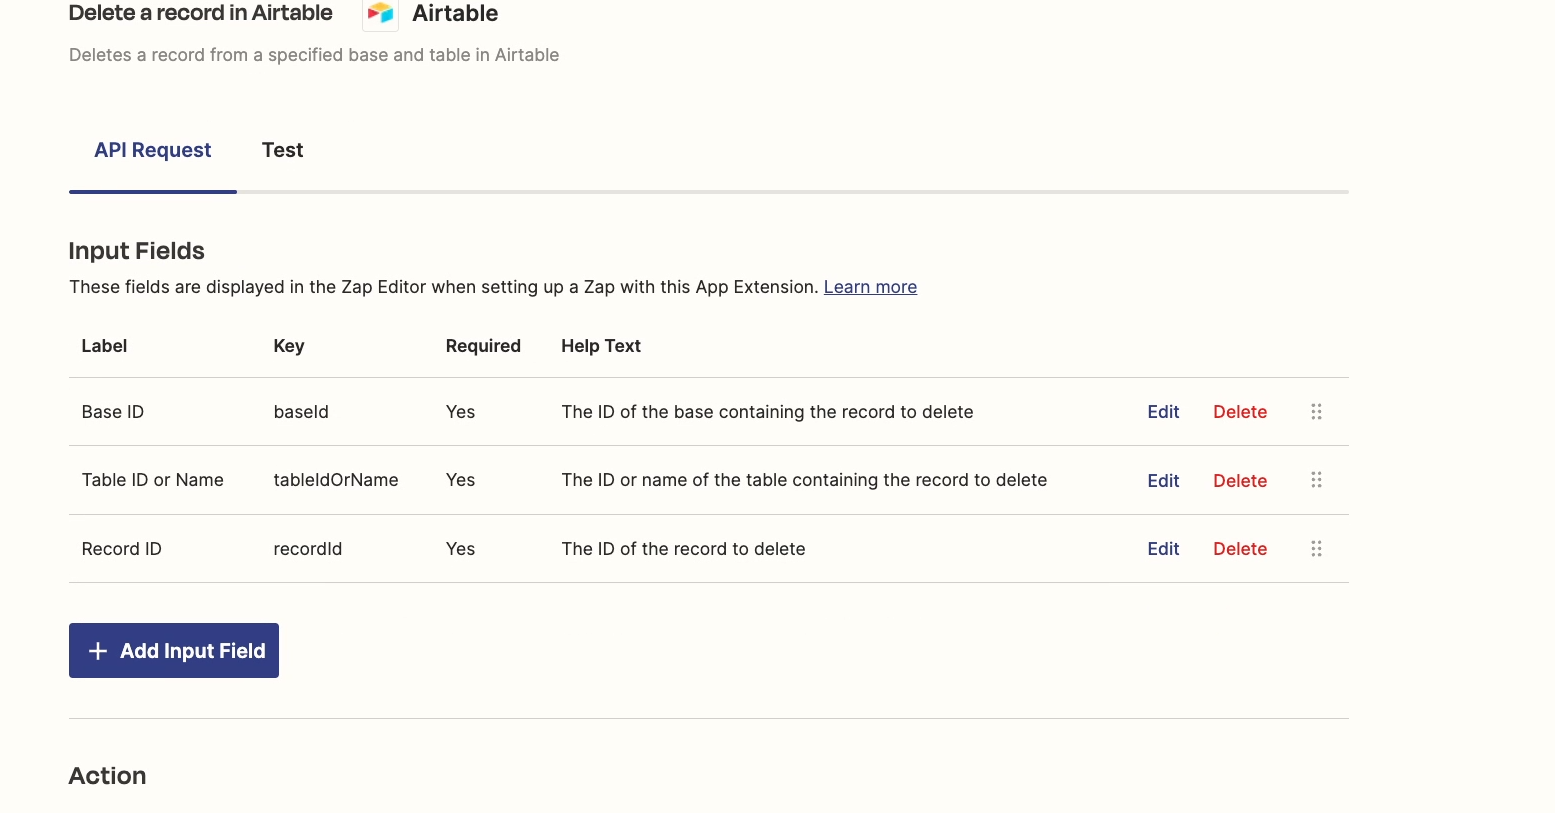
Review input fields
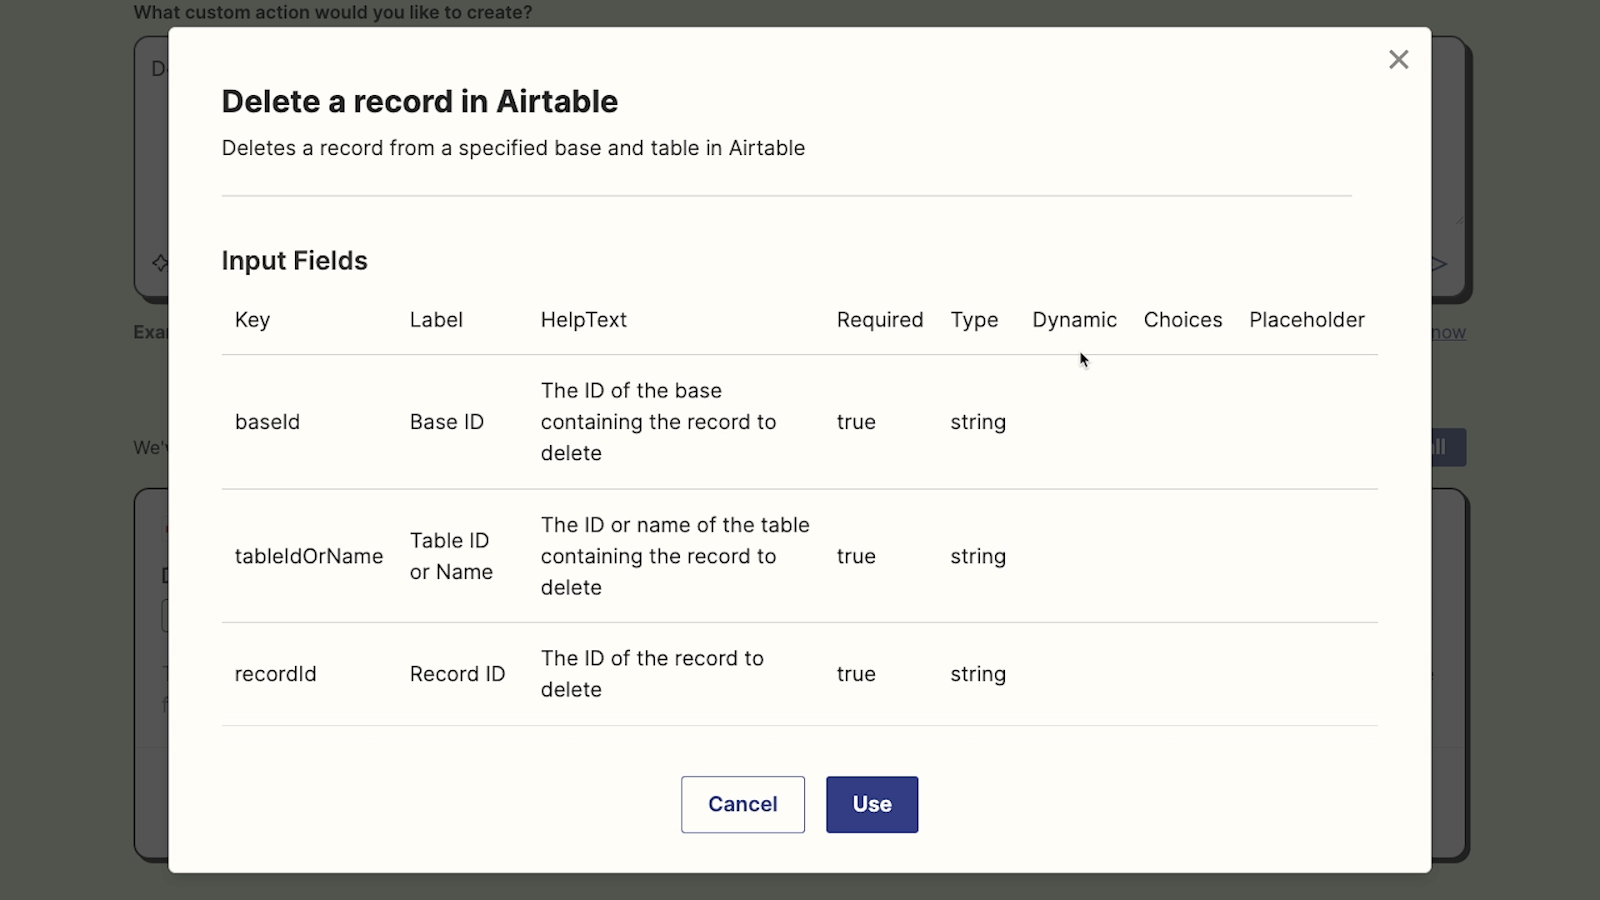
Under Input Fields, you can see all of the information that can be filled in when using the extension as a step in one of your Zaps. In this table, you can see several attributes for each input field.
• Key: Used behind the scenes to identify the field. You can see this in the URL, for instance.
• Label: Identifies the field to users
• Help Text: Provides explanations on what the data is used for.
• Required: Indicates if the field is mandatory, with required fields marked as "true".
• Data Type: Shows the type of data needed (e.g.,string [text], numbers, date/time, etc.).
• Dynamic: Specifies if the field has a dynamic dropdown menu for input.
• Choices: Lists multiple choices for fields set up as dropdown menus.
• Placeholder Text: Displays example or guiding text for each field.
Note that these fields here won’t always match up 1:1 with the variables in your extension’s URL. That just happens to be the case for our example. As you build your own extension, you may see some variables in the “Body” portion instead.
Take a moment to review all of the info listed in the preview window. If it looks good, click on “Use”.
Finalizing and using your app extension
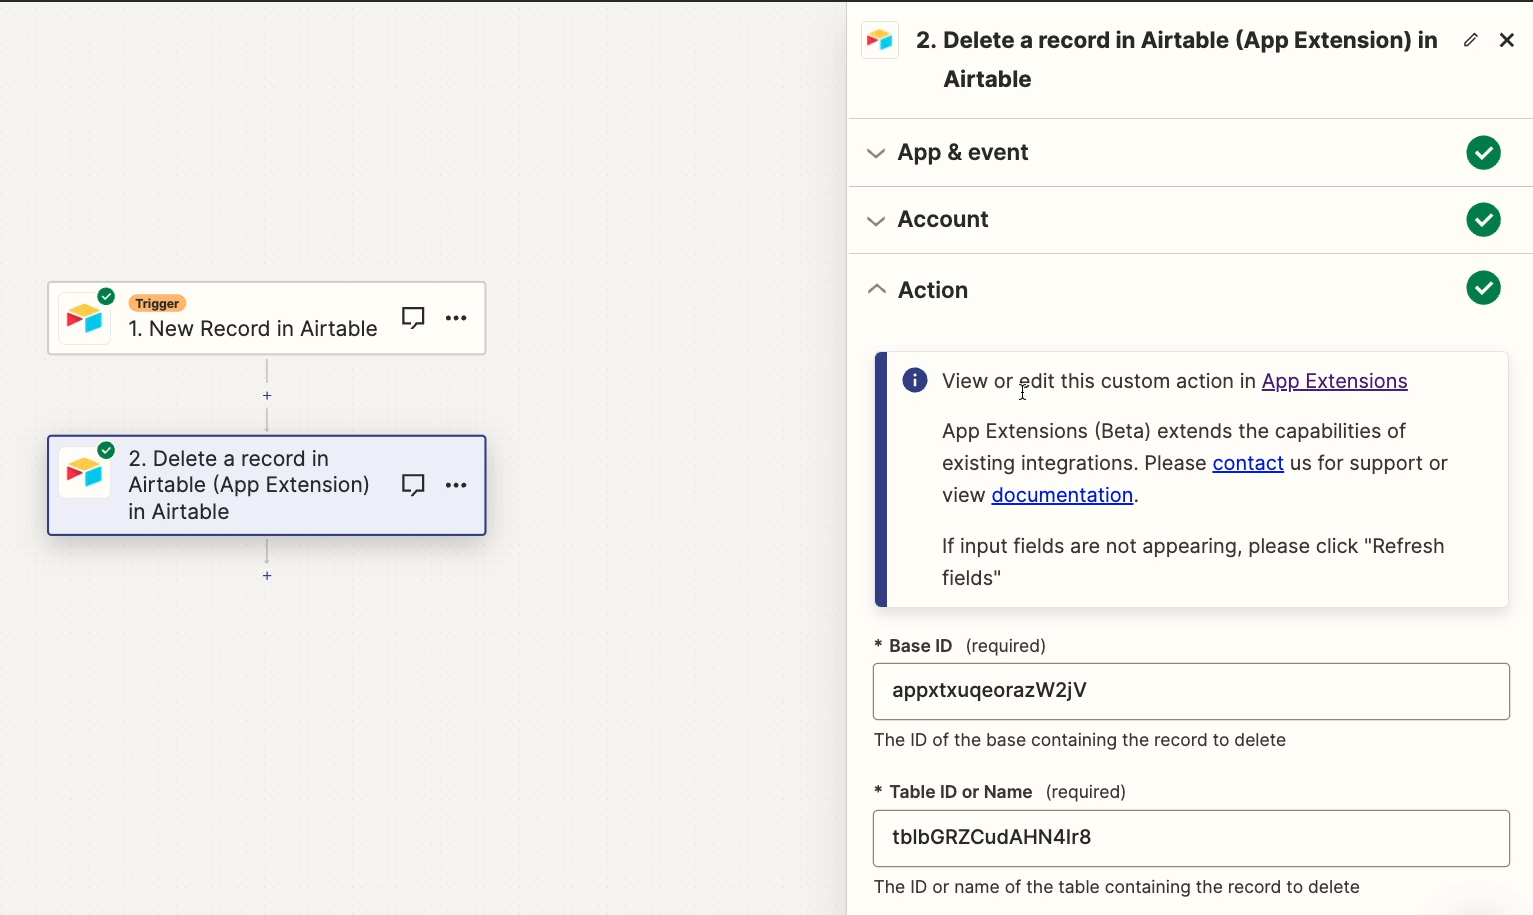
The preview window will close, and you can scroll down to see your extension’s settings.
Everything you see here should match what you already saw in the preview, but now, you can edit or update anything that you’d like. Just make sure to reference your app’s API docs to make sure your edits are correct.
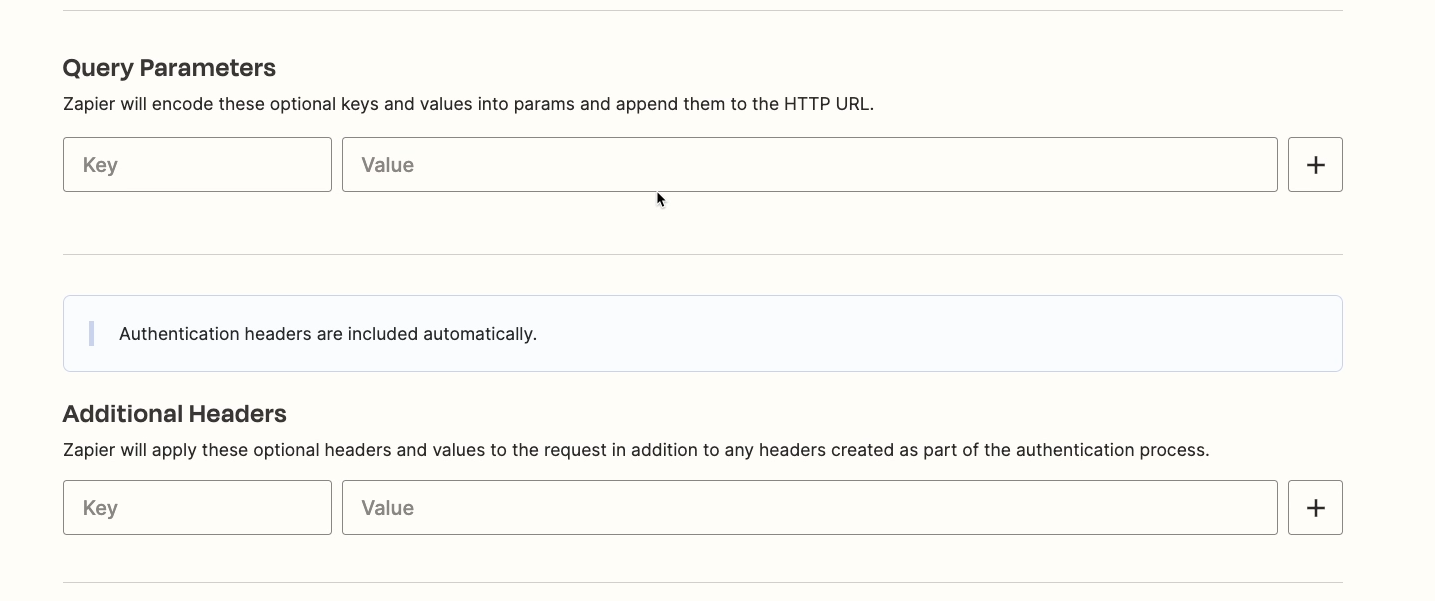
You can also add query parameters or additional headers to further refine the data created or retrieved, though that won’t be necessary for our “Delete” action.
Once you’ve confirmed all of your settings, your extension should be ready to go. Click “Save” to complete the extension and commit any changes you made. Then, publish it so it will show up in your action list.

Accessing your app extension
Now you can return to your Zap. Refresh the tab in your browser so Zapier retrieves the latest data from your extension. Go back to action in progress, and click on ‘Event’. You should see your new extension as an option. Click on it to use it.
Sign in or choose an existing authorized account to use for this action.
Now, you can configure the custom extension like any other action in Zapier. For our “Delete a Record” action, we’ll just fill in static values pointing to the right base and table. Then, we’ll retrieve the record ID dynamically from the trigger.
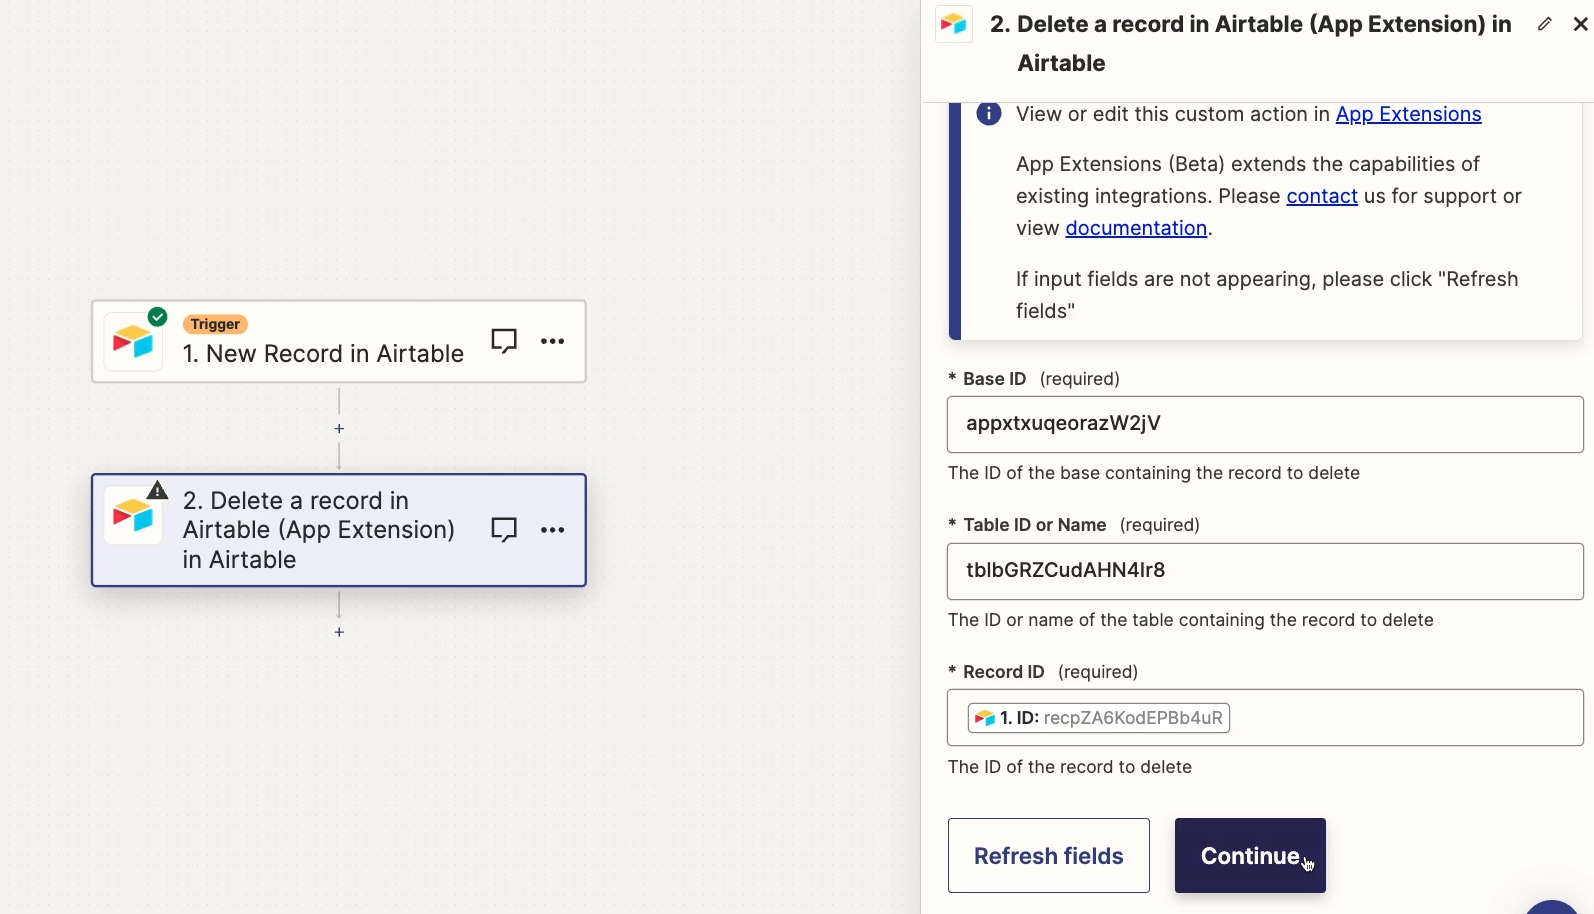
Once you’ve filled in all the necessary fields, give your action a test.
Pictured below, you can see the test record that Zapier retrieved. This is the record that should be deleted when we run the test.
Now we’ll test the action in Zapier.
Testing your app extension
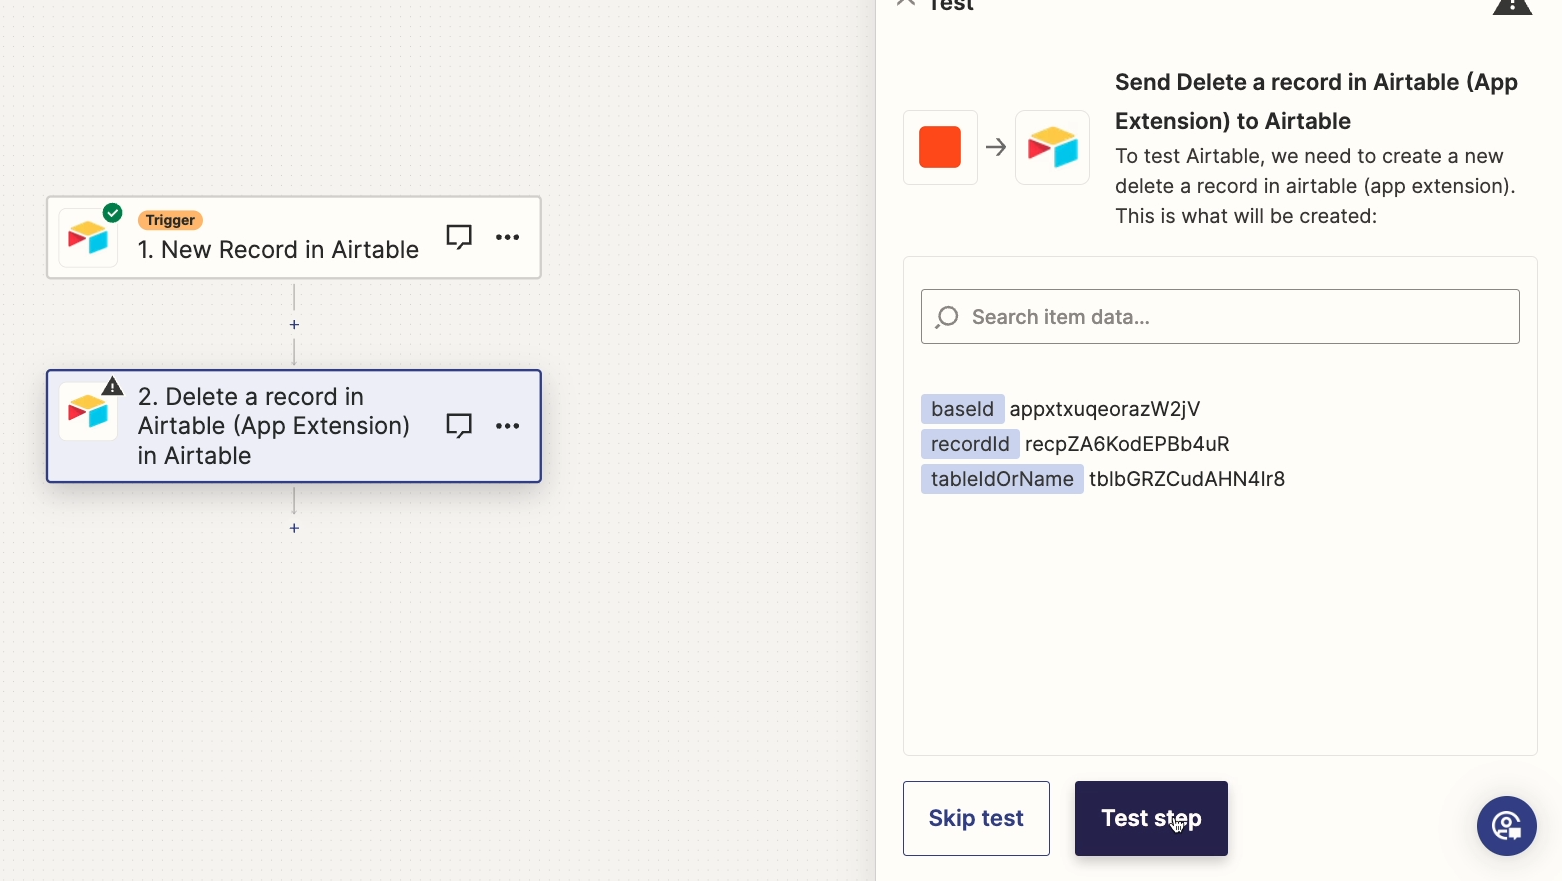
The test appears to be successful, as indicated by the 200 response code.
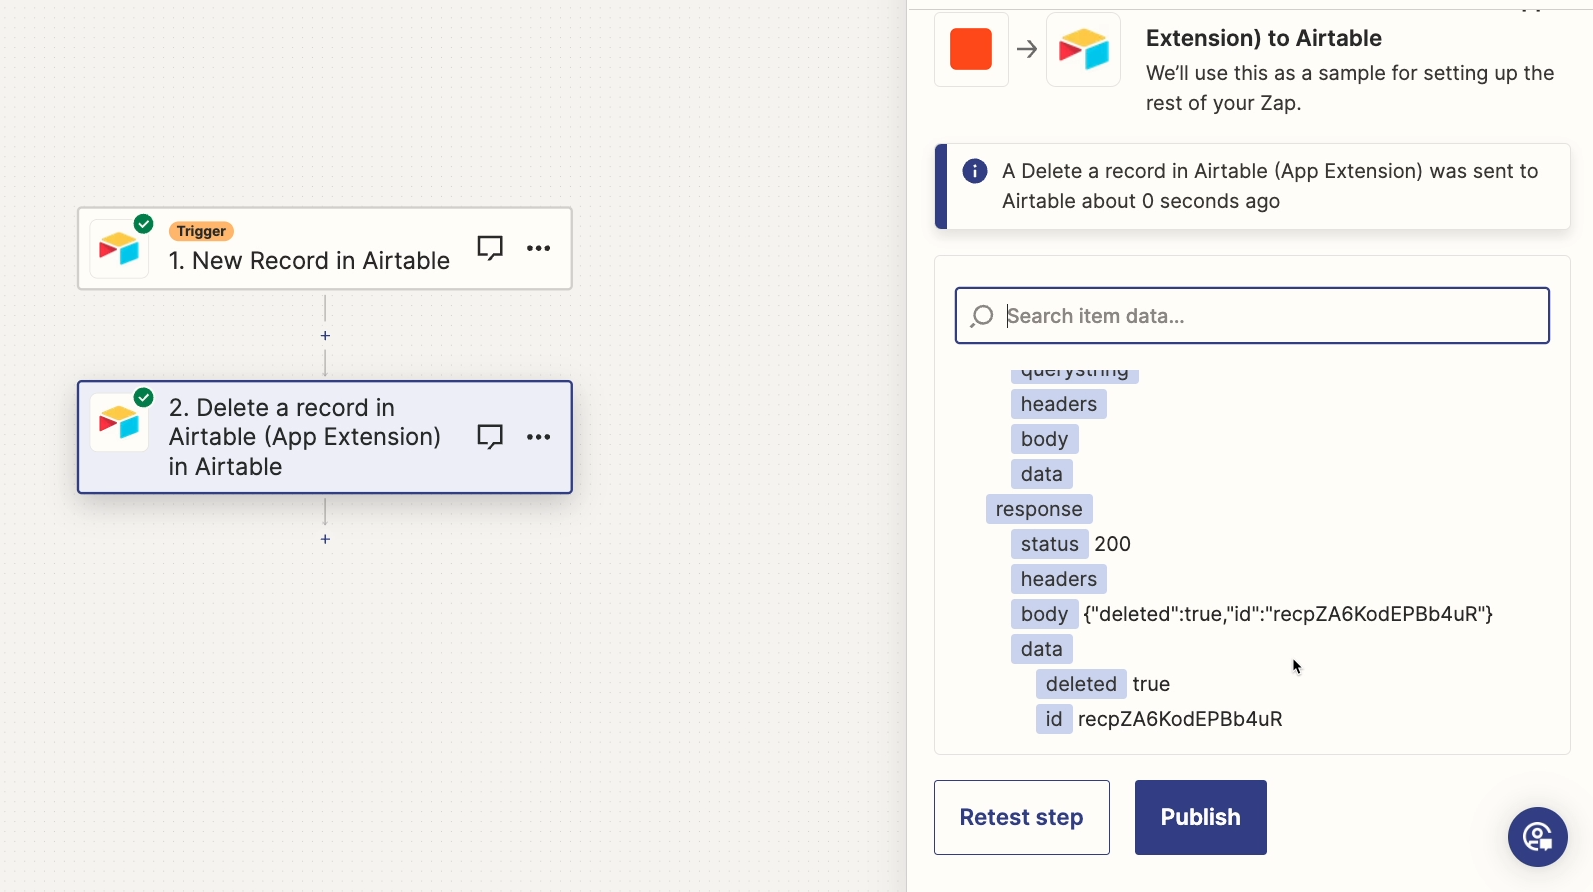
If your extension doesn’t work, you’ll likely see a 400 or 500 server code instead. You can see a fun reference guide here fur every possible server code.
However, it’s always possible that your extension may have technically worked and run correctly, but isn’t actually configured the way you want it to be. If, for example, the AI chose the wrong method and tried to update data instead of deleting it, you may see a “successful” 200 message even when your extension isn’t getting the desired results.
As such, it’s always a good idea to check your apps after running a test in Zapier to make sure that data was deleted, created, or updated in exactly the way you intended.
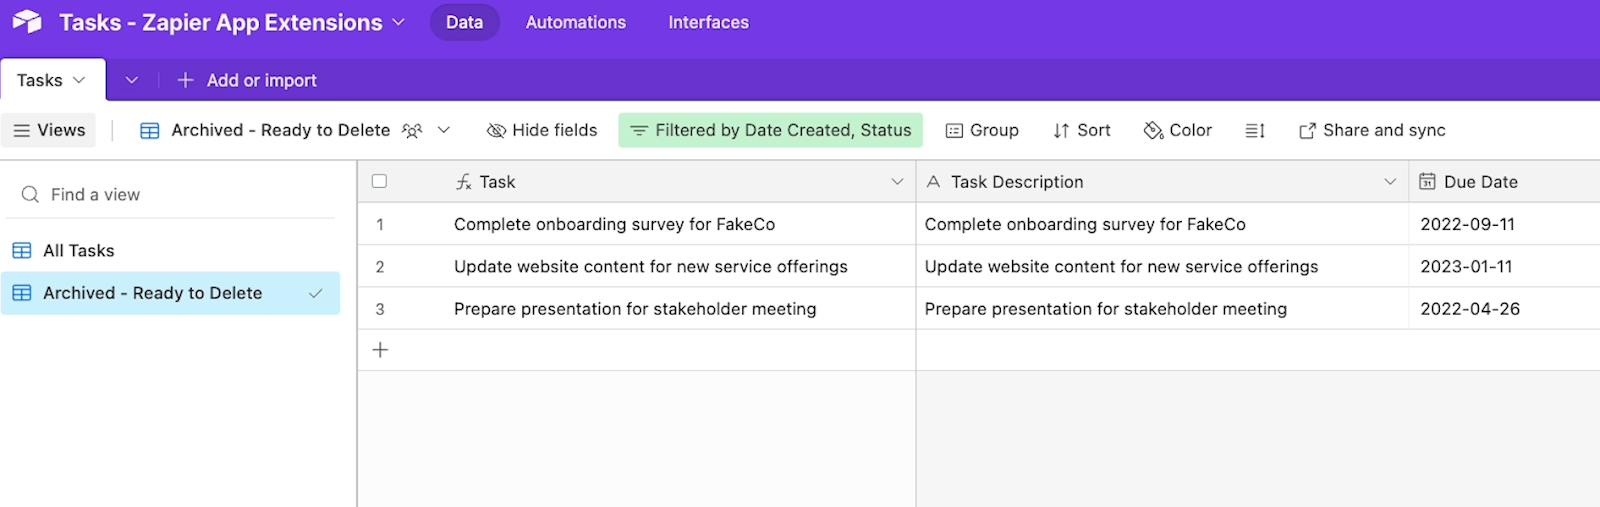
When we check our example Airtable base, we can see that the chosen record was deleted.
Again, as we noted earlier, be very careful when using a Delete action. It will immediately and permanently delete your data, so make sure you’ve configured everything correctly and backed up any important data before proceeding.
If you need to update your Extensions, just go to zapier.com/app/extensions.
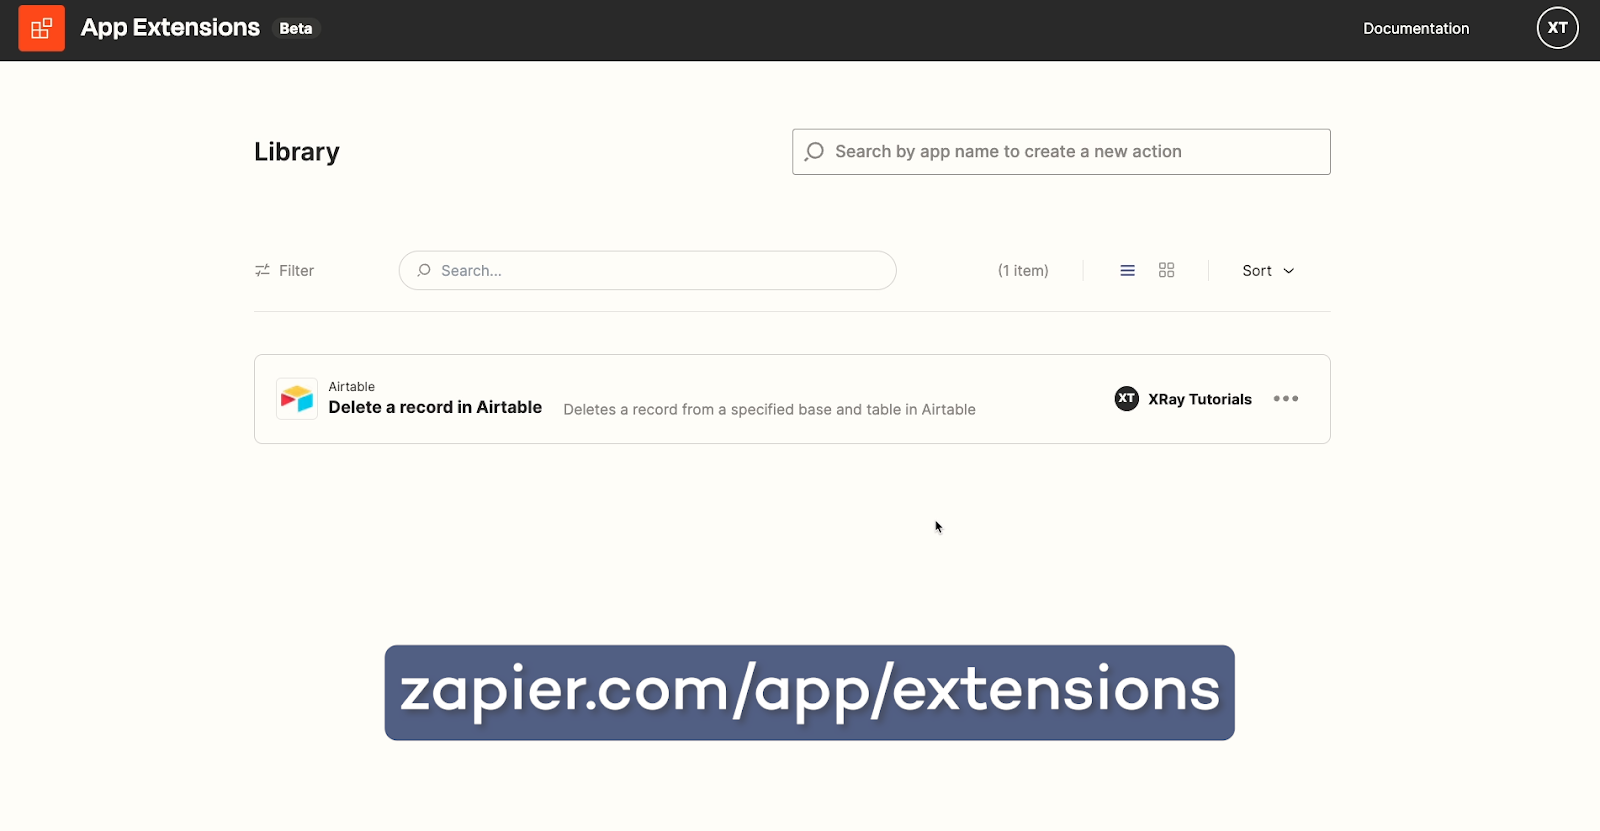
Then, select the extension you want to review, and make any edits you’d like. You can also add new extensions from this page.
Easily add support for custom actions in Zapier
Zapier doesn’t always support every action you want to automate right out of the box.
But with Zapier extensions built by AI prompts, it’s easier than ever to add any functionality you want to your Zaps, so give it a shot today.
To learn more about using Zapier and its latest features, check out our blog or our YouTube channel. You can also follow XRay on Twitter, Facebook, or LinkedIn.


