
Generative AI is not limited to standalone apps. With interest in AI growing every day, tools like ChatGPT are being integrated into all sorts of popular software that you might already use.
Right now, Airtable is rolling out a brand new field type called “AI Assist” that will let you generate AI prompts that automatically include the data in your base.
In this post, we’re going to show you how this new AI Assist field works, and how you can sign up to try it out for yourself.
In our demonstration, we’ll start by creating a couple prompts using Airtable’s templates. Then we’ll make one from scratch, so you can see all of the options you’ll have with this field.
AI assist is a brand new Airtable field type, and it’s still in a closed beta at the time of publication (09/20/23).
If you’d like to sign up for a chance to join the free beta, just go to https://www.airtable.com/product/ai, and sign into your Airtable account if you’re not signed in already.
Then, fill out the brief form to submit your request to join the beta. Not all requests will be granted access to the beta.

As Airtable notes in the sign-up form, they’re currently prioritizing accounts that are part of larger workspaces. However, small teams with free plans may still be able to join based on their circumstances, so it’s still worth signing up even if you’re not on an enterprise plan.
Eventually, we expect the AI Assist field to become a more widely available feature accessible to anyone who’s using Airtable.
But while you’re waiting, we’ll give you a preview of how it works. You can also check out our video tour at the bottom of the page if you’d like to see a live demonstration.
An AI assist field will generate its content by sending an AI prompt to GPT3 or GPT4. The field will then be filled in with the AI response.

The prompt can either be based on a template provided by Airtable, or written from scratch by the user.

However you choose to create your prompt, you’ll always have the option to reference specific fields in your table.

This allows you to create an AI field that summarizes the contents of several other fields, or an AI field that translates the contents of a specific field.

Next, we’ll show you how to create AI Assist fields step by step.
First, let’s create an AI assist field using a templated prompt.
In the image below, you can see a simple Airtable base where we’re tracking our latest blogs. It includes a small collection of relevant fields: title, subtitle, blog body, and date posted.

Once you’ve been admitted to the AI Assist beta, you can get started by simply adding a new field to your table. Then, choose “AI Assist” as the field type

When you create a new AI Assist field, you’ll have the option to configure the field from scratch or create a field based on a template.
We’ll start with a template.
When you choose to start from a template, you’ll see a template gallery with several options you can choose from.

The template gallery is divided into a few categories based on use cases: General, Product, Marketing, UX Research, and Recruiting.
All of the templates are available in a single list in the main window of the template gallery. If you select a category on the left, your window will scroll to the relevant part of the list.
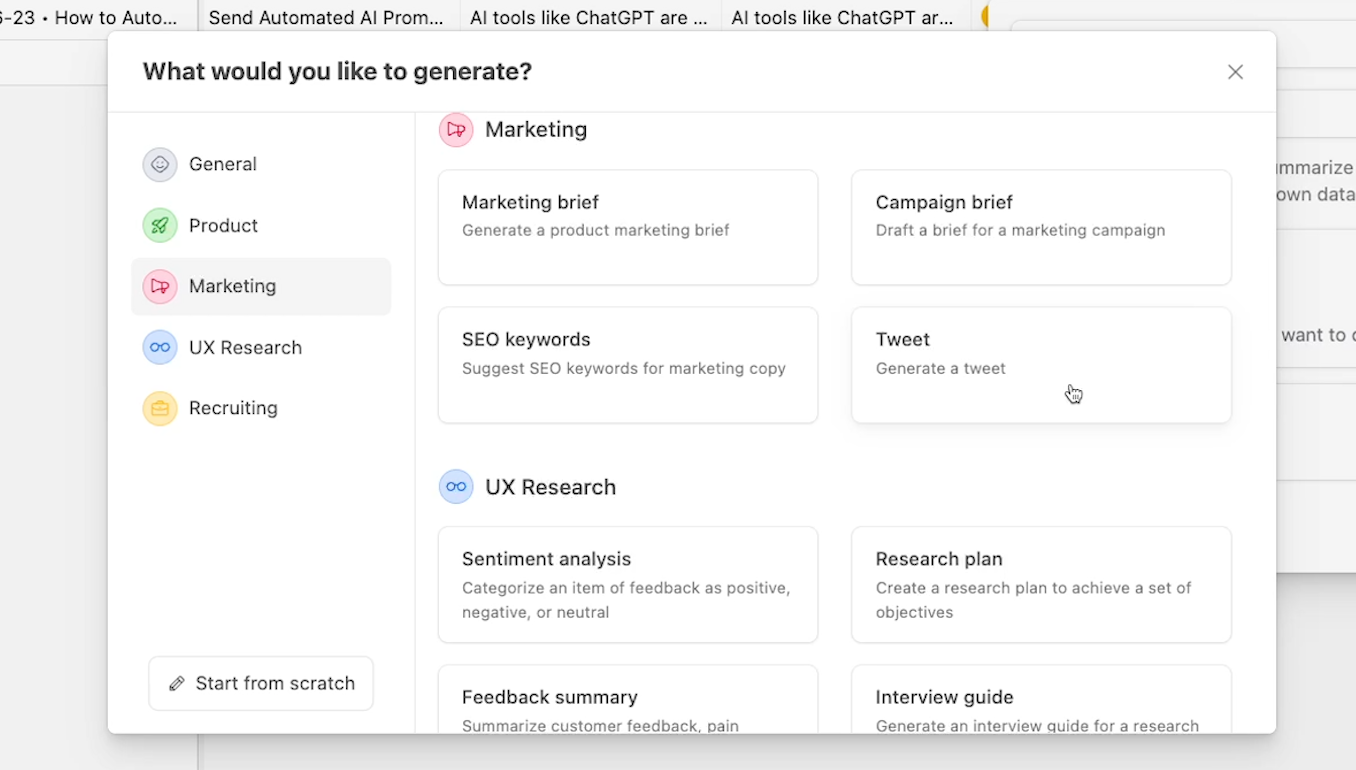
In the “Marketing” category, we can see an option to “Generate a tweet”. To use any AI template, just click on it to get started.
Once you’ve selected your template, you’ll see several options for configuring your prompt. Each template will have slightly different options, but the general approach will usually be similar.

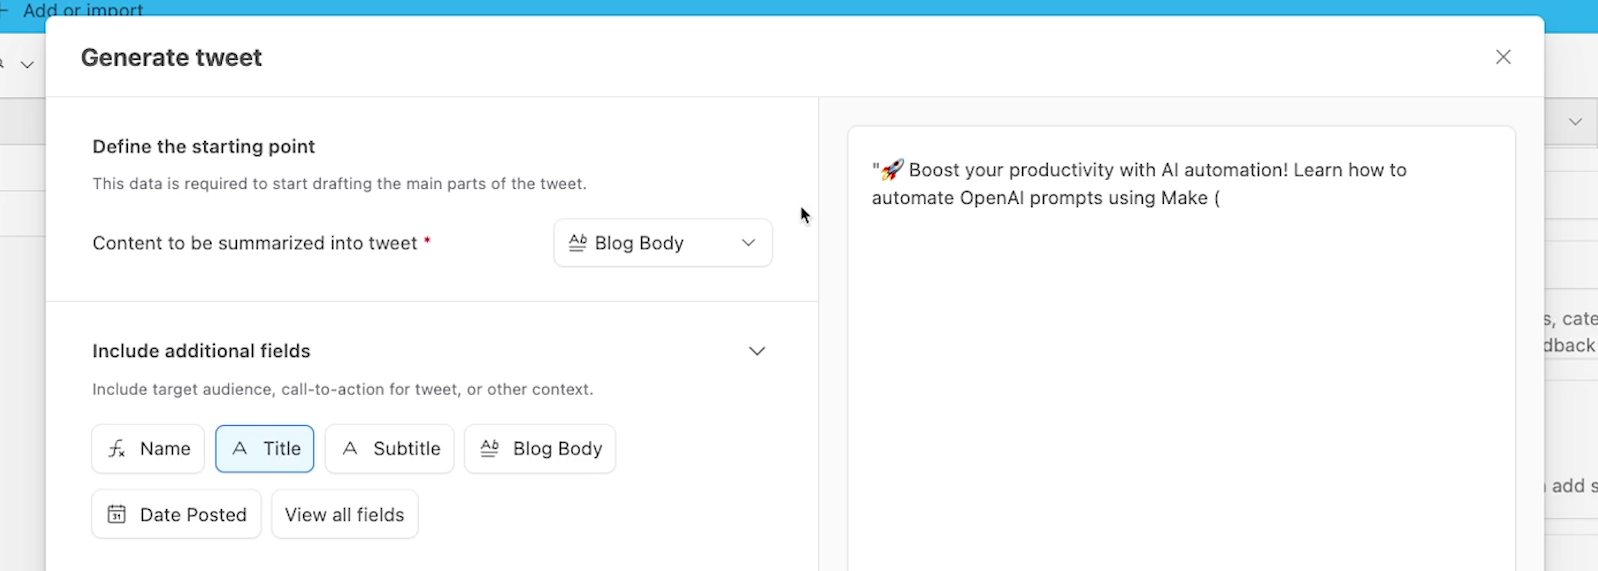
To start, you’ll need to identify the main field that you want to summarize into a tweet. In our example, we’ll select the Blog Body Excerpt, which includes the first 2,000 characters of the full Blog Body.
This means that for each record, the AI assist field will reference the contents of that record’s “Blog Body Excerpt” field.

As you’re configuring your prompt, you’ll see an example based on the first record in your base, but the finished AI field will dynamically reference unique content from each record.
Next, you can include other fields that the AI should reference as it builds the tweet. In our example, we’ll also select the “Title” and “Subtitle” fields.

Note that as you keep making changes, you can update the preview at any time to see how your changes influence the AI’s output.

Under “Provide your own examples”, you can enter an example of an ideal tweet that the AI should attempt to emulate. If you provide an example, the AI will try to compose a new tweet that follows a similar structure and style.

In our demo, we’ll enter this tweet that we published to our account several weeks ago:
✅😤 Getting frustrated with Asana and Monday? Build your own custom task management system in Airtable. In this XRAY tutorial, we'll show you how to start tracking tasks and projects with an Airtable base. Just copy our base to get started. https://youtu.be/djdjIE82Gsc
Finally, under “Give any other instructions”, you can choose an optional style for the AI to use and provide any other details that you’d like to include in your prompt.
Currently, there are only three options under the “Style” menu: Friendly, Informative, and Funny. We expect that Airtable will add more options as the beta continues and the tool is updated. For our example, we’ll choose “Funny”.

In the “Custom Instructions” field, you can enter any instructions or information that you’d like. This is a good place to enter any data that can’t be retrieved from the fields in your table.
In our example, we’ll provide some basic information about XRAY. These details about our company aren’t going to be in any field, so we’ll add them here.

XRAY (or XRAY) is a workflow automation consultancy. Every week, XRAY posts a blog about workflow automation using tools like Airtable, Notion, Zapier, Make, and more. XRAY's mission is to help knowledge workers create one billion hours of time for meaningful work.
When we update the preview, we can see that the AI is closely imitating the structure of our example tweet, and is using two emojis to start it off.

With all of your prompt options configured, click on “Use Template” to close this window and finish setting up your AI Assist field.
While Airtable doesn’t provide a specific character limit for the AI Assist field prompts, long selections of text often don’t work very well and may produce errors.
Our full blog referenced in this base is about 16,500 characters. Attempting to summarize this field with AI assist resulted in several errors, so we created the Blog Body Excerpt field to select the first 2,000 characters of the blog instead.
Hopefully, Airtable will add more info about the required prompt length in the future. For now, we’d recommend sticking with shorter prompts whenever possible for the best results.
When you close the prompt window, you’ll be taken back to the field details window. Here, you’ll see two tabs: Prompt, and Settings.

All of the template settings that we covered previously can be found under Prompt, and can be updated at any time.
Under settings, you’ll see additional technical parameters that you can adjust.

First, you can choose the AI model that you want to use. Currently, there are two choices: GPT3.5 and GPT4.

In general, GPT3.5 and 4 are very similar models, but GPT4 is a more advanced language model that is better suited to more creative use cases. You can learn more about all of OpenAI’s language models in their official documentation.
Airtable notes that GPT3.5 is a more popular model while GPT4 is more expensive. For now, the AI Assist field doesn’t require any additional charge, but this note may suggest that the feature could be a paid add-on when the beta’s over. We’ll just have to wait and see.
Using GPT4 will also disable automatic generation. To generate content in an AI Assist field using GPT4, you’ll need to click on the “generate” button.
In our example, we’ll go with GPT4.
Next, you can set a “Randomness” value for this field’s AI responses. “Randomness” is a similar concept to “temperature” and “creativity”, which you may have seen in other AI tools.

Randomness is set as a number between 0 and 1. The higher the number, the more unpredictable and adventurous the AI will be with its answers. The lower the number, the more straightforward and predictable the answers.
You can never guarantee total accuracy with an AI language model, but around 0 to 0.25 will help to ensure more reliable answers.
We want to see some creativity, so we’ll set ours to 0.4.

In the preview Tweet, we can see that the AI is throwing in a little humor with phrases like “the artist formerly known as Integromat”.
Finally, you’ll see a toggle to “Generate automatically”.

If you enable this setting, Airtable will automatically generate its AI response in this field. If you disable the setting, you’ll just have to click a button to generate an answer for each field.
As we noted earlier, you won’t be able to enable automatic generation if you’ve selected GPT4 as the model.

Once you’ve configured all of your settings, click on save to commit your changes.
If you enabled automatic generation, you’ll see AI responses fill in for every record in your table. Note that any records missing data for fields that you referenced in the AI Assist configuration won’t get a response.
If you’re using GPT4 or if you chose not to enable automatic generation, you’ll need to click on the “Generate” button in the AI assist field to send the prompt and get your response.

After a few seconds, you’ll get an answer in the AI Assist field. GPT4 will usually take a bit longer than GPT3.5.

Once a response is generated, it will be permanently saved to that record. To get a different response, you’ll need to edit the field’s settings or edit the dependent fields and regenerate the answer.
Since our template references the blog title, editing the “Title” field will erase the contents of the AI assist field and allow us to regenerate the answer.
As we noted earlier, different templates have different options. To see an example of those differences, let’s another AI Assist field and take a look at another template.
Under the “General” section, there’s an option for “Translation”. We’ll choose that, and see the options that come up.

In the configuration window, there are only three options. We just need to set a field to translate, a language to translate the text to, and provide other instructions if we want.
We’ll select the Blog Body Excerpt again as the field to translate. Then, we need to identify the language we want to translate it to.

The “Language to translate into” field will accept any kind of text field: single line text, long text, select fields, etc. However, its data must come from a field in your table. You cannot directly enter the language you want to translate your text into.
We’ve created a single-select “Translate to:” field in our table with options for “French”, “Spanish”, and “German”. This is the field we’ll use to identify the language we want to translate into.

You could create a similar field with different options, or simply use a text field and enter whatever language you’d like.
Finally, you can provide more specific directives under the “Give any other instructions” tab. Here, you may want to indicate that certain terms should not be translated, or that the text should be translated into casual slang rather than professional composition.

Note that under this “other instructions” tab, there’s no dropdown menu to change the style of the AI’s response like there was with the “generate a Tweet” template.
With all of your choices configured, you can click on “Use Template” to close the prompt template.

Under “Settings”, you’ll see all of the same technical options as with any other template. You can change the model, the randomness, and enable automatic generation.

We’ll save this field, and wait a moment for the automatically generated translation.

Immediately, we get a translated version of the excerpt in German. If we switch the language in the “Translate to” field to Spanish, we can get another excerpt in Spanish.

Overall, the “Translate” template is pretty similar to the “Generate a Tweet” template, but there are far fewer options. When you use Airtable’s AI Assist, you’ll need to play around a bit with each template to find out what options you have at your disposal and which settings work best.
Finally, let’s take a look at creating an AI assist field from scratch.
In our example, we’ll use our prompt to generate a meta description for our blog post. The meta description should be SEO-friendly so we can use it for search engines, and should be under 160 characters.
To start making an AI assist field with a custom prompt, create a new field in your table and choose “AI Assist”.

Then, pick “Start from scratch”.

When you build an AI assist field from scratch, you’ll just see a single field where you can enter any prompt that you’d like.

You can enter a prompt here in much the same way that would enter a prompt into ChatGPT. The key difference is that you can also insert dynamic data from your Airtable base into the prompt by clicking on the blue plus sign.
This data works just like dynamic data in Airtable automations. If you choose a field from this menu, it will insert the contents of that field into your prompt for each record.
Let’s see what that looks like in practice.
We’ll enter a prompt to create a meta description:
You are a digital marketing expert working for XRAY. XRAY is a workflow automation consultancy that helps people create time with no-code and low-code tools. XRAY posts a blog every week with tips, tutorials, and news about workflow automation tools.
Write a meta description for the following blog post:
Title:
Subtitle:
Blog excerpt:
The meta description should be SEO friendly and under 160 characters.

Then, we’ll add dynamic data to dynamically provide the title, subtitle, and blog excerpt for each record.

With our prompt configured, we can click on “Settings” to adjust the same technical parameters that are available for all AI assist fields: model, randomness, and automatic generation.

With everything configured, we can click on “Create Field” to close the configuration window and check out our new field.
After we click on “Generate”, we get a pretty decent meta description. But is it actually under 160 characters?
We’ll quickly add a formula field to our table, and use a simple LEN() function to calculate the length of the “Meta Description (SEO)” field.

The response is actually 176 characters. Turns out that language models can’t reliably do math, or even count very well.
Inaccurate answers are always a risk with AI. Even if you reduce the randomness to zero, you can’t count on AI to produce completely factual answers, or responses that perfectly meet your parameters.
This isn’t an issue that’s specific to Airtable’s AI, either. Whenever you’re using AI, it’s generally a good idea to have a human being check the work before publishing the AI-generated text or sending it off to a client.
A great way to check Airtable records before performing automated actions is with actionable messages.

With an actionable message, you can send the contents of an Airtable record in a Slack message for review. Then, the recipient can approve or reject the record with a single click, and update the record accordingly.
You can learn more about actionable messages in this tutorial on the XRAY blog.
AI is making it easier than ever to draft, brainstorm, and refine content. While standalone software like ChatGPT is already extremely useful for a wide range of use cases, integrated tools like Airtable’s AI assist create seamless options for using AI in the apps where we’re already getting work done.
Sign up for the free beta today and try it out for yourself!
If you’d like to learn more about AI and automation tools, be sure to check out our blog or our YouTube channel. You can also follow XRAY on Twitter, Facebook, or LinkedIn.

.pptx.png)
.pptx.png)
