


Airtable has recently added a new feature to give you even more direct control over your automations.
With the new actionable Slack messages in Airtable , you can add seamless human checkpoints to approve or reject automations before they run critical actions.
In this post, we’ll show you how to use actionable messages in Airtable automations step by step.
We’ll explain what actionable messages are, how to add them to your Airtable automations, and demonstrate an example automation that you might build with actionable messages.
What is an actionable message in Slack and Airtable?
First, let’s cover the basics of actionable messages. An actionable message is an automated message sent in Slack and configured in an Airtable automation.
Unlike typical Slack messages that you might create with your Airtable automations, actionable messages include customizable buttons.
When the message recipient clicks on one of the buttons, a record in Airtable can be instantly updated based on your specifications.
How to create an actionable Slack message in Airtable
Now let’s go over the entire process of creating an actionable message. We’ll start with a brief overview, then explain each step in more detail.
1. Create a new automation in your Airtable base. Choose any trigger that you’d like.
2. Add an action, and scroll down to “Slack”.
3. Choose “Send an actionable message”.
4. Configure your actionable message.
A. Provide a title and a message.
B. Choose the table and record you want to update.
C. Create one or more buttons to update the chosen record.
D. Choose the fields you want to update, and the values to update them to.
5. Test your actionable message. Currently, generating a preview is not possible.
6. Add any additional steps to your automation that you’d like.
Read on for more specific information.
Our example automation: approving automated follow-up emails
To illustrate actionable messages in more detail, we’ll show you each step of the process with an example Airtable automation.
In this automation, we’ll send an email to any lead that hasn’t responded in a week or more. By adding an actionable Slack message, we can enable one-click approval for every email before it gets sent.
This way, we can ensure that the lead wasn’t contacted through a channel that isn’t reflected in our Airtable base.
Ideal use cases for actionable messages
You can follow along with our example, or choose something that fits your needs better.
However, when you’re planning an automation with an actionable message, you’ll generally want to create approval flows like the one we’re demonstrating in this post.
Actionable messages can technically update any field in Airtable, but they work best with single- or multi-select fields, linked records, and checkboxes - essentially, any field with a limited number of options.
You can’t enter text in response to an actionable message. Instead, you’ll have to update the field to use the same value every time, which is why fields with limited options are the best choice.
In other words, you can easily configure a field to be marked “Approved” or “Ready”, but you’ll have a hard time entering a new email address or custom notes.
Create a new automation in Airtable and choose a trigger
To get started, create a new automation and choose the trigger you’d like to use.
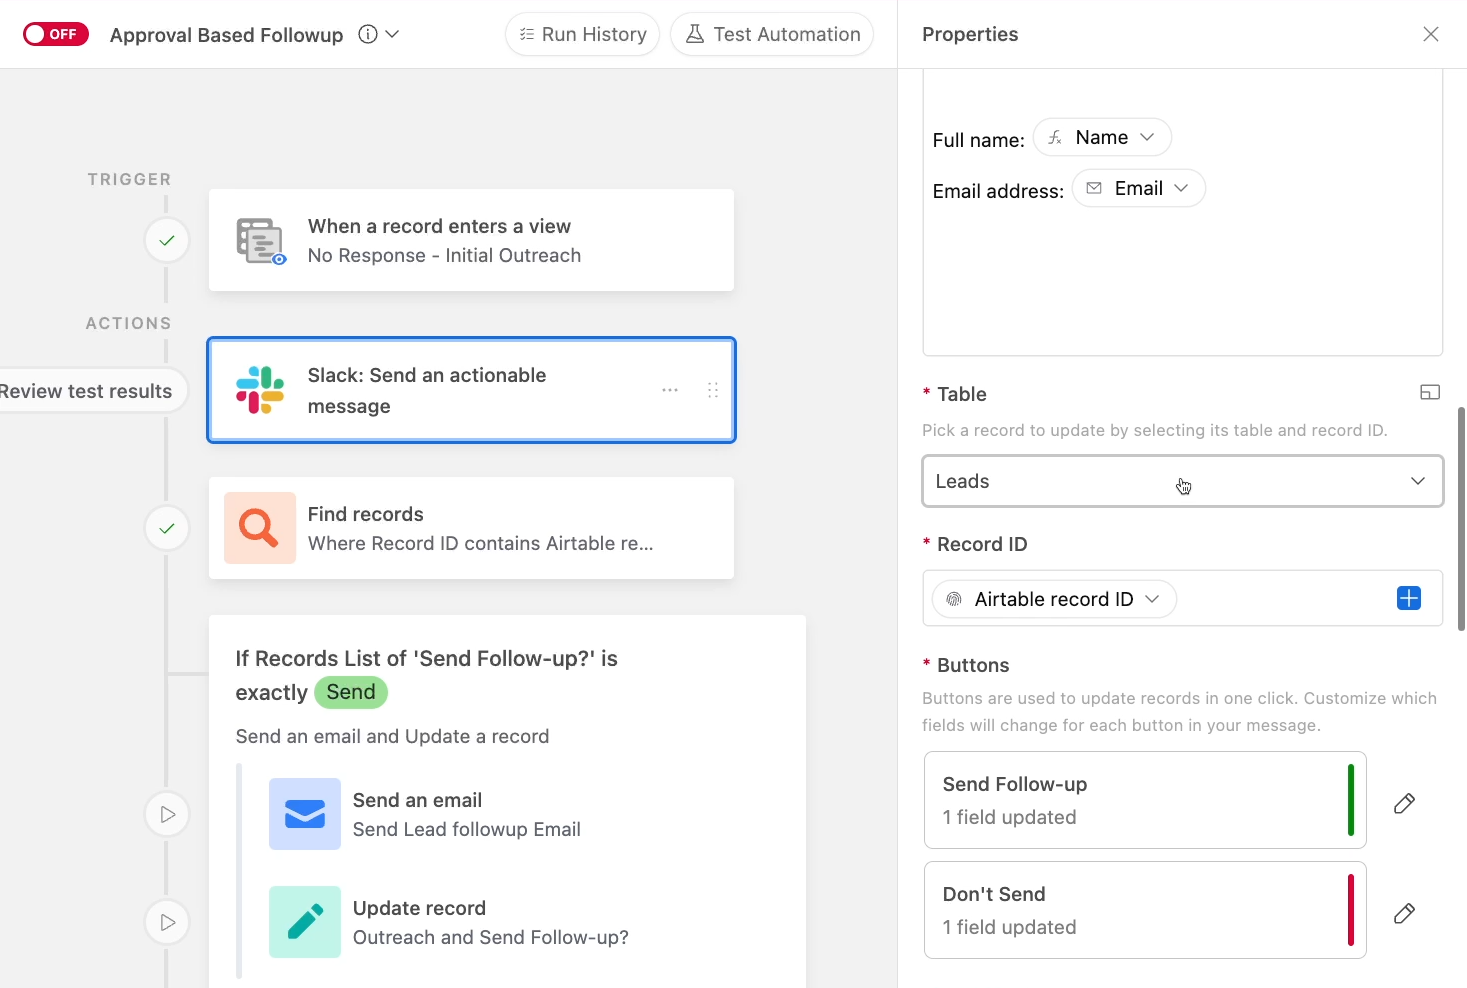
In our example, we’ll choose “When a new record enters a view”. We’ll configure the trigger to watch our “No Response - Initial Outreach” view.
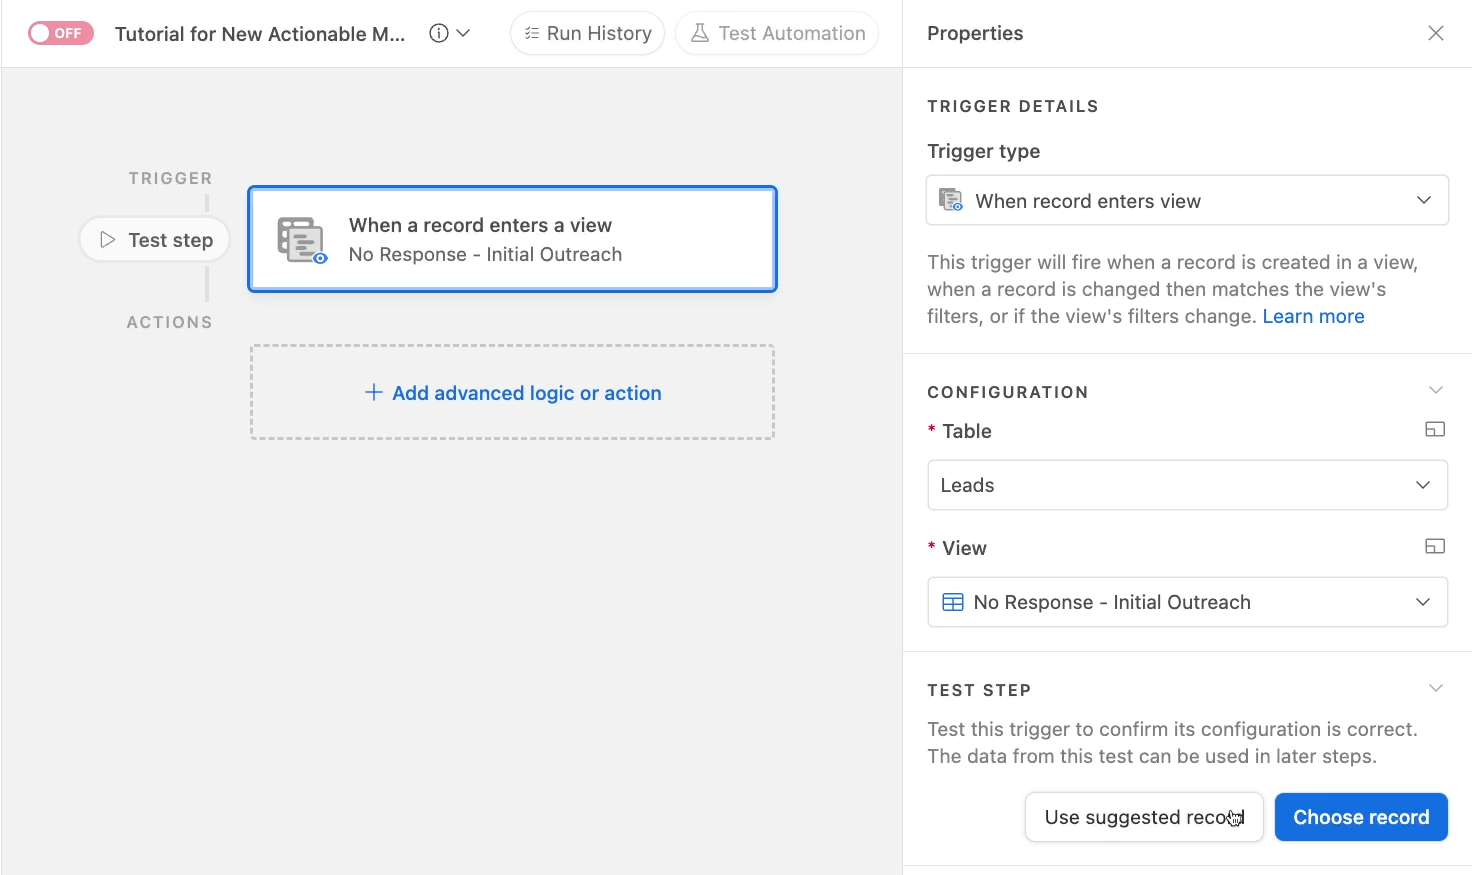
This view has a filter so that it only shows leads who haven’t responded to our outreach in one week or more.
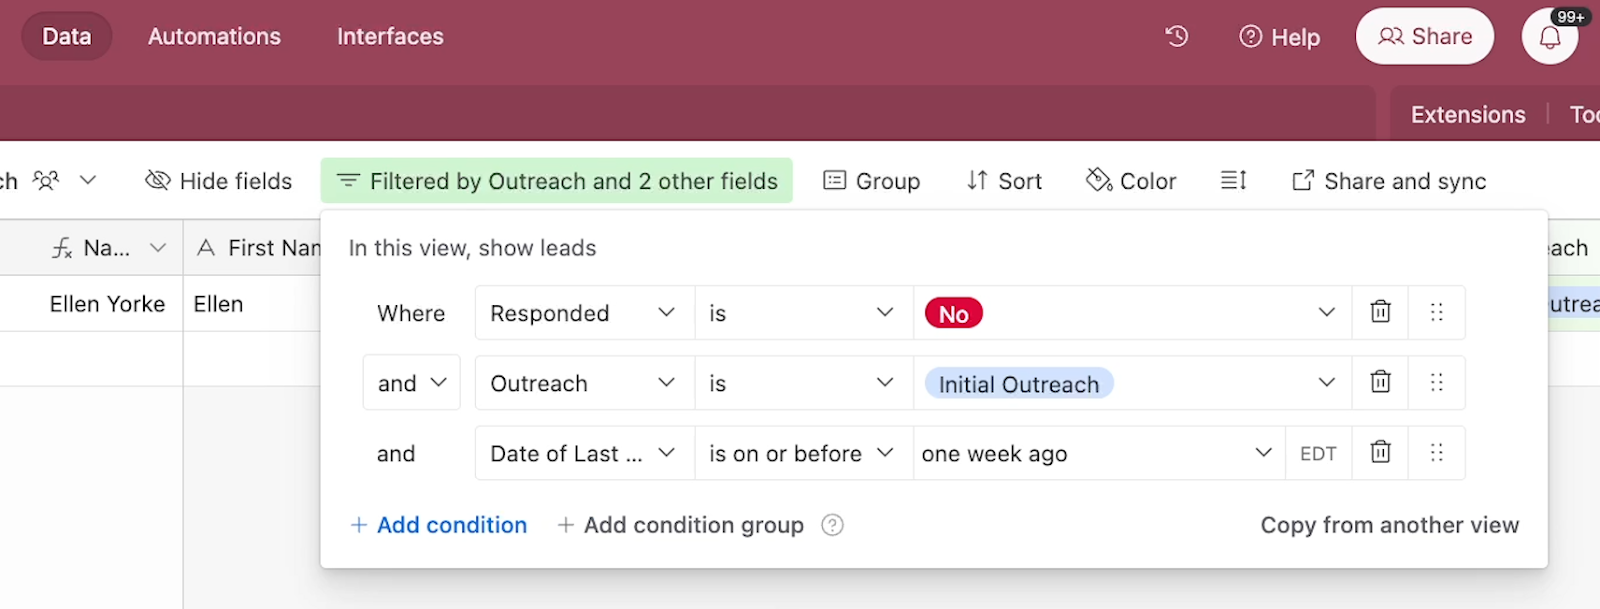
Each record that enters this view will be the record that our actionable message updates. In most cases, you’ll probably want to retrieve the record you want to update in your trigger. Otherwise, you’ll need to find it with a search step.
Once your trigger is ready, give it a quick test.
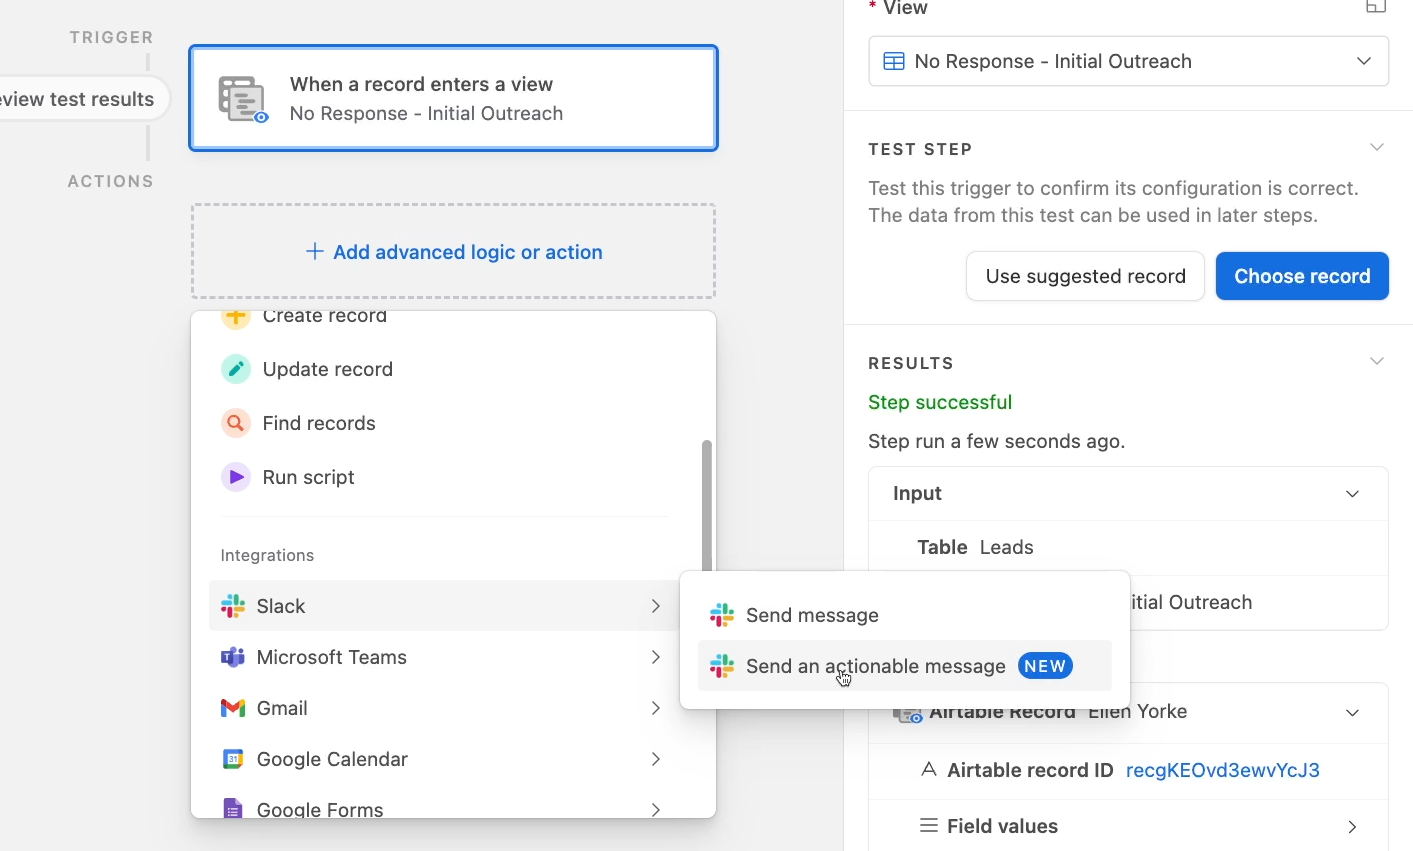
Add an actionable Slack message
Once you’ve tested your trigger, add a new action to your automation. Scroll down to Slack and choose “Send an actionable message”.
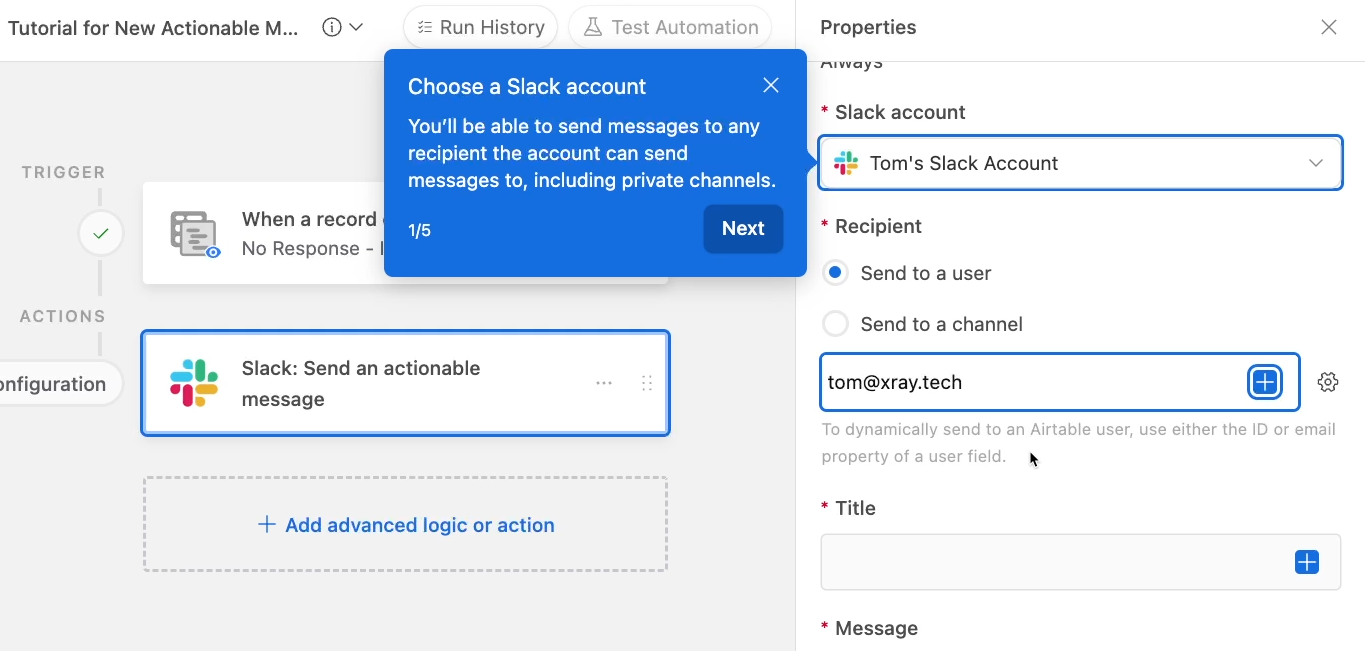
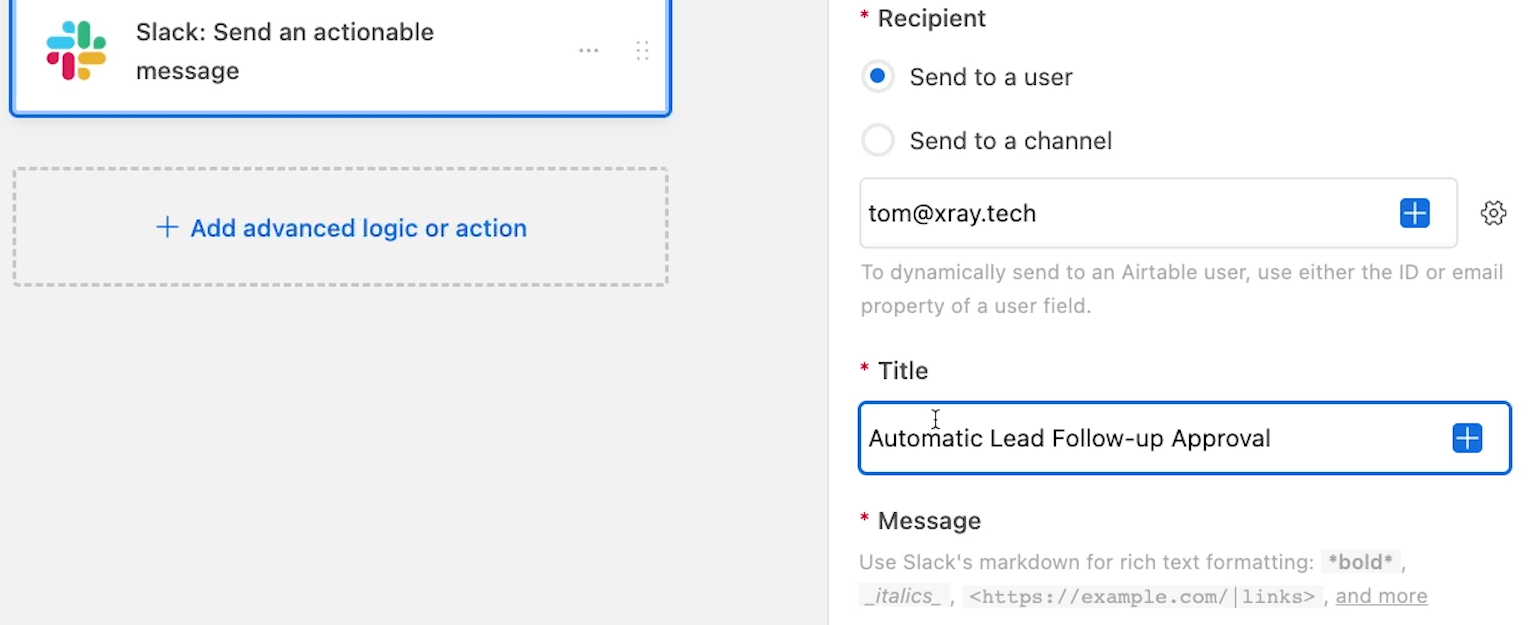
Select your Slack account, or connect a new one. Then, choose the user or channel you want to send the message to.
Configure your title and message
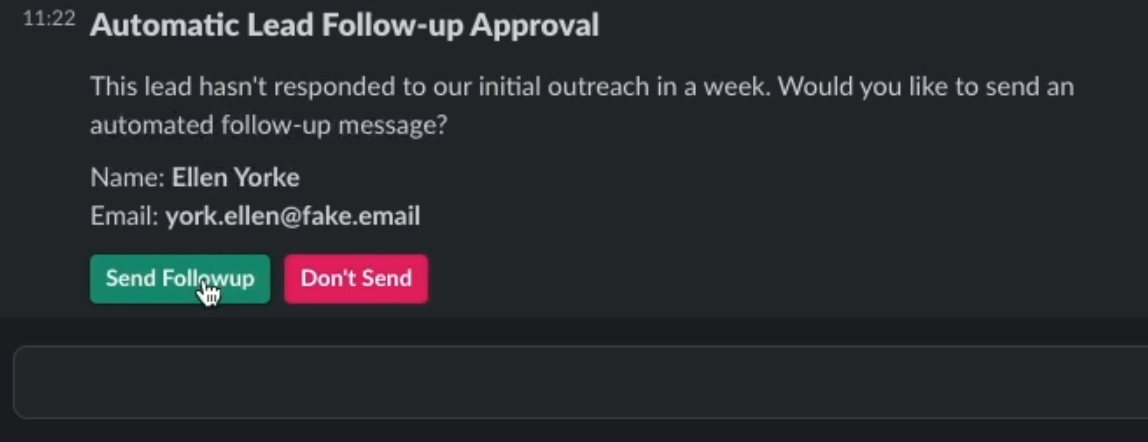
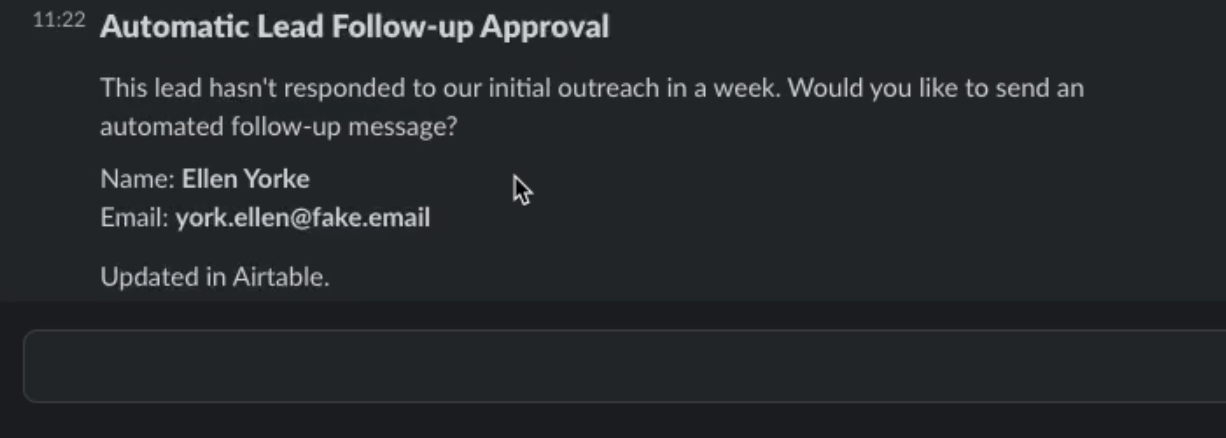
Next, you’ll need to provide a title for your message. Unlike typical messages, actionable messages begin with a large, bold title. This is a good place to add some key context for your message and the automation.
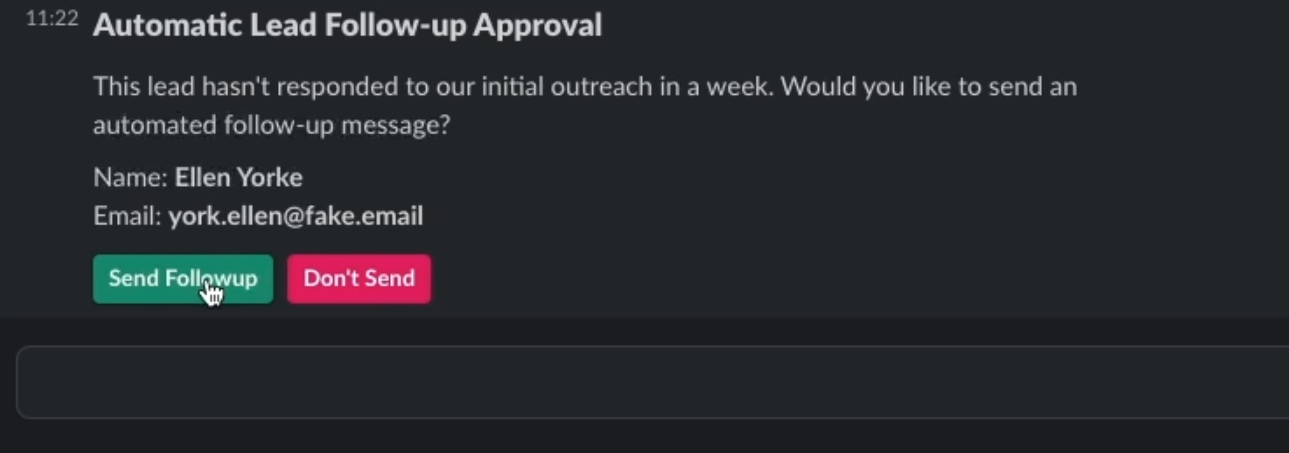
We’ll title ours “Automatic Lead Follow-up Approval”.
Then, you need to compose a message. This part is like any other Slack message that you might send with Airtable. You can enter any combination of static and dynamic text that you want.
We’d recommend providing some useful information so the recipient knows what the message is about and what they’re expected to do.
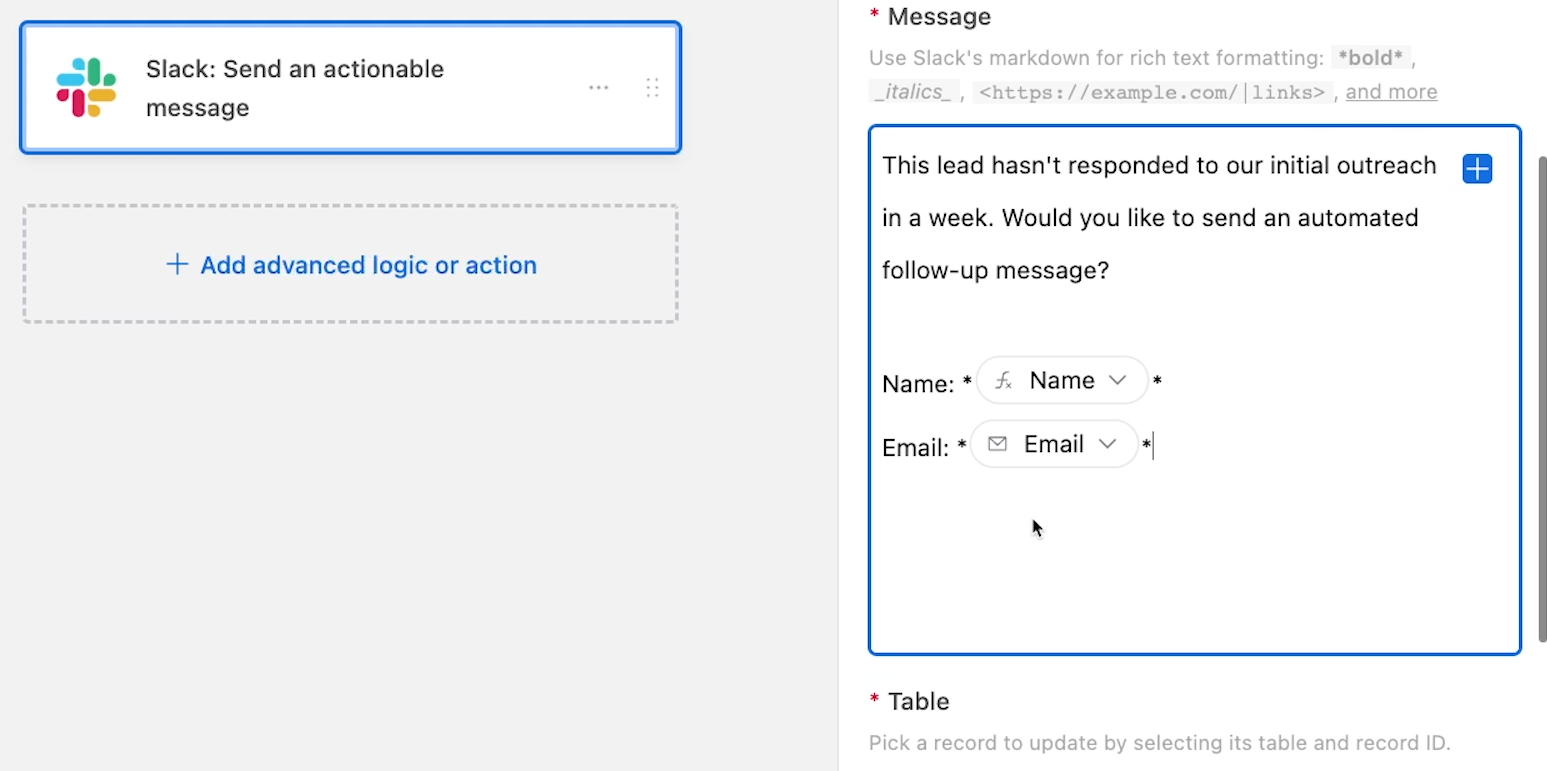
In our message, we’ll include the name and email from the record so that the recipient knows who the lead is without needing to open Airtable.
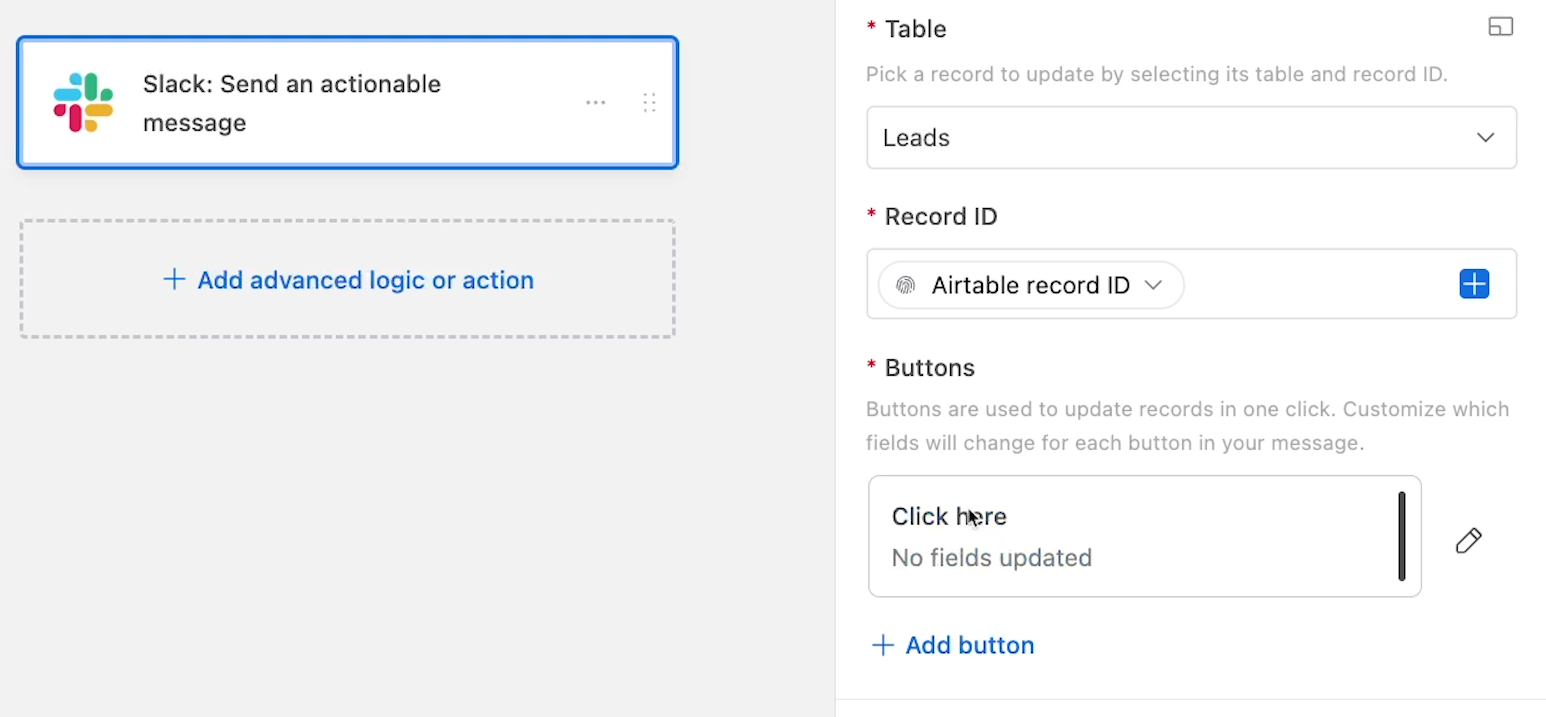
Configure the table and record to update
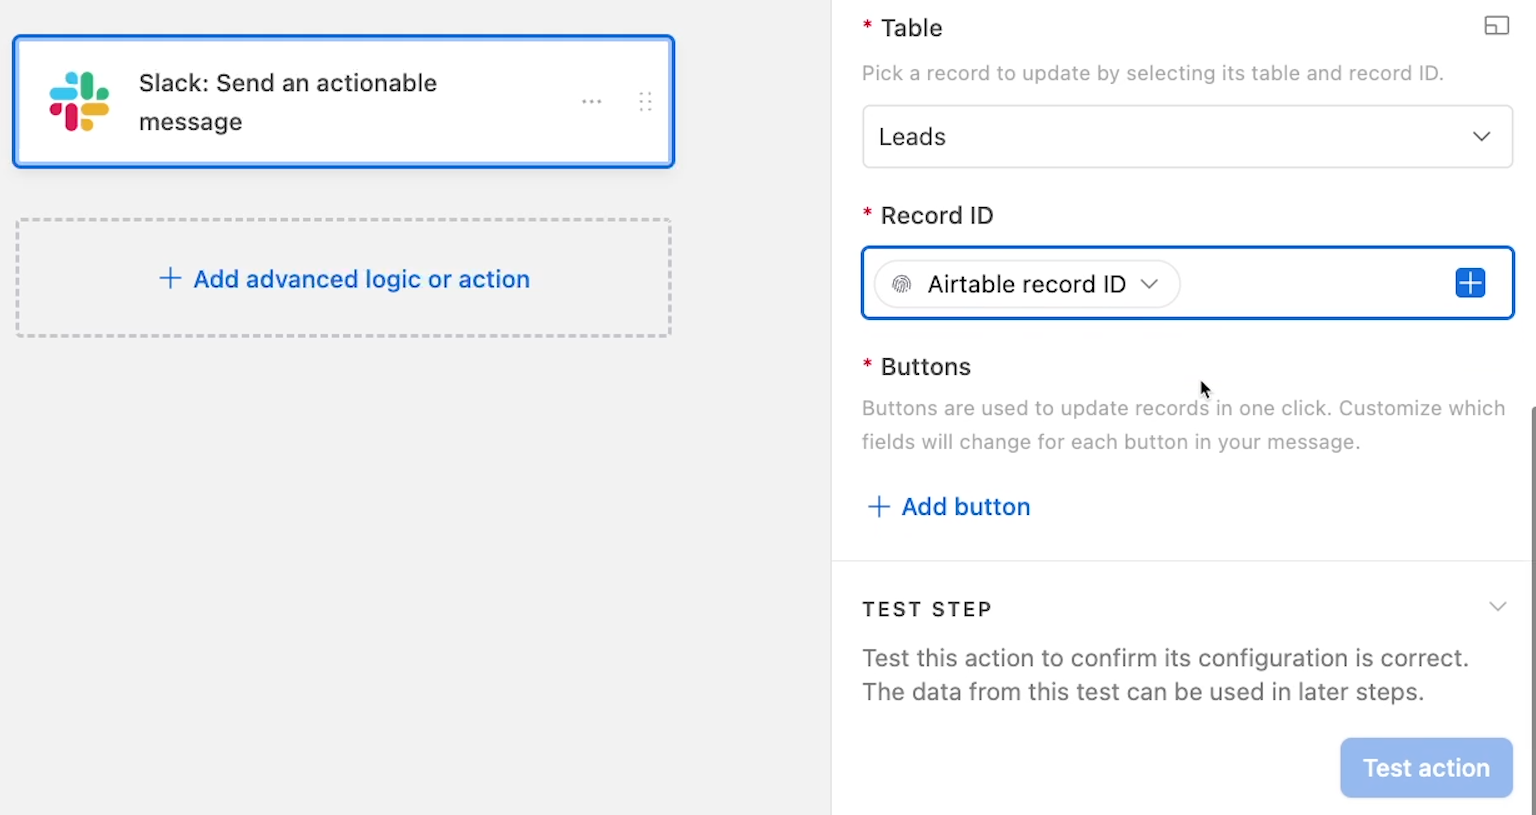
Now, you can set up the “actionable” part of the actionable message.
Choose the table that you want to update with your message’s buttons. We’ll choose our “Leads” table.
Then, provide the ID of the specific record that the buttons should update. In most cases, this will likely be the ID of the record that triggered the automation to run, or the record that you found in an earlier search step.
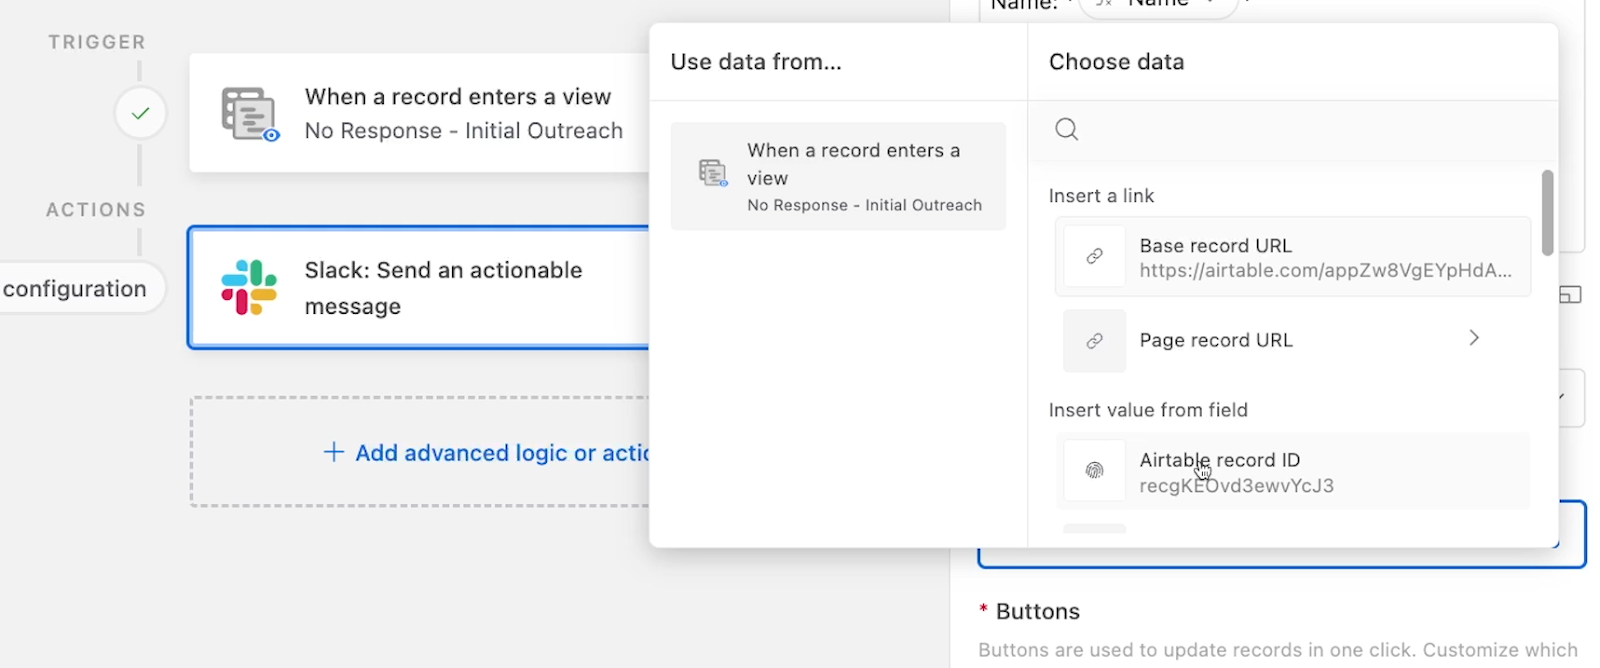
We’ll choose the ID of the record that triggered our automation.
Adding a button to your actionable message.
Next, you can add the buttons that will update your chosen record when they’re clicked.
As we noted earlier, these buttons can update any field, but they’ll work best when attached to fields with limited, pre-defined options: single-select fields, multi-select fields, linked records, or checkboxes.
Click “Add button” to create your first button. Then, configure the button by clicking on the pencil icon.
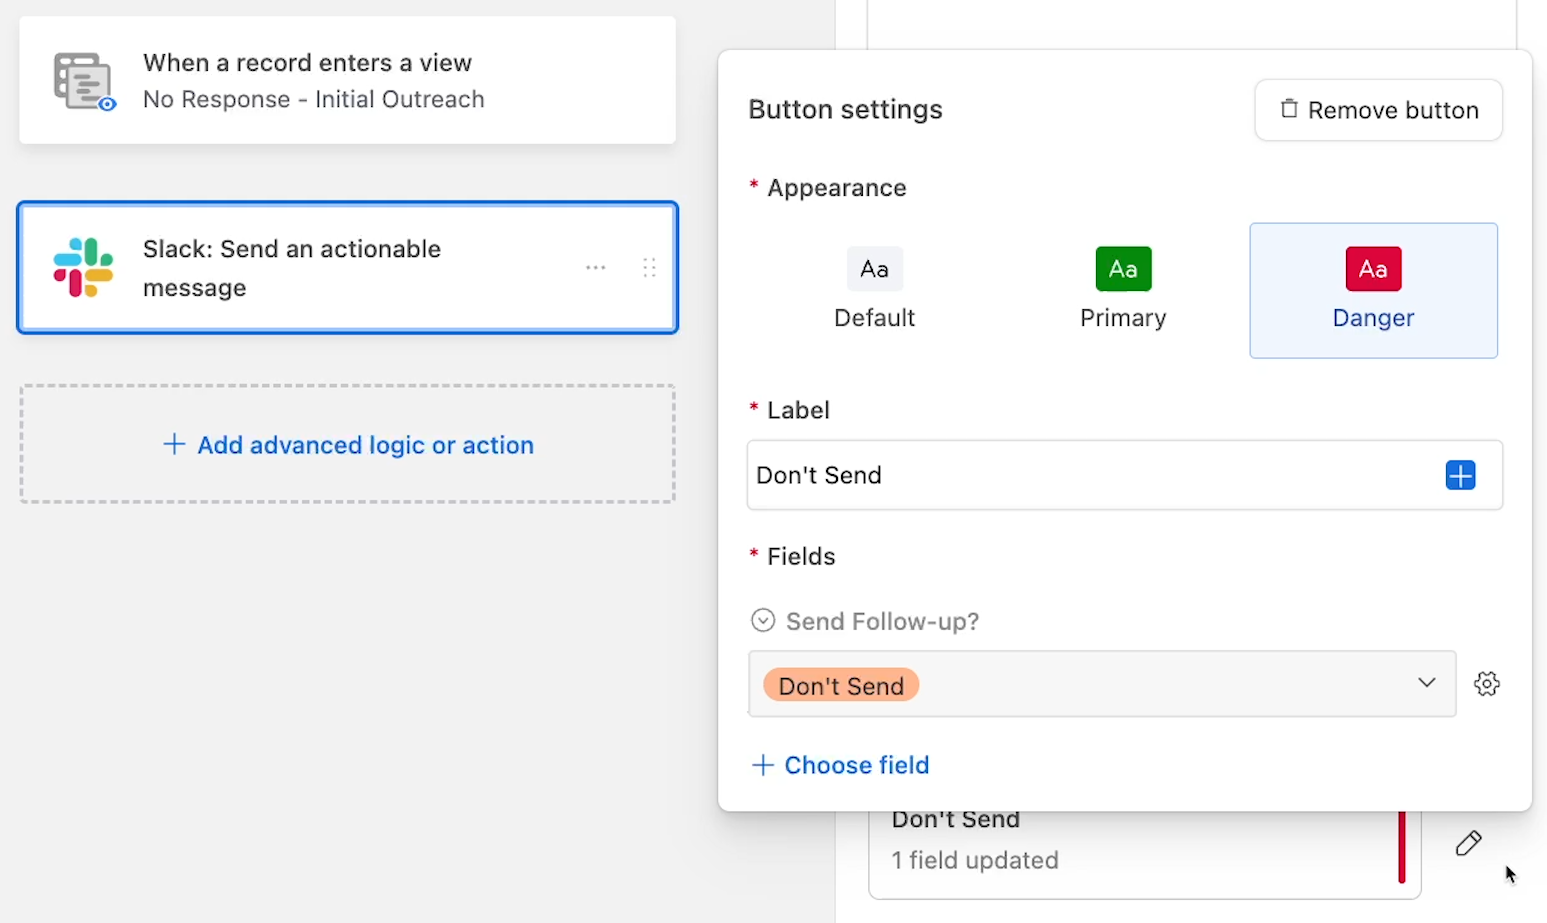
Choose an appearance and a label for your button. Airtable provides three appearance presets: Default, Primary, and Danger.
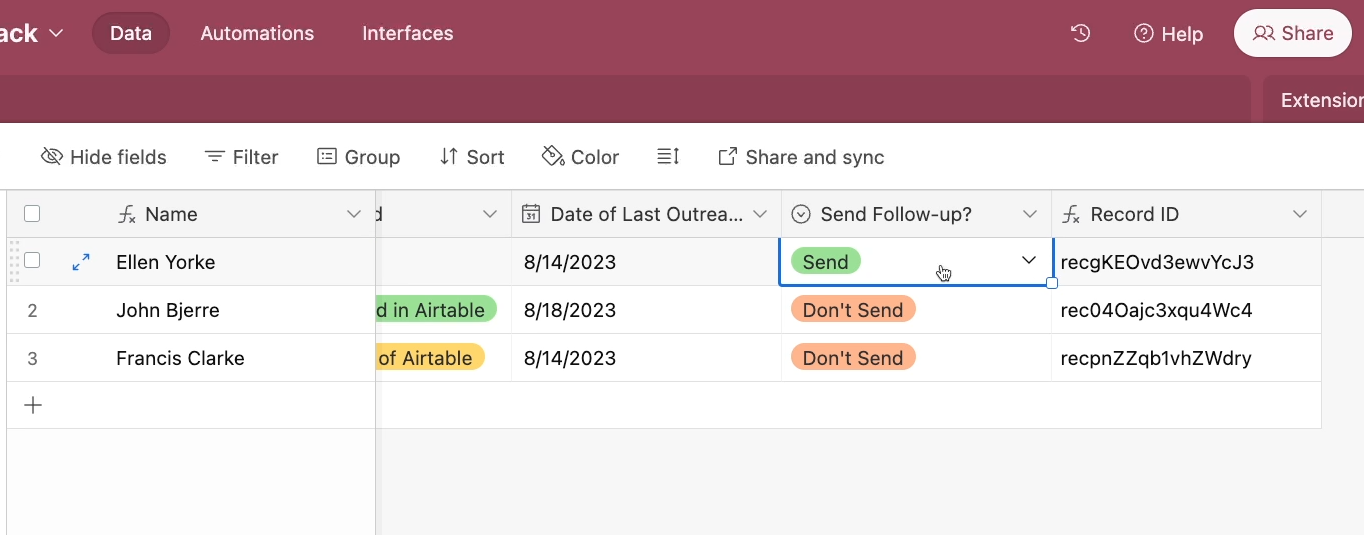
We’ll call our button “Send Follow-up” and select the green “Primary” option.
Next, you can choose the field that the button should update. We’ll choose the “Send Follow-up?” field, which is a single-select that includes options like “Send” and “Don’t Send”.
Then, choose the value that the field should be updated to when this button is clicked. You’ll be able to set each button in your message to update the field to a different value.
Note: if you leave the value blank, then clicking on the button will clear any value that’s already in the field.
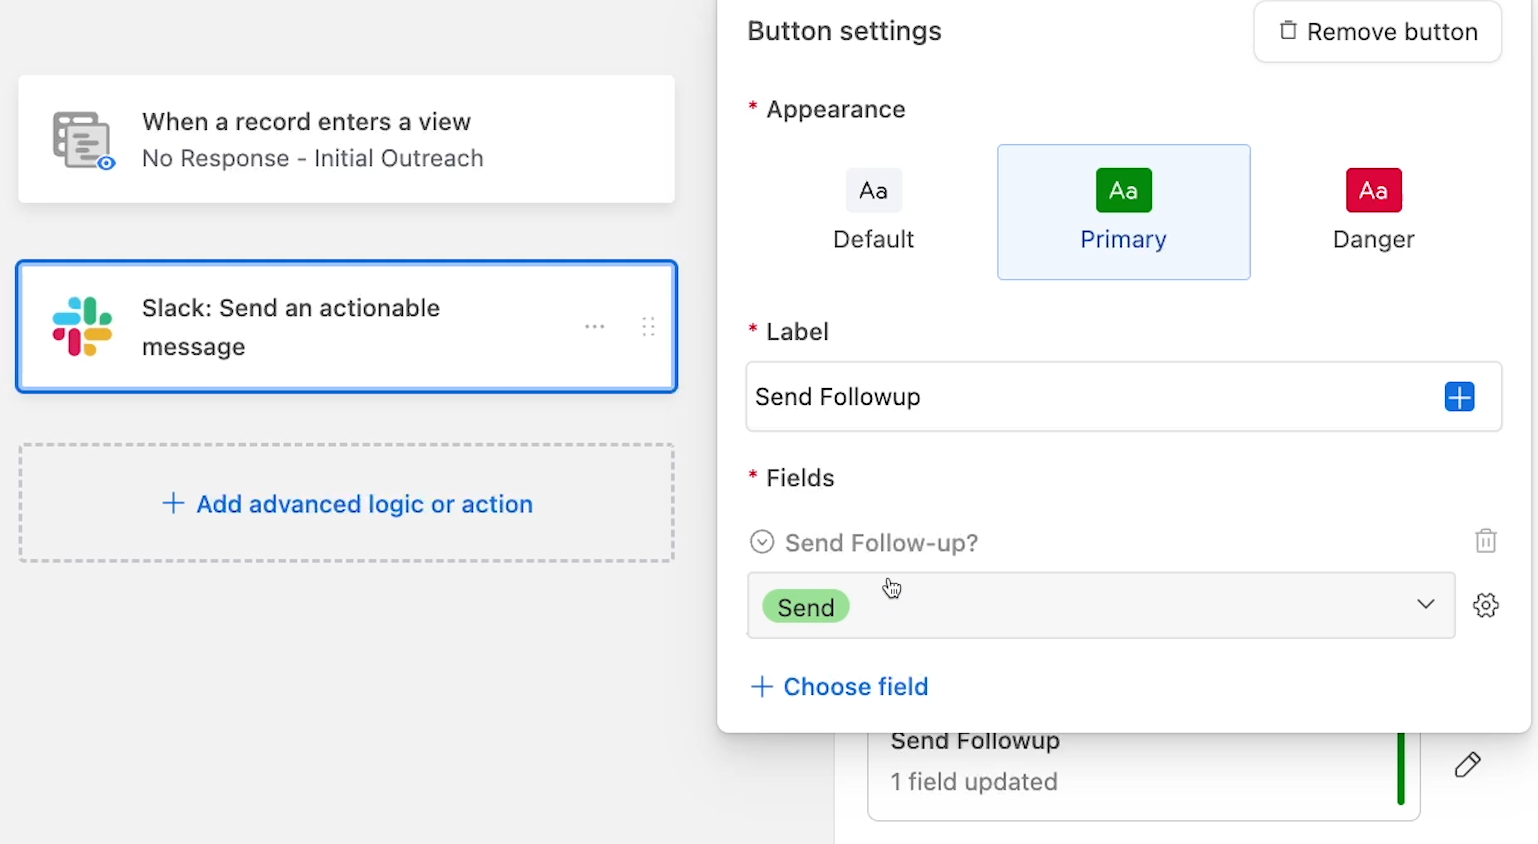
Since this button is called “Send Follow-up”, we’ll choose the matching “Send” value. Now, whenever this button is clicked in Slack, the related Airtable record will have its “Send Follow-up?” field to “Send”.
When your button is configured, click outside of the modal to close it.
Adding additional buttons
Follow the same process to create additional buttons. Additional buttons should update your field to different values.
We’ll add another button to our example that updates the “Send Follow-up?” field to “Don’t Send”.
Testing your actionable message
Once all of your buttons are added and configured, you can give the step a test. Note that you won’t be able to use the “generate preview” feature; instead, you’ll have to run a live test that will actually create and send a message.
Click on “Test action”.

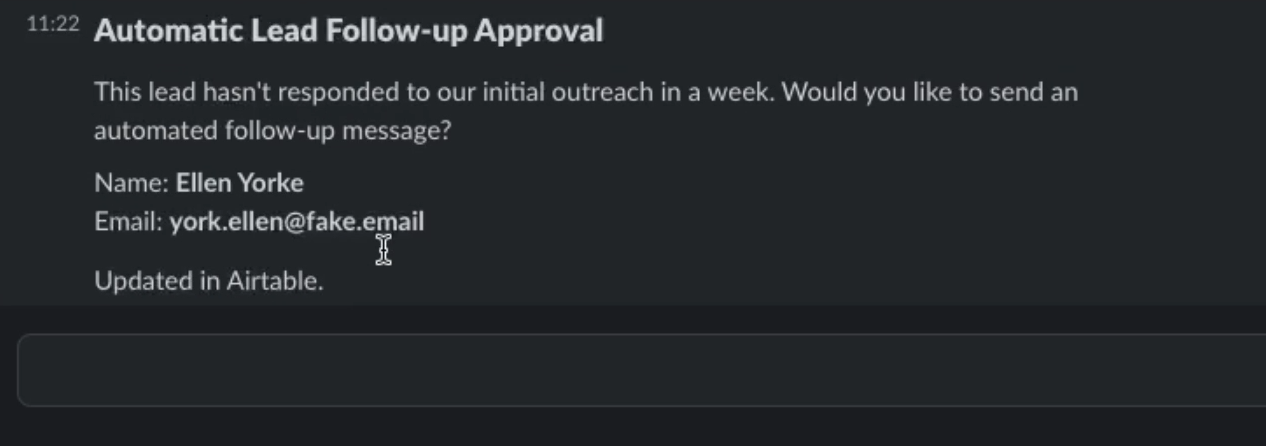
Then, check Slack. You should see your message there. Click on any of the buttons, then wait a moment.
Slack will then notify you once Airtable has been updated.
Return to Airtable to confirm that the record was updated correctly. In our example, the test record was correctly updated to “Send” after we clicked on the “Send follow-up” button.
NOTE: You should run a test for each button in your actionable message. Between each test, be sure to reset the record to its original state, or create a new test record.
That covers everything you need to do to send an actionable message. Now, let’s see how the actionable message works in the context of a full workflow with a bit of conditional logic
Adding conditional logic to your automation
To make full use of an actionable message, you’ll need to add further steps that perform different actions based on which button was clicked. You could also set up subsequent actions in separate automations.
Right now, we’ll quickly demonstrate an example of using conditional logic to perform different actions based on which button was clicked, and which value the associated field now contains.
If the “Send Follow-up?” field is set to “Send”, then our automation will send an email followup to the lead and update their status in Airtable.
Otherwise, the automation will not continue at all.
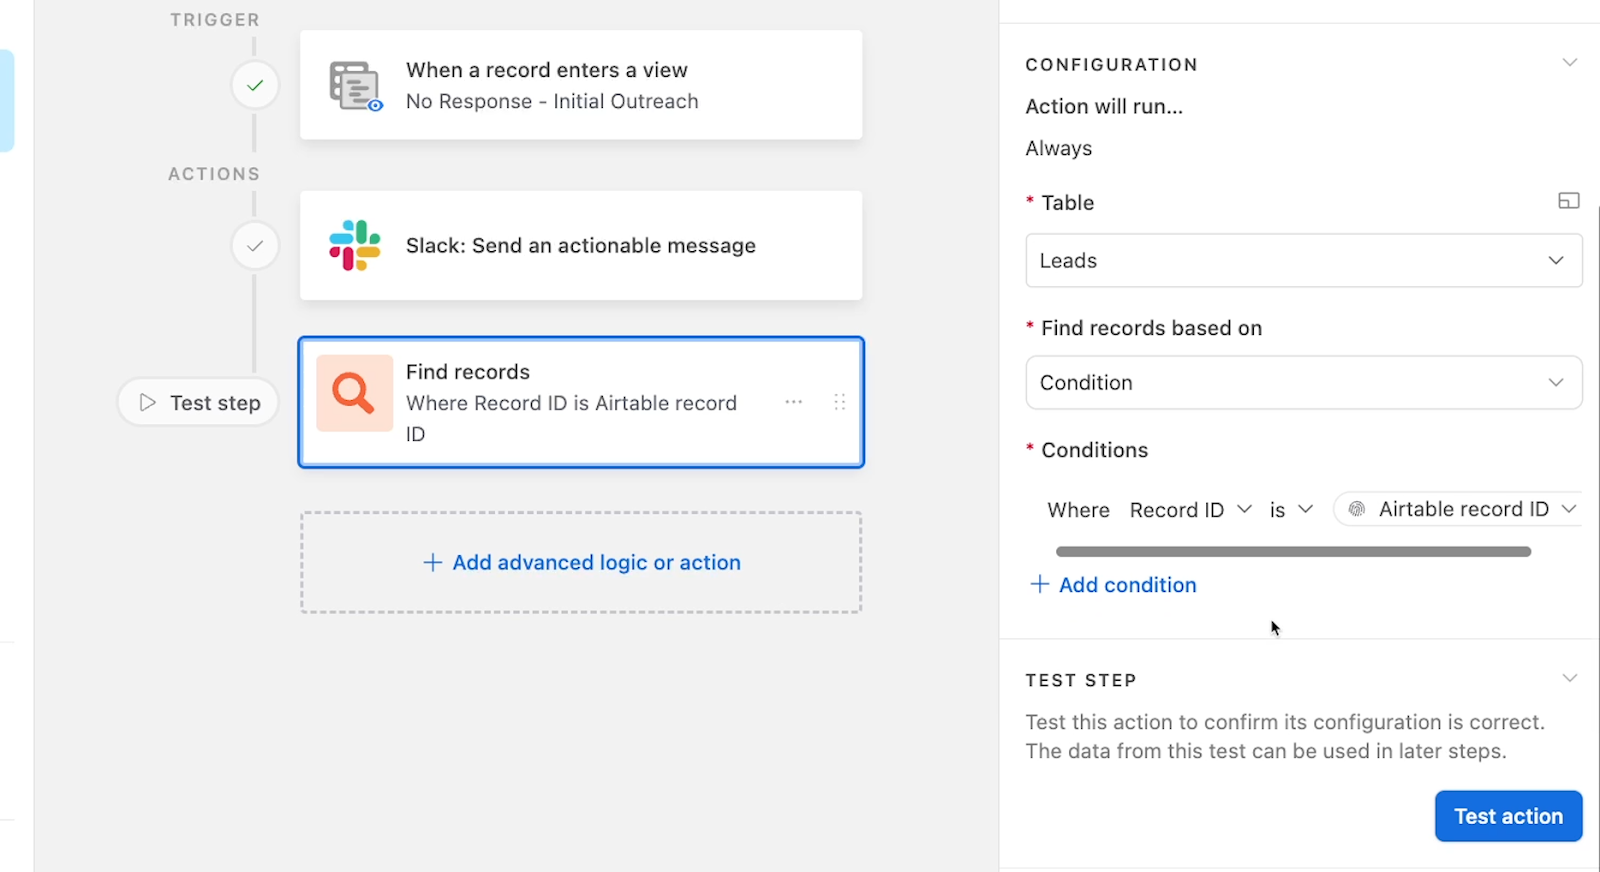
Use a search step to retrieve the updated record
Before we can add a “conditional logic” step to evaluate the record, we need to make sure we have an up to date version of the record.
When it retrieved the record in the trigger, Airtable logged all of the record’s attributes at that time.
So if we refer to the record from the trigger, we’ll likely have out of date information, since the record was just updated by our actionable message.
When you’re using actionable messages, bear in mind that your data will change while the automation is running, so you may need to use a search step like this to keep everything up to date.
To find the latest version of our record, we can just do a quick search in the leads table for the initial record’s ID (selected as dynamic data). This is a unique ID that will only apply to the record in question, so the search will always return the correct record.
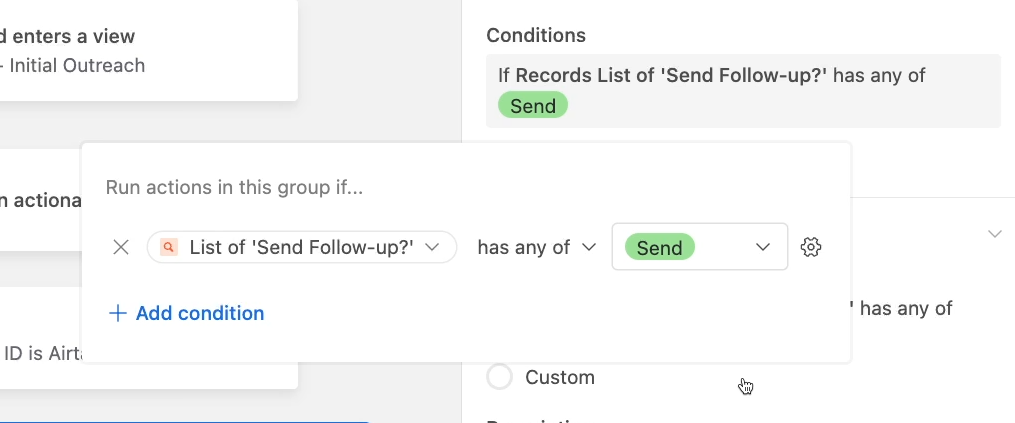
Adding a “conditional logic” step
Once you’ve retrieved an updated version of the record in question, you can add conditional logic to the automation.
Then, set the condition that you want to check for. In our example, we want to check the newly retrieved record’s “Send follow-up?” field.
If it’s set to “Send”, then the automation will send an email. Otherwise, the automation will stop. So we’ll configure our condition accordingly.
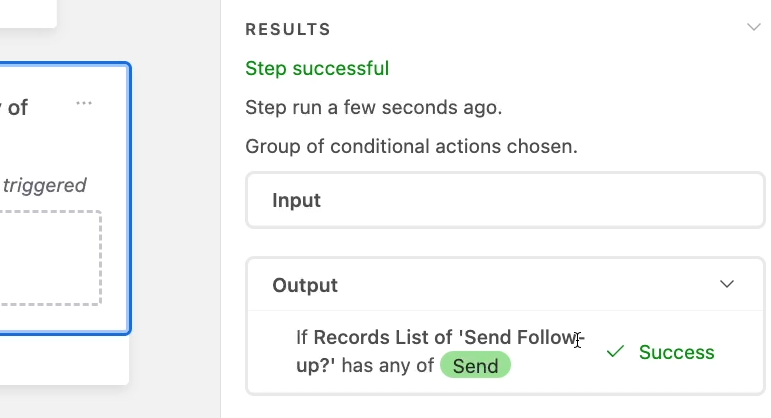
Next, test your condition. After you test, Airtable will tell you whether or not the automation would have continued based on your chosen record.

Our follow-up field was updated to “Send” by the actionable message, so after we test the condition, our record passes.
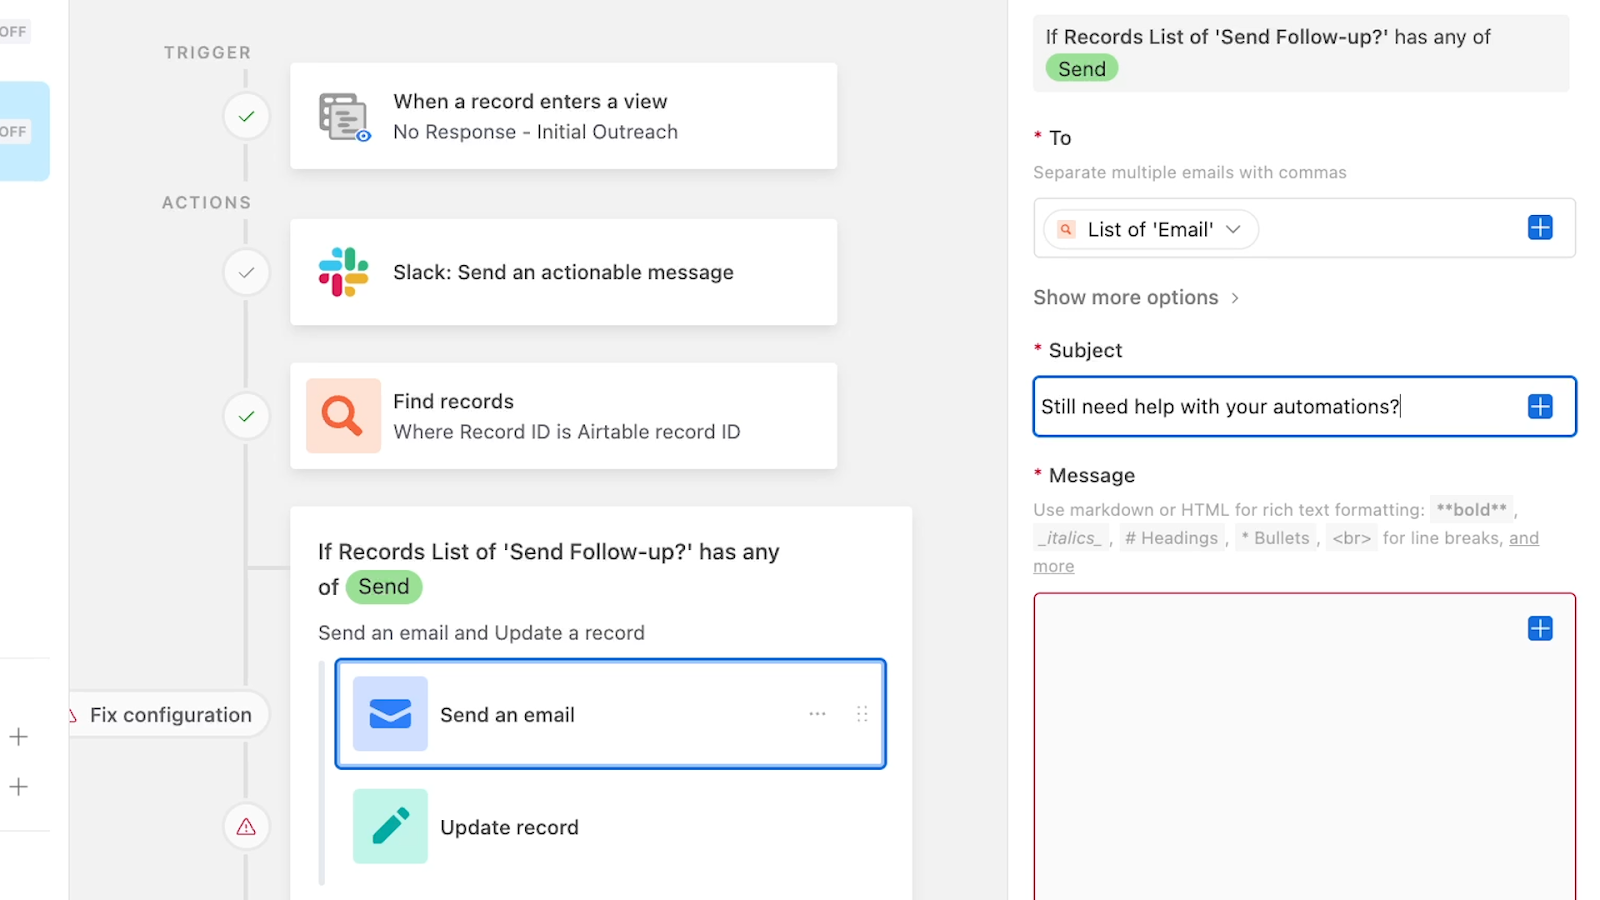
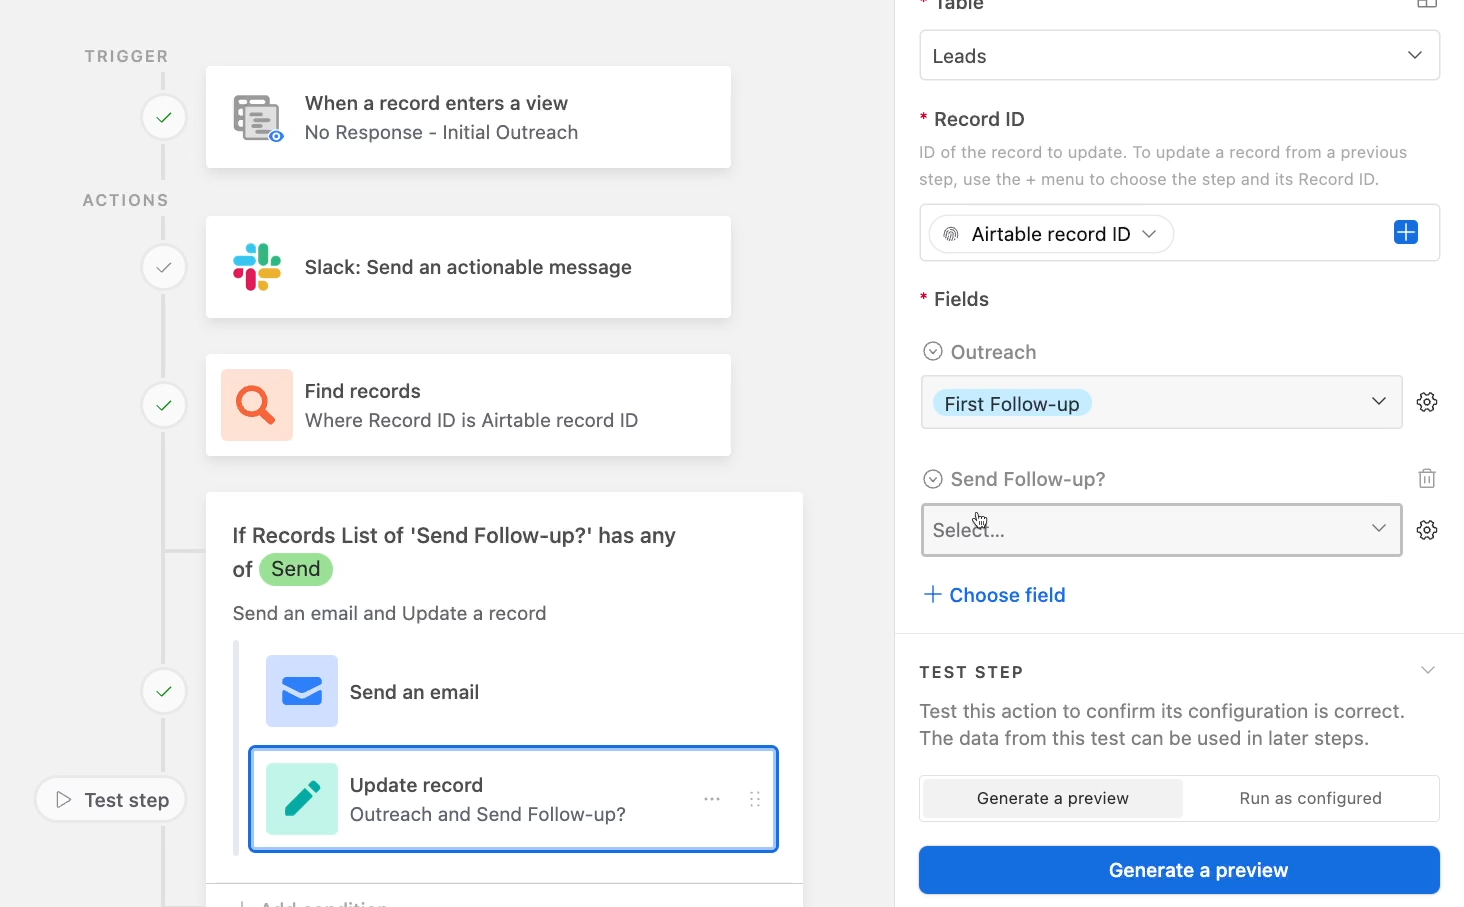
Adding actions in the conditional group
Once your condition is set up, you can add any actions you’d like. We’ll add two actions: one that sends an email to the lead, and one that updates the record in Airtable to indicate that a follow-up message was sent.
Testing your full automation
Once you’ve added every action that you want to your automation, give your full automation a test with a new record (or a record that’s reset to the right values).
Click on “Test automation” and choose a record.
Then, respond to the message in Slack.
You should see your Airtable record updated accordingly. You’ll probably want to run a full test for each button in your automation.
Once you’re finished testing, turn your automation on to start using it.
Easily adding human checkpoints to your Airtable automations with actionable Slack messages
Adding human checkpoints is a great way to ensure accuracy with automations, and to make sure they don’t run when they shouldn’t, and actionable Slack messages are a quick and easy way to add those human checkpoints to your Airtable automations.
If you’d like to learn more about using low-code tools like Airtable, Notion, Zapier, and Make, be sure to check out our blog or our YouTube channel. You can also follow XRay on Twitter, Facebook, or LinkedIn.


