

Customizing a Knack Web App: Building a Client Portal
In the second part of our Knack Beginner's Guide, we'll show you how to customize your no-code app with a Client Portal.
April 22, 2025

In Part 1 of our beginner’s guide, we introduced Knack and walked through the basics of setting up your first app. Now it's time to take your Knack skills to the next level by building something more complex: a client portal that connects your internal team with external partners.
Client portals are valuable tools for any business that collaborates closely with customers, vendors, or partners. They provide a convenient organized space where clients can submit requests, view project status, and access shared information—all while keeping your internal data protected from unauthorized edits.
Let's dive into how you can build a powerful client portal using Knack's no-code interface.
Planning your client portal structure
Before making any changes to your app, take a moment to consider what functionality your client portal needs. For our example, we'll extend the project management template from the previous tutorial by adding:
• A new user role for clients
• A table for storing client requests
• Pages where clients can view projects and submit requests
• Pages where your team can view and respond to client requests
This approach creates a natural workflow: clients can submit requests, which your team then reviews and potentially converts into projects or tasks.
Creating a new user role for clients
The first step in building a client portal is creating a dedicated user role for your external users.
User roles are foundational to your app's security model, allowing you to precisely control what information different people can access.
By creating a specific role for clients, you'll ensure they can only see their own data and the features designed for them.
To create a new user role in Knack, navigate to the Users section in your app builder, and click on “+ Role”.

Give your new user role a name—we'll use "Clients" for clarity–and click “Save”.
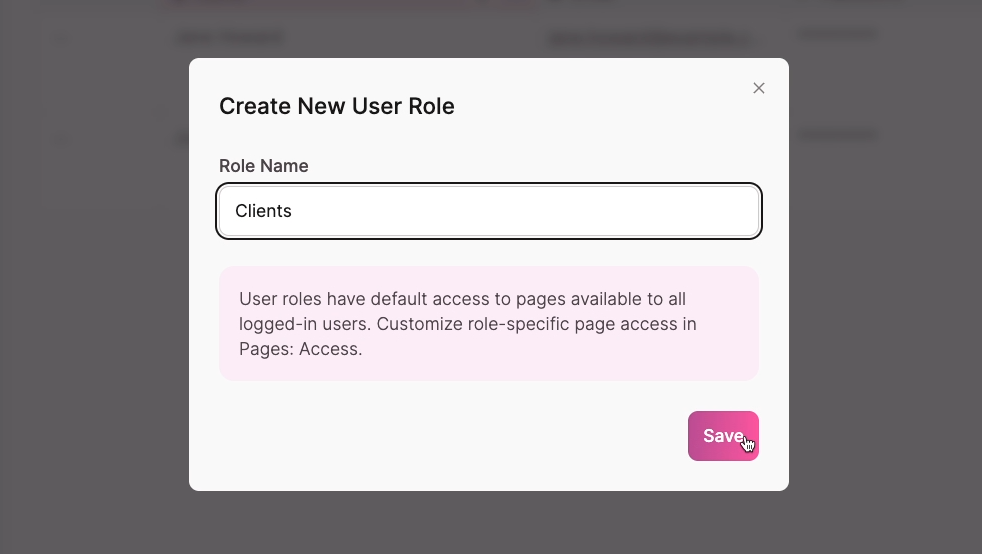
This immediately adds Clients to your list of account types alongside the existing Project Managers and Team Members roles from your template.
Controlling access with user roles
The power of role-based access becomes apparent when you start designing the client experience. Every page and element in your Knack app can be configured with specific permissions, so you can build a tailored interface for each type of user.
This means project managers, team members and clients can all view different pages with content that’s appropriate for them to access.
Adding a new user in Knack
Having a test client account allows you to switch between different user perspectives as you build, ensuring the experience works as intended for everyone who will use your system.
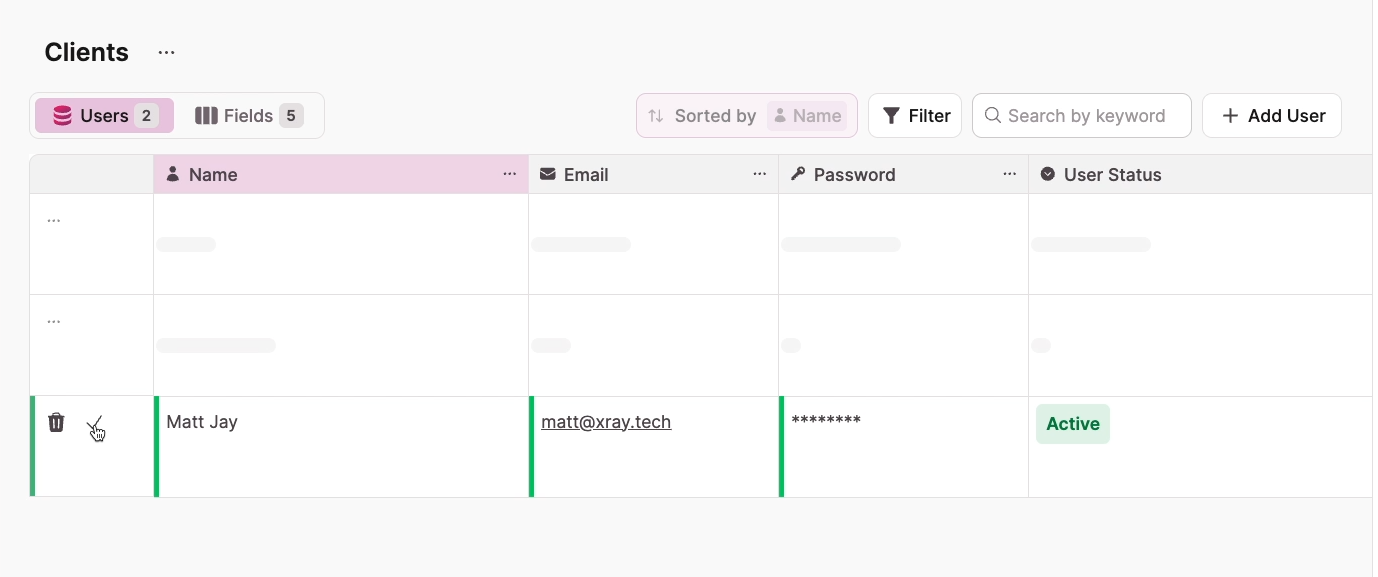
To make it easier to build and test out the portal, it’s best to add a test client account right away. Click on "Add User."
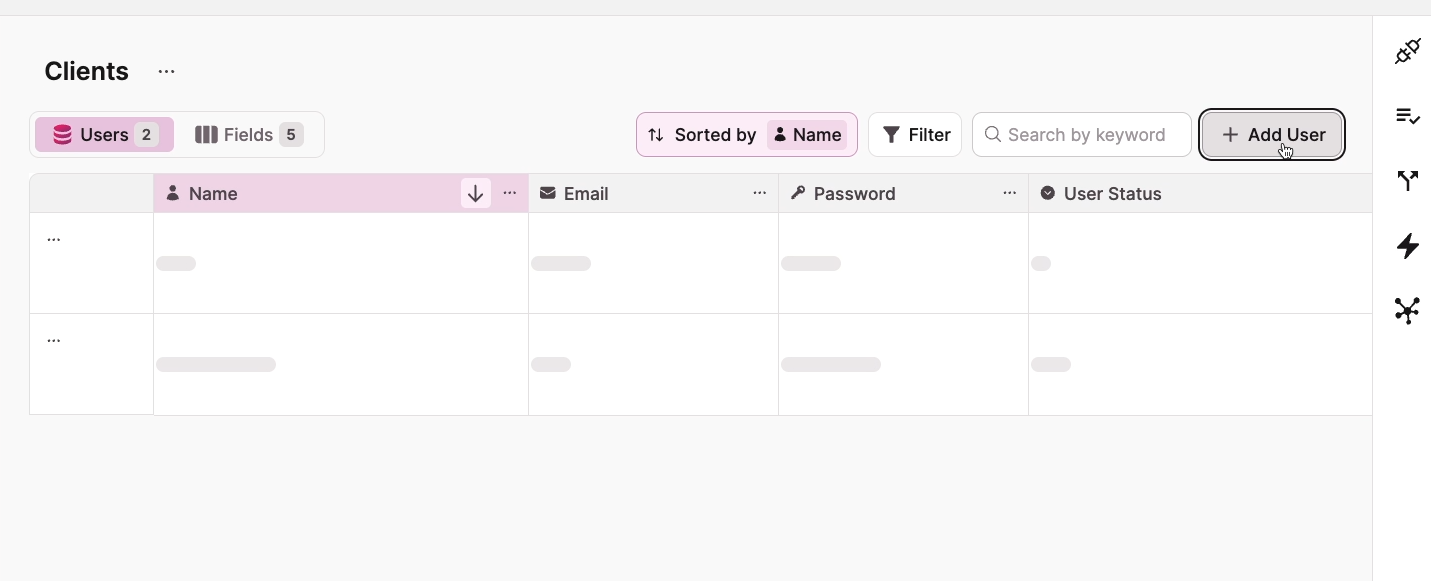
Then, fill out the required fields including name, email, and password.
Note: by default, Knack has specific password requirements for security—at least eight characters long with a capital letter, a number, and a special character. If you’d like, you can change these requirements in your app’s settings.
Once you’ve configured your new user, click the checkmark to save their information.
Setting up a new table for client requests
Next, we need to create a table where client requests will be stored. This table serves as the foundation for your entire client request system and establishes the structure for how information flows between clients and your team.
Creating a new table
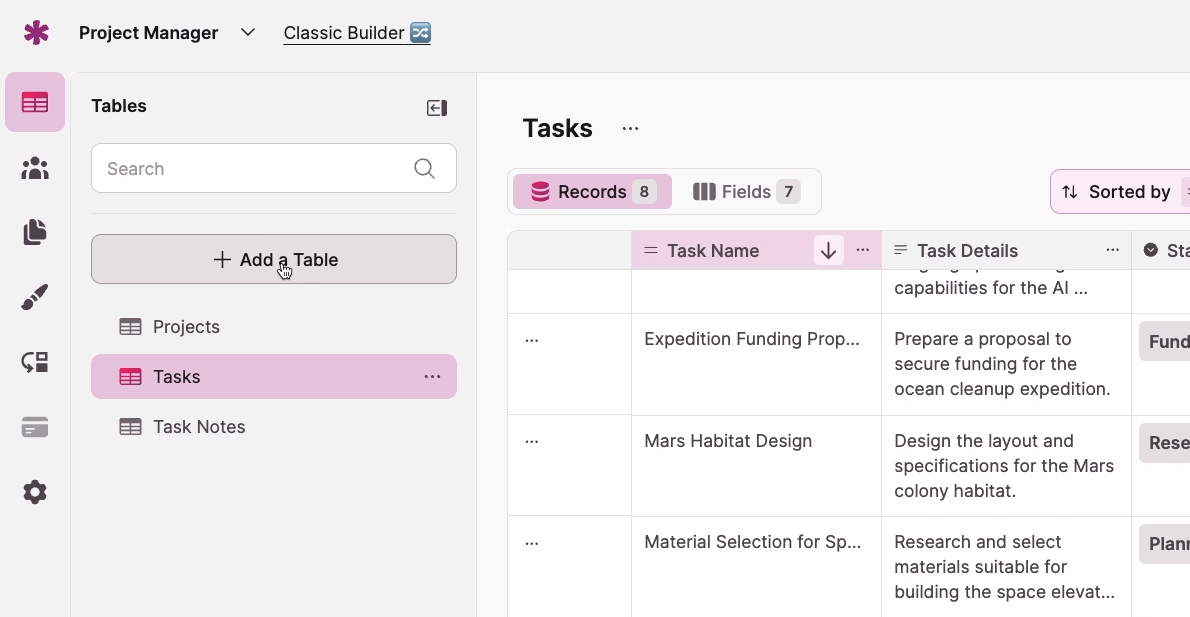
In your Knack builder, go to Tables and click "Add a Table."
While you could import data or start from a template, we’ll choose "Blank Table" to start from scratch and add fields one by one.
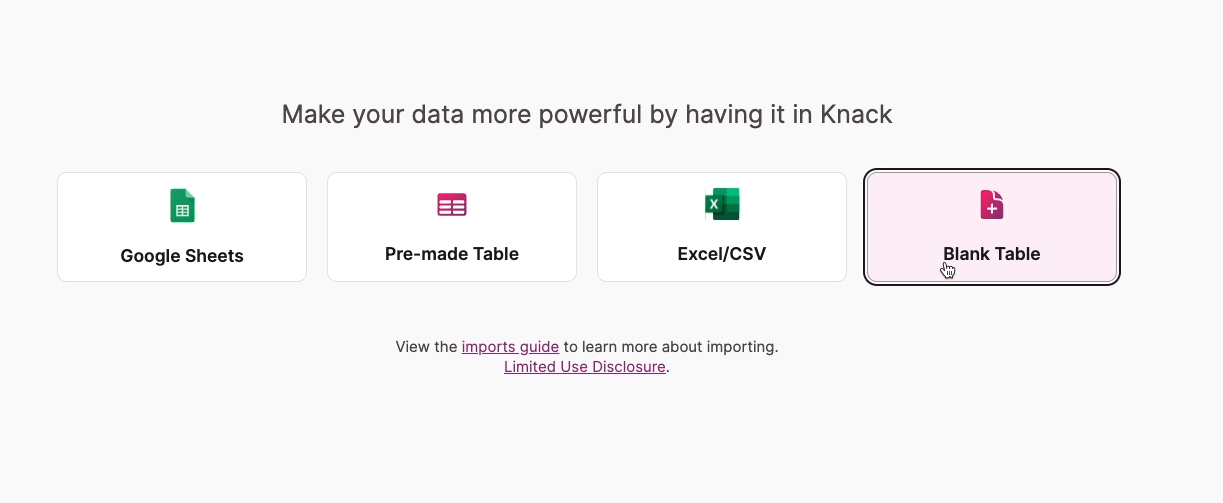
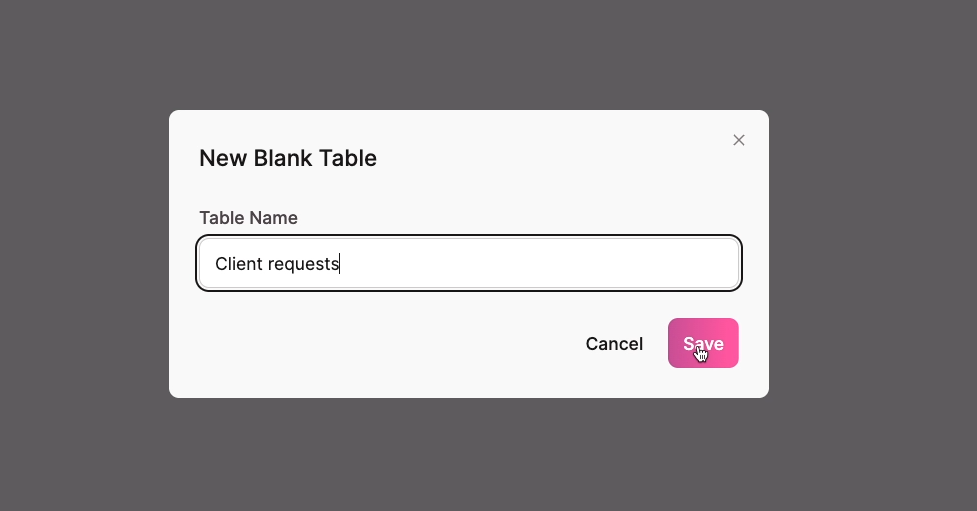
Give your table a name. We’ll call ours “Client requests”.
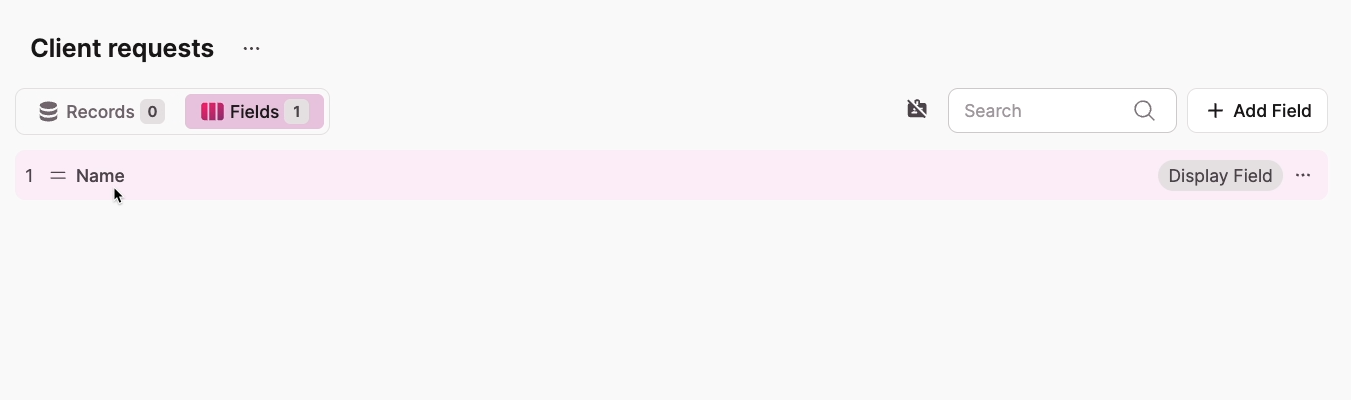
Then, you’ll see a new table with no records. When you click on the “Fields” tab, you’ll see the only field currently in the table – “Name”.
Customizing a table in Knack
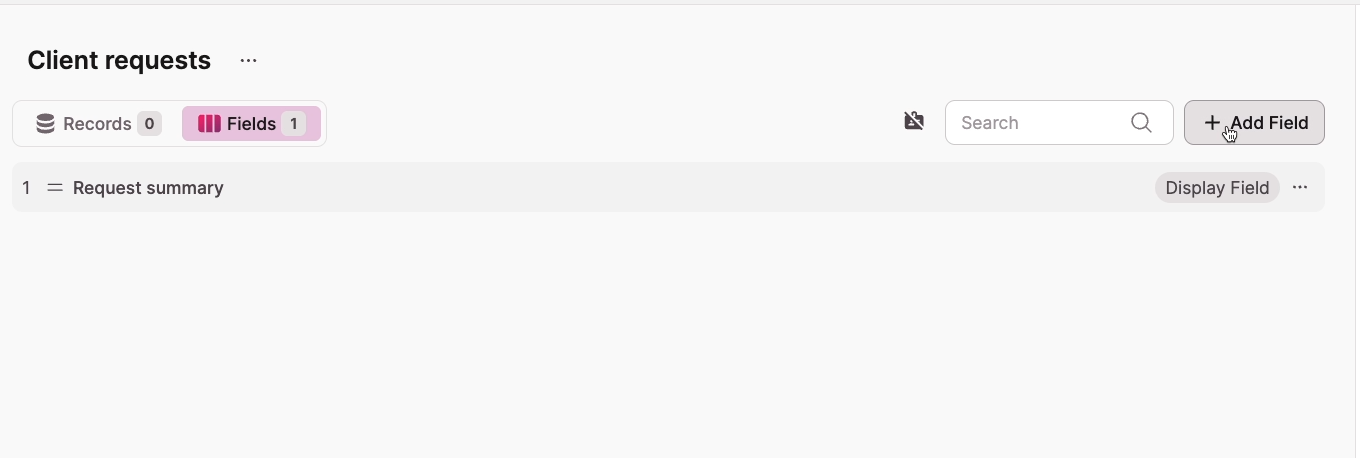
You can edit the default “name” field, and add any fields you’d like to your table in Knack. We’ll begin by renaming the “Name” field.
To edit a field in a Knack table, just click on it. Then, you can reconfigure it however you’d like.

In our example, we’ll change the field’s name to “Request summary”. Click save to commit your changes.
To add a new field, click on “Add field”.
Then, give your field a name and choose a field type. We’ll add a Rich Text field called "Request Details" where clients can explain their needs in depth.
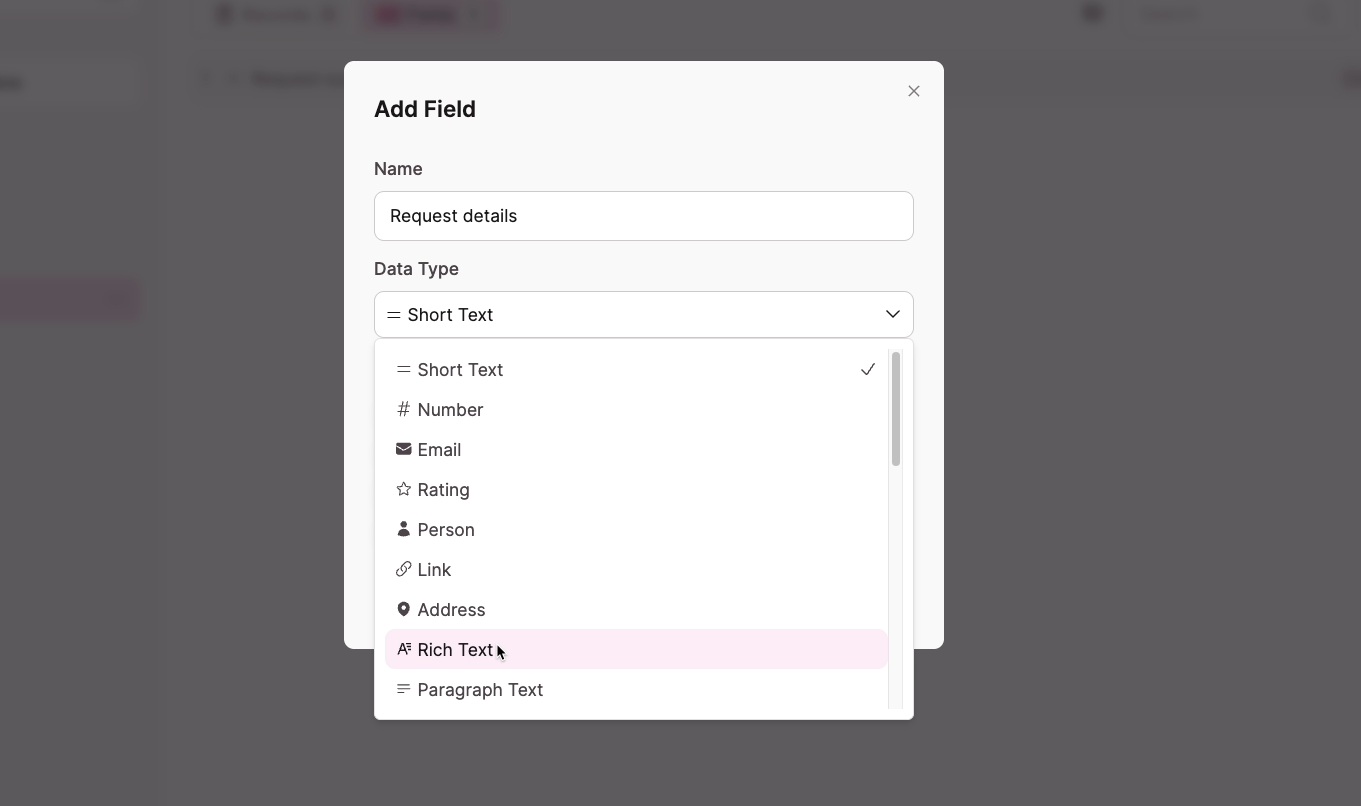
A critical field to include is a Multiple Choice field for "Request Status." This becomes the central tracking mechanism for where each request stands in your workflow.
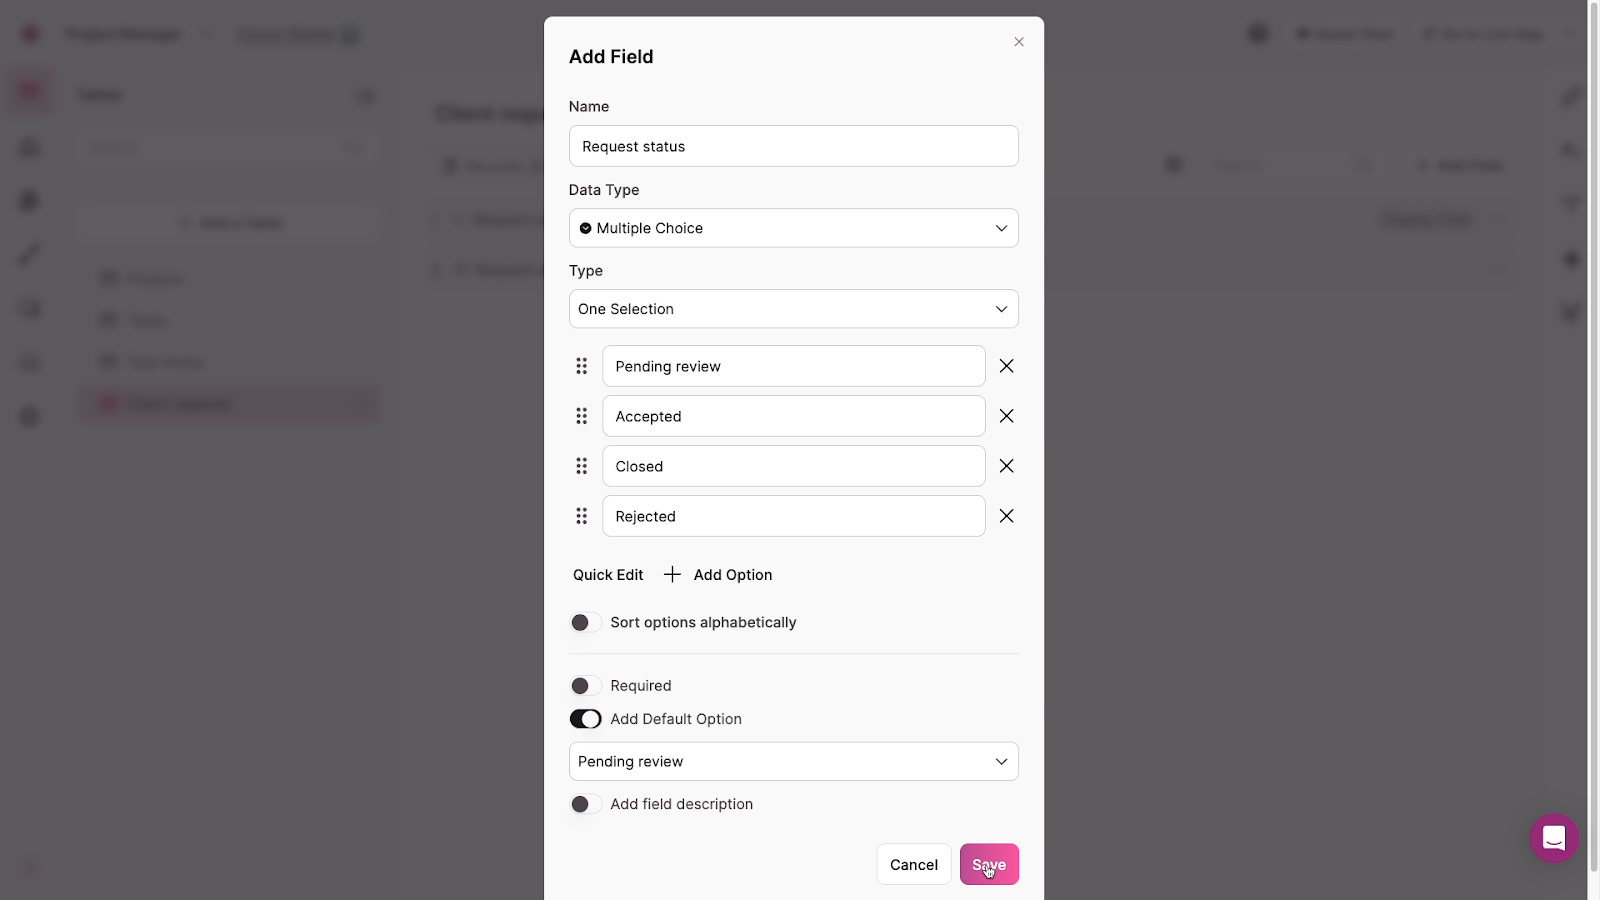
Include statuses that reflect your process: "Pending Review" for new submissions, "Approved" for requests you've accepted, "In Progress" for active work, "Completed" for finished requests, and "Declined" for those you can't accommodate. You can customize these options to match your specific workflow.
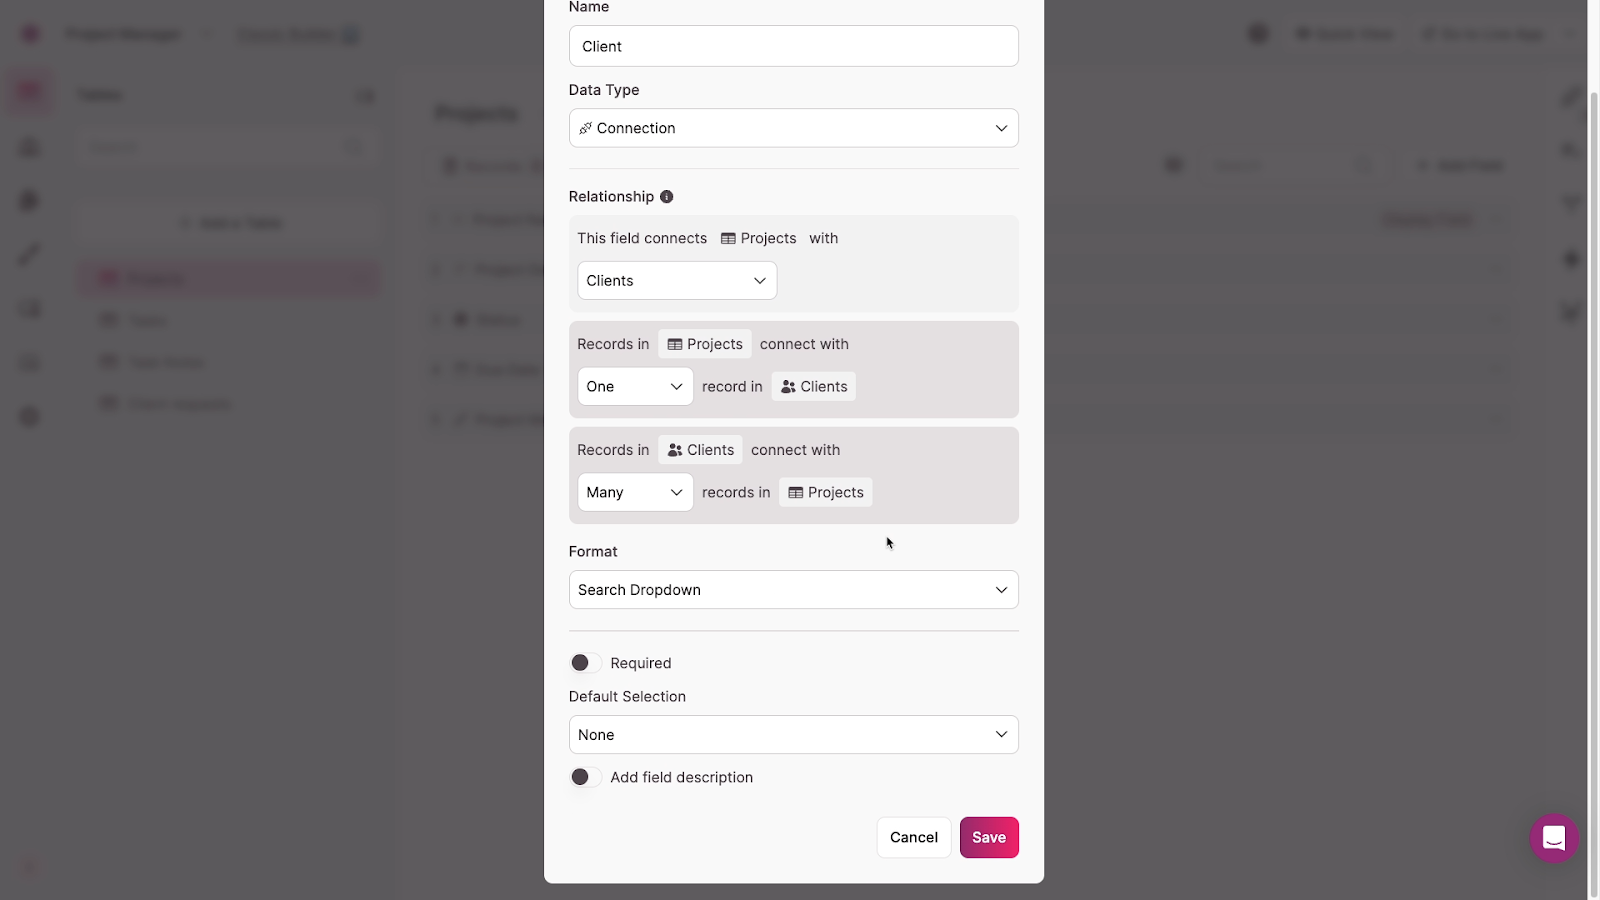
Creating connections in Knack tables
One of the most powerful features of Knack tables comes from creating connections between your data. These relationships transform separate lists of information into a cohesive system. For our client portal, we’re going to set up two crucial connections–one to Clients, and one to Projects.
To add a connection to a Knack table, add a new field and choose “Connection” as the field type.
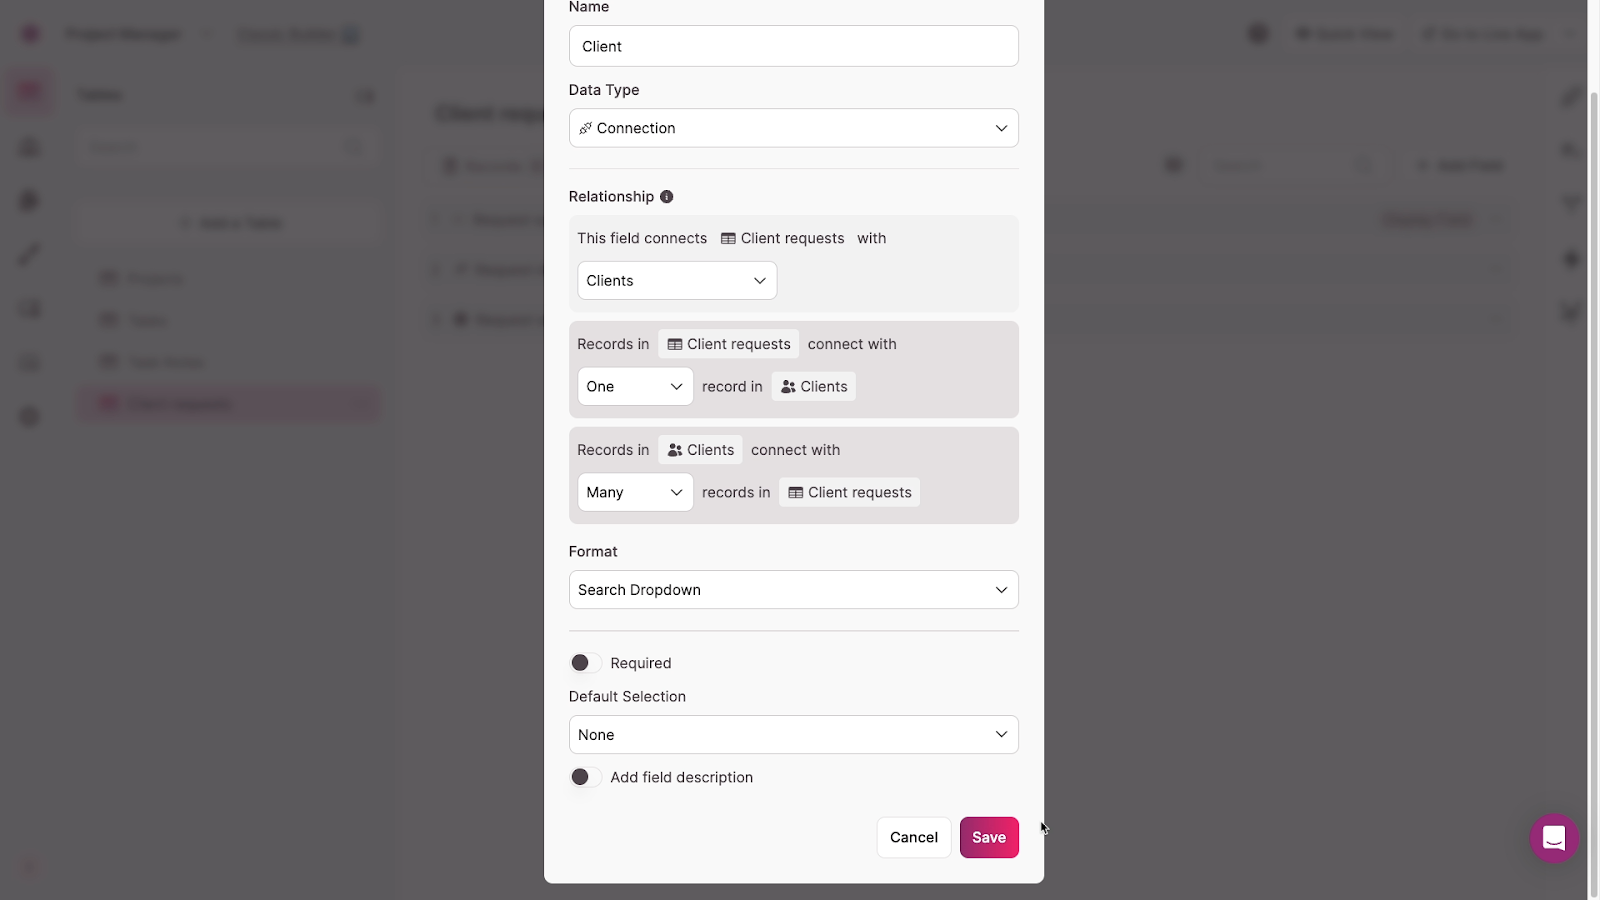
Choose the table (or user role) you want to connect to, and set the relationship type. We want each client request to connect to only one client, and we want each client to be able to connect to several requests.
You can set up “one-to-one”, “one-to-many”, or “many-to-many” relationships in any configuration that works for your data.
Once your field is all set, click Save to add it to your table.
Connecting the Projects table to Clients
Our data is nearly ready to go. We just need to make one more change before building the frontend interface.
Open up the Projects table, and add a connection to Clients.
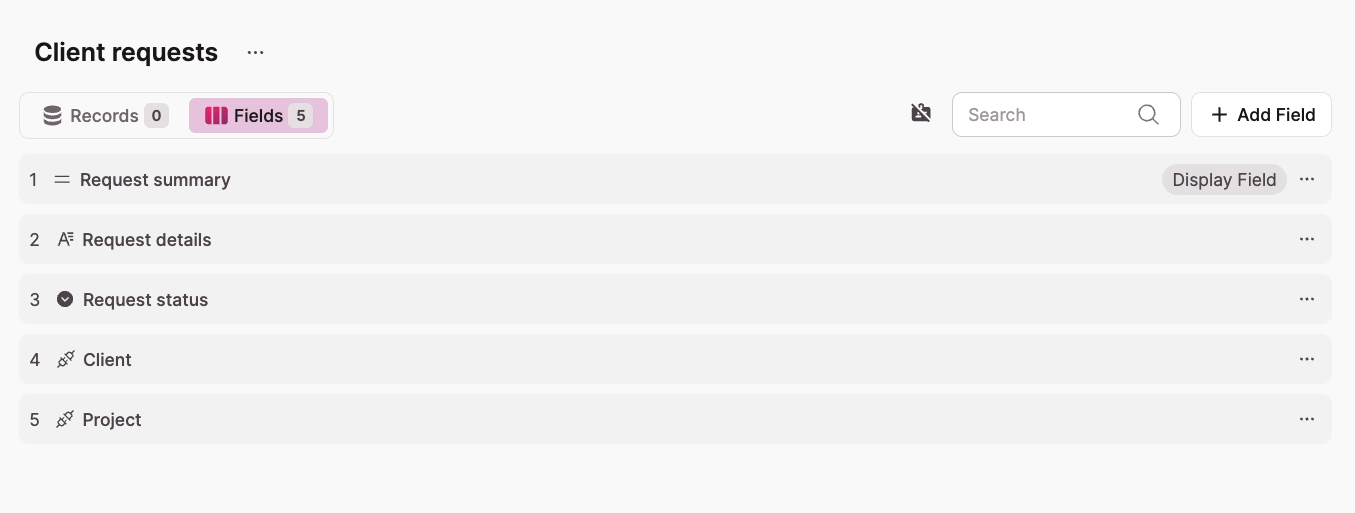
With these fields and connections in place, our Client Requests table is ready to store all the data we need. This carefully structured table will serve as the central hub connecting your clients to your internal project management system.
Build Knack apps and automations with XRay.Tech
Need help building automated systems for your company but don't have the time to do it yourself? XRay specializes in creating custom solutions with Knack and dozens of other no-code platforms.
We've helped businesses of all sizes build powerful tools that save thousands of hours of manual work.
Schedule a free 15-minute consultation to get started. We'll discuss your specific challenges, and determine your best options for automating and optimizing your company’s workflows.
Building a client-facing interface in Knack
Now that we have our backend structure in place, let's create pages where clients can log in, view their projects, and submit new requests. The interface design is crucial for client adoption—it needs to be intuitive, focused, and professionally presented.
Creating a page in Knack
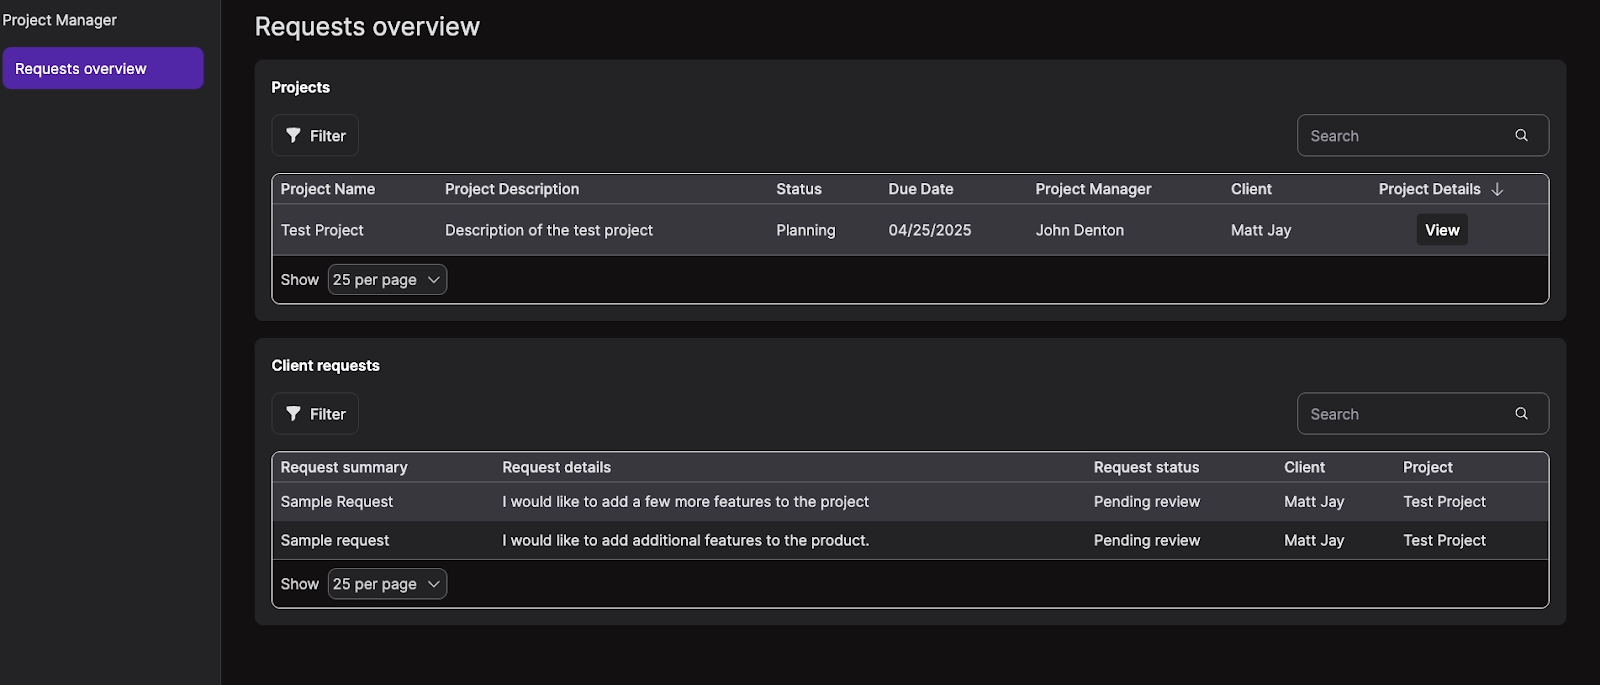
First, let's create a page where clients can log in, view their projects and related requests, and submit new ones.
Go to Pages and click "Add Page." Name it something like "Requests Overview".
Enable "Protect Page" to restrict access, then select only the "Clients" user role to have permission to view this page.
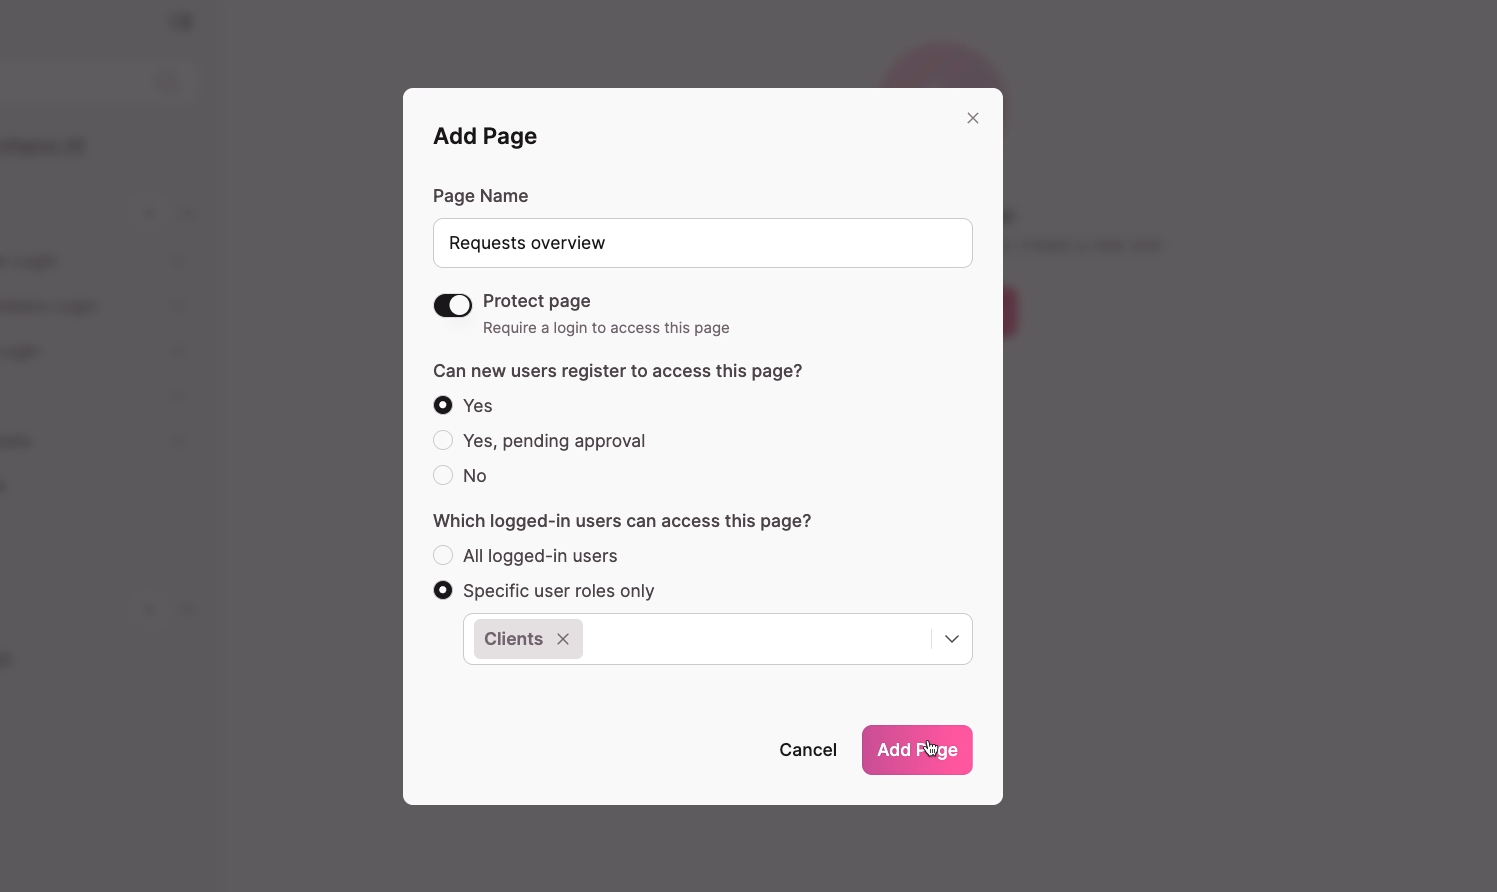
With all your settings in place, click “Add page”.
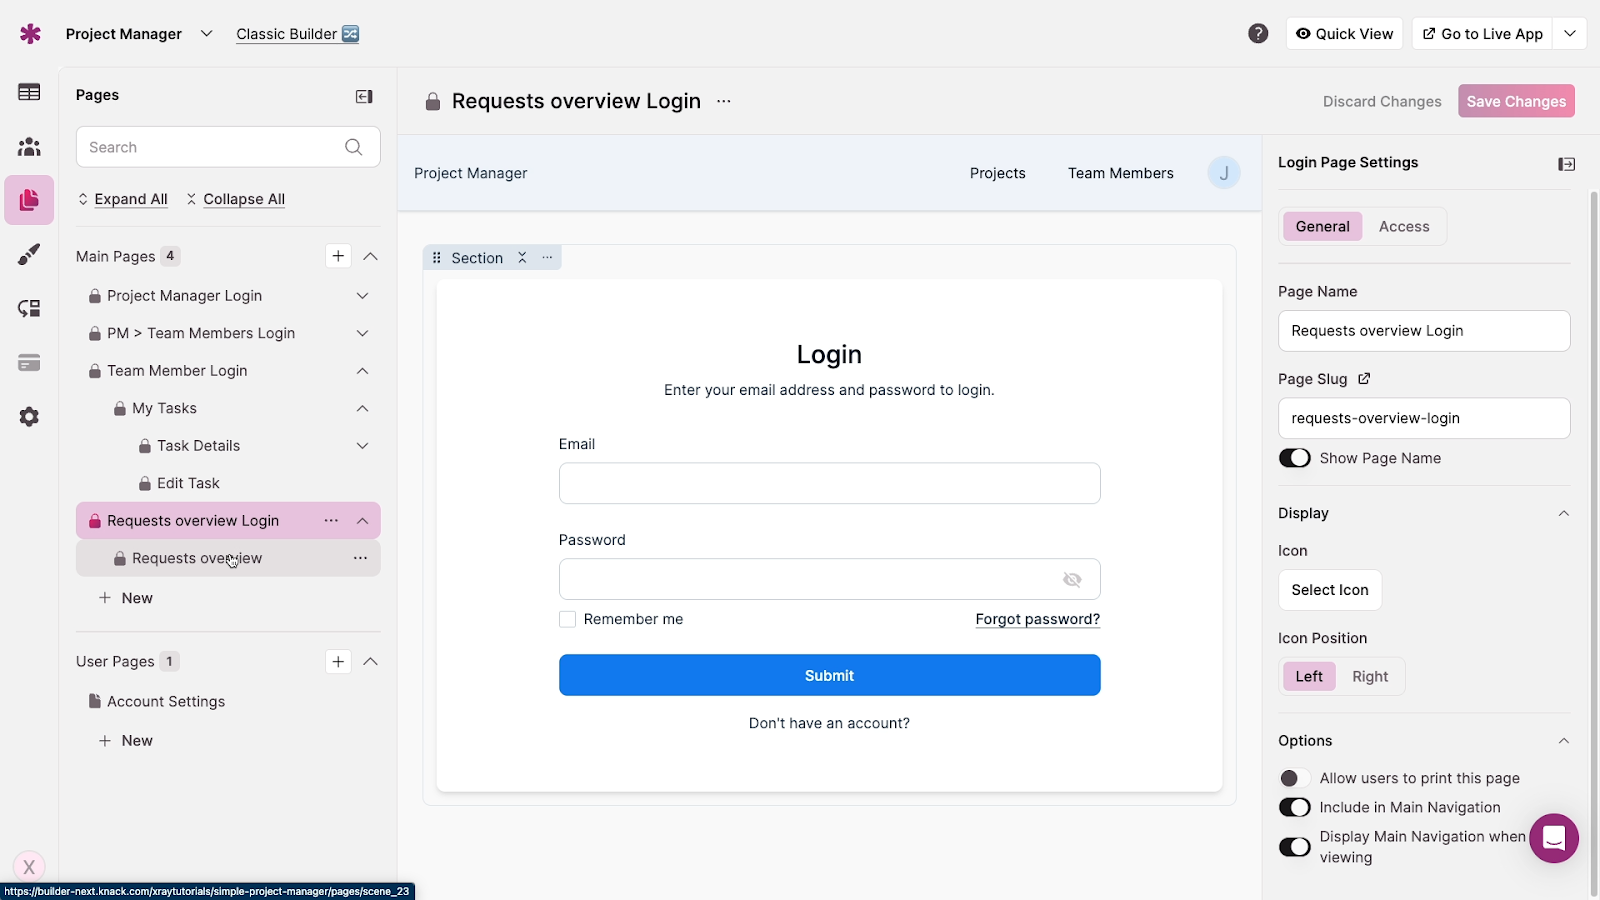
One of Knack's convenient features is that when you create a new protected page, it automatically generates a login screen, so you don't need to build that separately.
Adding elements to the page
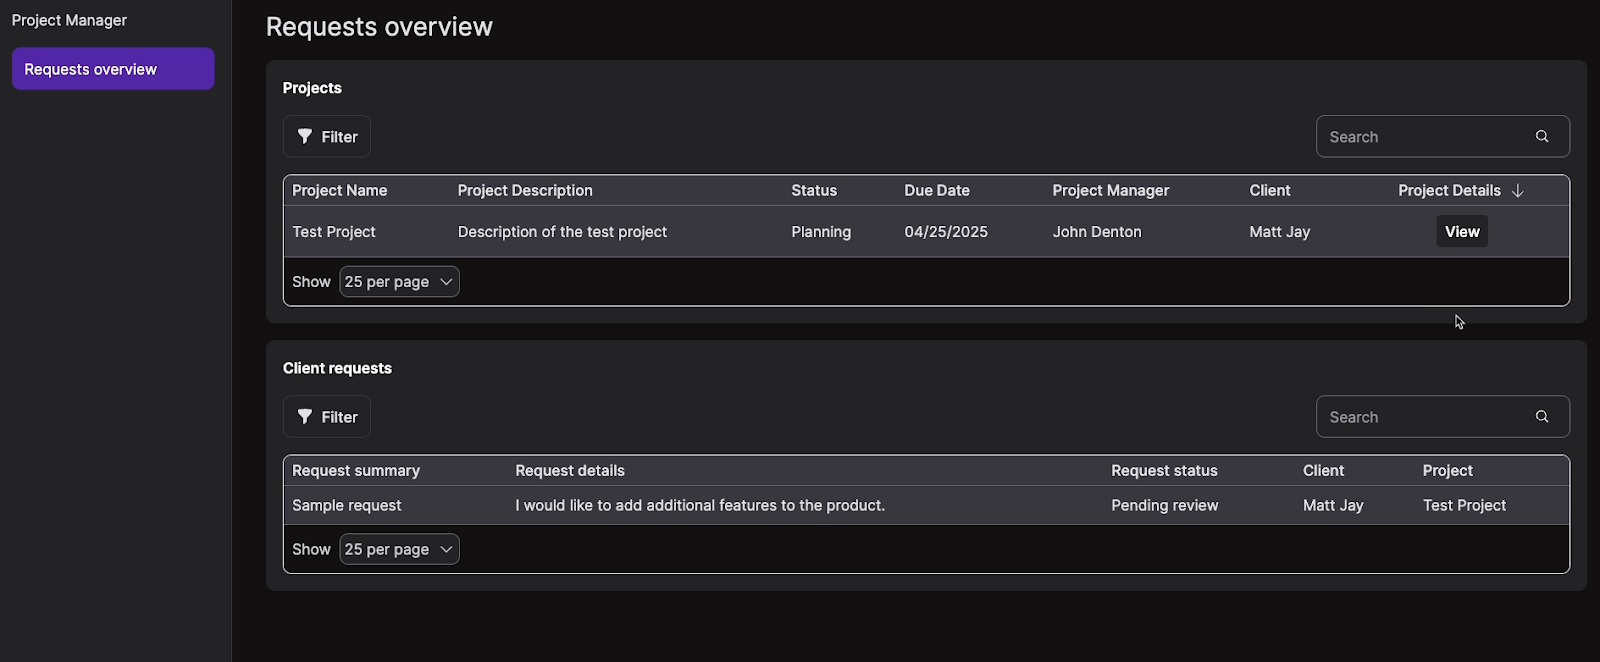
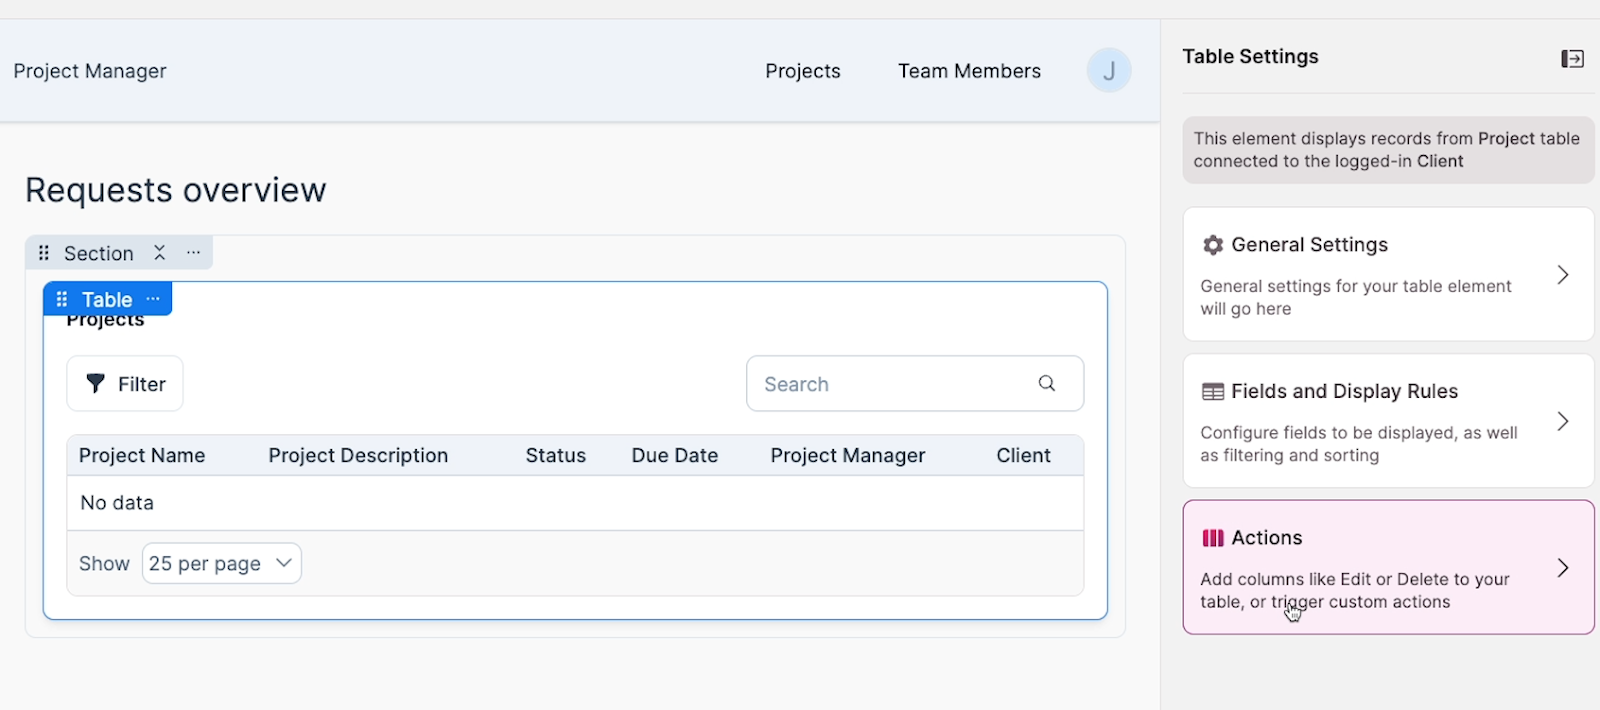
The client requests interface should provide immediate access to the most important information. To that end, we'll add two main elements to this page that together give clients a complete picture of their relationship with your company–a table with all of the client’s projects, and a table with their requests.
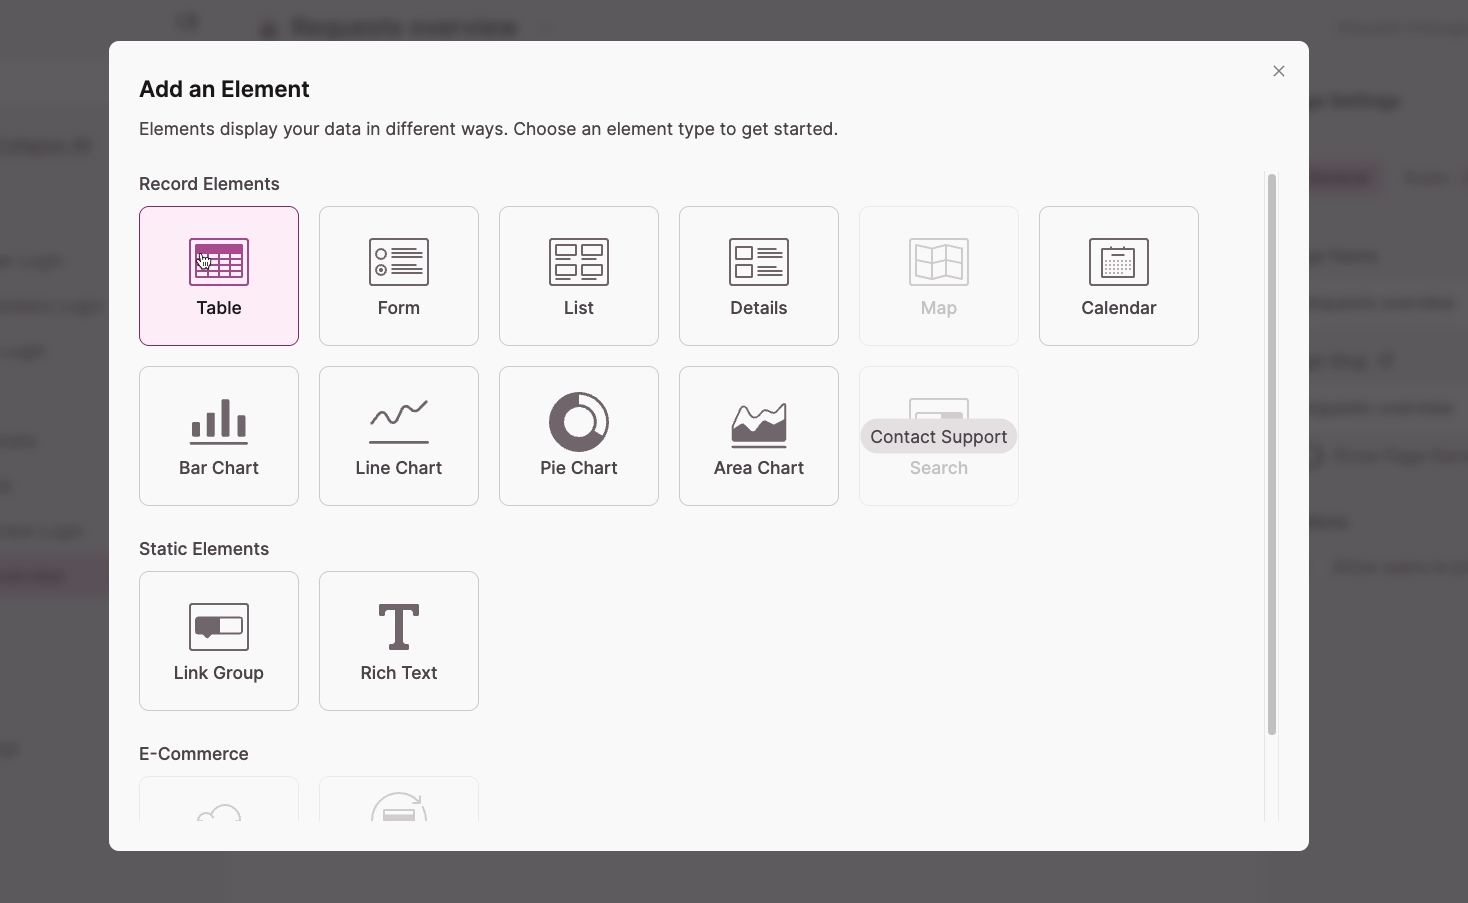
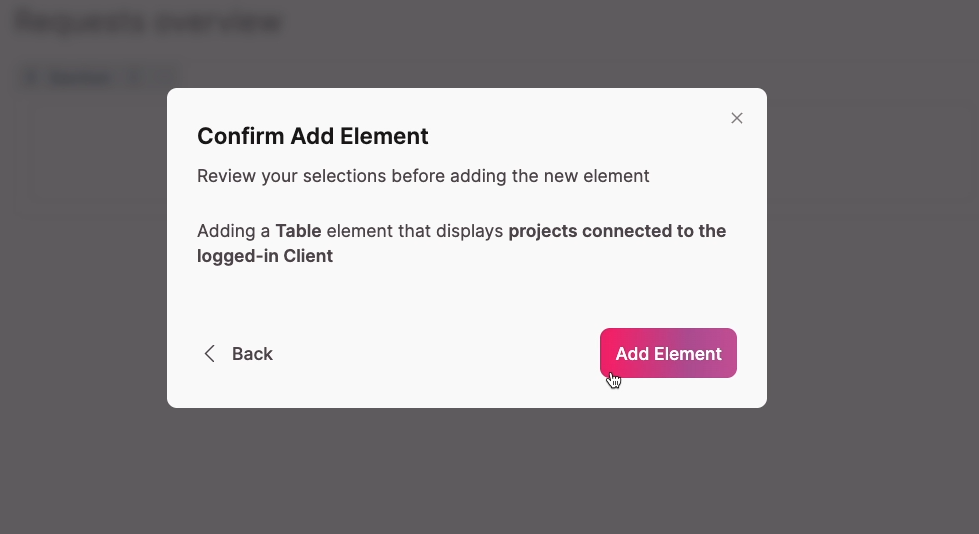
First, we'll add a table showing projects associated with the logged-in client. Click the "+" button to add an element to your page.
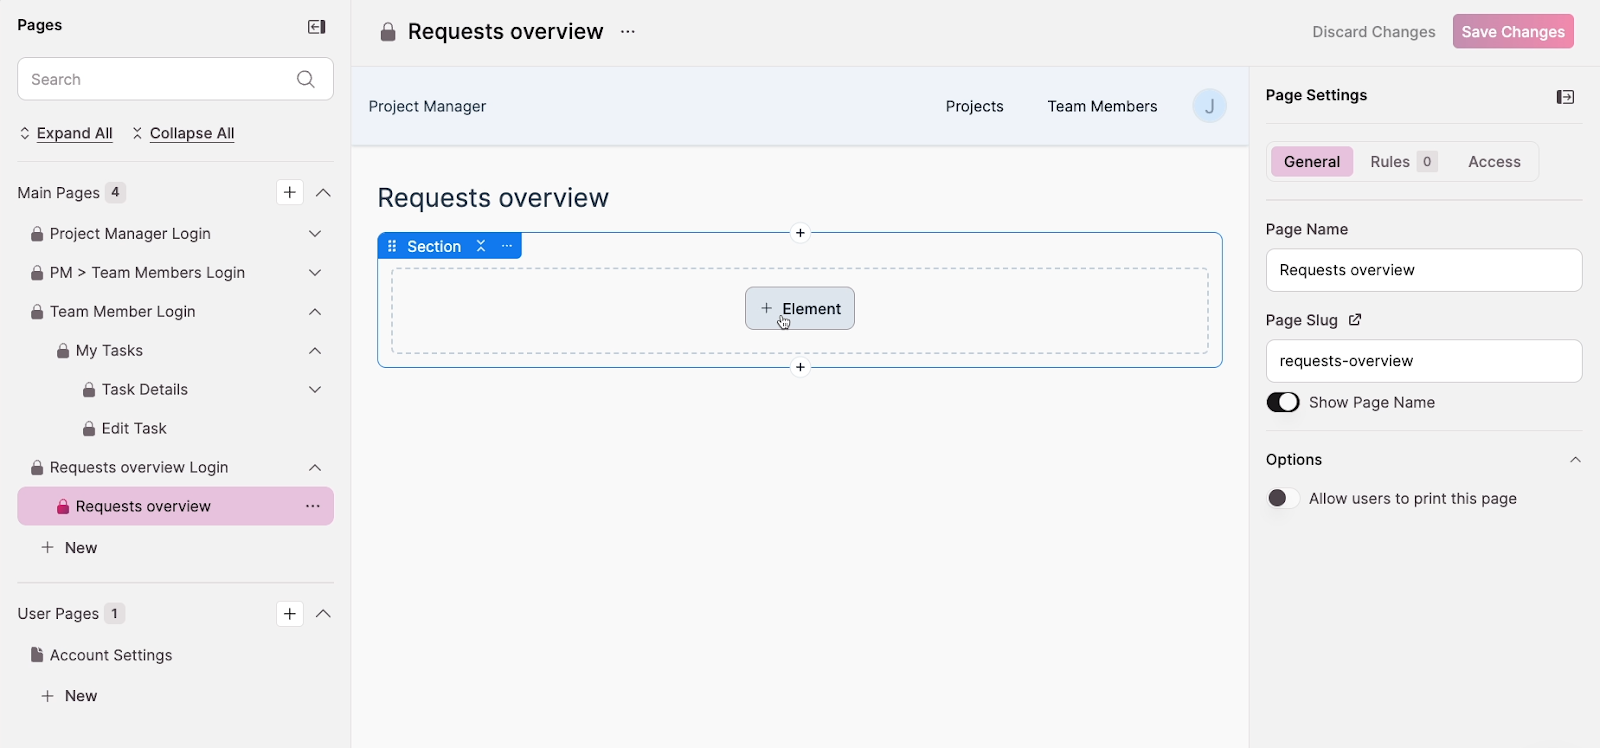
Then, choose your element type. For this example, we’ll select "Table" under Record elements.
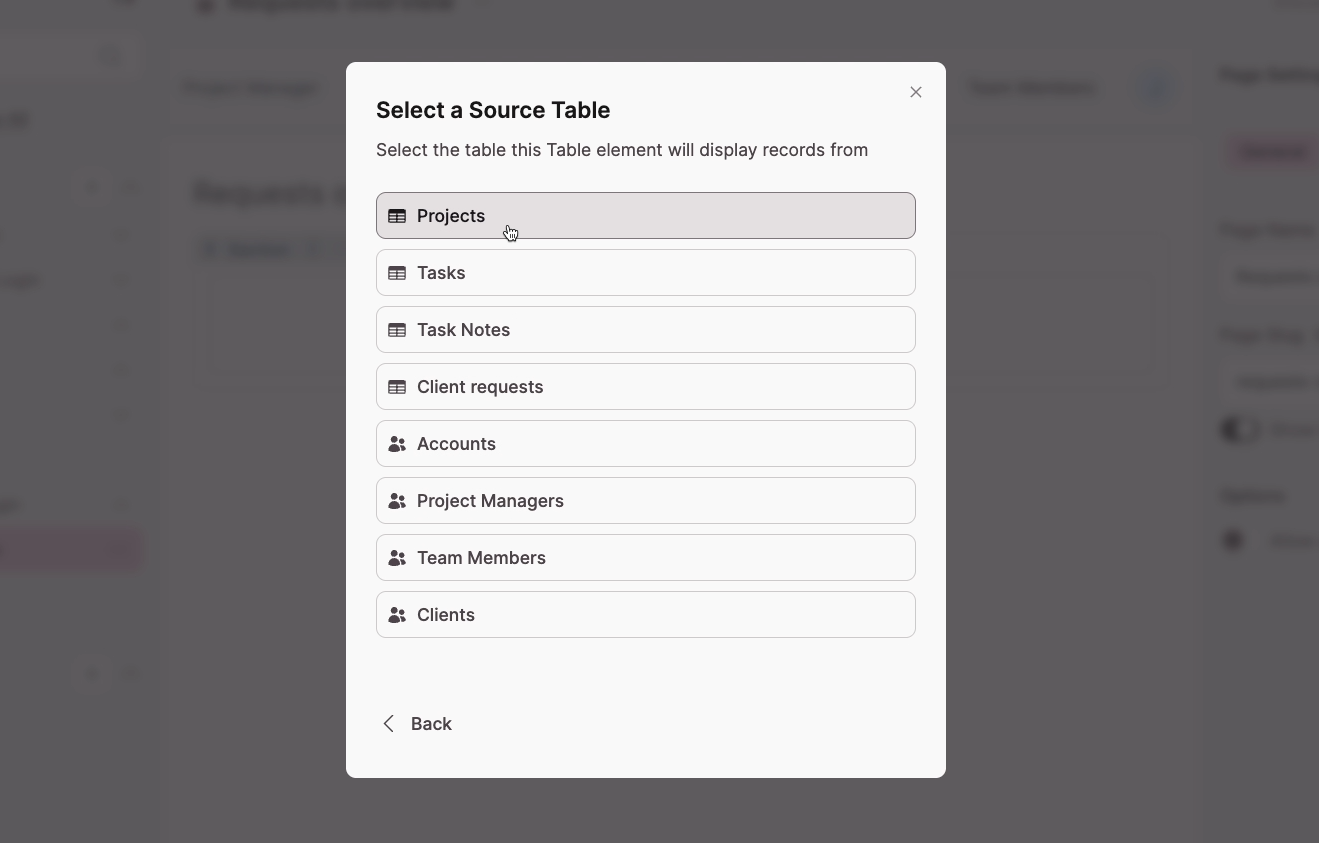
Choose the Projects table as your data source.
The magic happens in the display settings—under "Display Records," select "Only show records linked to the logged-in client."
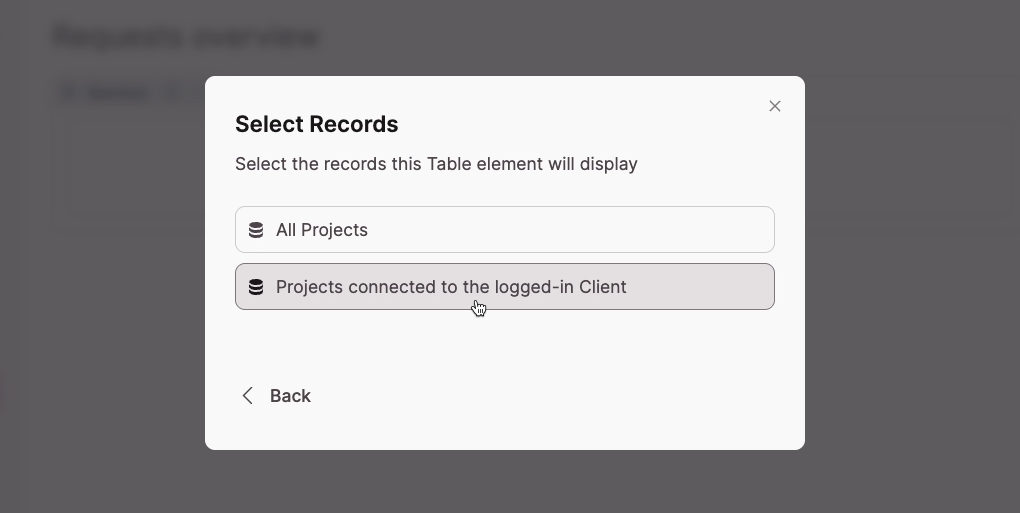
This crucial setting ensures data privacy, showing clients only their own projects without requiring any coding or complex filtering logic.
After selecting the records to display, Knack will show you a summary of the element you’ve configured. Review the settings, and click “Add Element” to finalize.
Adding an action: view record details
To make this Projects table interactive, we need to add an action that allows clients to drill down into details. With the projects table selected, click on Actions.
Then choose “View Record Details” as the action.
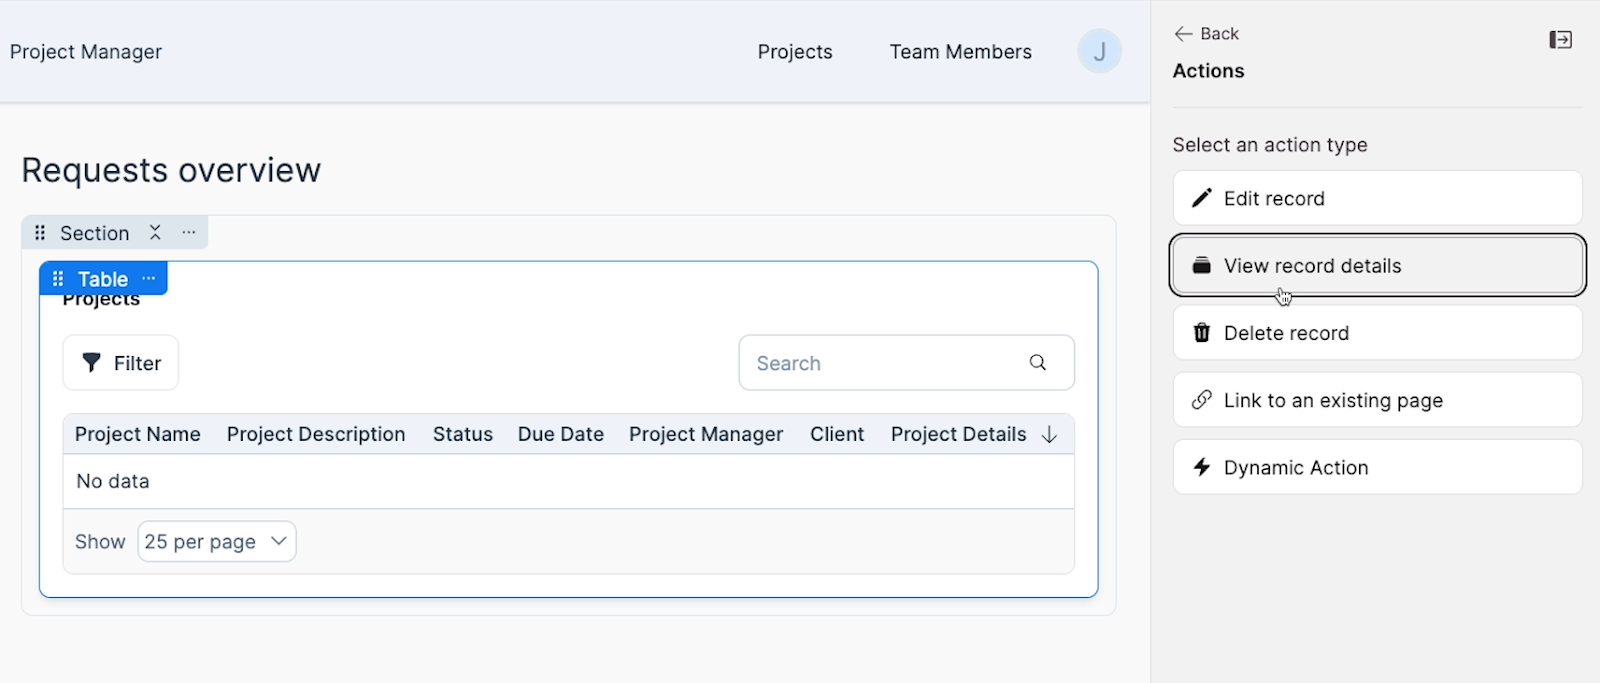
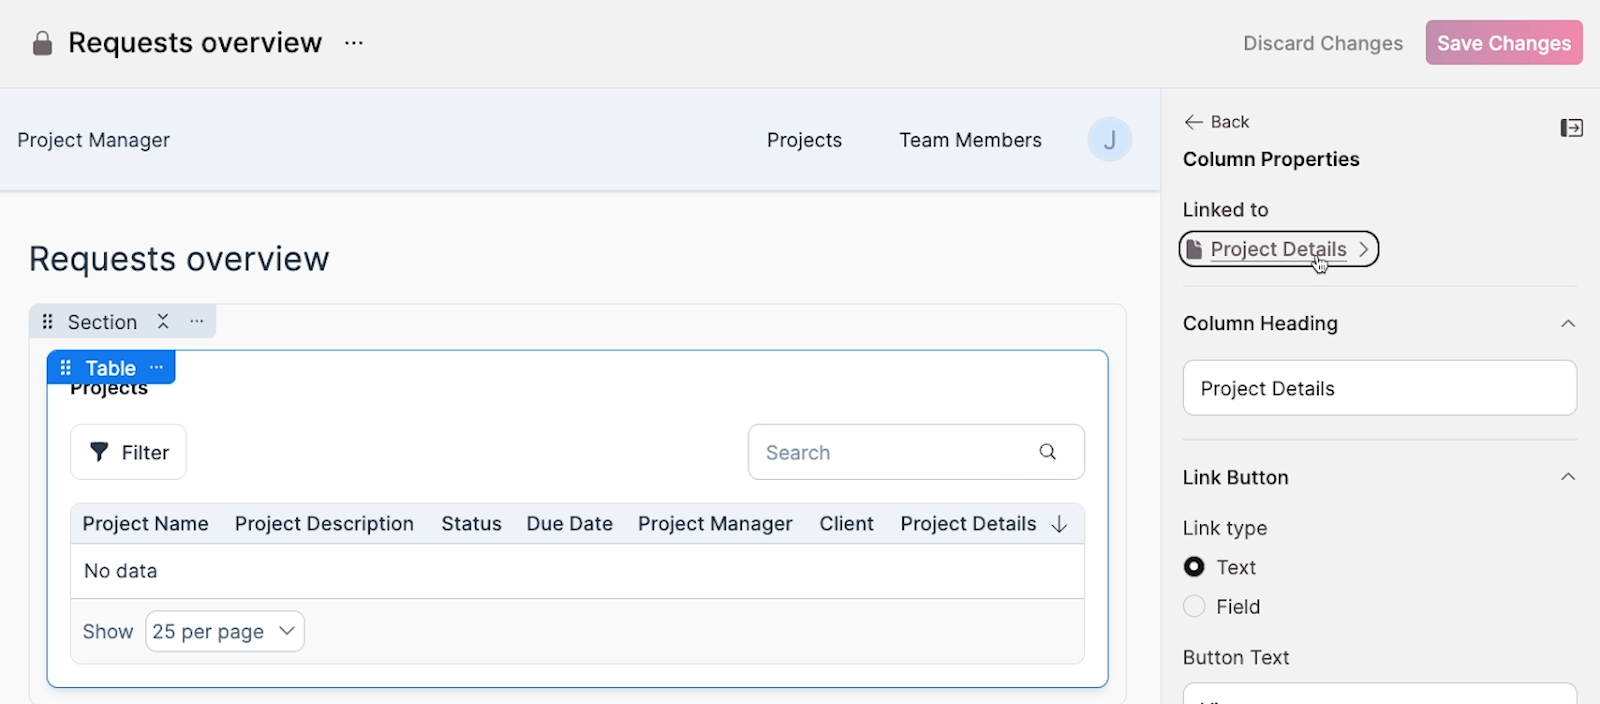
This creates a linked page where clients can see more information about each project. To view this page, save your changes, then click on the “Project details” column in the table element.
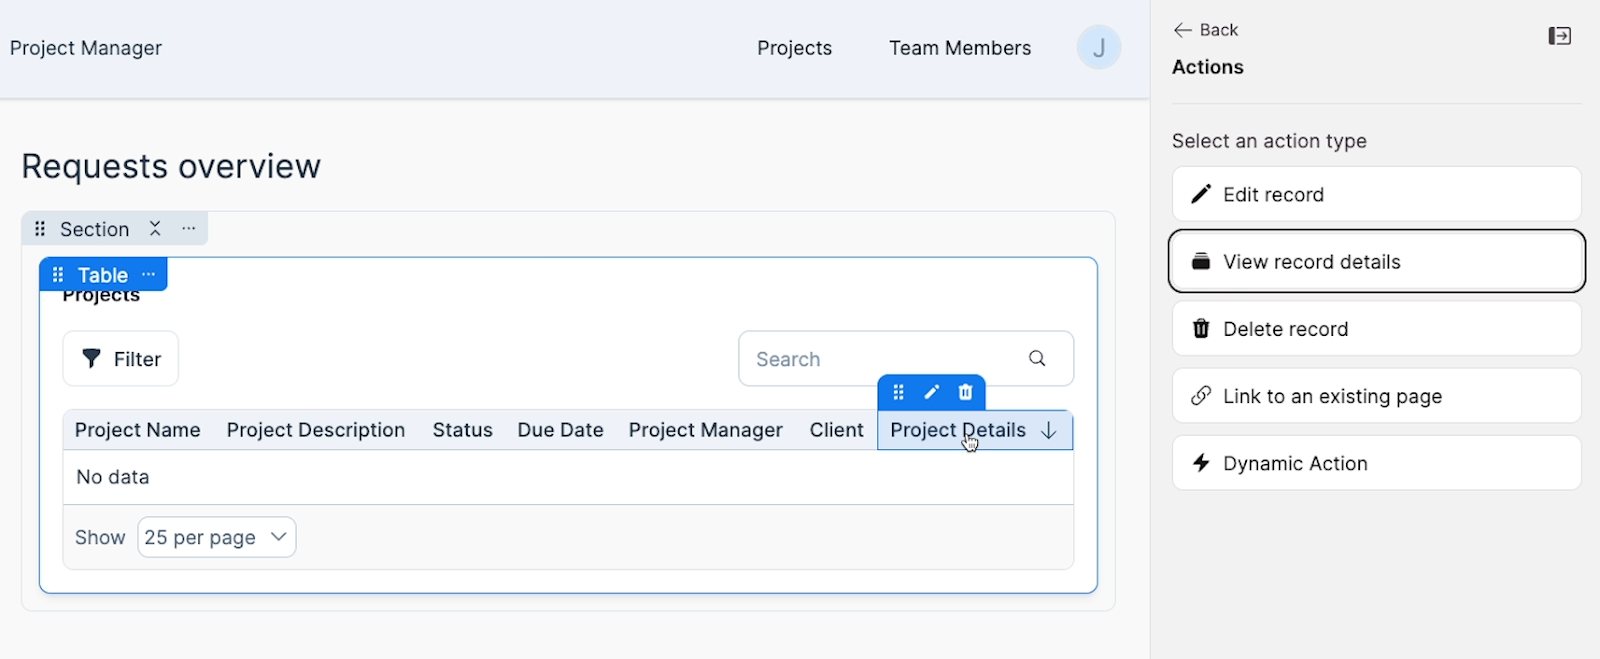
Then, click on the link under “linked to”.
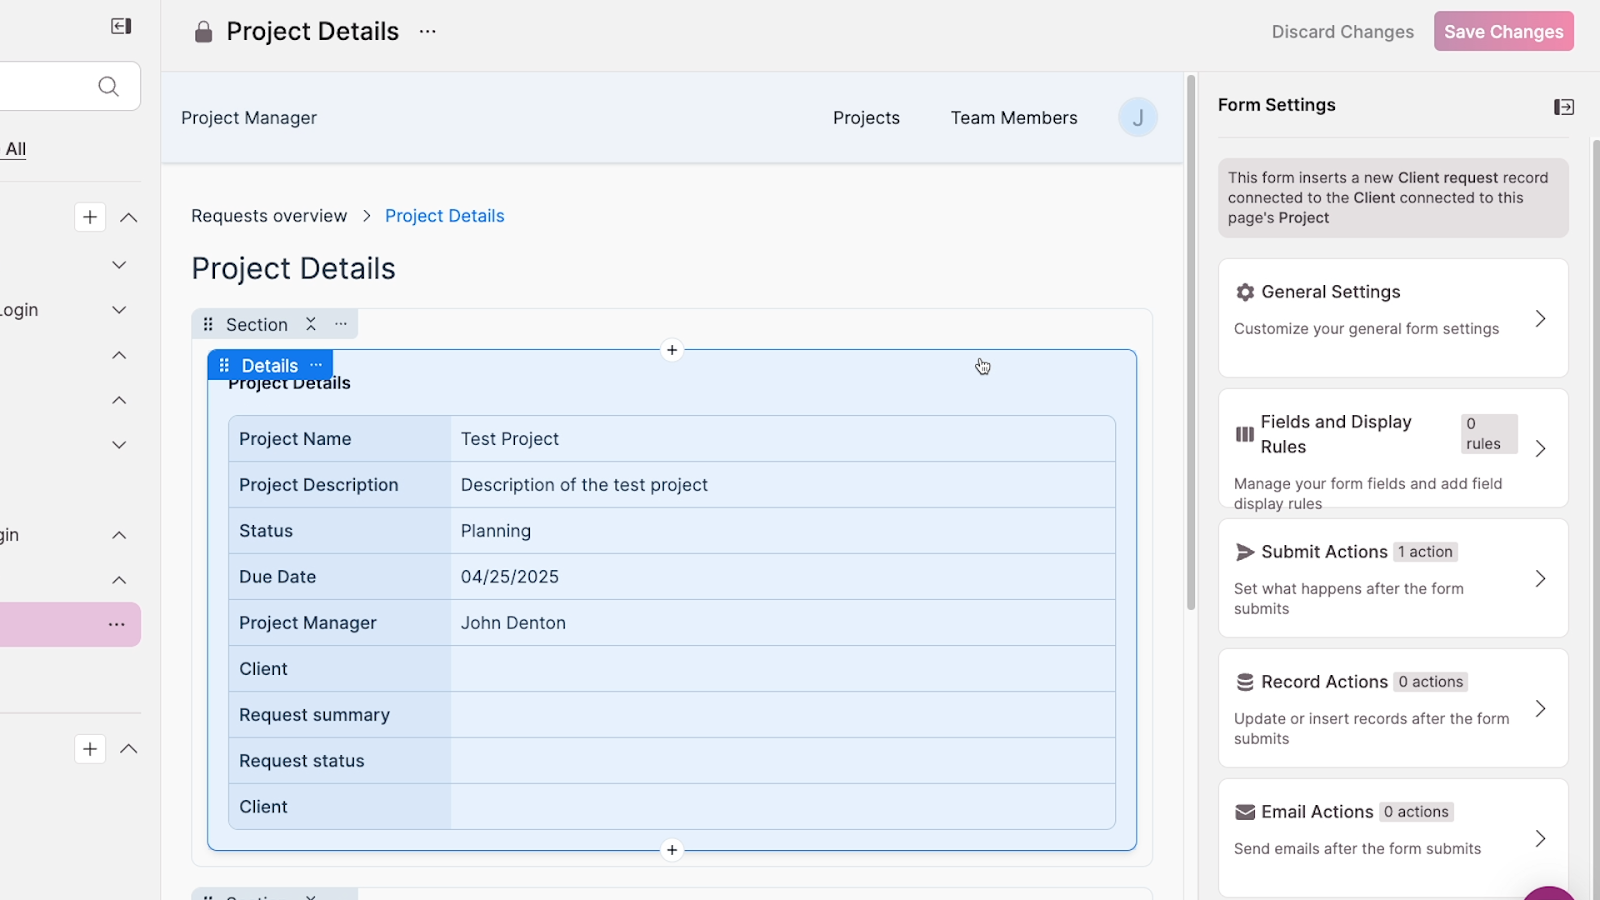
Adding a form to create new records
On the linked project details page, we'll create a useful enhancement—a form element that allows clients to submit requests related to specific projects.
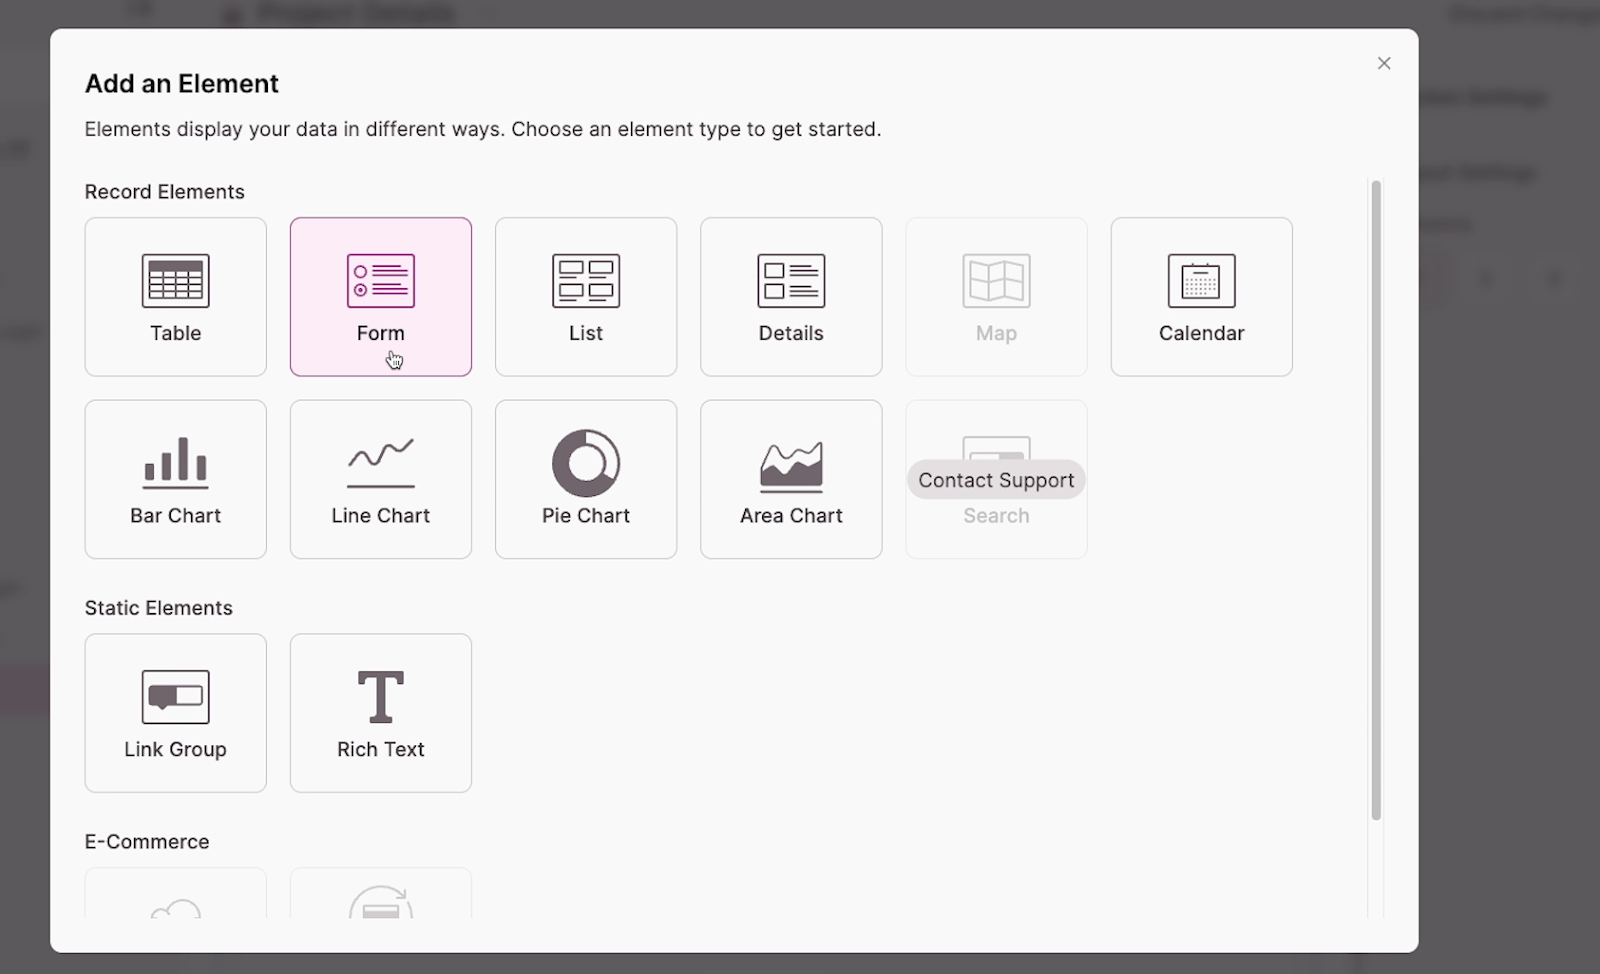
Add a new element by clicking on the plus (+) button at the bottom of the page.

Choose “Form” as the type.
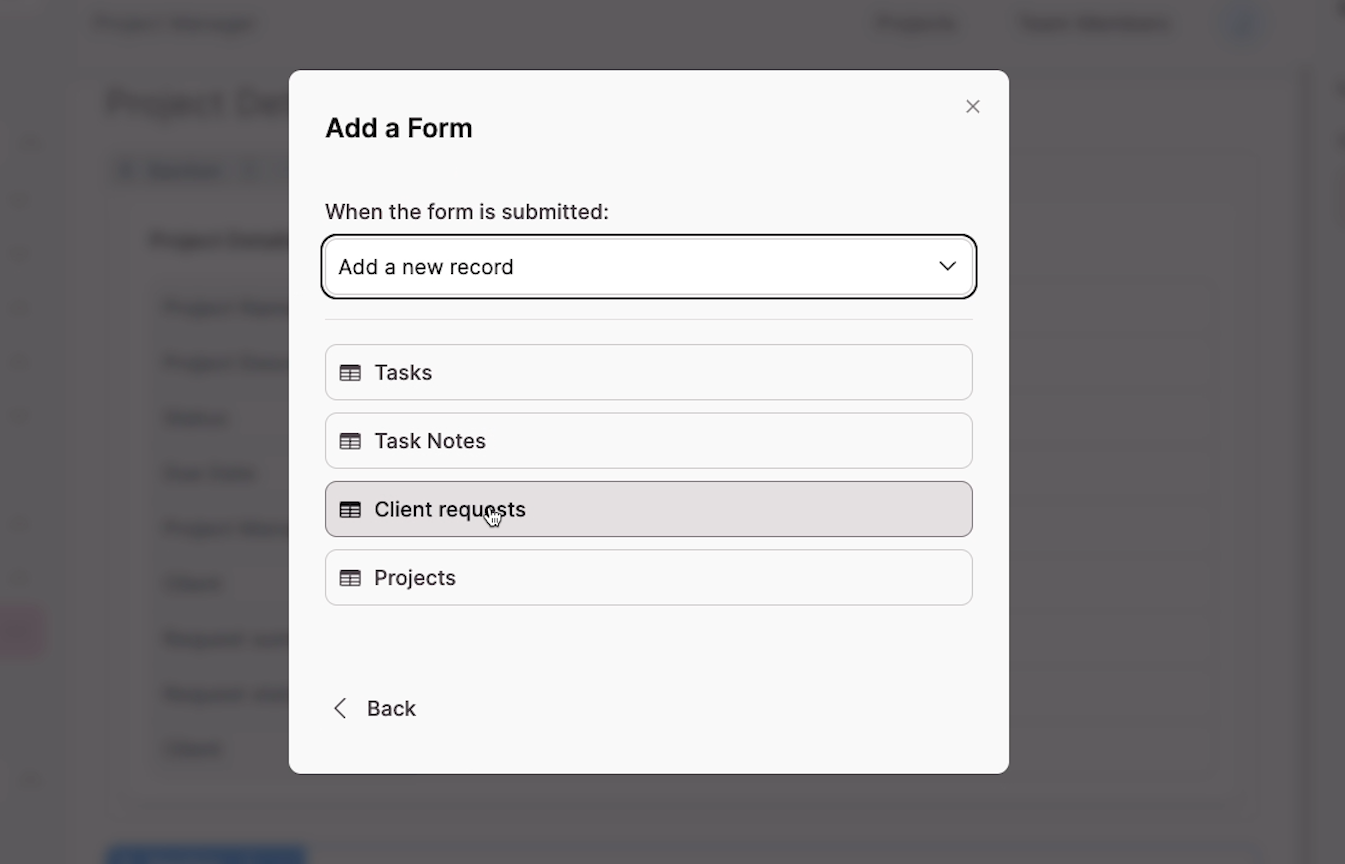
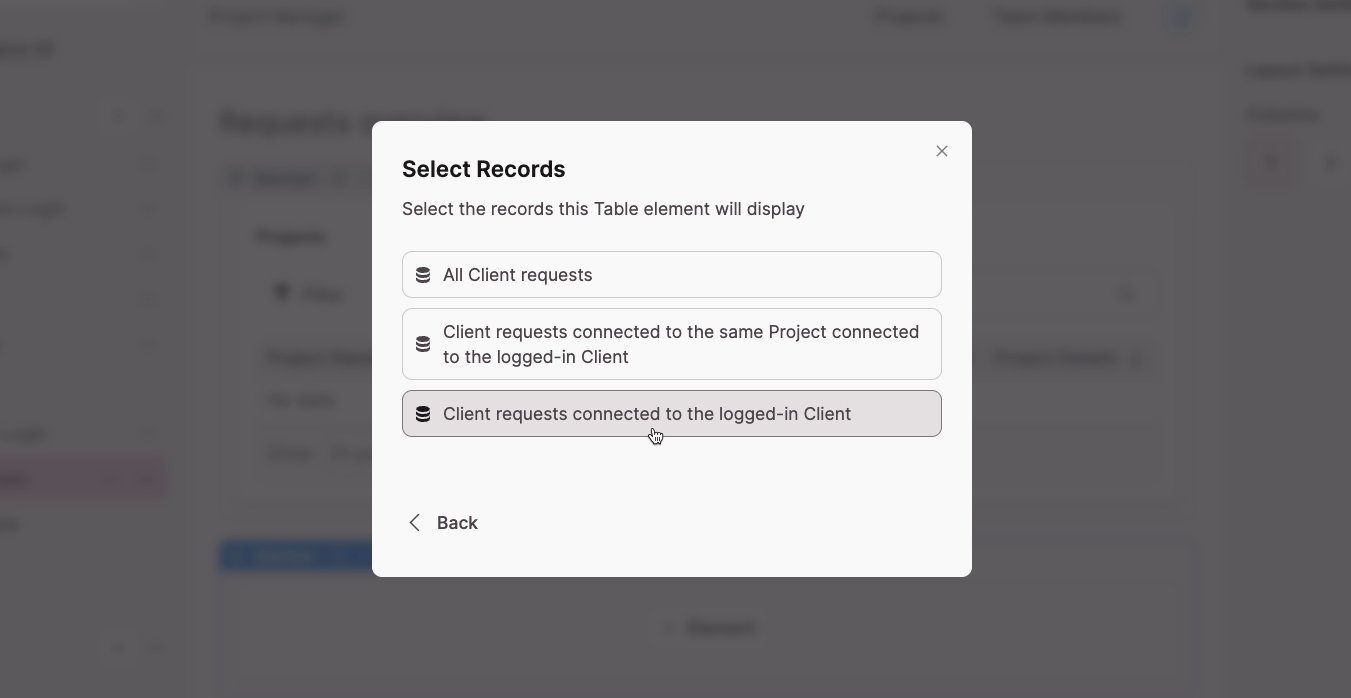
Set the form to create new records, and select the table that it should connect to – “Client requests”.
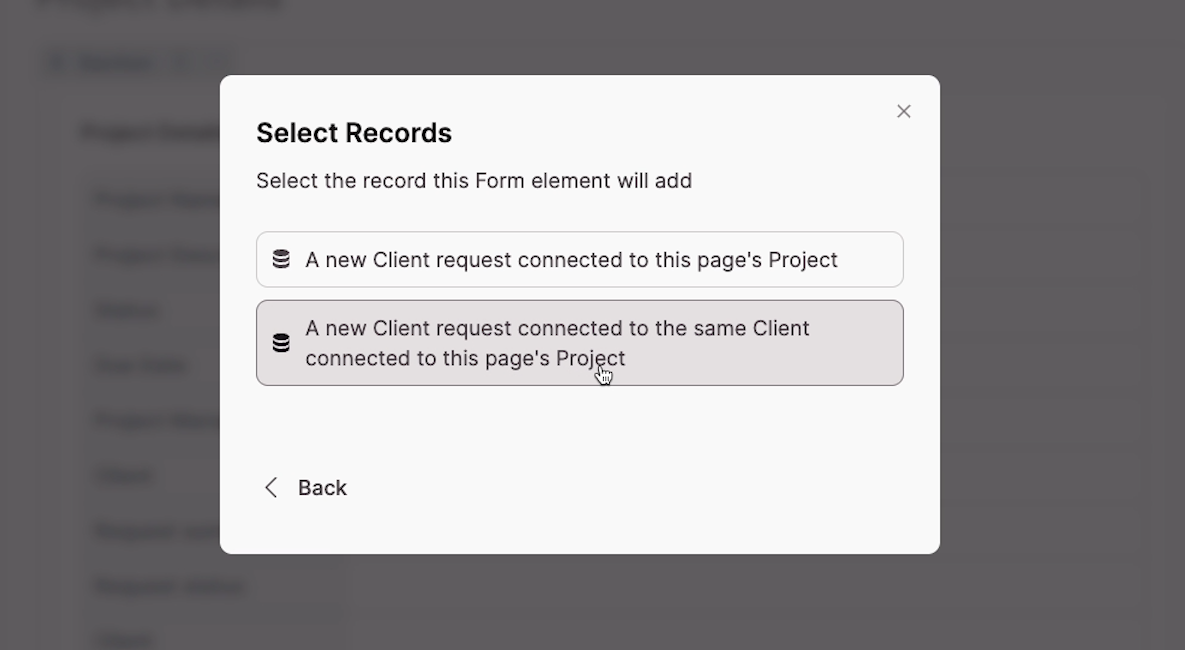
In the “Select Records” window, we can make sure that the newly created requests are attached to the client that owns the currently selected project.
Confirm your settings and add the element to your page. You should now see a form on the page like this:
Adding another table: client requests
Now, let's add the second major element—a table displaying the client's active requests.
Back on the main Requests Overview page, add another table element, select the Client Requests table as the data source, and again choose to only show records linked to the logged-in client.
Filtering records in a table
To make this table more useful, add a filter under "Fields and Display Rules" so it only shows active requests: "Status is not Completed." This keeps the interface focused on what still needs attention rather than cluttering it with completed items.
With the table element selected, click on “Source Filters”.
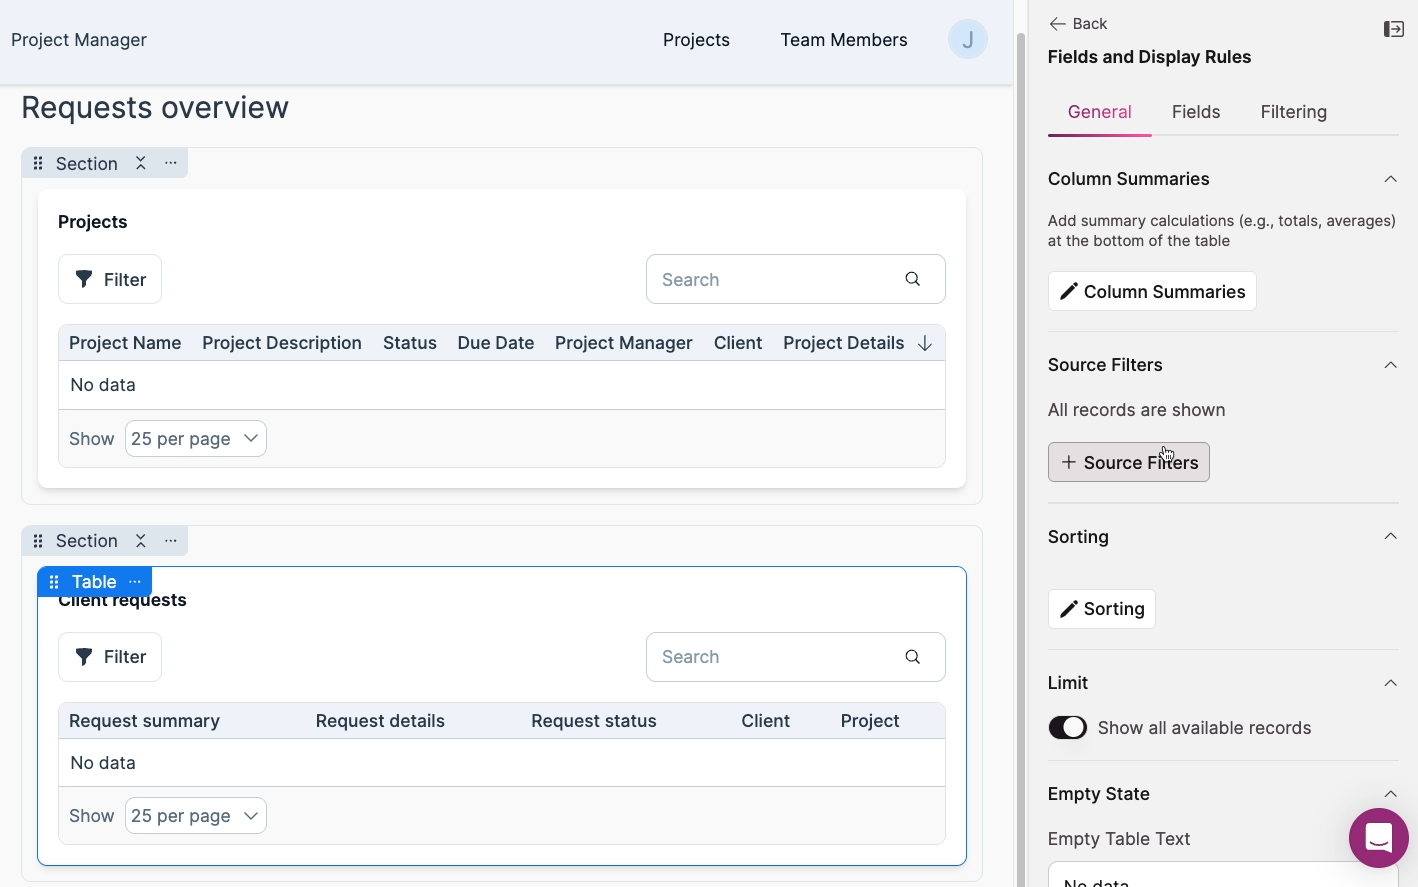
Add a new source filter.

Set the filter to only show records where the “Request status” field is not “Closed”. Click “Apply” to save your filter, then save your changes.

Testing the client portal
To test the client portal and make sure everything is laid out as designed, go over to “Tables” to prepare some test records.
Ensure that you have at least one project connected to your test client we created earlier.
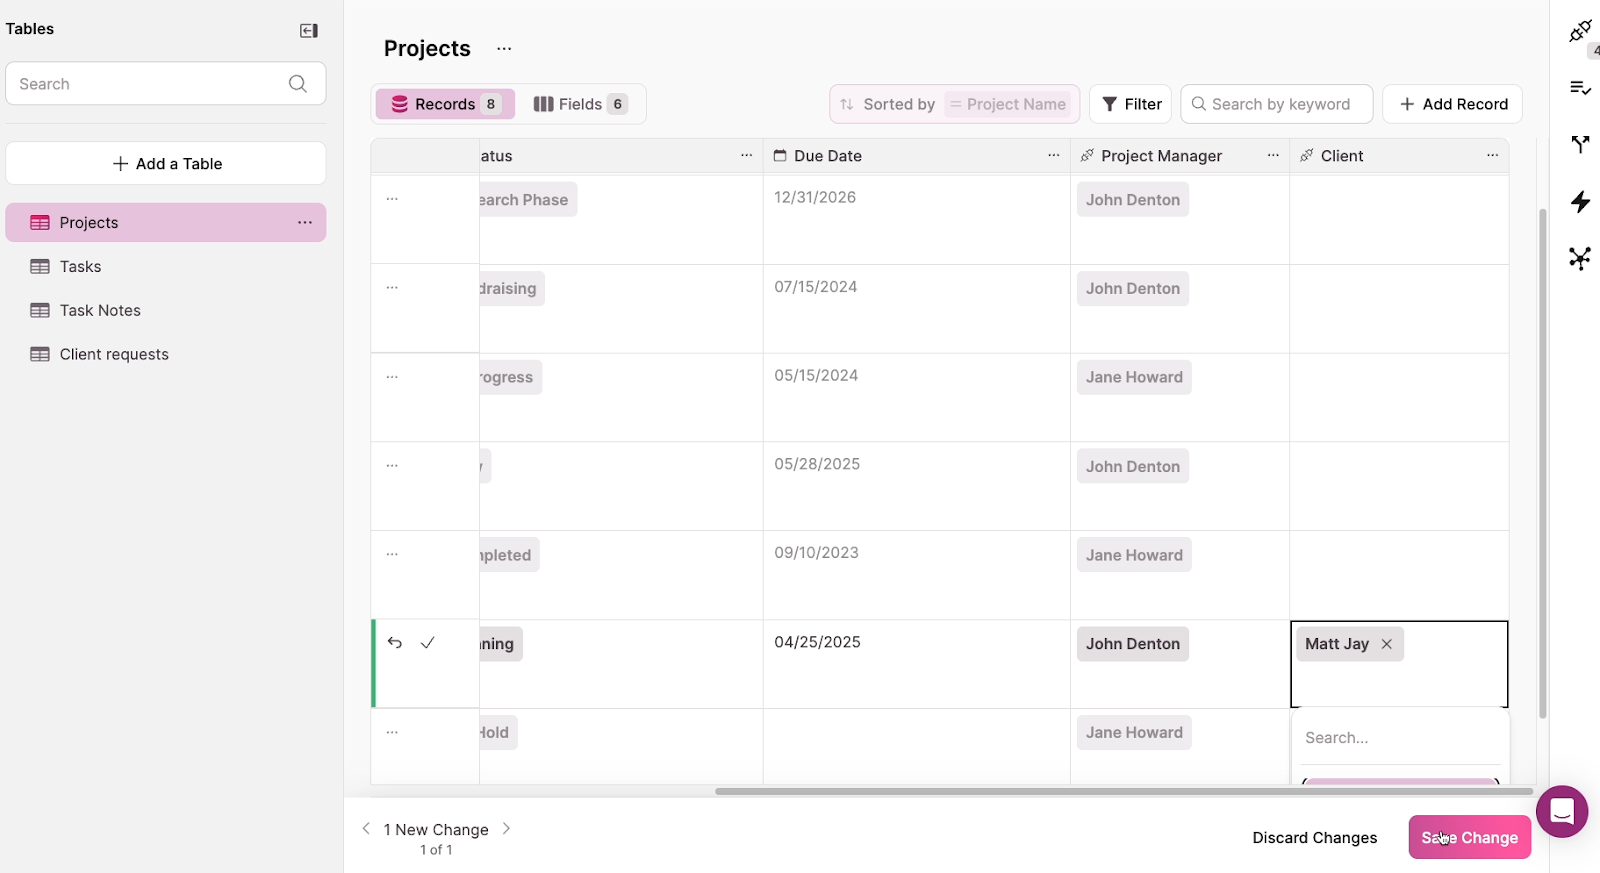
In the “Client Requests” table, add a new request connected to the same client and project.

Open your live app and log in as a client. You should see both tables: one showing a project, and the other showing requests. Click “view” to see the project details.

Try submitting a new request through the form.

You should see your new request in the table.
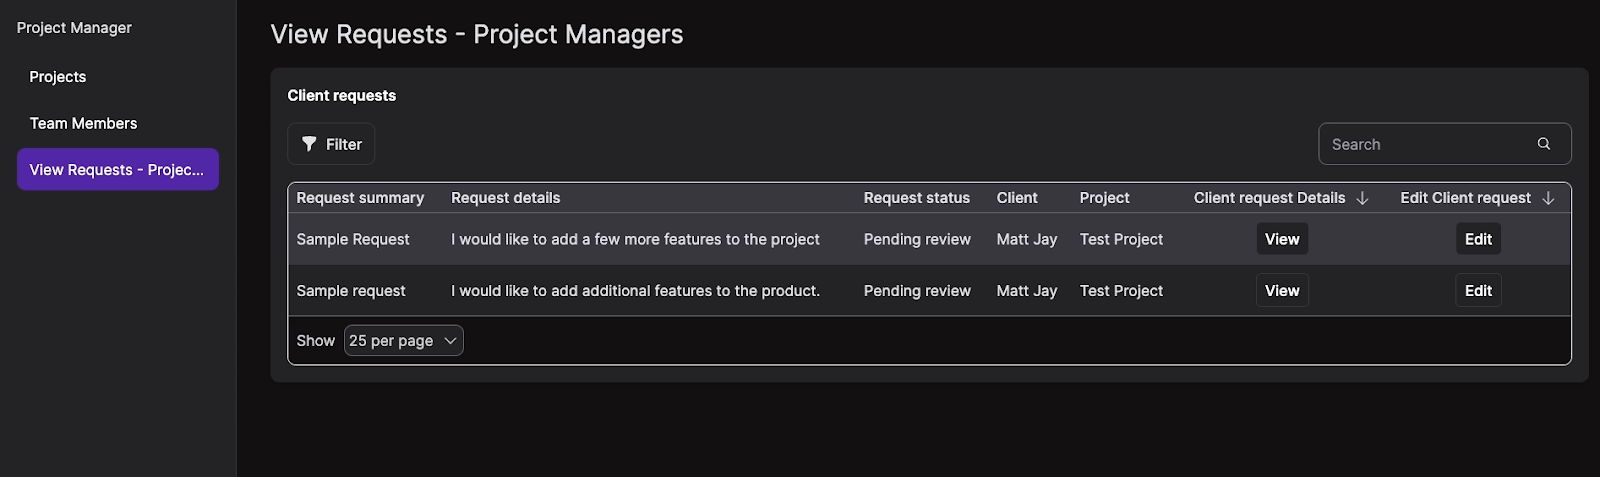
Creating an internal interface for client requests
Your team will need a way to view and manage client requests efficiently, so we’ll also create a page for Project Managers to view client requests. This page will be very similar to the one we just built, so we’ll just go over the steps briefly.
1. Add a new page. We’ll call ours “View Requests - Project Managers”. Restrict the page to the “Project Managers” user role.

2. Add a table element to display Client Requests. Only show requests connected to the logged-in Project Manager’s projects.

3. Add actions to view and edit record details.

When you’re all set, save your changes and open up the live page to check it out.
Creating an automation-ready client portal
Building a client portal in Knack demonstrates the platform's versatility. Without writing a single line of code, you've created a system that provides clients with self-service access to submit requests and view project information, while also giving your team a structured way to manage client interactions.
In the third and final post in this series, we’ll show you how to add automated alerts to your Knack app with Knack’s built-in automation tools.
This is the second in our series of Knack tutorials. In our next post, we'll explore how to leverage Knack's automation and integration capabilities to connect your app with your broader software ecosystem. Check it out here.
Need help building custom Knack solutions for your business? Schedule a free consultation call with our team of no-code experts.

.jpg)


