

Services for Businesses
Workflow Automation
Automating routine tasks to save your team time, allowing them to focus on what really matters.Workflow Design
Optimizing processes for greater efficiency. We look for bottlenecks and create improvements.Data & Systems Integration
Securely, automatically and continuously moving data between databases or systems for seamless transitions and syncs.AI Tools for Teams
Integrating AI to enhance your team's capabilities and increase their capacity.Training Content for Teams
Educating your team to use their new systems effectively and intelligently.
Integrations for Product Teams
Seamlessly connect your app to popular automation platforms, boosting user retention while reducing churn.
We'll support this integration with clear tutorials that empower customers to solve problems on their own, freeing your team from routine support requests.
Xray Blog
How to Get Your Claude API Key in 2026
Want to use Claude AI in Zapier? Build with it in Cursor? Connect it to any automation platform or coding tool you choose?
You need an API key.
An API key is your access pass. It lets you plug Claude into any third-party app that supports it.
Once you have it, you're no longer limited to the chat interface. You can automate with Claude, code with Claude, and build custom AI projects with Claude.
Here's how to set yours up.
Claude platform vs Claude chat
First, it’s important to note that platform.claude.com is not the same as claude.ai. They require separate accounts, they have separate billing (which we’ll cover at the end of this guide), and serve separate purposes.
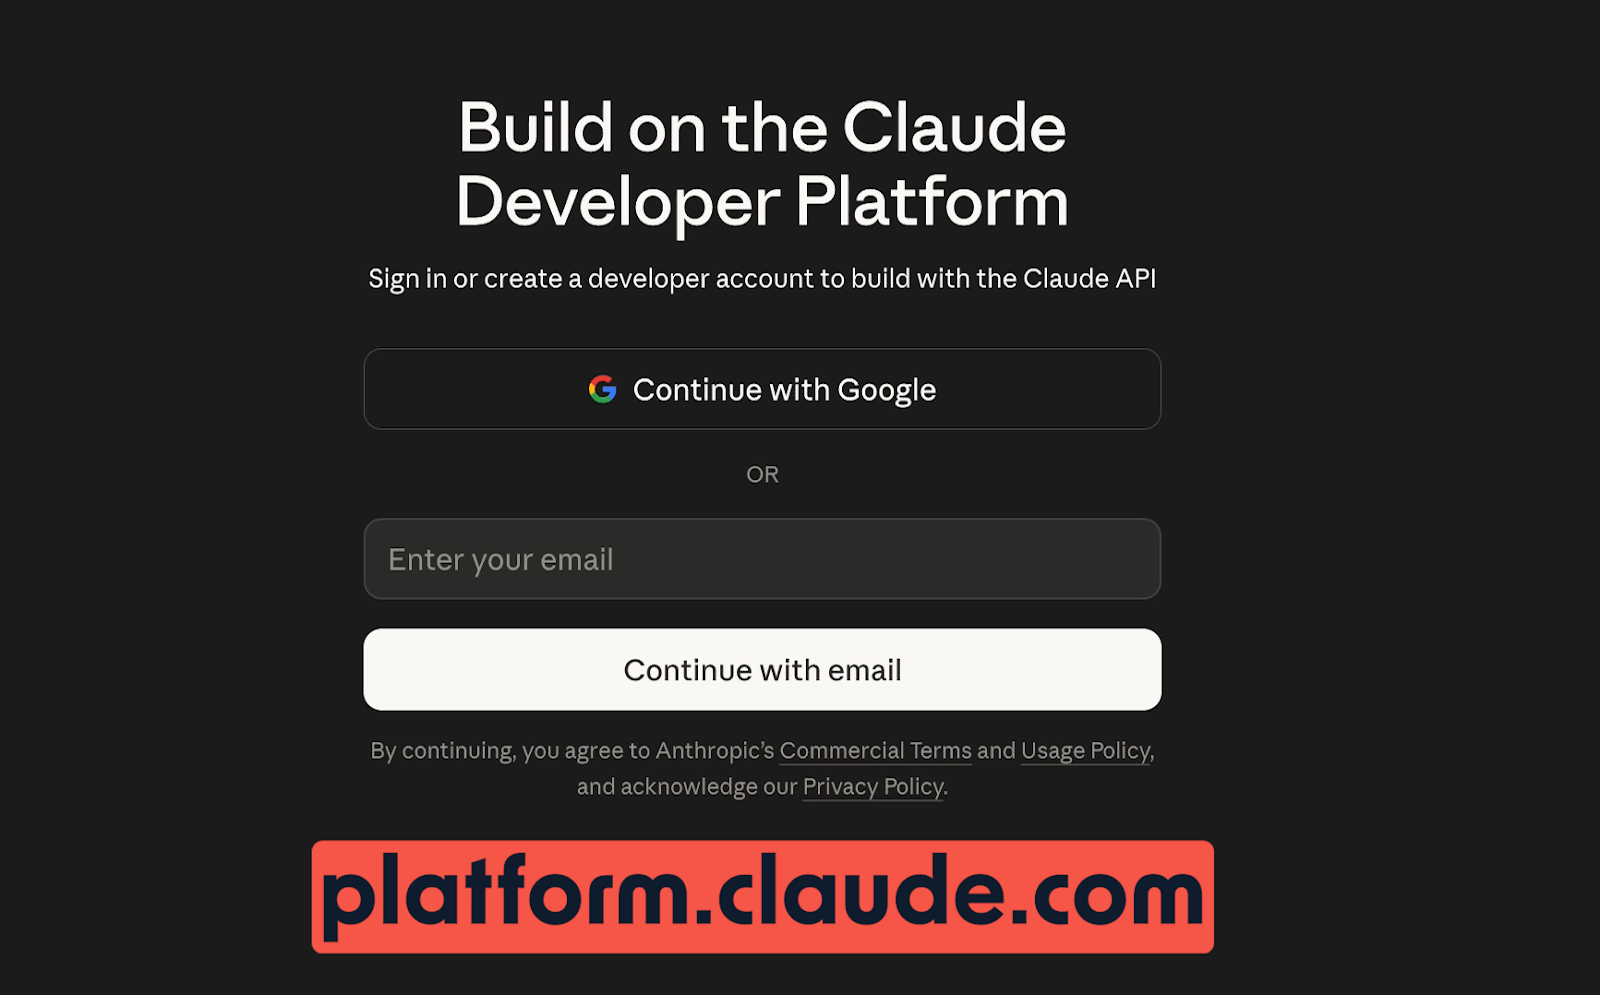
The chat side is for conversations. The platform side is for building custom tools via the Claude API.
You don't need a Claude subscription to use the API, and you also don't get API credits just because you pay for Claude Pro or Claude Team.
They're fully independent services.
Create your platform account
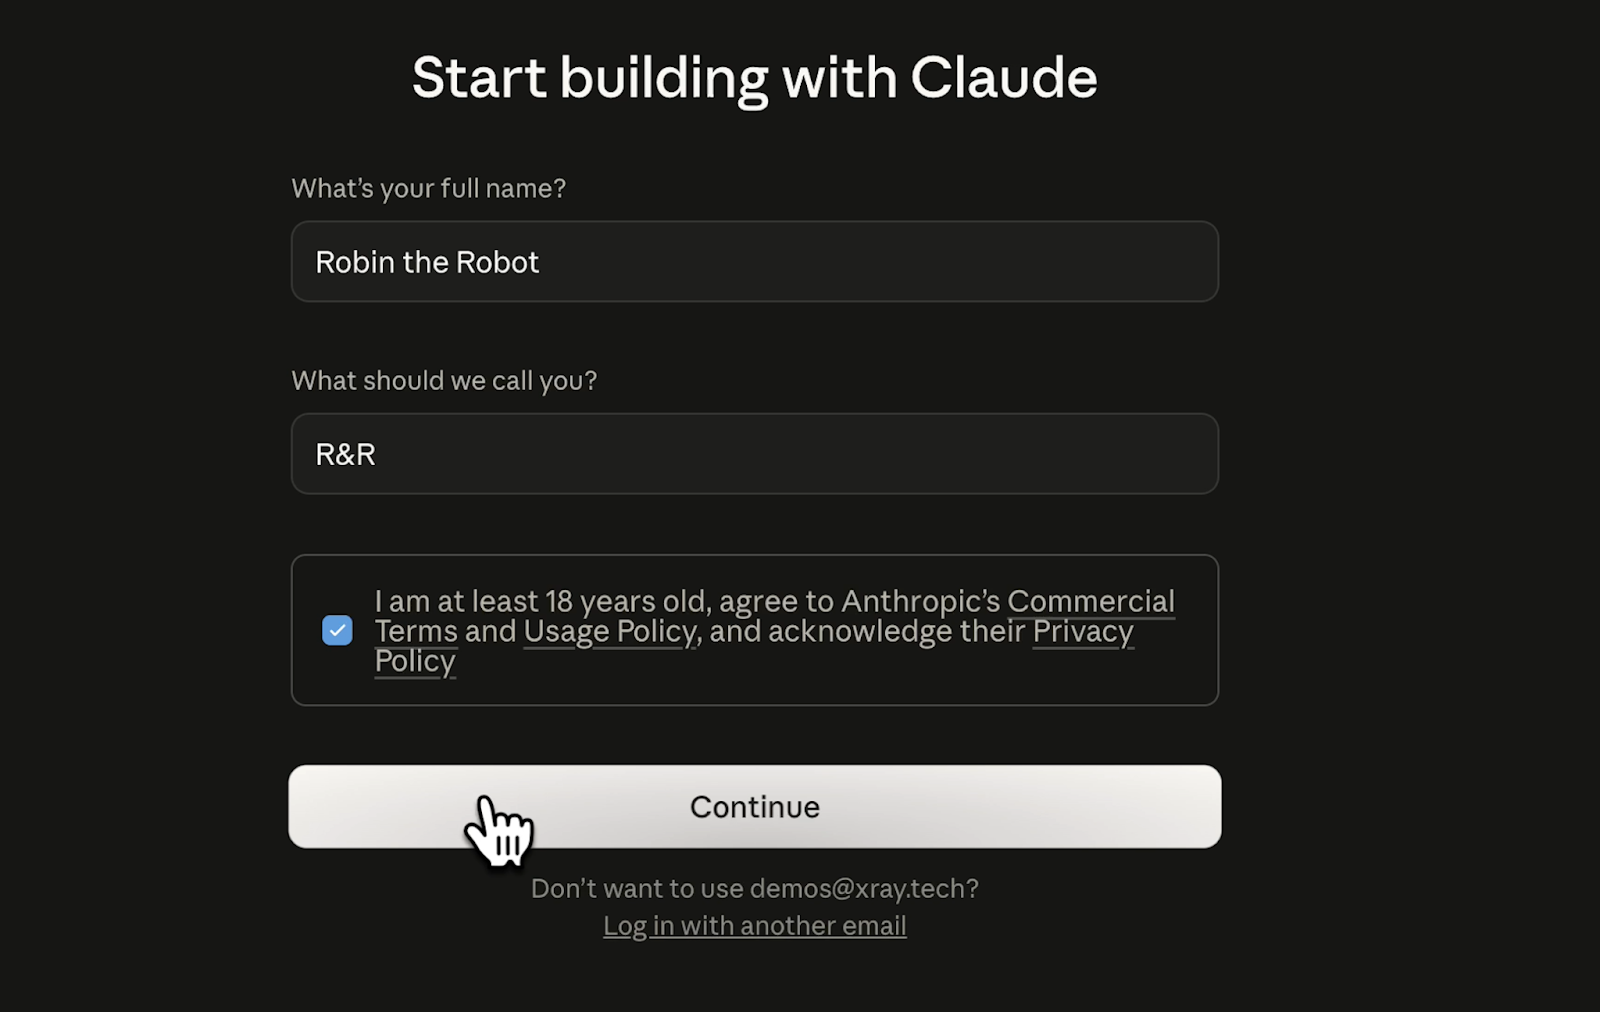
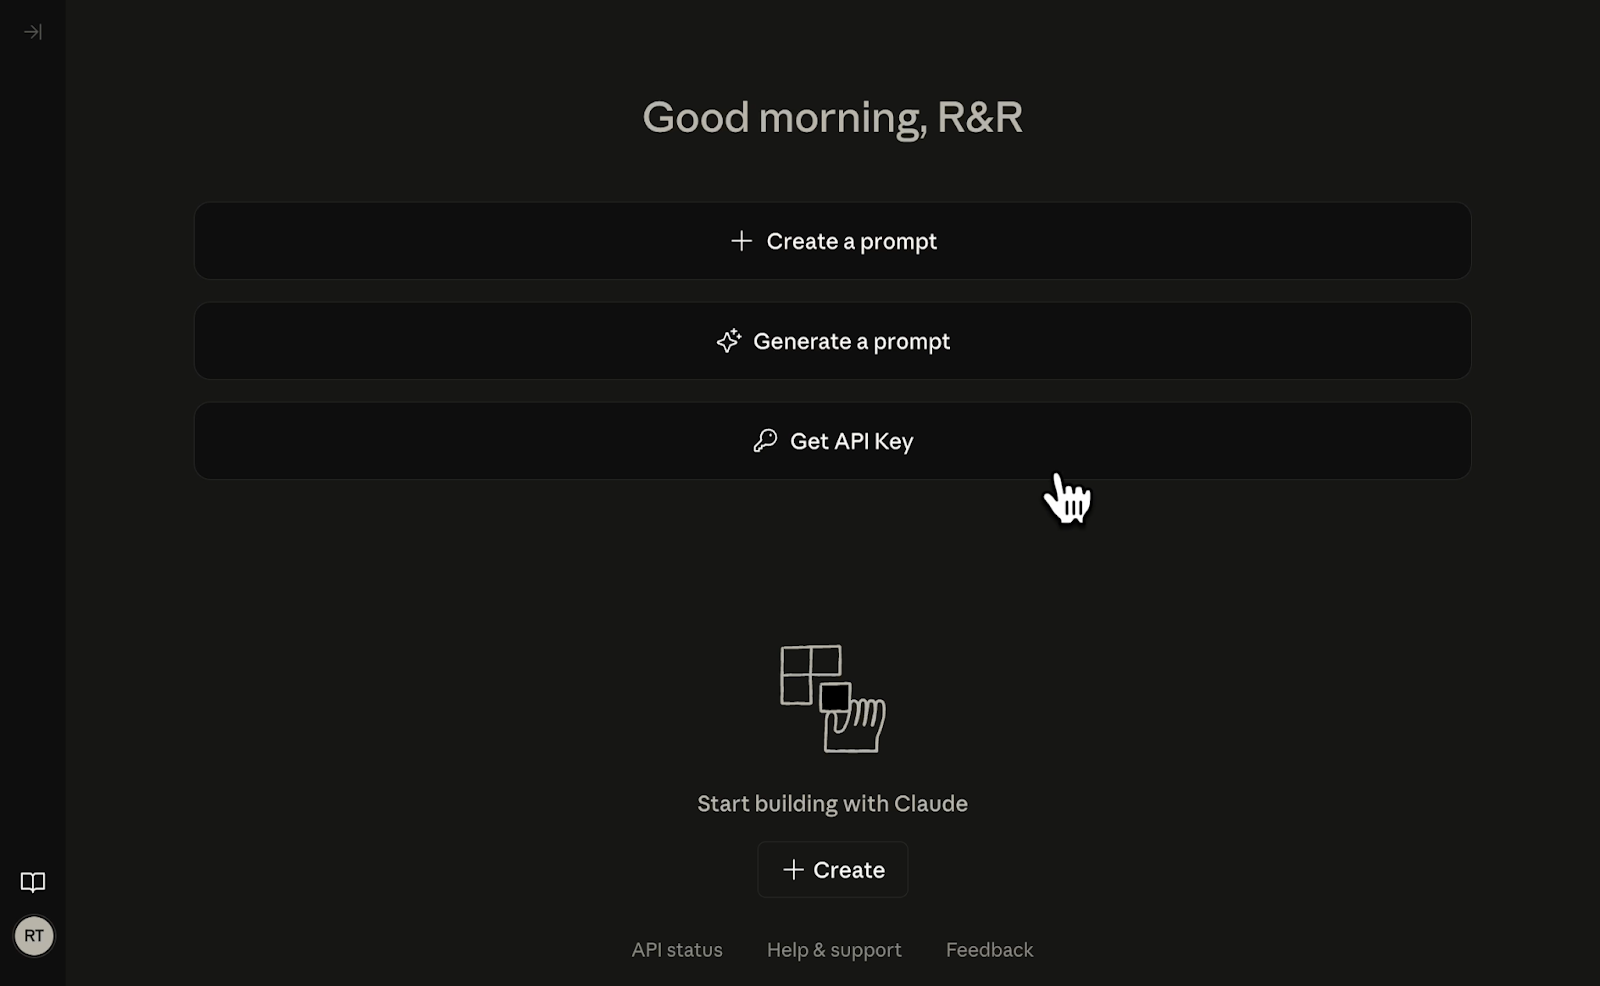
To get started, go to platform.claude.com and create a new account with your email address or Google OAuth. For the first-time setup, you'll need to provide a full name and a nickname.
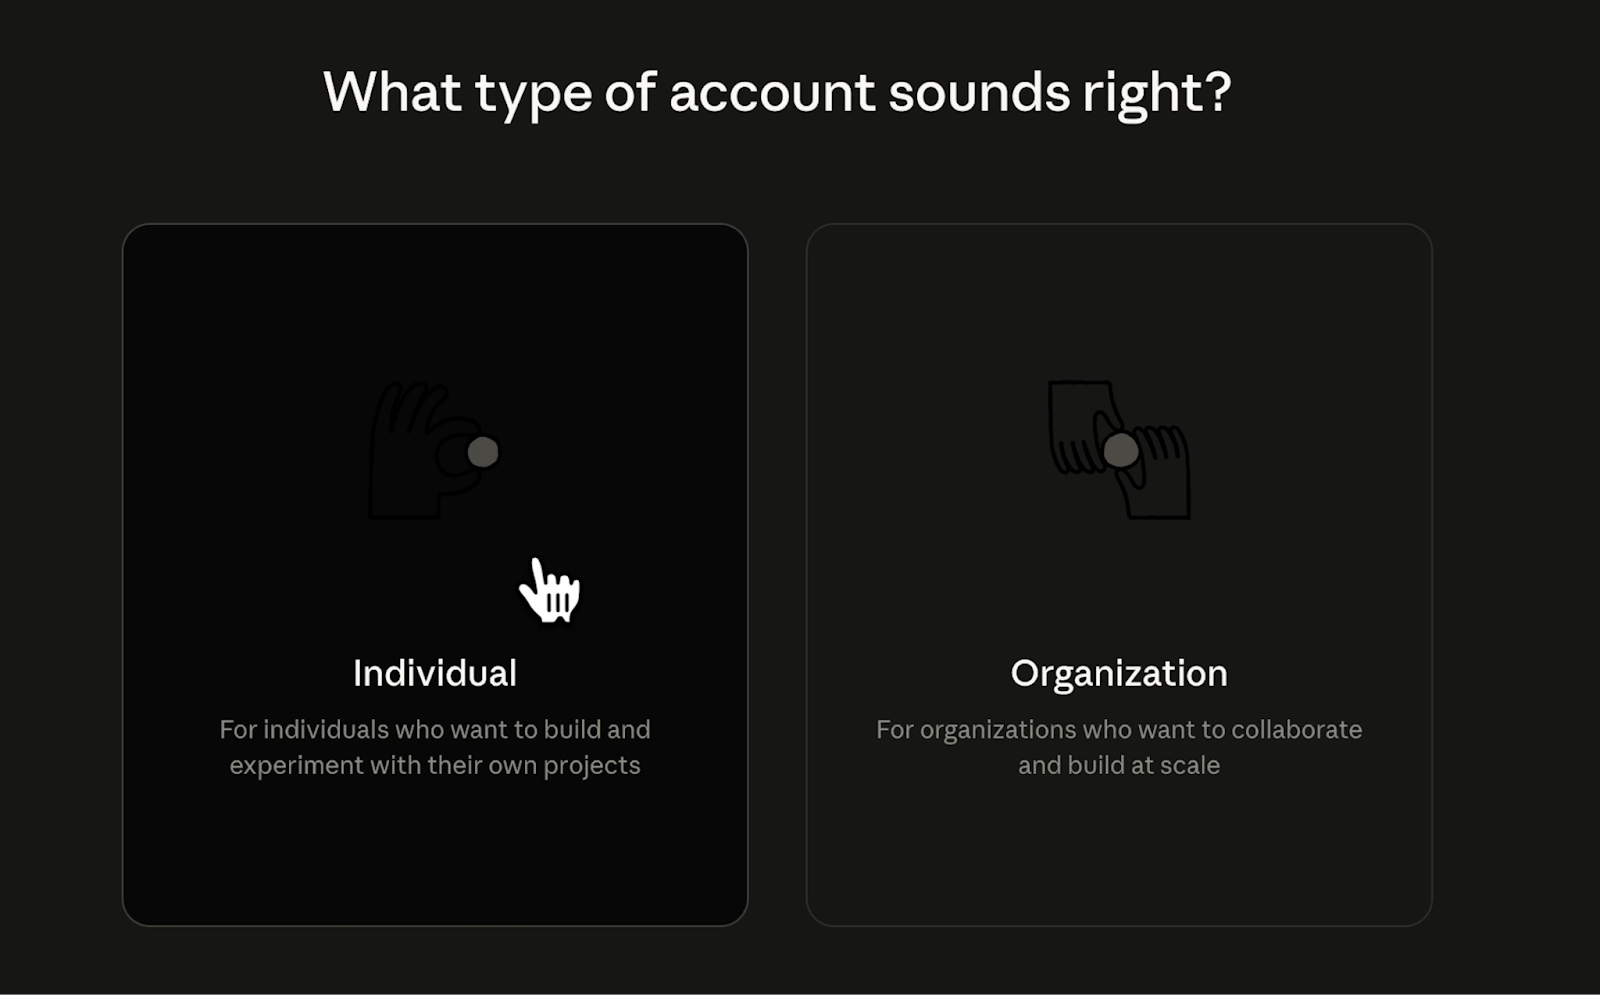
Then, indicate whether yours is an individual or organization account.
Create your API key
After providing your basic account details, you’ll be taken to a dashboard with a few options. Click the button that says "Get API Keys" (or navigate to the API Keys section in the left sidebar).
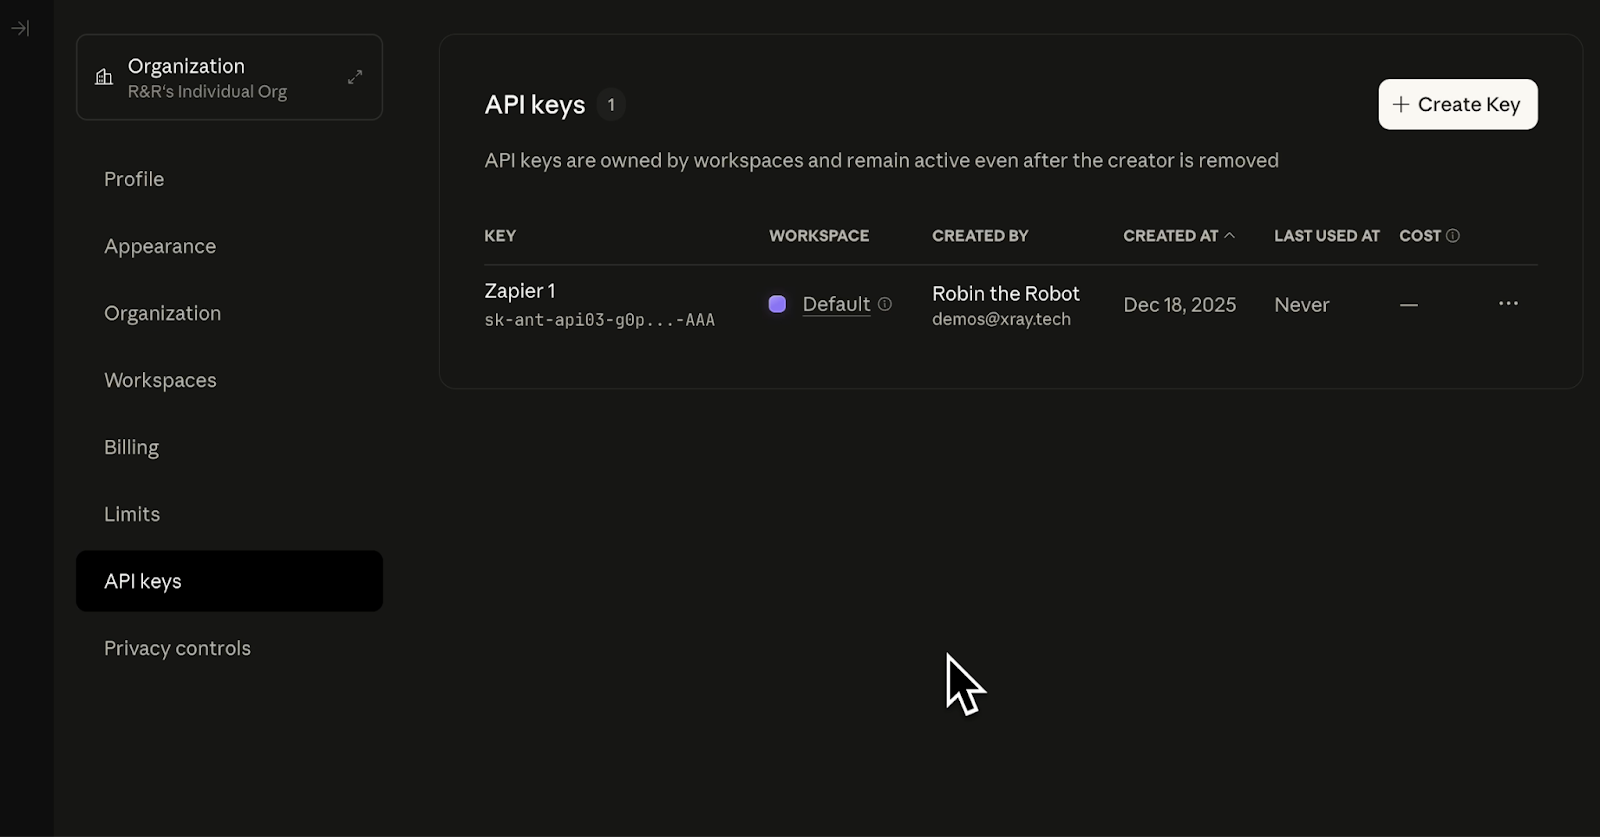
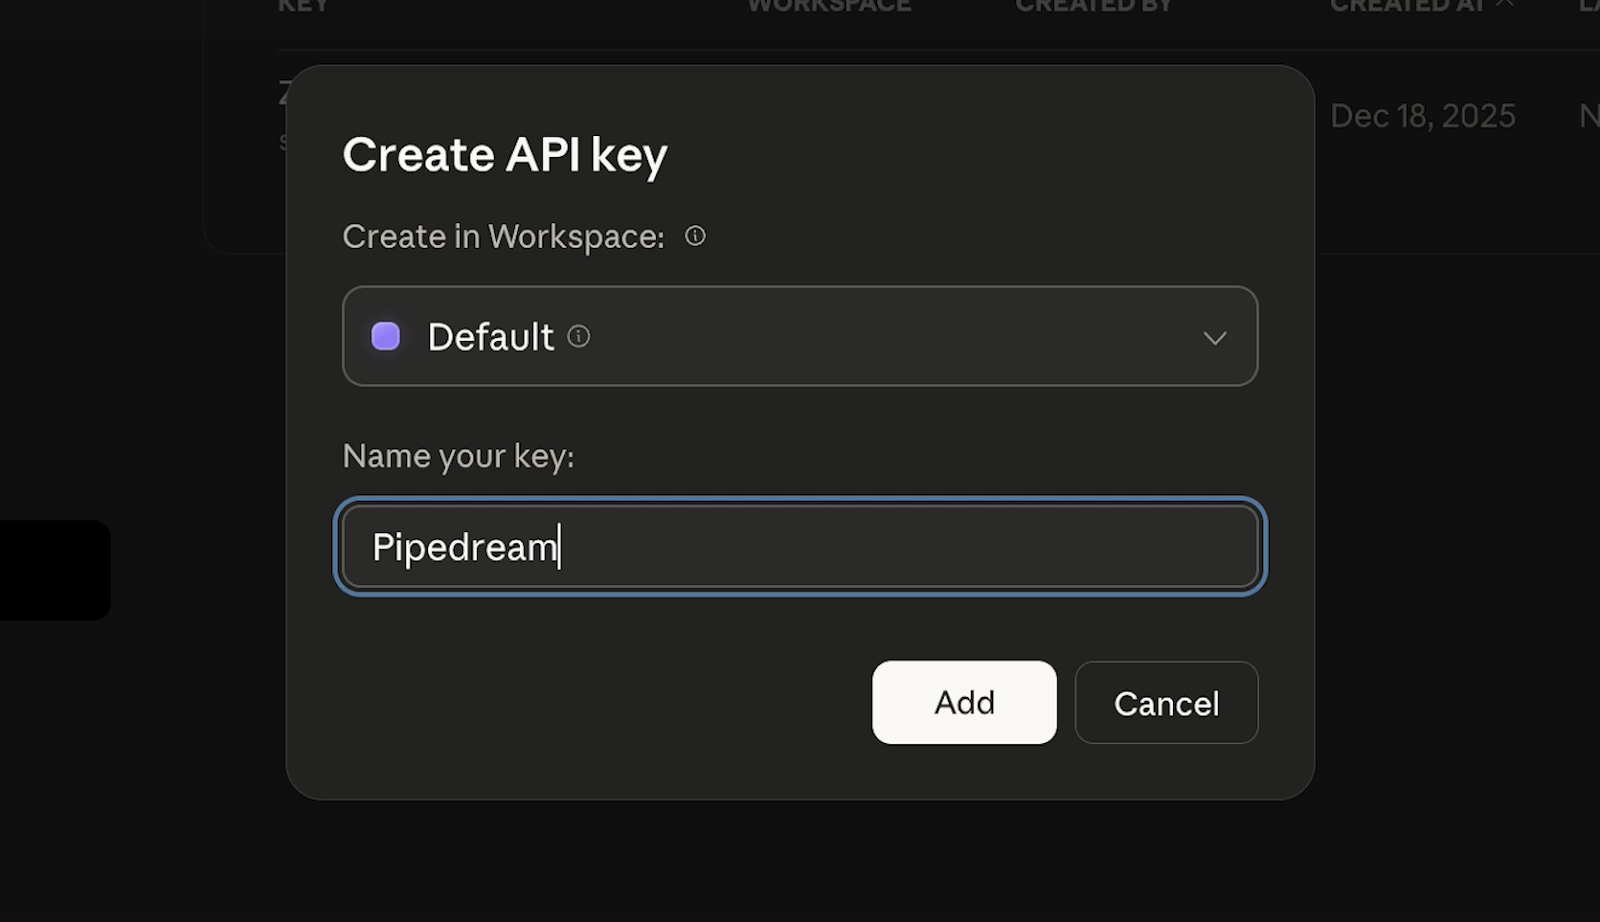
Give your key a descriptive name. For instance, if you're using it for Zapier, name it "Zapier." If it's for Cursor, call it "Cursor." You can create as many keys as you want, so use the name to reflect each key’s purpose. This keeps things organized and makes it easier to manage or revoke access later.

You can also use separate workspaces to further organize your keys. If you're just getting started, the default workspace is fine.
With a name and workplace chosen, click "Create API Key" to generate a unique key.
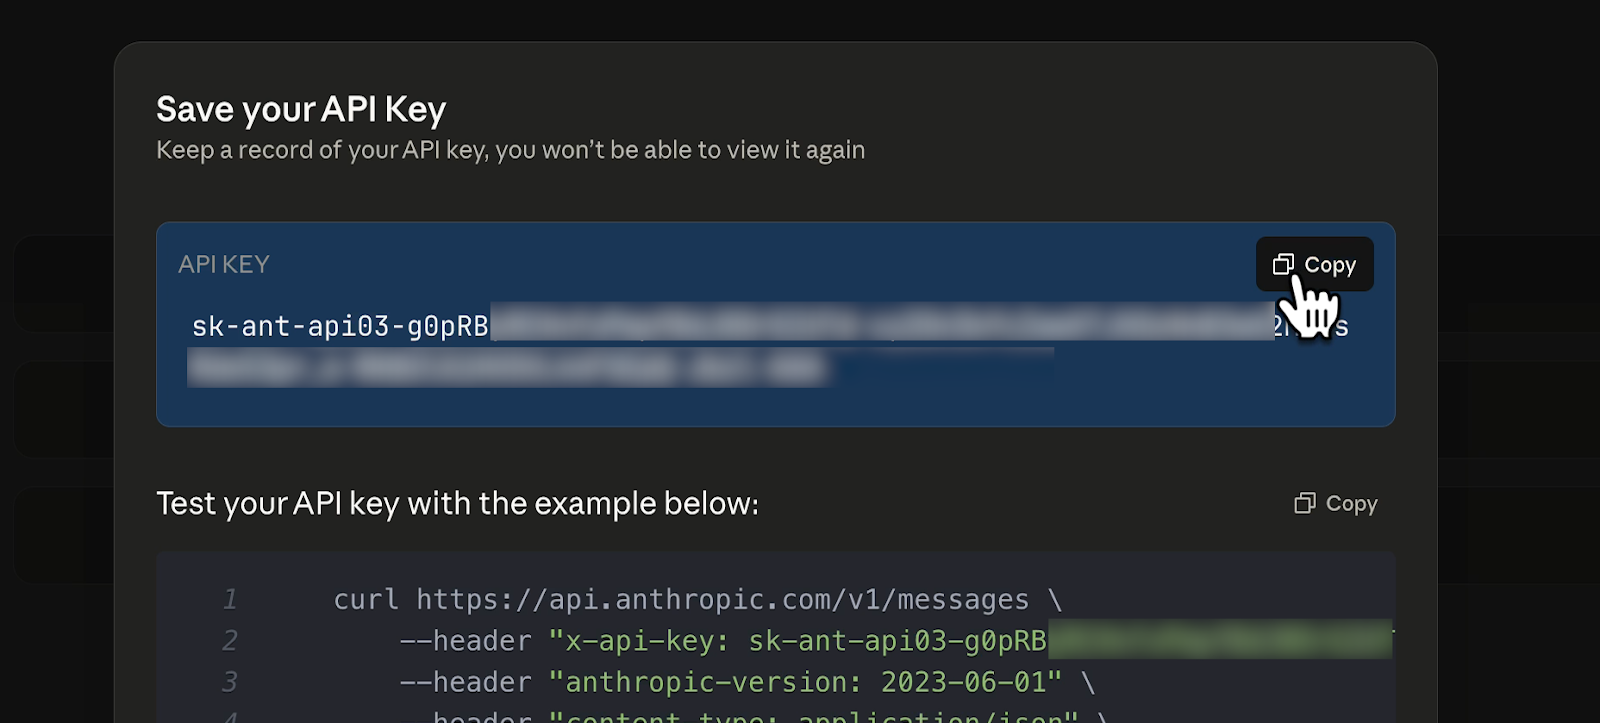
You should copy your key immediately and enter it wherever you need it to go (e.g., Zapier, Cursor, etc.).
This is important: You will not see this key again. Once you close the dialog, the full key is kept hidden for security. If you lose it, you'll need to create a new one.
Creating additional keys
To create additional API keys in the Claude console, click on “API keys” in the left hand menu. Then, click “Create Key”.
Just like your original key, this key will need a name and a workspace.
Copy this key and paste it wherever it needs to go. As with your first key, this key will only be exposed once. After you close the window, you won’t be able to see the full key again.
Add billing credits
When you use the Claude API, you’ll be billed for each request. Click on “Billing” in the left hand menu to view your billing information and add a payment method.
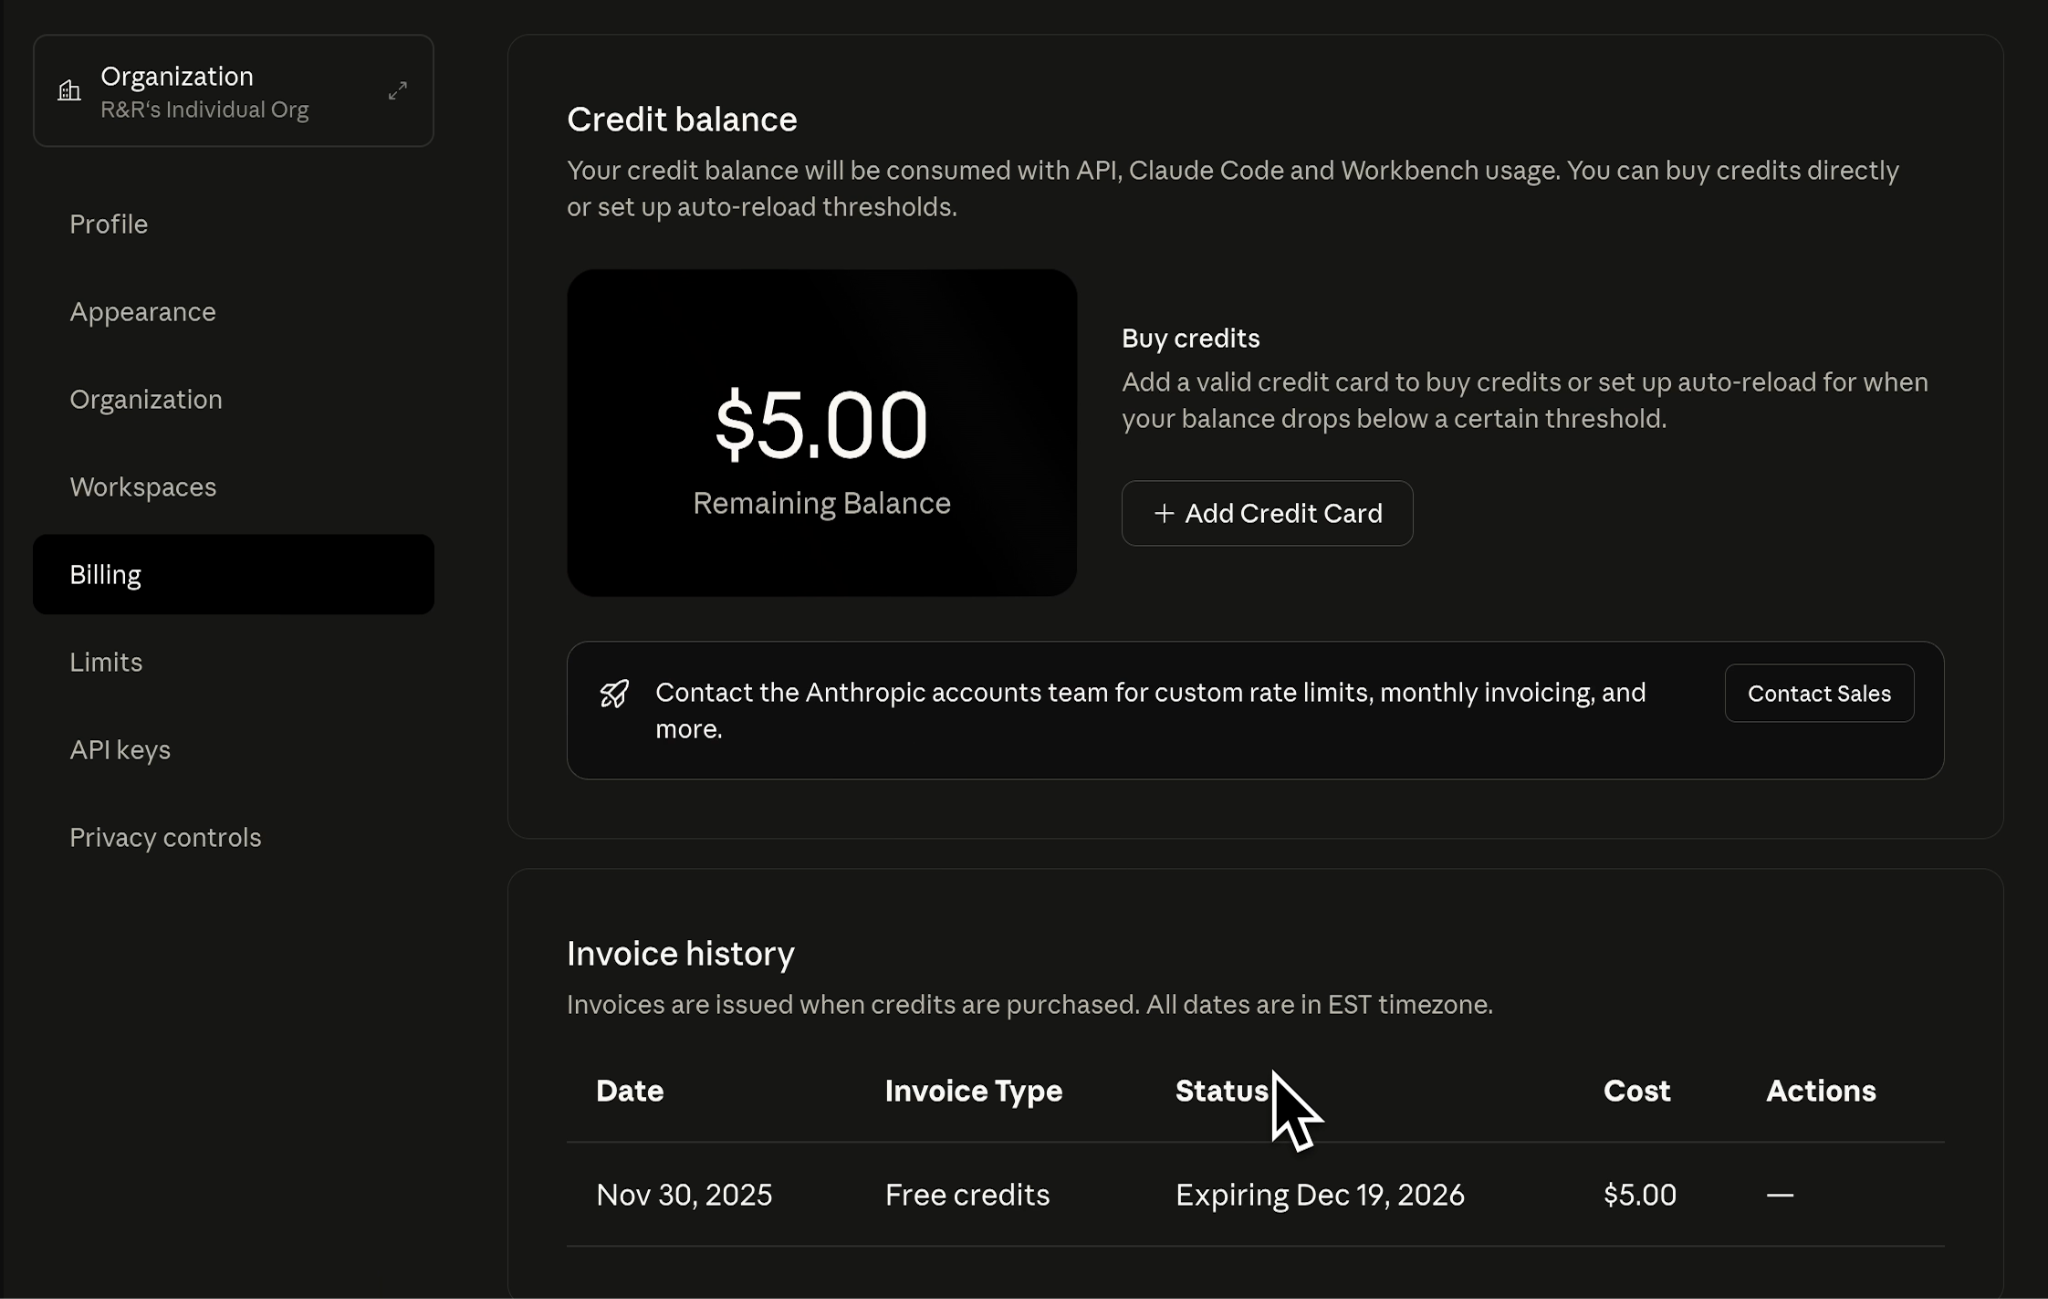
However, you don’t need to add a payment method right away; each new Claude Console account comes with $5 worth of free credits to start exploring the API.
What does it actually cost?
You can check out Claude’s API pricing page to view the pricing details of every available model.

It might seem expensive at first, but note that prices are listed per million tokens (“MTok”). An AI token is roughly equivalent to four characters, so most prompts only cost a few cents or less.
If you're using Claude Sonnet 4.5, you're looking at a price of $3 per million input tokens and $15 per million output tokens. Haiku 4.5 is cheaper at $1/MTok for inputs, while Opus is more expensive at $5/MTok.
Your $5 in free credits can handle hundreds or even thousands of prompts depending on complexity.
What can you actually do with the Claude API?
Now you have an API key and credits. What next?
Here are some ways to put Claude to work:
• Zapier automations: Trigger Claude to summarize emails, draft responses, analyze form submissions, or generate content whenever a specific event happens in your workflows.
• Cursor coding: Write, debug, and refactor code with Claude as your pair programmer. It's like ChatGPT for code, but inside your editor.
• n8n workflows: Build complex automations where Claude handles the thinking—summarizing documents, categorizing inputs, or making decisions based on data.
• Custom scripts: Call Claude directly from Python, JavaScript, or any language that can make HTTP requests. Use it to process data, generate reports, or handle any task that benefits from natural language understanding.
• Content generation pipelines: Automate blog post drafts, social media content, email sequences, or product descriptions by connecting Claude to your CMS or marketing tools.
• Data analysis: Feed Claude spreadsheets, CSVs, or database outputs and ask it to identify trends, flag anomalies, or write summaries.
The API is not just for developers. If you can connect apps in Zapier or n8n, you can use Claude's API. The key unlocks the same AI you use in chat, but now it works inside your tools.
Need help building with the Claude API?
You have the API key. You know what's possible. But turning that into a working project takes time, troubleshooting, and often a few failed attempts. That's where XRay Hourly comes in.
We match builders like you with vetted automation experts for one-on-one collaborative sessions.
You bring your project. We help you get it up and running. You learn how it works at the same time. No long-term commitment.
Just schedule as much time as you need on a flexible hourly basis. Go to hourly.xray.tech to get started.


Looking for short-term support or collaboration on your low-code project? With LowCodeEngineers, you can learn and build with vetted experts on a flexible hourly basis.
Learn more about LowCodeEngineersNot sure where to start?
Case Studies
CCAHA needed a streamlined and efficient project management system tailored to their unique workflows. Their goal was to replace an outdated, inefficient system with a modern, user-friendly solution that improved data accuracy, enhanced tracking, and increased collaboration across departments.
See the ROIXray Blog
How to Get Your Claude API Key in 2026
Want to use Claude AI in Zapier? Build with it in Cursor? Connect it to any automation platform or coding tool you choose?
You need an API key.
An API key is your access pass. It lets you plug Claude into any third-party app that supports it.
Once you have it, you're no longer limited to the chat interface. You can automate with Claude, code with Claude, and build custom AI projects with Claude.
Here's how to set yours up.
Claude platform vs Claude chat
First, it’s important to note that platform.claude.com is not the same as claude.ai. They require separate accounts, they have separate billing (which we’ll cover at the end of this guide), and serve separate purposes.
The chat side is for conversations. The platform side is for building custom tools via the Claude API.
You don't need a Claude subscription to use the API, and you also don't get API credits just because you pay for Claude Pro or Claude Team.
They're fully independent services.
Create your platform account
To get started, go to platform.claude.com and create a new account with your email address or Google OAuth. For the first-time setup, you'll need to provide a full name and a nickname.
Then, indicate whether yours is an individual or organization account.
Create your API key
After providing your basic account details, you’ll be taken to a dashboard with a few options. Click the button that says "Get API Keys" (or navigate to the API Keys section in the left sidebar).
Give your key a descriptive name. For instance, if you're using it for Zapier, name it "Zapier." If it's for Cursor, call it "Cursor." You can create as many keys as you want, so use the name to reflect each key’s purpose. This keeps things organized and makes it easier to manage or revoke access later.
You can also use separate workspaces to further organize your keys. If you're just getting started, the default workspace is fine.
With a name and workplace chosen, click "Create API Key" to generate a unique key.
You should copy your key immediately and enter it wherever you need it to go (e.g., Zapier, Cursor, etc.).
This is important: You will not see this key again. Once you close the dialog, the full key is kept hidden for security. If you lose it, you'll need to create a new one.
Creating additional keys
To create additional API keys in the Claude console, click on “API keys” in the left hand menu. Then, click “Create Key”.
Just like your original key, this key will need a name and a workspace.
Copy this key and paste it wherever it needs to go. As with your first key, this key will only be exposed once. After you close the window, you won’t be able to see the full key again.
Add billing credits
When you use the Claude API, you’ll be billed for each request. Click on “Billing” in the left hand menu to view your billing information and add a payment method.
However, you don’t need to add a payment method right away; each new Claude Console account comes with $5 worth of free credits to start exploring the API.
What does it actually cost?
You can check out Claude’s API pricing page to view the pricing details of every available model.
It might seem expensive at first, but note that prices are listed per million tokens (“MTok”). An AI token is roughly equivalent to four characters, so most prompts only cost a few cents or less.
If you're using Claude Sonnet 4.5, you're looking at a price of $3 per million input tokens and $15 per million output tokens. Haiku 4.5 is cheaper at $1/MTok for inputs, while Opus is more expensive at $5/MTok.
Your $5 in free credits can handle hundreds or even thousands of prompts depending on complexity.
What can you actually do with the Claude API?
Now you have an API key and credits. What next?
Here are some ways to put Claude to work:
• Zapier automations: Trigger Claude to summarize emails, draft responses, analyze form submissions, or generate content whenever a specific event happens in your workflows.
• Cursor coding: Write, debug, and refactor code with Claude as your pair programmer. It's like ChatGPT for code, but inside your editor.
• n8n workflows: Build complex automations where Claude handles the thinking—summarizing documents, categorizing inputs, or making decisions based on data.
• Custom scripts: Call Claude directly from Python, JavaScript, or any language that can make HTTP requests. Use it to process data, generate reports, or handle any task that benefits from natural language understanding.
• Content generation pipelines: Automate blog post drafts, social media content, email sequences, or product descriptions by connecting Claude to your CMS or marketing tools.
• Data analysis: Feed Claude spreadsheets, CSVs, or database outputs and ask it to identify trends, flag anomalies, or write summaries.
The API is not just for developers. If you can connect apps in Zapier or n8n, you can use Claude's API. The key unlocks the same AI you use in chat, but now it works inside your tools.
Need help building with the Claude API?
You have the API key. You know what's possible. But turning that into a working project takes time, troubleshooting, and often a few failed attempts. That's where XRay Hourly comes in.
We match builders like you with vetted automation experts for one-on-one collaborative sessions.
You bring your project. We help you get it up and running. You learn how it works at the same time. No long-term commitment.
Just schedule as much time as you need on a flexible hourly basis. Go to hourly.xray.tech to get started.

