

Services for Businesses
Workflow Automation
Automating routine tasks to save your team time, allowing them to focus on what really matters.Workflow Design
Optimizing processes for greater efficiency. We look for bottlenecks and create improvements.Data & Systems Integration
Securely, automatically and continuously moving data between databases or systems for seamless transitions and syncs.AI Tools for Teams
Integrating AI to enhance your team's capabilities and increase their capacity.Training Content for Teams
Educating your team to use their new systems effectively and intelligently.
Integrations for Product Teams
Seamlessly connect your app to popular automation platforms, boosting user retention while reducing churn.
We'll support this integration with clear tutorials that empower customers to solve problems on their own, freeing your team from routine support requests.
Xray Blog

Building custom apps and automations with Airtable requires secure access to your data. Personal Access Tokens (PATs) are the key to making that happen.
A Personal Access Token lets third-party applications connect to your Airtable bases safely. Whether you're building a custom integration, automating a workflow, or using AI tools to work with your data, you'll need to create a PAT first.
Here's how to set one up.
Creating a personal access token in Airtable: overview
We’ll start with a brief overview of the whole process. If you’d like more detail on each step, read on for the full tutorial.
1. Click on your profile in the top right corner and select “Builder Hub”
2. In the left-hand menu, navigate to “Personal Access Tokens” (found in the “Developers” section)
3. Create a new token and give it a name.
4. Set your token’s scopes to define the available actions (e.g., schema.bases.read)
5. Choose which bases can be accessed with your token
6. Save and copy your token. Paste it into your project.
Navigate to the Personal Access Tokens page
To start, click on your account profile in the top right corner of Airtable. Select "Builder Hub" from the dropdown menu.

In the Builder Hub’s left-hand sidebar, click on "Personal Access Tokens", which you can find under the "Developers" section.
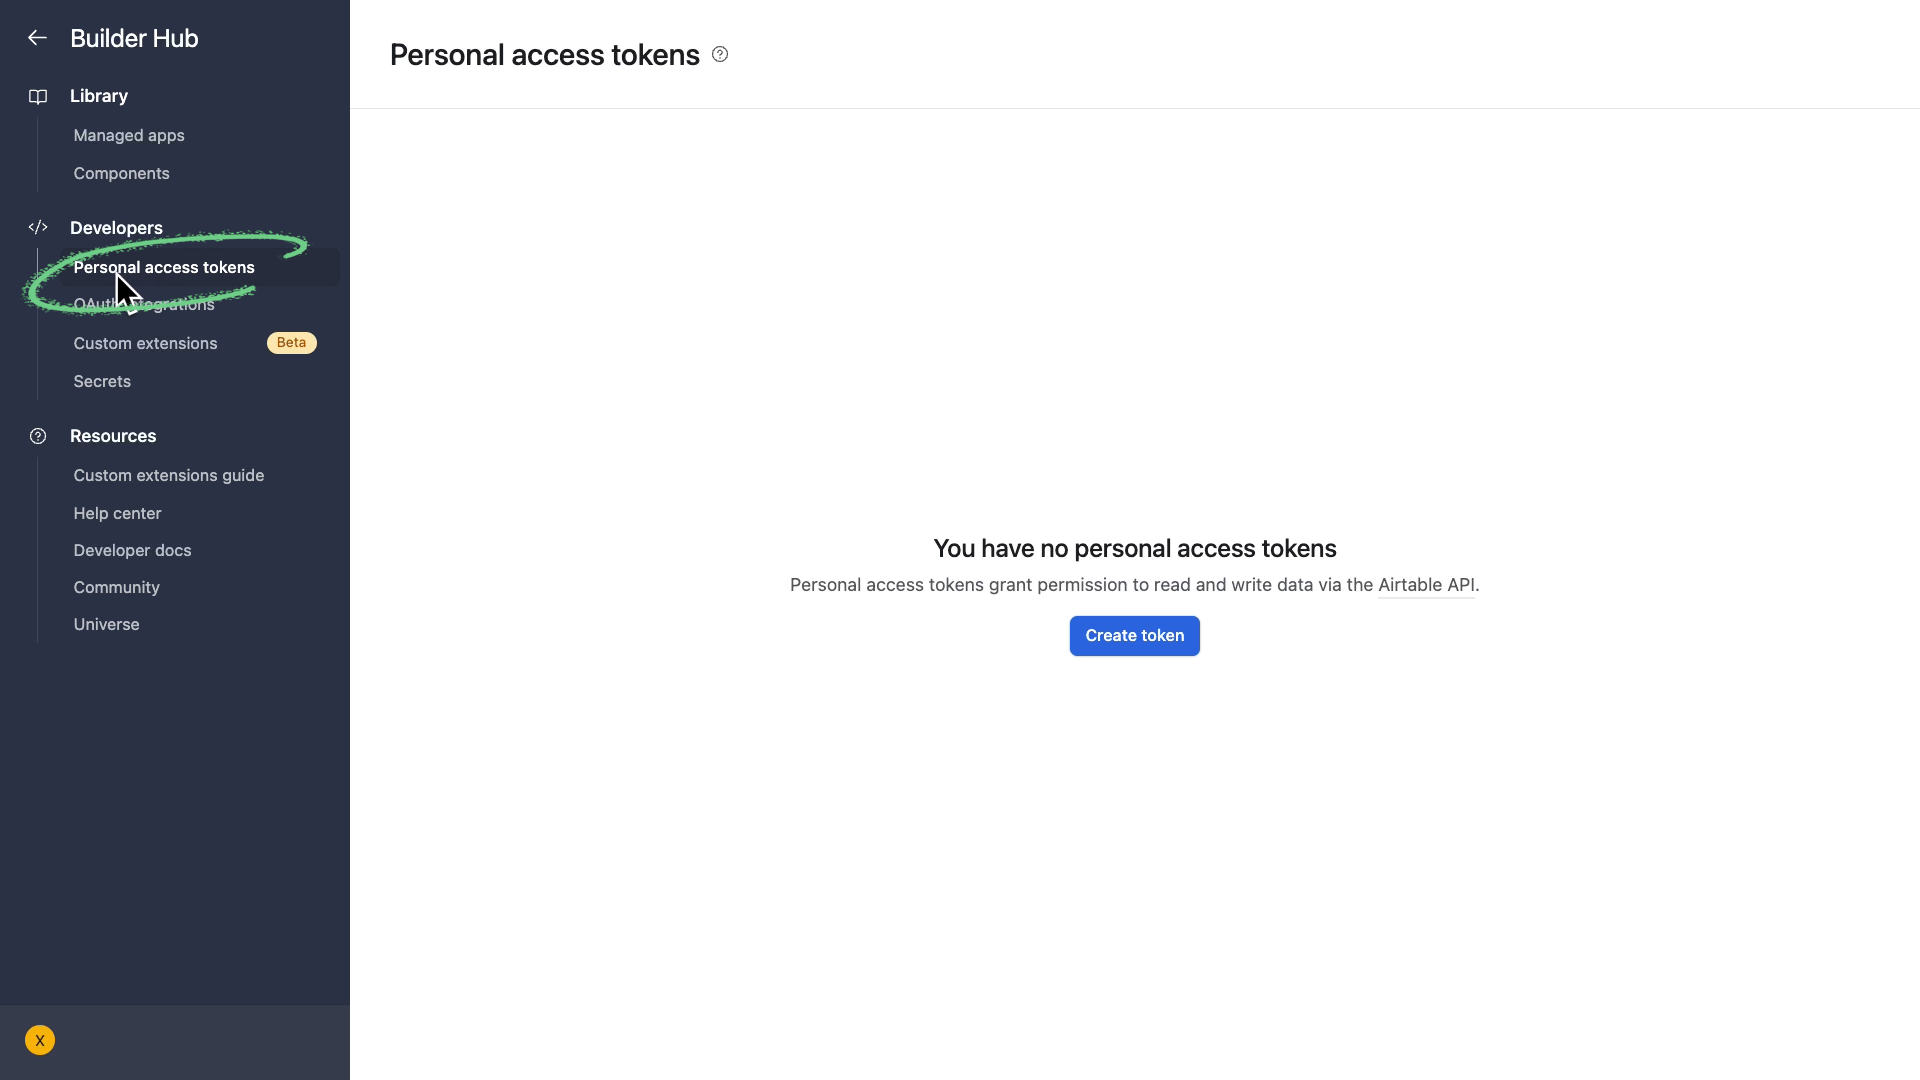
Click "Create a token", and give it a descriptive name. Choose something that clearly indicates what this token is for. You'll thank yourself later when you're managing multiple tokens.

Set your scopes
Scopes define what actions an app can perform when it connects using your token. Think of them as permissions.
Airtable offers several scope categories. The ones you need depend on the specific demands of your project.
If your app needs to read or modify the actual data in your base, add scopes from the "Record data and comments" section.
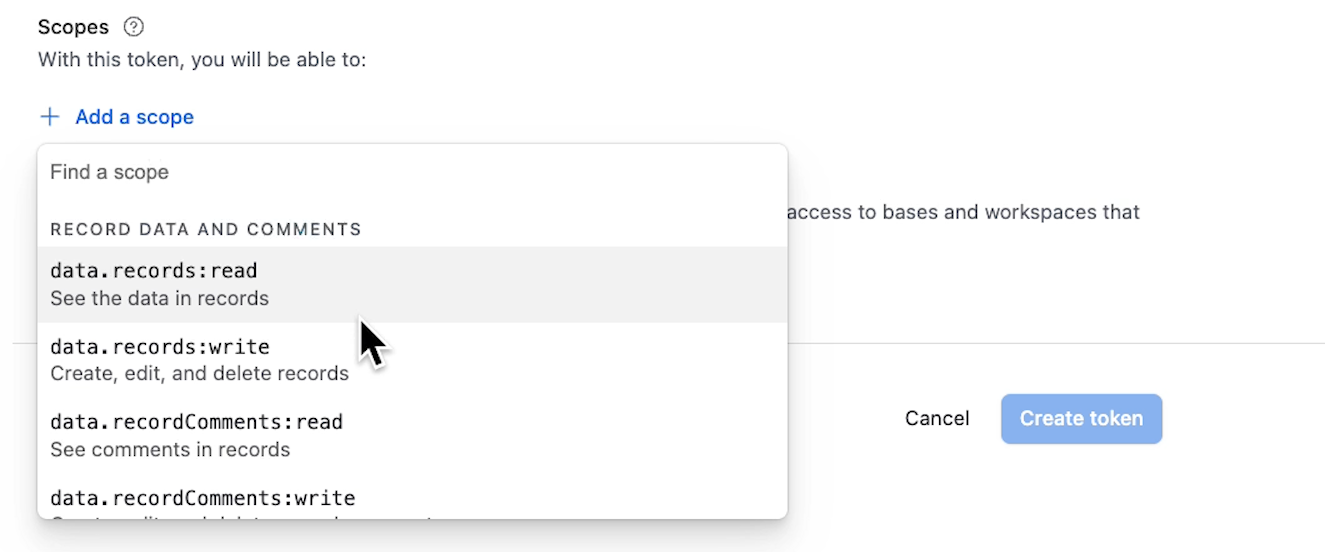
These let connected apps view, create, update, or delete records.
For projects that only need the structure of your base (i.e., tables, fields, and their configurations), use the schema scopes.

For our example, we’ll add schema.bases.read to let our app view our base structure, and schema.bases.write so they can modify it.
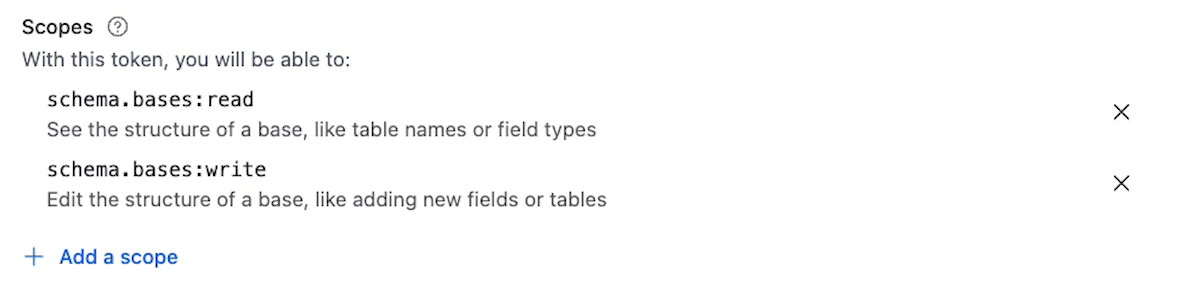
In general, it’s best to choose the minimum scopes your project needs. Limiting permissions reduces risk.
Define access boundaries
After setting scopes, you need to determine which bases this token can access.
You can select "Add all resources" to grant access to every workspace and every base in your account.
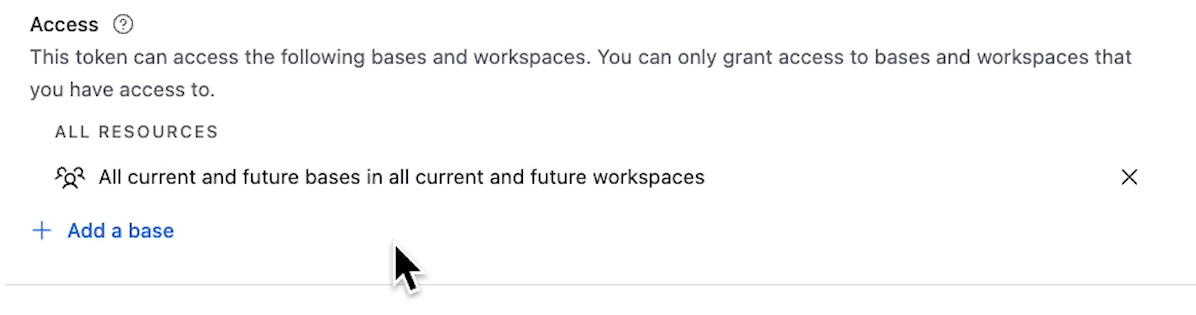
This works well for personal projects where convenience matters more than tight security.
For more precise control, you can specify individual workspaces or bases.

This approach keeps the token's reach limited, and ensures that your project won’t be able to alter unrelated bases.
Generate and save your token
With your scopes and access set, you can click "Create Token" to generate your token’s unique ID.

A popup will display your new token. Copy it immediately and paste it wherever you need to use it.

This is your only chance to see this token. Airtable won't expose the full token again.
If you lose the token, you can't recover it. Instead, you'll need to create a new one with the same settings. That's not difficult, but it means updating the token in any app or script that was using the old one.
Automate your work with XRay
Want to learn more about automating your work with Airtable, Zapier, and other no-code tools? Check out our blog for hundreds of free tutorials.
And if you want to design a better way to work for your entire team, reach out to XRay to learn about professional services.
We offer 1-on-1 hourly support for quick projects, as well as long-term retainers for total workflow transformation.


Looking for short-term support or collaboration on your low-code project? With LowCodeEngineers, you can learn and build with vetted experts on a flexible hourly basis.
Learn more about LowCodeEngineersNot sure where to start?
Case Studies

Xray Blog
Building custom apps and automations with Airtable requires secure access to your data. Personal Access Tokens (PATs) are the key to making that happen.
A Personal Access Token lets third-party applications connect to your Airtable bases safely. Whether you're building a custom integration, automating a workflow, or using AI tools to work with your data, you'll need to create a PAT first.
Here's how to set one up.
Creating a personal access token in Airtable: overview
We’ll start with a brief overview of the whole process. If you’d like more detail on each step, read on for the full tutorial.
1. Click on your profile in the top right corner and select “Builder Hub”
2. In the left-hand menu, navigate to “Personal Access Tokens” (found in the “Developers” section)
3. Create a new token and give it a name.
4. Set your token’s scopes to define the available actions (e.g., schema.bases.read)
5. Choose which bases can be accessed with your token
6. Save and copy your token. Paste it into your project.
Navigate to the Personal Access Tokens page
To start, click on your account profile in the top right corner of Airtable. Select "Builder Hub" from the dropdown menu.
In the Builder Hub’s left-hand sidebar, click on "Personal Access Tokens", which you can find under the "Developers" section.
Click "Create a token", and give it a descriptive name. Choose something that clearly indicates what this token is for. You'll thank yourself later when you're managing multiple tokens.
Set your scopes
Scopes define what actions an app can perform when it connects using your token. Think of them as permissions.
Airtable offers several scope categories. The ones you need depend on the specific demands of your project.
If your app needs to read or modify the actual data in your base, add scopes from the "Record data and comments" section.
These let connected apps view, create, update, or delete records.
For projects that only need the structure of your base (i.e., tables, fields, and their configurations), use the schema scopes.
For our example, we’ll add schema.bases.read to let our app view our base structure, and schema.bases.write so they can modify it.
In general, it’s best to choose the minimum scopes your project needs. Limiting permissions reduces risk.
Define access boundaries
After setting scopes, you need to determine which bases this token can access.
You can select "Add all resources" to grant access to every workspace and every base in your account.
This works well for personal projects where convenience matters more than tight security.
For more precise control, you can specify individual workspaces or bases.
This approach keeps the token's reach limited, and ensures that your project won’t be able to alter unrelated bases.
Generate and save your token
With your scopes and access set, you can click "Create Token" to generate your token’s unique ID.
A popup will display your new token. Copy it immediately and paste it wherever you need to use it.
This is your only chance to see this token. Airtable won't expose the full token again.
If you lose the token, you can't recover it. Instead, you'll need to create a new one with the same settings. That's not difficult, but it means updating the token in any app or script that was using the old one.
Automate your work with XRay
Want to learn more about automating your work with Airtable, Zapier, and other no-code tools? Check out our blog for hundreds of free tutorials.
And if you want to design a better way to work for your entire team, reach out to XRay to learn about professional services.
We offer 1-on-1 hourly support for quick projects, as well as long-term retainers for total workflow transformation.

